nx 9 - ide20.comide20.com/upload/modulenx/lesson01_9_jbs.pdf · button)->(all) programs->ugs...
TRANSCRIPT
ME1720 Software, NX Lesson 1 – Getting Started Document URL: http://ide20.com/upload/ModuleNX/Lesson01_9_JBS.pdf Developer: [email protected], 8/2015 update by [email protected]
Copyright 2015, Missouri S&T
1
NX 9.0 Lesson 1 – Getting Started Pre-reqs/Technical Skills
• Basic computer use Expectations
• Read lesson material • Implement steps in software while reading through lesson material • Complete quiz on Blackboard • Submit completed assignment on Blackboard • Ask questions as necessary
Objectives/Measurables • Learn the basics of using NX to create simple 3D parts, measured via assignment score • Learn various features in NX, measured via Blackboard quiz score
Lecture Topics • Opening NX • Basic sketching • Extrusions and revolutions • Adding features
Table of Contents
NX 9.0 ................................................................................................................................................. 1 Lesson 1 – Getting Started ................................................................................................................................................................... 1
Pre-reqs/Technical Skills ........................................................................................................................................................................... 1 Expectations ..................................................................................................................................................................................................... 1 Objectives/Measurables ............................................................................................................................................................................. 1 Lecture Topics ................................................................................................................................................................................................. 1
Introduction – NX .................................................................................................................................................................................... 1 Opening NX ................................................................................................................................................................................................ 2
Starting a New Model .................................................................................................................................................................................. 2 Drawing in NX ........................................................................................................................................................................................... 3
Trimming and Deleting ............................................................................................................................................................................... 8 Editing Dimensions ....................................................................................................................................................................................... 8 Extruding and Revolving ............................................................................................................................................................................ 9
Adding Features ..................................................................................................................................................................................... 11 Chamfer ........................................................................................................................................................................................................... 12 Edge Blend (Fillet) ..................................................................................................................................................................................... 13
Assignment ............................................................................................................................................................................................... 14
Introduction – NX NX is a premier 3D computer aided design suite. It allows you to model solid components and assemblies, to perform engineering analyses such as mechanism simulation and stress analysis, to create tool paths for computer-based manufacturing processes and to perform numerous other engineering design activities in a single software environment. Software suites like NX are referred to as product lifecycle management (PLM) tools since they are generally integrated in the product design process from start to finish. The ME1720 tutorials for NX will focus on basic 3D drafting and component modeling.

ME1720 Software, NX Lesson 1 – Getting Started Document URL: http://ide20.com/upload/ModuleNX/Lesson01_9_JBS.pdf Developer: [email protected], 8/2015 update by [email protected]
Copyright 2015, Missouri S&T
2
Opening NX NX 9.0 is not available on all campus CLC computers nor is it available for student computers. It is installed in CH105 and on computers in the Toomey Hall CLCs. To start NX, use the NX 9.0 shortcut under Start (or Windows button)->(All) Programs->UGS NX 9.0. It may take a minute or so for NX to start the first time. Once opened, you will be presented with the window shown in Figure 1.
Figure 1 - NX 9.0
Starting a New Model To start modeling, you must first create a part file. NX part files use the extension .prt for both components and assemblies of components. In this tutorial, a single part file will be used with one component. To create a new part, click the New button to open the New dialog (Figure 2). For now, stay in the Model tab. Select Model from the Templates list (the default) and set the Folder to a location on your S: drive or desktop. The default location may be stored locally on the lab computer you are using and might not be in your roaming profile (it might not be accessible on a different computer). Once a folder has been selected, set the name of the part file. Click OK to start modeling.

ME1720 Software, NX Lesson 1 – Getting Started Document URL: http://ide20.com/upload/ModuleNX/Lesson01_9_JBS.pdf Developer: [email protected], 8/2015 update by [email protected]
Copyright 2015, Missouri S&T
3
Figure 2 - New Part Dialog
Once the new file has been created, the NX modelling interface will open (Figure 3). Like most modern PLM tools, the interface for NX contains numerous icons, lists, text prompts and other features that can be incredibly overwhelming. For now, we will focus on the part navigator, viewer and menu.
Figure 3 - NX 9.0 User Interface
Drawing in NX NX, like most modern PLM tools, is feature-based. That means you build up a component from a set of features that are added in sequence. This sequence, and the details of each feature, can be edited later if the design needs to be changed. Features can be removed, inserted or modified to create almost any solid part imaginable. This allows a precise and highly editable method for describing solid components and differs from the 3D free-form modeling approach (freeform modeling is used in computer graphics applications such as making models for video games). The features you add to a part will appear in the Part Navigator under Model History. For a new part, the only thing appearing in the model history should be a Datum Coordinate System. This is the 3D Cartesian coordinate system used in the part and includes an origin location and coordinate axes. These are shown with the coordinate system indicator at the center of the Viewer.

ME1720 Software, NX Lesson 1 – Getting Started Document URL: http://ide20.com/upload/ModuleNX/Lesson01_9_JBS.pdf Developer: [email protected], 8/2015 update by [email protected]
Copyright 2015, Missouri S&T
4
The general workflow for creating a part in NX is to create a sketch, extrude or revolve the sketch and then add features to the resulting solid part. Sketches are 2D (mostly) drawings that are used to define a cross section of the part. This cross section can be extruded (pushed into or pulled out of the plane of the sketch) and rotated (wrapped around a axis) to form a 3D solid part.
To create a Sketch. Click the Sketch button in the menu (Figure 4). This will open a new dialog (Figure 5) for defining the sketch. The first step in defining the Sketch is to set the sketching plane. This is the 2D plane that the sketch will be drawn onto. This plane can be derived from the existing Datum Coordinate System or can be based on geometry from an existing part (you can sketch on the surface of a part). For now, start the sketch on the XY plane. To select the XY plane, move the cursor between the x and y axis until a blue xy plane appears (Figure 6).
Figure 4 – Sketch button in the menu
Figure 5 - Sketch Dialog
Figure 6 – Selected sketch plane
You can select the YZ and XZ plane the same way. Click once to set the plane. For now, no other information is required. Simply click OK on the Sketch dialog to start the sketch. The selected plane will rotate and align with the view of the sketch (Figure 7).

ME1720 Software, NX Lesson 1 – Getting Started Document URL: http://ide20.com/upload/ModuleNX/Lesson01_9_JBS.pdf Developer: [email protected], 8/2015 update by [email protected]
Copyright 2015, Missouri S&T
5
Figure 7 – Rotated sketch Plane
You can now draw on the plane. If you ever need to realign the view with the plane of the sketch, right-click in an empty space in the viewer and select Orient View to Sketch in the pop-up (Figure 8). Shift+F8 is the shortcut for this action. The view will rotate to match the plane of the sketch.
Figure 8 - Orienting the View
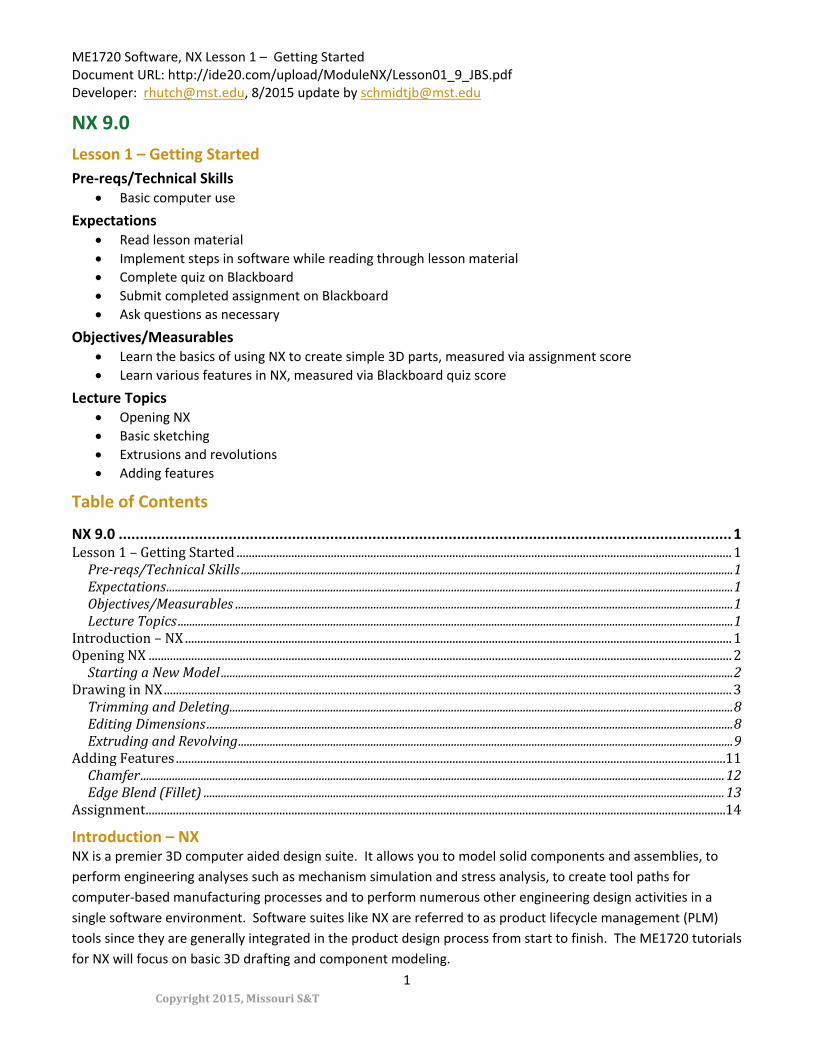
Sketches are comprised of simple drawing elements like lines and circles connected by constraints. For example, a box is made of four line segments with their endpoints constrained to connect to each other at the corners of the box and to be perpendicular to each other (Figure 9).
ME1720 Software, NX Lesson 1 – Getting Started Document URL: http://ide20.com/upload/ModuleNX/Lesson01_9_JBS.pdf Developer: [email protected], 8/2015 update by [email protected]
Copyright 2015, Missouri S&T
6
Figure 9 - A Sketch
As you add elements to a sketch, NX attempts to fully constrain the sketch automatically. A fully constrained sketch is completely defined by a set of parameters and object constraints. To see this process in action, draw the box shown in Figure 9. To do this, click the Line button in the Direct sketch pane of the menu (Figure 10).
Figure 10 - Line Tool
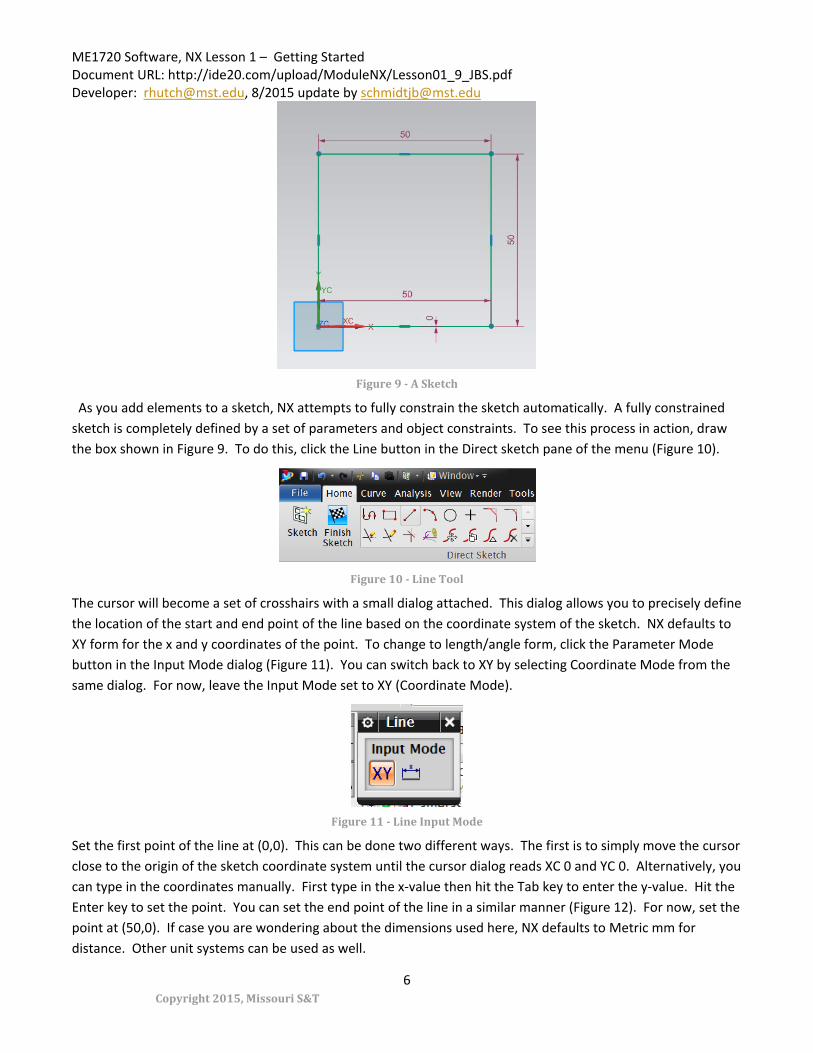
The cursor will become a set of crosshairs with a small dialog attached. This dialog allows you to precisely define the location of the start and end point of the line based on the coordinate system of the sketch. NX defaults to XY form for the x and y coordinates of the point. To change to length/angle form, click the Parameter Mode button in the Input Mode dialog (Figure 11). You can switch back to XY by selecting Coordinate Mode from the same dialog. For now, leave the Input Mode set to XY (Coordinate Mode).
Figure 11 - Line Input Mode
Set the first point of the line at (0,0). This can be done two different ways. The first is to simply move the cursor close to the origin of the sketch coordinate system until the cursor dialog reads XC 0 and YC 0. Alternatively, you can type in the coordinates manually. First type in the x-value then hit the Tab key to enter the y-value. Hit the Enter key to set the point. You can set the end point of the line in a similar manner (Figure 12). For now, set the point at (50,0). If case you are wondering about the dimensions used here, NX defaults to Metric mm for distance. Other unit systems can be used as well.

ME1720 Software, NX Lesson 1 – Getting Started Document URL: http://ide20.com/upload/ModuleNX/Lesson01_9_JBS.pdf Developer: [email protected], 8/2015 update by [email protected]
Copyright 2015, Missouri S&T
7
Figure 12 - Drawing a Line
Once you set the end point, select “Display Sketch Constraints” from the dropdown option in the menu (Figure 13). Two constraints will appear. A blue line and a purple dimension. The blue line means the line associated with the constraint is horizontal. The purple dimension sets the length of the line. Since the start point of the line is set to the origin of the coordinate system, only two constraints are needed to completely describe the line. In this case, these constraints are that the line is horizontal and 50mm long. Click the Line button again to start another line (NX doesn’t start a new line at the endpoint of the old line by default). Set the start point of the new line at the endpoint of the last line. Once you get close to this point, note that the cursor changes to show a set of four arrows pointed inward. This is to indicate that the new point will be snapped to the old point exactly (it that point moves, both lines will be altered). Once the start point is set, move the cursor up to set the next point in the box. Enter the coordinates manually or set the length and angle. Now draw the last two lines to complete the shape. Note the constraints added by NX including the horizontal arrows, vertical arrows and dimensions.
Figure 13 - Showing Constraints
Once the box is complete, add a circle to the right-hand side. To do this, click the Circle button in the sketching toolbar. Select the center of the right-hand line to set the center of the circle with a left-click (NX will snap to the middle of the line if you get close enough, watch for the change in the cursor). Once set, move the cursor to define the radius of the circle. To set the radius equal to the half-length of the edge of the box, you can move the cursor to the top-right corner of the box until the cursor changes to the arrows. This will snap the outside of the circle to the corner of the box (Figure 14).
ME1720 Software, NX Lesson 1 – Getting Started Document URL: http://ide20.com/upload/ModuleNX/Lesson01_9_JBS.pdf Developer: [email protected], 8/2015 update by [email protected]
Copyright 2015, Missouri S&T
8
Figure 14 - Example Sketch
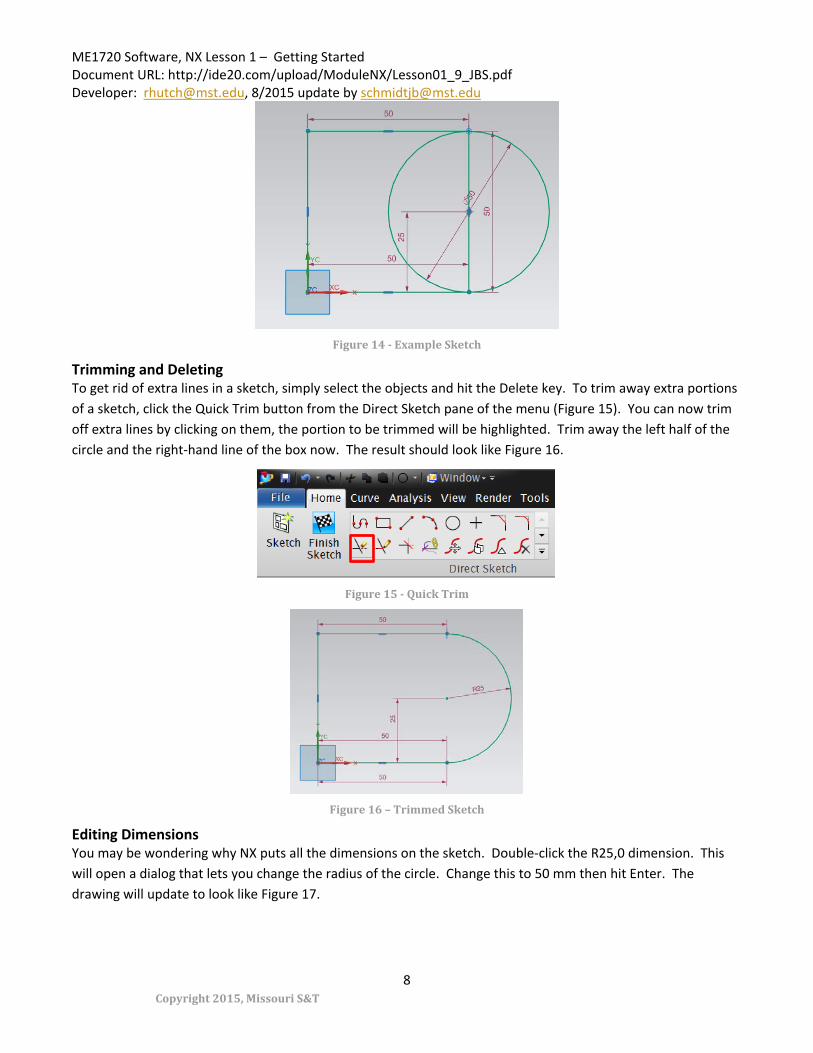
Trimming and Deleting To get rid of extra lines in a sketch, simply select the objects and hit the Delete key. To trim away extra portions of a sketch, click the Quick Trim button from the Direct Sketch pane of the menu (Figure 15). You can now trim off extra lines by clicking on them, the portion to be trimmed will be highlighted. Trim away the left half of the circle and the right-hand line of the box now. The result should look like Figure 16.
Figure 15 - Quick Trim
Figure 16 – Trimmed Sketch
Editing Dimensions You may be wondering why NX puts all the dimensions on the sketch. Double-click the R25,0 dimension. This will open a dialog that lets you change the radius of the circle. Change this to 50 mm then hit Enter. The drawing will update to look like Figure 17.

ME1720 Software, NX Lesson 1 – Getting Started Document URL: http://ide20.com/upload/ModuleNX/Lesson01_9_JBS.pdf Developer: [email protected], 8/2015 update by [email protected]
Copyright 2015, Missouri S&T
9
Figure 17 - Sketch with Altered Dimension
This is a key aspect of feature-based parametric modeling, dimensions and constraints can be updated at any time if aspects of the design need to be changed. For now, complete the sketch by selecting the Finish Sketch button in the sketching toolbar. The dimensions will hide for now but remain associated with the sketch.
Extruding and Revolving To convert the 2D sketch into a 3D object, it can be extruded along an axis or revolved around an axis. Both operations will be covered in this section. To extrude the shape, click the Extrude button in the menu. This will open the Extrude dialog (Figure 18).
Figure 18 - Extrude Dialog

ME1720 Software, NX Lesson 1 – Getting Started Document URL: http://ide20.com/upload/ModuleNX/Lesson01_9_JBS.pdf Developer: [email protected], 8/2015 update by [email protected]
Copyright 2015, Missouri S&T
10
The first input required is the 2D profile to extrude. To set this, move the cursor over the shape drawn in the sketch, the profile will highlight once you get close enough. Once highlighted, left-click to select the profile. This will set the Curve and Vector in the Extrude dialog. To only information you need to provide now is the distance to extrude. This distance can be set in the Limits group of the Extrude dialog. The extrusion can be pushed into the screen and pulled out at the same time by changing the start and end distances. For now, set the start distance to 0 and end distance to 50. Press OK to extrude the shape. To see the newly created 3D shape, click the Trimetric view button to rotate the view (Figure 19).
Figure 19 - Extruded Part
To manually rotate the view, press the F7 key. The cursor will change to a set of curved arrows, you can now click and drag to rotate the view as need. To zoom the view to fit the screen, click the Fit button (next to Trimetric). The mouse scroll wheel will zoom in and out as well.
The Sketch can be revolved about an axis instead of being extruded. The Revolve feature can be opened using the Revolve button in the Menu (Figure 20). Click the down arrow next to Extrude if Revolve is not shown. The Revolve dialog will open. From this dialog, you will need to pick a sketch to revolve, an axis to revolve about and an angle to revolve over (the default is 360 deg).
Figure 20 - Revolve Option
Figure 21 shows the result of revolving the sketch made in the previous section.

ME1720 Software, NX Lesson 1 – Getting Started Document URL: http://ide20.com/upload/ModuleNX/Lesson01_9_JBS.pdf Developer: [email protected], 8/2015 update by [email protected]
Copyright 2015, Missouri S&T
11
Figure 21 - Revolved Sketch
Adding Features Now that you have a solid part, various features can be added to modify the part. The features covered in this section include Holes, Chamfers and Edge Blends (also called Fillets). To place a hole in the object drawn in Figure 19, click the Hole button in the Menu. The Hole dialog will open. The first piece of input for this dialog is the location for the hole. To put the hole at the center of the circular portion of the object, select the circular edge highlighted in yellow in Figure 22. Once the edge is selected, you need to enter two pieces of information, the diameter of the hole and its depth. If the hole only needs to go part of the way through, set the Depth Limit to Value and enter the depth and angle at the bottom of the hole. To make the hole go all the way through a part, set the Depth Limit to Through Body. Click OK to make the hole (Figure 23).

ME1720 Software, NX Lesson 1 – Getting Started Document URL: http://ide20.com/upload/ModuleNX/Lesson01_9_JBS.pdf Developer: [email protected], 8/2015 update by [email protected]
Copyright 2015, Missouri S&T
12
Figure 22 - Placing a Hole
Figure 23 - Hole Placed
Chamfer Chamfers are used to add bevels to sharp edges. To add a chamfer to one side of the object, select the Chamfer option button from the Feature pane of the Menu (Figure 24).
Figure 24 - Chamfer Option
The Chamfer dialog will open. Like creating a Hole, you must first select the location for the chamfer. In this case, you will need to select edges of the part. Select an edge to get a preview and the Distance dialog (Figure 25).
Figure 25 - Chamfering

ME1720 Software, NX Lesson 1 – Getting Started Document URL: http://ide20.com/upload/ModuleNX/Lesson01_9_JBS.pdf Developer: [email protected], 8/2015 update by [email protected]
Copyright 2015, Missouri S&T
13
In this dialog, you can set the distance to chamfer. Try changing this value to see how it alters the appearance of the chamfer. Click OK in the Chamfer dialog to add the feature.
Edge Blend (Fillet) Edge blends, or Fillets, are like chamfers but with rounded edges instead of straight-cut edges. To add an edge blend, select the Edge Blend button (also shown in the menu in Figure 24). Use the same sequence to pick an edge and set the radius as you used with the chamfer.
Wrapping Up With these basic operations, you can make simple 3D models using NX. More in-depth features of NX will be covered in future tutorials.

ME1720 Software, NX Lesson 1 – Getting Started Document URL: http://ide20.com/upload/ModuleNX/Lesson01_9_JBS.pdf Developer: [email protected], 8/2015 update by [email protected]
Copyright 2015, Missouri S&T
14
Assignment Draw a single solid object using NX 9.0. The object should include at least one sketch. The sketch must include at least one circle and three line segments. Extrude or revolve the sketch and add at least one hole, chamfer and edge blend. Save the part file (.prt) and upload it via Blackboard. The following point breakdown will be used:
• Sketch (three lines and at least one circle) (3) • Extrusion/Revolution (3) • Hole (3) • Chamfer (3) • Edge Blend (3)
Figure 26 has an example that satisfies the requirements of this assignment.
Figure 26- Example