offender grievance table of contents … · offender grievance processing system section 2: getting...
TRANSCRIPT

OFFENDER GRIEVANCE PROCESSING SYSTEM
TABLE OF CONTENTS
i

TABLE OF CONTENTS
OFFENDER GRIEVANCE PROCESSING SYSTEM
ii

OFFENDER GRIEVANCE PROCESSING SYSTEM
TABLE OF CONTENTS
iii


OFFENDER GRIEVANCE PROCESSING SYSTEM
TABLE OF CONTENTS
i
TABLE OF CONTENTS
SECTION 1: GETTING STARTED Logging into OGRE II 1 Passwords 1 Creating a Shortcut for your Desktop 4 Toolbar Icons 3 Field Colors 4 Fields with Yellow Backgrounds 4 Date Fields 5 Spell Check 5 SECTION 2: OGRE II MAIN MENU 6 SECTION 3: MAINTAIN OFFENDER GRIEVANCE SCREEN
3-1 Maintain Offender Grievances - Main 12 3-2 Maintain Offender Grievance – Levels 18 3-3 View Scanned Documents 24 3-4 Upload Documents 26
SECTION 4: REPORTS 28
4-1 Top Filers 29 4-2 Top Receivers 30 4-3 Complaints by Topic 31 4-4 Counts by Topic 32 4-5 Filer History 33 4-6 Receiver History 34 4-7 Cross Tabulation by Topic/Facility 35 4-8 Complaint Status (Counts by Determination) 36 4-9 Monthly Count 37 4-10 Counts by Topic and Housing Unit 38 4-11 Open Appeal Cases at Central Office 39 4-12 Case Status Selection 40 4-13 Counts by Race 41 4-14 Print User’s Case List 42
SECTION 5: PASSWORD
5-1 Change Password 43 SECTION 6: WORKFLOW 35

TABLE OF CONTENTS
OFFENDER GRIEVANCE PROCESSING SYSTEM
ii
OFFENDER GRIEVANCE PROCESSING SYSTEM
SECTION 2: GETTING STARTED
1
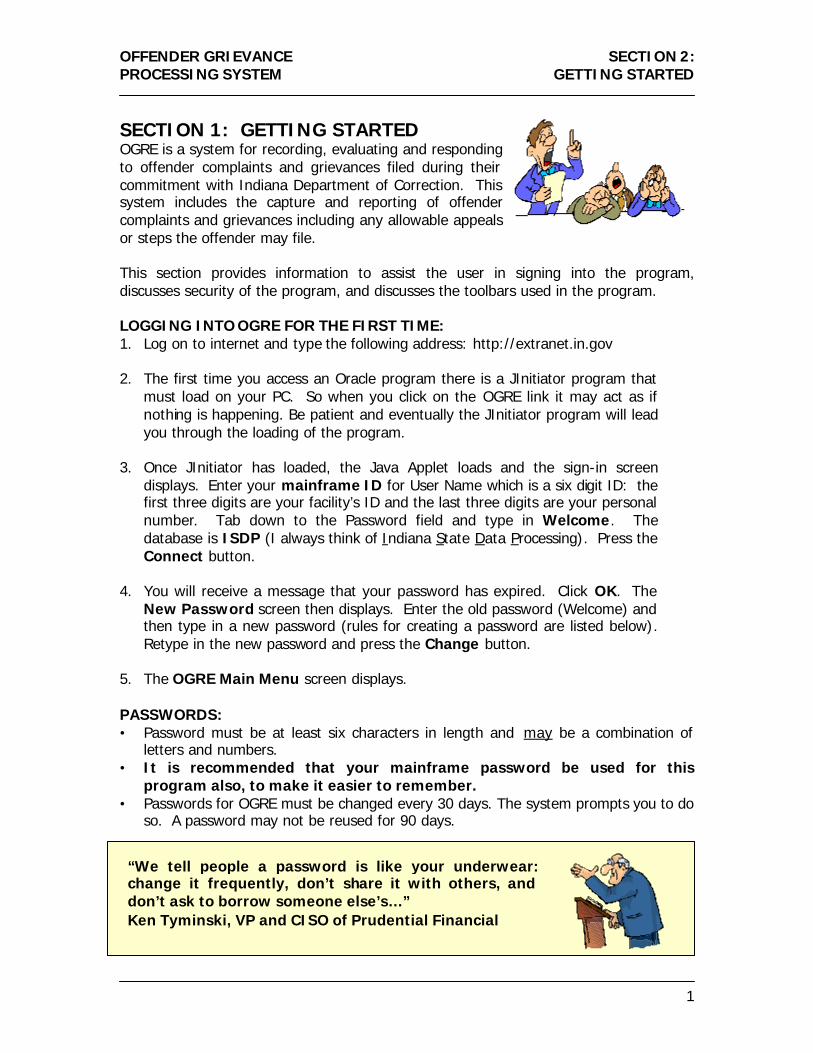
SECTION 1: GETTING STARTED OGRE is a system for recording, evaluating and responding to offender complaints and grievances filed during their commitment with Indiana Department of Correction. This system includes the capture and reporting of offender complaints and grievances including any allowable appeals or steps the offender may file. This section provides information to assist the user in signing into the program, discusses security of the program, and discusses the toolbars used in the program. LOGGING INTO OGRE FOR THE FIRST TIME: 1. Log on to internet and type the following address: http://extranet.in.gov
2. The first time you access an Oracle program there is a JInitiator program that
must load on your PC. So when you click on the OGRE link it may act as if nothing is happening. Be patient and eventually the JInitiator program will lead you through the loading of the program.
3. Once JInitiator has loaded, the Java Applet loads and the sign-in screen
displays. Enter your mainframe ID for User Name which is a six digit ID: the first three digits are your facility’s ID and the last three digits are your personal number. Tab down to the Password field and type in Welcome. The database is ISDP (I always think of Indiana State Data Processing). Press the Connect button.
4. You will receive a message that your password has expired. Click OK. The
New Password screen then displays. Enter the old password (Welcome) and then type in a new password (rules for creating a password are listed below). Retype in the new password and press the Change button.
5. The OGRE Main Menu screen displays. PASSWORDS: • Password must be at least six characters in length and may be a combination of
letters and numbers. • It is recommended that your mainframe password be used for this
program also, to make it easier to remember. • Passwords for OGRE must be changed every 30 days. The system prompts you to do
so. A password may not be reused for 90 days.
“We tell people a password is like your underwear: change it frequently, don’t share it with others, and don’t ask to borrow someone else’s…” Ken Tyminski, VP and CISO of Prudential Financial

SECTION 2: GETTING STARTED
OFFENDER GRIEVANCE PROCESSING SYSTEM
2
• If an incorrect password is entered three times, the system revokes the user and all
access to the system is lost until the Coordinator supplies the appropriate information to IOT. This security is supplied as a means to keep staff from accessing another individual’s account.
CREATING A SHORTCUT FOR YOUR DESKTOP: 1. On the OGRE Main Menu, click the right mouse button in the white strip between
the navy blue of the page header and the grey of the program menu bar.
2. Click on Create Shortcut on the menu that displays. 3. A message displays, that a shortcut is being placed on
your desktop.
4. Close OGRE and on your desktop is a new icon titled Oracle Application. Right
click on the icon and select Rename in the drop down menu. Then type “OGRE” which renames the icon.
It’s so much faster to access the program with this nifty shortcut I created for my desktop!

OFFENDER GRIEVANCE PROCESSING SYSTEM
SECTION 2: GETTING STARTED
3
TOOLBAR ICONS: The following is a detailed look at the icons on the Oracle toolbar and how they are used. Some are self -explanatory because they are in common use in the computer field. Others are more unique to Oracle and are given more explanation. The icons used are described below:
Save
Prin
t
Save
and
Exi
t
Cut
Copy
Past
e
Ente
r Q
uery
Exec
ute
Que
ry
Canc
el Q
uery
Not
use
d
Prev
ious
Rec
ord
Nex
t Rec
ord
Not
use
d
Inse
rt R
ecor
d
Rem
ove
Rec
ord
Not
use
d
Hel
p
Save: This selection saves the material without exiting from the screen. This is used especially with long narratives so that if the system “hiccups” all the material entered won’t be lost.
Print: Prints the current image on the screen to the default printer as
listed in the Windows printer settings. Save and Exit: Also called the GREEN DOOR, this function saves the data
entered and exits the function. It is the safest way to finish a function and go back to the Main Menu. If no changes were made, it allows the user to leave the screen immediately. If changes are made, the system presents two message of confirmation consecutively:
1. “Do you wish to save the changes you have made?” “Yes” to save, “No” to abort changes.
2. “FRM 40400: Transaction complete – 1 records applied and saved”.
Cut: This function cuts the highlighted material out of the current
document and stores it on the Windows Clipboard. Copy: This function makes a copy of the highlighted material from the
current document and stores it on the Windows Clipboard. Paste: This function pastes a copy of the material stored on the
Windows Clipboard into the current document where the cursor is flashing.
Previous Record: Not used in this application. Next Record: Not used in this application.

SECTION 2: GETTING STARTED
OFFENDER GRIEVANCE PROCESSING SYSTEM
4
Insert Record: Allows a new record line to be inserted in a table if all rows in the
table are already filled. It also allows entry on the next line of a screen.
Remove Record: Allows an existing record in a table to be deleted, if selected.
This only works on some records, so don’t depend on it to remove every record.
Help: Contains on-screen help menu accessible via contents tab or
index tab. FIELD COLORS: Certain fields within this program are color coded to indicate specific functions: White: Allows entry of data. Turquoise Blue: Indicates the current/selected record. Gray: Display only fields. Provides data downloaded from the OIS or
SAMS program or data from another screen in OGRE. Dark Blue: Indicates selected characters chosen for an edit or an error
highlighted by the system (i.e., incorrect date format). Yellow: Indicates that there is a list of values associated with that field.
See the information below. FIELDS WITH YELLOW BACKGROUNDS: A yellow background indicates that the field contains a List of Values (LOV) from which the contents of the field must be selected. Remember that users may not type in a field with a yellow background.
Double click in the field to display the LOV. To locate a specific item once the LOV is accessed, use the scroll bar on the right side of the screen or as soon as the LOV is displayed, before moving the mouse, begin typing what is being queried. This causes the screen to display just the items beginning with the letters that were typed.
Once the item is located, click on it once and press the OK button or double click on the selection. Both actions close the LOV and display the selected item on the screen.

OFFENDER GRIEVANCE PROCESSING SYSTEM
SECTION 2: GETTING STARTED
5
DATE FIELDS: Double clicking in a Date field displays a calendar even if the Date field already contains a date.
Once the calendar is accessed, to select today’s date, which is automatically highlighted on the calendar, press the OK button. This closes the calendar and enters the current date in the date field.
To select another date, double click on the date or click on the date once and press the OK button.
To select another month use the single arrows at the top of the calendar. The ‘<’ displays the previous month and ‘>’ displays the next month.
The double arrows display the past ‘<<’ and next ‘>>’ year. The arrows may continue being pressed until the needed month/year is displayed. SPELL CHECK FUNCTION: Spell Check is available for the narrative fields in OGRE. Once each of these fields is completed, press the Spell Check button and, if there are errors, the Error Detected screen displays.
It displays the incorrectly spelled word in the Not Found field and then provides replacements in the Replace With and Suggestions fields.
If the word listed in the Replace With field is acceptable, press the Replace button. If that is not the word that you were attempting to spell, other words are list below in the Suggestions field. If one of those words is the word you were attempting to spell, click on it and press the Replace button.
The other buttons on the Error Detected screen: Ignore: Pressing this button tells the program that the word
in the Not Found field is not to be changed. Replace All: This button replaces all the occurrences of the word
in the Not Found field to whatever word is selected to replace it.
Ignore All: Same as Ignore button, except it tells the system
to ignore all instances when that word is used.

SECTION 2: GETTING STARTED
OFFENDER GRIEVANCE PROCESSING SYSTEM
6
Learn: Prompts the system to always replace the word in
the Not Found field for the selected replacement. This is for those of us who tend to constantly misspell the same word.
Finish: This button closes the Error Detected screen without completing any function.

OFFENDER GRIEVANCE PROCESSING SYSTEM
SECTION 3: OGRE II MAIN MENU
7
SECTION 2: OGRE II MAIN MENU Once the OGRE II program is accessed, the Main Menu screen displays. This screen is used to select a grievance and view (or update it) and to create a new grievance. 1. When the Main Menu screen is accessed, the Case Listing section contains a list
of the grievances that have already been created by the user. (The Change Case Listing fields at the bottom of the screen show which data is displayed). If the user does not have a caseload, nothing displays in the Case Listing section and the user must change the listing of cases.
2. The Change Case Listing section at the bottom of the screen allows changing the
cases displayed on this screen. Each field further filters the case display. The choices for these fields are:
Which Facility? All Facilities My Facility
Which Specialist? My Caseload All Grievance Specialists
Case Status? Denied Rejected Remanded Resolved
All

SECTION 3: OGRE II MAIN MENU
OFFENDER GRIEVANCE PROCESSING SYSTEM
8
Sort By? Log ID
Received Date – Ascending order Received Date – Descending order Facility
No Response? Cases with no response All Final Determination? Cases with no final determination date All
3. Once a change is made to the Change Case Listing section, press the Refresh
Display button. The program then displays the cases that match the criteria selected.
4. To locate a specific case, press the Advanced Case Search button, which displays
the Search Cases screen.
On the Search Cases screen enter one of the criteria listed and press the Continue button. The OGRE II Main Menu then displays only the case(s) that match the criteria entered and the criteria entered displays in the Advanced Search Request Values field. NOTE: For non-date selections, use the ‘%’ symbol as a wild care, before, in the middle of, or after a string of characters, to stand for unknown characters in a series.

OFFENDER GRIEVANCE PROCESSING SYSTEM
SECTION 3: OGRE II MAIN MENU
9
NOTE: Selecting something unique like the log ID or the DOC number of an offender, who only has one grievance, causes the system to automatically advance to the Maintain Offender Grievance screen.
5. The Case Listing section of the Main Menu contains the following fields: Log ID:: This is a system-generated log number which is
assigned when the case is created. Grievance Date: This is the date the offender signed the grievance form. Topic Description: This is the topic of the complaint. Specialist: This is the staff member who entered the grievance. Case Status: This field reflects the status of the current step in the
complaint, grievance or appeal process. The valid statuses are:
AP Appealed The offender wasn’t satisfied with the resolution to his complaint and has asked for an answer from a higher authority.
GF Complaint
Filed This is the first step in the grievance process.
D Denied The grievance was denied at
the appeal stage. NR No Response A response was sent to the
offender and no further action has been requested.
RI Resolved
Informally Offender resolved his own complaint. This may be before or after it was submitted.
RJ Rejected The complaint, grievance or
appeal was rejected because the offender didn’t follow proper procedure in filing or the incident wasn’t grievable.
RM Remanded The grievance has been
referred to another division at the facility for possible further action.

SECTION 3: OGRE II MAIN MENU
OFFENDER GRIEVANCE PROCESSING SYSTEM
10
RS Resolved/
Signed Off The offender has agreed with the response.
WD Withdrawn The offender requested a
withdrawal of his complaint, grievance or appeal.
Double click in the Case Status field to access a
window which indicates the days the case is delinquent (pass the time frame/deadlines in the procedure to which the Grievance Specialist has to respond within a specific number of days).
NOTE: If the Case Status field is double clicked and
the case is not past due, the following message displays.
For overdue appeals a reminder email is generated to
the reviewing COA staff responsible for a case. Five (5) days prior to the 20-day deadline. If not completed by the deadline a past due email is generated.
• On(1) day over-due san email is automatically sent to the responsible reviewing staff
• Fifteen (15) days over-due an email is automatically sent to the reviewing staff and Director

OFFENDER GRIEVANCE PROCESSING SYSTEM
SECTION 3: OGRE II MAIN MENU
11
• Twenty-one (21) days over-due an email is
automatically sent to designated supervisor • Twenty-five (25) days over-due to the Director Facility: The facility at which the complaint or grievance was
filed. Current Step: This indicates at which step in the grievance process
the grievance has attained. I = Formal Grievance II = Appeal 6. To select a specific case in the Case Listing section of the Main Menu, click once
in any of the identifier fields described above. 7. Once the case is selected, functions may be selected by pressing on one of the
buttons on the bottom right of the Main Menu. These buttons allow entry or viewing of the complaints/grievances:
Print Preview: Selecting a case and then pressing this button allows
viewing and printing of a summary of the case. This summary includes all information entered in the system when the case was created.
Create Investigation: Displays the Maintain Offender Grievance screen
where a new complaint/grievance may be entered into the system. For information on this screen see the next section.
View/Update (Tab
form): Selecting a case and then pressing this button displays the Maintain Offender Grievance screen where the grievance may be viewed or updated (only by the person who created it). For information on this screen see the next section.
OGRE Manual: A copy of this manual in PDF format. Exit: To exit from the OGRE II program, press the Exit on
the menu bar at the top of the screen before pressing the ‘X’ located in the upper right corner of the browser.

SECTION 3-1: MAINTAIN OFF. GRIEVANCE - MAIN
OCMS PAROLE SERVICES PORTAL
12
SECTION 3-1: MAINTAIN OFFENDER GRIEVANCE - MAIN This screen allows entry of the complaint/grievance. It also allows viewing of the complaint/grievance and updating of the grievance by the person who entered it. This is the first of two tabs which together allow entry of the grievance and responses. 1. Once the OGRE II program is accessed, the Main Menu displays. On the Main
Menu press the Create Case button or select a case from the Case Listing section of the screen and press the View/Update (Tab form) button.
2. The Maintain Offender Grievance screen displays. Only the person who created
the grievance may update the report. 3. There are two tabs on this screen. The Main tab (shown in the screen print below)
is the tab that displays when the screen is accessed.
4. This is a description of the fields at the top of the screen: Case No: This is a log number which is automatically created and
displayed by the system when creating a new grievance.
Offender ID: This field is mandatory. Enter the DOC number, if
known. If the DOC number is not known, double click in this field to display a list of values (LOV) which lists all DOC offenders. Select an offender by clicking on his/her name and pressing the OK button.

OCMS PAROLE SERVICES PORTAL
SECTION 3-1: MAINTAIN OFF. GRIEVANCE - MAIN
13
Once the offender has been selected, press the tab key
and the offender’s name displays in the next field. Offender Name: This field is automatically populated with the name of
the person whose DOC number was entered in the Offender ID field or selected from the list of values.
Grievances: This field is automatically populated by the system with
the number of grievances the offender has filed including the one currently being entered.
Facility: This field is automatically populated by the system with
the facility in which the Grievance Specialist is currently assigned.
5. The buttons on this tab have the following functions: Scans: Displays the View Scanned Documents screen. This
screen allows uploading documents and provides a list of the documents that have been scanned and are associated with this grievance. See Section 4-3.
Manual: This displays a copy of the OGRE Manual in adobe
acrobat format. Once the manual is accessed, press on the Bookmark tab to the left of the screen. This displays a list of all sections in the manual which may be accessed by clicking on that link.
Print Case: This button allows the viewing and printing of a
complaint or grievance including the response for each level.
6. The screen contains two tabs which specific information on each. The first tab is
the Main and it contains the basic information regarding the grievance, including the offender’s attempt to informally resolve the incident/compla int. The following fields are contained on this tab.
Topic Description: This is a required field for the entry of the topic that the
offender has grieved. This field has a yellow background indicating that there is a list of values from which the topic must be selected.
Topic Area: This field is automatically populated once the Topic
Description is entered.
SECTION 3-1: MAINTAIN OFF. GRIEVANCE - MAIN
OCMS PAROLE SERVICES PORTAL
14
Location: This is a required field for the location of the incident.
This field has a yellow background indicating that there is a list of values associated with it. The location types are listed below and most include several location descriptions.
Administration (AD) Other Areas (OT) Cell House (CH) Pastoral Care (PC) Commissary (CM) Physical Plant (PP) Custody (CU) Recreation (RC) Education (ED) Transport/Receiving (TR) Food Service (FS) Visiting (VS) Health Care (HC) Vocations (VC) Housing Area (HA) Warehouse (WH) Mental Health (MH) Incident Date: This is a mandatory field for the entry of the date the
incident occurred. Click once in the field to enter today’s date. Double click in the field to access a calendar from which the date may be selected.
Executive Assistant: This is a mandatory field for the entry of the Executive
Assistant who is responsible for answering this grievance. This field has a yellow background indicating that there is a list of values from which the person must be selected.
Grievable: Enter a ‘Yes’ or ‘No’ to indicate whether the complaint is
grievable. Founded: This is an optional field to record if the offender
allegations were determined valid. The choices for this field are:
Yes No Not Determined Housing When
Complaint Filed: The bed assignment of the offender at the time the complaint was filed. The system automatically populates this field but the information may be changed if the offender had a different bed assignment at the time of the incident.
Current Facility: This field displays the offender’s current facility. This is
a view only field. Current Housing: This field is automatically populated with the offender’s
current housing information.

OCMS PAROLE SERVICES PORTAL
SECTION 3-1: MAINTAIN OFF. GRIEVANCE - MAIN
15
EPR Date: This field is automatically populated with the offender’s
earliest possible release date. Tort Claim Filed: This is actually two fields. This first allows a ‘Yes’ or
‘No’ answer. If the answer is ‘Yes’, the second field allows entry of the date the tort was filed.
Case Status: This is a mandatory field for the selection of the current
status of the case. The valid selections are: Appealed The offender has appealed the
response to the grievance.
Complaint Filed Filing a complaint is the first stage of the grievance process.
Denied Grievance was denied at an appeal stage.
No Response Response was sent to offender and no further action has been requested.
Rejected The complaint, grievance or appeal was rejected because the offender didn’t follow proper procedure in filing or the incident wasn’t grievable.
Remanded The grievance has been referred to another division at the facility for possible further action.
Resolved Informally
The offender has resolved the incident without needing further assistance.
Resolved/Signed Off
The offender has agreed with the response.
Final Determination
Date: Allows entry of the date the Grievance Specialist made a determination regarding the grievance. Click once in the field to enter today’s date. Double click in the field to access a calendar from which the date may be selected. This date must be equal to or later than the Complaint Received Date.

SECTION 3-1: MAINTAIN OFF. GRIEVANCE - MAIN
OCMS PAROLE SERVICES PORTAL
16
Informal Resolution
Text: Describe the offender’s attempt to informally resolve the incident. There is the Spell Check feature associated with this field.
Staff Being Grieved (if
any):: This field is completed when the complaint/grievance was directed at a specific staff person(s). Double click on the first available row to select a staff member. If there are no available rows click on the green + icon (Insert Record) in the menu bar which provides a clean line.
• The window below then displays inquiring whether
the staff member is DOC or non-DOC. • Click on the DOC or NON-DOC button and the list
of values displays for that category of staff members. The list automatically contains all DOC staff members.
If on the Non-DOC list the non-DOC staff member is
not listed, close out of the list and back to the Main tab. Above the Staff Title/Last Name field click on the Maintain Non-DOC Staff button to access the Maintain Non-DOC staff.

OCMS PAROLE SERVICES PORTAL
SECTION 3-1: MAINTAIN OFF. GRIEVANCE - MAIN
17
To add a new Non-DOC staff member, on the
Maintain Non-Offenders screen, click in any row and press the green ‘+’ sign (Insert Record) in the toolbar. This opens a new line on which the new non-DOC staff member’s information may be recorded. Note that personal information about the person may be entered at the bottom of the screen.
Once the information regarding the non-DOC staff
member is entered press the Green Door to save the information and exit the screen.
Once back to the Main tab, click in the first available
row of the Staff Title/Last Name field and select Non-DOC in the window that displays. The program then displays the list of values for the non-DOC staff members and the person just added should appear on that list. Select the person by clicking on the name and then pressing the OK button.
# Complaints: Once a staff member is named in the Complaint Staff
field, this field automatically displays the number of complaints/grievances in which the person has been named. This field has been added to the program to assist the Grievance Specialist in determining if specific staff members are having/causing excessive problems with the offenders.
7. Once all the fields on the Main tab have been completed, click on the Level tab
which is described in the next section. 8. A copy of the reports begins on the next page. 9. Click on the Levels tab to continue entering the grievance or click on the Green
Door to save the information and exit the screen.

SECTION 4: MAINTAIN OFFENDER GRIEVANCE
OFFENDER GRIEVANCE PROCESSING SYSTEM
18
SECTION 3-2: MAINTAIN OFFENDER GRIEVANCE - LEVELS This tab allows creating the levels of the grievance and entering the summaries of the case and submitting the case to COA. 1. Once the OGRE II program is accessed, the Main Menu displays. On the Main
Menu press the Create Case button or select a case from the Case Listing section of the screen and press the View/Update (Tab form) button.
2. The Maintain Offender Grievance screen displays. Only the person who created
the grievance may update the report. 3. There are two tabs on this screen. Click on the Levels tab. 4. The following screen displays.
5. The following fields are on this tab. The Case/Offender information continues to
display at the top of the screen. Untitled: The first two fields on this tab are untitled. The first
contains the level of the complaint/grievance that is currently being viewed. To scroll through the different levels (steps) of the grievance press on the Prev and Next buttons. The second untitled field displays how many levels there are in the system and which level is being viewed. Example: 1 of 2.
OFFENDER GRIEVANCE PROCESSING SYSTEM
SECTION 4: MAINTAIN OFFENDER GRIEVANCE
19
Form Issue Date: This is a required field for steps II - IV. This is the date
the form is sent to the offender which he/she would have to complete and return to take the grievance to the next level. This date is not necessary for the Complaint level as the offender may pick up a complaint form in public areas of the facility.
Receive Date: This is a required field. Enter the date in which the
form was received for the current level. To enter today’s date, click in the field one time. To select another date, double click in the field to display the calendar. This date must be equal to or later than the Form Issue Date.
Level Coordinator: This is the grievance specialist who is responsible for
updating and responding to the case at the current level. In many facilities, there is only one grievance specialist who is responsible for all levels, but some facilities have more than one grievance specialist and more than one could work on a case. This field has a yellow background indicating that there is a list of values associated with it. Double click in the field to access the list.
Appeal Received –
Acknowledged Date: Record the date the appeal was received. This date does not display on any of the reports.
Submitted to COA: Once the case has been submitted to COA, this field
displays the date. Level Text: This is a required field. A narrative field for a summary
of the offender’s complaint/grievance. The exact wording used by the offender on the complaint/ grievance form is not necessary.
Executive Assistant
Comments: Any comments the Executive Assistant wishes to enter about this grievance. It may contain any addit ional information is available that would help the reviewers resolve the grievance/appeal.
Response Text: This is a required field. A narrative field for the actual
text that is copied from this field and included on the Offender Grievance Response Report (see below) which is sent to the offender.
Level Omitted: Yes/No field for when, for any reason, a level is
omitted.

SECTION 4: MAINTAIN OFFENDER GRIEVANCE
OFFENDER GRIEVANCE PROCESSING SYSTEM
20
Reason Level
Omitted: Narrative field for the reason a level was omitted.
Response Date: This is a required fie ld. Once this date is entered and
information on the screen is saved, there can be no further updates of that level (step) of the complaint/grievance. Enter the date in which the grievance was answered and sent to offender at the current level. To enter today’s date, click in the field one time. To select another date, double click in the field to display the calendar. This date must be equal to or later than the Form Receive Date.
6. The buttons on this screen have the following functions. Create Next Level: Press this button when this screen is accessed to enter
a new level (step) in the grievance process. It clears the information from the previous level (step) so that the new information may be added.
I = Facility Level II = Central Office Level <<Previous: This button allows scrolling back through the levels of
the grievance. Next>>: This button allows scrolling forward through the levels
of the grievance. Print Response: This button allows viewing and printing of the response
to the offender. See a copy of the response report at the end of this section.
Spell Check: This button opens the spell check feature. Information
on spell check is in Section 2. Print Receipt: This button prints a response to the offender to
acknowledge that his complaint/grievance was entered into the system. Below is a copy of that acknowledgement. NOTE: The complaint/grievance must be saved before this response is accessed. Press the yellow disk in the tool bar then press the Print Receipt button. Remember that once the Response Date is entered and the information on the screen is saved, you may not change any information entered. See a copy of the response report at the end of this section.

OFFENDER GRIEVANCE PROCESSING SYSTEM
SECTION 4: MAINTAIN OFFENDER GRIEVANCE
21
Submit to COA: This button is for open Appeal Levels . The Executive
Assistant presses this button only after they are certain they have entered all the information and do not need to change anything for this case/level, and they are ready to send the grievance to COA.
When COA responds to this appeal in their task list in
Workflow, the Executive Assistant receives an email informing them of the action taken by COA for that specific case.
If this specific appeal has already been submitted to
COA, the user is notified and may respond to re-submit or not.
Re-submits may be necessary if the first appeal had inadequate information for the COA reviewer to make a decision, or if the appeal was sent through in error, both of which hopefully are expected to be rare situations.
7. Click on the Main tab to return to that screen or click on the Green Door to save
the information and exit the screen.

SECTION 4: MAINTAIN OFFENDER GRIEVANCE
OFFENDER GRIEVANCE PROCESSING SYSTEM
22
Indiana Department of Correction Technology Services Division
Offender Grievance Response Report Case Log #: 481
DOC No: Offender Name: Bldg/Range/Bed: 44-444-4444 _______________________________________________________________________________________ Topic: Bedding Incident Date: 22-JUL-05 Response ______________________________________________________________________________________ LEVEL Form Issue Date Level Receive Date Response Date __________________________________________________________________________ I – Complaint 19-AUG-05 19-AUG-05
Level Response You will be assigned to a different bed.
________________________________________ __________________________ Grievance Specialist Date ________________________________________ __________________________ Student/Offender Date
Indiana Department of Correction Technology Services Division
RECEIPT – ADMINISTRATIVE REMEDY
Date: 24—AUG-05 From: Trainer Zasada DOC To: Offender’s Name DOC#: 99 DOC THIS ACKNOWLEDGES THE RECEIPT OF THE ADMINISTRATIVE REMEDY REQUEST IDENTIFIED BELOW: Case ID: 481 Date Received: 23-AUG-05 Level – I – Complaint Response Due: 02-SEP-05 Subject: Bedding

OFFENDER GRIEVANCE PROCESSING SYSTEM
SECTION 4: MAINTAIN OFFENDER GRIEVANCE
23
Indiana Department of Correction
Central Office Offender Grievance Case Report
Case Log #: 481
DOC No : 99 Offender Name: Bldg/Range/Bed: 16-a-4u Topic: Bedding Incident Date: 19-AUG-05 Staff Determination Grievance Specialist Determination Date Receive Date Grievable Torte Claim Filed Complaint Filed Jonnie Zasada 19-AUG-05 19-AUG-05 No Complaint Staff (if any): Trainer Zasada Case Location Housing Area(HA) – MAIN HALL APPEALS LEVEL Form Issue Date Level Receive Date Response Date I - Complaint 19-AUG-05 19-AUG-05 Level Text I don’t’ like to sleep in this bunk. My bunk mate snores so loudly that it keeps me up all night.
Level Response You will be assigned to a different bed.
II - Grievance 30-JUN-05 01-JUL-05 01-JUL-05 Level Text The move was needed but my new bunk is by another snorer. I need some help with this. I’m becoming cranky and dispirited. I don’t mean to cause problems (much) but I need some place to lay my head at night in peace and quietness.
Level Response You are again being reassigned to a new bunk. We have seen you when you’re cranky and disspirited and that is not something we desire.
III – Appeal to Committee 22-AUG-05 23-AUG-05 24-AUG-05 Level Text I have no choice but to complain again as the new bunkmate talks all night in his sleep. I need some assistance with this!
Level Response We have reassigned you twice since your complaints began and you will now have to put up with the sleep talker and be thankful he doesn’t also snore.

SECTION 4: MAINTAIN OFFENDER GRIEVANCE
OFFENDER GRIEVANCE PROCESSING SYSTEM
24
SECTION 3-3: VIEW SCANNED DOCUMENTS This screen allows the user access to the Upload Documents screen and displays any documents that have been uploaded into OGRE. 1. Once the OGRE II program is accessed, the Main Menu displays. On the Main
Menu press the Create Case button or select a case from the Case Listing section of the screen and press the View/Update (Tab form) button.
2. The Maintain Offender Grievance screen displays. Only the person who created
the grievance may update the report. 3. Click on the Scans button at the top of the screen. 4. The View Scanned Documents screen displays.
5. The following fields are on this screen: Select Offender: This field allows selection of an offender. Enter the
offender’s DOC number in the first field and press the Tab key to display the offender’s name. This makes that offender the focus of this screen.
File Name: The name under which the file was saved. Upload Date: The date the file was uploaded into OCMS.

OFFENDER GRIEVANCE PROCESSING SYSTEM
SECTION 4: MAINTAIN OFFENDER GRIEVANCE
25
User ID: The ID of the user who uploaded the file. Ref No: A number given by the system to the document. 6. The buttons on this screen have the following functions: Query: To view the documents that have been uploaded for a
specific offender, enter the offender’s DOC number at the top of the screen in the field with the white background. Then press the tab key and the offender’s name displays. Press the Query button to display the documents.
View: Displays the document in PDF format. Upload
Documents: Displays the Upload Documents screen which is explained in the next section.
7. Click on the Green Door to exit the screen.

SECTION 5: REPORTS
OGRE II
26
SECTION 3-4: UPLOAD DOCUMENTS This screen allows documents to be uploaded into OGRE for viewing by Central Office staff members. 1. Once the OGRE II program is accessed, the Main Menu displays. On the Main
Menu press the Create Case button or select a case from the Case Listing section of the screen and press the View/Update (Tab form) button.
2. The Maintain Offender Grievance screen displays. Only the person who created
the grievance may update the report. 3. Click on the Scans button at the top of the screen. 4. On the View Scanned Documents screen, click on the Upload Documents
button. 5. The Upload Documents screen displays.
6. The following fields are on this screen: Select File to
Upload: This is the field that displays the file that is to be uploaded into OCMS. See the Browse button below.
Offender ID: This displays the offender’s DOC number and name. Host Name: This field is automatically updated by the system. User Name: This field is automatically updated by the system.

OFFENDER GRIEVANCE PROCESSING SYSTEM
SECTION 5: REPORTS
27
IP Address: This field is automatically updated by the system. O/S: This field is automatically updated by the system. 7. The buttons on this screen have the following functions: Browse: This button allows the user to browse through his folders to
locate a specific document. Once the document is located, it displays in the Select File to Upload field.
View Docs Before
Uploading: This button allows viewing of the document.
Upload: This button allows the file selected to be uploaded into
OCMS. Once this button is pressed, the following message displays, “File uploaded successfully into the database.”
8. Click on the Green Door to save the information and exit the screen. 9. Exit back to the Maintain Offender Grievance screen. Click on the Submit to
COA button to send the request to Central Office staff members.

SECTION 5: REPORTS
OGRE II
28
SECTION 4: REPORTS OGRE II contains many of the reports that were included in the first OGRE program. This section describes each report. To access the reports, from the Main Menu, click on Reports in the toolbar and a drop down menu displays. Select the report from this menu.

OGRE II SECTION 5-1: TOP FILERS
29
SECTION 4-1: TOP FILERS This report lists the ten offenders who have filed the most complaints, grievances or appeals within a given month. 1. When the Top Filers is selected from the Report menu, the following screen
displays.
2. The facility, month and year may be changed. The system automatically sets the Facility field for the user’s facility and the Month and Year fields to reflect the current date.
3. Once the criteria has been entered press the Continue button. 4. The Top Complaint Filers Report displays.
Indiana Department of Correction Putnamville Corr.
TOP COMPLAINT FILERS REPORT For Month of: JUN-2005
Offender Name DOC Number Offender Housing Number of Complaints Marvin Smith 467115 02-002-0011 8 Darryl Meswell 681990 C-1-22 8 Linda Darby 11 16-A-4U 7 Jerald Jessup 691151 B-1-14 5 Desmond Aaron 338166 5B-WB-11T 5 Gary Lowell 671571 U2-ALL014U 3 Marty Pearl 671999 U2-A33-14L 3 Peter Graves 719002 RD-56-10 3 Michael Dillon 319181 KP-JUN-13 2 Peter Handy 288002 PL-615-511 2

SECTION 5-2: TOP RECEIVERS
OGRE II
30
SECTION 4-2: TOP RECEIVERS This report lists the ten staff members who have had the most complaints, grievances or appeals within a given month. 1. When the Top Receivers is selected from the Report menu, the following screen
displays. 2. The facility, month and year may be changed. The system automatically sets the
Facility field for the user’s facility and the Month and Year fields to reflect the current date.
3. Once the criteria has been entered press the Continue button. 4. The Top Complaint Receivers Report displays.
Indiana Department of Correction Putnamville Corr.
TOP COMPLAINT RECEIVERS REPORT For Month of: JUN-2005
Staff Name Staff Number Number of Complaints Suzie Q 1001 23 Miss Scarlett 1625 20 Colonel Mustard 1515 18 Junior Samples 2010 12 Patty Paige 0075 10 Ernest Grimes 1331 8 Peter Pan 1616 5 Marvin Martin 412 3 Peter Gun 678 2 Pop Gun 258 2

OGRE II SECTION 5-3: COMPLAINTS BY TOPIC
31
SECTION 4-3: COMPLAINTS BY TOPIC This report lists each complaint/grievance received by the specified facility for the specified month. 1. When the Complaint by Topic is selected from the Report menu, the following
screen displays. 2. The facility, month and year may be changed. The system automatically sets the
Facility field for the user’s facility and the Month and Year fields to reflect the current date.
3. Once the criteria has been entered press the Continue button. 4. The Complaints by Topic Report displays.
Indiana Department of Correction Putnamville Corr.
COMPLAINTS BY TOPIC For Month of: JUN-2005
Topic Log ID Offender Complaint Response
Food Quantity 252 11 Offender stated that she is not getting enough to eat. This morning she wrote that she only had three eggs, two pieces of bacon, two sausages, oatmeal, pancakes, grits, biscuits and gravy, an English muffin, fruit, coffee, juice and milk.
The food is given in a specific amount so that offenders receive a well balanced meal. Extra food will no longer be given in the serving line.

SECTION 5-4: COUNTS BY TOPIC
OGRE II
32
SECTION 4-4: COUNTS BY TOPIC This report lists a count for each of the topics that were grieved about in the specified month at the specified facility. 1. When Counts by Topic is selected from the Report menu, the following screen
displays. 2. The facility, month and year may be changed. The system automatically sets the
Facility field for the user’s facility and the Month and Year fields to reflect the current date.
3. Once the criteria has been entered press the Continue button. 4. The Counts by Topic Report displays.
Indiana Department of Correction Putnamville Corr.
TOPIC COUNT REPORT For Month of: JUN-2005
Topic Area/Topic Type Number of Complaints Housing – Cell 14 Visits - Visitors 11 Food Services – Food Quantity 10 Food Service – Kitchen Staff 9 Telephone – Phone Call Privileges 7 Food Service – Quality 6 Housing – Bedding 3
OGRE II SECTION 5-5: FILER HISTORY
33
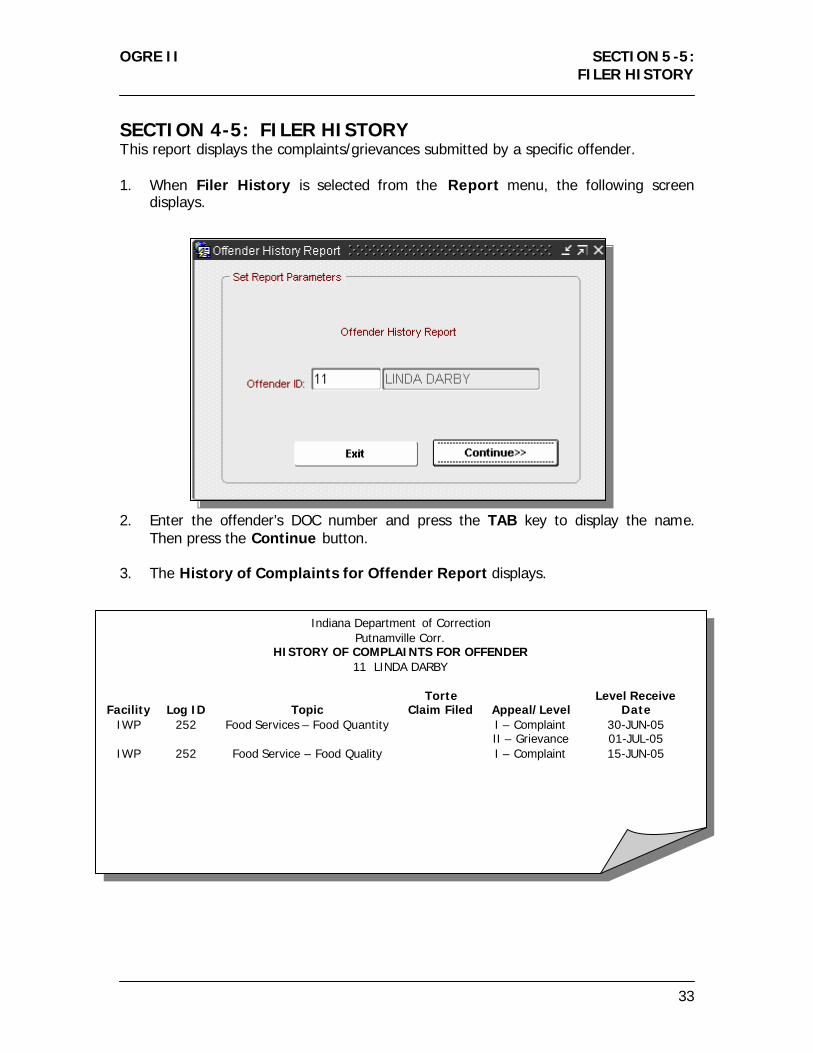
SECTION 4-5: FILER HISTORY This report displays the complaints/grievances submitted by a specific offender. 1. When Filer History is selected from the Report menu, the following screen
displays. 2. Enter the offender’s DOC number and press the TAB key to display the name.
Then press the Continue button. 3. The History of Complaints for Offender Report displays.
Indiana Department of Correction Putnamville Corr.
HISTORY OF COMPLAINTS FOR OFFENDER 11 LINDA DARBY
Facility
Log ID
Topic Torte
Claim Filed
Appeal/Level Level Receive
Date IWP 252 Food Services – Food Quantity I – Complaint
II – Grievance 30-JUN-05 01-JUL-05
IWP 252 Food Service – Food Quality I – Complaint 15-JUN-05
SECTION 5-6: RECEIVER HISTORY
OGRE II
34
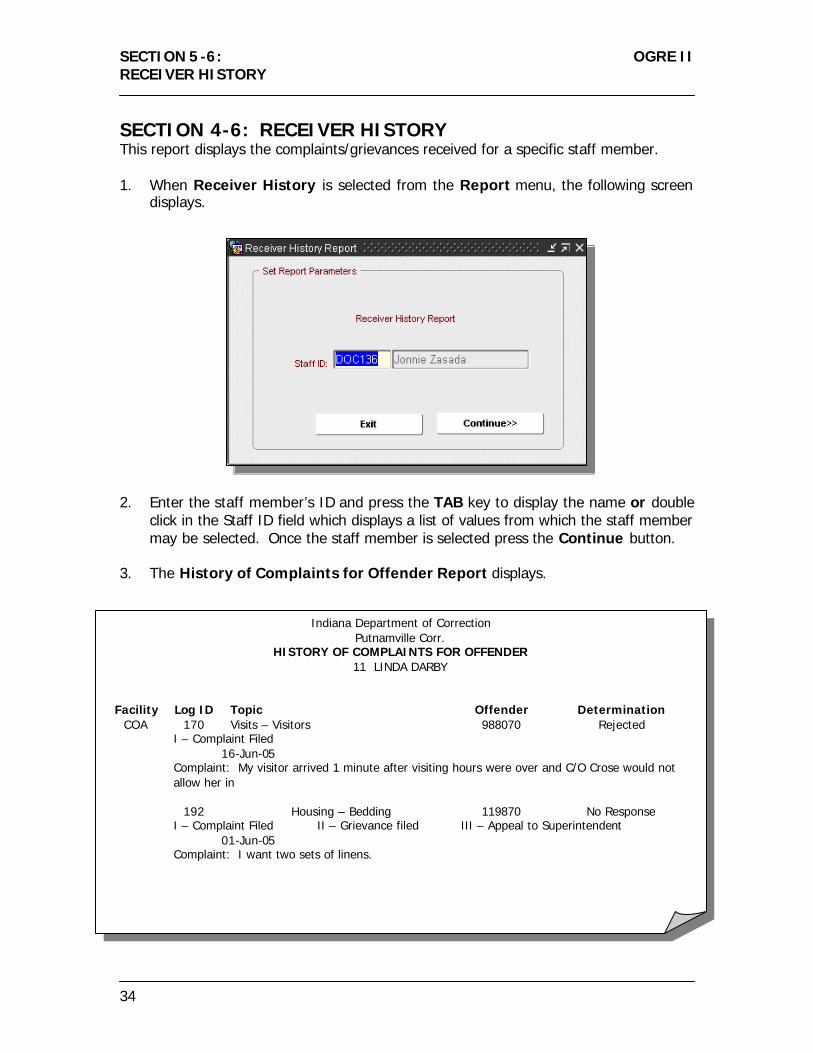
SECTION 4-6: RECEIVER HISTORY This report displays the complaints/grievances received for a specific staff member. 1. When Receiver History is selected from the Report menu, the following screen
displays. 2. Enter the staff member’s ID and press the TAB key to display the name or double
click in the Staff ID field which displays a list of values from which the staff member may be selected. Once the staff member is selected press the Continue button.
3. The History of Complaints for Offender Report displays.
Indiana Department of Correction Putnamville Corr.
HISTORY OF COMPLAINTS FOR OFFENDER 11 LINDA DARBY
Facility
Log ID
Topic
Offender
Determination COA 170 Visits – Visitors 988070 Rejected
I – Complaint Filed 16-Jun-05 Complaint: My visitor arrived 1 minute after visiting hours were over and C/O Crose would not allow her in
192 Housing – Bedding 119870 No Response I – Complaint Filed II – Grievance filed III – Appeal to Superintendent
01-Jun-05 Complaint: I want two sets of linens.

OGRE II SECTION 5-7: CROSS-TABULATION BY TOPIC/FAC
35
SECTION 4-7: CROSS-TABULATION BY TOPIC/FACILITY (GRIEVANCE SUMMARY REPORT) This report shows the numbers of grievances in various topic areas compared to the many facilities in the system for any given month. Enter the two digit month and four digit year and click the continue button. 1. When Cross-Tabulation by Topic/Facility is selected from the Report menu, the
following screen displays. Select the month and year and click on the Continue button.
2. This is a multi-page report as shown below.

SECTION 5-7: CROSS-TABULATION BY TOPIC/FAC.
OFFENDER GRIEVANCE PROCESSING SYSTEM
36
SECTION 4-8: COMPLAINT STATUS (COUNTS BY DETERMINATION) 1. When Complaint Status (Counts by Determination) is selected from the
Report menu, the following screen displays. 2. The facility, month and year may be changed. The system automatically sets the
Facility field for the user’s facility and the Month and Year fields to reflect the current date.
3. The Status of Complaints Received Report displays.
Indiana Department of Correction Putnamville Corr.
STATUS OF COMPLAINTS RECEIVED For Month of: JUN-2005
Category Number of Complaints Returned – Non-grievable 1 Complaints Resolved Informally 0 Number of Grievances filed 8 Grievances Resolved Informally 0 Appeals to Superintendent 7 Appeals to Regional Director 5

OGRE II SECTION 5-9: MONTHLY COUNT
37
SECTION 4-9: MONTHLY COUNT REPORT – (CURR/AVG) This report provides the number of complaints/grievances in categories along with their percentage compared to an average month. 1. When Monthly Count Report (Curr/Avg) is selected from the Report menu,
the following screen displays. 2. The facility, month and year may be changed. The system automatically sets the
Facility field for the user’s facility and the Month and Year fields to reflect the current date.
3. The Monthly Report of Complaints Filed displays.
Indiana Department of Correction Putnamville Corr.
MONTHLY REPORT OF COMPLAINTS FILED For Month of: JUN-2005
Category Current Month Average Month Denied 1 0.08 No Response 1 0.08 Non-grievable 1 0.08 Resolved – Informally 1 0.08 Resolved 1 0.17

SECTION 5-10: COUNTS BY TOPIC AND HOUSING UNIT
OGRE II
38
SECTION 4-10: COUNTS BY TOPIC AND HOUSING UNIT This report shows grievance topics sorted by topics and the counts for this topic by housing units within the facility. Enter the facility Acronym, month and year and click Continue. 1. When Counts by Topic and Housing Unit is selected from the Report menu, the
following screen displays. Select the facility, month and year and click on the Continue button.
2. The following report displays.

OGRE II SECTION 6: CHANGE PASSWORD
39
SECTION 4-11: OPEN APPEAL CASES AT CENTRAL OFFICE This report allows users to view the cases that at appeal level but for which no response has been sent. 1. When Open Appeal Cases at Central Office is selected from the Report menu,
the following report displays.
OGRE
Case Status Report (Appeal Level w/no Response)
Status: Facility Log ID Appeal Rec’d EA ID Submitted to CO Topic
CF ISF 999999 21-SEP-07 ISF999 29-SEP-07 Food Service CF WCC 999998 20-AUG-07 WCC999 01-SEP-07 Recreation, Leisure
Count: 2

SECTION 6: CHANGE PASSWORD
OFFENDER GRIEVANCE PROCESSING SYSTEM
40
SECTION 4-12: CASE STATUS SELECTION REPORT This report provides the list of cases according to the criteria selected. 1. When Case Status Selection Report is selected from the Report menu, the
following screen displays. Make selections on what is to be viewed and press the Continue button.
2. The following report displays.
CASE SELECTION REPORT
Select Criteria: Cases with no Response
Log ID
Offender ID/Name
Incident Date
Level
Level Receive Date
---------------------------------------------------------------------------------------------------------------------------------------------------- 60841 119877 Smith, Joseph 12-OCT-06 I 12-OCT-06 60844 112098 Jackson, Sammy 05-NOV-06 I 15-NOV-06 60897 913374 Harrison, Harley 22-NOV-06 I 22-NOV-06 60900 913373 Robertson, Aaron 22-0OV-06 I 21-NOV-06 60903 555111 Bennett, Rusty 28-NOV-06 II 28-NOV-06 30911 999999 Warren, Claude 01-DEC-06 I 21-FEB-07
Report Total: 6

OGRE II SECTION 6: CHANGE PASSWORD
41
SECTION 4-13: COUNTS BY RACE REPORT This report is not operational at this time.

SECTION 6: CHANGE PASSWORD
OFFENDER GRIEVANCE PROCESSING SYSTEM
42
SECTION 4-14: PRINT USER’S CASE LIST This prints the user’s list of open cases. 1. When Print User’s Case List is selected from the Report menu, the following
report displays.
Log ID Grievance Date Topic Description Case
Status Facility Current Step
61025 01-AUG-07 Other Classification Matters CF ISF LEVEL I 61125 10-AUG-07 Food Service CF ISF LEVEL I 61129 11-AUG-07 Administration CF ISF LEVEL I
Report Total: 3

OGRE II SECTION 6: CHANGE PASSWORD
43
SECTION 5-1: CHANGE PASSWORD This screen allows a user to change their password. 1. Once OGREII is accessed, the Main Menu screen displays. For this function it is not
necessary to select a student. 2. Select Utilities in the menu bar at the top of the screen and select Change
Password in the drop down menu. 3. The New Password screen displays.
4. To change a password, enter the user’s old password then tab down and enter a
new password then tab down and re-enter the new password. Press the Change button.
5. The system then displays a message that the password has been successfully
changed.

SECTION 7: WORKFLOW
OFFENDER GRIEVANCE PROCESSING SYSTEM
44
SECTION 6: WORKFLOW Synopsis of Enhancement to OGRE:
• Oracle Workflow has been added (to Appeal Level) to expedite processing of appeals at Central Office (COA).
• Automated sending of emails to Executive Assistants (EA’s) to inform them when central office responds to each appeal from Workflow.
• Added ability for Executive Assistants to load scanned or other pertinent documents into OGRE for a selected offender.
• A new field on OGRE screen (Main tab) labeled Specific State Relief Seeking for EA’s to enter the specific State relief the inmate is seeking. This new field also prints on the case report.
• Another new field on OGRE screen (Level tab) labeled Executive Assistant Comments allows EA’s to enter additional information for the reviewers to assist with resolution of the grievance. This does not print on the case report.
• Moved the Log ID field to be the first choice on the Advanced Search screen since it’s probably used more than other search fields.
• Level II Coordinator defaults to the assigned Central Office reviewer (based on appeal topic).
What is Oracle Workflow? Workflow is a tool used in SAMS to streamline the process of approving Time-Cuts. The same need exists to streamline the process of receiving and responding to offender grievances. Workflow assists with this using its own set of developer-designed programs. The user (CO Reviewer) logs into it the same as any other Oracle application. However, they have Workflow-specific roles which determines who should receive specific notifications in their task list. Workflow is also web-based and allows the user to log in just once daily, and then ‘refresh’ their task list to see new notifications by pressing one key. How does it work?
• When Executive Assistant enters the Level II – Appeal information for a case into OGRE, and are satisfied they have entered all the necessary pieces of information for that appeal, they press the Submit to COA button to submit that appeal to the staff member at Central Office.
• Workflow immediately sends a notification to the appropriate staff person responsible for reviewing that particular case, based on the topic being grieved (food, medical, etc.).
• When COA staff member responds to a case and presses Update an email is generated to the sending Executive Assistant to inform them of the action taken by the reviewing staff. At that time, the EA will be able to see the Response Text and Response Date updated accordingly in OGRE from the workflow reviewer’s response. The Receipt Acknowledged Date is also updated.
Other Rules: For overdue appeals a reminder email is generated to the reviewing COA staff responsible for a case. Five (5) days prior to the 20-day deadline. If not completed by the deadline a past due email is generated.
OFFENDER GRIEVANCE PROCESSING SYSTEM
SECTION 7: WORKFLOW
45
• One (1) day over-due san email is automatically sent to the responsible
reviewing staff • Fifteen (15) days over-due an email is automatically sent to the reviewing staff
and Director • Twenty-one (21) days over-due an email is automatically sent to designated
supervisor • Twenty-five (25) days over-due to the Director
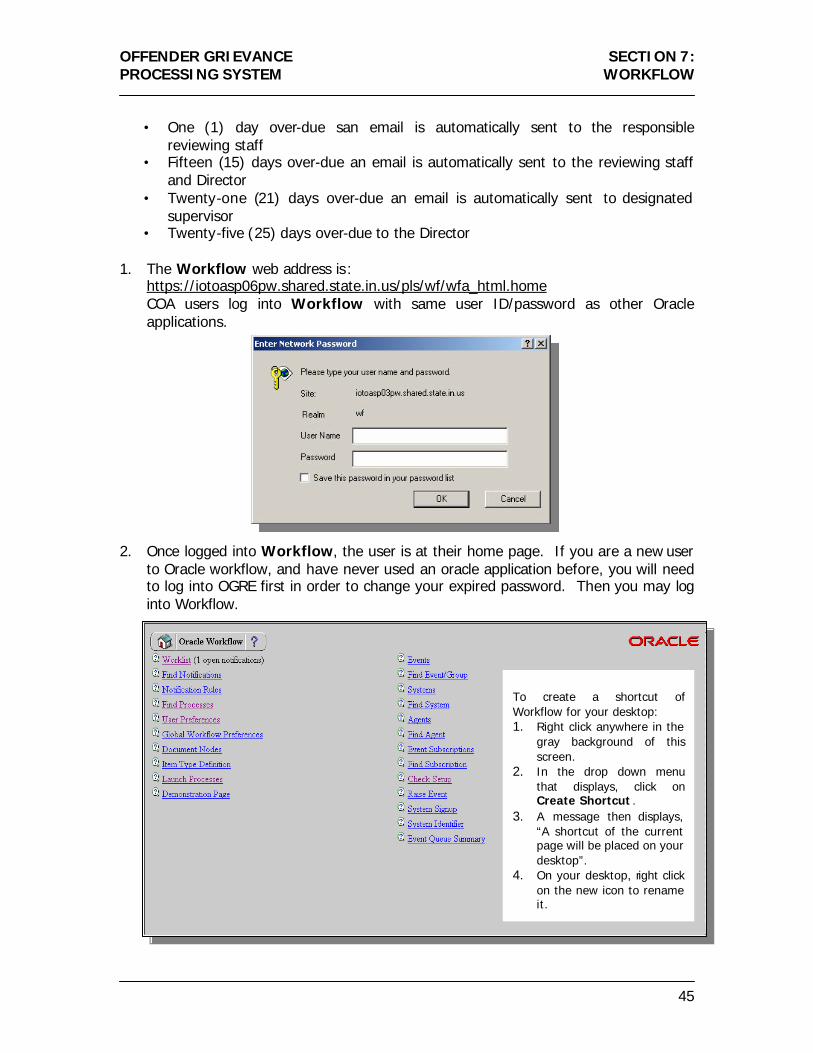
1. The Workflow web address is:
https://iotoasp06pw.shared.state.in.us/pls/wf/wfa_html.home COA users log into Workflow with same user ID/password as other Oracle applications.
2. Once logged into Workflow, the user is at their home page. If you are a new user
to Oracle workflow, and have never used an oracle application before, you will need to log into OGRE first in order to change your expired password. Then you may log into Workflow.
To create a shortcut of Workflow for your desktop: 1. Right click anywhere in the
gray background of this screen.
2. In the drop down menu that displays, click on Create Shortcut .
3. A message then displays, “A shortcut of the current page will be placed on your desktop”.
4. On your desktop, right click on the new icon to rename it.

SECTION 7: WORKFLOW
OFFENDER GRIEVANCE PROCESSING SYSTEM
46
3. In the screen print at the bottom of the previous page, there is one Open
Notification in the Worklist. This list may be refreshed at any time by pressing F5. 4. Clicking on Worklist, displays the details of all open notifications for the user.
5. The Sent column indicated the date the EA submitted the appeal. 6. Click on the underlined link in the Subject column to open the notification (see the
screen print below).

OFFENDER GRIEVANCE PROCESSING SYSTEM
SECTION 7: WORKFLOW
47
7. This is the screen on which the COA Reviewer enters their Responses to the case.
• The recipient of the notification is identified in the To: field by their Workflow role.
• Instructions for the Reviewer are stated in the white body area of the task. Please enter your Response Text below for this case, press Update Your Response and your response will be updated on the database for this case. Or enter your Reject Reason and press Reject to EA. Either response will send an email back to the sending Executive Assistant.
• In the columnar/table format are the pertinent details of the case: Case # Reviewer Responsible (see Attachment A) Appeal Date Submitted By (EA name and ID)
• If there are any scanned/loaded documents are available for this offender, the number in the next column reflects this. Next to this is the Go to scan Documents link to access the Scanned Documents Viewer screen.
• The EA Comments section displays additional information which was entered by the EA in OGRE.
8. Any of the following removes the task from the Workflow WorkList:
• The COA Reviewer enters their response (whether approve/deny) in the Response Text field and presses Update Your Response button. This action updates the case in OGRE and sends an email back to the sending EA.
• If the COA Reviewer does not want to respond to the case, they enter their reason in the Reject Reason field and press the Reject to EA button. This does NOT update the database but does send an email to the sending EA with the reject reason.
• If the COA Reviewer wants to delegate or reassign the case to another COA Reviewer, they may press the Reassign button and select from the list of user’s IDs. NOTE: The ID of the person must be known to reassign or delegate. In the current version of Workflow, the user name is not displayed: just the ID.
9. Go to Scan Document, opens the View Scanned Documents screen which is
discussed in Sections 4-3 and 4-4. Once this screen is accessed to view scanned documents from Workflow, any other attempts to go to this link/web page, do not open a new browser window. You must find the previously opened window on your task bar at the bottom of the desktop. This avoids numerous pages from being opened which might cause your PC to crash.
10. To find specific cases from your main Workflow page, select Find Notifications.

SECTION 7: WORKFLOW
OFFENDER GRIEVANCE PROCESSING SYSTEM
48
11. On the screen that displays, select OGRE Appeals Resp in the Type field.
12. In the Subject field, enter percent sign, case number, percent sign. (% is a ‘like’
wild card – e.g. example above - anything ‘like’ 5261 in subject). 13. The system displays only those cases with the case number in the Subject.

OFFENDER GRIEVANCE PROCESSING SYSTEM
SECTION 7: WORKFLOW
49

SECTION 7: WORKFLOW
OFFENDER GRIEVANCE PROCESSING SYSTEM
50