okta embedded-occ implementation guide · okta embedded-occ implementation guide . ... using an...
TRANSCRIPT
Okta Inc. 301 Brannan Street, 3rd Floor San Francisco, CA, 94107
[email protected] 1-888-722-7871
Okta Embedded-OCC Implementation Guide

Okta Embedded-OCC Implementation Guide
2
Contents
Overview .................................................................................................................... 3
Implementation Steps ................................................................................................ 4 Obtain API access for tenant creation .................................................................................................................................... 4 Build UI to capture input for tenant creation and app instantiation .......................................................................... 4
Create a brand new Okta tenant + App instantiation ................................................................................................. 4 Use an existing Okta tenant for App instantiation ....................................................................................................... 5
Tenant Creation API .................................................................................................... 5
App Instantiation API .................................................................................................. 8
References ............................................................................................................... 12 Errors – Tenant Creation API .................................................................................................................................................. 12 Errors - App Instantiation API ................................................................................................................................................ 15
Okta Embedded-OCC Implementation Guide
3
Overview Okta offers Okta Cloud Connect (OCC) program for ISV partners with the need to quickly and easily connect to customer’s AD infrastructure for authentication and lifecycle management support. For customers, OCC is a free offering for an unlimited time, and for an unlimited number of users to be used with a single ISV application. To learn more about the OCC program, visit the Okta Cloud Connect page. Embedded-OCC takes this one step further by providing an even more seamless user experience for your customers through the following:
1) Enhancing the Okta tenant creation experience by embedding this into your product admin UI. 2) Programmatically instantiating the appropriate app instance in the Okta tenant without the need to go
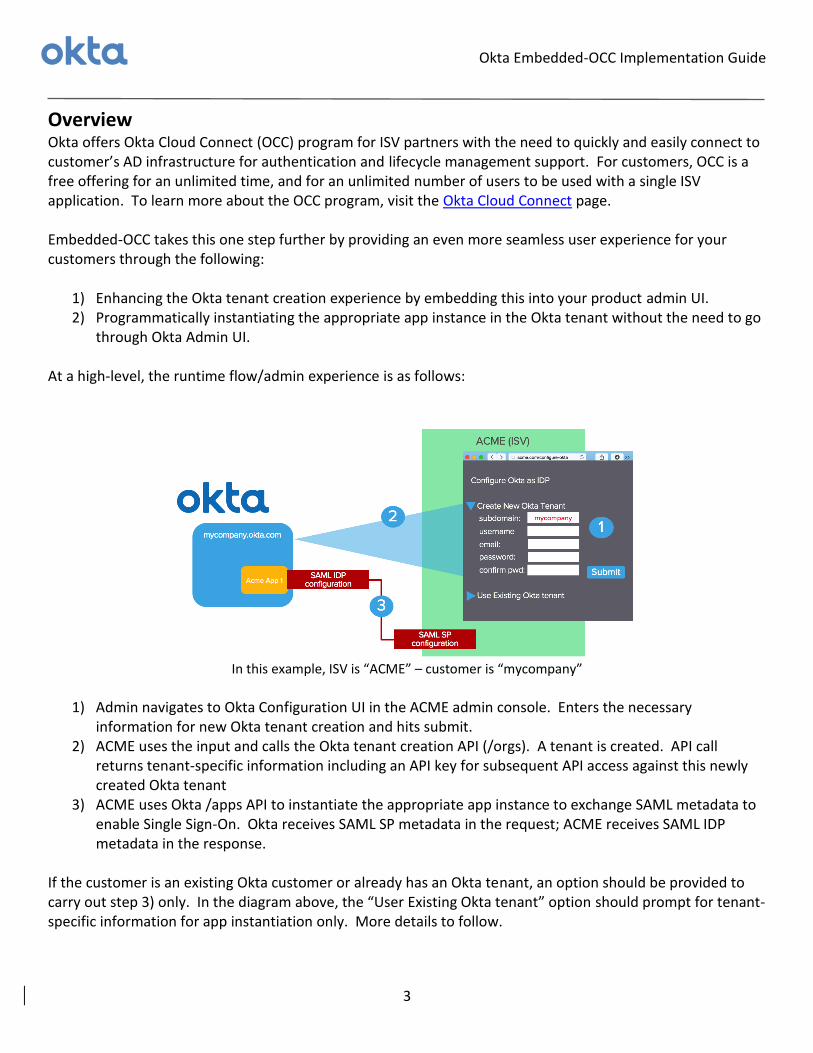
through Okta Admin UI. At a high-level, the runtime flow/admin experience is as follows:
In this example, ISV is “ACME” – customer is “mycompany”
1) Admin navigates to Okta Configuration UI in the ACME admin console. Enters the necessary
information for new Okta tenant creation and hits submit. 2) ACME uses the input and calls the Okta tenant creation API (/orgs). A tenant is created. API call
returns tenant-specific information including an API key for subsequent API access against this newly created Okta tenant
3) ACME uses Okta /apps API to instantiate the appropriate app instance to exchange SAML metadata to enable Single Sign-On. Okta receives SAML SP metadata in the request; ACME receives SAML IDP metadata in the response.
If the customer is an existing Okta customer or already has an Okta tenant, an option should be provided to carry out step 3) only. In the diagram above, the “User Existing Okta tenant” option should prompt for tenant-specific information for app instantiation only. More details to follow.
Okta Embedded-OCC Implementation Guide
4
Implementation Steps
Obtain API access for tenant creation Any ISVs interested in Embedded-OCC should contact Okta ([email protected]). Special privilege needs to be granted to an API user of your choice before you are allowed to create new tenants. Here is how the tenant creation privilege is set up:
1) You must have an existing Okta tenant in the appropriate Okta instance (*.okta.com and/or *.oktapreview.com). If your company is an existing Okta customer, we recommend that you create a separate tenant for the purpose of setting up Embedded-OCC.
2) Create a user in your Okta tenant. Best practice is to create a system account used solely for Embedded-OCC. Using an account that represents an end user/admin may lead to issues if this user is deactivated/locked-out in the future due to human activities.
3) Provide the user/tenant information to Okta. 4) Once approved, Okta will grant the tenant creation privilege to this particular user.
In general, ISVs are expected to test out their implementation on *.oktapreview.com first. Once the implementation has been reviewed and tested on *.oktapreview.com, Okta will then grant tenant creation privilege for the production environment (*.okta.com) in your production implementation. You may choose to ONLY allow your production environment to create Okta tenants in *.okta.com. Best practice is to support both *.okta.com and *.oktapreview.com as we have seen situations where this is useful for sandbox setup, UAT testing and diagnostics for your customers and your own testing.
Build UI to capture input for tenant creation and app instantiation You need to build and expose an admin UI to allow the following options:
1) Create a brand new Okta tenant + App instantiation. 2) Use an existing Okta tenant for App instantiation
Create a brand new Okta tenant + App instantiation You need to prompt for the following:
- If you allow admin to choose between *okta.com and *.oktapreview.com (recommended approach), prompt for it.
- Okta Subdomain – this determines the subdomain URL. The domain name must be unused. - Company Name – this is a “display name” for the customer’s company. (eg. “MyCompany Inc.”) - Admin First Name – Okta requires first name for all users - Admin Last Name – Okta requires last name for all users - Admin Email – This needs to be a real email. Notifications (activation, password reset, etc) will be sent
to this email. This value CAN be defaulted to be the Okta login name as well. However, the API does allow for login name and email to be different as they are two distinct attributes.
Okta Embedded-OCC Implementation Guide
5
- Password – Password for the Okta admin account. Best practice should include a “confirmation” field forcing user to retype the password. The default password policy requires the following and should be displayed in the UI. Tenant creation will result in an error if this is not met.
o at least 8 characters o a lowercase letter o an uppercase letter o a number o no parts of your username
- Security Question – A security question chosen by the user for simple 2-factor used during password recovery
- Security Answer – Answer to the above question chosen by the user for simple 2-factor used during password recovery
Note that the password policy and 2-factor settings in the Okta tenant can be modified by the customer once the tenant is created.
Use an existing Okta tenant for App instantiation If the admin wants to use an existing Okta tenant, you should prompt for the following in order to instantiate your application with the given Okta tenant:
- Okta tenant URL – eg. https://acme.oktapreview.com or https://acme.okta.com. Best practice, as stated before, is to support both *.okta.com and *.oktapreview.com
- Okta API token – This is the API token obtained from the Okta Admin Console for API access. The API token carries the privileges of the admin user used to fetch the token. If the token does not have sufficient privilege, the API call will return an error.
Tenant Creation API Continue with the “ACME” (ISV) and “mycompany” (customer) as an example. Okta has granted access to a system account (system user) in https://acme.oktapreview.com. You must create an API token for this user. Log into https://acme.oktapreview.com and navigate to admin console and go to Security->API

Okta Embedded-OCC Implementation Guide
6
Create a new token. The token will show up only once. You can create additional tokens if you lose the token or the token has expired. To learn more about Okta API tokens, go here. To test if the token is valid, you can try the following curl command:
curl -v -H "Authorization:SSWS <API token>" -H "Accept:application/json" -H "Content-type:application/json" -
X GET https://<your_tenant>.oktapreview.com/api/v1/users/me
The following curl command will create a new Okta tenant. If you use a *.okta.com token, the tenant will be created under *.okta.com. curl -v -H "Authorization:SSWS <API token>" -H "Accept:application/json" -H "Content-type:application/json" -
X POST https://<your_tenant>.oktapreview.com/api/v1/orgs -d
‘{
"subdomain": "mycompany",
"name": "MyCompany Inc",
"website": "https://www.mycompany.com",
"edition": "DIRECTORY",
"licensing": {
"apps": [
"boxnet"
]
},
"admin": {
"profile": {
"firstName": "Joe",
"lastName": "Smith",
"email": "[email protected]",
"login": “[email protected]",
"mobilePhone": null
},
"credentials": {
"password": {"value": “L0v30ktA!"},
"recovery_question": {

Okta Embedded-OCC Implementation Guide
7
"question": "Best IDaaS Solution",
"answer": "Okta"
}
}
}
}’
Some additional parameters are needed in the request beyond the input from your UI discussed earlier.
- website – This is the URL of the website we typically ask during our free trial sign-up. It is a mandatory attribute and it must be of a URL format. A suggestion is to hardcode your company URL.
- edition – An Okta tenant can be created with different editions/SKUs enabled. Here, we are creating an OCC tenant for a single app only – by specifying the “DIRECTORY” value.
- app – this is an attribute within the licensing object. This will be the internal Okta app ID of your application in the Okta Application Network. You can find this out by doing the following:
o Log into your Okta instance as an admin o Create a new app instance for your app o During the configuration wizard, your internal app name is part of the URL. The example below
shows “boxnet” as the internal app id for Box. If you have trouble figuring out your Okta App ID, contact us.
Here is a sample response from a successful call. {
"id": "00o8abcd3myfI6FM1234",
"subdomain": "mycompany",
"name": "MyCompany Inc",
"website": "https://www.mycompany.com",
"status": "ACTIVE",
"edition": "DIRECTORY",
"expiresAt": null,
"created": "2016-11-08T15:16:01.000Z",

Okta Embedded-OCC Implementation Guide
8
"lastUpdated": "2016-11-08T15:16:01.000Z",
"licensing": {
"apps": [
"boxnet"
]
},
"settings": {
"app": {
"errorRedirectUrl": null,
"interstitialUrl": null,
"interstitialMinWaitTime": 1200
},
"userAccount": {
"attributes": {
"secondaryEmail": true,
"secondaryImage": true
}
},
"portal": {
"errorRedirectUrl": null,
"signOutUrl": null
}
},
"token": "00AbCdefghPijn7s7sue77oi7zz7zzZZxyzOHa7XyZ",
"tokenType": "SSWS",
"_links": {
"organization": {
"href": "https://mycompany.oktapreview.com/api/v1/orgs/sleedemo1"
},
"administrator": {
"href": "https://mycompany.oktapreview.com/api/v1/users/00u1abcd1Abcd11a1a1"
},
"policy": {
"href": "https://mycompany.oktapreview.com/api/v1/orgs/sleedemo1/policy"
},
"contacts": {
"href": "https://mycompany.oktapreview.com/api/v1/orgs/sleedemo1/contacts"
}
}
}
App Instantiation API

Okta Embedded-OCC Implementation Guide
9
Now that you have created the Okta tenant, the next API call is to instantiate the app instance. You need two pieces of information for this – the Okta tenant URL and the API token. The API token either comes from the tenant creation response or come from admin input from UI where an existing Okta tenant is being used. Depending on the set of inputs required to set up SAML for your app in Okta, the input parameters. An example here is the “servicenow_app2” SAML app instantiation. The only parameter needed is “loginURL” which is set to the SAML endpoint on the ServiceNow side. The following curl command will create a new “servicenow_app2” app. You can try this call against your developer Okta tenant. curl -v -H "Authorization:SSWS <API token>" -H "Accept:application/json" -H "Content-type:application/json" -
X POST https://<your_tenant>.oktapreview.com/api/v1/apps -d { "name": "servicenow_app2",
"label": "SLEE Test",
"status": "ACTIVE",
"signOnMode": "SAML_2_0",
"settings": {
"app": {
"loginURL": "https://sleetesting.com/sso/saml"
}
}
}
The parameters above
- name – This is the Okta app id of your app - label – This is the “display name” of the app instance. It is normally provided by the administrator in
the Okta UI. There is uniqueness constraint on this attribute within an Okta tenant. A recommended logic is the following:
o Use a fixed “label name” – for eg. “Acme”. o When there is a duplicate, try using “Acme 1” and continue to increment until there is no
conflict
Here is a sample response from a successful call.
{
"id": "0oa12abc1xyABCfgk1d8",
"name": "servicenow_app2",
"label": "SLEE Test",
"status": "ACTIVE",
"lastUpdated": "2016-11-10T03:31:17.000Z",
"created": "2016-11-10T03:31:17.000Z",

Okta Embedded-OCC Implementation Guide
10
"accessibility": {
"selfService": false,
"errorRedirectUrl": null,
"loginRedirectUrl": null
},
"visibility": {
"autoSubmitToolbar": false,
"hide": {
"iOS": false,
"web": false
},
"appLinks": {
"login": true
}
},
"features": [],
"signOnMode": "SAML_2_0",
"credentials": {
"userNameTemplate": {
"template": "${source.login}",
"type": "BUILT_IN"
},
"signing": {}
},
"settings": {
"app": {
"loginURL": "https://sleetesting.com/sso/saml"
},
"notifications": {
"vpn": {
"network": {
"connection": "DISABLED"
},
"message": null,
"helpUrl": null
}
},
"signOn": {
"defaultRelayState": null
}
},
"_links": {
"logo": [
{
"name": "medium",

Okta Embedded-OCC Implementation Guide
11
"href":
"https://ok3static.oktacdn.com/assets/img/logos/servicenow_app2.99ac322e3dae5405fa0b04b8911a4cea.png",
"type": "image/png"
}
],
"appLinks": [
{
"name": "login",
"href": "https://mycompany.oktapreview.com/home/servicenow_app2/0oa19jdq4ytHHtfgk1d8/14155",
"type": "text/html"
}
],
"help": {
"href": "https://mycompany-admin.oktapreview.com
/app/servicenow_app2/0oa19jdq4ytHHtfgk1d8/setup/help/SAML_2_0/external-doc",
"type": "text/html"
},
"users": {
"href": "https://mycompany.oktapreview.com/api/v1/apps/0oa19jdq4ytHHtfgk1d8/users"
},
"deactivate": {
"href": "https://mycompany.oktapreview.com/api/v1/apps/0oa19jdq4ytHHtfgk1d8/lifecycle/deactivate"
},
"groups": {
"href": "https://mycompany.oktapreview.com/api/v1/apps/0oa19jdq4ytHHtfgk1d8/groups"
},
"metadata": {
"href": "https://mycompany.oktapreview.com/api/v1/apps/0oa19jdq4ytHHtfgk1d8/sso/saml/metadata",
"type": "application/xml"
}
}
}
At this point, the app instance in Okta is created and Okta is now aware of the SAML SP information based on your input in the app instantiation API call. Now you need to get the SAML IDP Metadata from Okta to complete the SAML configuration in your environment. The red portion in the response (the “metadata” object inside the “links” object) is the endpoint to be used to fetch the IDP metadata. The response will be returned in XML format. The following curl command will return the SAML IDP metadata (based on the sample response above). Note the “application/xml” value for both “Accept” and “Content-type”. curl -v -H "Authorization:SSWS <API Token>" -H "Accept:application/xml" -H "Content-type:application/xml" -
X GET https://mycompany.oktapreview.com/api/v1/apps/0oa19jdq4ytHHtfgk1d8/sso/saml/metadata

Okta Embedded-OCC Implementation Guide
12
Here is a sample response from a successful call: <?xml version="1.0" encoding="UTF-8"?>
<md:EntityDescriptor xmlns:md="urn:oasis:names:tc:SAML:2.0:metadata" entityID="exk19jdq4yshW8Ru71d8">
<md:IDPSSODescriptor WantAuthnRequestsSigned="false"
protocolSupportEnumeration="urn:oasis:names:tc:SAML:2.0:protocol">
<md:KeyDescriptor use="signing">
<ds:KeyInfo xmlns:ds="http://www.w3.org/2000/09/xmldsig#">
<ds:X509Data>
<ds:X509Certificate>MIIDmjCCAoKgAwIBAgIGAUtB2llRMA0GCSqGSIb3DQEBBQUAMIGNMQswCQYDVQQGEw
JVUzETMBEG
A1UECAwKQ2FsaWZvcm5pYTEWMBQGA1UEBwwNU2FuIEZyYW5jaXNjbzENMAsGA1UECgwET2t0YTEU
MBIGA1UECwwLU1NPUHJvdmlkZXIxDjAMBgNVBAMMBWFjbWUyMRwwGgYJKoZIhvcNAQkBFg1pbmZv
QG9rdGEuY29tMB4XDTE1MDEzMTIxMTU0M1oXDTQ1MDEzMTIxMTY0M1owgY0xCzAJBgNVBAYTAlVT
MRMwEQYDVQQIDApDYWxpZm9ybmlhMRYwFAYDVQQHDA1TYW4gRnJhbmNpc2NvMQ0wCwYDVQQKDARP
a3RhMRQwEgYDVQQLDAtTU09Qcm92aWRlcjEOMAwGA1UEAwwFYWNtZTIxHDAaBgkqhkiG9w0BCQEW
DWluZm9Ab2t0YS5jb20wggEiMA0GCSqGSIb3DQEBAQUAA4IBDwAwggEKAoIBAQCM5jfc+V1KcwKj
ewCrDkIu229aiXYcWtXHm+V3YAVy7nVUB4ybb6+ziRhiyr1tBktHjpqgTuI86mF9Hzzf8o5iw+Nx
tMSsWRGwIq28vEyFNU92IgKTSQLxc4IGei20YfpiXSjos3Rn1WDsApVZr/MwozYADDwqVlgbRr01
RZcvHEpofVRQaHNwD+uTm5yfUTnO5HjWdnoiTc13PoRkBdO2mpJ8flK5/x/q3AwxP3cRX71gd7n8
wII3XROktVEHQpiFlA7VvuHiHY/wleCFuBzC0gwiK9Nc0s7PDb/CdYI7is01+heYn1PfT0CeQ0by
STmyXWsdiAp3ae1NUtqMgoDxAgMBAAEwDQYJKoZIhvcNAQEFBQADggEBAG+/bGPHunSlQ/uWbIrX
5F7Ujjt6Ef2kxoyyVc++Oo8v+yi7ZRzghmYK7CMWwtKo+0HNwdZFwuEeRWOXecmrw+N6v56qZVW2
AbB2AQeO5aKZ/IkYsb/TYjrTDiOF64GEFYtWsy/zrOKRAGmAphb+DO5vyouoeXsQMdBz02ctujLK
CSjNy02SR66us8ZDWE3AyZIK9D9CxiCbY704P42C5T2VSVfpthPs9oCTW1VNnP7mniPQqQfl+gZ0
V/0ZIX3mxFy/7D4pZQQvhvp+Fh1TXp1b/iwoP2iNHIx2aGGFcTpjqIoG8n1q+I4+n0EqwuvOJl+1
lww2hU/dY2AOrZcXa14=</ds:X509Certificate>
</ds:X509Data>
</ds:KeyInfo>
</md:KeyDescriptor>
<md:NameIDFormat>urn:oasis:names:tc:SAML:1.1:nameid-format:emailAddress</md:NameIDFormat>
<md:NameIDFormat>urn:oasis:names:tc:SAML:1.1:nameid-format:unspecified</md:NameIDFormat>
<md:SingleSignOnService Binding="urn:oasis:names:tc:SAML:2.0:bindings:HTTP-POST"
Location="https://mycompany.oktapreview.com/app/servicenow_app2/exk19jdq4yshW8Ru71d8/sso/saml"/>
<md:SingleSignOnService Binding="urn:oasis:names:tc:SAML:2.0:bindings:HTTP-Redirect"
Location="https://mycompany.oktapreview.com/app/servicenow_app2/exk19jdq4yshW8Ru71d8/sso/saml"/>
</md:IDPSSODescriptor>
</md:EntityDescriptor>
References
Errors – Tenant Creation API

Okta Embedded-OCC Implementation Guide
13
Duplicate Subdomain: {
"errorCode": "E0000088",
"errorSummary": "Api validation failed: subDomain",
"errorLink": "E0000088",
"errorId": "08ab79d407eafb1c",
"errorCauses": [
{
"errorSummary": "subDomain: An object with this field already exists"
}
]
}
Invalid Token: {
"errorCode": "E0000011",
"errorSummary": "Invalid token provided",
"errorLink": "E0000011",
"errorId": "oaetOwX4JU-TD2EJUf2Vh9H1Q",
"errorCauses": []
}
Invalid App Name: {
"errorCode": "E0000007",
"errorSummary": "Not found: Resource not found: badappname (App)",
"errorLink": "E0000007",
"errorId": "oaeqE8V21bkSfy50jiJPgF1Zg",
"errorCauses": []
}
Password Requirements Not Met: {
"errorCode": "E0000001",
"errorSummary": "Api validation failed: admin.password",
"errorLink": "E0000001",
"errorId": "oaeE4lry9XFR_aZq6yJ-3uGsw",
"errorCauses": [
{
"errorSummary": "admin.password: Password requirements were not met. Your password must have at least
8 characters, a lowercase letter, an uppercase letter, a number, no parts of your username."

Okta Embedded-OCC Implementation Guide
14
}
]
}
Website value is blank: {
"errorCode": "E0000001",
"errorSummary": "Api validation failed: website",
"errorLink": "E0000001",
"errorId": "oaeswACavHpT3KAfRv8RwqrAw",
"errorCauses": [
{
"errorSummary": "website: The field cannot be left blank"
}
]
}
Blank Security Question
{
"errorCode": "E0000001",
"errorSummary": "Api validation failed: admin.customSecurityQuestion",
"errorLink": "E0000001",
"errorId": "oaebCAc-TxcT8y2fzG_vfvZgA",
"errorCauses": [
{
"errorSummary": "admin.customSecurityQuestion: The field cannot be left blank"
}
]
}
Blank Security Answer
{
"errorCode": "E0000001",
"errorSummary": "Api validation failed: admin.securityQuestion",
"errorLink": "E0000001",
"errorId": "oaeuVq3ykU8RmK-0GQoHkAVBg",
"errorCauses": [
{
"errorSummary": "admin.securityQuestion: Fields must both be empty, or both non-empty"
}
]
}

Okta Embedded-OCC Implementation Guide
15
Errors - App Instantiation API Invalid name (ie. Invalid Okta App ID being used) {
"errorCode": "E0000007",
"errorSummary": "Not found: Resource not found: bad_okta_app_id (App)",
"errorLink": "E0000007",
"errorId": "oae8P1iYH1pQw-_3NKOsMhqXg",
"errorCauses": []
}
Label already exists {
"errorCode": "E0000001",
"errorSummary": "Api validation failed: label",
"errorLink": "E0000001",
"errorId": "oae_cM34bW6TVOgQuxb2B94GA",
"errorCauses": [
{
"errorSummary": "label: An active ServiceNow - Eureka and later releases instance with the label \"SLEE
Test\" already exists."
}
]
}