omni pos getting started manual · omni pos getting started manual ... we recommend you use a...
TRANSCRIPT
i
Getting Started with POS
Omni POSGetting Started
Manual
switched on accounting

i
Getting Started with Omni POS
ii
Getting Started with POS
Table Of Contents
Overview ................................................................................................................................1
Setting up POS .....................................................................................................................2
Initial Steps .....................................................................................................................2
Tellers ................................................................................................................................2
POS Clearing Account .................................................................................................3
Printing .............................................................................................................................4
Overs & Unders ..............................................................................................................5
POS Menus ......................................................................................................................6
Using POS ...............................................................................................................................7
POS Sessions ..................................................................................................................7
POS Mode ........................................................................................................................8
Float ...................................................................................................................................9
POS Screen ................................................................................................................... 10
POS Invoices ................................................................................................................ 11
Cash Up Totals ............................................................................................................. 13
Cashing Up ................................................................................................................... 15
Bar Codes............................................................................................................................. 17
Bar Code Scanners .................................................................................................... 17
Printing Barcode Labels .......................................................................................... 17
Advanced Options ........................................................................................................... 19
POS Pole ........................................................................................................................ 19
POS Fields ..................................................................................................................... 19
Cash Drawers............................................................................................................... 21
1
Getting Started with POS
Overview
This booklet is intended as a Quick Start to Omni Accounts POS. For more detailed
information please consult the Online Help within Omni Accounts. Certain sections
of this booklet will refer you to Help topics where the relevant subject is covered
in more detail. Remember you can access the Online Help by pressing F1 on any
screen. To search for a topic, go to the Index tab and type in the topic name.
This booklet assumes that you have purchased the POS Bundle which will have all the relevant switches enabled. You may also want to consider getting one of our Dealers or Support Agents to come in and set up your POS for you. It may speed up the initial process as well as ensuring that your system is optimally configured for your business requirements and therefore worth considering spending the money for this service. They can also advise on what hardware purchases would be best suited to your needs.
2
Getting Started with POS
Setting up POS
Initial Steps
1. You will first need to create a company and define your financial periods
and select a chart of accounts. We recommend you use a pre-configured
chart of accounts.
2. You will need to create at least one Customer Account.
3. You will need to create a record for each stock item that you sell.
4. You need to create a Bank Account which if you choose a pre-configured
chart of accounts when creating your company will already be set up. NOTE:All of these topics are covered in detail in the ‘Getting Started’ Help topic accessed
by pressing F1 in the software. They are also covered in the Getting Started book-
let that came with the software in the section called ‘Setting Up A Company’ .
We can also send you a pre-configured company backup which has one customer,
one bank account and one stock item already created. You can then restore this
company and edit or create your own information. Simply email support@omniac-
counts.co.za and request this company be emailed to you.
Tellers
• The first step is to set up user accounts for your tellers.
• To create a User you will first need to log into Omni Control Centre. You
will find this icon on your desktop.
• Then choose User| List Users.
• Click on the ‘New’ button to add more users.
• Enter a User Name and select a Role. We suggest a restricted role such as
‘Teller’.
• Click on ‘Update’.
3
Getting Started with POS Setting up with POS
• Select ‘Yes’ to give your new tellers (users) access to the company that
they will be working in.
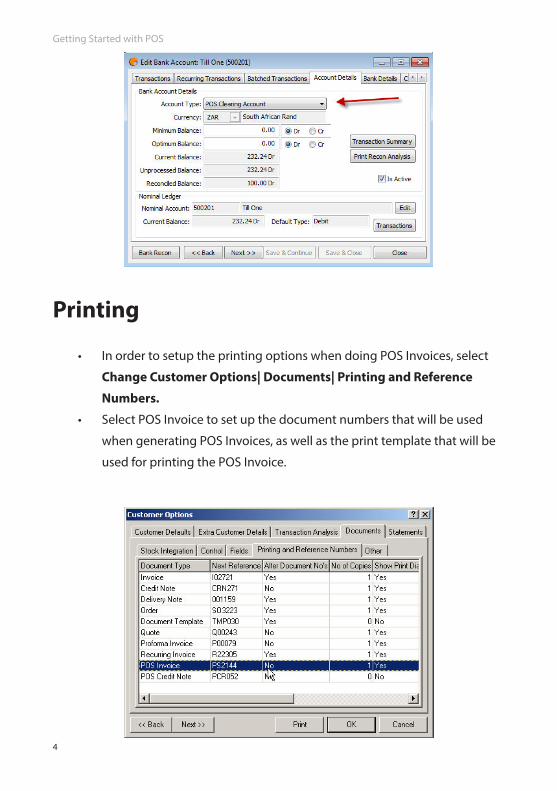
POS Clearing Account
• In order to work in POS Mode you first need to set up a Bank Account
which is marked as a POS Clearing Account. This Bank Account will repre-
sent the money in the till.
• To do this first create a bank account by choosing Banking| Bank Ac-
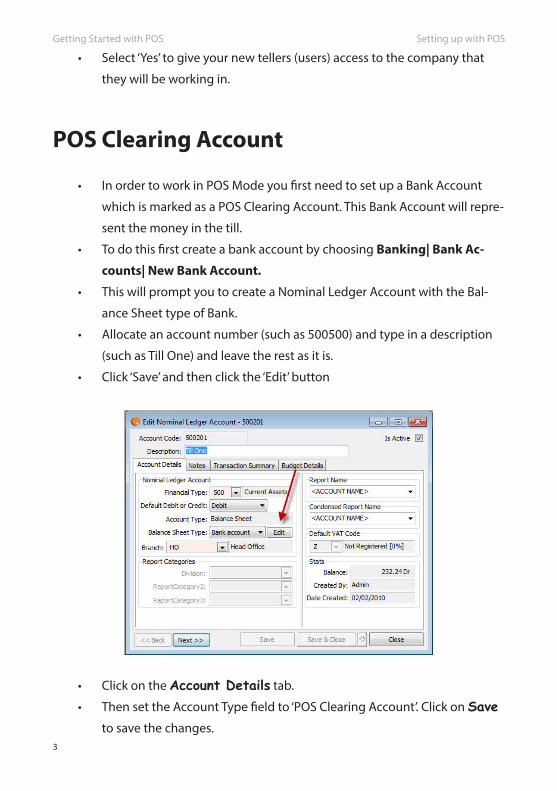
counts| New Bank Account.
• This will prompt you to create a Nominal Ledger Account with the Bal-
ance Sheet type of Bank.
• Allocate an account number (such as 500500) and type in a description
(such as Till One) and leave the rest as it is.
• Click ‘Save’ and then click the ‘Edit’ button
• Click on the Account Details tab.
• Then set the Account Type field to ‘POS Clearing Account’. Click on Save
to save the changes.
4
Getting Started with POS
Printing
• In order to setup the printing options when doing POS Invoices, select
Change Customer Options| Documents| Printing and Reference
Numbers.
• Select POS Invoice to set up the document numbers that will be used
when generating POS Invoices, as well as the print template that will be
used for printing the POS Invoice.
5
Getting Started with POS Setting up with POS
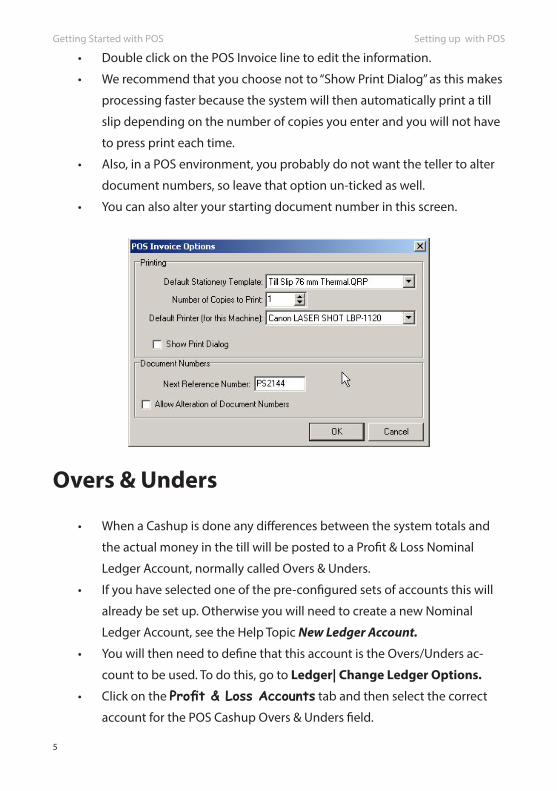
• Double click on the POS Invoice line to edit the information.
• We recommend that you choose not to “Show Print Dialog” as this makes
processing faster because the system will then automatically print a till
slip depending on the number of copies you enter and you will not have
to press print each time.
• Also, in a POS environment, you probably do not want the teller to alter
document numbers, so leave that option un-ticked as well.
• You can also alter your starting document number in this screen.
Overs & Unders
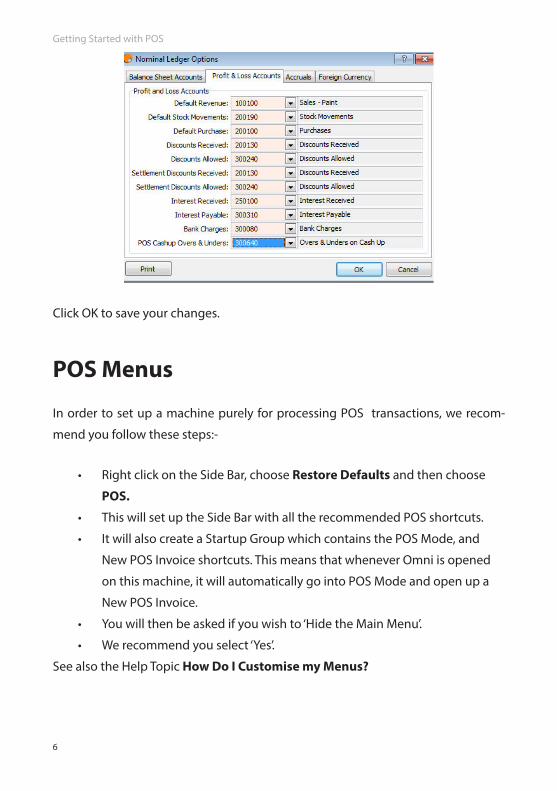
• When a Cashup is done any differences between the system totals and
the actual money in the till will be posted to a Profit & Loss Nominal
Ledger Account, normally called Overs & Unders.
• If you have selected one of the pre-configured sets of accounts this will
already be set up. Otherwise you will need to create a new Nominal
Ledger Account, see the Help Topic New Ledger Account.
• You will then need to define that this account is the Overs/Unders ac-
count to be used. To do this, go to Ledger| Change Ledger Options.
• Click on the Profit & Loss Accounts tab and then select the correct
account for the POS Cashup Overs & Unders field.
6
Getting Started with POS
Click OK to save your changes.
POS Menus
In order to set up a machine purely for processing POS transactions, we recom-
mend you follow these steps:-
• Right click on the Side Bar, choose Restore Defaults and then choose
POS.
• This will set up the Side Bar with all the recommended POS shortcuts.
• It will also create a Startup Group which contains the POS Mode, and
New POS Invoice shortcuts. This means that whenever Omni is opened
on this machine, it will automatically go into POS Mode and open up a
New POS Invoice.
• You will then be asked if you wish to ‘Hide the Main Menu’.
• We recommend you select ‘Yes’.
See also the Help Topic How Do I Customise my Menus?
7
Getting Started with POS Using POS
Using POS
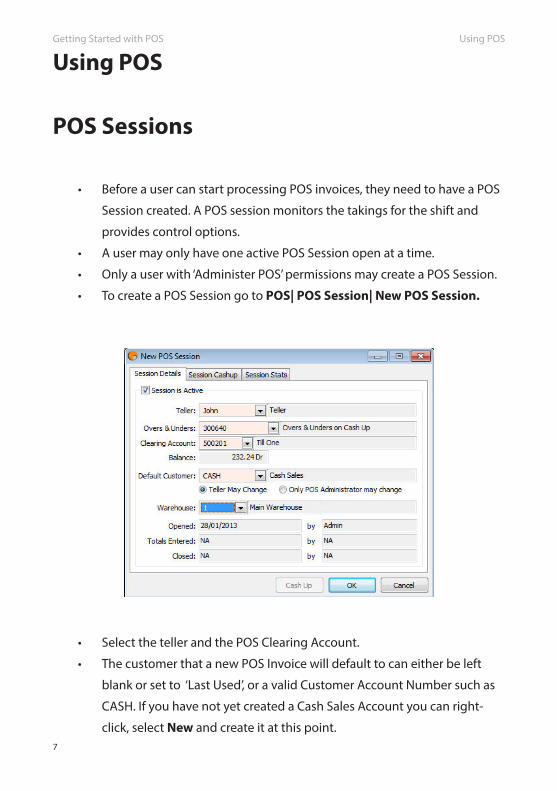
POS Sessions
• Before a user can start processing POS invoices, they need to have a POS
Session created. A POS session monitors the takings for the shift and
provides control options.
• A user may only have one active POS Session open at a time.
• Only a user with ‘Administer POS’ permissions may create a POS Session.
• To create a POS Session go to POS| POS Session| New POS Session.
• Select the teller and the POS Clearing Account.
• The customer that a new POS Invoice will default to can either be left
blank or set to ‘Last Used’, or a valid Customer Account Number such as
CASH. If you have not yet created a Cash Sales Account you can right-
click, select New and create it at this point.
8
Getting Started with POS
• It is recommended you set up a Cash Sale customer account with either
No Credit Limit or No Balances to which you post your POS Invoices.
• If you select an account number, you can define if the teller may change
the account number, or if only a user with Administer POS permissions
may make the change. This prevents tellers from invoicing out sales on
credit.
• See Help Topics Maintain POS Sessions Customer Account- Customer
Details tab and Customer Account - Customer Defaults tab or press F1
on the screen above.
POS Mode
• A user must be in POS Mode to process POS Invoices.
• If you have followed the instructions in the ‘POS Menus’ section of this
booklet, then when a teller logs into Omni they will automatically go into
POS Mode and a New POS Invoice will open.
• To manually get into POS Mode follow these steps:
• To do this go to POS| POS Mode or select the POS Mode
shortcut on the Side bar.
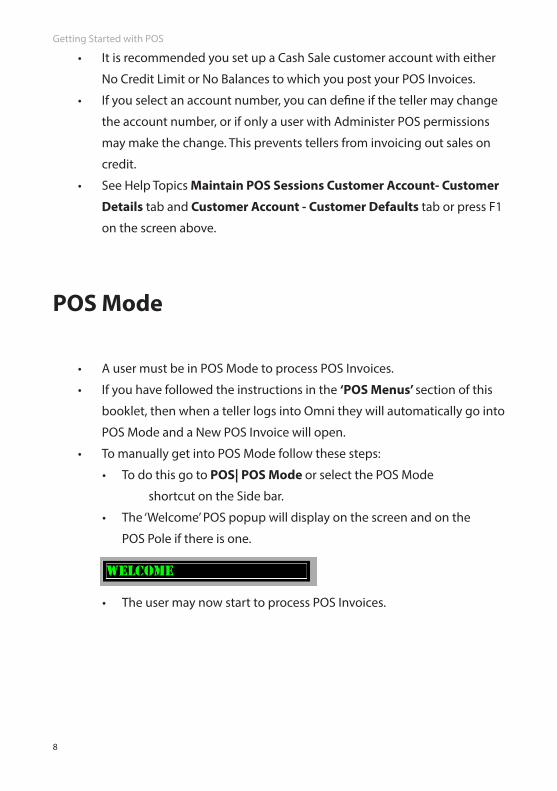
• The ‘Welcome’ POS popup will display on the screen and on the
POS Pole if there is one.
•
•
• The user may now start to process POS Invoices.
9
Getting Started with POS Using POS
Float
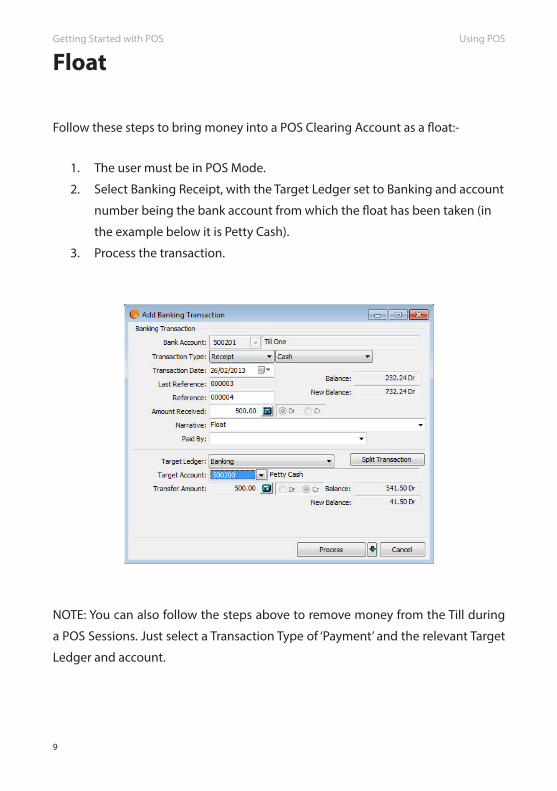
Follow these steps to bring money into a POS Clearing Account as a float:-
1. The user must be in POS Mode.
2. Select Banking Receipt, with the Target Ledger set to Banking and account
number being the bank account from which the float has been taken (in
the example below it is Petty Cash).
3. Process the transaction.
NOTE: You can also follow the steps above to remove money from the Till during
a POS Sessions. Just select a Transaction Type of ‘Payment’ and the relevant Target
Ledger and account.
10
Getting Started with POS
POS Screen
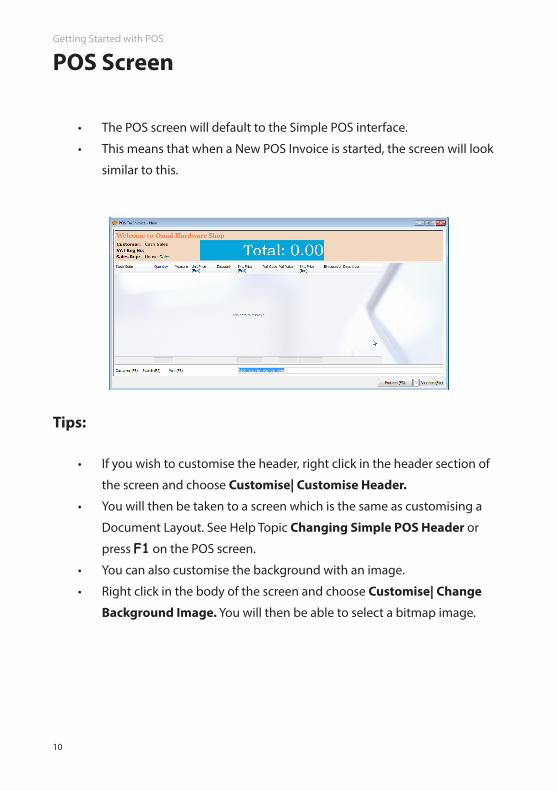
• The POS screen will default to the Simple POS interface.
• This means that when a New POS Invoice is started, the screen will look
similar to this.
Tips:
• If you wish to customise the header, right click in the header section of
the screen and choose Customise| Customise Header.
• You will then be taken to a screen which is the same as customising a
Document Layout. See Help Topic Changing Simple POS Header or
press F1 on the POS screen.
• You can also customise the background with an image.
• Right click in the body of the screen and choose Customise| Change
Background Image. You will then be able to select a bitmap image.
11
Getting Started with POS Using POS
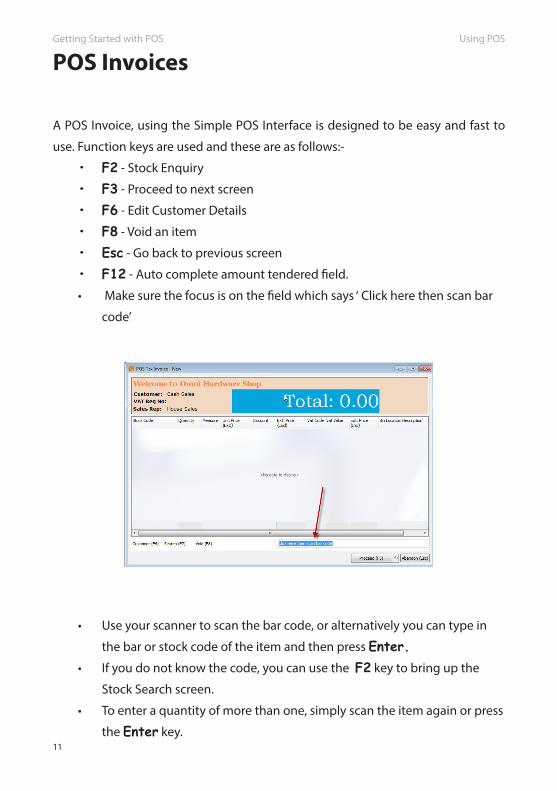
POS Invoices
A POS Invoice, using the Simple POS Interface is designed to be easy and fast to
use. Function keys are used and these are as follows:-
• F2 - Stock Enquiry
• F3 - Proceed to next screen
• F6 - Edit Customer Details
• F8 - Void an item
• Esc - Go back to previous screen
• F12 - Auto complete amount tendered field.
• Make sure the focus is on the field which says ‘ Click here then scan bar
code’
• Use your scanner to scan the bar code, or alternatively you can type in
the bar or stock code of the item and then press Enter. • If you do not know the code, you can use the F2 key to bring up the
Stock Search screen.
• To enter a quantity of more than one, simply scan the item again or press
the Enter key.
12
Getting Started with POS
• You can also just type in *3 and press Enter to multiply the quantity
of the item you have just entered by 3 or any other number. Another
method is to type in +2 and press Enter which will add 2 to the existing
quantity.
• If you need to change the customer code, press F6 or double click on
the heading. This will bring up a screen which will allow you to change
customer details.
• To void or delete a line that you have entered, press F8, you will then be
asked to enter the code to void, so scan the item or enter the stock or bar
code.
• To abandon the invoice, press the Esc key, if you do not have POS Ad-
ministrator permissions then you will be asked for an administrator user
name and password. See Simple POS Help Topic for more information or press F1 on the above screen.
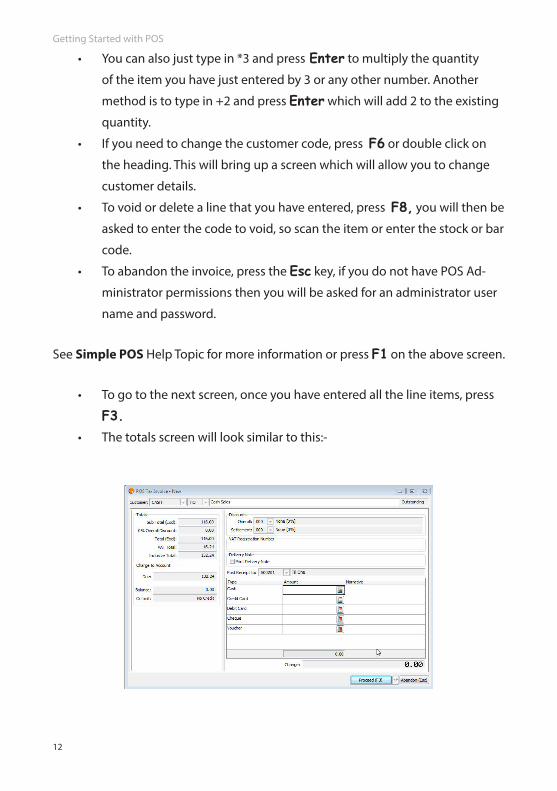
• To go to the next screen, once you have entered all the line items, press
F3.• The totals screen will look similar to this:-
13
Getting Started with POS Using POS
• The focus will be on the section where the amount tendered is entered.
• Use your arrow keys to get to the correct tender type and key in the
amount.
• You can also press the F12 key anywhere in the row which will auto
complete the amount tendered to be the same as the amount due.
• Pressing the Calculator button will also fill in the default amount
next to the relevant Tender Type and will also allow you to change it.
• Press F3 to process the invoice or Esc to go back to the previous screen. For more information see the Help Topic Customer Document - Receipt Tab or
press F1 on above screen.
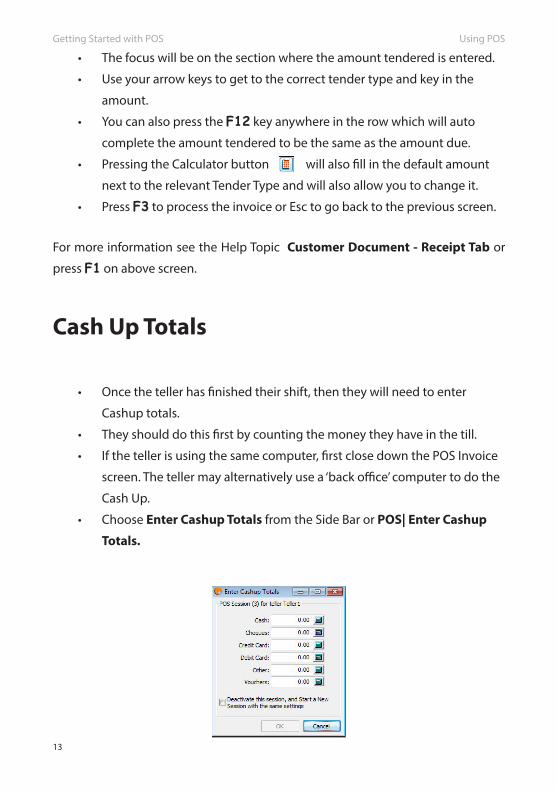
Cash Up Totals
• Once the teller has finished their shift, then they will need to enter
Cashup totals.
• They should do this first by counting the money they have in the till.
• If the teller is using the same computer, first close down the POS Invoice
screen. The teller may alternatively use a ‘back office’ computer to do the
Cash Up.
• Choose Enter Cashup Totals from the Side Bar or POS| Enter Cashup
Totals.
14
Getting Started with POS
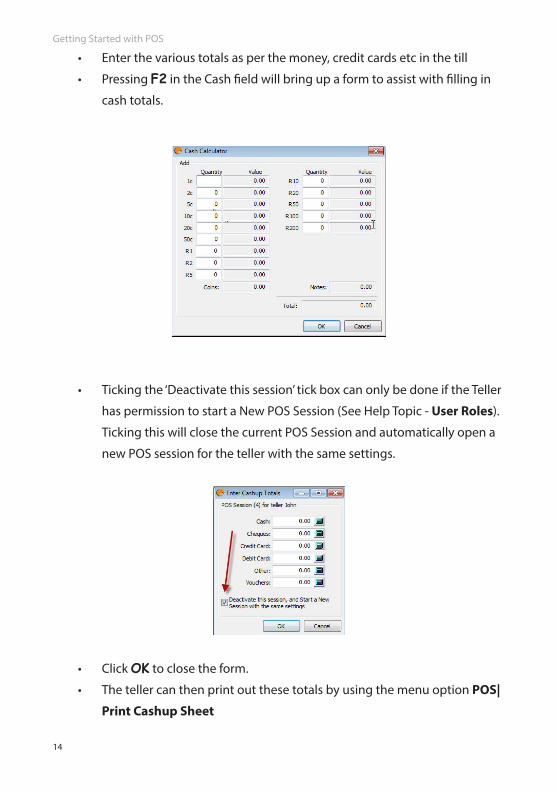
• Enter the various totals as per the money, credit cards etc in the till
• Pressing F2 in the Cash field will bring up a form to assist with filling in
cash totals.
• Ticking the ‘Deactivate this session’ tick box can only be done if the Teller
has permission to start a New POS Session (See Help Topic - User Roles).
Ticking this will close the current POS Session and automatically open a
new POS session for the teller with the same settings.
• Click OK to close the form.
• The teller can then print out these totals by using the menu option POS|
Print Cashup Sheet
15
Getting Started with POS Using POS
Cashing Up
• Once the teller has entered their Cashup totals and Logged out, then the
POS Administrator can perform the Cashup.
• This can also be done on a back office computer.
• To do the cashup go to POS| List POS Sessions.
• Double click on the required session to edit it.
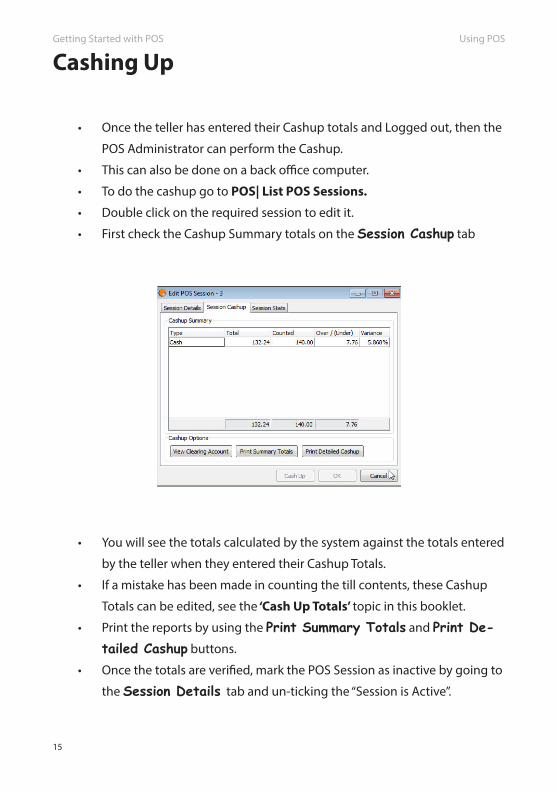
• First check the Cashup Summary totals on the Session Cashup tab
• You will see the totals calculated by the system against the totals entered
by the teller when they entered their Cashup Totals.
• If a mistake has been made in counting the till contents, these Cashup
Totals can be edited, see the ‘Cash Up Totals’ topic in this booklet.
• Print the reports by using the Print Summary Totals and Print De-tailed Cashup buttons.
• Once the totals are verified, mark the POS Session as inactive by going to
the Session Details tab and un-ticking the “Session is Active”.
16
Getting Started with POS
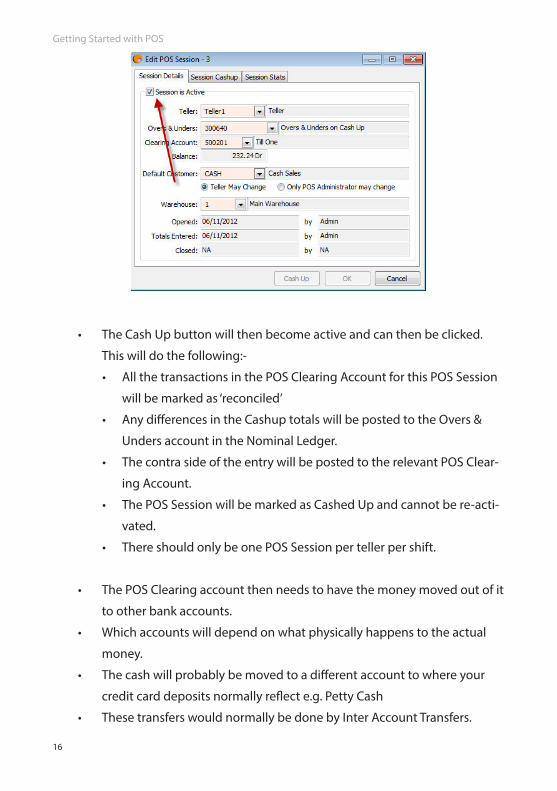
• The Cash Up button will then become active and can then be clicked.
This will do the following:-
• All the transactions in the POS Clearing Account for this POS Session
will be marked as ‘reconciled’
• Any differences in the Cashup totals will be posted to the Overs &
Unders account in the Nominal Ledger.
• The contra side of the entry will be posted to the relevant POS Clear-
ing Account.
• The POS Session will be marked as Cashed Up and cannot be re-acti-
vated.
• There should only be one POS Session per teller per shift.
• The POS Clearing account then needs to have the money moved out of it
to other bank accounts.
• Which accounts will depend on what physically happens to the actual
money.
• The cash will probably be moved to a different account to where your
credit card deposits normally reflect e.g. Petty Cash
• These transfers would normally be done by Inter Account Transfers.
17
Getting Started with POS
• Once all the money in the till has been transferred out, the balance will
be zero or the balance of the float.
• See the Help Topic Inter-account Transfer.
Bar Codes
Bar Code Scanners
• Omni Accounts supports bar code scanners which are connected to the
PC via the keyboard i.e. a keyboard wedge interface.
• It is recommended that you program the scanner to automatically press
Enter once the code has been scanned otherwise you will need to press
the Enter key manually each time you scan an item.
Printing Bar Code Labels
• Bar Code printing generally works best with bar code printers that come
with bar code fonts which install when the driver is installed. The printed
results on these sort of printers are of a far higher quality.
• Omni also has a built in bar code font which will print EAN-13, EAN-8 and
Code 39 type bar codes.
• If the bar code printer does not come with fonts, then one of the free
fonts which can be downloaded from the Internet can be used, but then
this bar code can only be used for internal use as they will not be compli-
ant with standard bar code formats such as EAN-13.
• Some bar code printers ship with drivers which include specific bar code
fonts. NB! These fonts only become available to select when the printer
is set as the default printer in either the software or Windows.
18
Getting Started with POS
• If you do not want to waste time at the tills with labels that do not scan
properly, then consider spending the extra money on a specialised print-
er with built in bar code fonts.
• You will not need any other specialised bar code printing software.
Omni can print bar codes directly.
• The recommended method of working would be to print bar code labels
for goods as they are received. It is strongly recommended that you read the Omni Help Topic Setting Up Bar
Code Labels for detailed information on how to print bar code labels.
19
Getting Started with POS Advanced Options
Advanced Options
POS Pole
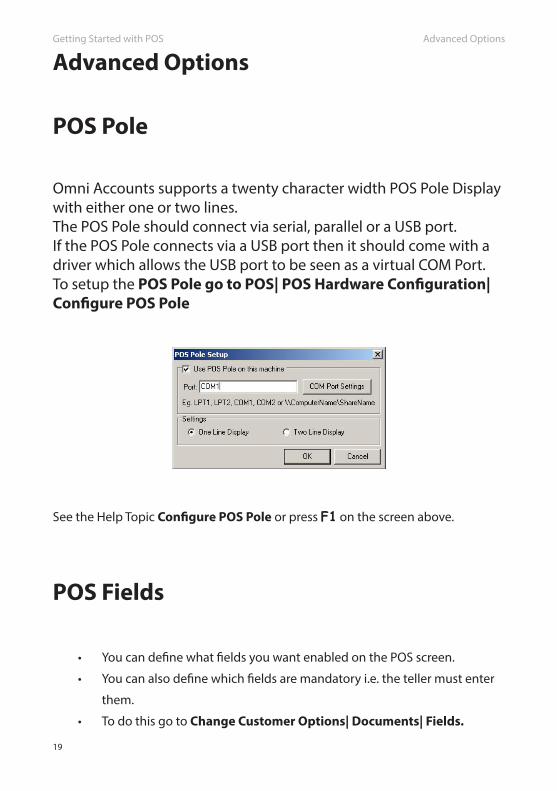
Omni Accounts supports a twenty character width POS Pole Display with either one or two lines. The POS Pole should connect via serial, parallel or a USB port. If the POS Pole connects via a USB port then it should come with a driver which allows the USB port to be seen as a virtual COM Port.To setup the POS Pole go to POS| POS Hardware Configuration| Configure POS Pole
See the Help Topic Configure POS Pole or press F1 on the screen above.
POS Fields
• You can define what fields you want enabled on the POS screen.
• You can also define which fields are mandatory i.e. the teller must enter
them.
• To do this go to Change Customer Options| Documents| Fields.
20
Getting Started with POS
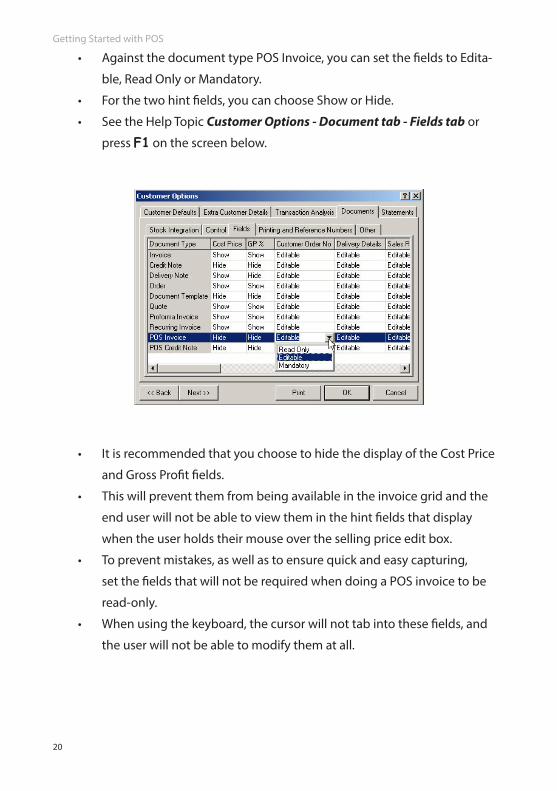
• Against the document type POS Invoice, you can set the fields to Edita-
ble, Read Only or Mandatory.
• For the two hint fields, you can choose Show or Hide.
• See the Help Topic Customer Options - Document tab - Fields tab or
press F1 on the screen below.
• It is recommended that you choose to hide the display of the Cost Price
and Gross Profit fields.
• This will prevent them from being available in the invoice grid and the
end user will not be able to view them in the hint fields that display
when the user holds their mouse over the selling price edit box.
• To prevent mistakes, as well as to ensure quick and easy capturing,
set the fields that will not be required when doing a POS invoice to be
read-only.
• When using the keyboard, the cursor will not tab into these fields, and
the user will not be able to modify them at all.

21
Getting Started with POS Advanced Options
Cash Drawers
• Omni Accounts supports two different type of Cash Drawer connections
• The Till Drawer plugs directly into the PC either via a parallel port,
USB or serial port.
• The Till Drawer plugs directly into the Till Slip printer.
• These topics are covered in a lot of detail in the Help Topic - How to set
up your POS System to use a Till Drawer
• It is recommended that you read this and the related Help Topics

Omni AccountsP.O. Box 412, Westville, 3630, RSA.
Tel: +27 (0)31 2668 182Fax: +27 (0)31 2666 928
Maxicall: 0861 666 472 / 0861 omnisa