online curriculum system
TRANSCRIPT

The Online Curriculum System was developed to improve the process by eliminating paper and streamlining the approval process electronically.
It went live August 18, 2008.
Online Curriculum System

Contents
Topics Page
Curriculum Web Site ....................................................................................................................... 1 Online Curriculum System .............................................................................................................. 2 Course Action Request System Home Page .................................................................................... 3 Add New Course ............................................................................................................................. 5 Edit Current Course ....................................................................................................................... 11 Delete Current Course .................................................................................................................. 17 Request New Subject Identifier .................................................................................................... 22 View Levels for Review ................................................................................................................. 23 Academic Level ................................................................................................................. 23 College Level ..................................................................................................................... 25 University Level ................................................................................................................. 26 My Proposed Courses ................................................................................................................... 27 Notes ............................................................................................................................................. 28 STEPS TO ADD NEW COURSE, EDIT OR DELETE CURRENT COURSE ................................. Back Cover
Online Curriculum System October 2008

CURRICULUM WEB SITE http://www.jmu.edu/curriculum This is general curriculum information. You can use links to go to specific areas.
Home Page
Left Navigation
All users get the same left navigation.
Home page for curriculum. Introduction to curriculum and instruction (C&I) process. Explanation about course proposals.
Explanation about program proposals. Explanations about roles and responsibilities.
Online and paper forms links available.
Faculty enter course proposal information. Approvers review and vote. Specific terms are explained.
FAQ = Frequently Asked Questions. OTHER LINKS Description You can view the JMU Computing Web site.
You can view the JMU Office of the Registrar Web site.
Online Curriculum System ‐ 1 ‐ October 2008

ONLINE CURRICULUM SYSTEM Click Online Curriculum System on the left navigation. Screen below.
Online Curriculum System ‐ 2 ‐ October 2008
Log‐in Box Click here to get the Log‐in Box. You must log in to get the secure site.
1. Enter your e‐ID. 2. Enter your password. 3. Click [OK].

COURSE ACTION REQUEST SYSTEM Home Page Left Navigation
All users get the same left navigation.
HELPFUL LINKS Description This link goes to the COURSE ACTION REQUEST SYSTEM Home page.
You can add a new course.
You get access to your academic unit’s existing courses.
You get access to a form to request a new subject identifier.
You can only view the courses that you submitted.
Approvers review and vote.
Self Help explains specific topics. It appears in a new window.
If you have any questions or ideas, e‐mail goes to [email protected].
ACADEMIC LEVEL Description These courses have not started the C&I process. They can be seen by others in your academic unit when the original proposer posts them for review.
Courses posted for the academic level to review as part of the C&I process.
COLLEGE LEVEL Description Courses approved at the academic level; currently pending review at the college level.
Courses approved by the originating college(s); pending review by Graduate Council.
UNIVERSITY LEVEL Description
All courses approved at the academic unit and college level which are available to review at the university level.
All can see the fully approved courses.
Online Curriculum System ‐ 3 ‐ October 2008

COURSE ACTION REQUEST SYSTEM Home Page Main Section
The Main Section appears to the right of the left navigation. There are two ways to add, edit, or delete a course on the Home page: Left Navigation and Main Section.
Category Course Action Left Navigation Main Section A Add New Course Add Course Create
B Edit Current Course Search for Course Edit or Delete
C Delete Current Course Search for Course Edit or Delete
Online Curriculum System ‐ 4 ‐ October 2008
A B C
A B C
Welcome, Karen!

Online Curriculum System ‐ 5 ‐ October 2008
Add New Course
You can add a new course for which you have access in the specific Subject Identifier field.
Actions 1. Click Add Course on the left navigation OR Create on the Home page. 2. Enter data for all required fields on the “Add Course Step 1” page.
Note: Data is saved during entry on each page. You can return and edit the data at any time before the course is posted, and you do not have to complete all steps at one time.
3. Click [Save and Proceed to Step 2] at the bottom of the “Add Course Step 1” page. 4. Select the response for the four questions on the “Step 2” page. Default = No. 5. Click [Save and Proceed to Step 3] at the bottom of the “Step 2” page. 6. Enter data for all required fields on the “Step 3” page.
Required Fields Justification and Resources: 3 boxes AND Faculty: 1 box Optional Fields Additional Resources: 4 boxes
7. Click [Complete Proposal] at the bottom of the “Step 3” page. 8. View or edit your information in Steps 1, 2, or 3 on the “Steps Complete” page. 9. When you are ready for others in your academic unit to view your course, click Post for Review. 10. When you are ready to post to your academic unit to approve your course, click Post for
Approval.

“Add Course Step 1” Page
3
Dissertation Field Studies Independent Study Internship Laboratory Lecture (DEFAULT) Practicum Research Research Project Seminar Supervision Thesis Tutorial NOTE: These fields are from PeopleSoft and cannot be changed.
Clinical Continuance Discussion
Drop‐down list:
New Field
New Field It only appears on the student transcript.
Online Curriculum System ‐ 6 ‐ October 2008

“Step 2” Page (Add New Course) All of the answers appear as “No” by default. No explanation is required. If you select “Yes” you must enter an explanation. Your course proposal will automatically be sent to the indicated areas for review.
5
Drop‐down list
Online Curriculum System ‐ 7 ‐ October 2008

“Step 3” Page (Add New Course) Required fields below. You can copy and paste text from another document to put in these boxes.
6OR here
6Required Faculty Field: here
6Required Field
Required Field 6
6Required Field
Online Curriculum System ‐ 8 ‐ October 2008

“Step 3” Page (Add New Course) Optional fields below. Default is “No”; if you check any boxes, you must enter an explanation.
7
Online Curriculum System ‐ 9 ‐ October 2008

“Steps Complete” Page (Add New Course) Screen below appears after clicking [Complete Proposal]. You can modify the course proposal at any time before it is posted by clicking on any Steps: 1, 2, 3.
“Posted for Review” Page (Add New Course) “Posted for Review” Page (Add New Course)
Screen below appears after clicking Post for ReviewScreen below appears after clicking Post for Review.
“Posted for Approval” Page (Add New Course) Screen below appears after clicking Post for Approval.
9
10
8
Online Curriculum System October 2008 ‐ 10 ‐

Edit Current Course You can edit specific current courses that already exist. Selecting the course will show the current course information. You have access to all courses in the academic unit in which you are assigned. If the subject identifier you need is not listed, click the “E‐mail for Help” link on the left to notify the system administrators.
Actions 1. Click Search for Course on the left navigation OR Edit or Delete on the Home page. 2. Click specific course under View/Edit Course column at the far left. 3. Enter data for all required fields on the “Edit Course Step 1” page. 4. Click [Submit] at the bottom of the “Edit Course Step 1” page.
Note: Data is saved during entry on each page. You can return and edit the data at any time before the course is posted, and you do not have to complete all steps at one time.
5. Enter any fields in Step 2 to indicate if review is needed from General Education, Honors, IDLS and Teacher Education. All fields are not required.
6. Click [Save and Proceed to Step 3] at the bottom of the “Step 2” page. 7. Enter data for all required fields on the “Step 3” page.
Required Fields Justification and Resources: 3 boxes AND Faculty: 1 box Optional Fields Additional Resources: 4 boxes
8. Click [Complete Proposal] at the bottom of the “Step 3” page. 9. View or edit your information in Steps 1, 2, 3 on the “Steps Complete” page. 10. When you are ready for others in your academic unit to view your course, click Post for Review. 11. When you are ready to post to your academic unit to approve your course, click Post for
Approval.
2
Online Curriculum System ‐ 11 ‐ October 2008

“Edit Course Step 1” Page Required fields below.
Online Curriculum System ‐ 12 ‐ October 2008
New Field It only appears on the student transcript.
Internship Laboratory Lecture (DEFAULT) Practicum Research Research Project Seminar Supervision Thesis Tutorial
NOTE: These fields are from PeopleSoft and cannot be changed.
Dissertation Field Studies Independent Study
Clinical Continuance Discussion
Drop‐down list:
New Field
4

Online Curriculum System ‐ 13 ‐ October 2008
“Step 2” Page (Edit Current Course) All of the answers appear as “No” by default. No explanation is required. If you select “Yes” you must enter an explanation. Your course proposal will automatically be sent to the indicated areas for review.
6

Online Curriculum System ‐ 14 ‐ October 2008
“Step 3” Page (Edit Current Course) Required fields below. You can copy and paste text from another document to put in these boxes.
7
7Required Field
7Required Field
7Required Field
7OR here
Required Faculty Field: here

“Step 3” Page (Edit Current Course) Optional fields below. Default is “No”; if you check any boxes, you must enter an explanation.
8
Online Curriculum System ‐ 15 ‐ October 2008

“Steps Complete” Page (Edit Current Course) Screen below appears after clicking [Complete Proposal]. You can modify the course proposal at any time before it is posted by clicking on any Steps: 1, 2, 3.
“Posted for Review” Page (Edit Current Course) Screen below appears after clicking Post for Review.
11
10
9
“Posted for Approval” Page (Edit Current Course)
Screen below appears after clicking Post for Approval.
Online Curriculum System ‐ 16 ‐ October 2008

Delete Current Course You can delete specific current courses that already exist. Selecting the course will show the current course information. You have access to all courses in the academic unit in which you are assigned. Actions 1. Click Search for Course on the left navigation OR Edit or Delete on the Home page. 2. Click specific course under Delete column at the far right. 3. Click [Delete] at the bottom on the “Delete Course Step 1” page.
Note: Data is saved during entry on each page. You can return and edit the data at any time before the course is posted, and you do not have to complete all steps at one time.
4. Enter any fields in “Step 2” to indicate if course affects other areas: General Education, Honors, IDLS and Teacher Education.
5. Click [Save and Proceed to Step 3] at the bottom on the “Step 2” page. 6. Enter data for the required field on the “Step 3” page.
Required Field Justification and Resources: 1 box 7. Click [Complete Proposal] at the bottom on the “Step 3” page. 8. Review or edit your information in Steps 1, 2, 3 on the “Steps Complete” page. 9. When you are ready for others in your academic unit to view your course, click Post for Review. 10. When you are ready to post to your academic unit to approve your course, click Post for
Approval.
2
Note: If you delete the course, you must edit other courses that show the deleted course as a corequisite and/or prerequisite.
Online Curriculum System ‐ 17 ‐ October 2008

“Delete Course Step 1” Page
3
New Field Drop‐down list does not appear here.
New Field It only appears on the student transcript.
Online Curriculum System ‐ 18 ‐ October 2008

“Step 2” Page (Delete Current Course) All of the answers appear as “No” by default. No explanation is required. If you select “Yes” you must enter an explanation. Your course proposal will automatically be sent to the indicated areas for review.
Online Curriculum System ‐ 19 ‐ October 2008
5

“Step 3” Page (Delete Current Course) Field below is required. Note: You can copy and paste text from another document in this box.
Online Curriculum System ‐ 20 ‐ October 2008
“Steps Complete” Page (Delete Current Course) Screen below appears after clicking [Complete Proposal].
Post for Review and Post for Approval screens appear on next page.
8
9
Required Field
7
6
10

“Posted for Review” Page (Delete Current Course) Screen below appears after clicking Post for Review.
“Posted for Approval” Page (Delete Current Course)
Screen below appears after clicking Post for Approval.
Online Curriculum System ‐ 21 ‐ October 2008

Request New Subject Identifier Click Create Subject Identifier on the left navigation to get a new form which opens in a new window. Screen below shows the form. You must enter all required fields.
Enter all text in 1 paragraph.Do not include multiple paragraphs.
Online Curriculum System ‐ 22 ‐ October 2008

View Levels for Review The Online Curriculum System includes the same three levels of review as the current C&I (Curriculum & Instruction) process:
• Academic Level • College Level • University Level
Some courses, such as those that are part of IDLS (Interdisciplinary Liberal Studies) or General Education, also require additional review and approval. Proposals must be available for review for at least 15 JMU business days.
Academic Level Two different levels appear under ACADEMIC LEVEL. These are the links: Courses Pending and Academic Level Reviewing. Courses Pending allows an informal review by members of your academic unit before the course enters the C&I process. The original proposer makes the course available to faculty in their specific department. Screen below shows one course in Accounting.
Academic Level Reviewing is the first step of the C&I process. Academic Unit approvers review and vote on the course. Required approvers are the Academic Unit Head and the Academic Unit C&I Chair. Optional approvers are in General Education, Honors, IDLS and Teacher Education. Those approvers review and vote on the course if the original proposer selects them during Step 2.
Online Curriculum System ‐ 23 ‐ October 2008
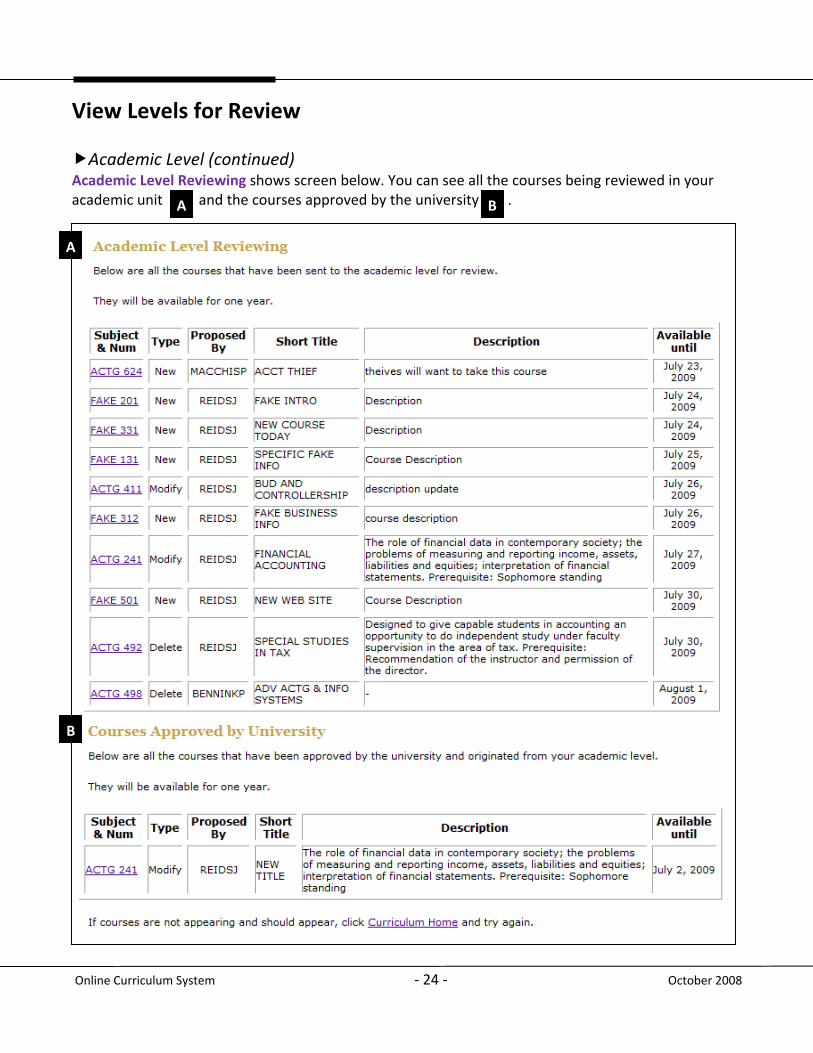
View Levels for Review Academic Level (continued)
A B
Academic Level Reviewing shows screen below. You can see all the courses being reviewed in your academic unit and the courses approved by the university .
B
A
Online Curriculum System ‐ 24 ‐ October 2008

View Levels for Review College Level
College C&I Chairs and College Deans review and vote on the course proposal. The College C&I Chair votes first and then the proposal goes to the College Dean. College Level Reviewing shows screen below. You can see all the courses being reviewed in your college.
Click FAKE 304 to get all of the course information. Screen below shows data at the top. All of the fields appear on one page.
Online Curriculum System ‐ 25 ‐ October 2008

View Levels for Review University Level
Two different levels appear under UNIVERSITY LEVEL. These are the links: University Review and Approved Courses. University Review This link shows all course proposals currently available for review at the university level. Click the specific course to view the information. Screen below shows one course.
Online Curriculum System ‐ 26 ‐ October 2008
Submit Comments appears at the bottom of the course proposal page.
Approved Courses All users can see all of the approved courses when they have completed the C&I process. These courses are fully approved and ready for inclusion in the catalog and e‐campus.
Enter your comments (optional).

My Proposed Courses Click My Proposed Courses on the left navigation. Screen below shows the Type of course action taken: New, Modify or Delete.
Online Curriculum System ‐ 27 ‐ October 2008

Notes
Online Curriculum System ‐ 28 ‐ October 2008
Subject ID Not Appear
Corequisites and Prerequisites
If a requirement is both a corequisite and a prerequisite, enter it in both fields.
Type “permission of the instructor” if it is required for your course. We request consistent formatting for it to appear in the catalogs and e‐campus.
If your correct Subject Identifier does not appear, e‐mail [email protected]. You will get a response within two business days. Steps 1, 2, 3 All Steps for adding, editing or deleting a course don’t have to be completed at the same time. Click [Button] at the bottom of the page to save it.
Example: You can do Step 1 on Tuesday. It gets saved. You can start doing Steps 2 and 3 on Thursday.
Help Two areas for Help on the left navigation: Self Help, E‐mail for Help
Self Help Click “Self Help” to get a separate window with information about the Web site.
E‐mail for Help Click “E‐mail for Help” to get an automatic e‐mail window that goes to [email protected] when you click [Send]. You will receive a response from the system administrators.

Online Curriculum System ‐ 29 ‐ October 2008
See Quick Steps on the back of this page to:
• Add New Course • Edit Current Course • Delete Current Course
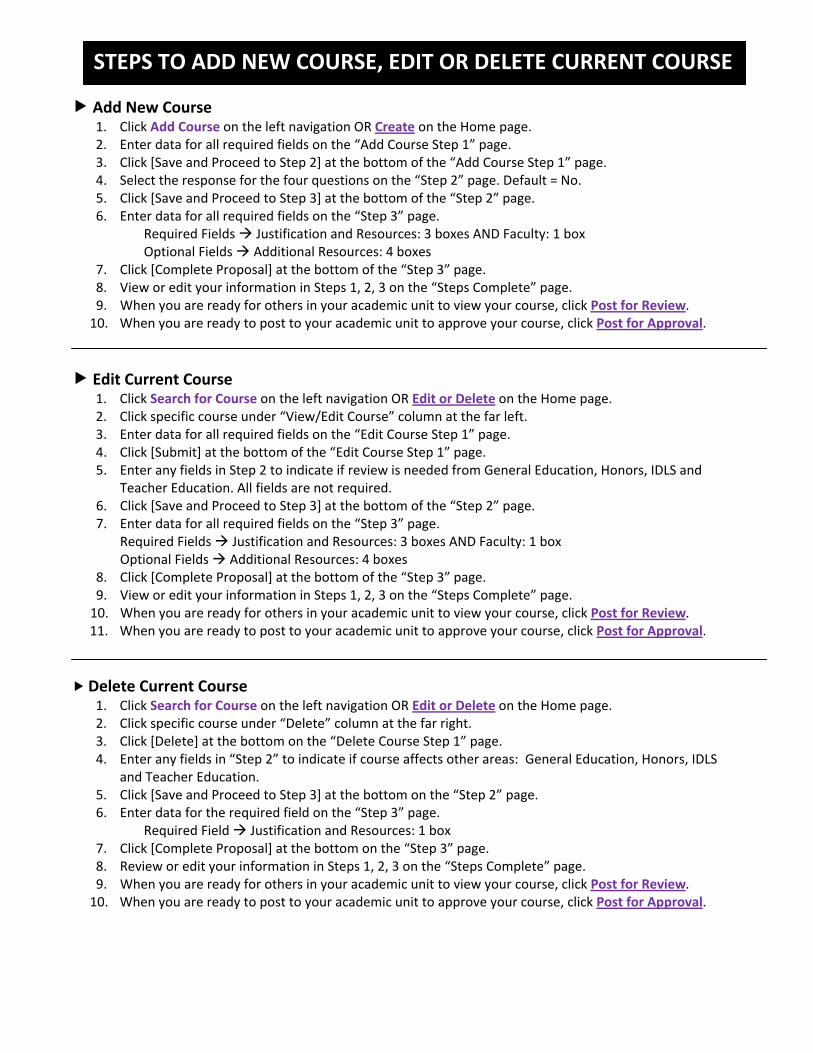
STEPS TO ADD NEW COURSE, EDIT OR DELETE CURRENT COURSE
Add New Course 1. Click Add Course on the left navigation OR Create on the Home page. 2. Enter data for all required fields on the “Add Course Step 1” page. 3. Click [Save and Proceed to Step 2] at the bottom of the “Add Course Step 1” page. 4. Select the response for the four questions on the “Step 2” page. Default = No. 5. Click [Save and Proceed to Step 3] at the bottom of the “Step 2” page. 6. Enter data for all required fields on the “Step 3” page.
Required Fields Justification and Resources: 3 boxes AND Faculty: 1 box Optional Fields Additional Resources: 4 boxes
7. Click [Complete Proposal] at the bottom of the “Step 3” page. 8. View or edit your information in Steps 1, 2, 3 on the “Steps Complete” page. 9. When you are ready for others in your academic unit to view your course, click Post for Review. 10. When you are ready to post to your academic unit to approve your course, click Post for Approval.
Edit Current Course 1. Click Search for Course on the left navigation OR Edit or Delete on the Home page. 2. Click specific course under “View/Edit Course” column at the far left. 3. Enter data for all required fields on the “Edit Course Step 1” page. 4. Click [Submit] at the bottom of the “Edit Course Step 1” page. 5. Enter any fields in Step 2 to indicate if review is needed from General Education, Honors, IDLS and
Teacher Education. All fields are not required. 6. Click [Save and Proceed to Step 3] at the bottom of the “Step 2” page. 7. Enter data for all required fields on the “Step 3” page.
Required Fields Justification and Resources: 3 boxes AND Faculty: 1 box Optional Fields Additional Resources: 4 boxes
8. Click [Complete Proposal] at the bottom of the “Step 3” page. 9. View or edit your information in Steps 1, 2, 3 on the “Steps Complete” page. 10. When you are ready for others in your academic unit to view your course, click Post for Review. 11. When you are ready to post to your academic unit to approve your course, click Post for Approval.
Delete Current Course 1. Click Search for Course on the left navigation OR Edit or Delete on the Home page. 2. Click specific course under “Delete” column at the far right. 3. Click [Delete] at the bottom on the “Delete Course Step 1” page. 4. Enter any fields in “Step 2” to indicate if course affects other areas: General Education, Honors, IDLS
and Teacher Education. 5. Click [Save and Proceed to Step 3] at the bottom on the “Step 2” page. 6. Enter data for the required field on the “Step 3” page.
Required Field Justification and Resources: 1 box 7. Click [Complete Proposal] at the bottom on the “Step 3” page. 8. Review or edit your information in Steps 1, 2, 3 on the “Steps Complete” page. 9. When you are ready for others in your academic unit to view your course, click Post for Review. 10. When you are ready to post to your academic unit to approve your course, click Post for Approval.