online student handbook 2016
TRANSCRIPT
STUDENT HANDBOOK
740 Front Street, Lisle, Illinois 60532 [email protected] 630-393-2529
Website: www.clayspace.net

2
Table of Contents
About ClaySpace Ceramic Arts Center _____________________________________ 3
Class Information _________________________________________________________ 3
Registration ___________________________________________________________ 3
Sign-in Sign-out Roster ________________________________________________ 4
Student Work Space ___________________________________________________ 4
Shelving Space ________________________________________________________ 4
Make-up Classes _______________________________________________________ 4
Ceramics Stages _______________________________________________________ 5
Last Wet Class _________________________________________________________ 5
Open Labs _______________________________________________________________ 5
Parking __________________________________________________________________ 5
Equipment _______________________________________________________________ 5
Clay______________________________________________________________________ 7
Throwing on the Wheel ____________________________________________________ 7
Handbuilding Area ________________________________________________________ 8
Glazing __________________________________________________________________ 8
Spraying Glazes __________________________________________________________ 9
Kiln Firing _______________________________________________________________ 10
Studio Layout ___________________________________________________________ 11
Clean Up ________________________________________________________________ 12
Code of Conduct_________________________________________________________ 12
Safety Procedures _______________________________________________________ 12
Gallery Exhibits and Hours _______________________________________________ 16
Internships ______________________________________________________________ 16
Resident Artist Memberships _____________________________________________ 16
Workshops, Events and Community Outreach _____________________________ 16

3
Welcome to ClaySpace Ceramic Arts Center!
We are a nonprofit art-centered community that is proud to have been providing
outstanding educational, artistic and collaborative programs in the ceramic arts to its
Resident Artists and the residents of Chicago’s Suburbs for over ten years.
At ClaySpace Ceramic Arts Center, you will find a studio environment that will help you
gain an introduction and growth in the clay and glass arts. We offer ceramics classes
for all ages and host workshops by nationally and internationally recognized visiting
artists.
ClaySpace was conceived by a small group of people who formed a bond while taking
continuing education ceramics classes. They envisioned a studio where one could
study and work free of the constraints of the traditional college model. Their divergent
backgrounds and educational disciplines came together in a shared desire to cultivate
their learning in the ceramic arts. Pooling their talents and resources, they created a
studio that addressed their wishes, founding ClaySpace NFP in 2006 as a 501(c)(3)
nonprofit Illinois corporation designed to provide a rich learning and working
environment to its members, as well as offer ceramics classes to the public at large.
Originally located in Warrenville, along the West Branch of the DuPage River, ClaySpace has recently moved to a substantially larger facility in Lisle across from the Lisle Public Library. The recent ClaySpace relocation affords the space required to expand its membership, class schedule, and gallery as all continue in production of clay arts projects. Our classes are taught by experienced educators
and are available for all levels of ceramics
knowledge. Customized classes can be designed for
special subjects or to host events such as team
building exercises, anniversary events, as well as kid
friendly events such as birthday parties and scout
events.
Class Information ClaySpace students can enjoy five class sessions each year. Each class in a session
meets once per week for three hours for eight weeks, although some specialty classes
may run on a different schedule. Students are welcome to enroll in more than one class
per session, if desired.
Registration for classes can be done on line, by phone or in person. Visit our website
at www.clayspace.net for a current list of class offerings. Registration must occur at
least three days before the start of any class or workshop to ensure your spot and to
allow prep time for teachers. Classes and workshops will be cancelled due to low
enrollment three days before class begins. Discounts are available for returning
student early registration, donor/membership and RAs who enroll in classes! Only one
discount per registration per person.
Lee Ristow
4
Each enrolled ClaySpace student receives a bag of clay. You can purchase more clay
as you progress through your class. It is important to only use clay that you purchase
at ClaySpace. There are many different clays for many different purposes and clays
fire at different temperatures. A clay fired at the wrong
temperature will create unfortunate and expensive
disasters and will ruin your project as well as the kiln.
The clay you purchase at ClaySpace will ensure that
you have the correct clay.
Enrolled students receive FREE three-hour Open
Labs (valued at $56). As a registered student, you will
receive one Open Lab for each class meeting, which
means if you’re enrolled in a four-week class, you’ll
receive four free Open Labs, and if you’re enrolled in
an eight-week class, you’ll receive eight free Open
Labs. Open Labs are available three times each
week, allowing students to choose a convenient time to practice the skills they are
learning during the course period. Be sure to take advantage of this valuable learning
tool as they are valid only until your last class.
Sign-in Sign-out Roster Students sign in and out in the Student Roster Book
located at the East entrance. This allows the Studio
Personnel to see how well the studio is being used, as
well as for insurance and safety purposes. Please
remember to sign in and out each time you attend class
or lab.
Student Work Space Student work space is separate from our Resident
Artist (RA) space so that RAs may also use the studio
while classes are in session without interrupting your
valuable class time and interaction with your instructor.
Shelving Space Enrolled students receive FREE shelving space to house projects, clay and tool kits.
Each student having access to the ceramic studio will be assigned shelf storage space.
Your full name should be put on your assigned shelf to help the Coordinator and
Faculty in identifying your work. This should be used for work in progress or completed
while enrolled in a class. Personal items should not be stored on these shelves as they
are not lockable and secure.
Make-up Classes It is possible to make up a class by going to another class. You must request a make-
up class with your instructor who will contact the instructor who teaches the alternative
class.
Michelle Kuo
Ken Maloney
5
Ceramics Stages Ceramics Stages include 1) wet, 2) leather-hard, 3) bone dry, 4) bisque fired and 5)
glaze fired. Each stage is important in learning to develop your skills as a ceramic
artist and takes time to become accomplished. Practice and patience are keys to
learning. Be generous with yourself in learning. ClaySpace instructors are very willing
to help you along your path of development.
Last Wet Class Each class has a last “wet” class to accommodate
students who need to complete their projects by the last
class meeting.
Open Labs Open Labs are designed for students to use to practice
what they have learned in class. Each Open Lab is
monitored but does not have instruction. Students
should sign in on the studio roster book and check in
with the Open Lab Monitor. Open Labs are only valid
until your last class meeting, so it is important to keep
track of your usage.
Free Parking Parking is available in the spaces on the East side of the building. This makes it very
convenient to enter and exit the East door for your class and lab.
Equipment
Pottery or Throwing Wheels – ClaySpace has 12 throwing wheels in the studio work
space.
Electric Kilns – ClaySpace has six electric kilns located in the kiln room near the East
entrance. These include a 10 cu ft Olympic, two 7 cu ft Cone Arts, one 11.7 cu ft L&L
Easy-Fire XT, one Cone Art 8.25 cu ft glass kiln, and a .57 cu ft test kiln.
Gas Kiln – ClaySpace has one 16 cu ft gas kiln.
Kilns and Shelf Names – A kiln named Duffy? It is a tradition in the ceramic arts to
name both our kilns and the shelving that holds our precious creations during firing.
Kilns are named in honor of donors who were involved or contributed to their
acquisition. Shelves, too, may be named for famous potters, ceramics movements or
themes, or a variety of craft-related events or memories. Besides being a great
tradition, their names allow us to keep track of how often kilns and shelves are being
used and assists in their maintenance and proper care.
Pauline Ares

6
Spray Booths – ClaySpace has two spray booths located on the East wall of the studio.
Usage steps are described in a later section entitled Spraying Glazes.
Slab Roller – We have a manually-operated slab roller. Canvas fabric is used to roll
clay through the equipment and are stored underneath the table. The slab roller’s
purpose is to allow the user to make consistent and uniformly thick slabs of clay to use
in construction of your project. Its usage will be covered during class. It is also expected
to be cleaned and maintained like all other components of the ceramic studio.
Extruders – We have a wall-mounted SuperDuper Clay Extruder in the studio, as well
as a Shimpo handheld one. Along with the slab roller, the extruder is the other piece
of equipment in the studio that is an essential tool for the handbuilder. They are also
manually-operated pieces of equipment for the purpose extruding simple shapes such
as round or square coils with uniformity and consistency to complex hollow forms. The
extruders come with standard sets of dies.
Clay Sinks – The ceramics studio has two sinks that as
an enrolled student you will be using. It is extremely
important to understand that whenever possible NO
clay is put into the sinks. This policy needs to be
followed very strictly so that all sinks function correctly.
Glaze Sink – There is also a glaze sink. Tools should
be rinsed in this sink to remove as much glaze as
possible before they are cleaned at the clay sinks.
Wedging Tables – There are three wedging tables for student
use. Please note that there is one dedicated to red/brown
clay and one for white clay. This will help prevent one clay
from contaminating the other. A third wedging table, made
of plaster, has specialized use which you will learn in your
class sessions.
Student Bisque Shelves – When your work is ready to be
bisqued, you should place it on the student bisque shelves.
Resident Artists will place your dry work into the kilns to be
fired at Cone 04 (^04 or Δ04). Bisque firing will take
approximately 8 to 12 hours to complete. You will want to make sure that your work is
bone dry before placing it on the shelves. The RAs will not place wet or damp work
into the kilns because the water still present could cause your project to explode when
the water turns to steam and creates pressure inside your greenware. Exploding
greenware not only ruins your project, it can destroy others’ work as well.
Student Glaze Shelves – After you’ve glazed your bisque work, and once again allowed
it to completely dry, you can place your glazed project on the Student Glaze shelves.
As before, RAs will place your work into a kiln to be glaze fired, this time at Cone 6 (^6,
Δ6). You will want to make sure that you have glazed your piece well and prepared it
carefully. You will not want to overglaze your work since this could cause the glaze to

7
run off the project piece and “glue” it to the kiln shelf. Glaze vitrifies, or becomes glass
like, and is extremely difficult to remove it from the kiln shelving. Projects that are
glazed to the shelves ruin both project and shelf. Cookies and stilts are available for
raising your work off the shelf surface. Your instructor will show you appropriate use
of each.
Completed Firing Shelves – All fired projects for both
students and RAs are removed from the kilns and
placed on completed firing shelves. One rack is used
to hold projects that have been bisqued and the other
rack holds work that has completed their glazework.
Project pieces on the glaze shelves are done. Here
is the moment of truth! It is hard to describe the joy
when seeing a completed piece that you created
from wet clay! Enjoy this pleasure! But, even if you
are not completely pleased with the results,
remember that this is a learning process. Be proud
of what you’ve done, examine your project and make
plans to learn from any mistakes.
Clay ClaySpace offers a variety of clays to students that are used by potters worldwide on
a daily basis. The clays we offer are known as high-fire clays and are safe to use for
your class projects. ClaySpace does not allow low-fire clays to be used as these will
not withstand the temperatures used in our kiln firings. Students may choose between
Standard 119; B-Mix, a white stoneware clay; and porcelain.
Throwing on the Wheel Many people think of the potter creating their wares at a pottery or throwing wheel. It
is mesmerizing and calming to watch a skilled craftsman as he or she coaxes a lump
of clay effortlessly into beautiful shapes. Every potter will tell you of the time and
patience it took to reach this stage. They, too, began as a student just like you.
Learning how to center a lump of clay on the throwing wheel is your first challenge,
and you will never forget the thrill when you are able to do so with what seems little
effort. Trust that you will get there, because we all do! You will learn methods of
wedging and preparing your clay to work on either the throwing wheel or for
handbuilding. Next, you will learn how to create a cylinder – the key to all projects, tall,
short, narrow or wide. It all begins with the cylinder. As you progress, you will learn
how to make cups, bowls, vases, teapots, plates, platters, and even oven and
tablewares.
With so many avenues and techniques to use to create imaginative and functional
things, it is no wonder that so many become addicted to the ceramics arts. Once you
gain skill and learn techniques, your imagination and curiosity can lead you into a
myriad of directions in which to develop your own style and voice.

8
Handbuilding Area Handbuilding is a term which describes making pottery pieces by hand using only
simple tools, not the throwing wheel. The three most
common forms of handbuilding are pinch pots, coiled
pots and slab work. We have two large work tables
located near the throwing wheels. This area is also
used for sculpture classes and demonstrations of
handbuilding techniques. Students can learn clay
preparation and decorating techniques, including slip
work, underglazing, impressing, incising, sgraffito,
and making your own pottery stamps.
The slab roller is manually operated, and its purpose
is to allow the user to make consistent and uniformly
thick slabs of clay to use in construction of your
project. Its usage will be covered during class. It is also expected to be cleaned and
maintained like all other components of the ceramic studio.
Pinch pots – Beginning with a lump of clay, it is smoothed into a sphere that fits the
size of your hand. Native Americans have created beautiful pottery for centuries using
pinch pot methods.
Coil Method – Creating coils or ropes, we can create bowls, vases, and many other
forms in various sizes and shapes. Coils built one on top of another can be melded
together to create a smooth texture. Adding more coils increases the size of the form.
Slab Method – An amount of wedged clay can be flattened then rolled between canvas
sheets through a manually operated slab roller. This method will flatten and expand
the clay from which the student can cut shapes using template patterns. Joining these
pattern pieces together into a vase, teapot or other forms can greatly expand one’s
pottery skills.
Glazing ClaySpace offers a variety of glazes prepared for student use by the Resident Artists of the studio. The current choices include glazes such as Blue Hare’s Fur, John’s Raspberry, Marge’s Red, Kate’s Green, Flossie White, Kira’s White, Ron Roy’s Clear, Blue Air, Nutmeg, Oilspot, Cartright Black, Ray’s Cream, and Swamp Green. Glazes purchased from sources other than ClaySpace should be reviewed and approved by your instructor prior to use.
Glaze Booths - The spray booth is centrally located in the glaze area. Because of its
excellent ventilation, this area can be used for handling chemicals in their dry state.
Generally, this spray booth is used by students to spray glazes on the surface of their
clay pieces. Students should always wear a respirator when spraying glazes.
Don Metz
9
Spraying Glazes Here are the items you should have ready: respirator, rubber gloves, spray gun, banding wheel, bat, newspaper, 80-mesh sieve, flat spatula, plastic container that the sieve will fit into, small sponge, large sponge, and a bucket of water. Step 1 – Clean your bisqued ceramics piece with a sponge and wax the bottom. Step 2 – Start the compressor. Tighten the knob at the bottom of the compressor. Turn lever to the ON position.
Step 3 – Check the bucket under the spray booth. This bucket will collect the glaze and water that you will use during your glazing session. If the bucket is nearly full, pour off the water on top into the sink, making sure not to include the settled glaze. Pour the settled glaze into the glaze prewash sink. Return the bucket to its location under the spray booth. Step 4 – Prepare your glaze. Place a small 80-mesh sieve into the plastic container so that it is resting just above it. Sieve your glaze by pushing it through the sieve with a flat spatula. Step 5 – Place the banding wheel on the work shelf in the booth. Place a newspaper-covered bat on top of the banding wheel. Step 6 – Attach your spray gun to a hose located in the spray booth. The hose connects to the air compressor and will provide the force needed to turn the liquid glaze into a fine mist. Step 7 – Attach the reservoir to the spray gun, with the lid off. Pour the sieved glaze into the reservoir and screw the lid on. You can hang the spray gun on the front edge of the spray booth or on one of the gun hangers nearby. Step 8 – Put on your respirator and rubber gloves to protect your lungs and skin from glazing materials. Step 9 – Place the first item to be sprayed onto the bat, upside down. Spray glaze gradually with up and down motions, while slowly turning the banding wheel with the other hand. Not lifting the pot, wipe the bottom, waxed area with a sponge. Move the item with the bat off the banding wheel to the counter where it can continue to dry. Step 10 – Place a fresh newspaper-covered bat onto the banding wheel. When the first pot/item is dry, place it on the fresh bat upside right. Repeat the spraying method as described in Step 9. Repeat Steps 9 and 10 for each piece you are glazing. Double check the bottoms and re-wipe clean as necessary.
Marie Gnesda
10
Finishing and clean-up – Pour unused glaze from the spray reservoir into the sieving container and then from the container back into the glaze bucket. Pre-wash the spray gun, reservoir, sieve and all other items used during the glazing session in the bucket of water. Wipe the spray booth with a sponge and clean the sponge in the bucket of water, too. Let the sediment settle in the bucket, then pour the water portion into the sink and pour the settled glaze at the bottom into the glaze pre-wash sink. Clean the spray gun reservoir. Remove the first filter from the spray booth. Fill the spray gun reservoir with clean water and spray it into the booth. Continue this process to clean both the spray booth and its filters. Remove the second filter and repeat the process. Complete the cleaning process of the filters in the clay sink. Wipe the spray booth, filters and glazing area clean with a sponge. Replace the booth filters. Final step – Turn off the compressor and loosen the knob at the bottom. Empty excess water from the bucket under the spray booth. Leave the area cleaner than when you arrived.
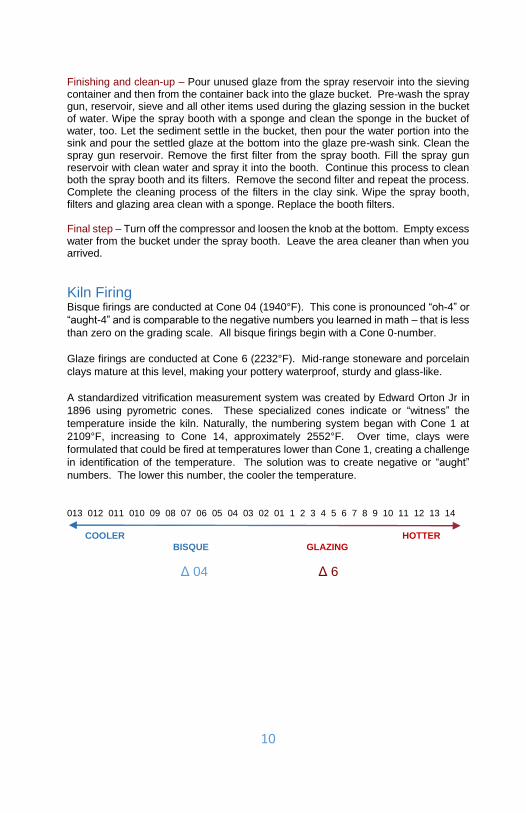
Kiln Firing Bisque firings are conducted at Cone 04 (1940°F). This cone is pronounced “oh-4” or
“aught-4” and is comparable to the negative numbers you learned in math – that is less
than zero on the grading scale. All bisque firings begin with a Cone 0-number.
Glaze firings are conducted at Cone 6 (2232°F). Mid-range stoneware and porcelain
clays mature at this level, making your pottery waterproof, sturdy and glass-like.
A standardized vitrification measurement system was created by Edward Orton Jr in
1896 using pyrometric cones. These specialized cones indicate or “witness” the
temperature inside the kiln. Naturally, the numbering system began with Cone 1 at
2109°F, increasing to Cone 14, approximately 2552°F. Over time, clays were
formulated that could be fired at temperatures lower than Cone 1, creating a challenge
in identification of the temperature. The solution was to create negative or “aught”
numbers. The lower this number, the cooler the temperature.
013 012 011 010 09 08 07 06 05 04 03 02 01 1 2 3 4 5 6 7 8 9 10 11 12 13 14
COOLER HOTTER BISQUE GLAZING
Δ 04 Δ 6

11
Studio Layout

12
Clean Up Every class is responsible for cleaning the equipment, areas used, and sinks at the
end of each class session.
Clay Sinks – There is a specific procedure which all students should follow to ensure
the cleanliness and workability of our sinks. It is best to first scoop out “chunky” clay
particles and dispose of them into the trash bins located next to each sink. Using a
water bucket, you should clean and sponge the debris from your wheel trays and tools,
catching the debris in the bucket. Empty the bucket contents into the large slop
buckets at the edge of the sink. Only after you’ve cleaned most of the clay debris from
your trays and tools can you follow up with a final rinsing in the sink.
Mop Sink – A third sink is located behind the two clay sinks. This sink is used to clean
and prepare the mops for cleaning the floor areas that have been used. Each student,
RA and instructor is responsible for cleaning their own areas after use.
Glaze Sink – When working with glazing materials, be sure to do an initial cleaning of
tools in the glaze sink. Complete the cleaning process of your tools at the clay sinks.
Code of Conduct It is expected that all participants of the studio conduct themselves in a controlled and
respectful manner during classes and labs. Abusive, aggressive and disruptive
behaviors are not acceptable and will cause immediate forfeiture of attendance. All
participants should treat each other and all equipment with respect.
Safety Procedures for Students and Resident Artists
You may develop problems if you are:
• A person with a history of asthma, allergies, or other chronic illnesses.
• Handling dry clay and glaze materials without proper respiratory protection.
• Working with highly toxic materials. (The use of lead, barium or manganese
is not allowed.)
In General - Studio Safety procedures
Know the exact location of the following safety items:
Fire extinguishers are in three locations:
1) On the wall outside the side loading bay.
2) On the wall outside the front bay
3) On the wall in the gallery, close to the front entrance.
Phone and emergency numbers are located in the multi-purpose room.
First Aid supplies are in the labeled container near the clay sinks.
13
Do not attempt to use equipment, materials or operate machinery before you have
been shown how to use it safely and properly. Report any irregularity in the machine
operation to the Operations Manager so the machine can be checked.
Know the materials being used -- especially if they will be used for a long period.
Material Data Safety Sheets are available for reference in a marked binder in the glaze
area.
Wash hands frequently to get rid of silica dust and other toxic materials. It is best to
keep fingernails short and clean while working. Remember, some materials, such as
oxides, can be absorbed through the skin (use the gloves that are provided) or ingested
with food.
Please keep food items out of the studio.
Clean the area each time work finishes. All cleaning must be done with wet mops or
sponges. Sweeping is not allowed as it generates silica dust, which is a long term
health hazard.
Wear shoes, not sandals, when working with heavy shelves or a Raku firing.
Long hair, jewelry and loose clothing must be restrained when working with electrical
and mechanical moving equipment.
Turn off machines and equipment not in use.
Beware of electrical hazards. Keep water buckets, wet sponges, etc. away from outlets
and the water heater.
When wedging, keep the wrist in neutral or mid-joint position and use the weight of the
body rather than just the muscles of the upper limb.
If you are pregnant or planning pregnancy, check with your doctor regarding your
exposure to potentially dangerous materials.
Use equipment properly as instructed. Any tools or equipment damaged or lost will be
repaired/replaced by the person using it. All tools or equipment must be put away by
user. Report any lost or damaged tools immediately.
Remember that you are ultimately responsible for your health and safety. Let’s watch
out for each other and keep the studio accident free.
Main Studio Safety
Wheels:
Report frayed wires or an electrical shock to your instructor or the Operations Director.
Avoid getting water on electrical plugins.
14
Slab Machine:
Make sure the clay is between two canvas sheets so it doesn’t stick to the rollers. Make
sure your fingers do not get caught in the rollers. Use softer clay to prevent stress on
the rollers and flatten the slab to less than an inch thickness.
Extruder:
Cleaning the extruder is best done with water and a sponge. Other objects put in it may
get jammed, and may result in pinched fingers. Use soft clay to avoid damage to the
machine. Clean the extruder immediately after using it.
Glaze Area Safety
Spray Booth:
The ventilation system should be on for all work performed in the spray booth.
Glazes, slips, etc. must be mixed in the spray booth. Screening and weighing must be
done within the hood with the fan on.
Anyone using the spray booth must wear a mask. (The approved mask N95 [3m 8511
NIOSH] mask can be purchased at Home Depot or most paint stores.) When working
with dry materials, avoid generating dust. Any spill of material, especially dry material,
needs to be reported to the studio manager or your instructor. Working with plaster
should also be done in the spray booth. Avoid contaminating clay in the studio with
plaster.
Grinding Wheel:
When grinding, wear a face shield, a two-strap dust mask (see above) and gloves.
Restrain loose hair, jewelry and long hair.
Fans and Heat Guns:
All electrical drying items are to be turned off and/or unplugged when not in use. Hot
heat guns should never be rested on a surface that will melt or burn. After cooling, heat
guns should be stored in the bin provided. Students may bring their own gas torches.
Kiln Area Safety
Electric Kilns:
Observe and follow all instructions for loading and unloading the kilns.
Anytime the kiln is being loaded or unloaded or the top is open, all controls must be on
“OFF” to avoid possible electric shock from the elements.
Make sure the kiln’s fan is on before using kiln.
To protect the kiln, never put projects or kiln furniture on top of the lids or on the brick
edge of the opening. When propping the lid open, use soft brick.
15
When opening or closing the lid hold with two hands and lower gently so the lid does
not slam shut.
Turn the controls to OFF after firing is complete.
Gas Kiln:
The instructional binder for the gas kiln is located in the storage area near the kiln itself.
Only experienced personnel operate this kiln.
The emergency shut off for the gas kiln is near the floor on the North wall immediately
to the left of the glass electric kiln under the sign reading “emergency gas shutoff”.
Glass Area Safety
Wear safety glasses when cutting, grinding or sawing glass. Small pieces of glass can
fly into the air and enter your eye causing serious damage.
Use respiratory protection when handling ground glass.
Wear a dust mask when working with glass powders. Glass powders can be inhaled,
especially when grinding and sawing glass.
Wear ear plugs when using loud equipment such as the grinder or glass saw.
Wear latex or similar gloves when cutting or molding ceramic fiber products.
For small cuts, wash your hands well and wrap on an adhesive bandage until the
bleeding stops. A "triple ointment" (Neosporin is one brand — it contains three different
antibiotics.) can help the cuts heal faster.
When using a grinder, keep the grinder head and glass edges wet to minimize dust in
the air.
If you open the kiln, watch out for gusts of hot air or bubbles in the glass that could pop
and harm your eyes.
Wipe out the shelf paper residue in the kiln with a damp sponge to minimize spreading
dust. (Updated January 2015)

16
Gallery Student Gallery Exhibit. Every year, the ClaySpace Gallery hosts a student exhibit,
providing a great opportunity for students to show and sell their work. Gallery
commission is 30%.
Annual Competition. ClaySpace also features a competition each year. Both RAs and
students may enter. All entries are displayed in the Gallery. The competition usually
occurs in April. Previous competition themes include Birdhouses, Banks, Salt &
Pepper, and Tea Pots.
Special Exhibits. The ClaySpace Gallery hosts special exhibits and students will be
notified if they may show their artwork in the exhibit.
Gallery Hours. Tuesday 1:00 pm-6:00 pm, Wednesday 10:00 am-3:30 pm, Thursday
1:00 pm-6:00 pm, Friday 10:00 am-2:00 pm, Saturday 10:00 am-2:00 pm
Office Hours. Tuesday 1:00 pm-6:00 pm, Wednesday 10:00 am-3:30 pm and
Thursday 1:00 pm-6:00 pm
Internships The internship program is designed as an extension of the educational experience for
individuals seriously planning to pursue a career in the ceramic arts. Our intention is
to provide a supportive, mentoring environment to assist the intern in developing the
skills needed for the next level of their ceramic career. Internship openings and
instructions are available on the ClaySpace website.
Resident Artist Memberships Our Resident Artists members receive full and unlimited access to the studio and
equipment and are also responsible for active participation in running of the enterprise.
Requirements for ClaySpace Resident Artists include establishing competency in skills
for procedures as well as studio equipment. Then, the student may submit an
application for a Resident Artist position. There is a waiting list at this time. Approved
applicants placed on the waiting list are eligible to sublet an active Resident Artist’s
position. The application form and instructions are available on the ClaySpace website.
Workshops, Events and Community Outreach ClaySpace regularly hosts workshops conducted by notable local artists as well as
nationally and internationally celebrated artists. ClaySpace also hosts several
Community Outreach programs throughout the year. Among these, you’ll see
programs such as the Empty Bowls campaign and the 8030 Project. Empty Bowls is
an international effort by potters and other artists to raise money for local food pantries.
The 8030 Project, founded by Mara Pelecis, allows us to help raise awareness of the
plight of so many of our American veterans who become homeless or at risk of suicide
every day. Proceeds from our sales during these events are donated locally.
17
ClaySpace admits students of any race, gender, color, national and ethnic origin to all rights,
privileges, programs and activities generally accorded or made available to students at the
school. It does not discriminate on the basis of race, gender, color, national or ethnic origin in
administration of its educational policies, admissions policies, scholarship and loan programs and
other administered programs.
Artwork featured throughout this handbook were created by Resident Artists of ClaySpace
Ceramics Arts Center.
740 Front Street, Lisle, Illinois 60532 [email protected] 630-393-2529
Website: www.clayspace.net