open enrollment instructions - deltaglobalstaffing.com
TRANSCRIPT

Page 1 of 13
New Hire Enrollment Instructions:
There are 13 benefits you must take action on before you can submit & finish
URGENT: You MUST submit your pre-enrollment within 30 days or less from your Hire Date
Welcome to SmartBen -- Our online enrollment tool. The site is accessible via the Internet at https://enroll.smartben.com/ and can be accessed 24 hours a day, seven days a week. The following tips will help you prepare for and complete the online enrollment process. Should you require technical assistance or guidance, you can contact the SmartBen Assist Team at 1-877-798-9374. They are open M-F, from 8am-8pm (eastern time).
Before You Enroll
Review Your Options & Make Your Choices Take time to review the information in the Plans section. It will help you understand your benefit choices. Discuss it with your family, too!
Click on the Plans link at the top of your home page and select a plan to review the plan details.
Consider This!
If you want to add a dependent for coverage for next year, now is the time to do it. You may not
add dependents during the plan year unless you have a qualified change in status, also known as a qualified life event. You will need to provide the Social Security number and date of birth for any spouse or dependent you enroll. If you have not received the Social Security number for a newborn, enter 111-11-1111. Contact Human Resources to update the dependent’s Social Security number after you receive it.
If you are electing Supplemental Term Life and AD&D Insurance, you need to enter the
Beneficiary name and relationship to the employee.
If you need to exit SmartBen before finishing your enrollment elections, click “log out”
Page 2 of 13
Steps to Complete Your
Enrollment
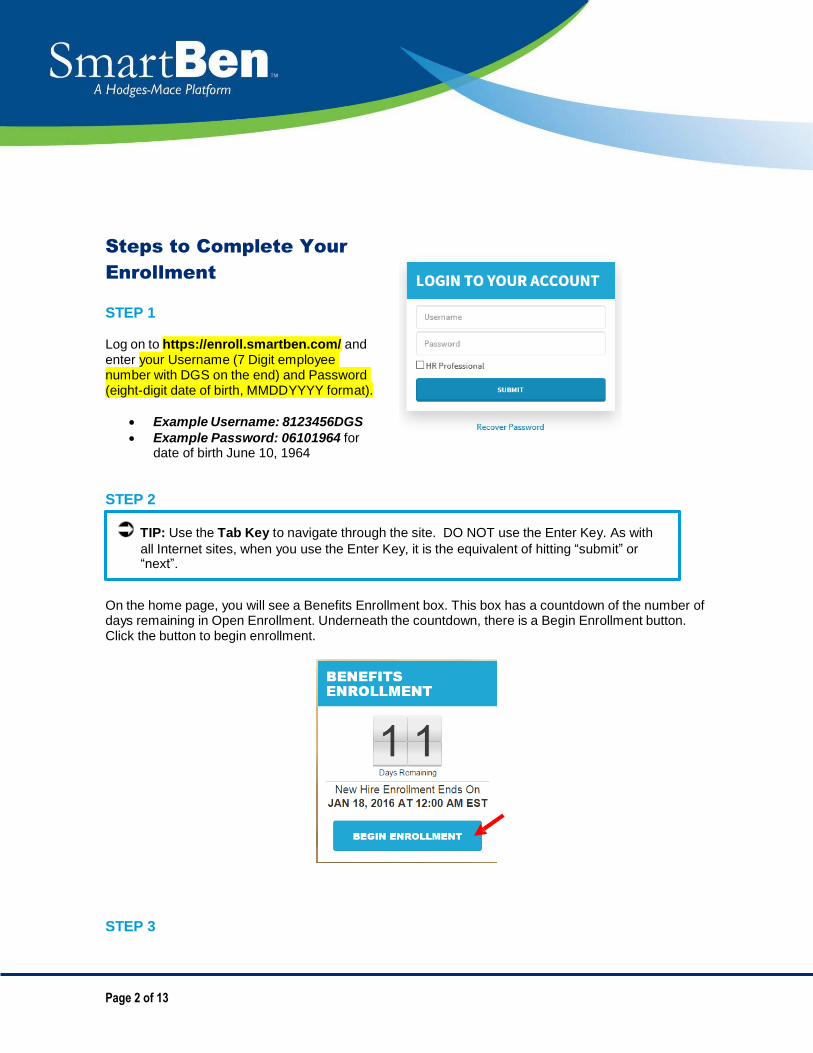
STEP 1
Log on to https://enroll.smartben.com/ and enter your Username (7 Digit employee number with DGS on the end) and Password (eight-digit date of birth, MMDDYYYY format).
Example Username: 8123456DGS
Example Password: 06101964 for date of birth June 10, 1964
STEP 2
TIP: Use the Tab Key to navigate through the site. DO NOT use the Enter Key. As with
all Internet sites, when you use the Enter Key, it is the equivalent of hitting “submit” or “next”.
On the home page, you will see a Benefits Enrollment box. This box has a countdown of the number of days remaining in Open Enrollment. Underneath the countdown, there is a Begin Enrollment button. Click the button to begin enrollment.
STEP 3

Page 3 of 13
On the next page, there is a box with Available Enrollments, telling you what enrollments are available. You will see a button for Annual Enrollment. Select the Annual Enrollment button to begin your enrollment session.
STEP 4
On this page you will see three options for enrollment; Quick Enrollment, Custom Enrollment, and Detailed Enrollment. This set of instructions will walk you through the “Custom Enrollment”. This enrollment is designed to ask sets of questions and recommend plans that will be best suited for you and your family. Click on the “Custom Enrollment” to begin.
STEP 5 You will be taken to a Disclaimer page first, you must read and click “Agree” before you can start enrollment.

Page 4 of 13
STEP 6 You will need to make any updates to your personal information on this page and at this time you will also need to add your spouse and dependents if you plan of covering them in your benefits. When creating a spouse or dependent, you will be given the option to create a beneficiary record. If you do not create the beneficiary record at this time you will need to create a separate one.
It will be important to add any and all dependents that you want to assign to coverage at this time – you will be answering medical questions and the system will use the dependents added to determine the level of coverage i.e. Employee Only, EE + Spouse, EE + Children or EE + Family.
Once you have added the dependents that you would like to cover, click the green “Continue” button.
STEP 7 You will be asked a series of health and financial questions in order to provide you with a recommended benefit bundle. Click the green “Continue” button to move to each new page.

Page 5 of 13

Page 8 of 13

Page 9 of 13
This page will give you a brief overview of your answers and the opportunity to review and edit your answers before continuing. Click “Agree & Continue” to see the benefit package that was selected for you and your family.

STEP 8
Page 10 of 13
This page will display your recommended benefits. At this time, you can “Accept & Continue” or you can click “Customize” to make changes to the recommendations.

Page 11 of 13
STEP 9
Once you have either accepted the recommended bundle or made your edits, you will be prompted to assign any beneficiaries and answer any required information that may be missing.

Page 12 of 13
***STEP 10
Review Confirmation: Review your elections thoroughly. YOU MUST GO THROUGH AND COMPLETE EVERY
Benefit (even if you are going to waive the item). All items will have a RED dot next to them to let you know you need to take action. When the dot turns GREEN, you will know it has recognized your action was submitted.
To confirm and submit, enter your initials at the bottom of the Confirmation page and click Continue.

Page 13 of 13
STEP 11
You will know you have successfully completed the enrollment process when you see the “Congratulations!” screen below. Select the Click Here link for a copy of your Confirmation Statement.
STEP 12
It’s time to review your Confirmation Statement! Carefully review your statement to ensure your benefit elections are accurate. Keep in mind, this Confirmation Statement is only a confirmation of your benefit elections. If carrier approvals (e.g., Supplemental Term Life/AD&D Insurance) are required, coverage will be subject to those requirements.
Note: No changes are allowed to New hire benefits elected except at yearly benefits renewal (Jan. 1st of each year). Mid-year coverage additions, changes or cancellations can only occur if you experience a Qualified Life Event Change. Please see the DGS Insider for instructions should you experience one of the following and need to change benefits as a result*:
Marriage or Divorce
Birth or adoption of a child
Death of dependent
Loss of coverage on spouse’s plan
Spouse loss of coverage
Gaining of coverage on spouse’s plan elsewhere
Reduction in DGS work hours
Promotion or change from PT to FT or FT to PT/RR status
*To request a mid-year plan change (QLE) a formal change request through the SmartBen system and supporting documentation are required within 30 days or less from the “Event Date.” These change rules and the documentation requirements, as well as the 30 day time window limit, are not determined by DGS but are federally stipulated.