operating and installation instructions - miele · operating and installation instructions built-in...
TRANSCRIPT

Operating and installation instructions
Built-in coffee machine
CVA 6431 (C)
To avoid the risk of accidents
or damage to the machine,
it is essential to read these
instructions before it is installed
and used for the first time. M.-Nr. 09 549 580
en - GB

Disposal of the packing
material
The packaging is designed to protect
the appliance from damage during
transportation. The packaging materials
used are selected from materials which
are environmentally friendly for disposal
and should be recycled.
Recycling the packaging reduces the
use of raw materials in the
manufacturing process and also
reduces the amount of waste in landfill
sites.
Disposal of your old machine
Electrical and electronic machines
often contain valuable materials. They
also contain materials which, if handled
or disposed of incorrectly, could be
potentially hazardous to human health
and to the environment. They are,
however, essential for the correct
functioning of your machine. Please do
not therefore dispose of it with your
household waste.
Please dispose of it at your local
community waste collection/recycling
centre, or contact your Dealer for
advice. Ensure that it presents no
danger to children while being stored
for disposal.
Caring for the environment
2

Caring for the environment . . . . . . . . . . . . . . . . . . . . . . . . . . . . . . . . . . . . . . . . . . 2
Guide to the machine . . . . . . . . . . . . . . . . . . . . . . . . . . . . . . . . . . . . . . . . . . . . . . 6
Accessories . . . . . . . . . . . . . . . . . . . . . . . . . . . . . . . . . . . . . . . . . . . . . . . . . . . . . . 9
Warning and Safety instructions . . . . . . . . . . . . . . . . . . . . . . . . . . . . . . . . . . . . 10
Preparing the coffee machine for use . . . . . . . . . . . . . . . . . . . . . . . . . . . . . . . . 17
Before using for the first time. . . . . . . . . . . . . . . . . . . . . . . . . . . . . . . . . . . . . . . . . 17
Switching on for the first time. . . . . . . . . . . . . . . . . . . . . . . . . . . . . . . . . . . . . . . . . 17
Water hardness . . . . . . . . . . . . . . . . . . . . . . . . . . . . . . . . . . . . . . . . . . . . . . . . . . . 18
Operation . . . . . . . . . . . . . . . . . . . . . . . . . . . . . . . . . . . . . . . . . . . . . . . . . . . . . . . 20
Filling the water container . . . . . . . . . . . . . . . . . . . . . . . . . . . . . . . . . . . . . . . . . 21
Switching on and off . . . . . . . . . . . . . . . . . . . . . . . . . . . . . . . . . . . . . . . . . . . . . . 22
Switching off for longer periods of time . . . . . . . . . . . . . . . . . . . . . . . . . . . . . . . . . 22
Filling the machine with coffee capsules . . . . . . . . . . . . . . . . . . . . . . . . . . . . . 23
Filling the capsule carousel . . . . . . . . . . . . . . . . . . . . . . . . . . . . . . . . . . . . . . . . . . 23
Taking capsules out of the capsule carousel . . . . . . . . . . . . . . . . . . . . . . . . . . . . 24
Making drinks . . . . . . . . . . . . . . . . . . . . . . . . . . . . . . . . . . . . . . . . . . . . . . . . . . . . 25
Making espresso or coffee . . . . . . . . . . . . . . . . . . . . . . . . . . . . . . . . . . . . . . . . . . 25
Preparing two portions. . . . . . . . . . . . . . . . . . . . . . . . . . . . . . . . . . . . . . . . . . . . . . 25
Cancelling preparation . . . . . . . . . . . . . . . . . . . . . . . . . . . . . . . . . . . . . . . . . . . . . 25
After preparing drinks . . . . . . . . . . . . . . . . . . . . . . . . . . . . . . . . . . . . . . . . . . . . . . 25
Preparing hot milk, milk froth and cappuccino . . . . . . . . . . . . . . . . . . . . . . . . . . . 26
Notes on using the cappuccinatore . . . . . . . . . . . . . . . . . . . . . . . . . . . . . . . . . 26
Dispensing froth directly into the cup. . . . . . . . . . . . . . . . . . . . . . . . . . . . . . . . 27
Preparing cappuccino . . . . . . . . . . . . . . . . . . . . . . . . . . . . . . . . . . . . . . . . . . . 28
Frothing milk in the cappuccinatore . . . . . . . . . . . . . . . . . . . . . . . . . . . . . . . . . 28
Preparing hot milk. . . . . . . . . . . . . . . . . . . . . . . . . . . . . . . . . . . . . . . . . . . . . . . 28
After preparing milk . . . . . . . . . . . . . . . . . . . . . . . . . . . . . . . . . . . . . . . . . . . . . 28
Making drinks using a profile. . . . . . . . . . . . . . . . . . . . . . . . . . . . . . . . . . . . . . . . . 29
Allocating the types of coffee (Type allocation) . . . . . . . . . . . . . . . . . . . . . . . . 30
Calling up "Type allocation" . . . . . . . . . . . . . . . . . . . . . . . . . . . . . . . . . . . . . . . . . . 30
Select type . . . . . . . . . . . . . . . . . . . . . . . . . . . . . . . . . . . . . . . . . . . . . . . . . . . . . . . 30
Allocate type . . . . . . . . . . . . . . . . . . . . . . . . . . . . . . . . . . . . . . . . . . . . . . . . . . . . . 30
Change type . . . . . . . . . . . . . . . . . . . . . . . . . . . . . . . . . . . . . . . . . . . . . . . . . . . . . 31
Delete type. . . . . . . . . . . . . . . . . . . . . . . . . . . . . . . . . . . . . . . . . . . . . . . . . . . . . . . 31
Contents
3

Changing the portion sizes . . . . . . . . . . . . . . . . . . . . . . . . . . . . . . . . . . . . . . . . . 32
Changing the portion size while making a drink . . . . . . . . . . . . . . . . . . . . . . . . . . 32
Setting the portion size from the Settings menu . . . . . . . . . . . . . . . . . . . . . . . . . . 33
Changing portion sizes for different profiles . . . . . . . . . . . . . . . . . . . . . . . . . . . . . 33
Setting up profiles . . . . . . . . . . . . . . . . . . . . . . . . . . . . . . . . . . . . . . . . . . . . . . . . 34
Calling up a profile. . . . . . . . . . . . . . . . . . . . . . . . . . . . . . . . . . . . . . . . . . . . . . . . . 34
Create profile . . . . . . . . . . . . . . . . . . . . . . . . . . . . . . . . . . . . . . . . . . . . . . . . . . . . . 34
Select profile . . . . . . . . . . . . . . . . . . . . . . . . . . . . . . . . . . . . . . . . . . . . . . . . . . . . . 35
Change name . . . . . . . . . . . . . . . . . . . . . . . . . . . . . . . . . . . . . . . . . . . . . . . . . . . . 35
Delete profile . . . . . . . . . . . . . . . . . . . . . . . . . . . . . . . . . . . . . . . . . . . . . . . . . . . . . 35
Change profile . . . . . . . . . . . . . . . . . . . . . . . . . . . . . . . . . . . . . . . . . . . . . . . . . . . . 36
Settings . . . . . . . . . . . . . . . . . . . . . . . . . . . . . . . . . . . . . . . . . . . . . . . . . . . . . . . . . 37
Calling up the Settings menu. . . . . . . . . . . . . . . . . . . . . . . . . . . . . . . . . . . . . . . . . 37
Changing and saving settings. . . . . . . . . . . . . . . . . . . . . . . . . . . . . . . . . . . . . . . . 37
Possible setting options. . . . . . . . . . . . . . . . . . . . . . . . . . . . . . . . . . . . . . . . . . . . . 38
Language. . . . . . . . . . . . . . . . . . . . . . . . . . . . . . . . . . . . . . . . . . . . . . . . . . . . . . . . 40
Time of day . . . . . . . . . . . . . . . . . . . . . . . . . . . . . . . . . . . . . . . . . . . . . . . . . . . . . . 40
Display (Time of day display) . . . . . . . . . . . . . . . . . . . . . . . . . . . . . . . . . . . . . . 40
Clock format . . . . . . . . . . . . . . . . . . . . . . . . . . . . . . . . . . . . . . . . . . . . . . . . . . . 40
Setting the time . . . . . . . . . . . . . . . . . . . . . . . . . . . . . . . . . . . . . . . . . . . . . . . . . 40
Date . . . . . . . . . . . . . . . . . . . . . . . . . . . . . . . . . . . . . . . . . . . . . . . . . . . . . . . . . . . . 40
Timer . . . . . . . . . . . . . . . . . . . . . . . . . . . . . . . . . . . . . . . . . . . . . . . . . . . . . . . . . . . 40
Selecting a timer . . . . . . . . . . . . . . . . . . . . . . . . . . . . . . . . . . . . . . . . . . . . . . . . 41
Allocating days of the week . . . . . . . . . . . . . . . . . . . . . . . . . . . . . . . . . . . . . . . 41
Activating and deactivating the timer . . . . . . . . . . . . . . . . . . . . . . . . . . . . . . . . 42
Eco mode. . . . . . . . . . . . . . . . . . . . . . . . . . . . . . . . . . . . . . . . . . . . . . . . . . . . . . . . 42
Lighting . . . . . . . . . . . . . . . . . . . . . . . . . . . . . . . . . . . . . . . . . . . . . . . . . . . . . . . . . 42
Setting the brightness. . . . . . . . . . . . . . . . . . . . . . . . . . . . . . . . . . . . . . . . . . . . 42
Setting the time the lighting switches off (Switch off after) . . . . . . . . . . . . . . . . 42
Info (Display information) . . . . . . . . . . . . . . . . . . . . . . . . . . . . . . . . . . . . . . . . . . . . 43
Locking the coffee machine (System lock �) . . . . . . . . . . . . . . . . . . . . . . . . . . . . 43
Activating and deactivating the system lock � . . . . . . . . . . . . . . . . . . . . . . . . 43
To override the System lock . . . . . . . . . . . . . . . . . . . . . . . . . . . . . . . . . . . . . . . 43
Water hardness . . . . . . . . . . . . . . . . . . . . . . . . . . . . . . . . . . . . . . . . . . . . . . . . . . . 43
Display brightness . . . . . . . . . . . . . . . . . . . . . . . . . . . . . . . . . . . . . . . . . . . . . . . . . 43
Volume . . . . . . . . . . . . . . . . . . . . . . . . . . . . . . . . . . . . . . . . . . . . . . . . . . . . . . . . . . 43
Factory default . . . . . . . . . . . . . . . . . . . . . . . . . . . . . . . . . . . . . . . . . . . . . . . . . . . . 43
Showroom programme (Demo mode) . . . . . . . . . . . . . . . . . . . . . . . . . . . . . . . . . 44
Contents
4

Cleaning and care . . . . . . . . . . . . . . . . . . . . . . . . . . . . . . . . . . . . . . . . . . . . . . . . 45
Quick guide . . . . . . . . . . . . . . . . . . . . . . . . . . . . . . . . . . . . . . . . . . . . . . . . . . . . . . 45
Rinsing the coffee machine . . . . . . . . . . . . . . . . . . . . . . . . . . . . . . . . . . . . . . . . . . 46
Water container . . . . . . . . . . . . . . . . . . . . . . . . . . . . . . . . . . . . . . . . . . . . . . . . . . . 46
Waste container . . . . . . . . . . . . . . . . . . . . . . . . . . . . . . . . . . . . . . . . . . . . . . . . . . . 47
Drip tray with grid . . . . . . . . . . . . . . . . . . . . . . . . . . . . . . . . . . . . . . . . . . . . . . . . . 47
Grille with drip tray cover . . . . . . . . . . . . . . . . . . . . . . . . . . . . . . . . . . . . . . . . . . . . 48
Capsule carousel and carousel runners . . . . . . . . . . . . . . . . . . . . . . . . . . . . . . . . 49
Central spout cover and drip catcher . . . . . . . . . . . . . . . . . . . . . . . . . . . . . . . . . . 50
Interior . . . . . . . . . . . . . . . . . . . . . . . . . . . . . . . . . . . . . . . . . . . . . . . . . . . . . . . . . . 50
Capsule plate. . . . . . . . . . . . . . . . . . . . . . . . . . . . . . . . . . . . . . . . . . . . . . . . . . . . . 51
Steam valve . . . . . . . . . . . . . . . . . . . . . . . . . . . . . . . . . . . . . . . . . . . . . . . . . . . . . . 51
Cappuccinatore . . . . . . . . . . . . . . . . . . . . . . . . . . . . . . . . . . . . . . . . . . . . . . . . . . . 52
Machine front . . . . . . . . . . . . . . . . . . . . . . . . . . . . . . . . . . . . . . . . . . . . . . . . . . . . . 53
Maintenance . . . . . . . . . . . . . . . . . . . . . . . . . . . . . . . . . . . . . . . . . . . . . . . . . . . . . 54
Descaling . . . . . . . . . . . . . . . . . . . . . . . . . . . . . . . . . . . . . . . . . . . . . . . . . . . . . . . 55
Descaling after being prompted by the display . . . . . . . . . . . . . . . . . . . . . . . . . . 55
Descaling without being prompted by the display . . . . . . . . . . . . . . . . . . . . . . . . 57
Problem solving guide . . . . . . . . . . . . . . . . . . . . . . . . . . . . . . . . . . . . . . . . . . . . 58
After Sales / Guarantee . . . . . . . . . . . . . . . . . . . . . . . . . . . . . . . . . . . . . . . . . . . . 69
Saving energy . . . . . . . . . . . . . . . . . . . . . . . . . . . . . . . . . . . . . . . . . . . . . . . . . . . 70
Electrical connection U.K., ZA, IRL . . . . . . . . . . . . . . . . . . . . . . . . . . . . . . . . . . 71
Installation . . . . . . . . . . . . . . . . . . . . . . . . . . . . . . . . . . . . . . . . . . . . . . . . . . . . . . 72
Building-in and combination options . . . . . . . . . . . . . . . . . . . . . . . . . . . . . . . . . . . 72
Ventilation . . . . . . . . . . . . . . . . . . . . . . . . . . . . . . . . . . . . . . . . . . . . . . . . . . . . . . . 73
Installation . . . . . . . . . . . . . . . . . . . . . . . . . . . . . . . . . . . . . . . . . . . . . . . . . . . . . . . 73
Adjusting the hinges . . . . . . . . . . . . . . . . . . . . . . . . . . . . . . . . . . . . . . . . . . . . . . . 74
Contents
5

Exterior view
aControls and display
bHandle
cPlastic grille
dMetal drip tray cover
eCentral spout
f Inset for Cappuccinatore
gSteam valve
Guide to the machine
6

Interior view
aCapsule plate
(replace with the red descaling funnel when descaling is carried out)
bBrew unit
cCapsule carousel
dCarousel runners
eWater container
fDrip tray with grid
gWaste container
hCentral spout cover
iDrip catcher
Guide to the machine
7

Controls and display
a On/Off sensor � For switching the coffee machine on and off
b "Profiles" � For saving and editing profiles
c "Two portions" � For preparing two portions of a drink
d Drinks sensors For dispensing
� Espresso
� Coffee
� Long coffee
e Display Shows information about the current action or status
f "Settings " � For altering settings, displaying information or
checking which settings are currently active
g "Back" � For returning to the previous menu, cancelling
unwanted actions
h Arrow sensors ��� For displaying further options and highlighting a
selection
i OK sensor For confirming display messages and saving
settings
j "Maintenance" � For calling up the maintenance programme
Guide to the machine
8

Accessories supplied
– Cappuccinatore
glass jug for making hot milk and
milk froth
– Descaling funnel (red)
for descaling the water pipework
– Descaling tablets
for descaling the water pipework
(Starter set)
– Cleaning tablets
for degreasing the capsule plate
(Starter set)
– Test strips
for determining the water hardness
level
– Maintenance tool
for changing the capsule hopper and
releasing the steam valve
These products and other useful
accessories can be ordered via the
internet, from Miele (see back cover for
contact details) or from your Miele
dealer.
Optional accessories
Miele accessories and cleaning and
conditioning products are available for
your coffee machine.
– Microfibre cloth
for removing finger marks and light
soiling
– Capsule hopper
must be replaced after approx.
15,000 coffee capsules have been
dispensed
– Cappuccinatore
glass jug for making hot milk and
milk froth
– Descaling tablets
for descaling the water pipework
– Cleaning tablets
for degreasing the capsule plate
– GCEO dishwasher insert
for cleaning the Cappuccinatore in a
dishwasher
Accessories
9

This coffee machine complies with all relevant legal safety
requirements. Improper use can, however, lead to personal injury
and damage to property.
To avoid the risk of accidents and damage to the machine,
please read these instructions carefully before using it for the first
time. They contain important information on installation, safety,
use and maintenance.
Miele cannot be held liable for damage caused by
non-compliance with these Warning and Safety instructions.
Keep these instructions in a safe place and ensure that new users
are familiar with the content. Pass them on to any future owner.
Correct application
~ This coffee machine is intended for use in domestic households
and similar working and residential environments. It is not intended
for outdoor use.
~ It must be used as a domestic appliance and only for the
preparation of espresso, cappuccino, latte macchiato etc.
Any other usage is not supported by the manufacturer and could be
dangerous.
~ The coffee machine can only be used by people with reduced
physical, sensory or mental capabilities, or lack of experience and
knowledge, if they are supervised whilst using it, or have been
shown how to use it in a safe way and recognise and understand the
consequences of incorrect operation.
Warning and Safety instructions
10

Safety with children
,Caution. The central spout and the steam valve present a
danger of burning and scalding. Children's skin is very sensitive
and reacts to hot temperatures.
Do not allow them to touch hot components of the coffee machine
or to place any part of their body under the spouts.
~ Install the coffee machine where it is out of the reach of children.
~ Children under 8 years of age must be kept away from the
machine unless they are constantly supervised.
~ Children 8 years and older may only use the machine
unsupervised if they have been shown how to use it in a safe way
and recognise and understand the consequences of incorrect
operation.
~ Children must not be allowed to clean or maintain the machine
unsupervised.
~ Please supervise children in the vicinity of the coffee machine
and do not allow them to play with it.
Remember that coffee and espresso are not suitable drinks for
children.
~ Danger of suffocation. Packaging, e.g. plastic wrappings, must
be kept out of the reach of babies and children. Whilst playing,
children could become entangled in packaging or pull it over their
head and suffocate.
Warning and Safety instructions
11
Technical safety
~ A damaged coffee machine could be dangerous. Before building
in the machine, check it for any externally visible damage. Do not
use a damaged machine.
~ Before connecting the machine to the mains supply, make sure
the connection data (voltage and frequency) on the data plate
corresponds to the household supply. Consult a qualified electrician
if in any doubt.
~ The electrical safety of this machine can only be guaranteed if
correctly earthed. It is essential that this standard safety requirement
is met. If in any doubt, please have the electrical installation tested
by a qualified electrician.
~ Do not connect the machine to the mains electrical supply by a
multi-socket adapter or an extension lead. These are a fire hazard
and do not guarantee the required safety of the machine.
~ For safety reasons, this machine may only be used when it has
been built in.
~ If the coffee machine is to be built in above another appliance,
there must be a full-width, closed shelf between them.
~ The coffee machine must not be used in a non-stationary location
(e.g. on a ship).
~ Only use the coffee machine in rooms where the ambient
temperature is between +10 °C and +38 °C.
Warning and Safety instructions
12

~ Ensure that there is sufficient ventilation around the coffee
machine. Otherwise condensation can build up and damage the
machine and / or the housing unit.
~ If the coffee machine is installed behind a kitchen furniture door,
it may only be used with the furniture door open. Do not close the
furniture door while the coffee machine is in use.
~ Repairs may only be carried out by a Miele authorised service
technician. Repairs and other work by unqualified persons can
cause considerable danger to users. The manufacturer cannot be
held liable for unauthorised work.
~ While the appliance is under guarantee, repairs should only be
undertaken by a Miele authorised service technician. Otherwise the
guarantee is invalidated.
~ Miele can only guarantee the safety of the machine when original
Miele replacement parts are used. Faulty components must only be
replaced by genuine Miele original spare parts.
~ The machine must be disconnected from the electrical supply
during installation or repair work.
~ Do not open the outer casing of the machine. Tampering with
electrical connections or components and mechanical parts is
highly dangerous to the user and can cause operational faults.
Warning and Safety instructions
13

~ Only use genuine original Miele accessories with this appliance.
Using spare parts or accessories from other manufacturers will
invalidate the guarantee, and Miele cannot accept liability.
Correct use
,Caution. The central spout and the steam valve present a
danger of burning and scalding.
The liquids and steam dispensed are very hot.
Please note:
– Keep well away from the area underneath the central spout and
steam valve when hot liquids and steam are being dispensed.
– Do not touch hot components.
– The spouts can spray hot liquid or steam.
– Water in the drip tray can be very hot. Take care when emptying
it.
,Danger of injury.
Do not touch the brew unit when the machine is connected to the
electrical supply.
Do not clean the inside of the capsule plate opening.
,Never look directly at the lighting or use optical instruments to
look at it.
~ Clean the coffee machine and the cappuccinatore (milk frother)
thoroughly before using for the first time (See "Cleaning and care").
Warning and Safety instructions
14

~ Please note the following regarding water:
– Only use cold, fresh tap water to fill the water container. Warm or
hot water or other liquids could damage the machine.
– Change the water every day to prevent a build-up of bacteria.
– Do not use mineral water. Mineral water will cause serious
limescale deposits to build up in your machine and damage it.
– Do not use water from a reverse osmosis unit in this machine. This
would damage it.
~ Do not put anything other than Nespresso coffee capsules in the
capsule carousel. Other manufacturers' capsules etc. would
damage the machine.
~ The coffee capsules must be intact before use. Do not use coffee
capsules which are damaged, broken or dented. These could
become jammed in the machine and damage it.
~ Do not use milk with additives. Sugar additives will stick to the
milk pipework and damage the coffee machine and the
cappuccinatore.
~ If using animal milk, use only pasteurised milk.
~ Never place a drink with ignited alcohol under the central spout of
the coffee machine. The flames could ignite plastic components
and cause fire damage.
~ Do not swing from or hang anything on the machine front when it
is open as this could damage the machine.
Warning and Safety instructions
15

~ Please note the following with regard to cleaning the coffee
machine:
– Clean the coffee machine and the cappuccinatore daily (see
"Cleaning and care").
– Do not use a steam cleaner to clean the machine. Steam could
reach electrical components and cause a short circuit.
– Descale the coffee machine regularly using the appropriate
number of Miele descaling tablets for the water hardness level in
your area. Descale the machine more frequently in areas with very
hard water. The manufacturer cannot be held liable for damage
arising from insufficient descaling.
~ Do not use the coffee machine or the cappuccinatore for cleaning
other objects.
For machines with a stainless steel front:
~ Do not use sticky notes, transparent adhesive tape, masking tape
or other types of adhesive on stainless steel surfaces. These
damage the surface, causing it to lose its dirt repellent protective
coating.
~ The finish on stainless steel surfaces is susceptible to scratching.
Even magnets can cause scratching.
Warning and Safety instructions
16

Please read the operating
instructions and take the time to
familiarise yourself with the coffee
machine before using it for the first
time.
Before using for the first time
^ The machine must be correctly
installed and connected (see
"Electrical connection" and
"Installation") before it is used for the
first time.
^ Remove any protective foil.
Clean the coffee machine thoroughly
(see "Cleaning and care") before
filling it with water and coffee
capsules.
Switching on for the first time
When you switch the coffee machine on
for the first time, you will be prompted
to set the following:
– Language and Country
– Time of day
– Date
– Display (Time of day display)
^ Touch the On/Off sensor �.
The welcome message "Miele -
Willkommen" will appear in the display
briefly.
Selecting the language
^ Touch the arrow sensors until the
language you want is highlighted.
Touch the OK sensor.
^ Touch the arrow sensors until the
country you want is highlighted.
Touch the OK sensor.
The setting is now saved.
Setting the time of day
^ Touch the arrow sensors until the
current hour appears. Touch the OK
sensor.
^ Touch the arrow sensors until the
current minutes appear. Touch the
OK sensor.
The setting is now saved.
Setting the date
^ Touch the arrow sensors until the
current year appears. Touch the OK
sensor.
^ Touch the arrrow sensors until the
current month appears. Touch the
OK sensor.
^ Touch the arrow sensors until the
current day appears. Touch the OK
sensor.
The setting is now saved.
Preparing the coffee machine for use
17

Selecting the display
You can choose from the following
options:
– On: the display will always show the
date and time (even when the
machine is switched off).
– Off: the date and time are not
displayed when the machine is
switched off.
– Night dimming: the date and time
are only displayed between the
hours of 5:00 and 23:00.
^ Touch the arrow sensors until the
option you want is highlighted.
Touch the OK sensor.
The coffee machine will use more
energy depending on the option you
choose for the display. Information
about this will appear in the display.
"Set-up successfully completed" will
appear in the display.
"Fill and replace the water container"
will appear in the display.
^ Fill the water container with fresh,
cold tap water.
Tip: Please continue to work though the
further steps outlined in the operating
instructions so that you can familiarise
yourself with the coffee machine and
set it up for your specific requirements.
Water hardness
The water hardness level indicates how
much calcium is dissolved in the water.
The higher the calcium content, the
harder the water, and the harder the
water, the more often the coffee
machine will need to be descaled.
The coffee machine measures the
quantity of water and steam used. The
number of drinks which can be
dispensed before the machine needs to
be descaled will depend on the water
hardness level set.
Set the water hardness level on the
coffee machine to the water hardness
level for the local area to ensure that
the machine functions correctly and is
not damaged. This will ensure that the
reminder to descale the machine will
appear in the display at the correct
time.
The machine has four programmable
levels:
Water hardness Local water
hardness
level
Setting
(Hardness
level)
0 - 8.4 °dH
(0 -1.5 mmol/l)
Soft Soft
8.4 - 14 °dH
(1.5 - 2.5 mmol/l)
Medium Medium
14 - 21 °dH
(2.5 - 3.7 mmol/l)
Hard Hard
> 21 °dH
(> 3.7 mmol/l)
Hard Very hard
Preparing the coffee machine for use
18

Checking the water hardness level
You can use the test strip supplied to
check the water hardness level, or your
local water supplier will be able to
advise you on the hardness of the water
in your area.
^ Dip the test strip in your drinking
water for a second, then shake off
any excess water. The result will be
evident after about a minute.
You can now set the water hardness
level for the coffee machine.
Setting the water hardness level
^ Touch �.
^ Touch the arrow sensors until "Water
hardness" is highlighted. Touch the
OK sensor.
^ Touch the arrow sensors until the
hardness level you want is
highlighted. Touch the OK sensor.
The setting is now saved.
Preparing the coffee machine for use
19

The coffee machine is operated by
touching the sensors.
You are in the drinks menu when the
display shows:
� Miele
Cosi
Ristretto
Roma
To prepare a drink, press one of the
drinks sensors
Calling up and navigating in a menu
To call up a menu, touch the relevant
sensor. You will be able to start actions
or alter settings in the selected menu.
Settings
Language F
Time of day
Timer
A scroll bar on the right hand side of
the display indicates more options or
text. These can be displayed using the
arrow sensors.
The setting which is currently selected
will have a tick � beside it.
To select an option, touch the � and �
arrow sensors to highlight the option
you want.
Touch the OK sensor to confirm your
selection.
Exiting a menu or cancelling an
action
To exit the current menu, touch
"Back" �.
If none of the sensors has been
touched for a while, the coffee machine
will revert to the drinks menu.
Operation
20
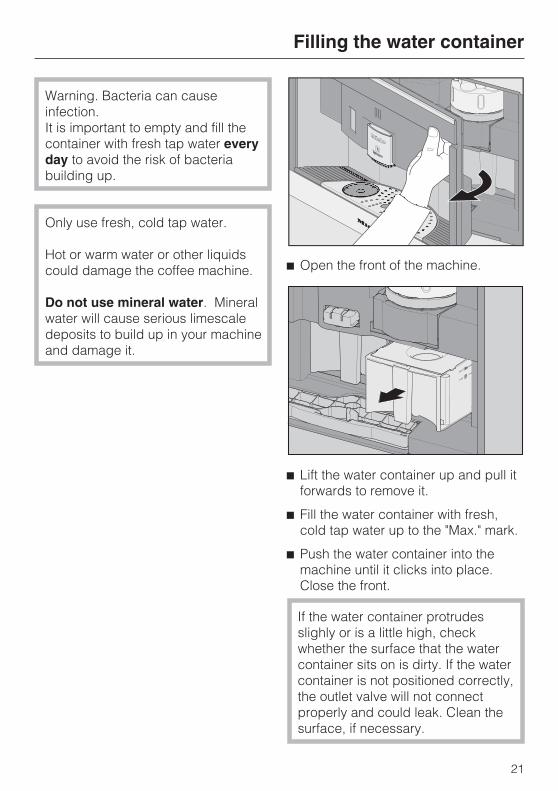
Warning. Bacteria can cause
infection.
It is important to empty and fill the
container with fresh tap water every
day to avoid the risk of bacteria
building up.
Only use fresh, cold tap water.
Hot or warm water or other liquids
could damage the coffee machine.
Do not use mineral water. Mineral
water will cause serious limescale
deposits to build up in your machine
and damage it.
^ Open the front of the machine.
^ Lift the water container up and pull it
forwards to remove it.
^ Fill the water container with fresh,
cold tap water up to the "Max." mark.
^ Push the water container into the
machine until it clicks into place.
Close the front.
If the water container protrudes
slighly or is a little high, check
whether the surface that the water
container sits on is dirty. If the water
container is not positioned correctly,
the outlet valve will not connect
properly and could leak. Clean the
surface, if necessary.
Filling the water container
21

Switching on
^ Touch the On/Off sensor �.
Tip: If you do not want the water from
the rinsing process to flow into the drip
tray, place a suitable container
underneath the central spout before
preparing the first coffee of the day.
At first "Heating-up phase" appears in
the display and after the coffee
machine has heated up, the pipework
is rinsed out. Hot water will be
dispensed from the central spout.
If the coffee machine still has an
operating temperature higher than
60 °C , then rinsing will not take
place.
The machine will now align the capsule
carousel and check the chambers. You
will be able to hear this happening.
When the different types of coffee
appear in the display, you can prepare
a drink.
Switching off
^ Touch the On/Off sensor �.
If coffee has been dispensed, the
coffee machine will carry out a rinse
automatically before switching off.
Switching off for longer
periods of time
If the machine is not going to be used
for a longer period of time, e.g. whilst
on holiday
^ Empty the drip tray, the waste
container and the water container.
^ Clean all components thoroughly,
including the central spout cover a
and the drip catcher b in the
machine front.
^ Switch the machine off.
If you are leaving the front open while
the coffee machine is not in being
used for a long time, disconnect it
from the mains to save energy.
Switching on and off
22
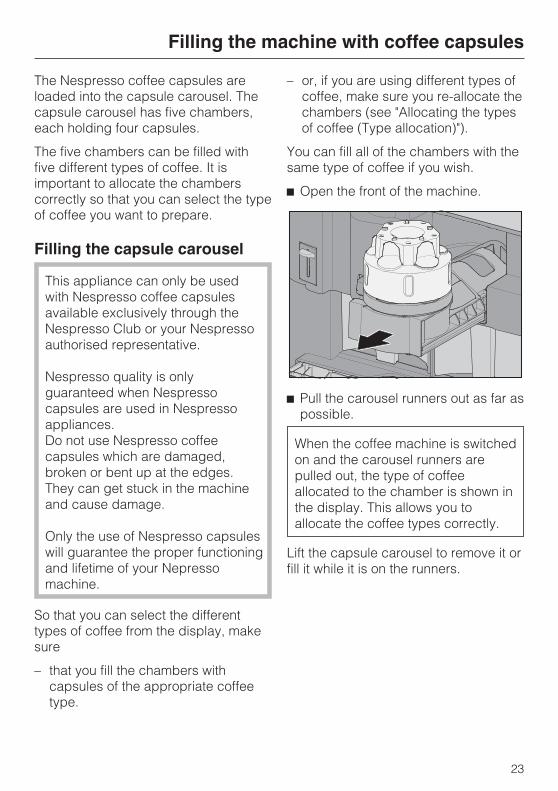
The Nespresso coffee capsules are
loaded into the capsule carousel. The
capsule carousel has five chambers,
each holding four capsules.
The five chambers can be filled with
five different types of coffee. It is
important to allocate the chambers
correctly so that you can select the type
of coffee you want to prepare.
Filling the capsule carousel
This appliance can only be used
with Nespresso coffee capsules
available exclusively through the
Nespresso Club or your Nespresso
authorised representative.
Nespresso quality is only
guaranteed when Nespresso
capsules are used in Nespresso
appliances.
Do not use Nespresso coffee
capsules which are damaged,
broken or bent up at the edges.
They can get stuck in the machine
and cause damage.
Only the use of Nespresso capsules
will guarantee the proper functioning
and lifetime of your Nepresso
machine.
So that you can select the different
types of coffee from the display, make
sure
– that you fill the chambers with
capsules of the appropriate coffee
type.
– or, if you are using different types of
coffee, make sure you re-allocate the
chambers (see "Allocating the types
of coffee (Type allocation)").
You can fill all of the chambers with the
same type of coffee if you wish.
^ Open the front of the machine.
^ Pull the carousel runners out as far as
possible.
When the coffee machine is switched
on and the carousel runners are
pulled out, the type of coffee
allocated to the chamber is shown in
the display. This allows you to
allocate the coffee types correctly.
Lift the capsule carousel to remove it or
fill it while it is on the runners.
Filling the machine with coffee capsules
23

^ Make sure you put the capsules into
the chambers of the capsule
carousel correctly with the foil facing
downwards.
Please note that the individual
capsules sit loosely in the capsule
carousel to prevent them from
becoming jammed.
If you have removed the capsule
carousel,
^ place it onto the carousel runners
before pushing it back into the
machine.
^ Push the carousel runners fully back
into the machine and close the
machine front.
The machine will now align the capsule
carousel and check the chambers. You
will be able to hear this happening.
Taking capsules out of the
capsule carousel
^ Pull the capsule runners out and
remove the capsule carousel.
^ Push upwards on the ring underneath
the carousel a and then remove the
capsules b.
Filling the machine with coffee capsules
24

Making espresso or coffee
^ Place a cup under the central spout.
^ Touch the arrow sensors until the
type of coffee you want is
highlighted.
Now select the type of drink you want.
^ Touch �, � or �.
The coffee or espresso will be
dispensed into the cup.
Preparing two portions
You can request two portions of
espresso or coffee at once either in one
cup or in two separate cups. The two
portions will be dispensed one after
the other.
^ Place a cup under the central spout.
^ Touch the arrow sensors until the
type of coffee you want is
highlighted.
^ Touch �.
The � sensor will now light up.
^ Touch �, � or �.
Two portions of the desired drink will be
dispensed from the central spout.
After a while, if no drink is selected
"Two portions �" disappears from
the display.
Cancelling preparation
Drink preparation can be cancelled
while "Stop" is showing in the display.
^ Touch the OK sensor.
Preparation will be cancelled.
The preparation of the first of two
portions can be stopped by touching
the OK sensor once. The whole
preparation can be cancelled by
pressing the OK sensor for longer.
After preparing drinks
If coffee has been dispensed, the
coffee machine will carry out a rinse
automatically before switching off.
Making drinks
25
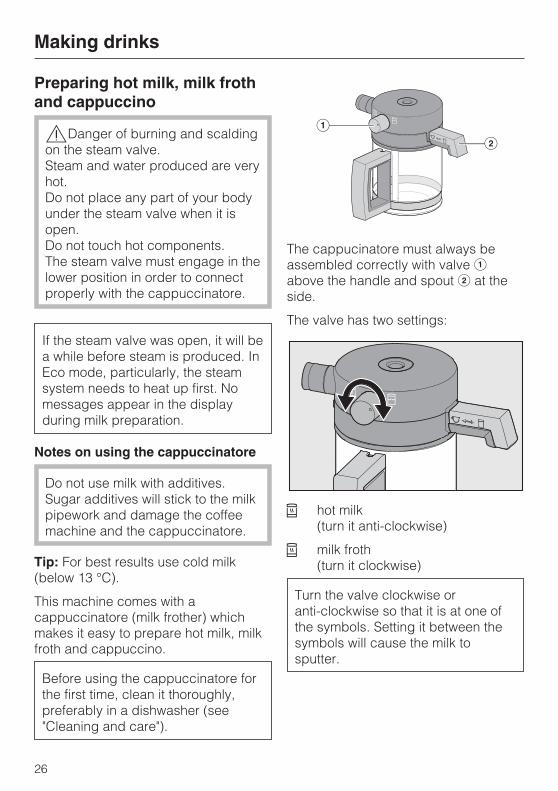
Preparing hot milk, milk froth
and cappuccino
,Danger of burning and scalding
on the steam valve.
Steam and water produced are very
hot.
Do not place any part of your body
under the steam valve when it is
open.
Do not touch hot components.
The steam valve must engage in the
lower position in order to connect
properly with the cappuccinatore.
If the steam valve was open, it will be
a while before steam is produced. In
Eco mode, particularly, the steam
system needs to heat up first. No
messages appear in the display
during milk preparation.
Notes on using the cappuccinatore
Do not use milk with additives.
Sugar additives will stick to the milk
pipework and damage the coffee
machine and the cappuccinatore.
Tip: For best results use cold milk
(below 13 °C).
This machine comes with a
cappuccinatore (milk frother) which
makes it easy to prepare hot milk, milk
froth and cappuccino.
Before using the cappuccinatore for
the first time, clean it thoroughly,
preferably in a dishwasher (see
"Cleaning and care").
The cappucinatore must always be
assembled correctly with valve a
above the handle and spout b at the
side.
The valve has two settings:
� hot milk
(turn it anti-clockwise)
� milk froth
(turn it clockwise)
Turn the valve clockwise or
anti-clockwise so that it is at one of
the symbols. Setting it between the
symbols will cause the milk to
sputter.
Making drinks
26

Milk can be frothed or dispensed
straight into a cup, or heated or frothed
into the cappuccinatore jug first and
then poured manually into the cup. The
spout must be pushed in or pulled out:
Milk spout pushed in (�) :
Milk will be frothed and dispensed
directly into the cup
Milk spout pulled out (�):
Milk will be frothed in the
cappuccinatore jug
Tip: Heating the milk in the
cappuccinatore jug gives you hotter
milk.
Dispensing froth directly into the cup
^ Push the spout into the lid as far as it
will go (�).
^ Turn the valve on the cappuccinatore
clockwise to �.
^ Fill the cappuccinatore up to the
upper mark with cold milk and
replace the lid.
^ Place the cappuccinatore into the
inset in the drip tray and place a
cappuccino cup under the central
spout.
^ Push the steam valve downwards
slowly and carefully to connect it to
the cappuccinatore.
^ When you have enough froth in the
cup push the steam valve up again.
Steam release is controlled by a
timer. If you have not got enough milk
froth, and no more steam is emerging
from the steam nozzle, push the
steam valve up then push it back
down again.
Making drinks
27

Preparing cappuccino
^ Dispense milk froth into the cup, as
described above. Fill the cup 2/3 full
with milk froth.
^ Touch the arrow sensors until the
type of coffee you want is
highlighted.
^ Touch � to make an espresso.
Espresso will be dispensed from the
central spout. The cappuccino is
ready.
Frothing milk in the cappuccinatore
^ Pull the spout out of the lid as far as it
will go (�).
^ Turn the valve on the cappuccinatore
clockwise to �.
^ Fill the cappuccinatore up to the
lower mark with cold milk and
replace the lid.
^ Place the cappuccinatore in the inset
in the drip tray.
^ Push the steam valve downwards
slowly and carefully to connect it to
the cappuccinatore.
^ When you have sufficient froth push
the steam valve up again.
Preparing hot milk
^ Turn the valve on the cappuccinatore
anti-clockwise to �.
^ Fill the cappuccinatore up to the
upper mark with cold milk and
replace the lid.
^ Push the milk spout in as far as it will
go � (for frothing hot milk into a cup)
or pull the milk spout out � (for
frothing hot milk in the
cappuccinatore jug) and place the
cappuccinatore in the inset of the
drip tray.
^ Push the steam valve downwards
slowly and carefully to connect it to
the cappuccinatore.
Tip: Heating the milk in the
cappuccinatore jug gives you hotter
milk.
After preparing milk
Warning.
Milk naturally contains bacteria
which proliferate rapidly with
inadequate cleaning. A dirty
machine can be harmful to health.
Clean the cappuccinatore and the
steam valve regularly to avoid a
build-up of bacteria.
If more than an hour elapses between
between milk preparations, dismantle
and rinse the lid of the cappuccinatore
and the glass jug. Milk residue can clog
up the cappuccinatore.
Making drinks
28

Making drinks using a profile
By using the profiles you can make
your coffee or espresso exactly the way
you like it (see "Profiles").
If you have already set the machine up
for a specific profile, you can select the
profile first before dispensing a drink.
^ Touch �.
^ Touch the arrow sensors until "Select
profile" is highlighted.
Touch the OK sensor.
^ Touch the arrow sensors until the
profile you want is highlighted.
Touch the OK sensor.
� John
Cosi �
Ristretto
Roma �
The name of the profle selected will
appear in the top of the display.
Now you can prepare your chosen
drink as described in "Making espresso
or coffee".
Making drinks
29

There are 16 different types of
Nespresso coffee available for use in
this machine (as well as occasional
"special" brands). They vary in taste,
aroma and how they are roasted.
Preparation time also affects the taste.
You can store five different types of
coffee in this machine (e.g. for five
different users with different tastes).
The capsule carousel has five
chambers numbered from 1 to 5.
The chambers are allocated a type of
Nespresso coffee at the factory.
Calling up "Type allocation"
^ Touch �.
^ Touch the arrrow sensors until "Type
allocation" is highlighted. Touch the
OK sensor.
^ Touch the arrow sensors until the
chamber you want is highlighted.
Touch the OK sensor.
For this chamber you can now
– Select type from the (factory default)
types of coffee which have already
been allocated to the coffee
machine.
– Allocate type if you want to enter the
name of a new type of coffee.
The following options are available if
you have already allocated a chamber
with a type of coffee yourself:
– Change type, to change the name of
a type of coffee and
– Delete type, if you want to delete a
type of coffee completely.
Select type
^ Touch the arrow sensors until "Select
type" is highlighted. Touch the OK
sensor.
There will be a tick � beside the type
of coffee which is currently allocated to
the chamber.
^ Touch the arrow sensors until the
type of coffee you want is
highlighted. Touch the OK sensor.
The setting is now saved.
Allocate type
^ Touch the arrow sensors until
"Allocate type" is highlighted. Touch
the OK sensor.
Letters will now appear in the display.
Use the arrows to select the letters you
require. You can select numbers and
upper and lower case letters using the
arrow sensors.
^ Touch the arrow sensors to select the
character you require. Touch the OK
sensor.
The character you have selected will
appear in the display.
^ Repeat the process until the name of
the type of coffee required appears
in the top line of the display.
Tip: If you make a mistake, touch � to
delete the last character.
Allocating the types of coffee (Type allocation)
30

When you have finished making your
entry and want to save it,
^ touch the arrow sensors until the tick
� is highlighted. Touch the OK
sensor.
If you do not want to save your entry,
^ Touch � until all the characters have
been deleted and the coffee machine
returns to the previous selection.
Change type
You can only change the type of coffee
for those types allocated in addition to
the default types.
^ Touch the arrow sensors until
"Change type" is highlighted. Touch
the OK sensor.
Now proceed as described in "Allocate
type"
– To delete a character, select �,
– to enter new characters, select the
relevant character and confirm with
OK.
– save the altered name by selecting �
and touching the OK sensor.
Delete type
You can only change the type of coffee
for those types allocated in addition to
the default types.
^ Touch the arrow sensors until "Delete
type" is highlighted. Touch the OK
sensor.
^ Use the arrow sensors to select the
type of coffee you want to delete.
^ Touch the OK sensor.
A tick � will appear beside the type of
coffee and after a short while the type
will be deleted.
Allocating the types of coffee (Type allocation)
31
The flavour of the coffee produced
depends on the type of coffee, how
finely the beans are ground and the
quantity of water used. You can
programme the amount of water used
for each portion of espresso, coffee or
hot water to suit your taste and your
cups.
A newly saved portion size applies to
the currently selected drink type. It is
not distinguished by coffee type or
chamber.
There is a maximum amount which can
be programmed for each type of drink.
Preparation stops when this is reached.
The maximum amount possible for that
type of drink will then be saved.
The changed portion size is always
saved in the current profile. The
name of the current profile is shown
in the top left of the display.
There are two ways of programming the
portion size, either:
– with the drinks sensor while making a
coffee, or
– by selecting "Portion size" in the
Settings menu.
If there is insufficient water in the
water container, the process will be
stopped and the amount will not be
saved.
Changing the portion size
while making a drink
Touch the �, � and � sensors for at
least 3 seconds to start portion size
programming.
^ Place the desired cup under the
central spout.
^ Touch the sensor for the drink you
want until "Change" appears in the
display.
The desired drink will be prepared and
"Save" will appear in the display.
^ Touch the OK sensor when the cup
has been filled to the level you want.
The portion size you have saved will
now be dispensed every time that
particular drink is selected.
Tip: You can cancel the portion size
programming as long as "Stop" is
visible in the display.
Changing the portion sizes
32

Setting the portion size from
the Settings menu
^ Touch �.
^ Touch the arrow sensors until "Portion
size" is highlighted in the display.
Touch the OK sensor.
^ Touch the arrow sensors until the
coffee drink you want is highlighted.
Touch the OK sensor.
Now proceed to set the portion size as
described under "Changing the portion
size while making a drink".
Changing portion sizes for
different profiles
You can change the portion sizes for
espresso, coffee and long coffee for
each individual profile.
^ Touch �.
^ Select the profile you want.
The name of the current profile is
shown in the top left of the display.
Now you can proceed as described
above, either by selecting "Portion size"
in the Settings menu, or by changing
the portion size while making a drink.
Changing the portion sizes
33

To cater for different tastes and
preferences, you can enter up to 7
individual profiles. For each individual
profile you can select the portion sizes
for each drink (see "Changing the
portion sizes").
� John
Cosi �
Ristretto
Roma �
The name of the current profile is
shown in the top left of the display.
Calling up a profile
^ Touch �.
The � sensor will now light up.
You can now create a profile.
If you have already created a profile in
addition to the standard Miele profile,
you have the following options:
– Select profile from the profiles which
are already allocated.
– Change name, if you want to alter
the name of a profile.
– Delete profile, if you want to delete a
profile.
– Change profile, to programme the
coffee machine so that it always
changes back to the Miele standard
profile or so that it retains the most
recently selected profile.
Tip: Touch � or � to return to the main
menu.
Create profile
^ Touch the arrow sensors until "Create
profile" is highlighted in the display.
Touch the OK sensor.
Letters will now appear in the display.
Use the arrows to select the letters you
require. You can select numbers and
upper and lower case letters using the
arrow sensors.
^ Touch the arrow sensors to select the
character you require. Touch the OK
sensor.
The character you have selected will
appear in the display.
^ Repeat the process until the name
required appears in the top line of the
display.
Tip: If you make a mistake, touch � to
delete the last character.
When you have finished making your
entry and want to save it,
^ touch the arrow sensors until the �
tick symbol is highlighted. Touch the
OK sensor.
Setting up profiles
34
If you do not want to save your entry,
^ touch � until all characters have
been deleted and the coffee machine
returns to the previous selection.
The most recently created profile is
selected as the current profile.
Select profile
This selection is only possible if you
have already created a profile in
addition to the standard Miele profile.
^ Touch the arrow sensors until "Select
profile" is highlighted in the display.
Touch the OK sensor.
^ Touch the arrow sensors until the
profile you want is highlighted.
Touch the OK sensor.
The name of the current profile is
shown at the top of the display in the
"Select drink" menu.
Change name
This selection is only possible if you
have already created a profile in
addition to the standard Miele profile.
^ Touch the sensor arrows until
"Change name" is highlighted in the
display. Touch the OK sensor.
Now proceed as described in "Create
profile".
– to delete a character, select �,
– to enter new characters, select the
relevant character and confirm with
OK.
– save the altered name by selecting �
and touching the OK sensor.
Delete profile
This selection is only possible if you
have already created a profile in
addition to the standard Miele profile.
^ Touch the arrow sensors until "Delete
profile" is highlighted. Touch the OK
sensor.
^ Use the arrow sensors to select the
profile you want to delete.
^ Touch the OK sensor.
A tick � will appear beside the profile
and after a short while the profile will be
deleted.
Setting up profiles
35

Change profile
You can programme the machine so
that it always changes back to the
Miele standard profile or so that it
retains the most recently selected
profile.
This selection is only possible if you
have already created a profile in
addition to the standard Miele profile.
^ Touch the arrow sensors until
"Change profile" is highlighted in the
display. Touch the OK sensor.
You now have the following options:
– Manually: The currently selected
profile will remain active until you
select another profile.
– After each use: The machine will
automatically change back to the
Miele standard profile after a drink is
dispensed.
– When switched on: Each time the
machine is switched on it will
automatically select the Miele stan-
dard profile regardless of user profile
was selected before the machine
was last switched off.
^ Touch the arrow sensors until the
option you want is highlighted.
Touch the OK sensor.
Setting up profiles
36

You can use the Settings menu to
customise the coffee machine to suit
your requirements.
Calling up the Settings menu
^ Touch �.
You can now check or alter settings.
Options which are currently selected
will have a tick � next to them.
Touch � to return to the menu
above.
Touch � to return to "Select drink".
Tip: If you have switched on the time
of day display or selected "Night
dimming", you can alter settings
without switching the coffee machine
on by touching �.
Changing and saving settings
^ Touch �.
^ Select the setting you want with the
arrow sensors and touch the OK
sensor.
^ Touch the arrow sensors until the
setting you want is highlighted.
^ Touch the OK sensor.
The setting is now saved.
Settings
37

Possible setting options
The factory setting for the option is shown in bold.
Option Available settings
Language Deutsch, English and other languages
Country
Set the date Year/Month/Day
Time of day Display
Off / On / Night dimming
Clock format
12 h / 24 h
Set
Timer Timer 1
Set
switch on at / switch off after (1:00) / switch off at
Days of the week
Monday / Tuesday / Wednesday / Thursday / Friday / Saturday /
Sunday / Accept
Activate
switch on at (Yes/ No) / switch off at (Yes / No)
Timer 2
Set
switch on at / switch off at
Days of the week
Monday / Tuesday / Wednesday / Thursday / Friday / Saturday /
Sunday / Accept
Activate
Switch on at (Yes / No) / switch off at (Yes / No)
Type allocation Chamber 1
Select type / Allocate type / Change type* / Delete type*
Chamber 2
Select type / Allocate type / Change type* / Delete type*
Chamber 3
Select type / Allocate type / Change type* / Delete type*
Chamber 4
Select type / Allocate type / Change type* / Delete type*
Chamber 5
Select type / Allocate type / Change type* / Delete type*
Portion size Espresso
Coffee
Long coffee
Eco mode On / Off
Settings
38

Option Available settings
Lighting Brightness
Machine switched on / machine switched off
Switch off after
Info Number of drinks
Total no. of portions / Espresso / Coffee / Long coffee / Steam
No. of uses until descaling
System lock On / Off
Water hardness Soft
Medium
Hard
Very hard
Display brightness
Volume Buzzer tones
Keypad tone
Showroom programme Demo mode ( On/ Off)
Factory default Do not reset
Reset
* Only appears when an additional coffee type has been allocated.
Settings
39

Language
You can select the language (and
country variant of that language) for all
the display text.
Tip: If you select the wrong language
by mistake, follow the flag symbol F to
find the Language option again.
Time of day
You can set the time of day display, the
clock format and the time.
Display (Time of day display)
You can choose from the following
options:
– On: The time will still show in the
display when the machine is
switched off.
– Off: The time will not show in the
display when the machine is
switched off.
– Night dimming: The time of day will
only show in the display during the
daytime.
The coffee machine will use more
energy depending on the option you
choose for the display. Information
about this will appear in the display.
Clock format
The options are:
– 24-hour display (24 h)
– 12-hour display (12 h)
Setting the time
Use the arrow sensors to set the hours
and minutes.
Date
Use the arrow sensors to set the year,
month and day.
Timer
There are two timers with the following
functions:
The coffee machine:
– switches on at a particular time, e.g.
in the morning for breakfast ("Switch
on at").
– switches off at a particular time
("Switch off at")
– switches off after a particular length
of time if none of the sensors have
been touched or no drink has been
prepared ("Switch off after"; Timer 1
only).
You can also allocate timer functions to
individual days of the week.
For "Switch on at" and "Switch off at",
the timer must be activated and at
least one day of the week allocated.
Settings
40
Selecting a timer
The options are:
– Timer 1
Switch on at, Switch off at, Switch off
after
– Timer 2
Switch on at, Switch off at
Switch on at:
Please note that the coffee machine
will not switch on at the required time
if you have activated the system lock.
Use the arrow sensors to set the hours
and minutes.
If the coffee machine has switched
itself on using the "Switch on at"
function 3 times and no drinks have
been dispensed, the machine will not
switch itself on again automatically.
This prevents the coffee machine from
switching itself on unnecessarily, for
example whilst you are away on holi-
day.
The programmed times will, however,
remain in memory and will be
reactivated after manually switching the
machine on again.
Switch off at
Use the arrow sensors to set the hours
and minutes.
The programmed times will remain in
memory and will be reactivated after a
long absence after manually switching
the machine on again (See "Switch on
at").
Switch off after
The timer function "Switch off after" is
only available in Timer 1.
If none of the sensors have been
touched or no drink has been
prepared, the coffee machine will
switch itself off after 30 minutes to save
energy.
You can change this to another time of
between 15 minutes and 9 hours.
Allocating days of the week
Select the day of the week you want.
The week day selected is marked with
a symbol.
When all week days required are
marked,
^ touch the � arrow sensor repeatedly
until "Accept" is highlighted.
Touch the OK sensor.
Settings
41

Activating and deactivating the timer
If the timer is activated for "Switch on
at", the symbol and the desired
switching-on time appear in the display
23:59 hours before, as long as "On" or
"Night dimming" are selected.
When the system lock is activated,
the "Switch on at" option for the timer
will not work.
Select the timer function you want. The
timer function selected is marked with a
symbol.
^ Touch the � arrow sensor repeatedly
until "Accept" is highlighted.
Touch the OK sensor.
Eco mode
The Eco mode is an energy-saving
mode. The steam system only heats up
when steam is required for hot milk or
milk froth.
With Eco mode switched off, milk froth
or hot milk, and coffee or espresso can
be made in rapid succession. The
steam system remains heated up and
this uses considerably more energy.
The altered energy consumption mode
is displayed.
Lighting
You have the following options:
– You can set the brightness when the
machine is switched on.
– You can set the brightness when the
machine is switched off.
– You can specify when the lighting
should switch off ("Switch off after").
Setting the brightness
First select:
– Machine switched on
– Machine switched off
Alter the brightness using the arrow
sensors.
To switch the lighting off:
^ touch the � arrow sensor, until no
more segments are filled in and
"Switched off" appears.
Setting the time the lighting switches
off (Switch off after)
You can adjust the length of time that
the coffee machine remains lit after
switching off.
When the coffee machine is switched
on, it remains lit for 10 minutes after the
last action. This time cannot be altered.
Use the arrow sensors to set the hours
and minutes.
Settings
42

Info (Display information)
In the "Info" option, the number of
portions prepared for each individual
drink can be displayed.
You can also see whether more than 50
portions can be dispensed before the
machine needs to be descaled ("No. of
uses until descaling").
To return to the previous display,
^ touch the OK sensor.
Locking the coffee machine
(System lock �)
You can lock the coffee machine to
prevent it being used without your
knowledge, by children, for example.
Activating and deactivating the
system lock �
When the system lock is activated,
the "Switch on at" option for the timer
will not work.
To override the System lock
When "Press the OK button for 6
seconds to unlock" appears in the
display,
^ Touch the OK sensor for 6 seconds.
As soon as you switch the coffee
machine off, the system lock will be
activated again and the coffee
machine is locked again.
Water hardness
Please see "Preparing the coffee
machine for use" for information about
water hardness.
Display brightness
Alter the Display brightness using the
arrow sensors.
Volume
You can alter the volume of the buzzer
and keypad tones using the arrow
sensors.
To switch the tones off:
^ touch the � arrow sensor, until no
more segments are filled in and
"Switched off" appears.
Factory default
You can reset the settings back to the
ones which were set when the coffee
machine was delivered - the factory
default settings.
Please refer to the "Possible setting
options" chart for the factory settings
which are shown in bold.
Please note that the following settings
will not be reset:
- Language
- Time of day
- Number of drinks (dispensed)
- Profile
- Portion size
Settings
43

Showroom programme (Demo
mode)
Do not activate this setting for
domestic use!
The coffee machine can be
demonstrated in the showroom or at
exhibitions in "demo mode". In this
mode the machine lights up but no
drinks are prepared or actions carried
out.
The coffee machine cannot be
switched off with the
On/Off sensor � when demo mode is
activated.
Settings
44

Quick guide
Clean the coffee machine every day to prevent a build-up of bacteria.
Recommended
frequency
What do I have to do?
After dispensing milk if it is
going to be more than an
hour until milk is dispensed
again
Rinse the lid of the cappuccinatore
Every day
(usually at the end of the
day, before the machine is
switched off)
Clean the cappuccinatore
Clean the water container
Clean the waste container
Clean the drip tray
Clean the grille and the drip tray cover
Once a week
(or more often if needed)
Clean the central spout cover
Clean the capsule carousel and carousel runners
Clean the small drip catcher inside the front of the machine
Clean the inside of the machine
Clean the steam valve
Clean the front of the machine (especially straight after descaling)
Once a month Clean the capsule plate (with a cleaning tablet)
After approx. 15,000 drinks
have been dispensed
Replace the capsule hopper
Depending on the hardness
of the water
Descale the machine
Some components of the coffee machine are dishwasher safe. Cleaning these
in the dishwasher frequently can cause them to become discoloured due to
regular contact with food residues (e.g. tomatoes) in the dishwasher. The
surface can also become damaged.
All removable parts can be cleaned in the dishwasher except for:
– Capsule plate
– Plastic grille
– Capsule carousel and carousel runners
Cleaning and care
45

,Danger of burning.
Always allow the machine to cool
down before cleaning. Please be
aware that water in the drip tray will
be hot.
Switch the machine off before
cleaning the interior.
Do not clean the inside of the
capsule plate opening.
Do not use a steam cleaner to clean
the machine. Steam could reach
electrical components and cause a
short circuit.
To avoid damaging the surfaces of
your machine, do not use:
– cleaning agents containing soda,
ammonia, acids or chlorides,
– solvent-based cleaning agents,
– cleaning agents containing
descaling agents,
– stainless steel cleaning agents,
– dishwasher cleaner,
– oven cleaner,
– abrasive cleaning agents, e.g.
powder cleaners and cream
cleaners,
– hard, abrasive sponges, e.g. pot
scourers, brushes or sponges which
have been previously used with
abrasive cleaning agents,
– melamine eraser blocks,
– sharp metal scrapers.
Rinsing the coffee machine
If coffee has been dispensed, the
coffee machine will carry out a rinse
automatically before switching off to
remove any remaining coffee residue.
You can however also rinse the coffee
pipework manually.
^ Touch �.
^ Touch the arrow sensors until "Rinse
appliance" is highlighted in the
display. Touch the OK sensor.
The machine will be rinsed out.
Water container
Change the water every day to prevent
a build-up of bacteria.
^ The water container can be cleaned
in the dishwasher or by hand using
hot water and a little washing-up
liquid. After cleaning, dry the water
container.
^ Carefully clean the surface the water
container sits on, taking special care
to clean the recesses properly.
Make sure that the valve, the
underside of the water container and
the surface the water container sits
on are clean. Otherwise the water
container will not sit correctly.
Cleaning and care
46
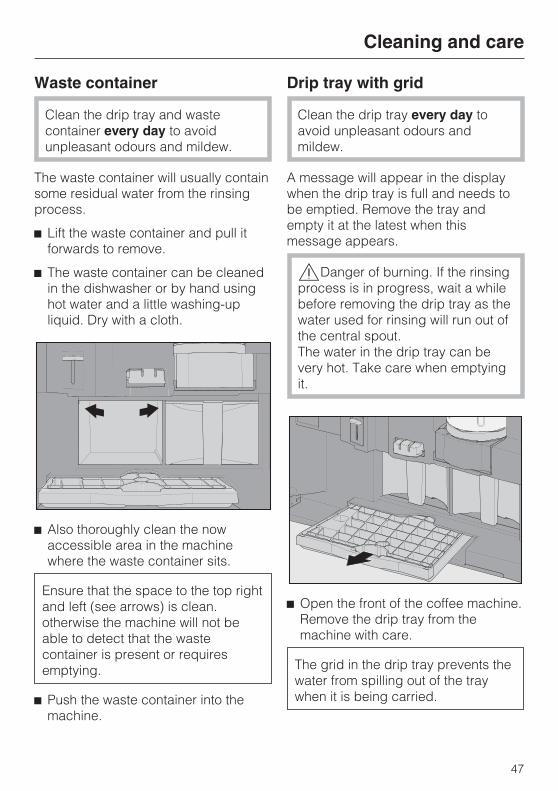
Waste container
Clean the drip tray and waste
container every day to avoid
unpleasant odours and mildew.
The waste container will usually contain
some residual water from the rinsing
process.
^ Lift the waste container and pull it
forwards to remove.
^ The waste container can be cleaned
in the dishwasher or by hand using
hot water and a little washing-up
liquid. Dry with a cloth.
^ Also thoroughly clean the now
accessible area in the machine
where the waste container sits.
Ensure that the space to the top right
and left (see arrows) is clean.
otherwise the machine will not be
able to detect that the waste
container is present or requires
emptying.
^ Push the waste container into the
machine.
Drip tray with grid
Clean the drip tray every day to
avoid unpleasant odours and
mildew.
A message will appear in the display
when the drip tray is full and needs to
be emptied. Remove the tray and
empty it at the latest when this
message appears.
,Danger of burning. If the rinsing
process is in progress, wait a while
before removing the drip tray as the
water used for rinsing will run out of
the central spout.
The water in the drip tray can be
very hot. Take care when emptying
it.
^ Open the front of the coffee machine.
Remove the drip tray from the
machine with care.
The grid in the drip tray prevents the
water from spilling out of the tray
when it is being carried.
Cleaning and care
47

^ The drip tray and grid can be
cleaned in the dishwasher or by hand
using hot water and a little
washing-up liquid. Dry all parts
thoroughly.
Make sure that the metal contact
discs on the drip tray are cleaned
and dried properly. The discs will
not be able to detect that the drip
tray is full if they are dirty or damp.
^ Clean the space under the drip tray
^ Push the drip tray back into the
coffee machine.
Make sure the drip tray has been
pushed right into the machine as far
as it will go.
Grille with drip tray cover
^ Take out the grille and the drip tray
cover.
^ Clean the plastic grille by hand using
hot water and a little washing-up
liquid.
^ The metal drip tray cover can be
cleaned in the dishwasher or by hand
using hot water and a little
washing-up liquid.
^ Dry all parts thoroughly and replace
them.
Cleaning and care
48

Capsule carousel and
carousel runners
^ Open the front of the coffee machine.
Pull the carousel runners out as far as
possible and remove the capsule
carousel.
^ Lift the carousel runner up at the front
a little and then pull it out completely.
^ Clean the capsule carousel and
carousel runners by hand using hot
water and a little washing-up liquid.
Dry all parts thoroughly and replace
them.
^ Also clean the area under the
carousel runners.
It is particularly important to clean
the sensor which is used to recog-
nise the capsule chambers as well
as the recess in the floor.
^ Dry everything with a soft cloth.
^ Place the carousel runners on the
guide rails.
^ Insert the capsule carousel.
^ Push the carousel runners with the
capsule carousel fully back into the
machine.
Cleaning and care
49

Central spout cover and drip
catcher
^ Open the front of the coffee machine.
^ Push up and remove the cover in the
middle of the inside of the machine
front.
^ The cover can be cleaned in the
dishwasher or by hand using hot
water and a little washing-up liquid.
Also clean the small drip catcher in the
lower part of the inside of the front of
the machine thoroughly.
^ Clean the inside of the machine front
with a solution of hot water and
washing-up liquid.
^ Dry all parts thoroughly.
^ Push the cover back onto the central
spout.
Interior
Take all removeable parts out of the
interior and
^ clean the interior with a solution of
lukewarm water and a little
washing-up liquid.
^ Dry the interior using a soft cloth.
^ Replace all parts in the machine.
Cleaning and care
50

Capsule plate
How quickly the capsule plate
becomes soiled will depend on the
content of natural oils in the coffee
used.
It should be cleaned once a month (or
more often, if necessary) using the
cleaning tablets supplied with the
machine, and at the latest, when the
machine is descaled.
The cleaning tablets for degreasing the
capsule plate have been specially
formulated for use in this coffee
machine and are available from your
Miele dealer or Miele (see "Optional
accessories").
^ Open the front of the coffee machine.
^ Press on the handle a, and pull the
capsule plate forwards to remove it.
^ Fill a small container with hot water
and dissolve one cleaning tablet in it.
^ Place the capsule plate in the
cleaning solution and leave for
approx. one hour.
^ Once all the coffee remains have
been removed, rinse it thoroughly
and dry it.
^ Push the capsule plate back into the
machine until it clicks into place.
Steam valve
The small rubber sleeve which
connects the steam valve and
cappuccinatore can be removed for
cleaning. The sleeve and also the tip of
the steam valve underneath should be
cleaned regularly.
,Danger of burning and scalding.
Even when the coffee machine is
switched off, hot steam and liquid
can escape.
After pushing the steam valve down,
wait a moment before removing the
rubber sleeve and cleaning the
valve.
^ Open the front of the coffee machine.
Cleaning and care
51

^ Push the steam valve down and pull
the rubber sleeve off.
^ Use a mild solution of hot water and
washing-up liquid to clean the rubber
sleeve and the tip of the steam valve.
^ Dry them and then put the sleeve
back onto the tip of the steam valve.
Make sure that the sleeve sits
securely on the tip.
^ Push the steam valve back upwards.
If you forget to push it back up, it
could break when you shut the
machine front.
Cappuccinatore
Clean the cappuccinatore regularly,
preferably once a day after use. The lid
of the cappuccinatore can be
dismantled for cleaning. It is best to
clean the cappuccinatore in the
dishwasher if possible - all parts are
dishwasher safe.
^ Dismantle the cappuccinatore lid.
Remove the spout and valve.
The valve can only be removed when
the dot is in the middle position
between the hot milk symbol � and
the milk froth symbol �.
^ All the lid components and the glass
jug can be cleaned in the dishwasher
or by hand using hot water and a little
washing-up liquid.
Cleaning and care
52

^ Reassemble the parts of the lid as
shown.
Check that the cappuccinatore is
correctly assembled
– and that there is no gap between the
two parts of the lid.
– Also make sure that the reassembled
lid is fitted onto the capuccinatore
jug correctly. The valve sits above
the cappuccinatore handle. If this is
not the case, the cappuccinatore will
not operate correctly.
Machine front
If soiling is not removed promptly it
could cause the surface of the
machine to alter or discolour.
Remove any soiling immediately.
Make sure that water cannot get in
behind the display.
All external surfaces are susceptible
to scratching. Scratches on glass
surfaces could even cause a
breakage.
Contact with unsuitable cleaning
agents can discolour the surfaces.
Wipe up any spillages or splashes
of descaling agent immediately.
^ Switch the machine off with the
On/Off sensor �.
^ Clean the casing with a clean, soft
sponge and hot water with a little
washing-up liquid. Dry using a soft
cloth.
Tip: You can also use a microfibre cloth
to clean the front.
Cleaning and care
53

Maintenance
The capsule hopper in the brew unit
needs to be replaced after approx.
15,000 coffee capsules have been
dispensed. Replacement capsule
hoppers are available from your Miele
dealer or from Miele (see "Optional
accessories").
^ Touch �.
^ Touch the arrow sensors until
"Maintenance" is highlighted in the
display. Touch the OK sensor.
The capsule hopper inside the machine
will be lowered. "Remove capsule plate
and change the capsule hopper" will
then appear in the display.
^ Open the front of the coffee machine.
^ Take out the capsule plate.
,Danger of injury.
Do not reach into the openings in
the brew unit.
^ Pull the rubber connector
downwards.
^ Insert the maintenance tool into brew
unit a from below and turn capsule
hopper b to the left to remove it.
^ Screw the new capsule hopper to the
right into position in the brew unit, as
shown above. The spring with the
ball must be inserted in the capsule
hopper so that the ball is at the top.
^ Replace the rubber connector and
the capsule hopper.
^ Insert the capsule plate and close the
machine front.
Cleaning and care
54

Warning. When descaling the
machine, cover delicate surfaces
and natural flooring or place a tea
towel over the waste container to
prevent damage from splashes of
descaling solution.
Ensure that any splashes of
descaling solution are wiped up im-
mediately.
Limescale builds up in the coffee
machine during use. How often, will
depend on the hardness of the local
water supply. Limescale must be
removed regularly.
The machine will guide you through the
descaling procedure. Various
instructions will appear in the display,
e.g. you will be prompted to empty the
drip tray, fill the water container, etc.
Descaling must be carried out. The
programme takes approx. 12 minutes.
During the descaling programme, water
containing descaling agent will run out
of the central spout and steam valve.
This is followed by an activation period
before a little more descaling agent is
dispensed.
The coffee machine will remind you
when the descaling programme needs
to be carried out. The following
message will appear in the display:
"No. of uses until descaling: 50". The
remaining number of drinks that can be
made before descaling will now show in
the display after each drink is made.
^ Confirm the message by touching the
OK sensor.
When 0 is reached, the coffee machine
will lock out. "Start descaling?" will
appear in the display.
You can switch the coffee machine off if
you do not want to run the descaling
programme at this time. However, you
will not be able to make any more
drinks until the descaling programme
has been carried out.
For descaling you will need:
– the red descaling funnel and
– Miele descaling tablets.
Descaling after being
prompted by the display
^ Touch the OK sensor to start the
descaling process.
The descaling process cannot be
cancelled once it has started. The
process has to be carried through to
the end.
Descaling solution
The descaling tablets supplied have
been specially formulated for use with
this coffee machine. They are available
from Miele (see back cover for contact
details) or via the internet from
www.miele-shop.com.
You will need two descaling tablets for
each descaling process.
Descaling
55

Only use the Miele descaling
tablets. Other types of descaling
agents will damage the coffee
machine and affect the taste.
^ Follow the instructions given in the
display.
^ Fill the water container up to the kmark with lukewarm water.
^ Drop two descaling tablets in the
water.
Follow the instructions for the mixing
ratio carefully. It is important that you
fill the water container with the
correct amount of water (not less or
more), otherwise descaling will be
cut short and must then be repeated.
^ Replace the water container.
When "Remove capsule plate Insert
descaling funnel and close the door"
appears,
^ remove the capsule plate and
replace it with the red descaling
funnel.
Please follow the instructions which
appear in the display.
Tip: Place the waste container under
the central spout and the steam valve.
Descaling
56

When "Rinse the water container and fill
with fresh water up to the k symbol"
appears,
^ remove the water container and rinse
it carefully with clean water. Make
sure that no descaling agent is left in
the water container. Also empty the
waste container.
Descaling is finished when "Empty the
drip tray and clean the contacts.
Process finished" appears in the
display.
^ Touch the OK sensor.
The coffee machine has now been
descaled and can be used for making
drinks again.
When descaling the machine, wipe
up any spillages or splashes of
descaling agent immediately. These
would damage the surface.
Descaling without being
prompted by the display
^ Touch �.
^ Use the arrow sensors to highlight
"Descale".
The descaling process cannot be
cancelled once it has started. The
process has to be carried through to
the end.
^ Touch the OK sensor.
The descaling process will begin.
Descaling
57

With the aid of the following guide, minor problems can be easily corrected
without contacting Miele.
,Warning. Do not open the outer casing of the machine.
Repairs may only be carried out by a suitably qualified and competent person
in strict accordance with national and local safety regulations. Repairs and
other work by unqualified persons can cause considerable danger to users.
The manufacturer cannot be held liable for unauthorised work.
If you cannot resolve the problem following these instructions please contact Miele
(see back cover for contact details).
Messages in the display
^ Follow the instructions to remedy the problem.
Message Possible cause and remedy
Fault 1 to
Fault 4
Fault 80 to
Fault 83
There is a fault.
^ Switch the coffee machine off with the On/Off sensor �.
Wait for one hour and then switch it back on again.
If the fault message appears in the display again, contact
Miele.
Fault 71 The capsule carousel is jammed and cannot turn properly.
^ Open the front of the coffee machine.
^ Pull the carousel runners out and check whether one of the
capsules is not positioned correctly in the carousel.
^ If all capsules are correctly positioned, push the carousel
back into the machine.
^ Close the front.
If the fault message appears in the display again, contact
Miele.
Problem solving guide
58

Message Possible cause and remedy
Fault 72 A coffee capsule has become jammed between the capsule
carousel and the capsule plate.
^ Try to remove the capsule plate.
^ Look for the capsule in the brewing area and try to remove
it. Dispose of this coffee capsule as it is likely to be
damaged or dented and could become stuck again if
reused.
^ Insert the capsule plate and close the front of the coffee
machine.
If the message appears again or if you cannot remove the
capsule, contact Miele.
Fault 73
Fault 76
The coffee capsule was not pushed onto the capsule plate
correctly and could have been damaged.
^ Open the front and remove the waste container, the
capsule carousel and the carousel runners.
^ There is an opening to the right of the slot for the capsule
plate. Check if a coffee capsule has become stuck there.
If a coffee capsule is lying on the capsule plate:
^ Push the coffee capsule with the handle of a wooden
spoon or similar item back into the waste container.
^ Replace all parts and close the machine front.
Problem solving guide
59
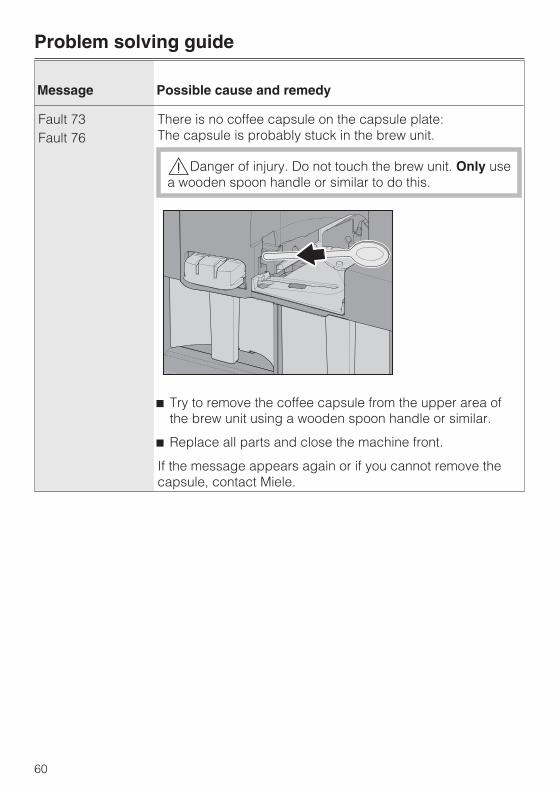
Message Possible cause and remedy
Fault 73
Fault 76
There is no coffee capsule on the capsule plate:
The capsule is probably stuck in the brew unit.
,Danger of injury. Do not touch the brew unit. Only use
a wooden spoon handle or similar to do this.
^ Try to remove the coffee capsule from the upper area of
the brew unit using a wooden spoon handle or similar.
^ Replace all parts and close the machine front.
If the message appears again or if you cannot remove the
capsule, contact Miele.
Problem solving guide
60
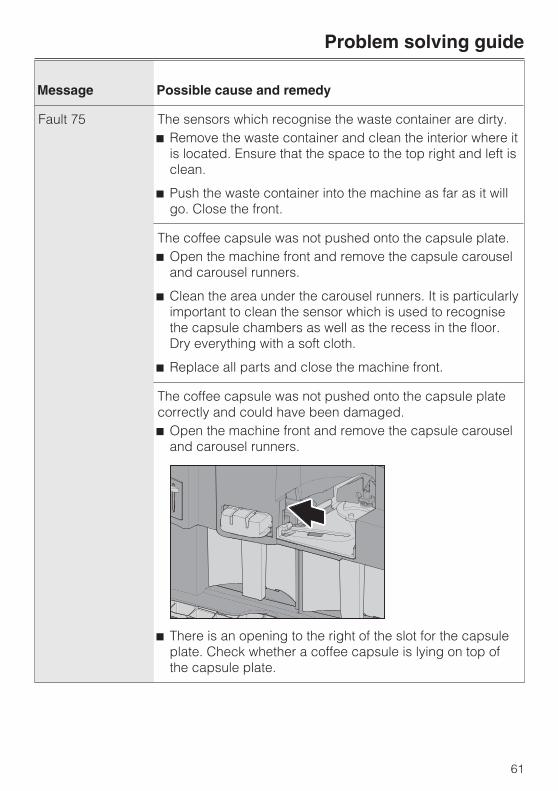
Message Possible cause and remedy
Fault 75 The sensors which recognise the waste container are dirty.
^ Remove the waste container and clean the interior where it
is located. Ensure that the space to the top right and left is
clean.
^ Push the waste container into the machine as far as it will
go. Close the front.
The coffee capsule was not pushed onto the capsule plate.
^ Open the machine front and remove the capsule carousel
and carousel runners.
^ Clean the area under the carousel runners. It is particularly
important to clean the sensor which is used to recognise
the capsule chambers as well as the recess in the floor.
Dry everything with a soft cloth.
^ Replace all parts and close the machine front.
The coffee capsule was not pushed onto the capsule plate
correctly and could have been damaged.
^ Open the machine front and remove the capsule carousel
and carousel runners.
^ There is an opening to the right of the slot for the capsule
plate. Check whether a coffee capsule is lying on top of
the capsule plate.
Problem solving guide
61

Message Possible cause and remedy
Fault 75 ^ Push the coffee capsule with the handle of a wooden
spoon or similar item back into the waste container.
^ Close the machine front.
If the message appears again or if you cannot remove the
capsule, contact Miele.
"Push water
container right in"
The water container has not been correctly positioned inside
the machine.
^ Remove the water container and replace it.
This fault message also appears if the water container was
not correctly filled and positioned for descaling.
^ Fill the water container with fresh tap water up to the �
symbol and start the descaling process again.
If the fault message appears in the display again, contact
Miele.
"Empty drip tray"
appears in the
display although
the drip tray has
been emptied.
The drip tray has not been correctly positioned inside the
machine.
^ Push the drip tray back in as far as it will go.
The sensors on the drip tray are not working properly.
^ Switch the machine off with the On/Off sensor �.
The metal contact discs are dirty.
^ Clean and dry the metal contacts thoroughly (see
"Cleaning and care - Drip tray with grid").
If the fault message appears in the display again, contact
Miele.
Problem solving guide
62
Unusual performance of the coffee machine
Problem Possible cause and remedy
When the coffee
machine is
switched on the
lighting does not
come on.
The lighting has been switched off.
^ Switch it back on (see "Settings - Lighting").
The lighting is faulty.
^ Call Miele.
The display
remains dark when
the coffee machine
is switched on
using the On/Off
sensor �.
The On/Off sensor � was not touched for long enough.
^ Touch the depression in middle of the On/Off sensor �
for at least 2 seconds.
The plug is not inserted in the socket correctly.
^ Insert the plug in the socket correctly and switch on.
The main fuse has tripped due to a problem with the coffee
machine, the electricity supply or another appliance.
^ Switch off at the wall socket and unplug it.
^ Contact a qualified electrician or Miele.
The coffee machine
switches off
suddenly.
The switching off time programmed using the timer has
been reached.
^ If required, you can select a new switching off time (see
"Settings - Timer").
The plug is not inserted in the socket correctly.
^ Insert the plug in the socket correctly and switch on.
The lighting
suddenly switches
off.
The lighting will switch itself off automatically after 10
minutes, if the coffee machine is not used for a certain
length of time.
The sensors do not
react to touch. You
cannot operate the
coffee machine.
There is a fault.
^ Open the front of the coffee machine.
The current process is stopped.
^ Disconnect the coffee machine from the power supply.
Problem solving guide
63
Problem Possible cause and remedy
The coffee machine
does not switch
itself on, although
the "Switch on at"
setting has been
activated for the
timer.
The system lock is activated.
^ Deactivate the system lock (see "Settings - System lock").
The day of the week has not been selected.
^ Check the timer settings and change these if necessary
(see "Settings - Timer").
The machine was not used after being switched on
automatically 3 times in succession.
^ Switch the machine on and make a drink.
You cannot read
the display.
The display brightness has been set too low.
^ Adjust the brightness (see "Settings - Display brightness")
The machine front
will not open or
close.
The steam valve is not closed and is not in the upper
position.
^ Push the steam valve right down and then push it
upwards as far as it will go.
The hinges are not aligned correctly.
^ Adjust the hinges (see "Installation - Adjusting the
hinges").
The machine does
not rinse when it is
switched on.
If the coffee machine still has an operating temperature
higher than 60 °C , then rinsing will not take place.
The date and time
of day must be
reset.
If the coffee machine is disconnected from the electrical
supply or in the case of a power cut, the date and time of
day will be saved for at least 3 days. After that, they must
be reset. Timer settings are not lost.
Coffee preparation
is interrupted.
A double portion was selected.
The machine uses two capsules for double portions.
However, if only one capsule of the selected capsule type
remains in the capsule carousel, preparation is interrupted.
^ Replenish the coffee capsules.
Problem solving guide
64

Problem Possible cause and remedy
Drinks are not
dispensed, even
though there are
coffee capsules in
the capsule
carousel and there
is enough water in
the water container.
The water container is not positioned correctly inside the
machine.
^ Remove the water container and replace it.
A coffee capsule has jammed in the capsule carousel.
^ Open the front of the coffee machine.
^ Pull the carousel runners out, lift the capsule carousel
upwards and release the coffee capsules so that they
can move without hindrance.
^ Replace the capsule carousel on its runners, and push
the runners as far as they will go into the machine. Close
the front.
While carrying out
the procedure for
changing the
portion size
(programming the
amount of water
used for a drink),
the drink stops
being dispensed.
The maximum possible water quantity was reached.
Preparation is halted and the maximum portion size
possible will be saved.
There is insufficient water in the water container. The
process for changing the portion size will be cancelled and
the portion size will not be saved.
^ Remove the water container, fill and replace it and carry
out the procedure for changing the portion size again.
The descaling
programme was
started by mistake.
The descaling process cannot be cancelled once you have
touched the OK sensor.
The process has to be carried through to the end. This is a
safety measure to ensure that the machine is fully
descaled, and is important for the long-term protection of
the machine and to ensure it functions correctly.
^ Descale the coffee machine (see "Descaling").
Problem solving guide
65

Problem Possible cause and remedy
Milk (steam) and
espresso / coffee
cannot be prepared
at the same time.
The energy-saving Eco mode is activated. In this mode, the
steam system is heated up for preparing hot milk or milk
froth. After preparation the steam system will cool down
again.
If you want to prepare milk without having to wait until the
steam system has heated up,
^ switch off "Eco mode" in the "Settings" menu.
If Eco mode is deactivated, the steam system will remain
heated and you can prepare drinks made with milk without
the need for heating up beforehand. However, with Eco
mode deactivated, the coffee machine will use
considerably more energy.
Eco mode is
switched on.
However, milk
(steam) and
espresso / coffee
can still be
prepared at the
same time.
If the steam system is still heated up, milk (steam) and
espresso / coffee can be prepared at the same time.
When the steam system has cooled down, milk (steam) and
espresso / coffee can only be prepared one after the other
(not at the same time).
The steam valve
has been pushed
downwards and has
engaged with the
cappuccinatore, but
no steam is coming
out. Milk is not
being heated or
frothed.
If the steam valve was open, it will be a while before steam
is produced. The steam system needs to heat up again. No
instructions appear in the display.
If you want to prepare milk without having to wait until the
steam system has heated up,
^ switch off "Eco mode" in the "Settings" menu.
If Eco mode is deactivated, the steam system will remain
heated and you can prepare drinks made with milk without
the need for heating up beforehand. However, with Eco
mode deactivated, the coffee machine will use
considerably more energy.
The steam valve is not properly engaged with the
cappuccinatore.
^ Push the steam valve upwards then back down again so
that it clicks into place.
Problem solving guide
66

Problem Possible cause and remedy
The steam valve
has been pushed
downwards and
has engaged with
the
cappuccinatore,
but no steam is
coming out. Milk is
not being heated or
frothed.
The steam valve is blocked.
^ Open the front of the coffee machine.
^ Push the steam valve back down again, and pull the
rubber sleeve off.
^ Using the small end of the tool for removing the capsule
hopper, turn the tip of the steam valve to the left to
remove it.
^ Clean the tip thoroughly and then screw it back on again.
No milk froth is
coming out of the
cappuccinatore.
The spout in the lid is pulled out (�). Milk will be frothed in
the cappuccinatore jug.
^ Push the spout back in (�).
The cappuccinatore lid is incorrectly assembled.
^ See "Cleaning and care - Cappuccinatore" for more
information.
The milk system of the cappuccinatore is blocked.
^ Clean the cappuccinatore thoroughly (see "Cleaning and
care - Cappuccinatore").
Problem solving guide
67

Unsatisfactory results
Problem Possible cause and remedy
Coffee residue is
left behind in the
coffee cups.
The capsule plate is dirty.
^ Clean the capsule plate (see "Cleaning and care").
The coffee is not
hot enough.
The cup has not been pre-heated.
Pre-heat the cups, e.g. with hot water.
The smaller and thicker the cup, the more important it is to
pre-heat it.
The coffee is
weak.
Too much water was saved as the portion size for the type
of coffee capsule used.
^ Change the portion size (see "Changing the portion size").
The preparation
time and colour of
the coffee varies.
The preparation time, colour and taste of the coffee will vary
depending on the type of coffee capsule and the type of
drink selected (espresso, coffee and long coffee). This is not
a fault.
^ Please follow the recommendations for the individual
capsule types (see packaging for more details).
There is residual
water in the waste
container.
The water is left over from the brewing and cleaning
process. This is not a fault.
The heating-up
time is getting
longer, the amount
of water being
dispensed is no
longer correct and
the coffee
machine is not
performing
properly.
The coffee machine need to be descaled.
^ Descale the coffee machine (see "Descaling").
Problem solving guide
68
In the event of a fault which you cannot
correct yourself, or if the appliance is
under guarantee, please contact:
– your Miele Dealer
or
– Miele (see back cover for contact
details).
Please note that telephone calls may
be monitored and recorded for
training purposes (UK only).
When contacting your Dealer or Miele,
please quote the model and serial
number of your machine. These are
shown on the data plate inside the
machine.
N.B. A call-out charge will be applied
for service visits where the problem
could have been resolved as described
in these instructions.
Guarantee
For information on the appliance
guarantee specific to your country
please contact Miele. See back cover
for address.
In the U.K. your coffee machine is
guaranteed for 2 years from the date of
purchase. However, you must activate
your cover by calling 0845 365 6640 or
registering online at www.miele.co.uk.
After Sales / Guarantee
69

Changing the following settings from
their factory default will increase the
energy consumption of the coffee
machine:
– Eco mode
– Lighting
– Time of day display
– Timer
When altering these settings, the
message "This setting increases energy
consumption" will appear in the display.
Saving energy
70

All electrical work should be carried out
by a suitably qualified and competent
person only, in strict accordance with
current national and local safety
regulations (BS 7671 in the UK).
Installation, repairs and other work by
unqualified persons could be
dangerous. The manufacturer cannot
be held liable for unauthorised work.
Ensure power is not supplied to the
machine until after installation work has
been carried out.
The voltage and frequency are given on
the data plate. Please ensure these
match the household mains supply. The
fuse rating is quoted on the plug.
The machine is supplied with a mains
cable with moulded plug for connection
to a 230 - 240 V mains supply.
Connection should be made via a fused
plug and suitable switched socket
which is easily accessible after
installation.
Do not connect via an extension lead.
For extra safety it is advisable to protect
the appliance with a suitable residual
current device (RCD). Contact a
qualified electrician for advice.
If the socket is not accessible after
installation (depending on country) an
additional means of disconnection must
be provided for all poles.
WARNING: THIS APPLIANCE
MUST BE EARTHED
Non-rewireable plugs BS 1363
The fuse cover must be refitted when
changing the fuse, and if the fuse cover
is lost, the plug must not be used until a
suitable replacement is obtained. The
colour of the correct replacement cover
is that of the coloured insert in the base
of the plug, or the colour that is
embossed in words on the base of the
plug (as applicable to the design of
plug fitted).
Replacement fuses should be ASTA
approved to BS 1362 and have the
correct rating. Replacement fuses and
fuse covers may be purchased from
your local electrical supplier.
Do not connect the machine to an
inverter such as those used with an
autonomous energy source e.g. Solar
power.
When switched on peak loads in the
system can cause the safety switch off
mechanism to be triggered. This can
damage the electronic unit.
The machine must not be used with
so-called Energy saving devices
either. These reduce the amount of
energy supplied to the machine
causing it to overheat.
Electrical connection U.K., ZA, IRL
71

Building-in and combination options
This machine is designed to be builit into a tall unit
or in a wall unit.
Installation
72

It can also be combined with other
Miele built-in appliances. If the coffee
machine is to be built in above another
appliance, there must be a full-width,
closed shelf between them.
Ventilation
Ensure that the back of the coffee
machine is sufficiently ventilated, so
that steam and warm air can dissipate
freely.
Otherwise condensation can build up
and damage the machine or the
housing unit.
Installation
Before installation make sure that
there is no power supply to the
machine. This also applies should it
ever need to be taken out of its
housing unit.
The machine may only be used
when it has been built in. It can only
be used in ambient temperatures of
+15 °C to +38 °C .
You will need two allen keys (size 3
and 5) for installing the machine.
Tip: It is useful to have somewhere at
the height of the niche to place the
machine on. This makes electrical
connection easier.
^ Using the large allen key, unscrew all
four feet underneath the machine out
by approx. 2 mm.
The feet can be unscrewed by up to
approx. 10 mm.
If the furniture unit walls are 19 mm
thick you will need to drill four holes in
the sides for securing the machine.
To mark the position of these holes:
^ Align the machine in the niche. Screw
the side socket screws inside the
machine in a little so that they make
indents in the side walls, and then
unscrew them again.
^ Take the machine out of the niche
and drill ø 4.5 mm holes,
approx. 2 mm deep where you made
the indentations.
Installation
73

^ Connect the machine to the electrical
supply.
^ Push it all the way into the niche until
you feel resistance.
Take care not to damage the
electrical connection, when pushing
the coffee machine into the the
niche.
^ Open the front of the machine, and
partially tighten the side socket
screws.
^ Carefully turn the lower socket
screws a to centre the machine in
the niche.
^ Tighten both upper socket screws b
by hand to secure the machine in the
unit. Do not overtighten them.
Ad usting the hinges
If the machine front becomes difficult to
open or close after installation you can
adjust the hinges to realign it:
^ Turn screw a to align the front of the
machine so that it is flush with the
front of the housing unit.
^ Turn screw b to align the front of the
machine horizontally and vertically.
Installation
74

75

Alteration rights reserved / 1313
CVA 6431, CVA 6431 C
M.-Nr. 09 549 580 / 00