operating instructions triple play matic modbus · operating instructions triple play matic for...
TRANSCRIPT
AUMA Actuators, Inc. 100 Southpoint Blvd Canonsburg PA 15317 Issued 12-20-2004 Phone: (724) 743-2862 FAX: (724) 743-4711
www.auma-usa.com
Triple Play Matic Modbus with CDN455
Operation Instructions


Operating Instructions Triple Play Matic for Modbus with CDN455
1
Scope of these instructions: These instructions cover the Triple Play Matic Modbus with the CDN455 control board covering firmware versions 1.011 thru 1.017. The firmware version can be determined by the sticker on the CDN455 board. See figure below.
Legend: FW 1 . 017
Firmware:
Major Revision:
Minor Revision:
CDN455 Software Version Sticker
Operating Instructions Triple Play Matic Modbus CDN455
2
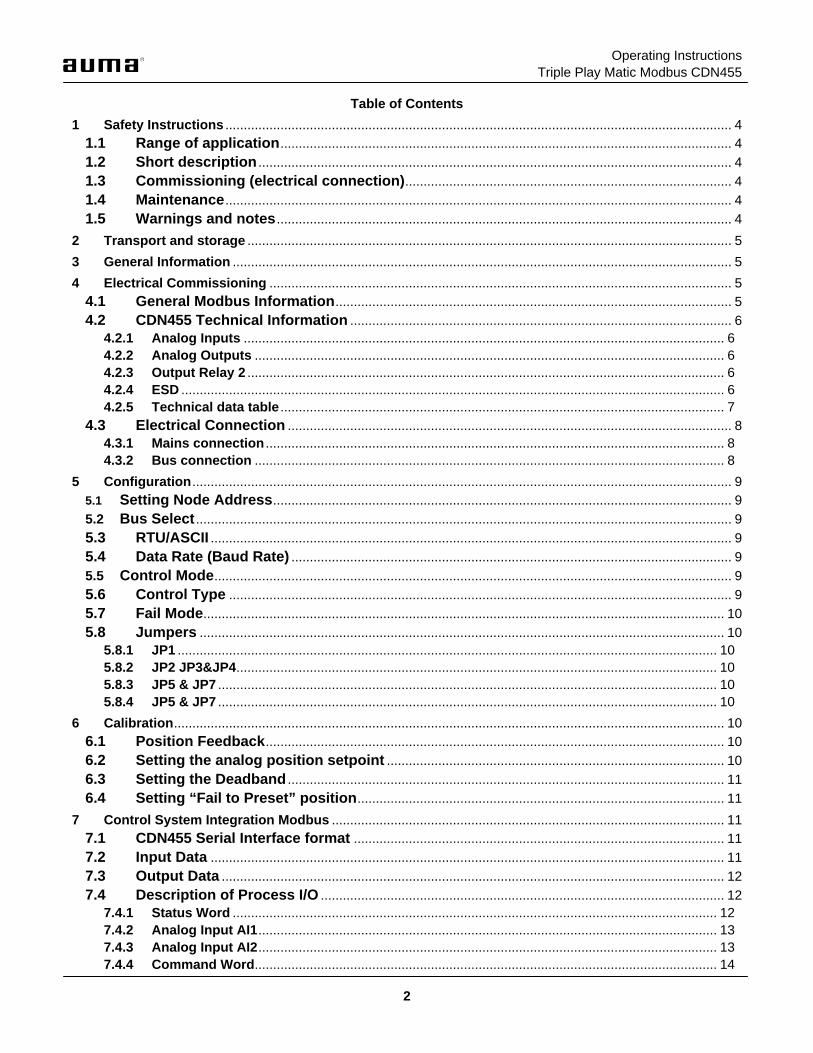
Table of Contents
1 Safety Instructions .......................................................................................................................................... 4
1.1 Range of application........................................................................................................................... 4
1.2 Short description ................................................................................................................................. 4
1.3 Commissioning (electrical connection)......................................................................................... 4
1.4 Maintenance.......................................................................................................................................... 4
1.5 Warnings and notes ............................................................................................................................ 4
2 Transport and storage .................................................................................................................................... 5
3 General Information ........................................................................................................................................ 5
4 Electrical Commissioning .............................................................................................................................. 5
4.1 General Modbus Information............................................................................................................ 5
4.2 CDN455 Technical Information ........................................................................................................ 6 4.2.1 Analog Inputs ................................................................................................................................... 6 4.2.2 Analog Outputs ................................................................................................................................ 6 4.2.3 Output Relay 2 .................................................................................................................................. 6 4.2.4 ESD .................................................................................................................................................... 6 4.2.5 Technical data table ......................................................................................................................... 7
4.3 Electrical Connection ......................................................................................................................... 8 4.3.1 Mains connection ............................................................................................................................. 8 4.3.2 Bus connection ................................................................................................................................ 8
5 Configuration................................................................................................................................................... 9
5.1 Setting Node Address............................................................................................................................. 9
5.2 Bus Select .................................................................................................................................................. 9
5.3 RTU/ASCII .............................................................................................................................................. 9
5.4 Data Rate (Baud Rate) ........................................................................................................................ 9
5.5 Control Mode............................................................................................................................................. 9
5.6 Control Type ......................................................................................................................................... 9
5.7 Fail Mode.............................................................................................................................................. 10
5.8 Jumpers ............................................................................................................................................... 10 5.8.1 JP1 ................................................................................................................................................... 10 5.8.2 JP2 JP3&JP4................................................................................................................................... 10 5.8.3 JP5 & JP7 ........................................................................................................................................ 10 5.8.4 JP5 & JP7 ........................................................................................................................................ 10
6 Calibration...................................................................................................................................................... 10
6.1 Position Feedback............................................................................................................................. 10
6.2 Setting the analog position setpoint ............................................................................................ 10
6.3 Setting the Deadband ....................................................................................................................... 11
6.4 Setting “Fail to Preset” position.................................................................................................... 11
7 Control System Integration Modbus ........................................................................................................... 11
7.1 CDN455 Serial Interface format ..................................................................................................... 11
7.2 Input Data ............................................................................................................................................ 11
7.3 Output Data ......................................................................................................................................... 12
7.4 Description of Process I/O .............................................................................................................. 12 7.4.1 Status Word .................................................................................................................................... 12 7.4.2 Analog Input AI1............................................................................................................................. 13 7.4.3 Analog Input AI2............................................................................................................................. 13 7.4.4 Command Word.............................................................................................................................. 14

Operating Instructions Triple Play Matic for Modbus with CDN455
3
7.4.5 Setpoint Word................................................................................................................................. 14
8 Troubleshooting Guide – Modbus............................................................................................................... 15 8.1 LED D1-Network........................................................................................................................................ 15 8.2 LED D2-Module ......................................................................................................................................... 15 8.3 LED D3-Status (actuator) ......................................................................................................................... 15 8.4 LED D4 ....................................................................................................................................................... 15 8.5 LED D5 ....................................................................................................................................................... 15 8.6 Actuator cannot be controlled by Modbus............................................................................................. 16
9 Appendix A CDN455 Board Layout ........................................................................................................... 18

Operating Instructions Triple Play Matic Modbus CDN455
4
1 Safety Instructions
1.1 Range of application AUMA actuators are designed for the operation of industrial valves, e.g. globe valves, gate valves, butterfly valves and ball valves.
For other applications please consult us. AUMA is not liable for any possible damage resulting from use in other than the designated applications. Such risk lies entirely with the user.
Observance of these operation instructions is considered as part of the controls designated use.
1.2 Short description AUMA actuators have a modular design. Motor and gearing are mounted in a common housing.
The actuators are driven by an electric motor and controlled with the electronic controls TriplePlay Matic. The electronic controls are included in the scope of delivery.
1.3 Commissioning (electrical connection) During electrical operation certain parts inevitably carry lethal voltages. Work on the electrical system or equipment must only be carried out by a skilled electrician and in accordance with the applicable electrical engineering rules.
1.4 Maintenance The maintenance instructions must be observed, otherwise a safe operation of the actuator is no longer guaranteed.
1.5 Warnings and notes Non-observance of the warnings and notes may lead to serious injuries or damage. Qualified personnel must be thoroughly familiar with all warnings and notes in these operation instructions.
Correct transport, proper storage, mounting and installation, as well as careful commissioning are essential to ensure a trouble-free and safe operation.
The following references draw special attention to safety-relevant procedures in these operation instructions. Each is marked by the appropriate pictograph.
This pictograph means: Note! “Note” marks activities or procedures, that have major, influence on the correct operation. Non-observance of these notes may lead to consequential damage.
This pictograph means: Electrostatically endangered parts! If this pictograph is attached to a printed circuit board, it contains parts, which may be damaged or destroyed by electrostatic discharges. If the boards need to be touched during setting, measurement or for exchange, it must be assured that immediately before a discharge through contact with an earthed metallic surface (e.g. the housing) has taken place.
This pictograph means: Warning! “Warning marks activities or procedures that, if not carried out correctly, can affect the safety of persons or material.

Operating Instructions Triple Play Matic for Modbus with CDN455
5
2 Transport and storage
Transport to place of installation in sturdy packing. Do not attach ropes or hooks to the hand wheel for the purpose of lifting by hoist. Store in well-ventilated, dry room. Protect against floor dampness by storage on a shelf or on a wooden pallet. Cover to protect against dust and dirt. Apply suitable corrosion protection agent to bright surfaces.
3 General Information
The CDN455 TriplePlay Board is furnished in the AUMA Matic motor control housing for controlling electric motor driven actuators used on valves, dampers and other devices. The board serves as the actuator’s interface with the plant control system.
The Triple Play Matic can be configured in the following control modes:
DeviceNet digital control mode
Modbus digital control mode
Analog control mode ( 4-20mA ) with or without bus monitoring.
This manual covers the operation of Modbus digital control and Analog control mode with or without bus monitoring.
4 Electrical Commissioning
4.1 General Modbus Information For the exchange of information among automation systems and between automation system and the connected decentralized field devices, serial fieldbuses are used today as the main communication system Thousands of applications have proved impressively the cost savings of up to 40% in wiring, commissioning and maintenance can be achieved by using field bus technology. Just two wires are needed to transmit all relevant information for the field devices, such as input and output signal, parameters and diagnostics data. Modbus is an open international fieldbus system, which is also used successfully throughout the world. The application range includes automation in the areas of manufacturing, processing and building. For a through introduction to Modbus the Modbus Organization web site is a good source. http://www.modbus.org/ .
Figure 3-1 CDN455 Control Board

Operating Instructions Triple Play Matic Modbus CDN455
6
Modbus uses a linear bus line topology. As a basic guideline the following table lists the allowable cable lengths and data rates allowed. This list includes the available baud rates for the CDN455
Baud Maximum distance rate Without Repeaters 1200 bits/s 1200m 2400 bits/s 1200m 9600 bits/s 1200m 19200 bits/s 1200m
Cable designed specifically for Modbus should be used to ensure proper communication. One cable that meets the Modbus requirements is Belden Cable 3105A which has 2 conductors and a shield.
4.2 CDN455 Technical Information
4.2.1 Analog Inputs The CDN455 provides two analog inputs AI1 and AI2 for customer use. If the actuator is configured for Analog control, input AI1 is used to provide the position command to the actuator. If the actuator is configured for Network control, inputs AI1 and AI2 are available for customer use.
4.2.2 Analog Outputs The analog output is a 4-20mA self-powered signal providing actuator position feedback. This is in addition to the actuator position feedback available from the Modbus process I/O.
4.2.3 Output Relay 2 Relay 2 is a dry contact Form C (SPDT) relay rated 5A @ 250VAC for customer use. This relay is energized from the Command Word via Modbus.
4.2.4 ESD ESD is an emergency function that when set, will cause the actuator to either fail as is, or fail to a preset position. The actuator will respond the same as if it went into a fail mode. The setting of the Fail Mode determines how the actuator will respond to ESD. This function is active only when the local selector switch is in Remote. The actuator can still be operated in the Local mode.
TR
Bus Line Terminating Resistor TR
Figure 4-1 Typical linear bus line
PLC Master
TR

Operating Instructions Triple Play Matic for Modbus with CDN455
7
4.2.5 Technical data table
Interface EIA-485 (RS-485) Transmission medium Shielded twisted pair Communication protocol Modbus (RTU or ASCII) Network topology Linear bus (line) Data transfer rate Data transfer rate in bit/s distance / segment length in m
1,200 2,400 9,600
19,200
1,200 1,200 1,200 1,000
The maximum distance can be multiplied with repeaters
Number of nodes 32 stations in each segment without repeaters, up to 247 stations with repeaters (6) No. active nodes (masters) 1 Bus access Master-Slave Function Codes 01 Read Coil Status
02 Read Input Status 03 Read Holding Registers 04 Read Input Registers 05 Single Coil Write 06 Single Register Write 15 Multiple Coil Write 16 Multiple Register Write
Control features
OPEN STOP CLOSE Run to Setpoint Position
Indications End-of-travel positions OPEN, CLOSE Selector switch in position LOCAL / OFF / REMOTE Open torque switch tripped Closed torque switch tripped Continuous valve position
Fault Indications Motor protection tripped – Thermal overload Phase failure, wrong phase sequence
Communication fail function Actuator performs fail action when it doesn’t receive a valid Modbus telegram for more than 10 sec (default value).
Analog / digital I/O 3 analog inputs 8 digital inputs 4 digital outputs 1 analog output (4..20mA)
Connection Typical Connection Board with integrated Termination Resistor circuit and Surge Protection Screw type clamp terminals. Conduit entries: 2 x ¾” and 1 x 1” NPT (standard)
Note: In certain configurations such as an actuator with NEMA4/6 with a disconnect switch the connection board cannot be used. In these instances a plug and socket connection will be used.

Operating Instructions Triple Play Matic Modbus CDN455
8
Table 4-5
4.3 Electrical Connection
4.3.1 Mains connection Work on the electrical system or equipment must only be carried out by a skilled electrician and in accordance with the applicable electrical engineering rules.
Refer to Figures 4.2 and 4.3 Remove Terminal Housing for access
to Plug and Socket . Remove Socket to gain access to Main connection terminals on socket. Insert mains cable thru Mains conduit entry
Connect to terminals per supplied wiring diagram.
4.3.2 Bus connection Disconnect power before removing the plug cover.
The Modbus connection board is located in the terminal housing (figure 4-3) Loosen and remove plug cover (figure 4-3). Insert cable thru Bus conduit entry. Connect incoming Modbus cable to X1 Pins1&2 (figure 4-4). Connect outgoing Modbus cable to X1 Pins 3&4 (figure 4-4). See Table 4-5 for pinout of X1.
The Modbus connection board provides a 120 ohm termination resistor that can be switched ON and OFF with switch S1 (figure 4-4). The termination resistor should be switched ON only if the actuator is the first or last node on the bus and no other termination resistors are installed elsewhere on the bus.
Pin Connection X1 1 RS485/A (-) In 2 RS485/B (+) In 3 RS485/A (-) Out 4 RS485/B (+) Out
Terminal Housing
Figure 4-3
Figure 4-4 Modbus Connection Board
Control Access Cover
Figure 4-2
Socket Terminal Housing
X1
Pin 1
S1
X2 (not used)
Plug Cover
Bus Mains

Operating Instructions Triple Play Matic for Modbus with CDN455
9
5 Configuration
This section covers the setting of the switches to configure the CDN455 board for DeviceNet control or Analog control with Modbus monitoring. To gain access to the switches loosen and remove the Control Access Cover to gain access to the CDN455 board (figure 5-1). Figure 5-1shows the CDN455 control board with the access cover removed and the cover plate installed over the CDN455 control board. To gain access to the board itself remove the cover plate. Appendix A Board Layout also provides the locations of board components.
5.1 Setting Node Address Default Address: 99 The allowable Modbus node addresses are 0-247. To set the node address use rotary switches SW1 and SW2 and dipswitch SW3. SW1 – 10’s Digit SW2 – 1’s Digit SW3-9 Adds 200 to address SW3-10 Adds 100 to address Examples: Switch Node 27 Node 148 Node 215 SW1 2 4 1 SW2 7 8 5 SW3-9 OFF OFF ON SW3-10 OFF ON OFF
5.2 Bus Select Default Bus: Modbus The CDN455 can communicate via DeviceNet or Modbus.
DeviceNet – SW3-2= Off Modbus – SW3-2 =On
5.3 RTU/ASCII Default Bus: RTU The CDN455 can communicate Modbus RTU or ASCII.
ASCII – SW3-8= Off RTU – SW3-8 =On
5.4 Data Rate (Baud Rate) Default Data Rate: 19.2kbits/s The CDN455 supports four data rates: 1.2Kbits/s, 2.4Kbits/s, 9.6Kbits/s and 19.2Kbits/s. See table 5-2.
5.5 Control Mode Default Control Mode: Network The control mode determines if the actuator will be controlled via the network (Modbus) or by an analog signal
Network – SW3-1 = Off Analog – SW3-1 = On
5.6 Control Type Default Control Type: Combination This setting selects either Combination or Modulating. When Combination is selected either open/close or modulating control is possible. When Modulating control is selected only modulating control is possible.
Combination Control – SW3-5 = Off Modulating Control – SW3-5 = On
SW3-3 SW3-4 Date Rate Off Off 1.2Kbits/s On Off 2.4Kbits/s Off On 9.6Kbits/s On On 19.2Kbits/s
SW1
SW2
Figure 5-1
SW5
SW4
SW3
DEADBAND
Table 5-2

Operating Instructions Triple Play Matic Modbus CDN455
10
5.7 Fail Mode Default Fail Mode: Fail As Is Fail Mode determines the action of the actuator when in fail mode or the ESD mode is set. Fail Mode is defined as a loss of communication (Modbus) after communication has first been established, or if the actuator is in analog control, the current signal is lost. See section 6.2 for setting the “Fail to Preset” position.
Fail As Is – SW3-6 = Off Fail Preset – SW3-6 = On
5.8 Jumpers Refer to Appendix A for jumper locations.
5.8.1 JP1 Jumper Description In Out Default JP1 Used to download program- Factory use only Download program Normal operation Out
5.8.2 JP2 JP3&JP4 Jumper Description In Out Default
JP2 Selects Current or Voltage for analog input AI0 Current (0-20mA) Voltage (0-5Vdc) Out JP3 Selects Current or Voltage for analog input AI1 Current (0-20mA) Voltage (0-5Vdc) In JP4 Selects Current or Voltage for analog input AI2 Current (0-20mA) Voltage (0-5Vdc) In
5.8.3 JP5 & JP7 Jumper Description In Out Default
JP5 Connects board power Vloop to the DeviceNet V+ Connected Not connected Out JP7 Connects board Gnd to the DeviceNet V- Connected Not connected Out
5.8.4 JP5 & JP7 Jumper Description In Out Default
JP6 Connects DeviceNet Shield to earth Gnd Connected Not connected Out
6 Calibration This section describes the procedures to calibrate the position feedback, setting the Fail to Preset position, setting the analog position control and Deadband. Refer to Figure 5-1 or Appendix A for location of push buttons used in the calibration procedures.
6.1 Position Feedback The CDN455 automatically calibrates the position feedback based on the open and close limit switches. In order for the position feedback to be calibrated, the open and close limit switches must first be set per the appropriate actuator manual. Once the limit switches are set the CDN455 will calibrate the position feedback each time the open and close limit switches are made.
6.2 Setting the analog position setpoint When the actuator is configured for Analog Mode, the position setpoint is provided via analog input AI1. This input can be either current or voltage input (See 5.7.2). The actuator does not need to be operated to set the Zero (full close) and Span (full open). Note: the Zero signal must be less than the Span; cannot have a 20mA Zero and a 4mA Span.
Set Zero (full close) o Apply analog signal desired for full close (Example: 4mA) o Press SW4 for approx. 5 seconds. LEDs D1, D2 & D3 will flash amber then solid green when accepted
Set Span (full open) o Apply analog signal desired for full open (Example: 20mA) o Press SW5 for approx. 5 seconds. LEDs D1, D2 & D3 will flash amber then solid green when accepted

Operating Instructions Triple Play Matic for Modbus with CDN455
11
6.3 Setting the Deadband The Deadband is a potentiometer adjustment on the CDN455 board (See Figure 5-1). This sets the allowable error around the setpoint when the actuator is in modulating mode. To prevent the actuator from constantly changing direction trying to reach the setpoint the deadband may need to be adjusted. To increase the deadband turn the potentiometer counter-clockwise to decrease turn clockwise. The actual deadband value can be read from parameter 20 of the EDS file (see section7.4.2)
6.4 Setting “Fail to Preset” position The “Fail to Preset” is the position the actuator will move to if it losses communication or the ESD function is set. This can be any position between 0-100% open.
Move the actuator to the desired “Fail to Preset” position (0-100% open). Press SW4 and SW5 at the same time for approx. 5 seconds. LEDs D1, D2 & D3 will flash amber then solid green when accepted
7 Control System Integration Modbus Modbus uses Function Codes for the exchange of information from the control system master to the slave devices. The table below describes the Modbus function codes. Sections 7.2 and 7.3 maps the actuator process I/O and the function codes to use for control of the actuator.
Definitions:
Holding Register: Data space which contains or holds the commands to a slave. (Example: Open/Close commands)
Input Register: Data space which contains the information about the slave. (Example: Position of Actuator)
Input information: Information about the slave sent to the master Output Information: Commands sent to the slave from the master Register: A 16bit word
7.1 CDN455 Serial Interface format 8 Data Bits No Parity 1 Stop Bit
7.2 Input Data Reading the actuator signals from the actuator using register functions
Function Code to use:
Function Function Code
Description
Read Coil Status 01 Reads the status of individual output bit information from the slave Read Input Status 02 Reads the status of individual input bit information from the slave Read Holding Registers 03 Reads the contents of the holding registers from the slave Read Input Registers 04 Reads the contents of the input data registers from the slave Force Single Coil 05 Sets an individual bit in the slave to ON or OFF Preset Single Register 06 Writes data into individual Holding Registers of the slave Force Multiple Coils 15 Sets several consecutive bits in the slave to ON or OFF Preset Multiple Registers 16 Writes data into consecutive Holding Registers in the slave

Operating Instructions Triple Play Matic Modbus CDN455
12
Read Input Register (04)
7.3 Output Data Sending or reading run commands from the control system to the actuator
Function Codes to use: Preset Single Register (06) Preset Multiple Register (16) Read Holding Register (03)
Variable Offset (Decimal)
Contents
Bit Bit Bit Bit Bit Bit Bit Bit Bit Bit Bit Bit Bit Bit Bit Bit 15 14 13 12 11 10 9 8 7 6 5 4 3 2 1 0
Command Word
0
ES
D
__ __ __ __ __ __ __ __ __ __
Ena
ble
Set
poin
t
__ R
elay
2
Clo
se
Ope
n Setpoint Word
1 Position command (0-1000)
7.4 Description of Process I/O
7.4.1 Status Word
Variable Offset (Decimal)
Contents
Bit Bit Bit Bit Bit Bit Bit Bit Bit Bit Bit Bit Bit Bit Bit Bit 15 14 13 12 11 10 9 8 7 6 5 4 3 2 1 0
Status Word
0
Con
trol
Mod
e
Fai
l Mod
e
__
Con
trol
Typ
e
Ala
rm A
ctiv
e
Com
mun
icat
ion
Fai
lure
Loss
of L
ocal
S
etpo
int
Loss
of P
ositi
on
Sel
ecto
r S
w.
Loca
l
Sel
ecto
r S
w.
Rem
ote
The
rmo
Ala
rm
Pha
se A
larm
Ope
n Li
mit
Clo
se L
imit
Ope
n T
orqu
e
Clo
se T
orqu
e
Analog Input AI1
1 Analog Input AI1 (0-1000)
Actuator Position
2 Actuator Position (0-1000)
Analog Input AI2
3 Analog Input AI2 (0-1000)

Operating Instructions Triple Play Matic for Modbus with CDN455
13
7.4.2 Analog Input AI1 The Analog Input AI1 input word has two possible meanings depending on the setting of the Control Mode.
Control Mode set to Network: In this case a transmitter (temperature, pressure, etc.) can be wired to analog input AI1 and this information can be read back via Modbus Control Mode set to Analog: In this case this word sends back the Local Setpoint via Modbus. The Local Setpoint is defined as the Position Command via analog input AI1.
7.4.3 Analog Input AI2 This is a spare analog input that a transmitter (temperature, pressure, etc.) can be wired to analog input AI2 and this information can be read back via Modbus.
Bit Designation Value Description 1 Close Torque Switch set
0 Close Torque 0 1 Open Torque Switch set
1 Open Torque 0 1 Close Limit Switch set -actuator fully closed
2 Close Limit 0 1 Open Limit Switch set -actuator fully open
3 Open Limit
Switch 0 1
4 Phase Alarm 0 Phase alarm set – phase of incoming power incorrect 1
5 Thermo Alarm 0 Motor thermal switch tripped 1 Actuator controlled remotely
6 Selector sw.
Remote 0 1 Actuator controlled from actuator control push buttons
7 Selector sw.
Local 0
1 Loss of Position set when the actuator position feedback has been lost 8
Loss of Position
0
1 Set if actuator is in Analog Mode and the analog position setpoint (AI1) is lost. 9
Loss of Local Setpoint
Alarm 0 1 Loss of DeviceNet connection
10 Communication
Failure 0
1 Indicates one or more of the following: Loss of Position, Loss of Local Setpoint, Comm. Failure, Torque Switch Set, Thermo alarm, Phase Alarm
11 Alarm Active
0 1 Modulating mode only
12 Control Type 0 Combination mode- open/close or modulating mode possible.
13 -
1 Fail to Preset – if actuator losses communication or the ESD is active the actuator will move to a Preset position
14 Fail Mode 0
Fail as is – if actuator losses communication or the ESD is active the actuator will stay at its current position
1 Network – actuator will be controlled from DeviceNet 15 Control Mode
0 Analog – actuator will be controlled via analog signal.

Operating Instructions Triple Play Matic Modbus CDN455
14
7.4.4 Command Word
7.4.5 Setpoint Word Provides the position command when the actuator is in Modulating mode. Scale is 0-1000 ( 0-100.0% Open ).
Bit Designation Value Description 1 Run Command
0 Open 0 1 Run Close Command Word
1 Close 0 1 Energize Relay 2
2 Relay 2 0
3 -
1 When the Control Type is set to Combination Mode setting this bit puts the actuator in Modulating Mode control
4 Enable Setpoint 0
If the Control Type is set to Combination Mode and this bit in not set, the control is open/close.
5 -
6 -
7 -
8 -
9 -
10 -
11 -
12 -
13 -
14 -
1 ESD mode set 15 ESD
0
Operating Instructions Triple Play Matic for Modbus with CDN455
15
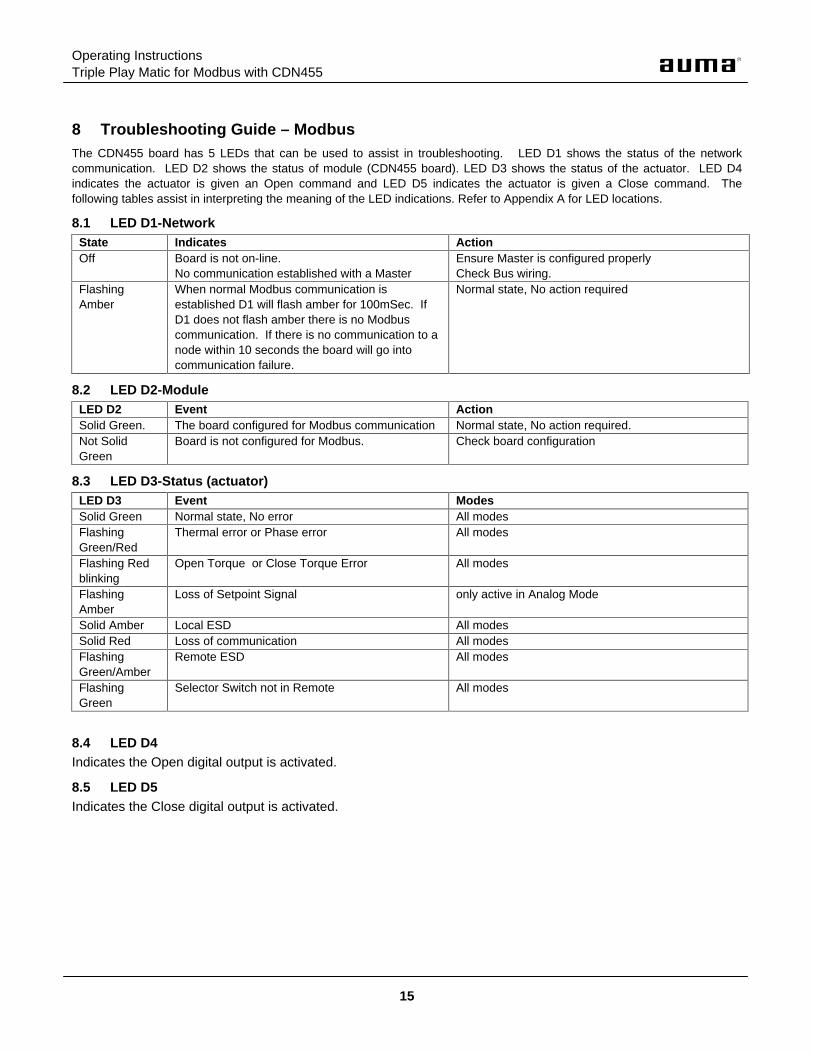
8 Troubleshooting Guide – Modbus The CDN455 board has 5 LEDs that can be used to assist in troubleshooting. LED D1 shows the status of the network communication. LED D2 shows the status of module (CDN455 board). LED D3 shows the status of the actuator. LED D4 indicates the actuator is given an Open command and LED D5 indicates the actuator is given a Close command. The following tables assist in interpreting the meaning of the LED indications. Refer to Appendix A for LED locations.
8.1 LED D1-Network State Indicates Action Off Board is not on-line.
No communication established with a Master Ensure Master is configured properly Check Bus wiring.
Flashing Amber
When normal Modbus communication is established D1 will flash amber for 100mSec. If D1 does not flash amber there is no Modbus communication. If there is no communication to a node within 10 seconds the board will go into communication failure.
Normal state, No action required
8.2 LED D2-Module LED D2 Event Action Solid Green. The board configured for Modbus communication Normal state, No action required. Not Solid Green
Board is not configured for Modbus. Check board configuration
8.3 LED D3-Status (actuator) LED D3 Event Modes Solid Green Normal state, No error All modes Flashing Green/Red
Thermal error or Phase error All modes
Flashing Red blinking
Open Torque or Close Torque Error All modes
Flashing Amber
Loss of Setpoint Signal only active in Analog Mode
Solid Amber Local ESD All modes Solid Red Loss of communication All modes Flashing Green/Amber
Remote ESD All modes
Flashing Green
Selector Switch not in Remote All modes
8.4 LED D4 Indicates the Open digital output is activated.
8.5 LED D5 Indicates the Close digital output is activated.

Operating Instructions Triple Play Matic Modbus CDN455
16
8.6 Actuator cannot be controlled by Modbus
LED D1 Network ?
Flashing Amber
Board On-line and communication established
Off
1. Board configuration 2. Check wiring 3. Check control system configuration
No Modbus communication
Operation via Local controls
possible ?
No
Yes
Flashing Green/Red
If thermo overload let motor cool and eliminate cause of overheating
If Phase fault check motor phase
Flashing Red
Eliminate cause of torque fault
Thermo overload or Phase fault
Torque fault
Flashing Green
1. Check fuse F4 2. Check motor 3. Check contactor
or solid state starter
Selector Switch not in Remote. Normal
1
Off
Check power to actuator.
No power to CDN455 board
Modbus actuator control not possible.
LED D3 Actuator Status ? Check with selector switch in Local

Operating Instructions Triple Play Matic for Modbus with CDN455
17
Configuration Switch SW3-1
ON
Set SW3-1 to OFF Control Mode set to Analog (4-20mA)
OFF
Control set to Open/Close or Modulating?
Modulating
Open/Close
Control Mode set to Network (Modbus)
1. Check Control Type setting. Should be set to Combination Mode (SW3-5 set to OFF).
2. With selector switch in Remote position give an Open command and check if LED D4 lights up. a. No – Check control system
programming b. Yes – ensure 115VAC is at (J6) pin 1
on CDN455 board.
3. With selector switch in Remote position give a close command and check if LED D5 lights up. a. No – Check control system
programming b. Yes – ensure 115VAC is at (J6) pin 1
on CDN455 board.
1. With selector switch in Remote position give the actuator a setpoint value above the current position of the actuator and check if LED D4 lights up. a. No – Check Programming and items 3 this box. b. Yes – ensure 115VAC is at (J6) pin 1 on CDN455 board
2. With selector switch in Remote position give the actuator a setpoint value below the current position of the actuator and check if LED D5 lights up. a. No – Check Programming and items 3. b. Yes – ensure 115VAC is at (J6) pin 1 on CDN455 board c. Check actuator Position Word to ensure actuator
3. Check Deadband of actuator and adjust if necessary.
1

Operating Instructions Triple Play Matic Modbus CDN455
18
9 Appendix A CDN455 Board Layout
+5V
/PO
T+
AI0
/PO
T IN
GN
D/P
OT
-A
I1G
ND
AI2
AO
+A
O-
GN
DV
LOO
PG
ND
J5
J7J8
J1
J2J4
J3J6
11
11
1
11
1
SW
2
SW
1
SW
3
DI COMMONDI7 LOCALDI6 REMOTEDI5 TH. POWERDI4 PDDI3 LSODI2 LSCDI1 TSODI0 TSCV LOOP
RELAY1 COM.
RELAY1 N.O.
RELAY1 N.C.
RELAY2 COM.
RELAY2 N.O.
RELAY2 N.C.
x10
x1A
DD
RE
SS
CO
NF
IG.
SW
ITC
H
VIN+VIN-LOCAL ESD IN
SU
PP
LY P
OW
ER
GNDRS485A
VCCRS485B
EARTHEARTH
MO
DB
US
/ES
DD
EV
ICE
NE
TV-
SHIELDCAN HI
CAN LO
V+
INP
UT
/A
NA
LOG
OU
TP
UT
DE
AD
BA
ND
D1
D2
D3
D4
D5
SW
4
SW
5
JP4
JP3
JP2
1 10
ON
+-
JP6
JP5
JP7
CD
N 4
55
JP1
Con
figur
atio
n S
witc
h S
W3
1C
ontr
ol
Des
crip
tion
OF
FO
N
Mod
e(D
evic
enet
or
Mod
bus)
Net
wor
kA
nalo
g (4
-20m
A)
2B
us s
elec
tD
evic
enet
Mod
bus
3D
ata
Rat
e S
elec
t 0S
ee D
ata
Rat
es T
able
4D
ata
Rat
e S
elec
t 1S
ee D
ata
Rat
es T
able
5C
ontr
ol T
ype
Com
bina
tion
Mod
e:op
en /
clos
e an
dM
odul
atin
g du
ty p
ossi
ble
Mod
ulat
ing
Mod
e:M
odul
atin
g du
ty o
nly
6F
ail M
ode
Fai
l as
isF
ail t
o pr
eset
7R
eser
ved
RT
UA
SC
IIM
odbu
s M
ode
8 9M
odbu
s A
ddre
ss O
ffset
+0
+20
0
10M
odbu
s A
ddre
ss+
0+
100
Dat
a R
ates
Dat
a R
ate
Sel
ect 0
(S
W3.
3)S
elec
t 1 (
SW
3.4)
Dat
a R
ate
Dat
a R
ate
Dev
icen
etD
ata
Rat
eM
odbu
s
OF
FO
FF
125K
1200
ON
OF
F25
0K24
00
OF
FO
N50
0K96
00
ON
ON
-19
200
AI1
Vol
tage
(0-
5V)
AI2
Vol
tage
(0-
5V)
AI1
Cur
rent
(0-
20m
A)
AI2
Cur
rent
(0-
20m
A)
AI0
Cur
rent
(0-
20m
A)
IN
Jum
pers
JP4
JP2
JP3
JP1
Dow
nloa
d P
rogr
am
AI0
Vol
tage
(0-
5V)
-OU
T
JP5,
7
JP6
Con
nect
Dev
. Net
Shi
eld
W/E
arth
Con
nect
Dev
icen
et V
+ /
V-
to V
Loop
/Gnd
Set
Fai
l pos
ition
Set
Clo
se L
ocal
Set
poin
t Val
ue
in A
nalo
g M
ode
Cal
ibra
tion
But
tons
ON
SW
4
OF
F
ON
ON
SW
5
ON
OF
F
Set
Fai
l Pos
ition
in N
etw
ork
Mod
e
No
Fun
ctio
n
No
Fun
ctio
n
Set
Ope
n Lo
cal S
etpo
int V
alue
SK
0991
40
RE
F. N
o.
DW
G. N
o.
BY
/DA
TE
DE
SC
RIP
TIO
NR
EV
AP
P/D
AT
E
FIR
ST
ISS
UE
0
PIT
TS
BU
RG
H P
A 1
5205
AC
TU
AT
OR
S IN
C.
SS
C4/
22/0
3

Operating Instructions Triple Play Matic for Modbus with CDN455
19
Intentionally left blank