oracle application express request an account on apex. . • subscribe to an account on the...
TRANSCRIPT

Oracle® Application ExpressTutorial: Building an Application
Release 5.1
E69083-02
June 2017

Oracle Application Express Tutorial: Building an Application, Release 5.1
E69083-02
Copyright © 2017, 2017, Oracle and/or its affiliates. All rights reserved.
Primary Author: John Godfrey
Contributors: David Peake, Terri Jennings, Shakeeb Rahman
This software and related documentation are provided under a license agreement containing restrictions onuse and disclosure and are protected by intellectual property laws. Except as expressly permitted in yourlicense agreement or allowed by law, you may not use, copy, reproduce, translate, broadcast, modify, license,transmit, distribute, exhibit, perform, publish, or display any part, in any form, or by any means. Reverseengineering, disassembly, or decompilation of this software, unless required by law for interoperability, isprohibited.
The information contained herein is subject to change without notice and is not warranted to be error-free. Ifyou find any errors, please report them to us in writing.
If this is software or related documentation that is delivered to the U.S. Government or anyone licensing it onbehalf of the U.S. Government, then the following notice is applicable:
U.S. GOVERNMENT END USERS: Oracle programs, including any operating system, integrated software,any programs installed on the hardware, and/or documentation, delivered to U.S. Government end users are"commercial computer software" pursuant to the applicable Federal Acquisition Regulation and agency-specific supplemental regulations. As such, use, duplication, disclosure, modification, and adaptation of theprograms, including any operating system, integrated software, any programs installed on the hardware,and/or documentation, shall be subject to license terms and license restrictions applicable to the programs.No other rights are granted to the U.S. Government.
This software or hardware is developed for general use in a variety of information management applications.It is not developed or intended for use in any inherently dangerous applications, including applications thatmay create a risk of personal injury. If you use this software or hardware in dangerous applications, then youshall be responsible to take all appropriate fail-safe, backup, redundancy, and other measures to ensure itssafe use. Oracle Corporation and its affiliates disclaim any liability for any damages caused by use of thissoftware or hardware in dangerous applications.
Oracle and Java are registered trademarks of Oracle and/or its affiliates. Other names may be trademarks oftheir respective owners.
Intel and Intel Xeon are trademarks or registered trademarks of Intel Corporation. All SPARC trademarks areused under license and are trademarks or registered trademarks of SPARC International, Inc. AMD, Opteron,the AMD logo, and the AMD Opteron logo are trademarks or registered trademarks of Advanced MicroDevices. UNIX is a registered trademark of The Open Group.
This software or hardware and documentation may provide access to or information about content, products,and services from third parties. Oracle Corporation and its affiliates are not responsible for and expresslydisclaim all warranties of any kind with respect to third-party content, products, and services unlessotherwise set forth in an applicable agreement between you and Oracle. Oracle Corporation and its affiliateswill not be responsible for any loss, costs, or damages incurred due to your access to or use of third-partycontent, products, or services, except as set forth in an applicable agreement between you and Oracle.

Contents
Preface ............................................................................................................................................................... vii
Audience ...................................................................................................................................................... vii
Documentation Accessibility .................................................................................................................... vii
Related Documents..................................................................................................................................... vii
Conventions................................................................................................................................................ viii
1 About Oracle Application Express ...................................................................... 1-1
2 Before You Begin................................................................................................ 2-1
3 Populating Your Workspace
3.1 Setting Up Your Workspace............................................................................................................ 3-1
3.2 Importing the Sample Tables .......................................................................................................... 3-1
3.3 Importing the Sample Data ............................................................................................................. 3-5
3.4 Populating the Tables with the Data.............................................................................................. 3-6
3.5 Reviewing Output with Object Browser ....................................................................................... 3-6
4 Creating the Initial Application
4.1 Creating a New Application Using the Create Application Wizard......................................... 4-1
4.2 Creating a Projects Page Using the Create Page Wizard ............................................................ 4-3
4.3 Creating a Calendar Using the Create Page Wizard ................................................................... 4-5
4.4 About Page Designer........................................................................................................................ 4-6
4.5 Running the Application for the First Time.................................................................................. 4-8
5 Developing the Home Page
5.1 Navigating to Page Designer from the Application Runtime.................................................... 5-1
5.2 Adding a Task Overview Chart to the Home Page ..................................................................... 5-2
5.3 Editing a Chart Region with the Property Editor ........................................................................ 5-3
5.4 Defining the SQL Query of a Chart................................................................................................ 5-6
5.5 Adding a Report of Outstanding Tasks to the Home Page ........................................................ 5-8
5.6 Changing Region Appearance Using the Developer Toolbar.................................................... 5-8
5.7 Adding Icons to the Home Page Sidebar .................................................................................... 5-11
iii
6 Developing the Team Member Pages
6.1 Editing the SQL Query of an Interactive Report .......................................................................... 6-1
6.2 Changing Which Columns Display in an Interactive Report in the Runtime ......................... 6-2
6.3 Moving Buttons to a Different Region........................................................................................... 6-4
6.4 Enabling Stretch Form Fields for a Modal Dialog ....................................................................... 6-6
6.5 Updating Form Fields to and Textarea.......................................................................................... 6-6
6.6 Creating an Expandable Sub Region ............................................................................................. 6-8
6.7 Restricting User Access with the Display Only Item Type......................................................... 6-9
7 Developing the Projects Pages
7.1 Updating the SQL Query and Displayed Columns..................................................................... 7-1
7.2 Adding Names to the Project Lead Column with a Shared LOV.............................................. 7-3
7.3 Updating the Appearance of the Projects Report Page............................................................... 7-5
7.4 Customizing the Projects Report Columns................................................................................... 7-6
7.5 Changing the Project Form Appearance with Live Template Options .................................... 7-7
7.6 Updating the Project Form in Page Designer ............................................................................... 7-8
7.7 Creating a Static LOV of Statuses................................................................................................. 7-10
7.8 Creating a Dynamic Action ........................................................................................................... 7-11
7.9 Adding a Validation for the Completed Date ............................................................................ 7-11
7.10 Copying a Sub Region to a Different Page................................................................................ 7-13
8 Developing the Maintain Project Form Regions
8.1 Updating the Milestones Interactive Grid .................................................................................... 8-1
8.2 Creating the Tasks Detail Region ................................................................................................... 8-3
8.3 Updating the Columns in the Tasks Region ................................................................................. 8-5
8.4 Adding a Region Display Selector ................................................................................................. 8-6
8.5 Improving the Default Milestones Report in the Runtime......................................................... 8-7
8.6 Improving the Default Tasks Report in the Runtime .................................................................. 8-8
9 Developing the Tasks Master Detail-Detail Regions
9.1 Creating the To-Dos Sub Region .................................................................................................... 9-1
9.2 Linking the To-Dos Sub Region...................................................................................................... 9-2
9.3 Improving the To-Dos Columns..................................................................................................... 9-3
9.4 Creating the Links Sub Region ....................................................................................................... 9-4
9.5 Linking the Links Sub Region......................................................................................................... 9-5
9.6 Improving the Links Columns........................................................................................................ 9-5
9.7 Adding a Dynamic Action to Enable Columns for Link Type................................................... 9-7
9.8 Adding Opposite Actions to Dynamic Actions............................................................................ 9-8
9.9 Improving the To-Dos Interactive Grid in the Runtime ............................................................. 9-9
9.10 Improving the Links Interactive Grid in the Runtime ............................................................ 9-10
iv
10 Developing the Calendar Page
10.1 Hiding the Header and Border of the Calendar in the Runtime ........................................... 10-1
10.2 Enabling Drag and Drop of Individual Projects ...................................................................... 10-2
10.3 Adding Links to the Calendar Page........................................................................................... 10-2
A Importing an Application into a Workspace
Index
v

vi

Preface
Oracle Application Express Building a Demo App Tutorial demonstrates how to build aworking application for managing projects and tasks using some of the latest featuresof Oracle Application Express.
AudienceOracle Application Express Building a Demo App Tutorial is intended for workspaceadministrators who want to set up an Oracle Application Express developmentenvironment and application developers who want to learn how to build database-centric web applications using Oracle Application Express.
To use this guide, you must have a general understanding of relational databaseconcepts and the operating system environment under which Oracle ApplicationExpress is running.
Documentation AccessibilityFor information about Oracle's commitment to accessibility, visit the OracleAccessibility Program website at http://www.oracle.com/pls/topic/lookup?ctx=acc&id=docacc.
Access to Oracle Support
Oracle customers that have purchased support have access to electronic supportthrough My Oracle Support. For information, visit http://www.oracle.com/pls/topic/lookup?ctx=acc&id=info or visit http://www.oracle.com/pls/topic/lookup?ctx=acc&id=trs if you are hearing impaired.
Related DocumentsFor more information, see these Oracle resources:
• Oracle Application Express Release Notes
• Oracle Application Express Installation Guide
• Oracle Application Express End User Guide
• Oracle Application Express App Builder User’s Guide
• Oracle Application Express Administration Guide
• Oracle Application Express SQL Workshop Guide
vii

• Oracle Application Express API Reference
• Oracle Application Express Application Migration Guide
ConventionsThe following text conventions are used in this document:
Convention Meaning
boldface Boldface type indicates graphical user interface elements associatedwith an action, or terms defined in text or the glossary.
italic Italic type indicates book titles, emphasis, or placeholder variables forwhich you supply particular values.
monospace Monospace type indicates commands within a paragraph, URLs, codein examples, text that appears on the screen, or text that you enter.
viii

1About Oracle Application Express
Oracle Application Express is an environment designed for rapid applicationdevelopment and deployment.
You can develop professional applications that are both fast and secure using only aweb browser and limited programming experience. Oracle Application Expressaccelerates the application development process with features such as user interfacethemes, navigational controls, form handlers, and flexible reports. The deployedapplications require only a browser and access to an Oracle database runningApplication Express.
This tutorial is intended to guide you through almost every step of creating an appwith a focused amount of context. For more in-depth information about OracleApplication Express, see the "Quick Start" section of the Oracle Application Express AppBuilder User’s Guide.
About This Tutorial
In Oracle Application Express Building a Demo App Tutorial, you create a simple HumanResources (HR) application for the fictitious AnyCo Corp. The application managesdepartmental and employee information stored in database tables. This tutorial showsyou how to build, modify, and run the application. Each chapter is a further lessonthat advances the work of previous one so that the concepts build on one another.
Oracle Application Express Building a Demo App Tutorial is intended to be followed in theorder it is written. To skip to the beginning of any lesson, you can import one of theexported application files stored in the .zip file accompanying this tutorial. Thisfeature is useful for skipping ahead in the tutorial to your skill level or checking yourwork.
See the appendix "Importing an Application into a Workspace (page A-1)."
About Oracle Application Express 1-1

1-2 Tutorial: Building an Application

2Before You Begin
For this tutorial, you must have access to an Oracle Application Express environment,an account with development privileges, and the Packaged App Sample DatabaseApplication installed in your workspace.
Accessing an Oracle Application Express Environment
You must have access to an Oracle Application Express release 5.1.2 or later. You canaccess Oracle Application Express in one of the following ways:
• Request an account on apex.oracle.com.
• Subscribe to an account on the Oracle Database Cloud Service which includesOracle Application Express.
• Install a local installation of Oracle Database which includes Oracle ApplicationExpress release 5.1.2 or later.
Oracle Application Express Development User Account
If you are accessing Oracle Application Express in a hosted environment, requestingan account creates a workspace and an account. If you are managing OracleApplication Express locally, you will create a workspace and account manually. Ineither scenario, your Oracle Application Express account must have developerprivileges.
Installing the Sample Database Application Packaged App
You must have the Packaged App Sample Database Application installed in yourworkspace. This tutorial uses several database objects that it populates.
To verify that Sample Database Application is installed in your workspace PackagedApps:
1. Sign in to your Oracle Application Express workspace.
2. Click Packaged Apps.
Before You Begin 2-1

3. Click Sample Database Application.
Tip: Use Ctrl + F or Cmd + F for quicker searching.
4. Do one of the following:
• If the screen says Installed, then no further steps are required.
• If the screen says Install Packaged App, click Install Packaged App andfollow the on-screen procedures.
2-2 Oracle Application Express Tutorial: Building an Application

3Populating Your Workspace
To build an Oracle Application Express app, you need a complete set of tables anddata. Oracle provides these in a .zip file that is designed to accompany this tutorial.
About This Lesson
In this lesson, you obtain and extract the .zip file to your local machine and use thetools in Oracle Application Express (SQL Workshop and SQL Scripts) to import someof its contents into your workspace.
Once imported, you also review the output of the scripts in Object Browser to confirmthe presence of the tables and data.
The sample tables and data that you load in these steps resemble the kind ofinformation that real Oracle Application Express HR apps use every day. They includeinformation typical of data sets for employees, projects, calendars, and schedules.
3.1 Setting Up Your WorkspaceTo proceed with this tutorial, you must meet complete the following tasks:
• Ensure you meet all the requirements that are described in "Before You Begin(page 2-1)."
• Download the .zip file containing the latest tables and data.
To download the .zip file:
1. Navigate to the Tutorials page: http://docs.oracle.com/database/apex-5.1/nav/tutorials.htm
2. Click Download sample tables and data zip file.
The download begins.
3. Extract the .zip file to an easily accessible location on your local machine.
3.2 Importing the Sample TablesOracle Application Express includes powerful wizards designed to quickly build aninitial app based on an existing set of data. However, first you must get the data intoyour workspace. The .zip file that you downloaded earlier contains a script to generatea set of sample tables.
Prepare your workspace by uploading the Demo_Project_Basic_Tables.sqlscript to your workspace and run it in the SQL Workshop.
To import the sample tables into your workspace:
Populating Your Workspace 3-1

1. Sign in to your Oracle Application Express workspace.
2. Click SQL Workshop and select SQL Scripts.
3. Click the Upload button.
The Upload Script dialog displays.
4. For Import file, click the appropriate button to browse your system for a file (forexample, in Chrome the Choose File button).
5. Navigate to the directory where you extracted the .zip file and open the filesfolder or subdirectory.
6. Select Demo_Project_Basic_Tables.sql and click Open.
7. Click Upload.
8. In the SQL Scripts list, click the Edit icon (pencil) adjacent to the script.
The Script Editor appears.
9. In the Script Editor, review the raw code of the script.
Importing the Sample Tables
3-2 Oracle Application Express Tutorial: Building an Application

The script creates the following objects:
• DEMO_TEAM_MEMBERS - Stores the details for the users of the applicationincluding a photo. Includes:
– Primary Key - ID
– Unique Key - USERNAME
– Before Insert or Update Trigger - Populates ID with Globally UniqueIdentifier (GUID); Populates audit columns; Sets USERNAME touppercase
• DEMO_PROJECTS - Stores the details for the projects, including the lead,status and completed date. Includes:
– Primary Key - ID
– Unique Key - NAME
– Foreign Key - PROJECT_LEAD must match an ID inDEMO_TEAM_MEMBERS
– Index - PROJECT_LEAD to improve query performance on the foreign keycolumn
– Before Insert or Update Trigger - Populates ID with GUID; Populates auditcolumns
• DEMO_MILESTONES - A child table under projects for milestones, includingthe due date. Includes:
Importing the Sample Tables
Populating Your Workspace 3-3

– Primary Key - ID
– Foreign Key - PROJECT_ID must match an ID in DEMO_PROJECTS
– Index - PROJECT_ID to improve query performance on the foreign keycolumn
– Before Insert or Update Trigger - Populates ID with GUID; Populates auditcolumns
• DEMO_TASKS - A child table under projects for tasks, optionally for a givenmilestone, and including an assignee and dates. Includes:
– Primary Key - ID
– Foreign Key - ASSIGNEE must match an ID in DEMO_TEAM_MEMBERS
– Foreign Key - PROJECT_ID must match an ID in DEMO_PROJECTS
– Foreign Key - MILESTONE_ID must match an ID inDEMO_MILESTONES
– Indexes - ASSIGNEE, PROJECT_ID, MILESTONE_ID to improve queryperformance on the foreign key columns
– Before Insert or Update Trigger - Populates ID with GUID; Populates auditcolumns
• DEMO_TO_DOS - A child table under tasks for to dos, and including anassignee and dates. Includes:
– Primary Key - ID
– Foreign Key - PROJECT_ID must match an ID in DEMO_PROJECTS
– Foreign Key - TASK_ID must match an ID in DEMO_TASKS
– Foreign Key - ASSIGNEE must match an ID in DEMO_TEAM_MEMBERS
– Indexes - PROJECT_ID, TASK_ID, ASSIGNEE to improve queryperformance on the foreign key columns
– Before Insert or Update Trigger - Populates ID with GUID; Populates auditcolumns
• DEMO_LINKS - A child table under tasks for links. Includes:
– Primary Key - ID
– Foreign Key - PROJECT_ID must match an ID in DEMO_PROJECTS
– Foreign Key - TASK_ID must match an ID in DEMO_TASKS
– Indexes - PROJECT_ID, TASK_ID to improve query performance on theforeign key columns
– Before Insert or Update Trigger - Populates ID with GUID; Populates auditcolumns
10. Click the Run button.
Importing the Sample Tables
3-4 Oracle Application Express Tutorial: Building an Application
The Run Script dialog appears.
11. Click Run Now to run the Demo_Project_Basic_Tables.sql script.
The Manage Script Results page appears.
12. Click the View Results icon (magnifying glass).
Your results should indicate 37 Statements Processed, 37 Successful, and 0 With Errors.
You have populated the sample tables in your workspace.
3.3 Importing the Sample DataNext, import the sample data.
Upload the Demo_Project_Basic_Data.sql script to your workspace and run itin the SQL Workshop.
To upload the sample data to your workspace:
1. In the SQL results summary page, click the SQL Scripts breadcrumb.
2. Click Upload.
3. For Import file, click the appropriate button to browse your system for a file (forexample, in Chrome the Choose File button).
4. Navigate to the directory where you extracted the .zip file and open the filesfolder or subdirectory.
5. Select the SQL script file named Demo_Project_Basic_Data.sql and clickOpen.
6. Click Upload.
7. In the SQL Scripts list, click the Run icon (pencil) adjacent to theDemo_Project_Basic_Data.sql script.
The Run Script dialog appears.
8. Click Run Now.
The Manage Script Results page appears.
9. Click the View Results icon (magnifying glass).
Your results should indicate 2 Statements Processed, 2 Successful, and 0 With Errors.
Importing the Sample Data
Populating Your Workspace 3-5

You have populated the sample data in your workspace. You must still populate thedata in the sample tables.
3.4 Populating the Tables with the DataThe two scripts that you loaded and ran in SQL Workshop in the previous topicgenerated the sample tables and data as database objects in your workspace. Now youmust add the data to the tables.
In addition to SQL Scripts, SQL Workshop also features the SQL Commands facility.SQL Commands enables you to run any valid SQL comfmand, such as loading a datapackage into a target table.
To run an Oracle Database package and populate the sample tables with the sampledata:
1. In the SQL Scripts Results page, click the SQL Workshop tab at the top of the pageto return to the SQL Workshop home page.
2. Click SQL Commands.
3. Enter the following code:
begin demo_projects_data_pkg.load_sample_data;end;
4. Click Run.
When the package is finished, the Results tab displays Statement processed.
You have populated the sample tables with the sample data.
3.5 Reviewing Output with Object BrowserObject Browser displays all the raw objects present in the Oracle database schemaassociated with your workspace. The APEX$ tables are created by Application Express
Populating the Tables with the Data
3-6 Oracle Application Express Tutorial: Building an Application
to store internal data that is specific to your workspace. Other tables such asDEMO_CUSTOMERS were created when you installed Sample Database Application.
To review the package that you created in the Object Browser:
1. Click SQL Workshop to return to the SQL Workshop home page.
2. Click Object Browser.
Tip: For quicker navigation, click the arrow next to SQL Workshop todisplay a drop-down menu.
3. In the list of tables, select DEMO_TEAM_MEMBERS.
4. Click the Data tab. The Data tab displays the raw information of theDEMO_TEAM_MEMBERS table.
Note: You can also click the Edit icon on the Data report to edit the currentdata directly. However, leave the data unchanged for now.
5. In the left pane, click Tables to view a drop-down list and select Packages.
A list of all packages present in your workspace schema displays.
6. Select DEMO_PROJECTS_DATA_PKG.
7. Select the Body tab to review the primary PL/SQL code that you executed topopulate your data.
This package includes complex PL/SQL code to insert images and replicate usersentering in records. It is not important that you understand the PL/SQL code inthis package, as you do not normally have to populate data in this matter.
Reviewing Output with Object Browser
Populating Your Workspace 3-7

Normally, you would create the tables with no data and then use the applicationyou build to insert the records.
8. When you finish, click the Oracle logo in the top-left of the page to return to theWorkspace home page.
You have fully populated your workspace and are ready to create a new application.
Proceed to the next lesson.
Reviewing Output with Object Browser
3-8 Oracle Application Express Tutorial: Building an Application

4Creating the Initial Application
About This Lesson
In this lesson, you use the Create Application Wizard to build the foundational pagesof your application based on the imported tables and data.
After you build the foundation of your app, use Page Designer’s Create Page Wizardto add a new page to an existing app and run the app for the first time.
4.1 Creating a New Application Using the Create Application WizardWith the tables populated, you are ready to create pages dedicated to each one withthe Create Application Wizard.
You can create many different types of pages from the tables with Create ApplicationWizard, such as Reports, Forms, and a Master Detail.
You learn more about each page type later in the tutorial, but here are some basics:
• Reports are pages that display the contents of a table.
• Forms enable users to modify a table.
• A master detail displays more than one table at a time, usually with a one-to-many relationship.
To create the initial application:
1. Click App Builder and select Create.
The Create Application Wizard appears.
Tip: You can also click the down arrow icon on the tabs at the top of thescreen to view a list of shortcuts to wizard and other pages.
2. Click Desktop.
3. In Name, enter Demo Projects and click Next.
Note: The Create Application Wizard creates a Home page automatically.
Often at the beginning of development, you only know some of the pages that yourapplication requires. You can save time by clicking Add Page to generate a batch ofapplication pages now instead of creating them one at a time later.
Each page appears in a list. You can also edit some attributes of each page by clickingthe Edit icon (pencil) or delete pages in this list view by clicking the Remove icon (X).
Next, you create an interactive report to enable your users to view and maintain theircontact information.
Creating the Initial Application 4-1

To add a report and form for the DEMO_TEAM_MEMBERS pages:
4. In the Create Application Wizard list view, click the Add Page button.
Edit the following:
a. Select Page Type - select Report and Form
b. Table Name - select DEMO_TEAM_MEMBERS
c. Report Type - select Interactive Report
d. Form Page Mode - select Modal Dialog
5. Click the Add Page button.
You return to the list view.
Notice that two pages appear in the list: a Report named Demo Team Members and aForm named Demo Team Members. Creating a report and form creates a pair ofpages with a parent-child relationship. For example, if you delete the report, theform is also deleted automatically (however, if you delete the Form, the Reportremains).
The Create Application Wizard automatically names new pages based on the name ofthe table. You should always ensure that the name of your pages makes sense to yourusers. In this case, remove the word "Demo" to avoid confusing your users.
To edit the name of the report in the Create Application Wizard:
6. Click the Edit icon (pencil) adjacent to Page 2, Demo Team Members.
The New Page Definition dialog appears.
7. In the Page Name field, change the name to Team Members and click ApplyChanges.
To edit the name of the form:
8. Click the Edit icon (pencil) adjacent to Page 3, Demo Team Members.
9. In the Page Name field, change the name to Maintain Team Member and clickApply Changes.
10. Verify that your list contains three pages:
• Page 1: Home Page, Type - Blank
• Page 2: Team Members, Type - Report
• Page 3: Maintain Team Member, Type - Form
Creating a New Application Using the Create Application Wizard
4-2 Oracle Application Express Tutorial: Building an Application

11. Click the Create Application button. On the confirmation page, click CreateApplication.
Application Express navigates to the Application home page in App Builder and an"Application created successfully" message appears.
You have completed generating the initial application.
4.2 Creating a Projects Page Using the Create Page WizardUse the Create Page Wizard to add new pages to an app. The Create Page Wizard hasa more sophisticated interface to make adding and pre-configuring complicated pagetypes easier (such as master detail or calendar).
Next, you want to add a project management page that your users can check forproject progress. Progress on projects is measured in milestones, so you need toconnect those two tables.
A master detail page reflects a one-to-many relationship between two tables. In thiscase, you want to show the relationship between the DEMO_PROJECTS and theDEMO_MILESTONES tables.
In addition to viewing progress on milestones and projects, you also want to give yourusers a way to edit the information themselves. A two page master detail is also pre-built like a report and form to give your users a way to edit the information.
To add a two page master detail page using the Create Page wizard:
1. On the Application home page for your Demo Projects application, click the CreatePage button.
Creating a Projects Page Using the Create Page Wizard
Creating the Initial Application 4-3

The Create Page Wizard appears.
2. For Select a Page Type, select Form.
3. Select Two Page Master Detail.
The Create Master Detail page appears.
4. Enter the following:
a. Master Page Number - enter 4
b. Master Page Name - enter Projects
c. Detail Page Number - enter 5
d. Detail Page Name - enter Maintain Project
e. Breadcrumb - select Breadcrumb
Note:
The names you entered into the page names populate automatically for theMaster Page Entry Name and Detail Page Entry Name fields.
f. Click Next.
5. For Navigation Preference, select Create a new navigation menu entry and clickNext.
6. For Master Source, enter the following:
a. Table / View name - select DEMO_PROJECTS (table)
b. Form Navigation Order - select CREATED (Timestamp(6) With Local TimeZone
Creating a Projects Page Using the Create Page Wizard
4-4 Oracle Application Express Tutorial: Building an Application

c. Click Next.
7. For Detail Source, enter the following:
a. Table / View Name - select DEMO_MILESTONES
b. Master Detail Foreign Key - select ID -> PROJECT_ID
8. Click Create.
Page Designer appears displaying the new page, Projects.
Page Designer is the comprehensive integrated development environment (IDE) forOracle Application Express. You explore Page Designer further in a future lesson. Fornow, you still have one more page to create.
4.3 Creating a Calendar Using the Create Page WizardUse the Create Page Wizard to add a calendar page so that your users can managetheir deadlines.
To add a calendar page with the Create Page Wizard:
1. On the Page Designer toolbar, click the Create menu (+) and select Page.
The Create Page Wizard appears.
2. For Select a Page Type, select Calendar.
The Page Attributes section appears.
3. For Page Attributes:
a. For Page Number, enter 6.
b. For Page Name, enter Calendar
c. For Breadcrumb, select Breadcrumb
d. Click Next.
4. For Navigation Preference, select Create a new navigation menu entry and clickNext.
5. For Source, enter the following:
a. Source Type - select Table
b. Table / View Name - select DEMO_TASKS (table)
c. Click Next.
6. For Settings, enter the following:
Creating a Calendar Using the Create Page Wizard
Creating the Initial Application 4-5

a. Display Column - select NAME
b. End Date Column - select END_DATE
7. Click Create.
Page Designer appears displaying the new Calendar page.
4.4 About Page DesignerUse Page Designer to develop and maintain the individual pages of your applicationin Oracle Application Express. Page Designer is a powerful integrated developmentenvironment (IDE) designed to provide developers with everything they need at theirfingertips with an array of panes and toolbars. Most of your time in this tutorial isspent in Page Designer.
Note:
This section is a condensed look at a very powerful tool. For more in-depthinformation about Page Designer’s capabilities, review the "Managing Pagesin Page Designer" chapter in the official Oracle Application Expressdocumentation Oracle Application Express App Builder User’s Guide.
Toolbar
At the top of Page Designer is the toolbar. The toolbar contains a number of buttonsand menus. You use the Page Selector, Undo Changes, Shared Components, Save,and Save and Run Page most often. You can hover your mouse cursor over a buttonto display its name in a tooltip.
About Page Designer
4-6 Oracle Application Express Tutorial: Building an Application

Page SelectorDisplays the current page. You can enter a page number directly, or click on thepopup list of values to select a page.
Page LockIndicates if the page is unlocked (clear), locked by you (green), or locked by anotherdeveloper (red). You can click on this icon to lock or unlock the page, providing it isnot locked by another developer.
Undo ChangesClick to undo the previous update you made within Page Designer.
Redo ChangesClick to reapply the last update that was undone using Undo Changes.
CreateCreate new pages, regions, shared components, developer comments and teamdevelopment entries.
UtilitiesPerform a check, delete, export, or review the history for the current page. You canalso access the attribute dictionary, application utilities or upgrade the application.
SettingsSwitch between two-pane and three-pane layouts or reset the page layout back todefault.
Team DevelopmentShow the Features, To Do’s, Bugs and Feedback entries for this page. You can alsodrill into filtered reports for each entry type.
Developer CommentsDrill into the developer comments entered for the current page, such as bugs or to-dos. You can also create new comments or delete comments from the modal windowthat is displayed.
Shared ComponentsNavigate to the Shared Components page.
SaveSave all changes you have made on the current page.
Save and Run PageSave all changes and then run the current page.
You cannot run modal and non-modal pages directly using Save and Run Page.Instead you need to navigate to a normal page and run the page from there, thennavigate to the modal or non-modal page within the running application.
Panes
Page Designer is divided up into different panes. Each pane is dedicated to a specificpurpose.
About Page Designer
Creating the Initial Application 4-7

Left Pane (Rendering Tree)Includes tabs for Rendering, Dynamic Actions, Processing, and Page SharedComponents. Each tab displays a list of the corresponding component types andcomponents created on the current page.
Right-click to access context sensitive menus. You can also drag components up anddown within the trees to change the position or sequence of the selected component.
Central PaneIncludes tabs for Layout, Component View, Messages, Page Search, and Help.
• Layout shows a visual representation of the page. You can add new componentsto a page by dragging them from the Gallery pane, at the bottom, and droppingthem in Layout.
• Component View groups user interface elements and application logic bycomponent type.
• Messages displays current errors and warnings. Clicking on a message changesthe focus within Property Editor to the corresponding attribute associated withthe error or warning.
• Page Search enables you to search for any text within the current page.
• Help displays attribute specific help. Click on the attribute name within PropertyEditor to see information and examples for that attribute.
Right Pane (Property Editor)Displays the Property Editor. Use the Property Editor to update attributes for theselected components.
When you select multiple components, the Property Editor only displays commonattributes. Updating a common attribute will update that attribute for all of theselected components.
4.5 Running the Application for the First TimeYour app is functionally ready to run.
When you "run" an app, you are telling Oracle Application Express to open a newbrowser window and render the app. The rendered app is called the "applicationruntime" (or just "runtime"). As you create new pages, you can run them individually,or run an entire application.
Run the app for the first time from Page Designer and view the application runtime.
To run the application from Page Designer:
1. Click the Save and Run Page button on the toolbar.
A Log In page appears.
Running the Application for the First Time
4-8 Oracle Application Express Tutorial: Building an Application

2. Enter your Application Express credentials and click Log In.
Your application opens to the Calendar page.
Explore the application by clicking on menu items and navigating to different pages inthe navigation pane. The sample tables and data display on various pages in a rawformat. The rest of this tutorial guides you through the development process toimprove both the presentation and functionality of this data for your end users.
Tip:
From this point on, you can load a different script from the .zip file to start atthe beginning of any of the following chapters. This is useful for skippingahead or around, or double-checking your work like an answer key.
Proceed to the next lesson.
Running the Application for the First Time
Creating the Initial Application 4-9

Running the Application for the First Time
4-10 Tutorial: Building an Application

5Developing the Home Page
Use Page Designer to create a chart of project tasks and a report that detailsoutstanding tasks on your app’s home page.
About This Lesson
In this lesson, you are introduced to the two primary means of development: PageDesigner and the Application Runtime ("runtime " for short).
In Page Designer, use the Rendering tree and Layout tab to add new regions to theHome page. Then, use the Property Editor to edit a wide array of attributes for regionand page components, including SQL statements and appearance options.
In the runtime, you use the Developer Toolbar to make changes on the pageimmediately and to quickly shift back to Page Designer.
You also use the Shared Components section, which contains elements that you cancreate once then add to multiple pages within your application after you create them,to update the placeholder icons in the Navigation Menu.
Starting from here: Basic Projects App Export - Topic 3.sql
If you have not completed the previous lessons, you can use the appendix"Importing an Application into a Workspace (page A-1)" to import the aboveSQL script into your workspace and continue working from this lessonforward. You can find this script in the /files subdirectory of where youunzipped the .zip file accompanying this tutorial.
5.1 Navigating to Page Designer from the Application RuntimeAt the end of the previous lesson, you ran the application from Page Designer. Doingso opened the Calendar page of the application runtime in a window in your webbrowser.
Note that when you run a desktop application from App Builder, the RuntimeDeveloper toolbar displays at the bottom of any editable running page:
You can use the Developer toolbar to quickly edit the current application or currentlyrunning page. The Developer Toolbar only appears for you and other users withdeveloper-level privileges.
Developing the Home Page 5-1

To begin developing the Home page, you could go back to Page Designer and find theHome page in App Builder—or, you can take a shortcut with the Developer Toolbar inthe runtime.
To navigate back to the Home page in Page Designer with the Developer Toolbar:
1. In the top-left of the application runtime, do one of the following:
• Click the name of the app Demo Projects.
• Click the Home link in the sidebar. (Do not click Home on the DeveloperToolbar.)
The Home page appears, which is blank.
2. On the Developer Toolbar, click Edit Page 1.
Note: The number in the Edit Page # button corresponds to its assigned pagenumber in Page Designer.
Your browser switches back to the Page Designer window automatically.
5.2 Adding a Task Overview Chart to the Home PageBack in Page Designer, you are looking at the bare skeleton of the Home page. Createa chart of the remaining tasks for all projects for your users to see immediately whenthey log in.
Below the Layout tab is the Gallery, which has three tabs: Regions, Items, and Buttons.Each Gallery tab contains elements that can be added to an application page by right-clicking the element and selecting the Add To function to place it.
Page Designer features several ways for you to interact with the page content,including dragging objects with the mouse in the Layout tab.
To add a chart to a page:
1. In Page Designer, click the Regions tab in the Gallery.
2. Locate the Chart element.
3. Right-click Chart, select Add To, and select Content Body.
Tip: You can also drag and drop content from the Gallery into the Layout.When you drag the region up and hover over the small yellow section belowContent Body, the yellow section expands. A darker yellow section with ablack box around it indicates where the region appears.
Tip:
Undo a previous action by clicking the Undo button.
Adding a Task Overview Chart to the Home Page
5-2 Oracle Application Express Tutorial: Building an Application

5.3 Editing a Chart Region with the Property EditorNext, you must configure the chart region, which includes updating things such as thename.
You must update a number of attribute fields in the Property Editor every time youconfigure a new region. The more complex the region, the more fields you mustconfigure. Some fields already contain default placeholder content, such as Title - New.
Select the chart region and edit its default values in the Property Editor.
To change the name of a chart region:
1. In the Rendering tree under Content Body, click the New chart to select it.
2. In the Property Editor, locate the Identification group.
Tip:
Attributes are organized into functional groups. To expand or collapse thesegroups, click the Show Common, Show All, Collapse All, and Expand Allicons.
To search for an attribute, enter a keyword search in the Filter Properties field.The groups and attributes containing the term appear.
3. For Title, enter Project Tasks and press Enter.
The name of the region updates in the Rendering tab and Layout.
Also note that a marker (blue triangle) appears near the group name after youchanged it. These markers appear next to fields with unsaved changes. You stillhave additional changes to make to the region, so complete those before saving.
Note: Fields in the Property Editor also update automatically if you clicksomewhere else within Page Designer.
Next, resize the chart by editing the appearance template in the Property Editor.
To change the Template Options of a region:
4. In the Property Editor, locate Appearance - Template Options.
Editing a Chart Region with the Property Editor
Developing the Home Page 5-3

Tip:
Click the Go to Group icon to view all the groups currently listed in theProperty Editor. Select the name of a group in the list to jump to it in theProperty Editor.
You can also use the search filter at the top of the Property Editor to narrowthe displayed fields, or Ctrl + F or Cmd + F to use your browser’s searchfunction to find items in Page Designer.
5. Click the Template Options button (Use Template Defaults, Scroll - Default).
Editing a Chart Region with the Property Editor
5-4 Oracle Application Express Tutorial: Building an Application
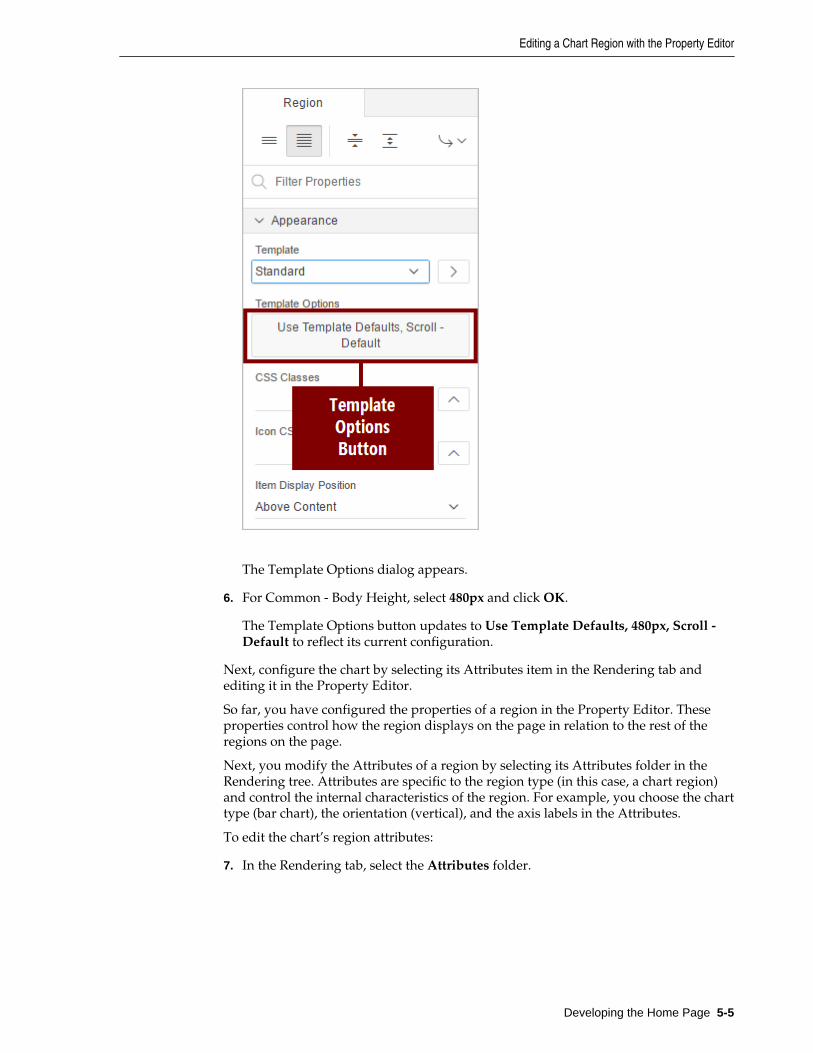
The Template Options dialog appears.
6. For Common - Body Height, select 480px and click OK.
The Template Options button updates to Use Template Defaults, 480px, Scroll -Default to reflect its current configuration.
Next, configure the chart by selecting its Attributes item in the Rendering tab andediting it in the Property Editor.
So far, you have configured the properties of a region in the Property Editor. Theseproperties control how the region displays on the page in relation to the rest of theregions on the page.
Next, you modify the Attributes of a region by selecting its Attributes folder in theRendering tree. Attributes are specific to the region type (in this case, a chart region)and control the internal characteristics of the region. For example, you choose the charttype (bar chart), the orientation (vertical), and the axis labels in the Attributes.
To edit the chart’s region attributes:
7. In the Rendering tab, select the Attributes folder.
Editing a Chart Region with the Property Editor
Developing the Home Page 5-5

8. In the Property Editor:
• Appearance: Orientation - select Horizontal
• Appearance: Stack - select Yes
• Layout: Height - enter 480
Note: Attributes within the Property Editor are organized into groups. TheProperty Editor bulleted lists specify Group: Attribute - Action to make it easierto locate the given attribute.
Next, add the required SQL query to supply the data of the chart.
5.4 Defining the SQL Query of a ChartFinally, you must define the SQL query of the chart to pull in data from theDEMO_PROJECTS table in the database.
The SQL query is the dynamic part of the chart. As your users update their progress inthe app, the chart reflects those changes and updates each time that a user refreshesthe page.
You define two queries for this chart. Both query the IS_COMPLETE_YN column of theDEMO_TASKS table, but the first displays items marked Y (for yes) while the seconddisplays items marked N (for no). Your users populate the IS_COMPLETE_YN columnwhen they indicate whether a task is complete in the app.
Tip:
Data series are contained in the Series folder in the Rendering pane. Currently,the New series appears with a red X next to it.
This is an error message to indicate that a required element is definedimproperly (in this case, because you have not entered the query yet). Alsonote that the Messages tab of the central pane indicates that three systemmessages now appear. You can click the Messages tab to view the specificerrors and where they appear in Page Designer. In this case, all the messagesindicate that a required element for the chart’s data series is missing.
Defining the SQL Query of a Chart
5-6 Oracle Application Express Tutorial: Building an Application

To define the "Yes" SQL query for the Series item in the Rendering pane:
1. In the Rendering tab, under Series, click New.
2. In the Property Editor:
a. Identification: Name - enter Completed Tasks
b. Locate the Source: SQL Query field. Copy and paste the following code:
select p.created, p.id, p.name, count(t.id) tasksfrom demo_projects p, demo_tasks twhere p.id = t.project_idand nvl(t.is_complete_yn,'N') = 'Y'group by p.created, p.id, p.nameorder by p.created
c. Column Mapping: Label - select NAME
d. Column Mapping: Value - select TASKS
Next, add a second series to apply the second query. Because the queries are sosimilar, you can duplicate this series and make some minor tweaks instead of definingfrom scratch.
To duplicate the SQL query and reconfigure it:
3. In the Rendering tree, right-click the Completed Tasks series.
4. Select Duplicate.
The series "Completed Tasks_1" appears under the Series folder and is selected.
5. In the Property Editor:
a. Identification: Name - enter Incomplete Tasks
b. Locate the Source: SQL Query field. Copy the following code and paste it toreplace the current contents:
select p.created, p.id, p.name, count(t.id) tasksfrom demo_projects p, demo_tasks twhere p.id = t.project_idand nvl(t.is_complete_yn,'N') = 'N'group by p.created, p.id, p.nameorder by p.created
Note: The two series ("Completed Tasks" and "Incomplete Tasks") are definedby counting the DEMO_TASKS for each project record and using anappropriate WHERE condition.
Finally, update the axes with appropriate labels.
Defining the SQL Query of a Chart
Developing the Home Page 5-7

6. In the Rendering tree, nested under the Axes folder, click the x axis.
7. For Identification: Title, enter Projects.
8. Click the y axis.
9. For Identification: Title, enter Tasks.
10. Click Save on the Page Designer toolbar.
You have completed adding a chart for task overview.
5.5 Adding a Report of Outstanding Tasks to the Home PageThe chart you added provides an overview of all tasks for all team members, so it onlyprovides information that applies to all users, not individuals. To add a space thatshows your users their own outstanding tasks, you can add a classic report.
In Oracle Application Express , a report is the formatted result of an SQL query, whichmeans that Application Express pulls in live information from the database andpopulates it in a human-readable table. Some reports are read-only, and some areinteractive so that end users can manipulate or edit the data.
To add a classic report region:
1. In the Rendering tree, right-click Content Body and select Create Region.
A new region appears.
2. In the Property Editor, edit the region properties:
a. Identification: Title - enter My Outstanding Tasks
b. Identification: Type - select Classic Report
c. SQL Query - copy and paste the following:
select p.name project, t.name task, t.end_datefrom demo_tasks t, demo_projects p, demo_milestones m, demo_team_members tmwhere p.id = t.project_idand m.id = t.milestone_id (+)and tm.id = t.assignee and nvl(t.is_complete_yn, 'N') = 'N'and upper(tm.username) = upper(:APP_USER)order by t.end_date
Tip: The where condition of username = :APP_USER restricts the recordsto those assigned to the person running the application.
3. Click Save and Run Page. If prompted, log into the app.
5.6 Changing Region Appearance Using the Developer ToolbarIn Page Designer, you can update Template Options by clicking the Appearance:Template Options button in the Property Editor.
Adding a Report of Outstanding Tasks to the Home Page
5-8 Oracle Application Express Tutorial: Building an Application

Alternatively, as a developer, you can also update the display characteristics ofregions in the runtime environment by invoking Live Template Options with theDeveloper Toolbar.
You can click the Quick Edit option on the Developer Toolbar to change options andimmediately see the effects on the underlying region. Use Quick Edit to editindividual page components, such as regions, items, columns, or buttons.
After you click Quick Edit, a wrench icon appears in the top-right corner of thecomponent under your mouse cursor. You have two options:
• Click within a component to instantly return to Page Designer with the selectedcomponent in focus.
• Click the wrench icon to invoke the Live Template Options dialog for thecomponent and remain in the runtime.
Tip: To cancel a Quick Edit, click outside a component or press Esc.
To edit page elements in the runtime with the Developer Toolbar:
1. On the runtime Developer Toolbar, click Quick Edit.
2. Hover over the My Outstanding Tasks region (bottom of the page) and click thewrench icon.
The Live Template Options dialog appears.
Changing Region Appearance Using the Developer Toolbar
Developing the Home Page 5-9
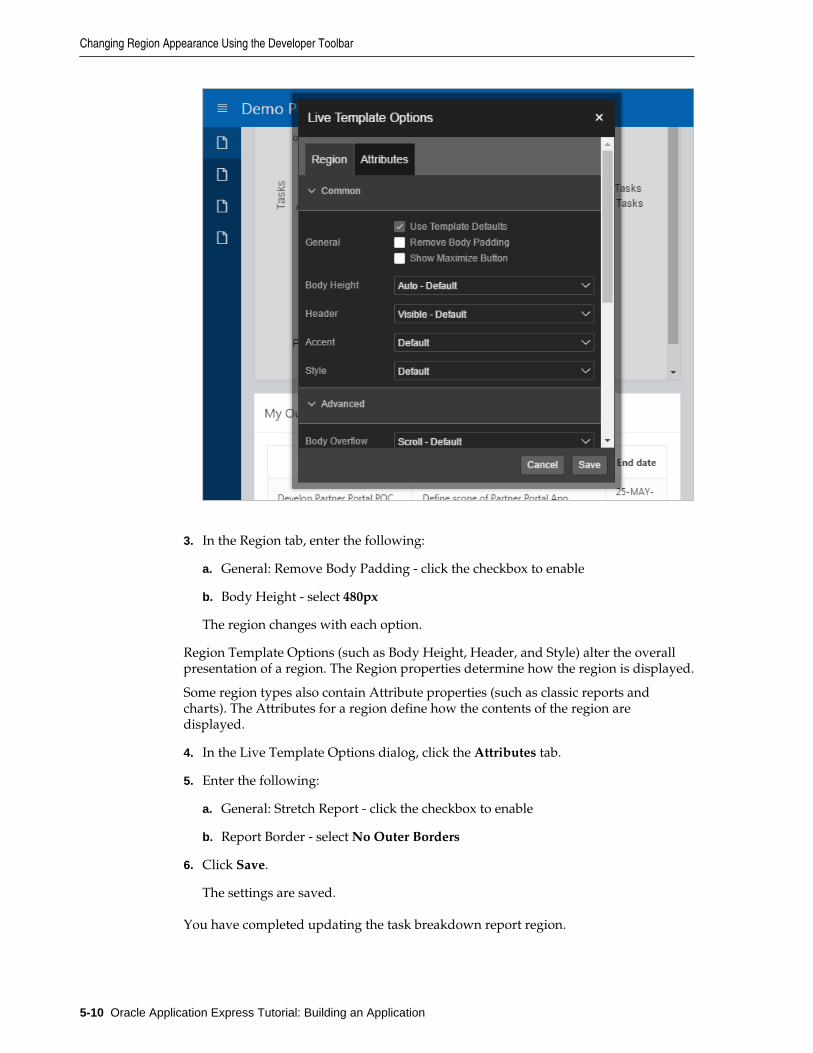
3. In the Region tab, enter the following:
a. General: Remove Body Padding - click the checkbox to enable
b. Body Height - select 480px
The region changes with each option.
Region Template Options (such as Body Height, Header, and Style) alter the overallpresentation of a region. The Region properties determine how the region is displayed.
Some region types also contain Attribute properties (such as classic reports andcharts). The Attributes for a region define how the contents of the region aredisplayed.
4. In the Live Template Options dialog, click the Attributes tab.
5. Enter the following:
a. General: Stretch Report - click the checkbox to enable
b. Report Border - select No Outer Borders
6. Click Save.
The settings are saved.
You have completed updating the task breakdown report region.
Changing Region Appearance Using the Developer Toolbar
5-10 Oracle Application Express Tutorial: Building an Application

5.7 Adding Icons to the Home Page SidebarThe icons next to the navigation links in the sidebar on the top-left of the page areblank placeholders (you may need to click the menu icon to expand the sidebar). Thissidebar is a list named the Navigation Menu. As a developer, you should be concernedwith both the form and function of your app. While the icons and links in theNavigation Menu are technically functional, updating the placeholder icon for eachlink to a relevant graphic increases your app’s usability.
All instances of Oracle Application Express come with a large set of icons ready to usefor this purpose.
You can update these icons assocaited with the Navigation Menu by editing the list inthe Shared Components section of App Builder. Shared Components are objects thatcan be used across an application. As a best practice, Oracle recommends that youdefine code once in a shared component wherever possible and then reference thatcomponent on different pages.
To update the Navigation Menu icons in Shared Components:
1. On the Developer Toolbar in the application runtime, click Application ####(where #### represents your application ID).
The Application home page appears.
2. Click Shared Components.
3. Under Navigation, click Lists.
4. In the Lists report, select Desktop Navigation Menu.
5. In List Details report, select Home.
6. Locate the Image/Class item. At the end of the field, click the up arrow icon (^).
The Images library opens in a separate window.
Review the images provided by the Font APEX library (abbreviated with the prefix"fa-"). These images can be used throughout the application to improve aestheticsand provide visual indicators rather than text only.
7. Locate and click fa-home.
Tip: You can use your browser’s search function (Ctrl + F or Cmd + F) tosearch the page.
The name of the image (fa-home) appears in the Image/Class field.
If this were the only change you need to make, you would click the Apply Changesbutton to save your changes; however, you still need to update the rest of theNavigation Menu entries.
You can also enter the name of the image in Image/Class rather than browse theImages library every time.
8. To update the remaining entries in the Navigation Menu:
a. In the top-left of the screen, click the Next icon (>) to navigate to the next entry(Team Members).
Adding Icons to the Home Page Sidebar
Developing the Home Page 5-11

b. On the Team Members list entry, for Image/Class enter fa-users
c. Click the Next icon (>).
d. On the Projects list entry, for Image/Class enter fa-folder
e. Click the Next icon (>).
f. On the Calendar list entry, for Image/Class enter fa-calendar
9. Click Apply Changes.
10. In the top-right of the List Details page, click the Run Page 1 icon (play button ).
The Home page reloads.
11. Review the new icons in the Navigation Menu on the left side of the screen.
12. When you are finished, return to the Shared Components - List Details windowand click Application #### in the page breadcrumbs to return to the Applicationhome page.
You have completed the Home page.
In this lesson, you learned how to use Page Designer to add and enhance pagecomponents on a page. You also used Live Template Options to improve theappearance of regions. Finally, you used Shared Components to update a componentthat appears on all pages (Navigation Menu).
Proceed to the next lesson.
Adding Icons to the Home Page Sidebar
5-12 Oracle Application Express Tutorial: Building an Application

6Developing the Team Member Pages
Develop the Team Member report generated by the Create Page Wizard into a usefuldirectory of team members, then develop the Team Member form so that your userscan edit the Team Member data more easily.
About This Lesson
You used the Create Application Wizard to generate a report and form for theDEMO_TEAM_MEMBERS table.
In this lesson, you use Page Designer to develop a common pair of pages: a report andform. reports are the formatted results of an SQL query; forms are pages paired withreports that enable users to update the table that the report queries. (Typically, a formis a child page to a parent report page.) Both pages query the DEMO_TEAM_MEMBERStable.
The Team Members report serves as a repository for your users’ contact information,whereas the Team Members form is a separate page that users can open to update theinformation in the Team Members report.
You develop the report page by updating the list of queried columns in the SQL query,updating the Primary report by removing some of the columns that are displayed inthe runtime, and moving a button on the page and editing its text.
When the Create Application Wizard creates a report and form, forms appear in theruntime by default as modal dialogs. A modal dialog is an overlay window thatdisplays within the same browser window. It remains active and focused until theuser finishes with it and closes it.
For the form page, you update the appearance and function of the fields from theCreate Page Wizard defaults, including the addition of a required condition to somefields and configure some Display Only items. You also add a sub region that userscan expand if necessary to view information that is used less frequently.
Starting from here: Basic Projects App Export - Topic 4.sql
If you have not completed the previous lessons, you can use the appendix"Importing an Application into a Workspace (page A-1)" to import the aboveSQL script into your workspace and continue working from this lessonforward. You can find this script in the /files subdirectory of where youunzipped the .zip file accompanying this tutorial.
6.1 Editing the SQL Query of an Interactive ReportEnd users can manipulate the data in interactive reports in Oracle Application Expressfor their own requirements, rather than needing you (the application developer) todefine numerous reports. To enable end users to manipulate what data is shown and
Developing the Team Member Pages 6-1

how it is displayed, you must define the SQL statement to retrieve all of the data fromthe underlying Oracle Database tables.
Use the Code Editor in Page Designer to edit the interactive report SQL to querycolumns in the DEMO_TEAM_MEMBERS table. This enables users to do things suchas view other users’ tasks and update their own workflow.
To edit the Team Members interactive report in Page Designer:
1. On the Application home page, click 2 - Team Members to navigate to Page 2.
2. In the Rendering tree, select the Team Members region.
3. In the Property Editor under Source: SQL Query, click the Code Editor icon.
4. In the Code Editor, delete the current contents, then copy and paste the followingcode:
select"ID","USERNAME","FULL_NAME","EMAIL","PROFILE","CREATED","CREATED_BY","UPDATED","UPDATED_BY" from "DEMO_TEAM_MEMBERS"
5. Click the Validate icon (checkmark) to confirm that the SQL statement is valid.
6. Click OK.
You have updated the SQL query of the interactive report.
6.2 Changing Which Columns Display in an Interactive Report in theRuntime
While the SQL statement of the interactive report must query all the above columns tofunction, displaying all of them in the interactive report hinders your users. Columnssuch as ID, CREATED, and CREATED_BY, exist primarily to inform you, not the enduser.
Use the Actions menu in the runtime to configure the Primary report of the interactivereport to change which columns end users can access.
To change which columns display in the interactive report:
Changing Which Columns Display in an Interactive Report in the Runtime
6-2 Oracle Application Express Tutorial: Building an Application

1. In Page Designer, click the Save and Run Page button.
a. Click Try Again if prompted with a message about focusing the page.
The runtime opens or refreshes in a separate browser window.
2. In the runtime, click the Actions menu button adjacent to the search bar.
3. Select Columns.
The Select Columns dialog displays.
4. In the Display in Report column, hold the Ctrl key and click the following items toselect multiple items:
• Id
• Username
• Created
• Created By
• Updated
• Updated By
5. Click the Remove button ( < ) located between the column panes.
6. Click Apply.
You can also improve the report’s usability by setting the default order of the table tothe alphabetic order of the Full Name column.
To sort the order of the rows by Full Name:
7. Click the Full Name column heading to open the Column Heading menu and clickthe Sort Ascending icon.
Changing Which Columns Display in an Interactive Report in the Runtime
Developing the Team Member Pages 6-3

Finally, you must save the report to preserve these changes to the Primary report ofthe interactive report (other report types include Private, Alternative, and Public).
All users can save a Private report, but only the developer can save a Primary report.A Primary report is the report that initially displays. A Primary report cannot berenamed or deleted by other users.
To save the current settings as the default:
8. Click Actions, select Report, and select Save Report.
9. For Save, select As Default Report Settings.
10. Verify the Default Report Type is Primary and click Apply.
Note: The Primary report is how all end users see the report when they firstaccess the page. You can save any number of alternative reports, which endusers can run by selecting from a drop-down list that is automaticallydisplayed once any additional report layouts are saved.
You have hidden several columns from view and changed the default sort order of theinteractive report.
6.3 Moving Buttons to a Different RegionThe Create Page Wizard added a CREATE button automatically to the interactivereport so that end users can add new members to the table quickly, but it would bemore appropriate to relocate the button to a different place.
Use the context menu in Page Designer to move the CREATE button to theBreadcrumbs region.
Tip:
You can also move items in the Layout via drag and drop.
Moving Buttons to a Different Region
6-4 Oracle Application Express Tutorial: Building an Application
Tip:
To undo a previous action, click the Undo button.
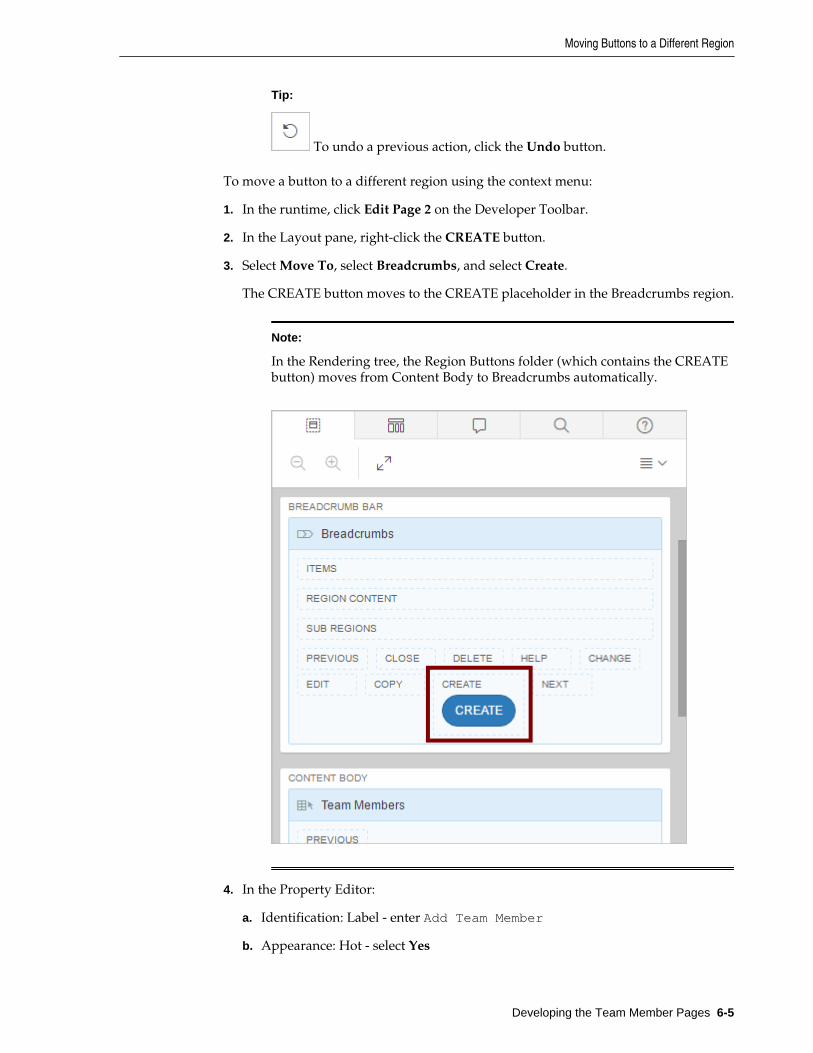
To move a button to a different region using the context menu:
1. In the runtime, click Edit Page 2 on the Developer Toolbar.
2. In the Layout pane, right-click the CREATE button.
3. Select Move To, select Breadcrumbs, and select Create.
The CREATE button moves to the CREATE placeholder in the Breadcrumbs region.
Note:
In the Rendering tree, the Region Buttons folder (which contains the CREATEbutton) moves from Content Body to Breadcrumbs automatically.
4. In the Property Editor:
a. Identification: Label - enter Add Team Member
b. Appearance: Hot - select Yes
Moving Buttons to a Different Region
Developing the Team Member Pages 6-5

5. Click Save and Run Page to review the changed button.
a. If the Focus Page dialog appears, click Try Again.
The runtime opens or refreshes in a separate browser window.
You have moved the Create button.
The Report portion of the Team Members Report and Form is complete. Next, youdevelop the Team Members Form.
6.4 Enabling Stretch Form Fields for a Modal DialogNext, develop the Maintain Team Member form for the Team Members report page.
The Maintain Team Member form is a modal dialog. Modal dialogs are treated asseparate pages in Page Designer because even though they behave like a page within apage, they can be as equally complex.
Begin by navigating to the form in Page Designer, then configuring the field widths inthe form’s Template Options so that the form looks cleaner and more consistent.
To stretch the width of all fields in a region:
1. In the runtime, click the Edit icon (pencil) next to a team member’s name to viewthe Maintain Team Member modal dialog.
2. Click Edit Page 3 on the Developer Toolbar to view the page in Page Designer.
3. Select the Maintain Team Member region.
4. In the Property Editor, locate Appearance: Template Options and click theTemplate Options button (Use Template Defaults).
5. In Template Options:
• Advanced: Item Width - select Stretch Form Fields
6. Click OK.
The Template Options button changes to "Use Template Defaults, Stretch FormFields."
6.5 Updating Form Fields to and TextareaThe Create App Wizard automatically populated this page with fields based on thecolumns of the DEMO_TEAM_MEMBERS table. Technically, the fields are all functioningand displaying correctly; however, your users would benefit from the followinginterface changes:
• Require users complete certain fields, such as username. This is common and agood practice. The NOT NULL constraint enforces a column to NOT accept NULLvalues. This enforces a field to always contain a value, which means that youcannot insert a new record, or update a record without adding a value to thisfield.
• Increase the size of the Profile field to encourage users to provide information.This field serves as a description of their roles and duties on the team.
Enabling Stretch Form Fields for a Modal Dialog
6-6 Oracle Application Express Tutorial: Building an Application

• Change the label of Photo Blob.
• Hide the unnecessary fields from view to reduce clutter.
To change the Username and Full Name fields to required (so that users cannot leavethem blank):
1. Press and hold the Ctrl key and click P3_USERNAME and P3_FULL_NAME toselect both of them.
2. In the Property Editor:
a. Appearance: Template - select Required
b. Validation: Value Required - select Yes
The Username and Full Name fields are now required.
The Profile field is where users enter biographical information, so it should supportthe display of multiple lines of text. To convert it to a Textarea:
3. Select P3_PROFILE.
4. In the Property Editor:
a. Identification: Type - select Textarea
The Profile field now displays as a paragraph instead of a single line.
To change the label of the “Photo Blob” field:
5. Select P3_PHOTO_BLOB.
6. In the Property Editor:
a. Label: Label - enter Photo
The field now is now labeled "Photo".
Several fields are completely unnecessary for users when they update their profile.
To hide fields from view:
7. Press and hold the Ctrl key to select only the four following items (do not selectP3_PHOTO_BLOB):
• P3_PHOTO_FILENAME
• P3_PHOTO_MIMETYPE
• P3_PHOTO_CHARSET
• P3_PHOTO_LAST_UPDATED
8. In the Property Editor:
a. Identification: Type - select Hidden
The filename, mimetype, charset, and last updated fields of the photo are hiddenfrom view in the runtime.
Updating Form Fields to and Textarea
Developing the Team Member Pages 6-7

Tip: You can also use the Quick Pick button to choose from a short list of themost commonly used types rather than viewing the entire list.
Note: When you select multiple components, the Property Editor identifiescommon attributes with a blue triangle adjacent to the attribute name andoutlines the attribute field in blue. If all of the selected components have thesame Attribute Value, then the name and value display normally; if all thevalues do not match, the field is blank.
6.6 Creating an Expandable Sub RegionSome details (such as timestamps) can be useful, but most of the time your users donot need to see them. You can group them into an "Audit Details" sub region topreserve them for future use but still save space in the form.
To create a collapsible sub region:
1. In the Rendering tree, right-click Maintain Team Member region and select CreateSub Region.
The New sub region appears within the Sub Regions folder.
2. In the Property Editor:
a. Identification: Title - enter Audit Details
b. Appearance: Template - select Collapsible
To move audit columns into the Audit Details sub region with the Property Editor:
3. Hold the Ctrl key and select the following items:
• P3_CREATED
• P3_CREATED_BY
• P3_UPDATED
Creating an Expandable Sub Region
6-8 Oracle Application Express Tutorial: Building an Application

• P3_UPDATED_BY
4. In the Property Editor:
a. Layout: Region - select ..Audit Details
Note:
The double periods are a shortening device for the names of sub regions in theinterface. Think of it as actually reading "Sub Region, Audit Details."
The items move into the sub region.
5. Click the Audit Details region.
6. Locate and click the Appearance: Template Options button (Use TemplateDefaults, Expanded, Scroll - Default).
7. In Template Options:
a. Default State - select Collapsed
b. Style - select Remove UI Decoration
8. Click OK.
9. In the Property Editor, click the Go to Group icon and select Server-sideCondition.
10. In the Property Editor:
a. Server-side Condition: Type - select Item is NOT NULL
b. Server-side Condition: Item - enter or select P3_ID
6.7 Restricting User Access with the Display Only Item TypeWhile it is acceptable for your users to view the information in the audit columns, theyshould never have permission to alter this system-generated data directly. You canrestrict users from editing these items by making them Display Only.
You should also verify this information is restricted in the runtime for securitypurposes.
To restrict users’ access to the audit columns in the region to Display Only:
1. Hold the Ctrl key and select the following items in the Audit Details sub region:
• P3_CREATED
• P3_CREATED_BY
• P3_UPDATED
• P3_UPDATED_BY
Restricting User Access with the Display Only Item Type
Developing the Team Member Pages 6-9
2. In the Property Editor:
a. Identification: Type - select Display Only
When you are editing a modal dialog in Page Designer, the Save and Run button onlysaves your changes; it does not navigate to the page in a new browser window. Youmust open modal dialogs in their parent page in the runtime.
3. Click Save.
To view the modal dialog in the runtime:
4. Do one of the following:
• Refresh the browser window containing the application runtime.
• In Page Designer, enter 2 in the Page Finder and press Enter to navigate to themodal dialog’s parent page. Click Save and Run. The runtime displays in anew browser window.
5. Click the Edit icon (pencil) adjacent to a user’s name to view the improved modaldialog.
6. When you are finished, click Application #### on the Developer Toolbar to returnto the Application home page.
You have completed updating the report and the form for the Team Members page.
In this lesson, you learned about interactive reports and how to edit their SQL queriesand Primary reports; how to relocate buttons to the Breadcrumbs region; update thefields of a modal dialog from their default settings; and create a sub region withDisplay Only items.
Proceed to the next lesson.
Restricting User Access with the Display Only Item Type
6-10 Oracle Application Express Tutorial: Building an Application

7Developing the Projects Pages
Develop the Projects report and form pages to support your users’ projectmanagement tasks.
About This Lesson
You used the Create Application Wizard to generate a report and form for theDEMO_PROJECTS table. This generated some default output similar to the raw Homeand Team Members pages in the previous lessons, except the Projects report uses aninteractive grid and the Projects form is a separate page (not a modal dialog).
The Maintain Project form is a master detail form (or "master detail" for short). Amaster detail reflects a one-to-many relationship between two tables in a database.Typically, a master detail form displays a master row and multiple detail rows withina single HTML form. With this form, users can insert, update, and delete values fromtwo tables or views.
In this lesson, you learn how to create a shared list of values (LOV) in SharedComponents and then add it to the report in Page Designer. You also tweak the reportto look more like the Team Members report for visual consistency.
For the form, you learn how to change the page directly in the runtime by using LiveTemplate Options with the Developer Toolbar. Then in Page Designer you learn howto create a static list of values, a dynamic action, and a validation.
Finally, you learn how to copy sub regions between pages in Page Designer.
Starting from here: Basic Projects App Export - Topic 5.sql
If you have not completed the previous lessons, you can use the appendix"Importing an Application into a Workspace (page A-1)" to import the aboveSQL script into your workspace and continue working from this lessonforward. You can find this script in the /files subdirectory of where youunzipped the .zip file accompanying this tutorial.
7.1 Updating the SQL Query and Displayed ColumnsBegin by updating the Projects report page by updating the SQL query ofDEMO_PROJECTS and reconfiguring the default displayed columns in the Primaryreport (similar to what you did for the Team Members pages).
Unlike the Team Members page, the Projects report page uses an interactive grid. Aninteractive grid is similar to an interactive report, but features more functionality tosupport more sophisticated interaction with data sets.
To update the SQL query and column display of an interactive grid:
Developing the Projects Pages 7-1

1. In the App Builder overview of your app, click 4 - Projects to open the Projectsreport in Page Designer.
2. In Page Designer, select the Projects region.
3. In the Property Editor:
a. Source: SQL Query - delete the current contents, then copy and paste thefollowing code:
select ID, NAME, DESCRIPTION, PROJECT_LEAD, COMPLETED_DATE, STATUS, CREATED, CREATED_BY, UPDATED, UPDATED_BY, (select count('x') from demo_milestones m where m.project_id = p.id ) milestones, (select count('x') from demo_tasks t where t.project_id = p.id ) tasksfrom DEMO_PROJECTS p
Note: The milestone and task statistics (lines 11 and 15, respectively) aredetermined using inner SQL select statements.
After you enter the SQL statement, when you change the page focus by clickingelsewhere on the page outside of the SQL Query field, Page Designer validates thecode automatically. If there is no error, the field displays normally with a bluetriangle to indicate an unsaved change. If an error is found, the area turns red inthe Property Editor and triggers an error message.
4. Click Save and Run Page.
a. If the Focus Page dialog appears, click Try Again.
To remove extraneous columns in the runtime:
5. In the application runtime, click Actions and select Columns.
The Columns dialog displays.
6. In the left-hand pane of the Columns dialog, deselect the box adjacent to followingcolumns to hide them from view:
• Id
• Created
• Created By
• Updated
Updating the SQL Query and Displayed Columns
7-2 Oracle Application Express Tutorial: Building an Application

• Updated By
7. Click Save.
The interactive grid refreshes with the chosen columns hidden.
Two columns are not sortable by default (Name and Description), so you shouldenable this function.
To enable sorting for a column in an interactive grid:
8. Click Edit Page 4 on the Developer Toolbar to return to Page Designer.
9. In the Rendering tree, under the Projects region, expand the Columns folder.
10. Press and hold the Ctrl key, then click the following items to select them:
• NAME
• DESCRIPTION
To find sort attributes in the Property Editor, enter a search in Filter Properties:
11. Above the Property Editor, click the Filter Properties field and enter sort.
The Property Editor displays only fields containing the "sort" string.
12. For Enable Users To: Sort/Control Break/Aggregate, select Yes.
13. Click Save.
7.2 Adding Names to the Project Lead Column with a Shared LOVIf you look at the runtime, you can see that the Project Lead column of the Projectsreport currently displays numeric identifiers instead of names of users. This istechnically accurate, but not user-friendly.
Adding Names to the Project Lead Column with a Shared LOV
Developing the Projects Pages 7-3

The Project Lead ID's are pulled from the DEMO_PROJECTS table. However, theDEMO_TEAM_MEMBERS table contains the names associated with each product lead ID.To convert the numeric IDs into the names of the team members, you must create aconnection between the two tables.
To connect the two tables to the Project Lead column, create a shared list of values(LOV) and add it to the Projects page interactive grid.
To access the Shared Components menu:
1. Do one of the following:
• In Page Designer, click the Shared Components icon (triangle, circle, square)adjacent to the Save button.
• In Page Designer, click Application #### to return to the overview of theapplication pages and click Shared Components.
To create a shared LOV:
2. Under Other Components, click List of Values.
3. Click Create.
The Create List of Values Wizard displays.
4. Verify that From Scratch is selected and click Next.
5. In the Name and Type section:
• Name - enter Team Members
• Type - select Dynamic
6. Click Next.
7. For Query, delete the current contents, and copy and paste the following code:
select full_name as display, id as returnfrom demo_team_membersorder by 1
8. Click Create List of Values.
The TEAM MEMBERS list of values appears.
9. Click the Edit Page 4 button on the toolbar to return to Page Designer.
Adding Names to the Project Lead Column with a Shared LOV
7-4 Oracle Application Express Tutorial: Building an Application

You have created the LOV. Next, add it to the PROJECT_LEAD column of the Projectsinteractive grid.
To add an LOV to a column in Page Designer:
10. In the Rendering tree, under the Projects region, expand the Columns folder.
11. Select the PROJECT_LEAD column.
12. In the Property Editor:
a. Identification: Type - select Select List
b. Heading: Alignment - select start
c. Layout: Column Alignment - select start
d. List of Values: Type - select Shared Component
e. List of Values: List of Values - select TEAM MEMBERS
f. List of Values: Display Extra Values - select No
g. List of Values: Null Display Value - enter - Select Project Lead -
You have added and configured the LOV to the PROJECT_LEAD column.
7.3 Updating the Appearance of the Projects Report PageThe Create Application Wizard generates buttons on pages for you automatically, butyou should always evaluate and reconfigure them as necessary to best suit your users.
Move the Create button to the Breadcrumb region (similar to what you did on theTeam Members report page).
Additionally, change the appearance template of the interactive grid to the one forinteractive reports for a consistent look across your app.
To move a button in Page Designer:
1. In the Layout tab, right-click the CREATE button.
2. Select Move To, select Breadcrumbs, and select Create.
Tip: You can also drag and drop the Create button from the Projects regioninto the Create Placeholder in the Breadcrumbs region.
3. In the Property Editor:
Updating the Appearance of the Projects Report Page
Developing the Projects Pages 7-5

a. Identification: Label - enter Add Project
You have updated the button.
To change the appearance template of the Projects region:
4. In the Rendering tree or Layout, select the Projects region.
5. In the Property Editor:
a. Appearance: Template - select Interactive Report
6. Click Save and Run Page to see the updated Create button in the runtime.
7.4 Customizing the Projects Report ColumnsIn the runtime, you should update the interactive grid that make it easier to read.
Prioritize the name of the project by freezing it in place on the page. Then move theDescription column to the end of the grid and apply a default sort rule to all columnswith the Data submenu in the Actions menu.
To freeze a column in an interactive grid:
1. Click Name (the heading of the Name column).
The Column Heading Menu appears.
2. Click the Freeze icon (snowflake).
The column freezes in place and a horizontal scroll bar appears under the rest ofthe columns. Now the Name column is always visible on the page.
Customizing the Projects Report Columns
7-6 Oracle Application Express Tutorial: Building an Application

To change the order of columns:
Tip: You can also drag and drop columns into place to reorder them byclicking and holding the Drag Handle that appears when you hover themouse cursor over a column heading.
3. Click the Actions button and select Columns.
The Columns dialog appears.
4. Click the Description column to select it.
5. Below the pane, click the move down button (down arrow) several times untilDescription appears at the bottom of the list (below Tasks).
6. Click Save.
To sort the records by their creation date:
7. Click the Actions button, select Data, then select Sort.
The Sort dialog appears.
8. In the Sort dialog:
a. Column - select Created
9. Click Save.
10. (Optional) Adjust the widths of all the columns as necessary so that none are toowide (such as Milestones and Tasks) nor too narrow (such as Description).
11. When you are finished, click the Actions button, select Report, and click Save.
The report saves your changes.
The Projects report page is complete. Next, develop the Projects form, MaintainProject.
7.5 Changing the Project Form Appearance with Live Template OptionsConsistency is important for your application’s usability. Update the properties of theProject form modal dialog to match the look and function of the Maintain TeamMember modal dialog. Some of this should seem familiar because you are applyingthe same set of settings from earlier in the tutorial to a new page.
Use the Live Template Options on the Developer Toolbar to modify the appearance ofthe form in the runtime, then switch to Page Designer for more elaborate changes(such as moving buttons and changing the condition of fields).
To navigate to the Maintain Project page:
1. On the Projects page in the runtime, click the Edit icon (pencil) adjacent to thename of any project.
The browser navigates to the Maintain Project form.
To update the page using Live Template Options:
2. On the Developer Toolbar, click Quick Edit.
Changing the Project Form Appearance with Live Template Options
Developing the Projects Pages 7-7

The page goes into Quick Edit mode.
3. Hover your mouse over the Maintain Project region (not the page title).
A wrench icon appears in the top-right corner.
4. Click the wrench icon.
The Live Template Options dialog appears.
5. In Live Template Options:
a. Header - select Hidden but accessible
b. Style - select Remove UI Decoration
c. Item Padding - select Slim Padding
The page updates with each change.
6. Click Save.
7.6 Updating the Project Form in Page DesignerFor the Projects report, you moved a Create button to the top-right of the page in theBreadcrumb region. Note that the same space is empty on the Maintain Project form.The default placement of a Create button in Page Designer is in the top-right corner ofthe page, but you can place any button in the placeholders (especially since nothing isthere now).
You also need to change some fields to required and add the TEAM MEMBERS LOVto the Project Lead field (similar to the changes you made to the Maintain TeamMember form).
Begin with the buttons.
1. On the Developer Toolbar, click Edit Page 5 to return to the page in Page Designer.
To move the navigation buttons for the project entries to the Create position:
2. In the middle of the Layout tab, locate the existing buttons near the bottom of theMaintain Project region (not the sub region).
Updating the Project Form in Page Designer
7-8 Oracle Application Express Tutorial: Building an Application

3. Press and hold the Ctrl key and click the following buttons to select both of them:
• GET_PREVIOUS_ROWID
• GET_NEXT_ROWID
4. In the Property Editor:
a. Layout: Region - select Breadcrumb
b. Layout: Button Position - select Create
The Previous and Next buttons move into the CREATE placeholder in theBreadcrumb region.
Note:
If you save and run the page, only the Next button appears when you viewthe first project in the list in the runtime because technically there is not aprevious entry in the list.
To make the Name field required:
5. In the Content Body region, select the P5_NAME item.
6. In the Property Editor:
a. Identification: Type - select Text Field
To add a LOV to the Project Lead field:
7. Select the P5_PROJECT_LEAD item.
8. In the Property Editor:
Updating the Project Form in Page Designer
Developing the Projects Pages 7-9

a. Identification: Type - select Select List
b. List of Values: Type - select Shared Component
c. List of Values: List of Values - select TEAM MEMBERS
d. List of Values: Display Extra Values - select No
e. List of Values: Null Display Value - enter - Select Project Lead -
Note: The P5_PROJECT_LEAD item uses the List of Values defined in SharedComponents in the Team Members lesson.
7.7 Creating a Static LOV of StatusesCurrently, your users must manually type one of the words "Assigned," "In-Progress,"or "Completed" into the Status field in order to update a project. This process is slowand prone to human error. You should convert this field to a selectable list of options.
Earlier you created a dynamic list (TEAM MEMBERS) that queries two tables toreplace numeric identifiers in the Project Lead fields with names. You can use thesimpler static list element for the Project status list because the Status information canbe contained in a single table.
Create and apply a list of possible options to the Status field in the Maintain Projectform.
To define a list with static values:
1. In the Layout or Rendering tree, select the P5_STATUS item.
2. In the Property Editor:
a. Identification: Type - select Select List
b. List of Values: Type - select Static Values
c. List of Values: Static Values - delete the current contents, then enterSTATIC2:Assigned,In-Progress,Completed
Note: Specifying STATIC2 displays the records in the order entered, ratherthan alphabetically.
d. List of Values: Display Extra Values - select No
e. List of Values: Display Null Values - select No
A good business practice is to require users to input a date for when a project isupdated to "Completed."
To make the Completed Date required when a project status is changed to Completed:
3. Select the P5_COMPLETED_DATE item.
4. In the Property Editor:
a. Appearance: Template - select Required
Creating a Static LOV of Statuses
7-10 Oracle Application Express Tutorial: Building an Application

Often when an item is required, you update Appearance: Template to Required andthe Validation: Value Required to Yes in the Property Editor. However, do not changethe Value Required attribute because the item is only mandatory when the status isCompleted, not for the other statuses.
Next, add a custom validation later to accommodate this business rule.
7.8 Creating a Dynamic ActionDynamic Actions within Oracle Application Express are used to declaratively defineclient-side behaviors without writing JavaScript or AJAX. Instead, the ApplicationExpress engine implements the necessary code based on your declaration.
Add a Dynamic Action to the P5_STATUS item so that when it is set to Completed ittriggers the Completed Date field to display.
To create a Dynamic Action:
1. In the Rendering tree, right-click the P5_STATUS item and select Create DynamicAction.
A Dynamic Actions folder populates as a child to P5_STATUS.
2. In the Property Editor:
a. Identification: Name - enter Show Completed Date
b. Client-side Condition: Type - select Item = Value
c. Client-side Condition: Value - enter Completed
Important: The capitalization and spelling of the When: Value attribute mustmatch the data entry value exactly in order for the dynamic action to fire.
3. In the Rendering tree, under the Show Completed Date dynamic action, expand theTrue folder and select Show.
4. In the Property Editor:
a. Affected Elements: Items(s) - select P5_COMPLETED_DATE
For Dynamic Action types such as Show, Enable, and Expand Tree, it is important toalso include the corresponding opposite action. In that way the affected elements areset one way if the When Condition evaluates to True and the opposite if the WhenCondition evaluates to False. Here, the P5_COMPLETED_DATE item is shown whenP5_STATUS equals Completed, and is hidden when any other status is selected. Toadd an opposite action:
5. In the Rendering tree, right-click Show.
6. Select Create Opposite Action.
7.9 Adding a Validation for the Completed DateAdd a validation for the Completed Date so that when a user changes the status toCompleted, they must also add the Completed Date.
Creating a Dynamic Action
Developing the Projects Pages 7-11

To add a validation for the Completed Date:
1. On the Maintain Project page in Page Designer, select the Processing tab (twoarrows chasing one another) above the Rendering tree.
2. Right-click the Validating folder and select Create Validation.
3. In the Property Editor:
a. Identification: Name - enter Completed Date is Not Null
b. Validation: Type - select Item is NOT NULL
c. Validation: Item - select P5_COMPLETED_DATE
d. Error: Error Message - enter #LABEL# must have some value
e. Error: Associated Item - select P5_COMPLETED_DATE
f. Server-side Condition: Type - select Item = Value
g. Server-side Condition: Item - select P5_STATUS
h. Server-side Condition: Value - enter Completed
Note: The #LABEL# text within the Error Message will be substituted withthe label of the associated item. If the item label is updated the error messagealso reflects the updated value. This improves consistency and ensures thatmessages have up-to-date label references.
Tip: After you click within the Error Message field, you can click the Help tabin the Central Pane to view examples of error messages. You can also view theHelp tab for example entries for other attributes too.
Adding a Validation for the Completed Date
7-12 Oracle Application Express Tutorial: Building an Application

Note: This condition ensures that the validation only fires when the Statusitem is Completed.
To add a Validation for Completed Date is not Forward Dated:
4. Right-click the Validating folder and select Create Validation.
5. In the Property Editor:
a. Identification: Name - enter Completed Date is not Forward Dated
b. Validation: PL/SQL Expression - enter :P5_COMPLETED_DATE <= sysdate
c. Error: Error Message - enter #LABEL# cannot be forward dated
d. Error: Associated Item - select P5_COMPLETED_DATE
e. Server-side Condition: Type - select Item is NOT NULL
f. Server-side Condition: Item - select P5_COMPLETED_DATE
6. Click Save.
7.10 Copying a Sub Region to a Different PageIn an earlier topic you created a sub region called Audit Details for the Maintain TeamMember form. Since the four items included in that region are the same as those on theMaintain Project page and are associated with the exact same database columns, youcan copy them to the Maintain Project form and save some time. Copying the regionalso copies the previously defined template and template options.
First delete the four existing audit detail columns on the Maintain Project form, thencopy the Audit Details sub region from the Maintain Team Member form to theMaintain Project form and modify it to fully suit its destination.
Note: If you do not delete the audit columns, the item names in the copiedAudit Details region are renamed with a unique name to ensure all page itemshave unique names (for example, when P5_CREATED is copied to itsdestination, it is renamed to P5_CREATED_1). While this automatic renamingdoes not break the page processing, Oracle does not recommend thisapproach.
To delete the four existing audit items on Maintain Project form:
1. In the Layout tab, press and hold the Ctrl key and click the following items to selectthem:
• P5_CREATED
• P5_CREATED_BY
• P5_UPDATED
• P5_UPDATED_BY
2. Do one of the following:
Copying a Sub Region to a Different Page
Developing the Projects Pages 7-13

• Right-click one of the items and select Delete.
• Press the Delete key.
3. Click Save
To copy the Audit Details sub region from Page 3 to Page 5:
4. In Page Designer, navigate to Page 3.
5. Click the Rendering tab.
6. In the Rendering tree, right-click the Audit Details sub region and select Copy toother Page...
7. In the Copy Region dialog:
a. To Page - enter 5
b. Copy Region Items - select Yes
8. Click Next.
9. Click Copy.
10. Navigate back to Page 5 to confirm the Audit Details sub region copied to page 5Content Body as a region (not a sub region).
To update the Audit Details sub region for the Maintain Project form:
Copying a Sub Region to a Different Page
7-14 Oracle Application Express Tutorial: Building an Application

11. On page 5, in the Rendering tree or Layout, select the Audit Details region.
12. In the Property Editor:
a. Layout: Parent Region - select the first Maintain Project
13. Click Save and Run Page.
14. Try out these functions to see how the page responds:
• Change the Status and see how the Completed Date is shown or hiddendepending on the status selected.
• Save a record with a Status of Completed and no Completion Date - An errormessage should display.
• Save a record with a Completion Date in the future - An error message shoulddisplay.
15. When you are finished, click Application #### on the Developer Toolbar to returnto the Application home page.
Copying a Sub Region to a Different Page
Developing the Projects Pages 7-15
You have made substantial revisions to the Projects report and Maintain Project form.In the next lessons, you add more regions to the form so that users can view moredetails of the project and further control their project management.
Proceed to the next lesson.
Copying a Sub Region to a Different Page
7-16 Oracle Application Express Tutorial: Building an Application

8Developing the Maintain Project Form
Regions
Update the Milestone region and create the Tasks region on the Maintain ProjectForm.
About This Lesson
In the previous lesson, you developed the Maintain Project form to include things suchas required fields and validations for modifying the DEMO_PROJECTS table to updateproject progress.
In this lesson, you learn to develop two regions on the Maintain Project form page:Milestones and Tasks. Both regions function as detail regions.
For the Milestones detail region, you update an existing interactive grid on the pagewith some basic updates that you learned in previous lessons, such as renaming theregion in Page Designer, isolating audit details, and updating the Live Templateoptions in the runtime. This interactive grid queries the DEMO_MILESTONES table.
For the Tasks detail region, you learn how to add an editable interactive grid in PageDesigner by creating an interactive grid region and then converting it to be editable.Then you learn how to improve use of the columns in an editable interactive grid byconverting the Milestone and Assignee columns each into a select list, the Namecolumn into a text field, and the Is_Complete? column into a switch.
You also learn how to add a region display selector to toggle which regions aredisplayed in the runtime.
Finally, you update both of the Milestones and Tasks region Live Template Options inthe runtime.
Starting from here: Basic Projects App Export - Topic 6.sql
If you have not completed the previous lessons, you can use the appendix"Importing an Application into a Workspace (page A-1)" to import the aboveSQL script into your workspace and continue working from this lessonforward. You can find this script in the /files subdirectory of where youunzipped the .zip file accompanying this tutorial.
8.1 Updating the Milestones Interactive GridIn addition to the DEMO_PROJECTS table, the app also contains theDEMO_MILESTONES and DEMO_TASKS tables. These two tables contain data forincremental milestones and tasks that help to track the progress of an entire projectmore precisely.
Developing the Maintain Project Form Regions 8-1

Currently, your app only supports changes to the status of entire projects. Modify thesecond Maintain Project interactive grid so that your users can view and change thestatus of these tasks and milestones.
Begin by updating the second interactive grid on page 5 which queries theDEMO_MILESTONES table .
To navigate to the Maintain Project form:
1. From the Application home page, click 5 - Maintain Project .
To rename the second Maintain Project region (the name was inherited from a copyprocedure in an earlier lesson):
2. Scroll to the bottom of the Rendering tree or Layout tab, and click the MaintainProject sub region (note the italicized name).
3. In the Property Editor:
a. Identification: Title - enter Milestones
The Milestones region contains several columns that your users do not really need.One can be hidden from end users entirely (ID), while the rest are audit details thatcan be useful, but should not be altered by end users.
Note: Oracle recommends hiding columns rather than deleting them in caseyou need them in the future.
To change how the columns display:
4. In the Rendering tree under Milestones, expand the Columns folder.
5. Select the ID column.
6. In the Property Editor:
a. Identification: Type - select Hidden
7. In the Rendering tree, click the Created column to both select it and deselect the IDcolumn. Press and hold the Ctrl key and to select the following columns:
• Created
• Created By
• Updated
• Updated By
Updating the Milestones Interactive Grid
8-2 Oracle Application Express Tutorial: Building an Application

8. In the Property Editor:
a. Identification: Type - select Display Only
8.2 Creating the Tasks Detail RegionThe Projects page already has a smaller Detail region that queries theDEMO_MILESTONES table. Next, you need to add another detail region for theDEMO_TASKS table.
Add a new interactive grid from the Gallery to query the DEMO_TASKS table andconfigure it to display as a smaller detail region.
To add an interactive grid region from the Gallery:
1. In the Gallery pane located below the Layout pane, click the Regions tab.
2. Right-click Interactive Grid, select Add To, select Content Body, selectMilestones, and select After.
A new region appears in the Layout pane under the Milestones region.
3. In the Property Editor:
a. Identification: Title - enter Tasks
b. Source: SQL Query - enter select * from demo_tasks whereproject_id = :P5_ID
Note: The SQL select * from [Table_Name] will return all of thecolumns from the specified table. The where condition will limit the recordsreturned to those for the current project.
Creating the Tasks Detail Region
Developing the Maintain Project Form Regions 8-3

c. Source: Page Items to Submit - select P5_ID
d. Layout: Start New Row - select Yes
e. Appearance: Template - select Standard
f. Server-side Condition: Type - select Item is NOT NULL
g. Server-side Condition: Item - select P5_ROWID
Interactive grids are read-only by default, so you must configure the interactive grid tobe editable.
To make an interactive grid editable:
4. In the Rendering tree, under Tasks, select the Attributes folder.
5. In the Property Editor:
a. Edit: Enabled - select Yes
b. Toolbar: Buttons - deselect Save
Note: You deselect the Save button because there is already a Save button inthe Maintain Project region, and it would be confusing for users to havemultiples.
You must hide the ID and PROJECT_ID columns from view because they are notuseful, but you must also perform an additional configuration on each to prepare themfor a later step.
To clean up the Tasks region:
6. In the Rendering tree, under Tasks, expand the Columns folder, and select the IDcolumn.
7. In the Property Editor:
a. Identification: Type - select Hidden
b. Source: Primary Key - select Yes
Note:
Defining the table's primary key is required later in this topic when childtables are added that relate to Task records.
The primary key of a table uniquely identifies each row and ensures that noduplicate rows exist (and typically, this is its only purpose).
8. In the Rendering tree, select the PROJECT_ID column.
9. In the Property Editor:
a. Default: Type - select Item
b. Default: Item - select P5_ID
Creating the Tasks Detail Region
8-4 Oracle Application Express Tutorial: Building an Application
8.3 Updating the Columns in the Tasks RegionNext, you improve the usability of the Tasks region by changing how some of thecolumns display.
To convert the MILESTONE_ID column to a select list:
1. In the Rendering tree under the Tasks region, expand the Columns folder.
2. Select the MILESTONE_ID column.
3. In the Property Editor:
a. Identification: Type - select Select List
b. Heading: Heading - enter Milestone
c. Heading: Alignment - select start
d. Layout: Column Alignment - select start
e. List of Values: Type - select SQL Query
f. List of Values: SQL Query - enter select name d, id r fromdemo_milestones order by 1
g. List of Values: Display Extra Values - select No
h. List of Values: Null Display Value - enter - Select Milestone -
To convert the ASSIGNEE column to a select list:
4. In the Rendering tree under the Tasks region, select the ASSIGNEE column.
5. In the Property Editor:
a. Identification: Type - select Select List
b. Heading: Alignment - select start
c. Layout: Column Alignment - select start
d. List of Values: Type - select Shared Component
e. List of Values: List of Values - select TEAM MEMBERS
f. List of Values: Display Extra Values - select No
g. List of Values: Null Display Value - enter - Select Assignee -
To change the NAME column to a text field:
6. In the Rendering tree under the Tasks region, select the NAME column.
7. In the Property Editor:
a. Identification: Type - select Text Field
To change the IS_COMPLETE_YN column to a switch:
Updating the Columns in the Tasks Region
Developing the Maintain Project Form Regions 8-5

8. In the Rendering tree under the Tasks region, select the IS_COMPLETE_YNcolumn.
9. In the Property Editor:
a. Identification: Type - select Switch
b. Heading: Heading - enter Is Complete?
To convert the audit columns to display only:
10. In the Rendering tree under the Tasks region, select the CREATED column toselect it, then press and hold the Ctrl key to select all of the following columns:
• CREATED
• CREATED_BY
• UPDATED
• UPDATED_BY
11. In the Property Editor:
a. Identification: Type - select Display Only
8.4 Adding a Region Display SelectorNow that you have added a Milestones detail and a Tasks detail to the MaintainProject form, the page looks cluttered. You can add a Region Display Selector so thatyour users can organize the page to view both Milestones and Tasks regions or justone of them.
First you must configure the Milestones region to be compatible with a Region DisplaySelector because originally you copied it from another region. The Tasks region, whichyou created from scratch, is compatible by default.
To configure the Milestones region for the Region Display Selector:
1. In the Rendering tree or Layout, select the Milestones region.
2. In the Property Editor:
a. Advanced: Region Display Selector - select Yes
To add a region display selector:
3. In the Gallery pane in the Regions tab, locate the Region Display Selector.
4. Right-click Region Display Selector, select Add To, select Content Body, selectMaintain Project, and select After.
Tip: You can also drag the Region Display Selector from the Gallery and dropit above the Milestones region with the mouse.
5. In the Property Editor:
a. Identification: Title - enter RDS
b. Appearance: Template - select Buttons Container
Adding a Region Display Selector
8-6 Oracle Application Express Tutorial: Building an Application

c. Server-side Condition: Type - select Item is NOT NULL
d. Server-side Condition: Item - select P5_ROWID
6. Click Save and Run Page.
7. Try clicking the Show All, Milestones, and Tasks in the region display selector toconfirm their functionality.
8.5 Improving the Default Milestones Report in the RuntimeRemove the audit columns from view, sort the report by due date, and widen theDescription column of the default Milestones report (which is an interactive grid) inthe runtime.
To change the Milestones report in the runtime:
1. In the runtime on the Milestones region, click the Actions button and selectColumns.
The Columns dialog displays.
2. Deselect the Displayed checkbox for the following columns:
• Created
• Created By
• Updated
• Updated By
3. Click Save.
To order the Milestones report by due date:
4. On the Milestones region, click the Actions button, select Data, and select Sort.
5. In the Sort dialog:
a. Column - select Due Date
6. Click Save.
Improving the Default Milestones Report in the Runtime
Developing the Maintain Project Form Regions 8-7

(Optional) To widen the Description column:
7. (Optional) Click and drag the dividers until you feel the content fits.
To save your changes to the default Primary report:
8. Click the Actions button, select Report, and select Save.
The system message "Default report saved for all users" displays.
8.6 Improving the Default Tasks Report in the RuntimeFinally, update the default Tasks report (which is also an interactive grid) byreconfiguring the columns.
To change the column order and hide columns from view:
1. On the Tasks region, click the Actions button and select Columns.
The Columns dialog displays.
2. In the columns pane, select Name.
3. Click the move up icon ( ^ ) until the Name column appears below the RowActions column.
4. Select the Is Complete? column.
5. Click the move up icon ( ^ ) until the Is Complete? column appears below theAssignee column.
6. Deselect the following columns:
• Project id
• Created
• Created By
• Updated
• Updated By
7. Click Save.
To freeze a column in place:
8. On the Tasks region, click the Name column heading.
9. Click the Freeze icon (snowflake).
To order the Tasks report by Start date and End date:
10. On the tasks region, click the Actions button, select Data, and select Sort.
The Sort dialog appears.
11. In the Sort Dialog:
a. Column - select Start date
Improving the Default Tasks Report in the Runtime
8-8 Oracle Application Express Tutorial: Building an Application

b. Press the Add icon ( + ) to add a new column.
c. Select the new column.
d. Column - select End date
e. Click Save.
12. Finally, resize the columns to fit. When you are finished, click the Actions button,select Report, and select Save.
The system message "Default report saved for all users" appears.
13. On the Developer Toolbar, click Application #### to return to the Applicationhome page.
The Milestones and Tasks detail regions of the Maintain Project form are complete.
Proceed to the next lesson.
Improving the Default Tasks Report in the Runtime
Developing the Maintain Project Form Regions 8-9

Improving the Default Tasks Report in the Runtime
8-10 Tutorial: Building an Application

9Developing the Tasks Master Detail-Detail
Regions
Add master detail-detail regions to the Tasks detail region on the Maintain Projectmaster detail form.
About This Lesson
Previously, you added the Milestones and Tasks detail regions to the Maintain Projectform to create a master detail page.
In this lesson, you learn how to add master detail-detail sub regions to a detail region.Master detail-details are basically detail regions within detail regions.
Add the To-Dos and Links sub regions to the Tasks region to query theDEMO_TO_DOS and DEMO_LINKS tables. These sub regions display additionalinformation depending on which Task the user selects. When you are finished, yourusers can update as many as five different tables with this single form in your app.
Creating master detail-detail regions is very similar to creating a master detail region,so many of the steps in this lesson should be familiar to you.
Starting from here: Basic Projects App Export - Topic 7.sql
If you have not completed the previous lessons, you can use the appendix"Importing an Application into a Workspace (page A-1)" to import the aboveSQL script into your workspace and continue working from this lessonforward. You can find this script in the /files subdirectory of where youunzipped the .zip file accompanying this tutorial.
9.1 Creating the To-Dos Sub RegionAdd the To-Dos editable interactive grid sub region to the Tasks region so that yourusers can easily update their to-dos for a task.
To add an interactive grid as a sub region to the Tasks region:
1. On the Application home page, click 5 - Maintain Project to navigate to theMaintain Project form in Page Designer.
2. In the Rendering tree, right-click Tasks and select Create Sub Region.
A new sub region appears.
3. In the Property Editor:
a. Identification: Title - enter To-Dos
Developing the Tasks Master Detail-Detail Regions 9-1

b. Identification: Type - select Interactive Grid
c. Source: SQL Query - enter select * from demo_to_dos
d. Appearance: Template - select Standard
e. Master Detail: Master Region - select Tasks
f. Server-side Condition: Type - select Item is NOT NULL
g. Server-side Condition: Item - select P5_ROWID
To make the interactive grid editable:
4. In the Rendering tree, under To-Dos, select the Attributes folder.
5. In the Property Editor:
a. Edit: Enabled select Yes
b. Toolbar: Buttons - deselect Save
9.2 Linking the To-Dos Sub RegionHide columns from display, but link them to the higher level tables so that this regionfunctions as the detail in a master-detail relationship. Then change the Assigneecolumn to a select list for improved usability.
To hide and link the ID, PROJECT_ID, and TASK_ID columns of the To-Dos subregion to the Tasks region:
1. In the Rendering tree under To-Dos, expand the Columns folder and select the IDcolumn.
2. In the Property Editor:
a. Identification: Type - select Hidden
3. In the Rendering tree under To-Dos, select the PROJECT_ID column.
4. In the Property Editor:
a. Identification: Type select Hidden
b. Master Detail: Master Column - select PROJECT_ID
Note: The columns displayed are the columns defined in the Tasks (master)region.
5. In the Rendering tree under To-Dos, select the TASK_ID column
6. In the Property Editor:
a. Identification: Type select Hidden
b. Master Detail: Master Column - select ID
To change the ASSIGNEE column to a select list:
Linking the To-Dos Sub Region
9-2 Oracle Application Express Tutorial: Building an Application

7. In the Rendering tree under To-Dos, select the ASSIGNEE column.
8. In the Property Editor:
a. Identification: Type - select Select List
b. Heading: Alignment - select start
c. Layout: Column Alignment - select start
d. List of Values: Type - select Shared Component
e. List of Values: List of Values - select TEAM MEMBERS
f. List of Values: Display Extra Values - select No
g. List of Values: Null Display Value - enter - Select Assignee -
9.3 Improving the To-Dos ColumnsChange the Name column to a text field and the Is Complete? column to a switch foreasier editing in the runtime.
Then make the audit details display only.
To change the NAME column to a text field:
1. In the Rendering tree in the To-Dos columns, select the NAME column.
2. In the Property Editor:
a. Identification: Type - select Text Field
To change the IS_COMPLETE_YN column to a switch:
3. In the Rendering tree in the To-Dos columns, select the IS_COMPLETE_YNcolumn.
4. In the Property Editor:
a. Identification: Type - select Switch
b. Heading: Heading - enter Is Complete?
To make the audit details display only:
5. In the Rendering tree in the To-Dos columns, select the CREATED column to selectonly it. Then press and hold the Ctrl key to select all of the following items:
• CREATED
• CREATED_BY
• UPDATED
• UPDATED_BY
Improving the To-Dos Columns
Developing the Tasks Master Detail-Detail Regions 9-3

6. In the Property Editor:
a. Identification: Type - select Display Only
You have completed the To-Dos sub region.
9.4 Creating the Links Sub RegionCreate and configure the Links sub region in the Tasks region.
To add the Links sub region to the Tasks region:
1. In the Rendering tree, right-click Tasks and select Create Sub Region.
2. In the Property Editor:
a. Identification: Title - enter Links
b. Identification: Type - select Interactive Grid
c. Source: SQL Query - enter select * from demo_links
d. Appearance: Template - select Standard
Creating the Links Sub Region
9-4 Oracle Application Express Tutorial: Building an Application

e. Master Detail: Master Region - select Tasks
f. Server-side Condition: Type - select Item is NOT NULL
g. Server-side Condition: Item - select P5_ROWID
To change the region to an editable interactive grid:
3. In the Rendering tree under Links, select the Attributes folder.
4. In the Property Editor:
a. Edit: Enabled - select Yes
b. Toolbar: Buttons - deselect Save
9.5 Linking the Links Sub RegionHide columns from display but link them to the higher level tables so that this regionfunctions as the detail in a master-detail relationship.
To hide the ID column:
1. In the Rendering tree under Links, expand the Columns folder and select the IDcolumn.
2. In the Property Editor:
a. Identification: Type - select Hidden
To hide the PROJECT_ID column and link it to the Tasks Project Id column:
3. In the Rendering tree, select the PROJECT_ID column.
4. In the Property Editor:
a. Identification: Type - select Hidden
b. Master Detail: Master Column - select PROJECT_ID
Note: The columns displayed are the columns defined in the Tasks (master)region.
To hide the TASK_ID column and link it to the Tasks Id column:
5. In the Rendering tree, select the TASK_ID column.
6. In the Property Editor:
a. Identification: Type - select Hidden
b. Master Detail: Master Column - select ID
9.6 Improving the Links ColumnsChange the Link Type column to a select list, update several columns with more user-friendly labels, and change the audit details to display only.
Linking the Links Sub Region
Developing the Tasks Master Detail-Detail Regions 9-5

To change the LINK_TYPE column to a select list:
1. In the Rendering tree in the Links columns, select the LINK_TYPE column.
2. In the Property Editor:
a. Identification: Type - select Select List
b. List of Values: Type - select Static Values
c. List of Values: List of Values - enter STATIC2:URL,Application
d. List of Values: Display Extra Values - select No
e. List of Values: Display Null Value - select No
To update the labels for the URL, APPLICATION_ID, and APPLICATION_PAGEcolumns:
3. In the Rendering tree, select the URL column.
4. In the Property Editor:
a. Heading: Heading - enter URL
5. In the Rendering tree, select the APPLICATION_ID column.
6. In the Property Editor:
a. Heading: Heading - enter Application ID
7. In the Rendering tree, select the APPLICATION_PAGE column.
8. In the Property Editor:
a. Heading: Heading - enter Page
To make the audit details display only:
9. In the Rendering tree, select the CREATED column to only select it, then press andhold the Ctrl key to select all of the following items:
• CREATED
• CREATED_BY
• UPDATED
• UPDATED_BY
Improving the Links Columns
9-6 Oracle Application Express Tutorial: Building an Application

10. In the Property Editor:
a. Identification: Type - select Display Only
9.7 Adding a Dynamic Action to Enable Columns for Link TypeUsers can add two kinds of links to the Links sub region:
• the URL of a relevant website
• a page in the application
Currently, when your users add a new entry to the Links sub region, they can enterinformation into columns that may not apply, which may be confusing.
Add a dynamic action to the LINK_TYPE column so that the interactive grid displaysonly the relevant columns when they select the link type. You must create and definetwo different "True" dynamic actions to enable the relevant columns for URLs. Then,create an Opposite Action for each dynamic action to enable the Application Pagescolumns.
To add a dynamic action to the LINK_TYPE column for URLs:
1. In the Rendering tree under Links, expand the Columns folder and locate theLINK_TYPE column.
2. Right-click the LINK_TYPE column and select Create Dynamic Action.
A new Dynamic Action populates in the Rendering tree.
Adding a Dynamic Action to Enable Columns for Link Type
Developing the Tasks Master Detail-Detail Regions 9-7

3. In the Property Editor:
a. Identification: Name - enter Enable Columns Based on Link Type
b. Client-side Condition: Type - select Item / Column = Value
c. Client-side Condition: Value - enter URL
4. In the Rendering tree under the LINK_TYPE column, expand the True folder andselect the Enable action.
5. In the Property Editor:
a. Affected Elements: Column(s) - select URL
To add a second dynamic action to the LINK_TYPE column for URLs:
6. In the Rendering tree, right-click Enable Columns Based on Link Type and selectCreate TRUE Action.
7. In the Property Editor:
a. Identification: Action - select Disable
b. Affected Elements: Column(s) - enter APPLICATION_ID,APPLICATION_PAGE
Important:
Do not enter any spaces in the Affected Elements: Column(s) field.
Tip: You can also use the Select List button to select the first column, then useit again to select the second column.
9.8 Adding Opposite Actions to Dynamic ActionsInclude the corresponding opposite action for dynamic action types such as Show,Enable, and Expand Tree. With an opposite action, the affected elements are set oneway if the Client-side Condition evaluates to True and the opposite if the Client-side
Adding Opposite Actions to Dynamic Actions
9-8 Oracle Application Express Tutorial: Building an Application

Condition evaluates to False. In this case, the URL column is enabled whenLINK_TYPE equals URL, and is disabled when any other link type is selected.Conversely, APPLICATION_ID and APPLICATION_PAGE are disabled whenLINK_TYPE equals URL.
To create an opposite action for each True action:
1. In the Rendering tree under the LINK_TYPE Dynamic Actions True folder, right-click the Enable True action and select Create Opposite Action.
2. In the Rendering tree under the LINK_TYPE Dynamic Actions True folder, right-click the Disable True action and select Create Opposite Action.
Two items (Enable and Disable) appear under a folder named False in theRendering tree.
9.9 Improving the To-Dos Interactive Grid in the RuntimeClean up the columns in the To-Dos report by removing the audit details andreordering the columns, then save your changes to the Primary report.
1. In Page Designer, click Save and Run Page to view the runtime.
To remove the audit detail columns and reorder the remaining columns:
2. On the To-Dos sub region, click the Actions menu and select Columns.
The Columns dialog appears.
3. In the Displayed column, deselect the following items:
• Created
• Created By
• Updated
• Updated By
4. Select Name and click the move up icon ( ^ ) to move the column above Assignee.
5. Select Is Complete? and click the move up icon ( ^ ) to move the column aboveDescription.
Improving the To-Dos Interactive Grid in the Runtime
Developing the Tasks Master Detail-Detail Regions 9-9

6. Click Save.
7. On the To-Dos region, click the Actions menu, select Data, and select Sort.
The Sort dialog appears.
8. For Column, select Is Complete?
The Is Complete? column appears in the left-hand pane.
9. Click the Add icon ( + ) to add a new entry.
10. Click within the new entry to select it, then for Column, select Created.
11. Click Save.
To resize the columns:
12. Click the Name column heading and click the Freeze icon (snowflake) to lock theName column in place.
13. (Optional) For the remaining columns in the To-Dos sub region, click and drag thedividers between the columns to suitable widths, such as a narrow column for IsComplete? and a wider column for Description.
To save the report:
14. Click the Actions menu, select Report, and select Save.
You have completed the To-Dos detail sub region.
9.10 Improving the Links Interactive Grid in the RuntimePerform similar tasks to make the Links sub region consistent with To-Dos, then saveyour changes to the Primary report.
Improving the Links Interactive Grid in the Runtime
9-10 Oracle Application Express Tutorial: Building an Application

To remove the audit detail columns:
1. In the Links sub region, click the Actions menu and select Columns.
The Columns dialog appears.
2. In the Displayed column, uncheck the following items:
• Created
• Created By
• Updated
• Updated By
3. Click Save.
To order the report by the Created column:
4. Click the Actions menu, select Data, and select Sort.
The Sort dialog appears.
5. For Column, select Created.
6. Click Save.
(Optional) To resize the columns:
7. (Optional) For the remaining columns in the Links sub region, click and drag thedividers between the columns to suitable widths, such as a narrow column for IsComplete? and a wider column for Description.
To save the report:
8. Click the Actions menu, select Report, and select Save.
9. When you are finished, click Application #### on the Developer Toolbar to returnto the application overview in App Builder.
You have completed the Links detail sub region and fully configured the masterdetail-detail page.
Proceed to the next lesson.
Improving the Links Interactive Grid in the Runtime
Developing the Tasks Master Detail-Detail Regions 9-11

Improving the Links Interactive Grid in the Runtime
9-12 Tutorial: Building an Application

10Developing the Calendar Page
Expand the functionality of the Calendar page to also enable users to view andmanage their projects.
About This Lesson
When you used the Create App Wizard to create a calendar page, you built thecalendar on the DEMO_TASKS table. Currently, the Calendar page is basically displayonly. You can view the names of tasks and their timeline—and that is it.
In this lesson, you learn how to make the projects displayed in the calendar interactiveby configuring drag and drop functionality and linking the task names to their entryin the Maintain Project form.
Starting from here: Basic Projects App Export - Topic 8.sql
If you have not completed the previous lessons, you can use the appendix"Importing an Application into a Workspace (page A-1)" to import theabove SQL script into your workspace and continue working from this lessonforward. You can find this script in the /files subdirectory of where youunzipped the .zip file accompanying this tutorial.
10.1 Hiding the Header and Border of the Calendar in the RuntimeBegin by hiding the header and border portions of the Calendar from view tostreamline the display.
1. On the Application home page, click 6 - Calendar to open the page in PageDesigner.
2. Do one of the following:
• Navigate to the Calendar page in the runtime.
• In Page Designer, click the Save and Run Page button to view the page in theruntime.
To hide the calendar header and border with Live Template Options:
3. On the Developer Toolbar, click Quick Edit.
4. Hover your mouse cursor over the Calendar region and click the wrench icon inthe top-right corner.
The Live Template Options dialog appears.
Developing the Calendar Page 10-1

5. In Live Template Options:
a. Header - select Hidden but accessible
b. Style - select Remove Borders
6. Click Save.
10.2 Enabling Drag and Drop of Individual ProjectsEnable drag and drop on the key columns of the DEMO_TASKS table so that yourusers can reposition projects within the calendar.
To enable drag and drop for projects in the calendar:
1. On the Developer Toolbar, click Edit Page 6 to return to Page Designer.
2. In the Rendering tree, locate the Calendar region under the Content Body folder.
3. In the Rendering tree under Calendar, select Attributes.
4. In the Property Editor:
a. Settings: Primary Key Column - select ID
b. Settings: Drag and Drop - select Yes
c. Settings: Drag and Drop PL/SQL Code - delete the current contents, then copyand paste the following code:
begin update demo_tasks set start_date = to_date(:APEX$NEW_START_DATE, 'YYYYMMDDHH24MISS') , end_date = to_date(:APEX$NEW_END_DATE, 'YYYYMMDDHH24MISS') where id = :APEX$PK_VALUE;end;
Tip: This PL/SQL code is copied from the example code on the Help tab, andthen updated with the appropriate table name.
10.3 Adding Links to the Calendar PageIn addition to drag and drop, you can convert all the projects to links that your userscan click a project, the app navigates to the Maintain Project page for that item forquicker editing.
To add a link to Maintain Project for every item in the calendar:
1. In the Rendering tree under Calendar, select Attributes.
2. In the Property Editor, expand the Settings group and click the View / Edit Linkbutton (No Link Defined).
The Link Builder dialog appears.
3. In the Link Builder - View / Edit Link dialog:
a. Page - select or enter 5
b. Name - select P5_ID
Enabling Drag and Drop of Individual Projects
10-2 Oracle Application Express Tutorial: Building an Application

c. Value - select PROJECT_ID or enter &PROJECT_ID.
d. Clear Cache - enter 5
4. Click OK.
5. Click Save and Run Page.
Review the changes to the Calendar and new functions.
Try out these functions to see how the page responds:
• Hover over a calendar entry to see the tooltip, which displays the Task Name,Start Date, and End Date.
• Click on an existing calendar entry and see how the Maintain Task page appears,populated with the calendar entry details.
• Click and hold a calendar entry and move it to a new date in the calendar and seehow the Start Date and End Date for the selected Task are updated.
• Click and hold on the end of a calendar entry and move left or right and see howjust the End Date for the selected Task is updated.
• Click the List button to see the list of events for the current month.
• After performing a drag-and-drop operation, click on the calendar entry to checkthat the dates for that task have changed.
Congratulations! Your app is complete.
Adding Links to the Calendar Page
Developing the Calendar Page 10-3

Adding Links to the Calendar Page
10-4 Tutorial: Building an Application

AImporting an Application into a Workspace
Upload an SQL script to your Oracle Application Express workspace to start at thebeginning of any chapter in this tutorial.
You began this tutorial by uploading and running series of scripts in SQL Scripts.These scripts created the base tables and data for the exercises in this tutorial. You canalso upload a script to start the tutorial at the beginning of a chapter. Each scriptupdates the application to matches the start of the chapter.
The files you upload are located in the /files subdirectory of the tutorial .zip file.Each file incorporates all the changes you are instructed to make in the chapterspreceding it and creates a new application named "Demo Projects" with a newapplication ID.
Tip: If you already have a Demo Projects app in your workspace, you maywant to rename you existing Demo Projects app by editing the Name attributeon the Edit Application Definition page. See "Editing Application Attributes"in the Oracle Application Express App Builder User’s Guide.
Prerequisites
To import an application, you must have the following:
• Access to an Oracle Application Express workspace
• The base application tables and data imported in "Populating Your Workspace(page 3-1)"
• Sufficient space allocated to your workspace
– to request more space, see "Requesting More Storage" in Oracle ApplicationExpress Administration Guide
To import an application export file (*.sql):
1. On the Workspace home page, click Application Builder to navigate to theApplication Builder Home Page.
2. Click Import.
The Import dialog displays.
3. For Import:
a. Import file - click the appropriate button to browse your system for a file (forexample, in Chrome the Choose File button).
b. Locate the extracted .zip archive and open the /files subdirectory.
Importing an Application into a Workspace A-1

c. Select the desired script and click Open.
Tip: To determine the appropriate script file name, see Starting from here atthe beginning of a chapter.
d. For File Type, select Database Application, Page or Component Export .
e. Click Next.
4. On the File Import Confirmation page, click Next.
5. On the Install Database Application page, click Install Application.
The new application builds. This may take a minute.
6. Click Edit Application to navigate to the imported application’s overview inApplication Builder.
You have imported the new application into your workspace.
A-2 Oracle Application Express Tutorial: Building an Application

Index
A
Actions menu button, 6-2appearance template, 7-5application runtime, 4-8, 6-2attributes, 5-3Attributes properties, 5-3audit columns, 6-8axis, of a chart, 5-6
B
button placeholder, 7-5
C
calendar, 4-5chart, 5-3chart region, 5-2column
switch, 9-3text field, 9-3
Create Application WizardAdd Page function, 4-1
CREATE button, 6-4, 7-5Create Page Wizard, 4-5
D
data series, 5-6Developer Toolbar
Quick Edit, 5-8display only, 6-9dynamic action, 7-11, 9-7
Ffield
hidden, 6-6label, 6-6
G
Gallery, 5-2
I
icons, Navigation Menu, 5-11import an application, A-1interactive grid
change column order, 7-6freeze column, 7-6hide columns, 7-1sort grid, 7-6SQL, 7-1
interactive report, 6-1, 6-2
L
Layout tab, 5-2linking to a different page in the application, 10-2links, 10-2list of values
static, 7-10Live Template Options, 5-8LOV, 7-3, 7-10
M
master detail, 7-7master detail page, 4-3modal dialog, 6-6Modal Dialog, viewing changes in browser, 6-9
N
Navigation Menu, 5-11
O
opposite action, 7-11, 9-8
Index-1

P
Page Designer, 4-6page items, copying to different page, 7-13photo blob, 6-6Processing tab, 7-11Project form, 7-7projects page, 4-3Property Editor, 5-3
Q
Quick Edit, 5-8
R
region, 5-2, 5-3region attributes, 5-3report, 5-8report region, 5-8runtime, 4-8, 5-1, 6-2
S
Save and Run Page, 4-8Shared Components
list of values, 7-3SQL query, 5-6Stretch Form Fields, 6-6sub region, 6-8, 7-13
T
template options, 5-8Template Options, 5-3Template Options button, 5-3textarea, 6-6
V
validation, 7-11
Index-2