oracle® application server wireless · 3.2 wdk installation and configuration ... 3.4 running a...
TRANSCRIPT

Oracle® Application Server WirelessDeveloper’s Guide
10g (9.0.4)
Part No. B10948-01
September 2003

Oracle Application Server Wireless Developer’s Guide, 10g (9.0.4)
Part No. B10948-01
Copyright © 2003 Oracle Corporation. All rights reserved.
The Programs (which include both the software and documentation) contain proprietary information of Oracle Corporation; they are provided under a license agreement containing restrictions on use and disclosure and are also protected by copyright, patent and other intellectual and industrial property laws. Reverse engineering, disassembly or decompilation of the Programs, except to the extent required to obtain interoperability with other independently created software or as specified by law, is prohibited.
The information contained in this document is subject to change without notice. If you find any problems in the documentation, please report them to us in writing. Oracle Corporation does not warrant that this document is error-free. Except as may be expressly permitted in your license agreement for these Programs, no part of these Programs may be reproduced or transmitted in any form or by any means, electronic or mechanical, for any purpose, without the express written permission of Oracle Corporation.
If the Programs are delivered to the U.S. Government or anyone licensing or using the programs on behalf of the U.S. Government, the following notice is applicable:
Restricted Rights Notice Programs delivered subject to the DOD FAR Supplement are "commercial computer software" and use, duplication, and disclosure of the Programs, including documentation, shall be subject to the licensing restrictions set forth in the applicable Oracle license agreement. Otherwise, Programs delivered subject to the Federal Acquisition Regulations are "restricted computer software" and use, duplication, and disclosure of the Programs shall be subject to the restrictions in FAR 52.227-19, Commercial Computer Software - Restricted Rights (June, 1987). Oracle Corporation, 500 Oracle Parkway, Redwood City, CA 94065.
The Programs are not intended for use in any nuclear, aviation, mass transit, medical, or other inherently dangerous applications. It shall be the licensee's responsibility to take all appropriate fail-safe, backup, redundancy, and other measures to ensure the safe use of such applications if the Programs are used for such purposes, and Oracle Corporation disclaims liability for any damages caused by such use of the Programs.
Oracle is a registered trademark, and Oracle9i, OracleMobile, Oracle JDeveloper, PL/SQL and SQL*Plus are trademarks or registered trademarks of Oracle Corporation. Other names may be trademarks of their respective owners.

iii
Contents
Send Us Your Comments ............................................................................................................... xxix
Audience and Roadmap .................................................................................................................. xxxi
Target Audience................................................................................................................................. xxxiRoadmap ............................................................................................................................................. xxxiDocumentation Accessibility .......................................................................................................... xxxiiiRelated Documents........................................................................................................................... xxxiii
Part I Introduction
1 Introduction to Oracle Application Server Wireless
1.1 Overview of OracleAS Wireless.......................................................................................... 1-11.2 New in OracleAS Wireless................................................................................................... 1-31.2.1 Multi-Channel Server .................................................................................................... 1-31.2.2 J2ME Support.................................................................................................................. 1-31.2.3 Notifications and Multi-media Messaging................................................................. 1-41.2.4 Wireless Development Kit ............................................................................................ 1-51.2.5 Web Clipping.................................................................................................................. 1-51.2.6 Location Services............................................................................................................ 1-61.3 OracleAS Wireless Deployed in a Network ...................................................................... 1-7
Part II Oracle Application Server Wireless Developer’s Tools

iv
2 Introducing Oracle Application Server Wireless Developer’s Tools
2.1 OracleAS Wireless Development Path ............................................................................... 2-12.1.1 Leverage Web Services and Reuse Business Logic.................................................... 2-22.1.2 Building and Testing Your Applications .................................................................... 2-32.1.3 Deploying your Applications ....................................................................................... 2-42.2 Delivering Your Applications.............................................................................................. 2-4
3 OracleAS Wireless Developer Kit
3.1 Wireless Developer Kit Overview....................................................................................... 3-13.2 WDK Installation and Configuration ................................................................................. 3-23.2.1 Oracle Application Server Wireless Developer Kit Structure.................................. 3-23.2.2 Multi-Channel Server Lite (MCSLite) ......................................................................... 3-33.2.2.1 Key Features............................................................................................................. 3-43.2.2.2 How to Use MCSLite .............................................................................................. 3-53.2.2.3 Sending Parameters to a Back-end Application ................................................. 3-63.2.2.4 MCSLite URL Rewriting and Caching................................................................. 3-73.2.2.5 National Language Support (NLS)....................................................................... 3-73.2.2.6 MCSLite Log File..................................................................................................... 3-73.2.2.7 MCSLite Advanced Configuration....................................................................... 3-83.2.2.8 Device Description.................................................................................................. 3-93.2.2.9 Device Detection.................................................................................................... 3-103.2.2.10 Multimedia Adaptation........................................................................................ 3-103.2.2.11 Location Services................................................................................................... 3-103.3 WDK Log File....................................................................................................................... 3-213.3.1 WDK Log Sample......................................................................................................... 3-223.3.2 Common Mistakes Encountered................................................................................ 3-273.4 Running a Wireless Application with the WDK Tutorial.............................................. 3-293.4.1 What you Need............................................................................................................. 3-293.4.2 Tutorial Overview ........................................................................................................ 3-303.4.3 Environment Set Up..................................................................................................... 3-303.4.3.1 Set up your WDK Environment.......................................................................... 3-303.4.3.2 Configure the WDK .............................................................................................. 3-303.4.3.3 Start the WDK........................................................................................................ 3-313.4.4 Multi-media Adaptation Demonstration.................................................................. 3-32

v
4 JDeveloper Wireless Extension
4.1 Overview ................................................................................................................................ 4-14.2 Developing Multi-Channel Applications .......................................................................... 4-24.3 Creating a Wireless-Enabled J2EE Application ................................................................ 4-34.4 Creating J2ME Applications ................................................................................................ 4-34.4.1 Creating a Default MIDlet ............................................................................................ 4-34.4.2 Deploying the MIDlet Application.............................................................................. 4-34.4.3 Creating a MIDlet that Calls a Web Service ............................................................... 4-4
5 Developing Services
5.1 Overview of the Service Manager....................................................................................... 5-15.2 Logging into the Service Manager ...................................................................................... 5-35.3 Managing Applications ........................................................................................................ 5-45.3.1 Searching for a Master Application............................................................................. 5-55.3.2 Creating a Folder............................................................................................................ 5-65.3.3 Creating an Application ................................................................................................ 5-75.3.4 Selecting the Application Type .................................................................................... 5-75.3.5 Creating a Multi-Channel Application ....................................................................... 5-85.3.5.1 Entering the Basic Information for the Application........................................... 5-95.3.5.2 Entering the Notification-Related Information .................................................. 5-95.3.5.3 Entering the Input Parameters for the Application ......................................... 5-115.3.5.4 Entering the Async Information ......................................................................... 5-145.3.5.5 Setting the Built-In Parameters ........................................................................... 5-165.3.5.6 Setting the Caching Information......................................................................... 5-185.3.5.7 Setting Additional Information........................................................................... 5-195.3.6 Creating a J2ME Application...................................................................................... 5-215.3.6.1 Entering the Basic Information for the MIDlet ................................................. 5-225.3.6.2 Specifying the Deliverable Content.................................................................... 5-225.3.6.3 Setting the Device Requirements........................................................................ 5-245.3.6.4 Setting Additional Information........................................................................... 5-255.3.7 Creating a Multi-Channel Application (Based on Any Adapter) ......................... 5-275.3.7.1 Step 1: Entering the Basic Information for the Application............................ 5-275.3.7.2 Step 2: Entering Caching Information................................................................ 5-295.3.7.3 Step 3: Entering the Initialization Parameters of the Application ................. 5-305.3.7.4 Step 4: Selecting the Input Parameters for the Application............................ 5-31

vi
5.3.7.5 Step 5: Selecting the Output Parameters for the Application ......................... 5-345.3.7.6 Step 6: Creating an Async Agent Service—Optional....................................... 5-355.3.7.7 Step 7: Selecting the Result Transformer—Optional ....................................... 5-365.3.8 Creating a Web Clipping Application....................................................................... 5-375.3.9 Editing an Application ................................................................................................ 5-385.3.10 Deleting an Application .............................................................................................. 5-395.3.11 Debugging an Application.......................................................................................... 5-395.3.12 Quick Publishing an Application............................................................................... 5-405.3.13 Moving Folders and Applications ............................................................................. 5-405.4 Managing Notifications ...................................................................................................... 5-405.4.1 Creating a Master Notification ................................................................................... 5-415.4.1.1 Step 1: Entering the Basic Configuration Parameters for the Notification ... 5-425.4.1.2 Step 2: Setting the Trigger Conditions for the Notification ............................ 5-435.4.1.3 Step 3: Creating the Message Template ............................................................. 5-465.4.2 Editing a Notification................................................................................................... 5-475.5 Managing Master Alerts (Deprecated) ............................................................................. 5-485.5.1 Creating a Master Alert ............................................................................................... 5-495.5.1.1 Step 1: Entering the Basic Configuration Parameters for the Master Alert .. 5-495.5.1.2 Step 2: Setting the Trigger Conditions for the Master Alert ........................... 5-505.5.1.3 Step 3: Creating the Message Template for the Master Alert ......................... 5-525.5.2 Editing a Master Alert ................................................................................................. 5-545.6 Managing Data Feeders ...................................................................................................... 5-545.6.1 Creating a Data Feeder ................................................................................................ 5-555.6.1.1 Step 1: Entering the Basic Information for the Data Feeder............................ 5-565.6.1.2 Step 2: Entering the Initialization Parameters for the Data Feeder................ 5-585.6.1.3 Entering the Init Parameters for the HTTP Protocol........................................ 5-595.6.1.4 Entering the Init Parameters for the File Protocol............................................ 5-605.6.1.5 Entering the Init Parameters for the FTP Protocol ........................................... 5-605.6.1.6 Entering the Init Parameters for the SQL Protocol........................................... 5-615.6.1.7 Entering the Init Parameters for the Application Protocol ............................. 5-625.6.1.8 Step 3: Entering the Input Parameters for the Data Feeder ............................ 5-635.6.1.9 Step 4: Entering the Output Parameters for the Data Feeder ......................... 5-645.6.2 Editing a Data Feeder .................................................................................................. 5-655.6.2.1 Editing the Basic Configuration of a Data Feeder ............................................ 5-655.6.2.2 Editing the Init Parameters of a Data Feeder .................................................... 5-66

vii
5.6.2.3 Editing the Input Parameters of a Data Feeder ................................................ 5-665.6.2.4 Editing the Output Parameters of a Data Feeder ............................................. 5-665.7 Managing Preset Definitions ............................................................................................. 5-675.7.1 Creating a Preset Definition........................................................................................ 5-685.7.1.1 Adding Preset Attributes ..................................................................................... 5-685.7.2 Editing a Preset Definition.......................................................................................... 5-705.7.2.1 Adding, Editing, and Deleting Preset Attribute Enumeration Options ....... 5-705.8 Managing J2ME Web Services........................................................................................... 5-715.8.1 Registering a J2ME Web Service ................................................................................ 5-715.8.2 Generating Stub Classes.............................................................................................. 5-735.8.2.1 Viewing the Class Method Details ..................................................................... 5-74
6 Mobile Studio
6.1 Overview ................................................................................................................................ 6-16.1.1 Mobile Studio Key Features.......................................................................................... 6-26.1.2 Mobile Studio on the Oracle Technology Network .................................................. 6-26.2 Getting Started with Mobile Studio.................................................................................... 6-26.2.1 Login and Registration .................................................................................................. 6-36.2.2 Building an Application Using Mobile Studio .......................................................... 6-36.2.3 Testing an Application .................................................................................................. 6-46.2.4 Deploying an Application............................................................................................. 6-56.3 Customizing Mobile Studio ................................................................................................. 6-56.3.1 Creating Sample Services.............................................................................................. 6-66.3.2 Branding .......................................................................................................................... 6-66.3.3 Supporting Multiple Locales ........................................................................................ 6-76.3.4 JSP Pages.......................................................................................................................... 6-86.3.4.1 JSP page: login.jsp ................................................................................................... 6-96.3.4.2 JSP page: registraton.jsp....................................................................................... 6-106.3.4.3 JSP Page: loginPortlet.jsp ..................................................................................... 6-136.3.4.4 JSP page: pageHeader.jsp .................................................................................... 6-136.3.4.5 JSP page: pageFooter.jsp ...................................................................................... 6-146.3.4.6 JSP page: pageMenu.jsp ....................................................................................... 6-156.3.4.7 JSP page: pagePortlets.jsp .................................................................................... 6-156.3.4.8 JSP page: profile.jsp .............................................................................................. 6-166.3.4.9 JSP page: home.jsp ................................................................................................ 6-18

viii
6.3.4.10 Java Beans............................................................................................................... 6-216.3.4.11 JSP page: testAppInfoBox.jsp .............................................................................. 6-21
7 Wireless Customization Portal
7.1 Overview of OracleAS Wireless Customization ............................................................... 7-17.2 Logging into Wireless Customization ................................................................................ 7-27.2.1 Accessing Wireless Customization as a New User ................................................... 7-37.2.2 Accessing Wireless Customization as a Registered User ......................................... 7-47.3 Managing User Profiles ........................................................................................................ 7-47.4 Customizing Applications.................................................................................................... 7-57.4.1 Managing Folders........................................................................................................... 7-77.4.1.1 Creating a Subfolder ............................................................................................... 7-77.4.1.2 Editing a Folder ....................................................................................................... 7-87.4.1.3 Reordering the Display Sequence for Folder ...................................................... 7-97.4.1.4 Deleting a Folder ................................................................................................... 7-107.4.2 Managing Bookmarks.................................................................................................. 7-107.4.2.1 Creating a Bookmark ............................................................................................ 7-107.4.2.2 Editing a Bookmark .............................................................................................. 7-117.4.2.3 Deleting a Bookmark ............................................................................................ 7-127.4.3 Managing Short Names............................................................................................... 7-127.4.4 Creating Short Names.................................................................................................. 7-137.4.4.1 Editing a Short Name ........................................................................................... 7-147.4.4.2 Deleting a Short Name ......................................................................................... 7-147.4.5 Managing a Notification Subscription ...................................................................... 7-147.4.5.1 Adding a New Notification Subscription.......................................................... 7-167.4.5.2 Editing Notification Subscriptions ..................................................................... 7-187.4.5.3 Deleting Notification Subscriptions ................................................................... 7-187.5 Managing Devices ............................................................................................................... 7-187.5.1 Creating a New Phone................................................................................................. 7-197.5.1.1 Validating a Phone................................................................................................ 7-207.5.1.2 Editing a Phone ..................................................................................................... 7-217.5.1.3 Deleting a Phone ................................................................................................... 7-217.5.2 Creating a New Fax...................................................................................................... 7-217.5.2.1 Validating a Fax..................................................................................................... 7-227.5.2.2 Editing a Fax .......................................................................................................... 7-23

ix
7.5.2.3 Deleting a Fax ........................................................................................................ 7-237.5.3 Creating an Email Device............................................................................................ 7-237.5.3.1 Validating the Email Device................................................................................ 7-247.5.3.2 Editing an Email Device....................................................................................... 7-247.5.3.3 Deleting an Email Device..................................................................................... 7-257.5.4 Creating a New Mobile Device .................................................................................. 7-257.5.4.1 Validating the Mobile Device.............................................................................. 7-267.5.4.2 Editing a Mobile Device....................................................................................... 7-277.5.4.3 Deleting an Mobile Device .................................................................................. 7-277.5.5 Setting a Default Device ............................................................................................. 7-277.6 Managing Location Marks ................................................................................................. 7-277.6.1 Creating Location Marks............................................................................................. 7-297.6.2 Editing a Location Mark.............................................................................................. 7-317.6.3 Changing the Default Status of a Location Mark .................................................... 7-327.6.4 Deleting a Location Mark............................................................................................ 7-327.6.5 Setting the Location Privacy Preferences.................................................................. 7-327.6.6 Managing the Location Awareness Authorization ................................................. 7-337.6.7 Assigning Location Awareness Authorization........................................................ 7-337.6.8 Changing Location Awareness Authorization ........................................................ 7-347.6.9 Managing the User Groups for Location Authorization........................................ 7-347.6.10 Creating User Group ................................................................................................... 7-357.6.11 Editing a User Group................................................................................................... 7-357.6.11.1 Deleting User Group ............................................................................................ 7-357.7 Managing Contact Rules .................................................................................................... 7-357.7.1 Contact Rules in the Customization Portal .............................................................. 7-367.7.1.1 Adding a Contact Rule......................................................................................... 7-377.7.1.2 Editing a Contact Rule ......................................................................................... 7-387.7.1.3 Deleting a Contact Rule ....................................................................................... 7-397.7.1.4 Selecting an Active Contact Rule........................................................................ 7-397.7.1.5 Selecting a Contact Rule from a Web-Based User Interface ........................... 7-407.7.2 Selecting a Contact Rule from a Device .................................................................... 7-407.7.2.1 Selecting a Contact Rule from a Web-Based User Interface ........................... 7-407.7.2.2 Selecting a Contact Rule from a Device ............................................................. 7-407.7.2.3 Selecting a Contact Rule from a Device ............................................................. 7-417.7.2.4 Selecting a Contact Rule from an SMS- or Email-Based Device .................... 7-42

x
7.7.2.5 Selecting a Contact Rule Using a Voice Application ....................................... 7-447.8 Viewing UTF-8 Pages in Localized Languages with Netscape 4.7 or Lower ............. 7-447.9 Rebranding the Customization Portal .............................................................................. 7-447.9.1 Page Naming Conventions ......................................................................................... 7-457.9.2 UIX Pages Structure ..................................................................................................... 7-457.9.3 Directory Structure....................................................................................................... 7-467.9.4 Customizing the Look of the Customization Portal................................................ 7-477.9.4.1 Colors and Fonts.................................................................................................... 7-477.9.4.2 UIX Modification................................................................................................... 7-477.9.5 Application Customization Page Plugin Framework............................................. 7-497.9.5.1 Customizing an Application in a Plugin Page.................................................. 7-507.9.6 Setting the Multi-Byte Encoding for the Customization Portal............................. 7-51
Part III Developing Wireless Applications
8 Authoring Mobile Browser and Voice Applications
8.1 Overview................................................................................................................................. 8-18.1.1 MobileXML or XHTML/XForms; Which to Use? ..................................................... 8-28.1.2 Multi-Channel Overview .............................................................................................. 8-48.2 XHTML+XForms ................................................................................................................... 8-48.2.1 Overview ......................................................................................................................... 8-58.2.2 Technology Background ............................................................................................... 8-58.2.2.1 XHTML ..................................................................................................................... 8-58.2.2.2 Cascading Style Sheets (CSS)................................................................................. 8-68.2.2.3 XForms...................................................................................................................... 8-88.2.2.4 Overview of XML Namespaces ............................................................................ 8-88.2.2.5 Overview of XPath.................................................................................................. 8-98.2.2.6 Overview of XForms............................................................................................. 8-118.2.2.7 XForms Processing Logic ..................................................................................... 8-138.2.2.8 XForms User Interface Components .................................................................. 8-158.2.2.9 XForms and XPath ................................................................................................ 8-168.2.2.10 XHTML as Host Language for XForms ............................................................. 8-178.2.2.11 Setting Document Content Type and Profile Attributes ................................. 8-178.2.3 Hello World Application Using XHTML and XForms ............................................. 8-188.2.3.1 About Hello World and Basic Requirements ...................................................... 8-18

xi
8.2.3.2 Writing the Hello World Application .................................................................. 8-198.2.3.3 Deploy the Hello World Page and Provide a CGI Program ............................. 8-238.2.4 OracleAS Wireless and XHTML+XForms+CSS....................................................... 8-238.2.4.1 OracleAS Wireless XHTML, XForms and CSS Support.................................. 8-258.2.4.2 OracleAS Wireless and XML Events Support................................................... 8-268.2.4.3 Visual Applications and XHTML+XForms....................................................... 8-268.2.4.4 Voice Applications and XHTML+XForms ........................................................ 8-348.2.5 Styling and Embedding Content Based on Media .................................................. 8-478.2.5.1 CSS Media Queries ............................................................................................... 8-478.2.5.2 MXML Media Attribute ....................................................................................... 8-498.2.6 Advanced Sample Using XHTML and XForms ...................................................... 8-508.2.6.1 About the Example ............................................................................................... 8-508.2.6.2 Shopping Cart Data and XForms Model ........................................................... 8-528.2.6.3 Showing the Data to a User ................................................................................. 8-538.2.6.4 Adding Repeating Structures.............................................................................. 8-548.2.6.5 Adding Calculated Fields: Sub-Totals and Totals............................................ 8-558.2.6.6 Adding Styles ........................................................................................................ 8-578.2.6.7 Adding Update Buttons and Using Events....................................................... 8-588.2.6.8 Adding Type Validations .................................................................................... 8-598.2.6.9 Complete Sample .................................................................................................. 8-608.2.7 Advanced Voice Sample Using XHTML and XForms ........................................... 8-638.3 OracleAS Wireless Client ................................................................................................... 8-728.3.1 Using the Wireless Client............................................................................................ 8-738.3.1.1 User Interactions ................................................................................................... 8-738.3.1.2 Logging................................................................................................................... 8-738.3.1.3 Server Side Considerations.................................................................................. 8-738.3.2 Using OracleAS Wireless with XClient..................................................................... 8-738.3.2.1 Mime Types ........................................................................................................... 8-748.3.3 Installing OracleAS Wireless Client .......................................................................... 8-748.3.3.1 Requirements......................................................................................................... 8-748.3.3.2 Installing the Wireless Client .............................................................................. 8-748.3.3.3 Deploying to Users ............................................................................................... 8-758.3.3.4 XClient.CAB File ................................................................................................... 8-768.3.3.5 Registry Keys ......................................................................................................... 8-768.4 XHTML Mobile Profile ....................................................................................................... 8-76

xii
8.4.1 Overview ....................................................................................................................... 8-768.4.2 OracleAS Wireless and XHTML MP + CSS Mobile Profile.................................... 8-778.4.3 XHTML Mobile Profile Modules Supported............................................................ 8-788.4.4 XHTML MP HelloWorld Example ............................................................................ 8-798.5 OracleAS Wireless XML .................................................................................................... 8-808.5.1 OracleAS Wireless XML Overview ........................................................................... 8-818.5.2 OracleAS Wireless XML and OracleAS Wireless .................................................... 8-818.5.3 Displaying and Formatting Content.......................................................................... 8-818.5.3.1 Hello World Example ........................................................................................... 8-828.5.3.2 DOCTYPE Declaration ......................................................................................... 8-838.5.3.3 SimpleResult .......................................................................................................... 8-848.5.3.4 Formatting the Display......................................................................................... 8-868.5.3.5 Tables and Basic Formatting Example ............................................................... 8-878.5.3.6 Image Adaptation Support in OracleAS Wireless XML.................................. 8-898.5.4 Enhancing with Audio for Voice Access................................................................... 8-918.5.4.1 SimpleAudio and SimpleSpeech......................................................................... 8-918.5.4.2 Recommendation for Voice Navigation ............................................................ 8-928.5.5 Application Navigation............................................................................................... 8-938.5.5.1 Introduction ........................................................................................................... 8-938.5.5.2 Basic Navigation.................................................................................................... 8-948.5.5.3 SimpleMenu, SimpleMenuItem .......................................................................... 8-948.5.5.4 Navigating by Voice ............................................................................................. 8-958.5.6 Document Linking ....................................................................................................... 8-988.5.6.1 SimpleHref, SimpleTimer .................................................................................... 8-988.5.6.2 Enhancing with Voice......................................................................................... 8-1038.5.7 Filling Out Forms for Data Entry and Navigation ................................................ 8-1088.5.7.1 Introduction ......................................................................................................... 8-1088.5.7.2 Basic User Interaction ......................................................................................... 8-1098.5.7.3 Complete User Forms......................................................................................... 8-1118.5.7.4 Enhancing Voice.................................................................................................. 8-1138.5.7.5 Working with Signature Capture Form Control ............................................ 8-1168.5.8 Advanced User Interactions and Channel Optimization .................................... 8-1188.5.8.1 Introduction ......................................................................................................... 8-1188.5.8.2 Events and Tasks Using SimpleBind................................................................ 8-1198.6 Device Headers and Device Class................................................................................... 8-121

xiii
8.6.1 Article.jsp..................................................................................................................... 8-1228.6.2 PageNavigation.Java.................................................................................................. 8-1248.6.3 Async-enabling OracleAS Wireless XML Applications ....................................... 8-1288.6.3.1 Overview.............................................................................................................. 8-128
9 Using Multi-Channel Server
9.1 Overview ................................................................................................................................ 9-19.1.1 Benefits of Multi-Channel ............................................................................................. 9-29.1.2 Features of Multi-Channel Server................................................................................ 9-49.2 Multimedia Adaptation........................................................................................................ 9-69.2.1 Overview ........................................................................................................................ 9-69.2.2 Image Adaptation Features .......................................................................................... 9-79.2.2.1 Authoring Multichannel Applications with Images.......................................... 9-89.2.3 Command Line Tool ...................................................................................................... 9-89.2.4 Extensibility Using ImageProcessor API .................................................................. 9-109.2.4.1 Description............................................................................................................. 9-109.2.4.2 Interface oracle.panama.multimedia.ImageProcessor .................................... 9-109.2.4.3 Implementation ..................................................................................................... 9-109.2.4.4 Configuration ........................................................................................................ 9-109.2.5 Ringtone Adaptation ................................................................................................... 9-119.2.5.1 Features .................................................................................................................. 9-119.2.5.2 RingtoneProcessor Java API................................................................................ 9-119.2.5.3 Implementation ..................................................................................................... 9-149.2.5.4 Configuration ........................................................................................................ 9-149.2.5.5 Sample Usage ........................................................................................................ 9-159.2.6 Ringtone Converter Java API ..................................................................................... 9-169.2.6.1 Description............................................................................................................. 9-169.2.6.2 Interface oracle.panama.multimedia.RingtoneConverter .............................. 9-169.2.6.3 Implementation ..................................................................................................... 9-169.2.6.4 Configuration ........................................................................................................ 9-169.3 Device Adaptation............................................................................................................... 9-179.3.1 Device Repository ........................................................................................................ 9-189.3.2 Device Repository Access ........................................................................................... 9-199.3.3 Device Detection........................................................................................................... 9-199.3.4 Dynamic HTTP Header Composition and UAProf ................................................ 9-20

xiv
9.3.5 Device Transformers.................................................................................................... 9-209.3.6 Device Repository API................................................................................................. 9-239.3.7 Device Information and Classification...................................................................... 9-279.4 Modifying Multi-Channel Server Runtime ..................................................................... 9-289.4.1 MCS Runtime Session Management ......................................................................... 9-289.4.2 MCS Runtime API ........................................................................................................ 9-309.4.2.1 Runtime Objects .................................................................................................... 9-309.4.2.2 Event Listeners ...................................................................................................... 9-329.4.3 MCS Reverse Proxy, URL Rewrite, Caching, and Compression........................... 9-399.4.4 MCS Virtual Browser Model ...................................................................................... 9-399.4.5 Wireless and Voice Portal ........................................................................................... 9-419.4.5.1 Device Identification............................................................................................. 9-429.4.5.2 Virtual User Concept ............................................................................................ 9-429.4.5.3 Authentication and Authorization ..................................................................... 9-439.4.6 Globalization (NLS) Support ...................................................................................... 9-449.5 Modifying the Data Models ............................................................................................... 9-459.5.1 OracleAS Wireless Services Overview...................................................................... 9-459.5.2 MasterService................................................................................................................ 9-469.5.2.1 Link.......................................................................................................................... 9-469.5.2.2 Module.................................................................................................................... 9-469.5.2.3 Folder ...................................................................................................................... 9-479.5.2.4 ExternalLink........................................................................................................... 9-479.5.3 Access Control .............................................................................................................. 9-479.5.4 Folder Renderer ............................................................................................................ 9-489.5.4.1 Overview ................................................................................................................ 9-489.5.4.2 Structure of JSP pages........................................................................................... 9-499.5.4.3 Execution Flow ...................................................................................................... 9-499.5.5 Bookmark....................................................................................................................... 9-509.5.5.1 Creating and Editing Bookmarks Using OracleAS Wireless Tools ............... 9-519.5.6 Model API: General Usage.......................................................................................... 9-519.5.6.1 Data Model Cache and Synchronization ........................................................... 9-529.5.6.2 Interfaces and Interface Hierarchy ..................................................................... 9-539.5.6.3 Model API Inheritance Hierarchy ...................................................................... 9-539.5.6.4 Sample Code that Uses the Data Model API..................................................... 9-55

xv
10 Creating Messaging Applications
10.1 Messaging Overview and Architecture ........................................................................... 10-110.1.1 General Overview ........................................................................................................ 10-110.1.2 Key Messaging Features.............................................................................................. 10-210.1.3 Multi-Channel, Adaptive Messaging ........................................................................ 10-310.1.4 Multimedia Messaging................................................................................................ 10-310.1.5 Transport Framework.................................................................................................. 10-310.1.6 MMS Center .................................................................................................................. 10-410.1.6.1 Actionable Messaging Framework..................................................................... 10-410.2 Sending and Receiving Messages ..................................................................................... 10-410.2.1 One-way Message Application API Overview........................................................ 10-410.2.1.1 XMSSimpleSender ................................................................................................ 10-510.2.1.2 XMSSender............................................................................................................. 10-710.2.1.3 Text-based Messages ............................................................................................ 10-810.2.1.4 Multimedia Messages........................................................................................... 10-810.2.1.5 Other Content ........................................................................................................ 10-910.2.2 Two Way Messaging, Transport API ........................................................................ 10-910.2.2.1 Destination Analysis........................................................................................... 10-1010.2.2.2 Message Routing ................................................................................................. 10-1010.2.2.3 Providing Hints to Facilitate Transport Internal Processing........................ 10-1110.2.3 Actionable Messages.................................................................................................. 10-1210.2.3.1 Components Overview ...................................................................................... 10-1210.2.3.2 Actionable Message Flow .................................................................................. 10-1310.2.3.3 Enabling Actionable Messages.......................................................................... 10-1510.2.3.4 Configuration Parameters ................................................................................. 10-1610.3 Building Async Applications........................................................................................... 10-1610.3.1 Asynchronous Listener ............................................................................................. 10-1610.3.1.1 Asynchronous Listener Architecture ............................................................... 10-1610.3.2 Key Challenges ........................................................................................................... 10-1710.3.2.1 Multiple messaging transport protocol support ............................................ 10-1710.3.2.2 The asynchronous nature of messaging protocols......................................... 10-1710.3.2.3 Supporting Sessions............................................................................................ 10-1810.3.2.4 User Navigation .................................................................................................. 10-1810.3.2.5 Naming/Addressing an Application............................................................... 10-1810.3.3 Key Solutions .............................................................................................................. 10-18

xvi
10.3.3.1 Multiple Transport Protocol Support............................................................... 10-1810.3.3.2 The asynchronous nature of messaging protocols ......................................... 10-1910.3.3.3 Supporting Sessions............................................................................................ 10-1910.3.3.4 User Navigation .................................................................................................. 10-1910.3.3.5 Naming/Addressing an Application............................................................... 10-1910.3.4 Async Request Authorization................................................................................... 10-2010.3.5 User Interface and Navigation Commands............................................................ 10-2010.3.6 Configuration and Customization ........................................................................... 10-2210.3.6.1 System Configuration Parameters .................................................................... 10-2210.3.6.2 User Customization Parameter ......................................................................... 10-2410.3.7 Application Invocation Examples............................................................................ 10-2410.3.7.1 Invoking the Application by the Application Short Name........................... 10-2410.3.7.2 Invocation through Application-Associated Access Point ........................... 10-2410.3.7.3 Menu Capability.................................................................................................. 10-2510.3.7.4 Form Capability................................................................................................... 10-2610.3.7.5 Form Field with Select Options......................................................................... 10-2710.3.7.6 Current Menu State............................................................................................. 10-2710.3.7.7 Current Form State.............................................................................................. 10-2810.3.7.8 Multiple Commands in One Message.............................................................. 10-2910.3.7.9 Parameter Separator ........................................................................................... 10-2910.3.8 Writing Async Applications ..................................................................................... 10-3010.4 XMS Message Center ........................................................................................................ 10-3110.4.1 Configuration.............................................................................................................. 10-3110.4.1.1 Server-Side ........................................................................................................... 10-3110.4.1.2 Client (Handset) Side.......................................................................................... 10-3210.5 Device Channel Selection ................................................................................................. 10-3210.5.1 Automatic Device Selection ...................................................................................... 10-3210.5.2 Presence Integration................................................................................................... 10-3310.6 Transport Component....................................................................................................... 10-3310.6.1 Pre-built Drivers ......................................................................................................... 10-3310.6.1.1 Nokia MMS Driver.............................................................................................. 10-3310.6.1.2 CMG MMS Driver............................................................................................... 10-3410.6.1.3 MM7 Driver.......................................................................................................... 10-3710.6.1.4 CIMD Driver ........................................................................................................ 10-3810.6.1.5 VVSP Driver......................................................................................................... 10-39
xvii
10.6.1.6 WCTP Driver ....................................................................................................... 10-4210.6.1.7 Data Communication Driver............................................................................. 10-4310.6.1.8 WAP Push PAP Driver....................................................................................... 10-4610.6.1.9 Instant Messaging (IM) Driver.......................................................................... 10-4710.6.1.10 XMS Driver .......................................................................................................... 10-6010.6.1.11 Email Driver......................................................................................................... 10-6110.6.1.12 Voice Driver ......................................................................................................... 10-6310.6.1.13 UCP Driver........................................................................................................... 10-6410.6.1.14 SMPP Driver ........................................................................................................ 10-6710.6.1.15 Fax Driver (RightFax) ......................................................................................... 10-7110.6.2 How to Develop New Drivers.................................................................................. 10-7210.6.2.1 Class oracle.panama.messaging.transport.TransportLocator ...................... 10-7310.6.2.2 Interface oracle.panama.messaging.transport.Driver ................................... 10-7410.6.2.3 Interface oracle.panama.messaging.transport.DriverController ................. 10-7610.6.2.4 Interface oracle.panama.messaging.transport.GSMSmartMSGEncoder.... 10-7610.6.2.5 Interface oracle.panama.messaging.transport.MessageListener and
StatusListener ............................................................................................10-7710.6.2.6 Class oracle.panama.messaging.common.Message....................................... 10-7710.6.2.7 Class oracle.panama.messaging.common.ContentTypes ............................. 10-7810.6.2.8 Properties of the driver ...................................................................................... 10-7810.6.2.9 Custom properties for a driver ......................................................................... 10-7810.6.2.10 Example: A Sample Driver ................................................................................ 10-7910.6.3 Upgrading OracleAS Wireless 9.0.2x Drivers ........................................................ 10-8710.6.3.1 New and Changed Methods ............................................................................. 10-8810.6.4 Extend the Transport Server, Hooks ....................................................................... 10-8810.6.4.1 Named Hooks...................................................................................................... 10-8910.6.4.2 General Hooks..................................................................................................... 10-9010.7 Supporting Premium SMS and Reverse Charge SMS.................................................. 10-9010.7.1 Premium SMS and Reverse Charge New Features ............................................... 10-9110.7.2 Enabling Premium SMS Services............................................................................. 10-92
11 Notification Engine
11.1 Overview and Architecture ............................................................................................... 11-111.1.1 Architecture................................................................................................................... 11-311.1.2 Key Features.................................................................................................................. 11-5

xviii
11.1.3 Backward Compatibility ............................................................................................. 11-711.2 Creating a Notification ....................................................................................................... 11-711.2.1 Defining a Master Notification Application............................................................. 11-811.2.1.1 Predicates ............................................................................................................... 11-811.2.1.2 Subscriber Filtering Hook .................................................................................... 11-911.2.1.3 Triggering Conditions ........................................................................................ 11-1011.2.1.4 Message Template............................................................................................... 11-1111.2.1.5 API Sample: Creating Master Notification Application................................ 11-1111.2.2 Mapping Master Notification Application to a Master Application .................. 11-1311.2.2.1 Sample Code: Notification Mapping................................................................ 11-1411.2.2.2 Sample Code: Template-based Notification Mapping .................................. 11-1511.2.3 Subscription................................................................................................................. 11-1511.2.3.1 Sample Code: Creating a Subscription ............................................................ 11-1711.2.4 Notification Administration ..................................................................................... 11-1911.2.5 Notification Migration ............................................................................................... 11-1911.2.5.1 Sample Usage....................................................................................................... 11-2011.3 Data Feeders ....................................................................................................................... 11-2111.3.1 Building a Data Feeder .............................................................................................. 11-2211.3.2 Creating a Passthrough DataFeeder ........................................................................ 11-2311.3.3 Sample Applications ................................................................................................. 11-2311.3.3.1 Sample Application: Downloading Stock Quotes in XML ........................... 11-2311.3.3.2 Sample Application: Downloading Stock Quotes in CSV Format............... 11-2411.3.3.3 Adding Input Parameter Values to the Feed .................................................. 11-2511.3.3.4 Retrieving Downloaded Values ........................................................................ 11-2611.3.3.5 Starting the Data Feeder Process ...................................................................... 11-2611.3.3.6 Feed Parameter External Names....................................................................... 11-2611.3.3.7 Feed Scheduling .................................................................................................. 11-2711.3.3.8 XML Data Feeds .................................................................................................. 11-2711.4 Integrated Notification Solutions .................................................................................... 11-2811.4.1 Notification Engine Integration................................................................................ 11-2911.4.2 Workflow Integration ................................................................................................ 11-3011.4.2.1 Notification Application .................................................................................... 11-3111.4.2.2 Worklist Application .......................................................................................... 11-3111.4.3 Microsoft Exchange Notification Integration......................................................... 11-3211.5 Migrating the Notification System.................................................................................. 11-33

xix
11.5.1 Notification Migration Scenario............................................................................... 11-3311.5.2 Structural Changes..................................................................................................... 11-3411.5.2.1 Event Generation ................................................................................................ 11-3411.5.2.2 Message Content Generation ............................................................................ 11-3511.5.2.3 Authorization ...................................................................................................... 11-3511.5.3 Migration Limitations................................................................................................ 11-3611.5.4 Running the Migration Script................................................................................... 11-3611.5.4.1 Sample code for subscription handling in both versions.............................. 11-3811.5.4.2 Sample Code for Adding a 9.0.2.x Subscription............................................. 11-39
12 J2ME Development and Provisioning
12.1 J2ME Overview.................................................................................................................... 12-112.1.1 Overview of Features................................................................................................... 12-212.1.1.1 Minimum Memory Requirement in the MIDlet Suite..................................... 12-312.1.1.2 Simple Registration and Invocation of Web Services ...................................... 12-312.1.1.3 Access to Both SOAP Web Services and Enterprise Applications................. 12-312.1.1.4 Result Caching and Call Queuing ...................................................................... 12-412.1.1.5 Request and Response Packetization and Compression................................. 12-412.1.1.6 Session Support ..................................................................................................... 12-412.1.1.7 Deployment to OracleAS Wireless ..................................................................... 12-412.1.2 Getting Started with the Wireless Development Kit............................................... 12-512.1.2.1 Setup ....................................................................................................................... 12-512.1.2.2 J2ME Directory Structure in the WDK............................................................... 12-512.1.3 Walkthrough: Developing a J2ME MIDlet ............................................................... 12-612.1.3.1 Step 1: Register a Web Service with the J2ME Proxy Server .......................... 12-612.1.3.2 Step 2: Generate J2ME Client Stub Class for the Registered Web Service.... 12-912.1.3.3 Step 3: Calling the Methods in the J2ME Stub Class from the MIDlet........ 12-1012.1.3.4 Using TestStubMidlet to Access Simple Services........................................... 12-1212.1.4 Advanced Features .................................................................................................... 12-1412.1.4.1 Response Caching ............................................................................................... 12-1512.1.4.2 HTTP Authentication ......................................................................................... 12-1512.1.4.3 Session Support ................................................................................................... 12-1512.1.4.4 Request and Response Packetization ............................................................... 12-1612.1.4.5 Client Library API............................................................................................... 12-1612.1.4.6 Deploying MIDLets to OracleAS Wireless...................................................... 12-21

xx
12.1.4.7 Deploying through scripts ................................................................................. 12-2212.1.4.8 Migration from One OracleAS Wireless Installation to Another................. 12-2312.2 Digital Rights Management Support.............................................................................. 12-2512.2.1 OracleAS Wireless Built-in DRM Polices................................................................ 12-2512.2.2 Custom-built Digital Rights Policy and Content Enhancement.......................... 12-2612.2.2.1 Use Case Study .................................................................................................... 12-2612.2.3 Deployment of Custom-built Digital Rights Policies............................................ 12-3012.3 The J2ME Provisioning Server......................................................................................... 12-3312.3.1 The Application Model.............................................................................................. 12-3312.3.2 Hooks ........................................................................................................................... 12-3512.3.3 Upload J2ME Application ......................................................................................... 12-3712.3.4 Publishing the J2ME Application............................................................................. 12-4012.3.5 Downloading a J2ME Application........................................................................... 12-41
13 Web Scraping
13.1 Web Scraping Overview..................................................................................................... 13-113.2 Web Clipping ....................................................................................................................... 13-113.2.1 Introduction................................................................................................................... 13-213.2.2 Getting Started.............................................................................................................. 13-713.2.3 Creating a Web Clipping Application....................................................................... 13-713.3 Creating a Wireless Application...................................................................................... 13-1913.3.1 Creating a Default Application ................................................................................ 13-1913.3.2 Building a Custom Application................................................................................ 13-2513.4 Migrating from Existing Transcoding Technologies.................................................... 13-2813.5 Customizing the Web Clipping Service ......................................................................... 13-3213.6 Administrative Tasks for OracleAS Wireless Administrators .................................... 13-3213.6.1 Configuring Security.................................................................................................. 13-3313.6.2 Rendering Events to Be Logged and Generating Useful Reports ....................... 13-3413.7 WML Translator................................................................................................................. 13-3913.7.1 Deploying and Configuring WML Translator ....................................................... 13-4313.7.2 Using the WML Translator ....................................................................................... 13-45
14 Using Location Services
14.1 Introduction to Location Services ..................................................................................... 14-114.1.1 Getting Started.............................................................................................................. 14-3

xxi
14.1.2 Using the System Manager Interface for Location-Related Information ............. 14-414.1.3 Location Services Architecture................................................................................... 14-614.1.4 Location Service Categories........................................................................................ 14-714.1.5 Service Providers.......................................................................................................... 14-714.1.5.1 Provider Selection ................................................................................................. 14-814.1.5.2 Logging of Provider Selection Information .................................................... 14-1414.1.5.3 Logging of Provider Performance Information.............................................. 14-1414.1.6 Geocoding Services .................................................................................................... 14-1414.1.6.1 Geocoding API .................................................................................................... 14-1514.1.6.2 Geocoder Interface.............................................................................................. 14-1614.1.7 Location Marks ........................................................................................................... 14-1614.1.8 LOCATIONMARK Table.......................................................................................... 14-1714.1.9 Mapping Services ....................................................................................................... 14-1814.1.10 Routing Services ......................................................................................................... 14-1814.1.10.1 Routing Settings .................................................................................................. 14-1814.1.10.2 Routing Results ................................................................................................... 14-1914.1.10.3 Support for Multiple Languages ...................................................................... 14-2014.1.10.4 Routing API ......................................................................................................... 14-2014.1.11 Business Directory (Yellow Pages) Services........................................................... 14-2114.1.11.1 Different Approaches Among Yellow Pages Providers................................ 14-2114.1.11.2 Business Directory Category Configuration ................................................... 14-2214.1.11.3 Business Directories (Yellow Pages) API......................................................... 14-2314.1.12 Traffic Services............................................................................................................ 14-2414.1.12.1 Traffic Report Caching ....................................................................................... 14-2514.1.12.2 Traffic XML Requests and Responses.............................................................. 14-2614.1.12.3 Traffic Java API ................................................................................................... 14-2714.1.12.4 Traffic Service Configuration ............................................................................ 14-2914.2 Developing Location-Based Applications ..................................................................... 14-3014.2.1 Creating JavaServer Pages (JSP) Files ..................................................................... 14-3114.2.1.1 JSP Examples for Location Services.................................................................. 14-3414.2.1.2 addMembers ........................................................................................................ 14-3914.2.1.3 address.................................................................................................................. 14-4014.2.1.4 businesses............................................................................................................. 14-4214.2.1.5 category ................................................................................................................ 14-4314.2.1.6 createPrivateCommunity................................................................................... 14-44

xxii
14.2.1.7 createSharedCommunity ................................................................................... 14-4514.2.1.8 createSystemCommunity................................................................................... 14-4614.2.1.9 defaultLocationMark .......................................................................................... 14-4714.2.1.10 deleteCommunity ............................................................................................... 14-4814.2.1.11 drivingDistance ................................................................................................... 14-4914.2.1.12 drivingTime ......................................................................................................... 14-5014.2.1.13 geocode ................................................................................................................. 14-5114.2.1.14 geometry............................................................................................................... 14-5214.2.1.15 getCommunity..................................................................................................... 14-5314.2.1.16 iterateBusinesses.................................................................................................. 14-5414.2.1.17 iterateBusinessesInCity ...................................................................................... 14-5614.2.1.18 iterateBusinessesInCorridor .............................................................................. 14-5714.2.1.19 iterateBusinessesInPostalCode.......................................................................... 14-5814.2.1.20 iterateBusinessesInRadius ................................................................................. 14-5914.2.1.21 iterateBusinessesInState ..................................................................................... 14-6014.2.1.22 iterateBusinessesNearestTo ............................................................................... 14-6114.2.1.23 iterateByDistance................................................................................................. 14-6314.2.1.24 iterateByDrivingDistance................................................................................... 14-6414.2.1.25 iterateByName ..................................................................................................... 14-6514.2.1.26 iterateByRegionName......................................................................................... 14-6614.2.1.27 iterateCategoriesMatchingKeyword ................................................................ 14-6614.2.1.28 iterateChildCategories........................................................................................ 14-6714.2.1.29 iterateGeocodes ................................................................................................... 14-6814.2.1.30 iterateLocationMarks.......................................................................................... 14-6914.2.1.31 iterateManeuvers................................................................................................. 14-7014.2.1.32 iterateReverseGeocodes ..................................................................................... 14-7114.2.1.33 listAllMembers .................................................................................................... 14-7214.2.1.34 listBusinessesInCity ............................................................................................ 14-7314.2.1.35 listBusinessesInCorridor .................................................................................... 14-7414.2.1.36 listBusinessesInPostalCode................................................................................ 14-7614.2.1.37 listBusinessesInRadius ....................................................................................... 14-7714.2.1.38 listBusinessesInState ........................................................................................... 14-7814.2.1.39 listBusinessesNearestTo ..................................................................................... 14-7914.2.1.40 listByDistance ...................................................................................................... 14-8014.2.1.41 listByDrivingDistance......................................................................................... 14-81

xxiii
14.2.1.42 listByName........................................................................................................... 14-8214.2.1.43 listByRegionName .............................................................................................. 14-8314.2.1.44 listCategoriesMatchingKeyword...................................................................... 14-8314.2.1.45 listChildCategories ............................................................................................. 14-8414.2.1.46 listCreatedCommunities .................................................................................... 14-8514.2.1.47 listCreatedPrivateCommunities ....................................................................... 14-8514.2.1.48 listCreatedSharedCommunities........................................................................ 14-8614.2.1.49 listCreatedSystemCommunities ....................................................................... 14-8714.2.1.50 listGeocodes ......................................................................................................... 14-8714.2.1.51 listLocationMarks ............................................................................................... 14-8814.2.1.52 listManeuvers ...................................................................................................... 14-8914.2.1.53 listReverseGeocodes ........................................................................................... 14-9014.2.1.54 map........................................................................................................................ 14-9114.2.1.55 mobilePos ............................................................................................................. 14-9214.2.1.56 point ...................................................................................................................... 14-9314.2.1.57 removeAllMembers ............................................................................................ 14-9414.2.1.58 removeMembers ................................................................................................. 14-9514.2.1.59 route ...................................................................................................................... 14-9614.2.1.60 setCommunityName .......................................................................................... 14-9814.2.2 Using the Location Java API..................................................................................... 14-9914.2.2.1 Geocoding ............................................................................................................ 14-9914.2.2.2 Location Marks.................................................................................................. 14-10214.2.2.3 Routing ............................................................................................................... 14-10314.2.2.4 Mapping ............................................................................................................. 14-10414.2.2.5 Business Directory (YP).................................................................................... 14-10514.2.2.6 Traffic.................................................................................................................. 14-10614.2.3 Using Web Services.................................................................................................. 14-10914.2.3.1 WSDL Files......................................................................................................... 14-10914.2.3.2 XML Files ........................................................................................................... 14-11014.2.3.3 XSD Files ............................................................................................................ 14-11014.3 Enabling Mobile Positioning ......................................................................................... 14-11114.3.1 Manual Positioning.................................................................................................. 14-11214.3.1.1 Enabling Manual Positioning.......................................................................... 14-11214.3.2 Automatic Positioning............................................................................................. 14-11314.3.2.1 Providing Location Using a GPS Device ....................................................... 14-114

xxiv
14.3.2.2 Location Cache .................................................................................................. 14-11614.3.2.3 Positioning Quality of Service......................................................................... 14-11614.3.2.4 Specifying Positioning Providers.................................................................... 14-11714.3.2.5 Granting and Revoking Positioning Rights .................................................. 14-12014.3.2.6 Mobile Communities ........................................................................................ 14-12014.3.2.7 Privacy Directives and Enabling/Disabling Automatic Positioning ........ 14-12214.3.2.8 Mobile Positioning API .................................................................................... 14-12314.3.2.9 Privacy API ........................................................................................................ 14-12314.4 Location Event Server ..................................................................................................... 14-12614.4.1 Location Event Server Concepts ............................................................................ 14-12714.4.2 Location Event Agent Example.............................................................................. 14-12814.4.3 Location-Based Condition Object (LBCondition) ................................................ 14-12914.4.4 Location Event Agent Object (LBEventAgent) .................................................... 14-12914.4.5 Location Event Handler Object (LBEventHandler)............................................. 14-13014.4.6 Location Event Server Configuration Options..................................................... 14-13014.5 Using the Region Modeling Tool .................................................................................. 14-13214.5.1 Service and Folder Visibility Using Region Modeling........................................ 14-13214.5.2 Folders and Hierarchies of Regions....................................................................... 14-13314.5.3 Associating a Region with an Application ........................................................... 14-13414.5.4 Loading and Updating Region Data ..................................................................... 14-13614.5.4.1 Tables for Region Data ..................................................................................... 14-13714.5.4.2 Inserting Data into Region Tables .................................................................. 14-13914.5.5 Region Modeling API .............................................................................................. 14-14014.6 Integrating an External Content Provider ................................................................... 14-14114.6.1 Accessing External URLs from Inside a Firewall ................................................ 14-14214.6.2 Functions to Implement........................................................................................... 14-14214.6.2.1 Geocoding Services: Available Functions...................................................... 14-14314.6.2.2 Mapping Services: Available Functions......................................................... 14-14314.6.2.3 Routing Services: Available Functions........................................................... 14-14414.6.2.4 Traffic Services: Available Functions ............................................................. 14-14414.6.2.5 Business Directory (YP) Services: Available Functions ............................... 14-14414.7 Integrating a Mobile Positioning Provider .................................................................. 14-14614.7.1 Implementing a Mobile Positioning Proxy........................................................... 14-14714.7.2 Handling Exceptions and Errors with Mobile Positioning ................................ 14-148

xxv
15 Enabling User Customization
15.1 Overview of User Preferences ........................................................................................... 15-115.2 Multiple Customization Profiles ....................................................................................... 15-415.2.1 Concepts ........................................................................................................................ 15-415.2.2 Sample Applications.................................................................................................... 15-615.3 Presets ................................................................................................................................... 15-815.3.1 Presets Concept and Architecture ............................................................................. 15-915.3.2 Sample Applications.................................................................................................. 15-1015.3.2.1 Example 1: Adding Attributes to the User Schema ....................................... 15-1015.3.2.2 Example 2: Adding a Unique Presets Relation for a User ............................ 15-1215.3.2.3 Example 3: Adding a Unique Presets Relation for Users’ Profiles .............. 15-1315.3.2.4 Example 4: Selecting the Presets Relation Under the Current Profile......... 15-1515.3.2.5 Example 5: Creating Presets without Given Name........................................ 15-1715.3.3 Regular Expressions Syntax for the Presets Attribute Formats........................... 15-2015.4 Location Marks .................................................................................................................. 15-2315.5 User Device Management ................................................................................................ 15-2415.6 User and Group Management......................................................................................... 15-2515.7 Service Management......................................................................................................... 15-25
16 Billing
16.1 Overview .............................................................................................................................. 16-116.1.1 Concepts ........................................................................................................................ 16-216.2 Using the Billing Integration Framework........................................................................ 16-316.2.1 Billable Actions and Billing System Interaction ...................................................... 16-316.2.1.1 Default Billable Actions ....................................................................................... 16-316.2.1.2 Custom Billable Actions....................................................................................... 16-416.3 BillingLoader Utility ........................................................................................................... 16-616.4 Billing Collector and Service Detail Record .................................................................... 16-616.4.1 Default Billing Collector Implementation ................................................................ 16-716.4.2 Service Detail Record ID Versus Billing Reference ID............................................ 16-916.4.3 Extend Default Billing Collector ................................................................................ 16-916.4.4 Maintaining Transaction Context on Multi-part Requests .................................. 16-1016.4.4.1 Creating and Assigning Billing Transactions ................................................. 16-1116.4.4.2 Logging Rules for Service Detail Records ....................................................... 16-1116.4.4.3 Maintaining Transaction State in a Single-Thread Multi-part Request ...... 16-12
xxvi
16.5 Billing Driver...................................................................................................................... 16-1216.6 Billing Integration Scenario.............................................................................................. 16-1316.6.1 Handling Prebilling.................................................................................................... 16-1316.6.2 Handling Postbilling.................................................................................................. 16-13
A XHTML Modules Supported
A.1 Structure Module................................................................................................................... A-2A.2 Text Module ........................................................................................................................... A-2A.3 HyperText Module ................................................................................................................ A-2A.3.1 Example Using the Rel Attribute ................................................................................. A-4A.4 List Module............................................................................................................................. A-4A.4.1 Example of a Nested Navigation List.......................................................................... A-5A.5 Presentation Module ............................................................................................................. A-5A.6 Object Module........................................................................................................................ A-5A.7 Embedding Images................................................................................................................ A-6A.8 Embedding Audio ................................................................................................................. A-7A.9 Embedding Voice and DTMF Grammar............................................................................ A-8A.10 Using <param> ...................................................................................................................... A-9A.11 Basic Tables Module.............................................................................................................. A-9A.12 Meta Information Module.................................................................................................. A-10A.13 Style Sheet Module.............................................................................................................. A-10A.14 Style Attribute Module ....................................................................................................... A-10A.15 Link Module ......................................................................................................................... A-10A.16 OracleAS Wireless MXML Media Attribute Module ..................................................... A-11A.17 Speech Recognition Grammar Module ............................................................................ A-11
B Media Types, Features and Capabilities
B.1 OracleAS Wireless CSS Media Query and MXML Media Attribute Syntax ................ B-1B.2 OracleAS Wireless Supported Media Types ..................................................................... B-2B.3 OracleAS Wireless Supported Media Features ................................................................. B-2B.3.1 Media Features Specified in CSS3 Media Queries Specification ............................. B-2B.3.2 Extended Media Feature Set ......................................................................................... B-4B.4 OracleAS Wireless-defined Capabilities ............................................................................ B-4B.4.1 Device/Software UA Capabilities ............................................................................... B-4B.4.2 Network Capabilities and Characteristics .................................................................. B-6

xxvii
B.5 Sample Media Queries.......................................................................................................... B-7
C XForms Specification Support
C.1 XForms Document Structure ............................................................................................... C-1C.2 XForms Processing Model.................................................................................................... C-3C.3 DataTypes............................................................................................................................... C-5C.4 Model Item Properties And Schema Constraints ............................................................. C-7C.5 XPath Expression in XForms ............................................................................................... C-8C.6 XForms UI Controls ........................................................................................................... C-11C.7 XForms Actions ................................................................................................................... C-16
D OracleAS Wireless CSS Support
D.1 OracleAS Wireless CSS Support.......................................................................................... D-1
E Using CSS Layout Properties
E.1 OracleAS Wireless CSS Layout Extensions—New Properties and Values................... E-1E.2 Grid Layout Model................................................................................................................ E-2E.2.1 Grid Cell Layout and Cell Spans ................................................................................. E-3E.2.2 Grid Cell and Grid Cell Label....................................................................................... E-3E.2.3 In-lining Content within a Grid Cell ........................................................................... E-5E.2.4 Label Side of a Grid Cell Label..................................................................................... E-5E.3 Default Styles for XForms Group........................................................................................ E-6
F Oracle XML Grammar Subset
F.1 Oracle XML Grammar Subset ............................................................................................. F-1
G JSP Tag Library
Index

xxviii
xxix
Send Us Your Comments
Oracle Application Server Wireless Developer’s Guide, 10g (9.0.4)
Part No. B10948-01
Oracle Corporation welcomes your comments and suggestions on the quality and usefulness of this document. Your input is an important part of the information used for revision.
■ Did you find any errors?■ Is the information clearly presented?■ Do you need more information? If so, where?■ Are the examples correct? Do you need more examples?■ What features did you like most?
If you find any errors or have any other suggestions for improvement, please indicate the document title and part number, and the chapter, section, and page number (if available). You can send comments to us in the following ways:
■ Electronic mail: [email protected]■ Postal service:
Oracle Corporation Oracle Mobile and Wireless Products500 Oracle Parkway, Mailstop 4OP6Redwood Shores, California 94065USA
If you would like a reply, please give your name, address, telephone number, and (optionally) electronic mail address.
If you have problems with the software, please contact your local Oracle Support Services.

xxx

xxxi
Audience and Roadmap
This guide discusses how you can use OracleAS Wireless to develop and deliver mobile services to any mobile device.
Target AudienceThis Guide is designed to drive developers quickly through major technology and product features, and to assist in evaluation of this product for development groups.
Roadmap This Guide includes the following sections:
Section Content
Chapter 1, "Introduction to Oracle Application Server Wireless"
Overview of OracleAS Wireless.
Chapter 2, "Introducing Oracle Application Server Wireless Developer’s Tools"
Introduction to building applications using OracleAS Wireless.
Chapter 3, "OracleAS Wireless Developer Kit"
How to develop and test OracleAS Wireless applications without the full installation of OracleAS.
Chapter 4, "JDeveloper Wireless Extension"
Information about using and extending JDeveloper.
Chapter 5, "Developing Services" Using Service Manager to create and manage the service-related objects of the Oracle Application Server Wireless repository.

xxxii
Chapter 6, "Mobile Studio" Oracle Mobile Studio is an online, hosted environment for developing, testing and deploying mobile applications for the OracleAS Wireless platform.
Chapter 7, "Wireless Customization Portal"
Directions on customizing portals from a browser.
Chapter 8, "Authoring Mobile Browser and Voice Applications"
Device-independent authoring using XHTML and XFORMS.
Chapter 9, "Using Multi-Channel Server" Developing Multichannel applications
Chapter 10, "Creating Messaging Applications"
Messaging applications support sending/receiving message to/from mobile users.
Chapter 11, "Notification Engine" Notifications and data feeds match interested users with relevant content.
Chapter 12, "J2ME Development and Provisioning"
Develop J2ME applications to access enterprise back-end applications.
Chapter 13, "Web Scraping" Reformatting device/markup language for use on any web-enabled device.
Chapter 14, "Using Location Services" Specialized services for developing location-based applications.
Chapter 15, "Enabling User Customization"
Adapting applications to increase mobile application efficiency.
Chapter 16, "Billing" OracleAS Wireless Billing Integration Framework provides an extensible and flexible framework to model billable services, capture billable actions, and integrate with any billing engine.
Appendix A, "XHTML Modules Supported"
Reference materials supporting XHTML documentation.
Appendix B, "Media Types, Features and Capabilities"
Reference materials regarding media types, their features and capabilities.
Appendix C, "XForms Specification Support"
Lists XForms properties supported.
Appendix D, "OracleAS Wireless CSS Support"
Lists CSS properties supported.
Appendix E, "Using CSS Layout Properties"
Reference material about using CSS capabilities.
Section Content

xxxiii
Documentation AccessibilityOur goal is to make Oracle products, services, and supporting documentation accessible, with good usability, to the disabled community. To that end, our documentation includes features that make information available to users of assistive technology. This documentation is available in HTML format, and contains markup to facilitate access by the disabled community. Standards will continue to evolve over time, and Oracle Corporation is actively engaged with other market-leading technology vendors to address technical obstacles so that our documentation can be accessible to all of our customers. For additional information, visit the Oracle Accessibility Program Web site at http://www.oracle.com/accessibility/.
Accessibility of Code Examples in Documentation JAWS, a Windows screen reader, may not always correctly read the code examples in this document. The conventions for writing code require that closing braces should appear on an otherwise empty line; however, JAWS may not always read a line of text that consists solely of a bracket or brace.
Accessibility of Links to External Web Sites in Documentation This documentation may contain links to Web sites of other companies or organizations that Oracle Corporation does not own or control. Oracle Corporation neither evaluates nor makes any representations regarding the accessibility of these Web sites.
Related DocumentsHere is a partial list of related documents that will provide you with important information concerning OracleAS Wireless and related products/components:
■ OracleAS Wireless Administrator’s Guide—all the information you need to be up and running in the shortest possible time.
Appendix F, "Oracle XML Grammar Subset"
Describes the Oracle XML Grammar subset.
Appendix G, "JSP Tag Library" Listing of jsp tags.
"Index" Index.
Section Content

xxxiv
■ OracleAS Wireless Release Notes—final notes about the products, since the Documentation and Help were produced.
■ OracleAS Wireless online Help (included in the product)
■ Javadoc with sample code included in product directory structure
■ OracleAS documentation (HTML and PDF library)
■ Oracle Technology Network
http://www.otn.oracle.com
Oracle Technology Network is your main resource for information, samples, updates, and other downloads for your products. Stylesheets, drivers, documentation updates, sample code, demonstration software, and other valuable resources are available to you on OTN. Sign-up (if you haven’t already done so; it’s free!) with OTN to gain access and receive up-to-the-minute information about Oracle products and practices.

Part I Introduction
Part I contains introductory information about Oracle Application Server Wireless.
■ Chapter 1, "Introduction to Oracle Application Server Wireless"


Introduction to Oracle Application Server Wireless 1-1
1Introduction to Oracle Application Server
Wireless
Each section of this document presents a different topic. These sections include:
■ Section 1.1, "Overview of OracleAS Wireless"
■ Section 1.2, "New in OracleAS Wireless"
■ Section 1.3, "OracleAS Wireless Deployed in a Network"
1.1 Overview of OracleAS WirelessOracleAS Wireless is the wireless and voice component of the Oracle Application Server. It enables enterprises and service providers to efficiently build, deploy and manage the following types of applications:
■ Browser-based applications
■ Voice applications
■ Async applications
■ Notifications
■ J2ME applications
For Service Providers, OracleAS Wireless is a Service Delivery Platform for rapidly building and deploying wireless services. It opens up the mobile network to third-party developers using standard interfaces. This helps to improve the Average Revenue Per User (ARPU). OracleAS Wireless is a unified platform for developing all kinds of mobile services such as: WAP, SMS, MMS, Location and Voice. This leads to lower total-cost-of-ownership (TCO).

Overview of OracleAS Wireless
1-2 Oracle Application Server Wireless Developer’s Guide
OracleAS Wireless can be used by Service Providers to run Mobile Portals, SMS Services, J2ME Provisioning Servers, Content Delivery Platforms, Third-party Integration Platform, Messaging and Location Gateways.
OracleAS Wireless components can be split into five groups. Each of these groups either help you quickly build compelling wireless applications, or manage and deploy existing applications.
■ Device Portal—the end-user wireless portal to access the developed applications and content.
■ Mobile Applications—out-of-the-box applications to quickly get an enterprise mobile-enabled.
■ Multi-Channel Server—detects devices and transforms content and applications to the device.
■ Foundation Services—enhance applications and speed development. These are in the form of Java APIs or Web services.
■ Development Tools—help developers code, test and debug wireless and voice applications.
As you build wireless applications, you can leverage the Wireless Development Kit (WDK) to create and test your applications with JDeveloper or any other Integrated Development Environment (IDE). You can run wireless applications on your development PC or laptop simulating the full installation of OracleAS Wireless. As you create mobile applications, they can be further enhanced with the Foundation Services of OracleAS Wireless. The Foundation Services allow you to easily add compelling features to your wireless applications such as location-awareness, alerting, personalization and more. These services are available through simple, open-standard Web services or Java APIs. Other tools such as Web Clipping allow you to take an existing PC browser application and turn it into a wireless application.
OracleAS Wireless also simplifies the deployment of your wireless and voice applications. From Oracle JDeveloper, you are able to automatically deploy your wireless applications to the Oracle Application Server environment. Once your application is in the Oracle Application Server environment, the Web-based Application Developer tool allows you to register your application for deployment. Even if your application is residing on another Web server, you are able to register your application with OracleAS Wireless (with its URL) giving mobile access to all your users. Your application can be delivered to your end users with several flexible methods, such as Over-the-Air (OTA) delivery, browser access, or download.

New in OracleAS Wireless
Introduction to Oracle Application Server Wireless 1-3
After your application has been created and deployed, you may need to manage access privileges, users and groups, or your complete system. OracleAS Wireless offers complete tools for each of these tasks in an intuitive set of web-based tools.
1.2 New in OracleAS WirelessOracleAS Wireless includes many new features and enhancements.
1.2.1 Multi-Channel ServerAt the core of OracleAS Wireless is the Multi-Channel Server, enabling applications to be accessed through multiple delivery methods such as SMS, voice access, WAP, Pocket PCs, and others. Multi-Channel Server greatly simplifies and reduces the time and cost of development by acting as an intelligent wireless proxy for mobile applications. Developers need not be concerned with the vast array of mobile devices and networks; they can now focus on creating mobile applications for any channel in one, future-proof, open-standards language. The new Multi-Channel Server extends the existing multi-channel capabilities of previous OracleAS Wireless releases.
Applications written in XHTML are passed through the Multi-Channel Server and translated for any device and network. For example, an XHTML application passed through the Multi-Channel Server is translated to VoiceXML if a phone is calling the application using a voice dialog, or it is translated to WML if a WAP phone is accessing the application.
1.2.2 J2ME SupportOracle J2ME Developer’s Kit offers the ability to extend web services to J2ME devices in an optimized manner for mobile devices.
Java 2 Micro Edition (J2ME), provides a lightweight operating system for mobile devices enabling open standards, client-side development. With the large amount of J2ME-enabled phones on the market, vendors need a method to efficiently build, manage and deliver J2ME applications to the right mobile devices. OracleAS Wireless includes complete, end-to-end support for building J2ME applications and delivering them to mobile devices. J2ME support includes the J2ME Developer’s Kit and the J2ME Provisioning system.
However, there is a restriction on the complexity of J2ME applications because of the limited computing power of mobile devices. The more complicated the J2ME application is, the less usable the application will be on a device. One way to create

New in OracleAS Wireless
1-4 Oracle Application Server Wireless Developer’s Guide
compelling J2ME applications is to use Web services. Applications are able to push some of the CPU-intensive logic to the Web services residing on the server side. Even the call to Web services from J2ME devices is too CPU-intensive. Using the J2ME Developer’s Kit, J2ME application developers can make web services calls through the Oracle Application Server J2ME proxy server using a client stub. Additionally, MIDlet developers can utilize built-in features optimizing communication, such as request and response caching, if the network is unavailable. The calls then can automatically resume when network connectivity is restored.
In order to deploy a J2ME application, OracleAS Wireless streamlines the deployment, management and delivery of J2ME applications with its provisioning system. Web-based application management allows users to upload J2ME applications for management and secure storage. A byte-code inspector verifies the application for any malicious content. OracleAS Wireless supports over-the-air (OTA), and efficiently delivers applications to target users or devices. Digital Rights Management (DRM) adds a digital layer around J2ME applications to support business logic that provides full control over the application. The digital wrapper supports billing strategies and application life span control.
1.2.3 Notifications and Multi-media MessagingOracleAS Wireless further enhances messaging with new functionality for actionable alerts, message adaptation, and failover delivery control. Also new are MMS features that allow for richer messaging experiences. Existing messaging capabilities have been enhanced to include more flexible message templates, security to prevent message spoofing, support for message prioritization, and a greater ability to handle volume notifications.
OracleAS Wireless supports Multi-media Messaging (MMS) for rich mobile messages including graphics, videos and audio. MMS messages can be authored natively in SMIL or in open-standards XHTML. Messages authored in XHTML are automatically adapted for MMS-compatible devices by OracleAS Wireless. The power of adaptation allows a message to be written once and automatically optimized for any target device.
Actionable alerts are notifications you can respond to from your mobile device. For example, a stock alert can prompt a user to take an action and sell when a target price is hit.
Location can also trigger an alert. Location-based alerts generate and deliver alert messages based on a mobile user’s current location. For example, a field service

New in OracleAS Wireless
Introduction to Oracle Application Server Wireless 1-5
coordinator receives an alert when a service engineer is within two miles of a customer with an urgent service request.
Also new to the Multi-Channel Server are Multimedia Adaptation Services. OracleAS Wireless Multimedia Adaptation Services provide device-specific adaptation of images, ringtones, voice grammars and audio/video streams. Devices support different image formats and have different screen sizes and color depths. As part of the content adaptation performed by OracleAS Wireless in responding to a request, images are dynamically adapted to suit the device. Ringtone adaptation allows for conversion of ringtone data to formats supported by the most popular phones such as RTTTL, iMelody and MIDI. The flexible framework for ringtone adaptation allows developers to easily add support for new ringtone formats.
1.2.4 Wireless Development KitThe Oracle Wireless Development Kit is a small-footprint OracleAS Wireless development environment for developing wireless and voice applications. This speeds the development process by giving extra flexibility to use any IDE, development tool, Web service and/or device simulator. The Wireless Development Kit can be used on any PC or laptop, connected or disconnected, to build and test wireless and voice applications. It is no longer necessary to have a full installation of Oracle Application Server on which to build and test wireless applications. The Wireless Development Kit supports development for voice, mobile browser, J2ME and messaging applications.
Oracle offers a version of the Wireless Development Kit specifically for JDeveloper called the JDeveloper Wireless Extension. JDeveloper users can utilize the JDeveloper Wireless Extension for complete wireless development with code templates, wizards, code insight and automatic deployment to Oracle Application Server.
1.2.5 Web ClippingThe Wireless Web Clipping Server allows clipping and scraping of existing Web content to create wireless applications that reuse your existing PC browser-based applications. The Wireless Web Clipping Server is used to create many applications, each of which represents Web content that has been clipped and scraped from one or more Web sites scattered throughout a large organization.

New in OracleAS Wireless
1-6 Oracle Application Server Wireless Developer’s Guide
Wireless Web Clipping Server includes:
■ Navigation through various styles of login mechanisms, including form and JavaScript-based submission and HTTP Basic and Digest Authentication with cookie-based session management.
■ Fuzzy matching of clippings. If a Web clipping gets reordered within the source page or if its character font, size, or style changes, it will be identified correctly by the Wireless Web Clipping Server and delivered as the Wireless Web Clipping application content.
■ Reuse of a wide range of Web content, including basic support of pages written with HTML 4.0.1, JavaScript, applets, and plug-in enabled content, retrieved through HTTP GET and POST (form submission).
All Wireless Web Clipping application definitions are stored persistently in the Oracle Application Server infrastructure database. Any secure information, such as passwords, is stored in encrypted form, according to the Data Encryption Standard (DES), using Oracle encryption technology.
1.2.6 Location ServicesOracleAS Wireless Location Services give access to the full Location-Based Service (LBS) functionality, such as user positioning, geocoding, mapping, driving directions, and business directory lookup in an open-standards manner. Any application or generic client can use the included WSDLs to invoke the LBS web services. In addition, OracleAS Wireless instances can use LBS features more conveniently by using the service provider proxy. This allows you to switch LBS providers without having to make modifications to the applications using LBS features.
LBS features have been made available through the OracleAS Wireless tools in addition to being available through APIs. The LBS features allow mobile positioning (to provide the user’s current location, and privacy management) to control when and to whom a mobile user’s location is available. Both mobile positioning and the caching of the location information can be enabled or disabled by the system or by individual users. Users can grant mobile positioning access to other users or groups of users (communities) for a certain date range and for specified time windows.
OracleAS Wireless Location Services also allows a mobile user/device to send the current location, which is usually provided by a GPS receiver, to OracleAS Wireless. The current location can be subsequently queried through the existing mobile positioning and privacy management framework. Users can also choose to position

OracleAS Wireless Deployed in a Network
Introduction to Oracle Application Server Wireless 1-7
themselves manually using the Location Mark feature. A Location Mark can be either a point location specified by an address or a region specified by a city, state, or country.
In the previous release, users could configure multiple content providers for geocoding, mapping, driving directions, and business directory services, and a provider was selected based on static ordering or its availability region. This release adds the ability to monitor the performance and reliability of providers and dynamically adjust the selection criteria. It also logs performance statistics that will help administrators manage their systems.
1.3 OracleAS Wireless Deployed in a NetworkOracleAS Wireless easily fits into an enterprises network allowing easy integration with existing backend data and legacy systems. Applications can run on any server using OracleAS Wireless as a mobile enabler. The following scenario describes how OracleAS Wireless can be deployed. It describes the network components as a mobile device requests content from an application.
Figure 1–1 Request for Process
The diagram shows a wireless network using WAP. WAP is only one of the wireless standards. Depending on the desired target device, the WAP gateway can be switched with other gateways; different gateways may be need to support different protocols. OracleAS Wireless processes a request for a wireless service as follows:
1. User sends a request for a wireless application.
A user requests an application from a mobile device with the device’s microbrowser, and the device sends the request to the wireless network base station. The request can be sent over a variety of different protocols, depending on the kind of device being used. These protocols have been optimized to function over a wireless network with limited bandwidth and intermittent

OracleAS Wireless Deployed in a Network
1-8 Oracle Application Server Wireless Developer’s Guide
connectivity. This ability makes these protocols more efficient over existing wireless networks than the standard Internet HTTP protocol.
2. Wireless request is translated to an internet request.
A gateway converts the request from the network protocol into the standard Internet HTTP protocol before the request is passed from the Wireless network to the traditional Internet. For WAP- enabled devices, a WAP gateway converts WTP to HTTP. There are a number of gateways on the market; typically a gateway for each device type. The gateway not only maps the request from one protocol to another, but also can pass the message from the wireless network to the traditional Internet infrastructure: HTTP.
3. OracleAS Wireless establishes a wireless session.
After the Gateway converts the wireless request to an HTTP URL, the message is sent as a standard Internet request to OracleAS Wireless. OracleAS Wireless and the gateway then authenticate with each other and establish a session. Depending on the deployment preference, the application asks for a username and password for user authentication (depending on your security preferences).
4. The wireless application is optimized and sent to the user.
When OracleAS Wireless receives the request, it processes it in three steps:
a. The application content is retrieved from its source. The application may reside on any Web server, so OracleAS Wireless makes HTTP requests for the application content.
b. After the application content is retrieved by OracleAS Wireless, the application is customized based on user preferences; the user may have localized information, display options, etc.
c. The content is transformed for the specific protocol being used. The user may have used any of a number of WAP devices, so OracleAS Wireless detects the device type, screen size and color options, and optimizes the content, providing it in the most efficient format.

Part IIOracle Application Server Wireless
Developer’s Tools
Part II contains information about Oracle Application Server Wireless Developer Tools.
■ Chapter 2, "Introducing Oracle Application Server Wireless Developer’s Tools"
■ Chapter 3, "OracleAS Wireless Developer Kit"
■ Chapter 4, "JDeveloper Wireless Extension"
■ Chapter 5, "Developing Services"
■ Chapter 6, "Mobile Studio"
■ Chapter 7, "Wireless Customization Portal"


Introducing Oracle Application Server Wireless Developer’s Tools 2-1
2Introducing Oracle Application Server
Wireless Developer’s Tools
Each section of this document presents a different topic. These sections include:
■ Section 2.1, "OracleAS Wireless Development Path"
■ Section 2.2, "Delivering Your Applications"
2.1 OracleAS Wireless Development PathThis chapter takes you through the high level steps of the wireless development path and describes some of the tools used to build a mobile application. There are many possible paths to create applications; this chapter is designed to compliment your current method for building PC-based applications by adding wireless-specific concepts. The first step in building a mobile application is to design it. The design phase outlines what you are mobile-enabling, whether it is a business process, a productivity tool, or an entertainment application.
Figure 2–1 Wireless Development Path

OracleAS Wireless Development Path
2-2 Oracle Application Server Wireless Developer’s Guide
The most productive way to approach the mobile application design process is to divide it into four steps. First, create the business case for making an application or business process mobile. This includes determining the tangible benefits of a mobile solution. If you want more information on the business case of a mobile application, see the Mobile Center on OTN: http://www.otn.oracle.com/mobile.
Secondly, decide on the application scope, determining the usage situation, desired business flows and most the appropriate access channels: mobile browsers, voice access, messaging, or an application without network access (offline). The third step is to choose the actual development model (XHTML/J2EE or J2ME) to enable that channel. The fourth important step consists of considerations regarding the deployment of the application. Deployment encapsulates the process an application is delivered to the end users and the method used to manage the applications’ lifecycle. Going through this process, developers can ensure they are:
■ Mobilizing the right business processes
■ Extending the business process through the right access channels
■ Developing the right amount of functionality
■ Deciding on the right deployment model
■ Ensuring the solution has a tangible return on investment (ROI)
2.1.1 Leverage Web Services and Reuse Business LogicOracle Application Server Wireless includes Web services that greatly enhance your mobile applications including location based services, messaging services and personalization services. For example, corporate Web services can be combined with the Messaging Web Service of Oracle Application Server Wireless to automatically alert a manager when an inventory level is reaching a critical low. The Oracle Application Server Wireless messaging Web service accepts an address, message text and a delivery channel (voice, fax, SMS, or Email) as input. Then, the Web service takes the message content and sends it to that address, SMS, email or even phone number - using text to speech. The developer’s job becomes greatly simplified because they do not need to worry about the underlying infrastructure and business relationships it takes to send that message. See Chapter 10, "Creating Messaging Applications" or the Mobile Center on OTN for more information on the Messaging Web Service.
When writing your wireless application, there is no need to duplicate business logic that already exists. You can expose your different back-end systems and applications as Web Services and then use Oracle Application Server Wireless to deliver them to any device. For example, you may want to reuse a legacy field

OracleAS Wireless Development Path
Introducing Oracle Application Server Wireless Developer’s Tools 2-3
service system, traditionally only for PCs. You should use the existing field service system and just create a mobile view of it using XHTML or J2ME.
2.1.2 Building and Testing Your ApplicationsOracle Application Server Wireless provides two tools to help build and test mobile applications whether you are using the J2EE/XHTML or J2ME model. The J2EE/XHTML development model allows you to build real-time, server-side wireless and voice applications. This includes channels such as messaging, voice interfaces, PDA and mobile phone browsers. You are able to build for all these channels in the single, open standards development model. J2ME is most appropriate for small-screen devices with limited or intermittent network connection. J2ME allow you to process business logic and UI logic on the device and make Web service calls to the server for CPU intensive processing – calls will be buffered when network connectivity is unavailable.
Oracle Application Server Wireless tools allow you to utilize mobile device simulators provided by device manufacturers (such as Nokia or Openwave). The device simulators allow you to view your application on a phone with your development PC or laptop. Although you will be able to test your mobile applications using a regular Web Browser on your personal computer, it is recommended that you perform testing using various device emulators with different form factors. This will allow you to understand the constructs on Oracle Application Server Wireless XML with respect to rendition on varying device form factors. The Mobile Center lists simulators for some of the most popular devices.
The JDeveloper Wireless Extension (JWE) enables you to code, debug and test your XHTML or J2ME mobile application in JDeveloper. Throughout the development cycle the JWE provides support at every stage:
■ Authoring applications through wizards and templates
■ Editing applications through GUI-based tools
■ Testing applications on integrated emulators or real devices
■ Debugging applications using advanced debugging systems and log files
■ Deploying applications through intuitive UIs
The JWE is available for download on the Mobile Center on OTN: http://www.otn.oracle.com/mobile.
The Wireless Developer’s Kit (WDK) is a small-footprint development environment for Oracle Application Server Wireless. The WDK allows you to use any development IDE and device simulator to develop wireless application for Oracle

Delivering Your Applications
2-4 Oracle Application Server Wireless Developer’s Guide
Application Server Wireless. The WDK is packed with XHTML and J2ME samples, device detection, error logging, and Web services. It allows a developer to simulate a full installation of Oracle Application Server Wireless on a development PC or laptop. The WDK is also available on the Mobile Center on http://www.otn.oracle.com/mobile.
2.1.3 Deploying your ApplicationsBefore deploying your applications, you must test them on real devices. Once you have built your application with the JWE or WDK and tested it with your target device simulator, you are ready to test them on real devices.
Oracle Application Server Wireless provides several web-based tools so you can register your application for deployment and manage the deployed applications. The two tools for registering applications are the Services Manager and the Mobile Studio.
The Mobile Studio is a developer testing environment for testing your applications on real devices. The Mobile Studio is installed with Oracle Application Server Wireless; however there is also a hosted version available on the Mobile Center on OTN: http://www.otn.oracle.com/mobile. You can register your application with the Mobile Studio and then see your application on a real mobile device, or call a phone number to access it using voice, or even SMS your applications to test it on an SMS device.
The Services Manager allows you to register your XHTML or J2ME application and give access privileges to the desired users. The Service Manager is used to deploy your application to a production environment. An installation of Oracle Application Server Wireless is required to use the Service Manager.
2.2 Delivering Your ApplicationsOracleAS Wireless provides Web-based, role-specific tools to create, manage, and deliver mobile services. OracleAS Wireless Tools include wizards for managing repository objects, managing the server and delivering your applications.
For more information on these web-based tools, see OracleAS Wireless Administrator’s Guide.

OracleAS Wireless Developer Kit 3-1
3OracleAS Wireless Developer Kit
Each section of this document presents a different topic. These sections include:
Section 3.1, "Wireless Developer Kit Overview"
Section 3.2, "WDK Installation and Configuration"
Section 3.3, "WDK Log File"
Section 3.4, "Running a Wireless Application with the WDK Tutorial"
3.1 Wireless Developer Kit OverviewOracleAS Wireless includes a developer’s kit to enable development and testing of wireless applications without the full installation of Oracle Application Server. The kit provides support for developing applications in the following areas:
■ J2ME—OracleAS Wireless Development Kit (WDK) contains J2ME Web Services Software Development Kit (J2ME SDK) and the J2ME Web Services Proxy Server (J2ME Proxy Server). The J2ME SDK should be installed on the device before testing the MIDlets.
■ Messaging—the WDK includes implementation of the OracleAS Wireless Java messaging APIs to enable developers to create applications that use those APIs, and then deploy them without making changes on the OracleAS Wireless server. There are also examples that help developers quickly start their development activities.
■ Location Services—there are several Web Services WSDL files that can be used to create Location Services.
■ Wireless Client—the WDK contains the installer of the OracleAS Wireless Client as well as documentation and examples about how to create client applications.

WDK Installation and Configuration
3-2 Oracle Application Server Wireless Developer’s Guide
■ Multi-Channel Server—The WDK contains a light version of Multi-Channel Server: MCSLite. It provides the same adaptation features as the full Multi-Channel Server product. Wireless and voice application developers can benefit from this small memory-footprint server to test their applications before deploying them on OracleAS Wireless.
OracleAS Wireless Developer Kit is tightly integrated with Oracle JDeveloper Wireless Edition, offering such features as wizards, code templates, and device simulators. Because OracleAS Wireless Developer Kit is offered in a standalone mode, any IDE or development tool can leverage the development functionality of OracleAS Wireless.
3.2 WDK Installation and ConfigurationOracle Application Server WDK is a part of the Oracle Application Server Developer CD. Also, it is embedded in Oracle JDeveloper Wireless Edition. The WDK is very easy to install and use and in normal situations does not require any post-installation configuration. For advanced configuration, see the WDK component-specific configuration in the corresponding sections of this document.
3.2.1 Oracle Application Server Wireless Developer Kit StructureAfter installing the WDK, you will have the following directory structure:
■ [ORACLE_HOME]
■ wireless
* bin
* dtd- simpleresult- xhtml+xforms
* examples- messaging- wclient
■ j2ee
* applications/wdk/wdk-web- logs- repository- webservice

WDK Installation and Configuration
OracleAS Wireless Developer Kit 3-3
■ j2me
■ lib
■ server
* classes
* messages
■ wclient
■ wsdl
3.2.2 Multi-Channel Server Lite (MCSLite)This section describes how developers can take advantage of the MCSLite component of the WDK to develop and test their Multi-Channel applications.
MCSLite is a J2EE web application containing servlets and a servlet filter. It has a small memory footprint, yet provides all the content adaptation functionality of a full-fledged MCS Server. Its purpose is to help developers to completely test their applications before deploying on OracleAS Wireless Server.
The main goal of the MCSLite is testing; it provides information to developers to help them better understand the execution of their application. The MCSLite log file contains the following important information:
■ HTTP headers and request parameters received from a device/simulator
■ HTTP headers and request parameters sent to back-end applications
■ HTTP headers and content received from back-end applications
■ HTTP headers and content sent to a device/simulator
■ any errors during request processing
MCSLite can be deployed in two ways:
■ local—MCSLite deployed as a servlet filter in front of a web application to be adapted. The advantage of this deployment is that MCSLite and the content-producing web application run in the same Java VM. This increases the overall performance of the application. The disadvantage of this deployment is that MCSLite must be deployed together with every application.
■ remote—MCSLite acts as an HTTP proxy between the device and the web application. The advantage of this deployment is that you can develop and deploy your web application independent of MCSLite, and still test it on any

WDK Installation and Configuration
3-4 Oracle Application Server Wireless Developer’s Guide
device. The disadvantage is that there are two HTTP hops from the device to the content; one from the device to the MCSLite server, and one from the MCSLite server to the web application. This affects performance, but it is a small price to pay compared to the ease-of-use. This is the recommended deployment for developers.
3.2.2.1 Key FeaturesThe key features of MCSLite are:
■ Full adaptation functionality (the same as Multi-Channel Server)
This is the process that occurs during a single cycle of adaptation:
1. Device detection—see below for more details.
2. Content retrieval—connecting to the data source and fetching the content produced by a back-end application.
3. Content type detection—content and HTTP headers returned by the back-end application are examined to obtain the correct content type. This is necessary for choosing the correct transformer based on the current device and content type.
4. Transformation—transformation from device-neutral markup language to device-specific markup language.
■ Small memory footprint—Advanced techniques (such as lazy object instantiation) result in a smaller memory footprint. This is helpful because developers can use less powerful machines to write and test applications in WDK.
■ Flexible log file system—A log file for the content adaptation process is generated. The amount of information in the log file is based on the log-level, which is configurable from the WDK web.xml. When debugging a wireless application, the log level should be set to debug as this will produce the most information. See the next section on how to change the default MCSLite configuration.
■ Transformers and Device descriptions auto reload—With the auto reload feature, changes to device and transformer metadata will be picked up automatically without a server restart. This is particularly useful when you are adding a new device or transformer to Multi-Channel Server. Since MCSLite uses the same XML representation of device metadata, it is very easy to create and test the new device description in MCSLite, and then upload it to MCS using the MCS XML provisioning tools.

WDK Installation and Configuration
OracleAS Wireless Developer Kit 3-5
3.2.2.2 How to Use MCSLiteMCSLite was designed to be extremely easy to use. To use it, you must first create and deploy your web application. You can use any web technology to develop your application. You can use either static or dynamic pages. Also, you can use either MobileXML or XHTML+XForms or XHTML MP markup languages. The only requirement is that the application is accessible through HTTP protocol.
3.2.2.2.1 Accessing your application through MCSLite The usage depends on the current deployment, either local or remote.
■ Local Deployment—Deploy your application along with the MCSLite web application. The easiest way to do that is to copy your JSP/Servlets into: [ORACLE_HOME]/wireless/wdk/server/applications/wdk/wdk-web directory. Use this method if you have a simple application that you want to test and do not want to go through the trouble of creating and deploying your own web application. Here is an example of how to use MCSLite in this deployment scenario:
MCSLite and the user application's URL is: http://apphost:port/myApp.jsp.
Start your device browser (simulator) and enter the application URL (that is, type http://apphost:port/myApp.jsp in the address field).
■ Remote Deployment (recommended)—This is the recommended usage of MCSLite because the application to be tested is a separate web application which can be deployed onto a running OracleAS Wireless server without any modification (after successful testing with MCSLite). Here is how to use MCSLite in this deployment scenario:
The application to be tested is deployed, and the URL to it is: http://apphost:port/myApp.jsp.
If MCSLite is deployed on a machine with hostname MCSLitehost, the URL to the MCSLite content retriever servlet is http://MCSLitehost:port/wdk/MCSLite.
The two web applications may or may not be deployed on the same machine. Using this deployment scenario, developers can share a single MCSLite instance. Then accessing the application from a device or simulator is a matter of entering a special URL in the browser. That special URL is: http://MCSLitehost:port/wdk/MCSLite/http/apphost/port/myApp.jsp (using the above examples).

WDK Installation and Configuration
3-6 Oracle Application Server Wireless Developer’s Guide
Here are the steps to create that special URL:
* Start with the URL of the MCSLite: http://MCSLitehost:port/wdk/MCSLite
* Append to it slash (/), and the URL of the back-end application (http://apphost:port/myApp.jsp). The result of that is: http://MCSLitehost:port/wdk/MCSLite/http://apphost:port/myApp.jsp
* The new URL is invalid. To fix it, change colon, slash, slash (://) and colon (:) in the application URL to a slash (/). The result of that is the special URL: http://MCSLitehost:port/wdk/MCSLite/http/apphost/port/myApp.jsp
3.2.2.3 Sending Parameters to a Back-end ApplicationRegardless of the MCSLite deployment scenario, sending parameters to a back-end application is the same; it is no different than sending such parameters from a regular browser. Just add those parameters in the query part of the URL. For example, to send two parameters to your application:
fname=John and lname=Doe
then you add to the URL as follows:
http:// ... /myApp.jsp?fname=John&lname=Doe
Note: There is a short form of the special URL. If the HTTP port on which the application is deployed is port 80 (the default HTTP port), then the port part of the back-end application URL can be skipped. The protocol part (http) can also be skipped. The short URL is: http://MCSLitehost:port/wdk/MCSLite/apphost/myApp.jsp
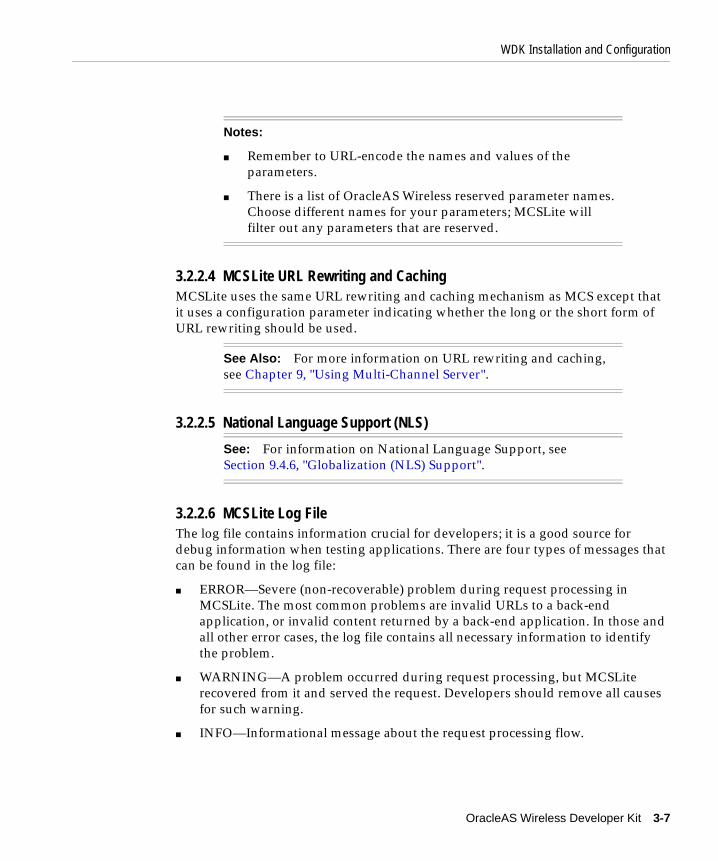
WDK Installation and Configuration
OracleAS Wireless Developer Kit 3-7
3.2.2.4 MCSLite URL Rewriting and CachingMCSLite uses the same URL rewriting and caching mechanism as MCS except that it uses a configuration parameter indicating whether the long or the short form of URL rewriting should be used.
3.2.2.5 National Language Support (NLS)
3.2.2.6 MCSLite Log FileThe log file contains information crucial for developers; it is a good source for debug information when testing applications. There are four types of messages that can be found in the log file:
■ ERROR—Severe (non-recoverable) problem during request processing in MCSLite. The most common problems are invalid URLs to a back-end application, or invalid content returned by a back-end application. In those and all other error cases, the log file contains all necessary information to identify the problem.
■ WARNING—A problem occurred during request processing, but MCSLite recovered from it and served the request. Developers should remove all causes for such warning.
■ INFO—Informational message about the request processing flow.
Notes:
■ Remember to URL-encode the names and values of the parameters.
■ There is a list of OracleAS Wireless reserved parameter names. Choose different names for your parameters; MCSLite will filter out any parameters that are reserved.
See Also: For more information on URL rewriting and caching, see Chapter 9, "Using Multi-Channel Server".
See: For information on National Language Support, see Section 9.4.6, "Globalization (NLS) Support".

WDK Installation and Configuration
3-8 Oracle Application Server Wireless Developer’s Guide
■ DEBUG—Low-level messages related to a problem in the MCSLite itself, rather than in a back-end application. Use the information in the log file when reporting bugs and problems with MCSLite.
You can view the log file in one of two ways:
■ Directly open the file in the [ORACLE_HOME]/wireless/wdk/server/applications/wdk/wdk-web/logs directory. This requires direct access to the machine on which MCSLite is running (usually the developer's own machine).
■ Use your PC HTML web browser to access the web log viewer. The URL for the MCSLite log viewer (a servlet) is: http://MCSLitehost:port/wdk/log. The web-based log viewer is useful when a group of developers share a single MCSLite server (such as in a remote MCSLite deployment).
For each message in the log file, the IP address and session information for the device request is provided. This is useful when you want to find requests coming from your device versus requests from someone else's device.
3.2.2.7 MCSLite Advanced ConfigurationOne of the advantages of MCSLite is that it works out of the box without any configuration. You can optionally perform advanced configuration actions. MCSLite allows configuration of: log file location and name, logging level, XML validation mode, enabling or disabling auto-reload of devices and transformers, and more. To perform these configuration actions, edit the MCSLite web.xml file. web.xml is located in [ORACLE_HOME]/wireless/wdk/server/applications/wdk/wdk-web/WEB-INF
Here are the configuration properties in MCSLite web.xml:
■ wdk.log.file—Absolute path to the log file (directory and file name). For example: D:\wdk\logs\wdk.log. You can also specify System.out or System.err to use the standard output or standard error. If no value is specified, then the default log file location is used: [ORACLE_HOME]/wireless/wdk/server/applications/wdk/wdk-web/logs/wdk.log
Note: Error messages in the log.xml file, of the format XFM-xxxx, are generated by the XForms processor.

WDK Installation and Configuration
OracleAS Wireless Developer Kit 3-9
■ wdk.log.level—Specifies how much information is written to the log file. The permissible values are debug, info, warning, and error. Debug yields the most information, info second, and so on. The default value of this property is info.
■ xml.validation.mode—Sets the validation mode of the XML parser. Permissible values are true or false. Default value is false.
■ autoreload.transformers—Specifies whether changes to the transformer should be detected and reloaded automatically. Permissible values are true or false. Default value is true.
■ autoreload.devices—Specifies whether changes to the devices should be detected and reloaded automatically. Permissible values are true or false. Default value is true.
■ long.url.format—Specifies whether long or short URL format should be used to rewrite embedded URLs. Permissible values are true or false. Default value is true.
3.2.2.8 Device DescriptionIn OracleAS Wireless server, all device descriptions are stored in the database. However, to simplify MCSLite, database connections are not necessary; each device description is stored in an XML file. The device XML files are located in [ORACLE_HOME]/wireless/wdk/server/applications/wdk/wdk-web/repository. Each XML file contains the metadata that describes attributes and characteristics of a single device.
Some of the important device properties required by the MCSLite are:
■ Name—Unique name of the device.
■ UserAgents—Device metadata may contain multiple user agent values, which means that the device metadata can match multiple physical devices. User agents are used for device detection.
■ Transformers—Contains the name of the transformer that should be used for a specific device. There are multiple transformer values; one for each markup language.
See Also: For explanation and comparison between long and short URL formats, see Section 3.2.2.4, "MCSLite URL Rewriting and Caching".

WDK Installation and Configuration
3-10 Oracle Application Server Wireless Developer’s Guide
■ DefaultMarkupLanguage—MIME type of the device. Together with Accept-Charset, constitute the content type of responses sent to a device.
■ Accept-Charset—Encoding of the device. Together with DefaultMarkupLanguage, constitute the content type of responses sent to a device.
■ DeviceClass—Class of the device (for example: microbrowser, pdabrowser, pcbrowser, voice, or micromessenger).
■ DeviceHeight and DeviceWidth—Height and width of the device screen
3.2.2.9 Device DetectionMCSLite uses the same sophisticated device detection algorithm as OracleAS Wireless server.
3.2.2.10 Multimedia AdaptationThe multimedia adaptation supported by MCSLite is the same as in OracleAS Wireless server, except that MCSLite multimedia adaptation does not provide the extensible framework for plugging-in your own implementation of the multimedia adaptation interfaces.
3.2.2.11 Location ServicesApplication developers can build exciting new location services, or enhance their existing applications with location information. To do that they need specialized services:
■ Mobile Positioning—Applications can acquire and set the current location of users.
See Also: For more information on device properties, see Chapter 9, "Using Multi-Channel Server".
See Also: For more information on device properties, see Chapter 9, "Using Multi-Channel Server".
See Also: For more information on multimedia adaptation, see Chapter 9, "Using Multi-Channel Server".

WDK Installation and Configuration
OracleAS Wireless Developer Kit 3-11
■ Location Services:
■ Geocoding—Find the geographical location of an address or fixed-line telephone number. Also, the inverse function of relating geographical locations to addresses or phone numbers.
■ Mapping—Get a map image of an area around a location, a map covering a set of locations, a map of a route, and more.
■ Driving Directions—Get driving directions between two addresses or locations.
■ Business Directory—Find businesses around an address or location, businesses in a city or state or country, and more.
OracleAS Wireless WDK provides an application programming interface (API) to access these location services components. Developers can access OracleAS Wireless Web Services from these APIs to develop, debug and test their applications without setting up the complete OracleAS Wireless environment together with the relevant content service providers.
The following sections briefly describe some of the important API calls along with some examples. API details can be found in the Javadoc provided with the WDK.
3.2.2.11.1 Mobile Positioning
The mobile positioning service allows you to get and set a mobile user's current location. This service is implemented as a web service in OracleAS Wireless WDK. It enables applications to get and set a mobile user's current location from anywhere on the Internet using any programming model.
The oracle.panama.mp.soap.MPSoapClient class wraps the client SOAP calls and exposes the services in the Java programming interface. A client Java program must first construct an object of this class using the web service URL and the service ID before getting and setting a mobile user's location. The web service URL is the SOAP router of the location web service on an OracleAS Wireless server; for example, http://myaswserver.oracle.com:7777/location/web services. The service ID is the SOAP service ID, for example: urn:MobilePositionServer.
■ Getting Location
Two methods can be used to get a mobile user's location:
■ getPositionSimple(String username, String password, String msid)

WDK Installation and Configuration
3-12 Oracle Application Server Wireless Developer’s Guide
■ getPosition(String username, String password, String msid, boolean getLatestLocationOnly)
In method getPositionSimple, parameters username and password are used for authentication purposes. The third parameter MSID is the mobile station ID of the user whose location is being requested. An MSID is usually a user’s mobile phone number. If the request succeeds, this function returns an array of two double precision numbers representing the longitude and the latitude.
In method getPosition, the first three parameters are the same as in method getPositionSimple. The last parameter is a Boolean value indicating whether the caller wants to get the last known location of the mobile station. If this is set to true, OracleAS Wireless server will return the latest known location of the mobile station without performing any positioning operation. If there is no location cached in the OracleAS Wireless server, an exception is raised. If it is set to false, then OracleAS Wireless server returns the cached location (if its age has not exceeded the default quality of service of the system). Otherwise OracleAS Wireless server performs a mobile positioning operation to get this mobile station’s current location. The return value of method getPosition is a string containing the user’s location (in XML format) with the following schema:
<?xml version="1.0" encoding="UTF-8"?><xsd:schema xmlns:xsd="http://www.w3.org/2000/10/XMLSchema" elementFormDefault="qualified"><xsd:element name="RESPONSE "><xsd:complexType><xsd:sequence><xsd:element ref="TIMESTAMP"/><xsd:element ref="POS"/><xsd:element ref="VELOCITY" minOccurs="0"/><xsd:element ref="BEARING" minOccurs="0"/><xsd:element ref="ALTITUDE" minOccurs="0"/><xsd:element ref="ALT_UNCERTAINTY" minOccurs="0"/></xsd:sequence></xsd:complexType></xsd:element><xsd:element name="ALTITUDE" type="xsd:string"/><xsd:element name="ALT_UNCERTAINTY" type="xsd:string"/><xsd:element name="BEARING" type="xsd:string"/><xsd:element name="LAT" type="xsd:string"/><xsd:element name="LONG" type="xsd:string"/><xsd:element name="POS"><xsd:complexType><xsd:sequence>

WDK Installation and Configuration
OracleAS Wireless Developer Kit 3-13
<xsd:element ref="LONG"/><xsd:element ref="LAT"/></xsd:sequence></xsd:complexType></xsd:element><xsd:element name="TIMESTAMP" type="xsd:string"/><xsd:element name="VELOCITY" type="xsd:string"/></xsd:schema>
■ The <POS> element contains the longitude and latitude of the location.
■ The <TIMESTAMP> element contains the time stamp when the location was acquired. The time always uses Greenwich Mean Time. For example 2003-03-12 20:01:06 GMT.
■ The optional <VELOCITY> element specifies the velocity of the mobile device, in meters per second.
■ The optional <BEARING> element specifies the bearing angle, in degrees, clockwise from North.
■ The optional <ALTITUDE> element specifies the altitude of the mobile device, in meters, above sea level.
The caller, identified by the username and the password parameters, must be a valid OracleAS Wireless user, and must have been granted the location authorization to access the location of the user associated with the MSID. An exception will be raised if the username and password cannot authenticate the caller, or the caller is not authorized to access the location information.
■ Setting Location
A mobile device can send its current location, usually provided through a global positioning system (GPS), to OracleAS Wireless server. The current location can then be cached in the server and queried using mobile positioning and privacy APIs. You must create a client application program that posts the device’s current location to OracleAS Wireless server. A Java client can call method setPosition(String xmlReq) in class oracle.panama.mp.soap.MPSoapClient. This function takes one String parameter representing the position data. The data must be in XML format, and it must conform to the following schema:
<?xml version="1.0" encoding="UTF-8"?><xsd:schema xmlns:xsd="http://www.w3.org/2000/10/XMLSchema" elementFormDefault="qualified"><xsd:element name="MP_GPS">

WDK Installation and Configuration
3-14 Oracle Application Server Wireless Developer’s Guide
<xsd:complexType><xsd:sequence><xsd:element ref="USERNAME"/><xsd:element ref="PASSWORD"/><xsd:element ref="MSID"/><xsd:element ref="TIME" minOccurs="0"/><xsd:element ref="GMT" minOccurs="0"/><xsd:element ref="POS"/><xsd:element ref="ALTITUDE" minOccurs="0"/><xsd:element ref="ALT_UNCERTAINTY" minOccurs="0"/><xsd:element ref="VELOCITY" minOccurs="0"/><xsd:element ref="BEARING" minOccurs="0"/></xsd:sequence></xsd:complexType></xsd:element><xsd:element name="ALTITUDE" type="xsd:string"/><xsd:element name="ALT_UNCERTAINTY" type="xsd:string"/><xsd:element name="BEARING" type="xsd:string"/><xsd:element name="GMT" type="xsd:string"/><xsd:element name="LAT" type="xsd:string"/><xsd:element name="LONG" type="xsd:string"/><xsd:element name="MSID" type="xsd:string"/><xsd:element name="PASSWORD" type="xsd:string"/><xsd:element name="POS"><xsd:complexType><xsd:sequence><xsd:element ref="LAT"/><xsd:element ref="LONG"/></xsd:sequence></xsd:complexType></xsd:element><xsd:element name="TIME" type="xsd:string"/><xsd:element name="USERNAME" type="xsd:string"/><xsd:element name="VELOCITY" type="xsd:string"/></xsd:schema>
■ The <USERNAME> and <PASSWORD> elements are used by OracleAS Wireless server to authorize the request.
■ The <MSID> element is the mobile station ID of the mobile device or user.
■ The optional <TIME> element indicates the time when this location is generated by a GPS. If this value is missing, the time when the data arrives at the OracleAS Wireless server is used.

WDK Installation and Configuration
OracleAS Wireless Developer Kit 3-15
■ The optional <VELOCITY> element specifies the velocity of the mobile device, in meters per second.
■ The optional <BEARING> element specifies the bearing angle, in degrees, clockwise from North.
■ The optional <ALTITUDE> element specifies the altitude of the mobile device, in meters, above sea level.
■ Mobile Positioning Example
Here is an example showing how to set and get a position to OracleAS Wireless server using the SOAP client:
MPSoapClient mpsc = new MPSoapClient("http://usunnab16.us.oracle.com:5555/location/webservices", "urn:MobilePositionServer");
String xmlReq = "<?xml version= ’1.0’ encoding=’ISO-8859-1’ standalone=’yes’?>\n" + "<MP_GPS>\n" + "<MSID>6038973096</MSID>\n" + "<POS>\n" + "<LAT>42.1576</LAT>\n" + "<LONG>-122.34</LONG>\n" + "</POS>\n"+ "</MP_GPS>"; System.out.println(mpsc.setPosition(xmlReq));
// NOTE: Need to change getPosition call// double[] ret = mpsc.getPositionSimple("", "", "6038973096"); System.out.println(ret[0] + "," + ret[1]);
3.2.2.11.2 Location Services The LBS web services API on the client side is virtually identical to the API within OracleAS Wireless server. The following examples demonstrate this. The most relevant difference is that a set() function must specify the server. Within OracleAS Wireless server, an application would not be required to specify such a target server.
GeocodingGeocoding supports these functions:
■ Geocoding—Assigning geographical coordinates (latitude and longitude) to an address.
■ Bulk geocoding—Geocoding for a larger set of addresses in one operation.
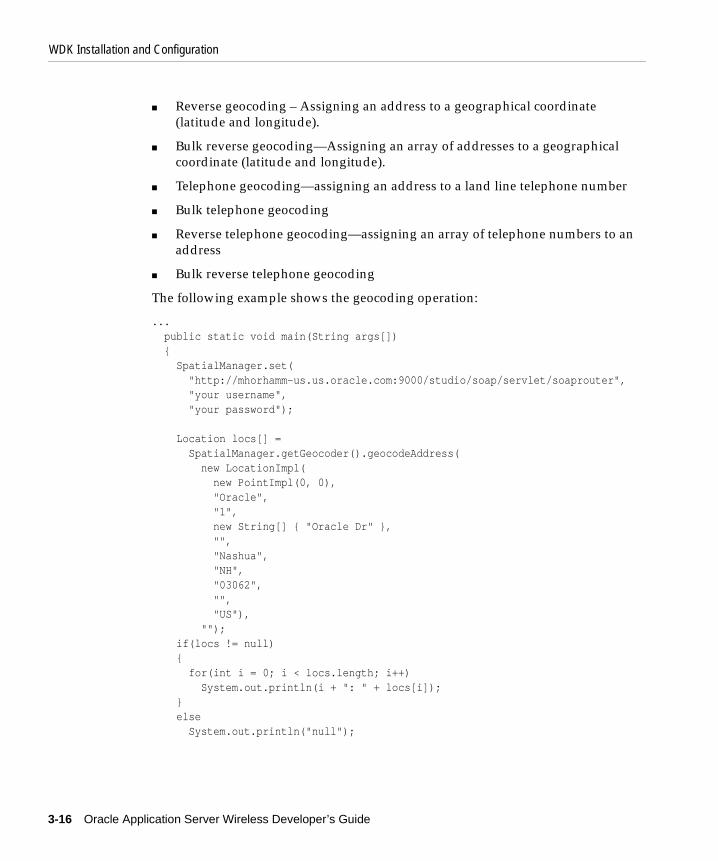
WDK Installation and Configuration
3-16 Oracle Application Server Wireless Developer’s Guide
■ Reverse geocoding – Assigning an address to a geographical coordinate (latitude and longitude).
■ Bulk reverse geocoding—Assigning an array of addresses to a geographical coordinate (latitude and longitude).
■ Telephone geocoding—assigning an address to a land line telephone number
■ Bulk telephone geocoding
■ Reverse telephone geocoding—assigning an array of telephone numbers to an address
■ Bulk reverse telephone geocoding
The following example shows the geocoding operation:
... public static void main(String args[]) { SpatialManager.set( "http://mhorhamm-us.us.oracle.com:9000/studio/soap/servlet/soaprouter", "your username", "your password");
Location locs[] = SpatialManager.getGeocoder().geocodeAddress( new LocationImpl( new PointImpl(0, 0), "Oracle", "1", new String[] { "Oracle Dr" }, "", "Nashua", "NH", "03062", "", "US"), ""); if(locs != null) { for(int i = 0; i < locs.length; i++) System.out.println(i + ": " + locs[i]); } else System.out.println("null");

WDK Installation and Configuration
OracleAS Wireless Developer Kit 3-17
}
MappingMapping supports these functions:
■ Display a map with or without labeled and marked points.
■ Display a map of a complete driving direction or a single maneuver (the same functionality in Driving Directions).
The following example shows the mapping with one marked point:
... public static void main(String args[]) { SpatialManager.set( "http://mhorhamm-us.us.oracle.com:9000/studio/soap/servlet/soaprouter", "your username", "your password");
Location adr1[] = SpatialManager.getGeocoder().geocodeAddress( new LocationImpl( new PointImpl(0, 0), "NEDC", "1", new String[] { "Oracle Dr" }, "", "Nashua", "NH", "03062", "", "US"), ""), adr2[] = SpatialManager.getGeocoder().geocodeAddress( new LocationImpl( new PointImpl(0, 0), "HQ", "500", new String[] { "Oracle Parkway" }, "",

WDK Installation and Configuration
3-18 Oracle Application Server Wireless Developer’s Guide
"Redwood City", "CA", "94065", "", "US"), "");
System.out.println( SpatialManager.getMapper().getMapURL( adr1[0], ImageFormats.GIF, 800, 600, false));
... }...
Driving DirectionsThe Driving Directions component supports these functions:
■ Determine driving directions between addresses or geographical point coordinates.
■ Display maps of complete directions or single maneuvers.
■ Provide a simple geometry of a driving direction.
■ Provide text directions, distance and time of a route requested.
The following example shows the driving direction between two addresses:
... public static void main(String args[]) { SpatialManager.set( "http://mhorhamm-us.us.oracle.com:9000/studio/soap/servlet/soaprouter", "your username", "your password");
Location adr1[] = SpatialManager.getGeocoder().geocodeAddress( new LocationImpl(

WDK Installation and Configuration
OracleAS Wireless Developer Kit 3-19
new PointImpl(0, 0), "NEDC", "1", new String[] { "Oracle Dr" }, "", "Nashua", "NH", "03062", "", "US"), ""), adr2[] = SpatialManager.getGeocoder().geocodeAddress( new LocationImpl( new PointImpl(0, 0), "HQ", "500", new String[] { "Oracle Parkway" }, "", "Redwood City", "CA", "94065", "", "US"), "");
//////////////////////////////////////////////////////////////////
RoutingSettings settings = new RoutingSettings(true, false); settings.setSecondaryOption(RoutingOption.maneuverMapWidth, "800"); settings.setSecondaryOption(RoutingOption.maneuverMapHeight, "600"); settings.setSecondaryOption(RoutingOption.overviewMapWidth, "800"); settings.setSecondaryOption(RoutingOption.overviewMapHeight, "600"); System.out.println( SpatialManager.getRouter().computeRoute( adr1[0], adr2[0], null, settings, Locale.US)); }

WDK Installation and Configuration
3-20 Oracle Application Server Wireless Developer’s Guide
Business DirectoryThe Business Directory component supports these functions:
■ Finding businesses within: Cities, States, Postal codes, Distance from an address or geographical location, Distance from a driving directions route, the set of closest n businesses around an address or geographical location.
■ Finding businesses: With a given name, in a given category, matching a given keyword (in name or category), matching a given name and category.
■ Searching and navigating the category hierarchy.
The following example shows several categories and businesses with a given name:
public static void main(String args[]) { SpatialManager.set( "http://mhorhamm-us.us.oracle.com:9000/studio/soap/servlet/soaprouter", "your username", "your password");
//////////////////////////////////////////////////////////////////
System.out.println(SpatialManager.getYPFinder().getCategoryAtRoot()); System.out.println(SpatialManager.getYPFinder().getCategoryAtPath(new String[0])); YPCategory cats[] = SpatialManager.getYPFinder().getCategoryAtRoot().getSubCategories(); if(cats != null) for(int i = 0; i < cats.length; i++) System.out.println(i + ": " + cats[i]);
//////////////////////////////////////////////////////////////////
YPBusiness b[] = SpatialManager.getYPFinder().getBusinessesAnywhere( "Border", Locale.US); for(int i = 0; i < b.length; i++) System.out.println(i + ": " + b[i]);
}

WDK Log File
OracleAS Wireless Developer Kit 3-21
3.3 WDK Log FileOracleAS Wireless WDK provides a log file to help you develop wireless applications. This section provides a detailed explanation of the information logged in the WDK log file.
The amount of information that is logged in the log file can be configured by changing the wdk.log.level parameter in WEB-INF/web.xml. The possible values for this parameter, with the amount of information being most to least, are: debug, info, warning, and error. The default value of this parameter is info. At this level, the kinds of information that are logged to the log file are:
■ The request URL—This is the URL string and the query parameters that are associated with the current request being served. For example, http://myhost:80/myapp/foo.jsp?param1=value1
■ Request HTTP headers received from client—This lists all the request HTTP headers that are received from the client (device). One important header from this list is the user-agent header whose value is used for device detection.
■ Detected device—Informs the user that this is the device that is detected based on the user-agent header. This information should be checked when something goes wrong.
■ Request HTTP headers sent to back-end application—Lists all the request HTTP headers that are sent to the back-end application. As a virtual browser, the WDK modifies some of the original headers and adds additional headers.
■ Response HTTP headers received from back-end application—Lists all the response HTTP headers that are received from the back-end application. Note that these headers are used by the WDK for processing the response and they will not be sent back to the client (device).
■ XML from back-end application—Shows the exact XML string response from the back-end application.
■ XML type and version—The WDK will try to detect the type of the XML (whether it is a Simple Result, XHTML+XFORMS, or XHTML-MP) and the version. The result of the detection is shown in this section of the log. Based on this, WDK chooses the correct transformer to use.
■ WDK Response—Shows the final markup language and HTTP headers that are sent to the client (device). This final result is obtained by applying a transformer (XSLT or Java transformer) to the XML response received from the back-end application.

WDK Log File
3-22 Oracle Application Server Wireless Developer’s Guide
When debug log level is used, more log messages are produced. The debug messages are:
■ Transformer loading—Shows a successful loading of a transformer.
■ Device loading—Shows a successful loading of a device.
■ Device-to-transformer mapping—Every device has multiple transformers that are associated with it (one for every markup type). This debug message shows such mapping between a device and a transformer.
■ Back end URL—Shows the back end URL for this request.
■ Back-end response code and response message—Shows the back-end response code and response message for this request.
■ The XML passed to the transformer—Shows the XML string passed to the transformer. This XML string differs from the original XML string received from the back-end application. It is an intermediate form that results from annotation and is used as input to the transformer.
3.3.1 WDK Log SampleThe following excerpt from the WDK log file in debug log level is for a single successful request-response cycle using UP Simulator 4.1.1.
The header includes:
■ Client IP Address: 127.0.0.1
■ Session ID: fe88712959d4470794599b62102e61df
■ Log Level: INFO
■ Timestamp: [Fri, 23 May 2003 10:41:11 PDT]
127.0.0.1 - - fe88712959d4470794599b62102e61df - - INFO : [Fri, 23 May 2003 10:41:11 PDT]**************** Start of serving request ***************
127.0.0.1 - - fe88712959d4470794599b62102e61df - - INFO : [Fri, 23 May 2003 10:41:11 PDT]Request URL:http://localhost:9010/wdk/mcslite/
127.0.0.1 - - fe88712959d4470794599b62102e61df - - INFO : [Fri, 23 May 2003 10:41:11 PDT]Request HTTP headers received from client:user-agent: OWG1 UP/4.1.20a UP.Browser/4.1.20a-XXXX UP.Link/4.1.HTTP-DIRECTx-upfax-accepts: nonex-up-devcap-max-pdu: 2984x-up-devcap-iscolor: 0x-up-devcap-numsoftkeys: 2

WDK Log File
OracleAS Wireless Developer Kit 3-23
accept: application/x-hdmlc, application/x-up-alert, application/x-up-cacheop, application/x-up-device, application/x-up-digestentry, application/vnd.wap.wml, text/x-wap.wml, text/vnd.wap.wml, application/vnd.wap.wmlscript, text/vnd.wap.wmlscript, application/vnd.uplanet.channel, application/vnd.uplanet.list, text/x-hdml, text/plain, image/vnd.wap.wbmp, image/bmp, application/remote-printing text/x-hdml;version=3.1, text/x-hdml;version=3.0, text/x-hdml;version=2.0, image/bmp, text/htmlx-up-devcap-smartdialing: 1x-up-devcap-msize: 8,18accept-charset: ISO-8859-1, UTF-8, *x-up-devcap-screenpixels: 171,108host: localhost:9010accept-language: enx-up-devcap-screendepth: 1content-type: application/x-www-form-urlencodedx-up-devcap-charset: ISO-8859-1x-up-subno: rhalimma_st3010pccookie: JSESSIONID=fe88712959d4470794599b62102e61dfx-up-devcap-immed-alert: 1
127.0.0.1 - - fe88712959d4470794599b62102e61df - - INFO : [Fri, 23 May 2003 10:41:11 PDT]Request HTTP headers sent to back end application:x-oracle-user.location.addresslastline: Room 200x-oracle-service.home.url: http://localhost:9000/omsdk/rmx-up-devcap-screendepth: 1host: localhost:9010x-up-devcap-numsoftkeys: 2x-oracle-user.deviceid: 1234x-oracle-orig-user-agent: OWG1 UP/4.1.20a UP.Browser/4.1.20a-XXXX UP.Link/4.1.HTTP-DIRECTaccept: application/vnd.oracle.xhtml+xforms, text/vnd.oracle.mobilexml, application/vnd.wap.xhtml+xml, application/xhtml+xml;profile="http://xmlns.oracle.com/ias/dtds/xhtml+xforms", application/xhtml+xml;profile="http://www.wapforum.org/xhtml", application/xhtml+xml, application/xml, text/xml, application/vnd.oracle.xad, */*, */*x-oracle-service.parent.url: http://localhost:9000/omsdk/rmx-oracle-user.location.addressline2: Apt# 1004x-oracle-user.location.addressline1: 1007 Broadway Stx-oracle-user.location.block: Block Ax-oracle-user.locale: USx-oracle-user.authkind: unauthenticatedx-oracle-user.displayname: Jon Smithx-oracle-user.location.type: profilex-up-devcap-max-pdu: 2984x-oracle-user.userkind: registeredx-up-devcap-iscolor: 0x-up-devcap-screenpixels: 171,108x-oracle-mcs.character.encoding: UTF-8x-oracle-user.location.postalcodeext: 3158accept-charset: ISO-8859-1, UTF-8, *accept-charset: UTF-8, *
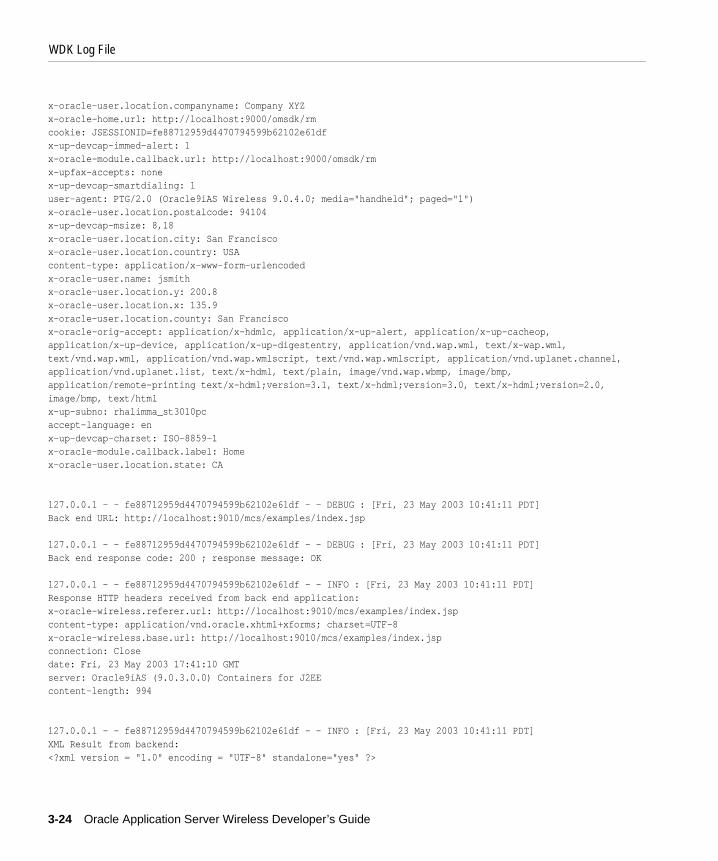
WDK Log File
3-24 Oracle Application Server Wireless Developer’s Guide
x-oracle-user.location.companyname: Company XYZx-oracle-home.url: http://localhost:9000/omsdk/rmcookie: JSESSIONID=fe88712959d4470794599b62102e61dfx-up-devcap-immed-alert: 1x-oracle-module.callback.url: http://localhost:9000/omsdk/rmx-upfax-accepts: nonex-up-devcap-smartdialing: 1user-agent: PTG/2.0 (Oracle9iAS Wireless 9.0.4.0; media="handheld"; paged="1")x-oracle-user.location.postalcode: 94104x-up-devcap-msize: 8,18x-oracle-user.location.city: San Franciscox-oracle-user.location.country: USAcontent-type: application/x-www-form-urlencodedx-oracle-user.name: jsmithx-oracle-user.location.y: 200.8x-oracle-user.location.x: 135.9x-oracle-user.location.county: San Franciscox-oracle-orig-accept: application/x-hdmlc, application/x-up-alert, application/x-up-cacheop, application/x-up-device, application/x-up-digestentry, application/vnd.wap.wml, text/x-wap.wml, text/vnd.wap.wml, application/vnd.wap.wmlscript, text/vnd.wap.wmlscript, application/vnd.uplanet.channel, application/vnd.uplanet.list, text/x-hdml, text/plain, image/vnd.wap.wbmp, image/bmp, application/remote-printing text/x-hdml;version=3.1, text/x-hdml;version=3.0, text/x-hdml;version=2.0, image/bmp, text/htmlx-up-subno: rhalimma_st3010pcaccept-language: enx-up-devcap-charset: ISO-8859-1x-oracle-module.callback.label: Homex-oracle-user.location.state: CA
127.0.0.1 - - fe88712959d4470794599b62102e61df - - DEBUG : [Fri, 23 May 2003 10:41:11 PDT]Back end URL: http://localhost:9010/mcs/examples/index.jsp
127.0.0.1 - - fe88712959d4470794599b62102e61df - - DEBUG : [Fri, 23 May 2003 10:41:11 PDT]Back end response code: 200 ; response message: OK
127.0.0.1 - - fe88712959d4470794599b62102e61df - - INFO : [Fri, 23 May 2003 10:41:11 PDT]Response HTTP headers received from back end application:x-oracle-wireless.referer.url: http://localhost:9010/mcs/examples/index.jspcontent-type: application/vnd.oracle.xhtml+xforms; charset=UTF-8x-oracle-wireless.base.url: http://localhost:9010/mcs/examples/index.jspconnection: Closedate: Fri, 23 May 2003 17:41:10 GMTserver: Oracle9iAS (9.0.3.0.0) Containers for J2EEcontent-length: 994
127.0.0.1 - - fe88712959d4470794599b62102e61df - - INFO : [Fri, 23 May 2003 10:41:11 PDT]XML Result from backend: <?xml version = "1.0" encoding = "UTF-8" standalone="yes" ?>

WDK Log File
OracleAS Wireless Developer Kit 3-25
<html profile="http://xmlns.oracle.com/ias/dtds/xhtml+xforms/0.9.0/1.0" xmlns="http://www.w3.org/1999/xhtml" xmlns:style="urn:oracle:iasw-internal:style.1.0" xmlns:extra="urn:oracle:iasw-internal:mxml.1.0"> <head> <title>Oracle9iAS Wireless Examples</title> <style type="text/css"> .title {font-style: italic; color: blue; font-size: xx-large} .menu {font-style: italic; color: blue; font-size: x-large} li {font-weight: bold; color: blue} </style> </head> <body> <nl style="list-style-type: decimal"> <label class="title">Oracle9iAS Wireless Examples</label> <li class="menu" href="xhtml%2Bxforms/index.jsp">XHTML+XFroms Examples</li> <li class="menu" href="xhtml%2Bmp/index.jsp">XHTML MP Examples</li> <li class="menu" href="mobile-xml/index.jsp">MobileXML Examples</li> </nl> </body></html>
127.0.0.1 - - fe88712959d4470794599b62102e61df - - INFO : [Fri, 23 May 2003 10:41:11 PDT]XML content info - Type: XHTML, version: 0.9.0
127.0.0.1 - - fe88712959d4470794599b62102e61df - - INFO : [Fri, 23 May 2003 10:41:11 PDT]Transformer that will be used: xforms-wml11-openwave
127.0.0.1 - - fe88712959d4470794599b62102e61df - - DEBUG : [Fri, 23 May 2003 10:41:11 PDT]The XML passed to transformer:<html profile="http://xmlns.oracle.com/ias/dtds/xhtml+xforms/0.9.0/1.0" xmlns="http://www.w3.org/1999/xhtml" xmlns:style="urn:oracle:iasw-internal:style.1.0" xmlns:extra="urn:oracle:iasw-internal:mxml.1.0" xmlns:mxml="http://xmlns.oracle.com/2002/MobileXML" style:mheight="0mm" style:mwidth="0mm" style:word-spacing="normal" style:padding-top="0" style:text-align="justify" style:border-top-color="#000000" style:border-right-style="none" style:font-size="medium" style:padding-bottom="0" style:margin-right="0" style:list-style-type="disc" style:vertical-align="baseline" style:border-bottom-color="#000000" style:pause-after="none" style:width="0px" style:speech-rate="default" style:border-left-width="medium" style:speak="normal" style:float="none" style:text-decoration="none" style:padding-right="0" style:border-right-color="#000000" style:list-style-image="none" style:background-attachment="scroll" style:clear="none" style:stress="none" style:font-family="serif,san-serif" style:margin-top="0" style:letter-spacing="normal" style:font-variant="normal" style:border-top-width="medium" style:margin-bottom="0" style:border-left-style="none" style:speak-numeral="none" style:background-image="none" style:pause-before="none" style:volume="default" style:border-bottom-width="medium" style:pitch="default" style:text-transform="none" style:list-style-position="outside" style:padding-left="0" style:margin-left="0" style:border-right-width="medium" style:color="#000000" style:text-indent="0" style:border-top-style="none" style:border-left-color="#000000" style:height="0px" style:font-weight="400" style:background-repeat="repeat" style:font-style="normal" style:pitch-range="default" style:border-bottom-style="none"

WDK Log File
3-26 Oracle Application Server Wireless Developer’s Guide
style:voice-family="neutral" style:speak-header="once" style:display="inline" extra:iaswhref="http://localhost:9010/wdk/mcslite/?PAckey=4!" extra:newdoc="true"><extra:param extra:name="PAckey" extra:value="4!" extra:hidden="true"/> <head style:border-left-width="medium" style:border-left-style="none" style:border-left-color="#000000" style:display="inline"><extra:messages/><extra:patparams/> <title style:border-left-width="medium" style:border-left-style="none" style:border-left-color="#000000" style:display="inline">Oracle9iAS Wireless Examples</title> <style type="text/css" style:border-left-width="medium" style:border-left-style="none" style:border-left-color="#000000" style:display="inline"> .title {font-style: italic; color: blue; font-size: xx-large} .menu {font-style: italic; color: blue; font-size: x-large} li {font-weight: bold; color: blue} </style> <extra:displaypage page="1" deck="1"/></head> <body __length__="13" style:border-left-width="medium" style:border-left-style="none" style:border-left-color="#000000" style:display="block" extra:emwidth="0" extra:pxwidth="0" extra:emheight="0" extra:pxheight="0" extra:random="30274" extra:softkeys="2" extra:paged="true"><extra:page page="1" pagelength="342" deck="1" extra:expand="true"> <nl style="list-style-type: decimal" __length__="70" style:white-space="nowrap" style:list-style-type="decimal" style:border-left-width="medium" style:margin-top="0.5em" style:margin-bottom="0.5em" style:border-left-style="none" style:border-left-color="#000000" style:display="block" extra:uid="XF1" extra:expand="true"> <label class="title" __length__="53" style:border-top-color="#0000ff" style:font-size="xx-large" style:border-bottom-color="#0000ff" style:border-left-width="medium" style:border-right-color="#0000ff" style:margin-top="0" style:margin-bottom="0" style:border-left-style="none" style:color="#0000ff" style:border-left-color="#0000ff" style:font-style="italic" style:display="inline">Oracle9iAS Wireless Examples</label> <li class="menu" href="xhtml%2Bxforms/index.jsp" __length__="78" extra:abshref="http://localhost:9010/mcs/examples/xhtml%2Bxforms/index.jsp" extra:iaswhref="/wdk/mcslite?PAckey=5!" extra:iaswphref="/wdk/mcslite?PAckey=%PAckey!" extra:iaswpkhref="5" style:border-top-color="#0000ff" style:font-size="x-large" style:border-bottom-color="#0000ff" style:border-left-width="medium" style:text-decoration="underline" style:border-right-color="#0000ff" style:margin-top="0" style:margin-bottom="0" style:border-left-style="none" style:color="#0000ff" style:border-left-color="#0000ff" style:font-weight="700" style:font-style="italic" style:display="list-item">XHTML+XFroms Examples</li> <li class="menu" href="xhtml%2Bmp/index.jsp" __length__="70" extra:abshref="http://localhost:9010/mcs/examples/xhtml%2Bmp/index.jsp" extra:iaswhref="/wdk/mcslite?PAckey=6!" extra:iaswphref="/wdk/mcslite?PAckey=%PAckey!" extra:iaswpkhref="6" style:border-top-color="#0000ff" style:font-size="x-large" style:border-bottom-color="#0000ff" style:border-left-width="medium" style:text-decoration="underline" style:border-right-color="#0000ff" style:margin-top="0" style:margin-bottom="0" style:border-left-style="none" style:color="#0000ff" style:border-left-color="#0000ff" style:font-weight="700" style:font-style="italic" style:display="list-item">XHTML MP Examples</li> <li class="menu" href="mobile-xml/index.jsp" __length__="71" extra:abshref="http://localhost:9010/mcs/examples/mobile-xml/index.jsp" extra:iaswhref="/wdk/mcslite?PAckey=7!" extra:iaswphref="/wdk/mcslite?PAckey=%PAckey!" extra:iaswpkhref="7" style:border-top-color="#0000ff" style:font-size="x-large" style:border-bottom-color="#0000ff" style:border-left-width="medium" style:text-decoration="underline" style:border-right-color="#0000ff" style:margin-top="0" style:margin-bottom="0" style:border-left-style="none" style:color="#0000ff" style:border-left-color="#0000ff" style:font-weight="700" style:font-style="italic"

WDK Log File
OracleAS Wireless Developer Kit 3-27
style:display="list-item">MobileXML Examples</li> </nl> </extra:page></body></html>
127.0.0.1 - - fe88712959d4470794599b62102e61df - - INFO : [Fri, 23 May 2003 10:41:11 PDT]Mobile WDK Response:Content-Type: text/vnd.wap.wml; charset=UTF-8Content-Length: 1384
<?xml version="1.0" encoding="UTF-8"?> <!DOCTYPE wml PUBLIC "-//PHONE.COM//DTD WML 1.1//EN" "http://www.phone.com/dtd/wml11.dtd"><wml><head><meta http-equiv="Cache-Control" forua="true" content="max-age=10"/></head><template><do type="accept" name="do_accept" label="Ok"><refresh/></do></template><card><onevent type="onenterforward"><go href="#ID117"/></onevent><onevent type="onenterbackward"><prev/></onevent></card><card id="ID117" title="Oracle9iAS Wireless Examples"><p mode="nowrap"><big><i>Oracle9iAS Wireless Examples</i></big><select name="mID117"><option value="5">XHTML+XFroms Examples</option><option value="6">XHTML MP Examples</option><option value="7">MobileXML Examples</option><option title="Ok">[Back]<onevent type="onpick"><prev/></onevent></option></select><do type="accept" name="do_accept" label="Ok"><go href="#_nav"><setvar name="_h" value="$(mID117)"/></go></do></p></card><card id="_nav" onenterforward="/wdk/mcslite?PAckey=$(_h)!"><onevent type="onenterbackward"><prev/></onevent></card><card id="_form"><onevent type="onenterforward"><go method="post" href="http://localhost:9010/wdk/mcslite/?r=30274"><postfield name="PAckey" value="4!"/><postfield name="$(_sb)" value="$(_sv)"/><postfield name="PATpage" value="$(PATpage)"/><postfield name="PATdeck" value="$(PATdeck)"/></go></onevent><onevent type="onenterbackward"><prev/></onevent></card></wml>
127.0.0.1 - - fe88712959d4470794599b62102e61df - - INFO : [Fri, 23 May 2003 10:41:11 PDT]**************** End of serving request ***************
3.3.2 Common Mistakes EncounteredThis section explains some of the common mistakes encountered in the WDK:
■ Incorrect URL to the back-end application. For example, here are examples of correct and incorrect URL based on the back end URL http://somehost:8080/myapp/first.jsp:
Correct: http://localhost:9010/wdk/mcslite/http/somehost/9090/myapp/first.jsp
Incorrect: http://localhost:9010/wdk/mcslite/http/somehost/9090/myap/first.jsp
When an incorrect URL is used, the user will get an error page with a detailed explanation of the cause (in this case, 404 Not Found).

WDK Log File
3-28 Oracle Application Server Wireless Developer’s Guide
The value of back-end URL can be checked in the log file under Back end URL.
Sample log entries:
127.0.0.1 - - 3b34912b68474bc1b1defa87e74dbd1e - - DEBUG : [Fri, 23 May 2003 11:06:45 PDT]Back end URL: http://localhost:9010/mcs/examples/mobile-xmll/index.jsp
127.0.0.1 - - 3b34912b68474bc1b1defa87e74dbd1e - - DEBUG : [Fri, 23 May 2003 11:06:45 PDT]Back end response code: 404 ; response message: Not Found
127.0.0.1 - - 3b34912b68474bc1b1defa87e74dbd1e - - ERROR : [Fri, 23 May 2003 11:06:45 PDT]javax.servlet.ServletException: HTTP(S) Error: 404 : Not Found
■ Incorrect content-type response header from back-end application. For example, when developing an XForms page, the content type should be set to application/vnd.oracle.xhtml+xforms. Without setting this value, the content detection logic in WDK might fail and result in an incorrect final markup language.
The value of content type that is received from the back-end application can be checked from the log file under Response HTTP headers received from back-end application.
Sample log entries:
127.0.0.1 - - 3b34912b68474bc1b1defa87e74dbd1e - - INFO : [Fri, 23 May 2003 10:59:27 PDT]Response HTTP headers received from back end application:x-oracle-wireless.referer.url: http://localhost:9010/mcs/examples/index.jspcontent-type: application/vnd.oracle.xhtml+xforms; charset=UTF-8x-oracle-wireless.base.url: http://localhost:9010/mcs/examples/index.jspconnection: Closedate: Fri, 23 May 2003 17:59:27 GMTserver: Oracle9iAS (9.0.3.0.0) Containers for J2EEcontent-length: 994
■ Incorrect XML content from back-end application. The XML content from back-end applications should be a well-formed XML document. A spelling error or a missing closing tag will result in an error code 500 from WDK. When this happens, an error message will be displayed in the client device (The xml could not be parsed. It contains invalid xml.).
The XML content from back-end applications can be checked from the log file under XML Result from backend.
Sample log entries:
127.0.0.1 - - 3b34912b68474bc1b1defa87e74dbd1e - - INFO : [Fri, 23 May 2003 11:00:50 PDT]XML Result from backend:

Running a Wireless Application with the WDK Tutorial
OracleAS Wireless Developer Kit 3-29
<?xml version = "1.0" encoding = "UTF-8" standalone="yes" ?>
<html profile="http://xmlns.oracle.com/ias/dtds/xhtml+xforms/0.9.0/1.0" xmlns="http://www.w3.org/1999/xhtml" xmlns:style="urn:oracle:iasw-internal:style.1.0" xmlns:extra="urn:oracle:iasw-internal:mxml.1.0"> <head> <title>Oracle9iAS Wireless Examples</title> <style type="text/css"> .title {font-style: italic; color: blue; font-size: xx-large} .menu {font-style: italic; color: blue; font-size: x-large} li {font-weight: bold; color: blue} </style> </head> <body> <nl style="list-style-type: decimal"> <label class="title">Oracle9iAS Wireless Examples</label> <li class="menu" href="xhtml%2Bxforms/index.jsp">XHTML+XFroms Examples</li> <li class="menu" href="xhtml%2Bmp/index.jsp">XHTML MP Examples</li> <li class="menu" href="mobile-xml/index.jsp">MobileXML Examples</li> </nl> <body></html>
127.0.0.1 - - 3b34912b68474bc1b1defa87e74dbd1e - - ERROR : [Fri, 23 May 2003 11:00:50 PDT]oracle.wireless.sdk.SdkException: The xml could not be parsed. It contains invalid xml.
3.4 Running a Wireless Application with the WDK TutorialThis tutorial takes you through the process of setting up a OracleAS Wireless development environment on your laptop or desktop using the Wireless Developer’s Kit (WDK). You will take a few existing applications and run them in your environment.
3.4.1 What you Need■ Mobile device simulator
■ Wireless Developer’s Kit (approximately 50MB)
■ JDK
Note: The WDK and simulators can be downloaded from http://otn.oracle.com/tech/wireless/tools/content.html.

Running a Wireless Application with the WDK Tutorial
3-30 Oracle Application Server Wireless Developer’s Guide
3.4.2 Tutorial OverviewThe WDK is a small runtime environment of OracleAS Wireless. It includes the Multi-Channel Server of OracleAS Wireless for device adaptation and multi-media adaptation allowing you to build and test wireless applications.
3.4.3 Environment Set UpThe following steps take you through the WDK environment setup.
3.4.3.1 Set up your WDK Environment1. Download and install JDK 1.4.1 onto your computer (to, for example,
D:\j2sdk1.4.1_01). If you do not have JDK 1.4.1, you can download it from http://java.sun.com. This tutorial assumes you installed the JDK at D:\j2sdk1.4.1_01.
2. Download and install the Wireless Developer’s Kit (WDK) onto your machine:
a. Unzip the WDK anywhere on your computer. Make sure the path to the WDK does not include spaces.
b. Set two environment variables on your computer:
* IAS_HOME to D:\wdk9041 (to where you unzipped the WDK); and
* JAVA_HOME to D:\j2sdk1.4.1_01 (to where you installed JDK 1.4.1)
3. Download and install a device simulator (if you do not already have one). If you have Internet access, you can get a device simulator at the Mobile Tech Center on OTN: http://otn.oracle.com/tech/wireless/tools/content.html.
3.4.3.2 Configure the WDKYou must modify the following WDK files:
■ WDK_INSTALL_DIR/wireless/j2ee/config/oc4j.properties
■ WDK_INSTALL_DIR/wireless/j2ee/config/global-web-application.xml
The entries: __REPLACE_WITH_IASW_HOME_PATH__, must be replaced with the absolute path to the WDK_INSTALL_DIR. Use the slash (/) for the directory separator, even in Microsoft Windows. For example, if the WDK is installed in d:\wdk, then replace __REPLACE_WITH_IASW_HOME_PATH__ with d:/wdk.

Running a Wireless Application with the WDK Tutorial
OracleAS Wireless Developer Kit 3-31
3.4.3.3 Start the WDK1. Run wdk.bat (in wdk9041/j2ee/home/wdk.bat) to start the Wireless
environment. At first startup, some files will be unpacked. After starting, a messaging appears stating the Containers for J2EE have initialized.
2. To stop the environment, type ctrl-C, and answer Yes. Restart the environment as in Step 1 above.
There are two main URLs that you need to know for the Wireless Development Kit: the URL to access your application and the URL to view the logs.
■ Access your application
http://<host_name>:9010/wdk/mcslite/http/<host_name>/9010/examples/<app_name>
For example, http://localhost:9010/wdk/mcslite/http/localhost/9010/examples/mobile-xml/Hello.jsp. Use this URL to access the Hello World example with your PC browser or your mobile device simulator. This is a simple demo to test your WDK.
The code for the Hello World application is in the following directory of the WDK: D:\wdk9041\wireless\j2ee\applications\wdk\examples-web\mobile-xml. You will not be able to see the examples code until you start the WDK for the first time and the WDK unpackages the examples.
Explanation of the URL: the WDK enables Wireless access to your application even if the application is not running in the WDK environment. The first part of the URL (http://localhost:9010/wdk/mcslite/http/), means that you want to access a wireless application with the WDK. The second part the URL (localhost/9010/examples/mobile-xml/Hello.jsp), is the URL of your application.
If your application was located on Geocities, the full URL would be http://localhost:9010/wdk/mcslite/http/www.geocities.com/myaccount/Hello.jsp.
■ URL to access the logs
http://<host_name>:9010/wdk/log. For example, http://localhost:9010/wdk/log. This provides the full error logs on requests to the WDK. Try this URL in your PC browser to view the log of your Hello World application; scroll down to the bottom to view the newest log output.

Running a Wireless Application with the WDK Tutorial
3-32 Oracle Application Server Wireless Developer’s Guide
3.4.4 Multi-media Adaptation DemonstrationOracleAS Wireless includes multi-media adaptation capabilities. If an application includes a GIF image, the server will automatically resize and convert the image to the appropriate format. For example, a GIF will be converted to WBMP format for a WAP phone. The following example will show an Oracle logo image on multiple devices. Copy and paste this URL into your PC browser, color phone, or black and white phone to see the images.
http://localhost:9010/wdk/mcslite/http/localhost/9010/examples/mobile-xml/ImageExample.jsp

JDeveloper Wireless Extension 4-1
4JDeveloper Wireless Extension
Each section of this document presents a different topic. These sections include:
■ Section 4.1, "Overview"
■ Section 4.2, "Developing Multi-Channel Applications"
■ Section 4.3, "Creating a Wireless-Enabled J2EE Application"
■ Section 4.4, "Creating J2ME Applications"
4.1 OverviewJDeveloper Wireless Extension (JWE), which is built on the Oracle Extension Framework, integrates OracleAS Wireless functionality with Oracle JDeveloper, enabling you to create wireless applications using JDeveloper. This chapter includes an overview of JWE, and some examples of JWE’s functionality. For all of the documentation, tutorials, and downloads, see http://otn.oracle.com/tech/wireless/tools/content.html.
The JWE enables you to develop, debug, deploy, and run Multi-Channel applications which can be accessed through different delivery methods, such as WAP, messaging or voice, and both regular J2ME (Java 2 Micro Edition) MIDlet applications as well as those which communicate with Web services through method calls.
You can test applications using emulators or real devices, debug MIDlets using breakpoints, and protect MIDlets using obfuscation. The JWE also enables you to use the development toolkits and emulators from a variety of manufacturers.
The installation of JWE in JDeveloper results in a new category node in the Category pane of JDeveloper’s gallery called Wireless Applications. Selecting this node invokes the JWE options (which are described in Table 4–1).

Developing Multi-Channel Applications
4-2 Oracle Application Server Wireless Developer’s Guide
Table 4–1 JWE Options
4.2 Developing Multi-Channel ApplicationsThe JWE enables you to mobile-enable an application from the JDeveloper IDE using the five-step Multi-Channel application wizard. This wizard enables you to generate templates for the selected application. To this end, the wizard provides you with two options, Basic Features and Messaging Support through Pushlite API. Specific templates are associated with each of these options. For example, selecting Basic Features enables you to select from among the following templates:
■ Hello World! (MXML)
■ Hello World! (XHTML JSP)
■ Hello World! (MXML JSP)
■ Hello World! (XHTML JSP)
■ Hello <Name>! (MXML JSP) - 2 pages
■ Hello <Name>! (XHTML JSP) - 2 pages
After you select the appropriate template (or templates) for the application and complete the wizard, JDeveloper generates the templates. You then use JDeveloper’s Component Palette to insert tags into the application and then test the application using the device emulators.
Option Description
J2ME Default MIDlet Enables you to create a MIDlet.
J2ME MIDlet Deployment Enables you to create the deployment profile needed for the MIDlet to run.
J2ME Proxy Connection Enables you to create a connection the J2ME Proxy server, From this connection, you register Web services with the WSDL (Web Service Definition Language) document URL, and generate J2ME stub classes.
Multi-Channel Application Creation Wizard Enables you to mobile-enable an application using the Multi-Channel Creation Wizard.
Multi-Channel Messenger Creation Wizard Enables you to add unified messaging to a J2EE application.

Creating J2ME Applications
JDeveloper Wireless Extension 4-3
4.3 Creating a Wireless-Enabled J2EE ApplicationThe JWE enables you to add OracleAS Wireless Messaging to any J2EE application in the JDeveloper IDE with the Multi-Channel Messenger Creation Wizard. This wizard generates a file called MultiChannelMessenger.java to the selected J2EE’s project file along with the required OracleAS Wireless SDK libraries. The MultiChannelMessenger.java file includes examples for using this utility class. In the J2EE application, you add an import statement for the MultiChannelMessenger utility. You then call the APIs of MultiChannelMessenger in the J2EE application by specifying the sender, recipient, and send information.
4.4 Creating J2ME Applications The JWE enables you to create a regular MIDlet and also a MIDlet that calls a Web service.
Creating a MIDlet is a two-step process: creating the default MIDlet and then packaging it into the a MIDlet Suite for deployment.
4.4.1 Creating a Default MIDletTo create the default MIDlet, the JWE provides a three-page wizard in which you select the package name and class name for the MIDlet. You can optionally add a specific library to the project where the MIDlet is created, or chain the default MIDlet to the Deployment Wizard immediately after the MIDlet’s classes have been generated. You can further extend the MIDlet by adding application-specific code.
4.4.2 Deploying the MIDlet ApplicationThe Deployment Wizard enables you to create a MIDlet suite in which you specify the packaging and deployment profile information needed to run the MIDlet. To create the MIDlet suite, you select the Java classes, images (.png files), or other resources included in the selected project. You then select from among the classes from the project that extends the javax.microedition.midlet.MIDlet class and serves as the entry point to the MIDlet. You then enter the MIDlet name to the selected class and then opt to publish the MIDlet to the MIDlet suite. You can also associate an icon with the MIDlet. In addition, you name the MIDlet suite, set the network proxy (if needed), manage the MIDlet’s manifest entries, and select the library (or libraries) to deploy with the MIDlet. You can deploy the MIDlet immediately upon completion of the MIDlet suite. Once the MIDlet has deployed, you can run and test it on an emulator.

Creating J2ME Applications
4-4 Oracle Application Server Wireless Developer’s Guide
4.4.3 Creating a MIDlet that Calls a Web ServiceThe JWE enables you to create a MIDlet that calls a Web service. A MIDlet calls a Web service using the OracleAS Wireless J2ME Proxy Server, which optimizes communication between the MIDlet and the Web service.
JWE enables you to register a Web service with the J2ME Proxy Server through a WSDL (Web Services Definition Language) document and generate a J2ME stub class for the service.The MIDlet calls the methods of the stub class; each of these methods in turn represents an operation of the Web service. Using JWE, you can quickly create a MIDlet to test the method calls to the Web service. You can then create a MIDlet suite to deploy and run the MIDlet.

Developing Services 5-1
5Developing Services
This chapter describes how Application Developers use the Service Manager to create and manage the service-related objects of the Oracle Application Server Wireless repository. Each section of this document presents a different topic. These sections include:
■ Section 5.1, "Overview of the Service Manager"
■ Section 5.2, "Logging into the Service Manager"
■ Section 5.3, "Managing Applications"
■ Section 5.4, "Managing Notifications"
■ Section 5.5, "Managing Master Alerts (Deprecated)"
■ Section 5.6, "Managing Data Feeders"
■ Section 5.7, "Managing Preset Definitions"
■ Section 5.8, "Managing J2ME Web Services"
5.1 Overview of the Service ManagerThe Service Manager provides a set of wizards for the creation of such service-related objects as applications, notifications, data feeders, preset definitions and J2ME web services. The Service Manager’s wizards enable you to create these objects quickly by presenting the creation of each of these objects as a discrete task, broken down into a series of steps. Completing these steps requires only a minimum of information. The Service Manager guides you through each of these steps to ensure that you enter information correctly.
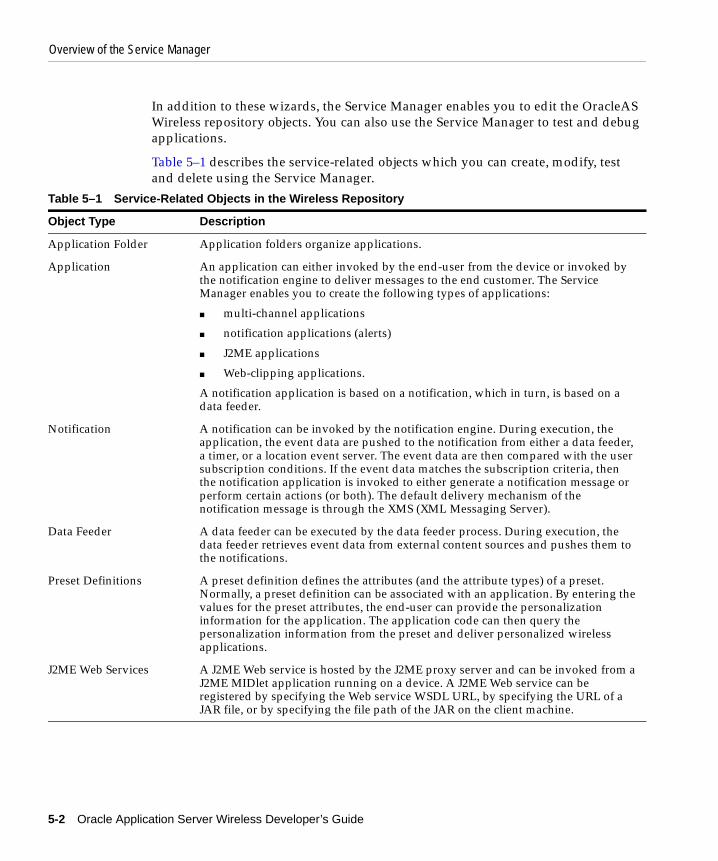
Overview of the Service Manager
5-2 Oracle Application Server Wireless Developer’s Guide
In addition to these wizards, the Service Manager enables you to edit the OracleAS Wireless repository objects. You can also use the Service Manager to test and debug applications.
Table 5–1 describes the service-related objects which you can create, modify, test and delete using the Service Manager.
Table 5–1 Service-Related Objects in the Wireless Repository
Object Type Description
Application Folder Application folders organize applications.
Application An application can either invoked by the end-user from the device or invoked by the notification engine to deliver messages to the end customer. The Service Manager enables you to create the following types of applications:
■ multi-channel applications
■ notification applications (alerts)
■ J2ME applications
■ Web-clipping applications.
A notification application is based on a notification, which in turn, is based on a data feeder.
Notification A notification can be invoked by the notification engine. During execution, the application, the event data are pushed to the notification from either a data feeder, a timer, or a location event server. The event data are then compared with the user subscription conditions. If the event data matches the subscription criteria, then the notification application is invoked to either generate a notification message or perform certain actions (or both). The default delivery mechanism of the notification message is through the XMS (XML Messaging Server).
Data Feeder A data feeder can be executed by the data feeder process. During execution, the data feeder retrieves event data from external content sources and pushes them to the notifications.
Preset Definitions A preset definition defines the attributes (and the attribute types) of a preset. Normally, a preset definition can be associated with an application. By entering the values for the preset attributes, the end-user can provide the personalization information for the application. The application code can then query the personalization information from the preset and deliver personalized wireless applications.
J2ME Web Services A J2ME Web service is hosted by the J2ME proxy server and can be invoked from a J2ME MIDlet application running on a device. A J2ME Web service can be registered by specifying the Web service WSDL URL, by specifying the URL of a JAR file, or by specifying the file path of the JAR on the client machine.

Logging into the Service Manager
Developing Services 5-3
5.2 Logging into the Service ManagerTo access the Service Manager:
1. You first log into the OracleAS Wireless Tools using the following URL:
http://hostname:port/webtool/login.uix
For example, you access the login page through the following URL:
http://hostname:7777/webtool/login.uix
2. Enter your user name and then enter your password. If you are an administrator, enter orcladmin as your user name. (The password is set during installation, but can be changed with the User Manager.)
After you log into the OracleAS Wireless Tools, you access the Service Manager by clicking the Services tab (Figure 5–1). The Service Manager includes the following subtabs:
■ Applications
■ Notifications
■ Data Feeders
■ Preset Definitions
■ J2ME Web Services
Clicking any of these subtabs invokes a browsing screen specific to the object. From these browsing screens, you can manage objects using functions for creating, editing and deleting, and testing.
Note: 7777 is the default port number for Oracle Application Server Wireless. The port number range is 7777 to 7877. To ensure that you are using the correct port number, check the port number for Oracle Application Server Wireless stored in [Oracle home]/install/portlist.ini. For more information on port usage, see your Oracle Application Server installation documentation, and the Oracle Application Server Administrator’s Guide.

Managing Applications
5-4 Oracle Application Server Wireless Developer’s Guide
Figure 5–1 The Service Manager (Partial View)
5.3 Managing ApplicationsSelecting the Applications tab displays the Application browsing page, which enables you to create, edit, delete, search for, and move applications and folders. The page also enables you to test and debug applications and view them on a phone simulator.
After you create and test an application, you can publish the application to your home folder by clicking Quick Publish button on the browsing page. After you publish this application, you can run it from the Device Portal.
The Applications screen enables you to view the top-level folders in the hierarchy, which the Service Manager displays as hyperlinks. These hyperlinks (depicted in Figure 5–2) allow you to "drill down" or traverse deeper into the hierarchy with each successive click. The trace path displays the structure of the hierarchy, enabling you to see the level that you currently access.
Figure 5–2 The Navigation Path
When you first access the Service Manager, the tool defaults to the browsing screen for the applications folders. This browsing screen includes a table listing the current
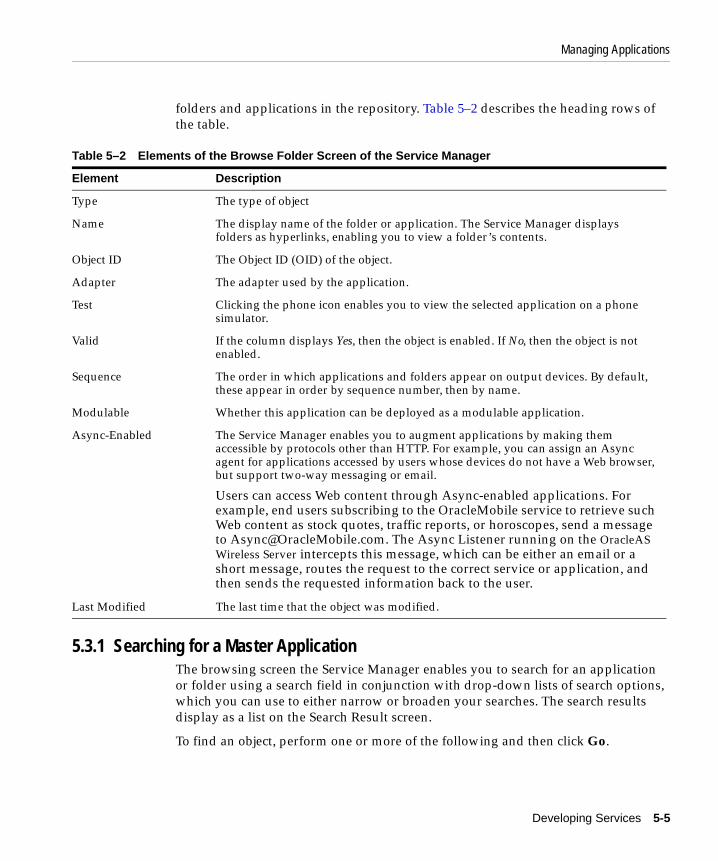
Managing Applications
Developing Services 5-5
folders and applications in the repository. Table 5–2 describes the heading rows of the table.
5.3.1 Searching for a Master ApplicationThe browsing screen the Service Manager enables you to search for an application or folder using a search field in conjunction with drop-down lists of search options, which you can use to either narrow or broaden your searches. The search results display as a list on the Search Result screen.
To find an object, perform one or more of the following and then click Go.
Table 5–2 Elements of the Browse Folder Screen of the Service Manager
Element Description
Type The type of object
Name The display name of the folder or application. The Service Manager displays folders as hyperlinks, enabling you to view a folder’s contents.
Object ID The Object ID (OID) of the object.
Adapter The adapter used by the application.
Test Clicking the phone icon enables you to view the selected application on a phone simulator.
Valid If the column displays Yes, then the object is enabled. If No, then the object is not enabled.
Sequence The order in which applications and folders appear on output devices. By default, these appear in order by sequence number, then by name.
Modulable Whether this application can be deployed as a modulable application.
Async-Enabled The Service Manager enables you to augment applications by making them accessible by protocols other than HTTP. For example, you can assign an Async agent for applications accessed by users whose devices do not have a Web browser, but support two-way messaging or email.
Users can access Web content through Async-enabled applications. For example, end users subscribing to the OracleMobile service to retrieve such Web content as stock quotes, traffic reports, or horoscopes, send a message to [email protected]. The Async Listener running on the OracleAS Wireless Server intercepts this message, which can be either an email or a short message, routes the request to the correct service or application, and then sends the requested information back to the user.
Last Modified The last time that the object was modified.

Managing Applications
5-6 Oracle Application Server Wireless Developer’s Guide
1. From the drop-down list, select one of the following options to narrow or broaden your search:
■ All Applications
■ Async-Agent-Enabled Applications
■ Modulable Applications
■ Folders
2. Enter a keyword.
3. From the drop-down list, select one of the following sorting options for the search results:
■ Name. Select this option to sort results by the name of the application or folder.
■ Last Modified Date. Select this option to sort results by the last time the object was modified.
4. Click Go. The Search Result screen appears, displaying the retrieved objects.
5.3.2 Creating a FolderYou can organize your applications by creating subfolders. These subfolders, which can represent topic areas, can be nested into other subfolders. When you create a subfolder, the Service Manager displays it as a hyperlink in the application browsing screen. Clicking this hyperlink enables you to see the folder’s contents.
You create a folder by first clicking Add Folder in the application browsing screen. The Create Folder screen appears, in which you define the folder properties (described in Table 5–3). After you complete the screen, click Create. The browsing screen reappears and displays the new folder.
Table 5–3 Parameters of the Create Folder Screen
Parameter Value
Folder Name The name of the folder. This is a required field.
Description A description of the folder.
Valid Selecting this option enables the folder.
Title Icon URI The URI of an image used as the icon that appears on top of the screen when this folder becomes the current folder. You do not need to specify the format type in this URI, as OracleAS Wireless selects the image format appropriate to the user ’s device.

Managing Applications
Developing Services 5-7
5.3.3 Creating an ApplicationYou create applications using the Service Manager’s Application Creation Wizard. The creation process is divided into multiple steps, each of which is presented as a screen. You need only define the parameters which are required and applicable to your application; you can skip any unneeded screens (or parameters) and click Finish to complete your application.
To access the Application Creation Wizard, click Create Application on the browsing page.
5.3.4 Selecting the Application TypeAfter you click Create Application, the Application Type screen appears (Figure 5–3). Using this screen, you select the type of application that you want to create. There are four types:
■ Multi-Channel Application
For multi-channel applications, the application content is retrieved from the HTTP adapter. The application result can be transformed and rendered on multiple device channels, including voice, messaging, and browsers.
■ J2ME Midlet
A MIDlet is an application that runs on a device that supports Java's MIDP (Mobile Information Device Profile) specification. This application is invoked when users download a J2ME application, and can be run online and offline from smart devices.
Menu Icon URI The URI of an image used as the icon that appears next to the folder in a menu listing. You do not need to specify the format type in this URI, as OracleAS Wireless selects the image format appropriate to the user’s device.
Title Audio URI The URI of the audio file (for example, a .wav file) read by a voice xml gateway when users access a folder. You do not need to specify the format type in this URI, as OracleAS Wireless selects the audio file format appropriate to the gateway.
Menu Audio URI The URI of the audio file (for example, a .wav file) read by a voice xml gateway along with a folder in a menu listing. You do not need to specify the format type in this URI, as OracleAS Wireless selects the audio file format appropriate to the gateway.
Table 5–3 Parameters of the Create Folder Screen
Parameter Value

Managing Applications
5-8 Oracle Application Server Wireless Developer’s Guide
■ Multi-Channel Application
For these applications, the application content can be retrieved from any adapter, such as the HTTP adapter, or the SQL adapter. The application result can be transformed and rendered on multiple device channels, including voice, messaging, and browsers.
■ Web Clipping Application
A Web Clipping application’s content is retrieved from the Web clipping studio, which can mobile-enable a Web-based application. The application result can be transformed and rendered on multiple device channels, including voice, messaging, and browsers
After you select the application type, click Create to launch the application creation wizard.
Figure 5–3 The Application Type Screen
5.3.5 Creating a Multi-Channel ApplicationAfter you select Multi-Channel Application and then click Create, the first page of the wizard appears, in which you enter the basic information of the application (Figure 5–4).

Managing Applications
Developing Services 5-9
5.3.5.1 Entering the Basic Information for the ApplicationEnter a unique name of the application (no two applications residing in the same folder can have the same name) and optionally, enter the URL pointing to the remote application which generates OracleAS Wireless XML or XHTML. You do not have to define the URL if this application is a message template used by a notification application.
You can complete the application at this point and exit the wizard by clicking Finish, or you can click Next to further define the application. Clicking Cancel at any point in an OracleAS Wireless wizard clears any of the values that you have entered.
Figure 5–4 Entering the Basic Information
5.3.5.2 Entering the Notification-Related Information Complete the second step of the wizard (Figure 5–5) if this application is based on a notification (an alert).

Managing Applications
5-10 Oracle Application Server Wireless Developer’s Guide
Select the Notification Enabled option if this application can be invoked by the notification engine to generate content for the notification message.
After you select the Notification Enabled option:
■ Select a notification from the Notification drop-down list. If none of the listed notifications suit your needs, then click Create to construct a notification application using the notification creation wizard. For more information on notifications, see Section 5.4, "Managing Notifications".
■ Select Use the default messaging URL for the notifications with message template to use the default messaging generation mechanism. OracleAS Wireless provides a default application JSP to generate the notification message based on the notification template. If you select this option along with a notification that includes a message template, then the default JSP handles the message generation. You do not need to provide the URL to the mobile application. For more information, see Section 5.4.1.3, "Step 3: Creating the Message Template".
■ Select Generate Non-Personalized Shared Content so that the mobile application is invoked only once for each incoming event. In this case, the user information passed to the mobile application is the system user, and generated content is shared by the users who are qualified for this event The mobile application can not perform any special processing for each user and can not generate personalized message for each user. However, selecting this option improves performance, since the mobile application is invoked only once for multiple notifications. For more information on notifications, see Chapter 11, "Notification Engine".
Click Next or Finish.
Note: While generating content for the notification message, these applications can invoke business logic which is dictated by the mobile application (written as a JSP, or in XMXL or XHTML). The input and output parameters of the notification application can be mapped to the input parameters of the application and passed to the Web application so that it can execute the appropriate actions.

Managing Applications
Developing Services 5-11
Figure 5–5 Entering the Notification Information for an Application
5.3.5.3 Entering the Input Parameters for the ApplicationThe Input Parameters screen (Figure 5–6) displays parameters which are passed to the mobile application (JSP, XHTML, MXML). The parameters for this application can either be defined in this screen, or by the Content Manager when publishing this application as an application link. For more information on publishing content, refer to the OracleAS Wireless Administrator’s Guide.

Managing Applications
5-12 Oracle Application Server Wireless Developer’s Guide
Figure 5–6 The Input Parameters Screen
Creating Parameters that Require Input from the End UsersIf you create a parameter that requires a value by leaving the Empty OK check box clear, and then do not enter a value for this parameter, then OracleAS Wireless prompts the user for this value at runtime.
Creating Parameters that Can be Modified by the Content ManagerIf you select the Modifiable option, then the Content Manager can change this parameter when creating an application link from this application. If you do not select this option, then the Content Manager cannot change this parameter.

Managing Applications
Developing Services 5-13
5.3.5.3.1 Adding a New Input Parameter to the Application
To add a new parameter to the application, you first click Add Another Row. You then define the parameters listed in Table 5–4 and then click Next or Finish.
Figure 5–7 depicts the Input Parameters screen, where you enter the values for the new input parameter.
Table 5–4 Adding an Input Parameter
Parameter Description
Name The name for the input parameter.
Caption The display label describing the input parameter, which prompts an action or input from the user.
Type Select an input parameter type, which can be SingleLine, MultiLine, Enum, Password.
Comment A description for the input parameter.
Modifiable Select this option to enable the Content Manager to change the parameter.
Empty OK Select this option if the input parameter does not require a value.
Value Enter, if needed, a default value for the parameter. If you do not enter a default value, then Wireless prompts the user for a value (That is, if the parameter is not also flagged as Empty-OK.)
Mapped Notification Parameter
Select a parameter from the drop-down list. These parameters are specific to the master notification you selected in the Notification-Related Information screen.

Managing Applications
5-14 Oracle Application Server Wireless Developer’s Guide
Figure 5–7 Adding an Input Parameter
5.3.5.3.2 Deleting an Input Parameter To delete an input parameter, select the parameter you want to remove from the input parameter values and then click Delete.
5.3.5.3.3 Editing an Input Parameter To edit an input parameter, select the parameter you want to edit from the input parameter values and then click Apply.
5.3.5.4 Entering the Async InformationIf you select the Async Enabled option, then this application, when published, can be accessed through messaging on asynchronous devices. Users invoke the application by sending a request message to the OracleAS Wireless Server. The Async Listener then retrieves the message, routes it to the appropriate Async application and then replies, sending the user a message with the results of the executed request the user as a message. A complicated Async application can require several round trips for the message. OracleAS Wireless preserves the session for messages sent from the same device.
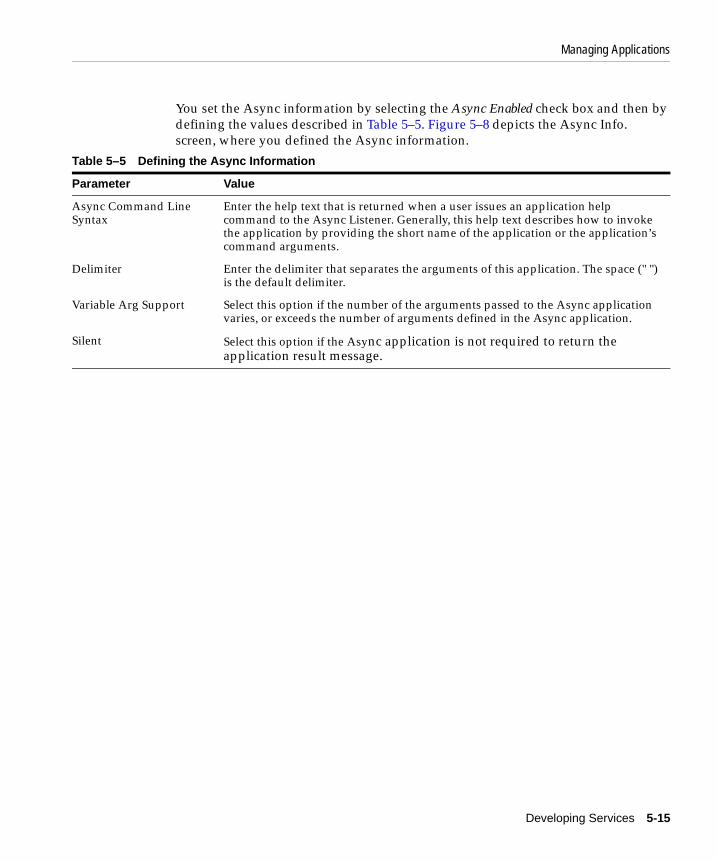
Managing Applications
Developing Services 5-15
You set the Async information by selecting the Async Enabled check box and then by defining the values described in Table 5–5. Figure 5–8 depicts the Async Info. screen, where you defined the Async information.
Table 5–5 Defining the Async Information
Parameter Value
Async Command Line Syntax
Enter the help text that is returned when a user issues an application help command to the Async Listener. Generally, this help text describes how to invoke the application by providing the short name of the application or the application’s command arguments.
Delimiter Enter the delimiter that separates the arguments of this application. The space (" ") is the default delimiter.
Variable Arg Support Select this option if the number of the arguments passed to the Async application varies, or exceeds the number of arguments defined in the Async application.
Silent Select this option if the Async application is not required to return the application result message.

Managing Applications
5-16 Oracle Application Server Wireless Developer’s Guide
Figure 5–8 The Async Information Screen
5.3.5.4.1 Adding the Async Input Parameters You add an input parameter by clicking Add and then by entering a name for the argument in the Name field. In the Value field, enter a default value for the argument. Leaving this field blank creates an application that requests a value from the user.
Click Next or Finish.
5.3.5.5 Setting the Built-In ParametersThe built-in parameters are the predefined HTTP adapter parameters. Because these parameters default to the correct values, you do not have to configure them. Figure 5–9 depicts the wizard’s Built-In Parameters screen.
If, however, you need to overwrite these default values:

Managing Applications
Developing Services 5-17
■ Enter the URI to the CatSpeech Server, where the grammars are defined.
■ Enter the base URI to the Audio Library, where the audio library classes are defined.
■ Enter the full classname for Adapter Invocation Listener, which can be invoked at the runtime to examine aspects of the runtime status, such as the HTTP request parameters, before the application is executed.
■ Select true for Do XML Validate, if you want the HTTP adapter to validate the XML generated by the mobile application. Validation can slow down the runtime performance.
■ Select true for Send HTTP headers if you would like the HTTP adapter send information through HTTP headers to the mobile application.
■ Select true for Rewrite Relative URLs if you want the HTTP adapter to rewrite the URL occurrences in the mobile application JSP, XHTML or MXML files. The URLs are rewritten to refer to the multi-channel server URL rather than to the mobile application server itself.
■ Select the HTTP method, (POST or GET). This is the method used by the HTTP adapter to make the HTTP connection to the mobile application pages.
■ Set the input encoding for the mobile application server. This encoding is used when HTTP adapter makes the HTTP connection with the mobile application server. Use IANA character set names.
Click Next or Finish.
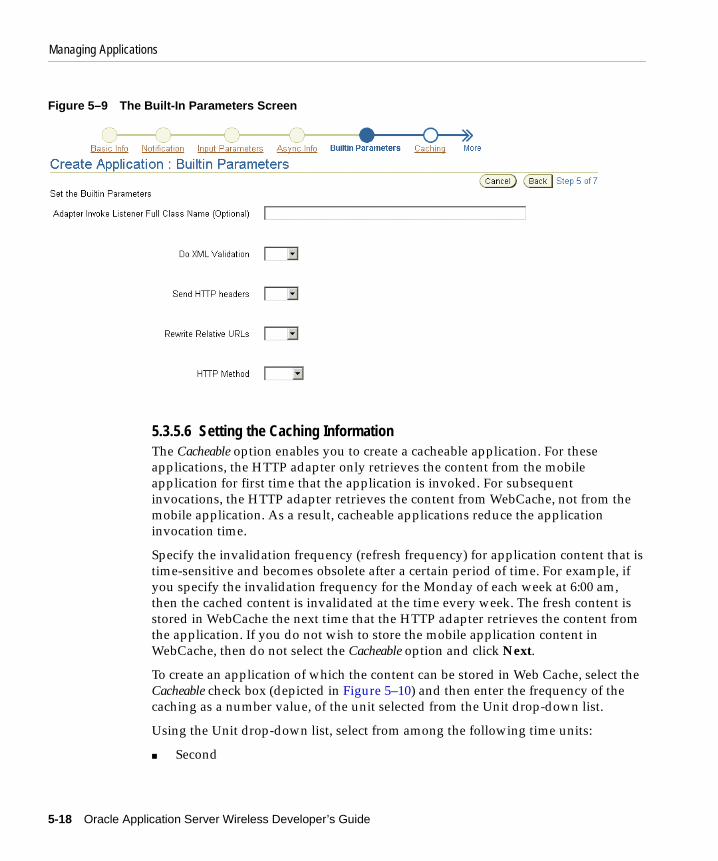
Managing Applications
5-18 Oracle Application Server Wireless Developer’s Guide
Figure 5–9 The Built-In Parameters Screen
5.3.5.6 Setting the Caching InformationThe Cacheable option enables you to create a cacheable application. For these applications, the HTTP adapter only retrieves the content from the mobile application for first time that the application is invoked. For subsequent invocations, the HTTP adapter retrieves the content from WebCache, not from the mobile application. As a result, cacheable applications reduce the application invocation time.
Specify the invalidation frequency (refresh frequency) for application content that is time-sensitive and becomes obsolete after a certain period of time. For example, if you specify the invalidation frequency for the Monday of each week at 6:00 am, then the cached content is invalidated at the time every week. The fresh content is stored in WebCache the next time that the HTTP adapter retrieves the content from the application. If you do not wish to store the mobile application content in WebCache, then do not select the Cacheable option and click Next.
To create an application of which the content can be stored in Web Cache, select the Cacheable check box (depicted in Figure 5–10) and then enter the frequency of the caching as a number value, of the unit selected from the Unit drop-down list.
Using the Unit drop-down list, select from among the following time units:
■ Second

Managing Applications
Developing Services 5-19
■ Minute
■ Hour
■ Day
■ Week
■ Month
Using the drop-down lists, select the day and time (if applicable) for the invalidation frequency.
Click Next or Finish.
Figure 5–10 Setting the Caching Information
5.3.5.7 Setting Additional InformationThe final screen of the wizard (Figure 5–11) enables you to set the display module configuration attributes for the application. Table 5–6 describes the additional parameters. After you have defined the values, select Finish to complete the master application.
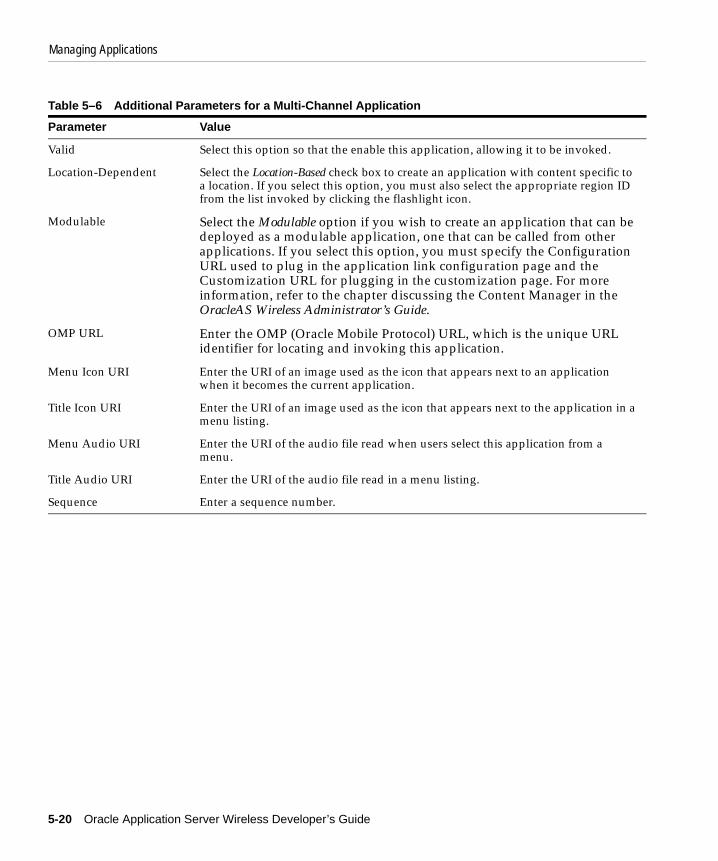
Managing Applications
5-20 Oracle Application Server Wireless Developer’s Guide
Table 5–6 Additional Parameters for a Multi-Channel Application
Parameter Value
Valid Select this option so that the enable this application, allowing it to be invoked.
Location-Dependent Select the Location-Based check box to create an application with content specific to a location. If you select this option, you must also select the appropriate region ID from the list invoked by clicking the flashlight icon.
Modulable Select the Modulable option if you wish to create an application that can be deployed as a modulable application, one that can be called from other applications. If you select this option, you must specify the Configuration URL used to plug in the application link configuration page and the Customization URL for plugging in the customization page. For more information, refer to the chapter discussing the Content Manager in the OracleAS Wireless Administrator’s Guide.
OMP URL Enter the OMP (Oracle Mobile Protocol) URL, which is the unique URL identifier for locating and invoking this application.
Menu Icon URI Enter the URI of an image used as the icon that appears next to an application when it becomes the current application.
Title Icon URI Enter the URI of an image used as the icon that appears next to the application in a menu listing.
Menu Audio URI Enter the URI of the audio file read when users select this application from a menu.
Title Audio URI Enter the URI of the audio file read in a menu listing.
Sequence Enter a sequence number.

Managing Applications
Developing Services 5-21
Figure 5–11 The Additional Info. Page of the Application Creation Wizard
5.3.6 Creating a J2ME ApplicationA OracleAS Wireless J2ME (Java 2 Micro Edition) application is a J2ME MIDlet programmed on top of the J2ME runtime and library. Using the J2ME MIDlet creation wizard, you can upload a MIDlet to the OracleAS Wireless J2ME Provisioning Server. The MIDlet can then be downloaded to a PC or to a device which supports J2ME MIDlets.
The J2ME Midlet creation wizard presents four steps:
■ Entering the Basic Information for the MIDlet
■ Specifying the Deliverable Content
■ Specifying the Device Requirement

Managing Applications
5-22 Oracle Application Server Wireless Developer’s Guide
■ Setting the Additional Information for the MIDlet
You need only enter information that is relevant to your MIDlet. You can skip any irrelevant information by clicking the Finish button on any wizard page.
5.3.6.1 Entering the Basic Information for the MIDletIn this first step of the wizard (depicted in Figure 5–12), you define two required parameters: the a name for the J2ME application, and the URL to the mobile application which generates the J2ME application download page. By default, the OracleAS Wireless server provides a default J2ME download page.
Click Next.
Figure 5–12 Entering the Basic Information for a J2ME MIDlet
5.3.6.2 Specifying the Deliverable ContentFor a OracleAS Wireless J2ME MIDlet application, the delivery content is the J2ME MIDlet binary, the core of the application. The delivery content includes a JAD (Java Archive Descriptor) and a JAR (Java Archive file). Each version of the content is specific to different device requirements.

Managing Applications
Developing Services 5-23
Entering the Version of the ContentIn Step 2 (depicted in Figure 5–13), you enter the version of the content. After you complete this application, you can create another version of the content for another device. The application’s name and the version uniquely identify a J2ME MIDlet
You can also optionally enter a display name and description for this version of the contents.
Importing the JAD and JAR FilesThe Import buttons enable you to browse for and select a JAD and JAR file for this application. To import these files, click the Import button. The Import File window appears. Click the Browse button, select the file and then click Import.
You can complete the application at this point by clicking Finish. Clicking Next takes invokes the Device Requirement screen (Figure 5–14).
Figure 5–13 Specifying the Deliverable Contents

Managing Applications
5-24 Oracle Application Server Wireless Developer’s Guide
5.3.6.3 Setting the Device RequirementsThe device requirement criteria are evaluated when the J2ME is downloaded to a device at runtime. Each version of the deliverable content has a different device requirement.When a device requests the download, the J2ME Provisioning Server selects the version number with the requirements that match the profile of the device requesting the application.
The Devices Excluded section enables you to prevent the download of the MIDlet to a selected device. To exclude devices, use the right arrow buttons (> and >>) to move devices from the Available Devices pane to the Devices Excluded pane. The devices listed in Devices Excluded display an error message if users try to download this MIDlet to these devices. Use the left arrow keys (< and <<) to move devices from the Devices Excluded pane to the Available Devices pane. Similarly, use the arrow keys in the Supported Physical Devices section to select the devices or devices that support downloading this version of content.
Specify heap size requirement for JVM (Java Virtual Machine) running this J2ME application.
Click Next or Finish.
Note: You cannot select the same device to both be excluded and supported; OracleAS Wireless automatically excludes a devices with such contradictory designations.

Managing Applications
Developing Services 5-25
Figure 5–14 Selecting Devices for the Deliverable Contents
5.3.6.4 Setting Additional InformationDefining the parameters of the Additional Information screen (Figure 5–15) enables you to set the display information for the MIDlet application. Click Finish to complete the J2ME MIDlet application. Table 5–7 describes these parameters.
Table 5–7 Additional Values for the MIDlet Application
Parameter Value
Description Enter a description for the J2ME application, which appears on the device.
Valid Select this option so that the application can be invoked.
Menu Icon URI Enter the URI of an image used as the icon that appears next to an application when it becomes the current application.
Title Icon URI Enter the URI of an image used as the icon that appears next to the application in a menu listing.

Managing Applications
5-26 Oracle Application Server Wireless Developer’s Guide
Figure 5–15 Entering Additional Information for the MIDlet Application
For more information on creating J2ME MIDlet applications, see Chapter 12, "J2ME Development and Provisioning"
Menu Audio URI Enter the URI of the audio file read when users select this application from a menu.
Title Audio URI Enter the URI of the audio file read in a menu listing.
Sequence Enter a sequence number.
Table 5–7 Additional Values for the MIDlet Application
Parameter Value

Managing Applications
Developing Services 5-27
5.3.7 Creating a Multi-Channel Application (Based on Any Adapter)You create a multi-channel application by first selecting Multi-Channel application (based on any adapter) option from the Application Type screen (Figure 5–3).
5.3.7.1 Step 1: Entering the Basic Information for the ApplicationFrom the Browse Folder Screen, click Create Application. The Basic Information screen of the Application Creation Wizard appears (Figure 5–16). You use this screen to define the configuration parameters for the application, which are described in Table 5–8.
Table 5–8 Basic Configuration Parameters for the Application
Note: You must follow the sequence to its end to create an application; if you exit the wizard at any point by clicking Cancel, then you lose all of the values that you have entered.
Parameter Value
Name The name of the application.
Description An optional description of the application.
Adapter A drop-down list of available adapters. Note: The SQL adapter and the Web Integration adapter are deprecated in this release. See OracleAS Wireless Administrator’s Guide for more information on adapters.
Valid Select the Valid check box to enable the application.
Moduable Clicking this check box creates an application that can be deployed as a module component within another application. A modulable application can be reused across applications and provide a consistent user interface for applications requiring input from end users.
Location-Dependent Select this check box to make the application specific to a designated region. Use this option to enable location-acquisition at runtime.
Region Name If you select the Location-Dependent option, then you must select a region by clicking this button.
Language A drop-down list of display languages.
Title Icon URI The URI of an image used as the icon that appears on top of the screen when this application becomes the current application. You do not need to specify the format type in this URI, as OracleAS Wireless selects the image format appropriate to the user’s device.
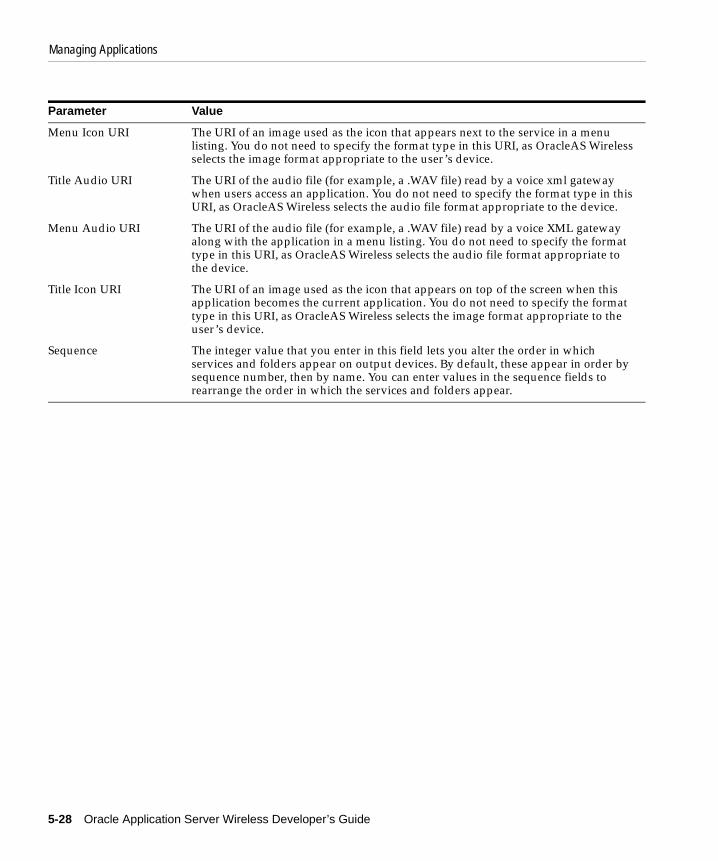
Managing Applications
5-28 Oracle Application Server Wireless Developer’s Guide
Menu Icon URI The URI of an image used as the icon that appears next to the service in a menu listing. You do not need to specify the format type in this URI, as OracleAS Wireless selects the image format appropriate to the user’s device.
Title Audio URI The URI of the audio file (for example, a .WAV file) read by a voice xml gateway when users access an application. You do not need to specify the format type in this URI, as OracleAS Wireless selects the audio file format appropriate to the device.
Menu Audio URI The URI of the audio file (for example, a .WAV file) read by a voice XML gateway along with the application in a menu listing. You do not need to specify the format type in this URI, as OracleAS Wireless selects the audio file format appropriate to the device.
Title Icon URI The URI of an image used as the icon that appears on top of the screen when this application becomes the current application. You do not need to specify the format type in this URI, as OracleAS Wireless selects the image format appropriate to the user’s device.
Sequence The integer value that you enter in this field lets you alter the order in which services and folders appear on output devices. By default, these appear in order by sequence number, then by name. You can enter values in the sequence fields to rearrange the order in which the services and folders appear.
Parameter Value

Managing Applications
Developing Services 5-29
Figure 5–16 The Basic Info. Screen of the Application Creation Wizard
5.3.7.2 Step 2: Entering Caching InformationSelect the Cacheable check box (depicted in Figure 5–17) for an application with changing content. When selected, this option saves the adapter invocation and transformation. If you create a cacheable application, then you must also specify the frequency at which the OracleAS Wireless server notifies the cache that a Web page has changed by issuing an invalidation report. To define the invalidation frequency, enter an integer value in the Cardinal field and use the screen’s drop-down lists to further define the time interval. If you do not wish to create applications that can be cached, then leave the Cacheable check box clear, and click Next.
Click Next. The Initialization (Init) Parameters screen appears.

Managing Applications
5-30 Oracle Application Server Wireless Developer’s Guide
Figure 5–17 The Caching Information Screen of the Application Creation Wizard
5.3.7.3 Step 3: Entering the Initialization Parameters of the ApplicationThe Init Parameters screen contains the initialization (init) parameters for the adapter that you selected in Step 2. Not all adapters have init parameters. Enter the values for the init parameters and then click Next. If the selected adapter does not contain init adapters, click Next.
If you want to plug in a listener for such purposes as debugging, specify the listener class in the HttpAdapterInvokerListener field. These listener methods are called at the following times:
■ When the HTTP adapter invocation starts.
■ Before the connection to a remote JSP.
Note: The SQL adapter and the Web Integration adapter are deprecated in this release.

Managing Applications
Developing Services 5-31
■ After the connection to the remote JSP.
■ At the end of the HttpAdapter invocation.
■ When errors occur.
5.3.7.4 Step 4: Selecting the Input Parameters for the ApplicationThe Input Parameters screen (Figure 5–18) displays the input parameters for the adapter that you selected in Step 1. The Application Creation Wizard queries the adapter definition to determine the parameters that appear in this screen. Table 5–9 describes the input parameters for applications using the HTTP Adapter and the OC4J Adapter.
Note: You must specify the classpath in the OC4J config/application XML file or you must copy the JAR file to wireless/lib.
Table 5–9 Input Parameters for the HTTP Adapter and the OC4J Adapter
Parameter Value
Name The name of the input parameter. The OracleAS Wireless Service Creation Wizard sets the name of the input parameter by querying the adapter definition.
Comment For applications based on the Web Integration adapter, OracleAS Wireless automatically populates this field with the name of the WIDL service that uses the parameter.
For applications based on other adapters, you can use this field to document the parameter. The comment is only used internally.
Mandatory Select this check box if this parameter must have a value. Do not select this option for that do not require a value (such as an optional parameter).
Default Value For most parameters, this value represents the default value for the parameter. If you specify a default value, OracleAS Wireless does not prompt the user for a value. Default values can be overridden by a value specified by an application link created by the Content Manager, if the parameter is visible to the user, by the user with OracleAS Wireless Customization.
The PAsection parameter is used by the Web Integration adapter. For PAsection, this value is the name of the WIDL service that the Web service should use. You can select the names from a drop-down selection list. If you do not specify a value for PAsection, OracleAS Wireless service includes all WIDL services in the WIDL interface.

Managing Applications
5-32 Oracle Application Server Wireless Developer’s Guide
The Input Parameters screen enables you to select an input parameter as well as add and delete input parameters to the adapter implementation for this application.
Selecting an Input ParameterTo select an input parameter for the application, click the Select radio button next to the input parameter you want to use and then click Next.
Adding a New Input Parameter to the AdapterTo add a new parameter to the adapter you selected in Step 1, click Add Another Row. Enter the values for the parameters described in Table 5–9, "Input Parameters for the HTTP Adapter and the OC4J Adapter" and then click Next.
See OracleAS Wireless Administrator’s Guide for information on the parameters for the SQL Adapter and WebIntegration Adapter.
Deleting an Input ParameterTo delete an input parameter, select the parameter you want to remove from the adapter implementation of this application and then click Delete. Click Next.

Managing Applications
Developing Services 5-33
Figure 5–18 The Input Parameters Screen of the Application Creation Wizard
Setting the Input Parameters for the HTTP AdapterThe HTTP adapter retrieves remote content and delivers it as mobile XML.Table 5–10 describes the input parameters for the HTTP adapter.

Managing Applications
5-34 Oracle Application Server Wireless Developer’s Guide
5.3.7.5 Step 5: Selecting the Output Parameters for the ApplicationThe Output Parameters screen enables you to select the output parameters for the adapter that you selected in Step 1, or to add output parameters to the application. The Application Creation Wizard queries the adapter definition to determine the parameters that appear in this screen.
Table 5–10 Input Parameters for the HTTP Adapter
Parameter Description
URL The URL to the data source. If there is a query in the URL, then its characters and URL must be encoded as follows: http://my.host.com:80/Hello.jsp?fn=First+Name&ln=Last+Name
This is a mandatory parameter.
REPLACE_URL Whether the adapter should replace the relative URLs inside the result with absolute ones. You should set this parameter to false only if you are sure that there will be no relative URLs inside the result. The default value is true.
FORM_METHOD The HTTP method used by the adapter to retrieve the content of the URL.The supported methods are GET and POST. The default method is GET.
INPUT_ENCODING The encoding scheme of the remote Web server. Use IANA character set names (for example: ISO-8859-1, UTF-8) to define this value.
Note: You do not need to define output parameters for applications using the HTTP adapter and the OC4J adapter.

Managing Applications
Developing Services 5-35
Table 5–11 describes the output parameters for adapters.
To select an output parameter, use the radio buttons to select the appropriate output parameter and then click Apply. To delete an output parameter, select the output parameter and click the Delete button.
Adding a New Output Parameter to the AdapterAfter you have finished adding or deleting the output parameters for the adapter, click Next. The Confirmation screen appears if OracleAS Wireless has not found a PASection in the application you have created. Review the values listed on the Confirmation screen. If they are correct, click the Finish button to complete the master application.
If the master application contains a PASection, the Create Result Transformer screen appears.
5.3.7.6 Step 6: Creating an Async Agent Service—OptionalBy assigning Async Agent to an application, you create an application that can be accessed by protocols other than HTTP.
To set the values for an Async Agent application, you first select the Async Agent check box. In the Async Command Line Syntax field, enter the text that is returned
Table 5–11 Output Parameters for Adapters
Parameter Value
Name The name of the output parameter. The Application Creation Wizard sets the name of the output parameter by querying the adapter definition.
Caption A label describing the parameter which OracleAS Wireless uses to prompt user input.
Comment For applications based on the Web Integration adapter, OracleAS Wireless automatically populates this field with the name of the WIDL service that uses the parameter.
For applications based on other adapters, you can use this field to document the parameter. The comment is only used internally.
User Customizable Specifies whether the end user can set a value for this parameter. You can make most input parameters customizable by the user.

Managing Applications
5-36 Oracle Application Server Wireless Developer’s Guide
when a user issues an application help command to the Async Server. In the Delimiter field, enter the delimiter parameters for the Async Agent service.
Complete the Async Application Argument List section as follows:
1. Click Add Another Row.
2. In the Name field, enter a name for the argument.
3. Enter a number to represent the sequence in which the argument appears on the command line.
4. Enter a default value for the argument. Leaving this field blank creates an application that requests a value from the user.
5. Click Next.
5.3.7.7 Step 7: Selecting the Result Transformer—OptionalAfter you have set the output parameters for the adapter, OracleAS Wireless checks if the input parameters include PASection, the value used by the WIDL adapter to identify the service that is the entry point in the chained service sequence. If the Application Creation Wizard finds a PASection input adapter, it invokes the Result Transformer screen.
The transformer screen enables you to select a transformer for the adapter or add a new one by importing the XSLT stylesheet from your local file system.
To select a transformer for the adapter you selected in Step 1, use the radio buttons and then click Apply. To delete a transformer from the adapter, select the transformer using the Select radio button and click Delete.
Importing an XSLT Style Sheet1. Click the tab that represents the PASection that you want to edit. Each panel
contains a text editor for entering the XSLT style sheet. You can also import an XSLT style sheet by clicking the import button.
Note: The space (" ") is the default delimiter.
Note: You can skip this step if you selected an adapter that returns Mobile XML.

Managing Applications
Developing Services 5-37
2. Click Next after you have completed editing the XSLT style sheet. The Device Transformer Screen appears. Leave this screen blank if you do not wish to create a result transformer and click Next until you reach the Confirmation screen.
3. If the values appear correct, click Finish to complete the creation of the application.
Adding a New Result TransformerTo add a new result transformer:
1. Enter a name for the transformer in the Name field.
2. Click the Import button to retrieve the XSLT stye sheet from your local file system. The style sheet then appears in the Content window.
3. Make any needed changes to the style sheet.
4. Click Add.
5. Click Finish to complete the creation of the master service.
You have created an application. This master service is not visible to users until the Content Manager publishes an application based upon it to user groups.
5.3.8 Creating a Web Clipping ApplicationThe Wireless Web Clipping server enables Wireless Service Administrators to clip and scrape Web content and create Wireless Web Clipping applications that are stored persistently in the Wireless Web Clipping server repository. When a mobile device user requests Wireless Web Clipping application, the HTTP Adapter retrieves the application and delivers it to OracleAS Wireless for processing and delivery to the mobile device.
From the Service Manager, you access the Web Clipping Manager, which enables you to create, edit, delete web clippings, or download the mobile application for the clipping as a Java application or a JSP. You can create a default application based on an existing web clipping. After the mobile application is created, the clipped portion of the web application can be invoked from multiple mobile devices. For more information, see Chapter 13, "Web Scraping".
On the first page of application wizard, you can select Web Clipping Application type. The Web clipping manager page displays after you click Create. Select an existing Web clipping and then click Create Default Application. A new application is created based on the Web clipping.

Managing Applications
5-38 Oracle Application Server Wireless Developer’s Guide
5.3.9 Editing an ApplicationThe Edit button in the application browsing screen enables you to edit all the all of the information for an application, from the basic information to the additional information. To edit an application, select an application in the browsing screen and then click Edit. The Basic Info. editing page appears (Figure 5–19), with its fields populated with the values set for the select application. From the left panel of the left panel of the editing screen, you can select the values that you want to edit, such as those for the basic configuration, initialization parameters, input parameters, output parameters, and the Async properties. After you modify a value, click Apply to save your changes. Clicking Cancel sets the values back to their original state. For more information on the parameters that you edit, see Section 5.3.3, "Creating an Application".
Figure 5–19 The Basic Info. Screen for Editing Applications
When you edit a J2ME application, you can edit the values for the JVM, the profile, and the maximum download size for the device requirement. Figure 5–20 depicts the Basic Info. screen for editing a J2ME application.

Managing Applications
Developing Services 5-39
Figure 5–20 Editing a J2ME Application
5.3.10 Deleting an ApplicationTo delete an application, select the application from the application browsing screen and then click Delete.
5.3.11 Debugging an ApplicationThe Service Manager enables you to simultaneously view an application on a phone simulator and in OracleAS Wireless XML or device.
Transformers, in the form of XSLT stylesheets or Java classes, convert the content returned by OracleAS Wireless adapters into the format best suited to a particular platform.
To test an application:
1. From the applications browsing screen, select an application.
2. Click Debug. The Debug Service screen appears.
3. Select from among the following output formats:
■ Adapter XML Result
Selecting this result type enables you to see OracleAS Wireless source content in the AdapterResult format, the intermediary format between the source and the target output device. Source content in the AdapterResult

Managing Notifications
5-40 Oracle Application Server Wireless Developer’s Guide
format must be converted into SimpleResult format before it can be delivered to a target device. If no text displays in the The Result panel, then no AdapterResult has been produced.
■ OracleAS Wireless XML Result
Selecting OracleAS Wireless XML Result displays the source content in OracleAS Wireless’ SimpleResult format of the output that is returned by an adapter.
■ Device Result
The DeviceTransformer drop-down menu lists the devices in the repository. Selecting a logical device enables you to see the final markup language for that device.
4. Click Set Parameters.
5. Click Run Application. The application appears on a phone simulator. The selected result appears in the Application Result window.
5.3.12 Quick Publishing an ApplicationAfter testing and debugging an application, you can publish the application to your home folder as an application link rather than having the application published through the Content Manager. After you publish the application to your home folder, you can view it through the Device portal.
To publish an application to your home folder, you first select the application from the browsing screen and then click Quick Publish. Enter the name of the application link and then click Create.
5.3.13 Moving Folders and ApplicationsThe Service Manager’s Move function enables you to organize your applications and folders.
To move an application, you first select the folder or application and then click Move. The Move screen appears.Select a new location from the list in the Move screen. Click Move Here.
5.4 Managing NotificationsThe Notifications tab of the Service Manager enables you to create, edit and delete notifications (alerts). When you select the Notifications tab, the Browse

Managing Notifications
Developing Services 5-41
Notifications screen appears (Figure 5–21), displaying a list of the current notifications. The Browse screen organizes the notifications by name, OID, datafeeder and time values. Table 5–12 describes the elements of the browsing screen.
Figure 5–21 The Browse Notifications Screen
The Basic Info. screen includes the following parameters:
5.4.1 Creating a Master NotificationThe Notification Creation Wizard steps you through the creation of a master notification. This wizard, invoked by clicking the Create Notification button in the browsing screen, provides a separate screen for each step of the process.
Table 5–12 Elements of the Browse Notifications Screen
Element Description
Name The name of the notification.
Object ID The ID of the notification in the database.
Data Feeder The data feeder, or content source, used for the notification.
Time-Based Enabled Denotes a notification that displays at predetermined times.

Managing Notifications
5-42 Oracle Application Server Wireless Developer’s Guide
5.4.1.1 Step 1: Entering the Basic Configuration Parameters for the NotificationYou define the following configuration parameters for the notification in the Basic Info. screen (Figure 5–21), the first screen in the notification creation wizard. Table 5–13 describes the parameters of the Basic Info. screen.
Note: Once you create a notification, you then map it to an application to enable the System Manager to attach this notification to a notification engine process. The notification becomes active once the System Manager starts both the notification engine process and the data feeder engine process.
Table 5–13 Basic Configuration Parameters for a Notification
Parameter Value
Name The name of the notification. This is a required parameter.
Description A description of the notification.
Subscriber Filtering Hook
A Java class name. This hook enables you to filter out subscribers to the qualified notifications before these notifications are sent to the messaging server.
Value-Based Specifies whether this notification triggers upon the receipt of an event.
Data Feeder A drop-down list of data feed sources. If this notification is value-based, then the value entered in this field must point to a data feeder.
Location-Based Enabled Specifies whether this notification triggers upon verification of location conditions.
Time-Enabled Specifies whether this notification triggers at predetermined times. The frequency options are daily, week day, and weekend. The user profile provides the time zone information.

Managing Notifications
Developing Services 5-43
Figure 5–22 The Basic Information Screen of the Master Notification Creation Wizard
Click Next. The Trigger Conditions screen appears (Figure 5–23).
5.4.1.2 Step 2: Setting the Trigger Conditions for the NotificationThe Trigger Condition screen enables you to set the conditions that invoke a notification on end users’ devices. For example, if you create a notification that alerts users of a stock price, you set the conditions that allow an end user to request a notification when the stock has risen above, or fallen below, a certain price.
Table 5–14 describes the parameters of the Trigger Conditions screen.

Managing Notifications
5-44 Oracle Application Server Wireless Developer’s Guide
Setting the Relationship Between Trigger ConditionsSelect an AND relationship (both conditions must be met) or an OR relationship (any of the conditions must be met).
Selecting a Trigger ConditionTo select a trigger condition:
1. From the list of trigger conditions, select the trigger condition.
2. Edit the Condition Type, Trigger Parameter, or Default Value fields as needed.
3. Click Apply.
Adding a New Trigger ConditionTo add a new Trigger Condition
1. Enter the name for the trigger condition in the Condition field.
2. Enter text used for prompting input from end users in the Caption field.
3. Select a trigger parameter from the drop-down list in the Trigger Parameter field.
Table 5–14 Trigger Conditions for Notifications
Parameter Value
Condition Name The name of the alert trigger for the notification. The Trigger name, which is limited to 30 characters, must contain only alphanumeric characters and an underscore. In addition, the trigger name cannot start with a numeric character and cannot use SQL reserved words. End users see this label when they subscribe to a notification application.
Trigger Parameter The trigger parameter is an element in a data feeder that you define a trigger condition against. For example, if a data feeder for a stock alert service includes an output parameter of stock price, you could select stock price as the trigger parameters for a condition name. For information on setting the output parameters of a data feeder, see Section 5.6.2.4, "Editing the Output Parameters of a Data Feeder".
Condition Type The condition, in relation to the value set by the end user, which triggers the notification.
Default Value The default value for the parameter. If you specify a default value, OracleAS Wireless does not prompt the user for a value. Default values can be overridden by a value specified by an application created by the Content Manager or, if the parameter is visible to the user, by the user through OracleAS Wireless Customization.

Managing Notifications
Developing Services 5-45
4. Select a Condition Type from the drop-down list in the Condition Type field. Condition types depend on the data type of the trigger parameter.
If the data type is a number, then the conditions include:
■ Less Than
■ Greater Than
■ Equal
■ Less Than and Equal
■ Greater Than and Equal
■ Less Than Absolute Value
■ Greater Than Absolute Value
■ Equal Absolute Value
■ Less Than and Equal Absolute Value
■ Greater Than and Equal Absolute Value
■ Value Change (The condition value for this type can only be 0 or 1, where 0 means no trigger and 1 means trigger when value changes. The default value is 0.)
If the data type is text, then the condition types include:
■ Exact Match
■ Not Match
■ Contain
■ Not Contain
■ Begin With
■ End With
■ Value Change (The condition value for this type can only be 0 or 1, where 0 means no trigger and 1 means trigger when value changes. The default value is 0.)
5. Enter a default value for the trigger condition in the Default Value field.
6. Click Add.
7. Click Next. The Message Template screen appears.

Managing Notifications
5-46 Oracle Application Server Wireless Developer’s Guide
Figure 5–23 Setting the Trigger Conditions
5.4.1.3 Step 3: Creating the Message Template The Message Template screen (Figure 5–24) enables you to create a message template by entering SimpleText stylesheet. In this stylesheet, the data feeder output values are the dynamic values. The following stylesheet represents these values as sym, price and change.
<SimpleResult> <SimpleContainer> <SimpleText> <SimpleTitle>OracleAS Wireless</SimpleTitle> <SimpleTextItem>Notification with price: $price; and change: $change: for stock: &sym;</SimpleTextItem> </SimpleText> </SimpleContainer></SimpleResult>

Managing Notifications
Developing Services 5-47
Figure 5–24 The Message Template Screen
5.4.2 Editing a NotificationThe Edit button in the Browse Notifications screen enables you to edit the basic configuration parameters, trigger conditions, and message template for a notification. To edit a notification, you first select one from the browsing screen and then click Edit. The Basic Info. screen for editing a notification appears, with its fields populated by the values set for the selected notification (Figure 5–25). Click Apply to save your changes. Clicking Cancel sets the values back to their original state. See Section 5.4.1, "Creating a Master Notification" for information on defining the parameters for the notification.
Note: OracleAS Wireless will not commit any of the values that you have entered until you complete the entire wizard.

Managing Master Alerts (Deprecated)
5-48 Oracle Application Server Wireless Developer’s Guide
Figure 5–25 The Basic Info. Screen for Editing a Notification
5.5 Managing Master Alerts (Deprecated)The Alerts tab of the Service Manager enables you to create, edit and delete master alerts. When you select the Alerts tab, the Browse Alerts screen appears, displaying a list of the current master alerts, organized by name, OID, data feeder and time values (Figure 5–26). Table 5–15 describes the elements of the browsing list for the master alerts.
Table 5–15 Elements of the Browse Master Alerts Screen
Element Description
Name The name of the master alert.
Object ID The ID of the alert in the database.
Data Feeder The data feeder, or content source, used for the master alert.
Time-Based Enabled Denotes an alert that displays at predetermined times.

Managing Master Alerts (Deprecated)
Developing Services 5-49
Figure 5–26 The Browse Master Alerts Screen
5.5.1 Creating a Master AlertThe Master Alert Creation Wizard steps you through the creation of a master alert. This wizard, invoked by clicking the Create Master Alert button in the Browse Master Alerts screen, provides a separate screen for each step of the process. The master alert becomes active once the System manager starts the both alert engine process and the data feeder engine process.
5.5.1.1 Step 1: Entering the Basic Configuration Parameters for the Master AlertYou enter the basic configuration parameters for the master alert in the Basic Info. screen, the first in the master alert creation sequence (Figure 5–27).
Figure 5–27 The Basic Info Screen of the Master Alert Creation Wizard

Managing Master Alerts (Deprecated)
5-50 Oracle Application Server Wireless Developer’s Guide
Table 5–16 describes the parameters of the The Basic Info. screen.
Click Next. The Trigger Conditions screen appears (Figure 5–28).
Figure 5–28 The Trigger Conditions Screen of the Master Alert Creation Wizard
5.5.1.2 Step 2: Setting the Trigger Conditions for the Master AlertThe Trigger Condition screen enables you to allow end users to set the conditions that invoke an alert on end users’ devices. For example, if you create an alert notifying users of a stock price, you can to set the alert conditions that allow an end user to request a notification when the stock has risen above, or fallen below, a certain price. Table 5–17 describes the parameters of the Trigger Condition screen
Table 5–16 Basic Configuration Parameters for a Master Alert
Parameter Value
Name The name of the alert. This is a required parameter.
Description A description of the alert.
Subscriber Filtering Hook A Java class name. This hook enables you to filter out subscribers to the qualified alerts before these alerts are sent to the messaging server.
Data Feeder A drop-down list of data feed sources. This is a required parameter.
Time-Enabled Specifies whether this alert triggers at predetermined times. The frequency options are daily, week day, and weekend. The time zone information is taken from the user profile.

Managing Master Alerts (Deprecated)
Developing Services 5-51
Selecting a Trigger ConditionTo select a trigger condition:
1. From the list of trigger conditions, select the trigger condition.
2. Edit the Condition Type, Trigger Parameter, or Default Value fields as needed.
3. Click Apply.
Adding a New Trigger ConditionTo add a new Trigger Condition
1. Enter the name for the trigger condition in the Condition field.
2. Enter text used for prompting input from end users in the Caption field.
3. Select a trigger parameter from the drop-down list in the Trigger Parameter field.
4. Select a Condition Type from the drop-down list in the Condition Type field. Condition types depend on the data type of the trigger parameter.
If the data type is a number, then the conditions include:
■ Less Than
Table 5–17 Trigger Conditions for Master Alerts
Parameter Value
Condition Name The name of the alert trigger for the master alert. The Trigger name must contain only alphanumeric characters and underscore and must be within 30 characters. In addition, the trigger name cannot start with a numeric character and cannot use SQL reserved words. End users see this label when they subscribe to an alert service.
Trigger Parameter The trigger parameter is an element in a data feeder that you define a trigger condition against. For example, if a data feeder for a stock alert service includes an output parameter of stock price, you could select stock price as the trigger parameters for a condition name. For information on setting the output parameters of a data feeder, see Section 5.6.2.4, "Editing the Output Parameters of a Data Feeder".
Condition Type The condition, in relation to the value set by the end user, which triggers the alert.
Default Value The default value for the parameter. If you specify a default value, OracleAS Wireless does not prompt the user for a value. Default values can be overridden by a value specified by an application created by the Content Manager or, if the parameter is visible to the user, by the user through OracleAS Wireless Customizing.

Managing Master Alerts (Deprecated)
5-52 Oracle Application Server Wireless Developer’s Guide
■ Greater Than
■ Equal
■ Less Than and Equal
■ Greater Than and Equal
■ Less Than Absolute Value
■ Greater Than Absolute Value
■ Equal Absolute Value
■ Less Than and Equal Absolute Value
■ Greater Than and Equal Absolute Value
■ Value Change (The condition value for this type can only be 0 or 1, where 0 means no trigger and 1 means trigger when value changes. The default value is 0.)
If the data type is text, then the condition types include:
■ Exact Match
■ Not Match
■ Contain
■ Not Contain
■ Begin With
■ End With
■ Value Change (The condition value for this type can only be 0 or 1, where 0 means no trigger and 1 means trigger when value changes. The default value is 0.)
5. Enter a default value for the trigger condition in the Default Value field.
6. Click Add.
7. Click Next. The Message Template screen appears.
5.5.1.3 Step 3: Creating the Message Template for the Master AlertThe Message Template screen (Figure 5–29) enables you to either import a message template or provide a hook. The data feeder output values are the dynamic values in the SimpleText stylesheet. The following stylesheet represents these values as &price and &change.

Managing Master Alerts (Deprecated)
Developing Services 5-53
<SimpleText> Stock Alert for [&sym;]: Price: &price; Change: &change;</SimpleText>
Figure 5–29 The Message Template Screen of the Master Alert Creation Wizard
Importing a Message TemplateTo import a message template:
1. Select the Message Template radio button.
2. Click Import to retrieve a message template from your local file system.
3. Click Next to complete the creation of the master alert.
Providing a HookTo create a message template by providing a programming hook:
1. Select Java Template Class Name.
2. Enter the name of the hook.
Note: OracleAS Wireless will not commit any of the values that you have entered until you complete the entire wizard.

Managing Data Feeders
5-54 Oracle Application Server Wireless Developer’s Guide
3. Click Next to complete the creation of the master alert.
5.5.2 Editing a Master AlertThe Edit button in the Browse Master Alerts screen enables you to edit the basic configuration parameters, trigger conditions, and message template for a master alert.
To edit the basic configuration parameters of a master alert, select a master alert from the browsing screen and then click Edit. The Basic Info. screen for editing a master alert appears, with its fields populated by the values set for the selected master alert (Figure 5–30). Edit the basic configuration values as needed. See Section 5.5.1.1, "Step 1: Entering the Basic Configuration Parameters for the Master Alert" for more information on the basic configuration parameters of a master alert. Click OK to save your changes. Clicking Cancel sets the values back to their original state and returns you to the Browse Master Alerts screen.
Figure 5–30 The Basic Info. Screen for Editing a Master Alert
5.6 Managing Data FeedersThe Service Manager’s Data Feeder tab (Figure 5–31) enables you to create, edit, and delete data feeders, OracleAS Wireless objects that download data from an internal or external content source and converts that data into a common format for OracleAS Wireless mobile alerts.

Managing Data Feeders
Developing Services 5-55
Figure 5–31 The Browse Data Feeders Screen
Clicking the Data Feeders tab displays the browse data feeders screen, which lists the current data feeders. Table 5–18 describes the elements of the data feeder list.
5.6.1 Creating a Data FeederThe Data Feeder Creation Wizard enables you to create a data feeder. This wizard, invoked by clicking the Create Data Feeder button in the Browse Data Feeders screen, steps you through the creation of a data feeder by providing a separate screen for each phase of the process. Once you create a data feeder, you can assign it to a master alert. A data feeder (and consequently the alert that derives its content using the data feeder) cannot become active until a user with the System Manager starts the data feeder process.
Table 5–18 Elements of the Browse Data Feeders Screen
Element Description
Name The Name of the data feeder.
Object ID The Object ID (OID) of the data feeder in the repository.
Protocol Type The protocol used by the data feeder to access the content provider and retrieve data.
Format Type The data format type for the retrieved content. Format include delimited text (such as comma-separated values), XML, and fixed-column text.
Data Filter Hook The Java class name that implements the DataFeedFilterHook, which enables post-processing before storing the data.
Download Hook A Java class name that implements the FeedDownloadHook.Implementing this Java interface implemented enables you to construct the download URL or POST page during download.

Managing Data Feeders
5-56 Oracle Application Server Wireless Developer’s Guide
5.6.1.1 Step 1: Entering the Basic Information for the Data FeederThe Basic Info screen of the Data Feeder Creation Wizard (Figure 5–32) enables you enter the basic properties for the data feeder.
Figure 5–32 The Basic Info. Screen of the Data Feeder Creation Wizard
Table 5–19 describes the parameters of the The Basic Info. screen of the Data Feeder Creation Wizard.

Managing Data Feeders
Developing Services 5-57
Table 5–19 Parameters of the Basic Info. Screen of the Data Feeder Creation Wizard
Parameter Value
Name The name of the content provider. This is a required parameter.
Type Select Regular if you use the built-in data retrieval framework to pull the data. Select Pass-Through for a push application using a Java class to retrieve the data. If you select Pass-Through, then you must specify a Java class. This is a required parameter.
Protocol Type The protocol used by the data feeder to access the content provider and retrieve data. The drop-down menu includes the following options:
■ sql—SQL Database. Runs a SQL query against the specified data feed and reads the output.
■ app—Local Application. Runs an application as a subprocess and then reads the .stdout file.
■ http—HTTP. Construct the URL, performs the GET/POST on the remote Web site and authenticates if necessary
■ ftp—FTP. Connects to the remote Web server, and then authenticates and downloads files. Requires a username and password.
■ file—Local File. Reads from an arbitrary file in the file system.
Format Type The data format type for the retrieved content. The drop-down menu includes the following options:
■ delimited—Parses delimited text. The default delimiter is the comma (,).
■ fixed—Fixed Column Text. Parses text delimited by fixed column positions.
■ xml—The preferred input format.
Data Filter Hook A Java class name. This option enables you to customize a data feeder for additional logic, such as splitting a single column from a provider into two columns or filtering out content data before feeding the data to the content cache table.
Download Hook A Java class name. This option enables you to customize a data feeder by generating a new URL to download data.
Null Value A string used to mark non-applicable data, such as N/A. Different providers use different strings.
Start Time The time to start downloading data.
End Time The time to stop downloading data.
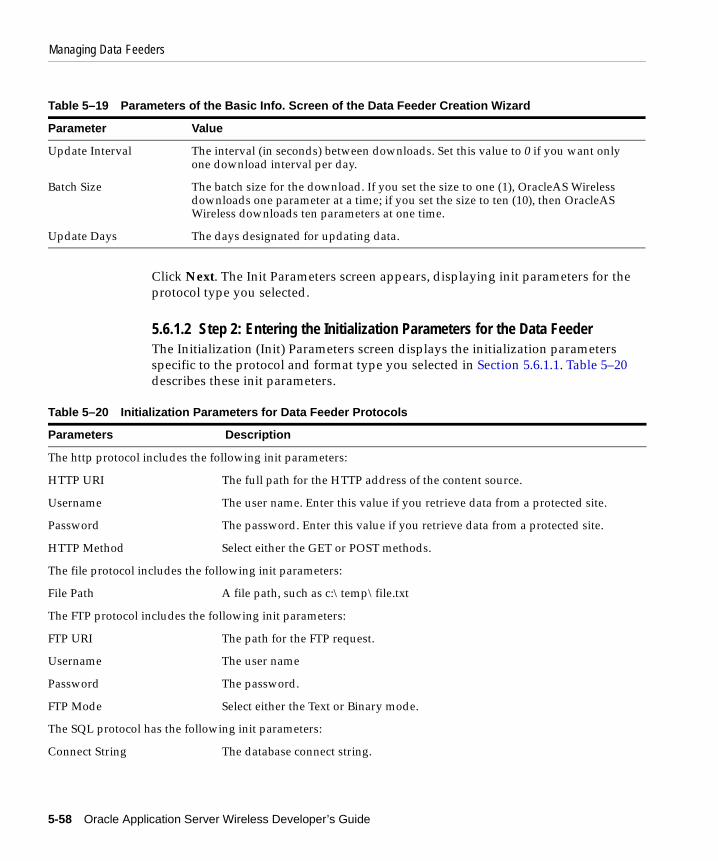
Managing Data Feeders
5-58 Oracle Application Server Wireless Developer’s Guide
Click Next. The Init Parameters screen appears, displaying init parameters for the protocol type you selected.
5.6.1.2 Step 2: Entering the Initialization Parameters for the Data FeederThe Initialization (Init) Parameters screen displays the initialization parameters specific to the protocol and format type you selected in Section 5.6.1.1. Table 5–20 describes these init parameters.
Update Interval The interval (in seconds) between downloads. Set this value to 0 if you want only one download interval per day.
Batch Size The batch size for the download. If you set the size to one (1), OracleAS Wireless downloads one parameter at a time; if you set the size to ten (10), then OracleAS Wireless downloads ten parameters at one time.
Update Days The days designated for updating data.
Table 5–20 Initialization Parameters for Data Feeder Protocols
Parameters Description
The http protocol includes the following init parameters:
HTTP URI The full path for the HTTP address of the content source.
Username The user name. Enter this value if you retrieve data from a protected site.
Password The password. Enter this value if you retrieve data from a protected site.
HTTP Method Select either the GET or POST methods.
The file protocol includes the following init parameters:
File Path A file path, such as c:\temp\file.txt
The FTP protocol includes the following init parameters:
FTP URI The path for the FTP request.
Username The user name
Password The password.
FTP Mode Select either the Text or Binary mode.
The SQL protocol has the following init parameters:
Connect String The database connect string.
Table 5–19 Parameters of the Basic Info. Screen of the Data Feeder Creation Wizard
Parameter Value

Managing Data Feeders
Developing Services 5-59
5.6.1.3 Entering the Init Parameters for the HTTP ProtocolTo enter the init parameters for a data feeder using the HTTP protocol and the XML format type:
1. Enter the HTTP URI of the content source.
2. Enter a user name.
3. Enter a password.
4. Select either the GET or POST HTTP methods.
5. If the feed ingests XML, then you must import an XSL stylesheet that converts the XML to standard feed XML format.
6. Click Next. The Input Parameters screen appears.
To enter init parameters for a data feeder using the HTTP Protocol and the delimited format:
1. Enter the HTTP URI of the content source.
2. Enter a user name.
3. Enter a password.
4. Enter the delimiter for the format type. For example, enter a comma (,).
5. Enter a quote character for the format type you selected. For example, enter quotation marks (").
6. Click Next. The Input Parameters screen appears.
To enter the init parameters for a data feeder using the HTTP protocol and the fixed column format:
1. Enter the HTTP URI of the content source.
2. Enter a user name.
3. Enter a password.
Query The SQL query.
The File protocol has the following init parameters:
File Path The file path of a content source.
Table 5–20 Initialization Parameters for Data Feeder Protocols
Parameters Description
Managing Data Feeders
5-60 Oracle Application Server Wireless Developer’s Guide
4. Select either the GET or POST HTTP methods.
5. Click Next. The Input Parameters screen appears.
5.6.1.4 Entering the Init Parameters for the File ProtocolTo enter the init parameters for a data feeder using the file protocol and the XML format:
1. Enter the file path. For example, enter c:\temp\file.txt.
2. If the feed ingests XML, then you must import an XSL stylesheet that converts the XML to standard XML.
3. Click Next. The Input Parameters screen appears.
To enter the init parameters for a data feeder using the file protocol with the delimited format:
1. Enter the file path.
2. Enter the delimiter for the format type. For example, enter a comma (,).
3. Enter a quote character for the format type you selected. For example, enter quotation marks (").
4. Click Next. The Input Parameters screen appears.
To enter the init parameters for a data feeder using the file protocol and the fixed column format:
1. Enter the file path.
2. Click Next. The Input Parameters screen appears.
5.6.1.5 Entering the Init Parameters for the FTP ProtocolTo enter the init parameters for a data feeder using the FTP protocol and the XML format:
1. Enter the FTP URI.
2. Enter the user name.
3. Enter the password.
4. Select either the Text or Binary FTP mode.
5. If the feed ingests XML, then you must import an XSL stylesheet that converts the XML to standard XML.

Managing Data Feeders
Developing Services 5-61
6. Click Next. The Input Parameters screen appears.
To enter the init parameters for a data feeder using the FTP protocol and the delimited format:
1. Enter the FTP URI.
2. Enter the user name.
3. Enter the password.
4. Select either the Text or Binary mode.
5. Enter the delimiter for the format type. For example, enter a comma (,).
6. Enter a quote character for the format type you selected. For example, enter quotation marks (").
7. Click Next. The Input Parameters screen appears.
To enter init parameters for a data feeder using the FTP protocol and the fixed column format:
1. Enter the FTP URI.
2. Enter the user name.
3. Enter the password.
4. Select either the Text or Binary FTP mode.
5. Click Next. The Input Parameters screen appears.
5.6.1.6 Entering the Init Parameters for the SQL ProtocolTo enter the init parameters for a data feeder using the SQL protocol and the XML format:
1. Enter the connect string.
2. Enter a SQL query.
3. If the feed ingests XML, then you must import an XSL stylesheet that converts the XML to standard XML.
4. Click Next. The Input Parameters screen appears.
To enter the init parameters for a data feeder using the SQL protocol and the delimited format:
1. Enter the connect string.

Managing Data Feeders
5-62 Oracle Application Server Wireless Developer’s Guide
2. Enter a query.
3. Enter the delimiter for the format type. For example, enter a comma (,).
4. Enter a quote character for the format type you selected. For example, enter quotation marks (").
5. Click Next. The Input Parameters screen appears.
To enter the init parameters for a data feeder using the SQL protocol and the fixed column format:
1. Enter the connect string.
2. Enter a query.
3. Click Next. The Input Parameters screen appears.
5.6.1.7 Entering the Init Parameters for the Application ProtocolTo enter the init parameters for a data feeder using the application protocol and the XML format:
1. Enter the command line.
2. If the feed ingests XML, then you must import an XSL stylesheet that converts the XML to standard XML.
3. Click Next. The Input Parameters screen appears.
To enter the init parameters for a data feeder using the application protocol and the delimited format:
1. Enter the command line.
2. Enter the delimiter for the format type. For example, enter a comma (,).
3. Enter a quote character for the format type you selected. For example, enter quotation marks (").
4. Click Next. The Input Parameters screen appears.
To enter init parameters for a data feeder using the application protocol with the fixed column format:
1. Enter the command line.
2. Click Next. The Input Parameters screen appears.

Managing Data Feeders
Developing Services 5-63
5.6.1.8 Step 3: Entering the Input Parameters for the Data FeederThe Input Parameters enables you to enter the input parameters for the data feeder. The input parameters screen displays the input parameters specific to the format type you selected in Section 5.6.1.1. Table 5–21 describes the input parameters of the data feeder.
To enter the input parameters:
1. Click Add Another Row. A row appears.
2. Complete the row as follows:
a. Enter the internal name.
b. Enter the data type.
Table 5–21 Data Feeder Input Parameters
Input Parameter Description
Internal Name The name used for this parameter internally for the column the caching table and also for setting conditions in the alert framework.
Data Type A drop down list that includes the following:
■ Number: For numeric input.
■ TEXT_30: Text with a maximum of 30 characters.
■ TEXT_80: Text with a maximum of 80 characters.
■ TEXT_150: Text with a maximum of 150 characters.
■ TEXT_800: Text with a maximum of 800 characters.
■ TEXT_1200: Text with a maximum of 1200 characters.
External Name A mapping to the external provider.
Column Number The column number for a delimited value. This input parameter is specific to the delimited format.
Starting Position The starting column for a value. This input parameter is specific to the fixed-column parameter.
Ending Position The ending column for a value. This input parameter is specific to the fixed-column parameter.
Caption A caption seen by end-users when they subscribe to alerts. For example, Stock Symbol.
Default Value The default value for the parameter.

Managing Data Feeders
5-64 Oracle Application Server Wireless Developer’s Guide
c. Enter the external name.
d. Enter the column number. This parameter is specific to the delimited format.
e. Enter the starting position. This parameter is specific to the fixed-column format.
f. Enter the ending position. This parameter is specific to the fixed-column format.
g. Enter a caption.
h. Enter a default value.
3. Click Next. The Output Parameters screen appears.
5.6.1.9 Step 4: Entering the Output Parameters for the Data FeederThe Output Parameters screen enables you to enter the output parameters for the data feeder. The output parameters screen displays parameters specific to the format type you selected in Section 5.6.1.1. The output parameters (described in Table 5–22) are the retrieved data from the content provider; you set alerts on the output parameters of a data feeder.
Table 5–22 Data Feeder Output Parameters
Output Parameter Description
Internal Name The name used for this parameter internally for the column in the caching table and also for setting conditions in the alert framework.
Data Type A drop down list that includes the following:
■ Number: For numeric input.
■ TEXT_30: Text with a maximum of 30 characters.
■ TEXT_80: Text with a maximum of 80 characters.
■ TEXT_150: Text with a maximum of 150 characters.
■ TEXT_800: Text with a maximum of 800 characters.
■ TEXT_1200: Text with a maximum of 1200 characters.
External Name A mapping to the external provider.
Column Number The column number for a delimited value. This output parameter is specific to the delimited format.

Managing Data Feeders
Developing Services 5-65
To enter the input parameters:
1. Click Add Another Row. A row appears.
2. Complete the row as follows:
a. Enter the internal name.
b. Select the data type.
c. Enter the external name.
d. Enter the column number. This parameter is specific to the delimited format.
e. Enter the starting position. This parameter is specific to the fixed-column format.
f. Enter the ending position. This parameter is specific to the fixed-column format.
g. Enter a caption.
3. Click Finish to complete the data feeder. The Browse Data Feeder screen reappears, displaying the new data feeder.
5.6.2 Editing a Data FeederThe Edit button in the Browse Data Feeder screen enables you to edit the basic configuration, init parameters, input parameters, and output parameters of a data feeder.
5.6.2.1 Editing the Basic Configuration of a Data FeederTo edit the basic configuration of a data feeder:
Starting Position The starting column for a value. This output parameter is specific to the fixed-column parameter.
Ending Position The ending column for a value. This output parameter is specific to the fixed-column parameter.
Caption The label that OracleAS Wireless uses for the parameter. End users see this label when they subscribe to an alert service.
Table 5–22 Data Feeder Output Parameters
Output Parameter Description

Managing Data Feeders
5-66 Oracle Application Server Wireless Developer’s Guide
1. From the Browse Data Feeders screen, select the data feeder that you wish to edit.
2. Click Edit.
3. The screen for editing the basic configuration of the data feeder appears, with its fields populated by the values set for the selected data feeder.
4. Edit the values as needed. See Section 5.6.1.1, "Step 1: Entering the Basic Information for the Data Feeder".for more information on the basic configuration parameters of a data feeder.
5. Click OK to save your changes. Clicking Cancel resets the basic configuration values back to their original state and returns you to the Browse Data Feeders screen.
5.6.2.2 Editing the Init Parameters of a Data FeederTo edit the init parameters of a data feeder:
1. From the menu, select Init Parameters. The screen for editing init parameters appears, populated with the init parameters set for the selected data feeder.
2. Edit the init parameters as needed. See Section 5.6.1.2, "Step 2: Entering the Initialization Parameters for the Data Feeder" for more information on the init parameters of a data feeder.
3. Click OK to save your changes. Clicking Cancel resets the values for the init parameters back to their original state and returns you to the Browse Data Feeders screen
5.6.2.3 Editing the Input Parameters of a Data FeederTo edit the output parameters of a data feeder:
1. From the menu, select Input Parameters. The screen for editing the input parameters appears, populated with the values set for the selected data feeder.
2. Edit the values as needed. See Section 5.6.1.8, "Step 3: Entering the Input Parameters for the Data Feeder" for more information on the input parameters of a data feeder.
3. Click OK to save your changes. Clicking Cancel sets the input parameters to their original state and returns you to the Browse Data Feeders screen.
5.6.2.4 Editing the Output Parameters of a Data FeederTo edit the output parameters of a data feeder:

Managing Preset Definitions
Developing Services 5-67
1. From the menu, select Output parameters. The screen for editing the output parameters appears, populated with the values set for the selected data feeder.
2. Edit the values as needed. See Section 5.6.1.9, "Step 4: Entering the Output Parameters for the Data Feeder" for more information on the output parameters of a data feeder.
3. Click OK to save your changes. Clicking Cancel sets the output parameters back to their original state and returns you to the Browse Data Feeder screen.
5.7 Managing Preset DefinitionsPreset definitions enable users to personalize applications by entering their own input parameters. When a user requests an application, the application loads the user-defined input parameters, (or presets). Typically, the application may list these presets for the user, who must select an item to execute the application.
.
Figure 5–33 The Browse Preset Definitions Screen
When selected, the Preset Definitions tab defaults to the Browse Preset Definitions Screen, which displays a list of the current preset definitions (Figure 5–33). From this screen, you can create, edit, and delete a preset definition. The Browse Preset Definitions screen includes the following parameters.
Note: Preset definitions are accessible to all users in a user group.

Managing Preset Definitions
5-68 Oracle Application Server Wireless Developer’s Guide
5.7.1 Creating a Preset DefinitionThe Service Manager enables you to create a preset definition, a template which enables users to add values to each pre-defined preset definition. When users invoke an application, they select a value from any of the preset definitions as an input parameter.
To create a new preset definition, click the Create Preset Definition button in the browsing screen. The Create Preset Definition screen appears (Figure 5–34). In this screen, you enter a unique name for the preset definition. In addition, you select Is System Object if this preset definition is not intended for users of the Wireless Customization Portal. Typically, preset definitions display in the Customization Portal to enable users to create their own preset values. You can complete the preset definition at this point by clicking Finish, or you can add preset attributes, as described in Section 5.7.1.1.
5.7.1.1 Adding Preset AttributesPreset attributes enable you to define the relation of input parameters that an end user can enter and save on the OracleAS Wireless server. You click the ADD button in the Create Preset Screen to add an attribute to the table. In the blank row that appears, you define the following parameters, described in Table 5–24.
Table 5–23 Parameters of the Browse Preset Definitions Screen
Parameter Description
Preset Definition Name The name of the Preset Definition.
Object ID The Object ID stored in the database.
Table 5–24 Preset Description Parameters
Parameters Value
Attribute Name A name for the preset attribute.
Description An optional description of the preset attribute.

Managing Preset Definitions
Developing Services 5-69
Click Finish after you have added the preset. Clicking Cancel clears all values and returns you to the Browse Preset Definitions screen.
You can add several rows of preset attributes to define relationships, such as Name, Street Address, Phone Number.
Value Format For text, enter anything that meets the regular expression org.apache.regexp.RE. For example, enter [:digit:] for numeric values.
For numbers, enter anything that meets the formats for Java.text.DecimalFormat. For example, enter #,##0.0 for currency.
Column Type A drop down list that includes the following:
■ Number: For numeric input.
■ TEXT_30: Text with a maximum of 30 characters.
■ TEXT_80: Text with a maximum of 80 characters.
■ TEXT_150: Text with a maximum of 150 characters.
■ TEXT_250: Text with a maximum of 250 characters.
■ TEXT_500: Text with a maximum of 500 characters.
■ TEXT_800: Text with a maximum of 800 characters.
■ TEXT_1200: Text with a maximum of 1200 characters.
Input Field Type Select from among the following preset types:
■ Single Line—Select for a single line entry, such as name.
■ Multiline—Select for a multiple line entry, such as a street address.
■ Enum—Select to assign conditions for an entry, such as show and hide. See Section 5.7.2.1, "Adding, Editing, and Deleting Preset Attribute Enumeration Options". for information on enumeration options.
Table 5–24 Preset Description Parameters
Parameters Value

Managing Preset Definitions
5-70 Oracle Application Server Wireless Developer’s Guide
Figure 5–34 The Create Preset Definition Screen
5.7.2 Editing a Preset DefinitionTo edit a preset definition, select a the preset definition from the browsing screen and then click Edit. The Edit Preset Definition screen appears. Edit the preset definition as needed. See Section 5.7.1.1, "Adding Preset Attributes" for information on Preset Descriptors. Click OK to commit your changes. The Browse Preset Definitions screen reappears.
5.7.2.1 Adding, Editing, and Deleting Preset Attribute Enumeration OptionsYou can edit, add, or delete a preset attribute enumeration option by using the Edit Preset Descriptor Enumeration Options screen.
To edit a preset descriptor enumeration option:
1. In the Preset Descriptors section of either the Create Preset Definitions screen or the Edit Preset Definitions screen, select Enum.
2. Click Edit. The Edit Preset Descriptor Enumeration Options screen appears.
3. In the Description Enumeration Options screen, perform the following operations as needed:
■ From the drop-down list, select the option you wish to edit or delete.
■ Click Add to add a new enumeration option.

Managing J2ME Web Services
Developing Services 5-71
4. Click Done. The Create Preset Definition screen or the Edit Preset Definition screen reappears.
5.8 Managing J2ME Web ServicesA J2ME Web Service is a service hosted by the J2ME proxy server, one that is invoked from a J2ME MIDlet running on a J2ME device.
Figure 5–35 The Browsing Screen for J2ME Web Services
5.8.1 Registering a J2ME Web ServiceYou can register a J2ME web service by either specifying the WSDL (Web Service Definition Language) URL, the URL to the JAR file, or the local JAR file. After you register the J2ME Web Service, you download the J2ME stub class and use it with your J2ME MIDlet. From the J2ME Web Services browsing screen of the Service Manager (Figure 5–35), you can view the details of the Web service methods.
Registering the J2ME Web Service by WSDLYou can register a J2ME Web service based on a normal Web service. To do this, you first click Register in the browsing screen. The Register a J2ME Web Service screen appears (Figure 5–36) in which you select the By WSDL option and enter the URL for the normal Web service's WSDL.

Managing J2ME Web Services
5-72 Oracle Application Server Wireless Developer’s Guide
Registering the J2ME Web Service by JAR File URLYou can also base a J2ME Web service on a normal Java class, which is packaged in a JAR file. This Java class can be situated on a Web site for downloading or located on the OracleAS Wireless Web server. To register a J2ME Web service, select the By Jar File URL option (depicted in Figure 5–36) and then enter either the URL of the Web site where the JAR can be downloaded, the Web site URL, or URL to the JAR file on the OracleAS Wireless Web server. You must also identify the class name of the Java class which is packaged in the JAR file.
Registering the J2ME Web Service by a Local JAR FileThe By Local JAR File option enables you to register a J2ME Web Service using a JAR file located on your client machine, which you then upload to the OracleAS Wireless server. To do this, select the By Local JAR File option and then click the Import button. From the Import window, use the Browse function to find and then select the JAR file. Click Import to upload the local JAR file.When using this option, you must also specify the class name of the Java class which is packaged in the local JAR file.
Specifying the Namespace for the J2ME Web ServiceThe J2ME proxy server stores J2ME web services by namespace to avoid naming conflicts. So when you register a J2ME Web service, you can either select an existing namespace or enter a new namespace. After you select the registration option and enter the namespace, click Finish to register the J2ME Web service.

Managing J2ME Web Services
Developing Services 5-73
Figure 5–36 Registering a J2ME Web Service
5.8.2 Generating Stub ClassesYou must include the J2ME stub class in your MIDlet so that you can use the J2ME Web service within that MIDlet.
To include the stub class, you select a J2ME Web service from the browsing page then click Generate Stub. In the Generate Stub Class screen (Figure 5–37), you enter the stub class name. OracleAS Wireless bases the generated the stub class on this name. After you download the stub class, you compile it with your MIDlet.

Managing J2ME Web Services
5-74 Oracle Application Server Wireless Developer’s Guide
Figure 5–37 Generating Stub Classes
5.8.2.1 Viewing the Class Method DetailsYou can view the Web service method details of a Web service after you register the J2ME Web Service with the J2ME proxy server. To view the method details, select a J2ME web service from the browsing page and then click the Method Details button. The J2ME Web Service Details screen appears (Figure 5–38), displaying method details by name, return type and parameter types.
Figure 5–38 Viewing the Method Details of the J2ME Web Service
Refer Section 12.2 in Chapter 12, "J2ME Development and Provisioning" for information on coding a J2ME Web service.

Mobile Studio 6-1
6Mobile Studio
Each section of this document presents a different topic. These sections include:
■ Section 6.1, "Overview"
■ Section 6.2, "Getting Started with Mobile Studio"
■ Section 6.3, "Customizing Mobile Studio"
6.1 OverviewThis chapter introduces OracleAS Wireless Mobile Studio. Mobile Studio is a completely online, hosted environment for developing, testing and deploying mobile applications for the OracleAS Wireless platform. It also serves as a Web portal, supporting the wireless developer community in the enterprise and on the Internet.
Mobile Studio offers developers a simple, intuitive and easy-to-use Web-based user interface to facilitate rapid configuration, testing and deployment of wireless applications. Developers do not need to download or install anything on their workstations; all they need is a Web browser and access to Mobile Studio. Once an application is registered with Mobile Studio, developers can test it using any mobile device or simulator (including voice). They can instantly access real-time logs to troubleshoot any issues. Once the application is tested, developers can deploy it to a production server with the click of a button.
Service providers can easily brand Mobile Studio (customizing its look-and-feel and content), and integrate it with their existing website. Mobile Studio can serve as an interactive development tool, a one-stop shop for up-to-date information and collateral on the OracleAS Wireless server platform, and service deployment portal for third-party content providers. This makes it easy for service providers to support their developer community and attract new developers.

Getting Started with Mobile Studio
6-2 Oracle Application Server Wireless Developer’s Guide
6.1.1 Mobile Studio Key FeaturesMobile Studio includes the following major features:
■ A hosted environment that is completely online. There is nothing to download.
■ A simple, Web-based user interface targeted at application developers. The OracleAS Wireless Tools, on the other hand, are targeted at system administrators and advanced developers.
■ Instant access to developed applications from any mobile device or simulator (including voice).
■ Instant debug log access for interactive testing.
■ An optional feature enabling one-click deployment to production servers.
For application providers:
■ Mobile Studio serves as a developer portal, supporting the existing developer community as well as attracting new developers.
■ Mobile Studio supports multiple languages and character sets out of the box.
■ Mobile Studio is targeted at Web masters, not engineers; no coding is needed for simple application customization.
6.1.2 Mobile Studio on the Oracle Technology NetworkVisit Mobile Studio hosted on the Oracle Technology Network (http://www.otn.oracle.com/wireless) for an example of how Mobile Studio can be branded and integrated into an existing website. Any developer, systems integrator or independent software vendor with access to the Internet can use this instance to quickly build and test mobile applications that are immediately accessible from any device. This unique environment allows companies to benefit from faster time to market, increased productivity and a dramatically simplified testing cycles.
6.2 Getting Started with Mobile StudioAccess the Mobile Studio main page at the following URL:
http://<studio_server>:<studio_port>/studio

Getting Started with Mobile Studio
Mobile Studio 6-3
where <studio_server> and <studio_port> are the name of the host and port number running the Mobile Studio instance. These are configured in the Oracle Installer during the installation process.
6.2.1 Login and RegistrationMobile Studio is deployed configured for Single Sign-on (SSO). The user profile information (including user ID and password) is stored in an Oracle Internet Directory (OID) repository and is shared by all SSO-enabled applications.
All user accounts are created and managed in a central repository backed by the Oracle Internet Directory (OID) server. Once Mobile Studio has been configured for SSO; any user in the shared repository can log in with their single sign-on user ID and password and use Mobile Studio. New users must have their accounts created before they can enter Mobile Studio.
6.2.2 Building an Application Using Mobile StudioThe first step in building an application for the OracleAS Wireless platform is to develop an application using your own tools in your own environment. The mechanism used to generate the presentation layer of your application is transparent to Mobile Studio; all of the dynamic page generation technologies (such as CGI, JSP, and ASP) are supported. The only requirements are:
■ The pages that you generate must be written in a markup language recognized by OracleAS Wireless, such as XHTML.
■ The entry point to your application must be an HTTP URL accessible from the Mobile Studio server.
Below is a simple “Hello World” application written in XHTML:
Note: Mobile Studio has been optimized for the latest versions of the popular Netscape and Internet Explorer browsers. Mobile Studio is not certified for Netscape 4.x or Internet Explorer 4.x.

Getting Started with Mobile Studio
6-4 Oracle Application Server Wireless Developer’s Guide
Figure 6–1 Simple Hello World Example
1. Upload these two files to a Web server accessible from Mobile Studio.
2. Log in to Mobile Studio.
3. On the My Studio page, click New Application.
4. Enter a short name (such as Hello) for your application, its URL, an optional description, and comments for your own reference.
5. Click Create to register your new application with Mobile Studio.
6.2.3 Testing an ApplicationOnce you have registered your application with Mobile Studio, you can test it using either an actual mobile device or device emulation software. Not only can Mobile Studio applications be accessed from any mobile device, but they can be accessed through multiple channels such as HTTP, Voice, and Messaging. Contact your Mobile Studio administrator for a list of valid access points (for example: URL for HTTP access, or a phone number for Voice access).
If you encounter errors (or if you are just curious), you can click the Log icon next to your application to see the real-time debug logs.

Customizing Mobile Studio
Mobile Studio 6-5
Figure 6–2 Samples Window
When you click the Log icon, log information appears in a new window.
Figure 6–3 View Log Messages Window
6.2.4 Deploying an ApplicationAfter testing your application, you can deploy it on a production instance of OracleAS Wireless. In the My Studio home page, select the application you want to deploy and click Deploy. If the Deploy button is not available, contact your Mobile Studio administrator for details.
6.3 Customizing Mobile StudioMobile Studio can be customized in a variety of ways, allowing powerful integration with existing customer Web sites.
See Also: For more information on logs, see Mobile Studio online Help.
See Also: For more information, see Mobile Studio online Help.

Customizing Mobile Studio
6-6 Oracle Application Server Wireless Developer’s Guide
6.3.1 Creating Sample ServicesMobile Studio ships with four sample services. Registered users of Mobile Studio may access these services and view their source code. These services were created to demonstrate how to develop mobile applications using various OracleAS Wireless features. To delete or edit existing sample services, see OracleAS Wireless Administrator’s Guide. This following section details how to create a new sample service.
To create a sample service, you must first develop the application using XHTML or OracleAS Wireless XML. Be sure to host the sample service at a location that is accessible by Mobile Studio. You must also host a document that contains the source code of your application. The contents of this file are retrieved and embedded inside the body tag of an HTML document when users’ choose to view the source code (that is, you may use HTML syntax to format this document).
6.3.2 BrandingIn Mobile Studio, branding refers to the particular look and feel of a site. For example, the images (logos, borders, icons) used, and the textual content (font size, colors) of a page constitute the look and feel of a site. This section details how to perform such look-and-feel customizations by creating new brandings. If you require more advanced customizations (such as modifying the layout and flow of pages) see Section 6.3.4, "JSP Pages" and Appendix G, "JSP Tag Library".
Creating a new branding does not require coding in Java; brandings are defined using a declarative approach. Only knowledge of HTML is required to create a new branding.
To create a new branding:
1. Navigate to the root directory of your installation of OracleAS Wireless and locate the directory where the J2EE applications are deployed (for example, $IASW_ROOT/wireless/j2ee/applications). The branding definitions are stored in the sub-directory studio/studio-web/sites (referred to hereinafter as the branding directory). In a fresh installation, the branding directory contains a folder called default, which stores the default branding shipped with Mobile Studio.
Note: You must use the Mobile Studio Administrator’s Tool to register the sample service you have created before it will be displayed in Mobile Studio. See OracleAS Wireless Administrator’s Guide for instructions.

Customizing Mobile Studio
Mobile Studio 6-7
2. Create a new branding by creating a new folder in the branding directory.
Each branding must contain a file called site.properties. This file contains declarations for the textual and image resources used. For example, common.css.filename is a key inside this file that controls which the cascading style sheet (CSS) file used by Mobile Studio. The branding which ships with Mobile Studio includes property files for each supported locale. For example, the properties file site_fr.properties is used for the French (fr) locale.
The valid keys that may be declared in the site.properties file is controlled by the master file SiteResources.properties. If you require additional keys (usually for more advanced customizations), you can locate this file at $IASW_ROOT/wireless/server/classes/messages/oracle/panama/studio. You must restart the OracleAS Wireless Server for changes in this file to take effect.
6.3.3 Supporting Multiple LocalesThe default branding included with Mobile Studio has bundled support for 28 locales. However, only the English locale (en) is enabled upon a fresh installation. To enable support for other locales, see OracleAS Wireless Administrator’s Guide for detailed instructions.
If you want to support locales in a branding that you have created or want to support additional locales in the default branding, you must create resource files
Note: The name of the folder is the name of your branding.
Hint: An easy way to create new brandings is to copy the default branding included with Mobile Studio, and edit the files as necessary. You may also perform look-and-feel customizations by directly modifying the default branding included with Mobile Studio.
Note: You must use the Mobile Studio Administrator’s Tool to declare the branding that Mobile Studio should display (by default, Mobile Studio will display the branding included with Mobile Studio). See OracleAS Wireless Administrator’s Guide for more information.

Customizing Mobile Studio
6-8 Oracle Application Server Wireless Developer’s Guide
containing the relevant translations (see Section 6.3.2, "Branding" for information about branding directories).
For example, to create the locale for Hindi (hi):
1. Create a resource bundle file in your branding directory. Navigate to the Mobile Studio brandings directory that you are using. The easiest approach is to copy an existing resource bundle for a supported locale, translate the appropriate keys, and save it as a new file called site_hi.properties.
2. Create a resource bundle file for server-side error messages. Navigate to the directory $IASW_ROOT/wireless/server/classes/messages/oracle/panama/studio. The easiest approach is to copy an existing resource bundle for a supported locale, translate the appropriate keys, and save it as a new file called messages_hi.properties.
3. Create translated client-side error messages. Navigate to the directory $IASW_ROOT/wireless/j2ee/applications/studio/studio-web/Javascript. The easiest approach is to copy an existing file in this folder, translate the appropriate keys and save it as a new file called ommsg_hi.js.
Mobile Studio determines which locale to display by examining the list of preferred locales originating from a request. The algorithm is similar to how Java loads Resource Bundles. English (en) is the default locale in a fresh installation.
6.3.4 JSP PagesThis section lists the customization details of the major JSPs used in Mobile Studio:
■ JSP page: login.jsp
■ JSP page: registraton.jsp
■ JSP Page: loginPortlet.jsp
■ JSP page: pageHeader.jsp
■ JSP page: pageFooter.jsp
■ JSP page: pageMenu.jsp
■ JSP page: pagePortlets.jsp
Note: You must use the Mobile Studio Administrator’s Tool to enable the locales that you want supported. See OracleAS Wireless Administrator’s Guide for instructions.

Customizing Mobile Studio
Mobile Studio 6-9
■ JSP page: profile.jsp
■ JSP page: home.jsp
■ Java Beans
■ JSP page: testAppInfoBox.jsp
6.3.4.1 JSP page: login.jspUsers trying to access other pages without logging in are redirected to this page, with an appropriate error message.
A User performs the following actions from this page:
■ Log in to Mobile Studio.
■ Register as a new user.
■ Browse through the information pages using the menu.
Note: In integrated mode, users log in (or self-register) with their OID username and password on a separate page. login.jsp is used only when Mobile Studio is running in standalone mode.

Customizing Mobile Studio
6-10 Oracle Application Server Wireless Developer’s Guide
Figure 6–4 Mobile Studio Log In Page (partial view)
6.3.4.2 JSP page: registraton.jspUser can register to Mobile Studio by filling in the registration form.
Table 6–1 Mobile Studio Log In Page Resources
Name Description Example
login.text.info Informational text. The OracleAS Wireless Studio is an online environment for quickly building testing and deploying wireless applications.
login.text.title The page title. Welcome To The OracleAS Wireless Studio
login.image.frontpage A 340 x 340 splash image on the login page
/images/frontpage.gif
common.label.register A label for the Register button. Register
Note: In integrated mode, users log in (or self-register) with their OID username and password on a separate page. login.jsp is used only when Mobile Studio is running in standalone mode.

Customizing Mobile Studio
Mobile Studio 6-11
Figure 6–5 Registration Page (partial view)
Table 6–2 Registration Page Resources
Name Description Example
common.href.register The URL for registration page. Registration.jsp
common.label.register The label for Register button. Register
register.text.title The body title text for the page. New User Registration
register.text.info The informational message for registration.
By registering, you indicate that you agree to our Terms of Use and Privacy policy. Fields marked with an asterisk (*) are required.
common.label.userid The label for user id field. User ID
register.hint.userid The hint for user id field. Choose an alphanumeric userid.
common.label.password The label for password field. Password

Customizing Mobile Studio
6-12 Oracle Application Server Wireless Developer’s Guide
register.hint.password The hint for password field. Choose an alphanumeric password.
common.label.password2 The label for password field, entered again.
Password (again)
register.hint.password2 The hint for password again field. Re-enter your password for verification.
register.label.accountnumber The label for account number field Voice account number
register.hint.accountnumber The hint for account number Choose an account number required for voice login.
register.label.voicepin The label for voice PIN. Voice PIN
register.hint.voicepin The hint for voice PIN. Choose a numeric PIN, required for voice login.
register.label.voicepinagain The label for voice PIN again. PIN (again)
register.hint.voicepin2 The hint for voice again PIN. Re-enter your PIN for verification.
common.label.name The label for name field. Name
register.hint.name The hint for name field. Enter your first and last name, for example: John Smith.
common.label.email The label for Email field. Email Address
register.hint.email The hint for email. Enter your email address, e.g. [email protected]
common.label.phone The label for phone field. Phone Number
register.hint.phone The hint for phone field. Enter your phone number, including country and area code. For example: 16505555000
common.label.workaddr The label for work address. Work Address
common.label.company The label for company. Company Name
common.label.addr The label for address line 1. Address Line 1
common.label.addr2 The label for address line 2. Address Line 2
common.label.city The label for city. City
common.label.state The label for state State
common.label.zip The label for the ZIP code. Zip
common.label.country The label for the country. Country
register.label.setdefault The label for set as default. Set as Default
Table 6–2 Registration Page Resources
Name Description Example

Customizing Mobile Studio
Mobile Studio 6-13
6.3.4.3 JSP Page: loginPortlet.jspThis page is included to provide a form for the user to login.
6.3.4.4 JSP page: pageHeader.jspThis page is included as a header for all the customer-facing JSPs.
register.hint.workaddr The hint for work address. Enter your work address.
common.label.homeaddr The label for home address. Home Address
register.hint.homeaddr The hint for home address. Enter your home address.
common.label.register The label for register button. Register
common.label.cancel The label for cancel button. Cancel
Note: In integrated mode, users log in (or self-register) with their OID username and password on a separate page. login.jsp is used only when Mobile Studio is running in standalone mode.
Table 6–3 Log In Portlet Resources
Name Description Example
common.label.login The label for the login button. Log In
common.label.password The label for the password text input field. Password
common.label.userid The label for user ID text input field. User ID
forgot.password.label The label for the forgot password? field. Forgot password?
Table 6–4 Page Header Resources
Name Description Example
page.title The window title. Home
site.name The site (branding) name.
common.css.filename The cascading style sheets (CSS) file.
sites/default/om.css
global.head Additional customizations to be included in HTML header.
sites/default/samplepagehead.html
Table 6–2 Registration Page Resources
Name Description Example
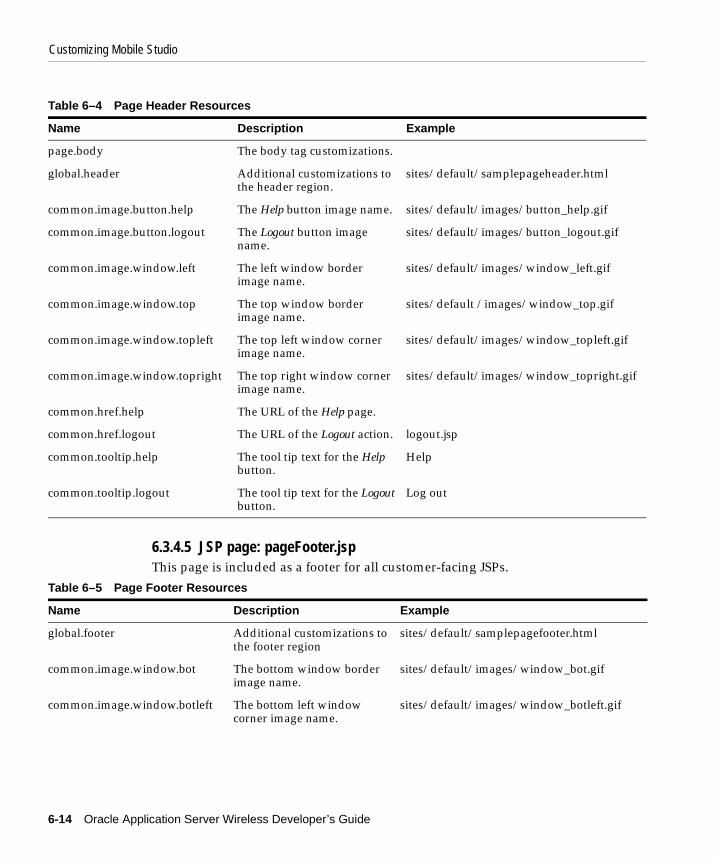
Customizing Mobile Studio
6-14 Oracle Application Server Wireless Developer’s Guide
6.3.4.5 JSP page: pageFooter.jspThis page is included as a footer for all customer-facing JSPs.
page.body The body tag customizations.
global.header Additional customizations to the header region.
sites/default/samplepageheader.html
common.image.button.help The Help button image name. sites/default/images/button_help.gif
common.image.button.logout The Logout button image name.
sites/default/images/button_logout.gif
common.image.window.left The left window border image name.
sites/default/images/window_left.gif
common.image.window.top The top window border image name.
sites/default /images/window_top.gif
common.image.window.topleft The top left window corner image name.
sites/default/images/window_topleft.gif
common.image.window.topright The top right window corner image name.
sites/default/images/window_topright.gif
common.href.help The URL of the Help page.
common.href.logout The URL of the Logout action. logout.jsp
common.tooltip.help The tool tip text for the Help button.
Help
common.tooltip.logout The tool tip text for the Logout button.
Log out
Table 6–5 Page Footer Resources
Name Description Example
global.footer Additional customizations to the footer region
sites/default/samplepagefooter.html
common.image.window.bot The bottom window border image name.
sites/default/images/window_bot.gif
common.image.window.botleft The bottom left window corner image name.
sites/default/images/window_botleft.gif
Table 6–4 Page Header Resources
Name Description Example

Customizing Mobile Studio
Mobile Studio 6-15
6.3.4.6 JSP page: pageMenu.jspThis page is included inside most pages to provide a common side bar for the user to browse.
6.3.4.7 JSP page: pagePortlets.jspThis page is included in most of the JSPs. The default branding displays the following page portlets:
■ Send Messaging
■ Discussion Forum
common.image.window.botright The bottom right window corner image name.
sites/default/images/window_botright.gif
common.image.window.left The left window border image name.
sites/default /images/window_left.gif
common.image.window.line The window separator line image name.
sites/default /images/window_line.gif
common.image.window.lineleft The window separator left joint image name.
sites/default /images/window_lineleft.gif
common.image.window.lineright The window separator right joint image name.
sites/default/images/window_lineright.gif
common.image.window.right The right window border image name.
sites/default /images/window_right.gif
Table 6–6 Page Menu Resources
Name Description Example
common.label.home The label for home button. My Studio
common.label.profile The label for profile button. My Profile
common.label.doc The label for documentation button. Documentation
common.label.logout The label for logout button. Log Out
page.menu Additional customizations to the menu region.
sites/default/samplepagemenu.html
Table 6–5 Page Footer Resources
Name Description Example

Customizing Mobile Studio
6-16 Oracle Application Server Wireless Developer’s Guide
Figure 6–6 Page Portlets
6.3.4.8 JSP page: profile.jspUsers can view and edit their profile in this page.
Table 6–7 Page Portlets Resources
Name Description Example
page.portlets HTML included for page portlets
Sites/default/samplepageportlets.html

Customizing Mobile Studio
Mobile Studio 6-17
Figure 6–7 Page Profile
Table 6–8 Page Profile Resources
Name Description Example
profile.body.title The body title text for the page. My Profile
common.labels.User.ID The label for user’s ID. User ID
register.label.accountnumber The label for the Account Number Account Number
common.labels.Name The label for the Name field Name
common.labels.email.address The label for the E-Mail field. Email
common.labels.Phone.Number The label for the Phone field. Phone
common.labels.Landmark The label for the Landmark field Landmark
common.labels.HOME The label for the Home field. HOME
common.labels.home.address The label for the Home Address field. Home Address
common.labels.city The label for the City field. City

Customizing Mobile Studio
6-18 Oracle Application Server Wireless Developer’s Guide
6.3.4.9 JSP page: home.jspThis is the main page for users; it is the first page that users see after logging in.
common.labels.stateZip The label for the State/Zip field. State/Zip
common.labels.country The label for the Country field. Country
common.labels.setDefault The label for the Set Default field. Set as Default
common.labels.WORK The label for the Work field. WORK
common.labels.Company The label for the Company field. Company
common.labels.work.address The label for the Work Address field. Work Address
common.labels.changePin The label for the Change Password field. Change Password
common.labels.NewPassword The label for the New Password field. New Password
common.labels.NewPasswordAgain The label for the New Password Again field. New Password (again)
profile.text.changepin The label for the Change PIN field. Change PIN
register.label.voicepin The label for the Voice PIN field. Voice PIN
register.label.voicepinagain The label for the Voice PIN Again field. PIN (again)
common.buttons.label.Save The label for the Save button. Save
common.buttons.label.Cancel The label for the Cancel button Cancel
Table 6–8 Page Profile Resources
Name Description Example

Customizing Mobile Studio
Mobile Studio 6-19
Figure 6–8 Home Page
Users can perform the following actions from this page:
■ Manage (create, edit, delete, rename, deploy, copy, move) applications.
■ Manage (create, rename, delete, copy, move) their device portal folders.
■ Manage (create, edit, delete, rename, copy, move) bookmarks.
■ Explore the folders and its contents.
■ Navigate to other portions of the site: sample applications, deployments and registered Web services.
Table 6–9 Home Page Resources
Name Description Example
home.text.greeting The welcome message for the user. Welcome
common.href.home The URL of the home page. home.jsp
home.image.currfold The image for the current folder (the image for the open folder).
sites/default/images/folderopen.gif

Customizing Mobile Studio
6-20 Oracle Application Server Wireless Developer’s Guide
home.tooltip.upfolder The informational message to the user for the upper level folder.
Up One Level
common.href.createfolder The URL for creating a new folder page. newFolder.jsp
home.tooltip.newfolder The message to the user for creating a new folder.
Create New Folder.
home.label.newfolder The label that appears on new Folder button.
New Folder
home.tooltip.newapp The informational message to the user for new application.
Create New Application.
home.label.newapp The label that appears on the New Application button.
New Application
home.label.appname The name of the application. Name
home.label.appdesc The description for the application. Description.
home.label.appstatus The status of the application. Status
home.image.application The icon for the application. sites/default /images/app.gif
home.label.view The label on View button. View
home.label.rename The label on Rename button. Rename
home.label.move The label on Move button. Move
home.label.copy The label on Copy button. Copy
home.label.delete The label on Delete button. Delete
home.label.deploy The label on Deploy button. Deploy
home.label.viewlog The label on View Log button. View Log
Table 6–9 Home Page Resources
Name Description Example

Customizing Mobile Studio
Mobile Studio 6-21
6.3.4.10 Java Beans
6.3.4.11 JSP page: testAppInfoBox.jspThis page is included where there are instructions for testing user applications. It is included in the home.jsp and samples.jsp pages.
Table 6–10 Java Beans
Name Type Description
foldersList Java.util.ArrayList This list of all the sub-folders for the user in the current folder.
servicesList Java.util.ArrayList This list of all of the services of the user for the given folder.
Table 6–11 Test App Info Box Resources
Name Description Example
home.text.test.boxtitle The title for the testing instructions box.
Test Your Applications
home.text.test.begin Instructions text
home.text.test.accessinfo Instructions text Connect using voice: 1-800-000-000
home.text.test.end Instructions text Click the View Log button for real time debug information

Customizing Mobile Studio
6-22 Oracle Application Server Wireless Developer’s Guide

Wireless Customization Portal 7-1
7Wireless Customization Portal
This chapter describes how users customize their portals from a browser using the Wireless Customization Portal. Each section of this document presents a different topic. These sections include:
■ Section 7.1, "Overview of OracleAS Wireless Customization"
■ Section 7.2, "Logging into Wireless Customization"
■ Section 7.3, "Managing User Profiles"
■ Section 7.4, "Customizing Applications"
■ Section 7.5, "Managing Devices"
■ Section 7.6, "Managing Location Marks"
■ Section 7.7, "Managing Contact Rules"
■ Section 7.8, "Viewing UTF-8 Pages in Localized Languages with Netscape 4.7 or Lower"
■ Section 7.9, "Rebranding the Customization Portal"
7.1 Overview of OracleAS Wireless CustomizationOracle Application Server Wireless Customization enables you to both customize the Wireless portal and access Wireless mobile services. You can also create such repository objects as folders, bookmarks, short names, devices, location marks, and contact rules, as well as view and create user views, subscribe to notification-enabled applications, and download J2ME media contents.

Logging into Wireless Customization
7-2 Oracle Application Server Wireless Developer’s Guide
7.2 Logging into Wireless CustomizationBefore using Wireless Customization, you must first log in as follows:
You Access the login page through the following URLs:
http://hostname:port/mobile/login.uix
or
http://hostname:port/mobile/
For example, enter the following:
http://hostname:7777/mobile/login.uix
or
http://hostname:7777/mobile/
After you enter the URL, the login page for OracleAS Wireless Customization appears. This page includes the Login and Help buttons, which are described in Table 7–1.
Enter your user name and then enter your password. If you are an administrator, enter orcladmin as your user name and then click Login.(The password is set during installation, but can be changed with the User Manager.)
You cannot log in if you enter an incorrect user name or password.
Note: 7777 is the default port number for OracleAS Wireless. The port number range is 7777 to 7877. To ensure that you are using the correct port number, check the port number for OracleAS Wireless stored in [Oracle home]/install/portlist.ini. For more information on port usage, see your Oracle installation documentation and the OracleAS Administrator’s Guide.
Table 7–1 Login Screen Buttons
Button Description
Login Clicking this button logs you in after you have entered the correct user name and password.
Help This button is disabled in this page

Logging into Wireless Customization
Wireless Customization Portal 7-3
After you successfully log in, the Welcome page appears, which includes the user’s account number as well as the addresses used to access the Oracle Application Server Wireless applications.
Table 7–2 describes the elements of Wireless Customization’s Welcome page.
After users log into Wireless Customization, they have access to the following buttons, desribed in Table 7–3.
7.2.1 Accessing Wireless Customization as a New UserIf you have not registered a primary phone and PIN, then OracleAS Wireless prompts you to the mobile device registration page, where you register a wireless and voice access account number by providing a primary phone number and a PIN. After you complete this registration, OracleAS Wireless prompts you through the
Table 7–2 Elements of the Welcome Page
Element Contents
Home A screen displaying the access information for voice, Web browser, and two-way messaging
User Profile A screen where users set up or edit their basic user information.
Applications Displays the application tree screen. You can manage folders, bookmarks, notification subscriptions and short names. You also can reorder applications within a folder, and download media application contents.
Devices Displays the Devicesscreen,which lists the devices currently associated with the user. From this page, you can create, delete, edit, or change the default status of the devices listed on this page.
Location Marks Displays the Location Mark screen, which lists the current locations belonging to a user. From this screen, you can create, delete, edit, or change the default status of a Location Mark. You also can set the location privacy by configuring the authorization in the location awareness policies.
Contact Rules Displays the Contact Rule screen, which lists the current contact rules. Using this page, you can create, delete, edit, or set the current contact rules.
Table 7–3 OracleAS Wireless Customization Buttons
Button Description
Logout Clicking this button logs out of Wireless Customization.
Help Clicking this button displays a list of help topics.

Managing User Profiles
7-4 Oracle Application Server Wireless Developer’s Guide
detail setup page, which has side navigation tabs called Home, User Profile, Applications, Devices, Location Marks, Devices, and Contact Rules.
7.2.2 Accessing Wireless Customization as a Registered UserIf you have already initialized your account and become a registered user, OracleAS Wireless prompts you to a detail setup page the next time you log into Wireless Customization. The detail page defaults to the Home Tab.
7.3 Managing User ProfilesOracleAS Wireless Customization enables you to edit a user profile.
To edit a profile, you first select the User Profile tab. The User Profile screen appears (Figure 7–1) and displays the configuration information for the selected user. Table 7–4 describes the elements in the User Profile screen.
Change the user configuration parameters as needed and then click Apply.
Table 7–4 Elements of the User Profile Screen
Parameter Description
Primary Phone Number This value entered for this parameter is also used as the voice access account number.
Display Name The display name of the user. Wireless uses the user name as the display name if the user does not enter a display name.
Click here to change your password
The link to the change password and PIN page.
Language A drop-down list of display languages. This is a required field. See Section 7.8 for information on viewing UTF-8 pages in localized languages with Netscape 4.7 (or lower).
Time Zone A drop-down of time zones for the user’s locale. Wireless generates and delivers notifications to the time zone selected by the user rather than by the time zone of the Wireless server itself. This is a required field.
Disclose Identity to External Application.
This check box enables the user identity to be disclosed to a third-party application.

Customizing Applications
Wireless Customization Portal 7-5
Figure 7–1 The User Profile Screen
7.4 Customizing ApplicationsThe Wireless Customization Portal includes the following application types: Folder, Bookmark, Async Application, J2ME Application, and Notification Application.
The default view of the Applications screen (Figure 7–2) displays the top-level folders. All of the applications displayed in this table those that you (and the groups to which you belong) can access. Table 7–5 describes the elements of the Applications Screen.

Customizing Applications
7-6 Oracle Application Server Wireless Developer’s Guide
By default, the top-level folders are collapsed. To view the contents of the folders, click Expand All. To collapse the folders to the top-level view, select Collapse All.
While an administrator can alter any application in Wireless Customization, users not granted the administrator role, such as end users, can only alter the applications that they own. (That is, the applications belonging to the user groups to which a user belongs.) The Content Manager, when publishing applications, assigns the applications to a user group. For more information on publishing applications to user groups using the Content Manager, see Oracle Application Server Wireless Administrator’s Guide.
By default, Wireless has the following user groups: Administrator, Guest, and Users. You use the ProvisioningHook to configure these user groups. A new user is automatically assigned to the Users group and has default privileges to all the applications that the Content Manager has assigned to the Users group. The Applications page does not reveal group membership to users, nor does it display other users belonging to the user’s group.
Table 7–5 Elements of the Applications Screen
Element Description
Focus Selecting this option enables you to display a selected folder as a root folder. If you have several folders at multiple levels, then this option isolates the view to a single folder.
Name The name of the folder.
Type The object type. In addition to folders, applications in Wireless Customization include bookmarks, Async applications, J2ME applications, and Notification-enabled services. The list of icons will be displayed to identify the different types of applications
Visible Select this check box to make the folder visible for a selected view profile.
Actions A list of action links. The actions are specific to the application type and include Reorder, Delete, Edit, Subscribe, Customize, and Download.

Customizing Applications
Wireless Customization Portal 7-7
Figure 7–2 The Applications Screen (Partial View)
7.4.1 Managing FoldersWireless Customization enables you to create, edit, and delete the subfolders that you own.
7.4.1.1 Creating a SubfolderYou can organize the folders in the Application page by creating subfolders.
Create a subfolder by first clicking the Create Folder button on the top of the Application Tree table. The Create Folder Screen appears (Figure 7–3).
Note: The phone simulator displays applications as they would appear on a real mobile device. The folders are rendered as working links so that you can navigate into the next page to the child nodes of that folder

Customizing Applications
7-8 Oracle Application Server Wireless Developer’s Guide
Figure 7–3 The Create Folder Screen
In this screen, enter the name for the subfolder (this is a required field) and then select the location for the folder from the drop-down list in the Parent Folder field. (The location is either the user’s home folder, or a subfolder of the user’s home folder.). Click Finish. The Application page reappears, displaying the folder in the appropriate location of the current folder. Clicking Cancel clears all the values you have entered and returns you to the Applications page.
7.4.1.2 Editing a FolderThe Edit Folder screen ( Figure 7–5 ) enables you to change the name of a folder.
To edit a folder, you first select a folder from the Application screen and then click Edit (which, as depicted in Figure 7–4, appears as a hyperlink adjacent to the folder, along with the actions Reorder and Delete).
Figure 7–4 Editing a Folder
The Edit page appears and displays the values set for the selected folder.
After you change the needed values (refer to Section 7.4.1.1 for more information on folder parameters) click Finish. The Application page reappears, displaying the folder in the appropriate location of the current. Clicking Cancel sets the values for a folder back to their previous state and returns you to the Applications page.

Customizing Applications
Wireless Customization Portal 7-9
Figure 7–5 The Edit Folder Screen
7.4.1.3 Reordering the Display Sequence for FolderTo reorder the display sequence of a folder, select the folder in the Application screen and then click the Reorder option (depicted in Figure 7–6). The Reorder screen appears.
Figure 7–6 The Reorder Screen

Customizing Applications
7-10 Oracle Application Server Wireless Developer’s Guide
The arrows enable you to reposition a folder, or move it to the top or bottom. Click Finish to apply the sequence settings and return to the Applications page. Clicking Cancel to returns the folder to its previous placement.
7.4.1.4 Deleting a FolderYou delete a folder by selecting it in the Applications page and then by clicking Delete. A confirmation page appears (Figure 7–7). Clicking Yes confirms the deletion; clicking No cancels the deletion.
Figure 7–7 The Confirmation Page
7.4.2 Managing BookmarksBookmarks are links to external URL that enable you to quickly visit a site.
Wireless Customization enables you to create, edit, and delete bookmarks.
7.4.2.1 Creating a BookmarkTo create a bookmark, you first click Add Bookmarks in the Applications screen. The Create Bookmark screen appears (Figure 7–8).
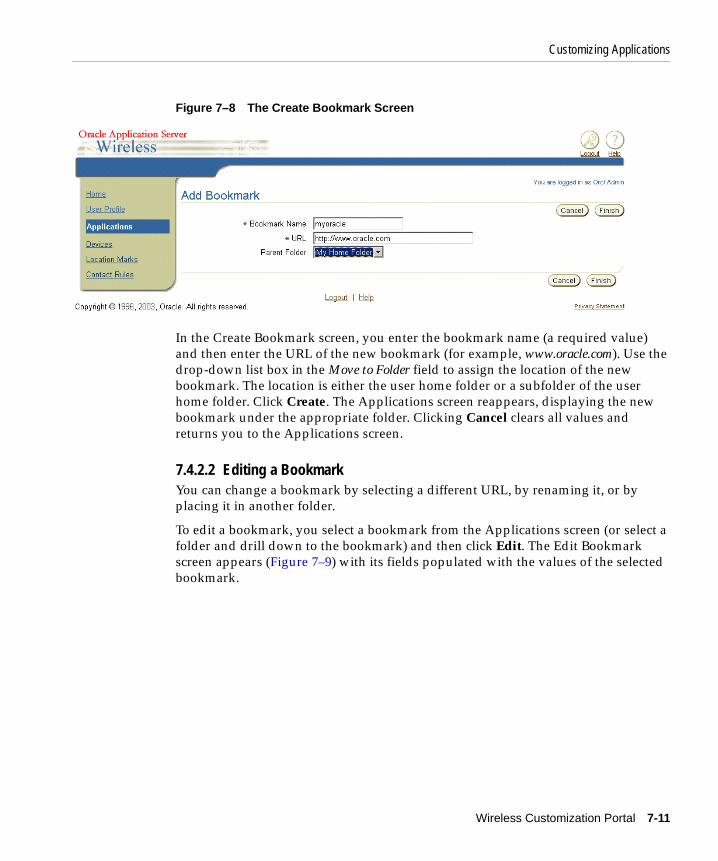
Customizing Applications
Wireless Customization Portal 7-11
Figure 7–8 The Create Bookmark Screen
In the Create Bookmark screen, you enter the bookmark name (a required value) and then enter the URL of the new bookmark (for example, www.oracle.com). Use the drop-down list box in the Move to Folder field to assign the location of the new bookmark. The location is either the user home folder or a subfolder of the user home folder. Click Create. The Applications screen reappears, displaying the new bookmark under the appropriate folder. Clicking Cancel clears all values and returns you to the Applications screen.
7.4.2.2 Editing a BookmarkYou can change a bookmark by selecting a different URL, by renaming it, or by placing it in another folder.
To edit a bookmark, you select a bookmark from the Applications screen (or select a folder and drill down to the bookmark) and then click Edit. The Edit Bookmark screen appears (Figure 7–9) with its fields populated with the values of the selected bookmark.

Customizing Applications
7-12 Oracle Application Server Wireless Developer’s Guide
Figure 7–9 The Edit Bookmark Screen
Modify the bookmark’s values as needed. For more information on the bookmark parameters, see Section 7.4.2.1, "Creating a Bookmark". Click Finish to commit your changes. Clicking Cancel sets the parameters back to their previous state.
7.4.2.3 Deleting a BookmarkTo delete a bookmark, select a bookmark from the Applications screen (or select a folder and drill down to the bookmark) and then click Delete. The delete confirmation page displays. Clicking Yes confirms the deletion; clicking No abandons the deletion.
7.4.3 Managing Short NamesA short name enables users to specify a command to access Async applications. One or more commands and system short names for applications can be grouped together and represented by a single short name. For example, you can assign a stock application with the system short name stk to the customized short name s. You can also assign a system short name and list of values to a short name. For example, you can assign the short name, s to the system short name stk followed by the value orcl (stk orcl). Further, you can create a short name that combines a list of system short names and their appropriate values, such as stk orcl; weather sj,sf.
Short names are used by two-way messaging devices such as SMS, Email, Instant Messaging or a two-way pager. You can send a message to a two-way messaging server access address (which usually is a Email address) by entering your customized short name in the message subject or in the message body. The server then replies to you with the messages responding to the requests issued by your short name command string.

Customizing Applications
Wireless Customization Portal 7-13
In Wireless Customization, you can create, edit, and delete short names by clicking the Manage Short Names button.
7.4.4 Creating Short NamesTo create a short name, you first click the Manage Short Names button in the Application page. The Short Names screen appears (Figure 7–10), listing a table of short names.
Figure 7–10 The Short Names Screen
Clicking Add invokes the Create Short Name screen (Figure 7–11). This screen includes a quick-reference table for all of the accessible Async applications.

Customizing Applications
7-14 Oracle Application Server Wireless Developer’s Guide
Figure 7–11 The Add Short Names Screen
Using this screen, you enter short name and then the command string. Click Finish to complete the short name. Clicking Cancel clears all values entered in this screen.
7.4.4.1 Editing a Short NameYou can edit a short name by renaming it and changing its command string.
To edit a short name, click the Manage Short Names button in the Applications screen. From the short names in the following screen, select a short name and then click Edit. The Edit Short Name screen then appears, populated with the values set for the selected short name. Edit the value and then click Finish to commit the changes. Clicking Cancel sets the values for the short name back to their original state.
7.4.4.2 Deleting a Short NameTo delete a short name, click the Manage Short Names button. Select a short name from the table in the following screen and then click Delete. In the confirmation screen that then appears, select Yes to confirm the deletion and No to cancel the deletion.
7.4.5 Managing a Notification SubscriptionA notification application uses predefined conditions to deliver a notification (an alert message). These conditions, or predicates, can be based on a value, time, or on

Customizing Applications
Wireless Customization Portal 7-15
a location condition. For example, a value condition for triggering a notification might be condition can be send me a stock quote if the Oracle stock price reaches a certain value. You also can specify the time condition, such as sending the stock index at 3:00PM every weekday. In addition to value and time conditions, you can define a location-based notification, such as notify me if the truck driver arrives at the customer site. For more information on location-based topics, refer to Chapter 11, "Notification Engine".
In the Application Table, the Subscribe action link appears in the Actions column for notification-enabled applications. In Figure 7–12, this link appears for the application called NotificationEventFormatService.
Figure 7–12 A Notification-Enabled Application
Clicking the Subscribe action link invokes the detail page (Figure 7–13), which includes a subscription table that lists all of the subscriptions for this application.

Customizing Applications
7-16 Oracle Application Server Wireless Developer’s Guide
Figure 7–13 The Detail Page for a Notification Application
From this page, you can create, delete or enable and disable the subscriptions. The table also lists the status of the subscriptions such as Enabled, Time-based, or Location-based.
7.4.5.1 Adding a New Notification SubscriptionTo add a new subscription:
1. To add a subscription, click the Subscribe link in the application table. In the detail screen, click Add. The Add Notification subscription screen for the selected notification appears (Figure 7–14).
2. Enter the subscription name. This is a required field.
3. Set the notification device preference for message delivery. The options for setting this value include:
■ You can specify the delivery of the notification based on the definition of the currently active contact rule.
■ You can specify the primary notification device and the maximum number of notifications that you want to receive per day on that device.
■ You also can specify an alternative means of handling the additional messages if the maximum number of notifications is reached for the primary notification device. You can discard all the excess messages or send them to an alternative device.
4. Enter the values for all the conditions. If the notification application is value-based, then the value condition list displays in the Value Condition section.

Customizing Applications
Wireless Customization Portal 7-17
5. If the notification application is time-based, then the time conditions display in the Time Condition section. The time conditions include a blackout period or options for setting the notification to trigger for a period of time or at a specific time. For more information on setting trigger conditions, refer to Chapter 11, "Notification Engine".
6. If the notification application is location-based, the location awareness conditions display in the Location Awareness Condition section. You can specify which target you want to monitor as well as the movement of that target. For example, you can set the condition as send me a notification when John is at Oracle Headquarters (where Oracle Headquarters is a region object defined in the Location management tool).
7. Click Finish to save your inputs. Clicking Cancel clears your entries.
Figure 7–14 The Add Notification Subscription Screen

Managing Devices
7-18 Oracle Application Server Wireless Developer’s Guide
7.4.5.2 Editing Notification SubscriptionsThe notification subscription screen enables you to edit a subscription by changing the trigger conditions of a selected subscription or by changing the notification delivery rules.
To edit a subscription, click the Subscribe action link in the application table to access the detail page. From the subscription table, select the subscription that you want to modify and then click the Edit button. The Edit screen appears, with its fields populated with the values for the selected notification subscription. (For information on these fields, refer to Section 7.4.5.1.) Edit the values as needed and then click Finish to save your changes. Clicking Cancel sets the parameters back to their previous values.
7.4.5.3 Deleting Notification SubscriptionsTo delete a notification subscription, select the notification subscription from the detail page and then click Delete. A confirmation page appears, asking you to confirm the deletion by clicking Yes, or cancel it by clicking No. Select Yes.
7.5 Managing DevicesIn OracleAS Wireless, the device object enables you to group multiple device addresses under a single entity. For example, you can group a number of device addresses for the same device, which may contain multiple user agents or may use multiple protocols. Each of these protocols (or channels) can have a different address or identification, but all of them emanate from the same physical entity.
Devices are used for both notification subscription and for managing contact rules. Only the validated devices receive notifications and set contact rules.
The Device screen (Figure 7–15), invoked by clicking the Devices tab, enables you to create, edit and delete a device. The devices are categorized into four different types: Phone, Fax, Email, and Mobile Device. Phone is for the devices that support only voice; Fax is for the devices that can only receive fax messages; Email is mainly for email accounts, and Mobile Device is for the multi-channel mobile devices.
The device table displays different device icons for each of these device types.

Managing Devices
Wireless Customization Portal 7-19
Figure 7–15 Browsing Devices
You can create devices by selecting the device type in the drop-down selection list next to the device table’s Add button.
7.5.1 Creating a New PhoneTo create a phone, you first select Phone from the drop-down list and then click the Add button. The Add Phone Number screen appears (Figure 7–16).
Figure 7–16 Adding a New Phone
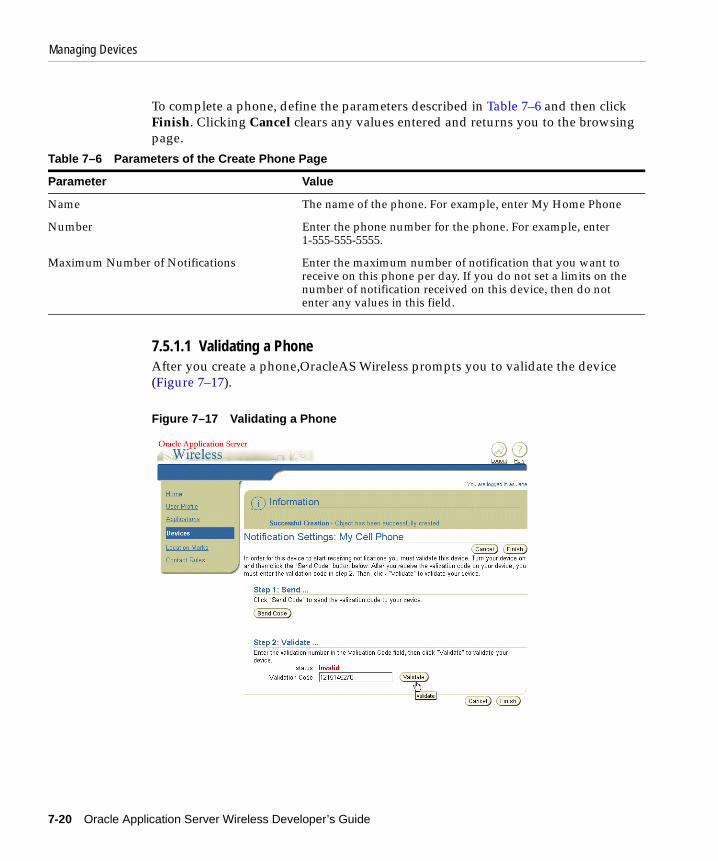
Managing Devices
7-20 Oracle Application Server Wireless Developer’s Guide
To complete a phone, define the parameters described in Table 7–6 and then click Finish. Clicking Cancel clears any values entered and returns you to the browsing page.
7.5.1.1 Validating a PhoneAfter you create a phone,OracleAS Wireless prompts you to validate the device (Figure 7–17).
Figure 7–17 Validating a Phone
Table 7–6 Parameters of the Create Phone Page
Parameter Value
Name The name of the phone. For example, enter My Home Phone
Number Enter the phone number for the phone. For example, enter 1-555-555-5555.
Maximum Number of Notifications Enter the maximum number of notification that you want to receive on this phone per day. If you do not set a limits on the number of notification received on this device, then do not enter any values in this field.

Managing Devices
Wireless Customization Portal 7-21
To validate a phone, you first click Send to send the validation code to your phone. After you receive this code, enter it in the screen and then click Validate. If the device is successfully validated, the Status column displays Valid.
7.5.1.2 Editing a PhoneYou can update a phone device by changing the name, number for the device, or the number of notifications received. To update a phone, you first select a phone and then click Edit. The editing page appears, with its fields populated by the values set for the selected device. For information on these values, see Section 7.5.1, "Creating a New Phone". After you change any values, you must once again validate the device. For information on validating the device, see Section 7.5.1.1, "Validating a Phone". Click Finish to save your changes. Clicking Cancel sets the parameters for the phone back to their previous values.
7.5.1.3 Deleting a PhoneTo delete a phone, select a phone from the Device List and then click Delete. In the confirmation screen that follows, click Yes to confirm the deletion and No to cancel the deletion.
7.5.2 Creating a New FaxTo create a fax, you first select Fax from the drop-down list and then click the Add button. The Add Fax Number screen appears (Figure 7–18).
Note: Be sure that your phone is turned on before you begin the validation process.

Managing Devices
7-22 Oracle Application Server Wireless Developer’s Guide
Figure 7–18 Creating a Fax
To complete a fax, define the parameters described in Table 7–7 and then click Finish. Clicking Cancel clears any values entered and returns you to the browsing page.
7.5.2.1 Validating a FaxAfter you create a fax, OracleAS Wireless prompts you to validate the device.
Table 7–7 Parameters of the Create Fax Screen
Parameter Value
Name The name of the fax. For example, enter My Home fax
Number Enter the number for the fax. For example, enter 1-555-555-5555.
Maximum Number of Notifications Enter the maximum number of notification that you want to receive on this fax per day. If you do not want set a limit on the number of notification received on this device, then do not enter any values in this field.

Managing Devices
Wireless Customization Portal 7-23
To validate a fax, you first click Send to send the validation code to your fax. After you receive this code, enter it in the screen and then click Validate. If the device is successfully validated, the Status column displays Valid.
7.5.2.2 Editing a FaxYou can update a fax device by changing the name, number or the number of notifications received. To update a fax, you first select a fax and then click Edit. The editing page appears, with its fields populated by values specific to the selected device. For information on these values, see Section 7.5.2, "Creating a New Fax". After you make any needed changes, you then validate the device. For information on validating the device, see Section 7.5.2.1, "Validating a Fax". Click Finish to save your changes. Clicking Cancel sets the parameters for the fax back to their previous values.
7.5.2.3 Deleting a FaxTo delete a fax, select a fax from the Device List and then click Delete. In the confirmation screen that follows, click Yes to confirm the deletion and No to cancel the deletion.
7.5.3 Creating an Email DeviceTo create an email, select Email from the drop-down list and then click Add. The Add Email screen appears (Figure 7–19). To complete an email device, you must define the values described in Table 7–8.
Note: Be sure that your fax is turned on before you begin the validation process.
Table 7–8 Parameters of the Create Email Screen
Parameter Value
Name Enter the name of the email. For example, enter My Home Email.
Address Enter the email address. For example, enter [email protected].
Maximum Number of Notifications Received Per Day
Enter the maximum number of notification that you want to be received by this email per day. Leave this field blank if you do not want to limit the number of email messages received.

Managing Devices
7-24 Oracle Application Server Wireless Developer’s Guide
Figure 7–19 Creating an Email Device
7.5.3.1 Validating the Email DeviceAfter you create a email, OracleAS Wireless prompts you to validate the device.
To validate a email, you first click Send to send the validation code to your email. After you receive this code, enter it in the screen and then click Validate. If the device is successfully validated, the Status column displays Valid.
7.5.3.2 Editing an Email DeviceYou can update a email device by changing the name, number or the number of notifications received. To update a email, you first select a email and then click Edit. The editing page appears, with its fields populated by values specific to the selected device. For information on these values, see Section 7.5.3, "Creating an Email Device". After you make any needed changes, you then validate the device. For information on validating the device, see Section 7.5.3.1, "Validating the Email Device". Click Finish to save your changes. Clicking Cancel sets the parameters for the email back to their previous values.
Note: Be sure that your email is turned on before you begin the validation process.

Managing Devices
Wireless Customization Portal 7-25
7.5.3.3 Deleting an Email DeviceTo delete a email, select a email from the Device List and then click Delete. In the confirmation screen that follows, click Yes to confirm the deletion and No to cancel the deletion.
7.5.4 Creating a New Mobile DeviceTo create a new mobile device select Mobile Device from the drop-down list and then click Add. The Add Mobile Device screen appears (Figure 7–20). To complete an email device, you must define the values described in (Figure 7–9). Click Finish after you define the parameters. Clicking Cancel clears any values entered and returns you to the browsing page.
Table 7–9 Parameters of the Create Mobile Device Page
Parameter Value
Name Enter the name of the mobile device. For example, enter My Home Email.
Address Enter the mobile device address. For example, enter [email protected].
Maximum Number of Notifications Received Per Day
Enter the maximum number of notification that you want to be received by this mobile device per day. Leave this field blank if you do not want to limit the number of messages received by this device.
Manufacturer Select a manufacturer from the drop-down list. The default setting is Unknown.
Model Select the device model from the list. The default selection is Unknown.
Preferred Channel Select the preferred channel for the device.
Enter the addresses in the format appropriate to the channel. For example, the address for Voice channel is a phone number, while the address for the Email channel is an email account. The address for the IM channel varies according to the messenger network that you selected from the list. Consult your ISP if you do not know the specific address format.
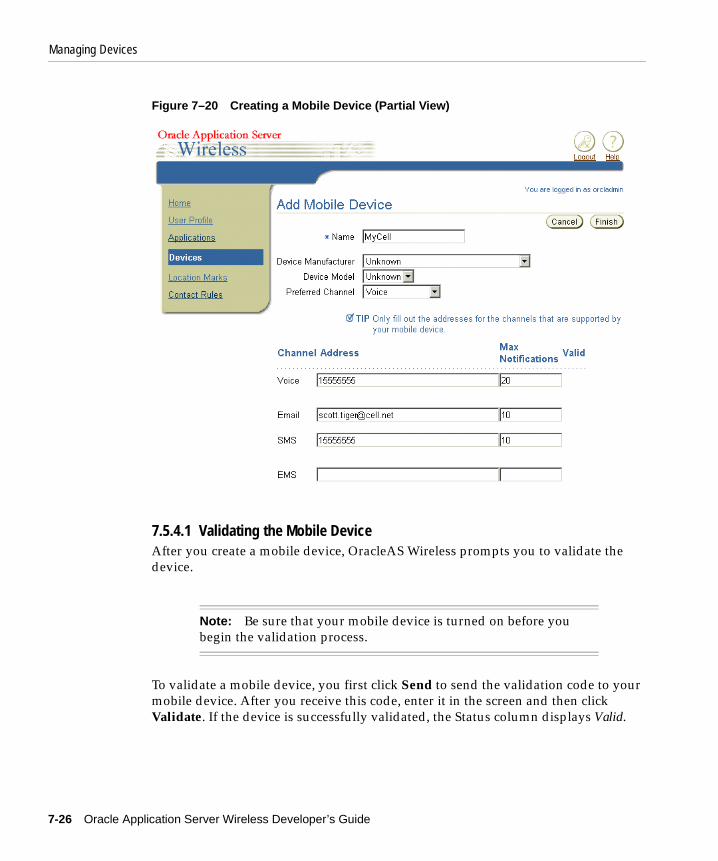
Managing Devices
7-26 Oracle Application Server Wireless Developer’s Guide
Figure 7–20 Creating a Mobile Device (Partial View)
7.5.4.1 Validating the Mobile DeviceAfter you create a mobile device, OracleAS Wireless prompts you to validate the device.
To validate a mobile device, you first click Send to send the validation code to your mobile device. After you receive this code, enter it in the screen and then click Validate. If the device is successfully validated, the Status column displays Valid.
Note: Be sure that your mobile device is turned on before you begin the validation process.

Managing Location Marks
Wireless Customization Portal 7-27
7.5.4.2 Editing a Mobile DeviceYou can update a email device by changing the name, number or the number of notifications received. To update a email, you first select a email and then click Edit. The editing page appears, with its fields populated by values specific to the selected device. For information on these values, see Section 7.5.4, "Creating a New Mobile Device". After you make any needed changes, you then validate the device. For information on validating the device, see Section 7.5.4.1, "Validating the Mobile Device". Click Finish to save your changes. Clicking Cancel sets the parameters for the email back to their previous values.
7.5.4.3 Deleting an Mobile DeviceTo delete a mobile device, select a mobile device from the Device List and then click Delete. In the confirmation screen that follows, click Yes to confirm the deletion and No to cancel the deletion.
7.5.5 Setting a Default DeviceTo set a default device, select the device from the Device List Section and then click Set Default.
7.6 Managing Location MarksLocation Marks are user-defined locations, such as a user’s home, office, or work-related addresses. End users can enter these locations into their location-aware applications. When using a location-aware application, such as a restaurant search application, the application can use an end-user’s current location, such as the user’s home address, to provide a reference point for driving directions to the target destination. To ensure security and privacy, users can control which applications can access their locations.
To create a Location Mark, you do not have to enter lengthy alphanumeric strings into a mobile device. Instead, Wireless Customization enables you enter and manage the underlying spatial information for the Location Marks, which are stored in the Wireless repository. You access the spatial information by selecting the Location Mark on your mobile device.
You can use a Region-typed Location Mark in a location-based notification subscription. For example, you can create a region-typed Location Mark for your work address that includes a radius of three miles around your office address. If you want to arrange transportation for clients from your office to the airport, for example, then you would subscribe to a notification such as notify me when the

Managing Location Marks
7-28 Oracle Application Server Wireless Developer’s Guide
airport limousine is within three miles of my office. You will then receive a notification message whenever the limousine comes within three miles of your office.
The geocoding feature cannot function unless the server has access to geocoded data from a vendor. You can still create a Location Mark even without the longitude and latitude geometry values. This type of Location Mark can be used for location information only and cannot be used by applications which require geometry information.
You access the functions to create, edit and delete Location Marks by clicking the the Location Marks tab. A browsing screen appears (Figure 7–21), which includes a table listing the current Location Marks.
Note: Location Marks can be created as a point-typed location or a region-typed location. Region-typed locations can be presented as a "circle" region, which is defined with a point and a radius. It can also be a system-defined map region, such as Redwood City, California or the entire state of California.

Managing Location Marks
Wireless Customization Portal 7-29
Figure 7–21 The Location Mark Screen (Partial View)
7.6.1 Creating Location MarksTo create a location mark, you first click the Add button. The Create Location Mark screen appears (Figure 7–22). To create a Location Mark, you must define the following parameters:
1. Enter a name that is meaningful to you in the Location Mark Name field. This is a required field.
2. Enter a description for the Location Mark that is meaningful to you (for example, Work or Home).
3. Enter a label for the Location Mark.
4. Enter the name of the company in the Company Name field.

Managing Location Marks
7-30 Oracle Application Server Wireless Developer’s Guide
5. Enter the address information in Address Line 1. For example, enter 123.
6. Enter the street name in Address Line 2. For example, enter Main Street.
7. Enter the county and state information (if applicable) in the County and State fields.
8. Enter the postal code in the Postal Code field. This can be a five-digit United States zip code or other postal code.
9. Enter the postal code extension (if applicable) in the Postal Code Ext. field.
10. Enter the country name in the Country name field.
11. Enter the radius value and the unit (kilometers or miles) of the distance if you want to create a region-typed Location Mark.
12. Click Apply to trigger the geocoding process.
Figure 7–22 Creating a Location Mark
If the geocoding process fails, a warning page displays, asking you if you want to save a Location Mark with no geocoding information.Click Save to save the location, or click Back to return to the creation page to enter more other values.
If the geocoder found more than result that matches the criteria for the Location Mark, then a selection page displays for you to select the closest match (Figure 7–23). The results can include the region-typed location marks such as those that match the corresponding city or state.

Managing Location Marks
Wireless Customization Portal 7-31
Figure 7–23 Selecting the Location Mark
Select the Location Mark you want to save, and click Save to save the selected Location Mark.
Clicking Cancel destroys the Location Mark.
7.6.2 Editing a Location Mark To edit a Location Mark:
From the Location Mark List screen, select the desired location mark and then click the Edit button. The Edit Location Mark screen appears, with its fields populated by the values set for the selected Location Mark (Figure 7–24). Edit the fields as needed. See Section 7.6.1, "Creating Location Marks" for information on entering locationmark values. Click Apply to trigger the geocoding process.

Managing Location Marks
7-32 Oracle Application Server Wireless Developer’s Guide
Figure 7–24 Editing a Location Mark
7.6.3 Changing the Default Status of a Location MarkTo change the default status of a Location Mark, select the new default Location Mark from the Location Mark List screen. Click Set Default. The status in the Default column of the Location Mark List changes to true. Only one Location Mark can be the default.
7.6.4 Deleting a Location MarkTo delete a Location Mark, select the Location Mark and then click Delete. In the confirmation screen, select Yes to confirm the deletion. Click No to cancel the deletion.
7.6.5 Setting the Location Privacy PreferencesTo set the location privacy, select from among the following options listed in the Location Mark List screen:
■ If needed, cache your location mark by checking Remember my last location mark.
■ Check Allow other applications to access my location to disclose your location.
■ You also can set your Mobile ID, which is used as your positioning ID, so that Mobile Positioning Server can detect your current position. Set this value if you want to expose your current position to location-aware applications.
Managing Location Marks
Wireless Customization Portal 7-33
Click Apply in the Location Privacy section to save the Location Privacy preference settings
7.6.6 Managing the Location Awareness AuthorizationLocation Awareness Authorization enables other users to detect your current location position for specified periods of time.
Location Awareness Authorization is used when other users subscribe to a location-based notification to monitor your location position or movement. For example, if you want to authorize your boss to monitor your position from 8:00 AM to 5:00 PM today, then you can create a authorization rule based on the time criteria and then enable it. Your boss can then subscribe a notification on your position, such as notify me whenever my employee moves three miles from the office.
The Location Mark screen includes a table listing users authorized to monitor your location. The Location Privacy and Authorization Rules are used by location-based applications. The location rules enable users to control if (and when) their locations can be revealed to the location-based applications. You can create, edit, delete, enable or disable an authorization rule. You can also manage the location awareness user groups used for the authorization rule
7.6.7 Assigning Location Awareness AuthorizationTo create location awareness authorization:
From the Location Awareness Authorization List screen (Figure 7–25), click the Add button. Select the Grantee type, which can be a User or a Group and then specify the value of grantee: enter the user name if you select User as the grantee type, or select the group from the group selection list if you select the Group as the grantee type. Specify the authorization period and then click Finish to save your changes. Click Cancel to clear all values.

Managing Location Marks
7-34 Oracle Application Server Wireless Developer’s Guide
Figure 7–25 Adding Location Awarness
7.6.8 Changing Location Awareness AuthorizationFrom the Location Awareness Authorization List screen (Figure 7–26), select an authorization object and then click the Edit button. The editing page appears, with the fields populated with the values set for the selected authorization object.
Edit the values as needed. See Section 7.6.7, "Assigning Location Awareness Authorization" for information on these values.
Figure 7–26 The Location Awareness Authorization List
7.6.9 Managing the User Groups for Location AuthorizationUser Group, as used in location awareness authorization, is a collection of user objects and is distinct from the user group concept used for the application access control list (ACL) as described in the Oracle Application Server Wireless Administrator’s Guide. The User Group for location awareness is a target type in the location awareness authorization, which enables you to assign the authorization to

Managing Contact Rules
Wireless Customization Portal 7-35
a group which contains multiple users rather than having to assign authorization to users singly. It is a type of grantee object in location awareness authorization management which enables you to easily manage authorization policies. For example, you can create just one authorization policy for a User Group which contains 10 users rather than creating individual authorization policies for each of these same users. In Figure 7–26, the user group, My Family, is comprised of the individual users jackguest and janeguest, who have both been assigned the User grantee type.
Clicking the Manage User Group button in the location awareness authorization section invokes the User Group list page. From this screen, you can create, edit, or delete the user groups
7.6.10 Creating User GroupTo create a User Group, click the Add button in the User Groups List screen. The Add Location Awareness Authorization screen appears (Figure 7–25). Enter the name for the user group (This is a required field.) and then enter the list of users that you want to include in this group. The user must be a valid Wireless Customization user. Otherwise, you cannot create the user group.Click Finish to create the user group. Click Cancel to clear all values.
7.6.11 Editing a User GroupTo edit a user group, select the user group from the table that you want to update. The Edit screen appears, with its fields populated by the values set for the selected user group. Edit the values as needed. For more information, see Section 7.6.10, "Creating User Group". Click Apply to save your change. Clicking Cancel sets the values back to their previous state.
7.6.11.1 Deleting User GroupSelect one user group and then click the Delete button. The confirmation page then displays. Click Yes to delete the selected User Group object. Click No to stop the deletion.
7.7 Managing Contact RulesA contact rule describes how you wish to receive calls and messages. For example, you can set a contact rule for meetings, wherein you receive all notifications on a cell phone. Oracle Application Server Wireless keeps track of your current

Managing Contact Rules
7-36 Oracle Application Server Wireless Developer’s Guide
circumstances, such as in a meeting or out of the office, the devices available to you at any time, and the way in which you wish to be notified.
Using the contact rule setting screens (accessed through the Oracle Application Server Wireless Customization portal), you create a contact rule by first naming it (for example, At Field Office) and then by adding the communication devices that are appropriate to that contact rule. When creating a communication device, you enter the number or address for the device, along with a nickname for the device, such as My MobilePhone (see Section 7.7.1.5, "Selecting a Contact Rule from a Web-Based User Interface" for creating and managing devices using Oracle Application Server Wireless Customization portal). You can choose devices from the following communication methods in the contact rule:
■ Voice
■ Fax
■ Messaging
For example, when creating the At Field Office contact rule, you may want to receive calls at a device called Field Office Phone, email at Corporate Office Email, and faxes at Field Office Fax. When creating a contact rule, you specify the preferred method for receiving notifications. For the At Field Office contact rule, you could choose to receive notifications as email messages, which are sent to Corporate Office Email.
The Oracle Application Server Wireless provides you with two pre-defined contact rules, Available and Unavailable. You can edit these contact rules and rename them. However, each contact rule name must be unique; you cannot have two contact rules with the same name. In addition, you cannot share a contact rule with another user.
You access functions to create and manage contact rules by selecting Contact Rules menu on the Home page of the Oracle Application Server Wireless Customization portal.
7.7.1 Contact Rules in the Customization PortalThe Contact Rules page in the Oracle Application Server Wireless Customization portal enables you to manage your contact rules.
■ Set Active: Click the Set Active button to set the selected contact rule as your currently active contact rule.

Managing Contact Rules
Wireless Customization Portal 7-37
■ Edit: Edit a contact rule by selecting the radio button of the contact rule you want to change, then click the Edit button.
■ Delete: Delete a contact rule by selecting the radio button of the contact rule you want to delete, then click the Delete button.
■ Add: Add a new contact rule by clicking the Add button.
7.7.1.1 Adding a Contact RuleTo add a Contact Rule, click the Add button in the Contact Rules page. Complete the fields as detailed below.
■ Contact Rule: Enter a name for your contact rule (for example, At My Desk).
Under the Device Settings,
■ Phone: Enter the communication device on which you want to be telephoned (for example, My Mobile Phone). You can select Do not call me if you do not want to be notified through a phone call. Only communication devices that have a voice feature will be listed for selection.
■ Email: Enter the communication device on which you want to be emailed (for example, My Email). You can select Do not email me if you do not want to be notified through email. Only communication devices that have an email feature will be listed for selection.
■ Fax: Enter the communication device on which you want to receive faxes (for example, My Fax). You can select Do not fax me if you do not want to be notified through a fax. Only communication devices that have a fax feature will be listed for selection.
■ Messaging: Enter the communication device on which you want to receive messaging data such as short messages or instant messages (for example, My SMS). You can select Do not send me messages if you do not want to be notified through this delivery method. Only communication devices that have such messaging feature will be listed for selection.
Under the Notification Settings:
■ Delivery Method: Enter the delivery method for receiving notifications.
■ Start Active Time: Enter the time for which notifications can start being delivered.
■ End Active Time: Enter the time for which notifications should no longer be delivered.

Managing Contact Rules
7-38 Oracle Application Server Wireless Developer’s Guide
■ Frequency: Enter which days of the week the active time is in effect (daily, weekdays, or weekend).
■ During Inactive Time: Set to either discard all the messages or delay the delivery of the messages, when messages are generated during the inactive time.
Ensure that the appropriate communication device is selected for the way you want to be notified. Otherwise you will not be able to receive notification. For example, if you want to be notified through a telephone call, make sure that Phone delivery method has a communication device selected.
Click Finish after entering your information.
7.7.1.2 Editing a Contact RuleTo edit a Contact Rule, click the radio button of the contact rule you want to modify. Complete the fields as detailed below.
Contact Rule: Enter or change a name for your contact rule (for example, At My Desk).
Under the Device Settings,
■ Phone: Enter or change the communication device on which you want to be telephoned (for example, My Mobile Phone). You can select Do not call me if you do not want to be notified through a phone call. Only communication devices that have a voice feature will be listed for selection.
■ Email: Enter or change the communication device on which you want to be emailed (for example, My Email). You can select Do not email me if you do not want to be notified through email. Only communication devices that have an email feature will be listed for selection.
■ Fax: Enter or change the communication device on which you want to receive faxes (for example, My Fax). You can select Do not fax me if you do not want to be notified through a fax. Only communication devices that have a fax feature will be listed for selection.
Note: Communication devices must be created before they can be selected.

Managing Contact Rules
Wireless Customization Portal 7-39
■ Messaging: Enter or change the communication device on which you want to receive messaging data such as short messages or instant messages (for example, My SMS). You can select Do not send me messages if you do not want to be notified through this delivery method. Only communication devices that have such messaging feature will be listed for selection.
Under the Notification Settings,
■ Delivery Method: Change the delivery method for receiving notifications, if necessary.
■ Start Active Time: Change the time for which notifications can start being delivered.
■ End Active Time: Change the time for which notifications should no longer be delivered.
■ Frequency: Change which days of the week the active time is in effect (daily, weekdays, or weekend).
■ During Inactive Time: Set to either discard all the messages or delay the delivery of the messages, when messages are generated during the inactive time.
Ensure that the appropriate communication device is selected for the way that you want to be notified, otherwise, you will not be able to receive notification. For example, if you want to be notified through a telephone call, make sure that the Phone delivery method has a communication device selected.
7.7.1.3 Deleting a Contact RuleTo delete a contact rule, select the contact rule radio button in the Contact Rule table, then click Delete.
7.7.1.4 Selecting an Active Contact RuleYou can select a contact rule to be your currently active contact rule. For example, if you are at the field office, you may set your At Field Office contact rule active, and thus, settings in this contact rule will be in effect for communication and all notifications.
Note: Communication devices must be created before they can be selected.

Managing Contact Rules
7-40 Oracle Application Server Wireless Developer’s Guide
7.7.1.5 Selecting a Contact Rule from a Web-Based User InterfaceYou can change your active contact rule setting from the Contact Rules page in the Oracle Application Server Wireless Customization portal by selecting the radio button of the contact rule you want to set as active, then clicking the Set Active button.
7.7.2 Selecting a Contact Rule from a Device You can select a contact rule from a Web-based interface, such as the home page of the Oracle Collaboration Suite or from a registered communications device.
7.7.2.1 Selecting a Contact Rule from a Web-Based User InterfaceYou can change your contact rules from the Home page of the Oracle Collaboration Suite by selecting a contact rule from the Contact me drop-down list (Figure 7–27) and then by clicking Change, or from the Advanced page by selecting a contact rule followed by clicking Set Current.
Figure 7–27 Selecting a Contact Rule from the Oracle Collaboration Suite
7.7.2.2 Selecting a Contact Rule from a DeviceYou can also select contact rules from a variety of devices, because OracleAS Wireless XML enables the conversion of XML from any Oracle Application Server Wireless application into several device-specific markup languages. As a result, you can select contact rules from a WAP-enabled device or from a regular phone. In addition, async-enabled applications enable you to select contact rules from devices having such asynchronous messaging applications as SMS or email, but lacking Internet access. To change contact rules from these devices, you send a message to the Async SMS or email address set by the system administrator.
From a device, such as a WAP-enabled mobile phone, you select a contact rule from a displayed list. When you change a contact rule, OracleAS Wireless switches from one rule’s settings (which controls how you are contacted) to those of another contact rule.
The following section describe the following:
■ Section 7.7.2.3, "Selecting a Contact Rule from a Device"

Managing Contact Rules
Wireless Customization Portal 7-41
■ Section 7.7.2.4, "Selecting a Contact Rule from an SMS- or Email-Based Device"
■ Section 7.7.2.5, "Selecting a Contact Rule Using a Voice Application"
7.7.2.3 Selecting a Contact Rule from a DeviceA mobile device, such as a mobile phone, displays your contact rules as a list and notes your current contact rule with an asterisk (*). Figure 7–28 for example, notes On The Go as the current contact rule. You select a new contact rule by using the device’s navigation keys and then by selecting OK.
Figure 7–28 Selecting a Contact Rule from a Device
The confirmation screen appears (Figure 7–29), noting the new contact rule. Clicking OK returns you to the main menu.

Managing Contact Rules
7-42 Oracle Application Server Wireless Developer’s Guide
Figure 7–29 The Confirmation Page (from a Device)
7.7.2.4 Selecting a Contact Rule from an SMS- or Email-Based DeviceFrom devices using async applications, you can set your contact rules by sending commands as messages to the Async SMS or email address. You can use messages to set your contact rules as follows:
7.7.2.4.1 Method 1 For this method, you change your contact rules by sending three separate messages as follows:
7.7.2.4.2 Message 1: Enter cr in the message subject line or body of the message. You then receive a message which prompts you for your mobile phone number and PIN number (For more information, see Section 7.7.1, "Contact Rules in the Customization Portal".)
7.7.2.4.3 Message 2: Enter your mobile phone number and PIN number in the subject line or body of the message. If you send this information in the body of an email, then you must enter it on the same line. You then receive a message with a numbered list of contact rules.
Managing Contact Rules
Wireless Customization Portal 7-43
7.7.2.4.4 Message 3: Enter the number of the new contact rule in the subject line or body of the message. For example, enter 2 if you wish to select 2. At My Desk from the numbered list. You then receive a message confirming the contact rule change. You can then return to the main menu.
7.7.2.4.5 Method 2 Using this method, you can change your contact rule by sending two separate messages by combining the cr command with the exact name of the contact rule as follows:
7.7.2.4.6 Message 1: Enter cr followed by the name of the contact rule in the subject line or body of the message. For example, enter cr "At My Desk". If there are spaces in the name of the contact rule, then you must enclose the entire name in quotation marks ("). The contact rule name is also case-sensitive. After you send this message, you then receive a message that prompts you to reply with your username and password.
7.7.2.4.7 Message 2: Enter your mobile phone number and PIN number in the subject line or body of the message. If you send this information in the body of an email, then you must enter it on the same line. After you send this message, you receive a reply confirming the contact rule change. You can then return to the main menu.
7.7.2.4.8 Method 3 You can also change your contact rule by sending a single message that combines the cr command, the name of the contact rule, and your username and password together in the subject line or body of your message. For example, you can select a new contact rule by entering all of the information in the subject line or body of a message as follows:
cr "At My Desk"; 16505555000 12345
After you send this message, you receive a reply confirming the contact rule change. You can then return to the main menu.
Note: Use a semi-colon (;) to separate the cr and contact rule name command from the username and password.

Viewing UTF-8 Pages in Localized Languages with Netscape 4.7 or Lower
7-44 Oracle Application Server Wireless Developer’s Guide
7.7.2.5 Selecting a Contact Rule Using a Voice ApplicationAfter you dial in, do the following:
1. Enter your mobile phone number. See(Section 7.7.1, "Contact Rules in the Customization Portal" for more information).
2. Enter your PIN. Confirm your PIN number when prompted.
3. Say Contact Rules to launch the Contact Rules application. The system first announces your current contact rule and then a list of the available contact rules.
4. Say the name of the new contact rule. For example, say At My Desk. The system then replies, confirming the change and returns to the main menu.
7.8 Viewing UTF-8 Pages in Localized Languages with Netscape 4.7 or Lower
Some languages may not display properly if you use Netscape 4.7 or a lower version. In some cases, characters may display as boxes. To fix this problem, configure the Netscape preferences as follows:
1. From the Netscape tool bar, select Edit.
2. Select Preferences from the drop-down menu. The Preferences dialog appears.
3. From the Category tree, select Fonts to display the Fonts dialog.
4. In the Fonts dialog, select Unicode from the For the Encoding drop-down list.
5. From the Variable Width Font and Fixed Width Font drop-down lists, select the font that supports the preferred language. For example, if you select Chinese as your preferred language, you can select MS Song to view the page in Chinese.
7.9 Rebranding the Customization PortalThe OracleAS Wireless Customization Portal is both a framework for the Customization interface and a sample implementation of that framework. The framework consists of UI-based XML Pages (UIX) files, JavaBean modules,
Note: If the name of your contact rule contains spaces, then you must use enclose the entire name of the contact rule in quotation marks ("). The contact rule name is also case-sensitive.

Rebranding the Customization Portal
Wireless Customization Portal 7-45
JavaScript, and such static elements as images, XSL stylesheets, and HTML files. Another element of the framework is the customized page plugin. You can rebrand the Customization Portal based on the existing framework or restructure the framework itself by plugging in your own service customization or replacing the static images.
The following sections describe the elements that compose the Customization Portal, the framework for plugin pages, as well as the file naming conventions and the directory structure used.
7.9.1 Page Naming ConventionsUIX is an extensible, J2EE-based framework for building web applications. It is based on the Model-View-Controller (MVC) design pattern. The UIX page defines View layer such as user interfaces including page layouts, and styles. There is no programming involved in the UIX file and the changes can be deployed without any compilation. The Model and Controller layers are all in the JavaBean files.
Each UIX file has one controller Java file which handles the page event and the dynamic data retrieving. Each model object has one corresponding Java file interface directly to the Model API layer and another wrapper Java file to handle the UIX page caching. For example, the each device management page has one controller file, DeviceHandler.java, and one data model file, DeviceDataObject.java, and a wrapper file, UIXDevice.java, to handle the object caching in the device management UIX pages.
■ The main UIX page for the summary list of objects uses a plural name for the page name. For example, Devices.uix.
■ The detail UIX page for editing begins with Edit. For example EditMobile.uix
■ The detail UIX page for creation begins with Add. For example, AddMobile.uix
■ The controller Java file uses …Handler.java as the name. For example, DeviceHandler.java.
■ The model Java file uses …DataObject.java as the file name. For example, DeviceDataObject.java.
7.9.2 UIX Pages StructureEach Customization Portal UIX page is composed of a series of UIX components:
■ Branding
■ Navigation

Rebranding the Customization Portal
7-46 Oracle Application Server Wireless Developer’s Guide
■ Global Buttons
■ Page Content Area
■ Footer
Table 7–10 describes the UIX components.
7.9.3 Directory StructureTo rebrand the Customization Portal, you modify the UIX files that generate the Customization Portal. After installing OracleAS Wireless, these files are located in the $ORACLE_HOME/OC4J_Wireless/j2ee/applications/mobile/mobile-web directory, which has the following structure:
Table 7–11 describes the contents of the Portal directory.
Table 7–10 UIX Components
UIX Components Description
Form and Page Layout Establishes the Header and Footer and reserves the remainder of the page for other content. This component contains the Tab Bar, Navigation Trace, Row Layout, and Button elements.
Header Company branding and global buttons.
Navigation Trace Displays navigation cue and display name elements.
Footer Global button links and Copyright information.
Page Content Contains the main content, form items and page buttons.
Table 7–11 Portal Directory Contents
Directory Contents
customization Container UIX files. Container files are accessed directly by browsers.
images Images used throughout the Customization Portal.
customization/templates UIX template files. These files are included by either container UIX files or other template files.
cabo JavaBean stylesheet, image, and JavaScript.
cabo/images/cache JavaBean generated images.
cabo/jsps Java server pages that are used by UIX.
cabo/styles/cache Generated stylesheets.

Rebranding the Customization Portal
Wireless Customization Portal 7-47
7.9.4 Customizing the Look of the Customization PortalYou can customize the Portal pages in several different ways; you can alter the appearance of logos, banners, and icons. Alternatively, you may want to create your own UIX or JSP to achieve the desired look and feel.
You can customize the appearance of the Customization Portal by replacing the static strings in the base.uit, basicFlow.uit and advancedFlow.uit files located in the $ORACLE_HOME/OC4J_Wireless/j2ee/applications/mobile/mobile-web/customization/templates directory. By changing the file names called in by these static strings, you can alter the banner art, logo art, and tool tip text. The labels are in the resource file customization.properties, which is located in the following directory:
$ORACLE_HOME/wireless/server/classes/messages/oracle/panama/webtool/
common/resources.
You can change the UI labels by replacing the corresponding string values in the resource file.
In UIX, a logical page consists of a hierarchical set of components known as user interface nodes. Some nodes define visible components, such as buttons, images, tables, and text fields, while others organize the layout and appearance of other nodes and may also manage their behavior.
7.9.4.1 Colors and FontsThe colors and fonts can be customized by modifying the XML Style Sheet file:
$ORACLE_HOME/uix/cabo/styles/blaf.xss.
After the modification, remove:
$ORACLE_HOME/j2ee/OC4J_Wireless/applications/mobile/mobile-web/
cabo/styles/cache directory, and restart the server.
The new Colors and Fonts will take effect on the Web page.
7.9.4.2 UIX ModificationThe UIX template files base.uit, basicFlow.uit and advancedFlow.uit generate the Customization Portal page template. The file base.uit is included in basicFlow.uit and advancedFlow.uit. Either basicFlow.uit or advancedFlow.uit is included in other UIX files. If any changes are made in the template file, then all of the pages that use that template file will automatically inherit the changes.

Rebranding the Customization Portal
7-48 Oracle Application Server Wireless Developer’s Guide
base.uit (described in Table 7–12) generates the logo
basicFlow.uit (described in Table 7–13) generates the global buttons basicFlow.uit includes the template page base.uit.
advancedFlow.uit generates (described in Table 7–14) the global buttons and side-navigation tab bar. advancedFlow.uit includes the template page base.uit. services.uix presents a hierarchical view of the applications accessible to the user. services.uix includes the template page advancedFlow.uit.
Table 7–12 base.uit String Usage
UIX Component Attribute Value Page Element
productBranding image source="images/wireless_logo.gif" Page logo image
productBranding data:shortDesc="comm on.brand.desc@labelBundle" Page logo tool tip text
Table 7–13 basicFlow.uitString Usage
UIX Component Attribute Value Page Element
globalButton Source="images/logout_ena.gif" Global button image
globalButton destination="/mobile/login.uix?event=logout" Global button event handling
Table 7–14 advancedFlow.uit String Usage
UIX Component Attribute Value Page Element
globalButton Source="images/logout_ena.gif" Global button image
globalButton destination="/mobile/login.uix?event=logout" Global button event handling
sideNav link data:text="common.tab.home@labelBundle" Side navigation tab text
sideNav destination="advancedSetup.uix" Side navigation destination page

Rebranding the Customization Portal
Wireless Customization Portal 7-49
7.9.5 Application Customization Page Plugin FrameworkCustomization Portal provides a framework to plug in the application (service) customization page. The initial application customization link must be defined in the OracleAS Wireless tools.
■ When a customization link is defined for the application node, a "Customize" action link will be rendered to invoke the customization page
■ The content of the application customization link will only be rendered inside the page content area where the header, navigation, and the footer of the page will still be controlled and rendered by the pageFlow engine.
■ The PageFlowManager manages the page flow values in the HTTP request by appending the keys and values in the URL and passing around the pages
■ All the links inside the customization page should call generateNextActionLink to fetch the generated URL for the action link.
■ All the redirected pages should call generateNextDisplayLink to fetch the generated URL for the next page link.
■ Because the plugin pages may be rendered by a server that is different from the server that renders the main Customization Portal pages, all of the image sources must use a fully qualified URL path such as http://server:port/component/images/file.gif.
■ The session level caching is not supported in the current implementation of PageFlowManager framework. Therefore, the intermediate cache object may need to use an alternative way to cache the object, such as temporarily storing it in the repository.
Figure 7–30 illustrates the customization process.

Rebranding the Customization Portal
7-50 Oracle Application Server Wireless Developer’s Guide
Figure 7–30 The Application Customization Flow
7.9.5.1 Customizing an Application in a Plugin PageThe pluginService.uix is the main page that includes the plugin customization page. The value of plugin URL is retrieved from the application (service) object and constructed using the generatePluginLink API to concatenate the necessary page flow parameters in the URL. The concatenated parameters include the application object ID, User object ID, GUID, and the page flow information of the main page.

Rebranding the Customization Portal
Wireless Customization Portal 7-51
7.9.6 Setting the Multi-Byte Encoding for the Customization PortalThe Customization Portal gets the encoding for the text of the site from the setting in the PAPZ device, which is in the repository. The default encoding is UTF-8, which can handle Western European languages as well as some Asian languages. The portal sets the content for each page with the encoding specified by the logical device. To change the default encoding, click PAPZ, which is listed in Devices browsing screen in the Foundation Manager and change the encoding to the IANA standards for your particular language.
The UI labels are loaded from customization_LANGUAGE (_COUNTRY if any). For example, customization_fr_CA.properties in the directory:
$ORACLE_HOME/OC4J_Wireless/j2ee/server/classes/messages/oracle/panama/webtool/customization.
Before login, the locale is determined by the OracleAS Wireless locale setting. After login, the locale setting is determined by the user’s locale preference.

Rebranding the Customization Portal
7-52 Oracle Application Server Wireless Developer’s Guide

Part III Developing Wireless Applications
Part III contains information about developing wireless applications using Oracle Application Server Wireless.
■ Chapter 8, "Authoring Mobile Browser and Voice Applications"
■ Chapter 9, "Using Multi-Channel Server"
■ Chapter 10, "Creating Messaging Applications"
■ Chapter 11, "Notification Engine"
■ Chapter 12, "J2ME Development and Provisioning"
■ Chapter 13, "Web Scraping"
■ Chapter 14, "Using Location Services"
■ Chapter 15, "Enabling User Customization"
■ Chapter 16, "Billing"


Authoring Mobile Browser and Voice Applications 8-1
8Authoring Mobile Browser and Voice
Applications
Each section of this document presents a different topic. These sections include:
Section 8.1, "Overview"
Section 8.2, "XHTML+XForms"
Section 8.3, "OracleAS Wireless Client"
Section 8.4, "XHTML Mobile Profile"
Section 8.5, "OracleAS Wireless XML"
Section 8.6, "Device Headers and Device Class"
8.1 OverviewThe wireless revolution has produced many mobile devices, each with different feature sets and varying form factors. Along with this variety of devices has come a variety of markup languages for authoring mobile applications such as HTML, WML, cHTML, XHTML and more. OracleAS Wireless abstracts the developer from device specific markup languages and by providing a single development model and environment for building browser-based, voice and messaging applications. This multi-channel solution lowers the learning curve for developers and ensures that applications developed on OracleAS Wireless are future proof, and will work on upcoming devices as markup languages are changed or enhanced.
OracleAS Wireless provides developers with three development options:
■ XHTML+XForms
■ XHTML MP

Overview
8-2 Oracle Application Server Wireless Developer’s Guide
■ OracleAS Wireless XML
The following table shows the types of applications that can be developed using each development model.
This chapter describes the following multi-channel authoring models supported in OracleAS Wireless and the features supported by each:
■ XHTML with XForms and CSS for Voice and Visual media including SMS and Instant messaging Interface
■ XHTML Mobile Profile for Visual media using mobile browsers
■ Wireless XML: OracleAS Wireless-defined abstract presentation oriented XML language for Voice and Visual media including SMS and Instant messaging Interface.
8.1.1 MobileXML or XHTML/XForms; Which to Use?Developers must provide wireless content for different channels and devices. Access channels and devices are the choice of end users, so applications or document content must be universally accessible. In the PC browser channel, the document content is usually presented using markup languages such as Hyper Text Markup Language (HTML), and is delivered to end users through an HTML browser. HTML tags are difficult to support on mobile devices due to hardware restrictions and narrow bandwidth. Also, most markup languages mix the content and the style in a document; making it difficult for a browser to distinguish the
Table 8–1 Types of Applications Created Using Different Models
Application Type/Development Language
XHTML+XForms XHTML MP
OracleAS Wireless XML
Browser-based X X X
Voice X X
Notifications (SMS, Email, MMS, IM) X X
Async X X
Note: XHTML MP is not supported for Voice or SMS/Instant Messaging access channels.

Overview
Authoring Mobile Browser and Voice Applications 8-3
presentation or the style from the content. For example, you can use the <font> tag to mark up sections that are important in a document. This is appropriate in a visual medium that supports color, but fails on devices that do not support color.
You must have a multi-channel authoring model to code and display documents in a device-independent manner. Oracle Application Server Wireless solved this problem by offering an XML markup, MobileXML, which can be used for many channels and devices: messaging, voice, micro-browsers, PDA browsers, and others. As companies recognized the importance of a device-independent XML, a standards-based effort began. As result of efforts in this direction by the World Wide Web Consortium (W3C), there is eXtensible Hypertext Markup Language (XHTML). XHTML is a standards-based solution replacing MobileXML.
The XHTML 1.0 standard is an extension of HTML represented as an XML 1.0 application. Using XHTML, you can share basic content across desktops, PDAs, voice and mobile phones. In addition, you can group XHTML elements into a collection of abstract modules, with each module providing a specific functionality. Cascading Style Sheets (CSS) and XForms are used with XHTML.
Cascading Style Sheets (CSS) separate the rendering style from the structure of an XML document. In other words, CSS shows you how to display the document using fonts, spacing and so on. Using CSS, you associate presentation style to markup fragments or elements (in XML or XHTML documents), without modifying the content document. There are two levels of CSS: CSS1 and CSS2. CSS2 is the second generation of CSS that adds on to CSS1 to support media specific styles. CSS2 includes support for media such as print, screen, voice, and handheld. CSS mobile profile is a subset of CSS2 suited for mobile devices and aural CSS properties control speech or voice rendering.
In HTML, you used forms to display a user interface to accept input from users. HTML forms did not separate the data from the presentation. Even for basic tasks such as input validation, you had to use scripting technologies. XForms is a W3C technology that addresses the problems in HTML forms. XForms is written in XML, and can be integrated with XHTML or any other markup language. Using XForms, you can:
■ Build device-independent user interface controls
■ Differentiate the data from the data definition
■ Use declarative syntax to support commonly-performed actions
■ Provide knowledge about the data and user interface style to the browser
■ Validate the data collected

XHTML+XForms
8-4 Oracle Application Server Wireless Developer’s Guide
You should use XHTML/XFORMS/CSS instead of MobileXML because it is more powerful and standards-based. The following architectural changes were implemented to accommodate XHTML, XForms, and CSS development in this release:
■ HTTP adapters handle XHTML, XForms, and CSS documents in addition to MobileXML documents
■ XForms processor implement XForms
■ XForms cache stores XForms documents during runtime
■ A new set of transformers, based on CSS annotated XHTML documents is used for XHTML+XForms model support. In this release, when you work with XForms using XHTML as the containing document, the new document model is called the XHTML+XForms model.
■ The XForms request broker interprets and feeds data or events to the XForms processor. The data or the events are based on the form data that you submit to OracleAS Wireless.
8.1.2 Multi-Channel OverviewAn application typically represents some content (or information), which needs to be presented to users. Users may access this information from multiple modes or devices that are capable of presenting the content. The characteristics of access modes and the devices are choices of the user community. Authors can save time by ensuring that applications are universally accessible. Universal accessibility implies the content must available over various channels of access and users must be allowed to interact with applications using multiple modes of interaction.
8.2 XHTML+XFormsThis section describes the features supported by the XHTML+XForms+CSS supported by OracleAS Wireless. This section is organized into the following subsections:
■ Section 8.2.1, "Overview"
■ Section 8.2.2, "Technology Background"
■ Section 8.2.3, "Hello World Application Using XHTML and XForms"
■ Section 8.2.4, "OracleAS Wireless and XHTML+XForms+CSS"
■ Section 8.2.5, "Styling and Embedding Content Based on Media"

XHTML+XForms
Authoring Mobile Browser and Voice Applications 8-5
■ Section 8.2.6, "Advanced Sample Using XHTML and XForms"
■ Section 8.2.7, "Advanced Voice Sample Using XHTML and XForms"
8.2.1 OverviewXHTML (eXtensible Hyper Text Markup Language, CSS [Cascading Style Sheets]) and XForms. CSS abstracts the presentation style of a document, XForms provides an abstract forms model, while XHTML provides the structure and semantics of a document. Each of these technologies provide specific features. In combination, they allow a document to be authored in a device-independent fashion.
Authors typically use markup languages to encode content in documents. The content in documents is typically presented to a user agent (browser). Most markup languages today mix the content and style in a single document, making it difficult for a user agent to distinguish presentation (or styling) from the content (information) that is contained in a document. A common example of this, in HTML3.2, is the usage of the <font> tag. HTML authors typically use color codes to mark up (using font tag) sections that are important in a document. While this may work as intended when presented using visual medium that supports color, it fails on devices that do not support color or when content is rendered aurally (text is spoken through a speech interface).
To enable documents to be authored in a device or access mode independent fashion, a Multi-Channel authoring model is required. A multi-channel authoring model must separate content (information) in a document from the presentation style.
Due to memory and processor constraints, presentation styles supported by mobile devices vary significantly. Further diversity in access methods means the mode of interface has an impact on the presentation styles.
8.2.2 Technology Background
8.2.2.1 XHTMLHTML4 has been widely accepted as the publishing language of choice for the world wide web. HTML4 and CSS provide the right separation of content from presentation. HTML4 supports rich semantics that is difficult to support on mobile devices due to both hardware restrictions and narrow bandwidth, though a subset of HTML4 with extensions can be supported on mobile devices.
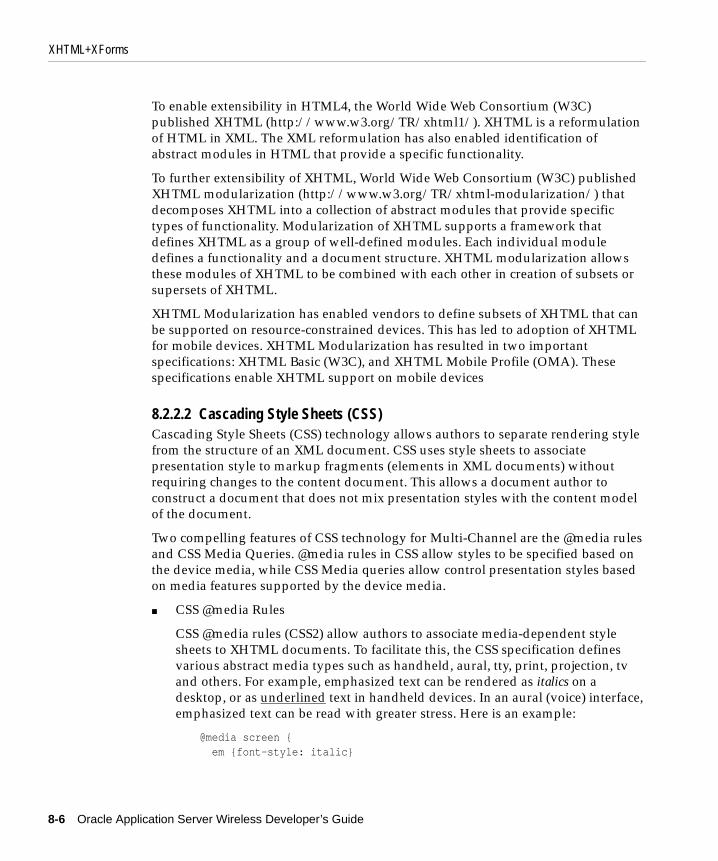
XHTML+XForms
8-6 Oracle Application Server Wireless Developer’s Guide
To enable extensibility in HTML4, the World Wide Web Consortium (W3C) published XHTML (http://www.w3.org/TR/xhtml1/). XHTML is a reformulation of HTML in XML. The XML reformulation has also enabled identification of abstract modules in HTML that provide a specific functionality.
To further extensibility of XHTML, World Wide Web Consortium (W3C) published XHTML modularization (http://www.w3.org/TR/xhtml-modularization/) that decomposes XHTML into a collection of abstract modules that provide specific types of functionality. Modularization of XHTML supports a framework that defines XHTML as a group of well-defined modules. Each individual module defines a functionality and a document structure. XHTML modularization allows these modules of XHTML to be combined with each other in creation of subsets or supersets of XHTML.
XHTML Modularization has enabled vendors to define subsets of XHTML that can be supported on resource-constrained devices. This has led to adoption of XHTML for mobile devices. XHTML Modularization has resulted in two important specifications: XHTML Basic (W3C), and XHTML Mobile Profile (OMA). These specifications enable XHTML support on mobile devices
8.2.2.2 Cascading Style Sheets (CSS)Cascading Style Sheets (CSS) technology allows authors to separate rendering style from the structure of an XML document. CSS uses style sheets to associate presentation style to markup fragments (elements in XML documents) without requiring changes to the content document. This allows a document author to construct a document that does not mix presentation styles with the content model of the document.
Two compelling features of CSS technology for Multi-Channel are the @media rules and CSS Media Queries. @media rules in CSS allow styles to be specified based on the device media, while CSS Media queries allow control presentation styles based on media features supported by the device media.
■ CSS @media Rules
CSS @media rules (CSS2) allow authors to associate media-dependent style sheets to XHTML documents. To facilitate this, the CSS specification defines various abstract media types such as handheld, aural, tty, print, projection, tv and others. For example, emphasized text can be rendered as italics on a desktop, or as underlined text in handheld devices. In an aural (voice) interface, emphasized text can be read with greater stress. Here is an example:
@media screen { em {font-style: italic}

XHTML+XForms
Authoring Mobile Browser and Voice Applications 8-7
}
@media handheld { em {text-decoration: underline}}
@media aural { em {speech-rate: slow; pitch: high}}
For more information on CSS syntax for @media rules and media types, see the CSS2 Specification at http://www.w3.org/TR/REC-CSS2
■ CSS3 Media Queries
CSS @media rules, though powerful, still cannot render or present content based on device features. For example using just CSS @media rules, it is not possible to differentiate the presentation style between a handheld that supports color versus a handheld that does not support color.
CSS3 Media Queries extends the @media rule defined in CSS2 to select style based on media type (screen, handheld, print, tv, and others) as well as the features and properties of a particular device. For example:
@media screen, handheld and {color) { em {color: red} }
@media handheld and (color: 0) { em {text-decoration: underline}}
For more information on the syntax of Media queries refer to CSS3 Media Query Specification at http://www.w3.org/TR/css3-mediaqueries/.
OracleAS Wireless supports CSS3 media queries and borrows the syntax for its media attribute (defined in the MXML namespace). The OracleAS Wireless-defined media attribute provides a shorthand notation to control the display:none property based on media. For more details on using the media attribute see Section 8.2.5, "Styling and Embedding Content Based on Media".
W3C has defined subsets of the CSS2 technology that are suitable for various resource-constrained devices. CSS Mobile Profile and CSS TV Profile are two subsets of the CSS2 specification. CSS Mobile Profile defines ac subset of CSS2 technology that is suitable for mobile devices. OracleAS Wireless supports CSS Mobile Profile.

XHTML+XForms
8-8 Oracle Application Server Wireless Developer’s Guide
8.2.2.3 XFormsXHTML and CSS provide a good separation of content from the presentation of the content. HTML defines a forms model that is not abstract enough in nature; HTML forms do not separate purpose from the display properties of form controls. Also, the lack of a document interaction model has driven authors to use scripting technologies even for very basic tasks such as input validation. All these factors have contributed to HTML applications being very browser-specific, even in the desktop world.
XForms is a new W3C technology that addresses the current problems in the HTML forms. XForms provides a way to define a rich form interface and interaction model without the need for auxiliary technologies such as scripting. The primary design goals of XForms are:
■ Device Independence through support of abstract UI controls
■ Declarative Syntax to support most commonly performed actions
■ Separation of Purpose (data and processing logic) from presentation
■ Structured Form Data (using XML)
It is important to understand that XForms does not define a complete document model, but merely defines the user interface components required for form processing. XForms is an additive technology to other document content information models, hence must be contained within other Markup Languages (such as XHTML). Even though XForms is viewed as a replacement to the current forms in HTML, the XForms design itself does not prohibit use of XForms with other user interface standards such as WML (or even the current HTML Forms).
8.2.2.4 Overview of XML NamespacesThe wide adoption of XML has led to a plethora of XML documents (DTDs) being defined by various industry groups and Independent Software Vendors (ISVs). This can result in conflicts in element and attribute names among these various XML technologies which would prevent a software module from identifying its elements. This has resulted in a requirement for uniquely identifying an element or attribute in an XML document. XML Namespaces addresses this requirement.
XML Namespaces is a mechanism that allows elements and attributes to be identified universally. XML Namespaces allow elements and attribute names to be identified with URI references. Element and attribute names, with XML Namespaces, are called qualified names. Qualified names of elements and attributes contain a namespace prefix, followed by a colon (:), followed by the local element name. The prefix is a short notation for the URI of the namespace.

XHTML+XForms
Authoring Mobile Browser and Voice Applications 8-9
The following Namespaces must be understood by authors in order to write an XHTML plus XForms document:
■ XHTML Namespace: Namespace URI: http://www.w3.org/1999/xhtml
HTML Namespace identifies elements and attributes defined in HTML specifications. Sections in this document use html as the namespace prefix for HTML elements. Example: <html:div>
■ XForms Namespace: Namespace URI: http://www.w3.org/2002/xforms/cr
XForms Namespace identifies elements and attributes defined in XForms specifications. Sections in this document use XForms or xf as the namespace prefix for XForms elements. Example: <xforms:input> or <xf:input>
■ XML Events: Namespace URI: http://www.w3.org/2001/xml-events
XML Events Namespace identifies attributes defined in XML Events specifications. Sections in this document use ev as namespace prefix for XML Events attributes. Example: <xforms:action ev:event="DOMActivate"/>
■ XML Schema: Namespace URI: http://www.w3.org/2001/XMLSchema
XML Schema Namespace identifies elements and attributes defined in XML Schema specifications.
Sections in this document use xsd or xs as namespace prefix for XML Schema datatypes. Example: <xforms:bind type="xsd:positiveInteger"/>
■ MXML: Namespace URI: http://xmlns.oracle.com/2002/MobileXML
OracleAS Wireless defines extension elements that can be used in an XHTML+XForms document. These extensions elements enhance the functionality of XHTML and XForms for Multi-Channel delivery. Sections in this document use mxml as namespace prefix for MXML elements. Example: <mxml:uiobject ....>
8.2.2.5 Overview of XPathXPath is a standard expression language defined by World Wide Web Consortium (W3C) that provides syntax to address and manipulate fragments of an XML
Note: The XML schema identifies all data types defined in XML schema.
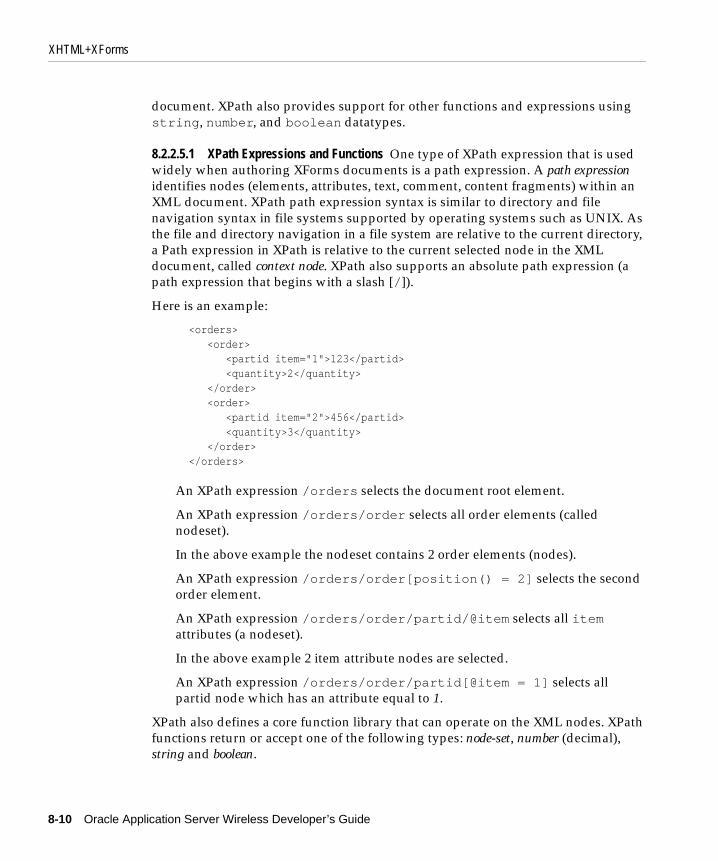
XHTML+XForms
8-10 Oracle Application Server Wireless Developer’s Guide
document. XPath also provides support for other functions and expressions using string, number, and boolean datatypes.
8.2.2.5.1 XPath Expressions and Functions One type of XPath expression that is used widely when authoring XForms documents is a path expression. A path expression identifies nodes (elements, attributes, text, comment, content fragments) within an XML document. XPath path expression syntax is similar to directory and file navigation syntax in file systems supported by operating systems such as UNIX. As the file and directory navigation in a file system are relative to the current directory, a Path expression in XPath is relative to the current selected node in the XML document, called context node. XPath also supports an absolute path expression (a path expression that begins with a slash [/]).
Here is an example:
<orders> <order> <partid item="1">123</partid> <quantity>2</quantity> </order> <order> <partid item="2">456</partid> <quantity>3</quantity> </order> </orders>
An XPath expression /orders selects the document root element.
An XPath expression /orders/order selects all order elements (called nodeset).
In the above example the nodeset contains 2 order elements (nodes).
An XPath expression /orders/order[position() = 2] selects the second order element.
An XPath expression /orders/order/partid/@item selects all item attributes (a nodeset).
In the above example 2 item attribute nodes are selected.
An XPath expression /orders/order/partid[@item = 1] selects all partid node which has an attribute equal to 1.
XPath also defines a core function library that can operate on the XML nodes. XPath functions return or accept one of the following types: node-set, number (decimal), string and boolean.

XHTML+XForms
Authoring Mobile Browser and Voice Applications 8-11
8.2.2.6 Overview of XFormsXForms separates forms processing into distinct logical modules. These modules are:
■ XForms Model
■ XForms Processing Logic
■ XForms User Interface Components
8.2.2.6.1 XForms Model The XForms Model contains both the structure of the Form data and properties associated with the Form data. The structure of the form data is represented as an XML document called the instance document. Each data node (XML element) in the instance document is called an instance data node (node as defined by XPath specification; these can be elements, attributes, or text data node in an XML document).
The following example shows an XForms instance document. The instance document is contained in the XForms <instance> element and must be a valid XML document. Also the instance document must be a singly rooted document (that is, the XForms instance element has only one child node and in this case it is the <example> element in http://my.org namespace with my as the namespace prefix). Elements datanode1, datanode2 and attributes nodeattr are called instance data nodes or instance items.
<xforms:model xmlns:xforms="http://www.w3.org/2002/xforms/cr"> <xforms:instance>
<!-- Data instance -->
<my:example xmlns:my="http://my.org"> <my:datanode1 nodeattr="2">120</my:datanode1> <my:datanode2>200</my:datanode2> </my:example>
<!-- End Data Instance -->
</xforms:instance></xforms:model>
XForms allows authors to define additional properties for the data in these instance items. These properties are called model item properties. The model item properties restrict and/or control the values of instance items and also defines when instance

XHTML+XForms
8-12 Oracle Application Server Wireless Developer’s Guide
items are required or relevant. The properties that can be defined for an instance item are:
■ type—the type property constrains the basic data type of an instance item. As an example, instance items could be a string, decimal, integer, date, time, and others. XForms uses XML Schema datatypes to define the data type of an instance item.
■ calculate—the calculate property allows a value for a instance item to be calculated based on other instance items. As an example, a currency converter application can convert currency amounts based on a conversion rates. The calculate property takes an XPath Expression as its value.
■ constraint—the constraint property defines validity constraints on a instance item that can be based on values in other instance items. As an example, a shopping cart application could enforce rules of free shipping as a valid selection only when the shopping cart contains two or more items. The constraint property takes an XPath Expression (that evaluates to a boolean expression) as its value.
■ readonly—the readonly property associates read-only constraints to an instance item. The readonly constraint can be based on values in other instance items. The readonly property takes an XPath Expression (that evaluates to a boolean expression) as its value.
■ required—the required property associates required constraints to an instance item. The required constraint can be based on values in other instance items. The required property takes an XPath Expression (that evaluates to a boolean expression) as its value.
■ relevant—the relevant property enables an instance item to be relevant based on the context. The relevancy of a instance item can be based on values in other instance items. The relevant property takes an XPath Expression (that evaluates to a boolean expression) as its value.
The model item properties are not directly declared on the instance items or nodes (within an XForms instance element), but rather are declared outside the XForms instance (but within the XForms model element). The model item properties are defined and associated to an instance item using an XForms <bind> element. Each <bind> element in an XForms model associates an instance item to its corresponding model item properties. The <bind> element has seven attributes, one for each of the model item properties, and one attribute for the binding expression that identifies the instance item with which the model item properties are associated.

XHTML+XForms
Authoring Mobile Browser and Voice Applications 8-13
The following example shows an XForms <bind> element. The <bind> elements in this example associate two model item properties, type and required, to instance item my:datanode2 and only the type property to the nodeattr (which is an attribute of datanode1).
<xforms:model xmlns:xforms="http://www.w3.org/2002/xforms/cr"> <xforms:instance>
<!-- Data Instance document here --->
</xforms:instance> <!-- Bind Elements begin --> <xforms:bind id="b1" nodeset="/my:example/my:datanode2" type="xsd:positiveInteger" required="/my:example/my:datanode1 > 1"/> <xforms:bind id="b2" nodeset="/my:example/my:datanode1/@nodeattr" type="xsd:positiveInteger" /> <!--Bind Elements end -->
</xforms:model>
8.2.2.7 XForms Processing LogicThe XForms document attains various intermediate states when a user is in the process of interaction with the Forms. XForms processing logic defines the when and what of the document state transitions. All XForms processing and state transitions are defined in terms of events and events handlers (actions). XForms processing
Note: The xsd:positiveInterger denotes an XML Schema type positive integer where xsd: is the namespace prefix for XML Schema datatypes.
Note: The XForms model element DOES NOT contain any UI controls (such as input, select, textarea). The XForms model element merely contains the data needed for a form (as an XML document) and model item properties for each of the instance items in the XML instance document. Other elements that can occur in an XForms model are XForms submission element (<submission>), XML Schema element (<xsd:schema>), and XForms Action elements.

XHTML+XForms
8-14 Oracle Application Server Wireless Developer’s Guide
logic describes when the XForms processor must throw an event and the default behavior associated with the event.
The events mechanism in XForms follows the DOM Level 2 (DOM2) Events specification. In DOM2 Events, all events dispatched have a defined target node (node in the document tree). The events dispatched reach the target node (from the document root node) after an event capture phase. After reaching the target node, the event may (optionally) go through a bubbling phase. Additionally each event has a defined default action that is performed by the XForms processor after the capture and bubble phase. The default action may be cancelled by the document author if desired. The document author may register event handlers (also called actions), to a node in the document, using event listeners. The event handlers can be registered (to be executed) either during the event capture phase or during the event bubble phase. For more information on DOM2 Events, see DOM Level 2 Events specification (http://www.w3.org/TR/DOM-Level-2-Events/).
A document author can register event listeners using a declarative syntax defined by XML Events. XML Events, an events syntax for XML, defines attributes that enable an element to register itself as an event observer and attributes that enable an element to be an action handler. For more information on XML Events, see XML Events specification (http://www.w3.org/TR/xml-events/).
As stated in the beginning of the section, XForms processing logic defines a default set of events and actions that allow a document author to declaratively specify a document interaction model. This declarative model eliminates the need for scripting technologies user interaction support. XForms processing logic defines events that fall into categories of Form Initialization, Form Interaction, Processor Notifications and Form/Processor Errors.
The following example shows how an event handler (the xforms:send action) is registered to a DOMActivate event. In this example, the send element uses the ev:observer attribute to declare the trigger element as an observer (listener) of the DOMActivate event. When DOMActivate reaches the "trigger" element, the processor detects that the trigger element is listening for the particular event and the processor also detects the send element is the handler defined by the trigger as an event handler. The processor performs the actions defined in response to a given event; in this case a send (submit) action
<xforms:trigger id="SubmitButton" xmlns:xforms="http://www.w3.org/2002/xforms/cr"> <xforms:label>Submit</xforms:label>
<!-- Event observer is the trigger and event action is the submit -->

XHTML+XForms
Authoring Mobile Browser and Voice Applications 8-15
<xforms:send ev:observer="SubmitButton" ev:event="DOMActivate" submission="ExpenseSave"/> </xforms:trigger>
8.2.2.8 XForms User Interface ComponentsIn addition to model and processing logic, XForms defines an abstract set of User Interface Controls. User interface components define the intent of a UI widget and do not dictate how the widget should be presented. An example is the select1 defined by XForms. select1 describes the intent of the control: only one item can be selected rather than presenting it as a list or a radio button control. Since these user interface controls only define the intent of a UI widget, the right presentation can be decided based on the constraints of the target device.
The user interface components in XForms do not contain the data that is captured or to be captured. The user interface components merely reflect the data in the instance data node (instance item) that the component is bound to. The user interface controls bind to the instance item using binding attributes defined in a control. The binding attributes defined by these components are bind, model, ref, and nodeset. A user interface control can directly bind to an instance item using the model and ref or nodeset attributes, or alternatively use the bind attribute that indirectly binds the control to the instance item (The bind attribute takes the id of an XForms bind element, which is bound to an instance item).
The following example shows a user interface control (input) that binds to an instance item. This example uses the model and ref attributes to bind the input control to the instance item.
<xforms:input model="first_model" ref="/my:example/my:datanode1"> <xforms:label>Input Label</xforms:label></xforms:input>
The following example shows a user interface control (input) that binds to an instance item. This example uses the bind attribute to bind the input control to the instance item.
Note: In both the XForms model and XForms processing logic, no specific user interface controls have been declared. This clear separation allows the XForms Model and Processing logic to be used with user interface components provided by a host language (such as WML or HTML Forms).
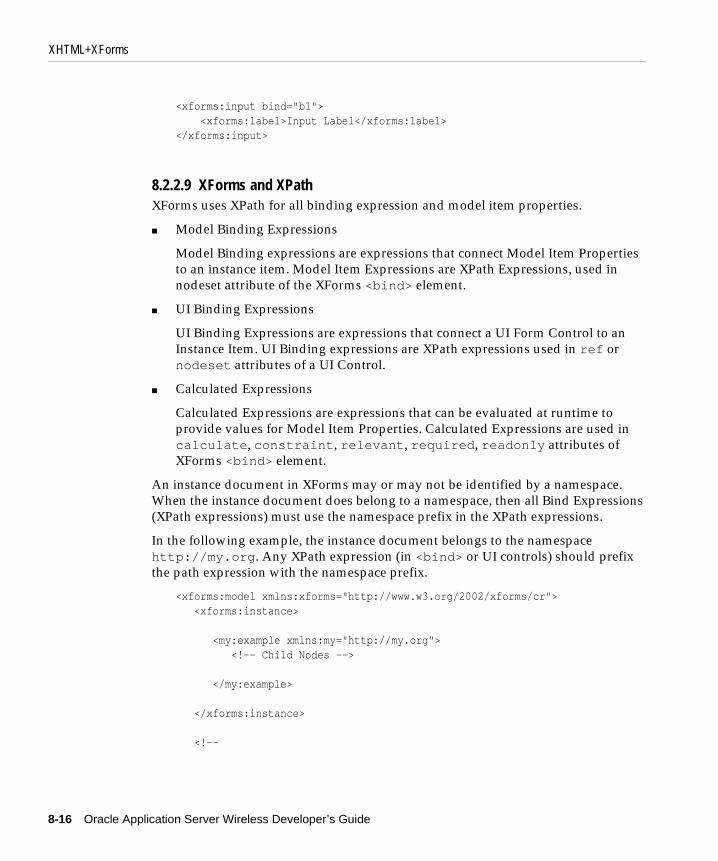
XHTML+XForms
8-16 Oracle Application Server Wireless Developer’s Guide
<xforms:input bind="b1"> <xforms:label>Input Label</xforms:label></xforms:input>
8.2.2.9 XForms and XPathXForms uses XPath for all binding expression and model item properties.
■ Model Binding Expressions
Model Binding expressions are expressions that connect Model Item Properties to an instance item. Model Item Expressions are XPath Expressions, used in nodeset attribute of the XForms <bind> element.
■ UI Binding Expressions
UI Binding Expressions are expressions that connect a UI Form Control to an Instance Item. UI Binding expressions are XPath expressions used in ref or nodeset attributes of a UI Control.
■ Calculated Expressions
Calculated Expressions are expressions that can be evaluated at runtime to provide values for Model Item Properties. Calculated Expressions are used in calculate, constraint, relevant, required, readonly attributes of XForms <bind> element.
An instance document in XForms may or may not be identified by a namespace. When the instance document does belong to a namespace, then all Bind Expressions (XPath expressions) must use the namespace prefix in the XPath expressions.
In the following example, the instance document belongs to the namespace http://my.org. Any XPath expression (in <bind> or UI controls) should prefix the path expression with the namespace prefix.
<xforms:model xmlns:xforms="http://www.w3.org/2002/xforms/cr"> <xforms:instance>
<my:example xmlns:my="http://my.org"> <!-- Child Nodes -->
</my:example>
</xforms:instance> <!--

XHTML+XForms
Authoring Mobile Browser and Voice Applications 8-17
The nodeset attribute use the "my:" prefix to address the
<example> element in the instance. Also the "my:" prefix must
be defined in the bind element or in one of the ancestors nodes
of the bind element --> <bind nodeset="/my:example" ...>
</xforms:model>
8.2.2.10 XHTML as Host Language for XFormsAs stated in the previous sections, XForms only provides components required for form processing. XForms does not define a complete document model. The World Wide Web Consortium (W3C) is working on the next generation of XHTML, XHTML 2.0, which will make XForms an integral part of XHTML. XHTML2.0 currently is a working draft that does not, yet, clearly specify how XForms will be integrated into XHTML 2.0.
OracleAS Wireless supports XForms processing using XHTML as the containing document for XForms. In this new document model, called XHTML+XForms, the XForms <model> element belongs to the <head> section of an XHTML document, Form controls and Forms User Interface components belong in the <body> of an XHTML document. OracleAS Wireless supports XHTML modules (elements) based on XHTML Basic with some additional modules, but replaces Forms Module in XHTML Basic with XForms.
XForms Forms Controls (such as inputs, selects, and textareas) are treated as XHTML inline content, that is, they can occur where any inline element (such as span or strong) can occur with certain restrictions. See Appendix A, "XHTML Modules Supported" for more details on the content model.
XForms User Interface components (such as groups, switch/cases, and repeats) are treated as an XHTML block content model, that is, they can occur where any block elements (such as div) can occur with certain restrictions. See Appendix A, "XHTML Modules Supported" for more details on the content model.
8.2.2.11 Setting Document Content Type and Profile AttributesTo enable OracleAS Wireless to identify a remote document as XHTML+XForms, the MIME media-type (content type) of the response document must be set to application/vnd.oracle.xhtml+xforms.

XHTML+XForms
8-18 Oracle Application Server Wireless Developer’s Guide
To enable OracleAS Wireless Server to determine if a document conforms to the XHTML+XForms content model as defined by OracleAS Wireless, all conformant documents must set the profile parameter in <html> element to http://xmlns.oracle.com/ias/dtds/xhtml+xforms/0.9.0/1.0.
The following example shows a JSP page that sets the correct content type and also sets the correct profile attribute:
<?xml version = "1.0"?>
<%@ page contentType="application/vnd.oracle.xhtml+xforms"%>
<html xmlns="http://www.w3.org/1999/xhtml"
xmlns:my="abc"
xmlns:ev="http://www.w3.org/2001/xml-events"
xmlns:xforms="http://www.w3.org/2002/xforms/cr"
profile="http://xmlns.oracle.com/ias/dtds/xhtml+xforms/0.9.0/1.0"> <head> .... </head> <body> .... </body></html>
8.2.3 Hello World Application Using XHTML and XForms
8.2.3.1 About Hello World and Basic Requirements■ About the Hello World Application
The Hello World application displays an input control to the user. The users may enter any text (string) data as value for the input control. Upon submission of the page, a Hello World message appears in a response page with the user’s entered value.

XHTML+XForms
Authoring Mobile Browser and Voice Applications 8-19
■ Server Requirements
The Hello World application requires an application server that can host and serve its JSP pages.
Application or document authors must be familiar with XML, XHTML and CSS in order to understand these materials. You should also have read the previous sections of the document and have a basic knowledge of XForms and XPath technologies.
8.2.3.2 Writing the Hello World Application1. The XHTML document must first contain <xml> declaration. Add the
following as the first set characters to your document:
<?xml version = "1.0"?>
2. Add <html> element as the document root (immediately following the <xml> declaration). Include both the start tag and the end of <html> element. Ensure that you include the default namespace declaration (xmlns attribute on the <html> element sets the default namespace to HTML). Also add the profile attribute to the <html> element:
<?xml version = "1.0"?> <html xmlns="http://www.w3.org/1999/xhtml" profile="http://xmlns.oracle.com/ias/dtds/xhtml+xforms/0.9.0/1.0"> </html>
3. Add the <head> and <body> sections of an XHTML document:
<?xml version = "1.0"?> <html xmlns="http://www.w3.org/1999/xhtml" profile="http://xmlns.oracle.com/ias/dtds/xhtml+xforms/0.9.0/1.0"> <head> <title>My First Hello World Application</title> </head> <body> <h1>My First XForms Page</h1> <div> <p>Welcome to my first XForms Page.</p>
Note: This tutorial uses JSP as a CGI programming environment; authors can use any CGI programming environment with which they are familiar.
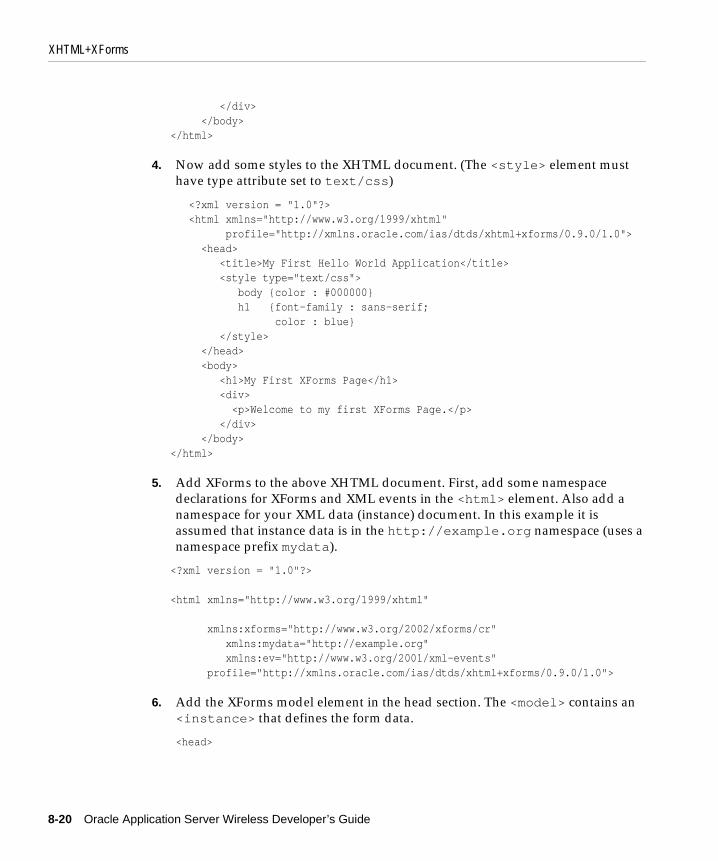
XHTML+XForms
8-20 Oracle Application Server Wireless Developer’s Guide
</div> </body> </html>
4. Now add some styles to the XHTML document. (The <style> element must have type attribute set to text/css)
<?xml version = "1.0"?> <html xmlns="http://www.w3.org/1999/xhtml" profile="http://xmlns.oracle.com/ias/dtds/xhtml+xforms/0.9.0/1.0"> <head> <title>My First Hello World Application</title> <style type="text/css"> body {color : #000000} h1 {font-family : sans-serif; color : blue} </style> </head> <body> <h1>My First XForms Page</h1> <div> <p>Welcome to my first XForms Page.</p> </div> </body> </html>
5. Add XForms to the above XHTML document. First, add some namespace declarations for XForms and XML events in the <html> element. Also add a namespace for your XML data (instance) document. In this example it is assumed that instance data is in the http://example.org namespace (uses a namespace prefix mydata).
<?xml version = "1.0"?>
<html xmlns="http://www.w3.org/1999/xhtml"
xmlns:xforms="http://www.w3.org/2002/xforms/cr" xmlns:mydata="http://example.org" xmlns:ev="http://www.w3.org/2001/xml-events" profile="http://xmlns.oracle.com/ias/dtds/xhtml+xforms/0.9.0/1.0">
6. Add the XForms model element in the head section. The <model> contains an <instance> that defines the form data.
<head>

XHTML+XForms
Authoring Mobile Browser and Voice Applications 8-21
<title>My First Hello World Application</title>
<style type="text/css"> .... </style> <xforms:model id="m1"> <xforms:instance> <mydata:example> <mydata:name/> </mydata:example> </xforms:instance></xforms:model> </head>
7. Add the UI Control that accepts the visitor’s name. To do this, use an xforms:input control to the contents of <body>. The input control binds to the instance item (name), defined in the xforms:instance, using the model and ref attributes.
<body>
<h1>My First XForms Page</h1>
<div>
<p>Welcome to my first XForms Page.</p> <p> <xforms:input model="m1" ref="/mydata:example/mydata:name"> <xforms:label>Hello Visitor, Please Enter your name</xforms:label> <xforms:help>Enter you name</xforms:help> <xforms:hint>Please Enter you name</xforms:hint> </xforms:input> </p>
</div> </body>
8. Finally to submit the data entered by the user, define a submission page to where the date will be submitted. To activate the submit, you must define a
Note: The ref attribute uses an XPath Expression that contains the path expression for the name element from the instance document (ref="mydata:example/mydata:name).
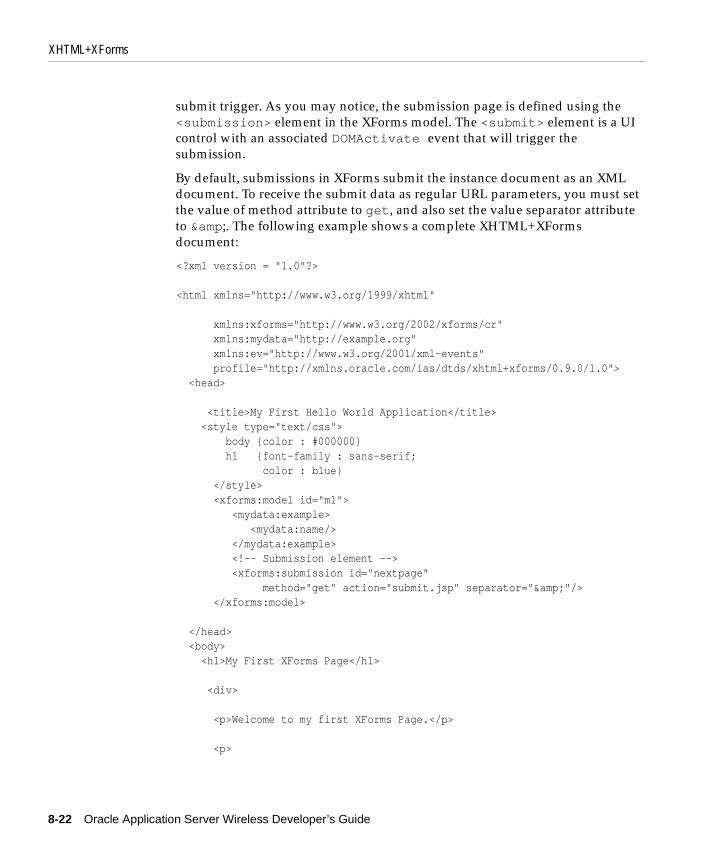
XHTML+XForms
8-22 Oracle Application Server Wireless Developer’s Guide
submit trigger. As you may notice, the submission page is defined using the <submission> element in the XForms model. The <submit> element is a UI control with an associated DOMActivate event that will trigger the submission.
By default, submissions in XForms submit the instance document as an XML document. To receive the submit data as regular URL parameters, you must set the value of method attribute to get, and also set the value separator attribute to &. The following example shows a complete XHTML+XForms document:
<?xml version = "1.0"?>
<html xmlns="http://www.w3.org/1999/xhtml"
xmlns:xforms="http://www.w3.org/2002/xforms/cr" xmlns:mydata="http://example.org" xmlns:ev="http://www.w3.org/2001/xml-events" profile="http://xmlns.oracle.com/ias/dtds/xhtml+xforms/0.9.0/1.0"> <head>
<title>My First Hello World Application</title> <style type="text/css"> body {color : #000000} h1 {font-family : sans-serif; color : blue} </style> <xforms:model id="m1"> <mydata:example> <mydata:name/> </mydata:example> <!-- Submission element --> <xforms:submission id="nextpage" method="get" action="submit.jsp" separator="&"/> </xforms:model>
</head> <body> <h1>My First XForms Page</h1>
<div>
<p>Welcome to my first XForms Page.</p>
<p>

XHTML+XForms
Authoring Mobile Browser and Voice Applications 8-23
<xforms:input model="m1" ref="/mydata:example/mydata:name">
<xforms:label>Hello Visitor, Please Enter your name</xforms:label>
<xforms:help>Enter you name</xforms:help>
<xforms:hint>Please Enter you name</xforms:hint>
</xforms:input>
</p> <p> To submit please select the submit trigger <xforms:trigger>
<xforms:label>Submit</xforms:label> <xforms:send submission="nextpage" ev:event="DOMActivate"/>
</xforms:trigger> </p>
</div> </body> </html>
8.2.3.3 Deploy the Hello World Page and Provide a CGI ProgramNow the XHTML+XForms document is ready to be deployed and tested. Authors may deploy the document on their web servers, making sure, at deployment time, to set the MIME media type (content-type) of the document to application/vnd.oracle.xhtml+xforms. The setting of the MIME media type can be done either programmatically or using web server configuration files. Authors must also provide a page that acts as the submit page for the example. This page will receive the form data (from the Hello World page) as query parameters.
8.2.4 OracleAS Wireless and XHTML+XForms+CSSOracleAS Wireless supports XHTML+XForms+CSS as the next generation of publishing language supporting device-independent authoring. This section provides more details on the authoring XHTML+XForms+CSS for specific channels using OracleAS Wireless.

XHTML+XForms
8-24 Oracle Application Server Wireless Developer’s Guide
OracleAS Wireless supports three different modes of rendering XHTML+XForms documents for supporting this breadth of devices. The three different modes are:
■ Devices that support no client code
These are devices that support a built-in user agent (browser) supporting only a limited set of functionality and providing no way for extending user agent behavior.
To support these devices, OracleAS Wireless behaves like a server-side virtual browser. The XHTML+XForms page is cached on the server, and only a view of the XHTML XForms is rendered to the device. All XForms events are handled on the server side; the device simply renders the contents of the updated state of the XHTML XForms document.
This is an example of a model in which the page processing (XForms Processor) and rendered view are distributed over the network. In this model the XForms application is not as interactive (in comparison to XForms-based browsers on the client), but allows the application to gracefully degrade on devices having limited processing power.
OracleAS Wireless supports this model processing and rendering for all Phone (WAP) and PDA (PocketPC, Palm) devices.
■ Devices that support a scripting environment
These are devices that support a built-in user agent (browser) supporting a scriptable environment. In this model, the XForms processor, on the server side, generates scripts (at runtime) to offload some of the processing logic to the client side, thereby bringing greater interactivity to the environment.
To support these devices, OracleAS Wireless behaves like a server-side virtual browser, on which the XHTML XForms pages are cached on the server, and only a view of the XHTML+XForms is rendered to the device. While generating the view for the client to render, the server also generates script code, allowing certain basic actions to be performed on the client (using scripts). The XForms processor on the server side still handles most of the events and actions (especially the non-trivial actions such as insert and delete).
This is also an example of a model in which the parts of page processing (XForms Processor) and rendered view are distributed over the network. This model utilizes the fact that the client side scripting brings greater interactivity, while being cognizant of the fact that the complete XForms processing model cannot be supported by these scripting environments.

XHTML+XForms
Authoring Mobile Browser and Voice Applications 8-25
OracleAS Wireless supports this model for aural (voice) rendering that uses a Voice Gateway. Typically the Voice Gateway and the OracleAS Wireless Server are connected on a high speed network; this allows OracleAS Wireless Server to send a large amount of scripting data.
■ Devices that can support a native Client
These are devices that allow implementation of native code and enable them to be a plug-in to the browser, while using the browser as the rendering container. In this model, the XForms processor resides on the client device as a plug-in, while the server performs pre-processing steps.
This model affords the most interactivity and allows OracleAS Wireless to better support XForms pages. In this model, both the page processing (XForms processing) and view rendering occur in a single process context, hence support for more of the XForms-specified features.
OracleAS Wireless provides a plug-in for the Microsoft Internet Explorer browser for Win32 environments (Laptop devices). Future releases of the software will support more devices (such as, WinCE and Pocket PC devices).
OracleAS Wireless dynamically selects the preferred mode for a request based on the device making a request. This dynamic discovery of the correct rendering mode allows OracleAS Wireless to support XHTML+XForms on a wide variety of devices. Developers of XForms pages should be aware of such varied rendering model and author XForms pages in a fashion that will retain the main functionality in all modes.
8.2.4.1 OracleAS Wireless XHTML, XForms and CSS SupportOracleAS Wireless combines XHTML, XForms and CSS technologies to provide a multi-channel authoring model. It supports a subset of all these technologies suitable for mobile applications.
OracleAS Wireless supports XHTML Basic (with some additional modules). The Forms module in XHTML Basic is replaced by XForms. OracleAS Wireless additionally adds some extra modules, namely: Navigation List (from XHTML2.0), MXML Media Attribute Module and Speech Grammar Module. For a list of XHTML modules supported, see Appendix A, "XHTML Modules Supported".
OracleAS Wireless also supports CSS Mobile Profile defined by W3C. OracleAS Wireless additionally adds some extra CSS Properties, namely: CSS aural (styling for voice rendering), CSS Media Queries (for media feature based styling) and Oracle CSS Layout Extensions (for styling XForms). Since OracleAS Wireless renders using the browser on the client device, not all properties are supported on

XHTML+XForms
8-26 Oracle Application Server Wireless Developer’s Guide
all devices; OracleAS Wireless attempts to find a reasonable representation of the style in such cases. For a list of CSS properties supported, see Section D, "OracleAS Wireless CSS Support" and Section 8.2.5, "Styling and Embedding Content Based on Media".
Oracle Application Server Wireless also supports a subset of features specified in W3C XForms 1.0 Candidate Recommendation at (http://www.w3.org/TR/2002/CR-xforms-20021112/). For a list of features supported, see Section C, "XForms Specification Support".
OracleAS Wireless defines a schema that combines the XHTML Modules (with additional modules) and XForms modules as supported. All XHTML+XForms documents, to be rendered and supported by OracleAS Wireless must:
■ conform to the XHTML+XForms schema defined by OracleAS Wireless,
■ be served to OracleAS Wireless with a MIME media type (Content-type) application/vnd.oracle.xhtml+xforms,
■ indicate the profile conformance by setting the profile attribute (in html element) to http://xmlns.oracle.com/ias/dtds/xhtml+xforms/0.9.0/1.0.
8.2.4.2 OracleAS Wireless and XML Events SupportXForms uses DOM2 Events for supporting processing logic and uses XML Events syntax to represent them in an XML document. Even though XML Events allows developers to attach event listeners (or observers) to any XML element (XForms and XHTML elements), OracleAS Wireless restricts the list of nodes to which events may be attached. With OracleAS Wireless, events listeners may be attached only to XForms forms control (input, secret, textarea, trigger, select1, select, submit) elements. OracleAS Wireless also supports attaching event listeners to the html body element and html navigation list (html:nl) elements. OracleAS Wireless DOES NOT support attaching events to any other XForms (such as xforms:group, xforms:item, xforms:itemset) and HTML elements (such as p, div).
8.2.4.3 Visual Applications and XHTML+XForms
8.2.4.3.1 Overview OracleAS Wireless enables web applications to be accessible from a variety of mobile devices, such as phones and PDAs. Access to these applications can also be accomplished using a browser interface or using a text-based interface such as SMS or Instant Messaging Interface. OracleAS Wireless supports most of the popular WML/HDML/HTML browsers, SMS protocols and popular IM protocols (Yahoo, AOL, MSN and Jabber). The following sections include best practices for

XHTML+XForms
Authoring Mobile Browser and Voice Applications 8-27
authoring applications which will be viewed on a variety of visual devices that not only differ in device form factor, but also in network interfaces supported.
8.2.4.3.2 Visual Applications for PDA/Laptop Devices Even though most PDA/laptop devices have HTML Browsers, there are significant differences in the HTML versions of HTML supported by these browsers. For instance, a primary difference between laptop and PDA devices is in their support for CSS Properties; most PDA devices support HTML 3.2 browsers, while most laptops support HTML 4.0 browsers with CSS support.
OracleAS Wireless treats PDAs and laptops as different media types (as defined by the CSS Specifications); a laptop device can be considered of media type screen while a PDA is considered media type handheld. Developers may use the media type and media properties (such as width, height, color) to lay out content of a page differently on these devices. For example, using a three column layout on a screen (laptop) media and a two column layout on a handheld (PDA) media.
Another important difference is that on some laptop environments, form processing and rendering can be supported using a OracleAS Wireless Client plugin to the browser. This rendering mode requires installation of additional software on the laptop device.
For laptop devices, OracleAS Wireless supports two modes of rendering:
■ Server-side transformation that renders to the browser on the laptop. In this mode, the server still behaves like a virtual browser, maintaining the state of the XForms page on the server. The server uses the browser on the laptop to render the transformed HTML Markup from the server.
■ Wireless Client plugin that supports XForms on the local client device. Using this plugin, OracleAS Wireless delegates most of the processing to the client side, while doing some pre-processing steps on the server. This plugin enables the browser to support an XHTML+XForms page on the device, hence most of the forms processing is performed on the device leading to fewer round trips to the OracleAS Wireless server. OracleAS Wireless Client can be invoked using an omc:// protocol scheme in the URL. For example: omc://wireless-host.com/ptg/rm.
For PDA devices, OracleAS Wireless supports only server-side based transformation, and all form processing happens on the server side. OracleAS
Note: This plugin is available for Internet Explorer browser on Windows platforms only.

XHTML+XForms
8-28 Oracle Application Server Wireless Developer’s Guide
Wireless uses HTML 3.2 tags for controlling style properties on PDA devices. This implies the all the CSS Properties (Mobile Profile) may not be supported on a PDA device, especially the box and background properties (Refer to CSS Properties Supported section).
8.2.4.3.3 Visual Applications for Phone Devices OracleAS Wireless supports a variety of phone device browsers available, including HDML, WML, XHTML MP, CHTML browsers. There are two varieties of phone browsers available:
■ Traditional WML/HDML-based browsers that hold multiple views (cards) in a single document. Users can navigate between the stack of views (cards) on the client (without a server round trip). These media can be considered as a paged media, which shows a single document in multiple page layouts where only one page is visible to a user at a time.
■ XHTML MP and CHTML browsers are just like HTML browsers where all the document content is displayed in a single view.
OracleAS Wireless treats all phones as media type handheld. Additionally, devices that support multiple card views are considered to have a special media feature called paged. For devices that support the paged media feature, developers can use CSS Page Break properties to control how to split documents into multiple cards. The following example shows each div in a separate card (See Section 8.2.5, "Styling and Embedding Content Based on Media" for more details CSS media queries and mxml:media attribute).
<html xmlns="http..." ....> .... <style type="text/css"> @media handheld and (paged) { body > div {page-break-after: always} } </style> .... <body> <div> Content on Card 1 on paged media </div> <div> Content on Card 2 on paged media </div> </body> </html>
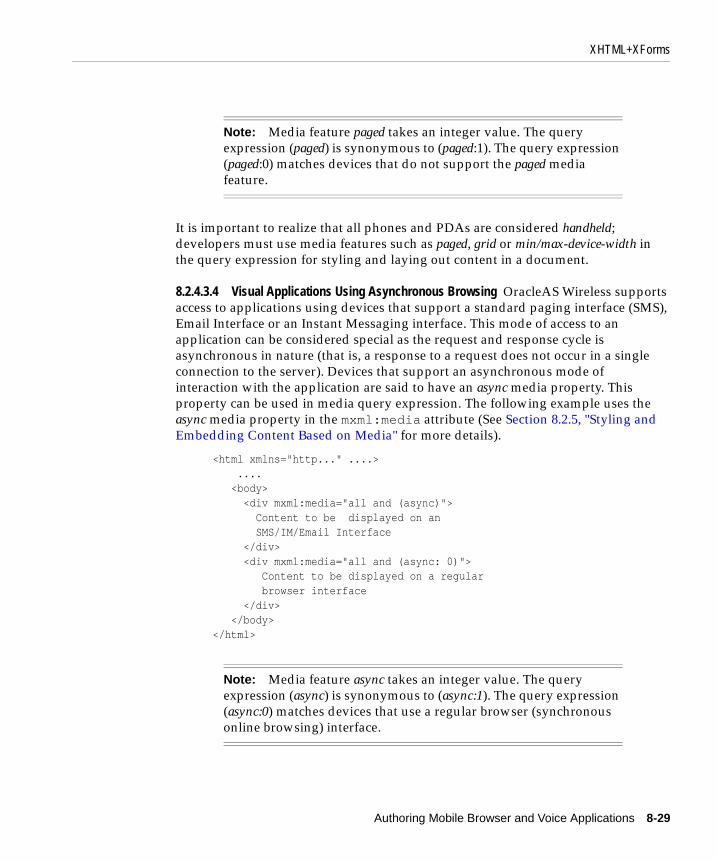
XHTML+XForms
Authoring Mobile Browser and Voice Applications 8-29
It is important to realize that all phones and PDAs are considered handheld; developers must use media features such as paged, grid or min/max-device-width in the query expression for styling and laying out content in a document.
8.2.4.3.4 Visual Applications Using Asynchronous Browsing OracleAS Wireless supports access to applications using devices that support a standard paging interface (SMS), Email Interface or an Instant Messaging interface. This mode of access to an application can be considered special as the request and response cycle is asynchronous in nature (that is, a response to a request does not occur in a single connection to the server). Devices that support an asynchronous mode of interaction with the application are said to have an async media property. This property can be used in media query expression. The following example uses the async media property in the mxml:media attribute (See Section 8.2.5, "Styling and Embedding Content Based on Media" for more details).
<html xmlns="http..." ....> .... <body> <div mxml:media="all and (async)"> Content to be displayed on an SMS/IM/Email Interface </div> <div mxml:media="all and (async: 0)"> Content to be displayed on a regular browser interface </div> </body> </html>
Note: Media feature paged takes an integer value. The query expression (paged) is synonymous to (paged:1). The query expression (paged:0) matches devices that do not support the paged media feature.
Note: Media feature async takes an integer value. The query expression (async) is synonymous to (async:1). The query expression (async:0) matches devices that use a regular browser (synchronous online browsing) interface.
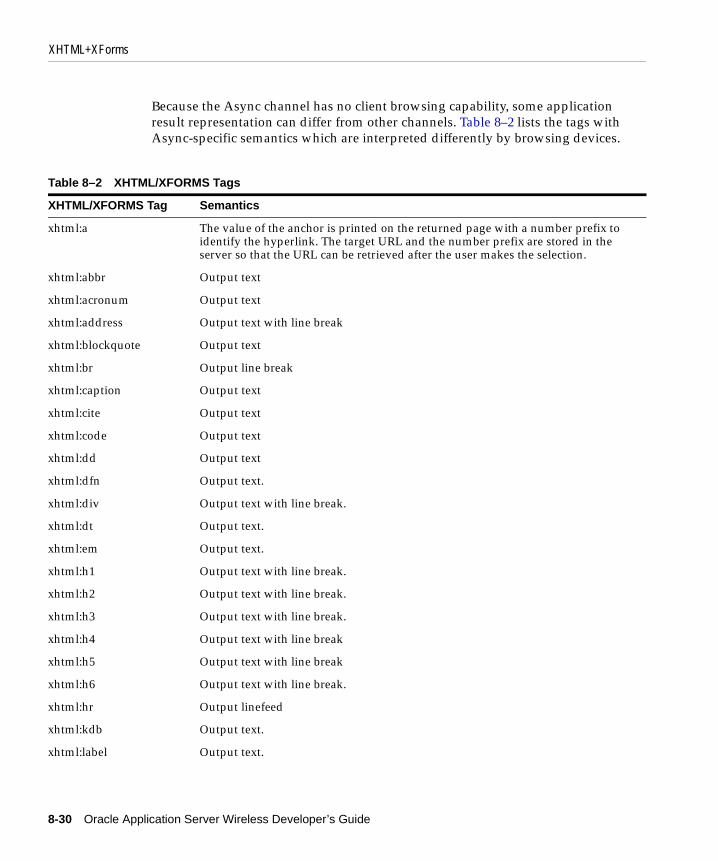
XHTML+XForms
8-30 Oracle Application Server Wireless Developer’s Guide
Because the Async channel has no client browsing capability, some application result representation can differ from other channels. Table 8–2 lists the tags with Async-specific semantics which are interpreted differently by browsing devices.
Table 8–2 XHTML/XFORMS Tags
XHTML/XFORMS Tag Semantics
xhtml:a The value of the anchor is printed on the returned page with a number prefix to identify the hyperlink. The target URL and the number prefix are stored in the server so that the URL can be retrieved after the user makes the selection.
xhtml:abbr Output text
xhtml:acronum Output text
xhtml:address Output text with line break
xhtml:blockquote Output text
xhtml:br Output line break
xhtml:caption Output text
xhtml:cite Output text
xhtml:code Output text
xhtml:dd Output text
xhtml:dfn Output text.
xhtml:div Output text with line break.
xhtml:dt Output text.
xhtml:em Output text.
xhtml:h1 Output text with line break.
xhtml:h2 Output text with line break.
xhtml:h3 Output text with line break.
xhtml:h4 Output text with line break
xhtml:h5 Output text with line break
xhtml:h6 Output text with line break.
xhtml:hr Output linefeed
xhtml:kdb Output text.
xhtml:label Output text.

XHTML+XForms
Authoring Mobile Browser and Voice Applications 8-31
xhtml:li Output indented text. A number prefix is added in front of the text as the hyperlink selector if its parent element is nl.
xhtml:object Output text.
xhtml:p Output text with line break.
xhtml:param Ignored (not applicable to Async-enabled devices).
xhtml:pre Output pre-formatted text with line breaks.
xhtml:q Output text
xhtml:samp Output text.
xhtml:span Output text.
xhtml:strong Output text.
xhtml:td Output text with each entry separated by a delimiter. The default delimiter is the comma (,).
xhtml:tr Output text with line break.
xhtml:var Output text.
xforms:alert Output text.
xforms:filename Ignored (not applicable to Async-enabled devices).
xforms:help Output text.
xforms:hint Ignored (not applicable to Async-enabled devices).
xforms:input Output label with the input marker [] at the end.
xforms:item Out the indented item label with a number prefix to identify the item selection.
xforms:itemset Output the indented item label with a number prefix
xforms:label Output text.
xforms:mediatype Ignored (not applicable to Async-enabled devices).
xforms:message Output text.
xforms:output Output text.
xforms:range Output label with input marker [] at the end.
xforms:secret Output label with the input maker [] at the end.
Table 8–2 XHTML/XFORMS Tags
XHTML/XFORMS Tag Semantics

XHTML+XForms
8-32 Oracle Application Server Wireless Developer’s Guide
xforms:select Output label with the input marker [..] at the end. The user of the device can make multiple selections by assigning multiple item prefixes to this form control. For example, in the following document:
<xforms:select ref="my:warehouse" selectUI="listbox"> <xforms:label>Select your favorite sports</xforms:label> <xforms:item> <xforms:label>Basketball</forms:label> <xforms:value>basketball</xforms:value> </xforms:item> <xforms:item> <xforms:label>Football</forms:label> <xforms:value>football</xforms:value> </xforms:item> <xforms:label>Basketball</forms:label> <xforms:value>basketball</xforms:value> </xforms:item> <xforms:item> <xforms:label>Football</forms:label> <xforms:value>football</xforms:value> </xforms:item> </xforms:select> ...
Should be transformed to
Select your favorite sport [...] 1 Basketball 2 Baseball 3 Football
The user responds by selecting 1 2 for both basketball and baseball.
xforms:select1 Output label with the input marker [] at the end.
Table 8–2 XHTML/XFORMS Tags
XHTML/XFORMS Tag Semantics

XHTML+XForms
Authoring Mobile Browser and Voice Applications 8-33
xforms:submit The element can be presented as either of the following options:
■ No input text for the element if the sum of the number of submit and trigger elements in the document is less than 2. Otherwise:
■ A select1 construct is created as the first form control with labels of the submit and trigger elements in the document to be item options. The label of the submit element should be output in the relative document context position.
For example, in the document:
...<xforms:input ref="my:name"> <xforms:label>Name:</xforms:label><x/forms:input>
<xforms:submit submission="form1"> <xforms:label2">Submit</xforms:label><x/forms:submit>
<xforms:submit Submission="form2"> <xforms:label>Reset</xforms:label><x/forms:submit>...
should be converted to
Actions []1 #Submit2 #ResetName: []
#Submit#Reset
Table 8–2 XHTML/XFORMS Tags
XHTML/XFORMS Tag Semantics

XHTML+XForms
8-34 Oracle Application Server Wireless Developer’s Guide
8.2.4.4 Voice Applications and XHTML+XFormsOracleAS Wireless supports voice access to XForms applications. Because OracleAS Wireless transforms XForms pages to VoiceXML and ECMAScript, voice access using OracleAS Wireless requires a conformant voice gateway that supports VoiceXML 1.0 or 2.0 and ECMAScript. OracleAS Wireless transforms XForms pages to VoiceXML. The OracleAS Wireless transformation process generates VoiceXML (VoiceXML executable content) for aural presentation, and also dynamically generates ECMAScript functions that implement a limited XForms processing model that executes on the voice gateway.
The primary execution required for XForms documents is the processing of XForms actions. Depending on its type, an XForms action will either be performed by VoiceXML executable content and dynamically generated ECMAScript, or handled on the server depending on the processing requirements of the actions and the capabilities of the VoiceXML and ECMAScript. For example, actions such as <message> and <setvalue> are executed on the client browser using executable content and ECMAScript, whereas actions such as <insert> or <delete> use server-side support, as they need a resource-intensive XML/XPath processor.
The following XForms actions are performed on the server:
■ insert and delete
■ setindex
■ send (submit)
■ reset
■ load
xforms:textarea Output label with input marker [] at the end.
xforms:trigger The element could be presented in one of the two ways shown below.
■ No output text for the element if the sum of the number of submit and trigger element in the document is less than 2. Otherwise,
■ A select1 construct will be created as the first form control with labels of the submit and trigger elements in the document to be the item options. The label of the submit element should be output in the relative document context position.
xforms:upload Ignored; not applicable to Async devices.
Table 8–2 XHTML/XFORMS Tags
XHTML/XFORMS Tag Semantics
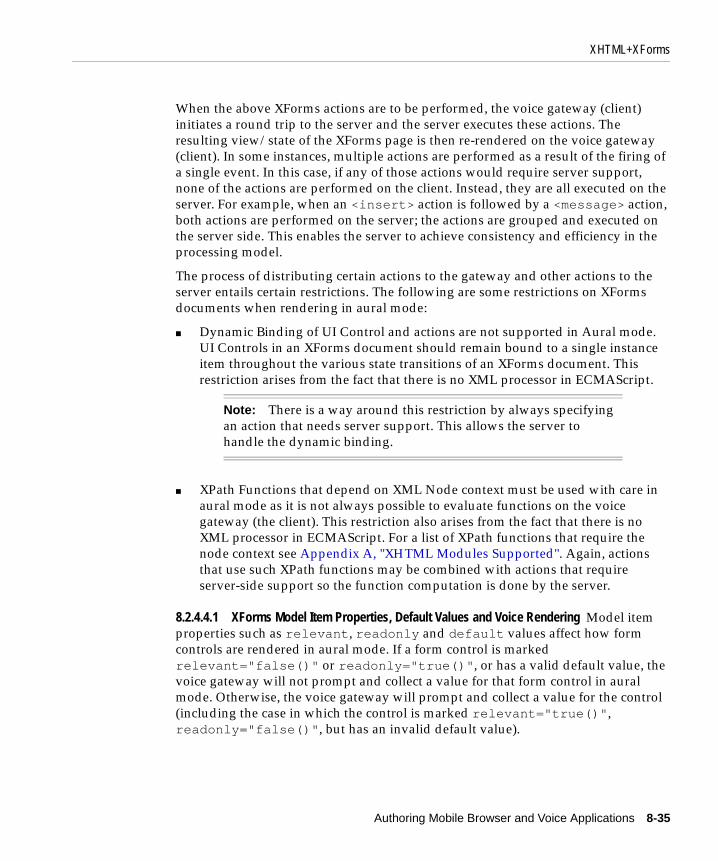
XHTML+XForms
Authoring Mobile Browser and Voice Applications 8-35
When the above XForms actions are to be performed, the voice gateway (client) initiates a round trip to the server and the server executes these actions. The resulting view/state of the XForms page is then re-rendered on the voice gateway (client). In some instances, multiple actions are performed as a result of the firing of a single event. In this case, if any of those actions would require server support, none of the actions are performed on the client. Instead, they are all executed on the server. For example, when an <insert> action is followed by a <message> action, both actions are performed on the server; the actions are grouped and executed on the server side. This enables the server to achieve consistency and efficiency in the processing model.
The process of distributing certain actions to the gateway and other actions to the server entails certain restrictions. The following are some restrictions on XForms documents when rendering in aural mode:
■ Dynamic Binding of UI Control and actions are not supported in Aural mode. UI Controls in an XForms document should remain bound to a single instance item throughout the various state transitions of an XForms document. This restriction arises from the fact that there is no XML processor in ECMAScript.
■ XPath Functions that depend on XML Node context must be used with care in aural mode as it is not always possible to evaluate functions on the voice gateway (the client). This restriction also arises from the fact that there is no XML processor in ECMAScript. For a list of XPath functions that require the node context see Appendix A, "XHTML Modules Supported". Again, actions that use such XPath functions may be combined with actions that require server-side support so the function computation is done by the server.
8.2.4.4.1 XForms Model Item Properties, Default Values and Voice Rendering Model item properties such as relevant, readonly and default values affect how form controls are rendered in aural mode. If a form control is marked relevant="false()" or readonly="true()", or has a valid default value, the voice gateway will not prompt and collect a value for that form control in aural mode. Otherwise, the voice gateway will prompt and collect a value for the control (including the case in which the control is marked relevant="true()", readonly="false()", but has an invalid default value).
Note: There is a way around this restriction by always specifying an action that needs server support. This allows the server to handle the dynamic binding.

XHTML+XForms
8-36 Oracle Application Server Wireless Developer’s Guide
8.2.4.4.2 Extension Events for Voice Applications To support voice applications, OracleAS Wireless has defined a list of voice events that can be activated in aural mode. The events defined for voice applications are:
■ vxml-nomatch
This event is dispatched when the voice grammar recognition cannot match a user utterance with any of the utterances it is listening for in the current scope.
Bubbles: Yes
Cancelable: Yes
Context Info: none
Default processing for this event is to read a list of possible options available for the user. If the event’s target is <nl>, <select>, or <select1>, the items or options under the target are read. Otherwise, the default processing is for the gateway to say a localized message asking the user to repeat his utterance or say help.
■ vxml-cancel
This is event is dispatched when the user says cancel.
Bubbles: Yes
Cancelable: Yes
Context Info: none
This is a notification event; default processing for this event is to do nothing.
■ vxml-exit
This is event is dispatched when the user says exit.
Bubbles: Yes
Cancelable: Yes
Context Info: none
Default processing for this event is to say a localized version of Goodbye, and then exit from the voice session.
■ vxml-error
This event is dispatched when an error occurs on the voice gateway. Voice gateway errors include syntactic or semantic errors in a document, or attempting to use telephony features that are not supported by the gateway.

XHTML+XForms
Authoring Mobile Browser and Voice Applications 8-37
Bubbles: Yes
Cancelable: Yes
Context Info: none
Default processing for this event is to say a localized message that an error occurred and then exit from the voice session.
■ vxml-error-badfetch
This event is dispatched when a fetch request of a resource fails.
Bubbles: Yes
Cancelable: Yes
Context Info: none
Default processing for this event is to say a localized message that a bad fetch has occurred and then exit from the voice session
■ vxml-main-menu
This event is dispatched when the user says main menu (Its intended use is to allow a service to handle the event by returning to a service-specific main menu document.
Bubbles: Yes
Cancelable: Yes
Context Info: none
This is a notification event; default processing for this event is to do nothing.
8.2.4.4.3 Extension Actions for Voice Applications OracleAS Wireless extends the list of XForms actions by defining custom actions in the MXML namespace.
■ mxml:handler
In visual applications, the screen provides a persistent view of the documents, to which the user can constantly refer for information. In voice applications, the view is transient; the user must remember what the system said in order to provide the correct response. Since voice applications depend on the user’s memory, the user may need an extended help and hint mechanism. However, this extended help or hint mechanism may be a source of annoyance for a more experienced user. To satisfy this need while accommodating a broad spectrum of users, voice applications typically provide messages based on the number of occurrences of an event. For example, it would be quite reasonable to assume

XHTML+XForms
8-38 Oracle Application Server Wireless Developer’s Guide
that when a user requests help twice, the user is looking for a more detailed help message.
To enable support actions based on the occurrence count of an event, OracleAS Wireless has extended the list of actions with a <handler> action defined in the MXML namespace. The <handler> action allows different handling based on the number of times the action has occurred, defined using the count attribute of the <catch> element. The following example uses the <mxml:handler> action that provides different help messages for the first and second occurrences of the xforms-help event.
<xforms:input> <mxml:handler ev:event="xforms-help"> <mxml:catch count="1"> <xforms:message>Brief Help Message</xforms:message> </mxml:catch> <mxml:catch count="3"> <xforms:message>Expanded Help Message</xforms:message> </mxml:catch> </mxml:handler></xforms:input>
■ mxml:disconnect
OracleAS Wireless supports voice access using a voice gateway that works over a telephony system. Users must dial in to the voice gateway to access the voice application. In such environments, it is sometimes useful for the author to be able to disconnect the call and end the user session. To support this, OracleAS Wireless defines an extension action <mxml:disconnect> in the MXML namespace.
8.2.4.4.4 Providing Help, Hint and No-Match Messages for Voice applications Voice applications typically provide messages to play for UI controls and navigation menus when the user says help, says something the gateway does not recognize
Note: The above example shows how to provide different help messages when a user invokes help the first time (count="1") and the third time (count="3"). If the user invokes help for the fourth time (count="4") the message defined for count="3" is used (as there is nothing defined for count="3"). Similarly when help is invoked for the second time (count="2"), the message defined in count="1" is used.

XHTML+XForms
Authoring Mobile Browser and Voice Applications 8-39
(no-match), or is silent for an extended period (no-input). In addition, most voice applications also declare default help, no-match, and no-input messages at the document (<html:body>) level.
UI Controls in XForms provide <help> and <hint> elements. By default the <help> element is played when the user says help, and the <hint> element is played when there is no user input (no-input).
If developers handle the xforms-help or xforms-hint events and do not want the default actions for help or hint to be executed, developers should use the defaultAction attribute of XML Events to prevent the default. The following example prevents the default action for the xforms-help event from occurring.
<xforms:input> <xforms:label>Input Control</xforms:label> <xforms:help>Default Help Message, not played.</xforms:help> <xforms:message ev:event="xforms-help" ev:defaultAction="cancel"> This help message is played. </xforms:message></xforms:input>
Voice applications are driven by user utterances, and it is not always possible to recognize what a user has said. In cases where a user’s utterance is not recognized, a vxml-nomatch event is thrown. The default response to this event is to say a list of options (if any) applicable for the context, but authors can provide their own handlers for vxml-nomatch, as in the following example:
<xforms:select1> <xforms:label>Select Control</xforms:label> <xforms:message ev:event="vxml-nomatch" ev:defaultAction="cancel"> Sorry, I didn’t understand what you said. </xforms:message> ...</xforms:select1>
Note: To provide help/hint/no-match at the document level (<html:body>) or for a navigation menu (<html:nl>), developers must declare these actions in the <xforms:model> section, and use the XML Events attribute observer to declare the <nl> and <body> elements as the observer. This is because XForms elements allow actions to be defined as child elements, but XHTML does not. The next version of XHTML is expected to resolve this issue.

XHTML+XForms
8-40 Oracle Application Server Wireless Developer’s Guide
The following example declares actions for the xforms-help event with the <body> element being the observer.
<html> <head> .... <xforms:model> <xforms:message ev:event="xforms-help" ev:observer="ID_of_BODY"> Document level help. </xforms:message> </xforms:model> ..... </head> <body id="ID_of_BODY"> ..... </body></html>
8.2.4.4.5 Embedding Voice Grammars In aural mode the content of a page is read to the user, and data is collected from the user through speech recognition or touchtone input. To enable data collection and command selection in aural mode, developers can provide grammars that specify a set of utterances or touchtone (using keypad) sequences that the voice gateway listens for using a speech recognition engine.
Multiple grammar formats have been defined by the various speech recognizer vendors, but they are not typically interoperable. Some vendor-specific grammar formats are enumerated in the table below. W3C has been working on a standard format, using an XML syntax, called the Speech Recognition Grammar Specification.
An author can embed grammars in an XForms document using the <grammar> element, which is contained in the <head> element. This grammar can then be associated with a UI control, link (anchor), or navigation list item (<li> in <nl>) using the html <object> element (see Section A, "XHTML Modules Supported" for examples). The type attribute of the <object> element specifies the format of grammar being used. This allows authors to use any available grammar format. The following table shows the grammar formats supported by OracleAS Wireless, with corresponding values for the type attribute.

XHTML+XForms
Authoring Mobile Browser and Voice Applications 8-41
The Built-in Grammars and Oracle Grammar Subset (OGS) are two grammar formats developers can use for all supported Voice Gateways. Other grammar types are not guaranteed to be transportable across different voice gateways (and are supported only for legacy applications), and these grammars may not be embedded into a document directly; they may be referenced by external URL only. Developers defining new grammars should use the Oracle Grammar Subset format for maximum portability.
Built-in grammars are grammars for certain common types of data collected by voice services. The types of data for which there are built-in grammars are: boolean, date, digits (which recognizes a string of numbers said individually, such as one one zero), currency, number (which recognizes a string of digits said as a single number, such as one hundred ten), phone, and time. In order to specify that a form control will be filled in with one of these types, the objects corresponding to the built-in speech and DTMF grammars for the type must be put in the extension element of the form control. In the following example, the input will be filled with a string of digits:
<xforms:input> <xforms:label>Digit String</xforms:label> <xforms:extension> <object type="application/vnd.oracle.builtin+grammar" data="builtin:grammar/digits"/> <object type="application/vnd.oracle.builtin+grammar" data="builtin:dtmf/digits"/> </xforms:extension></xforms:input>
Table 8–3 Grammar Formats Supported by OracleAS Wireless
Format Type (MimeT-ype)
GSL application/x-gsl
ABNF application/x-abnf
JSGF application/x-jsgf
XML Form of the W3C Speech Recognition Grammar Specification (SRGS)
application/srgs+xml
Built-in grammars application/vnd.oracle.builtin+grammar
Oracle Grammar Subset (OGS) application/vnd.oracle.srgs+xml
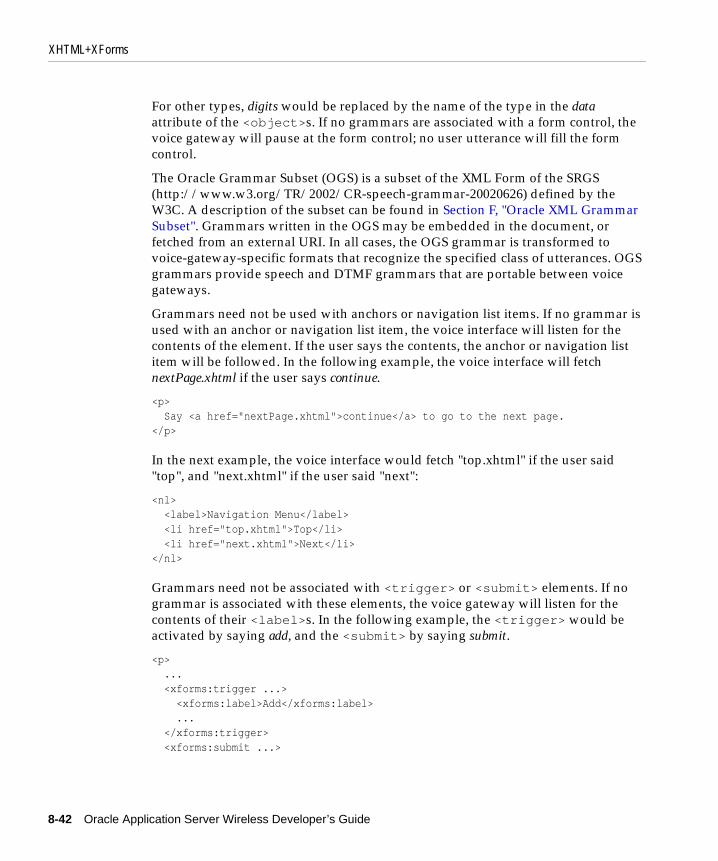
XHTML+XForms
8-42 Oracle Application Server Wireless Developer’s Guide
For other types, digits would be replaced by the name of the type in the data attribute of the <object>s. If no grammars are associated with a form control, the voice gateway will pause at the form control; no user utterance will fill the form control.
The Oracle Grammar Subset (OGS) is a subset of the XML Form of the SRGS (http://www.w3.org/TR/2002/CR-speech-grammar-20020626) defined by the W3C. A description of the subset can be found in Section F, "Oracle XML Grammar Subset". Grammars written in the OGS may be embedded in the document, or fetched from an external URI. In all cases, the OGS grammar is transformed to voice-gateway-specific formats that recognize the specified class of utterances. OGS grammars provide speech and DTMF grammars that are portable between voice gateways.
Grammars need not be used with anchors or navigation list items. If no grammar is used with an anchor or navigation list item, the voice interface will listen for the contents of the element. If the user says the contents, the anchor or navigation list item will be followed. In the following example, the voice interface will fetch nextPage.xhtml if the user says continue.
<p> Say <a href="nextPage.xhtml">continue</a> to go to the next page.</p>
In the next example, the voice interface would fetch "top.xhtml" if the user said "top", and "next.xhtml" if the user said "next":
<nl> <label>Navigation Menu</label> <li href="top.xhtml">Top</li> <li href="next.xhtml">Next</li></nl>
Grammars need not be associated with <trigger> or <submit> elements. If no grammar is associated with these elements, the voice gateway will listen for the contents of their <label>s. In the following example, the <trigger> would be activated by saying add, and the <submit> by saying submit.
<p> ... <xforms:trigger ...> <xforms:label>Add</xforms:label> ... </xforms:trigger> <xforms:submit ...>

XHTML+XForms
Authoring Mobile Browser and Voice Applications 8-43
<xforms:label>Submit</xforms:label> </xforms:submit></p>
A document can have multiple form controls and links. To interpret user input unambiguously, anchors, navigation list items, <trigger>s and <submit>s are given scopes. The scope of any of these elements is the smallest enclosing block element (<div>, <p>, <nl>, <xforms:group>, and so on). In the following example, saying go on while in the first <p> activates the <trigger>, whereas saying go on while in the second <p> activates the <submit>
<p> ... <xforms:trigger> <xforms:label>Go on</xforms:label> </xforms:trigger></p><p> ... <xforms:submit ...> <xforms:label>Go on</xforms:label> </xforms:submit></p>
It is important for authors to note the scopes of the anchors, <trigger>s, and so on in their document so that the commands or navigation options are available at the point where they should be listened for, and only at those points.
When listening for user input at a form control, developers can cause the voice gateway to stop listening for anything other than the grammars associated with the form control by setting modal="true" on the form control.
8.2.4.4.6 Using Aural CSS for Voice Style OracleAS Wireless supports aural CSS properties that allow control of presentation (speech synthesis) such as speech-rate, volume and others. In addition, OracleAS Wireless has extended the aural CSS properties to support behaviors such as bargein (_orcl-bargein), say-as formats (_orcl-sayas-format) and others. For a list of aural CSS Properties supported and aural extension properties supported see Section D, "OracleAS Wireless CSS Support".
8.2.4.4.7 Invoking VoiceXML Subdialogs through UI Objects When accessing XHTML+XForms through a VoiceXML gateway, subdialogs written in VoiceXML

XHTML+XForms
8-44 Oracle Application Server Wireless Developer’s Guide
can be accessed from XHTML+XForms using the <uiobject> element in the MXML namespace. The <uiobject> element is an extension UI control.
Suppose the author of an XHTML+XForms document wants to use the VoiceXML <record> element to record some audio and send it to a server to be stored. To make the VoiceXML document invoked a reusable component, the author wishes to pass in several messages that will be spoken, rather than having them statically embedded in the VoiceXML document, as well as passing in the URL to which the audio data should be submitted.
The author wishes the VoiceXML document to return the name of the file on the server in which the audio has been stored. Further, if the caller hangs up in the middle of recording, the author wants the VoiceXML document to throw an event indicating this, which the XHTML+XForms document will then handle.
This invocation can be performed in XHTML+XForms by the following markup:
<mxml:uiobject data="record.jsp" type="text/x-vxml"> <f:label>Invoking record function.</f:label>
<mxml:uiparam valuetype="in" name="prompt" value="’Please record your message.’" />
<mxml:uiparam valuetype="in" name="noinputMessage" value="’I did not hear anything. Please try again.’" />
<mxml:uiparam valuetype="submit" name="storageURL" ref="/data/urls/recordingSubmit" />
<mxml:uiparam valuetype="out" name="location" ref="/data/urls/recordingStorage" />
<mxml:uieventmap in="hangup" out="vxml-cancel"/>
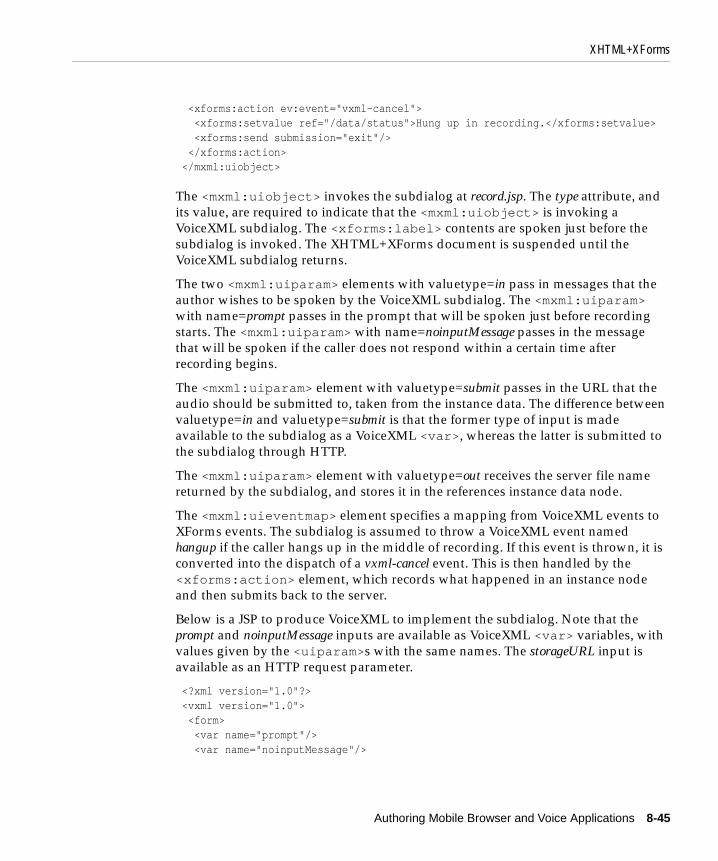
XHTML+XForms
Authoring Mobile Browser and Voice Applications 8-45
<xforms:action ev:event="vxml-cancel"> <xforms:setvalue ref="/data/status">Hung up in recording.</xforms:setvalue> <xforms:send submission="exit"/> </xforms:action> </mxml:uiobject>
The <mxml:uiobject> invokes the subdialog at record.jsp. The type attribute, and its value, are required to indicate that the <mxml:uiobject> is invoking a VoiceXML subdialog. The <xforms:label> contents are spoken just before the subdialog is invoked. The XHTML+XForms document is suspended until the VoiceXML subdialog returns.
The two <mxml:uiparam> elements with valuetype=in pass in messages that the author wishes to be spoken by the VoiceXML subdialog. The <mxml:uiparam> with name=prompt passes in the prompt that will be spoken just before recording starts. The <mxml:uiparam> with name=noinputMessage passes in the message that will be spoken if the caller does not respond within a certain time after recording begins.
The <mxml:uiparam> element with valuetype=submit passes in the URL that the audio should be submitted to, taken from the instance data. The difference between valuetype=in and valuetype=submit is that the former type of input is made available to the subdialog as a VoiceXML <var>, whereas the latter is submitted to the subdialog through HTTP.
The <mxml:uiparam> element with valuetype=out receives the server file name returned by the subdialog, and stores it in the references instance data node.
The <mxml:uieventmap> element specifies a mapping from VoiceXML events to XForms events. The subdialog is assumed to throw a VoiceXML event named hangup if the caller hangs up in the middle of recording. If this event is thrown, it is converted into the dispatch of a vxml-cancel event. This is then handled by the <xforms:action> element, which records what happened in an instance node and then submits back to the server.
Below is a JSP to produce VoiceXML to implement the subdialog. Note that the prompt and noinputMessage inputs are available as VoiceXML <var> variables, with values given by the <uiparam>s with the same names. The storageURL input is available as an HTTP request parameter.
<?xml version="1.0"?> <vxml version="1.0"> <form> <var name="prompt"/> <var name="noinputMessage"/>

XHTML+XForms
8-46 Oracle Application Server Wireless Developer’s Guide
<record name="audio"> <prompt> <value expr="prompt"/> </prompt>
<noinput> <value expr="noinputMessage"/> </noinput>
<catch event="telephone.disconnect.hangup"> <return event="hangup"/> </catch> </record>
<block> <submit next="<%= request.getParameter("storageURL") %>" method="post" namelist="audio" /> </block> </form> </vxml>
If the caller hangs up during recording, a telephone.disconnect.hangup event is thrown in the subdialog. The subdialog catches this event, and returns to the XHTML+XForms document, throwing a VoiceXML hangup event. Otherwise, the recorded audio is submitted to the URL supplied by the XHTML+XForms document. The server stores the audio in a file and returns a VoiceXML document like the following, with the file name in the location variable, which returns this value to the XHTML+XForms document.
<?xml version="1.0"?> <vxml version="1.0"> <form> <var name="location" expr="’recording529.wav’"/> <block> <return namelist="location"/> </block> </form> </vxml>

XHTML+XForms
Authoring Mobile Browser and Voice Applications 8-47
8.2.5 Styling and Embedding Content Based on MediaStyling is a very important aspect for the presentation of a document. Styling can be visual or auditory in nature. As an example, developers may want to present an error message in red for visual devices that support color, as bold text for visual devices without color support and play the message in a loud volume on aural devices. It is important to note here the message text is the same on all devices, but how it is presented to the user is different and is based on the characteristics of a device. To support such requirements OracleAS Wireless supports and recommends CSS Media Queries.
Another type of styling is customizing the actual content based on the devices. For example it is common to use shorthand notation such as Enter Amt. in visual devices, but the same content make more sense if presented as Please say the Amount when the application is accessed aurally. The conceptual content of the application has not changed, but rather the content is changed slightly for better presentation effect. To support such an model, OracleAS Wireless introduces an extension attribute media that is supported on all elements of the document.
8.2.5.1 CSS Media QueriesCSS Media Queries is a specification defined by W3C (http://www.w3.org/TR/css3-mediaqueries/). CSS Media Queries allows developers to style the same piece of content based on device (media) and features (media features) the device supports.
Note: By the semantics of VoiceXML subdialogs, the XHTML+XForms document (more specifically, its VoiceXML rendering) is not discarded when the first VoiceXML document above submits the audio to the server. The XHTML+XForms document remains loaded in the voice gateway in its own suspended execution context during the submission and fetching of the second VoiceXML document above. Returning from this second document returns to the execution context of the XHTML+XForms document.
Note: In this release of OracleAS Wireless, @media statements are not supported on style attribute.

XHTML+XForms
8-48 Oracle Application Server Wireless Developer’s Guide
The following example uses the @media statement to styles the content based on media type (device).
<html> <head> <style type="text/css"> @media handheld, screen, tty { .error {color: red} } @media aural { .error {volume: loud} } </style> </head> <body> <div> <span class="error"> This is an error message </span> </div> </body></html>
Here is a more sophisticated example that contains the @media statement using the query syntax defined in CSS media queries. In this example, color devices display the error message in red, monochrome devices display the error message as underlined text, and in voice mode the error message is played out loud.
<html xmlns="http://www.w3.org/1999/xhtml" profile="http://xmlns.oracle.com/ias/dtds/xhtml+xforms/0.9.0/1.0"> <head> <style type="text/css"> @media handheld and (color), screen and (color), tty and (color) { .error {color: red} } @media handheld and (monochrome), screen and (monochrome), tty and (monochrome) { .error {text-decoration: underline} } @media aural { .error {volume: loud} } </style> </head> <body>

XHTML+XForms
Authoring Mobile Browser and Voice Applications 8-49
<div> <span class="error"> This is an error message </span> </div> </body></html>
8.2.5.2 MXML Media AttributeOracleAS Wireless introduces an extension attribute media that is supported on all elements of an XHTML+XForms document. The media attribute is defined in OracleAS Wireless Namespace (MXML); the media must be prefixed with the namespace prefix (mxml:media).
mxml:media supports the conditional display of the content model based on the media and media features (device and device features) supported. The mxml:media attribute only affects the rendering (similar to the style attribute in HTML namespace) and does not affect any processing logic (such as XForms Events and Actions). mxml:media can be thought of as a shortcut that specifies the ’style="display: none"’ CSS property for media not listed in the mxml:media value space.
8.2.5.2.1 MXML Media Attribute Syntax Developers who use mxml:media must specify the media (device and device features) for which any particular content is targeted. OracleAS Wireless supports using CSS3 Media Queries syntax to support the mxml:media attribute. As discussed above, the media query syntax supports a query-like expression that can combine media and media features.
Here is a simple example that uses only the media type to control the rendered content. In this example the aural device will render a sentence while the visual devices will render a short string.
<div> <p mxml:media="handheld, screen, tty">
Note: mxml:media does not remove the element from the document. Specifying mxml:media on action elements has no effect. mxml:media is used only to control the rendering of elements. Also, mxml:media on elements that are event observers (with associated action handlers) still get the events, and the associated action handlers are executed.
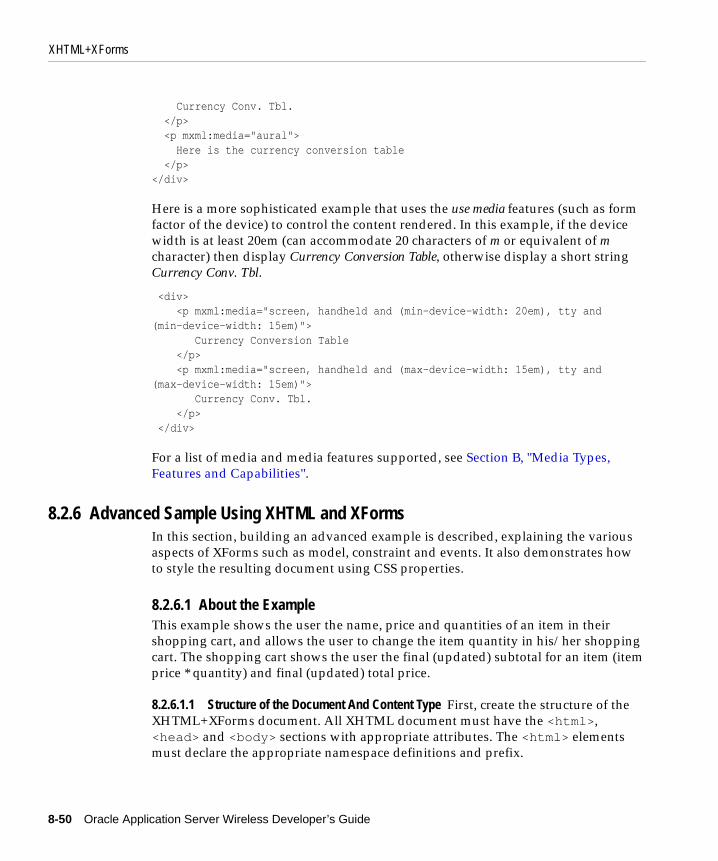
XHTML+XForms
8-50 Oracle Application Server Wireless Developer’s Guide
Currency Conv. Tbl. </p> <p mxml:media="aural"> Here is the currency conversion table </p></div>
Here is a more sophisticated example that uses the use media features (such as form factor of the device) to control the content rendered. In this example, if the device width is at least 20em (can accommodate 20 characters of m or equivalent of m character) then display Currency Conversion Table, otherwise display a short string Currency Conv. Tbl.
<div> <p mxml:media="screen, handheld and (min-device-width: 20em), tty and (min-device-width: 15em)"> Currency Conversion Table </p> <p mxml:media="screen, handheld and (max-device-width: 15em), tty and (max-device-width: 15em)"> Currency Conv. Tbl. </p> </div>
For a list of media and media features supported, see Section B, "Media Types, Features and Capabilities".
8.2.6 Advanced Sample Using XHTML and XFormsIn this section, building an advanced example is described, explaining the various aspects of XForms such as model, constraint and events. It also demonstrates how to style the resulting document using CSS properties.
8.2.6.1 About the ExampleThis example shows the user the name, price and quantities of an item in their shopping cart, and allows the user to change the item quantity in his/her shopping cart. The shopping cart shows the user the final (updated) subtotal for an item (item price * quantity) and final (updated) total price.
8.2.6.1.1 Structure of the Document And Content Type First, create the structure of the XHTML+XForms document. All XHTML document must have the <html>, <head> and <body> sections with appropriate attributes. The <html> elements must declare the appropriate namespace definitions and prefix.
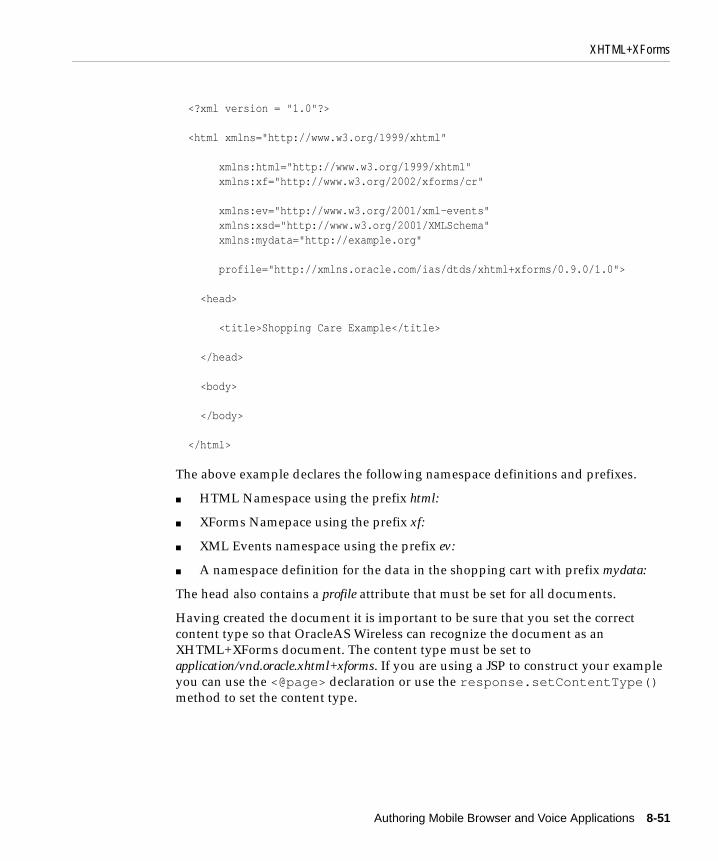
XHTML+XForms
Authoring Mobile Browser and Voice Applications 8-51
<?xml version = "1.0"?>
<html xmlns="http://www.w3.org/1999/xhtml"
xmlns:html="http://www.w3.org/1999/xhtml" xmlns:xf="http://www.w3.org/2002/xforms/cr"
xmlns:ev="http://www.w3.org/2001/xml-events" xmlns:xsd="http://www.w3.org/2001/XMLSchema" xmlns:mydata="http://example.org"
profile="http://xmlns.oracle.com/ias/dtds/xhtml+xforms/0.9.0/1.0">
<head>
<title>Shopping Care Example</title>
</head>
<body>
</body>
</html> The above example declares the following namespace definitions and prefixes.
■ HTML Namespace using the prefix html:
■ XForms Namepace using the prefix xf:
■ XML Events namespace using the prefix ev:
■ A namespace definition for the data in the shopping cart with prefix mydata:
The head also contains a profile attribute that must be set for all documents.
Having created the document it is important to be sure that you set the correct content type so that OracleAS Wireless can recognize the document as an XHTML+XForms document. The content type must be set to application/vnd.oracle.xhtml+xforms. If you are using a JSP to construct your example you can use the <@page> declaration or use the response.setContentType() method to set the content type.

XHTML+XForms
8-52 Oracle Application Server Wireless Developer’s Guide
8.2.6.2 Shopping Cart Data and XForms ModelThe data for this example primarily concerns a shopping cart which can contain multiple items. For each item, there are three pieces of data:
■ item name
■ item price
■ quantity
This data can be modeled in XML format. In the following example data, three items have been added to the cart:
<cart xmlns="http://example.org"> <item> <name>A Book</name> <price>10</price> <quantity>2</quantity> <subtotal/> </item> <item> <name>A Game</name> <price>15</price> <quantity>3</quantity> <subtotal/> </item> <item> <name>A Movie</name> <price>20</price> <quantity>4</quantity> <subtotal/> </item> </cart>
This XML data can be added to the XForms document in the instance, which is a component of the xforms:model element (in the xhtml:head section).
To put the shopping cart data in the <head> section:
1. Declare an XForms model in the <head> section (xf: model element in the example).
2. Declare an Instance data in the XForms model section (xf:instance in the example).
3. Put the XML data of the shopping cart in the Instance section of XForms.
<head>

XHTML+XForms
Authoring Mobile Browser and Voice Applications 8-53
<title>Shopping Care Example</title> <!-- Declare an XForms Model --> <xf:model id="model_1"> <!-- Declare an XForms Instance --> <xf:instance> <!-- Embed the above XML Data Document --> <cart xmlns="http://example.org"> ..... </cart> </xf:instance> </xf:model></head>
8.2.6.3 Showing the Data to a UserThe base document structure and shopping cart data are complete. Now to display the data to the user, display the first row (item) in the shopping cart to the user.
To display the first row (item) of the shopping cart:
1. Create three fields that can display the name of the item, the price of the item and the quantity of the item.
2. In this example, the modifiers name or price are not used; the user can modify the quantity only. Use the XForms Output controls to show the name and price, while using an XForms Input control to show the quantity.
3. Having created these three fields, make sure the value for these fields comes from the XML Data (instance) in the head section. To do that, create a mapping (binding) between the UI Controls and the XML data using XPath.This mapping, called UI Binding Expression, is done through the ref attribute of the UI Control.
For example, to bind to the name element first row of a shopping cart, use the following XPath Expression. (mydata: is the namespace prefix for the shopping cart XML data).
ref="/mydata:cart/mydata:item[1]/my:data:name"
Similarly for binding to "price" and "quantity" values of XML data from an UI control we will have to use the following XPath Expression
ref="/mydata:cart/mydata:item[1]/mydata:price"ref="/mydata:cart/mydata:item[1]/mydata:quantity"

XHTML+XForms
8-54 Oracle Application Server Wireless Developer’s Guide
Here is the <body> section with the XForms UI Controls and their mapping (Binding) XPath Expressions:
<body> <div> <!-- Display "Item name" <xf:output ref="/mydata:cart/mydata:item[1]/mydata:name"> <xf:label>Item Name</xf:label> </xf:output> <xf:output ref="/mydata:cart/mydata:item[1]/mydata:price"> <xf:label>Item Price</xf:label> </xf:output> <xf:input ref="/mydata:cart/mydata:item[1]/mydata:quantity"> <xf:label>Quantity</xf:label> </xf:input> </div></body>
If the above document is used with OracleAS Wireless Server, one would see that all of the UI controls are cluttered, and do not provide an elegant display. You will learn about adding styles in later sections.
8.2.6.4 Adding Repeating StructuresSo far we have just displayed the first row of the shopping cart. One method to display the other rows of the shopping cart is to add more UI controls which statically map to the second and third rows of the data. If someone adds a fourth and a fifth item, XForms uses the repeat construct. Repeat allows for repeating structures based on the instance data.
To add a repeating structure to the Shopping Cart example:
1. Define a <repeat> element with a nodeset attribute. The nodeset attribute is an XPath expression that selects the collection of instance (XML) data sets.
In the shopping cart example, nodeset="/mydata:cart/mydata:item" selects all the items (rows) from the instance (XML) data.
Note: To use the above document, merge <body> with the <head> section, and ensure that the content type of the document is set correctly on the web server.

XHTML+XForms
Authoring Mobile Browser and Voice Applications 8-55
2. Also add UI Controls inside the repeats that select and display details of each of the items selected by the repeat.
Here is <body> with repeat, displaying all items of the shopping cart.
<body> <xf:repeat nodeset="/mydata:cart/mydata:item"> <!-- Display "Item name" --> <xf:output ref="mydata:name"> <xf:label>Item Name </xf:label> </xf:output> <!-- Display "Item Price" --> <xf:output ref="mydata:price"> <xf:label>Item Price </xf:label> </xf:output> <!-- Display "Item Quantity" --> <xf:input ref="mydata:quantity" size="5"> <xf:label>Quantity </xf:label> </xf:input> </xf:repeat></body>
8.2.6.5 Adding Calculated Fields: Sub-Totals and TotalsHaving displayed all the rows in the shopping cart instance (XML) data, now add additional fields for sub-totals and totals. Sub Totals and Totals are calculated based on the price and quantity the user has selected, and one would naturally expect the totals to be updated when the user updates the number of quantities of the items in the shopping cart. Rather than doing the calculation on the backend after the data are submitted, the application can use the Forms processor to calculate these values as they are changed.
Each <item/> node in the instance data has a <subtotal/> child node. This node is used to store the Sub-Total for a particular item. The <subtotal/> node has an empty value in the initial data, but the XForms processor will fill it in based on the
Note: The XPath expression in the ref of the UI controls must have a path expression that is relative to the context established by the repeat (nodeset attribute).

XHTML+XForms
8-56 Oracle Application Server Wireless Developer’s Guide
values in the price and quantity for that item. To do this, the document must indicate to the XForms processor how the calculation of sub total is done.
XForms supports attaching conditions to the instance data. These conditions are called Model Item properties
A model item property (bind condition) can be attached using a <xf:bind> element in the model section of the XHTML+XForms Document. The XForms bind element supports a nodeset attribute that identifies, using an XPath expression, the instance node the condition is associated with. For the sub total, you must also attach a calculation rule using the calculate attribute.
Here is the XForms bind element that adds a calculation model item property (condition) to the subtotal instance item (data node):
<xf:bind nodeset="/mydata:cart/mydata:item/mydata:subtotal"
calculate="../mydata:price * ../mydata:quantity"/>
The above bind element must occur in the XForms model section of the XHTML+XForms document.
<head>
<title>Shopping Care Example</title> <!-- Declare an XForms Model --> <xf:model id="model_1"> <!-- Declare an XForms Instance --> <xf:instance> <!-- Embed the above XML Data Document --> <cart xmlns="http://example.org"> ..... </cart> </xf:instance> <!-- Bind Conditions --> <xf:bind nodeset="/mydata:cart/mydata:item/mydata:subtotal" calculate="../mydata:price * ../mydata:quantity"/>
Note: This is very similar to a database table in which one can not only declare a column name, but also add additional conditions such as not null and foreign key constraints. The model item properties (conditions) supported by the XForms processor are type (data type), relevant, calculate, readonly, required and constraint.

XHTML+XForms
Authoring Mobile Browser and Voice Applications 8-57
</xf:model></head>
Now, use an output control to show the sub total to the user:
<xf:repeat ...> <!-- Item Name --> .... <!-- Item Price --> .... <!-- Item Quantity --> .... <!-- Sub Total --> <xf:output ref="mydata:subtotal"> <xf:label>Sub Total </xf:label> </xf:output></xf:repeat>
Now, to show the Total of all items. To show the total use an aggregate function sum that sums up the subtotal (of each item). To show the total use an output control with a value attribute. (This output control occurs outside the repeating structure).
<xf:repeat ...> <!-- Item Name --> .... <!-- Item Price --> .... <!-- Item Quantity --> .... <!-- Sub Total --></xf:repeat><div> <xf:output value="sum(/mydata:cart/mydata:item/mydata:subtotal)"> <xf:label>Total </xf:label> </xf:output> </div>
8.2.6.6 Adding StylesAdd simple styles so that the repeat appears in the tabular structure (typically seen in shopping cart applications). To do so, add the <style> element in the <head> section as shown in the following example.
<head> <style type="text/css">

XHTML+XForms
8-58 Oracle Application Server Wireless Developer’s Guide
/*... Style Declarations */ /* Display repeat as tabular layout with 4 columns, but show the labels of UI Control only once */ repeat {_orcl-repeat-labels: once; display: grid; _orcl-grid-cells: 4} /* Display input and output within a repeat as a cell in in the tabular layout */ repeat > input, repeat > output {display: grid-cell} /* Display input and output labels as a cells in the tabular structure */ repeat > input > label, repeat > output > label {display: grid-cell; _orcl-label-side: top} /* Display all labels as bold and underlined */ label {text-decoration: underline; font-weight: bold} </style></head>
8.2.6.7 Adding Update Buttons and Using EventsSo far in the Shopping Cart example, you have added data, UI Controls and styling. Another important aspect of the application is to provide a mechanism that updates the screen with subtotals and totals, as the user makes changes to the shopping cart. On smart devices (a native client stack or device with scripting support), the

XHTML+XForms
Authoring Mobile Browser and Voice Applications 8-59
updates to the screen (or display) occur automatically on the client side. For user agents (browsers) that do not support dynamic update of screens, the application must provide a button that allows users to manually request an update of the screen (or display). The button (or trigger) initiates a round trip to the OracleAS Wireless middle tier that re-renders the page with updated values.
To add button in XForms, the XForms Trigger control should be used. The trigger control by itself does not do anything unless an action is associated with the trigger control. Also, the action must be associated with an event that can cause the action to be executed. The following example shows an XForms Trigger that has a refresh action associated with it and is performed on activation (DOMActivate event) of the trigger control.
<div> <xf:trigger> <xf:label>Update</xf:label> <xf:refresh model="model_1" ev:event="DOMActivate"/> </xf:trigger></div>
8.2.6.8 Adding Type ValidationsTo complete the sample application, add type validation. The Quantity field in the shopping cart is a number, but nothing prevents the user from entering a negative number or other character data. To prevent application errors, warn the user when he or she enters invalid values in the Quantity field. The validation of the Quantity field will be done through the XForms bind element, which can declare the schema datatype for the Quantity field. In this case, the XML Schema type nonNegativeInteger is used.
<xforms:model> <xf:bind nodeset="/mydata:cart/mydata:item/mydata:quantity" type="xsd:nonNegativeInteger"/></xforms:model>Also we have to provide an alert message that is displayed when user enters an invalid value.<xf:input ref="mydata:quantity" size="5"> <xf:label>Quantity </xf:label> <xf:alert>Quantity must be greater than or equal to zero</xf:alert></xf:input>

XHTML+XForms
8-60 Oracle Application Server Wireless Developer’s Guide
8.2.6.9 Complete SampleThe shopping cart example highlighted various aspects of building XForms applications which include the XForms data model, XForms UI Controls and Interfaces, events and actions, model item properties and style. Here is the complete XForms document for the shopping cart example:
<?xml version = "1.0"?><html xmlns="http://www.w3.org/1999/xhtml" xmlns:html="http://www.w3.org/1999/xhtml" xmlns:xf="http://www.w3.org/2002/xforms/cr" xmlns:ev="http://www.w3.org/2001/xml-events" xmlns:mydata="http://example.org" xmlns:xsd="http://www.w3.org/2001/XMLSchema" profile="http://xmlns.oracle.com/ias/dtds/xhtml+xforms/0.9.0/1.0"> <head> <title>Shopping Care Example</title> <!-- <style type="text/css"> repeat {_orcl-repeat-labels: once; _orcl-grid-cells: 4; display: grid} input, output {display: grid-cell} input > label, output > label {display: grid-cell; _orcl-label-side: top; text-decoration: underline; font-weight: bold} </style> --> <style type="text/css"> /*... Style Declarations */ /* Display repeat as tabular layout with 4 columns, but show the labels of UI Control only once */ repeat {_orcl-repeat-labels: once; display: grid; _orcl-grid-cells: 4; border-left-style: solid; border-left-width: 1px; border-top-style: solid; border-top-width: 1px; border-right-style: solid;

XHTML+XForms
Authoring Mobile Browser and Voice Applications 8-61
border-right-width: 1px; border-bottom-style: solid; border-bottom-width: 1px} /* Display input and output within a repeat as a cell in in the tabular layout */ repeat > input, repeat > output {display: grid-cell} /* Display input and output labels as a cells in the tabular structure */ repeat > input > label, repeat > output > label {display: grid-cell; _orcl-label-side: top} /* Display all labels as bold and underlined */ label {text-decoration: underline; font-weight: bold} </style> <xf:model id="model_1"> <!-- Declare an XForms Instance --> <xf:instance> <!-- Embed the above XML Data Document --> <cart xmlns="http://example.org"> <item> <name>A Book</name> <price>10</price> <quantity>2</quantity> <subtotal/> </item> <item> <name>A Game</name> <price>15</price>

XHTML+XForms
8-62 Oracle Application Server Wireless Developer’s Guide
<quantity>3</quantity> <subtotal/> </item> <item> <name>A Movie</name> <price>20</price> <quantity>4</quantity> <subtotal/> </item> </cart> </xf:instance> <xf:bind nodeset="/mydata:cart/mydata:item/mydata:subtotal" calculate="../mydata:price * ../mydata:quantity"/> <xf:bind nodeset="/mydata:cart/mydata:item/mydata:quantity" type="xsd:nonNegativeInteger"/> </xf:model> </head> <body> <xf:repeat nodeset="/mydata:cart/mydata:item"> <!-- Display "Item name"--> <xf:output ref="mydata:name"> <xf:label>Item Name </xf:label> </xf:output> <xf:output ref="mydata:price"> <xf:label>Item Price </xf:label> </xf:output> <xf:input ref="mydata:quantity" size="4"> <xf:label>Quantity </xf:label> <xf:alert>Quantity must be greater than or equal to zero</xf:alert> </xf:input> <xf:output ref="mydata:subtotal"> <xf:label>Sub Total </xf:label> </xf:output> </xf:repeat> <div> <xf:output value="sum(/mydata:cart/mydata:item/mydata:subtotal)"> <xf:label>Total </xf:label> </xf:output> </div> <div> <xf:trigger>

XHTML+XForms
Authoring Mobile Browser and Voice Applications 8-63
<xf:label>Update</xf:label> <xf:refresh model="model_1" ev:event="DOMActivate"/> </xf:trigger> </div> </body> </html>
8.2.7 Advanced Voice Sample Using XHTML and XFormsIn this section, we describe an advanced example of using XHTML+XForms to develop a voice service. We will not reiterate all of the details of the advanced example of the previous section, but will focus on the aspects of the service relevant to voice.
The example is a service to compute the tip on a bill and divide the resulting total bill between a number of people. The instance data for this service will consist of:
■ the amount of the bill before tax
■ the number of people the bill will be split between
■ the percentage tip
This will be represented in XML by the following instance data structure:
<tip> <amt/> <num/> <pct/></tip>
Initially, the amt, num, and pct nodes contain no data. The first step in the service is to collect this data. The amount of the bill, before tax, is collected by the following form control:
<xforms:input id="amt" ref="/tip/amt"> <xforms:label> <object data="/audio/howMuch.wav" type="audio/wav"> How much is the bill? </object> </xforms:label>
<xforms:extension> <object data="builtin:grammar/currency" type="application/vnd.oracle.builtin+grammar"

XHTML+XForms
8-64 Oracle Application Server Wireless Developer’s Guide
/>
<object data="builtin:dtmf/currency" type="application/vnd.oracle.builtin+grammar" /> </xforms:extension>
<xforms:help> Help. Say the amount of the bill in dollars and cents. For example, twenty-five dollars and ten cents. </xforms:help>
<mxml:handler ev:defaultAction="cancel" ev:event="xforms-hint"> <mxml:catch count="1"> <xforms:message>How much is the bill?</xforms:message> </mxml:catch>
<mxml:catch count="5"> <xforms:load resource="main.jsp"/> </mxml:catch> </mxml:handler>
<mxml:handler ev:defaultAction="cancel" ev:event="vxml-nomatch"> <mxml:catch count="1"> <xforms:message> Please say that again. How much is the bill? </xforms:message> </mxml:catch>
<mxml:catch count="2"> <xforms:message> Say the amount of the bill in dollars and cents. For example, twenty-five dollars and ten cents. </xforms:message> </mxml:catch>
<mxml:catch count="5"> <xforms:load resource="main.jsp"/> </mxml:catch> </mxml:handler> </xforms:input>

XHTML+XForms
Authoring Mobile Browser and Voice Applications 8-65
The <xforms:extension> element contains <object>s that refer to the built-in VoiceXML speech and DTMF grammars that recognize currency designations. To use such built-in grammars, the "data" attribute must use the VoiceXML built-in: URI scheme, and the "type" attribute must use that Oracle-specific MIME type for built-in grammars. When the voice gateway reaches this form control, it will listen for the caller to say an amount of money or to enter such an amount via touchtones. The value returned will be an amount of currency, preceded by a three-character code indicates the type of currency. We will assume for this example that this code is "USD" for US dollars, so if the caller responds "Twenty-three dollars and fifty-eight cents", the value "USD23.58" will be put in the "amt" instance node.
The help and event handler children of the <xforms:input> define messages and actions that take place when the caller asks for help, does not respond to the prompt, or responds with something the voice gateway does not recognize. If the caller says "help", the voice gateway will speak the content of the <xforms:help> element.
If the caller does not respond to the prompt within a certain period of time, an xforms-hint event will be dispatched. This event will be handled with the extension actions <mxml:handler> and <mxml:catch>. The first, second, third, and fourth time the gateway times out waiting for user input, the content of the <catch> with count="1" will be executed, and the message spoken. The fifth time the gateway times out, the service will return to a "main menu" document.
If the caller says something or inputs a sequence of touchtones that is not recognized as an amount of money, a vxml-nomatch event will be dispatched, and handled by the last <mxml:handler> element. The first unrecognized input will cause the first message to be spoken. The second, third, and fourth unrecognized inputs will cause the second message to be spoken. The fifth unrecognized input will cause the service to return to the main menu.
Both of the <mxml:handler> elements have an ev:defaultAction="cancel" attribute to cancel the default response to the xforms-hint and vxml-nomatch events (which is to play a generic message).
Note: The <label> content uses an audio <object> for the prompt. If the document is interpreted on a voice gateway that does not support the audio/wav MIME type, or if the attempted fetch of the audio file by the voice gateway fails, the contained text will be spoken by a TTS engine.

XHTML+XForms
8-66 Oracle Application Server Wireless Developer’s Guide
The next step is to collect the number of people the bill will be split between, which is done by the following form control:
<xforms:input ref="/tip/num"> <xforms:label> <object data="/audio/howMany.wav" type="audio/wav"> How many are in your party? </object> </xforms:label>
<xforms:extension> <object data="builtin:grammar/number" type="application/vnd.oracle.builtin+grammar" />
<object data="builtin:dtmf/number" type="application/vnd.oracle.builtin+grammar" /> </xforms:extension> </xforms:input>
This form control will listen for a spoken or touchtone-input number, and fill the "num" instance node with the number spoken. (In a real version of the service, help, no response, and unrecognized response handlers would be provided.)
Next, the tip percentage is collected. This is done by the following form control:
<xforms:select ref="/tip/pct"> <xforms:label> <object data="/audio/howBig.wav" type="audio/wav"> How big a tip would you like to leave? </object> </xforms:label>
<xforms:item> <xforms:label>small</xforms:label> <xforms:value>10</xforms:value> </xforms:item>
<xforms:item> <xforms:label>medium</xforms:label> <xforms:value>15</xforms:value> </xforms:item>

XHTML+XForms
Authoring Mobile Browser and Voice Applications 8-67
<xforms:item> <xforms:label>large</xforms:label> <xforms:value>20</xforms:value> </xforms:item>
<xforms:help> Help. Say small for a ten percent tip, medium for a fifteen percent tip, and large for a twenty percent tip. </xforms:help> </xforms:select>
This form control does not use an <xforms:extension> element containing grammar <object>s to specify what to listen to. The voice gateway listens for the contents of any of the <xforms:label> children of the <xforms:item> elements. If a <xforms:label> is spoken, the content of the corresponding <xforms:value> is put into the "pct" instance node. The <xforms:input> element gives instructions that are spoken if the user says "help".
After collecting the input, the service calculates the tip, the total amount to be paid including tip, and how much each person must pay, and reads out the result. The computation and output is done by the following markup:
On a bill of <xforms:output style="speak: currency" ref="/tip/amt"/>, a <xforms:output style="speak-numeral: continuous" ref="/tip/pct"/> percent tip is <xforms:output style="speak: currency" value="concat(’USD’,round(/tip/pct * substring(/tip/amt,4)) div 100)" />, for a total of <xforms:output style="speak: currency" value="concat(’USD’,round((100 * substring(/tip/amt,4)) + (/tip/pct * substring(/tip/amt,4))) div 100)" />. If divided evenly by <xforms:output style="speak-numeral: continuous" ref="/tip/num"/>, each person would owe <xforms:output style="speak: currency" value="concat(’USD’,round(((100 * substring(/tip/amt,4)) + (/tip/pct * substring(/tip/amt,4))) div /tip/num) div 100)" />.
The computations are done using XPath expressions in the value attributes of <xforms:output> form controls. When using the value of the "amt" instance node,

XHTML+XForms
8-68 Oracle Application Server Wireless Developer’s Guide
the substring function is used to remove the initial "USD" currency indicator. The "USD" prefix is added to the computed currency amounts using the concat function.
If a currency value like "USD23.58" is spoken by a TTS engine without indicating to the engine that the value is currency, it will be pronounced something like "You ess dee twenty-three point fifty-eight". The style="speak: currency" attributes in the markup above indicate to the TTS engine that the values being output should be spoken as currency. The style="speak-numeral: continuous" attribute ensures that the number of people the tip is being split between is spoken as a number rather than a digit string (e.g. "15" will be pronounced "fifteen" rather than "one five").
Finally, after the tip calculations are reported, the service gives the user the opportunity to return to the main menu or calculate another tip. This is done by the following markup:
To compute another tip, say another tip. To return to the main menu, say <a href="main.jsp">main menu</a>. <xforms:trigger> <xforms:label>Another tip</xforms:label> <xforms:action ev:event="DOMActivate"> <xforms:setvalue ref="/tip/amt"/> <xforms:setvalue ref="/tip/num"/> <xforms:setvalue ref="/tip/pct"/> <xforms:setfocus control="amt"/> </xforms:action> </xforms:trigger>
The text, including the content of the anchor, is spoken by the TTS engine; the label of the <xforms:trigger> is not spoken. The contents of the anchor and the <xforms:label> of the <xforms:trigger> are listened for by the voice gateway. Speaking the contents of the anchor causes the anchor’s href attribute to be fetched. Speaking the contents of the <xforms:label> will activate the <xforms:trigger>, which will clear the previously entered data and set the focus to the first form control. Note that clearing the instance nodes is necessary to input new data. If a form control with valid contents is visited in aural mode, the form control is skipped.
The complete advanced voice sample is given below. Note that the <div> elements control the scope of the anchor and <xforms:trigger> at the end of the document. When in the first <div>, the anchor and trigger are not in scope, so their contents are not being listened for. In the second <div>, both are in scope.
<?xml version="1.0"?> <html xmlns="http://www.w3.org/1999/xhtml"

XHTML+XForms
Authoring Mobile Browser and Voice Applications 8-69
xmlns:xforms="http://www.w3.org/2002/xforms/cr" xmlns:ev="http://www.w3.org/2001/xml-events" xmlns:mxml="http://xmlns.oracle.com/2002/MobileXML" profile="http://xmlns.oracle.com/ias/dtds/xhtml+xforms/0.9.0/1.0" > <head> <xforms:model> <xforms:instance> <tip> <amt/> <num/> <pct/> </tip> </xforms:instance> </xforms:model> </head>
<body> <div> <xforms:input id="amt" ref="/tip/amt"> <xforms:label> <object data="/audio/howMuch.wav" type="audio/wav"> How much is the bill? </object> </xforms:label> <xforms:extension> <object data="builtin:grammar/currency" type="application/vnd.oracle.builtin+grammar" /> <object data="builtin:dtmf/currency" type="application/vnd.oracle.builtin+grammar" /> </xforms:extension> <xforms:help> Help. Say the amount of the bill in dollars and cents. For example, twenty-five dollars and ten cents. </xforms:help> <mxml:handler ev:defaultAction="cancel" ev:event="xforms-hint"> <mxml:catch count="1">

XHTML+XForms
8-70 Oracle Application Server Wireless Developer’s Guide
<xforms:message>How much is the bill?</xforms:message> </mxml:catch> <mxml:catch count="5"> <xforms:load resource="main.jsp"/> </mxml:catch> </mxml:handler> <mxml:handler ev:defaultAction="cancel" ev:event="vxml-nomatch"> <mxml:catch count="1"> <xforms:message> Please say that again. How much is the bill? </xforms:message> </mxml:catch> <mxml:catch count="2"> <xforms:message> Say the amount of the bill in dollars and cents. For example, twenty-five dollars and ten cents. </xforms:message> </mxml:catch> <mxml:catch count="5"> <xforms:load resource="main.jsp"/> </mxml:catch> </mxml:handler> </xforms:input> <xforms:input ref="/tip/num"> <xforms:label> <object data="/audio/howMany.wav" type="audio/wav"> How many are in your party? </object> </xforms:label> <xforms:extension> <object data="builtin:grammar/number" type="application/vnd.oracle.builtin+grammar" /> <object data="builtin:dtmf/number" type="application/vnd.oracle.builtin+grammar" />

XHTML+XForms
Authoring Mobile Browser and Voice Applications 8-71
</xforms:extension> </xforms:input> <xforms:select ref="/tip/pct"> <xforms:label> <object data="/audio/howBig.wav" type="audio/wav"> How big a tip would you like to leave? </object> </xforms:label> <xforms:item> <xforms:label>small</xforms:label> <xforms:value>10</xforms:value> </xforms:item> <xforms:item> <xforms:label>medium</xforms:label> <xforms:value>15</xforms:value> </xforms:item> <xforms:item> <xforms:label>large</xforms:label> <xforms:value>20</xforms:value> </xforms:item> <xforms:help> Help. Say small for a ten percent tip, medium for a fifteen percent tip, and large for a twenty percent tip. </xforms:help> </xforms:select> On a bill of <xforms:output style="speak: currency" ref="/tip/amt"/>, a <xforms:output style="speak-numeral: continuous" ref="/tip/pct"/> percent tip is <xforms:output style="speak: currency" value="concat(’USD’,round(/tip/pct * substring(/tip/amt,4)) div 100)" />, for a total of <xforms:output style="speak: currency" value="concat(’USD’,round((100 * substring(/tip/amt,4)) + (/tip/pct * substring(/tip/amt,4))) div 100)" />. If divided evenly by <xforms:output style="speak-numeral: continuous" ref="/tip/num"/>, each person would owe

OracleAS Wireless Client
8-72 Oracle Application Server Wireless Developer’s Guide
<xforms:output style="speak: currency" value="concat(’USD’,round(((100 * substring(/tip/amt,4)) + (/tip/pct * substring(/tip/amt,4))) div /tip/num) div 100)" />. </div> <div>
To compute another tip, say new tip. To return to the main menu, say <a href="main.jsp">main menu</a>. <xforms:trigger> <xforms:label>New tip</xforms:label> <xforms:action ev:event="DOMActivate"> <xforms:setvalue ref="/tip/amt"/> <xforms:setvalue ref="/tip/num"/> <xforms:setvalue ref="/tip/pct"/> <xforms:setfocus control="amt"/> </xforms:action> </xforms:trigger> </div> </body> </html>
8.3 OracleAS Wireless ClientThe OracleAS Wireless Client is a client-side plug-in to the web browser, extending it to support XHTML/XForms client side processing and rendering.
Figure 8–1 Wireless Client Architecture
Since all rendering and processing is done as part of the browser, the round trip to the server is only needed when the user submits or downloads another document. This relieves your server from all the necessary XHTML/XForms processing and

OracleAS Wireless Client
Authoring Mobile Browser and Voice Applications 8-73
also requires the least bandwidth, working faster on even slow or unreliable networks.
The OracleAS Wireless Client plug-in manipulates the DHTML browser’s internal DOM structure to generate necessary user interface and captures all the events directly to provide the most responsive and feature-rich experience.
8.3.1 Using the Wireless ClientOnce installed, the Client may be used immediately. Start Internet Explorer and enter a valid xclient URI in the location bar. All xclient URIs begin with the omc protocol. Examples of valid URIs are:
omc://chalk.us.oracle.com/testexpense/expenser.xadomc://chalk.us.oracle.com/testexpense/expense.xforms
8.3.1.1 User InteractionsOnce an XHTML/XForms document is loaded, the plugin will take over and capture all events from the user. If any relevant action was taken, it will feed the events back to the local XForms processor and process them locally.
8.3.1.2 LoggingThe xclient logfile provides useful information when you are debugging your own XForms application. The logfile is an HTML file and can be found (by default) under the log directory of your xclient application folder. You have control over how much information is logged. The logLevel can be set from 0 (no logging) to 9 (max logging). Use the Offline Manager to set the log level.
8.3.1.3 Server Side ConsiderationsThe xclient retrieves XForms and other documents from a server machine. The server must set the proper content type and a suitable expiration time for each document.
8.3.2 Using OracleAS Wireless with XClientIf you use OracleAS Wireless as your middle tier, the XClient will take advantage of its added features.

OracleAS Wireless Client
8-74 Oracle Application Server Wireless Developer’s Guide
8.3.2.1 Mime TypesThe content type for XForms documents should be set by the server to application/vnd.oracle.xhtml+xforms. If the server does not set these content types properly, then the xclient will not handle them as intended.
OracleAS Wireless predefines these settings during installation; they are ready for use out of the box.
8.3.3 Installing OracleAS Wireless Client
8.3.3.1 RequirementsBefore installing ensure you have the following components installed on your desktop machine:
■ Internet Explorer (6.0 or above)
■ Java Development Kit (1.3.x or 1.4.x)
Ensure that your default browser is set to Internet Explorer. If you are not sure, you can make the browser to set itself as the default browser by following these steps:
1. Start Internet Explorer.
2. From the menu, select Tools->Internet Options.
3. From the Options dialog, select the tab Programs.
4. At the bottom of the dialog, check Internet Explorer should check to see whether it is the default browser. Next time when you start Internet Explorer, it will prompt you if it is not already the default browser.
8.3.3.2 Installing the Wireless ClientTo install the Wireless Client from the WDK, please go to the following directory:
$WDK_HOME/wclient
Open the HTML file install.html. This file contains javascript that checks to see if you have the necessary components installed. If not, it will add the necessary files and install the plugin for you.
Installation begins with an informational dialog followed by a dialog that asks for the application folder name. You may either enter your own folder name or proceed with the default folder. After you close the next dialog, the actual installation takes place, the application files are copied to the application folder and several environment variables are added/modified.
OracleAS Wireless Client
Authoring Mobile Browser and Voice Applications 8-75
At this point the install page shows that the installation was successful.
8.3.3.3 Deploying to UsersDeploying the OracleAS Wireless Client to your end users is as simple as deploying any other browsers plugins. You must first copy the OracleAS Wireless Client CAB file to an accessible location on your web server, then point your users to that URL. To get the Wireless Client CAB file, you must install the WDK on a machine, then copy the CAB file over. For more information, see Section 8.3.3, "Installing OracleAS Wireless Client".
A more seamless way to deploy the OracleAS Wireless Client for the user is to embed the URL to the CAB file in an <OBJECT> tag inside an XHTML/XForms document, which will cause your browser to automatically download the component if it is not already instead. You can include it in one (or all) of your application HTML documents using the following tags:
<OBJECT classid=CLSID:098f2470-bae0-11cd-b579-08002b30bfeb id=WClient codebase="xclient.CAB" ></OBJECT>
If you have this tag in the body of your document, the browser will automatically check to see if you have the plugin installed. If you do, no action is required. If the user does not have OracleAS Wireless Client installed, the browser will prompt the user to install it. The browser downloads the CAB file, extracts the necessary files from it, and installs the OracleAS Wireless Client. See Section 8.3.3.4, "XClient.CAB File" for details about this deployment file.
Notes:
■ You may need to reboot before attempting to use the OracleAS Wireless Client.
■ Your browser may have security settings that restrict the use of active and plug-ins. Before installing the Wireless Client, start the browser, select the menu item Tools->Internet Options. Select the Security Tab, and click Custom Level. Under the ActiveX Controls and Plug-ins group, set the following options to enable: 1) Download signed ActiveX controls, 2) Run ActiveX Controls and Plug-ins, 3) Script ActiveX controls and plug-ins marked safe for scripting.

XHTML Mobile Profile
8-76 Oracle Application Server Wireless Developer’s Guide
The classid tells the browser which COM object you are looking for. This must be set to the main interface CLSID for the Wireless Client. (098f2470-bae0-11cd-b579-08002b30bfeb).
8.3.3.4 XClient.CAB FileXCLIENT.CAB is an installable compressed file containing all the binaries for the OracleAS Wireless Client plugin, and instructions for configuring it to work with your browser (such as registering the COM components, or setting up the required registry keys).
8.3.3.5 Registry KeysThe OracleAS Wireless Client uses the registry for storing configuration and runtime parameters. All the keys are stored in:
HKEY_LOCAL_MACHINE/Software/Oracle/XForms
8.4 XHTML Mobile ProfileXHMTL Mobile Profile (XHTML MP) is a standard defined by Open Mobile Alliance (OMA, previously called WapForum) supported by all compliant mobile browsers. XHTML MP is a subset of XHTML 1.1, defined by W3C and based on XHTML Basic defined by W3C. This section explains the usage and features supported by OracleAS Wireless when using XHTML MP as the application authoring language. This section is organized into the following subsections:
■ Section 8.4.1, "Overview"
■ Section 8.4.2, "OracleAS Wireless and XHTML MP + CSS Mobile Profile"
■ Section 8.4.3, "XHTML Mobile Profile Modules Supported"
■ Section 8.4.4, "XHTML MP HelloWorld Example"
8.4.1 OverviewThe XHTML1.1 specifications defined by W3C (based on HTML4.1), is difficult to support on mobile and embedded devices. W3C defined XHTML Basic with a minimum set of HTML Modules (HTML elements) that can be supported on all devices (mobile and embedded). XHTML MP adds more modules (more HTML elements) to XHTML Basic that can be supported by mobile devices.
XHTML MP supports Forms Modules as defined in HTML specifications (advanced controls not included). HTML Forms is UI-oriented in nature and does not define

XHTML Mobile Profile
Authoring Mobile Browser and Voice Applications 8-77
interaction behaviors or any processing logic. The lack of such semantics in HTML Forms makes the application unusable over other channels such as Voice interface. OracleAS Wireless supports XHTML MP as an authoring language only for Visual mobile browser environments and does not support access channels/modes such as Voice, SMS or Instant Messaging Interface.
8.4.2 OracleAS Wireless and XHTML MP + CSS Mobile ProfileOracleAS Wireless combines XHTML MP and CSS Mobile Profile to provide a multi-channel authoring model for all visual medium of presentation.
OracleAS Wireless supports XHTML Mobile Profile (see Section A, "XHTML Modules Supported") with some additional modules. OracleAS Wireless additionally adds extra modules (namely Navigation List from XHTML2.0, and MXML Media Attribute Module). For a list of XHTML MP modules supported see Section 8.4.3, "XHTML Mobile Profile Modules Supported".
OracleAS Wireless supports CSS Mobile Profile defined by W3C. OracleAS Wireless additionally supports CSS3 Module - CSS Media Queries (for media feature-based styling). Since OracleAS Wireless renders using a browser on the client device, not all properties are supported on all devices. OracleAS Wireless attempts to find a reasonable representation of the style in such cases. For a list of CSS properties supported, see Section D, "OracleAS Wireless CSS Support" and Section C, "XForms Specification Support".
As defined in the OMA (WAP Forum) XHTML MP specification, all XHTML MP documents to be rendered and supported by OracleAS Wireless:
■ must conform to the XHTML MP DTD defined by OMA,
■ XHTML MP documents must be served to OracleAS Wireless with a MIME media type (Content-type) application/vnd.wap.xhtml+xml,
■ XHTML MP documents must have a DOCTYPE declaration:
<!DOCTYPE html PUBLIC "-//WAPFORUM//DTD XHTML Mobile 1.0//EN" "http://www.wapforum.org/DTD/xhtml-mobile10.dtd">
Note: The Open Mobile Alliance also defines a subset of CSS which closely maps to the CSS Mobile Profile defined by W3C. The OMA CSS Subset defines additional extension properties, but these additional properties are not supported by OracleAS Wireless.

XHTML Mobile Profile
8-78 Oracle Application Server Wireless Developer’s Guide
8.4.3 XHTML Mobile Profile Modules SupportedOracleAS Wireless supports the following modules of XHTML MP.
Table 8–4 XHTML MP Modules Supported
Module Description
Structure Module Elements html, head, title and body
Text Module Elements abbr, acronym, address, blockquote, br, cite, code, dfn, div, em, h1, h2, h3, h4, h5, h6, kbd, p, pre, q, samp, span, strong, var
Hypertext Module Element a
List Module Elements dl, dt, dd, ol, ul, li
Extension elements nl, label (see Section A.4, "List Module" for details)
Basic Forms and Partial Full Forms Module
Elements form, input, label, select, option, textarea, fieldset, optgroup (Note: It is recommended the label element be used for all form control labels, as this will allow proper rendering on all devices)
Basic Tables Module Elements caption, table, td, th, tr
Basic Tables do not allow nested tables
OracleAS Wireless does not support rowspan or colspan on tables
Image Module Element img
Object Module Elements object, param
When Object are used for images the server supports image adaptation (see Section A.6, "Object Module" for details).
Meta Information Module
Element meta
Link Module Element link
Base Module Element base
Presentation Module Element hr, b, big, i, small
Style Sheet Module Element style
Style Attribute Module
Attribute style
Media Attribute Module
Attribute media (see Section A.16, "OracleAS Wireless MXML Media Attribute Module" for details)

XHTML Mobile Profile
Authoring Mobile Browser and Voice Applications 8-79
8.4.4 XHTML MP HelloWorld Example1. The XHTML MP document must first contain <xml> declaration. Add the
following as the first characters of your document.
<?xml version="1.0" standalone="yes"?>
2. Add a DOCTYPE decl. to the XHTML MP Document (immediately following the <xml> declaration:
<!DOCTYPE html PUBLIC "-//WAPFORUM//DTD XHTML Mobile 1.0//EN"
"http://www.wapforum.org/DTD/xhtml-mobile10.dtd">
3. Add <html> element to as the document root (immediately following the <DOCTYLE> declaration). Include both the start tag and the end of html element. Also add the head section. The head section contains title and style elements:
<?xml version="1.0" standalone="yes"?><!DOCTYPE html PUBLIC "-//WAPFORUM//DTD XHTML Mobile 1.0//EN" "http://www.wapforum.org/DTD/xhtml-mobile10.dtd">
<html> <head> <title>Hello World</title> <style type="text/css"> body {color : #000000} h1 {font-family : sans-serif; color : blue} </style> </head> </html>
4. Now add the body section. The body in this example contains a form with an input control:
<?xml version="1.0" standalone="yes"?><!DOCTYPE html PUBLIC "-//WAPFORUM//DTD XHTML Mobile 1.0//EN" "http://www.wapforum.org/DTD/xhtml-mobile10.dtd">
<html> <head> <title>Hello World</title> </head> <body> <h1>My XHTML MP Page</h1>

OracleAS Wireless XML
8-80 Oracle Application Server Wireless Developer’s Guide
<form action="printForm.jsp" method="get"> <div> <label for="text"> Hello Visitor, Please Enter your name </label> <input id="text" name="text" type="text" size="5"/> </div> <div> <input name="submit" type="submit" value="Submit"/> </div> </form> </body> </html>
Now the XHTML MP document is ready to be deployed and tested. Authors may deploy the document on their web server and at deployment authors must make sure to set the MIME media type (content-type) of the document is set to application/vnd.wap.xhtml+xml. The setting of the MIME media type can be done either programmatically or by using web server configuration files. Authors should also make sure to provide a page that acts as the submit page for the example. This page will receive the form data (from the Hello World page) as query parameters.
8.5 OracleAS Wireless XMLTopics in this section include:
■ Section 8.5.1, "OracleAS Wireless XML Overview"
■ Section 8.5.2, "OracleAS Wireless XML and OracleAS Wireless"
■ Section 8.5.3, "Displaying and Formatting Content"
■ Section 8.5.4, "Enhancing with Audio for Voice Access"
■ Section 8.5.5, "Application Navigation"
■ Section 8.5.6, "Document Linking"
■ Section 8.5.7, "Filling Out Forms for Data Entry and Navigation"
■ Section 8.5.8, "Advanced User Interactions and Channel Optimization"

OracleAS Wireless XML
Authoring Mobile Browser and Voice Applications 8-81
8.5.1 OracleAS Wireless XML OverviewOracleAS Wireless XML is based on previous releases. Going forward, you should use XHTML+XForms and XHTML MP.
Consider the following XML document:
<address><first-name>Chandra</first-name><last-name>Patni</last-name><street>400 Oracle Parkway</street><zip>94065</zip></address>
In this example, the element names describe the data they encapsulate. This XML document can be transformed into HTML using another XML document called an XSL stylesheet. This same XML document can be transformed into WML using another XSL stylesheet. The document can then be displayed on a WAP device. This ability of XML makes it suitable for representing and delivering portable data to various devices. XML content are also future-proof; another stylesheet can be used to deliver the content to any future device. Therefore, XML transformation can be done programmatically on-the-fly. Oracle Application Server Wireless provides a framework to do exactly the same thing. It allows content represented by XML format defined by an Oracle Application Server Wireless schema to deliver content to any device at any time.
8.5.2 OracleAS Wireless XML and OracleAS WirelessAt the core of Oracle Application Server Wireless, XML from an application is transformed to device-specific markup languages using XSL transformation. Oracle Application Server Wireless provides a framework for interacting with applications and transforming XML to device-specific markup languages. Oracle Application Server Wireless provides an XML schema, elements of which can be used to build user interfaces to render application content to any device.
8.5.3 Displaying and Formatting ContentEach section of this document presents a different topic. These sections include:
■ Section 8.5.3.1, "Hello World Example"
■ Section 8.5.3.2, "DOCTYPE Declaration"
■ Section 8.5.3.3, "SimpleResult"

OracleAS Wireless XML
8-82 Oracle Application Server Wireless Developer’s Guide
■ Section 8.5.3.4, "Formatting the Display"
■ Section 8.5.3.5, "Tables and Basic Formatting Example"
■ Section 8.5.3.6, "Image Adaptation Support in OracleAS Wireless XML"
8.5.3.1 Hello World ExampleThe first example shows how to display the traditional "Hello World" content on a mobile device.
8.5.3.1.1 HelloWorld.xml <?xml version = "1.0" encoding = "UTF-8" standalone="yes" ?><!DOCTYPE SimpleResult PUBLIC "-//ORACLE//DTD SimpleResult 1.1//EN" "http://xmlns.oracle.com/ias/dtds/SimpleResult_1_1_0.dtd"><SimpleResult> <SimpleContainer> <SimpleText> <SimpleTextItem>Hello World</SimpleTextItem> </SimpleText> </SimpleContainer></SimpleResult>
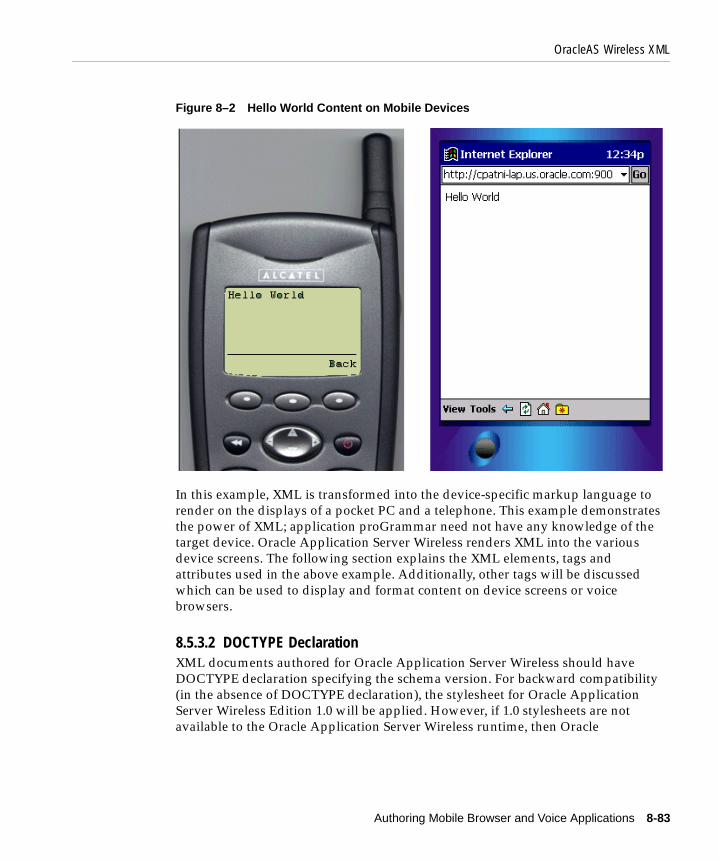
OracleAS Wireless XML
Authoring Mobile Browser and Voice Applications 8-83
Figure 8–2 Hello World Content on Mobile Devices
In this example, XML is transformed into the device-specific markup language to render on the displays of a pocket PC and a telephone. This example demonstrates the power of XML; application proGrammar need not have any knowledge of the target device. Oracle Application Server Wireless renders XML into the various device screens. The following section explains the XML elements, tags and attributes used in the above example. Additionally, other tags will be discussed which can be used to display and format content on device screens or voice browsers.
8.5.3.2 DOCTYPE DeclarationXML documents authored for Oracle Application Server Wireless should have DOCTYPE declaration specifying the schema version. For backward compatibility (in the absence of DOCTYPE declaration), the stylesheet for Oracle Application Server Wireless Edition 1.0 will be applied. However, if 1.0 stylesheets are not available to the Oracle Application Server Wireless runtime, then Oracle

OracleAS Wireless XML
8-84 Oracle Application Server Wireless Developer’s Guide
Application Server Wireless 1.x stylesheets will be used regardless of DOCTYPE declaration. If no 1.x stylesheets are found, an error will result.
8.5.3.3 SimpleResultSimpleResult is the root element of the Oracle Application Server Wireless XML schema. Every valid Oracle Application Server Wireless XML document must have SimpleResult as its root element. SimpleResult can contain multiple SimpleContainer blocks to allow for multi-card decks.
8.5.3.3.1 SimpleContainer SimpleContainer is the root of all major block constructs such as Form, Menu and Text. Elements such as menu, text and form items can act as cards in the deck. DeckExample.xml demonstrates the usage of SimpleText as a placeholder for cards. Considering the limitations of target devices and deck size restrictions on devices, judgment should be exercised in the number of cards per deck and the total content size in a single request.
8.5.3.3.2 DeckExample.xml <?xml version = "1.0" encoding = "UTF-8" standalone="yes" ?><!DOCTYPE SimpleResult PUBLIC "-//ORACLE//DTD SimpleResult 1.1//EN""http://xmlns.oracle.com/ias/dtds/SimpleResult_1_1_0.dtd"><SimpleResult> <SimpleContainer> <SimpleText id="card1"> <SimpleTextItem>This is Card 1 <SimpleBreak/> <SimpleHref target="#card2">Go to Card2</SimpleHref> </SimpleTextItem> </SimpleText> <SimpleText id="card2"> <SimpleTextItem>Welcome to Card2</SimpleTextItem> </SimpleText> </SimpleContainer></SimpleResult>

OracleAS Wireless XML
Authoring Mobile Browser and Voice Applications 8-85
Figure 8–3 Cards Displayed on Mobile Telephones
8.5.3.3.3 SimpleText, SimpleTextItem Content of SimpleTextItem are usually translated into paragraphs. SimpleTextItem can be grouped using the SimpleText element. SimpleText element contains one or more SimpleTextItem. The id attribute of SimpleText tag can be used to refer to SimpleText elements as a deck. SimpleText is rendered on a separate card on WML and HDML devices. SimpleHref can be used as a child of SimpleTextItem similar to HTML anchor. See Section 8.5.6.1, "SimpleHref, SimpleTimer" for more information on SimpleHref. The deviceclass attribute of SimpleText and SimpleTextItem take values “pdabrowser", "pcbrowser", "voice", "microbrowser", "micromessenger", and "messenger" which directs processing for either small screen clients or voice clients. In the absence of the deviceclass attribute, the content will be rendered to both small screen devices and voice enabled devices. By default, text-to-speech (TTS) synthesis is used to represent the text enclosed in these tags. SimpleAudio tag in conjunction with deviceclass attribute can be specified to override the default behavior. For a better user experience, do not use TTS whenever recorded audio is available. For voice interfaces SimpleAudio may be used. Refer to the following snippet of code for usage.
<SimpleText> <SimpleTextItem> <SimpleAudio src="http://www.domain.com/filename.wav" deviceclass="voice">Alt text for TTS if the wave file is not found. </SimpleAudio> </SimpleTextItem>

OracleAS Wireless XML
8-86 Oracle Application Server Wireless Developer’s Guide
<SimpleTextItem deviceclass="microbrowser"> Text for small screen devices </SimpleTextItem></SimpleText>
8.5.3.4 Formatting the Display
8.5.3.4.1 SimpleBreak, SimpleStrong and SimpleEm These elements are used for fine-tuning the display of text content on a screen. SimpleStrong displays enclosed text in a stronger representation, usually bold. SimpleEm displays the enclosed text with emphasis, usually displayed as italicized text. For voice-enabled applications, level attribute can be used to specify the level of emphasis. Permissible values for level attribute are: strong, moderate, none and reduced.
SimpleBreak creates a new line on the page on which the tag is placed. The rule attribute can be used to display a line <hr>, for HTML output. Deviceclass can be used for directive processing of small screen or voice enabled devices, or both. For voice-enabled applications, SimpleBreak inserts a pause; the msecs or size attribute enables you to control the length of the pause. See the following example for details.
8.5.3.4.2 FormattingExample.xml <?xml version = "1.0" encoding = "UTF-8" standalone="yes" ?><!DOCTYPE SimpleResult PUBLIC "-//ORACLE//DTD SimpleResult 1.1//EN" "http://xmlns.oracle.com/ias/dtds/SimpleResult_1_1_0.dtd"><SimpleResult bgcolor="99ff99"> <SimpleContainer> <SimpleText> <SimpleTitle>Seach Result</SimpleTitle> <SimpleTextItem> <SimpleEm level="strong">1 Entry found</SimpleEm> <SimpleBreak msecs="500"/> <SimpleStrong>Chandra Patni</SimpleStrong> <SimpleBreak/>400 Oracle Pkwy <SimpleBreak/>Redwood Shores <SimpleBreak/>CA, 94065 </SimpleTextItem> </SimpleText> </SimpleContainer></SimpleResult>
Note: The .wav file specified must be in CCITT mu-law, 8 bit, 8kHz.

OracleAS Wireless XML
Authoring Mobile Browser and Voice Applications 8-87
Figure 8–4 Results of Formatting Example
8.5.3.5 Tables and Basic Formatting Example
8.5.3.5.1 SimpleTable, SimpleTableHeader, SimpleTableBody, SimpleRow and SimpleCol SimpleTable displays a table. A table consists of a header and body which are abstracted by SimpleTableHeader and SimpleTableBody, respectively. The body of a table consists of SimpleRow and SimpleCol elements. Images can be used in tables cells. TableExample.xml provides an example of the table elements.
8.5.3.5.2 TableExample.xml <?xml version = "1.0" encoding = "UTF-8" standalone="yes" ?><!DOCTYPE SimpleResult PUBLIC "-//ORACLE//DTD SimpleResult 1.1//EN" "http://xmlns.oracle.com/ias/dtds/SimpleResult_1_1_0.dtd"><SimpleResult> <SimpleContainer> <SimpleTable > <SimpleTitle> My Portfolio </SimpleTitle> <SimpleTableHeader> <SimpleCol>Symbol</SimpleCol> <SimpleCol>Price</SimpleCol> <SimpleCol>Delta</SimpleCol> </SimpleTableHeader> <SimpleTableBody>

OracleAS Wireless XML
8-88 Oracle Application Server Wireless Developer’s Guide
<SimpleRow> <SimpleCol>ORCL</SimpleCol> <SimpleCol>18.32</SimpleCol> <SimpleCol>+0.24</SimpleCol> </SimpleRow> <SimpleRow> <SimpleCol>SUNW</SimpleCol> <SimpleCol>17.35</SimpleCol> <SimpleCol>+1.06</SimpleCol> </SimpleRow> <SimpleRow> <SimpleCol>CSCO</SimpleCol> <SimpleCol>20.30</SimpleCol> <SimpleCol>+0.24</SimpleCol> </SimpleRow> <SimpleRow> <SimpleCol>MSFT</SimpleCol> <SimpleCol>6647</SimpleCol> <SimpleCol>+0.28</SimpleCol> </SimpleRow> </SimpleTableBody> </SimpleTable> </SimpleContainer></SimpleResult>

OracleAS Wireless XML
Authoring Mobile Browser and Voice Applications 8-89
Figure 8–5 Results of Tables and Basic Formatting Example
8.5.3.6 Image Adaptation Support in OracleAS Wireless XMLApplication developers embed images in their OracleAS Wireless XML applications using the SimpleImage tag. Image adaptation support is provided through the addImageExtension attribute of the SimpleImage tag. The semantics of the values taken by addImageExtension and available attributes are listed below.
Table 8–5 Semantics of Values
Case addImageExtension Available Semantics
1 not set, true not set Since available is not set, use default device extension.
2 not set, true list of extensions
Use the available extensions if they match.
3 false not set Do not add any extension. src is an image URL.
4 false list of extensions
Ignore available list; do not add extension.
5 auto not set Adapt the image for all devices using the src URL input for adaptation.

OracleAS Wireless XML
8-90 Oracle Application Server Wireless Developer’s Guide
Example 1: The simplest case is one in which a single image is provided by the application and is adapted for all devices that support images based on the device profile.
<SimpleImage src="http://www.oracle.com/admin/images/oralogo.gif" alt="Oracle logo" addImageExtension="auto" />
Example 2: Multiple images are provided and the most suitable image is selected. If the size or content format needs to be adapted, the most suitable image is adapted. In this case, if the device supports GIF images, the GIF image is used for any adaptation to the size or content format if required. If the device supports WBMP, the WBMP image is used in the nested object for any adaptation to the size. If the device does not support either, the first listed image format is used.
<SimpleImage src="http://../images/oralogo" alt="Oracle logo" available="gif wbmp" addImageExtension="auto"/>
Example 3: Multiple images are provided with image adaptation turned off. The two lines below have the same meaning:
<SimpleImage src="http://../images/oralogo" alt="Oracle logo" available="gif wbmp" addImageExtension="true"/>
<SimpleImage src="http://../images/oralogo" alt="Oracle logo" available="gif wbmp" />
Example 4: Turn image adaptation off and only use the provided image, ignoring devices that do not support this format.
<SimpleImage src="http://www.oracle.com/admin/images/oralogo.gif" alt="Oracle logo" addImageExtension="false" />
6 auto list of extensions
Adapt the image for all devices using the supported extension as the input for adaptation.
Table 8–5 Semantics of Values
Case addImageExtension Available Semantics

OracleAS Wireless XML
Authoring Mobile Browser and Voice Applications 8-91
8.5.4 Enhancing with Audio for Voice Access
8.5.4.1 SimpleAudio and SimpleSpeechThe SimpleAudio element can be used for playing audio. The file specified by the src attribute must be in 8-bit mulaw format. The SimpleSpeech element may be used to control prosody, pitch and other VoiceXML text-to-speech engine parameters. For example, the class attribute can be used to specify that the contents of SimpleSpeech should be interpreted as the say-as type phone, date, digits, literal, currency, number or time. See the following example for usage.
<?xml version = "1.0" encoding = "UTF-8" standalone="yes" ?><!DOCTYPE SimpleResult PUBLIC "-//ORACLE//DTD SimpleResult 1.1//EN" "http://xmlns.oracle.com/ias/dtds/SimpleResult_1_1_0.dtd"><SimpleResult> <SimpleContainer> <SimpleText> <SimpleTextItem> <SimpleAudio src="welcome1.wav">Welcome to Oracle Mobile, India Development Center</SimpleAudio> <SimpleBreak/> <SimpleAudio src="welcome2.wav">You can contact us at phone number </SimpleAudio> <SimpleBreak/> <SimpleAudio src="phone.wav"> <SimpleSpeech class="phone">91 080 552 8335</SimpleSpeech> </SimpleAudio> </SimpleTextItem> </SimpleText> </SimpleContainer></SimpleResult>

OracleAS Wireless XML
8-92 Oracle Application Server Wireless Developer’s Guide
Figure 8–6 Results of SimpleAudio and SimpleSpeech Example
8.5.4.2 Recommendation for Voice NavigationWhile writing applications for Oracle Application Server Wireless, developers should consider voice navigation at design time. Well-designed voice applications tend to have different semantics than small screen devices and desktop applications. Although Oracle Application Server Wireless automatically provides an audio interface for service, the system is not intended to be a speech-controlled small-screen device browser, where speech is added as an afterthought. Application developers should develop services that have appropriate small-screen and speech interfaces in their own right, and the respective strengths of these different devices can be used to advantage.
The development path for beginners should follow this model:
1. Write a basic version of the service using exactly the same flow and markup for small-screen devices and audio interfaces.
2. Test on small-screen devices and voice telephones. If it is acceptable, you are done.
For a large class of services, particularly menu-driven services that provide information, the method works surprisingly well. If one or another interface seems clumsy, there are several things that can be done to improve it.
OracleAS Wireless XML
Authoring Mobile Browser and Voice Applications 8-93
1. There are a number of attribute values that can be adjusted to enhance the interface for one of the device classes.
2. If that is insufficient, one can selectively include or exclude certain elements from the user interface depending on the deviceclass.
3. You can alter the user interface flow by selectively following different paths through a service, again, depending on the deviceclass.
8.5.5 Application NavigationBefore examining the properties of writing mobile XML to handle text formatting from a small device and voice perspective, this section will help you gain the skills to write effective user interfaces to capture the required business logic with the least amount of effort by mobile users.
■ Section 8.5.5.1, "Introduction"
■ Section 8.5.5.2, "Basic Navigation"
■ Section 8.5.5.3, "SimpleMenu, SimpleMenuItem"
■ Section 8.5.5.4, "Navigating by Voice"
8.5.5.1 IntroductionThis section contains the details of creating Oracle Application Server Wireless XML pages containing navigation elements such as menus, hyperlinks, email, help, and cover forms. The elements necessary to build a form are different from a menu as these will be the core elements needed for a wireless developer to build an effective mobile application that simplifies user input without compromising a rich feature set across different devices.
Because voice navigation is inherently more complicated than in small screen devices, this section focuses on the fundamentals of Oracle Application Server Wireless XML for small devices, and highlights the required voice additions.
Menus allow consumers of services to simply navigate to a predefined choice and enable different URLs to be invoked for a given choice. Forms, on the other hand, typically differ from Menus in that there is one target which dictates the user’s next page based on user input.

OracleAS Wireless XML
8-94 Oracle Application Server Wireless Developer’s Guide
8.5.5.2 Basic Navigation
8.5.5.3 SimpleMenu, SimpleMenuItemThe SimpleMenu element represents a single menu with selectable menu items defined by SimpleMenuItem elements. It is possible to add images to the top of each Menu, but avoid using large titles and images. See SimpleMenuExample.xml for an example.
8.5.5.3.1 SimpleMenuExample.xml <?xml version = "1.0" encoding = "UTF-8" standalone="yes" ?><!DOCTYPE SimpleResult PUBLIC " = //ORACLE//DTD SimpleResult 1.1//EN""http://xmlns.oracle.com/ias/dtds/SimpleResult_1_1_0.dtd"><SimpleResult> <SimpleContainer> <SimpleMenu> <SimpleTitle>OracleMobile Services <SimpleImage src="http://portal.oraclemobile.com/other/oow/oramobile"alt="Oracle SoftwarePowers the Internet"/> </SimpleTitle> <SimpleMenuItem target="mission.xml">OracleMobileMissionStatement</SimpleMenuItem> <SimpleMenuItem target="timer.xml">Oracle Server</SimpleMenuItem> <SimpleMenuItem target="email.xml">Email the authors</SimpleMenuItem> </SimpleMenu> </SimpleContainer> </SimpleResult>

OracleAS Wireless XML
Authoring Mobile Browser and Voice Applications 8-95
Figure 8–7 Results of Simple Navigation Example
8.5.5.4 Navigating by VoiceThe system reads the items of menu elements and concurrently listens for the values of the SimpleMenuItem element. If one of these values is recognized, then the target URL is fetched. If the user says nothing, the system will prompt the user with a system default noinput message. If the user says something that the system is unable to recognize, the system default nomatch message is played. However, application programmer may control such messages. Such fail-over logic is critical for making robust voice applications. Application developers should make extensive use of such features. For menus with a large number of items, voice interfaces should not read the entire list of menu items to the user. The default can be disabled by setting the autoprompt attribute of SimpleMenu to false. Instead, applications should wait for user input and should only present an options list as help if requested by user. See EnhancedSimpleMenuExample.xml for an example. Some of the tags and elements used in the application are covered later in this chapter.

OracleAS Wireless XML
8-96 Oracle Application Server Wireless Developer’s Guide
8.5.5.4.1 EnhancedSimpleMenuExample.xml
<?xml version = "1.0" encoding = "UTF-8" standalone="yes" ?><!DOCTYPE SimpleResult PUBLIC " = //ORACLE//DTD SimpleResult 1.1//EN""http://xmlns.oracle.com/ias/dtds/SimpleResult_1_1_0.dtd"> <SimpleResult> <SimpleContainer> <SimpleMenu deviceclass="microbrowser pdabrowser pcbrowser micromessagermessenger"> <SimpleTitle>Oracle Mobile Services <SimpleImage src="http://portal.oraclemobile.com/other/oow/oramobile"alt="Oracle Software Powers the Internet"/></SimpleTitle> <SimpleTitle>Oracle Mobile Services</SimpleTitle> <SimpleMenuItem target="mission.xml">Oracle Mobile Mission Statement</SimpleMenuItem> <SimpleMenuItem target="timer.xml">Oracle Server</SimpleMenuItem> <SimpleMenuItem target="email.xml">Email the authors</SimpleMenuItem> </SimpleMenu> <SimpleMenu deviceclass="voice" autoprompt="false"> <SimpleTitle> <SimpleAudio src="title.wav">oracle mobile services </SimpleAudio> </SimpleTitle> <SimpleMenuItem target="mission.xml">Oracle Mobile Mission Statement <SimpleGrammar><grammar root="ms"> <rule id="ms"> <item repeat="0-1">Oracle</item> mission statement </rule> </grammar> </SimpleGrammar> </SimpleMenuItem> <SimpleMenuItem target="timer.xml">Oracle Server <SimpleGrammar><grammar root="server"> <rule id="server"> <item repeat="0-1">Oracle</item> server </rule> </grammar> </SimpleGrammar> </SimpleMenuItem> <SimpleMenuItem target="email.xml">Email the authors <SimpleGrammar><grammar root="email"> <ruleid="email"> <one-of> <item>email the authors</item> <item>email</item>

OracleAS Wireless XML
Authoring Mobile Browser and Voice Applications 8-97
<item>email authors</item> </one-of> </rule> </grammar> </SimpleGrammar> </SimpleMenuItem> <SimpleCatch type="noinput"> <SimpleAudio src="menuOptions.wav">Please speak up. You may also say help. </SimpleAudio> </SimpleCatch> <SimpleCatch type="nomatch"> <SimpleAudio src="nomatch.wav">I’m sorry, I did not understand you. Please say that again or say help.</SimpleAudio> </SimpleCatch type="help"> <SimpleAudio src="menuHelp.wav"> Help. Oracle Mobile. You may say mission statement, oracle server or email the authors. </SimpleAudio> </SimpleMenu> </SimpleContainer></SimpleResult>
The output of this application on small screen devices is the same as shown above, while a typical voice session may be as follows:
System: "Oracle Mobile Services."
User: "Help."
System: "Help. Oracle Mobile. You may say mission statement, oracle server or email the authors."
User: "I am going to trick you."
System: "I’m sorry, I did not understand you. Please say that again or say help."
User: "Email authors."
Voice gateways provide a text-to-speech (TTS) engine that reads out SimpleTitles, SimpleTextItems, and others. For the TTS to sound intelligible, proper spacing and punctuation are required.
SimpleFormOptions and SimpleMenuItems should not have text punctuation unless the deviceclass has been set to a value other than voice. This is because the text in these tags is used to produce speech recognition grammars, and many voice gateways cannot process such characters in speech grammars. If a developer wishes to avoid using the synthesized message, he may specify a prerecorded audio file to be played. The location of the audio file can be specified through the

OracleAS Wireless XML
8-98 Oracle Application Server Wireless Developer’s Guide
<SimpleAudio> tag. End user experience of TTS is often considered unpleasant, so as much as possible, prerecorded human sounds should be used instead of TTS.
8.5.6 Document Linking
8.5.6.1 SimpleHref, SimpleTimer For linking documents, SimpleHref can be used as a hyperlink. It can also be used to send email using the mailto:handler as shown in the following two examples. Similarly, the callto:handler can be used for devices that are capable of making phone calls. Application developers should specify deviceclass attributes which support the call or mail feature. Use of SimpleHref on voice devices is discouraged, as it is problematic to indicate in voice that a piece of inline text that is read by a text-to-speech engine is also a phrase that can be spoken to traverse the link. SimpleMenuItem should be used instead of SimpleHref.
SimpleTimer can be used to fetch a document after a specified delay. It can be used for navigation to display a showcase promotion, sponsor information, or system-wide critical messages.
8.5.6.1.1 ContactAuthors.xml <?xml version = "1.0" encoding = "UTF-8" standalone="yes" ?><!DOCTYPE SimpleResult PUBLIC "-//ORACLE//DTD SimpleResult 1.1//EN" "http://xmlns.oracle.com/ias/dtds/SimpleResult_1_1_0.dtd"><SimpleResult> <SimpleContainer> <SimpleText deviceclass="pdabrowser pcbrowser micromessenger messenger microbrowser"> <SimpleTextItem deviceclass="pdabrowser pcbrowser micromessenger messenger">Email the Authors only on clients with default mail clients like PocketPC and desktops <SimpleBreak/> <SimpleHref target="mailto:[email protected]">Chandra "duke" Patni </SimpleHref> <SimpleBreak/> <SimpleHref target="mailto:[email protected]">Peter "ptg" Feng </SimpleHref> </SimpleTextItem> <SimpleTextItem deviceclass="microbrowser">Call the Authors on clients with phone facility <SimpleBreak/> <SimpleHref target="callto:1234567890">Chandra "duke" Patni </SimpleHref>

OracleAS Wireless XML
Authoring Mobile Browser and Voice Applications 8-99
<SimpleBreak/> <SimpleHref target="callto:1234567890">Peter "ptg" Feng </SimpleHref> </SimpleTextItem> </SimpleText> <SimpleMenu deviceclass="voice"> <SimpleTitle>Call the Authors on voice clients</SimpleTitle> <SimpleMenuItem target="callto:1234567890">Chandra Patni</SimpleMenuItem> <SimpleMenuItem target="callto:1234567890">Peter Feng</SimpleMenuItem> </SimpleMenu> </SimpleContainer></SimpleResult>
Figure 8–8 Results of the Email Demo Example
8.5.6.1.2 PhoneCallDemo.xml
<?xml version = "1.0" encoding = "UTF-8" standalone="yes" ?><!DOCTYPE SimpleResult PUBLIC "-//ORACLE//DTD SimpleResult 1.1//EN" "http://xmlns.oracle.com/ias/dtds/SimpleResult_1_1_0.dtd">

OracleAS Wireless XML
8-100 Oracle Application Server Wireless Developer’s Guide
<SimpleResult> <SimpleContainer> <SimpleText deviceclass="microbrowser"> <SimpleTextItem><SimpleEm>Oracle</SimpleEm> Support </SimpleTextItem> <SimpleTextItem>Phone Book<SimpleBreak/> <SimpleHref target="callto:14155551212">Bob</SimpleHref> <SimpleHref target="callto:16505551212">Chris</SimpleHref> <SimpleHref target="callto:14085551212">Dina</SimpleHref> <SimpleHref target="callto:17075551212">Jere</SimpleHref> </SimpleTextItem> </SimpleText><SimpleMenu deviceclass="voice"> <SimpleTitle><SimpleEm>Oracle</SimpleEm> Support <SimpleBreak/> Phone Book</SimpleTitle> <SimpleMenuItem target="callto:14155551212">Bob</SimpleMenuItem> <SimpleMenuItem target="callto:16505551212">Chris</SimpleMenuItem> <SimpleMenuItem target="callto:14085551212">Dina</SimpleMenuItem> <SimpleMenuItem target="callto:17075551212">Jere</SimpleMenuItem> </SimpleMenu> </SimpleContainer></SimpleResult>

OracleAS Wireless XML
Authoring Mobile Browser and Voice Applications 8-101
Figure 8–9 Results of the Phone Call Demo Example
8.5.6.1.3 SimpleAction SimpleAction provides the ability to define a submit action that navigates users to a new context. Mobile devices can associate a submit action to a number of input methods of the device, such as pressing a key on a WAP device or speaking a command on a voice-enabled device. SimpleAction can also be used for navigation to different pages and different cards within a deck, and overriding default behavior on voice browsers. For mobile phones, the main usage would be to override the buttons (left and right) on a wireless phone and PDAs to provide a similar navigation functionality as SimpleHref.
Like many programming languages, SimpleAction, for a given type, conforms to scoping rules. For example, if SimpleAction is defined as a child of SimpleMenu and also as a child of the enclosing SimpleContainer for a given type, the SimpleAction tag within the SimpleMenu overrides the SimpleAction of the SimpleContainer. If the value for type attribute is different, then the two SimpleActions will be active within the context. The behavior of SimpleAction is unspecified if two elements are defined with the same type and same deviceclass values in the same context. See the following example for usage.

OracleAS Wireless XML
8-102 Oracle Application Server Wireless Developer’s Guide
8.5.6.1.4 SimpleCache SimpleCache enables you to specify caching policy of content either by the WAP gateway, by client browser, or both.
■ Caching policy is said to be public if the WAP gateway is allowed to cache the content of a URL.
■ Caching policy is said to be private if the content is only allowed to cache by the device.
SimpleCache can be specified as the child of SimpleHref, SimpleGo, SimpleMenuItem, SimpleAction, and others. SimpleCache also allows users to specify the prefetch policy (if supported by the browser), where a URL must be prefetched while still showing the current content. Time to live for the cached data is specified by the ttl attribute, which takes milliseconds as an argument.
SimpleCache should be used when the data is sensitive or becomes stale after a specified amount of time.
8.5.6.1.5 SimpleMeta SimpleMeta allows applications to specify meta information through a device browser, and pass that information to the transformers.
8.5.6.1.6 DocumentLinkingDemo.xml Here is an example of document linking:
<?xml version = "1.0" encoding = "UTF-8" standalone="yes" ?><!DOCTYPE SimpleResult PUBLIC "-//ORACLE//DTD SimpleResult 1.1//EN" "http://xmlns.oracle.com/ias/dtds/SimpleResult_1_1_0.dtd"><SimpleResult> <SimpleContainer id=”message”> <SimpleTimer target="#employeePortal" timer="30"/> <SimpleText> <SimpleTextItem> There will be ice cream bars in every lobby at Headquarters to promote the use of the new employee wireless portal. </SimpleTextItem> </SimpleText> </SimpleContainer> <SimpleContainer> <SimpleText id=”employeePortal”> <SimpleTitle> <SimpleImage valign=”top” src= http://portal.oraclemobile.com/other/oow/oraclemobile alt=”oraclemobile icon”/> </SimpleTitle> <SimpleTextItem>Welcome to <SimpleEm>OracleMobile</SimpleEm> Employee Portal <SimpleBreak/> </SimpleTextItem> <SimpleAction type=”secondary” label=”Support” target=”phone.xml”/> <SimpleHref label=”PORTAL” id=”portal” target=”form.xml”> enterPortal

OracleAS Wireless XML
Authoring Mobile Browser and Voice Applications 8-103
</SimpleHref> </SimpleText> </SimpleContainer></SimpleResult>
Figure 8–10 Results of the Document Linking Demo Example
8.5.6.2 Enhancing with Voice
8.5.6.2.1 SimpleDTMF SimpleDTMF specifies a VoiceXML DTMF grammar (that is, a grammar of touchtone sequences). In the voice application example, a user may select menu item withdraw either by saying "withdraw" or by selecting 2 on the device.
8.5.6.2.2 SimpleDTMF.xml
<?xml version = "1.0" encoding = "UTF-8" standalone="yes" ?><!DOCTYPE SimpleResult PUBLIC "-//ORACLE//DTD SimpleResult 1.1//EN" "http://xmlns.oracle.com/ias/dtds/SimpleResult_1_1_0.dtd"><SimpleResult> <SimpleCache ttl="0"/> <SimpleContainer> <SimpleMenu wrapmode="nowrap" autoprompt="false"> <SimpleTitle>Voice demo</SimpleTitle> <SimpleMenuItem target="deposit.jsp">Deposit

OracleAS Wireless XML
8-104 Oracle Application Server Wireless Developer’s Guide
<SimpleDTMF> <grammar root="one"> <rule id="one">1</rule> </grammar> </SimpleDTMF> </SimpleMenuItem> <SimpleMenuItem target="HelloWorld.jsp">Withdraw <SimpleDTMF> <grammar root="two"> <rule id="two">2</rule> </grammar> </SimpleDTMF> </SimpleMenuItem> <SimpleCatch type="cancel"> <SimpleGo target="cancel.jsp/> </SimpleCatch> <SimpleCatch type="help"> <SimpleAudio src="help2.wav">Help. For deposit, you may say deposit or press 1. For withdraw, you may say withdraw or press 2.</SimpleAudio> </SimpleCatch> <SimpleCatch type="help" count="2"> <SimpleAudio src="help.wav">Help. For deposit, you may say deposit or press 1. For withdraw, you may say withdraw or press 2. You may also say cancel to return to account menu.</SimpleAudio> </SimpleCatch> </SimpleMenu> </SimpleContainer></SimpleResult>
8.5.6.2.3 SimpleCatch SimpleCatch catches an event; it is a voice-only tag. This can be used to capture predefined voice events or error conditions such as noinput, nomatch, exit, cancel, error, help, telephone.disconnect, and others, and perform actions on them. For example, on a noinput event, a user can be given some help instructions and be reprompted for their input. The event types are specified by type attribute which is mandatory for SimpleCatch. Also, count attribute may be used for occurrences of the event. The default value is 1. It allows handling of multiple occurrences of an event in multiple ways. For example the nth occurrence of an event can be handled in a different manner than the previous occurrence. In a frequently occurring scenario, it may be used for increasing details of help as count increases. See SimpleDTMF.xml for usage.
8.5.6.2.4 SimpleGrammar SimpleGrammar provides a customized speech recognition grammar. Using this grammar, developers can not only provide the vocabulary to listen for, but also the mapping from, utterances to data values. If the rules for such

OracleAS Wireless XML
Authoring Mobile Browser and Voice Applications 8-105
mappings are in a remote location, then the src attribute may be used to specify the name of the file. The following example illustrates the use of SimpleGrammar.
<?xml version = "1.0" encoding = "UTF-8" standalone="yes" ?><!DOCTYPE SimpleResult PUBLIC "-//ORACLE//DTD SimpleResult 1.1//EN" "http://xmlns.oracle.com/ias/dtds/SimpleResult_1_1_0.dtd"><SimpleResult> <SimpleContainer> <SimpleMenu deviceclass="voice"> <SimpleTitle src="title.wav">Please select a freeway</SimpleTitle> <SimpleMenuItem target="./traffic.jsp?index=5">I 5 <SimpleGrammar> <grammar route="i5"> <rule id="i5"> <one-of> <item>i five</item> <item>interstate five</item> <item>five</item> <item>route five</item> <item>san diego</item> </one-of> </rule> </grammar> </SimpleGrammar> </SimpleMenuItem> <SimpleMenuItem target="./traffic.jsp?index=8 ">I 8 <SimpleGrammar><grammar root="i8"> <rule id="i8"> <one-of> <item>i eight</item> <item>interstate eight</item> <item>eight</item> <item>route eight</item> <item>alvarado freeway</item> <item>mission valley freeway</item> <item>ocean beach freeway</item> </one-of> </rule> </grammar> </SimpleGrammar> </SimpleMenuItem> <SimpleMenuItem target="./traffic.jsp?index=15 ">I 15 <SimpleGrammar> <grammar root="i15"> <rule id="i15"> <one-of>

OracleAS Wireless XML
8-106 Oracle Application Server Wireless Developer’s Guide
<item>i fifteen</item> <item>fifteen</item> <item>nterstate fifteen</item> <item>escondido freeway</item> <item>escondido</item> </one-of> </rule> </grammar> </SimpleGrammar> </SimpleMenuItem> <SimpleMenuItem target="./traffic.jsp?index=805 ">I 805 <SimpleGrammar> <grammar root="i805"> <rule id="i805"> <one-of> <item>i eight zero five</item> <item>i eight hundred five</item> <item>eight zero five</item> <item>eight hundred five</item> <item>interstate eight zero five</item> <item>interstate eight hundred five</item> <item>route eight zero five</item> <item>route eight hundred five</item> </one-of> </rule> </grammar> </SimpleGrammar> </SimpleMenuItem> </SimpleMenu> </SimpleContainer></SimpleResult>
In the above example, even though the last menu option is i eight hundred five, the user may say any one of the commands as specified by the <item>s in the <one-of> element. SimpleGrammar is a very useful construct for building user-friendly and smart voice applications. It also allows application developers to incorporate some of their localization issues. For example, “sure”, “ok”, “yes”, “please” and “yes please” all are used to refer to “yes” (in the America region) in different parts of world. Such speech diversity can be incorporated into an application using SimpleGrammar.

OracleAS Wireless XML
Authoring Mobile Browser and Voice Applications 8-107
8.5.6.2.5 Reply to Email Example This is a code that used to implement reply to Email.
For example, if a user listening to their Email on a phone says, "reply", a message instructs the user to speak their reply and then press the pound key (#). This recorded reply is sent as an attachment to the original Email sender.
To implement this, the spoken utterance is recorded on the VoiceXML gateway, and then passed back to the Multi-channel Server and the application to be attached to a reply Email.
MXML:
<SimpleResult> <SimpleContainer> <SimpleForm method="post" enctype="application/x-www-form-urlencoded" target="recordaudio.jsp"> <SimpleFormItem type="audio" enctype="audio/wav"> name="recorded_audio_msg" beep="true" dtmfterm="true"> Say something to record after the beep. </SimpleFormItem> </SimpleForm> </SimpleContainer></SimpleResult>
Here is recordaudio.jsp (partial):
// WRITE THE AUDIO CONTENT TO A FILE// AND PLAY BACK THE CONTENTSString myrecording = request.getParameter("record_audio_msg");String wavdirectory = "path/testharness/audio/"; // ABSOLUTE PATH OF WHERE TO STORE THE AUDIOString myWaveFile = wavdirectory + "test.wav";File myWFile = new File(myWaveFile);String result = "";try { byte[] myWaveBytes = myrecording.getBytes(); FileOutputStream myFileOutput = new FileOutputStream(myWaveFile); myFileOutput.write(myWaveBytes); myFileOutput.close(); result = "<SimpleAudiosrc=\"http://iaswvoice.oracle.com/testharness/audio/" + fileName +"test.wav\"/>"; // THIS IS TO CHECK TO MAKE SURE THE FILE WAS RECORDED} catch (IOException e) { result = "Error No Audio File Created";} %>

OracleAS Wireless XML
8-108 Oracle Application Server Wireless Developer’s Guide
Value: <%=result%> <!-- PLAY THE AUDIO FILE FOR THE USER, SEE ABOVE RESULT STRING -->
8.5.6.2.6 Mobile XML Voice Navigation Elements The following basic voice commands are available to users at all times. The response of the system to help and cancel will generally need to be tailored to each individual service.
■ Main menu—can be uttered at any time, and by default takes the user to the OracleAS Wireless main menu.
■ Goodbye—to end the session with one OracleAS Wireless instance, or user may just hang up the telephone.
■ Exit—same as Goodbye.
■ Help—for context-sensitive help.
■ Cancel—for aborting or restarting a dialog, as when the system has misrecognized a command or input.
8.5.6.2.7 Help Help is used by voice applications to provide context-sensitive help when users invoke help commands. Voice interfaces should make use of Help as much possible. Unlike small screen application help, voice help is vital to the navigation of voice interfaces and therefore should be incorporated at development time. See EnhancedSimpleMenuExample.xml for usage.
8.5.7 Filling Out Forms for Data Entry and NavigationEach section presents a different topic. These sections include:
■ Section 8.5.7.1, "Introduction"
■ Section 8.5.7.2, "Basic User Interaction"
■ Section 8.5.7.3, "Complete User Forms"
■ Section 8.5.7.4, "Enhancing Voice"
8.5.7.1 IntroductionForms provide the basic building blocks for user interactions. Forms for phones and PDAs are fairly similar, except in form factor. Like HTML forms, forms in mobile devices are used for passing name-value parameters to the server. Multiple form items can be laid out on the device screen, if supported. Therefore, a user may populate a form item in an arbitrary order. Certain format restrictions can be specified on a form item to ensure the type, safety and validity of form fields. For

OracleAS Wireless XML
Authoring Mobile Browser and Voice Applications 8-109
example, it is possible to specify a restriction of five digits for US postal codes. However, most of the validation should occur on the server side. This constraint is due to the limited resources on the devices. On a voice browser, every thing must be processed by the voice gateway, which enables rich validation and exception handling at the markup language level.
8.5.7.2 Basic User Interaction
8.5.7.2.1 SimpleForm SimpleForm is similar to HTML form, which provides an arbitrary collection of SimpleFormItem and SimpleFormSelect as a single entity. SimpleFormSelect may be used to display list, radio buttons or checkbox controls. Form has SimpleTitle as its child, and if specified, will appear as the Title of the form. SimpleForm along with SimpleBind can trigger form processing in several ways; multiple tasks can be executed upon form submission.
8.5.7.2.2 SimpleFormItem SimpleFormItem is the equivalent of a text field, text area, password field and hidden field for desktop browsers. The type of item may be specified using the display mode attribute. It may take text field, text area, noecho or hidden. SimpleFormItem can be used to obtain input from a user. This element presents a prompt and waits for input from the user. The content of this element, which is in parsable character format, specifies default values for the form item. For example, a login screen and guest book screen may appear as in the following example.
8.5.7.2.3 FormExample.xml <?xml version = "1.0" encoding = "UTF-8" standalone="yes" ?><!DOCTYPE SimpleResult PUBLIC "-//ORACLE//DTD SimpleResult 1.1//EN" "http://xmlns.oracle.com/ias/dtds/SimpleResult_1_1_0.dtd"><SimpleResult> <SimpleContainer> <SimpleForm target="login.jsp" method="post"> <SimpleFormItem name="userName">User Name:</SimpleFormItem> <SimpleFormItem name="password" displaymode="noecho">Password:</SimpleFormItem> </SimpleForm> </SimpleContainer></SimpleResult>

OracleAS Wireless XML
8-110 Oracle Application Server Wireless Developer’s Guide
Figure 8–11 Results of FormExample.xml Example
8.5.7.2.4 GuestBook.xml
<?xml version = "1.0" encoding = "UTF-8" standalone="yes" ?><!DOCTYPE SimpleResult PUBLIC "-//ORACLE//DTD SimpleResult 1.1//EN" "http://xmlns.oracle.com/ias/dtds/SimpleResult_1_1_0.dtd"><SimpleResult> <SimpleContainer> <SimpleForm target="sendMail.jsp" method="post"> <SimpleTitle>Thanks for signing my guestbook.</SimpleTitle> <SimpleFormItem name="Name">Name:</SimpleFormItem> <SimpleFormItem name="message" displaymode="textarea">Message:</SimpleFormItem> </SimpleForm> </SimpleContainer></SimpleResult>

OracleAS Wireless XML
Authoring Mobile Browser and Voice Applications 8-111
Figure 8–12 Results of GuestBook.xml Example
8.5.7.3 Complete User Forms
8.5.7.3.1 SimpleFormSelect, SimpleFormOption, and SimpleOptGroup These elements display a selected option list. It can display drop down list, checkbox and radio button, using the display mode attribute. Checkboxes or option lists may allow single selection or multiple selections using the multiple attribute. The items to be displayed are abstracted by the SimpleFormOption element. SimpleOptGroup groups SimpleFormOption elements into a hierarchy. It is useful for small screen devices, where long list of options cannot be esthetically presented. The content of SimpleFormOption element is parsable character data, which specifies default values for the form item. See the following example for usage.
8.5.7.3.2 Profile.xml
<?xml version = "1.0" encoding = "UTF-8" standalone="yes" ?><!DOCTYPE SimpleResult PUBLIC "-//ORACLE//DTD SimpleResult 1.1//EN" "http://xmlns.oracle.com/ias/dtds/SimpleResult_1_1_0.dtd"><SimpleResult> <SimpleContainer> <SimpleForm name="employeeinfo" target="process.jsp"> <SimpleTitle>Your Profile</SimpleTitle> <SimpleFormItem name="homepage" default="http://">Homepage</SimpleFormItem> <SimpleFormSelect name="skills" displaymode="checkbox" multiple="true">

OracleAS Wireless XML
8-112 Oracle Application Server Wireless Developer’s Guide
<SimpleTitle>Skills</SimpleTitle> <SimpleFormOption value="Java">Java</SimpleFormOption> <SimpleFormOption value="xml">XML</SimpleFormOption> <SimpleFormOption value="sql">SQL</SimpleFormOption> </SimpleFormSelect> <SimpleFormSelect name="nerd" displaymode="checkbox"> <SimpleTitle>Addicted to Java?</SimpleTitle> <SimpleFormOption value="yes">Yes</SimpleFormOption> <SimpleFormOption value="no">No</SimpleFormOption> </SimpleFormSelect> <SimpleFormSelect name="location" displaymode="list"> <SimpleTitle>Location</SimpleTitle> <SimpleFormOption value="Redwood Shores_CA">HQ Redwood Shores,CA</SimpleFormOption> <SimpleFormOption value="Nashua_NH">NEDC Nashua, NH</SimpleFormOption> <SimpleFormOption value="SanFrancisco_CA">SanFrancisco, CA</SimpleFormOption> <SimpleFormOption value="NewYork,NY">NewYork, NY</SimpleFormOption> </SimpleFormSelect> </SimpleForm> </SimpleContainer></SimpleResult>
Figure 8–13 Results of Profile.xml Example

OracleAS Wireless XML
Authoring Mobile Browser and Voice Applications 8-113
8.5.7.4 Enhancing Voice
8.5.7.4.1 SimpleGrammar, SimpleValue and SimpleDTMF
SimpleGrammar— SimpleGrammar provides a customized speech recognition grammar. For further details on the use of SimpleGrammar see Section 8.5.6.2.4, "SimpleGrammar".
SimpleValue—SimpleValue is a placeholder for dynamic information that is not known until runtime. This element is valuable for processing multiple cards within one deck and capturing client-side data validation.
SimpleDTMF—This is a keyboard binding used to process input. In the example below, the formItem ZipInput would pass only 232 to the target and nothing else.
<?xml version = "1.0" encoding = "UTF-8" standalone="yes" ?><!DOCTYPE SimpleResult PUBLIC "-//ORACLE//DTD SimpleResult 1.1//EN" "http://xmlns.oracle.com/ias/dtds/SimpleResult_1_1_0.dtd"><SimpleResult> <SimpleContainer> <SimpleForm id="Starting" target="test2a.jsp"> <SimpleFormItem name="addrInput" slot="value"> simple grammar test, please say oracle or san mateo <SimpleGrammar> <grammar root="addr"> <rule id="addr"> <one-of> <item>Oracle <tag>value = "bridge"</tag></item> <item>San Mateo <tag>value = "foster city"</tag></item> </one-of> </rule> </grammar> </SimpleGrammar> </SimpleFormItem> <SimpleFormItem name="zipInput" slot="zip"> <SimpleDTMF> <grammar root="n5"> <rule id="n5"> 95 <tag>zip = "232"</tag> </rule> </grammar> </SimpleDTMF> Simple DTMF test, please press 95 </SimpleFormItem> </SimpleForm> </SimpleContainer></SimpleResult>

OracleAS Wireless XML
8-114 Oracle Application Server Wireless Developer’s Guide
8.5.7.4.2 Recommendation for Voice Forms So far we have written the form for the small screen devices which are similar to the following form.
<?xml version = "1.0" encoding = "UTF-8" standalone="yes" ?><!DOCTYPE SimpleResult PUBLIC "-//ORACLE//DTD SimpleResult 1.1//EN" "http://xmlns.oracle.com/ias/dtds/SimpleResult_1_1_0.dtd"><SimpleResult> <SimpleContainer> <SimpleForm target="guess.jsp"> <SimpleFormItem name="guess"> <SimpleTitle> I am thinking of a number between 1 and 100. What is your first guess? </SimpleTitle> </SimpleFormItem> </SimpleForm> </SimpleContainer></SimpleResult>
This example would work well for a small screen device. However, this is not sufficient for spoken input. Speech recognition works only when there is a very narrowly-prescribed vocabulary for which to listen. Descriptions of such vocabularies are called speech-recognition grammars. <SimpleMenu>s and <SimpleFormSelect>s provide such grammars with their lists of <SimpleMenuItem>s and <SimpleFormOption>s. However, in examples such as the one above, the system should be listening for an arbitrary number. This is indicated by the type attribute of <SimpleFormItem>, as follows:
<?xml version = "1.0" encoding = "UTF-8" standalone="yes" ?><!DOCTYPE SimpleResult PUBLIC "-//ORACLE//DTD SimpleResult 1.1//EN" "http://xmlns.oracle.com/ias/dtds/SimpleResult_1_1_0.dtd"><SimpleResult> <SimpleContainer> <SimpleForm target="guess.jsp"> <SimpleFormItem name="guess" type="number"> <SimpleTitle> I am thinking of a number between 1 and 100. What is your first guess? </SimpleTitle> </SimpleFormItem> </SimpleForm> </SimpleContainer></SimpleResult>

OracleAS Wireless XML
Authoring Mobile Browser and Voice Applications 8-115
Setting type="number" tells the system to listen for any utterance that corresponds to a spoken number, if such an utterance is heard, the corresponding number is assigned to the identifier guess. In addition to number, the values boolean, digits, date, time, currency, and phone also specify vocabularies for which to listen. Besides specifying the type attribute, the developer can enhance the voice features by observing the following guidelines:
■ The voice experience can be enhanced with prerecorded audio using the <SimpleAudio> element.
■ As confirmation, echo the recognized utterance using <SimpleValue> and allow the user to cancel if an input has been misrecognized.
■ Always provide context-sensitive help.
■ As necessary, use the deviceclass attribute to tailor audio and text messages to voice (but use this attribute sparingly, as it tends to obfuscate the markup).
■ Always provide users the option of continuing in a service by moving forward—providing an appropriate command leading to the place the user wants to go—rather than forcing them to back out using Cancel.
■ Provide special event handlers for recognition failures (noinput, nomatch) and Internet fetch failures (error.badfetch) where appropriate.
The following example improves the user experience through the implementation of these guidelines.
<?xml version = "1.0" encoding = "UTF-8" standalone="yes" ?><!DOCTYPE SimpleResult PUBLIC "-//ORACLE//DTD SimpleResult 1.1//EN" "http://xmlns.oracle.com/ias/dtds/SimpleResult_1_1_0.dtd"><SimpleResult> <SimpleContainer> <SimpleForm target="tipcalc.jsp"> <SimpleFormItem name="howmuch" type="currency">How much is the bill? </SimpleFormItem> <SimpleFormItem name="howmany" format="N*" type="number"> How many are in your party? <SimpleCatch type="cancel">Canceling.
<SimpleClear> <SimpleName name="howmuch"/></SimpleClear> </SimpleCatch>
</SimpleFormItem> <SimpleFormSelect name="howbig" deviceclass="microbrowser pdabrowser pcbrowser micromessenger messenger"> <SimpleTitle>How big do you want your tip to be?</SimpleTitle>
OracleAS Wireless XML
8-116 Oracle Application Server Wireless Developer’s Guide
<SimpleFormOption value="10">small (10%)</SimpleFormOption> <SimpleFormOption value="15">medium (15%)</SimpleFormOption> <SimpleFormOption value="20">large (20%)</SimpleFormOption> </SimpleFormSelect> <SimpleFormSelect name="howbig" deviceclass="voice" autoprompt="false"> <SimpleTitle> How big do you want your tip to be? For ’ten percent’ say ’small’, for ’fifteen percent’ say ’medium’, for ’twenty percent’ say ’large’. </SimpleTitle> <SimpleFormOption value="10">small</SimpleFormOption> <SimpleFormOption value="15">medium</SimpleFormOption> <SimpleFormOption value="20">large</SimpleFormOption> <SimpleCatch type="nomatch">Please say that again</SimpleCatch> <SimpleCatch type="cancel">Canceling.
<SimpleClear> <SimpleName name="howmuch"/> <SimpleName name="howmany"/></SimpleClear>
</SimpleCatch> </SimpleFormSelect> </SimpleForm> </SimpleContainer></SimpleResult>
8.5.7.5 Working with Signature Capture Form ControlSome browsers (such as the Spectrum24® WebClient for Palm Computing Platform) support the ability to capture signatures. Applications developed using OracleAS Wireless XML can generate the target markup required to support signature capture. In this release, the following browsers are supported for signature capture:
■ Symbol Spectrum24® WebClient for Palm Computing PlatformVersion 2.8-10 for Palm OS 4.1
■ Microsoft Pocket Internet Explorer 4.1 on Microsoft Pocket PC
■ Microsoft Pocket Internet Explorer on Microsoft CE3 or later
On supported Microsoft Pocket PC and Windows Mobile platforms, the Oracle Signature Capture Plug-in for Pocket Internet Explorer must be installed. The Oracle Signature Capture Plug-in is available for download from Oracle MetaLink at http://metalink.oracle.com or contact Oracle Support.

OracleAS Wireless XML
Authoring Mobile Browser and Voice Applications 8-117
8.5.7.5.1 SimpleFormItem type=signature The OracleAS Wireless XML tag <SimpleFormItem> has an additional type signature to support signature capture on target browsers which have this capability. The following sample code segment illustrates how to use signature capture form control in an an application developed using OracleAS Wireless XML:
<SimpleResult><SimpleContainer>
<SimpleForm method="post" target="processForm.jsp" layout="linear"> <SimpleTitle>Signature</SimpleTitle>
<SimpleFormItem name="Text" size="6" type="text"> <SimpleTitle>Description:<SimpleBreak/></SimpleTitle> </SimpleFormItem>
<SimpleFormItem name="capture" type="signature"> <SimpleTitle>Signature: :<SimpleBreak/></SimpleTitle> </SimpleFormItem> <SimpleAction name="submit" type="submit" value="submit"/> </SimpleForm>
</SimpleContainer></SimpleResult>

OracleAS Wireless XML
8-118 Oracle Application Server Wireless Developer’s Guide
Figure 8–14 Signature Capture Code Rendered on a Pocket PC 2000 Emulator
8.5.7.5.2 Signature Capture Component Support If the target browser does not have signature capture support, OracleAS Wireless XML page(s) that use the signature capture control tag <SimpleFormItem type=signature>, will still work; the signature capture control tag is ignored and is not rendered.
8.5.8 Advanced User Interactions and Channel Optimization
8.5.8.1 IntroductionIn this section, we will discuss some of the advanced user interaction techniques provided by Oracle Application Server Wireless. So far, we have seen how Oracle Application Server Wireless allows users to specify a task when a user performs an action (for example, pressing a soft key on the phone or uttering a command on a voice-enabled device). Advanced User Interactions provide the ability to perform many tasks in response to an action triggered by a user (when supported by the

OracleAS Wireless XML
Authoring Mobile Browser and Voice Applications 8-119
device). And, the ability to perform tasks based on the value input by users is highly desirable.
Oracle Application Server Wireless provides an elaborate scheme to facilitate very sophisticated binding of tasks and actions. This is performed by the SimpleBind element which may appear in the context of SimpleText, SimpleForm, SimpleFormItem, SimpleFormSelect, SimpleMenu, SimpleResult or SimpleContainer.
8.5.8.2 Events and Tasks Using SimpleBindSimpleBind lets you specify a task which is performed in response to conditions specified by the children of the SimpleMatch element. SimpleMatch may specify primary, secondary, or continue keys, noinput or other events, a speech or DTMF grammar, the condition of filling in a form or form item (SimpleFinish), or menu item, and others. Only one task may be specified in SimpleTask, and when any of the conditions specified in the SimpleMatch occur, the task in the SimpleTask is executed. SimpleTask may also perform tasks selectively by using SimpleSwitch and SimpleCase elements which are analogous to the switch and case constructs of many programming languages.
In SimpleSwitch, a value of a particular user input is compared to the values enumerated by SimpleCase elements. SimpleTask may specify to:
■ go to a remote location using SimpleGo
■ display (or speak) a text item using SimpleTextItem
■ refresh the device screen (if supported) using SimpleRefresh
■ clear the specified device form fields using SimpleClear and SimpleName
■ allow voice users to reprompt input using SimpleReprompt
■ exit the application using SimpleExit
■ disconnect the device from connected state (for example, hang up the phone if the service is being accessed through a voice gateway) using SimpleDisconnect
■ go back using SimplePrev
■ submit form items using SimpleSubmit and SimpleName
The rendering characteristics of the SimpleBind element are specified by the SimpleDisplay element. SimpleDisplay supports SimpleTextItem as child elements that contain the actual render-and-display content. This allows you to play an audio or render the text for a MenuItem. See the example in SimpleBindExample.xml.

OracleAS Wireless XML
8-120 Oracle Application Server Wireless Developer’s Guide
8.5.8.2.1 SimpleBind.xml
<SimpleBind deviceclass="voice microbrowser"> <SimpleMatch> <SimpleFinish/> <SimpleGrammar> <grammar root="affirmative"> <rule id="affirmative"> <one-of> <item>yes</item> <item>correct</item> <item>true</item> <item>one</item> </one-of> </rule> </grammar>
</SimpleGrammar> <SimpleDTMF> <grammar root="one"> <rule id="one">1</rule> </grammar> </SimpleDTMF> <SimpleKey type="primary"/> </SimpleMatch>
<SimpleTask> <SimpleSubmit target="changepin.jsp" name="Submit" method="post"> <SimpleName name="p_old_pin" /> <SimpleName name="p_new_pin" /> </SimpleSubmit> </SimpleTask>
<SimpleDisplay> <SimpleTextItem deviceclass="voice"> <SimpleAudio src="sayYesOrPressOne.wav"> say yes, or press one, to submit </SimpleAudio> </SimpleTextItem>
<SimpleTextItem deviceclass="microbrowser"> Submit </SimpleTextItem>

Device Headers and Device Class
Authoring Mobile Browser and Voice Applications 8-121
</SimpleDisplay> </SimpleBind>
Figure 8–15 Results of SimpleBind, SimpleMatch and SimpleDisplay
8.5.8.2.2 Device Specific SimpleBind SimpleBind is primarily useful while writing voice applications. However, an application may use SimpleBind based on a particular device by the use of the deviceclass attribute. This attribute can take the values pdabrowser, pcbrowser, voice, microbrowser, micromessenger and messenger.
8.6 Device Headers and Device ClassTopics in this section include:
■ Section 8.6.1, "Article.jsp"
■ Section 8.6.2, "PageNavigation.Java"
■ Section 8.6.3, "Async-enabling OracleAS Wireless XML Applications"
Devices are classified based on two criteria in Oracle Application Server Wireless:
■ form factor of the device
■ communication channel of the device (synchronous request/response or async mode)

Device Headers and Device Class
8-122 Oracle Application Server Wireless Developer’s Guide
Developers may develop value-added services which make use of device-specific properties. For example, Oracle Application Server Wireless does not support server side management of large response. A service may use the maximum size of response for a device to provide navigation dynamically. The following headers are supported:
■ X-Oracle-Device.Class—indicates the channel mode and form factor of a device. Each value of the Device.Class indicates a unique communication channel mode and the unique form factor. The value set for the attribute deviceclass is same as the header X-Oracle-Device.class. Note that device.class does not represent target device markup language.
■ X-Oracle-Device.Orientation—indicates the orientation of a device. It may be used by an application to change the rendering style for certain devices. Possible values are landscape and portrait. The default value is portrait.
■ X-Oracle-Device.MaxDocSize—approximate value of maximum number of bytes of content that can be handled by the device in question. The approximation arises due to fact that Oracle Application Server Wireless XML size may not be the same as transformed device-specific markup language. If the service returns a Oracle Application Server Wireless XML document greater than the MaxDocSize, the response for such a request is unspecified. It is not guaranteed that a document size bounded by MaxDocSize will result in the content size, which can be pushed to the device. The value of the parameter is set by the administration tool of Oracle Application Server Wireless for the deviceclass. The default value is 0.
■ X-Oracle.Device.Secure—indicates if the connection between the Oracle Application Server Wireless Server and the device was secure when the current request for the resource was made. Possible values are true or false.
8.6.1 Article.jspThe following JSP uses a PageNavigation bean to deliver news content in multiple trips.
<?xml version = "1.0" encoding = "UTF-8" standalone="yes" ?><!DOCTYPE SimpleResult PUBLIC "-//ORACLE//DTD SimpleResult 1.1//EN" "http://xmlns.oracle.com/ias/dtds/SimpleResult_1_1_0.dtd"><%@ page import="oracle.wireless.xmldevguide.PageNavigation"%><%boolean loopback = Boolean.valueOf(request.getParameter("loopback")).booleanValue();int pageIndex = 0;try { pageIndex = Integer.parseInt(request.getParameter("pageIndex"));

Device Headers and Device Class
Authoring Mobile Browser and Voice Applications 8-123
}catch(Exception ex){}%><SimpleResult><SimpleContainer> <jsp:useBean id="contentHandler" class="oracle.wireless.xmldevguide.PageNavigation" scope="session"/> <% if(!loopback) { String size = request.getHeader("X-Oracle-Device.MaxDocSize"); if(size != null && !("0".equals(size))) { contentHandler.setDeckSize(Integer.parseInt(size)); } pageIndex = 0; // get the article content from a source. String articleContent = "OracleMobile Online Studio is an online "+ "developer portal for quickly building, testing and deploying "+ "wireless applications. It lets any developer, systems integrator "+ "or independent software vendor quickly develop a mobile application "+ "that is immediately accessible from all devices. This unique, next "+ "generation environment allows companies to benefit from faster time "+ "to market, increased productivity, and a dramatically simplified "+ "testing cycle, while providing access to the latest mobile applications "+ "and tools. It enables you to focus on your business logic which is your "+ "core competency, while we focus on the device complexity, our core "+ "competency. <SimpleBreak/><SimpleBreak/>"+ "OracleMobile Online Studio’s build, test, and deploy model is new and "+ "unique to software development. It presents a hosted approach to developing "+ "dynamic content. You do not need to download any software or tools to start "+ "using it. All you need to do is access the OracleMobile Online Studio, "+ "register, and login. Once authenticated, you will have access to "+ "reusable modules, examples, documentation, runtime information, and other "+ "useful resources. <SimpleBreak/><SimpleBreak/>"+ "Now you can even use OracleMobile Online Studio to write a single application "+ "that can be accessed via both wireless and voice interfaces. Listen to your "+ "OracleMobile Online Studio applications by calling: "+ "888-226-4854. <SimpleBreak/><SimpleBreak/>"+ "Simplify the development of your OracleMobile Online Studio application "+ "with Where2Net’s daVinci Studio."; contentHandler.setContent(articleContent); } String nextURL = null; String previousURL = null; int numPages = contentHandler.getAvailablePages(); if(numPages > 1) { nextURL = (pageIndex < numPages - 1) ? "article.jsp?loopback=true&pageIndex="+(pageIndex + 1) : null; previousURL = (pageIndex > 0) ? "article.jsp?loopback=true&pageIndex="+

Device Headers and Device Class
8-124 Oracle Application Server Wireless Developer’s Guide
(pageIndex - 1) : null; } String articleTitle = (pageIndex == 0) ? "OracleMobile online studio" : "contd..."; %> <SimpleText> <SimpleTitle><%=articleTitle%></SimpleTitle> <% String s = (nextURL == null) ? "articleIndex.jsp" : nextURL; if(pageIndex != numPages - 1) { %> <SimpleAction type="primary2" label="Close" target="articleIndex.jsp"/> <SimpleAction type="primary1" label="Next" target="<%=s%>"/> <% } else { %> <SimpleAction type="primary1" label="Close" target="<%=s%>"/> <% } %> <SimpleTextItem><%=contentHandler.getPage(pageIndex)%></SimpleTextItem> <% if(previousURL != null) { %> <SimpleTextItem><SimpleHref target="<%=previousURL%>">Previous</SimpleHref></SimpleTextItem> <% } if(nextURL != null){ %> <SimpleTextItem><SimpleHref target="<%=nextURL%>">Next</SimpleHref></SimpleTextItem> <% } %> </SimpleText> </SimpleContainer> </SimpleResult>
8.6.2 PageNavigation.Javapackage oracle.wireless.xmldevguide;
import Java.io.StringReader;import Java.io.StringWriter;import Java.io.Serializable;import Java.io.IOException;

Device Headers and Device Class
Authoring Mobile Browser and Voice Applications 8-125
import Java.util.ArrayList;
/** * The bean breaks a text content into mutiple deck of a defined size. Content * deck do not include any formatting information of the content which should * be provided by the content view. * * @author Chandra Patni * @version 1.0 */public class PageNavigation implements Serializable {
/** * To keep the location of a page */ private class Page { /** * starting index of the page, inclusive of start */ public int start; /** * end index of the page, exclusive */ public int end; /** * returns the length of the page */ public int length() { return end - start; }
/** * retruns the content of the page */ public String toString() { return content.substring(start, end); } }
/** * Default size of a deck in characters. The actual deck size will be adjusted * so that a word is not split. However, an orphan, end of paragraph etc * conditions are not checked for. */

Device Headers and Device Class
8-126 Oracle Application Server Wireless Developer’s Guide
public static final int DECK_SIZE = 900;
/** * size of a deck. default value is 900 chars */ private int deckSize = DECK_SIZE;
/** * Sets the size of one deck. Should be called before setContent() */ public void setDeckSize(int value) { deckSize = value; }
/** * Returns the size of one deck. */ public int getDeckSize() { return deckSize; }
/** * Conent to be decked */ private String content;
/** * Pages in the content */ private Page pages[];
/** * The total number of pages by the content */ private int totalPages;
/** * Default constructor */ public PageNavigation() { }
/** * Default constructor */

Device Headers and Device Class
Authoring Mobile Browser and Voice Applications 8-127
public PageNavigation(String content) { setContent(content); }
/** * get the page content at the given index */ public String getPage(int index) { return pages[index].toString(); }
/** * Returns the total number of pages */ public int getAvailablePages() { if(pages == null) return 0; return pages.length; }
/** * initializes the bean */ private void init() { // get the rough estimate of pages totalPages = content.length() / deckSize + 1; // initialize the array int lastIndex = 0; ArrayList list = new ArrayList(totalPages); Page p = null; while((p = getNextPage(lastIndex)) != null) { list.add(p); lastIndex = p.end; } pages = (Page []) list.toArray(new Page[list.size()]); }
private Page getNextPage(int lastIndex) { if(lastIndex >= content.length()) return null; char c = content.charAt(lastIndex); while(Character. isWhitespace(c)) { if(++lastIndex >= content.length()) return null; c = content.charAt(lastIndex); } Page p = new Page(); p.start = lastIndex;

Device Headers and Device Class
8-128 Oracle Application Server Wireless Developer’s Guide
// again look for whitespaces while trimming the content. p.end = p.start + deckSize; if(p.end >= content.length()) { p.end = content.length(); return p; } // if not then we need to figure out the previous white space do { c = content.charAt(p.end); if(Character. isWhitespace(c)) { return p; } p.end--; if(p.end == 0) { p.end = p.start + deckSize; return p; } }while(true); }
/** * sets the content to the specified value. default MIME type is text/plain */ public void setContent(String s) { content = s; init(); }}
8.6.3 Async-enabling OracleAS Wireless XML Applications
8.6.3.1 OverviewDevelopers may choose to have a different logic flow (for example, rendering the results differently) for Async devices. In this case, they would need to be able to recognize if the request was coming from an Async device class. This is accomplished by checking the device class attribute of the user request. See Chapter 10, "Creating Messaging Applications" for more information.
The request from Async has the deviceclass attribute value of either messenger, or micromessenger. The information can be acquired from the input arguments for a service written in adapter form, or the HTTP header for services based on HTTP/OC4J adapter. The input argument _DeviceCategory defined in the

Device Headers and Device Class
Authoring Mobile Browser and Voice Applications 8-129
ServiceContext specifies the device class value for adapter-formed services. For HTTP/OC4J based services, the value can be picked up through the HTTP header x-oracle-device.class.
Similarly, any section of the Async-specific OracleAS Wireless XML result, created by the application, binds the value of messenger or micromessenger to the element attribute deviceclass. Async processes elements common to all devices (with no deviceclass attribute), or elements with the attributes containing the value of messenger or micromessenger.
All OracleAS Wireless XML services can be made Async-enabled from a technical standpoint. The user experience while using Async is worth considering when deciding how to build an application or Async-enabling an existing application. This is the same practice you might have been applying to decide how you want to render you application to different types of devices (screen size, form factor and such). Async assumes a client with plain text input, so it is even more appropriate to consider user experience. Services that expect many user interactions or have a complicated UI may not work well.
In addition, some of the OracleAS Wireless XML tags are not appropriate for Async, and one should be aware of the specific semantics Async has for the set of XML tags. Since Async does not assume any sort of client-side browsing capability, it is common that tags which assume certain keys or actions on the device are not appropriate for Async. The following table lists tags that have specific Async semantics. Those tags which share common interpretation with other device channels are not listed.
Table 8–6 Summary of semantics for OracleAS Wireless XML tags
OracleAS WirelessXML Tag Semantics
SimpleAction Treated the same as the SimpleMenuItem and SimpleHref. Each SimpleMenuItem, SimpleHref or SimpleAction will be prefixed with a number in the device result for async user to make selection.
SimpleAudio Ignored - not applicable to async devices.
SimpleBind Ignored - not applicable to async devices.
SimpleBreak Output line break.
SimpleCache Ignored - not applicable to async devices.
SimpleCase Ignored - not applicable to async devices.
SimpleCatch Ignored - not applicable to async devices.
SimpleCol Output text.

Device Headers and Device Class
8-130 Oracle Application Server Wireless Developer’s Guide
SimpleDisconnect Ignored - not applicable to async devices.
SimpleDisplay Ignored - not applicable to async devices.
SimpleDTMF Ignored - not applicable to async devices.
SimpleEM Output text.
SimpleEvent Ignored - not applicable to async devices.
SimpleExit Ignored - not applicable to async devices.
SimpleFinish Ignored - not applicable to async devices.
SimpleFooter Ignored - not applicable to async devices.
SimpleForm The form state is maintained in the server so the parameters issued by the user can be paired with their corresponding keys.
SimpleFormItem The item text is printed on the returned page. User fills the corresponding item values in the same sequence as the item presented on the page.
SimpleFormOption A list of form options is printed on the returned message with a number prefixed each form option. The user can fill the select item by giving either the prefix number or the option text. For example, a select item of ’State’ may contain the option, ’1 AL, 2 CA, 3 UT...’. The user can supply the value of ’2’ or ’CA’ to select the option ’CA’.
SimpleFormSelect Output text.
SimpleGo Ignored - not applicable to async devices.
SimpleGrammar Ignored - not applicable to async devices.
SimpleHeader Output text
SimpleHelp Output text
SimpleHref This is treated the same as SimpleMenuItem. All the SimpleMenuItem is prefixed with a number so the user is able to select the item by responding with the corresponding number.
SimpleImage Ignored - not applicable to async devices.
SimpleKey Ignored - not applicable to async devices.
SimpleMatch Ignored - not applicable to async devices.
Table 8–6 Summary of semantics for OracleAS Wireless XML tags
OracleAS WirelessXML Tag Semantics
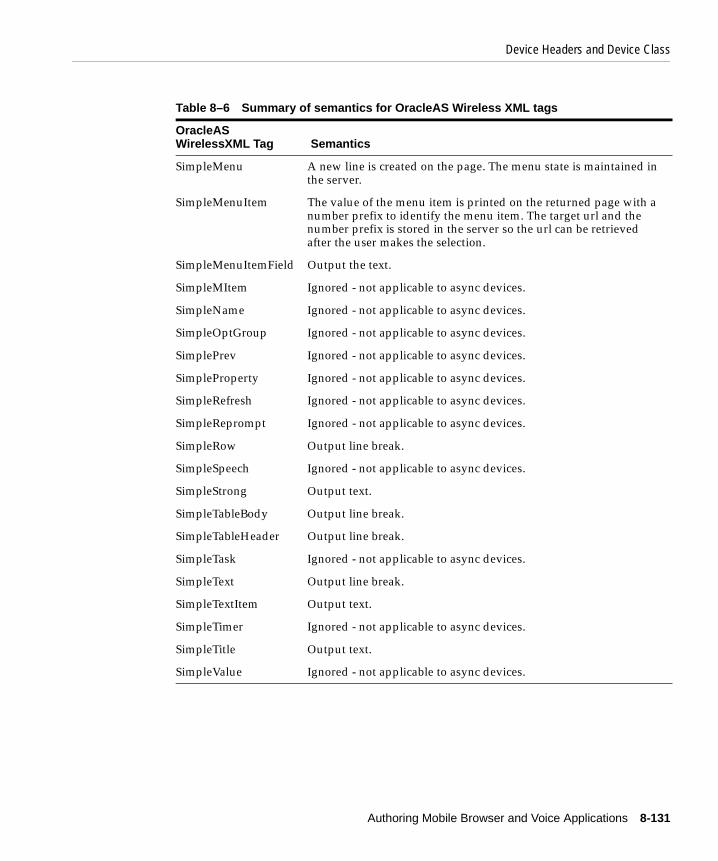
Device Headers and Device Class
Authoring Mobile Browser and Voice Applications 8-131
SimpleMenu A new line is created on the page. The menu state is maintained in the server.
SimpleMenuItem The value of the menu item is printed on the returned page with a number prefix to identify the menu item. The target url and the number prefix is stored in the server so the url can be retrieved after the user makes the selection.
SimpleMenuItemField Output the text.
SimpleMItem Ignored - not applicable to async devices.
SimpleName Ignored - not applicable to async devices.
SimpleOptGroup Ignored - not applicable to async devices.
SimplePrev Ignored - not applicable to async devices.
SimpleProperty Ignored - not applicable to async devices.
SimpleRefresh Ignored - not applicable to async devices.
SimpleReprompt Ignored - not applicable to async devices.
SimpleRow Output line break.
SimpleSpeech Ignored - not applicable to async devices.
SimpleStrong Output text.
SimpleTableBody Output line break.
SimpleTableHeader Output line break.
SimpleTask Ignored - not applicable to async devices.
SimpleText Output line break.
SimpleTextItem Output text.
SimpleTimer Ignored - not applicable to async devices.
SimpleTitle Output text.
SimpleValue Ignored - not applicable to async devices.
Table 8–6 Summary of semantics for OracleAS Wireless XML tags
OracleAS WirelessXML Tag Semantics

Device Headers and Device Class
8-132 Oracle Application Server Wireless Developer’s Guide

Using Multi-Channel Server 9-1
9Using Multi-Channel Server
Each section of this document presents a different topic. These sections include:
Section 9.1, "Overview"
Section 9.2, "Multimedia Adaptation"
Section 9.3, "Device Adaptation"
Section 9.4, "Modifying Multi-Channel Server Runtime"
Section 9.5, "Modifying the Data Models"
9.1 OverviewThe Internet has reinvented itself in the last few years. Previously, users typically accessed the Internet only from their desktop personal computers using one of the two popular browsers. That has drastically changed. Today, the Internet is accessible from smart phones, personal data assistants (PDAs), pagers, regular phones, cars, even refrigerators and other home appliances. This presents great opportunities for enterprises to provide new services. But, it is also a huge challenge for developers. Previously, they used only one markup language, HTML, to develop their applications; they only needed to provide for two browsers accessing their applications. Now, almost every channel has its own markup language; browsers have different capabilities and support different varieties of the same markup language. For example, most of the smart phones support WML. But there are different versions of WML supported by different phones. Even those claiming to support the same version of WML may still have some (minor) deviations from the standard. Phones typically use VoiceXML. Again, there are different varieties of VoiceXML that the different Voice Gateways support. How can developers create web applications for these varieties of channels? One option is to create separate

Overview
9-2 Oracle Application Server Wireless Developer’s Guide
applications for every channel that use the channel specific markup language. That option is prohibitively time-consuming and expensive.
Figure 9–1 The Multi-Channel Challenge
9.1.1 Benefits of Multi-ChannelOracle took the Multi-Channel challenge very seriously and decided to do something to help developers and enterprises to easily develop their applications only once for all channels. OracleAS Wireless Multi-Channel Server (MCS) hides the complexity that all channels present to developers. It acts as a single browser that accesses web applications.

Overview
Using Multi-Channel Server 9-3
Figure 9–2 The Multi-Channel Solution
The Multi-Channel Server supports three device-independent markup languages for developing applications:
■ XHTML+XForms—XHTML 1.0 (http://www.w3.org/TR/xhtml1/) standard markup language with XForms (http://www.w3.org/TR/xforms/) support
■ XHTML Mobile Profile (XHTML MP)—standard markup language (http://www1.wapforum.org/tech/documents/WAP-277-XHTMLMP-20011029-a.pdf) defined by Open Mobile Alliance Ltd. (http://www.openmobilealliance.org/)
■ OracleAS Wireless XML—markup language defined by OracleAS Wireless
Some developers may not be concerned with multi-channel, and may only want to expose their applications to, say, the voice channel. Why use MCS in such a case?. There are at least two reasons why even in that case you should consider the MCS:
■ You can develop your application using XHTML instead of VoiceXML. Most web developers already know XHTML and they will not need to learn VoiceXML. This obviously will save you time and money.

Overview
9-4 Oracle Application Server Wireless Developer’s Guide
■ There are a variety of Voice Gateways that support different varieties of VoiceXML. So, if you develop your application in native VoiceXML, then you must certify your application against all the different voice gateways. MCS guarantees that your application will work with many voice gateways without any changes.
Even if you are planning to expose your application through only one channel now, you may reconsider this in the future and decide that it will be beneficial to provide additional access to that application. In that case, you will not need to make changes in the application because MCS will already support the new channel.
9.1.2 Features of Multi-Channel ServerHere are some of the key features of Multi-Channel Server:
■ Multi-Channel Content Adaptation—the same device-independent content is delivered to different channels on different devices. Multi-Channel Server adapts application content based on current user device capabilities. It considers the device-specific markup language, screen size, network speed, etc.
■ Support for Standard Markup Languages—applications are developed using standard markup languages. That saves development time and money since developers are not required to learn new markup languages. Even if the application is to be delivered to a single channel (for example, voice), developers do not need to learn a new channel-specific markup language. They can use the very popular XHTML and still deliver their content to VoiceXML or WML or other devices.
■ Devices and Gateways Certification—with so many emerging devices and gateways on the market, it is difficult for application developers to certify that their application will run on all of them. There are only two major browsers for the PC, but still most web applications must be tailored to work best on either one of them. When you consider the new mobile devices, it becomes impossible for the developers to guarantee that their applications will work on all of them. Multi-Channel Server ensures compatibility with all those devices.
■ Device Detection—Multi-Channel Server uses a sophisticated algorithm to detect devices making requests. It takes into account User-Agent, Accept, and other HTTP headers. Some device capabilities (for newer devices) are also submitted with the request by the device and used for best content adaptation.
■ Multimedia Adaptation—along with text adaptation, Multi-Channel Server does device-specific adaptation of images, ringtones, voice grammars and audio/video streams.

Overview
Using Multi-Channel Server 9-5
■ Single Browser—Multi-Channel Server is the only browser that the applications interact with. It shields application developers from any deficiencies that the end user device may have. For example, most mobile devices do not support HTTP cookies. But cookies are the easiest way to keep user sessions. Multi-Channel Server handles session and other cookies on behalf of the end user device.
■ XForms Engine—Multi-Channel Server adds the power of XForms (http://www.w3.org/TR/xforms/) support to any user device.
■ Work with Existing Portals—access any device through your existing Portal by deploying Multi-Channel Server in front of your Portal server.
■ URL Caching—some devices have very limited memory, thus they limit the content that they can receive. Multi-Channel Server caches long URLs that are sent to a device, reducing the content size.
In addition to Multi-Channel Server, Oracle Application Server also includes Wireless and Voice Portal built on top of MCS. Here are some of the additional features that are provided by the Wireless and Voice Portal:
■ Portal—the Wireless and Voice Portal provides full portal capabilities, including users and services managements, ACL, etc. The portal provides users with their own customizable home page which is a launch pad for individual services. The available services have a wide variety of forms, including database information, personalization, alerts, and location services. The large number of content sources adds to the complexity of having a manageable way to deliver each application to every type of device in the most optimized fashion.
■ Network Adaptation—in addition to the HTTP(S) protocol, the Wireless and Voice Portal also supports various other protocols to allow access from non-HTTP devices. Network adaptation is based on an extensible framework that allows customers to plug in their own drivers for adapting to any network protocol.
■ J2ME WebServices—the Wireless and Voice Portal provides a WebServices proxy to let J2ME-enabled devices access WebServices. This enables MIDlets developers to enhance their applications by accessing any external applications exposed as WebServices.
The following figure shows the main components of the Multi-Channel Server.

Multimedia Adaptation
9-6 Oracle Application Server Wireless Developer’s Guide
Figure 9–3 Multi-Channel Server Components
Multi-Channel Server is an extensible mobile applications platform. It is built from pluggable modules. Modules implementation can be replaced to alter the default behavior. All modules and their default implementation are described below.
9.2 Multimedia Adaptation
9.2.1 OverviewOracleAS Wireless Multimedia Adaptation Services provide device-specific adaptation of images, ringtones, voice grammars and audio/video streams. These services are an integral part of the core Multi-Channel Server.
Devices and the browsers on them support different image formats, and have different screen sizes and color depths. As part of the content adaptation performed by OracleAS Wireless in responding to a request, images are dynamically adapted to suit client devices. Additionally, the new Intelligent Messaging component uses Image Adaptation Services to convert images for EMS and MMS.

Multimedia Adaptation
Using Multi-Channel Server 9-7
Ringtone adaptation is provided as a Java API and allows for conversion of ringtone data to formats supported by the most popular phones. The supported formats include RTTL, iMelody and MIDI. The framework for ringtone adaptation allows developers to easily add support for new ringtone formats. The Intelligent Messaging component uses Ringtone Adaptation Services to convert ringtones for delivery through SMS, EMS and MMS.
Multimedia Adaptation Services further enhance the voice support of OracleAS Wireless by allowing voice gateway vendors to extend the OracleAS Wireless platform to support new or vendor-specific grammar formats. These formats are transformed (through the SimpleGrammar tag) into the format supported by the voice browser. Grammars that are defined in OracleAS Wireless XML are considered inline, whereas those provided by a URL reference are considered external. Voice gateway vendors wanting to support a new grammar format can easily provide XSL stylesheets to transform OracleAS Wireless XML grammars to their grammar format. Support for inline grammar transformation is provided directly in the voice transformer, and Oracle Corporation also provides a framework for external voice grammar transformations using the relevant XSL stylesheet.
9.2.2 Image Adaptation FeaturesThe most important features of image adaptation are:
■ Support for multiple input image formats.
■ File Formats: BMP, GIF, JFIF, PNG, TIFF, WBMP
■ Content Formats: MONOCHROME, 1BIT, 2BIT, 4BIT, 8BIT, 12BIT, 16BIT, 24BIT, 32BIT, 48BIT, LUT, DRCT, RGB, GRAY
■ Compression Formats: JPEG, BMPRLE, LZW, LZWHDIFF, FAX3, FAX4, HUFFMAN3, PACKBITS, GIFLZW, DEFLATE
■ Support for multiple output image content formats including support for different color depths, compression formats, color schemes and file formats.
■ File Formats: JFIF (JPEG), GIF, BMP, WBMP, PNG
■ Compression: JPEG, GIFLZW, BMPRLE, DEFLATE
■ Content Formats: MONOCHROME, 2BITLUTGRAY, 4BITLUTGRAY, 8BITLUTGRAY, 8BITLUTRGB, 24BITRGB, 8BITGRAY
■ Support for scaling and resizing images.
■ Scale to fixed dimensions.

Multimedia Adaptation
9-8 Oracle Application Server Wireless Developer’s Guide
■ Maintaining aspect ratio, scale to fit in a bounding box. (If original image dimensions are smaller than desired image dimensions, the original image dimension is used to define a bounding box.)
■ Reduce size of image data in bytes to honor limits on size placed by device/network.
■ Provides the above image processing functionality as a J2EE-compliant component of OracleAS Wireless.
■ Supports limitation on URL length.
■ Supports inbound and outbound image caching. Inbound caching means that the original images are cached in the middle tier (using webcache) so that the requests from different device types for the same image would result in one fetch of the original image. Outbound caching means that the adapted images are cached (using webcache) so that different users on similar devices can share the same adapted image.
9.2.2.1 Authoring Multichannel Applications with ImagesSee Chapter 3, "OracleAS Wireless Developer Kit" for details on application development in XHTML and Wireless XML respectively with regards to using image adaptation.
9.2.3 Command Line ToolA command line tool is provided to convert images in batch mode before deployment to the web/wireless application.
■ Name: ImageGenerate.{bat|sh}
■ Description: A shell or unix shell script that invokes a Java application to generate images in all the formats supported by the different devices from a specified input image. The batch or script file can be found in {IAS_HOME}\wireless\bin\ImageGenerate.bat for Windows and in {IAS_HOME}/wireless/bin/ImageGenerate.sh for Unix.
Note: Image caching policy is determined by the owner of the original image. MCS passes on cache headers to the web cache so that if certain images are not cacheable, web cache will not cache them.

Multimedia Adaptation
Using Multi-Channel Server 9-9
■ Usage:
ImageGenerate.{bat|sh} -inFile filename -outFile filename [-outW width] [-outH height] -outFormat format [-outContent contentType] [-dataSizeLimit limit] [-maintainRatio {true|false}]
■ Parameters
■ inFile filename - The filename of the input file to process. Required argument.
■ outFile filename - The resulting file after processing. Required argument.
■ outW width - The width in pixels of the resulting image. Optional argument.
■ outFormat format - The output file format of the resulting image.
For examples, see interMedia User’s Guide (http://www.otn.oracle.com/docs/products/oracle9i/doc_library/901_ doc/nav/docindex.htm) for full specification.
Examples include: GIFF - Gif format, JFIF - jpg format, WBMP - wbmp format. PNGF - png format. Required argument.
■ outContent contentType - The content format of the resulting image.
For example, MONOCHROME to change the image to a black and white representation, or for GIF images 4BITLUT to change to 4 bit (16 color) representation. See interMedia User’s Guide for full specification. Optional argument.
■ dataLimitSize datalimitsize - For GIF images only. Make the image fit in the specified size by reducing the pixel depth, eventually to monochrome, and then reducing the image size if necessary. Optional argument.
■ maintainRatio {true | false} - Maintain the aspect ratio of the image. Make it fit within box bounded by outW and outH. Default true. Optional argument.
Example:
ImageGenerate -inFile stock_600_450.jpg -outFile stock_240_180.gif -outW 240 -outH 180 -outContent monochrome -outFormat giff
Note: Ensure that either Java_HOME or ORACLE_HOME is defined as an environmental variable.

Multimedia Adaptation
9-10 Oracle Application Server Wireless Developer’s Guide
9.2.4 Extensibility Using ImageProcessor API
9.2.4.1 DescriptionThe ImageProcessor Interface consists of a method named process that rewrites a given image URL into another URL that links to an image better suited for display on the calling device. The device information is provided by passing in a handle to the oracle.panama.model.Device instance corresponding to the calling device. Typically, the rewritten URL points to a server that can dynamically generate an adapted image based on the input image URL and device characteristics.
9.2.4.2 Interface oracle.panama.multimedia.ImageProcessorpackage oracle.panama.multimedia;
import oracle.panama.model.Device;
/** Use this interface to replace the existing Image processing * implementation for all formats with your own implementation */public interface ImageProcessor {
ImageResponse process(ImageRequest request, Device) throws MultimediaException;
}
The classes oracle.panama.multimedia.ImageRequest and ImageResponse capture the input image and desired output image information. For more details, see the Javadoc for oracle.panama.multimedia.
9.2.4.3 ImplementationThe default implementation of this interface oracle.panama.multimedia.impl.ImageProcessorImpl rewrites URLs to point at the Multimedia Adaptation Services image adaptation servlet. The servlet fetches the original image and dynamically processes it to return an adapted image to the requesting device.
9.2.4.4 ConfigurationIf you intend to replace the default implementation of the ImageProcessor interface, you must use the OracleAS Wireless Tools to give the name of the implementation class.
1. Log in to the OracleAS Wireless Tools as an administrator.

Multimedia Adaptation
Using Multi-Channel Server 9-11
2. Under the System folder, click Site Administration.
3. Under Component Configuration click Multimedia Adaptation Services.
4. Replace the Image Provider Class Name field value with your class name and click OK.
5. Additionally, ensure that the class is part of the OracleAS Wireless classpath.
9.2.5 Ringtone Adaptation
9.2.5.1 FeaturesRingtone Adaptation is used to convert ringtones specified in certain input formats to the device supported formats. This happens automatically for XMS messaging applications. However for developers who want greater control over the ringtone adaptation, a Java API is provided.
Here are the supported conversions:
■ From RTTTL to Nokia binary, IMelody, MIDI
■ From IMelody to Nokia binary, RTTTL, MIDI
9.2.5.2 RingtoneProcessor Java APIThe RingtoneProcessor Interface consists of a method-named process that rewrites a given ringtone into the format required by the output device. The process method accepts a RingtoneRequest instance, and returns the converted ringtone as output as a RingtoneResponse instance. This interface is invoked by the messaging framework and can be used directly as well.
9.2.5.2.1 Interface oracle.panama.multimedia.RingtoneProcessor
package oracle.panama.multimedia;
/** Use this interface to replace the existing Ringtone processing * implementation for all formats with your own implementation */public interface RingtoneProcessor {
RingtoneResponse process(RingtoneRequest request) throws MultimediaException;
}

Multimedia Adaptation
9-12 Oracle Application Server Wireless Developer’s Guide
9.2.5.2.2 Class oracle.panama.multimedia.RingtoneRequest
package oracle.panama.multimedia;import Java.io.InputStream;public class RingtoneRequest {
/** Ringtone input data types */ public static int RINGTONE_DATA_STRING = 0; public static int RINGTONE_DATA_STREAM = 1; public static int RINGTONE_DATA_BYTES = 2; public static int RINGTONE_DATA_NULL = -1; public String inputFormat = null; public String outputFormat = null;
public String inputMimeType = null; public String outputMimeType = null; private String dataString = null;
private InputStream dataStream = null; private byte[] dataBytes = null; private int dataType = RINGTONE_DATA_NULL; public RingtoneRequest() { }
public void setData (String ringtone) { this.dataString = ringtone; this.dataType = RINGTONE_DATA_STRING; }
public void setData (InputStream ringtone) { this.dataStream = ringtone; this.dataType = RINGTONE_DATA_STREAM; }
public void setData (byte[] ringtone) { this.dataBytes = ringtone; this.dataType = RINGTONE_DATA_BYTES; }
public String getDataAsString () { return this.dataString; }
public InputStream getDataAsStream() { return this.dataStream; }
public byte[] getDataAsBytes() {

Multimedia Adaptation
Using Multi-Channel Server 9-13
return this.dataBytes; }
/** note, no setDataType method is provided to prevent * inconsistency. The dataType attribute is set when * setting data. */ public int getDataType() { return this.dataType; }
}
9.2.5.2.3 Class oracle.panama.multimedia.RingtoneResponse
package oracle.panama.multimedia;
import Java.io.OutputStream;
public class RingtoneResponse { public String inputFormat = null; public String outputFormat = null; public String inputMimeType = null; public String outputMimeType = null; private String dataString = null; private OutputStream dataStream = null; private byte[] dataBytes = null; private int dataType = RingtoneRequest.RINGTONE_DATA_NULL; public RingtoneResponse() { }
public void setData (String ringtone) { this.dataString = ringtone; this.dataType = RingtoneRequest.RINGTONE_DATA_STRING; }
public void setData (OutputStream ringtone) { this.dataStream = ringtone; this.dataType = RingtoneRequest.RINGTONE_DATA_STREAM; }
public void setData (byte[] ringtone) { this.dataBytes = ringtone; this.dataType = RingtoneRequest.RINGTONE_DATA_BYTES; }
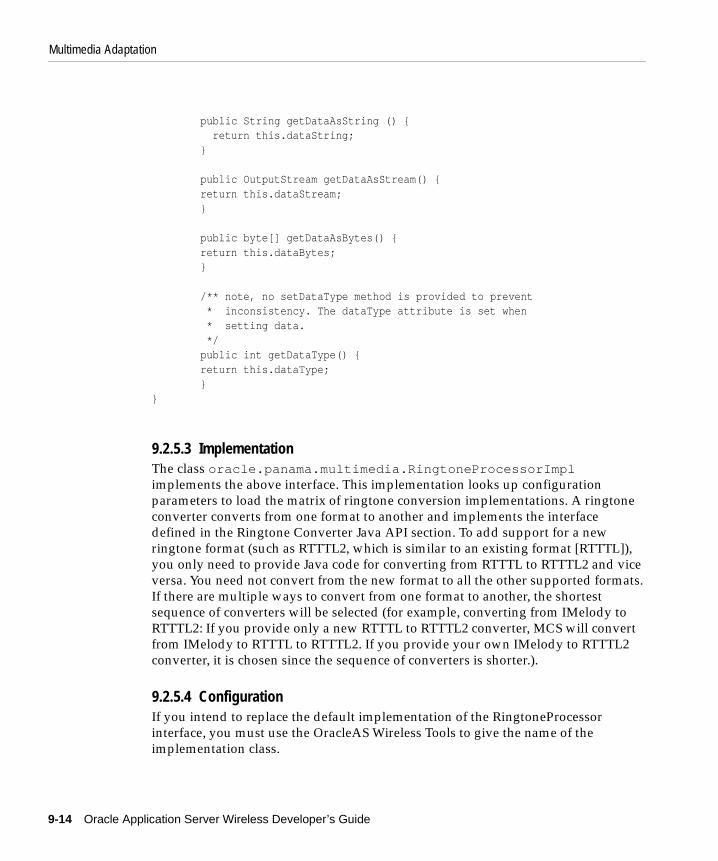
Multimedia Adaptation
9-14 Oracle Application Server Wireless Developer’s Guide
public String getDataAsString () { return this.dataString; }
public OutputStream getDataAsStream() { return this.dataStream; }
public byte[] getDataAsBytes() { return this.dataBytes; }
/** note, no setDataType method is provided to prevent * inconsistency. The dataType attribute is set when * setting data. */ public int getDataType() { return this.dataType; }
}
9.2.5.3 ImplementationThe class oracle.panama.multimedia.RingtoneProcessorImpl implements the above interface. This implementation looks up configuration parameters to load the matrix of ringtone conversion implementations. A ringtone converter converts from one format to another and implements the interface defined in the Ringtone Converter Java API section. To add support for a new ringtone format (such as RTTTL2, which is similar to an existing format [RTTTL]), you only need to provide Java code for converting from RTTTL to RTTTL2 and vice versa. You need not convert from the new format to all the other supported formats. If there are multiple ways to convert from one format to another, the shortest sequence of converters will be selected (for example, converting from IMelody to RTTTL2: If you provide only a new RTTTL to RTTTL2 converter, MCS will convert from IMelody to RTTTL to RTTTL2. If you provide your own IMelody to RTTTL2 converter, it is chosen since the sequence of converters is shorter.).
9.2.5.4 ConfigurationIf you intend to replace the default implementation of the RingtoneProcessor interface, you must use the OracleAS Wireless Tools to give the name of the implementation class.

Multimedia Adaptation
Using Multi-Channel Server 9-15
1. Log in to OracleAS Wireless Tools as an administrator.
2. Under the System folder, click Site Administration.
3. Under Component Configuration click Multimedia Adaptation Services.
4. Replace the Ringtone Provider Class Name field value with your class name and click OK.
5. Additionally, ensure that the class is part of the OracleAS Wireless CLASSPATH.
9.2.5.5 Sample UsageHere is a sample program that illustrates the use of RingtoneProcessor.
import Java.io.FileOutputStream;import Java.io.ByteArrayOutputStream;import oracle.panama.multimedia.RingtoneProcessor;import oracle.panama.multimedia.RingtoneRequest;import oracle.panama.multimedia.RingtoneResponse;import oracle.panama.multimedia.MultimediaException;
public class RingtoneUserTest {
public static void main(String[] args) {try {
RingtoneProcessor processor = RingtoneProcessorProvider.getProvider();if (processor != null) { RingtoneRequest request = new RingtoneRequest(); request.inputFormat = "IMELODY";request.setData("BEGIN:IMELODY\nVERSION:1.2\nFORMAT:CLASS1.0\nMELODY:r1a1a2a3e3lmnop2a2a2a2g2a2r3a3a3e3g2a3a3a2a2g2\nEND:IMELODY\r\n");request.outputFormat = "RTTTL"; RingtoneResponse response = processor.process(request); int dType = response.getDataType(); if (dType == RingtoneRequest.RINGTONE_DATA_STRING) { System.out.println(response.getDataAsString()); } else if (dType == RingtoneRequest.RINGTONE_DATA_STREAM) { FileOutputStream outFile = new FileOutputStream("ringtone.txt"); ((ByteArrayOutputStream) response.getDataAsStream()).writeTo(outFile); } else if (dType == RingtoneRequest.RINGTONE_DATA_BYTES) { // process the byte array response } else {

Multimedia Adaptation
9-16 Oracle Application Server Wireless Developer’s Guide
// process failed to set the response data }
} else {// Processor is null!! No ringtone converter availableSystem.out.println("No ringtone converter available");
}} catch (Exception ex) {
ex.printStackTrace();} catch (Error e) {
e.printStackTrace();System.out.println("Error parsing ringtone");
} }
}
9.2.6 Ringtone Converter Java API
9.2.6.1 DescriptionThe Ringtone Conversion Interface consists of an overloaded method (convert) that rewrites a given ringtone from one format to another. The convert method accepts an instance of RingtoneRequest and returns the converted ringtone in a RingtoneResponse instance. This interface is used by the RingtoneProcessorImpl to call the different converters for the supported formats. By implementing this interface (along with adding some configuration information), support for new ringtone formats can be added incrementally.
9.2.6.2 Interface oracle.panama.multimedia.RingtoneConverterpublic RingtoneResponse convert (RingtoneRequest request);
9.2.6.3 ImplementationThe class oracle.panama.multimedia.RingtoneConverterImpl implements the above interface. This implementation supports all the specified ringtone conversions.
9.2.6.4 ConfigurationIf you want to extend the default RingtoneProcessor implementation by providing additional RingtoneConverter implementations for new formats you must specify the RingtoneConverter implementation classes using the configuration file config.properties in:
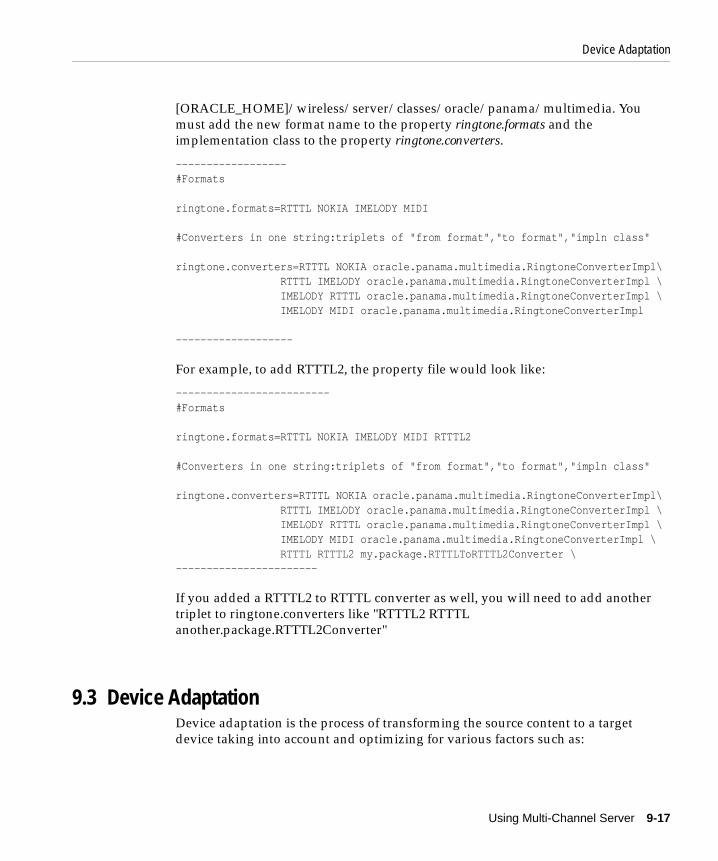
Device Adaptation
Using Multi-Channel Server 9-17
[ORACLE_HOME]/wireless/server/classes/oracle/panama/multimedia. You must add the new format name to the property ringtone.formats and the implementation class to the property ringtone.converters.
------------------#Formats
ringtone.formats=RTTTL NOKIA IMELODY MIDI
#Converters in one string:triplets of "from format","to format","impln class"
ringtone.converters=RTTTL NOKIA oracle.panama.multimedia.RingtoneConverterImpl\ RTTTL IMELODY oracle.panama.multimedia.RingtoneConverterImpl \ IMELODY RTTTL oracle.panama.multimedia.RingtoneConverterImpl \ IMELODY MIDI oracle.panama.multimedia.RingtoneConverterImpl
-------------------
For example, to add RTTTL2, the property file would look like:
-------------------------#Formats
ringtone.formats=RTTTL NOKIA IMELODY MIDI RTTTL2
#Converters in one string:triplets of "from format","to format","impln class"
ringtone.converters=RTTTL NOKIA oracle.panama.multimedia.RingtoneConverterImpl\ RTTTL IMELODY oracle.panama.multimedia.RingtoneConverterImpl \ IMELODY RTTTL oracle.panama.multimedia.RingtoneConverterImpl \ IMELODY MIDI oracle.panama.multimedia.RingtoneConverterImpl \ RTTTL RTTTL2 my.package.RTTTLToRTTTL2Converter \-----------------------
If you added a RTTTL2 to RTTTL converter as well, you will need to add another triplet to ringtone.converters like "RTTTL2 RTTTL another.package.RTTTL2Converter"
9.3 Device AdaptationDevice adaptation is the process of transforming the source content to a target device taking into account and optimizing for various factors such as:

Device Adaptation
9-18 Oracle Application Server Wireless Developer’s Guide
■ Environment (for example: carrier, connection speed)
■ Device form factor (for example: width, height, color)
■ User preferences
OracleAS Wireless adapts input source document written in XHTML/XForms, XHTML MP, and OracleAS Wireless Markup Language to various mobile devices:
■ HTML
■ XHTML
■ cHTML
■ WAP/WML
■ HDML
■ MML
■ VoiceXML
■ SMS
■ MMS
■ Instant Messaging clients
OracleAS Wireless Device Adaptation provides the following key benefits for developers:
■ Automatic device form factor recognition
■ Optimized rendering across all devices
■ Optimized rendering based on form factor
■ Vast device knowledge base
9.3.1 Device RepositoryOracleAS Wireless Device Repository contains a wealth of device knowledge that is at the heart of the system. Administrators and developers can add new device information using the OracleAS Wireless Tools.
All information in the Device Repository is used for source content adaptation to the target device. It is important the information in the repository be kept up-to-date.

Device Adaptation
Using Multi-Channel Server 9-19
9.3.2 Device Repository AccessDevelopers can access information in the Device Repository in these ways:
■ Oracle Application Server Device Repository API
■ W3C CSS Media Queries Standard
Oracle Application Server Device Repository API is a set of Java APIs available to Java and JSP developers for programmable API access to the Device Repository. CSS Media Queries can be used by OracleAS Wireless Markup authors to access Device Repository information directly from the source document. CSS Media Queries is W3C Standard with Candidate Recommendation status. For further information on CSS Media Queries, see Section D, "OracleAS Wireless CSS Support".
9.3.3 Device DetectionOracleAS Wireless automatically detects the type of device making a service request. The device detection component uses the User Agent, if available, to determine which device from the Device Repository to associate with the service request.
Here is how the device detection rule works:
1. If the UserAgent is not available in the HTTP Header, then proceed to Step 4.
2. Select a device from the Device Repository, where the useragent match string matches the UserAgent from the HTTP Header.
3. If more than one device is returned, then choose the one with the longest useragent match string. If this result in exactly one device matched, then return the device. Done.
4. Use the Accept HTTP Header to determine the preferred content types as per the IETF RFC-2616 specification.
5. Return the first device that matches the preferred mime-type.
6. If the request contains x-up-devcap-screenpixels and x-up-devcap-screenchars HTTP headers, then find the closest matching logical device using ScreenWidth, ScreenHeight, ScreenRows, ScreenColumns attributes of the device.
7. If there are no devices selected, then log an error in the log file.
Device Detection in OracleAS Wireless can be customized by specifying a hook class that implements the interface:
oracle.panama.rt.hook.DeviceIdentificationHook

Device Adaptation
9-20 Oracle Application Server Wireless Developer’s Guide
The default implementation of the hook is provided in:
oracle.panma.rt.hook.DeviceIdentificationPolicy class
9.3.4 Dynamic HTTP Header Composition and UAProfThe Device Repository APIs perform Dynamic HTTP Header form factor composition when such information is in the HTTP Request. Dynamic HTTP Header composition is accomplished as follows:
1. Retrieve the device information from the repository and create an instance of oracle.panama.model.DeviceV2 object.
2. Search for known device form factor information in the HTTP Header and update the appropriate attributes in oracle.panama.model.DeviceV2.
9.3.5 Device TransformersThe final phase in Oracle Application Server Device Adaptation is the selection and invocation of the device transformers to generate the markup language suitable for rendering on the target device from a supported source input document. Every device in the Device Repository has a list of appropriate transformers for that device.
The device transformers are grouped by the OracleAS Wireless Markup Language it accepts as an input source document as follows:
Here is a list of transformers, accepted by OracleAS Wireless Markup Language and the generated markup by the transformer
Table 9–1 Device Transformer Input Markup
Transformer prefixOracleAS Wireless Markup
OracleAS Wireless Markup Mime Type
mxml- mobile-xml text/vnd.oracle.mobilexml
xforms- xhtml+xforms application/vnd.oracle.xhtml+xforms
xhtml- xhtml+mp application/vnd.wap.xhtml+xml
Table 9–2 Device Transformers for mobile-xml
Transformer Target Markup Description
mxml-ASYNC_Java text/plain SMS devices, Text

Device Adaptation
Using Multi-Channel Server 9-21
Here are the device transformers for XHTML+XForms:
mxml-Adomo text/vxml Adomo Voice Gateway
mxml-Verascape text/vxml Verascape Voice Gateway
mxml-VoiceGenie text/vxml VoiceGenie Voice Gateway
mxml-avantgo text/html AvantGo Browser
mxml-blazer text/html Handspring Blazer Browser
mxml-chtml text/html cHTML browsers
mxml-ciscoip text/xml Cisco IP Phone
mxml-goweb text/html GoWeb browser
mxml-hdml text/x-hdml HDML browser
mxml-hdml-kddi text/x-hdml EZweb HDML browser
mxml-html32 text/html W3C HTML 3.2 compliant browsers
mxml-html40 text/html W3C HTML 4.0 compliant browsers
mxml-mml text/html J-PHONE Type C3 or later
mxml-mml-t04 text/html J-PHONE Type C2
mxml-palm-family text/html Palm browsers
mxml-pocketpc text/html PocketPC PDA browsers
mxml-smil application/smil MMS SMIL
mxml-wml11 text/vnd.wap.wml WML11 compliant browsers
mxml-wml11-ericsson text/vnd.wap.wml Ericsson WML11 browsers
mxml-wml11-openwave text/vnd.wap.wml Openwave WML11 browsers
mxml-wml11-wig text/vnd.wap.wml WIG browsers
mxml-xmp text/html XHTML MP Browsers
Table 9–3 Device Transformers for XHTML+XForms
Transformer Target Markup Description
xforms-Verascape text/vxml Verascape Voice Gateway
Table 9–2 Device Transformers for mobile-xml
Transformer Target Markup Description

Device Adaptation
9-22 Oracle Application Server Wireless Developer’s Guide
Here are the device transformers for XHTML + MP:
xforms-VoiceGenie text/vxml VoiceGenie Voice Gateway
xforms-async_xhtml text/plain SMS, Text
xforms-chtml text/html cHTML Browsers
xforms-hdml text/x-hdml HDML browser
xforms-html32 text/html W3C HTML 3.2 compliant browsers
xforms-html32-handheld text/html HTML 3.2 HandHeld Friendly browsers
xforms-html40 text/html W3C HTML 4.0 compliant browsers
xforms-mml text/html J-PHONEType C3 or later
xforms-mms-smil application/smil MMS SMIL
xforms-palm-family text/html Palm browsers
xforms-wml11 text/vnd.wap.wml WML11 compliant browsers
xforms-wml11-ericsson text/vnd.wap.wml Ericsson WML11 browsers
xforms-wml11-openwave text/vnd.wap.wml Openwave WML11 browsers
xforms-xmp text/html XHTML MP Browsers
Table 9–4 Device Transformers for XHTML+MP
Transformer Target Markup Description
xhtml-chtml text/html cHTML browser
xhtml-hdml text/x-hdml HDML browser
xhtml-html32 text/html W3C HTML 3.2 compliant browsers
xhtml-html32-handheld text/html HTML 3.2 HandHeld Friendly browsers
xhtml-html40 text/html W3C HTML 4.0 compliant browsers
xhtml-mml text/html Type 3 J-Phone
xhtml-mms-smil application/smil MMS SMIL
xhtml-palm-family text/html Palm browsers
xhtml-wml11 text/vnd.wap.wml WML11 compliant browsers
Table 9–3 Device Transformers for XHTML+XForms
Transformer Target Markup Description

Device Adaptation
Using Multi-Channel Server 9-23
9.3.6 Device Repository APIoracle.panama.model.Device API is deprecated. There is a new API available, oracle.panama.model.DeviceV2. DeviceV2 interface should be used to access the Device Repository from Java and JSP applications.
DeviceV2 interface can be accessed from the old Device API as follows:
Device device = RequestFactory.lookupRequest();DeviceV2 devicev2 = device.getDeviceV2();
The above code segment retrieves the target device from the Device Repository for the current HTTP Request context. That is, devicev2 is a handle to the actual device information.
Once a handle is obtained for a DeviceV2 interface, retrieving device attributes or capability is straight-forward. There are three methods provided to retrieve the capability value as a Java boolean, String, or int as in the following example:
boolean bool = devicev2.getDeliveryContextAttributeBoolean(DeviceAttr.COLORCAPABLE);String model = devicev2.getDeliveryContextAttributeString(DeviceAttr.MODEL); int width = devicev2.getDeliveryContextAttributeString(DeviceAttr.DEVICEWIDTH);
All device attributes or capabilities are listed in the oracle.panama.model.DeviceAttr interface. The following table lists all device attributes or capabilities.
xhtml-wml11-ericsson text/vnd.wap.wml Ericsson WML11 browsers
xhtml-wml11-openwave text/vnd.wap.wml Openwave WML11 browsers
xhtml-xmp text/html XHTML MP Browsers
Table 9–5 General Device Features
Device Attribute Description
VENDOR Device Manufacturer
MODEL model number
DEVICECLASS deviceclass (deprecated)
MEDIA CSS Media Type used for CSS Media Queries
Table 9–4 Device Transformers for XHTML+MP
Transformer Target Markup Description

Device Adaptation
9-24 Oracle Application Server Wireless Developer’s Guide
DEVICETAG Tag to identify and group related devices in the repository
DEVICEWIDTH width of viewable area in pixels
DEVICEHEIGHT height of viewable area in pixels
PIXELPITCH size of pixel in mm (only for bitmap devices)
DEFAULTFONTSIZE default font size on the device
GRID Grid device (not a bitmap device)
COLORCAPABLE If true, then device can render color
PAGEDMEDIA If true, then it’s a paged device like WAP/WML
BITSPERPIXEL Bits per pixel for a monochrome device, or bits per color component for a color device.
MAXDOCSIZE Maximum document size
TEXTINPUTCAPABLE If true, device supports text input
NUMBEROFSOFTKEYS Number of softkeys on the device
KEYBOARD Keyboard type. One of (qwerty, phone keypad, disambiguating)
Table 9–6 Browser Capabilities
MARKUP LANGUAGE List of markup supported on the device
PROLOG XML prolog for the document
SUPPORTSAMPERSANDENTITY If true, device supports XML ampersand entity. (deprecated)
SUPPORTSRELATIVEURL If true, relative URL is supported
SUPPORTSCOOKIE If true, supports cookies
MESSAGINGBASED If true, supports asynchronous messaging
TABLESCAPABLE If true, supports tables
AUDIOCONTENT List of supported audio mime types
EMAILCAPABLE If true, capable of sending/receiving email
TEXTTOSPEECH If true, supports TTS engine
Table 9–5 General Device Features
Device Attribute Description

Device Adaptation
Using Multi-Channel Server 9-25
SPEECHGRAMMAR If true, supports grammar
RECORDSPEECH If true, can record speech
VOICECALLCAPABLE If true, can make voice calls
CALLCONTROLCAPABLE If true, can control calls
DEFAULTMARKUPLANGUAGE Default mime type sent to device
ACCEPT List of accepted mime types
ACCEPT_CHARSET List of accepted character encodings
IMAGECAPABLE If true, can display images (deprecated)
IMAGECONTENTTYPES List of supported image mime types
VICEOCAPABLE If true, supports video (deprecated)
VIDEOCONTENTTYPES List of supported video mime types (deprecated)
VIDEOMODE Supported video mode (deprecated)
AUDIOCONTENTTYPES List of supported audio mime types
REVERSEENTITYMAP List of XML Entity conversion rules
Table 9–7 Messaging Capabilities
DELIVERYTYPESList of supported messaging delivery types or channels
BANDWIDTH Network speed
URLCAPABLE Can follow URL hyperlinks directly
NOKIASMARTMESSAGINGCAPABLE
If true, supports Nokia Smart Messaging
RINGTONECAPABLE If true, supports downloadable ringtones
OPERATORLOGOCAPABLE If true, can download operator logo
VCARDCAPABLE If true, can support vcard
VCALENDARCAPABLE If true, supports vcalendar
SYNCMLCAPABLE If true, supports SYNCML
Table 9–6 Browser Capabilities
MARKUP LANGUAGE List of markup supported on the device

Device Adaptation
9-26 Oracle Application Server Wireless Developer’s Guide
MESSAGESIZELIMIT Maximum number of characters per message
MULTIMEDIAAUDIOFORMATS Multi-media audio types
MULTIMEDIAIMAGEFORMATS Multi-media image types
MULTIMEDIAVIDEOFORMATS Multi-media video formats
SMILLAYOUTCAPABLE If true, MMS browser supports SMIL layout tag
Table 9–8 VoiceXML Gateway Capabilities
GRAMMARCONTENTTYPES List of supported speech grammar mime types
MIMETYPE_TEXTTOVOICEGRAMMAR Gateway specific mimetype of Voice Grammars generated from text
MIMETYPE_OGSTOVOICEGRAMMAR Gateway specific mimetype of Voice Grammars generated from OGS Grammars
MIMETYPE_TEXTTODTMFGRAMMAR Gateway specific mimetype of DTMF Grammar’s generated from text
MIMETYPE_OGSTODTMFGRAMMAR Gateway specific mimetype of DTMF Grammars generated from OGS Grammars
MIMEMAP_APPLICATION_SRGS_XML Enter gateway specific mimetype for application/srgs+xml
MIMEMAP_APPLICATION_X_ABNF Enter gateway specific mimetype for application/x-abnf
MIMEMAP_APPLICATION_X_GSL Enter gateway specific mimetype for application/x-gsl
MIMEMAP_APPLICATION_X_JSGF Enter gateway specific mimetype for application/x-jsgf
MIMEMAP_APPLICATION_X_DTMF Enter gateway specific mimetype for application/x-dtmf
MIMEMAP_APPLICATION_X_WATSON Enter gateway specific mimetype for application/x-watson
MIMEMAP_APPLICATION_X_SWI Enter gateway specific mimetype for application/x-swi
Table 9–9 Java (J2ME) Capabilities
JavaCAPABLE If true, supports J2ME
JavaPLATFORM Java configuration installed on the device such as CDC
Table 9–7 Messaging Capabilities
DELIVERYTYPESList of supported messaging delivery types or channels

Device Adaptation
Using Multi-Channel Server 9-27
9.3.7 Device Information and ClassificationOracleAS Wireless Server sends information about the user device to the back end applications using HTTP headers. This information may be used by the application to optimize the content that it generates. Here is a list of headers that an application will receive:
JVMVERSION JavaVM Version
JavaPROFILE Java profile installed on the device such as MIDP
JavaPROVISIONPROTOCOL Provisioning protocol, such as SUN-OTA
JavaMAXDOWNLOADSIZE The maximum download size allowed for the JVM installed
JVMHEAPSIZE JVM heap size
Table 9–10 Device Information and Classification
HTTP Header Name Description
X-Oracle-Device.Class Indicates the Channel mode and the form factor of a device. Each value of the Device.class indicates a unique communication channel mode and the unique form factor. (For possible values, explanation and representative devices see below)
X-Oracle-Device.Orientation Along with the form factor, the orientation of a device will help applications to change the rendering style for certain devices. Possible values are “landscape”/”portrait”, with default being portrait. (if nothing is specified by the System or if Width=height).
X-Oracle-Device.MaxDocSize The Maximum size (in bytes) of XML document (service response) that handled by the device making the current request. This is an approximation, as the Byte size of the document and target device digest byte size cannot be mapped. Also embedded content like Audio and Image need to be considered towards this size. If the service returns XML document greater than the MaxDocSize, the response for such a request is undefined.
X-Oracle.Device.Secure Possible values "true" or "false". Indicates if the connection between OracleAS Wireless server and the device was secure when the current request for the resource was made.
Table 9–9 Java (J2ME) Capabilities
JavaCAPABLE If true, supports J2ME

Modifying Multi-Channel Server Runtime
9-28 Oracle Application Server Wireless Developer’s Guide
9.4 Modifying Multi-Channel Server RuntimeOracleAS Wireless Multi-Channel Server (MCS) Runtime is invoked directly through OC4J Servlets, Async Servers, Voice Servers, or indirectly through the OC4J Servlet Filters. The MCS runtime processes requests from any devices, user agents, and autonomous mobile agents that use diverse communication channels, such as Voice, Hypertext Transaction Protocol (HTTP), Instance Messaging, SMS, e-Mail, or two-way paging. The MCS runtime adapts the service requests from any of these channels and transcodes the service responses to take advantage of the unique device capabilities, freeing developers from the encumbrance of device idiosyncrasies. By adapting the requests from different communication channels to the standard J2EE Servlet 2.3 service requests, OracleAS Wireless MCS lets developers develop generic mobile applications using industry-standard Servlet API, JSP, XHTML, XForms, and CSS in addition to Oracle’s own OracleAS Wireless XML. The MCS can effectively utilize an extensible repertoire of device models in a centrally managed device knowledge repository to take advantage of specific device capabilities.
This section describes the functions of MCS runtime. It describes the MCS runtime session management, session persistency, runtime API and extensibility, content adaptation, and URL rewrite mechanisms. The MCS runtime performs automatic session tracking and terminates the sessions when they expire after the maximum interval of inactivity or when the devices disconnect.
9.4.1 MCS Runtime Session ManagementOracleAS Wireless MCS runtime tracks runtime sessions independently of the OC4J Servlet sessions by rewriting every URL with an added parameter, PAsid, which specifies the MCS session ids. The session tracking identifies that a sequence of requests are submitted by the same user. The MCS runtime session contains the
X-Oracle-Orig-User-Agent If the request to the OracleAS Wireless server was made through HTTP protocol and the device sent “User-Agent” HTTP header then that header will be resend to the application using the header name.
X-Oracle-Orig-Accept If the request to the OracleAS Wireless server was made through HTTP protocol and the device sent “Accept” HTTP header then that header will be resend to the application using the header name.
Table 9–10 Device Information and Classification
HTTP Header Name Description

Modifying Multi-Channel Server Runtime
Using Multi-Channel Server 9-29
device credentials, user preferences, runtime contexts, cookies, URL caches, and other states essential for context-sensitive services. Furthermore, these MCS session states can be persistent. The MCS session id is used to restore the persistent MCS session states any time the MCS session id is referenced in the request, for example by putting the PAsid parameter in the URL. The MCS runtime maintains the runtime session so that users connecting through transient sessions under the alternative channels can share long-lived MCS runtime sessions. The persistent MCS sessions increase the life time of sessions and make the multi-modal interaction more enduring.
MCS runtime sessions can be bound to OC4J Servlet sessions. WAP 2.0 devices that implement the WAP HTTP State Management Specification (http://www.wapforum.org/) can support cookies for session management. Most of the commercial WAP gateways manage cookies on behalf of WAP devices. If the device or gateway does not support cookies, the OC4J Servlet container can revert to URL rewriting to track sessions. Since the MCS runtime also tracks the session, it is possible for more than one MCS runtime session to be bound to the same OC4J Servlet session. For example, two browser windows on the same device can open two independent MCS runtime sessions although the browsers may share the same servlet session because of the shared cookie repository.
The MCS runtime session states can be replicated to other OC4J instances in the island (An island replicates session state between two or more OC4J instances.) so that device requests can be redirected to another OC4J instance in the island when the first instance fails. By default, the binding to the OC4J Servlet session is enabled and is necessary to configure the OC4J session replication and failover. When the servlet sessions expire, the MCS runtime sessions that are bound to the servlet sessions are invalidated, provided the MCS runtime session is not bound to active sessions for other channels such as voice, instance messaging, or SMS. The invalidation of the MCS runtime session only releases the in-memory resources, but does not destroy the persistent MCS session states that can be restored when the runtime session is reactivated.
MCS runtime sessions are expired when the sessions remain idle for more than what is specified by a site-wide configuration parameter value for the Runtime Session Life Time (seconds) under System > Wireless Server: Administration > Runtime Configuration Console. The default session life time is 10 minutes. This parameter is overridden by the OC4J Servlet session expiration time, which is 30 minutes by default, when the MCS runtime session is bound to the OC4J Servlet session. The session binding from the runtime sessions to Servlet sessions can be disabled by the parameter setting enable.http.session.binding=false in the System.properties file. The MCS session persistency is enabled through the Enable Runtime Session Persistency”

Modifying Multi-Channel Server Runtime
9-30 Oracle Application Server Wireless Developer’s Guide
option under System > Wireless Server: Administration > Runtime Configuration Console. The runtime session persistency is disabled by default. The Persistent Session Life Time (days) under the same console specifies when the persistent MCS sessions are purged from persistent storage after they remain idle for the specified number of days. The MCS persistent session life time can be many orders longer than the OC4J Servlet session life time or the MCS runtime session life time; the default setting is two days.
9.4.2 MCS Runtime APIOracleAS Wireless MCS Runtime API provides the Java interfaces to examine the runtime execution states, trace the runtime execution flow, and augment the default execution semantics. The Runtime API consists of the following Java packages:
■ oracle.panama.rt provides the interfaces to the essential runtime objects for state management.
■ oracle.panama.rt.event provides the interfaces to monitor the runtime execution sequence based on the Java event model.
■ oracle.panama.rt.hook provides the interfaces for the essential runtime customizable components and the default implementation policies for these interfaces.
These packages are included in the wireless.jar file. Make sure you have included wireless.jar in your Java classpath when you compile your Java application or plug-in components that depend on the MCS Runtime API.
9.4.2.1 Runtime ObjectsThe oracle.panama.rt package defines the core of the Runtime API. The runtime custom plug in components, such as Event Listeners, can use the Request, Response, and Session interfaces in the oracle.panama.rt package.
The following subsections describe the interfaces in this package. The interfaces are:
■ Section 9.4.2.1.1, "Request"
■ Section 9.4.2.1.2, "Response"
■ Section 9.4.2.1.3, "Session"
9.4.2.1.1 Request A request object is used to define the URL parameters and HTTP header attributes for a service request. It also defines the user agent type, device model, and other runtime contexts. A listener can subscribe to events from a request.

Modifying Multi-Channel Server Runtime
Using Multi-Channel Server 9-31
The following methods in the Request interface allow you to access, replace, add, or remove the parameters that are associated with the request object:
■ Object getAttribute(AttributeCategory category, String name)
■ Object setAttribute(AttributeCategory category, String name, Object attribute)
The methods access the name and value of the attributes, which can be user parameters, system parameters, or application contexts. There are three categories of attributes:
■ PARAMETERS
■ RUNTIME
■ CONTEXTS
The most important attribute category for Request is PARAMETERS, which contains the query and form parameters submitted by a user. The MCS runtime parses the URL query strings to retrieve the parameters. Other runtime components can set these parameters programmatically. Since MCS runtime rewrites and caches the URLs, some of the parameters are retrieved from the URL cache in the runtime session. MCS runtime may need to parse both the query strings from the HTTP request and the URL cache in the session to build a complete list of query parameters.
9.4.2.1.2 Response This interface represents the Response objects in MCS runtime. A listener can subscribe to events from a Response. The Response object is the execution result of the Request object.
9.4.2.1.3 Session This interface represents the session objects in MCS runtime. Any request can only be executed in a valid session context. A session can expire after the session exceeds the maximum interval of inactivity. Developers can store the session-long information in the corresponding session object. A listener can subscribe to events from a session. See Section 9.4.1, "MCS Runtime Session Management" for how MCS runtime sessions are established.
The session caches the device credentials, personalization preferences, uncompressed URLs, Cookies, and XForms Documents among other runtime contexts. The SMS and Instant Messaging servers use the runtime sessions extensively to manage dynamically generated short names, for example, single digit menu numbers to identify the URLs. Sessions states include Cookies that represent various states of authentication against content providers’ applications. The MCS

Modifying Multi-Channel Server Runtime
9-32 Oracle Application Server Wireless Developer’s Guide
runtime caches the XForms documents in the runtime session. The session owner can interact with XForms documents over several request/response messages before submitting the instance data to applications.
The following methods in the Session interface allow you to access, replace, add, or remove the parameters that are associated with the session object:
■ Object getAttribute(AttributeCategory category, String name)
■ Object setAttribute(AttributeCategory category, String name, Object attribute)
The methods access the name and value of the attributes. There are three categories of attributes:
■ PARAMETERS
■ RUNTIME
■ CONTEXTS
9.4.2.2 Event ListenersThe MCS runtime is invoked from the OC4J Servlets, Servlet Filters, Voice Servers, or Async Servers. Similar to the Servlet 3.2 Filters, the MCS runtime controllers are extensible through pluggable MCS runtime Request, Response, and Session Listeners.
During the establishing of an MCS session, the expiration of an MCS session, or the processing of a request and response, MCS runtime can generate a sequence of events to signal the execution progress if any interested listener is registered with these objects. The listeners can monitor the runtime progress and modify the request and response data without changing the execution flow of the controllers in the MCS runtime. The possible applications for the event listeners include data logging, performance monitoring, and more advanced context-aware customizations. The oracle.panama.rt.event package defines the API based on the JDK Event models.
Listener and Event form an important Observer design pattern in which the Listener represents an observer. Three types of listeners are defined:
■ RequestListener Interface
■ ResponseListener Interface
■ SessionListener Interface

Modifying Multi-Channel Server Runtime
Using Multi-Channel Server 9-33
The ListenerRegistrationHook subscribes listeners to receive events from the subject, such as Request, Response, or Session.
9.4.2.2.1 RequestListener Interface The implementor of oracle.panama.rt.event.RequestListener can receive any of the following events:
■ before request
■ request begin
■ service begin
■ service end
■ transform begin
■ transform end
■ request end
■ after request
■ request error
Which specific Request-related event will be generated is controlled by the event mask in System Manager > Site > Wireless Web Server > Event and Listeners in OracleAS Wireless Tools. For example, if you want to have your RequestListener receive the request begin event, you should set the Enable request begin Event to true in System Manager > Site > Wireless Web Server > Event and Listeners control panel in OracleAS Wireless Tools. The site configuration property names are:
■ wireless.http.event.beforeRequest
■ wireless.http.event.requestBegin
■ wireless.http.event.requestEnd
■ wireless.http.event.serviceBegin
■ wireless.http.event.serviceEnd
■ wireless.http.event.transformBegin
■ wireless.http.event.transformEnd
■ wireless.http.event.requestError
■ wireless.http.event.afterRequest

Modifying Multi-Channel Server Runtime
9-34 Oracle Application Server Wireless Developer’s Guide
The RequestListener can intercept the input parameters during the requestBegin(RequestEvent) and apply additional business rules on the request parameters before service invocation.
9.4.2.2.2 ResponseListener Interface The implementor of oracle.panama.rt.event.ResponseListener can receive the Response-related event. The only possible Response-related event is response error. If you want MCS runtime to have your ResponseListener receive the response error event, you should set the Enable response error Event option to true in System Manager > Site > Wireless Web Server > Event and Listeners control panel in OracleAS Wireless Tools. The site configuration property name is: wireless.http.event.responseError
9.4.2.2.3 SessionListener Interface The implementor of oracle.panama.rt.event.SessionListener can receive Session life cycle events. The possible Session events include:
■ before session
■ session begin
■ session authenticated
■ session end
■ after session
Which specific Session event will be generated is controlled by the event masks in the System Manager > Site > Wireless Web Server > Event and Listeners control panel in OracleAS Wireless Tools. For example, if you want to have your SessionListener receive the session begin event, set the Enable session begin Event option to true in the System Manager > Site > Wireless Web Server > Event and Listeners control panel in OracleAS Wireless Tools. The site configuration property names are:
■ wireless.http.event.beforeSession
■ wireless.http.event.sessionBegin
■ wireless.http.event.sessionAuthenticated
■ wireless.http.event.sessionEnd
■ wireless.http.event.afterSession

Modifying Multi-Channel Server Runtime
Using Multi-Channel Server 9-35
9.4.2.2.4 MCS Runtime Listeners Implementation Guidelines
The following steps describe how to set up the customized Event Listener.
1. Implement the RequestListener, ResponseListener, or SessionListener interfaces.
2. Compile the new Java source files from Step 1 with the wireless.jar file in the classpath.
3. Modify the event mask entries in the System Manager > Site > Wireless Web Server > Event and Listeners control panel to enable the generation of specific events.
4. Specify the class names for the RequestListener, ResponseListener, and SessionListener in the System Manager > Site > Wireless Web Server > Event and Listeners control panel of OracleAS Wireless Tools. The site configuration property names are:
■ wireless.http.locator.combined.listener.classes
■ wireless.http.locator.session.listener.classes
■ wireless.http.locator.response.listener.classes
■ wireless.http.locator.request.listener.classes
5. Restart the OracleAS Wireless instance.
Any of the event listeners may throw the AbortServiceException to signal the MCS runtime controller to reject the request, but this veto signal is effective only if it is raised during one of the following events when the service is yet to be invoked:
■ beforeRequest(RequestEvent)
■ beforeSession(SessionEvent)
■ sessionAuthenticated(SessionEvent)
Note: Ensure that you set your CLASSPATH properly; include all relevant files. View your log.xml file to see the files that must be included.
Note: Each Listener must provide this method:
public static <ClassName> getInstance();

Modifying Multi-Channel Server Runtime
9-36 Oracle Application Server Wireless Developer’s Guide
■ requestBegin(RequestEvent)
■ sessionBegin(SessionEvent)
■ serviceBegin(RequestEvent)
The listeners may throw the AbortServiceException during the serviceEnd(), transformBegin(), and transformEnd() events to refuse the service’s content to the user, although any durable effect of the service invocation cannot be rolled back. The sessionEnd(), afterSession(), requestEnd(), and afterRequest() methods should not throw the AbortServiceException.
A listener that implements the Request, Response, and Session listener interfaces is described in the code example below. The listener in this example listens to all Request, Response, and Session events. The sample listener logs the response time of the requests.
An Implementation of the Event Listenerspackage oracle.panama.rt.event; import oracle.panama.rt.Request; import oracle.panama.rt.Response; import oracle.panama.rt.Session; import oracle.panama.rt.AttributeCategory; import oracle.panama.rt.event.RequestEvent; import oracle.panama.rt.event.ResponseEvent; import oracle.panama.rt.event.SessionEvent; import oracle.panama.rt.event.RequestListener; import oracle.panama.rt.event.ResponseListener; import oracle.panama.rt.event.SessionListener; import oracle.panama.rt.event.AbortServiceException; public class Listener implements RequestListener, ResponseListener, SessionListener { private final static String BEFORE_REQUEST = "L__L1"; private final static String REQUEST_BEGIN = "L__L2"; private final static String SERVICE_BEGIN = "L__L3"; private final static String SERVICE_END = "L__L4"; private final static String TRANSFORM_BEGIN = "L__L5"; private final static String TRANSFORM_END = "L__L6"; private final static String REQUEST_END = "L__L7"; private final static String AFTER_REQUEST = "L__L8"; private final static String BEFORE_SESSION = "L__L9"; private final static String SESSION_BEGIN = "L__LA"; private final static String SESSION_END = "L__LB"; private final static String AFTER_SESSION = "L__LC"; public void beforeSession(SessionEvent event) throws AbortServiceException {

Modifying Multi-Channel Server Runtime
Using Multi-Channel Server 9-37
System.out.println(event.toString()); } public void sessionBegin(SessionEvent event) throws AbortServiceException { //[29] StringBuffer buf = new StringBuffer(1000000); event.getSession().setAttribute(AttributeCategory.RUNTIME, this.SESSION_BEGIN, buf); } public void beforeRequest(RequestEvent event) throws AbortServiceException { event.put(BEFORE_REQUEST, new Long(event.getTimeStamp())); } public void requestBegin(RequestEvent event) throws AbortServiceException { event.put(REQUEST_BEGIN, new Long(event.getTimeStamp())); } public void serviceBegin(RequestEvent event) throws AbortServiceException { event.put(SERVICE_BEGIN, new Long(event.getTimeStamp())); } public void serviceEnd(RequestEvent event) throws AbortServiceException { event.put(SERVICE_END, new Long(event.getTimeStamp())); } public void transformBegin(RequestEvent event) throws AbortServiceException { event.put(TRANSFORM_BEGIN, new Long(event.getTimeStamp())); } public void transformEnd(RequestEvent event) throws AbortServiceException { event.put(TRANSFORM_END, new Long(event.getTimeStamp())); } public void requestEnd(RequestEvent event) throws AbortServiceException { event.put(REQUEST_END, new Long(event.getTimeStamp())); } public void afterRequest(RequestEvent event) throws AbortServiceException { //[54] Long val; long t1, t2, t3, t4, t5, t6; StringBuffer buf = (StringBuffer) event.getRequest().getSession().getAttribute( AttributeCategory.RUNTIME, this.SESSION_BEGIN); /* compute total response time */ t6 = event.getTimeStamp(); val = (Long) event.get(this.BEFORE_REQUEST); t1 = val.longValue(); buf.append("Request time = "); buf.append(t6 - t1);

Modifying Multi-Channel Server Runtime
9-38 Oracle Application Server Wireless Developer’s Guide
buf.append("\r\n"); /* compute service time */ val = (Long) event.get(this.SERVICE_END); t3 = val.longValue(); val = (Long) event.get(this.SERVICE_BEGIN); t2 = val.longValue(); buf.append("Service time = "); buf.append(t3 - t2); buf.append("\r\n"); /* compute transform time */ val = (Long) event.get(this.TRANSFORM_END); t5 = val.longValue(); val = (Long) event.get(this.TRANSFORM_BEGIN); t4 = val.longValue(); buf.append("Transform time = "); buf.append(t5 - t4); buf.append("\r\n"); } public void sessionEnd(SessionEvent event) throws AbortServiceException { // [84] StringBuffer buf = (StringBuffer) event.getSession().getAttribute( AttributeCategory.RUNTIME, this.SESSION_BEGIN); System.out.println(buf.toString()); System.out.println(event.toString()); } public void afterSession(SessionEvent event) throws AbortServiceException { System.out.println (event.toString()); } public void requestError(RequestEvent event) throws AbortServiceException { System.out.println(event.toString()); } public void responseError(ResponseEvent event) throws AbortServiceException { System.out.println(event.toString()); } }
The above example describes a sample listener that listens to all session, request, and response events. The example illustrates the use of the session for grouping all requests under the same session. The method sessionBegin() in line 29 creates a large string buffer for logging all events under the session. At the end of the session, in the sessionEnd() method in line 84, the string buffer containing the logs for the session is then printed. The values placed in the event object persist through the

Modifying Multi-Channel Server Runtime
Using Multi-Channel Server 9-39
life cycle of the event source and can be retrieved during subsequent events. Alternatively, the listener may place the values in the RUNTIME attribute category of the Request or Session objects. Both techniques allow the listeners to correlate and trace the events from individual event sources. In the above example, the listener puts the timestamp of each event in the event object. These timestamps are retrieved at the end of the request as shown in the afterRequest() method in line 54, where the timestamps are used to compute the total response time, service time, and transform time for the request.
9.4.2.2.5 Deploy the Listener In order to deploy your Listener, copy all of the .class files into the classes directory. By default: $ORACLE_HOME/wireless/server/classes.
9.4.3 MCS Reverse Proxy, URL Rewrite, Caching, and CompressionThe MCS runtime parses the documents and rewrites the URLs in the response documents before transforming and delivering the documents to the devices. The MCS replaces all URLs in the response document, including the channel protocol, target host names, and port numbers, so that the MCS can intercept all subsequent requests that follow from the links in the document. In this way, the MCS acts as a reverse proxy server to the devices.
The MCS runtime caches each of the original URLs in the MCS session and replaces the URL with a much shorter URL consisting only the PAsid and PAckey parameters. The PAsid parameter specifies the MCS runtime session id. The PAckey parameter specifies the key to look up the URL in the MCS session. The MCS session id, the URL caches, cache keys, and cookies are part of the persistent states of the MCS session. The MCS runtime amends the requests that it intercepts with the parameters from the original URLs in the MCS session caches.
Acting as a virtual browser in the reverse proxy, the MCS generates the HTTP requests to the target host and port number that are accompanied by the cookies from the MCS session caches. The MCS URL cache-and-rewrite scheme affords a high compression ratio if the URLs contain many hidden fields.
9.4.4 MCS Virtual Browser ModelThe MCS, acting as a reverse proxy server, rewrites all URLs including the channel protocol, target host, port number, and the form or query parameters so that it can proxy all requests from the devices. The MCS can thus translate the multi-channel proxy requests to the HTTP content provider requests. When generating the HTTP requests to the content providers, the MCS acts as a virtual browser to the content

Modifying Multi-Channel Server Runtime
9-40 Oracle Application Server Wireless Developer’s Guide
provider, thereby presenting a generic user agent type. The content providers need to write the application only for the generic user agent type of the MCS virtual browser. This simplifies the multi-channel application delivery model and at the same time provides a powerful development model based on industry-standard markup languages such as XHTML, XForms, and CSS.
Acting as a virtual browser, the MCS can follow the URL redirects from the content provider applications. MCS also supports HTTP Header Referrer for external applications to trace the context of the requests. MCS can use both HTTP and HTTPS protocols and support session cookies as well as other persistent cookies, which can be part of the persistent MCS sessions. The MCS chooses to use the GET or POST methods depending on the methods the devices use to access MCS runtime. Only when the device does not use HTTP channel does the MCS runtime default to the GET method.
The MCS runtime can detect the redirect response codes, such as the HTTP response code 301 to 305, and follow the redirected URLs specified by HTTP Location header. The MCS can also support post-based redirects. To send a post-based redirect, the content provider should send HTTP header x-oracle-mobile-redirect with value true, and the OracleAS Wireless XML form as shown in the following jsp file as the response content. The line [3] sends a Post redirect to the URL http://OracleAS Wireless.oracle.com. The param1=value1 is passed as post data to the URL.
<%response.setHeader("x-oracle-mobile-redirect", "true");response.setHeader("Content-Type", "tex/vnd.oracle.mobilexml"); // [3]%><?xml version = "1.0" encoding = "UTF-8" standalone="yes" ?><!DOCTYPE SimpleResult PUBLIC "-//ORACLE//DTD SimpleResult 1.1.0//EN" "http://xmlns.oracle.com/ias/dtds/SimpleResult_1_1_0.dtd"><SimpleResult> <SimpleContainer> <SimpleForm name="ProcessSignOnForm" mimetype="text/vnd.oracle.mobilexml" target="http://OracleAS Wireless.oracle.com/MyApp" method="post"> <SimpleFormItem name="param1" value="value1" type="hidden"/> </SimpleForm> </SimpleContainer></SimpleResult>
The MCS sends the referring URLs in the HTTP Header Referrer. This mechanism is used by content providers to trace the context of the current request. The Referrer header is not sent by default but the OracleAS Wireless XML attribute sendreferer described below is used to indicate that the Referrer header should be sent:

Modifying Multi-Channel Server Runtime
Using Multi-Channel Server 9-41
<?xml version="1.0" encoding="UTF-8"?><SimpleResult> <SimpleContainer> <SimpleHref target="HelloWorld.xml" sendreferer="true">Send Referer</SimpleHref> <SimpleHref target="HelloWorld.xml" sendreferer="false">Don’t Send Referer </SimpleHref> </SimpleContainer></SimpleResult>
The MCS can access HTTPS protocol based URLs. Before using HTTPS, the client certificates should be configured using the Site Configuration Tool. The MCS can access external URLs through a HTTP proxy server. The proxy settings can be specified using the Site Configuration Tool.
The MCS runtime implements the version 0 of the Cookie Specification by Netscape (http://www.netscape.com/newsref/std/cookie_spec.html). It stores the Cookies sent by the external URLs in the MCS runtime session and sends the relevant cookies from the session with the HTTP URL request to content providers. The cookies are valid as long as the MCS sessions are valid. The persistent MCS sessions must be enabled to support persistent cookies.
The MCS performs the content adaptation, and adapts web content written in standard XHTML, XForms, and CSS markups languages to the device-specific markup languages. The MCS uses a sophisticated algorithm to determine the device and network capability by looking at the User-Agent, Accept, HTTP headers attributes, and the optional device identifications and physical device models specified by the user when they register their devices. The MCS also examines the device capabilities that some of the newer devices submit with the request. It uses a repertoire of device models in the device knowledge base to render the optimal content adaptation.
9.4.5 Wireless and Voice PortalOracleAS Wireless also includes the facilities (such as User and Device Provisioning, User Management, Content and Service Management, Single-Sign-On Authentication, Authorization, Device Registration, User Preferences Management, End-User Personalized Portals, Billing Systems Integration, etc.), that are necessary components to build a self-contained Portal. The Wireless and Voice Portal shares the User Repositories, Oracle Internet Directory, and Single-Sign-On credentials with the Oracle Application Server Portal Product and can interoperate with the main Portal. In the Wireless and Voice Portal Runtime, every request from the device is serviced within the context of a valid runtime session. The requests from

Modifying Multi-Channel Server Runtime
9-42 Oracle Application Server Wireless Developer’s Guide
anonymous devices are also tracked and assigned to individual runtime sessions although the owners of the sessions may be the Guest user, which is an anonymous user.
9.4.5.1 Device IdentificationThe OracleAS Wireless and Voice Portal runtime automatically provisions a virtual user in the Oracle Application Server OID User Repository for each device that can be consistently identified, using the identifiers available in the devices. Runtime sessions for virtual users are opened whenever the device identifiers are present in the requests. The device identifiers may be based on native device identifiers such as the Mobile Identification Number (MIN), Mobile Subscriber ISDN (MSISDN), Ipv6 Address, Electronic Serial Number (ESN), etc. The device identifiers may also be provisioned into the device by the WAP gateway. The WAP Client ID Specification (http://www.wapforum.org/) defines a standard scheme for supporting the device identifiers. If no device identifiers are supplied in the request, the OracleAS Wireless runtime provisions the device identifiers into the devices using the persistent cookies whenever possible.
The Wireless and Voice Portal runtime uses the device identifiers only to facilitate personalization under the virtual user. The runtime sessions opened under the virtual users have access to the information such as personalized presets and preference profiles in the repository. The device identifier also enables the device to reconnect to the same runtime session for the user, as long as the session has not expired. The device identifiers add robustness to the session management for Wireless and Voice devices, enabling continuity of the service in the face of intermittent connection losses. The users may also make telephone calls in between connections to the portal without losing their contexts.
Device identifiers are not a means of authentication. Although the runtime sessions for the virtual users are not authenticated, it does not prevent the users from accessing their personalized portals. The users may establish authenticated sessions only if they register with the Wireless and Voice Portal. The user can supply the user name and password during the registration. The user’s personalization profiles and presets are still available to the user after the user becomes registered. The advantages of the registration include the authentication process that gives access to the secured services, such as e-Wallets and financial transaction services.
9.4.5.2 Virtual User ConceptThe Wireless and Voice Portal runtime automatically provisions virtual users in the Wireless repository for devices that can be consistently identified, using the identifiers available in the devices. The virtual user option gives the device owners

Modifying Multi-Channel Server Runtime
Using Multi-Channel Server 9-43
immediate access to the personalization features of the portal, which enhance the user experience. It automates the provisioning process for the carrier and enterprise portal administrators using the emerging WAP Client ID standards.
Device owners can register with Wireless and Voice Portal to gain access to secured services through authentication. The registration can be done from the setup menus by the device owner. This self-provisioning registration feature further simplifies the administration tasks. The devices with virtual user support let the registered users connect to Wireless and Voice Portal and access the personalized services without signing on to the system until they are requested by the secured services to authenticate. The virtual user feature not only improves the accessibility of the portal but also enhances the data mining capability of portal operators since the activities of the devices can be identified with virtual identities.
The virtual user feature can be disabled by the site wide configuration parameter setting wireless.virtualuser.enabled=false. This property can be modified by the Enable Virtual User option in the System Manager>Site>User Provisioning control panel. If the virtual user feature is disabled or if the device does not support device identifier, then the session is opened under the Guest user, which must be provisioned in the repository. The Wireless and Voice Portal bootstrap repository includes the anonymous user Guest.
Applications that have direct access to the Wireless and Voice Portal runtime objects can check the value of oracle.panama.model.UserType returned by the getUserType() method in oracle.panama.model.User. The User of the runtime session can be retrieved from the getUser() method in oracle.panama.rt.Session. The external content providers can get the user type information from the HTTP header attribute x-oracle-user.userkind. The possible values of this attribute are anonymous, virtual, or registered.
9.4.5.3 Authentication and AuthorizationThe application programs for services that require authenticated sessions must add the PAlogin=true parameter in the URLs. When the Wireless and Voice Portal runtime detects the PAlogin=true parameter among the URL parameters in the request for a service, the runtime tries to authenticate the user if the runtime session is not already authenticated. The authentication process, which typically involves the user supplying the user name and password to the Oracle Application Server Single Sign On (SSO) Server, is performed before the runtime invokes the service being requested. After the PAlogin parameter invokes the authentication process, the application programs for secured services still must verify that the session is authenticated. The applications that have direct access to the Wireless and Voice Portal runtime objects can use isUserAuthenticated() method in

Modifying Multi-Channel Server Runtime
9-44 Oracle Application Server Wireless Developer’s Guide
oracle.panama.rt.Session interface. The external content providers can get the information from the HTTP header attribute x-oracle-user.authkind which has the values authenticated or unauthenticated.
In addition, the applications can also check if the session is secured by the SSL, TLS, or WTLS channels. The application that has direct access to the Wireless and Voice Portal runtime objects can use the isSecure() method in the oracle.panama.rt.Request interface. External content providers can get the isSecure() condition through the HTTP header attribute x-oracle-device.secure, which has the values true or false.
The authorization for access to a service is performed for each request for all authenticated or unauthenticated sessions. The authorization makes sure that the session user has the privilege to access the service. The default authorization policy does not differentiate whether the session is authenticated or unauthenticated. The unauthenticated sessions of a virtual or registered user has as much visibility as the authenticated sessions. It is therefore critical for the applications to apply the PAlogin parameter to enforce the authentication.
9.4.6 Globalization (NLS) SupportThe Multi-Channel Server is a middle-tier server that is deployed between the device browser and the back-end web application. It communicates to the device and to the application through the HTTP(S) protocol.
In order to correctly do the character encoding/decoding for the requests/responses. the Multi-Channel Server must know the character encoding that both sides—device and application—use. These are the assumptions that the Multi-Channel Server makes when handling character encoding for each HTTP hop:
1. First Request from the Device—MCS uses the Accepted Character Encodings attribute of the device browser to decode the request parameters sent by the browser.
2. First Request from MCS to the Application—MCS does not know the character encoding that the Application expects. In this case, MCS UTF-8 character encoding for the very first request to the Application.
3. First Response from the Application—MCS follows the Hypertext Transfer Protocol—HTTP/1.1 specification to detect the media type of the entity-body sent to the recipient. According to that specification, the sender should include Content-Type HTTP header and add a charset value indicating the content character set. For example:

Modifying the Data Models
Using Multi-Channel Server 9-45
Content-Type: application/vnd.oracle.xhtml+xforms; charset=ISO-8859-4If the Content-Type header or the charset value are missing, then the MCS assumes ISO-8859-1 character encoding.
4. First Response from MCS—The MCS uses the Accepted Character Encodings attribute of the device browser to decode the request parameters sent by the browser.
5. Subsequent Request from the Device—The MCS uses the Accepted Character Encodings attribute of the device browser to decode the request parameters sent by the browser.
6. Subsequent Request from MCS to the Application—The MCS uses the same character encoding sent by the Application in the previous response.
7. Subsequent Response from the Application—The MCS uses the same logic as explained in step 3. The Application must specify the character encoding again. The Application can use a different encoding (though this is not common).
8. Subsequent Response from MCS—The MCS uses the Accepted Character Encodings attribute of the device browser to decode the request parameters sent by the browser.
Steps 5-8 repeat for all requests/responses after the first request/response.
In short, MCS always uses the Accepted Character Encodings device attribute to do the character encoding/decoding when communicating with a device. It always uses the charset value in the Content-Type HTTP header when communicating with the application. An exception from this rule is only the very first request from the MCS to the application when the MCS uses UTF-8 character encoding.
9.5 Modifying the Data Models
9.5.1 OracleAS Wireless Services OverviewServices enable end users to access the functionality of OracleAS Wireless. They represent a link between the content source and the delivery target. Services tie a specific data source (through an adapter) to the different devices.
There are different types of services:
Note: MCS remembers this character encoding value and will use it in subsequent requests to the Application.

Modifying the Data Models
9-46 Oracle Application Server Wireless Developer’s Guide
■ MasterService—provides the actual implementation of the service. MasterServices specify the adapter used for the service and any service-specific parameters.
■ Link—a pointer to a service. In most cases Links are used to publish MasterServices to end users and to customize the MasterService parameters.
■ Module--a pointer to a MasterService with a known URL.
■ Folder--container for other services, including other Folders. Used to build service trees.
■ ExternalLink--a service that points to an external resource.
9.5.2 MasterServiceMasterServices provide the basic wireless functionality. They are the actual implementation of the service. Each MasterService is based on one adapter. A MasterService sets values for the adapter init, input and output parameters. Each MasterService creates its own instance of the adapter it uses. Therefore, several services can use the same type of adapter, and each can pass its own service-specific argument values.
It is recommended that you build all MasterServices using the HTTPAdapter. That gives you the flexibility to implement the service business logic using JSPs or other web technologies.
9.5.2.1 LinkLinks are used to further customize existing services by overriding the values of their parameters.
When a Link service is invoked the OracleAS Wireless server merges the parameters with the parameters of the service the Link points to, and invokes that service.
Links are also used to better organize services into user service trees. They give you the flexibility to publish the same service under different names and in different folders (different levels in the service tree). If you do not override any parameter values, then invoking the link is the same as invoking the service it points to.
9.5.2.2 ModuleModules are wireless services with well-known virtual URLs (OMP URL, that is, omp://my.module).

Modifying the Data Models
Using Multi-Channel Server 9-47
Modules can be called from any application or module and may be instructed to return control to another application or module. Calls may be nested to any level. This mechanism of bi-directional linking allows quick applications assembly.
An important difference between a module and a regular service is that the module receives information about the service it needs to return to after it is done. This is not always the caller of the module (the module caller may want the module to return to a different service).
9.5.2.3 FolderFolders are containers for other services. They are used to better organize user-accessible services into a service tree. The content of a folder is displayed by invoking its rendering service; a special service associated with each folder.
The system rendering service displays the folder child services ordered by the specified sort rule.
Optionally, you can specify icons and audio files to be displayed or played when a service link is displayed in the folder content or when the service is invoked.
9.5.2.4 ExternalLinkAn ExternalLink is a wireless service that points to an external resource. The external resource is typically a Web page that serves content in a format supported by the target device.
OracleAS Wireless does not process the content of the ExternalLink target. As a result, ExternalLink services are not available to all targeted devices, as are other wireless services. In most cases, ExternalLinks are set in the Customization portal by the end user, not in the Service Designer.
9.5.3 Access ControlThere are two type of services in terms of access:
■ User Private Services—accessible by a single user.
■ Shared Services—accessible by multiple users.
There are different rules that apply to those two type of services.
■ The user private services are services that reside in the user home service tree. Users can access all of those services. No other user can access those services.

Modifying the Data Models
9-48 Oracle Application Server Wireless Developer’s Guide
■ Shared services, in contrast, are accessed by multiple users. The access is controlled by the User - Group - Service relationship. When you assign a service to a group, all users from that group can access the service.
9.5.4 Folder Renderer
9.5.4.1 OverviewFolder Renderer is a runtime component of OracleAS Wireless that is responsible for rendering the content of a folder. In order to provide customization possibilities to end users, the logic of the Folder Renderer component is externalized in the form of Folder Renderer Hook.
See the oracle.panama.rt.hook.FolderRendererHook Java interface for more details.
Out of the box, OracleAS Wireless provides a default implementation of the Folder Renderer Hook. The default implementation consists of multiple parts:
■ A system master service based on OC4J Adapter, which has a virtual URL of omp://oracle.iasw.folder.renderer.
■ A Java class that is responsible for looking up the master service and invoking it. The name of this Java class is oracle.panama.rt.hook.FolderRendererPolicy and it implements the interface FolderRendererHook.
■ A set of JSP pages. The master service points to a single JSP, with the relative URL of iaswfr/FolderRenderer.jsp, which acts as the point-of-entry to a set of JSP pages that is capable of rendering the content of a folder.
■ A utility Java class that contains a library of methods invoked by the JSP pages. The name of this Java class is oracle.panama.rt.hook.FolderRendererUtil.
The motivation of using a JSP-based folder renderer framework is to provide maximum customization possibilities to end users. With the logic of folder renderer written in JSP, end users can change the JSP pages easily without recompiling any Java code. The use of JSP-based Folder Renderer allows several possible levels of customization, which are listed below.
■ User can modify the JSP that is part of the default implementation.
■ User can create a new set of JSP pages and change the relative URL of the system master service to point to the new JSP pages.

Modifying the Data Models
Using Multi-Channel Server 9-49
■ User can create a new master service and a new set of JSP pages. In this approach, user replaces the default master service that is pointed by the virtual URL omp://oracle.iasw.folder.renderer with the new one.
■ Users can write their own implementation of the interface FolderRendererHook. The default implementation of this interface is oracle.panama.rt.hook.FolderRendererPolicy.
To be able to customize the Folder Renderer, users must understand the structure of the JSP pages and the execution flow.
9.5.4.2 Structure of JSP pagesThe logical structure of the JSP pages is as follows:
■ The top level JSP page that acts as the entry point is FolderRenderer.jsp. From FolderRenderer.jsp, we check the device category of the connecting device and include the second level of appropriate JSP page.
■ This second level of JSP is named XXXRenderer.jsp, where XXX is the device category of the connecting device. XXXRenderer.jsp itself includes three JSP pages, which are XXXHeader.jsp, XXXBody.jsp, and XXXFooter.jsp.
For example, if the request is from WAP phone, FolderRenderer.jsp will include MicroBrowserRenderer.jsp, which then includes MicroBrowserHeader.jsp, MicroBrowserBody.jsp, and MicroBrowserFooter.jsp.
9.5.4.3 Execution FlowThe default implementation of Folder Renderer has the following execution flow:
1. When the OracleAS Wireless runtime is ready to render a folder, it calls oracle.panama.rt.hook.FolderRendererPolicy invoke() method.
2. The invoke() method uses the hard-coded value of virtual URL. omp://oracle.iasw.folder.renderer, looks up the master service, and invoke the master service. The master service is implemented as a JSP, which has a relative URL of iaswfr/FolderRenderer.jsp.
3. The FolderRenderer.jsp is called and does the following:
■ Gets all the necessary information (such as ServiceContext, Session, User, Device) from the request and stores it. This information will be used by other JSP pages that are included from FolderRenderer.jsp.
■ Checks which device category the connecting device belong to and includes the appropriate JSP page (explained above).

Modifying the Data Models
9-50 Oracle Application Server Wireless Developer’s Guide
4. The included JSP pages will render the content of the current folder.
9.5.5 BookmarkOracleAS Wireless Server can be used to manage user bookmarks on the server side. Each bookmark refers to a Data Source (URL) whose returned content can be in any device-specific markup language. In OracleAS Wireless Server, users and administrators can place bookmarks anywhere in the user service tree.
Each Bookmark is a logical entry and can contain multiple URLs corresponding to different markup languages. For example, a Yahoo bookmark can contain a URL http://www.yahoo.com for HTML markup language and URL http://wap.yahoo.com for WML markup language. If a user accesses the Yahoo bookmark from a device supporting WML markup language, then the content from the http://wap.yahoo.com URL is returned to the device. If the Yahoo bookmark is accessed from a device supporting HTML language then the content from the http://www.yahoo.com URL is returned.
Each markup language can be uniquely identified by its MIME-type. Internally OracleAS Wireless Server stores bookmarks <URL, markup language> combinations as <URL, MIME-type> combinations.
Bookmarks are integrated with the wireless transcoding API that allows WML content (text/vnd.wap.wml MIME-type) to be converted to MobileXML, and then converted to any device-specific markup language supported by the OracleAS Wireless Server.
Depending on the MIME-type associated with the URL, some URLs are accessed directly from the user ’s device and some URLs are accessed through OracleAS Wireless. Currently only URLs associated with the text/vnd.wap.wml MIME type are accessed through OracleAS Wireless Server. This list will be extended when the transcoding API supports more input markup languages.
Additionally, any URL of a bookmark can be marked as a default URL. If a device accesses a bookmark which does not have a URL corresponding to the markup language supported by the device, then OracleAS Wireless Server invokes the default URL, transcodes the content to MobileXML, which is again transformed to the markup language supported by the device.
The markup language of the content returned by the default URL must be supported by the wireless transcoding API (that is, only WML text/vnd.wap.wml MIME-type content can be used in the default URL).

Modifying the Data Models
Using Multi-Channel Server 9-51
There are several ways to access a URL stored in a bookmark, depending on the user device and the MIME-types that are supported by that Bookmark (that is, the MIME-types for which there are associated URLs):
■ The user ’s device supports WML content type and there is a URL associated with text/vnd.wap.wml MIME type. In this case the user’s device accesses the URL through the OracleAS Wireless Server. The WML content is not modified, except that all relative URLs are rewritten to point back to the OracleAS Wireless Server. All subsequent requests go through OracleAS Wireless Server.
■ The user ’s device supports a markup language other than WML and there is a corresponding URL for that MIME type in the bookmark. In this case, the URL is accessed directly from the user’s device without coming to OracleAS Wireless Server (that is, the user leaves the wireless portal).
■ The user ’s device supports a markup language other than WML, there is no URL in the Bookmark associated with that markup language, but there is a default URL (with text/vnd.wap.wml MIME type). In this case the user’s device sends a request to OracleAS Wireless Server. The server fetches the WML content, transcodes the WML to MobileXML, and then converts the MobileXML to the device-specific markup language and sends the response back to the device. This is repeated for all subsequent requests.
■ The user ’s device supports a markup language for which there is no corresponding URL in the bookmark and there is no default URL. In this case the default FolderRenderer will not display a link for invoking that bookmark and the user will not see it.
9.5.5.1 Creating and Editing Bookmarks Using OracleAS Wireless ToolsUsers can use OracleAS Wireless Tools (or Customization Portal) to create, edit and delete bookmarks.
9.5.6 Model API: General UsageOracleAS Wireless Repository comprises the models for the Model-View-Control (MVC) architecture, while the OracleAS Wireless Runtime layer comprises the controllers for the MVC. The repository Model API in oracle.panama.model package lets you develop applications that create, delete, modify, and query the persistent objects in the OracleAS Wireless Repository.
OracleAS Wireless Repository imposes the organizational structure among the objects. For example, a user can belong to multiple Groups. Each user is assigned

Modifying the Data Models
9-52 Oracle Application Server Wireless Developer’s Guide
one or more Roles. A user can access the services that are accessible to the groups to which the user belongs. However, the implementations of the user interface can access external provisioning systems or repositories, such as the Oracle Internet Directory (OID) and the Oracle Applications User Repository (AOL), to manage the information for enterprise users and specify the user’s roles, the user's group membership, and the particular services that are accessible to that user.
A Folder is a special kind of Service used as a container of the services to build the service trees. A Service or Folder can be assigned to one or more groups. A user can own a collection of DeviceAddresses, a collection of LocationMarks, a collection of Customization Profiles, and one or more collections of Presets which are used in advanced customization. A default LocationMark and a default Profile can be assigned for each user. The Device interface in the Model API defines the target device protocol (such as: WAP, SMS, or EMAIL), as well as specifies the physical characteristics of target devices that can be used by the adapters and the transformers (for example, screen width and height, screen columns and rows, and number of softkeys).
The intended users of the Model API are developers of customization portals, portlets, custom hooks, listeners, and applications such as JSPs, servlets, modules, and other (URL addressable) resources that are invoked through the HTTP Adapter. Developers can also develop standalone applications which manipulate persistent objects using the Model API. Although these interfaces preserve the data integrity in the repository, they do not enforce access control security. The applications that access the repository through the Model API are not authenticated or authorized by the same Authentication and Authorization mechanisms in the OracleAS Wireless runtime layer. In fact, the Model APIs are used by trusted components to develop and customize authentication and authorization policies. OracleAS Wireless Tools provide authentication and authorized access control to the repository. Developers should apply extreme caution when developing services using the interfaces in the Model API, and should take appropriate measures to prevent any undesired side-effects when these services are invoked by the end users.
9.5.6.1 Data Model Cache and SynchronizationRepository objects are cached in the Java instances main memory when they are accessed from the Data Model API. These objects are removed from the main memory cache only after they are not accessed through the API for a time-to-live interval. This interval can be configured from Cache Object Life Time property in System Manager > Site > Runtime Configuration control panel in the OracleAS Wireless Tools. If the repository object is modified and committed into the repository from one of the Java instances; all other Java instances will automatically reload the modified object from the repository. You can specify the number of cache

Modifying the Data Models
Using Multi-Channel Server 9-53
synchronization threads from System Manager > Site > Object Cache Synchronization control panel in the OracleAS Wireless Tools.
9.5.6.2 Interfaces and Interface HierarchyThe ModelObject is the root interface that represents the common behavior and properties of all repository objects. It is included in the oracle.panama.model package.
9.5.6.3 Model API Inheritance HierarchyThe oracle.panama.model package also provides the following three locator and factory objects to access the model objects:
■ MetaLocator—the starting point for using the Model API. From this call you can get references to the ModelFactory and ModelServices interface implementations.
■ ModelFactory—a factory to create model objects.
■ ModelServices—the locator to access model objects.
Here is a brief description of the different model interfaces. For more details about the interfaces please refer to the model API Specification.
■ Adapter—the repository container for the RuntimeAdapter, which is the interface that is to be implemented by all custom adapters. The Adapter incorporates the RuntimeAdapter classes into the repository and supports the loading and initialization of the RuntimeAdapter.
■ DeviceV2—the definition of the target logical device protocol. It can, for example, be WML11 for WML specific devices, but also WML_Nokia7110 for Nokia specific WML. Other examples are SMS and EMAIL. DeviceV2 contains the Transformer objects.
■ User—represents the identity of the user and facilitates personalization in the OracleAS Wireless portals.
■ Profile—users can have one or more Profiles that encompass customizations of the service trees. The Profile for a user can specify a preferred ordering of services in a folder.
■ Group—a collection of users. It is used to publish specific services to group members. A user can access services that are accessible to the group to which the user belongs.

Modifying the Data Models
9-54 Oracle Application Server Wireless Developer’s Guide
■ Role—like a Group, a role is a collection of users. But while groups are used for the access control at run-time, Roles are used to control the access to different webtools.
■ Service—an abstract interface and handles all generic aspects of a service. It contains the following subinterfaces:
■ MasterService—the final Service. It is the template for all other Services. It always uses an adapter to communicate with an external source.
■ Folder—similar to a directory in a file system; it contains other services including other sub-folders.
■ ExternalLink—a logical reference to an external URL. One ExternalLink can refer to one URL per channel, or multiple channels can shared a single URL.
■ LocalModule—a pointer to a modulable MasterService.
■ Link—a pointer to any other service including another Link. The Link is used to customize MasterServices or to create private tree structures of accessible MasterServices. It can override any accessible parameter kept by the service chain down to the final master service.
■ LocationMark— a persistent object that represents the named a geocoded physical address.
■ Transformer—the base interface for all transformation sub-classes. It is the repository container for the real transformation implementation (Java or XSL). It performs loading and initialization of the custom transformer classes that implements the oracle.panama.rt.xform.RtTransformer interface. It also provides the XSLT transformers for the XSLT stylesheets.
It has the following subinterfaces:
■ JavaTransformer—a class that implements the Transformer interface and is expected to handle the transformation from the device independent markup language to the device-specific markup language. It incorporates the oracle.panama.xform.RtTransformer classes into the repository. It performs loading and initialization of the custom transformer classes that implements the oracle.panama.rt.xform.RtTransformer interface.
■ XSLTransformer—uses XSLT stylesheet which is expected to handle the transformation from the device independent markup language to the device-specific markup language. It incorporates the custom XSLT stylesheets into the repository. It also provides the XSLT processors for the XSLT stylesheets.

Modifying the Data Models
Using Multi-Channel Server 9-55
9.5.6.4 Sample Code that Uses the Data Model APIThe following sample code illustrates how you can provision new objects into the OracleAS Wireless repository using the interfaces in the Model API. The example includes the standalone class to introduce the sample codes, although other type of components, such as adapters, hooks, listeners, and servlets can be used to illustrate the Model API. The example only shows the search, create, delete, and commit operations in the Model API but does not include the necessary business logics.
The numbers that appear in brackets next to a line of code in the listing are referenced in the discussion to correlate the explanation with the corresponding lines in the code itself.
Use MetaLocator to get the ModelFactory and ModelServices (line [1]). Use ModelFactory to create a new object.Use ModelServices to search for an object. MetaLocator metaLocator = MetaLocator.getInstance(); modelFactory = metaLocator.getModelFactory();modelServices = metaLocator.getModelServices();
The MetaLocator interface is used to lookup the ModelFactory and ModelServices. The getInstance() method in this interface gets the singleton instance of this MetaLocator. The methods getModelFactory and getModelServices look up the ModelFactory and the ModelServices.
Typically, to create a new object, one should check first if the object already exists. To look up any object, use the ModelServices interface and the method lookupX(Java.lang.String name), where X is the interface name of the object. In this sample code, to create a new user (the code section for creating a new user starts in line [2]), you first look up the user by using the lookupUser(userName) method in the ModelServices interface (line [3]), as the following line of code shows:
modelServices.lookupUser(userName);
Lookup operation should be the first step before creating any new persistent object in the Repository. The lookupUser(userName) method searches for the user by name and, if the User by that name is found, returns the User object. If the user with that name cannot be found, the method throws the PanamaRuntimeException.
Next, check if the group to which the user belongs (or should belong) already exists (line [4]). Following the convention for looking up any object, you use the ModelServices interface and the lookupGroup(groupName) method to look up a group by name. If the group is found, the method returns the Group object. If the group is not found, the method throws the PanamaRuntimeException.

Modifying the Data Models
9-56 Oracle Application Server Wireless Developer’s Guide
After checking if the user and the group already exist, you create the new user object (line [5] to line [6]):
{ user = modelFactory.createUser(userName, groups); } else { user = modelFactory.createUser(userName);}user.setPassword(userPassword);user.setEnabled(true);
You must save the newly created user. Each newly created object must be saved after it is created (line [7]):
modelFactory.save();
Save applies to all created or modified objects in the current thread. The objects are saved to the persistent storage and the transaction is committed. The method throws PanamaException if it is unable to save the work.
The searchUser() method in the sample code (line [8]) illustrates how to search a User object. To enumerate over a set of users (for example, all the users whose names start with the letter B), you use the ResultSetEnumeration (line [9]) returned by the method findUsers (line [10]). The method findUsers uses the pattern matching on the names. See also lines [11] and [12] in the listing of the complete sample code.
Close the ResultSetEnumeration (line [13]) to release the database cursor, which otherwise will remain open.
To delete a user, use the deleteUser method following the sample code section in line [14]. The user name must be exact in line [15]. ModelServices.lookupUser() method rejects the pattern matching templates by throwing exceptions. The user object is deleted in line [16].
import Java.util.Vector;
import oracle.panama.PanamaException;import oracle.panama.PanamaRuntimeException;
import oracle.panama.model.MetaLocator;import oracle.panama.model.ModelFactory;import oracle.panama.model.ModelServices;import oracle.panama.model.ResultSetEnumeration;import oracle.panama.model.User;import oracle.panama.model.Group;

Modifying the Data Models
Using Multi-Channel Server 9-57
/** * This is a sample program demonstrates the usage of the model API. */public class SampleModelClient {
private ModelFactory modelFactory; private ModelServices modelServices; public SampleModelClient() { MetaLocator metaLocator = MetaLocator.getInstance(); [1] modelFactory = metaLocator.getModelFactory(); modelServices = metaLocator.getModelServices(); }
/** * Get all group names */ private String[] getGroupNames() throws PanamaException, PanamaRuntimeException { String[] names; ResultSetEnumeration result = null; try { // Find all user groups - use a wildcard for the name expression result = modelServices.findGroups("*"); Vector buffer = new Vector(); while (result.hasMoreElements()) { Group group = (Group)result.next(); String name = group.getName(); buffer.addElement(name); } names = new String[buffer.size()]; buffer.copyInto(names); } catch (PanamaRuntimeException ex) { throw ex; } finally { if (result != null) { result.close(); result = null; } } return names; }

Modifying the Data Models
9-58 Oracle Application Server Wireless Developer’s Guide
/** * Create a new user. */ private void createUser(String userName, String userPassword, String groupName) [2] throws PanamaException, PanamaRuntimeException { try { // First check if the user does not already exists modelServices.lookupUser(userName); [3] // If we are here the user must already exists return; } catch (PanamaRuntimeException ignore) {} Group group = null; try { // Get the group to add the user group = modelServices.lookupGroup(groupName); [4] } catch (PanamaRuntimeException ex) { // A PanamaRuntimeException is thrown if the group is not found group = null; } User user; // modelFactory.createUser() will automatically create a // home folder for the new user. if (group != null) { Group[] groups = new Group[1]; groups[0] = group; user = modelFactory.createUser(userName, groups); [5] } else { user = modelFactory.createUser(userName); } user.setPassword(userPassword); user.setEnabled(true); [6]
// save the newly created object modelFactory.save(); [7] }
/** * Search for users. */ private User[] searchUser(String userNamePattern) [8] throws PanamaException, PanamaRuntimeException { User[] users; ResultSetEnumeration result = null; [9] try {

Modifying the Data Models
Using Multi-Channel Server 9-59
result = modelServices.findUsers(userNamePattern); [10] Vector buffer = new Vector(); while (result.hasMoreElements()) { [11] User user = (User) result.next(); [12] buffer.addElement(user); } users = new User[buffer.size()]; buffer.copyInto(users); } catch (PanamaRuntimeException ex) { throw ex; } finally { if (result != null) { result.close(); [13] result = null; } } return users; }
/** * Delete a user. */ private void deleteUser(String userName) [14] throws PanamaException, PanamaRuntimeException { try { if (userName != null && userName.length() > 0) { User user = modelServices.lookupUser(userName); [15] user.delete(); [16] // Save the changes modelFactory.save(); } } catch (PanamaRuntimeException ex) { throw ex; } }
}

Modifying the Data Models
9-60 Oracle Application Server Wireless Developer’s Guide

Creating Messaging Applications 10-1
10 Creating Messaging Applications
This chapter describes Messaging Application architecture, and explains how to use these Applications to create and deploy mobile applications. Each section of this document presents a different topic. These sections include:
■ Section 10.1, "Messaging Overview and Architecture"
■ Section 10.2, "Sending and Receiving Messages"
■ Section 10.3, "Building Async Applications"
■ Section 10.4, "XMS Message Center"
■ Section 10.5, "Device Channel Selection"
■ Section 10.6, "Transport Component"
■ Section 10.7, "Supporting Premium SMS and Reverse Charge SMS"
10.1 Messaging Overview and Architecture
10.1.1 General OverviewMessaging services are a key component that enhance your mobile applications by supporting sending and receiving messages among mobile users. OracleAS Wireless Messaging services provide a highly scalable mechanism to deliver messages to all mobile devices. Messages are delivered to mobile devices using native device protocols, for example through SMS to a mobile phone, as an email to a 2-way pager, as an audio message to regular telephone, as an Instant Messaging (IM) message to an IM client or as a fax to a fax machine.
Messaging services in OracleAS Wireless also offer a Web Service Interface (specified using WSDL) that uses SOAP over HTTP. The SOAP service enables

Messaging Overview and Architecture
10-2 Oracle Application Server Wireless Developer’s Guide
applications to invoke remote object methods over HTTP protocol. This enables applications to invoke Messaging services from anywhere on the Internet, using any programming model. OracleAS Wireless Messaging services enable applications to specify both the message and the recipient(s) of the message. The application communicates to the Messaging service in OracleAS Wireless using SOAP and HTTP. OracleAS Wireless receives the message and delivers it to mobile devices using appropriate protocols such as SMS, Email, Voice, and others.
Figure 10–1 OracleAS Wireless Messaging Architecture
Messaging Services in OracleAS Wireless are scalable, and can handle large volumes of messages to many devices. The Messaging Service is based on extensible architecture and design; it can support a variety of devices and push protocols. Push protocols are handled by the XMS messaging API. The Messaging subsystem supports a driver-based architecture; the drivers are components in the wireless messaging system that handle all device-specific or communication protocol-specific routines.
10.1.2 Key Messaging FeaturesOracleAS Wireless provide intelligent messaging with functionality for:
■ Automatic device selection

Messaging Overview and Architecture
Creating Messaging Applications 10-3
■ Message content adaptation
■ Failover delivery control
■ MMS (multi-media messaging) features that allow for richer messaging experiences
■ Actionable notification messages
■ Contact Rule Integration
10.1.3 Multi-Channel, Adaptive MessagingMessages that are authored generically in XHTML or OracleAS Wireless XML are automatically adapted for devices by OracleAS Wireless. The power of adaptation allows a message to be written once and automatically optimized for receiving device capabilities. For example, multi-media content can be optimized for a device by using image conversion allowing images to be altered from full-color to black and white.
10.1.4 Multimedia MessagingOracleAS Wireless supports Multi-Media Messaging (MMS) for rich mobile messages including graphics, video and audio. MMS messages can be authored natively in SMIL, XHTML or OracleAS Wireless XML.
10.1.5 Transport FrameworkThe Messaging subsystem (based on the device address and transport type such as SMS, MMS, IM, Voice, Email), dispatches a message to the appropriate transport protocol driver. The driver interface delivers the message to a device in the native device protocol. The Messaging subsystem can support multiple drivers in a single instance.
Message drivers in OracleAS Wireless are plugable modules that implement device-specific or communication protocol-specific handling routines. OracleAS Wireless includes pre-built drivers that support communication protocols such as SMS (SMPP and UCP), MMS, IM, Voice, Email and Fax.
OracleAS Wireless includes a special driver implementation that enables your wireless instance to act as a client to another OracleAS Wireless installation or any service that respects the Web Service Interface defined by OracleAS Wireless. This special driver uses the SOAP interface (as the XMS APIs) to send messages. By default, this driver is configured to act as an XMS Client to an OracleAS Wireless

Sending and Receiving Messages
10-4 Oracle Application Server Wireless Developer’s Guide
instance hosted, on the Internet, by Oracle. Instance administrators can change this default setting to point to any server that respects the XMS WSDL interface defined by OracleAS Wireless. As a result, any OracleAS Wireless installation is capable of sending SMS, MMS, Email, Voice, Fax messages out-of-the-box without configuration.
There is a quota preconfigured. If you need to raise the quota after exceeding the pre-allotted limit, see your Oracle administrator.
10.1.6 MMS CenterThe XMS component includes MMS Center (MMSC) functionality out-of-the-box, supporting the MM1 message notification protocol. If the recipient device has an MMS browser, a notification message is sent to the browser, and the message is retrieved using HTTP. The content is stored and served out by OracleAS Wireless, the only external component needed is a regular SMSC for transmitting the notification message. Coupled with the fact that OracleAS Wireless can send SMS out-of-the-box using a hosted server, the product can send MMS out-of-the-box without configuration.
10.1.6.1 Actionable Messaging FrameworkThe notification framework includes flexible message templates, security to prevent message spoofing, support for message prioritization, and more flexibility in handling volume notifications.
10.2 Sending and Receiving Messages
10.2.1 One-way Message Application API OverviewThe OracleAS Wireless Messaging Service is deployed as a web service using SOAP with HTTP as the transport layer. WSDL (Web Services Definition Language) is a standard XML interface that defines a Web Service application. With clearly defined WSDL, developers can build applications in any programming language (such as Java and VB) that can communicate with the OracleAS Wireless messaging interface over the Internet. Developers can use any WSDL toolkit to quickly implement a one-way (Push) application and send messages to mobile devices using any OracleAS Wireless instance on the Internet.
Parallel to the Web Service interface, OracleAS Wireless also supports a simple Java API (the XMS API) for building one-way message (Push) applications. The XMS API uses SOAP over HTTP to communicate with the OracleAS Wireless server

Sending and Receiving Messages
Creating Messaging Applications 10-5
instance, however the XMS API abstracts any protocol-specific (SOAP) implementation details from the application’s Java code. XMS is the preferred API for application developers who need a clear and simple interface to deliver messages.
The XMS API supports a uniform interface for the delivery of messages to any kind of device (such as SMS, MMS, IM, Voice, Email and Fax). The API allows applications to specify multiple recipients for a single message using only one delivery request.
Furthermore, message destination addresses can have devices using different communications channels; for example, a single message delivery request application can send messages to Email as well as fax machines. Applications can make one delivery request and send the messages to a list of users with SMS or MMS devices, Email or IM clients and Voice devices.
OracleAS Wireless supports different types of contents for delivery. A message can consist of only text characters, or can be as complex as a multipart message. Message types are identified based on the MIME, hence delivering documents such as Microsoft Word or Adobe PDF is possible if the target device supports the message MIME type. OracleAS Wireless provides two variants of the XMS API: the XMSSimpleSender API supports text-only messages, while the XMSSender advanced XMS API supports messages of any MIME type.
The following is an abridged overview of the XMS API functionality; for a complete overview see the XMS JavaDoc.
10.2.1.1 XMSSimpleSenderoracle.panama.messaging.xms.XMSSimpleSender
XMSSimpleSender corresponds to the PushLite API from earlier OracleAS Wireless releases. It is a simple API that works on String parameters only. It is lightweight and very easy to use.
10.2.1.1.1 Send
public String[] sendMsg(String[] recipients, String message)
Sends out a text message (without subject) to multiple recipients of multiple transport types. Encoding and content of the message depends on the content of the message and the receiving device. This method provides the easiest way to send out text messages. Other overloaded send() methods can be used to set subject, reply to, content type encoding (MIME type) and associated key parameters.

Sending and Receiving Messages
10-6 Oracle Application Server Wireless Developer’s Guide
recipients—an array of recipients addresses. A sender's address consists of either an OracleAS Wireless user name or a transport type and address, separated by a colon (:).
Example 1: Email:[email protected]
Example 2: SMS:16505551234
Example 3: username
Valid transport types are defined in:
oracle.panama.messaging.common.TransportType
recipients—recipients' addresses (such as: email address, phone number or user name)
Format of address:
<address string ><:transport type > [;<address string>:<transport type >]* <address string> = <email address>|<phone number> |< subscriber ID > |< user address > <user address> = < brand name > ~ < user name > <phone number> = < country code > - < area code > - < local phone number > One line per recipient. A recipient may have multiple failover addresses and each address must have at least one transport type. Use a colon(:) to separate address and transport types. Use a comma(,) to separate transport types within the same address. Use a semicolon(;) to separate addresses.
Example 1: SMS:1-650-5551234,Voice:1-650-5551234;Fax:1-408-3456789
Example 2: Email:[email protected];Voice:mary,Email:mary,Fax:mary;Email:bob
[transport] is one of the types defined in oracle.panama.messaging.common.TransportType
message—body of the message. The message text can be either plain or rich text (XHTML or OracleAS Wireless XML). XMS examines the content of the message to detect whether rich text is used. Rich text will be transformed to the appropriate markup for the target device.
10.2.1.1.2 getStatus
public String[] getStatus(String[] messageIDs)

Sending and Receiving Messages
Creating Messaging Applications 10-7
Gets the current status of a set of message IDs.
Returns: an array of text status strings.
10.2.1.2 XMSSenderoracle.panama.messaging.xms.XMSSender
XMSSender corresponds to the Push API from earlier OracleAS Wireless releases. It is an API that allows users to send out more complex (multipart) messages.
10.2.1.2.1 Send
public WorkOrder[] sendMsg(Packet pkt)
Sends out a message packet.
pkt—The message packet to be delivered. Packet class will be discussed below.
Returns: a set of WorkOrders will be returned after the XMS server accepts the request. One WorkOrder will be returned for each instance of a recipient's address.
10.2.1.2.2 getStatus
public Status getStatus(WorkOrder workOrder)
Gets the current status of a work order. A work order has one address and the message ID of that address.
public Status[] getStatus(WorkOrder[] workOrders)
Gets the current status of a set of work orders.
oracle.panama.messaging.push.Packet
Packet class represents a generic message in the real world (For example: email). It may have a subject, a body or a set of message bodies (multipart). The same message may be delivered to multiple recipients of multiple transport types (delivery types). For example: the same message can be delivered to 2 Email recipients, 3 SMS recipients and 4 fax machines in the same packet.
Every transport type may have a sender, an alternate reply to address and a group of recipients. The packet could have a set of optional delivery instructions, such as priority or registered.
Sending and Receiving Messages
10-8 Oracle Application Server Wireless Developer’s Guide
To accomplish this, first construct an empty Packet instance. Then set message, message info, sender, reply to and recipients of the packet. See the sample code below for more details.
The XMS API provides methods to set the properties of a message and dispatch it to a OracleAS Wireless instance. For a detailed description of the API interfaces, see the OracleAS Wireless XMS Javadoc (oracle.panama.messaging.xms). To send a push message, you must provide the following:
■ OracleAS Wireless server on which the Push Web Service is running. Include the username and password, and the HTTP proxy required to access the remote OracleAS Wireless Web Service (unless the application will be running in an OracleAS Wireless VM).
■ Actual message to be sent and the content (MIME) type of the message.
10.2.1.3 Text-based MessagesThe simplest way to use the XMS API is to send text-only messages. When used in this manner, the XMS API behaves like the Push API from earlier OracleAS Wireless releases, with one important difference: when sending messages to devices that cannot display plain text (such as WAP Push), the input text is embedded in the correct markup for the chosen device.
10.2.1.4 Multimedia MessagesXMS accepts rich text (that is, text marked-up in OracleAS Wireless XML or XHTML markup languages supported by OracleAS Wireless). The content of the input message is converted to fit the target device chosen. This includes both the structure and layout of the document itself, as well as any embedded images or sound files. In addition, XMS also processes URLs to be appropriate for the target device. Specifically, if the target device cannot display HTTP hyperlinks, the message is rewritten to use the Reverse Async (RevAsync) format instead, which allows the end user to invoke links by using a request-reply messaging exchange.
In addition to transcoding the input markup, XMS also converts images and audio as appropriate. For images, the conversion includes changing the image format, as well as resizing and resampling the image if necessary for the target device. If a single image is sent through a channel that supports handset provisioning (such as SMS) it will be sent as an installable operator logo. Similarly, if a single audio clip is sent, it is converted to a ringtone in the format appropriate to the target device.
By providing transparent support for Reverse Async, XMS allows other applications (such as the Notification framework) to send rich content that a user can interact with (so-called actionable notifications). These are notifications that

Sending and Receiving Messages
Creating Messaging Applications 10-9
contain the output of a OracleAS Wireless service; the user can interact with the service by replying to the message. Actionable notifications can be thought of as RevAsync sessions that are started by the server rather than by the user.
XMS accepts regular OracleAS Wireless XML markup, as well as the mapping of the markup language elements (depending on the target device of the message). A rich target device such as an MMS browser receives all multimedia elements, and will also use any timing information present in the markup to control the duration of multimedia content. Images can be supplied in JPEG, GIF or BMP format; if the target device does not support the image format at hand, the image will be converted to another format suitable for the target device. XMS also supports the available attribute of the OracleAS Wireless XML SimpleImage tag; this means an image can be stored in multiple formats and the best format of those available will be chosen if possible. This is in fact the recommended approach, since automatic conversion both introduces some computational overhead and can lead to undesirable conversion artifacts in the final image. By pre-generating multiple versions of a given image, one can create simpler versions of the image for devices that support low-resolution images of limited colordepth.
10.2.1.5 Other ContentIn addition to plain and rich text, XMS can send any arbitrary content. In this case, no transcoding is performed, and it is up to the client programmer to format and package the message correctly.
An explicit MIME-type should be specified in this case, which means the XMSSender API is the correct API to use for this class of messages.
10.2.2 Two Way Messaging, Transport APITransport API is a rich set of APIs that can be used for both sending and receiving.
Transport API is the client side messaging interface. This section details the Transport API, explaining the major constructs and functionality available to customize the Transport System.
XMS API is built over Transport API. XMS API handles sending only. In terms of sending, transport API does not provide message transformation. However, Transport API provides some extra features which XMS API does not have, such as status tracking, hints and fine-tuned message routing.
When a message delivery request is submitted, the transport system performs analysis of the recipients and routes the message to the appropriate protocol drivers for delivery.

Sending and Receiving Messages
10-10 Oracle Application Server Wireless Developer’s Guide
To receive messages, an application must register listening end points and a message callback listener to the transport system. An end point is in the form of an address, such as a phone number. It identifies (to the transport system) how messages should be dispatched. When a message is received for a targeted address, it is dispatched to the listener associated with an end point with a matching address.
The key interface is oracle.panama.messaging.transport.Messenger. An instance of this interface will be returned through the Get method of oracle.panama.messaging.transport.MessengerController which in turn can be obtained through the TransportLocator class. This gives you access to the rest of the package to build your messaging applications. See the Javadoc for a complete reference of the APIs.
10.2.2.1 Destination AnalysisA single message can be delivered to multiple recipients of different communication protocols. For example, one can send a meeting reminder to a few people using SMS, and some other people to their email addresses. Before routing messages to drivers, the transport analyzes and groups recipients by their delivery category. Typically, the transport system starts its internal processing by analyzing all destinations and groups them accordingly.
10.2.2.2 Message RoutingTo send a message, the transport system must locate a proper driver to do so. The process of finding a proper driver is called message routing. The transport system at a particular time may have many messaging servers and protocol drivers configured. Different driver instances may handle different categories of messages.
For example, a driver may be able to send SMS messages only. Another one may be able to send email and fax messages only. Therefore, the transport system must use a driver with SMS capability to send SMS messages, a driver with email capability to send email messages. Sometimes, there may be more than one driver that can handle the same category of messages. For example, there could be more than two SMS drivers. One communicates with ATT’s SMSC, the other with Cingular’s SMSC. The transport system must use ATT’s SMS driver to send SMS messages to ATT’s devices, and use Cingular’s SMS driver to send SMS messages to Cingular’s devices.
All these decisions are made by the transport based on two sets of information. The first set is the sending criteria specified by the application (such as delivery type, speed, cost and encoding). Of these, the delivery type is required and can be specified in the class destination. The other information is provided by the set of

Sending and Receiving Messages
Creating Messaging Applications 10-11
available drivers. The properties of the drivers are configured by the administrator, such as driver speed, driver cost, encoding and delivery category.
As mentioned earlier, routing finds the best-matching driver. Some properties must match, for example, the delivery category; some of them just find the closest match, for example, cost and speed.
The transport uses the following information to do the routing:
■ delivery category
■ protocol
■ carrier
■ speed
■ cost
Attribute encoding is not used in routing.
The transport will route a message to a driver with best match:
1. The delivery category, such as SMS or EMAIL.
2. The protocol, such as UCP or SMPP.
3. The carrier, such as Cingular or Telia.
4. If (speed_requested >= 0 and cost_requested >= 0), the minimum (driver_speed -speed_requested)**2 + (driver_cost - cost_requested)**2
or
if cost_requested < 0 the minimum abs(driver_speed - speed_requested)
or
if speed_requested < 0, the minimum abs(driver_cost - cost_requested)
If more than one driver meet the above criteria, the transport chooses randomly one of them.
10.2.2.3 Providing Hints to Facilitate Transport Internal ProcessingApplications can provide hints that help speed up routing and destination analysis. For example, if you specify Email as the delivery category of all recipients, the

Sending and Receiving Messages
10-12 Oracle Application Server Wireless Developer’s Guide
transport will not have to look into each of the recipients to determine what they are.
In principal, the required parameter to deliver a message (the Messenger.send() methods) is Destination and Message. All others (SenderInfo, MessageInfo and DeviceInfo) are optional. When they are specified, they will be interpreted as hints that describe properties common to all recipients. For example, if DeviceInfo is specified and the getDeliveryType() of this DeviceInfo instance returns DeliveryType.EMAIL.getName() then the transport will take it as a hint that all recipients are email addresses and no destination analysis will be performed.
10.2.3 Actionable MessagesBefore OracleAS Wireless, messaging devices could not respond to Push messages initiated from a server. For example, the notification messages sent by the OracleAS Wireless instance were considered in their final result once they were received on a user’s device; there was no more interaction. The inability to respond to such messages limited the information and options provided to device users through Push messaging.
10.2.3.1 Components OverviewIntegrating XMS and Async exposes an API that enables content providers to create Push messages which can be acted on for messaging channels such as: SMS, Email and Instant Messaging. Figure 10–2, "Actionable Messages" the relevant components and their relationship.
Figure 10–2 Actionable Messages

Sending and Receiving Messages
Creating Messaging Applications 10-13
10.2.3.1.1 XMS Client
XMS Client is a component which calls the XMS API to deliver messages and content. There are several requirements on the kind of document it can generate in order to make a Push message actionable:
■ The document must be in OracleAS Wireless-supported content markup format. For this release, only OracleAS Wireless XML is supported for actionable messages.
■ The URL link used in the document could be in HTTP or OMP protocol. The OMP is a virtual URL to identify a service in an OracleAS Wireless instance. The benefit of using OMP URL is that it uniquely identifies a service created in OracleAS Wireless. Thus, any change of a service OID does not affect the user program.
10.2.3.1.2 XMS
The role of XMS for actionable messages is to determine if a document being sent must be in persistent state. One example is to push a document with an embedded URL to an SMS device. Since the device does not have a browser to process the URL link, the state must be cached in the server. The XML achieves this by calling the underlying component, RevAsync. The document is subsequently transformed to the device result and sent out.
10.2.3.1.3 RevAsync
RevAsync is a newly created entity under the XMS component. Its main function is to receive an OracleAS Wireless-supported markup document as input and analyze the document to locate all the elements and attributes which need to be cached. The cached objects are persisted into the database and are used by Async to reconstruct the session state once the device user replies.
10.2.3.2 Actionable Message FlowTo enable an actionable message, the content provided to XMS must be in a OracleAS Wireless-supported markup document. For this release, only OracleAS Wireless XML is supported.
There are two ways to trigger an actionable message:
■ Create a Notification service so that the service is invoked whenever a user-specified condition is fulfilled. The service returns an OracleAS Wireless XML result, possibly with some hyperlinks embedded within the document.

Sending and Receiving Messages
10-14 Oracle Application Server Wireless Developer’s Guide
■ Directly push an OracleAS Wireless XML document through XMS API. The document should contain some menu or form construct so user interaction can be applied. To address the service to be invoked on user reply, it’s use the OMP protocol for the URL values in the document, then the developer does not need to be concerned with the OID change of a service.
Receiving an OracleAS Wireless XML input, XMS traverses the document for any element that could trigger further user interaction. A typical example is the SimpleMenu element which presents a hyperlink for a device user to select. A persistent state and its corresponding transaction ID are generated once such a situation is detected. RevAsync adds an extra instruction line to the result message indicating the format and the transaction ID to be used for user reply. The ID must be part of the reply parameters if the user decides to respond. This way, Async is able to restore the session state by the transaction ID once it receives an actionable message reply.
To retrieve the persisted user state, Async uses the following methods to differentiate between the user reply of an actionable message and the typical Async requests:
1. A user replies with a site-wide unique Actionable Message (AM) Short Name. The AM short name is a site-wide unique system parameter. Async differentiates the request being a reply to an actionable message if the command line starts with an AM short name. With this option, the user reply should conform to the following format:
<AM short name> <transaction ID> <parameters> For example, a user may receive the following message for stock notifications:
To respond, type ’am 2 <link selector>’ [orcl] L 15.25 B 15.20 A 15.30 O 15.10 1 News 2 Detail Quote
A user would reply to this message with the content am 2 2 to get the Detail Quote option. Since am is the site-wide unique short name, Async will interpret the parameter right after the short name as the transaction ID and use it to retrieve all the persisted state.
2. Set the From address of the push message as a Dedicated Actionable Message Access Point. An Async access point can be configured as AM-dedicated, thereby causing all of the requests to the access point to be interpreted as the Actionable Message Reply. The user does not need to specify an Actionable

Sending and Receiving Messages
Creating Messaging Applications 10-15
Message Short Name (as in the example above, replying 2 2 to get the Detail Quote).
10.2.3.3 Enabling Actionable MessagesTo enable actionable messages, follow these steps:
1. Prepare an OracleAS Wireless document to be sent out.
As discussed earlier, the document can be either generated as the output of a notification service, or a document being pushed out by an XMS client. The document should contain action elements (such as SimpleMenu or SimpleForm, on which device users can act). A sample document is shown below.
<SimpleResult> <SimpleContainer> <SimpleText> <SimpleTextItem>Approve/Disapprove John Doe’s expense report #1234</SimpleTextItem> <SimpleTextItem>Upgrade 256 MB memory on desktop pc - $30<SimpleBreak/></SimpleTextItem> </SimpleText> <SimpleMenu name="" title=""> <SimpleMenuItem target="omp://expensereply?answer=approved&reportNo=1234">Approve</SimpleMenuItem> <SimpleMenuItem target="omp://expensereply?answer=disapproved&reportNo=1234">Disapprove</SimpleMenuItem> </SimpleMenu> </SimpleContainer></SimpleResult>
omp://expensereply identifies the service to be invoked once such an action item is triggered on a user reply message.
2. Create Application Links addressed in pushed document.
Application Links addressed in the pushed document must be created with the OMP value set. For the example above, the OMP value should is omp://expensereply
3. Create Access Points
At least one access point must be created for each supported delivery channel. The access point can be set as actionable-message-dedicated if it is only reserved as the entry point of the user reply of actionable message. Or, it can also be an access point, which allows messages from both Async requests and replies of an

Building Async Applications
10-16 Oracle Application Server Wireless Developer’s Guide
actionable message. The from address of the push message is set to the access point configured so it can be routed to the Async entry point when a user replies. If there are multiple access points set for the same channels, the one with a dedicated flag set has precedence.
10.2.3.4 Configuration ParametersBelow are the supported configuration parameters for Actionable Messages. See OracleAS Wireless Administrator’s Guide for detailed configuration steps.
10.3 Building Async Applications
10.3.1 Asynchronous Listener
10.3.1.1 Asynchronous Listener ArchitectureOracleAS Wireless presents a framework and a runtime environment for developing wireless and voice applications accessed through a browser-based device, such as a device with a WAP or XHTML browser, or through messaging-protocol-based devices such as mobile phones with SMS. Async is the
Table 10–1 Configuration Parameters of Actionable Message
Parameter Name Description
Short Name for Replying an Actionable Message
This is the site-wide unique short name to identify a reply of an Actionable Message if both Async requests and replies of Actionable Message share the same access point as the entry point.
Maximum Active Transaction Number per Device
This parameter defines the maximum number of active persistent transactions per device. Once a user replies to an actionable message, the persistent transaction addressed by the message gets deleted.
Expiration Time for Non-Active Transaction
This parameter specifies the expiration time (in number of days) for a non-active transaction. Once expired, the transaction will be removed from persistent store.
Access Point Dedicated for Actionable Message Reply
A flag to indicate if an Access Point is dedicated for Actionable Message Reply. Once set, all actionable Push messages will have the From address set to the access point. The instruction, added to the Push message, on how to reply to an actionable message, will have the short name omitted. Users only need to reply with the transaction ID and the application parameters.

Building Async Applications
Creating Messaging Applications 10-17
Wireless component that enables the messaging protocol-based devices to access these wireless applications.
Conventionally, the entry point into an application server is through the HTTP protocol. This limits applications built on an application server to only clients with Web capability. This server restriction is a problem for mobile market users, because the vast majority of mobile users does not have, or are not enabled, with Web access. These users, however, are almost certain to have some kind of message capabilities (such as e-mail or SMS). Consequently, developers are faced with the dilemma of building applications specifically for users depending on their capability, or ignoring them because the application server cannot deal with the mobile market.
OracleAS Wireless solves this dilemma for developers without them having to do anything at all. With the introduction of Async, mobile applications cannot only be accessed through the usual HTTP protocol, but through any other messaging protocol (such as e-mail or SMS) as well. Rather than worry about writing an application to fit a certain protocol, developers can instead focus on building their application logic. OracleAS Wireless establishes the proper connection and performs session management, and the interpretation of user requests. A mobile application is invoked the same way regardless of which protocol handles the incoming requests, offering complete transparency to application developers to allow access to their services.
10.3.2 Key Challenges
10.3.2.1 Multiple messaging transport protocol supportOne of the most obvious challenges is supporting multiple protocols. It is not desirable to build the same functionality to work with e-mail, then SMS, then some other protocols. OracleAS Wireless offers access to the same application regardless of the protocol used by clients. Hence the immediate challenge is to be able to support multiple protocols uniformly.
10.3.2.2 The asynchronous nature of messaging protocolsIn contrast to the HTTP protocol, (commonly referred to as the synchronous protocol) messaging protocols such as SMS or e-mail are asynchronous. It is asynchronous because unlike HTTP, they are not based on a "request and response" model. A single atomic operation is typically one way. For example, when you use a Web browser, you enter a URL and make the request, then you wait for the result to come back. In messaging protocols (such as SMS) sending a message itself

Building Async Applications
10-18 Oracle Application Server Wireless Developer’s Guide
completes one operation. Most applications respond to user requests so HTTP is usually adequate. To enable the same application be accessed through asynchronous protocols presents a challenge on how such behavior can be mimicked with protocols such as SMS or e-mail.
10.3.2.3 Supporting SessionsAnother big challenge is that most applications are session based; multiple requests and responses are typically required to complete a task. Applications are able to maintain sessions in the Web world because the client, a Web browser, has built in capabilities such as cookies to facilitate session semantics. This is not the case for an e-mail or SMS client. They do not have any such ability built in to support conversational applications.
10.3.2.4 User NavigationA Web browser offers a User Interface for navigating through applications (examples include clicking on a hyperlink and traversing through a menu or a series of steps to complete certain functionality). Clients that work with other protocols such as SMS or e-mail typically do not have similar navigation power. The challenge here is to offer similar navigating capability to such clients so that applications can be independent of the protocols.
10.3.2.5 Naming/Addressing an ApplicationIn the Web world, applications are typically assigned a URL. The URL is how the application can be identified and requested. Clients for messaging are typically plain text devices; although there is no convention on how to name an application, consistency across protocols is needed.
10.3.3 Key SolutionsAsync combines functionality of a HTTP server and portions of a Web browser to provide its functionality.
10.3.3.1 Multiple Transport Protocol SupportThis challenge is a relatively easy one. Built on top of the OracleAS Wireless transport system, support for multiple transport protocols is achieved by the nature of the transport system itself. Async registers as an application to the transport system to send and receive messages. It further registers one or more addresses for each of the protocols it is serving in order to interact with users on those protocols. For example, it can register [email protected] for e-mail and 1234567 for

Building Async Applications
Creating Messaging Applications 10-19
SMS. Then [email protected] and 1234567 become the URIs for their respective protocols similar to http://yourcompany.com in the Web world.
Async itself does not consider the incoming protocols; it is designed to send and receive messages by the means that it is registered to use. The payload (content) of the messages are what Async interprets and acts upon.
10.3.3.2 The asynchronous nature of messaging protocolsAsync builds logic similar to an HTTP listener to present synchronous semantics over asynchronous protocols. It achieves this by acting as a client to the application that the device requested. Async makes a request to the application on behalf of the user, waits and processes the response from the application, then formats the response and presents it back to the users. To users, it appears as if it is the response from an earlier request.
10.3.3.3 Supporting SessionsUpon receiving requests from a user, Async creates a session for the user to enable conversational applications to function. Unlike in HTTP, where session information is kept by the browser (or cookie), all session states are kept in the backend by Async.
10.3.3.4 User NavigationAsync transforms elements such as forms or menus, and presents a navigation command for end users. When elements such as forms are returned by an application, Async retains the format of the form in the backend, and determines what action to take when the form is submitted with all of the other necessary information. When this user (using the set of Async-specified commands) completes and submits the command, Async makes a request (based on the current user information stored in Async) and processes the result again on behalf of the user. This is akin to hyperlinks stored in the backend when a user clicks on the face of the link.
10.3.3.5 Naming/Addressing an ApplicationJust as in assigning a URL to an application in the Web world, using Async requires that a short name be assigned to an application so that it can be Async-enabled. For example, assume the stock quote application has been assigned the path: /finance/quote and can be accessed as http://mycompany.com/finance/stock. Through the Content Manager, one or more short names can be assigned to the application (for example, st.). Now any messages received by Async that begin with

Building Async Applications
10-20 Oracle Application Server Wireless Developer’s Guide
st signals a request for the stock quote application. A user can send st orcl (orcl is the stock ticker symbol for Oracle Corporation) to an Async access point to which Async is configured to listen, such as [email protected] for e-mail or 1234567 for SMS, and get back the stock quote for Oracle Corporation.
Optionally, service access points can be created to identify an Async application. Through Content Manager, you can also associate an e-mail access point ([email protected]) and an SMS access point (123FINANCE) to the stock quote application. Once this is done, sending just orcl as an email to [email protected] or as SMS message to 123FINANCE results in receiving the stock quote of Oracle Corporation.
10.3.4 Async Request AuthorizationAsync differentiates the user issuing a request into two categories: guest or registered. Upon receipt of a user request by Async, the source address of the request message is used to reverse-lookup an OracleAS Wireless user for authentication. A user object can be located if a user has a device address registered under his or her profile. This address is the same as the source address of the request message. The located user object is then bound to a newly authenticated session created by the request. Otherwise, a guest user object is bound to the session. Any applications which are authorized to the user are accessible to requests issued from the device.
Only those applications belonging to the guest group are accessible to a guest user. Accessing a non-guest application triggers a returned form challenging the user for name and password. A valid OracleAS Wireless username/password supplied by the user enables the previous session to be upgraded to an authenticated one with the user object identified by the name to be bound. Alternately, a guest user can log in explicitly through a login command,!L (followed by a user name and password) to avoid being challenged.
10.3.5 User Interface and Navigation CommandsAs discussed earlier, messaging clients typically only present plain text and do not offer conversational navigation capabilities. Async transforms and formats responses from applications to a certain presentation to enable such capabilities. Async includes a set of presentation formats and navigational commands similar to what a Web browser has done for the Web world. Hence when a user invokes applications using Async, he or she sees the response in the format transformed by Async. Further interactions with Async would have to comply with the format expected by Async.

Building Async Applications
Creating Messaging Applications 10-21
This section discusses the commands that users can issue to Async. Issuing a command is simply sending a message with the correct format. The command text can be put into a subject line or message body.
System Commands■ !H: (Help command) provides general help on the command usage
■ !E: (Escape command) clears current form state.
■ !S: marks the end of command sequence. A message may contain a sequence of commands, each separated by a line feed or command delimiter.!S marks the end of a command sequence. No interpretation will be done on text past the !S mark.
■ help: the application level help. If no parameter is provided, the all of the Async application help displays. Users can also provide an application short name as the parameters to acquire the help on a particular Async-enabled application.
■ !L <username> <password>- to sign on to the system with the user name and password.
■ !O - to terminate a session.
Application Invocation CommandsThese commands invoke an application, perform menu selection and fill parameters. There are no reserved command symbols for the application invocation and form commands. Certain commands, such as form command and menu item selection, can be invoked only when there is a current form/menu state maintained in the user’s session. More details on form/menu state will be discussed later in this chapter.
■ [<shortname>|<menuitem>] <parm1><parm2> . . . to invoke an application. The first field provided could be a application short name or a menu item number. A menu item can be provided only when the user previously received a menu message from an application result. The menu state is maintained in the user session of Async. A user can make a selection based on the menu to trigger further actions. More detail on current menu state is explained later in this chapter.
■ <parm1><parm2> . . . to fill the parameter of a form. When a user invokes an application without providing a required parameter, a form may be returned requesting the user to fill in the parameter values. This creates a current form state in the user session, which expects the user to send the parameter sequences in the subsequent command. The parameter values should be

Building Async Applications
10-22 Oracle Application Server Wireless Developer’s Guide
supplied on the command line in the same sequence as the parameters listed on the previously returned form.
10.3.6 Configuration and Customization
10.3.6.1 System Configuration ParametersA list of site and application configuration parameters enable the system administrator or application developer to customize Async site- and application- level behavior through the Oracle Enterprise Manager (OEM) console and the OracleAS Wireless Tools. For more information, see Section 5.3.5.4 in Chapter 5, "Developing Services".
Table 10–2 Service Configuration Parameters
Name Default Semantics
Async Command Line Syntax
Help message sent to users to describe the application, and how to use it.
Delimiter ’ ’ (blank space)
The delimiter separating each parameter value. For example, a horoscope service with the short name ho, and the delimiter ’,’ (comma). A user would supply the command ho gemini, aries to get the horoscope result for both Gemini and Aries.
Silent Flag False Select this flag for applications that should not send the response message back to the device. This is a static way to mark an application as silent. Another option to dynamically disable the application result is to set a flag in the result document with a meta element having the name attribute of 'ASYNC_NO_RESPONSE' and content attribute of 'true'. An example of silent meta element for OracleAS Wireless XML is <SimpleMeta name="ASYNC_NO_RESPONSE" content="true" />
Variable Argument Support
False This flag is useful when a user request may contain more parameter values than the corresponding Async application parameter. All of the additional values will be appended as the value to the last parameter.
Sessionless False This flag can be optionally selected for applications which do not provide conversational user interaction. Such applications always return the final result on application invocation, meaning that the result document does not contain any hyperlink or form control. The session will not be maintained for the device which requests to access such an application, therefore introducing some resource saving.

Building Async Applications
Creating Messaging Applications 10-23
Table 10–3 Site Configuration Parameters
Name Default Semantics
Working Threads
10 The number of working threads.
Filtered Subject Line Prefix
re:,fw:,[fwd:,fwd:
Specify a list of prefixes in the email subject line to indicated that the message subject lines which start with these prefixes should be ignored and not be interpreted as user commands. For example, specify the prefixes Re and Fwd.
System help command
!H Provides general help on command usage.
Escape command
!E Clears current form state.
Stop command
!S Marks the end of a command sequence.
Apps help Help Provides service-level help.
Login command
!L Enables user to sign on to the system with the user name and password.
Logoff command
!O To sign off a user session.
Command Line Delimiter
; Command separator for a request with multiple commands.
Command Prefix
. A symbol indicating that the text immediately after the symbol is an Async short name instead of a parameter value. This is useful when a user wants to escape out of a form state without having to use ’Escape command’. For example, the command .stk orcl with the period (.) as the command prefix.
Help Header
Usage - The header of the applications help result.
Help Footer The footer of the applications help result.
Short Name for Default Application
Specify the short name of the application this is invoked if the user request is empty. If the value is not specified, then the application service help page will be returned.

Building Async Applications
10-24 Oracle Application Server Wireless Developer’s Guide
10.3.6.2 User Customization ParameterThrough the Wireless Customization Portal, users create their own aliases as the short names to invoke Async applications. A user short name can be an alias that points to an application, or it could be an alias representing a sequence of Async short names.
For example, a user may define an alias (s) to represent the string, stk, which is the short name for a stock application. When the user issues an Async message with content, s orcl, to invoke the stock application, they receive a stock quote for Oracle Corporation (orcl is the stock ticker symbol for Oracle Corporation). A string (tw), can be created as the alias for a string value, traffic ny;weather ny, so two applications, traffic and weather, can be invoked by inputting two characters.
10.3.7 Application Invocation Examples
10.3.7.1 Invoking the Application by the Application Short NameAll Async-enabled applications should be assigned short names to enable end user access. The short name should uniquely identify an application on the entire site. To invoke an application, a message is sent to a site access point, such as [email protected], to which the Async Listener is configured to listen. The command line has the format:
<Svc Short Name> <parm1> <parm2> . . .
In the following example, a message is sent to the site access point: [email protected], to invoke a stock quote application with the short name, st. The application requires a stock symbol as its parameter (for this example, it is ORCL).
Figure 10–3 Invoking by Service Short Name
10.3.7.2 Invocation through Application-Associated Access PointEach application may have application access points associated with it. For example, an Email address, [email protected], can be used to identify a stock application. Since the application has been identified in the destination address of the request message, there is no need to specify the application short name in the

Building Async Applications
Creating Messaging Applications 10-25
command line. Only the application parameters, such as the stock symbol, are required in the command line.
All of the system commands (for example, help) can still be issued to the application-associated access point. The Async Listener interprets them in the same way they are sent to the site access point.
Figure 10–4 Invoking by Service-Associated Access Point
10.3.7.3 Menu CapabilityFeatures are presented similar to the HTTP model. An application invocation may trigger the return of a message with the menu. Each menu item is prefixed with a number. Users are able to make selections by issuing another message whose content contains the menu item number. This extends the application capability and enables improved user interaction. A yellow pages application having a short name of yp expects two user parameters: category and area. Users invoke applications by providing the values, for example, burger and home (a landmark for the user). The application searches for all the hamburger restaurants in the home area. A returned message from the application result contains a name list of burger restaurants. The user then issues another message to get detailed information on selected restaurants.
Figure 10–5 Menu Capability

Building Async Applications
10-26 Oracle Application Server Wireless Developer’s Guide
10.3.7.4 Form CapabilityA form is the result of a application invocation requesting user input. The ideal user interaction for Async is when the user enters the input parameters on the command line instead of having to fill in the form, which requires more message round trips.
Figure 10–6, "Form Capability" demonstrates the possible interaction of a phone book application. The phonedit command, which enables users to search and edit the phone number for a particular user, expects a name as its parameter. (For the following example, jdoe is this parameter) The information of jdoe is returned with a menu, enabling the device user to edit the phone number or remove the user. There are two options for editing the phone number:
■ Make a selection without entering any parameter—this is represented in box 2a. A form is returned prompting the user to enter the new phone number. The device user creates a new message with the message body containing the new phone number.
Or
■ Enter the selection with the required parameters. Box 2b demonstrates the scenario. The device user is aware that a form should be returned in response to their selection 1 (Change phone). Therefore, the parameter value (phone number) is supplied together with the selection. This saves a message round trip.
Figure 10–6 Form Capability

Building Async Applications
Creating Messaging Applications 10-27
10.3.7.5 Form Field with Select OptionsA form may present fields, which allow users to make either single or multiple selections, similar to the check box or pull-down menu construct for HTML. To simplify selection for the device user, each selection option is prefixed with a number. The user fills in those fields by responding with the number prefix for the items he or she chooses. The field which allows multiple selections is presented with a input marker, [..]. This differentiates this field from a single selection field, which is represented by the single selection marker, []. The values for the user responses should be surrounded with quotation mark if multiple selections are made.
The following figure demonstrates the Select Form fields: Gender, a single selection field and Sports, a multiple selection field.
Figure 10–7 Form Field with Select Options
10.3.7.6 Current Menu StateMenu navigation is possible since a session is maintained for each user. The term current menu identifies the latest menu that a user received from Async. The state of the current menu is kept in the user session on Async.
A user’s menu selection always applies to the current menu. If a menu has not yet been received for the user, then Async attempts to locate an application whose short name is the same as the number provided by the user. An error is returned when no such application is found.
An application invocation through short name or access point automatically cancels the menu state created by the previous application invocation. As illustrated in Figure 10–8, a menu returns as a response to invoking the phonedit application. A

Building Async Applications
10-28 Oracle Application Server Wireless Developer’s Guide
message for requesting the stk service is subsequently issued. It clears the menu state created by the invocation of the phonedit application. An attempt to make a menu selection triggers an error message from Async.
Figure 10–8 Current Menu State
10.3.7.7 Current Form StateA current form state is created in the user session whenever the user receives a form message. Form parameter values can be supplied by subsequent user requests to fill the parameter requested from the previous form message. If the user decides not to fill the form but instead to invoke another application, then the Escape command can be issued to cancel the current form state. Once the form state is clear, any form parameter values issued by the user are considered invalid. An error message should be returned in response to a form parameter value without a current form state. Alternatively, a user can issue a command prefix with a short name as a shortcut to clear the form state followed by the invocation of the service identified by the short name.
Figure 10–9, "Current Form State" illustrates a form state example. The device user invokes the phonedit application without providing any parameters. A form message is returned to the user expecting the user to fill in the search name. If the device user decides to invoke another application (for example stk), the first step is to clear the form state so that Async will not treat the command stk as the name value expected from the phonedit application. Then, a new stk command can be issued. These two steps are combined into one message by separating the two commands with the default command separator (;).
The short name, stk, when issued with the command prefix, such as a period ( . ), clears out the form state with fewer keystrokes.

Building Async Applications
Creating Messaging Applications 10-29
Figure 10–9 Current Form State
10.3.7.8 Multiple Commands in One MessageMultiple commands can be issued from one message. They can be issued from the same line, each command separated by the configurable command separator (default [;]). Or, commands can be on different lines. The first blank line or stop command (!s) encountered marks the end of the command sequence. No command interpretation will be done on text after the mark.
Figure 10–10 Multiple Commands in One Message
10.3.7.9 Parameter SeparatorAsync applications can require multiple parameters. The default parameter separator is a blank space. If a parameter value contains space within it, then it can be enclosed by double quotes to represent a single parameter value. The parameter separator is configurable at the application level.
Figure 10–11 illustrates an application that provides directions. This application expects both the from and to (destination) addresses. The from address is provided

Building Async Applications
10-30 Oracle Application Server Wireless Developer’s Guide
with double quotes to enclose the whole value. The to is supplied as a landmark, home, from the user profile. The second message sent from the user is to request traffic information application. The application is configured to use a comma (,) as the parameter delimiter; users provide the parameter values with (,) to separate them.
Figure 10–11 Parameter Separator
10.3.8 Writing Async ApplicationsAsync applications are developed in the same manner as browser-based applications. An application provider receives user parameters from the device through HTTP protocol, and responds with the result in OracleAS Wireless XML or XHTML/XForms format. The requirement on the Async client is low; only the ability to send and receive text messages is needed. Because of this, Async does not support all tags. For details on those Async-specific interpretations of the supported tags, and the ways to author documents for this channel, see Chapter 8, "Authoring Mobile Browser and Voice Applications". See also: Chapter 3, "OracleAS Wireless Developer Kit".
Developers may, at times, need to acquire the device information of a service request for accounting or logging purposes. This information can be located through the HTTP header (if the service is created based on an HTTP adapter). The two relevant user device headers are:
■ x-oracle-user.deviceaddress
■ x-oracle-user.deviceaddresstype

XMS Message Center
Creating Messaging Applications 10-31
10.4 XMS Message CenterThe XMS component includes the MMS Center (MMSC) functionality out-of-the-box, supporting the MM1 message notification protocol. If the recipient device has an MMS browser, a notification message is sent to the browser, and the message is retrieved using HTTP. The content is stored and served out by OracleAS Wireless. To support MMS, the only external component needed is a regular SMSC for transmitting the notification message.
When the MMS browser receives the notification message, it contacts the XMSC using HTTP, as per the MM1 spec. The message is served out in encoded MMS format.
XMSC also supports MO (Mobile Originated) messages to another phone. In that case, the message will be stored in the XMSC and a notification message is sent to the target device as above.
XMSC also supports message storage and notification for other messaging channels. For example, if a user has a device that only has MMS capability. If a message is sent that contains multimedia content, XMS will send a text-only SMS message containing a URL, which the user can input into a regular Web browser in order to view the message.
10.4.1 ConfigurationIn order to use the XMSC functionality, complete the following steps.
10.4.1.1 Server-Side■ An SMS driver must be set up. See Section 10.6, "Transport Component" for
information on how to set up drivers in general. This section also describes the details of configuring the drivers bundled with OracleAS Wireless.
■ Set up the site hostname and port (if not already configured):
Go to System > Wireless Server > Site Administration > HTTP, HTTPS Configuration.
Under the URL Section, add the host name and port.
■ If necessary, enable the XMSC (enabled by default):
Go to System > Wireless Server > Site Administration, and expand Component Configuration. Click XMS Configuration.
Under the XMS Center Section, mark the Enable XMSC checkbox.

Device Channel Selection
10-32 Oracle Application Server Wireless Developer’s Guide
10.4.1.2 Client (Handset) SideFor Mobile Terminated (MT) messages (messages sent to a device), the above configuration is sufficient. As XMSC is a full MMSC, it also supports MO (Mobile Originated) messages, that is, messages sent from one phone to another using OracleAS Wireless as the intermediary. In this case the phone must be configured as follows:
The MMS browser must be configured to use the OracleAS Wireless instance as the outgoing message server. The exact steps to follow depend on the specific phone. The following are the steps to follow for the Sony Ericsson T68i:
1. Select Messages
2. Select MMS (2)
3. Select Options (5)
4. Select Message Server (6)
5. Enter the URL of the MM1 listener servlet. This will be of the form:
http://<hostname>:<port>/xms/mm1
10.5 Device Channel SelectionWhen the recipient is specified as a user name, the XMS runtime will determine what device and channel to use, depending on the user’s available devices, as well as the user’s current contact rules.
10.5.1 Automatic Device SelectionIf the user has a number of different devices, the XMS runtime will select the best device and channel to use. The channel chosen will depend upon the user preference order as well as the content of the message. For example, imagine a user that has a cell phone with both SMS and MMS messaging capability. If a plain text message is sent to the user, the SMS channel will be chosen, as it is sufficient for that message, and since sending messages over SMS is usually cheaper and faster than through MMS. On the other hand, if the message has multimedia content, XMS will try to send the message through MMS.
Note: You must be able to connect to the hostname from the phone using the dial-up or WAP settings provided in the phone.

Transport Component
Creating Messaging Applications 10-33
10.5.2 Presence IntegrationIn OracleAS Wireless, each user can have a Presence setting, which specifies the user’s location and associated contact rule.The contact rule states the user's preferred delivery channel at that point in time. For more information about Contact Rules, see Chapter 15, "Enabling User Customization".
If a user has set a contact rule, that rule will be given preference over the automatic channel selection outlined above. Additionally, a contact rule may specify blackout periods where the user does not wish to receive messages. If the blackout period is set in the contact rule, XMS will delay delivery of the message until after the blackout period.
10.6 Transport ComponentThe Transport Layer is the foundation of the OracleAS Wireless messaging system. It contains the Transport API, Transport Server and Driver API. This section discusses the pre-built transport drivers, how to develop new drivers and how to extend the Transport Server.
The current Transport API is compatible with previous releases (new features created in this release are not, of course, available if you are using previous versions); the current, enhanced Driver API is incompatible with previous releases. However, all the pre-built drivers for previous releases are enhanced accordingly in this release. Previous releases of the pre-built driver cannot be used with this release of the Transport Server; only use current pre-built drivers. In addition to interface enhancements, the pre-built drivers include many new features.
Your own custom-built drivers from previous releases can be upgraded to work with the current Transport Server, provided the driver implements the new driver interface. The driver logic is not significantly changed; the change are confined mainly to the interface.
10.6.1 Pre-built Drivers
10.6.1.1 Nokia MMS DriverThis driver provides the ability to send and receive MMS messages to and from a Nokia MMSC (Multimedia Messaging Service Center). It requires the Nokia MMS Java Library v1.1. The driver opens two TCP connections to the MMSC, one connection for sending and the other for receiving messages.

Transport Component
10-34 Oracle Application Server Wireless Developer’s Guide
10.6.1.1.1 Required Third-Party Software This driver requires the Nokia MMS Java Library v1.1 (MMSLibrary.jar) that is available from Forum Nokia (http://www.forum.nokia.com). You must add this library to the CLASSPATH in $ORACLE_HOME/opmn/conf/opmn.xml (UNIX) or $ORACLE_HOME\opmn\conf\opmn.xml (Windows).
10.6.1.1.2 Class Name
oracle.panama.messaging.transport.driver.mms.NokiaMMSDriver
10.6.1.1.3 Configuration
mms.nokia.account.id—The Nokia Account ID or Phone Number. This is required.
mms.nokia.mmsc.url—The Nokia MMSC URL. This is required.
mms.nokia.debug—Enable logging extra debug information to a file. Options: true (debug enabled), false OR leave blank (debug disabled).
mms.nokia.log.filename—Log filename for extra debug information. The default filename is NokiaMMSDriver.log.
mms.nokia.receive.host—The logical local hostname or IP address. If not present, it is derived from the local host.
mms.nokia.receive.port—Port for receiving MMS messages from MMSC. The default is 7000.
mms.nokia.receive.mode.async—Set Asynchronous Mode for receiving MMS messages from MMSC. Options: true (enable), false OR leave blank (disable). For further information about asynchronous mode, see the documentation that came with the Nokia MMS Java Library v1.1.
10.6.1.2 CMG MMS DriverThis driver provides the ability to send and receive MMS messages to and from a CMG MMSC (Multimedia Messaging Service Center). The driver uses the CMG MMSC API for VAS v1.01.
10.6.1.2.1 Required Third-Party Software
This driver requires the CMG MMSC API for VAS v1.01 (mmscapi.jar and mmscapi.war) available from CMG (http://www.cmgwds.com). You must add the mmscapi.jar library to the CLASSPATH in

Transport Component
Creating Messaging Applications 10-35
$ORACLE_HOME/opmn/conf/opmn.xml (UNIX) or $ORACLE_HOME\opmn\conf\opmn.xml (Windows).
10.6.1.2.2 Class Name
oracle.panama.messaging.transport.driver.mms.CMGMMSDriver
10.6.1.2.3 Configuration
■ mms.cmg.account.id
The CMG MMSC Account ID or Phone Number. This is required.
■ mms.cmg.account.password
The CMG MMSC Account Password. This is required.
■ mms.cmg.config.file
The path to the core configuration file for the CMG MMSC API. This is required. For details regarding the contents of this file, see the User Manual that is packaged with the CMG MMSC API distribution. We have included a sample configuration file ($ORACLE_HOME\wireless\messaging\drivers\cmg\CMGMMSDriver.cfg) with this driver.
■ mms.cmg.debug
Enable logging extra debug information to file. Options: true (debug enabled), false OR leave blank (debug disabled).
■ mms.cmg.billing.category
MMSC Billing Category (optional). This value is used to send custom billing category information to the MMSC. For details and examples of the billing category, see the User Manual that is packaged with the CMG MMSC API distribution.
■ mms.cmg.billing.price
MMSC Billing Price Value (optional). This value is used to send custom billing price information to the MMSC. For details and examples of the billing price, refer to the User Manual that is packaged with the CMG MMSC API distribution.
10.6.1.2.4 Additional Configuration

Transport Component
10-36 Oracle Application Server Wireless Developer’s Guide
To configure the driver to receive MMS messages, you must perform these additional steps:
1. Package the mmscapi.war file into a cmgmmsc.ear file as follows:
■ Unzip $ORACLE_HOME\wireless\messaging\drivers\cmg\cmgmmsc.ear.zip into an empty directory. This creates the following directory structure:
* \META-INF\application.xml
* \META-INF\MANIFEST.MF
2. Copy mmscapi.war into this directory and rename this file cmgmmsc.war. This creates the final directory structure:
■ \META-INF\application.xml
■ \META-INF\MANIFEST.MF
■ \cmgmmsc.war
3. Zip this directory structure and rename the zip file cmgmmsc.ear.
4. Copy cmgmmsc.ear to $ORACLE_HOME\wireless\j2ee\applications\
5. In $ORACLE_HOME\wireless\j2ee\config\wireless-web-site.xml, add:
<web-app application="cmgmmsc" name="cmgmmsc" root="/cmgmmsc" load-on-startup="true"/>
6. In $ORACLE_HOME\wireless\j2ee\config\wireless-server.xml, add:
<application name="cmgmmsc" path="../applications/cmgmmsc.ear" auto-start="true" />
7. Start the OracleAS Wireless instance, which auto-deploys the cmgmmsc.ear file.
8. After the auto-deploying is done, in $ORACLE_HOME\wireless\j2ee\applications\cmgmmsc\cmgmmsc\WEB-INF\web.xmledit the trace directory and filename by adding the following section:
<servlet-mapping><servlet-name> HttpReceive</servlet-name><url-pattern> /HR</url-pattern>

Transport Component
Creating Messaging Applications 10-37
</servlet-mapping>
9. Backup (rename the file’s extension to anything except .jar) $ORACLE_HOME\wireless\lib\log4j-core.jar and $ORACLE_HOME\wireless\lib\log4j.jar.
Copy $ORACLE_HOME\wireless\j2ee\applications\cmgmmsc\cmgmmsc\WEB-INF\lib\log4j-1.2.5.jar to $ORACLE_HOME\wireless\lib\log4j-core.jar.
10. Restart the OracleAS Wireless instance.
10.6.1.3 MM7 DriverThis driver provides the ability to send MMS messages to a MMSC (Multimedia Messaging Service Center) using the MM7 protocol based on the specification of 3GPP TS 23.140 V5.3.0.
10.6.1.3.1 Class Name
oracle.panama.messaging.transport.driver.mms.MM7Driver
10.6.1.3.2 Configuration
mms.mm7.url—The URL to access the MMSC/MM7. This is required.
mms.vaspid—(Optional) Identifier of this application (VASP) for the MMSC.
mms.vasid—(Optional) Identifier of the originating application. Example: News.
mms.local.hostname—The logical local hostname or IP address. If not present, it is derived from the local host.
mms.local.port—The local listening port. The default value is 80.
Note: The servlet HttpReceive runs within the OracleAS Wireless instance, and requires RMI to communicate with the CMGMMSDriver. For more information, see the User Manual that is packaged with the CMG MMSC API distribution.

Transport Component
10-38 Oracle Application Server Wireless Developer’s Guide
mms.default.encoding—The default MM7/HTTP encoding format. The default encoding is UTF-8.
debug—Enable logging extra debug information to a file. Options: true (debug enabled), false OR leave blank (debug disabled).
10.6.1.4 CIMD DriverCIMD (Computer Interface to Message Distribution) is an SMS protocol specified by Nokia. The OracleAS Wireless Server product includes a pre-built implementation of the CIMD driver that is capable of both sending and receiving messages. The driver opens one TCP/IP connection to the SMSC, for sending and receiving messages. This driver can handle sending of text and binary messages (such as vCard, vCalendar.). The driver can receive only text messages.
10.6.1.4.1 Class Name
oracle.panama.messaging.transport.driver.sms.CIMDDriver
10.6.1.4.2 Configuration
The following parameters must be specified while creating the Driver:
■ sms.account.id
This is the account ID for the SMSC. Generally, it is the short number assigned by the operator. This is required.
■ sms.cimd.system.userid and sms.cimd.system.password
Along with the short number, the operator provides a User ID and password for you to login to the SMSC. These are required.
■ sms.server.host and sms.server.port
This information is used by the driver to open a TCP/IP connection to the SMSC.
■ sms.message.maxchunks
This is the maximum number of chunks allowed for any single message. Chunks after this number are ignored. The default is -1. A negative value means there is no limitation.
■ sms.message.chunksize
This is the maximum size for each chunk, in bytes. The default is 140.
■ sms.server.default.encoding

Transport Component
Creating Messaging Applications 10-39
Specify the encoding scheme for text messages. The default is IA-5.
■ sms.window.size
Specify the window size. If windowing is not supported then set window size = 1.
■ sms.send.alive.packet.interval
The time interval (in milliseconds) after which alive packet should be sent. Negative value means no alive packets will be sent. This parameter is required to keep the connection to the SMSC alive, because normally the user will be logged out automatically from the SMSC after a specified time interval. Specify a value which is less than that interval.
10.6.1.5 VVSP DriverThis driver provides the ability to send and retrieve SMS and MMS messages to and from the Via Vodafone Services Platform (VVSP). In order to use this driver, you must register it as an application with Vodafone Mobile Office. For details on how to register an application and obtain the necessary credentials to run this driver, contact Vodafone Mobile Office at http://www.mobileoffice.vodafone.com.
10.6.1.5.1 Class Name
oracle.panama.messaging.transport.driver.vvsp.VVSPDriver
10.6.1.5.2 Configuration
vvsp.sms.address—Comma-separated list of the SMS network IDs (MSISDN or short code).
For example: 8205, 8206
vvsp.sms.country—Corresponding comma-separated list of 2-letter country codes that the SMS network IDs above are registered for with the VVSP. ISO 3166-1-alpha-2 code element conventions apply.
For example: uk, de.
vvsp.sms.url—The URL to the VVSP SMS gateway. The default value is https://vvsp.vodafone.net/gns/sms.
vvsp.sms.id—The SMS Application Instance ID registered with VVSP.
vvsp.sms.password—The SMS Application Instance Password.

Transport Component
10-40 Oracle Application Server Wireless Developer’s Guide
vvsp.sms.onetimepassword—The SMS one-time password for password renewal. Use this field only if you are in the testing phase with VVSP, and want to use a fixed OTP. For example, 69696969.
vvsp.mms.address—Comma-separated list of the MMS network IDs (MSISDN or short code).
For example: 8005, 8006
vvsp.mms.country—Corresponding comma-separated list of 2-letter country codes that the MMS network IDs above are registered for with the VVSP. ISO 3166-1-alpha-2 code element conventions apply.
For example: uk, de.
vvsp.mms.url—The URL to the VVSP MMS gateway. The default value is https://vvsp.vodafone.net/gns/mms.
vvsp.mms.id—The MMS Application Instance ID registered with the VVSP.
vvsp.mms.password—The MMS Application Instance Password.
vvsp.mms.onetimepassword—The MMS one-time password for password renewal. Use this field only if you are in the testing phase with VVSP, and want to use a fixed OTP. For example, 69696969.
vvsp.admin.url—The URL to the VVSP Administration gateway. The default value is https://vvsp.vodafone.net/gns/admin.
vvsp.admin.log—The log file to store new passwords issued by the Administration gateway. The default value is VVSPAdmin.log.
vvsp.admin.url—The URL to the VVSP Administration gateway.
vvsp.local.hostname—The logical local hostname/IP to bind to, for receiving notifications from the VVSP. If not present, it is derived from the local host. The complete URL used to receive notifications will be http://vvsp.local.hostname:vvsp.local.port/.
vvsp.local.port—The local listening port. The default value is 80.
vvsp.ssl.trustStore—The path to the SSL trustStore file (in jks format). If left blank, the built-in VVSP-provided certificate file is automatically loaded. In most cases, you will not need to modify this parameter.
vvsp.ssl.trustPassword—The pass phrase of the trustStore file. Leave blank if none (default).
Transport Component
Creating Messaging Applications 10-41
vvsp.ssl.keyStore—The complete path to the SSL keyStore file (in pkcs12 format). You must provide this path if you have an SSL class 3 client certificate from VVSP.
vvsp.ssl.keyPassword—The pass phrase of the keyStore file. Leave blank if none.
vvsp.default.encoding—The default HTTP encoding format. The default value is UTF-8.
vvsp.sms.maxchunks—The maximum chunks for an SMS message if it exceeds the maximum SMS length. (Note that the per chunk maximum length is 160 chars for text SMS, and 140 chars for binary SMS.). Enter -1 for unlimited chunks. The default value is -1.
vvsp.retrieve.flush.freq—Frequency (in seconds) of periodic polling to retrieve and flush any unretrieved messages waiting at the VVSP due to missed or lost notifications. Enter 0 to disable polling. The default value is 600 seconds.
vvsp.debug—Enable logging extra debug information. Options: true (debug enabled), false OR leave blank (debug disabled).
10.6.1.5.3 Additional Configuration—Password Renewal
If you do not have an SSL class 3 client certificate from the VVSP, your application instance password will be periodically expired by the platform. When the password expires, the VVSP will send an SMS containing a one-time password (OTP) to the registered application operator’s handset. The application operator must enter this OTP so that the VVSPDriver can complete the password renewal procedure and receive the new application instance password from the VVSP. A utility has been provided to allow the operator to enter the OTP. It can be found on OTN at http://otn.oracle.com/tech/wireless/integration/. You can download and install it on your OracleAS Wireless instance using the instructions provided. Once installed on your instance, the utility can be accessed at http://<instance_hostname>:<instance_port>/vvsp/vvspdriverotp.jsp.
After the operator enters the OTP using this utility, the VVSPDriver renews the password and continues normal operation.
If the operator is unable to enter the OTP within a short time (approximately 4 minutes), the VVSP considers that OTP stale, and the driver reinitiates the password

Transport Component
10-42 Oracle Application Server Wireless Developer’s Guide
renewal process; the VVSP sends a new and valid OTP to the operator’s handset. The operator is then expected to enter this new OTP using the provided utility.
Oracle Corporation recommends that you get SSL class 3 certificates from VVSP so that you are not required to do periodic password renewal. For more information, refer to the guides available fromVodafone Mobile Office at http://www.mobileoffice.vodafone.com.
10.6.1.6 WCTP DriverWCTP (Wireless Communication Transfer Protocol) is specifically aimed at creating a simple means of passing alphanumeric and binary messages between wire line systems and mobile devices. HTTP 1.1 is the recommended transport protocol for WCTP. The built-in driver acts as an Enterprise Host and connects to the WCTP Gateway to send and receive messages. The driver can handle sending and receiving of text messages. The driver implements an HTTP listener to listen to incoming messages. The driver also supports status reporting for the sent messages.
10.6.1.6.1 Class Name
oracle.panama.messaging.transport.driver.sms.WCTPDriver
Note: The VVSPDriver cannot automatically update the new application instance password in the driver instance configuration in OracleAS Wireless Tools. As a result, the new password is lost when the messaging server is restarted. Thus, to ensure normal operation, the VVSPDriver instance configuration must be updated before you restart the OracleAS Wireless instance (or just the messaging server process). The new password along with the corresponding application instance ID is available on the utility you use to enter the OTP, and is also logged to the VVSPAdmin.log file (or the file name you specified in the vvsp.admin.log parameter). The administrator or operator is expected to copy the new password from this file and manually update the password in the VVSPDriver instance configuration. This process will be automated in a future release.
You must get an SSL Class 3 certificate from the VVSP so that you do not have to perform the manual steps involved in periodic password renewal. For more information, refer to the VVSP Gateway Overview Guide available from the Via Vodafone Developer Site at http://www.via.vodafone.com.

Transport Component
Creating Messaging Applications 10-43
10.6.1.6.2 Configuration
The following parameters must be specified while creating the Driver:
■ send-host, send-port and send-page
This is the host, port and page of the WCTP Gateway.
■ receive-host, receive-port and receive-page
This is the host, port and page at which the HTTP server implemented by the WCTP driver, listens for incoming messages.
■ receive-proxy-host and receive-proxy-port
This information is required if there is a proxy server. It is required while parsing the WCTP XML messages. These are optional.
■ maxchunks
This is the maximum number of chunks allowed for any single message. Chunks after this number are ignored. The default is -1. A negative value means there is no limitation.
■ chunksize
This is the maximum size for each chunk in bytes. The default is 160.
■ notify-when-queued
Specify true if notification is required when the message has been queued.
■ notify-when-delivered
Specify true if notification is required when the message has been delivered.
■ notify-when-read
Specify true if notification is required when the message has been read.
■ multi-recipient-message-support
Specify true if multiple recipients are sent in a single message. Otherwise a separate message will be sent for each of the recipients in the list.
10.6.1.7 Data Communication DriverThe data communication driver enables OracleAS Wireless to send and receive SMS messages through a Nokia phone. The driver code is capable of sending text and binary messages. Receiving is enabled only for text messages (the driver has been tested for 5110) when connected to a PC through a data cable.

Transport Component
10-44 Oracle Application Server Wireless Developer’s Guide
10.6.1.7.1 Setup Details
Follow the procedure below to set up the data communication driver in the Windows platform.
Before you start the setup make sure you have the following:
■ Java communication package—can be downloaded from http://Java.sun.com/products/Javacomm/
■ Nokia cell phone (the driver has been tested for 5100 and 6100 series of phone).
■ Data cable for the Nokia phone (the cable 9-pin RS-232C serial cable DAU-9P is required for 5100/6100 series of phone)
■ Data suite installation CD (if the phone does not have a built-in modem).
The setup procedure is divided into three categories:
■ Installing Java communication package.
■ Installing Data suite.(This step is required only if your phone does not have a built-in modem, such as the Nokia 5110).
■ Configuring OracleAS Wireless messaging server.
The details on each of the above categories are below.
■ Installing Java communication package
Download Javacomm20-win32.zip from the location http://Java.sun.com/products/Javacomm/
Follow all the steps given in the file PlatformSpecific.html (which you will get after unzipping the file Javacomm20-win32.zip).
Try running a sample, which is included in the zip file to confirm that the configuration is complete, and working fine.
■ Installing Data suite
Note: In case the sample programs are not listing the serial ports, try copying the file Javax.comm.properties in the directory <Java_HOME>\jre\lib. Where <Java_HOME> is the place where jdk is installed and the Java installed at <Java_HOME>\bin\Java is the one, which will be used to run the OracleAS Wireless components.

Transport Component
Creating Messaging Applications 10-45
(This step is required only if the Nokia phone used for the data communication doesn’t have in-built modem.)
Before installing Nokia data suite, go to control-panel -> ports. Note the ports present in your system.
1. Connect your Nokia cell phone using the appropriate data cable to any of the PC’s COM ports.
2. Install Nokia data suite (typical installation).
3. After the software is installed successfully, reboot the machine.
4. Go to control-panel -> ports; an extra port will be listed. For example if the ports listed before installation were COM1 and COM2 then after installation the ports may get listed as COM1, COM2 and COM3. In this case, COM3 is the virtual port, which the data suite has configured for data transfer between the phone and the pc.
10.6.1.7.2 Driver Configuration
Class Name
oracle.panama.messaging.transport.driver.datacommunication.DataCommunicationDriver
10.6.1.7.3 Configuration ·
■ sms.datacommunication.port
This is the port, which the driver will use to communicate with the phone connected through the cable. Type the name of the port is used to connect the phone to pc using the data cable. In case your phone doesn't have an in-built mode, you will have to type here name of the virtual port, which got created when you installed Data suite. (such as: COM3)
■ sms.datacommunication.phone-no
This is the phone number of the cell phone, which is connected using the data cable to the computer on which the messaging server is running (for example: 1-650-576-8055).
■ sms.message.maxchunks
This is the maximum number of message chunks to be sent, if the message size is greater than the chunk size. By default all the chunks will be sent.
■ sms.message.chunksize

Transport Component
10-46 Oracle Application Server Wireless Developer’s Guide
Maximum size of a chunk. Default is 150.
Before you run the messaging server, make sure you have included the path of comm.jar to the CLASSPATH in the file opmn.xml.
10.6.1.8 WAP Push PAP DriverPAP (Push Access Protocol) is a protocol to access a WAP Push gateway. OracleAS Wireless includes a pre-built implementation of the PAP driver as a driver that is capable of sending WAP pushes.
This driver can handle these content types:
■ ContentTypes.WAP_PUSH—All supported content types by the WAP push gateway.
■ ContentTypes.URL (only if the content type of the related resource is one of the above)—The driver accepts all content types and posts the message to the push gateway.
If the WAP push gateway does not understand the messages posted by the PAP driver, the PAP driver will throw a non-fatal exception to indicate the failure.
10.6.1.8.1 Class Name
oracle.panama.messaging.transport.driver.wap.PAPDriver
10.6.1.8.2 Configuration
■ pap.ppg.url
The URL of the WAP push gateway. This is required.
■ pap.notifyto.url
The URL to which notifications can be sent by the WAP push gateway. This is optional.
■ pap.listento.notify
Value is set to true of false. This flag indicates if this driver listens for notifications.
■ pap.source.reference
The source reference of this driver to the WAP push gateway.
■ pap.ppg.hostname

Transport Component
Creating Messaging Applications 10-47
The logical hostname of the PPG gateway; used as the PPG’s carrier identification. If not present, it is derived from the PPG URL.
■ pap.local.hostname
The logical local hostname or IP address. If not present, it is derived from the local notification URL if any, or the local machine.
■ pap.default.encoding
The default content encoding format; if not set, UTF-8 is used.
■ pap.version
The PAP version supported by the PPG, must be either 1.0 or 2.0.
10.6.1.9 Instant Messaging (IM) DriverThe Instant Messaging driver provides unidirectional as well as bidirectional access to end-users for accessing OracleAS Wireless applications through real-time instant messaging (IM). The IM driver uses Jabber, an open, XML-based instant messaging platform, which also integrates with proprietary IM networks such as Yahoo, MSN, AOL and ICQ. This driver allows end-users to receive alert notifications and interactively use applications through their IM client of choice.
10.6.1.9.1 About Jabber Jabber is an open, XML-based protocol for Instant Messaging and presence. Jabber-based software is deployed on thousands of servers across the Internet and is used by over a million people worldwide. Jabber consists of a client-server architecture, which resembles the ubiquitous e-mail network. Jabber servers are completely decentralized, allowing anyone to set up their own server. Messaging is achieved as in the email network, where recipients are addressed by a username and a hostname (for example: username@hostname). In the Jabber network, users are identified by a Jabber ID, which consists of a username and the hostname of the particular Jabber server to which the user connects. An end-user of Jabber connects to a Jabber server using a Jabber client in order to send instant messages to other Jabber users. This, however, is not the only way to achieve instant messaging. Jabber has an extensible and modular architecture. It integrates with proprietary IM networks such as Yahoo, MSN, AOL and ICQ using transport gateways that can connect to these networks. This allows Jabber users to communicate with those on Yahoo, MSN, AOL or ICQ.
In order to use the IM driver in OracleAS Wireless, you must access a Jabber server and a Jabber account for the OracleAS Wireless instance (using the ID that the IM driver will log in to Jabber with, to send to and receive messages from end-users). In addition, the IM driver includes configuration parameters that enable the OracleAS

Transport Component
10-48 Oracle Application Server Wireless Developer’s Guide
Wireless instance to communicate with users on Yahoo, MSN, AOL or ICQ IM networks. This requires that you additionally have accounts on these proprietary IM networks to which you are connecting using OracleAS Wireless, and thus, allow end-users of those particular networks to communicate with OracleAS Wireless.
The following figure depicts a scenario in which an OracleAS Wireless instance is connected to Jabber and MSN (through Jabber’s MSN transport gateway). This enables end-users on MSN and Alice to communicate with the OracleAS Wireless instance using MSN Messenger.
10.6.1.9.2 Third-party Jabber Software The Instant Messaging driver uses the JabberBeans Java library to connect to a Jabber Instant Messaging Server. It requires the following third-party software:
Table 10–4 Third-Party Software for the Instant Messaging Driver
Name Instructions Version(s)
JabberBeans OracleAS Wireless includes a copy of JabberBeans (version 0.9.1). If you wish to upgrade to a newer version of JabberBeans, follow these instructions:
Download and copy the latest jabberbeans.jar from http://jabberbeans.jabberstudio.org to $ORACLE_HOME/wireless/lib on UNIX, to %ORACLE_HOME%\wireless\lib on Windows. Examples of ORACLE_HOME values: Solaris: ORACLE_HOME=/u01/iaswv904NT: ORACLE_HOME=d:\oracle\iaswv904.
0.9.1
Jabber Server (jabberd)
Optional. To download and install your own Jabber server, follow the Jabber server’s installation guide on http://www.jabber.org.
1.4.2
Yahoo TransportGateway
Optional. Follow the transport installation guide. Refer to http://yahoo-transport.jabberstudio.org.
2.0.0
MSN Transport Gateway
Optional. Follow the transport installation guide. Refer to http://msn-transport.jabberstudio.org.
1.1.0 or greater
AOL & ICQ Transport Gateway
Optional. Follow the transport installation guide. Refer to http://aim-transport.jabberstudio.org.
0.9.25

Transport Component
Creating Messaging Applications 10-49
10.6.1.9.3 Configuring the Messaging Server with the Instant Messaging Driver
Use the OracleAS Wireless Tools to configure the messaging server with the instant messaging driver.
To add/enable the instant messaging driver:
1. Click the Administration tab.
2. Expand the Messaging Server section under Special Configuration for Wireless Site. Click Messaging Server Drivers. The Messaging Server Drivers screen appears.
3. In the Configuration section, click Messaging Server Drivers. The Messaging Server Drivers screen appears.
4. If you do not see an entry for IMDriver, go to Step 5. If you see an entry for IMDriver, enable the driver as follows:
a. Select the IMDriver entry and click Edit. This will open the IMDriver Properties screen.
b. Check the Enabled box and click Apply.
c. Go to the next section Configuring the Driver Instance.
5. Click Add Driver. The Add Driver screen appears. Enter only the values noted here; other values are not required.
a. In the Driver Name field, enter IMDriver.
b. Select IM from Delivery Category.
c. From the Speed Level drop-down list, select 8.
d. From the Cost Level drop-down list, select 1.
e. From the Capability drop-down list, select BOTH (or only SEND or RECEIVE, if you want unidirectional messaging).
f. Enter 1 in the Number of Message Queues field.
g. Check the Enabled box.
Note: You do not need to install your own Jabber server if you have access to an existing Jabber server. For a list of public Jabber servers, see http://www.jabberview.com.

Transport Component
10-50 Oracle Application Server Wireless Developer’s Guide
h. In the Driver Class Name field, enter oracle.panama.messaging.transport.driver.instantmessaging.InstantMessagingDriver
i. Click Add Another Row to add a row for each of the following parameters:
* For the Jabber server: im.server.host, im.server.port, im.server.username, im.server.password
To support users of proprietary, IM networks (for example: Yahoo, MSN, AOL or ICQ), add the parameters for each network as follows (Though you must add these parameters, entering values for these is optional when you configure the Driver Instance.):
* For Yahoo: im.yahoo.enable, im.yahoo.username, im.yahoo.password
* For MSN: im.msn.enable, im.msn.username, im.msn.password
* For AOL: im.aol.enable, im.aol.username, im.aol.password
* For ICQ: im.icq.enable, im.icq.username, im.icq.password
* To print verbose debug output: im.debug
* To adjust retry parameters which are used when the driver is disconnected from the Jabber server: im.retry.limit, im.retry.interval
j. Click OK to create the driver.
10.6.1.9.4 Configuring the Driver Instance
To configure the instant messaging driver instance:
1. Click the Wireless Server tab. The Server screen appears.
2. Click messagingserver1 in the process table. The messagingserver1 process screen appears.
3. Click Add Driver Instance. The Add Driver Instance screen appears.
4. Complete the Add Driver Instance screen as follows:
a. Enter IMDriver Instance in the Driver Instance Name field.
Note: Detailed explanations of these parameters are provided in the Table below.

Transport Component
Creating Messaging Applications 10-51
b. From the Driver Name drop-down list, select IMDriver.
c. Click Go.
d. In the Number of Sending Threads field, enter 2.
e. In the Number of Receiving Threads field, enter 1.
f. In the Driver Specific Parameter fields, enter the following values:
Table 10–5 Values for Driver Specific Parameters
For This Parameter Name... Enter this Value
Parameters for Jabber IM Enter these values for Jabber IM.
im.server.host localhost (Replace this value with the hostname of your Jabber server. For multiple servers, use a comma-separated list. If only one hostname is specified, it will be used for all accounts. Example: my1.host.com, my2.host.com.). If the Jabber server is outside your firewall, the IM driver will connect to it using the site-wide HTTP proxy settings configured in your OracleAS Wireless instance.
im.server.port 5222(default Jabber port. For multiple servers, provide a corresponding comma-separated list of ports. Example: 5222, 5222.)
im.server.username oracleagent (Replace this value with the Jabber username of the OracleAS Wireless instance). The IM Driver will connect to Jabber with this username. A Jabber ID is of the form username@hostname, and this parameter only requires the username part. For multiple accounts, enter a comma-separated list of Jabber usernames to login as. If you have multiple servers listed above, there must be an equal number of usernames (one username per server). If you have only one server listed above, all usernames listed here will use that server. Example: oracleagent1, oracleagent2). If an account does not exist on the Jabber server, the IM driver will attempt to register it as a new account.
im.server.password test (Replace this value with a corresponding comma-separated list of passwords for each username listed above.)
Optional Parameters for Yahoo IM
Enter these values only if you want to connect to Yahoo’s IM network
im.yahoo.enable Set im.yahoo.enable to true to enable the Yahoo transport. To disable using Yahoo, leave this field blank, and ignore the username and password fields. If you have multiple accounts specified above, provide a corresponding comma-separated list of values.
im.yahoo.username Enter a comma-separated list of Yahoo account IDs (requires that you already have these IDs registered on Yahoo), for each user account above (leave entries blank for accounts without Yahoo). Entering valid Yahoo account information enables Yahoo users to access OracleAS Wireless applications through Yahoo Messenger.
im.yahoo.password Enter corresponding comma-separated list of Yahoo account passwords.

Transport Component
10-52 Oracle Application Server Wireless Developer’s Guide
Optional Parameters for MSN IM
Enter these values only if you want to connect to MSN’s IM network
im.msn.enable Set im.msn.enable to true to enable the MSN transport. To disable using MSN, leave this field blank, and ignore the username and password fields. If you have multiple accounts specified above, provide a corresponding comma-separated list of values.
im.msn.username Enter comma-separated list of MSN account IDs (requires that you already have these IDs registered on MSN), for each user account above (leave entries blank for accounts without MSN). Entering valid MSN account information allows MSN users to access OracleAS Wireless applications through MSN Messenger.
im.msn.password Enter corresponding comma-separated list of MSN account passwords.
Optional Parameters for AOL IM
Enter these values only if you want to connect to AOL’s IM network.
im.aol.enable Set im.aol.enable to true to enable the AOL IM (AIM) transport. To disable using AOL, simply leave this field blank, and ignore the username and password fields. If you have multiple accounts specified above, provide a corresponding comma-separated list of values.
im.aol.username Enter comma-separated list of AOL account IDs (requires that you already have these IDs registered on AOL), for each user account above (leave entries blank for accounts without AOL). Entering valid AOL account information enables AOL users to access OracleAS Wireless applications through AOL Instant Messenger.
im.aol.password Enter corresponding comma-separated list of AOL account passwords.
Optional Parameters for ICQ Enter these values only if you want to connect to ICQ’s IM network
im.icq.enable Set im.icq.enable to true to enable the ICQ transport. To disable using ICQ, leave this field blank, and ignore the username and password fields. If you have multiple accounts specified above, provide a corresponding comma-separated list of values.
im.icq.username Enter comma-separated list of ICQ account IDs (requires that you already have these IDs registered on ICQ), for each user account above (leave entries blank for accounts without ICQ). Entering valid ICQ account information enables ICQ users to access OracleAS Wireless applications through ICQ Instant Messenger.
im.icq.password Enter corresponding comma-separated list of ICQ account passwords.
Additional Parameters Enter these values for additional configuration
Table 10–5 Values for Driver Specific Parameters
For This Parameter Name... Enter this Value

Transport Component
Creating Messaging Applications 10-53
g. Click OK to create the driver instance.
10.6.1.9.5 Using the IM Driver with the Async Server The IM driver can be used in conjunction with the Async Server to provide access to async-enabled applications on OracleAS Wireless through Instant Messaging. To enable, configure access points in the Async Server.
To configure the Async Server:
1. Click the Wireless Server tab.
2. Click the Administration tab.
3. Expand the Async Server section under Special Configuration for Wireless Site. Click Access Points. The Access Points screen appears.
4. Click Add Access Point.
5. Enter IM entry point in the Name field.
6. Select IM from Delivery Type.
7. In the Address field, enter jabber|<Jabber ID> where <Jabber ID> is the ID used by your IM driver (for example, oracleagent@localhost). In other words, the entire address will take the form: <im.server.username>@<im.server.host>).
8. Check the Allowed to Access All Services box.
im.debug Set this value to true to enable verbose debug output. This triggers the driver to output additional notification messages, which also requires that you have the Notify log level enabled in your system logging configuration for the OracleAS Wireless instance.
im.retry.limit 20 (Number of times the driver should attempt to reconnect when disconnected from a Jabber server. (the default limit is 20.)
im.retry.interval 20 Time interval, in seconds, between reconnect attempts. (the default interval is 20 seconds.)
Note: You must restart the messaging server each time you change the driver-specific attributes.
Table 10–5 Values for Driver Specific Parameters
For This Parameter Name... Enter this Value

Transport Component
10-54 Oracle Application Server Wireless Developer’s Guide
9. Click OK to add the access point.
10. If you have configured the IM driver for other IM networks such as Yahoo or MSN, you must specifically add an access point for each such network. The address must be of the form <network-name>|<userid>, where <network-name> is yahoo, msn, aim, or icq. For example, if you have configured the IM driver for MSN, you must add an access point with the address msn|<im.msn.username>, where <im.msn.username> is the value of the parameter you configured in the IM driver instance. Likewise, if you have configured the IM driver for AOL IM (AIM), add an access point with the address aim|<im.aol.username>.
This completes the Async Server configuration. To invoke an Async-enabled Application:
■ Depending on which IM systems (such as Jabber, Yahoo, MSN, AOL and ICQ) you have configured the IM driver for, you must add the corresponding user to your IM client’s roster or contact list. We refer to this user as the IM Agent.
Example: You have configured the MSN transport in the IM driver, using [email protected] as the value of im.msn.username. Now, launch your MSN Messenger client, login as yourself (with your own MSN account) and add the MSN IM Agent [email protected] to your contact list.
■ Send an instant message to the IM Agent with help as the body of the message. After you send this message, you receive an instant message with the list of applications you can invoke.
Example: Invoke the hello application by sending a message with the text hello to the IM Agent. The agent will return a simple Hello World response:
■ For applications that require user input, chat with the agent and enter the necessary values.
Example: Invoke the Short Messaging application by typing sm. You will receive a menu of options such as 0 Menu, 1 [] Type. Enter 1 to select Type. A list of types to choose from is returned. Type 3 to select Voice. You can enter other fields such as Recipients, Subject and Body in a similar manner, and finally send the message.
10.6.1.9.6 Using the XMS Service In order to send instant messages using the XMS service, you have two API options, namely XMSSimpleSender and XMSSender:
Note: The above example assumed that the hello application is async-enabled.

Transport Component
Creating Messaging Applications 10-55
■ Using XMSSimpleSender:
To address recipients, prepend the IM: tag to the IM address. In other words, use the following format:
IM:<address>
where <address> is the IM address of the recipient.
<address> further takes the form:
<network-name>|<userid>,
where <network-name> is the name of the IM network. For example: jabber, yahoo, msn, aim, icq.
<userid> is the ID of user on that network
Here are some examples:
■ Using XMSSender
To address recipients, use the address format specified above without the IM: tag (example shown below). Create the addresses as instances of the class IMAddressData, and use the IM transport type. Apart from this, use the XMS client as you would normally. Refer to the XMS examples in Section 10.6.1.10, "XMS Driver".
To create an instance of IMAddressData, you may use one of two constructors:
Note: The field separator used is the pipe (|) character.
Table 10–6 Address Formats for Different IM Addresses
IM Address XMSSimpleSender Address format
Jabber user with ID: [email protected]
IM:jabber|[email protected]
MSN user with ID: [email protected]
IM:msn|[email protected]
Yahoo user with ID: foo IM:yahoo|foo
AOL IM user with ID: foo IM:aim|foo
ICQ IM user with ID: 12345
IM:icq|12345

Transport Component
10-56 Oracle Application Server Wireless Developer’s Guide
IMAddressData(String address)
where address has the XMSSimpleSender Address format <address> as shown above.
For example:
IMAddressData("msn|[email protected]")IMAddressData("aim|foo")
IMAddressData(String userid, String network)
where userid is <userid>
network is <network-name>
For example:
IMAddressData("[email protected]", "msn")IMAddressData("foo", "aim")IMAddressData("[email protected]", "jabber")
Here is some sample XMS client code to show IM addressing using both the constructors:
// IM recipientsAddressData imRecipients[] = new AddressData[4]; /* using the first constructor */// specify a regular Jabber userimRecipients[0] = new IMAddressData("jabber|[email protected]");// specify a Yahoo user (by prepending the "yahoo|" tag)imRecipients[1] = new IMAddressData("yahoo|foo"); /* using the second constructor */// specify an MSN userimRecipients[2] = new IMAddressData("[email protected]", "msn");// specify an AOL IM userimRecipients[3] = new IMAddressData("foo", "aim"); // Packet objectPacket pkt = new Packet();AddressData imSender = new IMAddressData("jabber|[email protected]");pkt.setFrom(TransportType.IM, imSender);pkt.addRecipients(TransportType.IM, imRecipients);

Transport Component
Creating Messaging Applications 10-57
10.6.1.9.7 Standalone test of the IM Driver To test the IM driver on your local machine, you must perform a few more additional steps, specifically, installing a Jabber server and a Jabber client.
To install Jabber Server on Windows:
1. Download JabberD from http://jabberd.jabberstudio.org/downloads/JabberD-1.4.2.exe
2. Open the file to start the installation process. Proceed in the installation with the default values and finish the installation.
3. Start the Jabber server from Windows Start > Programs > JabberD > JabberD This opens a DOS Command Prompt window, and you will see log output that says [notice] (-internal): initializing server. If you see this message, you have successfully started the Jabber server.
To install Jabber Server on UNIX:
1. Download the Jabber server:
Solaris 2.6: http://jabberd.jabberstudio.org/downloads/jabber-1.4.2a-sparc-solaris-2.6.tar.gz
Solaris 7: http://jabberd.jabberstudio.org/downloads/jabber-1.4.2a-sparc-solaris-7.tar.gz
2. Extract the tar file.
# mkdir jabber# cd jabber# gtar xzvf jabber-1.4.2a-sparc-solaris-<ver>.tar.gz
3. Execute jabberd:
# jabberd/jabberd
Note: The following instructions are only meant for testing from a Jabber client. If you wish to test from proprietary networks such as Yahoo or AOL, you must add the appropriate transports to the Jabber server, and install the appropriate IM client (such as Yahoo Messenger or AOL Instant Messenger).

Transport Component
10-58 Oracle Application Server Wireless Developer’s Guide
4. This starts the Jabber server and begins printing log messages such as: [notice] (-internal): initializing server. If you see this message, you have successfully started the Jabber server.
To install Jabber Client on Windows:
1. Download and install a Jabber client of your choice from http://www.jabber.org/user/clientlist.php. Oracle Corporation recommends Rival (http://rival.chote.net/) for first-time Jabber users.
2. After installation, configure your client to connect to the Jabber server on localhost. Create a new Jabber account for yourself. Now add to your contact list the Jabber ID of the OracleAS Wireless instance that you configured in the IM driver. For example, if you use the pre-configured default settings in the IM driver, you would add the ID oracleagent@localhost to your contact list.
To install Jabber Client on UNIX:
1. Download, compile and install a Jabber client of your choice from http://www.jabber.org/user/clientlist.php?Platform=Linux. Not all clients may compile on UNIX; try at your own risk. There are pre-compiled UNIX binaries of Gabber (a popular Linux Jabber client) at: http://prdownloads.sourceforge.net/gabber/gabber0.8.7_solaris.tar.gz.
2. Once you have a client up and running, follow Step 2 from the Windows section above.
To send a test message to OracleAS Wireless:
1. From your Jabber client, double-click on the contact you just added (oracleagent@localhost) to send an instant message.
2. Type help in the body, and send the message. If your IM driver and Async access point are configured correctly, you will receive an instant response from OracleAS Wireless listing the async applications you can invoke.
10.6.1.9.8 Quick-configuring the IM Driver for AOL Instant Messenger To quick-configure the IM driver for AOL Instant Messenger:
1. Create AOL screennames.
You must have two AOL screennames (accounts), one for yourself (referred to here as <my_screenname>), and one for the IM driver (referred to here as

Transport Component
Creating Messaging Applications 10-59
<imdriver_screenname>). If you do not already have two screennames, create them at http://www.aim.com.
2. Configure IM Driver and Async Access Point.
a. Add an IMDriver Instance in the messagingserver1 process. Enter the following values:
im.server.host = myjabber.net (or any Jabber host that has an AOL IM (AIM) transport)im.server.username = <imdriver_screenname>im.server.password = <password of imdriver_screenname> (or whatever you want)im.aol.enable = trueim.aol.username = <imdriver_screenname>im.aol.password = <password of imdriver_screenname>
b. Add an IM access point from Wireless Tools > Site Administration > Component Configuration > Access Point:
* Enter IM entry for Name.
* Select IM for Delivery Type.
* Enter aim|<imdriver_screenname> for Address.
* Check Allowed to Access All Applications.
* Restart the messagingserver1 process.
3. Install AOL Instant Messenger (AIM).
a. Download and install AIM from http://aim.aol.com/aimnew/NS/congratsd2.adp.
b. Launch AIM and click Setup. Click Connection to configure HTTP proxy settings (host = www-proxy.us.oracle.com, port = 80, protocol = HTTP).
c. Sign on to AIM with your screenname <my_screenname>.
d. Add <imdriver_screenname> to your buddy list and start chatting.
Note: The AOL website limits the number of accounts you can create for a given email address or IP address. If you receive an error while trying to create an account, use an alternate email address, or a different machine.

Transport Component
10-60 Oracle Application Server Wireless Developer’s Guide
10.6.1.10 XMS DriverThis driver uses a hosted XMS service and by default uses the demonstration service hosted by Oracle Corporation. This driver acts as an XMS client to an OracleAS Wireless server hosted on the Internet, and can be configured to point to any service that supports the OracleAS Wireless XMS Web Service. The XMS driver uses a special protocol, SOAP over HTTP (the OracleAS Wireless XMS Web Service). The Oracle-hosted XMS server does not require any account for access. The XMS uses SOAP over HTTP. For trial purposes, you may use the hosted demonstration OracleAS Wireless instance and use "" (a pair of double quotes) as username and "" as password. This grants you limited usage for sending messages. The URL for it is: http://messenger.us.oracle.com/xms/webservices.
10.6.1.10.1 Class Name oracle.panama.messaging.transport.driver.push.PushDriver
10.6.1.10.2 Configuration
■ messaginggatewayURL
URL to the Hosted XMS Web Service. This parameter is required. For example: http://messenger.oracle.com/xms/webservices
■ username
Name to use to authenticate against the XMS Service. XMS Web Services can determine whether username and password are required. If username is not required by XMS Web Services, leave blank (empty string). Bad username or password is returned from XMS Web Services if the user name does not exist, or if the password of that username is incorrect.
Example: messaginguser
■ password
Password of the user specified in the username field, used to authenticate against the XMS Service. XMS Web Services can determine whether username and password are required. If username and password are not required, leave password blank (empty string). Bad username or password is returned from XMS Web Services if either the user name does not exist, or if the password of that user name is not correct.
Example: 8Uh42g
The XMS driver can handle all content types. The hosted XMS Web Services determine how to handle them. The driver runs on an HTTP connection; no explicit

Transport Component
Creating Messaging Applications 10-61
HTTP proxy setting is needed because the XMS driver inherits the proxy settings of OracleAS Wireless.
This driver sends only. It supports as many transport types as the Hosted XMS Service; the actual types supported are dependent on which Hosted (OracleAS Wireless Instance) service is running. The OracleAS Wireless Service supports an API that describes the exact transports supported by an Instance.
10.6.1.11 Email DriverThe email driver supports SMTP in delivering messages, and either IMAP or POP3 in receiving messages. This driver can handle sending and receiving messages. Both IMAP or POP3 protocols are supported for receiving messages.
10.6.1.11.1 Class Name oracle.panama.messaging.transport.driver.email.EmailDriver
10.6.1.11.2 Configuration
■ server.incoming.protocol
This is the value for the e-mail receiving protocol. The possible values are IMAP and POP3. Required only if email receiving is supported on the driver instance.
■ server.incoming.host
The host name of the incoming mail server. Required only if email receiving is supported on the driver instance.
■ server.incoming.receivefolder
The name of the folder the driver is polling messages from. The default value is INBOX.
■ server.incoming.usernames
The list of user names of the mail accounts the driver instance is polling from. Each name must be separated by a comma, for example, foo,bar. Required only if email receiving is supported on the driver instance.
■ server.incoming.passwords
The list of passwords corresponding to the user names above. Each password is separated by a comma and must reside in the same position in the list as their corresponding user name appears on the usernames list. Required only if email receiving is supported on the driver instance.

Transport Component
10-62 Oracle Application Server Wireless Developer’s Guide
Example: foopwd,barpwd
■ server.incoming.emails
The email addresses corresponding to the user names above. Each email address is separated by a comma and must reside in the same position in the list as their corresponding user name appears on the usernames list. Required only if email receiving is supported on the driver instance.
Example: [email protected],[email protected]
■ server.incoming.checkmailfreq
The frequency with which to retrieve messages from the mail server. The unit is in seconds and the default value is 5 seconds.
■ server.incoming.deletefreq
The frequency to permanently remove deleted messages. The unit is in seconds and the default value is 300 seconds. A negative value indicates the messages should not be expunged. For the POP3 protocol, the message is expunged after it is processed.
■ server.incoming.autodelete
This value indicates if the driver should mark the messages deleted after they have been processed. The value can be true or false and the default value is false. For the POP3 protocol, the messages are always deleted right after they are processed.
■ server.outgoing.host
The name of the SMTP server. Mandatory only if email sending is required.
Example: smtp05.oracle.com
■ default.outgoing.from.address
The default FROM address (if one is not provided in the outgoing message).
The email driver supports SMTP in delivering messages, and either IMAP4 or POP3 in receiving messages. This driver can handle sending and receiving messages. Both IMAP4 or POP3 protocols are supported for receiving messages.
Note: Only server.outgoing.host must be configured if the driver is going to be sending only.

Transport Component
Creating Messaging Applications 10-63
10.6.1.12 Voice DriverThe voice driver supports the Out Bound Call protocol supported by VoiceGenie. Currently, it has been tested only to work with a Voice gateway. This driver handles sending messages only. Although the driver can only send messages, it must be configured to have both sending and receiving capabilities for the driver to work.
This driver can handle:
■ text/plain
■ ContentTypes.MOBILE_XML_URL
■ ContentTypes.MOBILE_XML_URL_REMOTE
■ ContentTypes.MOBILE_XML
■ ContentTypes.URL (only if the content type of the URL resource is one of above)
For other content types, the driver will throw a non-fatal driver exception.
10.6.1.12.1 Class Name oracle.panama.messaging.transport.driver.voice.VoiceGenieDriver
10.6.1.12.2 Configuration
■ voicegenie.outbound.servlet.uri
URL for the VoiceGenie Outbound Call Servlet. This is required with no default value. Here is a sample:
http://rossini.us.oracle.com/servlet/com.voicegenie.outboundcallservlet.OutboundCallServlet
The driver uses the site level proxy configuration in accessing this URL.
■ voicegenie.outbound.servlet.username
Username for the VoiceGenie Outbound Call.
■ voicegenie.outbound.servlet.password
Password for the VoiceGenie Outbound Call.
■ voicegenie.outbound.servlet.dnis
The phone number to be set as the caller. This is optional. The default value is 12345678.

Transport Component
10-64 Oracle Application Server Wireless Developer’s Guide
■ voicegenie.urlservice.path
Servicepath to the prebuilt VoiceGenie service. This driver depends on an OracleAS Wireless service based on the HTTP adapter. By default the OracleAS Wireless installation has an HTTP Adapter service named VoiceGenieURLService to support this voice driver. This is a required parameter. There is no default value and one must look at a particular OracleAS Wireless installation to obtain a value for it. Here is an sample:
foo.oracle.com:9000/ptg/rm?PAservicepath=/VoiceGenieURLService&PAsubmit=Submit
■ voicegenie.driver.receive.host and voicegenie.driver.receive.port
These are the IP host and port for the HTTP adapter to get sending content in Mobile XML format. The port should be used by this driver only. These are required.
10.6.1.13 UCP DriverUCP (Universal Communication Protocol) is one of the most popular GSM SMS protocols. OracleAS Wireless includes a pre-built implementation of the UCP driver as a driver that is capable of both sending and receiving.
The UCP driver implements EMI/UCP 4.0. It supports both listening mode and non-listening mode. In the non-listening mode, the driver opens one connection to the SMSC. This connection is shared in sending and receiving. UCP driver works with most SMSC in the non-listening mode. In the listening mode, the driver listens to a port. The SMSC opens a connection to the driver to deliver received messages from devices to the driver. The driver opens a HTTP connection on demand to deliver a message to the SMSC for sending to the target device. The HTTP connection is reused if possible.
Note: This driver opens a port (as specified in voicegenie.driver.receive.port) and listens to HTTP traffic. It uses voicegenie.driver.receive.host and voicegeneie.driver.receive.port to compose a URL for OracleAS Wireless HTTP adapter to contact the driver. This is required if you want to send a message that contains OracleAS Wireless XML. Ensure that you provide the correct hostname and unique port number in order for the driver to function.

Transport Component
Creating Messaging Applications 10-65
This driver can handle:
■ text/plain
■ ContentTypes.RING_TONE
■ ContentTypes.GRAPHICS
■ ContentTypes.WAP_SETTINGS
■ ContentTypes.WAP_PUSH
■ ContentTypes.VCARD
■ ContentTypes.EMAIL_SETTING
■ ContentTypes.VCALENDAR
■ ContentTypes.MM1_NOTIFICATION
■ ContentTypes.EMS
■ ContentTypes.ENCODED_SMS
■ ContentTypes.URL (only if the content type of the related resource is one of above)
For other content types, the driver will throw a non-fatal driver exception.
10.6.1.13.1 Class Name oracle.panama.messaging.transport.driver.sms.UCPDriver
10.6.1.13.2 Configuration
■ sms.account.id
This is the account ID for the SMSSC. Generally, it should be the assigned short number by the operator. This is required.
■ sms.account.password
This is a password assigned by the operator. It is used to open a session to the SMSC with UCP command 60.
■ sms.ucptype
Specifies which command to use in sending a message. The possible values are 01 and 51. The default value is 51, which means UCP command 51 is used to send a message.
■ sms.server.host and sms.server.port
Transport Component
10-66 Oracle Application Server Wireless Developer’s Guide
SMSC server information the driver uses to open a TCP/IP connection.
■ sms.server.default.encoding
The default encoding of the text message. The default value is IA5.
■ sms.local.port
The local port the driver should use to make the outgoing connection, applicable to the non-listening mode driver.
■ sms.local.address
The logical hostname or IP address where the driver runs, applicable to the non-listening mode driver.
■ sms.window.size
The windowing size, applicable to the non-listening mode driver only.
■ sms.receiver.listener.port
If the driver is in listening mode, this port is used by the SMSC to initialize the TCP/IP connection to pass received messages to the driver. If the sms.server.url is specified, this one will be used. Otherwise, it will be ignored.
■ sms.server.url
This is the URL for the driver to access the SMSC to send messages through an HTTP connection. If specified, sms.server.host and sms.server.port will be ignored. If it is not specified, then sms.server.host and sms.server.port are required.
■ sms.bulk.sending
Determines whether to use command 02 to do bulk sending (if it is possible). The default value is true.
■ sms.message.maxchunks
This is the maximum chunks for any single message allowed. Chunks after this number are ignored. The default is -1, which means no limit.

Transport Component
Creating Messaging Applications 10-67
■ sms.message.chunksize
This is the maximum size for each chunk in byte. The default is 160.
■ sms.alert.interval
The interval (in seconds) at which command 31 is invoked. If it is set to a negative value, command 31 will not be invoked. This command is mainly used as a signal to the SMSC to keep the connection alive when the driver is in non-listening mode.
10.6.1.14 SMPP DriverSMPP (Short Message Peer-to-Peer) is one of the most popular GSM SMS protocols. OracleAS Wireless includes a pre-built implementation of the SMPP driver as a driver that is capable of both sending and receiving. The driver opens one TCP connection to the SMSC as a transmitter for sending if the sending feature is enabled, another connection to the SMSC as a receiver for receiving if the receiving feature is enabled. Hence two connections (initiated by the driver) are needed for all communication between the driver and the SMSC if both sending and receiving
Note:
■ If you have a direct TCP connection to the SMSC, the driver uses Command 60 to start a session with the SMSC. This allows the driver and the SMSC to communicate with one socket connection for sending, receiving and status. In this case sms.server.url is not used.
■ If the connection you have to an SMSC is HTTP-based, then you must provide the value for sms.server.url; this is the URL the driver instance uses to send messages. Also sms.receiver.listener.port must be provided so that the driver instance opens binds to this port for incoming messages. In the HTTP connection case, sms.server.host and sms.server.port are not used.
■ sms.message.chunksize controls the size of each message in case the message total size is bigger than one SMS message. sms.message.maxchunks controls the maximum number of chunks allowed for each message. Those beyond that will be discarded.

Transport Component
10-68 Oracle Application Server Wireless Developer’s Guide
features are enabled. This driver implements SMPP 3.4. It supports only SMSC which supports SMPP 3.4.
This driver can handle:
■ text/plain
■ ContentTypes.RING_TONE
■ ContentTypes.GRAPHICS
■ ContentTypes.WAP_SETTINGS
■ ContentTypes.WAP_PUSH
■ ContentTypes.VCARD
■ ContentTypes.EMAIL_SETTING
■ ContentTypes.VCALENDAR
■ ContentTypes.MM1_NOTIFICATION
■ ContentTypes.EMS
■ ContentTypes.ENCODED_SMS
■ ContentTypes.URL (only if the content type of the related resource is one of above)
For other content types, the driver will throw a non-fatal driver exception.
10.6.1.14.1 Class Name oracle.panama.messaging.transport.driver.sms.SMPPDriver
10.6.1.14.2 SMPP DRIVER--Configuration
■ sms.account.id
This is the account ID for the SMSSC. Generally, it should be the assigned short number by the operator. This is required.
■ sms.server.host
SMSC server information the driver uses to open a TCP/IP connection
■ sms.smpp.transmitter.system.idsms.smpp.transmitter.system.typesms.smpp.transmitter.system.passwordsms.server.transmitter.port

Transport Component
Creating Messaging Applications 10-69
These attributes depend on your SMSC. Along with the short number assigned to you, the operator may also give you a system ID, type, password and port for you to log in to the SMSC as transmitter (that is, to send SMS).
■ sms.smpp.receiver.system.idsms.smpp.receiver.system.typesms.smpp.receiver.system.passwordsms.server.receiver.port
These attributes depend on your SMSC. The operator may also give you a system ID, type, password and port for you to log in to the SMSC as receiver (that is, to receive SMS).
■ sms.server.default.encoding
The default encoding of the text message. The default value is IA5.
■ sms.local-sending.port
The local port the driver should use to make the outgoing sending connection.
■ sms.local-receiving.port
The local port the driver should use to make the outgoing receiving connection.
■ sms.local.address
The logical hostname or IP address where the driver runs.
■ sms.server.source.ton
The TON of the from-address (account id).
■ sms.server.source.npi
The NPI of the from-address (account id).
■ sms.server.destination.ton
The TON of the destination address.
■ sms.server.destination.npi
The NPI of the destination address.
■ sms.window.size
The windowing size. The default value is 1.

Transport Component
10-70 Oracle Application Server Wireless Developer’s Guide
■ sms.bulk.sending
Whether to use command submit_multi to do bulk sending (if it is possible). The default value is true.
■ sms.payload.sending
Whether to use message_payload field for sending when short_message field is operational. The default value is false.
■ sms.message.maxchunks
The maximum chunks a long message can be split into. Chunks after this number are ignored. A negative value means there is no limitation. The default is -1.
■ sms.message.chunksize
The maximum size for each chunk in bytes. The default is 160.
■ sms.enquire-link.interval
The interval in seconds that the enquire link is called. This feature is disabled if the interval is less than 0. The default value is -1.
■ sms.throttling.delay
The delay in seconds that sending re-starts after a throttling error is received from SMSC. This feature is disabled if the delay is less than 0. The default value is 15.
■ sms.extra.error-code
The list of comma-separated error codes that can be sent by the SMSC that require re-sending of the messages.(for example: 0x45, 0x50). By default if any error code is received as status, the message is discarded.
■ sms.bind.retry.delay
The delay in seconds, after which the driver will wait for an enquiry link response before trying to rebind with the SMSC. This feature is disabled if the value of this parameter or sms.enquire-link.interval is less than 0. The default value of this parameter is -1.
■ sms.registered.delivery.mark
The driver may set the registered-delivery flag when sending a message to the SMSC based on the requirement of the application. However, the SMSC may not support all valid flags. In this case, this mark can be used to disable certain flag bits so that the sending request is not rejected by the SMSC.

Transport Component
Creating Messaging Applications 10-71
10.6.1.15 Fax Driver (RightFax)This driver supports Fax messages and supports the RightFax (by Captaris) FAX protocol. The driver depends on the RightFax software package and the availability of a RightFax Fax server to deliver fax messages. This driver is capable of only sending messages.
This driver can handle any content type. It recognizes the following MIME types:
■ text/plain
■ application/msword
■ application/msexcel
■ application/msppt
■ application/postscript
■ application/octet-stream
In the case of the ContentTypes.URL, the driver retrieves the content from the specified URL. The content and MIME type returned by this operation become content and MIME type sent to the fax server.
10.6.1.15.1 Class Name oracle.panama.messaging.transport.driver.fax.RightFAXDriver
10.6.1.15.2 Configuration
■ server.url
URL to the RightFax server. This is required.
■ server.account
Account name to the RightFax server. This is required.
All the default attributes below are optional. They are used to customize the cover sheet only.
■ server.coverpage
The cover page to be used by this driver. If not specified, then the default cover page of the fax gateway will be used.
■ default.sender.name
The default sender name to be shown on the cover page.

Transport Component
10-72 Oracle Application Server Wireless Developer’s Guide
■ default.sender.corporation
The default sender corporation to be shown on the cover page.
■ default.sender.fax
The default sender’s fax number to be shown on the cover page.
■ default.sender.phone
The default sender’s phone number to be shown on the cover page.
■ default.sender.address
The default sender’s address to be shown on the cover page.
■ default.sender.notes
The default sender’s notes to be shown on the cover page.
■ server.coverpage
The RightFAX driver requires a coverpage setting to render the coverpage. The coverpage is under a coverpage directory of the RightFAX server. This parameter should be set to the filename of the coverpage you want. If this parameter is not set, the default coverpage of the fax server is used.
10.6.2 How to Develop New DriversThe driver interfaces are intended for the implementation of drivers for particular protocols. As explained above, drivers can be plugged into the transport system rather easily, extending network protocol support to the base product. A driver is expected to be a very thin layer and handles only the protocol-specific details. It is not designed to handle life cycle, load balancing or scalability issues. The transport system handles these issues.
The transport system initializes and destroys driver instances by respectively calling the init() and destroy() methods as specified in the Interface Driver. The transport system also handles load balancing and concurrence. A driver should just focus on interpreting the semantics of a particular protocol, leaving all others to the transport system.

Transport Component
Creating Messaging Applications 10-73
Figure 10–12 Driver Lifecycle
A driver can be capable of only sending, or receiving, or both. To implement the sending semantics, a driver only implements the send() methods as specified in the interface Driver. Receiving is a bit more complex in that the action to receive is driven by the transport. To implement receiving, a driver fills in the logic to receive in the receive() method specified by the Driver interface. The transport will continuously invoke the receive() method throughout the life cycle of the driver instance.
Drivers should be designed to be instance thread safe, or their usage must be clearly conveyed to system administrators so that proper configurations can be set to not thread the driver instance.
The key classes and interfaces required for developing the SMS driver interface to work with OracleAS Wireless are listed below.
10.6.2.1 Class oracle.panama.messaging.transport.TransportLocatorThe class TransportLocator defines interfaces that provide initial access to both the messaging interface and the driver interface. Two key methods defined for this class are:
■ getDriverController() returns an instance for the use of the driver interface
■ getMessagingController() returns a Controller instance for the use of the messaging interface

Transport Component
10-74 Oracle Application Server Wireless Developer’s Guide
10.6.2.2 Interface oracle.panama.messaging.transport.DriverThis is the main interface for developing drivers for a particular protocol. You develop a driver by implementing the Driver interface. Your component is a qualified OracleAS Wireless driver if it implements this interface.
10.6.2.2.1 The init() and destroy() methods These methods control the life cycle of the driver instance. The initialization properties passed to the init method are those specified through the OracleAS Wireless Tools configuration framework.
The init() method returns an initialization status, which can be one of:
Driver.FAILED, Driver.SEND, Driver.RECEIVEDriver.SEND_RECEIVE.
Ensure that the status returned is consistent with those configured through OracleAS Wireless Tools. If different, then the value of the status returned here and that configured through the webtool will be used.
10.6.2.2.2 The send() method Drivers implement this method to perform whatever is appropriate for their particular protocols to send out messages. The content to be delivered is stored in the Message object passed onto the send() method, while the address parameter specifies one or more recipients to deliver the message to.
Further, the driver is expected to return a unique ID for each message, or identifies one for each of the recipients. These IDs are used by the transport to query the status of the delivery when necessary.
The driver must return a null message ID to make the transport retry. Exceptions thrown out of the send method are caught, and logged as sending statuses. If the send () method throws any exception, the transport will not retry. If the send () method throws an exception of the type DriverException, the exception code is checked. If the code of the exception is marked fatal, the sending capability of this driver instance is revoked.
■ If the exception is not marked fatal, the driver will still be used to send other messages.
■ If the exception is not of the type DriverException, the driver will be used to send other messages as well.
Note: All classes mentioned below assume that you are using the oracle.panama.messaging.transport package, unless otherwise specified.

Transport Component
Creating Messaging Applications 10-75
Before a driver throws a non-fatal DriverException, the driver will try to recover. For example, if a TCP/IP connection is dropped, the driver tries to reconnect it without throwing an exception. If the driver does throw a non-fatal exception without trying to recover, the transport will keep sending messages, which will fail since the error is not recovered. This will decrease performance of the system, especially when the load is heavy.
10.6.2.2.3 The receive() method Drivers implement this method to perform whatever is appropriate for their particular protocols to receive messages and/or status reports.
As mentioned above, the transport drives the operation. Normally the driver is expected to return from this method once a message is received. Controlled is yielded back to the transport regularly so that the transport can evaluate the next best step.
The receive() method is called continuously by the transport. Hence it is preferable the receive() method blocks if it does not receive any messages. However it should not block indefinitely otherwise it will be considered a runaway operation and the thread that calls the receive will be terminated. The elapsed time for runaway threads can be configured by setting Maximum Execution Time per Request under runtime configuration (default is 60 second). When a message is received, it should call the onMessage method of the Message Listener to submit the message (or, the onStatus callback on the Status Listener if the message was a status report). The method can throw an exception of type DriverException and mark it as fatal to request that the transport stop calling the receive () method. The reason for this design is to simplify the logic and thread control of the driver.
10.6.2.2.4 The getStatus() method The transport calls this method in an attempt to retrieve delivery status for a particular message when necessary.
10.6.2.2.5 The queryTracking() and queryNotifying() methods With some protocols, an active poll to the external service must be performed to check the status of messages previously sent. These methods are called by the Transport to determine whether a getStatus() must be issued to retrieve status, or the driver would pass status back to Transport without such call (typically the driver calls onStatus() inside receive() ).

Transport Component
10-76 Oracle Application Server Wireless Developer’s Guide
10.6.2.3 Interface oracle.panama.messaging.transport.DriverControllerProvides an entry point into other driver-related utilities and interfaces such as Message Listener. You can get an instance of the DriverController by calling the getDriverController() method of the Locator.
Figure 10–13 Flow of Message and Status
10.6.2.3.1 The getMessageListener() and getStatusListener() methods These methods return the Transport callback instances for the receiving messages or status. You typically call the onMessage() or onStatus() methods within your implementation of the receive() method in the Driver interface to pass on messages and status to the Transport system respectively.
10.6.2.4 Interface oracle.panama.messaging.transport.GSMSmartMSGEncoderIf your implementation must process GSM smart message delivery (such as OTA WAP provisioning, ring-tone, graphics), you will find this interface useful. OracleAS Wireless includes a default implementation of this interface, which can be located by getting the value for the property wireless.messaging.gsmsms.encoder.class. The default implementation handles OTA WAP provisioning, ringtone, and graphics for Nokia and Ericsson handsets.
If you would want to extend the base capability, you can do so by developing your own implementation by extending this interface. Once done, you should configure the transport property wireless.messaging.gsmsms.encoder.class to include the value of the class of your implementation.
10.6.2.4.1 The encode() method This is the only method needed for the interface. The parameters indicate the type (ringtone, graphics), model (Nokia, Ericsson) and all the attributes relevant to the requested type.

Transport Component
Creating Messaging Applications 10-77
You process the information and return encoded messages in a form of GSMSmartMsg, which is the fragments for the message and some specific smart message information.
It might happen that either the type, model or other item are not supported by your implementation. In this case, you have two choices:
■ Throw a Transport exception when you know how to handle it and are sure that user data are corrupted or improper. In this case, the smart messaging process (not the physical Java process) terminates.
■ Do not throw an exception, just return null when you do not know how to handle it.
In this case, the pre-built SMS drivers (such as UCP driver, SMPP driver) will fall back to the default implementation of the GSMSmartMsgEncoder to see if it can handle the situation. This depends on whether a driver is developed with the correct semantics. If you are focused on extending the capabilities of the GSMSmartMsgEncoder, follow this convention to allow maximum utilization of your development.
10.6.2.5 Interface oracle.panama.messaging.transport.MessageListener and StatusListenerYou obtain instances of these interfaces by calling the appropriate methods in the DriverController interface.
They are typically used within your implementation of the receive() method in the Driver interface to inform the availability of messages or status to the Transport system.
10.6.2.6 Class oracle.panama.messaging.common.MessageThe message class is used to capture the content to be delivered or received. It is comprehensive, and has an expressive power similar to email. It supports multi-part messages and allows mime types to be associated with the content.
However, how to deal with the particular parts or MIME types is left for the implementation of the drivers.
You will find the header of the message a good place to pass information from your application to the driver if such information is not passed to the driver through the driver interface.

Transport Component
10-78 Oracle Application Server Wireless Developer’s Guide
10.6.2.7 Class oracle.panama.messaging.common.ContentTypesThis class is not a class only for drivers. It specifies a few content types (MIME types) in addition to the standard MIME types. As driver implementers, you might encounter these MIME types. How to deal with these MIME types is left to the individual driver, but it is critical that you are aware of them.
10.6.2.8 Properties of the driverWhile adding a driver to the OracleAS Wireless using OracleAS Wireless Tools, a set of properties must be specified, as listed in the table below.
10.6.2.9 Custom properties for a driverWhen installing a driver, custom properties can be specified for the driver to function. For example, for an email driver to work, it might need to have a property for the imap hostname. The driver can be coded to expect a property of, say, name imap.hostname. When adding a driver through OracleAS Wireless Tools, one can
Table 10–7 Driver properties
Name Description
NameRequired property A discretionary name for the driver.
ClassRequired property The class that implements the driver.
Delivery CategoryRequired properties
The supported categories of transport it supports, such as SMS, email.
Protocol The particular protocol the driver transmits, such as SMPP or UCP. This is optional. Default is "*", meaning all of the possibilities.
Carrier The carrier the driver can support, such as Cingular, Telia. This makes sense particularly in the SMS area and is optional. Default is "*", meaning all the possible carriers.
Speed Speed of the driver. This can be used to improve load balancing. This is optional, with possible value ranging from 0-10. Default is 0 (slowest).
Cost Cost to use this driver. This can be used to improve load balancing. This is optional, with possible value ranging from 0-10. Default is 0 (most inexpensive).
Capabilities Whether the driver can send, receive or both. This is optional defaulted to send only.
Encoding, locale Not used.

Transport Component
Creating Messaging Applications 10-79
specify any number of property names. When creating the driver instances, the specific values of such a property can be provided. For example, out of the same driver code, one can install two email driver instances, each provided with imap hostnames to two distinct IMAP servers.
These custom properties are passed into the driver instance when init() is called. In addition to the set of custom properties, some OracleAS Wireless site-level properties are also passed implicitly, they are:
■ wireless.log.directory
■ wireless.firewall.http.use.proxy
■ wireless.firewall.http.proxy.host
■ wireless.firewall.http.proxy.port
■ wireless.firewall.http.non.proxy.hosts
■ wireless.firewall.ftp.use.proxy
■ wireless.firewall.ftp.proxy.host
■ wireless.firewall.ftp.proxy.port
■ wireless.firewall.authentication.set
■ wireless.firewall.authentication.username
■ wireless.firewall.authentication.password
10.6.2.10 Example: A Sample Driver// Copyright (c) 2001 Oracle Corporation. All rights reserved.package oracle.panama.messaging.transport.driver.sample;/*** A SimpleDriver class.* <P>* @author Oracle Corporation*/import Java.util.Properties;import Java.net.ServerSocket;import Java.net.Socket;import Java.io.BufferedReader;import Java.io.PrintStream;import Java.io.InputStreamReader;import Java.io.IOException;import Java.io.PrintWriter;import Java.io.FileOutputStream;

Transport Component
10-80 Oracle Application Server Wireless Developer’s Guide
import Java.text.SimpleDateFormat;import oracle.panama.messaging.transport.*;import oracle.panama.messaging.common.*;import oracle.panama.model.DeliveryType;import oracle.panama.util.MessageCatalog;import oracle.panama.core.admin.L; /*** A Simple driver** @author ashah, jxiang*/public class SimpleDriver implements Driver {private String mCompanyName;private String mDeliveryType;private String mVersion;private PrintWriter log = null; /*** Initialize the driver.** @param properties the driver’s properties.* @return the initialization status.*/public int init(Properties properties) {// get the locator instance and various listenersTransportLocator locator = TransportLocator.getInstance();DriverController manager = locator.getDriverController();mMessageListener = manager.getMessageListener();mStatusListener = manager.getStatusListener();// read pr opertiesmCompanyName = properties.getProperty("company-name");// delivery type is needed. Use SMSmDeliveryType = DeliveryType.SMS.getName();mVersion = "1.0";int status = Driver.FAILED;try {String logName = properties.getProperty("logfile");if (logName == null)logName = new String("SimpleDriver.log");log = new PrintWriter(new FileOutputStream(logName, true ) );} catch(Exception e) {e.printStackTrace();return status;}

Transport Component
Creating Messaging Applications 10-81
log ("initialized: " + new Java.util.Date());mPort = Integer.parseInt(properties.getProperty("port"));mDelay = 20000; // 20 secondsmMessage = new Message();mSemaphore = new Object();status = Driver.SEND_RECEIVE; // TODO - verify the return codemStatus = new Status();log ("init complete");return status;} /*** Destroy the driver.*/public void destroy() {try {log ("destroy");mServerSocket.close();mReader.close();mWriter.close();log ("destroy comp lete");}catch (Exception e) {}} /*** Get the accepted attributes of the driver.** @return the accepted attributes of the driver.*/public Parameter[] getParameters() {Parameter[] parameters = new Parameter[3];parameters[0] = new Parameter("company-name", "a company name", true, null);parameters[1] = new Parameter("logfile", "the log file name", false, "SimpleDriver.log");parameters[2] = new Parameter("port", "the listening port of the driver", true, null);return parameters;} /*** Get the version of the driver.** @return the version of the driver.
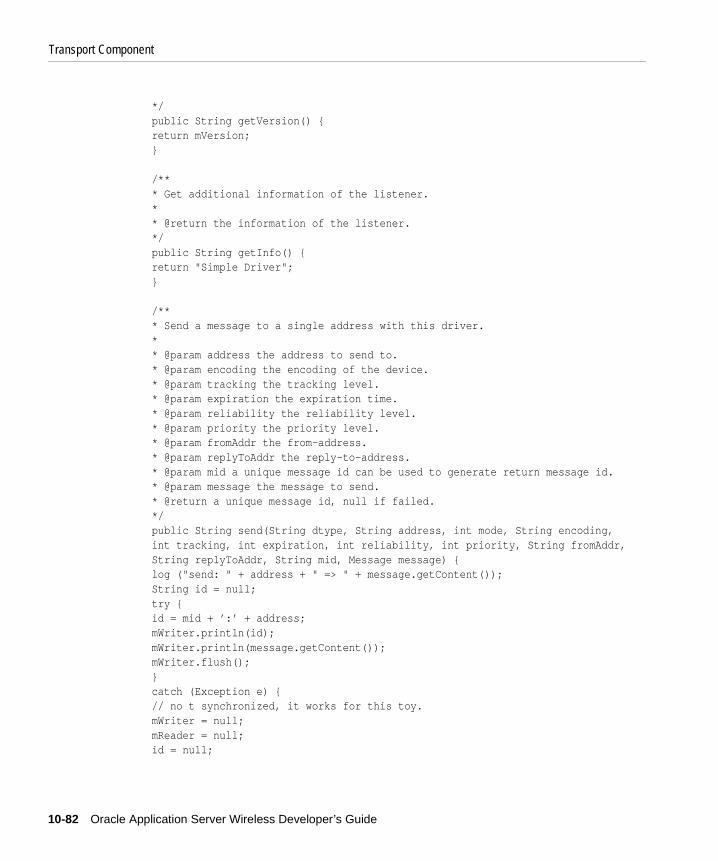
Transport Component
10-82 Oracle Application Server Wireless Developer’s Guide
*/public String getVersion() {return mVersion;} /*** Get additional information of the listener.** @return the information of the listener.*/public String getInfo() {return "Simple Driver";} /*** Send a message to a single address with this driver.** @param address the address to send to.* @param encoding the encoding of the device.* @param tracking the tracking level.* @param expiration the expiration time.* @param reliability the reliability level.* @param priority the priority level.* @param fromAddr the from-address.* @param replyToAddr the reply-to-address.* @param mid a unique message id can be used to generate return message id.* @param message the message to send.* @return a unique message id, null if failed.*/public String send(String dtype, String address, int mode, String encoding,int tracking, int expiration, int reliability, int priority, String fromAddr,String replyToAddr, String mid, Message message) {log ("send: " + address + " => " + message.getContent());String id = null;try {id = mid + ’:’ + address;mWriter.println(id);mWriter.println(message.getContent());mWriter.flush();}catch (Exception e) {// no t synchronized, it works for this toy.mWriter = null;mReader = null;id = null;

Transport Component
Creating Messaging Applications 10-83
}log ("sent id: " + id );return id;}/*** Send a message to a list of addresses with this driver.** @param addresses the addresses to send to.* @param encoding the encoding of the device.* @param tracking the tracking level.* @param expiration the expiration time.* @param reliability the reliability level.* @param priority the priority level.* @param fromAddr the from-address.* @param replyToAddr the reply-to-address.* @param mid a unique message id can be used to generate return message id.* @param message the message to send.* @return a list of unique message ids, null if failed.*/public String[] send(String dtype, String[] addresses, int[] modes, String encoding, int tracking, int expiration, int reliability,int priority, String fromAddr, String replyToAddr, String mid, Message message) {String[] ids = null;log ("send: mult iple => " + message.getContent());try {int count = addresses.length;ids = new String[count];String id = mid + ’:’ + addresses[0];ids[0] = id;mWriter.print(id);for (int i=1; i<count; i++) {id = mid + ’:’ + addresses[i];ids[i] = id;mWriter.print(’,’ + id);}mWriter.println();mWriter.println(message.getContent());mWriter.flush();}catch (Exception e) {// no t synchronized, it works for this toy.mWriter = null;mReader = null;ids = null;

Transport Component
10-84 Oracle Application Server Wireless Developer’s Guide
}log ("sent multiple");return ids;} /*** Send a message to a list of addresses with this driver.** @param dtypes the delivery types for all destinations* @param addresses the addresses to send to.* @param modes the delivery modes* @param encoding the encoding of the device.* @param tracking the tracking level.* @param expiration the expiration time.* @param reliability the reliability level.* @param priority the priority level.* @param fromAddr the from-address.* @param replyToAddr the reply-to-address.* @param mid a unique message id can be used to generate return message id.* @param message the message to send.* @return a list of unique message ids, null if failed.*/public String[] send(String[] dtypes, String[] addresses, int[] modes,String encoding, int tracking, int expiration, int reliability, int priority, String fromAddr,String replyToAddr, String mid,Message message) throws DriverException {String[] ids = null;int count = addresses.length;log (" send: " + count + " recipients : " + message.getContent());ids = new String[count];for (int i=0; i<count; i++) {ids[i] = send(dtypes[i], addresses[i], modes[i], encoding, tracking,expiration, reliability, priority, fromAddr,replyToAddr, mid, message);}return ids;} /*** Get the sending status of a message. The* status got by this call should be reported* the transport system via the driver listener* onStatus callback.** @param mid the id of the message.

Transport Component
Creating Messaging Applications 10-85
*/public void getStatus(String mid) {} /*** Get the sending statuses of a list of messages.* The statuses got by this call should be reported* the transport system via the driver listener* onStatus callback.** @param mids the ids of these messages.*/public void getStatus(String[] mids) {} /*** Check if query is required to get the notification.** @return true if required, false otherwise.*/public boolean queryNotifying() {return false;} /*** Check if query is required to track the* sending status.** @return true if required, false otherwise.*/public boolean queryTracking() {return false;} /*** Receive a message/status. If any message/status* is received, the driver should use the onMessage/* onStatus callbacks of the driver listener (got* via the controller) to report it to the transport* system. This method should do something if the* initization status has the RECEIVE ability.*/public void receive() {log ("receive started");synchronized (mSemaphore) {

Transport Component
10-86 Oracle Application Server Wireless Developer’s Guide
try {if (mServerSocket == null) {try {mServerSocket = new ServerSocket(mPort);mServerSocket.setSoTimeout(mDelay);}catch (IOException ioe) {mServerSocket = null;mSocket = null;throw ioe;}}if (mSocket == null) {try {mSocket = mServerSocket.accept();mSocket.setSoTimeout(mDelay);}catch (IOException ioe) {mSocket = null;throw ioe;}}if (mReader == null) {mReader = new BufferedReader(new InputStreamReader(mSocket.getInputStream()));mWriter = new PrintStream(mSocket.getOutputStream());}String buf = mReader.readLine();log ("receive read: " + buf);if (buf.charAt(0) == ’*’) {String address = buf.substring(1);mMessage.setContent(mReader.readLine());DeviceInfo info = new DeviceInfo();info.setDeliveryType(mDeliveryType);info.setEncoding("7b");String from = "FROM-ME-TODO";mMessageListener.onMessage(from, info, address, mMessage);log ("message sent to message listener");}else {mStatus.setContent("received");mStatusListener.onStatus(buf.substring(1), mStatus);log ("status sent to status listener");}}
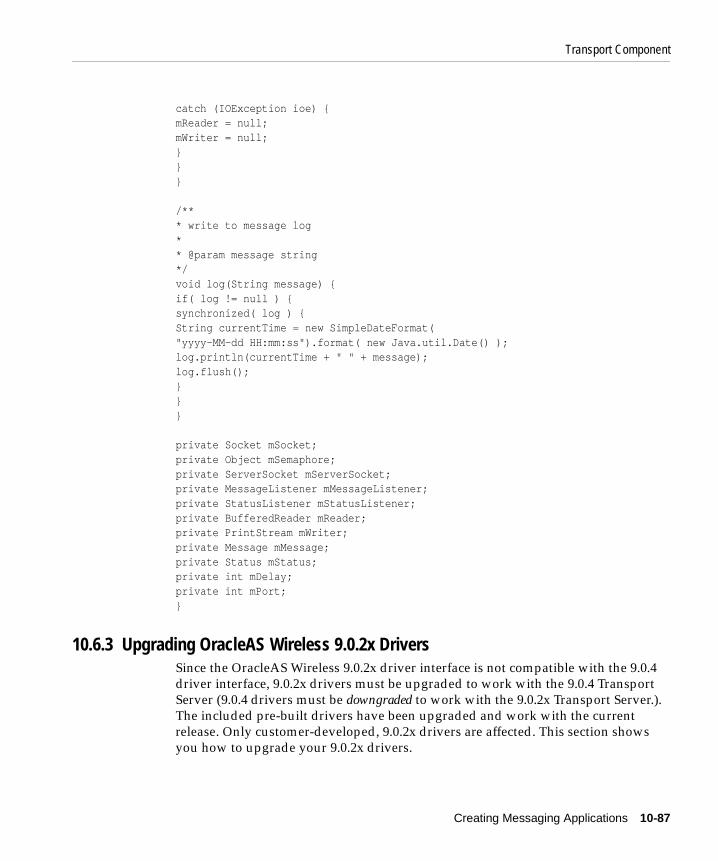
Transport Component
Creating Messaging Applications 10-87
catch (IOException ioe) {mReader = null;mWriter = null;}}} /*** write to message log** @param message string*/void log(String message) {if( log != null ) {synchronized( log ) {String currentTime = new SimpleDateFormat("yyyy-MM-dd HH:mm:ss").format( new Java.util.Date() );log.println(currentTime + " " + message);log.flush();}}} private Socket mSocket;private Object mSemaphore;private ServerSocket mServerSocket;private MessageListener mMessageListener;private StatusListener mStatusListener;private BufferedReader mReader;private PrintStream mWriter;private Message mMessage;private Status mStatus;private int mDelay;private int mPort;}
10.6.3 Upgrading OracleAS Wireless 9.0.2x DriversSince the OracleAS Wireless 9.0.2x driver interface is not compatible with the 9.0.4 driver interface, 9.0.2x drivers must be upgraded to work with the 9.0.4 Transport Server (9.0.4 drivers must be downgraded to work with the 9.0.2x Transport Server.). The included pre-built drivers have been upgraded and work with the current release. Only customer-developed, 9.0.2x drivers are affected. This section shows you how to upgrade your 9.0.2x drivers.

Transport Component
10-88 Oracle Application Server Wireless Developer’s Guide
The main differences between the 9.0.2x driver interface and 9.0.4 driver interface are:
■ one method getParameter() was added
■ all three send() methods are changed
■ several new attributes were added to the parameter list
10.6.3.1 New and Changed Methods■ The getParameter() method
This method lists the attributes the driver accepts. It can be called to get the accepted attributes information dynamically.
■ The send() methods
These methods are enhanced to pass more parameters from the Transport to the driver; none of the original parameters have been removed, making it very easy to upgrade the 9.0.2x drivers. The newly-added parameters are useful, but they are not required. The newly added parameters include priority, message ID (mid), and expiration. The priority is the priority level of the message. Its possible values are defined in MessageInfo as constants. The message ID is a unique message ID that can be used as a seed by the driver to generate unique return message IDs. Generally, the driver can use this message ID (appended with the destination address) as the return message ID. The expiration is the time in seconds when the message will expire. If the value is less than or equal to zero (0), the message will not expire. See the Java doc of the new driver interface more information on the newly added parameters.
To upgrade your 9.0.2x driver, you just must:
1. Add the new getParameter() method.
2. Modify all three of your send() methods to use the latest signatures.
10.6.4 Extend the Transport Server, HooksApplications can install hooks that are invoked during message sending and receiving depending on the type of hook. All hooks are optional. Typically the hooks are passed all of the information the application specifies and can do what ever is appropriate. Hooks are useful in providing routing information, and perform other custom logic in some cases.
There are two main categories of hooks:

Transport Component
Creating Messaging Applications 10-89
■ Named hooks--only at most one hook for each kind, and can be added only through OracleAS Wireless Tools configuration.
■ General hook--There are four kinds of general hook. They are: pre-send, post-send, pre-receive, post-receive. There can be none or multiple hooks for each kind and they can be added and removed either through the OracleAS Wireless Tools or programmatically through methods available on the Messenger interface.
No default hook is provided for the product.
10.6.4.1 Named Hooks■ DriverFinder--(interface
oracle.panama.messaging.transport.DriverFinder). The expected semantics of this hook is to fill in the driver name for a delivery request.
■ CarrierFinder--(interface oracle.panama.messaging.transport.CarrierFinder). This hook is a named hook that can be configured through OracleAS Wireless Tools. The expected semantics of this hook is to locate a carrier for a given device address. The carrier information is then used by the DriverFinder or the transport system to perform routing. It is generally called once per message. There can be only one hook of this kind.
■ SmartMsgEncoder (interface oracle.panama.messaging.transport.SmartMsgEncoder). This hook is used to encode GSM and/or CDMA smart messages. In 9.0.2.x releases, this hook is called GSMSmartMsgEncoder. It supports GSM smart message encoding only. This interface is extended in this release to support both GSM and CDMA smart messages; however, the semantics are unchanged. If a hook can not encode a message, it should return null to indicate this fact so that other encoders will be invoked until a proper encoder is found. The previously-shipped encoder will be upgraded to the new interface. To upgrade your implementation from 9.0.2.x to this release, change the class definition from implements oracle.panama.messaging.transport.GSMSmartMsgEncoder to extends oracle.panama.messaging.transport.SmartMsgEncoder, and change the method name encodeSmartMsg to encodeGSMSmartMsg.

Supporting Premium SMS and Reverse Charge SMS
10-90 Oracle Application Server Wireless Developer’s Guide
10.6.4.1.1 OracleAS Wireless Messaging System
■ FailOverHook--(interface oracle.panama.messaging.transport.FailOverHook). This hook is for future use.
10.6.4.2 General Hooks■ PreSendingHook
(interface oracle.panama.messaging.transport.GeneralHook). This hook is called before sending any message.
■ PostSendingHook(interface oracle.panama.messaging.transport.GeneralHook). This hook is called after sending any message.
■ PreReceivingHook(interface oracle.panama.messaging.transport.GeneralHook). This hook is called before passing any received message to the listener.
■ PostReceivingHook(interface oracle.panama.messaging.transport.GeneralHook). This hook is called after passing any received message to the listener.
10.7 Supporting Premium SMS and Reverse Charge SMSSMS phones are one of the major devices Async is targeted to serve. Within the SMS segment, a popular billing model is Premium SMS. It is similar to the 900 model of voice phone translated into SMS. SMS phones send a message (with all the service-required information) to a short number (termed as Large Account). The message is routed to the content provider, which has their system set up to listen to the SMS message sent to the number. The user request is processed and the result is sent back to the device. The end-user is charged a service premium rate on top of the typical SMS transport rate for the request message issued from the mobile device. The premium varies depending on the types of service to be invoked. The request charge is reflected on the subscriber’s existing SMS phone bill. At the end of the billing cycle, the premium will be split between the Carrier (Premium SMS operator), and the content provider. Figure 10–14, "Premium SMS Process" illustrates the process.

Supporting Premium SMS and Reverse Charge SMS
Creating Messaging Applications 10-91
Figure 10–14 Premium SMS Process
To access a Premium SMS service, a mobile user sends a message to a Large Account (Async address in OracleAS Wireless terminology) with a keyword (Async short name in OracleAS Wireless terminology) to identify the service. A predefined service premium (associated with the Large Account) is charged to the mobile subscriber when the request message is sent from the device to the network of the Premium SMS operator. The content provider invokes the corresponding service identified by the service keyword once it receives the message. The service result is sent back to the mobile subscriber through another SMS message.
Figure 10–15 Reverse Charge SMS
Reverse Charge SMS is a billing model which charges the service premium to the mobile subscriber on the Result SMS message. The service premium of the request depends on which service a mobile user accesses. Each service has a tariff class associated with it. Once the Service Provider generates the service result, it also supplies the Reverse Charge SMS operator with the required information so the operator is able to record the billing transaction correctly.
10.7.1 Premium SMS and Reverse Charge New FeaturesTo properly support the Premium SMS and Reverse Charge model on OracleAS Wireless, the following new features have been added:
■ A grouping object, named Service Category, has been created to classify services. This group represents a set of services which share some logical similarities. For

Supporting Premium SMS and Reverse Charge SMS
10-92 Oracle Application Server Wireless Developer’s Guide
example, Premium SMS services having the same premium level can be put into a Service Category.
■ Each Access Point (for example: Async address) can be optionally associated with one or more Service Categories. This binds an OracleAS Wireless access point to the set of services it allows access to. Any attempt to invoke a service outside the access point associated with the service set introduces a service invocation failure. In the case of Premium SMS, an Async address representing a Large Account can be mapped to a set of Service Categories which reflect the premium level of the Large Account. This association provides the model for request authorization based on premium levels between the services and the access point. A request sent to a Large Account having a premium level of 10 cents, will not be allowed to access a service that has a higher premium. The creation of a Service Category, and the association of services and access points can be done through OracleAS Wireless Tools.
■ A set of Routing Information Parameters have been added as part of Async application attributes. Billing information (such as Large Account) can be associated with the service so the value is sent back (as the message header) with the result message. The information is carried over to the Messaging driver, and eventually to a Premium SMS or Reverse Charge SMS operator so the message will be charged through the correct account.
■ The Routing Information is implemented as a Preset. A pre-seeded Preset Definition, called _MESSAGE_ROUTE_, is included with a standard installation. The administrator is able to edit the Preset Definition to add, modify or remove fields to custom fit their own requirements. This gives users added flexibility to define result message attributes.
10.7.2 Enabling Premium SMS ServicesTo make an OracleAS Wireless service Premium SMS-enabled, follow the steps below. For a more detailed step-by-step walk-through, see OracleAS Wireless Administrator’s Guide.
1. Create an Access Point using Enterprise Manager with the flag Allowed to Access All Applications unchecked. The address value of the Access Point should be the Large Account provided by the Premium SMS operator.
2. Create a Service Category using OracleAS Wireless Tools, and associate it with the Access Point created above. This object groups all the services that are accessible to the Access Point.

Supporting Premium SMS and Reverse Charge SMS
Creating Messaging Applications 10-93
3. Assign all Async applications (accessible to the access point) to the newly created Service Category.
4. Optionally, edit the pre-seeded _MESSAGE_ROUTE_ Preset Definition so that each portal is able to customize the message headers to be sent to the SMS driver as the billing information for the result message. For instance, the description of ROUTE_COST_LEVEL can be changed from Cost level to Tariff class. Those meta fields can also be added or deleted.
By default, the values of the two fields, ROUTE_CHANNEL and ROUTE_REV_CHANNEL, are set to From and ReplyTo fields of the result message. This allows the information to be passed to the Premium SMS operator without requiring a custom-built driver. If the administrator needs to change the mapping, he should modify the two attributes, wireless.async.routeinfo.to and wireless.async.routeinfo.replyto.
5. Using Content Manager, add SMS routing information to all Premium SMS-enabled applications. A typical example is to assign the value of the Large Account, which the reply message should be charged on, to the Channel field.

Supporting Premium SMS and Reverse Charge SMS
10-94 Oracle Application Server Wireless Developer’s Guide

Notification Engine 11-1
11Notification Engine
Each section of this document presents a different topic. These sections include:
■ Section 11.1, "Overview and Architecture"
■ Section 11.2, "Creating a Notification"
■ Section 11.3, "Data Feeders"
■ Section 11.4, "Integrated Notification Solutions"
■ Section 11.5, "Migrating the Notification System"
11.1 Overview and ArchitectureOracleAS Wireless notification system provides a scalable and flexible mechanism for delivering mobile notification messages based on predefined predicates. The message content is generated by invoking a regular OracleAS Wireless application upon verification of user-defined predicates, and end-user messages are delivered using OracleAS Wireless messaging application. See Chapter 10, "Creating Messaging Applications" for more information.
The notification engine evaluates predicates every time an event is received from time, data or location providers. The engine is triggered whenever there is a change in the underlying feed.
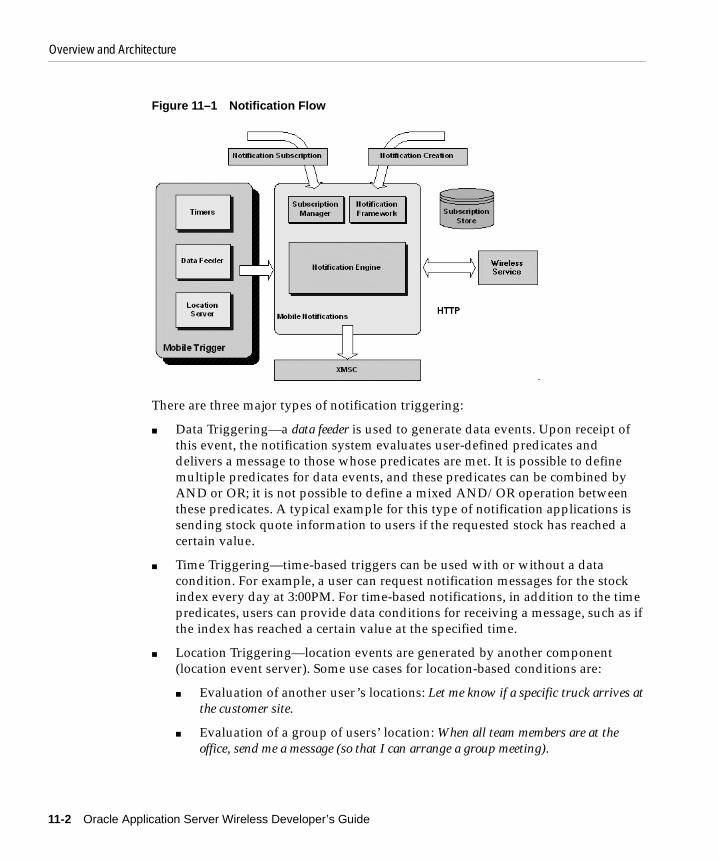
Overview and Architecture
11-2 Oracle Application Server Wireless Developer’s Guide
Figure 11–1 Notification Flow
There are three major types of notification triggering:
■ Data Triggering—a data feeder is used to generate data events. Upon receipt of this event, the notification system evaluates user-defined predicates and delivers a message to those whose predicates are met. It is possible to define multiple predicates for data events, and these predicates can be combined by AND or OR; it is not possible to define a mixed AND/OR operation between these predicates. A typical example for this type of notification applications is sending stock quote information to users if the requested stock has reached a certain value.
■ Time Triggering—time-based triggers can be used with or without a data condition. For example, a user can request notification messages for the stock index every day at 3:00PM. For time-based notifications, in addition to the time predicates, users can provide data conditions for receiving a message, such as if the index has reached a certain value at the specified time.
■ Location Triggering—location events are generated by another component (location event server). Some use cases for location-based conditions are:
■ Evaluation of another user ’s locations: Let me know if a specific truck arrives at the customer site.
■ Evaluation of a group of users’ location: When all team members are at the office, send me a message (so that I can arrange a group meeting).

Overview and Architecture
Notification Engine 11-3
■ Querying another user’s location at the specified time (Location and time): Let me know if my child is not at school between 9:00AM and 3:00PM.
■ Promotions and traffic report type of applications for which validation of a location condition is an input for further processing: Send me a notification message about promotions when I am in front of a specific store, or send me the traffic report if I am not at work or home at 9:00AM.
A notification need not be strictly based on only one of the above. The same notification can have multiple entry points, and can be triggered by a combination of these (that is, it can be time and data based, and can be triggered by both data feeder and timers).
11.1.1 ArchitectureNotification Engine is an event server which performs the following tasks:
■ Evaluates incoming events to find the set of users interested in a specific event
■ Invokes an application to generate the relevant content for the event
■ Delivers messages to users with the generated content.
Events are triggered when there are changes in the underlying data source; the data sources provide certain data for evaluation of this event.
See: For more information on Location capabilities, see Chapter 14, "Using Location Services"

Overview and Architecture
11-4 Oracle Application Server Wireless Developer’s Guide
Figure 11–2 Notification Architecture
The notification mechanism consists of four layers:
■ Event Generator Layer, of which OracleAS Wireless has 3 types:
■ Data Feeder—generate value events by providing a stream of data to the notification engine at specified intervals from a content source. The data feeder takes an input parameter (provided by the user), and returns a row of data for the specified input parameter. Each column in this row is considered as an output parameter by the notification engine. For example, a stock feed can retrieve stock price, P/E and price change for a given stock symbol.
■ Timer—generates time events at user-specified intervals.
■ Location Event Agent—generates location events when user-specified conditions are validated.
■ Event Handler Layer—each time an event is received from the corresponding event generator, this component finds a set of users who are interested in this specific event; it derives a set of users whose conditions are met by the incoming data. For example, when a data feeder generates an event by pushing stock prices for the stock ORCL, a value event handler finds users who are interested in ORCL, and whose value conditions are met with the current stock price.

Overview and Architecture
Notification Engine 11-5
■ Service Invoker Layer—for users whose conditions are met, the appropriate application is invoked by OracleAS Wireless Tools to retrieve content that will be pushed to the end-user as a notification message. This process involves passing available data (which is provided by the data feeder) to the application, creating a user session, authentication and finally retrieving the content.
■ Message Dispatcher delivers the generated content to an end-user through the XMS layer.
11.1.2 Key FeaturesThe key features of the Notification System are:
■ Actionable Notifications—OracleAS Wireless enhances notifications by enabling user interaction. Not only can users can receive notification messages, but they can also reply to these messages to perform further processing. For example, users can reply to a stock notification with an order to sell their stocks. For more information about actionable notifications, see Chapter 10, "Creating Messaging Applications".
■ Flexible Message Content—Since notification message content is generated through application invocation, the notification engine provides the flexibility to generate any type of notification. This also enables executing specific application logic while generating content. Actionable notifications can be used to provide further processing for this application logic (that is, sending a message with a confirmation request to sell the stocks when Oracle stock reaches a certain value).
■ Location Support—You can specify a location condition with a set of location criteria, expiration time and evaluation mode. Location criteria is defined by region (system region, custom region or user-defined region), target (OracleAS Wireless user, community or mobile device) and type (IN or OUT). The relation between specified criteria is defaulted to AND by the location server, meaning this condition will be satisfied only when all criteria are met. Evaluation mode for a location condition can be evaluate once, for which the location condition will not be evaluated after the first time it is satisfied, or evaluate until the expiration time.
■ Time Based Notifications—Use in conjunction with value based predicates. For this case, notification messages can be sent when either both time-based and data-based predicates are met, or when at least one of them is met.
■ Personalized Content versus Generic Content—By invoking a master application, the notification engine can provide more customizable content.

Overview and Architecture
11-6 Oracle Application Server Wireless Developer’s Guide
However, due to the fact that application invocation is a relatively expensive operation (compared to processing a message template), this feature may slow down the notification processing, and degrade engine performance. To overcome this challenge, the notification engine can invoke the target application once for a specific event for content that is not user-specific, and share the content between all users who are interested in this event and content.
■ Message Templates—Instead of creating a master application for content generation, you provide a message template with variables, which will be substituted with existing data at runtime. Since the notification engine generates messages by invoking an application, a default master application can be generated by the notification engine, and parameter-mapping will also be handled by the notification engine.
■ Comprehensive Time Predicates:
■ Activation and expiration dates—users can specify when to activate a specific notification, and provide a date for expiration.
■ Suspend start and end dates—users can choose to suspend a specific notification for a given period (for example: when the user is on vacation).
■ Specific date notifications—users can pick a specific date to deliver a one time notification (that is, sending flight information on user’s departure date/time).
■ Repetitive notifications—users can request repetitive notifications in a specific time period. For example, a user can subscribe to a stock notification to receive stock quotes every 30 minutes between 1:00PM and 4:00PM.
■ Notification times can be specified in <Hour:Minute> granularity with frequencies as Daily, Weekdays and Weekends.
■ User time zones (provided by the user profile) play an important role in time predicates. Every user-specified notification time is considered to be in that user’s time zone. For example, if two users subscribe to a notification to receive stock quotes at 9:00AM with one having GMT and other PST as their time zones in their profiles, the user who has GMT in his profile will get the notification 8 hours before the second user.
■ Device Support—users can pick a device for delivering notification messages. Since it is possible to set a maximum for the number of notifications that can be sent to a device on a daily basis, users can also specify what to do in case this maximum is reached. The alternatives are: send rest of the notifications to an alternate device, or ignore them.

Creating a Notification
Notification Engine 11-7
■ Presence-aware device selection—If users do not specify a device for notification delivery, OracleAS Wireless will pick a device using contact rules defined by the user and the optimum channel. For more information about Contact Rules, see Chapter 7, "Wireless Customization Portal".
■ Data Based Condition relation—Notifications can be defined to contain more than one condition, for example: price is greater than 20 and/or change is less than 10%. For multiple conditions, it is possible to specify a relation type between these conditions. Relation can be either AND or OR; mixed relations are not supported.
11.1.3 Backward CompatibilityThere have been significant changes in the notification engine since the previous release. The most important architectural difference is the way content is generated; now, content is retrieved from an application instead of processing a message template. Due to this paradigm shift, it is not possible for the new engine to process old type of notifications (referred to as alerts, alert services, and master alert services in previous Wireless releases).
To overcome this backward compatibility problem, administrators can create separate notification processes. Notifications created by the two different versions will be intact. The new engine will only handle the new type of notifications; new features will not be available for notifications created using the older version.
Since OracleAS Wireless Notification Engine supports message template specification (as explained in Section 11.1.2, "Key Features"), it is easy to migrate alert services (that is, notication applications) created with the old version into the new version; tools to automate this process are provided. After migration, migrated alerts will be handled by the new engine, then you can use new features included in this version.
11.2 Creating a NotificationWith OracleAS Wireless, creating notifications is straightforward. You simply build an application and notification-enable it. Based on the condition specified while notification enabling an application, end users subscribe to that application with their own criteria. That completes the process. The notification engine does the rest. At runtime, condition matching, subscription collecting, messaging generating and dispatching are fully automated and managed by the notification engine with no intervention necessary. The creation process can be summarized as follows:

Creating a Notification
11-8 Oracle Application Server Wireless Developer’s Guide
■ Using OracleAS Wireless Tools:
■ Create Data Feeder (if notification is data-based)
■ Create Notification Master Application
* Assign Data Feeder (if data based)
* Create triggering conditions (if data based)
* Define message template (optional)
■ Create Application Link
* Notification-Enable it
■ Publish Application
■ Using OracleAS Wireless Customization Portal or a custom-built end-user portal:
■ Locate Notification-Enabled application from the application tree.
■ Provide subscription criteria
* For time-based, provide activate start/end dates, frequency and interval
* For data-based, provide input parameters and triggering condition parameters
* For location-based, provide target, region and movement type.
The whole process can be performed using the OracleAS Wireless Tools and Customization Portal. These tools provide you with wizards that guide you through each step. For more information, see OracleAS Wireless Administrator’s Guide. Developers can also use provided public APIs to accomplish these tasks.
11.2.1 Defining a Master Notification Application
11.2.1.1 PredicatesThe most crucial information for creating a master alert application is to define the type of predicate(s) that can be used. Predicate types can be data, time or location-based. Furthermore, master notification applications can consist of a combination of these three types. Possible predicate types can be listed as follows:
■ Purely Time Based—Notification Engine will invoke an application at the specified time or time period. For example, sending the daily appointment

Creating a Notification
Notification Engine 11-9
schedule at 0900 hours. In this case, notification engine will invoke the designated application which retrieves the user calendar at 0900hrs every morning.
■ Purely Data Based—Notification Engine invokes an application only when the value condition(s) is/are satisfied. For example, sending the stock quote information when the stock price exceeds the specified value. If value-based predicates are involved, you must describe the data content on which this master notification application is built. OracleAS Wireless enables you to define the data content using a data feeder. The data feeder defines given content in two forms: input and output parameters. For example, stock quote content can be defined as having a stock ticker as its input parameter and having price, volume, change and change percentage as its output parameters. Data feeders use the input parameter(s) to uniquely identify output parameters.
■ Purely Location Based—Notification Engine invokes an application when the location condition is satisfied. For example, send a notification message when a specific truck arrives at the customer site.
■ Time and Data Based—In this case, notification will be delivered at the specified time if the data condition is met. For example, sending the stock quotes at 9:00AM if ORCL exceeds a user-specified value.
■ Time and Location based—Notification is delivered at the specified time, if the location condition is satisfied at that time. For example, send a notification message to the transportation manager if a specific truck is at the customer site at 9:00AM.
■ Data and Location based—Notification is delivered when both data and location conditions are satisfied. For example, send a notification message when I am not at work and ORCL stock exceeds a user-specified value.
■ Time + Data + Location-based—Notification is delivered at the specified time, if value and location conditions are satisfied. For example, send a notification message at 9:00AM, if ORCL stock value exceeds the specified value and if the user is not at the office.
11.2.1.2 Subscriber Filtering HookFor every event generated, the notification engine derives a list of users who are interested in this event. In some cases, a notification designer may need to apply some additional logic to manipulate this list. OracleAS Wireless Notification Engine allows developers to supply a Java class which implements the Java interface MobileAlertSubscriberFilter for additional filtering logic.

Creating a Notification
11-10 Oracle Application Server Wireless Developer’s Guide
11.2.1.3 Triggering ConditionsDesigners can provide a set of triggering conditions for data-based master notifications. These conditions must be based on output parameters of the selected data feeder. For each condition, a designer must specify which output parameter to check, the condition type, and default value for the user input. For example, for a stock feed which provides price and change, the condition can be defined as output parameter price is greater than <user specified value>.
For output parameters that are of type number, condition types can be:
■ Value Change
■ Equal
■ Equal Absolute Value
■ Greater Equal
■ Greater Equal Absolute Value
■ Greater Than
■ Greater Than Absolute Value
■ Less Equal
■ Less Equal Absolute Value
■ Less Than
■ Less Than Absolute Value
■ Not Equal
For output parameters that are variants of type string, condition type can be:
■ Begin With
■ Change
■ Contains
■ End With
■ Match
■ Not Contains
■ Not Match

Creating a Notification
Notification Engine 11-11
11.2.1.4 Message TemplateThis parameter is optional. If designers specify a message template, it can be used to generate notification content. The Messages Provided template should be a valid Mobile XML document. If this master notification application is based on a data feeder, any data feeder input or output parameter can be used in the template using the notation of &<parameter name>;, which is similar to the XML entity notation. The following sample shows a template for a notification with input parameter sym, and output parameters price and change:
<?xml version = "1.0" encoding = "UTF-8" standalone="yes" ?><SimpleResult> <SimpleContainer> <SimpleText> <SimpleTitle>OracleAS Wireless</SimpleTitle> <SimpleTextItem>Sample Notification: price: &price; and change: &change; for stock: &sym;</SimpleTextItem> </SimpleText> </SimpleContainer></SimpleResult>
If a message template is specified, the notification engine can generate required application parameters (such as URL and parameter-mapping) automatically to process this message template and generate notification messages. A generic jsp is included with OracleAS Wireless, and application designers should create a basic application and notification-enable it by specifying that this application is based on a message template.
11.2.1.5 API Sample: Creating Master Notification ApplicationThe following code fragment shows how to create a time + data + location-based master notification application named StockNotification. StockFeed is specified as the data feed for this notification application, and it has two triggering conditions: price > user_input (with default value 23) and change > user_input (with default value 10). The relation type between these two conditions is AND. Additionally, a message template is provided.
Note: The triggering condition is optional. If there is no triggering condition, notification engine will generate notification messages for every incoming data event, that is, every time the underlying data feeder retrieves data and pushes it into the notification engine.

Creating a Notification
11-12 Oracle Application Server Wireless Developer’s Guide
MetaLocator m = MetaLocator.getInstance();ModelFactory f = m.getModelFactory();ModelServices s = m.getModelServices();
//Locate the data feed that will be used by this notificationDataFeeder df = s.lookupDataFeeder("StockFeed")
//Create a master notification with timebase enabled.//Note that, new master notification interface is oracle.panama.mobilealert.MasterAlertServiceMasterAlertService mAS = null;mAS = f.createMobileMasterAlertService("StockNotification", true, "Stock Master Notification", df);
//Set the condition relation type to "AND"mAS.setConditionRelationType(MasterAlertService.RELATION_AND);
//Set time based typed to strictly time basedmAS.setTimeBasedType(true);
//Enable Location based supportmAS.enableLocationBaseAlert(true);
StringBuffer msgTemplate = new StringBuffer("<?xml version = \"1.0\" encoding = \"UTF-8\" standalone=\"yes\" ?>");msgTemplate.append("<SimpleResult><SimpleContainer>");msgTemplate.append("<SimpleText>Stock alert for [&symbol;] price is [&price;]");msgTemplate.append("</SimpleText>”);msgTemplate.append("</SimpleContainer></SimpleResult>");
//Provide the default message template //that can be used with default notification master servicemAS.setFormattedXMLTemplate(msgTemplate.toString());
//add conditions with default valuesto this notifications, i.e. if "price > 10 "
AlertConditionType cType1 = s.getMobileAlertConditionTypeByName("GT");FeedMetaData fmdPrice = df.getOutputParameter("price");mAS.addConditionDefinition("PriceMax", fmdPrice, cType1, "23");
AlertConditionType cType2 = s.getMobileAlertConditionTypeByName("GT");FeedMetaData fmdChange = df.getOutputParameter("Change");mAS.addConditionDefinition("ChangeMax", fmdChange, cType2, "10");

Creating a Notification
Notification Engine 11-13
//Notification object does not use the persistent store/wireless caching//Any create/update operation has to be committed with the savemAS.save();
11.2.2 Mapping Master Notification Application to a Master ApplicationApplication invocation is the recommended way for generating notification content. Designers should map master notification applications to master applications that will be used for generating notification content. In some cases, applications may need to have access to some or all of the input or output parameters of the master notification application, in order to perform further processing. For example, a stock price watch notification can trigger a stock selling application to sell the stocks in case of a significant price drop. In this case, the stock selling application must access the stock ticker so that it will know what to sell. To provide this information, application developers would map master notification application input and output parameter(s) to the master application input parameter(s).
Since the Notification Engine is a generic event server that can handle various event generators and invoke multiple applications, it is possible to create many-to-many mappings between master notification applications and master applications. Simply put, a particular master notification application can be mapped to many master applications such as: stock trade master application, or stock news master application. For example, a stock notification engine can invoke a master application that will sell the stocks for user A, and this engine can also be used to invoke a master application that sends the latest news about that particular stock for user B. The same engine can be used to deliver a simple message template for user C. Likewise, a stock trade master application can be invoked by a master notification application that checks if the stock has reached a certain value at some time (time and value-based) and/or another master notification application that is fired upon a significant price change (value-based); for example, a 10% price drop.
OracleAS Wireless Tools can only manage 1-to-n mappings due to user interface constraints (same master notification application can be mapped to many master applications). However, it is possible to accomplish m-to-n mapping using notification APIs.
As mentioned in Section 11.1.2, "Key Features", the notification engine can generate personalized content by invoking the target application separately for each user, or invoke it once per event and share the content between all users who are interested in that event. When application designers create a mapping, they must choose the proper content generation type depending on user requirements.

Creating a Notification
11-14 Oracle Application Server Wireless Developer’s Guide
11.2.2.1 Sample Code: Notification MappingThe following code fragment displays how to create a mapping between an existing master notification application (which was created in Section 11.2.1.5, "API Sample: Creating Master Notification Application") and a master application. In this example, the mapping will map the parameters symbol and price, and content generation type is specified as personalized content.
Notification mapping//Locate the existing master notification serviceMasterAlertService mAS = s.lookupMobileMasterAlertService("StockNotification");
//Locate the existing stock trade master serviceMasterService masterService = s.lookupMasterService("/master/examples/StockTradeMasterService");
//Create the mapping definition between the notification service and master serviceMAlertServiceMapping map = mAS.createMapping(masterService, "StockNotificationMapping");
//Retrieve input arguments for the master serviceArguments args = masterService.getInputArguments();InputArgument inpArgTicker = args.getInput("symbol");InputArgument inpArgPrice = args.getInput("price");
//Retrieve notification parameters (including input and output)AlertParameterMeta[] alertParams = mAS.getParameters(); //returns symbol, price
//Map notification master service parameter "symbol" to stock trade input argument "ticker”map.addChainParameter(alertParams[0], inpArgTicker);
//Map notification master service parameter "price" to stock trade input argument "price"map.addChainParameter(alertParams[1], inpArgPrice);
//This invocation has to be performed in “personalized content mode”, for each user separatelymap.setInvocationType(false);
//Commit changesmAS.save();

Creating a Notification
Notification Engine 11-15
11.2.2.2 Sample Code: Template-based Notification MappingThe following code fragment displays creating a mapping using the existing message template for the StockNotification master notification application. In this example, we must create a master application for template-based mapping with the least amount of information. Parameter mapping and target URL settings will be performed by the createTemplateMapping method.
Template-based Notification Mapping//Locate the existing master notification serviceMasterAlertService mAS = s.lookupMobileMasterAlertService("StockNotification");
//Create a simple master serviceMasterService templateMasterService = f.createMasterService("StockInfo", s.lookupUser("orcladmin"), s.lookupAdapter("HttpAdapter"), s.lookupFolder("/master/examples"));
//Parameter mappings will be handled by the createTemplateMapping method//this method will also modify the provided master service to use default template processormAS.createTemplateMapping(templateMasterService);
//Commit changesmAS.save();
11.2.3 Subscription
After notification creation, mapping the notification to a application and publishing it as an application, users can start subscribing to this notification-enabled application by using OracleAS Wireless Portal. The reason for subscribing to a application instead of notification is that end-users care about the content that is generated, but not how it is generated. Since the content is generated by an application that can be invoked by any notification, they do not and should not care about the underlying infrastructure.
As the notification creation process defines the structure and metadata by specifying predicate information, users must provide the required parameter values for each predicate in the subscription step. For each predicate type, users should set the following information:
Note: This is the only step that is visible to end-users.
Creating a Notification
11-16 Oracle Application Server Wireless Developer’s Guide
■ Data Based—Input Parameter(s) required by the data feeder, and triggering condition parameters.
■ Time Based:
■ Notification Frequency—Possible values are daily, weekday, weekend and once.
■ When to receive notifications—This can be a specific time (with hour and minute information), or a time period in a day. Time periods require a start time (hour and minute), end time (hour/minute) and interval. For example, between 3:00PM and 5:00PM every 15 minutes.
■ Blackout Period—During the specified blackout period (which is between two dates), users will not receive any notifications. This can be useful for cases in which the user is on holiday.
■ Expiration Date—After the specified date, users will not receive any notification. Due to UI complexity issues, OracleAS Wireless Portal does not provide support for the expiration date.
■ Location Based—Location predicates are based on location conditions objects. Location condition consists of one or more location criteria, each of which are defined by a target, region and criteria (movement) type. Target is what the location server will track, which can be a user, user group or mobile phone number. Criteria type is the type of movement the location server should monitor, such as when the user moves into a region, or moves out of a region. Due to UI complexity issues, OracleAS Wireless Customization Portal does not support multiple criteria creation for a single location condition, and only one criteria can be created using this tool for a specific subscription. However, it is possible to include multiple criteria by using the provided Java API.
Along with this information, users can pick a device to use for receiving notifications, and an alternative device to send notifications to when the maximum number of notifications is reached for the primary device. Device selection is an optional step.
When the notification engine validates user subscription predicates and generates message content for a user, it hands over this message to the XMS layer for delivery. If the user has selected a device for notification retrieval, XMS will use the selected device (or the specified alternative device, if the daily maximum is reached) to deliver end-user messages with the appropriate protocol. However, if the user prefers not to specify a device, XMS will pick the best device to use depending on contact rules, user profile and message content type. For more information about device selection, see Section 11.4, "Integrated Notification Solutions".

Creating a Notification
Notification Engine 11-17
11.2.3.1 Sample Code: Creating a SubscriptionThe following code fragment shows subscribing to a notification-enabled application. The link in this example is based on the StockTradeMasterService master application which was used in Section 11.2.2.1, "Sample Code: Notification Mapping". Remember that this master application was mapped to the StockFeed master notification application in that example.
Creating a Subscription //Locate the master notification service MasterAlertService mAS = s.lookupMobileMasterAlertService("StockNotification"); //Locate the stock trade master service MasterService masterService = s.lookupMasterService("/master/examples/StockTradeMasterService"); //Locate the stock trade link Link link = s.lookupLink("/Examples/StockTradeLink"); //Locate the user User user = s.lookupUser("orcladmin");
//Locate primary and alternative device addresses DeviceAddress addr1 = s.lookupDeviceAddress(DeliveryType.SMS, "1234567890"); DeviceAddress addr2 = s.lookupDeviceAddress(DeliveryType.EMAIL, "[email protected]");
//Create a subscription for orcladmin on the stock trade link ServiceAlertSubscription sub = mAS.addUserAlertSubscription(user, link);
//Set the data feed input parameter (ticker) to ORCL AlertInputParamValue[] paramVals = sub.getInputParameters(); paramVals[0].setValue("ORCL");
//Set triggering condition values: price:30 and change: 12 AlertConditionValue[] conVals = sub.getConditions(); conVals[0].setValue("30"); //price conVals[1].setValue("12"); //change
//Set frequency to daily, receive notifications on weekdays AlertTimeFrequency freq = AlertTimeFrequencyImpl.getAlertTimeFrequencys()[0];
//Activate the notification tomorrow Calendar startDate = Calendar.getInstance(); startDate.add(Calendar.DATE, 1);

Creating a Notification
11-18 Oracle Application Server Wireless Developer’s Guide
//User will be subscribed for 365 days Calendar expirationDate = Calendar.getInstance(); expirationDate.add(Calendar.DATE, 366);
//User will be going on vacation 30 days from now, //so deactivate them temporarily in that period for 10 days Calendar blackoutStartDate = Calendar.getInstance(); blackoutStartDate.add(Calendar.DATE, 30); Calendar blackoutEndDate = Calendar.getInstance(); blackoutEndDate.add(Calendar.DATE, 40);
//Create location condition for monitoring myself for getting into a region with id 18191. LocationPrivacyDomain lbDomain = new LocationPrivacyDomain(masterService); LBCondition lbCondition = f.createLBCondition(LBCondition.MODE_REPEAT, expirationDate, user, lbDomain); lbCondition.addCriteria("orcladmin", "user", "IN", 18191);
//Set data and time predicates for this subscription. //This notification will evaluate the conditions starting at 8:00 a.m. till 1:30pm //every 45 minutes, on every weekday (Monday-Friday). sub.setCondition(paramVals, conVals, 8, 0, 13, 30, 45, freq, expirationDate, startDate); //Set the location condition sub.setLocationCondition(lbCondition);
//Set the primary device that notifications will be send to sub.setSubscriptionDevice(addr1); //When the max. number of notifications is reached, //send the notifications to the alternative device sub.setAlternativeType(ServiceAlertSubscription.AFTERMAX_DEVICE); //Set the secondary device as alternative device sub.setAlternativeDevice(addr2);
//Set blackout periods, activation/deactivation information sub.setSuspendStartDate(blackoutStartDate); sub.setSuspendEndDate(blackoutStartDate); sub.setStartDate(startDate); sub.setExpirationDate(expirationDate);
//save the subscription sub.save();

Creating a Notification
Notification Engine 11-19
11.2.4 Notification AdministrationNotification Engine must run in continuos mode by managing its own resources (such as threads), so that it can process incoming events to determine which subscriptions are eligible for notification delivery. Upon successful notification creation, application developers should create a separate process for the notification engine, and attach appropriate notifications that are designed ahead of time.
Since Notification Engine is designed as a scalable system, OracleAS Wireless Tools, as part of Oracle Enterprise Manager, can create multiple processes to manage a single notification. In this case, load (incoming events) is distributed among these processes; each of these processes handle incoming events independently, meaning each process will perform the filtering for a specific event that they receive.
For notifications that do not consume much resource, it is also possible to share the resources among various notifications in a single process. In this case, application designers should create a process, and add multiple notifications to this process.
As explained earlier, data-based notifications rely on incoming data events, which are provided by the data feeders. Therefore, a separate data feeder process should also be created and started for the Data Feeder instance that will be providing data events for the notification engine.
11.2.5 Notification MigrationIt is possible to migrate 9.0.2.x notifications (referred to as alerts hereinafter) to the current release by running the provided migrateNotifications.sh[.bat] script. For migrating:
1. Navigate to $ORACLE_HOME/wireless/bin/
2. Do one of the following:
a. Run migrateNotifications.sh[.bat] name <deprecated master alert name(s)> -owner <owner username>
The name parameter is used to locate the alerts (that will be migrated) by name.
You can use wildcards, such as % in <deprecated master alert name(s)>. All 9.0.4.x notification-related objects (such as master notification application, master application, application link) will be owned by the given username.
b. You can also run the same script with the -oid option as:
migrateNotifications.sh[.bat] -oid <deprecated master alert oid> -owner <owner use name>

Creating a Notification
11-20 Oracle Application Server Wireless Developer’s Guide
Using the OID option locates a specific notification by object ID.
Running (a) or (b) above performs the following operations:
■ Create a new master notification application; name will be <old master alert name>_New. This process involves converting the message template to a valid mobile xml if necessary.
■ Create a new folder as /master/notifications for the master application if this folder does not exist.
■ Create a new master application with the name <old master alert name>_MS.
■ Create a mapping for the new master notification and new master application based on the old master alert’s message template.
■ Create a new folder for the link as /Users Home/<username>/notifications if this folder does not exist.
■ Detect all associated 9.0.2.X AlertService (notification application) objects and convert them to link objects. Topic-level authorization will be flattened into link level authorization during this process.
■ Transform all subscriptions for alert applications converted in the previous section.
11.2.5.1 Sample UsageSample usage of Notification Migration is provided below.
UNIX:
migrateNotifications.sh -name StockAlert% -owner orcladmin
Migrate all 9.0.2.X master alert applications whose names start with StockAlert (such as, StockAlertNews, StockAlertWarning). All new objects will be owned by orcladmin user.
migrateNotification.sh -name StockAlert -owner systemadmin
Migrate 9.0.2.X master alert application that have the name StockAlert. Assign all new objects to systemadmin user.
WINDOWS:
migrateNotification.sh -oid 1973 -owner systemadmin

Data Feeders
Notification Engine 11-21
Migrate 9.0.2.X master alert application whose ID is 1973. Assign all new objects to systemadmin user.
11.3 Data FeedersThe Data Feeder is the agent that downloads content. The data feeder runs periodically, independent of application invocations. The feed framework is designed to download content for a OracleAS Wireless process. The downloaded content can be used both for asynchronous notifications as well as cached data for synchronous applications.
The download schedule for a data feeder is maintained in the update policy for that data feeder. The update policy determines the update interval, or how often the data feeder runs. The update policy tracks the time of day, and which days of the week to run the data feeder.
Each data feeder has a content provider, which is the source of the content. The content provider maintains information about the URI of the content, the protocol to use for downloading the content, and the format of the data to be downloaded.
When specifying a feed, a user sets up a metadata definition of the content to be downloaded using feed parameters. These parameters are instances of the data type, FeedMetaData. Feed parameters have an underlying SQL data type chosen from a predefined set of types, defined in oracle.panama.feed.FeedUtil.
Feed Input Parameters are input parameters particular to a content provider. They specify the data used when requesting data from the content provider. For example, when downloading data from a content provider using HTTP, the input parameters will be used either to construct a GET URL or as POST parameters in the HTTP request.
Feed Output Parameters define the data type of the output from the content provider.
The runtime behavior of a data feeder can be customized with the FeedDownloadHook and the FeedDataFilterHook.
The FeedDownloadHook is used to customize the URI used when downloading content. For example, in an HTTP download, the input parameters are, by default, used to construct a GET URL, with the input parameters used as GET HTTP parameters. In some cases, however, the base URL depends on the input parameters. In such a case, the URL would be http://www.ahost.com/input_ param_1/input_param2/index.html. The behavior for constructing the URL can be overridden with a custom FeedDownloadHook to achieve the desired result.

Data Feeders
11-22 Oracle Application Server Wireless Developer’s Guide
The FeedDataFilterHook is used to do additional processing on the downloaded content. As each row of data is downloaded, the data filter hook is invoked on each row. This allows the feed implementer to perform special processing, such as splitting a single output parameter into several output parameters.
The pass-through data feeder is a datafeeder that accesses local content through user-defined Java code. Consequently, a pass-through data feeder has neither a content Provider nor an update policy. Similarly, the FeedDownloadHook and the FeedDataFilterHook are not relevant for a pass-through data feeder. The feed metadata must still be set up for a pass-through data feeder.
11.3.1 Building a Data FeederYou can create a data feeder using OracleAS Wireless Tools, or programatically. OracleAS Wireless Tools provides you with a wizard to guide you through each step of the creation process. For more information, see OracleAS Wireless Administrator’s Guide.
Creating a data feeder includes these steps:
1. Create a named data feeder—all data feeders must have a name; the name may be changed. The data feeder also has an object ID which is permanent and unique, and is generated by the system when created.
2. Set Content Provider parameters—set the protocol and format for the current Content Provider. There are constants for the built-in protocols and formats.
3. Create Data Feeder Input parameters—a data feeder must have at least one input parameter. For each input parameter you specify, you must give an internal name and data type. Parameters may have options that depend on the chosen format. If the format chosen is delimited text, you have the option of specifying the column number in which the input parameter appears. This is useful if the input parameter is also included in the output from the content provider. The index for the columns starts at 1, as SQL. If 0 is specified, then the input parameter is assumed to not be in the output.
4. Create Data Feeder Output parameters: A data feeder must have at least one output parameter. The output parameter can be customized in the same manner as an input parameter.
Note: Previously, data feeders were designed to perform request-reply (data pull feeds). Although the architecture has been designed to also accommodate push data feeds, this functionality is not included in this version.

Data Feeders
Notification Engine 11-23
5. Finalize the Feed—finally, you must call the DataFeeder method createFeedDefinition. This method creates the feed metadata definition in the repository, which is required to use the feed and the feed cache table. Once the feed definition has been created, feed parameters cannot be deleted, only renamed.
11.3.2 Creating a Passthrough DataFeederA pass-through datafeeder requires that you specify the classname of the pass-through datafeeder to use. It does not require all the information that a regular datafeeder needs; in particular, the protocol and format to use is irrelevant.
The following code creates a pass-through datafeeder:
ModelFactory mf = MetaLocator.getInstance().getModelFactory();// Create a named datafeederPassthroughDataFeeder df = mf. createPassThroughDataFeeder ("stock_passthrough")// Set the class name to use for implementationdf.setClassName("fully.qualified.package.and.Class");// Create input parametersFeedMetaData fmi = df.createMetaData("sym", "TEXT_30");df.addInputParameter(fmi):// Create output parametersFeedMetaData fmo1 = df.createMetaData("price", "NUMBER");df.addOutputParameter(fmo1);
FeedMetaData fmo2 = df.createMetaData("change", "NUMBER");df.addOutputParameter(fmo2);
// Finalize the feed -- create feed definition // in repositorydf.createFeedDefinition();
11.3.3 Sample Applications
11.3.3.1 Sample Application: Downloading Stock Quotes in XMLOracleAS Wireless includes sample200.xml. This sample file contains a datafeeder for retrieving stock quotes over HTTP. The stock quotes are in XML format; the sample datafeeder includes a stylesheet for extracting the relevant values from the XML input feed.

Data Feeders
11-24 Oracle Application Server Wireless Developer’s Guide
In order to create this data feeder programmatically, you would use the following code:
ModelFactory mf = MetaLocator.getInstance().getModelFactory();// Create a named datafeederDataFeeder df = mf.createDataFeeder("stock_screamingmedia");// Set content provider parametersContentProviderInfo cpi = df.getContentProviderInfo();cpi.setProtoolType(ContentProviderInfo.PROTOCOL_HTTP);cpi.setPrimarySource("http://www.screamingmedia.com/");cpi.setFormatType(ContentProviderInfo.FORMAT_XML);// Create input parametersFeedMetaData fmi = df.createMetaData("sym", "TEXT_30");df.addInputParameter(fmi):// Set the parameters for this parameter and content providerMap paramOptions = new Hashtable();paramOptions.put(ContentProviderInfo.COLUMN_NUMBER, 1);cpi.setParamArguments(fmi, paramOptions);
// Create output parametersFeedMetaData fmo1 = df.createMetaData("price", "NUMBER");df.addOutputParameter(fmo1);paramOptions.put(ContentProviderInfo.COLUMN_NUMBER, 2);cpi.setParamArguments(fmo1, paramOptions);
FeedMetaData fmo2 = df.createMetaData("change", "NUMBER");df.addOutputParameter(fmo2);paramOptions.put(ContentProviderInfo.COLUMN_NUMBER, 3);cpi.setParamArguments(fmo2, paramOptions);// Finalize the feed -- create feed definition in repository// create cache table as neededdf.createFeedDefinition();
11.3.3.2 Sample Application: Downloading Stock Quotes in CSV Formatsample200.xml also includes a datafeeder for retrieving stock quotes over HTTP that downloads the stocks in a comma-separated variable (CSV) format.
The following code illustrates how to create this data feeder programmatically.
ModelFactory mf = MetaLocator.getInstance().getModelFactory();// Create a named datafeederDataFeeder df = mf.createDataFeeder("stock_yahoo")// Set content provider parameters

Data Feeders
Notification Engine 11-25
ContentProviderInfo cpi = df.getContentProviderInfo();cpi.setProtocolType(ContentProviderInfo.PROTOCOL_HTTP);cpi.setPrimarySource("http://quotes.yahoo.com/quote");cpi.setFormatType(ContentProviderInfo.FORMAT_DELIMITED);// Create input parametersFeedMetaData fmi = df.createMetaData("sym", "TEXT_30");df.addInputParameter(fmi):// Set the parameters for this parameter and // content providerMap paramOptions = new Hashtable();paramOptions.put(ContentProviderInfo.COLUMN_NUMBER, 1);cpi.setParamArguments(fmi, paramOptions);
// Create output parametersFeedMetaData fmo1 = df.createMetaData("price", "NUMBER");df.addOutputParameter(fmo1);paramOptions.put(ContentProviderInfo.COLUMN_NUMBER, 2);cpi.setParamArguments(fmo1, paramOptions);
FeedMetaData fmo2 = df.createMetaData("change", "NUMBER");df.addOutputParameter(fmo2);paramOptions.put(ContentProviderInfo.COLUMN_NUMBER, 3);cpi.setParamArguments(fmo2, paramOptions);
// Finalize the feed -- create feed definition // in repository, create cache table as neededdf.createFeedDefinition();
11.3.3.3 Adding Input Parameter Values to the FeedThe data feeder only downloads content which has a specified input parameter. Input parameter values can be set either implicitly or programmatically. Input values can be added implicitly by adding a notification topic subscription. The following code illustrates how to add a notification programmatically:
// Look up existing data feederDataFeeder df = ModelServices.getInstance().lookupDataFeeder("stock_yahoo");// Want to add input params for ORCLMap params = new Hashtable();params.put("sym", "ORCL");df.setData(params);

Data Feeders
11-26 Oracle Application Server Wireless Developer’s Guide
11.3.3.4 Retrieving Downloaded ValuesOne primary use of the data feeder is to download cached data for use with regular synchronous applications. Downloaded data can be accessed using the datafeeder method getData(). This method takes an argument as a map, which is a name-value mapping of the parameters which get values. The following code example illustrates how you can retrieve current price and change given a stock symbol:
ModelServices ms = MetaLocator.getInstance().getModelServices();DataFeeder df = ms.lookupDataFeeder("stock_yahoo");Map params = new Hashtable();params.put("sym", "ORCL");Map values = df.getData(params);Iterator i = values.keys(); while(i.hasMore()) {String key = (String)i.next();String val = (String)values.get(key);System.out.println(key + " = " + val);}Running this code we while get the following output:sym = ORCLprice = 18.75change = 0.5
11.3.3.5 Starting the Data Feeder ProcessSystem managers start a data feeder process. Like other processes, the system manager must set up a process of the datafeeder in order to run it. For more information, see OracleAS Wireless Administrator’s Guide.
11.3.3.6 Feed Parameter External NamesThe external name is the name used when retrieving content from a content provider. This mechanism is intended for cases in which the external representation of the parameter name changes after the feed has been built, such as when one changes to another content provider. The external name is optional; if it is not specified, then the internal name is used.
Note: The data feeder only downloads content where it has an input parameter value specified, when there is an notification application created, and when there is a subscription for that notification.

Data Feeders
Notification Engine 11-27
You specify a caption to use for the input parameter. This is for documentation purposes only.
There are cases in which an input parameter has been defined, but is not relevant when retrieving content. If the special constant __NONE__ is used for the external parameter name, that input parameter will be ignored when constructing the download URL or POST request.
11.3.3.7 Feed SchedulingBy default, feeds run continuously when started. Each feed has an associated update policy, which can be used to fine-tune the running of the feed (such as the time of day to start and stop the feed, the days on which to run and the interval between feed runs).
The following code sets the update policy of the example data feeder to run on weekdays between 9:00 AM and 5:00 PM.
ModelServices ms = MetaLocator.getInstance().getModelServices();DataFeeder df = ms.lookupDataFeeder("stock_yahoo");UpdatePolicy up = df.getUpdatePolicy();up.setStartTime(9,0,0);up.setEndTime(17,0,0);up.setUpdateDays(UPDATE_WORKDAYS);// Set update interval to 300 seconds, i.e. update every // 5 minutesup.setUpdateInterval(300);
11.3.3.8 XML Data FeedsWhen accessing datafeeds with XML content, you must specify an XSLT stylesheet that will transform the input XML to a common XML format.
The common XML format consists of a feed result (<omfeed_result>), which has a number (zero or more) of datarows (<omfeed_datarow>), each one consists of one or more named datacolumns (<omfeed_datacolumn>). The name of the data column is matched with the parameters defined for the feed. Each output parameter should have a corresponding data column. This code sample illustrates the output of a stock feed:
<?xml version="1.0"?><market-data><quote-set><quote symbol="ORCL" name="ORACLE CORPORATION" type="stock" exchange-code="NASDAQ" last="32.000000" close="28.562500" close-flag="closed" change="3.4375" percent-change="12.04%" volume="56362800" open="30.0"

Integrated Notification Solutions
11-28 Oracle Application Server Wireless Developer’s Guide
high="32.4375" low="29.9375" bid="32.0" ask="32.0625" bid-size="36" ask-size="90" high-52-week="46.468998" low-52-week="15.438" shares-outstanding="5629833" pe-ratio="29.299999" volatlity="16.150000" yield="0.000000" earnings-per-share="1.092000" status="ok"/></quote-set></market-data>The stylesheet for transforming this result would then look like this:<xsl:stylesheet version="1.0" xmlns:xsl="http://www.w3.org/1999/XSL/Transform"> <xsl:template match="quote-set"> <omfeed_result> <xsl:for-each select="quote"> <omfeed_datarow> <omfeed_datacolumn> <xsl:attribute name="name">sym</xsl:attribute> <xsl:value-of select="@symbol"/> </omfeed_datacolumn> <omfeed_datacolumn> <xsl:attribute name="name">price</xsl:attribute> <xsl:value-of select="@last"/> </omfeed_datacolumn> <omfeed_datacolumn> <xsl:attribute name="name">change</xsl:attribute> <xsl:value-of select="@change"/> </omfeed_datacolumn> </omfeed_datarow> </xsl:for-each> </omfeed_result> </xsl:template>
11.4 Integrated Notification SolutionsMany software applications offer the ability to notify users of certain events that are occurring in an application. For example, a calendar system may notify users that they have been invited to a meeting, or that the location of a previously scheduled meeting has changed. In most cases the application allows users to indicate the types of events they are interested in. This allows users to limit notifications to only those events they consider urgent. These event notifications are typically sent as emails.
Based on the Notification Engine, OracleAS Wireless includes out-of-the-box multi-channel notification solutions for a number of applications, including Oracle Calendar, Oracle Unified Messaging, Oracle Workflow, and Microsoft Exchange Email. It provides an infrastructure to deliver application notifications to users’ preferred wireless devices, with content customized for the specific device type. For
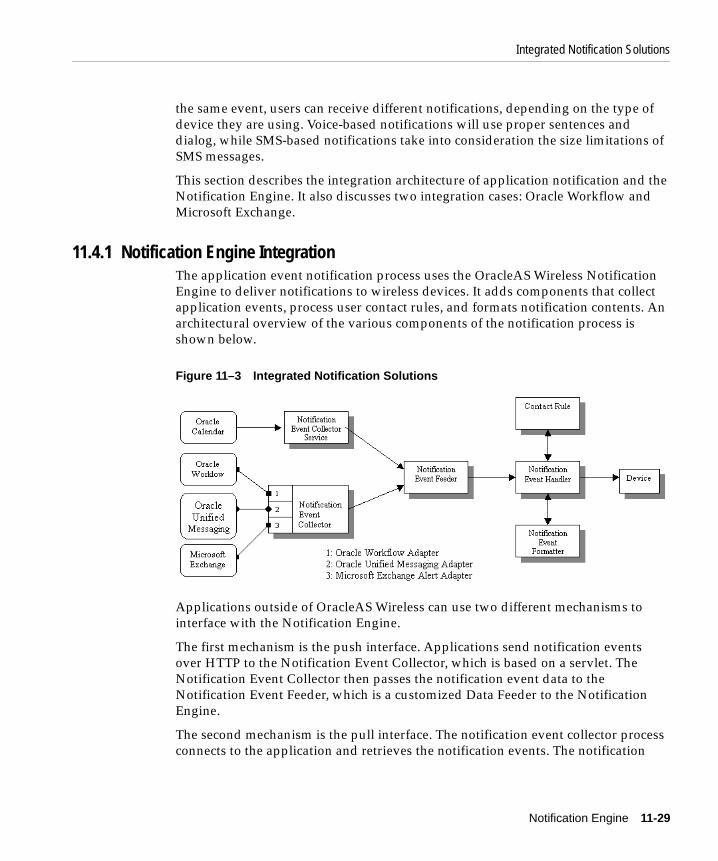
Integrated Notification Solutions
Notification Engine 11-29
the same event, users can receive different notifications, depending on the type of device they are using. Voice-based notifications will use proper sentences and dialog, while SMS-based notifications take into consideration the size limitations of SMS messages.
This section describes the integration architecture of application notification and the Notification Engine. It also discusses two integration cases: Oracle Workflow and Microsoft Exchange.
11.4.1 Notification Engine IntegrationThe application event notification process uses the OracleAS Wireless Notification Engine to deliver notifications to wireless devices. It adds components that collect application events, process user contact rules, and formats notification contents. An architectural overview of the various components of the notification process is shown below.
Figure 11–3 Integrated Notification Solutions
Applications outside of OracleAS Wireless can use two different mechanisms to interface with the Notification Engine.
The first mechanism is the push interface. Applications send notification events over HTTP to the Notification Event Collector, which is based on a servlet. The Notification Event Collector then passes the notification event data to the Notification Event Feeder, which is a customized Data Feeder to the Notification Engine.
The second mechanism is the pull interface. The notification event collector process connects to the application and retrieves the notification events. The notification

Integrated Notification Solutions
11-30 Oracle Application Server Wireless Developer’s Guide
event data is then passed onto the Notification Event Feeder. The notification event collector process consists of a number of different adapters; each adapter is specific for a particular application. You can enable and disable adapters by configuring the notification collector process. Use the Enterprise Manager console to create, start, stop or configure notification collector processes.
The notification event handler is a customized system-level notification application that reads data from the notification event feeder. The data indicates the target user for this notification, as well as the type of notification and other notification-specific data.
The notification event handler then looks up the target user’s active contact rule to determine the user’s preferred notification device type and address. The notification event formatter is then invoked, which generates the content of the notification, customized for the user’s device type. The generated notification content is delivered to user’s devices by the notification engine.
The notification event handler is a system-level notification application. Users do not need to explicitly create a notification subscription on this process in order to receive notifications. Instead, only the user ORCLADMIN is subscribed to this process. Depending on the application, users can specify (either in the customization portal, or in the actual application itself), for which events they want to receive notifications. For each notification processed, the system will look up the contact rule of the target user and make sure that the correct user receives the notification. Use the Enterprise Manager console to start, stop or configure notification event process. See OracleAS Wireless Administrator’s Guide for more information on using Oracle Enterprise Manager to start and stop processes.
The notification event collector and notification event handler are two separate processes. Both of them must be running at the same time for the system to process application event notifications.
11.4.2 Workflow IntegrationOracle Workflow integration includes two components. One is a notification application which receives notifications from the Oracle Workflow Notification queues and sends them to the user's mobile device. The other component is an
Note: Only the ORCLADMIN user should be subscribed to the notification event handler notification application. If there is more than one subscription, then users will receive multiple copies of each notification (as many as there are subscriptions).

Integrated Notification Solutions
Notification Engine 11-31
Oracle Workflow Notification Worklist application which can be accessed through the OracleAS Wireless portal.
Since Oracle Workflow and OracleAS Wireless are both components of Oracle Application Server, OracleAS Wireless has the ability to connect to Oracle Workflow through OID. And since OracleAS Wireless connects to Oracle Workflow through OID, they share the same user repository.
11.4.2.1 Notification ApplicationOracle Workflow provides a queue which contains all the outgoing notifications for that particular instance. Each message on the queue contains all the necessary information for the notification and the user to which it is going. OracleAS Wireless dequeues these messages and constructs a message to be sent to the end user using XMS. The user can then respond to this notification. The response is directed to a OracleAS Wireless application which will then update Oracle Workflow according to the user’s response.
11.4.2.2 Worklist ApplicationThis is the equivalent of the Oracle Workflow Notification Worklist through the OracleAS Wireless portal. Using OID, the Worklist Application will connect to Workflow to retrieve a list of all the user’s open notifications. Each notification can be closed or responded to (depending on the type of notification).
Note: If end users cannot receive notifications during the testing of the Wireless integration with Oracle Workflow, then you must check the log file for an ORA-4031 error, which indicates that the notification service failed because of insufficient memory pool size in the database. To increase the shared memory pool:
1. Increase the value for the shared_pool_size parameter in the init.ora file. (Typically, the init.ora file is located on the infrastructure machine in the $ORACLE_HOME/dbs directory.)
2. Restart the database for the change to take effect.
If end users still cannot receive notifications, then you must further increase the size of the shared memory pool.
See: For more information on Oracle Workflow and OracleAS Wireless, see Oracle Workflow Administrator’s Guide, and Oracle Workflow Developer’s Guide.

Integrated Notification Solutions
11-32 Oracle Application Server Wireless Developer’s Guide
11.4.3 Microsoft Exchange Notification IntegrationOracleAS Wireless provides multi-channel notification capability for Microsoft Exchange Email Server, based on the architecture described above. Users of OracleAS Wireless who have Microsoft Exchange Email accounts are able to receive notification messages on their wireless devices when they receive urgent email and/or email from specified people.
An architectural overview of the various components in Microsoft Exchange Notification Integration is shown below.
Figure 11–4 Microsoft Exchange Notification Integration
The Microsoft Exchange notification is integrated through the pull interface. A special Microsoft COM object is deployed in the Exchange server. The COM intercepts Exchange Server’s store events and creates notification events based on user’s event subscription. The notification events are delivered into a special exchange notification account in the form of email. The Microsoft Exchange adapter in the notification event collector process retrieves those notification event emails through standard IMAP or POP3 protocol.
Users create notification subscriptions using OracleAS Wireless Tools. The subscription data is transferred to the Microsoft Exchange Server host through HTTP/ASP, and saved as Microsoft Exchange store event parameters.
See OracleAS Wireless Administrator’s Guide for notification configuration for Microsoft Exchange Server and OracleAS Wireless.

Migrating the Notification System
Notification Engine 11-33
11.5 Migrating the Notification SystemThis section is for users who want to migrate from the 9.0.2.x version of the notification system to the current version. It requires basic knowledge of the notification systems in both versions, and details the steps required to perform this migration. For information on the notification system for this or the previous release, see the appropriate Developer’s Guide.
In this release, 9.0.2.x notifications and their APIs are depleted. Oracle Corporation strongly recommends that you do not mix 9.0.2.x notifications with 9.0.4.x notifications. Use only 9.0.2.x OR only 9.0.4.x notifications at a given time.
If you have not previously used 9.0.2.x notifications, then start with the 9.0.4.x after you have completely migrated your OracleAS Wireless instance to the current release.
If you have existing 9.0.2.x notifications on your system, continue using only them in an environment in which OracleAS Wireless 9.0.2.x and 9.0.4.x co-exist. After migrating your OracleAS Wireless instance to 9.0.4.x, upgrade your notification to the 9.0.4.x style, and start using exclusively 9.0.4.x notifications. A script (provided as part of the product) enables you to upgrade your 9.0.2.x notification objects into 9.0.4.x-compliant notifications. The script is discussed later in this section.
11.5.1 Notification Migration ScenarioHere is a typical notification migration scenario:
1. Start with a pure 9.0.2.x environment.
2. Start upgrade, and have an OracleAS Wireless 9.0.2.x and 9.0.4.x mixed environment. At this time, use only 9.0.2.x-style notifications.
3. Complete upgrade to OracleAS Wireless 9.0.4.x environment.
4. Run the script migrateNotifications to upgrade 9.0.2.x-style notifications to 9.0.4.x-style.
5. Use only 9.0.4.x-style notifications from this point on. The script is further described later in this section.
Note: If you have any applications (such as a subscription portal) that use the 9.0.2.x API to manipulate notifications, those applications must be rewritten to use the 9.0.4.x notification API. An example is provided later in this section.

Migrating the Notification System
11-34 Oracle Application Server Wireless Developer’s Guide
11.5.2 Structural ChangesThere have been significant structural changes to notifications in this release. Major differences include:
■ Section 11.5.2.1, "Event Generation"
■ Section 11.5.2.2, "Message Content Generation"
■ Section 11.5.2.3, "Authorization"
11.5.2.1 Event GenerationPreviously, there were only two types of notifications: value-based and time-based.
Value-based notifications are evaluated every time the notification engine receives a data push event from the data feeder component.
Time-based notifications are a bit more complicated.
These notifications were evaluated at certain times (specified by the notification user at subscription time). Every notification, whether time- or value-based, was based on a data feeder (in 9.0.2.x). 9.0.2.x timer events result in data retrieval at this specified time. Furthermore, these time-based notifications are also evaluated every time the notification system receives a data push event from the data feeder. For example, a developer designs a time-based notification, created on a stock feed data feeder. This stock feed data feeder has one input parameter: TICKER and one output parameter: PRICE. If the user subscribes to this notification for 10:00A.M. everyday, then the notification system will generate a notification at 10:00A.M., but it will also evaluate notifications every time the notification engine receives data from the data feeder. So, even though the user has subscribed to receive notifications at 10:00A.M., the user will receive notifications whenever the value triggering condition is validated.
In this release, time-based notifications are extended to avoid receiving notifications at times other than the specified time; this type of time-based notifications are called strictly time-based. All new notifications are defaulted to strictly time-based, if a developer does not specify this parameter.
In this release, it is also possible to design notifications without any data feeder. This type of notification can be used when a user wants to send a simple notification message at certain times, or to retrieve relevant content using the message generation mechanism. For example, if a developer wants to design a calendar notification, there are two options:
■ Design a data feeder that will push calendar information into the notification system. Then, the developer can create a time-based master notification based

Migrating the Notification System
Notification Engine 11-35
on the calendar data feeder, which will generate a message using the content and data provided by the data.
■ Design a time-based master notification without any data feeder. At content generation time, the notification system calls an OracleAS Wireless application provided by the developer. This OracleAS Wireless application can connect to the calendar system, and retrieve relevant information to generate the content.
In 9.0.4.x, you can also utilize the Location Server to design location-based notifications.
11.5.2.2 Message Content GenerationUsing 9.0.2.x, one can provide a simple message template to generate message content which in turn will be pushed to end-users. 9.0.2.x notifications can also invoke a hook (java class) to generate message content for more complicated cases.
In this release, the only mechanism to generate message content is by invoking an OracleAS Wireless application, which usually invokes an OracleAS Wireless application to generate this content. For this reason, every notification must be mapped to an OracleAS Wireless master application. In other words, in 9.0.4.x, developers must notification-enable master applications. This feature avoids replication of code, since the same master application can be used by both notifications and regular device access. Also, user subscriptions can be handled by using the mobile portal application tree.
It is still possible to use message templates in this release by utilizing a seeded OracleAS Wireless application, which is capable of accessing and processing this message template to generate end-user content. However, developers must still create a master application to define mapping information between the seeded OracleAS Wireless application and the master notification. In this case, the master application creation process is automated, and manual steps (and API calls) are minimal.
11.5.2.3 AuthorizationPreviously, notification authorization was performed by using topics and Alert Services. After designing a master notification, developers must create AlertServices/Topics and assign these to appropriate users for authorization control.
In this release, since message generation is performed by regular master applications, the notification system is utilizing regular Link and Folder objects to provide authorization.

Migrating the Notification System
11-36 Oracle Application Server Wireless Developer’s Guide
11.5.3 Migration LimitationsAfter upgrading to 9.0.4.x, users must not mix 9.0.4.x notifications with 9.0.2.x. Use 9.0.2.x notifications only until you are ready to migrate to the 9.0.4.x notifications, and use only 9.0.4.X notifications after a successful migration.
The 9.0.4.x OracleAS Wireless Webtool utility is defaulted to show/create only 9.0.4.x notifications. Likewise, the 9.0.4.x OracleAS Wireless Mobile Portal utility can only process 9.0.4.x subscriptions. If you want to process 9.0.2.x notifications using 9.0.4.x OracleAS Wireless Webtool, you must modify the System.properties file located in IASW_HOME/wireless/server/classes/oracle/panama/core/admin directory as follows:
■ Edit the IASW_HOME/wireless/server/classes/oracle/panama/core/admin/System.properties using a standard text editor.
■ Locate the parameter named: DeprecatedAlertSupport, and change its value to true.
■ Save this file, and restart your OC4J Portal instance.
Since the subscription process and authorization are completely different in 9.0.2.x and 9.0.4.x, it is not possible to use OracleAS Wireless Mobile Portal to process 9.0.2.x subscriptions. To do so, users should either enable 9.0.2.x Customization Portal utility or develop their own subscription mechanism. Sample code is provided at the end of this section demonstrating how to migrate your existing code for subscription handling.
11.5.4 Running the Migration ScriptIt is possible to transform (migrate) any 9.0.2.x notification to 9.0.4.x using a script provided with OracleAS Wireless. This script performs the following operations:
■ Creates a new template-based 9.0.4.x master notification using the information defined in the 9.0.2.x master notification. If the 9.0.2.x notification is time based, then the time-based type will be set to non-strictly time-based in 9.0.4.x. This can be changed any time using the OracleAS Wireless Webtool. The name of the 9.0.4.x master notification will be <OLD_MASTER_NOTIFICATION_NAME>_NEW, the script will append _NEW to the 9.0.2.x master alert name. All information (such as message template triggering conditions), is copied over, and partial message templates are transformed into well-formed mobile XMLs if necessary.

Migrating the Notification System
Notification Engine 11-37
■ Creates a master application and maps it to the new master notification. The name of this master application will be <OLD_MASTER_NOTIFICATION_NAME>_MS, and the master application will be created in a folder called /master/notifications.
■ Creates a link based on the new master application for each 9.0.2.x alert. The name of this link will be the same as the alert service, and again, it will be created in the /notifications folder.
■ Migrates all group and user access information for the given 9.0.2.x master notification application related objects (that is: AlertService, Topic, and others).
■ Converts all existing subscriptions to 9.0.4.x subscriptions.
Although the migration script does not remove or disable the old master alert service for integrity and security purposes, you should disable the old master alert services once the migration process is successfully completed.
To run this script:
1. Stop all notification processes that use the master notifications that are to be migrated, or remove these master alert service from those processes and restart them.
2. Change directory to $IASW_HOME/wireless/bin
3. Execute migrateNotifications.[sh|bat] by providing parameters as follows:
a. migrateNotifications.[sh|bat] -name <9.0.2.X master alert name(s)> -owner <owner user name>
b. migrateNotifications.[sh|bat] -oid <9.0.2.X master alert oid> -owner <owner user name>
c. You can use % as a wildcard for the name parameter, but not for the OID.

Migrating the Notification System
11-38 Oracle Application Server Wireless Developer’s Guide
d. The Owner user name will be used to create required master applications, application links and folders.
e. Check OracleAS Wireless Webtool and Mobile Portal to verify the migration process for the master notification, master application, link and subscriptions.
f. Create a new notification process and attach migrated master alerts to this process.
Remember that you must stop existing notification processes that contain migrated 9.0.2.x notifications, or remove these master notifications from those processes and restart them. As explained before, the migration script does not remove or disable 9.0.2.x notifications. Therefore, if these processes are not maintained correctly, users will receive 2 copies of each notification, one from the old master notification and one from the new one.
11.5.4.1 Sample code for subscription handling in both versionsSince the 9.0.4.x notification system is backward-compatible, any custom code written for altering 9.0.2.x notifications or subscriptions should work without any errors or problems, even after the migration. However, code written for 9.0.2.x APIs will be altering 9.0.2.x notifications and subscriptions only; that is, if a new master notification is created using the old API, this master notification will not be available on the 9.0.4.x notification system, hence it will not be processed by the 9.0.4.x notification engine.
Table 11–1 Migration Script Examples
Script Function
migrateNotifications.[sh|bat] -name StockAlert -owner orcladmin
Migrates the master notification named “StockAlert”
migrateNotifications.[sh|bat] -name Stock% -owner orcladmin
Migrates all master notifications starting with “Stock”, such as “StockAlert”, “StockTransaction”
migrateNotifications.[sh|bat] -name % -owner orcladmin
Migrates all master notifications.
migrateNotifications.[sh|bat] -oid 1089 -owner orcladmin
Migrates the master notification that has the oid 1089.

Migrating the Notification System
Notification Engine 11-39
Developers must modify their existing code to use 9.0.4.x APIs after successful migration in order to take advantage of new functionality. As of this release, all notification APIs included in the oracle.panama.alert package have been deprecated, and a new package (oracle.panama.mobilealert) is introduced to provide 9.0.4.x functionary. Some methods and interfaces are replicated in both 9.0.2.x and 9.0.4.x APIs. However, every 9.0.4.x notification-related method calls should be performed using this new package (oracle.panama.mobilealert), even for the methods that exist in 9.0.2.x APIs (in oracle.panama.alert package).
The following code samples illustrate how to create a user subscriptions in 9.0.2.x using the deprecated oracle.panama.alert package and also in 9.0.4.x (after migrating the same notification) using the oracle.panama.mobilealert package.
11.5.4.2 Sample Code for Adding a 9.0.2.x SubscriptionThe following sample illustrates code for adding a 9.0.2.x subscription.
MetaLocator m = MetaLocator.getInstance(); ModelServices s = m.getModelServices();
//Assuming we have a user named "DemoUser" User myUser = s.lookupUser("DemoUser");
//Assuming we have a validated E-Mail address, the first e-mail device address DeviceAddress[] deviceAddrList = myUser.getDeviceAddresses(DeliveryType.EMAIL); DeviceAddress subscriptionDeviceAddr = deviceAddrList[0];
//Retrieve the alert service object that will be used to create a subscription oracle.panama.alert.AlertService alert = s.lookupAlertService("StockNotification");
alert.setUserAlertDevice(subscriptionDeviceAddr);
oracle.panama.alert.UserAlertSubscription userSub = alert.addUserAlertSubscription(myUser);
userSub.setDisplayName("DemoSubscription");
// Set subscription time to 13:30 in daily mode. userSub.setHour(13);
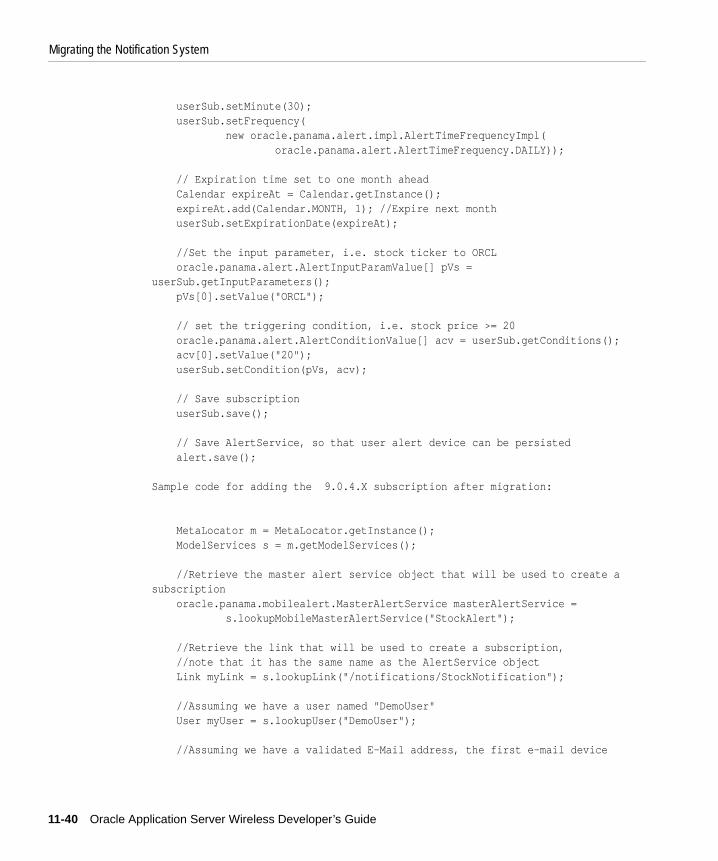
Migrating the Notification System
11-40 Oracle Application Server Wireless Developer’s Guide
userSub.setMinute(30); userSub.setFrequency( new oracle.panama.alert.impl.AlertTimeFrequencyImpl( oracle.panama.alert.AlertTimeFrequency.DAILY));
// Expiration time set to one month ahead Calendar expireAt = Calendar.getInstance(); expireAt.add(Calendar.MONTH, 1); //Expire next month userSub.setExpirationDate(expireAt);
//Set the input parameter, i.e. stock ticker to ORCL oracle.panama.alert.AlertInputParamValue[] pVs = userSub.getInputParameters(); pVs[0].setValue("ORCL");
// set the triggering condition, i.e. stock price >= 20 oracle.panama.alert.AlertConditionValue[] acv = userSub.getConditions(); acv[0].setValue("20"); userSub.setCondition(pVs, acv);
// Save subscription userSub.save();
// Save AlertService, so that user alert device can be persisted alert.save();
Sample code for adding the 9.0.4.X subscription after migration:
MetaLocator m = MetaLocator.getInstance(); ModelServices s = m.getModelServices();
//Retrieve the master alert service object that will be used to create a subscription oracle.panama.mobilealert.MasterAlertService masterAlertService = s.lookupMobileMasterAlertService("StockAlert");
//Retrieve the link that will be used to create a subscription, //note that it has the same name as the AlertService object Link myLink = s.lookupLink("/notifications/StockNotification");
//Assuming we have a user named "DemoUser" User myUser = s.lookupUser("DemoUser");
//Assuming we have a validated E-Mail address, the first e-mail device

Migrating the Notification System
Notification Engine 11-41
address DeviceAddress[] deviceAddrList = myUser.getDeviceAddresses(DeliveryType.EMAIL); DeviceAddress subscriptionDeviceAddr = deviceAddrList[0];
// oracle.panama.mobilealert.ServiceAlertSubscription userSub = masterAlertService.addUserAlertSubscription(myUser, myLink);
userSub.setSubscriptionDevice(subscriptionDeviceAddr); userSub.setAlternativeType(ServiceAlertSubscription.AFTERMAX_DISCARD);
userSub.setDisplayName("DemoSubscription");
// Set subscription time to 13:30 in daily mode. //Since start/end time are same, interval can be any value userSub.setHour(13); userSub.setMinute(30); userSub.setEndHour(13); userSub.setEndMinute(30); userSub.setInterval(1); userSub.setFrequency( new oracle.panama.mobilealert.impl.AlertTimeFrequencyImpl( AlertTimeFrequency.DAILY));
// Expiration time set to one month ahead Calendar expireAt = Calendar.getInstance(); expireAt.add(Calendar.MONTH, 1); //Expire next month userSub.setExpirationDate(expireAt);
//Set the input parameter, i.e. stock ticker to ORCL oracle.panama.mobilealert.AlertInputParamValue[] pVs = userSub.getInputParameters(); pVs[0].setValue("ORCL");
// set the triggering condition, i.e. stock price >= 20 oracle.panama.mobilealert.AlertConditionValue[] acv = userSub.getConditions(); acv[0].setValue("20");
// Save subscription information userSub.save();

Migrating the Notification System
11-42 Oracle Application Server Wireless Developer’s Guide
Note that all notification-related objects are proceeded by the full package name to avoid confusion.

J2ME Development and Provisioning 12-1
12J2ME Development and Provisioning
Each section of this document presents a different topic. These sections include:
■ Section 12.1, "J2ME Overview"
■ Section 12.2, "Digital Rights Management Support"
■ Section 12.3, "The J2ME Provisioning Server"
12.1 J2ME OverviewJ2ME (Java 2, Micro Edition) is a technology for Java applications on small devices. As a mobile application development platform, J2ME is standard-based and offers a rich UI, one that is comparable to browser-based solutions. In addition, J2ME-based applications are more resilient to network disruption because they do not depend on a wireless network to perform many sophisticated operations.
With the increasing market penetration of J2ME-capable handsets, enterprises are eager to develop J2ME applications to access their back-end applications for their mobile employees. Operators are also seeking to expand their revenue source by deploying new customer applications on these handsets.
OracleAS Wireless provides a complete J2ME offering, which includes a J2ME Developer Kit as a component of OracleAS Wireless Developer Kit for developing Web service-enabled J2ME applications, J2ME application management, and J2ME application provisioning which enables the flexible and reliable provisioning of J2ME applications to handsets.
The key features provided by the OracleAS Wireless J2ME solution include:
■ Developer Kit: The OracleAS Wireless Developer Kit, which is installed with the Oracle Application Server Developer Kit installation option offers a simple J2ME client library API, utilities, and a J2ME Web service proxy server to invoke

J2ME Overview
12-2 Oracle Application Server Wireless Developer’s Guide
standard Web services from J2ME applications. The J2ME client library API offers other advanced functionalities, including request queuing, response caching and additional functions that address network unreliability.
■ J2ME Application Management: The provisioning system enables J2ME applications to be uploaded into the OracleAS Wireless repository and managed and categorized by OracleAS Wireless Tools. The provisioning system enables developers to specify the API scan policy, the devices which support a J2ME application (and those which cannot support the J2ME application) and the required device capability to run a J2ME application. The provisioning system tracks a user’s download history for future billing and reporting usage.
■ Digital Rights Management (DRM) Support: A Service Developer can associate a Digital Rights Management policy for each J2ME application. Out of the box, OracleAS Wireless provides count-based, and time-based pre-built DRM policies, which are compliant to the Open Digital Rights Language (ODRL) 1.0 specification. The DRM framework can be further extended to integrate the usage with any external billing system so that operators and service providers can create a profitable business model for the J2ME provisioning service.
■ Delivery: OracleAS Wireless J2ME provisioning system supports the standard Sun Over-the-air (OTA) provisioning protocol for delivering J2ME applications to J2ME capable handsets. Additionally, the provisioning system provides an open and extensible delivery framework to provision any J2ME application through any delivery protocol.
OracleAS Wireless J2ME solution not only enables Service Developers to quickly develop J2ME application that integrate with enterprise back-end systems through Web service technology, but also enables Content Managers to easily manage these applications. The provisioning and Digital Rights Management support offers a new means of creating revenue for the operators and service providers marketing J2ME applications to their consumers.
12.1.1 Overview of FeaturesThe following sections provide an overview of the following features of the J2ME Client Library and J2ME Proxy Server:
■ Section 12.1.1.1, "Minimum Memory Requirement in the MIDlet Suite"
■ Section 12.1.1.2, "Simple Registration and Invocation of Web Services"
■ Section 12.1.1.3, "Access to Both SOAP Web Services and Enterprise Applications"
J2ME Overview
J2ME Development and Provisioning 12-3
■ Section 12.1.1.4, "Result Caching and Call Queuing"
■ Section 12.1.1.5, "Request and Response Packetization and Compression"
■ Section 12.1.1.6, "Session Support"
■ Section 12.1.1.7, "Deployment to OracleAS Wireless"
12.1.1.1 Minimum Memory Requirement in the MIDlet SuiteMIDlets are packaged and deployed as MIDlet Suite. Each MIDlet suite contains the MIDlet’s JAR file and its descriptor (JAD) file. The J2ME Client Library client JAR file requires only 26 KB of memory in a MIDlet suite. A currently available alternative is kSOAP 1.2, which is 41 KB and requires kXML, which adds another 21 KB for a total size of 62 KB.
The proxy server enables the 36 KB memory requirement because the server performs the operations on the Web services, thereby reducing the amount of work performed by MIDP device.
12.1.1.2 Simple Registration and Invocation of Web ServicesThe entire process of a J2ME MIDlet calling a Web service consists of:
1. Registering a Web service with the J2ME Proxy Server using the Web service's WSDL (Web Services Definition Language) document.
2. Generating a J2ME client stub class for the registered service.
3. Calling a Java method on the generated stub class from your J2ME MIDlet. Each method in the generated J2ME client stub represents an operation of the Web service. For example, a MIDlet compiled with the J2ME Client Library JAR file makes a request to a Web service simply by making a Java method call.
12.1.1.3 Access to Both SOAP Web Services and Enterprise ApplicationsTo register SOAP Web services with the J2ME Proxy Server, you provide the file location of the Web service's WSDL document. During WSDL Registration, the J2ME Proxy Server generates a SOAP client Java class. During execution, the J2ME Proxy Server calls this client class to invoke operations on the Web service.
The J2ME Proxy Server also supports a second type of registration called Class Registration, which enables you to register any Java class with the J2ME Proxy Server. This enables you to access enterprise applications from J2ME MIDlets by creating a Java client to these applications. Once you register this Java client with

J2ME Overview
12-4 Oracle Application Server Wireless Developer’s Guide
the J2ME Proxy Server, all of the public methods of the Java class become available for invocation from the J2ME MIDlet.
12.1.1.4 Result Caching and Call QueuingThe methods in the generated J2ME client stub classes contain additional parameters that allow you to cache the result from a Web service call in local persistent storage on the MIDP device. This enables the MIDlet to access the results returned from the Web service repeatedly without requiring additional network round-trips, even after the device has been turned off or has been moved to an area without network access.
Call queuing enables you to queue Web service operation invocations if a network error prevents calling a Web service normally. The J2ME Client Library runtime automatically retries the queued calls until they succeed, and then caches the responses in persistent storage until MIDlet retrieves them.
12.1.1.5 Request and Response Packetization and CompressionRequest packetization enables you to specify a maximum request size for cases in which a wireless network cannot handle HTTP requests that exceed a certain size. The J2ME Client Library and J2ME Proxy Server automatically break up call requests and responses into pieces no larger than the maximum specified size.
The J2ME Client Library and J2ME Proxy Server compress requests and responses for improved bandwidth and memory usage. Requests and responses are encoded to reduce their size during network transmission and when cached in the MIDlet. This is done automatically.
12.1.1.6 Session SupportSession support is activated by default, meaning that an instance of the Java class registered with the J2ME Proxy Server (a class that was either generated during WSDL Registration or provided during Class Registration) is stored in an HttpSession object and then reused when the J2ME Proxy Server receives multiple requests from the same MIDlet. Session support can be turned off by setting a property in the J2ME Client Library.
12.1.1.7 Deployment to OracleAS WirelessOnce you complete the development of a MIDlet, the J2ME MIDlets and the Web services registered with the J2ME Proxy Server can be easily deployed to a complete OracleAS Wireless installation. The WDK and OracleAS Wireless contain migration scripts to facilitate this deployment.

J2ME Overview
J2ME Development and Provisioning 12-5
12.1.2 Getting Started with the Wireless Development KitThis section describes how to develop Web service-enabled J2ME MIDlets using the J2ME Web Services Client Library (J2ME Client Library) and the J2ME Web Services Proxy Server (J2ME Proxy Server) in the Wireless Development Kit (WDK).
12.1.2.1 SetupThe OracleAS Wireless Proxy Server consists of two sets of components: the actual server and the scripts to manage the server.
1. First launch the WDK server, which includes the J2ME Proxy Server, by executing the following script:
Windows: <ORALCE_HOME>\opmn\bin\opmnctl start wdk
UNIX: <ORACLE_HOME>/opmn/bin/opmnctl.sh start wdk
2. If you are running the Wireless Development Kit behind a firewall, you must also configure your HTTP proxy server settings in the j2mesdkmgr.bat (Windows) and j2mesdkmgr.sh (UNIX) scripts, located in <ORACLE_HOME>\wireless\bin/. The scripts contain commented-out examples for setting the HTTP proxy server for -registerwsdl option. If you want to register Java classes as services and the classes are at URLs which are outside of your firewall, you must also include HTTP proxy server settings in the –registerclass option of above scripts. As illustrated in the examples for the -registerwsdl option, setting the HTTP proxy server consists of defining the following variables in the Java command line:
Dhttp.useProxy=true -Dhttp.proxyHost=<http proxy server>Dhttp.proxyPort=<port number> -Dhttp.nonProxyHosts=<hosts inside firewall>
12.1.2.2 J2ME Directory Structure in the WDKThe following are the WDK directories relevant to the J2ME Client Library and J2ME Proxy Server.
■ wireless/-- (OracleAS Wireless and WDK home)
■ bin/ (scripts for registration and management of Web services)
■ lib/ (libraries and properties files)
■ j2me/-- (J2me sdk home)
* docs/Javadoc (J2me SKD API documentation)

J2ME Overview
12-6 Oracle Application Server Wireless Developer’s Guide
* lib/ (contains J2me DK JAR file)
* sample/ (sample MIDlets and WSDL files)
■ j2ee/OC4J_Wireless/-- (OracleAS Wireless J2EE base)
■ applications/wdk/wdk-Web/Webservice -- (J2ME proxy server home)
* repository/ (descriptions of registered Web services)
* stage/ (source of classes generated during WSDL registration)
* classes/ (compiled classes generated during WSDL registration)
* lib/ (contains jar file with test services used by sample MIDlets)
* src/ (source code)
12.1.3 Walkthrough: Developing a J2ME MIDlet This section walks you through the following step for creating a J2ME MIDlet that calls a Web service:
■ Step 1: Registering a Web Service with the J2ME Proxy Server
■ Step 2: Generating a J2ME Client Stub Class for the Registered Web Service
■ Step 3: Calling the Methods in the J2ME Stub Class from the MIDlet
The Wireless Tools provide you with a graphical interface to the J2ME Proxy Server. In the Wireless Development Kit, however, the interface to the J2ME Proxy Server is through command-line scripts. The J2ME Proxy Server registration and management scripts are:
For Windows: <ORACLE_HOME>\wireless\bin\j2mesdkmgr.bat
For UNIX: <ORACLE_HOME>/wireless/bin/ j2mesdkmgr.sh
12.1.3.1 Step 1: Register a Web Service with the J2ME Proxy ServerYou can register a Web service either through Web Service Registration or through Class Registration.
For Web Service Registration, you registering Web services with the J2ME Proxy Server to make those Web services accessible to J2ME MIDlets. You register a SOAP Web service with the J2ME Proxy Server by providing the WSDL document describing the Web service. Once registered, the Web service is available to J2ME MIDlets by calling methods of a J2ME stub class generated from the registered service.
J2ME Overview
J2ME Development and Provisioning 12-7
In addition to registering SOAP Web services, you can also register any Java class with the J2ME Proxy Server using Class Registration. All of the public methods of the Java class become available for remote invocation from your MIDlet. This enables you to give your MIDlets access to any enterprise application simply by building a Java client to the enterprise application. This Java class must have either a public constructor with no arguments or a public static method called getInstance() with no arguments that returns an instance of the class.
NamespacesWhen registering Web services, you can group them into namespaces. Associating services with a namespace enables you to group related Web services and to avoid naming conflicts. If you do not specify a namespace, then the Web service is registered under the default namespace.
WSDL Registration Script Option (registerwsdl)j2mesdkmgr –registerwsdl registers a Web service using the Web service’s WSDL document.
Usage:
j2mesdkmgr –registerwsdl <URL of the WSDL> [<namespace>]
For example, to register the Hello World service (hello.wsdl) available from the Oracle Technology Network (OTN), execute:
For Windows:
j2mesdkmgr.bat –registerwsdl http://otn.oracle.com/tech/Webservices/htdocs/live/hello.wsdl
For UNIX:
j2mesdkmgr.sh –registerwsdl http://otn.oracle.com/tech/Webservices/htdocs/live/hello.wsdl
To register the service inside a namespace, use the namespace as the third parameter to the script. For example, to register the Hello World application in a namespace called samples, execute:
For Windows:
j2mesdkmgr.bat –registerwsdl http://otn.oracle.com/tech/Webservices/htdocs/live/hello.wsdl samples
For UNIX:

J2ME Overview
12-8 Oracle Application Server Wireless Developer’s Guide
j2mesdkmgr.sh –registerwsdl http://otn.oracle.com/tech/Webservices/htdocs/live/hello.wsdl samples
Class Registration Script Option (registerclass)j2mesdkmgr –registerclass registers a Web service using a Java class.
Usage:
j2mesdkmgr -registerclass <URL of the Class Library> <Name of the class> [<namespace>]
The first parameter must be a URL. It may point to either a directory containing the class or to a JAR file.
The second parameter must be a fully qualified class name. For example, to register a service called TestWebService (which is included in the WDK), execute:
For Windows:
j2mesdkmgr.bat -registerclass file:C:\ora9ias\j2ee\OC4J_Wireless\applications\wdk\wdk-Web\Webservice\lib\testservices.jar oracle.wireless.me.server.TestWebService
For UNIX:
j2mesdkmgr.sh -registerclass file:/ias/j2ee/OC4J_Wireless/applications/wdk/wdk-Web/Webservice/lib/testservices.jar oracle.wireless.me.server.TestWebService
To register the service inside a namespace, use the namespace as the fourth parameter to the script. For example, to register the TestWebService class in the samples namespace, execute:
For Windows:
j2mesdkmgr.bat -registerclass file:C:\ora9ias\j2ee\OC4J_Wireless\applications\wdk\wdk-Web\Webservice\lib\testservices.jar oracle.wireless.me.server.TestWebService samples
For UNIX:
Note: For this example, the WDK home directory is /iaswv904/wireless (UNIX) and C:\iaswv904\wireless (Windows).

J2ME Overview
J2ME Development and Provisioning 12-9
j2mesdkmgr.sh -registerclass file:/ias/j2ee/OC4J_Wilreless/applications/wdk/wdk-Web/Webservice/lib/testservices.jar oracle.wireless.me.server.TestWebService samples
12.1.3.2 Step 2: Generate J2ME Client Stub Class for the Registered Web ServiceThe simplest way to call a Web service that you have registered with the J2ME Proxy Server from your MIDlet is to generate a J2ME stub for the service and to call the methods of the generated stub from your MIDlet.
Stub Generation Script Option (-generatestub)j2mesdkmgr -generatestub generates a J2ME client stub class for a registered Web service.
Usage:
j2mesdkmgr -generatestub [<namespace>.]<service name> [<Output directory> [<stub name>]]
For example, to generate a J2ME stub class for the Hello World service available from the Oracle Technology Network (IOTNHelloWorld):
j2mesdkmgr -generatestub IOTNHelloWorld
If the service is inside a namespace, you must prefix the service name with the namespace and a period (.). For example, if the Hello World service (IOTNHelloWorld) is registered inside the samples namespace, generate the stub with:
j2mesdkmgr -generatestub samples.IOTNHelloWorld
You can specify a directory in which to place the generated stub as a third parameter to the script.
If you do not specify a stub name, then the generated J2ME client stub class will be called:
IOTNHelloWorldJ2MEStub.Java
To specify a different name for the generated stub, specify an output directory as the third parameter (tmp in the following examples) and the desired stub class name (HelloWord in the following examples) as the fourth parameter. For example:
For Windows:
j2mesdkmgr.bat -generatestub samples.IOTNHelloWorld c:\tmp HelloWorld

J2ME Overview
12-10 Oracle Application Server Wireless Developer’s Guide
For UNIX:
j2mesdkmgr.sh -generatestub samples.IOTNHelloWorld /tmp HelloWorld
The generated J2ME client stub class contains one method for each operation of the Web service.
12.1.3.3 Step 3: Calling the Methods in the J2ME Stub Class from the MIDletEach of the public methods in the generated J2ME stub class represents an operation of a registered service. The first two parameters of each method have special meaning to J2ME Client Library: the first parameter is the number of minutes to cache the response; the second parameter is a boolean, which should be set to true to bypass any cached responses (that is, force the J2ME Client Library to make a network call to the Web service), and set to false to use a cached response if available and valid. For more information about these parameters, see Section 12.1.4.1, "Response Caching".
All of the other parameters of the methods in the generated stub correspond to the parameters of the service operation that the method represents. Calling these methods from your MIDlet invokes these operations on the Web service.
To test your MIDlet with Sun’s J2ME Wireless Toolkit (http://Java.sun.com/products/j2mewtoolkit/download.html):
1. Create a project for your MIDlet. Put the J2ME Client Library JAR file j2me_sdk.jar in the lib directory of your project. Put the generated J2ME stub class in the src directory of your project.
2. In the source code of your J2ME MIDlet, enter an import statement for the generated J2ME stub class, create an instance of the stub class, and make calls to the methods in the stub class. The first parameter of each stub method is the number of minutes to cache the result. Set 0 for no caching, or -1 to cache forever. The second parameter of each stub method is true to ignore cached results (that is, always make a network call), or false to use valid cached results if available. The remaining parameters of the stub methods correspond to the parameters of the Web service operations represented by the methods.
3. Build and run your J2ME MIDlet.
12.1.3.3.1 Hello World Example The J2ME Client Library contains several sample MIDlets. One of these calls the IOTNHelloWorld service using a generated stub. The sample MIDlet is:
<ORACLE_HOME>\wireless\j2me\j2mesdk\sample\HelloWorld.Java

J2ME Overview
J2ME Development and Provisioning 12-11
12.1.3.3.2 Other Management Command Line Utilities
The listservices option lists all of the registered services. The removeservice option removes registered services.
The Listing Services Option (-listservices)The option j2mesdkmgr –listservices lists all the registered services. This script takes no parameters.
This script lists all registered services, but does not list the methods available in the services or the parameters that the methods take. You can view this information with a Web browser, using the URL to the J2ME Proxy Server in the WDK:
http://<host name>:9010/wdk/proxy
For example:
http://www.example.com:9010/wdk/proxy
The Removing Services Option (-removeservice)The option j2mesdkmgr –removeservice removes registered services.
Usage:
j2mesdkmgr –removeservice [<namespace>.]<service name>
For example, to remove the registered service Hello World (IOTNHelloWord):
j2mesdkmgr –removeservice IOTNHelloWorld.
If the service is inside a namespace, you must prefix the service name with the namespace and a period (.). For example, to remove the Hello World service (IOTNHelloWorld), which is registered inside the samples namespace:
j2mesdkmgr –removeservice samples.IOTNHelloWorld
Note: The directory also contains other MIDlets that have examples of calling Web services through the J2ME Proxy Server using either generated stubs or the J2ME Client Library API.

J2ME Overview
12-12 Oracle Application Server Wireless Developer’s Guide
12.1.3.4 Using TestStubMidlet to Access Simple ServicesThe J2ME Client Library provides a sample J2ME MIDlet, called TestStubMidlet, which enables you to quickly test the generated stub files for the Web services that you register with the J2ME Proxy Server.
To use the sample TestStubMidlet:
1. Download and install Sun’s J2ME Wireless Toolkit (http://Java.sun.com/products/j2mewtoolkit/download.html)
2. Make the following modifications to the sample MIDlet file TestStubMidlet.Java, which is located in:
<ORACLE_HOME>/wireless/j2me/j2mesdk/sample/
a. Add an import statement for the generated Java stub class.
b. Modify the callStub()method to instantiate the stub class, call the operation, and assign the result to the instance variable sCallResultString, used to display the result.
3. Create a Project in Sun’s J2ME Wireless Toolkit. (You must first locate the OracleJ2ME Web Service Client Library, j2me_sdk.jar, which is located in <ORACLE_HOME>/wireless/wdk/j2me/lib/)
Place this library inside the lib directory of the project. Place the stub class in the src directory of the project, and place the modified TestStubMidlet class in an oracle/wireless/me/sample1/ subdirectory inside the src directory of the project (TestStubMidlet is in the package oracle.wireless.me.sample1)
4. Build and run the project. When the J2ME device emulator appears, launch the test MIDlet and execute Call Stub. The test result then appears.
Example:
This example uses TestStubMidlet to call the XMethods Delayed Stock Quote Web service to display a stock quote for Oracle Corporation:
a. Register the XMethods Delayed Stock Quote Web service (xmethods-delayed-quotes.wsdl):
j2mesdkmgr -registerwsdl http://services.xmethods.net/soap/urn:xmethods-delayed-quotes.wsdl
b. Generate the stub:
j2mesdkmgr -generatestub NetXmethodsServicesStockquoteStockQuoteService

J2ME Overview
J2ME Development and Provisioning 12-13
c. Modify TestStubMidlet.Java as in the following example.
...import NetXmethodsServicesStockquoteStockQuoteServiceJ2MEStub;.../*** Call Stub. Edit this method to test the stub.* Remember to import the stub class*/private void callStub(){ try { // Add your code to test the stub. // For example: // Use the stub to call the XMethods delayed stock quote service to get // Oracle’s stock price and cache the result for 1 minute. // Instantiate the Stub class: NetXmethodsServicesStockquoteStockQuoteServiceJ2MEStub stub = new NetXmethodsServicesStockquoteStockQuoteServiceJ2MEStub();
// Call GetQuote Operation to get Oracle’s stock price and // cache the result for 1 minute sCallResultString = new String("Stock price for ORCL :" + stub.getQuote(1, false, "ORCL")); }...
d. Build and run. The delayed stock quote for Oracle appears on the test result screen. If you invoke the stub a second time within one minute, the result appears quickly, since it is reading from the local cache without making a round trip to the network.
12.1.3.4.1 Using TestStubMIDlet for Other Web Services You can register and test the following Web services with TestStubMidlet:
■ Web Services Provided by Oracle Technology Network (http://otn.oracle.com/tech/Webservices/htdocs/live/content.html):
Hello World:
http://otn.oracle.com/tech/Webservices/htdocs/live/hello.wsdl
■ Web Services Provided by XMethods, Inc (http://www.xmethods.com):

J2ME Overview
12-14 Oracle Application Server Wireless Developer’s Guide
Delayed Stock Quotes:
http://services.xmethods.net/soap/urn:xmethods-delayed-quotes.wsdl
Weather Temperature:
http://www.xmethods.net/sd/2001/TemperatureService.wsdl
FedEx Tracker:
http://www.xmethods.net/sd/2001/FedExTrackerService.wsdl
12.1.3.4.2 TestWebService and TestWebService2 Sample Services The J2ME Proxy Server in OracleAS Wireless includes a JAR file with two simple sample Web services in the Java classes. Some of the sample MIDlets distributed with the J2ME Client Library use these sample services. To register them, execute the scripts:
For Windows:
<ORALCE_HOME>\wireless\bin\installj2mesamples.bat
For UNIX:
<ORALCE_HOME>/wireless/bin/installj2mesamples.sh
The script registers two Java classes as Web services – TestWebService and TestWebService2.
The TestWebService class contains several simple methods for testing different parameter types. It has a public constructor with no arguments.
The TestWebService2 class contains one simple test method and a getInstance() method with no arguments that returns an instance of TestWebService2. Its constructor is private.
The source code for these test services can be found at:
<ORACLE_HOME>/j2ee/OC4J_Wireless/applications/wdk/wdk-Web/Webservice/src
The JAR file that contains the compiled services is:
<ORACLE_HOME>/j2ee/OC4J_Wireless/applications/wdk/wdk-Web/Webservice/lib/testservices.jar
12.1.4 Advanced FeaturesThis section describes the usage instructions for the key features provided by the J2ME Client Library and J2ME Proxy Server.

J2ME Overview
J2ME Development and Provisioning 12-15
12.1.4.1 Response CachingThe first two parameters of every public method in a generated stub are int timetokeep and boolean refresh. These parameters are used to control response caching. The J2ME Client Library is able to cache the response of a Web service operation in persistent memory on the wireless device. For future invocations of the same operation, the response is retrieved from the local cache instead of from the Web service.
int timetokeep
This is the time in minutes to keep the response in the cache. Further invocations of the same operation within the specified number of minutes will retrieve the response from the local cache instead of making a network round-trip to the Web service. After the specified number of minutes has elapsed, the response in the cache becomes invalid, and the next invocation of this operation will again make a network round-trip to the Web service. Set this parameter to 0 to disable caching, or to –1 to cache forever (the response never becomes invalid).
boolean refresh
This parameter indicates whether to bypass the cache when invoking this operation. Setting this parameter to true forces a network round-trip, even if a valid response is available in the local cache. If this parameter is false, the response if retrieved from the local cache if an available cached response is valid.
12.1.4.2 HTTP AuthenticationThe J2ME Proxy Server and Client Library support accessing Web services that use the HTTP basic authentication scheme. To set the username and password for authentication, update the Web services’ generated stub, setting the instance variables userName and password to the appropriate values. This username and password will be passed to the Web service’s HTTP server by the proxy server for authentication.
12.1.4.3 Session SupportSession support is activated by default. To disable session support, update the Web services’ generated stub, setting the enableSession instance variable to false. The J2ME Proxy Server uses a Java class to invoke operations on the Web service whether you use WSDL Registration or Class Registration to register a Web service with the J2ME Proxy Server, Session support means that successive invocations of operations of a Web service coming from the same J2ME device use the same instance object of this Java class. The instance of the class is saved in the J2ME Proxy

J2ME Overview
12-16 Oracle Application Server Wireless Developer’s Guide
Server’s servlet HttpSession object, so it is available as long as the HTTP session is valid.
12.1.4.4 Request and Response PacketizationThe J2ME Client Library sends requests to the J2ME Proxy Server using HTTP, the only protocol that is guaranteed to support all MIDP implementations. Some wireless carriers are unable to correctly send an HTTP request if it exceeds a certain size. To work around this problem, the J2ME Client Library enables you to specify a maximum size in bytes for the request and response. In the J2ME stub generated for a Web service, edit the maxRequestSize instance variable to set the maximum HTTP request and response size in bytes.
12.1.4.5 Client Library APIIn most cases, you can use the server-generated client stub to invoke services registered with the J2ME Proxy Server. If you want to use an advanced feature such as call queuing, however, you must use the Client Library API directly, either from your own MIDlet, or by modifying the generated stub.
The API documentation for the J2ME Client Library is located at:
<ORACLE_HOME>\wireless\j2me\Javadoc\index.html
12.1.4.5.1 Web Service Calls Use the ServiceFactory class to create Service objects, which represent services registered with the J2ME Proxy Server. For convenient access, store the URL of the J2ME Proxy Server as a property of your MIDlet suite. For example, to create a Service object for the TestWebService class in the default namespace (assuming that the J2ME Proxy Server URL is stored in a MIDlet suite property called j2me_proxy_url):
// Get the URL of the J2ME proxy server.String servURL = getAppProperty("j2me_proxy_url");if (servURL == null) {servURL = "http://localhost:9010/wdk/proxy";System.out.println("Unable to get j2me_proxy app property, usingdefault: " + servURL);}ServiceFactory serviceFactory = ServiceFactory.getInstance();Service service = serviceFactory.createService(servURL,Service.DEFAULT_NAMESPACE,"TestWebService");
In the preceding code example, the first parameter to createService is the URL of the J2ME Proxy Server, servURL the second is the namespace that contains the

J2ME Overview
J2ME Development and Provisioning 12-17
service (Service.DEFAULT_NAMESPACE), and the third is the name of the registered service ("TestWebService").
Once you have an object of class Service, you can create Call objects. Each Call object represents an operation of the remote Web service. For example, to create a Call object for an operation called hello:
// Set cache timeout to 1 hour.Call call = service.createCall("hello", 60);
The first parameter to createCall is the name of the operation of the Web service ("hello"). The second parameter is the number of minutes to cache the response in the wireless device (60). Enter 0 to disable response caching, and –1 to cache forever. For more information, see Section 12.1.4.1, "Response Caching".
Once you have a Call object, you can invoke the Web service operation that it represents. Build a Java Vector to hold the parameters, and then call the Call object’s invoke method. Assuming the hello operation takes a single String parameter, invoke hello is as follows:
// Put the parameters in a Vector.Vector params = new Vector();params.addElement( new String("World") );Response response = call.invoke(params, false);
The first parameter to the Call object’s invoke method is the Vector of parameters for the Web service operation. The second parameter may be set to true if you want to bypass the local cache. In other words, true ignores any valid cached response and forces a network call to the remote Web service. For more information, see Section 12.1.4.1, "Response Caching".
The invoke method returns a Response object. Always check the Response object’s return code. If it is 0, then the call succeeded and you can use the Response object’s methods to access the information returned from the remote operation. If the return code is not 0, use the Response object’s getErrorMsg method to get the error message. Assuming that the operation, hello, returns a String, perform the following:
// Check if the response is valid (0 = OK).int retCode = response.getReturnCode();String retVal;if (retCode == 0) { retVal = response.getString();}else { // return code not 0

J2ME Overview
12-18 Oracle Application Server Wireless Developer’s Guide
retVal = "Call unsuccessful: " + response.getErrorMsg();}
12.1.4.5.2 Setting Properties Use the Service.setProperty method to set the following properties of the Service object, which represents a Web service registered with the J2ME Proxy Server:
Service.USERNAME and Service.PASSWORD – Set these properties to access Web services that require basic HTTP authentication.
Service.SESSION_MAINTAIN – Set this property to enable or disable session support. For more information, see Section 12.1.1.6, "Session Support".
Service.MAX_REQUEST_SIZE – Set the maximum HTTP request and response size. For more information, see Section 12.1.4.4, "Request and Response Packetization".
12.1.4.5.3 Call Queuing Calls to Web services from wireless devices sometimes fail due to network connectivity problems. The J2ME Client Library enables MIDlets to queue Web service calls for later invocation. Once queued, the J2ME Client Library automatically retries the call periodically until it succeeds. You would queue a call following a network error using the ServiceManager.queueCall method, as follows:
try { Response response = call.invoke(params, false);...catch (ServiceException se) { if (se.getErrorCode() == ServiceException.CONNECTION_FAILED) { int queuedId = ServiceManager.getInstance().queueCall(call); } ...}...
Use the getQueuedCalls method of the ServiceManager class to retrieve queued calls. Set the boolean parameter of getQueuedCalls to true to retrieve the IDs of queued calls that have already been invoked, and false to retrieve the IDs of queued calls that have not yet been invoked. Then, use the ServiceManager.getQueuedCall method to get a Call object from an ID, and use Call.getResponse to retrieve the response to the call.
To find the queued Web service calls that have been invoked:
int[] queuedIds = ServiceManager.getInstance().getQueuedCalls( true );for (int i = 0; i < queuedIds.length; i++){ //Retrieve Call object

J2ME Overview
J2ME Development and Provisioning 12-19
Call invokedCall = ServiceManager.getInstance().getQueuedCall(queuedIds[i]); Response response = invokedCall.getResponse(); ...}
To find the queued calls that have not been invoked:
...int[] queuedIds = ServiceManager.getInstance().getQueuedCalls( false );...
12.1.4.5.4 Required MIDlet Cleanup You should always call the close() method of the ServiceManager class when your MIDlet exits. This closes the RMS RecordStore used for Response Caching and Call Queuing. In a J2SE environment, this is performed in the ServiceManager’s finalize() method. However, J2ME does not support the finalize() method. As a result, your code is responsible for closing the RMS RecordStore used by the J2ME Client Library.
You must collect all the cleanup code for your MIDlet into one method, which you call from the MIDlet’s destroyApp method and from any other code that would cause the MIDlet to terminate (such as an Exit command). In the following example, which is taken from one of the sample MIDlets included in the J2ME Client Library, the cleanup code is collected in the exitMIDlet method:
private void exitMIDlet() { try { ServiceManager.getInstance().close(); } catch (Exception e) { }
notifyDestroyed(); }
protected void destroyApp(boolean unconditional) throws MIDletStateChangeException { exitMIDlet(); }

J2ME Overview
12-20 Oracle Application Server Wireless Developer’s Guide
public void commandAction(Command c, Displayable d) { if (c == exitCommand) { exitMIDlet(); } . . . }
12.1.4.5.5 Supported Data Types Currently, the J2ME Web Services Client Library and Proxy Server support the following data types for Web service operation parameters and return values:
■ String
■ Integer
■ Boolean
■ Date
■ int
■ boolean
■ Vector
■ Hashtable
■ Arrays of String, Integer, Boolean, and Date
For every registered Web service, only those operations that use these data types can be registered with the J2ME Proxy Server and invoked using the J2ME Client Library.
Note: J2ME does not support the data types: float or double. As a workaround, the J2ME Proxy Server converts float and double to String. This workaround applies only to the data type of the return value of Web service operations, not to operation parameters. This enables you to call Web service operations that return prices, temperatures, and other decimal values.

J2ME Overview
J2ME Development and Provisioning 12-21
The mapping of WSDL simple data types (which are XML Schema data types) to Java data types is as follows:
12.1.4.6 Deploying MIDLets to OracleAS WirelessWhen you have finished developing and testing your Web service-enabled J2ME MIDlets using the Wireless Development Kit, you can deploy them on a real OracleAS Wireless installation. You can do this by either one of the following two methods.
12.1.4.6.1 Deploying through Re-registration You may migrate your work by re-registering your Web services with the OracleAS Wireless J2ME Proxy Server. The Service Manager, one of the OracleAS Wireless tools, enables you to register Web services and generate J2ME stubs for them.
To deploy a service through re-registration:
1. Register every Web service that your MIDlets access.
2. Generate new J2ME stubs for the Web services that your MIDlets call.
3. Recompile your MIDlets with the new J2ME stubs.
If you made any manual modifications to the generated stubs, then you must manually modify the J2ME stubs that you already have as an alternative to Step 2. To do this, you must change the value of the _proxyUrl instance variable. Update this URL with the correct hostname of the OracleAS Wireless server, the correct port number for OracleAS Wireless (typically 7777), and the correct path (typically: /mcs/wsproxy/proxy). For example:
private String _proxyUrl= "http://example.com:7777/mcs/wsproxy/proxy";
Table 12–1 WSDL Data Types Mapping
WSDL data type Java data type
boolean Java.lang.Boolean
integer Java.lang.Integer
string Java.lang.String
dateTime Java.util.Date

J2ME Overview
12-22 Oracle Application Server Wireless Developer’s Guide
12.1.4.7 Deploying through scriptsYou can avoid reregistering every Web service that your MIDlets access by using the migration scripts. The process consists of downloading, or exporting, all information on the registered Web services to an XML file, and then uploading, or importing, this information from the XML file to a OracleAS Wireless installation.
1. Export the Web services registered with the WDK J2ME Proxy Server to an XML file using the following script:
migrateStandalone
This script is used to extract Web services registered with the WDK J2ME Proxy Server into an XML file. This script is located with the other WDK J2ME Proxy Server scripts for registration and management of Web services, at <ORACLE_HOME>/wireless/wdk/bin.
Usage:
j2mesdkmgr -export <xml file name>
Examples:
For Windows:
j2mesdkmgr -export C:\temp\registered_services.xml
For UNIX:
j2mesdkmgr.sh -export /usr/tmp/registered_services.xml
2. Import the XML file to a OracleAS Wireless installation, using the following script:
uploadJ2MEProxy
This script takes a single parameter: the name or full path to an XML file produced by the j2mesdkmgr -export script. All of the Web services described in this XML file are inserted into the database of this OracleAS Wireless and become registered with the J2ME Proxy Server of this OracleAS Wireless installation. This script is located in the directory <ORACLE_HOME>/wireless/bin/.
Usage:
uploadJ2MEProxy <xml file name>

J2ME Overview
J2ME Development and Provisioning 12-23
Examples:
For Windows:
uploadJ2MEProxy.bat c:\temp\registered_services.xml
For UNIX:
uploadJ2MEProxy.sh /usr/tmp/registered_services.xml
5. Generate new J2ME stubs for the Web services that your MIDlets call.
You can skip this step by manually modifying the J2ME stubs that you already have.(Do this if you made any manual modifications to the generated stubs.) You must change the value of the _proxyUrl instance variable to the correct hostname of the OracleAS Wireless server, the correct port number (typically 7777), and the correct path: /mcs/wsproxy/proxy. For example:
private String _proxyUrl= "http://example.com:7777/mcs/wsproxy/proxy";
6. Recompile your MIDlets with the new or corrected J2ME stubs.
12.1.4.8 Migration from One OracleAS Wireless Installation to AnotherAt some point, you may want to migrate all of the information on Web services registered with the J2ME Proxy Server from one OracleAS Wireless installation to another. The process consists of downloading, or exporting, all information on the registered Web services of the source OracleAS Wireless to an XML file, and then uploading, or importing, this information from the XML file to the destination OracleAS Wireless. The scripts to do this are found in the following directory:
<ORACLE_HOME>/wireless/bin/
To migrate the information on Web services registered with the J2ME Proxy Server from on OracleAS Wireless installation to another:
1. Export the Web services registered with the source OracleAS Wireless J2ME Proxy Server to an XML file, using the following script:
downloadJ2MEProxy
This script takes a single parameter: the name or full path to an XML file. All Web services registered with the J2ME Proxy Server on the OracleAS Wireless where this script is run are extracted from the OracleAS Wireless database and placed into this XML file.

J2ME Overview
12-24 Oracle Application Server Wireless Developer’s Guide
Usage:
downloadJ2MEProxy <xml file name>
Examples:
For Windows:
downloadJ2MEProxy.bat c:\temp\registered_services.xml
For UNIX:
downloadJ2MEProxy.sh /usr/tmp/registered_services.xml
7. Import the XML file to the destination OracleAS Wireless J2ME Proxy Server, using the following script:
uploadJ2MEProxy
This script takes a single parameter: the name or full path to an XML file produced by the downloadJ2MEProxy script. All of the Web services described in this XML file are inserted into the database of the OracleAS Wireless where this script is run and become registered with the J2ME Proxy Server of this OracleAS Wireless installation.
Usage:
uploadJ2MEProxy <xml file name>
Examples:
For Windows:
uploadJ2MEProxy.bat c:\temp\registered_services.xml
For UNIX:
uploadJ2MEProxy.sh /usr/tmp/registered_services.xml
8. Generate new J2ME stubs for the Web services that your MIDlets call.
You can skip this step by manually modifying the J2ME stubs that you already have.(Do this if you made any manual modifications to the generated stubs.) Change the value of the _proxyUrl instance variable. Update this URL with the correct hostname of the OracleAS Wireless server, the correct port number (typically 7777), and the correct path (/mcs/wsproxy/proxy). For example:
private String _proxyUrl= "http://example.com:7777/mcs/wsproxy/proxy";
9. Recompile your MIDlets with the new (or corrected) J2ME stubs.

Digital Rights Management Support
J2ME Development and Provisioning 12-25
12.2 Digital Rights Management SupportDigital Rights Management (DRM) enables the Content Manager to define the content usage policy after the content has been downloaded to the device. The usage policy defines the allowed permission associated with the content to the end user with additional temporal and monetary constraints if necessary. The common types of permission include:
■ Execute: The right to invoke the application (for example, a J2ME game).
■ Display: The right to display the content (for example, an image).
■ Play: The right to play the content (for example, audio/video clip).
■ Print: The right to create a hardcopy of the content (for example, image/jpeg).
■ The optional constraints on the permission for providing fine-grained consumption control of content (for example, preview rights).
■ Count: The number of times the permission rights are granted (for example, the number of times you can run).
■ Interval: The recurring period of time during which the permission rights are granted (for example, the number of hours you can use).
■ Start and End time: The pre-defined time range which the permission rights are granted.
There are many standards on expressing the digital rights. The one proposed by Open Mobile Alliance (OMA) for mobile content is a simplified version of the Open Digital Rights Language (ODRL) which means that digital rights should be expressed in an XML document following the syntax defined as ODRL Mobile Profile.
12.2.1 OracleAS Wireless Built-in DRM PolicesOracleAS Wireless includes two types of DRM policies that can be used to package J2ME applications: Count DRM Policy and Interval DRM Policy.
■ Count DRM Policy: restricts the downloaded J2ME application to be run on the device up to x times, where x is the count specified by the Foundation Developer specifies while creating the policy.
■ Interval DRM Policy: restricts the downloaded J2ME application to be run on the device for a specified period after it has been downloaded. The duration is specified in years, months, days, hours or minutes (or all of these). A standard conversion is used to handle years (365 days) and months (30 days).

Digital Rights Management Support
12-26 Oracle Application Server Wireless Developer’s Guide
The policy creation and the association of the policy with content is similar in both cases. The actual packaging of the policy with the content occurs at download time. The policy is enforced on the downloaded content after the user launches the downloaded application on the device. The Foundation Manager, one OracleAS Wireless Tools enables you to create built-in DRM policies Another Tool, the Content Manager, enables you to associate those policies with the J2ME application. See the Oracle Application Server Wireless Administrator’s Guide for more information on the Content Manager.
12.2.2 Custom-built Digital Rights Policy and Content EnhancementOracleAS Wireless provides a platform to facilitate customized Digital Rights Policy and Content Enhancement for J2ME devices (OracleAS Wireless supports MIDP 1.0 complaint devices). Although Customized Digital Rights Policy and Content Enhancement are two completely different features, they are implemented using one framework in OracleAS Wireless.
The custom implementation of Digital Rights Policy or Content Enhancement is a two-step development process.
1. Implementation of Custom Digital Rights for MIDP platform by extending oracle.wireless.me.drm.DRMAgent class for MIDP platform. This implementation is also referred to as a Digital Rights Object.
2. Implementation of oracle.wireless.me.server.tools.drm.DRMPackager interface, which implements the packaging logic of content with the Rights object developed in Step 1.
12.2.2.1 Use Case StudyThe following sections describe an example of PoweredByPolicy, where a splash screen is packaged with the associated applications.
PoweredByPolicy.Java for Target Mobile Information Devices package devguide; import Java.io.IOException;import Javax.microedition.midlet.*;import Javax.microedition.lcdui.*;import oracle.wireless.me.drm.DRMAgent; /*** <code>PoweredByPolicy</code> displays a "Powered By" splash

Digital Rights Management Support
J2ME Development and Provisioning 12-27
* screen for a packaged content. The product copyright string may * be set using a property parameter using OracleAS Wireless Server.*/ public class PoweredByPolicy extends DRMAgent implements CommandListener { /*** value of copyright*/private String copyright; public PoweredByPolicy(MIDlet ctx) {super(ctx);copyright = getProperty("copyright");} /*** Displays a splash screen when the application starts up.*/public void onStartApp() {showSplash();} /*** Creates a splash screen and sets it be the current display*/private void showSplash() {Form form = new Form("Powered By:");try {form.append(Image.createImage("/devguide/9i.png"));}catch(IOException ioe){form.append("Oracle AS Wireless");}form.append(copyright);form.addCommand( new Command("OK", Command.SCREEN, 1));form.setCommandListener(this);Display.getDisplay(context).setCurrent(form);} /*** Resume the normal application logic when user * attends to the splash screen*/public void commandAction(Command c, Displayable d) {resumeStartApp();

Digital Rights Management Support
12-28 Oracle Application Server Wireless Developer’s Guide
}} // end of class PoweredByPolicy
The PoweredByPolicy class defines an implementation of oracle.wireless.me.drm.DRMAgent (referred to as DRMAgent hereafter). It defines a constructor with a single argument of type Javax.microedition.midlet.MIDlet to satisfy the general contract of DRMAgent, The implementation of onStartApp() method displays a splash screen by calling the showSplash() method that houses the business logic of the policy. Finally, the event handler of splash screen calls resumeStartApp() for the packaged application to resume normally.
You can use the Sun J2ME Wireless Toolkit to compile and pre-verify the PoweredByPolicy class. The required lib containing DRMAgent class can be obtained from <IASW_HOME>/wireless/lib/j2medrm_demo.jar. The compiled and pre-verified class file or JAR file (which must also be pre-verified) containing the class file can be packaged by defining a packager as explained in Section 12.2.2.1.1.
12.2.2.1.1 Packaging Custom-built Digital Rights Policy oracle.wireless.me.server.tools.drm.DRMPackager interface (referred to hereafter as DRMPackager) defines API for packaging a MIDlet suite content with Digital Rights Policy or Content Enhancement developed in Section 12.2.2.1. The DRMPackager.getInitPropertiesDef() method defines a contract to return a set of Properties used by tools such as user interfaces and publishing frameworks for discovering the parameter definitions of the Digital Rights Object. In turn, the OracleAS Wireless Runtime calls the init(Properties prop) method with the value of the parameters. DRMPackager defines the following API contract, which is invoked by OracleAS Wireless Runtime for packaging MIDlet Suite content with the Digital Rights object.
public byte[] packageDRMContent(byte[] content, Properties policyProperties, Document odrlXml,UserDevice device)
To simplify the implementation of DRMPackager, oracle.wireless.me.server.tools.drm.J2MEDRMPackager (referred to hereafter as J2MEDRMPackager) defines the default implementation to specify the Digital Rights object and contain the JAR file using the setDRMAgentInfo(String agentClassName, String implJarFileName) method. The implJarFileName can be the absolute path of the file containing the Rights Objects. If not, the J2MEDRMPackager performs a search for the specified JAR file in the CLASSPATH.
No customization is required for Rights object specified using ODRL.

Digital Rights Management Support
J2ME Development and Provisioning 12-29
The following class describes the packaging logic of the Rights object. The implementation assumes that JAR file containing the Rights object is archived in the C:\temp\poweredby.jar file. You do not have to restart the OracleAS Wireless server for changes made to the file containing the Digital Rights Object (C:\temp\poweredby.jar).
package devguide;
import oracle.wireless.me.server.tools.drm.J2MEDRMPackager;import oracle.wireless.me.server.tools.drm.DRMPackager;import Java.util.Properties;
/** * Powered By Rights Packager */public final class PoweredByPolicyPackager extends J2MEDRMPackager { private static Properties defaultInitProperties = null;
static { defaultInitProperties = new Properties(); // initializes the copyright property with a default value defaultInitProperties.setProperty("copyright", "Copyright 2003 Oracle Corporation. All Rights Reserved."); }
private Properties initProperties = null;
private static PoweredByPolicyPackager instance = new PoweredByPolicyPackager();
/** * Static factory that returns the instance of DRMPackager */ public static DRMPackager getInstance() { return instance; }
private PoweredByPolicyPackager() { initProperties = defaultInitProperties; setDRMAgentInfo("devguide.PoweredByPolicy", "C:\\temp\\poweredby.jar"); }
public Properties getInitPropertiesDef() { return defaultInitProperties; }

Digital Rights Management Support
12-30 Oracle Application Server Wireless Developer’s Guide
}// end of the class
public static DRMPackager getInstance() { return instance; }
12.2.3 Deployment of Custom-built Digital Rights Policies1. Before you deploy the custom-built Digital Rights Policy, you must create a new
Digital Rights Policy using the Foundation Developer, one of the OracleAS Wireless Tools. For more information on the Foundation Developer, see the Oracle Application Server Wireless Administrator’s Guide.
To create a new Digital Rights Policy:
1. From the browsing page (Figure 12–1), click Create. The Select Digital Rights Policy Type screen appears (Figure 12–2).
Figure 12–1 The Browsing Page for DRM Policies
Note: This class implements the general contract of DRMPackager by implementing the following method.
Note: To use the Foundation Developer, you must be granted the Foundation Manager role or the Super User role.

Digital Rights Management Support
J2ME Development and Provisioning 12-31
2. Select the Customized Package option.
3. Enter the name of the package. You can also define the initialization (init) parameters and the ODRL document if the policy is supported by DRMPackager implementation. See Figure 12–3, "Creating a New Digital Rights Policy".
Figure 12–2 Create a New Digital Rights Policy
4. Click Create. The New Digital Rights Policy screen appears (Figure 12–3).
5. Enter the Name of the policy.
6. Click Create.

Digital Rights Management Support
12-32 Oracle Application Server Wireless Developer’s Guide
Figure 12–3 Creating a New Digital Rights Policy
Once the Digital Rights Object is created, you can associate it with an application link of a MIDlet application. You use the Service Manager to create a J2ME MIDlet application and then the Content Manager to create an application link to that MIDlet, which is a means to customize a application and publish it to a user group. For more information on creating a MIDlet application, see Section 5.3.6, "Creating a J2ME Application". For more information on creating an application link, see Oracle Application Server Wireless Administrator’s Guide.

The J2ME Provisioning Server
J2ME Development and Provisioning 12-33
Figure 12–4 Associating a Digital Rights Policy with a J2ME Application
12.3 The J2ME Provisioning ServerUsing OracleAS Wireless J2ME Provisioning Server, Service Developers can upload, organize, and download J2ME applications. The uploaded J2ME application can then be published as an application using the Content Manager to users groups for downloading. The published service is available in the wireless user’s application tree along with the other applications distributed to that user.
12.3.1 The Application ModelThe OracleAS Wireless J2ME Provisioning Framework’s Repository consists of the Content Repository and the framework which provide a means to create an association between the uploaded Digital Rights Management Policies (DRM) and the content. The association of the content with a DRM policy is done at the service creation time. All Content download transactions are recorded in an audit table.
The content repository stores the deliverable contents information for any uploaded content. The information is accessible through public APIs. Table 12–2 describes this information.
Table 12–2 Deliverable Content
Information Description
Name The name of the content.
Version The version of the content.
Display Name The display name of the content

The J2ME Provisioning Server
12-34 Oracle Application Server Wireless Developer’s Guide
The Deliverable Content contains the meta-information of the actual content, which is available as a DeliverableContentItem object (described in Table 12–3).
The provisioning transactions are logged in an audit table, the PROVISIONING_TRANSACTION_LOG (described in Table 12–4). These transactions are exposed as runtime metrics in the System Manager.
Description A description of the content.
Verify time The time when content was pre-verified using the Api-Scan feature.
Status Indicates if the content is valid.
Owner The owner of the content.
Table 12–3 DeliverableContentItem
Information Description
MIME Type The MIME type of the content. (That is, the JAR or JAD MIME type.)
Content Binary The actual content stored in a binary format
Content Size The size of the content.
Audit Information The audit information, such as creation time, update time, and user information.
Table 12–4 PROVISIONING_TRANSACTION_LOG
Column Name Column Type Description
INSTANCE_NAME VARCHAR2 (256) (NOT NULL) The Instance name of the Provisioning server which served this content
HOST_NAME VARCHAR2 (256) The host name of the server
USER_DOWNLOAD_ID NUMBER Internal unique id of this download transaction
USER_NAME VARCHAR2(2000) The name of the user who was provisioned with this content
SERVICE_NAME VARCHAR2 (256) The service used to access the content
Table 12–2 Deliverable Content
Information Description

The J2ME Provisioning Server
J2ME Development and Provisioning 12-35
12.3.2 HooksThe framework enables the download operation to be tracked and controlled by allowing the implementer to plug in hooks at different stages. A custom implementation of the hooks can be plugged using the System Manager. The hooks need to be singleton classes and must contain the getInstance() method to return their object reference.
APPLICATION_NAME VARCHAR2 (256) (NOT NULL) The application encapsulating this content
APPLICATION_TYPE VARCHAR2 (256) The application type. For example: J2ME
CONTENT_NAME VARCHAR2 (256) (NOT NULL) The name of the content. The content name and version uniquely identifies content.
CONTENT_VERSION VARCHAR2 (100) (NOT NULL) The version of the content. The content name and version uniquely identifies content.
MIME_TYPE VARCHAR2 (256) (NOT NULL) The MIME type of the content.
DRM_POLICY_NAME VARCHAR2 (256) The DRM policy (if any) associated with this service used to download the content.
NUMBER_OF_DOWNLOADS NUMBER The total number of downloads of this content by the user
DEVICE_ID NUMBER The downloading device information
DOWNLOAD_TIME_STAMP DATE The time stamp of the download operation
DOWNLOAD_INTERNAL_STATUS VARCHAR2 (256) The internal status code to indicate if the download was successful or if it failed.
DOWNLOAD_DISPLAY_STATUS VARCHAR2 (256) The descriptive status code to indicate if the download was successful or if it failed.
Table 12–4 PROVISIONING_TRANSACTION_LOG
Column Name Column Type Description

The J2ME Provisioning Server
12-36 Oracle Application Server Wireless Developer’s Guide
■ Pre download Hook: This is invoked at the time of application invocation before the actual download happens. The hook interface is supplied to the user download status object containing the user information and content information. The hook can return a true or false status to allow the user to proceed with the download or abort the operation respectively.
The ProvisioningPreDownloadHook interface is defined in the public package oracle.panama.rt.hook as follows:
public interface ProvisioningPreDownloadHook { /** Delegate additional processing of this download * @param UserDownloadStatus The download status object encapsulates the current download transaction i.e. user, application, content, version, mime type etc. * @return boolean to indicate successful hook processing * @see oracle.panama.model.UserDownloadStatus */ public boolean processRequest ( UserDownloadStatus uds );
}
■ Post download Hook: This hook is invoked at two stages during the post download cycle: after a successful download and after a device notification of a successful download.
The hook supplies the user download status object, which contains the user information and the content information. The hook implementation can decide to bill or audit the download operation at either of the stages.
The ProvisioningPostDownloadHook interface is defined in the public package oracle.panama.rt.hook as follows:
public interface ProvisioningPostDownloadHook { public static final int POST_DOWNLOAD = 1; public static final int POST_NOTIFY = 2; public boolean processRequest ( UserDownloadStatus uds, HttpServletRequest request, int hookType /* determines if it is a post notify or a post download hook */ );}

The J2ME Provisioning Server
J2ME Development and Provisioning 12-37
12.3.3 Upload J2ME ApplicationYou use the Service Manager to create a J2ME application. To access this tool, you must be granted either the Service Manager or Super User roles.
To create a J2ME MIDlet application:
1. From the browsing screen, click Create Application.
2. From the application type selection screen, select J2ME Midlet as the application type.
3. Enter a name for the MIDlet application. For example, enter Morphing (as depicted in Figure 12–5).
The URL parameter points to the Download Service manager JSP that is included. You can also enter a custom JSP that provides the similar functionality.
Figure 12–5 Entering the Basic Information for the MIDlet Application
4. Click Next to enter the details of the J2ME Content (Figure 12–6).

The J2ME Provisioning Server
12-38 Oracle Application Server Wireless Developer’s Guide
Figure 12–6 Entering the Content Details
5. Enter the version number, display name, and description for the application.
6. Upload the JAD and JAR file for the J2ME MIDlet application.
7. Click Next. The Device Requirement page appears (Figure 12–7).

The J2ME Provisioning Server
J2ME Development and Provisioning 12-39
Figure 12–7 Selecting the Devices that Support the J2ME Application
8. If needed, exclude the devices which cannot support the application.
9. Optionally, set the heap size requirement for the device.
10. Click Next. The Additional Information screen appears (Figure 12–8).
11. Select the Valid option.
12. Provide any additional information for the application, such as the file location for a display menu icon.
13. Click Finish to complete the J2ME MIDlet application.

The J2ME Provisioning Server
12-40 Oracle Application Server Wireless Developer’s Guide
Figure 12–8 Entering Additional Information for the J2ME Application
12.3.4 Publishing the J2ME ApplicationThe Content Manager enables you to publish the J2ME application to user groups. The application created using the Service Manager is published as an application link, which you create using the Content Manager. The Service Designer-created application, or master application, forms the core of the application link. Using the application link, you can customize the application. For example, you can customize the application to a user group or to a location. For more information, see Oracle Application Server Wireless Administrator’s Guide.
To publish the J2ME application:
1. From the browsing screen of the Content Manager, click Add Application Link.
2. Select the application targeted for publishing. For example, select Morphing Application.
3. Click Next.

The J2ME Provisioning Server
J2ME Development and Provisioning 12-41
4. Enter a name for the application link.
5. If needed, select a DRM policy. By default, the user is allowed unrestricted usage of the downloaded application. For more information, see Section 12.2.2, "Custom-built Digital Rights Policy and Content Enhancement".
6. You can click Finish to complete the application link by accepting the defaults. If needed, enter information in the Additional Information screen, such as a a non-zero value for cost information for billing purposes. Select the Visible option and any other information as appropriate.
12.3.5 Downloading a J2ME ApplicationFor the J2ME to be accessed (that is used) you must assign the application to a user group. Only users belonging to group to which you assign the J2ME application can use the application. In addition, group members must have at least one device address.
To access the application, users must log in to the Wireless and Voice portal using a URL similar to the following:
http://yourwirelessserver:7777/ptg/rm

The J2ME Provisioning Server
12-42 Oracle Application Server Wireless Developer’s Guide
Figure 12–9 Morphing Service Example
When you choose the Morphing application (as depicted in Figure 12–9), the JSP displays a list all the J2ME contents uploaded for that application. Download the selected content to the device by clicking Download.
In the Customization Portal, you can view the download history log in to by clicking Applications and then View Download History.

Web Scraping 13-1
13Web Scraping
This document explains Transcoding. Each section of this document presents a different topic. These sections include:
■ Section 13.1, "Web Scraping Overview"
■ Section 13.2, "Web Clipping"
■ Section 13.3, "Creating a Wireless Application"
■ Section 13.4, "Migrating from Existing Transcoding Technologies"
■ Section 13.5, "Customizing the Web Clipping Service"
■ Section 13.6, "Administrative Tasks for OracleAS Wireless Administrators"
■ Section 13.7, "WML Translator"
13.1 Web Scraping OverviewThe majority of applications available on web render content in format specific to certain types of devices. Web scraping allows applications developed for a particular markup language to be reformatted for use with other devices. Web scraping includes Web Clipping for repurposing PC browser applications and the WML Translator for reusing WML applications.
13.2 Web ClippingThis section describes the Web Clipping application feature available with OracleAS Wireless. It also describes the roles of the OracleAS Wireless Administrator and user for creating, customizing, and viewing Web Clipping applications on a wireless device. Information about some administrative tasks, such as how to configure proxy settings and security, is also included.

Web Clipping
13-2 Oracle Application Server Wireless Developer’s Guide
13.2.1 IntroductionThe Web Clipping server architecture relative to OracleAS Wireless is shown in Figure 13–1, "Web Clipping Server Architecture Relative to OracleAS Wireless Core".
Figure 13–1 Web Clipping Server Architecture Relative to OracleAS Wireless Core
The Web Clipping server enables OracleAS Wireless Administrators to clip and scrape Web content and create Web Clipping applications that are stored persistently in the Web Clipping server repository. When a request is initiated by a user using a mobile wireless device to view a particular Web Clipping application, that application is retrieved by the HTTP Adapter and delivered to OracleAS Wireless Core for processing and delivery to the mobile device, as shown in Figure 13–2, "Web Clipping Application".

Web Clipping
Web Scraping 13-3
Figure 13–2 Web Clipping Application
Figure 13–3, "Detailed Web Clipping Server Architecture" shows a more detailed look at the Web Clipping server. Web clipping content can be clipped and scraped from Internet or Intranet Web sites scattered throughout a large organization. Using OracleAS Wireless, you can create and store in the wireless repository applications containing Web clippings. In addition, you can create customized applications that uses Web clippings to their best advantage by first identifying the development environment that best fits your needs. Depending upon the development environment you select, you must download and deploy the required archive files

Web Clipping
13-4 Oracle Application Server Wireless Developer’s Guide
into that development environment. Next, clip the desired content. Then, download either the Java or JSP stub files to start developing.
Figure 13–3 Detailed Web Clipping Server Architecture
The archive files available are for each of the following development environments are:
■ J2EE—for developing in a J2EE (OC4J) environment using the Sun standard JCA Common Client Interface (CCI) instead of the Web Clipping Bean API, and for developing with an OC4J version that is release 9.0.3 or higher. Download the JCA Resource Adaptor Archive (RAR) file, webclipping.rar.
■ J2SE—for developing not only in a J2EE (OC4J) environment, but also with a standalone Java 2 SDK environment. Download the Java library (JAR) file, wcbean.jar.
Applications can be customized and deployed in the J2EE or J2SE environments as standalone Java applications or part of other JSP applications, or these applications can be created into wireless applications and stored in the wireless repository, or this content can be clipped.
To create a Web Clipping application, the OracleAS Wireless Administrator simply uses a Web browser to navigate to the Web page containing the desired content, then selects the portion of the page to clip and scrape, sets some attributes and if the Web clipping uses form-based submission, exposes input parameters, saves the application, and tests the application.

Web Clipping
Web Scraping 13-5
Web Clipping applications support:
■ Navigation through various styles of login mechanisms, including form- and JavaScript-based submission and HTTP Basic and Digest Authentication with cookie-based session management.
■ Fuzzy matching of clippings. If a Web clipping gets reordered within the source page or if its character font, size, or style changes, it will still be identified correctly by the Web Clipping server and delivered as the Web Clipping application content.
■ Reuse of a wide range of Web content, including support for pages written with HTML 4.0.1, JavaScript, applets, and plug-in enabled content, retrieved through HTTP GET and POST (form submission) methods.
■ Clipping page content from HTML 4.0.1 pages, including:
– Clipping of <table>, <td>, <img>, <span>, <div> tagged content
– Preservation of <head> styles and fonts, Cascading Style Sheets (CSS)
– UTF-8 compliant character sets
– Navigation through hyperlinks (HTTP GET), form submissions (HTTP POST), frames, URL redirection.
■ HTTPS-based external Web sites can be navigated and clipped, provided that appropriate server certificates are acquired.
■ National Language Sets (NLS) from existing Web content in the following ways. First, it checks the "Content-Type" in the HTTP header for the charset attribute. If this is present, it assumes that this is the character encoding of the HTML page; if this is not present, it next checks the HTML "META" tag on the page to determine the character encoding. If the HTML "META" tag is not found, it defaults to the ISO-8859-1 character encoding. In addition, support includes NLS in URL and URL parameters.
■ Browsers including Netscape Navigator releases 6 and 7, Microsoft Internet Explorer releases 5.0, 5.5, 6.0, and higher.
■ Most non-HTML elements, including applets, plugin content (for example, embedded QuickTime video, Macromedia Flash presentation), and client-side Javascript (v1.2).
Web Clipping
13-6 Oracle Application Server Wireless Developer’s Guide
The following are known limitations of Web clipping:
■ NLS or internationalization limitations include the following:
– Character set must be specified in the meta tags or HTTP header; if not specified, the studio & provider will default to UTF-8 character set.
– Languages not supported under UTF-8 will not be shown correctly.
– Characters from two or more character sets specified on a page will not be shown properly.
■ Back and Forward buttons in the Web Clipping Studio operate on the whole page, not on individual frames.
■ Pages linked from plugin content (for example, Macromedia Flash)
■ Customization of HTTP parameters with multiple values
■ Javascript-based encryption of username/password for login pages
The following page content cannot be clipped by Web clipping:
■ Global Javascript statements that contain doc.write().
■ Javascript in sectioned Web clipping that writes additional Javascript.
The Web Clipping server provides and renders clipped Web content as Web Clipping application content. The Web Clipping Studio allows OracleAS Wireless Administrators and wireless application users to do the following:
■ Browse for Web content.
■ Divide the chosen target page into sections.
■ Choose the exact portion of the Web content to clip.
■ Preview the clipped content.
■ Scrape the clipped content.
■ Set some Web Clipping application attributes, parameterize input parameters in form-based submission, and save the Web Clipping application.
■ Test the Web Clipping application and, if using form-based submission, modify initial input values and test these as well.
All Web Clipping application definitions are stored persistently in the Oracle Application Server infrastructure database. Any secure information, such as passwords, are stored in encrypted form, according to the Data Encryption Standard (DES), using Oracle encryption technology.

Web Clipping
Web Scraping 13-7
13.2.2 Getting StartedThe Web Clipping server is automatically installed as part of OracleAS Wireless. OracleAS Wireless administrators can access the Web Clipping server in the repository under the Applications: Browse Folder: page in the Wireless Web Tool.
An OracleAS Wireless administrator may need to perform some configuration tasks (see Section 13.6, "Administrative Tasks for OracleAS Wireless Administrators") before getting started.
13.2.3 Creating a Web Clipping ApplicationTo create a Web Clipping, perform the following steps:
1. Log into OracleAS Wireless Web Tool as an OracleAS Wireless Administrator.
2. Click the Services tab.
3. Click Create Application at the Applications Browse Folder: master page.
4. Click the Web Clipping Application radio button on the Select the Application to Be created page, then click Create.
5. Click Add Web Clipping on the Manage Web Clippings page.
6. In the URL Location field on the Find Web Clipping page in the Web Clipping Studio, enter the location of the first Web page that leads to the actual Web page you want to clip. In the steps that follow, as an example, start with http://oraclestore.oracle.com, as shown in Figure 13–4, "Find a Web Clipping".

Web Clipping
13-8 Oracle Application Server Wireless Developer’s Guide
Figure 13–4 Find a Web Clipping
7. Click Start.
The page that appears tells you to choose your store.
8. Click United States or another country of your choice.
The Oracle Store Web page for the country of your choice appears inside the Web Clipping Studio, as shown in Figure 13–5, "Browse ORACLESTORE.ORACLE.COM in the Web Clipping Studio".
Note: To import a WIDL file and create a Web clipping, select the Import from WIDL tab. The Import from WIDL page appears. See Section 13.4, "Migrating from Existing Transcoding Technologies" for more information.

Web Clipping
Web Scraping 13-9
Figure 13–5 Browse ORACLESTORE.ORACLE.COM in the Web Clipping Studio
As you click hyperlinks in the Web page to browse to the desired content you want to clip, your navigation links are recorded. For example, using the starting-point URL oraclestore.oracle.com, then clicking United States to select the country, you could search for a product by name once you provide the name in the Quick Search box and click Go. For example, enter the feature name interMedia and click Go. All products containing that name appeared in the search results, as shown in Figure 13–6, "Browse to the Content to Be Clipped".

Web Clipping
13-10 Oracle Application Server Wireless Developer’s Guide
Figure 13–6 Browse to the Content to Be Clipped
Note: Any browsing operations that do not contribute to the eventual Web clipping will be discarded. Thus, only the significant browsing operations are recorded for later playback during the test mode; any discarded links are not visited. See Figure 13–6, "Browse to the Content to Be Clipped" and note for this example there are just three URLs listed, the starting URL, one additional URL, and the URL containing the form.
Note: For any Web sites that require HTTP Basic or Digest Authentication, a form is displayed that requests user name and password information. This encoded authentication information is recorded as part of the browsing information.

Web Clipping
Web Scraping 13-11
9. In the Web Clipping Studio in browse mode, once you find the content you want to clip, click Section. This divides the target Web page into its clippable sections as shown in Figure 13–7, "Divide the Page into Clippable Sections in the Web Clipping Studio".
Figure 13–7 Divide the Page into Clippable Sections in the Web Clipping Studio
10. In the Web Clipping Studio in section mode, find the Product Name section of the Web content you want to clip, click Choose.
Note: After you click Section, you are no longer able to browse links in the displayed page. If you want to continue navigation, click Unsection.

Web Clipping
13-12 Oracle Application Server Wireless Developer’s Guide
11. In the Web Clipping Studio in preview mode, a preview of the Product Name sections is displayed with the search results, as shown in Figure 13–8, "Preview the Web Clipping in the Web Clipping Studio". If it is the section you want, click Scrape to continue to scrape mode.
Figure 13–8 Preview the Web Clipping in the Web Clipping Studio
If you do not want to use the section you clipped in your Web Clipping application, click Unselect to return to the page containing the section. You can
Note: Web content on the page is sectioned into Choose sections. You can click only one Choose section. Only the content immediately below the Choose section icon you selected is chosen as a clipping. Continuing to preview mode will let you view the clipped content; then, clicking Unselect will return you to section mode again to choose another section to clip if the section you had chosen was not the one you wanted. To increase the number of sections available from which to choose, click Zoom In. For example, you would click Zoom In to drill down one level of nested tables. To decrease the number of sections available from which to choose, click Zoom Out.

Web Clipping
Web Scraping 13-13
choose another section on the page, or click Unsection to navigate to another page.
12. In scrape mode, click the check box at the end of the first output. For each output you select, a row of values appears under the Value and Name table in the bottom frame, where you can name your output. In the Name column, enter a meaningful name for your output, such as Book.
In tables with cells, a special stacked check box appears to allow selection of all text in the cell as output.
After selecting the output (first check box), you will have created a group that can be repeated as a whole as long as the first output you selected represents the first item in the collection of similar output. This means that you can only apply repeatability to a collection of similar output. Click More once to increase the repeat level to encompass the entire collection of similar output, as shown in Figure 13–9, "Scrape Mode". Click Continue to continue to the Web Clipping application attributes page.
A check box following anything indicates that you can select it as an output that can be scraped. One or more items of output may make up a collection of similar output. You can select output from the first row of similar output to be scraped. For each output you select, a row of values appears under the Value and Name table where you can name your output in the Name column. Give each output a meaningful name based, for example, on the column name from which it was scraped. Clicking More lets you quickly select the entire collection of similar output to be scraped. As you click More, check boxes of successive groups of selected output are checkmarked and designated to be scraped.This is a quick way of selecting successive groups of similar output to be scraped as output, rather than individually checking each one.
After you save your Web Clipping application and its attributes, you will be returned to the Applications Browse Folders: Master page.
Note: The name cannot contain any spaces.

Web Clipping
13-14 Oracle Application Server Wireless Developer’s Guide
Figure 13–9 Scrape Mode
13. In the Edit Clipping Attributes section of the Find Web Clipping page, you can set attributes of the Web Clipping application.
a. Specify the following Web Clipping application attributes: Title, Description, Timeout (seconds). See Help for more information and see Figure 13–10, "Select Web Clipping Application Options and Edit Clipping Attributes", which shows the top third of the attributes page. For the Description field, enter keyword search.

Web Clipping
Web Scraping 13-15
Figure 13–10 Select Web Clipping Application Options and Edit Clipping Attributes
b. If the OracleAS Wireless Administrator went through form-based submission while clipping content for the Web Clipping application, a heading titled Select the Clipping Customizable Parameters appears in the Web Clipping dialog box. To customize parameters, select the desired parameters to be customizable in the table that is displayed, as shown in Figure 13–11, "Customize Form Input Information for a Web Clipping Application", which shows the middle third of the attributes page. Find each parameter you want to express as customizable to the page viewer by selecting the desired parameter in the drop-down box in the Parameters column, then selecting the box in the Customizable column. Doing this lets OracleAS Wireless Administrators customize the input value to personalize each parameter selected. See the help topic Editing Web Clipping Application Attributes and Customizing Parameters in OracleAS Wireless help for more information, and especially why you should not customize user name and password parameters.

Web Clipping
13-16 Oracle Application Server Wireless Developer’s Guide
Figure 13–11 Customize Form Input Information for a Web Clipping Application
c. For the parameter kw in the row whose Index value is 2, change its Display Name from kw to keyword to make this name more recognizable for wireless application users, then click the Customizable box to let wireless application users customize the parameter input value.
d. To test the Web clipping application, click Test in the Test the Web Clipping section as shown in Figure 13–12, "Test the Web Clipping Application", which shows the bottom third of the attributes page. Results of the Web clipping test appear in a browser page as an XML document. Inspect the contents of the XML document to see if it contains the desired content. In a wireless device, this XML document would appear formatted.
Figure 13–12 Test the Web Clipping Application
e. Click Apply to save your changes when you have finished choosing the options.

Web Clipping
Web Scraping 13-17
f. After you click Apply to save your changes, in the Test the Web Clipping section of the Web Clipping application attributes dialog box, an Inputs heading appears, listing all the parameters that were parameterized and customized, along with their initial input values, as shown in Figure 13–13, "Testing the Web Clipping Application Input Value".
Figure 13–13 Testing the Web Clipping Application Input Value
g. Notice the parameter named keyword and its input value interMedia appears. To test another input value, replace the initial value interMedia and enter a new initial value syndication, as shown in Figure 13–14, "Changing the Input Value". Click Test to test the new input value.
Note: Selecting Apply saves all edits and options for the Web Clipping application, which makes these changes immediately accessible to wireless application users while letting the OracleAS Wireless Administrator make more edits as necessary on the Web Clipping application attributes page. On the other hand, selecting OK both saves all edits to the Web Clipping application attributes, and makes these changes immediately accessible to wireless application users, but exits the Web Clipping application attributes page and returns the OracleAS Wireless Administrator to the Applications page.

Web Clipping
13-18 Oracle Application Server Wireless Developer’s Guide
Figure 13–14 Changing the Input Value
h. Results of this Web Clipping application test appear in a browser page. Inspect the contents of the XML document to see if it contains the desired content.
i. Click OK to save your changes and return to the Manage Web Clippings page as shown in Figure 13–15, "Managing Web Clippings", where you can manage Web clippings in the following ways:
Figure 13–15 Managing Web Clippings

Creating a Wireless Application
Web Scraping 13-19
– Create a new Web clipping.
Click Add Web Clipping. The Find Web Clipping page appears in which you can enter a starting-point URL and begin browsing a Web site, and looking for content to clip.
– Search for a Web clipping.
Enter a search string in the Search field that matches any part of the name of the Web clipping you are looking for, then click Go to initiate the search. The list of Web clippings whose names match this search string is displayed.
– Edit a Web clipping.
Select the Web clipping you want to edit by clicking its radio button in the Select column and then click Edit. The Find a Web Clipping and Clipping Attributes page, as shown in Figure 13–10, "Select Web Clip-ping Application Options and Edit Clipping Attributes", appears where you can edit the Web clipping attributes.
– Delete a Web clipping.
Select the Web clipping you want to delete by clicking its radio button in the Select column and then click Delete. A confirmation message is displayed indicating the Web clipping is deleted.
13.3 Creating a Wireless ApplicationTo create a wireless application from a Web clipping, you use either of the following approaches:
■ You can choose to create a default application for development purposes just to see a default rendering of your newly created Web clipping. See Section 13.3.1, "Creating a Default Application".
■ You can use Java APIs to access the clipped data and customize the rendering. See Section 13.3.2, "Building a Custom Application".
13.3.1 Creating a Default ApplicationAt the Manage Web Clippings page as shown in Example 13–15, "Managing Web Clippings", you can create a default wireless application.
Select the Web clipping you want to turn into a default wireless application by clicking the radio button next to it, and then click Create Default Application. A

Creating a Wireless Application
13-20 Oracle Application Server Wireless Developer’s Guide
default wireless application will be created to deliver a default rendering of the scraping just performed, in OracleAS Wireless XML.
After creating the default application, you are returned to the OracleAS Wireless Applications page, where you can create new Web Clipping applications.
Continuing with our example, the iStore: Search Result application is added to the list of applications, as shown in Figure 13–21, "The Develop Custom Applications Page".
Figure 13–16 Your New Wireless Application iStore: Search Result Is Added to the List of Applications
Once you create a default application from a Web clipping, you can also:
■ Edit an existing Web Clipping application’s attributes.
Select the application to be edited by clicking its radio button, then click Edit in the Edit Clip in Web Clipping Studio section to edit the Web Clipping application attributes.
■ Delete a Web Clipping application.
Select the application to be deleted by clicking its radio button in the Select column, and then click Delete. A confirmation message appears indicating that the selected Web Clipping application is deleted.

Creating a Wireless Application
Web Scraping 13-21
■ Publish a new application
To create a new application link for a new wireless application, click the Content tab and click Add Application Link to add this new application to the Applications Links page. Follow the five steps provided by the wizard. At the Application step, select the application on which you want to base this application, then select your application, iStore: Search Result, then click Next. At the General step, enter the application name ORACLESTORE for the name of your new application, then click Next. At the Input Parameters step, accept the default settings for your new application by clicking Next. At the Async Application step, click Next. At the Additional step, in the Description field, enter the word Books, then click Finish. Your new application should appear in the Applications Links list of applications that will enable an application to be published to user groups and made accessible to mobile users of wireless devices, as shown in Figure 13–17, "Your New Application ORACLESTORE Is Published to the Content Manager".

Creating a Wireless Application
13-22 Oracle Application Server Wireless Developer’s Guide
Figure 13–17 Your New Application ORACLESTORE Is Published to the Content Manager
■ Test an existing Web Clipping application.
You can test an application either from the Services tab or if you have published it, from the Content tab.
a. At the Content tab, select the application to be tested, in this case, your new application link ORACLESTORE by clicking its Test icon in the Test column. An OracleAS Wireless PDA Simulator page appears in a new browser window, showing the contents of the Web Clipping application, as shown in Figure 13–2, "Web Clipping Application".
b. On the OracleAS Wireless PDA Simulator test display, scroll down to the bottom of the page and click Change Input to change the value of the initial input value for the parameter named keyword, as shown in Figure 13–18, "Wireless PDA Simulator Showing an Initial Value interMedia". Delete the initial input value interMedia and enter the value syndication, as shown in

Creating a Wireless Application
Web Scraping 13-23
Figure 13–19, "Wireless PDA Simulator Showing a New Value Syndication". Then click Submit.
Figure 13–18 Wireless PDA Simulator Showing an Initial Value interMedia

Creating a Wireless Application
13-24 Oracle Application Server Wireless Developer’s Guide
Figure 13–19 Wireless PDA Simulator Showing a New Value Syndication
c. The OracleAS Wireless PDA Simulator test page now displays the results of the search for items in the Oracle Store relating to the value syndication as shown in Figure 13–20, "Wireless PDA Simulator Shows the Results of a New Search for Items in the Oracle Store Using the Keyword Syndication".

Creating a Wireless Application
Web Scraping 13-25
Figure 13–20 Wireless PDA Simulator Shows the Results of a New Search for Items in the Oracle Store Using the Keyword Syndication
13.3.2 Building a Custom ApplicationAt the Manage Web Clippings page as shown in Figure 13–15, "Managing Web Clippings", you can build a custom wireless application. Click the Custom Applications tab. A Downloads page appears, as shown in Figure 13–21, "The Develop Custom Applications Page", from which you can either:

Creating a Wireless Application
13-26 Oracle Application Server Wireless Developer’s Guide
Figure 13–21 The Develop Custom Applications Page
■ Download (for J2EE development) the Java Connector Architecture (JCA) Resource Adaptor Archive (RAR) for development within an instance of Oracle Container for J2EE (OC4J) using JCA’s Common Client Interface (CCI).
Click the RAR link under J2EE Development to download the JCA RAR file, webclipping.rar.
Follow the instructions in the "OC4J Services" section in the latest Oracle Application Server documentation to deploy an RAR file into your OC4J. Refer to the Oracle Application Server Documentation page to find the documentation for the correct version of OC4J.
You may need to restart OC4J for the library to take effect.
Return to the Web Clippings tab and find your desired Web clipping in the form of a Java Server Page (JSP) to start developing using the RAR file you have just deployed.
■ Download (for J2SE development) the Java library (JAR) for development using a standalone Java 2 SDK.

Creating a Wireless Application
Web Scraping 13-27
Click the JAR link under J2SE development to download the Java library file, wcbean.jar.
For a standalone Java 2 SDK environment, place the JAR file in the classpath during compilation and running of your code.
For J2EE (OC4J) development, place this JAR file where your Web application can access it, either in the root classpath of OC4J, in the application’s own library path, or in the WEB-INF/lib directory of the Web Archive (WAR) file containing your Web application. You must restart your OC4J instance to be able to start using the Web Clipping Bean API.
The other files that are needed in order to compile and run the stub Java files are http_client.jar, Javax-ssl-1_2.jar, jssl-1_2.jar, and xmlparserv2.jar. Look for these files in your installation of Oracle Application Server OC4J.
Return to the Web Clippings tab and find your desired Web clipping in the form of a Java source file (.Java) to start developing using the JAR file you just deployed.
■ At the Web Clippings tab, you can do either of the following:
– Generate a .Java file.
Click Download Java (see Figure 13–15, "Managing Web Clippings") to generate .Java file from the Web clipping. This.Java file can be compiled with other Java classes into an application, and deployed in J2SE as a standalone Java 2 SDK application.
– Generate a .jsp file.
Click Download JSP (see Figure 13–15, "Managing Web Clippings") to generate a .jsp file from the Web clipping. This .jsp file can be deployed into J2EE OC4J so you can execute the Web clipping as a JSP.
■ Create your own custom HTTP application using the downloaded .Java file or .jsp file.
– Using the .Java file
Starting with the .Java file that contains the sample code of how to use the Web Clipping Bean APIs, the Wireless developer can create his own HTTP application using any standard J2EE Container (such as OC4J), after having included the previously mentioned wcbean.jar file as well as its dependency libraries into the library path of the HTTP Server.

Migrating from Existing Transcoding Technologies
13-28 Oracle Application Server Wireless Developer’s Guide
– Using the .jsp file
Similarly, with the .jsp file that contains the sample code of how to use the Java Connector Architecture APIs, the Wireless developer can create his own HTTP application using OC4J (this is a hard requirement as the RAR file is compliant to OC4J).
– Building the Mobile UI
In order to be compliant with OracleAS Wireless, the HTTP application must render its output in either OracleAS Wireless XML, XHTML/MP, or XHTML/XForms. The Wireless developer will have full control over the Mobile UI of this HTTP application including the addition of mobile links or images. Note that the default JSP code renders the data as an HTML unordered list; the Wireless developer will need to change that rendering to one that is compliant with OracleAS Wireless.
– Creating a Wireless Application
After the creation of the HTTP application, the Wireless developer can use it to create a Wireless application using the HTTP Adaptor.
13.4 Migrating from Existing Transcoding TechnologiesPreviously in OracleAS Wireless, transcoding or Web content reuse was performed using Web Methods’ Web Integration technologies. The recorded instructions on how and where to fetch external Web content was captured in a Web Integration Definition Language (WIDL) file. WIDL is a meta-language that implements a service-based architecture over the document-based resources of the World Wide Web. In this release, the responsibility of transcoding falls on Web Clippings. Without having the developers or users recreate the same set of instructions on Web Clippings terms, there is a migration path for them that allows for importing WIDL files into Web Clippings so that they may reuse what they have captured previously. This is shown in the augmented Web Clipping Server architecture (see Figure 13–22, "Web Clipping Server Architecture Showing Importing a WIDL Definition File"), with the added WIDL Source as an alternate means of creating a Web Clipping.
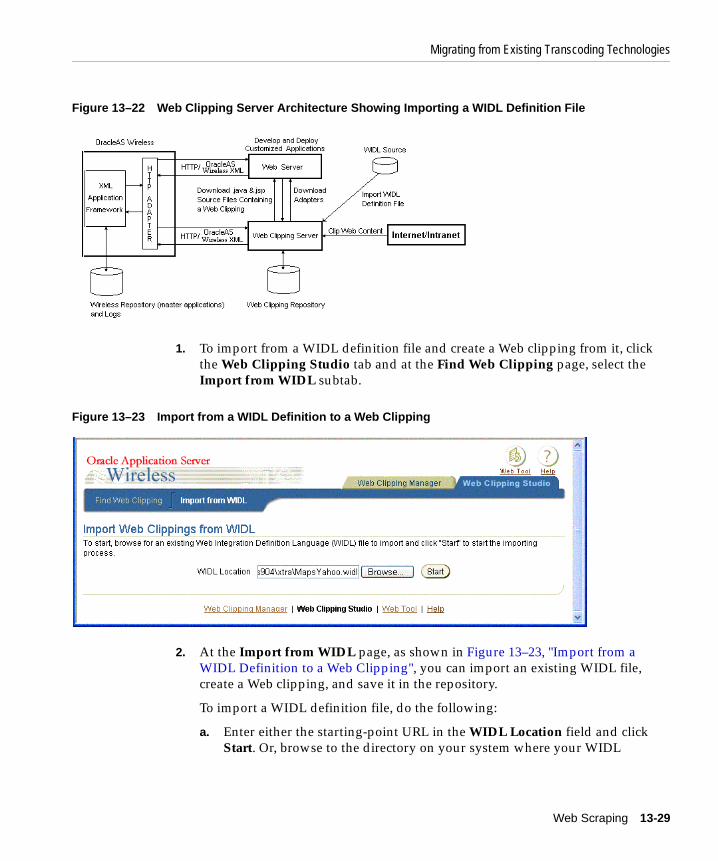
Migrating from Existing Transcoding Technologies
Web Scraping 13-29
Figure 13–22 Web Clipping Server Architecture Showing Importing a WIDL Definition File
1. To import from a WIDL definition file and create a Web clipping from it, click the Web Clipping Studio tab and at the Find Web Clipping page, select the Import from WIDL subtab.
Figure 13–23 Import from a WIDL Definition to a Web Clipping
2. At the Import from WIDL page, as shown in Figure 13–23, "Import from a WIDL Definition to a Web Clipping", you can import an existing WIDL file, create a Web clipping, and save it in the repository.
To import a WIDL definition file, do the following:
a. Enter either the starting-point URL in the WIDL Location field and click Start. Or, browse to the directory on your system where your WIDL

Migrating from Existing Transcoding Technologies
13-30 Oracle Application Server Wireless Developer’s Guide
definition file is located and click the WIDL file to populate the WIDL Location field, then click Start to begin importing the WIDL definition file. The Import from WIDL page reappears, containing a new section Choose the WIDL service to import, as shown in Figure 13–24, "Choose the WIDL Service to Import, Choose Parameters, and Specify a Default Value for Each Chosen Parameter (Upper Part of Page)" and Figure 13–25, "Choose the WIDL Service to Import and Choose Parameters and Specify a Default Value for Each Chosen Parameter (Lower Part of Page)".
Figure 13–24 Choose the WIDL Service to Import, Choose Parameters, and Specify a Default Value for Each Chosen Parameter (Upper Part of Page)

Migrating from Existing Transcoding Technologies
Web Scraping 13-31
Figure 13–25 Choose the WIDL Service to Import and Choose Parameters and Specify a Default Value for Each Chosen Parameter (Lower Part of Page)
b. If your WIDL file contains more than one service to be imported, below the Choose the WIDL service to import section, select the service that you want to import from the Choose WIDL Service drop-down box.
c. If the WIDL service went through form-based submission, choose each parameter from the Parameters column drop-down box that you want, and also enter a default value for each chosen parameter.
d. Click Continue. The WIDL service is imported and made into a Web clipping. A Find a Web Clipping and Clipping Attributes page appears where you can edit the attributes of the new Web clipping, including customizing form input information if the Web clipping has form-based submission. Edit the clipping attributes, such as the Description field, then click OK to save your changes and return to the Manage Web Clippings page.
Customizing the Web Clipping Service
13-32 Oracle Application Server Wireless Developer’s Guide
At the Manage Web Clippings page, you can then either create a default application (see Section 13.3.1, "Creating a Default Application") and then create an application link to enable an application to be published to user groups and made accessible to mobile users of wireless devices, or build a custom application and generate either a .Java file or a .jsp file from the Web clipping (see Section 13.3.2, "Building a Custom Application").
13.5 Customizing the Web Clipping ServiceWireless users can click Change Input on the test page to customize values for any input parameters of a form if the OracleAS Wireless Administrator parameterized these input parameters and made them customizable. (See the help topic Editing Web Clipping Application Attributes and Customizing Parameters in Help for more information.)
13.6 Administrative Tasks for OracleAS Wireless AdministratorsThe administrative tasks that must be performed by the OracleAS Wireless Administrator include:
■ Configuring HTTP or HTTPS proxy settings. See Server Configuration in Oracle Application Server Wireless Administrator’s Guide for information about configuring the proxy server.
■ Configuring security.
A trusted server certificate file, ca-bundle.txt, generated from Oracle Wallet Manager, is shipped with the Web Clipping server feature. This file, located in <ORACLE_HOME>/portal/conf on UNIX or in <ORACLE_HOME>\portal\conf on Windows, contains an initial list of trusted server certificates that might be used for navigating to some secure servers using HTTPS. However, this is not a complete list of all possible server certificates that exist on the Web. Therefore, this file must be configured or extended to recognize any additional trusted server certificates for any new trusted sites that are visited. See Section 13.7.1, "Deploying and Configuring WML Translator" for more information about how to configure or extend this trusted certificate file.
Note: The ca-bundle.txt file will still be present and functional, even if Oracle Application Server Portal has not been configured.

Administrative Tasks for OracleAS Wireless Administrators
Web Scraping 13-33
■ Rendering events to be logged and generating useful reports
Web Clippings allows rendering events to be logged so that an administrator can query the event log and generate useful reports like those used for billing. See Section 13.7.2, "Using the WML Translator" for more information about how to enable the logging of rendering events and how to make use of a set of PL/SQL procedures to operate on the logged events to generate useful reports.
13.6.1 Configuring SecurityWhen an OracleAS Wireless Administrator navigates to a secure site, the Web site giving secure information typically returns a certificate identifying itself to the administrator. If the OracleAS Wireless Administrator accepts the certificate, the certificate is placed into the list of trusted certificates of the browser so that a secure channel can be opened between the browser and that server. Like a Web browser, the Web Clipping server behaves as an HTTP client to external Web sites. In order for the Web Clipping server to keep track of trusted sites, it makes use of a file that stores the certificates of those sites, namely the ca-bundle.crt file.
The shipped ca-bundle.txt file is an exported version of the trusted server certificate file from Oracle Wallet Manager. The default trusted server certificate in Oracle Wallet Manager does not cover all possible server certificates that exist on the Web. For this reason, when an OracleAS Wireless Administrator navigates to a secure server using HTTPS, the administrator may get an "SSL Hand-shake failed" exception in the Web Clipping Studio. To solve this problem, the ca-bundle.crt file needs to be augmented with new trusted sites that are visited. As an OracleAS Wireless administrator, you must do the following to extend the shipped ca-bundle.crt file:
1. Use a browser (preferably Internet Explorer) to download the root server certificate from each external HTTPS Web site in BASE64 format that is visited, and is missing from the trusted certificate file.
2. Use Oracle Wallet Manager to import each certificate.
3. Export the trusted server certificates into a file, and replace the ca-bundle.crt file with that file.
For more information about Oracle Wallet Manager, see Chapter 17 Using Oracle Wallet Manager in Oracle Advanced Security Administrator’s Guide in the Oracle9i Release 2 (9.0.2) documentation section on the Oracle Technology Network (OTN) (http://otn.oracle.com).

Administrative Tasks for OracleAS Wireless Administrators
13-34 Oracle Application Server Wireless Developer’s Guide
13.6.2 Rendering Events to Be Logged and Generating Useful ReportsWeb Clippings allows rendering events to be logged so that an administrator can query the event log and generate useful reports, such as those used for billing purposes. To enable event logging, the administrator must manually modify a context-param within the web.xml file located at <ORACLE_HOME>/j2ee/OC4J_Wireless/applications/webclipping/webclipping-web/WEB-INF/web.xml. The context-param to look for has its param-name equal to oracle.webclipping.LogBusiness and has a default param-value of false. To enable the logging of rendering events, the administrator must change that value to true. After setting this parameter, restart the OC4J_Wireless instance to refresh this change. Refer to the OC4J guide for how to use DCM to do that.
Once the logging is enabled, the Administrator can make use of a set of PL/SQL procedures in the infrastructure database to operate on the logged events. The administrator needs to first connect to the infrastructure database as a SYSDBA, then execute the following line to change his user to WCRSYS:
ALTER SESSION SET CURRENT_SCHEMA=WCRSYS;
As user WCRSYS, the Administrator can make use of the following PL/SQL procedures and functions to operate on the events logged. As a preface, the record type that you will be using in most of these procedures and functions is WWWCP_API_REGISTRY.REC_RENDER_EVENT:
/*** This describes a record type used to return a single clipping rendering* event.** This structure is used by the lookup APIs to encapsulate the * information that is retrieved from the wwwcp_render_log$ table. * It is used to describe the cursor that will be returned as an OUT * parameter of lookup_render_events.** @field clip_id The clip id that allows the fetching of the * other facets of the clipping definition to * populate the events table.* @field clip_description Textual description of the clip rendered.* @field clip_title Title of the clip that was rendered.* @field clip_timeout Timeout in milliseconds that allows the clipping* that was rendered to be timed out. This could be* an indication of the quality of service.* @field effective_url The url where the clip resides. This is usually* the last url declared in the clipping definition

Administrative Tasks for OracleAS Wireless Administrators
Web Scraping 13-35
* clipping definition, where the clip would reside.* @field render_status A number that indicates either success or * failure of the rendering call.* @field render_type Tells what type of rendering is in question,* whether it be for Portal Show Mode, for * Wireless default SimpleResult show mode, or * for the Wireless connector show mode.* @field render_start Starting time of the rendering.* @field render_end Ending time of the rendering.* @field fuzzy_used Indicates whether fuzzy match was kicked in.* @field db_lookup The time it takes in milliseconds to look up* the clipping definition from the database.* @field http_latency The time it takes to reach the first byte to* read from the http remote site.* @field render_user The user (together with a possible realm) for* which the rendering was done.* @field error_cause The cause of the error if the status indicated* a failure of the rendering.* @field event_description This field provides more information about* the logged event.* @field clip_input The input provided to render this clipping. It* is usually provided in the form of an HTTP URL* query string like abc=def.* @field clip_output The possible output (only if it’s small) of * rendering, if it gives any more hints on the* billing process.*/type rec_render_event is record ( clip_id integer, clip_description varchar2(1024), clip_title varchar2(512), clip_timeout integer, effective_url varchar2(2048), render_status integer, render_type integer, render_start date, render_end date, fuzzy_used integer, db_lookup integer, http_latency integer, render_user varchar2(512), error_cause varchar2(256), event_description varchar2(256), clip_input varchar2(128), clip_output varchar2(256));

Administrative Tasks for OracleAS Wireless Administrators
13-36 Oracle Application Server Wireless Developer’s Guide
The Cursor type that is used with this record type is WWWCP_API_REGISTRY.RENDER_EVENT_CURSOR. The following procedures within the WWWCP_API_REGISTRY have been defined to allow lookups on the render event log.
/** * This API looks up rows of render events from the wwwcp_render_log$ * table, filtered by a specific clip id. * * The full rendering event information structure is returned as iterable * by the cursor returned. * * @param p_clip_id The clip id as a filtering mechanism of the * events that were logged for this particular * clip. * @param p_cv_render_events The list of render events that are associated * with this clip. */ procedure lookup_render_events( p_clip_id in integer, p_cv_render_events out render_event_cursor );
/** * This API looks up rows of render events from the wwwcp_render_log$ * table, filtered by a specific effective url. * * This is useful for business queries that center on not the clip id but by * the actual location of where the clips are found. For example, if Yahoo’s * partner, namely someone using Web Clippings, can do a search of all the * events that went to http://my.yahoo.com, it can find out how to charge * each user for what they have rendered. * * The full rendering event information structure is returned as iterable * by the cursor returned. * * @param p_effective_url The effective url, starting with which points * to the web page containing the clip. * @param p_cv_render_events The list of render events that are associated * with this clip. */ procedure lookup_render_events( p_effective_url in varchar2, p_cv_render_events out render_event_cursor

Administrative Tasks for OracleAS Wireless Administrators
Web Scraping 13-37
); /** * This API looks up rows of render events from the wwwcp_render_log$ * table, filtered by the domain. * * This is useful for business queries that center on not the clip id but by * the domain of where the clips are found. For example, if Yahoo can do a * search of all the events that went to *.yahoo.com, it can find out how to * charge each user for what they have rendered. * * The full rendering event information structure is returned as iterable * by the cursor returned. * * @param p_effective_domain The domain of the effective url, starting with * which points to the web page containing the * clip. This domain is provided in the format * "oracle.com" or "yahoo.com". * @param p_cv_render_events The list of render events that are associated * with this clip. */ procedure lookup_render_events( p_effective_domain in varchar2, p_cv_render_events out render_event_cursor ); /** * This API looks up rows of render events from the wwwcp_render_log$ * table, filtered by the user that requested the render. * * This is useful for business queries that center on not the clip id but by * the user to visualize how much a user has rendered, regardless of where * the clipping is from, so it can charge for a flat fee based on for * example, the number of render events for a particular user. * * The full rendering event information structure is returned as iterable * by the cursor returned. * * @param p_render_user The user on behalf of whom the render request * is made. * @param p_cv_render_events The list of render events that are associated * with this clip. */ procedure lookup_render_events( p_render_user in varchar2,
Administrative Tasks for OracleAS Wireless Administrators
13-38 Oracle Application Server Wireless Developer’s Guide
p_cv_render_events out render_event_cursor);
It is also the responsibility of the Administrator to make sure that the logged events do not exceed the allotted database table space. Therefore the following procedures have been defined to allow removal of entries from the render event log.
/** * This API removes all render events from the wwwcp_render_log$ table. * * This is useful as a cleansing measure that an organization can do between * the different phases of rolling out their Web Clipping usage initiative. * It can be used to reset the stage before going into development testing * phase, or when the rollout is going live and the company wishes to begin * charging its subscribers for their usages, or another possible cleansing * may occur at for example, every month end or year end when the data * recorded is no longer useful. */ procedure remove_all_render_events; /** * This API removes all render events from the wwwcp_render_log$ table for * a given rendering user. * * This is useful as a cleansing measure that an organization can do for * example, labeling the development user to be some constant user id and * then removing all rendering events when it goes live. * * @param p_render_user The user on behalf of whom the render request is * made. */ procedure remove_render_events(p_render_user in varchar2); /** * This API removes all render events from the wwwcp_render_log$ table for * a given starting or stopping time before or after the query time. * * This is useful as a cleansing measure that an organization can do for * example, all rendering events that started or stopped before a certain * date are deemed development efforts and therefore should be disregarded. * * @param p_query_time The date/time with which to query. * @param p_query_before Whether the query is for before or after. A value * of 1 signifies that the query is for comparing * times before the p_query_time while a 0 value.
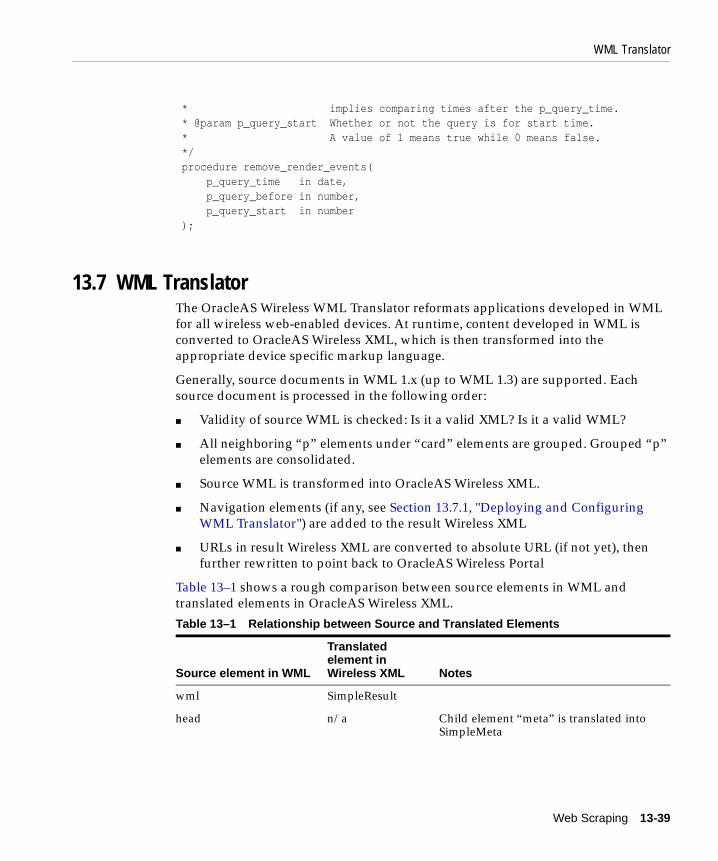
WML Translator
Web Scraping 13-39
* implies comparing times after the p_query_time. * @param p_query_start Whether or not the query is for start time. * A value of 1 means true while 0 means false. */ procedure remove_render_events( p_query_time in date, p_query_before in number, p_query_start in number );
13.7 WML TranslatorThe OracleAS Wireless WML Translator reformats applications developed in WML for all wireless web-enabled devices. At runtime, content developed in WML is converted to OracleAS Wireless XML, which is then transformed into the appropriate device specific markup language.
Generally, source documents in WML 1.x (up to WML 1.3) are supported. Each source document is processed in the following order:
■ Validity of source WML is checked: Is it a valid XML? Is it a valid WML?
■ All neighboring “p” elements under “card” elements are grouped. Grouped “p” elements are consolidated.
■ Source WML is transformed into OracleAS Wireless XML.
■ Navigation elements (if any, see Section 13.7.1, "Deploying and Configuring WML Translator") are added to the result Wireless XML
■ URLs in result Wireless XML are converted to absolute URL (if not yet), then further rewritten to point back to OracleAS Wireless Portal
Table 13–1 shows a rough comparison between source elements in WML and translated elements in OracleAS Wireless XML.
Table 13–1 Relationship between Source and Translated Elements
Source element in WML
Translated element in Wireless XML Notes
wml SimpleResult
head n/a Child element “meta” is translated into SimpleMeta

WML Translator
13-40 Oracle Application Server Wireless Developer’s Guide
template n/a Attributes “@onenterforward”, “@onenterbackward”, “@ontimer”, and child element “do”, “onevent” are honored based on WML specification (see element “card” below)
card SimpleContainer Attributes “@onenterforward”, “@onenterbackward”, “@ontimer”, and child element “do”, “onevent” are processed in combination with those corresponding attributes/child elements in “template” element. See blow “card/@onenterforward”, “card/@onenterbackward”, and “card/@ontimer” for details.
card/@onenterforward (or template/@onterforward, if applicable)
SimpleBind Child element SimpleMatch (with child element SimpleEvent/@type=”onenterforward”), and child element SimpleTask (with child element SimpleGo/@target assigned to card/@onenterforward)
card/@onterbackward (or template/@onenterbackward, if applicable)
SimpleBind Child element SimpleMatch (with child element SimpleEvent/@type=”onenterbackward”), and child element SimpleTask (with child element SimpleGo/@target assigned to card/@onenterforward)
card/@ontimer (or template/@ontimer, if applicable)
SimpleTimer
card/onevent (or template/onevent, if applicable)
SimpleBind, or SimpleTimer
If event/@type=”ontimer”, SimpleTimer is generated; otherwise, SimpleBind with corresponding child element (SimpleEvent & SimpleTask) is generated
Table 13–1 Relationship between Source and Translated Elements
Source element in WML
Translated element in Wireless XML Notes

WML Translator
Web Scraping 13-41
card/do n(or template/do, if applicable)
SimpleBind If “do” has a child “go” element, SimpleBind with child element (SimpleMatch/SimpleKey, SimpleTask/SimpleSubmit, & SimpleDisplay) is generated; if “do” has a child “prev” element, SimpleBind with child element (SimpleMatch/SimpleKey, SimpleTask/Prev, & SimpleDisplay) is generated; if “do” has a child “refresh” element, SimpleBind with child element (SimpleMatch/SimpleKey, SimpleTask/SimpleRefresh, & SimpleDisplay) is generated.
p SimpleForm, SimpleMenu, or SimpleText
If “p” has an “input” element or “select” element (with option/@value), SimpleForm is generated; if “p” has “select/option” elements with only “@onpick” attributes, SimpleMenu is generated; otherwise, SimpleText is generated
pre Only child elements “a”, “anchor”, “do”, “u”, “br”, “b”, “i”, “em”, “strong” are processed.
input SimpleFormItem Title which normally resides outside the “input” element is copied into SimpleFormItem
select SimpleMenuItem, SimpleHref, or SimpleFormOption
select/option/@onpick (without “event” child) is translated to SimpleMenu/SimpleMenuItem; select/option/@onpick (with “event” child) is translated to SimpleMenu/SimpleBind/SimpleMatch/SimpleMItem; select/@value is translated to SimpleForm/SimpleFormSelect/SimpleFormOption
a SimpleHref
Table 13–1 Relationship between Source and Translated Elements
Source element in WML
Translated element in Wireless XML Notes

WML Translator
13-42 Oracle Application Server Wireless Developer’s Guide
The WML Translator does not support pass-through mode. Even if the end user’s device supports WML, WML translator will still translate source WML into OracleAS Wireless XML format.
URLs are generally rewritten to point back to the Wireless and Voice Portal. However, URLs to images are not rewritten. Image adaptation is utilized in this release. For example, the following WML element
<img src="/images/yahooicon.wbmp" alt="Yahoo!"/>
is translated into
<SimpleImage src="http://wap.yahoo.com/images/yahooicon.wbmp" vspace="0" hspace="0" valign="bottom" alt="Yahoo!" addImageExtension="auto"/>
This image is adapted and rendered based on end user’s device model.
anchor SimpleHref If “anchor” has a “go” element, SimpleHref is generated; if “anchor” has a “prev” or “refresh” element, nothing will be generated in current release.
img SimpleImage Image adaptation is utilized from 904 release.
br SimpleBreak
b, strong, em, big SimpleStrong
i, small SimpleEm
u SimpleUnderline
text node SimpleTextItem Generally the text node is copied as it is, except for the following two cases: 1. The node is a immediate preceding sibling of “input”, “select”; 2. The node is not the only child of a “formatting” element (such as “em”, “b”, “u”, and etc.)
table SimpleTable
tr SimpleRow
td SimpleCol
Table 13–1 Relationship between Source and Translated Elements
Source element in WML
Translated element in Wireless XML Notes

WML Translator
Web Scraping 13-43
There are certain constraints in current release of WML Translator:
■ OracleAS Wireless XML has certain limitations that prevent flawless transformation from WML to Wireless XML. The most noticeable drawback is that Wireless XML does not have an event-processing model.
■ The WML user agent equipped with WML translator is limited. It does not maintain a navigation history. It has very limited support of WML variables.
■ WML script is not supported yet.
■ Anchor submit: If there is an “anchor” element with a “go” child, then only one “anchor” can appear in this card.
13.7.1 Deploying and Configuring WML TranslatorThe WML Translator is deployed as an OracleAS Wireless application. It can be accessed via Commerce->Translator by end users like the previous version. However, the following three service input parameters are no longer supported:
ORACLE_SERVICES_COMMERCE_TRANSLATOR_DEFAULT_CONNECTIONORACLE_SERVICES_COMMERCE_TRANSLATOR_HELPER_WMLORACLE_SERVICES_COMMERCE_TRANSLATOR_XSL_WML_FILENAME The following service input parameter is still supported:
ORACLE_SERVICES_COMMERCE_TRANSLATOR_SHOW_GOHOME The following service input parameter is added to enhance navigation support:
ORACLE_SERVICES_TRANSCODER_NAVIGATION If ORACLE_SERVICES_TRANSCODER_NAVIGATION has valid value, ORACLE_SERVICES_COMMERCE_TRANSLATOR_SHOW_GOHOME is ignored.
ORACLE_SERVICES_TRANSCODER_NAVIGATION should point to an XML file that can be accessed via either a URL or a file on server's local file system. The XML contains the navigation specification. The following is sample navigation XML:
<?xml version="1.0" encoding="UTF-8"?><Navigation><NavigationItems><Item target="%value home.url%" label="Home"showAs="Link" preferredLocation="Header" /><Item target="%value service.parent.url%"

WML Translator
13-44 Oracle Application Server Wireless Developer’s Guide
label_prefix="Back"showAs="Link" /><Item target="http://www.oraclemobile.com" label="OracleMobile" showAs="Button" preferredLocation="Footer" /></NavigationItems></Navigation> Each navigation item has the attributes described in Table 13–2.
Here is the schema for navigation XML:
<?xml version="1.0" encoding="UTF-8"?><xs:schema xmlns:xs="http://www.w3.org/2001/XMLSchema"
Table 13–2 Navigation Item Attributes
Attribute Name Meaning MandatoryAccepted values Default value
target where to go yes either a fully-qualified URL, or a placeholder for mobile context, for example, portal home, service home.
N/a
label label shown to end user
optional string N/a
label_prefix prefix to the label
optional Only meaningful for mobile context, for example, portal home
label_suffix suffix to the label optional Only meaningful for mobile context, for example, portal home
showAs how to show the label
Optional menuitem, link, or button
button
preferredLocation
where to show the label
Optional header, or footer header

WML Translator
Web Scraping 13-45
elementFormDefault="qualified" attributeFormDefault="unqualified"><xs:element name="Navigation"><xs:complexType><xs:all><xs:element ref="NavigationItems" minOccurs="0"/></xs:all></xs:complexType></xs:element><xs:element name="NavigationItems"><xs:complexType><xs:sequence><xs:element ref="Item" minOccurs="0" maxOccurs="unbounded"/></xs:sequence></xs:complexType></xs:element><xs:element name="Item"><xs:complexType><xs:attribute name="target" type="xs:string" use="required"/><xs:attribute name="label" type="xs:string" use="optional"/><xs:attribute name="label_prefix" type="xs:string" use="optional"/><xs:attribute name="label_suffix" type="xs:string" use="optional"/><xs:attribute name="showAs" type="xs:string" use="optional"/><xs:attribute name="preferredLocation" type="xs:string" use="optional"/></xs:complexType></xs:element></xs:schema>
13.7.2 Using the WML TranslatorThe WML Translator is deployed as an OracleAS Wireless Application at URL omp://oracle/services/commerce/translator. The application can be invoked by passing WML source URL in request parameter XLTORSITE. For example, to invoke www.oraclemobile.com, you can use the following URL in your OracleAS Wireless XML
omp://oracle/services/commerce/translator?XLTORSITE=http%3A%2F%2Fwww.oraclemobile.com

WML Translator
13-46 Oracle Application Server Wireless Developer’s Guide

Using Location Services 14-1
14Using Location Services
This chapter provides conceptual and usage information for developers of location-based applications. It contains the following major sections:
■ Section 14.1, "Introduction to Location Services"
■ Section 14.2, "Developing Location-Based Applications"
■ Section 14.3, "Enabling Mobile Positioning"
■ Section 14.4, "Location Event Server"
■ Section 14.5, "Using the Region Modeling Tool"
■ Section 14.6, "Integrating an External Content Provider"
■ Section 14.7, "Integrating a Mobile Positioning Provider"
14.1 Introduction to Location ServicesDevelopers of location-based applications need specialized services for:
■ Mobile positioning: associating a location with a mobile user
■ Geocoding: associating geographical coordinates with addresses
■ Mapping: providing a graphical map for a point, set of points, route, or driving maneuver
■ Routing: providing driving directions
■ Business directories (Yellow Pages): listing businesses by region by either category or name
■ Traffic: providing information about accidents, construction, and other incidents that affect traffic flow

Introduction to Location Services
14-2 Oracle Application Server Wireless Developer’s Guide
Several companies provide these types of specialized content and applications. For example, some Web sites have categories for business directories, and some sites provide driving directions. Developers building mobile applications based on the OracleAS Wireless framework can benefit from being able to use the specialized content and services. It is inefficient for each application to write custom interfaces to all the services that it wants to access.
OracleAS Wireless location application components are a set of APIs (application programming interfaces) for performing geocoding, providing driving directions, and looking up business directories. Service proxies are included that map existing important providers to the APIs, and additional providers are expected to be accommodated in the future.
OracleAS Wireless application developers can take advantage of a uniform interface to access different service providers without having to make any changes to their applications. They can also use the infrastructure to prioritize services based on criteria such as quality, availability, or cost. Service providers also benefit from the fact that their contents and specialized functions are available "out-of-the-box" to all OracleAS Wireless application developers.
This section introduces the location application components API, describes how to find the detailed javadoc-generated documentation and online examples, and explains conceptual and usage information that you must understand before using the components. It contains the following major subsections:
■ Section 14.1.1, "Getting Started"
■ Section 14.1.2, "Using the System Manager Interface for Location-Related Information"
■ Section 14.1.3, "Location Services Architecture"
■ Section 14.1.4, "Location Service Categories"
■ Section 14.1.5, "Service Providers"
■ Section 14.1.6, "Geocoding Services"
■ Section 14.1.7, "Location Marks"
■ Section 14.1.9, "Mapping Services"
■ Section 14.1.10, "Routing Services"
■ Section 14.1.11, "Business Directory (Yellow Pages) Services"
■ Section 14.1.12, "Traffic Services"

Introduction to Location Services
Using Location Services 14-3
14.1.1 Getting StartedTo get started using the OracleAS Wireless location application components, follow these steps:
1. Read the conceptual and usage information in this document before using any example programs or creating any applications.
2. Go to the sample directory, which contains example files. Read the Readme.txt file in that directory; examine the supplied files, and use any that meet your needs.
3. View the javadoc documentation, and refer to it for detailed reference information about packages and classes. To view the javadoc documentation, open the following file in a Web browser:
iAS-Wireless-Home/wireless/doc/index.html
where ias-Wireless-Home is your OracleAS Wireless home directory.
Figure 14–1 shows part of the index.html display. Navigate to find detailed information about packages and classes.

Introduction to Location Services
14-4 Oracle Application Server Wireless Developer’s Guide
Figure 14–1 Javadoc Documentation
14.1.2 Using the System Manager Interface for Location-Related InformationYou can use the OracleAS Wireless System Manager (referred to as System Manager) interface within Enterprise Manager to perform configuration operations and find information relating to location application components.
1. In the Wireless Server System tab page, click Site Administration.
2. Click to expand Component Configuration.
Figure 14–2 shows the System Manager page with the Component Configuration section expanded.

Introduction to Location Services
Using Location Services 14-5
Figure 14–2 Component Configuration Section of Wireless System Manager
As shown in Figure 14–2, the Location-Related section in the Component Configuration section contains the following links:
■ Location Management for mobile positioning configuration, mobile positioning provider information and configuration, and mobile ID names
■ Location Services for configuration options relating to geocoding, routing, mapping, traffic, and business directory services
■ Location Event Server for options relating to the location event server (described in Section 14.4)
■ Location Mark Address Format for specifying location mark address fields

Introduction to Location Services
14-6 Oracle Application Server Wireless Developer’s Guide
14.1.3 Location Services ArchitectureLocation services are based on the architecture shown in Figure 14–3.
Figure 14–3 Location Services Architecture
As shown in Figure 14–3:
■ An alert engine and location-based applications are outside the architecture (enclosed in a thick line), but communicate with it.
■ The architecture can process requests that use Java, XML, or JSP tags.
■ The processing is handled by components that handle specific activities and kinds of service: business directory, geocoding, routing, map support, region support, positioning, location query, location cache, and privacy management.
■ The provider connector framework communicates with local and external sources of data and service, and has components for the various kinds of

Introduction to Location Services
Using Location Services 14-7
available providers, such as business directory, routing, mapping, and mobile positioning.
14.1.4 Location Service CategoriesLocation services are provided in the following major categories: geocoding, mapping, routing, business directory (Yellow Pages), and traffic.
Other sections in this chapter describe how to specify and configure external providers for location services, and describe each type of service in greater detail.
The SpatialManager Java class manages all these location services, and is defined as follows:
package oracle.panama.spatial;import ...;public class SpatialManager{ public static synchronized Geocoder getGeocoder() {...} public static synchronized Router getRouter() {...} public static synchronized YPFinder getYPFinder() {...} public static synchronized Mapper getMapper() {...} public static synchronized TrafficReporter getTrafficReporter() {...}}
14.1.5 Service ProvidersThe actual core computation for location services is generally performed at an external provider. The external provider might be accessed over the Internet or other means of communication, or might be local. OracleAS Wireless Location Application Components API performs the communication and adaptation of results in a unified framework, so that users are generally not aware of which provider is supplying a particular service. In addition, the API minimizes the application developer’s implementation effort and dependence on specific providers.
Access to an initial set of providers for most services is included. Some providers have full configuration information included, and some do not. (For providers that do not have configuration information, you usually receive the necessary information after you purchase the right to use their user name and password.)
You can provide access to additional providers by using the OracleAS Wireless System Manager through the Enterprise Manager interface. If a a new provider is added and if the provider does not use the same interface as an existing provider, a

Introduction to Location Services
14-8 Oracle Application Server Wireless Developer’s Guide
Java class must be created to translate between the provider’s format and the Wireless location application components API. (This program is specified as the ProviderImpl attribute.) In addition, the implementing class file for the program must be added to the class path.
Using multiple providers for a service increases the probable reliability of the service. The API fails only either if all providers fail or if Web access is temporarily unavailable. Because providers are specified in preference list, the API automatically fails over when the preferred provider cannot perform the requested service, such as when any of the following occurs:
■ The provider is temporarily inaccessible over the Web.
■ The provider does not support the exact requested service.
■ The request is incorrectly specified (such as a nonexistent address).
14.1.5.1 Provider SelectionLocation services use a list of providers and support fail-over between them. The sequence in which providers are tried should ideally represent an order of preference. The preference ranking can be a simple ranking of providers, or it might be affected by region, time, performance, reliability, and cost. Whichever criteria are used, they are evaluated by a provider selection framework that determines provider order of preference.
The provider selection framework needs to be configured, as described in this section. If a service request is not satisfied by the framework, then either the provider selection framework implementation has been incorrectly configured or all providers have failed. You can find information about any problems or failures from the console log or the log file, as explained in Section 14.1.5.2.
You must select a provider selection framework to be used. To select the framework, use the OracleAS Wireless System Manager and follow these steps:
1. In the Wireless Server System tab page, click Site Administration.
2. Click to expand Component Configuration.
3. Click Location Services in the Configuration subsection. The Location Services page is displayed, as shown in Figure 14–4.
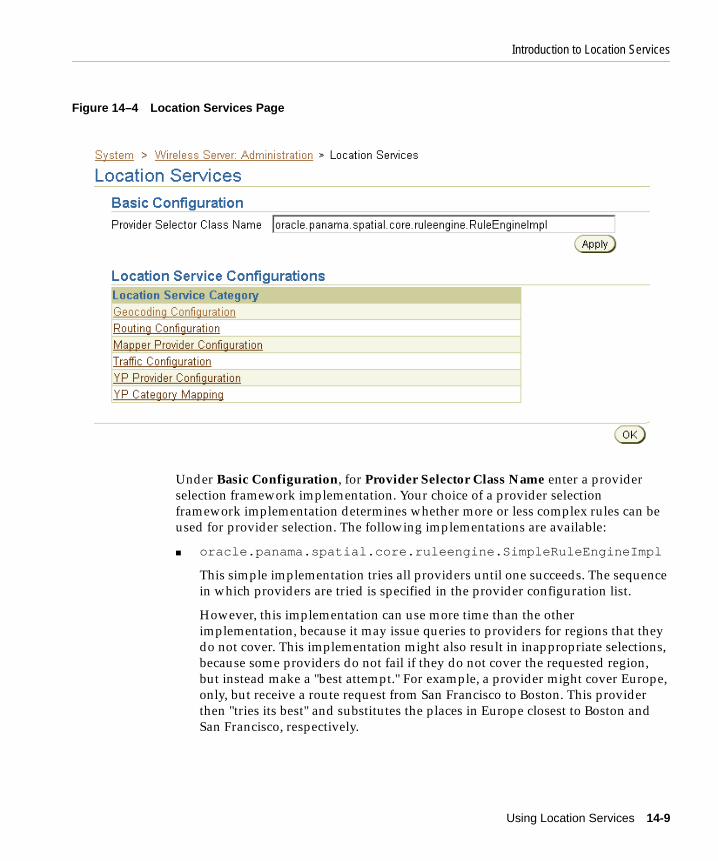
Introduction to Location Services
Using Location Services 14-9
Figure 14–4 Location Services Page
Under Basic Configuration, for Provider Selector Class Name enter a provider selection framework implementation. Your choice of a provider selection framework implementation determines whether more or less complex rules can be used for provider selection. The following implementations are available:
■ oracle.panama.spatial.core.ruleengine.SimpleRuleEngineImpl
This simple implementation tries all providers until one succeeds. The sequence in which providers are tried is specified in the provider configuration list.
However, this implementation can use more time than the other implementation, because it may issue queries to providers for regions that they do not cover. This implementation might also result in inappropriate selections, because some providers do not fail if they do not cover the requested region, but instead make a "best attempt." For example, a provider might cover Europe, only, but receive a route request from San Francisco to Boston. This provider then "tries its best" and substitutes the places in Europe closest to Boston and San Francisco, respectively.

Introduction to Location Services
14-10 Oracle Application Server Wireless Developer’s Guide
■ oracle.panama.spatial.core.ruleengine.RuleEngineImpl
This implementation can select providers based on whether or not they provide satisfactory coverage for a given country. Among all providers that provide satisfactory coverage for a given country, providers are tried based on the sequence in the provider configuration list.
This implementation avoids time being wasted trying providers that do not provide coverage for a country or that provide unsatisfactory service (for example, if the cost is too high or the service quality is poor). However, this selection framework does require more configuration: lists of countries and country aliases need to be specified for each provider (although examples of such configurations are provided).
■ oracle.panama.spatial.core.ruleengine.ExtendedRuleEngineImpl
This implementation automatically adjusts to changing provider properties. It dynamically measures the performance and reliability of each provider. Based on these statistics, the provider list is dynamically re-ranked.
This implementation automatically favors the providers that are currently fastest and most reliable. It can also be used for load balancing, in that the fastest and most reliable service will be used virtually all the time, until the heavy load slows it down sufficiently for other providers to compete. From that point on, other providers will start getting more requests than they did before.
14.1.5.1.1 Configuring Provider Information To configure the provider information, on the Location Services page under Location Service Configurations (shown in Figure 14–4 in Section 14.1.5.1), select the appropriate type of service for configuration:
■ Geocoding Configuration
■ Routing Configuration
■ Mapper Configuration
■ Traffic Configuration
■ YP Provider Configuration
The provider information (described in Section 14.1.5.1.2, "Provider Configuration") is very similar for all types of services (geocoding, mapping, routing, traffic, and YP).
For geocoding and perhaps other services, you may need to provide configuration information for country name aliases (see Section 14.1.5.1.3, "Country Name Alias
Introduction to Location Services
Using Location Services 14-11
Configuration") and address formats (see Section 14.1.5.1.4, "Address Format (International) Configuration").
If the administrator configures the provider list (using the OracleAS Wireless System Manager) to include a Web services proxy, any location service request will automatically (and transparently) use Web services. For information about using Web services, see Section 14.2.3, "Using Web Services".
14.1.5.1.2 Provider Configuration An ordered list of providers is configured with the following parameters:
■ Provider Name: the provider name, which serves as an ID
■ Provider Impl Class: the class implementing the proxy for this provider (for translation and communication with the provider)
■ URL: the static URL prefix used to access the provider
■ User Name: a user name as determined by the provider
■ Password: the password to be used in combination with the user name
■ Parameters: any parameters required to customize and configure the provider proxy
■ ISO Locales: a semicolon-delimited list of country IDs (as specified in the country name alias list, described in Section 14.1.5.1.3)
■ Corporate URL: the corporate URL of the provider (used as an advertisement)
■ Service Version: the service version for the provider that this proxy uses
■ Corporate Logo URL: the corporate logo URL of the provider (used as an advertisement)
14.1.5.1.3 Country Name Alias Configuration The country name alias configuration relates country names and synonyms to a single standard identifier for a given
Note: All location services configuration information, except YP category information, is maintained internally (by Wireless) in an XML configuration file named site_cfg_bootstrap.xml. However, you are encouraged not to modify that file directly; instead, use the OracleAS Wireless System Manager interface to modify configuration information.

Introduction to Location Services
14-12 Oracle Application Server Wireless Developer’s Guide
country. This standard identifier should be the ISO name (US for United States, DE for Germany, and so on), although you can specify other identifiers.
The aliases are used in combination with the oracle.panama.spatial.core.ruleengine.RuleEngineImpl provider selection framework implementation. Each provider is configured for a set of countries, specified by their IDs. For example, when a service request is made, for example to geocode an address in the United States, the country alias table is consulted to find the standard ID US. Subsequently, only providers with US in their list of covered countries are tried.
If a country name is used which is not configured as a known alias for some country ID, the ID unknown is used, instead. In this case, providers with unknown in the covered country list are tried.
If the simple provider selection framework implementation (oracle.panama.spatial.core.ruleengine.SimpleRuleEngineImpl) is used, country aliases are not required for provider selection.
14.1.5.1.4 Address Format (International) Configuration The address format configuration is used to specify international address formats. The oracle.panama.spatial.intladdress package in the API uses this list to determine which components are part of an address (US, French, German, Chinese, and so on) and how they are presented for input and output.
The international address framework is configured with a list of address formats in the repository, accessible through the OracleAS Wireless System Manager. This configuration specifies all components of an address, aliases for the components, and mappings to standard concepts such as city, state, and street name. The format of the textual representation is also configured, to determine such things as:
■ How is the address usually divided into separate lines?
■ In which sequence do the components occur?
■ Which components are optional, and which are required?
This approach requires that users specify a country-specific format for addresses, in order to view and enter addresses in that format. Otherwise, for example, the system cannot know whether to ask a user to specify a state or province before the country.
The benefits of this approach include the following:
■ Users see a form that exactly matches the desired address format for mailed letters.

Introduction to Location Services
Using Location Services 14-13
■ The system can better analyze addresses when each component is known separately and meaningfully identified, rather than simply being included somewhere in first line, second line, and last line.
■ An application looks more professional if it automatically adapts to the local address format, both for input and output of addresses.
■ Outside the US, customers are much more impressed when presented with their local address format, as opposed to the US format.
■ The application does not have to be rewritten for different countries. Everything is handled automatically by the framework
Several international address formats are supplied. Two examples are as follows.
For the US:
{name}{house number/house} {street}[ Apt {apt}]{city} {state} {postal code}[-{postal code ext}]{country}
For Germany:
{Name/name}{Strasse/street/first line} {Hausnummer/house}[ Wohnung {Wohnung/apt}]{PLZ/postal code} {Stadt/city} [{Bundesland/state}]{Land/country}
Syntax notes:
■ { } (braces) enclose an address component.
■ / (slash) separates alternative aliases within a component.
■ [ ] (brackets) enclose optional elements.
■ Anything outside braces other than brackets is taken as quoted from an address (such as Apt in 123 Main Street Apt 4).
For programming information and examples relating to international address formats, see Section 14.2.2.1.1, "International Addresses".

Introduction to Location Services
14-14 Oracle Application Server Wireless Developer’s Guide
14.1.5.2 Logging of Provider Selection InformationThe provider selection framework implementation logs selection, success, and failure of providers in the OracleAS Wireless log file (for example, sys_panama.log). For example, you can look for events such as the following:
■ The multiplexers for geocoding, mapping, and so on (other types of services) have been initialized.
■ The provider selection framework implementation has been initialized.
■ The proxies for geocoding, mapping, and so on (other types of services) have been initialized.
■ A specific provider has been tried.
■ A specific provider has failed.
■ A specific provider has succeeded.
■ All providers have failed.
14.1.5.3 Logging of Provider Performance InformationThe provider selection framework implementation logs provider performance statistics. For each request made to a provider, the following information is logged, regardless of whether the provider succeeds or fails:
■ Provider name
■ Provider proxy Java class
■ Time spent (in ms)
■ Success (true or false)
■ Time that request was made (timestamp)
The performance information is written to a table named PTG_LBS_LOG. You can see this information using the Wireless System Manager, as follows:
1. In the Wireless Server System tab page, click Site Performance.
2. In the Component Performance section, click Location-Related.
14.1.6 Geocoding ServicesThe geocoding API provides the geographic location of a given address. For a user of Wireless, an address is the most common way to specify a location. However, for finding locations such as restaurants in close vicinity or providing driving

Introduction to Location Services
Using Location Services 14-15
directions, the text representation of an address may not be useful unless it is first geocoded, that is, translated to geographic coordinates.
The address to be geocoded has a textual representation like that from a standard mailed letter. The result returned is the longitude/latitude corresponding to the address. For example, the input to geocoding might include the following:
■ firmName: "oracle"
■ firstLine: "1 Oracle Drive"
■ secondLine: ""
■ lastLine: "Nashua NH 03062"
■ matchMode: "tight"
In this example, the result is: Point( x = -71.455, y = 42.7117)
Because a user might specify an ambiguous address, the GeocodeResult contains an array of Location objects instead of a single object.
14.1.6.1 Geocoding APIThis section describes the geocoding API for location application components.
Two of the following classes, Point and Location, are used by the whole API and are not specific to geocoding. However, they are described here because they represent components central to the geocoding service, both for input and output.
14.1.6.1.1 Point Class The Point class defines a longitude/latitude coordinate point. Additional values for a label and a radius can be used for representing a point on a map. The label and radius are not used by any other functions than map display.
14.1.6.1.2 Location Class The Location class defines a location with address and longitude/latitude. If the location object is constructed using firstLine, secondLine, and lastLine, then some external providers might not correctly identify the city or state, because lastLine can contain city, state, and postal code in a country-specific and relatively flexible format.
If no specific substring can be identified as the component representing the city, the city is "unknown". In this case, the API itself might not try complex analysis, but instead leave this task to the experts, that is, the external geocode providers.

Introduction to Location Services
14-16 Oracle Application Server Wireless Developer’s Guide
14.1.6.2 Geocoder InterfaceThe Geocoder interface defines how an application programmer accesses the geocoding service. An object of a class implementing this interface is returned by the SpatialManager.
14.1.7 Location MarksDue to the limitations of certain mobile devices such as telephones, it is difficult to input/display lengthy alphanumeric strings. A location mark stores a piece of spatial information identified by a concise, easy-to-understand name. For example, My home might be the name of a location mark, while the underlying spatial information might be 123 Main Street, Somewhere City, CA, 12345; Lon = -122.42, Lat = 37.58.
Location marks allow users to avoid inconvenient string input on mobile devices. Users can manage their location marks on a desktop and then access them by referring to their names from mobile devices. Today’s location-aware applications typically just use a point location (such as an address or a road intersection). In this case, the spatial information can be provided by geocoding. However, a location mark can also be a circular area around a point (that is, if you specify a point and a radius) or a region that has been defined using the region modeling tool (described in Section 14.5).
Location marks also allow users to try what-if scenarios: to make an application behave as if they were in a location different from their default or current location. For example, a user of an entertainment services application might actually be in Boston now, but will be traveling to San Francisco in a few days. This person could set a location mark in San Francisco as the default, and be presented with information relevant to the San Francisco area.
Each user has personalized location marks, which are stored in the Wireless repository.
A default location mark can be set for each user. If there is no mobile positioning information for a user, that user’s default location mark (if defined) is used. For example if the default location mark for user Smith is that person’s office, and if there is no current positioning information for Smith, the current location is assumed to be Smith’s office.
Location marks are created using the LocationMark class. Users can also create location marks by logging into the Customization Portal, clicking the LocationMarks tab, and clicking Create.

Introduction to Location Services
Using Location Services 14-17
For information about using a location mark to enable mobile positioning, see Section 14.3.1, "Manual Positioning".
14.1.8 LOCATIONMARK TableA new table named LOCATIONMARK is added to the Wireless repository schema. This table contains detailed information about each location mark, including the user associated with each location mark. For example, several users might have a location mark named Office but with a different location for each.
Table 14–1lists the columns in the LOCATIONMARK table.
Table 14–1 LOCATIONMARK Table columns
Column Name Type
objectId_ NUMBER(10)
name VARCHAR2(32)
userId NUMBER(10)
longitude NUMBER
latitude NUMBER
addrline1 VARCHAR2(256)
addrline2 VARCHAR2(256)
addrlastline VARCHAR2(256)
block VARCHAR2(256)
city VARCHAR2(256)
country VARCHAR2(256)
county VARCHAR2(256)
firmname VARCHAR2(256)
pcode VARCHAR2(32)
pcode_ext VARCHAR2(16)
state VARCHAR2(256)
matchmode VARCHAR2(32)
description VARCHAR2(256)

Introduction to Location Services
14-18 Oracle Application Server Wireless Developer’s Guide
14.1.9 Mapping ServicesThe mapping API provides functions for creating map images for any of the following:
■ A single point (such as an address or a location mark)
■ Multiple points (such as several addresses or location marks)
■ A complete route
■ A single driving maneuver
The mapping API lets you specify the size (resolution) of the map and the image format.
Mapping capabilities can be made visible to users as a purely mapping application or as part of a routing application. In a routing application, the mapping of routes and driving maneuvers is performed by the routing provider. For information about routing services, see Section 14.1.10, "Routing Services".
14.1.10 Routing ServicesThe routing API provides routing (driving directions) information based on a start point, an end point, and optionally a list of intermediate via points. All points are specified as longitude/latitude pairs or addresses.
The routing result consists of a set of maneuvers. A maneuver corresponds to a driving instruction, such as turn left onto I-93 or bear right and merge to Route 3. The routing result also includes estimated driving time and distance. Optionally, maps and route coordinates can be requested.
14.1.10.1 Routing SettingsRouting can be influenced by preferences or requirements, called routing options. These options are combined in a set, called routing settings. There are two types of routing options: basic options and secondary options.
Basic options include:
■ Whether maps (images) are requested
■ Whether geometries (route coordinates) are requested
Secondary options include:
■ Optimization method, such as shortest distance or shortest driving time
Introduction to Location Services
Using Location Services 14-19
■ Route properties to avoid, such as toll roads, ferry lanes, or limited-access highways
■ Map sizes
Secondary options can be mandatory or preferred:
■ If a secondary option is mandatory but not supported by the provider, the API will automatically fail over to the next provider.
■ If a secondary option is preferred but not supported by the provider, the API will not check to see if other providers support the option.
If the application developer requests a secondary option without specifying whether it is mandatory or preferred, the following defaults are applied:
■ Optimization method: preferred
■ Avoid Ferry: preferred
■ Avoid Limited Access Hwy: preferred
■ Avoid Toll: preferred
■ Overview Map size: mandatory
■ Maneuver Map size: mandatory
■ Overview Map scale and zoom level: preferred
■ Maneuver Map scale and zoom level: preferred
14.1.10.2 Routing ResultsThe application can query the following components of a returned route:
■ List of maneuvers
■ Total distance
■ Total estimated driving time
■ Overview map
An overview map shows the source and destination, with the route highlighted.
A set of maneuvers (driving directions) is returned as part of the routing result. Each maneuver corresponds to a driving instruction and contains the following information:
■ Textual narrative

Introduction to Location Services
14-20 Oracle Application Server Wireless Developer’s Guide
■ Distance traveled during or prior to this maneuver ("After how many miles do I have to make this right turn?")
■ Detailed maneuver map
■ Geometry (list of coordinate points, longitude/latitude)
Maps of the complete route or maneuvers can be requested as Java Image objects or as Strings representing a URL.
14.1.10.3 Support for Multiple LanguagesIf the routing provider supports multiple languages, the API chooses a language based on the Java locale object specified in the request to the router. The language setting can affect the maneuver narratives and distance measures.
14.1.10.4 Routing APIThis section describes the routing API for location application components.
14.1.10.4.1 Router Interface The Router interface defines how an application programmer accesses the routing service. An object of a class implementing this interface is returned by the SpatialManager.
14.1.10.4.2 RoutingSettings Class The RoutingSettings class defines a set of options passed to routing. There are two types of routing options: basic and secondary.
Basic options include whether or not to request a map or a geometry. Basic options can be specified in the constructor of a RoutingSettings object.
Secondary options can be set using setSecondaryOption. The first parameter is a RoutingOption object, which is a static constant defined in the RoutingOption class. It identifies the option for which a value is set. The second parameter is a String representing the value.
Whether or not the secondary option is mandatory is defined by setSecondaryOptionRequired. The first parameter is the RoutingOption and the second parameter specifies whether this option requirement is mandatory. Unless this function is called, the default value is assumed.
14.1.10.4.3 RoutingResult Class The RoutingResult class defines the routing results, which are described in Section 14.1.10.2.

Introduction to Location Services
Using Location Services 14-21
14.1.10.4.4 Maneuver Class The Maneuver class defines a single maneuver in a route (see Section 14.1.10.2, "Routing Results" for the maneuver attributes).
14.1.11 Business Directory (Yellow Pages) ServicesBusiness directory (Yellow Pages, or YP) services provide lists of businesses in a given area and matching a specified name or category.
Existing providers use YP services with different interfaces. Specifically, they all have different YP categories, and even different hierarchical structures. The categories might be organized in a flat list or in a hierarchy of categories and subcategories. A hierarchy tree might be deep or shallow, with a high or low fanout, and might be balanced or unbalanced.
To unify the service of different providers, the Oracle business directory services use a custom hierarchy that the OracleAS Wireless developer defines in an XML file. Each leaf in this hierarchy has a reference to a category of one or more providers. Non-leaf nodes might also have such references. This custom hierarchy defines preferred categories first. Subsequently, the carrier using OracleAS Wireless tries to match these categories to semantically similar categories supported by external providers.
The customized hierarchy with the references to external providers’ categories is represented in an XML file that stores hierarchical and ordered structures. Representing order in the category hierarchy can account for the popularity of different categories. For example, on a device with a limited screen size, an application might restrict the choices among the most popular categories.
14.1.11.1 Different Approaches Among Yellow Pages ProvidersSeveral providers offer YP services on the Web; however, the approaches taken by these providers differ significantly and do not offer a uniform interface. Furthermore, the respective approaches are not final in their methodology and can be expected to change.
A unifying pattern in the various approaches is that businesses are categorized by subject and location. The location component is well understood in that either a ZIP code or the combination of a city and state can be used to determine the location.
The categorization of businesses, on the other hand, is not uniformly implemented. Some providers offer a flat list of categories, user-selected by simple substring matching. Another approach is a 3-level or 4-level hierarchical organization of subcategories, often with a fanout of 20 to 50, sometimes more than 100. A user might start the hierarchy traversal at the root of the hierarchy (by default).

Introduction to Location Services
14-22 Oracle Application Server Wireless Developer’s Guide
Alternatively, a user might enter a keyword that is matched to an appropriate starting point within the hierarchy. Such keyword matching might go beyond simple substring search and result in more intelligent choices.
14.1.11.2 Business Directory Category ConfigurationSupport for business categories and the hierarchy of categories is provided through an XML configuration file. (You should view and modify business directory provider information using the OracleAS Wireless System Manager; however, you must view and modify business directory category information using the XML file.)
The category hierarchy definition file in Example 14–1 represents the custom hierarchy of business directory categories. Each category can have any number of subcategories. There is no restriction to the level of nesting. A category can be linked to multiple business directory content providers. The flexibility allowed by this file accommodates the different approaches of various business directory service providers, as discussed in Section 14.1.11.1.
Example 14–1 Business Directory Category Hierarchy Definition File
<?xml version="1.0" standalone="yes"?><Categories> ... <Category CategoryName = "Berry crops"> <Provider Name = "..." Parameter = "..."/> <Category CategoryName = "Cranberry farm"> <Provider Name = "..." Parameter = "..."/> </Category> </Category> ... <Category CategoryName = "Ornamental nursery products"> <Provider Name = "..." Parameter = "..."/> <Category CategoryName = "Florists’ greens and flowers"> <Provider Name = "..."

Introduction to Location Services
Using Location Services 14-23
Parameter = "..."/> </Category> <Category CategoryName = "Bulbs and seeds"> <Provider Name = "..." Parameter = "..."/> </Category> </Category> <Category CategoryName = "Crops grown under cover"> <Provider Name = "..." Parameter = "..."/> <Category CategoryName = "Mushrooms grown under cover"> <Provider Name = "..." Parameter = "..."/> </Category> </Category> ...</Categories>
14.1.11.3 Business Directories (Yellow Pages) APIThe application developers can traverse the category hierarchy by using the functions in the YPFinder interface. For any resulting category, the following can be requested:
■ List of businesses
■ List of direct subcategories
■ List of direct or indirect subcategories containing a substring
14.1.11.3.1 YPFinder Interface The YPFinder interface defines how an application programmer accesses the YP service. An object of a class implementing this interface is returned by the SpatialManager.
An object of this class lets the user query:
■ Businesses in a state
■ Businesses in a city
■ Businesses in a postal code

Introduction to Location Services
14-24 Oracle Application Server Wireless Developer’s Guide
■ Businesses in a radius around a center
■ The closest n businesses around a center
In each of these region types, businesses can be found:
■ Matching a given business name or keyword
■ Matching a given category
■ Matching both a given business name or keyword and a given category
■ Matching a keyword in either a business name or category
14.1.11.3.2 YPCategory Class The YPCategory class defines a single category that is part of the hierarchy. This class lets users access businesses in the category. It also lets users find subcategories of the category; specifically, you can find:
■ All the direct subcategories
■ All direct or indirect subcategories matching a keyword
■ A subcategory with a given name
One of the most popular applications probably is to find subcategories of the root matching a given keyword.
14.1.11.3.3 YPBusiness Class The YPBusiness class defines a single business. It represents an address (Location interface) that also has a telephone number, a description, and a list of categories it matches. You can get all businesses in a category or all categories for each of these businesses. For example, a given bookstore might be both in the categories book store and cafe.
14.1.12 Traffic ServicesThe traffic API provides information about conditions that can affect traffic flow on road networks in major metropolitan areas. These areas are typically further divided into smaller areas, such as downtown, metro West, metro East, and so on. Real-time traffic reports update conditions in short time periods (such as every 5 minutes), thus providing information that is important for fleet management as well as personal navigation.
The major components of traffic reports are incidents. An incident is an event that will probably affect the flow of traffic. Examples of incidents are accidents, construction activity, and traffic congestion (normal or unexpected). Each incident includes such information as the type of incident, where the incident occurred (such

Introduction to Location Services
Using Location Services 14-25
as the route number, the location, or the region), the direction along the route (such as northbound), the expected delay, and the length of the traffic backup.
For the current release, the following kinds of queries are supported for incident-based traffic information:
■ City-level query: return traffic incidents in the entire city.
■ Route-level query: return traffic incidents on the specified route in a city.
■ Longitude/latitude (point) or address plus radius-level query: return traffic incidents in the requested circular area.
Examples of traffic queries include returning the traffic report for:
■ A metropolitan area (such as Boston)
■ A route in a metropolitan area (such as I-93 South in Boston)
■ A planned route (such as from Nashua, NH to Boston, MA), returned as a collection of (route, city)
■ A mobile range consisting of a location (longitude, latitude) and a radius from the location
■ The vicinity of a given address (such as One Oracle Drive, Nashua, NH 03062)
The traffic API processes requests and returns responses. The requests and responses can be in Java or XML format. Section 14.1.12.2 provides examples of an XML request and response in XML format. Section 14.1.12.3 describes the traffic Java API.
14.1.12.1 Traffic Report CachingTraffic report information is cached at the city level. The first time that a traffic report on a city is fetched, the report is written to the traffic report cache. The cached report is considered invalid after a maximum cache age time (for example, 15 minutes), which can be set using the System Manager.
A network round-trip operation to the traffic service provider is required to update the cached traffic report for the city. The cached report is updated only when both of the following conditions are true:
Note: For the current release, no traffic service providers are included in the sample configuration files.

Introduction to Location Services
14-26 Oracle Application Server Wireless Developer’s Guide
■ A query is made for the city or for any Spatial geometry (route or point with radius) that is in or partially in the city (that is, where the queried geometry spatially interacts with the city’s geometry).
■ The cached report for the city is older than the maximum cache age time.
14.1.12.2 Traffic XML Requests and ResponsesExample 14–2 shows a city-level request in XML format for traffic information for Boston.
Example 14–2 Traffic Request for Boston
<?xml version="1.0" encoding="UTF-8"?><traffic_request> <query_list> <query_info query_type="city_level_query" city_name="boston" state_name="MA" country_name="US" /> </query_list></traffic_request>
Example 14–3 shows a response in XML format for traffic information for Boston.
Example 14–3 Traffic Response for Boston
<?xml version="1.0" encoding="UTF-8"?><traffic_response> <report_list> <traffic_report> <provider name="Trafficstation" covered_city_name="Boston" state_name="MA" country_name="US"/> <report_time month="6" day="19" year="2001" hour="5" minute="28" meridian = "PM"/> <unit distance_unit="MILES" time_unit="MINUTE"/> <incident_list> <incident id = "1"> <incident_type>ACCIDENT</incident_type> <description>CAR ACCIDENT</description>

Introduction to Location Services
Using Location Services 14-27
<route type = "Interstate" name = "I-93" direction = "SOUTH"/> <geo_location longitude = "-71.0607" latitude = "42.3659" radius = "5.0"/> <location_range> <at_location>EXIT 26</from_location> </location_range> <time_range> <from_time month = "6" day = "19" year = "2001" hour = "5" minute = "28" meridian = "PM"/> <to_time month = "6" day = "19" year = "2001" hour = "5" minute = "28" meridian = "PM"/> </time_range> <severity>HEAVY</severity> <speed>15.0</speed> <impact>EXPECT DELAY</impact> <advice>TAKE LEFT LANE</advice> </incident> <incident id = "2"> <incident_type>CONSTRUCTION</incident_type> <description>REGULAR MAINTENANCE</description> <route type = "Interstate" name = "I-95" direction = "NORTH"/> <geo_location longitude = "-71.3555" latitude = "42.3601" radius = "30.0"/> <location_range> <at_location>EXIT 36</at_location> </location_range> <time_range> <at_time month = "6" day = "19" year = "2001" hour = "5" minute = "28" meridian = "PM"/> </time_range> <severity>MINOR</severity> <speed>35.0</speed> <impact>EXPECT DELAY</impact> <advice>USE I-495</advice> </incident> </incident_list> </traffic_report> </report_list></traffic_response>
14.1.12.3 Traffic Java APIThis section describes the traffic Java API for location application components.

Introduction to Location Services
14-28 Oracle Application Server Wireless Developer’s Guide
14.1.12.3.1 CityInfo Class The CityInfo class provides the city name, state name, and country name for a city. A common use of this class is to create a CityInfo instance with city name, state name (optional), and country name, and pass it to the query for a traffic report at city level, route level, or point and radius level with a city.
14.1.12.3.2 City Interface The City interface provides information about a city from a specified service provider. The information includes the city name, state name, country name, and information about routes. A City instance could be obtained from the TrafficReport interface.
14.1.12.3.3 RouteInfo Class The RouteInfo class provides the name and type for a route. A common use of this class is to create a RouteInfo instance and pass it to the query for a traffic report at route level.
14.1.12.3.4 TrafficRoute Interface The TrafficRoute interface provides information for a route from a specified service provider. The information includes the route name, route type, geometry that represents the route, and the city name. A TrafficRoute instance could be obtained from the TrafficIncident interface.
14.1.12.3.5 TrafficReport Interface The TrafficReport interface provides information for an incident-based traffic report, such as the report time, the number of incidents, the provider’s information, the city, and the incidents. A report could then be created to show to users or administrators of the application.
14.1.12.3.6 TrafficIncident Interface The TrafficIncident interface provides information for a traffic incident, such as the severity, type, description, route and direction on which the occurred, location, time range, impact, and advice.
14.1.12.3.7 TrafficReporter Interface The TrafficReporter interface provides functions that return a traffic report based on different queries. The following kinds of queries are supported:
■ Given the information about a city (city name, state name [optional], country name), return the report.
■ Given the information about a route (with or without direction) and the city where the route is located in, return the report.
■ Given the longitude/latitude coordinates of a point and the radius, return the report for the area.
■ Given the address of a location and the radius, return the report for the area.

Introduction to Location Services
Using Location Services 14-29
When using SpatialManager.createLocation() to get an instance of Location, you must specify the city name and country name. Do not use the LastLine attribute to combine these pieces of information. Set the value of the Point geometry to null to avoid automatic geocoding.
14.1.12.3.8 TrafficCityManager Interface The TrafficCityManager interface provides two functions, one to obtain all the cities for which traffic information is provided, and the other to obtain the routes info for a given city. A common use of these functions is to call them to create a drop-down list of cities and routes supported by the application.
14.1.12.4 Traffic Service ConfigurationAfter the region modeling data and city coverage data has been loaded into the repository during the Wireless installation, you can add traffic providers and supported cities for a provider.
14.1.12.4.1 Adding a Traffic Provider To add support for a new traffic service provider, follow these steps:
1. Using the System Manager, set the traffic provider information and the traffic report cache time.
2. For each supported city of this new provider, use the region modeling tool (described in Section 14.5) to check if there is an entry in the CITY table for that city, including a valid GEOMETRY column value. If there is not an entry for the city, including its geometry, add an entry.
3. Get and note the ID of this city.
4. Use SQL*Plus connect to the Wireless repository.
5. For each city to be supported for this traffic service provider, set the value of the COVERED_BY_TRAFFIC column in the CITY_COVERAGE table to ’Y’, and use the value of city’s ID to perform the update. For example:
UPDATE city_coverage SET covered_by_traffic = ’Y’ WHERE id = 12345;COMMIT;
If there is not already an entry in the CITY_COVERAGE table for this city, add a row and set the value of the COVERED_BY_TRAFFIC column to 'Y', and be sure that the ID value in this table is the same as the ID value for the city in the CITY table. For example:
INSERT INTO city_coverage (id, name, state_name, country_name,

Developing Location-Based Applications
14-30 Oracle Application Server Wireless Developer’s Guide
covered_by_traffic) VALUES (10750, ’BOSTON’, ’MA’, ’US’, ’Y’);COMMIT;
14.1.12.4.2 Adding a Supported City for a Provider To add support for a new city for an existing traffic service provider, follow these steps:
1. For each supported city of this new provider, use the region model tool (described in Section 14.5) to check if there is an entry in the CITY table for that city, including a valid GEOMETRY column value. If there is not an entry for the city, including its geometry, add an entry.
2. Get and note the ID of this city.
3. Use SQL*Plus connect to the Wireless repository.
4. If there is an entry in the CITY_COVERAGE table for this city, set the value of the COVERED_BY_TRAFFIC column in the CITY_COVERAGE table to ’Y’, and use the value of city’s ID to perform the update. For example:
UPDATE city_coverage SET covered_by_traffic = ’Y’ WHERE id = 12345;COMMIT;
If there is not already an entry in the CITY_COVERAGE table for this city, add a row and set the value of the COVERED_BY_TRAFFIC column to 'Y', and be sure that the ID value in this table is the same as the ID value for the city in the CITY table. For example:
INSERT INTO city_coverage (id, name, state_name, country_name, covered_by_traffic) VALUES (10750, ’BOSTON’, ’MA’, ’US’, ’Y’);COMMIT;
14.2 Developing Location-Based ApplicationsYou can develop a location-based application by using any of the following approaches:
■ Creating JavaServer Pages (JSP) files that contain MobileXML and/or HTML tags and that include custom Oracle-supplied tags (see Section 14.2.1, "Creating JavaServer Pages (JSP) Files")
■ Using the Java API in JSP files (see Section 14.2.2, "Using the Location Java API")
■ Using Web services (see Section 14.2.3, "Using Web Services")

Developing Location-Based Applications
Using Location Services 14-31
Using tags in JSP files is often easier and more convenient than using the Java application programming interface (API); however, using the API gives you greater flexibility and control over the application logic.
14.2.1 Creating JavaServer Pages (JSP) FilesIf you do not need to write an adapter, you can create JavaServer Pages (JSP) files to provide location-based capabilities to users.
This section provides detailed information about the Oracle-supplied tags that you can use. Each reference section includes an example.
Table 14–2 groups the JSP tags for location services by the type of application for which the tag is useful, and briefly describes the information specified by the tag.
Table 14–2 JSP Tags for Location Services
Category Tags
General geometry
point
Geocoding address
geocode
iterateGeocodes
iterateReverseGeocodes
listGeocodes
listReverseGeocodes
Mapping map
Routing drivingDistance
drivingTime
iterateManeuvers
listManeuvers
route

Developing Location-Based Applications
14-32 Oracle Application Server Wireless Developer’s Guide
Business directory (YP) businesses
category
iterateBusinesses
iterateBusinessesInCity
iterateBusinessesInCorridor
iterateBusinessesInPostalCode
iterateBusinessesInRadius
iterateBusinessesInState
iterateBusinessesNearestTo
iterateCategoriesMatchingKeyword
iterateChildCategories
listBusinessesInCity
listBusinessesInCorridor
listBusinessesInPostalCode
listBusinessesInRadius
listBusinessesInState
listBusinessesNearestTo
listCategoriesMatchingKeyword
listChildCategories
Sorting iterateByDistance
iterateByDrivingDistance
iterateByName
iterateByRegionName
listByDistance
listByDrivingDistance
listByName
listByRegionName
Location marks defaultLocationMark
iterateLocationMarks
listLocationMarks
Table 14–2 (Cont.) JSP Tags for Location Services
Category Tags

Developing Location-Based Applications
Using Location Services 14-33
Many pairs of tags have similar names, with one starting with iterate and the other starting with list (for example, iterateManeuvers and listManeuvers).
■ Tags with names starting with iterate create a collection and present each item in the collection individually, so that you can perform some processing action. For example, on a Web page you might want display a horizontal rule after each item, and perhaps some static text before each item.
■ Tags with names starting with list present an unformatted list of returned items. These tags are useful for passing a single list of data for processing by a script or algorithm; they are not typically used for directly displaying data on Web pages.
The JSP tags for location services must be used with a prefix, which must be specified in the JSP file. The following example defines the loc prefix, which is used in other examples of specific tags:
<%@ taglib uri="LocationTags" prefix="loc" %>
The following example shows the loc prefix used with the address tag:
Mobile positioning mobilePos
Communities addMembers
createPrivateCommunity
createSharedCommunity
createSystemCommunity
deleteCommunity
getCommunity
listAllMembers
listCreatedCommunities
listCreatedPrivateCommunities
listCreatedSharedCommunities
listCreatedSystemCommunities
removeAllMembers
removeMembers
setCommunityName
Table 14–2 (Cont.) JSP Tags for Location Services
Category Tags
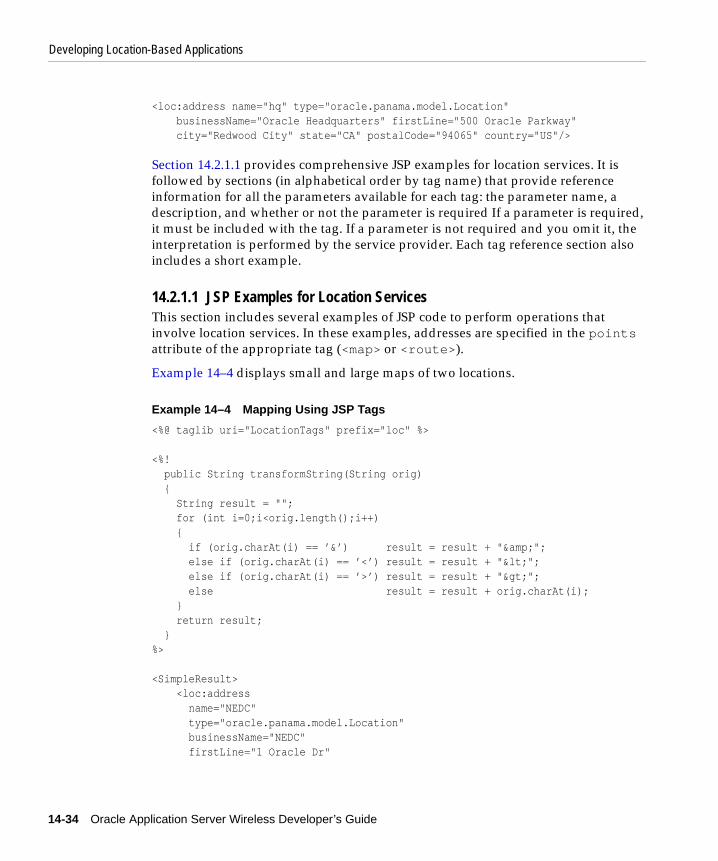
Developing Location-Based Applications
14-34 Oracle Application Server Wireless Developer’s Guide
<loc:address name="hq" type="oracle.panama.model.Location" businessName="Oracle Headquarters" firstLine="500 Oracle Parkway" city="Redwood City" state="CA" postalCode="94065" country="US"/>
Section 14.2.1.1 provides comprehensive JSP examples for location services. It is followed by sections (in alphabetical order by tag name) that provide reference information for all the parameters available for each tag: the parameter name, a description, and whether or not the parameter is required If a parameter is required, it must be included with the tag. If a parameter is not required and you omit it, the interpretation is performed by the service provider. Each tag reference section also includes a short example.
14.2.1.1 JSP Examples for Location ServicesThis section includes several examples of JSP code to perform operations that involve location services. In these examples, addresses are specified in the points attribute of the appropriate tag (<map> or <route>).
Example 14–4 displays small and large maps of two locations.
Example 14–4 Mapping Using JSP Tags
<%@ taglib uri="LocationTags" prefix="loc" %>
<%! public String transformString(String orig) { String result = ""; for (int i=0;i<orig.length();i++) { if (orig.charAt(i) == ’&’) result = result + "&"; else if (orig.charAt(i) == ’<’) result = result + "<"; else if (orig.charAt(i) == ’>’) result = result + ">"; else result = result + orig.charAt(i); } return result; }%>
<SimpleResult> <loc:address name="NEDC" type="oracle.panama.model.Location" businessName="NEDC" firstLine="1 Oracle Dr"

Developing Location-Based Applications
Using Location Services 14-35
city="Nashua" state="NH" postalCode="03062" country="US"/> <loc:map name="NEDCSmall" type="oracle.panama.spatial.jsptags.beans.Map" xres="400" yres="300" points="NEDC"> </loc:map>
<loc:address name="HQ" type="oracle.panama.model.Location" businessName="HQ" firstLine="500 Oracle Parkway" city="Redwood City" state="CA" postalCode="94065" country="US"/> <loc:map name="HQSmall" type="oracle.panama.spatial.jsptags.beans.Map" xres="400" yres="300" points="HQ"> </loc:map>
<loc:map name="BothSmall" type="oracle.panama.spatial.jsptags.beans.Map" xres="400" yres="300" points="NEDC HQ"/> <loc:map name="NEDCLarge" type="oracle.panama.spatial.jsptags.beans.Map" xres="800" yres="600" points="NEDC"/> <loc:map name="HQLarge" type="oracle.panama.spatial.jsptags.beans.Map" xres="800" yres="600" points="HQ"/> <loc:map name="BothLarge" type="oracle.panama.spatial.jsptags.beans.Map" xres="800" yres="600" points="NEDC HQ"/>
<SimpleImage target="<%= transformString(NEDCLarge.toString()) %>" src="<%= transformString(NEDCSmall.toString()) %>"/>
<SimpleImage target="<%= transformString(HQLarge.toString()) %>" src="<%= transformString(HQSmall.toString()) %>"/>
<SimpleImage target="<%= transformString(BothLarge.toString()) %>" src="<%= transformString(BothSmall.toString()) %>"/></SimpleResult>
Example 14–5 displays the route between two locations and the driving directions (maneuvers).

Developing Location-Based Applications
14-36 Oracle Application Server Wireless Developer’s Guide
Example 14–5 Routing Using JSP Tags
<%@ taglib uri="LocationTags" prefix="loc" %>
<%! public String transformString(String orig) { String result = ""; for (int i=0;i<orig.length();i++) { if (orig.charAt(i) == ’&’) result = result + "&"; else if (orig.charAt(i) == ’<’) result = result + "<"; else if (orig.charAt(i) == ’>’) result = result + ">"; else result = result + orig.charAt(i); } return result; }%>
<SimpleResult> <loc:address name="NEDC" type="oracle.panama.model.Location" businessName="NEDC" firstLine="1 Oracle Dr" city="Nashua" state="NH" postalCode="03062" country="US"/> <loc:address name="HQ" type="oracle.panama.model.Location" businessName="HQ" firstLine="500 Oracle Parkway" city="Redwood City" state="CA" postalCode="94065" country="US"/> <loc:route name="myRoute" type="oracle.panama.spatial.jsptags.beans.Route" xres="800" yres="600" points="NEDC HQ"> </loc:route>
<SimpleImage src="<%= transformString(myRoute.getMap()) %>"/>
<SimpleText> <loc:iterateManeuvers name="aManeuver"

Developing Location-Based Applications
Using Location Services 14-37
type="oracle.panama.spatial.jsptags.beans.Maneuver" routeID="myRoute"> <SimpleTextItem> <%= aManeuver.getNarrative() %> </SimpleTextItem> </loc:iterateManeuvers> </SimpleText></SimpleResult>
Example 14–6 displays business directory (YP) information by name within a specified distance of a location: specifically, a map with the ten Starbucks locations nearest to Oracle headquarters.
Example 14–6 Business Directory (YP) by Name Using JSP Tags
<%@ taglib uri="LocationTags" prefix="loc" %>
<%! public String transformString(String orig) { String result = ""; for (int i=0;i<orig.length();i++) { if (orig.charAt(i) == ’&’) result = result + "&"; else if (orig.charAt(i) == ’<’) result = result + "<"; else if (orig.charAt(i) == ’>’) result = result + ">"; else result = result + orig.charAt(i); } return result; }%>
<SimpleResult> <loc:address name="HQ" type="oracle.panama.model.Location" businessName="HQ" firstLine="500 Oracle Parkway" city="Redwood City" state="CA" postalCode="94065" country="US"/>
<loc:businesses name="starbucks" type="java.util.Collection"

Developing Location-Based Applications
14-38 Oracle Application Server Wireless Developer’s Guide
businessName="Starbucks" centerID="HQ" nearestN="10"/> <loc:map name="starbucksMap" type="oracle.panama.spatial.jsptags.beans.Map" xres="800" yres="600" points="starbucks"> </loc:map>
<SimpleImage src="<%= transformString(starbucksMap.toString()) %>"/>
<SimpleText> <loc:iterateBusinesses name="singleStarbucks" type="oracle.panama.model.Point" collection="starbucks"> <SimpleTextItem> <%= singleStarbucks %> </SimpleTextItem> </loc:iterateBusinesses> </SimpleText></SimpleResult>
Example 14–7 displays business directory (YP) information by category within a specified area: specifically, a map with all automobile dealers (new cars) in San Francisco, California.
Example 14–7 Business Directory (YP) by Category Using JSP Tags
<%@ taglib uri="LocationTags" prefix="loc" %>
<%! public String transformString(String orig) { String result = ""; for (int i=0;i<orig.length();i++) { if (orig.charAt(i) == ’&’) result = result + "&"; else if (orig.charAt(i) == ’<’) result = result + "<"; else if (orig.charAt(i) == ’>’) result = result + ">"; else result = result + orig.charAt(i); } return result; }%>
<SimpleResult> <loc:category name="automotive" type="oracle.panama.spatial.yp.YPCategory" categoryName="Automotive"> </loc:category>

Developing Location-Based Applications
Using Location Services 14-39
<loc:category name="automotiveDealers" type="oracle.panama.spatial.yp.YPCategory" categoryName="Dealers" parentCategory="automotive"> </loc:category>
<loc:category name="newAutomotiveDealers" type="oracle.panama.spatial.yp.YPCategory" categoryName="New" parentCategory="automotiveDealers"> </loc:category>
<loc:businesses name="dealers" type="java.util.Collection" categoryID="newAutomotiveDealers" country="US" state="CA" city="San Francisco"/>
<loc:map name="dealerMap" type="oracle.panama.spatial.jsptags.beans.Map" xres="800" yres="600" points="dealers"> </loc:map>
<SimpleImage src="<%= transformString(dealerMap.toString()) %>"/>
<SimpleText> <loc:iterateBusinesses name="dealer" type="oracle.panama.model.Point" collection="dealers"> <SimpleTextItem> <%= transformString(dealer.toString()) %> </SimpleTextItem> </loc:iterateBusinesses> </SimpleText></SimpleResult>
14.2.1.2 addMembersThe addMembers tag adds one or more members to a mobile community. For an explanation of mobile communities, see Section 14.3.2.6, "Mobile Communities".
Table 14–4 lists the addMembers tag parameters. (See Section 14.2.1, "Creating JavaServer Pages (JSP) Files" for an explanation of the information provided.)
Table 14–3 addMembers Tag Parameters
Parameter Name Description Required
name Name for the returned object. Example: add_members Yes
type Type of object. Must be: Boolean (TRUE if the operation is successful, FALSE if the operation is not successful).
Yes

Developing Location-Based Applications
14-40 Oracle Application Server Wireless Developer’s Guide
The following example adds the user named Song, at the request of the user named Mike, to the mobile community associated with the variable named comm_private. It also creates a java.util.Enumeration object of members of this community, and displays this object.
<loc:addMembers name="add_members" type="Boolean" userName="Mike" communityID="comm_private" communityMembers="Song" /><loc:listAllMembers name="list_all_mem1" type="java.util.Enumeration" communityID="comm_private" /><%= list_all_mem1.toString() %>
14.2.1.3 addressThe address tag specifies an address to be geocoded, located on a map, or used as the start or end address of a route or as the center for a business directory query.
Table 14–4 lists the address tag parameters. (See Section 14.2.1, "Creating JavaServer Pages (JSP) Files" for an explanation of the information provided.)
userName Name of the Oracle Application Server Wireless user requesting the operation. The default is the current user.
No
communityID Name of variable associated with the community to which to add the members. Example: comm_private
Yes
communityMembers A space-delimited list of Oracle Application Server Wireless users to be added to the community.
Yes
Table 14–4 address Tag Parameters
Parameter Name Description Required
name Name for the returned object. Example: office. Yes
type Type of object. Must be: oracle.panama.model.Location Yes
Table 14–3 (Cont.) addMembers Tag Parameters
Parameter Name Description Required

Developing Location-Based Applications
Using Location Services 14-41
The following example creates a route named myRoute between two addresses (a person’s office and home), displays a map of the route followed by a horizontal rule, and presents each driving maneuver (using the iterateManeuvers tag and the getMap and getNarrative function calls) followed by a horizontal rule. Each driving maneuver description is also a link that users can click to display a map of the maneuver.
<loc:route name="myRoute" type="oracle.panama.spatial.jsptags.beans.Route" xres="800" yres="600"> <loc:address name="office" type="oracle.panama.model.Location" businessName="My office" firstLine="1 Oracle Dr" city="Nashua" state="NH" postalCode="03062" country="US"/> <loc:address name="home" type="oracle.panama.model.Location" businessName="My home" firstLine="2 Royal Crest Dr" city="Nashua" state="NH" postalCode="03060" country="US"/>
businessName Descriptive name of the business or other entity at the address. Example: My office
No
firstLine Street address. No
city City name. No
state 2-character state (US) or province (Canada) code. No
postalCode Postal code. No
country Country name. No
provider Name of the first-choice provider for the request, if there is a preference.
No
Table 14–4 (Cont.) address Tag Parameters
Parameter Name Description Required

Developing Location-Based Applications
14-42 Oracle Application Server Wireless Developer’s Guide
</loc:route>
<img src="<%= myRoute.getMap() %>"><HR>
<loc:iterateManeuvers name="aManeuver" type="oracle.panama.spatial.jsptags.beans.Maneuver" routeID="myRoute"> <a href="<%= aManeuver.getMap() %>"> <%= aManeuver.getNarrative() %> </a> <HR></loc:iterateManeuvers>
14.2.1.4 businessesThe businesses tag creates a collection (of oracle.panama.spatial.yp.YPBusiness objects) of businesses that share one or more attributes.
Table 14–5 lists the businesses tag parameters. (See Section 14.2.1, "Creating JavaServer Pages (JSP) Files" for an explanation of the information provided.)
Table 14–5 businesses Tag Parameters
Parameter Name Description Required
name Name for the returned object. Example: mikes_hardware_stores
Yes
type Type of object. Must be: java.util.Collection Yes
businessName Descriptive name of the business or other entity at the address. Example: Mike’s Hardware
No
categoryID Business services category variable name. Example: Automotive.
No
keyword Any string to search for in the name or categoryID. Example: French
No
city City name. No
state 2-character state (US) or province (Canada) code. No
postalCode Postal code. No
country Country name No

Developing Location-Based Applications
Using Location Services 14-43
The following example of the businesses tag specifies all businesses named Borders in the state of California in the United States. The use of the map tag to enclose the businesses tag causes a map to be created that includes and labels each Borders bookstore.
<loc:map name="map1" type="oracle.panama.spatial.jsptags.beans.Map" xres="1000" yres="500"> <loc:businesses name="bord" type="java.util.Collection" businessName="Borders" country="US" state="CA"/></loc:map>
14.2.1.5 categoryThe category tag creates a business category (an oracle.panama.spatial.yp.YPCategory object).
Table 14–6 lists the category tag parameters. (See Section 14.2.1, "Creating JavaServer Pages (JSP) Files" for an explanation of the information provided.)
centerID A point variable name (such as for an address) to be used as the center point from which to start searching. If you specify centerID, you must also specify radius or nearestN.
No
radius Length (in meters) of the radius of the circle in which to search. If you specify radius, you must also specify centerID.
No
nearestN Maximum number of nearest results that satisfy the query requirements (for example, to find the 3 nearest banks to a hotel or the user’s current position). If you specify nearestN, you must also specify centerID.
No
provider Name of the first-choice provider for the request, if there is a preference.
No
Table 14–6 category Tag Parameters
Parameter Name Description Required
name Name for the returned object. Example: cat_dealers Yes
type Type of object. Must be: oracle.panama.spatial.yp.YPCategory
Yes
Table 14–5 (Cont.) businesses Tag Parameters
Parameter Name Description Required

Developing Location-Based Applications
14-44 Oracle Application Server Wireless Developer’s Guide
The following example uses two category tags. The first category tag creates an object named cat_auto that specifies a category named Automotive. The second category tag creates an object named cat_dealers that specifies a category named Dealers that is a child of the cat_auto (Automotive) parent category.
<loc:category name="cat_auto" type="oracle.panama.spatial.yp.YPCategory" categoryName="Automotive" /><loc:category name="cat_dealers" type="oracle.panama.spatial.yp.YPCategory" parentCategory="cat_auto" categoryName="Dealers" />
14.2.1.6 createPrivateCommunityThe createPrivateCommunity tag creates a private mobile community. For an explanation of mobile communities, including types of communities, see Section 14.3.2.6, "Mobile Communities".
Table 14–7 lists the createPrivateCommunity tag parameters. (See Section 14.2.1, "Creating JavaServer Pages (JSP) Files" for an explanation of the information provided.)
parentCategory Name of the object containing the specification of the parent category (created previously using the category tag). If not specified, the root is assumed.
No
categoryName Name of the category. Example: Dealers. Yes
Table 14–7 createPrivateCommunity Tag Parameters
Parameter Name Description Required
name Name for the returned object. Example: comm_private Yes
type Type of object. Must be: oracle.panama.model.Community
Yes
userName Name of the Oracle Application Server Wireless user to be the owner of the community. The default is the current user.
No
communityName Descriptive name of the community. Example: My Private Community
Yes
Table 14–6 (Cont.) category Tag Parameters
Parameter Name Description Required
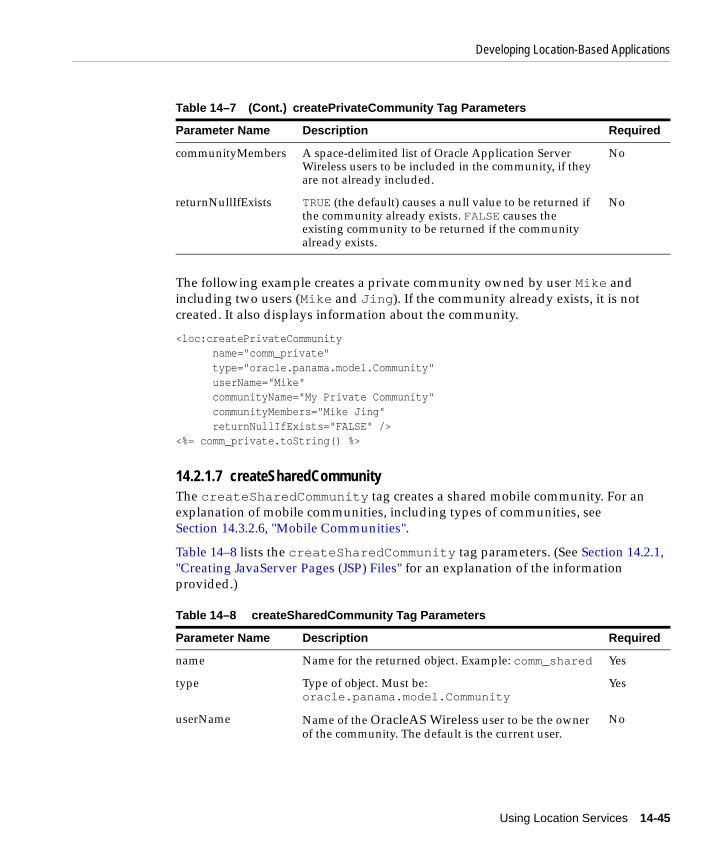
Developing Location-Based Applications
Using Location Services 14-45
The following example creates a private community owned by user Mike and including two users (Mike and Jing). If the community already exists, it is not created. It also displays information about the community.
<loc:createPrivateCommunity name="comm_private" type="oracle.panama.model.Community" userName="Mike" communityName="My Private Community" communityMembers="Mike Jing" returnNullIfExists="FALSE" /><%= comm_private.toString() %>
14.2.1.7 createSharedCommunityThe createSharedCommunity tag creates a shared mobile community. For an explanation of mobile communities, including types of communities, see Section 14.3.2.6, "Mobile Communities".
Table 14–8 lists the createSharedCommunity tag parameters. (See Section 14.2.1, "Creating JavaServer Pages (JSP) Files" for an explanation of the information provided.)
communityMembers A space-delimited list of Oracle Application Server Wireless users to be included in the community, if they are not already included.
No
returnNullIfExists TRUE (the default) causes a null value to be returned if the community already exists. FALSE causes the existing community to be returned if the community already exists.
No
Table 14–8 createSharedCommunity Tag Parameters
Parameter Name Description Required
name Name for the returned object. Example: comm_shared Yes
type Type of object. Must be: oracle.panama.model.Community
Yes
userName Name of the OracleAS Wireless user to be the owner of the community. The default is the current user.
No
Table 14–7 (Cont.) createPrivateCommunity Tag Parameters
Parameter Name Description Required

Developing Location-Based Applications
14-46 Oracle Application Server Wireless Developer’s Guide
The following example creates a shared community owned by user Mike and including two users (Mike and Jing). If the community already exists, it is not created. It also displays information about the community.
<loc:createSharedCommunity name="comm_shared" type="oracle.panama.model.Community" userName="Mike" communityName="My Shared Community" communityMembers="Mike Jing" returnNullIfExists="FALSE" /><%= comm_private.toString() %>
14.2.1.8 createSystemCommunityThe createSystemCommunity tag creates a system mobile community. For an explanation of mobile communities, including types of communities, see Section 14.3.2.6, "Mobile Communities".
Table 14–9 lists the createSystemCommunity tag parameters. (See Section 14.2.1, "Creating JavaServer Pages (JSP) Files" for an explanation of the information provided.)
communityName Descriptive name of the community. Example: My Shared Community
Yes
communityMembers A space-delimited list of Oracle Application Server Wireless users to be included in the community, if they are not already included.
No
returnNullIfExists TRUE (the default) causes a null value to be returned if the community already exists. FALSE causes the existing community to be returned if the community already exists.
No
Table 14–9 createSystemCommunity Tag Parameters
Parameter Name Description Required
name Name for the returned object. Example: comm_system Yes
type Type of object. Must be: oracle.panama.model.Community
Yes
Table 14–8 (Cont.) createSharedCommunity Tag Parameters
Parameter Name Description Required

Developing Location-Based Applications
Using Location Services 14-47
The following example creates a system community owned by user Mike and including two users (Mike and Jing). If the community already exists, it is not created. It also displays information about the community.
<loc:createSystemCommunity name="comm_system" type="oracle.panama.model.Community" userName="Mike" communityName="My System Community" communityMembers="Mike Jing" returnNullIfExists="FALSE" /><%= comm_private.toString() %>
14.2.1.9 defaultLocationMarkThe defaultLocationbMark tag creates an object that represents the default location mark for a specified user. You can use this tag to find a user’s default location mark.
Table 14–10 lists the defaultLocationbMark tag parameters. (See Section 14.2.1, "Creating JavaServer Pages (JSP) Files" for an explanation of the information provided.)
userName Name of the Oracle Application Server Wireless user to be the owner of the community. The default is the current user.
No
communityName Descriptive name of the community. Example: My System Community
Yes
communityMembers A space-delimited list of Oracle Application Server Wireless users to be included in the community, if they are not already included.
No
returnNullIfExists TRUE (the default) causes a null value to be returned if the community already exists. FALSE causes the existing community to be returned if the community already exists.
No
Table 14–9 (Cont.) createSystemCommunity Tag Parameters
Parameter Name Description Required
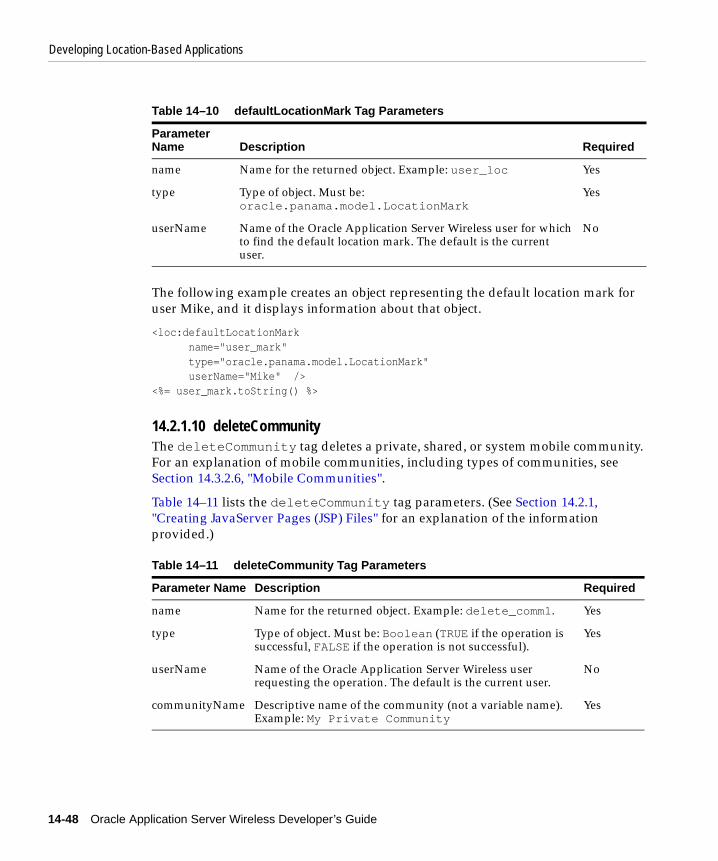
Developing Location-Based Applications
14-48 Oracle Application Server Wireless Developer’s Guide
The following example creates an object representing the default location mark for user Mike, and it displays information about that object.
<loc:defaultLocationMark name="user_mark" type="oracle.panama.model.LocationMark" userName="Mike" /><%= user_mark.toString() %>
14.2.1.10 deleteCommunityThe deleteCommunity tag deletes a private, shared, or system mobile community. For an explanation of mobile communities, including types of communities, see Section 14.3.2.6, "Mobile Communities".
Table 14–11 lists the deleteCommunity tag parameters. (See Section 14.2.1, "Creating JavaServer Pages (JSP) Files" for an explanation of the information provided.)
Table 14–10 defaultLocationMark Tag Parameters
Parameter Name Description Required
name Name for the returned object. Example: user_loc Yes
type Type of object. Must be: oracle.panama.model.LocationMark
Yes
userName Name of the Oracle Application Server Wireless user for which to find the default location mark. The default is the current user.
No
Table 14–11 deleteCommunity Tag Parameters
Parameter Name Description Required
name Name for the returned object. Example: delete_comm1. Yes
type Type of object. Must be: Boolean (TRUE if the operation is successful, FALSE if the operation is not successful).
Yes
userName Name of the Oracle Application Server Wireless user requesting the operation. The default is the current user.
No
communityName Descriptive name of the community (not a variable name). Example: My Private Community
Yes

Developing Location-Based Applications
Using Location Services 14-49
The following example deletes, at the request of the user named Mike, the community named My Private Community, and it displays the result of the operation (TRUE or FALSE).
<loc:deleteCommunity name="delete_comm1" type="Boolean" userName="Mike" communityName="My Private Community" /><%= delete_comm1.toString() %>
14.2.1.11 drivingDistanceThe drivingDistance tag presents the driving distance for a route or driving maneuver, as determined by the provider.
Table 14–12 lists the drivingDistance tag parameters. Although route and maneuver are listed as optional, you must specify one of these parameters. (See Section 14.2.1, "Creating JavaServer Pages (JSP) Files" for an explanation of the information provided.)
The following example creates a route named myRoute between two addresses (a person’s office and home), and displays the driving distance for the route.
<loc:route name="myRoute" type="oracle.panama.spatial.jsptags.beans.Route" xres="800" yres="600"> <loc:address name="office" type="oracle.panama.model.Location" businessName="My office" firstLine="1 Oracle Dr" city="Nashua" state="NH" postalCode="03062"
Table 14–12 drivingDistance Tag Parameters
Parameter Name Description Required
name Name for the returned object. Example: drive_dist Yes
type Type of object. Must be: String Yes
route Name of the route. Example: myRoute No
maneuver Name of the maneuver. No

Developing Location-Based Applications
14-50 Oracle Application Server Wireless Developer’s Guide
country="US"/> <loc:address name="home" type="oracle.panama.model.Location" businessName="My home" firstLine="2 Royal Crest Dr" city="Nashua" state="NH" postalCode="03060" country="US"/></loc:route><loc:drivingDistance name="drive_dist" type="String" route="myRoute" /><%= drive_dist.toString() %>
14.2.1.12 drivingTimeThe drivingTime tag creates an object containing the estimated driving time for a route.
Table 14–13 lists the drivingTime tag parameters. (See Section 14.2.1, "Creating JavaServer Pages (JSP) Files" for an explanation of the information provided.)
The following example creates a route named myRoute between two addresses (a person’s office and home), and displays the driving time for the route.
<loc:route name="myRoute" type="oracle.panama.spatial.jsptags.beans.Route" xres="800" yres="600"> <loc:address name="office" type="oracle.panama.model.Location" businessName="My office" firstLine="1 Oracle Dr" city="Nashua" state="NH" postalCode="03062" country="US"/>
Table 14–13 drivingTime Tag Parameters
Parameter Name Description Required
name Name for the returned object. Example: drive_time Yes
type Type of object. Must be: String Yes
route Name of the route. Example: myRoute Yes

Developing Location-Based Applications
Using Location Services 14-51
<loc:address name="home" type="oracle.panama.model.Location" businessName="My home" firstLine="2 Royal Crest Dr" city="Nashua" state="NH" postalCode="03060" country="US"/></loc:route><loc:drivingTime name="drive_time" type="String" route="myRoute" /><%= drive_time.toString() %>
14.2.1.13 geocodeThe geocode tag specifies an address to be geocoded, located on a map, or used as the start or end address of a route or as the center for a business directory query.
Table 14–14 lists the geocode tag parameters. (See Section 14.2.1, "Creating JavaServer Pages (JSP) Files" for an explanation of the information provided.)
Table 14–14 geocode Tag Parameters
Parameter Name Description Required
name Name for the returned object. Example: hardware1 Yes
type Type of object. Must be: oracle.panama.model.Location
Yes
businessName Descriptive name of the business or other entity at the address. Example: Mike’s Hardware
No
houseNumber Number of the address on the street. No
streetName Name of the street. Yes
secondLine Second line of street address. No
intersection Name of the intersecting street, if houseNumber is not specified.
No
city City name. Yes
state 2-character state (US) or province (Canada) code. Yes
postalCode Postal code (main part). Example: 01742 Yes
postalCodeExt Extension of the postal code, such as 4 additional numbers. No

Developing Location-Based Applications
14-52 Oracle Application Server Wireless Developer’s Guide
The following example of the geocode tag specifies an address (for a store named Mike’s Hardware) to be geocoded.
<loc:geocode name = "hardware1" type = "oracle.panama.model.Location" businessName = "Mike’s Hardware" houseNumber = "22" streetName = "Monument Sq" city = "Concord" state = "MA" postalCode = "01742" country = "US" makeCorrections = "TRUE" />
14.2.1.14 geometryThe geometry tag creates a java.util.List object of points of type oracle.panama.model.Point.
Table 14–15 lists the geometry tag parameters. (See Section 14.2.1, "Creating JavaServer Pages (JSP) Files" for an explanation of the information provided.) You must specify the points, route, or maneuver parameter.
country Country name or code. Yes
makeCorrections TRUE if the geocoding provider should correct any misspellings in the address; FALSE if the geocoding provider should not make corrections.
Yes
provider Name of the first-choice service provider for the request, if there is a preference.
No
Table 14–15 geometry Tag Parameters
Parameter Name Description Required
name Name for the returned object. Example: my_geom Yes
type Type of object. Must be: java.util.List Yes
points Name of the variable for the points that make up the geometry. No
Table 14–14 (Cont.) geocode Tag Parameters
Parameter Name Description Required

Developing Location-Based Applications
Using Location Services 14-53
The following example creates a route between a user’s office and home addresses, uses the geometry tag to create an unformatted list of points along the route, and displays the list.
<loc:route name="myRoute" type="oracle.panama.spatial.jsptags.beans.Route" xres="800" yres="600" requestGeom="true"> <loc:address name="office" type="oracle.panama.model.Location" businessName="My office" firstLine="1 Oracle Dr" city="Nashua" state="NH" postalCode="03062" country="US"/> <loc:address name="home" type="oracle.panama.model.Location" businessName="My home" firstLine="2 Royal Crest Dr" city="Nashua" state="NH" postalCode="03060" country="US"/></loc:route>
<loc:geometry name="my_geom" type="java.util.List" route="myRoute" /><%= my_geom.toString() %>
14.2.1.15 getCommunityThe getCommunity tag returns the object associated with the specified name of a private, shared, or system mobile community. For an explanation of mobile
route Name of the variable for the route that makes up the geometry. If you specify this parameter, the route tag that created the route object must have specified the requestGeom="TRUE" parameter.
No
maneuver Name of the variable for the maneuver that makes up the geometry.
No
Table 14–15 (Cont.) geometry Tag Parameters
Parameter Name Description Required

Developing Location-Based Applications
14-54 Oracle Application Server Wireless Developer’s Guide
communities, including types of communities, see Section 14.3.2.6, "Mobile Communities".
Table 14–16 lists the getCommunity tag parameters. (See Section 14.2.1, "Creating JavaServer Pages (JSP) Files" for an explanation of the information provided.)
The following example returns, at the request of the user named Mike, the community named My Private Community, and it displays information about the community.
<loc:getCommunity name="get_comm" type="oracle.panama.model.Community" userName="Mike" communityName="My Private Community" /><%= get_comm.toString() %>
14.2.1.16 iterateBusinessesThe iterateBusinesses tag presents individually the businesses in a collection returned by the businesses tag.
Table 14–17 lists the iterateBusinesses tag parameters. (See Section 14.2.1, "Creating JavaServer Pages (JSP) Files" for an explanation of the information provided.)
Table 14–16 getCommunity Tag Parameters
Parameter Name Description Required
name Name for the returned object. Example: get_comm. Yes
type Type of object. Must be: oracle.panama.model.Community
Yes
userName Name of the Oracle Application Server Wireless user requesting the operation.The default is the current user.
No
communityName Descriptive name of the community (not a variable name). Example: My Private Community
Yes

Developing Location-Based Applications
Using Location Services 14-55
The following example creates a map that shows the 10 Starbucks business locations nearest to Oracle headquarters, and for each location displays information about it followed by a horizontal rule. Each line of information is a link that the user can click to display a detailed map of the location and its surrounding area.
<loc:address name="HQ" type="oracle.panama.model.Location" businessName="HQ" firstLine="500 Oracle Parkway" city="Redwood City" state="CA" postalCode="94065" country="US"/><loc:map name="starbucksMap" type="oracle.panama.spatial.jsptags.beans.Map" xres="800" yres="600"> <loc:businesses name="starbucks" type="java.util.Collection" businessName="Starbucks" centerID="HQ" nearestN="10"/></loc:map>
<img src="<%= starbucksMap %>"><HR>
<loc:iterateBusinesses name="singleStarbucks" type="oracle.panama.spatial.yp.YPBusiness" collection="starbucks"> <loc:map name="singleStarbucksMap" type="oracle.panama.spatial.jsptags.beans.Map" xres="800" yres="600" points="singleStarbucks"/>
Table 14–17 iterateBusinesses Tag Parameters
Parameter Name Description Required
name Name for the returned object. Example: singleStarbucks Yes
type Type of object. Must be: oracle.panama.spatial.yp.YPBusiness
Yes
collection Name for the returned collection. Example: starbucks Yes
provider Name of the first-choice provider for the request, if there is a preference.
No

Developing Location-Based Applications
14-56 Oracle Application Server Wireless Developer’s Guide
<a href="<%= singleStarbucksMap %>"> <%= singleStarbucks %> </a> <HR></loc:iterateBusinesses>
14.2.1.17 iterateBusinessesInCityThe iterateBusinessesInCity tag presents individually businesses in a specified city.
Table 14–18 lists the iterateBusinessesInCity tag parameters. (See Section 14.2.1, "Creating JavaServer Pages (JSP) Files" for an explanation of the information provided.)
The following example presents individually all Borders bookstores in San Francisco, California. For each location, it displays information about the location followed by a horizontal rule.
<loc:iterateBusinessesInCity name="a_business_city" type="oracle.panama.spatial.yp.YPBusiness" city="San Francisco" state="CA" country="US" businessName="Borders"> <%= a_business_city.toString() %> <HR>
Table 14–18 iterateBusinessesInCity Tag Parameters
Parameter Name Description Required
name Name for the returned object. Example: a_business_city Yes
type Type of object. Must be: oracle.panama.spatial.yp.YPBusiness
Yes
businessName Descriptive name of the business. Example: Starbucks No
categoryID Name of the variable associated with the category, if a category is involved in the query.
No
keyword The keyword, if a keyword is involved in the query. No
city City name. Yes
state 2-character state (US) or province (Canada) code. Yes
country Country name. Yes
provider Name of the first-choice provider for the request, if there is a preference.
No

Developing Location-Based Applications
Using Location Services 14-57
</loc:iterateBusinessesInCity>
14.2.1.18 iterateBusinessesInCorridorThe iterateBusinessesInCorridor tag presents individually the businesses in a corridor. A corridor is a collection of points, such as points representing intersections or exits when creating a route.
Table 14–19 lists the iterateBusinessesInCorridor tag parameters. (See Section 14.2.1, "Creating JavaServer Pages (JSP) Files" for an explanation of the information provided.)
The following example creates a route between an office and another location, and presents individually the Starbucks locations that are within 3000 meters of any point in the corridor associated with the route. For each location, the example, displays information about the location followed by a horizontal rule.
<loc:route name="myRoute" type="oracle.panama.spatial.jsptags.beans.Route" xres="800" yres="600" requestGeom="true"> <loc:address name="office" type="oracle.panama.model.Location" businessName="Some office" firstLine="500 Oracle Parkway" city="Redwood City"
Table 14–19 iterateBusinessesInCorridor Tag Parameters
Parameter Name Description Required
name Name for the returned object. Example: hardware_1. Yes
type Type of object. Must be: oracle.panama.spatial.yp.YPBusiness
Yes
businessName Descriptive name of the business. Example: Starbucks No
categoryID Name of the variable associated with the category, if a category is involved in the query.
No
keyword The keyword, if a keyword is involved in the query. No
corridorID Name of the variable associated with the corridor. Yes
radiusInMeters Radius in meters around each point in the corridor. Yes
provider Name of the first-choice provider for the request, if there is a preference.
No

Developing Location-Based Applications
14-58 Oracle Application Server Wireless Developer’s Guide
state="CA" postalCode="94065" country="US"/> <loc:address name="ucsb" type="oracle.panama.model.Location" businessName="UCSB" firstLine="6750 El Colegio Rd" city="Goleta" state="CA" postalCode="93117" country="US"/></loc:route>
<loc:geometry name="myRouteGeom" type="java.util.List" route="myRoute"/>
<loc:iterateBusinessesInCorridor name="a_business_corridor" type="oracle.panama.spatial.yp.YPBusiness" businessName="Starbucks" corridorID="myRouteGeom" radiusInMeters="3000"> <%= a_business_corridor.toString() %> <HR></loc:iterateBusinessesInCorridor>
14.2.1.19 iterateBusinessesInPostalCodeThe iterateBusinessesInPostalCode tag presents individually businesses in a specified postal code.
Table 14–20 lists the iterateBusinessesInPostalCode tag parameters. (See Section 14.2.1, "Creating JavaServer Pages (JSP) Files" for an explanation of the information provided.)
Table 14–20 iterateBusinessesInPostalCode Tag Parameters
Parameter Name Description Required
name Name for the returned object. Example: a_business_pcode Yes
type Type of object. Must be: oracle.panama.spatial.yp.YPBusiness
Yes
businessName Descriptive name of the business. Example: Starbucks No
categoryID Name of the variable associated with the category, if a category is involved in the query.
No
keyword The keyword, if a keyword is involved in the query. No

Developing Location-Based Applications
Using Location Services 14-59
The following example presents individually all Starbucks locations in postal code 93117 in the United States. For each location, it displays information about the location followed by a horizontal rule.
<loc:iterateBusinessesInPostalCode name="a_business_pcode" type="oracle.panama.spatial.yp.YPBusiness" postalCode="93117" country="US" businessName="Starbucks"> <%= a_business_pcode.toString() %> <HR></loc:iterateBusinessesInPostalCode>
14.2.1.20 iterateBusinessesInRadiusThe iterateBusinessesInRadius tag presents individually businesses within a circular area, associated with a specified radius in meters, around a point.
Table 14–21 lists the iterateBusinessesInRadius tag parameters. (See Section 14.2.1, "Creating JavaServer Pages (JSP) Files" for an explanation of the information provided.)
postalCode Postal code. Yes
country Country name. Yes
provider Name of the first-choice provider for the request, if there is a preference.
No
Table 14–21 iterateBusinessesInRadius Tag Parameters
Parameter Name Description Required
name Name for the returned object. Example: a_business_radius
Yes
type Type of object. Must be: oracle.panama.spatial.yp.YPBusiness
Yes
businessName Descriptive name of the business. Example: Starbucks No
categoryID Name of the variable associated with the category, if a category is involved in the query.
No
keyword The keyword, if a keyword is involved in the query. No
Table 14–20 (Cont.) iterateBusinessesInPostalCode Tag Parameters
Parameter Name Description Required

Developing Location-Based Applications
14-60 Oracle Application Server Wireless Developer’s Guide
The following example presents individually all Starbucks locations within 5000 meters (5 kilometers) of the point associated with the address for Oracle headquarters. For each location, it displays information about the location followed by a horizontal rule.
<loc:address name="HQ" type="oracle.panama.model.Location" businessName="HQ" firstLine="500 Oracle Parkway" city="Redwood City" state="CA" postalCode="94065" country="US"/><loc:iterateBusinessesInRadius name="a_business_radius" type="oracle.panama.spatial.yp.YPCategory" businessName="Starbucks" centerID="HQ" radiusInMeters="5000"> <%= a_business_radius.toString() %> <HR></loc:iterateBusinessesInRadius>
14.2.1.21 iterateBusinessesInStateThe iterateBusinessesInState tag presents individually businesses in a specified state.
Table 14–22 lists the iterateBusinessesInState tag parameters. (See Section 14.2.1, "Creating JavaServer Pages (JSP) Files" for an explanation of the information provided.)
centerID Name of the variable associated with the center point for the query.
Yes
radiusInMeters Number of meters of the radius for the circle around centerID.
Yes
provider Name of the first-choice provider for the request, if there is a preference.
No
Table 14–21 (Cont.) iterateBusinessesInRadius Tag Parameters
Parameter Name Description Required

Developing Location-Based Applications
Using Location Services 14-61
The following example presents individually all Starbucks locations in the state of New Hampshire. For each location, it displays information about the location followed by a horizontal rule.
<loc:iterateBusinessesInState name="a_business_state" type="oracle.panama.spatial.yp.YPBusiness" state="CA" country="US" businessName="Starbucks"> <%= a_business_state.toString() %> <HR></loc:iterateBusinessesInState>
14.2.1.22 iterateBusinessesNearestToThe iterateBusinessesNearestTo tag presents individually businesses within a circular area, associated with a specified radius in meters, around a point.
Table 14–23 lists the iterateBusinessesNearestTo tag parameters. (See Section 14.2.1, "Creating JavaServer Pages (JSP) Files" for an explanation of the information provided.)
Table 14–22 iterateBusinessesInState Tag Parameters
Parameter Name Description Required
name Name for the returned object. Example: a_business_state Yes
type Type of object. Must be: oracle.panama.spatial.yp.YPBusiness
Yes
businessName Descriptive name of the business. Example: Starbucks No
categoryID Name of the variable associated with the category, if a category is involved in the query.
No
keyword The keyword, if a keyword is involved in the query. No
state 2-character state (US) or province (Canada) code. Yes
country Country name. Yes
provider Name of the first-choice provider for the request, if there is a preference.
No

Developing Location-Based Applications
14-62 Oracle Application Server Wireless Developer’s Guide
The following example presents individually the 10 Starbucks locations nearest to the point associated with the address for Oracle headquarters. For each location, it displays information about the location followed by a horizontal rule.
<loc:address name="HQ" type="oracle.panama.model.Location" businessName="HQ" firstLine="500 Oracle Parkway" city="Redwood City" state="CA" postalCode="94065" country="US"/><loc:iterateBusinessesNearestTo name="a_business_nearest" type="oracle.panama.spatial.yp.YPBusiness" businessName="Starbucks" centerID="HQ" n="10"> <%= a_business_nearest.toString() %> <HR></loc:iterateBusinessesNearestTo>
Table 14–23 iterateBusinessesNearestTo Tag Parameters
Parameter Name Description Required
name Name for the returned object. Example: a_business_nearest
Yes
type Type of object. Must be: oracle.panama.spatial.yp.YPBusiness
Yes
businessName Descriptive name of the business. Example: Starbucks No
categoryID Name of the variable associated with the category, if a category is involved in the query.
No
keyword The keyword, if a keyword is involved in the query. No
centerID Name of the variable associated with the center point for the query.
Yes
n Number of nearest businesses around centerID. Yes
provider Name of the first-choice provider for the request, if there is a preference.
No

Developing Location-Based Applications
Using Location Services 14-63
14.2.1.23 iterateByDistanceThe iterateByDistance tag presents individually the points in a collection, sorted by distance from a specified point. The distance is measured along a straight line along the curvature of the Earth.
Table 14–24 lists the iterateByDistance tag parameters. (See Section 14.2.1, "Creating JavaServer Pages (JSP) Files" for an explanation of the information provided.)
The following example creates a collection of the 10 Starbucks business locations nearest to Oracle headquarters. It uses the iterateByDistance tag to present individually the locations sorted by distance from headquarters, and it displays the information about each location followed by a horizontal rule.
<loc:address name="HQ" type="oracle.panama.model.Location" businessName="HQ" firstLine="500 Oracle Parkway" city="Redwood City" state="CA" postalCode="94065" country="US"/><loc:businesses name="starbucks" type="java.util.Collection" businessName="Starbucks" centerID="HQ" nearestN="10"/><loc:iterateByDistance name="iter_dist" type="oracle.panama.model.Point" collection="starbucks" centerID="HQ">
Table 14–24 iterateByDistance Tag Parameters
Parameter Name Description Required
name Name for the returned object. Example: iter_dist Yes
type Type of object. Must be: oracle.panama.model.Point Yes
collection Name of the variable associated with the collection of points to be sorted by distance.
Yes
centerID A point variable name (such as for an address) to be used as the center point from which distances are to be computed.
Yes

Developing Location-Based Applications
14-64 Oracle Application Server Wireless Developer’s Guide
<%= iter_dist.toString() %> <HR></loc:iterateByDistance>
14.2.1.24 iterateByDrivingDistanceThe iterateByDrivingDistance tag presents individually the points in a collection, sorted by driving distance from a specified point, as determined by the routing provider.
Table 14–25 lists the iterateByDrivingDistance tag parameters. (See Section 14.2.1, "Creating JavaServer Pages (JSP) Files" for an explanation of the information provided.)
The following example creates a collection of the 10 Starbucks business locations nearest to Oracle headquarters, and it uses the iterateByDrivingDistance tag to sort the locations by driving distance from headquarters, and display the information about each location followed by a horizontal rule.
<loc:address name="HQ" type="oracle.panama.model.Location"
Note: The sorting by driving distance is performed by the routing provider. Therefore, this tag can be used only with providers that support sorting by driving distance.
Table 14–25 iterateByDrivingDistance Tag Parameters
Parameter Name Description Required
name Name for the returned object. Example: iter_drive Yes
type Type of object. Must be: oracle.panama.model.Point Yes
collection Name of the variable associated with the collection of points to be sorted by driving distance.
Yes
centerID A point variable name (such as for an address) to be used as the center point from which driving distances are to be computed.
Yes
provider Name of the first-choice provider for the request, if there is a preference.
No

Developing Location-Based Applications
Using Location Services 14-65
businessName="HQ" firstLine="500 Oracle Parkway" city="Redwood City" state="CA" postalCode="94065" country="US"/><loc:businesses name="starbucks" type="java.util.Collection" businessName="Starbucks" centerID="HQ" nearestN="10"/><loc:iterateByDrivingDistance name="iter_drive" type="oracle.panama.model.Point" collection="starbucks" centerID="HQ"> <%= iter_drive.toString() %> <HR></loc:iterateByDrivingDistance>
14.2.1.25 iterateByNameThe iterateByName tag presents individually the points in a collection, sorted by business name.
Table 14–26 lists the iterateByName tag parameters. (See Section 14.2.1, "Creating JavaServer Pages (JSP) Files" for an explanation of the information provided.)
The following example presents individually the businesses, sorted by name, in a collection named bookstores, which was previously created. For each business, it displays information about the location followed by a horizontal rule.
<loc:iterateByName name="iter_name" type="oracle.panama.model.Point" collection="bookstores"> <%= iter_name.toString() %> <HR></loc:iterateByName>
Table 14–26 iterateByName Tag Parameters
Parameter Name Description Required
name Name for the returned object. Example: iter_name Yes
type Type of object. Must be: oracle.panama.model.Point Yes
collection Name of the variable associated with the collection of points to be sorted by name.
Yes

Developing Location-Based Applications
14-66 Oracle Application Server Wireless Developer’s Guide
14.2.1.26 iterateByRegionNameThe iterateByName tag presents individually the points in a collection, sorted by region name. The regions are sorted first by country, then by state, then by city, and then by postal code.
Table 14–27 lists the iterateByRegionName tag parameters. (See Section 14.2.1, "Creating JavaServer Pages (JSP) Files" for an explanation of the information provided.)
The following example presents individually the businesses, sorted by region name (country, then state, then city, then postal code), in a collection named starbucks, which was previously created. For each business, it displays information about the location followed by a horizontal rule.
<loc:iterateByRegionName name="iter_reg_name" type="oracle.panama.model.Point" collection="starbucks"> <%= iter_reg_name.toString() %> <HR></loc:iterateByRegionName>
14.2.1.27 iterateCategoriesMatchingKeywordThe iterateCategoriesMatchingKeyword tag creates a collection of categories that match a specified keyword value, and presents the categories individually.
Table 14–28 lists the iterateCategoriesMatchingKeyword tag parameters. (See Section 14.2.1, "Creating JavaServer Pages (JSP) Files" for an explanation of the information provided.)
Table 14–27 iterateByRegionName Tag Parameters
Parameter Name Description Required
name Name for the returned object. Example: iter_reg_name Yes
type Type of object. Must be: oracle.panama.model.Point Yes
collection Name of the variable associated with the collection of points to be sorted by name.
Yes

Developing Location-Based Applications
Using Location Services 14-67
The following example presents individually the categories that match the keyword restaurant. For each category, it displays the fully qualified name followed by a horizontal rule.
<loc:iterateCategoriesMatchingKeyword name="a_category" type="oracle.panama.spatial.yp.YPCategory" keyword="restaurant"> <%= a_category.getFullyQualifiedName() %> <HR></loc:iterateCategoriesMatchingKeyword>
14.2.1.28 iterateChildCategoriesThe iterateChildCategories tag specifies a collection of immediate child subcategories, presented individually.
Table 14–29 lists the iterateChildCategories tag parameters. (See Section 14.2.1, "Creating JavaServer Pages (JSP) Files" for an explanation of the information provided.)
Table 14–28 iterateCategoriesMatchingKeyword Tag Parameters
Parameter Name Description Required
name Name for the returned object. Example: a_category Yes
type Type of object. Must be: oracle.panama.spatial.yp.YPCategory
Yes
parentCategory Name of the object containing the specification of the parent category (created previously using the category tag).
No
keyword Word or phrase to be searched for in the parent category name, or in all category names if parentCategory is not specified.
Yes
Table 14–29 iterateChildCategories Tag Parameters
Parameter Name Description Required
name Name for the returned object. Example: hardware_stores Yes
type Type of object. Must be: oracle.panama.spatial.yp.YPCategory
Yes
parentCategory Name of the object containing the specification of the parent category (created previously using the category tag).
No

Developing Location-Based Applications
14-68 Oracle Application Server Wireless Developer’s Guide
The following example presents individually all child categories of the parent category associated with the variable restaurant. For each child category, it displays the fully qualified name followed by a horizontal rule.
<loc:iterateChildCategories name="a_child_category" type="oracle.panama.spatial.yp.YPCategory" parentCategory="restaurant"> <%= a_child_category.getFullyQualifiedName() %> <HR></loc:iterateChildCategories>
14.2.1.29 iterateGeocodesThe iterateGeocodes tag returns a collection of geocoded addresses, presented individually.
Table 14–30 lists the iterateGeocodes tag parameters. (See Section 14.2.1, "Creating JavaServer Pages (JSP) Files" for an explanation of the information provided.)
Table 14–30 iterateGeocodes Tag Parameters
Parameter Name Description Required
name Name for the returned object. Example: main_bus Yes
type Type of object. Must be: oracle.panama.model.Location Yes
businessName Descriptive name of the business or other entity at the address. Example: Mike’s Hardware
No
houseNumber Number of the address on the street. No
streetName Name of the street. Yes
secondLine Second line of street address. No
intersection Name of the intersecting street, if houseNumber is not specified.
No
city City name. Yes
state 2-character state (US) or province (Canada) code. Yes
postalCode Postal code (main part). Example: 01742 Yes
postalCodeExt Extension of the postal code, such as 4 additional numbers. No

Developing Location-Based Applications
Using Location Services 14-69
The following example of the iterateGeocodes tag presents each geocoded address on Daniel Webster Highway in postal code 03060 in Nashua, New Hampshire. For each geocoded address, it displays a horizontal rule and a line of text, performs a line break, and displays the address information from the provider.
<loc:iterateGeocodes name = "a_business" type = "oracle.panama.model.Location" streetName = "Daniel Webster Hwy" city = "Nashua" state = "NH" postalCode = "03060" country = "US"> <HR> Another business in our community: <br><%= a_business.toString() %></loc:iterateGeocodes>
14.2.1.30 iterateLocationMarksThe iterateLocationMarks tag presents individually the location marks for an Oracle Application Server Wireless user.
Table 14–31 lists the iterateLocationMarks tag parameters. (See Section 14.2.1, "Creating JavaServer Pages (JSP) Files" for an explanation of the information provided.)
country Country name or code. Yes
provider Name of the first-choice service provider for the request, if there is a preference.
No
Table 14–31 iterateLocationMarks Tag Parameters
Parameter Name Description Required
name Name for the returned object. Example: iter_marks Yes
Table 14–30 (Cont.) iterateGeocodes Tag Parameters
Parameter Name Description Required

Developing Location-Based Applications
14-70 Oracle Application Server Wireless Developer’s Guide
The following example presents each location mark for user Mike as an object associated with the variable iter_marks, and for each object it displays information about the object followed by a horizontal rule.
<loc:iterateLocationMarks name="iter_marks" type="oracle.panama.model.LocationMark" userName="Mike" > <%= iter_marks.toString() %> <HR></loc:iterateLocationMarks>
14.2.1.31 iterateManeuversThe iterateManeuvers tag creates a collection of driving maneuvers, and it presents the maneuvers individually.
Table 14–32 lists the iterateManeuvers tag parameters. (See Section 14.2.1, "Creating JavaServer Pages (JSP) Files" for an explanation of the information provided.)
The following example creates a route named myRoute between two addresses (a person’s office and home), displays a map of the route followed by a horizontal rule, and presents each driving maneuver (using the iterateManeuvers tag and
type Type of object. Must be: oracle.panama.model.LocationMark
Yes
userName Name of the Oracle Application Server Wireless user for which to present the location marks. The default is the current user.
No
Table 14–32 iterateManeuvers Tag Parameters
Parameter Name Description Required
name Name for the returned object. Example: eManeuver Yes
type Type of object. Must be: oracle.panama.spatial.jsptags.beans.Maneuver
Yes
routeID Name of the route for which to present the driving maneuvers.
Yes
Table 14–31 (Cont.) iterateLocationMarks Tag Parameters
Parameter Name Description Required

Developing Location-Based Applications
Using Location Services 14-71
the getMap and getNarrative function calls) followed by a horizontal rule. Each driving maneuver description is also a link that users can click to display a map of the maneuver.
<loc:route name="myRoute" type="oracle.panama.spatial.jsptags.beans.Route" xres="800" yres="600"> <loc:address name="office" type="oracle.panama.model.Location" businessName="My office" firstLine="1 Oracle Dr" city="Nashua" state="NH" postalCode="03062" country="US"/> <loc:address name="home" type="oracle.panama.model.Location" businessName="My home" firstLine="2 Royal Crest Dr" city="Nashua" state="NH" postalCode="03060" country="US"/></loc:route>
<img src="<%= myRoute.getMap() %>"><HR>
<loc:iterateManeuvers name="aManeuver" type="oracle.panama.spatial.jsptags.beans.Maneuver" routeID="myRoute"> <a href="<%= aManeuver.getMap() %>"> <%= aManeuver.getNarrative() %> </a> <HR></loc:iterateManeuvers>
14.2.1.32 iterateReverseGeocodesThe iterateReverseGeocodes tag returns a collection of reverse geocoded addresses (addresses associated by the provider with a specified point), presented individually.

Developing Location-Based Applications
14-72 Oracle Application Server Wireless Developer’s Guide
Table 14–33 lists the iterateReverseGeocodes tag parameters. (See Section 14.2.1, "Creating JavaServer Pages (JSP) Files" for an explanation of the information provided.)
The following example of the iterateReverseGeocodes tag presents each geocoded address that the provider associates with a specified point For each geocoded address, it displays the address information from the provider followed by a horizontal rule.
<loc:iterateReverseGeocodes name = "iter_rev" type = "oracle.panama.model.Location" lon = "-71.4424" lat = "42.712" label = "You Are Here" ><%= iter_rev.toString() %><HR></loc:iterateReverseGeocodes>
14.2.1.33 listAllMembersThe listAllMembers tag creates an unformatted list of all members of a specified mobile community.
Table 14–33 iterateReverseGeocodes Tag Parameters
Parameter Name Description Required
name Name for the returned object. Example: hardware_1. Yes
type Type of object. Must be: oracle.panama.model.Location Yes
businessName Descriptive name of the business or other entity at the address. Example: Mike’s Hardware
No
firstLine Street address. No
city City name. No
state 2-character state (US) or province (Canada) code. No
postalCode Postal code. No
country Country name. No
provider Name of the first-choice provider for the request, if there is a preference.
No

Developing Location-Based Applications
Using Location Services 14-73
Table 14–34 lists the listAllMembers tag parameters. (See Section 14.2.1, "Creating JavaServer Pages (JSP) Files" for an explanation of the information provided.)
The following example creates an unformatted list of all members of the community associated with the variable named comm_private, and it displays the java.util.Enumeration object that is created.
<loc:listAllMembers name="list_all_mem" type="java.util.Enumeration" communityID="comm_private" /><%= list_all_mem.toString() %>
14.2.1.34 listBusinessesInCityThe listBusinessesInCity creates an unformatted list of businesses in a specified city.
Table 14–35 lists the listBusinessesInCity tag parameters. (See Section 14.2.1, "Creating JavaServer Pages (JSP) Files" for an explanation of the information provided.)
Table 14–34 listAllMembers Tag Parameters
Parameter Name Description Required
name Name for the returned object. Example: list_all_mem. Yes
type Type of object. Must be: java.util.Enumertion Yes
communityID Name of the variable associated with the community whose members are to be listed.
Yes
Table 14–35 listBusinessesInCity Tag Parameters
Parameter Name Description Required
name Name for the returned object. Example: all_businesses_city
Yes
type Type of object. Must be: java.util.List Yes
businessName Descriptive name of the business. Example: Starbucks No

Developing Location-Based Applications
14-74 Oracle Application Server Wireless Developer’s Guide
The following example creates an unformatted list of all Borders bookstores in San Francisco, California, and it displays the list.
<loc:listBusinessesInCity name="all_businesses_city" type="java.util.List" city="San Francisco" state="CA" country="US" businessName="Borders"></loc:listBusinessesInCity><%= all_businesses_city.toString() %>
14.2.1.35 listBusinessesInCorridorThe listBusinessesInCorridor tag creates an unformatted list of the businesses in a corridor. A corridor is a collection of points, such as points representing intersections or exits when creating a route.
Table 14–36 lists the listBusinessesInCorridor tag parameters. (See Section 14.2.1, "Creating JavaServer Pages (JSP) Files" for an explanation of the information provided.)
categoryID Name of the variable associated with the category, if a category is involved in the query.
No
keyword The keyword, if a keyword is involved in the query. No
city City name. Yes
state 2-character state (US) or province (Canada) code. Yes
country Country name. Yes
provider Name of the first-choice provider for the request, if there is a preference.
No
Table 14–36 listBusinessesInCorridor Tag Parameters
Parameter Name Description Required
name Name for the returned object. Example: hardware_1. Yes
type Type of object. Must be: oracle.panama.model.Location Yes
businessName Descriptive name of the business or other entity at the address. Example: Mike’s Hardware
No
Table 14–35 (Cont.) listBusinessesInCity Tag Parameters
Parameter Name Description Required

Developing Location-Based Applications
Using Location Services 14-75
The following example creates a route between an office and another location, creates an unformatted list of the Starbucks locations that are within 3000 meters of any point in the corridor associated with the route, and displays the list.
<loc:route name="myRoute" type="oracle.panama.spatial.jsptags.beans.Route" xres="800" yres="600" requestGeom="true"> <loc:address name="office" type="oracle.panama.model.Location" businessName="Some office" firstLine="500 Oracle Parkway" city="Redwood City" state="CA" postalCode="94065" country="US"/> <loc:address name="ucsb" type="oracle.panama.model.Location" businessName="UCSB" firstLine="6750 El Colegio Rd" city="Goleta" state="CA" postalCode="93117" country="US"/></loc:route>
<loc:geometry name="myRouteGeom" type="java.util.List" route="myRoute"/>
<loc:listBusinessesInCorridor name="all_businesses_corridor" type="java.util.List"
categoryID Name of the variable associated with the category, if a category is involved in the query.
No
keyword The keyword, if a keyword is involved in the query. No
corridorID Name of the variable associated with the corridor. Yes
radiusInMeters Radius in meters around each point in the corridor. Yes
provider Name of the first-choice provider for the request, if there is a preference.
No
Table 14–36 (Cont.) listBusinessesInCorridor Tag Parameters
Parameter Name Description Required

Developing Location-Based Applications
14-76 Oracle Application Server Wireless Developer’s Guide
businessName="Starbucks" corridorID="myRouteGeom" radiusInMeters="3000"></loc:listBusinessesInCorridor><%= all_businesses_corridor.toString() %>
14.2.1.36 listBusinessesInPostalCodeThe listBusinessesInPostalCode tag creates an unformatted list of businesses in a specified postal code.
Table 14–37 lists the listBusinessesInPostalCode tag parameters. (See Section 14.2.1, "Creating JavaServer Pages (JSP) Files" for an explanation of the information provided.)
The following example creates an unformatted list of all Starbucks locations in postal code 93117 in the United States, and it displays the list.
<loc:listBusinessesInPostalCode name="all_businesses_pcode" type="java.util.List" postalCode="93117" country="US" businessName="Starbucks"></loc:listBusinessesInPostalCode><%= all_businesses_pcode.toString() %>
Table 14–37 listBusinessesInPostalCode Tag Parameters
Parameter Name Description Required
name Name for the returned object. Example: all_businesses_pcode
Yes
type Type of object. Must be: java.util.List Yes
businessName Descriptive name of the business. Example: Starbucks No
categoryID Name of the variable associated with the category, if a category is involved in the query.
No
keyword The keyword, if a keyword is involved in the query. No
postalCode Postal code. Yes
country Country name. Yes
provider Name of the first-choice provider for the request, if there is a preference.
No

Developing Location-Based Applications
Using Location Services 14-77
14.2.1.37 listBusinessesInRadiusThe listBusinessesInRadius tag creates an unformatted list of businesses within a circular area, associated with a specified radius in meters, around a point.
Table 14–38 lists the listBusinessesInRadius tag parameters. (See Section 14.2.1, "Creating JavaServer Pages (JSP) Files" for an explanation of the information provided.)
The following example creates an unformatted list of all Starbucks locations within 5000 meters (5 kilometers) of the point associated with the address for Oracle headquarters, and it displays the list.
<loc:address name="HQ" type="oracle.panama.model.Location" businessName="HQ" firstLine="500 Oracle Parkway" city="Redwood City" state="CA" postalCode="94065" country="US"/><loc:listBusinessesInRadius name="all_businesses_radius" type="java.util.List"
Table 14–38 listBusinessesInRadius Tag Parameters
Parameter Name Description Required
name Name for the returned object. Example: all_businesses_radius
Yes
type Type of object. Must be: java.util.List Yes
businessName Descriptive name of the business. Example: Starbucks No
categoryID Name of the variable associated with the category, if a category is involved in the query.
No
keyword The keyword, if a keyword is involved in the query. No
centerID Name of the variable associated with the center point for the query.
Yes
radiusInMeters Number of meters of the radius for the circle around centerID.
Yes
provider Name of the first-choice provider for the request, if there is a preference.
No

Developing Location-Based Applications
14-78 Oracle Application Server Wireless Developer’s Guide
businessName="Starbucks" centerID="HQ" radiusInMeters="5000"></loc:listBusinessesInRadius><%= all_businesses_radius.toString() %>
14.2.1.38 listBusinessesInStateThe listBusinessesInState tag creates an unformatted list of businesses in a specified state.
Table 14–39 lists the listBusinessesInState tag parameters. (See Section 14.2.1, "Creating JavaServer Pages (JSP) Files" for an explanation of the information provided.)
The following example creates an unformatted list of all Starbucks locations in the state of New Hampshire, and it displays the list.
<loc:listBusinessesInState name="all_businesses_state" type="java.util.List" state="CA" country="US" businessName="Borders"></loc:listBusinessesInState><%= all_businesses_state.toString() %>
Table 14–39 listBusinessesInState Tag Parameters
Parameter Name Description Required
name Name for the returned object. Example: all_businesses_state
Yes
type Type of object. Must be: java.util.List Yes
businessName Descriptive name of the business. Example: Starbucks No
categoryID Name of the variable associated with the category, if a category is involved in the query.
No
keyword The keyword, if a keyword is involved in the query. No
state 2-character state (US) or province (Canada) code. Yes
country Country name. Yes
provider Name of the first-choice provider for the request, if there is a preference.
No

Developing Location-Based Applications
Using Location Services 14-79
14.2.1.39 listBusinessesNearestToThe listBusinessesNearestTo tag creates an unformatted list of businesses within a circular area, associated with a specified radius in meters, around a point.
Table 14–40 lists the listBusinessesNearestTo tag parameters. (See Section 14.2.1, "Creating JavaServer Pages (JSP) Files" for an explanation of the information provided.)
The following example creates an unformatted list of the 10 Starbucks locations nearest to the point associated with the address for Oracle headquarters, and it displays the list.
<loc:address name="HQ" type="oracle.panama.model.Location" businessName="HQ" firstLine="500 Oracle Parkway" city="Redwood City" state="CA" postalCode="94065" country="US"/><loc:listBusinessesNearestTo name="all_businesses_nearest" type="java.util.List"
Table 14–40 listBusinessesNearestTo Tag Parameters
Parameter Name Description Required
name Name for the returned object. Example: all_businesses_nearest
Yes
type Type of object. Must be: java.util.List Yes
businessName Descriptive name of the business. Example: Starbucks No
categoryID Name of the variable associated with the category, if a category is involved in the query.
No
keyword The keyword, if a keyword is involved in the query. No
centerID Name of the variable associated with the center point for the query.
Yes
n Number of nearest businesses around centerID. Yes
provider Name of the first-choice provider for the request, if there is a preference.
No

Developing Location-Based Applications
14-80 Oracle Application Server Wireless Developer’s Guide
businessName="Starbucks" centerID="HQ" n="10"></loc:listBusinessesNearestTo><%= all_businesses_nearest.toString() %>
14.2.1.40 listByDistanceThe listByDistance tag creates an unformatted list of the points in a collection, sorted by distance from a specified point. The distance is measured along a straight line along the curvature of the Earth.
Table 14–41 lists the listByDistance tag parameters. (See Section 14.2.1, "Creating JavaServer Pages (JSP) Files" for an explanation of the information provided.)
The following example creates a collection of the 10 Starbucks business locations nearest to Oracle headquarters, uses the listByDistance tag to create an unformatted list of locations sorted by distance from headquarters, and displays the list.
<loc:address name="HQ" type="oracle.panama.model.Location" businessName="HQ" firstLine="500 Oracle Parkway" city="Redwood City" state="CA" postalCode="94065" country="US"/><loc:businesses name="starbucks" type="java.util.Collection" businessName="Starbucks"
Table 14–41 listByDistance Tag Parameters
Parameter Name Description Required
name Name for the returned object. Example: list_dist Yes
type Type of object. Must be: java.util.List Yes
collection Name of the variable associated with the collection of points to be sorted by distance.
Yes
centerID A point variable name (such as for an address) to be used as the center point from which distances are to be computed.
Yes

Developing Location-Based Applications
Using Location Services 14-81
centerID="HQ" nearestN="10"/><loc:listByDistance name="list_dist" type="java.util.List" collection="starbucks" centerID="HQ"></loc:listByDistance><%= list_dist.toString() %>
14.2.1.41 listByDrivingDistanceThe listByDrivingDistance tag creates an unformatted list of the points in a collection, sorted by driving distance from a specified point, as determined by the routing provider.
Table 14–42 lists the listByDrivingDistance tag parameters. (See Section 14.2.1, "Creating JavaServer Pages (JSP) Files" for an explanation of the information provided.)
The following example creates a collection of the 10 Starbucks business locations nearest to Oracle headquarters, uses the listByDrivingDistance tag to create an unformatted list of locations sorted by driving distance from headquarters, and displays the list.
Note: The sorting by driving distance is performed by the routing provider. Therefore, this tag can be used only with providers that support sorting by driving distance.
Table 14–42 listByDrivingDistance Tag Parameters
Parameter Name Description Required
name Name for the returned object. Example: hardware_1. Yes
type Type of object. Must be: java.util.List Yes
collection Name of the variable associated with the collection of points to be sorted by driving distance.
Yes
centerID A point variable name (such as for an address) to be used as the center point from which driving distances are to be computed.
Yes
provider Name of the first-choice provider for the request, if there is a preference.
No

Developing Location-Based Applications
14-82 Oracle Application Server Wireless Developer’s Guide
<loc:address name="HQ" type="oracle.panama.model.Location" businessName="HQ" firstLine="500 Oracle Parkway" city="Redwood City" state="CA" postalCode="94065" country="US"/><loc:businesses name="starbucks" type="java.util.Collection" businessName="Starbucks" centerID="HQ" nearestN="10"/><loc:listByDrivingDistance name="list_drive" type="java.util.List" collection="starbucks" centerID="HQ"></loc:listByDrivingDistance><%= list_drive.toString() %>
14.2.1.42 listByNameThe listByName tag creates an unformatted list of the points in a collection, sorted by business name.
Table 14–43 lists the listByName tag parameters. (See Section 14.2.1, "Creating JavaServer Pages (JSP) Files" for an explanation of the information provided.)
The following example creates an unformatted list of the businesses, sorted by name, in a collection named bookstores (which was previously created), and it displays the list.
<loc:listByName name="list_name" type="java.util.List" collection="bookstores"></loc:listByName>
Table 14–43 listByName Tag Parameters
Parameter Name Description Required
name Name for the returned object. Example: iter_name Yes
type Type of object. Must be: java.util.List Yes
collection Name of the variable associated with the collection of points to be sorted by name.
Yes

Developing Location-Based Applications
Using Location Services 14-83
<%= list_name.toString() %>
14.2.1.43 listByRegionNameThe listByName tag creates an unformatted list of the points in a collection, sorted by region name. The regions are sorted first by country, then by state, then by city, and then by postal code.
Table 14–44 lists the listByName tag parameters. (See Section 14.2.1, "Creating JavaServer Pages (JSP) Files" for an explanation of the information provided.)
The following example creates an unformatted list of the businesses, sorted by region name (country, then state, then city, then postal code), in a collection named starbucks (which was previously created), and it displays the list.
<loc:listByRegionName name="list_reg_name" type="java.util.List" collection="starbucks"></loc:listByRegionName><%= list_reg_name.toString() %>
14.2.1.44 listCategoriesMatchingKeywordThe listCategoriesMatchingKeyword tag creates an unformatted list of business directory categories that match a specified keyword.
Table 14–45 lists the listCategoriesMatchingKeyword tag parameters. (See Section 14.2.1, "Creating JavaServer Pages (JSP) Files" for an explanation of the information provided.)
Table 14–44 listByRegionName Tag Parameters
Parameter Name Description Required
name Name for the returned object. Example: list_reg_name Yes
type Type of object. Must be: oracle.panama.model.Point Yes
collection Name of the variable associated with the collection of points to be sorted by name.
Yes

Developing Location-Based Applications
14-84 Oracle Application Server Wireless Developer’s Guide
The following example creates an unformatted list of the categories that match the keyword restaurant, and it displays the list.
<loc:listCategoriesMatchingKeyword name="all_categories_key" type="java.util.List" keyword="restaurant"></loc:listCategoriesMatchingKeyword><%= all_categories_key.toString() %>
14.2.1.45 listChildCategoriesThe listChildCategories tag creates an unformatted list of immediate child subcategories.
Table 14–46 lists the listChildCategories tag parameters. (See Section 14.2.1, "Creating JavaServer Pages (JSP) Files" for an explanation of the information provided.)
Table 14–45 listCategoriesMatchingKeyword Tag Parameters
Parameter Name Description Required
name Name for the returned object. Example: all_categories_key
Yes
type Type of object. Must be: java.util.List Yes
parentCategory Name of the object containing the specification of the parent category (created previously using the category tag).
No
keyword Word or phrase to be searched for in the parent category name, or in all category names if parentCategory is not specified.
Yes
Table 14–46 listChildCategories Tag Parameters
Parameter Name Description Required
name Name for the returned object. Example: all_categories_child
Yes
type Type of object. Must be: java.util.List Yes
parentCategory Name of the object containing the specification of the parent category (created previously using the category tag).
No

Developing Location-Based Applications
Using Location Services 14-85
The following example creates an unformatted list of all child categories of the parent category associated with the variable restaurant, and it displays the list.
<loc:listChildCategories name="all_categories_child" type="java.util.List" parentCategory="restaurant"></loc:listChildCategories><%= all_categories_child.toString() %>
14.2.1.46 listCreatedCommunitiesThe listCreatedCommunities tag creates an unformatted list of all mobile communities (private, shared, and system) owned by a specified Oracle Application Server mobile use. For an explanation of mobile communities, including types of communities, see Section 14.3.2.6, "Mobile Communities".
Table 14–47 lists the listCreatedCommunities tag parameters. (See Section 14.2.1, "Creating JavaServer Pages (JSP) Files" for an explanation of the information provided.)
The following example created an unformatted list, at the request of the user named Mike, of all mobile communities, and it displays the list.
<loc:listCreatedCommunities name="list_cr_comm" type="java.util.List" userName="Mike" /><%= list_cr_comm.toString() %>
14.2.1.47 listCreatedPrivateCommunitiesThe listCreatedPrivateCommunities tag creates an unformatted list of all mobile private communities owned by a specified Oracle Application Server mobile use. For an explanation of mobile communities, including types of communities, see Section 14.3.2.6, "Mobile Communities".
Table 14–47 listCreatedCommunities Tag Parameters
Parameter Name Description Required
name Name for the returned object. Example: list_cr_comm
Yes
type Type of object. Must be: java.util.List Yes
userName Name of the Oracle Application Server Wireless user requesting the operation. The default is the current user.
Yes

Developing Location-Based Applications
14-86 Oracle Application Server Wireless Developer’s Guide
Table 14–48 lists the listCreatedPrivateCommunities tag parameters. (See Section 14.2.1, "Creating JavaServer Pages (JSP) Files" for an explanation of the information provided.)
The following example created an unformatted list, at the request of the user named Mike, of all mobile private communities, and it displays the list.
<loc:listCreatedPrivateCommunities name="list_cr_priv_comm" type="java.util.List" userName="Mike" /><%= list_cr_priv_comm.toString() %>
14.2.1.48 listCreatedSharedCommunitiesThe listCreatedSharedCommunities tag creates an unformatted list of all mobile shared communities owned by a specified Oracle Application Server mobile use. For an explanation of mobile communities, including types of communities, see Section 14.3.2.6, "Mobile Communities".
Table 14–49 lists the listCreatedSharedCommunities tag parameters. (See Section 14.2.1, "Creating JavaServer Pages (JSP) Files" for an explanation of the information provided.)
Table 14–48 listCreatedPrivateCommunities Tag Parameters
Parameter Name Description Required
name Name for the returned object. Example: list_cr_priv_comm
Yes
type Type of object. Must be: java.util.List Yes
userName Name of the Oracle Application Server Wireless user requesting the operation.The default is the current user.
Yes
Table 14–49 listCreatedSharedCommunities Tag Parameters
Parameter Name Description Required
name Name for the returned object. Example: list_cr_shar_comm
Yes
type Type of object. Must be: java.util.List Yes
userName Name of the Oracle Application Server Wireless user requesting the operation. The default is the current user.
Yes
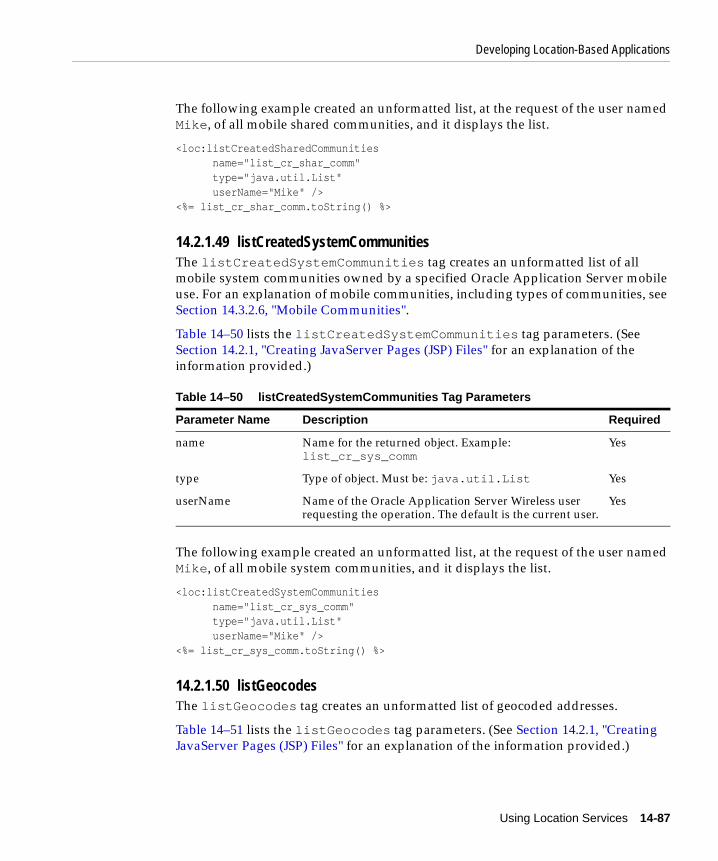
Developing Location-Based Applications
Using Location Services 14-87
The following example created an unformatted list, at the request of the user named Mike, of all mobile shared communities, and it displays the list.
<loc:listCreatedSharedCommunities name="list_cr_shar_comm" type="java.util.List" userName="Mike" /><%= list_cr_shar_comm.toString() %>
14.2.1.49 listCreatedSystemCommunitiesThe listCreatedSystemCommunities tag creates an unformatted list of all mobile system communities owned by a specified Oracle Application Server mobile use. For an explanation of mobile communities, including types of communities, see Section 14.3.2.6, "Mobile Communities".
Table 14–50 lists the listCreatedSystemCommunities tag parameters. (See Section 14.2.1, "Creating JavaServer Pages (JSP) Files" for an explanation of the information provided.)
The following example created an unformatted list, at the request of the user named Mike, of all mobile system communities, and it displays the list.
<loc:listCreatedSystemCommunities name="list_cr_sys_comm" type="java.util.List" userName="Mike" /><%= list_cr_sys_comm.toString() %>
14.2.1.50 listGeocodesThe listGeocodes tag creates an unformatted list of geocoded addresses.
Table 14–51 lists the listGeocodes tag parameters. (See Section 14.2.1, "Creating JavaServer Pages (JSP) Files" for an explanation of the information provided.)
Table 14–50 listCreatedSystemCommunities Tag Parameters
Parameter Name Description Required
name Name for the returned object. Example: list_cr_sys_comm
Yes
type Type of object. Must be: java.util.List Yes
userName Name of the Oracle Application Server Wireless user requesting the operation. The default is the current user.
Yes

Developing Location-Based Applications
14-88 Oracle Application Server Wireless Developer’s Guide
The following example of the listGeocodes tag presents all geocoded addresses on Daniel Webster Highway in postal code 03060 in Nashua, New Hampshire.
<loc:listGeocodes name = "all_businesses" type = "java.util.List" streetName = "Daniel Webster Hwy" city = "Nashua" state = "NH" postalCode = "03060" country = "US" />
14.2.1.51 listLocationMarksThe listLocationMarks tag creates an unformatted list of the location marks for an OracleAS Wireless user.
Table 14–51 listGeocodes Tag Parameters
Parameter Name Description Required
name Name for the returned object. Example: hardware1 Yes
type Type of object. Must be: java.util.List Yes
businessName Descriptive name of the business or other entity at the address. Example: Mike’s Hardware
No
houseNumber Number of the address on the street. No
streetName Name of the street. Yes
secondLine Second line of street address. No
intersection Name of the intersecting street, if houseNumber is not specified.
No
city City name. Yes
state 2-character state (US) or province (Canada) code. Yes
postalCode Postal code (main part). Example: 01742 Yes
postalCodeExt Extension of the postal code, such as 4 additional numbers. No
country Country name or code. Yes
provider Name of the first-choice service provider for the request, if there is a preference.
No

Developing Location-Based Applications
Using Location Services 14-89
Table 14–52 lists the listLocationMarks tag parameters. (See Section 14.2.1, "Creating JavaServer Pages (JSP) Files" for an explanation of the information provided.)
The following example creates an unformatted list of the location marks for user Mike as an object associated with the variable list_marks, and it displays information about the object.
<loc:listLocationMarks name="list_marks" type="java.util.List" userName="Mike" /><%= list_marks.toString() %>
14.2.1.52 listManeuversThe listManeuvers tag creates an unformatted list of driving maneuvers.
Table 14–53 lists the listManeuvers tag parameters. (See Section 14.2.1, "Creating JavaServer Pages (JSP) Files" for an explanation of the information provided.)
Table 14–52 listLocationMarks Tag Parameters
Parameter Name Description Required
name Name for the returned object. Example: list_marks Yes
type Type of object. Must be: oracle.panama.model.LocationMark
Yes
userName Name of the Oracle Application Server Wireless user for which to list the location marks. The default is the current user.
No
Table 14–53 listManeuvers Tag Parameters
Parameter Name Description Required
name Name for the returned object. Example: hardware_1. Yes
type Type of object. Must be: java.util.List Yes
businessName Descriptive name of the business or other entity at the address. Example: Mike’s Hardware
No
firstLine Street address. No
city City name. No
state 2-character state (US) or province (Canada) code. No

Developing Location-Based Applications
14-90 Oracle Application Server Wireless Developer’s Guide
The following example creates a route named myRoute between two addresses (a person’s office and home), displays a map of the route followed by a horizontal rule, and presents an unformatted list of all the driving maneuvers for the route.
<loc:route name="myRoute" type="oracle.panama.spatial.jsptags.beans.Route" xres="800" yres="600"> <loc:address name="office" type="oracle.panama.model.Location" businessName="My office" firstLine="1 Oracle Dr" city="Nashua" state="NH" postalCode="03062" country="US"/> <loc:address name="home" type="oracle.panama.model.Location" businessName="My home" firstLine="2 Royal Crest Dr" city="Nashua" state="NH" postalCode="03060" country="US"/></loc:route><loc:listManeuvers name="all_maneuvers" type="java.util.List" routeID="myRoute" /><%= all_maneuvers.toString() %>
14.2.1.53 listReverseGeocodesThe listReverseGeocodes tag creates an unformatted list of reverse geocoded addresses (addresses associated by the provider with a specified point).
Table 14–54 lists the listReverseGeocodes tag parameters. (See Section 14.2.1, "Creating JavaServer Pages (JSP) Files" for an explanation of the information provided.)
postalCode Postal code. No
country Country name. No
Table 14–53 (Cont.) listManeuvers Tag Parameters
Parameter Name Description Required
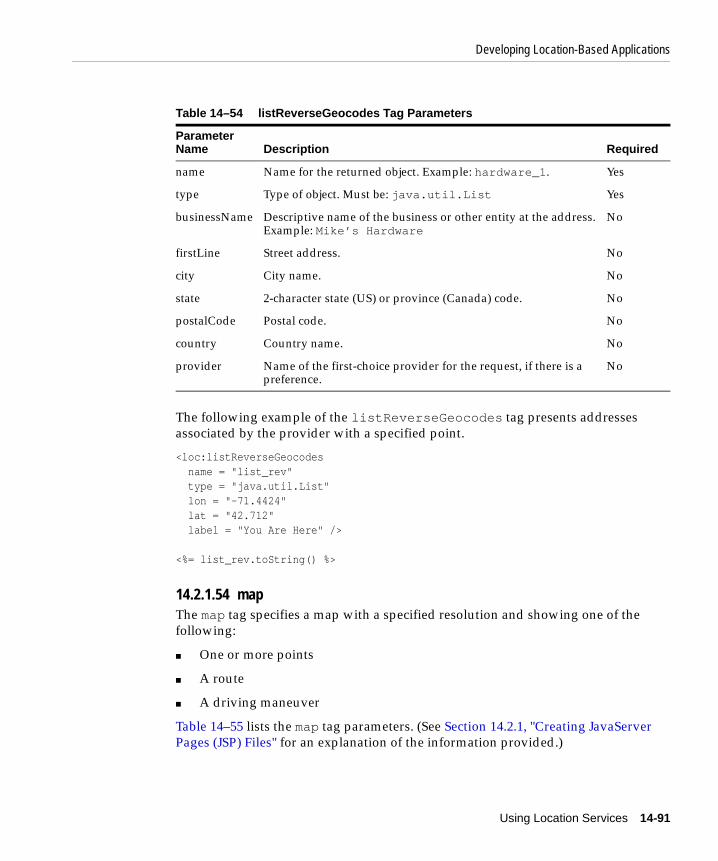
Developing Location-Based Applications
Using Location Services 14-91
The following example of the listReverseGeocodes tag presents addresses associated by the provider with a specified point.
<loc:listReverseGeocodes name = "list_rev" type = "java.util.List" lon = "-71.4424" lat = "42.712" label = "You Are Here" />
<%= list_rev.toString() %>
14.2.1.54 mapThe map tag specifies a map with a specified resolution and showing one of the following:
■ One or more points
■ A route
■ A driving maneuver
Table 14–55 lists the map tag parameters. (See Section 14.2.1, "Creating JavaServer Pages (JSP) Files" for an explanation of the information provided.)
Table 14–54 listReverseGeocodes Tag Parameters
Parameter Name Description Required
name Name for the returned object. Example: hardware_1. Yes
type Type of object. Must be: java.util.List Yes
businessName Descriptive name of the business or other entity at the address. Example: Mike’s Hardware
No
firstLine Street address. No
city City name. No
state 2-character state (US) or province (Canada) code. No
postalCode Postal code. No
country Country name. No
provider Name of the first-choice provider for the request, if there is a preference.
No

Developing Location-Based Applications
14-92 Oracle Application Server Wireless Developer’s Guide
The following example of the map tag creates a map named NEDCSmall 400 pixels wide and 300 pixels high. The center point for the map is the address defined by the address tag enclosed in the map tag.
<loc:map name="NEDCSmall" type="oracle.panama.spatial.jsptags.beans.Map" xres="400" yres="300"> <loc:address name="NEDC" type="oracle.panama.model.Location" businessName="NEDC" firstLine="1 Oracle Dr" city="Nashua" state="NH" postalCode="03062" country="US"/></loc:map>
14.2.1.55 mobilePosThe mobilePos tag creates an object with positioning information about a mobile user.
Table 14–56 lists the mobilePos tag parameters. (See Section 14.2.1, "Creating JavaServer Pages (JSP) Files" for an explanation of the information provided.)
Table 14–55 map Tag Parameters
Parameter Name Description Required
name Name for the returned object. Example: myMap Yes
type Type of object. Must be: oracle.panama.spatial.jsptags.beans.Map
Yes
points Name of a collection of points around which to create the map.
No
route Name of a route around which to create the map. No
maneuver Name of a maneuver around which to create the map. No
xres Width of the map in screen display units. Yes
yres Height of the map in screen display units. Yes
provider Name of the first-choice provider for the request, if there is a preference.
No

Developing Location-Based Applications
Using Location Services 14-93
The following example creates an object with positioning information for user Mike. By default, if the current position cannot be obtained, the default location mark for that user is used. The example also displays the positioning information.
<loc:mobilePos name="position" type="oracle.panama.model.Point" userName="Mike" /><%= position.toString() %>
14.2.1.56 pointThe point tag specifies the longitude and latitude value of a point, using the WGS 84 coordinate system (Oracle Spatial SRID value 8307).
Table 14–57 lists the point tag parameters. (See Section 14.2.1, "Creating JavaServer Pages (JSP) Files" for an explanation of the information provided.)
Table 14–56 mobilePos Tag Parameters
Parameter Name Description Required
name Name for the returned object. Example: position
Yes
type Type of object. Must be: oracle.panama.model.Point
Yes
userName Name of the Oracle Application Server Wireless user for which to request positioning information. The default is the current user.
No
requestingUser Name of the Oracle Application Server Wireless user for which to request positioning information. The default is the current user. If the requesting user is not authorized to retrieve positioning information about userName, the request fails.
No
failoverToDefaultLocationMark TRUE (the default) causes the default location mark for userName to be used if the user cannot be positioned and if requestingUser is authorized to retrieve the positioning information. FALSE causes the request to fail if the user cannot be positioned.
No

Developing Location-Based Applications
14-94 Oracle Application Server Wireless Developer’s Guide
The following example of the point tag specifies the point at 75.3 degrees west longitude and 45.71 degrees north latitude.
<loc:point lon = "-73.5" lat = "45.71" />
14.2.1.57 removeAllMembersThe removeAllMembers tag removes all members from a mobile community. (It does not delete the community; to delete a community, use the deleteCommunity tag.) For an explanation of mobile communities, see Section 14.3.2.6, "Mobile Communities".
Table 14–58 lists the removeAllMembers tag parameters. (See Section 14.2.1, "Creating JavaServer Pages (JSP) Files" for an explanation of the information provided.)
Table 14–57 point Tag Parameters
Parameter Name Description Required
name Name for the returned object. Example: my_pt Yes
type Type of object. Must be: oracle.panama.model.Location Yes
lon Longitude value of the point (WGS 84 coordinate system). Example: -75.3
Yes
lat Latitude value of the point (WGS 84 coordinate system). Example: 45.71
Yes
Table 14–58 removeAllMembers Tag Parameters
Parameter Name Description Required
name Name for the returned object. Example: remove_all_members
Yes
type Type of object. Must be: Boolean (TRUE if the operation is successful, FALSE if the operation is not successful).
Yes
userName Name of the Oracle Application Server Wireless user requesting the operation. The default is the current user.
No
communityID Name of variable associated with the community from which to remove all members. Example: comm_private
Yes

Developing Location-Based Applications
Using Location Services 14-95
The following example removes, at the request of the user named Mike, all members from the mobile community associated with the variable named comm_private. It also creates a java.util.Enumeration object of members of this community, and displays this object.
<loc:removeAllMembers name="remove_all_members" type="Boolean" userName="Mike" communityID="comm_private" /><loc:listAllMembers name="list_all_mem3" type="java.util.Enumeration" communityID="comm_private" /><%= list_all_mem3.toString() %>
14.2.1.58 removeMembersThe removeMembers tag removes one or more members from a mobile community. For an explanation of mobile communities, see Section 14.3.2.6, "Mobile Communities".
Table 14–59 lists the removeMembers tag parameters. (See Section 14.2.1, "Creating JavaServer Pages (JSP) Files" for an explanation of the information provided.)
The following example removes, at the request of the user named Mike, the users named Oscar and Maria from the mobile community associated with the variable
Table 14–59 removeMembers Tag Parameters
Parameter Name Description Required
name Name for the returned object. Example: remove_members
Yes
type Type of object. Must be: Boolean (TRUE if the operation is successful, FALSE if the operation is not successful).
Yes
userName Name of the Oracle Application Server Wireless user requesting the operation. The default is the current user.
No
communityID Name of variable associated with the community from which to remove the members. Example: comm_private
Yes
communityMembers A space-delimited list of Oracle Application Server Wireless users to be removed from the community.
No

Developing Location-Based Applications
14-96 Oracle Application Server Wireless Developer’s Guide
named comm_private. It also creates a java.util.Enumeration object of members of this community, and displays this object.
<loc:removeMembers name="remove_members" type="Boolean" userName="Mike" communityID="comm_private" communityMembers="Oscar Maria" /><loc:listAllMembers name="list_all_mem2" type="java.util.Enumeration" communityID="comm_private" /><%= list_all_mem2.toString() %>
14.2.1.59 routeThe route tag specifies a route with a specified map resolution. It includes maneuvers, an overview map, and maneuver maps.
Table 14–60 lists the route tag parameters. (See Section 14.2.1, "Creating JavaServer Pages (JSP) Files" for an explanation of the information provided.)
Table 14–60 route Tag Parameters
Parameter Name Description Required
name Name for the returned object. Example: myRoute Yes
type Type of object. Must be: oracle.panama.spatial.jsptags.beans.Route
Yes
xres Width of the displayed route in screen display units. Yes
yres Height of the displayed route in screen display units. Yes
requestGeom TRUE causes a route geometry to be created and supplied by the provider (for example, to be used with the geometry tag). FALSE (the default) causes a route geometry not to be created.
No

Developing Location-Based Applications
Using Location Services 14-97
The following example creates a route named myRoute between two addresses (a person’s office and home), displays a map of the route followed by a horizontal rule, and presents each driving maneuver (using the iterateManeuvers tag and the getMap and getNarrative function calls) followed by a horizontal rule. Each driving maneuver description is also a link that users can click to display a map of the maneuver.
<loc:route name="myRoute" type="oracle.panama.spatial.jsptags.beans.Route" xres="800" yres="600"> <loc:address name="office" type="oracle.panama.model.Location" businessName="My office" firstLine="1 Oracle Dr" city="Nashua" state="NH" postalCode="03062" country="US"/> <loc:address name="home" type="oracle.panama.model.Location" businessName="My home" firstLine="2 Royal Crest Dr" city="Nashua" state="NH" postalCode="03060" country="US"/></loc:route>
<img src="<%= myRoute.getMap() %>"><HR>
requestMap TRUE (the default) causes a route map to be created and supplied by the provider; however, it does not actually display the map. (To display the map, use the map tag.). FALSE causes a route map not to be created. Note, however, that some providers might always supply a map, regardless of the requestMap setting.
No
provider Name of the first-choice provider for the request, if there is a preference.
No
Table 14–60 (Cont.) route Tag Parameters (Cont.)
Parameter Name Description Required

Developing Location-Based Applications
14-98 Oracle Application Server Wireless Developer’s Guide
<loc:iterateManeuvers name="aManeuver" type="oracle.panama.spatial.jsptags.beans.Maneuver" routeID="myRoute"> <a href="<%= aManeuver.getMap() %>"> <%= aManeuver.getNarrative() %> </a> <HR></loc:iterateManeuvers>
14.2.1.60 setCommunityNameThe setCommunityName tag specifies an address to be geocoded, located on a map, or used as the start or end address of a route or as the center for a business directory query.
Table 14–61 lists the address tag parameters. (See Section 14.2.1, "Creating JavaServer Pages (JSP) Files" for an explanation of the information provided.)
The following example sets, at the request of the user named Mike, the community name of the existing community that is associated with the variable named comm_shared. The community name is set to the value Renamed Shared Community. The example also displays the result of the operation (TRUE or FALSE).
<loc:setCommunityName name="set_comm_name" type="Boolean" userName="Mike" communityID="comm_shared" newName="Renamed Shared Community" /><%= set_comm_name.toString() %>
Table 14–61 setCommunityName Tag Parameters
Parameter Name Description Required
name Name for the returned object. Example: hardware_1. Yes
type Type of object. Must be: Boolean (TRUE if the operation is successful, FALSE if the operation is not successful).
Yes
userName Name of the Oracle Application Server Wireless user requesting the operation. The default is the current user.
No
communityID Name of variable associated with the community from which to remove all members. Example: comm_shared
Yes
newName Descriptive new name to be assigned to the community. Yes

Developing Location-Based Applications
Using Location Services 14-99
14.2.2 Using the Location Java APIYou can use the location Java API to write an application, such as in JSP files or servlets, if you need to have more precise control over the application behavior than is possible with JSP tags alone.
This section provides information on using the location Java API. It does not describe JSP concepts or how to write MobileXML applications, because these topics are covered in other chapters of this guide.
14.2.2.1 GeocodingIn a geocoding application, the user is asked for an address, and the application geocodes that address. Such an application can start by constructing a SimpleForm object for the address, as shown in Example 14–9.
Example 14–8 Constructing a SimpleForm Object
<SimpleResult> <SimpleForm target="EnterAddress2.jsp"> <SimpleFormItem name="businessName" title="Business Name" value="Oracle"/> <SimpleFormItem name="houseNum" title="House Number" value="500"/> <SimpleFormItem name="street" title="Street" value="Oracle Parkway"/> <SimpleFormItem name="city" title="City" value="Redwood City"/> <SimpleFormItem name="state" title="State" value="CA"/> <SimpleFormItem name="postalCode" title="Postal Code" value="94065"/> <SimpleFormItem name="country" title="Country" value="US"/> </SimpleForm></SimpleResult>
The next time the application is invoked (after the user has entered values into the fields), the application can access the data, as shown in Example 14–9.
Example 14–9 Accessing Address Data
String businessName = request.getParameter("businessName"), houseNumber = request.getParameter("houseNum"), streetName = request.getParameter("street"), city = request.getParameter("city"), state = request.getParameter("state"), postalCode = request.getParameter("postalCode"), country = request.getParameter("country");

Developing Location-Based Applications
14-100 Oracle Application Server Wireless Developer’s Guide
Geocoding can be done with a call, as shown in Example 14–10. (Another format of SpatialManager.createlocation, not shown in Example 14–10, specifies a point with longitude and latitude coordinates, in which case a Location object is created but no geocoding is done.)
Example 14–10 Geocoding the Address
Location address = SpatialManager.createLocation( businessName, houseNumber, new String[] { streetName }, null, city, state, postalCode, null, country);
The resulting longitude and latitude values can be accessed, as shown in Example 14–11.
Example 14–11 Accessing Values of the Geocoded Address
address.getLongitude()address.getLatitude()address.getAddressLine1()address.getCity()address.getState()
Note that the getLongitude and getLatitude methods are inherited from the Point interface.
14.2.2.1.1 International Addresses To better adapt to local address formats, you can use the international address formatting options provided in the oracle.panama.spatial.intladdress package. (For information about international address formats, see Section 14.1.5.1.4, "Address Format (International) Configuration".) The number of steps necessary to have a user input an address increases by one: the user first has to select a country (address format) in order to be presented with a form for entering the address. Because the form depends on the choice of country, the two separate steps cannot be merged to one.
Example 14–12 creates a drop-down SimpleFormSelect element that lets the user select an address format (US, German, French, and so on).

Developing Location-Based Applications
Using Location Services 14-101
Example 14–12 Selecting an Address Format
<SimpleResult> <SimpleMenu> <% java.util.Iterator it = oracle.panama.spatial.intladdress.IntlAddressManager.getAddressFormats(); while(it.hasNext()) { String name = (String)it.next(); %> <SimpleMenuItem target="enterIntlAddress.jsp?name=<%= name %>"> <%= name %> </SimpleMenuItem> <% } %> </SimpleMenu></SimpleResult>
The next step is to provide a form requesting all address components relevant to the given address format. The components are determined dynamically based on the specified country, as shown in Example 14–13.
Example 14–13 Requesting Address Components for a Specified Country
<SimpleResult> <SimpleForm target="readIntlAddress.jsp?name=<%= request.getParameter("name") %>"> <% java.util.Iterator addressComponentNames = oracle.panama.spatial.intladdress.IntlAddressManager.getAddressFormat( request.getParameter("name")).getComponentNames(); int num = 1; while(addressComponentNames.hasNext()) { String name = (String)addressComponentNames.next(); %> <SimpleFormItem name="component<%= num++ %>" title="<%= name %>"/> <% } %> </SimpleForm></SimpleResult>

Developing Location-Based Applications
14-102 Oracle Application Server Wireless Developer’s Guide
Example 14–14 displays the result. The components to display and the number of lines depend on the country.
Example 14–14 Displaying Addresses in a Country-Specific Format
<SimpleResult> <SimpleText><% String name = request.getParameter("name"); boolean finished = false; java.util.Vector components = new java.util.Vector(); for(int i = 1; !finished; i++) { String component = request.getParameter("component" + i); if(component != null) components.add(component); else finished = true; } String componentArray[] = new String[components.size()]; for(int i = 0; i < componentArray.length; i++) componentArray[i] = (String)components.get(i); oracle.panama.spatial.intladdress.IntlAddress loc = oracle.panama.spatial.intladdress.IntlAddressManager.createAddress( name, componentArray);
java.util.Iterator lines = loc.getAddressLines(false, true); while(lines.hasNext()) { %> <SimpleTextItem> <%= (String)lines.next() %> </SimpleTextItem> <% }%> </SimpleText></SimpleResult>
14.2.2.2 Location MarksAn adapter can work with location marks. Example 14–15 retrieves the location marks into an array. (Code not relevant to location marks is omitted from this example.)

Developing Location-Based Applications
Using Location Services 14-103
Example 14–15 Getting Location Marks
…LocationMark locMarks[] = sr.getSession().getUser().getLocationMarks();…
Note that LocationMark extends Location (an address).
14.2.2.3 RoutingYou can create an adapter that provides routing information between a start address and an end address that the user enters. The adapter must:
1. Set the routing settings and options.
2. Compute the route.
3. Present the resulting route to the user (for example, as a list of maneuvers and maneuver maps, plus an overview map).
Example 14–16 sets the routing settings and options by constructing a RoutingSettings object and specifying the resolution (height and width) of the resulting overview and maneuver maps.
Example 14–16 Setting Routing Settings and Options
RoutingSettings rS = new RoutingSettings(true, false);rS.setSecondaryOption(RoutingOption.overviewMapHeight, "600");rS.setSecondaryOption(RoutingOption.overviewMapWidth, "800");rS.setSecondaryOption(RoutingOption.maneuverMapHeight, "600");rS.setSecondaryOption(RoutingOption.maneuverMapWidth, "800");
Example 14–17 computes the route, returning a RoutingResult object.
Example 14–17 Computing the Route
RoutingResult rR = SpatialManager.getRouter().computeRoute( startLoc, endLoc, null, // via points rS, // routing options Locale.US);
Example 14–18 presents the resulting route to the user, displaying a list of maneuvers and maneuver maps, plus an overview map. (In this example, code specific to the routing API is shown in bold.)

Developing Location-Based Applications
14-104 Oracle Application Server Wireless Developer’s Guide
Example 14–18 Presenting the Route to the User
<%! public static String translate(String orig) { return oracle.panama.spatial.XMLEncoder.encodeToSimplifiedXML(orig); }%>
<% oracle.panama.spatial.router.RoutingResult rR = ...%><SimpleResult> <SimpleImage src="<%= translate(rR.getOverviewMapURL()[0].toString()) %>"/> <SimpleText> <% oracle.panama.spatial.router.Maneuver mans[] = rR.getManeuvers(); for(int i = 0; i < mans.length; i++) { %> <SimpleTextItem> <%= mans[i].getNarrative() %> </SimpleTextItem> <% } %> </SimpleText></SimpleResult>
14.2.2.4 MappingIn a typical mapping application, the user enters an address and wants to see a map. Example 14–19 gets the map image URL of an address to be mapped. (The variable loc of type Location contains an address that has been previously geocoded.)
Example 14–19 Getting a Map Image URL:
String url = SpatialManager.getMapper().getMapURL( loc, oracle.panama.imagex.ImageFormats.GIF, 800, // width 600, // height false); // allow turning

Developing Location-Based Applications
Using Location Services 14-105
In Example 14–19, the last parameter specifies whether or not the API can switch the width and height of the image to fit the map better to some mobile device screens. In this example, this option is disabled.
As alternatives to passing a single point object as the first parameter, as shown in Example 14–19, you can pass an array of Point objects or an object of type Location (address) or YPBusiness, which extend the Point interface.
14.2.2.5 Business Directory (YP)In a typical business directory (YP) application, the user enters a region specifying a country, state, and city, and wants to get businesses in some category, such as relating to wine tasting or wineries. The user must be asked for country, state, and city, and the application must determine the exact category and then all the relevant businesses.
The first step in determining the category is usually to ask the user for a category keyword (for example, wine) through a SimpleForm object.
The next step is to determine all the categories that match the keyword, as shown in Example 14–20.
Example 14–20 Finding Categories Matching a Keyword
YPFinder ypF = SpatialManager.getYPFinder();YPCategory cats[] = ypF.getCategoryAtRoot().getCategoriesMatchingName(keyword);
Example 14–21 shows a simple user interface that presents categories from which to choose. The user is presented a drop-down menu from which select the category that best matches what he or she is looking for.
Example 14–21 User Interface for Selecting a Category
<SimpleResult> <SimpleMenu> <% oracle.panama.spatial.yp.YPFinder ypF = oracle.panama.spatial.SpatialManager.getYPFinder(); oracle.panama.spatial.yp.YPCategory cats[] = ypF.getCategoryAtRoot().getCategoriesMatchingName("auto"); for(int i = 0; i < cats.length; i++) { %> <SimpleMenuItem target="listCategories.jsp?cat=<%= cats[i].getFullyQualifiedName() %>">

Developing Location-Based Applications
14-106 Oracle Application Server Wireless Developer’s Guide
<%= cats[i].getFullyQualifiedName() %> </SimpleMenuItem> <% } %> </SimpleMenu></SimpleResult>
When the application determines the fully qualified name of the chosen category, you can obtain the appropriate category, as shown in Example 14–22.
Example 14–22 Finding the Category
YPCategory cat = YPCategory.fromFullyQualifiedName(categoryNameString);YPBusiness b[] = SpatialManager.getYPFinder().getBusinessesInCity( cat, country, state, city, Locale.US);
The conversion in Example 14–22 from a category object to a String object and back to a category object is required because a drop-down menu lets you make a selection among String objects, not among general objects.
14.2.2.6 TrafficTo create an application based on the traffic services API, you must do the following:
1. Prepare input objects (such as CityInfo, RouteInfo, Point, and Location) for the query.
2. Get TrafficReporter and summit the query.
3. Obtain TrafficReport and process the information.
The rest of this section contains examples of typical operations. Example 14–23 performs a city-level query.
Example 14–23 City-Level Query
TrafficReporter reporter = SpatialManager.getTrafficReporter();CityInfo c = new CityInfo("BOSTON", "MA", "US");TrafficReport report = null;
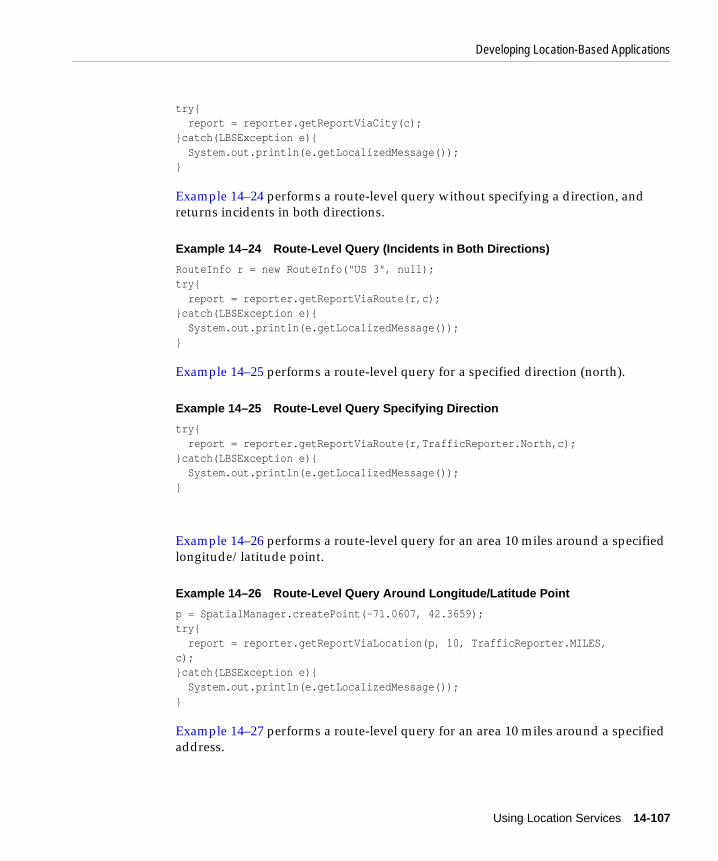
Developing Location-Based Applications
Using Location Services 14-107
try{ report = reporter.getReportViaCity(c);}catch(LBSException e){ System.out.println(e.getLocalizedMessage());} Example 14–24 performs a route-level query without specifying a direction, and returns incidents in both directions.
Example 14–24 Route-Level Query (Incidents in Both Directions)
RouteInfo r = new RouteInfo("US 3", null);try{ report = reporter.getReportViaRoute(r,c);}catch(LBSException e){ System.out.println(e.getLocalizedMessage());}
Example 14–25 performs a route-level query for a specified direction (north).
Example 14–25 Route-Level Query Specifying Direction
try{ report = reporter.getReportViaRoute(r,TrafficReporter.North,c);}catch(LBSException e){ System.out.println(e.getLocalizedMessage());}
Example 14–26 performs a route-level query for an area 10 miles around a specified longitude/latitude point.
Example 14–26 Route-Level Query Around Longitude/Latitude Point
p = SpatialManager.createPoint(-71.0607, 42.3659);try{ report = reporter.getReportViaLocation(p, 10, TrafficReporter.MILES,c);}catch(LBSException e){ System.out.println(e.getLocalizedMessage());}
Example 14–27 performs a route-level query for an area 10 miles around a specified address.

Developing Location-Based Applications
14-108 Oracle Application Server Wireless Developer’s Guide
Example 14–27 Route-Level Query Around Address
Location loc = SpatialManager.createLocation(null, null, "839 Kearny Street", null, "San Francisco", "CA", null, null, "US");try{ report = reporter.getReportViaAddress(loc, 10, TrafficReporter.MILES);}catch(LBSException e){ System.out.println(e.getLocalizedMessage());}
Example 14–28 processes a traffic report to get useful information.
Example 14–28 Processing a Traffic Report
Calendar rTime = report.getReportTime();TrafficIncident[] incidents = report.getIncidents();if(incidents != null){ for(int i=0; i<incidents.length; i++){ TrafficIncident inc = incidents[i]; String desc = inc.getDescription(); String severity = inc.getSeverity(); String type = inc.getType(); TrafficRoute route = inc.getIncidentRoute(); String[] locations = inc.getLocationRange(); //text description if(locations.length == 2){ //a location range String exit1 = locations[0]; String exit2 = locations[1]; } else if(locations.length == 1){ String exit1 = locations[0]; //one location } Point geoLocation = inc.getIncidentLocation(); //lon/lat orlon/lat+radius Calendar[] tr = inc.getTimeRange(); }}
Example 14–29 returns a list of cities for which traffic support is provided.
Example 14–29 Returning a List of Cities
TrafficCityManager manager = reporter.getCityManager();CityInfo[] cities = null;try{ cities = manager.getActiveCities();}catch(LBSException e){

Developing Location-Based Applications
Using Location Services 14-109
System.out.println(e.getLocalizedMessage());}
Example 14–30 returns a list of routes for which traffic support is provided in a specified city (San Francisco, California).
Example 14–30 Returning a List of Routes in a City
TrafficCityManager manager = reporter.getCityManager();CityInfo sf = new CityInfo("SAN FRANCISCO", "CA", "US");RouteInfo[] routes = null;try{ routes = manager.getRoutesInCity(sf);}catch(LBSException e){ System.out.println(e.getLocalizedMessage());}
14.2.3 Using Web ServicesOracle Application Server location services support the use of Web services with wireless applications that use the capabilities of the Geocoder, Mapper, Router, or YPFinder interfaces. Application developers do not need to add special coding if the application runs within OracleAS Wireless. Rather, Web services are integrated as service proxies for geocoding, mapping, routing, and business directory (YP) support.
If you develop external applications, whether written in Java or another language, you can access location-based Web services using the following kinds of files supplied with Wireless:
■ WSDL files (see Section 14.2.3.1, "WSDL Files")
■ XML files (see Section 14.2.3.2, "XML Files")
■ XSD files (see Section 14.2.3.3, "XSD Files")
14.2.3.1 WSDL FilesThe following WSDL files describe the Web services interfaces for geocoding, mapping, routing, and business directory (yellow pages) services:
■ LbsSoapServiceGeocoder.wsdl
■ LbsSoapServiceMapper.wsdl
■ LbsSoapServiceRouter.wsdl

Developing Location-Based Applications
14-110 Oracle Application Server Wireless Developer’s Guide
■ LbsSoapServiceYPFinder.wsdl
14.2.3.2 XML FilesThe following XML files contain example XML documents for the schema files:
■ lbsAddress.xml
■ lbsAddressArray.xml
■ lbsAddressArray2.xml
■ lbsBusiness.xml
■ lbsBusinessArray.xml
■ lbsCategory.xml
■ lbsMap.xml
■ lbsMapURL.xml
■ lbsMapURLArray2.xml
■ lbsPhone.xml
■ lbsPhoneArray.xml
■ lbsPoint.xml
■ lbsPointArray.xml
■ lbsRoute.xml
■ lbsRouteSettings.xml
14.2.3.3 XSD FilesThe following XSD files describe the XML parameters and return values in the Web services calls:
■ lbsAddress.xsd
■ lbsAddressArray.xsd
■ lbsAddressArray2.xsd
■ lbsBusiness.xsd
■ lbsBusinessArray.xsd
■ lbsCategory.xsd

Enabling Mobile Positioning
Using Location Services 14-111
■ lbsMap.xsd
■ lbsMapURL.xsd
■ lbsMapURLArray2.xsd
■ lbsPhone.xsd
■ lbsPhoneArray.xsd
■ lbsPoint.xsd
■ lbsPointArray.xsd
■ lbsRoute.xsd
■ lbsRouteSettings.xsd
14.3 Enabling Mobile PositioningYou can enable mobile positioning for individual users or groups of users of a location-based application. Mobile positioning of a user refers to associating a location with that user. When mobile positioning is enabled for a user, the user’s current location, whether it is obtained dynamically from automatic positioning or from a default location mark, is used by OracleAS Wireless to determine the visibility of location-based services or folders. A service or folder can be defined as location-dependent (as described in Section 14.5.3) by associating it with a system region or a previously defined custom region. A location-dependent service or folder appears in a user’s portal only when the user’s current location (from automatic positioning or from a default location mark) is within the associated region. For example, if the user’s current location is in Boston, a Boston traffic information service would be visible to the user; otherwise, the service would not be visible to that user.
Mobile positioning can be manual or automatic:
■ Manual positioning occurs when a specific location is assigned to a user. The assigned location could be the geocoded result of an address that the user is asked to enter, an explicitly specified location mark, or a default location for the user. For example, the location of the user’s home might be specified for mobile positioning, and an application could then offer information and options relevant to that home area (regardless of the user’s actual current physical location).
■ Automatic positioning (sometimes called location acquisition) occurs when the user’s location is determined automatically based on positioning information

Enabling Mobile Positioning
14-112 Oracle Application Server Wireless Developer’s Guide
based on the location of the mobile device. For example, the location of a delivery truck driver or service technician might be periodically determined based on the person’s mobile device location, and an application could consider that location data when providing information or instructions to the user.
Automatic positioning provides several options relating to frequency of position updates and user privacy.
This section describes manual and automatic positioning in more detail, and describes how to enable each type of positioning.
14.3.1 Manual PositioningManual positioning associates a specific location with the mobile application user. The location can be explicitly specified (such as the user entering an address or the name of a location mark), or it can be a default location mark for that user. A location mark is a position that is typically associated with longitude and latitude coordinates and that has a name. For example, an application user can create location marks named MyHome and MyOffice (for the person’s home and office locations, respectively), and associate a geocoded address with each one. If this person designated MyHome as the default location mark, the mobile application would consider the person’s home address as the person’s location.
If a user tries to set a default location mark that is not geocoded, a geocoding operation is performed before the location mark is made the default. If the geocoding operation fails, it is recommended that you not set that location mark as the default, because many capabilities (such as location-dependent service visibility) depend on the geocoded information of the default location mark.
For more information about location marks, see Section 14.1.7, "Location Marks".
14.3.1.1 Enabling Manual PositioningTo enable manual positioning for a user, first set up any location marks that you might want to use. Use the API (LocationMark class) or the Personalization Portal Web interface to create one of more location marks (if they do not already exist), and specify a location mark as the default for that user.
Note: If automatic positioning (described in Section 14.3.2) is turned off or if the positioning server is temporarily unavailable, manual positioning is used, and the user’s default location mark is used. (Automatic positioning can be turned on and off using the OracleAS Wireless System Manager.)

Enabling Mobile Positioning
Using Location Services 14-113
To enable manual positioning using the Personalization Portal interface, follow these steps:
1. Log in to the Personalization Portal Web interface
2. Click the LocationMarks tab.
3. If the location mark that you want for your default location does not already exist it, create it. (Click Create and complete the information on the page that is displayed.)
4. Select the location mark that you want for your default location.
5. Click Set Default.
14.3.2 Automatic PositioningAutomatic positioning allows the user’s location to be determined based on a position based on the location of the user’s mobile device. You can determine how timely, and thus potentially how accurate, the location is by setting a positioning quality of service (QoS) value.
The OracleAS Wireless API enables an application to access a mobile user’s current location through the current session (see getCurrentLocation() in the oracle.panama.rt.Session interface). If automatic positioning is turned on in the system, the user’s current physical location is returned from the mobile positioning system. If automatic positioning is turned off or if the positioning server is temporarily unavailable, the user’s default location mark is returned.
Privacy and the security of privacy-related information are important concerns in a location acquisition system. OracleAS Wireless location services provide a privacy management component that allows users to view and edit their privacy settings, to enable and disable the positioning operation on themselves, and to authorize one or more people (a mobile community) to obtain positioning information on them within certain time frames. It also allows application developers to access these capabilities through a public API.
Automatic positioning is controlled by the mobile positioning framework, which is shown in Figure 14–5.

Enabling Mobile Positioning
14-114 Oracle Application Server Wireless Developer’s Guide
Figure 14–5 Mobile Positioning Framework
As Figure 14–5 shows:
■ Application developers can use the mobile positioning API together with the privacy API to provide services.
■ The mobile positioning API in the application communicates with the location cache (described in Section 14.3.2.2) and the location acquisition layer to determine the user’s location. Whether or not the cache is used is affected by the positioning quality of service (QoS) value, which is described in Section 14.3.2.3.
■ The location acquisition layer passes the actual current position to the location cache and to the mobile positioning API.
■ Privacy management logic controls privacy-related aspects of the mobile positioning framework, which are described in later sections.
14.3.2.1 Providing Location Using a GPS DeviceA mobile device can send its current location, usually provided through a global positioning system (GPS), to the OracleAS Wireless server. The current location can then be queried using the mobile positioning and privacy APIs.
You must create a client application program that runs on the mobile device and posts the device's current location to the OracleAS Wireless server. The data can be posted either to a JSP running on the OracleAS Wireless server or through a Web service.

Enabling Mobile Positioning
Using Location Services 14-115
The data must be in XML format, and it must conform to the following schema:
<?xml version="1.0" encoding="UTF-8"?><xsd:schema xmlns:xsd="http://www.w3.org/2000/10/XMLSchema"elementFormDefault="qualified"> <xsd:element name="MP_GPS"> <xsd:complexType> <xsd:sequence> <xsd:element ref="USERNAME"/> <xsd:element ref="PASSWORD"/> <xsd:element ref="MSID"/> <xsd:element ref="TIME" minOccurs="0"/> <xsd:element ref="GMT" minOccurs="0"/> <xsd:element ref="POS"/> <xsd:element ref="ALTITUDE" minOccurs="0"/> <xsd:element ref="ALT_UNCERTAINTY" minOccurs="0"/> <xsd:element ref="VELOCITY" minOccurs="0"/> <xsd:element ref="BEARING" minOccurs="0"/> </xsd:sequence> </xsd:complexType> </xsd:element> <xsd:element name="ALTITUDE" type="xsd:string"/> <xsd:element name="ALT_UNCERTAINTY" type="xsd:string"/> <xsd:element name="BEARING" type="xsd:string"/> <xsd:element name="GMT" type="xsd:string"/> <xsd:element name="LAT" type="xsd:string"/> <xsd:element name="LONG" type="xsd:string"/> <xsd:element name="MSID" type="xsd:string"/> <xsd:element name="PASSWORD" type="xsd:string"/> <xsd:element name="POS"> <xsd:complexType> <xsd:sequence> <xsd:element ref="LAT"/> <xsd:element ref="LONG"/> </xsd:sequence> </xsd:complexType> </xsd:element> <xsd:element name="TIME" type="xsd:string"/> <xsd:element name="USERNAME" type="xsd:string"/> <xsd:element name="VELOCITY" type="xsd:string"/></xsd:schema>
The <USERNAME> and <PASSWORD> elements are used by OracleAS Wireless server to authorize the request.

Enabling Mobile Positioning
14-116 Oracle Application Server Wireless Developer’s Guide
The <MSID> element is the mobile station ID of the mobile device or user.
The optional <TIME> element indicates the time when this location is generated by a GPS. If this value is missing, the time when the data arrives at the OracleAS Wireless server is used.
The optional <VELOCITY> element specifies the velocity of the mobile device, in meters per second.
The optional <BEARING> element specifies the bearing angle, in degrees, clockwise from North.
The optional <ALTITUDE> element specifies the altitude of the mobile device, in meters, above sea level.
14.3.2.2 Location CacheThe location cache is an area in memory that temporarily stores a mobile user’s ID, the most recently acquired location information, and the time when that information was gathered. If the location cache is searched for a mobile positioning request, and if there is an entry in the cache for the user whose location is requested, the time difference between the cache entry time and the current request time is compared against the positioning quality of service level of the positioning request. (Positioning quality of service is explained in Section 14.3.2.3.)
When a positioning request is satisfied by information in the cache, no position sensing is required; that is, no network round-trip operation is required.
14.3.2.3 Positioning Quality of ServiceThe positioning quality of service (QoS) value controls:
■ Whether to check the current device position or the location cache to determine the location.
■ If the location cache is checked, a maximum "age" of the most recent cached location value (that is, a number of seconds since that value was written to the location cache) for it to be used by the application.
You can specify the positioning quality of service value in either of the following ways:
■ As a number of seconds, representing the maximum age of the position in the location cache for it to be used by the application. If the most recent position in the location cache is older than the appropriate time, the actual current position of the device is obtained, written in the cache, and used by the application. A

Enabling Mobile Positioning
Using Location Services 14-117
value of 0 (zero) causes the positioning framework always to give the actual positioning result and not to search the location cache.
■ As one of the following string values, each representing a level of positioning quality:
■ Exact: Causes the positioning framework always to give the actual positioning result and not to search the location cache; equivalent to specifying 0 (zero) seconds.
■ High: Represents a high level of probable accuracy.
■ Medium: Represents a medium level of probable accuracy.
■ Low: Represents a lower level of probable accuracy than the Medium value.
For the High, Medium, and Low values, the positioning framework determines an age value (number of seconds) in a heuristic manner.
There is a system default positioning quality of service level, which you can set. If a positioning quality of service level is not specified with a positioning request, the system default is used. The level can be set using the mobile positioning API (see Section 14.3.2.8, "Mobile Positioning API") or the System Manager.
The trade-off in selecting a positioning quality of service level is probable accuracy versus application performance. A value of 0 seconds or Exact guarantees that the actual current position is obtained; however, obtaining the actual position requires network round-trip to the service provider for each mobile positioning request. Such round-trip operations can slow application performance, especially if there are positioning requests for many users or many requests for the same user. You should use a value of 0 seconds or Exact only if the application always needs to know the actual position. A value of Low returns a location that is least likely to be accurate (unless the user has not moved at all); however, it increases the probability that the location will be obtained from the cache, eliminating the need for a network round-trip operation. If the user is not likely to move very far or fast, or if it is not important to know the actual current location, a value of Low may be best.
14.3.2.4 Specifying Positioning ProvidersAutomatic mobile position is queried by calling the Positioner.requestPosition function. (Positioner is a class in the oracle.panama.mp package). A Positioner object is based on one or more mobile positioning providers. As with other location service providers, a mobile positioning is configured by specifying information such as the name, version, URL, user name, and password.

Enabling Mobile Positioning
14-118 Oracle Application Server Wireless Developer’s Guide
However, a mobile positioning service differs from other location services in that in some cases positioning can only be handled by one specific provider, which is less likely to be true for other location based services. For example, if you request a map of California, several mapping providers are able to provide the map. However, if you request mobile position for a specific phone number (such as +4412345678), it is very likely only one provider can provide the position. A mobile ID (typically a phone number) usually identifies a wireless carrier and thus also determines the mobile positioning provider or providers. Therefore, application developers need to be able to get a positioner based on specific mobile positioning providers.
To meet different application needs, several getPositioner signatures are provided in the MPManager class:
■ getPositioner()
■ getPositioner(MPProvider provider)
■ getPositioner(MPProvider[] providers)
An Internet portal may have subscribers from different carriers, and they may need to decide dynamically, based on the mobile ID, which provider to use at run time. This need is supported by mobile positioning provider selector hooks (implemented through the oracle.panama.mp.MPProviderSelector interface).
A provider selector hook takes a mobile ID and returns an array of MPProvider objects that can handle the positioning request. The default provider selector hook is provided by oracle.panama.mp.core.ProviderSelectorImpl, which returns all providers in the system, which means by default the positioning framework does not attempt to choose a provider. A selector hook is used by a positioner when calling positioner.requestPosition and is applicable for the getPositioner() signature. If the providers are already specified when the positioner is called, the selector hook is not used.
OracleAS Wireless API enables an application to access a mobile user’s current location through the current session (Session.getCurrentLocation()). By default, the user’s mobile ID (which is in the user’s profile) is used to call the mobile positioning API to get the current position. However, if advanced users want to use a different value for positioning, they can write their own mobile ID hook by implementing the oracle.panama.rt.hook.MobileIDHook interface. A mobile ID hook takes the current user’s information and returns his or her mobile ID for positioning. If the automatic positioning fails, the system fails over to the user’s default location mark as the current location.
Note that you do not have to implement either the provider selector hook or the mobile ID hook. If the default settings meet your needs, you can simply configure

Enabling Mobile Positioning
Using Location Services 14-119
mobile positioning providers and call MPManager.getPositioner().requestPosition().
To summarize:
■ A Positioner can be a system default based on all mobile positioning providers configured in the system, or it can be customized based only on one or more specific providers.
■ When a system default is used, a provider selector hook is used only when choosing the system default positioner. A selector hook takes a mobile ID and decides which provider or providers can handle it. In the case of batch query, the first mobile ID in the batch determines which provider is selected.
■ Failover is provided when a positioner is based on more than one provider and a provider cannot handle the request.
Programs should check that the PositionResult has a nonzero error code before using it.
Example 14–31 gets the user’s position using system default providers and the default positioning quality of service.
Example 14–31 Getting Position using System Default Providers and Default QoS
Positioner positioner = MPManager.getPositioner(); PositionResult res = positioner.requestPosition("46708123456790"); Date timeStamp = res.getTimeStamp(); double lon = res.getPositionAreas()[0].getCenterPointLongitude(); double lat = res.getPositionAreas()[0].getCenterPointLatitude();
Example 14–32 shows two examples of getting the user’s position and specifying a positioning quality of service level. The first example specifies the quality descriptively as high, and the second example specifies the quality as a number of seconds. (Section 14.3.2.3 explains the ways in which you can specify positioning quality of service.)
Example 14–32 Getting Position Specifying QoS
PositionResult res = positioner.requestPosition("46708123456790", ServiceQoS.HIGH_QUAL);
PositionResult res = positioner.requestPosition("46708123456790", new ServiceQos(120));
Example 14–33 gets the user’s position based on an array of specific providers.

Enabling Mobile Positioning
14-120 Oracle Application Server Wireless Developer’s Guide
Example 14–33 Getting Position Based on an Array of Providers
MPProvider[] providers = new MPProvider[2]; providers[0] = MPManager.lookup("CellPoint", "1.2"); providers[1] = MPManager.lookup("Ericsson", "3.0"); Positioner positioner = MPManager.getPositioner(providers);
14.3.2.5 Granting and Revoking Positioning RightsBy default a user’s location information can only be accessed by himself or herself. No other user has the right to access the user’s location information. If users want to allow other users to access their location information, they must grant the positioning right to those users. A user granting the positioning right can later revoke the granted right.
The positioning right can also be granted for a certain duration or recurring interval of time. In many cases, users want to restrict the time periods to grant other users the right to access their location information. For example, users may want to grant coworkers this right from 9:00 am to 5:00 pm during weekdays, but they do not want coworkers to position them at night or during weekends. Users can specify such time restrictions as:
■ Starting and ending dates of the granted right
■ Starting and ending time during a day
■ Exclusions: days that are within the start and end dates but are excluded from the positioning right, such as Saturdays and Sundays
14.3.2.6 Mobile CommunitiesA mobile community is a collection of one or more users who can be granted or denied positioning rights. Mobile users can be assigned to one or more communities, and users can grant and deny positioning rights to communities. Users can view and manage their community information through the Personalization Portal, and application developers can access these capabilities through the public API.
The concept of mobile community is useful in many mobile application scenarios. For example, a project team can create a project community. A team member can grant to the project community the right of accessing to his or her location information instead of granting the right to each team member individually. For example, with mobile positioning and location-based alerts, a field service manager could know when service representatives are nearby and could contact them to get status updates or to have them respond to local problems.

Enabling Mobile Positioning
Using Location Services 14-121
The concept of visibility applies to communities and to members of communities. Visibility refers to the ability of system users to see that a community or member exists and to obtain some relevant information. Visibility can depend on the relationship of the requesting user to the community or member: for example, whether the requesting user has administrator privileges or is a member of the community in question. Visibility is implemented using calls to the privacy API, which is described in Section 14.3.2.9, "Privacy API".
For any given request by a user to see information about a community or members of a community, the following visibility conditions are possible:
■ The community and the members of the community are visible to the requesting user.
■ The community is visible to the requesting user, but the members of the community are not visible. For example, the community has been set up so that its existence is visible to all system users; however, information about community members is available only to administrators.
■ The community is not visible to the requesting user, and therefore members of the community are not visible either.
Different types of communities are supported, to accommodate different user requirements for visibility. When you create a community, you can specify the type of community, namely:
■ Private: A private community is visible only to the creator of the community, who has sole and complete control. No other users, including members of the community, can see or perform operations on a private community.
■ Shared: A shared community is visible to all the community members but not to other users in the system. A community member is visible to all other community members. A community member can remove himself or herself from the community.
■ Public with Member Visibility: A public community with member visibility is visible to all the users in the system. Any users in the system can add themselves to the community and remove themselves from the community.
■ Public Member-Controlled Visibility: A public community with member-controlled visibility is visible to all the users in the system; however, each member can control whether he or she is visible or not visible to other users.
■ System: A system community is visible to all users of the system, but the members are visible only to users who have administrator privileges. Users

Enabling Mobile Positioning
14-122 Oracle Application Server Wireless Developer’s Guide
without administrator privileges cannot remove themselves from a system community.
The following community operations are supported:
■ Create a community and add initial members
■ Delete a community
■ View a list of all the communities that are visible to the user
■ View all the members in the community who are visible to the user
■ Add users to a community (for the creator of a community)
■ Remove users from a community (for the creator of a community, or any community member for removing himself or herself from a shared community)
14.3.2.7 Privacy Directives and Enabling/Disabling Automatic PositioningWith the initial default privacy settings, the system does not have the right to position a user and temporarily store the user’s position in the location cache, and write the user’s location information to the cache log. However, the administrator can use the OracleAS Wireless System Manager to specify a different system default level of privacy -- and users can control their level or privacy through the Personalization Portal -- by using any of the following privacy directives, listed in decreasing order of privacy provided:
■ Disable Positioning and Caching: No positioning on the user is allowed. The system has no right to position the user, and no access to the user’s location is allowed. This setting provides the most privacy.
■ Enable Positioning, Disable Caching: The user’s location information is not cached. The system has the right to position the user, but the system cannot store the user’s location information in the location cache. In this case, the user’s location is always obtained by going to the positioning service providers directly.
For example, with this directive a mobile user’s movements might not be tracked, and the position at any time might be reported as the user’s office or whatever location the service provider supplies.
■ No Log: The user’s location information is stored in the location cache, but is not written to the cache log. Cache items for this user are not written to the log when they are replaced from the cache, but are simply discarded.

Enabling Mobile Positioning
Using Location Services 14-123
For example, with the No Log directive, a mobile user’s current position might be available, but earlier positions might not be available if they had discarded from the location cache.
■ Enable Positioning and Caching: The system has the right to acquire and cache the user’s location information.
14.3.2.8 Mobile Positioning APIMobile device positioning is performed by calling the corresponding requestPosition functions in the Positioner class. The API allows application developers to specify the positioning quality of service (QoS) level. (These levels are explained in Section 14.3.2.3.)
14.3.2.9 Privacy APIDevelopers of mobile applications can manage the privacy capabilities through the location services privacy API. This section describes the privacy API and provides examples.
14.3.2.9.1 LocationPrivacyManager Class The LocationPrivacyManager class handles all the location privacy-related operations, such as granting and revoking positioning rights, enabling and disabling positioning rights, setting and getting system privacy options, and checking if a user has right to position another user. The class also provides ways to retrieve the LocationPrivacyAuth object, which stores information about a privacy authorization item.
A user can grant authorization to another user or to a mobile community using grantAuthorization. The authorization can be temporarily disabled using disableAuthorization. The disabled authorization can be recovered by using enableAuthorization. The granted right can be permanently revoked using revokeAuthorization. checkAuthorization can be used to check whether a user has right to position another user at specific time.
All the privacy authorization operations are application-specific, which means that they only affects the application in which the operation is performed.
14.3.2.9.2 CommunityManager Class The CommunityManager class handles community-related operations, such as creating and deleting community and retrieving community information. Community operations specific to a single community are defined in the Community interface.

Enabling Mobile Positioning
14-124 Oracle Application Server Wireless Developer’s Guide
14.3.2.9.3 LocationPrivacyAuth Interface The LocationPrivacyAuth interface provides methods to retrieve information specific to a location authorization item, such as the authorization period, the service where the authorization occurs, the user granting the right, and the user receiving the right.
14.3.2.9.4 Community Interface The Community interface provides methods to retrieve information about the community object, add members to and remove members from the community, and set community attributes.
14.3.2.9.5 AuthPeriod Class The AuthPeriod class maintains a time range that is used when a user grants the positioning right to other users. An authorization period is composed of start date, end date, start time, end time, and exclusions. The class also provides a method contains to check whether a specific time falls in the time range represented by the class.
14.3.2.9.6 LocationPrivacyException Class The LocationPrivacyException class is a subclass of PanamaException. It represents a location privacy-specific exception.
14.3.2.9.7 Privacy API Examples This section contains examples of the location services privacy API. The examples are taken from the sample adapters SampleCommunityManager.java and SampleFriendFinder.java is the iAS-wireless-home\sample\sampleadapter\mp\privacy directory. These two sample adapters demonstrate the major capabilities of the privacy API.
Example 14–34 lists all communities of a specified type that are visible to a user.
Example 14–34 List Communities of a Specified Type Visible to a User
CommunityManager commMan = CommunityManager.getInstance(); ...try{ ResultSetEnumeration comms = commMan.getVisibleCommunities(user,type); while (comms.hasNextElement()){ sfo = XML.makeElement(sfs,"SimpleFormOption"); oracle.panama.model.Community comm =(oracle.panama.model.Community)(comms.next()); sfo.setAttribute("value",String.valueOf(comm.getId())); txt = XML.makeText(sfo,comm.getCreator().getName()+":"+ comm.getName() ); sfo.appendChild(txt); sfs.appendChild(sfo); }

Enabling Mobile Positioning
Using Location Services 14-125
}catch(Exception e){ throw new AdapterException(e); }
Example 14–35 grants the positioning right to a user or a community based on user input.
Example 14–35 Grant Positioning Right to a User or Community
CommunityManager commMan = CommunityManager.getInstance(); LocationPrivacyManager priMan = LocationPrivacyManager.getInstance();
...
SimpleDateFormat ddf = new SimpleDateFormat("MM/dd/yyyy"); SimpleDateFormat tdf = new SimpleDateFormat("HH:mm"); Calendar startD,endD,startT,endT=null; try{ startD = Calendar.getInstance(); startD.setTime(ddf.parse(sdate));
endD = Calendar.getInstance(); endD.setTime(ddf.parse(edate));
startT = Calendar.getInstance(); startT.setTime(tdf.parse(stime));
endT = Calendar.getInstance(); endT.setTime(tdf.parse(etime));
}catch(ParseException e){ showError(result,sr,"Illegal Date Format","&grantmenu=y"); return; }
StringTokenizer st = new StringTokenizer(excl,","); String exclDate = null; byte exclusions=0; while (st.hasMoreTokens()) { exclDate=st.nextToken(); if ("Mon".equals(exclDate)) exclusions =(byte)(exclusions|AuthPeriod.MONDAY); else if ("Tue".equals(exclDate)) exclusions =(byte)(exclusions | AuthPeriod.TUESDAY); else if ("Wed".equals(exclDate)) exclusions =(byte)(exclusions | AuthPeriod.WEDNESDAY); else if ("Thu".equals(exclDate))

Location Event Server
14-126 Oracle Application Server Wireless Developer’s Guide
exclusions =(byte)(exclusions | AuthPeriod.THURSDAY); else if ("Fri".equals(exclDate)) exclusions =(byte)(exclusions | AuthPeriod.FRIDAY); else if ("Sat".equals(exclDate)) exclusions =(byte)(exclusions | AuthPeriod.SATURDAY); else if ("Sun".equals(exclDate)) exclusions =(byte)(exclusions | AuthPeriod.SUNDAY); else { showError(result,sr,"Illegal Exclusions.", "&grantmenu=y"); return; } }
AuthPeriod period = new AuthPeriod(startD,endD, startT,endT, exclusions); oracle.panama.model.Community commObj = null; User posUserObj = null; try{ if (community!=null && !community.equals("")){ commObj = commMan.getCommunity(Long.parseLong(community)); priMan.grantAuthorization(service,owner,commObj,period); } else{ posUserObj = services.lookupUser(positionUser); priMan.grantAuthorization(service,owner,posUserObj,period); } }catch(PanamaException e){ throw new AdapterException(e); }
14.4 Location Event ServerThe location event server generates an event when a location-based condition occurs. The event could result in a location-based alert being delivered based on a mobile user’s current location.
The wireless alert engine allows users to subscribe to a location-based alert service and specify location-based conditions. When a location-based condition is satisfied, the alert engine receives a location event. If all other conditions for delivering the alert are also satisfied, the alert engine sends an alert to the subscriber. The following are some typical scenarios in which location-based alerts can be provided for mobile users:
■ A traveler wants to receive an alert when the limousine that she will take is within 1 mile of the airport.
■ A member of a project team wants to receive an alert when all other team members are at corporate headquarters.

Location Event Server
Using Location Services 14-127
■ A field service coordinator wants to receive an alert when a new service request arrives and an engineer qualified to handle the request is within 2 miles of the service center.
■ A subscriber to a weather information service wants to receive an alert when the forecast predicts snow and his sister is not at home, because his sister travels frequently and has asked him to take care of her plants when she is out of town.
The potential scenarios reflect a range of complexity, for example, combining a location-related condition and conditions not directly related to location.
14.4.1 Location Event Server ConceptsA location-based alert is an alert service that has a location-based condition.
A location-based condition is a set of location-based alert criteria plus related information, such as the condition expiration time and the condition evaluation mode. The condition is satisfied only when all criteria in the condition are satisfied.
Location-based alert criteria are components of a location-based condition. Each criterion has three elements: a target, a region, and a type. The target can be a user, a community, or a mobile device. The region is a system-defined or user-defined location. The type must be IN or OUT, indicating the position of the target in relation to the region. Examples of location-based alert criteria include the following:
■ All team members are in Chicago.
■ Mr. Smith is outside the state of New York.
A location event server is a standalone process that retrieves the location-related information from the positioning service provider, evaluates the location-based conditions, and generates an event if a condition is satisfied. The location event server cooperates with the mobile positioning and region modeling components to do scheduling: the condition evaluation result is periodically updated, and when a condition is satisfied, a location event is sent out to the client that generated the condition.
A location event client is a wireless application or system component that specifies location-based conditions and reports location-related information. Each location event client has a location event agent that handles two-way communication between the server and the client. The location event agent gets the location-based conditions created in the client instance and registers them to the server side. The agent receives location events from the server and invokes the location event handler to process the event. It also supports the pull query, a request for the evaluation result of a specified location condition.

Location Event Server
14-128 Oracle Application Server Wireless Developer’s Guide
A location event can be sent out to the client that generated the condition, or to one or more other clients, or any combination. When a condition is activated, the application can determine which recipients should receive a location event.
You can configure and use multiple location event servers and location event clients.
Java classes are provided for implementing a location event client:
■ Location-based condition (LBCondition class; see Section 14.4.3, "Location-Based Condition Object (LBCondition)")
■ Location event agent (LBEventAgent class; see Section 14.4.4, "Location Event Agent Object (LBEventAgent)")
■ Location event handler (LBEventHandler class; see Section 14.4.5, "Location Event Handler Object (LBEventHandler)")
14.4.2 Location Event Agent ExampleExample 14–36 creates a location event agent and activates a location-based condition, so that a parent will be alerted when his or her child goes out of the region associated with the child’s school. A different location event agent (named anotherAgent) will receive the event generated from the server when the condition is satisfied.
Example 14–36 Location Event Agent
try{ LBEventAgent alertAgent = factory.createLBEventAgent("alertAgent",true); LBEventHandler handler = new ALBEventHandlerImpl(); alertAgent.registerLBEventHandler(handler); User parent = factory.createUser(USERNAMEPARENT); User child = factory.createUser(USERNAMECHILD); LocationPrivacyDomain privacyDomain = new LocationPrivacyDomain(); LBCondition condition = factory.createLBCondition(LBCondition.MODE_ONCE, null, parent, privacyDomain); condition.addCriteria(String.valueOf(child.getId()), LBCondition.TARGETTYPE_USER,LBCondition.TYPE_OUT,SCHOOL_REGION_ID); alertAgent.activateCondition(condition,null,null,"anotherAgent",false); }catch(LBEventException e){ ...... }

Location Event Server
Using Location Services 14-129
14.4.3 Location-Based Condition Object (LBCondition)A location-based condition (LBCondition) object represents a location-based condition. A typical alert condition consists of multiple criteria, each of which defines a target, a criterion type (IN or OUT), and a region (system region, custom region, or user-defined region). The relationship between the specified criteria is AND, which means that the condition is satisfied only when all the criteria are satisfied.
The LBCondition object also specifies a condition expiration time and a condition evaluation mode. The condition expiration time indicates when the condition becomes invalid. The condition evaluation mode must be one of the following:
■ Evaluate only once. After the condition is satisfied for the first time, the condition is not evaluated any more and the condition status becomes inactive.
■ Evaluate until the expiration time arrives. If the condition is satisfied, a location event is sent to the location event client. Regardless of whether the condition is satisfied or the number of times the condition is satisfied, the condition remains active until the expiration time. If the condition is satisfied, then not satisfied, and then satisfied again, a new event is sent to the user. (For example, if the condition is "user Smith is in Boston" and if Smith enters Boston, leaves Boston, and enters Boston again, an event is sent each time Smith enters Boston.)
14.4.4 Location Event Agent Object (LBEventAgent)A location event agent (LBEventAgent) object communicates with the location event server on behalf of a location event client. A location event agent object performs the following operations:
■ Activates location-based conditions.
■ Supports queries about whether a specific location-based condition is satisfied.
■ Allows the location event client to register a location event handler and to start threads to listen to the location events. When a location event arrives, the location event handler is invoked to process the event.
■ Deactivates location-based conditions from the server.
Each location event agent has a name and a messaging channel. When a location event client creates a location event agent, it can specify whether it allows other agents to share the same name with the new agent. Location event agents that have the same name share the same messaging channel, which means that location events sent to the messaging channel will be distributed among those location event agents.

Location Event Server
14-130 Oracle Application Server Wireless Developer’s Guide
When a location-based condition is activated, the condition information is sent to the location event server, and the server begins to evaluate the condition. If the evaluationMode parameter passed to the activateCondition method, its value overrides the evaluation mode defined in the LBCondition object. If the RecipientAgent parameter is passed to the activateCondition method, it specifies the name of the recipient agent, which means that a condition can be created in one agent and the event can be sent to another agent when the condition is satisfied.
The isSatisfied method in the location event agent checks if a specific condition is satisfied or not. If the condition is not active, the isSatisfied method initiates the condition evaluation, and this may take some time (from several seconds to several minutes, depending on how complicated the condition is). The checkStatusNoWait method also checks if a specific condition is satisfied or not, but is the condition is not active, condition evaluation is not activated.
14.4.5 Location Event Handler Object (LBEventHandler)The location event handler (LBEventHandler) object is a public interface. Application developers are expected to implement the handler interface and register it at the location event agent. The implementation should be thread safe. The location event handler is responsible for processing a location event.
After a location event agent receives a location event, it invokes the handleLocationEvent method of the location event handler that is registered with the agent. The handleLocationEvent method accepts a condition ID that uniquely identify a location-based condition, an event type that specifies whether the condition has been satisfied and whether there are any errors, and the time when the event was generated.
14.4.6 Location Event Server Configuration OptionsYou can configure the location event server using the Wireless System Manager, as follows:
1. In the Wireless Server System tab page, click Site Administration.
2. Click to expand Component Configuration.
3. Under Location-Related, click Location Event Server.
The following location event server configuration options are available. The options that you choose affect the behavior and performance of the location event client applications.

Location Event Server
Using Location Services 14-131
■ Default validity period for no-wait pull request in seconds
The location event agent can use the checkStatusNoWait method to pull a result from a location event server without waiting. The validity period for no-wait pull request determines how old the pulled result can be and still be considered valid. If the result was generated within the validity period, the result is considered valid. If the pulled result is not valid, the no-wait pull request does not wait for the server to generate a new result. For example, if the validity period is 600 seconds (10 minutes) and if the most recent report of a user’s position was 11 minutes ago, the positioning report is not considered valid, and the checkStatusNoWait method returns without waiting.
The longer the validity period, the more likely a positioning report is to be considered valid. However, if the application requires recent positioning information, a short validity period might be needed.
■ Default validity period for pull request in seconds
The location event agent can use the isSatisfied method to pull a result from a location event server. The validity period for pull request decides whether the pulled result is valid. If the result was generated within the validity period, the result is considered valid. If the pulled result is not valid, the pull request will wait till a new result is generated by the server. For example, if the validity period is 600 seconds (10 minutes) and if the most recent report of a user’s position was 11 minutes ago, the positioning report is not considered valid, and the isSatisfied method waits until the next report of the user’s position is received.
The longer the validity period, the more likely a positioning report is to be considered valid, and the more likely it is that the isSatisfied method will accept the positioning information and return, so that the application can continue. However, if the application requires recent positioning information, a short validity period might be needed, although it may risk delaying the application while the isSatisfied method waits for new information.
■ Default number of location event listeners
A location event agent can have multiple listeners listening for location-based events. This setting specifies how many listeners a location event agent has.
The value should be based on the system workload. If many location based-conditions are created and processed, a number greater than 1 (such as 5 or 10), is probably better. However, if few location based-conditions are created and processed, one location event listener is sufficient. An application can override this default.

Using the Region Modeling Tool
14-132 Oracle Application Server Wireless Developer’s Guide
For each location event server, you can specify the following:
■ Number of Positioning Schedulers
Each location event server can have one or more positioning schedulers that process the location-based conditions. This setting specifies the number of positioning schedulers for each location event server.
The value should be based on the system workload. If many location based-conditions are created and processed, a number greater than 1 (such as 5 or 10), is probably better. However, if few location based-conditions are created and processed, one positioning scheduler is sufficient. System administrators can monitor the performance of the location event server and adjust the value accordingly.
14.5 Using the Region Modeling ToolThe region modeling tool lets administrators of a wireless portal service manage regions and make a service or folder location-dependent. When you create a service or a folder, you can specify that it is location-dependent by associating a system region or a previously created custom region with the service or folder. A location-dependent service or folder appears is a user’s portal only when the user ’s current location (either from automatic mobile positioning or from the user’s default location mark) is within the specified region.
A region is simply a geographic entity, or location. A region can be small (such as a street address) or large (such as a country). A region can be represented by a point, as is often done for addresses and locations of interest (such as airports and museums), or by a polygon, as is usually done for states and countries.
14.5.1 Service and Folder Visibility Using Region ModelingYou may want to define specific regions for a variety of applications and services, such as:
■ City guides for selected metropolitan areas, so that users in those areas receive only services and information (such as restaurant listings or advertisements) relevant to them
■ Colleges that have a certain ranking or that specialize in certain subject areas, so that prospective students and their parents can receive information about those locations

Using the Region Modeling Tool
Using Location Services 14-133
■ Art museums in a city or a multistate area, so that art lovers can plan trips to museums
Your company may provide many specialized services, and users may be able to subscribe to and pay for individual services tied to regions. For example, one user might subscribe to city guides for the entire United States, while another user might subscribe only to city guides for southeastern states.
To implement the city guide example, you could do the following:
1. Create a folder (static, not location dependent) called City_guide.
2. Under the City_guide folder create city guide services for Boston, San Francisco, and California
3. Set the default location mark to an address in a city. If the address is in Boston, the user sees the Boston city guide; if the address is in San Francisco, the user sees both the San Francisco and California guides.
In another example scenario, several services may be relevant to a region, in which case you can create a location-dependent folder and place the relevant services in that folder (instead of designating each service as location-dependent on the region). For example, assume that you have ATM Locator, Flight Gate Information, Airport Parking Information, and Taxi Finder services associated with a region named Airport, and that you have Printer Finder, Conference Room Scheduler, and Cafeteria Menu services associated with a region named Office. In this case, you can create two location-dependent folders named Airport and Office, and associate them with the Airport and Office regions, respectively.
14.5.2 Folders and Hierarchies of RegionsRegions are stored in folders. Folders can be in a hierarchy (that is, there can be folders in folders). There are two top-level folders: System-Defined Regions and Custom Regions.
■ System-defined regions are arranged in a hierarchy of predefined areas: continents, which contain countries. The United States further contains states, which contain postal codes, counties, and cities.
■ Custom regions are regions created by users, based on entering an address or on selecting one or more other regions (system-defined or custom).

Using the Region Modeling Tool
14-134 Oracle Application Server Wireless Developer’s Guide
14.5.3 Associating a Region with an ApplicationWhen you specify an application to be location-dependent, you must specify the region for which the service applies or is relevant. Before you can specify the region, it must already exist, either as a system-defined region or a custom region. If it is a custom region, it must have been created using the region modeling tool.
Follow these steps to specify that an application is location-dependent and to use the region modeling tool.
1. In the Wireless Server Services tab page, click the Applications tab (if it is not already selected).
2. Select a location-dependent application (or one to be made location-dependent), and click Edit.
3. Click Additional Info.
4. Enable (check) Location-Dependent.
5. To start the region modeling tool, click the flashlight icon next to the Region Name box, shown in Figure 14–7.
Figure 14–6 Page for Starting the Region Modeling Tool

Using the Region Modeling Tool
Using Location Services 14-135
The region modeling tool is displayed, as shown in Figure 14–7.
Figure 14–7 Region Modeling Tool Interface
The Web browser window initially displays the top level of the region hierarchy, with two entries: system-defined regions and custom regions. You can find regions, and you can select regions for viewing or for adding to a collection from which you create a custom region.
To find a region in a display of system or custom regions, enter a character string that is in its name to search by name, or enter a number to search by ID (by region ID). Specify to search all regions or only under current region (the currently selected region), then click Go.
To select a region to perform an operation on it, click the box to the left of its icon and name. (To deselect a selected item, click the box.) You can select all regions in the current display by clicking Select All, and deselect all regions in the current display by clicking Select None.
To perform an operation on the selected region or regions, click the command text link or button shown in Table 14–62.

Using the Region Modeling Tool
14-136 Oracle Application Server Wireless Developer’s Guide
14.5.4 Loading and Updating Region DataThe region modeling tool is installed with an extensive set of data for the United States, as well as country data for many countries. However, you can add data about other countries, states, cities, and so on by adding rows to the tables where the region data is stored. For example, you could add a row for each state in India to the STATE table. If you are careful and know what you are doing, you can also modify certain data in those tables, such as editing the DESCRIPTION column values for certain cities or states.
Table 14–62 Region Modeling Tool Operations
To Do This: Click This:
Add selected regions to the collection of regions at the bottom of the display
Add to Collection
View a map display showing selected regions
View
Create a custom region from the collection of regions at the bottom of the display
Create from Collection. A series of pages is then displayed, in which you specify the location in the region hierarchy and the name for the custom region.
Create a custom region from a street address that you enter
Create from Address. A series of pages is then displayed, in which you specify the address, the location in the region hierarchy, and the name for the custom region.
Create a custom region from the collection of regions at the bottom of the display
Create from Collection. A series of pages is then displayed, in which you specify a location in the region hierarchy and a name for the custom region.
Create a folder in which to organize regions
Create Folder. A series of pages is then displayed, in which you specify the location in the region hierarchy under which to create the folder and the name for the folder.
Go to the previous or next set of entries in the display of regions or the current collection
Previous or Next
Go up one or more levels in the region hierarchy
The name of the desired level on the current hierarchy line near the top of the page. Example of how this line might look (with all items except the last as links): Regions > System Defined Regions > NORTH AMERICA > USA > California
Get help about any screen Help

Using the Region Modeling Tool
Using Location Services 14-137
14.5.4.1 Tables for Region Data Region data is stored in the OracleAS Wireless repository in the tables listed in Table 14–63.
To see the definition of any of these tables, use the SQL statement DESCRIBE. Example 14–37 shows the DESCRIBE statement output with information about all of the tables.
Example 14–37 Region Data Table Definitions
SQL> DESCRIBE continent; Name Null? Type ----------------------------------------- -------- ---------------------------- ID NOT NULL NUMBER NAME VARCHAR2(100) REFCNT NUMBER DESCRIPTION VARCHAR2(2000) GEOMETRY MDSYS.SDO_GEOMETRY
SQL> DESCRIBE country; Name Null? Type ----------------------------------------- -------- ---------------------------- ID NOT NULL NUMBER NAME VARCHAR2(300) REFCNT NUMBER CONT_ID NUMBER DESCRIPTION VARCHAR2(2000) GEOMETRY MDSYS.SDO_GEOMETRY
Table 14–63 Tables for Region Data
Table Name Contains Information About
CONTINENT Continents
COUNTRY Countries
STATE States
COUNTY Counties
CITY Cities
POSTALCODE Postal codes
USERDEFINED Custom regions

Using the Region Modeling Tool
14-138 Oracle Application Server Wireless Developer’s Guide
SQL> DESCRIBE state; Name Null? Type ----------------------------------------- -------- ---------------------------- ID NOT NULL NUMBER NAME VARCHAR2(400) REFCNT NUMBER ABBR VARCHAR2(32) CONT_ID NUMBER COUNTRY_ID NUMBER DESCRIPTION VARCHAR2(2000) GEOMETRY MDSYS.SDO_GEOMETRY
SQL> DESCRIBE county; Name Null? Type ----------------------------------------- -------- ---------------------------- ID NOT NULL NUMBER NAME VARCHAR2(400) REFCNT NUMBER CONT_ID NUMBER COUNTRY_ID NUMBER STATE_ID NUMBER DESCRIPTION VARCHAR2(2000) GEOMETRY MDSYS.SDO_GEOMETRY
SQL> DESCRIBE city; Name Null? Type ----------------------------------------- -------- ---------------------------- ID NOT NULL NUMBER NAME VARCHAR2(400) REFCNT NUMBER CONT_ID NUMBER COUNTRY_ID NUMBER STATE_ID NUMBER DESCRIPTION VARCHAR2(2000) GEOMETRY MDSYS.SDO_GEOMETRY MIN_LON NUMBER MIN_LAT NUMBER MAX_LON NUMBER MAX_LAT NUMBER
SQL> DESCRIBE postalcode; Name Null? Type ----------------------------------------- -------- ---------------------------- ID NOT NULL NUMBER NAME VARCHAR2(400)
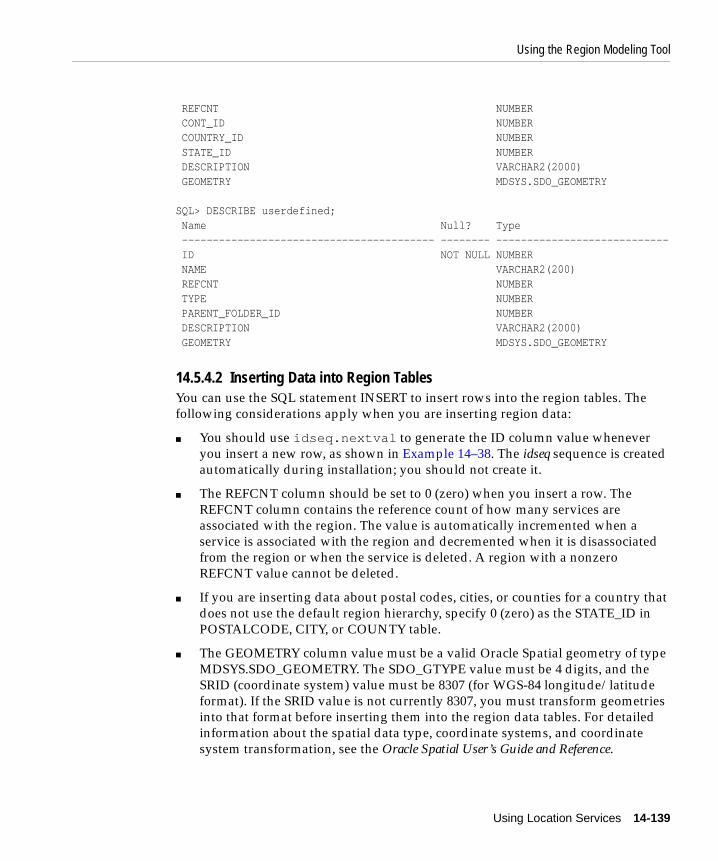
Using the Region Modeling Tool
Using Location Services 14-139
REFCNT NUMBER CONT_ID NUMBER COUNTRY_ID NUMBER STATE_ID NUMBER DESCRIPTION VARCHAR2(2000) GEOMETRY MDSYS.SDO_GEOMETRY
SQL> DESCRIBE userdefined; Name Null? Type ----------------------------------------- -------- ---------------------------- ID NOT NULL NUMBER NAME VARCHAR2(200) REFCNT NUMBER TYPE NUMBER PARENT_FOLDER_ID NUMBER DESCRIPTION VARCHAR2(2000) GEOMETRY MDSYS.SDO_GEOMETRY
14.5.4.2 Inserting Data into Region TablesYou can use the SQL statement INSERT to insert rows into the region tables. The following considerations apply when you are inserting region data:
■ You should use idseq.nextval to generate the ID column value whenever you insert a new row, as shown in Example 14–38. The idseq sequence is created automatically during installation; you should not create it.
■ The REFCNT column should be set to 0 (zero) when you insert a row. The REFCNT column contains the reference count of how many services are associated with the region. The value is automatically incremented when a service is associated with the region and decremented when it is disassociated from the region or when the service is deleted. A region with a nonzero REFCNT value cannot be deleted.
■ If you are inserting data about postal codes, cities, or counties for a country that does not use the default region hierarchy, specify 0 (zero) as the STATE_ID in POSTALCODE, CITY, or COUNTY table.
■ The GEOMETRY column value must be a valid Oracle Spatial geometry of type MDSYS.SDO_GEOMETRY. The SDO_GTYPE value must be 4 digits, and the SRID (coordinate system) value must be 8307 (for WGS-84 longitude/latitude format). If the SRID value is not currently 8307, you must transform geometries into that format before inserting them into the region data tables. For detailed information about the spatial data type, coordinate systems, and coordinate system transformation, see the Oracle Spatial User’s Guide and Reference.

Using the Region Modeling Tool
14-140 Oracle Application Server Wireless Developer’s Guide
Example 14–38 shows an INSERT statement to insert a row for Concord, Massachusetts into the CITY table. It assumes that the geometry representing Concord exists in another table named MY_CITIES.
Example 14–38 Inserting a City
DECLARE city_geom MDSYS.SDO_GEOMETRY;
BEGIN
-- Populate geometry variable with city geometry from another table.SELECT m.geometry into city_geom FROM my_cities m WHERE m.name = ’Concord’;
-- Insert into the CITY table.INSERT INTO CITY VALUES ( idseq.nextval, ’Concord’, 0, 5004, -- continent ID for North America 5006, -- country ID for USA 5028, -- state ID for Massachusetts ’The historic town of Concord’, city_geom, -71.35, -- minimum longitude 42.46, -- minimum latitude -71.34, -- maximum longitude 42.47); -- maximum latitudeEND;/
The minimum and maximum longitude and latitude values in the CITY table are required and are used by traffic support services. The minimum longitude and latitude values identify the lower-left corner, and the maximum longitude and latitude values identify the upper-right corner, of the bounding rectangle.
14.5.5 Region Modeling APIThe region modeling tool is based on the region modeling API, which is implemented through the RegionModel interface of the oracle.panama.spatial.region package. The RegionModel interface includes methods for getting the postal code, state, and country, and for determining different kinds of interaction among regions.

Integrating an External Content Provider
Using Location Services 14-141
14.6 Integrating an External Content ProviderOracleAS Wireless supports access to a number of location-related services, such as geocoding, driving directions, business directory (Yellow Pages) services, and mapping. It does not perform many of the services itself, but relies on external providers. This section describes the features that you, the provider, can implement and the interface options for communicating with OracleAS Wireless.
External providers can integrate their products with OracleAS Wireless by creating a custom service proxy for each type of location-based service that you provide. A service proxy is a Java class implementing a common interface; and for each service (geocoding, mapping, routing, traffic, yellow pages), there is one interface. A service proxy is executed on the same system as OracleAS Wireless, rather than on your server.Service Proxies
The service proxy must translate between the interface for your server and the interface specified by Oracle location services. It must also extend an Oracle-supplied class to provide the necessary internal infrastructure.
Depending on the type of service (geocoding, mapping, and so on), you must implement the appropriate interface from the following list:
oracle.panama.spatial.geocoder.Geocoderoracle.panama.spatial.mapper.Mapperoracle.panama.spatial.router.Routeroracle.panama.spatial.traffic.TrafficReporteroracle.panama.spatial.yp.YPFinderSimple
Within the interface, there are functions that you must implement, may implement, and must not implement, as explained in Section 14.6.2.
Depending on the type of service (geocoding, mapping, and so on), you must extend the appropriate interface from the following list:
oracle.panama.spatial.core.geocoder.GeocoderImplXMLImpersonatororacle.panama.spatial.core.mapper.MapperImplXMLImpersonatororacle.panama.spatial.core.router.RouterImplXMLImpersonatororacle.panama.spatial.core.traffic.TrafficReporterImplXMLImpersonatororacle.panama.spatial.core.yp.YPFinderSimpleImplXMLImpersonator
For example, if you implement the oracle.panama.spatial.geocoder.Geocoder interface, you must also extend the following interface:
oracle.panama.spatial.core.geocoder.GeocoderImplXMLImpersonator

Integrating an External Content Provider
14-142 Oracle Application Server Wireless Developer’s Guide
14.6.1 Accessing External URLs from Inside a FirewallThe service proxies are located on the OracleAS Wireless server, which might be behind a firewall. Content providers, on the other hand, are usually outside the firewall. In this case, the proxy must use the OracleAS Wireless firewall proxy setup (which is different from the location service proxy setup). The following example is an excerpt that shows how to set the firewall proxy, with the important lines in bold type:
URL u = …
try { URLConnection c = u.openConnection(); ProxyFirewall.setProxyAuthorization(c); c.connect(); BufferedReader bReader = new BufferedReader( new InputStreamReader( c.getInputStream())); ... } catch(...) { ... } ...
14.6.2 Functions to ImplementThe available functions for a service proxy are in three categories:
■ Must be implemented: functions that must be implemented as essential parts of each proxy
■ May be implemented: functions that are optional, but that you can implement (for example, to provide features that distinguish your product from those of competitors)
■ Must not be implemented: functions that are already implemented by the framework and must not be implemented by the proxy
The Javadoc documentation for each interface explains each available function.
This section lists the functions in each category for each type of service (geocoding, mapping, and so on), with the class name in bold. However, for some types of services, no functions are in the "may be implemented" category.

Integrating an External Content Provider
Using Location Services 14-143
14.6.2.1 Geocoding Services: Available FunctionsA geocoding service proxy must implement the following function:
public Location[] geocodeAddress(Location inp, String matchMode);
A geocoding service proxy may implement the following functions:
public Location[][] geocodeAddresses(Location[] inp, String matchMode);public Location[] reverseGeocodePoint(Point pt);
A geocoding service proxy must not implement the following function:
public String xmlGeocode(Document xmlRequest);
14.6.2.2 Mapping Services: Available FunctionsA mapping service proxy must implement the following function:
public String getMapURL(Point[] locations, ImageFormats fileType, double minLon, double maxLon, double minLat, double maxLat, int width, int height, boolean allowTurning);
A mapping service proxy must not implement the following functions:
public String getMapURL(Point[] locations, ImageFormats fileType, int width, int height, boolean allowTurning);public String getMapURL(Point location, ImageFormats fileType, int width, int height, boolean allowTurning);public String getMapURL(RoutingResult route, boolean allowTurning);public String getMapURL(Maneuver man, boolean allowTurning);public String getMapURL(Point location, ImageFormats fileType, double minLon, double maxLon, double minLat, double maxLat, int width, int height, boolean allowTurning);public String[][] getMapURLs(Point[] locations, ImageFormats fileType, int width, int height, int subdivisionLevel, boolean allowTurning);public String[][] getMapURLs(Point[] locations, ImageFormats fileType, double minLon, double maxLon, double minLat, double maxLat, int width, int height, int subdivisionLevel, boolean allowTurning);public String[][] getMapURLs(Point location, ImageFormats fileType, int width, int height, int subdivisionLevel, boolean allowTurning);public String[][] getMapURLs(Point location, ImageFormats fileType, double minLon, double maxLon, double minLat, double maxLat, int width, int height, int subdivisionLevel, boolean allowTurning);public String[][] getMapURLs(RoutingResult route, int subdivisionLevel, boolean allowTurning);public String[][] getMapURLs(Maneuver man, int subdivisionLevel, boolean

Integrating an External Content Provider
14-144 Oracle Application Server Wireless Developer’s Guide
allowTurning);public String xmlMap(Document xmlRequest);
14.6.2.3 Routing Services: Available FunctionsA routing service proxy must implement the following function:
public RoutingResult computeRoute(Point source, Point destination, Point[] viaPoints, RoutingSettings opt, Locale locale);
A routing service proxy may implement the following functions:
public RoutingResult computeRoute(Location source, Location destination, Location[] viaPoints, RoutingSettings opt, Locale locale);public Ranking rankByDrivingDistance(Point source, Point[] locations);
A routing service proxy must not implement the following function:
public String xmlRoute(Document xmlRequest);
14.6.2.4 Traffic Services: Available FunctionsA traffic service proxy must implement the following functions:
public TrafficReport getReportViaCity(CityInfo city) throws LBSException;public TrafficReport getReportViaLocation(Point location, double radius, int unit, CityInfo city) throws LBSException;public TrafficReport getReportViaRoute(RouteInfo route, CityInfo city) throws LBSException;public TrafficReport getReportViaRoute(RouteInfo route, String direction, CityInfo city) throws LBSException;
A traffic service proxy must not implement the following functions:
public TrafficCityManager getCityManager();public TrafficReport getReportViaLocation(Point location, double radius, int unit) throws LBSException;public TrafficReport getReportViaAddress(Location address, double radius, int unit) throws LBSException;public String xmlTraffic(Document xmlRequest) throws LBSException;
14.6.2.5 Business Directory (YP) Services: Available FunctionsA business directory (YP) service proxy must implement the following functions:
public YPBusiness[] getBusinessesInCity(String businessName, String country, String state, String city, Locale locale);public YPBusiness[] getBusinessesInState(String businessName, String country,

Integrating an External Content Provider
Using Location Services 14-145
String state, Locale locale);
A business directory (YP) service proxy may implement the following functions:
public Boolean anyBusinessesInCity(YPCategory category, String country, String state, String city);public Boolean anyBusinessesInState(YPCategory category, String country, String state);public Boolean anyBusinessesInPCode(YPCategory category, String country, String postalCode);public Boolean anyBusinessesInRadius(YPCategory category, Point location, double metersRadius);public YPBusiness[] getBusinessesInRadius(String businessName, Point location, double metersRadius, Locale locale);public YPBusiness[] getBusinessesInPCode(String businessName, String country, String postalCode, Locale locale);public YPBusiness[] getBusinessesInCity(YPCategory category, String country, String state, String city, Locale locale);public YPBusiness[] getBusinessesInState(YPCategory category, String country, String state, Locale locale);public YPBusiness[] getBusinessesInRadius(YPCategory category, Point location, double metersRadius, Locale locale);public YPBusiness[] getBusinessesInPCode(YPCategory category, String country, String postalCode, Locale locale);public YPBusiness[] getNearestNBusinesses(String businessName, Point location, int n, Locale locale);public YPBusiness[] getNearestNBusinesses(YPCategory category, Point location, int n, Locale locale);
A business directory (YP) service proxy must not implement the following functions:
public Boolean anyBusinessesInSameCity(YPCategory category, Location loc);public Boolean anyBusinessesInSameState(YPCategory category, Location loc);public Boolean anyBusinessesInSamePCode(YPCategory category, Location loc);public YPBusiness[] getBusinessesInSameCity(String businessName, Location loc, Locale locale);public YPBusiness[] getBusinessesInSameState(String businessName, Location loc, Locale locale);public YPBusiness[] getBusinessesInSamePCode(String businessName, Location loc, Locale locale);public YPBusiness[] getBusinessesInSameCity(YPCategory category, Location loc, Locale locale);public YPBusiness[] getBusinessesInSameState(YPCategory category, Location loc, Locale locale);

Integrating a Mobile Positioning Provider
14-146 Oracle Application Server Wireless Developer’s Guide
public YPBusiness[] getBusinessesInSamePCode(YPCategory category, Location loc, Locale locale);public YPBusiness[] getBusinessesInSameCity(String businessName, YPCategory category, Location loc, Locale locale);public YPBusiness[] getBusinessesInSameState(String businessName, YPCategory category, Location loc, Locale locale);public YPBusiness[] getBusinessesInSamePCode(String businessName, YPCategory category, Location loc, Locale locale);public YPBusiness[] getBusinessesInCity(String businessName, YPCategory category, String country, String state, String city, Locale locale);public YPBusiness[] getBusinessesInState(String businessName, YPCategory category, String country, String state, Locale locale);public YPBusiness[] getBusinessesInRadius(String businessName, YPCategory category, Point location, double metersRadius, Locale locale);public YPBusiness[] getBusinessesInPCode(String businessName, YPCategory category, String country, String postalCode, Locale locale);public YPBusiness[] getNearestNBusinesses(String businessName, YPCategory category, Point location, int n, Locale locale);public String xmlYP(Document xmlRequest);
14.7 Integrating a Mobile Positioning ProviderThis section describes how to implement the service proxy for integrating an external mobile positioning provider into OracleAS Wireless. Before you integrate a mobile positioning provider, be sure that you understand the following:
■ Mobile positioning concepts and options, as explained in Section 14.3
■ External provider concepts in Section 14.6
Mobile positioning includes the following steps:
1. Check the location privacy settings to determine if the positioning request is authorized.
2. Get the user’s mobile station ID through the provider selector hook (described in Section 14.3.2.4). The system default is to use the Mobile Station ID field in the user profile.
3. Check the location cache. If location caching is enabled and the request can be satisfied from the cache, return the location found in the cache, and skip step 4.
4. If the location not satisfied from the cache, invoke one or more mobile positioning proxies to acquire the user’s current location.

Integrating a Mobile Positioning Provider
Using Location Services 14-147
Step 4 in the preceding list (invoking one or more mobile positioning providers) involves the following specific actions:
1. Examine the information about mobile positioning providers in the system configuration file. This information includes the following: provider name, proxy implementation class name, version number, mobile positioning server URL, mobile positioning user name and password, and any additional parameters.
2. Instantiate the proxy class.
3. Invoke the requestPosition() method in the class to acquire the location of a mobile station.
14.7.1 Implementing a Mobile Positioning ProxyTo integrate a mobile positioning provider, you must implement the oracle.panama.mp.Positioner interface.
The constuctor of the class must have the following format:
public MyMPImpl (String providerName, String providerImpl, String version, String url, String username, String password, String parameters);
The mobile positioning framework reads this information from the system configuration and uses it to construct your proxy implementation. The class stores the information in class variables for later use.
In addition to the constructor, the class must implement the following methods:
public PositionResult requestPosition ( String msid);public PositionResult requestPosition ( String msid, PositionQoS qos);public PositionResult[] requestPosition ( String[] msids);public PositionResult[] requestPosition ( String[] msids, PositionQoS qos);
The first method takes a mobile station ID as the parameter.
The second method takes a mobile station ID and a quality of position (PositionQoS) parameter. The PositionQoS parameter specifies the maximum acceptable age of the mobile station’s location that can served out of the cache. For example, an application may be willing to accept a user’s location that is as much as

Integrating a Mobile Positioning Provider
14-148 Oracle Application Server Wireless Developer’s Guide
5 minutes old. In your proxy implementation, you do not need to check with the Oracle Application Server Wireless location cache to determine if the location already exists, because that logic is implemented in the mobile positioning framework. In other words, if a location exists in the system cache and satisfies the request, the proxy will not be invoked. The proxy needs to consider the PositionQoS parameter only if the actual mobile positioning provider has a similar caching concept and can use this parameter.
The third and fourth methods are similar to the first and second methods, respectively, but they are used to request the locations of multiple mobile stations. If the actual mobile positioning provider can handle bulk requests, the proxy should take advantage of this capability and be able to request multiple locations in a single call (for example, using a FOR loop). If the provider cannot handle multiple requests, the proxy must call the provider multiple times, once for each location.
Each method returns a PositionResult object or an array of these objects. The PositionResult object represents the current location of a mobile station. For more information about the PositionResult object, see the Javadoc documentation for the oracle.panama.mp.PositionResult and oracle.panama.mp.PositionArea classes.
The following guidelines apply to using the PositionResult object:
■ If the mobile positioning provider does not return one or more values in the object, set these values to be null.
■ The PositionResult object includes an array of PositionArea objects. If the mobile positioning provider returns only one PositionArea object, you still must still include that single object in an array.
Your implementation of the oracle.panama.mp.Positioner interface must also handles exceptions and error, as explained in Section 14.7.2.
14.7.2 Handling Exceptions and Errors with Mobile PositioningThis section describes guidelines for handling runtime mobile positioning errors and exceptions, which can occur in any of the following ways:
■ The provider’s response includes an error code and error message.
■ An exception is thrown during parsing.
■ If the request is for positioning multiple mobile stations (using the third and fourth requestPosition methods described in Section 14.7.1), the number of returned results and the number of subscriber IDs do not match.

Integrating a Mobile Positioning Provider
Using Location Services 14-149
For any errors or exceptions from a request for a single subscriber ID or multiple subscriber IDs, check the error code and error message from the provider:
■ If the error is a severe error, return null immediately to fail over. Severe errors include authentication errors, errors during XML parsing, and other errors that are not caused by the proxy implementation and that cannot be resolved by re-sending the request.
■ If the error refers to unknown subscriber ID, construct and return a PositionResult object with the error ID UNKNOWNSUBSCRIBER and the error message UNKNOWNSUBSCRIBER_STR. You can later retrieve the error message by using the getErrorMessage() method on the PositionResult object.
■ For other error codes, construct and return a PositionResult object with the error ID and error message from the provider.

Integrating a Mobile Positioning Provider
14-150 Oracle Application Server Wireless Developer’s Guide

Enabling User Customization 15-1
15Enabling User Customization
Each section of this document presents a different topic. These sections include:
■ Section 15.1, "Overview of User Preferences"
■ Section 15.2, "Multiple Customization Profiles"
■ Section 15.3, "Presets"
■ Section 15.4, "Location Marks"
■ Section 15.5, "User Device Management"
■ Section 15.6, "User and Group Management"
■ Section 15.7, "Service Management"
15.1 Overview of User PreferencesOracleAS Wireless provides secure, reliable, and scalable facilities to manage User Preferences. User Preferences enable development of adaptable applications that personalize interactions and increase mobile application efficiency. This facility allows rapid development and deployment of context-aware, multi-modal, multi-channel applications. The result is enhanced user experiences and turning a series of anonymous transactions into an enduring one-to-one customer relationship.
This chapter describes OracleAS Wireless’s facilities for managing user preferences and step-by-step examples for how to apply the user preferences to develop advanced customization features. Customization typically refers to how a user adapts the system or how the system adapts to the particular needs and preferences of a user. The user-centric customization features give the users control over how they adapt the system to their needs and preferences. The system can also introduce mass customization techniques that apply user profiling (for example: by

Overview of User Preferences
15-2 Oracle Application Server Wireless Developer’s Guide
associating a user with like-minded group of users) to predict the user’s needs and preferences, and adapt the system accordingly.
Customization can be performed by the applications that understand the users’ needs based on their roles and preferences — for example, it is beneficial to present information in different ways to customers, suppliers, and employees. By knowing enough about a user’s preferences and needs, the applications can intelligently enhance user experiences.
You can introduce mass customization techniques using automatic user profiling. The usage history of users can be found in the ptg_service_log and ptg_session_ log tables in the OracleAS Wireless repository; some of the examples in this chapter describe how to extend the OracleAS Wireless runtime to introduce mass customization. OracleAS Wireless includes a sample customization portal to enable end-users to manage their preferences from a PC browser.
The sample customization portal in OracleAS Wireless is developed using Oracle Cabo UI XML (uix) and UI Beans. The customization portal enables end users to customize their user preferences around the usual artifacts such as user devices, folders, applications (also known as services), bookmarks, notification events (also known as alerts), notification addresses, location marks, and presets. In addition, users can specify the contact rules and location privacy rules used by collaboration services. The UIX components and class library are categorized by specific functions. You can reuse the UIX components to rebrand the sample customization portal. By using and combining the UIX components, you can also develop your own brand of customization portals or integrate the customization wizards to your existing portals.
The example customization portal enables users to organize their folders, subscribe or unsubscribe to services and create or delete bookmarks and quicklinks under one or more customization profiles. Users can:
■ Create new location marks and geocode the location marks.
Note: UIX is not required to customize the customization portal; any web UI framework may be used.
See Runtime API, Data Model API, and the sample UIX components for guidance when developing customization portals. You will find the concepts and examples provided in this chapter useful for designing the customization features to empower end users.

Overview of User Preferences
Enabling User Customization 15-3
■ Edit presets that contain personal information or preference settings.
■ Create new user devices, specify the manufacturer and models for the devices. Based on the device manufacturer and model names, the system can determine the device capabilities from its device repository.
■ Specify device addresses and validate the addresses to receive asynchronous notifications. Users can subscribe to notification events for these devices.
OracleAS Wireless also provides a sample Device Customization Portal that enables users to customize their personal portal directly from wireless devices, such as web phones and PDAs; the Device Customization Portal can be accessed from set-up buttons on wireless devices. This portal adapts to the limited display and input capability of the devices and provides a special mode to enable users to change user preference settings, organize their folders and service links, create, modify, or delete location marks, bookmarks, quick links, and customization profiles.
Multiple user customization profiles make the interaction from wireless devices more efficient and more personalized. Users can maintain one or more of their customization profiles and manage them from a PC or Device Customization Portal. They can switch between different customization profiles in their devices.
OracleAS Wireless includes the option to save the input values that a user has entered as a preset value for future invocations. Furthermore, OracleAS Wireless includes options to enter a symbolic name to represent presets. These symbolic names allow easy selection if there are more than one group of preset values. In addition, users can manage their presets from any device or PC.
Presets can contain as many attributes as required to match the fields in web forms. Application developers can create Preset Categories to define the attributes of the Presets. Each Preset Category consists of a Preset Category Name and any number of Preset Attributes. For example, the name of a Preset Category can be Auto-Fill Address Forms Fields whose first, second, and third attributes are Street, City, and ZIP. Users can have multiple Presets under this category, for example, my home, my work, Mom’s home, which can be used to auto-fill the forms for driving direction services.
User Preferences in OracleAS Wireless include Contact Rules and Location Privacy and Authorization Rules. The Contact Rules are one of the user preference settings used by collaboration services and the messaging service. A Contact Rule describes how the user wishes to receive calls and messages. For example, a user can set a contact rule for meetings, wherein the user receives all notifications on a cell phone. You may define multiple contact rules, each with appropriate settings for a given set of circumstances. At any one time, only one contact rule is active. The active Contact Rule controls which devices are available to the user and the way in which the user

Multiple Customization Profiles
15-4 Oracle Application Server Wireless Developer’s Guide
wishes to be notified. The Location Privacy and Authorization Rules are used by location-based collaboration services. The location rules let the user control if and when their locations can be revealed to the location-based applications. The rules also let users authorize which services or users can query their locations.
15.2 Multiple Customization ProfilesOracleAS Wireless enables development of user-centric web services that adapt the contents not only to the device and network capability but also to the end-user’s preferences. The device portals typically provide a menu of services which may be organized under several folders and subfolders. Menu-driven device portals are designed to optimize the interactive efficiency of wireless devices. Service menus are usually static, but the portal may intelligently suggest new services to the user as it learns more about the user’s needs and preferences. OracleAS Wireless Server enables end-users to personalize the portal by controlling the arrangement of services in the menus. The portal can suggest new services to the user, but the user still controls when to include or exclude each service in the user’s personalized portal. Administrators can explicitly prevent end-users from rearranging or removing certain services (such as promotions, preferred partners, emergency services) from their personalized portals.
15.2.1 ConceptsProfiles enable users to create multiple personalized versions of the portals for their devices; the service menus may be different from one profile to another. For example, suppose that one of the folders for a user contains the following services:
■ News
■ Stocks
■ Map
■ Phone Directory
■ Shopping
In the Home profile, the service menu in the folder may be customized as:
Note: For more information on Contact Rules, see OracleAS Wireless Administrator’s Guide.

Multiple Customization Profiles
Enabling User Customization 15-5
■ Phone Directory
■ News
■ Stocks
The same folder may be customized differently for the Traveling profile as:
■ Map
■ Shopping
■ Phone Directory
Multiple profiles can be created for different roles, locations or contexts, device and network characteristics, or any other taxonomy.
Profiles may be created for each of these roles to increase efficiency and accessibility of services. For a traveling user who frequents multiple metropolitan centers, profiles may be created for each location. For example, a user’s customization Profile for a cultural center (such as Rome, Italy) may include services for theaters, museums, and transit schedules. The same user may have another profile for the Lake Baikal area with a different combination of services. A location-aware portal can automatically set the session Profiles for users when they connect from different locations. A Profile may be associated with a Location Mark as described in the section on Location Marks.
OracleAS Wireless runtime controllers can be extended to automatically provision the Profiles for users, for example to provide different views of the portal from more than one type of device. The example in the following section describes how to automatically provision a profile for a user. Alternatively, end-users can create any number of Profiles for any context through the Customization Portal using a PC browser. Through OracleAS Wireless Tools, they can customize the arrangement of services for each of the Profiles.
Administrators can specify the default sorting rules for shared folders. Under the Profile architecture, end-users can alter the default sorting rules to personalize their own views of shared folders. They can choose from the following sorting rules:
■ specified sequence numbers
■ lexicographic ordering
■ date of creation
■ frequency of access

Multiple Customization Profiles
15-6 Oracle Application Server Wireless Developer’s Guide
■ last access time
The sequence numbers, lexicographic ordering, and date-of-creation produce static views of the folders. Sorting by frequency of access or last access time produces a dynamic view of the folders. Furthermore, administrators can control the static or dynamic arrangements of some of the applications in a folder, such as emergency, promotion and preferred partner’s services, that may not be rearranged by end-users. Administrators can designate the segments of the views that may be rearranged or hidden by end-users.
The view of a folder may be segmented such that one segment is sorted by the administrator ’s specification and another segment is sorted by a user’s specification.
The Profile architecture enables end-users to specify the visibility of an application in the profile, provided the administrator does not explicitly disable the personalizable attribute of the application. This enables end-users to subscribe or unsubscribe to an application that may be placed in the user’s folder by the system. The system may also apply location-based filtering of services in the location-enabled folders, which offers additional dynamism to the views that vary with the user’s mobile position.
Applications that access runtime objects can get the current Profile from the ServiceContext.getProfile method. See Section 9.4.2, "MCS Runtime API" for a description of runtime objects. This method first looks up the Profile in the current Request. If the Request does not specify a Profile, the method looks in the runtime Session for the session Profile. If the session Profile is empty, then the method looks up the default Profile of the user. This resolution strategy lets the Request override the session Profile, and the session to override the default user profile. ServiceContext.getProfile will return null if no Profile is found. Applications should be designed to react with default behavior when the Profile is not specified.
15.2.2 Sample ApplicationsThe following example illustrates how to automatically provision a user device, and the device Profile for each of the device types that a user may use. SampleRequestListener listens for the serviceBegin() event and provisions a new user device and Profile in lines [22], [25], and [27]; if the Request and Session do not already specify a Profile, line [17] and [19]. For the new Profile, it sets the user’s home folder to sort the services in the home folder by the last access time of the service in line [36]. For each service that is view-customizable in line [39], it sets the service to be hidden in the Profile in line [40]. End-users can later customize the

Multiple Customization Profiles
Enabling User Customization 15-7
Profiles to unhide the services that they want to use. This must be done only once after the Profiles are first created. The listener then sets the Profile in the Request in line [54].
import oracle.panama.model.*;import oracle.panama.rt.Session;import oracle.panama.rt.Request;import oracle.panama.rt.event.RequestAdapter;import oracle.panama.rt.event.RequestEvent;import oracle.panama.rt.event.AbortServiceException;import oracle.panama.PanamaException;
public class SampleRequestListener extends RequestAdapter {
public void serviceBegin(RequestEvent event) throws AbortServiceException { Request request = event.getRequest(); Session session = request.getSession(); User user = session.getUser();
Profile profile = request.getProfile(); //[17] if (profile == null) profile = session.getProfile(); //[19] if (profile == null) { Device device = request.getDevice(); String deviceName = device.getName(); Profile deviceProfile; synchronized(user) { ModelFactory factory = MetaLocator.getInstance().getModelFactory(); UserDevice userDevice = user.lookupUserDevice(deviceName); boolean deviceProfileCreated = false; if (userDevice == null) { userDevice = user.createUserDevice(); //[22] userDevice.setName(deviceName); userDevice.setDisplayName("My user device name for " + deviceName); try { factory.save(); deviceProfileCreated = true; } catch (PanamaException ex) { deviceProfile = null; } } deviceProfile = userDevice.getUserProfile(); if (deviceProfile == null) { deviceProfile = user.lookupProfile(deviceName); //[25] if (deviceProfile == null) { deviceProfile = user.createProfile(deviceName); //[27] } try {
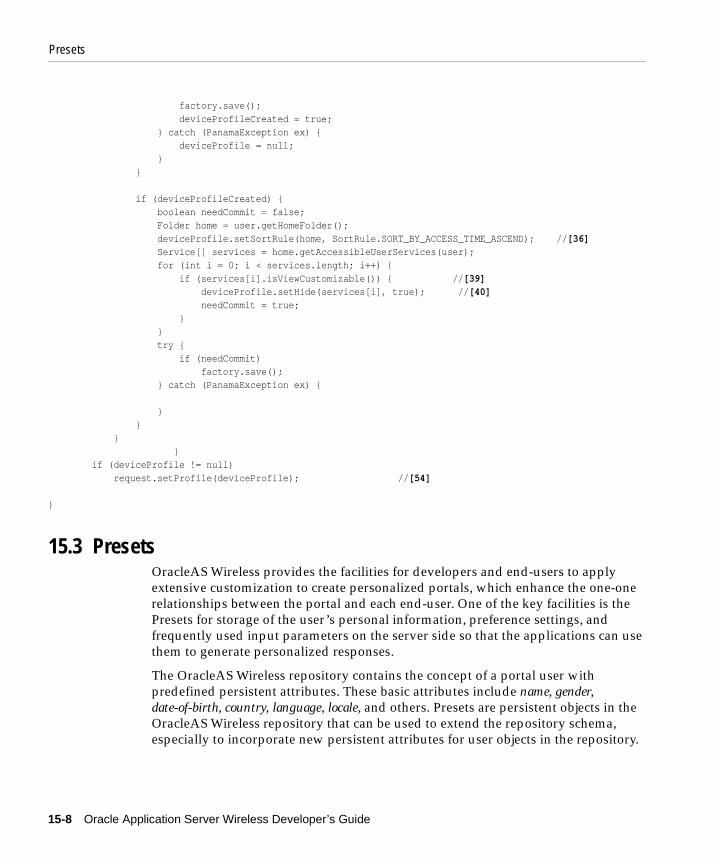
Presets
15-8 Oracle Application Server Wireless Developer’s Guide
factory.save(); deviceProfileCreated = true; } catch (PanamaException ex) { deviceProfile = null; } } if (deviceProfileCreated) { boolean needCommit = false; Folder home = user.getHomeFolder(); deviceProfile.setSortRule(home, SortRule.SORT_BY_ACCESS_TIME_ASCEND); //[36] Service[] services = home.getAccessibleUserServices(user); for (int i = 0; i < services.length; i++) { if (services[i].isViewCustomizable()) { //[39] deviceProfile.setHide(services[i], true); //[40] needCommit = true; } } try { if (needCommit) factory.save(); } catch (PanamaException ex) {
} } } } if (deviceProfile != null) request.setProfile(deviceProfile); //[54]
}
15.3 PresetsOracleAS Wireless provides the facilities for developers and end-users to apply extensive customization to create personalized portals, which enhance the one-one relationships between the portal and each end-user. One of the key facilities is the Presets for storage of the user’s personal information, preference settings, and frequently used input parameters on the server side so that the applications can use them to generate personalized responses.
The OracleAS Wireless repository contains the concept of a portal user with predefined persistent attributes. These basic attributes include name, gender, date-of-birth, country, language, locale, and others. Presets are persistent objects in the OracleAS Wireless repository that can be used to extend the repository schema, especially to incorporate new persistent attributes for user objects in the repository.

Presets
Enabling User Customization 15-9
15.3.1 Presets Concept and ArchitecturePresets are persistent objects in the OracleAS Wireless repository that can be used to extend the user schema and incorporate users’ personal information into the repository. Developers of applications can define the Preset Categories to extend the user schema in application-specific ways, for example to incorporate the billing address, credit card charge account, bank accounts, brokerage accounts, stock portfolios, emergency contacts. These extended schemas may be defined and exclusively maintained by Personal Information Management (PIM) services.
Presets can also be used to incorporate user preferences into the repository. The standard user agent types and the device models in the repository describe the capabilities of devices. Individual end-users can customize some of the capabilities of the user agents. Presets for user agent profiles can be used to let end-users customize the capabilities of the user agent, for example, to enable or disable sound, select background color, select quality of service, or to disable images to minimize packet transmissions. The user agent profiles control the format of the content, but more general user preference profiles can affect the selection of the applications and response of the applications. For example, the user preference profile for sports, entertainment, technology and privacy requirements can be used by the applications to filter the contents. The Presets architecture enables the development of adaptive web services based on the emerging Composite Capability/Preference Profile (CC/PP), User Agent profile (WAP UAProf), and Platform for Privacy Preferences (P3P) standards (www.wapforum.org).
Presets can also store frequently-used input parameters for applications. The applications can define the attributes of Presets to closely match the forms used by the applications. These Presets can be used to auto-fill forms. The applications can store user inputs as the Presets for subsequent use. The Presets names uniquely identify the input parameter values and can be used as shorthand to significantly reduce the amount of data entry.
There are different categories of Presets in the repository. Each Presets relation contains a set of preset attribute values whose types and relations are defined by the Preset Category. A user may own one or more Presets relations in each of the Preset Categories. A Preset Category contains a collection of Preset Descriptors, each of which provide the metadata for the attributes in the Presets relation. The metadata of an attribute includes the name, type, size, format, and description of the attribute. For example, a Presets relation of the address book Preset Category may contain the name, address, and phone number attributes of a contact for the user. Such a Preset Category may be defined and exclusively maintained by a Personal Information Management (PIM) application. Another Preset Category may define the attributes of the Presets relations that contain the stock symbols, names, and classifications of

Presets
15-10 Oracle Application Server Wireless Developer’s Guide
the companies in the user’s watch list or portfolio. The stock symbols in this category can be used as input parameters for the stock quote service.
The name of the Preset Category must be unique within the repository. Likewise, the name of the Preset Descriptor must be unique within the Preset Category to which it belongs. The name of the Presets relation is optional but if given a name, it must be unique among the Presets relations that are owned by the same user within the same Preset Category. Preset Categories created programmatically are marked as system by default; they are to be maintained by the applications exclusively. System-level Preset Categories are not visible in the customization portals and cannot be edited by end users directly. The applications can set the Preset Category to non-system so that end-users may edit its Presets in the customization portal.
15.3.2 Sample ApplicationsPreset Categories can be created programmatically as shown in the following examples. They can also be created from OracleAS Wireless Tools > Preset Definitions control panel.
15.3.2.1 Example 1: Adding Attributes to the User SchemaThe following code example shows how to create a Preset Category Billing Address to extend a user schema. The method first checks in line [13] if the Billing Address category already exists in the repository. If the category does not exist, the ModelFactory method createPresetCategory(Billing Address) is used to create the category in line [21]. Lines [23] through [27] define the first attribute Addressee Name of the category. Line [25] defines that the first attribute is comprised of a single line of text. In contrast, the second attribute Street Address is defined as a multi-line text field in line [31]. The new Preset Category is committed in line [47].
import oracle.panama.model.ModelFactory;import oracle.panama.model.PresetCategory;import oracle.panama.model.PresetDescriptor;import oracle.panama.ArgumentType;import oracle.panama.PanamaException;
public void createAddressBook() throws PanamaException {
ModelFactory factory = MetaLocator.getInstance().getModelFactory(); ModelServices services = MetaLocator.getInstance().getModelServices();
PresetCategory category; try {

Presets
Enabling User Customization 15-11
category = services.lookupPresetCategory("Billing Address"); [13] } catch (PanamaRuntimeException ex) { category = null; }
if (category != null) { return; // category already exists } category = factory.createPresetCategory("Billing Address"); [21]
PresetDescriptor descriptor = category.createPresetDescriptor("Addressee Name"); [23] descriptor.setDescription("The name of the addressee"); descriptor.setPresetType(ArgumentType.SINGLE_LINE); [25] descriptor.setStoredType(Java.sql.Types.VARCHAR); descriptor.setSize(new Long(40));[27]
descriptor = category.createPresetDescriptor("Street Address"); descriptor.setDescription("The street address"); descriptor.setPresetType(ArgumentType.MULTI_LINE); [31] descriptor.setStoredType(Java.sql.Types.VARCHAR); descriptor.setSize(new Long(120));
descriptor = category.createPresetDescriptor("State"); descriptor.setDescription("The name of the state"); descriptor.setPresetType(ArgumentType.SINGLE_LINE); descriptor.setStoredType(Java.sql.Types.VARCHAR); descriptor.setSize(new Long(2));
descriptor = category.createPresetDescriptor("Zip code"); descriptor.setDescription("The postal zip code"); descriptor.setPresetType(ArgumentType.SINGLE_LINE); descriptor.setStoredType(Java.sql.Types.NUMERIC); descriptor.setSize(new Long(5));
factory.save(); [47] }
The name of the Preset Category must be unique in the repository. The createPresetCategory() method of the ModelFactory will throw oracle.panama.model.NameUniquenessViolationException if the application tries to create a Preset Category with the same name. Likewise, the name of the Preset Descriptor must be unique within the Preset Category. The createPresetDescriptor() method of the PresetCategory will throw oracle.panama.model.NameUniquenessViolationException if the
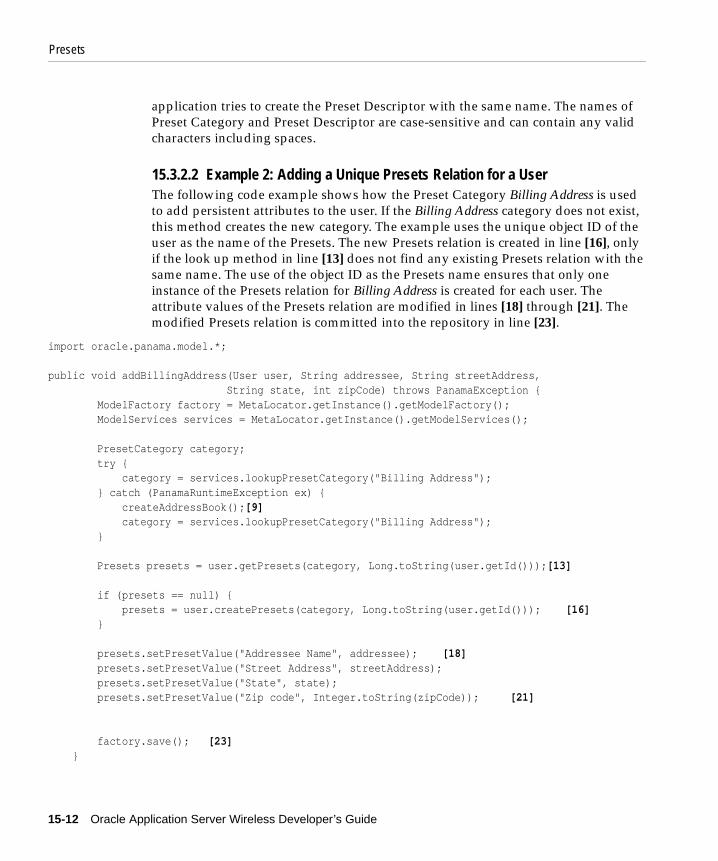
Presets
15-12 Oracle Application Server Wireless Developer’s Guide
application tries to create the Preset Descriptor with the same name. The names of Preset Category and Preset Descriptor are case-sensitive and can contain any valid characters including spaces.
15.3.2.2 Example 2: Adding a Unique Presets Relation for a UserThe following code example shows how the Preset Category Billing Address is used to add persistent attributes to the user. If the Billing Address category does not exist, this method creates the new category. The example uses the unique object ID of the user as the name of the Presets. The new Presets relation is created in line [16], only if the look up method in line [13] does not find any existing Presets relation with the same name. The use of the object ID as the Presets name ensures that only one instance of the Presets relation for Billing Address is created for each user. The attribute values of the Presets relation are modified in lines [18] through [21]. The modified Presets relation is committed into the repository in line [23].
import oracle.panama.model.*;
public void addBillingAddress(User user, String addressee, String streetAddress, String state, int zipCode) throws PanamaException { ModelFactory factory = MetaLocator.getInstance().getModelFactory(); ModelServices services = MetaLocator.getInstance().getModelServices();
PresetCategory category; try { category = services.lookupPresetCategory("Billing Address"); } catch (PanamaRuntimeException ex) { createAddressBook();[9] category = services.lookupPresetCategory("Billing Address"); }
Presets presets = user.getPresets(category, Long.toString(user.getId()));[13]
if (presets == null) { presets = user.createPresets(category, Long.toString(user.getId())); [16] } presets.setPresetValue("Addressee Name", addressee); [18] presets.setPresetValue("Street Address", streetAddress); presets.setPresetValue("State", state); presets.setPresetValue("Zip code", Integer.toString(zipCode)); [21]
factory.save(); [23] }

Presets
Enabling User Customization 15-13
The name of the Presets relation must be unique within the user’s domain. If the application tries to create the Presets again with the same name for the same user, the createPresets() method of the user will throw the oracle.panama.model.NameUniquenessViolationException. The names of Presets relations are case-sensitive and can contain any valid characters including spaces.
15.3.2.3 Example 3: Adding a Unique Presets Relation for Users’ ProfilesProfiles are repository objects that support multiple versions of personalized portals for each user. If a user has a Profile for Business and another Profile for Personal and requires a separate credit card charge account for each of the Profiles, then the following code example shows how to create the Credit Card Charge Account category and the Presets relation that is unique for each profile of the user. The unique presets name is created from the object ID of the User and the Profile in line [43] to ensure that only one Presets relation is created for each profile. The example also shows the use of preset type ArgumentType.ENUM for the Card Type attribute. The ENUM type enables you to specify the valid options for that attribute as shown in lines [28] and [30]. Lines [60] through [62] show the use of the Java.sql.Date type for persistent storage. The expiration date of the credit card is formatted using the Java.text.DateFormat utility in line [61] so that it can be parsed and stored as Date type in the repository.
import oracle.panama.model.*;import Java.util.Date;import Java.text.DateFormat;
public void addCreditAccount(User user, Profile profile, String cardNumber, String cardType, int expireMonth, int expireYear) throws PanamaException { ModelFactory factory = MetaLocator.getInstance().getModelFactory(); ModelServices services = MetaLocator.getInstance().getModelServices();
PresetCategory category; try { category = services.lookupPresetCategory("Credit Card Charge Account"); } catch (PanamaRuntimeException ex1) { try { category = factory.createPresetCategory("Credit Card Charge Account"); } catch (PanamaException ex2) { throw ex2; }

Presets
15-14 Oracle Application Server Wireless Developer’s Guide
PresetDescriptor descriptor = category.createPresetDescriptor("Account Number"); descriptor.setDescription("The credit card account number"); descriptor.setPresetType(ArgumentType.SINGLE_LINE); descriptor.setStoredType(Java.sql.Types.VARCHAR); descriptor.setSize(new Long(40));
descriptor = category.createPresetDescriptor("Card Type"); descriptor.setDescription("The type of credit card"); descriptor.setPresetType(ArgumentType.ENUM); [25] descriptor.setStoredType(Java.sql.Types.VARCHAR); descriptor.setSize(new Long(40)); String cardTypes[] = { "Master", "Visa", "Discover", "American Express", "Diners Club" }; [28] try { descriptor.setOptions(cardTypes); [30] } catch (TooManyOptionsException ex3) { throw new PanamaException(ex3); }
descriptor = category.createPresetDescriptor("Expiration Date"); descriptor.setDescription("The expiration date of the credit card"); descriptor.setPresetType(ArgumentType.SINGLE_LINE); descriptor.setStoredType(Java.sql.Types.DATE);
factory.save(); [40] }
String presetsName = Long.toString(user.getId()) + "-" + Long.toString(profile.getId()); [43] Presets presets = profile.getPresets(category, presetsName); if (presets == null) { presets = profile.createPresets(category, presetsName); }
presets.setPresetValue("Account Number", cardNumber); presets.setPresetValue("Card Type", cardType); Date date = new Date(expireYear, expireMonth, 1); [60] String dateStr = DateFormat.getInstance().format(date); [61] presets.setPresetValue("Expiration Date", dateStr); [62]
factory.save(); [64] }

Presets
Enabling User Customization 15-15
15.3.2.4 Example 4: Selecting the Presets Relation Under the Current ProfileThe following code example from a Request Listener illustrates how the Presets relation for the Credit Card Charge Account is accessed during the serviceBegin() event notification. The routine throws AbortServiceException if no valid credit card charge account is available for the user. It checks for request profile, session profile, or default user profile, in order, as shown in lines [14] and [16]. It composes the Presets name from the object ID of the User and Profile. If the Presets relation for Credit Card Charge Account is found, the listener provides the credit card information to the service as request parameters in lines[51] through [52].
import oracle.panama.rt.event.RequestEvent;import oracle.panama.rt.event.AbortServiceException;import oracle.panama.rt.Session;import oracle.panama.rt.Request;
public void serviceBegin(RequestEvent event) throws AbortServiceException { Request request = event.getRequest(); PresetCategory category; String presetsName; ModelServices services = MetaLocator.getInstance().getModelServices(); String serviceName = request.getServicePath(); User user;
Profile profile = request.getProfile(); [14] if (profile == null) { profile = request.getSession().getProfile(); [16] } if (profile != null) { user = profile.getUser(); presetsName = Long.toString(user.getId()) + "-" + Long.toString(profile.getId()); } else { user = request.getSession().getUser(); presetsName = Long.toString(user.getId()); }
try { category = services.lookupPresetCategory("Credit Card Charge Account"); } catch (PanamaRuntimeException ex1) { throw new AbortServiceException("This service " + serviceName + " requires a valid charge account"); }
Presets presets = null; if (profile == null) {

Presets
15-16 Oracle Application Server Wireless Developer’s Guide
presets = user.getPresets(category, presetsName); } else { presets = profile.getPresets(category, presetsName); if (presets == null) { presets = user.getPresets(category, presetsName); } }
if (presets == null) { throw new AbortServiceException("This service " + serviceName + " requires a valid charge account"); }
String creditCardNumber; String cardType; String expiration; try { creditCardNumber = presets.getPresetValue("Account Number"); cardType = presets.getPresetValue("Card Type"); expiration = presets.getPresetValue("Expiration Date"); } catch (PanamaException ex) { throw new AbortServiceException("This service " + serviceName + " requires a valid charge account"); }
if (! creditAvailable(creditCardNumber, cardType, expiration)) { throw new AbortServiceException("This service " + serviceName + " requires a valid charge account"); }
request.setParameter("Account Number", creditCardNumber); [51] request.setParameter("Card Type", cardType); [52] request.setParameter("Expiration Date", expiration); [53] }
The above examples are based on a scenario that requires the applications to use well-defined naming conventions for the Presets relations, although the Presets names themselves are optional. The following example illustrates a Preset Category Appointments which allows multi-set entries. The identity of the Presets relation is provided by one of the attributes in the Presets relation. In this example, the Presets are created without names.

Presets
Enabling User Customization 15-17
15.3.2.5 Example 5: Creating Presets without Given NameThe following code example shows the Preset Category Appointments that lets users create appointment events. Since the attribute Short Title can be used to identify the events, the event Presets are created without names as shown in line [65]. All event Presets for the user can be retrieved from the repository as shown in line [97]. The Appointments category is set to non-system in line [25] so that the category can be included in the customization portal for end-users to edit. The example shows the use of DateFormat utility to save the event time in line [69] and retrieve it in line [105]. The expired events are deleted from the repository in line [112]. The example also shows the use of the regular expression to constrain the format of the Phone Number attribute. The regular expression is compatible with the public domain org.apache.regexp.RE toolset. The regular expression in line [59] is for the phone numbers in the US locale, which is:
"\s*[(]?[1-9]\d{2}[)]?\s*-?\s*\d{3}\s*-?\s*\d{4}"
without the escape characters. The setPresetValue() method, line [77], in the Presets will throw PanamaException if the value does not match the regular expression. The full regular expression syntax, which is compatible with the org.apache.regexp.RE toolset, is given in the next section.
import oracle.panama.model.*;import oracle.panama.PanamaException;import oracle.panama.PanamaRuntimeException;import oracle.panama.ArgumentType;
import Java.util.Vector;import Java.util.Enumeration;import Java.util.Date;import Java.text.DateFormat;import Java.text.ParseException;
public class SamplePresets {
public void addAppointment(User user, String title, String memo, Date time, boolean alarm, String phone) throws PanamaException { ModelFactory factory = MetaLocator.getInstance().getModelFactory(); ModelServices services = MetaLocator.getInstance().getModelServices();
PresetCategory category; try { category = services.lookupPresetCategory("Appointments"); } catch (PanamaRuntimeException ex1) { try {

Presets
15-18 Oracle Application Server Wireless Developer’s Guide
category = factory.createPresetCategory("Appointments"); category.setSystem(false); [25] } catch (PanamaException ex2) { throw ex2; }
PresetDescriptor descriptor = category.createPresetDescriptor("Short Title"); descriptor.setDescription("Brief description of the event"); descriptor.setPresetType(ArgumentType.SINGLE_LINE); descriptor.setStoredType(Java.sql.Types.VARCHAR); descriptor.setSize(new Long(40));
descriptor = category.createPresetDescriptor("Memo"); descriptor.setDescription("Memo for the event"); descriptor.setPresetType(ArgumentType.MULTI_LINE); descriptor.setStoredType(Java.sql.Types.VARCHAR); descriptor.setSize(new Long(400));
descriptor = category.createPresetDescriptor("Time"); descriptor.setDescription("Time of event"); descriptor.setPresetType(ArgumentType.SINGLE_LINE); descriptor.setStoredType(Java.sql.Types.VARCHAR); descriptor.setSize(new Long(40));
descriptor = category.createPresetDescriptor("Alarm"); descriptor.setDescription("Enable or disable alarm before event"); descriptor.setPresetType(ArgumentType.SINGLE_LINE); descriptor.setStoredType(Java.sql.Types.VARCHAR); descriptor.setSize(new Long(1));
descriptor = category.createPresetDescriptor("Phone Number"); descriptor.setDescription("Optional phone number to ring for alarm"); descriptor.setPresetType(ArgumentType.SINGLE_LINE); descriptor.setStoredType(Java.sql.Types.VARCHAR); descriptor.setSize(new Long(40)); descriptor.setFormat("\\s*[(]?[1-9]\\d{2}[)]?\\s*-?\\s*\\d{3}\\s*-?\\s*\\d{4}"); [59] descriptor.setEmptyOK(true);
factory.save(); }
Presets presets = user.createPresets(category); [65]

Presets
Enabling User Customization 15-19
presets.setPresetValue("Short Title", title); presets.setPresetValue("Memo", memo); String timeStr = DateFormat.getDateTimeInstance().format(time); [69] presets.setPresetValue("Time", timeStr); if (alarm) { presets.setPresetValue("Alarm", "Y"); } else { presets.setPresetValue("Alarm", "Y"); } try { presets.setPresetValue("Phone Number", phone); [77] } catch (PanamaException ex) { // ignore }
factory.save(); }
public Presets[] getAppointments(User user) throws PanamaException { ModelFactory factory = MetaLocator.getInstance().getModelFactory(); ModelServices services = MetaLocator.getInstance().getModelServices();
PresetCategory category; try { category = services.lookupPresetCategory("Appointments"); } catch (PanamaRuntimeException ex1) { throw new PanamaException(ex1); }
Date now = new Date(System.currentTimeMillis()); Vector allPresets = user.getAllPresets(category); [97] Enumeration enum = allPresets.elements(); Vector pending = new Vector(); while (enum.hasMoreElements()) { Presets event = (Presets) enum.nextElement(); String timeStr = event.getPresetValue("Time"); Date time; try { time = DateFormat.getDateTimeInstance().parse(timeStr); [105] } catch (ParseException ex) { time = null; } if (time != null && time.after(now)) { pending.add(event);

Presets
15-20 Oracle Application Server Wireless Developer’s Guide
} else { user.deletePresets(category, new Long(event.getId())); [112] } } factory.save();
Presets presetsArray[] = new Presets[pending.size()]; pending.copyInto(presetsArray); return presetsArray; }
}
15.3.3 Regular Expressions Syntax for the Presets Attribute FormatsThe following tables shows the full regular expression syntax that can be used to define formats.
Table 15–1 Characters Used to Define Presets Attribute Formats
Character Description
char Matches any identical character
\ Used as an escape character (for example: \*, \\, \w)
\\ Matches a single ’\’ character
\0nnn Matches a character with given octet number
\xhh Matches a character with given 8-bit hexadecimal value
\\uhhhh Matches a character with given 16-bit hexadecimal value
\t Matches a tab character
\n Matches a newline character
\r Matches a return character
\f Matches a form feed character
Table 15–2 Character Classes
Character Description
[abc] Simple character class

Presets
Enabling User Customization 15-21
[a-zA-Z] Range character class; range specified with “-” and “]” (for example: [x-z]
[^abc] Negated character class, for exclusion tests.
Table 15–3 Standard POSIX Character Classes
Character Description
[:alnum:] Alphanumeric characters.
[:alpha:] Alphabetic characters.
[:digit:] Numeric characters.
[:upper:] Upper-case alphabetic characters.
[:lower:] Lower-case alphabetic characters.
[:space:] Space characters (such as space, tab, and formfeed, to name a few).
Table 15–4 Variable Classes
Class Description
. Matches any character other than newline
\w Matches an alphanumeric character
\W Matches a non-alphanumeric character
\s Matches a whitespace character
\S Matches a non-whitespace character
\d Matches a digit character
\D Matches a non-digit character
Table 15–2 Character Classes
Character Description

Presets
15-22 Oracle Application Server Wireless Developer’s Guide
Table 15–5 Boundary Matchers
Matcher Description
^ Matches the beginning of a line
$ Matches the end of a line
\b Matches a word boundary
\B Matches a non-word boundary
Table 15–6 Greedy Closures (match as many elements as possible)
Element Description
A* Matches A 0 or more times (greedy)
A Matches A 1 or more times (greedy)
A? Matches A 1 or 0 times (greedy)
A{n} Matches A exactly n times (greedy)
A{n,} Matches A at least n times (greedy)
A{n,m} Matches A at least n but not more than m times (greedy)
Table 15–7 Reluctant Closures (match as few elements as possible)
Element Description
A*? Matches A 0 or more times (reluctant)
A? Matches A 1 or more times (reluctant)
A?? Matches A 0 or 1 times (reluctant)
Table 15–8 Logical Operators
Operator Description
AB Matches A followed by B (concatenation)
A|B Matches either A or B(union)

Location Marks
Enabling User Customization 15-23
15.4 Location MarksLocation awareness is a key feature of OracleAS Wireless. A user’s location can be obtained from E911 or GPS units or Location Marks. Location Marks are user-defined locations. For example, an end-user may enter home, work and headquarters office addresses into their location-aware applications. Then, when using a restaurant look-up application, the application can use the current location to provide driving directions. To ensure security and privacy, users can control which applications can access their location.
Due to the limitations of certain mobile devices such as telephones, it is difficult to input or display lengthy alphanumeric strings. A location mark stores a piece of spatial information identified by a concise, easy-to-understand name. For example, My Home might be the name of a location mark, while the underlying spatial information might be 123 Main Street, Somewhere City, CA, 12345; Lon = -122.42, Lat = 37.58.
Users have complete control over their location marks and are easily able to select, create, delete and modify location with any device or PC.
Location marks also allow users to try what-if? scenarios; to make an application behave as if they were in a location different from their default or current location. For example, a user of an entertainment services application might be in Boston, but will be traveling to Montevideo in a few days. This person could set a location mark in Montevideo, and be presented with information relevant to the Montevideo area. Each user can have personalized location marks, which are stored in the Wireless repository.
Location marks are created using the LocationMark class. Users can also create location marks by logging into the OracleAS Wireless Customization Portal, clicking the LocationMarks tab, and clicking Create. See Chapter 14, "Using Location Services" for more information on using Location Marks with Geocoding, Mapping, Routing, Traffic and Region Modeling services. Location Marks may be geocoded as a point (latitude and longitude) or a spatial region covering a metropolitan area.
The following code example illustrates how a Location Mark for the user JohnBSmith’s work address is created and assigned to the user’s location profile
(A) Matches subexpression inside “(” and “)”, not including “(” and “)”
Table 15–8 Logical Operators
Operator Description

User Device Management
15-24 Oracle Application Server Wireless Developer’s Guide
NEDC AREA LOCATION PROFILE. The user can switch to this location profile from their device to adapt the responses from location-aware services.
public void createLocations() throws Exception { User user = services.lookupUser("JohnBSmith"); Point point = SpatialManager.createPoint(-71.455, 42.7117); Location location = SpatialManager.createLocation(point,"", "","1 oracle drive", "", "nashua", "nh", "03062", "", "", "", "","us"); LocationMark locMark = factory.createLocationMark("NEDC AREA", user, location, 2.0); Profile locationProfile = user.createProfile("NEDC AREA LOCATION PROFILE"); locationProfile.setLocationMark(locMark); factory.save(); }
15.5 User Device ManagementOracleAS Wireless enables users with multiple devices to easily manage and optimize their mobile experiences for each device. Users can manage their devices from either a PC or mobile device. In addition, users are easily able to modify their current default device.
A User Device objects is a means for grouping multiple device addresses under the same entity. This is useful for situations in which the same device may contain multiple User Agents or may use multiple protocols or channels, each with a different address or identification, but all emanating from the same physical entity. Furthermore, the preference settings, location settings, device settings in one User Agent may affect another User Agent on the same device. A customization profile is automatically created for each User Device object.
Once a user creates a new device profile, they can enter the following attributes for each device:
■ Device Name
■ Number of accepted notifications per day
■ One or more addresses/phone numbers
■ Device Type (such as: voice, WAP, PDA)

Service Management
Enabling User Customization 15-25
15.6 User and Group ManagementOracleAS Wireless provides Group and User Management and Access Control Lists (also known as Roles) to restrict or grant access to any folder or application. Any user that is granted User Manager role is able to create, delete and modify groups and users through any device or PC.
Group and User objects represent a convenient mechanism to define access control on folders and applications. A user may be a member of one or more groups. Every folder or application is owned by a single user, but can be shared among a group of users by assigning the folder or application to the group. All users in a group are granted access to any folder or application when the folder or application is assigned to the group.
Users have full control over their own folders and applications placed under their private folders. They can create, delete, or modify applications in their private folders, especially Bookmarks and Quicklinks.
15.7 Service ManagementOracleAS Wireless offers complete control to developers to manage what end-users can do in terms of folder management. Developers can offer groups or users complete flexibility with their Service Management or restricted use of Service Management.
Services and folders may be organized in the following ways:
■ user-specified sequence numbers (any order)
■ lexicographic ordering
■ date of creation
■ dynamic ordering based on frequency of access or last access
End-user also have the ability to customize their mobile experience with Bookmarks and Quicklinks. This gives users the ability to link frequently-accessed services to the home deck or any other desired folder.

Service Management
15-26 Oracle Application Server Wireless Developer’s Guide

Billing 16-1
16Billing
Each section of this document presents a different topic. These sections include:
Section 16.1, "Overview"
Section 16.2, "Using the Billing Integration Framework"
Section 16.3, "BillingLoader Utility"
Section 16.4, "Billing Collector and Service Detail Record"
Section 16.5, "Billing Driver"
Section 16.6, "Billing Integration Scenario"
16.1 OverviewOracleAS Wireless Billing Integration Framework provides an extensible and flexible framework to model billable services, capture billable actions, and integrate with any billing engine.

Overview
16-2 Oracle Application Server Wireless Developer’s Guide
Figure 16–1 Billing Framework Architecture
16.1.1 ConceptsBillable Action—Customer actions which should be tracked, authorized and reported to the billing system. Typical examples are premium service access, mobile content download, alert subscription and message delivery.
Billing Context—A marker interface whose implementation object provides all the data related to a given billable action. OracleAS Wireless has the following objects predefined as Billing Context:
■ For Multi-Channel service access: oracle.panama.rt.ServiceContext
■ For J2ME application download: oracle.panama.model.UserDownloadStatus
■ For mobile alert subscription: oracle.panama.mobilealert.ServiceAlertSubscription
■ For messaging:
■ Sending: oracle.panama.messaging.transport.impl.SendingBillingContext
■ Receiving: oracle.panama.messaging.transport.impl.ReceivingBillingContext
Service Detail Record (SDR)—A generic object that captures all the billing-specific attributes from the billing context for a given billable action. The attributes are of two types: mandatory and extended. Mandatory attributes are user information,

Using the Billing Integration Framework
Billing 16-3
service information and component information. Extended attributes contain the component-specific information.
Billing Collector—An extensible object that processes the BillingContext and generates the corresponding service detail record.
Billing Driver—A Java interface defined by OracleAS Wireless; it interacts with an external billing system to handle a given billable action. A billable action is usually handled in two steps:
■ Before the action starts, the driver's preService API is called by the billing framework. For example: In a typical scenario in which usage authorization is based on user balance and credit, resource reservation, rating and fraud detection, the driver can instruct the billing framework to veto the user billable action request.
■ After the action completes, the driver's postService API will be called by the billing framework which completes the billing transaction.
16.2 Using the Billing Integration Framework
16.2.1 Billable Actions and Billing System Interaction
16.2.1.1 Default Billable ActionsOracleAS Wireless defines the following billable actions:
■ Multi-Channel service request—the model service is defined with the cost attribute set to a non-zero value:
■ calling driver's preService API right after service authorization and before service invocation. If the result code of the API call indicates failure, the request is rejected.
■ calling driver's postService API after the service request has been served and before any listener notification.
■ J2ME application download:
■ calling driver's preService API right before the download request is generated by the provisioning server. If the result code of the API call indicates failure, the request is rejected.

Using the Billing Integration Framework
16-4 Oracle Application Server Wireless Developer’s Guide
■ calling driver’s postService API after provisioning server has received notification from the installed device indicating successful installation and before any listener notification.
■ Alert Subscription:
■ calling driver’s preService API right before user subscribes to a mobile alert service. If the result code of the API call indicates failure, the request is rejected.
■ calling driver’s postService API after the alert subscription has been created.
■ Messaging:
■ Sending
* calling driver’s preService API before the message delivery request is accepted by the messaging framework. If the result code of the API call indicates failure, the request is rejected.
* calling driver’s postService API after the message delivery request is accepted by the messaging framework.
■ Receiving
* calling driver’s preService API before the message is routed to targeted registered application. If the result code of the API call indicates failure, the message is discard.
* calling driver’s postService API after the message has been routed to targeted registered application.
16.2.1.2 Custom Billable ActionsOracleAS Wireless billing integration framework allows users to introduce custom billable actions to meet their business needs. Following are the steps to introduce a new billable action:
■ Identify the place where the new billable action should take place, for example, a runtime hook or a JSP.
■ Define an object which provides access to all the data related to this new billable action. This object can be any Java class as long as it implements the marker interface BillingContext. You may also use the predefined BillingContext objects mentioned above if appropriate.

Using the Billing Integration Framework
Billing 16-5
■ Customize the Billing Collector object to handle your new BillingContext object by either extending the BillingCollectorImpl or defining your own implementation of the Billing Collector. Billing Collector’s implementation is presented in greater detail in the next section.
The Billing Collector class can be extended (subclassed) from the out-of-the-box collector implementation or created new. Once it is created, the implementation class is set in: EM > Wireless Server: Site Administration > Billing Framework > Billing Collector Class name.
Use the following code segment to trigger a new billable action for a preService call:
// Suppose your BillingContext Object is foo BillingController controller = BillingController.getInstance(); if (controller.isBillingEnabled() ) { try { BillingResult result = controller.preService(foo); if ( result != null ){ ServiceDetailRecord sdr = result.getServiceDetailRecord(); if (result.getResultCode() != BillingResult.FAILED) { //Succeed // Add your logic here } else { // Failed // Add your logic here to handle preService failure //BillingException e = new BillingException(failure message); // e.setResult(result); // throw e;
} } } catch (BillingException be) { //Handle Billing Execption here }
Use the following code segment to trigger a new billable action for postService call:
// Suppose your BillingContext Object is foo BillingController controller = BillingController.getInstance(); if (controller.isBillingEnabled() ) { try { BillingResult result = controller.postService(foo); if ( result != null ){

BillingLoader Utility
16-6 Oracle Application Server Wireless Developer’s Guide
ServiceDetailRecord sdr = result.getServiceDetailRecord(); if (result.getResultCode() != BillingResult.FAILED) { //Succeed // Add your logic here } else { // Failed // Add your logic here to handle postService failure } } } catch (BillingException be) { //Handle Billing Execption here }
16.3 BillingLoader UtilityThe BillingLoader Utility is a batch utility to download, purge and upload billing transaction records. For more information on BillingLoader Utility, see OracleAS Wireless Administrator’s Guide.
16.4 Billing Collector and Service Detail RecordA billable operation for every component is split into 2 parts: a pre-event and post-event. An SDR is generated for both the pre- and post- events. The billing data collector class is used to create one SDR for each pre- or post- service call.
When the pre-service SDR is passed to the billing system, the billing system is expected to set a unique Billing Reference ID and return the SDR as part of the billing result.
The returned pre-service billing reference ID is extracted by OracleAS Wireless. It is set in the post service SDR of the same billable operation so that the external billing system can maintain state between the pre- and post- event of any single billable operation based on the billing reference ID.
Only the post service billing event SDR is logged to the database, unless the driver starts-up a transaction by setting the transaction ID attribute in the SDR which it returns after the pre-service. If the transaction ID is set, then the pre-service SDRs are also logged. You can identify the pre and post service SDRs based on the LOG_TYPE column which will be either PRE_SERVICE or POST_SERVICE.
The SDR ID is an internal ID used as a primary key in our tables. You can look up a particular SDR based on the SDR ID.
There is normally only one SDR ID for every post-service event, unless the driver starts up a transaction (in which case the pre-service SDR is logged).

Billing Collector and Service Detail Record
Billing 16-7
16.4.1 Default Billing Collector ImplementationThe BillingCollector implementation object is responsible for processing the BillingContext for a given billable action. It generates an appropriate Service Detail Record for the billing driver to process. OracleAS Wireless includes a default BillingCollector implementation named BillingCollectorImpl which handles the following BillingContext objects:
■ For multi-channel service access: oracle.panama.rt.ServiceContext
■ Extended Attribute Name:
* SERVICE_URL—the URL of the service invoked
* SERVICE_TYPE—the type of the service, that is, Folder or Link (FOLD, LINK)
* DEVICE_NAME—the device name
* INVOKER—the Invoker for this runtime service. The list of values include HTTP, ASYNC, ALERT, PROVISIONING, AGENT. This attribute can be used by the driver to trace the root-invoker of this service. The Invoker attribute and the list of values are defined in the BillingDataCollector Interface.
* ASK_IN_MSGID—this is set if the service is the INVOKER attribute value is ASYNC. The value denotes the Incoming message ID for the Async application. It can use used to relate the message request with the Async action.
■ For J2ME application download: oracle.panama.model.UserDownloadStatusAPPLICATION_NAME
■ Extended Attribute Name:
* CONTENT_NAME—the Application name
* CONTENT_VERSION—the Content version
* USER_DEVICE_NAME (if available)—the user device name
* MIME_TYPE—the mime type downloaded
* CURRENT_NUMBER_OF_DOWNLOADS—the number of previous downloads before the current download
* CONTENT_SIZE—the size of the content

Billing Collector and Service Detail Record
16-8 Oracle Application Server Wireless Developer’s Guide
■ For mobile alert subscription: oracle.panama.mobilealert.ServiceAlertSubscription
■ Extended Attribute Name:
* OPERATION_TYPE—indicates if it is an Alert Message SDR or Alert Subscription SDR. The value for mobile alert is ALERT_SUBSCRIPTION
* SERVICE_URL—URL for the invoked service. Alert Engine invokes a service to generate content, and this attribute is the URL for the service.
* ALERT_DELIVERY_ADDR—the end-user address to which alerts will be delivered. A comma-separated list of possible addresses.
■ For messaging:
■ Sending: oracle.panama.messaging.transport.impl.SendingBillingContext
■ Extended Attribute Name:
* TYPE—indicates if the action a sending or receiving action. It is set to S for sending.
* FROM—the from address (can be null).
* TO—the destination address.
* DELIVERY_TYPE—the delivery channel type.
* SERVICE_NAME (Optional)—the client name (such as Push Server, Async Agent).
* DRIVER_NAME—the driver name (for the sending case only).
* REPLY_TO—the reply to address.
■ Receiving: oracle.panama.messaging.transport.impl.ReceivingBillingContext
■ Extended Attribute Name:
■ Extended Attribute Name:
* TYPE—indicates if the action a sending or receiving action. It is set to R for receiving.
* FROM—the from address (can be null).

Billing Collector and Service Detail Record
Billing 16-9
* TO—the destination address.
* DELIVERY_TYPE—the delivery channel type.
* SERVICE_NAME (Optional)—the client name (such as Push Server, Async Agent).
* DRIVER_NAME—the driver name (for the sending case only).
* REPLY_TO—the reply to address.
16.4.2 Service Detail Record ID Versus Billing Reference IDService Detail Record ID is defined by the Billing Collector. The default format is [Component Name: Random Key]. The Billing Reference ID is obtained from the billing system. In the pre-bill case, it is usually defined as the authorization ID.
16.4.3 Extend Default Billing CollectorOracleAS Wireless billing integration framework enables users to extend the default billing collector implementation for various reasons:
■ To capture more data than the default implementation for a default BillingContext:
public class MyBillingCollector extends oracle.wireless.billing.BillingDataCollectorImpl { ... public ServiceDetailRecord createServiceDetailRecord(BillingContext context) { ServiceDetailRecord sdr = null; if (context instanceof oracle.panama.rt.ServiceContext ){ sdr = super.createServiceDetailRecord(context); if ( sdr != null){ // Add your additional data capture logic here // For example: // oracle.panama.rt.ServiceContext serviceContext = (oracle.panama.rt.ServiceContext)context; // sdr.setExtendedData("SERVICE_PATHURL", context.getService().getURLPathParameter()); } } else{ sdr = super.createServiceDetailRecord(context); }

Billing Collector and Service Detail Record
16-10 Oracle Application Server Wireless Developer’s Guide
return sdr; } ... }■ To capture data from a custom BillingContext:
public class MyBillingCollector extends oracle.wireless.billing.BillingDataCollectorImpl { ... public ServiceDetailRecord createServiceDetailRecord(BillingContext context) { ServiceDetailRecord sdr = null; if (context instanceof MyBillingContext ){ // MyBillingContext mycontext = (MyBillingContext)context; // get the user name from your context // Java.sql.Timestamp accessTime = null; // BillingManager manager = BillingManager.getInstance(); //sdr = manager.createServiceDetailRecord(<User Name>, <Your service Name>, accessTime, <your billing component name>); // sdr.setExtendedData("MY_DATA", <Get data from your context object>); ... } } else{ sdr = super.createServiceDetailRecord(context); } return sdr; } ... } To ignore a billable action base on the context data. Simply return a null object from the createServiceDetailRecord call based on your business logic.
Specify your extended Billing Collector using Oracle Enterprise Manager:
EM > Wireless Server: Site Administration > Billing Framework > Billing Collector Class name
16.4.4 Maintaining Transaction Context on Multi-part RequestsA typical wireless request spans multiple entities (a multi-part request). For example, an Async request may originate at the Messaging Server, forwarded to the

Billing Collector and Service Detail Record
Billing 16-11
Async Listener, which invokes a Runtime service and then returns the result back to the user through the Messaging Server. The Billing Rules may demand a billing at each stage of the transaction, but the pricing may vary depending on the context of the request. To support such a scenario, it is necessary to maintain the history of the request’s path (available resources to the Billing Driver [or Data Collector]), where the Billing Rules are enforced.
16.4.4.1 Creating and Assigning Billing TransactionsThe Billing Driver (or Data Collector) can assign a given Service Detail Record to be part of a transaction. For example, the pre-service call implementation of the Billing Driver can contain the following lines to add the SDR to a newly created transaction.
BillingTransaction Trans = BillingTransactionManager.getInstance().createTransaction(); Trans.getId(); // if its XYZ say sdr.setTransaction(Trans);
This creates a new transaction and adds the Service Detail Record to it. The subsequent service detail records can be added to the same transaction by retaining the transaction ID. Here is the pseudo-code for subsequent Service Detail Records:
BillingTransaction Trans = BillingTransactionManager.getInstance().lookupTransaction (XYZ); Trans.getId(); // if its XYZ say Trans.addSdr(sdr); // OR sdr.setTransaction(Trans);
The past Service Detail Records for this transaction can be looked-up using the BillingTransaction public APIs (see BillingTransaction’s getServiceDetailRecords()).
16.4.4.2 Logging Rules for Service Detail RecordsA Service Detail Record, which is part of a transaction, is implicitly logged to the database as soon as the call BillingResult is returned from the BillingDriver implementation. The BillingController inspects the Service Detail Record and does this automatically.
The SDR’s part of this transaction is available for lookup (see BillingTransaction’s getServiceDetailRecords()). If the SDR is not part of a transaction, then its logging is deferred to the logging framework, to be accomplished in the background.

Billing Driver
16-12 Oracle Application Server Wireless Developer’s Guide
16.4.4.3 Maintaining Transaction State in a Single-Thread Multi-part RequestIf all subsequent requests of a multi-part request are done in the context of the same Java Thread, the transaction information can be stored in the Thread as a Thread Local object and referenced later for a subsequent request. The Default implementation of the BillingDataCollector (oracle.wirless.billing.BillingDataCollectorImpl) provides just that. The transaction APIs for setting and getting are available through the BillingController object.
/** * Returns the current billing transaction * @return BillingTransaction the current billing transaction */public BillingTransaction getCurrentTransaction();
/** Sets the transaction for the current transaction * @param transaction the current transaction */public void setCurrentTransaction(BillingTransaction transaction);
16.5 Billing DriverTo integrate OracleAS Wireless billing integration with an external billing system, the system integrator must provide a Java implementation class which implements the BillingDriver interface. To set your driver:
EM > Wireless Server: Site Administration > Billing Framework > Billing Driver Provider (Driver Class Name)
The desired behavior of the Billing Driver implementation is as follows:
■ init—this API must contain logic to connect to an external billing system.
■ preService—this API must contain logic to handle one or all of the following billing operations:
■ Authorization
■ Rating
■ Resource Reservation
■ Fraud Detection
■ Others
■ postService—this API must contain logic to complete a billing transaction.

Billing Integration Scenario
Billing 16-13
■ cancelService—this API must contain logic to cancel a billing transaction.
■ destroy—this API must contain logic to disconnect from a billing system.
16.6 Billing Integration Scenario
16.6.1 Handling PrebillingHere is an implementation example of handling prebilling:
■ Define the billable actions using either default or custom actions.
■ Use the driver's preService call to do billing authorization and/or resource reservation, return an authorization ID generated by the billing system.
■ Use the driver's postService call to complete the billing transaction by passing the authorization obtained from the preService call.
16.6.2 Handling PostbillingHere is an implementation example of handling postbilling:
■ Define the billable actions using either default or custom actions.
■ Use the driver's preService call to do billing authorization and/or rating/fraud detection.
■ Use the driver's postService call to submit billing-related data to the billing system.
Note: In this release, integration with only one billing system at a time is supported. However, the driver implementor can use a proxy which interfaces with different billing systems as needed.

Billing Integration Scenario
16-14 Oracle Application Server Wireless Developer’s Guide

XHTML Modules Supported A-1
AXHTML Modules Supported
This appendix contains information about XHTML modules supported, and their capabilities. Topics include:
■ Section A.1, "Structure Module"
■ Section A.2, "Text Module"
■ Section A.3, "HyperText Module"
■ Section A.4, "List Module"
■ Section A.5, "Presentation Module"
■ Section A.6, "Object Module"
■ Section A.7, "Embedding Images"
■ Section A.8, "Embedding Audio"
■ Section A.9, "Embedding Voice and DTMF Grammar"
■ Section A.10, "Using <param>"
■ Section A.11, "Basic Tables Module"
■ Section A.12, "Meta Information Module"
■ Section A.13, "Style Sheet Module"
■ Section A.14, "Style Attribute Module"
■ Section A.15, "Link Module"
■ Section A.16, "OracleAS Wireless MXML Media Attribute Module"
■ Section A.17, "Speech Recognition Grammar Module"

Structure Module
A-2 Oracle Application Server Wireless Developer’s Guide
A.1 Structure ModuleThe Structure module in XHTML defines the following elements:
■ <html> — OracleAS Wireless defines additional profile attribute. The profile attribute specifies document compliance to a specific XHTML profile. The profile values accepts URI List and must contain the following URI value: http://xmlns.oracle.com/ias/dtds/xhtml+xforms/0.9.0/1.0
■ <head>
■ <title>
■ <body>
A.2 Text ModuleThe Text module in XHTML defines the following elements:
■ <div>, <p>
■ <span>, <br>
■ <address>, <blockquote>, <h1>, <h2>, <h3>, <h4>, <h5>, <h6>, <pre>
■ <abbr>, <acronym>, <cite>, <code>, <dfn>, <em>, <kbd>, <q>, <samp>, <strong>, <var>
A.3 HyperText ModuleThe HyperText module in XHTML defines the following elements:
■ <a>
■ The href attribute supports attribute value templates (as used in XSLT). This allows the anchor to obtain the URL from the XForms instance data, for example: <a href="{instance(’data’)/links/url}">
■ The type attribute is used to indicate the content type (mime-type/media-type) of the indicated resource (href) would generate when invoked. If the type attributes contain a value that is not a OracleAS Wireless supported mime-type, then this resource will be treated as an external resource. OracleAS Wireless will not act as a virtual browser/proxy for this URL resource. When a user navigates to such a resource (link), the device fetches the content from the resource.

HyperText Module
XHTML Modules Supported A-3
■ The rel attribute describes the relationship between the current document and the target resource (href). rel can accommodate multiple relationships; in such cases the values are space-separated. You can get a list of known rel types at: http://www.w3.org/TR/html4/types.html#type-links. OracleAS Wireless recognizes the following rel values:
* next —indicates that the href resource referenced could be the next document in the application, and browsers can use this to prefetch the document. A value of Next is used as a prefetch indicator for these resources (otherwise the resource will be fetched by the device only when activated by a user).
* maxage —a value added by OracleAS Wireless. The values indicate that the device/browser can use a document from its cache with an age that is less than the amount of time specified. The time is specified with maxage value using a dash (-) as a separator as in: rel="maxage-5" (implies an age of 5 seconds). The unit of time for Maxage is in seconds. This is supported only on Voice interfaces that use a VoiceXML Gateway.
* maxstale —a value added by OracleAS Wireless. The values indicate the browser can use a document from its cache that has not exceeded expiration time + specified limit time. The time limit is specified with maxstale value using a dash (-) as a separator as in: rel="maxstale-5" (implies the browser can accept stale documents, and has not be stale for more than 5 seconds). The unit of time for maxstale is in seconds. This is supported only on Voice interfaces that use a VoiceXML Gateway.
* connecttimeout—a value added by OracleAS Wireless. The values indicate to the browser a minimum time after which connect timeout can occur in the case of when an anchor invokes a telephony services such as: "tel:..". The time limit is specified with connect-timeout value using a dash (-) as a separator such as: rel="connecttimeout-5ms" (implies that the browser can issue a timeout if the connection did not succeed after at least 5 milli seconds). The unit of time for connect-timeout is either s or ms (this units must be specified).
* caching —possible values fast and safe. This is supported only on Voice interfaces that a VoiceXML Gateway.

List Module
A-4 Oracle Application Server Wireless Developer’s Guide
A.3.1 Example Using the Rel Attribute
<a href="mypage.jsp" rel="Next Maxage-0 Maxstale-5 Fetchtimeout-2">Link</a>
href supports the following protocols:
■ HTTP (http:// or https://)—industry-standard HTTP protocol
■ OMP (omp://)—allows applications to link to services defined in OracleAS Wireless using a virtual URL
■ Mail To (mailto:)—allows applications to invoke a mail application (if supported by the target device)
■ Tel To (tel:)—allows applications to invoke a phone application (if supported by the target device)
To embed Grammar for Links (for Voice interface), <object> module will be used.
A.4 List ModuleThe List module in XHTML defines the following elements:
■ ol, ul, li
■ dl, dt, dd
■ nl—navigation list
Navigation List (nl) is part of the XHTML 2.0 specification (http://www.w3.org/tr/xhtml20). Navigation lists are to be used to define a navigation menu. Each Navigation list supports one <name> element and <li> elements for each menu item. Navigation list can be nested; an <li> element can contain another navigation list.
Each menu item in a Navigation list is defined by an <li> element, and <li> elements have an href attribute (and other linking attributes such as type, rel and others as defined by <a> element). The contents of an <li> element, presented as a menu item in the menu, when selected, the link defined by the href attribute is followed.
The navigation list item <li> supports href, rel and type (content type) attributes. (See <a> above for details on rel and type attributes). To define Voice Grammar for a navigation list <object> module must be used within the content model of <li> element.

Object Module
XHTML Modules Supported A-5
A.4.1 Example of a Nested Navigation List <nl>
<name>Contents</name> <li href="/link1">Item 1</li> <li> <nl> <name>Nested Menu List</name> <li href="sub1">Sub List Item 1</li> <li href="sub2">Sub List Item 2</li> </nl> </li> <li href="#conformance>Conformance</li> </nl>
When Nested Navigation lists are nested (<nl> within an <li>), only the nested navigation list is presented (ignoring all other elements with the same <li>).
A.5 Presentation ModuleOracleAS Wireless supports the following elements defined in XHTML Presentation module:
■ <hr>
A.6 Object ModuleThe Object module in XHTML defines the following elements:
■ <object> —Attributes declare, name, usemap and standby are not supported by OracleAS Wireless. The data attribute supports the use of attribute value templates as defined in <a> element. Object element is used for embedding external content including images, audio or other embedded content such as Applets or Flash (if the target device supports such content). The Objects tag can contain HTML markup. The semantics of <object> requires that the embedded markup (within the <object>) is rendered if the device's user agent does not recognize the object's type or the user agent cannot render the <object>. Objects can be nested, and the same semantics apply to any nested <object>s.
In the following example, the markup contained in the <object> tag is rendered when the target user agent does not support images.

Embedding Images
A-6 Oracle Application Server Wireless Developer’s Guide
<object data="myimage.jpg" type="image/jpeg"> <strong>Images</strong> are <em>not</em> supported by your device</object>
A.7 Embedding Images<object> element must be used to embed images in a document. The data attribute of <object> point to a URI where the image resource resides while the type specifies the media type (mime-type) of the image.
Supporting multiple image formats for various devices can be done using nested <object>s. In the following example, OracleAS Wireless renders the correct image for the current device request.
gif image, if gif not supported then bmp else wbmp
<object data="http://../myimage.gif" type="image/gif"> <!-- render "bmp" if "gif" not supported --> <object data="http://../myimage.bmp" type="image/bmp"> <!-- render "wbmp" if "bmp" not supported --> <object data="http://../myimage.wbmp" type="image/wbmp"> Your UA does not support any image format </object> </object> </object>
If none of the images are supported by the device, OracleAS Wireless tries to adapt the image provided in the top-level <object> to the format supported by the device. The adaptation process affects both the image format and the image size based on the device/media properties. Developers may provide additional parameters that may affect the adaptation process.
Optional parameters that can be specified are adapt and notsize. Specifying a <param> with the name adapt with the value attribute set to false will turn off the image adaptation on <object>. Specifying a <param> with the name adapt with a value attribute notsize will turn off size adaptation, while adapting only the format of the image.
Here is an example that turns off any auto adaptation of the image:
Note: If the original image is small enough to fit in the screen (or relevant frame where the object occurs), the size is unchanged by default.

Embedding Audio
XHTML Modules Supported A-7
<!-- Turn of auto adaptation, using <param> element --> <object id=myid2" data="images/oralogo.gif" type="image/gif"> <param name="adapt" value="false" /> </object>
Here is an example that limits the auto adaptation to image format only:
<!-- Turn of auto size adaptation, using <param> element --> <object id=myid2" data="images/oralogo.gif" type="image/gif"> <param name="adapt" value="notsize" /> </object>
A.8 Embedding Audio<object> element must be used to embed audio content into a document. The data attribute of <object> point to a URI where the audio resource resides while the type specifies the media-type of the image. Audio content can be used for both visual devices and aural (voice) devices. If a particular format is not supported by the Voice Gateway or Visual Browser, then the embedded audio markup is used to play text using TTS.
<object id="myid" data="myaudio.gif" type="audio/wav"> <div> <p>Audio is not supported by your UA<p> <p>This will played using TTS</p> </div> </object>
Note: If none of the images are supported by the device, OracleAS Wireless tries to adapt the image based on the supported formats for a device and its width and height. It is recommended (and a good practice) to specify <object> width and height (using CSS width and height) in percentages, rather than absolute widths and heights, enabling better and consistent image adaptation.

Embedding Voice and DTMF Grammar
A-8 Oracle Application Server Wireless Developer’s Guide
A.9 Embedding Voice and DTMF Grammar<object> element must be used to embed voice grammar resources. The data attribute of <object> point to the grammar resource while the type specifies grammar format.
Following is an example associating Voice Grammar with Link anchor (<a>):
<a href="mypage.jsp"> My Home Page <object data="grammar.dat" type="application/srgs+xml"/> </a>
You can associate more than one grammar using multiple Objects:
<a href="mypage.jsp"> My Home Page <object data="grammar.dat" type="application/srgs+xml"/> <object data="#Grammar_in_head_1"" type="vnd.oracle.srgs+xmlapplication/srgs+xml"/> </a>
<object> element can also use inline grammar. To embed inline Grammar, OracleAS Wireless allows <grammar> element in the head section of the HTML element, and <object> element can point to an inline grammar using a fragment URI (#id). The <grammar> element (and its namespace) is as defined by the W3C Speech Recognition Grammar Specification: (http://www.w3.org/TR/speech-grammar/)
<head> <grammar xmlns="http://www.w3.org/2001/06/grammar" id="grammar_in_head_1"> ........ </grammar> <grammar xmlns="http://www.w3.org/2001/06/grammar" id="grammar_in_head_2">
Note: The media-type (type attribute) does not identify the exact format of the audio file. <param> element is used to identify the format. To identify the audio format, use <param> element with name="format" and the value containing the audio format. Also, when embedding audio, parameters can be supplied for format, fetchhint, fetchtimeout, maxage, maxstale and cache using <param> element.

Basic Tables Module
XHTML Modules Supported A-9
........ </grammar> </head>
A.10 Using <param>Parameters for an <object> can be provided using <param> element. For example, <param> element can be used to support prefetch, and use cached sources for Aural interface (such as audio or grammar resources). Following are some examples of using <param> element:
■ To support prefetch use: <param name="fetchhint" value="prefetch"/>
■ To enable usage of a cached resource, use (maxage and/or maxstale). The value represents unit of time in seconds:
<param name="maxage" value="5"/> <param name="maxstale" value="5"/>
A.11 Basic Tables ModuleThe Basic tables module in XHTML defines the following elements
■ <table>
■ <caption>
■ <tr>
■ <tr>, <th>
Nested tables are illegal (XHTML Basic Tables defines this restriction). It is also recommended to use tables for presenting tabular data only. Do not use tables for presentation as this will break the device independence model; use CSS properties for layout.
Note: When embedding a grammar using <object>, grammar parameters can be supplied for scope, mode, root, version, weight, fetchhint, fetchtimeout, maxage, maxstale, caching using <param> element.
For more information on speech recognition, see Section A.17, "Speech Recognition Grammar Module"

Meta Information Module
A-10 Oracle Application Server Wireless Developer’s Guide
OracleAS Wireless does not support rowspan or colspan attributes
A.12 Meta Information ModuleThe Meta Information Module in XHTML defines the following elements:
■ <meta> —expected to provide meta information about the document, though authors have used the <meta> element for embedding HTTP protocol semantics. Using meta for http equivalents (such as refresh, expires, cache-control and others) may not produce a consistent result on all user agents/devices. Documents authored to be device-independent should not use <meta> element as http equivalent. Sample values for meta are author, copyright, description, keywords, maintainer, robots, bookmark.
OracleAS Wireless supports a special <meta> for the following:
■ <meta> with name=" __ASYNC_NO_RESPONSE__"
The meta tag indicates to OracleAS Wireless Server that the response must not be forwarded to the device. This is valid only when the target device is messaging-based. Messaging protocol-based devices, sometimes do not expect a response for a request message. Since the application uses HTTP protocol, it is forced to generate a valid response stream. This <meta> value allows the application to generate a response stream that is not forwarded to the device.
A.13 Style Sheet ModuleThe Style Sheet Module in XHTML defines the following element:
■ <style> —used to embed CSS style rules within an XHTML document. The type attribute must use text/css media type (mime-type).
A.14 Style Attribute ModuleThe Style Attribute Module defines the style attribute. The style attribute specifies the CSS style rules for the a given element.
A.15 Link ModuleThe Link Module in XHTML defines the following element:
■ <link> —allows references to external sources that can be used by an XHTML document processor (such as a browser). OracleAS Wireless supports external

Speech Recognition Grammar Module
XHTML Modules Supported A-11
CSS Style sheet references using <link> element. To reference an external CSS style sheet, the author must specify both the type attribute (type="text/css") and rel (rel="stylesheet") attribute (if these attributes are missing or contain different values, OracleAS Wireless will ignore these external references).
A.16 OracleAS Wireless MXML Media Attribute ModuleThe Media Attribute Module defines the media attribute. The media attribute is defined in the MXML namespace mxml:media attribute (mxml is the namespace prefix for MXML namespace).
mxml:media assigns a media (device and device features) display condition to an element. This a core attribute that specifies the target media (device and device features) on which the current element is displayed/rendered. mxml:media supports the Media Query Syntax as defined in: (http://www.w3.org/TR/css3-mediaqueries/). For a list of media and media features supported, see the sections on embedding media-specific content.
A.17 Speech Recognition Grammar ModuleThe Speech Recognition Grammar Module defines the following element:
■ <grammar> —grammar element's content model and namespace are defined by the Speech Recognition Grammar Specification Version 1.0: (http://www.w3.org/TR/speech-grammar/). The speech recognition grammar is defined in XML, and all the elements are defined in the speech recognition grammar namespace. The root element of this XML is <grammar>. The
Note: mxml:media merely affects the rendering. It does not remove the element from the document, hence specifying mxml:media on elements that declare event handlers/observers still remain as part of the document and are registered with the Events implementation irrespective of the value in mxml:media attribute. mxml:media must be thought of as shortcut that specifies the ’style="display: none"’ CSS property for the current element where the current media (and media features) do not match those specified in the mxml:media attribute.

Speech Recognition Grammar Module
A-12 Oracle Application Server Wireless Developer’s Guide
<grammar> element has been added to the XHTML Schema, as a module, as defined by the XHTML Modularization specification.
OracleAS Wireless has added <grammar> element as an XHTML module to support inline grammars for Voice devices. The <grammar> element can occur in the head section of the XHTML document. Multiple grammars can be declared. In addition, the <grammar> element can occur within the <extension> element of the XForms UI Controls.
Elements such as <a>, <li> (within an <nl>) or UI Controls can reference the <grammar>s in the <head> section using the <object> element. The grammar defined in the head section can be referenced by <object> using a document fragment identifier (#id). Here is an example of such a grammar, included in an XHTML document, that associates a grammar to a link (<a>) element:
<html xmlns="http://www.w3.org/1999/html" xmnls:grammar="http://www.w3.org/2001/06/grammar" .....> <head> <meta name=".." content="..."/> <title>...</title <grammar id="g1" xmlns="http://www.w3.org/2001/06/grammar" xml:lang="en" version="1.0" mode="voice"> <rule id="flight"> ... <ruleref uri="#city"/> </rule> <rule id="city"> <one-of> <item>New York</item> <item>Los Angeles</item> <item>Chicago</item> ... </one-of> </rule> ... </grammar> <grammar id="g2" xmlns="http://www.w3.org/2001/06/grammar" ....> another grammar </grammar> </head> <body>

Speech Recognition Grammar Module
XHTML Modules Supported A-13
.... <a href="hello.jsp"> Hello <object data="#id_of_grammar_element_in_head_section" type="application/vnd.oracle.srgs+xml"> <param name="scope" value="dialog"/> .. <!-- all other attributes supported by <grammar> element as defined in VoiceXML--> <param name="....." value="...."> </object> .... </a> </body> </html>

Speech Recognition Grammar Module
A-14 Oracle Application Server Wireless Developer’s Guide

Media Types, Features and Capabilities B-1
BMedia Types, Features and Capabilities
This appendix contains information about media types, their features and capabilities. Topics include:
■ Section B.1, "OracleAS Wireless CSS Media Query and MXML Media Attribute Syntax"
■ Section B.2, "OracleAS Wireless Supported Media Types"
■ Section B.3, "OracleAS Wireless Supported Media Features"
■ Section B.4, "OracleAS Wireless-defined Capabilities"
■ Section B.5, "Sample Media Queries"
B.1 OracleAS Wireless CSS Media Query and MXML Media Attribute Syntax
The CSS Media Query syntax consists of two parts:
1. Media Type—specifies a particular media as defined by CSS2 specification. Examples of media type values are screen, handheld, tty, tv, aural.
2. Media Feature or Capability—specifies a particular capability of a target media (such as color capability or sound capability).
The CSS Media queries allow media type and media features to be used together in Query style syntax. For example:
media="handheld and (color)"
The query syntax also allows you to specify not and only conditions (by default only is assumed if nothing is specified). For example:
mxml:media="not all and (color)"

OracleAS Wireless Supported Media Types
B-2 Oracle Application Server Wireless Developer’s Guide
The Media Query Syntax is defined in CSS3 Media queries at: http://www.w3.org/TR/css3-mediaqueries
B.2 OracleAS Wireless Supported Media TypesOracleAS Wireless supports the following Media Types (in mxml:media attribute):
■ all—all media types
■ screen—computer screens, continuous, visual, both interactive and static
■ handheld—handheld devices, both continuous and paged, interactive and static
■ tty—portable devices with limited display capabilities, continuous (that is, not paged) and fixed-pitch character grid
■ aural—for aural/voice interfaces
B.3 OracleAS Wireless Supported Media Features
B.3.1 Media Features Specified in CSS3 Media Queries SpecificationA list of Media Features are specified by CSS3 Media Queries specification. OracleAS Wireless will only support the following set of media features:
■ Media Feature: color
Description: Specifies the number of bits per color component supported by the target device
min-property: min-color
max-property: max-color
Values: <integer>
Applies To: Visual Media
■ Media Feature: monochrome
Description: Specifies number of bits per pixel supported by the target (monochrome) device
min-property: min-monochrome
max-property: max-monochrome

OracleAS Wireless Supported Media Features
Media Types, Features and Capabilities B-3
Values: <integer>
Applies To: Visual Media
■ Media Feature: device-width
Description: Specifies the screen height requirements of the target device
min-property: minidevice-width
max-property: max-device-width
Values: <length> (Supported length units in, cm, mm, pt, pc, px, em)
Applies To: Visual Media
■ Media Feature: device-height
Description: Specifies the screen height requirements of the target device
min-property: min-device-height
max-property: max-device-height
Values: <length> (Supported length units in, cm, mm, pt, pc, px, em)
Applies To: Visual Media
■ Media Feature: device-aspect-ratio
Description: Specifies the aspect ratio requirements of the target device
min-property: min-device-aspect-ratio ("min-device-aspect-ratio:1" implies Portrait)
max-property: max-device-aspect-ratio ("max-device-aspect-ratio:1" implies Landscape)
Values: <ratio> (<integer>/<integer>)
Applies To: Visual Media
■ Media Feature: grid
Description: Specifies grid versus bitmap requirements of the target device
min-property: No
max-property: No
Values: <integer> (Value of 1 indicates the device display type that is grid-based and a value of 0 indicates a bitmap display type)
Applies To: Visual Media

OracleAS Wireless-defined Capabilities
B-4 Oracle Application Server Wireless Developer’s Guide
B.3.2 Extended Media Feature SetThe following is an extended list of media features defined by OracleAS Wireless:
■ Media Feature: paged
Description: Specifies paged versus continuous medium
min-property: No
max-property: No
Values: <integer>. Value of 1 indicates the paged device medium (such as a WML Phone device or printer) and value of 0 indicates a continuous device medium such as a desktop screen
Applies To: Visual Media
B.4 OracleAS Wireless-defined Capabilities
B.4.1 Device/Software UA Capabilities■ Media Feature: text-input
Description: Specifies if device is capable if text input. Devices at the minimum are assumed to have a phone key pad
min-property: No
max-property: No
Values: <integer>. Value of 1 indicates the device supports text input and a value of 0 indicates a device only supports a phone keypad
Applies To: All Media
■ Media Feature: keyboard
Description: Specifies the type of keyboard support
min-property: No
max-property: No
Values: PhoneKeypad | Qwerty | Disambiguating
Applies To: All Media
■ Media Feature: tables
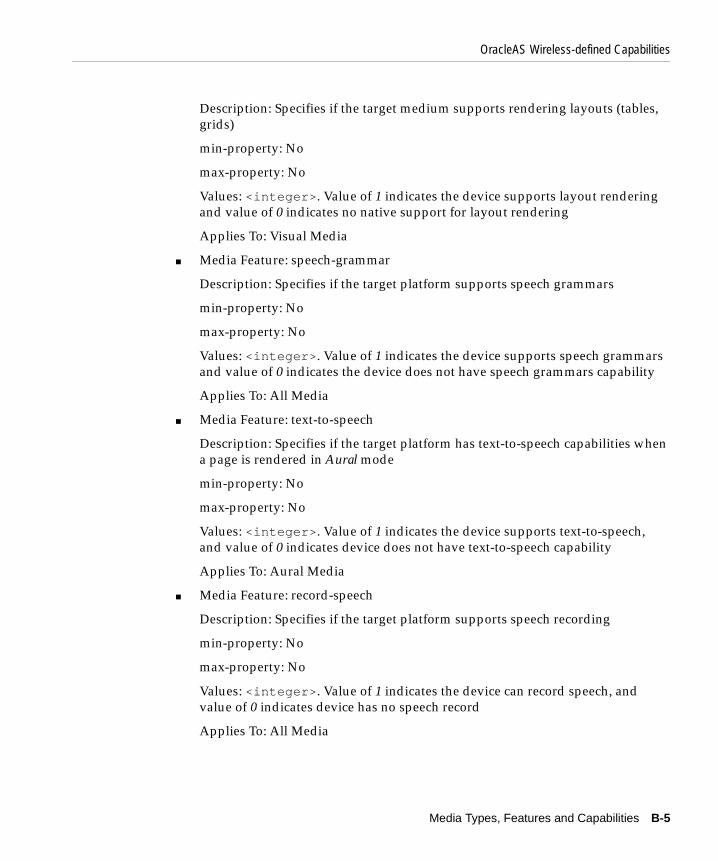
OracleAS Wireless-defined Capabilities
Media Types, Features and Capabilities B-5
Description: Specifies if the target medium supports rendering layouts (tables, grids)
min-property: No
max-property: No
Values: <integer>. Value of 1 indicates the device supports layout rendering and value of 0 indicates no native support for layout rendering
Applies To: Visual Media
■ Media Feature: speech-grammar
Description: Specifies if the target platform supports speech grammars
min-property: No
max-property: No
Values: <integer>. Value of 1 indicates the device supports speech grammars and value of 0 indicates the device does not have speech grammars capability
Applies To: All Media
■ Media Feature: text-to-speech
Description: Specifies if the target platform has text-to-speech capabilities when a page is rendered in Aural mode
min-property: No
max-property: No
Values: <integer>. Value of 1 indicates the device supports text-to-speech, and value of 0 indicates device does not have text-to-speech capability
Applies To: Aural Media
■ Media Feature: record-speech
Description: Specifies if the target platform supports speech recording
min-property: No
max-property: No
Values: <integer>. Value of 1 indicates the device can record speech, and value of 0 indicates device has no speech record
Applies To: All Media

OracleAS Wireless-defined Capabilities
B-6 Oracle Application Server Wireless Developer’s Guide
B.4.2 Network Capabilities and Characteristics■ Media Feature: async
Description: Specifies the network mode of the target device
min-property: No
max-property: No
Values: <integer>. Value of 1 indicates the device is currently operating in messaging mode in which the request and response are not blocked calls to the remote resource. Value of 0 means device is operating in a synchronous mode, where each request has a response
Applies To: All Media
■ Media Feature: voice-call
Description: Specifies if the network allows voice-call to be initiated from the device agent
min-property: No
max-property: No
Values: <integer>. Value of 1 indicates the voice-call can be initiated and a Value of 0 indicates voice-calls cannot be initiated
Applies To: All Media
■ Media Feature: call-control
Description: Specifies if the network allows call control of voice calls initiated from the device’s agent. Call Control enables features such as transfer
min-property: No
max-property: No
Values: <integer>. Value of 1 indicates the call-control is supported and Value of 0 indicates call-control is not supported
Applies To: All Media
■ Media Feature: email
Description: Specifies if the network allows email messages to be initiated from the device’s agent
min-property: No

Sample Media Queries
Media Types, Features and Capabilities B-7
max-property: No
Values: <integer>. Value of 1 indicates the email can be initiated and Value of 0 indicates email cannot be initiated
Applies To: All Media
■ Media Feature: content-length
Description: Specifies the minimum and maximum content length size supported by the network
min-property: Yes
max-property: Yes
Values: <Message Length> (size in bytes, for example: "content-length: 10")
Applies To: All Media
B.5 Sample Media QueriesTable B–1 Sample Media Queries
Device Query
Desktop browsers @media screen
Handheld (all PDAs, WML/HDML phones, Industrial devices, XHTML phone browser)
@media handheld
HDML/WML browsers in phones @media handheld and (tables: 0)
Color PDAs (pocketpc), Color XHTML phones
@media handheld and (color)
Palms (Palm VII and Palm V) - Monochrome devices
@media handheld and (monochrome)
Two Way Pagers/SMS devices @media all and (async)
Voice devices @media aural
Note: @media handheld will map PDAs and HDML/WML phones. If media is not specified, the implied media is always all.

Sample Media Queries
B-8 Oracle Application Server Wireless Developer’s Guide

XForms Specification Support C-1
CXForms Specification Support
This appendix contains information about XForms specification support. Topics include:
■ Section C.1, "XForms Document Structure"
■ Section C.2, "XForms Processing Model"
■ Section C.3, "DataTypes"
■ Section C.4, "Model Item Properties And Schema Constraints"
■ Section C.5, "XPath Expression in XForms"
■ Section C.6, "XForms UI Controls"
■ Section C.7, "XForms Actions"
C.1 XForms Document Structure
Note: OracleAS Wireless also supports a subset of features specified by W3C XForms 1.0 Candidate Recommendation at http://www.w3.org/TR/2002/CR-xforms-20021112/
Table C–1 XForms Document Structure
XForms Specification Supported Comments
XForms Namespace
Yes
Common Attributes
Yes xsd:ID supported with XHTML as container

XForms Document Structure
C-2 Oracle Application Server Wireless Developer’s Guide
Linking Attributes
Partial Supported only on instance element
Single-Node Binding Attributes
Yes Not supported in XForms elements label, help, hint, alert or message elements. (Note: The same can be achieved using an <output> control within any of label, help, hint, alert or message element)
Node-Set Binding Attributes
Yes
model Element Yes Supports multiple models. Attributes "schema" not supported. Attribute "functions" not supported
instance Element
Yes Multiple Instances Supported
submission Element
Yes method="put" in xforms:submission is not supported.
bind Element Yes Attribute p3ptype not supported.
xsd:schema Element
Yes
Must Understand
No
Extension Module
Yes
Table C–1 XForms Document Structure
XForms Specification Supported Comments

XForms Processing Model
XForms Specification Support C-3
C.2 XForms Processing Model
Table C–2 Initialization Events
XForms Specification Supported Comments
xforms-model-construct Yes
xforms-model-initialize Yes
xforms-initialize-done Yes
xforms-ui-initialize Yes
xforms-form-control-initialize Yes
xforms-model-destruct No
Table C–3 Interaction Events
XForms Specification Supported Comments
xforms-previous No
xforms-next No
xforms-focus No
xforms-help Yes Supported where user agents support help events
xforms-hint Yes Supported where user agents support hint events
xforms-refresh Yes
xforms-revalidate Yes
xforms-recalculate Yes
xforms-reset Yes
xforms-submit Yes

XForms Processing Model
C-4 Oracle Application Server Wireless Developer’s Guide
Table C–4 Notification Events
XForms Specification Supported Comments
DOMActivate Yes
xforms-value-changing No
xforms-value-changed Yes
xforms-select No
xforms-deselect No
xforms-scroll-first No
xforms-scroll-last No
xforms-insert No
xforms-delete No
xforms-valid Yes
xforms-invalid Yes
DOMFocusIn No
DOMFocusOut No
xforms-readonly Yes
xforms-readwrite Yes
xforms-required Yes
xforms-optional Yes
xforms-enabled Yes
xforms-disabled Yes
xforms-submit-done Yes
xforms-submit-error Yes
Table C–5 Error Indications
XForms Specification Supported Comments
xforms-bind-exception No

DataTypes
XForms Specification Support C-5
C.3 DataTypes
xforms-link-exception No
xforms-link-error No
xforms-compute-exception No
Table C–6 Basic Data Types
XForms Specification Supported Comments
dateTime Yes
time Yes
date Yes
gYearMonth Yes
gYear Yes
gMonthDay Yes
gDay Yes
gMonth Yes
string Yes
boolean Yes
base64Binary No
decimal Yes
anyURI Yes
integer Yes
nonPositiveInteger Yes
negativeInteger Yes
long Yes
int Yes
short Yes
Table C–5 Error Indications
XForms Specification Supported Comments

DataTypes
C-6 Oracle Application Server Wireless Developer’s Guide
byte Yes
nonNegativeInteger Yes
unsignedLong Yes
unsignedInt Yes
unsignedShort Yes
unsignedByte Yes
positiveInteger Yes
Table C–7 XForms DataTypes
XForms Specification Supported Comments
xforms:listItem Yes
xforms:listItems Yes
xforms:dayTimeDuration Yes
xforms:yearMonthDuration Yes
Table C–8 Advanced and Derived DataTypes
XForms Specification Supported Comments
normalized String No
hexBinary No
float No
double No
QName No
NOTATION No
token No
language No
Name No
Table C–6 Basic Data Types
XForms Specification Supported Comments

Model Item Properties And Schema Constraints
XForms Specification Support C-7
C.4 Model Item Properties And Schema Constraints
NCName No
ID No
IDREF No
IDREFS No
ENTITY No
ENTITIES No
NMTOKEN No
NMTOKENS No
Table C–9 Model Item Properties
XForms Specification Supported Comments
type Yes Restricted to schema datatypes supported by the current implementation
readonly Yes
required Yes
relevant Yes
calculate Yes
constraint Yes
maxOccurs Yes
minOccurs Yes
p3ptype No
Table C–10 Schema Constraints
XForms Specification Supported Comments
Schema association No
Table C–8 Advanced and Derived DataTypes
XForms Specification Supported Comments

XPath Expression in XForms
C-8 Oracle Application Server Wireless Developer’s Guide
C.5 XPath Expression in XForms
xsi:type Yes
type attribute in Bind Yes
default xsi:string Yes
Table C–11 XPath DataTypes, DOM Access and Evaluation Context
XForms Specification Supported Comments
XPath 1.0 Datatypes (boolean, string, number, node-set)
Yes
DOM Access to Instance Data
No
Evaluation Context Yes
Table C–12 Binding Expressions
XForms Specification Supported Comments
Model Binding Expressions Yes Expression used in Model Item Propertied (bind element)
Dynamic dependences in Model Binding Expressions
No XForms specifications does not allow dynamic dependencies in model binding expressions.
UI Binding Expressions Yes
Dynamic dependencies in UI Binding Expressions
Yes XForms can support dynamic binding expression in binding attributes of UI controls. OracleAS Wireless supports dynamic binding expressions in UI controls with exception of Voice rendering mode.
Table C–10 Schema Constraints
XForms Specification Supported Comments

XPath Expression in XForms
XForms Specification Support C-9
Table C–13 XPath Node Set Functions
XForms Specification Supported Comments
count() Yes
id()1 Yes
last()1 Yes
position()1 Yes
name()1 Yes
local-name()1 Yes
namespace-uri()1 Yes
instance()1 Yes
Table C–14 XPath String Functions
XForms Specification Supported Comments
concat() Yes
contains() Yes
normalize-space()1 Yes
starts-with() Yes
string() Yes
string-length() Yes
substring() Yes
substring-after() Yes
substring-before() Yes
translate() Yes
property() No

XPath Expression in XForms
C-10 Oracle Application Server Wireless Developer’s Guide
1 These XPath functions must be used carefully in Voice (aural) mode. The Voice (aural) mode uses a scripting model to bring some actions to the client side for greater form interactivity. If these XPath functions are used in aural mode, the
Table C–15 XPath Number Functions
XForms Specification Supported Comments
ceiling() Yes
floor() Yes
number() Yes
round() Yes
sum() Yes
avg() Yes Defined in XForms Specification
min() Yes Defined in XForms Specification
max() Yes Defined in XForms Specification
count-non-empty()1 Yes
index() Yes Defined in XForms Specification
Table C–16 XPath Boolean Functions
XForms Specification Supported Comments
boolean() Yes
false() Yes
lang()1 Yes
not() Yes
true() Yes
boolean-from-string() Yes Defined in XForms Specification
if() Yes Defined in XForms Specification
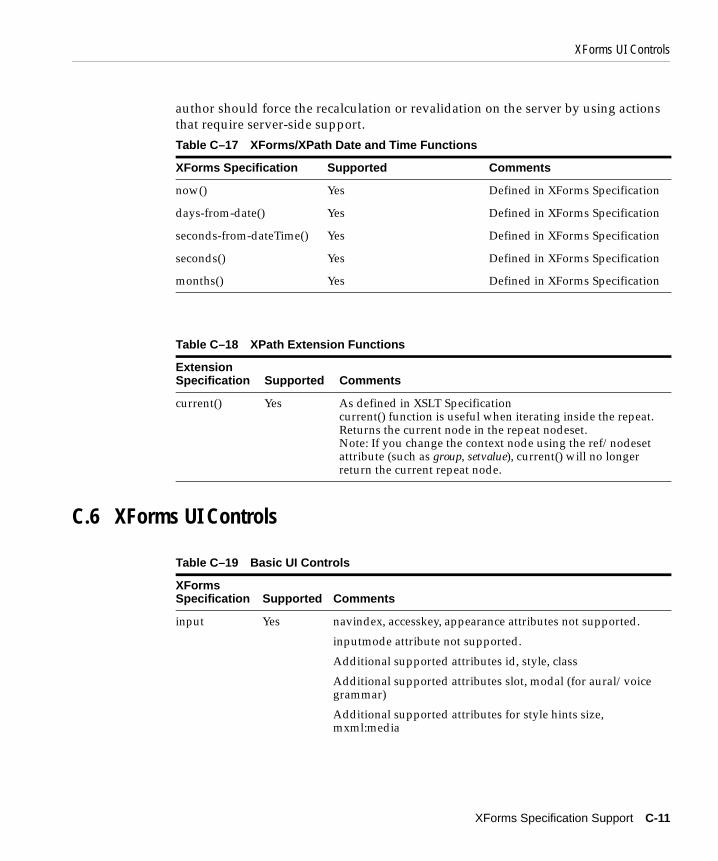
XForms UI Controls
XForms Specification Support C-11
author should force the recalculation or revalidation on the server by using actions that require server-side support.
C.6 XForms UI Controls
Table C–17 XForms/XPath Date and Time Functions
XForms Specification Supported Comments
now() Yes Defined in XForms Specification
days-from-date() Yes Defined in XForms Specification
seconds-from-dateTime() Yes Defined in XForms Specification
seconds() Yes Defined in XForms Specification
months() Yes Defined in XForms Specification
Table C–18 XPath Extension Functions
Extension Specification Supported Comments
current() Yes As defined in XSLT Specificationcurrent() function is useful when iterating inside the repeat. Returns the current node in the repeat nodeset.Note: If you change the context node using the ref/nodeset attribute (such as group, setvalue), current() will no longer return the current repeat node.
Table C–19 Basic UI Controls
XForms Specification Supported Comments
input Yes navindex, accesskey, appearance attributes not supported.
inputmode attribute not supported.
Additional supported attributes id, style, class
Additional supported attributes slot, modal (for aural/voice grammar)
Additional supported attributes for style hints size, mxml:media

XForms UI Controls
C-12 Oracle Application Server Wireless Developer’s Guide
secret Yes navindex, accesskey, appearance, incremental attributes not supported.
inputmode attribute not supported.
Additional supported attributes id, style, class
Additional supported attributes slot, modal (for aural/voice grammar)
Additional supported attributes for style hints size, mxml:media
textarea Yes navindex, accesskey, appearance, incremental attributes not supported.
inputmode attribute not supported.
Additional supported attributes id, style, class
Additional supported attributes slot, modal (for aural/voice grammar)
Additional supported attributes for style hints rows, cols, mxml:media
output Yes appearance attributes not supported.
Additional Extended attributes id, style, class
Additional device style hints mxml:media
upload No
range No
trigger Yes navindex, accesskey, appearance attributes not supported. Additional Extended attributes id, style, class
Additional supported attributes slot, modal (for aural/voice grammar)
Additional device style hints mxml:media
submit Yes navindex, accesskey, appearance attributes not supported. Additional Extended attributes id, style, class
Additional supported attributes slot, modal (for aural/voice grammar)
Additional device style hints mxml:media
Table C–19 Basic UI Controls
XForms Specification Supported Comments

XForms UI Controls
XForms Specification Support C-13
select Yes navindex, accesskey, appearance attributes not supported.
selection attribute not supported. selection is always "closed"
Select ui displays as a checkbox.
Additional supported attributes id, style, class
Additional supported attributes slot, modal (for aural/voice grammar)
Additional supported attributes for style hints size, mxml:media
select1 Yes navindex, accesskey, appearance attributes not supported.
selection attribute not supported. selection is always "closed"
Select ui displays as a radio button.
Additional supported attributes id, style, class
Additional supported attributes slot, modal (for aural/voice grammar)
Additional supported attributes for style hints size, mxml:media
choices Yes
item Yes help, hint, alert, actions on item is not supported
filename No
mediatype No
value Yes Only PCDATA, as child node, is supported by the value element.
label Yes Single Node binding attributes are not supported (Note: Can use <output> within label to embed values from instance).
Linking attributes not supported
help Yes Single Node Binding attributes are not supported (Note: Can use <output> within help to embed values from instance).
Linking attributes not supported
hint Yes Single Node Binding attributes are not supported (Note: Can use <output> within hint to embed values from instance).
Linking attributes not supported
Table C–19 Basic UI Controls
XForms Specification Supported Comments

XForms UI Controls
C-14 Oracle Application Server Wireless Developer’s Guide
alert Yes Single Node Binding attributes are not supported (Note: Can use <output> within notification to embed values from instance).
Linking attributes not supported
itemset Yes help, hint, alert, actions on itemset are not supported
copy No No
extension Yes <extension> element supports declaration of <grammar> for UI controls
<extension> element supports <label> elements. This allows an UI control to have multiple Labels. These multiple <label>’s are played on a voice interface as extended prompt interface.
Table C–20 Advanced UI Controls
XForms Specification Supported Comments
group Yes navindex, accesskey, appearance attributes not supported.
repeat Yes navindex, accesskey, appearance attributes not supported.
Nested repeats not supported
repeat Attributes
No
switch/case Yes navindex, accesskey, appearance attributes not supported.
Table C–19 Basic UI Controls
XForms Specification Supported Comments

XForms UI Controls
XForms Specification Support C-15
Table C–21 Extension UIControls
Extension Supported Comments
mxml:uiobject Yes This is an extension UI Control defined in the MXML namespace. The “uiobject” element allows XForms applications to launch user interfaces defined in other languages, enabling reuse of existing applications defined in those languages.
“uiobject” allows an XForms application to pass and receive parameters (form data) from the external user interface using the “uiparam” element. The content type of a “uiobject” is indicated by its “type” attribute. The URI of the external user interface is indicated by the <uiobject>'s “data” attribute, while its “method” and “enctype” attributes determine how the form data parameters are passed to the external user interface. The <uiobject>'s Single Node Binding attributes, as for XForms <group>, sets the XPath context for the <uiparam>'s child elements.
mxml:uiparam Yes This is an extension element defined in the MXML namespace which occurs as a child node of a <uiobject>. <uiparam> provides the ability to pass/receive instance data between an XForms instance and the <uiobject>. <uiparam> has single node binding attributes that map instance data to either an input value to the <uiobject> (if valuetype=”in”), an output value from the <uiobject> (if valuetype=”out”), or a submission parameter to the URI specified by the <uiobject>'s “data” attribute (if valuetype”submit”). The “name” attribute of <uiparam> identifies the parameter name in the external user interface that is associated with the instance data.
mxml:uieventmap Yes This is an extension element defined in the MXML namespace which occurs as a child of <uiobject>. <uieventmap> allows the author to map custom events thrown by the external user interface to XForms events.
Note: In this release, <uiobject> only supports launching of UI interfaces defined in VoiceXML. The <uiobject> that links to interfaces implemented in VoiceXML must have their type set to text/x-vxml.
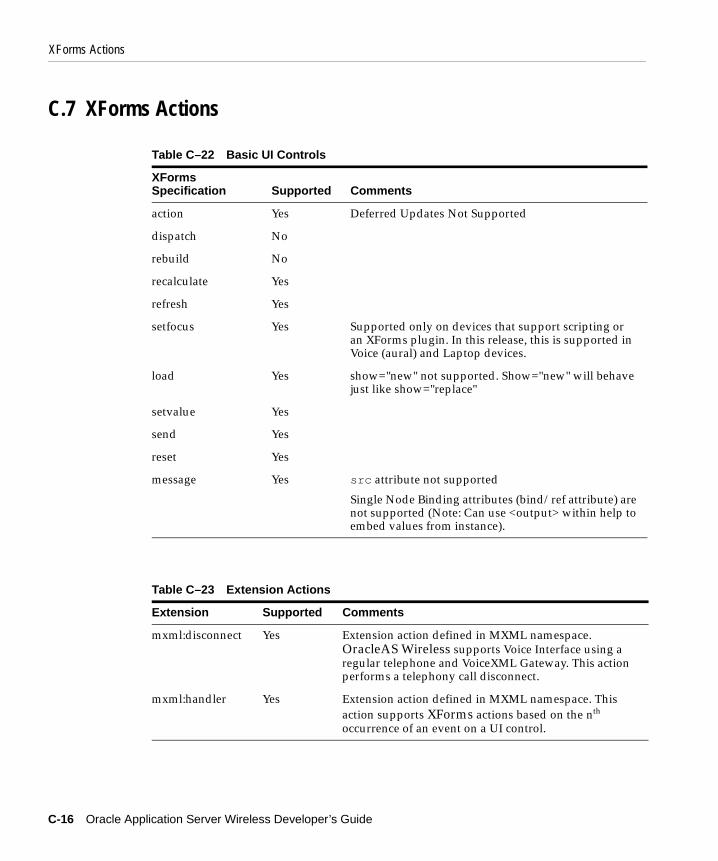
XForms Actions
C-16 Oracle Application Server Wireless Developer’s Guide
C.7 XForms Actions
Table C–22 Basic UI Controls
XForms Specification Supported Comments
action Yes Deferred Updates Not Supported
dispatch No
rebuild No
recalculate Yes
refresh Yes
setfocus Yes Supported only on devices that support scripting or an XForms plugin. In this release, this is supported in Voice (aural) and Laptop devices.
load Yes show="new" not supported. Show="new" will behave just like show="replace"
setvalue Yes
send Yes
reset Yes
message Yes src attribute not supported
Single Node Binding attributes (bind/ref attribute) are not supported (Note: Can use <output> within help to embed values from instance).
Table C–23 Extension Actions
Extension Supported Comments
mxml:disconnect Yes Extension action defined in MXML namespace. OracleAS Wireless supports Voice Interface using a regular telephone and VoiceXML Gateway. This action performs a telephony call disconnect.
mxml:handler Yes Extension action defined in MXML namespace. This action supports XForms actions based on the nth occurrence of an event on a UI control.

OracleAS Wireless CSS Support D-1
DOracleAS Wireless CSS Support
This appendix contains information about CSS Support.
D.1 OracleAS Wireless CSS Support
Table D–1 CSS Selectors
CSS Specification
Supported Comments
* Yes
E Yes Matches any E element (i.e., any element of type E)
E F Yes Matches any E element (i.e., any element of type E)
E > F Yes Matches any F element that is a child of an element E
E.warning Yes Match any E element with class="warning" (Class Selectors)
E#myid Yes Matches any E element with id equal to "myid"
#myid Yes Matches any element with id equal to "myid"
Note: In this release, OracleAS Wireless does not support namespaces in CSS Selectors. Element selectors match all elements in any (and no) namespace. XForms and XHTML do not have conflicting element names.

OracleAS Wireless CSS Support
D-2 Oracle Application Server Wireless Developer’s Guide
Table D–2 CSS at-rules (@ Rules)
CSS Specification Supported Comments
@media (CSS3 Media Query Syntax)
Yes The following values are supported: "all", "screen", "handheld", "tty", "aural".
@import Yes Yes
Table D–3 CSS BackGround Properties
CSS Specification
Supported Values Supported
Initial value/Inherited/Applies to/media
background-color
Yes <color> | transparent | inherit Initial Value: transparent
Inherited: no
Applies To: All Elements
Media: Visual Media
background-image
Yes <uri> | none | inherit Initial Value: none
Inherited: no
Applies To: All Elements
Media: Visual Media
background-position
No
background-repeat
No
background-attachment
No
background No

OracleAS Wireless CSS Support
OracleAS Wireless CSS Support D-3
Table D–4 CSS Border Properties
CSS Specification Supported Values Supported
Initial value/Inherited/Applies to/media
border-top-width, border-right-width, border-bottom-width, border-left-width
Yes <border-width> | inherit
<border-width> => [thin | medium | thick | <length>]
Initial Value: mediumInherited: noApplies To: All ElementsMedia: Visual Media
border-top-color, border-right-color, border-bottom-color, border-left-color
Yes <color> | inherit Initial Value: <value of color property>Inherited: noApplies To: All ElementsMedia: Visual Media
border-top-style, border-right-style, border-bottom-style, border-left-style
Yes <border-style> | inherit
<border-style> => [solid | none]
Initial Value: noneInherited: noApplies To: All ElementsMedia: Visual Media
Note: Border Properties are supported only on HTML-based browsers. Also in HTML32 browsers, these properties are supported only by table and grid layout elements. In addition, HTML32 browsers do not support control of sides (left, right, top, bottom) separately. In HTML32, you may either turn on or off the properties for all sides using the ’border-left-*’ properties.

OracleAS Wireless CSS Support
D-4 Oracle Application Server Wireless Developer’s Guide
Table D–5 CSS Box Properties
CSS Specification Supported Values Supported
Initial value/Inherited/Applies to/media
margin-top,
margin-right,
margin-bottom
margin-left
Yes <margin-width> | inherit
Note: Supported where devices supports. In HTML32 Browsers only table elements supported
Initial Value: 0
Inherited: no
Applies To: All Elements
Media: Visual Media
padding-top, padding-right, padding-bottom, padding-left
Yes <padding-width> | inherit
Note: Supported where devices supports. In HTML32 Browsers only table elements supported
Initial Value: 0Inherited: noApplies To: All ElementsMedia: Visual Media
Note: Box Properties are supported only on HTML-based Browsers. In HTML32 browsers, these properties are supported only by table and grid layout elements. In addition, HTML32 browsers do not support control of sides (left, right, top, bottom) separately. In HTML32, you may either turn on or off the properties for all sides using the ’border-left-*’ properties.
Table D–6 CSS Color Properties
CSS Specification Supported Values Supported
Initial value/Inherited/Applies to/media
color Yes <color> Initial Value: #000000Inherited: YesApplies To: All ElementsMedia: Visual Media

OracleAS Wireless CSS Support
OracleAS Wireless CSS Support D-5
Table D–7 CSS Font Properties
CSS Specification Supported Values Supported
Initial value/Inherited/Applies to/media
font-family Yes [[<family-name> | <generic-family>],]* [<family-name> | <generic-family>] | inherit
Inherited: YesApplies To: All ElementsMedia: Visual Media
font-size Yes <absolute_size> | inherit
<absolute_size> =>[ xx-small | x-small | small | medium | large | x-large | xx-large]
Initial Value: mediumInherited: YesApplies To: All ElementsMedia: Visual Media
font-style Yes normal | italic | oblique | inherit
Initial Value: normalInherited: YesApplies To: All ElementsMedia: Visual Media
font-weight Yes normal | bold | bolder | lighter | 100 | 200 | 300 | 400 | 500 | 600 | 700 | 800 | 900 | inherit
Initial Value: normalInherited: YesApplies To: All ElementsMedia: Visual Media

OracleAS Wireless CSS Support
D-6 Oracle Application Server Wireless Developer’s Guide
Table D–8 CSS Layout Properties
CSS Specification Supported Values Supported
Initial value/Inherited/Applies to/media
display Yes inline | block | list-item | none |grid | grid-label | grid-cell | grid-cell-label
Initial: inlineInherited: YesApplies To: All ElementsMedia: All Media
(Note: Only "display: none" can be applicable to aural media, as other values are visual in nature)
height Yes ‘‘<length> | <percentage> | auto | inherit
Initial Value: autoInherited: YesApplies To: All ElementsMedia: Visual Media
width Yes <length> | <percentage> | auto | inherit
Initial Value: autoInherited: YesApplies To: All ElementsMedia: Visual Media
float No
clear No
visibility No
Note: Height and width Properties are supported only on HTML based browsers. In HTML32 Browsers (Pocket PC, Palm), these properties are supported only by image, table and grid layout elements. In general and especially for Multi-Channel applications, it is good practice to use percentages for width and height.

OracleAS Wireless CSS Support
OracleAS Wireless CSS Support D-7
Table D–9 CSS List Properties
CSS Specification Supported Values Supported
Initial value/Inherited/Applies to/media
list-style Yes list-style-type | list-style-position | list-style-image | inherit
Inherited: YesApplies To: Elements with display: list-itemMedia: Visual Media
list-style-image Yes <uri> | none | inherit Initial Value: noneInherited: YesApplies To: Elements with display: list-itemMedia: Visual Media
list-style-type Yes disc | circle | square | decimal | lower-roman | upper-roman | lower-alpha | upper-alpha | none | inherit
Initial Value: discInherited: YesApplies To: Elements with display: list-itemMedia: Visual Media
list-style-position No
Table D–10 CSS Text Properties
CSS Specification Supported Values Supported
Initial value/Inherited/Applies to/media
text-align Yes left | right | center | justify | inherit
Inherited: YesApplies To: All ElementsMedia: Visual Media
text-decoration Yes none | underline | inherit
Initial Value: noneInherited: YesApplies To: Elements with display: list-itemMedia: Visual Media

OracleAS Wireless CSS Support
D-8 Oracle Application Server Wireless Developer’s Guide
text-transform Yes capitalize | uppercase | lowercase | none | inherit
Initial Value: noneInherited: YesApplies To: All ElementsMedia: Visual Media
text-indent Yes <length> | <percentage> | inherit
Initial Value: 0Inherited: YesApplies To: All ElementsMedia: Visual Media
vertical-align Yes top | middle | bottom | sub | super
Initial Value: baselineInherited: YesApplies To: All ElementsMedia: Visual Media
white-space Yes normal | pre | nowrap | inherit
Initial Value: normalInherited: YesApplies To: All ElementsMedia: Visual Media
Note:
text-align and vertical-align properties are supported only on HTML based browsers. The following additional constraints on HTML32 Browsers (Pocket PC, Palm) apply:’vertical-align: top | middle| bottom’ is supported only by block level elements such as div, p and table-cells’vertical-align: sub | super’ is supported only by inline elements such as span, strong’text-align: left | right | center’ is supported only by block-level elements such as div, p and table-cells’text-indent’ is supported only on XHTML MP-compliant browsers’white-space’ property should be used to control wrapping (white-space: normal) and nowrapping modes.
Table D–10 CSS Text Properties
CSS Specification Supported Values Supported
Initial value/Inherited/Applies to/media

OracleAS Wireless CSS Support
OracleAS Wireless CSS Support D-9
Table D–11 CSS Page Break Properties
CSS Specification Supported Values SupportedInitial value/Inherited/Applies to/media
page-break-before Yes auto | always | avoid | inherit
Initial: autoInherited: NoApplies To: All ElementsMedia: Visual and Paged Media
page-break-after Yes auto | always | avoid | inherit
Initial: autoInherited: NoApplies To: All ElementsMedia: Visual and Paged Media
page-break-inside Yes auto | avoid | inherit Initial: autoInherited: NoApplies To: All ElementsMedia: Visual and Paged Media
Note: Page break properties are used to split a single page into multiple cards on paged devices (browsers that support WML/HDML). These properties control how deck (page) overflow support is handled by the server on devices where deck (page) size limitations may exist.
Table D–12 Oracle CSS Extensions for UI Layout
CSS Specification Supported Values Supported
Initial value/Inherited/Applies to/media
display Yes grid | grid-cell
(OracleAS Wireless supports the above extension values for ’display’ property)
Initial: inlineInherited: YesApplies To: All ElementsMedia: Visual Media

OracleAS Wireless CSS Support
D-10 Oracle Application Server Wireless Developer’s Guide
_orcl-grid-cells Yes <number> Initial: 1Inherited: NoApplies To: Elements with display: gridMedia: Visual Media
_orcl-grid-cellspan Yes <number | all Initial Value: 1Inherited: NoApplies To: Elements with display: grid-cellMedia: Visual Media
_orcl-label-side Yes left | right | top | bottom
Initial Value: leftInherited: NoApplies To: Elements with display: grid-cell and display: inlineMedia: Visual Media
Note: _orcl-label-side property supports only ’left | right’ when ’display: inline’.
Table D–13 Oracle CSS Extensions for List Control Layout
CSS Specification Supported Values Supported
Initial value/Inherited/Applies to/media
_orcl-list-orient Yes horizontal | vertical Inherited: YesApplies To: List Controls (select/select1)Media: Visual Media
Table D–12 Oracle CSS Extensions for UI Layout
CSS Specification Supported Values Supported
Initial value/Inherited/Applies to/media

OracleAS Wireless CSS Support
OracleAS Wireless CSS Support D-11
Table 16–1 Oracle CSS Extensions for Repeat Layout
CSS Specification Supported Values SupportedInitial value/Inherited/Applies to/media
_orcl-repeat-labels Yes none | once | always Initial: onceInherited: YesApplies To: Repeat ElementsMedia: Visual Media
Note: _orcl-repeat-labels property is applicable only to repeat elements. This property controls the display of label, or UI controls with a repeat structure.
Table D–14 Other Oracle CSS Extensions
CSS Specification Supported Values Supported
Initial value/Inherited/Applies to/media
_orcl-table-col-separator Yes <string> Initial: ","Inherited: YesApplies To: Table and Table rowMedia: Visual Media with no "table" Media Feature
Note: _orcl-table-col-separator property is used when tables are not supported natively on the target browser.

OracleAS Wireless CSS Support
D-12 Oracle Application Server Wireless Developer’s Guide
Table D–15 CSS Aural Properties
CSS Specification Supported Values Supported
Initial value/Inherited/Applies to/media
volume Yes default | silent | soft | medium | loud | inherit
Initial: defaultInherited: YesApplies To: All ElementsMedia: Aural Media
speak Yes normal | spell-out | date | time | currency | duration | telephone | net | address| inherit | measurement | name
Initial: normalInherited: YesApplies To: All ElementsMedia: Aural Media
speak-numeral Yes digits | continuous | ordinal | inherit
Initial Value: continuousInherited: YesApplies To: All ElementsMedia: Aural Media
speak-header Yes once | always | inherit Initial Value: onceInherited: YesApplies To: Elements that have table headerMedia: Aural Media
pause-after Yes <time> | none | small | medium | large | inherit
Initial Value: noneInherited: NoApplies To: All ElementsMedia: Aural Media
pause-before Yes <time> | none | small | medium | large | inherit
Initial Value: noneInherited: YesApplies To: All ElementsMedia: Aural Media
speech-rate Yes slow | medium | fast | default | inherit
Initial Value: defaultInherited: NoApplies To: All ElementsMedia: Aural Media
pitch Yes low | medium | high | default | inherit
Initial Value: defaultInherited: YesApplies To: All ElementsMedia: Aural Media

OracleAS Wireless CSS Support
OracleAS Wireless CSS Support D-13
pitch-range Yes low | medium | high | default | inherit
Initial Value: defaultInherited: YesApplies To: All ElementsMedia: Aural Media
stress Yes none | reduced | moderate | strong | inherit
Initial Value: noneInherited: YesApplies To: All ElementsMedia: Aural Media
Table D–16 Oracle CSS Extensions for Aural
CSS Specification Supported Values Supported
Initial value/Inherited/Applies to/media
_orcl-bargein Yes true | false | inherit Initial: trueInherited: YesApplies To: All ElementsMedia: Aural Media
_orcl_sayas_format Yes none | date(dmy | mdy | ymd | ym | my | md | y) | time(hm | hms) | duration(hm | hms | ms | h | m | s) | net (email | url)
Initial: noneInherited: YesApplies To: All ElementsMedia: Aural Media
_orcl-duration Yes <time> Inherited: YesApplies To: All Elements with "speak: duration"Media: Aural Media
_orcl-pitch-contour Yes <string>Examples: "(0%,+20)(10%,+30%)(40%,+10)"
Inherited: YesApplies To: All Elements with "speak: duration"Media: Aural Media
_orcl-aural-props Yes vxml-gateway-property-name(property-value)
[,vxml-gateway-property-name(property-value)]*
Inherited: YesApplies To: All ElementsMedia: Aural Media
Table D–15 CSS Aural Properties
CSS Specification Supported Values Supported
Initial value/Inherited/Applies to/media

OracleAS Wireless CSS Support
D-14 Oracle Application Server Wireless Developer’s Guide

Using CSS Layout Properties E-1
EUsing CSS Layout Properties
This appendix contains information about using CSS capabilities. Topics include:
■ Section E.1, "OracleAS Wireless CSS Layout Extensions—New Properties and Values"
■ Section E.2, "Grid Layout Model"
■ Section E.3, "Default Styles for XForms Group"
E.1 OracleAS Wireless CSS Layout Extensions—New Properties and Values
OracleAS Wireless defines CSS extension properties to layout form controls in visual rendering of an XHTML+XForms document.
To support a grid layout model, OracleAS Wireless extends the valuespace of CSS ’display’ with the following additional values; these values are in addition to those values defined by the CSS Specification.
’display’ : grid | grid-cell
In addition, OracleAS Wireless defines the following additional CSS properties:
■ ’_orcl-grid-cells’
Value: <number>
Initial: 1
Applies to: all elements with ’display: grid’
Inherited: No

Grid Layout Model
E-2 Oracle Application Server Wireless Developer’s Guide
Percentages: N/A
Media: Visual
■ ’_orcl-grid-cellspan’
Value: <number> | all
Initial: 1
Applies to: All Elements with ’display: grid-cell’
Inherited: No
Percentages: N/A
Media: Visual
■ ’_orcl-label-side’
Value: left | right | top | bottom
Initial: left
Applies to: Label Elements with ’display: grid-cell’ and ’display: inline’
Inherited: No
Percentages: N/A
Media: Visual
E.2 Grid Layout ModelGrid control is a generated box that contains grids of cells laid out in a number of rows. Elements with the CSS property ’display: grid’ generates a grid control. Each cell in a grid control is called a ’grid-cell’. The number of grid-cells in a row is determined by the CSS property ’_orcl-grid-cells’. Each child element of a grid control will lay out its contents in a grid-cell when their CSS ’display’ property is set to ’grid-cell’ (style="display: grid-cell"). The document order determines the exact grid-cell a particular element occupies. Elements may span more than one grid-cell based on the CSS property ’_orcl-grid-cellspan’.
Example of a Grid layout:
<xforms:group style="display: grid; _orcl-grid-cells: 2"> <p style="display: grid-cell"> Content of ’grid-cell’ 1

Grid Layout Model
Using CSS Layout Properties E-3
</p> <p style="display: grid-cell"> Content of ’grid-cell’ 2 </p> <p style="display: grid-cell"> Content of ’grid-cell’ 3 </p> <xforms:group>
E.2.1 Grid Cell Layout and Cell SpansAn element with ’display: grid-cell’ in the grid can span multiple cells and the number of cell spans is controlled by the property ’_orcl-grid-cellspan’.
Example of a Grid layout and cell span:
<xforms:group style="display: grid; _orcl-grid-cells: 2"> <p style="display: grid-cell"> Content of ’grid-cell’ 1 </p> <p style="display: grid-cell"> Content of ’grid-cell’ 12 </p> <p style="display: grid-cell;_orcl-grid-cellspan: all"> Content of ’grid-cell’ 3 </p> <xforms:group>
Figure E–1 Result of Grid Layout and Cell Span
E.2.2 Grid Cell and Grid Cell LabelChild elements of a grid control can have a CSS display value of ’grid-cell’ or can be another grid layout control. A grid-cell can optionally have elements identified by the CSS property ’display: grid-cell’. Elements with ’display: grid-cell’ will occupy a separate grid cell in the grid structure. An example of this is the <xforms:input> UI control which has <xforms:label>

Grid Layout Model
E-4 Oracle Application Server Wireless Developer’s Guide
that will occupy a separate grid-cell (distinct from the cell occupied from the UI control itself).
Example of ’grid-cell’ and ’grid-cell-label’:
<xforms:group style="display: grid; _orcl-grid-cells: 2"> <xforms:input style="display: grid-cell"> <xforms:label style="display: grid-cell"> Field 1 </xforms:label> </xforms:input> <xforms:input style="display: grid-cell"> <xforms:label style="display: grid-cell"> Field 2 </xforms:label> </xforms:input> <xforms:group>
Figure E–2 Result of ’grid-cell’ and ’grid-cell-label’
It is not necessary for a <label> to be placed in a cell different from the UI Control itself. For the label to be placed in the same cell as the UI control the CSS ’display’ property can be set to ’inline’ (’display: inline’).
Example of an Inline Label:
<xforms:group style="display: grid; _orcl-grid-cells: 2"> <xforms:input style="display: grid-cell"> <xforms:label style="display: inline"> Field 1 </xforms:label> </xforms:input> <xforms:input style="display: grid-cell"> <xforms:label style="display: inline"> Field 2 </xforms:label> </xforms:input> <xforms:group>

Grid Layout Model
Using CSS Layout Properties E-5
Figure E–3 Result of an Inline Label
E.2.3 In-lining Content within a Grid CellAll child elements of a grid control do not place their content in a separate grid-cell. Child elements with ’display’ property set to inline will lay out its contents in the cell created by a preceding element.
Example of ’display: inline’ in Grid Layout:
<xforms:group style="display: grid; _orcl-grid-cells: 2"> <xforms:input style="display: grid-cell"> <xforms:label style="display: grid-cell-label"> Field 1 </xforms:label> </xforms:input> <xforms:input style="display: grid-cell"> <xforms:label style="display: grid-cell-label"> Field 2 </xforms:label> </xforms:input> <p style="display: inline"> Some text </p> <xforms:group>
Figure E–4 Result of ’display: inline’ in Grid Layout
E.2.4 Label Side of a Grid Cell LabelOracleAS Wireless defines a new CSS property ’_orcl-label-side’. _orcl-label-side controls the placement of the label relative to the grid cell contents. The possible values for _orcl-label-side are left | right | top | bottom

Default Styles for XForms Group
E-6 Oracle Application Server Wireless Developer’s Guide
Example of Label Side on Grid Cell:
<xforms:group style="display: grid; _orcl-grid-cells: 2"> <xforms:input style="display: grid-cell"> <xforms:label style="display: grid-cell; _orcl-label-side: top"> Field 1 </xforms:label> </xforms:input> <xforms:input style="display: grid-cell; "> <xforms:label style="display: grid-cell; _orcl-label-side: left"> Field 2 </xforms:label> </xforms:input> <xforms:group>
Figure E–5 Result of Label Side on Grid Cell
E.3 Default Styles for XForms GroupOracleAS Wireless defines a default style sheet for the XForms Group element based on the Grid Layout model. The default stylesheet renders XForms Group as Grid Layout (display: grid) with the group’s label on top (_orcl-label-side: top). Also the number of cells for a XForms group is 2 by default (_orcl-grid-cells: 2). Also by default, all the Form Controls and its label within the group occupy one grid cell each, with the label of the form control on the left.
Example Using the Default CSS Stylesheet:
<xforms:group> <xforms:label>Grid label</xforms:label> <xforms:input> <xforms:label> Field 1

Default Styles for XForms Group
Using CSS Layout Properties E-7
</xforms:label> </xforms:input> <div> some text that spans <p> entire line </p> </div> <xforms:input> <xforms:label> Field 2 </xforms:label> </xforms:input> <xforms:group>
Figure E–6 Result of Using the Default CSS Stylesheet

Default Styles for XForms Group
E-8 Oracle Application Server Wireless Developer’s Guide

Oracle XML Grammar Subset F-1
FOracle XML Grammar Subset
This appendix contains information about the Oracle XML Grammar Subset.
F.1 Oracle XML Grammar SubsetThe Oracle Grammar Subset (OGS) is a subset of the XML Form of the W3C Speech Recognition Grammar Format (SRGS). The primary aims of the subset are:
■ make OGS grammars self-contained so they can be transformed to other formats without resolving references to other grammars
■ exclude features such as multiple entry points and recursive rule references that may not be supported by all gateways
■ exclude syntax-like double-quoted-delimited tokens
■ exclude features such as weights, and repeat probabilities whose semantics are not well defined by the Speech Recognition Grammar Specification (SRGS)
■ restrict the use of semantic interpretation
■ rule out some features of both XML Form grammars and semantic interpretation whose semantics are more likely to vary between implementations (such as ambiguous grammars), and references to undefined identifiers
Grammars in the OGS are not standalone XML documents; they have no XML header or DOCTYPE, but consist only of the root <grammar> element and contents. Such a <grammar> element and contents are in the subset if and only if they are legal according to the DTD of the W3C Speech Recognition Grammar Format, and satisfy the following additional restrictions:
■ The root attribute of the <grammar> element is defined, and is a reference to one of the <rule>s in the grammar (which must, therefore, define at least one

Oracle XML Grammar Subset
F-2 Oracle Application Server Wireless Developer’s Guide
<rule>). The rule referred to by the root attribute of the <grammar> will be called the root rule.
■ Any scope attributes defined have the value private.
■ All <ruleref> elements have a uri attribute whose value begins with a #; that is, they are references to other rules in the same grammar. No <ruleref> has a type, alias, or special attribute.
■ There are no loops in rule references. In other words:
■ No rule contains a <ruleref> that refers to itself.
■ There is no sequence of rules r1, ..., rn such that ri contains a <ruleref> that refers to ri+1 for all i = 1, ..., n-1, and rn contains a <ruleref> that refers to r1.
■ There are no double-quote-delimited tokens; all multi-word tokens are delimited by <token> tags.
■ The only entity references occurring in the grammar are &, <, >, ", and ', and those represented using decimal or hex codes.
■ There are no <example>, <alias>, <meta>, <metadata>, or <lexicon> elements.
■ No element has a weight or repeat-prob attribute.
■ The grammar is not ambiguous, as defined in the Speech Recognition Grammar Specification.
■ Any utterance recognized by a rule includes at most one <ruleref> occurring in that rule with a given uri attribute value (In other words, no rule can recognize an utterance that includes more than one <ruleref> that refers to the same rule).
■ All <tag> elements contain text in a subset of the format described in W3C Semantic Interpretation for Speech Recognition (SISR), and satisfy the following additional restrictions:
■ The content of every <tag> is one of the following:
* a double-quote-delimited string element
* a grammar rule reference attribute, that is, a $ followed by the id attribute of a <rule>
* a property of a grammar rule reference attribute, that is, a grammar rule reference attribute followed by a period (.) and a property name.

Oracle XML Grammar Subset
Oracle XML Grammar Subset F-3
* an AssignmentList as defined in the Semantic Interpretation specification (a semicolon-delimited list of assignments), in which the left-hand side of each assignment is an Identifier as defined in the Semantic Interpretation specification, and the right-hand side is one of the above three types of expression (a double-quote-delimited string element, a grammar rule reference attribute, or a property of a grammar rule reference attribute).
For example, all of the following lines are allowed content of a <tag>:
"sausage"$gender$animal.specieswhat = "animal"where = "New York City";; when = "now"who = "me"; why = "because"question = "how" ; how = "by hook or by crook";;;food = $orderdiameter = $order.sizewhat = "pizza"; size = $order.diameter
■ If a rule is not the root rule, it falls into one of the following categories:
* the rule contains no <tag>s (we will call such rules void rules)
* each utterance recognized by the rule includes exactly one <tag> in that rule, that <tag> is the last thing in the rule that is included in the utterance, and the content of the <tag> is a double-quote-delimited string, a grammar rule reference attribute, or a property of a grammar rule reference attribute (we will call such rules string rules).
* each utterance recognized by the rule includes exactly one <tag> in that rule, that <tag> is the last thing in the rule that is included in the utterance, and the content of the <tag> is an AssignmentList (we will call such rules structure rules).
■ Every <tag> in a structure rule must assign to the exact same set of identifiers (that is, the exact same identifiers must appear as left-hand sides of assignments in the every <tag>’s content). The set of identifiers assigned to by the <tag>s in a structure rule will be called the signature of the rule.
■ If the content of a <tag> includes a property of a grammar rule reference attribute, the referenced rule must be a structure rule, and the property

Oracle XML Grammar Subset
F-4 Oracle Application Server Wireless Developer’s Guide
must be in the referenced rule’s signature. For example, if a <tag> has content:
$y.z or
x = $y.z
then the rule with id y must be a structure rule, and all of the <tag>s in rule y must include an assignment to identifier z.
■ If the content of a <tag> contains a grammar rule reference attribute with no property, the referenced rule must be a string rule. For example, if a <tag> has content:
$y or
x = $y
then the rule with id y must be a string rule.
■ Every <tag> in the root rule contains an AssignmentList (the term structure rule applies only to non-root rules, so the root rule is not subject to the above restrictions on structure rules).
■ If an utterance is recognized by a rule (root rule or not), then the collection of <tag>s in that rule that are included in that utterance do not contain more than one assignment to the same identifier (not even if the expression the identifier is assigned to is the same).
■ If an utterance recognized by a rule (root rule or not) includes a <tag> in that <rule>, and that <tag> contains a grammar rule reference attribute $id (standalone or as part of a property), then that utterance must include a <ruleref> in the same rule as the <tag>, occurring before the <tag> in the utterance, with uri= #id.

JSP Tag Library G-1
GJSP Tag Library
Mobile Studio pages are written using J2EE JSP technology, making use of the power of custom tag libraries. This section documents the custom tags available for use when customizing Mobile Studio pages.
This document contains a listing of JSP tags. Tags include:
■ <om:is />
■ <om:not>
■ <om:get />
■ <om:bean />
■ <om:test />
■ <om:equals />
■ <om:indexIs />
■ <om:indexEquals />
■ <om:index />
■ <om:res />
■ <om:enc />
■ <om:exist />
■ <om:notexist />
Note: The JSP tag library is only used to customize Mobile Studio, and is not required for developing wireless applications.

G-2 Oracle Application Server Wireless Developer’s Guide
■ <om:if />
■ <om:elseif>
■ <om:else />
■ <om:then />
■ <om:iterate />
■ <om:switch />
■ <om:case />
■ <om:default />

JSP Tag Library G-3
Table G–1 <om:is />
Specification in taglib Usage
<tag>
<name>is</name>
<attribute>
<name>attr</name>
<required>true</required>
<rtexprvalue>true</rtexprvalue>
</attribute>
<attribute>
<name>value</name>
<required>true</required>
<rtexprvalue>true</rtexprvalue>
</attribute>
<attribute>
<name>name</name>
<required>false</required>
<rtexprvalue>true</rtexprvalue>
</attribute>
<attribute>
<name>prefix</name>
<required>false</required>
<rtexprvalue>true</rtexprvalue>
</attribute>
<tagclass>oracle.panama.studio.taglib.IsTag</tagclass>
<bodycontent>JSP</bodycontent>
<info>Evaluate the body if the value found from the bean matches the given value</info>
</tag>
<om:is attr= attrName value= attrValue (name= beanName) (prefix= prefixName) >.</om:is>
Note: The attributes in parenthesis are optional.
<om:is> is a body tag, that is, if the condition evaluates to true, then the body content will be processed and output as appropriate.
attr is the attribute of the bean whose value is being tested.
value is the value of the bean attribute being tested against.
name (optional) is the name of the bean in context.
prefix (optional) When asking the bean for the attribute, we add the prefix to the name of the attribute (for example, if prefix is is, and the attr is empty, then the method to invoke on the bean is isEmpty() which follows Java naming convention). If not given, then we test first get and then is as the prefixes, if neither one is found, then an exception will be thrown.

G-4 Oracle Application Server Wireless Developer’s Guide
Table G–2 <om:not>
Specification in taglib Usage
<tag>
<name>not</name>
<attribute>
<name>attr</name>
<required>true</required>
<rtexprvalue>true</rtexprvalue>
</attribute>
<attribute>
<name>value</name>
<required>true</required>
<rtexprvalue>true</rtexprvalue>
</attribute>
<attribute>
<name>name</name>
<required>false</required>
<rtexprvalue>true</rtexprvalue>
</attribute>
<attribute>
<name>prefix</name>
<required>false</required>
<rtexprvalue>true</rtexprvalue>
</attribute>
<tagclass>oracle.panama.studio.taglib.NotTag</tagclass>
<bodycontent>JSP</bodycontent>
<info>Evaluate the body if the value found from the bean does not match the given value.</info>
</tag>
<om:not attr= attrName value= attrValue (name= beanName) (prefix= prefixName) >.</om:not>
Note: The attributes in parenthesis are optional.
<om:is> is a body tag, that is, if the condition evaluates to true, then the body content will be processed and output as appropriate.
attr is the attribute of the bean whose value is being tested.
value is the value of the bean attribute being tested against.
name (optional) is the name of the bean in context.
prefix (optional) When asking the bean for the attribute, we add the prefix to the name of the attribute (for example, if prefix is is, and the attr is empty, then the method to invoke on the bean is isEmpty() which follows Java naming convention). If not given, then we test first get and then is as the prefixes, if neither one is found, then an exception will be thrown.

JSP Tag Library G-5
Table G–3 <om:get />
Specification in taglib Usage
<tag>
<name>get</name>
<attribute>
<name>attr</name>
<required>true</required>
<rtexprvalue>true</rtexprvalue>
</attribute>
<attribute>
<name>name</name>
<required>false</required>
<rtexprvalue>true</rtexprvalue>
</attribute>
<tagclass>oracle.panama.studio.taglib.GetTag</tagclass>
<bodycontent>empty</bodycontent>
<info>Gets the value of a bean attribute using reflection.</info>
</tag>
<om:get attr= attrName (name= beanName)/>
<om:get> is a simple tag, that is, it does not allow content inside its body. This tag attempts to get the attribute from the bean and outputs it if found. It does nothing if the bean or the attribute are not found.
attr is the attribute of the bean whose value is being tested.
name (optional) is the name of the bean in context.

G-6 Oracle Application Server Wireless Developer’s Guide
Table G–4 <om:bean />
Specification in taglib Usage
<tag>
<name>bean</name>
<attribute>
<name>name</name>
<required>true</required>
<rtexprvalue>true</rtexprvalue>
</attribute>
<tagclass>oracle.panama.studio.taglib.BeanTag</tagclass>
<bodycontent>JSP</bodycontent>
<info>Sets up the context for the bean.</info>
</tag>
<om:bean name= beanName/>
<om:bean> is a simple tag, that is, it does not allow content inside its body. This tag puts the bean in the context (same as JSP page context) with the given name.
attr is the attribute of the bean that is being tested.
name (optional) is the name of the bean in context.

JSP Tag Library G-7
Table G–5 <om:test />
Specification in taglib Usage
<tag>
<name>test</name>
<attribute>
<name>attr</name>
<required>true</required>
<rtexprvalue>true</rtexprvalue>
</attribute>
<attribute>
<name>value</name>
<required>true</required>
<rtexprvalue>true</rtexprvalue>
</attribute>
<attribute>
<name>prefix</name>
<required>false</required>
<rtexprvalue>true</rtexprvalue>
</attribute>
<tagclass>oracle.panama.studio.taglib.TestTag</tagclass>
<bodycontent>JSP</bodycontent>
<info>Test if the value of a bean attribute is the same as given using reflection.</info>
</tag>
<om:test attr= attrName value= attrValue (prefix = prefix)>.</om:test>
<om:test> is a body tag, that is, its body content is evaluated and output as appropriate if the test condition evaluates to true.
attr is the attribute of the bean being tested.
value is the value of the attribute of the bean being tested against.
prefix (optional) is the prefix used when invoking the method against the bean in context.

G-8 Oracle Application Server Wireless Developer’s Guide
Table G–6 <om:equals />
Specification in taglib Usage
<tag>
<name>equals</name>
<attribute>
<name>attr</name>
<required>true</required>
<rtexprvalue>true</rtexprvalue>
</attribute>
<attribute>
<name>name</name>
<required>true</required>
<rtexprvalue>true</rtexprvalue>
</attribute>
<attribute>
<name>prefix</name>
<required>false</required>
<rtexprvalue>true</rtexprvalue>
</attribute>
<tagclass>oracle.panama.studio.taglib.EqualsTag</tagclass>
<bodycontent>JSP</bodycontent>
<info>Test if the value of a bean attribute is the same as given using reflection.</info>
</tag>
<om:equals attr= attrName name= attrName (prefix = prefix)>.</om:equals>
<om:equals> is a body tag, that is, its body content is evaluated and output as appropriate if the test condition evaluates to true.
attr is the attribute of the bean being tested.
name is the name of the attribute in context whose value is being tested against.
prefix (optional) is the prefix used when invoking the method against the bean in context.

JSP Tag Library G-9
Table G–7 <om:indexIs />
Specification in taglib Usage
<tag>
<name>indexIs</name>
<tagclass>oracle.panama.studio.taglib.IndexIsTag</tagclass>
<bodycontent>JSP</bodycontent>
<info>Test if the index inside iteration is the same as given by the user.</info>
<attribute>
<name>value</name>
<required>true</required>
<rtexprvalue>true</rtexprvalue>
</attribute>
</tag>
<om:indexIs value= value >.</om:indexIs>
<om:indexIs> is a body tag, that is, its body content is evaluated and output as appropriate if the test condition evaluates to true.
value is the value of the index being tested against.

G-10 Oracle Application Server Wireless Developer’s Guide
Table G–8 <om:indexEquals />
Specification in taglib Usage
<tag>
<name>indexEquals</name>
<tagclass>oracle.panama.studio.taglib.IndexEqualsTag</tagclass>
<bodycontent>JSP</bodycontent>
<info>Test if the index inside iteration is the same as the value found.</info>
<attribute>
<name>name</name>
<required>true</required>
<rtexprvalue>true</rtexprvalue>
</attribute>
</tag>
<om:indexEquals name= attrName >.</om:indexEquals>
<om:indexEquals> is a body tag, that is, its body content is evaluated and output as appropriate if the test condition evaluates to true.
name is the name of the attribute in context whose value is being tested against.
Table G–9 <om:index />
Specification in taglib Usage
<tag>
<name>index</name>
<tagclass>oracle.panama.studio.taglib.IndexTag</tagclass>
<bodycontent>empty</bodycontent>
<info>Gets the current index during iteration.</info>
</tag>
<om:index/>
<om:index> is a simple tag, that is, there is no content inside the tag allowed. It simply outputs the index of the current bean which is used mostly inside <om:iterate>.
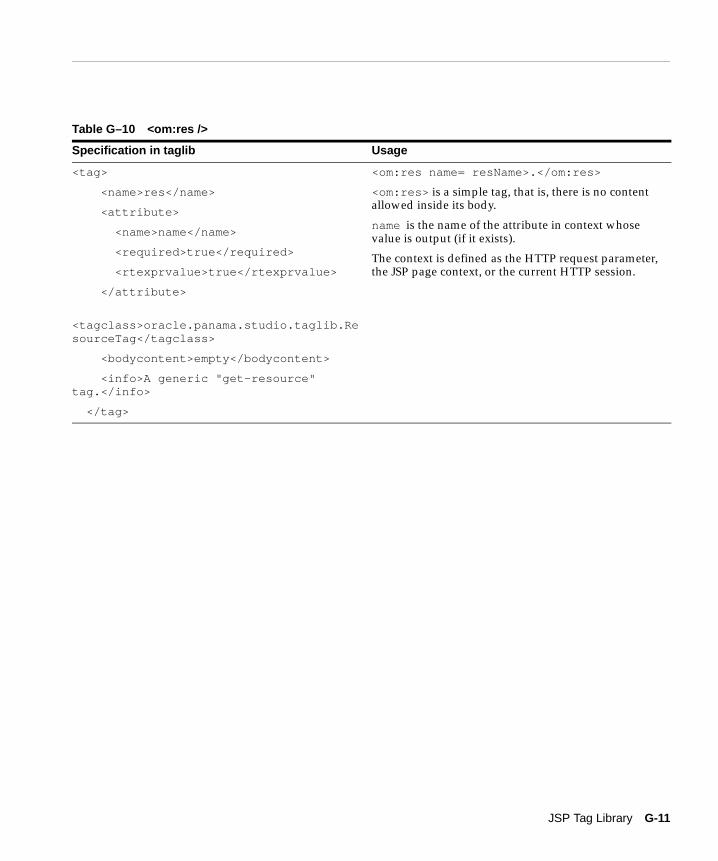
JSP Tag Library G-11
Table G–10 <om:res />
Specification in taglib Usage
<tag>
<name>res</name>
<attribute>
<name>name</name>
<required>true</required>
<rtexprvalue>true</rtexprvalue>
</attribute>
<tagclass>oracle.panama.studio.taglib.ResourceTag</tagclass>
<bodycontent>empty</bodycontent>
<info>A generic "get-resource" tag.</info>
</tag>
<om:res name= resName>.</om:res>
<om:res> is a simple tag, that is, there is no content allowed inside its body.
name is the name of the attribute in context whose value is output (if it exists).
The context is defined as the HTTP request parameter, the JSP page context, or the current HTTP session.

G-12 Oracle Application Server Wireless Developer’s Guide
Table G–11 <om:enc />
Specification in taglib Usage
<tag>
<name>enc</name>
<attribute>
<name>name</name>
<required>true</required>
<rtexprvalue>true</rtexprvalue>
</attribute>
<tagclass>oracle.panama.studio.taglib.EncodeTag</tagclass>
<bodycontent>empty</bodycontent>
<info>A generic "encode-resource" tag.</info>
</tag>
Table G–12 <om:exist />
Specification in taglib Usage
<tag>
<name>exist</name>
<tagclass>oracle.panama.studio.taglib.ExistTag</tagclass>
<bodycontent>JSP</bodycontent>
<info>A logical exists tag.</info>
<attribute>
<name>name</name>
<required>true</required>
<rtexprvalue>true</rtexprvalue>
</attribute>
</tag>
<om:exist name= attrName >.</om:exist>
<om:exist> is a body tag, that is, its body content is evaluated and output as appropriate if the test condition evaluates to true.
name is the name of the attribute in context being tested against.
The context is defined as the HTTP request parameter, the JSP page context, or the current HTTP session.

JSP Tag Library G-13
Table G–13 <om:notexist />
Specification in taglib Usage
<tag>
<name>notexist</name>
<tagclass>oracle.panama.studio.taglib.NotExistTag</tagclass>
<bodycontent>JSP</bodycontent>
<info>A logical not-exists tag.</info>
<attribute>
<name>name</name>
<required>true</required>
<rtexprvalue>true</rtexprvalue>
</attribute>
</tag>
<om:notexist name= attrName >.</om:notexist>
<om:notexist> is a body tag, that is, its body content is evaluated and output as appropriate if the test condition evaluates to true.
name is the name of the attribute in context being tested against.
The context is defined as the HTTP request parameter, the JSP page context, or the current HTTP session.

G-14 Oracle Application Server Wireless Developer’s Guide
Table G–14 <om:if />
Specification in taglib Usage
<tag>
<name>if</name>
<tagclass>oracle.panama.studio.taglib.IfTag</tagclass>
<bodycontent>JSP</bodycontent>
<info>A logical if tag.</info>
<attribute>
<name>name</name>
<required>true</required>
<rtexprvalue>true</rtexprvalue>
</attribute>
<attribute>
<name>value</name>
<required>true</required>
<rtexprvalue>true</rtexprvalue>
</attribute>
<attribute>
<name>op</name>
<required>true</required>
<rtexprvalue>false</rtexprvalue>
</attribute>
</tag>
<om:if name= attrName value= attrValue” op= equal >
<om:then> .</om:then>
<om:elseif name=attrName value=attrValue op=equal>
<om:then> </om:then>
<om:ese>
<om:then> </om:then>
</om:else>
</om:elseif>
</om:if>
<om:if> is used in combination with <om:elseif>, <om:else> and <om:then>.
If the application of the operator between the value of the given attribute in context and the value given evaluates to true, then the immediate child <om:then> tag’s content is evaluated and output. Otherwise, the <om:elseif> or <om:else> that is an immediate child of the <om:if> is evaluated, and their contents are output as appropriate to them.
name: The name of the attribute in context whose value we want to test against.
The context is the defined as the HTTP request parameter, the JSP page context, or the current HTTP session.
value: The value of the attribute that we are testing against.

JSP Tag Library G-15
Table G–15 <om:elseif>
Specification in taglib Usage
<tag>
<name>elseif</name>
<tagclass>oracle.panama.studio.taglib.ElseIfTag</tagclass>
<bodycontent>JSP</bodycontent>
<info>A logical elseif tag, allowed only inside if or elseif.</info>
<attribute>
<name>name</name>
<required>true</required>
<rtexprvalue>true</rtexprvalue>
</attribute>
<attribute>
<name>value</name>
<required>true</required>
<rtexprvalue>true</rtexprvalue>
</attribute>
<attribute>
<name>op</name>
<required>true</required>
<rtexprvalue>false</rtexprvalue>
</attribute>
</tag>
<om:if name= attrName value= attrValue op= equal >
<om:then> .</om:then>
<om:elseif name=attrName value=attrValue op=equal>
<om:then> </om:then>
<om:ese>
<om:then> </om:then>
</om:else>
</om:elseif>
</om:if>
<om:elseif> is used in combination with <om:if>, <om:else> and <om:then>.
If the application of the operator between the value of the given attribute in context and the value given evaluates to true, then the immediate child <om:then> tag’s content is evaluated and output. Otherwise, the <om:else> that is an immediate child of the <om:elseif> is evaluated, and its contents are output as appropriate to it.
name is the name of the attribute in context whose value is being tested against.
The context is defined as the HTTP request parameter, the JSP page context, or the current HTTP session.
value is the value of the attribute being tested against.

G-16 Oracle Application Server Wireless Developer’s Guide
Table G–16 <om:else />
Specification in taglib Usage
<tag>
<name>else</name>
<tagclass>oracle.panama.studio.taglib.ElseTag</tagclass>
<bodycontent>JSP</bodycontent>
<info>A logical else tag.</info>
</tag>
<om:if name= attrName value= attrValue op= equal >
<om:then> .</om:then>
<om:elseif name=attrName value=attrValue op=equal>
<om:then> </om:then>
<om:ese>
<om:then> </om:then>
</om:else>
</om:elseif>
</om:if>
<om:else> is used in combination with <om:elseif>, <om:else> and <om:then>.
When the parent <om:if> or <om:elseif> evaluates to false, then the content of the child <om:then> tag is evaluated and output as appropriate, otherwise, no action is taken.

JSP Tag Library G-17
Table G–17 <om:then />
Specification in taglib Usage
<tag>
<name>then</name>
<tagclass>oracle.panama.studio.taglib.ThenTag</tagclass>
<bodycontent>JSP</bodycontent>
<info>A logical else tag.</info>
</tag>
<om:if name= attrName value= attrValue op= equal >
<om:then> .</om:then>
<om:elseif name=attrName value=attrValue op=equal>
<om:then> </om:then>
<om:ese>
<om:then> </om:then>
</om:else>
</om:elseif>
</om:if>
<om:then> is used in combination with <om:if> , <om:elseif> and <om:else>.
If the parent <om:if> , <om:elseif> and <om:else> evaluate to true, then the contents of the <om:then> tag are evaluated and output as appropriate.

G-18 Oracle Application Server Wireless Developer’s Guide
Table G–18 <om:iterate />
Specification in taglib Usage
<tag>
<name>iterate</name>
<tagclass>oracle.panama.studio.taglib.IterateTag</tagclass>
<!-- teiclass>oracle.panama.studio.taglib.IterateTagTEI</teiclass -->
<bodycontent>JSP</bodycontent>
<info>An iteration tag.</info>
<attribute>
<name>name</name>
<required>true</required>
<rtexprvalue>true</rtexprvalue>
</attribute>
</tag>
<om:iterate name= collectionName >
. . .
</om:iterate>
<om:iterate> is used for iterating over a collection of bean objects. If an object with the given name is found in the context, and it is of Java Collection type, then we can loop through the collection and use each of the objects inside the collection as we loop through it. The body of the <om:iterate> tag will be output n times where n is the number of objects inside the collection.

JSP Tag Library G-19
Table G–19 <om:switch />
Specification in taglib Usage
<tag>
<name>switch</name>
<tagclass>oracle.panama.studio.taglib.SwitchTag</tagclass>
<bodycontent>JSP</bodycontent>
<info>A switch tag.</info>
<attribute>
<name>name</name>
<required>true</required>
<rtexprvalue>true</rtexprvalue>
</attribute>
</tag>
<om:switch name= attrName>
<om:case value= value1>
</om:case>
<om:case value= value2 >
</om:case>
<om:default>
</om:default>
</om:switch>
<om:switch> is used in combination with <om:case> and <om:default>, where in <om:switch> we specify the name of the attribute we are testing upon, and inside <om:case> we specify the value of the attribute we are testing against, in case of a match, the body of the <om:case> that satisfies the match is evaluated and output as appropriate, otherwise if the <om:default > is specified, then its body is evaluated and output instead.

G-20 Oracle Application Server Wireless Developer’s Guide
Table G–20 <om:case />
Specification in taglib Usage
<tag>
<name>case</name>
<tagclass>oracle.panama.studio.taglib.CaseTag</tagclass>
<bodycontent>JSP</bodycontent>
<info>A case tag.</info>
<attribute>
<name>value</name>
<required>true</required>
<rtexprvalue>true</rtexprvalue>
</attribute>
</tag>
<om:switch name= attrName>
<om:case value= value1>
</om:case>
<om:case value= value2 >
</om:case>
<om:default>
</om:default>
</om:switch>
<om:switch> is used in combination with <om:case> and <om:default>, where in <om:switch> we specify the name of the attribute we are testing upon, and inside <om:case> we specify the value of the attribute we are testing against, in case of a match, the body of the <om:case> that satisfies the match is evaluated and output as appropriate, otherwise if the <om:default > is specified, then its body is evaluated and output instead.

JSP Tag Library G-21
Table G–21 <om:default />
Specification in taglib Usage
<tag>
<name>default</name>
<tagclass>oracle.panama.studio.taglib.DefaultTag</tagclass>
<bodycontent>JSP</bodycontent>
<info>A default tag. </info>
</tag>
<om:switch name= attrName>
<om:case value= value1>
</om:case>
<om:case value= value2 >
</om:case>
<om:default>
</om:default>
</om:switch>
<om:switch> is used in combination with <om:case> and <om:default>, where in <om:switch> we specify the name of the attribute we are testing upon, and inside <om:case> we specify the value of the attribute we are testing against, in case of a match, the body of the <om:case> that satisfies the match is evaluated and output as appropriate, otherwise if the <om:default > is specified, then its body is evaluated and output instead.

G-22 Oracle Application Server Wireless Developer’s Guide

Index-1
IndexAaccidents, 14-24Advanced Customization, 16-1alerts
location-based, 14-126Application
debugging, 5-39deleting, 5-39editing, 5-38Quick Publishing, 5-40
ApplicationsBuilding and Testing, 2-3Delivering, 2-4Deploying, 2-4moving, 5-40
automatic positioning, 14-113enabling and disabling, 14-122using GPS with, 14-114
Average Revenue Per User (ARPU), 1-1
Bbasic formatting, 8-87
tables, 8-87Billing, 16-1
concepts, 16-2integration scenario, 16-13
Billing Collector, 16-6extending, 16-9
Billing Driver, 16-12Billing Integration Framework
using, 16-3BillingLoader, utility, 16-6
Bookmarkdeleting, 7-12
Bookmarksediting, 7-11managing, 7-10
Bookmarks,creating, 7-10Building and Testing Your Applications, 2-3business directory services
API, 14-23overview, 14-21XML configuration files, 14-22
Ccache
location, 14-116, 14-122log, 14-122
Cascading Style Sheets (CSS), 8-6City interface, 14-28CityInfo interface, 14-28community
mobile, 14-120operations supported on, 14-122types of, 14-121visibility, 14-121
configuration filesite_cgf_bootstrap.xml, 14-11
construction activity, 14-24Contact Rules
managing, 7-35contact rules
selecting from a voice application, 7-44selecting from an Async service, 7-42selecting from devices, 7-40
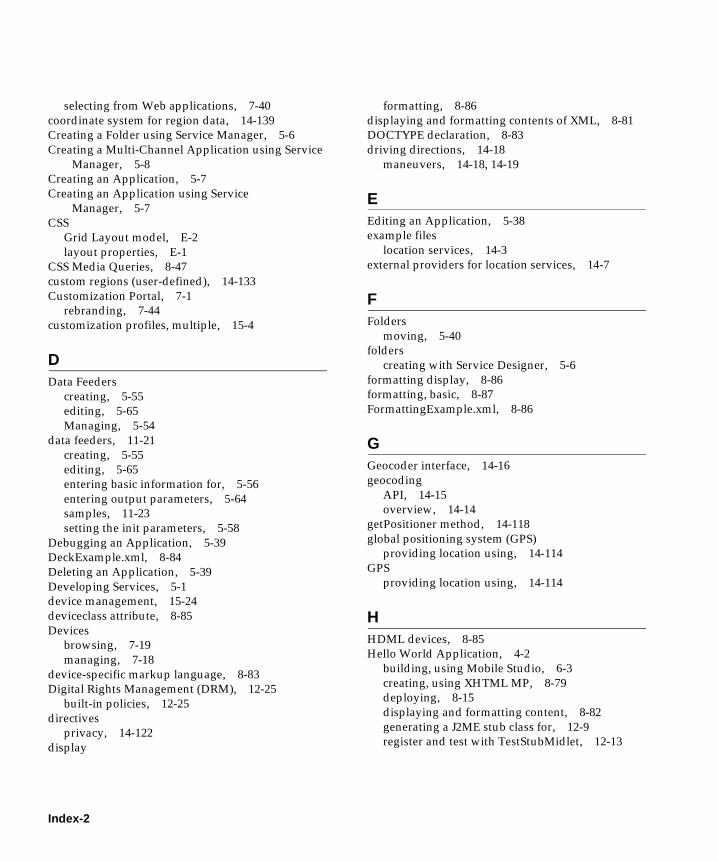
Index-2
selecting from Web applications, 7-40coordinate system for region data, 14-139Creating a Folder using Service Manager, 5-6Creating a Multi-Channel Application using Service
Manager, 5-8Creating an Application, 5-7Creating an Application using Service
Manager, 5-7CSS
Grid Layout model, E-2layout properties, E-1
CSS Media Queries, 8-47custom regions (user-defined), 14-133Customization Portal, 7-1
rebranding, 7-44customization profiles, multiple, 15-4
DData Feeders
creating, 5-55editing, 5-65Managing, 5-54
data feeders, 11-21creating, 5-55editing, 5-65entering basic information for, 5-56entering output parameters, 5-64samples, 11-23setting the init parameters, 5-58
Debugging an Application, 5-39DeckExample.xml, 8-84Deleting an Application, 5-39Developing Services, 5-1device management, 15-24deviceclass attribute, 8-85Devices
browsing, 7-19managing, 7-18
device-specific markup language, 8-83Digital Rights Management (DRM), 12-25
built-in policies, 12-25directives
privacy, 14-122display
formatting, 8-86displaying and formatting contents of XML, 8-81DOCTYPE declaration, 8-83driving directions, 14-18
maneuvers, 14-18, 14-19
EEditing an Application, 5-38example files
location services, 14-3external providers for location services, 14-7
FFolders
moving, 5-40folders
creating with Service Designer, 5-6formatting display, 8-86formatting, basic, 8-87FormattingExample.xml, 8-86
GGeocoder interface, 14-16geocoding
API, 14-15overview, 14-14
getPositioner method, 14-118global positioning system (GPS)
providing location using, 14-114GPS
providing location using, 14-114
HHDML devices, 8-85Hello World Application, 4-2
building, using Mobile Studio, 6-3creating, using XHTML MP, 8-79deploying, 8-15displaying and formatting content, 8-82generating a J2ME stub class for, 12-9register and test with TestStubMidlet, 12-13

Index-3
registering with the J2ME Proxy Server, 12-7removing a registered service, 12-11sample MIDlets, 12-10writing, using XHTML and XForms, 8-19
HelloWorld.xml, 8-82HTTP Adapter
setting input parameters, 5-33
Iidseq sequence, 14-139image adaptation, 9-7incident (traffic), 14-24
JJ2ME (Java 2, Micro Edition)
and the Wireless Development Kit (WDK), 12-5development and provisioning, 12-1features, 12-2overview, 12-1
J2ME Applicationcreating, 5-21
J2ME applicationdownloading, 12-41publishing, 12-40uploading, 12-37
J2ME Applicationscreating, 4-3
J2ME Provisioning Server, 12-33J2ME Web Services
managing, 5-71registering, 5-71
Java 2 Micro Edition (J2ME), 1-3Java Beans, 6-21JavaServer Pages (JSP) tags for location-based
applications, 14-31JDeveloper Wireless Extension (JWE), 2-3, 4-1
Developing Multi-Channel Applications, 4-2JSP Page
loginPortlet.jsp, 6-13JSP page
home.jsp, 6-18login.jsp, 6-9pageFooter.jsp, 6-14
pageHeader.jsp, 6-13pageMenu.jsp, 6-15pagePortlets.jsp, 6-15profile.jsp, 6-16registraton.jsp, 6-10testAppInfoBox.jsp, 6-21
JSP tags, G-1JWE Options, 4-2
Llanguages (support for multiple), 14-20location cache, 14-116, 14-122Location class, 14-15location event server, 14-126location mark, 14-16, 14-112Location Marks, 15-23
managing, 7-27location privacy, 14-113location services, 14-7
providers, 14-7location-based alerts, 14-126location-dependent
identifying service as, 14-134LocationMark class, 14-16LOCATIONMARK table, 14-17log
cache, 14-122longitude/latitude region data, 14-139
Mmanagement
service, 15-25user and group, 15-25user device, 15-24
Managing Applications using Service Manager, 5-4maneuver, 14-18, 14-19Maneuver class, 14-20, 14-21manual positioning, 14-112
enabling, 14-112Master Alert
creating, 5-49master alert service, 11-8Master Alerts

Index-4
editing, 5-54managing, 5-48
master alertscreating, 5-49creating a message template for, 5-43, 5-50editing, 5-47, 5-54entering basic information, 5-49setting trigger conditions, 5-43, 5-50
Master Notificationcreating, 5-41
master notification servicecreating, 11-11mapping to a master service, 11-13
master servicesassigning Async Agents to, 5-35debugging, 5-39deleting, 5-39editing, 5-38entering basic information, 5-27entering caching information, 5-29entering init parameters, 5-30entering input parameters, 5-31entering output parameters, 5-34moving, 5-40searching, 5-5selecting a result transformer, 5-36
MCSLiteAdvanced Configuration, 3-8Common Mistakes Encountered, 3-27Device Description, 3-9Device Detection, 3-10Key Features, 3-4Location Services, 3-10Log File, 3-7Multimedia Adaptation, 3-10National Language Support (NLS, 3-7Sending Parameters to a Back-end
Application, 3-6URL Rewriting and Caching, 3-7
MCSLite deploymentlocal, 3-3remote, 3-3
messenger, 8-85microbrowser, 8-85micromessenger, 8-85
Microsoft Exchange notification integration, 11-32Mobile Browser & Voice Applications
Overview, 8-1Mobile Center on OTN, 2-2mobile community, 14-120
operations supported on, 14-122types of, 14-121visibility, 14-121
mobile positioningAPI, 14-123framework, 14-113privacy directives relating to, 14-122using GPS with, 14-114
Mobile Studio, 6-1branding, 6-6building applications with, 6-3Creating Sample Services, 6-6customizing, 6-5deploying applications, 6-5Getting Started, 6-2JSP pages used in, 6-8key features, 6-2Login and Registration, 6-3on Oracle Technology Network, 6-2Overview, 6-1supporting multiple locales, 6-7testing applications, 6-4
MPManager class, 14-118Multi-Channel Application
creating, 5-27Multi-Channel Server, 9-1
features, 9-4Multimedia Adaptation Services, 9-6MXML Media Attribute, 8-49MXML Media Attribute syntax, B-1
NNew Features
J2ME Support, 1-3Location Services, 1-6Multi-Channel Server, 1-3Notifications and Multi-media Messaging, 1-4Web Clipping, 1-5Wireless Development Kit (WDK), 1-5

Index-5
notification engine, 11-1architecture, 11-3backward compatibility, 11-7integrated solutions, 11-28triggering, 11-2
Notification Subscriptionsadding new, 7-16deleting, 7-18editing, 7-18managing, 7-14
Notificationsediting, 5-47managing, 5-40
notificationsadministering, 11-19creating, 11-7migrating, 11-19subscribing to, 11-15
OOracle JDeveloper, 1-2, 3-2Oracle Workflow, 11-30Oracle XML Grammar Subset, F-1OracleAS Mobile Studio, 2-4OracleAS Wireless
Billing Integration Framework, 16-1CSS Media Query, B-1CSS support, D-1Deployed in a Network, 1-7Developing Services, 5-1Development Path, 2-1Introducing Developer Tools, 2-2notification system, 11-1supported media features, B-2supported media types, B-2
OracleAS Wireless Client, 8-72installing, 8-74using, 8-73
OracleAS Wireless Developer Kit, 3-1Installation and Configuration, 3-2J2ME, 3-1Location Services, 3-1Messaging, 3-1Multi-Channel Server, 3-2
Multi-Channel Server Lite (MCSLite), 3-3Overview, 3-1Structure, 3-2Wireless Client, 3-1
OracleAS Wireless J2ME Provisioning Server, 12-33
OracleAS Wireless Mobile Studio, 6-1OracleAS Wireless XML, 8-80overview map, 14-19
PPAsection parameter, 5-31pcbrowser, 8-85pdabrowser, 8-85Point class, 14-15positioning
automatic, 14-113manual, 14-112privacy directives relating to, 14-122providers, 14-117quality of service, 14-116using GPS with, 14-114
positioning rights, 14-120Preset Definitions
creating, 5-68editing, 5-70managing, 5-67
preset definitionscreating, 5-68editing, 5-68, 5-70
Presets, 15-8concepts and architecture, 15-9
presetssamples, 15-10
privacyAPI, 14-123directives, 14-122location, 14-113
providersconfiguring, 14-11location services, 14-7positioning, 14-117selection of, 14-8selector hook, 14-118

Index-6
Push Service, 10-1
QQoS (quality of service), 14-116quality of service, 14-116
RREFCNT column in region tables, 14-139reference count (REFCNT), 14-139region, 14-132
adding new region, 14-139API for modeling, 14-140associating with a service, 14-134custom, 14-133reference count (REFCNT), 14-139system-defined, 14-133using sequence to generate ID, 14-139
repeating structures, 8-54rights
positioning, 14-120Ringtone Adaptation, 9-11RouteInfo interface, 14-28Router interface, 14-20routing
languages (support for), 14-20maneuver, 14-18, 14-19overview, 14-18overview map, 14-19results, 14-19settings, 14-18
RoutingSettings class, 14-20
SSample Media Queries, B-7Searching for a Master Application using Service
Manager, 5-5selection of service providers, 14-8selector hook, 14-118Service Detail Record, 16-6service management, 15-25Service Manager
Creating a Folder, 5-6
Creating an Application, 5-7Logging in, 5-3Managing Applications, 5-4Overview, 5-1Searching for a Master Application, 5-5
service proxyintegrating external content provider, 14-141
Short Namescreating, 7-13deleting, 7-14editing, 7-14managing, 7-12
SimpleAudio, 8-85SimpleBreak, 8-86SimpleCol, 8-87SimpleContainer, 8-84SimpleEm, 8-86SimpleHref, 8-85SimpleResult, 8-84SimpleRow, 8-87SimpleStrong, 8-86SimpleTable, 8-87SimpleTableBody, 8-87SimpleTableHeader, 8-87SimpleText, 8-85SimpleTextItem, 8-85site_cgf_bootstrap.xml, 14-11spatial mark, 14-16SpatialManager class, 14-7SRID (coordinate system) for region data, 14-139Stub Classes
generating, 5-73stylesheet
XSL, 8-81styling and embedding content, 8-47system-defined regions, 14-133
TTableExample.xml, 8-87traffic
incident, 14-24overview, 14-24request XML DTD, 14-26
TrafficCityManager interface, 14-29

Index-7
TrafficIncident interface, 14-28TrafficReport interface, 14-28TrafficReporter interface, 14-28TrafficRoute interface, 14-28triggering conditions, 11-10
Uuser and group management, 15-25User Customization, 15-1
Vvisibility
mobile community, 14-121voice, 8-85
WWDK
Log File, 3-21Log Sample, 3-22
Web Clipping, 13-1customizing the service, 13-32
Web Clipping Applicationcreating, 5-37
Web Clipping Servicecreating, 13-7
Web Integrationmigrating from, 13-28
Web Scraping, 13-1Web services
for location-based applications, 14-109WGS-84 coordinate system for region data, 14-139Wireless components
Development Tools, 1-2Device Portal, 1-2Foundation Services, 1-2Mobile Applications, 1-2Multi-Channel Server, 1-2
Wireless Customizationaccessing as a new user, 7-3accessing as a registered user, 7-4customizing applications, 7-5logging into, 7-2
managing folders, 7-7managing user profiles, 7-4overview, 7-1
Wireless Developer’s Kit (WDK), 2-3Wireless Development Kit (WDK), 1-2Wireless-Enabled J2EE Application
creating, 4-3WML Translator, 13-39
deploying and configuring, 13-43using, 13-45
WSDL files for location services, 14-109
XXForms, 8-8
Actions, C-16DataTypes, C-5document structure, C-1Model Item Properties And Schema
Constraints, C-7Processing Model, C-3specification support, C-1UI Controls, C-11XPath Expression, C-8
XHMTL Mobile Profile (XHTML MP), 8-76XHTML
Basic Tables module, A-9embedding audio, A-7embedding images, A-6embedding voice and DTMF grammar, A-8HyperText module, A-2Link module, A-10List module, A-4Meta Information module, A-10modules supported, A-1Object module, A-5Presentation module, A-5Speech Recognition Grammar module, A-11structure model, A-2Style Attribute module, A-10Style Sheet module, A-10text module, A-2using, A-9Wireless MXML Media Attribute module, A-11
XHTML+XForms, 8-4

Index-8
advanced sample, 8-50advanced voice sample, 8-63and visual applications, 8-26and voice applications, 8-34
XHTML, technology background, 8-5XML
schema, 8-81XML configuration file
site_cgf_bootstrap.xml, 14-11XML Events Support, 8-26XML files
business directory category hierarchy, 14-22examples, 14-3traffic request DTD, 14-26
XML Namespaces, overview, 8-8XPath, 8-16XPath, overview, 8-9XSL stylesheet, 8-81
YYellow Pages services, 14-21YPBusiness class, 14-24YPCategory class, 14-24YPFinder interface, 14-23