orotimesheet 7 user’s guide -...
TRANSCRIPT

OroTimesheet 7
User’s guide
Copyright © 1996-2011 OroLogic Inc. http://www.orologic.com Revision 7.02
Contents
I
Contents
OroTimesheet 7 user’s guide ______________________________________________________ 1 Introducing OroTimesheet 7___________________________________________________________ 1 What’s new in version 7 ______________________________________________________________ 3 Basic concepts_______________________________________________________________________ 5 The main window:___________________________________________________________________________5 Toolbars: __________________________________________________________________________________5 The Add, Edit and Delete buttons: ______________________________________________________________5 The Search button: __________________________________________________________________________5 The filter button: ____________________________________________________________________________5 Pop-up menus:______________________________________________________________________________5 Sort order: _________________________________________________________________________________5 Display properties: __________________________________________________________________________5 Quick search:_______________________________________________________________________________6
Principles of OroTimesheet____________________________________________________________ 7 Time tracking management ____________________________________________________________________7 OroTimesheet, simple as 1,2, 3 _________________________________________________________________7 Timesheets_________________________________________________________________________________8 Employees _________________________________________________________________________________8 Projects ___________________________________________________________________________________8 Activities __________________________________________________________________________________8 Expenses __________________________________________________________________________________9 Periods____________________________________________________________________________________9
Installing OroTimesheet 7____________________________________________________________ 10 Migrating from a previous version of OroTimesheet______________________________________ 10 Description of modules ______________________________________________________________ 11 Employees ________________________________________________________________________________11 Groups___________________________________________________________________________________14 Customers ________________________________________________________________________________15 Projects __________________________________________________________________________________16 Projects __________________________________________________________________________________16 Activities _________________________________________________________________________________19 Timesheets________________________________________________________________________________20 Invoices __________________________________________________________________________________25 Periods___________________________________________________________________________________27
Other options and utilities____________________________________________________________ 28 Configuration wizard________________________________________________________________________28 Security wizard ____________________________________________________________________________28 Categories ________________________________________________________________________________28 Types of expense___________________________________________________________________________28 Costs and billing rules _______________________________________________________________________28 Users defined fields_________________________________________________________________________29 User defined fields initialization _______________________________________________________________33 Reports __________________________________________________________________________________34 Integrating with other software ________________________________________________________________35 Data export _______________________________________________________________________________38 Data import _______________________________________________________________________________38

Contents
II
Update time banks__________________________________________________________________________45 Undo time banks update _____________________________________________________________________46 Timesheet batch modification _________________________________________________________________48 Purging timesheets _________________________________________________________________________48 Parameters ________________________________________________________________________________49 Security into OroTimesheet___________________________________________________________________53 Change your password ______________________________________________________________________55 Timer for OroTimesheet _____________________________________________________________________56 Web interface of OroTimesheet _______________________________________________________________58 Punch clock software for OroTimesheet _________________________________________________________60 Backing up data____________________________________________________________________________65 Licensing_________________________________________________________________________________65 Technical support __________________________________________________________________________66 Copyright_________________________________________________________________________________67 Copyright_________________________________________________________________________________67

OroTimesheet 7 user's guide
1
OroTimesheet 7 user’s guide Introducing OroTimesheet 7 Very easy to use with a very user-friendly interface, OroTimesheet is a very easy and very complete project time tracking software OroTimesheet is currently used by thousands of users in more than 75 countries. So, it is incontestably a solution of choice to follow worked time on your different projects. OroTimesheet allows you to enter time spent by your employees on different projects of your company. Very flexible, OroTimesheet adapts to your needs, whether you work in a department of a big organization or are a self-employed worker.
The new version 7 of OroTimesheet includes the following main modules: Customers, Projects, Activities, Employees, Timesheets and Invoices. Several new features were added to version 7. Refer to the section What's new in version 7 for more information. OroTimesheet allows you to manage worked time, budgets, costs, billing and expenses. You can also add your own cost and billing rules if needed. Most of modules of OroTimesheet include additional customizable fields and some of these modules can be used only if needed.
OroTimesheet 7 user's guide
2
A complete security by user and very flexible access rights, can also be activated if needed. For example, an employee X could access timesheets of the employee Y or only to some specific timesheets’ fields. A powerful reports generator is also included with OroTimesheet. It allows you to create your own reports or to customize existing ones. Moreover, the reports generator includes a programming language called RAP (Report Application Programming language) which will allow experienced users to create more dynamic and complex reports. OroTimesheet has been developed to run in multi-user mode as well as in stand-alone mode. OroTimesheet is using the Firebird database engine to keep its data. Firebird is a robust Open Source database. Refer to the OroTimesheet 7 Installation guide document for more information. By using OroTimesheet, you will appreciate several other functionalities not mentioned previously and you will be surprised by the simplicity of its use. Congratulations for your purchase and good reading. The OroLogic team.

OroTimesheet 7 user's guide
3
What’s new in version 7 The version 7 of OroTimesheet includes several new functionalities and improvements. Here is a non exhaustive list: Performances were improved. Indeed, the new version 7 is now using the version 2.5 of the Firebird database engine. Firebird 2.5 is faster that the previous version. So, OroTimesheet 7 is now faster. A new simplified interface is now available. Old daily and weekly view are still also available. You can now synchronize data and export invoices with QuickBooks (from Intuit) and Simply Accounting (from SAGE software) software. You can now set fixed price for specific projects. You can also invoice fixed amounts (or until a fixed amount) instead of invoicing per time unit. It is now possible to grant rights to specific users so that they can see all employees on reports even if these users do not supervise these employees. It is now possible to grant rights to specific users so that they can see all projects on reports even if these users do not have access to these projects. It is now much simpler to create new databases. It is also now much simpler to do database backups and restores. It is also now possible to directly save a backup file on another media (such as a USB drive) or to send it by e-mail. “Auto-complete” style drop down lists are now available to select employees and projects. You can now connect to OroTimesheet using credentials (username and password) of a Windows domain. You can now enter notes on timesheets through the Timer for OroTimesheet program. Importing data is now easier. OroTimesheet automatically insert default information in most mandatory imported fields. It is now possible to select sub-projects in reports search criteria. It is now possible to send reports and invoices by e-mail. These reports are automatically converted in PDF format. Timesheet search option was improved. A new improved interface for costs and billing rules management is now available. The punch clock software interface was improved. You can now see “budget versus real” information of projects (jobs) on screen. The web interface was improved. It is now possible to search for projects using project codes or job numbers. You can now enter paid tax amounts when entering expenses. A wizard is now available to quickly configure OroTimesheet. A wizard is also available to activate or deactivate the security into OroTimesheet.

OroTimesheet 7 user's guide
4
More reports are included with OroTimesheet and are still all customizable using the powerful reports generator also included with OroTimesheet. The reports generator was also improved. New RAP functions were added. You can now print the record of project, customer or employee. You can now transfer data from a previous version of OroTimesheet directly at OroTimesheet startup instead of using a separate program. OroTimesheet is now 100% Unicode compatible. This allows you to enter text in any language such as Chinese or Greek characters. Several other minor improvements not mentioned here are also included in the new version 7.

OroTimesheet 7 user's guide
5
Basic concepts This section explains how to navigate through OroTimesheet and how to perform common tasks. The main window: When you start OroTimesheet you are in the software’s main window. This window contains a menu located at the top from which you can reach all the software’s modules. Below this menu, you will find the software main toolbar which also allows you to access the most used modules. Below this toolbar, you will find days of week for the current week. Just click the New timesheet button at the top of the selected day to add worked time. By default, the security is not activated into OroTimesheet, so you automatically have access to all employees and projects. Refer to the section Security into OroTimesheet 7 for more information on access and supervision rights or to know how to activate security into OroTimesheet. Toolbars: Like the main window’s toolbar, each module has its own toolbar. Each button on a toolbar corresponds to an action. The toolbar’s buttons of the main window are used to access the modules, while buttons on a module’s toolbar are used to perform an action for this module. Here are the most common button actions: The Add, Edit and Delete buttons: These buttons are used to manage your data everywhere in the software. For example, if you are in the module Employees, use the Add button to add a new employee, the Edit button to edit information about the selected employee or the Delete button to delete the selected employee. The Search button: This button is used to make a detailed search through timesheets. The filter button: This button is used to hide inactive employees, projects or customers. To display inactive items, simply click again on this button. Pop-up menus: In each module, in addition to the toolbar, you can access a pop-up menu. Most of the toolbar’s options are available in the pop-up menu. However, the pop-up menu may contain more options. The pop-up menu is displayed when you click on the right button of your mouse. Sort order: OroTimesheet allows you at any time to change the sort order of information displayed on screen in almost every module. For example, If you click on the button Employees, in the main window’s toolbar, you will see that the employees are displayed alphabetically by default. If you want employees be sorted by employee code, click on the header Code and the employees will be automatically displayed by code (from the smaller to the greater). Click again on the header Code and the list will be displayed by code but this time from the greater to the smaller. When leaving OroTimesheet, these parameters are saved so that when you will start OroTimesheet again, the sort order will be the same as when you left the software. Display properties: Most of OroTimesheet modules allow you to personalize information displayed on screen. From the pop-up menu of a module (for example the module Employees), select the option Display properties. The list of fields for the current module appears. You can choose the fields to be displayed or not in the grid for this module by checking the desired fields. Click on the button OK to save your changes.

OroTimesheet 7 user's guide
6
In addition to choose which fields to display in a grid, you can choose the position of fields in it. For example, in the module Employees, to change the position of the field Name and to put it before the field Code, click on the field’s header Name. While holding down the button of the mouse, drag the header towards the left over the header Code then release the button. The field Name is now located before the field Code. You can also choose the width of the fields. For example, if you want to increase the width of the field Name, position your mouse’s cursor between the header Name and the header Code until the mouse’s cursor change for a double arrow. Then click on the button of your mouse, and while holding it, move towards the right. When you reached the desired column width, simply release the button. When leaving OroTimesheet, these parameters are also automatically saved. When you will start OroTimesheet again, all changes you have made will be automatically restored. Quick search: OroTimesheet allows you, at any time, to locate a specific record in most of the modules. For example, click on the button Employees in the main window’s toolbar to display the employee list. Click on the header Code to have the employees sorted by employee code. Type the first letters of an employee code who is on the list, and the selection will move on the first employee who matches the letters you typed. If you want to make a search by employee name, sort the employee list alphabetically by clicking on the header Name and type the first letters of the employee’s name.

OroTimesheet 7 user's guide
7
Principles of OroTimesheet Time tracking management Time tracking management consists in keeping track of the time your employees spent performing activities on each project for a given date. Thereafter, you can extract data (for example by running reports) for management purposes (pay management, worked time, billing, costs, statistics, etc.). With OroTimesheet, these information are entered through the module Timesheets. Each timesheet must contain at least the following information: a date, an employee, a project (or sub-project), an activity and a number of time units (by default the time unit is: hours).
An employee can enter as many timesheets as necessary for a same date. For example, if for the day January 17, 2005, John worked on 2 different projects and that for each project he performed 2 different activities, John should enter 4 timesheet for this day (we suppose here that John worked 2 hours for each activity of each project). January 17, project A, activity X, 2 hours January 17, project A, activity Y, 2 hours January 17, project B, activity X, 2 hours January 17, project B, activity Y, 2 hours Total 8 hours. That’s all! Now you know how OroTimesheet works basically. OroTimesheet, simple as 1,2, 3 Before you can enter timesheets in OroTimesheet, you must first enter basic information in the software. The basic information to enter are the minimal information needed to create a timesheet: 1- Create employees, customers, projects and activities. 2- You or your employees can then enter timesheets.

OroTimesheet 7 user's guide
8
3- When timesheets are entered, you can print reports for management purpose or simply create invoices
from the Invoices module. Timesheets As you can see, timesheets are the heart of OroTimesheet. All options of the software are linked together and are used for timesheet management. In addition to the minimal information to enter in a timesheet, several other (optional) information can also be entered such as the in/out time, a shift, a description of the work done, the cost per time unit, the billing rate, expenses as well as much more information that you can add using user defined fields that you can define through the option User defined fields. Each timesheet can have the status approved or non approved (these terms can be replaced as needed) and a status invoiced or not invoiced when the timesheet has been invoiced from the Invoices module. When a timesheet is approved or invoiced, it become locked and cannot be edited anymore. Same thing when the date of the timesheet is in a closed period. You cannot edit it anymore. Refer to the section Periods below for more information. Employees Employees are managed through the module Employees. They can be grouped by category through the option Categories and also be grouped by groups through the module Groups. While categories of employee are mostly used to categorize employees when printing reports, groups of employee are mostly used to reduce security management (access rights on the software’s options and supervision rights). An employee can be a member of several groups. However, each employee belongs to a base group that is used, for example, when printing reports by group. If you want to manage your projects’ costs in addition to manage time, enter a Cost per time unit in each employee’s record. When adding timesheets, the field cost per time unit of a timesheet is automatically filled using the field cost per time unit in the record of the selected employee in the timesheet. However, different personalized cost rules can be applied using the option Cost and billing rules. Projects Projects are managed through the module Projects. Projects can be grouped by category through the option Categories. Each project must be associated to a customer. Customers are managed through the module Customers and can also be categorized by category through the module Categories. Employees and/or groups must be associated to projects to limit employee access to these specific projects when adding timesheets. By default, the group All employees is automatically associated to each new created project. Each project can have an unlimited number of sub-projects. When entering a timesheet, if the selected project has sub-projects, a sub-project must be also selected. Activities Activities are managed through the module Activities. These activities can thereafter be associated to different projects. Thus, a project may have only a few activities whereas another may have several activities. If you manage billing of your projects in addition to time management, enter a billing rate in each activity record. Indeed, when entering timesheets, the field Billing rate is automatically filled using the field Billing rate of the record of the selected activity in the timesheet. However, when an activity is associated to a project, its default billing rate may be changed for a specific billing rate for this project. Moreover, some personalized billing rules can also be applied using the option Billing rules.

OroTimesheet 7 user's guide
9
Note that if you have indicated in the record of the employee to always use a fixed billing rate instead of a billing rate per activity, then the billing rate indicated in the employee’s record will be automatically entered in the timesheet. Expenses Expenses may be entered for each timesheet. Types of the expense that can be selected are managed through the option Types of expense. You can enter a default unit cost and a default billing price for each type of expense. You can also indicate if the type of expense is by default, refundable to the employee and/or billable to the customer. Periods Although it is optional, you can add periods in OroTimesheet through the option Periods. Each period can have the status Opened or Closed. Periods are mostly used to limit access to timesheets and to print reports grouped by period. For example, if you have a period from January 1, 2005 to January 31, 2005, and this period is Closed, automatically, timesheets between these two dates will not be editable anymore. A period can be reopened to allow you to make modifications to timesheets of this period. Note that the module Periods is optional and may be used only if needed.

OroTimesheet 7 user's guide
10
Installing OroTimesheet 7 OroTimesheet 7 can be used in stand-alone mode as well as in multi-user mode. In stand-alone mode, the software and the database are located on the same computer. This mode is perfect for a use by only one user or simply to evaluate OroTimesheet. In multi-user mode, the software is installed on several computers (client computers) whereas the database is installed on a remote server. So, several users can simultaneously access the same centralized database. If you are actually using a previous version of OroTimesheet, first, refer to the section Migrating from a previous version of OroTimesheet of the OroTimesheet 7 Installation guide document. To install OroTimesheet 7 in stand-alone mode or in multi-user mode, please refer to the document OroTimesheet 7 Installation guide. Migrating from a previous version of OroTimesheet If you are currently using a previous version of OroTimesheet, you can easily transfer data of your previous version to OroTimesheet version 7. Refer to the section Migrating from a previous version of OroTimesheet of the document OroTimesheet 7 Installation guide for more information about this utility.

OroTimesheet 7 user's guide
11
Description of modules Employees The module Employees allows you to manage employees who will have to work on projects. Briefly, from this module, you can control the security (access rights and supervision rights), modify time banks, assign a default time unit cost, assign a default billing rate, assign an employee to groups, manage passwords as well as access to the software Punch clock software for OroTimesheet. Note that it is also possible to copy employees on new ones. It accelerates greatly employee creation.
If the security in OroTimesheet is activated, only an employee who has administrator rights (or the administrator himself) can add, modify or delete employees. However, note that some specific supervision rights can grant access to modify some information of an employee. Fields description Code and name: Enter an abbreviation of a maximum of 30 alphanumeric characters, representing the employee code. Then enter his name. Ex.: JDOE for John Doe. Category: Select in the combo box a category for this employee. To add a new category, click on the icon on the right of the field to open the module Categories of employee. Categories of employee are mainly used to categorize employees according to a specific criterion for example, by department, by title, etc. Categories can be very useful when printing reports.

OroTimesheet 7 user's guide
12
Cost per time unit: Enter the cost per time unit (cost by default) for this employee. This cost is automatically entered in the field Cost per time unit when entering timesheets. Note that this default cost per time unit can be bypassed if personalized cost rules were defined in the option Cost rules. If you do not manage costs of your projects, you do not have to enter this information. Billing rate: By default, when adding a timesheet, the field billing rate is automatically filled from the field billing rate of the activity selected in the timesheet. However, as needed, you can indicate to use a fixed billing rate per employee instead of a billing rate per activity for some employees. To do that, simply check the box When entering timesheets, I want the default billing rate come from the employee instead of the activity and enter a billing rate for this employee. Please note that this billing rate (no matter it comes from the activity or the employee) can be bypassed if personalized billing rules have been defined from the option Billing rules. Refer to this section for more information about billing rules. If you do not manage billing of your projects, you do not have to enter this information. Time bank With OroTimesheet, you have the possibility to keep overtime worked by your employees by using the option Update time banks. Indeed, some businesses, instead of paying overtime to their employees, keep it in a bank for a later use. Ex.: paid holidays, additional vacations, bonus, etc. You can modify manually an employee’s time bank from this section. You can also enter the number of time units usually paid each week for this employee. This is from this number of time units that OroTimesheet can suggest the number of time units to pay to the employee when updating time banks. User defined fields tab This tab displays user defined fields you have defined for the module Employees. These user defined fields are used to keep information specific to your business. Then, you can also use the information in these fields to create new reports or customize existing ones, based on these fields. For further details on how to define user defined fields, refer to the section User defined fields. Tab Groups This option allows you to assign an employee to various groups. To assign the employee to a group, select the desired group in the left column and click on the button Add. Select the same way every group to which you want this employee be a member. To remove a group, select it in the right column and click on the button Remove. The concept of group in OroTimesheet is mainly used to assign access and supervision rights at a group level instead of an individual level. Please also note that you must assign a basic group for each employee by checking the radio button Base. Security tab Password: Enter a password for this employee. If the security is activated in OroTimesheet 7, the employee will have to enter his employee code and password to enter in the software. For further information on the security in OroTimesheet, refer to the section Security in OroTimesheet 7. Status: Select inactive if this employee is inactive. An inactive employee cannot enter in the software anymore.

OroTimesheet 7 user's guide
13
Administrator: Check this box if you want to give the software administrative rights to this employee. When an employee has administrator rights, he automatically has all access rights to all options of the software and have also all supervision rights on all the employees. Usually, this right is limited to a few employees only. Use the access right of a group: Check this box if you want to give to this employee access rights of a group (do not confuse with supervision rights) instead of assigning individual rights to the employee. For further information on how to grant access rights to a group or how to add a group, refer to the section Groups. Punch clock tab If you use the software Punch clock for OroTimesheet 7, and this employee must punch in and out using this software, you must enter an employee number and a personal identification number (PIN) from this tab. You can also determine if this employee can punch using the punch clock software by checking the box Show this employee in the punch clock software. Refer to the section Punch clock for OroTimesheet for more information. Access rights tab If you do not want to give administrator rights or rights of an existing group to this employee, this option allows you to give the employee individual access rights for modules, options and reports of OroTimesheet. For further information about rights, refer to the section Security in OroTimesheet. Supervision rights tab To add an employee or a group on which the new employee has supervision rights, select the desired employee or group in the left column and click on the button Add. To remove an employee or a group, select the desired employee or group in the right column and click on the button Remove. Once you have added employees or groups, you can set specific supervision rights that the employee has on these employees or groups. To do that, click on the button Rights… located on the right of the desired employee or group and check the appropriated supervision rights. For further information about supervision rights in OroTimesheet 7, refer to the section Security in OroTimesheet 7.
OroTimesheet 7 user's guide
14
Groups Using this module, you can create new groups, assign your employees to these groups and manage access and supervision rights on these groups. For example, you could group all employee of a same department in a group and then assign access rights to this group. You could also group all employees performing the same tasks in a group and then associate a specific project to this group. It could be very useful to manage security at the group level instead of per employee, mostly if you have several employees. When you create a new employee, it prevents you to configure manually his access and supervision rights. You only have to assign him to an existing group. Fields description General information tab Access rights tab: This option allows you to attribute access rights to modules, options and reports of OroTimesheet 7 to a group. For further information about access rights in OroTimesheet 7, refer to the section Security in OroTimesheet. Employees tab To add an employee to this group, select the desired employee in the left column and click on the button Add. To remove an employee from this group, select the employee to remove from the right column and click on the button Remove. Supervision rights tab To add an employee or a group, on which the group has supervision rights, select the desired employee or group in the left column and click on the button Add. To remove an employee or a group, select the desired employee or group in the right column and click on the button Remove. Once you have added the employees or groups, you can select some specific supervision rights that the group has on these employees or groups. To do that, click on the button Rights… located on the right of the desired employee or group and check the appropriated supervision rights. For further information about supervision rights in OroTimesheet, refer to the section Security in OroTimesheet 7.

OroTimesheet 7 user's guide
15
Customers The module Customers allows you to manage customers, which are associated to your projects. If you only manage in-house projects, you can create a unique customer. If you manage in-house projects but related to different departments, you could, for example, create the list of these departments. Note that for each project, you must assign it a customer.
Fields description General information tab This tab contains name, address and phone number details of your customer. Notes tab This tab allows you to enter information on this customer, in text format. User defined fields tab This tab displays user defined fields you defined for the module Customers. These user defined fields are used to keep information specific to your business. Then, you can also use the information in these fields to create new reports or customize existing ones, based on these fields. For further details on how to define user defined fields, refer to the section User defined fields. Taxes tab This tab allows you to adjust tax rates for a specific customer. The general tax rates are defined in the option General parameters. However, you can set a different tax rates for some of your customers. This option is very useful for example if you have customers in other countries or other provinces or states and the tax rates are different. Please note that taxes are used only when generating invoices.
OroTimesheet 7 user's guide
16
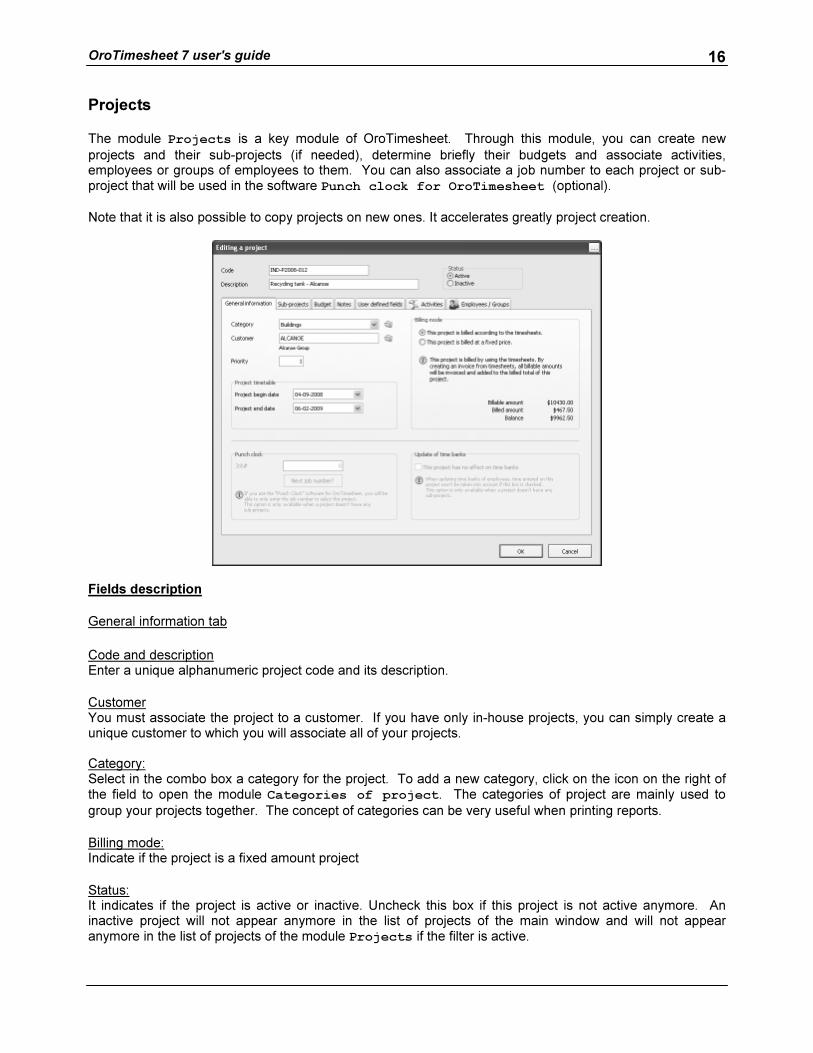
Projects The module Projects is a key module of OroTimesheet. Through this module, you can create new projects and their sub-projects (if needed), determine briefly their budgets and associate activities, employees or groups of employees to them. You can also associate a job number to each project or sub-project that will be used in the software Punch clock for OroTimesheet (optional). Note that it is also possible to copy projects on new ones. It accelerates greatly project creation.
Fields description General information tab Code and description Enter a unique alphanumeric project code and its description. Customer You must associate the project to a customer. If you have only in-house projects, you can simply create a unique customer to which you will associate all of your projects. Category: Select in the combo box a category for the project. To add a new category, click on the icon on the right of the field to open the module Categories of project. The categories of project are mainly used to group your projects together. The concept of categories can be very useful when printing reports. Billing mode: Indicate if the project is a fixed amount project Status: It indicates if the project is active or inactive. Uncheck this box if this project is not active anymore. An inactive project will not appear anymore in the list of projects of the main window and will not appear anymore in the list of projects of the module Projects if the filter is active.

OroTimesheet 7 user's guide
17
Update of time banks: If you check this box, when updating time banks, time entered on this project will not be taken into account. For example, if you have a project named Absence not paid, then, for such project, you could check this box because you will probably not want that the time entered in this project be added to the employee time bank when updating time banks.. Punch clock: If you use the software Punch clock for OroTimesheet 7, you can enter a job number that will be used to represent this project. Sub-projects tab This tab allows you to create sub-projects for this project. You can also enter a job number for each sub-project if needed. Each sub-project can also have user defined fields. The status of a sub-project can be active or inactive. An inactive sub-project could not be selected on new timesheets. Check the box This sub-project has no effect on time banks so that time entered on this sub-project be not taken into account when updating time banks. For example, if you have a sub-project named Absence not paid, then, for such sub-project, you could check this box because you will probably not want that the time entered in this project be added to the employee time bank when updating time banks. When creating one or several sub-projects, you can also link different activities for each sub-project. By default, all activities linked to the project are selected. Simply unselect activities you do not want to see linked to your sub-project. Budget tab Enter the number of time units planned for this project, the cost of labor and expenses planned and the labor and expenses billable amount planned for this project. As employees enter timesheets, the number of time units and the amounts of the columns Real and Difference will be automatically adjusted as well as the percentage of the column "%". Please note that if your project has sub-projects, budgets must be entered per sub-project and not globally at the project level. The total of budget entered at the level of each sub-project will be automatically summed and displayed at the project level.
Once your budget is entered, you can distribute it per activity, per employee and even per type of expense by clicking on the corresponding button. User defined fields tab This tab displays the user defined fields you have defined for the module Projects. These user defined fields are used to keep information specific to your business. Then, you can also use the information in these fields to create new reports or customize existing ones, based on these fields. For further details on how to define user defined fields, refer to the section User defined fields. Activities tab This option allows you to associate activities to the project. To associate an activity, click on the activity to associate in the left column and click on the button Add. Do the same thing for all activities you want to associate to the project. If you have unchecked the option Allow selection of activities that are not linked to this project, only activities you have selected will be available when entering timesheets. For each activity associated to a project, you can indicate for this activity to use the standard billing rate of the activity (editable in the module Activities) or to use a specific rate for this specific project. To enter a

OroTimesheet 7 user's guide
18
specific rate of an activity associated to a project, from the activities list Activities linked to this project, click on the button Bill. rate at the right of the selected activity. Uncheck the box Use the standard billing rate of this activity and enter the new rate in the field Billing rate. Click the button OK to save changes. For further information on how to add new activities, refer to the section Activities. Employees / Groups tab This tab allows you to assign employees or groups to a project. When employees or groups are associated to a project, a main manager must obligatory be selected for this project. Then, for each employee or group, you can determine if this employee or group is also a manager of the project. Each employee or group that are manager of the project has automatically the right to edit the project. This right is granted, even if this employee or group do not usually have rights to edit projects.

OroTimesheet 7 user's guide
19
Activities The module Activities allows you to manage activities. These activities will be associated to each project or sub-project and can be selected in timesheets. In addition to track time on projects, OroTimesheet 7 allows you to manage activities an employee performed on a specific project. For example, if you work on a project, which is a new washing machine, you will add a new project Washing machine and you will add activities for this project. (Ex.: Drawing, design, research, etc…). After it, when entering timesheets, in addition to select a project, you will select an activity for this project. Note: You can use the same activity for several projects. For example, if you add an activity Drawing, you can associate this activity to any project, which contains drawing activity. Fields description Billing rate: Enter the default billing rate for this activity. When entering timesheets, the billing rate field will be automatically filled with this value. Note that when you associate an activity to a project, the billing rate of this activity may be modified for this specific project. Note also that if you have indicated in the record of the employee to always use a fixed billing rate instead of a billing rate by activity, this billing rate will be entered in the timesheet. Also note that the billing rate (no matter it comes from the activity or the employee) can be bypassed if personalized billing rules have been defined in the option Billing rules. User defined fields tab This tab displays user defined fields you have defined for the module Activities. These user defined fields are used to keep information specific to your business. Then, you can also use the information in these fields to create new reports or customize existing ones, based on these fields. For further details on how to define user defined fields, refer to the section User defined fields.

OroTimesheet 7 user's guide
20
Timesheets The module Timesheets is the main module of OroTimesheet. This is from this module that you can add and/or update your timesheets. Each timesheet must contain at least the following information: an employee, a project, an activity, a number of time units and a date. However, several other (optional) information can be added such as in/out time, a shift, notes about the work performed, a cost per time unit, a billing rate and expenses. Moreover, user defined fields can be defined according to your needs.

OroTimesheet 7 user's guide
21
When adding timesheets, the cost per time unit is automatically filled when an employee is selected in the timesheet. By default, the cost per time unit is maintained at the employee level but cost rules can be defined according to specific criteria to meet your needs. For example, an employee can have a default hourly cost of 25$/hour but when he perform a specific activity, his hourly cost can become 30$/hour. For further information on cost management, refer to the sections Employees and Cost and billing rules. When adding timesheets, the billing rate is automatically filled when an activity is selected in the timesheet. By default, the billing rate is maintained at the activity level but this billing rate can be replaced when this activity is associated to a project. Note that the billing rate can also be maintained per employee. Moreover, some billing rules can be defined according to specific criteria to meet your needs. For example, by default, an activity can usually be billable at 50$/hour but when it is associated to a specific project, this rate can become 60$/hour. For further information on billing management, refer to the section Activities and Cost and billing rules. Note: When entering timesheets, you can decide which fields and/or tabs will be available for the employee. For example, you could decide that when an employee add timesheets, he does not have access to the cost and billing information. Thus, when the employee will add a timesheet, he will not be able to see these information but the information will be nevertheless automatically filled (according to default cost per time unit and billing rates, cost and billing rules, etc.). Everything can be configured through the Supervision rights tab of the employee of group record. For further information, refer to the section Security in OroTimesheet. When you enter in the software, you are automatically in the module Timesheets. At the top under the toolbar, you have a Projects button and an Employees button that allow you to view timesheets per project or per employee. When the Projects button is down, your timesheets are automatically grouped per project. When the Employees button is down. Timesheets are grouped per employee. To add a new timesheet, click on the button New timesheet at the top of the desired day then enter information in fields.

OroTimesheet 7 user's guide
22
Fields description Date: Enter the date when you worked on the project. Employee: Enter the employee code or click on the button Employee at the right of the field to display the list of employees and select one from this list. Only employees on whom you have supervision rights (and you can select in the timesheet) will be displayed. Note: When you display the list of employees, you will notice that some employees have a green flag and some a gray flag. The green flag indicates that you have supervision rights on this employee and you can edit his record. The gray flag indicates that you have supervision rights on this employee but you cannot edit his record. For further information on supervision rights, refer to the section Security in OroTimesheet. Project and Sub-project: Enter the project code on which you worked or select a project by clicking on the button Project at the right of the field to display the list. Only projects you can select in the timesheet are displayed in this list (projects that can be selected by you or by employees on which you have supervision rights). Select a sub-project if needed. Note: When you display the list of projects, you will notice that some projects have a green flag, and some a gray flag. The green flag indicates that you are manager of this project and you can edit the project record. The gray flag indicates that you are not manager of this project and you cannot edit the project record. However, if you have administrator rights or if you have the right Edit projects, you will be able to edit all projects, no matter if you are manager or not. Then, all projects displayed in the list will have a green flag. For further information on supervision rights, refer to the section Security in OroTimesheet 7. Activity: From the combo box, select the activity you performed for the selected project. Number of time units: Enter the number of time units worked. For example, if your time unit is Hour(s) and you worked 1 hour and 15 minutes, enter 1.25. Note that you can also enter time in the format hh:mm and OroTimesheet will automatically convert it in decimal. For example, if you enter 1:15 (for 1 hour and 15 minutes), then, OroTimesheet will convert it to 1.25. General information tab Notes: You can enter notes to document the timesheet you are currently entering. Overtime Check this box if the worked time is overtime. Please note that from the General parameters option, you can indicate to OroTimesheet to change the cost per time unit or the billing rate in the timesheets when the box Overtime is checked. Timesheets with the box Overtime checked are tagged with a + sign in the main window. Timesheets containing expenses are tagged with a coin. Timesheets approved are tagged with a check. Timesheets
OroTimesheet 7 user's guide
23
invoiced are tagged with a stamp. Shift: You can specify on which shift the work was done. The description of shifts can be customized from the menu Configuration | Parameters | General. In/out time: You can specify in and out time. You can also click the button at the right of these fields (an arrow) to automatically copy the difference between of in and out time in the field number of time units of the timesheet. Affect costs If this timesheet does not affect costs, uncheck this box. By unchecking this box, the cost by time unit will be automatically set to 0. Cost reports included in OroTimesheet only print timesheets with this box checked. Cost by time unit This cost usually automatically filled (see above) can be edited for the current timesheet. Billable If this timesheet is not billable, uncheck this box. By unchecking this box, the billable rate will be automatically set to 0. If you use the module Invoices, all generated invoices are based on this option. In fact, if the box Billable is not checked, no invoice will be generated for this timesheet. Moreover, invoicing reports included with OroTimesheet print only timesheets with this box checked. Billable rate This billable rate usually automatically filled (see above) can be edited for the current timesheet. User defined field tab This tab displays the user defined fields you have defined for the module Timesheets. These user defined fields are used to keep information that is specific to your business. Then, you can also use information in these fields to create new reports or customize existing ones, based on these fields. For further details on how to define user defined fields, refer to the section User defined fields. Expenses tab: This tab gives you the possibility to enter expenses affecting project cost in the timesheet and indicate if the expenses must be refunded to the employee and also billable to the customer. Keyboard shortcuts When entering timesheets, some keyboard shortcuts are available to speed-up adding or editing timesheets. Here are these keyboard shortcuts : CTRL-B Toggle between billable/not billable CTRL-K Toggle between affect cost/ does not affect costs CTRL-S Save and continue (Daily view only) CTRL-T Move selection from field Number of time units to field Notes and vice versa. (Week view only) CTRL-P Move selection on the projects (or employees) dropdown list. (Week view only) F8 Display the list of employees (Daily view) F9 Display the list of projects (Daily view) F10 Display the list of activities (Daily view)

OroTimesheet 7 user's guide
24

OroTimesheet 7 user's guide
25
Invoices The module Invoices allows you to convert timesheets into invoices. To generate invoices from timesheets, you must have checked the box Billable in each timesheet you want to bill. You must also preset some information from the option General parameters (you will find it in the menu Configuration) such as default tax rates, business name, etc. Click on the button Generate to create one or several invoices. Choose the range of dates, customers, employees, projects and activities for which you want to create invoices and click on the button Next to display the invoices to generate. You can indicate to generate one invoice for each customer or one invoice for each project.
Once invoices to generate are displayed on screen, you can remove timesheets you do not want to invoice immediately by clicking on the + sign and by unchecking them. These timesheets will keep the status not invoiced and you will be able to generate a new invoice for these timesheets later. To finish, click on the button Generate when you are ready to permanently generate the displayed invoices. Edit an invoice Once an invoice created, you can edit it by double clicking on it. You can edit several information for each invoice such as the invoice number, status, time and expenses adjustments, user defined fields, etc. Invoices status can be customized from the menu Configuration | Parameters | General.

OroTimesheet 7 user's guide
26
Print and delete an invoice You can at anytime delete an invoice, no matter its status. Notice: By deleting an invoice, you release timesheets linked to this invoice and make them not invoiced again. To print an invoice, click on the invoice to print using the right button of your mouse and select Print. Select the desired form in the list and click on Ok. Please note that invoice forms are completely customizable according to your needs, using the reports generator included with OroTimesheet 7. Refer to the document Reports generator for OroTimesheet 7 for more information on report and form customization.

OroTimesheet 7 user's guide
27
Periods Although it is optional, you can add periods in OroTimesheet through the option Periods. Each period can have the status Opened or Closed. Periods are mostly used to limit access to timesheets and to print reports grouped by period. For example, if you have a period from January 1, 2005 to January 31, 2005, and this period is Closed, automatically, timesheets between these two dates will not be editable anymore. A period can be reopened to allow you to make modifications to timesheets of this period. To add a new period, click on the button Add and enter the information in the fields. Note that the field Beginning date will be available only when you will add the first period in the software. For the subsequent periods, this field will be automatically equal to the end of the previous period plus 1 day and could not be modified. To modify a period, select the period to be modified, click on the button Edit and make the desired modifications. Note that it will be impossible to modify the dates of a period except the ending date of the last period added. To be able to modify dates of previous periods, you must first delete the periods in the chronological order and then recreate it again. To delete a period, select the period to be deleted, click on the button Delete and answer Yes to the confirmation request. Note that the periods must be deleted in the chronological order from the most recent to the oldest. Fields description Beginning date: Select the beginning date of the period. This field will be available only when you will add the first period in the software. For the subsequent periods, this field will be automatically equal to the ending date of the previous period plus 1 day and will not be editable. Ending date: Select the ending date of the period. Description: Enter a description for your period. For example January 2005 Status: Select the period status: Opened or Closed. Note that it will be impossible to close a period if the previous period is still open. Also note that it is not possible to reopen a period previously closed if a previous period is closed. You must open or close periods in a chronological order. Fiscal year and fiscal month: Enter the fiscal year and fiscal month of the period.

OroTimesheet 7 user's guide
28
Other options and utilities Configuration wizard At first startup of OroTimesheet, a configuration wizard asks you some information about your company to quickly configure the software. Information entered such as your company name, address or your logo image will be automatically displayed into the software and on different reports and forms such as invoices. Most information entered through this wizard can be directly edited from the menu Configuration | General | Parameters. However, you can also, any time, run back the configuration wizard using the menu Configuration | Configuration wizard. Security wizard At first startup of OroTimesheet, a security wizard asks you if you want to activate the security into OroTimesheet (after having answered questions of the configuration wizard). Security into OroTimesheet is optional. If you do not activate it, it will allow you to access OroTimesheet without entering any user code or password. If you are the only user to use OroTimesheet, it is not mandatory to activate the security. However, if several users must access OroTimesheet, we strongly recommend you to activate it. Refer to the section Security into OroTimesheet for more information about security of OroTimesheet. Please note that you can activate or deactivate the security of OroTimesheet anytime by executing the security wizard from the menu Configuration | Security wizard. Categories Employees, projects or customers can be grouped by category. Categories are mostly used to group information when printing reports. Types of expense Types of expense are used when adding expenses on timesheets. These expenses can be refundable to the employee by default, according to the unit cost specified and/or billable to the customer, according to the unit price. Costs and billing rules Billing rules The option Billing rules allows you to modify the usual billing rate for specific situations. Let us take the example of a software company. Usually when employees do programming, this activity is usually billable at a billing rate of 50$. However, for specific more complex projects, this company would like to bill the programming task at a billing rate of 60$. With the option Billing rules you can indicate that when adding a timesheet, if the activity is Programming and the project is this specific project, the billing rate will be automatically set to 60$ instead of 50$.

OroTimesheet 7 user's guide
29
Criteria that can be entered for each billing rule are: Customers, Projects or sub-projects, Employees, Groups, Activities and Categories (customer, project, employee). A billing rule can contain only one criterion (for example, a project) or several criteria (for example, an activity and a project). When adding timesheets, billing rules are verified in the same order as they are in the list. The first billing rule that matches the information entered in the timesheet is automatically applied to the timesheet and other billing rules are not verified. It is important in this case to always order the most specific billing rules at the top of the list and less specifics thereafter. Use the buttons Up and Down to order your billing rules in the list. Costs rules The Cost rules allow you to modify the usual cost per time unit of an employee for specific situations. Again, let us take the example of a software company. Some employees have different tasks linked to their work and may be remunerated differently according to the performed task. For example, when an employee do programming, he can be remunerated at an hourly rate of 25$ and when he do analysis, he can be remunerated at an hourly rate of 35$. With the option Cost rules, you can indicate that when entering a timesheet, if the employee select the activity Analysis, the hourly cost must be automatically set to 35$ instead of 25$. Criteria that can be entered for each cost rule are: Customers, Projects or sub-projects, Employees, Groups, Activities and Categories (customer, project, employee). a customer, a project or sub-project, an activity, a group or an employee. A cost rule can contain only one criterion (for example, an activity) or several criteria (for example, an employee and an activity). When adding a timesheet, the cost rules are verified in the same order as they are in the list. The first cost rule that match the information entered in the timesheet is automatically applied to the current timesheet and other rules are not verified. It is important in this case to always order most specific costs rules at the top of the list and less specifics thereafter. Use the buttons Up and Down to order your cost rules in the list. Users defined fields User defined fields can be defined in most of the modules of OroTimesheet. These fields are used to enter and manage information that is specific to your company. Thereafter, you can add this information on new reports or on existing ones. For example, your company employs 3 representatives and you want to indicate for each of your customers, who, in your company, is the representative for this customer. You can define a new user defined field in the module Customers named Representative. This user defined field can be of type Radio button and offers the 3 following choices: Janet B., Jos W. and John D. When adding customers, you would have a new field Representative and you would only have to select the representative for this customer. Thereafter, for example, you could create personalized reports and print information on your customers grouped by your user defined field Representative with subtotals per Representatives.

OroTimesheet 7 user's guide
30
Each module can contain a maximum of 12 users defined fields that includes 2 fields of type alphanumeric (max of 50 characters each), 2 fields of type numeric (integer or decimal), 2 fields of type integer, 2 fields of type currency, 2 fields of type date, 1 field of type date and hour and finally, 1 field of type notes. User defined fields defined for a module are always located in the section Users defined fields of this module. The section Users defined fields of each module is divided in 6 tabs. Each user defined field can be associated to a specific tab of this module. How to define a User defined field These user defined fields are fixed and already created in the OroTimesheet database. It is not possible to delete them or create new ones. Select the type of the user defined field you want to modify, click on the button Edit and make the desired changes. Fields description Label: Enter the desired name for this user defined field. The name assigned in this section will be displayed in the corresponding module. For example Representative. Active: Check this box to activate the user defined field if you want it to be displayed in the module.

OroTimesheet 7 user's guide
31
Object type: There are 7 types of objects available for a user defined field. Select the appropriate type of object among: Edit box: This type of object allows entering information freely. A default value may be entered if needed. Check box: This type of object allows you to make a choice between 2 possibilities: "Checked" or "Unchecked". You can define if the box is checked or not by default. Radio button: This type of object allows you to make a choice between several possibilities (ex.: the list of representatives described previously). Combo box: This type of object also allows you to make a choice between several possibilities (ex.: the list of representatives described previously). Date: This type of object allows you to select a date. The default date is the current date. This type of object is only available for users defined fields of type date (Users defined fields #9 and #10 of each module). Date / hour: This type of object allows you to select a date and an hour. The default date and hour is the current date/time. This type of object is only available for the user defined fields of type “Date/Hour” (Users defined fields #11 of each module). Note: This type of object allows you to enter text on several lines. This type of object is only available for the users defined fields of type Note (User defined fields #12 of each module). NOTE: For objects of type Radio Button and Combo box, you have to define the list of the items that will be displayed in the list of the object. Use the buttons Add an item, Edit an item and Delete an item, to add, modify or erase the list of choices. Each item entered must have a corresponding value. It is this value that will be saved in the user defined field in the database and not the description of the item. For example, if you use a field of type Integer for the list of your representatives, each representative will have a corresponding value (ex.: Janet will have the value 1, Jos will have the value 2 and John the value 3). You can also decide the display order of the list of choices using the buttons Up and Down, as well as the item selected by default by clicking on the radio button on the left of the selected item. Linked to: OroTimesheet allows you to link a user defined field to another. Let us take as example the representatives described previously. Even if a representative is assigned to each of your customers, it can happen that for a specific project, the representative be exceptionally different than the representative usually assigned to this customer. Thus, you could add a new user defined field in the module Projects which may contain the same list of representatives as the module Customers. This solution would work perfectly but when you would like to add a new representative to your list, you would have to modify the user defined field Representative in the module Customers as well as the user defined field Representative in the module Projects.

OroTimesheet 7 user's guide
32
The option Linked to allows you to define a user defined field in a module but with information of another user defined field of another module. Using the previous example, instead of defining a new user defined field Representative in the module Projects, you only have to indicate to your user defined field to link to the user defined field Representative of the module Customers. Here are the main benefits for using the option Linked to: - Only the list of representatives of the user defined field Representative in the module Customers have to be updated when new representatives must be added. - When adding a new project, by selecting a customer for this project, the representative of this customer is automatically selected in the project’s user defined field Representative. A user defined field in a module cannot necessarily be linked to any other user defined field of other modules. Here are the rules to follow to be able to link a user defined field to another: - A user defined field must be linked to another user defined field of the same type (alphanumeric, integer, numeric) - A user defined field of the module Projects can be linked only to a user defined field of the module Customers. - A user defined field of the module Sub-projects can be linked only to a user defined field of the module Projects. - A user defined field of the module Timesheets can be linked only to a user defined field of the module Activities, Projects or Employees. - A user defined field of the module Invoices can be linked only to a user defined field of the module Customers. - A user defined field of the module Customers. Activities or Employees cannot be linked to any other user defined fields. Tab: Select in the combo box the tab in which you want to see this user defined field. You can insert a maximum of 6 tabs in the section Users defined fields of each module of OroTimesheet. You can change the description of each tab from the option General parameters.

OroTimesheet 7 user's guide
33
User defined fields initialization This option is used to enter a default value in a user defined field in a module where data are already entered. For example, in the module Projects, you already added 50 projects, and you decide to define a user defined field for this module of type Radio button that will have the value Yes or No. Since this field was not existing when you added your 50 projects, the new user defined field for these projects is automatically empty. If you do not want to change manually the value of each of these 50 projects, you can use the option User defined field initialization.

OroTimesheet 7 user's guide
34
Reports More than 200 reports are included with OroTimesheet. Also, using the powerful reports generator also included with OroTimesheet, you can customize existing reports or even create new ones. Refer to the document Reports generator for OroTimesheet 7 for more information about reports and forms customization. Reports that are already included with OroTimesheet are divided into several branches such as: - Lists - Time reports - Costs reports - Billing reports - Expense reports - Budget Vs Real reports - Time banks reports - Punch clock reports - Other reports Since it is impossible to describe all reports or possibilities, here is a brief overview: Lists This branch contains reports that contain different information on OroTimesheet in list format. Time reports This branch contains several summary or detailed reports related to time units. No information on cost or billing is printed on these reports. This branch also contains a sub-branch that includes reports grouped per week and period. Costs reports This branch contains several summary or detailed reports that print information related to costs. This branch also contains a sub-branch that includes reports grouped per week and period and another sub-branch that includes overtime reports. Billing reports This branch contains several summary or detailed reports that print information related to billing. This branch also contains a sub-branch that includes reports grouped per week and period. Expense reports This branch contains several summary or detailed expense reports. Budget Vs Real reports This branch contains several reports that print comparative budget Vs real related to time units, costs, billing and expenses. Time banks reports This branch contains several reports related to employee time banks. Punch clock reports This branch contains several reports related to the transactions of the punch clock software for OroTimesheet. Other reports This branch contains other miscellaneous reports.

OroTimesheet 7 user's guide
35
How to preview and print a report: From the Reports menu, select the report you want. If the report contains criteria, they will be asked to you. Note that criteria that you enter for a report can be saved for a later use. This is very useful if you must often print several reports with same criteria. Click on the button OK to display the report on screen. You can zoom reports on screen by clicking on the zoom buttons located on the left side of the preview window's toolbar. If your report contains several pages, you can view next pages by clicking the arrow buttons on the toolbar. To print your report, click the Print button to display the print property dialog box. Notice that all reports can be printed to a file. File formats that are available are: PDF (Adobe Acrobat), HTML, RTF, XLS (Excel), GIF, JPEG, BMP, EMF, WMF as well as structured text files and report emulation text files. Refer to the document Reports generator for OroTimesheet 7 for more information. To close the report, click on the button Close, on the right side of the preview window's toolbar. Original reports reinstallation utility: A utility named Original reports reinstallation utility is included with OroTimesheet. To run this utility, from the Windows Start button, select Programs | OroTimesheet 7 | Reports reinstallation utility. This utility is used to reinstall reports included with OroTimesheet 7. For example, if you customized some reports using the reports generator and you did not keep a copy of the original report before customization, you could restore original reports of OroTimesheet by running this utility. To change the paper format or reports, use options available from the menu Tools of the Reports Generator utility. Indeed, by default, all reports included with OroTimesheet are in Letter paper format. You could use these options to convert reports to the A4 paper format or vice versa. Integrating with other software OroTimesheet allows you to exchange data with QuickBooks and Simply Accounting software. You can among other, synchronize the list of your customers and projects as well as export your invoices to these software with a simple mouse click. Before being able to synchronize data or export invoices, you must first configure OroTimesheet for that purpose. Integration with Simply Accounting To configure integration with Simply Accounting, from the menu Integration, select the option Configuration then select the tab Simply Accounting. Check the box Activate integration with Simply Accounting then select your Simply Accounting company file. The extension of this file is usually .SAI. After it, enter your username (usually sysadmin) to access Simply Accounting and enter your password if you set one into Simply Accounting. Then, click the button Test connection to see if OroTimesheet can access Simply Accounting correctly. Note: Please note that so that OroTimesheet can access Simply Accounting, you must first indicate to Simply Accounting that you authorize other software to access it. To do that, run Simply Accounting, select the menu Setup | Set Up Users, select the user (usually sysadmin), click the

OroTimesheet 7 user's guide
36
button Modify User then select Read/Write access from the section Rights With Third-Party Products then click OK. After it, click Close to close the Set Up Users option. Please also note that if you are using a version of Simply Accounting that do not allow several users to access its data simultaneously, maybe you will have to quit Simply Accounting each time OroTimesheet will have to access Simply Accounting data. To be able to synchronize customers and/or projects of OroTimesheet with Simply Accounting, check the box Activate the synchronization of customers from the tab Customers and projects then select desired options. To be able to export invoices from OroTimesheet to Simply Accounting, check the box Activate invoice export from the tab Invoices then select desired options. Please note that it is important to correctly configure GL account numbers and taxes options so that you can correctly export invoices from OroTimesheet to Simply Accounting. Indeed, when exporting invoices, exported invoices must match valid GL account numbers of Simply Accounting. Please also note that OroTimesheet taxes must also match valid taxes information of Simply Accounting. This is for this reason that it is important to correctly configure these options so that you can correctly export invoices from OroTimesheet to Simply Accounting. Synchronizing customers and projects To synchronize customers and/or projects of OroTimesheet with Simply Accounting, select the menu Integration | Synchronize with Simply Accounting than answer Yes at the confirmation message. If errors occur while synchronizing data, they will be displayed at the end of the synchronization process. Exporting invoices to Simply Accounting To export an invoice of OroTimesheet to Simply Accounting, from the option Invoices of OroTimesheet, select the invoice to export then click the button Export to Simply Accounting from the tool bar. Integration with QuickBooks To configure integration with QuickBooks, from the menu Integration, select the option Configuration then select the tab QuickBooks. Check the box Activate integration with QuickBooks then select your QuickBooks company file. The extension of this file is usually .QBW. After it, click the button Test connection to see if OroTimesheet can access QuickBooks correctly. Note: So that OroTimesheet can access QuickBooks, for the first time, QuickBooks must be running and your company file must be open. When OroTimesheet will try to access QuickBooks (when you will click the test button), just answer Yes, always; allow access even if QuickBooks is not running. Once you answered this question, the connection test should display the message The connection test to the QuickBooks database was successful. To be able to synchronize customers and/or projects of OroTimesheet with QuickBooks, check the box Activate the synchronization of customers from the tab Customers and projects then select desired options. To be able to synchronize employees of OroTimesheet with QuickBooks, check the box Activate the synchronization of employees from the tab Employees and time then select desired options. To be able to export invoices from OroTimesheet to QuickBooks, check the box Activate invoice export from the tab Invoices then select desired options. Please note that it is important to correctly

OroTimesheet 7 user's guide
37
configure GL account numbers and taxes options so that you can correctly export invoices from OroTimesheet to QuickBooks. Indeed, when exporting invoices, exported invoices must match valid GL account numbers of QuickBooks. Please also note that OroTimesheet taxes must also match valid taxes information of QuickBooks. This is for this reason that it is important to correctly configure these options so that you can correctly export invoices from OroTimesheet to QuickBooks. Synchronizing customers and/or projects To synchronize customers and/or projects of OroTimesheet with QuickBooks, select the menu Integration | Synchronize with QuickBooks then answer Yes at the confirmation message. If errors occur while synchronizing data, they will be displayed at the end of the synchronization process. Transferring time to QuickBooks You can transfer worked time of employees directly to QuickBooks. To do that, select the menu Integration | Transferring time to QuickBooks then answer Yes at the confirmation message. If errors occur while synchronizing data, they will be displayed at the end of the synchronization process. Exporting invoices to QuickBooks To export an invoice of OroTimesheet to QuickBooks, from the option Invoices of OroTimesheet, select the invoice to export then click the button Export to QuickBooks from the tool bar.

OroTimesheet 7 user's guide
38
Data export The export data option of OroTimesheet allows you to export data in an Excel, Access or dBase file. Data that can be exported are customers, projects, activities, employees, timesheets, expenses, periods and types of expense. This option is available from the File menu. From this option, select data you want to export, enter selection criteria (as the case may be), select the file type to create as well as its name and location then click OK to start the export process. Note that data that you do not have access will be replaced by *** characters (or empty or zero in the case of numeric data) in the created file. Note: To synchronize data with Simply Accounting or QuickBooks, use the menu Integration instead of using the option Export. Refer to the section Integration with other software for more information.
Data import The data import option of OroTimesheet is a very powerful option that allows you to import (or update) data of OroTimesheet from an external data source. Note: To synchronize data with Simply Accounting or QuickBooks, use the menu Integration instead of using the option Import. Refer to the section Integration with other software for more information. For example, using this option, you could import the list of your customers from a database or a file. This option allows you also to save your import parameters for a later use. To reach this option, select the option Import from the File menu.

OroTimesheet 7 user's guide
39
Accessing data with Microsoft ADO The import option is using the ADO (ActiveX Data Objects) data access system developed by Microsoft. One advantage of using ADO is to be able to access uniformly several kinds of database using drivers such as OLE DB or ODBC. For example, with ADO, you can access simple dBase, Excel or MS Access files as well as more sophisticated databases such as Firebird, Oracle or MS SQL. ADO is compatible with the ODBC (Open DataBase Connectivity) technology. If you use an ODBC driver to access a specific database, you will be able to access this database with the import option. ADO is a part of the MDAC (Microsoft Data Access Components). The MDAC is a set of components specifically designed for data access and contains the ADO, OLE DB and ODBC data access systems. MDAC is now automatically installed with latest Windows versions (Windows 2000 or higher) as well as latest Microsoft products such as MS Office 2000 or Higher. When using the data import option, verification is automatically made to check that the Microsoft MDAC is installed on your computer. If the MDAC if not detected, an information message will be displayed on screen, informing you that the MDAC is required to run this utility. In this case, you just have to download and install absolutely free the MDAC from the Microsoft web site at http://www.microsoft.com/data/ . Note that only version 2.1 or higher of the Microsoft MDAC is compatible with the data import option of OroTimesheet. If you need more information about ADO or the MDAC, or you need to download the latest version of the MDAC, please visit the special section of the Microsoft web site at http://www.microsoft.com/data/ . This section contains many useful information about accessing different kinds of database using the MDAC. Importing data step by step This sections explains how to import data into OroTimesheet. You can import data in the following modules: - Customers - Projects - Activities - Employees - Timesheets Warning: Do not use the import option to import data from a previous version of OroTimesheet. Use instead the data transfer option available when starting OroTimesheet. Refer to the document OroTimesheet 7 installation guide for more information about this option. Step 1/6: What do you want to do ? This step allows you to load a file that contains import parameters that you created and saved in a previous import. This is very useful when you import data from the same source on a regular basis. This avoids you to reenter import parameters each time. If it’s the first time you import data, select Start a new import then click the Next button to continue to step 2. If you want to load parameters of a previous import process, select Import data using information previously saved in a file, then select the file containing your import parameters by using the button on the right side of the edit box. Click the Next button to continue to step 2.

OroTimesheet 7 user's guide
40
Step 2/6: Select the source of data to import This step allows you to specify where is the data and in which format is the data to import. If your data is in an MS Access, dBase, MS Excel, Paradox, Lotus, Html or Text file, just select the file to import using the button on the right side of the edit box the click the Next button to continue to step 3.
If your data are in another file format or in a more sophisticated database, select the another data source option, then, click the Other source of data button to display the ADO connection utility. Click the Build button to access the different tabs. The ADO connection utility can differ, according to the ADO and/or Windows version you are currently using. From the utility, select the data source type you want to access (usually from the Provider tab) then, enter the connection parameters, specific to your data source (usually from the Connection tab). The provider list available from the ADO connection utility (Provider tab) can differ between computers, depending on the ADO and/or Windows version used and software installed. As indicated previously, visit the ADO section of the Microsoft web site at http://www.microsoft.com/data/ for more information and/or download the latest version of the MDAC. A few examples of providers that can be available: The Microsoft Jet 4.0 OLE DB Provider is usually available and is used to access data file such as MS Access, MS Excel, dBase, Lotus, Exchange, Paradox, Text, Html or any other file format that Microsoft could add. The Microsoft OLE DB Provider for SQL server provider should be available if you currently use the MS SQL database server into your organization and that the MS SQL client software has been installed on your computer. Use this provider to access an MS SQL database. The Microsoft OLE DB Provider for ODBC Drivers provider is also usually available. Use this provider to access a data source through an ODBC driver. As you can see, ADO allows you to access most of the databases available on the market. However, the configuration process of the connection can differ, depending on the type of data you want to access. Please, refer to your database documentation to enter correct ADO connection parameters. The assistance of your database administrator is also strongly recommended. When all ADO connection parameters have been entered, click the Test connection button to verify the connection to your data source. If the connection test is successful, click the OK button to close the ADO connection utility and to return to the import option. You will notice that the parameters, typed from the ADO connection utility, will be automatically entered into the edit box under the Other source of data button.

OroTimesheet 7 user's guide
41
Click the Next button to continue to step 3. Step 3/6: Select the table to import After having specified the data source, you must indicate which table contains the information to import. For example, if your data source is a relational database (such as Firebird, Oracle, MS SQL, etc.) the list of tables and views will be displayed. In the case of a spreadsheet (such as Excel of Lotus), the list of worksheets (tabs of the spreadsheet) will be displayed. Select the desired table to import from the drop down list, then click the Next button to continue to step 4. Step 4/6: Select which module of OroTimesheet you want to import data to. As indicated previously, data can be imported into the following modules: - Customers - Projects - Activities - Employees - Timesheets Select the destination module where you want data be imported, then click the Next button to continue to step 5.
Importing data in the Projects module: When importing projects, be sure that the project code as well as the description of each imported project has a value. A project without code or without description will be automatically rejected. You must also be sure that each imported project be linked to a customer code that exists into OroTimesheet. You can use the option >>> Several fields <<< and directly enter the code of a customer that exists into OroTimesheet so that all imported projects be linked to this customer. Also, each imported project must have a unique project code. If projects that you want to import do not have unique project code, you can use the option >>> Generate automatically <<<. This option will attempt to generate a unique project code for each project imported. Other fields are also mandatory, but you will see that you can assign them a default value using drop down lists. Importing data in the Customers module:

OroTimesheet 7 user's guide
42
When importing customers, be sure that the customer code as well as the name of each imported customer has a value. A customer without code or without name will be automatically rejected. Also, each imported customer must have a unique customer code. If customers that you want to import do not have unique customer code, you can use the option >>> Generate automatically <<<. This option will attempt to generate a unique customer code for each customer imported. Other fields are also mandatory, but you will see that you can assign them a default value using drop down lists. Importing data in the Employees module: When importing employees, be sure that the employee code as well as the name of each imported employee has a value. An employee without code or without name will be automatically rejected. Also, each imported employee must have a unique employee code. If employees that you want to import do not have unique employee code, you can use the option >>> Generate automatically <<<. This option will attempt to generate a unique employee code for each employee imported. Other fields are also mandatory, but you will see that you can assign them a default value using drop down lists. Importing data in the Timesheets module: When importing timesheets, 2 fields are mandatory: The employee code and the project code. Other fields are also mandatory, but you will see that you can assign them a default value using drop down lists. For each record imported, the employee code and the project code must match an employee code and a project code that exist into OroTimesheet. Step 5/6: Associate source fields to OroTimesheet destination fields Now, you must specify which field of the source table will be transferred for each field of the destination module. When you are done, click the Next button to continue to step 6. On the right side of the screen, you have all fields available of the selected destination module as well as their type between parenthesis. Fields that are preceded by a star (*) indicate that they are obligatory.
The left part contains a drop down list for each destination field. It’s from this drop down list that you must specify which source field will be associated to each destination field. Each drop down list contains the list of source fields and their type between parenthesis. Also, each drop down list can contain the following options:

OroTimesheet 7 user's guide
43
>> Generate automatically << This option is only available for the following fields: Employee code, Project code and Customer code. For example, you can use this option if you are importing a list of projects, and the imported projects do not have a unique project code. By selecting this option, the data import option will attempt to generate a unique code for each project imported. However, note that it is preferable to import a list of records, which already have a unique code for each record instead of using this option. >>> Several fields <<< This option allows you to concatenate several source fields together instead of only associating one source field to one destination field. Example: You want to import data in the Customers module. In your source table, you have the following four fields: Address 1, Address 2, City and Zip code. However, in the Customers module of OroTimesheet 7, only one field is necessary to keep all information about the customer address. Since using drop down list, you can only select one source field for each destination field, you cannot indicate that you want that all four source fields indicated above be associated to the Address field of the Customers module. To correct this kind of problem, you can use the option >>> Several fields <<<. By selecting this option, an edit box is displayed and you can enter fields that you want to concatenate together. Here is an example that will import source fields Address1, Address2, City and ZipCode in the Address destination field of the Customers module. Address + <CRLF> + Address2 + <CRLF> + City + " " + ZipCode The field Address of the Customers module of OroTimesheet is a field of type memo. In a memo field you can enter several lines of text. So, you will see that characters <CRLF> has been used. These special characters indicate to insert a carriage return between some fields to be able to get the information on several lines. You can also add simple text by putting the text between double-quotes. In our example, we just wanted to add 3 spaces between the city and the zip code. For example, if the field Address1 would have the value 99, Wilson Blv, the field Address2 Suite #123, the field City Montreal and the field ZipCode H3A 1Y2, the result would be: 99, Wilson Blv Suite #123 Montreal H3A 1Y2 Instead of manually entering fields in the edit box, you can click on the button on the right side and simply drag fields available from the list, in the edit box. >>> Do not import <<< Select this option if you do not want to assign anything to some destination fields. Status and categories In addition to previous options, each drop down list can contains (in specific cases) the list of status (Active and Inactive) or the list of categories of customer, project or employee. For example, when importing data in the Customers module, the drop down list that correspond to the Category destination field will also contain the list of all customer categories available into OroTimesheet.

OroTimesheet 7 user's guide
44
So, you could simply select an existing category for this field. Step 6/6: Other information required before importing data You must indicate what to do when a record that the code already exists in the database is encountered. Then, if you want to save all the import parameters entered, check the option Save information about this import for a later use and type a file name where parameters will be saved.
Now, click on the Start button to start the import process. While importing data, if errors are encountered, they will be displayed on screen. Also, a summary of the import process will be displayed at the end of the operation. Note that you can stop an import process at anytime by clicking the Stop button. If you stop the import process before it is finished, no information will be saved to the database. If errors are encountered while the import process, please change your import parameters and try again. In most cases, the errors encountered are data errors. Here is a list of common errors encountered during an import process: Incompatible data type (Ex.: Trying to assign a String to a Date or Integer field). Value out of limit (Ex.: Trying to assign a value other than 0 (Inactive) or 1 (Active) to a Status field or trying to assign a non-existent category number to a category field).

OroTimesheet 7 user's guide
45
Update time banks OroTimesheet allows you to maintain a time bank for each of your employees working overtime. In some cases, employees and employers will choose to keep overtime in a bank and later give additional paid holidays, extend vacations or simply calculate bonus at the end of the year, based on time accumulated in the bank. In all these case, OroTimesheet is an efficiently tool to maintain time banks. Also note that you can adjust manually an employee’s time bank from the module Employees. To update your employees’ time banks, from the menu Tools, select the option Time banks then the option Update time banks. Since the update of time banks is made by group, all groups are displayed. Check groups for which you want to update time banks. Then, for each selected group, enter the begin and end date for timesheet selection that will be taken into account for update of time banks. By default, the software calculate the number of weeks between the begin and end date you selected. However, if you want, you can change this value from the field Number of affected weeks. Before going at the next step, if you want that timesheets where the box Overtime is checked be multiplied by a factor, enter this factor in the field Multiply overtime hours by. Then click on the button Next step. At the next step, a tab for each group selected at the previous step is displayed. The list of employee of each group is displayed in each tab. Note that an employee will be displayed in the group that corresponds to his base group. For each employee, here are information displayed: The column In bank indicates hours that are currently in the time bank of the employee. The column Ignored time indicates timesheet hours that are not taken into account for the update of time banks. This is hours that are entered on projects or sub-projects where the box This project has no effect on time banks or the box This sub-project has no effect on time banks is checked. The column Overtime indicates timesheets hours where the employee checked the box Overtime. These hours are multiplied by the number you entered in the field Multiply overtime hours by at the previous step. The column Regular time indicates timesheet hours entered by the employee. These hours exclude hours where the employee checked the box Overtime and hours entered on projects or sub-projects where the box This project has no effect on time banks or the box This sub-project has no effect on time banks is checked. The column Expected time indicates hours that the software suggest to pay. Usually, hours in that column are equal to the number of hours usually paid by week (editable in the employee record) multiplied by the value entered in the field Number of affected weeks at the previous step. The column Total indicates the total worked hours by the employee as well as hours that the employee currently has in his time bank. This column is the sum of columns In bank, Overtime and Regular time. The column Time to pay indicates hours that the software suggest to pay. For example, if the employee works usually 40 hours a week, and you are updating time banks for two weeks, the number of hours indicated in that column should be 80. In this case, the software will always attempt to pay 80 hours. If the

OroTimesheet 7 user's guide
46
employee worked more than 80 hours, additional hours will be added to the column To bank. If the employee worked less than 80 hours, the software will attempt to subtract hours from the column To bank to attempt to pay 80 hours. If you check the box Always pay the standard time for each week, still in this same case, the software will put 80 in the column Time to pay even if the employee does not have enough hours. In such case, the time bank of the employee will become negative. In short, this option is used to indicate to OroTimesheet to always pay the time usually paid by week even if there is not enough hours in the time bank of the employee. You will notice that there is a small button with tree points on the right side of the column Total. This indicates that you can manually modify the column Time to pay. The software will automatically adjust the column To bank if you modify this field. The column To bank indicates hours that will be in the time bank of the employee after the time bank update. Once you have verified information of each employee in each tab, click on the button Update timebanks for displayed groups to update time banks. After the update of time banks, if you want to manually adjust time bank of some employees, you can go directly in the employee record and adjust directly the time bank. Please also note that it is also possible to undo a time bank update for all employees of a group using the option Undo time banks updates.
Undo time banks update Once the time banks update is done, if you have some adjustments to do for some employees, you can go directly in the employee record and manually adjust his time bank. This is very fast and efficient. However, if for one reason or another, you made a mistake when you updated time banks, (for example, if you selected a wrong parameter), in such case, you can completely undo the last time banks update for a specific group. To access this option, select the menu Tools | Time banks | Undo time banks update. From this

OroTimesheet 7 user's guide
47
option, you can see the list of groups on which at least one time banks update was done. Under each group, you can see each time banks update that was done for this group. Only a single time banks update can be undone at a time. Also, updates must be undone in chronological order from the most recent to the older. To undo a time banks update, select the most recent update for the desired group and click the button Undo and answer Yes to the confirmation. Once the time banks update is undone, you will be able to redo the time banks update for this group. Important notes: After the time banks update for a specific group, if you had manually modified the time bank of some employees of this group, so, these modifications will be lost if you undo the time banks update of this group.

OroTimesheet 7 user's guide
48
Timesheet batch modification The option timesheet batch modification allows you to edit some fields for a group of timesheets. This can be very useful, for example, when you want to change the status of several timesheets or change the billable rate of timesheets of a specific project. This option is available from the Tools menu. From this option, enter your timesheets selection criteria and indicate which field you want to edit and the new value for this field. Click on the button Update to update timesheets according to your criteria.
Please note that using this option, you can also modify the cost per time unit as well as the billing rate for a group of timesheets so that it can be recalculated according to current parameters and rules. In such case, select the option Billing and cost (Use current rates) from the drop down list. Purging timesheets After using the software for a while, you would probably want to purge some timesheets you do not need anymore. It is not an obligation to purge timesheets but it can help the software to increase its performance and to be more efficient. Some users will want to purge timesheets after a few months, while others after a few years. Select the beginning and ending dates for the period you want to purge timesheets. OroTimesheet allows you to purge timesheets for the employees, projects, sub-projects and activities of your choice. Select for which specific employees, projects, sub-projects or activities you want to purge timesheets. By leaving the default values, the timesheets of all employees, projects and activities will be purged between the two dates you entered. Click on the button OK. A confirmation box will appear asking you to confirm your choice. Click Yes to begin the purge process. WARNING: Timesheets purged will be erased forever. We recommend you to backup your data before purging your timesheets.

OroTimesheet 7 user's guide
49
Parameters This option is used to personalize the software. Parameters are divided in two categories: personal parameters and general parameters. Modifications made in personal parameters affect only the current user. Modifications made in general parameters affect all the users. Personal parameters You can modify the following personal parameters: Display language for OroTimesheet This option allows you to choose between a French or English display interface. However, please note that this option do not change the reports display language. To apply the modification, you must close OroTimesheet and run it again. Default number of time units when entering timesheets: Enter the number of time units you want to see entered by default when adding a new timesheet. For example, if you enter 1.5 in this option, when adding a new timesheet, the default number of time units entered in the timesheet will be 1.5. Employees and projects display on main window: Several projects are created and then completed. This option is used to display in the main window all employees and projects or only active employees and projects. Do not load memo fields at start up You can choose to not automatically load memo fields of OroTimesheet’s modules at startup. This option was added to maximize the loading time of information on screen when a business must manage a lot of entries. For example, if you have thousands of customers, it may be useful to not load the memo fields of the module Customers at start up. Note that you still have access to these fields when clicking on the entry. For example, to see the address field (which is a memo field), simply click on the customer in the grid and the memo field will be automatically loaded and displayed on screen. Refresh of information When OroTimesheet is used in multi-user mode, the software must continuously retrieve changes of other users in the database to allow you to always work with updated data. Use the slider to determine the frequency to refresh your data. Note that you can press the F5 key anytime from the main screen for an immediate refresh. Tab Hidden projects From this option, you can decide to hide some projects when entering timesheets through the week view or the web version. For example, if you hide the project Project X, then, when you will add timesheets through the week view of the web version, this project will not be displayed in the dropdown list. Note that you can also hide/display projects using the button Parameters in the web version. General parameters General parameters tab First day of week: In the timesheets’ main window (daily view), you always have 7 tabs displayed on the screen which represent each day of the week. You can determine here which day will be the first day displayed. The first day of the week is also used when printing reports grouped by week.

OroTimesheet 7 user's guide
50
Label for non approved and approved status: Each timesheet can have two statuses: Approved or Non-approved. Type in these fields the labels you want to see displayed as the description for these status instead of Approved and Non-Approved. For example, if you type labels To be verified and Verified for status, when a timesheet is not approved, you will see To be verified for the status of this timesheet. At the opposite, you will see Verified. Time units (Label and maximum by day): Type the description of your time unit in the Label field. For example, if you want to manage timesheets in 1/4 day, type 1/4 day into the Label field. Time information in timesheets and on all reports will be automatically displayed in 1/4 day. Type the maximum number of time units that an employee can enter on its timesheets by day, in the Maximum by day field. For example, if you type 4 into this field, if the employee try to enter more than 4 time units by day on its timesheets, a message will automatically be displayed indicating that this employee cannot enter more time units by day than the maximum allowed. Note that no conversion is made by the software regarding the time unit label. For example, if you change your time unit label from 1/4 day to Hour, no changes will be made to timesheets. So, a timesheet that has been entered with 2 time units of time worked, will still have 2 time units of time worked even if the label of the time unit has changed. The only difference is that on screen or on reports, the time unit displayed will be 2 Hour instead of 2 1/4 day. Overtime When adding a timesheet, a check box named Overtime is available. When an employee check this box, his hourly cost and billing rate can be multiplied by a number. Enter this number in the box Multiply the cost by and Multiply the billing rate by. Shift You can customize the description of each shift you can select when entering timesheets. User defined fields tab User defined fields can be defined in most of the OroTimesheet modules. User defined fields defined for a module will always appear in the section User defined fields of that module. The section User defined fields is divided into six tabs. Each user defined field defined can be associated to a specific tab of the module. This option is used to define the tabs’ title under the tab User defined fields of each module. For example, write Other information in the section Tab #1 of the Employees‘ tab. If then you define a user defined field for the module Employees, and you associate your user defined field to the tab Other information, automatically when you will add and/or modify an employee, you will find your user defined field in the tab Other information of the section User defined fields. Colors tab For each module or option, select the color you want the information be displayed for each status. To modify a color, click on it and select a new color in the pallet. Click OK to confirm your choice. Security tab The security into OroTimesheet is optional. At the initial installation time of OroTimesheet, the security is not activated. You can activate or deactivate the security from this tab. Before activating the security of OroTimesheet, make sure that you know the password of the employee Administrator. The employee Administrator is the one who has all rights in the software. Note that you can also attribute the Administrator rights to other employees.

OroTimesheet 7 user's guide
51
At the initial installation time of OroTimesheet, the password for the employee Administrator (employee code ADMIN) is OROLOGIC. If you decide to activate the security of OroTimesheet, we recommend you to change this password for a password of your choice. Refer to the section Employees for more information. If you activate the security, the next time you or one of your users will start OroTimesheet, you will need an employee’s code and a valid password to access OroTimesheet. The employee’s code of the employee Administrator is ADMIN. Next time you will start OroTimesheet, enter ADMIN in the edit box Employee code and the password in the edit box Password to access OroTimesheet as the administrator. If the security of OroTimesheet is activated, and you want to deactivate it, access OroTimesheet with an employee’s code who has administrator rights and select the option Security inactive. By checking this box, all users will be able to access OroTimesheet directly without employee code and password. For further information on the security into OroTimesheet, refer to the section Security in OroTimesheet 7. Information on your company This tab is used to enter information on your company. These information are mainly used when printing reports or invoices. Invoicing tab This tab’s options allows you to configure invoicing parameters in OroTimesheet. Note that tax rates entered from this option apply to all customers, unless you specified different tax rates at the customer level. Each invoice can have up to 5 status. You can change each status description from this option. You can also decide of the form to use by default when printing invoices. Note that forms can be customized according to your needs (logo, text, colors, etc.) using the report generator included with OroTimesheet. Refer to the document Report generator for OroTimesheet 7 for further information. Punch clock tab This tab allows you to configure the options for the software Punch clock for OroTimesheet 7 (optional). From this tab, you can choose the time format displayed between the civilian or military. You can also set if the employee must select or not a project and an activity when he punches. Example 1: The company ABC uses the software Punch clock for OroTimesheet 7 in its factory to manage the employees’ working time, no matter the activities they do. The company ABC will therefore choose to check the option The employee select his name then punch. However, since the punch clock software is linked to OroTimesheet and all punch clock software’s entries are converted in timesheets, you must specify a default project and activity. Note that this project and activity can be dummy. Example 2: The company ABC uses the software Punch clock for OroTimesheet 7 in its factory of used furniture restoration. The time spent to restore each furniture is billed to customer. The company ABC will therefore choose to check the option The employee select his name, a project (or sub-project) then punch. The option The employee select his name, a project (or sub-project), an activity, then punch is the same as example 2 but the employee must also select an activity. The security section allows you to set if the employee must enter his PIN (Personal Identification Number) when he punches. The PIN is numeric only and must be defined in the record of each employee.

OroTimesheet 7 user's guide
52
This section also allows you to define a password (numeric only) to quit the punch clock software. The section Automatic input allows you to enter a ending character when you are using the Punch clock software with a bar code reader. The section Round transactions allows you to indicate to the Punch clock software to always round in time or out time at the number of minutes specified. For example, if you indicate to round the in time at the next 15 minutes, if an employee punch in at 7:53h, then, the Punch clock software will indicate 8:00h as the in time. Note that the real in time (7:53h) is also always kept into the database for information purpose. This is the same thing for the out time. If you indicate to the Punch clock software to always round the out time to the previous 5 minutes, so, if the employee punch out at 17:04h, then, the Punch clock software will indicate that the employee was out at 17:00h. Note also that the real out time is always kept into the database for information purpose.

OroTimesheet 7 user's guide
53
Security into OroTimesheet This section explains how the security works through OroTimesheet. Activate the security or not? Since OroTimesheet is very flexible, it can be used by big organizations with hundreds of users as well as self-workers with only one computer. If OroTimesheet is used by several simultaneous users, a security is essential to limit user access to specific software options and timesheets. However, when OroTimesheet is used only by one user, the security can become embarrassing. OroTimesheet adapts as well to one or the other of the situations above. Indeed, the security of OroTimesheet can be activated or not, according to your needs. At the time of the initial installation of OroTimesheet, by default, the security is not activated. To activate or deactivate it, you just have to select the menu Configuration | Security wizard. WARNING: Before activating the security of OroTimesheet, make sure that you know the password of the employee Administrator. At the time of the initial installation of OroTimesheet, the password of the employee Administrator is OROLOGIC and his employee code is ADMIN. Next time you will start OroTimesheet, you will have to enter ADMIN as the employee code and OROLOGIC as the password (if you have not changed it) to access OroTimesheet and have administrator rights. If the security is activated, you must have administrator’s rights to be able to add, modify and/or delete employees and change their password. Moreover, only an administrator can access the general parameters of OroTimesheet to change parameters or deactivate security. Access rights Vs Supervision rights The security into OroTimesheet is divided in two parts: the access rights and the supervision rights. The access rights are the access rights through the software. These rights determine access to different modules and options of OroTimesheet. For example, a user can have a full access to the module Customers (add, edit, delete) while another user can have only viewing rights. On the other hand, supervision rights determine the hierarchy of employees. For example, an employee who has no supervision rights on other employees, will be able to modify only his own timesheets. On another side, an employee who has supervision rights on another employee or group will be able to access his own timesheets and the timesheets of the employees or groups on which he has supervision rights. With OroTimesheet, supervision rights are very flexible. For example, an employee who has supervision rights on 2 different groups, could have access on the first group’s timesheets in read only and full access on the second group’s timesheets. Access rights Access rights can be granted at the employee or group level. When you grant access rights to an employee, this employee will be limited to these rights, whatever the groups the employee is a member. Unlike supervision rights, access rights are not summed together. For example, if you grant access rights to an employee to the Customers module in read only mode, even if this employee is a member of a group which has full access rights to the Customers module, this employee will only have access rights to the Customers module in read only. To minimize the management of access rights, instead of specifying access rights for each employee, access rights can be granted for a group. After it, you just have to specify at the employee level (by checking the box Use the access rights of a group and by selecting a group in the list) to use the security of a group. We remind you that in opposition to the supervision rights, access rights are not summed together. So even if an employee is member of several groups, if you want this employee use access rights of a group, you will have to choose only one group from the list.
OroTimesheet 7 user's guide
54
To grant access rights to an employee, in the module Employees, select the desired employee. Click on the button Edit then select the tab Access rights. Check the access rights you want to grant to the employee. Select the tab Reports to grant access rights to the different reports. After the rights are granted, click on the button OK to save your changes. To grant access rights to a group, in the module Groups, select the desired group. Click on the button Edit and follow the same procedure as for an employee. IMPORTANT: Note that when employees or groups are linked to a project, you can determine if this employee or group is manager of the project. Each employee or group manager of a specific project automatically has the right to edit this project. This right is granted even if this employee or group usually cannot edit projects. You will notice that no access rights can be granted for the module Employees. To add, edit or delete employees, you must obligatory have administrator rights. There is an exception; some fields of this module can be edited by employees (or groups) even if they do not have administrator rights. These special rights are granted from the supervision rights tab. Refer to the section Supervision rights below for more information. Reports access rights Determine rights to view and print reports included in OroTimesheet. In the reports generator of OroTimesheet, you can create new reports and/or customize existing ones. New branches of menu can also be created to arrange your reports according to your needs. All new branches of menu and new created reports appear automatically in the tab Reports of the Access rights tab. Thus, you can also manage the security on your own customized reports. Reports access rights can be granted in two ways: for each report or per branch. To grant rights to specific reports, you only have to check reports individually. If new reports are added, since you granted access rights to specific reports, the employee (or group) will not have automatically access to these new reports. Instead of granting access to individual reports, you can grant access rights to branches. In this case, the employee (or group) will have automatically access to all other branches and/or reports under these branches. Warning: If you give to an employee or group access to a branch, when you will add new reports under this branch (via the report generator), the employee or group will automatically have access to these new reports. To grant access to all reports (even new reports and/or branches you add), you only have to check the box All reports. Supervision rights: As described previously, supervision rights determine the hierarchy of employees. For example, a department supervisor could have supervision rights on the employees of his department. Whereas his employees could be allowed to modify only their own timesheets, the supervisor could have access to all his employees’ timesheets. When you add a new employee in OroTimesheet, through supervision rights tab, you can determine if this employee will have access to other timesheets or only access to his own timesheets. Moreover, each supervision right can be personalized. For example, you can determine that an employee has supervision rights on another employee’s timesheets but in read only mode. Another example could be that an employee has supervision rights on his own timesheets but he cannot see or modify the billing information.

OroTimesheet 7 user's guide
55
When you add a new employee in OroTimesheet, this employee automatically has supervision rights on himself. This supervision right cannot be removed, but different parameters can be personalized to limit his access to his own timesheets. Supervision rights can be granted at the employee level as well as the group level. Unlike access rights, supervision rights are summed together. For example, the employee 1 has only supervision rights on himself. This employee is a member of the group 1. The group 1 has supervision rights on the employee 2 and also on the group 2. Automatically, the employee 1 will have supervision rights on himself, the employee 2 and the group 2. To modify supervision rights of an employee, from the module Employees, select the desired employee, then click on the button Edit. Select the tab Supervision rights and add the employees and/or groups on which you want this employee have supervision rights. For each employee and/or group added, you can click on the button Rights... at the right of the employee (or group) to personalize supervision rights of this employee (or group). To modify supervision rights of a group, in the module Groups, select the group you want to modify and click on the button Edit. Then follow the same procedure as to modify employee supervision rights. Special notes when printing reports When creating new reports, you can limit information to include on reports. To allow an employee to see only information of the employees, on which he has supervision rights, add a search criterion on the employee. Thus, when an employee will ask for the report, he will have to choose for which employees he wants the report, but only the employees on whom he has supervision rights will be included in the list. Note that most of reports included with OroTimesheet already have a search criterion on the employee. So, printed information is limited according to supervision rights. However, note also that rights Can see all employees on reports and Can see all projects on reports can affect this behavior. For more information on search criteria in reports, refer the document Reports generator for OroTimesheet 7. Administrator rights You can attribute the administrator rights to an employee in OroTimesheet. When an employee has administrator rights, he has automatically all access rights to all software’s options and complete supervision rights on all employees. Usually, this privilege is restricted only to a few employees in your company. To attribute administrator rights to an employee, from the module Employees, select the desired employee and click on the button Edit. Then, select the Security tab and check the box Administrator. Click on the button OK to save your changes. Change your password This option allows the user to modify his password any time when the security is activated in OroTimesheet. This option is available from the Tools menu.

OroTimesheet 7 user's guide
56
Timer for OroTimesheet A program named Timer for OroTimesheet is now included with OroTimesheet 7. This program install itself in the Windows system tray and allows to record spent time on projects and activities. Then, this time can be converted into timesheets. When installing OroTimesheet, you can indicate that you want that this program starts automatically at Windows startup. In such case, an icon will be displayed in the Windows system tray. If the program does not seem to be started, from the Windows Start button, select Programs | OroTimesheet 7 | Timer. To start a new task, click on the icon Timer in the Windows system tray then select Add a task from the popup menu. The first time you start a task after the program started, you must connect to the OroTimesheet database by selecting a connection from the list. If you had indicated in the connections manager to not display the list of connections, then, the Timer program directly connects to the default connection. Then, you must enter your employee code and password. If the security into OroTimesheet is not activated, then, you will be automatically connected as the employee Administrator and time will be recorded for this employee. Once connected, you can select the project, sub-project and the activity (that constitute your task) then click OK to start the timer for this task. Time begins to calculate automatically. If you want to start a new task or manage tasks in progress, click again on the Timer icon in the Windows system tray. You will see from the popup menu your tasks in progress as well as the elapsed time for each one. You can pause a task or restart it by selecting the task from the popup menu then by selecting the option Pause task or Start task as the case may be. You can also stop the task and convert it into timesheet or even cancel the task. When you cancel a task, it is not converted into timesheet. When you stop a task and convert it into timesheet, you can modify the number of hours before creating the timesheet. This is specifically useful, for example, when you want to round the number of hours that will be entered in the timesheet. From the popup menu, you can also pause, stop or resume all tasks in progress in only one operation by selecting the proper option from the menu. An menu option named Options is also available from the popup menu This option allows you to set some parameters. For example, you can decide if the program Timer can allow you to have several concurrent tasks. If you deactivate this option, when you start a new task while another one is running, the running task will be automatically paused and the new task will start. If this option is activated, you can have several concurrent tasks simultaneously. You can also indicate to always round the number of hours that will be entered on the timesheet when you stop a task. For example, if you stop a task that has a duration of 3 hours and 14 minutes, since duration in timesheets is always kept in decimal format, the duration of the timesheet will be 3.23333. In such case, you can indicate to always round timesheets at the nearest, round up or round down to 7.5, 15 or 30 minutes. For your information, 7.5 minutes in decimal format is 0.125, 15 minutes is 0.25, 30 minutes is 0.5 and 60 minutes is 1.0. Here are some rounding examples: 3h 00m rounded to 15 minutes (round down) will give 3h 00m (decimal = 3.00) 3h 01m rounded to 15 minutes (round down) will give 3h 00m (decimal = 3.00) 3h 06m rounded to 15 minutes (round down) will give 3h 00m (decimal = 3.00) 3h 07m rounded to 15 minutes (round down) will give 3h 00m (decimal = 3.00) 3h 08m rounded to 15 minutes (round down) will give 3h 00m (decimal = 3.00)

OroTimesheet 7 user's guide
57
3h 14m rounded to 15 minutes (round down) will give 3h 00m (decimal = 3.00) 3h 15m rounded to 15 minutes (round down) will give 3h 15m (decimal = 3.25) 3h 00m rounded to 15 minutes (round up) will give 3h 00m (decimal = 3.00) 3h 01m rounded to 15 minutes (round up) will give 3h 15m (decimal = 3.25) 3h 06m rounded to 15 minutes (round up) will give 3h 15m (decimal = 3.25) 3h 07m rounded to 15 minutes (round up) will give 3h 15m (decimal = 3.25) 3h 08m rounded to 15 minutes (round up) will give 3h 15m (decimal = 3.25) 3h 14m rounded to 15 minutes (round up) will give 3h 15m (decimal = 3.25) 3h 15m rounded to 15 minutes (round up) will give 3h 15m (decimal = 3.25) 3h 00m rounded to 15 minutes (round nearest) will give 3h 00m (decimal = 3.00) 3h 01m rounded to 15 minutes (round nearest) will give 3h 00m (decimal = 3.00) 3h 06m rounded to 15 minutes (round nearest) will give 3h 00m (decimal = 3.00) 3h 07m rounded to 15 minutes (round nearest) will give 3h 00m (decimal = 3.00) 3h 08m rounded to 15 minutes (round nearest) will give 3h 15m (decimal = 3.25) 3h 14m rounded to 15 minutes (round nearest) will give 3h 15m (decimal = 3.25) 3h 15m rounded to 15 minutes (round nearest) will give 3h 15m (decimal = 3.25) Finally, you can indicate from that option to always start the Timer program at Windows startup by checking the box Start automatically with Windows.

OroTimesheet 7 user's guide
58
Web interface of OroTimesheet A web interface is included with OroTimesheet. This web interface is used to enter timesheets using a simple web browser. Indeed, you do not have to install OroTimesheet on the client computer to access the web interface. However, before employees can access the web interface, you must install it. If you did not installed the web interface at OroTimesheet installation time, take a look at the document OroTimesheet 7 Installation guide to know how to install the web interface manually. Please note that you must activate the security of OroTimesheet to use the web interface. If the security is not activated, only the ADMIN user will be able to enter timesheets. Once you have entered in your Internet browser the address of your server where the web interface is installed, the OroTimesheet web interface’s home page appears. You must select the database you want to access. Also select the display language and click on the button Connect. Then, enter your employee code and password. Once you are in the web interface, simply click on the button Add to enter new timesheets. You will notice that the timesheet entry is weekly. Select the project/sub-project, select the activity and enter the number of time units worked each day. Click on the button OK to save entered data or click on the button Details to enter additional information in other fields such as notes or expenses. Click on the buttons Edit or Delete at the left of the timesheets to edit or delete timesheets. Click on the buttons Prev. Week and next week to change the current week. You will notice that by default, even if there is no timesheet entered in the current week, projects and activities of timesheets of previous week are already available in the grid ready to be edited. This is very useful when you work usually on the same projects. This avoid you to always select again same projects when you enter time on a new week. Click the button Options to access some options of the web version such as options to change your password or to hide some projects.

OroTimesheet 7 user's guide
59

OroTimesheet 7 user's guide
60
Punch clock software for OroTimesheet The Punch clock software for OroTimesheet is a complementary software to OroTimesheet and allows you to install (or replace) an electronic punch clock for your factory. The OroTimesheet software and the Punch clock for OroTimesheet software are two different software working together using two different time entry principles. Indeed, the punch clock software for OroTimesheet is dedicated to be used in a factory whereas the OroTimesheet software is dedicated to be used by office employees.
Note that the Punch clock software for OroTimesheet is already included in the installation kit of OroTimesheet. You do not have to download additional files to use it. Refer to the document OroTimesheet 7 Installation guide for further information on installation and start up of the punch clock software. Principles of Punch clock for OroTimesheet The Punch clock software for OroTimesheet has been created to meet different needs. To understand its main functions, please read the following examples: Example 1: The punch clock software is used as a standard punch clock. At the end of the week, a person calculate working hours for pay management.
OroTimesheet 7 user's guide
61
In this factory, knowing on which projects employees work is not essential. Employees work on several tasks but it do not affect invoicing nor project management of the company. The Punch clock software for OroTimesheet is installed on one or several different computer, linked to the same database of OroTimesheet. The person responsible for the pay management works directly in the OroTimesheet software. First of all, the person must create the employees working in the factory from the Employees module and attribute to each employee a number (optional) and a PIN (Personal Identification Number) also optional. During the week, employees punch in and out (for example at the beginning and end of day) in the punch clock software by using their employee number or by selecting their name in the list (according to the selected configuration). At the end of the week, the person responsible of the pay management run OroTimesheet 7 and converts the punch clock entries into timesheets. From there, different reports can be printed for the pay management. Example 2: The Punch clock software for OroTimesheet is installed in a modular houses factory. This company uses the software for pay management but also to manage the cost of each house built. The company does not need to manage the invoicing to the customers since at the time the contract is signed, the customer already knows exactly the price for the house. The punch clock software is installed on one or several computers in the factory. The person responsible for the pay management and the person responsible for the production will work directly in the OroTimesheet software. First of all, the person responsible of the pay management must create employees working in the factory from the Employees module like in example 1. Then, the person responsible of the production must create projects from the Projects module. For this example, each new house is a unique project. During the week, the employees punch in and out in the punch clock software, using their employee number. Then, they choose in the list, the project on which they are about to work (or enter the job number). When they work on another project, they punch out for the first project and punch in for the second project. At the end of the week, the person responsible for the pay management converts the entries in timesheets. From there, different reports can be printed for the pay management. The person responsible for the production can also access several reports regarding the cost management of each project (each house). Example 3: The Punch clock software for OroTimesheet is installed in a printing house. This company uses the punch clock software to manage project costs and billing to customers. In this example, the company does not use OroTimesheet for the pay management. The Punch clock software for OroTimesheet is installed on one or several computers in the factory. The person responsible of management of jobs works directly into OroTimesheet. First of all, the person must create employees from the Employees module, like example 1 and 2. Then, this person must create projects from the Projects module. Since the company uses the software to bill his customers and since each project’s activity has a specific billing rate, the person will also create activities from the Activities module and will associate them to the different projects. During the week, employees punch in and out in the punch clock software using their employee number. Then, they choose from the list, the project on which they are about to work (or enter the job number) and

OroTimesheet 7 user's guide
62
finally, select the activity. When they work on another project or another activity for the same project, they punch out and punch in again. At the end of the week, the person responsible run OroTimesheet and converts the punch clock entries in timesheets. Then, several reports can be printed for the cost management and timesheets can be billed to customers from the Invoices module. As you can see in the previous examples, the Punch clock software for OroTimesheet can be set and used in many different ways according to your needs. This configuration is made from the option General parameters. Refer to the section Parameters for more information. Convert transactions from the Punch Clock software into timesheets This option is used to convert punch in and punch out transactions of the punch clock software into timesheets. When converting transactions into timesheets, several possibilities are offered to adjust time according to your collective agreement or simply to make easier the pay management. For example, you can modify or adjust punch clock transactions, calculate overtime per day or per week or round timesheets. To launch this option, from the Tools menu, select Punch clock software transactions | Convert transactions into timesheets. From the first screen, all transactions that are not converted are displayed. To be able to see transactions already converted, you must run reports available from the menu Reports | Punch clock reports. From this screen, you can group transactions by date, by employee or by project. So, it is easy to know the number of hours done per date, week, employee or project. You can click on the small plus sigh on the left side to see transaction details. Each transaction can be modified (adjusted) as needed by selecting the transaction to modify and by clicking the button Edit. In such case, a window is displayed and allow you to make changes needed. Once modified, changes are kept into the database. So, you could quit OroTimesheet and run it back later, and your changes will still be there. Indeed, it is not obligatory to convert transactions immediately after having modified transactions. Please note that when you modify a transaction, you can always see original information of the transaction in the right part. Original information of a transaction cannot be modified. You can also delete transactions that you do not want to convert. In such case, transactions deleted will not be displayed on screen anymore. Indeed, deleted transactions will be marked as converted and will remain into the database for history purpose. You will be able to see there transactions again using Punch clock reports. Once you verified transactions and made changes (if necessary), you are now ready to convert transactions into timesheets. To convert transactions into timesheets, click the button Convert to timesheets. A new window is displayed. From this window, select the date range (begin and ending date) for transaction that you want to convert. You can then adjust overtime parameters if you want to manage overtime. Indeed, you can indicate that overtime be calculated after a certain number of hours per day or a certain number of hours per week. For example, if you indicate that overtime is calculated after 8 hours per day and that the employee Bob worked 9 hours for a specific day (we assume here that Bob worked 9 hours on the same project and same activity), then, in such case, two timesheets will be created for Bob for that day. A first timesheet that contains 8 hours and a second timesheet that contains 1 hour. The box Overtime of the

OroTimesheet 7 user's guide
63
second timesheet will be automatically checked. You can also indicate that you want to round the number of hours that will be entered into timesheets. For example, if after transactions are converted, a timesheet is created with a duration of 3 hours and 14 minutes, then, since duration into timesheets are kept in decimal format, the duration of the timesheet will be 3.23333. To prevent this kind of result, you can indicate to always round timesheets at the nearest, round up or round down to 7.5, 15, 30 or 60 minutes. For your information, 7.5 minutes in decimal format is 0.125, 15 minutes is 0.25, 30 minutes is 0.5 and 60 minutes is 1.0. Here are some rounding examples: 3h 00m rounded to 15 minutes (round down) will give 3h 00m (decimal = 3.00) 3h 01m rounded to 15 minutes (round down) will give 3h 00m (decimal = 3.00) 3h 06m rounded to 15 minutes (round down) will give 3h 00m (decimal = 3.00) 3h 07m rounded to 15 minutes (round down) will give 3h 00m (decimal = 3.00) 3h 08m rounded to 15 minutes (round down) will give 3h 00m (decimal = 3.00) 3h 14m rounded to 15 minutes (round down) will give 3h 00m (decimal = 3.00) 3h 15m rounded to 15 minutes (round down) will give 3h 15m (decimal = 3.25) 3h 00m rounded to 15 minutes (round up) will give 3h 00m (decimal = 3.00) 3h 01m rounded to 15 minutes (round up) will give 3h 15m (decimal = 3.25) 3h 06m rounded to 15 minutes (round up) will give 3h 15m (decimal = 3.25) 3h 07m rounded to 15 minutes (round up) will give 3h 15m (decimal = 3.25) 3h 08m rounded to 15 minutes (round up) will give 3h 15m (decimal = 3.25) 3h 14m rounded to 15 minutes (round up) will give 3h 15m (decimal = 3.25) 3h 15m rounded to 15 minutes (round up) will give 3h 15m (decimal = 3.25) 3h 00m rounded to 15 minutes (round to nearest) will give 3h 00m (decimal = 3.00) 3h 01m rounded to 15 minutes (round to nearest) will give 3h 00m (decimal = 3.00) 3h 06m rounded to 15 minutes (round to nearest) will give 3h 00m (decimal = 3.00) 3h 07m rounded to 15 minutes (round to nearest) will give 3h 00m (decimal = 3.00) 3h 08m rounded to 15 minutes (round to nearest) will give 3h 15m (decimal = 3.25) 3h 14m rounded to 15 minutes (round to nearest) will give 3h 15m (decimal = 3.25) 3h 15m rounded to 15 minutes (round to nearest) will give 3h 15m (decimal = 3.25) Finally, before displaying timesheets suggested by the software, you can check the option Merge similar transactions. For example, if for a same day, the employee Bob has a transaction of 4 hours on the project X and activity Y (for example, time worked in morning) and he has another transaction of 3.5 hours on the project X and activity Y (for example, time worked in the afternoon), then, instead of creating 2 timesheets (one of 4 hours and another one of 3.5 hours), by checking the option Merge similar transactions, only one timesheet of 7.5 hours will be created instead of two timesheets. Once parameters are entered, you can click on the button Generate timesheets. So, timesheets that the software suggest to create are displayed on screen. To see the detail of timesheets, click the plus sign on the left side of each employee or each date. You can manually modify the duration of timesheets suggested by clicking on the button on the right side of the duration suggested. If you entered wrong parameters and you want make changes, you can click on the button Edit parameters and change them back. Warning: If you manually modified duration of some timesheets suggested, these changes will be lost.
OroTimesheet 7 user's guide
64
Once information verified, you can click on the button Save generated timesheets. Once suggested timesheets are saved, punch clock transactions related to these timesheets will be marked as converted and will not be displayed anymore in the option to convert transactions into timesheets. However, as indicated above, to see transactions already converted, you can run reports available from the menu Reports | Punch clock reports. Note that it is not obligatory to save all timesheets suggested for all employees at the same time. Indeed, before clicking on the button Save generated timesheets, you can uncheck the box on the left side of employees. In such case, only suggested timesheets of employees where the box is checked will be saved. Purging punch clock transactions As indicated above, once converted, punch clock transactions still remain into the database for history purpose. These transactions can be viewed using reports from the menu Reports | Punch clock reports. However, if for a reason or another, after a certain amount of time, you want to purge some of these transactions, you can do that via the menu Tools | Punch clock software transactions | Purge transactions. From this option, enter the date from which you want to purge transactions then click OK to proceed. Note that only converted transactions will be purged.

OroTimesheet 7 user's guide
65
Backing up data We strongly recommend that you backup your data on a regular basis. Backing up your data protects you from losing your data by a hardware failure (computer, hard disk, etc.) or a software failure (operating system, virus, electricity lost, etc.). To know how to back up your data or restore it, please refer to the document OroTimesheet 7 Installation guide. Licensing Refer to the document OroTimesheet 7 installation guide for more information about licensing or the option Licenses manager.

OroTimesheet 7 user's guide
66
Technical support To get technical support on installation and/ore use of OroTimesheet 7, here are the different sources of information available: Support via our web site: You can, 24 hours a day, 7 days a week, access the Support section of our web site, at http://www.orologic.com. The Support section of our web site is updated on a regular basis and you can consult the list of frequent problems and their suggested solutions. This service is free for all users of OroTimesheet 7. Online support request: From the menu Help | Online services | Fill an online support request of OroTimesheet, you can fill an online support request. This option automatically opens your browser and accesses the Online support request form in the Support section of our web site at http://www.orologic.com. Support requests made directly from this form are usually faster to answer and process since most information we need are automatically filled. This service is free for all OroTimesheet 7 users. Note that support requests from users that already bought or rented OroTimesheet 7 licenses will be processed in priority. If for any reason, you cannot run OroTimesheet and you do not have access to the OroTimesheet Help menu, you can access to the online support request form by accessing the Support section of our web site at http://www.orologic.com. Error messages: If you fill a support request, according to an error or problem you get when you are using OroTimesheet, please add this error message in the description of your support request. When an error message is displayed on screen, just click the More info… button then click Copy to clipboard. After it, just paste it in your support request description.

OroTimesheet 7 user's guide
67
Copyright
OroTimesheet 7 Copyright© 1996-2011 OroLogic Inc., All rights reserved.
Warning: This software and its documentation are protected by copyright law and international treaties. Unauthorized reproduction or distribution of this program, or any portion of it, may result in severe civil and criminal penalties, and will be prosecuted to the maximum extent possible under the law. OroTimesheet and OROLOGIC are trademarks of OroLogic Inc., 330 St-Vallier East, suite 110B Quebec, (Quebec), Canada, G1K 9C5. The names of other products, services and societies mentioned are trademarks of their respective owners. The societies, names used in the examples are fictive. Association with any society, name, product or events existing is not desired and is not an insinuation.