oshpd e-services portal
TRANSCRIPT

OSHPD e-Services Portal
Public User Guide
Version Number: 4.0

eCA User Guide ii
TableofContents1 Introduction .......................................................................................................................................... 1
2 eCA System Overview ........................................................................................................................... 1
2.1 eCA Functionality .......................................................................................................................... 1
2.2 eCA Navigation .............................................................................................................................. 2
2.3 eCA Icons ....................................................................................................................................... 2
3 User Registration .................................................................................................................................. 4
3.1 Apply for an eCA User Account ..................................................................................................... 4
3.2 Reset Password ............................................................................................................................. 6
3.3 Facility Authorization .................................................................................................................... 8
3.3.1 Letter of Authorization.......................................................................................................... 8
3.3.2 Delegation ............................................................................................................................. 8
3.3.3 Linking to Licensed Professional ........................................................................................... 8
4 eCA System Orientation ........................................................................................................................ 9
4.1 eCA Home Tab ............................................................................................................................... 9
4.1.1 Collections ........................................................................................................................... 10
4.1.2 Reports ................................................................................................................................ 11
4.1.3 Account Management ......................................................................................................... 15
4.1.4 Logout ................................................................................................................................. 15
4.1.5 Home Tab – Facility Information ......................................................................................... 15
4.1.6 Home Tab – Projects ........................................................................................................... 17
4.2 Projects Tab ................................................................................................................................. 18
5 Account Management ........................................................................................................................ 20
5.1 Login Information ........................................................................................................................ 20
5.2 Contact Info ................................................................................................................................. 21
5.3 License Info ................................................................................................................................. 21
5.4 Delegates .................................................................................................................................... 23
5.4.1 Delegate Overview .............................................................................................................. 23
5.4.2 Add Delegate ....................................................................................................................... 23
5.4.3 Delegate Permissions .......................................................................................................... 25
5.4.4 Accept or Reject Delegate Invitation .................................................................................. 26
5.4.5 Delegate Effect .................................................................................................................... 27

eCA User Guide iii
6 Project Applications ............................................................................................................................ 27
6.1 Page Flow Overview .................................................................................................................... 27
6.2 Basic rules of page flow .............................................................................................................. 28
6.3 Create and Submit an AFNP ........................................................................................................ 29
6.4 Create and submit an Amendment ............................................................................................. 39
6.5 Print Preliminary Invoice after Submitting the Project ............................................................... 48

eCA User Guide 1
1 Introduction Welcome to OSHPD Electronic Services Portal Client Access (eCA) User Guide
This user guide provides step‐by‐step instructions for performing various functions in eCA to submit
OSHPD construction project applications.
2 eCA System Overview eCA is an online system that allows the facility users and licensed professionals to submit the OSHPD
construction project applications. eCA enables users to register for online accounts, manage their user
accounts, create project applications, submit project applications, pay application fees, and track the
application statues.
eCA is accessible to all public users via the internet at https://eserv.oshpd.ca.gov/CitizenAccess/. To
perform the core functions, users must apply and obtain a user account. Once the project application is
submitted to OSHPD, the information regarding construction project is available to the public via eCA.
2.1 eCA Functionality
Users can navigate the eCA system simply by following the links in the system and clicking on buttons to
perform various tasks. eCA is consisted of two main functional areas grouped by anonymous users and
registered public users. Figure 1 below illustrates the main functionalities in each group.
Figure 1 ‐ eCA System Functionality Map

eCA User Guide 2
2.2 eCA Navigation
Figure 2 below illustrates the available web pages in eCA system and the navigation path among the
web pages. User must log in eCA to create and submit project applications.
Figure 2 ‐ eCA Navigations
2.3 eCA Icons
Table 1 below lists the common icons used in eCA.
Table 1 ‐ eCA Icons
Icon Description
Search a record in eCA or in a list
Click on icon to display help instructions
eCA User Guide 3
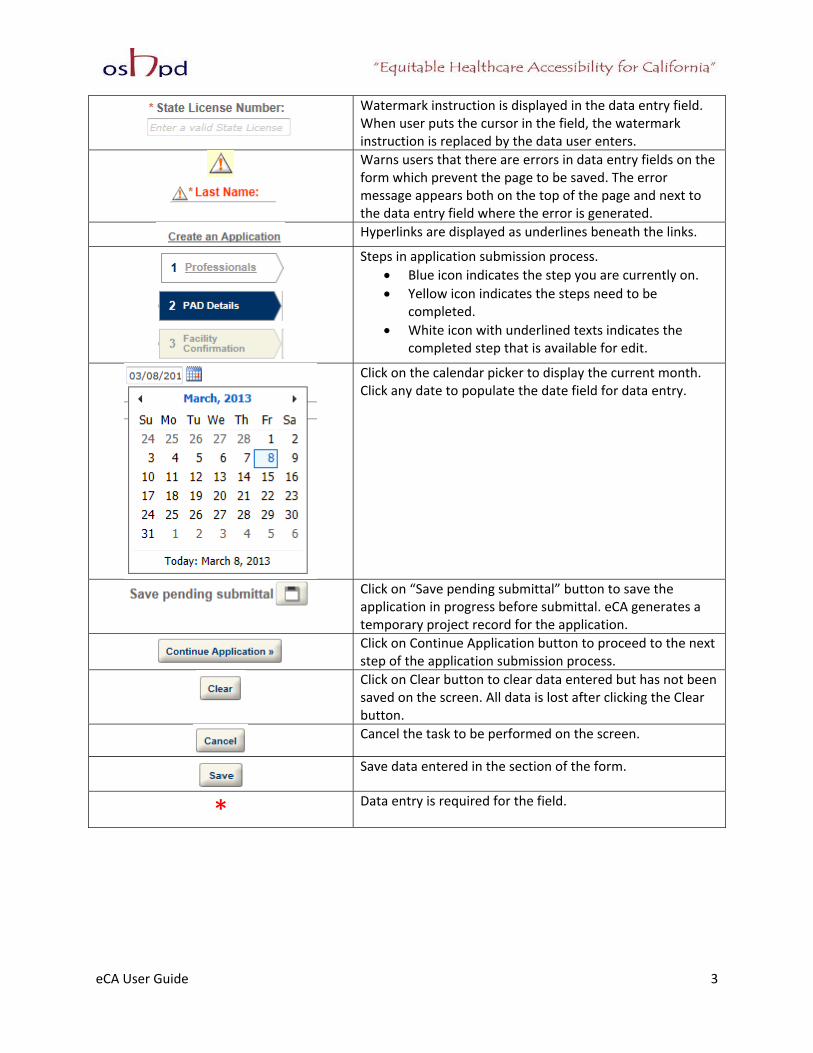
Watermark instruction is displayed in the data entry field. When user puts the cursor in the field, the watermark instruction is replaced by the data user enters.
Warns users that there are errors in data entry fields on the form which prevent the page to be saved. The error message appears both on the top of the page and next to the data entry field where the error is generated.
Hyperlinks are displayed as underlines beneath the links.
Steps in application submission process.
Blue icon indicates the step you are currently on.
Yellow icon indicates the steps need to be completed.
White icon with underlined texts indicates the completed step that is available for edit.
Click on the calendar picker to display the current month. Click any date to populate the date field for data entry.
Click on “Save pending submittal” button to save the application in progress before submittal. eCA generates a temporary project record for the application.
Click on Continue Application button to proceed to the next step of the application submission process.
Click on Clear button to clear data entered but has not been saved on the screen. All data is lost after clicking the Clear button.
Cancel the task to be performed on the screen.
Save data entered in the section of the form.
* Data entry is required for the field.

eCA User Guide 4
Alert users that they are leaving the current page.
3 User Registration To submit project applications in eCA, users must obtain an eCA online account. User registration is the
first step in utilizing functionalities in eCA. OSHPD must approve the registered account before users
can log in the system.
3.1 Apply for an eCA User Account
User applies for an eCA user account by entering his or her account information. Figure 3 below shows
the online form to be filled out by users when registering an eCA account.
User first must accept the OSHPD Privacy Policy.

eCA User Guide 5
Figure 3 – Register an eCA Account
After filling out the online registration form, eCA sends user a notification email, see figure below.
OSHPD must activate the account before user can log in eCA and starts submitting project applications.
eCA sends user an email notifying the registered account is now activated and ready to be used.
Figure 4 ‐ eCA System Generated Emails

eCA User Guide 6
3.2 Reset Password
Users can reset their eCA account passwords online. Follow the steps described below.
Step 1: Click on “I’ve forgotten my password” link.
Step 2: Enter the e‐mail address used for your account
Step 3: Answer the security question
eCA User Guide 7
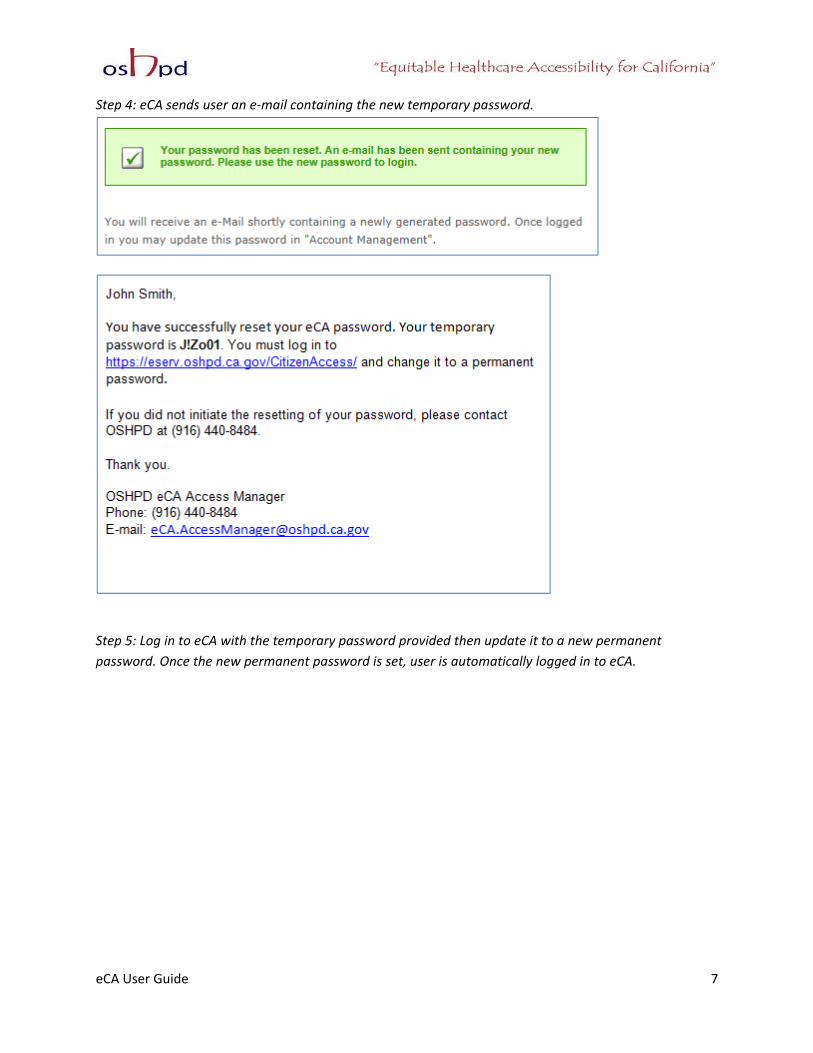
Step 4: eCA sends user an e‐mail containing the new temporary password.
Step 5: Log in to eCA with the temporary password provided then update it to a new permanent
password. Once the new permanent password is set, user is automatically logged in to eCA.
eCA User Guide 8
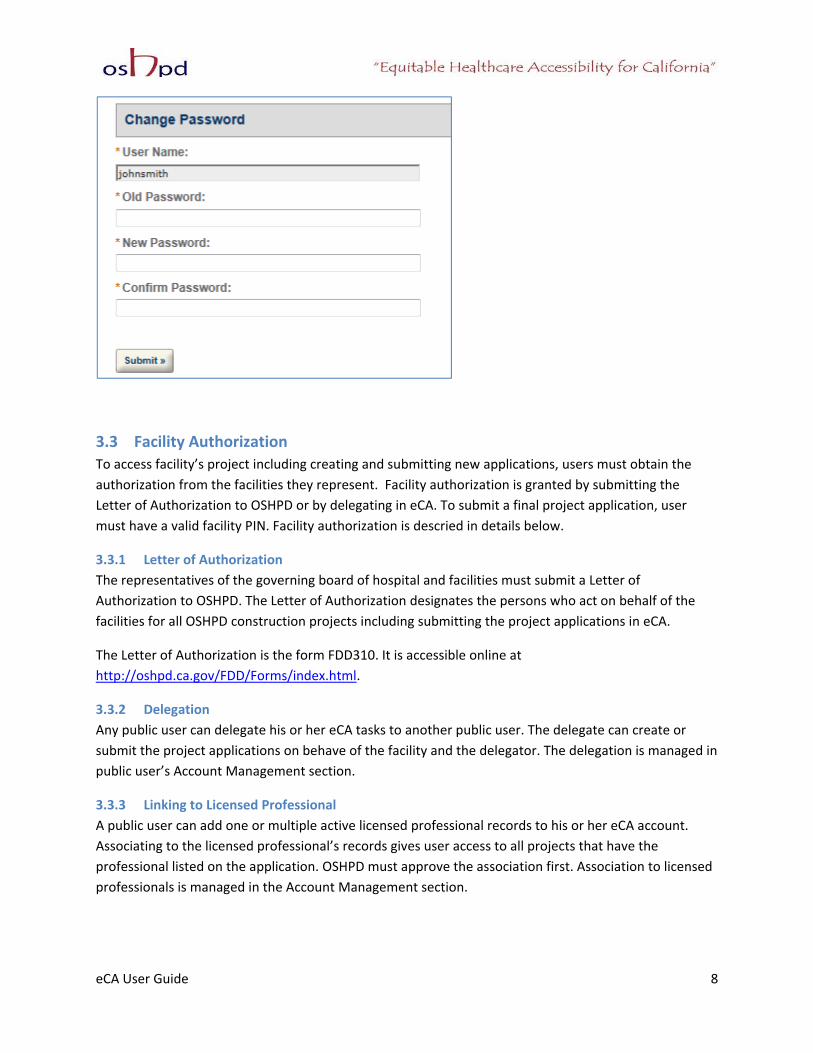
3.3 Facility Authorization
To access facility’s project including creating and submitting new applications, users must obtain the
authorization from the facilities they represent. Facility authorization is granted by submitting the
Letter of Authorization to OSHPD or by delegating in eCA. To submit a final project application, user
must have a valid facility PIN. Facility authorization is descried in details below.
3.3.1 Letter of Authorization
The representatives of the governing board of hospital and facilities must submit a Letter of
Authorization to OSHPD. The Letter of Authorization designates the persons who act on behalf of the
facilities for all OSHPD construction projects including submitting the project applications in eCA.
The Letter of Authorization is the form FDD310. It is accessible online at
http://oshpd.ca.gov/FDD/Forms/index.html.
3.3.2 Delegation
Any public user can delegate his or her eCA tasks to another public user. The delegate can create or
submit the project applications on behave of the facility and the delegator. The delegation is managed in
public user’s Account Management section.
3.3.3 Linking to Licensed Professional
A public user can add one or multiple active licensed professional records to his or her eCA account.
Associating to the licensed professional’s records gives user access to all projects that have the
professional listed on the application. OSHPD must approve the association first. Association to licensed
professionals is managed in the Account Management section.

eCA User Guide 9
4 eCA System Orientation This section provides an overview of the main page and basic system functions and features.
4.1 eCA Home Tab
The home tab is the main page for all user activity. It is the page presented to the users after they log
into eCA.
Figure 5 ‐ eCA Home Tab
The home tab offers the following functionality and features.
A. Breadcrumbs – The breadcrumbs show users “where they are” in the system. Users can click the
“Home” link to return to the Home Tab. Note: if the users is in a project application, the “Home”
link does NOT save the work in process.
B. Logged in User – eCA shows the logged in user name.
C. Collections – This link shows how many collections the user has created and provides link the
collections. Collections are a convenient and easy way to group records.
D. Account Management – This link opens the user account management features described later
in this manual such as delegation and password maintenance.
E. Logout – This link logs the user out of eCA.
F. Home Tab – One of two tabs that all on the main page, the other being the Projects Tab.
G. Projects Tab – This tab show users all projects associated with their user account (either projects
they created, facilities associated to their ID, or via delegation)
H. Facility Information – This link opens the facility search page.
A B C D E
F G
H I

eCA User Guide 10
I. Projects – This link opens the project tab and the general search.
4.1.1 Collections
Collections are a convenient way to access projects. Think of it as a “quicklist”. Add projects you work on
frequently. Add child projects. Remove them. You can add projects from the projects list as well as the
search result.
4.1.1.1 AddProjectstoCollectionsVia any search results or from the Projects tab, users merely select the projects they wish to user to
create a collection or add to an existing collection and then click on the “Add to Collection” hyperlink.
Figure 6 ‐ Add to, or Create, Collections
4.1.1.2 TheCollectionsListTo open and view collections, click on the “Collections” hyperlink at the top of the screen.
Figure 7 ‐ Open Collections

eCA User Guide 11
Figure 8 ‐ The Collections List
The above figure shows two collections in this user’s Collections list. Users can delete collections
without deleting or affecting the underlying projects. Users can open the collections and work the
projects as the would from the main Project Tab. See Below.
Figure 9 ‐ Sample Collection "My Projects"
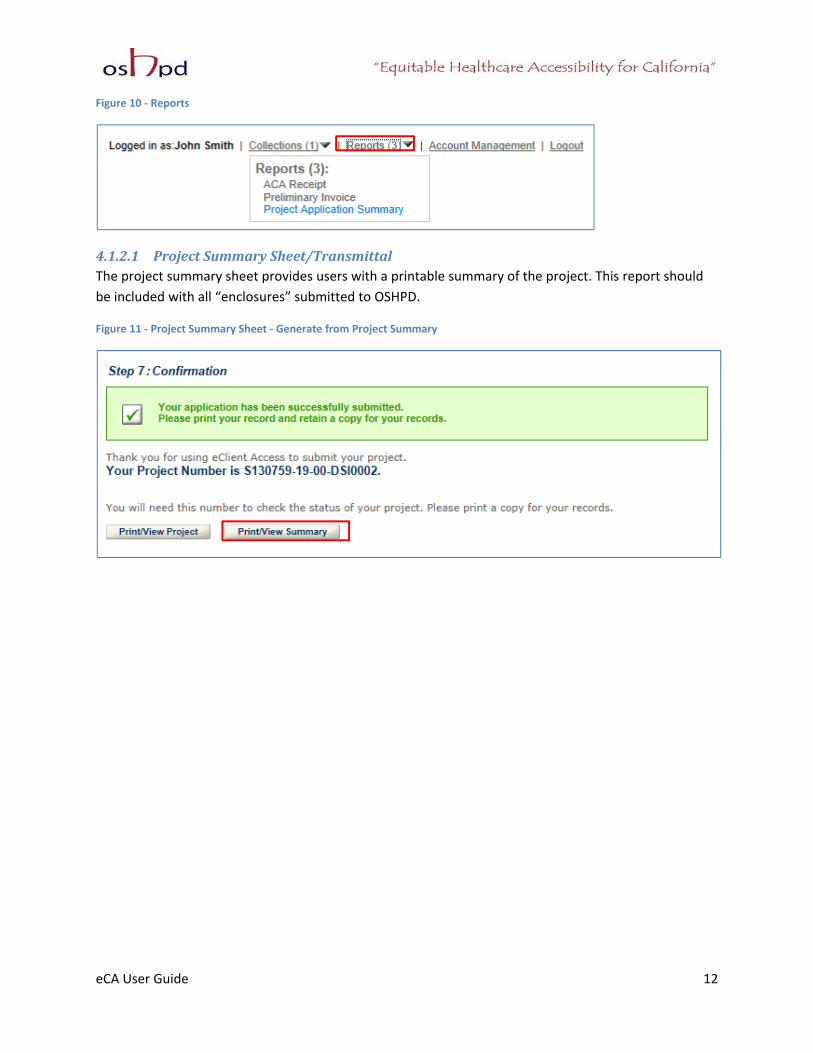
4.1.2 Reports
eCA provides multiple ways to run reports. The easiest way to generate a report is from the project
summary because eCA passes information from the project summary to the report. The other way to
generate a report is from the reports hyperlink on the main page. The reports hyperlink allows users to
generate a Receipt for the Application Fee, a Preliminary Invoice (for projects which opt to “pay later”),
and the Project Application Summary. With the reports link it is necessary to provide the exact project
number or receipt number in order to generate the report.
eCA User Guide 12
Figure 10 ‐ Reports
4.1.2.1 ProjectSummarySheet/TransmittalThe project summary sheet provides users with a printable summary of the project. This report should
be included with all “enclosures” submitted to OSHPD.
Figure 11 ‐ Project Summary Sheet ‐ Generate from Project Summary

eCA User Guide 13
Figure 12 ‐ Sample Project Summary Report
4.1.2.2 PrintReceiptIf the user pays by credit card, the user may print the receipt at the time of payment or later, provided
the user saves the receipt number.
Figure 13 ‐ Print Receipt

eCA User Guide 14
Figure 14 ‐ Sample Receipt
4.1.2.3 PreliminaryInvoiceThe preliminary invoice report is for users who opt for the “pay later” when creating the project. The
pay later option enables users to submit a project without generating an invoice from OSHPD (the
traditional payment method) or paying immediately with a credit card. Users who select “pay later” can
print the preliminary invoice and have another, who is user authorized to pay with a credit card, use the
information on the preliminary invoice to find the project and make the payment. If the application fee
is not paid within 10 calendar days, OSHPD will issue an invoice to the facility’s billing contact.

eCA User Guide 15
Figure 15 ‐ Sample Preliminary Invoice
4.1.3 Account Management
User Account Management is detailed in section five of this document.
4.1.4 Logout
Logout logs the user out of eCA so another user may log in. It is a recommended practice to log out
when users conclude their session.
4.1.5 Home Tab – Facility Information
The Lookup Facility Information hyperlink on the Home tab enables logged in users to look up facilities
by facility number, county code, geographic region, and responsible region (i.e. OSHPD Region).
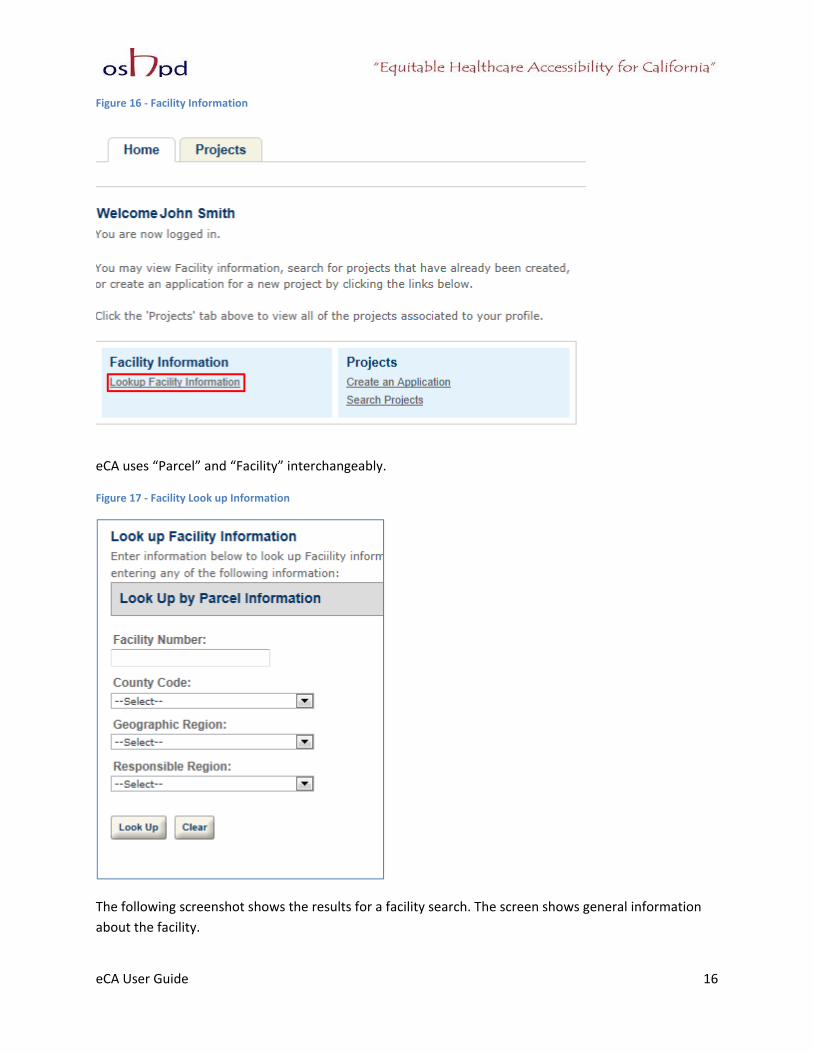
eCA User Guide 16
Figure 16 ‐ Facility Information
eCA uses “Parcel” and “Facility” interchangeably.
Figure 17 ‐ Facility Look up Information
The following screenshot shows the results for a facility search. The screen shows general information
about the facility.

eCA User Guide 17
Figure 18 ‐ Facility Search Results
4.1.6 Home Tab – Projects
The Projects links on the Home Tab allow the user to either create a new AFNP (Section 6 of this
document) or search projects (Section 4.3 of this document). The Search Projects hyperlink takes users
to the Projects Tab.

eCA User Guide 18
4.1.6.1 CreateandanApplicationThe Create an Application link takes users to create a new Application for New Project (AFNP). See
section six of this document.
4.2 Projects Tab
The Projects Tab is the main workspace for most users. It presents users with all projects associated with
their user login. Associations are created by:
License – See user account management.
Delegation – See user account management.
Association with a Facility – Established by submitting the FDD310 ‐ eCA Letter of Authorization.
Created – Projects created by the logged in user.
Figure 19 ‐ Project Tab
4.2.1.1 SearchProjects–GeneralSearchUsers can search for any projects in the eCA system via the search page.

eCA User Guide 19
Figure 20 ‐ Project Search ‐ General Search
4.2.1.2 SearchProjects–SearchbyLicensedProfessionalUsers may also search for projects by license professional information. This search is flexible. It allows
users to search by license type and/or license number. When searching for a license number, eCA allows
for the entry of partial license numbers (e.g. “C223” instead of “C22341”). It also allows wildcard
searches (e.g. “C223%”).
Figure 21 ‐ Project Search ‐ Licensed Professional

eCA User Guide 20
5 Account Management Public user can perform various tasks to manage his or her public user account. User must log in eCA
first. Click on “Account Management” link to start managing the account information.
Figure 22: Account Management link
5.1 Login Information
Click on “Edit” button to update the account login information such as e‐mail and password. A pop
window appears for user to perform the updates.
Figure 23: Edit Login
User can update all but the “User Name”. Click on “Save” button to save your updates. Click on “Cancel”
to cancel the updates. User can click on exit icon “X” on the upper right corner to exit the pop up
window.
Figure 24: Update Login Information
eCA User Guide 21
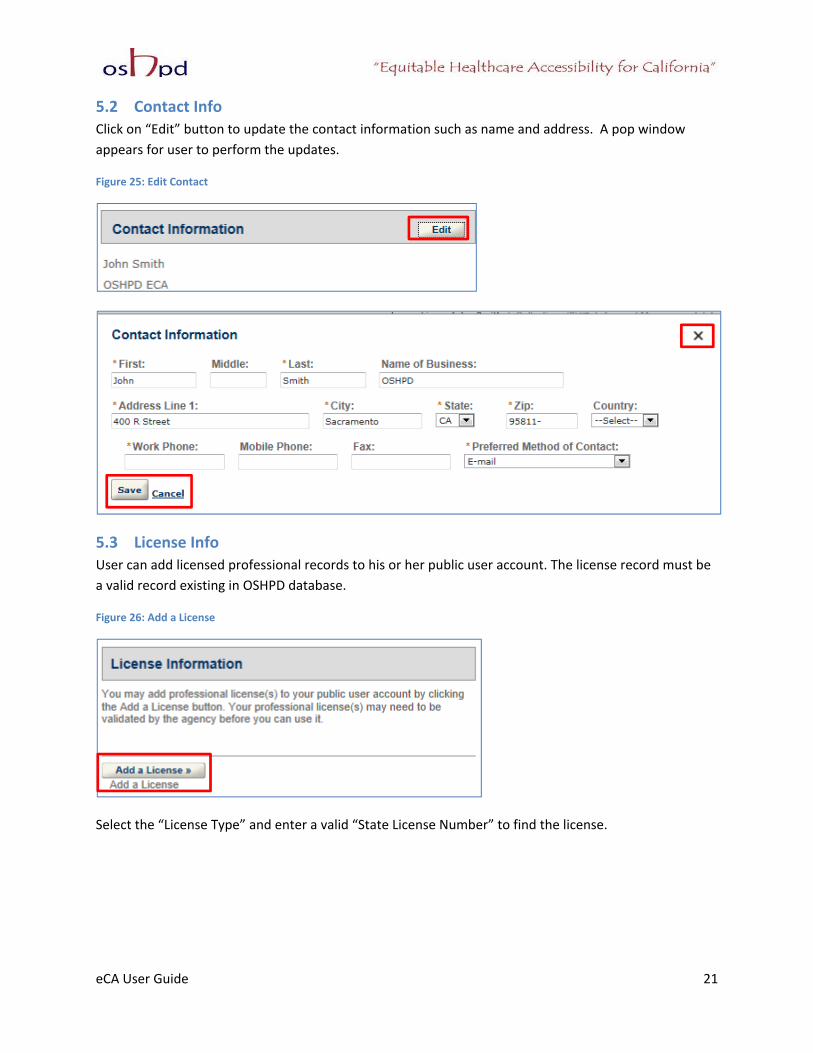
5.2 Contact Info
Click on “Edit” button to update the contact information such as name and address. A pop window
appears for user to perform the updates.
Figure 25: Edit Contact
5.3 License Info
User can add licensed professional records to his or her public user account. The license record must be
a valid record existing in OSHPD database.
Figure 26: Add a License
Select the “License Type” and enter a valid “State License Number” to find the license.

eCA User Guide 22
Once the license record is found, click on the “License Number”. A pop up window appears. Click on
“OK” to confirm the selection.
Figure 27: Associate a License
Click on “Remove my license” to delete the licensed added to the user account.
Figure 28: Remove a License

eCA User Guide 23
After adding a license professional record, eCA sends user an email notification. The addition of licensed
professional records to the user account must be approved by OSHPD. Below is a sample email.
Figure 29: Email notification of licensed professional association
5.4 Delegates
5.4.1 Delegate Overview
User can add another public user to be his or her delegate. By default, the added delegate can view the
project data belongs to the user. In addition, user can grant additional permission to the delegate so he
or she can perform various tasks on user’s behave. The Delegates section displays users who are added
to your account and users who added you to their accounts.
5.4.2 Add Delegate
Click on “Add a Delegate” to start managing the delegations. A pop up window appears for user to
designate the delegation permissions.

eCA User Guide 24
Enter the name and the e‐mail address of the delegate. The e‐mail address must be the address
delegate registered with for his or her eCA account. After selecting appropriate delegate permission,
click on “Invite a Delegate” button.
Figure 30: Add a Delegate

eCA User Guide 25
5.4.3 Delegate Permissions
In “Set Delegate Permission” section, select the appropriate permissions. Below is a list of delegate
permission descriptions.
Create Applications in Projects: select this checkbox to create new applications or new applications for
an existing project.
Renew Records in Projects: select this checkbox to renew application for a project. This permission is
currently not used for OSHPD eCA.
Amend Records in Projects: select this checkbox to amend an application such as PAD for an existing
project.
Manage Inspections in Projects: select this checkbox to request inspections for a project. This
permission is currently not implemented by OSHPD eCA.
Manage Documents in Projects: select this checkbox to upload and manage documents in eCA. This
permission is currently not implemented by OSHPD eCA.
Make Payments in Project: select this checkbox to allow delegate to select application fee payment
method and pay fees online.
Select “Create Applications in Projects” and “Amend Records in Projects” to allow your delegate to
create PAD for your existing projects.
Select “Make Payments in Projects” in addition to allow your delegate to select payment method and
pay for the application fee.
After selecting the delegate permission and inviting the delegate, user has option to change the
delegate permission. Click on “View Invitation” link. A pop up window appears to allow user to make any
needed permission change.
eCA User Guide 26
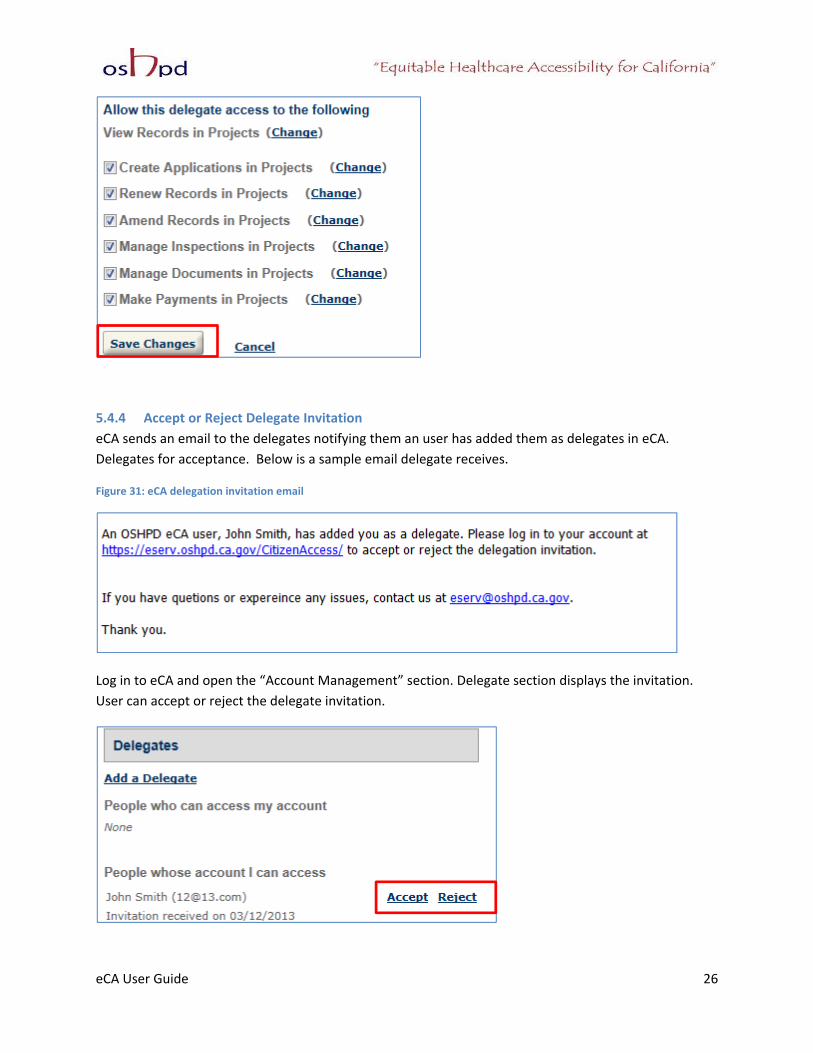
5.4.4 Accept or Reject Delegate Invitation
eCA sends an email to the delegates notifying them an user has added them as delegates in eCA.
Delegates for acceptance. Below is a sample email delegate receives.
Figure 31: eCA delegation invitation email
Log in to eCA and open the “Account Management” section. Delegate section displays the invitation.
User can accept or reject the delegate invitation.

eCA User Guide 27
After accepting the invitation, user can review the permission or remove delegate if needed.
Click on “Actions” as shown below to perform above tasks.
5.4.5 Delegate Effect
After accepting the delegate invitation, the delegate’s project list displays the projects the delegators
created and projects associated with the delegators. Based on the delegation permission, the delegate
can amend the PAD or resume applications.
6 Project Applications
6.1 Page Flow Overview
User follows the predefined steps to create and submit project applications. User can submit
applications for Application for New Project (AFNP) and Post Approval Document (PAD). The steps
involved in submitting AFNP is slightly different from those in submitting for PAD. Below is an illustration
of the page flow steps.
Table 2: eCA Pageflow
Page No. Page Title Description
Application for New Project
1 Facility Information
User selects a facility from OSHPD’s facility database. eCA auto populates the facility, address, and facility owner information.
2 Contacts User records Licensed Professional(s) and Contact(s) to the

eCA User Guide 28
application.
3 Project Details User records Project Name, Scope, and other project details including costs and enclosures.
4 Facility Authorization
User enters a valid Facility PIN code.
5 Payment Options
User selects one of the three application fee payment options.
6 Review User reviews the data entered on the application and makes edits if necessary.
7 Pay Fees If user selects “Pay Now” option, user pays the outstanding fee by credit card online.
8 Confirmation Project application submitted. eCA issues a project ID. User prints project summary sheet, preliminary invoice or payment receipt.
PAD
1 Professionals Users add any additional professionals who are not on the parent AFNP application form.
2 PAD Details Users enter Plan Review information, Deferred Items, Costs, and Enclosures.
3 Facility Confirmation
Users add additional contacts to the application if needed. Users enter the facility PIN in order to proceed to the submittal screen.
4 Payment Method
Users with valid PIN select one of the three payment options: Pay Now, Pay Later, or Invoice Me.
5 Review Users review the data entered on the application and make any changes if needed.
6 Pay Fee If users select “Pay Now” option on page 4, they can make application payment online using credit card.
7 Confirmation After users select a payment option or successfully paid online, eCA issues a final Project ID. User can print the summary sheet and invoice. User can view record details.
6.2 Basic rules of page flow
Below are some basic rules of submitting an application using the page flow.
To start creating a project application or to resume an existing application, user must start from
the first page flow step.
User can navigate back and forth the completed pages.
User must click on “Continue Application” or “Save pending submittal” button to save the data
entered on the page.
If a page contains a section that allows for multiple records to be added, for example multiple
licensed professional or multiple contacts, user must click on “Save” button in the section to
save each record added to the project.
It is recommended that user performs “Save pending submittal” as needed to prevent the data
lose due to data entry errors.

eCA User Guide 29
If any required data is missing from the page, upon clicking on “Continue Application”, an error
message is displayed on the top of the page. User must correct the errors before continuing to
the next page flow screen.
6.3 Create and Submit an AFNP
Please follow the steps described below to create an AFNP. Make sure you have been given permission
by the facility to create
Step 1. Start create an ANFP
User must log in eCA, click on the “Create an Application” link in Projects to start a new AFNP.
Step 2. Accept OSHPD Privacy Policy
Check “I have read and accepted the above terms” then click on “Continue Application” button. Click on
the link in the window to review the privacy policy.
Step 3. Select Record Type

eCA User Guide 30
Select the “Application for New Project” then click on “Continue Application” button. Do Not select
“Post Approval Document” or “Alternate Method of Compliance” record type here. The instructions for
creating and submitting PAD are provided in section 7.4 of this user guide.
Step 4. Enter Facility Information
Enter a Facility ID or Facility Name then click on “Search” button. If the facility is found, the facility
information, address, and owner will be auto filled.

eCA User Guide 31

eCA User Guide 32
To search for another facility, click on “Clear” button in Facility section. This clears the previous entered
facility. User can search for a new facility described in the steps above.
To advance to the next page flow step, click on “Continue Application”. If any required data is missing,
an error message will be displayed on the top of the screen.
Step 5. Add one or multiple Licensed Professionals (LP) to the project.
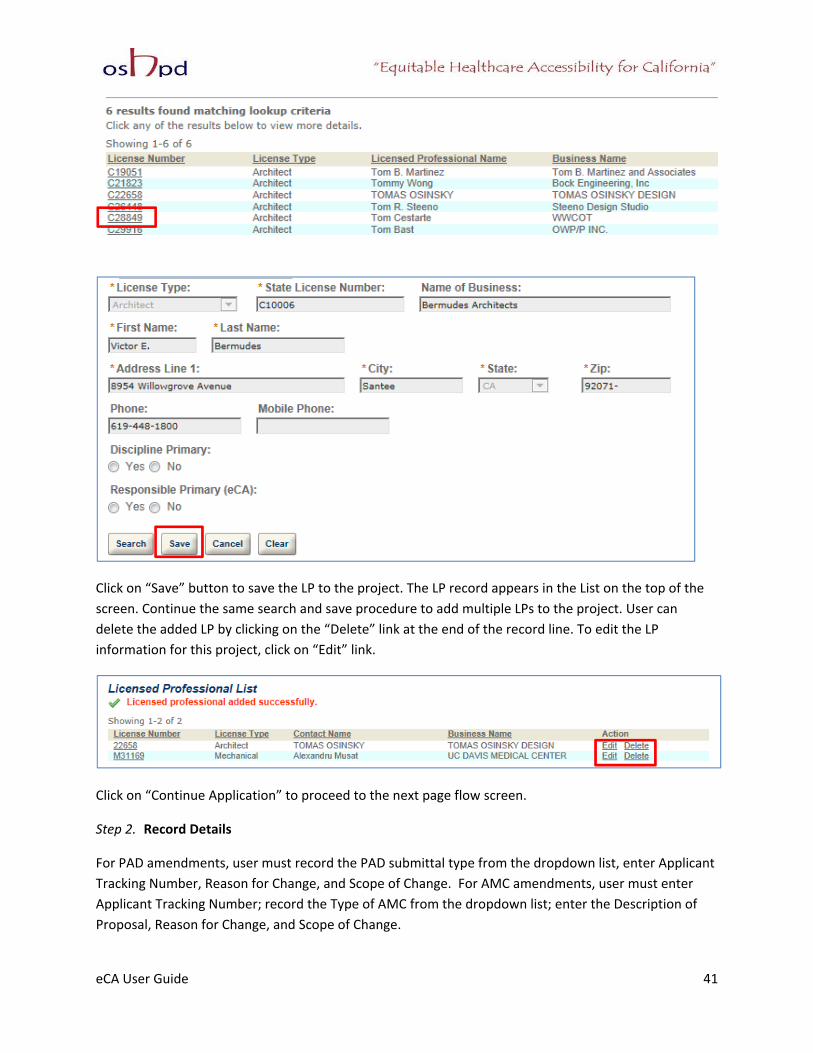
On this screen, user first searches an existing and active LP record by at least one search criteria such as
License Type, License Number, or Name. Click on “Search” button to perform the search.
Locate the correct LP in the returned list then click on the License Number of the record. The LP
information will auto populate the field above.

eCA User Guide 33
Indicate whether the licensed professional is the discipline Primary for the project and whether he or
she is the Responsible Primary for the project. Click on “Save” button to save the LP to the project. The
LP record appears in the List on the top of the screen. Continue the same search and save procedure to
add multiple LPs to the project. User can delete the added LP by clicking on the “Delete” link at the end
of the record line. To edit the LP information for this project, click on “Edit” link.
Click on “Continue Application” to proceed to the next page flow screen.
Step 6. Add one or multiple Contacts to this project.
Similar to adding one or multiple LPs, user can add one or multiple Contacts to this project. User can
enter a search criteria such as name or address, click on “Search” button, then select the correct contact
from the returned list. User must add at least one Contact to this project.
In addition, user can check “Auto‐fill with” and add either the applicant or facility contacts to this
project. The information of the highlighted contact will be auto populated in the fields below.
User must select a Contact Type and click on “Save” button to save the selected contact.

eCA User Guide 34
Click on “Continue Application” to proceed to the next page flow screen.
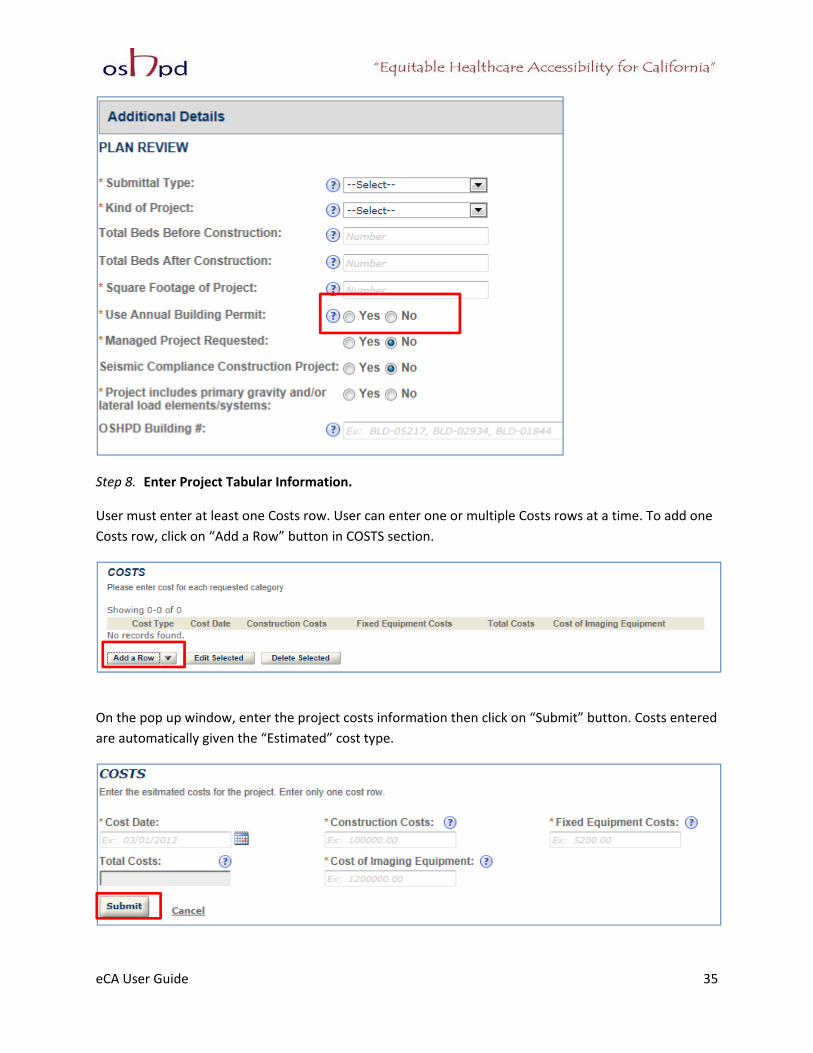
Step 7. Enter Project Details and Additional Details.
Enter meaningful Project Name and Project Scope description.
Enter ASI according to your project. Make sure you have an available Annual Building Permit (ABP)
before selecting the answer “Yes”. eCA generates the error message if an available ABP does not exist
for the current fiscal year. User can not submit the application unless the error is corrected.
eCA User Guide 35
Step 8. Enter Project Tabular Information.
User must enter at least one Costs row. User can enter one or multiple Costs rows at a time. To add one
Costs row, click on “Add a Row” button in COSTS section.
On the pop up window, enter the project costs information then click on “Submit” button. Costs entered
are automatically given the “Estimated” cost type.
eCA User Guide 36
Continue to add other tabular information in various sections on this screen. When finished, click on
“Continue Application” to proceed to the next page flow screen.
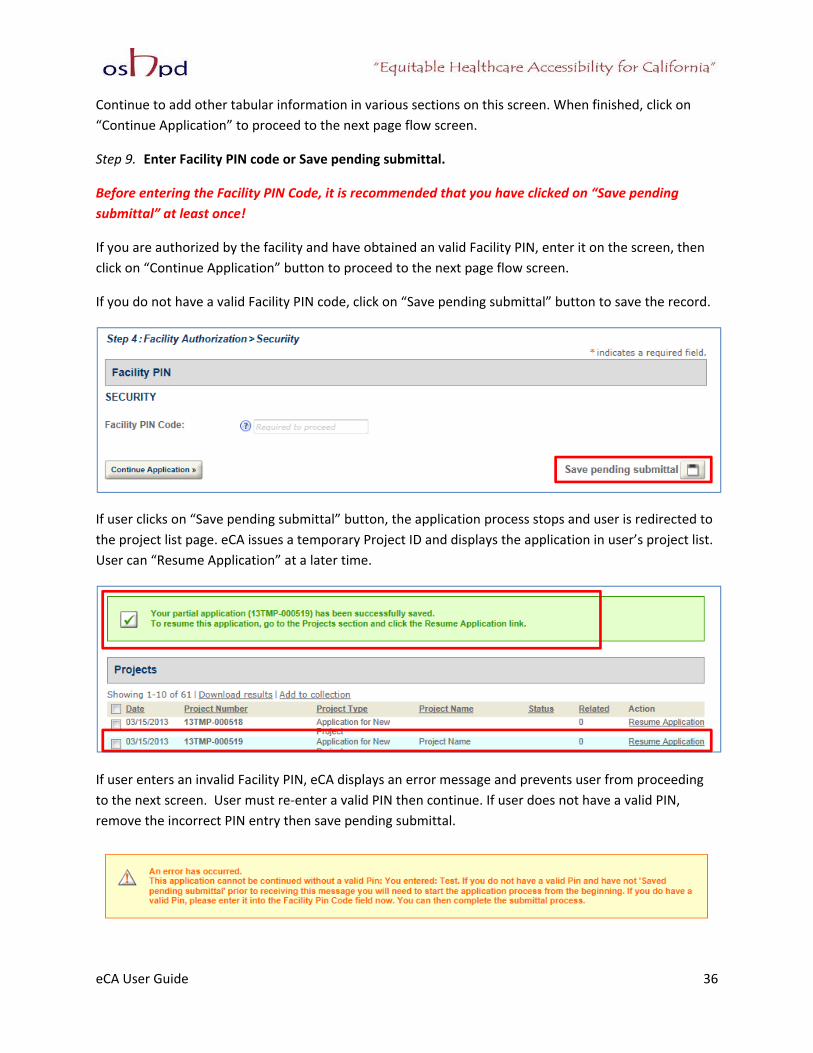
Step 9. Enter Facility PIN code or Save pending submittal.
Before entering the Facility PIN Code, it is recommended that you have clicked on “Save pending
submittal” at least once!
If you are authorized by the facility and have obtained an valid Facility PIN, enter it on the screen, then
click on “Continue Application” button to proceed to the next page flow screen.
If you do not have a valid Facility PIN code, click on “Save pending submittal” button to save the record.
If user clicks on “Save pending submittal” button, the application process stops and user is redirected to
the project list page. eCA issues a temporary Project ID and displays the application in user’s project list.
User can “Resume Application” at a later time.
If user enters an invalid Facility PIN, eCA displays an error message and prevents user from proceeding
to the next screen. User must re‐enter a valid PIN then continue. If user does not have a valid PIN,
remove the incorrect PIN entry then save pending submittal.
eCA User Guide 37
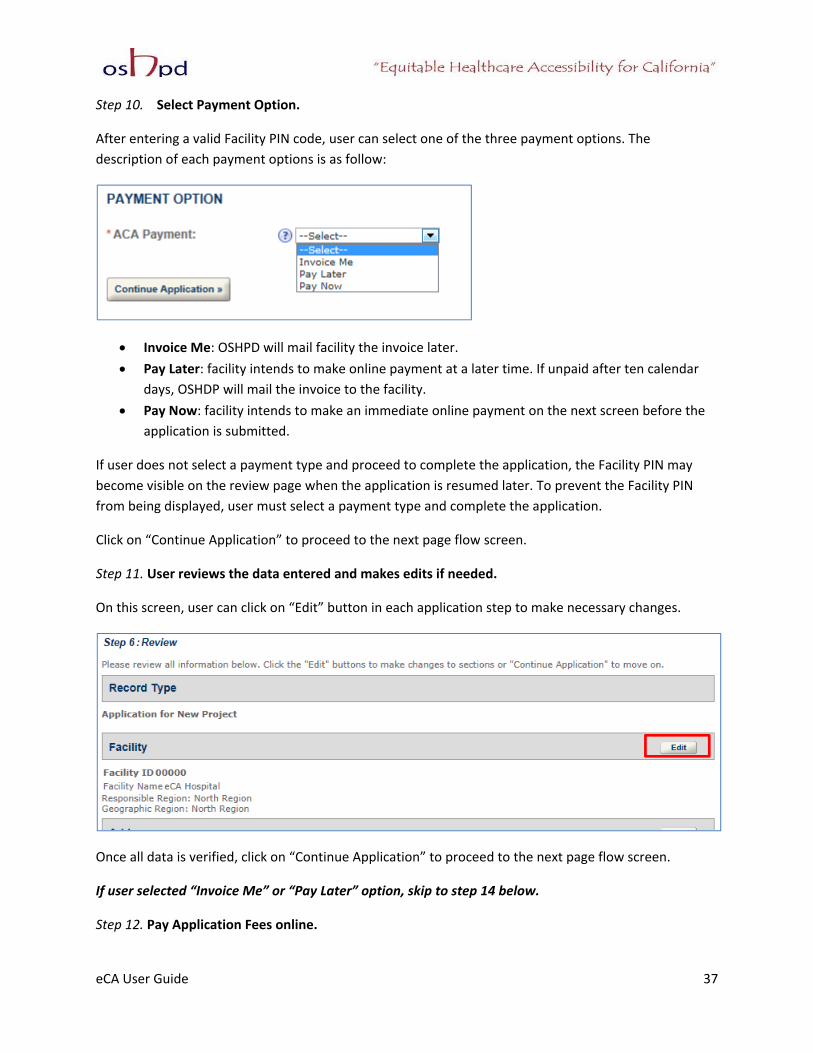
Step 10. Select Payment Option.
After entering a valid Facility PIN code, user can select one of the three payment options. The
description of each payment options is as follow:
Invoice Me: OSHPD will mail facility the invoice later.
Pay Later: facility intends to make online payment at a later time. If unpaid after ten calendar
days, OSHDP will mail the invoice to the facility.
Pay Now: facility intends to make an immediate online payment on the next screen before the
application is submitted.
If user does not select a payment type and proceed to complete the application, the Facility PIN may
become visible on the review page when the application is resumed later. To prevent the Facility PIN
from being displayed, user must select a payment type and complete the application.
Click on “Continue Application” to proceed to the next page flow screen.
Step 11. User reviews the data entered and makes edits if needed.
On this screen, user can click on “Edit” button in each application step to make necessary changes.
Once all data is verified, click on “Continue Application” to proceed to the next page flow screen.
If user selected “Invoice Me” or “Pay Later” option, skip to step 14 below.
Step 12. Pay Application Fees online.

eCA User Guide 38
If user selected “Pay Now” option previously, this screen displays the total fees to be paid.
Click on “Continue Application” to proceed to the payment screen.
Step 13. Submit online payment.
On this screen, enter the accurate credit card information then click on “Submit Payment” button.
Step 14.Project submission confirmation.

eCA User Guide 39
On this screen, eCA display a project submission confirmation including the project record number. User
can print a project record summary from this screen, save or email as a reference copy. User can view
the detailed information about the project by clicking on “View Record Details” button.
Congratulations! You have successfully submitted an AFNP.
6.4 Create and submit an Amendment
Amendment to a parent project can be Post Approval Document (PAD) or Alternate Method of
Compliance (AMC). To create an amendment application, user can do one of the followings:
1. Search for the project for which you want to submit an Amendment such as PAD either by
searching fields or locating it from your project list. If you have permission to create a PAD, a link
“Amendment” appears to the last of the project record.
2. Click on the project number link to view project details. On the details page, click on “Create
Amendment” to create a PAD.
On the following screen, select the Amendment Type (PAD or AMC) using one of the radio options.

eCA User Guide 40
Submit the amendment by following the steps below. Steps for AMC and the PAD application
submission are the same unless described otherwise.
Step 1. Add additional licensed professionals
When submitting an amendment for a PAD or AMC, the Licensed Professional(s) on the parent project
will be automatically copied to the amendment. Only Licensed Professional(s) not listed on the parent
project need to be added to the new record. User can add one or multiple additional licensed
professionals. Do not add licensed professionals if they already existed on the parent project.
On this screen, user first searches an existing and active Licensed Professional (LP) record by at least one
search criteria such as License Type, License Number, or Name. Click on “Search” button to perform the
search.
Locate the correct LP in the returned list then click on the License Number of the record. The LP
information will auto‐populate the field above.
eCA User Guide 41
Click on “Save” button to save the LP to the project. The LP record appears in the List on the top of the
screen. Continue the same search and save procedure to add multiple LPs to the project. User can
delete the added LP by clicking on the “Delete” link at the end of the record line. To edit the LP
information for this project, click on “Edit” link.
Click on “Continue Application” to proceed to the next page flow screen.
Step 2. Record Details
For PAD amendments, user must record the PAD submittal type from the dropdown list, enter Applicant
Tracking Number, Reason for Change, and Scope of Change. For AMC amendments, user must enter
Applicant Tracking Number; record the Type of AMC from the dropdown list; enter the Description of
Proposal, Reason for Change, and Scope of Change.

eCA User Guide 42
PAD only ‐ Record the PAD details, enter the information as below.
AMC only ‐ Record the AMC record details, enter the information as below.
Click on “Continue Application” to proceed to the next screen.
Step 3. Continue Recording Details

eCA User Guide 43
PAD only ‐ Add Costs data.
Users must enter at least one Costs row. To add one Costs row, click on “Add a Row” button in COSTS
section.
On the pop up window, enter the project costs information (Construction Costs, Fixed Equipment Costs
and Imaging Equipment Costs) then click the “Submit” button. Costs entered are automatically recorded
as “Estimated”.
AMC only ‐ Add Applicable Codes
Enter applicable codes as needed. The Applicable Codes are optional to AMC application submission.
PAD and AMC ‐ Add Enclosures

eCA User Guide 44
Add PAD and AMC Enclosures as needed. Enclosures are optional for AMC application submission and
must be included when supporting data or construction documents are necessary to assist in the
approval of materials or assemblies not specifically provided for in the code.
Step 4. Add additional Contacts
Contacts are not required. However, user can add additional contacts if they do not exist on the parent
project.
User can enter search criteria such as name or address, click on “Search” button, and then select the
correct contact from the returned list.
In addition, user can check “Auto‐fill with” and add either the applicant or facility contacts to this
project. The information of the highlighted contact will be auto populated in the fields below.
User must select a Contact Type and click on “Save” button to save the selected contact.
Step 6. Add Facility PIN Code

eCA User Guide 45
If you are authorized by the facility and have obtained an valid Facility PIN, enter it on the screen, then
click on “Continue Application” button to proceed to the next page flow screen.
If you do not have a valid Facility PIN code, click on “Save pending submittal” button to save the record.
If a valid PIN is entered, click on “Continue Application” to proceed to the next screen.
Step 7. Select payment options
After entering a valid Facility PIN code, user MUST complete the payment option and complete the
application. User can select one of the three payment options. The description of each payment options
is as follow:
Invoice Me: OSHPD will mail facility the invoice later.
Pay Later: facility intends to make online payment at a later time. If unpaid after ten calendar
days, OSHDP will mail the invoice to the facility.
Pay Now: facility intends to make an immediate online payment by credit card on the next
screen before the application is submitted.
If user does not select a payment type and proceed to complete the application, the Facility PIN may
become visible on the review page when the application is resumed later. To prevent the Facility PIN
from being displayed, user must select a payment type and complete the application.
Click on “Continue Application” to proceed to the next page flow screen.
Step 8. User reviews the data entered and makes edits if needed.
On this screen, user can click on “Edit” button in each application step to make necessary changes.

eCA User Guide 46
Once all data is verified, click on “Continue Application” to proceed to the next page flow screen.
If user selected “Invoice Me” or “Pay Later” option, eCA will skip to step 11 below.
Step 9. Pay Application Fees online.
If user selected “Pay Now” option previously, this screen displays the total fees to be paid.
Click on “Continue Application” to proceed to the payment screen.
Step 10. Pay online now
On this screen, enter the accurate credit card information then click on “Submit Payment” button.

eCA User Guide 47
Click on “Continue Application” to proceed to the payment screen.
Step 11. Project Confirmation
On this screen, eCA display a project submission confirmation including the project record number. User
can print a project record summary from this screen, save or email as a reference copy. User can view
the detailed information about the project by clicking on “View Record Details” button.

eCA User Guide 48
Congratulations! You have successfully submitted an amendment project
application.
6.5 Print Preliminary Invoice after Submitting the Project
To print the preliminary invoice after the project is submitted, follow the steps below.
Step 1. If user is on the application confirmation page, click “View Record Details” button.
Step 2. Alternatively, user can click the Project Number link in Projects list to navigate to the project
details page.
Step 3. Open the “Fees” section on the record details page. Write down or copy the Invoice Number.
Step 4. At the top of the page, click the “Reports” link then select “Preliminary Invoice” menu.
Step 5. In the popup window, enter the invoice number noted in step 3 above, then click “Submit”.

eCA User Guide 49
Step 6. The preliminary invoice is displayed in the popup window.