owner’s manual - artesian spasowner’s manual certificate of authenticity thank you for your...
TRANSCRIPT

Revision 1 – December 17, 2018
OWNER’S MANUAL


CERTIFICATE OF AUTHENTICITY
Thank you for your purchase. This certificate
hereby verifies that the spa you have purchased
from an Artesian Spas™ (May Manufacturing, LLC)
authorized dealer is authentic, brand new and
original. The spa has been crafted and built in the
U.S.A in accordance with industry quality standards.
WARRANTY REGISTRATION
Please activate your warranty and register your spa
at www.ArtesianSpas.com click SUPPORT then
“Click Here to Register Your Spa” or mail the
registration card in the back of the Owner’s Manual.
Spa Serial #: _______________________________
Spa Model: ________________________________
Date Purchased: ____________________________
Installation Date: ___________________________
Dealer Name: _____________________________
Dealer Telephone #: _______________________


Table of Contents
IMPORTANT SAFETY INSTRUCTIONS ........................................................................ 3
Equipment Assemblies ................................................................................................ 8
Audio Component Warnings ...................................................................................... 12
VGB 2008 - Important Safety Instructions .................................................................. 14
ELECTRICAL REQUIREMENTS .................................................................................. 16
SPA START-UP ............................................................................................................ 16
Selecting a Location ................................................................................................... 16
General Guidelines ................................................................................................. 16
Outdoor Spa Installation Guidelines ....................................................................... 18
Indoor Spa Installation Guidelines .......................................................................... 19
Electrical Wiring ......................................................................................................... 19
60 Hz, 240 V Residential GFCI Wiring Schematic .................................................. 20
50 Hz, 240 V Residential 2 Pole RCD Wiring Schematic ........................................ 21
50 Hz Single, Two and Three Phase Power Wiring ................................................ 22
Filling the Spa with Water .......................................................................................... 23
Powering the Spa On ................................................................................................. 24
Testing the GFCI for a 60 Hz System ........................................................................ 25
Priming Pumps ........................................................................................................... 25
Water Preparation ...................................................................................................... 25
TOPSIDE CONTROLLER INSTRUCTIONS ................................................................. 26
Main Screen ............................................................................................................... 27
Spa Status .............................................................................................................. 27
Navigation .................................................................................................................. 30
Messages................................................................................................................... 30
The Set Temperature Screen ..................................................................................... 31
Set Temperature ..................................................................................................... 31
Press-and-Hold ....................................................................................................... 31
The Spa Screen ......................................................................................................... 32
Common Icons ........................................................................................................... 32
Values Increment / Decrement ............................................................................... 32
Invert Panel ............................................................................................................ 32

Exiting Screens ....................................................................................................... 33
Page Right/Left ....................................................................................................... 34
Page Up / Down ...................................................................................................... 34
Programming, Etc. .................................................................................................. 35
Dual Temperature Ranges (High vs. Low) .............................................................. 35
Heat Mode – Ready vs. Rest .................................................................................. 36
Circulation Mode ..................................................................................................... 36
Ready-in-Rest Mode ............................................................................................... 36
Preparation and Filling ............................................................................................ 37
Priming Mode – M019* ........................................................................................... 37
Priming the Pumps ................................................................................................. 37
Exiting Priming Mode .............................................................................................. 38
Pumps ........................................................................................................................ 38
Circulation Pump Modes ......................................................................................... 38
Filtration and Ozone ............................................................................................... 39
Freeze Protection ................................................................................................... 39
Time of Day ................................................................................................................ 39
Set the Time-of-Day ................................................................................................ 39
Adjusting Filtration ..................................................................................................... 40
Main Filtration ......................................................................................................... 40
Filter Cycle 2 - Optional Filtration ............................................................................... 41
Circulation Pump Modes ......................................................................................... 41
Purge Cycles .......................................................................................................... 42
The Meaning of Filter Cycles .................................................................................. 42
Auxiliary Panels ......................................................................................................... 42
Specific Buttons for Specific Devices ...................................................................... 42
Restricting Operation ................................................................................................. 42
Locking and Unlocking ............................................................................................... 43
Additional Settings ..................................................................................................... 43
Hold Mode – M037* ................................................................................................ 43
Utilities .................................................................................................................... 44
Units Screen ........................................................................................................... 45

Information ................................................................................................................. 46
System Information ................................................................................................. 46
Heater Voltage (Feature not used on CE rated systems.) ...................................... 47
Heater Wattage as Configured in Software (CE Systems Only.) ............................ 47
GFCI Test Feature ..................................................................................................... 49
Forcing the GFCI Trip Test (North America Only) ................................................... 49
General Messages ..................................................................................................... 50
Water Temperature is Unknown ............................................................................. 50
Possible Freezing Condition ................................................................................... 50
The Water is Too Hot – M029** .............................................................................. 50
The Water Level is Too Low ................................................................................... 50
Heater-Related Messages ......................................................................................... 51
The Water Flow is Low – M016** ............................................................................ 51
Flow-Related Checks .............................................................................................. 51
The Water Flow has Failed* – M017** .................................................................... 51
The Heater May be Dry* – M028** ......................................................................... 51
The Heater is Dry* – M027** .................................................................................. 51
Flow-Related Checks .............................................................................................. 51
The heater is too hot* – M030** .............................................................................. 51
Flow-Related Checks .............................................................................................. 52
Sensor Related Messages ......................................................................................... 52
Sensors Are Out of Sync – M015** ......................................................................... 52
Sensors Are Out of Sync – Call for Service – M026** ............................................ 52
Sensor A Fault, Senor B Fault – Sensor A: M031*, Sensor B: M032** ................... 52
Miscellaneous Messages ........................................................................................... 53
Communications Error ............................................................................................ 53
Test Software Installed ........................................................................................... 53
System Related Messages ........................................................................................ 53
Program Memory Failure* – M022** ....................................................................... 53
The Settings Have Been Reset (Persistent Memory Error)* – M021** ................... 53
The Clock has Failed* – M020** ............................................................................. 53
Configuration Error (Spa Will not Start) .................................................................. 53
The GFCI Test Failed (System Could Not Test the GFCI) – M036** (North America
Only) ....................................................................................................................... 53
A Pump May be Stuck On – M034** ....................................................................... 53
Hot Fault – M035** ................................................................................................. 53
Reminder Messages .................................................................................................. 54
General maintenance helps .................................................................................... 54
Check the pH .......................................................................................................... 54
Check the Sanitizer ................................................................................................. 54
Clean the Filter ....................................................................................................... 54
Test the GFCI (or RCD) .......................................................................................... 54
Change the Water ................................................................................................... 55
Clean the Cover ...................................................................................................... 55
Treat the wood ........................................................................................................ 55
Change the filter ..................................................................................................... 55
Change the UV ....................................................................................................... 55
Check ozone ........................................................................................................... 55
Service check-up .................................................................................................... 55
CHROMOZONƎ™ ........................................................................................................ 56
CHROMOZONƎ™ Main Screen ................................................................................ 58
CHROMOZONƎ™ Groups ........................................................................................ 58
Screen Interface ..................................................................................................... 59
Zone Settings.......................................................................................................... 60
CHROMOZONƎ™ Colors .......................................................................................... 60
Screen Interface ..................................................................................................... 60
CHROMOZONƎ™ Test ............................................................................................. 62
CHROMOZONƎ™ Troubleshooting .......................................................................... 63
MAINTAINING THE SPA .............................................................................................. 65
Draining the Spa ........................................................................................................ 65
Pillow Care ................................................................................................................. 66
Jet Care ..................................................................................................................... 66
Removing, Installing and Cleaning Filters .................................................................. 67
Storing or Winterizing the Spa ................................................................................... 68
Spa Cabinet Care ...................................................................................................... 68

Cleaning the Spa Interior ........................................................................................... 68
Spa Cover Use, Installation and Care ........................................................................ 69
Chemical Treatment of Water .................................................................................... 69
ARTESIAN ELITE™ WARRANTY ................................................................................ 70
List of Figures
Figure 1. GFCI Wiring Schematic for 60 Hz Systems.................................................... 20
Figure 2. Proper Voltage Readings Across Terminals on House Breaker Box, Spa
System Box and GFCI ................................................................................................... 21
Figure 3. Wiring Schematic for 50 Hz Systems ............................................................. 21
Figure 4. Single Phase Power TN and TT Electrical Systems .................................... 22
Figure 5. Two Phase Power TN and TT Electrical Systems ....................................... 22
Figure 6. Three Phase Power TN and TT Electrical Systems .................................... 23
Figure 7. Filling Location in Filter Housing .................................................................... 24
Figure 8. Artesian Elite™ Topside Controller Face ....................................................... 26
Figure 9. Artesian Elite™ DIRECTFLOW Personal Control ....................................... 26
Figure 10. Main Screen Layout ..................................................................................... 27
Figure 11. Hose Bib Opening Instructions ..................................................................... 65
3
IMPORTANT SAFETY INSTRUCTIONS IMPORTANTES CONSIGNES DE SÉCURITÉ
May Manufacturing, LLC dba Artesian Spas™ or any affiliates are not responsible for any defects, failure or damage resulting from improper installation or use, abnormal environmental conditions, cellular signal reception or transmission, and/or viruses or other software problems introduced into this product or other products that are used or purchased products by the user.
PLEASE TAKE THE TIME TO READ ALL OF THESE WARNINGS AND CAUTIONS PRIOR TO USING THE SPA.
PRIÈRE DE LIRE ATTENTIVEMENT TOUTES CES MISES EN GARDE AVANT D’UTILISER LE SPA. PLEASE, be a responsible spa owner. When installing and using this spa, always adhere to basic safety precautions. Be sure to list emergency telephone numbers at the telephone nearest the spa, including physician, hospital, ambulance, police, and the fire department. Be certain to explain safety precautions to all new or occasional users of the spa. Remember, they may not be aware of the possible risks associated with the spa water temperature. Have at least one family member learn CPR (cardiopulmonary resuscitation).
IT COULD SAVE A LIFE!
VEUILLEZ agir de façon responsable en tant que propriétaire de spa. Lorsque vousinstallez et utilisez ce spa, veuillez prendre les précautions de sécurité de base entout temps. Conservez près du spa une liste indiquant les numéros de téléphoned’urgence, notamment le médecin, l’hôpital, l’ambulance, la police et les pompiers. Veillez à expliquer les précautions de sécurité à tous ceux qui utilisent votre spa occasionnellement ou pour la première fois. Rappelez-vous qu’ils ne sont probablement pas au courant des risques inhérents à la température de l’eau du spa. Demandez à au moins un membre de la famille d’apprendre la réanimation cardiopulmonaire (RCP). CELA POURRAIT SAUVER UNE VIE!
4
READ AND FOLLOW ALL INSTRUCTIONS
1. WARNING – To reduce the risk of injury, do not permit children to use this product unless they are closely supervised at all times. The appliance can be used by children aged 8 years and above and persons with reduced physical, sensory or mental capabilities or lack of experience and knowledge if they have been given supervision or instruction concerning use of the appliance in a safe way and understand the hazards involved. Children shall not play with the appliance. Cleaning and user maintenance shall not be made by children without supervision.
2. A wire connector is provided on this unit to connect a minimum 8 AWG (8.4 mm) solid
copper conductor between this unit and any metal equipment, metal enclosures of electrical equipment, metal water pipe, or conduit within 5 feet (1.5 m) of the unit.
3. For cord connected/convertible units:
DANGER – Risk of Injury
a) Replace damaged cord immediately.
b) Do not bury cord.
c) Connect to a grounded, grounding type receptacle only. 4. DANGER – Risk of Accidental Drowning – Extreme caution must be exercised to
prevent unauthorized access by children. To avoid accidents, ensure that children cannot use this spa unless they are supervised at all times.
5. DANGER – Risk of Injury - The suction fittings in this area are sized to match the
specific water flow created by the pump. Should the need arise to replace the suction fittings or the pump, be sure the flow rates are compatible.
Never operate spa if the suction fittings are broken or missing. Never replace a suction fitting with one rated less than the flow rate marked on the original suction fitting.
6. DANGER – Risk of Electrical Shock – Warning: Before obtaining access to terminals, all supply circuits must be disconnected. Install at least 5 feet (1.5 m) from all metal surfaces. As an alternative, a spa may be within 5 feet of metal surfaces if each metal surface is permanently connected by a minimum 8 AWG (8.4 mm) solid copper conductor to the wire connector on the terminal box that is provided for this purpose.
7. DANGER – Risk of Electric Shock - Do not permit any electrical appliance such as
a light, telephone, radio, or television, within 5 feet (1.5 m) of a spa. Parts containing live parts, except parts supplied with safety extra-low voltage not exceeding 12 V, must be inaccessible to a person in the bath. Parts incorporating electrical

5
components, except remote control devices, must be located or fixed so that they cannot fall into the bath.
8. WARNING – To reduce the risk of injury:
a) The water in a spa should never exceed 104F (40C). Water temperatures
between 100F (38C) and 104F (40C) are considered safe for a healthy adult. Lower water temperatures are recommended for young children and when spa use exceeds 10 minutes.
b) Since excessive water temperatures have a high potential for causing fetal damage during the early months of pregnancy, pregnant or possibly pregnant women
should limit spa water temperatures to 100F (38C).
c) Before entering a spa, the user should measure the water temperature with an accurate thermometer since the tolerance of water temperature regulating devices varies.
d) The use of alcohol, drugs, or medication before or during spa use may lead to
unconsciousness with the possibility of drowning.
e) Obese persons and persons with a history of heart disease, low or high blood pressure, circulatory system problems, or diabetes should consult a physician before using a spa.
f) Persons using medication should consult a physician before using a spa since
some medication may induce drowsiness while other medication may affect heart rate, blood pressure, and circulation.
9. To ensure proper functionality and component longevity, individual Jet Pumps must not be
cycled on and off more than one time every minute.
SAVE THESE INSTRUCTIONS
6
LIRE ET ADHÉRER À TOUTES LES CONSIGNES
1. MISE EN GARDE – Pour réduire le risque de blessure, ne pas laisser les enfants
utiliser ce produit sans supervision constante. L'appareil peut être utilisé par des enfants âgés de 8 ans et plus et des personnes ayant des capacités physiques, sensorielles ou mentales réduites ou un manque d'expérience et de connaissances s'ils ont reçu une supervision ou des instructions concernant l'utilisation de l'appareil de manière sécuritaire et comprennent les dangers inhérents. Les enfants ne doivent pas jouer avec l'appareil. Le nettoyage et l'entretien des utilisateurs ne doivent pas être effectués par des enfants sans surveillance.
2. Un raccordeur de fils est compris avec cet appareil afin de brancher un conducteur
en cuivre massif d’au moins 8 AWG (8,4 mm) entre cet appareil et toute pièce d’équipement en métal, enveloppes métalliques d’équipement électrique, tuyau en métal ou canalisation à 5 pieds (1,5 m) ou moins de l’appareil.
3. Appareils convertibles/à cordon:
DANGER – Risque de blessure:
a) Remplacer sans tarder le cordon endommagé.
b) Ne pas enterrer le cordon.
c) Raccorder à une mise à la terre. 4. DANGER – Risque de noyade accidentelle – Faire preuve d’extrême prudence afin
d’empêcher l’accès non autorisé aux enfants. Pour éviter tout accident, veiller à ce que les enfants ne puissent utiliser ce spa à moins d’être supervisés en tout temps.
5. DANGER – Risque de blessure – La taille des raccords de succion est déterminée
en fonction du débit d’eau spécifique de la pompe. Si les raccords de succion ou la pompe doivent être remplacés, veiller à ce que les débits d’eau soient compatibles.
Ne jamais faire fonctionner un spa si les raccords de succion sont endommagés ou manquants. Ne jamais remplacer un raccord de succion par un autre dont le débit d’eau est inférieur à celui indiqué sur le raccord de succion original.
6. DANGER – Risque d’électrocution – Avertissement: Avant d'accéder aux bornes, tous les circuits d'alimentation doivent être déconnectés. Installer à au moins 5 pieds (1,5 m) de toutes les surfaces en métal. Le spa peut également se trouver à moins de 5 pieds des surfaces en métal si chaque surface en métal est raccordée en permanence par un conducteur en cuivre massif d’au moins 8 AWG (8,4 mm) au raccordeur de fils du disjoncteur prévu à cette fin.

7
7. DANGER – Risque d’électrocution – Interdire tout appareil électrique tel qu’une lampe, un téléphone, une radio ou un téléviseur, à moins de 5 pieds (1,5 m) du spa. Les pièces contenant des pièces en direct, à l'exception des pièces fournies avec une tension extra-basse de sécurité ne dépassant pas 12 V, doivent être inaccessibles à une personne dans le bain. Les pièces incorporant des composants électriques, à l'exception des dispositifs de télécommande, doivent être situées ou fixées de sorte qu'elles ne puissent pas tomber dans le bain.
8. MISE EN GARDE – Pour atténuer le risque de blessure:
a) La température de l’eau du spa ne doit jamais dépasser 40C (104F). L’eau dont
la température varie entre 38C (100F) et 40C (104F) est jugée sécuritaire pour un adulte en bonne santé. Pour de jeunes enfants ou un usage d’une durée supérieure à 10 minutes, une température plus basse est conseillée.
b) Étant donné que l’eau très chaude peut causer des dommages au foetus durant les
premiers mois de la grossesse, les femmes enceintes qui utilisent le spa doivent
limiter la température à 38C (100F).
c) Avant d’entrer dans le spa, l’utilisateur doit vérifier la température de l’eau.
d) La consommation d’alcool, de drogues ou de médicaments avant ou pendant l’utilisation du spa peut causer une perte de conscience entraînant la noyade.
e) Les personnes obèses ainsi que celles qui ont des problèmes cardiaques, une
tension artérielle faible ou élevée, des problèmes de circulation sanguine, ou qui souffrent de diabète doivent consulter un médecin avant d’utiliser le spa.
f) Les personnes qui consomment des médicaments doivent consulter un médecin
avant d’utiliser le spa, car certains médicaments peuvent favoriser la somnolence, et d’autres peuvent affecter le rythme cardiaque, la tension artérielle et la circulation sanguine.
9. Afin d’assurer le bon fonctionnement et longévité des composants, des pompes à Jet ne doit pas être recyclés et s’éteint plusieurs fois chaque minute.
CONSERVER CES CONSIGNES

8
Equipment Assemblies
An equipment assembly shall be additionally provided with the following important safety instructions
1. WARNING – Risk of Accidental Drowning. Extreme caution must be exercised to prevent unauthorized access by children to avoid accidents, ensure that children cannot use a spa or hot tub unless they are closely supervised at all times. The appliance can be used by children aged 8 years and above and persons with reduced physical, sensory or mental capabilities or lack of experience and knowledge if they have been given supervision or instruction concerning use of the appliance in a safe way and understand the hazards involved. Children shall not play with the appliance. Cleaning and user maintenance shall not be made by children without supervision.
2. DANGER – To reduce the risk of drowning from hair and body entrapment, install a suction fitting(s) with a marked flow rate that equals or exceeds the flow rate marked on the equipment assembly.
3. DANGER – To reduce the risk of injury, do not remove the suction fittings. Never operate a spa or hot tub if the suction fittings are broken or missing. Never replace a suction fitting with one rated less than the flow rate marked on the equipment assembly.
4. WARNING – Risk of Electric Shock. Warning: Before obtaining access to terminals, all supply circuits must be disconnected. Install at least 5 feet (1.5 m) from inside wall of hot tub or spa using nonmetallic plumbing.
5. WARNING – Risk of Electric Shock. Do not permit any electric appliance, such as a light, telephone, radio, or television, within 5 feet (1.5 m) of a spa or hot tub. Parts containing live parts, except parts supplied with safety extra-low voltage not exceeding 12 V, must be inaccessible to a person in the bath. Parts incorporating electrical components, except remote control devices, must be located or fixed so that they cannot fall into the bath.
6. WARNING – To reduce the risk of injury:
a) The water in a spa should never exceed 104F (40C). Water temperatures
between 100F (38C) and 104F (40C) are considered safe for a healthy adult. Lower water temperatures are recommended for young children and when spa use exceeds 10 minutes.
b) Since excessive water temperatures have a high potential for causing fetal damage during the early months of pregnancy, pregnant or possibly pregnant women
should limit spa water temperatures to 100F (38C).
c) Before entering a spa or hot tub, the user should measure the water temperature since the tolerance of water temperature regulating devices varies.
d) The use of alcohol, drugs or medication before or during spa or hot tub use may lead to unconsciousness with the possibility of drowning.
e) Obese persons and persons with a history of heart disease, low or high blood

9
pressure, circulatory system problems, or diabetes should consult a physician before using a spa.
f) Persons using medication should consult a physician before using a spa or hot tub since some medication may induce drowsiness while other medication may affect heart rate, blood pressure, and circulation.
7. For equipment assemblies with a gas heater:
WARNING – Risk of suffocation. This equipment assembly uses a gas heater and is intended for outdoor use only unless proper ventilation can be provided for an indoor installation.
8. For equipment assemblies with a blower:
WARNING – Install blower no less than 1 foot (305 mm) above the maximum water level to prevent water from contacting electrical equipment.
Marking for Equipment Assemblies
WARNING
REDUCE THE RISK OF ELECTROCUTION 1. Install at least 5 feet from water using non-metallic plumbing.
2. Do not install under spa skirt or within an enclosure that would restrict ventilation.
3. If blower is included, install at least 1 foot above maximum water level.
REDUCE THE RISK OF CHILD DROWNING
1. Supervise children at all times.
2. Attach spa cover after each use.
3. Install a suction guard with marked flow rate no less than 170 GPM to avoid hair and body entrapment.
REDUCE THE RISK OF OVERHEATING 1. Check with a doctor before use if pregnant, diabetic, in poor health, or under medical care.
2. Exit immediately if uncomfortable, dizzy or sleepy. Spa heat can cause hyperthermia
and unconsciousness.
3. Spa heat in conjunction with alcohol, drugs, or medication can cause unconsciousness.
WHEN PREGNANT, soaking in hot water for long periods can harm your fetus. Measure water
temperature before entering.
1. Do not enter spa if water is hotter than 100F (38C).
2. Do not stay in spa for longer than 10 minutes.
SAVE THESE INSTRUCTIONS

10
MODES D’ASSEMBLAGE
Un mode d’assemblage doit également être fourni et comporter les consignes de sécurité suivantes:
1. MISE EN GARDE – Risque de noyade accidentelle. Faire preuve d’extrême prudence afin d’empêcher l’accès non autorisé aux enfants. Pour éviter tout accident, veiller à ce que les enfants ne puissent utiliser ce spa à moins d’être supervisés en tout temps. L'appareil peut être utilisé par des enfants âgés de 8 ans et plus et des personnes ayant des capacités physiques, sensorielles ou mentales réduites ou un manque d'expérience et de connaissances s'ils ont reçu une supervision ou des instructions concernant l'utilisation de l'appareil de manière sécuritaire et comprennent les dangers inhérents . Les enfants ne doivent pas jouer avec l'appareil. Le nettoyage et l'entretien des utilisateurs ne doivent pas être effectués par des enfants sans surveillance.
2. DANGER – Pour atténuer le risque de noyade causée par la succion du corps et des cheveux, installer un ou des raccords de succion dont le débit d’eau indiqué est égal ou supérieur à celui qui est indiqué sur l’équipement.
3. DANGER – Pour atténuer le risque de blessure, ne pas retirer les raccords de succion. Ne jamais faire fonctionner un spa si les raccords de succion sont endommagés ou manquants. Ne jamais remplacer un raccord de succion par un autre dont le débit d’eau est inférieur à celui indiqué sur l’équipement.
4. MISE EN GARDE – Risque d’électrocution. Avertissement: Avant d'accéder aux bornes, tous les circuits d'alimentation doivent être déconnectés. Installer au moins 5 pieds (1,5 m) de la paroi intérieure du spa avec de la tuyauterie non métallique.
5. DANGER – Risque d’électrocution. Ne pas laisser d’appareil électrique tel qu’une lampe, un téléphone, une radio ou un téléviseur, à moins de 5 pieds (1,5 m) du spa. Les pièces contenant des pièces en direct, à l'exception des pièces fournies avec une tension extra-basse de sécurité ne dépassant pas 12 V, doivent être inaccessibles à une personne dans le bain. Les pièces incorporant des composants électriques, à l'exception des dispositifs de télécommande, doivent être situées ou fixées de sorte qu'elles ne puissent pas tomber dans le bain.
6. MISE EN GARDE – Pour atténuer le risque de blessure:
a) La température de l’eau du spa ne doit jamais dépasser 40C (104F). L’eau dont
la température varie entre 38C (100F) et 40C (104F) est jugée sécuritaire pour un adulte en bonne santé. Pour de jeunes enfants ou un usage d’une durée supérieure à 10 minutes, une température plus basse est conseillée.
b) Étant donné que l’eau très chaude peut causer des dommages au foetus durant les premiers mois de la grossesse. Les femmes enceintes qui utilisent le spa doivent
limiter la température à 38C (100F).
c) Avant d’entrer dans le spa, l’utilisateur doit vérifier la température de l’eau.
11
d) La consommation d’alcool, de drogues ou de médicaments avant ou pendant
l’utilisation du spa peut causer une perte de conscience entraînant la noyade.
e) Les personnes obèses ainsi que celles qui ont des problèmes cardiaques, une tension artérielle faible ou élevée, des problèmes de circulation sanguine, ou qui souffrent de diabète doivent consulter un médecin avant d’utiliser le spa.
f) Les personnes qui consomment des médicaments doivent consulter un médecin avant d’utiliser le spa, car certains médicaments peuvent favoriser la somnolence, et d’autres peuvent affecter le rythme cardiaque, la tension artérielle et la circulation sanguine.
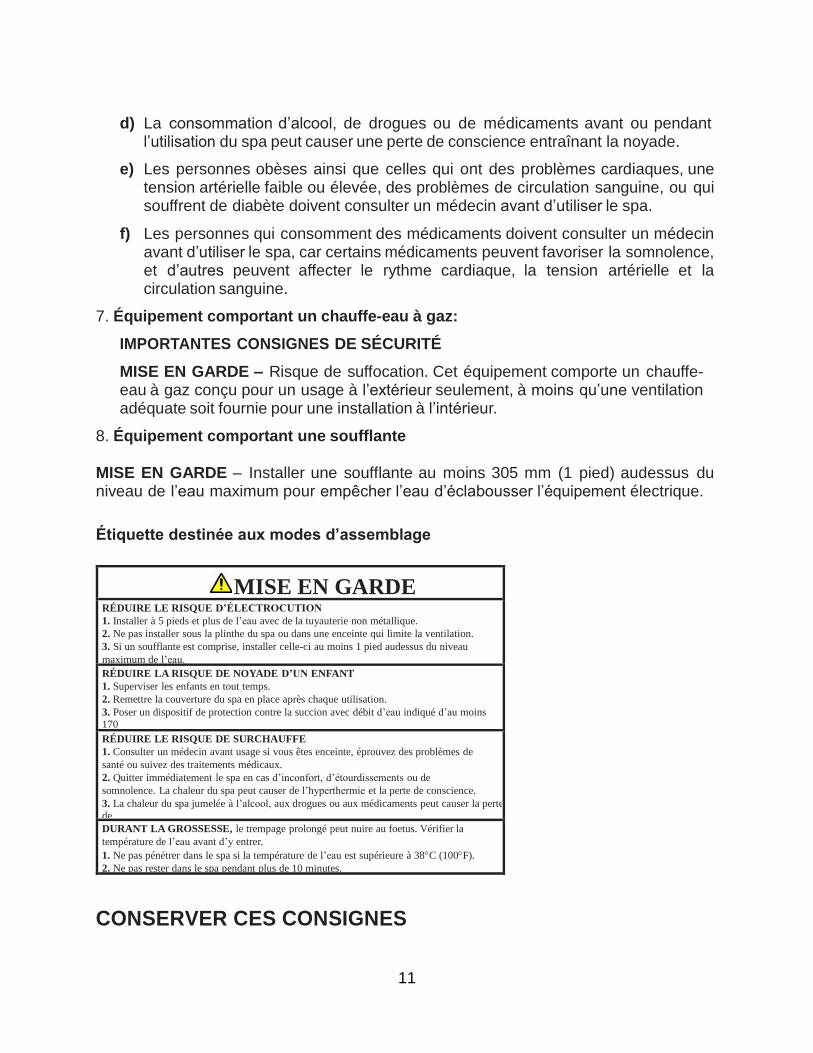
7. Équipement comportant un chauffe-eau à gaz:
IMPORTANTES CONSIGNES DE SÉCURITÉ
MISE EN GARDE – Risque de suffocation. Cet équipement comporte un chauffe-eau à gaz conçu pour un usage à l’extérieur seulement, à moins qu’une ventilation adéquate soit fournie pour une installation à l’intérieur.
8. Équipement comportant une soufflante MISE EN GARDE – Installer une soufflante au moins 305 mm (1 pied) audessus du niveau de l’eau maximum pour empêcher l’eau d’éclabousser l’équipement électrique.
Étiquette destinée aux modes d’assemblage
MISE EN GARDE RÉDUIRE LE RISQUE D’ÉLECTROCUTION
1. Installer à 5 pieds et plus de l’eau avec de la tuyauterie non métallique.
2. Ne pas installer sous la plinthe du spa ou dans une enceinte qui limite la ventilation.
3. Si un soufflante est comprise, installer celle-ci au moins 1 pied audessus du niveau
maximum de l’eau.
RÉDUIRE LA RISQUE DE NOYADE D’UN ENFANT
1. Superviser les enfants en tout temps.
2. Remettre la couverture du spa en place après chaque utilisation.
3. Poser un dispositif de protection contre la succion avec débit d’eau indiqué d’au moins 170
GPM pour éviter la succion du corps et descheveux. RÉDUIRE LE RISQUE DE SURCHAUFFE
1. Consulter un médecin avant usage si vous êtes enceinte, éprouvez des problèmes de
santé ou suivez des traitements médicaux.
2. Quitter immédiatement le spa en cas d’inconfort, d’étourdissements ou de
somnolence. La chaleur du spa peut causer de l’hyperthermie et la perte de conscience.
3. La chaleur du spa jumelée à l’alcool, aux drogues ou aux médicaments peut causer la perte de
conscience. DURANT LA GROSSESSE, le trempage prolongé peut nuire au foetus. Vérifier la
température de l’eau avant d’y entrer.
1. Ne pas pénétrer dans le spa si la température de l’eau est supérieure à 38C (100F).
2. Ne pas rester dans le spa pendant plus de 10 minutes.
CONSERVER CES CONSIGNES
12
Audio Component Warnings
Spas equipped with the Audio system should follow these guidelines for safety:
1. CAUTION – Risk of Electrical Shock - Do not leave compartment door open.
2. CAUTION – Risk of Electrical Shock - Replace components only with identical components.
3. Do not operate the audio controls while inside the spa.
4. WARNING – Prevent Electrocution - Do not connect any auxiliary components (for example cable, additional speakers, headphones, additional audio/video components, etc.) to the system.
5. These units are not provided with an outdoor antennae; when provided, it should be installed in accordance with Article 810 of the National Electrical Code, ANSI/NFPA 70.
6. Do not service this product yourself as opening or removing covers may expose you to dangerous voltage or other risk of injury. Refer all servicing to qualified service personnel.
7. When the power supply connections or power supply cord(s) are damaged: if water is entering the audio/video compartment or any electrical equipment compartment area; if the protective shields or barriers are showing signs of deterioration; or if there are signs of other potential damage to the unit, turn off the unit and refer servicing to qualified service personnel.
8. This unit should be subjected to periodic routine maintenance (for example, once every 3 months) to make sure that the unit is operating properly.
KEEP THESE SAFETY INSTRUCTIONS IN A CONVENIENT AND READILY ACCESSIBLE LOCATION!

13
MISES EN GARDE SUR LES COMPOSANTES DU SYSTÈME DE SON Les utilisateurs d’un spa doté d’un système de son doivent suivre ces consignes de sécurité:
1. ATTENTION – Risque d’électrocution – Ne pas laisser la porte du compartiment
ouverte.
2. ATTENTION – Remplacer les composantes du système de son par des composantes identiques.
3. Ne pas utiliser les commandes audio lorsqu’on se trouve à l’intérieur du spa.
4. MISE EN GARDE – Prévention du risque d’électrocution – Ne pas raccorder les composantes auxiliaires (p. ex., câble, hautparleur supplémentaire, casque d’écoute, autres composantes audio/vidéo, etc.) au système.
5. Ces appareils ne comportent pas d’antenne extérieure; lorsque celle-ci est fournie, elle doit être installée conformément à l’article 810 du Code national de l’électricité, ANSI/NFPA 70.
6. 6. Ne pas tenter de réparer le produit soi-même en ouvrant ou en retirant les couvercles, car cela peut exposer l’utilisateur à une tension dangereuse ou autre risque de blessure. Confier toute réparation à un technicien compétent.
7. Raccords d’alimentation ou les cordons d’alimentation endommagés: si l’eau pénètre dans le compartiment audio/vidéo ou tout compartiment de l’équipement électrique; si les écrans ou barrières de protection montrent des signes d’usure; ou si l’appareil semble endommagé, fermer l’appareil et appeler un technicien compétent.
8. Cet appareil doit être entretenu périodiquement (p. ex., tous les trois mois) pour s’assurer qu’il fonctionne adéquatement.
PRIÈRE DE CONSERVER CES CONSIGNES DE SÉCURITÉ DANS UN LIEU
PRATIQUE ET FACILE D’ACCÈS!
14
VGB 2008 - Important Safety Instructions
WARNING!
Read and follow all instructions in this owner’s manual and on the
equipment. Failure to follow instructions can cause severe injury and/or
death.
WARNING SUCTION ENTRAPMENT HAZARD
Suction in suction outlets and/or suction outlet covers which are damaged,
broken, cracked, missing, or unsecured can cause severe injury and/or death
due to the following entrapment hazards:
Hair Entrapment: Hair can become entangled in suction outlet cover.
Limb Entrapment: A limb inserted into an opening of a suction outlet sump or suction
outlet cover that is damaged, broken, cracked, missing, or not securely attached can
result in a mechanical bind or swelling of the limb.
Body Suction Entrapment: A negative pressure applied to a large portion of the body or
limbs can result in an entrapment.
Evisceration / Disembowelment Entrapment: A negative pressure applied directly to
the intestines through an unprotected suction outlet sump or suction outlet cover which is
damaged, broken, cracked, missing, or unsecured can result in evisceration /
disembowelment entrapment.
Mechanical Entrapment: There is potential for jewelry, swimsuit, hair decorations, finger,
toe, or knuckle to be caught in an opening of a suction outlet cover resulting in mechanical
entrapment.
Failure to remove pressure test plugs and/or plugs used in winterization of the
pool/spa from the suction outlets can result in an increased potential for suction
entrapment as described on the previous page.
Failure to keep suction outlet components clear of debris, such as leaves, dirt,
hair, paper and other material, can result in an increased potential for suction
entrapment as described above.
Suction outlet components have a finite life. The cover/grate should be
inspected frequently and replaced at least every seven years, or if found to be
damaged, broken, cracked, missing, or not securely attached.
If the fitting is missing or broken, replace with a fitting of equivalent rating or
higher. Use of a lower rated suction fitting could result in entrapment of the body
which could result in serious injury including drowning.

15
Do not use or operate pool, spa, or hot tub if suction fittings are missing, broken
or not secured per instructions. The suction fitting is intended to prevent
entrapment of the body. Use of the spa hot tub with a missing, broken or
improperly secured suction grate may result in serious personal injury including
drowning.
When the pool, spa or hot tub is in operation, suction is created at this fitting.
Users of the spa or hot tub must be instructed not to come in contact with this
fitting in such a way as to block its orifice. If a user of the spa or hot tub blocks
this fitting with his/her body, serious personal injury or drowning may occur.
In order to remove the suction cover (for service or winterization), using a
Phillips-head screw driver remove the screws. Inspect both the suction cover
and suction fitting for any cracks or damages.
It is imperative to securely attach the suction cover to the wall fittings (use only
the original supplied screws or obtain original replacements). Do not over
tighten the screws. Inspection of fasteners and observation for
damaged/tampered with suction fittings is required.
Any and all broken or missing parts must be replaced prior to starting spa or
pool pump. Never operate spa or pool without drain cover in place and properly
affixed, death or serious injury can result.
Do not exceed the safe flow rate. Do not increase flow through system by
increasing pump size or horsepower.
Do not allow children to sit, play or interact with main drains or suction outlet.

16
ELECTRICAL REQUIREMENTS
The following information is provided for guidance alone in connecting the electrical power
supply to the new spa. A qualified, licensed, electrician must perform this work.
Failure to follow these instructions will terminate all warranty coverage and could
result in serious injury or death.
Codes and Compliance
North America – 60 Hz
5X, 6X or 7X Jets, 6 or 7 Pumps
Voltage 240 VAC
Maximum Current 48 A
Number of Wires 4
GFCI Rating 60 A
*X is between 0-9
Export 50 Hz Artesian Elite™ spas are factory preset to operate at 240 V with 3 wires and
30 A maximum input. This product must always be connected to a residual current device
(RCD) having a trip current of not more than 30 mA.
SPA START-UP
Please read each step of the Start-up section prior to performing the step.
Selecting a Location
General Guidelines
In preparation for installing the new Artesian Elite™ spa, you should ensure that the
following general guidelines are considered:
Artesian Spas™ (May Manufacturing, LLC) highly recommends consulting a
qualified licensed contractor, engineer and/or architect prior to the installation
of any spa to ensure safety, compliance with national, state and local building,
electrical and plumbing codes and to account for local geotechnical and
environmental conditions. For further assistance, please contact your
authorized Artesian Spas™ Dealer.
1. Place the spa on a structurally sound and level surface that is large enough for the
entire spa. Allow additional space for easy access to equipment compartments

17
and circuit breakers. The location must allow for electrical connections and
components to remain dry and away from external sources of water. An adequate
drainage system containing proper drainage away from the spa to deal with
overflow water and prevent water from entering the electrical equipment areas is
necessary in both semi-inground and above ground installations in order to prevent
damage to electronics and tripping circuit breakers. The foundation and/or floor
must be able to bear the weight of the expected load consisting of both the filled
spa and occupants. Please contact your local authorized dealer and/or contractor
to get the maximum weight value for the corresponding spa model.
2. If the spa is placed on the ground, even for a short period of time, it must be
supported by stones that are at least 2 inches (5.1 cm) thick and 12 inches
(30.5 cm) square. Placing the spa on a solid foundation as soon as possible is
recommended.
3. The spa must be on a solid, level foundation which may include a concrete pad,
concrete pavers or bricks or a reinforced deck. Concrete foundations must be a
minimum 4 inch (10 cm) cement slab that has properly cured for at least 72 hours
(this duration may vary due to local conditions and cement properties) and should
be reinforced with rebar or mesh. Rebar or mesh reinforcement in the pad should
be attached to a #10 AWG bonding wire per national electrical codes. Contact
your local building department and/or electrical code compliance inspector for
more information and to determine whether an inspection for proper foundation
and grounding is required before pouring the concrete slab. The spa warranty
will be voided if an improper installation is performed. Structural damage
due to an inadequate or improper foundation is not covered under warranty.
4. Ensure ample space is provided for any required servicing, that equipment access
panels are not blocked and easy access to electrical panels or Ground Fault Circuit
Interrupters (GFCI) is available. Installation of all spas must be in accordance with
national, state and local electrical codes and rules. A licensed Electrician must
perform the electrical installation of models without a preinstalled cord and
conduct a GFCI test procedure in accordance with applicable codes and
approved building plans if required. Fixed wiring requires a disconnect
device to be incorporated into the wiring in accordance with national, state
and local electrical codes and rules. When permitted by applicable codes
and rules, a GFCI or Residual-Current Device (RCD) sub-panel may be used
in place of a disconnect device. All Artesian Spas’ spas are manufactured and
tested to all required codes and standards providing maximum protection against
electrical shock. Spa safety features may not operate properly due to
improper wiring and could result in risk of fire, electrical shock, injury, or
death. In accordance with all pertinent national, state and local codes and
rules, all metal components within the maximum specified distance must be

18
bonded and connected to the ground lug on the exterior of the spa control
pack.
5. Ensure the equipment compartment is in a location where it will not be damaged
by water infiltration due to drainage or constant exposure. Cover the equipment
compartment with a heavy screen if rodents are a problem. Damage due to
rodents is not covered under warranty.
Outdoor Spa Installation Guidelines
WARNING: To prevent serious damage to the spa, support surfaces, support structures
and/or injury, it is important that the spa foundation be supported by a stable and
consistent subsurface.
Spa placement must take into consideration national, state and local building,
electrical, plumbing and safety codes, as well as local environmental and
geotechnical conditions. Proof of code compliance for the proposed design plans
by a qualified licensed contractor, engineer and/or architect prior to installation
may be required for issuance of construction permits. The spa must be positioned
at the minimum horizontal and vertical distances from all overhead power lines as
required by national, state and local codes. Further factors to consider are the desired
proximity to the home, environmental exposures such as wind and sun (ultraviolet
radiation), location of trees and other vegetation (falling leaves, grass and dirt tracked into
spa, roots, shade, etc.), dressing area, landscaping design, lighting, etc. when selecting
a location
Since ambient humidity will rise around the spa, materials and components in the
surrounding area must be able to withstand elevated humidity levels. Some chemicals
for use in sanitation of the spa may corrode metals or degrade other materials in the
surrounding area. To avoid potential water damage to the cabinet and frame, the spa
must be located on a site away from automatic sprinklers, drains, gutters, etc. and/or
sources of frequent external water exposure.
For installations on a deck or elevated surface, the maximum filled weight of the
spa and occupants must be determined. The adequacy of the structural support
for a spa placed on a deck or an elevated structure must be determined by a
licensed structural engineer, architect or contractor depending on local and state
requirements. Inadequate structural support may result in structural damage to
the spa and/or serious injury or death to occupants. Have the spa deck installed
by a knowledgeable contractor to ensure proper support.

19
Indoor Spa Installation Guidelines
Spa placement must take into consideration national, state and local building, electrical
and plumbing codes, local geotechnical conditions affecting the structure of the building,
indoor environmental conditions, etc. The surrounding floor surface must have sufficient
traction to prevent slips and falls when wet. It is recommended that a floor drain and/or
catch basin is present to remove water that accumulates in the area with a capacity up to
the total volume of the spa model. Since ambient humidity will rise due to the spa, ample
ventilation is required to prevent mold, mildew, rot, fungus, bacteria and other conditions
related to high humidity. Materials and components in the surrounding area must be able
to withstand elevated humidity levels. Some chemicals for use in sanitation of the spa
may corrode metals, or degrade other materials in the surrounding area. A ventilation
design incorporating suction, fresh air intake, cross ventilation and/or dehumidifiers may
be required and should be determined by an appropriately licensed professional. Ensure
ample room is provided for any required servicing and that equipment access panels are
not blocked. Strong foundational support is vital, particularly if a second story site
is selected. The adequacy of the structural support for a spa placed on a floor
above ground level or an elevated surface must be determined by a licensed
structural engineer, architect or contractor depending on local and state
requirements. Have the spa deck installed by a knowledgeable contractor to
ensure proper support.
Electrical Wiring
WARNING: The spa must be wired by a certified electrician in accordance with local
codes and regulations, as well as with these instructions. Failure to do so will
terminate all warranties and invalidate the independent certification company’s
mark.
1. The Artesian Elite™ spa requires a 240 VAC dedicated system. The spa must be
hard wired to the power supply, with no plug-in connections, extension cords, or
sharing of service. For stationary appliances not fitted with means for
disconnection from the electrical supply mains having a contact separation in all
poles that provide full disconnection under Overvoltage Category III, the
disconnection must be incorporated in the fixed wiring of all supply circuits in
accordance with the applicable wiring rules.
2. The spa requires that you run 6 (10 mm²) or 8 (8.4 mm²) AWG copper wire,
depending on the GFCI size. Do Not Use aluminum wire.
3. The power supply must have a suitable Ground Fault Circuit Interrupter (GFCI),
according to Section 422-20 of the National Electrical Code, ANSI/NFPA 70-7987
or other national installation requirement with a residual current device (RCD)
having a trip current of not more than 30 mA. This could be used as the shut-off
switch, which must be installed in plain view of the spa. This electrical service must

20
be readily accessible to the spa occupants, but must not be within 5 feet of the
spa.
4. Use only non-metallic conduit and fittings when installing power to the spa.
5. After the spa has been positioned, route lines through the knockout on the left or
right front corner of the spa.
6. Connect the power to the spa Connect each color to its respective terminal block
location. The Ground (green) wire must be connected to the grounding terminal
which is outside of the system box. The Grounding wire must first enter the system
box and then access the grounding terminal via a hole on the side of the box,
adjacent to the grounding terminal as shown in the picture below.
60 Hz, 240 V Residential GFCI Wiring Schematic
Figure 1. GFCI Wiring Schematic for 60 Hz Systems

21
Figure 2. Proper Voltage Readings Across Terminals on House Breaker Box, Spa System Box and GFCI
50 Hz, 240 V Residential 2 Pole RCD Wiring Schematic
Figure 3. Wiring Schematic for 50 Hz Systems
22
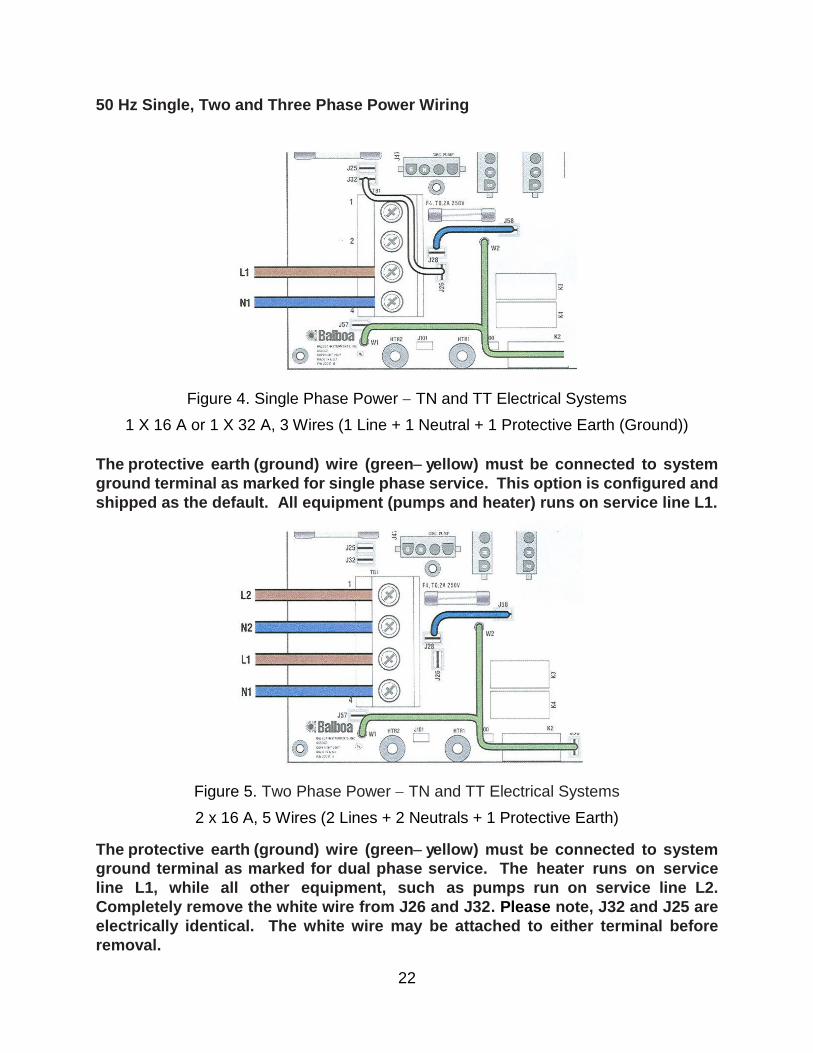
50 Hz Single, Two and Three Phase Power Wiring
Figure 4. Single Phase Power TN and TT Electrical Systems
1 X 16 A or 1 X 32 A, 3 Wires (1 Line + 1 Neutral + 1 Protective Earth (Ground))
The protective earth (ground) wire (green yellow) must be connected to system
ground terminal as marked for single phase service. This option is configured and
shipped as the default. All equipment (pumps and heater) runs on service line L1.
Figure 5. Two Phase Power TN and TT Electrical Systems
2 x 16 A, 5 Wires (2 Lines + 2 Neutrals + 1 Protective Earth)
The protective earth (ground) wire (green yellow) must be connected to system
ground terminal as marked for dual phase service. The heater runs on service
line L1, while all other equipment, such as pumps run on service line L2.
Completely remove the white wire from J26 and J32. Please note, J32 and J25 are
electrically identical. The white wire may be attached to either terminal before
removal.
23
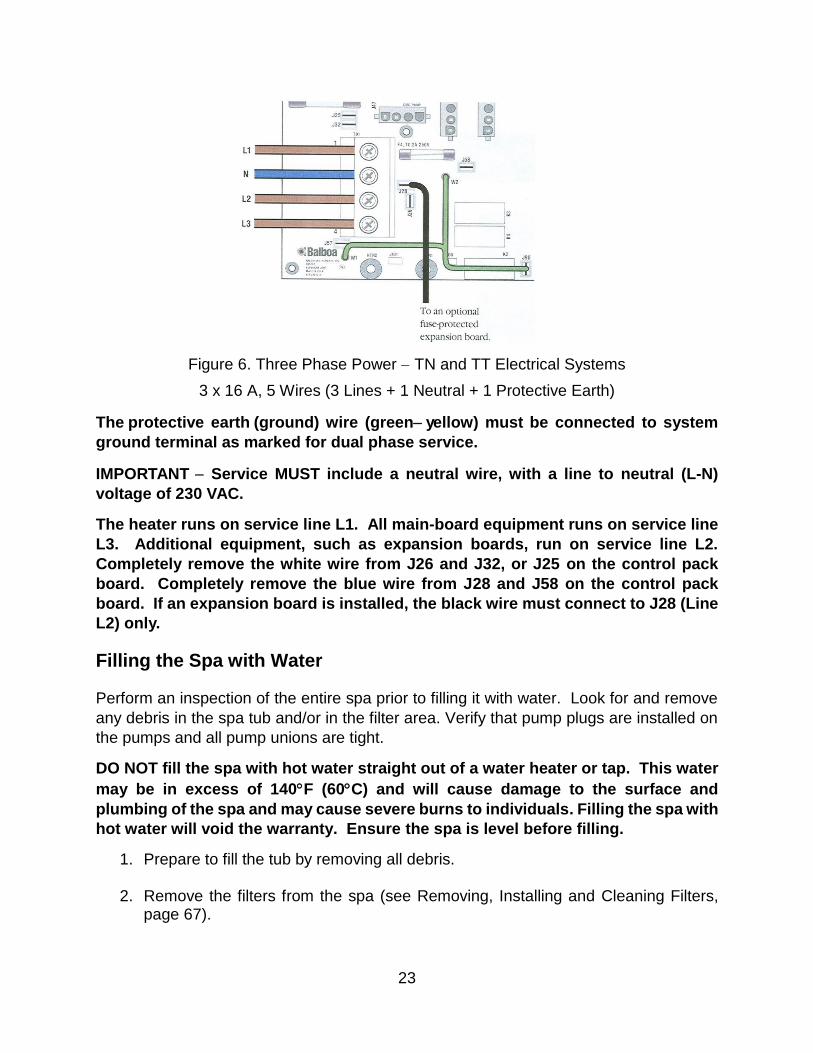
Figure 6. Three Phase Power TN and TT Electrical Systems
3 x 16 A, 5 Wires (3 Lines + 1 Neutral + 1 Protective Earth)
The protective earth (ground) wire (green yellow) must be connected to system
ground terminal as marked for dual phase service.
IMPORTANT Service MUST include a neutral wire, with a line to neutral (L-N)
voltage of 230 VAC.
The heater runs on service line L1. All main-board equipment runs on service line
L3. Additional equipment, such as expansion boards, run on service line L2.
Completely remove the white wire from J26 and J32, or J25 on the control pack
board. Completely remove the blue wire from J28 and J58 on the control pack
board. If an expansion board is installed, the black wire must connect to J28 (Line
L2) only.
Filling the Spa with Water
Perform an inspection of the entire spa prior to filling it with water. Look for and remove
any debris in the spa tub and/or in the filter area. Verify that pump plugs are installed on
the pumps and all pump unions are tight.
DO NOT fill the spa with hot water straight out of a water heater or tap. This water
may be in excess of 140F (60C) and will cause damage to the surface and
plumbing of the spa and may cause severe burns to individuals. Filling the spa with
hot water will void the warranty. Ensure the spa is level before filling.
1. Prepare to fill the tub by removing all debris.
2. Remove the filters from the spa (see Removing, Installing and Cleaning Filters, page 67).
24
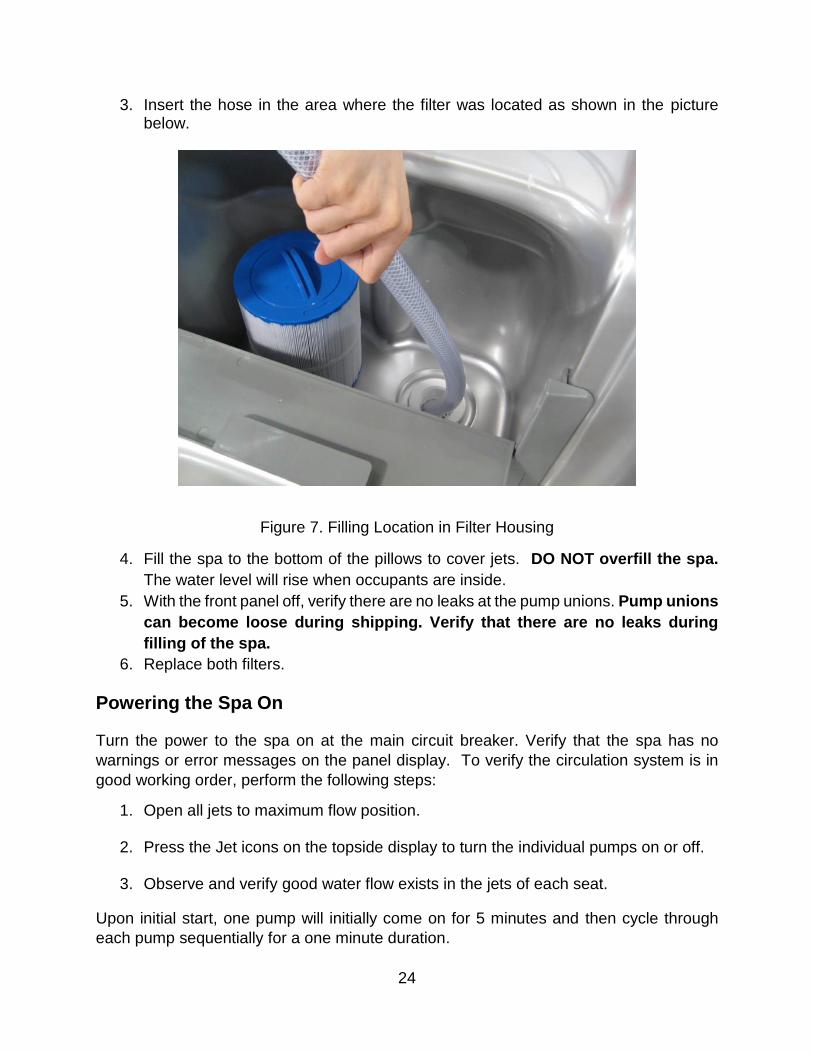
3. Insert the hose in the area where the filter was located as shown in the picture below.
Figure 7. Filling Location in Filter Housing
4. Fill the spa to the bottom of the pillows to cover jets. DO NOT overfill the spa.
The water level will rise when occupants are inside.
5. With the front panel off, verify there are no leaks at the pump unions. Pump unions
can become loose during shipping. Verify that there are no leaks during
filling of the spa.
6. Replace both filters.
Powering the Spa On
Turn the power to the spa on at the main circuit breaker. Verify that the spa has no
warnings or error messages on the panel display. To verify the circulation system is in
good working order, perform the following steps:
1. Open all jets to maximum flow position.
2. Press the Jet icons on the topside display to turn the individual pumps on or off.
3. Observe and verify good water flow exists in the jets of each seat.
Upon initial start, one pump will initially come on for 5 minutes and then cycle through
each pump sequentially for a one minute duration.

25
Testing the GFCI for a 60 Hz System
The electrical service panel for the spa must be equipped with a GFCI. To
avoid the risk of electrical shock, perform the following safety test before each use
of the spa:
1. Check that the power is turned on at the electrical service panel.
2. Turn on the GFCI. If the GFCI stays on, it is functioning properly.
The spa system will automatically trip the GFCI 24 hours after power up. This is a safety
feature and cannot be disabled.
DANGER RISK OF ELECTRICAL SHOCK
If the GFCI fails to operate as described, there is a possibility of electric shock if the spa
is used. Shut off the power at the main electrical service panel until the source of the
problem has been identified and corrected by a licensed electrician or qualified spa
technician.
Priming Pumps
1. Turn off power at electrical service panel.
2. Locate and loosen the pump union by turning it counterclockwise one half of one
turn.
3. Allow air to escape from the fitting. When a steady stream of water flows from the
pump union, close it by turning it clockwise until tight.
4. Turn on power at electrical service panel.
5. Perform one additional check to ensure water is flowing from the jets during the
auto purge cycle. If so, continue to Water Preparation. If no water flow is coming
from the spa jets, please call your Artesian Elite™ dealer for further assistance.
Water Preparation
Proper understanding of the treatment of fresh water prior to use is an important part of
maintenance and is one of the key aspects enabling worry free usage. Failure to properly
prepare the water can result in substantially decreased life of the components and may
void the warranty in severe cases. Please consult your local Artesian Elite™ dealer in
regards to appropriate start-up and maintenance kits available when purchasing the spa.

26
TOPSIDE CONTROLLER INSTRUCTIONS
Figure 8. Artesian Elite™ Topside Controller Face
Figure 9. Artesian Elite™ DIRECTFLOW Personal Control

27
Main Screen
Figure 10. Main Screen Layout
Spa Status
Important information about spa operation can be seen on the Main Screen. Most
features, including Set Temperature adjustment, can be accessed from this screen. The
actual water temperature can be seen, and the Set Temperature can be adjusted. Time-
of-Day, Ozone and Filter status is available, along with other messages and alerts. The
selected Temperature Range is indicated in the upper left corner. The Spa Equipment
Control Icon will spin if any pump is running; however, it will not spin if only a circulation
pump is running. A Lock icon is visible if the panel or settings are locked.
To ensure proper functionality and component longevity, individual Jet Pumps
must not be cycled on and off more than one time every minute.
Note: After a period of no activity the display will automatically go into sleep
mode, which turns the display off. This is normal operation. Touch anywhere on

28
the screen to wake the panel up.

29
30
Navigation
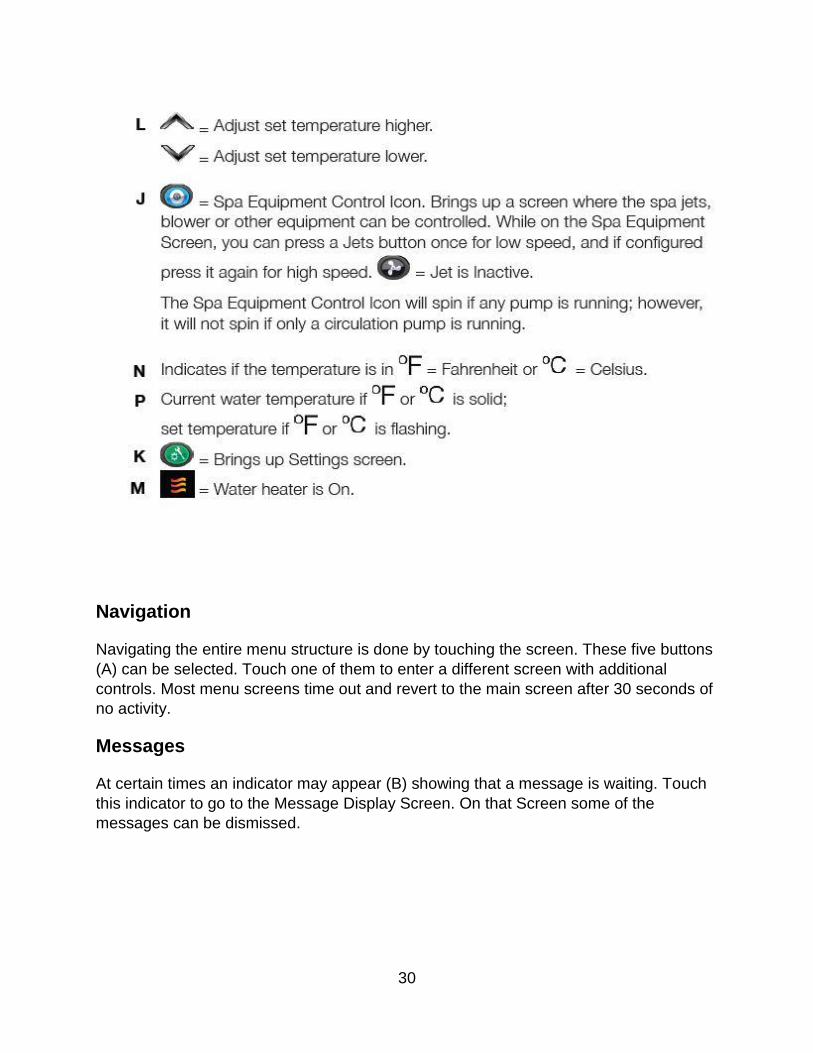
Navigating the entire menu structure is done by touching the screen. These five buttons
(A) can be selected. Touch one of them to enter a different screen with additional
controls. Most menu screens time out and revert to the main screen after 30 seconds of
no activity.
Messages
At certain times an indicator may appear (B) showing that a message is waiting. Touch
this indicator to go to the Message Display Screen. On that Screen some of the
messages can be dismissed.

31
The Set Temperature Screen
Set Temperature
Press Up or Press Up or Down (A) once to display the Set Temperature (indicated by a
flashing ºF or ºC, plus a change in color of the temperature). Press Up or Down again to
modify the Set Temperature. The Set Temperature changes immediately.
If you need to switch between High Temperature Range and Low Temperature Range
you need to go to the Settings Screen.
Press-and-Hold
If Up or Down (A) is pressed and held, the temperature will continue to change until you
stop pressing, or until the Temperature Range limits are reached.
32
The Spa Screen
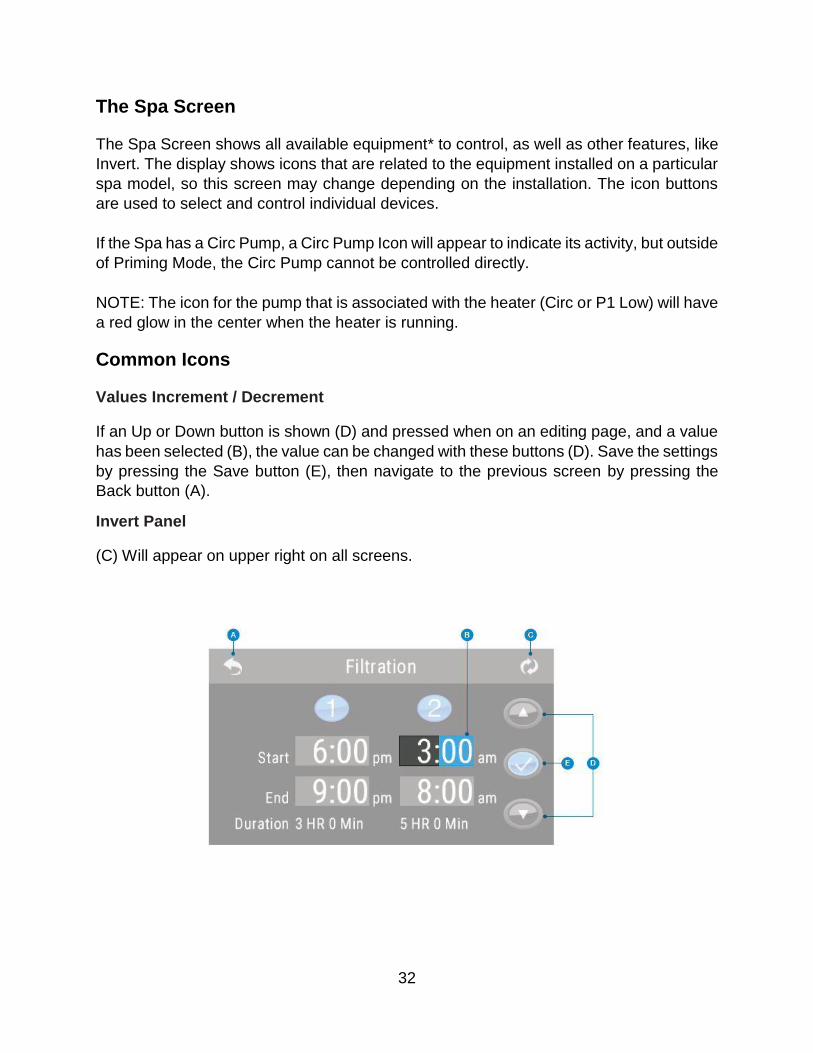
The Spa Screen shows all available equipment* to control, as well as other features, like
Invert. The display shows icons that are related to the equipment installed on a particular
spa model, so this screen may change depending on the installation. The icon buttons
are used to select and control individual devices.
If the Spa has a Circ Pump, a Circ Pump Icon will appear to indicate its activity, but outside
of Priming Mode, the Circ Pump cannot be controlled directly.
NOTE: The icon for the pump that is associated with the heater (Circ or P1 Low) will have
a red glow in the center when the heater is running.
Common Icons
Values Increment / Decrement
If an Up or Down button is shown (D) and pressed when on an editing page, and a value
has been selected (B), the value can be changed with these buttons (D). Save the settings
by pressing the Save button (E), then navigate to the previous screen by pressing the
Back button (A).
Invert Panel
(C) Will appear on upper right on all screens.
33
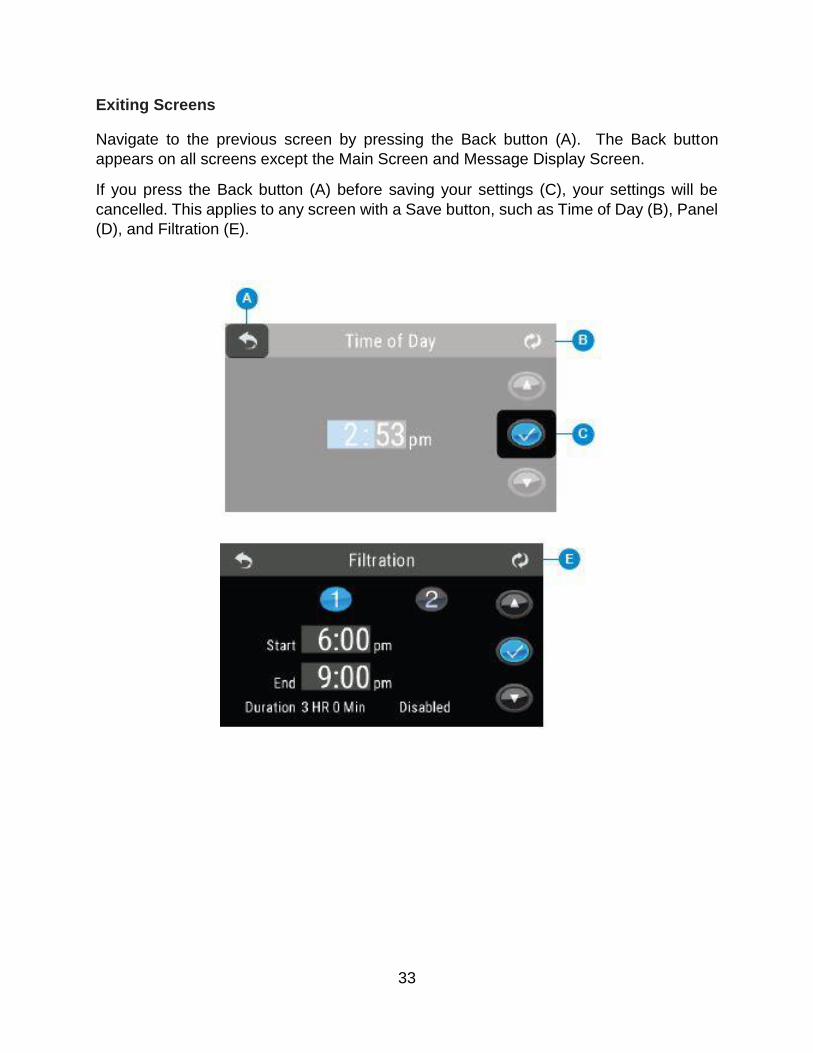
Exiting Screens
Navigate to the previous screen by pressing the Back button (A). The Back button
appears on all screens except the Main Screen and Message Display Screen.
If you press the Back button (A) before saving your settings (C), your settings will be
cancelled. This applies to any screen with a Save button, such as Time of Day (B), Panel
(D), and Filtration (E).

34
Page Right/Left
If there is a right arrow (A) at the bottom of the screen, it takes you to the next screen.
If there is a left arrow (B) at the bottom of the screen, it takes you to the previous
screen.
Page Up / Down
If an Up or Down button (C) is shown and pressed when on a page with a text list, the list
can be scrolled a page at a time.

35
Programming, Etc.
The Settings Screen is where all programming and other spa behaviors are controlled.
Each icon on the Settings screen takes you to a different screen, where one or more
setting may be viewed and/or edited.
Dual Temperature Ranges (High vs. Low)
This system incorporates two temperature range settings with independent set
temperatures. The specific range can be selected on the Settings screen and is visible
on the Main Screen in the upper left corner (B) of the display. These ranges can be used
for various reasons, with a common use being a “ready to use” setting vs. a “vacation”
setting. Each range maintains its own set temperature as programmed by the user. This
way, when a range is chosen, the spa will heat to the set temperature associated with
that range.
High Range can be set between 80°F and 104°F.
Low Range can be set between 50°F and 99°F.
More specific Temp Ranges may be determined by the Manufacturer.
Freeze Protection is active in either range.

36
Heat Mode – Ready vs. Rest
In order for the spa to heat, a pump needs to circulate water through the heater. The
pump that performs this function is known as the “heater pump.”
Rest Mode will only allow heating during programmed filter cycles. Since polling does not
occur, the temperature display may not show a current temperature until the heater pump
has been running for a minute or two.
When the heater pump has come on automatically (for example for heating) you can
switch between low speed and high speed but you cannot turn the heater pump off.
Circulation Mode
If the spa is configured for 24HR circulation, the heater pump generally runs continuously.
Since the heater pump is always running, the spa will maintain set temperature and heat
as needed in Ready Mode, without polling.
In Rest Mode, the spa will only heat to set temperature during programmed filter times,
even though the water is being filtered constantly when in 24HR circulation mode.
Ready-in-Rest Mode
Ready in Rest Mode appears in the display (A) if the spa is in Rest Mode and the Jets 1
Button is pressed. When the heater pump has come on automatically (for example for
heating) you can switch between low speed and high speed but you cannot turn the heater
pump off. After 1 hour, the System will revert to Rest Mode. This mode can also be reset
by selecting the Heat Mode line on the Screen shown here.

37
Preparation and Filling
Fill the spa to its correct operating level. Be sure to open all valves and jets in the plumbing
system before filling to allow as much air as possible to escape from the plumbing and
the control system during the filling process.
After turning the power on at the main power panel, the top-side panel will display a splash
screen or startup screen.
* M0XX is a Message Code. Codes like this will be seen in the Fault Log.
Priming Mode – M019*
After the initial start-up sequence, the control will enter Priming Mode and display a
Priming Mode screen. Only pump icons appear on the priming mode screen. During the
priming mode, the heater is disabled to allow the priming process to be completed without
the possibility of energizing the heater under low-flow or no-flow conditions. Nothing
comes on automatically, but the pump(s) can be energized by selecting the “Jet” buttons.
If the spa has a Circ Pump, it can be turned on and off by pressing the “Circ” button during
Priming Mode.
Priming the Pumps
As soon as the Priming Mode screen appears on the panel, select the “Jets 1” button
once to start Pump 1 in low-speed and then again to switch to high-speed. Also, select
the other pumps, to turn them on. The pumps should be running in high-speed to facilitate
priming. If the pumps have not primed after 2 minutes, and water is not flowing from the

38
jets in the spa, do not allow the pumps to continue to run. Turn off the pumps and repeat
the process. Note: Turning the power off and back on again will initiate a new pump
priming session. Sometimes momentarily turning the pump off and on will help it to prime.
Do not do this more than 5 times. If the pump(s) will not prime, shut off the power to the
spa and call for service.
Important: A pump should not be allowed to run without priming for more than 2 minutes.
Under NO circumstances should a pump be allowed to run without priming beyond the
end of the 4-5 minute priming mode. Doing so may cause damage to the pump and cause
the system to energize the heater and go into an overheat condition
Exiting Priming Mode
The system will automatically enter the normal heating and filtering at the end of the
priming mode, which lasts 4-5 minutes.
You can manually exit Priming Mode by pressing the “Back” button on the Priming Mode
Screen. Note that if you do not manually exit the priming mode as described above, the
priming mode will be automatically terminated after 4-5 minutes. Be sure that the pump(s)
have been primed by this time.
Once the system has exited Priming Mode, the top-side panel will display the Main
Screen, but the display will not show the water temperature yet, as shown below. This is
because the system requires approximately 1 minute of water flowing through the heater
to determine the water temperature and display it.
– – –°F – – –°C
Pumps
On the Spa Screen, select a “Jets” button once to turn the pump on or off, and to shift
between low- and high-speeds if equipped. If left running, the pump will turn off after a
time-out period.
Circulation Pump Modes
If the system is equipped with a circ pump, it will be configured to work in one of three
different ways:

39
1, The circ pump operates continuously (24 hours) with the exception of turning off for 30
minutes at a time when the water temperature reaches 3°F (1.5°C) above the set
temperature (most likely to happen in very hot climates).
2, The circ pump stays on continuously, regardless of water temperature.
3, A programmable circ pump will come on when the system is checking temperature
(polling), during filter cycles, during freeze conditions, or when another pump is on.
The specific Circulation Mode that is used has been determined by the Manufacturer and
cannot be changed in the field. Other device options may be available, like Blower, Light,
Mister, etc.
Filtration and Ozone
On circ systems, the ozone will generally run with the circ pump, but can be limited to
filtration cycles. (On some circ systems, Pump 1 low will run along with the circ Pump
during filtration.)
The system is factory-programmed with one filter cycle that will run in the evening
(assuming the time-of-day is properly set) when energy rates are often lower. The filter
time and duration are programmable. A second filter cycle can be enabled as needed.
At the start of each filter cycle, the water devices like blower, mister device (if these exist)
and other pumps will run briefly to purge the plumbing to maintain good water quality.
Freeze Protection
If the temperature sensors within the heater detect a low enough temperature, then the
water devices automatically activate to provide freeze protection. The water devices will
run either continuously or periodically depending on conditions. In colder climates, an
optional freeze sensor may be added to protect against freeze conditions that may not be
sensed by the standard sensors. Auxiliary freeze sensor protection acts similarly except
with the temperature thresholds determined by the switch. See your dealer for details.
Time of Day
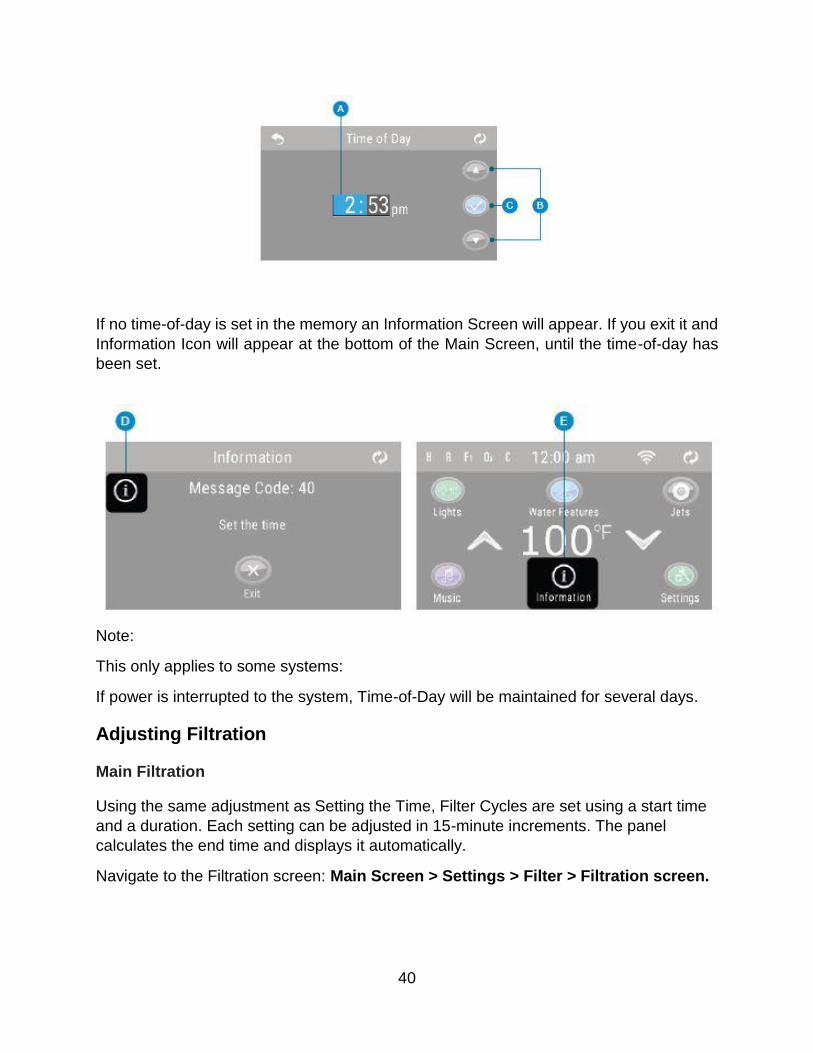
Set the Time-of-Day
Setting the time-of-day is important for determining filtration times and other background
features.
Navigate to Time of Day: Main Screen > Settings > Time > Time of Day screen.
Select Hours (B) and use the Up and Down Buttons (C) to make changes, then press the
Save button (D). Use the same steps to edit Seconds.
40
If no time-of-day is set in the memory an Information Screen will appear. If you exit it and
Information Icon will appear at the bottom of the Main Screen, until the time-of-day has
been set.
Note:
This only applies to some systems:
If power is interrupted to the system, Time-of-Day will be maintained for several days.
Adjusting Filtration
Main Filtration
Using the same adjustment as Setting the Time, Filter Cycles are set using a start time
and a duration. Each setting can be adjusted in 15-minute increments. The panel
calculates the end time and displays it automatically.
Navigate to the Filtration screen: Main Screen > Settings > Filter > Filtration screen.

41
Filter Cycle 2 - Optional Filtration
Filter Cycle 2 is OFF by default (A).
Press “1” (B) to view Filter 1. Press “2” (C) once to view Filter 2. Press “2” again to turn
Filter 2 ON or OFF.
When Filter Cycle 2 is ON, it can be adjusted in the same manner as Filter Cycle 1.
It is possible to overlap Filter Cycle 1 and Filter Cycle 2, which will shorten overall filtration
by the overlap amount.
Circulation Pump Modes
Some spas may be manufactured with Circ Pump settings that allow programming
filtration cycle duration. Some circ Modes are pre-programmed to operate 24 hours a day
and are not programmable. Refer to the spa manufacturer’s documentation for any Circ
Mode details.
42
Purge Cycles
In order to maintain sanitary conditions, as well as protect against freezing, secondary
water devices will purge water from their respective plumbing by running briefly at the
beginning of each filter cycle.
If the Filter Cycle 1 duration is set for 24 hours, enabling Filter Cycle 2 will initiate a purge
when Filter Cycle 2 is programmed to begin.
The Meaning of Filter Cycles
1. The heating pump always runs during the filter cycle*
2. In Rest Mode, heating only occurs during the filter cycle
3. Purges happen at the start of each filter cycle
* For example, if your spa is set up for 24/hour circulation except for shutting off when the
water temperature is 3˚F/1.3˚C above the set temperature, that shutoff does not occur
during filter cycles.
Auxiliary Panels
Specific Buttons for Specific Devices
If the spa has an Auxiliary Panel(s) installed, pressing buttons on that panel will activate
the device indicated for that button.
These dedicated buttons will operate just like the Spa Screen buttons (see page 31) and
the equipment will behave in the same manner with each button press.
Restricting Operation
The control can be restricted to prevent unwanted use or temperature adjustments.
Locking the Panel (C) prevents the controller from being used, but all automatic functions
are still active.
Locking the Settings (A) allows Jets and other features to be used, but the Set
Temperature and other programmed settings cannot be adjusted.
Settings Lock (A) allows access to a reduced selection of menu items. These include
Filter Cycles, Invert, Information and Fault Log. They can be seen, but not changed or
edited.
Navigate to the Lock screen: Main Screen > Settings > Lock > Lock screen.

43
Locking and Unlocking
The same steps are used to Lock and Unlock.
To lock either Settings (A) or Panel (C) first select Settings (if it says “Unlocked”) or
Panel (if it says “Unlocked”), than press the word “Lock“ (B) for at least 5 seconds.
To unlock either Settings or Panel first select Settings (if it says “Locked”) or Panel (if it
says “Locked”), than press the word “Lock“ for at least 5 seconds.
Additional Settings
* M0XX is a Message Code. Codes like this will be seen in the Fault Log.
Hold Mode – M037*
Hold Mode is used to disable the pumps during service functions like cleaning or replacing
the filter. Hold Mode will last for 1 hour unless the mode is exited manually. If spa service
will require more than an hour, it may be best to simply shut down power to the spa.
Navigate to the System Hold screen: Main Screen > Settings > Hold > System Hold
screen.
Press the Back button (A) to exit Hold Mode.

44
Utilities
Navigate to the Utilities screen: Main Screen > Settings > Utilities > Utilities screen.
Panel
Set how long it takes the panel to go to sleep after the last activity. The Sleep Timer can
be set from 1 minute to 60 minutes. The default is 30 minutes.
Fault Log
The Fault Log is a record of the last 24 faults that can be reviewed by a service tech. Use
the Up and Down buttons to view each of the Faults. When Priming Mode shows in the
Fault Log, it is not a fault. Rather, it is used to keep track of spa restarts.
GFCI Test (Feature not available on CE rated systems.)
Your systems may have GFCI configured in one of three ways:
1) GFCI test is not enabled.
2) Manual GFCI test is enabled but automatic GFCI test is not enabled.
3) Both manual and automatic GFCI tests are enabled. The automatic test will happen
within 7 days of the spa being installed and if successful will not repeat. (If the automatic
test fails it will repeat after the spa is restarted.)
GFCI Test will not appear on the screen if it is not enabled. This screen allows the GFCI
to be tested manually from the panel and can be used to reset the automatic test feature.
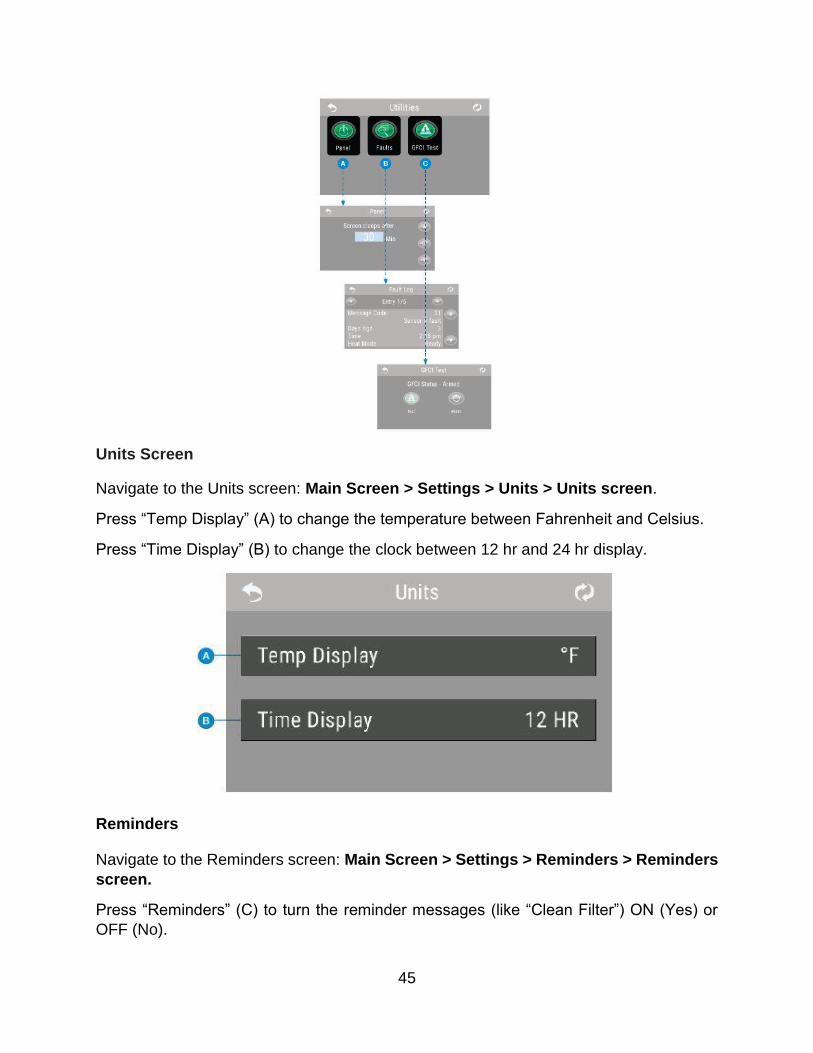
45
Units Screen
Navigate to the Units screen: Main Screen > Settings > Units > Units screen.
Press “Temp Display” (A) to change the temperature between Fahrenheit and Celsius.
Press “Time Display” (B) to change the clock between 12 hr and 24 hr display.
Reminders
Navigate to the Reminders screen: Main Screen > Settings > Reminders > Reminders
screen.
Press “Reminders” (C) to turn the reminder messages (like “Clean Filter”) ON (Yes) or
OFF (No).

46
Language
Navigate to the Language screen: Main Screen > Settings > Language > Language
screen.
Change the language displayed on the panel.
Information
System Information
The System Information Screen displays various settings and identification of the
particular system.
Navigate to the System Information screen: Main Screen > Settings > Info > System
Information screen.
47
System Model
Displays the Model Number of the System.
Panel Version
Displays a number of the software in the topside control panel.
Software ID (SSID)
Displays the software ID number for the System.
Configuration Signature
Displays the checksum for the system configuration file.
Current Setup
Displays the currently selected Configuration Setup Number.
Dip Switch Settings
Displays a number that represents the DIP switch positions of S1 on the main circuit
board.
Heater Voltage (Feature not used on CE rated systems.)
Displays the operating voltage configured for the heater.
Heater Wattage as Configured in Software (CE Systems Only.)
Displays a heater kilowatt rating as programmed into the control system software (1-3 or
3-6).

48
Heater Type
Displays a heater type ID number.
Continued Information
If you press the Down button (B) two times after entering the System Information
screen, you’ll get to a page which shows either Jets 1 status (A) or Circ status (C) near
the top of the page.
If Jets 1 is shown (A), there is no circ pump on the spa.
If Circ is shown (C), there is a circ pump on the spa, and this line tells you (via On or Off
at the right) whether the circ pump is running or not.
This is the only place on this panel to see the circ pump status (once Priming Mode has
ended).

49
GFCI Test Feature
The Ground Fault Circuit Interrupter (GFCI) or Residual Current Detector (RCD) is an
important safety device and is required equipment on a hot tub installation.
(The GFCI Test Feature is not available on CE rated systems.)
Used for verifying a proper installation
Your spa may be equipped with a GFCI Protection feature. If your spa has this feature
enabled by the manufacturer, the GFCI Trip Test must occur to allow proper spa function.
On some systems:
Within 1 to 7 days after startup, the spa will trip the GFCI to test it. (The number of days
is factory programmed.) The GFCI must be reset once it has tripped. After passing the
GFCI Trip Test, any subsequent GFCI trips will indicate a ground fault or other unsafe
condition and the power to the spa must be shut off until a service person can correct the
problem.
Forcing the GFCI Trip Test (North America Only)
Navigate to the GFCI Test screen: Main Screen > Settings > Utilities > GFCI Test >
GFCI Test screen.
The installer can cause the GFCI Trip Test to occur sooner by pressing Test on the GFCI
Test screen. The GFCI should trip within several seconds and the spa should shut down.
If it does not, shut down the power and manually verify that a GFCI breaker is installed
and that the circuit and spa are wired correctly. Verify the function of the GFCI with its
own test button. Restore power to the spa and repeat the GFCI Trip Test. Once the GFCI
is tripped by the test, reset the GFCI and the spa will operate normally from that point.
You can verify a successful test by navigating to the above screen. “Passed” should
appear after the Reset line is selected on the GFCI screen.
50
Warning:
On those systems that automatically test the GFCI within 1 to 7 days after startup: The
end-user must be trained to expect this one-time test to occur. The end-user must be
trained how to properly reset the GFCI. If freezing conditions exist, the GFCI or RCD
should be reset immediately or spa damage could result.
CE Product:
CE registered systems do not have an RCD Test Feature due to the nature of the
electrical service. Some UL registered systems do not have the GFCI Test Feature
activated. The end-user must be trained how to properly test and reset the RCD.
Reset Button:
Only use the Reset Button prior to moving the spa to a new location. Pressing the Reset
the button forces a new Test to be performed at the new location.
General Messages
Most messages and alerts will appear at the bottom of the normally used screens. Several alerts and messages may be displayed in sequence.
– – –F – – –C Water Temperature is Unknown
After the pump has been running for 1 minute the water temperature will be displayed.
Possible Freezing Condition
A potential freeze condition has been detected. All water devices are activated. In some cases, the pump may turn on and off and the heater may operate during Freeze Protection. This is an operational message, not an error code.
The Water is Too Hot – M029**
The system has detected a spa water temp of 110°F (43.3°C) or more, and spa functions are disabled. System will auto reset when the spa water temp is below 108°F (42.2°C). Check for extended pump operation or high ambient temp. The Water Level is Too Low
This message can only appear on a system that uses a water level sensor. It appears whenever the water level get too low (or the water level sensor is disconnected), and automatically disappears when the water level is adequate. Pumps and the heater turn OFF when this message appears.

51
Heater-Related Messages
The Water Flow is Low – M016**
There may not be enough water flow through the heater to carry the heat away from the heating element. Heater start up will begin again after about 1 min. See “Flow Related Checks” below.
Flow-Related Checks
Check for low water level, suction flow restrictions, closed valves, trapped air, too many closed jets and pump prime.
On some systems, even when spa is shut down by an error condition, some equipment may occasionally turn on to continue monitoring temperature or if freeze protection is needed.
The Water Flow has Failed* – M017**
There is not enough water flow through the heater to carry the heat away from the heating element and the heater has been disabled. See “Flow Related Checks” below. After the problem has been resolved, reset the message*.
The Heater May be Dry* – M028**
Possible dry heater, or not enough water in the heater to start it. The spa is shut down for 15 min. Reset this message* to reset the heater start-up. See “Flow Related Checks” below.
The Heater is Dry* – M027**
There is not enough water in the heater to start it. The spa is shut down. After the problem has been resolved, you must reset the message* to restart heater start up. See “Flow Related Checks” below.
Flow-Related Checks
Check for low water level, suction flow restriction (filters), closed valves, or trapped air.
The heater is too hot* – M030**
One of the water temperature has detected 118 °F (47.8 °C) in the heater and the spa
is shut down. You must clear the message when water is below 108 °F (42.2 °C).
52
Flow-Related Checks
Check for low water level, suction flow restriction (filters), closed valves, or trapped air.
* Some messages can be reset from the panel. Messages that can be reset will appear with a Clear Icon at the bottom of the Message Screen. Press the Clear Icon text to reset the message.
**M0XX is a Message Code. Codes like this will be seen in the Fault Log.
Sensor Related Messages
Sensors Are Out of Sync – M015**
The temperature sensors MAY be out of sync by 3°F. Call for Service if this message does not disappear within a few minutes. Sensors Are Out of Sync – Call for Service – M026**
The temperature sensors ARE out of sync. The fault above has been established for at least 1 hour. Call for Service. Sensor A Fault, Senor B Fault – Sensor A: M031*, Sensor B: M032**
The temperature sensors or sensor circuit has failed. Call your dealer for service.

53
Miscellaneous Messages
Communications Error
The control panel is not receiving communication from the System. Call for Service.
Test Software Installed
The Control System is operating with test software. Call for Service.
* Some messages can be reset from the panel. Messages that can be reset will appear with a Clear Icon at the bottom of the Message Screen. Press the Clear Icon text to reset the message.
**M0XX is a Message Code. Codes like this will be seen in the Fault Log
System Related Messages
Program Memory Failure* – M022**
At Power-Up, the system has failed the Program Checksum Test. This indicates a
problem with the firmware (operation program) and requires a service call.
The Settings Have Been Reset (Persistent Memory Error)* – M021**
Contact your dealer or service organization if this message appears on more than one
power-up.
The Clock has Failed* – M020**
Contact your dealer or service organization.
Configuration Error (Spa Will not Start)
Call your dealer for service.
The GFCI Test Failed (System Could Not Test the GFCI) – M036** (North America Only)
(North America Only) May indicate an unsafe installation. Contact your dealer or service
organization.
A Pump May be Stuck On – M034**
Water may be overheated.
POWER DOWN THE SPA! DO NOT ENTER THE WATER!
Call your dealer for service.
Hot Fault – M035**
54
A pump appears to have been stuck on when the spa was last powered on. Water may
be overheated.
POWER DOWN THE SPA! DO NOT ENTER THE WATER!
Call your dealer for service.
* Some messages can be reset from the panel. Messages that can be reset will appear with a Clear Icon at the bottom of the Message Screen. Press the Clear Icon text to reset the message.
**M0XX is a Message Code. Codes like this will be seen in the Fault Log
Reminder Messages
General maintenance helps
Reminder Messages can be suppressed by using the Reminders Screen.
Reminder Messages can be chosen individually by the Manufacturer. They may be
disabled entirely, or there may be a limited number of reminders on a specific model. The
frequency of each reminder (i.e. 7 days) can be specified by the Manufacturer.
Check the pH
May appear on a regular schedule, i.e. every 7 days.
Check pH with a test kit and adjust pH with the appropriate chemicals.
Check the Sanitizer
May appear on a regular schedule, i.e. every 7 days.
Check sanitizer level and other water chemistry with a test kit and adjust with the
appropriate chemicals.
Clean the Filter
May appear on a regular schedule, i.e. every 30 days.
Clean the filter media as instructed by the manufacturer.
Test the GFCI (or RCD)
May appear on a regular schedule, i.e. every 30 days.
The GFCI or RCD is an important safety device and must be tested on a regular basis to
verify its reliability.
Every user should be trained to safely test the GFCI or RCD associated with the hot tub
installation.
55
A GFCI or RCD will have a TEST and RESET button on it that allows a user to verify
proper function.
Change the Water
May appear on a regular schedule, i.e. every 90 days.
Change the water in the spa on regular basis to maintain proper chemical balance and
sanitary conditions.
Additional messages may appear on specific systems.
Reminder messages can be reset from the panel. Messages that can be reset will appear
with a Clear Icon at the bottom of the Message Screen. Press the Clear Icon text to reset
the message.
Clean the Cover
May appear on a regular schedule, i.e. every 180 days. Vinyl covers should be cleaned
and conditioned for maximum life.
Treat the wood
May appear on a regular schedule, i.e. every 180 days.
Wood skirting and furniture should be cleaned and conditioned per the manufacturer’s
instructions for maximum life
Change the filter
May appear on a regular schedule, i.e. every 365 days.
Filters should be replaced occasionally to maintain proper spa function and sanitary
conditions.
Change the UV
May appear on a regular schedule.
Change the UV as instructed by the manufacturer.
Check ozone
May appear on a regular schedule.
Check the ozone generator as instructed by the manufacturer.
Service check-up
May appear on a regular schedule.
Do a service check-up as instructed by the manufacturer.

56
Additional messages may appear on specific systems.
Reminder messages can be reset from the panel. Messages that can be reset will appear
with a Clear Icon at the bottom of the Message Screen. Press the Clear Icon text to reset
the message.
CHROMOZONƎ™
CHROMOZONƎ™ provides fully customizable spa lighting with stunning color choices.
Three separate lighting zones give you full lighting control and flexibility. A zone is a
group of LED lights. CHROMOZONƎ™ as three zones. Each zone can display a light
pattern, display one of eight factory default colors, and display custom color. There are
three light patterns to choose from: Color Wheel, Party Light, Lounge Light. Speed and
brightness are customizable for each light pattern. Any combination of the three zones
can be grouped and controlled simultaneously.
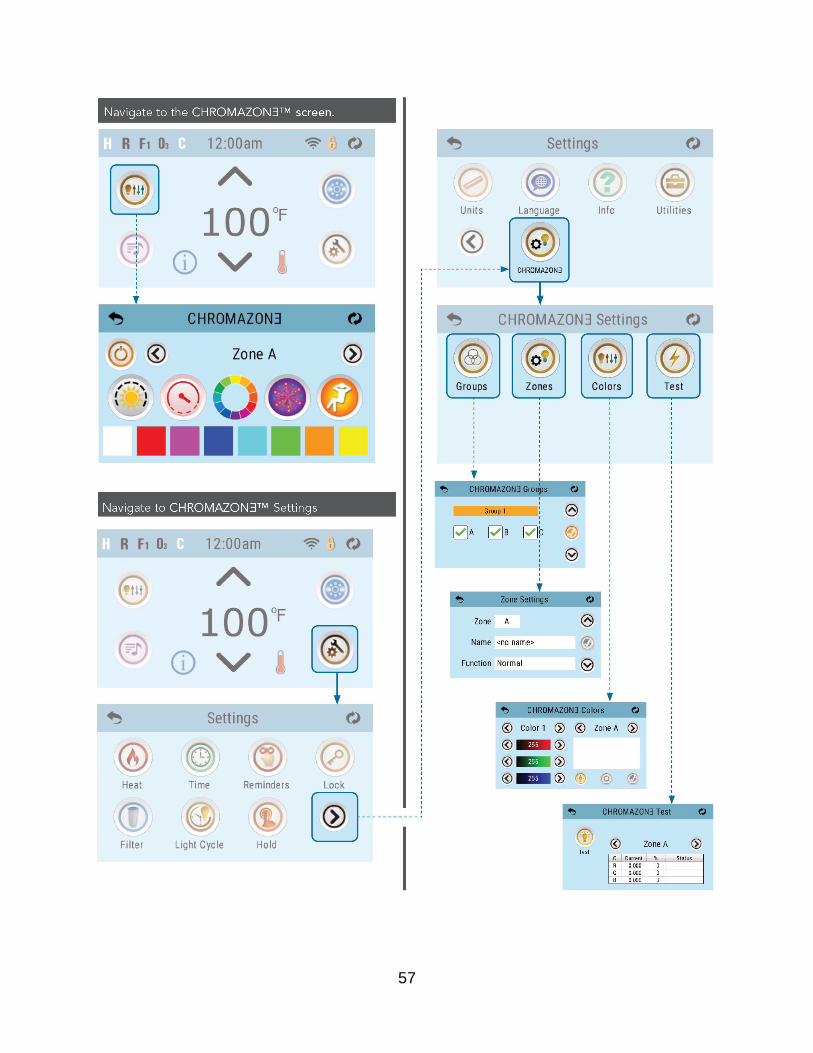
57

58
CHROMOZONƎ™ Main Screen
CHROMOZONƎ™ has eight factory default colors to choose from. Each color is
numbered. Also, you can replace any default color with a custom color of your choice.
Custom colors will be explained later. (A) Press-and-hold this spot for three seconds to
reset all eight colors to their factory default settings.
CHROMOZONƎ™ Groups
59
A group is two or more zones. Zones A, B and C can be grouped in any combination. A
group enables you to control two or more zones simultaneously.
There are four groups with the following names:
Group 1
Group 2
Group 3
Group 4
Screen Interface
(A) The name of the group that is being edited/controlled.
(B) Press-and-hold this spot for three seconds to reset all four groups to factory default
settings.
(C) Select any combination of zones A, B and C, and assign them to a group.
(D) Use the navigation buttons to select which group you want to edit/control.
(E) Press this button to save your settings for the currently shown group. When the button
changes from color to black and white, your settings have been saved.
Once you’ve defined one or more Groups:
When you go to the CHROMOZONƎ™ Main Screen and scroll from Zone A to Zone B,
and so on (F), once you pass the last Zone, it’ll list the Group(s) that you’ve defined. Each
Group is labeled in the format “Group 1: ABC” (i.e., the number of the Group followed by
the Zones which that Group includes).
You can still control Zones independently when viewing a Zone, but when viewing a
Group, if you select a color or a pattern, that color or pattern will be applied to all of the
Zones in that Group.
While you stay on the Group view, everything further that you do will affect all of the Zones
in that Group the same way.
But if you scroll back to an individual Zone (which is in the Group), and select a color or
a pattern, that’ll only change which color or pattern that particular Zone is displaying, while
the other Zones in the Group will continue displaying what you had last set while viewing
the Group.

60
Zone Settings
A different name can be assigned to each zone.
Select from a list of preprogrammed names. Also, the functionality of each zone can be
changed. Here’s how.
ASSIGN A NAME TO A ZONE
Step 1: Select this field (A), and use the navigation buttons (D) to select a zone. The
name of the zone that is being edited appears in this field (A).
Step 2: Select this field (B), and use the navigation buttons (D) to select a name from the
preprogrammed list.
Step 3: Press the Save button (E). When the button changes from color to black and
white, your settings have been saved.
CHROMOZONƎ™ Colors
CHROMOZONƎ™ has eight factory default colors (H) to choose from. Each color can be
customized with the CHROMOZONƎ™ Colors screen shown above.
Screen Interface
(A) Choose one of the eight colors.
“Color 1” corresponds with color swatch 1 (H).
“Color 2” corresponds with color swatch 2 (H).

61
and so on...
(B) Create your custom color by pressing the left or right arrow buttons, or sliding your
finger along any one of the color bars.
(D) The custom color appears here as you make changes here (B). When you’re ready
to see how this custom color looks on actual LEDs, select the spa zone for previewing
with (G), then press the “Preview” button (C).
(E) Press the “Reset” button to delete any unsaved changes.
(F) Press the “Save” button to save your custom color. Custom colors (H) have no effect
on light patterns (I).

62
CHROMOZONƎ™ Test
CHROMOZONƎ™ Test tests the electrical load of all the LEDs in all zones connected
to CHROMOZONƎ™ (E).
(A) Press this button to run a test.
(B) Specific test results are shown here. You can only view test results for one zone at a
time. View test results for each zone by pressing the navigation buttons (C).
(C) This indicates which zone results you are viewing. Navigate between zones with the
left and right arrow buttons.
(D) Overall test results. (This area is blank until the test is completed).

63
CHROMOZONƎ™ Troubleshooting
Question: All lights change to the same color (C) after running a test (A). Is this normal?
Answer: Yes.
Question: All lights change to the same color (C) after I apply minimum brightness (B) to
all three zones. Is this normal?
Answer: Yes.

64
Question: How do I confirm my topside panel and system pack are compatible with
CHROMOZONƎ™?
Answer: CHROMOZONƎ™ is compatible with all BP system packs (software version 43.0
and above) and spaTouch 2 topside panels (software version 2.19 and above). View the
topside panel software version here (C). View the system pack software version here (D).
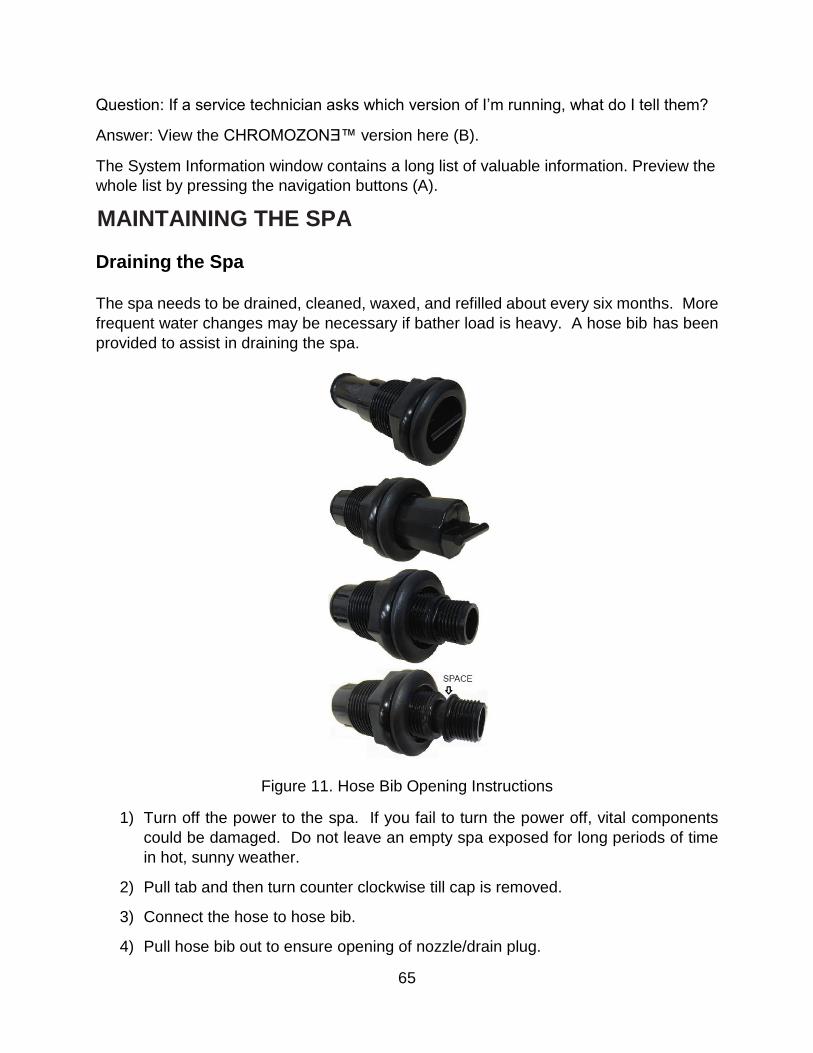
65
Question: If a service technician asks which version of I’m running, what do I tell them?
Answer: View the CHROMOZONƎ™ version here (B).
The System Information window contains a long list of valuable information. Preview the
whole list by pressing the navigation buttons (A).
MAINTAINING THE SPA
Draining the Spa
The spa needs to be drained, cleaned, waxed, and refilled about every six months. More
frequent water changes may be necessary if bather load is heavy. A hose bib has been
provided to assist in draining the spa.
Figure 11. Hose Bib Opening Instructions
1) Turn off the power to the spa. If you fail to turn the power off, vital components
could be damaged. Do not leave an empty spa exposed for long periods of time
in hot, sunny weather.
2) Pull tab and then turn counter clockwise till cap is removed.
3) Connect the hose to hose bib.
4) Pull hose bib out to ensure opening of nozzle/drain plug.

66
5) Check the garden hose end to see if water is flowing. If water is not flowing, check
the hose for kinks. Also check to see if the valve is in the full open position.
CAUTION: The chemical content and temperature of the water will cause damage
to certain vegetation. Draining the spa onto plants or lawns is not recommended.
When choosing to do this, please remove the spa cover and allow spa to cool for a
minimum of 24 hours with the spa turned off.
Pillow Care
Remove and clean the pillows with soapy water and a soft cloth when needed. Use a
vinyl conditioner once a month. Remove pillows when doing chemical shock treatment.
Jet Care
Cleaning the jets when draining the spa is recommended.
1) Spray jet inserts with a mixture of 1 part vinegar to two parts warm water and let
soak for 10 15 minutes. Periodically rotate the spinner nozzle to break up
residue in the jets.
2) Rinse the jet inserts with a standard garden hose.
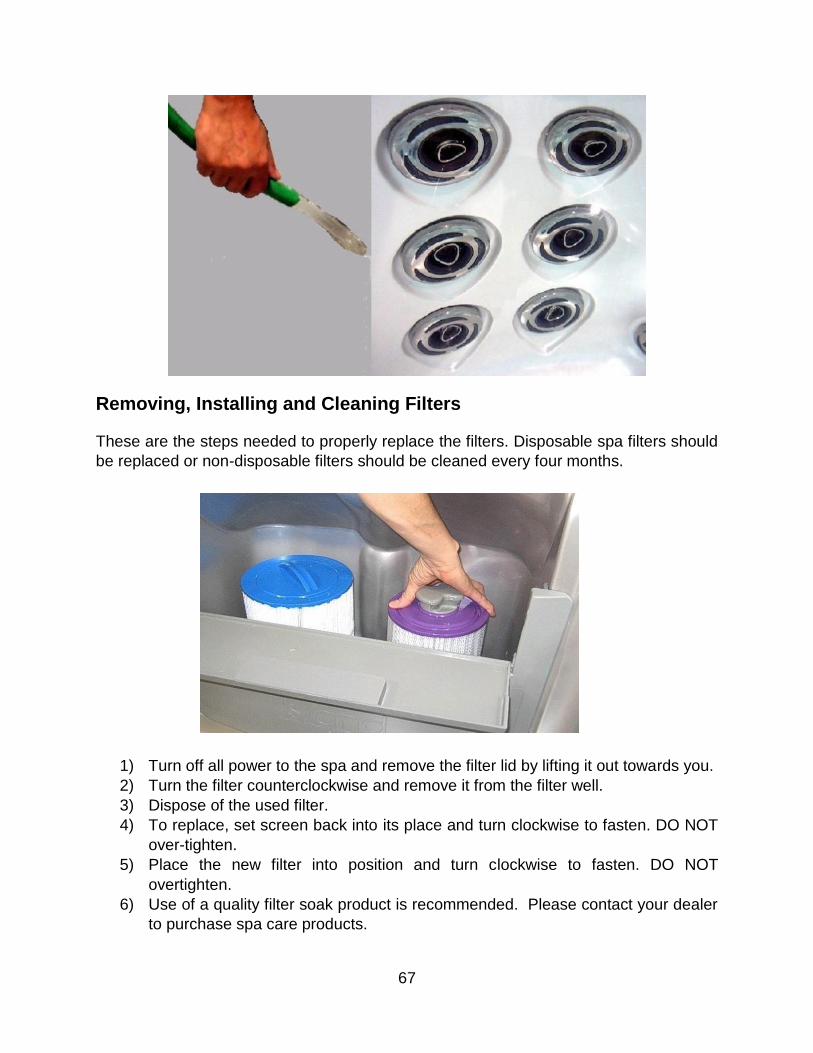
67
Removing, Installing and Cleaning Filters
These are the steps needed to properly replace the filters. Disposable spa filters should
be replaced or non-disposable filters should be cleaned every four months.
1) Turn off all power to the spa and remove the filter lid by lifting it out towards you.
2) Turn the filter counterclockwise and remove it from the filter well.
3) Dispose of the used filter.
4) To replace, set screen back into its place and turn clockwise to fasten. DO NOT
over-tighten.
5) Place the new filter into position and turn clockwise to fasten. DO NOT
overtighten.
6) Use of a quality filter soak product is recommended. Please contact your dealer
to purchase spa care products.

68
NOTE: Only use Artesian Spas™ approved filters. Using a Non Artesian Spa
approved filter can cause issues with the circulation system and heater and can
void warranty coverage. The filter can be upgraded to a 75 Sq. ft. filter. Please see
your Artesian Elite™ dealer.
WARNING: Power to the spa must be turned off prior to removing the filters. The
suction at the filter is extremely strong and can cause injury if there is no filter.
NEVER run the spa without the filters properly installed. Injury to person and
damage to the equipment can occur. Any damage to equipment due to this
circumstance will not be covered under warranty.
Storing or Winterizing the Spa
An emptied spa (without water) must not be exposed to direct sunlight as acrylic shell
damage may occur to UV radiation. It is not recommended that the spa be drained
completely during freezing conditions. Leaving the spa full of water with the power on is
recommended to keep the tub from freezing. If you decide to drain the spa during freezing
conditions, contact your local authorized dealer for assistance.
Contact your Artesian Elite™ dealer before refilling a drained spa in freezing
temperatures.
WARNING: Damage to the spa caused by freezing is NOT covered under warranty.
Please contact your local Artesian Elite™ dealer to assist you in winterizing the
spa.
Spa Cabinet Care
The spa comes standard with a Monarch Elite, or faux wood, cabinet. This cabinet
requires no maintenance. You may wish to clean the cabinet with mild soap and water
from time to time.
Gently wash the cabinet with mild soap and water and allow to dry completely.
Do not apply any solid type finish such as shellac or varnish. After weathering,
these types of finishes will crack and/or turn yellow.
Cleaning the Spa Interior
It is important to clean the interior of the spa every time it is drained to help preserve the
sheen of the spa’s surface. However, it is important that you do not use any abrasive
cleaners or strong chemicals. Your Artesian Elite™ authorized dealer will be able to
supply you with the proper cleaning solution for the spa. After cleaning, make sure all
residues are removed prior to filling the spa. This will help prevent sudsing and improper
chemical balance.
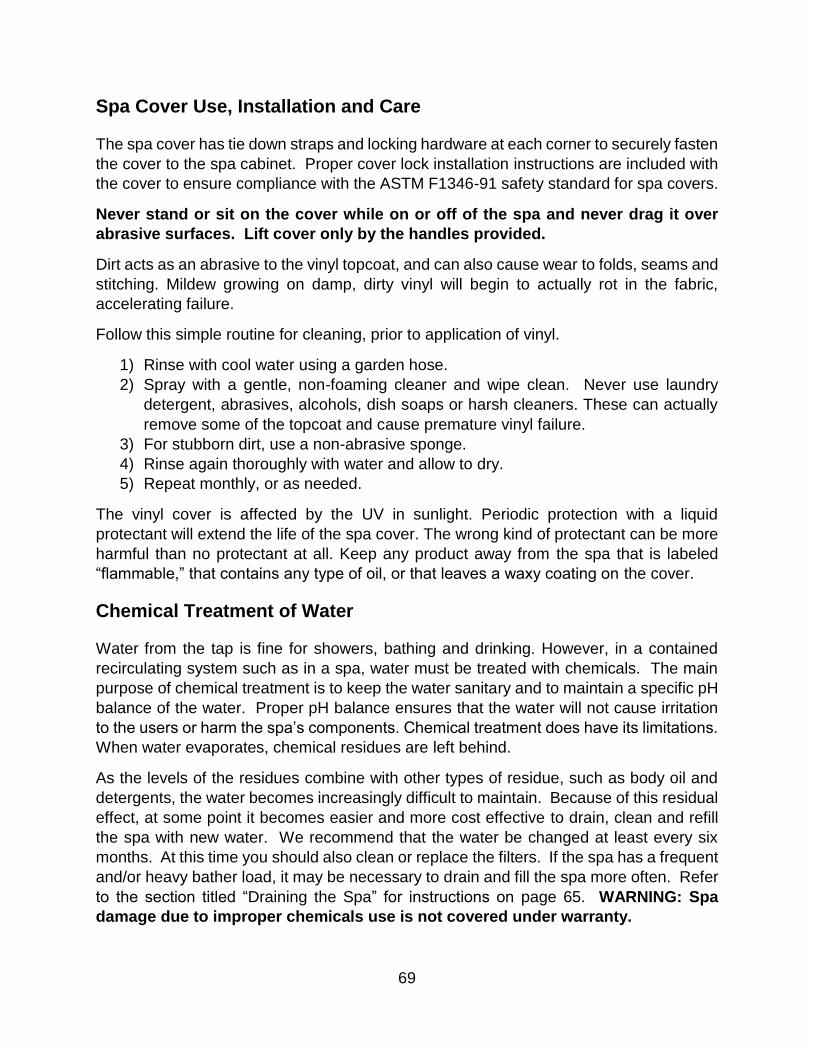
69
Spa Cover Use, Installation and Care
The spa cover has tie down straps and locking hardware at each corner to securely fasten
the cover to the spa cabinet. Proper cover lock installation instructions are included with
the cover to ensure compliance with the ASTM F1346-91 safety standard for spa covers.
Never stand or sit on the cover while on or off of the spa and never drag it over
abrasive surfaces. Lift cover only by the handles provided.
Dirt acts as an abrasive to the vinyl topcoat, and can also cause wear to folds, seams and
stitching. Mildew growing on damp, dirty vinyl will begin to actually rot in the fabric,
accelerating failure.
Follow this simple routine for cleaning, prior to application of vinyl.
1) Rinse with cool water using a garden hose.
2) Spray with a gentle, non-foaming cleaner and wipe clean. Never use laundry
detergent, abrasives, alcohols, dish soaps or harsh cleaners. These can actually
remove some of the topcoat and cause premature vinyl failure.
3) For stubborn dirt, use a non-abrasive sponge.
4) Rinse again thoroughly with water and allow to dry.
5) Repeat monthly, or as needed.
The vinyl cover is affected by the UV in sunlight. Periodic protection with a liquid
protectant will extend the life of the spa cover. The wrong kind of protectant can be more
harmful than no protectant at all. Keep any product away from the spa that is labeled
“flammable,” that contains any type of oil, or that leaves a waxy coating on the cover.
Chemical Treatment of Water
Water from the tap is fine for showers, bathing and drinking. However, in a contained
recirculating system such as in a spa, water must be treated with chemicals. The main
purpose of chemical treatment is to keep the water sanitary and to maintain a specific pH
balance of the water. Proper pH balance ensures that the water will not cause irritation
to the users or harm the spa’s components. Chemical treatment does have its limitations.
When water evaporates, chemical residues are left behind.
As the levels of the residues combine with other types of residue, such as body oil and
detergents, the water becomes increasingly difficult to maintain. Because of this residual
effect, at some point it becomes easier and more cost effective to drain, clean and refill
the spa with new water. We recommend that the water be changed at least every six
months. At this time you should also clean or replace the filters. If the spa has a frequent
and/or heavy bather load, it may be necessary to drain and fill the spa more often. Refer
to the section titled “Draining the Spa” for instructions on page 65. WARNING: Spa
damage due to improper chemicals use is not covered under warranty.

70
ARTESIAN ELITE™ WARRANTY
This section is a description of the warranty, what is covered under the Artesian Elite™
spa warranty and conditions that can void the warranty. PLEASE READ THE
WARRANTY THOROUGHLY. Please take a moment to register your warranty. You can
register on line at http://www.artesianspas.com, click on SUPPORT or mail in the
warranty registration card attached to this manual. For warranty information outside of
the USA and Canada, please refer to your country’s Artesian Spas’™ Distributor.
LIFETIME STRUCTURE WARRANTY
Artesian Elite™ carry a lifetime structure warranty. The structure is defined as the
fiberglass vessel below the exposed material finish. The manufacturer warrants the spa
against loss of water due to a defect in the spa structure, for the lifetime of the spa. In the
event of a defect in the material and/or workmanship, the spa structure will be repaired
or replaced at the discretion of the manufacturer. THIS WARRANTY IS GIVEN ONLY TO
THE ORIGINAL OWNER, AND TERMINATES UPON TRANSFER OF OWNERSHIP.
COMMERCIAL APPLICATIONS ARE EXCLUDED FROM THIS AND ALL
WARRANTIES.
If the spa structure is defective and must be replaced, it will be returned to the factory.
The original, installed equipment (this includes the frame, skirt, and all equipment) will be
reinstalled. If new equipment is desired, there will be additional charges to the customer.
If the frame and/or skirt of the spa has been badly damaged, there will be additional
charges to the spa owner for repairs or replacement. When a spa needs to be returned
to the factory for repair, the cost of one way freight to the company will be at the spa
owner’s expense. The manufacturer will not pay for removal, installation, cranes,
construction, de-construction, or any other cost associated with access, egress, or
ingress, of the spa at the customer’s home. The manufacturer reserves the right to an on-
site inspection by its authorized representative. In the unlikely event a shell or spa must
be replaced, all warranties (shell, surface, electrical and plumbing) date back to the
original start date of the warranty. The warranty period starts either the day of delivery to
the customer or eighteen (18) months from the date of manufacturing, whichever date
comes first.
SEVEN YEAR SURFACE WARRANTY
The spa surface is described as the exposed acrylic material finish. The manufacturer
warrants the spa surface to be free from defects in the material and workmanship, such
as blistering, cracking, or delaminating, this does not cover micro-crazing, under normal
use and maintenance for a period of seven years from the original date of the warranty.
The warranty period starts either the day of delivery to the customer or eighteen (18)
month from the date of manufacturing, whichever date comes first. THIS WARRANTY IS
ONLY AVAILABLE TO THE ORIGINAL OWNER, AND TERMINATES UPON
71
TRANSFER OF OWNERSHIP. COMMERCIAL APPLICATIONS ARE EXCLUDED
FROM THIS AND ALL WARRANTIES.
The spa must be set on a level solid surface that is sufficient to support the entire length
and width of the spa. Standard building practices must be followed. Damage caused by
failure to have a leveled and supported foundation under the spa is not covered under
warranty. The manufacturer does not warrant problems associated with prolonged
exposure to the sun and/or use of any sanitization or ozone system not approved by the
manufacturer. Damage to the spa surface caused by leaving the spa uncovered and
empty of water with direct sunlight exposure will terminate this warranty. Any alteration to
any system, either electrical, plumbing, or mechanical, or over use of chemicals, or any
other problems caused by external source are not covered under warranty. Other
exclusions may apply.
Normally problems associated with material and workmanship can and will be repaired.
If the spa surface is repaired, the repair is limited to the affected area only, and there is
no guarantee against discoloration of fading. The decision to repair will be made by the
manufacturer and its field representative after a review of the facts, pictures, or any other
data presented by the dealer or customer. In all cases, pictures of the affected area and
foundation of the spa must be provided before any decisions to repair or replace can be
made. In the unlikely event a shell or spa must be replaced, all warranties (shell, surface,
electrical and plumbing) date back to the original date of installation. If it is determined
that the surface is to be replaced, the same conditions and terms as outlined in the shell
warranty will apply.
FIVE YEAR ELECTRICAL WARRANTY
(i.e., pumps, equipment packs, heaters, topside, etc.)
The MANUFACTURER warrants all electrical equipment to be free from defect in material
and workmanship for five years from the original start date of the warranty. The warranty
period starts either the day of delivery to the customer or eighteen (18) month from the
date of manufacturing, whichever date comes first. THIS WARRANTY IS GIVEN ONLY
TO THE ORIGINAL CONSUMER AND TERMINATES UPON TRANSFER OF
OWNERSHIP. COMMERCIAL APPLICATIONS ARE EXCLUDED FROM THIS AND
ALL WARRANTIES.
The stereo, speakers, L.E.D. lighting, and Ozone are not included in this warranty but are
covered under a separate warranty. Damage caused by acts of nature, poor water
chemistry, and/or improper maintenance will not be covered under this warranty.
Alterations or replacements of components installed in the spa that are not purchased
and/or approved by the MANUFACTURER, including incorrect wiring, will terminate the
complete spa warranty.
72
FIVE YEAR PLUMBING WARRANTY
The plumbing is described as all piping, jet bodies, valve bodies and air controls. The
manufacturer warrants all plumbing for a period of five years from the original start date
of the warranty. The warranty period starts either the day of delivery to the customer or
eighteen (18) month from the date of manufacturing, whichever date comes first. THIS
WARRANTY IS GIVEN ONLY TO THE ORIGINAL OWNER, AND TERMINATES UPON
TRANSFER OF OWNERSHIP. COMMERCIAL APPLICATIONS ARE EXCLUDED
FROM THIS AND ALL WARRANTIES. Jet internals, valve handles, and other such
items are regular maintenance items. They are covered for the item only, labor is not
covered for these items. Damage caused by acts of nature, poor water chemistry, and/or
improper maintenance will not be covered under this warranty.
TWO YEAR MONARCH ELITE CABINET WARRANTY
The spa cabinet is described as the outer material encasing the spa structure. The
manufacturer warrants it to be free from defects in material and/or workmanship for a
period of two years from the original start date of the warranty. The warranty period starts
either the day of delivery to the customer or eighteen (18) month from the date of
manufacturing, whichever date comes first. THIS WARRANTY IS GIVEN ONLY TO THE
ORIGINAL OWNER, AND TERMINATES UPON TRANSFER OR OWNERSHIP.
COMMERCIAL APPLICATIONS ARE EXCLUDED FROM THIS AND ALL
WARRANTIES. This warranty does not cover normal darkening, staining, or aging. The
spa cabinet requires care and maintenance by the consumer. Damage caused by acts of
nature, poor water chemistry, and/ or improper maintenance will not be covered under
this warranty.
OTHER ITEMS NOT COVERED IN THIS WARRANTY
Some items are not covered in this warranty. These items either have a different warranty,
or are warranted through the manufacturer of that item.
STEREO AND STEREO COMPONENTS
The stereo and stereo components, including speakers, Bluetooth, subwoofer, stereo
power supply, wire harness and remote control are covered for 30 days from the original
start date of the warranty. The warranty period starts either the day of delivery to the
customer or eighteen (18) month from the date of manufacturing, whichever date comes
first. Please note: Warranty coverage for both parts and labor is covered for 30 days only.
Parts, not labor, will be covered for one year from date of installation. This warranty does
not cover damage to a stereo or stereo component from abuse, poor reception, or
damage caused by putting a wet CD into the stereo. If a stereo is replaced under this
warranty, the manufacturer reserves the right to replace the unit with another like unit, but
not necessarily the same stereo manufacturer. No spa will be replaced for a failed stereo.
The stereo does not affect the performance of the spa.
73
NOTE: For all operating instructions see the stereo manufacturer’s owner’s manual
included with the spa.
OZONATOR
The ozonator is covered for one year from the original start date of the warranty. The
warranty period starts either the day of delivery to the customer or eighteen (18) month
from the date of manufacturing, whichever date comes first.
SPA COVER
The spa cover manufacturer warrants the spa cover skin for one year from the original
start date of the warranty. The warranty period starts either the day of delivery to the
customer or eighteen (18) month from the date of manufacturing whichever date comes
first.
Do not return the spa cover to the manufacturer. This will delay the replacement or repair
of the cover. The spa manufacturer is not responsible for lost covers.
LIGHTING
The lighting is guaranteed to work upon delivery. There is no warranty covering the
lighting.
PERFORMANCE
In the event of any defect covered by this LIMITED warranty, a May Manufacturing LLC,
authorized agent will correct such defect within the terms and conditions contained herein.
There will be no charge for parts or labor within the above terms. However, travel charges
that occur will not be covered under terms and conditions by the warranty. If it is
determined by May Manufacturing LLC that the repair of the product is not feasible, a
replacement spa equal to the value of the original purchase price will be provided. Cost
for removal of the defective spa and delivery and installation of the replacement spa is
the responsibility of the homeowner and will not under any circumstances be covered by
May Manufacturing, LLC dba Artesian Spas™.
LIMITATIONS
This warranty is void if this Artesian Elite™ spa has been subjected to alteration, misuse,
or repairs have been performed by anyone other than an authorized agent of May
Manufacturing LLC. Misuse or abuse is defined as: use of the spa in a nonresidential
application, water temperature outside the range of 32 °F to 110 °F, damage caused by
clogged or dirty filter cartridges, damage to the spa from an absence of a hard cover,
damage to components from improper pH, use of any type of acid, or from chemical
imbalance. ACTS OF NATURE are not covered under this warranty.
NOTE: Warranty on 50 Hz spas excludes labor.
(Outside US and Canada)

74
DISCLAIMER
May Manufacturing LLC dba Artesian Spas™, or its agents shall not be liable for any
injury, cost or other damage, whether incidental or consequential, arising out of any defect
covered by the LIMITED WARRANTY. The liability of May Manufacturing, LLC dba
Artesian Spas™ under this LIMITED WARRANTY shall not exceed the original amount
paid for the spa.
LEGAL REMEDIES
This LIMITED WARRANTY gives specific rights, and other rights that may apply and will
vary from state to state.
WHAT IS NOT COVERED UNDER THE WARRANTY
The following is a general overview of non-warranty items and work. This is not an all-
inclusive list.
Diagnosis of Spa Problems
Fuses
Light Bulbs of Any Kind
Removing a Spa from a Structure
Pillows
Filters
Chemical Misuse/ Damage
Filter Lids
Any Part Not Purchased from Artesian Spas™
Jet Inserts Valve Handles Pump Seals
Draining and filling the Spa
Acts of Nature Travel Charges Cabinet Screws Incorrect Wiring Shipping Charges
By Using Non-Artesian Parts
THIS WARRANTY IS GIVEN ONLY TO THE ORIGINAL OWNER, AND TERMINATES
UPON TRANSFER OF OWNERSHIP. COMMERCIAL APPLICATIONS ARE
EXCLUDED FROM THIS AND ALL WARRANTIES.
Any alteration of the spa that has not been pre-authorized by the manufacturer will void
all warranties. If the manufacturer approves an alteration, verify that this alteration is
covered under warranty. Damage caused by moving a spa that is blocked in or that has
been recessed, along with additional charges for labor, is not covered by this warranty.


© 2019 Artesian Spas™ (May Manufacturing, LLC) 11-1410-11
Rev_R121718
4720 N Lamb Blvd
Las Vegas, NV 89115 www.ArtesianSpas.com