owner’s manual: qm, qa & qc controller€¦ · qm controller instructions ; main controls ;...
TRANSCRIPT

OWNER’S MANUAL: QM, QA & QC CONTROLLER
QM CONTROLLER QA CONTROLLER QC CONTROLLER
IMPORTANT - INSTALLER MUST COMPLETE FOR WARRANTY PURPOSES
Model:
Serial Number:
Installation Date:
Installed by:
Dealer:
Invoice No:
QC Series

2
CONTENTS
MAXIMISING YOUR COOLBREEZE EVAPORATIVE AIR CONDITIONER 3
QUICK START GUIDE: ALL CONTROLLERS 4
QM CONTROLLER INSTRUCTIONS 5
QA AUTO CONTROLLER INSTRUCTIONS 7
QC AUTO CONTROLLER INSTRUCTIONS 10
QC AUTO CONTROLLER TEMPERATURE CALIBRATION 14
SETTING UP COOLBREEZE CONNECT 15
GENERAL INFORMATION: APPLICABLE TO ALL CONTROLLERS 16
GENERAL INFORMATION & MAINTENANCE 16
TROUBLESHOOTING GUIDE 18
COOLBREEZE PRODUCT WARRANTY TERMS AND CONDITIONS 19

3
MAXIMISING YOUR COOLBREEZE EVAPORATIVE AIR CONDITIONER CoolBreeze evaporative air-conditioning provides a continuous supply of cool, fresh, filtered air into your home to push out the warm, stale air.
To maximise the cooling efficiency it is important to allow sufficient window or door openings to disperse the warm, stale air.
Ceiling outlets should be positioned across the room from the window to allow the cool air to pass through the room and exit through the window.
It is possible to direct the airflow by closing the windows in an unused room and the air will flow through the opened doorway into other rooms.
Insufficient openings will restrict the airflow; it may lead to ‘dampness’ on floors and furniture. See below for ventilation openings required.
If you prefer not to operate your system with windows or doors open or in the case where QC controller is operated remotely, there is the optional Security Air Relief Vent available from your CoolBreeze dealer.
This allows the escaping air to vent into the roof space rather than through the windows, which has the added benefit of providing additional insulation as it cools the air inside the roof cavity.
NATURAL DISPLACEMENT COOLING
Model 95 100 125 165 195 230 240 255 400 500 Opening m² 1.5 1.5 2.0 3.0 3.5 4.0 4.0 4.5 6.5 8.5

4
QUICK START GUIDE: ALL CONTROLLERS
1. Press ‘Cool’ The unit will start it’s pre-start wash cycle, once the filter media is clean and wet, the fan will start up.
This will take about 5 minutes.
2. To bypass the pre-start wash, press ‘Fan’, then ‘Cool’.
3. Adjust speed as follows: Use the ▲ and ▼ buttons.
4. Turn the unit off by pressing the ‘Off’ button
OFF
COOL OFF COOL
FAN UP
FAN
EXHAUST
TIMER
AUTO EXHAUST DOWN DOWN UP
QM CONTROLLER
QA/QC AUTO CONTROLLER
WI-FI (QC ONLY)

5
QM CONTROLLER INSTRUCTIONS
MAIN CONTROLS OFF Switches the unit off. When the air conditioning system is switched off, the water tank is emptied and a fresh tank of water is taken in. The fresh water is used to perform a 15 minute FLUSH cycle. Fresh water rinses and cleans the pads of any impurities or minerals left from the evaporative cooling process. To by-pass the FLUSH Mode, press FAN then OFF.
FAN In FAN mode, the water pump is not activated and the
OFF
COOL UP
FAN
EXHAUST DOWN
unit will deliver ambient temperature air from outside throughout the property. Airflow is adjusted using the UP and DOWN buttons.
EXHAUST The EXHAUST function allows the hot air which has built up to be expelled before the cooling process starts, this can reduce the time needed to cool the property.
COOL In COOL mode, both the fan and water pump operate to provide cool airflow throughout the property. Air flow can be adjusted from 1 % to 100% using the UP and DOWN buttons
If the unit is operating in COOL or FAN mode when
QM CONTROLLER
switched to EXHAUST, there will be a 30 second delay to allow the motor to stop prior to reversing direction.
The system has been pre-set to provide a 5 minute pre-wash cycle before the fan starts. Water is circulated over the pads to wash off any dust. To bypass this wash cycle, press FAN and then COOL. After each 5 hours of operation a periodic drain cycle empties the tank of water. This 5 hour cycle may be altered if required. See “Water Management System Settings”.
When the air conditioning system is switched off, the water tank is emptied and a fresh tank of water is taken in. This fresh water is used to perform a 15 minute FLUSH cycle. Fresh water rinses and cleans the pads of any impurities or minerals left from the evaporative cooling process. To by-pass this FLUSH cycle, press FAN then OFF.
FAN The FAN Mode is useful when the outside ambient temperature is cool and no direct cooling from the air conditioner is required.
EXHAUST Exhaust mode is useful for eliminating heat or odours from the property without the in-rush of air experienced with the COOL and FAN modes. It is particularly useful in winter when a cold draft of air is not desirable.
A delay occurs when switching to EXHAUST Mode. This is to protect the motor and allow it time to stop, before the rotation is reversed.
QM
CON
TROLLER

6
WATER MANAGER SYSTEM SETTINGS The Water Manager System has been factory set at 5 hours.
The DRAIN, WASH and FLUSH cycles can be adjusted using the DIP switches on the Keypad circuit board. (Service Technician only to adjust)
They function as follows:
DRAIN CYCLE INTERVAL: 5 hour drain cycle interval - DIP switch 1 to OFF position – Factory Setting
2.5 hour drain cycle interval - DIP switch 1 to ON position
PRE-START FLUSH: (USE IN DUSTY ENVIRONMENTS) To drain the water after the initial pre-start wash
DIP switch 2 to OFF position
No drain after the initial pre-start wash
DIP switch 2 to ON position (Factory Setting)
END OF DAY WASH & FLUSH: To wash unit and drain when unit is switched off
DIP switch 3 to ON position (Factory Setting)
No wash and drain when unit is switched off
DIP switch 3 to OFF position
Dip switch 4 must remain in the OFF position.
It is advisable to have regular drain cycles to maintain water purity and cooling efficiency.
FACTORY SETTING OF DIP SWITCHES
QM
CO
NTR
OLL
ER

7
QA AUTO CONTROLLER INSTRUCTIONS
MAIN CONTROLS
COOL OFF FAN TIMER
EXHAUST AUTO
DOWN UP
QA AUTO CONTROLLER
Function Screen View Description COOL C 50 In COOL mode, both the fan and water pump operate to provide
cool airflow throughout the property. Airflow can be adjusted from 1% to 100% using the UP and DOWN buttons. When COOL is selected the unit enters a pre- wash cycle. This 5 minute cycle washes dust and pollen off the filter media. (Bypass the wash cycle by pressing FAN then COOL) Display shows Cool function at 50% fan speed.
AUTO COOL AC 28º The unit is set to run automatically to a pre-set temperature. See page 8 for details of setting this mode.
TIMER 7.57.28 The TIMER function switches the system on or off. Pushing the TIMER button adds 30 minutes to a maximum of 99 hours. If the unit is OFF when the TIMER is selected, the unit will automatically start in COOL mode when the timer counts down to zero. If the unit is operating in either COOL, FAN or EXHAUST mode the unit will switch off when the timer reaches zero.
FAN F 50 In FAN mode, the water pump is not activated and the unit will deliver ambient temperature air from outside throughout the property. Airflow is adjusted using the Up and DOWN buttons. Fan operating at 50% fan speed.
QA CO
NTRO
LLER
8
QA
CO
NTR
OLL
ER
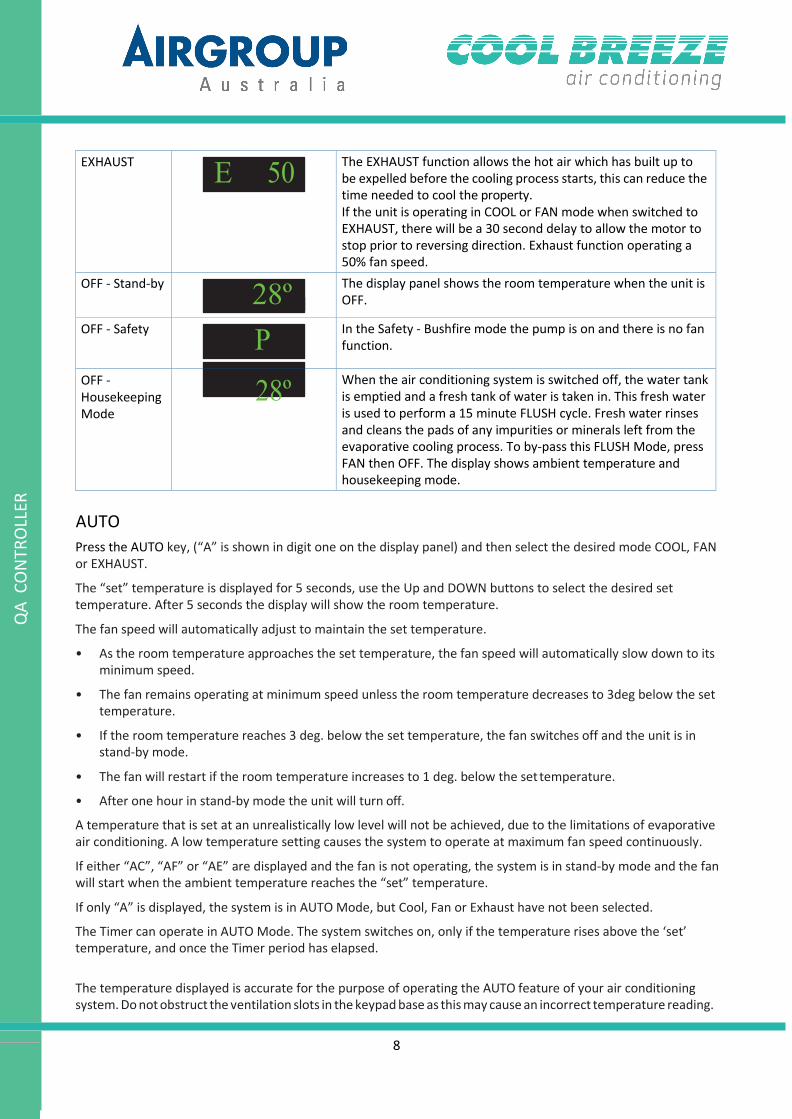
EXHAUST E 50 The EXHAUST function allows the hot air which has built up to be expelled before the cooling process starts, this can reduce the time needed to cool the property. If the unit is operating in COOL or FAN mode when switched to EXHAUST, there will be a 30 second delay to allow the motor to stop prior to reversing direction. Exhaust function operating a 50% fan speed.
OFF - Stand-by 28º The display panel shows the room temperature when the unit is OFF.
OFF - Safety P In the Safety - Bushfire mode the pump is on and there is no fan function.
OFF - Housekeeping Mode
28º When the air conditioning system is switched off, the water tank is emptied and a fresh tank of water is taken in. This fresh water is used to perform a 15 minute FLUSH cycle. Fresh water rinses and cleans the pads of any impurities or minerals left from the evaporative cooling process. To by-pass this FLUSH Mode, press FAN then OFF. The display shows ambient temperature and housekeeping mode.
AUTO Press the AUTO key, (“A” is shown in digit one on the display panel) and then select the desired mode COOL, FAN or EXHAUST.
The “set” temperature is displayed for 5 seconds, use the Up and DOWN buttons to select the desired set temperature. After 5 seconds the display will show the room temperature.
The fan speed will automatically adjust to maintain the set temperature.
• As the room temperature approaches the set temperature, the fan speed will automatically slow down to its minimum speed.
• The fan remains operating at minimum speed unless the room temperature decreases to 3deg below the set temperature.
• If the room temperature reaches 3 deg. below the set temperature, the fan switches off and the unit is in stand-by mode.
• The fan will restart if the room temperature increases to 1 deg. below the set temperature.
• After one hour in stand-by mode the unit will turn off.
A temperature that is set at an unrealistically low level will not be achieved, due to the limitations of evaporative air conditioning. A low temperature setting causes the system to operate at maximum fan speed continuously.
If either “AC”, “AF” or “AE” are displayed and the fan is not operating, the system is in stand-by mode and the fan will start when the ambient temperature reaches the “set” temperature.
If only “A” is displayed, the system is in AUTO Mode, but Cool, Fan or Exhaust have not been selected.
The Timer can operate in AUTO Mode. The system switches on, only if the temperature rises above the ‘set’ temperature, and once the Timer period has elapsed.
The temperature displayed is accurate for the purpose of operating the AUTO feature of your air conditioning system. Do not obstruct the ventilation slots in the keypad base as this may cause an incorrect temperature reading.

9
SAFETY (BUSHFIRE) MODE The SAFETY mode allows the water pump to continue to operate to keep the filter media wet while the fan is switched off to prevent smoke being drawn into the property.
To operate this mode do as follows”
• If the unit is Off press the “COOL” button twice. The letter “P” (flashing) will be displayed.
• If the unit is operating in COOL mode, press the COOL button again to enter SAFETY mode.
• To turn off SAFETY mode, press the COOL button again. The unit reverts to COOL mode and the “P” on the
keypad display will be replaced with a “C”.
WATER MANAGER PERIODIC DRAIN TIME The unique Coolbreeze Water Management System has been developed to ensure only fresh, filtered cool air enters the property while saving water and reducing maintenance requirements. The System has a default five hour drain cycle. This five hour drain cycle is adequate for most water supplies.
To change the drain cycle do as follows:
• Press OFF
• Press and hold AUTO button
• Press TIMER until required time is reached
• Release AUTO
• Press OFF
• Press AUTO. (“A” on the left of display will now disappear) The periodic drain cycle has now been altered to the displayed time.
It is advisable to have regular drain cycles to maintain water purity and cooling efficiency.
CALIBRATING THE TEMPERATURE SENSOR (Recommended for Service Technicians only)
When the unit is off, the ambient room temperature is displayed. If this temperature is not accurate, it can be re-set:
The temperature sensor pot is located on the right hand side of the keypad 15mm from the lower edge
Using a calibrated thermometer, compare the displayed temperature against the thermometer.
Use a small screwdriver to adjust the temperature sensor which is located on the lower right side of the control panel.
Place the screwdriver in the slot of the temperature sensor and turn several times (clockwise to increase the reading), there is a time lag between the turning of the pot and the keypad display changing so wait for the temperature reading on the keypad to change. This process may need to be repeated several times before the desire temperature is attained.
QA CO
NTRO
LLER

10
QC
CO
NTR
OLL
ER
QC AUTO CONTROLLER INSTRUCTIONS
MAIN CONTROLS Indicates WIFI connection
COOL OFF FAN TIMER
EXHAUST AUTO
DOWN UP
Reset button (see pg 14)
Function Screen View Description COOL
C 50 In COOL mode, both the fan and water pump operate to provide cool airflow throughout the property. Airflow can be adjusted from 1% to 100% using the UP and DOWN buttons. When COOL is selected the unit enters a pre- wash cycle. This 5 minute cycle washes dust and pollen off the filter media. (Bypass the wash cycle by pressing FAN then COOL and this is followed by a “drain after pre-wash”. See QC controller setting mode S2). Display shows Cool function at 50% fan speed.
AUTO COOL AC 23° The unit is set to run automatically to a pre-set temperature. See page 11 for details of setting this mode.
TIMER 7.57.28
The TIMER function switches the system on or off. Pushing the TIMER button adds 30 minutes to a maximum of 99 hours. If the unit is OFF when the TIMER is selected, the unit will automatically start in COOL mode when the timer counts down to zero. If the unit is operating in either COOL, FAN or EXHAUST mode the unit will switch off when the timer reaches zero.
FAN F 50
In FAN mode, the water pump is not activated and the unit will deliver ambient temperature air from outside throughout the property. Airflow is adjusted using the Up and DOWN buttons. Fan operating at 50% fan speed.
QC Series

11
QC
CON
TRO
LLER
AUTO
Press the AUTO key, (“A” is shown in digit one on the display panel) and then select the desired mode COOL.
The “set” temperature is displayed for 5 seconds, use the Up and DOWN buttons to select the desired set temperature. After 5 seconds the display will show the room temperature.
The fan speed will automatically adjust to maintain the set temperature.
• The fan will run at maximum fan speed if the room temperature and set temperature are greater than 3 degree differential.
• As the room temperature drops to within 3 degrees of the set temperature the fan will slow down.
• Once the room temperature reaches 3 degree below the set temperature the fan will turn off.
• The unit will continue to circulate water so that if the room temperature rises. The fan comes back on it will circulate cool air.
• Should the fan not come back on after 1 hour the unit will drain the water and be in a standby function.
A temperature that is set at an unrealistically low level will not be achieved, due to the limitations of evaporative air conditioning. A low temperature setting causes the system to operate at maximum fan speed continuously.
If either “AC are displayed and the fan is not operating, the system is in stand-by mode and the fan will start when the ambient temperature reaches the “set” temperature.
If only “A” is displayed, the system is in AUTO Mode, but Cool, Fan or Exhaust have not been selected.
The Timer can operate in AUTO Mode. The system switches on, only if the temperature rises above the ‘set’ temperature, and once the Timer period has elapsed.
The temperature displayed is accurate for the purpose of operating the AUTO feature of your air conditioning system. Do not obstruct the ventilation slots in the keypad base as this may cause an incorrect temperature reading.
EXHAUST E 50 The EXHAUST function allows the hot air which has built up to be expelled before the cooling process starts, this can reduce the time needed to cool the property. If the unit is operating in COOL or FAN mode when switched to EXHAUST, there will be a 30 second delay to allow the motor to stop prior to reversing direction. Exhaust function operating a 50% fan speed.
OFF - Stand-by 21º The display panel shows the room temperature when the unit is OFF.
OFF - Safety P In the Safety - Bushfire mode the pump is on and there is no fan function. For setting details see page 12.
OFF - Housekeeping Mode
- 28º When the air conditioning system is switched off, the water tank is emptied and a fresh tank of water is taken in. This fresh water is used to perform a 15 minute FLUSH cycle. Fresh water rinses and cleans the pads of any impurities or minerals left from the evaporative cooling process. To by-pass this FLUSH Mode, press FAN then OFF. The display shows ambient temperature and housekeeping mode.
QC CO
NTRO
LLER

12
QC
CO
NTR
OLL
ER
Indicates WiFi connection
Reset Button, see pg. 14
SAFETY (BUSHFIRE) MODE The SAFETY mode allows the water pump to continue to operate to keep the filter media wet while the fan is switched off to prevent smoke being drawn into the property.
To operate this mode do as follows”
• If the unit is Off press the “COOL” button twice. The letter “P” will be displayed.
• If the unit is operating in COOL mode, press the COOL button again to enter SAFETY mode.
• To turn off SAFETY mode, press the COOL button again. The unit reverts to COOL mode and the “P” on the
keypad display will be replaced with a “C”.
QC CONTROLLER SETTINGS MODE To reach the SETTINGS menu, firstly turn off the controller. Then press and hold the OFF and TIMER. Release the OFF key followed by the Timer key. The display will now show 5–1 5
To navigate the SETTINGS menu, use the following buttons:
EXHAUST
(Down - Navigate Menu) DOWN
(Change Value)
AUTO (Up - Navigate Menu)
UP (Change Value)
QC Series
13
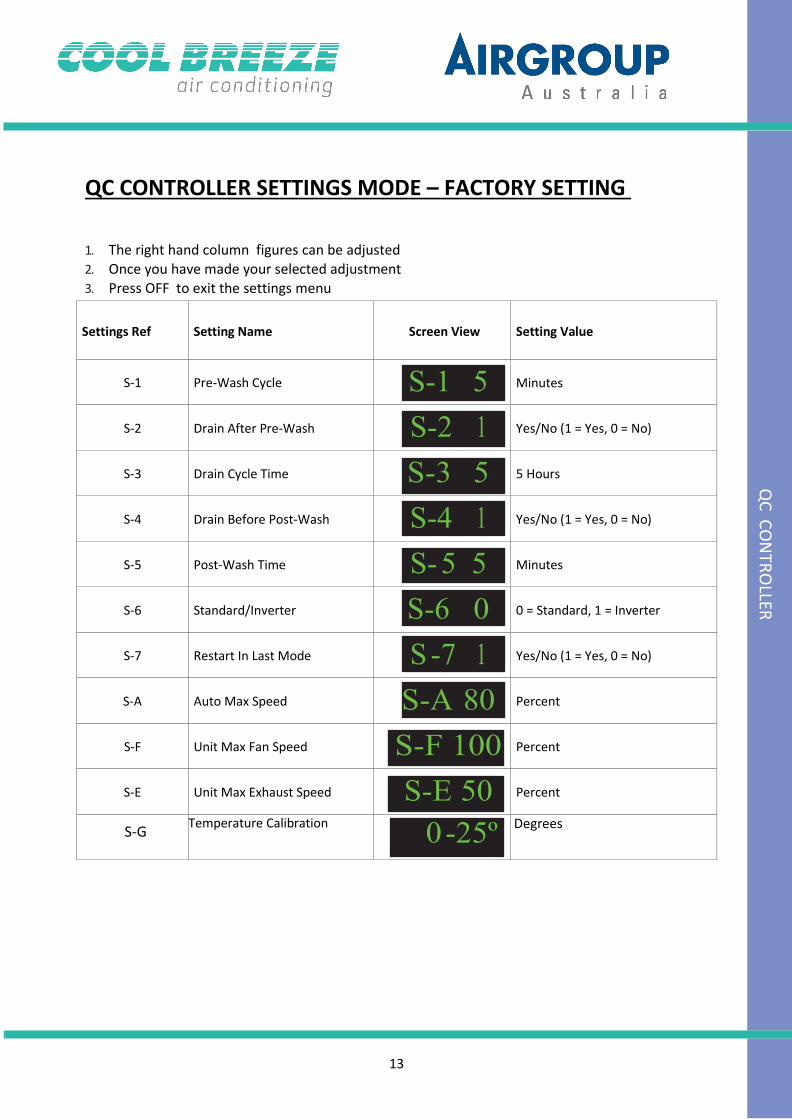
QC CONTROLLER SETTINGS MODE – FACTORY SETTING
1. The right hand column figures can be adjusted 2. Once you have made your selected adjustment 3. Press OFF to exit the settings menu
Settings Ref
Setting Name
Screen View
Setting Value
S-1
Pre-Wash Cycle S-1 5
Minutes
S-2
Drain After Pre-Wash S-2 1
Yes/No (1 = Yes, 0 = No)
S-3
Drain Cycle Time S-3 5
5 Hours
S-4
Drain Before Post-Wash S-4 1
Yes/No (1 = Yes, 0 = No)
S-5
Post-Wash Time S- 5 5
Minutes
S-6
Standard/Inverter S-6 0
0 = Standard, 1 = Inverter
S-7
Restart In Last Mode S -7 1
Yes/No (1 = Yes, 0 = No)
S-A
Auto Max Speed S-A 80
Percent
S-F
Unit Max Fan Speed S-F 100
Percent
S-E
Unit Max Exhaust Speed S-E 50
Percent
S-G Temperature Calibration 0 -25º Degrees
QC CO
NTRO
LLER
14
QA
CO
NTR
OLL
ER
Indicates WiFi connection
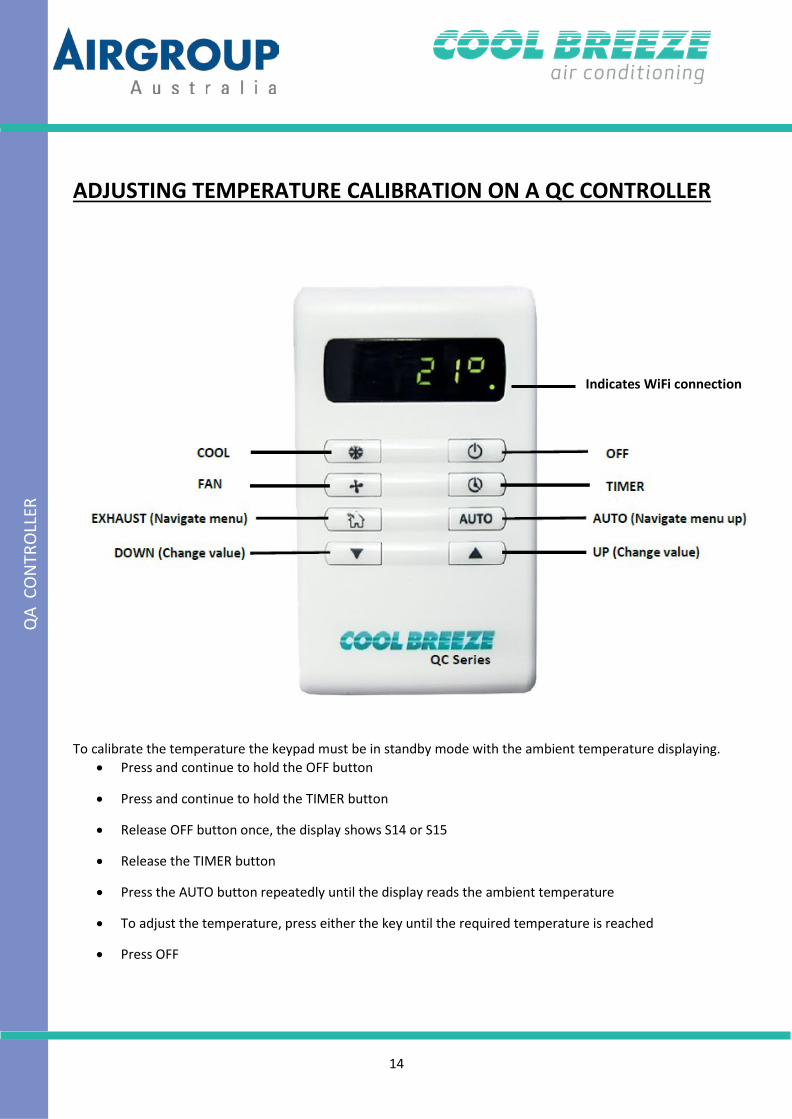
ADJUSTING TEMPERATURE CALIBRATION ON A QC CONTROLLER
To calibrate the temperature the keypad must be in standby mode with the ambient temperature displaying.
• Press and continue to hold the OFF button
• Press and continue to hold the TIMER button
• Release OFF button once, the display shows S14 or S15
• Release the TIMER button
• Press the AUTO button repeatedly until the display reads the ambient temperature
• To adjust the temperature, press either the key until the required temperature is reached
• Press OFF

15
QC
CON
TRO
LLER
Indicates WiFi connection
* Reset Button
SETTING UP COOLBREEZE CONNECT
To set up CoolBreeze Connect, you will need your QC Controller, your home Wi-Fi details (name and password) and a Wi-Fi-enabled device (a laptop, smartphone or tablet).
Visit www.connect.coolbreeze.com.au, or download the CoolBreeze Connect App from the Apple App Store or Google Play Store.
WiFi connection must be made within 90 seconds otherwise the procedure must start again
To register, you will be required to set a User Name (email address) and a Password.
Note this information in the blue box at the bottom of this page for future reference.
Once registered, follow the instructions online or in the app, to connect your CoolBreeze.
PREPARE YOUR QC CONTROLLER Once prompted online or in the app, turn off the controller. Then press and hold the OFF and COOL buttons simultaneously.
The screen should now show CBC-AP (CoolBreeze Connect Access Point)
You can now continue with the set up process, as directed by the website or app.
*Should the display loose the green dot – press the reset button on the side of controller
STORE YOUR LOG-IN DETAILS WI-FI NAME: WI-FI PASSWORD: CBC PASSWORD:
cbc-ap
QC Series
QC CO
NTRO
LLER

16
GENERAL INFORMATION: APPLICABLE TO ALL CONTROLLERS • If the unit appears to surge at times, check that strong wind drafts are not the cause. A strong gust of wind may
cause the fan to race momentarily as it is ‘wind assisted’.
• At times of high humidity, cooling performance is diminished. Ensure adequate windows are open or operate in fan only mode.
• The cooling ability of a system is not only related to the efficiency of the unit design, but also to the duct design and professional installation. Insulated ceilings will lower internal temperatures significantly over non- insulated ceilings.
• During operation in Cool Mode, water discharges from the overflow pipe. This water has been re-circulated through the pads many times. The evaporation process results in a build-up of minerals and solids in the water. This water can be channelled onto the garden but may be harmful to some plants. Test the water on plants in small amounts before fully discharging into the garden. This water is not suitable for animal or human consumption.
• Never operate the system if the room vents have been closed off. This may cause overheating and damage to the motor.
• At the time of initial start-up an odour may be detected. This odour is characteristic of filter media pads. It is neither harmful nor particularly unpleasant and will dissipate within 2-3 days. The fan motor may also have an ‘electrical’ type smell for a short period as it heats up initially, and residual varnish is ‘burnt off’ the motor’s surface.
• When the COOL mode commences, the tank is filled with water. This takes approximately 90 seconds, during which time the pump remains switched off. When the pump starts, water is pumped up into the filter media pads which quickly lowers the water level. Dependant on the water pressure supplying the unit, for a short period of up to one minute the water being pumped up into the filter pads may exceed the amount of fresh water flowing into the base. The pump may make an intermittent “sucking” noise until the water level is balanced. This is not harmful to the pump.
• The filter media pads are the heat exchange mechanism which enables the cooling process. They need to be maintained and checked periodically. The life of the pads is governed by the quality of the water supplied to the unit.
• Should the keypad be illuminated but there is no airflow switch off the unit and call for a service agent.
GENERAL INFORMATION & MAINTENANCE
PRE SEASON MAINTENANCE We recommend an annual service, to keep your system in top operating condition.
The Service Centre telephone number together with the unit size and serial number are recorded on the front and back of this guide. Electrical components to be maintained by qualified service people.
4. Isolate power at property’s main supply board. Disconnect unit’s power plug from the mains supply. If cable damaged have it replaced by qualified person.
5. Remove the lid.
6. If necessary, clean the sump reservoir.
7. Close the water shut-off valve. Remove and clean shut-off valve filter. Open shut-off valve.
8. Turn on the power. Operate the system in COOL Mode, check that the drain valve closes and the tank fills.

17
9. Adjust the water level if necessary. Ideally this level should be 10mm below the overflow.
10. Check that the water is being evenly distributed over the pads and that there are no obstructions in the water distributor, located above the pads.
11. It is recommended that the hoses and washers on the drain valve are replaced bi-annually.
12. Replace the lid and secure it by firmly tightening the lid bolts. Do not over-tighten.
SHUT-OFF VALVE AND FILTER
END OF SEASON MAINTENANCE At the end of each season, carry out the following steps:
1. Isolate the power to the air conditioner which will be located in the meter box. An internal isolator is located on the electrical box inside the unit.
2. Turn off the water supply to the unit.
3. Remove the lid and pads. Carry the pads to the ground and gently hose down both sides of the pads to remove any dust or pollen.
4. Gently but thoroughly clean the sump reservoir of the unit. A mild detergent may be used, but no solvent type product which may react with the polymer.
5. Replace the lid and ensure that it is securely fastened.
6. In areas where winter temperatures go below freezing the supply tap/filter is to be drained of water at the end of the summer season.
IMPORTANT INFORMATION ON MAINTENANCE NEEDS When units are installed in certain environments for example, in bakeries, textile factories, paint shops or similar places, servicing will need to be done more frequently. When pads are clogged with lint or flour or other airborne contaminants the airflow through the pads is restricted. This will cause the motor to over- heat which could lead to failure of the motor fan assembly.

18
TROUBLESHOOTING GUIDE
Fault Action No display on Control Panel Check circuit breaker or fuse in meter-box
If circuit breaker and fuses are ON, call for service Fan operating but blowing warm air Check that Control Panel is set to Cool or Auto Cool
Turn unit off and see if water runs from drain pipe (wait 5- 10 minutes to drain)
NO - Check the water supply tap is turned on YES – call for service Water runs continuously from unit while operating
Turn unit on and off once per hour – allowing 20 minutes between restarting. Repeat this 2 – 3 times to flush debris from unit.
If water continues to run - call for service
Water runs continuously from unit when unit is turned off
Turn off water isolation tap – call for service
No airflow Check if Control Panel display is lit:
No - check circuit breaker in meter-box Yes – call for service
QA controller only:
Control Panel may be set in Auto mode (Display shows AC, AF or AE)
Control Panel may be set in TIMER mode (Display shows numbers counting down each minute)
To reset Control Panel modes, switch off circuit breaker for 10 seconds and turn on again.
Keypad shows unit is operating but there is no airflow
If the motor is fitted with a manual thermistor the mains power must be reset to the unit by turning the circuit breaker off . The motor will need to be below 80 degrees prior to resetting. Wait for 1 hour prior to resetting. If fault re-occurs call for Service.
Moisture on floors and furnishings Make sure sufficient doors and windows open to allow adequate airflow.
For service or warranty support, phone 1300 364 220 or visit www.coolbreeze.com.au For service calls attended during the warranty period:
1. Provide the service person with proof of purchase, i.e. Invoice from installing dealer.
2. Where no fault has been found, service charges will be payable at the standard service rate.

19
COOLBREEZE PRODUCT WARRANTY TERMS AND CONDITIONS
AUSTRALIA ONLY FOR MODELS PURCHASED FROM 01 OCTOBER 2016 This AirGroup Australia (the Manufacturer) Warranty is provided in addition to and in conjunction with the statutory warranties contained in the Australian Consumer Law and provided to you as the Purchaser (the Consumer) of an AirGroup Australia product (the Product).
CoolBreeze Air-conditioning units are the Product covered under this warranty from the date of purchase for a period of:
Residential Installations: 5 years Parts & Labour
10 years Cabinet and Structural
Commercial Installations: 2 years Parts & Labour
10 years Cabinet and Structural
TERMS AND CONDITIONS OF THE WARRANTY COVER Should a defect or fault occur to the product due to faulty material or workmanship within the period of the Warranty, AirGroup Australia will repair or replace the defective Product or defective part for the original Purchaser of the Product. Such repairs or replacement will cover parts and labour only subject to the conditions mentioned below. The decision as to whether to repair or replace a defective Product or defective part of a Product will be determined at the sole discretion of AirGroup Australia.
This Warranty covers only the CoolBreeze evaporative air-conditioning unit and does not cover any ducting or air distribution components, electrical or plumbing.
This Warranty does not cover a defect to the product if:
1. It is caused by accident, neglect, vandalism and/or misuse.
2. It is caused by an act of nature, such as wind, rain and/or lightning.
3. It is caused by animals, birds, insects, plants and/or any other natural cause.
4. It is caused by particles, matter or other factors in the installed environment, having an adverse effect on the Product.
5. It is caused by instability of electrical or water supply, outside of the product specified ranges.
6. Unauthorised modifications and use of accessories or components not approved by the Manufacturer.
7. It has not been installed by a qualified person (who meets the Manufacturer’s standards), in the manner prescribed by State or local regulations and licenses, and the Manufacturer’s specifications.
8. The defect is caused by factors other than normal use in accordance with the owner’s manual.
This Warranty does not cover:
1. Programming or set up of the product or controls, which can be done by the Consumer; (as provided in the owner’s manual).
2. Any problem and/or performance issues arising from faulty, incorrect and/or poor installation.
3. Inadequate sizing or not fit-for-purpose design and supply of Product.
4. Products that have been re-located from the original place of installation.
5. Noise and/or vibration that is considered by an authorized AirGroup Australia representative or agent (acting reasonably) to be normal operation.

20
6. Any costs and/or additional labour associated with gaining access to or working on a unit installed in restricted or unsafe locations including multi-storey homes.
7. Repairs outside normal Monday to Friday business hours;
8. Consequential damage and/or loss of any type whatsoever, whether such loss was incurred directly or indirectly.
9. Filter pads and consumables that are subject to operational wear and tear are specifically not included. This includes scale and lime build-up caused by poor water quality.
10. Changes in appearance to the Product or components, unless they have a significant effect on unit function.
PLACE OF SERVICE For products installed further than 25 km from an AirGroup Australia Designated Service Agent (DSA), a supply part only warranty applies from the Manufacturers warehouse (Perth or Melbourne). Diagnosis of the required part/s needs to be done by a suitably qualified person, before any parts will be supplied. Transport of goods and any costs associated with repairs or replacement of parts in the Product shall be borne by the Purchaser. Fitting of parts and repairs must be done by a suitably qualified and licensed person, or under the direct guidance of the Manufacturer.
AirGroup Australia reserves the right to decline to comply with its obligations under this Warranty if regular maintenance service is not carried out in accordance with recommendations in the owner’s manual.
Where you make a request for any form of service or repair under the Warranty, and where no defect is found by the AirGroup Australia DSA, or the defect is outside the terms and conditions of the original warranty, the Purchaser will be liable for all costs incurred by the AirGroup Australia service provider in complying with your request, including, but not limited to, all labour, travel and administration expenses.
HOW TO MAKE A CLAIM UNDER THIS WARRANTY: Subject to the terms and conditions of this Warranty, if you become aware of a defect in your Product that is covered under this Warranty, please contact the AirGroup National Service Hotline 1300 364 220.
Original, legible proof of purchase documentation (Dealer’s invoice and/or receipt of payment) MUST be provided to the Manufacturer, or the AirGroup Australia DSA or their designated service technician, to access any Warranty services or parts. Supporting information such as the Dealer and installers details and the Product serial number may be required.
COSTS OF AND INCIDENTAL TO A CLAIM UNDER THIS WARRANTY: Any remedial work undertaken by AirGroup Australia or one of its approved representatives or agents will be conducted at AirGroup Australia’s sole expense, subject to the terms and conditions and exclusions contained in this Warranty. To the extent permitted by law, AirGroup Australia will not reimburse the Purchaser for any expenses incurred in applying for a remedy under this Warranty.
AUSTRALIAN CONSUMER LAW DISCLAIMER: Our goods come with guarantees that cannot be excluded under the Australian Consumer Law. You are entitled to a replacement or refund for a major failure and for compensation for any other reasonably foreseeable loss or damage. You are also entitled to have the goods repaired or replaced if the goods fail to be of acceptable quality and the failure does not amount to a major failure.
TEN YEAR EXTENDED WARRANTY (MODELS PURCHASED FROM 01 OCTOBER 2016 ONLY) In addition to the above standard five year parts and labour warranty, AirGroup Australia will extend the Warranty period to a maximum of ten years for parts and labour for Heritage and Cascade models only and is limited to residential installations only. This extended warranty is provided subject to the following terms and conditions:
1. That the Purchaser registers for the extended warranty by completing the Warranty Extension Certificate (supplied with the Product in the Owner’s manual booklet) and posting it to AirGroup Australia within 6

months of purchase of the CoolBreeze air conditioner product.
2. That within the fifth year from purchase, an Extension Service is carried out by AirGroup Australia or their designated service agent.
3. This Warranty Extension Service will be charged to the Purchaser by AirGroup Australia. The service will be carried out by an AirGroup Australia designated service agent.
4. The completion and payment for the Warranty Extension Service will automatically extend the Warranty by 2 years to a total of 7 years.
5. That within the seventh year from purchase an Extension Service is carried out by AirGroup Australia or their designated service agent.
6. This Warranty Extension Service will be charged to the Purchaser by AirGroup Australia. The service will be carried out by an AirGroup Australia designated service agent.
7. The completion and payment for the Warranty Extension Service will automatically extend the Warranty by 3 years to a total of 10 years.
8. The Warranty Extension Services can be booked online at www.coolbreeze.com.au.
This Extended Warranty is not transferable and cannot be sold, assigned or transferred by the Purchaser to any other person.
Failure to register your CoolBreeze unit within 6 months of the purchase date or failure to have the Warranty Extension Services during the fifth and seventh year will void the Extended Warranty, and the Standard 5 years parts and labour warranty will apply.
AIRGROUP AUSTRALIA 28-30 Division Street, Welshpool, Perth
Tel. 08 9350 2200 Website : www.coolbreeze.com.au
FM2514/0818