owner's manual - aerobask · owner's manual e1000 for simulation only! do not use for...
TRANSCRIPT

Owner's Manual
E1000
FOR SIMULATION ONLY!DO NOT USE FOR REAL FLIGHT!

THE NEXT GENERATION
Thanks a lot for purchasing the newest and most complex Aerobask product ever, the new Epic E1000 Skyview. First of all you will notice a high fidelity simulation of the Dynon SkyView. No longer we are confined to X-Plane's default instruments, but can offer avionics which do the modern Epic aircraft justice! The SkyView was completely custom-coded in SASL by Lionel Zamouth.
The main features of the Aerobask Epic E1000 3.0 are:
● High quality 3D model with high resolution textures (4K), ambient occlusion, specular and normal mapping
● Realistic simulation of the Dynon SkyView – no default instruments used, all custom-coded.Including Touch Control Operation – SID/STAR – Airways – Custom Weather – TCAS.
● Fully functional virtual 3D cockpit, with a different interior design based on the selected livery
● Windshield with reflections, rain and ice● Configurable passengers and luggage● Many custom sounds: rolling, gear, flaps, canopy,
vocal alert, callout, …● 3D surround engine sound
On behalf Jean-François Edange (liveries) and Mario Donick (owner's manual) we wish you lots of fun with our product!
TABLE OF CONTENTS
REQUIREMENTS & INSTALLATION 3
PART I: FEATURES 4
SPECIFICATIONS 5
THE DYNON SKYVIEW 6
POPUP PANELS 7
WEATHER EFFECTS & EQUIPMENT 8
PART II: INSTRUCTIONS 9
PANEL OVERVIEW 10
PEDESTAL 11
OPTION PANELS 12
MASTER SWITCHES 13
THE MVP50 EIS 14
THE GARMIN GNC255 RADIOS 15
THE S-TEC 5000 AUTOPILOT 16
SPECIAL FEATURES 17
FREQUENTLY ASKED QUESTIONS 18
Please note that the Dynon SkyView is described in its own manual which you can find in the DOCUMENTS folder of the aircraft.
2
Stephane Buon& Lionel Zamouth

REQUIREMENTS & INSTALLATION
Our Aerobask Epic E1000 requires X-Plane 10.45 (64-bit) or higher. This aircraft is not compatible with X-Plane 9 or the 32-bit version of X-Plane 10.
Unzip the downloaded file and copy the directory to the "Aircraft / General aviation" folder of your X-Plane copy.
Performance Optimization
This product has been optimized for good performance. However, the aircraft uses several high definition liveries (4096 px) for a high graphical quality and complex custom programming for the avionics. We recommend at least 2 GB of RAM.
In case of low FPS, you can reduce graphic options in the main program (esp. switching off HDR, reducing anti aliasing, lowering the drawing distance etc.) If you use AI planes, select only simple aircraft without 3D cockpit and without plug-ins.
Custom Commands
The Aerobask Epic E1000 features complex avionics. To make operation of the avionics easier for various kinds of hardware setups, we have created 66 custom commands which you can assign to buttons or keyboard. Some available custom commands are shown on the right; more are available.
Please refer to the X-Plane manual for information on how to setup buttons and keys in X-Plane and how to assign custom commands to them.
3

PART I
FEATURES

5
SPECIFICATIONS

THE DYNON SKYVIEW
Our Aerobask Epic E1000 is equipped with a detailed simulation of the Dynon SkyView. The E1000's SkyView does not use X-Plane's default instruments anymore. Instead the SkyView has been developed from scratch. Lionel Zamouth utilized the SASL plugin for achieving an unmatched degree of functional detail and readability.
It is no exaggeration to state that the Aerobask Epic E1000 features the most detailed simulation of a SkyView currently available in any home-use flight simulator.
The three displays on the panel are fully configurable to be used as Primary Flight Display (PFD) or Navigation Display (ND). The virtual screen resolution is the same as in the real SkyView, so the displays are very readable even in the 3D cockpit. However, by clicking on the displays, you can also show them as popup windows which enhances readability even more.
For details on the SkyView, please refer to the separate SkyView manual.
6

POPUP VIEWS
Ensuring good readability of virtual displays one a desktop simulator is not an easy challenge and strongly depends on your viewpoint. The higher the simulated display resolution (in case of the SkyView 1024 x 600 pixels), the more condensed the 3D view gets when you don't change your viewpoint. Actually this works as in reality, where readability of a certain resolution also changes with display size and viewpoint.
Therefore, the Aerobask Epic E1000 offers you to optionally show the SkyView displays, the EIS, the radios and the autopilot as popup windows. Just click on any of the instruments to make the popup appear. Click on the center of each popup to make it disappear.
You can move and resize the popups using your mouse and close them using the small “x” icon on their upper right corner.
7
WEATHER EFFECTS & EQUIPMENT
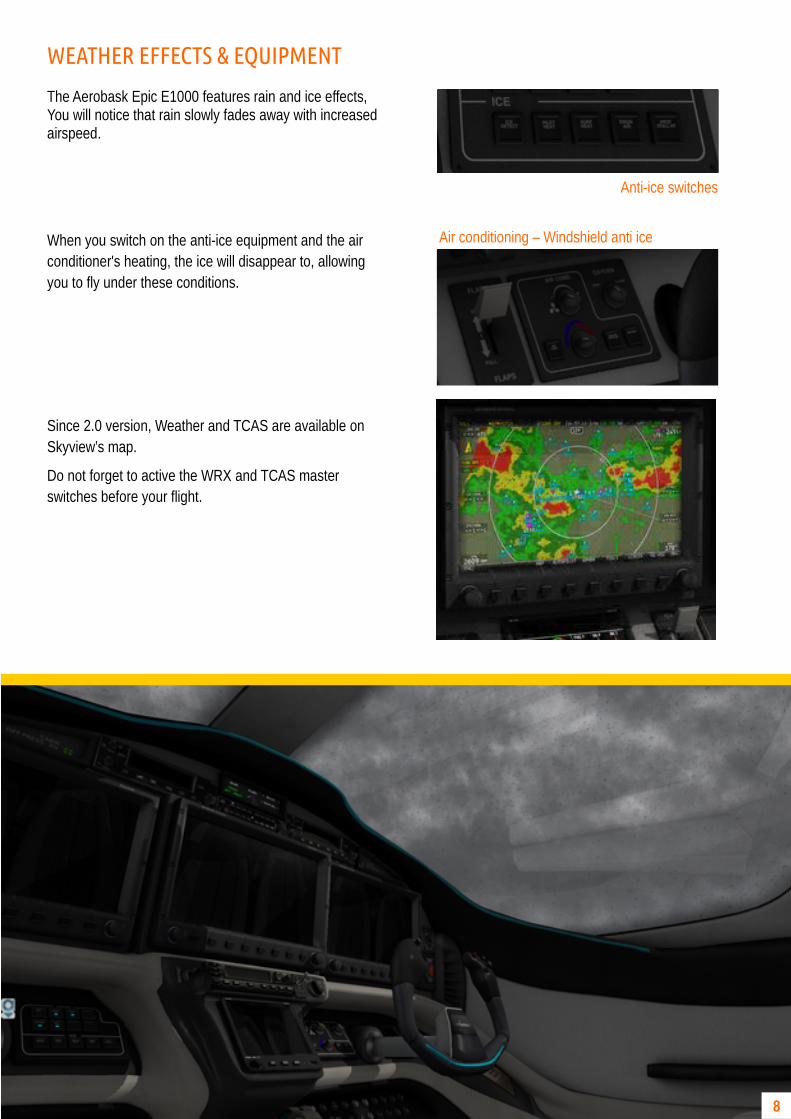
The Aerobask Epic E1000 features rain and ice effects, You will notice that rain slowly fades away with increased airspeed.
When you switch on the anti-ice equipment and the air conditioner's heating, the ice will disappear to, allowing you to fly under these conditions.
Since 2.0 version, Weather and TCAS are available on Skyview’s map.
Do not forget to active the WRX and TCAS master switches before your flight.
8
Anti-ice switches
Air conditioning – Windshield anti ice

PART II
INSTRUCTIONS

10
Pilot PFD
PANEL OVERVIEW
If you own the Aerobask Epic Victory, many aspects of the Epic Victory panel may look familiar to you.
Backup Instruments
MFD Co-pilot PFD
Fuel Tank Selector
Throttle / PropCondition
levers
GNC255 Radio
GNC255 Radio
S-TEC 5000Autopilot
Indicators (Gear, Systems, Flaps)
Flaps
MVP50 EIS
Climate Controls
Main Switch Panels
Standby Compass
GMA350 Audio Panel
IndicatorCabin diff. press
11
PEDESTAL
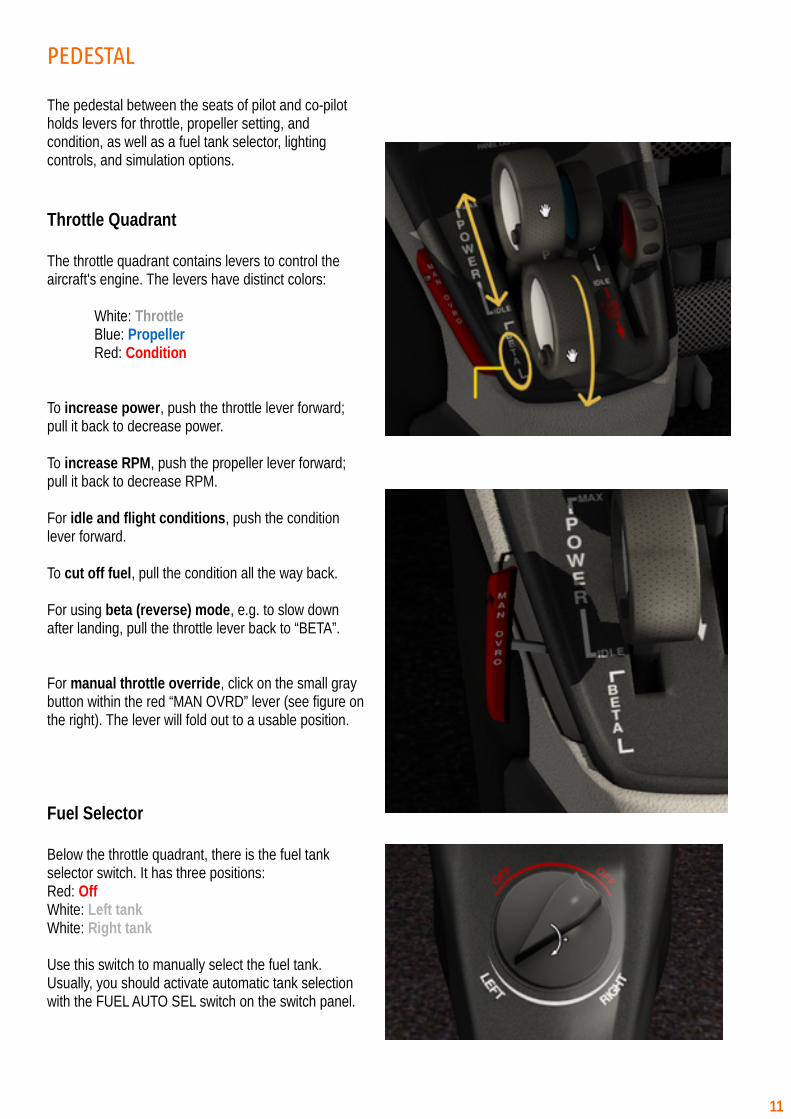
The pedestal between the seats of pilot and co-pilot holds levers for throttle, propeller setting, and condition, as well as a fuel tank selector, lighting controls, and simulation options.
Throttle Quadrant
The throttle quadrant contains levers to control the aircraft's engine. The levers have distinct colors:
White: ThrottleBlue: PropellerRed: Condition
To increase power, push the throttle lever forward; pull it back to decrease power.
To increase RPM, push the propeller lever forward; pull it back to decrease RPM.
For idle and flight conditions, push the condition lever forward.
To cut off fuel, pull the condition all the way back.
For using beta (reverse) mode, e.g. to slow down after landing, pull the throttle lever back to “BETA”.
For manual throttle override, click on the small graybutton within the red “MAN OVRD” lever (see figure on the right). The lever will fold out to a usable position.
Fuel Selector
Below the throttle quadrant, there is the fuel tank selector switch. It has three positions:Red: OffWhite: Left tankWhite: Right tank
Use this switch to manually select the fuel tank. Usually, you should activate automatic tank selection with the FUEL AUTO SEL switch on the switch panel.

12
OPTION PANELS
The option panels allow you to hide or show yokes and reflections, to set weight & fuel, and to start or stop a ground power unit. To open the option panels, first click the Aerobask logo on the left of the screen, then select either “Options”, “Weight & Fuel”, or “GPU Control”.
OptionPageSelect
Start/Stop GPU
Open/Close aircraft door
Click each seat to toogle
between empty, adult, or child. Click
one of the bags to select
amount of luggage.
Note that the door has to be open prior to
selecting.
Select amount of fuel
Add/Remove static
elements

MASTER SWITCHES
Similar to the Epic Victory, the aircraft's main switches are placed behind the pilot's yoke, albeit in a more simple layout. You can click the the yoke to hide it, for better access to the switches.
On the left side, you find switches for starting up the aircraft and for initializing various systems. On the right side, there are switches for deicing.Behind the levers (Throttle, Condition and fuel), there are knobs for cabin lightning.
To start the aircraft, use the fuel tank selector on the pedestal to select the fuel tank with the larger amount of fuel. Switch on the batteries and avionics with “Batt1”, “Batt2” and ''Avionics''. Check levers position : Throttle, Prop and Condition in IDLE position.Press “Fuel Pump” to switch on the fuel pump.Finally, press and hold “Start” until NG > 10%, then enable the ''Igniter switch''.
After start, press “Starter Gen” is pressed. For later use of autopilot and electric trim, you also need to press the “Autopilot” and “Trim” master switches. Otherwise, autopilot and trim won't work. Please note that this autopilot switch is not the same as the AP button you can find directly on the autopilot. Finally, you should also enable “Press Air” to ensure the cabin gets pressurized properly, and TCAS & WRX switches for safe.
13
Batteries1&2
Avionics Master
FuelPump
Pusher
LandingLight
TaxiLight
StrobeLights
NavigationLightsIce light
Detection
PropHeat
InertSep
WindshieldHeat
Pitot Heat
Igniter Pressurize Cabin
Starter Generator
Automatic Fuel Tank Selection
Autopilot Master
Trim Master
Oxygen
EngineStart
Dump Cabin
Pressure
De iceBoot
WRX& TCASMaster

THE MVP50 EIS
In the Epic E1000, engine and system information are not displayed on the Dynon SkyView. Instead, a dedicated instrument is used for that, the MVP50 engine information system (EIS).
The E1000's MVP50 is realistic. For example, if you exceed the maximal values of Torque or ITT, the gauges will be shown in red color, to make you aware of that fact.
Please note that in version 1.0.x of the Aerobask rendition of the MVP50, only the main page is available and the EXIT and MENU buttons are inactive. Future free updates will add additional pages.
14
AnnunciatorsEngine Status
Fuel & Oil Status
Clocks
Voltage &Amperes
Fuel Flow & Remaining Fuel
Cabin Air Temperature
Outside Air Temperature
Test Annunciators

THE GARMIN GNC255 RADIOS
Our Epic E1000 Skyview is equipped with two Garmin GNC255 radios for controlling COM and NAV frequencies. One radio is above the pilot's PFD, the second one is above the co-pilot's PFD.
Click the COM knob to power on the device (please note that avionics needs to be switched on first.) The display either shows COM or NAV; you can toggle this with the C/N button. If a given frequency has a published name (such as NTTM ATIS), it is shown beneath the frequency.
Use the FUNC button to toggle between traditional and 8.33 Khz channel spacing.
The other buttons of the GNC255 are not simulated in this version of the aircraft.
To control the audio output of the radios, use the Garmin GMA 350 audio panel, located on the pedestal, below the MVP50 and above the throttle. Blue triangular LEDs above the various audio source buttons (such as COM1, NAV1, etc.) indicate that you will hear the related audio source. Press the button to mute the respective source; press again to switch it on.
15
Click: Power-on
Toggle8.33 Khz
COM spacing
ToggleCOM/NAV
Name of selected COM
frequency
Toggle Active/Standby
Turn to change standby
frequency
GMA350

THE S-TEC 5000 AUTOPILOT
The Genesys S-TEC 5000 autopilot device is situated below the center display.
● AP: This button activates or de-activates the autopilot.
● FD: This button shows or hides the flight director bars on the PFD. The flight director shows you the direction and altitude you need to fly in order to reach a set target heading and target altitude.
● YD: This button activates or de-activates the yaw damper.
● HDG: This button activates the autopilot's heading hold mode. The autopilot will follow the heading bug you set on the PFD's HSI.
● NAV: This button activates the autopilot's navigation mode. The autopilot will follow the active navigation source. Change the navigation source with the „HSI SRC“ softkey in the PFD menu.
● APR: This button activates the autopilot's approach mode. Use this button for capturing the localizer and glideslope of an ILS approach.
● LVL: This button activates the autopilot's level mode, in which the autopilot will level the wings of the plane.
● IAS: This button activates the IAS hold mode. The autopilot will try to hold the indicated airspeed set on the PFD's speedtape.
● VS: This button activates the vertical speed mode. The autopilot will try to climb or descend with the speed selected with the “UP/DN” buttons. The autopilot will climb or descend to the altitude pre-selected with the “ALT SEL” knob.
● ALT: This button activates the altitude hold mode. The autopilot will hold the current or pre-selected altitude.
● MNU: – not used in simulation –
● ALT SEL: This knob is used to pre-select an altitude for the autopilot's VS and ALT modes.
16

SPECIAL FEATURES
Stick Pusher
The Epic E1000 features a stick pusher. When the aircraft notices that it is about to stall, the yoke will be pushed forward automatically, in order to lower the aircraft's nose.This should increase speed and therefore prevent the stall.
Torque Limiter
Usually, engine torque is watched by your aircraft systems, to prevent overtorque. You can enable or disable the overtorque limiter in the Options menu.
If the torque limiter is disabled, be careful of engine overtorque.
Manual Throttle Override
Under normal conditions, the power lever (throttle) is controlled by an ECU system. If this systems failed, you can manually control the throttle.
Be careful to not damage the engine!
17
FREQUENTLY ASKED QUESTIONS
The plane is shaking on the ground! What can I do?
Open X-Plane's “Operations and warning” settings and increase the number of models per frame to 3 or 4. Also, make sure that your FPS is at least 20. If needed, reduce your X-Plane rendering settings.
The plane takes very long to load!
When loading, the aircraft generates its custom database from all available data in your X-Plane scenery folder. To reduce this time, you can slim your custom scenery folder by moving the scenery folders not used in the current flight to a different location.
When engaging the autopilot, the plane constantly banks from left to right or up/down!
Check your joystick setting. Trims should not be assigned to an axis. Assign the trim to keys or to your joystick thumb hat, not to an axis. Reset the rudder trim to center, to avoid left/right banking. Make sure that the autopilot is engaged under normal flight conditions. For example, if your IAS is too high or too low, or if you are trying to fly too high (the E1000's ceiling is 34,000 ft), X-Plane's autopilot will have problems to follow your commands.
How does the pressurization work?
When you press the “PRESS AIR” switch on the switch panel, cabin pressure will climb up to 7,500 ft. If you don't activate this switch, cabin pressure will continue to climb. When you pass 12,500 ft without pressurization, a “CABIN ALT” warning is displayed on the MVP50 and your view will fade to black, due to the lack of oxygen (you can switch off the fade in X-Plane's rendering settings, though).
18
The aircraft is too fast when taxiing!
You have to use the beta (reverse) throttle position for taxiing. Leave your throttle lever at idle. Push the propeller lever a bit forward.You should have about 900 to 950 NP. Then engage BETA mode before releasing the parking breaks.
According the Epic Aircraft POH :“ The airplane tends to track straight even in high wind conditions. It does not take very much power above ground idle to invokeforward speed. Now that you have the ability to use Beta, practice using a balance of brakes and beta, so as to minimize brake wear and propeller chips. Balancing beta and brakes makes for a smooth ride and gives the “professional” feeling to your passengers. “
How does the “FUEL AUTO SEL” switch work?
When this switch is active, the fuel tank is selected automatically each 15 nm. You can observe this on the fuel selector switch.
Why do I have a “Check Engine” alarm?
On ground, maintain engine RPM over 950 RPM by adding a bit power with the throttle lever.
Why do I have a “Torque” alarm?
This alarm shows up if ITT temperature is greater than800 °C. In flight, reduce POWER for maintaining ITT below 760 °C.

Credits
Aircraft: Stephane Buon (modelling, texturing, programming)Lionel Zamouth (programming), Jean-François Edange (liveries)
Owner's Manual: Mario Donick
SkyView Manual: Lionel Zamouth
The scenery backdrop on the front cover is KAVX Catalina freeware by Justin Kißling (MisterX6), available from x-plane.org, used with permission.