owner's manual infotainment radio blues
TRANSCRIPT

www.skoda-auto.com
BluesInfotainment anglicky 11.2012S00.5614.07.205E0 012 149 H
SIMPLY CLEVER
Infotainment Radio BluesOwner's Manual

Structure of this Owner's Manual(explanations)
This Owner's Manual has been systematically designed to make it easy for you tosearch for and obtain the information you require.
At the beginning of this manual you will find a table of contents where all the top-ics described are arranged sequentially. At the end of this manual you will find analphabetical index.
Direction indicationsAll direction indications such as “left”, “right”, “front”, “rear” relate to the direction oftravel of the vehicle.
Explanation of symbols Denotes the end of a section.
Denotes the continuation of a section on the next page.
® Denotes a registered trademark.
Notes
WARNING
The most important notes are marked with the heading WARNING. TheseWARNING notes draw your attention to a serious risk of accident or injury.
CAUTION
A Caution note draws your attention to the possibility of damage to your vehicle(e.g. damage to gearbox), or points out general risks of an accident.
Note
A normal Note draws your attention to important information about the operationof your vehicle.

Preface
You have chosen a ŠKODA vehicle, which is fitted with an Infotainment Radio Blues (hereafter called theunit) – we thank you for your confidence in us.The new operating concept allows you to make all the vehicle settings and to operate electronic systemscentrally from the device.
Please read this Owner's Manual carefully, because the operation in accordance with these instructions is aprerequisite for proper use of the unit.
Please note that these instructions are meant only as an addendum to the information presented in theOwner's Manual of your vehicle. Therefore, they can be used only in conjunction with the latest manual forthis vehicle. For a detailed description of some functions listed in these instructions, see the Owner's Manualfor your vehicle.
If you have any questions about your device, please contact a ŠKODA Service Partner.
Your ŠKODA AUTO a.s. (hereinafter referred to as ŠKODA)

Table of Contents
General information
Vehicle equipment 3
Safety instructions 3
Warranty 3
Component protection 3
Unit overview and operation 4
Unit setup
Main menu 6
Sound setup 6
Radio setup 6
Media setup 7
Unit system setup 7
Radio
Main menu 9
Station finding 9
Traffic programme TP 10
Media
Main menu 11
Using buttons 11
Setting special functions 12
External audio sources 12
Vehicle systems setup
Main menu 14
Deactivating traction control (TCS) 14
Vehicle status 14
Auxiliary heater and ventilation 14
Driving assistant 15
Lights 15
Vision 16
Opening/closing 16
Seats 16
Driving data 16
Winter tyres limit 16
Service 16
Reset to factory settings 17
Other functions
Introductory information 18
Selecting driving mode 18
Setting Climatronic and auxiliary heater andventilation 19
Index
2 Table of Contents

General information
Vehicle equipment
These operating instructions describe all possible equipment variants withoutidentifying them as special equipment, model variants or market-dependentequipment.
Consequently, this vehicle does not need to contain all of the equipment compo-nents described in this Owner's manual.
The level of equipment of your vehicle refers to your contract. Further informationis available from a ŠKODA Service Partner.
The illustrations can differ in minor details from your vehicle; they are only inten-ded for general information. Ð
Safety instructions
WARNING
■ Concentrate fully at all times on your driving! As the driver you are fully re-sponsible for road safety. Only use the device such that you are in full controlof your vehicle in every traffic situation - risk of accident!■ Adjust the volume to ensure that acoustic signals from outside, e.g. sirensfrom vehicles which have the right of way, such as police, ambulance and firebrigade vehicles, can be heard at all time.■ High volumes can cause hearing damage. Ð
Warranty
The equipment warranty terms and conditions apply to this unit just like to newvehicles » service schedule. Ð
Component protection
Some electronic control units are factory-equipped with component protection.
The component protection was developed as a protection mechanism for:
› impairment of factory- or garage-fitted control units after installation in anothervehicle (for example, after a theft);
› impairment of components operated outside of the vehicle;› the possibility of a legitimate installation or change of control units for repairs
at a ŠKODA specialist garage.
When the component protection is enabled, the following message appears onthe display of the device Component theft protection: Restricted function.Switch on ignition.
If the component protection does not activate by switching on the ignition,please contact a ŠKODA specialist garage. Ð
3General information

Unit overview and operation
Unit overview
Fig. 1 Unit overview
- Unit on/off, adjust volumeOperation and confirmationFunction keys (the function keys are described in each chapter)DisplayRADIO - Radio menu » page 9MEDIA - Media menu » page 11MUTE - MuteSETUP - Device settings » page 6CAR - Settings of the vehicle systems » page 14BACK - Return to higher-level menu - Backward and forward menu navigation (the key functions are descri-bed in each chapter)
1
2
3
4
5
6
7
8
9
10
11
Note
Some functions can be operated via the multifunction steering wheel » Owner'sManual. Ð
Switching the unit on/off
› Press the knob 1 » Fig. 1 on page 4 to switch the unit on or off.
After switching on the unit, the last audio source that was active before switch-ing off will be played.
If the vehicle key is pulled out of the ignition lock while the unit is switched on,the unit will switch off automatically. After switching on the ignition, the unit isturned on automatically.
If the unit is switched off with the knob , it will not switch on automaticallywhen you switch on the ignition.
If your vehicle is fitted with the KESSY system, the unit will switch off automati-cally after the engine is turned off and the door opened. If you open the driver'sdoor before switching off the engine, the unit will also switch off.
When the ignition is switched off, the system switches off automatically after ap-prox. half an hour (discharge protection of the vehicle battery). Ð
Volume setting
Increase volume› Turn the knob 1 » Fig. 1 on page 4 to the right.
Decrease volume› Turn the knob to the left.
Muting› Press the button MUTE or set the volume to 0 with the knob .
Note
■ The change in volume will appear in the display of the unit (does not apply tochanging the volume using the corresponding button on the multifunction steer-ing wheel).■ When the sound is muted, the symbol appears in the display. Ð
4 General information

Displays and control of the device
Fig. 2 Displays
Display of menus, menu items and functionsCurrently selected menu item/functionPrevious menu item/functionNext menu item/functionHigher-level menuFunction with “checkbox”› - Function is switched on.› - Function is switched offFunction in the menu/menu item
Selecting menu/menu itemSelect by turning the menu knob 2 » Fig. 1 on page 4.
Confirming menu/menu itemConfirm by pressing the menu knob 2 » Fig. 1 on page 4.
A
B
C
D
E
F
Confirming function in menu/menu itemThe menu/menu item may include various functions F that are confirmed bypressing the appropriate function key 3 » Fig. 2 under the function name.
Returning to higher-level menuReturn by pressing the button BACK 10 » Fig. 1 on page 4.
Switching function on/off with “checkbox”Switch the function on/off by pressing the menu knob 2 » Fig. 1 on page 4.
Note
■ Greyed out menus or menu items are not enabled or available.■ Some menus or menu items, the current setting is displayed, e.g. Distance: kmor Distance: mi.■ If the device is currently not being used, the display will return to the higher-level menu after a few seconds. Ð
Examples of the information listed in the Owner's Manual
Examples of actions› Press the button SETUP → Sound.
This information indicates that you must first press the SETUP button and thenselect and confirm the Sound menu.
The “→” symbol indicates the next step.
This may be followed by a list of available menus, menu items or functions, suchas:
■ Bass - Bass setting■ Mid - Mid range setting■ Treble - Treble setting
Example menu■ xyz - the first menu level
■ xyz - the second menu level■ xyz - the third menu level
■ xyz - the first menu level Ð
5General information

Unit setup
Main menu
Fig. 3 Main menu
First and foremost, pay attention to the safety instructions » page 3, Safety in-structions.
Select and confirm all functions as described at the beginning of this man-ual » page 4, Unit overview and operation.
Opening the main menu for unit setup› Press the button SETUP .
Menus in the main menu for unit setup
■ Sound - Sound setup » page 6■ Radio - Radio setup » page 6■ Media - Media setup » page 7■ System - System setup » page 7 Ð
Sound setup
› Press the button SETUP → Sound.
■ Bass - Bass setting■ Mid - Mid range setting■ Treble - Treble setting■ Balance - Setting the balance between the left and right■ Fader - Setting the balance between the front and the rear
■ Volume - Volume setting■ Maximum switch-on volume - Volume after switching on■ Traffic announcement - sets the volume for the Traffic program alerts (TP)■ Speed-dependent vol. adjustment - Speed-dependent volume increase■ AUX volume - Sets the playback volume from an external source
■ Quiet - Low volume■ Medium - Medium volume■ Loud - High volume Ð
Radio setup
› Press the button SETUP → Radio.
■ Radio text - Radio text display on/off■ Alternative frequency (AF) - Search for alternative frequencies of the station
currently being listened to on/off■ Arrow keys - Sets the function of the station selection in RADIO mode
■ Station list - Switches all stations currently in range for the selected fre-quency band
■ Preset list - Switches to only stored stations■ RDS regional - Switches the automatic tracking of related regional stations on/
off■ Fixed - Maintains the selected regional station continuously. When the signal
is lost, another regional station must be set manually.■ Automatic - Automatic tracking of regional stations. The radio tunes to anoth-
er available region if the given region can no longer be received.■ PTY filter - Selects radio stations by broadcast topics (programme)
■ Off - Switches off■ News - News■ Music - Music■ Sport - Sports■ Culture - Culture■ Special - Other
■ Station list sort - Sorts the station list■ Default - by the programme identification (PI code)■ A-Z - in alphabetical order and then by frequency number £
6 Unit setup

■ Name of station - Displays the station name■ Variable - Scrolling display of a long station name Changing the station name
is not permitted.■ Fixed - Fixed display of station name, a long station name is not fully dis-
played The station name is firmly fixed (suitable for the A-Z list).■ Delete presets - Deletes the stored stations
Note
■ RDS (Radio Data System) is used to transmit programme IDs and additionalservices, thus enabling automatic station tracking, for example. In the event ofsufficiently satisfactory reception, the suitable RDS radio stations will display thestation name instead of the station frequency.■ In countries where the RDS (Radio Data System) function is not adequatelysupported, we recommend turning off the AF and RDS setting, otherwise theycan affect the functionality of the radio.■ The AF (alternative frequency) function ensures that the best receivable fre-quency of the selected station is automatically and precisely set. Ð
Media setup
› Press the button SETUP → Media.
■ Activate AUX - Activation of the external audio source AUX on/off■ Mix/repeat including subfolders - Playback of the tracks in modes Mix and Re-
peat including sub-folders on/off■ Display ID3 tags - Display of the artist, album and track name in the screen of
the unit on/off1) Ð
Unit system setup
› Press the button SETUP → System.
■ Language - Defines the menu language for displays■ Time/date - Time and date settings
■ Time - Time settings■ Date - Date settings■ Summer (DST) - Summer time adjustment on/off■ Time format - Sets the time format■ Date format - Sets the date format
■ Units - Sets units of measurement■ Distance - Distance units
■ km - Kilometres■ mi - Miles
■ Temperature - Temperature units■ °C - Degrees Celsius■ °F - Degrees Fahrenheit
■ Volume - Volume units■ l - Litres■ gall. (UK) - Gallons (UK)■ gall. (US) - Gallons (US)
■ Speed - Speedunits■ km/h - Kilometres per hour■ mph - Miles per hour
■ Consumption - Consumption units■ l/100 km - Litres per 100 kilometres■ km/l - Kilometres per litre■ mpg (US) - Miles per gallon (US)■ mpg (UK) - Miles per gallon (UK)
■ Gas consumption - Gas consumption units■ kg/100 km - Kilograms per 100 km■ km/kg - Kilometres per kilogram
■ Display - screen setting■ Brightness - Adjusts the brightness of the screen
■ Brightest - brightest level■ Brighter - brighter level■ Medium - medium level■ Darker - darker level■ Darkest - darkest level
■ Clock in standby mode - Time display in screen when the ignition is switchedon and the device is switched off £
1) Artists/track names are always displayed in the information display of the instrument cluster, regard-less of the setting.
7Unit setup

■ Remove USB device safely - Safe removal of USB device1)
■ Factory settings - Resets to factory settings■ All - All settings■ Sound - Sound setup■ Radio - Radio setup■ Vehicle - Vehicle system setup■ Media - Media setup■ System - System setup■ Driving profile - Driving mode setup
■ Display off - Switches the display to the so-called energy-saving mode wherethe display is black. The display can be switched on again by pressing the menuknob 2 .
■ System information - Displays system information■ Versions data - Displays version information
■ Device part number - Part number of the unit■ Hardware - Hardware used■ Software version - Software version
■ Copyright - Information on licences and copyrights used Ð
1) If currently a sound is played from the USB device, this function is not active.
8 Unit setup

Radio
Main menu
Fig. 4 Main menu/selecting the frequency band
First and foremost, pay attention to the safety instructions » page 3, Safety in-structions.
Select and confirm all functions as described at the beginning of this man-ual » page 4, Unit overview and operation.
Accessing radio mode in main menu› Press the button RADIO .
Selecting a frequency bandYour radio allows reception of FM frequencies (memory bank FM1 and FM2) andthe AM frequency bands (AM1 and AM2 memory bank).› Press the button RADIO → Confirm the selection with the function key 3 or
the button RADIO .
Saving a radio station› Set the desired radio station » page 9, Station finding and press and hold
the corresponding function key 3 until a beep is heard.
Selecting a stored radio station from the preset list› In the selected frequency band, press the buttons and or the function key
3 under the desired radio station.
Five presets are available in each memory bank.
Selecting a radio station from the station list› Press the buttons and or rotate the menu knob 2 to select and confirm
the desired station.
If no station list is available, the device will automatically search for radio sta-tions.
Symbols in the displaySymbol Importance
Sound is muted
Traffic information station
Station without traffic information
, , , Currently selected frequency band
Radio station is selected by desired topic » page 6, Radiosetup
Radio station from the station list is a station from thepreset list
Auto-play of available radio stations Ð
Station finding
› Press the button RADIO → menu knob 2 .
■ TP - Switches traffic programme on/off » page 10■ Manual - Manual station finding by turning the menu button 2 or with the keys and £
9Radio

■ Scan - auto--play all stations in the current frequency band, each station foraround five seconds■ OK - Stop auto-play function at the current radio station■ Skip - Selects another radio station
■ Auto store - Automatic station finding where the station with the strongest sig-nal are stored in memory banks FM1, FM2 Ð
Traffic programme TP
› Press the button RADIO → menu knob 2 → TP.
The display in combination with a station name (e.g. in the station or presetlist), indicates a traffic programme station.
Traffic monitoring is indicated by the letters in the display.
While playing in Media mode, the last selected radio station continues to be re-ceived in the background if it supports traffic information. If a radio station is setthat does not support TP, the most appropriate TP station is set automatically inthe background to continuously receive traffic reports in the media.
The radio works the same in a selected AM frequency range. If no traffic pro-gramme station can be found because, for example, radio reception is interruptedin general, No TP will be displayed instead of TP. Ð
10 Radio

Media
Main menu
Fig. 5 Main menu/CD mode
First and foremost, pay attention to the safety instructions » page 3, Safety in-structions.
Select and confirm all functions as described at the beginning of this man-ual » page 4, Unit overview and operation.
Accessing main menu in media mode› Press the button MEDIA .
■ USB - Changes to a connected external audio source at the USB in-put1) » page 12
■ AUX - Changes to a connected external audio source at the AUX in-put » page 12
Symbols in the displaySymbol Importance
Sound is muted
Track repeat
Random play
, Currently selected audio source
Auto-play of tracks Ð
Using buttons
The buttons or will always affect the currently heard audio source, irrespec-tive of the current menu used.
It is also possible to change tracks in the menu of the currently played audiosource using the function keys 3 .
Button
Action Operation
Press brieflyChanges to the beginning of the track beingplayed» table on page 12
Each time you press Changes to the beginning of the previous track
Press button for a longperiod of time
Fast-reverse of the track
Button
Action Operation
Press briefly Changes to the beginning of the next track
Press button for a longperiod of time
Fast-forward of the track £
1) Operating an externally connected audio source is possible with certain restrictions, depending pri-marily on the type of the connected device.
11Media

Function /Action Operation
Press briefly
Play/Pause: The play function is stopped at the cur-rent position and the symbol changes to £ - afterpressing again, the play function will continue fromthis position.
Operation Action Operation
Press briefly Changes to the beginning of the track being playeda)
Each time you press Changes to the beginning of the previous track
Press button for a longperiod of time
Fast-reverse of the track
a) If the elapsed play time of the track is less than 3 seconds, play skips to the beginning of the previoustrack.
Operation Action Operation
Press briefly Changes to the beginning of the next track
Press button for a longperiod of time
Fast-forward of the track
Operation Action Operation
Press briefly Scrolling down in folders
Operation Action Operation
Press briefly Scrolling up in folders Ð
Setting special functions
› Press the button MEDIA → menu knob 2 .
■ TP - Traffic programme on/off■ - Displays the artist, album and track name1)
■ Repeat - Displays the repeat options■ Off - Repeat function off■ Track - Repeats the current track■ Folder - Repeats all tracks in folder
■ Mix - Random play■ Off - Random play function off■ All - Random plays all tracks of the current audio source■ Folder - Repeats all tracks in folder
■ Scan■ OK - Stops auto-play function at the current track■ Skip - Selects another track■ Cancel - Changes to the track played originally Ð
External audio sources
AUX inputExternal audio sources connected to the AUX input cannot be operated from yourunit.
Use the standard 3.5 mm jack plug for the AUX input. If the external audio sourcedoes not have this jack plug, you must use an adapter .
USB inputBefore removing the USB device, proceed as follows:
External audio sources connected to the USB input can be operated from yourunit.› Press the button SETUP → System → Remove USB device safely.
Adjusting the play volume of the external audio sourceThe playback volume of the external audio source can be changed with the but-ton .
Depending on the connected audio source, the output volume can be changed onthe external audio source » page 6, Sound setup. £
1) If there are no artist, album and track names available in the file being played, the folder or file nameis displayed.
12 Media

Conditions for successful connection› Only USB devices with the specification 2.0 can be connected.› The version of the file allocation table (FAT) of the connected device must be in
FAT16, FAT32 or exFAT format.› When playing from a device which holds a complex folder structure or a very
high data volume, there may be a delay when reading the audio files.› The folder structure in the connected unit must not exceed a depth of 8 levels.
One folder must not contain more than 1000°data.
WARNING
■ Never place external audio sources on the dash panel. They could be throwninto the passenger compartment during sudden driving manoeuvres, injuringthe occupants.■ Never place external audio sources close to the airbags. They could bethrown into the passenger compartment when the airbags are deployed, in-juring the occupants.■ Never hold external audio sources in your hand or on your knees while driv-ing. They could be thrown into the passenger compartment during suddendriving manoeuvres, injuring the occupants.■ Always route the connection cable of the external audio source such that isdoes not restrict you when driving.
CAUTION
The AUX input must only be used for audio sources!
Note
■ If an external audio source is connected to the AUX input, which is equippedwith an adapter for external power supply, the sound may be impaired. This de-pends on the quality of the adapter which is used.■ See the owner's manual of the specific manufacturer for operating the externalaudio source. Ð
13Media
Vehicle systems setup
Main menu
First and foremost, pay attention to the safety instructions » page 3, Safety in-structions.
Select and confirm all functions as described at the beginning of this man-ual » page 4, Unit overview and operation.
Accessing the main menu for vehicle systems setup› Press the button CAR .
■ Deactivate traction control (ASR) - Traction control (ASR) off » page 14■ Vehicle status - Vehicle status » page 14■ Auxiliary heater - Sets the auxiliary heater and ventilation » page 14■ Assistants - Sets the driving assistants » page 15■ Lights - Sets the lights » page 15■ Vision - Adjusts the mirrors and windshield wipers » page 16■ Opening/closing - Adjusts opening and closing » page 16■ Seats - Adjusts the seats » page 16■ Driving data - Display of data from the multi-function display on/off » page 16■ Winter tyres limit - Sets the winter tyres limit » page 16■ Service - Service interval display, VIN » page 16■ Factory settings - Resets to factory settings » page 17
Note
■ The individual systems are described in the » Vehicle Owner's Manual.■ If the functions of some systems are switched off, some functions, such asparts of the ESC system » Vehicle Owner's Manual, are switched on again auto-matically for security reasons, after switching the ignition off and on. Ð
Deactivating traction control (TCS)
› Press the button CAR → Deactivate traction control (ASR) - Deactivation oftraction control (ASR) on/off Ð
Vehicle status
› Press the button CAR → Vehicle status.
■ Convenience consumers - Displays up to three consumers which have the larg-est share of fuel consumption and displays the fuel consumption to run all con-venience consumers » Vehicle Owner's Manual
■ Tyre pressure monitoring - Starts a new calibration process of the tyre pressuremonitor
■ Start-stop status - Displays information about the status of the START-STOPsystem Ð
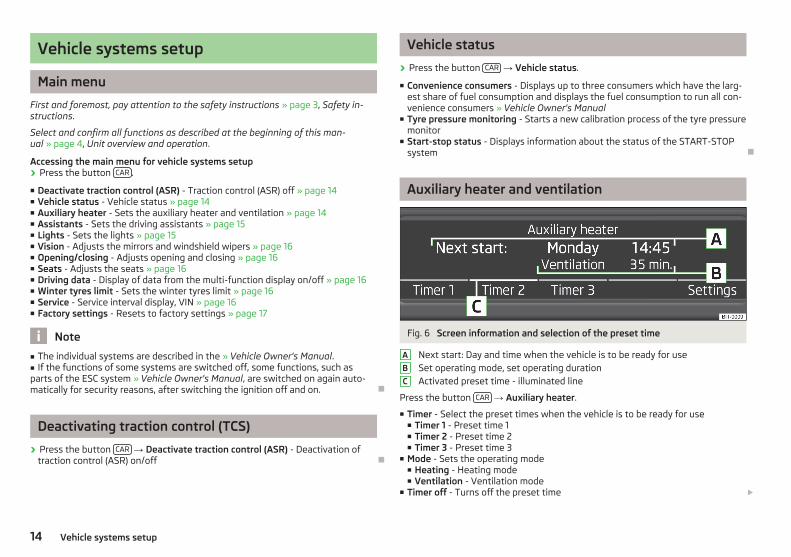
Auxiliary heater and ventilation
Fig. 6 Screen information and selection of the preset time
Next start: Day and time when the vehicle is to be ready for useSet operating mode, set operating durationActivated preset time - illuminated line
Press the button CAR → Auxiliary heater.
■ Timer - Select the preset times when the vehicle is to be ready for use■ Timer 1 - Preset time 1■ Timer 2 - Preset time 2■ Timer 3 - Preset time 3
■ Mode - Sets the operating mode■ Heating - Heating mode■ Ventilation - Ventilation mode
■ Timer off - Turns off the preset time £
A
B
C
14 Vehicle systems setup

■ Settings - Sets the day and time when the vehicle is to be ready for use■ Timer 1 - Sets the preset time 1■ Timer 2 - Sets the preset time 2■ Timer 3 - Sets the preset time 3■ Set running time - Sets the time frame in which to run the device (10 - 60 mi-
nutes)
After setting the desired time, press the button BACK to save the preset time.
Note
■ Only one preset time can be active. The activated preset time will be deactiva-ted again after it has started automatically. For the next start, activate one of thepreset times.■ In the selection of the day in the preset time, there is an option between Sun-day and Monday without the specified day. If this setting is made, the vehicle willbe ready for use at the selected time, regardless of the current day.■ The running system deactivates after expiration of the operating period or canbe deactivated earlier by pressing the button for directly switching on/off onthe Climatronic control unit or by using the radio remote control.■ If a different time is set » page 7, Unit system setup, the activated preset time isautomatically deactivated. The preset time must be reactivated. Ð
Driving assistant
› Press the button CAR → Assistants.
■ Front assist - Sets the assistant for distance monitoring to the vehicles ahead■ Active - Assistant on/off■ Advance warning - Advance warning on/off■ Display distance warning - Distance display on/off
■ ACC (Adaptive Cruise Control) - Sets the adaptive cruise control■ Distance - Sets the distance monitoring to the vehicles ahead
■ Very close - Very small distance■ Close - Small distance■ Medium - Medium distance■ Far - Large distance■ Very far - Very large distance
■ Last distance selected - Last selected distance on/off
■ Driving programme - Sets the vehicle acceleration when adaptive cruise con-trol is active■ Normal - Normal■ Sport - Sports■ Eco - Economical
■ Park Assist - Sets the park assist■ Front volume - Adjusts the volume of the front sensors■ Front tone setting - Adjusts the tone of the front sensors■ Rear volume - Adjusts the volume of the rear sensors■ Rear tone setting - Adjusts the tone of the rear sensors■ Audio lowering - Lowers the volume
■ Off - No lowering of the volume■ Weak - Weak lowering of the volume■ Medium - Medium lowering of the volume■ Strong - Strong lowering of the volume
■ ProActive passenger protection - Proactive passenger protection on/off■ Fatigue detection - Fatigue detection on/off Ð
Lights
› Press the button CAR → Lights.
■ Light Assist - Sets the light assist■ Switch-on time - Sets the sensibility of the light sensor against the intensity
of the ambient light■ Early - Low sensibility■ Medium - Medium sensibility■ Late - High sensibility
■ Head Light Assist - Automatic head light control on/off■ Automatic headlight control (rain) - Automatic head light control in rain on/
off■ Daytime running lights - Daytime running lights on/off■ Lane change flash - Convenience flashing on/off■ Travel mode - Travel mode on/off
■ Left-hand traffic - For left-hand traffic■ Right-hand traffic - For right-hand traffic
■ Interior lighting - Sets the interior lighting■ Instrument lighting - Sets the brightness of the instrument lighting■ Footwell light - Sets the brightness of the footwell light
■ Coming home - COMING HOME function on/off, timer setting■ Leaving home - LEAVING HOME function on/off, timer setting Ð
15Vehicle systems setup

Vision
› Press the button CAR → Vision.
■ Mirrors - Adjusts the mirrors■ Synchronous mirror adjustment - Synchronous mirror adjustment on/off■ Lowering in reverse - Lowering of front passenger mirror in reverse on/off■ Fold in while parking - Folding the mirrors after parking on/off
■ Wipers - Adjusts the windscreen wipers■ Automatic wiping in rain - Automatic wiping in rain on/off■ Automatic rear wiper - Automatic rear wiper on/off Ð
Opening/closing
› Press the button CAR → Opening/closing.
■ Windows - Sets the windows■ Convenience opening - Sets the convenience opening
■ Off - No window■ All windows - All windows■ Driver - Driver's window only
■ Central locking - Sets the doors■ Door unlocking - Sets the door unlocking
■ All - All doors■ Single door - Single door■ Driver side - Door on the driver's side
■ Automatic locking - Automatic locking on/off■ Alarm system confirmation - Acoustic signals on/off when locking/unlocking a
vehicle with an anti-theft alarm system Ð
Seats
› Press the button CAR → Seats.
■ Store driver's seat position on key - Storing driver's seat position on key on/off Ð
Driving data
› Press the button CAR → Driving data.
■ Current consumption - Display of current fuel consumption on/off■ Travelling time - Display of travelling time on/off■ Distance travelled - Display of distance travelled on/off■ Avg. speed - Display of average speed on/off■ Avg. consumption - Display of average fuel consumption on/off■ Digital speed - Display of current speed on/off■ Oil temperature - Display of oil temperature on/off■ Winter tyres warning - Winter tyres warning on/off■ Coolant temperature - Coolant temperature on/off■ Refuel quantity - Display of refuel quantity on/off■ Eco tips - Display of tips for economical driving on/off■ Convenience consumers - Display of fuel consumption of convenience consum-
ers on/off■ Reset since “start driving data” - Resets the single-trip memory■ Reset “long-term driving data” - Resets the long-term memory Ð
Winter tyres limit
› Press the button CAR → Winter tyres limit.
■ Winter tyres warning - Winter tyres warning on/off■ Warning at: --- km/h - Sets the speed for the warning
Note
This function is, for example, used for winter tyres where the maximum permissi-ble speed is lower than the maximum speed of the vehicle. Ð
Service
› Press the button CAR → Service.
■ Oil change service - Oil change due■ Oil change service due in … days / ... km - Displays the days and distance trav-
elled until the next engine oil change■ Inspection - Mandatory inspection service
■ Inspection due in … days / ... km - Displays the day and distance travelled untilthe mandatory inspection service
■ Vehicle ID - Displays the vehicle identification number Ð
16 Vehicle systems setup

Reset to factory settings
› Press the button CAR → Factory settings.
■ All - Settings of all menu items■ Assistants - Settings of menu items for Assistants■ Vision - Settings of menu items for Vision■ Lights - Settings of menu items for Lights■ Opening/closing - Settings of menu items for Opening/closing■ Seats - Settings of menu items for Seats■ Diving data - Settings of menu items for Driving data Ð
17Vehicle systems setup

Other functions
Introductory information
First and foremost, pay attention to the safety instructions » page 3, Safety in-structions.
Select and confirm all functions as described at the beginning of this man-ual » page 4, Unit overview and operation. Ð
Selecting driving mode
Fig. 7 Centre console: Button for se-lecting the driving mode
The menu for selecting the driving mode allows you to set the vehicle to one ofthe three preset driving profiles Normal, Sport and Eco, or to the driving profileIndividual which allows individual settings.
When the Profile Sport, Eco or Individual are activated, the symbol lights up inthe button » Fig. 7.
Press the button .
■ Normal - Activates Normal mode■ Info - Displays the defaults
■ Sport - Activates Sport mode■ Info - Displays the defaults
■ Eco - Activates the fuel-saving mode■ Info - Displays the defaults
■ Individual - Activates the Individual mode■ Settings - Individual settings
■ Steering action - Sets the power steering characteristics■ Normal - Normal■ Sport - Sports
■ Engine - Sets the engine characteristics■ Normal - Normal■ Sport - Sports■ Eco - Economical
■ ACC driving programme - Sets the vehicle acceleration when adaptive cruisecontrol is activated■ Normal - Normal■ Sport - Sports■ Eco - Economical
■ Front lighting - Sets the characteristics of the adaptive headlights■ Normal - Normal■ Sport - Sports■ Eco - Economical
■ Reset - Sets the profile Normal Ð
18 Other functions

Setting Climatronic and auxiliary heater andventilation
Fig. 8 Main menu Climatronic/Auxiliary heater and ventilation: Screen infor-mation and selection of the preset time
Main menu Climatronic » Fig. 8
Function On - illuminated lineFunction off - greyed-out lineSet interior temperature on driver's sideSet interior temperature on front passenger's sideSet airflow direction
Auxiliary heating and ventilation » Fig. 8
Next start: Day and time when the vehicle is to be ready for useSet operating mode, set operating durationActivated preset time - illuminated line
A
B
C
D
E
F
G
H
Press the button SETUP on the Climatronic control panel.
■ Profile - Sets the Climatronic operating mode■ Light - Low power, quiet operation■ Medium - Base power■ Strong - High power
■ - Automatic recirculated air mode on/off■ - Quick interior heating on/off■ - Set the auxiliary heater and ventilation
■ Timer - Select the preset times when the vehicle is to be ready for use■ Timer 1 - Preset time 1■ Timer 2 - Preset time 2■ Timer 3 - Preset time 3
■ Mode - Sets the operating mode■ Heating - Heating mode■ Ventilation - Ventilation mode
■ Timer off - Turns off the preset time■ Settings - Sets the day and time when the vehicle is to be ready for use
■ Timer 1 - Sets the preset time 1■ Timer 2 - Sets the preset time 2■ Timer 3 - Sets the preset time 3■ Set running time - Sets the time frame in which to run the device (10 - 60
minutes)
After setting the desired time, press the button BACK to save the preset time.
Note
■ Set the Climatronic mode (Profile) by pressing the function key 3 again.■ Only one preset time can be active. The activated preset time will be deactiva-ted again after it has started automatically. For the next start, activate one of thepreset times.■ In the selection of the day in the preset time, there is an option between Sun-day and Monday without the specified day. If this setting is made, the vehicle willbe ready for use at the selected time, regardless of the current day.■ The running system deactivates after expiration of the operating period or canbe deactivated earlier by pressing the button for directly switching on/off onthe Climatronic control unit or by using the radio remote control.■ If a different time is set » page 7, Unit system setup, the activated preset time isautomatically deactivated. The preset time must be reactivated. Ð
19Other functions

Index
AAnti-theft protection 3AUX 7, 12Auxiliary heater and ventilation 14, 19
CClimatronic 19Component protection 3
DDriving mode 18
EExternal input
AUX 12USB 12
GGeneral information 3
MMain menu
Media 11Radio 9Unit setup 6Vehicle systems setup 14
MediaMain menu 11Setup 7
ModeMedia 11Radio 9
Unit setup 6Vehicle systems setup 14
RRadio
Main menu 9Setup 6Traffic programme (TP) 10
SSelecting driving mode 18Setting vehicle systems
Lights 15Winter tyres limit 16
SetupMedia 7Radio 6Sound 6Unit 6Unit system 7
Sound 6Switching the unit off 4Switching the unit on 4
TTP (traffic programme) 10Traffic programme (TP) 10
UUnit overview 4USB 12
VVehicle systems 14Vehicle systems setup
Auxiliary heater and ventilation 14, 19
Climatronic 19Driving assistants 15Driving data 16Main menu 14Opening/closing 16Reset to factory settings 17Seats 16Service 16Traction control (ASR) 14Vehicle status 14Vision 16
WWarranty 3
20 Index

ŠKODA AUTO a.s. pursues a policy of constant development of Infotainment ra-dios and navigation systems. We trust that you will understand that changes tomodels in terms of shape and engineering may be introduced at any time. The de-tails of appearance, dimensions and functions of the Infotainment radios and nav-igation systems were correct at the time of publication. It is therefore not possi-ble for legal claims to be made based on the data, illustrations and descriptionscontained in this Owner's Manual.
Reprinting, reproduction or translation, either in whole or in part, is not permittedwithout the written consent of ŠKODA AUTO a.s.
ŠKODA AUTO a.s. expressly reserves all rights relating to copyright laws.
We reserve the right to make changes to this document.
Issued by: ŠKODA AUTO a.s.
© ŠKODA AUTO a.s. 2012

www.skoda-auto.com
BluesInfotainment anglicky 11.2012S00.5614.07.205E0 012 149 H
SIMPLY CLEVER
Infotainment Radio BluesOwner's Manual