ozp user guide
TRANSCRIPT
User & Steward Guide
June 3, 2015
Version: 10.0.0.1
1
OZONE User and Steward Guide
Contents
1 Introduction .............................................................................................. 3
Introduction ...................................................................................................................... 3 1.11.1.1 Overview..................................................................................................................................... 3 Global Toolbar................................................................................................................... 3 1.2
1.2.1 Notifications .............................................................................................................................. 4 1.2.1.1 Dismissing notifications ................................................................................................................ 4
1.2.2 Help ............................................................................................................................................. 4 1.2.3 Main Menu .................................................................................................................................. 4
1.2.3.1 Personalize ..................................................................................................................................... 5 1.2.3.2 Create .............................................................................................................................................. 5 1.2.3.3 Manage ........................................................................................................................................... 6
1.2.3.3.1 Listing Management Page for a User .................................................................................... 6 1.2.3.3.2 Listing Management Page for a Steward .............................................................................. 7
2 HUD (Heads up display) ........................................................................... 7
HUD Overview .................................................................................................................. 7 2.1 Accessing HUD .................................................................................................................. 8 2.2 Listing Actions from HUD ................................................................................................ 8 2.3
3 Webtop ...................................................................................................... 9
Webtop Overview ............................................................................................................ 9 3.1 Accessing Webtop .......................................................................................................... 10 3.2 Actions in Webtop .......................................................................................................... 10 3.3
3.3.1 Using the Lower Toolbar ........................................................................................................10 Adding Listings to Webtop ........................................................................................... 11 3.4
3.4.1 Maximize, Minimize, Close Listings on Webtop ...................................................................12 Dashboards ..................................................................................................................... 12 3.5
4 Marketplace ............................................................................................ 13
Marketplace Overview ................................................................................................... 13 4.1 Listings: View, Create, Edit ............................................................................................ 15 4.2
4.2.1 Definition ..................................................................................................................................15 4.2.2 Listing Short View ...................................................................................................................15 4.2.3 Listing Detailed View ..............................................................................................................15
4.2.3.1 Overview Tab ............................................................................................................................... 17 4.2.3.2 Reviews Tab.................................................................................................................................. 18 4.2.3.3 Details Tab .................................................................................................................................... 18
4.2.3.4 Resources Tab .............................................................................................................................. 19 4.2.3.5 Administration Tab ...................................................................................................................... 19
4.2.4 Create a Listing ........................................................................................................................20 4.2.5 Fields on the Create/Edit Form ..............................................................................................20
4.2.5.1 Basic Listing Information ............................................................................................................ 21 4.2.5.2 Resources ..................................................................................................................................... 23 4.2.5.3 Graphics ........................................................................................................................................ 23 4.2.5.4 Owners & Contacts ...................................................................................................................... 25
4.2.6 Edit a Listing.............................................................................................................................26 4.2.7 Review/Edit a Listing ..............................................................................................................26 4.2.8 Search .......................................................................................................................................27

2
OZONE User and Steward Guide
5 Content Steward Guide ......................................................................... 28
Define Content Steward Roles ..................................................................................... 29 5.1 Org Listing Page ............................................................................................................. 29 5.2 Manage Listings .............................................................................................................. 30 5.3
5.3.1 Org Steward Listing Approval Instructions ..........................................................................30 5.3.2 Marketplace Steward Listing Approval Instructions ...........................................................32 5.3.3 Feature Flag .............................................................................................................................33 Marketplace Manager .................................................................................................... 34 5.4 Marketplace Settings ..................................................................................................... 34 5.5
5.5.1 Marketplace Settings: Add/Edit/Delete................................................................................35 5.5.1.1 Categories .................................................................................................................................... 35
5.5.1.2 Contact Types .............................................................................................................................. 37 5.5.1.3 Intents ........................................................................................................................................... 38
5.5.1.4 Organizations ............................................................................................................................... 39 5.5.1.5 Stewards ....................................................................................................................................... 40
5.5.1.6 Notifications ................................................................................................................................. 40 5.5.1.6.1 Cancel a Notification .............................................................................................................. 42

3
OZONE User and Steward Guide
1 Introduction
Introduction 1.1
1.1.1 Overview OZONE is an ecosystem of software that enables users from numerous organizations to share data and manipulate it solely within browser memory. It comprises three specific products that interact with each other. Also, OZONE includes an inter-widget communication (IWC) component that enables its widgets to communicate solely within the browser. Each product performs a specific task:
HUD – An organizational display that houses applications users find in Marketplace and want to store in their local environment, much like a bookmark in an Internet browser window, see section 2.
Marketplace – A store—compared to a commercial application store like Apple’s App Store or Google Play—use it to search for and download applications to use in your instance of OZONE.
Webtop – The framework where applications run and interact with each other. Webtop creates an environment where OZONE compatible applications can share a virtual network and core services that solely exist within the browser’s memory.
IWC – The technology widgets use to communicate with each other within a browser without sending data back to their respective servers.
Global Toolbar 1.2The Global Toolbar appears at the top of each product in the OZONE family. Use it to navigate between HUD, Marketplace and Webtop. From the toolbar, you can access your settings and Help resources, see notifications or create a listing.
Figure 1: Global Toolbar
A blue Global Toolbar icon signifies which part of OZONE you are viewing and alerts you of unread notifications. Each Global Toolbar icon is described:
-- HUD (Heads up display), see section 2.
-- Marketplace, see section 3.
-- Webtop [link]

4
OZONE User and Steward Guide
-- Notifications, see section 1.2.1.
-- Help Content see section 1.2.2.
-- Main Menu see section 1.2.3.
1.2.1 Notifications Notifications are located on the top-right side of the Global Toolbar. Marketplace stewards use them to alert users of upcoming events. If you have any unread
notifications, the changes to . When you click the notifications icon, notifications will display below it:
Figure 2: Notifications
1.2.1.1 Dismissing notifications Click the X in the upper-right corner of a notification to dismiss it. If notifications are not dismissed by a user, they will disappear from the list when they expire.
1.2.2 Help
Click the to access system help.
1.2.3 Main Menu The Main Menu is identified by three parallel, stacked, horizontal lines on the right side of the Global Toolbar: . From there you can access your Profile, update Settings, and create or manage listings. The menu is described below:

5
OZONE User and Steward Guide
Figure 3: Main Menu
1.2.3.1 Personalize Personalize contains links to your personalized, account functions.
Bookmarks returns to the HUD which displays all listings that are linked to your account.
Profile opens a window with your account information: o Name o Username o Email o A list of listings you own. Clicking a listing opens its Detailed Listing View
in Marketplace. Note: Owning a listing means you are responsible for it and probably created it. To see listings that you downloaded from the Store, click Bookmarks to open your HUD.
Settings ask your preference for the Default Application Launch. By default, applications launch in a new tab. If you change the default setting to Open in Webtop all listings will launch on Webtop when you double-click them in the HUD. Also, they will be automatically bookmarked in your HUD.
1.2.3.2 Create The Create section relates to the development of applications and their submission to Marketplace.
Submit a Listing takes you to the Listing Create/Edit Form. Completing the form allows you to submit listings to Marketplace. For instructions see section 4.2: Listings: View, Create, Edit.
Developer Resources opens a website selected by a Marketplace steward. It is intended to provide a resource that will help develop applications.
6
OZONE User and Steward Guide
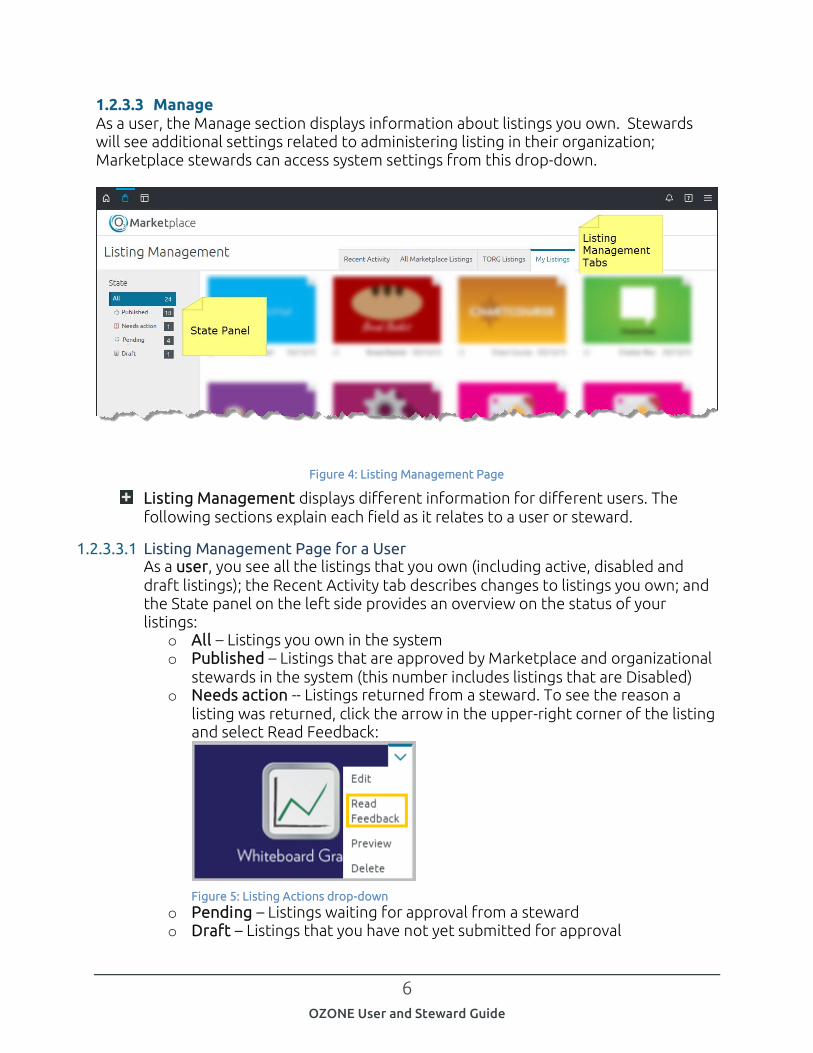
1.2.3.3 Manage As a user, the Manage section displays information about listings you own. Stewards will see additional settings related to administering listing in their organization; Marketplace stewards can access system settings from this drop-down.
Figure 4: Listing Management Page
Listing Management displays different information for different users. The following sections explain each field as it relates to a user or steward.
1.2.3.3.1 Listing Management Page for a User As a user, you see all the listings that you own (including active, disabled and draft listings); the Recent Activity tab describes changes to listings you own; and the State panel on the left side provides an overview on the status of your listings:
o All – Listings you own in the system o Published – Listings that are approved by Marketplace and organizational
stewards in the system (this number includes listings that are Disabled) o Needs action -- Listings returned from a steward. To see the reason a
listing was returned, click the arrow in the upper-right corner of the listing and select Read Feedback:
Figure 5: Listing Actions drop-down
o Pending – Listings waiting for approval from a steward o Draft – Listings that you have not yet submitted for approval

7
OZONE User and Steward Guide
1.2.3.3.2 Listing Management Page for a Steward As a steward, you see multiple tabs on the Listing Management screen. The My Listings tab displays listings you own. The organizational tab(s) display listings that you oversee for a specific organization. All the organization’s listings appear there. If you are the Marketplace Steward, all listings in the system appear under the Marketplace tab. The Recent Activity tab displays changes to all listings you oversee. The left-side State panel provides slightly different information than a user’s left-side panel:
o All – Listings you oversee as a steward o Published – Listings that are approved by Marketplace and organizational
stewards within your organization (this number includes listings that are Disabled)
o Needs action –Listing waiting for your approval. For instructions regarding approving or returning listings see 5.3: Manage Listings.
o (Pending) Org approved – Listings waiting for Marketplace steward approval
o Returned – Listings returned to their owners o Draft – Listings that you have not yet submitted for approval o Marketplace Stewards also see an Organization filter on the left-side
panel. o All stewards see the Enabled section which allows them to filter by
Enabled and Disabled listings (For information about Enabled and Disabled listings see 5.3: Manage Listings)
Marketplace Settings (only visible to Marketplace Stewards) is the home page for Marketplace management tools and all customizations administered within the user interface (as opposed to backend code). To learn more about Marketplace settings see 5.4: Marketplace Manager.
Metrics can provide data about listing Web traffic and Marketplace. It is only visible to Marketplace stewards and must be configured by one of them.
2 HUD (Heads up display)
HUD Overview 2.1HUD is a repository for all listings that you bookmark in Marketplace. From HUD, you can quickly find, launch or get help relating to each listing. Also, you can remove the bookmark from a listing.

8
OZONE User and Steward Guide
Figure 6: HUD
Accessing HUD 2.2You can access HUD two ways using the Global Toolbar:
Click the icon on the far-left side or click the icon on the far-right side and select Bookmarks:
Figure 7: Accessing HUD from the Global Toolbar
Listing Actions from HUD 2.3From HUD you can open, get help or remove the bookmark for a listing. Each action is found under the drop-down listing menu:
9
OZONE User and Steward Guide
Figure 8: Drop-down listing actions menu
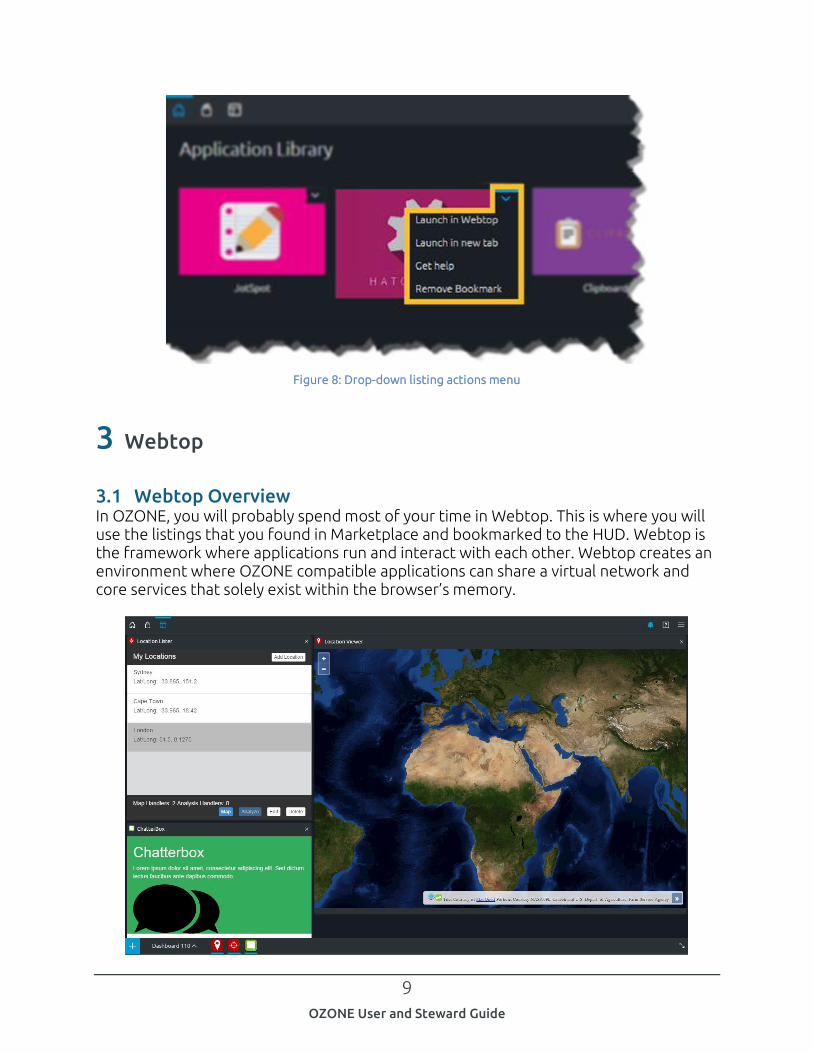
3 Webtop
Webtop Overview 3.1In OZONE, you will probably spend most of your time in Webtop. This is where you will use the listings that you found in Marketplace and bookmarked to the HUD. Webtop is the framework where applications run and interact with each other. Webtop creates an environment where OZONE compatible applications can share a virtual network and core services that solely exist within the browser’s memory.

10
OZONE User and Steward Guide
Figure 9: Webtop
Accessing Webtop 3.2You access Webtop from the Global Toolbar:
Click the icon on the left side of the Global Toolbar:
Figure 10: Accessing Webtop from the Global Toolbar
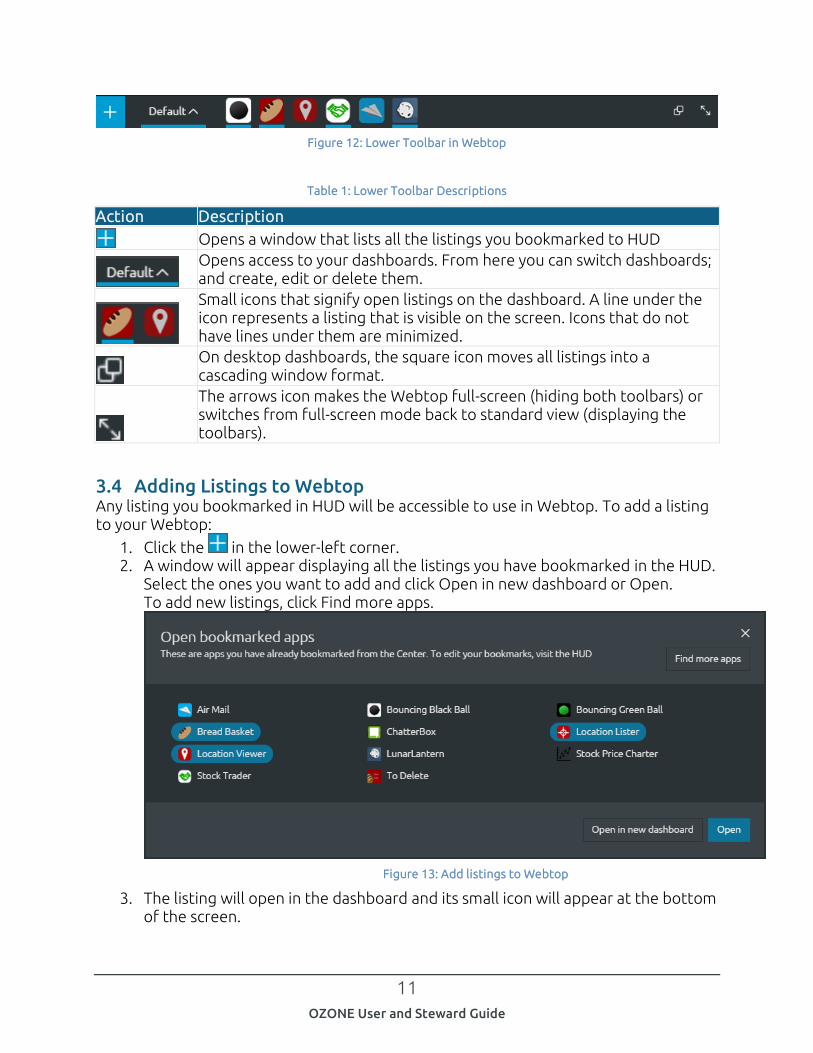
Actions in Webtop 3.3This section explains how you do your work in Webtop. You will learn how to add listings, create dashboards and configure your screen. We’ll start with a quick overview:
Figure 11: Webtop Overview
3.3.1 Using the Lower Toolbar Use the lower toolbar to add listings to a dashboard, switch dashboards and manage open listings.
11
OZONE User and Steward Guide
Figure 12: Lower Toolbar in Webtop
Table 1: Lower Toolbar Descriptions
Action Description
Opens a window that lists all the listings you bookmarked to HUD
Opens access to your dashboards. From here you can switch dashboards; and create, edit or delete them.
Small icons that signify open listings on the dashboard. A line under the icon represents a listing that is visible on the screen. Icons that do not have lines under them are minimized.
On desktop dashboards, the square icon moves all listings into a cascading window format.
The arrows icon makes the Webtop full-screen (hiding both toolbars) or switches from full-screen mode back to standard view (displaying the toolbars).
Adding Listings to Webtop 3.4Any listing you bookmarked in HUD will be accessible to use in Webtop. To add a listing to your Webtop:
1. Click the in the lower-left corner. 2. A window will appear displaying all the listings you have bookmarked in the HUD.
Select the ones you want to add and click Open in new dashboard or Open. To add new listings, click Find more apps.
Figure 13: Add listings to Webtop
3. The listing will open in the dashboard and its small icon will appear at the bottom of the screen.

12
OZONE User and Steward Guide
3.4.1 Maximize, Minimize, Close Listings on Webtop You can maximize, minimize or close a listing using the action buttons If you want to keep a listing open/running but not look at it on your screen, use the minimize button in upper-right side of the listing:
Figure 14: Maximize, Minimize and Close Listings
Table 2: Listing Actions Descriptions
Action Description
Minimizes the listing. Its icon remains at the bottom of the screen, however, the blue line under the icon disappears to signify that the listing is not visible.
Maximizes the listing so that it fills the entire screen
Closes the listing. To reopen it, use the to add it from the HUD
Dashboards 3.5A dashboard is a screen where you organize your tools. It is your workspace to configure listings and allow them to share information that is only saved in the browser, not returned to each listing’s respective servers.
3.5.1 Create a Dashboard You can create multiple dashboards with different configurations of listings. This makes it possible to configure different dashboards for different tasks. You can use the same listing on multiple dashboards. The dashboards can be in grid or desktop format. If you edit the dashboard to change it from one format to the other, your listings will lose their state (i.e. they will refresh and you will lose the data they are currently displaying). Create a dashboard and add listings to it:
1. Click the at the bottom-left side of Webtop’s lower toolbar. 2. Click +Create a new dashboard. 3. Type a Name and select if the dashboard will have a grid or desktop format.

13
OZONE User and Steward Guide
4. Click Create Dashboard, the dashboard will automatically open.
5. Now it’s time to add listings. Click the at the bottom-left side of the Webtop’s lower toolbar.
6. All the listings you bookmarked to the HUD will appear. Select the ones you want to use on this dashboard and click Open.
3.5.2 Edit or Delete a Dashboard After creating a dashboard you can change its name or view. However, if you change its view, you will lose the state of the listings on that dashboard. That means you will lose any data loaded in that dashboard when it resets. To edit a dashboard:
1. Click the at the bottom-left side of Webtop’s lower toolbar. 2. Click the edit icon beside the dashboard that you want to change:
Figure 15: Dashboard edit icon
3. The edit window opens. Change the Name or View.
Note: If you change the view, you will lose the state of the listings on the dashboard.
4. Click Save Dashboard.
4 Marketplace
Marketplace Overview 4.1Use Marketplace to find the applications you need to do your work. You can explore it using search, filters and categories or add your own listings.

14
OZONE User and Steward Guide
Figure 16: Marketplace Search and Discovery Page
When you enter OZONE, the first thing you’ll see is the Marketplace Search and Discovery Page. It displays Featured, New Arrivals and the Most Popular listings. Use the categories on the left to reduce the number of listings you see on the page. From the top of the page, you can search for a listing and results will be returned based on listing name, description, tags, etc. A complete description of listings and search follow.

15
OZONE User and Steward Guide
Listings: View, Create, Edit 4.2
4.2.1 Definition Listing –Any software application or component that a user enters into Marketplace is called a “listing.” Like apps on smart phones, listings in Marketplace contain various types of Web content. From Marketplace, you can save listings to your HUD or open them in a new browser tab.
4.2.2 Listing Short View On the Search and Discovery Page, you see each listing’s icon, name, rating and organizational association. Hover over the listing to display its Short View.
Figure 17: Listing Short View
From the Listing Short View you can read a short description, open or bookmark a listing:
Figure 18: Listing Actions
4.2.3 Listing Detailed View While the Listing Short View displays basic information, its Detailed View provides much more information. Click inside the view to open the Detailed Listing View. Each tab is described in this section:

16
OZONE User and Steward Guide
Figure 19: Listing Detailed View
The listing’s header information and actions appear on each tab. Its header includes: listing icon, name, rating, organizational affiliation and actions such as opening, bookmarking and editing:
Figure 20: Listing Heading
Basic listing information:
Figure 21: Left-side Detailed Listing View Header
At the top of the listing’s Detailed View, you will see the listing’s: - Icon - Name - Rating - Organizational association
17
OZONE User and Steward Guide
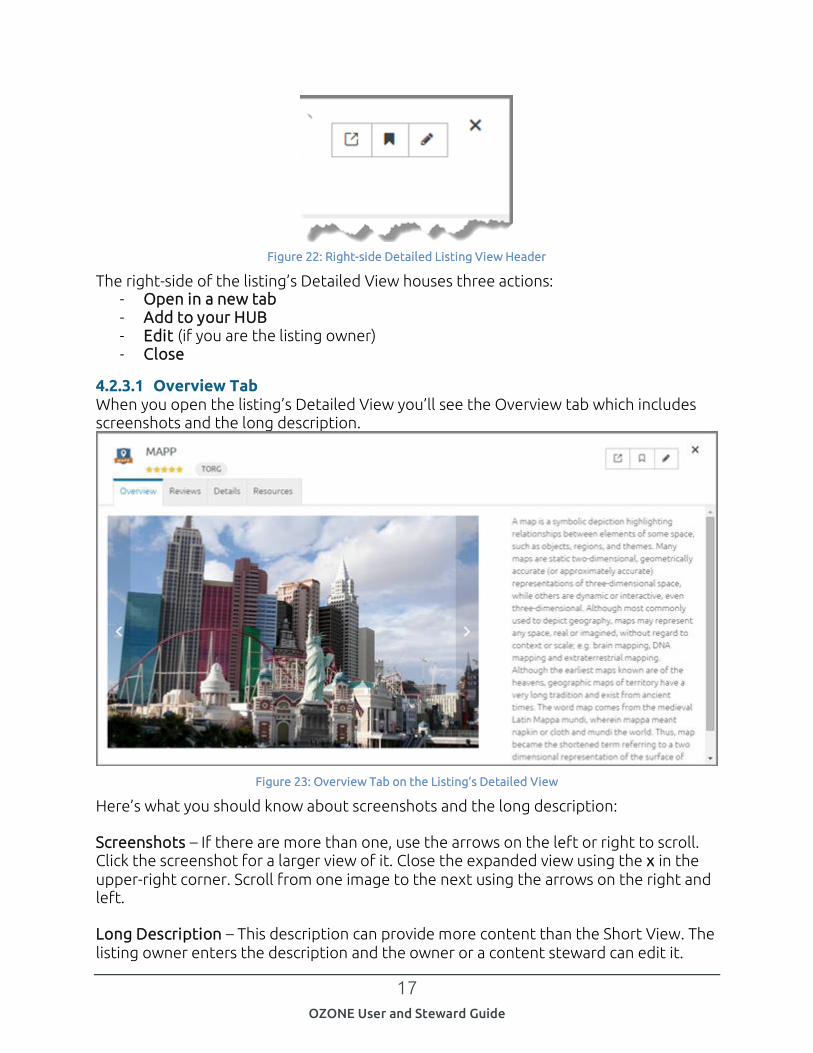
Figure 22: Right-side Detailed Listing View Header
The right-side of the listing’s Detailed View houses three actions: - Open in a new tab - Add to your HUB - Edit (if you are the listing owner) - Close
4.2.3.1 Overview Tab When you open the listing’s Detailed View you’ll see the Overview tab which includes screenshots and the long description.
Figure 23: Overview Tab on the Listing’s Detailed View
Here’s what you should know about screenshots and the long description: Screenshots – If there are more than one, use the arrows on the left or right to scroll. Click the screenshot for a larger view of it. Close the expanded view using the x in the upper-right corner. Scroll from one image to the next using the arrows on the right and left. Long Description – This description can provide more content than the Short View. The listing owner enters the description and the owner or a content steward can edit it.
18
OZONE User and Steward Guide
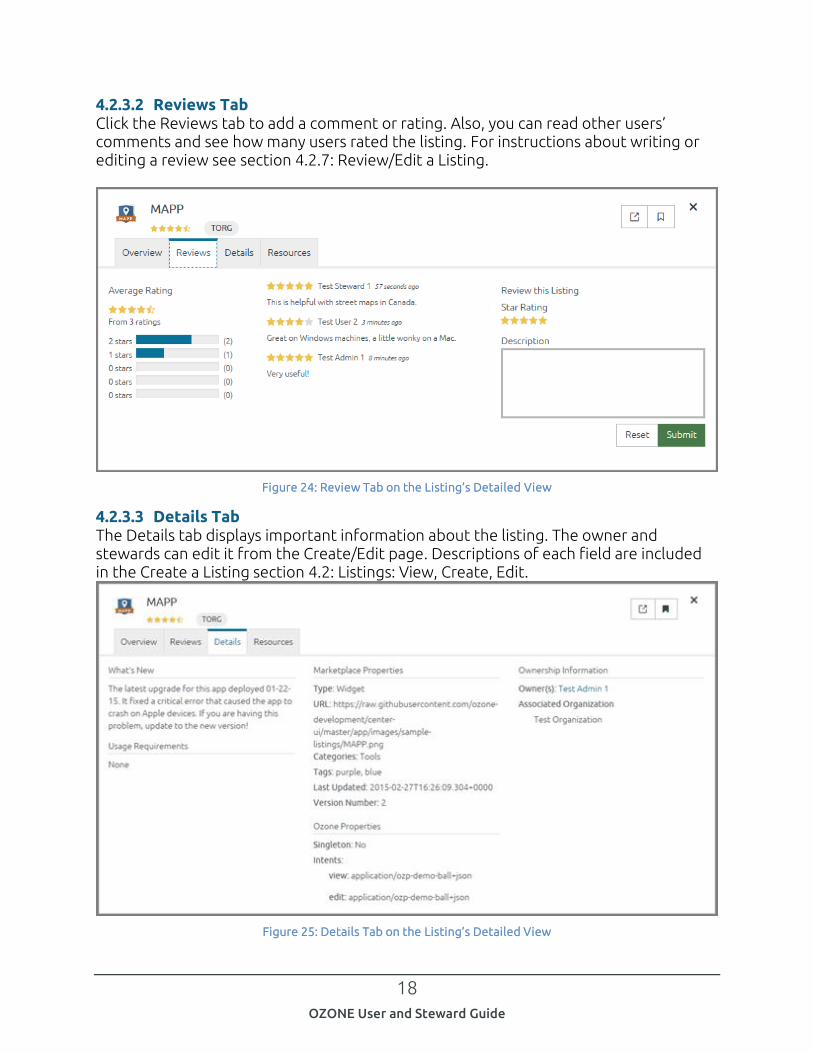
4.2.3.2 Reviews Tab Click the Reviews tab to add a comment or rating. Also, you can read other users’ comments and see how many users rated the listing. For instructions about writing or editing a review see section 4.2.7: Review/Edit a Listing.
Figure 24: Review Tab on the Listing’s Detailed View
4.2.3.3 Details Tab The Details tab displays important information about the listing. The owner and stewards can edit it from the Create/Edit page. Descriptions of each field are included in the Create a Listing section 4.2: Listings: View, Create, Edit.
Figure 25: Details Tab on the Listing’s Detailed View

19
OZONE User and Steward Guide
4.2.3.4 Resources Tab The Resources tab links to information and people that support the app. Descriptions of each filed are included in the Create a Listing section 4.2: Listings: View, Create, Edit.
Figure 26: Resources Tab on a Listing’s Detailed View
4.2.3.5 Administration Tab The Administration tab only appears if you are the listing owner or a content steward. From this tab, stewards approve or reject listings; make them visible or hide them from Marketplace (Enabled) and decide if the listing will be featured in the banner at the top of the Discovery Page. Stewards can find instructions about administering listings in section 5.3: Manage Listings.
Figure 27: Administration Tab on a Listing’s Detailed View

20
OZONE User and Steward Guide
4.2.4 Create a Listing Anyone can create a listing. Only stewards can approve them. This section explains how to create a listing and it defines each field on the Create/Edit Listing Form. To create a listing:
1. From the Global Toolbar, click the drop-down Main Menu.
2. Select Submit a Listing 3. The Listing Create/Edit Form opens. To save the listing, you must enter a Name,
Type and Owner. At this point, you may save the listing without completing it. If you do this, you can open it from your Profile and Listing Management.
4. Complete the listing. All fields are required unless marked optional.
5. Click at the top of the form to save. The save icon switches to a green checkmark after saving.
6. To preview the listing, click .
7. When you are ready to publish the listing, click to notify the Organizational Steward that the listing is ready for review. Find steward approval instructions in section 5.3.1: Org Steward Listing Approval Instructions.
8. After an organizational steward and Marketplace steward approve the listing, it will appear in Marketplace.
4.2.5 Fields on the Create/Edit Form The following fields appear on the Create/Edit Listing Form:

21
OZONE User and Steward Guide
4.2.5.1 Basic Listing Information
Figure 28: Create/Edit Listing Form – Basic Information
Field Description Additional information
Name The name/title of the listing. Names are not required to be unique within the system.
Listing Type The listing technology description (e.g. Widget, Web Application).
Categories The categories associated with the listing used to group them. Stewards can add and remove categories as needed.
A listing can be associated with multiple categories.
Tags A list of user generated words used to describe the listing.
- Tags influence search results.
- The tags appear on the Details tab of the Detailed
Owners and stewards add tags from the Create/Edit Form.
22
OZONE User and Steward Guide
View. Full Description This field can contain 4,000
characters. To make it easier for users to determine the nature of the listing, a succinct summary should be captured in the first few lines of the description.
The full description appears on the Overview tab of the listing’s Detailed View.
Short Description This 100 character description appears when a user hovers over a listing on the Search and Discovery Page.
This description can differ from the full description.
Figure 29: Create/Edit Listing Form – Listing Details
Field Description Additional information
Version Number An identifier used to distinguish one version from another.
This is a free text field.
Listing URL The address where users can access the listing
Usage Requirements
A list of any required dependencies
Example: This listing requires Adobe Flash and functions best
23
OZONE User and Steward Guide
on IE9 or newer browsers. What’s New (optional)
A message from the owner or a stewards
Example: This release enhanced the search features and corrected a bug with editing.
Intents Intents are the instructions for carrying out a listing’s intentions.
There are three main aspects of intents:
- Action - Data Type - Send/Receive
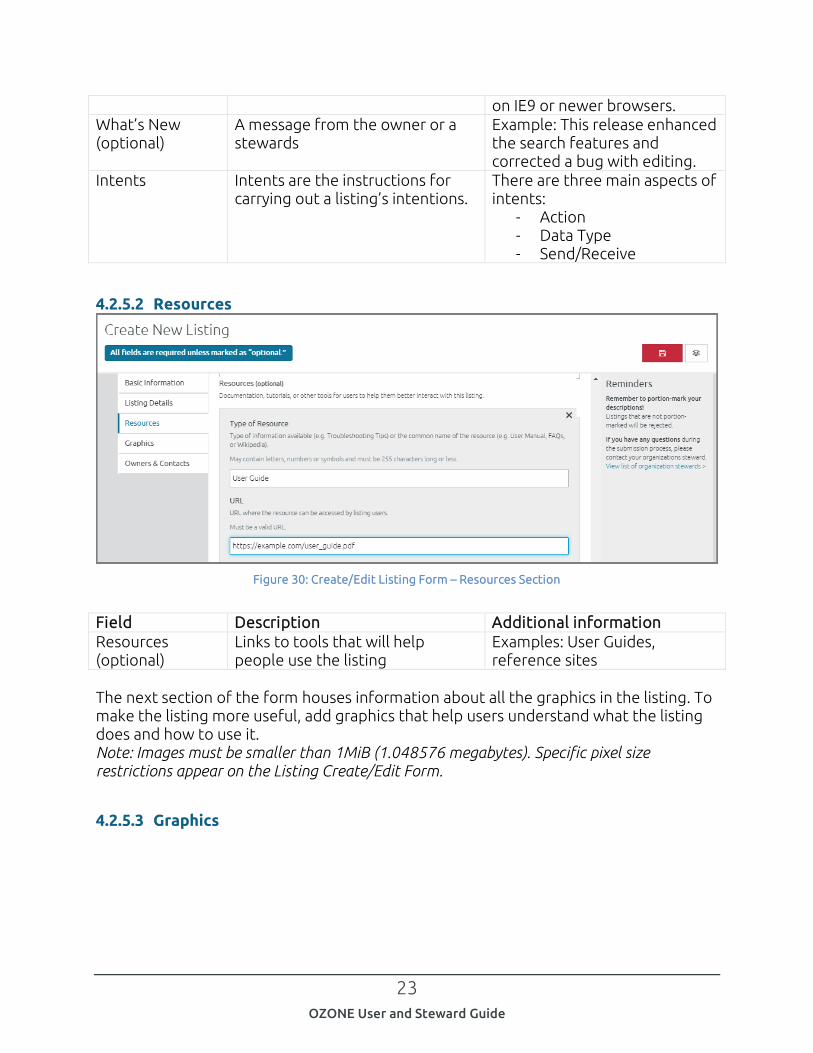
4.2.5.2 Resources
Figure 30: Create/Edit Listing Form – Resources Section
Field Description Additional information
Resources (optional)
Links to tools that will help people use the listing
Examples: User Guides, reference sites
The next section of the form houses information about all the graphics in the listing. To make the listing more useful, add graphics that help users understand what the listing does and how to use it. Note: Images must be smaller than 1MiB (1.048576 megabytes). Specific pixel size restrictions appear on the Listing Create/Edit Form.
4.2.5.3 Graphics

24
OZONE User and Steward Guide
Figure 31: Create/Edit Listing Form – Graphics
The following figure displays the large and small banner icons on the Search and Discovery Page:
Figure 32: Large and Small Banner Image Examples
25
OZONE User and Steward Guide
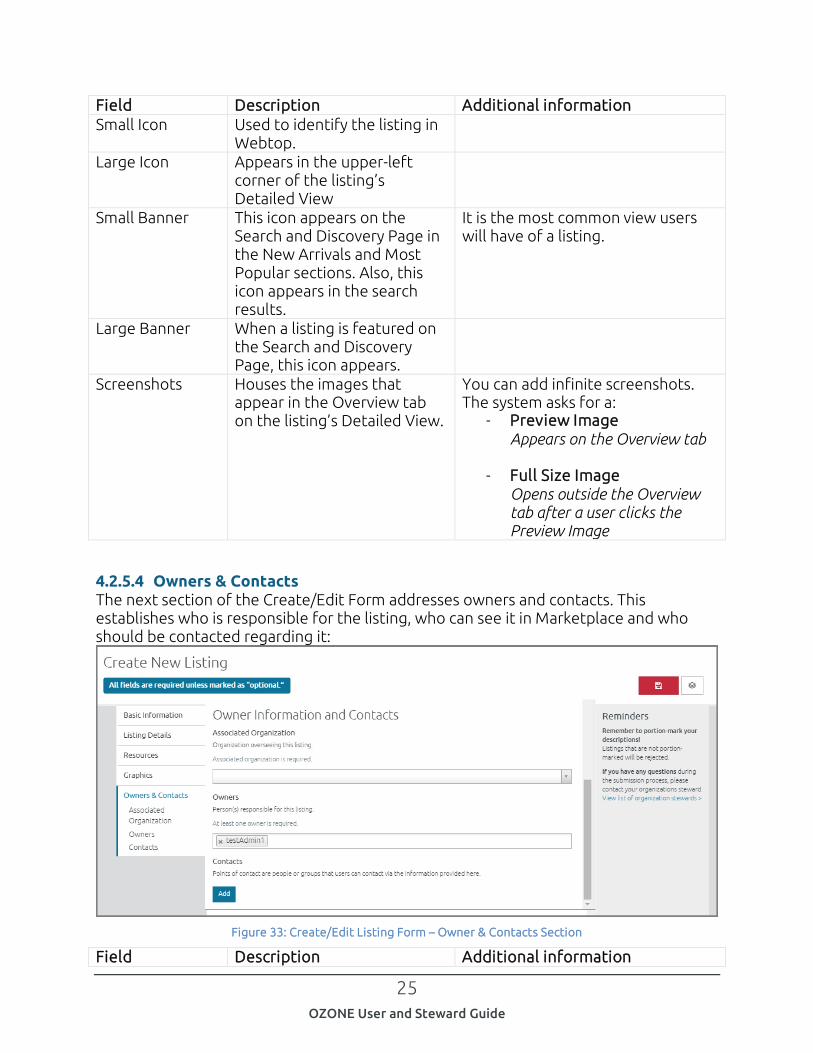
Field Description Additional information
Small Icon Used to identify the listing in Webtop.
Large Icon Appears in the upper-left corner of the listing’s Detailed View
Small Banner This icon appears on the Search and Discovery Page in the New Arrivals and Most Popular sections. Also, this icon appears in the search results.
It is the most common view users will have of a listing.
Large Banner When a listing is featured on the Search and Discovery Page, this icon appears.
Screenshots Houses the images that appear in the Overview tab on the listing’s Detailed View.
You can add infinite screenshots. The system asks for a:
- Preview Image Appears on the Overview tab
- Full Size Image Opens outside the Overview tab after a user clicks the Preview Image
4.2.5.4 Owners & Contacts The next section of the Create/Edit Form addresses owners and contacts. This establishes who is responsible for the listing, who can see it in Marketplace and who should be contacted regarding it:
Figure 33: Create/Edit Listing Form – Owner & Contacts Section
Field Description Additional information
26
OZONE User and Steward Guide
Associated Organization
Use this field to identify which organization will see the listing in Marketplace.
A drop-down list displays all organizations.
Owners Pre-populated with the name of the person who creates the listing, ownership can be reassigned by typing a new owner’s name in the owner field on the listing page.
- To add more than one listing owner, type the name of the next owner after selecting the first one.
- Only a listing’s owner(s) and content stewards can edit the listing.
Contacts A field that can contain the contact’s information that the submitter wishes to enter (e.g., email, phone).
- Click Add to associate more than one contact with a listing.
- The Marketplace steward decides if the field is optional or required.
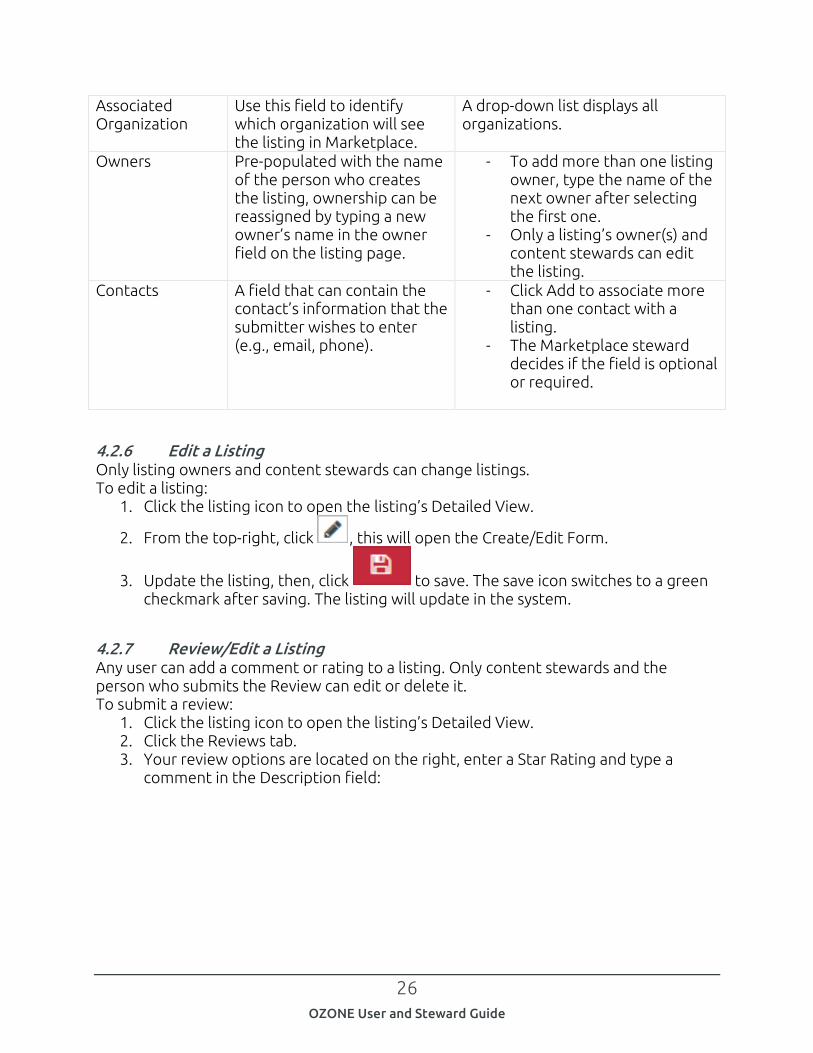
4.2.6 Edit a Listing Only listing owners and content stewards can change listings. To edit a listing:
1. Click the listing icon to open the listing’s Detailed View.
2. From the top-right, click , this will open the Create/Edit Form.
3. Update the listing, then, click to save. The save icon switches to a green checkmark after saving. The listing will update in the system.
4.2.7 Review/Edit a Listing Any user can add a comment or rating to a listing. Only content stewards and the person who submits the Review can edit or delete it. To submit a review:
1. Click the listing icon to open the listing’s Detailed View. 2. Click the Reviews tab. 3. Your review options are located on the right, enter a Star Rating and type a
comment in the Description field:

27
OZONE User and Steward Guide
Figure 34: Review section of Detailed Listing View 4. Click Submit, your comment will be added to the listing Reviews and affect the
Star rating.
4.2.8 Search There are a number of ways to find listings in Marketplace. Remember that only Approved, Enabled listings appear in search results. This section explains Marketplace’s searching tools:

28
OZONE User and Steward Guide
Figure 35: Searching Tools
- Search box – The search box is located at the top of the Search and Discovery Page. When you enter a search term, the system looks for your term in the listing name, description, tags, etc.
- Categories – Groupings of listings determined by the owner or stewards, a listing can be associated with multiple categories. Click a category on the left panel and only listings associated with that category will appear on the page. If you select multiple categories, only listings associated with all of the selected categories will appear.
- Types – Located at the upper-right side of the Search and Discovery Page, click the checkbox beside the Types you want to display. Only the listings of the selected Types will appear in the filtered list. Owners determine listing Type.
- Organizations – If you are a member of more than one organization, you can filter by organization using this field which is located on the upper-right side of the Search and Discovery Page.
5 Content Steward Guide Content stewards are the gatekeepers. They oversee all listings in Marketplace. Before listings are available for users to find and use, an organizational content steward and a Marketplace content steward must approve them.

29
OZONE User and Steward Guide
Define Content Steward Roles 5.1- Marketplace content steward – People with this role have two main
functions. They must approve every listing in Marketplace and administer the system and enable or disable them. Administering the system includes making new Categories, etc., and sending notifications.
- Organizational content steward – Every organization has at least one organizational content steward or “org steward.” The org steward must approve listings before sending them to a Marketplace steward for final approval. Org stewards can approve listings or send them back to their owners for updates. Also, they can edit or delete reviews.
Org Listing Page 5.2Org stewards can see every listing in their organization from their Listing Management page. To access this page, click the drop-down Main Menu on the right side of the Global Toolbar and select Listing Management:
Figure 36: Listing Management
All users, including stewards, see My Listings when the Listing Management page opens. Only listings you own appear on the My Listings tab. To see all the listings you oversee as an org steward, click the Org Tab:

30
OZONE User and Steward Guide
Figure 37: Listing Management Org Steward Tab
Marketplace stewards have an additional tab that lists all listings in the store. From the org steward or Marketplace steward tabs, you can Edit, View or Delete a listing. To Approve/Reject or Enable/Disable, see 5.3: Manage Listings.
Manage Listings 5.3Before users can find and bookmark listings from Marketplace, an org steward and Marketplace steward must approve the listings as described in the following sections.
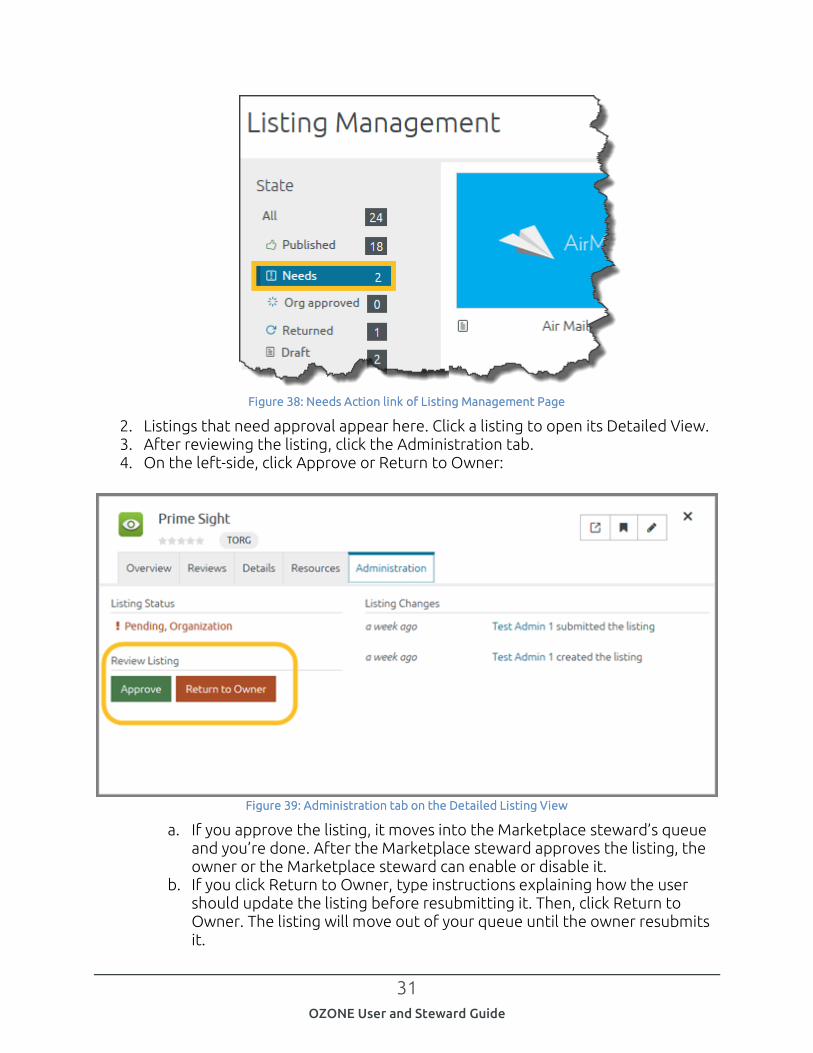
5.3.1 Org Steward Listing Approval Instructions After a user submits a listing, the org steward must approve it, and then a Marketplace steward must approve it. To approve a listing as an org steward:
1. Open the Needs action page. To do this, click the drop-down Main Menu and select Listing Management. Click Needs action from the State panel on the left:
31
OZONE User and Steward Guide
Figure 38: Needs Action link of Listing Management Page
2. Listings that need approval appear here. Click a listing to open its Detailed View. 3. After reviewing the listing, click the Administration tab. 4. On the left-side, click Approve or Return to Owner:
Figure 39: Administration tab on the Detailed Listing View
a. If you approve the listing, it moves into the Marketplace steward’s queue and you’re done. After the Marketplace steward approves the listing, the owner or the Marketplace steward can enable or disable it.
b. If you click Return to Owner, type instructions explaining how the user should update the listing before resubmitting it. Then, click Return to Owner. The listing will move out of your queue until the owner resubmits it.
32
OZONE User and Steward Guide
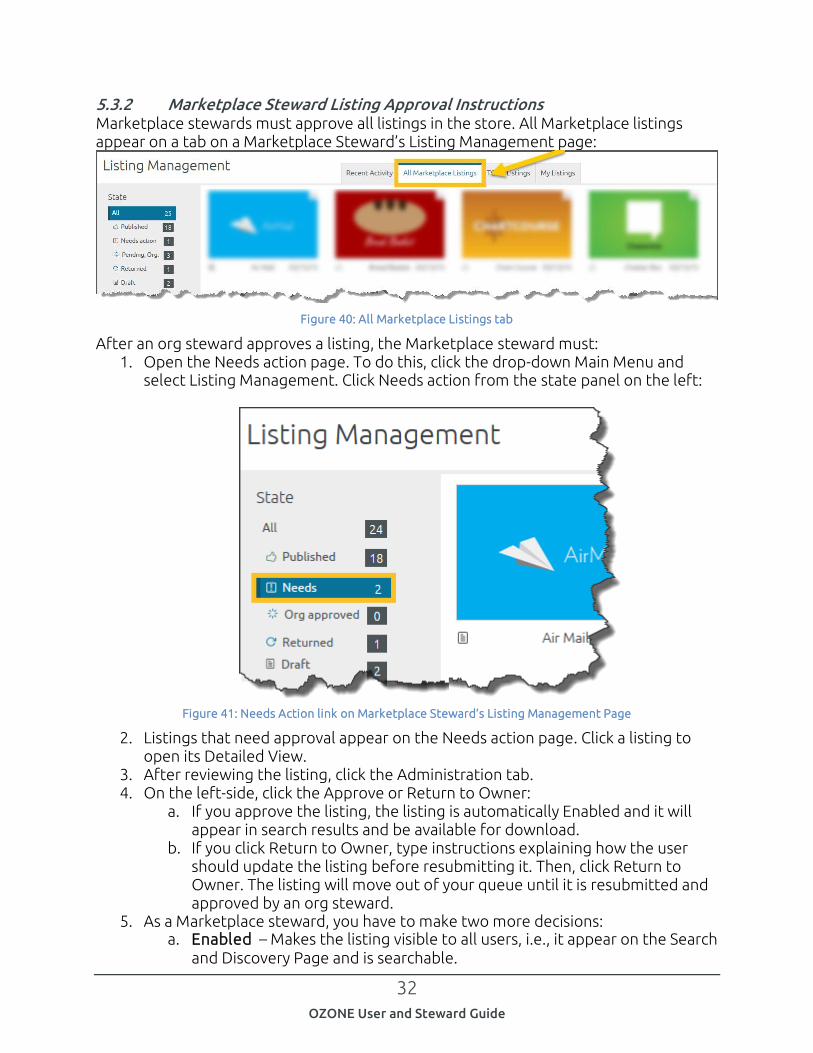
5.3.2 Marketplace Steward Listing Approval Instructions Marketplace stewards must approve all listings in the store. All Marketplace listings appear on a tab on a Marketplace Steward’s Listing Management page:
Figure 40: All Marketplace Listings tab
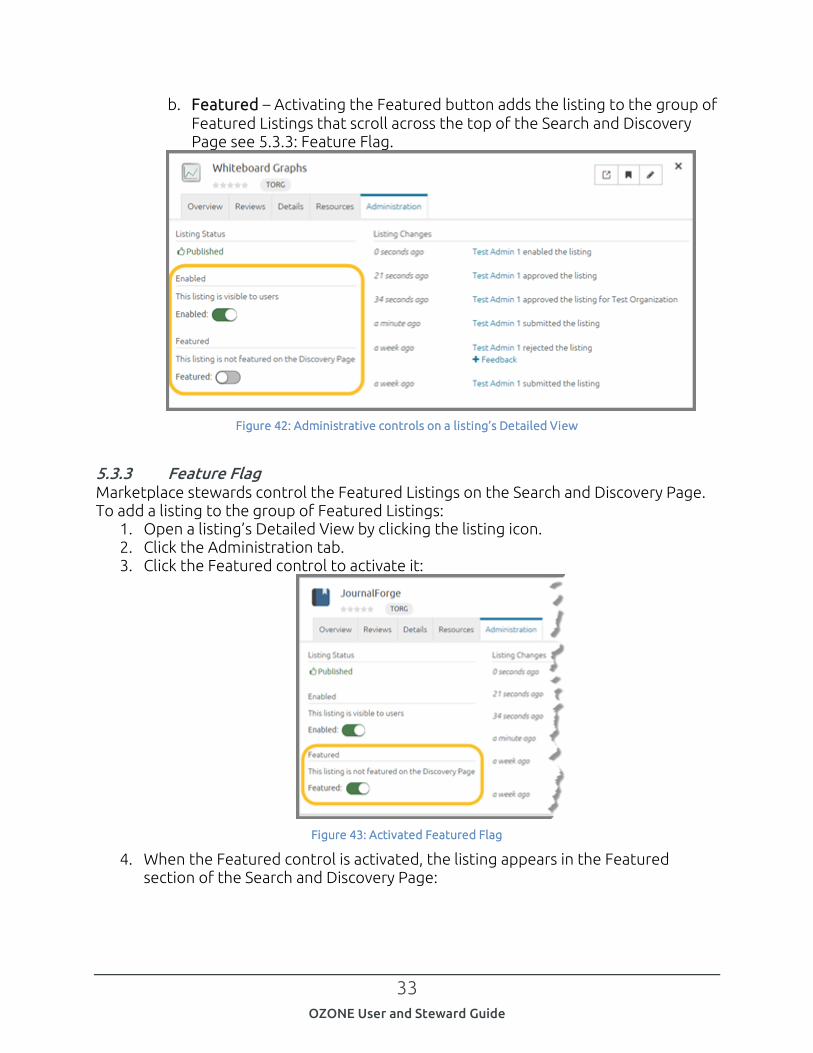
After an org steward approves a listing, the Marketplace steward must: 1. Open the Needs action page. To do this, click the drop-down Main Menu and
select Listing Management. Click Needs action from the state panel on the left:
Figure 41: Needs Action link on Marketplace Steward’s Listing Management Page
2. Listings that need approval appear on the Needs action page. Click a listing to open its Detailed View.
3. After reviewing the listing, click the Administration tab. 4. On the left-side, click the Approve or Return to Owner:
a. If you approve the listing, the listing is automatically Enabled and it will appear in search results and be available for download.
b. If you click Return to Owner, type instructions explaining how the user should update the listing before resubmitting it. Then, click Return to Owner. The listing will move out of your queue until it is resubmitted and approved by an org steward.
5. As a Marketplace steward, you have to make two more decisions: a. Enabled – Makes the listing visible to all users, i.e., it appear on the Search
and Discovery Page and is searchable.
33
OZONE User and Steward Guide
b. Featured – Activating the Featured button adds the listing to the group of Featured Listings that scroll across the top of the Search and Discovery Page see 5.3.3: Feature Flag.
Figure 42: Administrative controls on a listing’s Detailed View
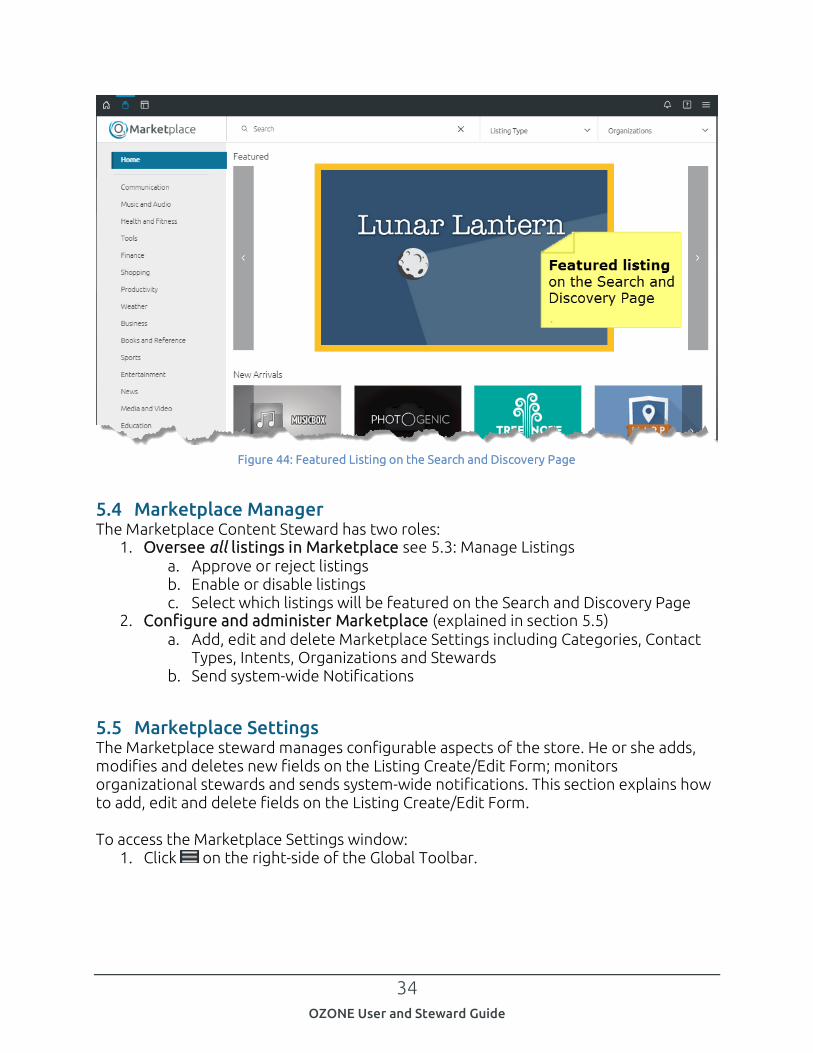
5.3.3 Feature Flag Marketplace stewards control the Featured Listings on the Search and Discovery Page. To add a listing to the group of Featured Listings:
1. Open a listing’s Detailed View by clicking the listing icon. 2. Click the Administration tab. 3. Click the Featured control to activate it:
Figure 43: Activated Featured Flag
4. When the Featured control is activated, the listing appears in the Featured section of the Search and Discovery Page:
34
OZONE User and Steward Guide
Figure 44: Featured Listing on the Search and Discovery Page
Marketplace Manager 5.4The Marketplace Content Steward has two roles:
1. Oversee all listings in Marketplace see 5.3: Manage Listings a. Approve or reject listings b. Enable or disable listings c. Select which listings will be featured on the Search and Discovery Page
2. Configure and administer Marketplace (explained in section 5.5) a. Add, edit and delete Marketplace Settings including Categories, Contact
Types, Intents, Organizations and Stewards b. Send system-wide Notifications
Marketplace Settings 5.5The Marketplace steward manages configurable aspects of the store. He or she adds, modifies and deletes new fields on the Listing Create/Edit Form; monitors organizational stewards and sends system-wide notifications. This section explains how to add, edit and delete fields on the Listing Create/Edit Form. To access the Marketplace Settings window:
1. Click on the right-side of the Global Toolbar.

35
OZONE User and Steward Guide
2. Select Marketplace Settings:
3. The Marketplace Settings page will open to the Categories tab:
Figure 45: Marketplace Settings
5.5.1 Marketplace Settings: Add/Edit/Delete
5.5.1.1 Categories Categories can group listings by similar characteristics. They help people narrow their search results on the Search and Discovery Page:

36
OZONE User and Steward Guide
Figure 46: Categories location on the Search and Discovery Page
To create a category: 1. Click the Add New button at the top of the Categories table:
2. The Create Category window opens. Give the category a Title and Description,
and then click Save. 3. The category will appear on the list of categories on the Marketplace Settings
page and on the Search and Discovery Page. To edit a category:
1. From the Categories tab on the Marketplace Settings page, click the category that you want to edit.
2. The Edit button will become active, click it. 3. The Edit Category window will open, make your change and click Save. 4. The change will appear on the list of categories on the Marketplace Settings
page and on the Search and Discovery Page. To delete a category:
1. From the Categories tab on the Marketplace Settings page, click the category that you want to delete.
2. The Delete button will become active, click it.

37
OZONE User and Steward Guide
3. A confirmation window appears, click Delete:
4. The category will be removed from the list of categories on the Marketplace
Settings page and on the Search and Discovery Page. However, if the category is associated with a listing, it cannot be deleted. To delete the category you have to remove its association with all listings. Edit each listing using the Create/Edit Form.
5.5.1.2 Contact Types Contact Types identify designated contact people. The information appears on the Resources tab of the listing’s Detailed View:
Figure 47: Contact information on the listing’s Detailed View
To create a Contact Type: 1. Click the Contact Types tab on the Marketplace Settings page. 2. Click Add New at the top of the table:
3. The Create Contact Type window opens. Give the contact type a Title and check
Required if the field is required for listing submission.
38
OZONE User and Steward Guide
4. Click Save. - The contact type will appear on the list of contact types on the
Marketplace Settings page. - It will be a drop-down choice on the Contacts section of the Listing
Create/Edit Form. - If the contact type is required, it must be populated when anyone edits an
existing listing. To edit a contact type:
1. From the Contact Types tab on the Marketplace Settings page, click the contact type that you want to edit.
2. The Edit button will become active, click it. 3. The Edit Contact Type window will open, make your change and click Save. 4. The change will appear on the list of contact types on the Marketplace Settings
page and on the Listing Create/Edit Form. To delete a contact type:
1. From the Contact Types tab on the Marketplace Settings page, click the contact type that you want to delete.
2. The Delete button will become active, click it. 3. A confirmation window appears, click Delete. 4. The contact type will be removed from the list of contact types on the
Marketplace Settings page and on the Listing Create/Edit Form.
5.5.1.3 Intents Intents are the instructions for carrying out a listing’s intentions. Intents comprise an Action (graph, view, edit, etc.), a Data Type (HTML, text, image, etc.) and a Send/Receive request. You can associate this action or data type with an icon. However, this information is only metadata used as a placeholder. For any intent to function, a developer has to code the actual function into the listing. From the Intents tab on the Marketplace Settings page, you can create an intent placeholder that will appear on the Listing Create/Edit Form. To create an Intent placeholder:
1. Click the Intent tab on the Marketplace Settings page. 2. Click Add New at the top of the table. 3. The Create Intent window opens. Populate the following fields:
a. Label – Explain what the intent does. This label will appear in the drop-down list when a user chooses an intent on the Listing Create/Edit Form.
b. Action – Describe the intent in 64 characters. c. Type – Describe the intent in 64 characters.
Ex: application/json, application/custom-type, etc. d. Icon – Attach an image that will appear when anyone uses the intent.
Think of this like the icon that appears on a smart phone when you decide to open an address and the system prompts you to open that address in a browser or a mapping app.
4. Click Save.

39
OZONE User and Steward Guide
a. The intent will appear on the list of intents on the Marketplace Settings page.
b. It will be a drop-down choice in the Intents section of the Listing Create/Edit Form.
To edit an intent Label or Icon:
1. From the Intents tab on the Marketplace Settings page, click the intent that you want to edit.
2. The Edit button will become active, click it. 3. The Edit Intent window will open, make your change and click Save.
Note: You cannot edit the intent Action and Type after it is created. The change will appear on the list of Intents on the Marketplace Settings page and on the Listing Create/Edit Form.
To delete an Intent:
1. From the Intents tab on the Marketplace Settings page, click the Intent that you want to delete.
2. The Delete button will become active, click it. 3. A confirmation window appears, click Delete.
The intent will be removed from the list of intents on the Marketplace Settings page and on the Listing Create/Edit Form.
5.5.1.4 Organizations Marketplace can filter listings by organizations. To create an organization:
1. Click the Organizations tab on the Marketplace Settings page. 2. Click Add New at the top of the table. 3. The Create Organization window opens. Enter a Title and Acronym or
Abbreviation that will appear on the listing’s Short View and Detailed View. 4. Click Save. After refreshing, the organization will appear as an option in the
Stewards drop-down. See the next section “Stewards” to learn how to associate a steward with the new organization.
To edit an organization: 1. From the organization tab on the Marketplace Settings page, click the
organization that you want to edit. 2. The Edit button will become active, click it. 3. The Edit Organization window will open, make your change and click Save. 4. The change will appear on the list of Organizations on the Marketplace Settings
page. To delete an organization:
1. From the organizations tab on the Marketplace Settings page, click the organization that you want to delete.
2. The Delete button will become active at the top of the table, click it. 3. A confirmation window appears, click Delete.

40
OZONE User and Steward Guide
The organization will be removed from the list of organizations on the Marketplace Settings page and on the Listing Create/Edit Form. Note: An organization cannot be removed if it is associated with a listing.
5.5.1.5 Stewards Stewards oversee listings in Marketplace. They are the gatekeepers that approve, enable and moderate listings. There are two kinds of stewards: Org Stewards who oversee specific organizations and Marketplace Stewards who oversee all listings and specific settings in the store. At log-in, your system will determine your role as a user, org steward or Marketplace steward. When someone signs in as a steward, their name is added to the list of Stewards in the Marketplace Settings page:
Figure 48: Steward Management in the Marketplace Settings Menu
Marketplace stewards cannot add or delete stewards listed on the Stewards tab. However, they can edit the organizations assigned to each steward. To edit a steward’s assigned organization(s):
1. From the Stewards tab on the Marketplace Settings page, click the Display Name that you want to edit.
2. The Edit button in the table header will become active, click it. 3. The Edit Steward window will open:
a. To remove an organization, click Remove beside the Stewarded organizations drop-down field.
b. To add an organization, click Add and select the new organization from the drop-down list.
4. Click Save, the change will appear on the list of Stewards on the Marketplace Settings page.
5.5.1.6 Notifications Only Marketplace Stewards can alert all system users via the Notifications feature. This section explains how to send and delete notifications:
1. From the Marketplace Settings page, click the Notifications tab. 2. Schedule and write the notification:
41
OZONE User and Steward Guide
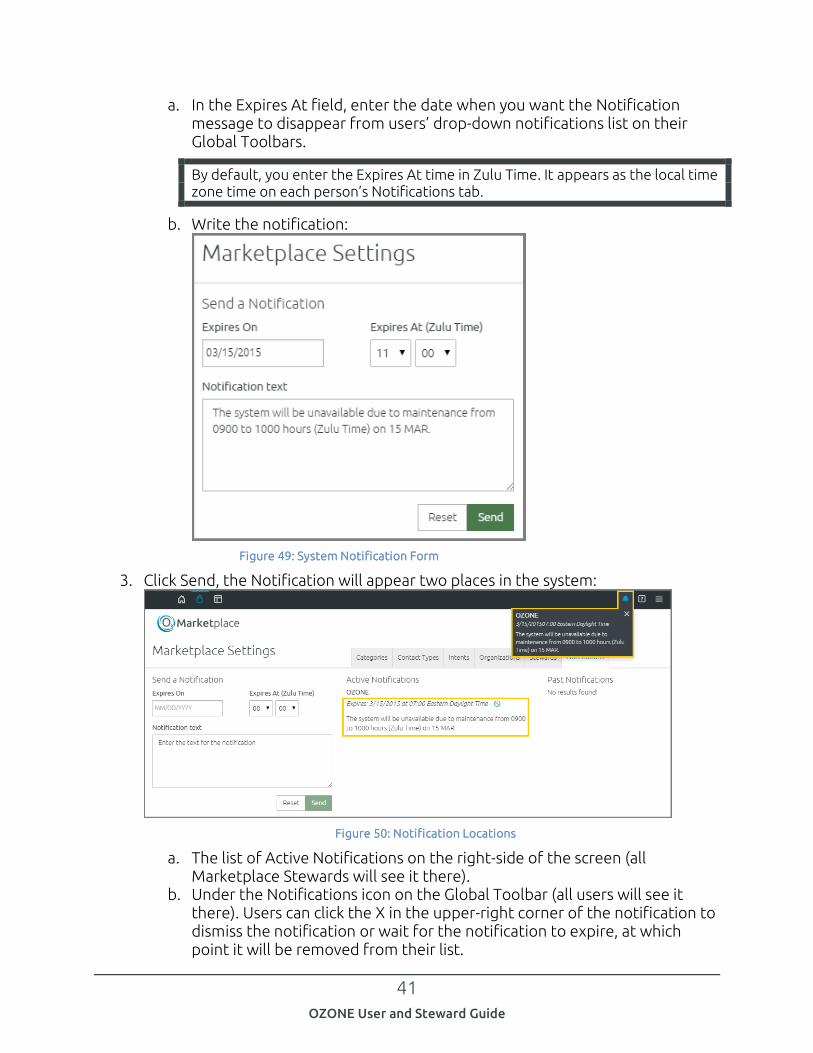
a. In the Expires At field, enter the date when you want the Notification message to disappear from users’ drop-down notifications list on their Global Toolbars.
By default, you enter the Expires At time in Zulu Time. It appears as the local time zone time on each person’s Notifications tab.
b. Write the notification:
Figure 49: System Notification Form
3. Click Send, the Notification will appear two places in the system:
Figure 50: Notification Locations
a. The list of Active Notifications on the right-side of the screen (all Marketplace Stewards will see it there).
b. Under the Notifications icon on the Global Toolbar (all users will see it there). Users can click the X in the upper-right corner of the notification to dismiss the notification or wait for the notification to expire, at which point it will be removed from their list.
42
OZONE User and Steward Guide
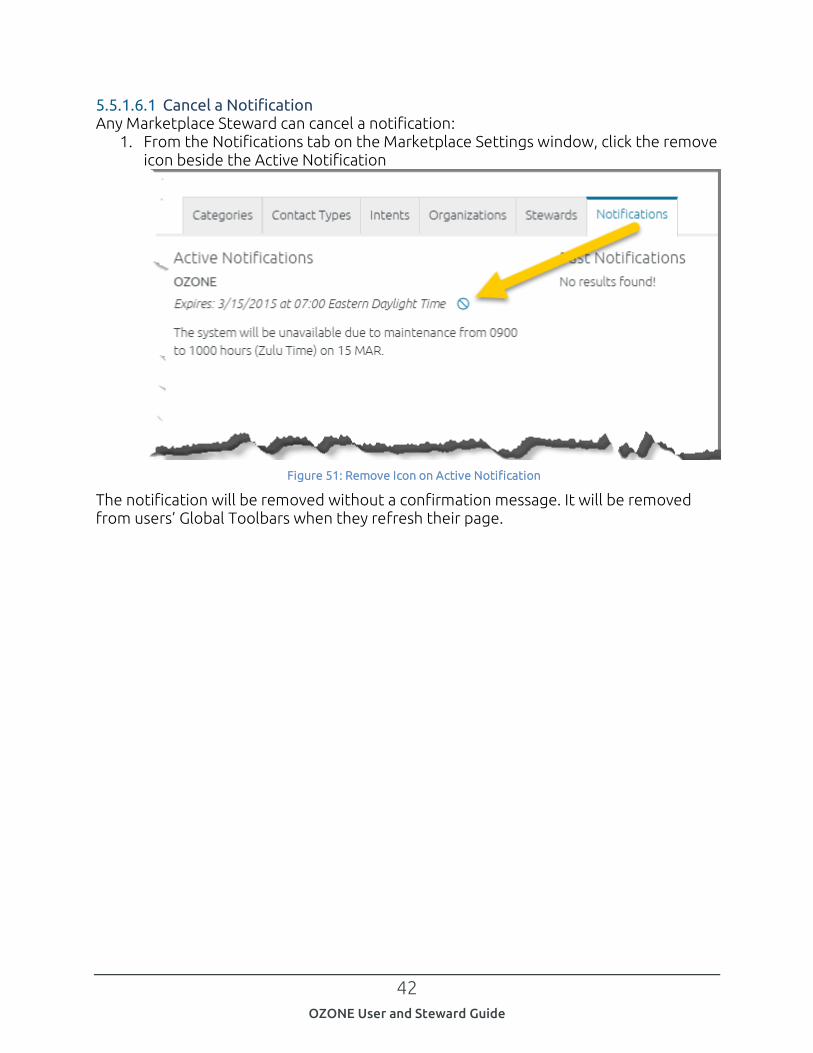
5.5.1.6.1 Cancel a Notification Any Marketplace Steward can cancel a notification:
1. From the Notifications tab on the Marketplace Settings window, click the remove icon beside the Active Notification
Figure 51: Remove Icon on Active Notification
The notification will be removed without a confirmation message. It will be removed from users’ Global Toolbars when they refresh their page.