part v: remote management€œspecifying the timeout value for establishing a remote control or...
TRANSCRIPT

Novell Confidential Manual (99a) 11 September 2003
V Remote Management
ZENworks® for Desktops (ZfD) Remote Management gives you the ability to manage remote workstations (called managed workstations) from the management console. Remote Management gives you the ability to do the following:
Remotely wake up a powered-off managed workstation
Assume control of a managed workstation
Execute files found on a managed workstation
Reboot a managed workstation
Transfer files between the management console and a managed workstation
Chat with the user at a managed workstation
Diagnose problems on a managed workstation
Ping the Remote Management Agent on a managed workstation
Blank the managed workstation screen during a Remote Control session
Lock the keyboard and mouse controls at the managed workstation during a Remote Control session
Suppress the wallpaper displayed on the desktop of the managed workstation during a Remote Control or Remote View session
Configure the time-out period for a Remote Control or a Remote View session
Remote Management can save you and your organization time and money. For example, you or your organization's help desk can analyze and remotely fix workstation problems without having to visit the user's workstation, which reduces problem resolution times and increases productivity.
The following sections will help you understand and use ZfD Remote Management:
Chapter 21, “Understanding Remote Management Components,” on page 251
Chapter 22, “Managing Remote Workstations,” on page 261
Chapter 23, “Diagnostic Information,” on page 277
Chapter B, “Documentation Updates,” on page 285
Remote Management 249

Novell Confidential Manual (99a) 11 September 2003
250 ZENworks for Desktops 3.2 Administration Guide

Novell Confidential Manual (99a) 11 September 2003
21 Understanding Remote Management Components
You can use ZENworks® for Desktops (ZfD) to remotely manage Windows* 95, Windows 98, Windows NT*, or Windows 2000 workstations from the management console.
The following sections provide information that will help you understand the functionality of Remote Management components:
“Understanding Remote Management Agents” on page 251
“Understanding Remote Management Security” on page 252
“Understanding Remote Wake Up” on page 252
“Understanding Remote Control” on page 252
“Understanding Remote View” on page 252
“Understanding Remote Execute” on page 253
“Understanding Remote Diagnostics” on page 253
“Understanding File Transfer” on page 254
“Understanding Chat” on page 254
“Understanding the Audit Log” on page 254
“Monitoring Login and Logout events” on page 258
“Specifying the Timeout Value for Establishing a Remote Control or Remote View Session” on page 258
Understanding Remote Management AgentsThe Remote Management Agent is a ZfD component that is installed on a managed workstation so that the administrator can remotely manage that workstation.
The Remote Management Agent starts automatically when the managed workstation boots up. When you initiate a Remote Management session with a managed workstation, the Remote Management Agent uses NDS® to verify if you have the Remote Management rights. On successful verification the Remote Management session proceeds.
How the Remote Management Agent Uses ProtocolsYou can use the Remote Management policy to specify the preferred protocol (IP or IPXTM) that the agent should use to communicate with the management console during a remote session. If you select a protocol that is not available on that managed workstation, the agent will attempt to use the available protocol. The management console attempts to contact the agent using the network
Understanding Remote Management Components 251

Novell Confidential Manual (99a) 11 September 2003
addresses stored within the Workstation object in NDS. It will cycle once through the network addresses trying to communicate with the agent on the managed workstation. For IP addresses in the workstation, the management console attempts to contact the agent using IP. For IPX addresses stored in the Workstation object, the management console attempts to contact the agent using IPX. However, for the management console to communicate with the managed workstation using IPX, ensure that the IP and IPX stacks are installed on the managed workstation. If the IPX stack only is installed, the management console will not be able to communicate with the managed workstation using IPX.
Understanding Remote Management SecurityIn order for the Remote Management Agent to accept a Remote Management request, the managed workstation must be registered into NDS and be imported as an NDS Workstation object. The Remote Management Agents use NDS authentication to verify that the user requesting to remotely access the managed workstation is authorized to do so. The effective policy settings based on which the administrator performs Remote Management sessions on the managed workstation are taken from the NDS Workstation object and the User object of the user logged in to the managed workstation.
The ZfD management console runs under ConsoleOne®. The Remote Management Agents are NDS authentication-aware and policy-aware and will not allow unauthorized Remote Management sessions to occur.
Understanding Remote Wake UpRemote Wake Up lets you remotely power up a powered down node in your network (providing that the network card on the node is Wake on LAN* enabled). This feature lets the administrator manage nodes during off-hours to minimize the downtime users experience for system maintenance and upgrades. It also facilitates power savings while keeping systems available for maintenance. For more information, see “Managing a Remote Wake Up Session” on page 263.
Understanding Remote ControlRemote Control lets you control a managed workstation from the management console (ConsoleOne) to provide user assistance and to help resolve workstation problems.
Remote Control establishes a connection between the management console and the managed workstation. With remote control connections, the administrator can go beyond viewing the managed workstation to taking control of it. For more information, see “Managing a Remote Control Session” on page 264.
Understanding Remote ViewRemote View lets you view the desktop of the managed workstation from the management console.
Remote View lets you connect with a managed workstation so you can view the managed workstation instead of controlling it. This will help you troubleshoot problems that the user encountered. For example, you can observe how the user at a managed workstation performs certain tasks to ensure that the user performs a task correctly. For more information, see “Managing a Remote View Session” on page 271.
252 ZENworks for Desktops 3.2 Administration Guide

Novell Confidential Manual (99a) 11 September 2003
Understanding Remote ExecuteRemote Execute lets you run any executable on the managed workstation from the management console. An application can be remotely executed by specifying its executable name in the Remote Execute window (if the program is in the path of the managed workstation) or by entering the complete path of the application (if it is not in the path of the managed workstation). For more information, see “Running an Application on the Managed Workstation” on page 272.
You can determine the value of the path from the Environment window launched from the Diagnostic feature of ZfD. For more information, see “Environment Information” on page 278.
Understanding Remote DiagnosticsRemote Diagnostics helps you shorten problem resolution times and assist users without requiring a technician to physically visit the troubled workstation. This increases user productivity by keeping desktops up and running. Diagnostic information of managed workstations is available over IP only; diagnostics of workstations with pure IPX is not supported. For more information, see “Diagnostic Information” on page 277.
Diagnostics provide real-time information so the network manager can diagnose workstation problems. The following table lists the diagnostic information that is available on Windows 95/98 and Windows NT/2000 managed workstations:
Diagnostic Information Windows 95/98 managed workstations
Windows NT/2000 managed workstations
Windows Memory Available Available
Environment Available Available
Event Log Not Available Available
WIN32 Processes Available Not Available
WIN32 Modules Available Not Available
Device Drivers Not Available Available
Services Not Available Available
NetWare Connections Available Available
Novell ClientTM Available Available
Network Protocols Available Available
Name Space Providers Available Available
Network Drives Available Available
Network Open Files Available Available
Print Capture Available Available
Understanding Remote Management Components 253

Novell Confidential Manual (99a) 11 September 2003
Understanding File TransferFile Transfer lets you perform file operations between the management console and a managed workstation. To be able to transfer files between the management console and the managed workstation, ensure that the Remote Management Agent is installed on the managed workstation.
Using File Transfer, you can move or copy files between the management console and a managed workstation. You can also rename and delete files, and create directories on the management console and on the managed workstation. From the File Transfer window, you can view the properties of files and directories on the management console and the managed workstation, including size of the file, and the date and time of file creation. File Transfer also lets you open files with the associated application on the management console. For more information, see “Managing a File Transfer Session” on page 274.IMPORTANT: The File Transfer program does not allow access to non-fixed drives on the managed workstation.
Understanding ChatChat is a real-time messaging tool that lets the management console user communicate with a user at the managed workstation. Only a management console user logged in as an administrator can initiate a Chat session. To chat with the user at the managed workstation, you need to ensure that the Remote Management Agent is installed on the managed workstation.
When the management console user initiates a Chat session with the user at the managed workstation, the user at the managed workstation will be prompted for permission to initiate the Chat session. The Chat session begins when the user at the managed workstation provides the permission to initiate the Chat session. During the Chat session, you can copy and paste text in the message area. Either the management console user or the user at the managed workstation can close the Chat session. For more information, see “Managing a Chat Session” on page 275.
Understanding the Audit LogThe Windows NT and Windows 2000 event logging mechanism allows applications running on the managed workstation to record events as log files. You can use the Event Viewer to view the event logs. The Event Viewer maintains Application, Security, and System log files. The events for Remote Management sessions are stored in the Application log file. The managed workstation on which the Remote Management Agent is installed, maintains this log information as an audit log. For more information, see “Viewing the Audit Log of Remote Management Sessions” on page 276.IMPORTANT: ZENworks 2 stored audit information of Remote Management events in the Security log file. ZfD stores the audit information in the Application log file. You can save the information of previous events using the Save As option from the File menu of the Event Viewer.
The audit log maintains the list of events for each Remote Management session and stores the following details:
The success or failure of the authentication process
The permission required status
The start time or end time of the remote control and remote view session
The name of the user attempting to remotely manage the workstation
The domain name and address of the management console accessing the managed workstation
254 ZENworks for Desktops 3.2 Administration Guide

Novell Confidential Manual (99a) 11 September 2003
The remote operation performed on the managed workstation
The name of the user logged in to the managed workstation
The event success or failure status, and details for the failure
The following sections contain additional information:
“Details of Events in the Audit Log” on page 255
“Event Log Messages for Remote Management Sessions” on page 256
Details of Events in the Audit LogThe following table explains the information stored by each event during a Remote Management session:
Parameter Description
Date Date of the event occurrence.
Time Time stamp of the event occurrence.
User Name of the user logged in to the managed workstation.
Computer Name of the computer on which the event occurred.
Event ID Unique ID assigned to the event.
Source The source name for the Remote Management audit log is Remote Management Agent.
Type The type of the event indicates if the particular event was a success, failure, information, warning, or error.
Category The category lists the different events for the application. The details of an event are in the detailed message for the event. The events for Remote Management Agent are:
Ping Event
Authentication Event
Permission Event
Session Start Event
Session Terminate Event
Understanding Remote Management Components 255

Novell Confidential Manual (99a) 11 September 2003
Event Log Messages for Remote Management SessionsInformational and error messages will be recorded for the following events during a Remote Management session:
“Ping Event” on page 256
“Authentication Event” on page 257
“Permission Event” on page 257
“Session Start Event” on page 257
“Session Terminate Event” on page 257
You can view the details of events that occurred during a Remote Management session from the Description box in the Event Detail window. For more information about event details, see “Viewing the Audit Log of Remote Management Sessions” on page 276.
Ping Event
The Ping event records if the management console user could verify that the Remote Management Agent is up and running. The following table describes the Ping Event messages.
Operation The various operations that a management console user can perform on the managed workstation are:
Remote Control
Remote View
Remote Diagnostics
File Transfer
Chat
Remote Execute
Remote Reboot
Ping
All events, excluding the Ping event, record the domain name of the administrator who is remotely accessing the managed workstation.
Console Address IP or IPX address of the workstation that the administrator uses to remotely access the managed workstation.
Console DN Domain name of the workstation that the administrator uses to remotely access the managed workstation.
Local User Domain name of the user logged in to the managed workstation.
Workstation DN Domain name of the managed workstation.
Event Message The message for the event.
Type Message
Success Ping was successful
Parameter Description
256 ZENworks for Desktops 3.2 Administration Guide

Novell Confidential Manual (99a) 11 September 2003
Authentication Event
The Authentication event records if the Remote Management Agent could authenticate the remote user for that operation. The following table describes the Authentication Event messages:
Permission Event
The Permission event records if the remote user was granted permission for the specified operation. The following table describes the Permission Event messages:
Session Start Event
The Session Start event records the time when a particular session was started. The following table describes the Session Start Event messages:
Session Terminate Event
The Session Terminate event details the time at which the session was disconnected, and the reason for terminating the session. The following table describes the Session Terminate Event messages:
Failure The managed workstation is being managed by another remote operator
Type Message
Success Authentication was successful
Failure The Remote Management Agent was unable to find the workstation in NDS. Ensure that the workstation is correctly registered.
The remote operator does not have permissions to manage this workstation.
The agent was unable to read NDS for authentication.
The operation is disabled in a policy associated with the workstation of the User object.
There is invalid NDS Authentication information.
An unknown management console tried to establish a Remote Management session.
Type Message
Information Permission was requested by the remote operator.
Success The remote user granted permission for the requested operation.
Failure The remote user did not grant permission for the requested operation.
The remote user did not grant permission for the requested operation within the specified time interval.
Type Message
Information Session started.
Type Message
Understanding Remote Management Components 257

Novell Confidential Manual (99a) 11 September 2003
Monitoring Login and Logout eventsZfD takes full advantage of the security functionality of NDS. NDS functionality ensures secure Remote Management sessions when users log out or new users log in to the management console or the managed workstation during a Remote Management session. A remote Management session will terminate, restart, or continue based on the Remote Management security settings for the new user as explained in the following table.
Specifying the Timeout Value for Establishing a Remote Control or Remote View Session
If the administrator has the rights to access the managed workstation, the administrator can specify the maximum duration of time to wait for connecting with the managed workstation to start a Remote Control or a Remote View session. The default timeout value is 5 minutes. The administrator can change the default timeout value and choose a value between the range of 1 minute and 30 minutes.
When the administrator initiates a Remote Control or Remote View session, the management console attempts to establish connection with the managed workstation. If the Remote Management Agent is up and running on the managed workstation and if the network link between
Type Message
Information Session terminated normally.
Warning Remote View session terminated because a mouse or keyboard event was received.
Session terminated because too many negative acknowledgments were outstanding. Check the NetWare® connection.
Session timed out because the management console did not respond.
Error Remote reboot operation failed, Windows Error Message.
Action Scenario
Session Continue
When the remote management security settings for the new user on the managed workstation are similar to the settings for the current user.
When a new user logs in to the managed workstation and the Audible Signal or Visible Signal settings are different, the session will continue with newer settings.
Session Terminate
When a new user logs in to the management console.
When a new user logs in to the managed workstation and the Remote Control option is disabled.
Session Restart
When a new user logs in to the managed workstation and the Screen Blank or Lock Controls settings are different, the session will restart with newer settings.
When a new user logs in to the managed workstation and if permission for a remote session is required from the user at the managed workstation.
258 ZENworks for Desktops 3.2 Administration Guide

Novell Confidential Manual (99a) 11 September 2003
the management console and the managed workstation is up, the connection for Remote Control or Remote View will be established and the session will proceed.
To specify the timeout value for establishing a Remote Control or Remote View session:
1 From the management console, right-click the User object for the management console user.
2 Click Properties > Remote Management
3 Click the General tab.
4 In the Remote Control/View Timeout for Console User text field, specify the maximum duration for the management console to try and establish a Remote Control or Remote View session with the managed workstation.IMPORTANT: The timeout value set in the User object or associated policy for the User object is applicable to the management console user, not to the managed workstation user. All other security settings in the Remote Management property page are applicable only to the managed workstation user.
Understanding Remote Management Components 259

Novell Confidential Manual (99a) 11 September 2003
260 ZENworks for Desktops 3.2 Administration Guide

Novell Confidential Manual (99a) 11 September 2003
22 Managing Remote Workstations
The following sections provide information that will help you effectively manage Remote Management sessions:
“Using the Remote Management Agents” on page 261
“Managing a Remote Wake Up Session” on page 263
“Managing a Remote Control Session” on page 264
“Managing a Remote View Session” on page 271
“Running an Application on the Managed Workstation” on page 272
“Viewing Diagnostic Information for a Managed Workstation” on page 273
“Managing a File Transfer Session” on page 274
“Managing a Chat Session” on page 275
“Viewing the Audit Log of Remote Management Sessions” on page 276
Using the Remote Management AgentsYou will be able to access managed workstations if you have installed the Remote Management Agent on the managed workstation. For more information, see “Understanding Remote Management Agents” on page 251.
The following sections explain how you can use the Remote Management Agent during remote sessions:
“Pinging the Remote Management Agent from the Management Console” on page 261
“Shutting Down the Remote Management Agent” on page 262
“Reloading the Remote Management Agent” on page 262
“Uninstalling the Remote Management Agent using the Novell Application Launcher” on page 263
Pinging the Remote Management Agent from the Management ConsoleYou can ping the Remote Management Agent on the managed workstation before you begin a Remote Management session. The Ping window displays the response received from the Remote Management Agent based on the packets sent from the management console, which helps you determine if the Remote Management Agent is loaded on the managed workstation.
To ping the managed workstation from the management console:
1 Right-click the managed workstation from the management console.
Managing Remote Workstations 261
Novell Confidential Manual (99a) 11 September 2003
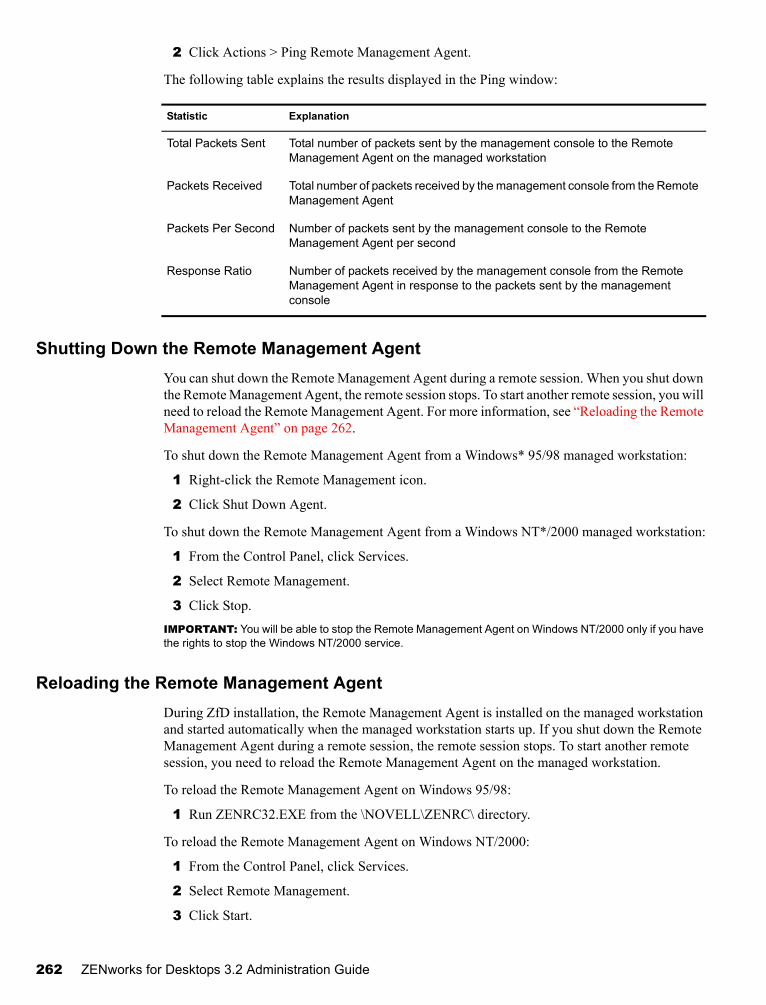
2 Click Actions > Ping Remote Management Agent.
The following table explains the results displayed in the Ping window:
Shutting Down the Remote Management AgentYou can shut down the Remote Management Agent during a remote session. When you shut down the Remote Management Agent, the remote session stops. To start another remote session, you will need to reload the Remote Management Agent. For more information, see “Reloading the Remote Management Agent” on page 262.
To shut down the Remote Management Agent from a Windows* 95/98 managed workstation:
1 Right-click the Remote Management icon.
2 Click Shut Down Agent.
To shut down the Remote Management Agent from a Windows NT*/2000 managed workstation:
1 From the Control Panel, click Services.
2 Select Remote Management.
3 Click Stop.IMPORTANT: You will be able to stop the Remote Management Agent on Windows NT/2000 only if you have the rights to stop the Windows NT/2000 service.
Reloading the Remote Management AgentDuring ZfD installation, the Remote Management Agent is installed on the managed workstation and started automatically when the managed workstation starts up. If you shut down the Remote Management Agent during a remote session, the remote session stops. To start another remote session, you need to reload the Remote Management Agent on the managed workstation.
To reload the Remote Management Agent on Windows 95/98:
1 Run ZENRC32.EXE from the \NOVELL\ZENRC\ directory.
To reload the Remote Management Agent on Windows NT/2000:
1 From the Control Panel, click Services.
2 Select Remote Management.
3 Click Start.
Statistic Explanation
Total Packets Sent Total number of packets sent by the management console to the Remote Management Agent on the managed workstation
Packets Received Total number of packets received by the management console from the Remote Management Agent
Packets Per Second Number of packets sent by the management console to the Remote Management Agent per second
Response Ratio Number of packets received by the management console from the Remote Management Agent in response to the packets sent by the management console
262 ZENworks for Desktops 3.2 Administration Guide
Novell Confidential Manual (99a) 11 September 2003
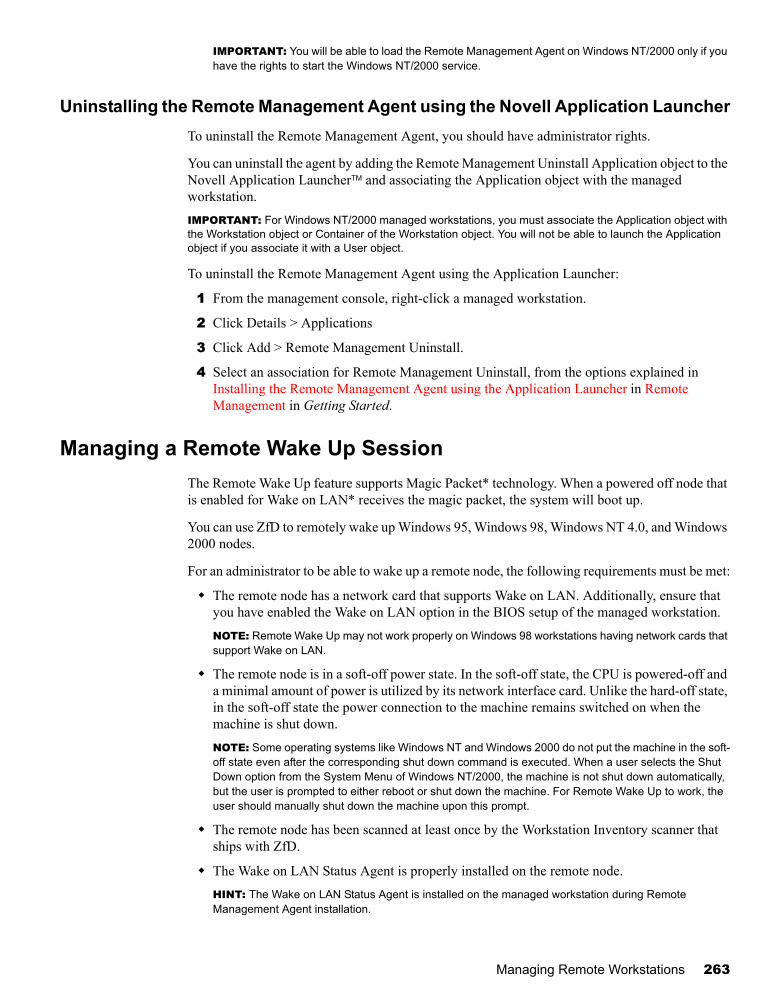
IMPORTANT: You will be able to load the Remote Management Agent on Windows NT/2000 only if you have the rights to start the Windows NT/2000 service.
Uninstalling the Remote Management Agent using the Novell Application LauncherTo uninstall the Remote Management Agent, you should have administrator rights.
You can uninstall the agent by adding the Remote Management Uninstall Application object to the Novell Application LauncherTM and associating the Application object with the managed workstation.IMPORTANT: For Windows NT/2000 managed workstations, you must associate the Application object with the Workstation object or Container of the Workstation object. You will not be able to launch the Application object if you associate it with a User object.
To uninstall the Remote Management Agent using the Application Launcher:
1 From the management console, right-click a managed workstation.
2 Click Details > Applications
3 Click Add > Remote Management Uninstall.
4 Select an association for Remote Management Uninstall, from the options explained in Installing the Remote Management Agent using the Application Launcher in Remote Management in Getting Started.
Managing a Remote Wake Up SessionThe Remote Wake Up feature supports Magic Packet* technology. When a powered off node that is enabled for Wake on LAN* receives the magic packet, the system will boot up.
You can use ZfD to remotely wake up Windows 95, Windows 98, Windows NT 4.0, and Windows 2000 nodes.
For an administrator to be able to wake up a remote node, the following requirements must be met:
The remote node has a network card that supports Wake on LAN. Additionally, ensure that you have enabled the Wake on LAN option in the BIOS setup of the managed workstation.NOTE: Remote Wake Up may not work properly on Windows 98 workstations having network cards that support Wake on LAN.
The remote node is in a soft-off power state. In the soft-off state, the CPU is powered-off and a minimal amount of power is utilized by its network interface card. Unlike the hard-off state, in the soft-off state the power connection to the machine remains switched on when the machine is shut down.NOTE: Some operating systems like Windows NT and Windows 2000 do not put the machine in the soft-off state even after the corresponding shut down command is executed. When a user selects the Shut Down option from the System Menu of Windows NT/2000, the machine is not shut down automatically, but the user is prompted to either reboot or shut down the machine. For Remote Wake Up to work, the user should manually shut down the machine upon this prompt.
The remote node has been scanned at least once by the Workstation Inventory scanner that ships with ZfD.
The Wake on LAN Status Agent is properly installed on the remote node.HINT: The Wake on LAN Status Agent is installed on the managed workstation during Remote Management Agent installation.
Managing Remote Workstations 263

Novell Confidential Manual (99a) 11 September 2003
The routers connecting the management console and the remote node are configured to forward subnet-oriented broadcasts.
The network link between the management console and the remote node is established.
To wake up a remote node:
1 Right-click the Workstation Object from the management console.
2 Click Actions > Remote Wake Up.
Managing a Remote Control SessionZfD lets you remotely control a managed workstation. For more information, see “Understanding Remote Control” on page 252. You can effectively manage a Remote Control session by performing the following tasks with the Viewing window control options, the Viewing window toolbar buttons, and the Remote Management icon options:
“Starting a Remote Control Session” on page 264
“Enabling the Wallpaper on the Managed Workstation” on page 264
“Controlling the Display of the Viewing Window” on page 265
“Enhancing the Remote Control Performance Over a WAN or a Slow Link” on page 266
“Using the Viewing Window Accelerator Keys” on page 266
“Using the Toolbar Buttons on the Viewing Window” on page 268
“Using the Remote Management Icon” on page 269
“Obtaining Information About Remote Management Sessions” on page 270
“Stopping a Remote Control Session from the Managed Workstation” on page 271
Starting a Remote Control SessionBefore you start a Remote Control session with the managed workstation, make sure that the appropriate Remote Management Agent is loaded on the managed workstation.
To start a Remote Control session:
1 Right-click the managed workstation from the management console.
2 Click Actions > Remote Control.
You can configure the timeout value for establishing a Remote Control session. For more information, see “Specifying the Timeout Value for Establishing a Remote Control or Remote View Session” on page 258.
Enabling the Wallpaper on the Managed WorkstationWhen an administrator initiates a Remote Control or Remote View session with the managed workstation, any wallpaper displayed on the desktop of the managed workstation will be suppressed. This feature reduces the response time from the managed workstation for requests from the management console because less traffic is generated over the network while the wallpaper is suppressed.
264 ZENworks for Desktops 3.2 Administration Guide

Novell Confidential Manual (99a) 11 September 2003
You can configure the control parameter for this option to change the default settings and enable the display of the wallpaper on the managed workstation. When you terminate the Remote Control or Remote View session, the suppressed wallpaper will be restored.NOTE: On Windows 95/98 managed workstations, the Suppress Wallpaper option is enabled only if you log in to the workstation as a Windows User.
To enable the display of suppressed wallpaper on the managed workstation:
1 Click the Remote Management icon at the top-left corner of the Viewing window > click Configure.
2 Deselect the Suppress Wallpaper control option.
Controlling the Display of the Viewing WindowYou can control the display of the managed workstation by using the Viewing window control options.
To enable control options:
1 Click the Remote Management icon at the top-left corner of the Viewing window.
2 Click Configure.
3 Select the control options you want to enable for the remote session.
The following table explains the options you can use to control the display of the Viewing window.
Option Description
Warn me on Screen Blanking
Informs the user at the management console before the managed workstation screen is blanked.
Accelerator Keys Enabled
Enables the accelerator keys on the management console so that default accelerator key sequences are always available during the remote session.
For details, see “Using the Viewing Window Accelerator Keys” on page 266.
System Key Pass Through
Passes Alt-key sequences on the management console to the managed workstation.
During a Remote View session, the System Key Pass-Through option is not enabled.
Suppress Wallpaper Suppresses any wallpaper displayed on the managed workstation.
Force 16 Color Viewing Forces the use of 16-color palette on the managed workstation during a Remote Management session. This enhances the Remote Management performance.
Use this option only if you are performing a Remote Management session over a slow WAN.
Managing Remote Workstations 265

Novell Confidential Manual (99a) 11 September 2003
Enhancing the Remote Control Performance Over a WAN or a Slow LinkThe performance of Remote Control, especially on a WAN, has been enhanced through using improved compression.
Performance during a Remote Control session over a WAN or a slow link varies depending on the network traffic. For better response time, try one or more following strategies:
Enable the Force 16 Color Viewing option in the Control Parameters dialog box.
Disable the Give User Visible Signal option in the Remote Management Property page.
Enable the Suppress Wallpaper option on the managed workstation in the Control Parameters dialog box.
Assign color settings on the management console higher than the managed workstation or assign the same color settings for the management console and the managed workstation.
Using the Viewing Window Accelerator KeysYou can use accelerator keys to control the display of the Viewing window. Default accelerator key sequences are assigned to each accelerator key option. The Accelerator Keys dialog box displays the default key sequence in the edit field of each accelerator key option. You can define a custom accelerator key sequence to change the default sequence. For more information, see “Defining a Custom Accelerator Key Sequence” on page 267.
To open the Accelerator Keys dialog box:
1 Click the Remote Management icon at the top-left corner of the Viewing window.
2 Click Accelerator Keys.
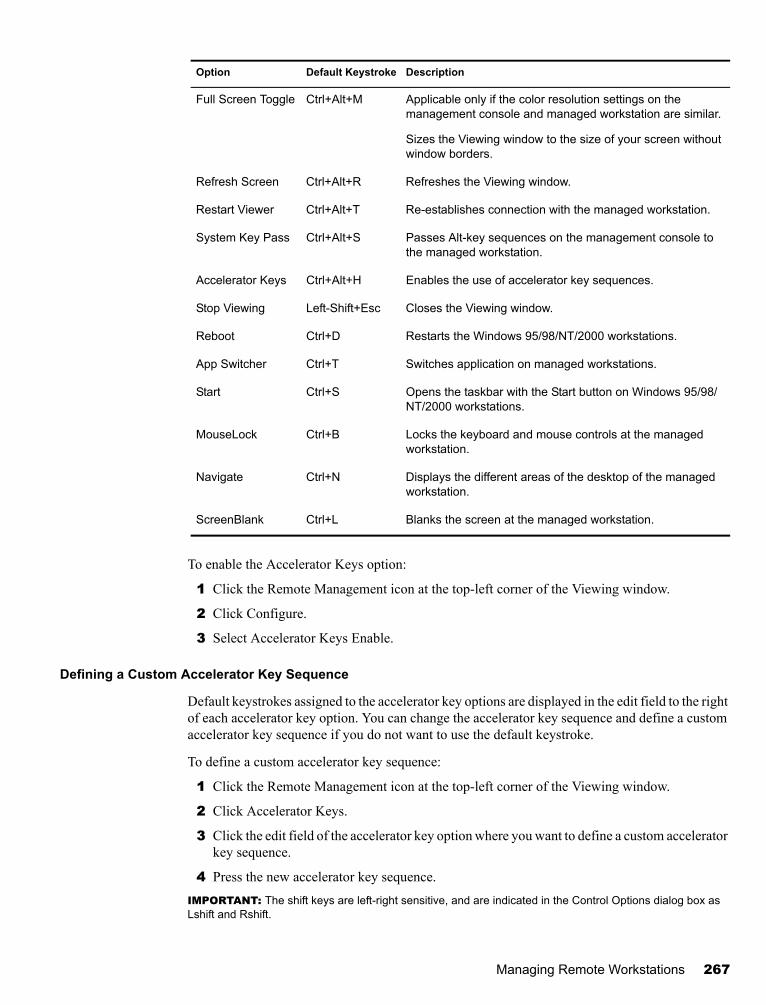
The following table explains the Accelerator Key options you can use to control the display of the Viewing window:
Compression Type Choose the preferred compression on the basis of the network bandwidth/speed.
Select Default if the network bandwidth/speed is high, probably over a LAN environment.
Select Fast if the network bandwidth/speed is high, probably over a high speed LAN environment.
IMPORTANT: Selecting Fast compression over a high network bandwidth/speed may slow down the response time compared to that of the Default compression for certain Remote Control operations. In such situations, select Default compression.
Select Best if the network bandwidth/speed is slow, probably over a WAN or dial-up environment.
Option Description
266 ZENworks for Desktops 3.2 Administration Guide
Novell Confidential Manual (99a) 11 September 2003
To enable the Accelerator Keys option:
1 Click the Remote Management icon at the top-left corner of the Viewing window.
2 Click Configure.
3 Select Accelerator Keys Enable.
Defining a Custom Accelerator Key Sequence
Default keystrokes assigned to the accelerator key options are displayed in the edit field to the right of each accelerator key option. You can change the accelerator key sequence and define a custom accelerator key sequence if you do not want to use the default keystroke.
To define a custom accelerator key sequence:
1 Click the Remote Management icon at the top-left corner of the Viewing window.
2 Click Accelerator Keys.
3 Click the edit field of the accelerator key option where you want to define a custom accelerator key sequence.
4 Press the new accelerator key sequence.IMPORTANT: The shift keys are left-right sensitive, and are indicated in the Control Options dialog box as Lshift and Rshift.
Option Default Keystroke Description
Full Screen Toggle Ctrl+Alt+M Applicable only if the color resolution settings on the management console and managed workstation are similar.
Sizes the Viewing window to the size of your screen without window borders.
Refresh Screen Ctrl+Alt+R Refreshes the Viewing window.
Restart Viewer Ctrl+Alt+T Re-establishes connection with the managed workstation.
System Key Pass Ctrl+Alt+S Passes Alt-key sequences on the management console to the managed workstation.
Accelerator Keys Ctrl+Alt+H Enables the use of accelerator key sequences.
Stop Viewing Left-Shift+Esc Closes the Viewing window.
Reboot Ctrl+D Restarts the Windows 95/98/NT/2000 workstations.
App Switcher Ctrl+T Switches application on managed workstations.
Start Ctrl+S Opens the taskbar with the Start button on Windows 95/98/NT/2000 workstations.
MouseLock Ctrl+B Locks the keyboard and mouse controls at the managed workstation.
Navigate Ctrl+N Displays the different areas of the desktop of the managed workstation.
ScreenBlank Ctrl+L Blanks the screen at the managed workstation.
Managing Remote Workstations 267

Novell Confidential Manual (99a) 11 September 2003
Using the Toolbar Buttons on the Viewing WindowThe following table describes the toolbar options in the Viewing window:
Button Default Keystroke Key Function
Blank/Unblank Screen
Ctrl+L Displays only if the Allow Blanking User’s Screen option is enabled in the security settings.
Blanks the screen at the managed workstation. When the administrator selects this option, the screen of the managed workstation will be blacked out and the operations performed by the administrator on the managed workstation will not be visible to the user at the managed workstation.
Not supported over certain display adapters. Refer to the ZfD 3.2 Readme for the list of display adapters that do not support this feature.
Lock/Unlock Keyboard-Mouse
Ctrl+B Locks the keyboard and mouse controls at the managed workstation. When the administrator selects this option, the user at the managed workstation will not be able to use the keyboard and mouse controls of the managed workstation.
Start
Ctrl+S Sends the Ctrl+Esc keystroke to the managed workstation.
Opens the taskbar with the Start button on Windows 95/98/NT/2000 workstations.
App Switcher
Ctrl+T Sends the Alt-tab key sequences to the managed workstation.
Switches application on managed workstations. If this option is on, you will need to press only the Tab key on the management console to select applications, and then switch the button off.
Control+Alt+Del/Reboot
Ctrl+D Sends the Ctrl+Alt+Del keystroke to the managed workstation.
This button is labeled Reboot if the managed workstation is Windows 95/98.
Restarts the Windows 95/98 workstations.
This button is labeled Control+Alt+Del if the managed workstation is Windows NT/2000.
Displays the Security window on Windows NT/2000.
268 ZENworks for Desktops 3.2 Administration Guide

Novell Confidential Manual (99a) 11 September 2003
IMPORTANT: During a Remote View session, only the Navigate button is displayed in the Viewing window.
You can change the default key sequence and define a custom key sequence if you do not want to use the default key sequence. For more information, see “Defining a Custom Accelerator Key Sequence” on page 267
Using the Remote Management IconYou can manage a remote session from the managed workstation using the Remote Management icon options. The Remote Management icon will be displayed in the taskbar of the Windows 95, Windows 98, Windows NT 4.0, and Windows 2000 workstations.
This icon indicates that the Remote Management Agent is loaded on the managed workstation. If the Remote Management Agent is loaded and the Remote Management icon is not displayed in the taskbar, Task List, or the desktop, it indicates that you have disabled the display option in the Remote Management Policy settings. After the Remote Management Agent is loaded, an administrator with sufficient rights can start a remote session on the managed workstation.
The user at the managed workstation can right-click the Remote Management icon and choose from the following options:
System Key Pass Through
Ctrl+Alt+S Sets the system key pass to On or Off.
Passes Alt-key sequences on the management console to the managed workstation.
Certain key sequences such as Ctrl+Esc, Alt+Tab, Ctrl+Alt+Del, and Alt+PrintScreen are not allowed even when the System Key Pass-Through is set to On. However, you can use the toolbar buttons on the Viewing window for the Ctrl+Esc, Alt+Tab, and Ctrl+Alt+Del keystrokes.
Navigate
Ctrl+N Represents the desktop of the managed workstation on the management console.
Displays the different areas of the desktop of the managed workstation. You can move the red frame on the Viewing window to focus on a particular area of the managed workstation desktop.
Option Description
Terminate Session Disconnects and closes the remote session on the managed workstation and displays a message on the management console indicating that the remote session is closed.
Shut Down Agent Shuts down the Remote Management Agent on the managed workstation. To start another remote session, the Remote Management Agent should be reloaded on the managed workstation. For details, see “Reloading the Remote Management Agent” on page 262.
This option is not enabled for Windows NT/2000 managed workstations. The Remote Management Agent runs as a service on Windows NT/2000 and can be shut down from the Windows NT/2000 Services dialog box.
Button Default Keystroke Key Function
Managing Remote Workstations 269
Novell Confidential Manual (99a) 11 September 2003
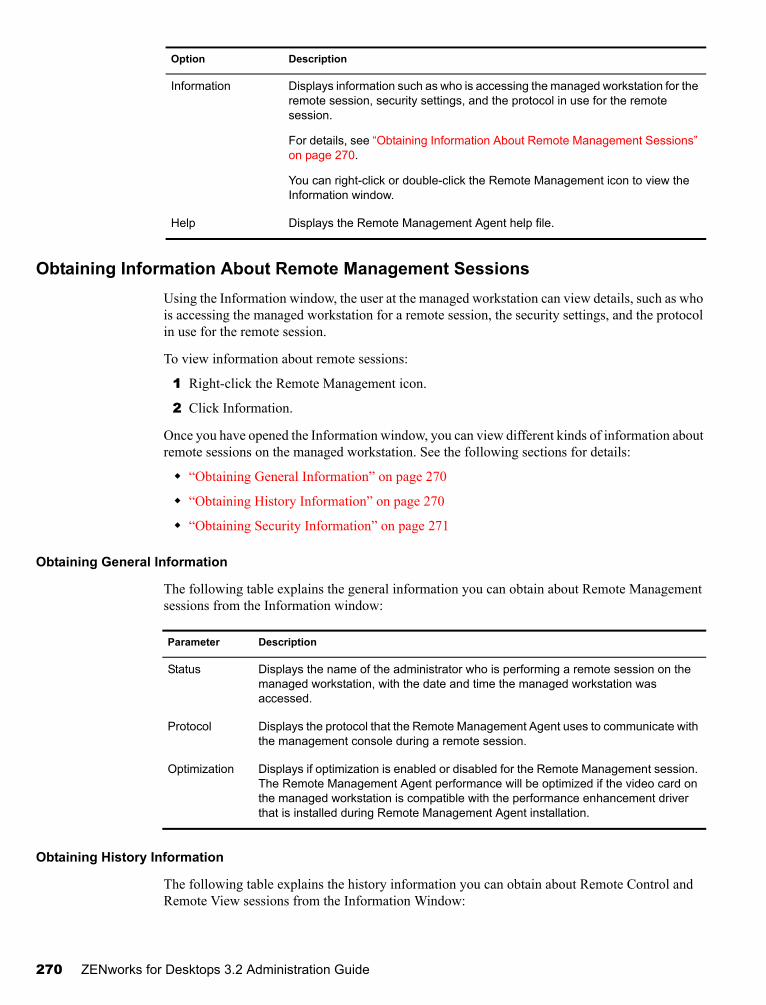
Obtaining Information About Remote Management SessionsUsing the Information window, the user at the managed workstation can view details, such as who is accessing the managed workstation for a remote session, the security settings, and the protocol in use for the remote session.
To view information about remote sessions:
1 Right-click the Remote Management icon.
2 Click Information.
Once you have opened the Information window, you can view different kinds of information about remote sessions on the managed workstation. See the following sections for details:
“Obtaining General Information” on page 270
“Obtaining History Information” on page 270
“Obtaining Security Information” on page 271
Obtaining General Information
The following table explains the general information you can obtain about Remote Management sessions from the Information window:
Obtaining History Information
The following table explains the history information you can obtain about Remote Control and Remote View sessions from the Information Window:
Information Displays information such as who is accessing the managed workstation for the remote session, security settings, and the protocol in use for the remote session.
For details, see “Obtaining Information About Remote Management Sessions” on page 270.
You can right-click or double-click the Remote Management icon to view the Information window.
Help Displays the Remote Management Agent help file.
Parameter Description
Status Displays the name of the administrator who is performing a remote session on the managed workstation, with the date and time the managed workstation was accessed.
Protocol Displays the protocol that the Remote Management Agent uses to communicate with the management console during a remote session.
Optimization Displays if optimization is enabled or disabled for the Remote Management session. The Remote Management Agent performance will be optimized if the video card on the managed workstation is compatible with the performance enhancement driver that is installed during Remote Management Agent installation.
Option Description
270 ZENworks for Desktops 3.2 Administration Guide

Novell Confidential Manual (99a) 11 September 2003
Obtaining Security Information
The Security Information dialog box displays information based on the following categories of remote sessions:
Remote Control
Remote View
File Transfer
Remote Execute
Others (Chat and Diagnostics)
The administrator can use the Remote Management Policy pages to change the settings for each parameter.
Stopping a Remote Control Session from the Managed WorkstationTo stop a Remote Control session from the managed workstation:
1 Right-click the Remote Management icon.
2 Click Terminate Session.
Managing a Remote View SessionYou can use ZfD to remotely view the managed workstation. For more information, see “Understanding Remote View” on page 252. The following sections explain the tasks you can perform to effectively manage a Remote View session:
“Starting a Remote View Session” on page 271
“Controlling the Display of the Viewing Window During a Remote View Session” on page 272
“Stopping a Remote Control Session from the Managed Workstation” on page 271
Starting a Remote View SessionTo start a Remote View session:
1 Right-click the managed workstation from the management console.
2 Click Actions > Remote View.
You can configure the timeout value for establishing a remote view session. For more information, see “Specifying the Timeout Value for Establishing a Remote Control or Remote View Session” on page 258.
Parameter Description
Operation Displays a list of the last ten remote sessions.
Initiator Displays the name of administrator who initiated the remote session.
Start Date/Time Displays the date and time when the remote session was initiated.
Managing Remote Workstations 271

Novell Confidential Manual (99a) 11 September 2003
Controlling the Display of the Viewing Window During a Remote View SessionWhen you initiate a Remote View session, a representation of the desktop of the managed workstation will be displayed on your screen in a separate window called the Viewing window. The following table lists the control options and toolbar button that you can use during a Remote View session. For a description of the options and button, see “Controlling the Display of the Viewing Window” on page 265 and “Using the Toolbar Buttons on the Viewing Window” on page 268.
Stopping a Remote View Session from the Managed WorkstationTo stop a Remote View session from the managed workstation:
1 Right-click the Remote Management icon.
2 Click Terminate Session.
Running an Application on the Managed WorkstationYou can remotely run executables on the managed workstation using the Remote Execute feature of ZfD. For more information, see “Understanding Remote Execute” on page 253.
To execute an application program on a managed workstation:
1 Right-click the managed workstation from the management console.
2 Click Actions > Remote Execute.
3 Enter the command line in the Remote Execute window.
Specify the complete path of the application if the application is not in the path of the managed workstation.
If you do not specify the extension of the file you want to execute at the managed workstation, Remote Execute will append the .EXE extension.
4 Click Execute.
Enter the name of the application or the parameter within double quotes if the application or parameter has a space character. Following are a few examples:
"My Wordpad"
"C:\Program Files\Accessories\My Wordpad"
"C:\Program Files\Accessories\MyWordpad" "C:\myfile.txt"
"C:\Program Files\Accessories\My Wordpad" C:\myfile.txt
Wordpad
Options Option Name
Control Options Warn me on Screen Blanking
Accelerator Keys Enabled
Force 16 Color Viewing
Toolbar Button Navigate
272 ZENworks for Desktops 3.2 Administration Guide
Novell Confidential Manual (99a) 11 September 2003
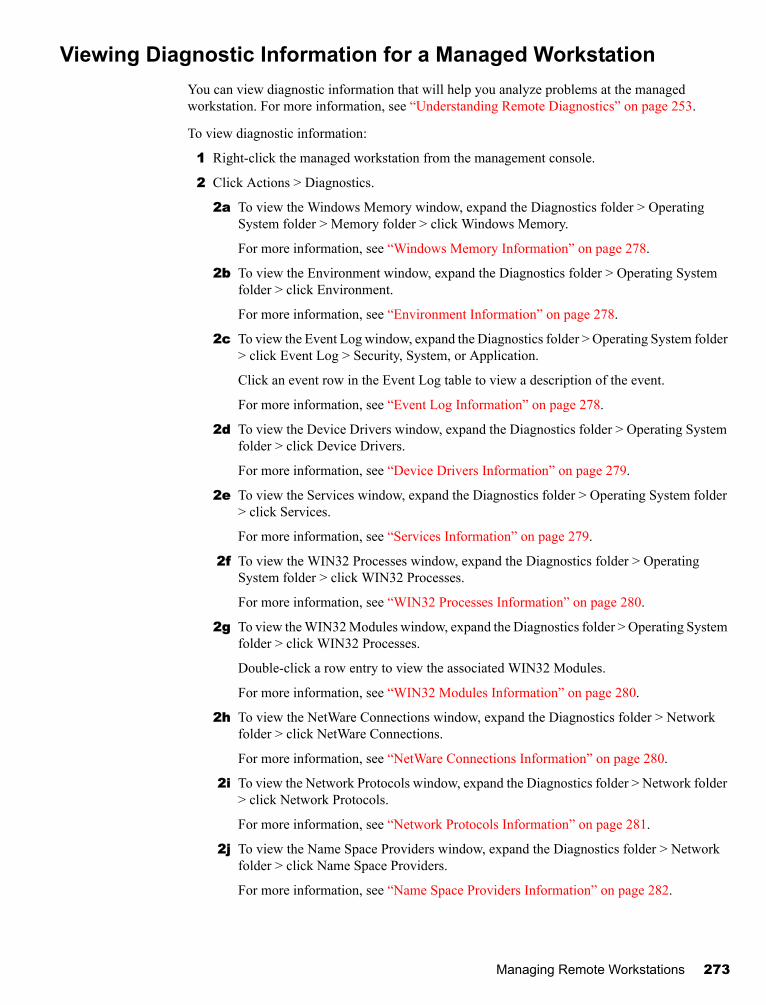
Viewing Diagnostic Information for a Managed WorkstationYou can view diagnostic information that will help you analyze problems at the managed workstation. For more information, see “Understanding Remote Diagnostics” on page 253.
To view diagnostic information:
1 Right-click the managed workstation from the management console.
2 Click Actions > Diagnostics.
2a To view the Windows Memory window, expand the Diagnostics folder > Operating System folder > Memory folder > click Windows Memory.
For more information, see “Windows Memory Information” on page 278.
2b To view the Environment window, expand the Diagnostics folder > Operating System folder > click Environment.
For more information, see “Environment Information” on page 278.
2c To view the Event Log window, expand the Diagnostics folder > Operating System folder > click Event Log > Security, System, or Application.
Click an event row in the Event Log table to view a description of the event.
For more information, see “Event Log Information” on page 278.
2d To view the Device Drivers window, expand the Diagnostics folder > Operating System folder > click Device Drivers.
For more information, see “Device Drivers Information” on page 279.
2e To view the Services window, expand the Diagnostics folder > Operating System folder > click Services.
For more information, see “Services Information” on page 279.
2f To view the WIN32 Processes window, expand the Diagnostics folder > Operating System folder > click WIN32 Processes.
For more information, see “WIN32 Processes Information” on page 280.
2g To view the WIN32 Modules window, expand the Diagnostics folder > Operating System folder > click WIN32 Processes.
Double-click a row entry to view the associated WIN32 Modules.
For more information, see “WIN32 Modules Information” on page 280.
2h To view the NetWare Connections window, expand the Diagnostics folder > Network folder > click NetWare Connections.
For more information, see “NetWare Connections Information” on page 280.
2i To view the Network Protocols window, expand the Diagnostics folder > Network folder > click Network Protocols.
For more information, see “Network Protocols Information” on page 281.
2j To view the Name Space Providers window, expand the Diagnostics folder > Network folder > click Name Space Providers.
For more information, see “Name Space Providers Information” on page 282.
Managing Remote Workstations 273

Novell Confidential Manual (99a) 11 September 2003
2k To view the Network Drives window, expand the Diagnostics folder > Network folder > click Network Drives.
For more information, see “Network Drives Information” on page 282.
2l To view the Network Open Files window, expand the Diagnostics folder > Network folder > click Open Files.
For more information, see “Network Open Files Information” on page 283.
2m To view the Novell Client window, expand the Diagnostics folder > Network folder > click Novell Client.
For more information, see “Novell Client Information” on page 281.
2n To view the Print Capture window, expand the Diagnostics folder > Network folder > click Print Capture.
For more information, see “Print Capture Information” on page 284.HINT: You can use the Edit menu options to copy all or selected diagnostic information from the diagnostics windows to a text editor for later analysis.
Managing a File Transfer SessionZfD lets you transfer files between the management console and a managed workstation. For more information, see “Understanding File Transfer” on page 254. Before you begin a File Transfer session, ensure that you have uninstalled any third-party File Transfer service from the managed workstation.
The following sections explain how you can use File Transfer and the options that are available for working with files from the File Transfer window:
“Starting a File Transfer Session” on page 274
“Using File Transfer Window Controls” on page 274
Starting a File Transfer SessionTo start a File Transfer session:
1 Right-click the managed workstation from the management console.
2 Click Actions > File Transfer.
Using File Transfer Window ControlsThe left pane of the File Transfer window shows the files in the current folder on the management console and the right pane shows the files on the managed workstation. The following table explains the function of the File Transfer controls:
Menu Option Toolbar Option
Description
File > Open Opens the selected file in Notepad or Wordpad at the management console.
Opens the folder with the list of files at the management console.
274 ZENworks for Desktops 3.2 Administration Guide

Novell Confidential Manual (99a) 11 September 2003
Managing a Chat SessionThe Chat feature lets you communicate with the user at the managed workstation. For more information, see “Understanding Chat” on page 254. The following sections explain how you can manage Chat sessions using the Chat window:
“Chatting with a User at the Managed Workstation” on page 276
File > Open with Opens the file at the management console with the specified application.
File > New Folder Creates the folder with the specified name.
File > Delete Deletes the selected files.
Deletes the folder if the folder selected from the management console is empty.
File > Rename Renames the selected file.
File > Properties Displays the properties of a selected file or folder, such as size of the file and the date and time of last modification.
File > Upload Moves files from the management console to the managed workstation.
File > Download Moves files from the managed workstation to the management console.
File > Exit Closes the File Transfer window.
Edit > Cut Transfers the selected files to the Clipboard.
Edit > Copy Copies the selected files to the Clipboard.
Edit > Paste Pastes the selected files from the Clipboard to the current location.
Edit > Select All Selects all the files in the current pane.
Edit > Cancel All Deselects all the files in the current pane.
View Refresh Updates the display in the Operator Station pane and Target Station pane
Help Displays help for this window.
Up One Level Folder button
Moves one level up in the directory tree.
Right-click the file or folder to view the list of available menu options.
Operator Station Pane
The left pane of the File Transfer window shows the files in the current folder on the management console.
Target Station Pane The right pane of the File Transfer window shows the files in the current folder on the managed workstation.
Menu Option Toolbar Option
Description
Managing Remote Workstations 275

Novell Confidential Manual (99a) 11 September 2003
“Editing the Messages in the Chat Window on the Management Console” on page 276HINT: Ensure that the Remote Management Agent that ships with ZfD is installed on the managed workstation. If you have installed an earlier version of the Remote Management Agent, you will be prompted to upgrade the agent before the Chat program loads.
Chatting with a User at the Managed WorkstationTo chat with the user at the managed workstation:
1 Right-click the recipient’s managed workstation from the management console.
2 Click Actions > Chat.
To proceed with the Chat session, the user at the managed workstation must accept the Chat session.
3 Type a message.
4 Click File > Exit to exit the Chat window.
Editing the Messages in the Chat Window on the Management ConsoleTo clear the contents of the text boxes during a Chat session:
To clear the contents of the Input text box, click Edit > Clear Input.
To clear the contents of the Response text box, click Edit > Clear Response.
To clear the contents of the both text boxes, click Edit > Clear All.
To insert existing text into Chat window text boxes:
To copy the selected text to the Windows Clipboard, click Edit > Copy.
To add copied text to a text box, Click Edit > Paste.
Viewing the Audit Log of Remote Management SessionsZfD records log information on a Windows NT/2000 managed workstation. For more information, see “Understanding the Audit Log” on page 254.
To view the audit log of Remote Management sessions:
1 Click Start > Programs > Administrative Tools > Event Viewer.
2 Click Log > Application.
3 Double-click the event associated with the source Remote Management Agent.
HINT: To view only the events pertinent to the Remote Management Agent, choose Remote Management Agent from the source drop-down list in the Filter dialog box.
ZfD provides remote diagnostics of workstations. Remote diagnostics displays the event log information of Windows NT/2000 managed workstations. You can also view the audit log for Remote Management using the Event Log window. For more information, see “Event Log Information” on page 278.
276 ZENworks for Desktops 3.2 Administration Guide

Novell Confidential Manual (99a) 11 September 2003
23 Diagnostic Information
You can diagnose the managed workstation and obtain information that will help you analyze problems at the managed workstation. For more information, see “Understanding Remote Diagnostics” on page 253.
You can view real-time managed workstation diagnostic information from the management console. For more information, see “Viewing Diagnostic Information for a Managed Workstation” on page 273.
Before you begin to obtain diagnostic information, ensure that the Remote Management Agent is installed on the managed workstation. During Remote Management Agent installation, the Diagnostic Agent is also installed on the managed workstation, which runs automatically when the managed workstation boots up. When the management console user requests diagnostic information from the managed workstation, the Diagnostic Agent on the managed workstation procures the requested information and provides it to the Remote Management Agent, which then makes it available to the management console.
The following sections describe the diagnostic information you can obtain using ZfD:
“Windows Memory Information” on page 278
“Environment Information” on page 278
“Event Log Information” on page 278
“Device Drivers Information” on page 279
“Services Information” on page 279
“WIN32 Processes Information” on page 280
“WIN32 Modules Information” on page 280
“NetWare Connections Information” on page 280
“Novell Client Information” on page 281
“Network Protocols Information” on page 281
“Name Space Providers Information” on page 282
“Network Drives Information” on page 282
“Network Open Files Information” on page 283
“Print Capture Information” on page 284
Diagnostic Information 277

Novell Confidential Manual (99a) 11 September 2003
Windows Memory InformationOn Windows* 95/98 and Windows NT*/2000 managed workstations, the Windows Memory window displays the percentage of memory in use, physical memory, paging details, and free space details.
The following table describes the fields in the Windows Memory window:
Environment InformationThe Environment window displays the variables set at the managed workstation. You can view the Environment information on Windows 95/98 and Windows NT/2000 managed workstations.
The following table describes the fields in the Environment window:
Event Log InformationEvent logging in Windows NT/2000 provides a standard, centralized way for applications and the operating system to record important software and hardware events. Event logging provides a means to merge events from various sources into a single informative story. The event log diagnostics help the administrator view the System, Security, and Application event logs. You can view the Event Log Information on Windows NT/2000 managed workstations.
The following table describes the fields in the Event Log window:
Field Description
Memory Load (%) Percentage of memory utilization. Zero percentage memory indicates memory usage is nil; 100% indicates that all the available memory is in use.
Total Physical Memory (MB) Total physical memory in MB.
Free Physical Memory (MB) Amount of available physical memory in MB.
Total Paging File Size (MB) Total number of MB that can be stored in the paging file. This number does not indicate the actual physical size of the paging file on the managed workstation.
Free Space in Paging File (MB) Number of MB available in the paging file.
Total Address Space (MB) Total number of MB described in the user mode portion of the virtual address space of the calling process.
Free User Bytes (MB) Number of MB in unreserved and uncommitted memory of the user address space of the calling process.
Field Description
Variables Environment variable name.
Value Value of the variable or the path.
278 ZENworks for Desktops 3.2 Administration Guide

Novell Confidential Manual (99a) 11 September 2003
Device Drivers InformationThe Device Drivers window displays information about the device drivers installed on Windows NT/2000 managed workstations. You can use the information in this window to determine whether the workstation has the required drivers loaded and their status.
The following table describes the fields in the Device Driver window for Windows NT/2000 managed workstations:
Services InformationThe Services window indicates which services are available on Windows NT/2000 managed workstations, and lists the state of each service.
The following table describes the fields in the Services window:
Field Description
Event Generated Date
Date on which the entry was submitted (MM/DD/YYYY).
Event Generated Time
Time at which the entry was submitted (HH:MM:SS).
Event ID Identifies the event specific to the source that generated the event log entry.
Event Generated Type
Classification of the type as Error, Warning, Information, Success, or Failure.
Event Generated Category
Subcategory for the event. This subcategory is source specific.
Source Name Name of the source (application, service, driver, subsystem) that generated the entry.
Description Details of the event.
Computer Name Name of the computer that generated the event.
Field Description
Name Name of the device driver.
State Indicates if the device driver is Stopped or Running.
Item Description
Service Name List of services available on the workstation.
State Indicates if the service is Stopped or Running.
Diagnostic Information 279
Novell Confidential Manual (99a) 11 September 2003
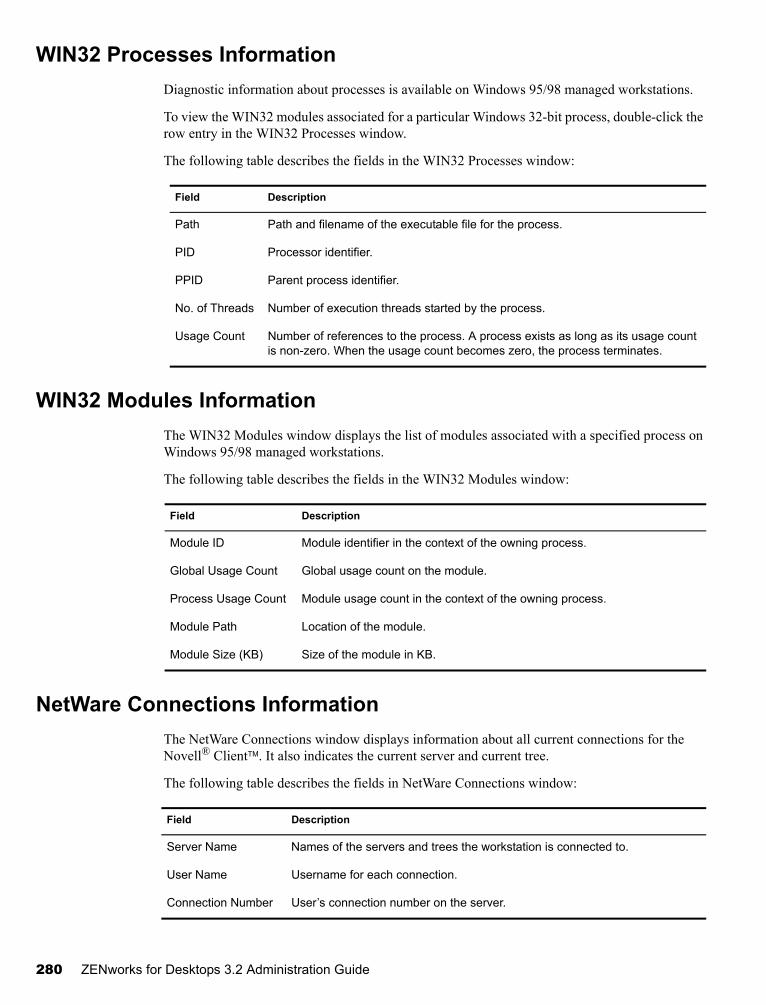
WIN32 Processes InformationDiagnostic information about processes is available on Windows 95/98 managed workstations.
To view the WIN32 modules associated for a particular Windows 32-bit process, double-click the row entry in the WIN32 Processes window.
The following table describes the fields in the WIN32 Processes window:
WIN32 Modules InformationThe WIN32 Modules window displays the list of modules associated with a specified process on Windows 95/98 managed workstations.
The following table describes the fields in the WIN32 Modules window:
NetWare Connections InformationThe NetWare Connections window displays information about all current connections for the Novell® ClientTM. It also indicates the current server and current tree.
The following table describes the fields in NetWare Connections window:
Field Description
Path Path and filename of the executable file for the process.
PID Processor identifier.
PPID Parent process identifier.
No. of Threads Number of execution threads started by the process.
Usage Count Number of references to the process. A process exists as long as its usage count is non-zero. When the usage count becomes zero, the process terminates.
Field Description
Module ID Module identifier in the context of the owning process.
Global Usage Count Global usage count on the module.
Process Usage Count Module usage count in the context of the owning process.
Module Path Location of the module.
Module Size (KB) Size of the module in KB.
Field Description
Server Name Names of the servers and trees the workstation is connected to.
User Name Username for each connection.
Connection Number User’s connection number on the server.
280 ZENworks for Desktops 3.2 Administration Guide
Novell Confidential Manual (99a) 11 September 2003
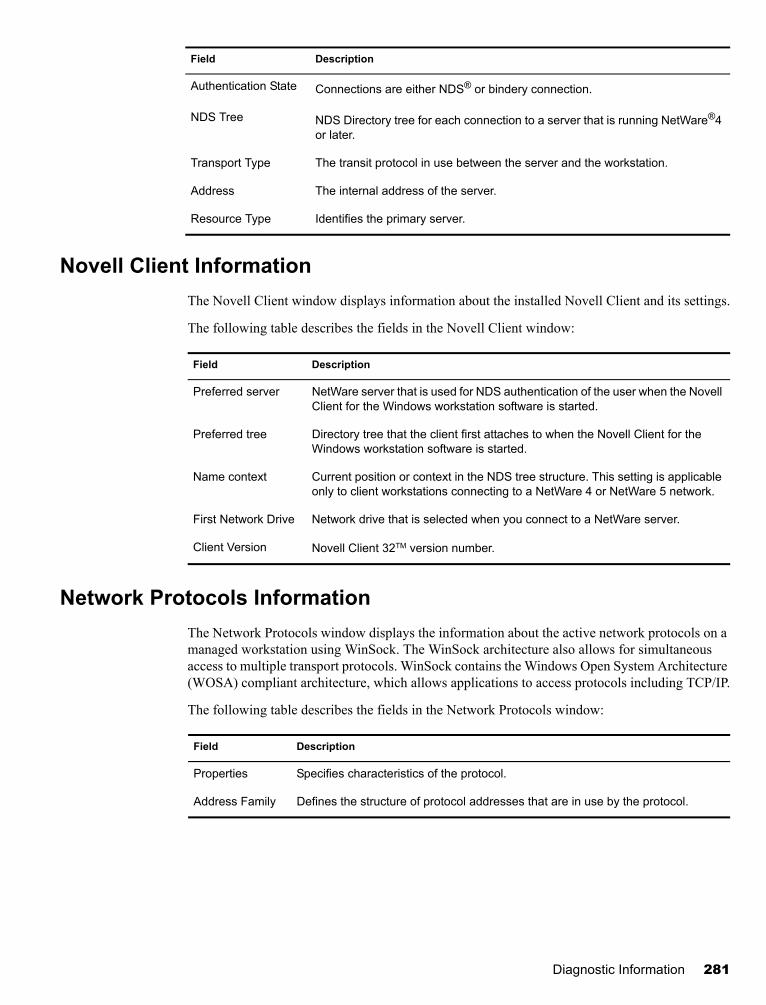
Novell Client InformationThe Novell Client window displays information about the installed Novell Client and its settings.
The following table describes the fields in the Novell Client window:
Network Protocols InformationThe Network Protocols window displays the information about the active network protocols on a managed workstation using WinSock. The WinSock architecture also allows for simultaneous access to multiple transport protocols. WinSock contains the Windows Open System Architecture (WOSA) compliant architecture, which allows applications to access protocols including TCP/IP.
The following table describes the fields in the Network Protocols window:
Authentication State Connections are either NDS® or bindery connection.
NDS Tree NDS Directory tree for each connection to a server that is running NetWare®4 or later.
Transport Type The transit protocol in use between the server and the workstation.
Address The internal address of the server.
Resource Type Identifies the primary server.
Field Description
Preferred server NetWare server that is used for NDS authentication of the user when the Novell Client for the Windows workstation software is started.
Preferred tree Directory tree that the client first attaches to when the Novell Client for the Windows workstation software is started.
Name context Current position or context in the NDS tree structure. This setting is applicable only to client workstations connecting to a NetWare 4 or NetWare 5 network.
First Network Drive Network drive that is selected when you connect to a NetWare server.
Client Version Novell Client 32TM version number.
Field Description
Properties Specifies characteristics of the protocol.
Address Family Defines the structure of protocol addresses that are in use by the protocol.
Field Description
Diagnostic Information 281

Novell Confidential Manual (99a) 11 September 2003
Name Space Providers InformationThe Name Space Providers window displays information about the Name Space Provider registered with WinSock Name Resolution and Registration APIs. WinSock 2 includes a new set of API functions that standardize how the applications access and use the various network naming services. This information will not be displayed for workstations with WinSock 1.1.
The following table describes the fields in the Name Space Providers Information window:
Network Drives InformationThe Network Drives window displays information about mapped drives, drive capacity, volume label, file system information, sector size, and cluster size.
The following table describes the fields in the Network Drives window:
Socket Type Name represents the different socket types by the BSD socket interface. It can have the following values:
Stream
Datagram
Raw Socket
Seq. Packet
RDM Socket
Unknown
Protocol ID Protocols identifier.
Message Size (Bytes)
Specifies the maximum message size (in bytes) supported by the protocol. This is the maximum size of a message that can be sent from or received by the host. For protocols that do not support message framing, the actual maximum size of a message that can be sent to a given address may be less than this value.
If the protocol is stream-oriented, the concept of message size is not relevant.
If the protocol is message-oriented, there is no maximum message size.
Protocol Name Name of the protocol that is supported, such as TCP/IP, UDP/IP, or IPXTM.
Field Description
Name space Specifies the name space (SAP, DNS, SLP).
Connected Displays whether the Name Space Provider is enabled on the workstation.
Version The name space version identifier.
Service Provider Displays the string for the name space provider.
Field Description
Drive Letter Mapped drive letter.
Field Description
282 ZENworks for Desktops 3.2 Administration Guide

Novell Confidential Manual (99a) 11 September 2003
Network Open Files InformationThe Open Files window displays the names of open files on a file server. It lists the files opened in the network mapped drives, with the server name and connection ID.
Path NetWare path of the volume or directory to which the drive is mapped. For example, if the directory ZENWORKS on SYS: volume of server ZEN_KYOTO is mapped to drive Q, the path displays ZEN_KYOTO\SYS:ZENWORKS.
File System File system type for the mapped NetWare directory or volume.
Effective Rights
Read
For a folder, grants the right to open files in the folder and read the contents or run the programs. For a file, grants the right to open and read the file.
Write
For a folder, grants the right to open and change the contents of files in the folder. For a file, grants the right to open and write to the file.
Create
For a folder, grants the right to create new files and folders in the folder. For a file, grants the right to create a file and to salvage a file after it has been deleted.
Delete
Grants the right to delete the folder or file.
Modify
Grants the right to change the attributes or name of the folder or file, but does not grant the right to change its contents. Changing the contents requires the Write right.
File Scan
Grants the rights to see the folder or file with the DIR or NDIR command.
Ownership
Grants the ownership rights of the file, folder, or volume.
If the corresponding rights are not given to the user, Effective Rights displays hyphen (-).
Long Name Size (Bytes)
Maximum length in characters of a filename component supported by the specified file system. For example, for a FAT file system supporting long names, the value is 255. The value for a DOS file system is 11.
Sector Size (Bytes)
Sector size in bytes.
Sectors Per Cluster
Number of sectors per cluster.
Total Clusters
Size of the volume in clusters.
Free Clusters
Number of clusters currently free for allocation. This number includes the space that is reclaimed from the sub-allocation file system and also clusters freed from deleted files.
Field Description
Diagnostic Information 283
Novell Confidential Manual (99a) 11 September 2003
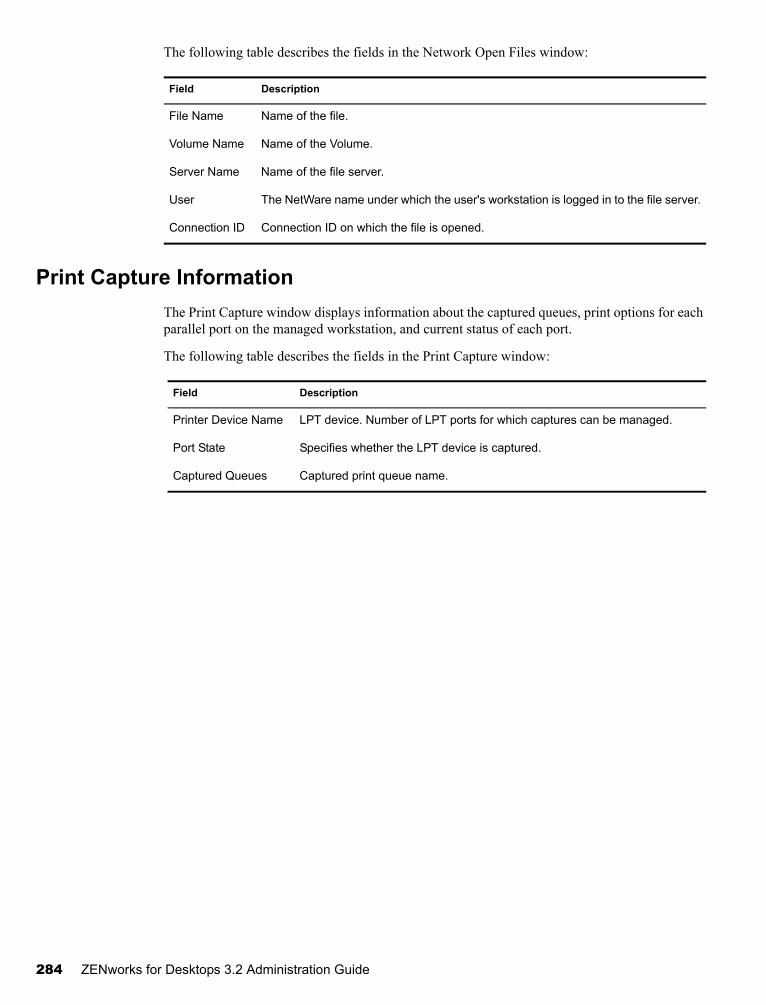
The following table describes the fields in the Network Open Files window:
Print Capture InformationThe Print Capture window displays information about the captured queues, print options for each parallel port on the managed workstation, and current status of each port.
The following table describes the fields in the Print Capture window:
Field Description
File Name Name of the file.
Volume Name Name of the Volume.
Server Name Name of the file server.
User The NetWare name under which the user's workstation is logged in to the file server.
Connection ID Connection ID on which the file is opened.
Field Description
Printer Device Name LPT device. Number of LPT ports for which captures can be managed.
Port State Specifies whether the LPT device is captured.
Captured Queues Captured print queue name.
284 ZENworks for Desktops 3.2 Administration Guide

Novell Confidential Manual (99a) 11 September 2003
B Documentation Updates
This section contains information about documentation content updates made for Remote Management administration since the initial release of ZENworks® for Desktops (ZfD) 3.2. The information will help you to keep current on updates to the documentation and, in some cases, the ZfD software (such as with a ZfD Support Pack release).
The information is organized according to the date the documentation updates were published. Within a dated section, the updates are alphabetically listed according to the names of the main table of contents sections for Remote Management administration.
The documentation is provided on the Web in two formats: HTML and PDF. Both formats are kept current with the documentation changes listed in this section.
The documentation was updated on the following dates:
June 18, 2002
June 18, 2002Updates were made to the following section:
Managing a Remote Wake Up Session
Managing a Remote Wake Up SessionThe following update was made in this section:
Location Change
Managing a Remote Wake Up Session Clarificaton made regarding the type of scanner that needs to be run on the remote node: "The remote node has been scanned at least once by the Workstation Inventory scanner that ships with ZfD."
Documentation Updates 285

Novell Confidential Manual (99a) 11 September 2003
286 ZENworks for Desktops 3.2 Administration Guide