partner mf-2351 um - peripheral resources
TRANSCRIPT

F1 F2 F3
3 DEF F42 ABC1
6 MNO5 JKL4 GHI
9WXYZ8TUV
#..0*7PQRS
ALPHA
CANCEL
CLEAR
EHTER
MF2351All in One Mobile TerminalUser's Manual

ENG
LISH
Safety Information .............................................................................1DEVICE STORAGE ...................................................................................... 2BATTERY HANDLING PRECAUTIONS ....................................................... 2FEDERAL COMMUNICATIONS COMMISSION (FCC) ............................... 3DECLARATION OF CONFORMITY ............................................................. 4COPYRIGHT ................................................................................................ 4DISCLAIMER ................................................................................................ 4TRADEMARK RECOGNITION ..................................................................... 4
SAR Information ................................................................................... 4Federal Communications Commission Statement ............................... 5RF Exposure Information (SAR) .......................................................... 5WEEE Notice ....................................................................................... 6FCC Regulations .................................................................................. 7
Chapter 1 - Introduction ....................................................................8PRODUCT OVERVIEW ................................................................................ 8
FRONT AND BACK ............................................................................. 8LEFT AND RIGHT ................................................................................ 9TOP AND BOTTOM ............................................................................. 10
FEATURES ................................................................................................... 11PACKAGE CONTENTS ................................................................................ 11LED INDICATORS ........................................................................................ 12
Chapter 2 - Getting Started ...............................................................13INSTALLING THE BATTERY ....................................................................... 13CHARGING THE BATTERY ......................................................................... 15INSTALLING THE MEMORY CARD ............................................................ 15INSTALLING THE SIM CARD ...................................................................... 17INSTALLING THE SAM CARD(S) ................................................................ 19ATTACHING THE STYLUS .......................................................................... 21INSTALLING THE PAPER ROLL ................................................................. 22
Chapter 3 - Using the Terminal ........................................................24POWERING THE DEVICE ON/OFF ............................................................. 24ENABLING BACKUP BATTERY .................................................................. 25HOT SWAP MAIN BATTERY ....................................................................... 25INITIAL SETUP ............................................................................................. 26
CALIBRATING THE TOUCH SCREEN ............................................... 26SETTING THE DATE AND TIME ......................................................... 27ADJUSTING THE SCREEN BRIGHTNESS ........................................ 28CONFIGURING THE TASKBAR AND START MENU ......................... 29
USING THE KEYPAD ................................................................................... 30
Chapter 4 - Using the Stylus ............................................................32KEYBOARD MODE ...................................................................................... 32TRANSCRIBER MODE ................................................................................ 34
OPTIONS BUTTON ............................................................................. 35LETTER SHAPE SELECTOR .............................................................. 37
ii

ENG
LISH
MINI KEYBOARD ................................................................................. 38RECOGNITION MODE ........................................................................ 38SPACE ................................................................................................. 39RETURN .............................................................................................. 39LEFT ARROW, RIGHT ARROW, BACKSPACE .................................. 40
Chapter 5 - Configuring Utilities Settings .......................................41MSR .............................................................................................................. 42PRINTER ...................................................................................................... 45WLAN ........................................................................................................... 46BARCODE SCANNER ................................................................................. 47RFID ............................................................................................................. 51IC CARD READER ....................................................................................... 52CAMERA ...................................................................................................... 53GPS .............................................................................................................. 54GENERAL SETTING .................................................................................... 56BLUETOOTH ................................................................................................ 57GSM .............................................................................................................. 59GPRS ............................................................................................................ 63
Chapter 6 - SPECIFICATIONS ..........................................................67OPTIONAL FEATURES ............................................................................... 68
iii

ENG
LISH
Preface
CopyrightCopyright © 2013. All rights reserved.No part of this user manual may be reproduced, transmitted, stored in a retrieval system, or translated into any language, in any form or by any means, without permission from the manufacturer.Windows CE and the Windows CE logo are trademarks of the Microsoft Corporation.Wi-Fi is a registered trademark of the Wireless Fidelity Alliance.microSD is a trademark of SD Card Association.Bluetooth and the Bluetooth logo are trademarks owned by Bluetooth SIG, Inc.All other products use in this device and trademarks mentioned herein are trademarks or registered trademarks of their respective owners.
Safety InformationBefore installing and using the MF2351, take note of the following precautions:SAR compliance for body-worn operations requires at least 2 cm of separation between the device and the user's bodyRequest service for damaged products: Turn off the product, unplug it from the electrical outlet, and request service from a service partner under the following conditions:• The power cord or plug is damaged• Liquid has been spilled into the product• An object has fallen into the product• The product has been exposed to rain or water• The product has been dropped or damaged• The product does not operate normally when you follow the operating instructionsAvoid hot areas: The product should be placed away from heat sources such as radiators, heat registers, stoves, and other products (such as amplifiers) that produce heat.Allow the product to cool: Allow the product to cool before removing covers and touching internal components.Avoid wet areas: Never use the product in a wet location.Avoid inserting objects into product: Never insert objects of any kind into slots or other openings in the product.Clean the product properly: Unplug the product from the wall outlet before cleaning it. Do not use liquid cleaners or aerosol cleaners. Use a soft cloth dampened with water for cleaning exterior components, but NEVER apply water directly to the product or to an LCD screen.
1

ENG
LISH
Use the product with approved equipment: Use your product only with the computers and accessories identified as suitable for use with your product.Adjust the volume: Turn down the volume before using headphones or other audio devices.
DEVICE STORAGEWhen device will not be used for a long period of time, please remove the battery, place product in a dry box, and store both device and battery in a cool, dark, and dry place.Batteries in storage need to be recharged at least once every three months to avoid degradation.
BATTERY HANDLING PRECAUTIONSDo not attempt to disassemble or reconstruct the packs. The battery has integrated protection circuits and safety functions to avoid danger. If battery is damaged, it may rupture, generate heat, or cause smoke and flame.Do not short circuit battery. Neither short connect the positive terminal and negative terminal with metals, nor carry or store the battery with metal objects. If the battery is short circuited, excessive large current will flow and generate heat, rupture or flame will occur, and also it will cause heat generation for metals. Please cover the plug with waterproof cap when not using the battery.Do not incinerate or heat the battery. This will cause the insulator to melt, damage the gas release vent, and cause loss of safety function, or electrolyte ignition. Above mentioned matters will cause battery to rupture, generate heat, or cause smoke and flame.Do not use near high temperature areas. Do not use or leave battery near fire, stove or heated areas of more than 80°C, to avoid melting of the polymer separator which would cause internal short circuits to occur in individual cells, and cause the battery to rupture, generate heat, or cause smoke and flame.Do not immerse the battery in water, seawater, or get it wet. This may cause internal short circuits to occur within individual cells, and cause the battery to rupture, generate heat, or cause smoke and flame.Do not charge battery near fire or under the blazing sun. If the battery protection circuit does not function properly due to high temperature, or it is broken, the battery will be charged at an abnormal current, and abnormal chemical reaction may occur, causing the battery to rupture, generate heat, or cause smoke and flame.Only use the official product charger and observe the charging requirement. If the battery is charged in unusual conditions, it will cause loss of safety functions, or abnormal chemical reactions, causing the battery to rupture, generate heat, or cause smoke and flame.
2

ENG
LISH
Do not try to damage the battery. Do not drive a nail into the battery, strike it with a hammer, or tread on it. The impact will cause leakage, causing the battery to rupture, generate heat, or cause smoke and flame.Do not attempt to solder anything onto the battery. This will cause the insulator to melt due to heat, or cause the gas release vent to break, causing the battery to rupture, generate heat, or cause smoke and flame.Do not connect battery to a plug socket or car-cigarette plug. Connecting high voltage to the battery, means excessive current will flow in it, and cause the battery to rupture, generate heat, or cause smoke and flame.Do not use battery for powering other equipment. If the battery is used for powering other equipment, it will deteriorate its performance and cycle-life. At worst, abnormal current will flow, and cause the battery to rupture, generate heat, or cause smoke and flame.Do not touch a leaked battery directly. If battery leaks and hands touch leaked electrolyte, wash your hands with soap immediately. If leaked electrolyte gets into your eyes, do not rub them, and wash eyes immediately with fresh water. Consult a doctor immediately. Do not continue to charge over specified time. If the battery has not finished charging over recommended time, let it stop charging. There is a possibility that the battery might be defective, and continued charging may cause the battery to deform, generate heat, or cause smoke or flame.Do not insert battery into a microwave or high pressure container. This may cause battery to deform, generate heat, or cause smoke or flame, because of sudden heat, intense pressure, or damage to the sealing condition of the battery.Do not put leaked battery near fire. If liquid leaks from the battery, or the battery give outs a bad smell, do not leave battery near flammable objects. Otherwise, the electrolyte leaked from battery will catch on fire.Do not use an abnormal battery. If battery has a bad smell, changes color, deforms, or causes something wrong during usage, remove it from equipment or charger, and do not use. If an abnormal battery is used, it may cause battery to rupture, generate heat, or cause smoke and flame.
FEDERAL COMMUNICATIONS COMMISSION (FCC)This equipment has been tested and found to comply with the limits for a Class B digital device, pursuant to Part 15 of the FCC Rules. These limits are designed to provide reasonable protection against harmful interference in a residential installation. This equipment generates, uses, and can radiate radio frequency energy and, if not installed and used in accordance with the instructions, may cause harmful interference to radio communications. However, there is no guarantee that interference will not occur in a particular installation. If this equipment does cause harmful interference to radio or television reception, which can be determined by turning the equipment off and on, the user is encouraged to try to correct the interference by one or more of the following measures:• Reorient or relocate the receiving antenna.• Increase the separation between the equipment and the receiver.
3

ENG
LISH
• Connect the equipment onto an outlet on a circuit different from that to which the receiver is connected.
• Consult the dealer or an experienced radio/TV technician for help.Shielded interconnect cables and a shielded AC power cable must be employed with this equipment to ensure compliance with the pertinent RF emission limits governing this device. Changes or modifications not expressly approved by the system's manufacturer could void the user's authority to operate the equipment.
DECLARATION OF CONFORMITYThis device complies with part 15 of the FCC rules. Operation is subject to the following conditions:• This device may not cause harmful interference• This device must accept any interference received, including interference that may
cause undesired operation.
COPYRIGHTThis publication, including all photographs, illustrations and software, is protected under international copyright laws, with all rights reserved. Neither this manual, nor any of the material contained herein, may be reproduced without written consent of Partner Tech Corp.
DISCLAIMERThe information in this document is subject to change without notice. The manufacturer makes no representations or warranties with respect to the contents in this document, and specifically disclaims any implied warranties of merchantability or fitness for any particular purpose. The manufacturer reserves the right to revise this publication and to make changes from time to time in the content hereof without obligation of the manufacturer to notify any person of such revision or changes.
TRADEMARK RECOGNITIONAll product names used in this manual are the properties of their respective owners and are acknowledged.
SAR InformationTHIS MOBILE DEVICE MEETS GUIDELINES FOR EXPOSURE TO RADIO WAVES. Your mobile device is a radio transmitter and receiver. It is designed not to exceed the limits for exposure to radio waves recommended by international guidelines. These
4

ENG
LISH
guidelines were developed by the independent scientific organization ICNIRP and include safety margins designed to assure the protection of all persons, regardless of age and health.The exposure guidelines for mobile devices employ a unit of measurement known as the Specific Absorption Rate or SAR. The SAR limit stated in the ICNIRP guidelines is 2.0 W/kg averaged over 10 grams of tissue. Tests for SAR are conducted using standard operating positions with the device transmitting at its highest certified power level in all tested frequency bands. The actual SAR level of an operating device can be below the maximum value because the device is designed to use only the power required to reach the network. That amount changes depending on a number of factors such as how close you are to a network base station. The highest SAR value under the ICNIRP guidelines for use of the device at the body is 0.403 W/kg. Use of device accessories and enhancements may result in different SAR values. SAR values may vary depending on national reporting and testing requirements and the network band. The device could be used with a separation distance of 0 cm to the human body.
Federal Communications Commission StatementThis device complies with Par 15 of the FCC Rules. Operation is subject to the following two conditions: (1) This device may not cause harmful interference, and (2) this device must accept any interference received, including interference that may cause undesired operation.This device has been tested and found to comply with the limits for a Class B digital device, pursuant to Part 15 of the FCC Rules.These limits are designed to provide reasonable protection against harmful interference in a residential installation. This device generates, uses, and can radiate radio frequency energy and, if not installed and used in accordance with the instructions, may cause harmful interference to radio communications. However there is no guarantee that interference will not occur in a particular installation if this device does cause harmful interference to radio or television reception, which can be determined by turning the device off and on, the user is encouraged to try to correct the interference by one or more of the following measures: • Reorient or relocate the receiving antenna.- Increase the separation between the
equipment and receiver.• Connect the equipment into an outlet on a circuit different from that to which the
receiver connected.- Consult the dealer or an experienced radio/TV technician for help.
Changes or modifications not expressly approved by the party responsible for compliance could void the user‘s authority to operate the equipment.
RF Exposure Information (SAR)This device meets the government’s requirements for exposure to radio waves. This device is designed and manufactured not to exceed the emission limits for exposure to radio frequency (RF) energy set by the Federal Communications Commission of the U.S. Government. The exposure standard employs a unit of measurement known as the Specific Absorption Rate, or SAR. The SAR limit set by the FCC is 1.6W/kg.
5

ENG
LISH
Tests for SAR are conducted using standard operating positions accepted by the FCC with the EUT transmitting at the specified power level in different channels. The highest SAR value for the device as reported to the FCC is 0.75 W/kg when placed next to the body. The FCC has granted an Equipment Authorization for this device with all reported SAR levels evaluated as in compliance with the FCC RF exposure guidelines. SAR information on this device is on file with the FCC and can be found under the Display Grant section of www.fcc.gov/oet/ea/fccid after searching on FCC ID: NDPEM-70B.This device is compliance with SAR for general population /uncontrolled exposure limits in ANSI/IEEE C95.1-1999 and had been tested in accordance with the measurement methods and procedures specified in OET Bulletin 65 Supplement C.
WEEE NoticeThe WEEE logo on the product or on its box indicates that this product must not be disposed of or dumped with your other household waste. You are liable to dispose of all your electronic or electrical waste equipment by relocating over to the specified collection point for recycling of such hazardous waste. Isolated collection and proper recovery of your electronic and electrical waste equipment at the time of disposal will allow us to help conserve natural resources. Moreover, proper recycling of the electronic and electrical waste equipment will ensure safety of human health and environment. For more information about electronic and electrical waste equipment disposal, recovery, and collection points, please contact your local city center, household waste disposal service, shop from where you purchased the equipment, or manufacturer of the equipment.
6

ENG
LISH
FCC Regulations15.19(a)(3):This device complies with part 15 of the FCC Rules. Operation is subject to the following two conditions: (1) This device may not cause harmful interference, and (2) this device must accept any interference received, including interference that may cause undesired operation.15.105(b):NOTE: This equipment has been tested and found to comply with the limits for a Class B digital device, pursuant to part 15 of the FCC Rules. These limits are designed to provide reasonable protection against harmful interference in a residential installation.This equipment generates, uses and can radiate radio frequency energy and, if not installed and used in accordance with the instructions, may cause harmful interference to radio communications. However, there is no guarantee that interference will not occur in a particular installation. If this equipment does cause harmful interference to radio or television reception, which can be determined by turning the equipment off and on, the user is encouraged to try to correct the interference by one or more of the following measures:• Reorient or relocate the receiving antenna.• Increase the separation between the equipment and receiver.• Connect the equipment into an outlet on a circuit different from that to which the
receiver is connected.• Consult the dealer or an experienced radio/ TV technician for helpChanges or modifications not expressly approved by the party responsible for compliance could void the user‘s authority to operate the equipment.
About this ManualThe content in this manual is as accurate as possible. However, due to continuous product improvements, some contents and specifications may have been changed since this manual was written. In this case, take the actual device as basis.No part of this user manual may be reproduced, transmitted, stored in a retrieval system, or translated into any language, in any form or by any means, without a written permission from the manufacturer. Information is subject to change without prior notice.
7

CHAPTER 1 - INTRODUCTION: PRODUCT OVERVIEW
ENG
LISH
Chapter 1 - IntroductionMF-2351 is a handheld mobile terminal, offering high performance in a compact and slim full functional body. It includes a 2" thermal printer, wireless 802.11b/g, and many optional functions such as MSR (ISO7811 Track 1, 2, 3), barcode scanner, RFID, GPS, and Telecom standards (GPRS/WCDMA/CDMA2000).
PRODUCT OVERVIEWFRONT AND BACK
No. Item Description
1 RFID reader RFID reader module.
2 Thermal printer Thermal printer module for printing purposes.
3 3.5 LCD screen Mobil terminal main screen.
4 Speaker Speaker units.
5 Camera 3.0 megapixel digital camera module.
6 LED light LED light for the digital camera module.
7 Battery Main battery compartment.
8 Handstrap The strap adds ease of use functionality.
F1 F2 F3
3 DEF F42 ABC1
6 MNO5 JKL4 GHI
9WXYZ8TUV
#..0*7PQRS
ALPHA
CANCEL
CLEAR
EHTER
1
2
3
4
56
78
8

CHAPTER 1 - INTRODUCTION: PRODUCT OVERVIEW
ENG
LISH
LEFT AND RIGHT
No. Item Description
1 DC jack Connects to the power adaptor.
2, 6 Function keys Software programmable function keys.
3 RS232 connector Connects to a RS232 cable for data transfer purposes.
4 Fingerprint sensor Fingerprint sensor module to scan fingerprints.
5 Earphone jack Connects to an earphone.
7 USB port Connects to a mini USB cable for data transfer purposes.
1
3
25
4
7
6
9

CHAPTER 1 - INTRODUCTION: PRODUCT OVERVIEW
ENG
LISH
TOP AND BOTTOM
No. Item Description
1 Barcode scanner window
Aim this scanner window to read barcodes.
2 IC Card IC Card module reads data from smartcards.
3 MSR MSR module reads data from magnetic cards.
1
2
3
10

CHAPTER 1 - INTRODUCTION: FEATURES
ENG
LISH
FEATURESMF-2351 mobile terminal includes the following features.
PACKAGE CONTENTS
Standard Features Optional Features
2” thermal printer Barcode scanner 1D/2D
MSR ISO7811 Track 1, 2, 3 bidirectional RFID ISO 14443 A/B
WLAN 802.11 b/g GPRS/WCDMA/CDMA2000
microSD card reader read/write GPS
ISO7816-EMV2000 Level 1,2 IC cardreader
Fingerprint sensor
3.0 megapixels autofocus camera
DC jack, earphone+microphone jack,speaker, integrated microphone, vibratormotor, reset button
MF-2351 mobile terminal AC adaptor Power cord
Battery Stylus and strap USB cable
F1 F2 F3
3 DEF F42 ABC1
6 MNO5 JKL4 GHI
9WXYZ8TUV
#..0*7PQRS
ALPHA
CANCEL
CLEAR
EHTER
11

CHAPTER 1 - INTRODUCTION: LED INDICATORS
ENG
LISH
LED INDICATORSMF-2351 has 4 LED indicators located across the top of the display. The first LED is the charging indicator. The light will blinks during charging, and lit when the battery is full.The last three are software programmable.
Chargingindicator
Softwareprogrammable
12

CHAPTER 2 - GETTING STARTED: INSTALLING THE BATTERY
ENG
LISH
Chapter 2 - Getting Started
INSTALLING THE BATTERY
1. Release the strap. Pull the lower-end of the strap downward.
2. Pull down the battery latch and open the cover.
3. Insert the battery. Re-orient the battery contact side to the bottom. Push the battery down until it clicks into place.
13

CHAPTER 2 - GETTING STARTED: INSTALLING THE BATTERY
ENG
LISH
4. Replace the cover while pullingdown the battery latch.
5. Replace the hand strap.
14

CHAPTER 2 - GETTING STARTED: CHARGING THE BATTERY
ENG
LISH
CHARGING THE BATTERY
1. Plug the power cord to a power outlet.2. Plug the adapter into the DC jack, located at the right side of the device.
The leftmost LED light will blinks during charging, and lit red when the battery is full.
INSTALLING THE MEMORY CARDThe mobile terminal’s internal space storage can be used to store user files such as snapshots from the camera module and various applications. This storage can be expanded with a microSD memory card sized up to 64GB.
1. Open the battery compartment cover and remove the battery.
1
2
15

CHAPTER 2 - GETTING STARTED: INSTALLING THE MEMORY CARD
ENG
LISH
2. Insert the card into the memory card slot with contact side facing down, push it until it clicks into place.
3. Insert the battery. Re-orient the battery contact side to the bottom. Push the battery down until it clicks into place.
4. Replace the cover while pulling down the battery latch.
16

CHAPTER 2 - GETTING STARTED: INSTALLING THE SIM CARD
ENG
LISH
INSTALLING THE SIM CARDThe mobile terminal features a SIM card slot. SIM card is required for internet access.
1. Open the battery compartment cover and remove the battery.
2. Release the card slot by pulling it left and upward.
3. Slide the SIM card into the slot.
4. Close it back and push toward right.
17

CHAPTER 2 - GETTING STARTED: INSTALLING THE SIM CARD
ENG
LISH
5. Insert the battery. Re-orient thebattery contact side to the bottom. Push the battery down until it clicks into place.
6. Replace the cover while pulling down the battery latch.
18

CHAPTER 2 - GETTING STARTED: INSTALLING THE SAM CARD(S)
ENG
LISH
INSTALLING THE SAM CARD(S)Secure Access Module card is used for authentication purposes. It is commonly needed by devices performing secure transactions and payment applications.
1. Open the battery compartment cover and remove the battery.
2. Release the slot by pulling to the top and upward.
3. Slide the SAM card into the slot.
4. Close it back and push toward bottom.
19

CHAPTER 2 - GETTING STARTED: INSTALLING THE SAM CARD(S)
ENG
LISH
5. Insert the battery. Re-orient thebattery contact side to the bottom. Push the battery down until it clicks into place.
6. Replace the cover while pulling down the battery latch.
20

CHAPTER 2 - GETTING STARTED: ATTACHING THE STYLUS
ENG
LISH
ATTACHING THE STYLUSThe stylus is the standard input tool to interact with the terminal’s touch screen..
1. Fasten one end of the stylus strap to the stylus.
2. Fasten the other end of the stylus strap to the terminal’s backside.
3. Insert the stylus into its slot when not in use.
1
2
21

CHAPTER 2 - GETTING STARTED: INSTALLING THE PAPER ROLL
ENG
LISH
INSTALLING THE PAPER ROLLThe thermal printer module provides a means to print out data from payment applications.
1. Pull up the lever located at the top of the device to eject the printer cover.
2. Insert the paper roll into place. Refer to the illustration for the correct positioning of the paper roll.
3. Close the cover firmly.
22

CHAPTER 2 - GETTING STARTED: INSTALLING THE PAPER ROLL
ENG
LISH
23

CHAPTER 3 - USING THE TERMINAL: POWERING THE DEVICE ON/OFF
ENG
LISH
Chapter 3 - Using the TerminalPOWERING THE DEVICE ON/OFFThe device has three different power states: Off, Standby, and On. Below table shows how to power on/off, enter Standby mode, and wake-up from Standby mode.
Power state Procedure
Off → On Press and hold Power button.
On → Off Press and hold Power button, tap Shutdown on the screen.
On → Standby Press Power button.
Standby → On Press Power button.
Powerbutton
24

CHAPTER 3 - USING THE TERMINAL: ENABLING BACKUP BATTERY
ENG
LISH
Press and hold Power button to show these options: Shutdown, Reboot, Sleep, Remove Battery, and Cancel.
ENABLING BACKUP BATTERYBackup battery is used to maintain Standby mode data when main battery is empty or removed. Backup battery can keep the information for 3 minutes. Charging of the backup battery is automatically done via AC adaptor, or when main battery is present.To enable/disable the backup battery:
1. Remove main battery.2. At the bottom left of the battery slot, there is a switch. Put switch towards the
right side to disable backup battery. Put switch towards the left to enable backup battery.
HOT SWAP MAIN BATTERYWhen backup battery is enabled, hot swap of the main battery is possible.To perform the hotswap procedure:
1. Press and hold Power button, then tap Remove Battery on the screen, or
2. Tap Remove Battery icon directly on the desktop.
• Shutdown will power down the terminal.
• Reboot will restart the operating system and clear the memory.
• Sleep will power down the terminal into hibernate mode and keep the memory state intact. The next power up will be faster compared to a reboot.
• Remove Battery is used when the main battery power is critically low and needs to be changed. The terminal will be put into hibernate mode and user can put in a fully charged battery to continue operation.
• Cancel will close the dialog box and return to normal operation.
25

CHAPTER 3 - USING THE TERMINAL: INITIAL SETUP
ENG
LISH
INITIAL SETUPCALIBRATING THE TOUCH SCREENFor first time use, the touch screen needs a calibration to match its input sensor with a particular stylus or any other tapping tool. It can be repeated many times as necessary whenever the tapping is becoming inaccurate.
3. From Start Menu > Settings > Control Panel, double-tap Stylus.
4. Double-tap on the grid to calibrate the taps.
5. Select the Calibration tab to calibrate the tap zone.
6. The device will show a plus sign at several different places.
7. Tap the stylus point at the plus sign to complete the procedure.
1
2
3
26
CHAPTER 3 - USING THE TERMINAL: INITIAL SETUP
ENG
LISH
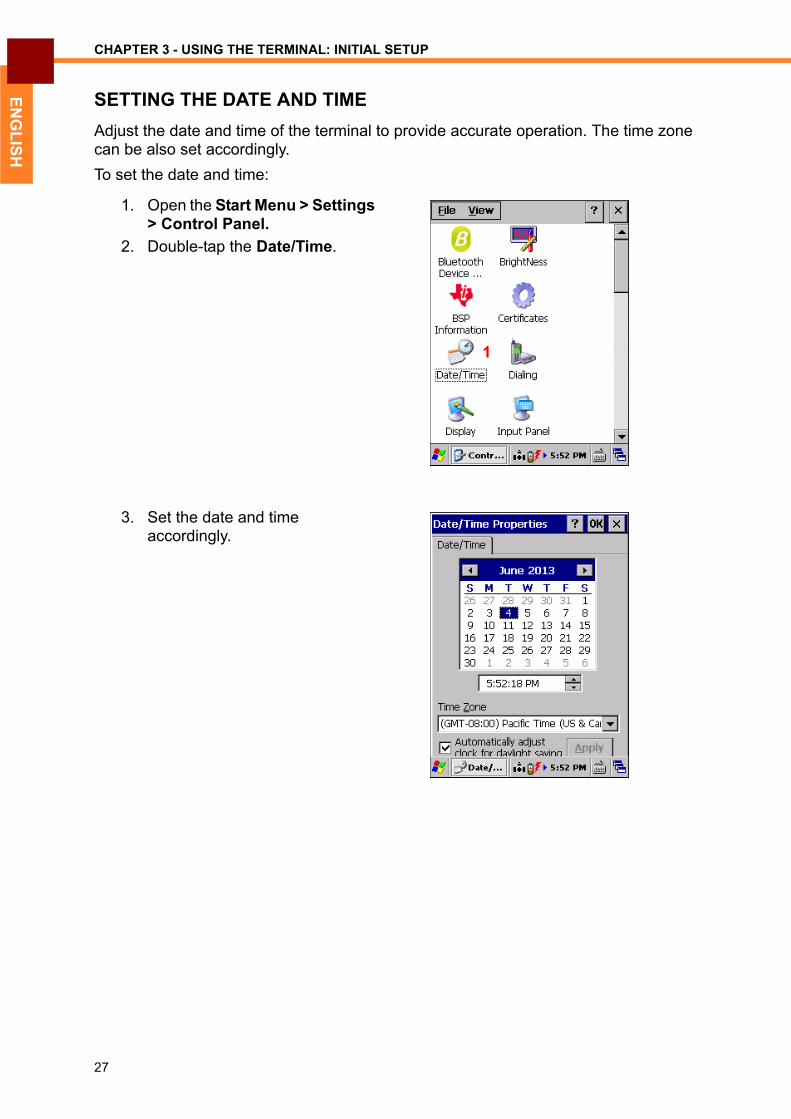
SETTING THE DATE AND TIMEAdjust the date and time of the terminal to provide accurate operation. The time zone can be also set accordingly.To set the date and time:
1. Open the Start Menu > Settings > Control Panel.
2. Double-tap the Date/Time.
3. Set the date and time accordingly.
1
27

CHAPTER 3 - USING THE TERMINAL: INITIAL SETUP
ENG
LISH
ADJUSTING THE SCREEN BRIGHTNESSThe terminal screen's brightness can be adjusted to suit the environment.To adjust the screen brightness:
1. Open the Start Menu > Settings > Control Panel.
2. Double-tap the Brightness.
3. Set the value anywhere between 1 (dimmest) and 9 (brightest).
2
3
28

CHAPTER 3 - USING THE TERMINAL: INITIAL SETUP
ENG
LISH
CONFIGURING THE TASKBAR AND START MENUSet the visual response and setting of the Taskbar.
1. Select Start Menu > Settings.2. Select Taskbar and Start Menu. 3. Options available for Taskbar
are 'Always on top', 'Auto hide', and 'Show Clock'.• Always on top means the
Taskbar will be displayed all the time. If disabled, running an application may block the Taskbar.
• Show Clock will display the clock at the lower right corner when enabled.
29

CHAPTER 3 - USING THE TERMINAL: USING THE KEYPAD
ENG
LISH
USING THE KEYPADThe keypad consists of numeric buttons 0-9, four function keys, Cancel, Clear, Alpha, #, and Enter button.
• Power button: powering up/down mobile terminal.• Function buttons: programmable through applications.• Cancel button: cancel current input.• Clear button: move the cursor left one character and erase any text.• Enter button: confirm and submit current input.• Numeric buttons: input numbers. Press ALPHA once to input the alphabets.
Press ALPHA again to input the alphabets in capital.
Numericbuttons
Powerbutton
FunctionbuttonsCancelbutton
Clearbutton
Enterbutton
30

CHAPTER 3 - USING THE TERMINAL: USING THE KEYPAD
ENG
LISH
31

CHAPTER 4 - USING THE STYLUS: KEYBOARD MODE
ENG
LISH
Chapter 4 - Using the StylusYou can tap and double-tap anywhere on the display with the stylus. Right click is emulated by holding the stylus tip, indicated by a dotted circle on the screen. Hold it until the circle is completed.There are two modes of operation for the stylus: Keyboard and Transcriber.
KEYBOARD MODE
When in Keyboard mode, a mini keyboard will be displayed at the bottom of the screen. Typing is simply done by tapping the character on the mini keyboard.
To activate this mode:
1. Tap the Keyboard icon at the right side of Taskbar.
2. Select Keyboard.
32

CHAPTER 4 - USING THE STYLUS: KEYBOARD MODE
ENG
LISH
Hide the input panel to return to normal operation and maximize the screen estate.
To hide the input panel:
1. Tap the Keyboard icon on the right-side of Taskbar.
2. Select Hide Input Panel.
33

CHAPTER 4 - USING THE STYLUS: TRANSCRIBER MODE
ENG
LISH
TRANSCRIBER MODEThe other mode is Transcriber, a free-form writing mode.In this form user can use the stylus to gesture handwriting directly on the screen.
To activate this mode:
1. Tap the Keyboard icon at the right side of the Taskbar.
2. Select Transcriber.
3. A row of icons will appears at the bottom side of the screen.
34

CHAPTER 4 - USING THE STYLUS: TRANSCRIBER MODE
ENG
LISH
OPTIONS BUTTON
Configures the writing direction, inking, and shorthand.
Writing DirectionSelect a direction that represents the angle in the recognition process.
• The first option is the default.
• The second option is used for writing that slants up to the right.
• The third option is used for writing that slants down to the left.
• The last option changes the screen orientation for recognition between portrait and landscape.
35

CHAPTER 4 - USING THE STYLUS: TRANSCRIBER MODE
ENG
LISH
Intro ScreenIf selected the intro screen will be displayed every time the Transcriber mode is activated.
SoundIf selected sound cue will be played as feedback.
Recognition Delay• Set the delay to shorten or lengthen
the delay for handwriting recognition.
• Center position is about a second worth of delay.
Add Space AfterAutomatically add a space after recognition.
36

CHAPTER 4 - USING THE STYLUS: TRANSCRIBER MODE
ENG
LISH
LETTER SHAPE SELECTORIn this menu the recognition can be fine-tuned to match a certain handwriting style and shorten the recognition process.
PenSet the width and color of ink to be displayed on the screen during handwriting input.
Tap the LSS to open this menu.
• File > Open to import the .LSS file.• File > Save to save the configured
.LSS file for future use or for other terminals.
37

CHAPTER 4 - USING THE STYLUS: TRANSCRIBER MODE
ENG
LISH
MINI KEYBOARDAllow quick input of numbers, punctuation, and other symbols. The keyboard appears at the bottom of the screen.
RECOGNITION MODE
Freeform handwriting input method can be used as an alternative to the usualkeyboard tapping. The terminal will recognize any character written with the stylusdirectly on the touch screen.
Tap the Keyboard to display the mini keyboard.
Tap Recognition to switch between modes. Available modes are:• a - alpha mode. The default mode
and the optimum method for handwriting recognition.
• 123 - numeric mode. Numerals and some letters allowed in this mode.
• A - uppercase mode. Automatically capitalizes all letters from recognition.
The stylus will revert to default alpha mode once the pen is lifted.
38

CHAPTER 4 - USING THE STYLUS: TRANSCRIBER MODE
ENG
LISH
SPACE
RETURN
Insert a space at the cursor position.• Tap spc to insert a space.
Insert a return character at the cursor position.• Tap Return to insert a Return
character.
39

CHAPTER 4 - USING THE STYLUS: TRANSCRIBER MODE
ENG
LISH
LEFT ARROW, RIGHT ARROW, BACKSPACE
Left ArrowMove the cursor one space to the left of the cursor position.• Tap Left to move the cursor left.
Right ArrowMove the cursor one space to the right of the cursor position.• Tap Right to move the cursor right.
BackspaceMove the cursor one space back and erase any text.• Tap Backspace to move the cursor
back and erase any text.
40

CHAPTER 5 - CONFIGURING UTILITIES SETTINGS:
ENG
LISH
Chapter 5 - Configuring Utilities SettingsMF-2351 comes with a utility to configure the terminal's settings.
To access this utility, tap Start Menu > Control Panel > Setting Manager.
There are five buttons under the Test Utilities.• RFID: wireless tag reader module
test utility.• ICCard: smartcard reader module
test utility.• Printer: thermal printer module test
utility.• Camera: digital camera module test
utility.• GPS: Global Positioning System
module test utility.
41

CHAPTER 5 - CONFIGURING UTILITIES SETTINGS: MSR
ENG
LISH
MSRMagnetic Stripe Reader module is located at the bottom of MF-2351.The module supports track 1, 2, and 3 covering all possible recording methods currently in use.
This is the default tab when you open Setting Manager.Under Key Wedge:• Enable MSR key wedge will send
the reading result from MSR module to the currently active application.
• Enable 1D BCR key wedge will send the reading result from barcode module to the currently active application.
Tap MSR Setting to open MSR setting window.
42

CHAPTER 5 - CONFIGURING UTILITIES SETTINGS: MSR
ENG
LISH
Configuring MSR module.• Tap Test to start the MSR testing
procedure, with the currently displayed configurations.
• Type a symbol to mark the start sentinel for each track and the end sentinel. The default values are set to the ISO standard:
• track 1: %• track 2: ;• track 3: +• end sentinel: ?
• Input the Prefix/Suffix to add beginning/ending for package and each tracks accordingly.
• Tap Default to reset the configurations back to the factory default.
• Tap Apply to save the current configurations for the MSR module.
Test read a magnetic card.1. Tap Test to open the test
window.
43

CHAPTER 5 - CONFIGURING UTILITIES SETTINGS: MSR
ENG
LISH
2. Swipe the card through the MSRmodule.
3. Data will appear in the window for a successful read.
44

CHAPTER 5 - CONFIGURING UTILITIES SETTINGS: PRINTER
ENG
LISH
PRINTERThe thermal printer module is located at the top of MF-2351.
Printer sample window controls the thermal printer module and provides testing procedures for it. Be sure to install a paper roll before starting any print testing procedure. Please refer to the 'Installing the Paper Roll' how to install one.
Tap Printer to open Printer setting window.
Configuring Printer module.• Print 16x16, 24x24, 32x32, 48x48:
Set the printout density. 16x16 is the coarsest, while 48x48 is the densest.
• Type in the desired print-head depth in the field, then tap Set Print Depth. This will affect the printout saturation.
• Load Bitmap: prepare a bitmap file.
• Print Bitmap: print a bitmap file.
45

CHAPTER 5 - CONFIGURING UTILITIES SETTINGS: WLAN
ENG
LISH
WLANWLAN stands for Wireless LAN, providing connection wirelessly and lets user roam freely within the coverage of the wireless local network. This module complies to the 802.11b/g standard.
Tap the WLAN tab on the Setting Manager to open WLAN setting window.
Configuring WLAN module.• Tap Power On to power up the
WLAN module. • Tap Power Off to power it down.• Power on WLAN when bootup:
the terminal will automatically power up the WLAN module during boot-up, otherwise it will need to be manually activated.
46

CHAPTER 5 - CONFIGURING UTILITIES SETTINGS: BARCODE SCANNER
ENG
LISH
BARCODE SCANNERLocated at the topside of MF-2351, the barcode scanner module supports many of the popular barcode formats currently used worldwide.
Tap 1D BCR setting on the Modules tab to open the barcode setting window.
47

CHAPTER 5 - CONFIGURING UTILITIES SETTINGS: BARCODE SCANNER
ENG
LISH
Configuring Barcode module.• Tap Test to start the test procedure.• Beep: play a sound read a barcode.• Add enter at end: automatically to
go the next line after a read.• Prefix: add a prefix at the beginning
of a barcode.• Suffix: add a suffix at the end of a
barcode.• Code ID: determine whether to
transmit the code ID or not.• Tap Config to open the recognition
setting for various barcode types supported by MF2351.
• Tap Default to reset the configuration to factory setting.
• Tap Apply to save the current configuration.
Barcode configuration.Select the appropriate barcode types. The selected items are marked with "_" icon.• Tap Default to reset the
configuration to factory setting.• Tap Apply to save the current
setting.
48

CHAPTER 5 - CONFIGURING UTILITIES SETTINGS: BARCODE SCANNER
ENG
LISH
Test read a barcode.1. Tap Test to open the test
window.
2. Aim the barcode reader window at a barcode.
3. Press the Barcode Trigger button.
barcodetrigger
49

CHAPTER 5 - CONFIGURING UTILITIES SETTINGS: BARCODE SCANNER
ENG
LISH
4. Data will appear in the windowfor a successful read.
50

CHAPTER 5 - CONFIGURING UTILITIES SETTINGS: RFID
ENG
LISH
RFIDThe RFID (Radio Frequency Identification) Reader module is located at the front side top of MF-2351. This module complies with the ISO 14443 A/B standard.
Tap the RFID to open RFID setting window.
Configuring the RFID module.• Open: start the RFID reader.• Close: shutdown the RFID reader.• AB Key: choose the type of key to
access between A and B for Mifare card.
• Key: define the key value. Enter the value in hex.
• Block: select the block to access.• UID: scan the RFID tag
identification.• Read data: fetch data from the
RFID tag.• Write data: send data to the RFID
tag.
51

CHAPTER 5 - CONFIGURING UTILITIES SETTINGS: IC CARD READER
ENG
LISH
IC CARD READERThe IC Card Reader module is located at the bottom side of MF-2351. The module complies with the ISO7816-EMV2000 Level 1 and 2.
Tap the ICCard on the Modules tab to open the IC Card setting window.
Configuring IC Card module.• Slot: choose the slot to access.• IC Card check: check the selected
IC card. The result will be displayed on the dialog box.
• IC Card reset: reset the selected IC card.
• IC Card command: send command to IC card for various tasks specific to the selected IC card. The results will be displayed on the dialog box.
• IC Card close: close the access to the currently selected IC card.
52

CHAPTER 5 - CONFIGURING UTILITIES SETTINGS: CAMERA
ENG
LISH
CAMERAThe camera module is located at the back of MF-2351. Equipped with light and autofocus, the 3.0 Megapixels camera can perform equally during day and night time.
Tap Camera on the Modules tab to open Camera setting window.
Configuring Camera module.• Preview: display the viewport on
screen for preview purpose.• Snap: take a snapshot.• Close: close the camera window
and return to the Setting Manager.• LightOn: turn on the camera light
to help in darker ambience.• LightOff: turn off the camera light.
53

CHAPTER 5 - CONFIGURING UTILITIES SETTINGS: GPS
ENG
LISH
GPSGPS (Global Positioning System) module shows the current location of MF-2351.
Configuring GPS module.1. Tap GPS to open the GPS
setting window.
2. Notice a message will appear when barcode scanner module is active. Skip to step 4 if this message does not appear.
3. Turn off Enable 1D BCR key wedge to use the GPS test utility.
54

CHAPTER 5 - CONFIGURING UTILITIES SETTINGS: GPS
ENG
LISH
4. Dialog box will appear to show results from GPS module.• Port Open: start the GPS
module.• Port Close: shutdown the
GPS module.• Clear: empty the dialog box.
55

CHAPTER 5 - CONFIGURING UTILITIES SETTINGS: GENERAL SETTING
ENG
LISH
GENERAL SETTINGThis window displays the general setting and display additional information such as OS version and serial number.
To open it tap Other tab on the Setting Manager.
Configuring general setting.• Enable setting manager tray:
display the Setting Manager icon on the Taskbar for easy access.
• Apply: save the changes.
56

CHAPTER 5 - CONFIGURING UTILITIES SETTINGS: BLUETOOTH
ENG
LISH
BLUETOOTHMobile terminal can connect to other devices through Bluetooth connection.
Configuring Bluetooth.1. Tap Bluetooth from the Start >
Control Panel.
2. Tap Scan Device to start discovering nearby Bluetooth connection.
3. Available Bluetooth connection(s) will appear.
57

CHAPTER 5 - CONFIGURING UTILITIES SETTINGS: BLUETOOTH
ENG
LISH
4. Right tap to establish aconnection, and tap Trusted.
5. Tap Yes to connect with a password protected connection.
6. Input the PIN and tap OK.
58

CHAPTER 5 - CONFIGURING UTILITIES SETTINGS: GSM
ENG
LISH
GSMThe mobile terminal can establish an internet connection through a GSM (Global System for Mobile) device.
To create an internet connection using GSM device:
1. Tap Start > Setting > Network and Dial-up Connections.
2. Double tap Make New Connection.
3. Type in the name for the connection, and select Dial-Up Connection. Tap Next to continue.
4. Select ztemtmodem.
59
CHAPTER 5 - CONFIGURING UTILITIES SETTINGS: GSM
ENG
LISH
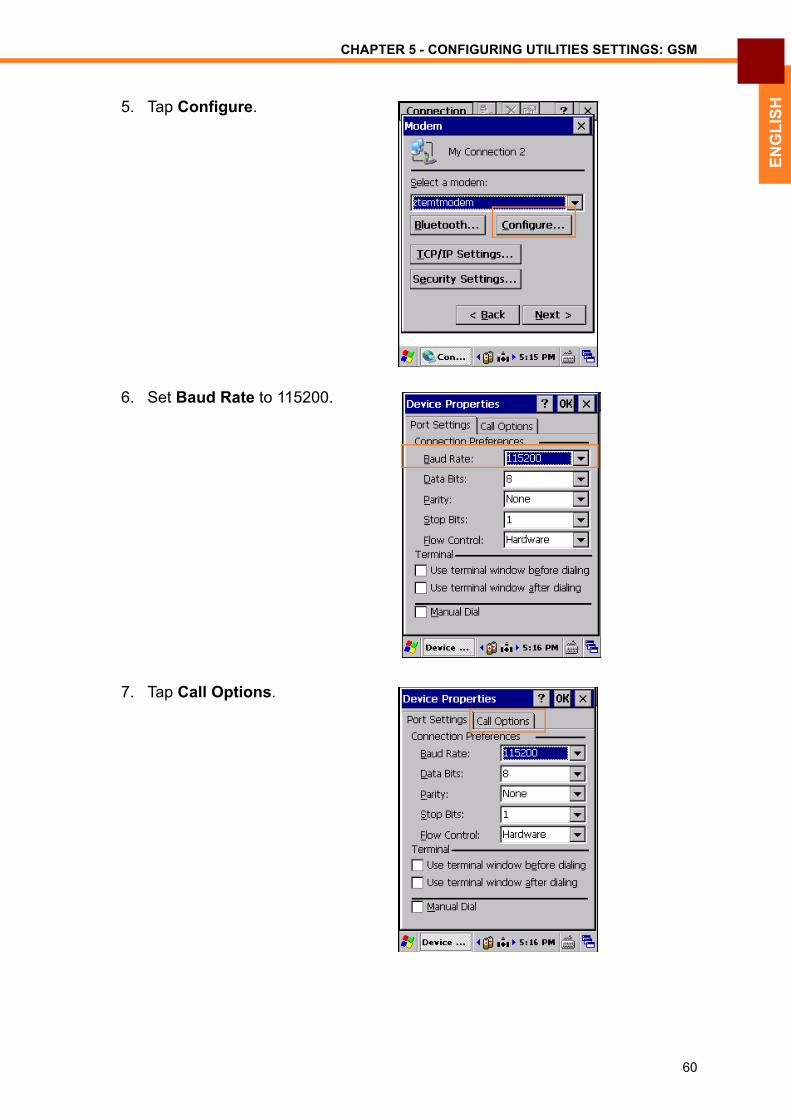
5. Tap Configure.6. Set Baud Rate to 115200.
7. Tap Call Options.
60

CHAPTER 5 - CONFIGURING UTILITIES SETTINGS: GSM
ENG
LISH
8. On Extra Settings insert this command: +cdgcont=1,"ip","internet"
9. Tap OK to complete the configure step.
10. Tap Next to continue.
11. Set these settings:• Country: 886• Area code: 2• Phone number: *99#
12. Tap Finish.
61

CHAPTER 5 - CONFIGURING UTILITIES SETTINGS: GSM
ENG
LISH
13. Double tap on the newly createdconnection.
14. Type in the login information then tap Connect.
62

CHAPTER 5 - CONFIGURING UTILITIES SETTINGS: GPRS
ENG
LISH
GPRSThe mobile terminal can establish an internet connection through a GPRS (General Packet Radio Service) device.
To create an internet connection using GPRS device:
1. Tap Start > Setting > Network and Dial-up Connections.
2. Double tap Make New Connection.
3. Type in the name for the connection, and select Dial-Up Connection. Tap Next to continue.
4. Select Hayes Modem on COM2.
63

CHAPTER 5 - CONFIGURING UTILITIES SETTINGS: GPRS
ENG
LISH
5. Tap Configure.6. Set Baud Rate to 115200.
7. Tap Call Options.
64

CHAPTER 5 - CONFIGURING UTILITIES SETTINGS: GPRS
ENG
LISH
8. On Extra Settings insert this command: +cdgcont=1,ip,internet
9. Tap OK to complete the configure step.
10. Tap Next to continue the setting.
11. Set these settings:• Country: 886• Area code: 2• Phone number: *99***1#
12. Tap Finish.
65

CHAPTER 5 - CONFIGURING UTILITIES SETTINGS: GPRS
ENG
LISH
13. Double tap on the newly createdconnection.
14. Type in the login information then tap Connect.
66

CHAPTER 6 - SPECIFICATIONS:
ENG
LISH
Chapter 6 - SPECIFICATIONSItem Specification
CPU TI OMAP 3715 1GHz Cortex A8
Operating System Windows CE 6.0
Display 3.5” TFT LCD with resistive touch screen 240 x 320
Memory DDR 256 MB SDRAM / Flash 512 MB
Communication WLAN 802.11 b/g
Printer 2” thermal printer roll ∅30
Extension Slot microSD card support read/write operation
Interface USB 2.0 OTG (Client & Host) x1RS-232 x1SIM Card x1SAM Card x2
Keypad Alphanumeric
IC Card ISO7816-EMV2000 Level 1,2 certified
Camera 3.0 Megapixels autofocus with light
Other DC jackearphone and microphone jackspeakerintegrated microphonevibrator motorreset button
Battery Main: rechargeable li-ion battery 7.4V 2000mAhHotswap: rechargeable polymer battery 3.7V 100mAh
Environmental Operating temperature 0 to 40°CStorage temperature -20 to 70°C
Dimensions 85.5 mm (H) x 208 mm (W) x 38mm (D)
Weight Full feature model including battery 500g
Accessories Hand strapStylusLeather carrying case with shoulder strap (optional)
Certification PCI 3.0, EMV2000 Level 1 & 2CE, FCC, CCC, BSMI, VCCI
67

CHAPTER 6 - SPECIFICATIONS: OPTIONAL FEATURES
ENG
LISH
OPTIONAL FEATURESSpecification subject to change without prior notice.
Item Specifications
Barcode 1D / 2D
RFID ISO 14443 A/B
Telecom Standards GPRS / WCDMA / CDMA2000
GPS Channels: 50Frequency: L1Signals: GPS C/A Code
Fingerprint Sensor Image sensor256 x 360 sensors array format508 DPI
68
