pavers by ideal - idealconcreteblock.com · pavers by ideal. ideal’s pisa2 and ... using basic...
TRANSCRIPT

TheIdeal Wayto Build
using
Pisa2®
and Roman Pisa®
Walls withStyle™
P A V E R S B Y I D E A L

Ideal’s Pisa2 and Roman Pisa are full component landscaperetaining wall systems that are easy to assemble. A tongue and groovemolded into the units locks them together and provides automatic step-back when stacked. They sit on a base of compacted gravel. Mortar orconcrete are not required, so you can take your time building a strong,durable retaining wall that will provide yearsof lasting beauty.
This step by step guide will assist you fromstart to finish for beautiful do-it-yourselfresults. Using basic construction techniques,you can build classic style retaining walls,90° corners, and stairs. We have even included some helpful hints thatthe professionals use!
PlanningFirst, determine the height, length, and configuration of thewall and make a drawing showing any adjoining fences,structures, stairs, and paved areas. Be sure to include an
accurate sketch of the area to be retained, noting the slope anddrainage patterns.
Once the plan is complete, check with your local building departmentto determine if a permit will be necessary. In some cases, a stampeddrawing may be required, which means you will need the services of aprofessional engineer. The authorized Ideal dealer in your area may beable to help you obtain this type of service. Otherwise, they can helpdetermine the quantity of Pisa units, gravel, crushed stone, and othermaterials you will need to complete your project. You can also refer tothe handy charts we have included in the Estimating Section.
Most likely, you will need to have the materials delivered. Rememberthat delivery trucks are heavy, so select a convenient location wherethe materials can be placed. The Pisa2 or Roman Pisa will arrive onpallets, while the gravel and crushed stone will be sent in separatetrucks and dumped into piles. Plan to move the materials by wheel-barrow and to do some clean up afterwards.
Also, you will require the following tools, equipment, and materials:
• gloves • wheelbarrow • shovel• rake • tape measure • pick• string line • torpedo level • line level• carpenter’s level • wood stakes • brush• caulking gun • hard rubber mallet • 3 lb hammer• perforated pipe • mason’s chisel or brick-set• landscape filter fabric
In addition, you may need a hand tamper or plate compactor and apower saw with a diamond blade. Check with your Ideal dealer or localequipment rental store for these items.
PreparingBefore beginning any excavation, contact your localutility companies such as Dig Safe or Call Before You Digand request that they mark underground cables or pipes.
These services are usually free, but may require 72 hours notice.
The following instructions are typically suitable for walls under 4' high(measured from the first course of blocks placed on the base) withoptimum site conditions. Walls 4' and higher, terraced walls, sites withpoor drainage, weak soils, excessive groundwater, sloping embank-ments and surcharges such as parking behind the wall, will requirespecial consideration and construction techniques, including the useof geogrid. See the section titled “Engineered Walls” for moreinformation. We recommend you contact a qualified soils engineer forthese conditions. Remember, safety is paramount, so you may need touse the services of a professional contractor. Ask your Ideal dealer toprovide you with names. Some advice before you start. Follow thedirections carefully as you proceed through each step. If you make amistake, simply take the units apart to dismantle the section of thewall, correct the problem, and pick up where you left off.
ExcavatingThe key to building a good retaining wall is preparing afirm foundation for good structural support. Segmentalretaining wall units are considered flexible structures, so
the footing does not need to be placed below the frost line.
Begin by staking out the location of your wall. Be sure to allow for theautomatic step-back of 3/4" with every course of wall units. If buildingyour wall in front of an existing embankment, allow enough room tomaintain 12" of space behind the wall for a drainage zone, which willbe filled with 3/4" stone as you build the wall. The wall location isespecially important on outside (convex) curves where the step-backof the units will decrease the radius of the curve as the wall heightincreases. See the section on Curved Walls for more information.
Once you have staked out the wall location, excavate a trench at least12" deep by 24" wide. You will need to dig deep enough to allow for a6" thick gravel base and the first row of units that will be embeddedbelow finished grade. If the wall will step-up into a slope at differentlevels, start at the lowest point and excavate each rise in elevation in6" increments. If the wall has multiple step-ups, be sure to allow for the3/4" step-back that occurs in every course for each 6" increase inheight.
Note: If the height of your wall above finished grade is 2' or less, you maymake the gravel base 4" thick and bury the first course of block just 3". On theother hand, if your wall is greater than 4' high, it will be necessary to excavatedeeper. The first course must be buried an additional 1" for every course ofblock over 4'. For example, for a 6' high wall, you will need to dig the trench atleast 16" deep in order to bury the entire first course and 4" of the secondcourse of block.
Stretcher Unit

Start by placing the Stretcher units directly on the base in thecenter of the trench. If your wall steps up, begin at the lowestelevation. Use acarpenter’s level toalign and level eachunit from side toside and front toback (Fig. 3). Use ahard rubber malletto tap them intoposition. Lay theunits side by sidealong the length ofthe footing, followingthe desiredalignment of the wall.
If your wall has 90° corners, it is best to start from a corner. Seethe Details Section for more information on building corners. Youcan also start next to a fixed structure such as a house foundation.
Tip: Snap a chalk line directly on the gravel footing as a guide to align the wall.
After the first course has been installed, place perforated pipebehind the wall to help collect water and drain it away. Lay the pipe,with the holes facing down, on the base behind the units along theentire length of the wall and several feet beyond. Some types ofpipe are available with a geotextile sock, otherwise, wrap the pipein filter fabric. Slopethe pipe at eachend to allow gravityto drain waterbeyond the wall.Next, backfill thetrench behind thefirst course with 3/4"crushed stone,and tamp level tothe top of the wallunits, being carefulnot to move them inany way. Now, filland compact the trench on the front side of the unitsby using the same 11/2" processed gravel you used for the base(Fig. 4). Sweep the top of the wall units clean.
The soil at the bottomof the trench must befirm and stable.Remove all loam,grass, roots and largerocks. If necessary, continueto excavate until youreach granular typesoil. Compact withthe plate compactor orhand tamper until thebottom of the trench is level and firmly packed (Fig. 1). Next, coverthe bottom and sides of the trench with landscape fabric. To preventsoil from washing into the crushed stone drainage zone that will bebehind the wall, extend the fabric up the slope to completely coverthe embankment. Overlap sections of fabric by at least 12".
Installing & Compacting the BaseThe material for the base, or footing as it is sometimescalled, should be well-draining, coarse granularmaterial. We recommend 11/2" processed gravel or
crusher run.
Fill the trench with about 3" of gravel, then level and compact itthoroughly with the plate compactor. If you are using a hand tamper,compact only 1" to 2" of gravel at a time. When you can walk on the
base without leavingan indentation, addthe next layer ofgravel. Add andcompact enoughgravel until the base is6" thick with the top 6"below grade (Fig. 2). (As noted earlier, theelevation of the basewill be deeper forwalls over 4' high.)
Tip: To facilitate the compaction process, soak but do not saturate the gravel with water.
Installing the First CourseThe first course of wall units is the most important andtakes the longest time to install. Once you havepositioned and leveled the units in this row, you will be
able to place subsequent courses quickly and easily.
Figure 1
Figure 2
Figure 4
Figure 3
Tip: To make leveling easier, spread and compact up to 1/2" of coarse concrete sand on top of the compacted base.
Laying the WallInstall the second course of units by fitting the grooveonto the tongue of the unit below. Align the units withthe tongue to achieve a uniform appearance - the
tongue and groove allows some play for adjustment. Position theunits in a “running bond” pattern, staggering the joints over themiddle of the wall unit below. You may need to use Half units tomaintain the bond and it may even be necessary to cut some units.While a perfect running bond is not necessary, always maintainsome stagger to the joints. Use a mason’s chisel or cut-off saw ifcutting is necessary. Always exercise caution, wear safetyglasses and a NIOSH approved respirator! Occasionally, it maybe necessary to shim units to maintain level coursing.
Tip: Level wall and corner units using plastic shims or asphalt shingles.
Roman Pisa - Ashlar Patterns - So far, we have described thesteps involved with the construction of a Pisa2 or Roman Pisawall using regular 6"h x 8"l x 12"d Stretcher units. If building aRoman Pisa wall in an ashlar pattern, you will be combining Halfand 12" Jumbo units with regular Stretcher units. Although theymay look complicated, the ashlar patterns are easy to assembleand simply repeat throughout the wall. See our Roman PisaInstallation Pattern sheet for the configuration of the pattern youhave chosen. You can even create your own custom pattern byinterchanging Stretcher and Half units with Jumbo units. Groovesmolded into the 12" length and 8" side of the Jumbo unit allow it tobe placed either horizontally or vertically in the wall. Always placeseveral 3/8" beads of SRW Adhesive on the top surface of Jumbounits immediately prior to placing the next course of units onto it.One 10 oz tube will be required for about every 10 sq ft of wallarea for ashlar patterns.
Tip: Always select block from several pallets as you are installing to distribute the color uniformly.
When you have laid the second course, fill the area behind theunits to about 12" back with 3/4" crushed stone for a drainage zone.Then you’ll backfill behind the crushed stone. Pull the filter fabricover the front of the wall and place a 3"- 4" layer of 11/2" processedgravel (or soil that was excavated from the site) and compactthoroughly. Add enough gravel or soil until it is even with the top ofthe wall units. If necessary, add more 3/4" drainage stone and tamplevel. The key is to consolidate the stone and backfill material asmuch as possible to avoid future settlement.
Tip: Place a piece of plywood between the crushed stone and the slope to keep the 3/4" stone and backfill material asseparated as possible. Slide the plywood up as you backfill.
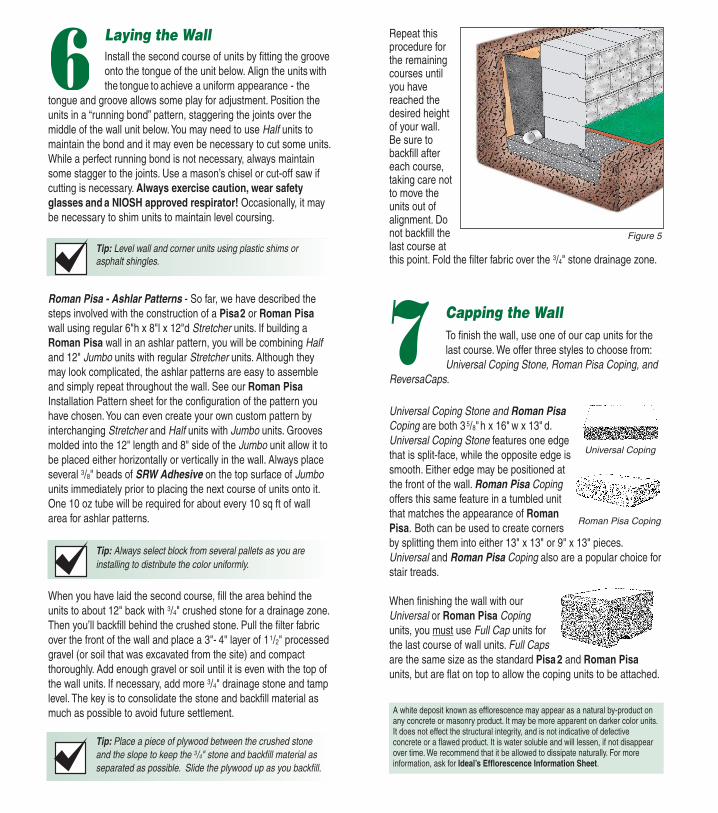
Repeat thisprocedure forthe remainingcourses untilyou havereached thedesired heightof your wall.Be sure tobackfill aftereach course,taking care notto move theunits out ofalignment. Donot backfill thelast course atthis point. Fold the filter fabric over the 3/4" stone drainage zone.
Capping the WallTo finish the wall, use one of our cap units for thelast course. We offer three styles to choose from:Universal Coping Stone, Roman Pisa Coping, and
ReversaCaps.
Universal Coping Stone and Roman PisaCoping are both 3 5/8"h x 16" w x 13" d.Universal Coping Stone features one edgethat is split-face, while the opposite edge issmooth. Either edge may be positioned atthe front of the wall. Roman Pisa Copingoffers this same feature in a tumbled unitthat matches the appearance of RomanPisa. Both can be used to create cornersby splitting them into either 13" x 13" or 9" x 13" pieces.Universal and Roman Pisa Coping also are a popular choice forstair treads.
When finishing the wall with ourUniversal or Roman Pisa Copingunits, you must use Full Cap units forthe last course of wall units. Full Capsare the same size as the standard Pisa 2 and Roman Pisaunits, but are flat on top to allow the coping units to be attached.
Universal Coping
Roman Pisa Coping
Figure 5
A white deposit known as efflorescence may appear as a natural by-product onany concrete or masonry product. It may be more apparent on darker color units.It does not effect the structural integrity, and is not indicative of defectiveconcrete or a flawed product. It is water soluble and will lessen, if not disappearover time. We recommend that it be allowed to dissipate naturally. For moreinformation, ask for Ideal’s Efflorescence Information Sheet.

Details
Step-upsWhen buildinginto thedirection of aslope, the wallmust bestepped in 6"increments. Donot attempt toslant the wallto the angle ofthe slope (Fig. 7).
Ending the WallWhen the wall ends as a step-down, use a Full Cap and aCorner unit as the last two units in the course. For Pisa2 walls,split a Universal Coping Stone into the appropriate corner andplace it onto the Full Cap and Corner blocks. Position it tooverhang the exposed faces by about 1". Be sure to securethem with SRW Adhesive (Fig. 6). For Roman Pisa use theRoman Pisa Coping Stone.
Curved WallsPisa2 and Roman PisaStretcher units are tapered1" in width from front toback, so building curvedwalls is easy. They lay out toa minimum radius of 71/2' forconvex (outside) curves.Note that the units are only tapered on either the right or leftside. Typically, a shipment includes about half of each type.When laying convex curves, only use units with the same taperin a row. It does not matter whether they are “rights or lefts” -just don’t mix them together. Alternate them every course asyou build the wall to get a 7 1/2' radius. Concave (inside) curvescan be built with a radius as tight as 6' by laying the faces tightand opening the back as much as possible. Fill the spacebetween the units with 3/4" crushed stone as you backfill. If building a curved wall in a Roman Pisa ashlar pattern, planon laying out a radius of 15' to minimize cutting.
CornersOutside Corners: Building outside corners is easy with Pisa2and Roman Pisa. They are constructed using Full Caps andRight and Left Hand Corner units. When ordering, be sure tospecify the height in order to get the right amount of each typeof unit. It is best to start the wall in the corner and build out.Follow these simple steps to construct 90° corners (Fig. 8).
ReversaCaps are tapered front to back,with one face 8" wide and the opposite7" wide. For straight walls, simplyreverse every other unit, while forcurves, reverse them as needed toeliminate gaps as you follow the curvature. For walls with aradius less than 7 1/2', it may be necessary to cut a few.ReversaCaps come with a smooth face, or edge. If you preferto match the textured face of Pisa2, simply split the faces offalong the groove we’ve molded into the bottom. Use a brick set chisel or, if you have a lot of units to split, consider using aguillotine splitter. See your Ideal dealer or a local equipment rental store. You will need to miter ReversaCap if your wallincludes 90° corners. Ask your Ideal dealer for easy to followstep-by-step instructions.
Whatever cap style you select, secure them to the wall with ourSRW Adhesive, which is a construction-grade sealant that’sbeen formulated for use with concrete. Simply apply several3/8" beads to the topsurface of the units in thelast course (Fig. 6). It’sbest to do only 3 or 4units at a time to preventthe sealant from skinningover. When setting thecoping units, apply firmpressure to secure themin place. Allow 24 hoursor so for complete curing.
Completing the ProjectTo complete the project, add topsoil behind thewall to bring the embankment to the desiredheight. Finish the grading so that water will not
pond behind the wall. If necessary, construct a small swale tocollect and channel the water away, or grade the surface todirect water over the top and down the face of the wall.Complete your new landscape wall by installing sod, flowers,and plants. And don’t forget, Pisa 2 and Roman Pisa wallslook great with Ideal interlocking concrete pavers. You canintegrate a walkway, patio, or terrace into your wall design tomaximize your outdoor living area!
Congratulations! You have built a beautiful landscaperetaining wall that will provide years of enjoyment andmaintenance-free service.
Figure 6
Figure 7
Left Right

1) As you lay out the location of the wall, mark the position ofthe corner with a stake and use string lines to indicate the line ofthe intersecting walls. When digging the trench, allow foradditional space at the corner location.
2) Once the gravel base has been placed and compacted tothe desired elevation, mark the exact location of the corner. Use a builder’s square to ensure an accurate 90° angle, or lay itout using the 3-4-5 triangle method.
3) Carefully position a Right Hand Corner unit first. Place aFull Cap unit beside it to the left. Using a level, align and plumbthe units. Continue the wall on each side using Pisa2 or RomanPisa Stretchers as described in Section 5.
4) For the second course, select a Left Hand Corner unit andposition it onto the Right Hand Corner and Full Cap. Next placea Full Cap beside it to the right and continue the second courseusing Stretcher units.
5) Continue this procedure for each course remembering toalternate the Right and Left Hand Corner units every course tomaintain the running bond pattern. When the wall reaches theheight you desire, use a Universal Coping Stone or Roman PisaCoping as a cap to finish the corner.
Note: Apply several 3/8" beads of SRW Adhesive to the top of eachcorner unit immediately prior to placing the successive corner unit. If your wall has 90° corners on each end, it will be necessary to cut unitswithin the wall to accommodate the wall batter and to maintain the pattern.
Inside Corners: Inside corners are easy to build. Use 2 FullCaps for every course at the intersecting corners, alternating thecourses as shown in Fig. 9. Apply SRW Adhesive to the cornercap units for added strength.
FencesIf your project requires a fence, the posts must be placed at least3' behind the back of the wall. Do not anchor into the coping units.
StairsStairs serve a functional purpose and add a beautiful dimensionto any landscape design. Building stairs with Pisa2 or RomanPisa is relatively simple. Most stairs are 48" wide; otherwise laythem out in multiples of 8". There are two methods for building stairs. They are known as the “cut” method and “fill” method. With either method, first determine the location of the stairway. Be sure to allow enough space behind the wall, as each stair will step back 12".
It is better to construct the corners and side walls independent ofthe risers. Start by building corners, as shown in the CornerSection, on each side of the stairs. To construct the side walls, werecommend using Full Caps to avoid the automatic step-backcreated by the tongue and groove molded into the Stretcher units.Lay all the courses of block in the side walls vertically with nosetback. Be sure to bond the units together with SRW Adhesive.Backfill with 3/4" stone as you go up, using filter fabric to keep thesoil from infiltrating the drainage stone.
Stair Construction using the “Cut” Method
With the “cut” method, a separate gravel base is used under eachstair. The risers will consist of a Stretcher, a Full Cap and a copingunit for the tread, although you can have the Full Caps as thetread. Depending on the style you choose, you must thendetermine the height of the rise. Generally, 6" to 8" is acceptable,although building codes may dictate specific heights.
You can start the stairs at the front of the wall or set them backfrom the corners. The depth of the excavation will depend on theheight required for the risers and style coping unit used. Theheight of the first riser should measure from the top of the tread tothe finished grade. Install and compact a 6" gravel base as thefooting. See Fig. 10. Place a row of Pisa Stretchers onto the baseand level them. Next, place the second course using Full Caps.
Figure 8
Figure 9
Cap
Full Cap
Full Cap
StretcherUnitsStretcher
Units
Left HandCorner Unit
Right HandCorner Unit
Cap Cap
Cap
Alternating Courses
All units meet the physical requirements for Segmental Retaining Wall Units of ASTM C 1327 and/or NCMA Tek 2-4B.

Construct the nextriser assembly byplacing andcompacting another 6" thickgravel footing behindthe first course ofunits. Place anotherrow of Stretchersonto the base, directly behind theFull Caps. Complete the riser with Full Caps as the second course.Install successive risers in the same manner for the number ofstairs needed.
Once the stair risers have been constructed, you need to set thetreads. Adhere the coping units with SRW Adhesive as instructed inSection 7 - Finishing the Wall. Position the treads to provide a 1"overhang. Allow the adhesive to cure at least 24 hours beforeopening the stairs to traffic.
Stair Construction using the “Fill” Method
Although more units are required using the “fill” method, it mayprove faster and easier, especially if there are a small number ofsteps. Simply excavate the entire stairway area straight back thenplace and compact a 6" thick gravel base as a level foundation. Use multiple courses of wall units to build up the risers for thenumber of steps you want. Use Full Caps as the last course foreach stair and finish the treads as noted above.
Engineered WallsPisa2 and Roman Pisa, as well as all other types of segmentalretaining walls, or SRWs as they are known, function as gravitystructures where the weight of the wall resists the weight of theearth it retains. When the wall is 4' and higher, or if the site involvesconditions as noted in Section 2, additional construction techniques,such as tiered construction or the use of geogrid, and the servicesof a qualified engineer are required.
As a “rule of thumb”, a terraced wall should be set back a distanceequal to, but not less than, twice the height of the lower wall in front.For example, if the lower wall in front is 31/2' high, the tiered wallbehind it should be built at least 7' back.
Geogrid is a PVC-coated polyester mesh that reinforces the earthbehind the wall when embedded between layers of soil. The grid isplaced on the wall units, then extended back over the compactedgravel. Additional gravel is placed on top of the grid and compacted.As courses of units are added and back-filled, additional layers ofgrid are placed at appropriate heights. The number of layers andlength of geogrid depend on several conditions, including the type ofsoil being retained. Poor draining soils such as clay require moregeogrid than granular soils, which drain well.
Typically, gridshould be placedevery 2 or 3courses andshould extendback a distanceabout equal to theheight of the wall(Fig. 11). Yourengineer will beable to specify thenumber of layers of grid that will berequired for your wall and the distance the grid should extend back.
Estimating ChartsThe following charts should be used as guides to estimate thenumber of units required to build a Pisa2 or Roman Pisa wall.Remember to allow a few extra units for cutting and waste. Wallsexceeding the heights shown on the charts require additionalconstruction techniques and engineering consideration. Contact Idealfor additional information.
Figure 10
Figure 11
HEIGHT & COURSE
PISA2® & ROMAN PISA®
Stretcher Unit - 6"h x 8"w x 12"d • 3 pcs/sf • 43 lb ea.
Half Unit - 6"h x 4"w x 12"d • 6 pcs/sf • 23 lb ea.Corner Unit - 6"h x 8"w x 12"l • 46 lb ea.Jumbo* Unit - 6"h x 12"w x 8"d • 2 pcs/sf • 51lb ea.*Jumbo Unit available only for Roman Pisa
5'
8
15
23
30
38
45
53
60
10'
15
30
45
60
75
90
105
120
15'
23
45
68
90
113
135
158
180
20'
30
60
90
120
150
180
210
240
30'
45
90
135
180
225
270
315
360
40'
60
120
180
240
300
360
420
480
50'
75
150
225
300
375
450
525
600
6"
12"
18"
24"
30"
36"
42"
48"
1st
2nd
3rd
4th
5th
6th
7th
8th
LENGTH
STYLE5'
3.75
8
8
3.75
10'
7.5
16
15
7.5
15'
11.25
24
23
11.25
20'
15
32
30
15
30'
22.5
48
45
22.5
40'
30
64
60
30
50'
37.5
80
75
37.5
Universal Coping3 5/8"h x 16"w x 13"d
ReversaCap3"h x 8/7"w x 14"d
Pisa Full Cap6"h x 8"w x 12"d
Roman Pisa Coping3 5/8"h x 16"w x 13"d
LENGTH
Shaded row is the buried course
COPING UNITS

ROMAN PISA PATTERNS (Also see Pattern Card)
*Includes 9 Full Cap units for every 10' of closure row.
Here are some “rules of thumb” that you might find handy for estimating theamount of gravel needed for the base and the quantity of 3/4" crushed stoneused for drainage.
Base material* : Approx. 6-7 tons of 11/2" processed gravel or crusher run arerequired to construct a base 6" thick by 24" wide by 100' long.
Drainage stone*: For every 100 sf of wall, approx. 5 tons of 3/4" crushed stonewill be required to fill the 12" drainage zone behind the wall.
*Based on the approx. weights of: 115 lb/cu ft for 1 1/2" processed gravel or crusher run100 lb/cu ft for 3/4" crushed stone
Ideal cannot assume liability for the accuracy or completeness of the information containedin this brochure, nor do we guaranty or warrant the recommendations contained herein.Final determination of the suitability of any information provided and its manner or use, isthe sole responsibility of the user.
STYLE Stretcher Half Jumbo
164*
164*
160*
168*
139*
265
110
110
42
30
47
66
56
56
80
60
93
-
Ashlar Pattern 1
Ashlar Pattern 2
Ashlar Pattern 3
Ashlar Pattern 4
Ashlar Pattern 5
Stretcher & Half - 4:1 Ratio
NO. OF UNITS IN ROMAN PISA PATTERNS per 100 sf