hyperion navigation - cook county...
TRANSCRIPT

Hyperion Navigation
Created on 6/5/2017 1:30:00 PM


Training Guide
Page i
Table of Contents Hyperion Navigation Topics ........................................................................................ 1
Hyperion Navigation ................................................................................................. 1 Hyperion Planning Navigation .................................................................................................. 1
Navigating Workspace ........................................................................................................................ 3 Logging Into Workspace ................................................................................................................. 3 Understanding Toolbar Icons .......................................................................................................... 6 Reviewing the Workspace User Interface ....................................................................................... 8 Accessing Online Help .................................................................................................................. 12 Changing the Password ................................................................................................................ 14 Setting General Preferences ........................................................................................................ 16 Setting Preferences for an Application .......................................................................................... 20
Setting Preferences for the Application ................................................................................ 24 Setting Preference - User Point of View ............................................................................... 38
Adding Favorites ........................................................................................................................... 40 Reviewing the Training Manual .................................................................................................... 42 Reviewing the "What's New" document ........................................................................................ 44 Logging Out .................................................................................................................................. 48
Navigating in Planning ...................................................................................................................... 51 Opening Planning Applications ..................................................................................................... 51 Reviewing the View Pane and Content Area ................................................................................ 54 Opening Data Forms .................................................................................................................... 57 Reviewing Menus ......................................................................................................................... 60 Navigating the My Task List .......................................................................................................... 64
Hyperion Capital Budgeting Navigation ................................................................................. 70 Navigating in Capital Budgeting ........................................................................................................ 71
Logging Into and Navigating to Capital Application ...................................................................... 71 Setting Preferences for the Application ................................................................................ 75 Setting Preference - User Point of View ............................................................................... 89
Checking For Your Entity .............................................................................................................. 91


Training Guide
Page 1
Hyperion Navigation Topics
Hyperion Navigation
Planning is a Web-based budgeting and planning solution that enables collaborative, event-based, operational planning processes throughout the organization for a wide range of financial and operational needs. Workspace is the Web user interface that is used to access all Oracle Hyperion and non-Oracle Hyperion content.
Workspace provides a centralized environment for users to access and interact with the following components:
Financial Management application tasks
Planning application tasks
High-performance, multidimensional modeling, analysis, and reporting with Web Analysis
Financial Reporting for scheduled or on-demand, highly formatted, financial and operational reporting from most data sources, including Financial Management and Planning
Access and interaction with other published content, such as Microsoft Word or Excel documents
Integration tasks to move data and metadata from Enterprise Resource Planning (ERP) source systems into Enterprise Performance Management (EPM) target applications
Upon completion of this lesson, you should be able to:
Launch Workspace
Review the Workspace user interface
Set General and Explore preferences
Open Planning applications
Add favorites
Hyperion Planning Navigation
Planning is a Web-based budgeting and planning solution that enables collaborative, event-based, operational planning processes throughout the organization for a wide range of financial and operational needs. Workspace is the Web user interface that is used to access all Oracle Hyperion and non-Oracle Hyperion content.
Workspace provides a centralized environment for users to access and interact with the following components:
Financial Management application tasks
Planning application tasks
High-performance, multidimensional modeling, analysis, and reporting with Web Analysis
Financial Reporting for scheduled or on-demand, highly formatted, financial and

Training Guide
Page 2
operational reporting from most data sources, including Financial Management and Planning
Access and interaction with other published content, such as Microsoft Word or Excel documents
Integration tasks to move data and metadata from Enterprise Resource Planning (ERP) source systems into Enterprise Performance Management (EPM) target applications
Upon completion of this lesson, you should be able to:
Launch Workspace
Review the Workspace user interface
Set General and Explore preferences
Open Planning applications
Add favorites
Training Guide
Page 3
Navigating Workspace
Learning Objective: In this section, you will learn how to navigate the Hyperion Workspace.
Workspace provides a centralized environment for users to access and interact with many components.
Upon completion of this lesson you will be able to:
- Navigate the Workspace
- Review the Workspace User Interface
- Set Preferences
- Open Planning Applications
- Add to Favorites
Logging into Workspace
Learning Objective: In this topic you will learn how to launch the Workspace.
Upon completion of this topic you will be able to:
Launch the Workspace
This topic will cover: - Logging into Workspace Estimated time to complete this topic: 1 minute

Training Guide
Page 4
Step Action
1. The Oracle Enterprise Performance Management (EPM) System Workspace Log On page provides access to the Hyperion Applications and is the gateway into the applications that are assigned to your job role. To access the Hyperion Applications, enter the assigned user name into the User Name field. In this example enter "TestUser1g7".
2. The System Administrator will assign an initial Password. Enter the assigned password into the Password field. Note: The Password field is case-sensitive In this example, enter "12345".
3. Click the Log On button when you are finished entering the user name and password.
Training Guide
Page 5
Step Action
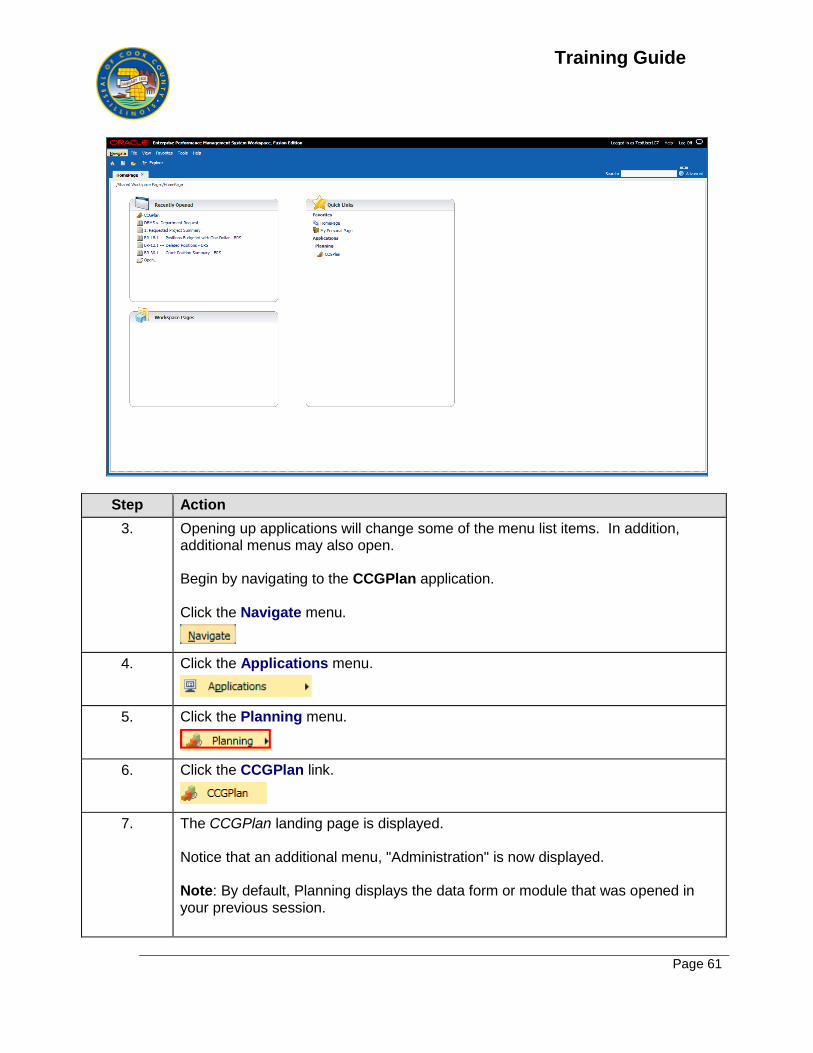
4. The Home page is displayed. The Home page provides a single point of login for a user. The Home page contains: - Recently Opened Area. - Quick Links Area. - Workspace area.
5. This topic covered: - Logging Into Workspace. End of Procedure.
Training Guide
Page 6
Understanding Toolbar Icons
Learning Objective: In this topic you will navigate through the Toolbar.
Upon completion of this topic you will be able to:
Understand the Toolbar Icons.
This topic will cover: - Understanding the Toolbar Icons Estimated time to complete this topic: 1 minute
Step Action
1. To navigate the Hyperion Applications use the toolbar icons that are located in a row beneath the main menu.
2. The Home icon returns you to the landing page.
3. The New Document icon is used to: - Create a Workspace Page - Collect Reports into a Book - Batch Reports for Scheduling
4. The Open icon is used to open a file or folder that will display in the content area.
5. The Explore icon opens to the Root folder tab. Use Explore to list and navigate repository contents; manage and control files and folders and use elements like the Open dialog box that present the repository as a file management system.
6. The New Folder icon is used to create a new folder within the Explore directory.
7. The Copy icon is used to copy a form within the Root folder.
8. The Cut icon is used to move a form from the Root folder to paste in a new location.
9. The Paste icon will become available once a file is cut or copied.
10. The Go Up a Level icon is used to navigate upward in the view pane.
11. The Refresh icon is used to refresh the folder contents.
12. The Properties icon is used to modify general and advanced properties.

Training Guide
Page 7
Step Action
13. This topic covered: - Understanding Toolbar Icons. End of Procedure.

Training Guide
Page 8
Reviewing the Workspace User Interface
Learning Objective: In Workspace, you use the Workspace menus and toolbars to open applications, search for and manage documents, and modify the view.
Upon completion of this topic you will be able to:
Review the Workspace User Interface
This topic will cover: - Review the Workspace User Interface Estimated time to complete this topic: 3 minutes
Step Action
1. Begin by navigating to the Root folder. Use the Navigate menu to access Workspace modules. Click the Navigate menu.
2. Click the Applications menu.

Training Guide
Page 9
Step Action
3. Click the Planning menu.
4. Click the CCGPlan link.
5. Note you can also access the application under the Planning Quick Links.
6. The CCGPlan tab is displayed. Click the Explore button.
7. The Root folder and subfolders are displayed. Use the Menu bar to open applications and documents, manage favorites, modify the Workspace view, and access online help.
8. Use the Standard toolbar to manage documents in Workspace.
9. Use the View pane to navigate between Workspace documents.
10. Use the Content area to view active module items, tasks, or files.
11. Click the View menu to close the View pane.
12. Click the View Pane menu.
13. The View pane is now hidden. The Show button. restores the View pane.
14. Search for a sample report.
15. From the Content area, you can search for forms, documents, and reports. Click in the Search: field.
16. Enter a keyword into the Search: field to find a report. In this example, enter "Training".
17. Click the Search: button.

Training Guide
Page 10
Step Action
18. Use the Search results page to view the results of a search. The links to the Workspace documents that contain the word "Training" are displayed in the content area.
Step Action
19. Select a sample document within the results. Click the HFM.073 link.
20. The report is displayed in the Content area.
Training Guide
Page 11
Step Action
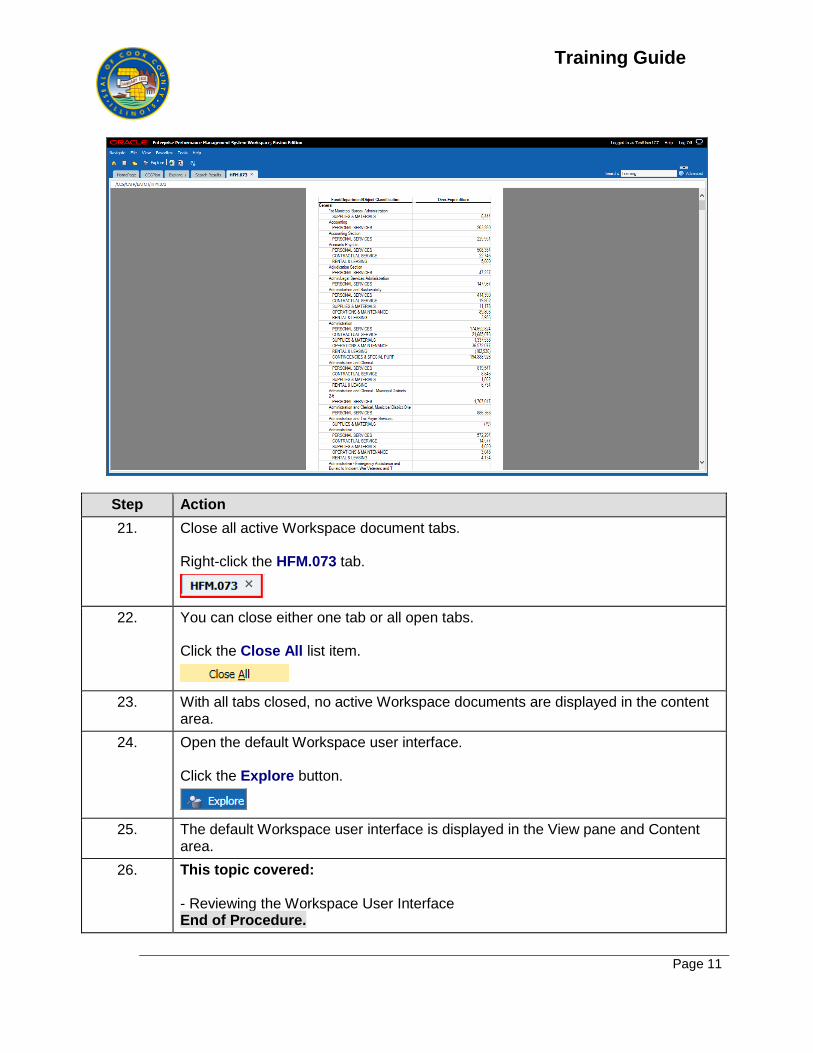
21. Close all active Workspace document tabs. Right-click the HFM.073 tab.
22. You can close either one tab or all open tabs. Click the Close All list item.
23. With all tabs closed, no active Workspace documents are displayed in the content area.
24. Open the default Workspace user interface. Click the Explore button.
25. The default Workspace user interface is displayed in the View pane and Content area.
26. This topic covered: - Reviewing the Workspace User Interface End of Procedure.

Training Guide
Page 12
Accessing Online Help
Learning Objective: In this topic you will learn how to Access the Online Help Link.
Upon completion of this topic you will be able to:
Access the Online Help Link.
This topic will cover: - Accessing Online Help Estimated time to complete this topic: 1 minute
Step Action
1. Begin by clicking the Help menu.
2. From the Help menu, you can access the following: - Help on This Topic - Contents - Technical Support - EPM Documentation - About the Application

Training Guide
Page 13
Step Action
3. To view context-sensitive help, select Help, and then Help on This Page. This will provide information regarding the specific page within the application. To browse the help system, select Help, and then Contents. This will provide access to all of the content within the application. In this example, click the Help on This Topic link.
4. The Online Help window is displayed. This window displays details about the specific page you are on (in this case, the Home Page) and its functionality. On the left hand side of the window, you can also search key terms.
5. This topic covered: - Accessing Online Help End of Procedure.

Training Guide
Page 14
Changing the Password
Learning Objective: In Workspace, you use the Change Password feature to update your current password.
Upon completion of this topic you will be able to:
Change and Update your password.
This topic will cover: - Changing the Password. Estimated time to complete this topic: 1 minute
Step Action
1. Begin by navigating to the Tools menu. Click the Tools menu.
2. Click the Change Password... menu.
3. The Change Native User Password window is displayed.
Training Guide
Page 15
Step Action
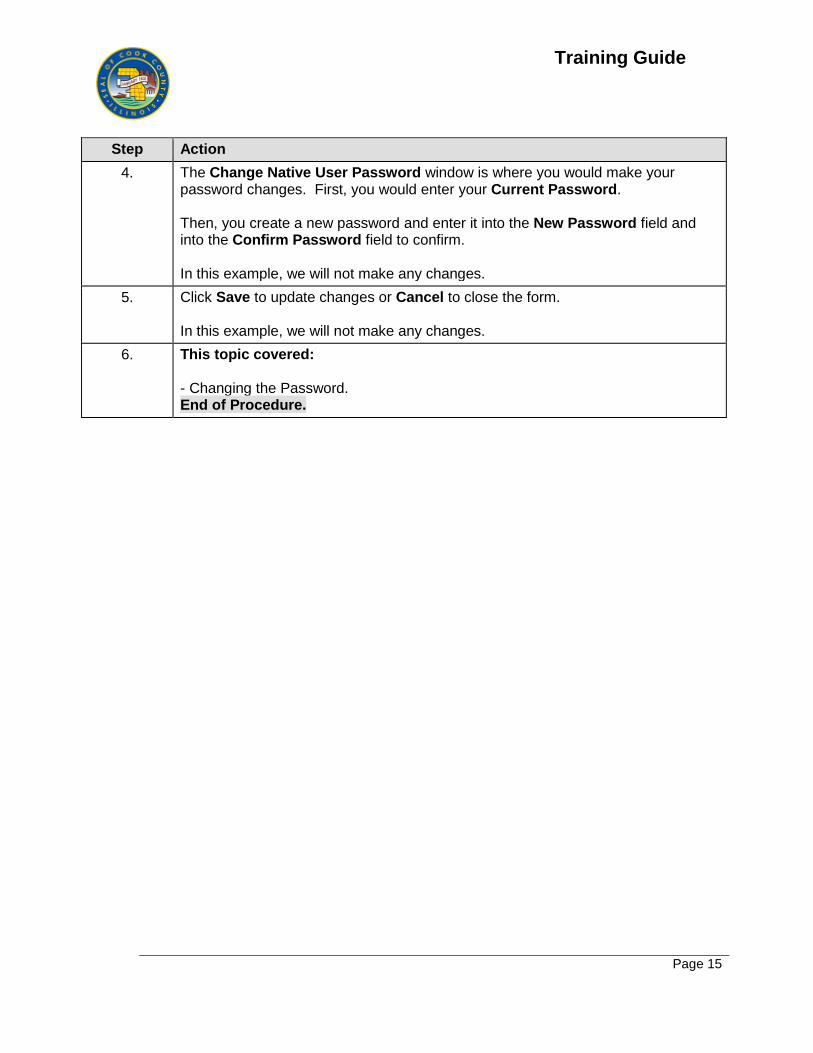
4. The Change Native User Password window is where you would make your password changes. First, you would enter your Current Password. Then, you create a new password and enter it into the New Password field and into the Confirm Password field to confirm. In this example, we will not make any changes.
5. Click Save to update changes or Cancel to close the form. In this example, we will not make any changes.
6. This topic covered: - Changing the Password. End of Procedure.

Training Guide
Page 16
Setting General Preferences
Learning Objective: You can set preferences that change the general appearance of your Workspace user interface. For example, you can display the path for documents that you open in Workspace, and you can change the default start page. You can also set the preferences that define your default Explore folders.
Upon completion of this topic you will be able to:
Set User Preferences
This topic will cover: - Setting general preferences Estimated time to complete this topic: 3 minutes
Step Action
1. Begin by navigating from the Home page. Click the File menu.
2. Click the Preferences... list item.
Training Guide
Page 17
Step Action
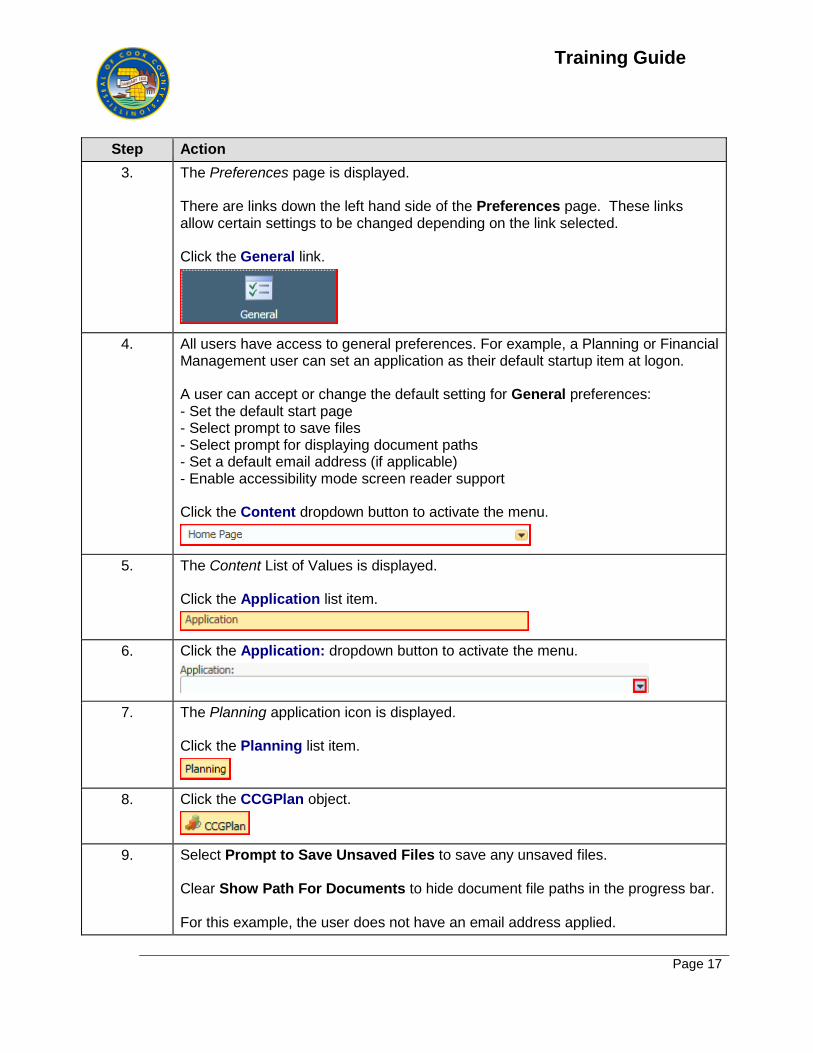
3. The Preferences page is displayed. There are links down the left hand side of the Preferences page. These links allow certain settings to be changed depending on the link selected. Click the General link.
4. All users have access to general preferences. For example, a Planning or Financial Management user can set an application as their default startup item at logon. A user can accept or change the default setting for General preferences: - Set the default start page - Select prompt to save files - Select prompt for displaying document paths - Set a default email address (if applicable) - Enable accessibility mode screen reader support Click the Content dropdown button to activate the menu.
5. The Content List of Values is displayed. Click the Application list item.
6. Click the Application: dropdown button to activate the menu.
7. The Planning application icon is displayed. Click the Planning list item.
8. Click the CCGPlan object.
9. Select Prompt to Save Unsaved Files to save any unsaved files. Clear Show Path For Documents to hide document file paths in the progress bar. For this example, the user does not have an email address applied.

Training Guide
Page 18
Step Action
10. Click the Explore link.
11. The Explore preferences page is displayed. Explore preferences define default folders and default permissions for items that you create or import. You can specify default permissions for specific users, groups, or roles. If you do not set these preferences, the Default folder and New Document folder are set to the top-most, or root folder and permissions for items are set to Empty.
12. Your default folder is shown when you use Explore. Set it to the folder you access most frequently. Click the Select... button.
13. The Select folder page is displayed. Double-click the Root tree item.
14. Double-click the CCG tree item.
15. Double-click the CAFR tree item.
16. Select the BATCH tree item.
17. Click the OK button.
18. A new default folder is displayed. Click the OK button.
Training Guide
Page 19
Step Action
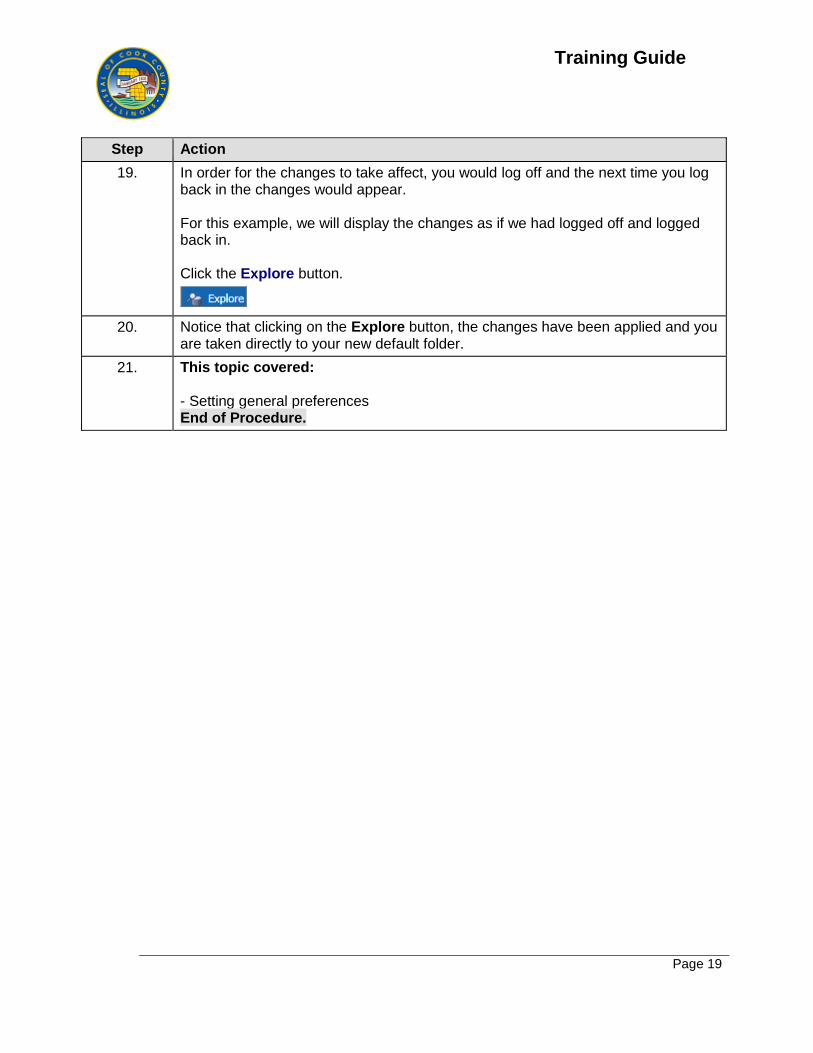
19. In order for the changes to take affect, you would log off and the next time you log back in the changes would appear. For this example, we will display the changes as if we had logged off and logged back in. Click the Explore button.
20. Notice that clicking on the Explore button, the changes have been applied and you are taken directly to your new default folder.
21. This topic covered: - Setting general preferences End of Procedure.
Training Guide
Page 20
Setting Preferences for an Application
Learning Objective: You can set preferences that change the appearance of your application. You can also set the preferences that reset your default items.
Upon completion of this topic you will be able to:
Set Preferences for an Application
This topic will cover: - Setting preferences for an application Estimated time to complete this topic: 2 minutes
Step Action
1. To begin setting preferences for an application, first select the application. Click the Navigate menu.
2. Click the Applications list item.
Training Guide
Page 21
Step Action
3. Click the Planning list item.
4. Click the CCGPlan link.
5. The CCGPlan page is displayed. Click the File menu.
6. Click the Preferences list item.
7. The Preferences page is displayed. To set preferences for the Planning application, click the Planning object.
8. In the Preferences page, use the Application Settings tab to set preferences: - Set up email for approvals and job notifications. - Select a set of alias names for displaying dimension and member names. - Set approvals options and out of office settings. Note: To reset an option to the value set by an administrator, select Use Application Default.
9. Click the Display Options tab.
Training Guide
Page 22
Step Action
10. The Display Options tab is displayed. Use the Display Options tab to: - Specify the number formatting of grid rows and columns. - Change how numbers are displayed in forms. - Set aspects of page display. - Control the display of consolidation operators. - Open part of a form. - Set how many members to display on each page of the Dimensions page. - Set how many users and groups display on each page. - Enlarge the screen text size. - Set the display of dates.
11. Click the Printing Options tab.
12. The Printing Options tab is displayed. The form designer sets forms' printing options. You can accept the default settings or set your own options for creating PDF files. To print to PDF, you must have Adobe Acrobat Reader installed on your computer. You set printing options directly from the form when you are ready to print. Or, you can use Preferences to set printing options, which apply to all forms to which you have access permissions. Note: To reset an option to the value your administrator set, select Use Application Default.
13. Click the User Variable Options tab.
14. The User Variable Options tab is displayed. - Administrators set up user variables, which help you navigate large forms. - User variables filter the members displayed on forms, letting you focus on those members you are interested. - You can limit the number of rows displayed on the form by selecting a member for the Department user variable. Later, you can select another value for Department. - You can set variables in preferences or directly in forms.
Training Guide
Page 23
Step Action
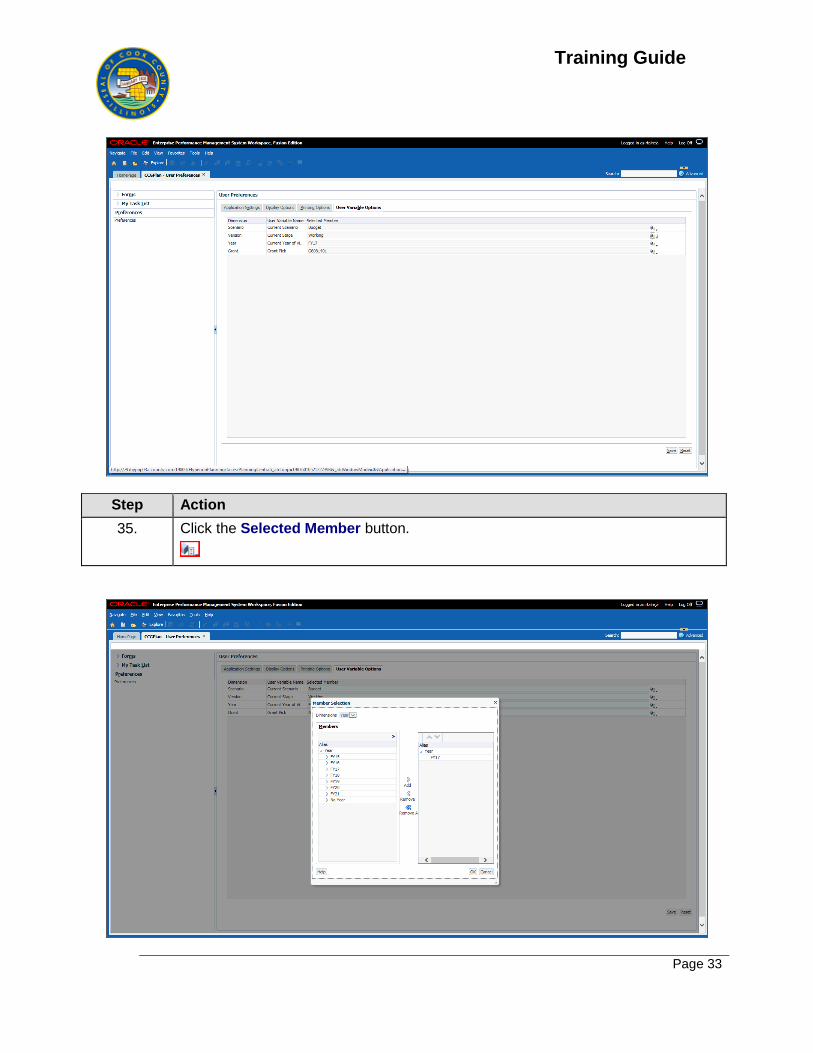
15. Clicking on any Dimension allows you to make changes to the Selected Member. Click the Scenario Member Selector icon to make changes.
16. The Member Selection page is displayed. Use the Member Selection dialog box to select members and other information for Planning features. You can make changes to each of the dimensions in the Member Selection page using the same steps.
17. This topic covered: - Setting preferences for an application End of Procedure.

Training Guide
Page 24
Setting Preferences for the Application
Learning Objective: You can set preferences that change the appearance of the application. You can also set the preferences that reset your default items.
Upon completion of this topic you will be able to:
Set Preferences for the Application
This topic will cover: - Setting preferences for the application Estimated time to complete this topic: 5 minutes
Step Action
1. The HomePage is displayed. To setup preferences for the application, click the CCGPlan link in your Quick Links section or access the application from the Navigate menu.
Training Guide
Page 25
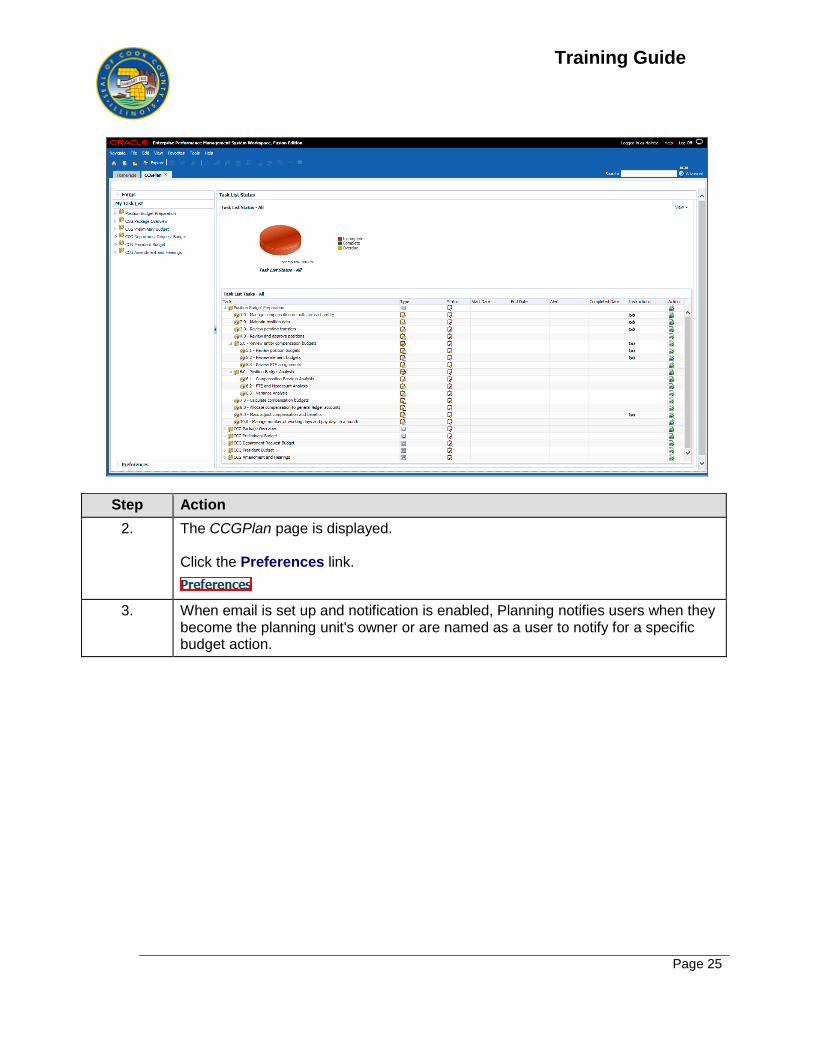
Step Action
2. The CCGPlan page is displayed. Click the Preferences link.
3. When email is set up and notification is enabled, Planning notifies users when they become the planning unit's owner or are named as a user to notify for a specific budget action.

Training Guide
Page 26
Step Action
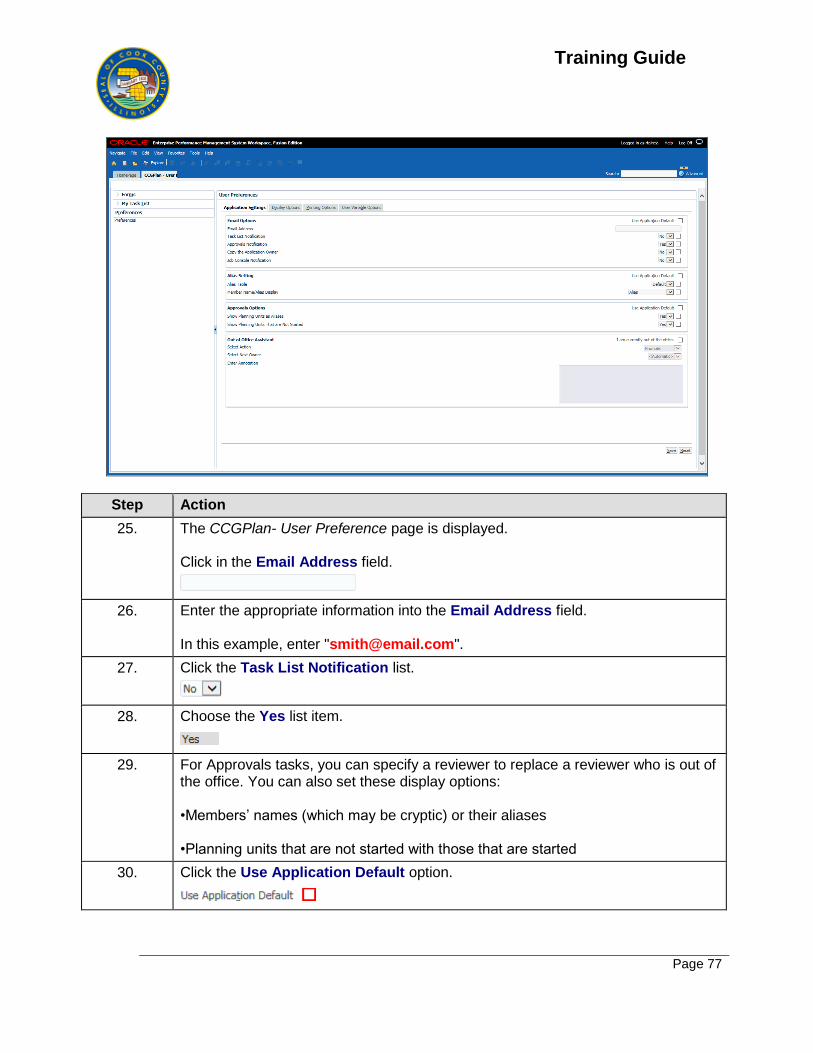
4. The CCGPlan- User Preference page is displayed. Click in the Email Address field.
5. Enter the appropriate information into the Email Address field. In this example, enter "[email protected]".
6. Click the Task List Notification list.
7. Choose the Yes list item.
8. For Approvals tasks, you can specify a reviewer to replace a reviewer who is out of the office. You can also set these display options: •Members’ names (which may be cryptic) or their aliases •Planning units that are not started with those that are started
9. Click the Use Application Default option.
Training Guide
Page 27
Step Action
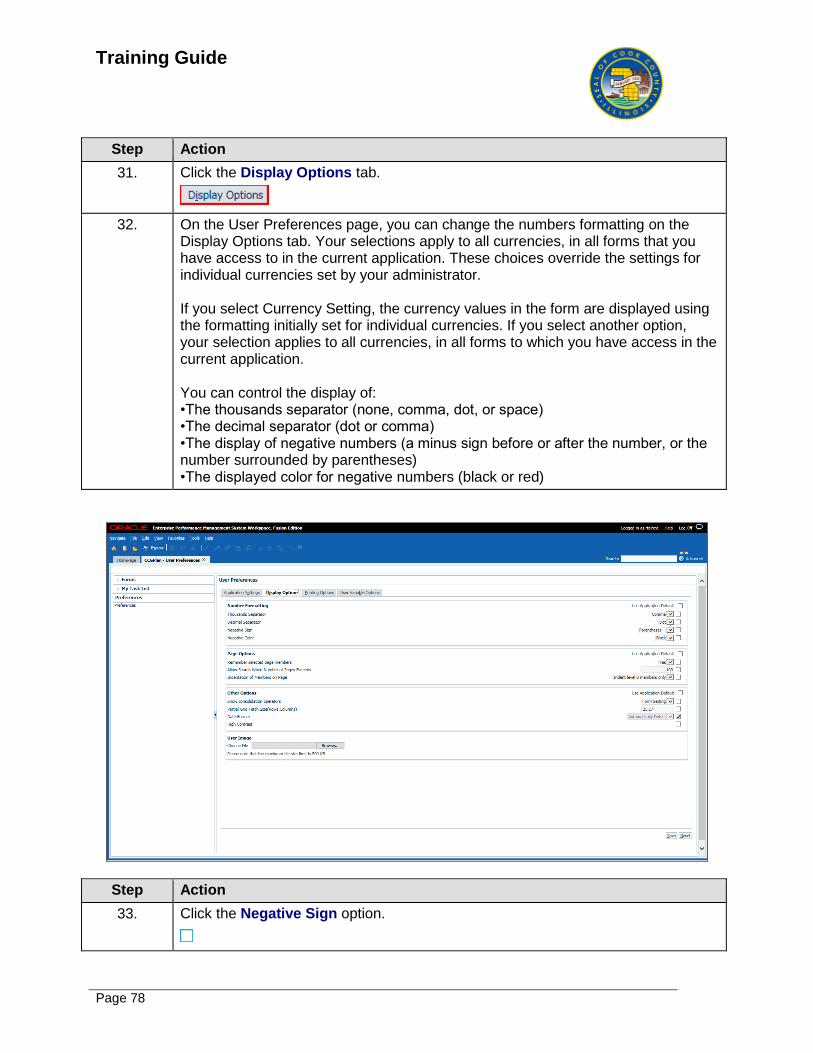
10. Click the Display Options tab.
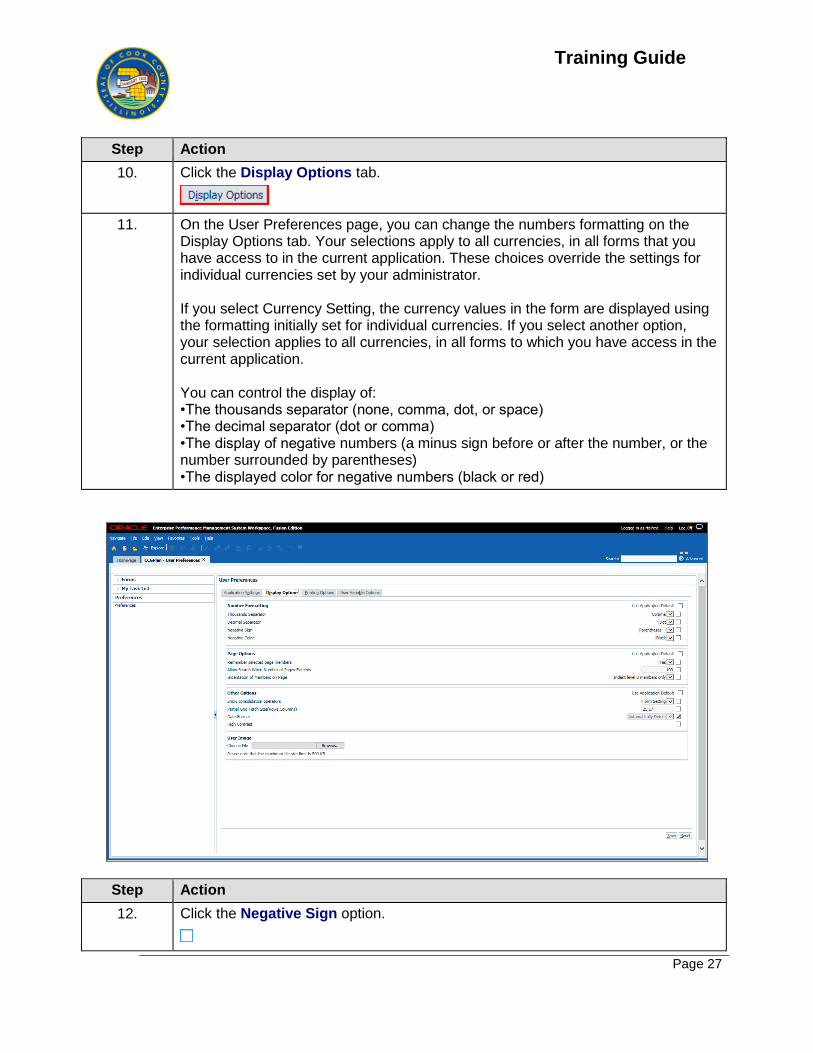
11. On the User Preferences page, you can change the numbers formatting on the Display Options tab. Your selections apply to all currencies, in all forms that you have access to in the current application. These choices override the settings for individual currencies set by your administrator. If you select Currency Setting, the currency values in the form are displayed using the formatting initially set for individual currencies. If you select another option, your selection applies to all currencies, in all forms to which you have access in the current application. You can control the display of: •The thousands separator (none, comma, dot, or space) •The decimal separator (dot or comma) •The display of negative numbers (a minus sign before or after the number, or the number surrounded by parentheses) •The displayed color for negative numbers (black or red)
Step Action
12. Click the Negative Sign option.
Training Guide
Page 28
Step Action
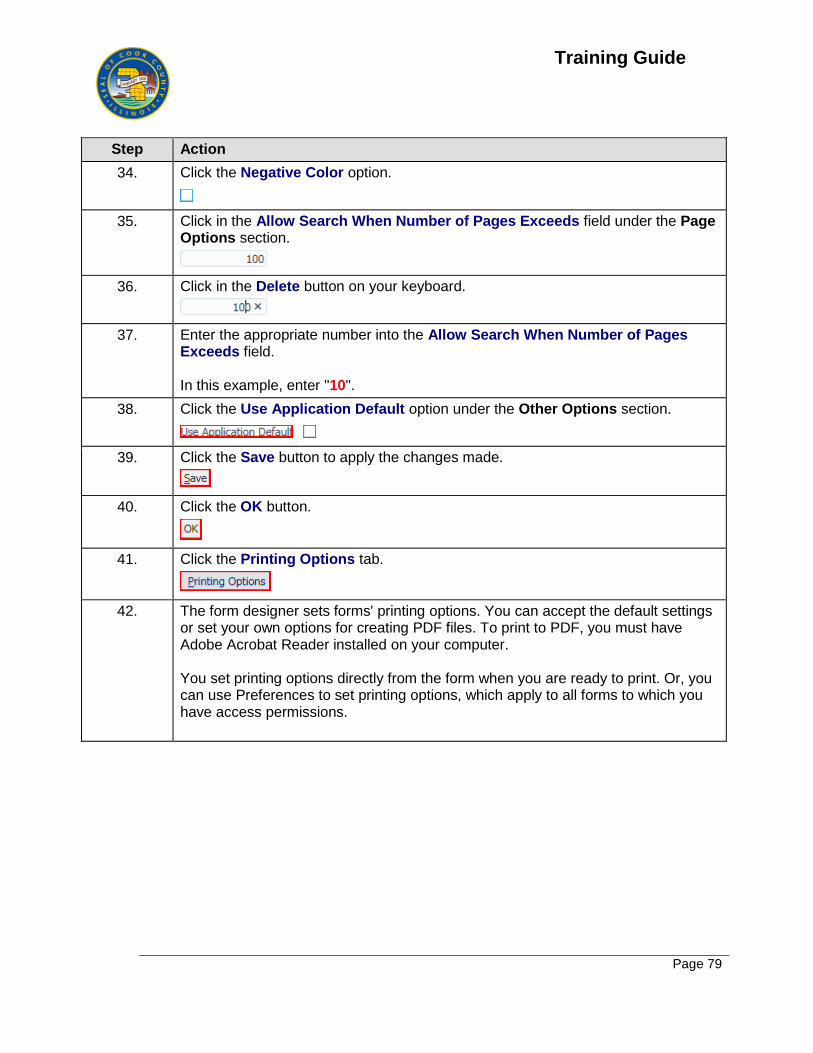
13. Click the Negative Color option.
14. Click in the Allow Search When Number of Pages Exceeds field under the Page Options section.
15. Click in the Delete button on your keyboard.
16. Enter the appropriate number into the Allow Search When Number of Pages Exceeds field. In this example, enter "10".
17. Click the Use Application Default option under the Other Options section.
18. Click the Save button to apply the changes made.
19. Click the OK button.
20. Click the Printing Options tab.
21. The form designer sets forms' printing options. You can accept the default settings or set your own options for creating PDF files. To print to PDF, you must have Adobe Acrobat Reader installed on your computer. You set printing options directly from the form when you are ready to print. Or, you can use Preferences to set printing options, which apply to all forms to which you have access permissions.
Training Guide
Page 29
Step Action
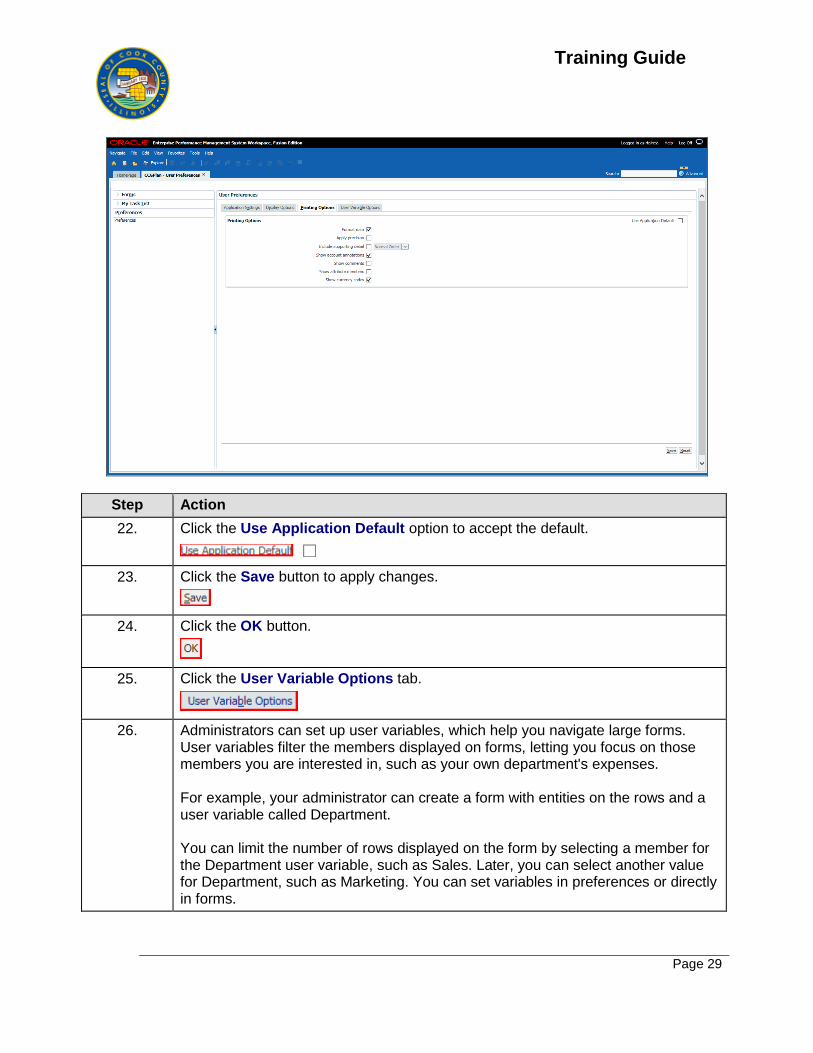
22. Click the Use Application Default option to accept the default.
23. Click the Save button to apply changes.
24. Click the OK button.
25. Click the User Variable Options tab.
26. Administrators can set up user variables, which help you navigate large forms. User variables filter the members displayed on forms, letting you focus on those members you are interested in, such as your own department's expenses. For example, your administrator can create a form with entities on the rows and a user variable called Department. You can limit the number of rows displayed on the form by selecting a member for the Department user variable, such as Sales. Later, you can select another value for Department, such as Marketing. You can set variables in preferences or directly in forms.

Training Guide
Page 30
Step Action
27. Click the Selected Member button.

Training Guide
Page 31
Step Action
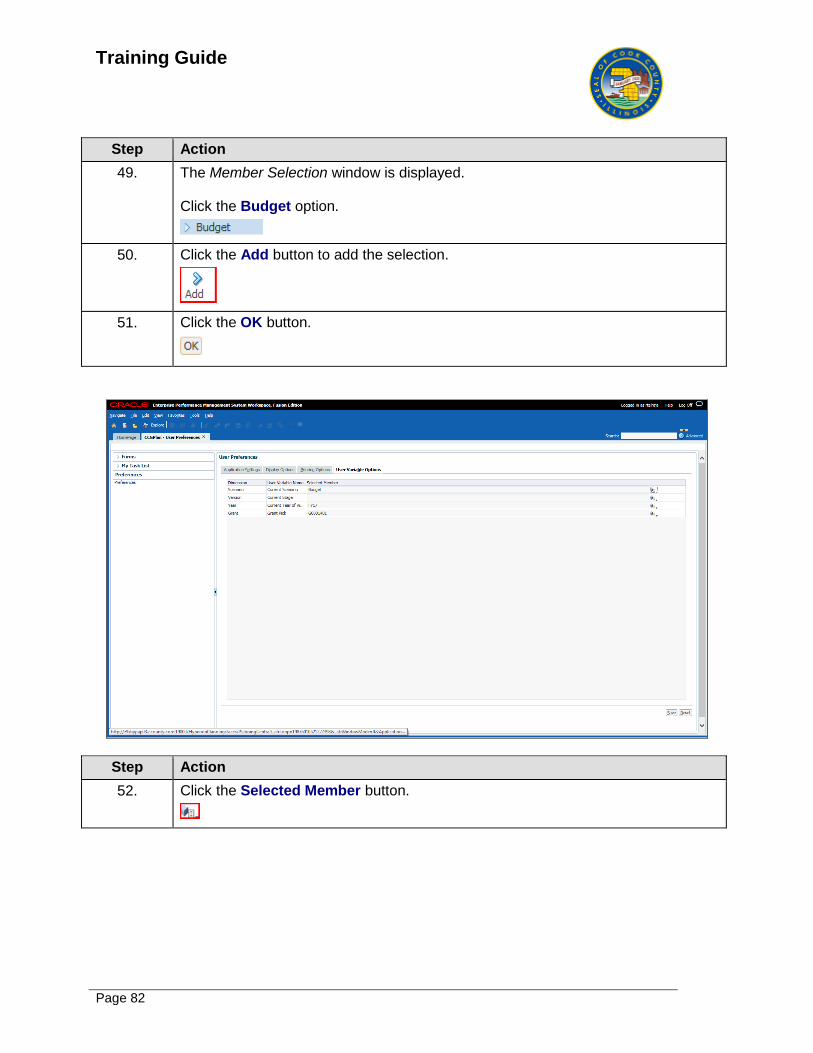
28. The Member Selection window is displayed. Click the Budget option.
29. Click the Add button to add the selection.
30. Click the OK button.
Step Action
31. Click the Selected Member button.

Training Guide
Page 32
Step Action
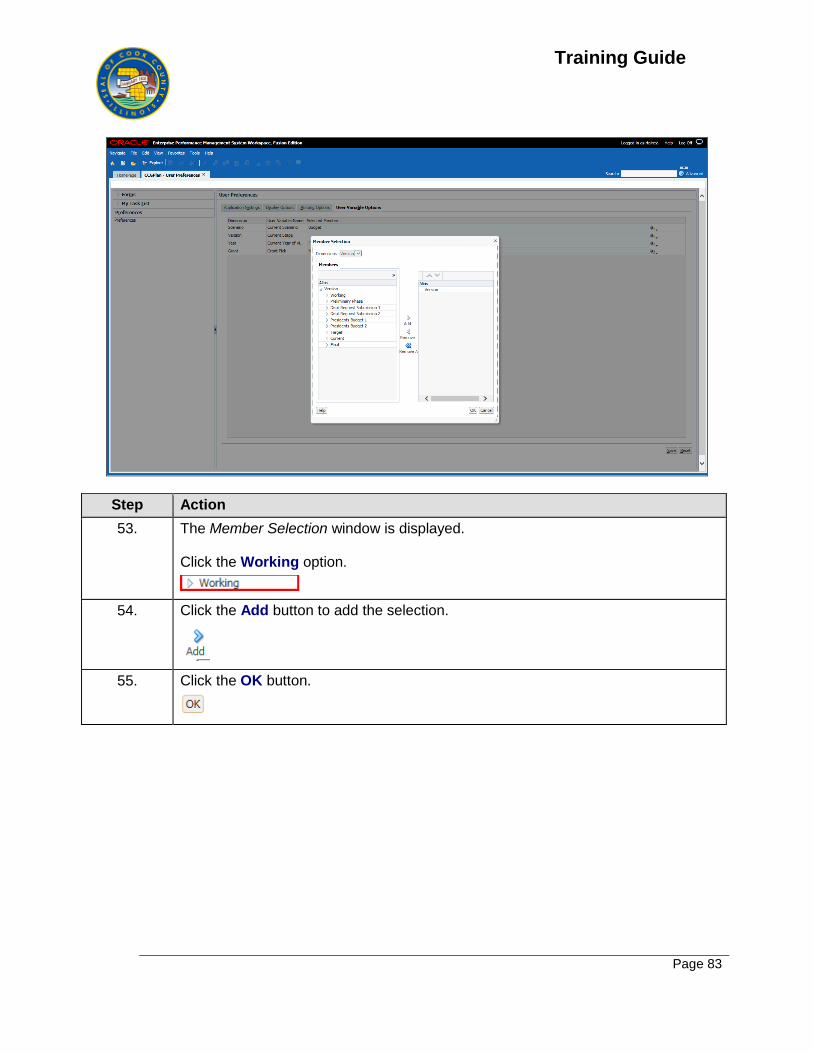
32. The Member Selection window is displayed. Click the Working option.
33. Click the Add button to add the selection.
34. Click the OK button.
Training Guide
Page 33
Step Action
35. Click the Selected Member button.
Training Guide
Page 34
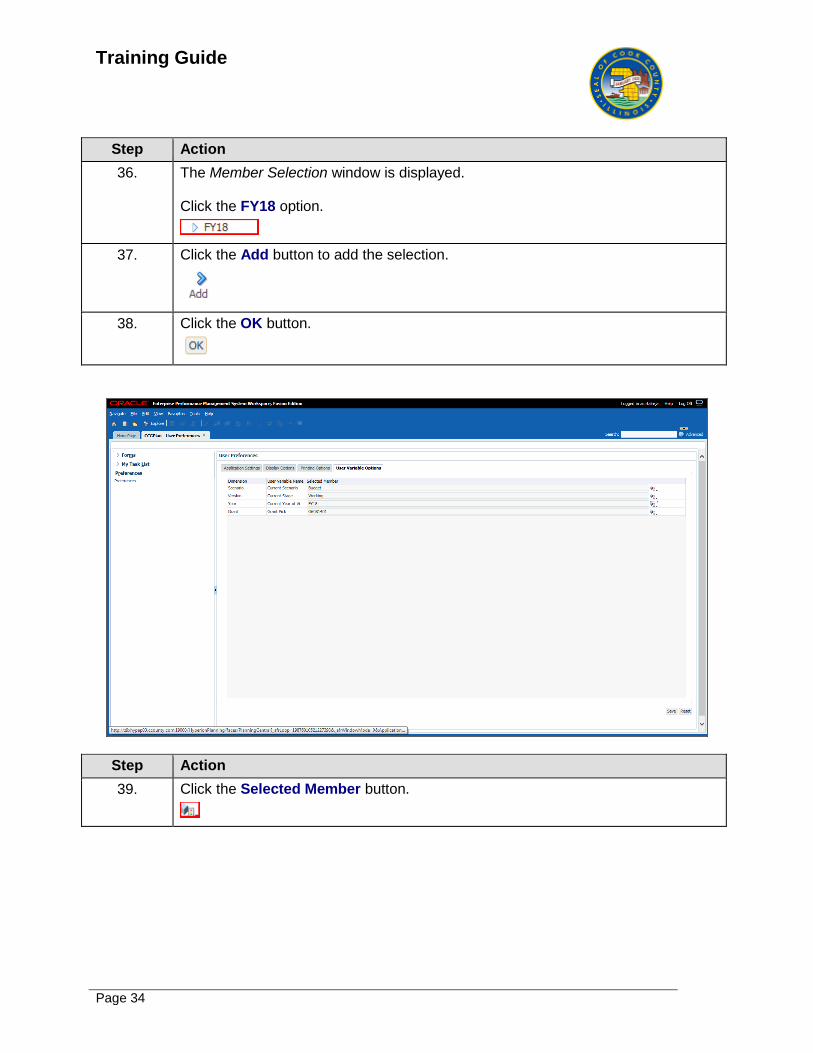
Step Action
36. The Member Selection window is displayed. Click the FY18 option.
37. Click the Add button to add the selection.
38. Click the OK button.
Step Action
39. Click the Selected Member button.
Training Guide
Page 35
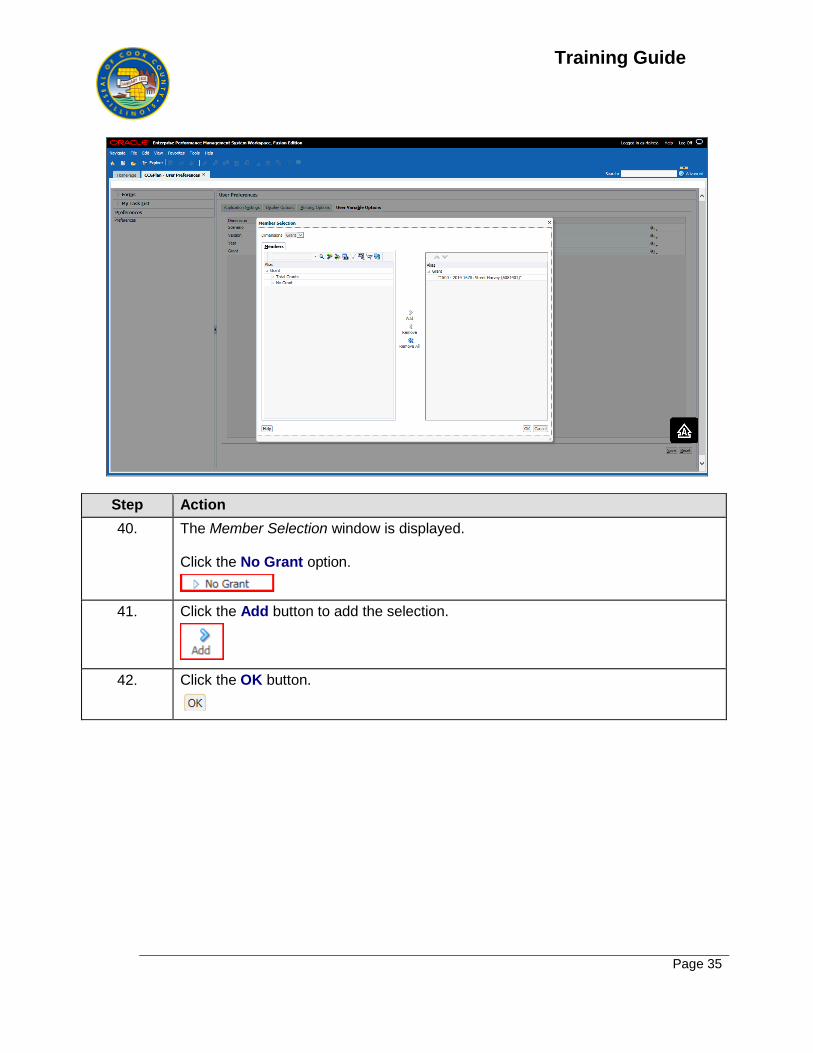
Step Action
40. The Member Selection window is displayed. Click the No Grant option.
41. Click the Add button to add the selection.
42. Click the OK button.
Training Guide
Page 36
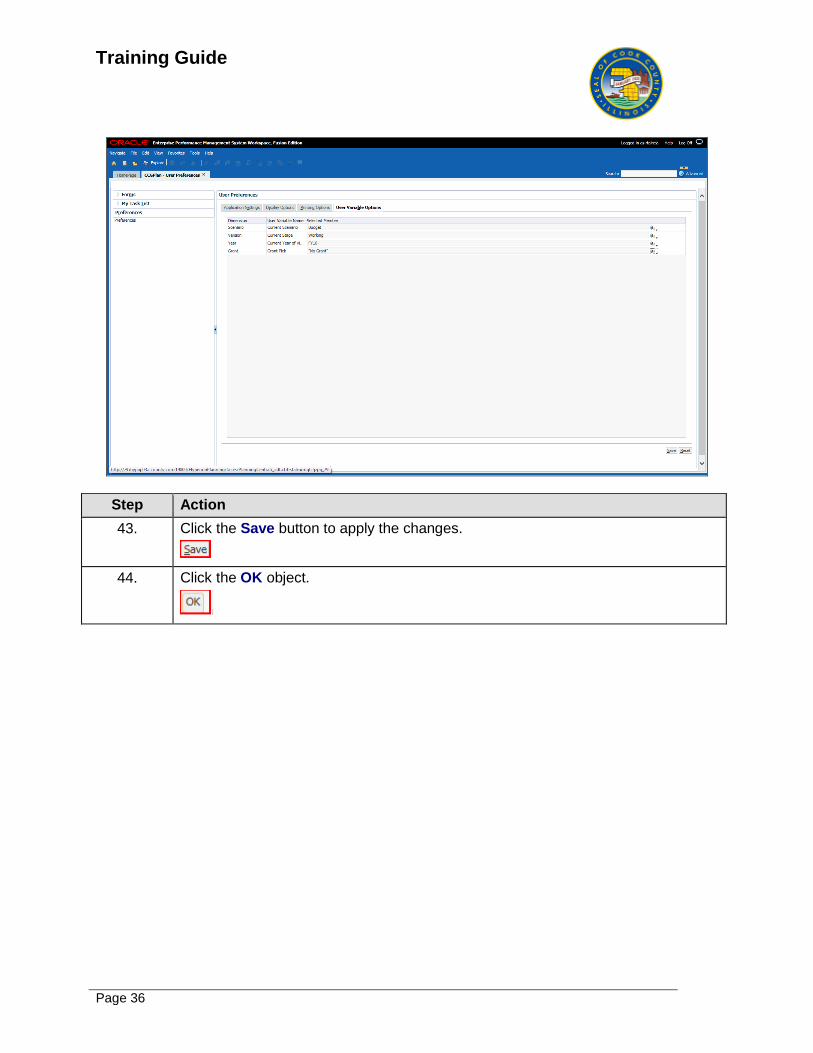
Step Action
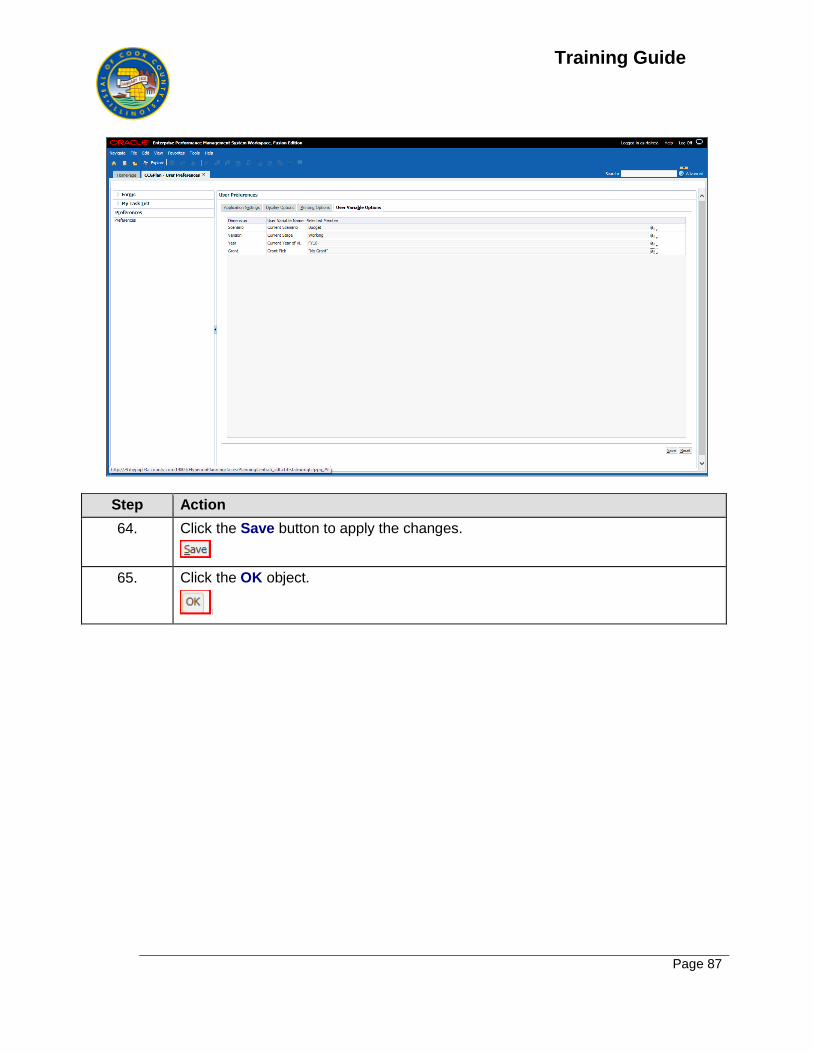
43. Click the Save button to apply the changes.
44. Click the OK object.

Training Guide
Page 37
Step Action
45. Click the Close button to close the user preferences window.
46. This topic covered: - Setting preferences for the application End of Procedure.

Training Guide
Page 38
Setting Preference - User Point of View
Learning Objective: You can set the user point of view by accessing the financial reporting preferences. By setting this preference, you define how the user views reports.
Upon completion of this topic you will be able to:
Set Preferences for User Point of View
This topic will cover: - Setting Preferences - User Point of View Estimated time to complete this topic: 1 minute
Step Action
1. Begin by navigating from the Home page. Click the File menu.
2. Click the Preferences... list item.

Training Guide
Page 39
Step Action
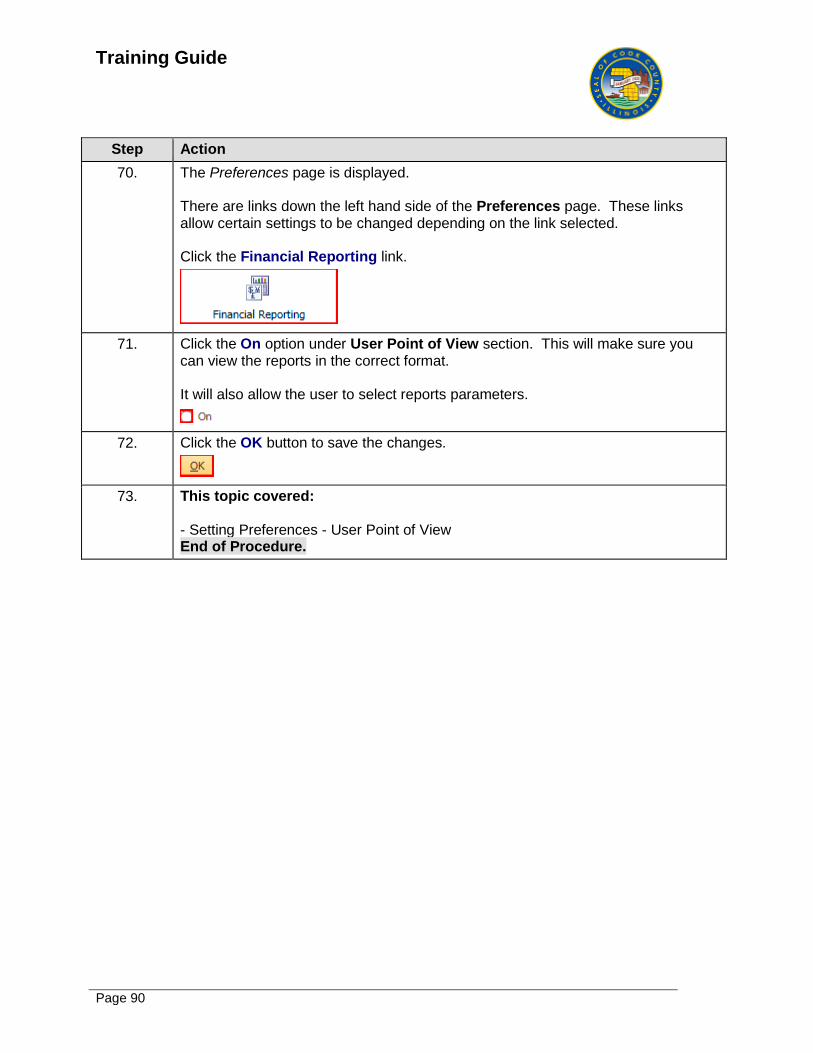
3. The Preferences page is displayed. There are links down the left hand side of the Preferences page. These links allow certain settings to be changed depending on the link selected. Click the Financial Reporting link.
4. Click the On option under User Point of View section. This will make sure you can view the reports in the correct format. It will also allow the user to select reports parameters.
5. Click the OK button to save the changes.
6. This topic covered: - Setting Preferences - User Point of View End of Procedure.
Training Guide
Page 40
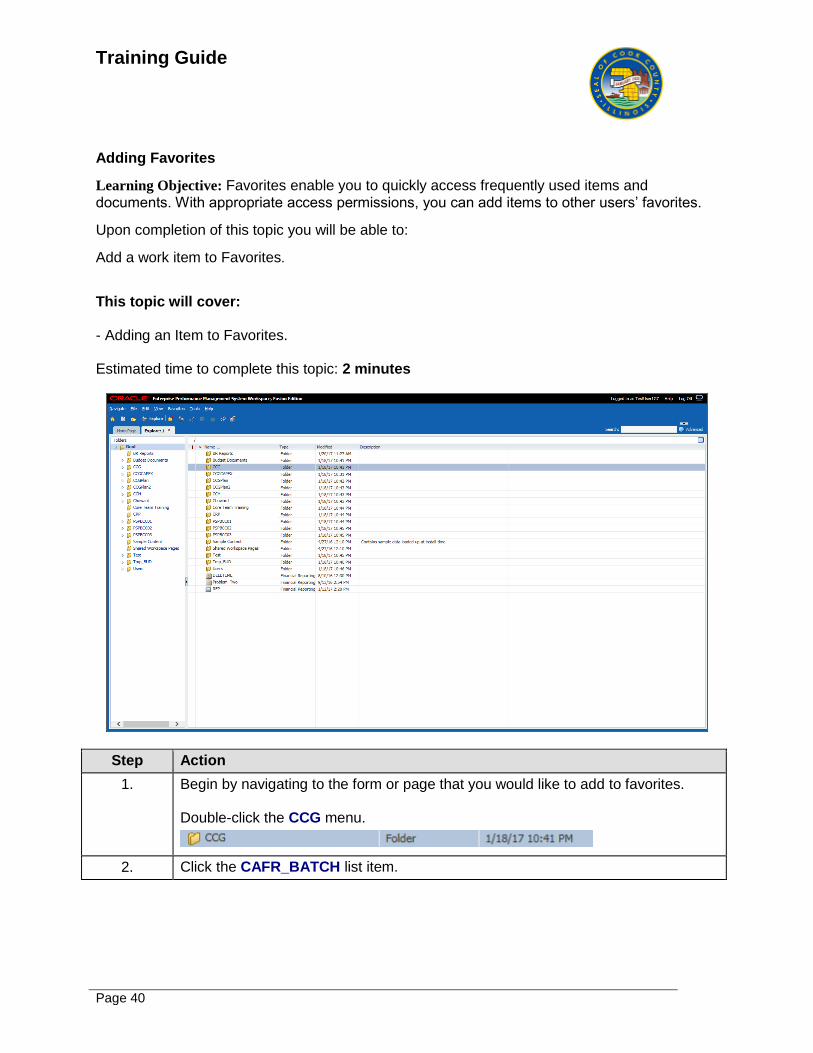
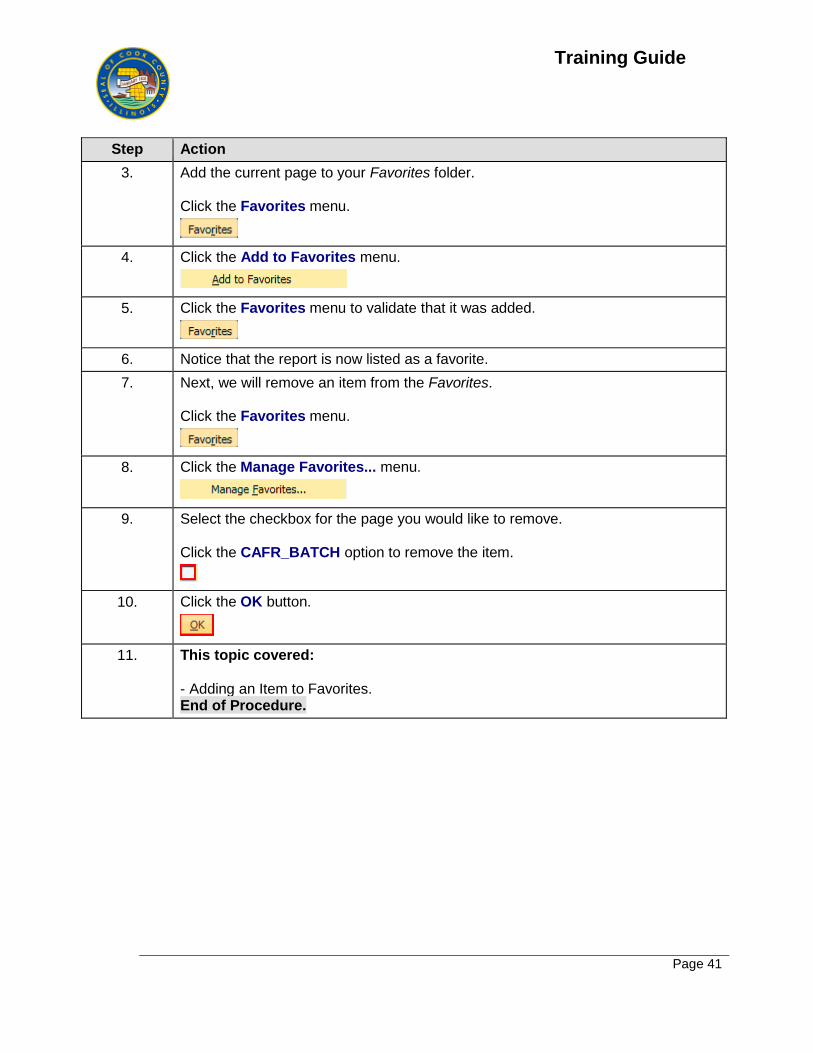
Adding Favorites
Learning Objective: Favorites enable you to quickly access frequently used items and documents. With appropriate access permissions, you can add items to other users’ favorites.
Upon completion of this topic you will be able to:
Add a work item to Favorites.
This topic will cover: - Adding an Item to Favorites. Estimated time to complete this topic: 2 minutes
Step Action
1. Begin by navigating to the form or page that you would like to add to favorites. Double-click the CCG menu.
2. Click the CAFR_BATCH list item.
Training Guide
Page 41
Step Action
3. Add the current page to your Favorites folder. Click the Favorites menu.
4. Click the Add to Favorites menu.
5. Click the Favorites menu to validate that it was added.
6. Notice that the report is now listed as a favorite.
7. Next, we will remove an item from the Favorites. Click the Favorites menu.
8. Click the Manage Favorites... menu.
9. Select the checkbox for the page you would like to remove. Click the CAFR_BATCH option to remove the item.
10. Click the OK button.
11. This topic covered: - Adding an Item to Favorites. End of Procedure.
Training Guide
Page 42
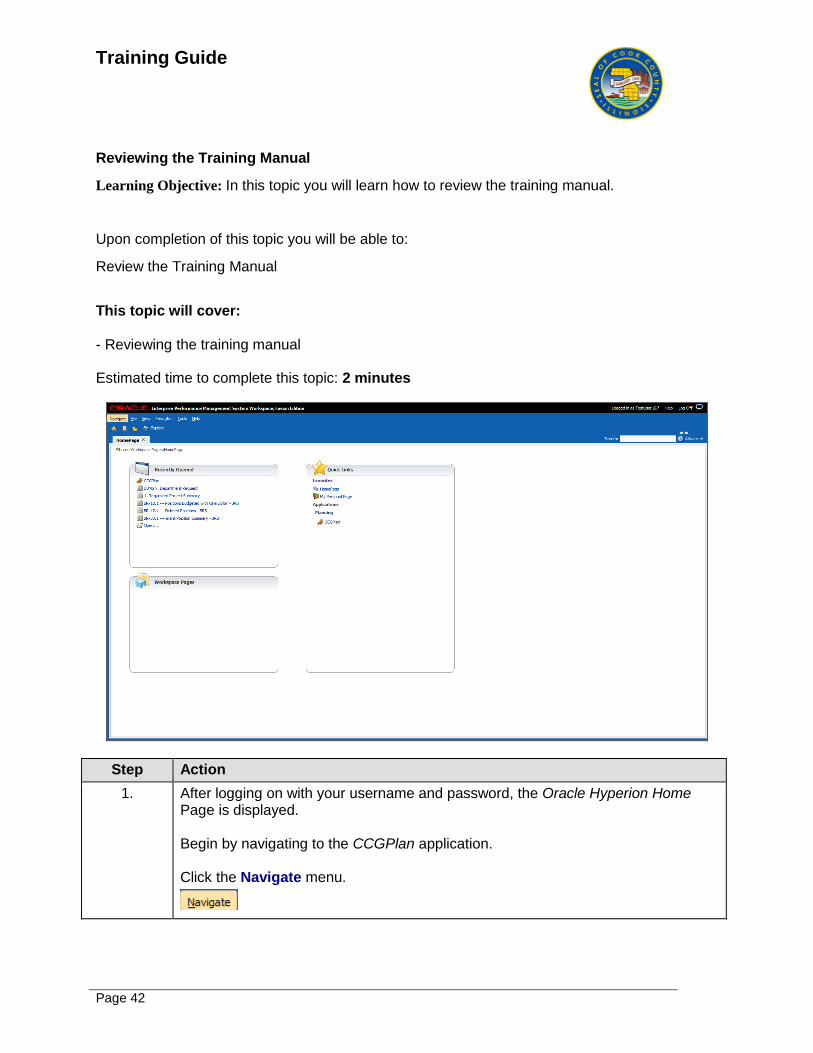
Reviewing the Training Manual
Learning Objective: In this topic you will learn how to review the training manual.
Upon completion of this topic you will be able to:
Review the Training Manual
This topic will cover: - Reviewing the training manual Estimated time to complete this topic: 2 minutes
Step Action
1. After logging on with your username and password, the Oracle Hyperion Home Page is displayed. Begin by navigating to the CCGPlan application. Click the Navigate menu.
Training Guide
Page 43
Step Action
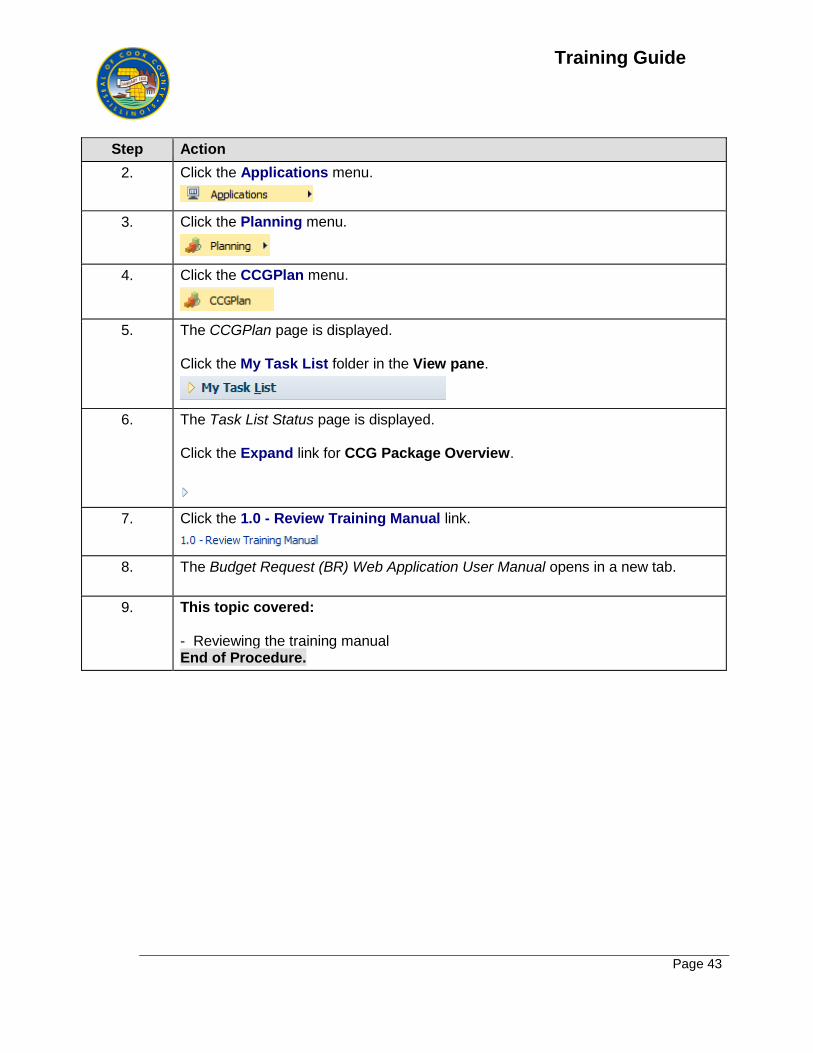
2. Click the Applications menu.
3. Click the Planning menu.
4. Click the CCGPlan menu.
5. The CCGPlan page is displayed. Click the My Task List folder in the View pane.
6. The Task List Status page is displayed. Click the Expand link for CCG Package Overview.
7. Click the 1.0 - Review Training Manual link.
8. The Budget Request (BR) Web Application User Manual opens in a new tab.
9. This topic covered: - Reviewing the training manual End of Procedure.

Training Guide
Page 44
Reviewing the "What's New" document
Learning Objective: In this topic you will learn how to review the "What's New" budget document.
Upon completion of this topic you will be able to:
Review the "What's New" budget document
This topic will cover: - Reviewing the "What's New" document Estimated time to complete this topic: 2 minutes
Step Action
1. After logging on with your username and password, the Oracle Hyperion Home Page is displayed. Begin by navigating to the CCGPlan application. Click the Navigate menu.

Training Guide
Page 45
Step Action
2. Click the Applications menu.
3. Click the Planning menu.
4. Click the CCGPlan menu.
Step Action
5. The CCGPlan page is displayed. Click the My Task List menu.

Training Guide
Page 46
Step Action
6. The CCGPlan page is displayed. Under the My Task List menu, click the Expand button for CCG Package Overview.
7. Click the 2.0 - What's New task link.

Training Guide
Page 47
Step Action
8. The 2018 Budget Memo from Tanya Anthony is displayed. You can page down to see the entire 6 page letter. Press [Page Down].
9. You are now at the end of the letter.
10. This topic covered: - Reviewing the "What's New" document End of Procedure.

Training Guide
Page 48
Logging Out
Learning Objective: In this topic you will learn how to Log Out of the Application.
Upon completion of this topic you will be able to:
Log Out of the Application.
This topic will cover: - Logging out of Workspace Estimated time to complete this topic: 1 minute
Step Action
1. In the system, there are two ways to Log Off. In this example, we will review them both.

Training Guide
Page 49
Step Action
2. In the first example, use the Menu bar to access the Log Out link. Click the File menu.
3. You can select Log Off from the drop-down. In this example, we will log off using the other method.
Step Action
4. In the far right corner of the page, you will notice your log in name and a Log Off link. From here, you can log off as well. Click the Log Off link.

Training Guide
Page 50
Step Action
5. A Confirmation window displays. The system will prompt you to confirm. Click the Yes button.
6. This topic covered: - Logging out of Workspace End of Procedure.

Training Guide
Page 51
Navigating in Planning
Learning Objective: In this section, you will learn how Planning provides several tools for working with data forms and tasks:
- Planning menus
- Planning toolbar
- View Pane
- Content area
Upon completion of this lesson, you will be able to:
- Review menus
- Select Advanced and Basic modes
- Navigate the Task List
- Review the View Pane and content area
- Open data forms
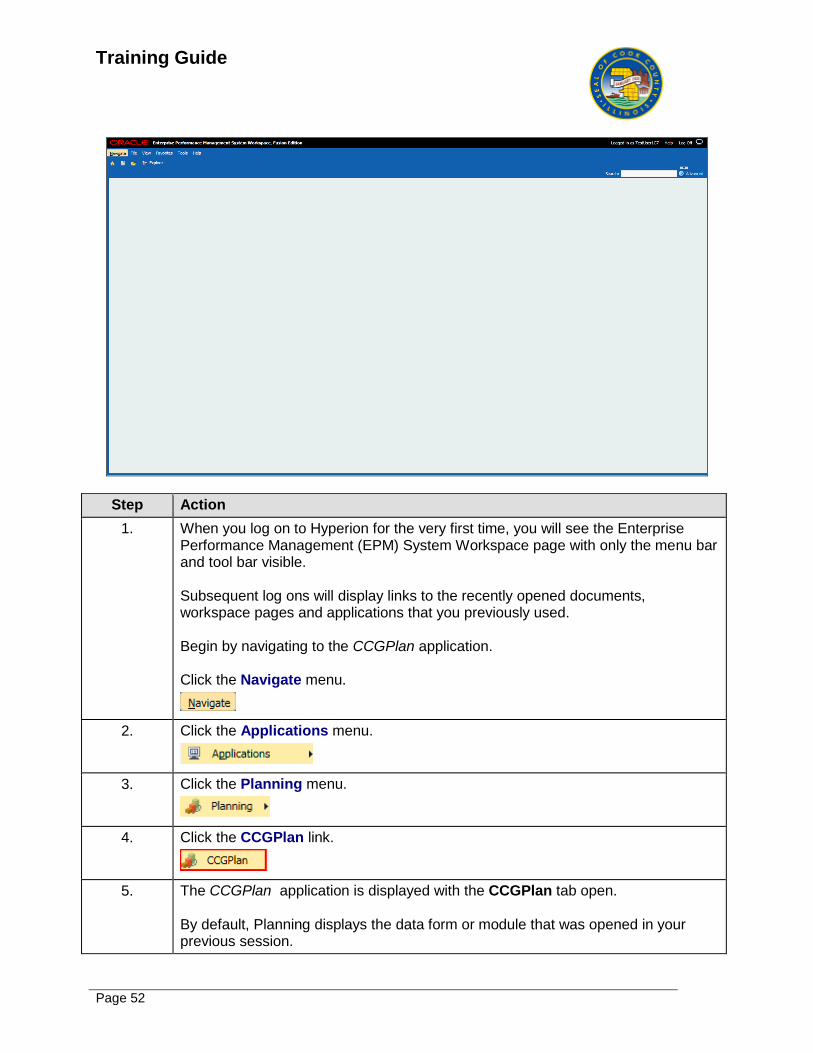
Opening Planning Applications
Learning Objective: In this topic you will learn about how to open Planning Applications.
Upon completion of this topic you will be able to:
Launch Planning Applications.
This topic will cover: - Opening Planning Applications Estimated time to complete this topic: 1 minute
Training Guide
Page 52
Step Action
1. When you log on to Hyperion for the very first time, you will see the Enterprise Performance Management (EPM) System Workspace page with only the menu bar and tool bar visible. Subsequent log ons will display links to the recently opened documents, workspace pages and applications that you previously used. Begin by navigating to the CCGPlan application. Click the Navigate menu.
2. Click the Applications menu.
3. Click the Planning menu.
4. Click the CCGPlan link.
5. The CCGPlan application is displayed with the CCGPlan tab open. By default, Planning displays the data form or module that was opened in your previous session.

Training Guide
Page 53
Step Action
6. This topic covered: - Opening Planning Applications End of Procedure.

Training Guide
Page 54
Reviewing the View Pane and Content Area
Learning Objective: In this topic you will learn about the View Pane and Content Area.
Upon completion of this topic you will be able to:
Understand the View Pane and Content Area
This topic will cover: - Reviewing the View Pane and Content Area Estimated time to complete this topic: 2 minutes
Step Action
1. Begin by navigating to the CCGPlan application. Click the Navigate menu.
2. Click the Applications menu.
3. Click the Planning menu.

Training Guide
Page 55
Step Action
4. Click the CCGPlan link.
5. The CCGPlan tab is displayed. By default, Planning displays the data form or module that was opened in your previous session. The View Pane displays the Forms area which includes: - Form Folder - Forms in Forms - Manage Tasks Lists - My Task List - Preferences - Diagnostics
6. The Content Area displays the Forms and Ad Hoc Grid Management section. This section displays the contents of any items selected from the Forms, Task Lists and Preferences shown in the View Pane section.
7. Use the View Pane to select items, documents, or data forms from a list.
8. Use the Content Area to view a document or data form that you selected in the View Pane.

Training Guide
Page 56
Step Action
9. Drill down in the Form Folder tree menu by clicking the Expand button.
10. Click the Expand button before the Design Session forms.
11. Click the Test Forms link.
12. The View Pane displays the Form Folder with the contents of the subfolder, "Design Session" in alphabetical order.
13. The Content Area displays the data forms in the Test Forms folder. The tools and actions for the data forms are displayed in a tool bar above the Ad Hoc Grid.. Ad hoc grids reflect the root dimensional layout of the form from which they are created. However, users are not confined by the form definition and can completely change the data intersection and layout of ad hoc grids (assuming that they have access to the members). Notice the Access column for the forms in the ad hoc grid. Ad hoc users can open and personalize ad hoc grids but cannot save them.
14. This topic covered: - Reviewing the View Pane and Content Area End of Procedure.

Training Guide
Page 57
Opening Data Forms
Learning Objective: In this topic you will learn about data forms.
Upon completion of this topic you will be able to: Open Data Forms
This topic will cover: - Opening Data Forms Estimated time to complete this topic: 2 minutes
Step Action
1. Begin by navigating to the CCGPlan application. Click the Navigate menu.
2. Click the Applications menu.
3. Click the Planning menu.

Training Guide
Page 58
Step Action
4. Click the CCGPlan list item.
5. The CCGPlan tab opens. By default, Planning displays the data form or module that was opened in your previous session.
6. Use the View Pane to select items, documents, or data forms from a list.
Step Action
7. Expand the menu for the Forms folder. Click the Forms menu.
8. Tow folders are displayed. Click to expand the menu for Design Session.
Training Guide
Page 59
Step Action
9. Two forms items are displayed. Click the Test Forms link.
10. The Form and Ad Hoc Grid Management content area is displayed. Use the content area to view a document or data form that you selected in the View Pane.
11. Select the relevant form you would like to use. Click the FDMEE_Test object.
12. Click the Actions menu.
13. You can use the Actions menu to create or edit a simple or composite form.
14. Click the View menu.
15. Use the View menu to manage the Columns.
16. Use the Search tool to find forms within the repository. Tip: You can enter the start of a text pattern for the search and use a trailing asterisk as a wildcard symbol. For example, to find Test Combo - Grant, you can enter “test combo*” or “test*".
17. Click the Detach button.
18. The Detach option opens the table in a new and separated window.
19. This topic covered: - Opening Data Forms. End of Procedure.

Training Guide
Page 60
Reviewing Menus
Learning Objective: In this topic you will learn about the Hyperion menus.
Upon completion of this topic you will be able to:
Understand the Hyperion menus.
This topic will cover: - Reviewing menus Estimated time to complete this topic: 3 minutes
Step Action
1. You have access to only the menus that your user profile permits you to access. For example, users who are assigned the role of Administrator or Power User can access all functions on certain menus and users who are assigned the User role can access only some functions on the certain menus. Note: Menus and menu items my change depending on from where you access the menus. For instance, accessing Edit menu with the Home page or Explore page open, will present different menu items than when you are in the Planning application.
2. The menus that are displayed depend on the settings, access permissions and associated business rules, and where you are within the system. The menu bar for the Home page has the following options: - Navigate: Use the Navigate menu to access Applications, Workspace pages, and any Open items - File: Use the File menu to access documents, pages and preferences - View: The View menu allows you to view panes in open applications and to navigate between Workspace documents - Favorites: Favorites menu allows you to manage your favorites. - Tools: The Tools menu allows you to change your password and to launch other modules - Help: The Help menu allows you to access online Help.
Training Guide
Page 61
Step Action
3. Opening up applications will change some of the menu list items. In addition, additional menus may also open. Begin by navigating to the CCGPlan application. Click the Navigate menu.
4. Click the Applications menu.
5. Click the Planning menu.
6. Click the CCGPlan link.
7. The CCGPlan landing page is displayed. Notice that an additional menu, "Administration" is now displayed. Note: By default, Planning displays the data form or module that was opened in your previous session.
Training Guide
Page 62
Step Action
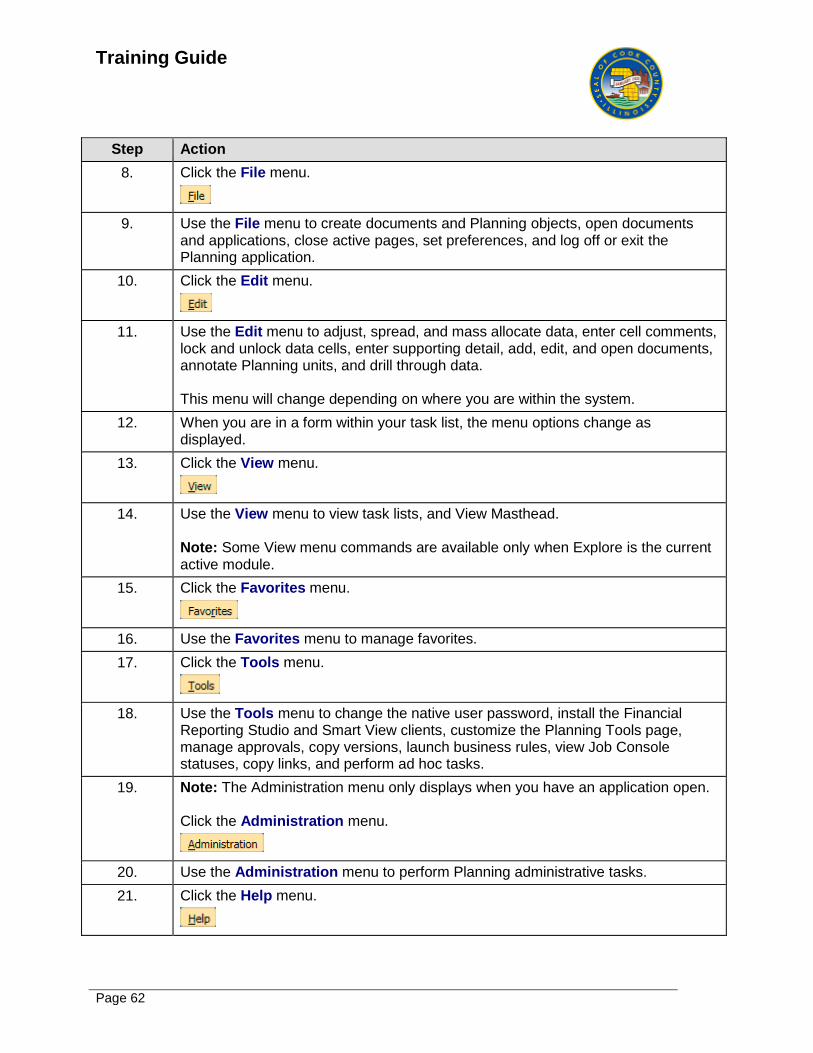
8. Click the File menu.
9. Use the File menu to create documents and Planning objects, open documents and applications, close active pages, set preferences, and log off or exit the Planning application.
10. Click the Edit menu.
11. Use the Edit menu to adjust, spread, and mass allocate data, enter cell comments, lock and unlock data cells, enter supporting detail, add, edit, and open documents, annotate Planning units, and drill through data. This menu will change depending on where you are within the system.
12. When you are in a form within your task list, the menu options change as displayed.
13. Click the View menu.
14. Use the View menu to view task lists, and View Masthead. Note: Some View menu commands are available only when Explore is the current active module.
15. Click the Favorites menu.
16. Use the Favorites menu to manage favorites.
17. Click the Tools menu.
18. Use the Tools menu to change the native user password, install the Financial Reporting Studio and Smart View clients, customize the Planning Tools page, manage approvals, copy versions, launch business rules, view Job Console statuses, copy links, and perform ad hoc tasks.
19. Note: The Administration menu only displays when you have an application open. Click the Administration menu.
20. Use the Administration menu to perform Planning administrative tasks.
21. Click the Help menu.

Training Guide
Page 63
Step Action
22. Use the Help menu to access help on the active page or document. Accessing Online Help is covered in a different topic.
23. This topic covered: - Reviewing menus. End of Procedure.
Training Guide
Page 64
Navigating the My Task List
Learning Objective: In this topic you will learn how to navigate the My Task List.
In Workspace, a task list contains items and tasks that you use frequently.
Upon completion of this topic you will be able to:
Navigate the My Task List
This topic will cover: - Navigating the My Task List Estimated time to complete this topic: 3 minutes
Step Action
1. Upon first login, the panes on the Hyperion landing page may appear full compared to this example. You will see CCGPlan as one of the applications in the Quick Links section. You may see a variation of Planning applications with a title of, "CCGPlan1". However,"CCGPlan" will be what you will need to access. As you begin working in the system, the Recently Opened pane will display those applications and tasks you worked on recently.

Training Guide
Page 65
Step Action
2. The menus that are displayed depend on the settings, access permissions and associated business rules, and where you are within the system. Begin by navigating to the CCGPlan application. Click the Navigate menu.
3. Click the Applications menu.
4. Click the Planning button.
5. Click the CCGPlan menu.
Training Guide
Page 66
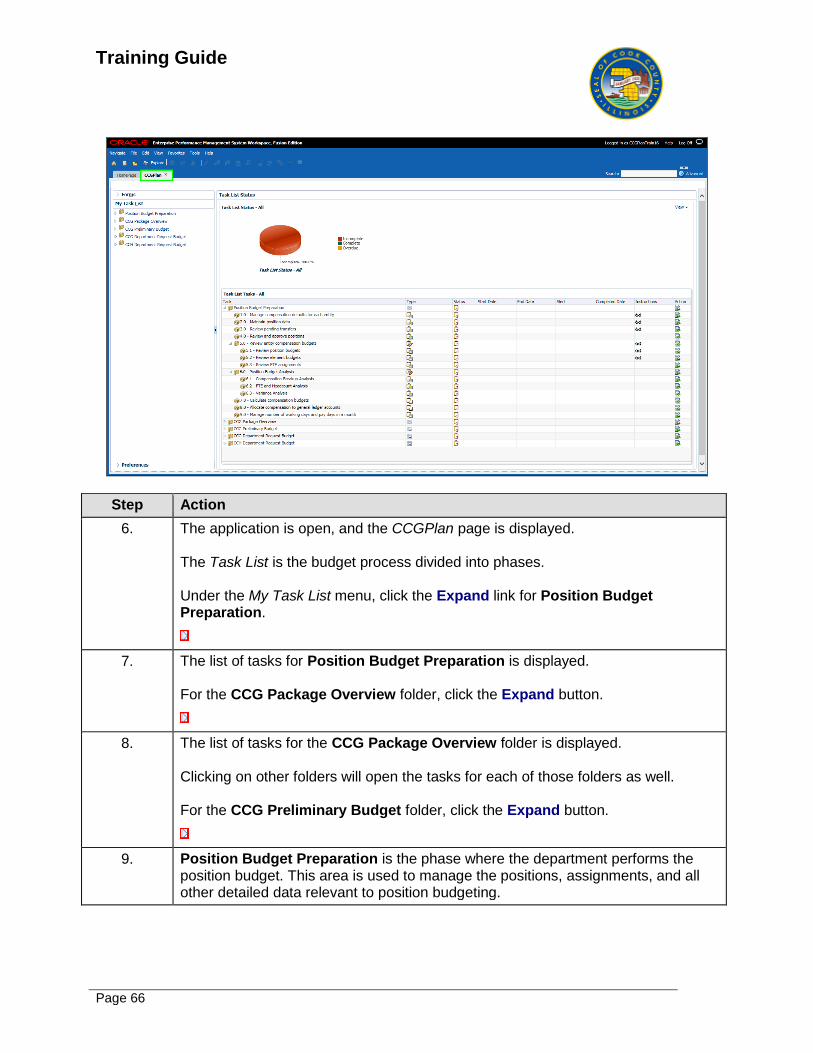
Step Action
6. The application is open, and the CCGPlan page is displayed. The Task List is the budget process divided into phases. Under the My Task List menu, click the Expand link for Position Budget Preparation.
7. The list of tasks for Position Budget Preparation is displayed. For the CCG Package Overview folder, click the Expand button.
8. The list of tasks for the CCG Package Overview folder is displayed. Clicking on other folders will open the tasks for each of those folders as well. For the CCG Preliminary Budget folder, click the Expand button.
9. Position Budget Preparation is the phase where the department performs the position budget. This area is used to manage the positions, assignments, and all other detailed data relevant to position budgeting.
Training Guide
Page 67
Step Action
10. CCG Package Review contains information used to communicate with the users. Training materials and news communications will be accessible in this section of the Task List.
11. CCG Preliminary Budget phase is a high level overview. It is a snapshot on the status for the current year. The Preliminary Forecast is then input into they system.
12. For the CCG Department Request Budget folder, click the Expand button.
13. CCG Department Request Budget contains a longer list of tasks relevant to Reviewing Targets, Grants, funds transfers, and overtime requests. The Departments will do an overview of the Preliminary Budget and complete department requests based off of that budget.
14. As you complete tasks within the Task List, you can mark them as completed to better track progress. This step is optional. The pie chart on the center of the page shows the status of all Task List items related to the selected section.
15. Next, we will run an example to display the changes in completed status in the pie chart. Click the 2.0 - Revenue link.

Training Guide
Page 68
Step Action
16. The Task - 2.0 - Revenue page is displayed. To the right of the Revenue tab is a Task Instructions tab. Click the Task Instructions tab.
17. The Task Instructions page is displayed. Task Instructions guide you in preparing budget data for a particular task. You will see this tab on the landing page of each task.
18. Click the Task - 2.0 - Revenue tab.
19. Once this task is done, in the lower right corner, click the Complete option.
20. The completed task will display a clipboard icon with a green checkmark..
21. Click the Next Incomplete button to move to the next incomplete task to be completed.
Training Guide
Page 69
Step Action
22. Clicking the Next Incomplete button will move you to the next incomplete task that needs to be completed. Clicking the Next button will move you to the next task (whether completed or not) in the Task List. Click the Next button.
23. The Task - 3.0 - Expense page is displayed. Click the Task List Home button to return to the Task List Status page.
24. The Task List Status page is displayed. From the Task List Status page, you can see updates, view instructions and take actions for any of the tasks within a section.
25. This topic covered: - Navigating the My Task List End of Procedure.
Training Guide
Page 70
Hyperion Capital Budgeting Navigation
Capital Budgeting is a Web-based solution that enables you to manage, prioritize, and plan for capital expenses. With Capital Expense Planning, you create a model of your organization's capital expenses and provide an effective way for decision makers and front-line managers to communicate throughout the request, justification, review, and approval process.
The Capital Expense Planning model is based on a 12–month calendar, and the default calculations of Capital Expense Planning support multiple years. If your application uses custom time periods, you must modify time-related formulas to support custom time periods.
Upon completion of this lesson, you should be able to:
Launch Workspace
Review the Workspace user interface
Set General and Explore preferences
Open Capital Budgeting applications
Training Guide
Page 71
Navigating in Capital Budgeting
Learning Objective: In this section, you will learn how login, navigate and set preference in Capital Budgeting application.
Upon completion of this lesson, you will be able to:
- Login to Capital Budgeting Application
- Set Preference for the application
- Set up user point of view
- Check for your entity
Logging Into and Navigating to Capital Application
Learning Objective: In this topic you will learn how to login and navigate the capital budgeting
application. You will also learn how to use the workspace menus and toolbars to open the application, manage documents and modify the view.
Upon completion of this topic you will be able to:
Login and Navigate the Capital Budgeting Application.
This topic will cover: - Logging Into Workspace and Navigating the CAPEX Application Estimated time to complete this topic: 3 minutes

Training Guide
Page 72
Step Action
1. The Oracle Enterprise Performance Management (EPM) System Workspace Log On page provides access to the Hyperion Applications and is the gateway into the applications that are assigned to your job role. To access the Hyperion Applications, enter the assigned user name into the User Name field. In this example enter "rtalreja".
2. Click in the Password: field.
3. The System Administrator will assign an initial Password. Enter the assigned password into the Password field. Note: The Password field is case-sensitive In this example, enter "12345".
4. Click the Log On button.
Training Guide
Page 73
Step Action
5. The Home page is displayed. The Home page provides a single point of login for a user. The Home page contains: - Recently Opened Area. - Quick Links Area. - Workspace Pages Area.
6. Begin by navigating to the Root folder. Use the Navigate menu to access Workspace modules. Click the Navigate menu.
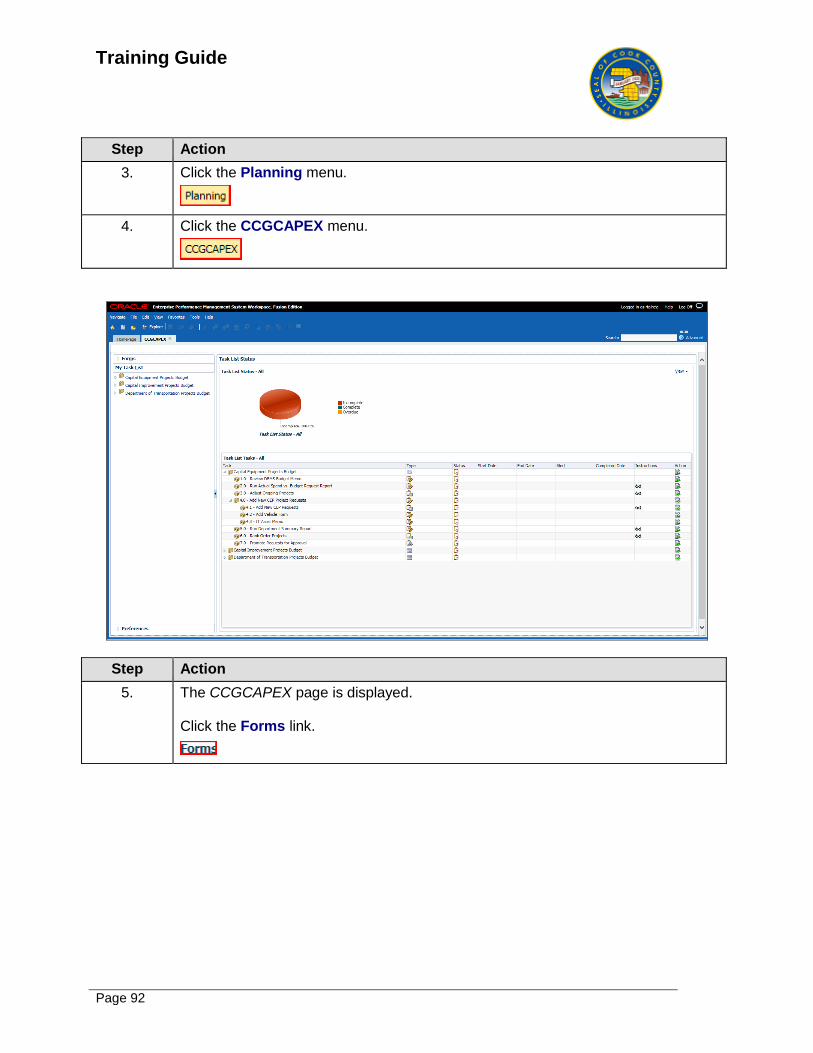
7. Click the Applications menu.
8. Click the Planning menu.
9. Click the CCGCAPEX link.
10. Note: you can also access the application under the Planning Quick Links.
11. Click the CCGCAPEX link.
12. The Forms page and Task Lists are displayed. Use the Menu bar to open applications and documents, manage favorites, modify the Workspace view, and access online help.
13. The CCGCAPEX tab is displayed. Click the Explore button.
14. The Root folder and subfolders are displayed. Use the Standard toolbar to manage documents in Workspace.
15. Use the View pane to navigate between Workspace documents.
16. Use the Content area to view active module items, tasks, or files.
17. Click the View menu to close the View pane.
Training Guide
Page 74
Step Action
18. Click the View Pane menu.
19. The View pane is now hidden. The Show button. restores the View pane.
20. Click the Close button to close the Explore tab.
21. This topic covered: - Logging Into Workspace and Navigating the CAPEX Application End of Procedure.
Training Guide
Page 75
Setting Preferences for the Application
Learning Objective: You can set preferences that change the appearance of the application. You can also set the preferences that reset your default items.
Upon completion of this topic you will be able to:
Set Preferences for the Application
This topic will cover: - Setting preferences for the application Estimated time to complete this topic: 5 minutes
Step Action
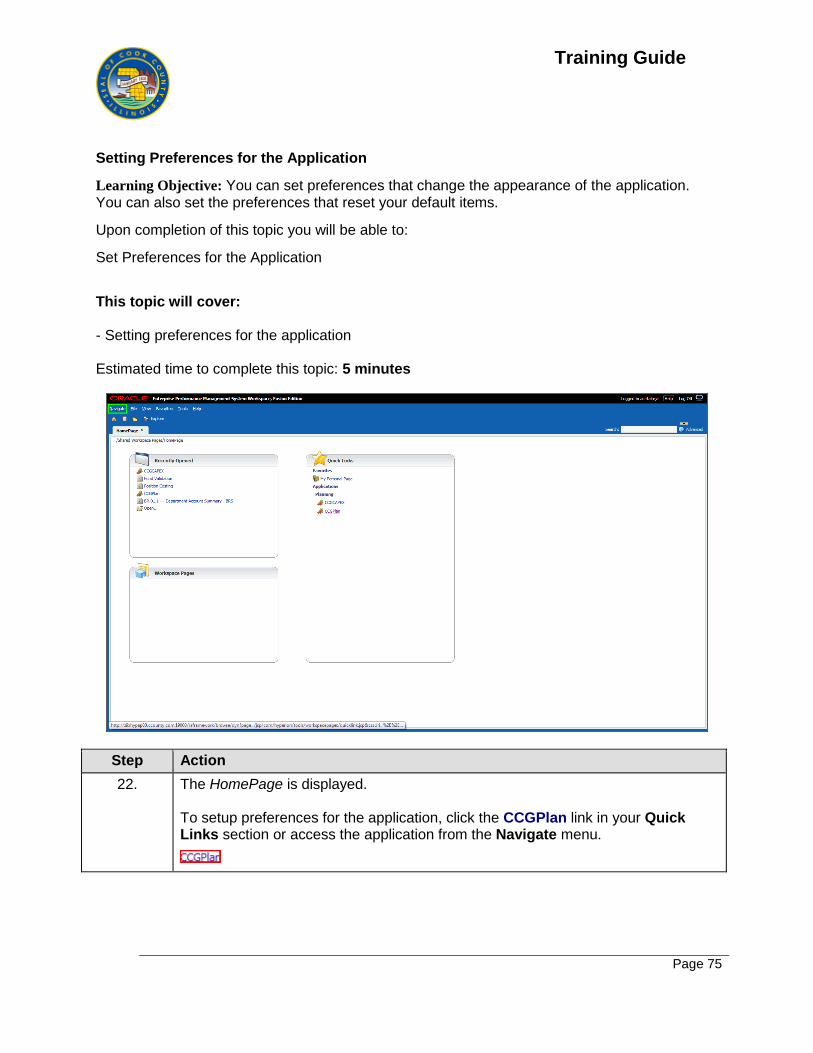
22. The HomePage is displayed. To setup preferences for the application, click the CCGPlan link in your Quick Links section or access the application from the Navigate menu.

Training Guide
Page 76
Step Action
23. The CCGPlan page is displayed. Click the Preferences link.
24. When email is set up and notification is enabled, Planning notifies users when they become the planning unit's owner or are named as a user to notify for a specific budget action.
Training Guide
Page 77
Step Action
25. The CCGPlan- User Preference page is displayed. Click in the Email Address field.
26. Enter the appropriate information into the Email Address field. In this example, enter "[email protected]".
27. Click the Task List Notification list.
28. Choose the Yes list item.
29. For Approvals tasks, you can specify a reviewer to replace a reviewer who is out of the office. You can also set these display options: •Members’ names (which may be cryptic) or their aliases •Planning units that are not started with those that are started
30. Click the Use Application Default option.
Training Guide
Page 78
Step Action
31. Click the Display Options tab.
32. On the User Preferences page, you can change the numbers formatting on the Display Options tab. Your selections apply to all currencies, in all forms that you have access to in the current application. These choices override the settings for individual currencies set by your administrator. If you select Currency Setting, the currency values in the form are displayed using the formatting initially set for individual currencies. If you select another option, your selection applies to all currencies, in all forms to which you have access in the current application. You can control the display of: •The thousands separator (none, comma, dot, or space) •The decimal separator (dot or comma) •The display of negative numbers (a minus sign before or after the number, or the number surrounded by parentheses) •The displayed color for negative numbers (black or red)
Step Action
33. Click the Negative Sign option.
Training Guide
Page 79
Step Action
34. Click the Negative Color option.
35. Click in the Allow Search When Number of Pages Exceeds field under the Page Options section.
36. Click in the Delete button on your keyboard.
37. Enter the appropriate number into the Allow Search When Number of Pages Exceeds field. In this example, enter "10".
38. Click the Use Application Default option under the Other Options section.
39. Click the Save button to apply the changes made.
40. Click the OK button.
41. Click the Printing Options tab.
42. The form designer sets forms' printing options. You can accept the default settings or set your own options for creating PDF files. To print to PDF, you must have Adobe Acrobat Reader installed on your computer. You set printing options directly from the form when you are ready to print. Or, you can use Preferences to set printing options, which apply to all forms to which you have access permissions.

Training Guide
Page 80
Step Action
43. Click the Use Application Default option to accept the default.
44. Click the Save button to apply changes.
45. Click the OK button.
46. Click the User Variable Options tab.
47. Administrators can set up user variables, which help you navigate large forms. User variables filter the members displayed on forms, letting you focus on those members you are interested in, such as your own department's expenses. For example, your administrator can create a form with entities on the rows and a user variable called Department. You can limit the number of rows displayed on the form by selecting a member for the Department user variable, such as Sales. Later, you can select another value for Department, such as Marketing. You can set variables in preferences or directly in forms.

Training Guide
Page 81
Step Action
48. Click the Selected Member button.
Training Guide
Page 82
Step Action
49. The Member Selection window is displayed. Click the Budget option.
50. Click the Add button to add the selection.
51. Click the OK button.
Step Action
52. Click the Selected Member button.
Training Guide
Page 83
Step Action
53. The Member Selection window is displayed. Click the Working option.
54. Click the Add button to add the selection.
55. Click the OK button.

Training Guide
Page 84
Step Action
56. Click the Selected Member button.

Training Guide
Page 85
Step Action
57. The Member Selection window is displayed. Click the FY18 option.
58. Click the Add button to add the selection.
59. Click the OK button.
Step Action
60. Click the Selected Member button.

Training Guide
Page 86
Step Action
61. The Member Selection window is displayed. Click the No Grant option.
62. Click the Add button to add the selection.
63. Click the OK button.
Training Guide
Page 87
Step Action
64. Click the Save button to apply the changes.
65. Click the OK object.

Training Guide
Page 88
Step Action
66. Click the Close button to close the user preferences window.
67. This topic covered: - Setting preferences for the application End of Procedure.

Training Guide
Page 89
Setting Preference - User Point of View
Learning Objective: You can set the user point of view by accessing the financial reporting preferences. By setting this preference, you define how the user views reports.
Upon completion of this topic you will be able to:
Set Preferences for User Point of View
This topic will cover: - Setting Preferences - User Point of View Estimated time to complete this topic: 1 minute
Step Action
68. Begin by navigating from the Home page. Click the File menu.
69. Click the Preferences... list item.
Training Guide
Page 90
Step Action
70. The Preferences page is displayed. There are links down the left hand side of the Preferences page. These links allow certain settings to be changed depending on the link selected. Click the Financial Reporting link.
71. Click the On option under User Point of View section. This will make sure you can view the reports in the correct format. It will also allow the user to select reports parameters.
72. Click the OK button to save the changes.
73. This topic covered: - Setting Preferences - User Point of View End of Procedure.

Training Guide
Page 91
Checking For Your Entity
Learning Objective: In this topic you will learn how to check for your entity.
Upon completion of this topic you will be able to:
Check for your entity.
This topic will cover: - Checking for your entity Estimated time to complete this topic: 2 minutes
Step Action
1. Begin by navigating to the Root folder. Use the Navigate menu to access Workspace modules. Click the Navigate menu.
2. Click the Applications menu.
Training Guide
Page 92
Step Action
3. Click the Planning menu.
4. Click the CCGCAPEX menu.
Step Action
5. The CCGCAPEX page is displayed. Click the Forms link.
Training Guide
Page 93
Step Action
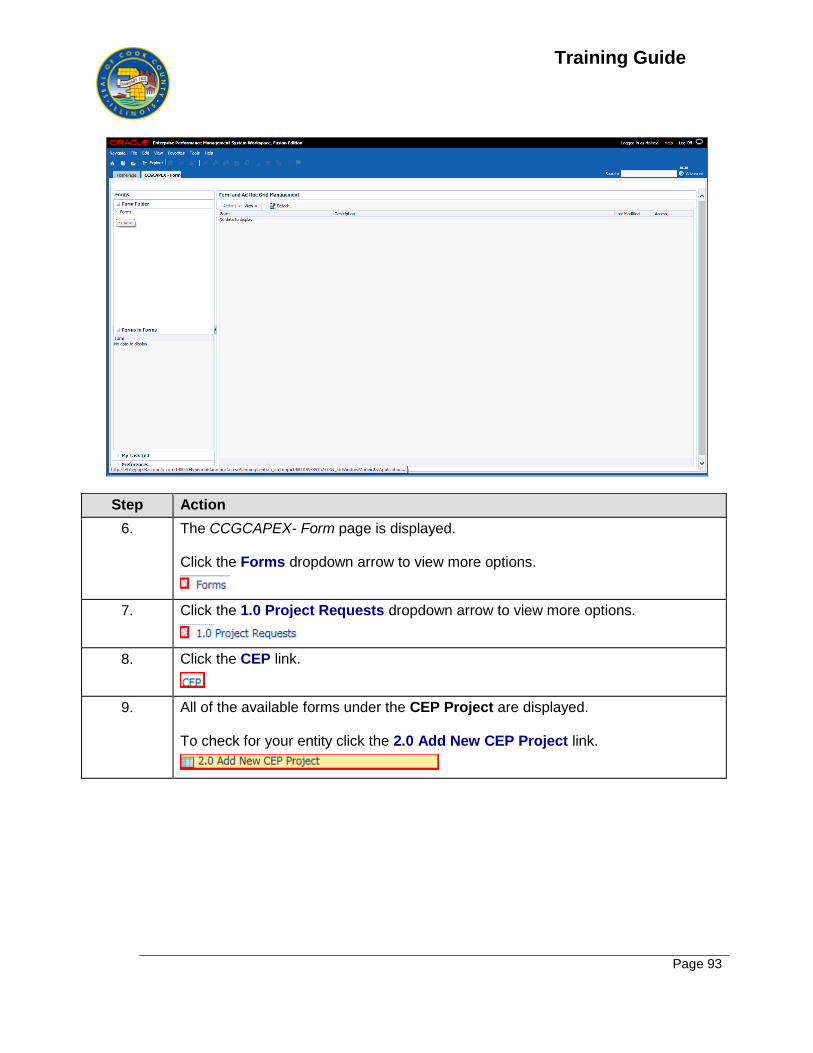
6. The CCGCAPEX- Form page is displayed. Click the Forms dropdown arrow to view more options.
7. Click the 1.0 Project Requests dropdown arrow to view more options.
8. Click the CEP link.
9. All of the available forms under the CEP Project are displayed. To check for your entity click the 2.0 Add New CEP Project link.

Training Guide
Page 94
Step Action
10. The Add New CEP Project page is displayed. Click the Entity dropdown button to view all entities.
11. Click the Close button after checking for your entity.
12. This topic covered: - Checking for your entity End of Procedure.