pella lifestyle series triple-pane hinged glass...
TRANSCRIPT

Page 1 of 7© 2019 Pella Corporation Rev. 04/25/19 GIF-000000747-1 Part Number: 80ML0107
CAUTION: On hinged and sliding patio doors, DO NOT remove or cut the white cord that limits the opening of the hinged glass panel. Doing so may cause serious damage, including glass breakage, to your Pella product. The cord should only be detached by a qualified service technician when performing service related procedures.
Table of Contents: 1. Operating the Hinged Glass Panel
2. Bottom Up Slimshade Blind and Cellular Shade Removal and Installation
INSTALLATION INSTRUCTION – INSTRUCCIONES DE INSTALACIÓN PELLA® LIFESTYLE SERIES TRIPLE-PANE HINGED GLASS PANEL, BLIND AND SHADE INSTRUCTIONS
Casement window is shown.
Latch Release
Latch Release
Shade operator handle
Shade operator handle
Latch Release
Latch Release
Hinged patio door is shown.

Page 2 of 7© 2019 Pella Corporation Rev. 04/25/19 GIF-000000747-1 Part Number: 80ML0107
1 OPERATING THE HINGED GLASS PANEL
Note: Venting Windows go to step A or B. Fixed windows and patio doors proceed to step C.
A. Awning or Casement window with flat screen: Remove the flat screen by unlatching the screen clip(s) and pulling the screen to the interior.
B. Casement window with Rolscreen® Retractable Screen: Unlock and open the sash to 90° so the hinged panel will not interfere with the Rolscreen. (Or remove the Rolscreen tracks and cartridge.)
C. Sliding Doors: Slide the flat screen to the other side of the frame so it is not blocking the panel with the HGP to remove Open Rolscreen® Retractable screen.
D. Hinge Doors: Remove the handle set.
Windows and Patio Door Latch Releases:
E. Locate the hinged glass panel latch release(s).
Note: Depending on the product type and size, there may be multiple latch releases on each side, top and/or bottom of the HGP.
F. Insert a small Phillips head screwdriver into the opening in the HGP release. Press the screwdriver in to release the HGP latch. Repeat on all other latch releases.

Page 3 of 7© 2019 Pella Corporation Rev. 04/25/19 GIF-000000747-1 Part Number: 80ML0107
1 OPERATING THE HINGED GLASS PANEL (CONTINUED)
Restrictor Arm
To remove the panel:
G. Hold the panel with one hand to keep it from falling.
H. Release the restrictor arm with the other hand while continuing to hold the panel with the other hand.
I. With both hands holding panel, tilt it downward until it can be removed (about 35 to 45 degrees).
Note: When re-installing HGP, hold the panel until the restrictor arm is re-attached.
Windows: Window HGP's hinge at the bottom are
held open by the restrictor arm in the channel on the top of the HGP.
1H 1H
1I 1I 1I
Page 4 of 7© 2019 Pella Corporation Rev. 04/25/19 GIF-000000747-1 Part Number: 80ML0107
1 OPERATING THE HINGED GLASS PANEL (CONTINUED)
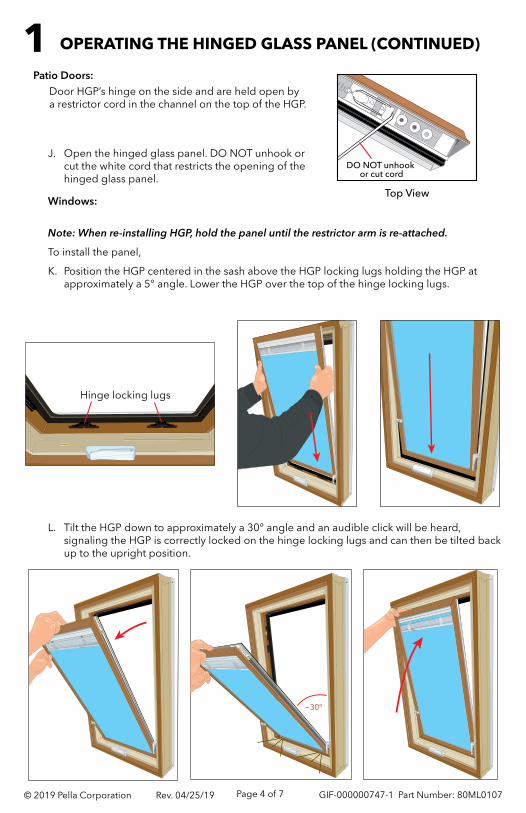
J. Open the hinged glass panel. DO NOT unhook or cut the white cord that restricts the opening of the hinged glass panel.
Windows:
Note: When re-installing HGP, hold the panel until the restrictor arm is re-attached.
To install the panel,
K. Position the HGP centered in the sash above the HGP locking lugs holding the HGP at approximately a 5° angle. Lower the HGP over the top of the hinge locking lugs.
L. Tilt the HGP down to approximately a 30° angle and an audible click will be heard, signaling the HGP is correctly locked on the hinge locking lugs and can then be tilted back up to the upright position.
Patio Doors: Door HGP’s hinge on the side and are held open by
a restrictor cord in the channel on the top of the HGP.
DO NOT unhook or cut cord
Top View
Hinge locking lugs
~30°

Page 5 of 7© 2019 Pella Corporation Rev. 04/25/19 GIF-000000747-1 Part Number: 80ML0107
1 OPERATING THE HINGED GLASS PANEL (CONTINUED)
M. Insert the end of the restrictor arm into the top of the HGP.
Windows and Patio Doors:
N. Close the hinged glass panel, noting the latch
locations. Press firmly on the hinged glass panel
frame at the latch locations until you hear a click
which indicates the latch has engaged.
Note: Ensure all latches are engaged.
Latch

Page 6 of 7© 2019 Pella Corporation Rev. 04/25/19 GIF-000000747-1 Part Number: 80ML0107
Note: Follow the steps in Instruction 1 to open the hinged glass panel.
Note: Remove the protective strips at the top of the HGP located near each side.
PULLPULLTABTABT0T0
REM0VE
REM0VE
Pull the release tab on the shade handle holder to allow for shade operation.
2 BOTTOM UP SLIMSHADE® BLIND AND CELLULAR SHADES
A. Place the blind/shade in the full open position.
B. For shades 47” or wider only: Remove the shade support clip located near the center of the shade mounting channel. Remove the clip from the bottom of the mounting channel, then remove the clip from the hinged glass panel.
C. Release the blind/shade from the mounting stud by pulling
the plastic tab.
D. Remove the blind/shade head rail from the drive gear and
second mounting stud by sliding it away from the operator
side of the hinged glass panel.
Plastic Tab
Shade Support ClipREMOVAL
Page 7 of 7© 2019 Pella Corporation Rev. 04/25/19 GIF-000000747-1 Part Number: 80ML0107
2 BOTTOM UP SLIMSHADE® BLIND AND CELLULAR SHADES (CONTINUED)
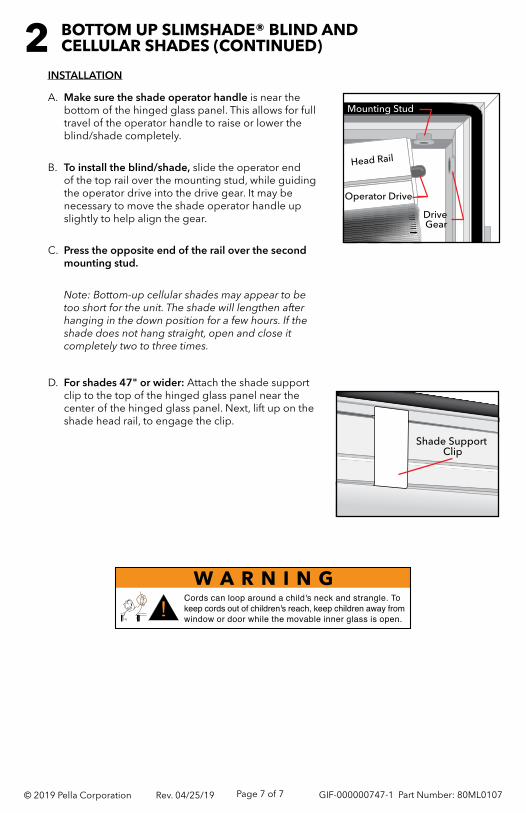
A. Make sure the shade operator handle is near the bottom of the hinged glass panel. This allows for full travel of the operator handle to raise or lower the blind/shade completely.
B. To install the blind/shade, slide the operator end of the top rail over the mounting stud, while guiding the operator drive into the drive gear. It may be necessary to move the shade operator handle up slightly to help align the gear.
C. Press the opposite end of the rail over the second mounting stud.
Note: Bottom-up cellular shades may appear to be too short for the unit. The shade will lengthen after hanging in the down position for a few hours. If the shade does not hang straight, open and close it completely two to three times.
D. For shades 47" or wider: Attach the shade support clip to the top of the hinged glass panel near the center of the hinged glass panel. Next, lift up on the shade head rail, to engage the clip.
INSTALLATION
DriveGear
Mounting Stud
Head Rail
Operator Drive
Shade Support Clip
W A R N I N G

This page is intentionally left blank.