peopleadmin user’s guide - clayton state university user manual.pdf · • notify hr of your...
TRANSCRIPT
PeopleAdmin User’s Guide Human Resources Department
2 | P e o p l e A d m i n U s e r M a n u a l - 2 0 1 2
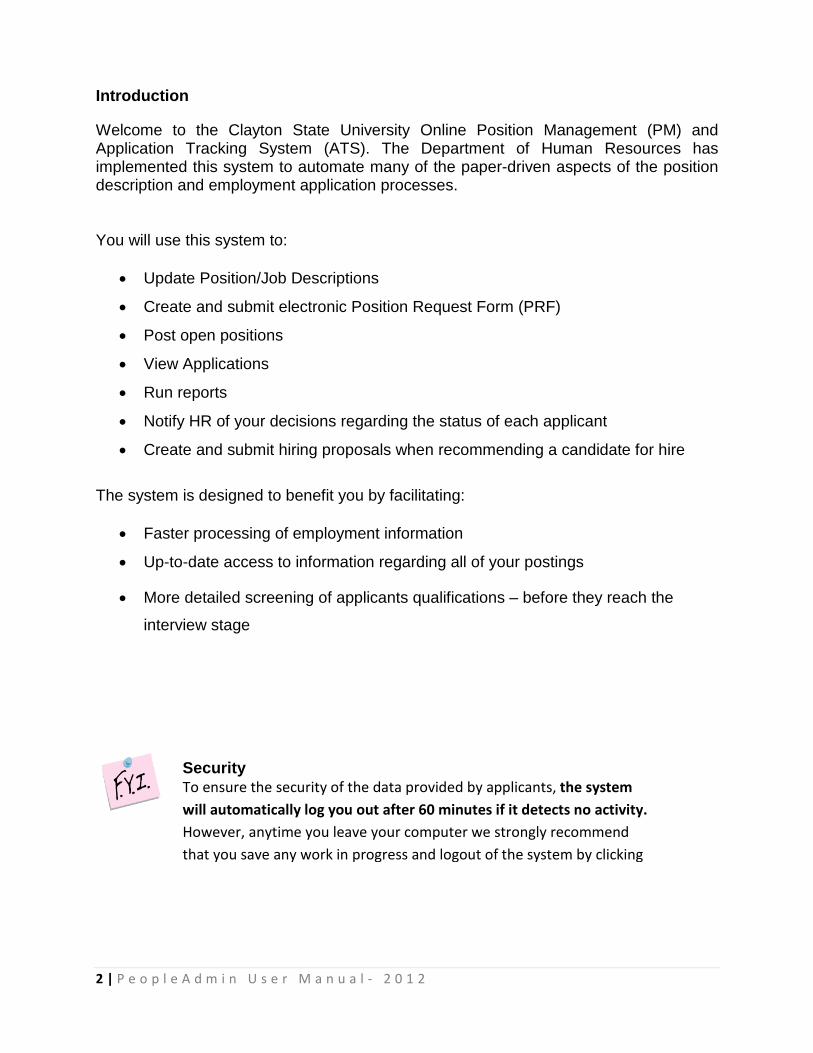
Introduction
Welcome to the Clayton State University Online Position Management (PM) and Application Tracking System (ATS). The Department of Human Resources has implemented this system to automate many of the paper-driven aspects of the position description and employment application processes. You will use this system to:
• Update Position/Job Descriptions
• Create and submit electronic Position Request Form (PRF)
• Post open positions
• View Applications
• Run reports
• Notify HR of your decisions regarding the status of each applicant
• Create and submit hiring proposals when recommending a candidate for hire
The system is designed to benefit you by facilitating:
• Faster processing of employment information
• Up-to-date access to information regarding all of your postings
• More detailed screening of applicants qualifications – before they reach the
interview stage
Security To ensure the security of the data provided by applicants, the system will automatically log you out after 60 minutes if it detects no activity. However, anytime you leave your computer we strongly recommend that you save any work in progress and logout of the system by clicking

3 | P e o p l e A d m i n U s e r M a n u a l - 2 0 1 2
Getting Started
User Site: https://clayton.peopleadmin.com/hr/
Use your current Clayton State username and password to access the system.
4 | P e o p l e A d m i n U s e r M a n u a l - 2 0 1 2
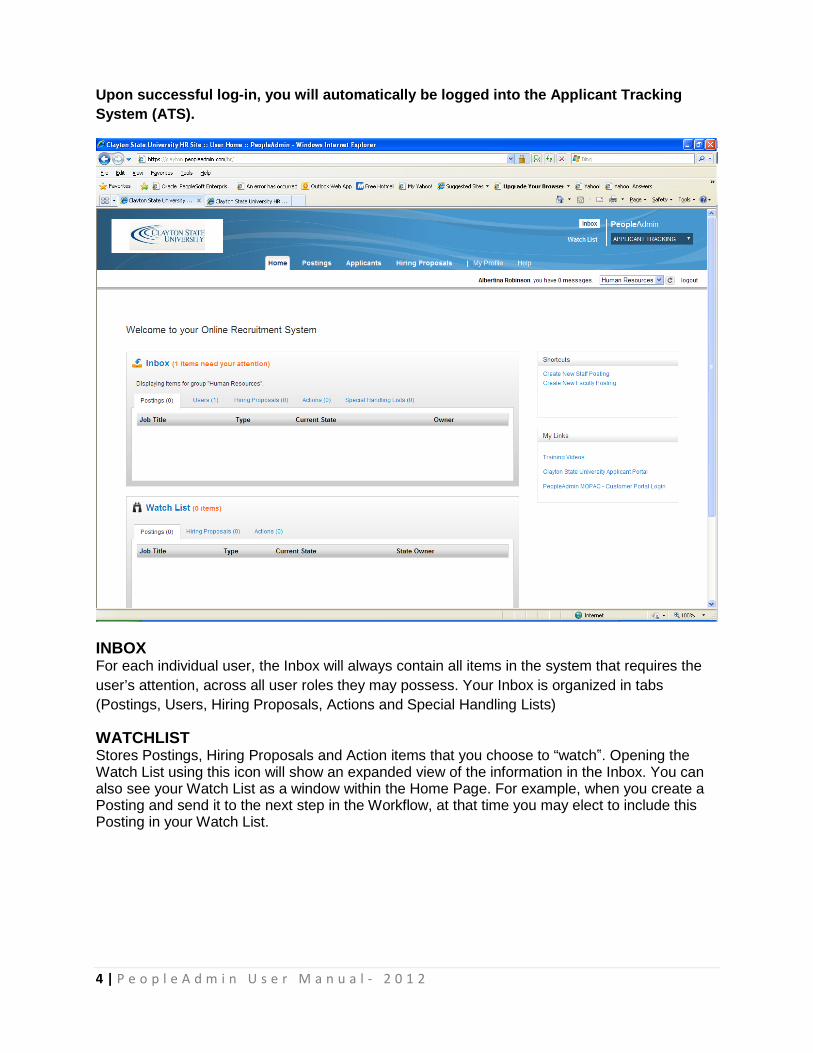
Upon successful log-in, you will automatically be logged into the Applicant Tracking System (ATS).
INBOX For each individual user, the Inbox will always contain all items in the system that requires the user’s attention, across all user roles they may possess. Your Inbox is organized in tabs (Postings, Users, Hiring Proposals, Actions and Special Handling Lists)
WATCHLIST Stores Postings, Hiring Proposals and Action items that you choose to “watch‟. Opening the Watch List using this icon will show an expanded view of the information in the Inbox. You can also see your Watch List as a window within the Home Page. For example, when you create a Posting and send it to the next step in the Workflow, at that time you may elect to include this Posting in your Watch List.
5 | P e o p l e A d m i n U s e r M a n u a l - 2 0 1 2
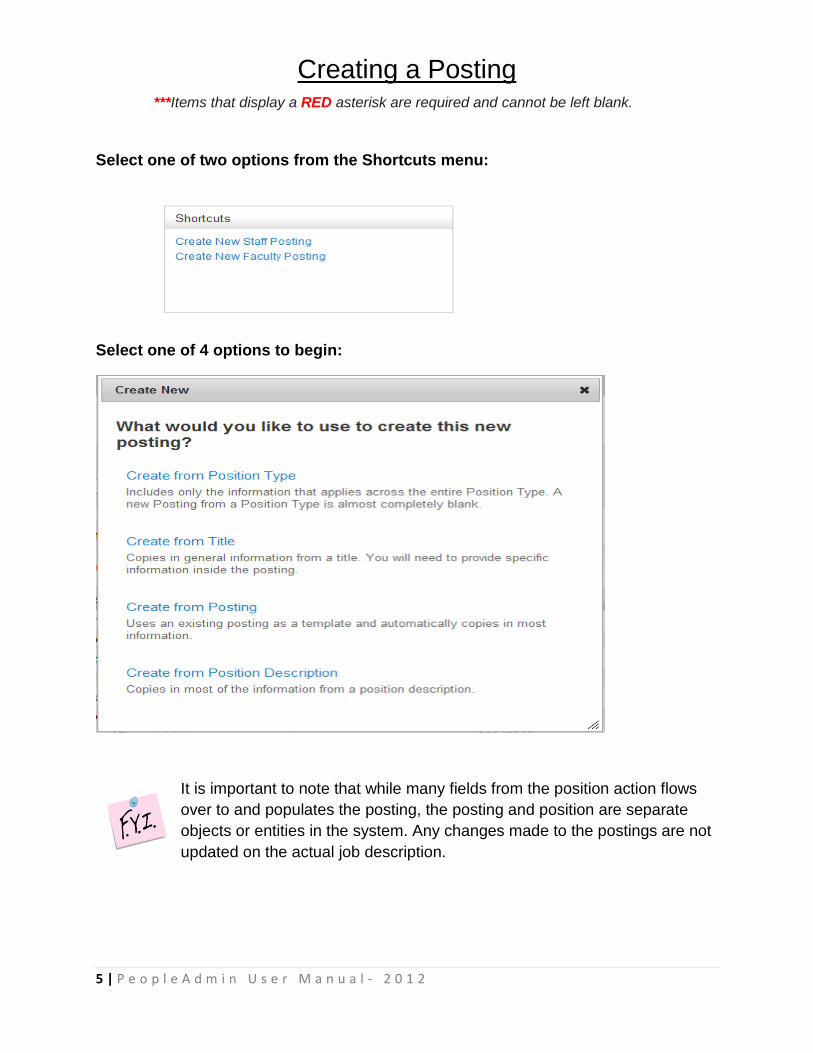
Creating a Posting
Select one of two options from the Shortcuts menu:
Select one of 4 options to begin:
It is important to note that while many fields from the position action flows over to and populates the posting, the posting and position are separate objects or entities in the system. Any changes made to the postings are not updated on the actual job description.
***Items that display a RED asterisk are required and cannot be left blank.
6 | P e o p l e A d m i n U s e r M a n u a l - 2 0 1 2
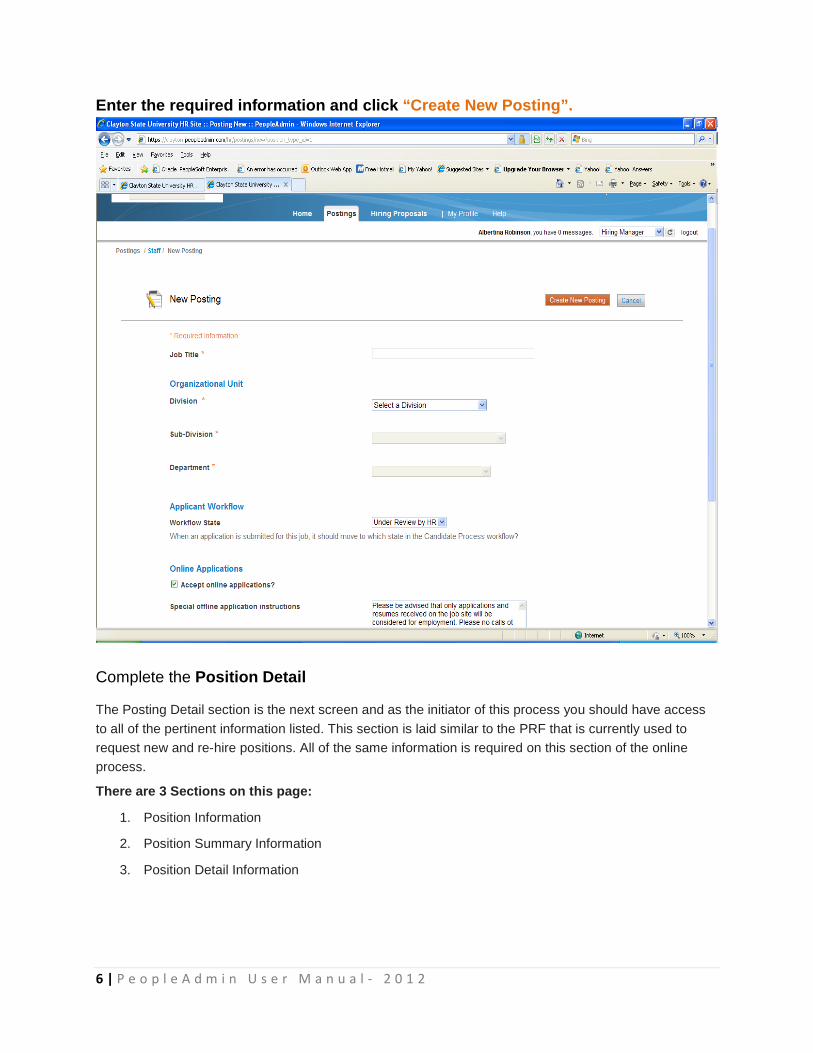
Enter the required information and click “Create New Posting”.
Complete the Position Detail
The Posting Detail section is the next screen and as the initiator of this process you should have access to all of the pertinent information listed. This section is laid similar to the PRF that is currently used to request new and re-hire positions. All of the same information is required on this section of the online process. There are 3 Sections on this page:
1. Position Information
2. Position Summary Information
3. Position Detail Information

7 | P e o p l e A d m i n U s e r M a n u a l - 2 0 1 2
Position Information
Position Summary Information

8 | P e o p l e A d m i n U s e r M a n u a l - 2 0 1 2
Posting Detail Information
Select
9 | P e o p l e A d m i n U s e r M a n u a l - 2 0 1 2
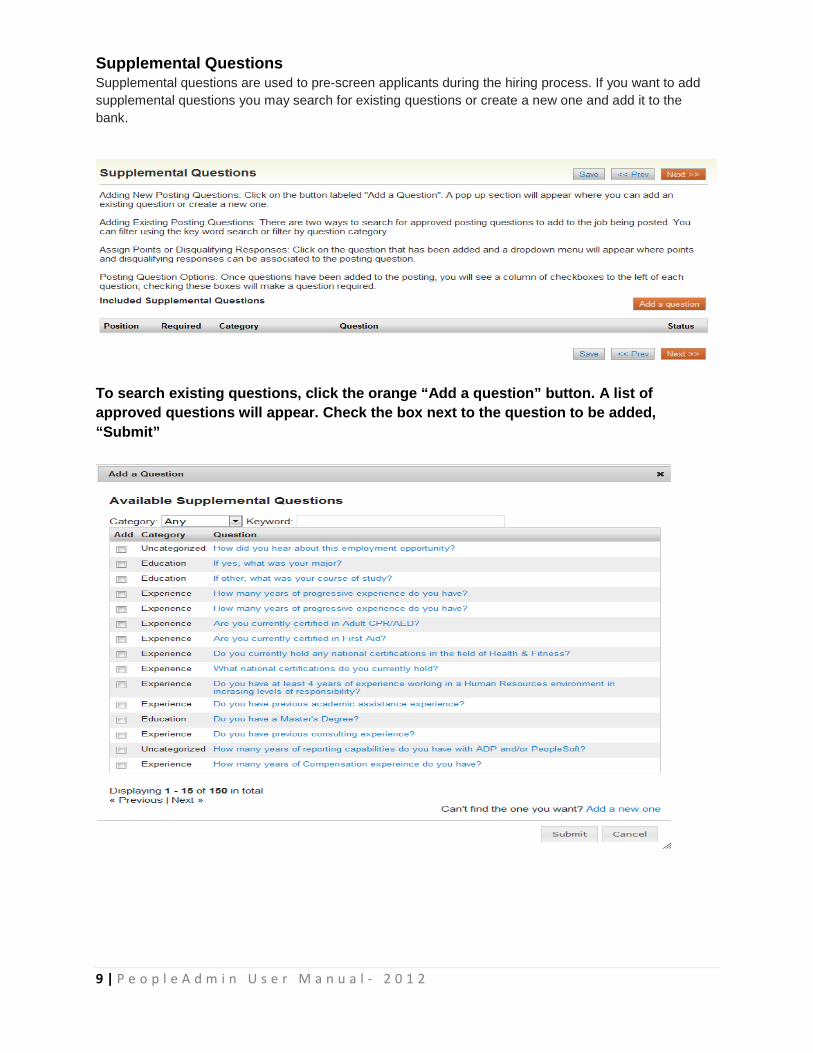
Supplemental Questions Supplemental questions are used to pre-screen applicants during the hiring process. If you want to add supplemental questions you may search for existing questions or create a new one and add it to the bank.
To search existing questions, click the orange “Add a question” button. A list of approved questions will appear. Check the box next to the question to be added, “Submit”
10 | P e o p l e A d m i n U s e r M a n u a l - 2 0 1 2
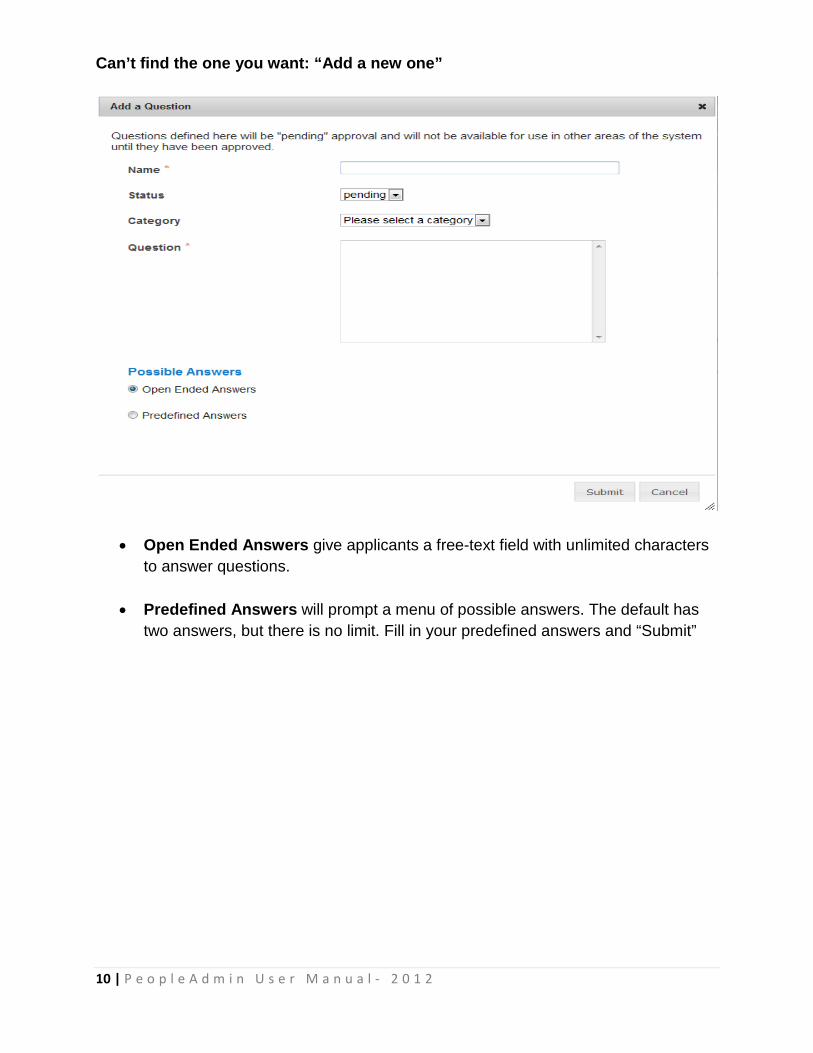
Can’t find the one you want: “Add a new one”
• Open Ended Answers give applicants a free-text field with unlimited characters to answer questions.
• Predefined Answers will prompt a menu of possible answers. The default has two answers, but there is no limit. Fill in your predefined answers and “Submit”
11 | P e o p l e A d m i n U s e r M a n u a l - 2 0 1 2
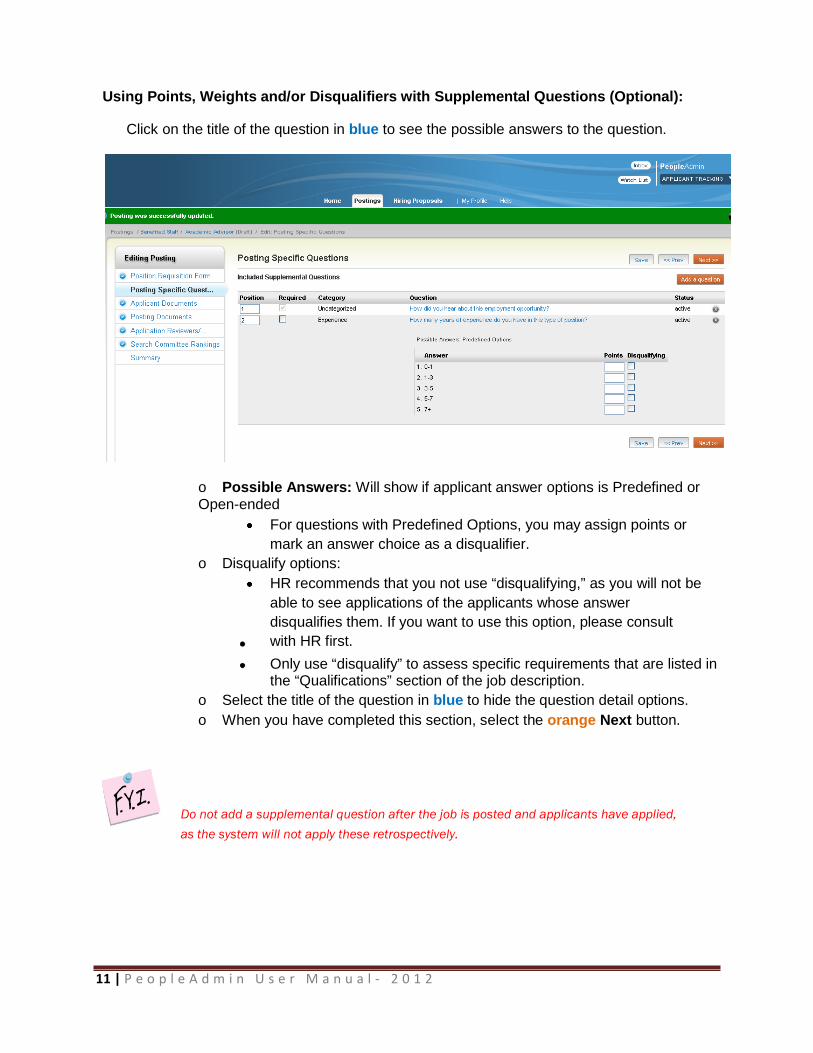
Using Points, Weights and/or Disqualifiers with Supplemental Questions (Optional):
Click on the title of the question in blue to see the possible answers to the question.
o Possible Answers: Will show if applicant answer options is Predefined or Open-ended
For questions with Predefined Options, you may assign points or mark an answer choice as a disqualifier.
o Disqualify options: HR recommends that you not use “disqualifying,” as you will not be
able to see applications of the applicants whose answer disqualifies them. If you want to use this option, please consult with HR first. Only use “disqualify” to assess specific requirements that are listed in the “Qualifications” section of the job description.
o Select the title of the question in blue to hide the question detail options. o When you have completed this section, select the orange Next button.
Do not add a supplemental question after the job is posted and applicants have applied, as the system will not apply these retrospectively.
12 | P e o p l e A d m i n U s e r M a n u a l - 2 0 1 2
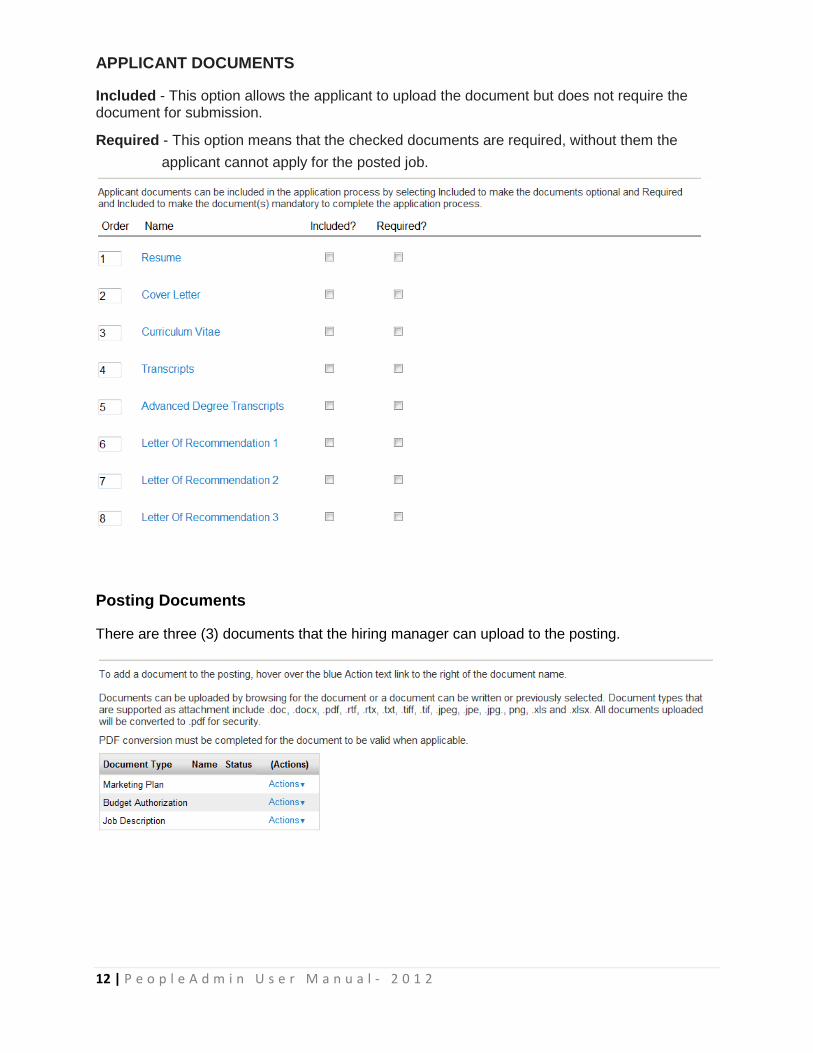
APPLICANT DOCUMENTS Included - This option allows the applicant to upload the document but does not require the document for submission. Required - This option means that the checked documents are required, without them the
applicant cannot apply for the posted job.
Posting Documents
There are three (3) documents that the hiring manager can upload to the posting.
13 | P e o p l e A d m i n U s e r M a n u a l - 2 0 1 2
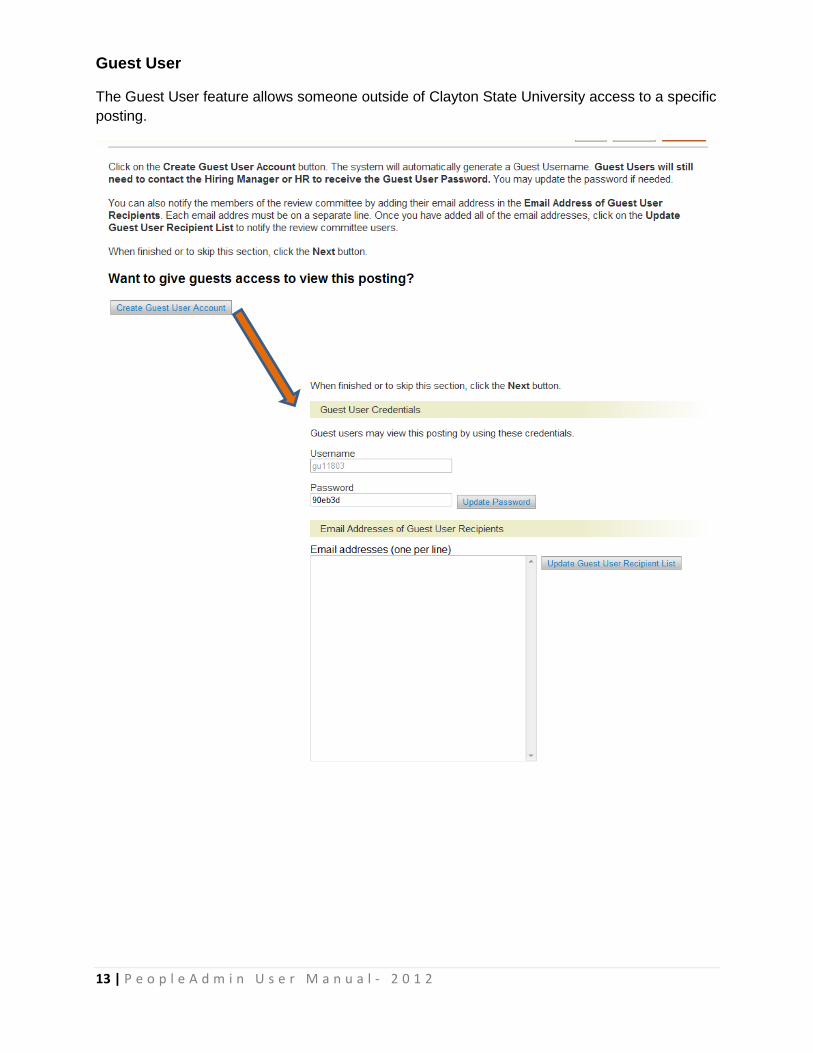
Guest User
The Guest User feature allows someone outside of Clayton State University access to a specific posting.

14 | P e o p l e A d m i n U s e r M a n u a l - 2 0 1 2
Search Committee Members
Search Committee Members are necessary for all positions. The database includes all hiring managers on campus but it does not include all employees. If the CSU employee you wish to add is not in our database complete the ‘New Search Committee Member’ section.
Search Committee Ranking
Ranking criteria which is used by search committee members during the applicant review process is not presented to the applicant. These are questions that are posed to the Search Committee members only.
Adding a Criterion allows allows Search Committees to configure specific ranking criteria on a posting by posting basis.
15 | P e o p l e A d m i n U s e r M a n u a l - 2 0 1 2
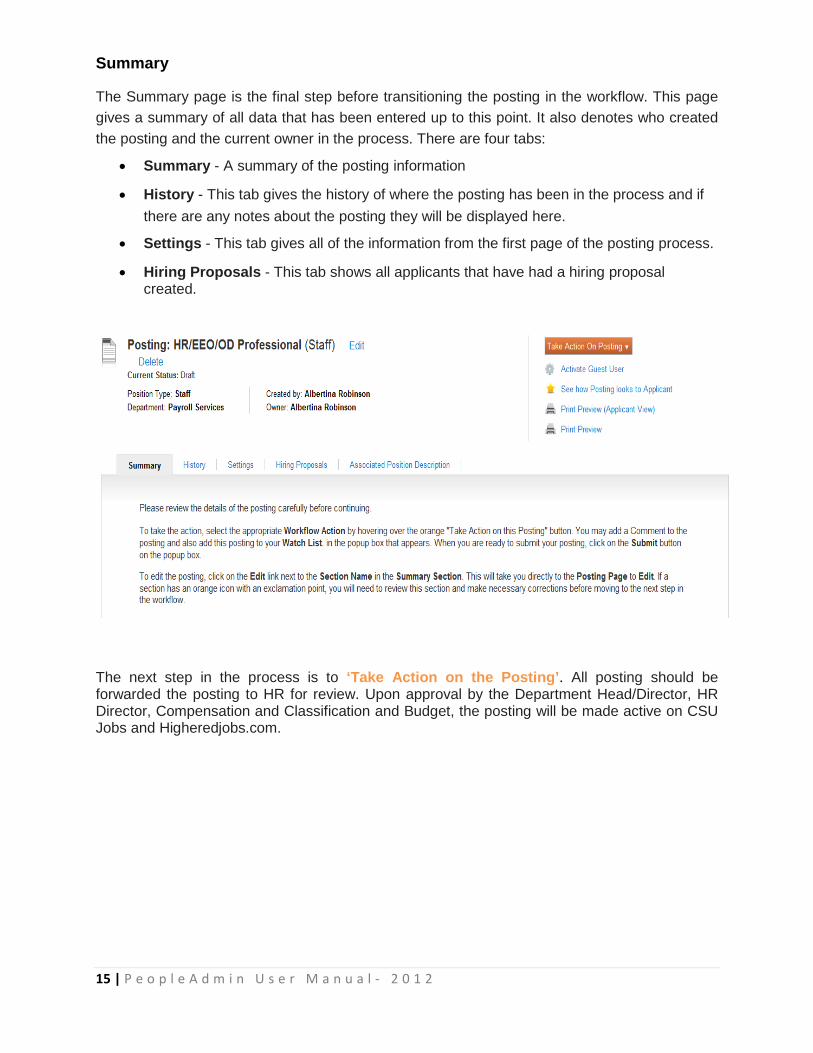
Summary
The Summary page is the final step before transitioning the posting in the workflow. This page gives a summary of all data that has been entered up to this point. It also denotes who created the posting and the current owner in the process. There are four tabs:
• Summary - A summary of the posting information
• History - This tab gives the history of where the posting has been in the process and if there are any notes about the posting they will be displayed here.
• Settings - This tab gives all of the information from the first page of the posting process.
• Hiring Proposals - This tab shows all applicants that have had a hiring proposal
created.
The next step in the process is to ‘Take Action on the Posting’. All posting should be forwarded the posting to HR for review. Upon approval by the Department Head/Director, HR Director, Compensation and Classification and Budget, the posting will be made active on CSU Jobs and Higheredjobs.com.
16 | P e o p l e A d m i n U s e r M a n u a l - 2 0 1 2
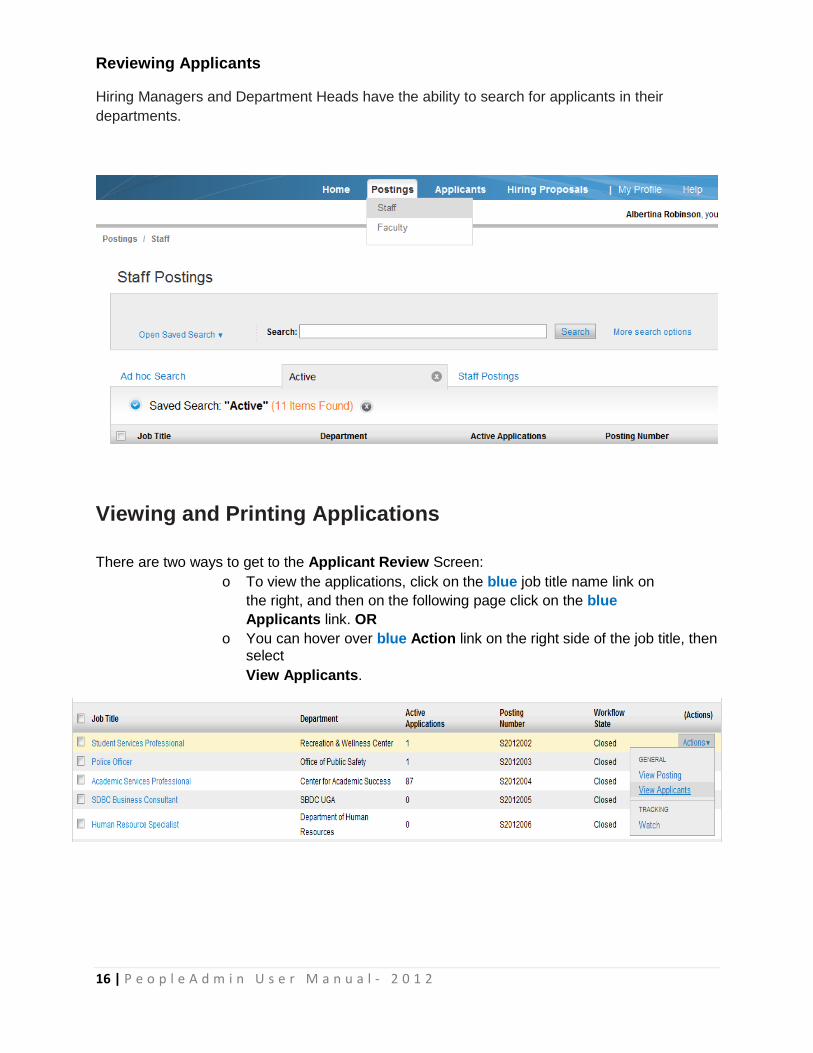
Reviewing Applicants
Hiring Managers and Department Heads have the ability to search for applicants in their departments.
Viewing and Printing Applications
There are two ways to get to the Applicant Review Screen:
o To view the applications, click on the blue job title name link on the right, and then on the following page click on the blue Applicants link. OR
o You can hover over blue Action link on the right side of the job title, then select View Applicants.
17 | P e o p l e A d m i n U s e r M a n u a l - 2 0 1 2
From the Applicant Review screen you will be able to perform several actions. You will see the links under the main Actions button, on the left hand side of the screen, above all the applicant rows.
o Review an applicant’s application, answers to the supplemental questions, and attachments, you may either:
Click on the applicant’s name, OR Hover over the blue Actions link on the far right of the screen across from their name, and select “View Application.”
o View all applicant scores, click on the blue “More search options” link to the right of the “Search” field. This will reveal an “Add Column” field. Select “Supplemental Question Score.” Now you will see the scores displayed. To save this format, you will notice a blue “Save this search?” link right above the rows of applicants.
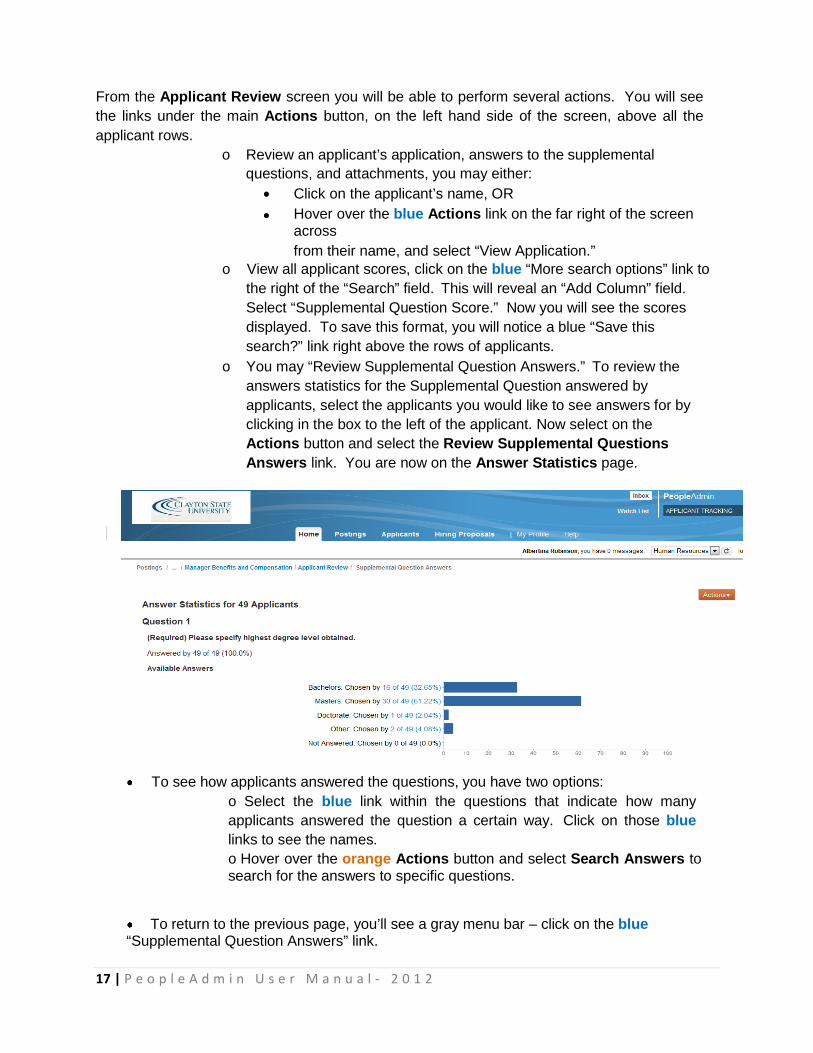
o You may “Review Supplemental Question Answers.” To review the answers statistics for the Supplemental Question answered by applicants, select the applicants you would like to see answers for by clicking in the box to the left of the applicant. Now select on the Actions button and select the Review Supplemental Questions Answers link. You are now on the Answer Statistics page.
To see how applicants answered the questions, you have two options: o Select the blue link within the questions that indicate how many applicants answered the question a certain way. Click on those blue links to see the names. o Hover over the orange Actions button and select Search Answers to search for the answers to specific questions.
To return to the previous page, you’ll see a gray menu bar – click on the blue “Supplemental Question Answers” link.
18 | P e o p l e A d m i n U s e r M a n u a l - 2 0 1 2
If you want to export the answers to an excel spreadsheet, hover over the orange Actions
button and click on Export Answers. This will export the answers, but not the applicant names.
To get back to the Applicant Review page, you can: o Hover over the orange Actions button and select Show All Applicants, OR o From the gray menu bar, click on the blue “Applicant Review” link.
MOVE APPLICANTS THROUGH THE WORKFLOW
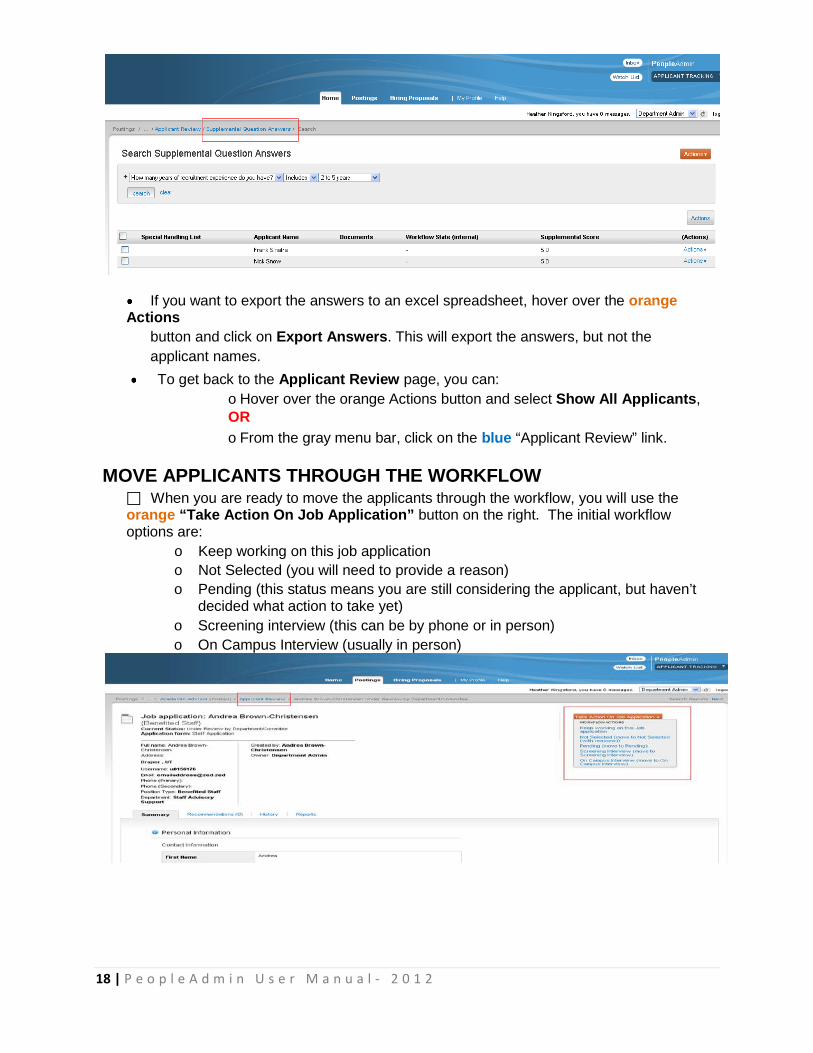
When you are ready to move the applicants through the workflow, you will use the orange “Take Action On Job Application” button on the right. The initial workflow options are:
o Keep working on this job application o Not Selected (you will need to provide a reason) o Pending (this status means you are still considering the applicant, but haven’t
decided what action to take yet) o Screening interview (this can be by phone or in person) o On Campus Interview (usually in person)
19 | P e o p l e A d m i n U s e r M a n u a l - 2 0 1 2
When you select the option you want for the applicant, you may make a comment, you may put the item in your “Watch” list, and you will need to “submit.”
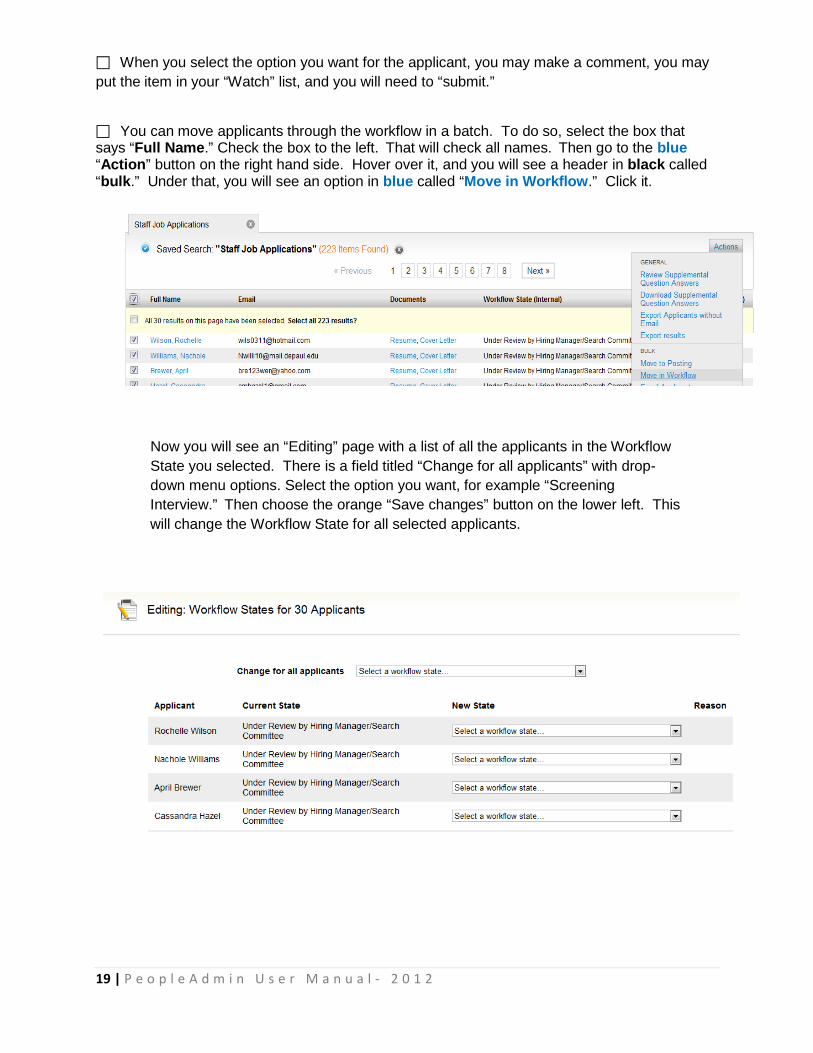
You can move applicants through the workflow in a batch. To do so, select the box that says “Full Name.” Check the box to the left. That will check all names. Then go to the blue “Action” button on the right hand side. Hover over it, and you will see a header in black called “bulk.” Under that, you will see an option in blue called “Move in Workflow.” Click it.
Now you will see an “Editing” page with a list of all the applicants in the Workflow State you selected. There is a field titled “Change for all applicants” with drop-down menu options. Select the option you want, for example “Screening Interview.” Then choose the orange “Save changes” button on the lower left. This will change the Workflow State for all selected applicants.
20 | P e o p l e A d m i n U s e r M a n u a l - 2 0 1 2
CREATING THE HIRING PROPOSAL
Once the applicant review process has been completed and the candidate or candidates you would like to hire have been transitioned in the workflow to “Recommend for Hire,” then the hiring proposal option will be displayed.
NOTE: Hiring Proposals are the way that your system tracks information on everyone who becomes employed through the system. This is vital for system reporting and can be used to load data with a variety of third party software programs.
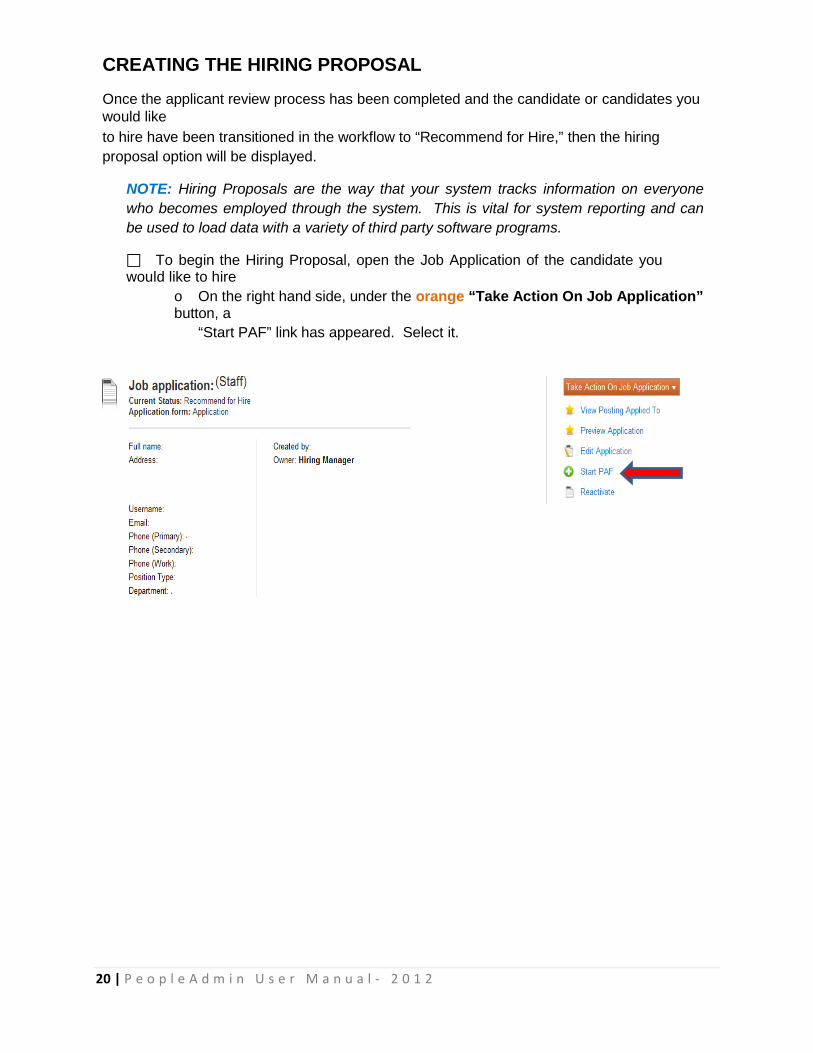
To begin the Hiring Proposal, open the Job Application of the candidate you would like to hire
o On the right hand side, under the orange “Take Action On Job Application” button, a
“Start PAF” link has appeared. Select it.

21 | P e o p l e A d m i n U s e r M a n u a l - 2 0 1 2
Hiring Proposal Summary o You are now viewing the “Hiring Proposal Summary” page. All fields are
optional and will be reviewed by HR. o You may propose a salary in the “Compensation” field. When HR receives this request, they will complete a salary calculation for you. o When completed, click “Next.” o Now you are on the “PAF” page. Attach documents as relevant for the
position type. Then click “Next.” o Now you are on the “PAF” summary page. Check all information and when
completed, hover over the orange “Take Action On Hiring Proposal” button on the right. A drop down menu with your options will appear.
Congratulations! You’ve just hired a new employee!
Department of Human Resources 5823 Trammell Road, Morrow, GA 30260
678-466-4230