perception neuron unity handbook
TRANSCRIPT

PERCEPTION NEURON UNITY HANDBOOK
Perception Neuron Unity Integration 0.2.19
Noitom Technology Co.Ltd:http://noitom.com.cn/ Nov,2th,2020
TABLE OF CONTENTS
TABLE OF CONTENTS ......................................................................................................... 2
1.Introduction ........................................................................................................................... 3
2.Import SDK Package ........................................................................................................... 4
3. Structure Overview ........................................................................................................... 5 3.1 Example Scenes .................................................................................................................................. 5
3.2 Core Scripts Overview ....................................................................................................................... 6
3.3 Public Variables of Neuronanimatorinstance.cs ......................................................................... 8
4.Data Streaming setup in Axis ........................................................................................... 9 4.1 Axis Neuron Setup ............................................................................................................................. 9
4.2 Axis Studio Setup ............................................................................................................................. 10
5.Neuron Skeleton Tools ..................................................................................................... 11
6. How to Configure a New Skeleton ............................................................................... 13
7.How to Apply Real-time Data from Axis ...................................................................... 15
8. HMD INTEGRATION .......................................................................................................... 18
9.How to Apply FBX file Data from Axis ......................................................................... 19 9.1 Humanoid Animation type. ........................................................................................................... 19
9.2 Generic Animation Type ................................................................................................................. 22
APPENDIX A: SKELETON MAPPING ............................................................................ 23
APPENDIX B: SKELETON BONES ................................................................................. 25
APPENDIX C: BINARY DATA SEQUENCE .................................................................. 27

1.Introduction
This document should help you get familiar with real-time motion capture data reading and how to use fbx file exported from Axis Neuron/Axis Studio inside the game engine Unity 3D. Axis Neuron/Axis Studio not only allows the export of motion capture data but also be able to stream motion capture data in real-time to third party applications, making the data available to drive characters in animation.
The data stream to the game engine is identical regardless if you use recorded or live motion data. This allows you to record certain actions and use them to test before putting on the full system and doing a live test.You can have multiple actors at the same time inside Axis and have them all streamed into Unity.The data stream is based on the BVH structure including header information and body dimension data is available from Axis via a command interface.Because motion-data is streamed over network the computer running Axis Neuron doesn’t necessarily have to be the same computer running Unity.
If you find bugs or need help please contact us at [email protected] If you’re looking to extend your real-time Perception Neuron experience, then have a look at the
NeuronDataReader SDK.

2.Import SDK Package
Choose Assets > Import Package > Custom Packages to import PerceptionNeuron Unity SDK.

3. Structure Overview
3.1 Example Scenes
Here are some pre-made examples explained of the SDK package:
1. FaceToVrCamera: A simple example to observeneuron-body in VR mode.
The CameraResetToNeuron class help user to align the VR-HMD axis with the neuron axis.
This feature will auto effect after scene started, or user can press ‘R’ key to re- align.
You can refer to CameraResetToNeuron.cs for details. when you use this script, make sure
you have resetthe camera’s position and rotation to zero.
2. OVRExample:A simple example of how to use Perception Neuron with a VR HMD.
3. ShutterKeyBinding:A simple example of Shutter hotkey
4. SimpleFBXAnimation:some simple example of how to use exported animations from
Axis Neuron/Axis Studio directly inside Unity.

3.2 Core Scripts Overview
1. Assets/Neuron/Scripts/Mocap/NeuronDataReaderManaged.cs
C# managed version for receiving BVH data from Axis Neuron.
2. Assets/Neuron/Scripts/Mocap/NeuronConnection.cs
NeuronConnection manages connections with Axis Neuron using
NeuronDataReaderManaged.cs. You can connect to multiple instances of Axis Neuron and
each connection will be mapped to a NeuronSource instance.
3. Assets/Neuron/Scripts/Mocap/NeuronSource.cs
NeuronSource manages instances of NeuronActor with two dictionaries called activeActors
and suspendedActors. NeuronSource monitors the latest timestamp update inside
NeuronActor in the OnUpdate method and use a threshold to judge if any actor is lost
(number of actors in Axis Neuron has changed or the connection was lost completely). When
this happens NeuronSource will add or remove actors between the two dictionaries and
notify NeuronActor.
4. Assets/Neuron/Scripts/Mocap/NeuronActor.cs
Data class to store only the most recent motion data frame, also provides methods to parse
the received motion data which is received as float values from the network. NeuronActor
also saves mocap info and provides methods to register callbacks when it was resumed or
suspended by NeuronSource.
5. Assets/Neuron/Scripts/Mocap/NeuronInstance.cs
Base class for all kinds of instances for receiving motion data. Inherits from
UnityEngine.MonoBehaviour. NeuronInstance provides callbacks for state changes and the
receiving of mocap info from a NeuronActor instance which was bound to this instance by
connect or other methods. This class is not intended to be used directly but can be inherited
to provide custom methods to apply motion data, handle states change and mocap info.
6. Assets/Neuron/Scripts/Mocap/NeuronAnimatorInstance.cs
Inherited from NeuronInstance. Provides custom methods to apply Neuron motion data to
the transform components of the bones bound in the Unity animator component. Needs a
humanoid skeleton setup to work properly.

7. Assets/Neuron/Scripts/Mocap/NeuronAnimatorPhysicalReference.cs
Data class for initialization and cleanup of a reference skeleton used for motions based upon
Unity’s rigidbody component. Used by NeuronAnimatorInstance if physics toggle is enabled.
8. Assets/Neuron/Scripts/Mocap/NeuronTransformsInstance.cs
Inherited from NeuronInstance. Provides custom methods to apply Neuron motion data
directly to transform components. Use this for non-humanoid skeletons or skeletons with
more bones then the default setup used in Unity.
9. Assets/Neuron/Scripts/Mocap/NeuronTransformsPhysicalReference.cs
Data class for initialization and cleanup of a reference skeleton used for motions based upon
Unity’s rigidbody component. Used by NeuronTransformsInstance if physics toggle is
enabled.
10. Assets/Neuron/Scripts/Mocap/NeuronInstancesManager.cs
For each NeuronActor, NeuronInstancesManager keep exactly one NeuronAnimatorInstance.
Used in NeuronDebugViewer.
11. Assets/Neuron/Scripts/Utilities/BoneLine.cs
Utility class using a line renderer to draw bone lines.
12. Assets/Neuron/Scripts/Utilities/BoneLines.cs
Utility class for Neuron editor to add or remove BoneLines.
13. Assets/Neuron/Scripts/Utilities/BoneRigidbodies.cs
Utility class for Neuron editor to add or remove Rigidbodies.
14. Assets/Neuron/Scripts/Utilities/FPSCounter.cs
Utility class to calculate the FPS (Frames-Per-Second).

3.3 Public Variables of Neuronanimatorinstance.cs
1. Address is the IP address of the machine running Axis Neuron. If it's the same computer, the
address should be 127.0.0.1. You can use this stream motion data from any other computer
in the same network. In this case change the address accordingly.
2. Port is the port number associated with the BVH data stream output setting in Axis.
3. Socket Type is the socket type to be used for that data stream. This should be identical to
your setting in Axis Neuron.
4. Actor ID is the id number for the actor you want to use. If you have more than one actor
connected in Axis Neuron this id number will increase. Default is 0 which is the first actor.
5. Connect To Axis means the script will connect to Axis Neuron and apply the motion data.
You can use this toggle to starts/stop the data stream.
6. Use New Rig if this flag is checked, it means the script will use the PN Studio seleton
structure which includes 3 joints of spine, and 2 joints of neck.
if this flag is not checked, it means the script will use the PN/PN Pro seleton structure which
includes 4 joints of spine and 1 joint of neck.
7. Bound Animator the Animator component this instance should use for the received motion
data. You can use this if you don’t want to keep the script on the same GameObject as the
animator component.
8. Motion Update Method tells the instance if it should use rigidbody functions provided by
Unity to move and rotate each bone. The default method is to apply the received float
values directly to the transform components of each bone.

4.Data Streaming setup in Axis
4.1 Axis Neuron Setup
1. Run Axis Neuron/Axis Neuron Pro
2. Click File >Settings >Broadcasting, select TCP/UDP protocol and enable BVH data streaming
by checking the Enable checkbox.In this case we use TCP protocol.
3. Playback a recorderd motion capture data or connect a device

4.2 Axis Studio Setup
1. Run Axis Studio and open a project 2. Click Menu >Settings
3. Navigate to BVH Broadcasting, enable BVH-Edit (or BVH-Capture) ,in this case we select
BVH -Edit. Set network and other appropriate options, then click OK.
Note:Enable BVH-Capture if you stream motion capture data from Capturing viewport.
4. Playback a recorderd motion capture data or connect a device

5.Neuron Skeleton Tools
We programmed a nifty tool to help you with configuring and making changes to your avatar. Its called Skeleton Tools and can be found in the menu Neuron -> Skeleton Tools.
1. Select your GameObject that either has a NeuronAnimatorInstance or NeuronTransformInstance script attached to it. This will provide the tools script with the right interface to work with.

2. Keep your model selected and click Neuron >SkeletonTools to open the SkeletonTools panel.
3. Now you can add/remove components for bones such as: 1) Adding/removing of colliders. 2) Showing/hiding of colliders. 3) Adding/removing of rigidbody components. 4) Adding/removing of bone lines. (Bone lines are a great tool for debugging and can also be added to
instantiated reference skeleton, when using physics update, during runtime). The render order setting defines which line to render ontop of eachother if you have multiple bone lines.

6. How to Configure a New Skeleton
The following is a guide for how to configure a new character model to receive real-time motion data by Perception Neuron. Before we start you need to be aware of a few things:
1. Your model needs to be rigged on a humanoid skeleton
2. The bones of your rig can not have any existing rotations in them
3. Your model needs to be rigged in a T-Pose
4. The rotation value of all bones in T pose is zero
5. Each bone’s local rotation axes should be the same orientation as shown in the following figure:
6. Fingers posture refer to the following two kinds, one is thumb inside the palm and the other one
is thumb open.
1) Thumb inside the palm shown as in the following figures.

2) Thumb open shown as in the following figures.
7. We support two sets of Skeleton Structure PN/PN Pro and PN Studio. Please refer to APPENDIX B:
SKELETON BONES
8. Set BVH output data without displacement in Axis If you’re model is not rigged with our skeleton setup or your model may be twisted. For the BVH data without displacement, except the root node (Hip) having displacement and rotation, other bones only have rotation data.
. Note: If you don’t consider the points mentioned above the applied motion from the integration will look wrong. Please make sure to correct those issues. Worst case suggestion is to rig your model on the included skeleton template found at: Noitom/PerceptionNeuron/Resources/Models

7.How to Apply Real-time Data from Axis
1. Import PerceptionNeuron.unitypackage
2. Import your Humanoid skeleton model into Unity.
3. In the Project tab in Unity click on your model and then click on the Rig tab in the inspector
windows.Set your Animation Type to “Humanoid”, then click on 【Apply】.
4. Next click on 【Configure】to check the bone mapping. Usually Unity will find the right bone
references for almost all the humanoid skeleton so its good check them.
5. Click on Mapping and then click on Load to load our template file that fixes the mapping for
you.In the new window navigate to Noitom/PerceptionNeuron/Resources and load the file AxisStudioMapping.ht.
Please refer to APPENDIX A: SKELETON MAPPING
Make sure you have all the right bones mapped to the correct body segments inside each of the
tabs for Body and Click on 【Apply】and then on 【Done】

6. Load the scene you want to use your model in.Click and drag your model into the Hierarchy tab to load it into the scene.
7. Select your model in the Hierarchy tab and click on 【Add Component】in the inspector window.In the search field type “Neuron” and select the script “NeuronTransformInstance.cs”.
8. Adjust the settings of the NeuronTransformInstance Script according to your own setup. enable
the toggle “Connect To Axis” to make the script connect to Axis, click 【bind】 to do skeleton retargeting automatically before hit Play. Make sure you have Axis Neuron/ Axis Studio running and playing a recorded animation in loop or a live actor connected to it. Also make sure you turned on BVH data streaming in the Neuron Axis settings.

17
9. Click on 【Play】 in Unity to see the motion being applied to your new model.

18
8. HMD INTEGRATION
Getting any HMD synced up with the Perception Neuron integration can be a bit tricky. Here is how we got it done and what we found out to be working the best. There are three core rules worth mentioning:
1. The rotation tracker of the HMD should always have priority. Don’t overwrite its rotation
values with something else and don’t use the head rotation values from the Perception Neuron
system.
2. Don’t use the positional tracking of the HMD.
3. Never parent the HMD cameras or GameObjects to the skeleton setup. Inside the examples folder there is an example called: VRExample. It contains a simple script and a
scene showing you how to combine our system with any virtual reality HMD. The example script works in the following ways:
1. On every new frame we position the VR Camera Rig to the same position as the head target
object.
2. This target object is an empty GameObject inside the Head skeleton hierarchy. We use the
target object to provide an easy way to define an offset and to set the correct position on the
head.
3. Since we never change the rotation of the VR Rig you need to reset its tracker once you have
the HMD on your head. This way the rig will be aligned correctly with your virtual body. Make
sure you’re facing forward in a T-Pose manner when resetting the VR tracking. Press the R key
on your keyboard to do so.

19
9.How to Apply FBX file Data from Axis
9.1 Humanoid Animation type.
1. Import your model and in the Project tab in Unity click on your model and then click on the
Rig tab in the inspector windows.Set your Animation Type to “Humanoid”, then click on
【Apply】.
2. Next click on 【Configure】to check the bone mapping. Usually Unity will find the right bone
references for almost all the humanoid skeleton so its good check them. You can load pre-
make .ht mapping file or manually do the mapping.
3. Click【Apply】
4. If the bone Mapping is correct, but the character is not in the correct pose, you will see
the message “Character not in T-Pose”. You can try to fix that with Enforce T-Pose or
rotate the remaining bones into T-pose.

20
5. Export a fbx file from Axis Neuron/Axis Studio. In this case the export setting in Axis
Studio is shown as the figure.
6. Import this .fbx format animation file into Unity and click on it. on the Rig tab in the
inspector windows.Set your Animation Type to “Humanoid”, then click on 【Apply】.

21
7. Make sure the bone Mapping and the initial T-pose are exactly same as the settings of
the imported model we set in Step4, You may need to do Enforce T-Pose and rotate
some bone’s value in the Transform panel.
8. Click on 【Apply】and then on 【Done】
9. You can preview the animation on your model
22
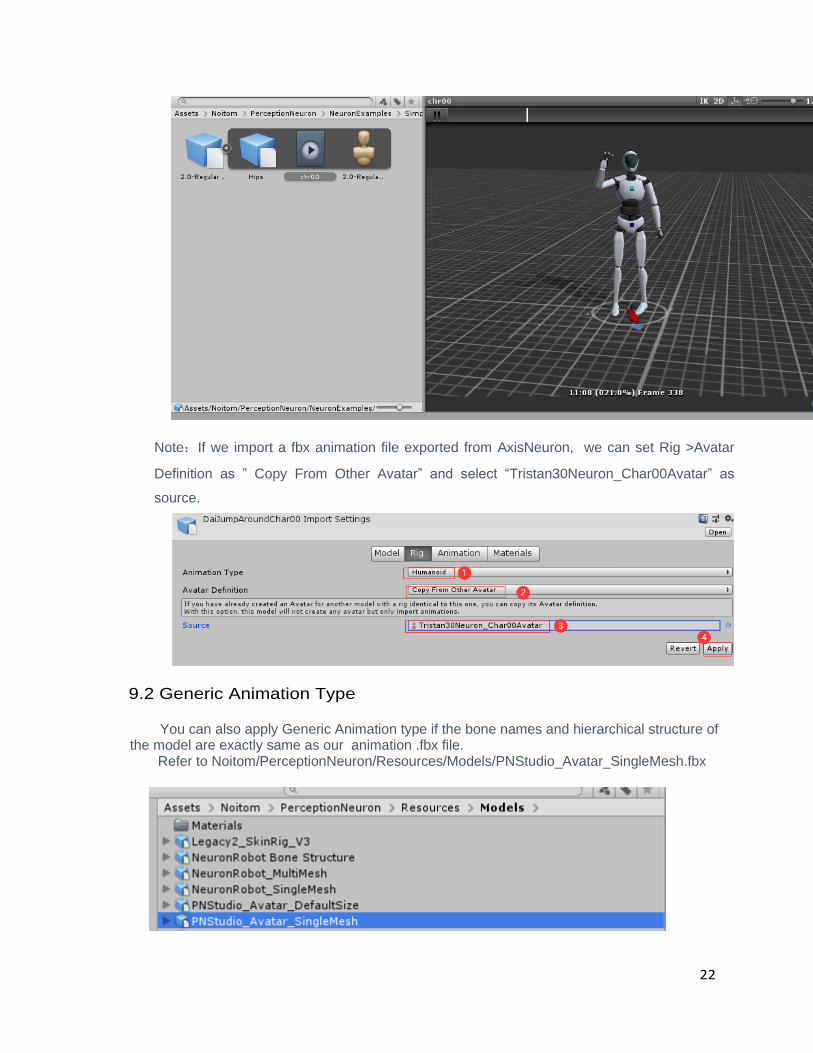
Note:If we import a fbx animation file exported from AxisNeuron, we can set Rig >Avatar
Definition as ” Copy From Other Avatar” and select “Tristan30Neuron_Char00Avatar” as
source.
9.2 Generic Animation Type
You can also apply Generic Animation type if the bone names and hierarchical structure of the model are exactly same as our animation .fbx file.
Refer to Noitom/PerceptionNeuron/Resources/Models/PNStudio_Avatar_SingleMesh.fbx

23
APPENDIX A: SKELETON MAPPING
PN/PN Pro skeleton structure mapping
24
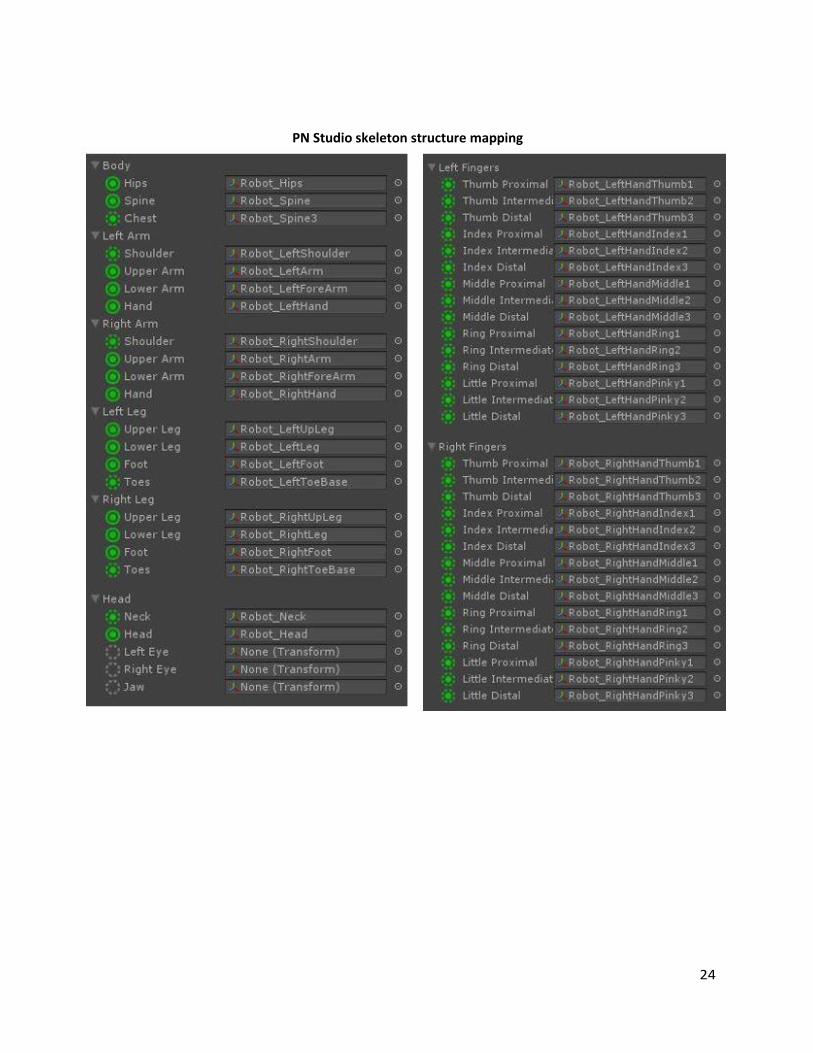
PN Studio skeleton structure mapping
25
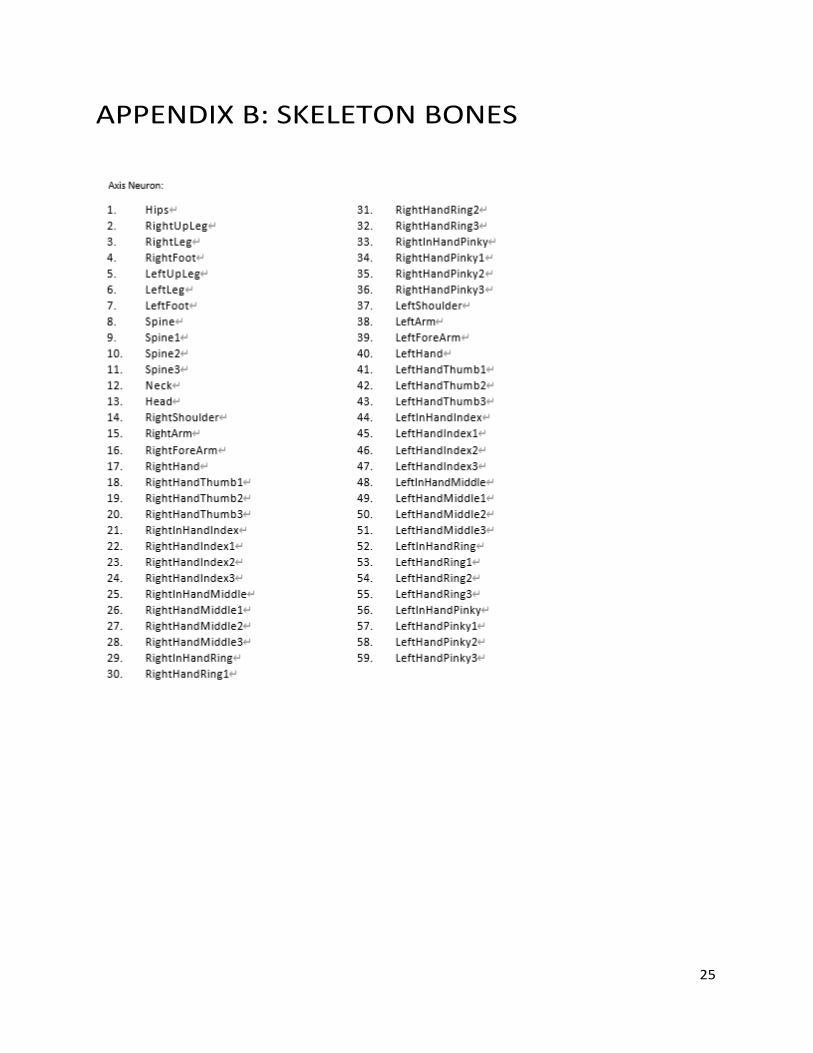
APPENDIX B: SKELETON BONES

26
This is the complete structure of our skeleton model. If we use the humanoid skeleton in Unity, we
skip some of them resulting in 51 bones remaining. However, we need to include the data of the bones we skip in the following bones for the correct values. We skip all the InHand bones and two of the spine bones.

27
APPENDIX C: BINARY DATA SEQUENCE
On the next two pages you’ll find a complete graph of the whole sequence of the binary data received from Axis Neuron. It is a one-dimensional float array with different ordering and length depending on whether you’re using displacement data or not.
Axis Neuron

28
AxisStudio