performing de novo assemblies using the nbic galaxy instance
TRANSCRIPT
1 | P a g e Performing de novo assemblies using NBIC GALAXY
Performing de novo assemblies using the
NBIC Galaxy instance
In this part of the practicals, we are going to assemble the same data of
Staphylococcus aureus as yesterday.
The main difference is that instead of using soapdenovo, we will now perform the
assembly with Velvet1.
After the assemblies we will have a quick look at the different metrics to describe the
assemblies, and choose a winner based on those.
Setting up an account on the NBIC Galaxy instance
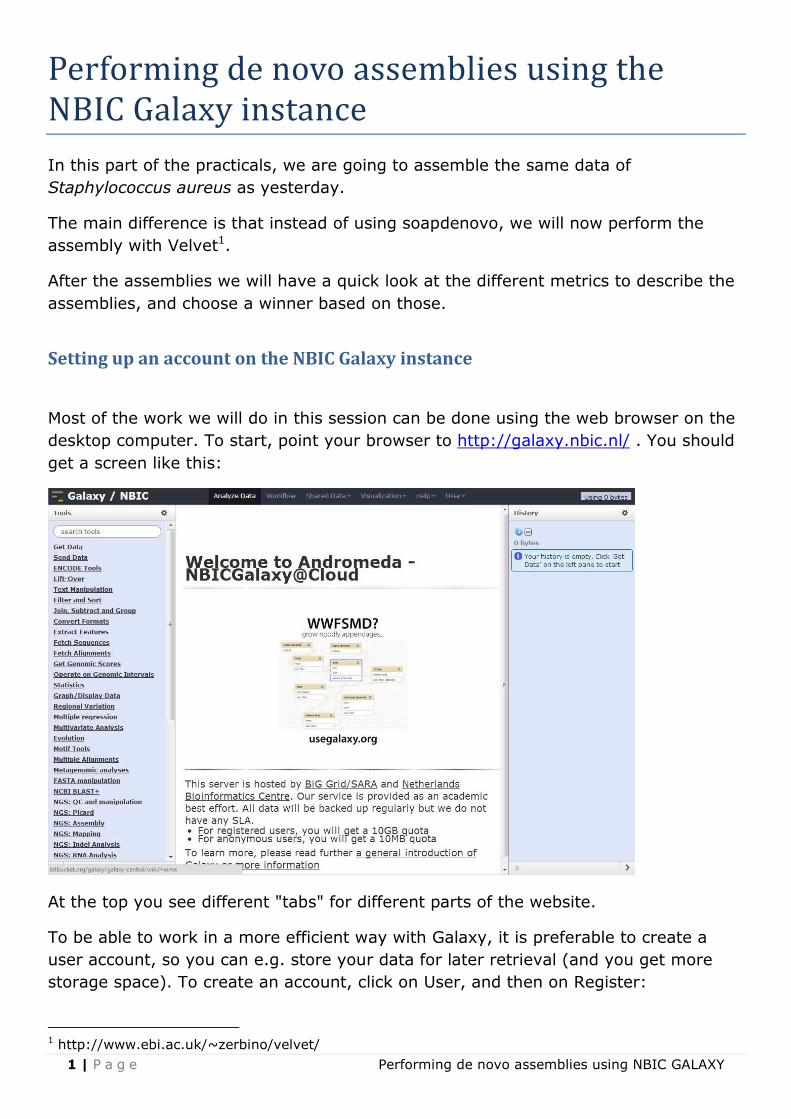
Most of the work we will do in this session can be done using the web browser on the
desktop computer. To start, point your browser to http://galaxy.nbic.nl/ . You should
get a screen like this:
At the top you see different "tabs" for different parts of the website.
To be able to work in a more efficient way with Galaxy, it is preferable to create a
user account, so you can e.g. store your data for later retrieval (and you get more
storage space). To create an account, click on User, and then on Register:
1 http://www.ebi.ac.uk/~zerbino/velvet/
2 | P a g e Performing de novo assemblies using NBIC GALAXY
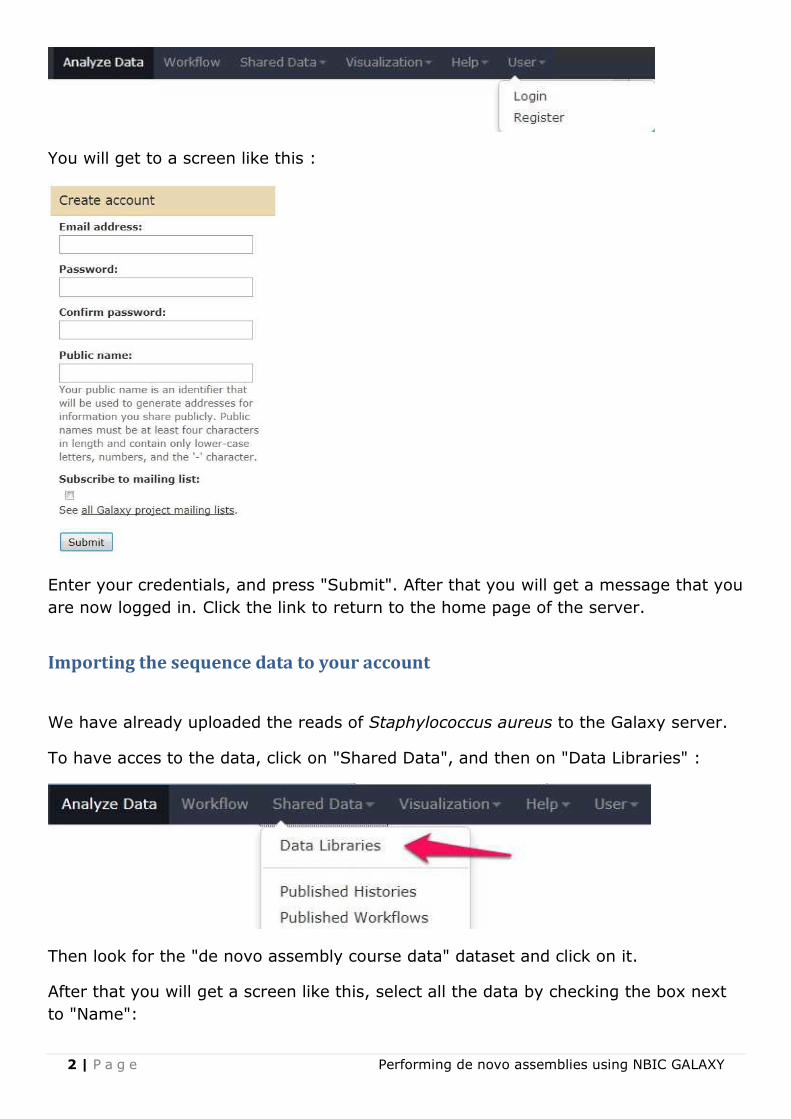
You will get to a screen like this :
Enter your credentials, and press "Submit". After that you will get a message that you
are now logged in. Click the link to return to the home page of the server.
Importing the sequence data to your account
We have already uploaded the reads of Staphylococcus aureus to the Galaxy server.
To have acces to the data, click on "Shared Data", and then on "Data Libraries" :
Then look for the "de novo assembly course data" dataset and click on it.
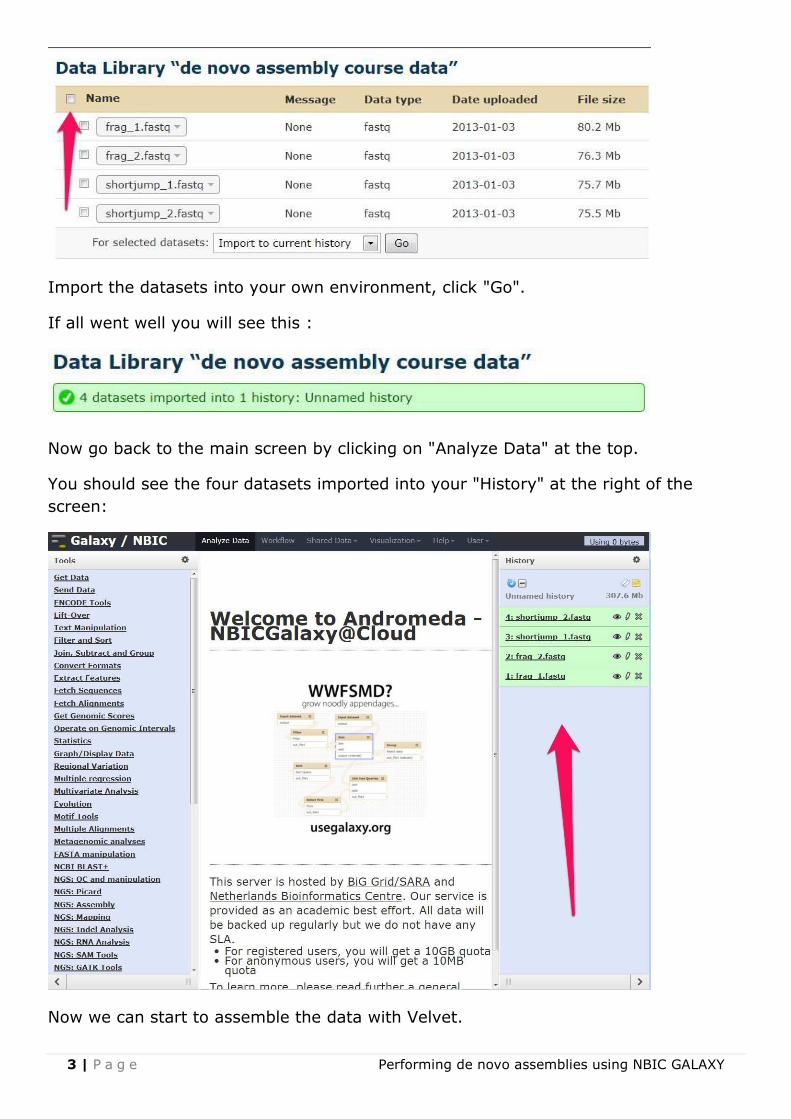
After that you will get a screen like this, select all the data by checking the box next
to "Name":
3 | P a g e Performing de novo assemblies using NBIC GALAXY
Import the datasets into your own environment, click "Go".
If all went well you will see this :
Now go back to the main screen by clicking on "Analyze Data" at the top.
You should see the four datasets imported into your "History" at the right of the
screen:
Now we can start to assemble the data with Velvet.

4 | P a g e Performing de novo assemblies using NBIC GALAXY
De novo assembly with Velvet
The assembly with Velvet is divided in two steps : first we will have to create an index
of the data, or "hash" it. For that we will use velveth.
In the second step we will perform the assembly itself, or as it is called, build a graph
from the hashed data. For that we will use velvetg.
To index the data, we first have to select the right tool from the list at the left hand
side of the screen.
Look for "NGS Taskforce: WUR denovo benchmarking" , somewhere in the bottom
half , and click on it. The list will expand, and look like this :
Now click on "velveth" and this screen will appear in the center :

5 | P a g e Performing de novo assemblies using NBIC GALAXY
Enter our data in the fields, so it looks like this :

6 | P a g e Performing de novo assemblies using NBIC GALAXY
7 | P a g e Performing de novo assemblies using NBIC GALAXY
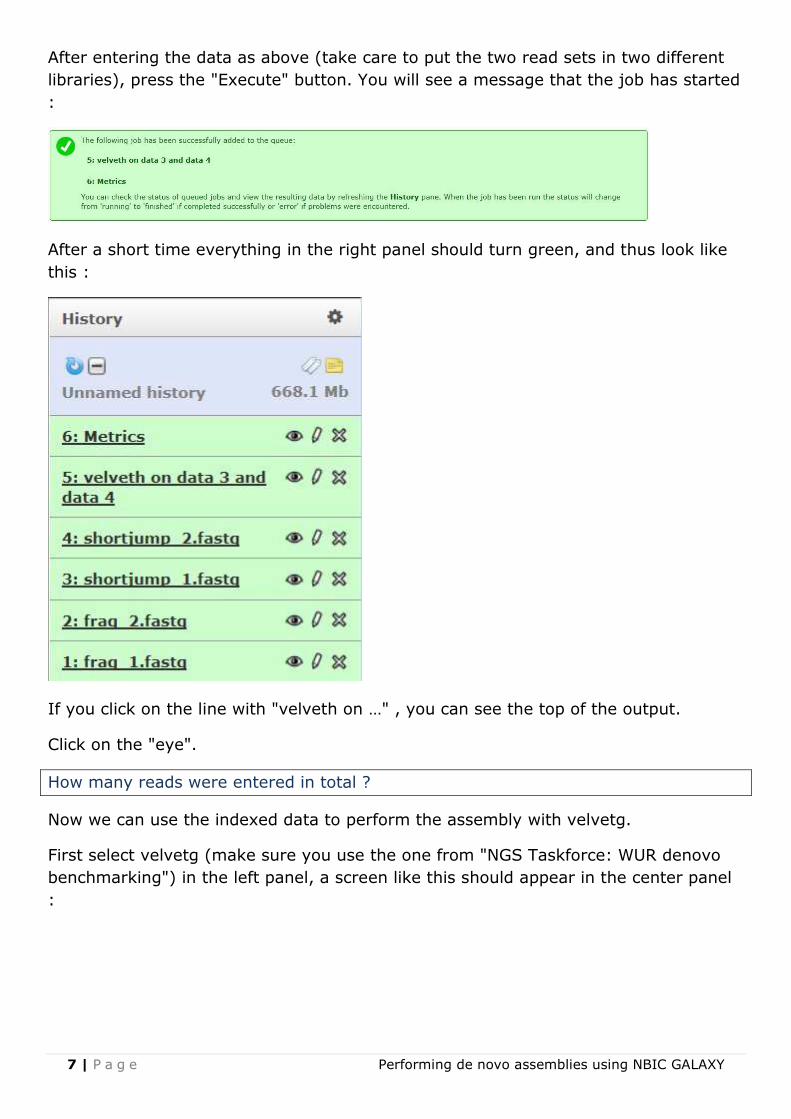
After entering the data as above (take care to put the two read sets in two different
libraries), press the "Execute" button. You will see a message that the job has started
:
After a short time everything in the right panel should turn green, and thus look like
this :
If you click on the line with "velveth on …" , you can see the top of the output.
Click on the "eye".
How many reads were entered in total ?
Now we can use the indexed data to perform the assembly with velvetg.
First select velvetg (make sure you use the one from "NGS Taskforce: WUR denovo
benchmarking") in the left panel, a screen like this should appear in the center panel
:
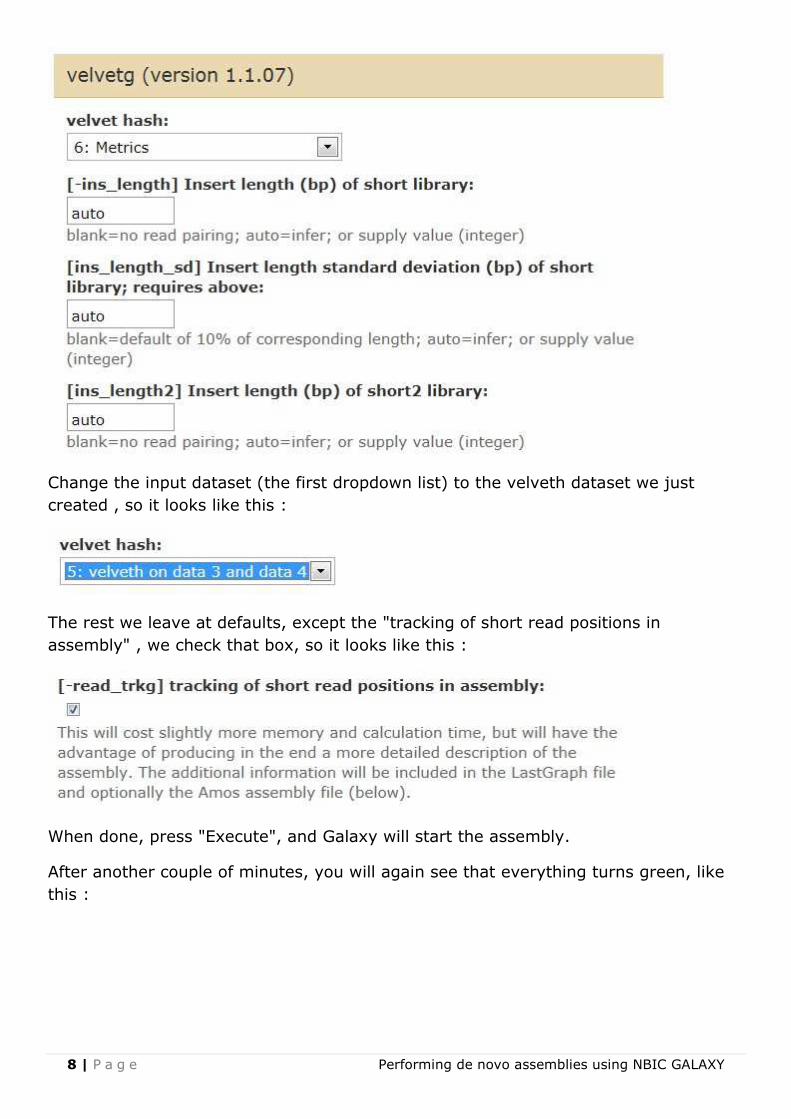
8 | P a g e Performing de novo assemblies using NBIC GALAXY
Change the input dataset (the first dropdown list) to the velveth dataset we just
created , so it looks like this :
The rest we leave at defaults, except the "tracking of short read positions in
assembly" , we check that box, so it looks like this :
When done, press "Execute", and Galaxy will start the assembly.
After another couple of minutes, you will again see that everything turns green, like
this :

9 | P a g e Performing de novo assemblies using NBIC GALAXY
Now click on the "velvetg on …" set.
What is the N50 of this assembly ?
What percentage of the reads was used in the assembly ?
Are there warnings in the output that we should address ?
As there are warnings in the output of the assembly, it might be wise to try to fix
those and see if the assembly improves.
Luckily, rerunning a tool is very easy, just click on the "velvetg on …" I it wasn't
already opened.
Then click on the blue circling arrow to run the tool again (after changing some
settings).
We will address the warnings by setting the following to auto :

10 | P a g e Performing de novo assemblies using NBIC GALAXY
• Expected short read k-mer coverage
• Removal of low coverage nodes AFTER tour bus
And set the "Minimum contig length" to 100, it should now look like this :
Check that Galaxy is using the right dataset as input, and press "Execute".
After running, answer these questions again :
What is the N50 of this assembly ?
What percentage of the reads was used in the assembly ?
Are there warnings in the output that we should address ?
Which one would you consider "better" ?
Measuring assembly metrics
Now that we have an assembly, we would like to know the metrics of it.
For that, we use another tool within Galaxy called "assemblystats".
We will look for it in a slightly different way, by using the search of Galaxy.

11 | P a g e Performing de novo assemblies using NBIC GALAXY
First click on the gear next to "Tools" at the top of the left block:
This will show this :
Now click on "Show Tool Search".
Enter "assembly" in the search box, and then select the "assemblystats" tool.
You will get a screen like this :
Now select the Contigs you have produced in the first assembly and press "Execute".
After some time, you can have a look at the results, the most interesting are "
Assembly statistics" and "Cumulative sum of contig sizes".
Now do the same for the second assembly.
What are the differences between the two assemblies ?
Do you see an effect of the changed settings for the second assembly ?
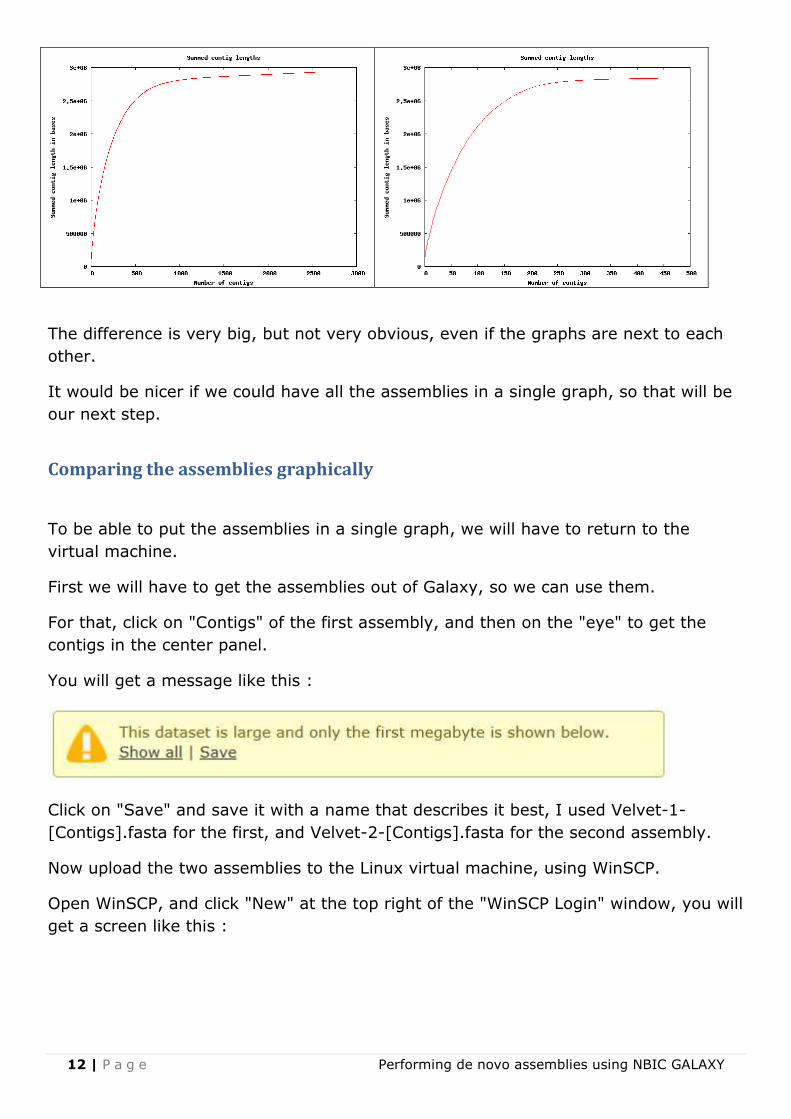
With a bit of trouble, you could get the images of the " Cumulative sum of contig
sizes" next to each other, like this:
12 | P a g e Performing de novo assemblies using NBIC GALAXY
The difference is very big, but not very obvious, even if the graphs are next to each
other.
It would be nicer if we could have all the assemblies in a single graph, so that will be
our next step.
Comparing the assemblies graphically
To be able to put the assemblies in a single graph, we will have to return to the
virtual machine.
First we will have to get the assemblies out of Galaxy, so we can use them.
For that, click on "Contigs" of the first assembly, and then on the "eye" to get the
contigs in the center panel.
You will get a message like this :
Click on "Save" and save it with a name that describes it best, I used Velvet-1-
[Contigs].fasta for the first, and Velvet-2-[Contigs].fasta for the second assembly.
Now upload the two assemblies to the Linux virtual machine, using WinSCP.
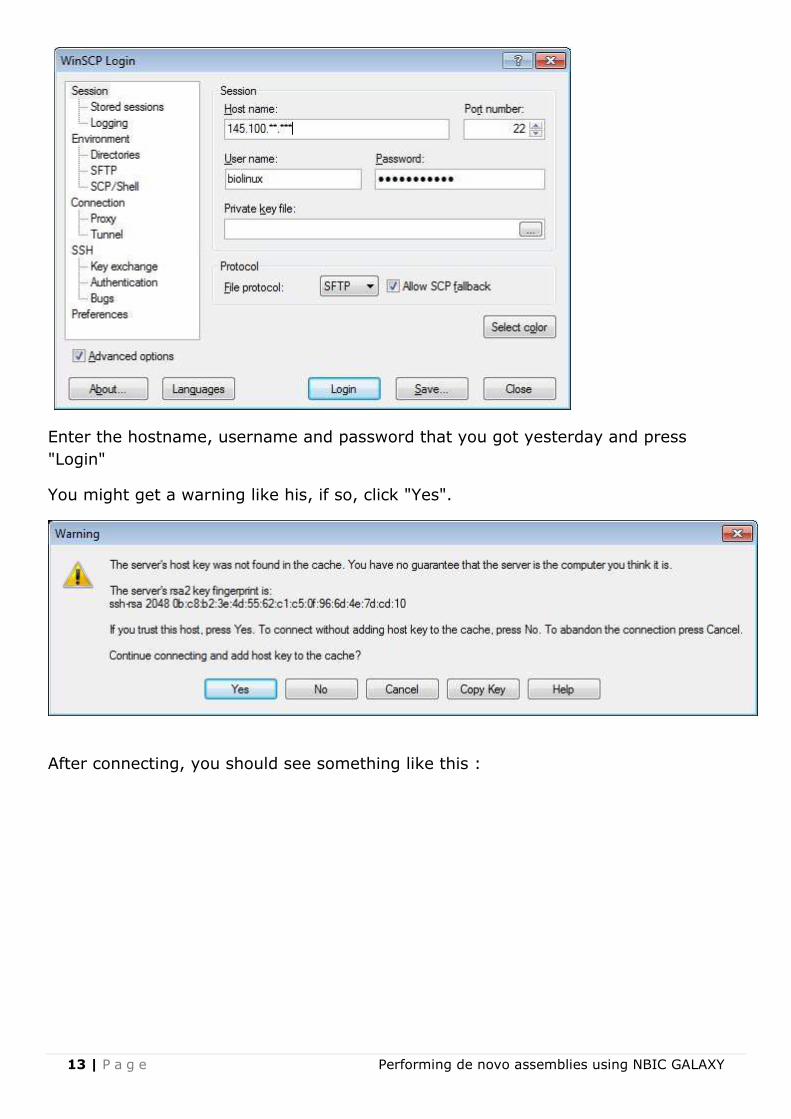
Open WinSCP, and click "New" at the top right of the "WinSCP Login" window, you will
get a screen like this :
13 | P a g e Performing de novo assemblies using NBIC GALAXY
Enter the hostname, username and password that you got yesterday and press
"Login"
You might get a warning like his, if so, click "Yes".
After connecting, you should see something like this :

14 | P a g e Performing de novo assemblies using NBIC GALAXY
Now open the "Galaxy_upload" folder by double clicking, and drag and drop the two
assemblies to it. Click "Copy" when you see this, leaving the defaults as they are.
Now the two assemblies are on the server, and we can start putting them in a single
graph.
Open a Putty session to your server, as you did yesterday.
On the command line, enter rstudio &
If all goes well, another window should open, looking somewhat like this :
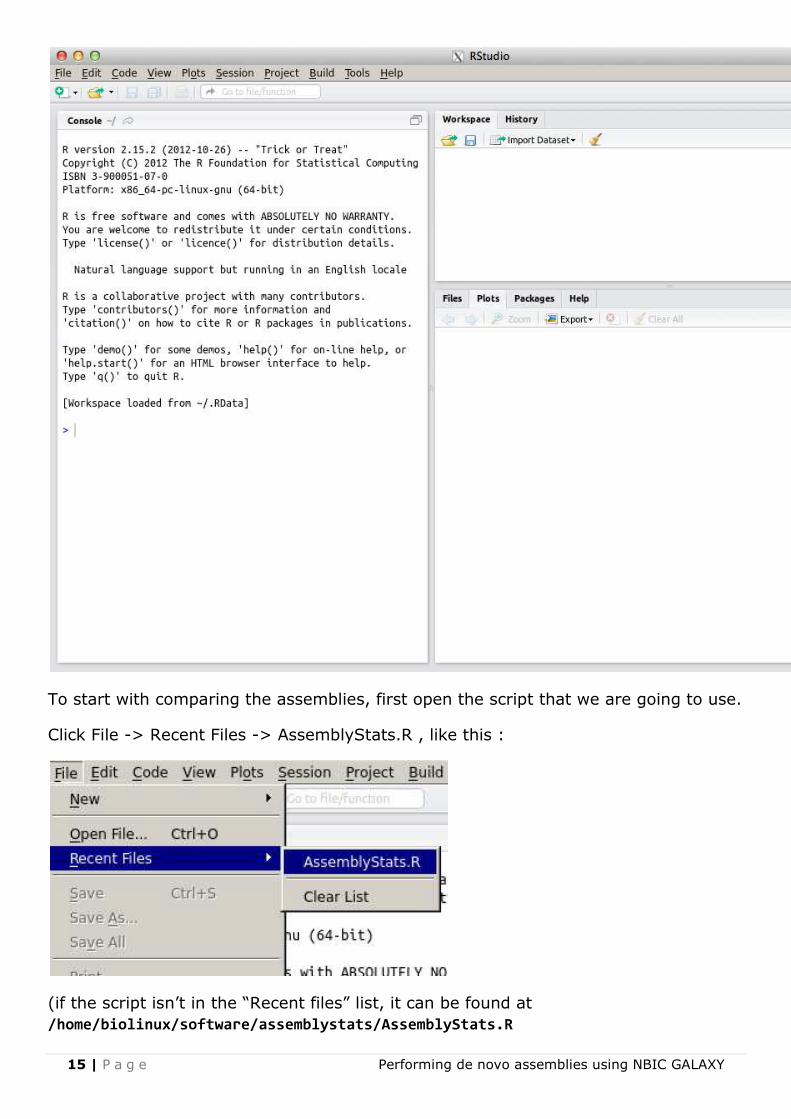
15 | P a g e Performing de novo assemblies using NBIC GALAXY
To start with comparing the assemblies, first open the script that we are going to use.
Click File -> Recent Files -> AssemblyStats.R , like this :
(if the script isn’t in the “Recent files” list, it can be found at
/home/biolinux/software/assemblystats/AssemblyStats.R

16 | P a g e Performing de novo assemblies using NBIC GALAXY
The script will load and you can enter the name of your files, instead of the names
that are prefilled for you.
As you can see, the soapdenovo assemblies are also there. If you do not have them
anymore, just remove them from the script.
Once you have changed the script to reflect your situation, press “Save”:
After that, press “Source” :
This will run the script, and produce a lot of assembly information in text and in
graphs.
If you want a better look at the graph you are looking at, click on “Zoom” :
There are two plots to view, one called “longest” , the other called “own”. You can
switch between the two with the arrows next to the “Zoom” button.
To get a better look at what is happening in the graph, please change the max_count
to 500 by removing the “#” in front of the line “max_count <- 500”.
Again, save and “Source”.
We are now seeing more clearly the effect of improving the assembly between the
first and second Velvet assembly. Also the impact of scaffolding the soapdenovo
assembly (the difference between the asm31.contig and asm31.scafSeq) is striking.
Can you describe why we need to use the longest assembly as a reference length for
the N50 plots and metrics ?
Now put the maximum count at 50, and again, save and “Source”.
Order the assemblies in “best” order, only based on looking at the graph. Just write it
down on paper.
Now do the same by looking at the numbers.
Is the order of the two lists completely the same ?
This concludes this part of the practicals.