personalization in webcenter portal
TRANSCRIPT

Overview
This technical article explains personalization concept in Webcenter Portal. It also provides steps to create a scenario
and use it in Webcenter Portal.
Product - Webcenter Portal 11.1.1.8
Personalization
Personalization provides a dynamically derived user experience for your Webcenter Portal. Personalization
evaluates defined sources of input data, generates a decision based on that evaluation, and applies this information to
a declaratively defined Personalization scenario. Personalization in Webcenter Portal is showing recommended
content for respective user for example in an ecommerce application user will see content or get application
navigation flow based on information about a user i.e. his activity/history and personal information targeting the
application experience for that specific user.
It is not same as customization in Webcenter Portal for example changing the number of column in table or setting
color for particular component. It is a programming model using rest and java interfaces to give recommended
content or output. It helps in making the framework more extensible.
Published content targeting is implemented by leveraging WebCenter Personalization Service (aka Conductor).
WebCenter Personalization (P13N) supports delivering targeted content based on both user and application context.
It also provides a run-time and associated design time tools that allow declarative definition of decision flow for the
content targeting.
Personalization Architecture
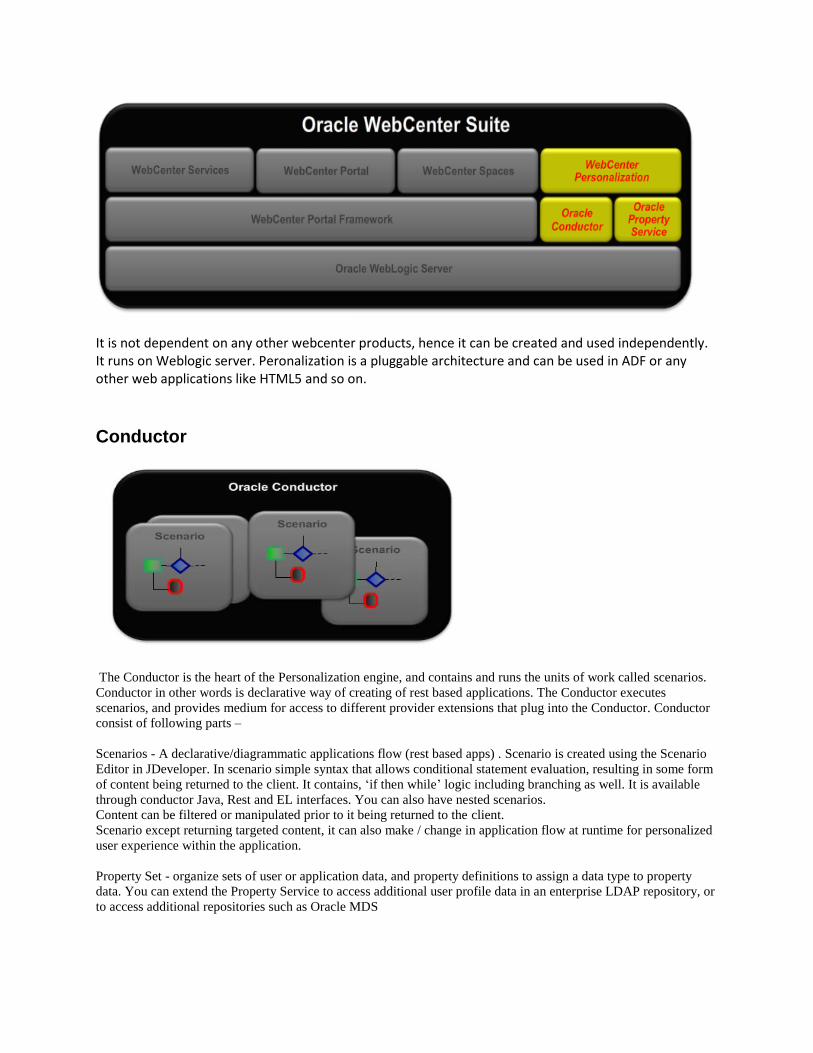
It is not dependent on any other webcenter products, hence it can be created and used independently. It runs on Weblogic server. Peronalization is a pluggable architecture and can be used in ADF or any other web applications like HTML5 and so on.
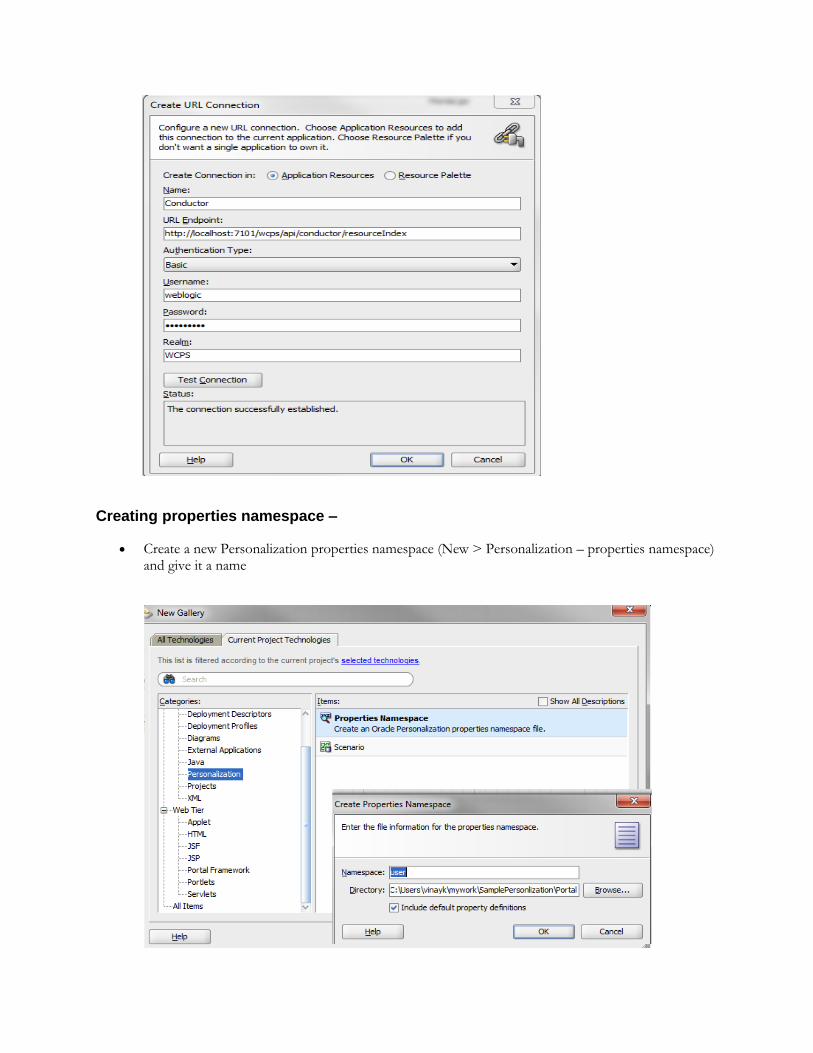
Conductor
The Conductor is the heart of the Personalization engine, and contains and runs the units of work called scenarios.
Conductor in other words is declarative way of creating of rest based applications. The Conductor executes
scenarios, and provides medium for access to different provider extensions that plug into the Conductor. Conductor
consist of following parts –
Scenarios - A declarative/diagrammatic applications flow (rest based apps) . Scenario is created using the Scenario
Editor in JDeveloper. In scenario simple syntax that allows conditional statement evaluation, resulting in some form
of content being returned to the client. It contains, ‘if then while’ logic including branching as well. It is available
through conductor Java, Rest and EL interfaces. You can also have nested scenarios.
Content can be filtered or manipulated prior to it being returned to the client.
Scenario except returning targeted content, it can also make / change in application flow at runtime for personalized
user experience within the application.
Property Set - organize sets of user or application data, and property definitions to assign a data type to property
data. You can extend the Property Service to access additional user profile data in an enterprise LDAP repository, or
to access additional repositories such as Oracle MDS

Providers - It provides a medium to access external resources within your scenario. It’s a reusable resource for
data or similar type of functionality. You can create a plug-in to get data from database or for content retrieval. It
can be accessible through local java interface. Remote provider can be accessed by local proxy via REST.
We have three out-of-the-box providers i.e. Property Service, Content Server Provider (CMIS) and Activity Graph.
Conductor also supports an extensible architecture that make you implement and access custom providers from
within your Scenarios.
Out-of-the-Box Providers
Property Service Provider (Integrate property set to provide set of properties)
CMIS Provider (Get content from CMIS content server)
Activity Graph Provider (provide access to activity graph engine)
People Connections Locator (provide user information)
For example
deliver content from UCM (CMIS Provider)
make recommendations based on activities in the WebCenter Space (Activity Graph Provider)
retrieve properties for a given WebCenter profile (People Connections Locator)
You can also write your custom provider. Read more on developer guide.
Create Personalization Scenario
Extend technology scope of you portal application to include WebCenter Personalization (hint – right-click on
the Portal Project and open Project Properties, select WebCenter Personalization and move it to the right panel):

1) P13N Expression Builders require live connection to WCPS, so it is recommended to start
embedded WLS before starting work on P13N artifacts (property namespace, scenarios, etc.). That
will start WCPS service.
2) Add connection to WCPS service (hint – Application Resources > New Connection > URL..)
using the following parameters:
URL Endpoint http://localhost:7101/wcps/api/conductor/resourceIndex
Authentication Basic
Username/Password weblogic/weblogic1
Realm WCPS
Creating properties namespace –
Create a new Personalization properties namespace (New > Personalization – properties namespace) and give it a name

Creating scenario –
Create a new Personalization scenario (New > Personalization – Conductor Scenario) and give it a name (it is a best practice to use name that describes scenario that you are going to build), e.g. AgeBasedRecommendation.scenarios_diagram.
After creating properties namespaces and scenario, you will have a project structure as
To build the property map right-click on the root node Property Namespace Definitions and select Create New -
Property Set Definition. Give a name, e.g. ‘userProfile’ to the new set. Follow a similar procedure to create new
Property Definition Mappings. Continue creating your property definition and properties that are shown on the
diagram below to the ‘userProfile’ Property Set:
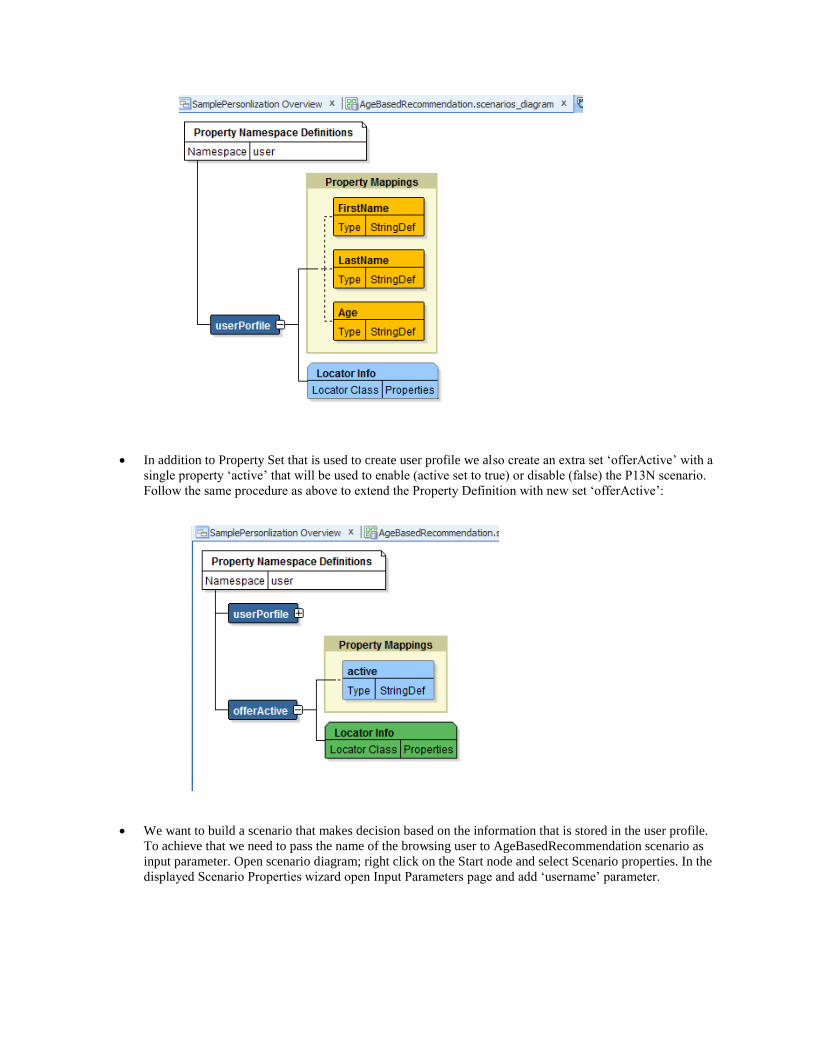
In addition to Property Set that is used to create user profile we also create an extra set ‘offerActive’ with a
single property ‘active’ that will be used to enable (active set to true) or disable (false) the P13N scenario.
Follow the same procedure as above to extend the Property Definition with new set ‘offerActive’:
We want to build a scenario that makes decision based on the information that is stored in the user profile.
To achieve that we need to pass the name of the browsing user to AgeBasedRecommendation scenario as
input parameter. Open scenario diagram; right click on the Start node and select Scenario properties. In the
displayed Scenario Properties wizard open Input Parameters page and add ‘username’ parameter.

Then we can create a flow inside the scenario. We can add different nodes inside the scenario .i.e.
Node Types ■ Start: The Start node is a root level node that defines where a scenario begins.
■ Return: The Return node halts execution of the scenario, and returns the specified results of evaluation
of an EL expression to the caller.
■ Set Variable: The Set Variable node lets you define a variable that is scoped within the context of the
currently running scenario and initialize it with an expression.
■ Script: Use the Script node to add a script, including ones that use embedded EL expressions, to your
scenario. A script engine can be specified by either the mime type or engine name.
■ Execute: The Execute node invokes a specified EL expression with no expected return value. Similar to
Variable Assignment, only the results of the expression are not stored within the Scenario context.
■ Error Handler: The Error Handler node provides a Java-like Catch/Try construct where you can use the
Try node to test a condition and execute a response depending on the results.
■ Conditional: The Conditional node evaluates an EL expression and executes the contained statements if
the EL expression evaluates to true. Statements within the otherwise block will only execute if all condition
statements evaluate to false.

■ For Each: The For Each node provides looping/iterative functionality over a collection of things.
■ While: Provides looping/iterating functionality as long as a specified EL expression evaluates to true.
■ Raise Error: Raise and throw an error with the specified error message
■ Invoke Provider: Invokes a named implementation of IDataProvider. Results are stored within the
context of the currently running Scenario.
■ Invoke Scenario: Invokes another named Scenario within the same namespace. Results are stored within
the context of the currently running Scenario
Continue creating scenario, we add Invoke provider.
Scenario nodes are added with empty settings. To configure the Invoke Provider node right-click on it and
select Invoke Provider Properties. When Properties wizard is selected first time for a new scenario,
JDeveloper prompts you to select WCPS (Conductor) connection.

In this example, I am using default Property Provider – in the Invoke Provider Properties wizard expand
oracle. PropertiesServiceProvider tree and then select GetProperty method with 4 arguments – namespace,
definition, set and property.
To select namespace, definition or property for the Provider method call, double click in the corresponding
Value field and then open Select dialogue for this field by clicking on the ‘…’ button.
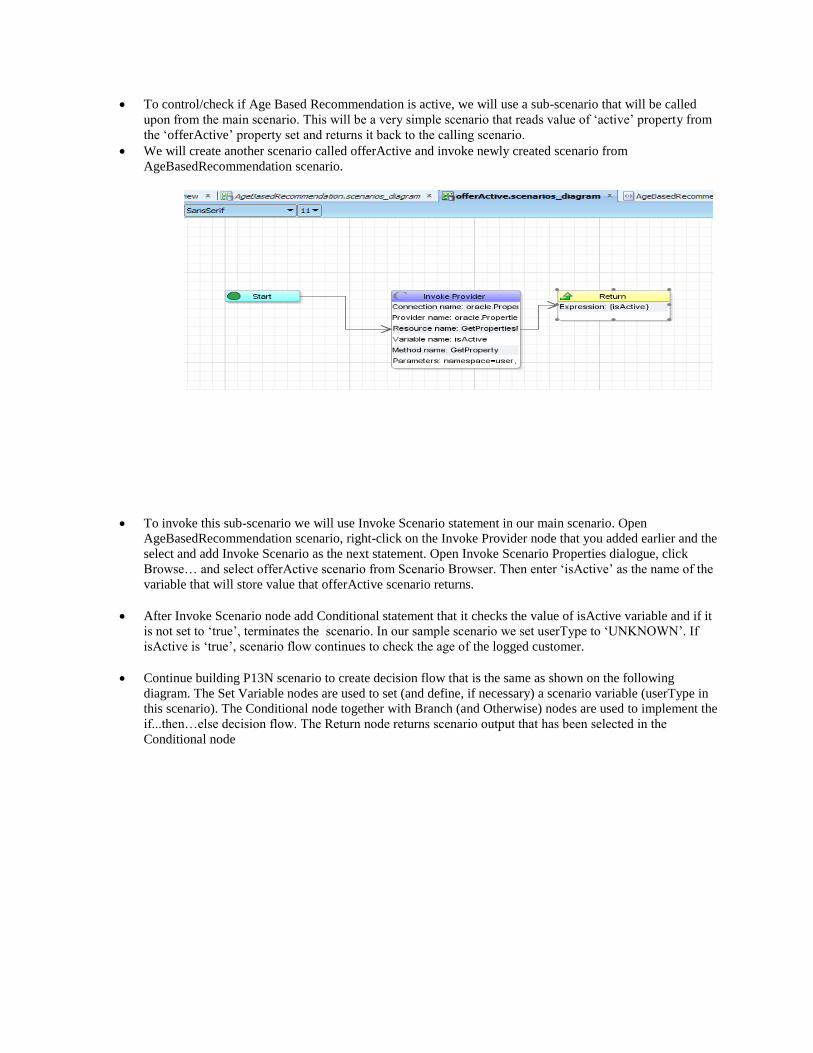
To control/check if Age Based Recommendation is active, we will use a sub-scenario that will be called
upon from the main scenario. This will be a very simple scenario that reads value of ‘active’ property from
the ‘offerActive’ property set and returns it back to the calling scenario.
We will create another scenario called offerActive and invoke newly created scenario from
AgeBasedRecommendation scenario.
To invoke this sub-scenario we will use Invoke Scenario statement in our main scenario. Open
AgeBasedRecommendation scenario, right-click on the Invoke Provider node that you added earlier and the
select and add Invoke Scenario as the next statement. Open Invoke Scenario Properties dialogue, click
Browse… and select offerActive scenario from Scenario Browser. Then enter ‘isActive’ as the name of the
variable that will store value that offerActive scenario returns.
After Invoke Scenario node add Conditional statement that it checks the value of isActive variable and if it
is not set to ‘true’, terminates the scenario. In our sample scenario we set userType to ‘UNKNOWN’. If
isActive is ‘true’, scenario flow continues to check the age of the logged customer.
Continue building P13N scenario to create decision flow that is the same as shown on the following
diagram. The Set Variable nodes are used to set (and define, if necessary) a scenario variable (userType in
this scenario). The Conditional node together with Branch (and Otherwise) nodes are used to implement the
if...then…else decision flow. The Return node returns scenario output that has been selected in the
Conditional node

In this way, we can create flow based P13N scenarios.
Final project structure in Jdeveloper will be like following image
Then we can deploy the personalization file to the server. After P13N scenario is finished and tested .It can be used
in WebCenter application to control displaying of targeted content. WCPS exposes REST API that you can access
from the JavaScript or directly from your custom application. Alternatively, you can use P13N EL expressions that
are made available on WebCenter pages
The expression language can be added in ‘datasource’ parameter of content presenter and then modify its value
attribute by adding a call on your p13n scenario to determine ID of the content that this Content Presenter task flow
will display. The P13N functionality is exposed on WebCenter pages through p14nContext object. The easiest way
to build a P13N EL is to use Expression builder to run a P13N scenario:
In the el, we can call the scenario using this syntax
#{p13nContext.conductor.default.namespaces['p13nApp'].scenario['AgeBasedRecommendation'].withInput[bindings.userNameVariable].results}
Ref- http://docs.oracle.com/cd/E17904_01/webcenter.1111/e10148/jpsdg_personalize.htm#JPSDG6732
About the Author
Vinay Kumar is an Oracle ACE/Principal Consultant and certified Oracle ADF/WebCenter Portal implementation
specialist. An Oracle Fusion Middleware evangelist. Vinay has seven years of experience consulting in Oracle ADF,
Oracle WebCenter Portal/Content.