pf osm 12-16-14 - astec inc. osm 1-23-15.pdf · astec’s economical aggregate drying burner fury...
TRANSCRIPT

ASTEC’S ECONOMICAL AGGREGATE DRYING BURNER
FURY
Version 1, 12/16/2014
OPERATION AND SERVICE MANUAL ASTEC Burner Group

Phoenix FURY - Operation and Service Manual
2
Table of Contents Table of Contents ........................................................................................................................... 2
Introduction .................................................................................................................................... 4
Operation and Service Statement ................... .................................................................................... 4
Scope of this Manual .............................. .............................................................................................. 4
Danger Safety and Warnings ........................................................................................................ 4
DANGER Combustion Equipment ....................... ............................................................................... 4
Basic Safety instructions ......................... ............................................................................................ 4
How to Recognize Shock ............................ ......................................................................................... 5
WARNING! .......................................... ................................................................................................... 5
General Burner Information ......................................................................................................... 5
Receiving and Inspection ............................................................................................................... 6
Burner Capacity ............................................................................................................................. 6
Table - 1 Burner Capacities ................................................................................ 6
Notes: For Table-1 ................................ ................................................................................................ 6
Combustion Flighting .................................................................................................................... 7
Operation ........................................................................................................................................ 7
Illustration 1b – Component Identification and Location ................................... 8
Illustration 1c – Component Identification and Location ................................... 9
Illustration 1d – Component Identification and Location ................................... 9
Adjustments .................................................................................................................................... 9
Burner Dimensions ...................................................................................................................... 10
Burner Mounting ......................................................................................................................... 11
Burner Pilot System ..................................................................................................................... 11
Illustration 2 - Pilot System .............................................................................. 11 Illustration 3 – Typical Pilot Gas Train ............................................................ 12
Adjustment and Operation of the Pilot System………………… ………………………………………12
Natural Gas Fuel Piping System ................................................................................................. 13
Illustration 4 - Gas Train Components.............................................................. 13
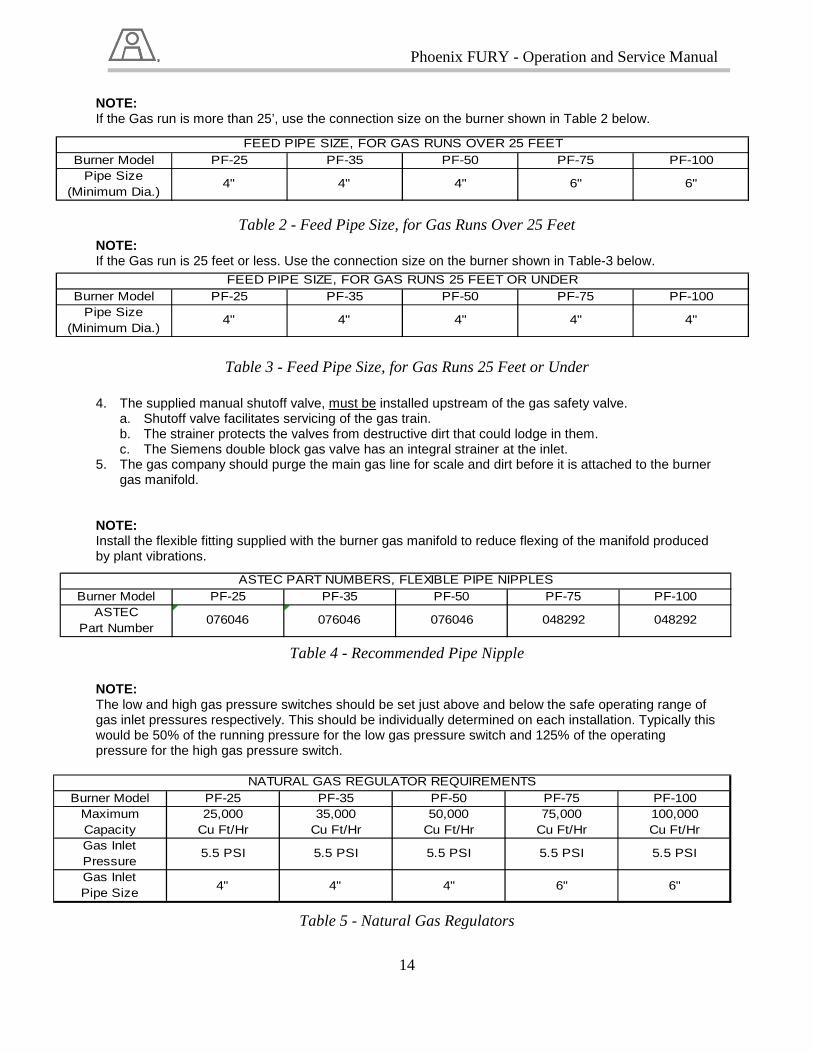
Table 2 - Feed Pipe Size, for Gas Runs Over 25 Feet ...................................... 14
Table 3 - Feed Pipe Size, for Gas Runs 25 Feet or Under ................................ 14
Table 4 - Recommended Pipe Nipple ............................................................... 14
Table 5 - Natural Gas Regulators ...................................................................... 14
Illustration 5 - Regulator Requirements ............................................................ 15

Phoenix FURY - Operation and Service Manual
3
Oil Fuel Piping System ................................................................................................................ 16
Illustration 6 - Oil Train .................................................................................... 16 Table 8 – Oil Train Settings .............................................................................. 17 Table 9 – Minimum Oil Line Size for various lengths ..................................... 17
Heavy Oil Fuel Piping System ..................................................................................................... 18
Illustration 7 - Heavy Oil Piping Schematic ..................................................... 18
Fuel Oil Atomizer ......................................................................................................................... 20
Illustration 8 – PF Nozzle Settings ................................................................... 20
To Reset the Nozzle Position, use the following ste ps: ............................................... .................. 20
To Remove the Oil Gun Assembly, use the following s teps: ............................................. ........... 21
Flame Shape Adjustments ........................................................................................................... 21
Flame Scanner ............................................................................................................................. 21
Illustration 9 - Flame Scanner ........................................................................... 22
Flame Scanner Cooling Air ......................................................................................................... 22
Maintenance & Trouble Shooting Guide .................................................................................... 23
Maintenance Schedule .............................. ......................................................................................... 23
Trouble Shooting .................................. .............................................................................................. 24
Recommended Spare Parts .......................................................................................................... 26
Table 10 – Spare Parts List ............................................................................... 26 Table 11 – Nozzle Spare Parts List ................................................................... 26
Detailed Burner Performance Sheets.......................................................................................... 27
Altitude Correction Chart ............................................................................................................ 28 High Altitude Blower Kit Addition
Illustration 10a - Burner High Altitude Blower Kit Addition…………..……...29 Illustration 10b - Burner High Altitude Blower Kit Addition .………………...29 Illustration 11 - Burner High Altitude Blower Kit Addition ………………......30 Illustration 12 - Burner High Altitude Blower Kit Addition ………………......31 Illustration 13 - Burner High Altitude Blower Kit Addition ………...………...32 Illustration 14 - Burner High Altitude Blower Kit Addition …………...……...33
V-Belt Tensioning Detail Illustration 15 – V-Belt Tensioning Detail………………………………………….34
Phoenix FURY - Operation and Service Manual
4
Introduction Operation and Service Statement These instructions are intended to serve as guidelines covering the installation, operation, and maintenance of ASTEC Burner Systems Group equipment. While every attempt has been made to ensure completeness, unforeseen or unspecified applications, details, or variations may preclude covering every possibility. If there is any information that is unclear, contradictory, or absent from this manual, please contact ASTEC Burner Group for clarification before proceeding. Scope of this Manual The objectives of this manual are to document the installation, operation, and maintenance of ASTEC Burner Systems Group equipment. It provides policies, procedures and references for assuring and controlling quality and compliance to requirements.
Danger Safety and Warnings DANGER Combustion Equipment Operating this Burner outside its design parameters, and/or removing, disabling, or bypassing any Phoenix FURY safety device can cause an explosion, serious injury, or death. Basic Safety instructions 1. Always lockout power to any plant equipment before working on it. 2. Equipment that is de-energized can still retain residual energy, or may be susceptible to gravity or
other potential energy sources. 3. Keep away from power driven parts, even if they are not moving, unless they are locked out or
chained down. 4. Use extreme caution if you must approach running equipment. 5. Check that all fuel sources are shut off, and locked out prior to working on the burner. 6. All the drive guards, handrails, and other safety devices must be in place before starting the
equipment. 7. Prior to start up check that all plant components are in good working condition. 8. Never remove, disable, defeat, or bypass any safety device on this equipment. 9. Make no modifications to your Phoenix FURY Burner without the recommendation or approval of a
representative of ASTEC Burner Group, Engineering, or Service Departments. 10. Account for all your personnel, on the jobsite, before plant startup. 11. Avoid wearing loose clothing, long hair, necklaces, neckties, or anything that could become entangled
in rotating machinery. 12. Never leave the control house unattended, while the plant is in operation. 13. To avoid engulfment by loose aggregate, never walk on the material stockpiles, or on the material in
the cold feed bins. 14. Never enter a potentially hazardous enclosed space, without an OSHA enclosed space permit
program in effect. (Contact ASTEC Parts Department for an outline of these requirements.) 15. Relieve internal pressure before working on any equipment containing high pressure. 16. Carefully vent any flammable gas using safety measures that will prevent ignition. 17. Thoroughly tighten all fittings before reapplying pressure.

Phoenix FURY - Operation and Service Manual
5
How to Recognize Shock Shock is caused by a rapid loss of blood pressure, the symptoms include: • A rapid and weak pulse. • Rapid breathing. • A feeling of tiredness, or sleepiness. • Confused thinking. • Pale, cold, and sweaty skin.
First aid for shock: • Have the victim lie down, and remain quiet. • Elevate the victim’s feet, to improve circulation to the head and chest. • Cover the victim with a blanket to maintain body temperature. • Transport the victim to a hospital, medical clinic, or doctor’s office as soon as possible. WARNING! Carefully read the safety instructions in this oper ating and service manual. Follow all the safety warning messages located throughout this manual. • Always lock-out power before working on any plant equipment. • To prevent serious bodily injury, do not operate any plant equipment with the guards or other safety
components removed. • Never repair this burner with replacement parts not approved by the manufacturer.
(Approved parts are only those available through ASTEC parts department, or any other parts specifically approved by the ASTEC Burner Systems Group.)
• These instructions are intended for use only by experienced and qualified personnel. (Qualified personnel are those trained by ASTEC Burner Systems Group, or ASTEC’s Service Department.)
General Burner Information The PHOENIX FURY burner is designed to provide maximum firing capability with minimum noise and pollution.
With its compact flame shape, the Phoenix FURY flame provides the ideal means for drying aggregate. The flame shape is pre-set at the factory for the most efficient profile for your drum and burner configuration.
The PHOENIX FURY Burner has an open fired combustion system that provides 60% of all the necessary combustion air. This ensures that the combustion air, plus 25% excess air, is available for efficient operation at maximum capacities.
The Fuel/Air ratio is maintained throughout the burner's operating range with either mechanically or electronically linked valves. The PHOENIX FURY will burn all commercial grades of fuel oil and natural gas, depending on your configuration.
The burner provides a nominal 7:1 turndown from its maximum firing rate. This provides efficient operation at various production rates.
Phoenix FURY - Operation and Service Manual
6
BURNERMODEL
BURNERAIR FLOW
SCFH
BURNERBLOWER
HP
NATURALGAS
SCFH
OILFLOWGPM
MAXIMUMCAPACITYBTU/HOUR
PF-25 192,000 30 25,000 2.9 25,000,000
PF-35 269,000 40 35,000 4.1 35,000,000
PF-50 430,000 50 50,000 5.9 50,000,000
PF-75 590,000 75 75,000 8.8 75,000,000
PF-100 768,000 100 100,000 11.7 100,000,000
Receiving and Inspection Upon receipt of the Burner: 1. Check each item on the bill of lading and/or invoice to determine that all the equipment that was
shipped has been received. 2. Carefully examine all of the equipment, assemblies and subassemblies to check if there has been
any damage in shipment. 3. If there are any damaged or missing parts, contact ASTEC Burner Systems Group for assistance.
(423-867-4210, or FAX 423-827-1560)
NOTE: If the installation is delayed and the equipment is to be stored outside: 1. Provide adequate protection, as dictated by your climate and the period of exposure. 2. Special care should be given to all; motors, hydraulics, electrical parts, and bearings, to protect them
from rain, snow, or excessive moisture.
Burner Capacity
Table - 1 Burner Capacities
Notes: For Table-1 1. The maximum BTU/hour rating is based on 25% excess air. 2. The figures used in Table – 1 are based on: 60Hz AC, and Standard Cubic Feet per Hour (SCFH), at
70F air temperature, at sea level. 3. Correction factors must be applied for altitude or temperature variations. (See Altitude Correction
Chart.) 4. Viscosity of the oil delivered to the burner must be 80 SSU (maximum) or lower. 5. The system exhaust fan must have enough capacity to provide a slight negative pressure (0.15” to
0.25" water column) at the burner breech plate. (This will exhaust the products of combustion, and prevent “puffing” at the breeching plate.)
6. The air flow in the PHOENIX FURY can be monitored using the pressure tap in front of the damper. (The body pressure for a given flow is in the individual burner capacity tables.)
7. Gas burners are supplied with a metering orifice plate. This creates a differential pressure at a given flow rate measured in inches of water column with a differential pressure gauge, or manometer.
8. The values of differential pressure versus flow are listed in the individual burner capacity sheets found on the plant’s flash drive.

Phoenix FURY - Operation and Service Manual
7
Combustion Flighting 1. The flight design in the combustion zone of the drum is especially important for minimizing flue gas
pollutant emissions. 2. The flights provide heat shielding to keep the drum skin temperature low. (Protecting the metal drum
skin from the flame radiating directly onto the drum.) 3. For the lowest possible emissions of CO and Total Hydrocarbons, the combustion zone must be clear
of veiling material. (Showering material through the flame is a common cause of incomplete combustion.)
4. The combustion zone must be large enough to accommodate complete combustion. (The length and diameter of the combustion zone must be large enough for the burner flame to fit inside. See the Burner Performance Data Sheets for the flame dimensions.)
5. The combustion flights are designed to be self-cooling, to prevent their failure through overheating. (A good combustion flight design plows most of the material over the fights, while allowing some to flow under them next to the shell, insulating the drum from radiant heat, and using the aggregate to cool the flights.)
6. The ASTEC Parts Department can supply combustion flights designed for your application.
Operation 1. The basic model PHOENIX FURY uses a firing rate control motor mounted to the combustion air
damper which is mechanically linked to the fuel valves and air damper. 2. The Programmable Logic Control (PLC) option to the burner control, adds additional sophistication to
the management of the fuel/air ratio, by adding another control motor that manipulates the fuel valve position.
3. The PLC allows the fuel and air valve to be controlled independently. 4. A combustion blower pressure switch (normally open) must be made to prove the blower is operating.
This pressure switch is usually set at 1.5” w.c. 5. The combustion air control damper must open to initiate the purge cycle prior to lighting the burner.
a. The safety limit parameters must be satisfied. b. The purge pressure switch must be tripped for the purge cycle to begin. This pressure switch is
usually set at 10” w.c. c. The plant flue gas exhaust fan must be confirmed to be running. d. The fan damper must be open enough for the calculated volume of air to flow during the required
purge time. e. The minimum purge time is the time required for four volumes of air to flow through the heating
chamber 5. Before light-off the combustion air damper must be at the low-fire position. 6. The low-fire combustion air damper limit switch is set to close its contacts at the minimum fire light off
position. 7. The low fire proof fuel valve limit switch (the switch that contacts the fuel valve linkage arm) must be
closed with the low fire combustion air switch for the light-off sequence to begin

Phoenix FURY - Operation and Service Manual
8
Illustration 1a – Component Identification and Location
Illustration 1b – Component Identification and Location

Phoenix FURY - Operation and Service Manual
9
Illustration 1c – Component Identification and Location
Illustration 1d – Component Identification and Location
Adjustments

Phoenix FURY - Operation and Service Manual
10
Burner Dimensions PHOENIX FURY dimension drawings are located on the plant’s flash drive. If the drawings cannot be located please contact Astec Burner Group.

Phoenix FURY - Operation and Service Manual
11
Burner Mounting 1. The centerline of the Burner should be mounted on the centerline of the drum, at the same pitch as
the drum. 2. The insertion depth should be such that the end of the burner is 2 or 3” behind the breaching ring. 3. Cut out a hole in the breeching plate 3" smaller in diameter than the burner radiation shield. 4. Check burner blower rotation. Rotation should be clockwise from the motor end.
Burner Pilot System The PHOENIX FURY incorporates a forced-air pilot system. The Pilot and the main flame are monitored by a single Ultra Violet (UV) flame detector attached to the burner, and included in the complete burner package. The air for the pilot is provided from inside the fan housing where there is a constant air pressure. The adjustment and operation of the pilot system is detailed below.
Illustration 2 - Pilot System
Illustration 3 – Typical Pilot Gas Train
Phoenix FURY - Operation and Service Manual
12
Adjustment and Operation of the Pilot System 1. Use Natural Gas (NG) or Liquid Propane (LP) vapor only to fuel the pilot.
WARNING! Never connect the LP fuel line to the pilot from the bottom of the LP tank. LP would likely be sent to the pilot, where it could quickly boil off, causing either an explosion or fire in the burner.
2. If natural gas is the primary fuel, the pilot fuel supply should be connected to the natural gas feed piping, upstream of the main regulator.
3. If you will be firing using liquid fuels, and/or natural gas service is not currently available, connect the gas feed piping to a LP vapor line. (See above warning.)
4. Purge the fuel piping of any contaminates before connecting it to the pilot assembly. 5. Size the pilot gas supply line to avoid an excessive pressure drop. (For a pilot gas supply line up to
50 feet long, use a minimum of 3/8" pipe.) 6. Gas pressures at the inlet of the gas pilot manifold can range from 2 to 25 psig. 7. The entire pilot assembly can be removed from the burner by removing the strut bolts and pipe
unions along the side of the burner, then pulling the assembly backwards. 8. Remove the spark plug wire boot; then the spark plug can be removed with a standard spark plug
socket. 9. Make sure the spark igniter is connected to the ignition transformer. 10. Remove the protective cover on the adjustable pilot gas orifice; rotate the adjustment screw clockwise
for less gas pressure, Turn counter-clockwise to increase the gas pressure 11. The initial recommended fuel pressure setting is approximately 1”-2” Water Column for Vaporized
Propane, 1”-2” Water Column for Natural Gas measured at the test port. Air pressure not adjustable. 12. At this rate the pilot should light the main burner easily, and deliver a sufficient UV flame signal.
WARNING! • The pilot ignition transformer can cause a painful shock, use care around the ignition cable. • Only leave the pilot gas on for a very short period of time while lighting the burner. • If pilot does not light at once, shut it off, and then purge it before attempting to relight.
Phoenix FURY - Operation and Service Manual
13
Natural Gas Fuel Piping System
Illustration 4 - Gas Train Components 1. Install a controlling gas regulator in the main gas line within 25 feet of the burner.
a. This regulator should be sized to provide the required gas flow at the inlet of the burner manifold. b. 3 – 5 psig is the nominal expected gas pressure required at the burner Consult the burner profile
sheet found on the plant flash drive for more precise information. ( See Detailed Burner Performance Sheets)
c. Exact gas pressure must be set at the initial start-up depending on piping configuration, burner size, and maximum rated capacity.
2. The piping from the gas regulator outlet to the burner gas manifold should be sized to minimize pressure losses.
3. The pipe size from the control regulator to the gas train, can be identical to the gas pipe size at the entrance to the burner gas train, see tables below.
NOTE: It is normal for the regulator size to be smaller than the line size.
Phoenix FURY - Operation and Service Manual
14
Burner Model PF-25 PF-35 PF-50 PF-75 PF-100Pipe Size
(Minimum Dia.)4" 4" 4" 6" 6"
FEED PIPE SIZE, FOR GAS RUNS OVER 25 FEET
Burner Model PF-25 PF-35 PF-50 PF-75 PF-100Pipe Size
(Minimum Dia.)4" 4" 4" 4" 4"
FEED PIPE SIZE, FOR GAS RUNS 25 FEET OR UNDER
Burner Model PF-25 PF-35 PF-50 PF-75 PF-100ASTEC
Part Number076046 076046 076046 048292 048292
ASTEC PART NUMBERS, FLEXIBLE PIPE NIPPLES
Burner Model PF-25 PF-35 PF-50 PF-75 PF-100MaximumCapacity
25,000Cu Ft/Hr
35,000Cu Ft/Hr
50,000Cu Ft/Hr
75,000Cu Ft/Hr
100,000Cu Ft/Hr
Gas InletPressure
5.5 PSI 5.5 PSI 5.5 PSI 5.5 PSI 5.5 PSI
Gas InletPipe Size
4" 4" 4" 6" 6"
NATURAL GAS REGULATOR REQUIREMENTS
NOTE: If the Gas run is more than 25’, use the connection size on the burner shown in Table 2 below.
Table 2 - Feed Pipe Size, for Gas Runs Over 25 Feet NOTE: If the Gas run is 25 feet or less. Use the connection size on the burner shown in Table-3 below.
Table 3 - Feed Pipe Size, for Gas Runs 25 Feet or Under 4. The supplied manual shutoff valve, must be installed upstream of the gas safety valve.
a. Shutoff valve facilitates servicing of the gas train. b. The strainer protects the valves from destructive dirt that could lodge in them. c. The Siemens double block gas valve has an integral strainer at the inlet.
5. The gas company should purge the main gas line for scale and dirt before it is attached to the burner gas manifold.
NOTE: Install the flexible fitting supplied with the burner gas manifold to reduce flexing of the manifold produced by plant vibrations.
Table 4 - Recommended Pipe Nipple NOTE: The low and high gas pressure switches should be set just above and below the safe operating range of gas inlet pressures respectively. This should be individually determined on each installation. Typically this would be 50% of the running pressure for the low gas pressure switch and 125% of the operating pressure for the high gas pressure switch.
Table 5 - Natural Gas Regulators

Phoenix FURY - Operation and Service Manual
15
Illustration 5 - Regulator Requirements
6. The gas valve linkage must be adjusted for proper flow control.. 7. See individual burner performance sheets for air and gas flows. (See Detailed Burner Performance
Sheets) 8. Use the utmost care in making any adjustment to prevent an unsafe condition. WARNING!
• The settings in Table 5 are for the regulator sizing only. • Final settings will have to be adjusted for the particular operating conditions. • Be sure not to have more fuel flow than there is combustion air available to burn, or "puffing", and
a dangerously rich firing condition could occur. 9. Metering natural gas is accomplished by taking a differential pressure across the orifice plate in the
pre-piped gas train. • The gas flows versus orifice plate differential pressures are shown in the Detailed Burner
Performance Sheets.

Phoenix FURY - Operation and Service Manual
16
Oil Fuel Piping System
Illustration 6 – Heavy Oil Train
Phoenix FURY - Operation and Service Manual
17
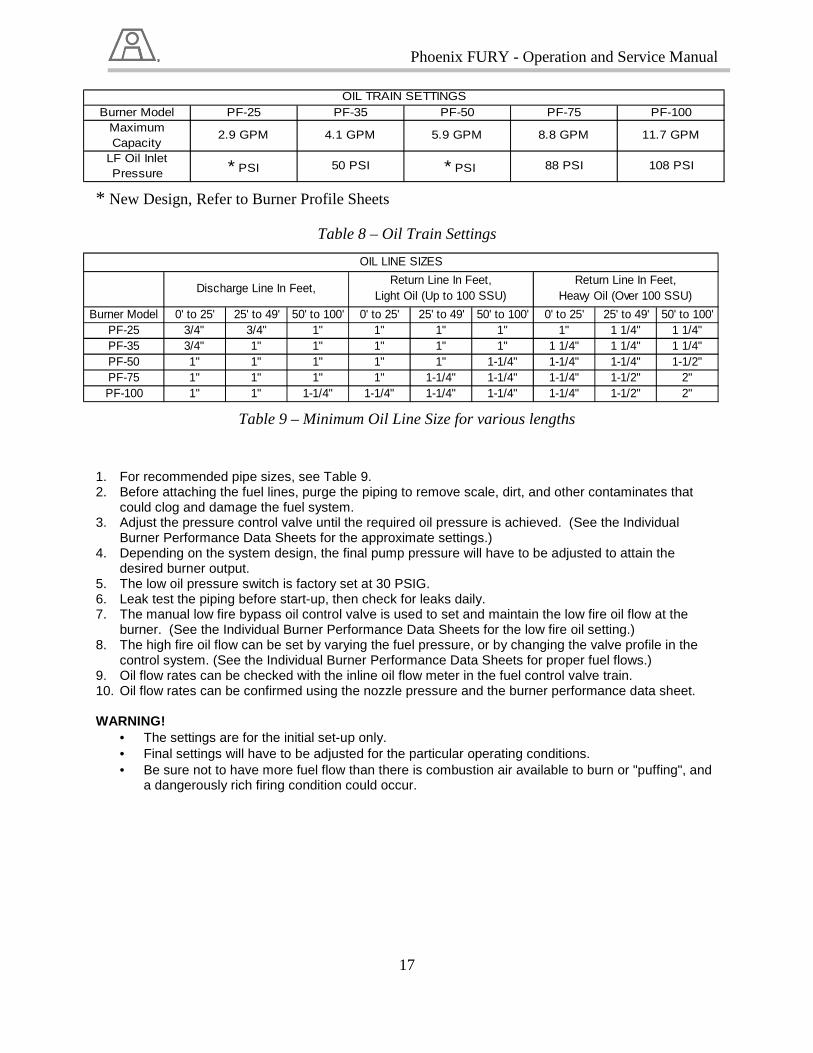
Burner Model 0' to 25' 25' to 49' 50' to 100' 0' to 25' 25' to 49' 50' to 100' 0' to 25' 25' to 49' 50' to 100'PF-25 3/4" 3/4" 1" 1" 1" 1" 1" 1 1/4" 1 1/4"PF-35 3/4" 1" 1" 1" 1" 1" 1 1/4" 1 1/4" 1 1/4"PF-50 1" 1" 1" 1" 1" 1-1/4" 1-1/4" 1-1/4" 1-1/2"PF-75 1" 1" 1" 1" 1-1/4" 1-1/4" 1-1/4" 1-1/2" 2"PF-100 1" 1" 1-1/4" 1-1/4" 1-1/4" 1-1/4" 1-1/4" 1-1/2" 2"
Discharge Line In Feet,Return Line In Feet,
Light Oil (Up to 100 SSU)Return Line In Feet,
Heavy Oil (Over 100 SSU)
OIL LINE SIZES
Burner Model PF-25 PF-35 PF-50 PF-75 PF-100MaximumCapacity
2.9 GPM 4.1 GPM 5.9 GPM 8.8 GPM 11.7 GPM
LF Oil InletPressure * PSI 50 PSI * PSI 88 PSI 108 PSI
OIL TRAIN SETTINGS * New Design, Refer to Burner Profile Sheets
Table 8 – Oil Train Settings
Table 9 – Minimum Oil Line Size for various lengths
1. For recommended pipe sizes, see Table 9. 2. Before attaching the fuel lines, purge the piping to remove scale, dirt, and other contaminates that
could clog and damage the fuel system. 3. Adjust the pressure control valve until the required oil pressure is achieved. (See the Individual
Burner Performance Data Sheets for the approximate settings.) 4. Depending on the system design, the final pump pressure will have to be adjusted to attain the
desired burner output. 5. The low oil pressure switch is factory set at 30 PSIG. 6. Leak test the piping before start-up, then check for leaks daily. 7. The manual low fire bypass oil control valve is used to set and maintain the low fire oil flow at the
burner. (See the Individual Burner Performance Data Sheets for the low fire oil setting.) 8. The high fire oil flow can be set by varying the fuel pressure, or by changing the valve profile in the
control system. (See the Individual Burner Performance Data Sheets for proper fuel flows.) 9. Oil flow rates can be checked with the inline oil flow meter in the fuel control valve train. 10. Oil flow rates can be confirmed using the nozzle pressure and the burner performance data sheet. WARNING!
• The settings are for the initial set-up only. • Final settings will have to be adjusted for the particular operating conditions. • Be sure not to have more fuel flow than there is combustion air available to burn or "puffing", and
a dangerously rich firing condition could occur.
Phoenix FURY - Operation and Service Manual
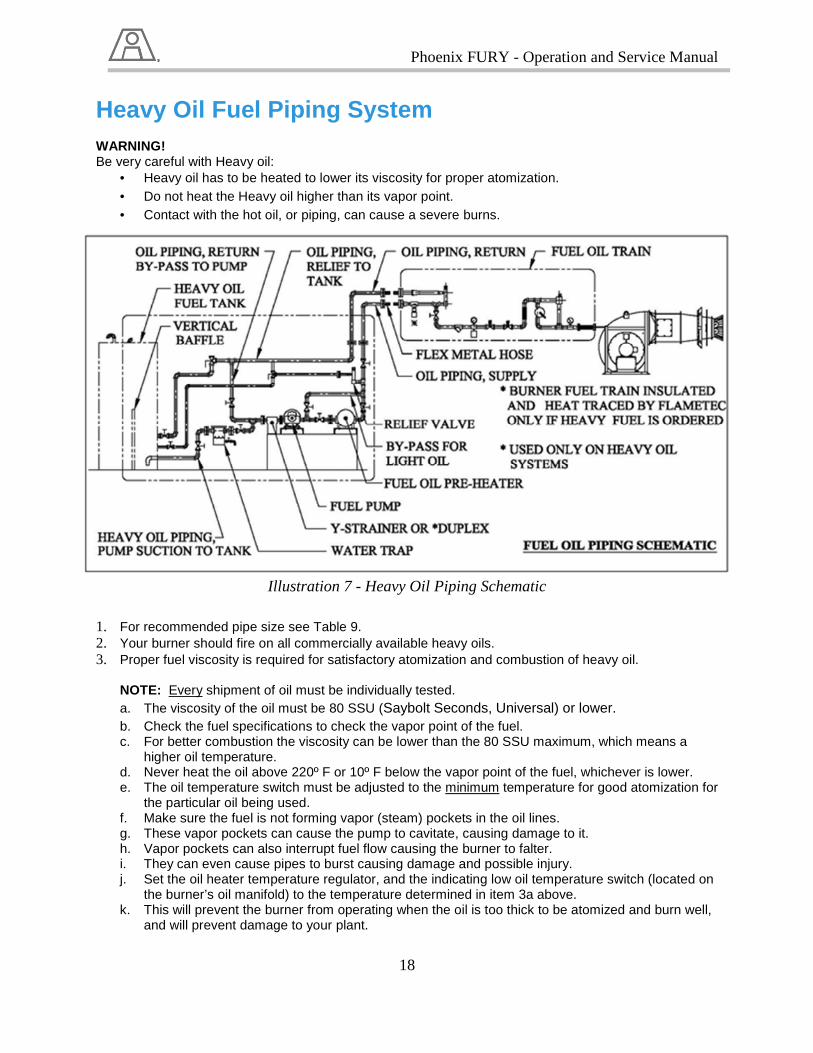
18
Heavy Oil Fuel Piping System WARNING! Be very careful with Heavy oil:
• Heavy oil has to be heated to lower its viscosity for proper atomization. • Do not heat the Heavy oil higher than its vapor point. • Contact with the hot oil, or piping, can cause a severe burns.
Illustration 7 - Heavy Oil Piping Schematic
1. For recommended pipe size see Table 9. 2. Your burner should fire on all commercially available heavy oils. 3. Proper fuel viscosity is required for satisfactory atomization and combustion of heavy oil.
NOTE: Every shipment of oil must be individually tested. a. The viscosity of the oil must be 80 SSU (Saybolt Seconds, Universal) or lower. b. Check the fuel specifications to check the vapor point of the fuel. c. For better combustion the viscosity can be lower than the 80 SSU maximum, which means a
higher oil temperature. d. Never heat the oil above 220º F or 10º F below the vapor point of the fuel, whichever is lower. e. The oil temperature switch must be adjusted to the minimum temperature for good atomization for
the particular oil being used. f. Make sure the fuel is not forming vapor (steam) pockets in the oil lines. g. These vapor pockets can cause the pump to cavitate, causing damage to it. h. Vapor pockets can also interrupt fuel flow causing the burner to falter. i. They can even cause pipes to burst causing damage and possible injury. j. Set the oil heater temperature regulator, and the indicating low oil temperature switch (located on
the burner’s oil manifold) to the temperature determined in item 3a above. k. This will prevent the burner from operating when the oil is too thick to be atomized and burn well,
and will prevent damage to your plant.
Phoenix FURY - Operation and Service Manual
19
4. Purge the lines before attaching them to the fuel manifold. 5. Adjust the pressure relief valve until the required oil pressure is attained. 6. See the individual burner performance sheets for approximate valve settings. (See Burner
Performance Data Sheets for proper fuel flows.) 7. Final pump pressure will have to be adjusted to obtain the rated burner output, depending on system
design. 8. High fire oil flow can be set by adjusting fuel pressure or by restroking the oil valve. Refer to individual
burner performance sheets. (See Burner Performance Data Sheets) 9. The manual low fire bypass oil control valve is used to set and maintain the low fire oil flow at the
burner. Refer to individual burner performance sheets. (See Burner Performance Data Sheets) 10. The low oil pressure switch is factory set at 30 PSIG. 11. The high oil pressure switch is factory set at 150 PSIG. WARNING!
• Final settings will have to be adjusted for the particular operating conditions. • Be sure not to have more fuel flow than there is combustion air available, or "puffing" and a
dangerously rich firing condition could occur.

Phoenix FURY - Operation and Service Manual
20
Fuel Oil Atomizer
Illustration 8 – PF-Nozzle Settings The position of the fuel oil atomizer in the nozzle affects its ability to atomize the oil. The nozzle is preset at the factory as shown in Illustration 8. In case of variation, changing the oil atomizer nozzle position is accomplished by the following.
To Reset the Nozzle Position, use the following ste ps: 1. Shut down the burner, and de-energize the burner compressed air system. WARNING: Lock-out the plant power, before working on the burner. 2. Shut off the manual oil ball valve on the burner oil train. 3. Allow enough time for the oil in the piping to cool. 4. Look at Illustration 8, to determine if the oil atomizing nozzle must be moved in or out to regain the
proper adjustment. 5. Make a note of the initial position of the oil nozzle. 6. Loosen the set screws of the set collars on the mounting plate of the Oil Gun/Pilot Assembly. 7. Move the nozzle pipes in or out to effect the required retraction or extension of the Oil Gun/Pilot
Assembly. 8. Once the proper positioning of the Oil Gun/Pilot Assembly is completed; Re-tighten the set screws of
the set collars on the mounting plate of the Oil Gun/Pilot Assembly. 9. Contact ASTEC Burner Systems Group for any questions about proper positioning.

Phoenix FURY - Operation and Service Manual
21
To Remove the Oil Gun Assembly, use the following steps: 1. Shut down the burner, and de-energize the burner compressed air system. WARNING: Lock-out the plant power, before working on the burner. 2. Shut off the manual oil ball valve on the burner oil train. 3. If heated heavy oil is being used, allow enough time for the oil in the piping to cool. 4. Remove the four nuts holding the Oil Gun/Pilot Assembly onto the burner/blower. 5. Pull out the Oil Gun/Pilot Assembly from the burner/blower body. 6. Make a note of the initial position of the oil nozzle. 7. Contact ASTEC Burner Systems Group for any questions about proper positioning. 8. Once the proper positioning of the Oil Gun/Pilot Assembly is completed:
a. Re-tighten the set screws of the set collars on the mounting plate of the Oil Gun/Pilot Assembly. b. Install the Oil Atomizer Assembly in the burner/blower with the four nuts.
Flame Shape Adjustments 1. The PHOENIX FURY Burner is preset at the factory for the shortest and narrowest flame possible.
This makes flame adjustment burners virtually obsolete. 2. Do not change the spin vanes from the factory settings. (They are preset at 45°.) 3. The length of the flame must be shorter than the combustion zone in your drum. (Material that
showers through the flame causes increased pollutants in the flue gas.) 4. The width of the flame must be less than the I.D. of the combustion flights. 5. See the detailed Burner Performance Data Sheets for the flame size and diameter. (See Burner
Performance Data Sheets.)
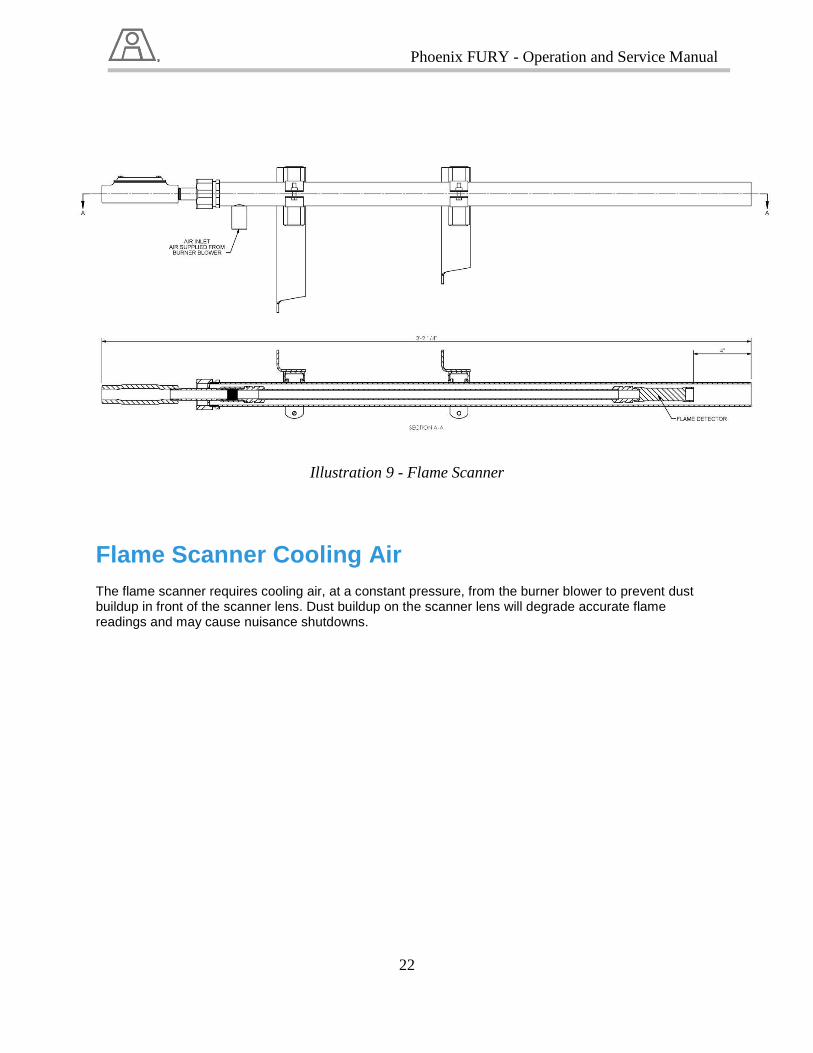
Flame Scanner The PHOENIX FURY is supplied with a Flame Scanner that detects Ultra Violet (UV) radiation in the flame. The flame scanner is located in an air cooled guide tube near the front of the burner. It can be removed by unthreading the 1 ¼” aluminum cap on the back of the burner and pulling the flexible conduit attached to it out. NOTE: Be careful not to physically shock or overheat the Flame Detector as this can cause it to fail.
Phoenix FURY - Operation and Service Manual
22
Illustration 9 - Flame Scanner
Flame Scanner Cooling Air The flame scanner requires cooling air, at a constant pressure, from the burner blower to prevent dust buildup in front of the scanner lens. Dust buildup on the scanner lens will degrade accurate flame readings and may cause nuisance shutdowns.

Phoenix FURY - Operation and Service Manual
23
Maintenance & Trouble Shooting Guide The PHOENIX FURY burner has minimal internal moving parts and is relatively maintenance free; however there are a few items that for safety reasons and for fuel efficiency should be periodically checked. Maintenance Schedule Daily Maintenance
• Clean all oil filters and strainers as needed. • Check oil temperature and viscosity of waste oil, It must be less than 80 SSU. • Check fuel pressure.
Weekly Maintenance
• Clean the oil nozzle and atomizer. • Clean the flame scanner using a soft cloth and Windex.
Monthly Maintenance
• Remove the oil gun assembly from the back of the burner. • Clean the swirl plate, attached to the back of the nozzle body. • Clean and inspect the igniter plug and igniter wire. • Inspect the heat tracing on heavy oil trains and immersion heater on oil gun. • Inspect the burner cone for signs of distortion, or other heat damage. • Remove any build-up on the burner front.
Yearly Maintenance
• Thoroughly wash and inspect the burner blower impeller. It is accessed through the hatch on the back of the blower.
• Clean the pilot gas Y-strainer. • Clean the gas screen. It is located at the inlet of the double blocking gas valve. • Check the oil nozzle for signs of wear. • Check fuel & air piping for leaks and tightness. • Have combustion quality checked with a combustion analyzer. • Check the function of all safety equipment (pressure switches, limit switches, etc), to make
sure they are all fully operational. Maintenance Notes: 1. Check and lubricate all points of the valve linkage. 2. Mark the linkage so that any slippage will be noticed. 3. Dirt can clog the atomizing air nozzle, as well as causing burner firing problems. It can also waste fuel
through poor atomization. 4. To remove and clean the burner oil tube and nozzle assembly use the procedure from Section M. 5. Check to make sure the atomizing oil nozzle is at the proper position inside the burner. (See
Illustration 8) 6. Periodically check the functioning of all safety equipment (pressure switches, limit switches, and
solenoids) to make sure they are not clogged with dirt, or in any way inoperative.
Phoenix FURY - Operation and Service Manual
24
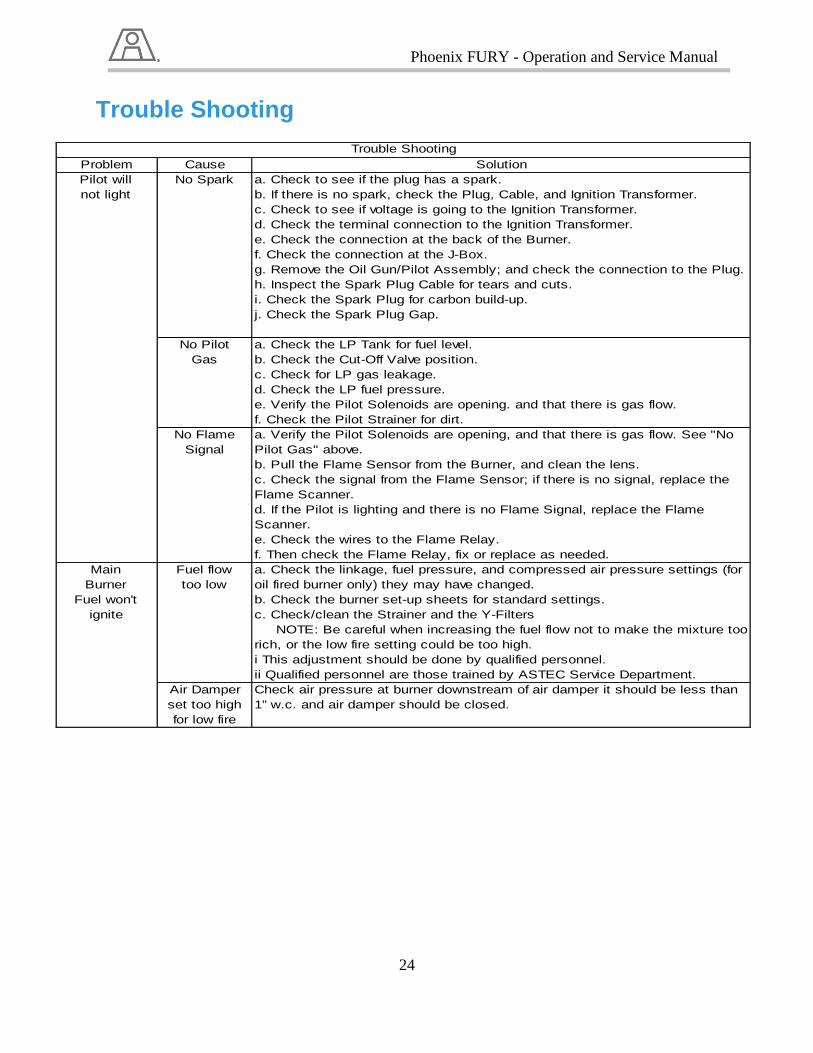
Problem Cause SolutionNo Spark a. Check to see if the plug has a spark.
b. If there is no spark, check the Plug, Cable, and Ignition Transformer.c. Check to see if voltage is going to the Ignition Transformer.d. Check the terminal connection to the Ignition Transformer.e. Check the connection at the back of the Burner.f. Check the connection at the J-Box.g. Remove the Oil Gun/Pilot Assembly; and check the connection to the Plug.h. Inspect the Spark Plug Cable for tears and cuts.i. Check the Spark Plug for carbon build-up.j. Check the Spark Plug Gap.
No PilotGas
a. Check the LP Tank for fuel level.b. Check the Cut-Off Valve position.c. Check for LP gas leakage.d. Check the LP fuel pressure.e. Verify the Pilot Solenoids are opening. and that there is gas flow.f. Check the Pilot Strainer for dirt.
No FlameSignal
a. Verify the Pilot Solenoids are opening, and that there is gas flow. See "No Pilot Gas" above.b. Pull the Flame Sensor from the Burner, and clean the lens.c. Check the signal from the Flame Sensor; if there is no signal, replace the Flame Scanner.d. If the Pilot is lighting and there is no Flame Signal, replace the Flame Scanner.e. Check the wires to the Flame Relay.f. Then check the Flame Relay, fix or replace as needed.
Fuel flowtoo low
a. Check the linkage, fuel pressure, and compressed air pressure settings (for oil fired burner only) they may have changed.b. Check the burner set-up sheets for standard settings.c. Check/clean the Strainer and the Y-Filters NOTE: Be careful when increasing the fuel flow not to make the mixture too rich, or the low fire setting could be too high.i This adjustment should be done by qualified personnel.ii Qualified personnel are those trained by ASTEC Service Department.
Air Damper set too high for low fire
Check air pressure at burner downstream of air damper it should be less than 1” w.c. and air damper should be closed.
Trouble Shooting
Pilot willnot light
MainBurner
Fuel won'tignite
Trouble Shooting
Phoenix FURY - Operation and Service Manual
25
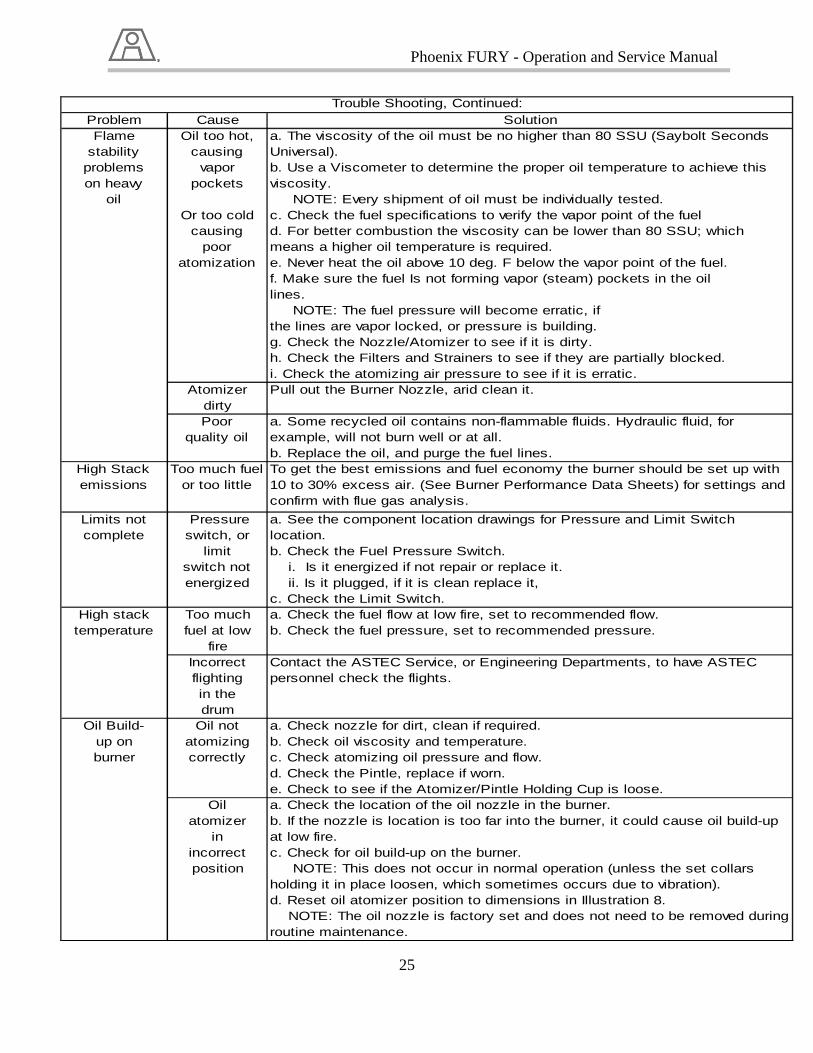
Problem Cause SolutionOil too hot,
causingvapor
pockets
Or too coldcausing
pooratomization
a. The viscosity of the oil must be no higher than 80 SSU (Saybolt Seconds Universal).b. Use a Viscometer to determine the proper oil temperature to achieve this viscosity. NOTE: Every shipment of oil must be individually tested.c. Check the fuel specifications to verify the vapor point of the fueld. For better combustion the viscosity can be lower than 80 SSU; which means a higher oil temperature is required.e. Never heat the oil above 10 deg. F below the vapor point of the fuel.f. Make sure the fuel Is not forming vapor (steam) pockets in the oillines. NOTE: The fuel pressure will become erratic, ifthe lines are vapor locked, or pressure is building.g. Check the Nozzle/Atomizer to see if it is dirty.h. Check the Filters and Strainers to see if they are partially blocked.i. Check the atomizing air pressure to see if it is erratic.
Atomizerdirty
Pull out the Burner Nozzle, arid clean it.
Poorquality oil
a. Some recycled oil contains non-flammable fluids. Hydraulic fluid, for example, will not burn well or at all.b. Replace the oil, and purge the fuel lines.
High Stackemissions
Too much fuel or too little
To get the best emissions and fuel economy the burner should be set up with 10 to 30% excess air. (See Burner Performance Data Sheets) for settings and confirm with flue gas analysis.
Limits notcomplete
Pressureswitch, or
limitswitch notenergized
a. See the component location drawings for Pressure and Limit Switch location.b. Check the Fuel Pressure Switch. i. Is it energized if not repair or replace it. ii. Is it plugged, if it is clean replace it,c. Check the Limit Switch.
Too muchfuel at low
fire
a. Check the fuel flow at low fire, set to recommended flow.b. Check the fuel pressure, set to recommended pressure.
Incorrectflightingin thedrum
Contact the ASTEC Service, or Engineering Departments, to have ASTEC personnel check the flights.
Oil notatomizingcorrectly
a. Check nozzle for dirt, clean if required.b. Check oil viscosity and temperature.c. Check atomizing oil pressure and flow.d. Check the Pintle, replace if worn.e. Check to see if the Atomizer/Pintle Holding Cup is loose.
Oilatomizer
inincorrectposition
a. Check the location of the oil nozzle in the burner.b. If the nozzle is location is too far into the burner, it could cause oil build-up at low fire.c. Check for oil build-up on the burner. NOTE: This does not occur in normal operation (unless the set collars holding it in place loosen, which sometimes occurs due to vibration).d. Reset oil atomizer position to dimensions in Illustration 8. NOTE: The oil nozzle is factory set and does not need to be removed during routine maintenance.
Trouble Shooting, Continued:
Flamestability
problemson heavy
oil
High stacktemperature
Oil Build-up onburner

Phoenix FURY - Operation and Service Manual
26
Burner ModelNozzle Assembly
ASTEC P/NPintle OnlyASTEC P/N
Cap OnlyASTEC P/N
Body/MixerASTEC P/N
PF-25 095611 095180 084723 084330PF-35 095611 095180 084723 084330PF-50 084329 084331 084723 084330PF-75 081177 083011 N/A 050923PF-100 081177 083011 N/A 050923
PHOENIX FURY NOZZLE SPARE PARTS LIST
Item Quantity ASTEC P/N Description1 1 075050 Igniter2 1 001001 Motor, Barber Colman #EA57 on two control motor burners and WJ503 1 063336 Fireye UV Scanner4 1 002018 Honeywell UV Scanner5 1 075699 Low/High, air pressure switch 30 i.w.c.6 1 081185 Pilot Solenoid Valve7 2 005788 Switch limit single pole 3SE03-AR18 1 078550 High Pressure Switch Oil 150 PSI9 1 076926 Low Pressure Switch Oil 30 PSI10 1 080222 Temperature Switch, 100~350oF (Heavy Oil Burners)11 1 076217 Thermocouple 1/2" NPT 350~1400oF (Heavy Oil Burners)12 1 084885 Ignition Transformer13 1 075700 High/Low Gas Pressure Switch (Gas Burners)14 1 077247 Actuator (Gas Burners Only)
PHOENIX FURY SPARE PARTS LIST (Domestic Burners Only, 120V/60Hz)
Recommended Spare Parts
Table 10 – Spare Parts List
Table 11 – Nozzle Spare Parts List
Parts Hotline 1-800-251-6042 Hours: Monday thru Friday 7:00 a.m. to 12:00 a.m. midnight, EST
Saturday 8:00 a.m. to Noon EST Telephone: 423-867-4210 | Fax: 423-867-7609
Our complete line includes items for many brands and types of plants. From liners and bearings to fabricated assemblies, we’ve got it all. ASTEC Parts Department is the OEM for Barber-Greene® asphalt plants and is the only OEM for Barber-Greene® asphalt plant replacement parts.
We also supply computerized asphalt plant controls customized to your requirements. And our engineers are available to assist you with facility upgrade design.
ASTEC Parts Department has one of the largest spare parts inventories for hot mix asphalt plants in the world. A new warehouse and shipping facility has expanded the capabilities of this facility even further. Ten in-house parts technicians take your calls and make sure you get the part you need when you need it. If you need next day delivery, we will put that part on a plane and get it to you. If you need a Field Service Technician to come install it, we will send one.
Phoenix FURY - Operation and Service Manual
27
The ASTEC Parts Department runs two shifts daily, from 7:00 am to 12:00 midnight Eastern Standard Time. After 12 midnight and on weekends, our phones are forwarded to an answering service that will have the Astec Parts Technician on-call contact you right away.
Detailed Burner Performance Sheets The burner performance data sheet(s) are located on the plant’s flash drive. Other items that should be found on the plant’s flash drive: 1. The burner general arrangement which will have the dimensions and overall weight of the burner. 2. The piping and instrumentation (P & I) drawing which is a representation of all the piping and
electrical components on the burner. The components which are tagged, for example PI 1-1, will have the Astec part number listed with it. The tags on the components match the P & I drawing. This will allow you to call the Astec Parts Department and obtain an identical part.
If you cannot locate or are missing any of these documents please contact the Astec burner group to obtain a replacement. Note: • Should further information be required, or answers to questions not covered generally, or should
particular problems arise which are not covered in this manual, contact the Astec Service Department, or the Astec Burner Systems Group
• Whenever any replacement parts are needed, call Astec Parts Department, any time day or night at 1-800-251-6042
Phoenix FURY - Operation and Service Manual
28
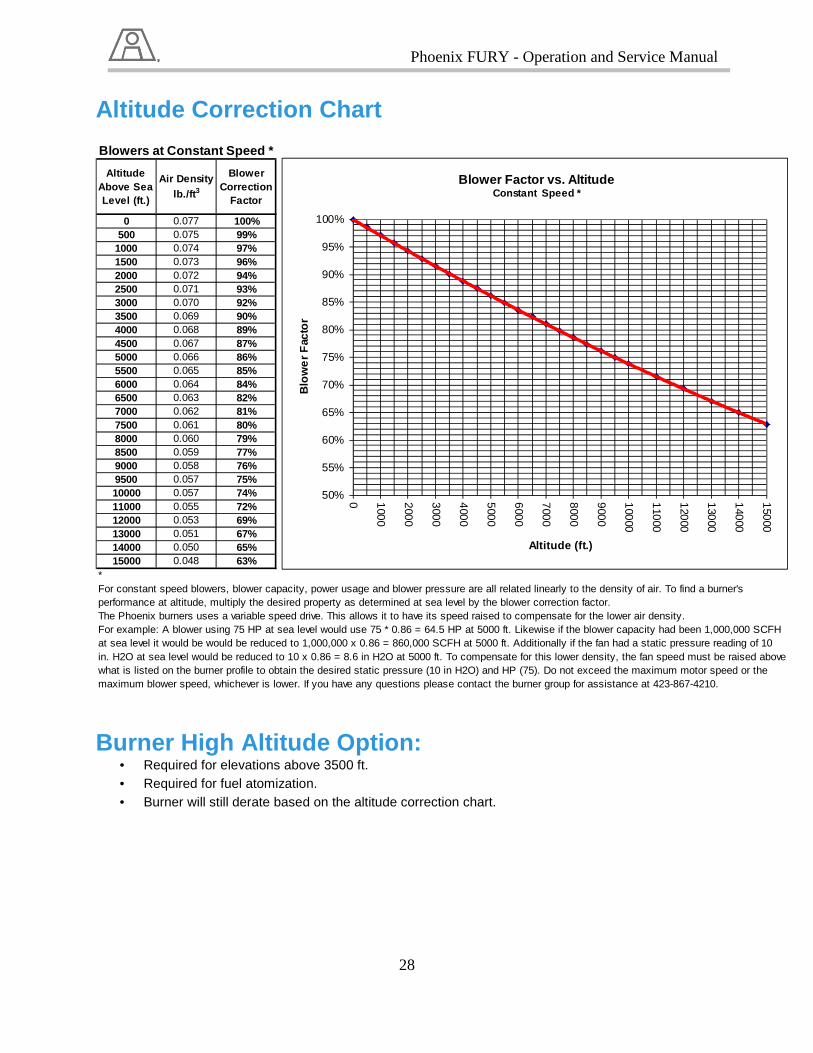
Altitude Correction Chart
Burner High Altitude Option: • Required for elevations above 3500 ft. • Required for fuel atomization. • Burner will still derate based on the altitude correction chart.
Altitude Above Sea Level (ft.)
Air Density lb./ft 3
Blower Correction
Factor
0 0.077 100%500 0.075 99%
1000 0.074 97%1500 0.073 96%2000 0.072 94%2500 0.071 93%3000 0.070 92%3500 0.069 90%4000 0.068 89%4500 0.067 87%5000 0.066 86%5500 0.065 85%6000 0.064 84%6500 0.063 82%7000 0.062 81%7500 0.061 80%8000 0.060 79%8500 0.059 77%9000 0.058 76%9500 0.057 75%10000 0.057 74%11000 0.055 72%12000 0.053 69%13000 0.051 67%14000 0.050 65%15000 0.048 63%
*
The Phoenix burners uses a variable speed drive. This allows it to have its speed raised to compensate for the lower air density.
For constant speed blowers, blower capacity, power usage and blower pressure are all related linearly to the density of air. To find a burner's performance at altitude, multiply the desired property as determined at sea level by the blower correction factor.
Blowers at Constant Speed *
For example: A blower using 75 HP at sea level would use 75 * 0.86 = 64.5 HP at 5000 ft. Likewise if the blower capacity had been 1,000,000 SCFH at sea level it would be would be reduced to 1,000,000 x 0.86 = 860,000 SCFH at 5000 ft. Additionally if the fan had a static pressure reading of 10 in. H2O at sea level would be reduced to 10 x 0.86 = 8.6 in H2O at 5000 ft. To compensate for this lower density, the fan speed must be raised above what is listed on the burner profile to obtain the desired static pressure (10 in H2O) and HP (75). Do not exceed the maximum motor speed or the maximum blower speed, whichever is lower. If you have any questions please contact the burner group for assistance at 423-867-4210.
50%
55%
60%
65%
70%
75%
80%
85%
90%
95%
100%
0 1000
2000
3000
4000
5000
6000
7000
8000
9000
10000
11000
12000
13000
14000
15000
Blo
we
r Fac
tor
Altitude (ft.)
Blower Factor vs. AltitudeConstant Speed *

Phoenix FURY - Operation and Service Manual
29
Illustration 10a – Burner High Altitude Blower Kit Addition
Illustration 10b – Burner High Altitude Blower Kit Addition
Phoenix FURY - Operation and Service Manual
30
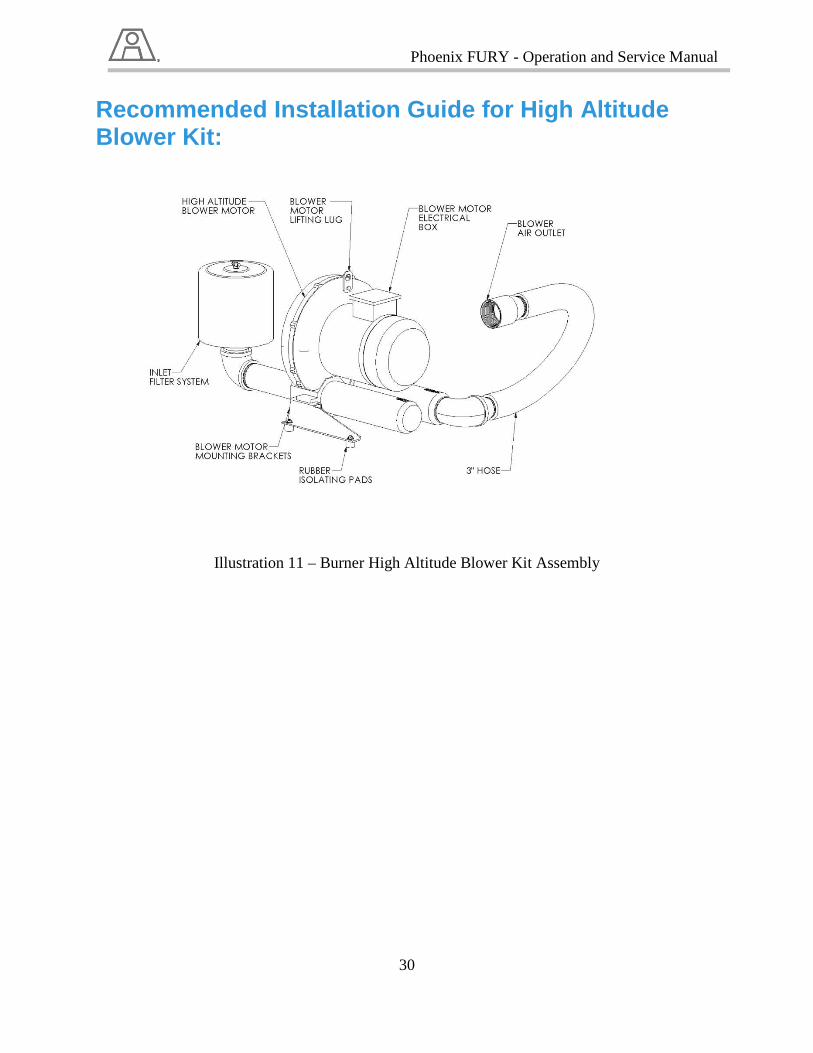
Recommended Installation Guide for High Altitude Blower Kit:
Illustration 11 – Burner High Altitude Blower Kit Assembly

Phoenix FURY - Operation and Service Manual
31
Illustration 12 – Burner High Altitude Blower Kit Assembly
• Step (1) Remove the Burner inlet plate assembly located above the Oil train assembly.
Phoenix FURY - Operation and Service Manual
32
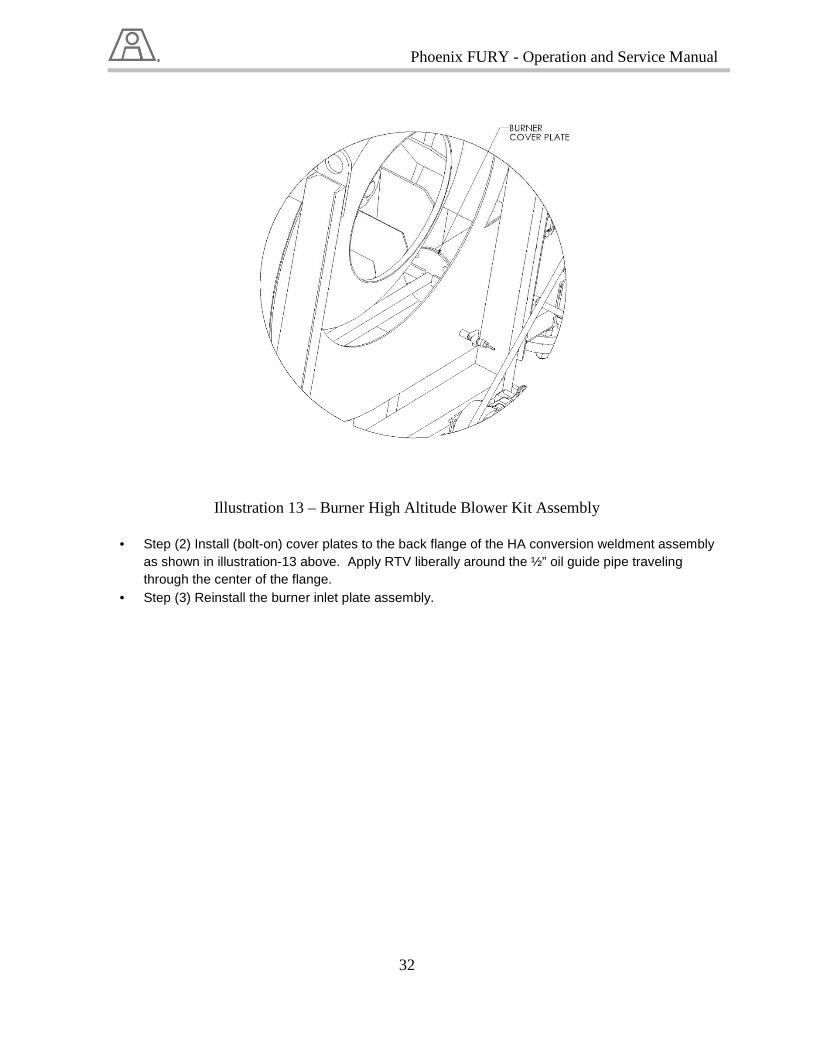
Illustration 13 – Burner High Altitude Blower Kit Assembly
• Step (2) Install (bolt-on) cover plates to the back flange of the HA conversion weldment assembly
as shown in illustration-13 above. Apply RTV liberally around the ½” oil guide pipe traveling through the center of the flange.
• Step (3) Reinstall the burner inlet plate assembly.

Phoenix FURY - Operation and Service Manual
33
Illustration 14 – Burner High Altitude Blower Kit Assembly
• Step (4) Mount the High Altitude Blower Motor assembly. Note that all motor assemblies must be mounted on rubber isolating pads provided by the vendor.
• Step (5) Thru holes (Appropriately sized) may need to be placed in the existing base frame in order to mount the new blower motor assembly. Match drill holes with blower motor frame.
• Step (6) Install the 3” hose onto the booster blower outlet first. Finally install the 3” hose onto the blower air inlet.
• Step (7) Make sure all hoses have been tighten in place and are ready for operation.

Phoenix FURY - Operation and Service Manual
34
Illustration 15 – V-Belt Tensioning Detail: