phottix indra360 ttl studio light - welcome to phottix ... · phottix indra360 ttl studio light ......
TRANSCRIPT

1
En INSTRUCTION MANUAL
Phottix Indra360 TTL Studio Light
INSTRUCTION MANUAL
说明书
說明書
En
Cn Simp
Cn Trad

2
En INSTRUCTION MANUAL
Table of ContentParts and Functions …..........................................................…... 2Flash Modes ……......................................................................... 8Wireless Receiving Modes ........................................................... 9Custom Functions ..................................................................... 12 Technical Specs …...................................................................... 13
PartsFull View
1. Front Cover 2. Umbrella Holder3. Quick-Release Locking Latch4. Handle5. 3.5mm Sync Port6. USB Output Port7. External Power Port8. Angle Adjustment Ratchet Handle9. Mounting Column10. Clamp Screw
Back View11. LCD Display12. Function Button 113. Function Button 214. Test/Ready Button15. Adjust/Set Knob16. Power Switch17. Modeling Light Switch18. Function Button 319. Function Button 420. Optical Signal Sensor
Front View21. Mounting Slot22. Glass Dome23. LED Modeling Light24. Flash Tube25. Reflector
Note: Before using the Phottix Indra360 TTL Studio Light, please read this instruction manual carefully.
The Phottix Indra360 TTL is a battery and AC powered portable studio light with a built-in radio and Optical Slave function. It offers TTL, Manual and Multi Stroboscopic modes, as well as high speed sync and second curtain sync functions. The Phottix Indra360 TTL Studio Light is compatible with many existing Phottix products.
Safety instructions● The Indra360 contains high voltage electronic parts. Do not disassemble or attempt to repair the Indra360. Keep this product out of the reach of children.
● Never use this product near combustible gases, solvents or in an environment with a high electrical charge.
● Make sure all plugs and cables are well connected during charging and use.
● Disconnect the Indra360 TTL Studio light from a power source for 10 minutes before changing the flash tube. Use caution, the flash tube can get very hot.
● Do not touch the external power port and ensure it does not have contact with any metal objects – this could cause electric shocks and serious injury.
● The external power source should not exceed the technical specifications in this manual.
● The external power should be used in an environment with good ventilation. Do not use this product in dusty or sandy conditions.
● This product is not waterproof. Keep it away from rain, snow and high humidity conditions.
● Do not clean the product with organic solvent or alcohol-based liquid.
● Do not put opaque objects in front of the studio flash head when firing the studio light. The heat energy emitted by the Indra360 may cause objects to burn, or cause damage to the studio flash tube.
● Use your studio light safely. Do not fire the Indra360 into the eyes of people or animals at short distances this may cause damage to the eyes and/or blindness.
● Do not leave the studio light in a hot location (direct sunlight, in a closed car, etc.).
● Should you notice smoke or an unusual smell coming from this product, immediately turn off the power switch on the studio light.
● Turn off the power switch on the studio light when not being used for an extended period of time.
● Remove the front cover before operating the studio light. Otherwise, the front cover will get deformed or cause a fire due to the high temperature of the studio light.
● Use caution in touching the studio flash head after use. It may still be hot and could cause burns.
● Consult local authorities on the proper disposal or recycling of a Phottix Indra360 TTL Studio Light.
Thank you for purchasing a Phottix product

3
En INSTRUCTION MANUAL
External Power PortThe Indra360 TTL Studio Light can be connected to the Phottix Indra AC Adapter or the Phottix Indra Battery Pack through the external power port.
Please note: When connecting the external power source, only use Phottix flash power cords designed for use with the Indra360 TTL Studio Light.
Connecting the Indra360 to the external power source
Using the Phottix Indra360 Battery Pack1. Insert the battery pack’s output plug into the external power port on the Indra 360 TTL Studio Light. The high voltage indicator on battery pack will be lit. (See picture 1, 2)
2. Turn on the battery pack.
3. Turn on the power switch on the Phottix Indra360 TTL Studio Light.
Using the Phottix Indra Battery Pack1. Insert one end of the included flash power cord into the external power port on the Indra360 TTL Studio Light. (See picture 1)
Note: To insert properly, please align the red dots on the cable and port.
2. Insert the other end into the output port on the Phottix Indra Battery Pack. (See picture 3)
3. Turn on the Output Toggle Switch on the Battery Pack.
4. Turn on the power switch on the Phottix Indra360 TTL Studio Light.
Using the Phottix Indra AC Adapter1. Insert one end of the included flash power cord into the external power port on the Indra360 TTL Studio Light. (See picture 1)
Note: To insert properly, please align the red dots on the cable and port.
2. Insert the other end into the output port on the Phottix Indra AC Adapter.
(See picture 4)
3. Connect the AC Adapter to the mains supply.
4. Turn on the main power switch and the output power switch on the AC Adapter.
5. Turn on the power switch on the Phottix Indra360 TTL Studio Light.
Disconnecting the Indra360 from the external power source
Disconnecting the Phottix Indra360 Battery Pack1. Turn off the power switch on the Phottix Indra360 TTL Studio Light.
2. Turn off the battery pack.
3. Unplug the output plug of battery pack according to the picture 7.
Disconnecting the Phottix Indra Battery Pack1. Turn off the power switch on the Indra360 TTL Studio Light.
2. Move the output toggle switch on the battery pack to the “OFF” position.
3. Unplug the flash power cord according to picture 5.
4. Unplug the other end according to picture 6.
Disconnecting the Phottix Indra AC Adapter1. Turn off the power switch on the Indra360 TTL Studio Light.
2. Turn off the main power switch and output power switch on the AC Adapter. Unplug the flash power cord according to picture 6.

4
En INSTRUCTION MANUAL
3. Unplug the flash power cable from the Phottix Indra Studio Light (picture 7).
Attaching and removing the ReflectorTo attach the reflector1. Hold the Indra360 with one hand.
2. Align the reflector with the mounting slot using your other hand.
3. Insert and rotate the reflector clockwise following the direction of the arrow in the diagram until the lock engages with a click. This ensures the reflector is locked. (See picture 8)
4. If using an umbrella, make sure the umbrella pass-through hole in the reflector is aligned with the umbrella holder on the Indra studio light.
To remove the reflector1. Push the quick-release locking latch with one hand.
2. Rotate the reflector anti-clockwise in the same direction as the arrow in the diagram and remove it from the Indra360 with the other hand. (See picture 9)
Note: Please be aware to keep the reflector parallel to the mount of the studio light while removing the reflector to prevent it touches the glass dome and incur damage.
Using the Umbrella HolderThe Phottix Indra360 TTL has an umbrella holder on the top of the light, making it easy to mount umbrellas and umbrella-style softboxes. Using the umbrella mount is simple: Insert the umbrella shaft into the umbrella holder on the Phottix Indra Studio Light. Turn the screw on the umbrella holder to tighten against the umbrella shaft.
Using the Softbox MountThe Phottix Indra360 TTL features a Bowen’s-compatible locking ring for softboxes, and other light modifying accessories. Using the Softbox Mount is the same as mounting and removing the Phottix Indra Reflector (above).
To attach: Align the softbox speed ring with the mounting slot on the Indra360. Insert and rotate the softbox mount clockwise following the direction of the arrow in the diagram until the lock engages with a click. (See picture7)
To remove: Push the quick-release locking latch backwards, and rotate the softbox mount anti-clockwise to remove it from the Indra360. (See picture 8)
Sync and USB Ports1. A Phottix flash trigger (Phottix Odin TTL, Strato II Multi and Strato TTL) or camera can be connected to the Indra’s 3.5mm sync port using a compatible cable. The device will then be able to trigger the Indra360 TTL Studio Light.
2. The USB port is used for firmware upgrades. Firmware announcements and instructions will be made available on Phottix websites.
Please note:Only the manual mode is supported when a flash trigger is connected via the sync port.
Transmission ChannelsThe Phottix Indra360 TTL Studio Light Wireless system has four channels; 1, 2, 3, and 4. The same channel needs to be set on the Indra360 TTL Studio Light when in wireless receiving mode as on the triggering device or flashes used to trigger the Indra.
Quick Flash FunctionThe Quick Flash function allows the studio light to fire when it is not fully cha-rged, i.e. the status LED is still flashing green. Quick Flash recycle times are faster; this helps for snap photography at short distances.
Quick Flash can be used for continuous drive modes, Quick Flash for continuous shot function can be enabled or disabled in the Menu (See the Menu section below).
Please note:The Quick Flash Function makes flash firing a priority. Under-exposure could result if the subject is located too far from the camera.
Flash Exposure Bracketing – FEBFlash Exposure Bracketing (FEB) can be used to automatically change the flash power over a series of photos. The camera will record a series of images with different exposures. FEB is useful in run-and-gun situations as well as when shooting scenes with different lighting conditions to help ensure a properly exposed photo. FEB can also be used for HDR photography.
The FEB function is supported but cannot be set on the Indra360 TTL Studio Light. The availability of this function depends on whether the trigger or camera is equipped with an FEB function. See your camera manual for more information on Flash Exposure Bracketing.

5
En INSTRUCTION MANUAL
Flash Exposure Lock – FEL/FV Lock Flash Exposure Lock (FEL, also FV Lock in Nikon camera) can be used to lock the flash exposure before a photo is taken. This is useful when manual spot metering is being used in a scene with different lighting conditions. While in TTL mode, press the camera’s function button to use this function. See your camera user manual for more information on FEL functions and usage.
The FEL function is supported but cannot be set on the Indra360 TTL Studio Light. The availability of this function depends on whether the trigger or camera is equipped with an FEL function. See you camera manual for more information on Flash Exposure Lock.
High Speed Sync – HSS/Auto FPHigh Speed Sync (HSS) mode is used to shoot at shutter speeds higher than a camera’s set flash sync speed (typically 1/200-1/250s). This is useful when using aperture priority mode and in limiting ambient light. HSS results may vary with different camera models – refer to your camera user manual for more details.
Please note: 1. HSS function is supported by the Phottix Indra360 TTL Studio Light, but it cannot be set on the studio light itself.
2. The camera, flash trigger and receiving mode can greatly affect HSS mode. For best results in HSS mode please use recommended Phottix flash triggers. Please see the “Compatibility Table” below and refer to your flash trigger and camera user manuals for more details.
3. HSS function will not work in Manual and Multi Stroboscopic mode.
4. Use the HSS mode frequently will shorten the flash tube life.
5. Nikon’s flash protocols may limit the maximum sync speed of some Nikon camera bodies.
Compatibility Table
Second Curtain Sync - SCSThe Phottix Indra360 TTL Second Curtain Sync function makes the studio light fire at the end of an exposure, not the beginning. This helps capture special effects when using slow shutter speeds.
Please note:1. SCS function is supported by the Phottix Indra360 TTL Studio Light, but it cannot be set on the studio light itself. Instead please set the SCS function on your camera or flash trigger. For more details, please refer to your flash trigger and camera user manuals.
2. SCS function will not work in Multi Stroboscopic mode.
Test/Ready Button1. Pressing the test button will trigger the studio light. This can be used for metering in Manual mode.
2. This button also offers a Flash-ready indication function. The LED indicator on the button will flash green when the light has the minimum recycle charge. It will flash red when fully charged.
6
En INSTRUCTION MANUAL
Menu

7
En INSTRUCTION MANUAL
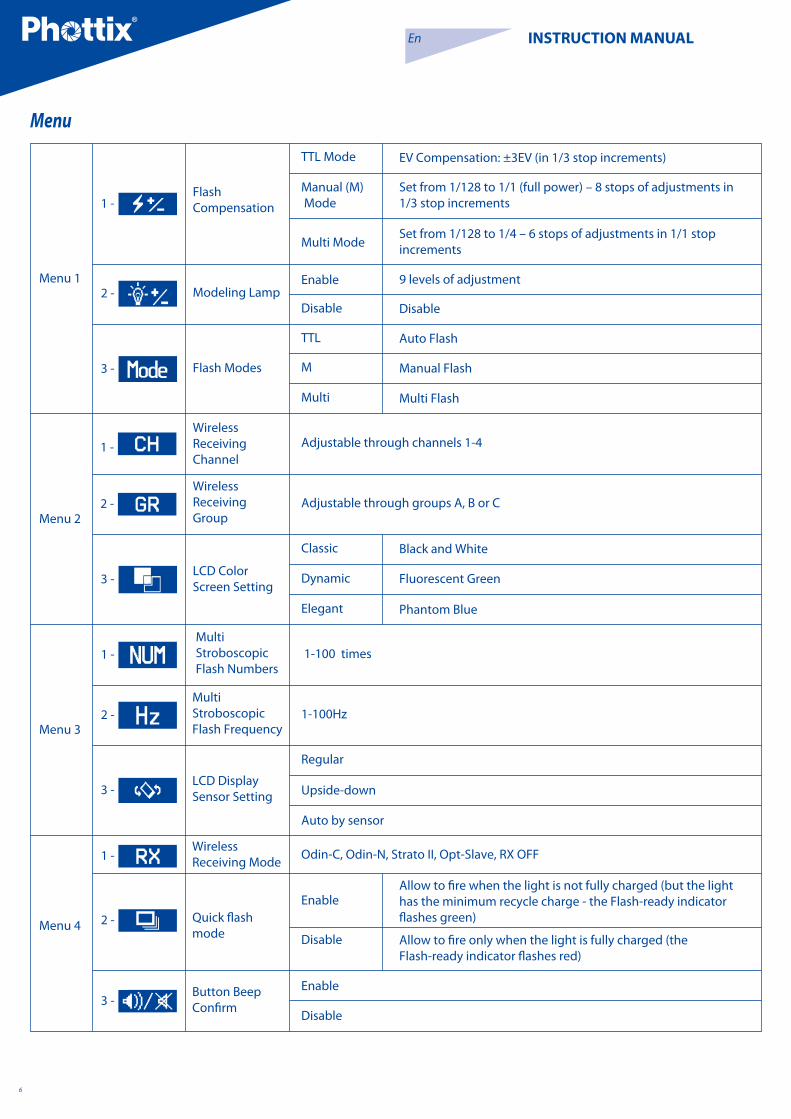
Menu SettingsUse the four function buttons below the LCD display to select the corresponding function setting options. You can edit each setting when the selected function is highlighted. Depending on the LCD color screen settings this will be in either: red, white, or yellow (The LCD color screen setting and the LCD display sensor setting will be shown in the Menu list).
1. Turn the “Adjust/Set knob” to change the setting.
2. When finished press the corresponding function button, or the “Adjust/Set knob” to confirm and exit.
The LCD Display
Wireless receiving modes: Odin-C, Odin-N, Strato II, Opt-SlaveRX OFF
Flash modes:TTL, M, Multi
Quick flash : Enable
: Disable
Beep signal
ON
OFF
Menu: see more details in Menu function part
Flash exposure compensation/Flash output
Wireless receiv-ing channel
Wireless receiving group
Modeling light: Manual 01-09 levels, OFF
Menu Screen
8
En INSTRUCTION MANUAL
Auto-Save Functions The Indra360 TTL will remember studio light settings. Previous settings will be retained each time it is turned on.
Modeling Flash1. Pressing the camera depth-of-field preview button (if available) will fire the studio light continuously for 1 second. The modeling flash allows you to see the lighting effects and balance on the subject. (Please see your camera manual for more information on the DOF button and button assignment.)
2. The modeling flash is available in all modes, TTL, Manual and Multi.
Modeling LightThe Phottix Indra360 TTL is equipped with an LED modeling light. This is helpful for both previewing lighting set-ups and assisting with focusing in dimly lit environments.
The Modeling Light has two modes1. Manual mode: 9 brightness levels from 01 to 09 are available.
2. OFF mode: The modeling light will be turned off.
Please note: 1. When the studio light is firing, the modeling light will not turn off automatically.
2. Using the modeling light uses a lot of battery power.
Adjusting the brightness of the Modeling Light
The modeling light can be turned on/off via menu option in
or with the modeling light swtich .
Via Menu option
1. Press Function Button 4 until appears on the LCD display.
2. Press the corresponding function button to .
3. When the modeling light option is selected, it will be highlighted
on the LCD display.
4. Turn the “Adjust/Set knob” to change the modeling light mode from Manual (01-09 stop) or OFF.
5. Press the function button corresponding to or the “Adjust/Set knob” to confirm the settings and exit the editing mode.
Via Modeling Light Switch1. Press the modeling light switch to turn on/off the modeling light.
2. When the modeling light is turned on the modeling light icon will be highlighted on the LCD display.
3. Turn the “Adjust/Set knob” to change the modeling light mode from Manual (01-09 stop) or OFF.
4. Press “Adjust/Set knob” to confirm the settings and exit the editing mode.
Flash ModesThe Phottix Indra360 TTL Studio Light has three flash modes: TTL Auto, Manual and Multi.
TTL Flash ModeWhen the Phottix Indra360 TTL Studio Light is set to TTL mode, the studio light will fire at the selected flash mode and flash power, as set on a Phottix Odin or other Phottix compatible flash trigger featuring power control.
Flash Exposure Compensation-FECThe Phottix Indra360 TTL Studio Light can be used to adjust Flash Exposure Compensation (FEC) from-3 to +3 in 1/3rd stops. This is useful in environments where fine-tuning of the TTL system is needed.
Please note: 1. If both the triggering device (if TTL mode is available) and the studio light are set to TTL modes and EV adjustment is set on both units, then the final exposure value will be the sum of the two Flash Exposure Compensation Values.
2. If the triggering device is set to Manual mode (if available) and the studio light is set to TTL mode with Flash Exposure Compensation Value, then the Flash EV Value will be used to calculate the final flash output.
Manual Flash ModeIn Manual mode the studio light will fire at the power levels set. The Phottix Indra360 TTL Studio Light can be adjusted from 1/128 to 1/1 in 1/3 stop incre-ments (1/128, 1/64, 1/32, 1/16, 1/8, 1/4, 1/2, and 1/1). Flash modes and power of the studio light cannot be adjusted and controlled on the triggering device.
Multi Stroboscopic Flash ModeWith Multi Stroboscopic mode a series of rapid flashes will be fired. The flash count, frequency and power of these flashes can be programmed on the Phottix Indra360 TTL Studio Light. Multi mode is useful for capturing multiple images of a moving subject in the same photo and for other special effects.
In Multi Stroboscopic mode, the studio light will be fired at the programmed manual flash power, flash counts (1-100), and frequency (1-100Hz). The flash power can be set from 1/128 to 1/4 in 1/1 stop increments (1/128, 1/64, 1/32, 1/16, 1/8, and 1/4). Flash modes and power of the studio light cannot be adjusted and controlled on the triggering device.
Please note:1. Overheating and even damage to the flash tube can be resulted from excessive use of the Multi Stroboscopic mode.
2. If overheated the flash will automatically increase charging time. If the temperature continues to rise, the light will stop firing.
9
En INSTRUCTION MANUAL
Wireless Receiving ModeThe Phottix Indra360 TTL Studio Light is equipped with 5 wireless receiving modes: Odin-C, Odin-N, Strato II, Opt-Slave and RX OFF. Please see below for more details.
Supported Flash Modes
Odin-C Radio Frequency Receiving ModeThis mode allows the Indra360 TTL Studio Light to be triggered by a Phottix Odin TTL Flash Trigger TCUs for Canon or by a Phottix Mitros+ TTL Transceiver Flash for Canon in Odin TX mode. To work correctly they must be set to the same channel and in the same group.
How to use:
1. Press Function Button 4 or turn the “Adjust/Set Knob” until appears on the LCD display.
2. Press the corresponding function button to . The wireless receving function option will be highlighted on the LCD display.
3. Turn the “Adjust/Set Knob” to change the wireless mode to Odin-C.
4. Press the “Adjust/Set Knob” to confirm the setting.
5. Press the corresponding function button to in to adjust from TTL, Manual or Multi.
Odin-N Radio Frequency Receiving ModeThis mode allows the Indra360 TTL Studio Light to be triggered by a Phottix Odin TTL Flash Trigger TCUs for Nikon or by a Phottix Mitros+ TTL Transceiver Flash for Nikon in ODIN TX mode. To work correctly they must be set to the same channel and in the same group.
How to use:
1. Press Function Button 4 or turn the “Adjust/Set Knob” until appears on the LCD display.
2. Press the corresponding function button to . The wireless receving function option will be highlighted on the LCD display.
3. Turn the “Adjust/Set Knob” to change the wireless mode to Odin-N.
4. Press the “Adjust/Set Knob” to confirm the setting.
5. Press the corresponding function button to in to adjust from TTL, Manual or Multi.
Strato II Radio Frequency Receiving ModeThis mode allows the Indra360 TTL Studio Light to be triggered by the Phottix Odin TTL Flash Trigger TCUs for Canon/Nikon, the Phottix Mitros+ TTL Transceiver Flash for Canon/Nikon in Odin Tx mode, the Phottix Strato TTL transmitter for Canon/Nikon or by the Phottix Strato II Multi transmitter for Canon/Nikon. To work correctly they must be set to the same channel and in the same group.
Please note: HSS, SCS, and TTL are not supported in Strato II Radio Frequency Receiving Mode.
How to use:
1. Press Function Button 4 or turn the “Adjust/Set Knob” until appears on the LCD display.
2. Press the corresponding function button to . The wireless receving function option will be highlighted on the LCD display.
3. Turn the “Adjust/Set Knob” to change the wireless mode to Strato II.
4. Press the “Adjust/Set Knob” to confirm the setting.
5. Press the corresponding function button to in to adjust from Manual and Multi.
Opt-Slave Optical Pulse Receiving ModeIn this mode any other studio lights or flashes fired nearby will trigger the Indra360 TTL Studio Light.
Please note: Pre-flashes from nearby TTL flashes will trigger the Phottix Indra if set in Opt-Slave mode. Please take care when using this mode that nearby TTL flashes do not trigger the Phottix Indra before you are ready.
How to use:
1. Press Function Button 4 or turn the “Adjust/Set Knob” until appears on the LCD display.
2. Press the corresponding function button to . The wireless receving function option will be highlighted on the LCD display.
3. Turn the “Adjust/Set Knob” to change the wireless mode to Opt-Slave.
4. Press the “Adjust/Set Knob” to confirm the setting.
RX OFF ModeIn this mode wireless receiving is turned off.
How to use:
1. Press Function Button 4 or turn the “Adjust/Set Knob” until appears on the LCD display.
2. Press the corresponding function button to . The wireless receving function option will be highlighted on the LCD display.
3. Turn the “Adjust/Set Knob” to change the wireless mode to RX OFF.
10
En INSTRUCTION MANUAL
4. Press the “Adjust/Set Knob” to confirm the setting.
5. Press the corresponding function button to in to adjust from Manual and Multi.
For Odin-C/Odin-N/Strato IIFunctions in Multi mode
1. Press the corresponding function button to in . Turn the “Adjust/Set knob”to adjust the flash power from 1/4 to 1/128 - 6 stops.
2. Press the corresponding function button to in . Turn the “Adjust/Set knob” to adjust the Modeling Light mode (OFF/01-09).
3. Press the corresponding function button to in . Turn the “Adjust/Set knob”to adjust the Chanel from 1-4.
4. Press the corresponding function button to in . Turn the “Adjust/Set knob” to adjust the Group from A, B to C.
5. Press the corresponding function button to in . Turn the “Adjust/Set knob”to adjust the LCD Color Screen Setting (Classic, Dynamic, Elegant).
6. Press the corresponding function button to in . Turn the “Adjust/Set knob” to adjust the flash count from 1-100 times (based on the flash frequency and flash output).
7. Press the corresponding function button to in . Turn the “Adjust/Set knob”to adjust the flash frequency from 1-100Hz.
8. Press the corresponding function button to in . Turn the “Adjust/Set knob”to adjust the LCD Display Sensor Setting (Regular, Up-side-down and Auto by sensor).
9. Press the corresponding function button to in , the Continuous flash mode option will be highlighted on the LCD screen. Turn the “Adjust/Set knob” to turn the Quick Continuous flash mode on/off.
10. Press the corresponding function button to in . Turn the “Adjust/Set knob”to turn the sound on/off.
For Odin-C/Odin-NFunctions in TTL mode
1. Press the corresponding function button to in . Turn the “Adjust/Set knob”to adjust the Flash Exposure Compensation Value from -3.0EV to +3.0EV.
2. Press the corresponding function button to in . Turn the “Adjust/Set knob”to adjust the Modeling Light mode (OFF/01-09).
3. Press the corresponding function button to in . Turn the “Adjust/Set knob”to adjust the Chanel from 1-4.
4. Press the corresponding function button to in . Turn the “Adjust/Set knob”to adjust the Group from A, B to C.
5. Press the corresponding function button to in . Turn the “Adjust/Set knob”to adjust the LCD Color Screen Setting (Classic, Dynamic, Elegant).
6. Press the corresponding function button to in . Turn
the “Adjust/Set knob”to adjust the LCD Display Sensor Setting (Regular, Upside-down and Auto by sensor).
7. Press the corresponding function button to in . the continuous flash mode option will be highlighted on the LCD screen. Turn the “Adjust/Set knob” to turn the Quick Continuous flash mode on/off.
8. Press the corresponding function button to in . Turn the
“Adjust/Set knob”to turn the sound on/off.
For Odin-C/Odin-N/Strato IIFunctions in Manual mode
1. Press the corresponding function button to in . Turn the “Adjust/Set knob” to adjust the flash power from 1/1 to 1/128 in 1/3rd stop increments.
2. Press the corresponding function button to in . Turn the “Adjust/Set knob” to adjust the Modeling Light mode (OFF/01-09).
3. Press the corresponding function button to in . Turn the “Adjust/Set knob” to adjust the Chanel from 1-4.
4. Press the corresponding function button to in . Turn the “Adjust/Set knob”to adjust the Group from A, B to C.
5. Press the corresponding function button to in . Turn the “Adjust/Set knob”to adjust the LCD Color Screen Setting (Classic, Dynamic, Elegant).
6. Press the corresponding function button to in . Turn the “Adjust/Set knob” to adjust the LCD Display Sensor Setting (Regular, Up-side-down and Auto by sensor).
7. Press the corresponding function button to in . the Continuous flash mode option will be highlighted on the LCD screen. Turn the “Adjust/Set Knob” to turn the Quick Continuous flash mode on/off.
8. Press the corresponding function button to in . Turn the “Adjust/Set knob”to turn the sound on/off.
For Opt-Slave/RX OFFFunctions in Manual mode
1. Press the corresponding function button to in . Turn the “Adjust/Set knob”to adjust the flash power from 1/1 to 1/128 in 1/3rd stop increments.
2. Press the corresponding function button to in . Turn the “Adjust/Set knob” to adjust the Modeling Light mode (OFF/01-09).
3. Press the corresponding function button to in . Turn the “Adjust/Set knob”to adjust the LCD Color Screen Setting (Classic, Dynamic, Elegant).
4. Press the corresponding function button to in . Turn the “Adjust/Set knob”to adjust the LCD Display Sensor Setting (Regular, Upside-down and Auto by sensor).
5. Press the corresponding function button to in , the Continuous flash mode option will be highlighted on the LCD screen. Turn the “Adjust/Set knob” to turn the Quick Continuous flash mode on/off.

11
En INSTRUCTION MANUAL
6. Press the corresponding function button to in . Turn the “Adjust/Set knob”to turn the sound on/off.
For RX OFFFunctions in Multi mode
1. Press the corresponding function button to in . Turn the “Adjust/Set knob” to adjust the flash power from 1/4 to 1/128 - 6 stops.
2. Press the corresponding function button to in . Turn the “Adjust/Set knob” to adjust the Modeling Light mode (OFF/01-09).
3. Press the corresponding function button to in . Turn the “Adjust/Set knob”to adjust the LCD color screen setting (Classic, Dynamic, Elegant).
4. Press the corresponding function button to in to adjust the flash count from 1-100 times (based on the flash frequency and flash output).
5. Press the corresponding function button to in . Turn the “Adjust/Set knob”to adjust the flash frequency from 1-100Hz.
6. Press the corresponding function button to in . Turn the “Adjust/Set knob”to adjust the LCD Display Sensor Setting (Regular, Upside-down and Auto by sensor).
7. Press the corresponding function button to in , the Continuous flash mode option will be highlighted on the LCD screen. Turn the “Adjust/Set Knob” to turn the Quick Continuous flash mode on/off.
8. Press the corresponding function button to in . Turn the “Adjust/Set knob”to turn the sound on/off.
Please Note:If the “Adjust/Set knob” or the corresponding function button is not pressed to confirm the selected parameter, the selected parameter will be confirmed by default within 10 seconds.
12
En INSTRUCTION MANUAL
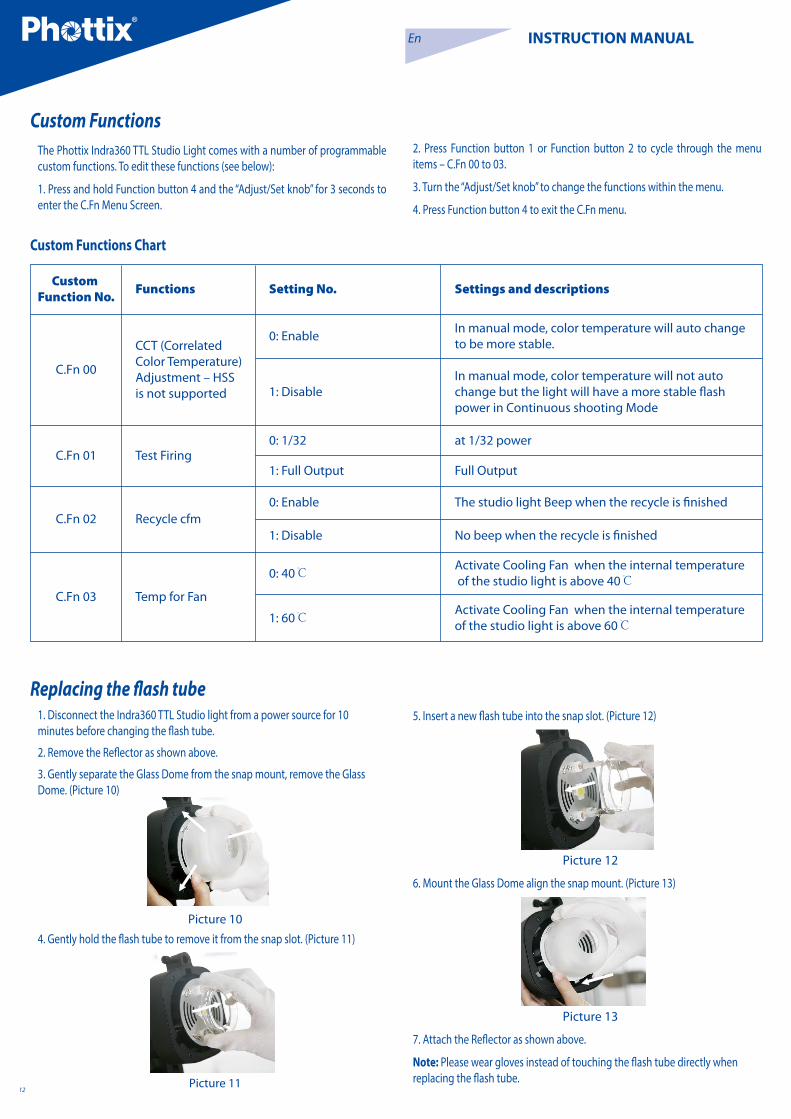
2. Press Function button 1 or Function button 2 to cycle through the menu items – C.Fn 00 to 03.
3. Turn the “Adjust/Set knob” to change the functions within the menu.
4. Press Function button 4 to exit the C.Fn menu.
Custom Functions Chart
Custom Functions The Phottix Indra360 TTL Studio Light comes with a number of programmable custom functions. To edit these functions (see below):
1. Press and hold Function button 4 and the “Adjust/Set knob” for 3 seconds to enter the C.Fn Menu Screen.
Replacing the flash tube1. Disconnect the Indra360 TTL Studio light from a power source for 10 minutes before changing the flash tube.
2. Remove the Reflector as shown above.
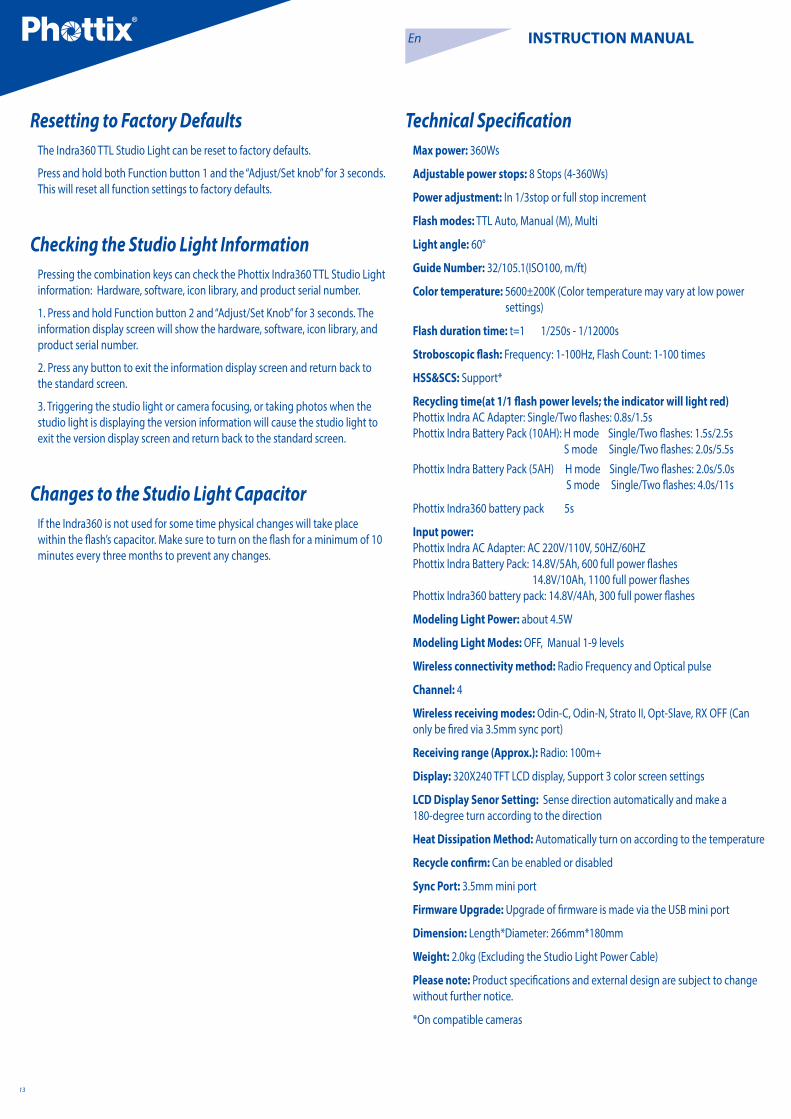
3. Gently separate the Glass Dome from the snap mount, remove the Glass Dome. (Picture 10)
4. Gently hold the flash tube to remove it from the snap slot. (Picture 11)
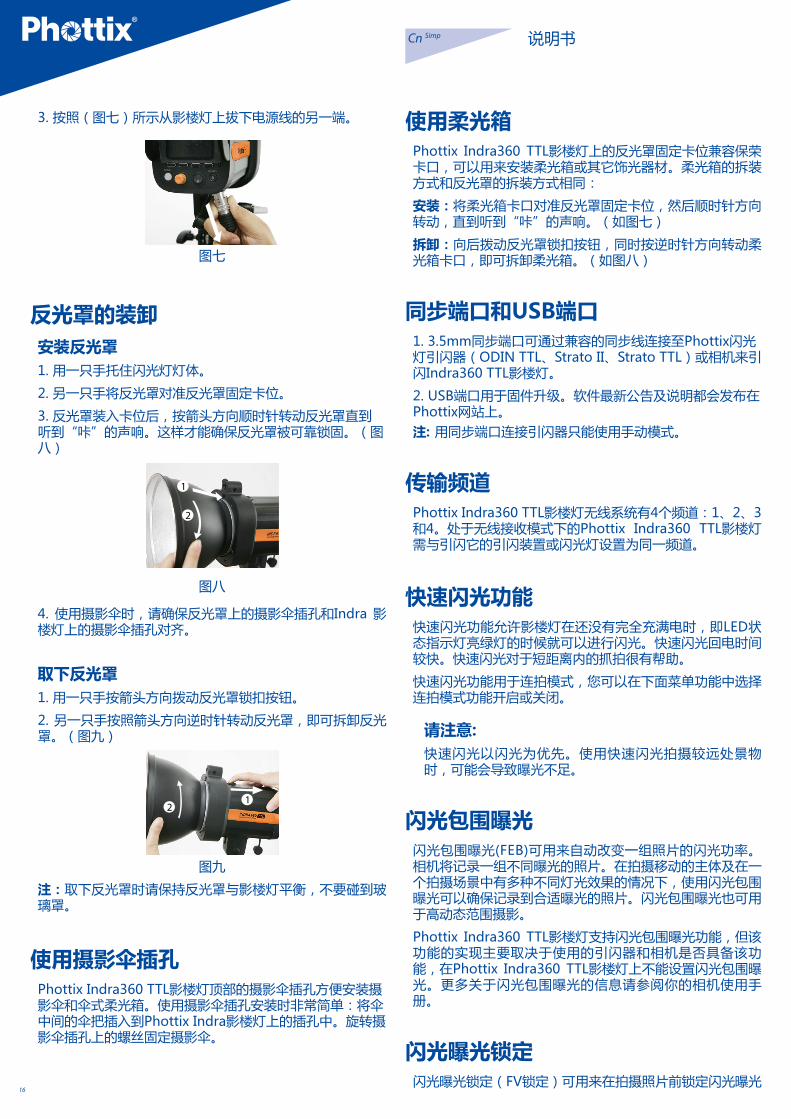
5. Insert a new flash tube into the snap slot. (Picture 12)
6. Mount the Glass Dome align the snap mount. (Picture 13)
7. Attach the Reflector as shown above.
Note: Please wear gloves instead of touching the flash tube directly when replacing the flash tube.
13
En INSTRUCTION MANUAL
Resetting to Factory DefaultsThe Indra360 TTL Studio Light can be reset to factory defaults.
Press and hold both Function button 1 and the “Adjust/Set knob” for 3 seconds. This will reset all function settings to factory defaults.
Checking the Studio Light InformationPressing the combination keys can check the Phottix Indra360 TTL Studio Light information: Hardware, software, icon library, and product serial number.
1. Press and hold Function button 2 and “Adjust/Set Knob” for 3 seconds. The information display screen will show the hardware, software, icon library, and product serial number.
2. Press any button to exit the information display screen and return back to the standard screen.
3. Triggering the studio light or camera focusing, or taking photos when the studio light is displaying the version information will cause the studio light to exit the version display screen and return back to the standard screen.
Changes to the Studio Light CapacitorIf the Indra360 is not used for some time physical changes will take place within the flash’s capacitor. Make sure to turn on the flash for a minimum of 10 minutes every three months to prevent any changes.
Technical SpecificationMax power: 360Ws
Adjustable power stops: 8 Stops (4-360Ws)
Power adjustment: In 1/3stop or full stop increment
Flash modes: TTL Auto, Manual (M), Multi
Light angle: 60°
Guide Number: 32/105.1(ISO100, m/ft)
Color temperature: 5600±200K (Color temperature may vary at low power settings)
Flash duration time: t=1 1/250s - 1/12000s
Stroboscopic flash: Frequency: 1-100Hz, Flash Count: 1-100 times
HSS&SCS: Support*
Recycling time(at 1/1 flash power levels; the indicator will light red)Phottix Indra AC Adapter: Single/Two flashes: 0.8s/1.5sPhottix Indra Battery Pack (10AH): H mode Single/Two flashes: 1.5s/2.5s S mode Single/Two flashes: 2.0s/5.5sPhottix Indra Battery Pack (5AH) H mode Single/Two flashes: 2.0s/5.0s S mode Single/Two flashes: 4.0s/11s
Phottix Indra360 battery pack 5s
Input power: Phottix Indra AC Adapter: AC 220V/110V, 50HZ/60HZ Phottix Indra Battery Pack: 14.8V/5Ah, 600 full power flashes 14.8V/10Ah, 1100 full power flashesPhottix Indra360 battery pack: 14.8V/4Ah, 300 full power flashes
Modeling Light Power: about 4.5W
Modeling Light Modes: OFF, Manual 1-9 levels
Wireless connectivity method: Radio Frequency and Optical pulse
Channel: 4
Wireless receiving modes: Odin-C, Odin-N, Strato II, Opt-Slave, RX OFF (Can only be fired via 3.5mm sync port)
Receiving range (Approx.): Radio: 100m+
Display: 320X240 TFT LCD display, Support 3 color screen settings
LCD Display Senor Setting: Sense direction automatically and make a 180-degree turn according to the direction
Heat Dissipation Method: Automatically turn on according to the temperature
Recycle confirm: Can be enabled or disabled
Sync Port: 3.5mm mini port
Firmware Upgrade: Upgrade of firmware is made via the USB mini port
Dimension: Length*Diameter: 266mm*180mm
Weight: 2.0kg (Excluding the Studio Light Power Cable)
Please note: Product specifications and external design are subject to change without further notice.
*On compatible cameras

14
Cn Simp 说明书
目录部件和功能 …...................................................................... .14闪光模式.....…….....................................................................20无线接收模式 ..................................................................... 21自定义功能............................................................................24
技术参数 …............................................................................ 95
部件全视图1. 灯头前盖 2. 摄影伞插孔3. 反光罩锁扣4. 把手5. 3.5mm同步端口6. USB输出端口7. 外置电源端口8. 把手角度调节旋钮9. 把手固定柱 10. 固定螺栓
后视图11. LCD显示界面12. 功能按钮113. 功能按钮214. 测试/闪光就绪按钮15. 调节/确定旋钮 16. 电源开关17. 造型灯开关18. 功能按钮319. 功能按钮420. 光学信号传感器
前视图21. 反光罩固定卡位22. 玻璃防护灯罩23. LED造型灯24. 闪光灯灯管25. 反光罩
注意:在使用Phottix Indra360 TTL影楼灯前,请仔细阅读使用说明书。
Phottix Indra360 是一款由移动电源和交流电源供电的便携式TTL影楼灯。内置无线电接收和光学无线接收功能。支持TTL模式、手动模式(M)和频闪模式(Multi)。支持高速同步(HSS)和后帘同步(SCS)。Phottix Indra360 TTL影楼灯可以和Phottix多款现行闪光灯引闪器兼容使用。
安全须知● 本产品内包含高压电器元件。请勿试图自行打开或进行维修。 禁止让儿童接触本产品。
● 不要在有易燃气体、液体化学品或高电荷环境下使用本产品。
● 确保所有插头、插座是可靠稳固连接的。
● 更换闪光灯管时,要先切断Indra360影楼灯和供电电源的连接达10分钟以上。请小心,影楼灯灯管使用后会很烫。
● 请勿用金属物体接触影楼灯的外置电源端口,有可能触电或造成重伤!
● 请参考本说明书中的技术参数选择合适的电源。
● 外置电源应有良好的散热空间,请不要在布满粉尘及固体悬浮的环境中使用。
● 本产品不具备防水特性,请远离雨、雪等高湿度的场合。
● 请勿使用有机溶剂或含酒精的液体来清洁本产品。
● 影楼灯闪光时,请勿在影楼灯的灯头前放置不透光的物体,否则影楼灯发出的热量将可能烧灼放置的物体或是损坏影楼灯灯管!
● 请安全使用您的影楼灯。切勿在短距离内直接对着人或动物的眼睛触发影楼灯,否则会损伤眼睛,甚至导致失明。
● 请勿将产品置于高温环境下(如直射阳光、封闭的汽车等)。
● 如在使用过程中出现冒烟或发出焦味时,请立即关闭影楼灯的电源开关。
● 长期不使用时,请务必切断影楼灯的电源开关。
● 在使用闪光灯时,请务必取下灯头前盖,以免闪光时温度过高,导致前盖变形或燃烧。
● 产品外壳在使用后会很烫,请勿触摸,有灼伤的危险。
● 有关Phottix Indra360 TTL影楼灯 交流电源适配器的妥善处理和回收,请咨询地方当局。
感谢您购买Phottix产品

15
Cn Simp 说明书
外置电源端口通过外置电源端口可以将影楼灯连接至Phottix Indra交流电源适配器和Phottix Indra移动电源。
请注意:外接外置电源时,只能搭配Phottix Indra360 TTL影楼灯专用的电源线。
连接影楼灯和外置电源使用Phottix Indra360 移动电源1. 将Indra机顶电源的输出插头插入Indra360 TTL 影楼灯的外置电源端口,机顶电源红色高压指示灯随即亮起。(图一、二)
图一 图二
2. 打开机顶电源开关。
3. 打开Indra360 TTL影楼灯电源开关。
使用Phottix Indra移动电源时1. 将Indra360 TTL影楼灯电源线的一端插入 Indra360 TTL 影楼灯的外置电源端口。(图一)
注:插入时请对准电源线和电源端口上的红点标记卡位。
2. 将另一端插入Phottix Indra移动电源的闪光灯输出插孔。(图三)
图三
3. 打开移动电源输出拨动开关。
4. 打开Indra360 TTL影楼灯电源开关。
使用Phottix Indra 交流电源适配器时1. 将Indra360 TTL影楼灯电源线的一端插入 Indra360 TTL 影楼灯的外置电源端口。(图一)
注:插入时请对准电源线和电源端口上的红点标记卡位。
2. 将另一端插入Phottix Indra交流电源适配器的电源输出
插座。(图四)
图四
3. 将交流电源适配器接入到交流市电。
4. 打开交流电源适配器输入电源开关和电源输出开关。
5. 打开Indra360 TTL影楼灯电源开关。
断开影楼灯和外置电源断开Phottix Indra360 移动电源1. 关闭Indra360 TTL影楼灯的电源开关。
2. 关闭机顶电源开关。
3. 按照(图七)拔下机顶电源的输出插头即可。
断开Phottix Indra移动电源时1. 关闭Indra360 TTL影楼灯的电源开关。
2. 将移动电源开关打到“OFF”, 按照(图五)的方式拔下影楼灯的电源线。
图五
3. 按照(图七)拔下影楼灯电源的另一端。
断开Phottix Indra交流电源时1. 关闭Indra360 TTL影楼灯的电源开关。
2. 将交流电源输入/输出电源开关打到“OFF”,按照(图六)所示拔下影楼灯的电源线。
图六
16
Cn Simp 说明书
3. 按照(图七)所示从影楼灯上拔下电源线的另一端。
图七
反光罩的装卸安装反光罩1. 用一只手托住闪光灯灯体。
2. 另一只手将反光罩对准反光罩固定卡位。
3. 反光罩装入卡位后,按箭头方向顺时针转动反光罩直到听到“咔”的声响。这样才能确保反光罩被可靠锁固。(图八)
图八
4. 使用摄影伞时,请确保反光罩上的摄影伞插孔和Indra 影楼灯上的摄影伞插孔对齐。
取下反光罩1. 用一只手按箭头方向拨动反光罩锁扣按钮。
2. 另一只手按照箭头方向逆时针转动反光罩,即可拆卸反光罩。(图九)
图九
注:取下反光罩时请保持反光罩与影楼灯平衡,不要碰到玻璃罩。
使用摄影伞插孔Phottix Indra360 TTL影楼灯顶部的摄影伞插孔方便安装摄影伞和伞式柔光箱。使用摄影伞插孔安装时非常简单:将伞中间的伞把插入到Phottix Indra影楼灯上的插孔中。旋转摄影伞插孔上的螺丝固定摄影伞。
使用柔光箱Phottix Indra360 TTL影楼灯上的反光罩固定卡位兼容保荣卡口,可以用来安装柔光箱或其它饰光器材。柔光箱的拆装方式和反光罩的拆装方式相同:
安装:将柔光箱卡口对准反光罩固定卡位,然后顺时针方向转动,直到听到“咔”的声响。(如图七)
拆卸:向后拨动反光罩锁扣按钮,同时按逆时针方向转动柔光箱卡口,即可拆卸柔光箱。(如图八)
同步端口和USB端口1. 3.5mm同步端口可通过兼容的同步线连接至Phottix闪光灯引闪器(ODIN TTL、Strato II、Strato TTL)或相机来引闪Indra360 TTL影楼灯。
2. USB端口用于固件升级。软件最新公告及说明都会发布在Phottix网站上。注: 用同步端口连接引闪器只能使用手动模式。
传输频道Phottix Indra360 TTL影楼灯无线系统有4个频道:1、2、3和4。处于无线接收模式下的Phottix Indra360 TTL影楼灯需与引闪它的引闪装置或闪光灯设置为同一频道。
快速闪光功能快速闪光功能允许影楼灯在还没有完全充满电时,即LED状态指示灯亮绿灯的时候就可以进行闪光。快速闪光回电时间较快。快速闪光对于短距离内的抓拍很有帮助。
快速闪光功能用于连拍模式,您可以在下面菜单功能中选择连拍模式功能开启或关闭。
请注意:快速闪光以闪光为优先。使用快速闪光拍摄较远处景物时,可能会导致曝光不足。
闪光包围曝光 闪光包围曝光(FEB)可用来自动改变一组照片的闪光功率。相机将记录一组不同曝光的照片。在拍摄移动的主体及在一个拍摄场景中有多种不同灯光效果的情况下,使用闪光包围曝光可以确保记录到合适曝光的照片。闪光包围曝光也可用于高动态范围摄影。
Phottix Indra360 TTL影楼灯支持闪光包围曝光功能,但该功能的实现主要取决于使用的引闪器和相机是否具备该功能,在Phottix Indra360 TTL影楼灯上不能设置闪光包围曝光。更多关于闪光包围曝光的信息请参阅你的相机使用手册。
闪光曝光锁定 闪光曝光锁定(FV锁定)可用来在拍摄照片前锁定闪光曝光

17
Cn Simp 说明书
量,这对于在使用手动点测光的情况下,在一个场景中有多种不同灯光效果很有帮助。在TTL模式下,通过相机上的功能按钮可以开启闪光曝光锁定功能,更多闪光曝光锁定功能和使用详情,请参阅相机使用手册。
Phottix Indra360 TTL影楼灯支持闪光曝光锁定功能,但该功能的实现主要取决于使用的引闪器和相机是否具备支持该功能。更多关于闪光曝光锁定的信息请参阅你的相机使用手册。
高速同步高速同步(HSS/ 自动 FP)模式下,可以使用高于相机设置的影楼灯同步速度(通常是1/200-1/250s)的快门速度进行拍摄。在您需要使用光圈优先模式或限制环境光的情况下,高速同步功能将很有帮助。高速同步能达到的同步速度将可能因相机型号不同而有所差异,详情请参阅相机使用手册。
请注意:1. Phottix Indra360 TTL影楼灯支持高速同步功能,但此影楼灯不能设置这项功能。需在您所使用的相机或引闪器上设置高速同步功能。
2. 相机、触发器和接收模式都可以在很大程度上影响高速同步模式。为取得最佳效果,使用高速同步模式时,您可以选用本手册中兼容表里所列出的触发器。详请参阅引闪器和相机使用手册。
3. 手动模式(Manual)和频闪模式(Multi)下不支持高速同步。
4. 经常使用高速同步会缩短灯管寿命。
5.尼康的闪光灯协议可能会限制部分尼康相机的最大同步速度。
产品兼容性
后帘同步后帘同步(SCS)是在曝光快结束时触发影楼灯,而不是在曝光开始时触发,它可以结合低快门速度达到创意性效果。
请注意:1. Phottix Indra360 TTL影楼灯支持后帘同步功能,但灯本身不能设置这项功能。需在您所使用的相机或引闪器上设置后帘同步功能。详情请参阅引闪器和相机使用手册。
2. 频闪模式(Multi)不支持后帘同步。
测试/闪光就绪按钮(READY)1. 按测试按钮将会触发影楼灯闪光,可用于手动模式下测光。
2. 此按键也具有闪光灯回电指示功能,达到最小闪光电压时LED亮绿灯。充满电后,LED指示灯亮红灯。
18
Cn Simp 说明书
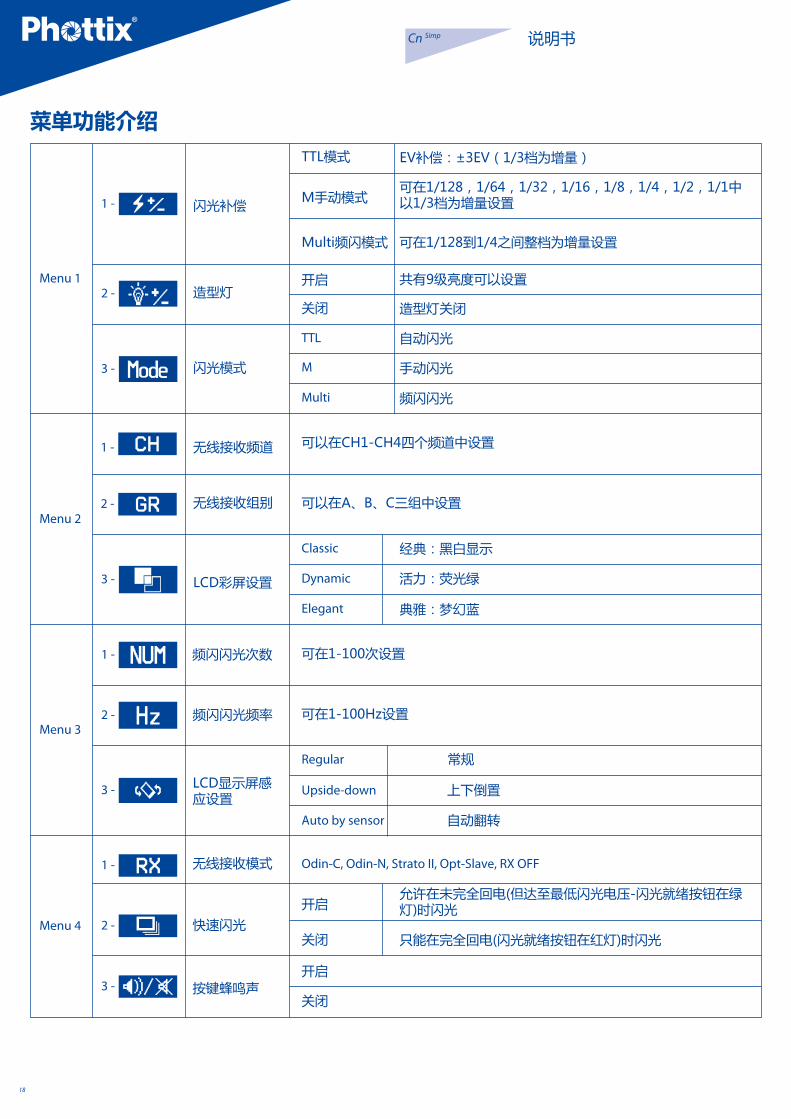
菜单功能介绍

19
Cn Simp 说明书
菜单功能参数设置使用LCD显示屏下面的四个功能按钮,选定对应的功能设置项。被选定的功能项在LCD显示屏上将会以红/白/黄色高亮显示(LCD彩屏设置和LCD显示屏感应设置除外,这两项功能将会以菜单形式显示),可以开始设置功能。
1. 通过“调节/确定旋钮”即可选择参数。
2. 参数设置完毕后,请再次按对应的功能按键或按压设置旋钮确认,并退出参数编辑状态。
液晶显示屏显示界面
无线接收模式:Odin-C, Odin-N, Strato II, Opt-SlaveRX OFF
闪光模式:TTL、M、Multi
快速闪光 : 开启
: 关闭
按键提示音 开启 关闭
菜单栏:详见菜单功能介绍
闪光曝光补偿/闪光输出
无线接收频道
无线接收组别 造型灯:亮度级别:01-09九级、OFF(关闭)
菜单栏显示界面

20
Cn Simp 说明书
自动存储功能 Phottix Indra360 TTL 能够自动保存影楼灯设置。即使关机重启,之前所有设置仍将会保存在影楼灯内,直到下次您重新设置为止。
造型闪光1. 按相机上的景深预览按钮(如果相机上有)将会触发影楼灯连续闪光约1秒。造型闪光有利于看到被摄体的光影效果和光平衡(请阅读您的相机使用说明书获得更多关于景深预览按钮功能的信息)。
2. 所有模式(TTL、手动(M)和频闪模式(Multi))下都可以使用造型闪光。
造型灯Phottix Indra360 TTL影楼灯配备一个LED造型灯。造型灯有利于预览灯光的布置,还可以在黑暗的环境下提供辅助对焦及照明用途。
造型灯有两种模式1. 手动模式:01-09, 共9个亮度级别
2. 关闭模式(OFF):造型灯将被关闭。
请注意:1. 闪光灯闪光时,造型灯不会自动关闭。
2. 使用造型灯电量消耗会很大。
造型灯亮度参数设置通过Phottix Indra360 TTL影楼灯 下的菜单选项
或者造型灯快捷按钮 开启或关闭造型灯。
通过菜单选项设置1. 按功能按钮4,直至 出现在LCD显示屏上。
2. 按 对应的功能按钮。
3. 造型灯亮度选项被选定后,在LCD显示屏上,将会高亮显示。
4. 旋转“调节/确定旋钮”可以选择手动模式(01-09亮度级)或关闭模式(OFF)。
5. 设置完成后,按 对应的功能按钮或“调节/确定旋钮”,确定并退出编辑模式。
通过造型灯按钮设置1. 按造型灯按钮可以开启或关闭造型灯。
2. 造型灯开启后,造型灯选项 将会在LCD显示屏上高亮显示。
3. 旋转“调节/确认旋钮” 可以选择手动模式(01-09亮度级)或关闭模式(OFF)。
4. 按“调节/确定旋钮”,确定并退出编辑模式。
闪光模式Phottix Indra360 TTL影楼灯具有三种闪光模式:TTL模式、手动模式(M)和频闪模式(Multi)。
TTL闪光模式当Phottix Indra360 TTL影楼灯设置为TTL模式时,被引闪时,影楼灯将会按照引闪装置上设置的闪光模式和闪光功率闪光,即用户可以在Phottix Odin或其他兼容的Phottix引闪器上调节影楼灯的闪光功率。
闪光曝光补偿Phottix Indra360 TTL影楼灯可以在±3档间以1/3档为增量调节闪光曝光补偿(FEC)。闪光曝光补偿对于基于环境的需要而需要微调TTL系统的情况有很大帮助。
请注意: 1. 如在引闪装置上设置为TTL模式(如果所使用的引闪装置支持该功能),在Phottix Indra360 TTL影楼灯上也设置为TTL模式,且两者都设置了EV补偿值,那么最终的EV值是两者的EV设定值累计计算而得出来的。
2. 如在引闪装置上设置为M模式(如果所使用的引闪装置支持该功能),在Phottix Indra360 TTL影楼灯上设置为TTL模式,且在影楼灯上设置了EV补偿值,那么Phottix Indra360 TTL影楼灯上设置的EV补偿值也将参与最终的闪光输出量的计算。
手动闪光模式(M)Phottix Indra360 TTL影楼灯设置为手动模式(M),影楼灯将会按照设置的手动闪光功率闪光,而不能在主控端的引闪器或闪光灯上调节影楼灯的闪光模式和闪光功率。影楼灯的手动模式(M)闪光功率可在1/128,1/64,1/32, 1/16,1/8,1/4,1/2,1/1中以1/3档为增量设置。
频闪闪光模式(Multi)Phottix Indra360 TTL影楼灯设置为频闪模式(Multi),可以发出一系列快速闪光。您可以在Phottix Indra360 TTL影楼灯上设置功率、频率和闪光次数。频闪模式有利于在同一张照片上拍摄移动的被摄体的多个图像以达到特殊效果。
Phottix Indra360 TTL影楼灯设置为频闪模式(Multi), 影楼灯将会按照自身设置的手动闪光功率、闪光次数 (1-100次)和闪光频率(1-100Hz)闪光,而不能在主控端的引闪器或闪光灯上调节影楼灯的闪光模式和闪光功率。影楼灯频闪模式(Multi)的闪光功率可在1/128,1/64, 1/32,1/16,1/8,1/4中以整档为增量设置。

21
Cn Simp 说明书
请注意:1. 过多使用频闪会导致过热甚至损坏灯管。
2. 影楼灯过热将会自动延长回电时间, 如温度继续升高将会停止闪光。
无线接收模式Phottix Indra360 TTL影楼灯具有Odin-C, Odin-N, Strato II, Opt-Slave及RX OFF模式。详情请参见下文。
接收支持的闪光模式
Odin-C无线电接收模式处于该模式下的Phottix Indra360 TTL影楼灯,可以被处于同一频道和同一组别下的Phottix Odin TTL 触发器(佳能版)的发射器和处于ODIN TX模式下的Phottix Mitros+收发一体TTL闪光灯(佳能版)触发。
如何设置:1. 按功能按钮4或旋转“调节/确定旋钮”直至LCD显示屏上显示 。
2. 按 对应的功能按钮,LCD显示屏上对应的无线接收功能高亮显示。
3. 旋转“调节/确定旋钮”,将无线模式切换到Odin-C。
4. 按“调节/确定旋钮”,确认设置。
5. 按 在 下对应的功能按钮,旋转“调节/确定旋钮”进行 TTL、M、Multi选择。
Odin-N无线电接收模式处于该模式下的Indra360 TTL影楼灯可以被同一频道和同一组别下的Phottix Odin TTL触发器(尼康版)的发射器和处于ODIN TX模式下的Phottix Mitros+ 收发一体TTL闪光灯(尼康版)触发。
如何设置:1. 按功能按钮4或旋转“调节/确定旋钮”直至LCD显示屏上显示 。
2. 按 对应的功能按钮,LCD显示屏上对应的无线接收功能高亮显示。
3. 调节“调节/确定旋钮”将无线模式切换到Odin-N。
4. 按“调节/确定旋钮”确认设置。
5. 按 在 下对应的功能按钮,旋转“调节/确定旋钮”进行 TTL、M、Multi选择。
Strato II无线电接收模式处于该模式下的Indra360 TTL影楼灯可以被同一频道和同一组别下的Phottix Odin TTL 触发器(佳能版或尼康版)的发射器、处于ODIN TX模式下的Phottix Mitros+ 收发一体TTL闪光灯(佳能版或尼康版)、Phottix Strato TTL无线电触发器(佳能版或尼康版)的发射器及Phottix Strato II多功能无线电触发器二代(佳能版或尼康版)的发射器触发。
请注意:
Strato II无线电接收模式不支持高速同步、后帘同步和TTL功能。
如何设置:1. 按功能按钮4或旋转“调节/确定旋钮”直至LCD显示屏上显示 。
2. 按 对应的功能按钮,LCD显示屏上对应的无线接收功能高亮显示。
3. 调“调节/确定旋钮”将无线模式切换到Strato II。
4. 按“调节/确定旋钮”,确认设置。
5. 按 在 下对应的功能按钮。旋转“调节/确定旋钮”进行 M、Multi选择。
Opt-Slave光学接收模式该模式下,来自附近其他闪光灯或影楼灯的闪光都可能触发Indra360 TTL影楼灯。
请注意: 来自附近TTL闪光灯的预闪将触发处于Opt-Slave模式下的Phottix Indra影楼灯。使用该模式时请小心,以防附近的TTL闪光灯在你没有准备好之前触发Phottix Indra影楼灯。
如何设置:1. 按功能按钮4或旋转“调节/确定旋钮”直至LCD显示屏上显示 。
2. 按 对应的功能按钮,LCD显示屏上对应的无线接收功能高亮显示。
3. 调节“调节/确定旋钮”将无线模式切换到Opt-Slave。
4. 按“调节/确定旋钮”,确认设置。
22
Cn Simp 说明书
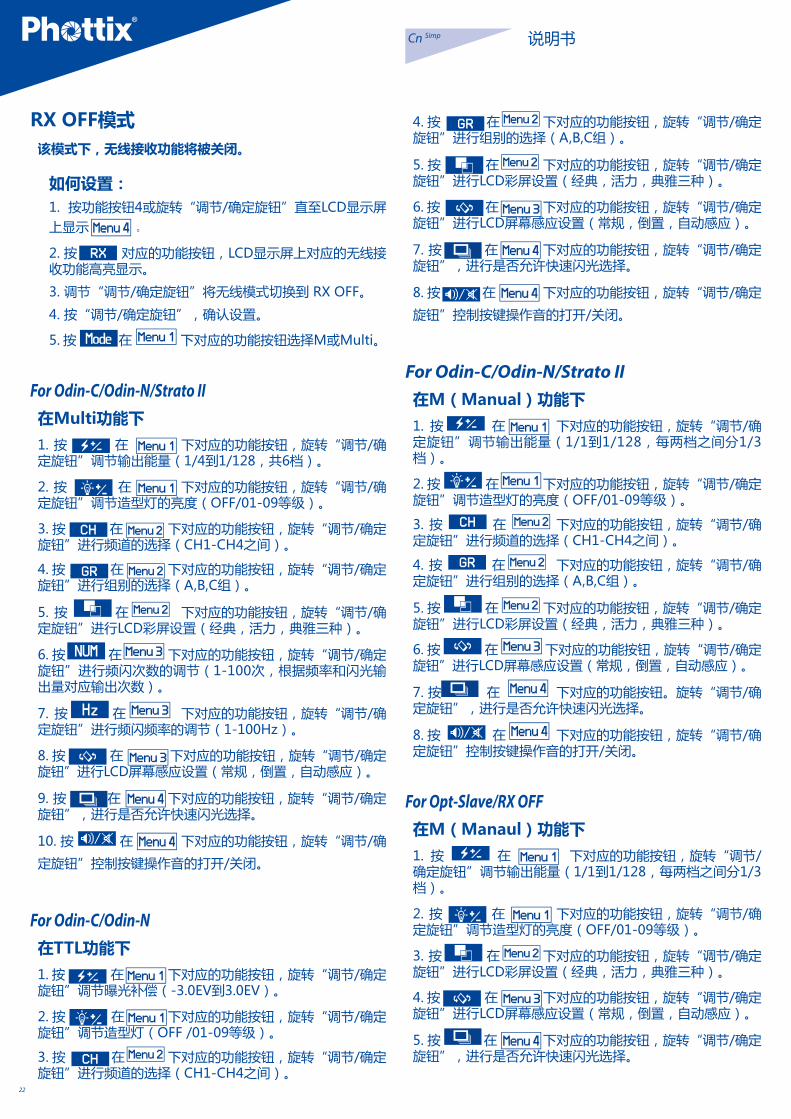
RX OFF模式该模式下,无线接收功能将被关闭。
如何设置:1. 按功能按钮4或旋转“调节/确定旋钮”直至LCD显示屏上显示 。
2. 按 对应的功能按钮,LCD显示屏上对应的无线接收功能高亮显示。
3. 调节“调节/确定旋钮”将无线模式切换到 RX OFF。
4. 按“调节/确定旋钮”,确认设置。
5. 按 在 下对应的功能按钮选择M或Multi。
For Odin-C/Odin-N/Strato II在Multi功能下1. 按 在 下对应的功能按钮,旋转“调节/确定旋钮”调节输出能量(1/4到1/128,共6档)。
2. 按 在 下对应的功能按钮,旋转“调节/确定旋钮”调节造型灯的亮度(OFF/01-09等级)。
3. 按 在 下对应的功能按钮,旋转“调节/确定旋钮”进行频道的选择(CH1-CH4之间)。
4. 按 在 下对应的功能按钮,旋转“调节/确定旋钮”进行组别的选择(A,B,C组)。
5. 按 在 下对应的功能按钮,旋转“调节/确定旋钮”进行LCD彩屏设置(经典,活力,典雅三种)。
6. 按 在 下对应的功能按钮,旋转“调节/确定旋钮”进行频闪次数的调节(1-100次,根据频率和闪光输出量对应输出次数)。
7. 按 在 下对应的功能按钮,旋转“调节/确定旋钮”进行频闪频率的调节(1-100Hz)。
8. 按 在 下对应的功能按钮,旋转“调节/确定旋钮”进行LCD屏幕感应设置(常规,倒置,自动感应)。
9. 按 在 下对应的功能按钮,旋转“调节/确定旋钮”,进行是否允许快速闪光选择。
10. 按 在 下对应的功能按钮,旋转“调节/确
定旋钮”控制按键操作音的打开/关闭。
For Odin-C/Odin-N在TTL功能下1. 按 在 下对应的功能按钮,旋转“调节/确定旋钮”调节曝光补偿(-3.0EV到3.0EV)。
2. 按 在 下对应的功能按钮,旋转“调节/确定旋钮”调节造型灯(OFF /01-09等级)。
3. 按 在 下对应的功能按钮,旋转“调节/确定旋钮”进行频道的选择(CH1-CH4之间)。
4. 按 在 下对应的功能按钮,旋转“调节/确定旋钮”进行组别的选择(A,B,C组)。
5. 按 在 下对应的功能按钮,旋转“调节/确定旋钮”进行LCD彩屏设置(经典,活力,典雅三种)。
6. 按 在 下对应的功能按钮,旋转“调节/确定旋钮”进行LCD屏幕感应设置(常规,倒置,自动感应)。
7. 按 在 下对应的功能按钮,旋转“调节/确定旋钮”,进行是否允许快速闪光选择。
8. 按 在 下对应的功能按钮,旋转“调节/确定
旋钮”控制按键操作音的打开/关闭。
For Odin-C/Odin-N/Strato II在M(Manual)功能下1. 按 在 下对应的功能按钮,旋转“调节/确定旋钮”调节输出能量(1/1到1/128,每两档之间分1/3档)。
2. 按 在 下对应的功能按钮,旋转“调节/确定旋钮”调节造型灯的亮度(OFF/01-09等级)。
3. 按 在 下对应的功能按钮,旋转“调节/确定旋钮”进行频道的选择(CH1-CH4之间)。
4. 按 在 下对应的功能按钮,旋转“调节/确定旋钮”进行组别的选择(A,B,C组)。
5. 按 在 下对应的功能按钮,旋转“调节/确定旋钮”进行LCD彩屏设置(经典,活力,典雅三种)。
6. 按 在 下对应的功能按钮,旋转“调节/确定旋钮”进行LCD屏幕感应设置(常规,倒置,自动感应)。
7. 按 在 下对应的功能按钮。旋转“调节/确定旋钮”,进行是否允许快速闪光选择。
8. 按 在 下对应的功能按钮,旋转“调节/确定旋钮”控制按键操作音的打开/关闭。
For Opt-Slave/RX OFF在M(Manaul)功能下1. 按 在 下对应的功能按钮,旋转“调节/确定旋钮”调节输出能量(1/1到1/128,每两档之间分1/3档)。
2. 按 在 下对应的功能按钮,旋转“调节/确定旋钮”调节造型灯的亮度(OFF/01-09等级)。
3. 按 在 下对应的功能按钮,旋转“调节/确定旋钮”进行LCD彩屏设置(经典,活力,典雅三种)。
4. 按 在 下对应的功能按钮,旋转“调节/确定旋钮”进行LCD屏幕感应设置(常规,倒置,自动感应)。
5. 按 在 下对应的功能按钮,旋转“调节/确定旋钮”,进行是否允许快速闪光选择。

23
Cn Simp 说明书
6. 按 在 下对应的功能按钮,旋转“调节/确定旋钮”控制按键操作音的打开/关闭。
For RX OFF在Multi功能下1. 按 在 下对应的功能按钮,旋转“调节/确定旋钮”调节输出能量(1/4到1/128,共6档)。
2. 按 在 下对应的功能按钮,旋转“调节/确定旋钮”调节造型灯的亮度(OFF/01-09等级)。
3. 按 在 下对应的功能按钮,旋转“调节/确定旋钮”进行LCD彩屏设置(经典,活力,典雅三种)。
4. 按 在 下对应的功能按钮,旋转“调节/确定旋钮”进行频闪次数的调节(1-100次,根据频率和闪光输出量对应输出次数)。
5. 按 在 下对应的功能按钮,旋转“调节/确定旋钮”进行频闪频率的调节(1-100Hz)。
6. 按 在 下对应的功能按钮,旋转“调节/确定旋钮”进行LCD屏幕感应设置(常规,倒置,自动感应)。
7. 按 在 下对应的功能按钮,旋转“调节/确定旋钮”进行是否允许快速闪光选择。
8. 按 在 下对应的功能按钮,旋转“调节/确定旋钮”控制按键操作音的打开/关闭。
注:选定参数后,如不按相应的功能按钮或“调节/确定旋钮”确认,10秒内仍默认选中。

24
Cn Simp 说明书
2. 按功能按钮1和2将循环自定义功能菜单项 – C.Fn 00至C.Fn03。
3. 旋转调节/确定按钮可在菜单内改变自定义功能。
4. 按功能按键4退出自定义功能菜单。
自定义功能表
自定义功能 Phottix Indra360 TTL影楼灯具备可编辑的自定义功能。编辑自定义功能步骤如下:
1. 同时按住功能按钮4和“调节/确定旋钮”约3秒将进入自定义功能菜单屏幕。
更换灯管1. 确保切断电源10分钟以上。
2. 按反光罩拆卸方式取下反光罩。
3. 稍微用力掰开玻璃防护罩卡位,取下玻璃防护罩。(图十)
4. 轻握住闪光灯灯管从卡槽中取出。(图十一)
5. 将新的灯管插入卡槽中。(图十二)
6. 对准卡位装上玻璃防护罩。(图十三)
7. 按反光罩安装方式装回反光罩。
注:更换灯管时,请佩戴手套,不要直接用手接触灯管。

25
Cn Simp 说明书
影楼灯恢复默认值如需将Phottix Indra360 TTL影楼灯所有功能恢复到出厂设置,只需同时按住功能按钮1和“调节/确定旋钮”约3秒即可。
影楼灯版本信息查询通过组合键,可以查询影楼灯的硬件版本号、软件版本号、图标库版本号和产品序列号。
同时按住功能按钮2和“调节/确定旋钮”约3秒。版本信息界面将会显示影楼灯的硬件版本号、软件版本号、图标库版本号和产品序列号。
按任意按键都可以退出影楼灯版本信息显示界面返回到正常的工作显示界面。
在影楼灯显示版本信息界面时,如果引闪影楼灯或者相机对焦、拍照,影楼灯将会自动退出版本信息显示界面,返回到工作界面。
影楼灯电容器的物理变化如果影楼灯一段时间内未使用,影楼灯内的电容器会发生物理变化。请每三个月开启至少10分钟以避免电容器的物理变化。
规格参数最大闪光能量: 360Ws
功率调节档位: 8档(4-360Ws)
功率调节步长: 1/3档,或整档
闪光模式: TTL自动、M手动和Multi频闪
闪光指数: 32/105.1 (ISO100,m/ft)
发光角度: 60°
相关色温: 5600±200K(在低输出功率下色温有可能会 有变化)
闪光持续时间: t =1 1/250s-1/12000s
频闪闪光: 频率:1-100Hz 闪光次数:1-100次
高速/后帘同步:支持*
回电时间(1/1,按影楼灯闪光指示灯亮红灯时为准):
Phottix Indra 交流电源适配器:单/双灯:1s/1.5s
Phottix Indra移动电源(10AH电池):H mode 单/双灯:1.5s/2.5sS mode 单/双灯:2.0s/5.5s
Phottix Indra移动电源(5AH电池):H mode 单/双灯:2.0s/5.0sS mode 单/双灯:4.0s/11s
Phottix Indra360 移动电源(4AH电池): 5s
输入电源: Phottix Indra交流电源适配器: AC 220V/110V, 50HZ/60HZ
Phottix Indra移动电源: 14.8V/5Ah: 600次全功率闪光 14.8V/10Ah: 1100次全功率闪光
Phottix Indra360 移动电源: 14.8V/4Ah:300次全功率闪光
造型灯功率: 约4.5W
造型灯控制模式:OFF,1-9档
无线接收方式: 光学脉冲和无线电
频道: 4
无线接收模式: Odin-C、 Odin-N、Strato II、Opt-Slave、 RX OFF(仅允许3.5mm同步端口触发)
接收范围: 无线电传输:100米以上
显示分辨率: 320*240 TFT LCD彩屏,支持3种配色模式
LCD屏幕感应设置:可自动感应方位,根据方位180度翻转 显示屏幕
散热方式: 根据温度自动开启风扇
回电指示音: 可设置开启或关闭
同步端口: 3.5mm mini端口
软件升级: 采用USB mini端口,可通过软件对影楼灯 固件升级。
外部尺寸: 长x直径:约266mm*180mm
重量: 约2000g(不含影楼灯电源线)
注:当产品的设计和规格有变化时,恕不另行通知
*仅支持兼容的相机

26
Cn Trad 說明書
目錄部件和功能…...................................................................…..26閃光模式 …….........................................................................32無線接收模式........................................................................33自訂功能...............................................................................36
技術參數 …............................................................................37
部件全視圖1. 燈頭前蓋 2. 攝影傘插孔3. 反光罩鎖扣4. 把手5. 3.5mm同步埠6. USB輸出埠7. 外置電源埠8. 把手角度調節旋鈕9. 把手固定柱 10. 固定螺栓
後視圖11. LCD顯示介面12. 功能按鈕113. 功能按鈕214. 測試/閃光就緒按鈕15. 調節/確定旋鈕 16. 電源開關17. 造型燈開關18. 功能按鈕319. 功能按鈕420. 光學信號感測器
前視圖21. 反光罩固定卡位22. 玻璃防護燈罩23. LED造型燈24. 閃光燈燈管25. 反光罩
注意:在使用Phottix Indra360 TTL影樓燈前,請仔細閱讀使用說明書。
Phottix Indra360 是一款由移動電源和交流電源供電的可擕式TTL影樓燈。內置無線電接收和光學無線接收功能。支援TTL模式、手動模式(M)和頻閃模式(Multi)。支援高速同步(HSS)和後簾同步(SCS)。Phottix Indra360 TTL影樓燈可以和Phottix多款現行閃光燈引閃器相容使用。
安全須知● 本產品內包含高壓電器元件。請勿試圖自行打開或進行維修。 禁止讓兒童接觸本產品。
● 不要在有易燃氣體、液體化學品或高電荷環境下使用本產品。
● 確保所有插頭、插座是可靠穩固連接的。
● 更換閃光燈管時,要先切斷Indra360影樓燈和供電電源的連接達10分鐘以上。請小心,影樓燈燈管使用後會很燙。
● 請勿用金屬物體接觸影樓燈的外置電源埠,有可能觸電或造成重傷!
● 請參考本說明書中的技術參數選擇合適的電源。
● 外置電源應有良好的散熱空間,請不要在佈滿粉塵及固體懸浮的環境中使用。
● 本產品不具備防水特性,請遠離雨、雪等高濕度的場合。
● 請勿使用有機溶劑或含酒精的液體來清潔本產品。
● 影樓燈閃光時,請勿在影樓燈的燈頭前放置不透光的物體,否則影樓燈發出的熱量將可能燒灼放置的物體或是損壞影樓燈燈管!
● 請安全使用您的影樓燈。切勿在短距離內直接對著人或動物的眼睛觸發影樓燈,否則會損傷眼睛,甚至導致失明。
● 請勿將產品置於高溫環境下(如直射陽光、封閉的汽車等)。
● 如在使用過程中出現冒煙或發出焦味時,請立即關閉影樓燈的電源開關。
● 長期不使用時,請務必切斷影樓燈的電源開關。
● 在使用閃光燈時,請務必取下燈頭前蓋,以免閃光時溫度過高,導致前蓋變形或燃燒。
● 產品外殼在使用後會很燙,請勿觸摸,有灼傷的危險。
● 有關Phottix Indra360 TTL影樓燈 交流電源適配器的妥善處理和回收,請諮詢地方當局。
感謝您購買Phottix產品

27
Cn Trad 說明書
外置電源埠通過外置電源埠可以將影樓燈連接至Phottix Indra交流電源適配器和Phottix Indra移動電源。
請注意:外接外置電源時,只能搭配Phottix Indra360 TTL影樓燈專用的電源線。
連接影樓燈和外置電源使用Phottix Indra360 移動電源1. 將Indra機頂電源的輸出插頭插入Indra360 TTL 影樓燈的外置電源埠,機頂電源紅色高壓指示燈隨即亮起。(圖一、二)
圖一 圖二
2. 打開機頂電源開關。
3. 打開Indra360 TTL影樓燈電源開關。
使用Phottix Indra移動電源時1. 將Indra360 TTL影樓燈電源線的一端插入 Indra360 TTL 影樓燈的外置電源埠。(圖一)
注:插入時請對準電源線和電源埠上的紅點標記卡位。
2. 將另一端插入Phottix Indra移動電源的閃光燈輸出插孔。(圖三)
圖三
3. 打開移動電源輸出撥動開關。
4. 打開Indra360 TTL影樓燈電源開關。
使用Phottix Indra 交流電源適配器時1. 將Indra360 TTL影樓燈電源線的一端插入 Indra360 TTL 影樓燈的外置電源埠。(圖一)
注:插入時請對準電源線和電源埠上的紅點標記卡位。
2. 將另一端插入Phottix Indra交流電源適配器的電源輸出插座。(圖四)
圖四
3. 將交流電源適配器接入到交流市電。
4. 打開交流電源適配器輸入電源開關和電源輸出開關。
5. 打開Indra360 TTL影樓燈電源開關。
斷開影樓燈和外置電源斷開Phottix Indra360 移動電源1. 關閉Indra360 TTL影樓燈的電源開關。
2. 關閉機頂電源開關。
3. 按照(圖七)拔下機頂電源的輸出插頭即可。
斷開Phottix Indra移動電源時1. 關閉Indra360 TTL影樓燈的電源開關。
2. 將移動電源開關打到“OFF”,按照(圖五)的方式拔下影樓燈的電源線。
圖五
3. 按照(圖七)拔下影樓燈電源的另一端。
斷開Phottix Indra交流電源時1. 關閉Indra360 TTL影樓燈的電源開關。
2. 將交流電源輸入/輸出電源開關打到“OFF”,按照(圖六)所示拔下影樓燈的電源線。
圖六

28
Cn Trad 說明書
3. 按照(圖七)所示從影樓燈上拔下電源線的另一端。
圖七
反光罩的裝卸安裝反光罩1. 用一隻手托住閃光燈燈體。
2. 另一隻手將反光罩對準反光罩固定卡位。
3. 反光罩裝入卡位後,按箭頭方向順時針轉動反光罩直到聽到“哢”的聲響。這樣才能確保反光罩被可靠鎖固。(圖八)
圖八
4. 使用攝影傘時,請確保反光罩上的攝影傘插孔和Indra 影樓燈上的攝影傘插孔對齊。
取下反光罩1. 用一隻手按箭頭方向撥動反光罩鎖扣按鈕。
2. 另一隻手按照箭頭方向逆時針轉動反光罩,即可拆卸反光罩。(圖九)
圖九
注:取下反光罩時請保持反光罩與影樓燈平衡,不要碰到玻璃罩。
使用攝影傘插孔Phottix Indra360 TTL影樓燈頂部的攝影傘插孔方便安裝攝影傘和傘式柔光箱。使用攝影傘插孔安裝時非常簡單:將傘中間的傘把插入到Phottix Indra影樓燈上的插孔中。旋轉攝影傘插孔上的螺絲固定攝影傘。
使用柔光箱Phottix Indra360 TTL影樓燈上的反光罩固定卡位相容保榮卡口,可以用來安裝柔光箱或其它飾光器材。柔光箱的拆裝方式和反光罩的拆裝方式相同:
安裝:將柔光箱卡口對準反光罩固定卡位,然後順時針方向轉動,直到聽到“哢”的聲響。(如圖七)。
拆卸:向後撥動反光罩鎖扣按鈕,同時按逆時針方向轉動柔光箱卡口,即可拆卸柔光箱。(如圖八)
同步埠和USB埠1. 3.5mm同步埠可通過相容的同步線連接至Phottix閃光燈引閃器(ODIN TTL、Strato II、Strato TTL)或相機來引閃Indra360 TTL影樓燈。
2. USB埠用於固件升級。軟體最新公告及說明都會發佈在Phottix網站上。注: 用同步埠連接引閃器只能使用手動模式
傳輸頻道Phottix Indra360 TTL影樓燈無線系統有4個頻道:1、2、 3 和4。處於無線接收模式下的Phottix Indra360 TTL影樓燈需與引閃它的引閃裝置或閃光燈設置為同一頻道。
快速閃光功能快速閃光功能允許影樓燈在還沒有完全充滿電時,即LED狀態指示燈亮綠燈的時候就可以進行閃光。快速閃光回電時間較快。快速閃光對於短距離內的抓拍很有幫助。
快速閃光功能用於連拍模式,您可以在下面功能表功能中選擇連拍模式功能開啟或關閉。
請注意:快速閃光以閃光為優先。使用快速閃光拍攝較遠處景物時,可能會導致曝光不足。
閃光包圍曝光 閃光包圍曝光(FEB)可用來自動改變一組照片的閃光功率。相機將記錄一組不同曝光的照片。在拍攝移動的主體及在一個拍攝場景中有多種不同燈光效果的情況下,使用閃光包圍曝光可以確保記錄到合適曝光的照片。閃光包圍曝光也可用于高動態範圍攝影。
Phottix Indra360 TTL影樓燈支持閃光包圍曝光功能,但該功能的實現主要取決於使用的引閃器和相機是否具備該功能,在Phottix Indra360 TTL影樓燈上不能設置閃光包圍曝光。更多關於閃光包圍曝光的資訊請參閱你的相機使用手冊。
閃光曝光鎖定 閃光曝光鎖定(FV鎖定)可用來在拍攝照片前鎖定閃光曝光
29
Cn Trad 說明書
量,這對於在使用手動點測光的情況下,在一個場景中有多種不同燈光效果很有幫助。在TTL模式下,通過相機上的功能按鈕可以開啟閃光曝光鎖定功能,更多閃光曝光鎖定功能和使用詳情,請參閱相機使用手冊。
Phottix Indra360 TTL影樓燈支持閃光曝光鎖定功能,但該功能的實現主要取決於使用的引閃器和相機是否具備支援該功能。更多關於閃光曝光鎖定的資訊請參閱你的相機使用手冊。
高速同步高速同步(HSS/ 自動 FP)模式下,可以使用高於相機設置的影樓燈同步速度(通常是1/200-1/250s)的快門速度進行拍攝。在您需要使用光圈優先模式或限制環境光的情況下,高速同步功能將很有幫助。高速同步能達到的同步速度將可能因相機型號不同而有所差異,詳情請參閱相機使用手冊。
請注意:1. Phottix Indra360 TTL影樓燈支援高速同步功能,但此影樓燈不能設置這項功能。需在您所使用的相機或引閃器上設置高速同步功能。
2. 相機、觸發器和接收模式都可以在很大程度上影響高速同步模式。為取得最佳效果,使用高速同步模式時,您可以選用本手冊中相容表裡所列出的觸發器。詳請參閱引閃器和相機使用手冊。
3. 手動模式(Manual)和頻閃模式(Multi)下不支援高速同步。
4. 經常使用高速同步會縮短燈管壽命。
5. 尼康的閃光燈協定可能會限制部分尼康相機的最大同步速度。
產品相容性
後簾同步後簾同步(SCS)是在曝光快結束時觸發影樓燈,而不是在曝光開始時觸發,它可以結合低快門速度達到創意性效果。
請注意:1. Phottix Indra360 TTL影樓燈支援後簾同步功能,但燈本身不能設置這項功能。需在您所使用的相機或引閃器上設置後簾同步功能。詳情請參閱引閃器和相機使用手冊。
2. 頻閃模式(Multi)不支援後簾同步。
測試/閃光就緒按鈕(READY)1. 按測試按鈕將會觸發影樓燈閃光,可用於手動模式下測光。
2. 此按鍵也具有閃光燈回電指示功能,達到最小閃光電壓時LED亮綠燈。充滿電後,LED指示燈亮紅燈。
30
Cn Trad 說明書
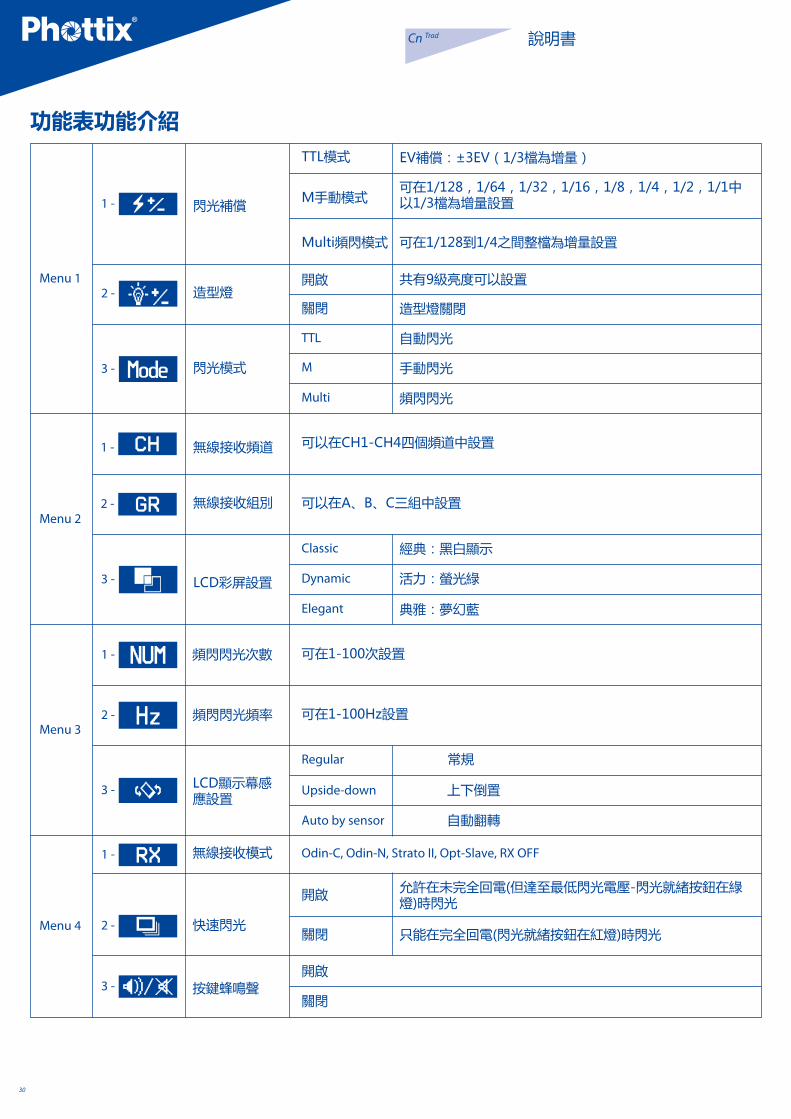
功能表功能介紹
31
Cn Trad 說明書
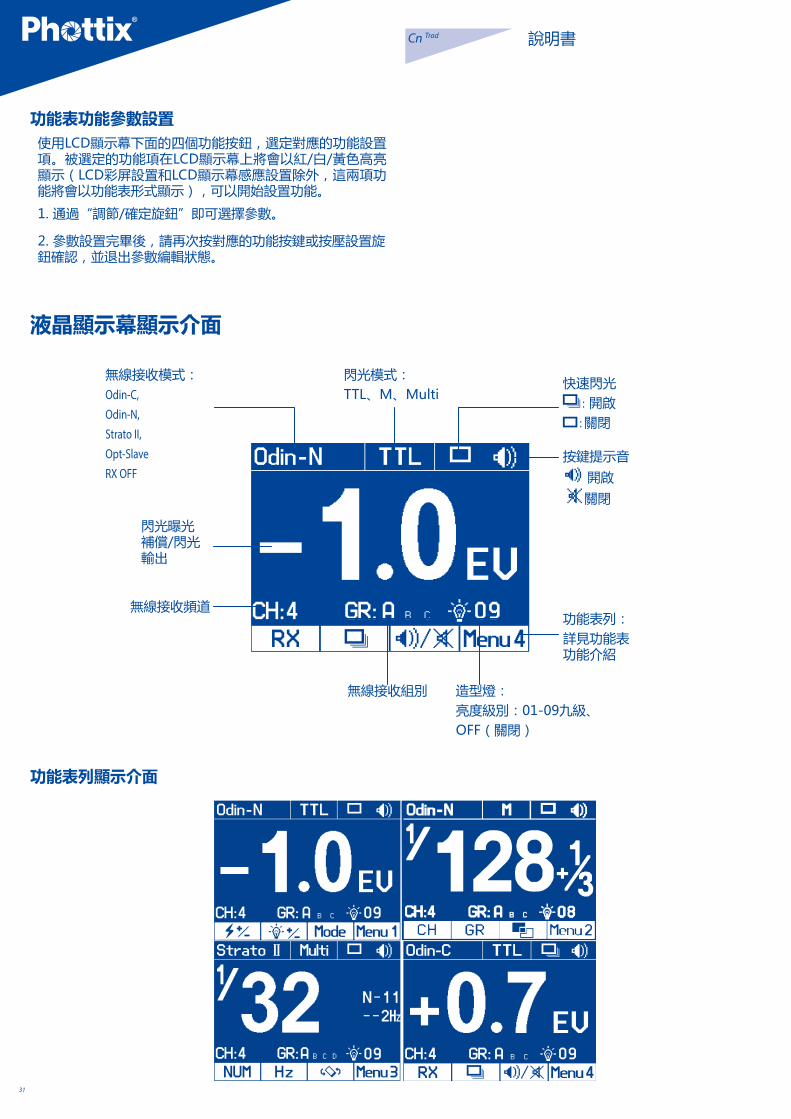
功能表功能參數設置使用LCD顯示幕下面的四個功能按鈕,選定對應的功能設置項。被選定的功能項在LCD顯示幕上將會以紅/白/黃色高亮顯示(LCD彩屏設置和LCD顯示幕感應設置除外,這兩項功能將會以功能表形式顯示),可以開始設置功能。
1. 通過“調節/確定旋鈕”即可選擇參數。
2. 參數設置完畢後,請再次按對應的功能按鍵或按壓設置旋鈕確認,並退出參數編輯狀態。
液晶顯示幕顯示介面
無線接收模式:Odin-C, Odin-N, Strato II, Opt-SlaveRX OFF
閃光模式:TTL、M、Multi
快速閃光 : 開啟
: 關閉
按鍵提示音 開啟 關閉
功能表列:詳見功能表功能介紹
閃光曝光補償/閃光輸出
無線接收頻道
無線接收組別 造型燈:亮度級別:01-09九級、OFF(關閉)
功能表列顯示介面
32
Cn Trad 說明書
自動存儲功能 Phottix Indra360 TTL 能夠自動保存影樓燈設置。即使關機重啟,之前所有設置仍將會保存在影樓燈內,直到下次您重新設置為止。
造型閃光1. 按相機上的景深預覽按鈕(如果相機上有)將會觸發影樓燈連續閃光約1秒。造型閃光有利於看到被攝體的光影效果和光平衡(請閱讀您的相機使用說明書獲得更多關於景深預覽按鈕功能的資訊)。
2. 所有模式(TTL、手動(M)和頻閃模式(Multi))下都可以使用造型閃光。
造型燈Phottix Indra360 TTL影樓燈配備一個LED造型燈。造型燈有利於預覽燈光的佈置,還可以在黑暗的環境下提供輔助對焦及照明用途。
造型燈有两種模式1. 手動模式:01-09, 共9個亮度級別
2. 關閉模式(OFF):造型燈將被關閉。
請注意:1. 閃光燈閃光時,造型燈不會自動關閉。
2. 使用造型燈電量消耗會很大。
造型燈亮度參數設置通過Phottix Indra360 TTL影樓燈 下的功能表選項
或者造型燈快 開啟或關閉造型燈。
通過功能表選項設置1. 按功能按鈕4,直至 出現在LCD顯示幕上。
2. 按 對應的功能按鈕 。
3. 造型燈亮度選項被選定後,在LCD顯示幕上,將會高亮顯示。
4. 旋轉“調節/確定旋鈕”可以選擇手動模式(01-09亮度級)或關閉模式(OFF)。
5. 設置完成後,按 對應的功能按鈕或“調節/確定旋鈕”,確定並退出編輯模式。
通過造型燈按鈕設置1. 按造型燈按鈕可以開啟或關閉造型燈。
2. 造型燈開啟後,造型燈選項 將會在LCD顯示幕上高亮顯示。
3. 旋轉“調節/確認旋鈕” 可以選擇手動模式(01-09亮度級)或關閉模式(OFF)。
4. 按“調節/確定旋鈕”,確定並退出編輯模式。
閃光模式Phottix Indra360 TTL影樓燈具有三種閃光模式:TTL模式、手動模式(M)和頻閃模式(Multi)。
TTL閃光模式當Phottix Indra360 TTL影樓燈設置為TTL模式時,被引閃時,影樓燈將會按照引閃裝置上設置的閃光模式和閃光功率閃光,即用戶可以在Phottix Odin或其他相容的Phottix引閃器上調節影樓燈的閃光功率。
閃光曝光補償Phottix Indra360 TTL影樓燈可以在±3檔間以1/3檔為增量調節閃光曝光補償(FEC)。閃光曝光補償對於基於環境的需要而需要微調TTL系統的情況有很大説明。
請注意: 1. 如在引閃裝置上設置為TTL模式(如果所使用的引閃裝置支援該功能),在Phottix Indra360 TTL影樓燈上也設置為TTL模式,且兩者都設置了EV補償值,那麼最終的EV值是兩者的EV設定值累計計算而得出來的。
2. 如在引閃裝置上設置為M模式(如果所使用的引閃裝置支援該功能),在Phottix Indra360 TTL影樓燈上設置為TTL模式,且在影樓燈上設置了EV補償值,那麼Phottix Indra360 TTL影樓燈上設置的EV補償值也將參與最終的閃光輸出量的計算。
手動閃光模式(M)Phottix Indra360 TTL影樓燈設置為手動模式(M),影樓燈將會按照設置的手動閃光功率閃光,而不能在主控端的引閃器或閃光燈上調節影樓燈的閃光模式和閃光功率。影樓燈的手動模式(M)閃光功率可在1/128,1/64, 1/32,1/16,1/8,1/4,1/2,1/1中以1/3檔為增量設置。
頻閃閃光模式(Multi)Phottix Indra360 TTL影樓燈設置為頻閃模式(Multi),可以發出一系列快速閃光。您可以在Phottix Indra360 TTL影樓燈上設置功率、頻率和閃光次數。頻閃模式有利於在同一張照片上拍攝移動的被攝體的多個圖像以達到特殊效果。
Phottix Indra360 TTL影樓燈設置為頻閃模式(Multi),影樓燈將會按照自身設置的手動閃光功率、閃光次數(1-100次)和閃光頻率(1-100Hz)閃光,而不能在主控端的引閃器或閃光燈上調節影樓燈的閃光模式和閃光功率。影樓燈頻閃模式(Multi)的閃光功率可在1/128,1/64,1/32, 1/16,1/8,1/4中以整檔為增量設置。
33
Cn Trad 說明書
請注意:1. 過多使用頻閃會導致過熱甚至損壞燈管。
2. 影樓燈過熱將會自動延長回電時間, 如溫度繼續升高將會停止閃光。
無線接收模式Phottix Indra360 TTL影樓燈具有Odin-C, Odin-N, Strato II, Opt-Slave及RX OFF模式。詳情請參見下文。
接收支援的閃光模式
Odin-C無線電接收模式處於該模式下的Phottix Indra360 TTL影樓燈,可以被處於同一頻道和同一組別下的Phottix Odin TTL 觸發器(佳能版)的發射器和處於ODIN TX模式下的Phottix Mitros+收發一體TTL閃光燈(佳能版)觸發。
如何設置:1. 按功能按鈕4或旋轉“調節/確定旋鈕”直至LCD顯示幕上顯示 。
2. 按 對應的功能按鈕,LCD顯示幕上對應的無線接收功能高亮顯示。
3. 旋轉“調節/確定旋鈕”,將無線模式切換到Odin-C。
4. 按“調節/確定旋鈕”,確認設置。
5. 按 在 下對應的功能按鈕,旋轉“調節/確定旋鈕”進行 TTL、M、Multi選擇。
Odin-N無線電接收模式處於該模式下的Indra360 TTL影樓燈可以被同一頻道和同一組別下的Phottix Odin TTL觸發器(尼康版)的發射器和處於ODIN TX模式下的Phottix Mitros+ 收發一體TTL閃光燈(尼康版)觸發。
如何設置:1. 按功能按鈕4或旋轉“調節/確定旋鈕”直至LCD顯示幕上顯示 。
2. 按 對應的功能按鈕,LCD顯示幕上對應的無線接收功能高亮顯示。
3. 調節“調節/確定旋鈕”將無線模式切換到Odin-N。
4. 按“調節/確定旋鈕”確認設置。
5. 按 在 下對應的功能按鈕,旋轉“調節/確定旋鈕”進行 TTL、M、Multi選擇。
Strato II無線電接收模式處於該模式下的Indra360 TTL影樓燈可以被同一頻道和同一組別下的Phottix Odin TTL 觸發器(佳能版或尼康版)的發射器、處於ODIN TX模式下的Phottix Mitros+ 收發一體TTL閃光燈(佳能版或尼康版)、Phottix Strato TTL無線電觸發器(佳能版或尼康版)的發射器及Phottix Strato II多功能無線電觸發器二代(佳能版或尼康版)的發射器觸發。
請注意:
Strato II無線電接收模式不支援高速同步、後簾同步和TTL功能。
如何設置:1. 按功能按鈕4或旋轉“調節/確定旋鈕”直至LCD顯示幕上顯示 。
2. 按 對應的功能按鈕,LCD顯示幕上對應的無線接收功能高亮顯示。
3. 調“調節/確定旋鈕”將無線模式切換到Strato II。
4. 按“調節/確定旋鈕”,確認設置。
5. 按 在 下對應的功能按鈕。旋轉“調節/確定旋鈕”進行 M、Multi選擇。
Opt-Slave光學接收模式該模式下,來自附近其他閃光燈或影樓燈的閃光都可能觸發Indra360 TTL影樓燈。
請注意: 來自附近TTL閃光燈的預閃將觸發處於Opt-Slave模式下的Phottix Indra影樓燈。使用該模式時請小心,以防附近的TTL閃光燈在你沒有準備好之前觸發Phottix Indra影樓燈。
如何設置:1. 按功能按鈕4或旋轉“調節/確定旋鈕”直至LCD顯示幕上顯示 。
2. 按 對應的功能按鈕,LCD顯示幕上對應的無線接收功能高亮顯示。
3. 調節“調節/確定旋鈕”將無線模式切換到Opt-Slave。
4. 按“調節/確定旋鈕”,確認設置。

34
Cn Trad 說明書
RX OFF模式該模式下,無線接收功能將被關閉。
如何設置:1. 按功能按鈕4或旋轉“調節/確定旋鈕”直至LCD顯示幕上顯示 。
2. 按 對應的功能按鈕,LCD顯示幕上對應的無線接收功能高亮顯示。
3. 調節“調節/確定旋鈕”將無線模式切換到 RX OFF。
4. 按“調節/確定旋鈕”,確認設置。
5. 按 在 下對應的功能按鈕選擇M或Multi。
For Odin-C/Odin-N/Strato II在Multi功能下1. 按 在 下對應的功能按鈕,旋轉“調節/確定旋鈕”調節輸出能量(1/4到1/128,共6檔)。
2. 按 在 下對應的功能按鈕,旋轉“調節/確定旋鈕”調節造型燈的亮度(OFF/01-09等級)。
3. 按 在 下對應的功能按鈕,旋轉“調節/確定旋鈕”進行頻道的選擇(CH1-CH4之間)。
4. 按 在 下對應的功能按鈕,旋轉“調節/確定旋鈕”進行組別的選擇(A,B,C組)。
5. 按 在 下對應的功能按鈕,旋轉“調節/確定旋鈕”進行LCD彩屏設置(經典,活力,典雅三種)。
6. 按 在 下對應的功能按鈕,旋轉“調節/確定旋鈕”進行頻閃次數的調節(1-100次,根據頻率和閃光輸出量對應輸出次數)。
7. 按 在 下對應的功能按鈕,旋轉“調節/確定旋鈕”進行頻閃頻率的調節(1-100Hz)。
8. 按 在 下對應的功能按鈕,旋轉“調節/確定旋鈕”進行LCD螢幕感應設置(常規,倒置,自動感應)。
9. 按 在 下對應的功能按鈕,旋轉“調節/確定旋鈕”,進行是否允許快速閃光選擇。
10. 按 在 下對應的功能按鈕,旋轉“調節/確
定旋鈕”控制按鍵操作音的打開/關閉。
For Odin-C/Odin-N在TTL功能下1. 按 在 下對應的功能按鈕,旋轉“調節/確定旋鈕”調節曝光補償(-3.0EV到3.0EV)。
2. 按 在 下對應的功能按鈕,旋轉“調節/確定旋鈕”調節造型燈(OFF /01-09等級)。
3. 按 在 下對應的功能按鈕,旋轉“調節/確定旋鈕”進行頻道的選擇(CH1-CH4之間)。
4. 按 在 下對應的功能按鈕,旋轉“調節/確定旋鈕”進行組別的選擇(A,B,C組)。
5. 按 在 下對應的功能按鈕,旋轉“調節/確定旋鈕”進行LCD彩屏設置(經典,活力,典雅三種)。
6. 按 在 下對應的功能按鈕,旋轉“調節/確定旋鈕”進行LCD螢幕感應設置(常規,倒置,自動感應)。
7. 按 在 下對應的功能按鈕,旋轉“調節/確定旋鈕”,進行是否允許快速閃光選擇。
8. 按 在 下對應的功能按鈕,旋轉“調節/確定旋鈕”控制按鍵操作音的打開/關閉。
For Odin-C/Odin-N/Strato II在M(Manual)功能下1. 按 在 下對應的功能按鈕,旋轉“調節/確定旋鈕”調節輸出能量(1/1到1/128,每兩檔之間分1/3檔)。
2. 按 在 下對應的功能按鈕,旋轉“調節/確定旋鈕”調節造型燈的亮度(OFF/01-09等級)。
3. 按 在 下對應的功能按鈕,旋轉“調節/確定旋鈕”進行頻道的選擇(CH1-CH4之間)。
4. 按 在 下對應的功能按鈕,旋轉“調節/確定旋鈕”進行組別的選擇(A,B,C組)。
5. 按 在 下對應的功能按鈕,旋轉“調節/確定旋鈕”進行LCD彩屏設置(經典,活力,典雅三種)。
6. 按 在 下對應的功能按鈕,旋轉“調節/確定旋鈕”進行LCD螢幕感應設置(常規,倒置,自動感應)。
7. 按 在 下對應的功能按鈕。旋轉“調節/確定旋鈕”,進行是否允許快速閃光選擇。
8. 按 在 下對應的功能按鈕,旋轉“調節/確定旋鈕”控制按鍵操作音的打開/關閉。
For Opt-Slave/RX OFF在M(Manaul)功能下1. 按 在 下對應的功能按鈕,旋轉“調節/確定旋鈕”調節輸出能量(1/1到1/128,每兩檔之間分1/3檔)。
2. 按 在 下對應的功能按鈕,旋轉“調節/確定旋鈕”調節造型燈的亮度(OFF/01-09等級)。
3. 按 在 下對應的功能按鈕,旋轉“調節/確定旋鈕”進行LCD彩屏設置(經典,活力,典雅三種)。
4. 按 在 下對應的功能按鈕,旋轉“調節/確定旋鈕”進行LCD螢幕感應設置(常規,倒置,自動感應)。
5. 按 在 下對應的功能按鈕,旋轉“調節/確定旋鈕”,進行是否允許快速閃光選擇。

35
Cn Trad 說明書
6. 按 在 下對應的功能按鈕,旋轉“調節/確定旋鈕”控制按鍵操作音的打開/關閉。
For RX OFF在Multi功能下1. 按 在 下對應的功能按鈕,旋轉“調節/確定旋鈕”調節輸出能量(1/4到1/128,共6檔)。
2. 按 在 下對應的功能按鈕,旋轉“調節/確定旋鈕”調節造型燈的亮度(OFF/01-09等級)。
3. 按 在 下對應的功能按鈕,旋轉“調節/確定旋鈕”進行LCD彩屏設置(經典,活力,典雅三種)。
4. 按 在 下對應的功能按鈕,旋轉“調節/確定旋鈕”進行頻閃次數的調節(1-100次,根據頻率和閃光輸出量對應輸出次數)。
5. 按 在 下對應的功能按鈕,旋轉“調節/確定旋鈕”進行頻閃頻率的調節(1-100Hz)。
6. 按 在 下對應的功能按鈕,旋轉“調節/確定旋鈕”進行LCD螢幕感應設置(常規,倒置,自動感應)。
7. 按 在 下對應的功能按鈕,旋轉“調節/確定旋鈕”進行是否允許快速閃光選擇。
8. 按 在 下對應的功能按鈕,旋轉“調節/確定旋鈕”控制按鍵操作音的打開/關閉。
注:選定參數後,如不按相應的功能按鈕或“調節/確定旋鈕”確認,10秒內仍默認選中。
36
Cn Trad 說明書
2. 按功能按鈕1和2將迴圈自訂功能功能表項目 – C.Fn 00至C.Fn03。
3. 旋轉“調節/確定旋鈕”可在功能表內改變自訂功能。
4. 按功能按鍵4退出自訂功能功能表。
自訂功能表
自訂功能 Phottix Indra360 TTL影樓燈具備可編輯的自訂功能。編輯自訂功能步驟如下:
1. 同時按住功能按鈕4和“調節/確定旋鈕”約3秒將進入自訂功能功能表螢幕。
更换灯管1. 確保切斷電源10分鐘以上。
2. 按反光罩拆卸方式取下反光罩。
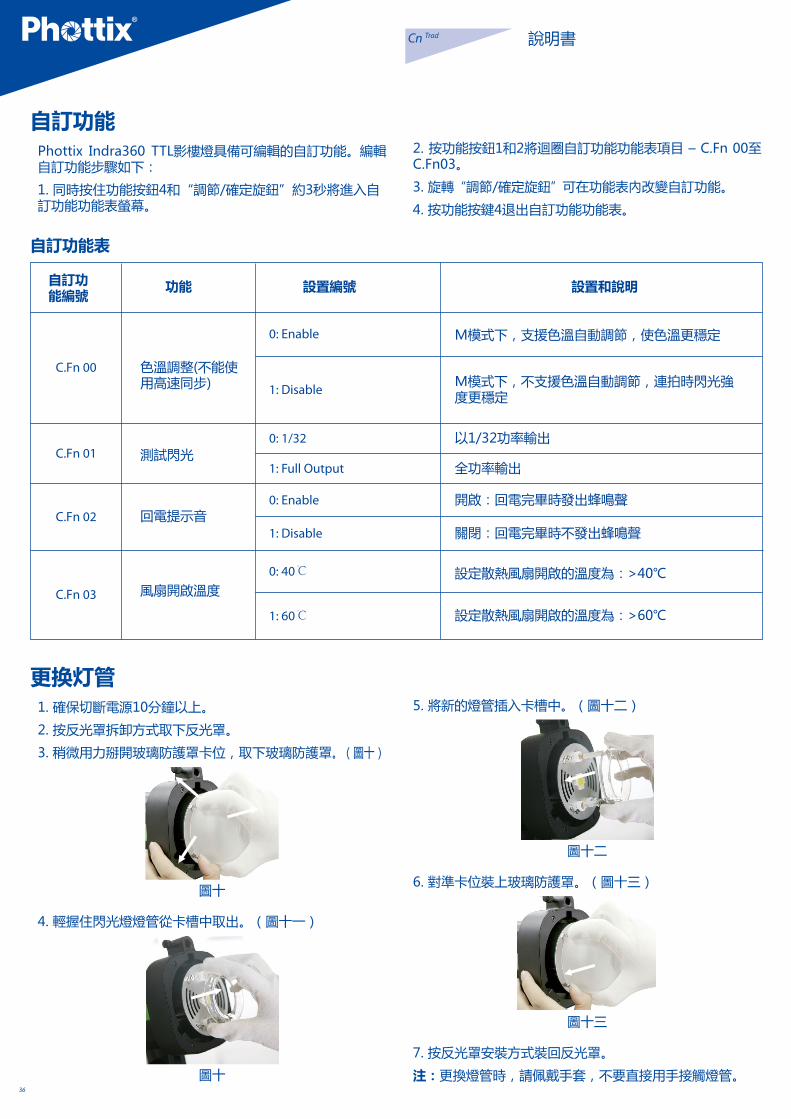
3. 稍微用力掰開玻璃防護罩卡位,取下玻璃防護罩。(圖十)
圖十
4. 輕握住閃光燈燈管從卡槽中取出。(圖十一)
圖十
5. 將新的燈管插入卡槽中。(圖十二)
圖十二
6. 對準卡位裝上玻璃防護罩。(圖十三)
圖十三
7. 按反光罩安裝方式裝回反光罩。
注:更換燈管時,請佩戴手套,不要直接用手接觸燈管。

37
Cn Trad 說明書
影樓燈恢復預設值如需將Phottix Indra360 TTL影樓燈所有功能恢復到出廠設置,只需同時按住功能按鈕1和“調節/確定旋鈕”約3秒即可。
影樓燈版本資訊查詢通過複合鍵,可以查詢影樓燈的硬體版本號、軟體版本號、圖示庫版本號和產品序號。
同時按住功能按鈕2和“調節/確定旋鈕”約3秒。版本資訊介面將會顯示影樓燈的硬體版本號、軟體版本號、圖示庫版本號和產品序號。
按任意按鍵都可以退出影樓燈版本資訊顯示介面返回到正常的工作顯示介面。
在影樓燈顯示版本資訊介面時,如果引閃影樓燈或者相機對焦、拍照,影樓燈將會自動退出版本資訊顯示介面,返回到工作介面。
影樓燈電容器的物理變化如果影樓燈一段時間內未使用,影樓燈內的電容器會發生物理變化。請每三個月開啟至少10分鐘以避免電容器的物理變化。
規格參數最大閃光能量: 360Ws
功率調節檔位: 8檔(4-360Ws)
功率調節步長: 1/3檔,或整檔
閃光模式: TTL自動、M手動和Multi頻閃
闪光指数: 32/105.1(ISO100,m/ft)
發光角度: 60°
相關色溫: 5600±200K(在低輸出功率下色溫有可能會 有變化)
閃光持續時間: t =1 1/250s-1/12000s
頻閃閃光: 频率:1-100Hz 闪光次数:1-100次
高速/後簾同步:支持*
回電時間(1/1,按影樓燈閃光指示燈亮紅燈時為准):
Phottix Indra 交流電源適配器:單/雙燈:1s/1.5s
Phottix Indra移動電源(10AH電池):H mode 單/雙燈:1.5s/2.5sS mode 單/雙燈:2.0s/5.5s
Phottix Indra移動電源(5AH電池):H mode 單/雙燈:2.0s/5.0sS mode 單/雙燈:4.0s/11s
Phottix Indra360 移動電源(4AH電池): 5s
輸入電源: Phottix Indra 交流電源適配器: AC 220V/110V, 50HZ/60HZ
Phottix Indra移動電源: 14.8V/5Ah: 600次全功率閃光 14.8V/10Ah: 1100次全功率閃光
Phottix Indra360 移動電源: 14.8V/4Ah: 300次全功率閃光
造型燈功率: 約4.5W
造型燈控制模: OFF,1-9檔
無線接收方式: 光學脈衝和無線電
頻道: 4
無線接收模式: Odin-C、 Odin-N、Strato II、Opt-Slave、 RX OFF (僅允許3.5mm同步埠觸發)
接收範圍: 無線電傳輸:100米以上
顯示解析度: 320*240 TFT LCD彩屏,支援3種配色模式
LCD螢幕感應設置:可自動感應方位,根據方位180度翻轉 顯示幕幕
散熱方式: 根據溫度自動開啟風扇
回電指示音: 可設置開啟或關閉
同步埠: 3.5mm mini埠
軟體升級: 採用USB mini埠,可通過軟體對影樓燈固 件升級
外部尺寸: 長x直徑:約266mm*180mm
重量: 約2000g(不含影樓燈電源線)
注:當產品的設計和規格有變化時,恕不另行通知
*僅支持相容的相機