phottix mitros+ ttl transceiver flash for canon · 2017-02-16 · the phottix mitros+ ttl...
TRANSCRIPT
1
En INSTRUCTION MANUAL
Phottix Mitros+ TTL Transceiver Flash for Canon
INSTRUCTION MANUAL
BENUTZERHANDBUCH
MANUEL D’UTILISATION
MANUAL DE INSTRUCCIONES
ISTRUZIONI D’USO
INSTRUKCJA OBSŁUGI
РУКОВОДСТВО ПОЛЬЗОВАТЕЛЯ
说明书
說明書
En
De
Fr
Es
Pl
It
Ru
Cn Simp
Cn Trad

2
En INSTRUCTION MANUAL
Note: To start immediately using this flash please refer to the Quick-Start guide. For advanced features please read this manual and be familiar with your camera manual and operations.
The Phottix Mitros+ TTL Transceiver Flash for Canon is designed to work with Canon DSLR cameras and features ETTL I/II, Manual, Multi modes as well as Wire-less Master/Slave triggering.
Warnings1. Use your flash safely. Do not fire the flash into the eyes of people or animals at short distances – damage and/or blindness can occur
2. Be careful using the flash in or around cars, buses, motorcycles or other mov-ing vehicles as accidents can result.
3. Never use the flash near combustible gases (gasoline, solvents, etc.)
4. Do not expose the flash or batteries to dripping/splashing water, or high hu-midity.
5. Do not leave the flash or batteries in a hot location (direct sunlight, in a closed car, etc.)
6. Remove batteries from the flash when not being used for an extended period of time.
7. Change the batteries when required. Use undamaged batteries in good con-dition. Do not mix battery types or new and used batteries.
8. Do not put opaque objects in front of the flash lens when firing the flash. The energy emitted by the flash may cause objects to burn, or cause damage to the flash tube or fresnel lens.
9. Use caution in touching the flash head after use. It may be hot and can cause burns.
10. The flash contains high voltage electronic parts. Do not disassemble or at-tempt to repair the flash. Never touch the flash’s internal components.
11. Do not touch the External Power Port contacts with any metal objects – this can cause electric shock and serious injury.
Table of ContentsParts and Functions ….........................................................…... 2Modes ……...................................................................................8Wireless Triggering……..............................................................10Custom Functions……...............................................................14Technical Specs……...................................................................16
Phottix Mitros+ TTL Transceiver Flash
for CanonPartsBack / Left Side
1. LCD Display 2. Mode Button3. Test Button4. Power Switch5. Ready Light6. Arrow Adjustment Buttons (see below)7. Set Button8. Locking Lever9. 3.5mm Sync Port10. USB Port11. External Power Port
Arrow Adjustment Buttons
1. Up Arrow / Zoom Adjustment Mode Button2. Right Arrow / Wireless Flash Mode Button3. Down Arrow / HSS / SCS Button 4. Left Button / Custom Functions Button
Front / Right Side
1. Bounce Card2. Wide Angle Diffuser3. Flash Head4. Wireless Signal Receiver Area5. AF Assist Light6. Hot Shoe7. Battery Compartment

3
En INSTRUCTION MANUAL
Please note:This instruction assumes:
1. Both the flash and camera are switched on.
2. The flash and camera are set to the same settings as this manual.
3. Camera menu and flash custom functions menu are set to default values.
4. The flash is being used with a compatible Canon DSLR.
Installing Batteries1. Press the battery cover in while pushing it towards the bottom of the flash. The battery cover will open and raise.
2. Insert AA batteries as shown by the diagram inside the battery compartment.
3. Lower the battery cover and push back towards the top of the flash, locking it in place.
Please note:
- Please use four standard high-quality batteries of the same brand. Make sure all batteries are at similar power levels.
- Batteries can get hot when the flash is being used. Use caution when chang-ing batteries.
- If you do not use the flash for an extended period of time, store with bat-teries removed.
Attaching the Flash to a CameraTurn off both the camera and flash
1. Align the flash hot shoe with the camera hot shoe.
2. Slide the flash into the camera hot shoe until fully inserted.
3. Lock the flash in position by pushing the locking lever to the right until the lock engages with a click.
4. To Unlock, press the locking release button on the locking lever and slide to the left.
Turning the Flash On / Off1. To power on the flash move the power switch to the on position.
2. To power off the flash move the power switch to the off position.
Battery Level IndicatorThe Battery Level Indicator on the LCD (see below) will display an approximate indication of how much power remains in the batteries in the flash. Use this as a rough guide as to when a battery change is needed. If flash recycling time has become very long (30 seconds) change the batteries.
Raising and Rotating the Flash Head1. The flash head will elevate from -7 to 90 degrees with stops at -7, 0, 45, 60, 75 and 90 degrees. Gently raise or lower the flash head into the required position.
2. The flash head will rotate 180 degrees in either direction with stops at 60, 75, 90, 120, 150 and 180 degrees. Gently rotate the flash head into the required position.
3. When the flash head is raised or rotated from the 0 degree standard forward position the flash zoom will set itself to 50mm. “- -” will be displayed on the LCD. Flash zoom when the head is raised or rotated can be changed in MZoom mode (see below).
4. At -7 degrees the flash zoom will act the same as 0 degree – it will not change any settings.
Using the Bounce Card or Wide Angle DiffuserThe Phottix Mitros+ Flash comes equipped with a white bounce card and wide angle diffuser panel in the flash head.
1. The wide angle diffuser panel will cause the flash to spread light to a 14mm equivalent.
2. The white bounce card can be used when the flash head is in a raised position to bounce light forward to assist with catch lights in a subject’s eyes.
To use:
1. Gently pull the diffuser panel and bounce card from the flash head using the ridge on the bottom of the diffuser panel.
2. If using the diffuser panel it will drop into position over the flash head. Gen-tly push the bounce card back into the flash head if not needed.
3. If using the bounce card only gently push the diffuser panel back into the flash head.
Using the Flash Head DiffuserThe Phottix Mitros+ TTL Flash comes with an attachable diffuser that can be added to the front of the flash head when needed. It is good for softening light, reducing hot spots and shadows and better coverage for macro photography.
To use:
1. Align the diffuser with the flash head, with the “UP” mark on the diffuser facing up.
2. Snap one side of the diffuser mount into the corresponding flash head mount.
3. Repeat step 2 on the other side of the diffuser.
4
En INSTRUCTION MANUAL
Overheating ProtectionThe Phottix Mitros+ contains an overheating protection circuit that will slow flash recycle time to avoid overheating-related damage. Approximately 20 full-power flashes in a short amount of time will trigger this protection. A [ Hot! ] Icon will appear when the overheating protection circuit is in operation.
To avoid further overheating or possible damage the flash will increase the re-cycling time to assist in lowering the flash temperature. Wait 10 minutes before using the flash.
If the flash continues to be used after the [ Hot! ] Icon appears and the flash does not cool down a [ Stop ] icon will appear on the LCD. Cease using the flash and wait 10 minutes for it to cool down..
Sync and USB Ports1. The 3.5mm Sync Port can be used with a 3.5mm sync cable to trigger the flash – from a flash trigger or camera. This port is input only – flash signals are not output from this port.
2. The USB port is used for firmware upgrades. Firmware announcements and instructions will be made available on Phottix websites.
Status LEDLeft LED: Flash-ready indicator. In Quick Flash Mode, the LED will flash green when the flash has the minimum recycle charge. It will flash red when fully charged.
Right LED: Flash exposure confirmation lamp. If a standard flash exposure is obtained, the flash exposure confirmation lamp will light blue for approximately 3 seconds. If the flash exposure confirmation lamp doesn’t light, move closer to the subject or increase the camera ISO setting.
External Battery PortThe External Battery Port is a proprietary Phottix design for use with Phottix flash cables. The external port is compatible with the Canon CP-E4 compact bat-tery pack or compatible models when the included adapter is used.
Please note: - Batteries must be used in the flash even when an external battery pack is used.
- Never use non Canon-compatible battery packs.
5
En INSTRUCTION MANUAL
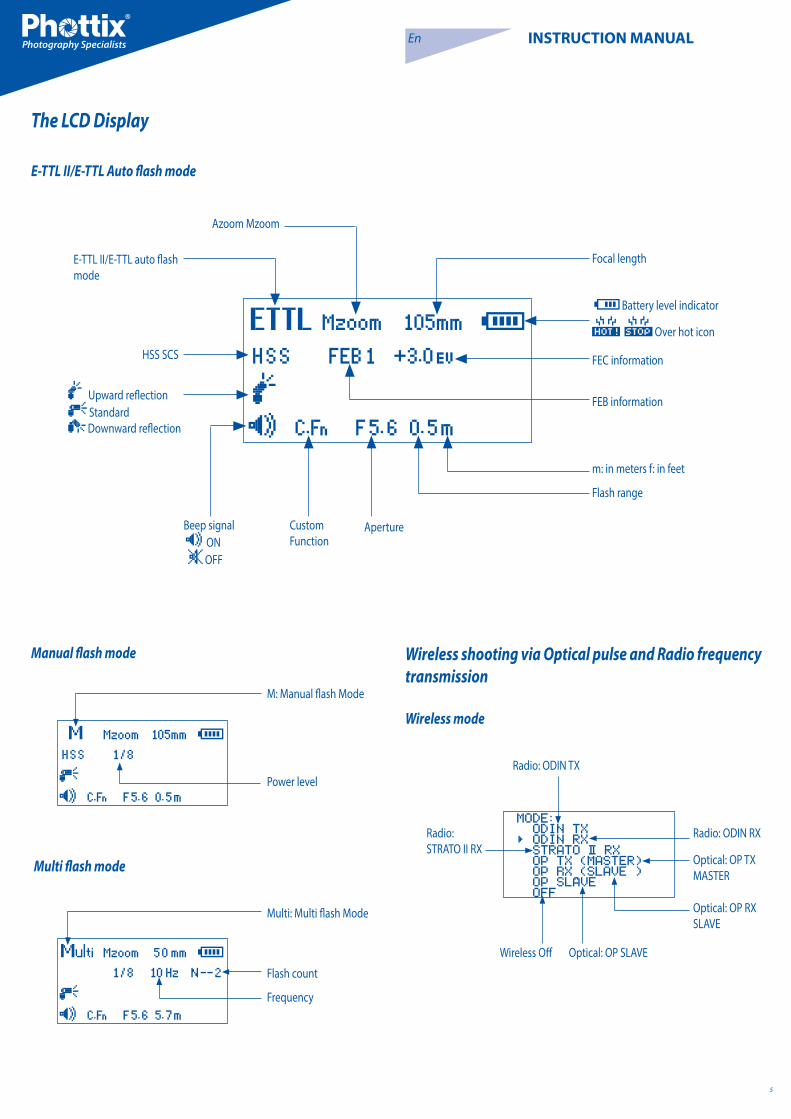
The LCD Display
E-TTL II/E-TTL Auto flash mode
Manual flash mode Wireless shooting via Optical pulse and Radio frequency transmission
Wireless mode
Multi flash mode
Azoom Mzoom
E-TTL II/E-TTL auto flash mode
Upward reflection Standard Downward reflection
Beep signal ON OFF
Custom Function
M: Manual flash Mode
Multi: Multi flash Mode
Flash count
Frequency
Power levelRadio: ODIN TX
Radio: STRATO II RX
Wireless Off Optical: OP SLAVE
Radio: ODIN RX
Optical: OP TX MASTER
Optical: OP RX SLAVE
Flash range
FEB information
FEC information
Focal length
Battery level indicator
Over hot icon
m: in meters f: in feet
Aperture
HSS SCS

6
En INSTRUCTION MANUAL
Radio frequency transmission : ODIN TX mode
Optical pulse transmission: OP RX (SLAVE) mode
Optical pulse transmission: OP Slave
MEMORY mode
Radio frequency transmission : ODIN TX ratio mode
Radio frequency transmission : ODIN RX mode
Radio frequency transmission : STRATO II RX mode
Optical pulse transmission: OP TX (Master) mode
TX Unit (Local) Flash
Group
Ratio mode
Flash ratio
ODIN Group
Radio: Odin RX
Radio: STRATO II RX
Flash mode
Ratio mode
Channel display
Optical: OP TX (Master)Flash ratio
Master flash is off
Master flash is on.
EV compensation for A: B
Group Off
Group Mode
Slave group
Optical: OP RX (Slave)
Optical: OP Slave
Memory mode
Save menu
Cancel
Recall menu
OK / Confirm
TX unit flash mode
Channel display
AF assist light is on
AF assist light is off
7
En INSTRUCTION MANUAL
Auto-Save FunctionsThe Phottix Mitros+ will remember flash settings. Mode, power levels, etc. will be retained in the flash if it is turned off and then back on.
Setting Flash ZoomThe Phottix Mitros+ Flash has two flash head zoom modes – Auto (Azoom) and Manual (Mzoom). Auto zoom will dynamically change flash head zoom as a camera’s zoom lens is changed to provide optimum lighting. Manual zoom allow the user to set the zoom of the flash head.
To set:
1. Press the button.
2. The Zoom area on the LCD will be highlighted and flash.
3. Press the or buttons to set the flash head zoom to Azoom or the desired Mzoom manual level.
4. Press the button when the zoom is properly set.
Please note:1. When in Azoom and the flash head is raised or rotated from the 0 degree standard forward position - the flash zoom will set itself to 50mm. “- -” will be displayed on the LCD. The flash zoom will not change if the head is lowered to -7 degrees.
2. Azoom will work ONLY when the flash head is set to either 0 or -7 degrees.
3. When in Mzoom and the flash head is raised or rotated from the 0 degree standard forward position - the flash zoom will not be changed from the pre-vious setting.
4. Flash Zoom can be adjusted when the head is raised or rotated by switch-ing to Mzoom mode and making desired adjustments.
Setting High Speed Sync or Second Curtain Sync The Phottix Mitros+ flash has both High Speed Sync and Second Curtain Sync functions. See further details under High Speed Sync and Second Curtain Sync later in this manual.
To set:
1. Press the button.
2. The button will cycle between HSS, SCS and turning both off.
Please note:-HSS and SCS are available in ETTL and Manual modes, but not in Multi mode.
Test ButtonPressing the test button will trigger the flash. This can be used metering (in manual mode only). In Wireless Master Mode pressing the test button will fire slave flashes on the same channel being controlled by the Master flash. Test but-ton output levels can be configured (see C.Fn-07 below).
Auto-Idle FunctionsTo save battery power the Phottix Mitros+ TTL Transceiver Flash is equipped with Idle and Auto Off modes.
1. In Non-Wireless Slave Modes: The flash will go into Auto Idle mode after 90 sec. if no buttons have been pressed or it has not been fired. The flash LCD will go blank. Half-pressing the camera shutter button or pressing the test button on the flash will wake up the Phottix Mitros+.
2. In Wireless Slave Mode, the flash will go to Slave Idle Mode after 60 min-utes if no buttons have been pressed or it has not been fired, “IDLE” will be displayed on the flash LCD. Full-pressing the camera shutter button or press-ing the Master flash test button will wake up flashes in idle mode. Slave Idle Timer can be changed from 60 minutes to 10 minutes (see C.Fn-10 below). The flash will go into Slave Auto Off Mode after 8 hours if no buttons have been pressed or it has not been fired after “IDLE” is displayed on the flash LCD. Pressing the test button on the flash will wake it up. Slave Auto Off can be changed from after 8 hours to after 1 hour (see C.Fn-11 below).
Modeling Flash1. Pressing the camera depth-of-field preview button (if available) will fire the flash continuously for 1 second. This Modeling Flash is useful in seeing lighting effects and balance on the subject. (Please see your camera manual for more information on the DOF button and button assignment.)
2. Modeling Flash is available in all modes, ETTL, Multi and Manual.
3. Modeling Flash can be used in both normal and wireless shooting and can be set (see C.Fn-02 below).
Please note: 1. Overheating and damage can result from excessive use of the Modeling Flash. Do not use more than 20 times in succession.
2. When overheating the flash will automatically increase charging time until the flash temperature has decreased.
Autofocus (AF) Assist Light1. In low light/contrast situations the Phottix Mitros+’s built-in Auto Focus Assist Light will illuminate to assist with AF. The AF Assist Light on the front of the flash will project a focusing target on the subject.
2. AF Assist Light functions can be set to on or off (see C.Fn-08 below).
AdjustmentsThe Phottix Mitros+ will adjust levels in 1/3 stop increments. Some cameras have custom functions to change stop adjustments from 1/3 to 1/2 stop incre-ments for FEB and FEC. If camera custom functions are changed the Phottix Mi-tros+ will automatically adjust levels in 1/2 stops.

8
En INSTRUCTION MANUAL
Flash ModesThe Phottix Mitros+ has three flash modes: ETTL, Manual (M) and Multi (Stro-boscopic).
To change modes:
1. Press the button.
2. The flash modes will cycle through ETTL, Manual (M) and Multi modes.
3. The current mode will be displayed in the top left corner of the LCD.
Non-wireless ETTL Mode
Non-wireless ETTL Mode screen on the Mitros+
In ETTL Mode the flash and camera will work together to calculate the correct exposure for recorded images. When the shutter button is fully pressed the flash will fire a pre-flash that the camera will use to calculate exposure and flash pow-er the instant before the photo is taken.
Flash Exposure Compensation - FECThe Phottix Mitros+ Flash can be used to adjust Flash Exposure Compensation (FEC) from -3 to +3 in 1/3rd stops. This is useful in situations where fine-tuning of the TTL system is needed based on the environment.
To set FEC:1. Press the button to enter FEC Adjustment Mode.
2. Press the or buttons to adjust FEC up or down.
3. Press the button to exit FEC Adjustment Mode.
Please note:- Some cameras have custom functions to change stop adjustments from 1/3 to 1/2 stop increments for FEB and FEC. If camera custom functions are changed the Phottix Mitros+ will adjust levels in 1/2 stop increments.
Flash Exposure Bracketing - FEBFlash Exposure Bracketing (FEB) can be used to automatically change flash pow-er over a series of photos. The camera will record three images with different exposures – one exposed as per camera calculations, one over-exposed and another under-exposed. Over and under exposure levels can be set by the user. FEB is useful in run-and-gun situations as well as when shooting scenes with different lighting conditions to help ensure a properly exposed photo. It can also be used for HDR photography.
Some cameras have flash exposure storage function, see your camera user man-ual for more details.
To set FEB:1. Press the button.
2. Press the button. “FEB 0” will be displayed and highlighted on the LCD.
3. Press the and buttons to adjust the exposure bracketing amount.
4. Press the button to confirm the setting.
Please note:- By default: FEB will be cancelled after three photos are taken. FEB can be set in the Custom Functions screen (see C.Fn-03 below).
- FEB shooting sequence can be changed (see C.Fn-04 below).
- FEB can be used with FEC and FEL (see below).
- For best results set the camera drive mode to “single” and ensure the flash is fully recharged before taking the second and third photos.
- Some cameras have custom functions to change stop adjustments from 1/3 to 1/2 stop increments for FEB and FEC. If camera custom functions are changed the Phottix Mitros+ will adjust levels in 1/2 stop increments.
Flash Exposure Lock - FELFlash Exposure Lock (FEL) can be used to lock the flash exposure before a photo is taken. This is useful when manual spot metering is being used in a scene with different lighting conditions.
While in ETTL mode, press the camera’s FEL button (the “ ” button) to use this function. See your camera user manual for more information on FEL functions and usage.
Pressing the FEL Button will cause the flash to fire a pre-flash that will be used to calculate flash power during the exposure. This will be retained in the camera memory. The FEL icon will be displayed in the camera viewfinder.
Each time the FEL button is pressed a pre-flash will fire and a new exposure cal-culated. When the shutter button is fully pressed the flash will fire at the locked exposure.
Please note:- If the subject is too far away underexposure will result, the “FEL” icon will blink for approximately 0.5 sec. in the camera viewfinder.
- If the subject is too small in the viewfinder, FEL may not be effective.
High Speed Sync – HSSIn HSS mode, the camera/flash maximum sync speed can reach the camera’s maximum shutter speed. This is useful when using aperture priority mode or to limit ambient light. HSS may vary with different camera models - see your camera user manual for details.
To use HSS mode:1. Press the button.
2. The HSS icon will be displayed on the flash LCD.
3. Set shutter speeds higher than the camera’s flash sync speed and take photos.
To exit HSS mode:1. Press the button twice.
2. It will cycle from HSS to SCS and back to regular FCS mode.
9
En INSTRUCTION MANUAL
on the LCD) Power, Frequency (HZ) and Flash Count. Power is highlighted and flashing upon entering the adjustment screen.
3. Press the and buttons to change between Power, Frequency (HZ) and Flash count.
4. Press the and buttons while the setting is highlighted to adjust Power, Frequency (HZ) and Flash count to the desired levels.
5. Press the button to exit the adjustment screen.
Please note:1. Overheating and damage can result from excessive use of the Multi Strobo-scopic Mode. Do not use more than 20 times in succession.
2. When overheated the flash will automatically increase charging time until the flash temperature has decreased.
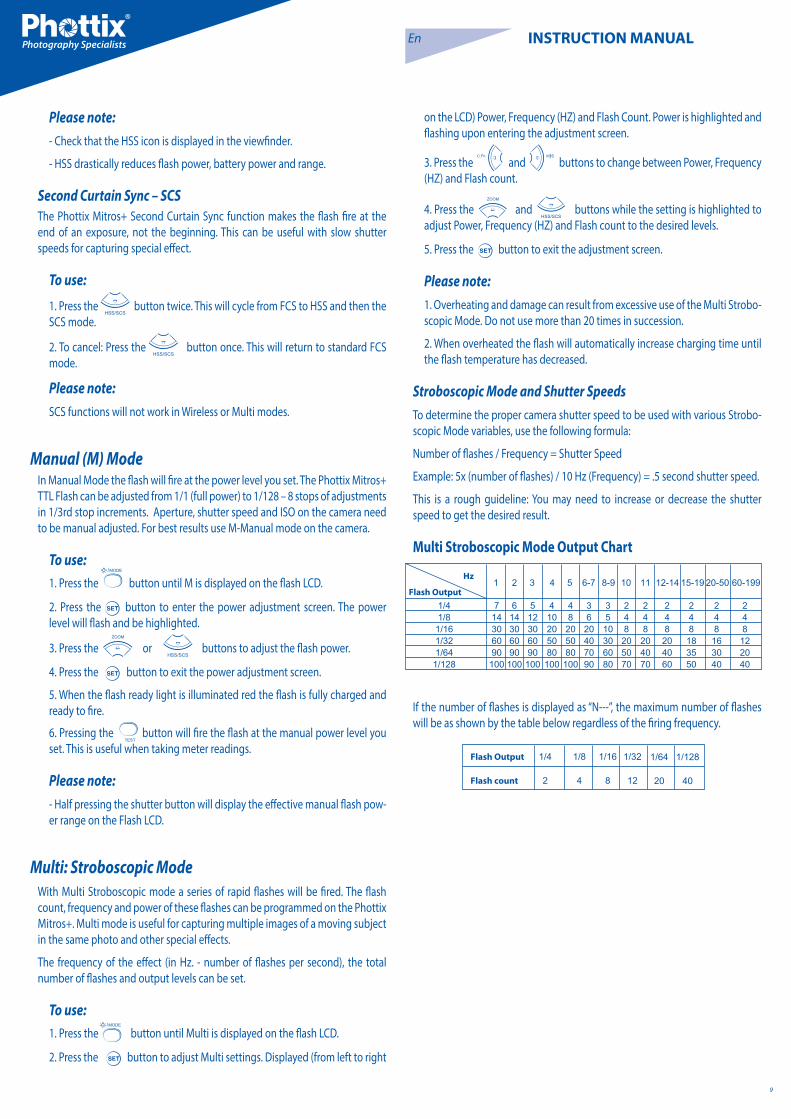
Stroboscopic Mode and Shutter SpeedsTo determine the proper camera shutter speed to be used with various Strobo-scopic Mode variables, use the following formula:
Number of flashes / Frequency = Shutter Speed
Example: 5x (number of flashes) / 10 Hz (Frequency) = .5 second shutter speed.
This is a rough guideline: You may need to increase or decrease the shutter speed to get the desired result.
Multi Stroboscopic Mode Output Chart
If the number of flashes is displayed as “N---”, the maximum number of flashes will be as shown by the table below regardless of the firing frequency.
Please note:- Check that the HSS icon is displayed in the viewfinder.
- HSS drastically reduces flash power, battery power and range.
Second Curtain Sync – SCSThe Phottix Mitros+ Second Curtain Sync function makes the flash fire at the end of an exposure, not the beginning. This can be useful with slow shutter speeds for capturing special effect.
To use:
1. Press the button twice. This will cycle from FCS to HSS and then the SCS mode.
2. To cancel: Press the button once. This will return to standard FCS mode.
Please note: SCS functions will not work in Wireless or Multi modes.
Manual (M) ModeIn Manual Mode the flash will fire at the power level you set. The Phottix Mitros+ TTL Flash can be adjusted from 1/1 (full power) to 1/128 – 8 stops of adjustments in 1/3rd stop increments. Aperture, shutter speed and ISO on the camera need to be manual adjusted. For best results use M-Manual mode on the camera.
To use:1. Press the button until M is displayed on the flash LCD.
2. Press the button to enter the power adjustment screen. The power level will flash and be highlighted.
3. Press the or buttons to adjust the flash power.
4. Press the button to exit the power adjustment screen.
5. When the flash ready light is illuminated red the flash is fully charged and ready to fire.
6. Pressing the button will fire the flash at the manual power level you set. This is useful when taking meter readings.
Please note:- Half pressing the shutter button will display the effective manual flash pow-er range on the Flash LCD.
Multi: Stroboscopic ModeWith Multi Stroboscopic mode a series of rapid flashes will be fired. The flash count, frequency and power of these flashes can be programmed on the Phottix Mitros+. Multi mode is useful for capturing multiple images of a moving subject in the same photo and other special effects.
The frequency of the effect (in Hz. - number of flashes per second), the total number of flashes and output levels can be set.
To use:1. Press the button until Multi is displayed on the flash LCD.
2. Press the button to adjust Multi settings. Displayed (from left to right

10
En INSTRUCTION MANUAL
Wireless Triggering ModeThe Phottix Mitros+ TTL Transceiver Flash is equipped with several wireless transmitter and receiver modes. The Mitros+ offers built-in compatibility with the Phottix Odin TTL Trigger system for Canon and the Phottix Strato II Multi for Canon. For information on the Odin or Strato II system consult the product manuals.
The Mitros+ functions as:
Phottix Odin Tx(Transmitter)
Full adjustments to local and remote TTL and Manual flash power and zoom on other Mitros+ flashes (in Odin Rx mode)or compatible flashes equipped with Phottix Odin receivers. Flashes or studio lights with Strato, Strato II or Atlas II receivers can be triggered in manual mode by the Mitros+ in Odin Tx mode.
Phottix Odin Rx ( Receiver)
The Mitros+ in Odin Rx Wireless Mode can be triggered by another Mitros+ in Odin Tx mode or by Phottix Odin TCUs.
Phottix Strato II Rx (Receiver)
The Mitros+ in Strato Rx wireless Mode can be triggered by Phottix Strato II transmitters, Phottix Odin TCUs and Phottix Mitros+ Flash in Odin Tx Mode.
OP Tx (Master) - Using Canon’s IR triggering system
Using pulses of light, a flash on the camera adjusts and fires remote flashes.
OP Rx (Slave) - Using Canon’s IR triggering system
Remote flashes in OP Rx Mode are controlled and fired by on-camera flashes in OP Tx Master mode. Using pulses of light, a flash on the camera adjusts and fires remote flashes.
OP Slave- Optical Slave
In OP slave mode other nearby fired flashes will trigger the Mitros+ in manual mode only.
Please note:The Mitros+ cannot be triggered by Phottix Strato, Strato II or Ares transmit-ters or Atlas II transceivers in Tx mode.
Selecting Wireless Triggering ModesTo access and set the wireless triggering modes on the Mitros+:
1. Press and hold the button until the Mode Menu appears.
2. Use the or Arrow buttons to select the wireless mode.
3. Press the button to select the wireless mode.
4. Set up wireless mode parameters (group, channel) as needed.
Please note:If the button is not pressed, the Mitros+ will use the highlighted selection if no button is pressed for approximately 16 seconds.
Odin Tx (Transmitter Mode)Using the Mitros+ in Odin Tx Mode allows for a flash to be used on camera in TTL or Manual Mode as well as control three groups (A, B, C) – adjusting TTL and manual power levels as well as flash head zoom on Mitros+ flashes set in Odin Rx mode or other compatible flashes equipped with Phottix Odin receivers.
Using Odin Tx Mode
Odin Tx mode screen
After selecting Odin Tx Mode (above)
1. Press the button to edit the groups.
2. The and buttons will cycle though groups L, A, B, C.
3. Pressing the button while a group is selected will change the mode from TTL, M (manual) and Off.
4. Pressing the or Arrow buttons when a group is selected will allow for adjustment to the EV Level ±3EV in 1/3 stop in TTL Mode or adjust-ments to the power level (1/128 to 1/1 in 1/3 stops) in Manual Mode.
5. Press the button to exit the Odin Tx Mode editing menu.
Ratio ModeOdin Tx ratio mode screen
Ratio is similar to Canon’s native TTL system. The ratio of groups A and B can be set from 8:1 to 1:8. EV levels can also be adjusted. Adjustments to the local flash (L) mode and power can be made.
To access Ratio Mode:
1. Press and hold the button while in the Odin Tx Menu. The Ratio Ad-justment Menu will appear.
2. Press the button to open the editing mode.
3. Press the or buttons to cycle though Local Flash(L) , Flash

11
En INSTRUCTION MANUAL
Ratio and Ratio EV adjustment.
4. Press the or buttons to adjust Local Flash EV, Ratio and Ratio EV when selected.
5. The button will change the mode the local flash from TTL to Manual to Off.
6. Press the button to exit Ratio Mode editing.
7. Press and hold button to exit Odin Tx Ratio mode and return to Odin Tx Mixed Mode.”)
Please noteThe flash on camera (L) is not part of the ratio calculation. Power for the local flash is controlled independently.
Adjusting Flash Head Zoom in Odin Tx Mode
1. Pressing the button will open the Zoom Adjustment Menu.
2. The and buttons will cycle though groups L, A, B, C.
3. The and buttons will adjust from Azoom (automatic zoom that changes dynamically as a zoom lens is changed) and Mzoom 24, 28, 35, 50, 70, 80 and 105mm.
4. Pressing the button will exit Zoom Adjustment Mode.
Adjusting Transmission Channels
1. From the Odin Tx or Ratio Menu, press the button to access the Trans-mission Channel selection.
2. Press the and buttons to cycle through Channels 1-4.
3. Press the button to lock in the channel.
Using High Speed Sync (HSS) and Second Curtain Sync (SCS) in Odin Tx Mode
Pressing the button will cycle between HSS, SCS and standard opera-tions.
1. HSS will allow faster shutter speeds to be used. Shutter speeds up to 1/8000 sec. can be achieved with compatible cameras.
2. Note: At high shutter speeds the power of flashes is greatly reduced.
3. SCS will fire the flash at the end of an exposure, not at the beginning. This can be combined with longer exposures for creative effects.
Odin Rx (Receiver) ModeOdin Rx Mode screen
When the Odin Rx Wireless mode is selected the Phottix Mitros+ Flash will trig-ger using a built-in Odin-compatible receiver. While in Odin Rx Mode the Mi-tros+ can be controlled and triggered from another Mitros+ Flash in Odin Tx Mode or an Odin TCU.
Changing Channels and Groups
1. Press the button to access the Channel and Group selection.
2. Use the and buttons to select Channel or Group.
3. Use the and buttons to adjust the reception channel (1-4) or group assignment (A-C).
4. Press the button to exit Channel and Group editing mode.
5. Pressing the button will allow the EV adjustment for the flash to be set
using the and buttons. Press the button again to exit EV Adjustment mode.
Please note:The effect of EV adjustment is cumulative. If EV adjustment is set on the Odin Rx screen and on an Odin TCU or Mitros+ in Odin Tx mode, and/or in TTL Pref in the Custom Functions menu, all of these settings will be used to calculate final EV.
Strato II Rx ModeStrato II Rx Mode screen
When the Strato II Rx Mode is selected the Mitros+ will be triggered by Phot-tix Strato II Multi Transmitters, a Phottix Odin TCU or Phottix Mitros+ in odin Tx mode.
1. Press the button to access the Channel and Group selection.
2. Use the and buttons to select Channel or Group.
3. Use the and buttons to adjust the reception channel (1-4) or group assignment (A-C).
4. Press the button to adjust the Manual Power level of the Mitros+ (from 1/1 to 1/128 in 1/3 stops) Press the button again to exit Manual Power Adjustment Mode.
5. Press the Button to edit the flash head zoom. Pressing the or
Arrow buttons will cycle between AZoom and MZoom settings. Press the button to return to the main menu.
Please noteIn Strato II Rx (Receiver) Mode there are no wireless TTL functions such as HSS or SCS, or wireless power/zoom control. Power and zoom levels must be set manually on the Mitros+ flash while in Strato II Rx Mode.
12
En INSTRUCTION MANUAL
OP Tx (Master) and OP Rx (Slave) Wireless ModesOP Tx (Master) and OP Rx (Slave) modes use Canon wireless control and trig-gering system. A Mitros+ flash set to OP Tx (Master) is needed on the camera to control remote (slave) flashes set to OP Rx (Slave). The same transmission chan-nel needs to be set on both Master and Slave flashes. Groups need to be set for Slave flashes, Group Ratio functions need to be set for Master flashes. A Mitros+ set to OP Tx (Master) or other compatible flash in Master mode can be used on the camera to control and trigger Mitros+ flashes in OP Rx (Slave), or other compatible flashes in Slave mode.
OP Tx (Master) Mode:
1. Pressing button will allow changes to be made to the flash firing, transmission channel and ratio mode and ratio.
2. With the flash icon highlighted and blinking press the or buttons to turn the flash firing on or off (see below).
3. With transmission channels highlighted, press the or but-tons to change the channel from 1-4.
4. With the ratio mode highlighted, press the or buttons to change the wireless ratio mode (see below).
5. With the ratio highlighted, press the or buttons to change the wireless ratio. When in M or Multi mode, flash parameters of the slave units can be set individually on the OP Tx (Master) flash (see below).
6. Press the button to confirm and exit the screen.
Master with Flash mode : The Master flash on the camera will fire when a photo is taken.
Master without Flash mode : The Master flash on the camera will not fire when a photo is taken. The flash will emit a short burst of light to communicate with slave flashes but this light will not be part of the exposure.
To set OP Rx (Slave) Mode:
1. Pressing button will allow changes to be made to the flash’s channel and group.
2. With transmission channels highlighted, press the or But-tons to change the channel from 1-4.
3. With group highlighted, Press the or Buttons to change the group the flash is assigned to (A,B,C).
4. Press the button to confirm and exit the screen.
5. When OP Rx (Slave) flashes are ready to shoot the AF Assist light on the front of the flash will blink once every 1 second.
6. To set Multi or M modes for the Slave – press and hold the button for approximately 2 sec.
7. Set Power Levels or Multi Strobe Frequency / Flash Count using the arrow buttons.
Please note: - Make sure the OP Tx (Master) and OP Rx (Slave) flashes are set to the same transmission channel (1-4).
- Do not place any obstacles between the master unit and slave unit(s). Obsta-cles can block signal transmissions.
- When using wireless bounce flash, please ensure the slave flash Wireless Signal Receiver Area faces toward the Master flash.
- When using only one flash set Wireless Mode to “Off”.
Transmission Channels
The Phottix Mitros+ OP Tx/Rx Wireless system has four transmission channels: 1, 2, 3 and 4. Signals from the OP Tx (Master) flash are sent to OP Rx (Slave) flashes on these channels. If Master and Slave flashes are set to different channels the Slave flashes will not fire.
Using OP Tx/Rx Wireless Triggering
With a flash in OP Tx (Master) mode on the camera and remote flashes in OP Rx Slave mode, pressing the shutter button will fire the OP Tx (Master) flash (if set to fire the flash) and flashes set to OP Rx (Slave) mode within the range of the OP Tx (Master) flash. The camera and flash will meter the scene and fire flashes in TTL mode to properly expose the scene.
Ratio ModesSlave flashes can be controlled by the master flash in different ratio modes. Available modes are:
ETTL Modes A+B+C All three groups fire at an average of the total calculated output.
A:BC Groups A and B can be set by Flash Ratio (see below). Group C is inde-pendent with its flash output level assigned by the camera.
The EV compensation of Groups A and B can be adjusted.
1. Press the button after exiting the Flash Ratio Setting Screen.
2. Press the or buttons to adjust up or down EV for Groups A and B.
3. The EV compensation for Group C can also be adjusted.
4. Pressing the button after setting the flash ratio will move the high-lighted selection to EV adjustment for Group C.
5. Press the or buttons to adjust the EV for Group C.
A:B Groups A and B can be set by Flash Ratio (see below). Group C is not adjustable and does not fire.
The EV compensation of Groups A and B can be adjusted.
1. Press the button after exiting the Flash Ratio Setting Screen.
2. Press the or buttons to adjust up or down EV for Groups A and B.

13
En INSTRUCTION MANUAL
Setting and Adjusting Ratio Modes
ETTL Modes
1. After entering OP Tx (Master) mode (above) press the button to edit the OP Tx (Master) parameters.
2. Press the button Three times to highlight the ratio area.
3. Select the Ratio mode. Pressing the and buttons will cycle between A+B+C, A:B and A:BC modes.
4. When A:B or A:BC are highlighted pressing the button will highlight the ratio adjustment selection below the ratio.
5. Pressing the button will change the ratio from 1:1 to 1:8 in steps of 1:1.5, 1:2, 1:3, 1:4, 1:6, 1:8.
6. Pressing the button will change the ratio from 1:1 to 1.5:1, 2:1, 3:1, 4:1, 6:1, 8:1.
7. Press the button to confirm and exit the screen.
Manual Modes
A+B+C In manual mode all three groups fire at the same output level. This power level can be set.
A:B:C The output level of each group is individually adjusted by the user (see below). Each group is independent, one not affecting the other.
A:B Groups A and B power level can be set individually by the user (see below). Group C is not adjustable and does not fire.
Setting and Adjusting Manual Modes
1. After entering OP Tx (Master) mode (above) press the button to change the flash into Manual (M) Mode.
2. Press the button to edit the OP Tx (Master) parameters.
3. Press the button three times to highlight the ratio area.
4. Pressing the and buttons will cycle between A+B+C, A:B and A:B:C modes.
5. Press the button to confirm and exit the screen.
6. Press the button to adjust power levels.
7. Pressing the or buttons will change the Flash Power Level (1/1 to 1/128 in 1/3rd stops).
8. Pressing the button will change the Groups from A to B to C, the
button from C to B to A (if applicable).
9. Press the button to exit power level adjustment mode.
Multi Mode
A+B+C All three groups fire in Multi Mode at the same power level, frequency and flash count.
A:B:C The output level of each group is adjusted individually by the user (see below). The frequency and flash count of the multi strobe of each group are same and can only be adjusted on Group A.
A:B Groups A and B can be set by power level individually by the user (see below). The frequency and flash count of the multi strobe of Groups A and B are same and can only be adjusted on Group A. Group C is not adjustable and does not fire.
Setting and Adjusting Multi Mode
1. After entering OP Tx (Master) mode (above) press the button to change the flash into Multi Mode.
2. Press the button to edit the OP Tx (Master) parameters.
3. Press the button three times to highlight the ratio area.
4. Select the Ratio mode. Pressing the and buttons will cycle between A+B+C, A:B and A:B:C modes.
5. Press the button to confirm and exit the screen.
6. Press the button to adjust power levels.
7. Pressing the or buttons will change the Flash Power Level (1/1 to 1/128 in 1/3rd stops).
8. Pressing the button will change the Groups from A to B to C, the
button from C to B to A (if applicable), and allow power level to be changed on these groups.
9. Pressing the button after cycling through the groups will move to the frequency and flash count selections.
10. Pressing the or buttons will allow changes to be made to frequency and flash count. These setting can only be changed on Group A and will be applied to Group B or C (if applicable).
11. Press the button to exit power level adjustment mode.

14
En INSTRUCTION MANUAL
Custom Functions The Phottix Mitros+ TTL Flash comes with a number of programmable custom functions. To edit these functions (below):
1. Press the button for 2 seconds to enter the C.Fn Menu Screen.
2. Press the or buttons to cycle through the menu items – C.Fn 0 to 15.
3. Press the or buttons to change the function within the menu.
4. Press the button to exit the C.Fn menu.
Custom Functions Chart

15
En INSTRUCTION MANUAL
Quick Flash FunctionThe Quick Flash function allows the flash to fire at 1/6 to 1/2 of the full output. Quick Flash recycle times are faster. It helps for snap photography for near sub-jects.
Quick flash can be used for continuous drive modes, quick flash for continuous shot function can be enabled or disabled (see C.Fn-06 above).
Please note: The Quick Flash Function makes flash firing a priority. Under-exposure could result if the subject is located to far from the camera.
Auto BacklightThe backlight will light up for 8 seconds and then go off if no buttons are pressed. When the auto backlight function is enabled, pressing any button will light it up after it goes off. When the auto backlight function is set to “disable”, pressing the mode button will light it up.
TTL PrefTTL may vary slightly when using the flash on different cameras. TTL Pref (C.Fn-15) setting allows users to adjust EV from +3 to -3 in 1/3rd stops to compensate for these slight variations. This adjustment is a personal preference based on camera standard TTL and will be stored in memory. When this EV level prefer-ence is set, this compensation will be used for images taken in TTL mode. This EV compensation will not be displayed on the LCD during regular use.
Memory Function
The Phottix Mitros+ Flash is equipped with a programmable Memory function. Using the Memory Function allows flash parameters, data and custom functions to be saved and quickly recalled for future use. Flash modes, wireless settings, flash power – all the current programming of the flash will all be saved for later use.
Memory Mode Screen
Menu:
Three saved data and three recall locations are available in Memory Mode:SAVE TO 1SAVE TO 2SAVE TO 3LOAD FROM 1LOAD FROM 2 LOAD FROM 3
To enter Memory Mode
Press and hold button to enter the Memory Mode.
To save data:1. After setting flash data, press and hold the button to enter the Memory mode.
2. Press the and buttons to select a save location: SAVE TO 1, SAVE TO 2 and SAVE TO 3.
3. Press the button to confirm the location and save the data.
4. The LCD display will exit the Memory Mode screen and return to the last used screen.
5. To cancel the save action, press the button to exit the Memory Mode screen and return to the last used screen.
To recall data:
1. After entering the Memory mode (see above), Press the and buttons to select LOAD FROM 1, LOAD FROM 2. LOAD FROM 3.
2. Press the button will recall the saved data from the selected location.
Please note:After recalling saved data and exiting the memory mode, the recalled data will be displayed on the screen. Flash setting used before recalling data will be lost. To avoid losing data save current setting before recalling saved data.
Resetting to Factory DefaultsThe Phottix Mitros+ Flash can reset to factory defaults.
To reset the flash:
1. Press and hold the and buttons for 3 seconds.
2. The flash will reset to factory default settings.
3. All custom functions will be reset to factory defaults.
Flash Information DisplayFor technical support or firmware upgrade checking the Phottix Mitros+ infor-mation may be need. To display the hardware, software, icon library and serial number display:
1. Press the button as the flash is turned on.
2. Press any button to cancel this display and enter the LCD screen.
Changes to the Flash Capacitor:If the flash is not used for some time physical changes will take place within the flash’s capacitor. Make sure to turn on the flash a minimum of 10 minutes every three months to prevent any physical changes.

16
En INSTRUCTION MANUAL
Technical SpecificationModes: E-TTL and E-TTL II, Manual, and Multi Stroboscopic
Guide No.: 58/190 (at 105mm focal length, ISO 100 in meters/feet)
Flash coverage: 24-105mm (14mm with wide angle diffuser panel)
Auto zoom (Flash coverage automatically adjusts to match the lens focal length)
Manual zoom (Zoom can be adjusted by changing setting on the flash/cam-era)
Rotation: 360 degrees, Up-Down: -7 to 90 degrees.
FEC (Flash exposure compensation): Manual
FEB (Flash exposure bracketing): ±3 stops in 1/3 stop increments (Manual flash exposure compensation and FEB can be combined)
Sync modes: First Curtain Sync, Second Curtain Sync, and High Speed Sync
Stroboscopic flash: Frequency:1-199Hz Number of flashes: 1-100
Flash exposure confirmation: Blue LED lamp lights up in E-TTL mode
Flash Recycling (with size-AA alkaline batteries)
Recycling time/Flash-ready indicator:
Normal flash: Approx.0.1-5 sec./Red LED indicator lamp lights up. Quick flash: Approx.0.1-2.5 sec./Green LED indicator lamp lights up.
Internal power: Four size-AA alkaline batteries or size-AA Ni-MH batteries
External battery: Compatible with Phottix Battery Pack and Canon compact battery pack CP-E4 through specific adapter
Power saving: Non-wireless slave modes: 90 seconds, Wireless slave mode: (programmable) 10 minutes or 60 minutes
Wireless flash
Transmission method: Radio Frequency and Optical pulse
Channels: 4
Wireless options: Odin Tx, Odin Rx, Strato II Rx, OP Tx (Master), OP Rx (Slave), OP Slave, OFF
Transmission range (Approx.): Radio: 100m +, Optical: Indoors: 12-16m/39.3-52.4 ft., Outdoors: 7-9m/22.9-29.5 ft.
Reception angle: Radio: 360 ° all directions, Optical transmission:±40°(hori-zontal), ±30°(vertical)
Controlled slave groups: 3 (A, B, and C)
Flash ratio control: 1:8-1:1-8:1
Standby current: ≤100uA in sleep mode
Dimensions: (L x W x H): 202.8×77.5×58.3 mm
Weight: 427g (flash only, excluding batteries)
17
En INSTRUCTION MANUAL
www.phottix.com
EC Declaration of Conformity We Phottix (HK) Ltd.
Of 10/F Block A, Yip Fat Factory Building, Phase 1, 77 Hoi Yuen Rd, Kwun Tong, Kln, Hongkong
The European Authorized Representative
Phottix Europe Sp. z o.o.
Piotrkowska 66
90-105 Lodz, Poland
KRS 0000327336
declare herewith that the product designated below:
Product name: Phottix Mitros+ TTL Transceiver Flash
Model No.: Mitros+
complies with the relevant fundamental requirements as per R&TTE Directive 1999/5/EC, insofar as the product is used correctly, and the following standards or other normative documents
ETSI EN 300 440-1 V1.6.1 (2010-08)
ETSI EN 300 440-2 V1.4.1 (2010-08)
ETSI EN301 489-1 V1.9.2/2011-09
ETSI EN301 489-3 V1.4.1/2002-08
EN 62479: 2010-09
Signed by:
Paul Czernik
CEO/Prezes Zarządu
Phottix Europe Sp. z o.o.
Lodz, September 2013
FCC Compliance Information
Company: Phottix (HK) Ltd.
Name: Phottix Mitros+ TTL Transceiver FlashModel Number: Mitros+ FCC ID: P9M-MITROSPS
This device complies with Part 15 of the FCC Rules. Operation is subject to the following two conditions: (1) this device may not cause harmful interference, and (2) this device must accept any interference received, including interference that may cause undesired operation.Changes or modifications not expressly approved by the party responsible for compliance could void the user’s authority to operate the equipment.
NOTE: This equipment has been tested and found to comply with the limits for a Class B digital device, pursuant to Part 15 of the FCC Rules. These limits are de-signed to provide reasonable protection against harmful interference in a resi-dential installation.
This equipment generates, uses and can radiate radio frequency energy and, if not installed and used in accordance with the instructions, may cause harmful interference to radio communications. However, there is no guarantee that interference will not occur in a particular installation. If this equipment does cause harmful interference to radio or televi-sion reception, which can be determined by turning the equipment off and on, the user is encouraged to try to correct the interference by one or more of the following measures:
--Reorient or relocate the receiving antenna.--Increase the separation between the equipment and receiver.--Connect the equipment into an outlet on a circuit different from that to which the receiver is connected.--Consult the dealer or an experienced radio/TV technician for help.
18
De BENUTZERHANDBUCH
Hinweis: Um das Blitzgerät sofort in Betrieb zu nehmen, lesen Sie die Anleitung zum Schnelleinstieg. Für eine komplette Übersicht über alle Funktionen lesen Sie bitte diese Anleitung und machen Sie sich mit dem Handbuch Ihrer Kamera vertraut.
Der Phottix Mitros+ TTL Elektronenblitz für Canon ist für den Betrieb an Canon DSLR-Kameras ausgelegt und unterstützt folgende Funktionen: ETTL I/II, Ma-nuell, Multi sowie die kabellose Master/Slave Steuerung.
Warnhinweise1. Feuern Sie den Blitz nicht direkt auf Gegenstände, Personen oder Tiere ab. Blicken Sie nicht direkt in den Blitz – Augenschäden können die Folge sein.
2. Gehen Sie mit dem Blitzgerät in oder in der Nähe von Fahrzeugen vorsichtig um. Es besteht Unfallgefahr!
3. Verwenden Sie das Blitzgerät nicht in der Nähe brennbarer oder explosive Gase.
4. Vermeiden Sie den Kontakt des Blitzgerätes mit Wasser oder hoher Luft-feuchtigkeit.
5. Setzen Sie den Blitz oder die Batterien keiner großen Hitze aus (direktes Son-nenlicht, in einem geschlossenen Auto, etc.) .
6. Entfernen Sie die Batterien aus dem Blitz, wenn dieser über einen längeren Zeitraum nicht benutzt wird.
7. Wechseln Sie die Batterien, wenn erforderlich. Verwenden Sie unbeschädigte Batterien in gutem Zustand. Vermischen Sie niemals verschiedene Batterie-typen oder neue und gebrauchte Batterien.
8. Decken Sie das Blitzgerät bei der Auslösung nicht mit undurchsichtigen Ge-genständen ab. Die abgegebene Energie kann Gegenstände, die Blitzröhre oder Fresnellinse beschädigen.
9. Berühren Sie die Blitzfläche direkt nach Gebrauch nicht. Diese könnte heiß sein und Verbrennungen verursachen.
10. Öffnen Sie das Blitzgerät nicht! Innenliegende Bauteile können auch ohne eingelegte Batterien unter Hochspannung stehen! Es besteht Lebensgefahr!
11. Schließen Sie die Externen-Power Kontakte des Blitzgerätes nicht kurz. Dies könnte einen Kurzschluss verursachen und das Blitzgerät beschädigen.
InhaltTeile und Funktionen…....................................................…......18Modi ……....................................................................................24Fernauslösung…….....................................................................26Individualfunktionen……..........................................................31Technische Daten…….................................................................33
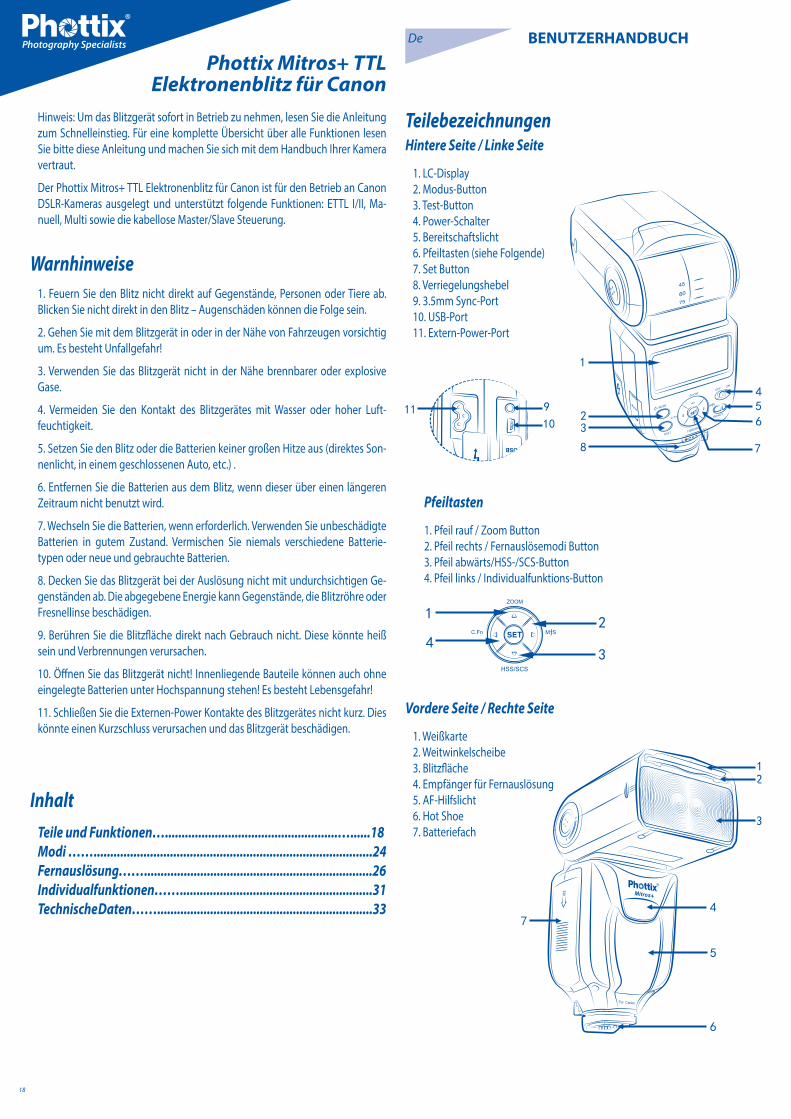
Phottix Mitros+ TTL Elektronenblitz für Canon
TeilebezeichnungenHintere Seite / Linke Seite
1. LC-Display 2. Modus-Button3. Test-Button4. Power-Schalter5. Bereitschaftslicht6. Pfeiltasten (siehe Folgende)7. Set Button8. Verriegelungshebel9. 3.5mm Sync-Port10. USB-Port11. Extern-Power-Port
Pfeiltasten
1. Pfeil rauf / Zoom Button2. Pfeil rechts / Fernauslösemodi Button3. Pfeil abwärts/HSS-/SCS-Button 4. Pfeil links / Individualfunktions-Button
Vordere Seite / Rechte Seite
1. Weißkarte2. Weitwinkelscheibe3. Blitzfläche4. Empfänger für Fernauslösung5. AF-Hilfslicht6. Hot Shoe7. Batteriefach

19
De BENUTZERHANDBUCH
Hinweise:Diese Anleitung setzt voraus:
1. Kamera und Blitzgerät sind eingeschaltet.
2. Kamera und Blitzgerät sind wie angegeben eingestellt.
3. Kamera und Blitzgerät befinden sich in den Standardeinstellungen.
4. Der Blitz wird auf einer kompatiblen Canon Kamera verwendet.
Einlegen der Batterien1. Drücken Sie leicht auf den Deckel des Batteriefaches und schieben Sie es nach unten auf. Lassen Sie den Deckel los, damit dieser sich von alleine öffnet.
2. Legen Sie Batterien/Akkus des Typs AA/Mignon ein, wie auf der Zeichnung im Batteriefach angegeben.
3. Klappen Sie das Batteriefach zu und schieben Sie den Deckel zurück in seine ursprüngliche Position.
Hinweise:
- Verwenden Sie nur Qualitätsbatterien. Stellen Sie sicher, dass die Batterien den gleichen Ladestand aufweisen.
- Batterien können sich während des Gebrauchs erhitzen. Wechseln Sie diese vorsichtig, wenn der Blitz direkt zuvor verwendet wurde.
- Wenn das Gerät längere Zeit nicht verwendet wird, entnehmen Sie die Bat-terien aus dem Blitzgerät.
Den Blitz an einer Kamera anbringenSchalten Sie die Kamera und das Blitzgerät aus
1. Achten Sie auf die korrekte Einschubrichtung beim Anbringen.
2. Schieben Sie den Fuß des Blitzgerätes komplett in die Aufnahme an der Kam-era.
3. Schieben Sie den Sperrhebel am Blitzgerätefuß nach rechts bis dieser ein-rastet.
4. Zum Entsperren des Hebels drücken Sie die Entriegelungstaste am Hebel und ziehen Sie den Hebel nach links zurück.
Gerät ein- und ausschalten1. Um das Gerät einzuschalten, schieben Sie den Power-Schalter in die Position “ON”.
2. Um das Gerät auszuschalten, schieben Sie den Power-Schalter in die Position “OFF”.
BatterieanzeigeDie Batterieanzeige auf dem LC-Display (siehe unten) zeigt an, wie viel Resten-ergie ungefähr in den Batterien verbleibt. Sobald sich die Ladezeit des Gerätes verlängert sollten Sie die Batterien wechseln.
Kippen und Drehen des Blitzkopfes1. Der Blitzkopf kann zwischen -7° und 90°, mit Raststufen bei -7°, 0°, 45°, 60°, 75° und 90° gekippt werden. Ziehen oder drücken Sie den Kopf vorsichtig in die gewünschte Rastposition.
2. Der Blitzkopf lässt sich um 180° in jede Richtung drehen. Raststufen bei: 60°, 75°, 90°, 120°, 150° und 180°. Drehen Sie den Kopf in die gewünschte Rastposi-tion.
3. Wird das Gerät in einer größeren Stellung als 0° betrieben fährt der Zoom auf 50mm und “- -” wird im LC-Display angezeigt. Diese Einstellung kann im Modus “MZoom” (siehe unten) verändert werden.
4. Bei der -7°Position agiert der Blitzkopf wie bei der 0°Stellung - es werden da-durch keine Funktionen verändert.
Benutzen der Weißkarte und der Weitwinkelschei-be
Der Phottix Mitros+ Blitz ist mit einer Weißkarte und einer Weitwinkel-Diffusor-scheibe ausgestattet, welche im Blitzkopf versenkt sind.
1. Mit der Diffusorscheibe wird eine 14mm äquivalente Zoomstellung erreicht.
2. Die Weißkarte kann bei gekipptem Blitzkopf verwendet werden, um einen Teil des Lichts zu reflektieren, um z.B. Spitzlichter in Augen zu erzeugen.
Verwendung:
1. Ziehen Sie vorsichtig die Weißkarte und Weitwinkelscheibe aus den Blitz-kopf, benutzen Sie dazu die Riffelung an der Unterseite der Scheibe.
2. Wenn Sie die Scheibe ganz herausziehen, wird sie sich umklappen und vor dem Blitzkopf positionieren. Die Weißkarte können Sie einfach wieder hinein-schieben, wenn Sie diese nicht benötigen.
3. Wenn Sie nur die Weißkarte benutzen wollen, schieben Sie die Diffusor-scheibe einfach wieder zurück.
Benutzen des BlitzkopfdiffusorsDer Phottix Mitros+ TTL Blitz hat einen aufsteckbaren Diffusor, der bei Bedarf auf den Kopf gesteckt werden kann. Der Diffusor softet das Licht ab, reduziert Spitzenlichter und Schlagschatten und verbessert die Lichtverhältnisse bei Makroaufnahmen.
Verwendung:
1. Stecken Sie den Diffusor so auf den Kopf, dass die Markierung UP nach oben zeigt.
2. Lassen Sie den Diffusor in die Kerben am Blitzgerät einrasten.
3. Wiederholen Sie Schritt 2 für die andere Seite des Diffusors.

20
De BENUTZERHANDBUCH
ÜberhitzungsschutzDer Phottix Mitros+ ist mit einem Überhitzungsschutz ausgestattet durch welchem die Blitzfolgezeit reduziert wird, um eine Überhitzung zu vermeiden. Nach 20 Voll-Power Auslösungen wird der Schutz aktiviert. Im Display erscheint das [Hot!] Symbol wenn der Schutz aktiv ist.
Zur Vermeidung weiterer Überhitzungen oder möglichen Beschädigungen wird der Blitz die Ladezeit so anpassen, dass die Temperatur gesenkt wird. Warten Sie besser ca. 10 Minuten, bis sich der Blitz wieder temperiert hat.
Wenn der Blitz weiter benutzt wird obwohl das [Hot!] Symbol leuchtet, wird sich der Blitz nicht abkühlen, dann erscheint das [Stop] Symbol im Display. Beenden Sie die Benutzung des Gerätes und lassen Sie es für ca. 10 Minuten abkühlen.
Synchron- und USB-Port1. Der 3,5mm Sync-Port kann mit einem 3,5mm Sync-Kabel benutzt werden, um den Blitz mit einem Blitzauslöser oder einer Kamera auszulösen. Dieser An-schluss ist nur dafür da ein Signal zu empfangen – nicht um eines zu senden.
2. Der USB Port wird für Firmware-Upgrades benutzt. Firmware-Ankündigungen und Instruktionen erhalten Sie auf der Phottix-Website.
Status LEDLED links: Blitzbereitschaftsanzeige. Im Quick Flash Modus leuchtet die LED grün wenn der Blitz minimal aufgeladen ist. Die LED leuchtet rot wenn der Blitz voll aufgeladen ist.
LED rechts: Blitz Belichtungs-Kontrollanzeige. Wenn eine Standard-Blitzbelich-tung erreicht ist, wird die LED für 3 Sekunden blau leuchten. Wenn die blaue LED nicht leuchtet, verringern Sie den Abstand zum Motiv oder erhöhen Sie den ISO-Wert der Kamera.
Externer BatterieanschlußDer externe Batterie Port ist speziell für Phottix Blitzkabel entwickelt. Mit dem beiliegenden Adapter können auch das Canon CP-E4 oder kompatible Batte-rie-Packs benutzt werden.
Bitte beachten: - Die Batterien des Blitzgerätes müssen auch dann eingelegt sein wenn ein externes Batterie-Pack benutzt wird.
- Niemals inkompatible Batterie-Packs benutzen.

21
De BENUTZERHANDBUCH
Das Display (LCD)
E-TTL II/E-TTL Automatikmodus
manueller Modus Kabelloser Betrieb mittels optischer oder Radio-Sig-nalen
Kabelloser Betrieb
Multi-Blitz Modus
M: manueller Modus
Multi: Multi-Blitz Modus
Anzahl der Blitze
Blitzfrequenz
Intensität
Azoom Mzoom
E-TTL II/E-TTL Modus
Reflektor nach oben Standard Reflektor nach unten
Tonsignal ON OFF
Fonctions Personalisées
Blitz-Reichweite
FEB Information
FEC Information
Brennweite
Batteriezustand
Anzeige Überhitzung
m: in Metern f: in Fuß
Blende
HSS SCS
Radio: ODIN TX
Radio: STRATO II RX
Kabelloser Betrieb aus
Optisch: OP SLAVE
Radio: ODIN RX
Optisch: OP TX MASTER
Optisch: OP RX SLAVE

22
De BENUTZERHANDBUCH
Radio-Signalübertragung : ODIN TX Modus
Optische Übertragung: OP RX (SLAVE) Modus
Radio-Signalübertragung: ODIN TX Ratio-Modus
Radio-Signalübertragung: ODIN RX Modus
Radio-Signalübertragung: STRATO II RX Modus
Optische Übertragung: OP TX (Master) Modus
ODIN Gruppe
Radio: Odin RX
TX Blitzmodus (local)
Gruppe
Gruppe Aus
Gruppenmodus
TX Blitzmodus (remote)
Kanalanzeige
AF Hilfslicht an
AF Hilfslicht aus
Ratio Modus
Verhältnis EV Ausgleich für A:B
Radio: STRATO II RX
Blitzmodus
Verhältnis
Kanalanzeige
Optisch: OP TX (Master)Blitzverhältni
Master ist ausgeschaltet
Master ist eingeschaltet
Slave Gruppe
Optisch: OP RX (Slave)
Optische Übertragung: OP Slave
Optisch: OP Slave
Speicher
Speicher
Speichermenü
Abbruch
Lademenü
OK / Bestätigen
23
De BENUTZERHANDBUCH
Auto-Save FunktionDer Phottix Mitros+ speichert die Blitzeinstellungen. Modus, Levels usw. werden gespeichert und sind nach dem erneuten Einschalten wieder verfügbar.
Blitz Zoom EinstellungDer Phottix Mitros+ hat zwei Blitzkopf-Zoommodi – Auto (Azoom) und Manuell (Mzoom). Auto Zoom ändert sich dynamisch, wenn der Zoom am Kameraobjek-tiv verändert wird. Manuell Zoom erlaubt dem Benutzer die manuelle Einstel-lung des Zooms.
Einstellen:
1. Drücken Sie den Button.
2. Der Zoom-Bereich wird im Display markiert und blinkt.
3. Drücken Sie den oder Button, um den Zoom auf Azoom oder Mzoom einzustellen.
4. Drücken Sie den Button, um die Einstellung zu speichern.
Bitte beachten:1. Wenn im Azoom der Blitzkopf von der 0°-Position aus angehoben oder gedreht wird, wird sich der Blitz selbst auf 50mm einstellen, “--” wird im Dis-play angezeigt. Der Zoom lässt sich nicht einstellen, wenn der Kopf unter -7° geneigt ist.
2. Azoom funktioniert NUR, wenn der Blitzkopf entweder auf 0° oder auf -7° eingestellt ist.
3. Wenn im Mzoom der Blitzkopf von der 0°-Position aus angehoben oder gedreht wird, wird sich die Zoomeinstellung nicht ändern.
4. Wenn der Kopf angehoben oder gedreht wird, kann der Zoom durch Wechseln in den Mzoom Modus eingestellt werden.
Einstellungen für High-Speed-Synchronisation oder Zweiten Verschlussvorhang
Der Phottix Mitros+ verfügt über High-Speed-Synchronisation oder Zweiten Verschlussvorhang. Siehe weiter Details unter High-Speed-Synchronisation oder Zweiten Verschlussvorhang weiter unten in diesem Handbuch.
Einstellen:
1. Drücken Sie den Button.
2. Der Button ermöglichst das wechseln zwischen HSS, SCS und
HSS/SCS OFF.
Bitte beachten:- HSS und SCS sind verfügbar im ETTL und Manuell-Modus, aber nicht im Multi-Modus.
Test-ButtonDurch drücken des Test-Button wird der Blitz ausgelöst. Dies kann zum einstel-len der Blitzleistung benutzt werden (nur im manuellen Modus). Im kabellosen Mastermodus werden beim Drücken des Test-Buttons alle Slave-Blitzgeräte
ausgelöst, die sich im selben Kanal befinden wie der Master und von diesem gesteuert werden. Der Test-Button kann individuell konfiguriert werden (siehe C.Fn-07).
Auto-OFF und RuhefunktionUm Batterieenergie zu sparen, ist der Phottix Mitros+ mit einem Ruhe- und Auto-Off-Modus ausgestattet.
1. Im Slavemodus (nicht kabellos): Wenn 90s lang kein Button gedrückt oder der Blitz ausgelöst wird, geht der Blitz in die Ruhestellung. Das Display erlis-cht. Der Blitz wird durch Halbdrücken des Kameraauslösers oder des Test-But-tons aufgeweckt.
2. Im Slavemodus (kabellos): Wenn 60min lang kein Button gedrückt oder der Blitz ausgelöst wird, geht der Blitz in den Slave-Ruhemodus. Im Display erscheint “IDLE”. Durch Volldrücken des Kameraauslösers oder des Test-But-tons am Masterblitzes werden Blitzgerät im Slave-Ruhemodus aufgeweckt. Der Slave-Ruhemodus Timer kann von 60-10min eingestellt werden (siehe C.Fn-10). Wenn 8h lang kein Button gedrückt oder der Blitz ausgelöst wird oder nachdem “IDLE” im Display stand, geht der Blitz in den Slave-Auto-OFF-Modus. Drücken Sie den TestButton, um den Blitz wieder aufzuwecken. Slave-Auto-OFF kann von 8-1h eingestellt werden (siehe C.Fn-11).
Einstellblitz1. Drücken Sie die Abblendtaste (wenn verfügbar), dadurch wird 1s lang eine Reihe von Blitzen ausgelöst. Dieser Einstellblitz ist hilfreich, um die Lichtverhält-nisse und Schatteneffekte im Motiv zu überprüfen.
2. Der Einstellblitz ist für jeden Modus verfügbar, ETTL, Multi und Manual.
3. Der Einstellblitz kann für normal und kabelloses Auslösen eingestellt werden (C.Fn-02).
Bitte beachten: 1. Überhitzungen und Beschädigung können durch exzessives Benutzen des Einstellblitzes vorkommen. Lösen Sie niemals mehr als 20x in Folge den Ein-stellblitz aus.
2. Wenn der Blitz überhitzt ist, wird automatisch die Ladezeit erhöht, bis die Temperatur wieder gesunken ist.
AF-Hilfslicht1. Bei schwacher Licht-/Kontrast-Situation kann die Kamera unter Umständen nicht automatisch scharf stellen. Dafür verfügt der Phottix Mitros+ über ein AF-Hilfslicht an der Front des Blitzes. Das AF-Hilfslicht sendet ein Fokuslicht auf das Motiv, sodass die Kamera automatisch scharf stellen kann.
2. Die AF-Hilfslicht Funktion kann ein- oder ausgeschaltet werden (siehe C.Fn-08).
AnpassungenDer Phottix Mitros+ arbeitet mit 1/3 Blendestufen. Einige Kameras sind umstell-bar von 1/3 auf 1/2 Blendestufen für FEB und FEC. Wenn die Kamera auf 1/2 Blendenstufen eingestellt ist, übernimmt der Mitros+ dies automatisch.
24
De BENUTZERHANDBUCH
Blitz ModusDer Phottix Mitros+ hat drei Blitzmodi: ETTL, Manuel (M) und Multi (Stroboscop).
Modus wechseln:
1. Drücken Sie den Button.
2. Der Blitzmodus ist nun wählbar, ETTL, Manual (M) und Multi Modus.
3. Der aktuelle Modus wird in der linken, oberen Ecke des Displays angezeigt.
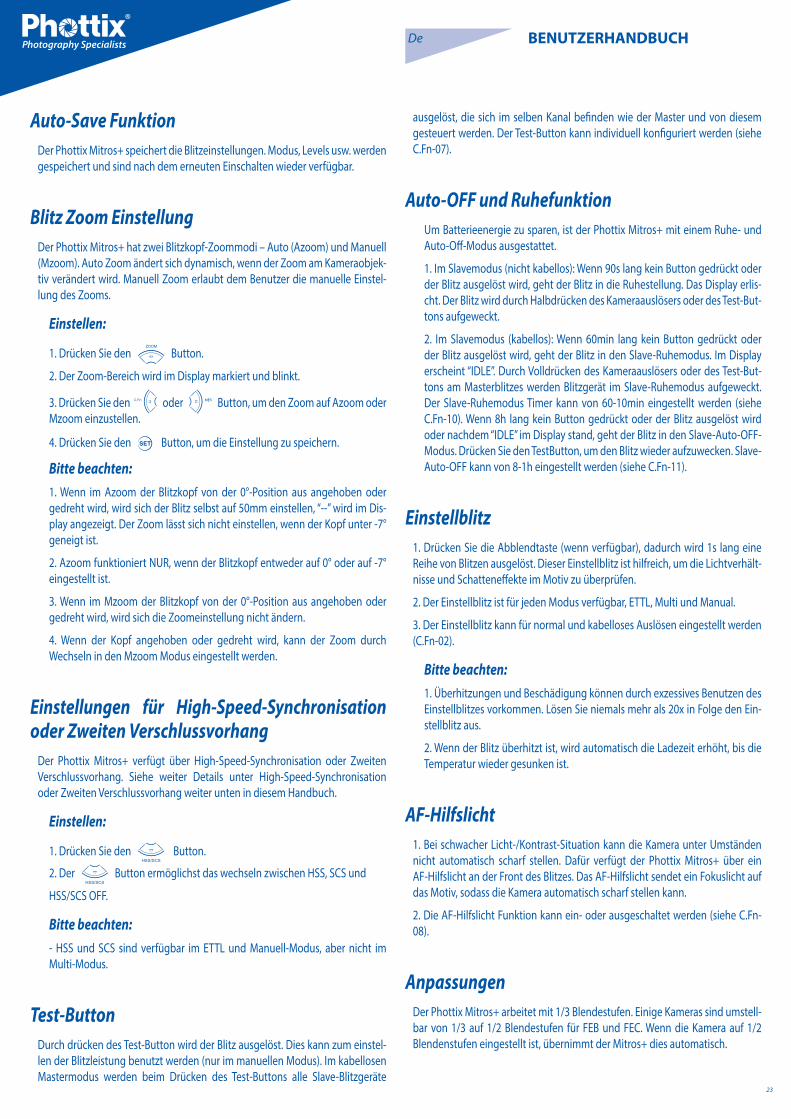
ETTL Modus (nicht kabellos)
ETTL Modus beim Mitros+ (nicht kabellos) Bildschirm
Im ETTL Modus arbeiten Kamera und Blitzgerät perfekt aufeinander abgestim-mt. Beim Drücken des Kameraauslösers wird ein Vorblitz ausgelöst durch den die Kamera die korrekte Belichtung und Blitzleistung errechnet und an den Mi-tros+ sendet.
Blitzbelichtungskorrektur - FECDer Phottix Mitros+ ermöglicht die Blitzsbelichtungskorrektur (FEC) von -3 bis +3 in 1/3 Stufen. Dies ist nützlich, wenn die Feinabstimmung des TTL-Systems basierend auf die Umgebung eingestellt werden muss.
FEC einstellen:1. Drücken Sie den Button, um den FEC Modus zu starten.
2. Drücken Sie den oder Button, um FEC einzustellen.
3. Drücken Sie den Button, um den FEC Modus zu beenden.
Bitte beachten:- Der Phottix Mitros+ arbeitet mit 1/3 Blendestufen. Einige Kameras sind um-stellbar von 1/3 auf 1/2 Blendestufen für FEB und FEC. Wenn die Kamera auf 1/2 Blendenstufen eingestellt ist, übernimmt der Mitros+ dies automatisch.
Belichtungsreihe - FEBBelichtungsreihe (FEB) können benutzt werden, um automatisch 3 Fotos hin-tereinander mit unterschiedlicher Belichtung zu erstellen. Über- und Unterbe-lichtung kann vom Benutzer eingestellt werden. FEB ist besonders hilfreich, wenn Sie unterschiedliche Lichtverhältnisse im Motiv haben und für HDR-Auf-nahmen.
Einige Kameras verfügen über Belichtungsspeicher. Schauen Sie dafür bitte im Handbuch Ihrer Kamera nach.
FEB einstellen:1. Drücken Sie den Button.
2. Drücken Sie den Button. “FEB 0” erscheint hervorgehoben im Display.
3. Drücken Sie den und Buttons, um die Belichtungsreihen-menge einzustellen.
4. Drücken Sie den Button, um die Einstellung zu übernehmen.
Bitte beachten:- Standard: FEB wird nach 3 Aufnahmen abgebrochen. FEB kann eingestellt umgestellt (siehe C.Fn-03).
- FEB Aufnahmesequenz kann geändert werden (siehe C.Fn-04).
- FEB kann mit FEC und FEL benutzt werden (siehe weiter unten).
- Für bessere Ergebnisse stellen Sie die Kamera in den Singlemodus, um sicherzustellen, dass der Blitz für die weiteren Aufnahmen bereit ist.
- Einige Kameras sind umstellbar von 1/3 auf 1/2 Blendestufen für FEB und FEC. Wenn die Kamera auf 1/2 Blendenstufen eingestellt ist, übernimmt der Mitros+ dies automatisch.
Belichtungsspeicherung - FELBelichtungsspeicherung (FEL) kann zum sperren der Blitzbelichtung verwendet werden, bevor ein Foto aufgenommen wird. Dies ist hilfreich, wenn die ma-nuelle Spotmessung bei unterschiedlichen Lichtverhältnissen benutzt wird.
Im ETTL Modus drücken Sie die FEL-Taste (die “ ” Taste) der Kamera, um dieses Funktion zu benutzen. Schauen Sie für mehr Informationen über FEL bitte im Handbuch der Kamera nach.
Beim Drücken des FEL-Button wird ein Vorblitz ausgelöst durch dem die Kamera die korrekte Belichtung und Blitzleistung errechnet und an den Mitros+ sendet. Diese Einstellung wird im Kameraspeicher gehalten. Das FEL-Symbol wird im Sucher der Kamera angezeigt.
Jedes Mal wenn Sie den FEL-Button drücken wird ein Vorblitz ausgelöst und eine es wird eine neue Belichtung berechnet. Wenn der Auslöser ganz durchgedrückt wird, wird der Blitz mit der gespeicherten Belichtung auslösen.
Bitte beachten:- Wenn das Motiv zu weit entfernt ist, wird es zur Unterbelichtung kommen. Das FEL-Ikon wird für 0,5s im Sucher der Kamera blinken.
- Wenn das Motiv im Sucher zu klein ist, hat FEL keine Wirkung.
High-Speed-Synchronisation – HSSIm HSS-Modus erreicht der Blitz die maximale Synchronzeit. Das ist hilfreich wenn Sie den Zeitautomatik-Modus nutzen oder, um das Umgebungslicht zu begrenzen. Schauen Sie für weitere Informationen im Handbuch Ihrer Kamera nach.
HSS Modus benutzen:1. Drücken Sie den Button.
2. Das HSS-Ikon erscheint im Display.
3. Stellen Sie die Verschlusszeit höher als die Blitzsynchronzeit ein und machen Sie ein Foto.
HSS Modus beenden:1. Drücken Sie den Button doppelt.
2. Sie wechseln nun von HSS zu SCS und zurück zum FCS-Modus.
Bitte beachten:- Überprüfen Sie, dass das HSS-Symbol im Sucher angezeigt wird.

25
De BENUTZERHANDBUCH
3. Drücken Sie die und Button, um zwischen Leistung, Frequenz (Hz) und Blitzanzahl zu wechseln.
4. Drücken Sie die und während die Einstellung markiert ist, um Power, Frequenz (Hz) und Blitzanzahl einzustellen.
5. Drücken Sie den Button, um das Einstellungsmenü zu verlassen.
Bitte beachten:1. Überhitzungen und Beschädigung können durch exzessives Benutzen der Stroboskop-Funktion vorkommen. Lösen Sie niemals mehr als 20x in Folge die Stroboskop-Funktion aus.
2. Wenn der Blitz überhitzt ist, wird automatisch die Ladezeit erhöht, bis die Temperatur wieder gesunken ist.
Stroboskop-Modus und VerschlusszeitUm die richtige Kamera Verschlusszeit mit verschiedenen Stroboskop-Modi zu ermitteln, benutzen Sie die folgende Formel:
Blitzanzahl / Frequenz = Verschlusszeit
Beispiel: 5x (Blitzanzahl) / 10 Hz (Frequenz) = 0,5s Verschlusszeit
Dies ist nur eine grobe Richtlinie: Sie müssen die Verschlusszeit erhöhen oder verringern, um das gewünschte Ergebnis zu erhalten.
Multi Stroboskop-Modus Ausgabe-Diagramm
Wenn die Blitzanzahl als “N ---“ dargestellt wird, wird die max. Blitzanzahl wie in der Tabelle unabhängig von der Frequenz angezeigt.
- Der HSS-Modus reduziert drastisch die Blitzleistung, Batteriekapazität und die Reichweite.
Zweiter Vorhang Synchronisation – SCSDie Phottix Mitros+ Zweiter Vorhang bewirkt, dass der Blitz am Ende der Belich-tung ausgelöst wird, nicht am Anfang. Dies ist hilfreich bei langen Verschlussze-iten.
Benutzung:1. Drücken Sie den Button doppelt. Sie wechseln nun von FCS zu HSS und dann zum SCS-Modus.
2. Beenden: Drücken Sie den Button einmal. Dadurch gelangen Sie zum FCS-Modus.
Bitte beachten: SCS funktioniert nicht im Drahtlosen- oder im Multi-Modus.
Manuell-Modus (M)Im Manuell-Modus löst der Blitz mit der Leistung aus, die Sie einstellen. Der Phottix Mitros+ TTL Blitz kann von 1/1 (volle Leistung) bis 1/128 eingestellt werden, 8 Schritte in 1/3 Blendenstufen. Blende, Verschlusszeit und ISO müssen an der Kamera manuell eingestellt werden. Für beste Ergebnisse verwenden Sie den Manuellen-Modus der Kamera.
Benutzung:1. Drücken Sie den Button bis M im Display erscheint.
2. Drücken Sie den Button, um in das Leistungseinstellungsmenü zu gelangen. Die Leistungsstufen blinken und sind markiert.
3. Drücken Sie den oder Button, um zur Leistungsanpassung zu gelangen. Die Blitzleistung wird markiert und blinkt.
4. Drücken Sie den Button, um die Leistungsanpassung zu beenden.
5. Wenn die Blitzbereitschafts-LED rot leuchtet ist der Blitz voll geladen und auslöse bereit.
6. Drücken Sie den Button, um den Blitz mit der von Ihnen eingestellten Leistung auszulösen.
Bitte beachten:- Beim Halbdrücken des Auslösers wird die effektive manuelle Blitzleistung im Display angezeigt.
Multi: Stroboskop-ModusBei der Benutzung der Stroboskop Funktion, wird eine schnelle Folge von Blitzen ausgelöst. Die Anzahl, Frequenz und Leistung kann im Phottix Mitros+ programmiert werden. Multi-Modus ist hilfreich für die Aufnahme eines sich be-wegenden Objektes und andere Spezialeffekte.
Die Frequenz des Effektes (Hz - Blitze/s), die Gesamtzahl der Blitze und die Aus-gangsleistung kann eingestellt werden.
Benutzung:1. Drücken Sie den Button bis Multi im Display erscheint.
2. Drücken Sie den Button, um Einstellungen vorzunehmen. Anzeige von links nach rechts: Leistung, Frequenz (Hz) und Blitzanzahl. Die Leistung-sanzeige ist markiert und blinkt beim Eintritt in das Einstellungsmenü.
26
De BENUTZERHANDBUCH
Drahtlose AuslösungDer Phottix Mitros+ verfügt über mehrere kabellose Auslösemöglichkeiten. Der Mitros+ ist mit dem Phottix Odin TTL System für Canon und dem Phottix Stra-to II Multi für Canon kompatibel. Nähere Einzelheiten entnehmen Sie bitte den jeweiligen Bedienungsanleitungen.
Der Mitros+ funktionen wie folgt:
Phottix Odin Tx (Sender)
Volle Anpassung an lokalen und drahtlosen TTL Betrieb, manueller Blitzleistung und Zoom-Stellung auf anderen Mitros+ Blitzgeräten (im Odin Rx-Modus) oder kompatiblen Blitzgeräten die mit Phottix Odin Empfängern ausgestattet sind. Blitzgeräte oder Studioblitze, ausgestattet mit Strato, Strato II oder Atlas II-Emp-fänger können im manuellen Modus durch den Mitros+ im Odin Tx -Modus aus-gelöst werden.
Phottix Odin Rx (Empfänger)
Der Mitros+ im Odin Rx Wireless-Modus kann durch einen anderen Mitros+ im Odin Tx -Modus oder durch die Phottix Odin Sendereinheit ausgelöst werden.
Phottix Strato II Rx (Empfänger)
Der Mitros+ im Strato Rx Wireless-Modus kann durch einen Phottix Strato II Sender, eine Phottix Odin Sendereinheit und einen Phottix Mitros+ Blitz im Odin Tx-Modus ausgelöst werden.
OP Tx (Master) – Benutzung des Canon IR Auslösesystems
Ein Blitz auf der Kamera feuert Lichtimpulse ab und justiert kabellos die Blitzgeräte.
OP Rx (Slave) - Mit dem Canon IR Auslösesystem
Remote-Blitze im OP Rx-Modus werden gesteuert und ausgelöst von einem auf der Kamera montierten Master Blitz im OP Tx Master-Modus. Ein Blitz auf der Kamera feuert Lichtimpulse ab und justiert kabellos die Blitzgeräte.
OP Slave - optischer Slave-Modus
Im OP-Slave-Modus werden andere, nahe gelegene Blitzgeräte nur im Ma-nuel-Modus ausgelöst.
Hinweis:Der Mitros+ kann nicht von Phottix Strato, Strato II und Ares Sendern oder Atlas II -Transceivern im Tx-Modus ausgelöst werden.
Auswahl des drahtlosen AuslösemodusFür den Zugriff und das Verstellen des drahtlosen Auslösemodus des Mitros+:
1. Drücken und halten Sie die Taste gedrückt, bis das Menü erscheint.
2. Verwenden Sie die oder Pfeiltasten, um den Wireless-Modus auszuwählen.
3. Drücken Sie die Taste, um den Wireless-Modus zu wählen.
4. Verstellen Sie die Wireless-Modus Parameter (Gruppen-, Kanäle) je nach Bedarf.
Bitte beachten Sie:Wenn die Taste nicht gedrückt wird, wird der Mitros+ die markierte Aus-wahl verwenden, wenn keine weitere Taste für ca. 16 Sekunden gedrückt wird.
Odin Tx (Transmitter-Modus)Benutzung des Mitros+ im Odin Tx-Modus ermöglicht es einen Blitz auf der Kamera im TTL oder manuellen Modus zu benutzen, sowie die Kontrolle der drei Gruppen (A, B, C) und Anpassung von TTL und manuellen Leistungsstufen, sow-ie Anpassung der Zoom-Blitzkopfposition des Mitros+ Blitzgerätes, wenn sich dieses im Odin Rx-Modus befindet oder mit anderen, kompatiblen Blitzgeräten die mit Phottix Odin Empfängern ausgestattet sind.
Benutzung des Odin Tx-Modus
Odin Tx-Bildschirm
Nach Auswahl des Odin Tx-Modus (siehe oben)
1. Drücken Sie die Taste um die Gruppen zu bearbeiten.
2. Die oder Pfeiltaste wechselt durch die Gruppen L , A, B , C.
3. Durch Drücken der Taste, während eine Gruppe gewählt ist, wird der Modus von TTL, M (manuell) und Off verändert.
4. Wenn eine Gruppe gewählt ist, wird durch Drücken der oder Pfeil-Tasten eine Anpassung des EV Niveaus von ± 3 EV in 1/3 Blendenstufen im TTL-Modus oder Einstellungen der Leistung (1/128 bis 1/1 in 1/3 Stufen) im manuellen Modus gewährleistet.
5. Drücken Sie die Taste, um das Odin Tx-Modus Menü zu verlassen.
VerhältnismodusOdin Tx Verhältnis-Bildschirm
Der Verhältnismodus ist ähnlich aufgebaut wie der des Canon TTL Systems. Das Verhältnis der Gruppen A und B kann von 8:1 bis 1:8 eingestellt werden. EV-Werte können ebenfalls eingestellt werden, sowie Anpassungen des lokalen Blitzgerätemodus (L) und dessen Leistung.

27
De BENUTZERHANDBUCH
Um auf den Verhältnis Modus zuzugreifen:
1. Drücken und halten Sie die Taste während Sie sich im Odin Tx Menü befinden. Das Verhältnismodus-Menü erscheint.
2. Drücken Sie die Taste , um dessen Bearbeitung zu öffnen.
3. Drücken Sie die oder Pfeiltasten um zwischen Verhält-niswerten und EV-Werten des lokalen Blitzgerätes (L) zu wechseln.
4. Drücken Sie die oder Pfeiltasten des lokalen Blitzgerätes um EV-, Verhältnis- und Verhältnis-EV Werte einzustellen.
5. Die Taste ändert den Modus des lokalen Blitzgerätes von TTL, Ma-nuell und Off.
6. Drücken Sie die Taste, um den Verhältnismodus-Bearbeitung zu beenden.
7. Drücken und halten Sie die Taste, um den Odin Tx-Verhältnismodus zu verlassen und zum Odin Tx-Modus zurückzukehren.
Bitte beachten Sie:Der Blitz auf der Kamera (L) ist nicht Teil der Verhältnis-Berechnung. Die Leis-tung des lokalen Blitzgerätes wird unabhängig gesteuert.
Einstellen der Blitzkopf Zoomposition im Odin Tx-Modus
1. Durch drücken der Taste öffnet sich das Blitzkopfzoom-Menü.
2. Die und Pfeiltaste wechselt durch die Gruppen L, A, B, C.
3. Durch drücken der und Pfeiltaste wird zwischen AZoom (automatische Zoomposition, die dynamisch verändert wird, wenn ein Zoom-Objektiv verstellt wird) und MZoom Positionen (24, 28, 35, 50, 70, 80 und 105mm) gewechselt.
4. Durch Drücken der Taste beendet die Zoom-Einstellung Modus.
Einstellen der Übertragungskanäle
1. Vom Odin Tx- oder Verhältnis-Menü, drücken Sie die Pfeiltaste, um auf die Auswahl der Übertragungskanäle zuzugreifen.
2. Drücken Sie die und Pfeiltasten um durch die Kanäle 1-4 zu wechseln.
3. Drücken Sie die Taste um den gewählten Kanal zu sichern.
Benutzung der High-Speed-Synchronisation (HSS) und Zweiter Verschlussvorhang Syncronisation (SCS) im Odin Tx-ModusDurch Drücken der Taste wechseln Sie zwischen HSS, SCS und Stand-ardsynchronisation.
1. HSS erlaubt es schnellere Verschlusszeiten zu verwenden. Verschlusszeiten bis zu 1/8000 sek. können mit kompatiblen Kameras erreicht werden.
2. Hinweis: Bei High-Speed Verschlusszeiten wird die Leistung der Blitzgeräte stark reduziert.
3. SCS wird den Blitz am Ende der Belichtung auslösen, nicht am Anfang. Dies kann kombiniert mit längeren Verschlusszeiten für kreative Effekte genutzt werden.
Odin Rx (Empfänger) ModusOdin Rx-Modus-Bildschirm
Wenn der Odin Rx Wireless-Modus ausgewählt wird der Phottix Mitros+ Blitz ausgelöst, wenn dieser mit einem Odin-kompatiblen Empfänger ausgerüstet ist. Im Odin Rx-Modus kann der Mitros+ von einem anderen Mitros+ Blitzgerät ausgelöst und kontrolliert werden, welches sich im Odin Tx-Modus befindet, oder einer Odin Sender TCU.
Wechseln der Kanäle und Gruppen
1. Drücken Sie die Pfeiltaste nach um auf die Kanal- und Grup-penauswahl zuzugreifen.
2. Mit der und Pfeiltaste werden Kanäle oder Gruppen angewählt.
3. Verwenden Sie die und Pfeiltasten um die Empfangskanäle (1-4) oder Gruppen anzupassen (A-C).
4. Drücken Sie die Taste, um den Kanal- und Gruppen-Modus zu verlas-sen.
5. Drücken der Taste ermöglicht es, eine EV-Anpassung für den aus-
gewählten Blitz durchzuführen, mit Hilfe der und Pfeiltasten. Drücken Sie die Taste erneut, um den Anpassung der EV-Werte Modus zu verlassen.
Bitte beachten Sie:Die Wirkung von EV Einstellungen ist kumulativ. Wenn die EV-Einstellung auf dem Odin Rx Bildschirm und auf einem Odin TCU oder Mitros+ im Odin Tx-Modus, und/oder in den Individualfunktionen-Menü der Kamera eingestellt ist, werden all diese Einstellungen verwendet werden, um den endgültigen EV zu berechnen.
Strato II Rx-ModusStrato II Rx-Modus-Bildschirm
Wenn der Strato II Rx-Modus ausgewählt ist, wird der Mitros+ von Phottix Stra-to II Multi-Sendern, Phottix Odin TCUs oder Phottix Mitros+ im Odin Tx-Modus ausgelöst werden.
1. Drücken Sie die Pfeiltaste nach um auf die Kanal- und Grup-penauswahl zuzugreifen.
2. Mit der und Pfeiltaste werden Kanäle oder Gruppen angewählt.
3. Verwenden Sie die und Pfeiltasten um die Empfangskanäle (1-4) oder Gruppen anzupassen (A-C).

28
De BENUTZERHANDBUCH
4. Drücken Sie die Taste, um die manuellen Leistungsstufen des Mitros+ (von 1/1 bis 1/128 in 1/ 3 Stufen) anzupassen. Drücken Sie die Taste erneut, um die manuelle Blitzleistungseinstellung zu verlassen.
5. Drücken Sie die Taste , um die Blitzkopf-Zoomposition zu verän-
dern. Drücken Sie die oder Pfeiltasten um zwischen AZoom und MZoom Einstellungen hin und her zu wechseln. Drücken Sie die Taste um zum Hauptmenü zurückzukehren.
Bitte beachten Sie:Im Strato II Rx (Empfänger) Modus gibt es keine drahtlosen TTL Funktionen wie HSS, SCS oder drahtlose Leistungs-/Zoomsteuerung. Leisung und Zoom-stufen müssen im Strato II Rx -Modus manuell auf dem Mitros+ Blitzgerät eingestellt werden.
OP Tx (Master) und OP Rx (Slave) drahtlos ModiOP Tx (Master) und OP Rx (Slave) Modi verwenden Canons wireless control und Auslöse System. Ein Mitros+ Blitzgerät in OP Tx (Master) Stellung wird an der Kamera benötigt um drahtlose (Slave) Blitzgeräte in OP Rx (Slave) Stellung zu kontrollieren. Der gleiche Übertragungskanal muss auf dem Master- und Slave-Blitzgeräten eingestellt sein. Gruppen müssen für die Slave-Blitzgeräte, Gruppen Verhältnisse müssen für die Master-Blitzgeräte eingestellt werden. Ein Mitros+, eingestellt auf OP Tx (Master) oder andere kompatible Blitzgeräte im Master-Modus, können auf der Kamera benutzt werden um Mitros+ Blitzgeräte im OP Rx (Slave) Modus oder andere kompatible Blitze in Slave-Modus zu kon-trollieren und auszulösen.
OP Tx(Master)-Modus:
1. Durch Drücken der Taste können Veränderungen in der Blitzzündung, Übertragungskanälen und des Verhältnis-Modus vorgenommen werden.
2. Mit dem gekennzeichneten und blinkenden Blitzsymbol, benutzen
Sie die oder Pfeiltasten um die Blitzauslösung ein oder auszus-chalten (siehe unten).
3. Hervorgehobene Übertragungskanäle lassen sich zwischen Kanal 1-4 mit
dem oder Pfeiltasten verändern.
4. Mit dem Verhältnis-Modus markiertem Symbol lassen sich mittels der
oder Pfeiltasten der drahtlose Verhältnis-Modus verändern (sie-he unten).
5. Mit dem hervorgehobenen Verhältnis-Modus Symbol, drücken Sie
oder Pfeiltasten um den drahtlosen Verhältnis-Modus verändern. Wenn Sie sich im M oder Multi-Modus befinden können die Blitzeinstellun-gen der Slave-Blitzgeräte individuell am OP Tx (Master) Blitzgerät eingestellt werden (siehe unten).
6. Drücken Sie die Taste , um zu die Einstellungen zu bestätigen und den Bildschirm zu verlassen.
Master mit Blitz-Modus : Das Master-Blitzgerät auf der Kamera wird ausgelöst wenn ein Foto gemacht wird.
Master ohne Blitz- Modus : Das Master-Blitzgerät auf der Kamera wird nicht ausgelöst wenn ein Foto gemacht wird. Der Blitz emittiert ein kleine Menge von Licht um mit den Slave- Blitzen zu kommunizieren, aber dieses Licht ist nicht Bestandteil der Belichtung.
Um den OP Rx (Slave) Modus einzustellen:
1. Drücken der Taste erlaubt es Änderungen an den Blitz-Kanälen und Gruppen vorzunehmen.
2. Hervorgehobene Übertragungskanäle lassen sich zwischen Kanal 1-4 mit
dem oder Pfeiltasten verändern.
3. Hervorgehobene Gruppen lassen sich zwischen A,B,C mit dem oder
Pfeiltasten verändern.
4. Drücken Sie die Taste, um zu die Einstellungen zu bestätigen und den Bildschirm zu verlassen.
5. Wenn OP Rx (Slave) Blitzgeräte bereit sind zum auslösen, blinkt das AF-Hilfslicht an der Vorderseite des Blitzgerätes einmal jede Sekunde.
6. Um Multi oder M Modi für die Slave-Blitzgeräte einzustellen - drücken und
halten Sie die Taste für ca. 2 Sekunden.
7. Um Leistungsstufen oder Multi Blitz-Frequenzen/Blitzanzahl zu ändern nutzen Sie die Pfeiltasten.
Bitte beachten Sie: - Stellen Sie sicher das die OP Tx (Master) und OP Rx (Slave) Blitzgeräte auf den gleichen Übertragungskanal (1-4) eingestellt sind.
- Stellen Sie keine Hindernisse zwischen die Master- und Slave-Blitzgerät Ein-heit(en). Hindernisse können dieSignalübertragung blockieren.
- Bei der Anwendung von drahtlosen, indirekten Blitzen, stellen Sie bitte sich-er das der Slave-Blitzgerät Empfänger dem Master-Blitzgerät zugewandt ist.
- Wenn Sie nur ein Blitzgerät benutzen, stellen Sie den Wireless-Modus auf “Off”.
Übertragungskanäle
Das Phottix Mitros+ OP Tx/Rx Wireless System hat 4 Übertragungskanäle: 1, 2, 3 and 4. Signale vom OP Tx (Master) Blitzgerät werden an die OP Rx (Slave) Blitzgeräte auf diesen Kanälen gesendet. Wenn die Master- und Slaveblitzgeräte auf verschiedene Kanäle eingestellt sind werden die Slaveblitzgeräte nicht aus-lösen.
Benutzen der drahtlosen OP Tx/Rx Auslösung
Mit einem Blitzgerät im OP Tx (Master) Modus auf der Kamera und draht-losen Blitzgeräten im OP Rx Slave Modus, drücken des Auslösers wird den OP Tx (Master) Blitz auslösen (wenn dieser dafür eingestellt ist) und Blitzgeräte, eingestellt auf OP Rx (Slave) Modus, innerhalb der Reichweite des OP Tx (Master) Blitzgerätes. Die Kamera und Blitzgeräte werden die Belichtung bestimmen und Blitze im TTL-Modus senden um die Aufnahme korrekt zu belichten.
Verhältnis ModiSlave-Blitzgeräte können vom Master-Blitzgerät in verschiedenen Verhältnis Modi kontrolliert werden. Verfügbare Verhältnis Modi sind:
ETTL Modus A+B+C Alle drei Gruppen blitzen im gleichen Verhältnis zur kalkulierten Blit-zleistung.
A:BC Gruppe A und B können über den Blitz-Verhältnis Modus verstellt

29
De BENUTZERHANDBUCH
werden (siehe unten). Gruppe C ist unabhängig mit seiner Blitzleistung, vorgegeben von der Kamera.
Die EV-Korrektur der Gruppen A und B können verändert werden.
1. Drücken Sie die Taste nachdem Sie den Blitz-Verhältnis-Modus verlas-sen haben.
2. Drücken Sie die oder Taste um + oder – EV-Korrekturen für die Gruppe A und B zu vollziehen.
3. Die EV-Kompensation für Gruppe C kann auch verändert werden.
4. Drücken der Taste, nachdem Sie die Blitz-Verhältnis Leistung bes-timmt haben, stellt den hervorgehobenen Bereich auf die EV-Korrektur der Gruppe C ein.
5. Drücken Sie die oder Taste um die EV-Korrektur der Gruppe C zu verändern.
A:B Nur Gruppe A und B können über den Verhältnis-Modus verändert werden (siehe unten). Gruppe C ist nicht regelbar und löst nicht aus.
Die EV-Korrektur von Gruppe A und B kann verändert werden.
1. Drücken Sie die Taste nachdem Sie den Blitz-Verhältnis-Modus ver-lassen haben.
2. Drücken Sie die oder Taste um + oder – EV-Korrekturen für die Gruppe A und B zu vollziehen.
Einstellen und verändern der Verhältnis-Modi
ETTL Modi
1. Nach Aktivierung des OP Tx (Master) Modus (siehe oben) drücken Sie die
Pfeiltaste um die OP Tx (Master) Parameter zu verändern.
2. Drücken Sie die Pfeiltaste dreimal um den Verhältnis-Bereich hervorzuheben.
3. Auswahl des Verhältnis-Modus. Durch drücken der und Taste wechseln Sie zwischen den A+B+C, A:B und A:BC Modus.
4. Wenn A:B oder A:BC hervorgehoben sind, drücken der Taste hebt die Verhältnis-Modus Auswahl hervor.
5. Drücken der Taste verändert das Verhältnis von 1:1 bis 1:8 in Schrit-ten von 1:1.5, 1:2, 1:3, 1:4, 1:6, 1:8.
6. Drücken der Taste verändert das Verhältnis von 1:1 nach 1.5:1, 2:1, 3:1, 4:1, 6:1, 8:1.
7. Drücken Sie die Taste um die Einstellungen zu bestätigen und das Menü zu verlassen.
Manuelle Modi
A+B+C Im manuell Modus blitzen alle Gruppen mit demselben Leistungslev-el. Die Gesamtleistung kann geregelt werden.
A:B:C Die Leistung jeder Gruppe wird individuell vom Benutzer festgelegt (sie-he unten). Jede Gruppe ist unabhängig und beeinflusst die anderen nicht.
A:B Die Leistung der Gruppe A und B wird individuell vom Benutzer festgelegt (siehe unten). Gruppe C ist nicht regelbar und löst nicht aus.
Einstellen und regulieren der Manuell Modi
1. Nach betreten des OP Tx (Master) Modus (siehe oben) drücken Sie die Taste um den Blitz in den Manuell-Modus (M) zu versetzen.
2. Drücken Sie die Pfeiltaste um OP Tx (Master) Parameter zu verändern.
3. Drücken Sie die Pfeiltaste dreimal um den Verhältnis-Bereich hervorzuheben.
4. Durch drücken der und Taste wechseln Sie zwischen den A+B+C, A:B und A:BC Modus.
5. Drücken Sie die Taste um die Einstellungen zu bestätigen und das Menü zu verlassen.
6. Drücken Sie die Taste um die Leistungslevel zu verändern.
7. Drücken der oder Taste verändert das Blitzleistungslevel (1/1 bis 1/128 in 1/3 Schritten).
8. Drücken der Taste verändert die Kanäle von A nach B nach C, drück-
en der Taste von C nach B nach A (wenn verfügbar).
9. Drücken Sie die Taste um den Leistungslevelkorrektur-Modus zu ver-lassen.
Multi Modus
A+B+C Alle drei Gruppen blitzen im Multi Modus mit demselben Leistung-slevel, Frequenz und Blitzanzahl.
A:B:C Die Leistung jeder Gruppe wird individuell vom Benutzer festgelegt (siehe unten). Die Frequenz und Blitzanzahl des Stroboskopblitzes jeder Gruppe sind gleich und können nur in Gruppe A verändert werden.
A:B Die Leistung der Gruppe A und B wird individuell vom Benutzer festgelegt (siehe unten). Gruppe C ist nicht regelbar und löst nicht aus. Die Frequenz und Blitzanzahl des Stroboskopblitzes jeder Gruppe sind gleich und können nur in Gruppe A verändert werden. Gruppe C ist nicht regelbar und löst nicht aus.
Einstellen und regulieren der Multi Modi
1. Nach betreten des OP Tx (Master) Modus (siehe oben) drücken Sie die Taste um den Blitz in den Manuell-Modus (M) zu versetzen.
2. Drücken Sie die Pfeiltaste um OP Tx (Master) Parameter zu verändern.
3. Drücken Sie die Pfeiltaste dreimal um den Verhältnis-Bereich hervorzuheben.
4. Durch drücken der und Taste wechseln Sie zwischen den A+B+C, A:B und A:BC Modus.
5. Drücken Sie die Taste um die Einstellungen zu bestätigen und das Menü zu verlassen.
6. Drücken Sie die Taste um die Leistungslevel zu verändern.
7. Drücken der oder Taste verändert das Blitzleistungslevel (1/1 bis 1/128 in 1/3 Schritten).
8. Drücken der Taste verändert die Kanäle von A nach B nach C, drück-
en der Taste von C nach B nach A (wenn verfügbar).

30
De BENUTZERHANDBUCH
9. Durch drücken der Taste, nachdem man die Gruppen gewählt hat, lässt sich die Blitzfrequenz und Blitzanzahl verändern.
10. Drücken der oder Taste erlaubt Veränderungen der Fre-quenz und Blitzanzahl. Diese Veränderungen können nur in Gruppe A verändert werden und werden auch auf Gruppe B und C angewandt (wenn verfügbar).
11. Drücken Sie die Taste um den Leistungslevelkorrektur-Modus zu verlassen.

31
De BENUTZERHANDBUCH
Individualfunktionen (CF) Der Phottix Mitros+ TTL Blitz verfügt über eine Vielzahl an einstellbaren Individ-ualfunktionen. Diese Funktionen werden wie folgt eingestellt:
1. Drücken Sie die Taste für 2s, um das C.Fn Menü aufzurufen.
2. Drücken Sie die oder Taste, um zwischen den Menüpunkten zu wählen – C.Fn 0 bis 15.
3. Drücken Sie den oder Taste, um die Einstellung/Funktion vorzunehmen.
4. Drücken Sie die Taste, um das C.Fn Menü zu beenden.
Individualfunktion Tabelle

32
De BENUTZERHANDBUCH
Schnellblitz FunktionDie Schnellblitz-Funktion ermöglicht es den Blitz bei 1/6 bis 1/2 der vollen Leistung auszulösen. Die Ladezeiten im Schnellblitz-Modus sind schneller. Be-sonders hilfreich für die Snap-Shot-Fotografie naher Motiv.
Die Schnellblitz-Funktion kann dauerhaft ein- oder ausgeschaltet werden. (sie-he C.Fn-06).
Bitte beachten: Wenn Schnellblitz eingeschaltet ist, kann es zu Unterbelichtungen bei zu weit entfernten Motiven kommen.
Automatische HintergrundbeleuchtungWenn die automatische Hintergrundbeleuchtung eingeschaltet ist, wird durch Drücken einer beliebigen Taste das Licht eingeschaltet. Die Hintergrundbe-leuchtung leuchtet 8s lang und geht dann automatisch aus, wenn keine Tasten gedrückt werden.
TTL PrefTTL kann bei Verwendung verschiedener Kameras leicht variieren. “TTL Pref” Funktion (C.Fn 15) ermöglicht es deshalb Benutzern den EV des TTL von +3 bis -3 in 1/3 Stufen anzupassen, um so diese geringen Schwankungen zu kompensier-en. Diese Einstellung ist eine persönliche Präferenz basierend auf der Basis des Standard-Kamera TTL und wird im Speicher aufgezeichnet. Diese Einstellung wird zum Ausgleich genommen für alle Bilder die im TTL-Modus aufgenommen werden. Diese EV-Kompensation wird nicht auf dem LCD während der nor-malen Anwendung angezeigt werden.
Memory Funktion
Das Phottix Mitros+ Blitzgerät ist ausgestattet mit einer Memory Funktion. Nutzung der Memory Funktion erlaubt es Blitzgerät-Parameter, Daten und Nutzerfunktionen zu sichern und schnell abzurufen für künftigen Gebrauch. Blitz Modi, wireless settings, Blitzleistung – alle aktuellen Programmierungen werden für späteren Gebrauch gespeichert.
Memory Modus Bildschirm
Menü:Drei Speicherplätze und drei Ladeplätze stehen im Memory Modus zur Verfügung:SAVE TO 1SAVE TO 2SAVE TO 3LOAD FROM 1LOAD FROM 2 LOAD FROM 3
Einschalten des Memory Modus
Drücken und halten Sie die Taste um den Memory Modus abzurufen.
Um Daten zu speichern:1. Nachdem sie die Blitzfunktionen wie gewünscht eingestellt haben, drück-
en Sie die Taste und halten sie gedrückt um den Memory Modus ab-zurufen.
2. Drücken Sie die und Tasten um einen Speicherorz zu wählen: SAVE TO 1, SAVE TO 2 and SAVE TO 3.
3. Drücken Sie die Taste um den Speicherort zu bestätigen und dessen gespeicherten Daten.
4. Das LCD Display wird den Memory Modus ausblenden und zum zuvor be-nutzten Menü zurückkehren.
5. Um die Sicherung der Daten abzubrechen, drücken Sie Taste.
Drücken Sie die Taste um den Memory Modus zu beenden und zum zuletzt verwendeten Menü zurückzukehren.
Daten abrufen:1. Nachdem Sie den Memory Modus aufgerufen haben (siehe oben) drücken
Sie die und Taste um die einzelnen Speicherplätze LOAD FROM 1, LOAD FROM 2. LOAD FROM 3 anzuwählen.
2. Drücken der Taste wird die gespeicherten Daten abrufen.
Bitte beachten:Nachdem Sie die gespeicherten Daten abgerufen haben und den Memory Modus verlasen haben, werden diese auf dem Display angezeigt. Zuvor be-nutzte Blitzeinstellungen gehen verloren. Um Datenverluste zu vermeiden speichern Sie aktuelle Einstellungen bevor Sie gespeicherte Daten abrufen.
Auf Werkseinstellung zurücksetzenDer Phottix Mitros+ kann auf die Werkseinstellungen zurückgesetzt werden.
Zurücksetzen des Blitzes:
1. Drücken und halten Sie den und Button für 3s.
2. Der Blitz wird auf die Werkseinstellungen zurückgesetzt.
3. Alle Individualfunktionen werden auf die Werkseinstellungen zurückge-setzt.
Informations-MenüZur technischen Unterstützung oder zum Firmware-Upgrade können im In-formations-Menü folgende Angaben ausgelesen werden: Hardware, Software, Symbol-Bibliothek und Seriennummer:
1. Drücken Sie den Button beim Einschalten des Blitzgerätes.
2. Drücken Sie eine beliebige Taste, um die Anzeige zu löschen und das Menü zu verlassen.

33
De BENUTZERHANDBUCH
Technische DatenModus: E-TTL und E-TTL II, Manuell und Multi Stroboskop
Leitzahl: 58/190 (bei 105mm Brennweite, ISO 100 in Meter/Fuß)
Leuchtwinkel: 24-105mm (14mm Weitwinkelscheibe)
Autozoom (Zoom passt sich automatisch der Brennweite an)
Manuellzoom (Zoom wird manuell an der Kamera oder am Blitz eingestellt)
Rotation: 360°, hoch/runter: -7° bis 90°
FEC (Blitzbelichtungskorrektur): Manuell
FEB (Flash exposure bracketing): ±3 Blenden in 1/3 Schritten (Manuelle Blitzbelichtung Kompensation und FEB können kombiniert werden)
Synchronisations-Modi: Erster Vorhang, Zweiter Vorhang und High-Speed
Stroboskopblitz: Frequenz: 1-199Hz Blitzanzahl: 1-100
Belichtungsbestätigung: blaue LED leuchtet auf im E-TTL Modus
Blitz-Recycling (mit AA/Mignon Alkaline Batterien/Akkus)
Blitzbereitschaftsanzeige:
Normalblitz: ca. 0,1-5s / rote LED leuchtet auf. Schnellblitz: ca.0,1-2,5s / grüne LED leuchtet auf.
Power intern: 4x AA/Mignon Alkaline Batterien oder AA/Mignon Ni-MH Akkus
Power extern: Kompatibel mit dem Phottix Battery Pack und Canon compact Battery Pack CP-E4 mit speziellem Adapter
Stromsparfunktion: Auf-Kamera-Modus: 90s, drahtloser Slave-Modus: 60min
Drahtlos Blitzen
Übertragungsmethode: Radiosignale und optischer Impuls
Kanäle: 4
Drahtlos Optionen: Odin Tx, Odin Rx, Strato II Rx, OP Tx (Master), OP Rx (Slave), OP Slave, OFF
Übertragungsbereich (ca.): Radio: 100m +, Optisch: Innenbereich: 12-16m/39.3-52.4 ft., Außenbereich: 7-9m/22.9-29.5 ft.
Empfangswinkel: Radio: 360 ° alle Richtungen, Optische Übertragung: ±40°(horizontal), ±30°(vertikal)
Slave Gruppen Steuerung: 3 (A, B, und C)
Verhältniskontrolle: 1:8-1:1-8:1
Standby-Strom: ≤100uA im Schlafmodus
Dimensionen: (L x B x H): 202,8 × 77,5 × 58,3mm
Gewicht: 427g (ohne Batterien/Akkus)
Veränderungen am Blitzkondensator:Wenn der Blitz längere Zeit nicht benutzt wurde, kann es zu Veränderungen am Blitz-Kondensator kommen. Benutzen Sie den Blitz alle drei Monate für mindes-tens 10 Minuten, damit es keine Veränderungen gibt.

34
De BENUTZERHANDBUCH
www.phottix.com
Konformitätserklärung “CE” Wir: Phottix (HK) Ltd.
Adresse: 10/F Block A, Yip Fat Factory Building, Phase 1, 77 Hoi Yuen Rd, Kwun Tong, Kln, Hongkong
Europäischer Bevollmächtigter:
Phottix Europe Sp. z o.o.
Piotrkowska 66
90-105 Lodz, Polen
KRS 0000327336
erklären hiermit, dass das unten aufgeführte Produkt:
Produktname: Phottix Mitros+ TTL Transceiver Flash
Modellnummer: Mitros+
die grundlegenden Anforderungen der Richtlinie R&TTE 1999/5/EC erfüllt, wenn das Produkt richtig verwendet wird, sowie die folgenden Bestimmungen, Nor-men und normative Dokumente:
ETSI EN 300 440-1 V1.6.1(2010-08)
ETSI EN 300 440-2 V1.4.1(2010-08)
ETSI EN 301 489-1 V1.9.2/2011-09
ETSI EN 301 489-3 V1.4.1/2002-08
EN 62479: 2010-09
Unterzeichnet von:
Paul Czernik
CEO/Chief Executive Officer
Phottix Europe Sp. z o.o
Lodz, September 2013

35
Fr MANUEL D’UTILISATION
Pour commencer rapidement à utiliser ce flash, veuillez consulter le mode d’em-ploi abrégé. Pour les fonctions avancées, lisez ce mode d’emploi et familiari-sez-vous avec le mode d’emploi et les fonctions de votre appareil photo.
Le flash Phottix Mitros+ TTL pour Canon est conçu pour les appareils reflex numériques de la marque Canon. Il dispose des modes : ETTL I/II, Manuel, Mode Multi et options sans fil: Maître et Esclave.
Consignes de sécurité1. Utilisez prudemment le flash. Ne déclenchez pas le flash à proximité des yeux de personnes ou d’animaux – cela peut occasionner de graves troubles visuels pouvant aller jusqu’à l’aveuglement.
2. Faites attention quand vous utilisez le flash à proximité des voitures, des bus, des motos ou d’autres véhicules – sous le coup de l’éblouissement il risque de provoquer un accident.
3. N’utilisez pas le flash à proximité de gaz ou de liquides inflammable (p.ex. essence, solvants).
4. Ne soumettez pas le flash ni les piles à l’eau / aux projections d’eau ni à une forte humidité.
5. Ne soumettez pas le flash ni les piles à une trop grande chaleur (ne conservez pas le flash p.ex. au soleil ou dans une voiture fermée).
6. Retirez les piles du flash si vous ne comptez pas l’utiliser pendant un certain temps.
7. Remplacez les piles si nécessaire. Utilisez des piles en bon état. Utilisez des piles neuves et de même marque.
8. Au moment du déclenchement d’un éclair, aucune matière opaque ne doit se trouver directement devant ni sur la vitre du réflecteur - l’énergie de l’éclair peut provoquer des brûlures.
9. La vitre du réflecteur est très chaude après une séquence d’éclairs. Ne la touchez pas : risque de brûlure.
10. Le flash contient des éléments électroniques à haute tension. Ne démontez pas le flash, n’essayez pas de le réparer. Ne touchez jamais aux composants in-ternes du flash.
11. Ne touchez jamais à la prise d’alimentation externe avec des objets en métal:risque de choc électrique et de sérieuses blessures.
Table des matièresÉléments et Fonctions…....................................................…......35Modes…......................................................................................41Déclenchement Sans Fil .............................................................43Fonctions Personnalisées...........................................................48Caractéristiques techniques.......................................................50
Phottix Mitros+ Flash TTL – Emetteur / récepteur pour Canon
ÉlémentsDos/Côté gauche
1. Écran LCD 2. Bouton de réglage3. Bouton TEST4. Commutateur d’alimentation5. Témoin de disponibilité6. Touches de direction7. Bouton de sélection (voir ci-dessous)8. Levier de verrouillage9. Port de synchronisation 3,5 mm10. Port USB11. Prise d’alimentation externe
Touches de direction
1. Touche de déplacement vers le haut / Réglage du Zoom2. Touche de déplacement vers la droite / Réglage du Mode flash sans fil3. Touche de déplacement vers le bas / HSS/SCS 4. Touche de déplacement vers la gauche / Fonctions Personnalisées
Devant/Côté droite
1. Panneau de réflexion2. Diffuseur Grand-Angle3. Tête du flash4. Récepteur signal sans fil5. Illuminateur d’assistance AF6. Griffe flash7. Compartiment à piles

36
Fr MANUEL D’UTILISATION
Veuillez noter:Pour suivre les instructions:
1. Le flash et l’appareil doivent être allumés.
2. Le flash et l’appareil sont réglés comme mentionné dans le manuel d’utilisa-tion.
3. Le menu de l’appareil et les fonctions personnalisées du flash sont réglés aux valeurs par défaut.
4. Le flash est utilisé avec un reflex Canon compatible.
Mise en place des piles1. Appuyez sur le couvercle du compartiment à piles et faites-le glisser vers le bas du flash. Le couvercle s’ouvrira.
2. Installez les piles de type AA comme indiqué dans le compartiment à piles.
3. Fermez le couvercle et faites-le glisser vers le haut du flash. Le déclic indique le verrouillage du couvercle.
Veuillez noter:
- Utilisez quatre piles de haute qualité de la même marque. Vérifiez si toutes les piles ont le même niveau de charge.
- Les piles peuvent devenir très chaudes lors de l’utilisation du flash. Soyez prudents quand vous remplacez les piles.
- Si vous n’utilisez pas le flash pendant un certain temps, veuillez retirer les piles du compartiment.
Fixation du flash sur l’appareil photoÉteignez l’appareil et le flash
1. Alignez le sabot de fixation du flash sur la griffe de l’appareil photo.
2. Insérez complètement le sabot de fixation du flash dans la griffe de l’appareil photo.
3. Verrouillez le flash en faisant glisser le levier de verrouillage vers la droite jusqu’à ce que vous entendiez le déclic.
4. Pour retirer le flash, appuyez sur le bouton de déverrouillage sur le levier de verrouillage et faites glisser vers la gauche.
Allumer/Éteindre le flash1. Pour allumer le flash, mettez le commutateur d’alimentation sur “on”.
2. Pour éteindre le flash, mettez le commutateur d’alimentation sur “off”.
L’indicateur de niveau de batterieL’indicateur de niveau de la batterie sur l’écran LCD (voir ci-dessous) indique approximativement la quantité d’énergie restante dans les piles du flash. C’est une évaluation donnée à titre indicatif que vous pouvez prendre en compte quand le remplacement des piles est nécessaire. Si la durée de recharge du flash devient très longue (30 secondes), remplacez les piles.
Relever et pivoter la tête du flash1. La tête du flash peut être relevée de -7 à 90° par incréments de -7, 0, 45, 60, 75 et 90°. Soulevez ou baissez doucement la tête du flash pour obtenir la position requise.
2. La tête du flash peut être tournée à 180° vers la gauche et vers la droite par incréments de 60, 75, 90, 120, 150 et 180°. Pivotez la tête du flash doucement pour obtenir la position requise.
3. Quand la tête du flash est à une valeur différente de la position standard 0°, le zoom du flash est fixe à 50 mm. “- -” sera affiché sur l’écran LCD. Quand la tête du flash est relevée ou pivotée, le zoom du flash peut être mis en mode Mzoom (voir ci-dessous).
4. À -7°, le zoom du flash fonctionnera comme à 0° - aucuns paramètres ne se-ront modifiés.
Utilisation du réflecteur ou du Diffuseur Grand-An-gle
Le Flash Phottix Mitros+ est équipé d’un réflecteur blanc et d’un diffuseur grand-angle (dans la tête du flash).
1. Avec le diffuseur grand-angle, le flash disperse la lumière à un équivalent de 14 mm.
2. Le réflecteur peut être utilisé quand la tête du flash est orientée vers le haut, pour faire réfléchir la lumière afin de créer un reflet dans les yeux du sujet.
Pour l’utiliser:
1. Tirez doucement le diffuseur grand-angle et le réflecteur de la tête du flash en utilisant la nervure du bas du diffuseur.
2. Si le diffuseur est placé sur la tête du flash, repoussez doucement le réflec-teur dans la tête du flash s’il n’est pas nécessaire.
3. Si vous utilisez uniquement le réflecteur, replacez doucement le diffuseur grand-angle dans la tête du flash.
Utilisation du diffuseur externeLe Flash Phottix Mitros+ est fourni avec un diffuseur rattachable qui peut être placé devant la tête du flash si nécessaire. Il est idéal pour obtenir une lumière plus douce, pour réduire les ombres et pour la macrophotographie.
Pour l’utiliser:
1. Alignez le diffuseur sur la tête du flash, l’indication “UP” sur le diffuseur tourné vers le haut.
2. Mettez un côté du diffuseur dans la monture de la tête du flash.
3. Faites la même chose sur le deuxième côté du diffuseur.

37
Fr MANUEL D’UTILISATION
Protection contre la surchauffeLe Flash Phottix Mitros+ est équipé d’un système de protection contre la sur-chauffe qui rend le temps de recharge du flash plus lent pour éviter une sur-chauffe ou une détérioration de la tête du flash. 20 éclairs consécutifs activent le système de protection. L’icône [ Hot! ] apparaîtra sur l’écran quand le système sera activé.
Pour éviter une surchauffe ou une détérioration, le flash augmentera le temps de recharge afin d’abaisser la température du flash.Patientez 10 minutes avant d’utiliser le flash à nouveau.
Si le flash est toujours utilisé (malgré l’affichage de l’icône [ Hot! ]) et que le flash ne retrouve pas son état habituel, l’icône [ Stop ] apparaîtra sur l’écran LCD. Ces-sez d’utiliser le flash et patientez 10 minutes pour que le flash retrouve son état normal.
Port de synchronisation et port USB1. Le port de synchronisation de 3,5 mm peut être utilisé avec un câble de syn-chronisation de 3,5 mm pour déclencher le flash en utilisant un déclencheur de flash ou bien un appareil photo. Ce port constitue uniquement un récepteur du signal.
2. Le port USB est utilisé pour les mises à jour du firmware. Les informations sur les mises à jour et les instructions seront disponibles sur le site internet de Phottix.
Les diodes LEDDiode de gauche: Témoin du flash rechargé. En Mode Flash Rapide, la diode clignote en vert si le flash est rechargé au minimum. Quand il est complètement rechargé – elle clignotera en rouge.
Diode de droite: Voyant de confirmation d’exposition au flash. Si une exposition standard au flash est obtenue, le voyant de confirmation d’exposition au flash s’allumera en bleu pendant environ 3 secondes. Si le voyant de confirmation d’exposition au flash ne s’allume pas, rapprochez-vous du sujet ou bien aug-mentez la sensibilité ISO de l’appareil.
Port Externe d’AlimentationLe Port Externe d’Alimentation est un élément breveté par Phottix, et peut être utilisé avec les câbles Phottix pour flashs. Le port externe d’alimentation est compatible avec l’Alimentation Compacte Canon CP-E4 et avec les modèles compatibles utilisés avec l’adaptateur fourni.
Veuillez noter: - Les piles doivent se trouver dans le flash même si l’Alimentation Externe est utilisée.
- N’utilisez jamais les Alimentations Externes qui ne sont pas compatibles avec le système Canon.

38
Fr MANUEL D’UTILISATION
L’écran LCD
Mode E-TTL II/E-TTL automatique
Mode Manuel Déclenchement sans fil par impulsion optique et par un signal radio
Mode sans fil
Mode Multi
M: Mode manuel
Multi: Mode Multi
Nombre de flashs
Fréquence
Puissance du flash
Azoom: zoom automatiqueMzoom: zoom manuel
Mode E-TTL II/E-TTL
tête du flash vers le haut standard vers le bas
Signal sonore activé désactivé
Fonction personnalisée
Portée du flash
Information FEB
Information FEC
Focale
indicateur de niveau de batterie
icône d’avertissement de surchauffe
m: en mètres f: en pieds
Ouverture
HSS SCS
Radio: Transmetteur ODIN
Radio: Récepteur STRATO II
Mode sans fil désactivé
Optique: Esclave
Radio: Récepteur ODIN
Optique: Emetteur (Maître)
Optique: Récepteur (Esclave)
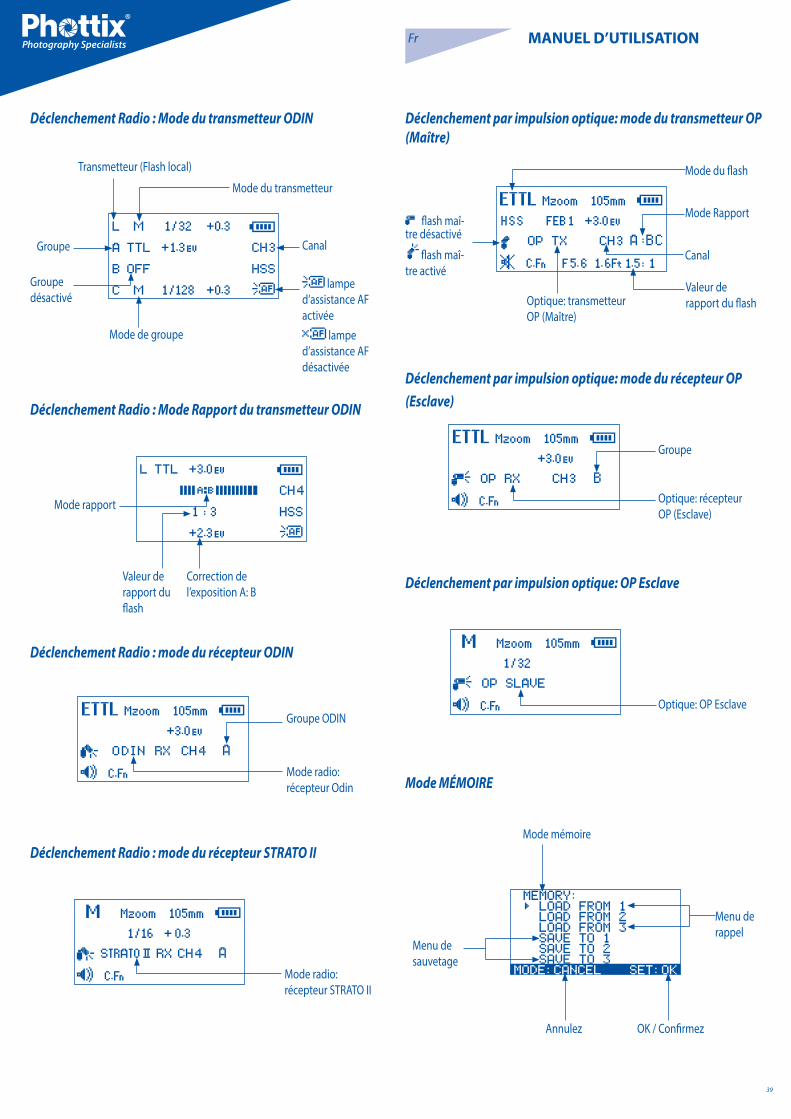
39
Fr MANUEL D’UTILISATION
Déclenchement Radio : Mode du transmetteur ODIN
Déclenchement par impulsion optique: mode du récepteur OP (Esclave)Déclenchement Radio : Mode Rapport du transmetteur ODIN
Déclenchement Radio : mode du récepteur ODIN
Déclenchement Radio : mode du récepteur STRATO II
Déclenchement par impulsion optique: mode du transmetteur OP (Maître)
Groupe ODIN
Mode radio: récepteur Odin
Transmetteur (Flash local)
Groupe
Groupe désactivé
Mode de groupe
Mode du transmetteur
Canal
lampe d’assistance AF activée
lampe d’assistance AF désactivée
Mode rapport
Valeur de rapport du flash
Correction de l’exposition A: B
Mode radio: récepteur STRATO II
Mode du flash
Mode Rapport
Canal
Optique: transmetteur OP (Maître)
Valeur de rapport du flash
flash maî-tre désactivé
flash maî-tre activé
Groupe
Optique: récepteur OP (Esclave)
Déclenchement par impulsion optique: OP Esclave
Optique: OP Esclave
Mode MÉMOIRE
Mode mémoire
Menu de sauvetage
Annulez
Menu de rappel
OK / Confirmez

40
Fr MANUEL D’UTILISATION
Fonctions d’Auto-EnregistrementLe Flash Phottix Mitros+ enregistre les paramètres du flash. Mode, puissance etc., seront enregistrés après avoir éteint le flash et l’avoir allumé de nouveau.
Réglage du Zoom du FlashLe Flash Phottix Mitros+ offre deux modes de zoom du flash – le zoom peut être réglé manuellement (Mzoom) ou automatiquement (Azoom). Azoom change dynamiquement le zoom du flash quand le zoom de l’objectif est modifié, ce qui assure un éclairage optimal. Le mode Mzoom permet à l’utilisateur de régler le zoom du flash manuellement.
Pour régler:
1. Appuyez sur le bouton .
2. La zone Zoom sur l’écran LCD clignotera et sera éclairée.
3. Appuyez sur le bouton ou pour régler le zoom du flash – choisissez Azoom ou Mzoom (dans le cas de Mzoom – la valeur requise doit être choisie manuellement).
4. Appuyer sur le bouton une fois le zoom réglé.
Veuillez noter:1. En Azoom, quand la tête du flash est relevée ou pivotée de la position standard 0°, le zoom du flash sera réglé à 50 mm. “- -” sera affiché sur l’écran LCD. Le zoom du flash ne sera pas modifié si la tête est baissée à -7°.
2. Azoom fonctionne UNIQUEMENT quand la tête du flash est réglée à 0 ou -7°.
3. En Mzoom quand la tête du flash est relevée ou pivotée de la position standard 0° - le zoom du flash ne sera pas modifié par rapport au réglage précédent.
4. Le zoom du flash peut être réglé quand la tête du flash est relevée ou piv-otée, en choisissant le mode Mzoom et en réglant comme requis.
Réglage de la Synchronisation à Haute Vitesse (HSS) et de la Synchronisation sur le Deuxième Rideau (SCS)
Le Flash Phottix Mitros+ permet la Synchronisation à haute vitesse (HSS) et la Synchronisation sur le deuxième rideau (SCS). Veuillez voir plus de détails sur ces fonctions dans la suite de ce manuel d’utilisation.
Pour régler:
1. Appuyez sur le bouton .
2. En appuyant sur le bouton vous pouvez choisir entre les modes HSS, SCS et la désactivation de ces deux modes.
Veuillez noter:- Les HSS et SCS sont disponibles en modes ETTL et Manuel, mais pas en mode Multi.
Le Bouton TestEn appuyant sur le bouton Test vous déclenchez le flash. Cela peut être utilisé pour effectuer une mesure (uniquement en mode manuel). En mode Maître Sans Fil, en appuyant sur le bouton Test vous déclenchez les flashs asservis, réglés sur le même canal. Ces flashs sont sous le contrôle du flash Maître. La pu-issance d’éclair émis en appuyant le bouton Test peut être configurée. (Veuillez voir Fonctions Personnalisées-07 en bas).
Fonction Veille AutomatiquePour économiser l’énergie des batteries, le flash Phottix Mitros+ possède des modes: Veille Automatique et Mise Hors Tension Automatique.
1. En mode Sans Fil désactivé et en mode flash esclave activé: le flash se met en mode Veille Automatique après 90 secondes (aucun bouton ne peut être appuyé et aucun flash déclenché durant ce temps). L’écran LCD s’éteint. Le flash Mitros+ sera réveillé quand vous appuyez à mi-course sur le déclencheur de l’appareil ou quand vous appuyez sur le bouton Test du flash.
2. En Mode Sans Fil activé et en mode flash esclave activé : le flash se met en mode Veuille Automatique après 60 minutes (aucun bouton ne peut être ap-puyé et aucun flash déclenché durant ce temps). “IDLE” sera affiché sur l’écran LCD du flash. Les flashs en mode Veille Automatique seront réveillés après la pression à fond du déclencheur de l’appareil ou après la pression à mi-course du bouton Test du flash Maître. Le temps peut être modifié de 60 minutes à 10 minutes (veuillez voir Fonctions Personnalisées-10 en bas). Le flash esclave se met en mode Mise Hors Tension Automatique après 8 heures si aucun bouton n’est appuyé et s’il n’a pas été déclenché après que “IDLE” ait été affiché sur l’écran LCD du flash. En appuyant sur le bouton Test sur le flash, vous le réveil-lez. Le mode Mise Hors Tension Automatique peut être modifié pour s’activer entre 1 et 8 heures (veuillez voir Fonctions Personnalisées-11 en bas).
Fonction Lampe Pilote du Flash1. Une pression sur le bouton de contrôle de la profondeur de champ (si disponi-ble) déclenchera le flash pendant 1 seconde. Cette fonction permet de voir les effets et l’équilibre de la lumière sur le sujet. (Consultez le manuel d’utilisation de l’appareil pour plus de détails sur le bouton test de profondeur de champ).
2. La fonction Lampe Pilote du flash est disponible pour tous les modes : ETTL, Multi et Manuel.
3. La fonction Lampe Pilote du flash peut être utilisée pendant le déclenche-ment filaire ou sans fil et peut être réglée (voir C.Fn 02 en bas).
Veuillez noter: 1. La surchauffe et la détérioration peuvent avoir pour origine l’utilisation ex-cessive de la Fonction Lampe Pilote du Flash. Ne pas utiliser plus de 20 fois de suite.
2. En cas de surchauffe, le flash augmentera automatiquement le temps de recharge jusqu’à ce que la température de flash baisse.
Illuminateur d’Assistance d’Autofocus (AF)1. En condition de faible éclairage/contraste, l’illuminateur d’Assistance AF du Flash Mitros+ intégré est automatiquement activé pour faciliter la mise au point automatique. Une cible de mise au point sera projetée sur le sujet.
2. Cette fonction peut être activée ou désactivée (voir C.Fn 08 en bas).

41
Fr MANUEL D’UTILISATION
RéglagesLe Phottix Mitros+ réglera les niveaux par incréments de 1/3 IL. Certains appa-reils photo disposent des fonctions personnalisées qui permettent de modifi-er les incréments de 1/3 à ½ pour FEB et FEC. Si les fonctions personnalisées de l’appareil sont modifiées, le Phottix Mitros+ réglera automatiquement les niveaux par incréments à ½ IL .
Les modes du FlashLe Phottix Mitros+ possède trois modes: ETTL, Manuel (M) et Stroboscopique (Multi).
Pour modifier les modes:
1. Appuyez sur le bouton .
2. Choisissez parmi les modes: ETTL, M et Multi .
3. Le mode choisi sera affiché en haut de l’écran LCD, à gauche .
Mode ETTL
Écran du mode ETTL
En mode ETTL le flash et l’appareil photo fonctionnent ensemble pour calculer la valeur d’exposition correcte. Quand le déclencheur est totalement enclenché, le flash émet un pré-éclair que l’appareil utilisera pour calculer l’exposition et la puissance du flash avant que la photo ne soit prise.
Valeur de Correction d’Exposition au Flash (FEC – Flash Exposure Compensation)Le Phottix Mitros+ peut être utilisé pour régler la valeur de correction d’exposi-tion au flash de -3 à +3 IL par incréments de 1/3 IL. C’est très pratique quand il faut ajuster précisément l’exposition calculée par le système TTL.
Pour régler la valeur de correction d’exposition au flash:1. Appuyez sur le bouton pour choisir le mode de réglage de correction d’exposition au flash.
2. Appuyez sur le bouton ou pour régler la valeur de correc-tion d’exposition au flash.
3. Appuyez sur le bouton pour confirmer le réglage et sortir du mode de réglage de correction d’exposition au flash.
Veuillez noter:- Certains appareils photo disposent des fonctions personnalisées qui per-mettent de modifier les incréments de 1/3 à ½ pour FEB et FEC. Si les fonc-tions personnalisées de l’appareil photo sont modifiées, le Phottix Mitros+ réglera automatiquement les niveaux à ½ IL.
Bracketing d’Exposition au Flash (FEB – Flash Exposure Bracket-ing)Le FEB peut être utilisé pour changer la puissance du flash pour une série des photos. L’appareil enregistre trois photos avec trois valeurs d’exposition dif-férentes – une avec valeur d’exposition calculée par l’appareil photo, une sur-ex-posée et une sous-exposée. Les niveaux des sur- et sous-expositions peuvent être réglées par l’utilisateur. Le mode FEB est pratique pour assurer une valeur d’exposition correcte dans les situations où vous n’avez pas le temps de régler la valeur d’exposition. Il peut être utilisé également pour la photographie HDR.
Certains appareils possèdent une fonction de mise en mémoire de la valeur d’exposition. Consultez le mode d’emploi de votre appareil photo pour plus de détails.
Pour régler le FEB:1. Appuyez sur le bouton .
2. Appuyez sur le bouton “FEB 0” sera affiché et souligné sur l’écran LCD.
3. Appuyez sur le bouton et pour régler la valeur de bracket-ing d’exposition.
4. Appuyez sur le bouton pour confirmer le réglage.
Veuillez noter:- Par défaut: le FEB sera annulé après la prise de trois photos. Le FEB peut être réglé dans les Fonctions Personnalisées (veuillez voir Fonctions Person-nalisées-03 en bas).
- La séquence de prise des photos du FEB peut être modifiée (veuillez voir Fonctions Personnalisées-04 en bas).
- Le FEB peut être utilisé avec le FEC et le FEL (veuillez voir en bas).
- Pour de meilleurs résultats, réglez l’appareil en mode « simple prise de vue » et assurez-vous que le flash soit entièrement rechargé avant de prendre la deuxième et la troisième photo.
- Certains appareils photo disposent de fonctions personnalisées qui permet-tent de modifier les incréments de 1/3 à ½ pour FEB et FEC. Si les fonctions personnalisées de l’appareil photo sont modifiées, le Phottix Mitros+ réglera automatiquement les niveaux à ½ IL.
Mémorisation d’Exposition au Flash (FEL – Flash Exposure Lock)La Mémorisation d’Exposition au Flash peut être utilisée pour mémoriser l’ex-position au flash avant que la photo soit prise. Cette fonction est très pratique pendant l’usage du mode manuel de mesure spot quand il y a beaucoup de sources de lumière.
En mode ETTL, appuyez sur le bouton FEL de l’appareil ( “ ”) pour utiliser ce-tte fonction. Consultez le manuel d’utilisation de votre appareil pour avoir plus d’informations sur le FEL et son usage.
Quand vous appuyez sur le bouton FEL, le flash émet un pré-flash pour calculer la puissance correcte du flash. Le réglage reste en mémoire de l’appareil. L’icône FEL sera affichée dans le viseur de l’appareil photo.
Chaque fois que le bouton FEL est appuyé, un pré-flash est émis. Quand le dé-clencheur est entièrement appuyé, le flash est déclenché avec la puissance en-registrée.
Veuillez noter:- Si le sujet est trop éloigné, il risque d’être sous-exposé. L’icône FEL clignotera

42
Fr MANUEL D’UTILISATION
2. Appuyez sur le bouton pour activer le mode du changement de puis-sance du flash. Le niveau de puissance sera souligné et clignotera.
3. Appuyez sur le bouton ou pour régler la puissance du flash.
4. Appuyez sur le bouton pour sortir du réglage.
5. Quand le témoin de disponibilité du flash est illuminé en rouge, le flash est entièrement rechargé et prêt pour être déclenché.
6. En appuyant sur le bouton vous déclencherez le flash avec la puis-sance réglée.
Veuillez noter:- Si vous appuyez sur le déclencheur à mi-course, vous verrez la puissance effective du flash sur l’écran LCD du flash.
Mode Multi – StroboscopiqueEn Mode Multi Stroboscopique une série d’éclairs rapides sera émise. La quan-tité, la fréquence et la puissance peuvent être programmées sur le flash Mitros+. Le Mode Multi est idéal pour prendre plusieurs vues d’un sujet en mouvement sur une seule photo.
La fréquence de l’effet (en Hz – le nombre d’éclairs par seconde), le nombre total de flashs et la puissance peuvent être réglés.
Pour l’utiliser:1. Appuyez sur le bouton jusqu’à ce que « Multi » soit affiché sur l’écran LCD du flash.
2. Appuyez sur le bouton pour ajuster le mode Multi. Vous verrez, af-fichés de la gauche vers la droite sur l’écran LCD : Puissance, Fréquence (Hz) et le compteur du flash. La puissance est illuminée et clignote après être entré à l’écran d’ajustement.
3. Appuyez sur le bouton et pour choisir parmi Puissance, Fréquence (Hz) et le compteur du flash.
4. Appuyez sur le bouton et une fois que le réglage actuel est illuminé pour régler Puissance, Fréquence (Hz) et le compteur du flash sur les niveaux requis.
5. Appuyez sur le bouton pour sortir du réglage des paramètres.
Veuillez noter:1. La surchauffe et la détérioration peuvent avoir pour l’origine l’utilisation excessive du Mode Multi Stroboscopique. Ne déclenchez pas la lampe pilote du flash plus de 20 fois consécutives.
2. En cas de surchauffe, le flash augmentera automatiquement le temps de recharge jusqu’à ce que la température de flash baisse.
Mode Stroboscopique et Vitesses d’ObturationPour déterminer la vitesse d’obturation correcte à utiliser avec les diverses vari-ables du Mode Stroboscopique, utilisez la formule suivante:
Nombre de flashs / Fréquence = Vitesse d’obturation
Exemple : 5x (nombre de flashs) / 10 Hz (Fréquence) = 0.5 seconde vitesse d’ob-turation
Il peut arriver que vous deviez augmenter ou abaisser la vitesse d’obturation pour obtenir un résultat optimal.
dans le viseur durant environ 0,5 seconde.
- Si le sujet est trop petit, le FEL peut être inefficace.
Synchronisation à Haute Vitesse (HSS – High Speed Synchroni-sation)En mode HSS la vitesse de synchronisation maximale de l’appareil/flash peut atteindre la vitesse maximale d’obturation de l’appareil. Cette fonction est très utile lorsque vous utilisez le mode Av ou pour compenser la lumière ambiante. HSS peut varier selon les modèles des appareils – consultez le manuel d’utilisa-tion de votre appareil pour plus de détails.
Pour utiliser le mode HSS:1. Appuyez sur le bouton .
2. L’icône HSS sera affichée sur l’écran LCD du flash.
3. Réglez la vitesse d’obturation supérieure à la vitesse de synchronisation maximum du flash de l’appareil photo et prenez les photos.
Pour sortir du mode HSS:1. Appuyez sur le bouton deux fois.
2. Vous allez passer du mode HSS, par le mode SCS pour revenir au mode normal FCS.
Veuillez noter:- Vérifiez si l’icône du mode HSS est affichée dans le viseur.
- Le mode HSS réduit radicalement la puissance du flash, la puissance des piles et la portée.
Synchronisation sur le Deuxième Rideau (SCS – Second Curtain Sync)La fonction SCS du Flash Mitros+ permet de déclencher le flash un moment avant la fermeture de l’obturateur. Cette une fonction idéale pour obtenir des effets spéciaux (avec une faible vitesse d’obturation).
Pour l’utiliser:Appuyez sur le bouton deux fois. Vous allez passer du mode FCS par le HSS au mode SCS.
Pour annuler:Appuyez sur le bouton une fois pour revenir en mode normal FCS.
Veuillez noter: Les fonctions du mode SCS ne fonctionnent pas en modes Sans Fil et Multi.
Mode Manuel (M – Manual)En Mode Manuel le flash est déclenché selon la puissance réglée par l’utilisateur. Le Phottix Mitros+ permet de régler la puissance du flash entre 1/1 et 1/128 (8 incréments par incréments de 1/3 IL). L’ouverture, la vitesse d’obturation et la sensibilité ISO doivent être réglées manuellement sur l’appareil. Pour obtenir des meilleurs résultats, utilisez le mode M de votre appareil.
Pour l’utiliser:1. Appuyez sur le bouton jusqu’à ce qu’un “M” soit affiché sur l’écran LCD.

43
Fr MANUEL D’UTILISATION
Mode de Déclenchement Sans FilLe Phottix Mitros+ possède plusieurs modes sans fil pour le transmetteur et le récepteur. Le Mitros+ offre une compatibilité intégrée avec le système de déclenchement Phottix Odin TTL pour Canon et le Phottix Strato II Multi pour Canon. Pour plus d’informations sur les systèmes Odin et Strato II consultez les manuels de ces produits.
Le Mitros+ dispose des fonctions:
Transmetteur Phottix Odin
Un plein contrôle du flash local et du flash asservi en TTL et le réglage manuel de la puissance du flash et du zoom sur d’autres flashs Mitros+ (en mode Récep-teur Odin) ou sur les flashs compatibles, équipés de récepteurs Phottix Odin. Les flashs cobra ou les flashs de studio avec les récepteurs Strato, Strato II ou Atlas II peuvent être déclenchés en mode Manuel par le Mitros+ en mode Transmetteur Odin.
Récepteur Phottix Odin
Le Mitros+ en mode Récepteur Odin sans fil peut être déclenché par un autre flash Mitros+ en mode Transmetteur Odin ou par un transmetteur Phottix Odin.
Récepteur Strato II
Le Mitros+ en mode Récepteur Strato II sans fil peut être déclenché par un trans-metteur Phottix Strato II, par un transmetteur Phottix Odin ou par un autre flash Phottix Mitros+ en mode Transmetteur Odin.
Transmetteur OP (Maître) - en utilisant le système de déclenche-ment IR de Canon
En utilisant des impulsions optiques, un flash sur l’appareil photo ajuste et dé-clenche des flashs asservis.
Récepteur OP (Esclave) - en utilisant le système de déclenche-ment IR de Canon
Les flashes asservis en mode Récepteur OP sont contrôlés et déclenchés par des flashs sur l’appareil photo en mode Transmetteur OP (Maître). En utilisant des impulsions optiques, un flash sur l’appareil photo ajuste et déclenche des flashes asservis.
OP Esclave
En mode OP Esclave, les éclairs des autres flashs à proximité déclencheront le Mitros+ (uniquement en mode Manuel).
Veuillez noter:Le Mitros+ ne peut pas être déclenché par des transmetteurs Phottix Strato, Strato II, Ares ni Atlas II en mode transmetteur.
Sélection des modes de déclenchement sans filPour accéder et régler les modes de déclenchement sans fil sur le Mitros+:
1. Appuyez et maintenez le bouton jusqu’à ce que le Menu Mode appa-raisse.
2. Utilisez les touches de déplacement ou pour sélectionner le mode sans fil.
3. Appuyez sur le bouton pour sélectionner le mode sans fil.
4. Réglez les paramètres du mode sans fil (groupe, canal) si nécessaire.
Veuillez noter:Si le bouton n’est pas appuyé, le Mitros+ utilisera la sélection illuminée après environ 16 secondes si aucun bouton n’est appuyé.
Odin TX (Mode Transmetteur Odin)L’utilisation du Mitros+ en mode Transmetteur Odin permet au flash d’être utilisé sur l’appareil en mode TTL ou Manuel ainsi que de contrôler les trois groupes (A, B, C) – en réglant les puissances des flash en mode TTL ou Manuel ainsi que le zoom des flashs Mitros+ réglés en mode Récepteur Odin ou d’autres flashs compatibles, équipés de récepteurs Phottix Odin.
Pour utiliser le mode Transmetteur Odin
Écran du mode Transmetteur Odin
Après avoir choisi le mode Transmetteur Odin (ci-dessus)
1. Appuyez sur le bouton pour modifier les groupes.
2. Utilisez les touches de déplacement ou pour choisir parmi les groupes : L, A, B, C.
3. Appuyer sur le bouton tandis qu’un groupe est sélectionné, chang-
Le tableau des puissances en Mode Multi Stroboscopique
Si le nombre de flashs est affiché comme « N--- », le nombre maximal de flashs sera affiché comme dans le tableau suivant, indépendamment de la fréquence des éclairs.

44
Fr MANUEL D’UTILISATION
era le mode de TTL à M (manuel) ou Désactivé.
4. Appuyer sur la touche de déplacement ou , tandis qu’un groupe est sélectionné, permettra de régler la valeur d’exposition ± 3EV par incréments de 1/3 IL en mode TTL ou bien de modifier la puissance du flash (de 1/1 à 1/128 par incréments de 1/3 IL) en mode manuel.
5. Appuyez sur le bouton pour sortir du mode de réglage du mode Trans-metteur Odin.
Mode RapportÉcran du mode Rapport transmetteur Odin
Le mode Rapport est similaire au mode original de Canon. Les valeurs de rap-port des groupes A et B peuvent être réglées de 8:1 à 1:8. On peut aussi régler les valeurs d’exposition. On peut régler le mode du flash local (L) et la puissance du flash.
Pour modifier les réglages du mode Rapport :
1. Appuyez et maintenez le bouton , lorsque vous vous trouvez dans le menu du Transmetteur Odin. Le réglage du mode Rapport apparaîtra.
2. Appuyez sur le bouton pour entrer dans le mode d’édition.
3. Utilisez les touches de déplacement ou pour choisir parmi: le Flash Local (L), Rapport du flash et Valeur d’exposition du mode Rapport.
4. Utilisez les touches de déplacement ou pour régler la valeur d’exposition du flash, les valeurs de rapport et la valeur d’exposition du mode Rapport lorsqu’elles sont sélectionnées.
5. Le bouton changera le mode du flash local du mode TTL au mode Manuel ou désactivé.
6. Appuyez sur le bouton pour sortir du réglage du mode Rapport.
7. Appuyez et maintenez le bouton pour sortir du mode Rapport du transmetteur Odin et revenir au mode mixte du transmetteur Odin.
Veuillez noter :Le flash sur l’appareil (L) ne fait pas partie du calcul du rapport. La puissance du flash local est contrôlée de façon indépendante.
Réglage du zoom du flash en mode Transmetteur Odin
1. Appuyez sur le bouton pour entrer dans le mode de réglage du zoom.
2. Utilisez les touches de déplacement ou pour choisir parmi les groupes L, A, B, C.
3. Utilisez les touches de déplacement ou pour choisir entre le mode Azoom (le zoom change dynamiquement quand le zoom de l’objectif est modifié) et le mode Mzoom : 24, 28, 35, 50, 70, 80 et 105mm.
4. Appuyez sur le bouton pour sortir du mode de réglage du zoom.
Réglage des canaux de transmission
1. Dans le menu du Transmetteur Odin ou dans le menu du mode Rapport, appuyez sur la touche de déplacement pour entrer dans le menu de sélection du canal de transmission.
2. Utilisez les touches de déplacement ou pour choisir parmi les canaux 1-4.
3. Appuyez sur le bouton pour valider le canal.
Utilisation de la Synchronisation à Haute Vitesse (HSS) et Syn-chronisation sur le Deuxième Rideau (SCS) en mode Transmet-teur OdinEn appuyant sur le bouton vous pouvez choisir entre les modes HSS, SCS et le mode standard.
1. HSS permet d’utiliser des vitesses d’obturation plus rapides que la synchro-nisation standard au flash. Des vitesses d’obturation jusqu’à 1/8000 de sec-onde peuvent être utilisées avec des appareils compatibles.
2. Veuillez noter: Avec des vitesses d’obturation élevées, la puissance des flashs est considérablement réduite.
3. SCS permet de déclencher le flash un moment avant la fermeture de l’ob-turateur (et non à son ouverture). Cette une fonction idéale pour obtenir des effets spéciaux (avec une faible vitesse d’obturateur).
Mode Récepteur OdinÉcran du mode Récepteur Odin
Quand le mode Récepteur Odin sans fil est sélectionné, le Mitros+ sera dé-clenché en utilisant le récepteur Odin intégré. Dans ce mode, le Mitros+ peut être contrôlé et déclenché par un transmetteur Odin ou par un autre flash Mi-tros+ en mode Transmetteur Odin.
Pour changer des canaux et des groupes
1. Appuyez sur la touche de déplacement pour entrer dans le menu de sélection du canal et du groupe.
2. Utilisez les touches de déplacement ou pour choisir le Groupe ou le Canal.
3. Utilisez les touches de déplacement ou pour régler le canal (1-4) ou le groupe (A-C).
4. Appuyez sur le bouton pour sortir du mode de sélection du canal et du groupe.
5. En appuyant sur le bouton vous pouvez régler la valeur d’exposition
du flash à l’aide des touches de déplacement ou . Appuyez de nouveau sur le bouton pour sortir du mode de réglage de la valeur d’exposition.
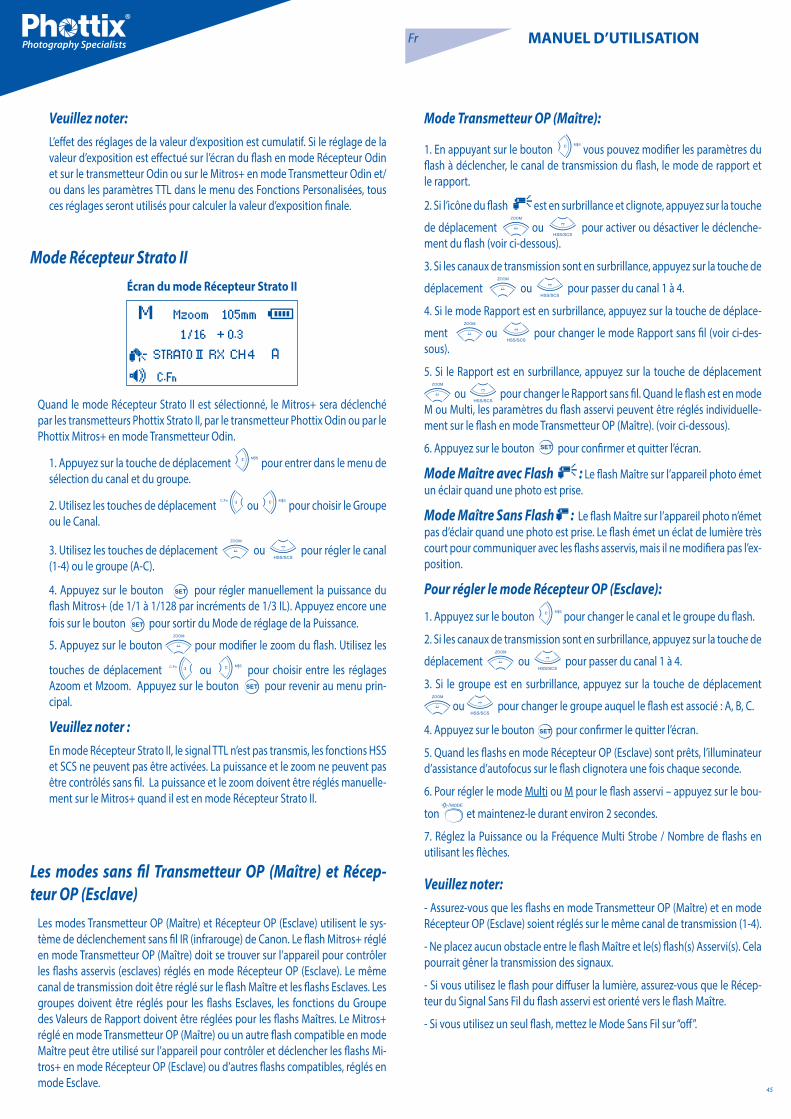
45
Fr MANUEL D’UTILISATION
Veuillez noter:L’effet des réglages de la valeur d’exposition est cumulatif. Si le réglage de la valeur d’exposition est effectué sur l’écran du flash en mode Récepteur Odin et sur le transmetteur Odin ou sur le Mitros+ en mode Transmetteur Odin et/ou dans les paramètres TTL dans le menu des Fonctions Personalisées, tous ces réglages seront utilisés pour calculer la valeur d’exposition finale.
Mode Récepteur Strato IIÉcran du mode Récepteur Strato II
Quand le mode Récepteur Strato II est sélectionné, le Mitros+ sera déclenché par les transmetteurs Phottix Strato II, par le transmetteur Phottix Odin ou par le Phottix Mitros+ en mode Transmetteur Odin.
1. Appuyez sur la touche de déplacement pour entrer dans le menu de sélection du canal et du groupe.
2. Utilisez les touches de déplacement ou pour choisir le Groupe ou le Canal.
3. Utilisez les touches de déplacement ou pour régler le canal (1-4) ou le groupe (A-C).
4. Appuyez sur le bouton pour régler manuellement la puissance du flash Mitros+ (de 1/1 à 1/128 par incréments de 1/3 IL). Appuyez encore une fois sur le bouton pour sortir du Mode de réglage de la Puissance.
5. Appuyez sur le bouton pour modifier le zoom du flash. Utilisez les
touches de déplacement ou pour choisir entre les réglages Azoom et Mzoom. Appuyez sur le bouton pour revenir au menu prin-cipal.
Veuillez noter :En mode Récepteur Strato II, le signal TTL n’est pas transmis, les fonctions HSS et SCS ne peuvent pas être activées. La puissance et le zoom ne peuvent pas être contrôlés sans fil. La puissance et le zoom doivent être réglés manuelle-ment sur le Mitros+ quand il est en mode Récepteur Strato II.
Les modes sans fil Transmetteur OP (Maître) et Récep-teur OP (Esclave)
Les modes Transmetteur OP (Maître) et Récepteur OP (Esclave) utilisent le sys-tème de déclenchement sans fil IR (infrarouge) de Canon. Le flash Mitros+ réglé en mode Transmetteur OP (Maître) doit se trouver sur l’appareil pour contrôler les flashs asservis (esclaves) réglés en mode Récepteur OP (Esclave). Le même canal de transmission doit être réglé sur le flash Maître et les flashs Esclaves. Les groupes doivent être réglés pour les flashs Esclaves, les fonctions du Groupe des Valeurs de Rapport doivent être réglées pour les flashs Maîtres. Le Mitros+ réglé en mode Transmetteur OP (Maître) ou un autre flash compatible en mode Maître peut être utilisé sur l’appareil pour contrôler et déclencher les flashs Mi-tros+ en mode Récepteur OP (Esclave) ou d’autres flashs compatibles, réglés en mode Esclave.
Mode Transmetteur OP (Maître):
1. En appuyant sur le bouton vous pouvez modifier les paramètres du flash à déclencher, le canal de transmission du flash, le mode de rapport et le rapport.
2. Si l’icône du flash est en surbrillance et clignote, appuyez sur la touche
de déplacement ou pour activer ou désactiver le déclenche-ment du flash (voir ci-dessous).
3. Si les canaux de transmission sont en surbrillance, appuyez sur la touche de
déplacement ou pour passer du canal 1 à 4.
4. Si le mode Rapport est en surbrillance, appuyez sur la touche de déplace-
ment ou pour changer le mode Rapport sans fil (voir ci-des-sous).
5. Si le Rapport est en surbrillance, appuyez sur la touche de déplacement
ou pour changer le Rapport sans fil. Quand le flash est en mode M ou Multi, les paramètres du flash asservi peuvent être réglés individuelle-ment sur le flash en mode Transmetteur OP (Maître). (voir ci-dessous).
6. Appuyez sur le bouton pour confirmer et quitter l’écran.
Mode Maître avec Flash : Le flash Maître sur l’appareil photo émet un éclair quand une photo est prise.
Mode Maître Sans Flash : Le flash Maître sur l’appareil photo n’émet pas d’éclair quand une photo est prise. Le flash émet un éclat de lumière très court pour communiquer avec les flashs asservis, mais il ne modifiera pas l’ex-position.
Pour régler le mode Récepteur OP (Esclave):
1. Appuyez sur le bouton pour changer le canal et le groupe du flash.
2. Si les canaux de transmission sont en surbrillance, appuyez sur la touche de
déplacement ou pour passer du canal 1 à 4.
3. Si le groupe est en surbrillance, appuyez sur la touche de déplacement
ou pour changer le groupe auquel le flash est associé : A, B, C.
4. Appuyez sur le bouton pour confirmer le quitter l’écran.
5. Quand les flashs en mode Récepteur OP (Esclave) sont prêts, l’illuminateur d’assistance d’autofocus sur le flash clignotera une fois chaque seconde.
6. Pour régler le mode Multi ou M pour le flash asservi – appuyez sur le bou-
ton et maintenez-le durant environ 2 secondes.
7. Réglez la Puissance ou la Fréquence Multi Strobe / Nombre de flashs en utilisant les flèches.
Veuillez noter: - Assurez-vous que les flashs en mode Transmetteur OP (Maître) et en mode Récepteur OP (Esclave) soient réglés sur le même canal de transmission (1-4).
- Ne placez aucun obstacle entre le flash Maître et le(s) flash(s) Asservi(s). Cela pourrait gêner la transmission des signaux.
- Si vous utilisez le flash pour diffuser la lumière, assurez-vous que le Récep-teur du Signal Sans Fil du flash asservi est orienté vers le flash Maître.
- Si vous utilisez un seul flash, mettez le Mode Sans Fil sur “off”.

46
Fr MANUEL D’UTILISATION
Canaux de transmission
Le système sans fil des modes Transmetteur OP (Maître) et Récepteur OP (Es-clave) du Phottix Mitros+ dispose des canaux: 1, 2, 3 et 4. Les signaux du flash en mode Transmetteur OP (Maître) sont envoyés vers les flashs en mode Récepteur OP (Esclave) réglés sur ces canaux. Si les flashs Maître et Esclaves sont réglés sur différents canaux, les flashs Esclaves n’émettront aucun éclair.
Déclenchement par impulsion optique
Avec le flash en mode Transmetteur OP (Maître) sur l’appareil photo et les flash-es à distance en mode Récepteur OP (Esclave) , la pression du bouton d’ob-turation déclenchera le flash Maître (si réglé sur déclenchement) et les flashs Esclaves à la portée du Flash Maître. L’appareil photo et le flash mesureront la scène et émettront les flashs en mode TTL pour obtenir une exposition correcte.
Modes Rapport Les flashs Esclaves peuvent être contrôlés par le flash Maître en maintenant des valeurs de rapport différentes. 3 modes sont disponibles:
Modes ETTL A+B+C Les trois groupes émettent un éclair avec la puissance moyenne cal-culée.
A:BC Les Groupes A et B peuvent être réglés dans Valeurs de Rapport du Flash (veuillez voir en bas). Le Groupe C est indépendant de la puissance de son flash assigné par l’appareil.
La correction de la valeur d’exposition des groupes A et B peut être ajustée.
1. Appuyez sur le bouton après être sorti de l’écran de réglage des Valeurs de Rapport du Flash.
2. Appuyez sur le bouton ou pour régler la valeur d’exposition pour les groupes A et B.
3. La correction d’exposition du groupe C peut être réglée aussi.
4. Appuyez sur le bouton après avoir réglé les valeurs de rapport du flash – le champ illuminé passera du réglage de la valeur d’exposition du groupe C.
5. Appuyez sur le bouton ou pour régler la valeur d’exposition du groupe C.
A:B Les Groupes A et B peuvent être réglés dans Valeurs de Rapport du Flash (veuillez voir en bas). Il n’est pas possible de régler le groupe C et il n’est pas déclenché.
La correction de valeur d’exposition des groupes A et B peut être réglée.
1. Appuyez sur le bouton après être sorti de l’écran de réglage des valeurs de rapport du flash.
2. Appuyez sur le bouton ou pour régler la valeur d’exposition des groupes A et B.
Réglage et Ajustement des Modes Rapport
Modes ETTL
1. Après avoir activé le mode Transmetteur OP (Maître) (ci-dessous), appuyez sur la touche de déplacement pour modifier les paramètres du mode
Transmetteur OP (Maître) .
2. Appuyez trois fois sur la touche de déplacement pour mettre le mode Rapport en surbrillance.
3. Sélectionnez le mode Ratio. En appuyant sur le bouton et vous pouvez choisir entre les modes: A+B+C, A:B et A:BC.
4. Quand A:B ou A:BC est en surbrillance, la pression sur le bouton illu-minera la sélection du Ratio ci-dessus.
5. La pression du bouton changera les valeurs de rapport du flash de 1:1 à 1:8 (1:1.5, 1:2, 1:3, 1:4, 1:6, 1:8).
6. La pression du changera les valeurs de rapport du flash de 1:1 à 8:1 (1.5:1, 2:1, 3:1, 4:1, 6:1, 8:1).
7. Appuyez sur le bouton pour confirmer et quitter l’écran.
Modes Manuels
A+B+C En mode manuel les trois groupes sont déclenchés avec la même pu-issance. La puissance peut être réglée.
A:B:C La puissance de chaque groupe est réglée individuellement par l’utili-sateur (veuillez voir en bas). Chaque groupe est indépendant, l’un n’affecte pas l’autre.
A:B La puissance des groupes A et B peut être réglée individuellement par l’utilisateur (veuillez voir en bas). Le Groupe C n’est pas ajustable et n’est pas déclenché.
Le réglage des Modes Manuels
1. Après avoir activé le mode Transmetteur OP (Maître) (ci-dessous), appuyez
sur le bouton pour mettre le flash en Mode Manuel (M).
2. Appuyez sur la touche de déplacement pour modifier les paramètres du mode Transmetteur OP (Maître).
3. Appuyez trois fois sur la touche de déplacement pour mettre le mode Rapport en surbrillance.
4. En appuyant sur le bouton et vous pouvez choisir entre les modes: A+B+C, A:B et A:BC.
5. Appuyez sur le bouton pour confirmer et quitter l’écran.
6. Appuyez sur le bouton pour régler la puissance.
7. En appuyant sur le bouton ou vous pouvez modifier la puis-sance du flash (de 1/1 à 1/128 par incréments de 1/3 IL).
8. En appuyant sur le bouton vous pouvez modifier les groupes entre
A, B et C. En appuyant sur le bouton vous passerez du groupe C, par le B, jusqu’au groupe A (si applicable).
9. Appuyez sur le bouton pour sortir du Mode de réglage de la Puissance.
Mode Multi
A+B+C Les trois groupes sont déclenchés en Mode Multi avec la même puis-sance, fréquence et quantité.
A:B:C Le niveau de puissance de chaque groupe est réglé individuellement par

47
Fr MANUEL D’UTILISATION
l’utilisateur (veuillez voir en bas). La fréquence et le nombre de flashs en mode Multi sont les mêmes pour chaque groupe et les paramètres peuvent être réglés seulement pour le grupe A .
A:B La puissance des groupes A et B peut être réglée individuellement par l’uti-lisateur (veuillez voir en bas). La fréquence et le nombre de flashs pour le groupe A est le même que pour le groupe B et le paramètres peuvent être réglés seule-ment pour le groupe A.Le Groupe C n’est pas ajustable et n’est pas déclenché.
Le réglage du Mode Multi1. Après avoir activé le mode Transmetteur OP (Maître) (ci-dessous), appuyez
sur le bouton pour mettre le flash en Mode Multi.
2. Appuyez sur la touche de déplacement pour modifier les paramètres du mode Transmetteur OP (Maître).
3. Appuyez trois fois sur la touche de déplacement pour mettre le mode Rapport en surbrillance.
4. Sélectionnez le mode Ratio. En appuyant sur le bouton et vous pouvez choisir entre les modes: A+B+C, A:B et A:BC.
5. Appuyez sur le bouton pour confirmer et quitter l’écran.
6. Appuyez sur le bouton pour régler la puissance.
7. En appuyant sur le bouton ou vous pouvez modifier la puis-sance du flash (de 1/1 à 1/128 par incréments de 1/3 IL).
8. En appuyant sur le bouton vous pouvez modifier les groupes entre
A, B et C. En appuyant sur le bouton vous passerez du groupe C, par le B, jusqu’au groupe A (si applicable). Vous pouvez modifier la puissance des éclairs de ces groupes.
9. La pression sur le bouton permet de choisir la fréquence et le nom-bre de flashs.
10. La pression sur le bouton ou permet d’enregistrer les mod-ifications sur la fréquence et le nombre de flashs. Ces paramètres peuvent être modifiés uniquement sur le groupe A et seront appliqués au groupe B ou C (si applicable).
11. Appuyez sur le bouton pour sortir du Mode de réglage de la Puis-sance.

48
Fr MANUEL D’UTILISATION
Fonctions Personalisées Le Phottix Mitros+ Flash TTL offre un grand nombre de fonctions personnal-isées. Pour les éditer (en bas):
1. Appuyez sur le bouton pour 2 secondes pour afficher l’écran des Fonctions Personnalisées (C.Fn.)
2. Appuyez sur le bouton ou pour choisir entre les fonctions personnalisées de 0 à 15.
3. Appuyez sur le bouton ou pour changer la fonction.
4. Appuyez sur le bouton pour sortir du menu des Fonctions Personnal-isées.
Tableau des Fonctions Personnalisées

49
Fr MANUEL D’UTILISATION
Fonction Flash RapideLa fonction Flash Rapide permet le déclenchement du flash avec une puissance de 1/6 à 1/2 de la puissance maximale. Le temps de recharge est plus rapide dans cette fonction. Cela facilite la prise des photos instantanées des sujets à proximité.
Le Flash Rapide peut être utilisé pour le mode rafale. Il peut être activé ou dés-activé (veuillez voir C.fn-06).
Veuillez noter: En mode Flash Rapide, le déclenchement du flash devient prioritaire. Une sous-exposition peut être observée quand le sujet se trouve trop loin de l’ap-pareil photo.
Rétroéclairage automatiqueLe rétroéclairage automatique s’allumera pour 8 secondes et s’éteindra si au-cun bouton n’est appuyé. Quand la fonction de rétroéclairage automatique est activée, la pression de n’importe quel bouton l’activera. Quand la fonction de rétroéclairage automatique est désactivée, il faut appuyer sur le bouton Mode pour l’activer.
Préf TTLLE mode TTL peut varier légèrement quand on utilise le flash avec des appareils différents. Préf TTL (C.Fn-15) permet aux utilisateurs de régler la valeur d’exposi-tion de +3 à -3 par incréments de 1/3 IL. Ce réglage est une préférence person-nelle basée sur le TTL standard de l’appareil et sera mémorisé. Quand la valeur d’exposition est réglée, la correction sera utilisée pour les photos prises en mode TTL. La correction de valeur d’exposition ne sera pas affichée sur l’écran LCD pendant l’usage normal.
Fonction de Mémoire
Le Flash Phottix Mitros+ est équipé d’une fonction de Mémoire programmable. Cette fonction permet de sauvegarder les réglages et les fonctions personnal-isées et de les rappeler dans le futur. Les modes des flashs, les réglages sans fil, la puissance – tous les réglages actuels seront sauvegardés afin de les utiliser plus tard.
Écran du Mode Mémoire
Menu:
Trois réglages sauvegardés et trois réglages rappelés sont disponibles en mode Mémoire:
Sauvegarder sur 1
Sauvegarder sur 2
Sauvegarder sur 3
Charger de 1
Charger de 2
Charger de 3
Pour entrer dans le mode Mémoire
Appuyez et maintenez le bouton pour entrer dans le mode Mémoire.
Pour sauvegarder les réglages:1. Après avoir réglé les paramètres du flash, appuyez et maintenez le bouton
pour entrer dans le mode Mémoire.
2. Appuyez les boutons et pour choisir la position : Sauvegard-er sur 1, Sauvegarder sur 2 ou Sauvegarder sur 3.
3. Appuyez sur le bouton pour confirmer la position et sauvegarder les réglages.
4. Le menu de Mémoire sera quitté et le menu dernièrement utilisé s’affichera.
5. Pour annuler la sauvegarde, appuyez sur le bouton pour quitter l’écran du mode Mémoire et revenir au dernier écran utilisé.
Pour charger les réglages:
1. Après être entré dans le menu Mémoire (voir ci-dessus), appuyez sur les
boutons et pour choisir : Charger de 1, Charger de 2 ou Charger de 3.
2. Appuyez sur le bouton pour charger les réglages sauvegardés sur la position sélectionnée.
Veuillez noter:Après avoir chargé les réglages sauvegardés et après avoir quitté le menu de mode Mémoire, les réglages chargés seront affichés sur l’écran. Les réglages du flash utilisés avant le rappel des réglages seront perdus. Pour éviter de les perdre, sauvegardez les réglages actuels avant de charger les réglages sauvegardés.
Restaurer les paramètres d’usineLe Flash Phottix Mitros+ peut être restauré aux paramétres d’usine.
Pour restaurer le flash:
1. Appuyez sur les boutons et et maintenez-les pendant 3 sec-ondes.
2. Le flash sera restauré aux paramètres état d’usine.
3. Toutes les fonctions personnalisées seront restaurées aux paramètres d’usine.
Affichage de l’Information sur le flashLa vérification des informations sur le Phottix Mitros+ peut être nécessaire pour l’assistance technique ou la mise à jour du logiciel. Pour afficher les informations sur le flash, sur le logiciel et le numéro de série:
1. Appuyez sur le bouton quand le flash est allumé.
2. Appuyez sur n’importe quel bouton pour annuler cet affichage et activer l’écran LCD.
50
Fr MANUEL D’UTILISATION
SpécificationsModes: E-TTL et E-TTL II, Manuel et Multi Stroboscopique
Nombre guide: 58/190 (avec une focale de 105mm, à 100 ISO en mètres/pieds)
Couverture du flash: 24-105mm (14mm avec Panneau Diffuseur Grand-Angle)
Zoom Auto (La Couverture du flash est réglée automatiquement en fonction de la longueur de focale utilisée)
Zoom Manuel (le zoom peut être réglé en changeant les paramètres sur le flash/ l’appareil)
Rotation: 360°, vers le haut/le bas: de -7° à 90°
Correction d’exposition au flash (FEC): Manuelle
Bracketing d’exposition au flash (FEB): ±3 IL par incréments de 1/3 de IL (possibilité d’associer la correction manuelle et le bracketing d’exposition au flash)
Modes de synchronisation: Synchronisation sur le premier rideau, Synchroni-sation sur le deuxième rideau et Synchronisation à Haute Vitesse
Flash Stroboscopique: 1-199Hz Nombres de flashs : 1-100
Confirmation d’exposition au flash: Voyant bleu s’allume en mode E-TTL
Recharge du flash (avec des piles alcalines de type AA)
Durée de recharge/ Indicateur de disponibilité du flash:
Flash normal: Approx. 0.1-5sec./voyant rouge de l’indicateur pilote allumé
Flash rapide: Approx. 0.1-2.5sec/voyant vert de l’indicateur pilote allumé
Alimentation interne: quatre piles alcalines de type AA ou piles Ni-MH de type AA
Source d’alimentation externe: Compatible avec Alimentation Externe Phot-tix et Alimentation Canon Compacte CP-E4 (avec un adaptateur spécifique)
Économie d’énergie: Modes Asservis Avec Fil: 90 secondes. Mode Asservi Sans Fil: (programmable) 10 minutes ou 60 minutes
Le Flash Sans Fil
Méthode de transmission: impulsions optiques et signal radio
Canaux: 4
Options Sans Fil: Transmetteur Odin, Récepteur Odin, Récepteur Strato II, Transmetteur OP (Maître), Récepteur OP (Esclave), OP Esclave, Désactivé
Portée de la transmission (Approx.): Rario : 100m+, Optique : à l’intérieur: 12-16m / 39.3-52.4 pieds, à l’extérieur: 7-9m/22.9-29.5 pieds
Angle de réception: Radio : 360° toutes les directions, Optique : ±40° (horizon-tal), ±30° (vertical)
Les groupes Esclaves sous le contrôle: 3 (A, B et C)
Valeurs de rapport du flash: 1:8-1:1-8:1
Prise de courant en veille: ≤100uA en mode veille
Dimensions: 202.8 x 77.5 x 58.3mm
Poids: 427g (exclusivement le flash, sans piles)
Modifications sur le condensateur du flash:Si le flash n’est pas utilisé pour une longue période, des changements physiques auront lieu sur le condensateur du flash. Allumez le flash pendant 10 minutes minimum tous les trois mois pour éviter ces changements physiques.

51
Fr MANUEL D’UTILISATION
www.phottix.com
Déclaration de conformité «CE» Nous: Phottix (HK) Ltd.
Adresse: 10/F Block A, Yip Fat Factory Building, Phase 1, 77 Hoi Yuen Rd, Kwun Tong, Kln, Hongkong
Représentant européen agréé:
Phottix Europe Sp. z o.o.
Piotrkowska 66
90-105 Lodz, Pologne
KRS 0000327336
déclarons que le produit indiqué ci-dessous:
nom du produit: Phottix Mitros+ TTL Transceiver Flash
numéro de modèle: Mitros+
est conforme aux exigences fondamentales de la Detective R&TTE 1999/5/EC, si le produit est utilisé correctement, et aux autres dispositions, normes et docu-ments normatifs:
ETSI EN 300 440-1 V1.6.1(2010-08)
ETSI EN 300 440-2 V1.4.1(2010-08)
ETSI EN 301 489-1 V1.9.2/2011-09
ETSI EN 301 489-3 V1.4.1/2002-08
EN 62479: 2010-09
Signé par:
Paul Czernik
CEO/Chef de la direction
Phottix Europe Sp. z o.o.
Lodz, Septembre 2013
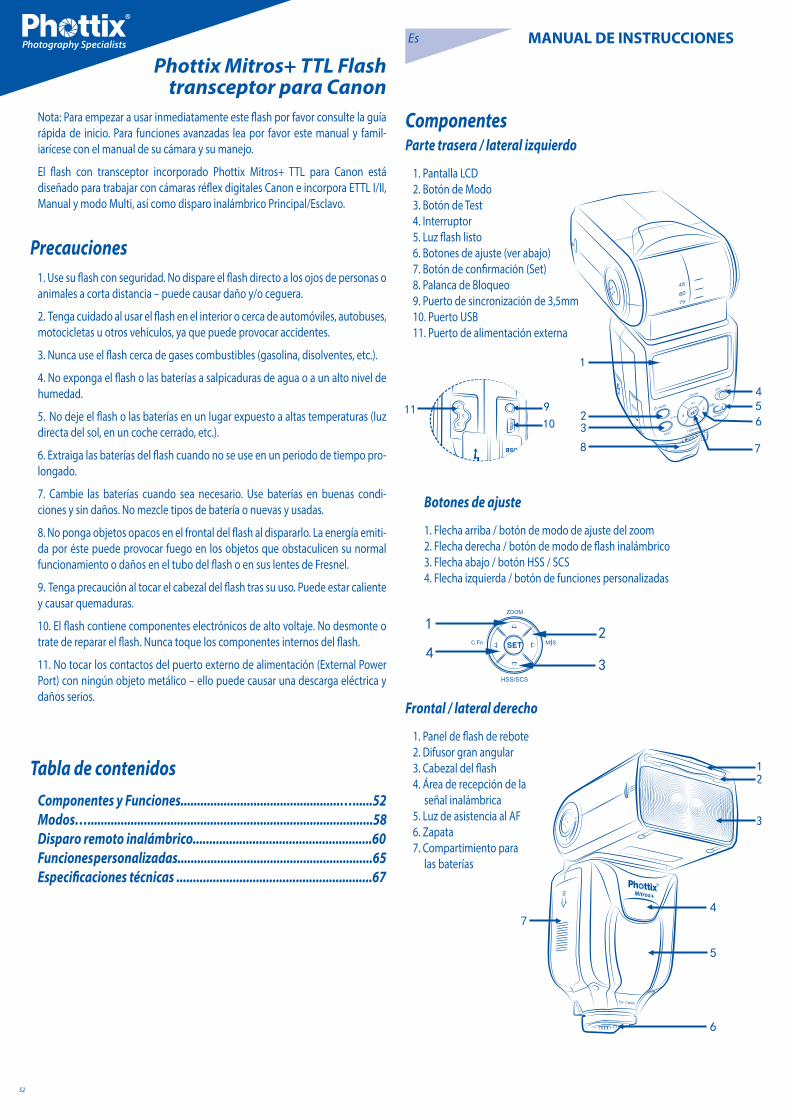
52
Es MANUAL DE INSTRUCCIONES
Nota: Para empezar a usar inmediatamente este flash por favor consulte la guía rápida de inicio. Para funciones avanzadas lea por favor este manual y famil-iarícese con el manual de su cámara y su manejo.
El flash con transceptor incorporado Phottix Mitros+ TTL para Canon está diseñado para trabajar con cámaras réflex digitales Canon e incorpora ETTL I/II, Manual y modo Multi, así como disparo inalámbrico Principal/Esclavo.
Precauciones1. Use su flash con seguridad. No dispare el flash directo a los ojos de personas o animales a corta distancia – puede causar daño y/o ceguera.
2. Tenga cuidado al usar el flash en el interior o cerca de automóviles, autobuses, motocicletas u otros vehículos, ya que puede provocar accidentes.
3. Nunca use el flash cerca de gases combustibles (gasolina, disolventes, etc.).
4. No exponga el flash o las baterías a salpicaduras de agua o a un alto nivel de humedad.
5. No deje el flash o las baterías en un lugar expuesto a altas temperaturas (luz directa del sol, en un coche cerrado, etc.).
6. Extraiga las baterías del flash cuando no se use en un periodo de tiempo pro-longado.
7. Cambie las baterías cuando sea necesario. Use baterías en buenas condi-ciones y sin daños. No mezcle tipos de batería o nuevas y usadas.
8. No ponga objetos opacos en el frontal del flash al dispararlo. La energía emiti-da por éste puede provocar fuego en los objetos que obstaculicen su normal funcionamiento o daños en el tubo del flash o en sus lentes de Fresnel.
9. Tenga precaución al tocar el cabezal del flash tras su uso. Puede estar caliente y causar quemaduras.
10. El flash contiene componentes electrónicos de alto voltaje. No desmonte o trate de reparar el flash. Nunca toque los componentes internos del flash.
11. No tocar los contactos del puerto externo de alimentación (External Power Port) con ningún objeto metálico – ello puede causar una descarga eléctrica y daños serios.
Tabla de contenidos Componentes y Funciones................................................…......52Modos…......................................................................................58Disparo remoto inalámbrico......................................................60Funciones personalizadas...........................................................65Especificaciones técnicas ...........................................................67
Phottix Mitros+ TTL Flash transceptor para Canon
ComponentesParte trasera / lateral izquierdo
1. Pantalla LCD 2. Botón de Modo3. Botón de Test 4. Interruptor5. Luz flash listo6. Botones de ajuste (ver abajo)7. Botón de confirmación (Set)8. Palanca de Bloqueo9. Puerto de sincronización de 3,5mm10. Puerto USB 11. Puerto de alimentación externa
Botones de ajuste
1. Flecha arriba / botón de modo de ajuste del zoom2. Flecha derecha / botón de modo de flash inalámbrico3. Flecha abajo / botón HSS / SCS 4. Flecha izquierda / botón de funciones personalizadas
Frontal / lateral derecho
1. Panel de flash de rebote2. Difusor gran angular3. Cabezal del flash4. Área de recepción de la señal inalámbrica5. Luz de asistencia al AF6. Zapata7. Compartimiento para las baterías
53
Es MANUAL DE INSTRUCCIONES
Notas:Estas instrucciones asumen:
1. Tanto el flash como la cámara están conectados.
2. El flash y la cámara están ajustados en los parámetros indicados en este man-ual.
3. El menú de la cámara y el menú de funciones personalizadas del flash están ajustados a los valores por defecto.
4. El flash se usa con una cámara Canon DSLR compatible.
Instalando las baterías1. Pulse la cubierta de las baterías mientras la desplaza hacia la parte trasera del flash. La cubierta de las baterías se abrirá elevándose.
2. Inserte baterías AA tal como se muestra en el diagrama en el interior del com-partimiento de las baterías.
3. Baje la cubierta de las baterías y empújela hacia la parte superior del flash, bloqueándola.
Nota:
- Por favor use cuatro baterías de alta calidad de la misma marca. Asegúrese que todas las baterías tienen un nivel de potencia y carga similar.
- Las baterías se pueden calentar al usar el flash. Tenga cuidado al cambiar las baterías.
- Si no utiliza el flash durante un largo periodo de tiempo, almacénelo con las baterías quitadas.
Montando el flash en la cámaraDesconecte tanto la cámara como el flash
1. Alinee la zapata del flash con la zapata de la cámara.
2. Deslice el flash en la zapata de la cámara hasta que esté totalmente insertado.
3. Bloquee el flash en dicha posición empujando la palanca de bloqueo hacia la derecha hasta que se engrane con un click.
4. Para desbloquear, pulse el botón de liberación del bloqueo en la palanca de bloqueo y desplace ésta hacia la izquierda.
Conectando / desconectando el flash1. Para conectar el flash mueva el interruptor a la posición ‘on’.
2. Para desconectar el flash mueva el interruptor a la posición ‘off’.
Indicador del nivel de bateríaEl indicador de nivel de batería en la LCD (ver abajo) muestra una indicación aproximada de cuanta energía queda en las baterías del flash. Debe usarlo como indicación aproximada de cuando es necesaria una carga de baterías. Si el tiem-po de recarga del flash se hace muy largo (30 segundos), cambie las baterías.
Elevando y girando el cabezal del flash1. El cabezal del flash se puede elevar entre -7 y 90 grados con pasos a -7, 0, 45, 60, 75 y 90 grados. Levante o descienda suavemente el cabezal del flash en la posición deseada.
2. El cabezal del flash puede girar 180 grados en ambas direcciones, con pasos en 60, 75, 90, 120, 150 y 180 grados. Gire suavemente el cabezal del flash hasta la posición deseada.
3. Cuando el cabezal del flash se eleva o gura desde la posición estándar de 0 grados el zoom del flash se ajusta a 50mm. Se mostrará “- -” en la pantalla LCD. Cuando el cabezal está elevado o girado el zoom de flash se puede cambiar en modo MZoom (ver abajo).
4. En la posición -7 grados el zoom de flash funciona igual que a – no cambia los ajustes.
Usar el panel para rebote de luz o el difusor gran angular
El flash Phottix Mitros+ está equipado con un panel blanco para rebote de luz y un panel difusor gran angular en el cabezal del flash.
1. El panel difusor gran angular hace que el flash extienda la luz hasta un equiv-alente de 14mm.
2. El panel blanco para rebote de luz se puede usar cuando el cabezal del flash está en una posición elevada para rebotar el destello hacia adelante, con lo que facilita la aparición de brillos en los ojos del sujeto.
Manejo:
1. Pulse suavemente el panel difusor y el panel para rebote de luz en el cabez-al del flash usando el borde en la parte trasera del panel difusor.
2. Si usamos el panel difusor, este se coloca en posición sobre el cabezal del flash. Pulse suavemente el panel para rebote de luz de vuelta al interior del cabezal del flash si no lo necesita.
3. Si utiliza únicamente el panel para rebote del destello, simplemente empu-je el panel difusor de vuelta en el interior del cabezal de flash.
Usando el difusor del cabezal del flashEl flash Phottix Mitros+ TTL viene con un difusor externo que se puede mon-tar en el frontal del cabezal del flash cuando sea necesario. Es adecuado para suavizar la luz, reducir brillos y sombras y para una mejor cobertura en foto-grafía macro.
Manejo:
1. Alinee el difusor con el cabezal del flash, con la marca “UP” en el difusor mirando hacia arriba.
2. Colocar un lado de la montura del difusor en la montura correspondiente del cabezal del flash.
3. Repita el paso anterior en el otro lado del difusor.

54
Es MANUAL DE INSTRUCCIONES
Protección contra sobrecalentamientoEl Phottix Mitros+ contiene un circuito de protección contra el sobrecalentam-iento que ralentiza el tiempo de recarga del flash para evitar daños producidos con sobrecalentamiento. Esta protección se activa tras aproximadamente 20 destellos a toda potencia en un periodo corto de tiempo. Aparecerá un icono [ Hot! ] cuando dicha protección se active.
Para evitar un mayor sobrecalentamiento o posible daño, el flash incrementará el tiempo de recarga para ayudar a disminuir la temperatura del flash. Espere 10 minutos antes de usar el flash.
Si el flash se sigue usando tras la aparición del icono [ Hot! ] y no desciende la temperatura del flash, aparecerá un icono [ Stop ] en la pantalla LCD. Deje de usar el flash y espere 10 minutos a que se refrigere.
Puertos de Sincronización y USB1. El puerto de Sincronización de 3,5mm se puede usar con un con un cable de sincronización de 3,5mm para disparar el flash – desde un disparador de flash o una cámara. Este puerto es solo de entrada – no hay salida de señal de flash desde este puerto.
2. El puerto USB se usa para actualizaciones del firmware. Los anuncios de nue-vas versiones del Firmware y sus correspondientes instrucciones estarán dis-ponibles en los sitios web de Phottix.
LED de StatusLED izquierdo: Indicador de Flash-listo. En modo Quick Flash, el LED se ilumi-nará en verde cuando el flash tenga la carga de disparo mínima. Se iluminará en rojo cuando esté totalmente recargado.
LED derecho: Para la confirmación de exposición. Si obtenemos una exposición de flash estándar, dicho LED se iluminará en azul durante aproximadamente 3 segundos. Si no se ilumina, deberá acercarse al sujeto o incrementar el ajuste ISO de la cámara.
Puerto externo de bateríasEl puerto externo de baterías es un diseño propietario de Phottix para su uso con los cables de flash Phottix. Este puerto externo es compatible con el pack de baterías compacto Canon CP-E4 o modelos compatibles cuando se usa con el adaptador incluido.
Tenga en cuenta: - Deben usarse baterías en el flash incluso al usar un pack de baterías externo.
- Nunca use packs de baterías no compatibles con Canon.
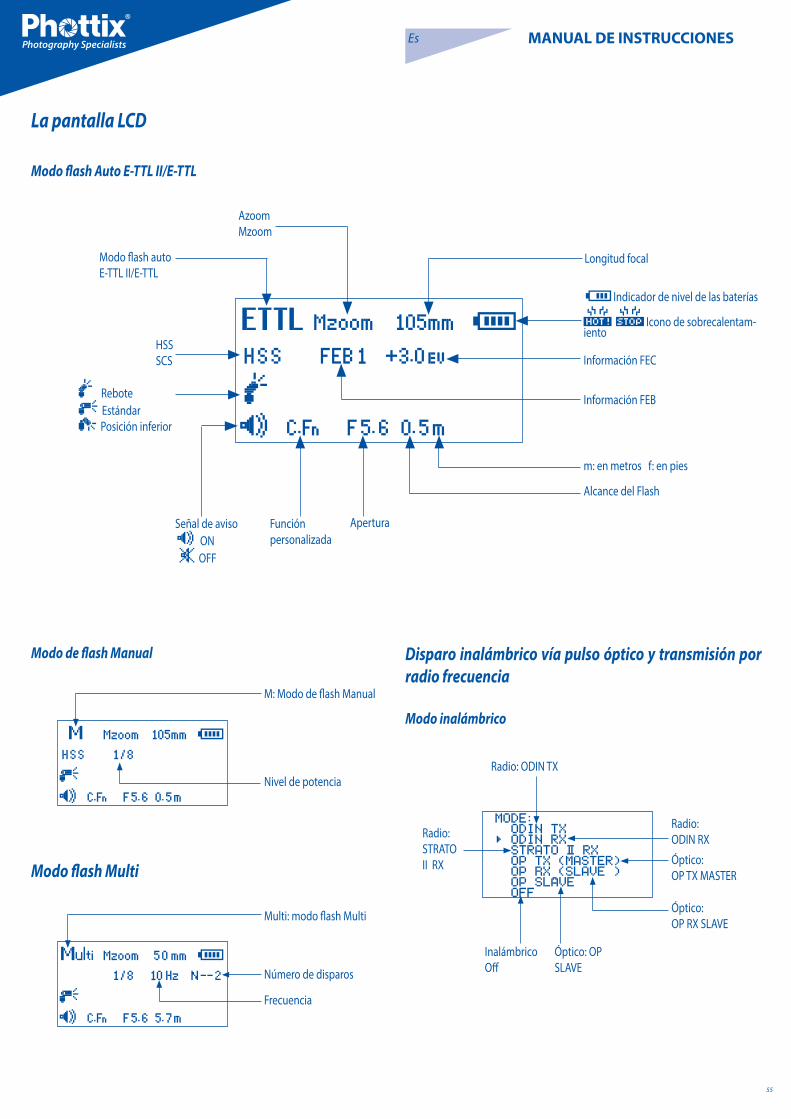
55
Es MANUAL DE INSTRUCCIONES
La pantalla LCD
Modo flash Auto E-TTL II/E-TTL
Modo de flash Manual Disparo inalámbrico vía pulso óptico y transmisión por radio frecuencia
Modo inalámbrico
Modo flash Multi
M: Modo de flash Manual
Multi: modo flash Multi
Número de disparos
Frecuencia
Nivel de potencia
Azoom Mzoom
Modo flash auto E-TTL II/E-TTL
Rebote Estándar Posición inferior
Señal de aviso ON OFF
Función personalizada
Alcance del Flash
Información FEB
Información FEC
Longitud focal
Indicador de nivel de las baterías
Icono de sobrecalentam-iento
m: en metros f: en pies
Apertura
HSS SCS
Radio: ODIN TX
Radio: STRATO II RX
Inalámbrico Off
Óptico: OP SLAVE
Radio: ODIN RX
Óptico: OP TX MASTER
Óptico: OP RX SLAVE

56
Es MANUAL DE INSTRUCCIONES
Transmisión radio frecuencia: modo ODIN TX
Transmisión pulso óptico: modo OP RX (SLAVE)
Transmisión radio frecuencia: modo ODIN TX ratio
Transmisión radio frecuencia: modo ODIN RX
Transmisión radio frecuencia: modo STRATO II RX
Transmisión pulso óptico: modo OP TX (Master)
Grupo ODIN
Radio: Odin RX
Unidad de Flash TX (Local)
Grupo
Grupo Off
Modo de grupo
Modo unidad de flash TX
Canal
Luz ayuda AF on
Luz ayuda AF off
Modo Ratio
Ratio de Flash
Compensación EV para A: B
Radio: STRATO II RX
Modo de Flash
Modo Ratio
Canal
Óptico: OP TX (Master)Ratio de Flash
Flash Master off
Flash Master on
Grupo Slave (esclavo) group
Óptico: OP RX (Slave)
Transmisión pulso óptico: OP Slave
Óptico: OP Slave
Modo MEMORY (memoria)
Modo Memory (memoria)
Menú Grabar menu
Cancelar
Menú recuperar
OK / Confirmar

57
Es MANUAL DE INSTRUCCIONES
Almacenamiento en memoria de ajustesEl Phottix Mitros+ almacena en memoria los ajustes del flash. El modo, nivel de potencia, etc. quedan memorizados en el flash si este se desconecta y se vuelve a conectar.
Ajustado el Zoom del FlashEl flash Phottix Mitros+ posee dos modos para control del zoom del flash – Auto (Azoom) y Manual (Mzoom). Auto zoom cambia de forma automática el zoom del cabezal del flash según cambiamos el zoom del objetivo en la cámara para proporcionar la cobertura óptima. El zoom Manual permite al usuario ajustar el zoom del cabezal del flash.
Para ajustar:
1. Pulse el botón .
2. El área de zoom en la pantalla LCD se verá destacada y parpadeará.
3. Pulse o para ajustar el cabezal del flash a Azoom o el ajuste manual deseado en Mzoom.
4. Pulse el botón cuando el zoom esté ajustado correctamente.
Notas:1. En modo Azoom y con el flash elevado o girado de la posición estándar 0 grados – el flash se ajusta automáticamente a 50mm. Se muestra “- -” en la pantalla LCD. El zoom de flash no cambia al mover el cabezal a la posición baja de -7 grados.
2. Azoom SOLO funciona cuando el cabezal del flash está ajustado a 0 o a -7 grados.
3. En modo Mzoom y con el flash elevado o girado de la posición estándar 0 grados – el zoom del flash no cambiará del ajuste previo.
4. El zoom del flash se puede ajustar con el cabezal elevado o girado cambi-ando a modo Mzoom y realizando los ajustes deseados.
Ajustando la Sincronización de alta velocidad o la Sincronización a la segunda cortinilla
El flash Phottix Mitros+ posee funciones tanto de Sincronización de alta vel-ocidad como de Sincronización a la segunda cortinilla. Vea más detalles bajo Sincronización de alta velocidad y Sincronización a la segunda cortinilla más adelante en este manual.
Para ajustar:
1. Pulse el botón .
2. La indicación cambiará entre HSS, SCS y ambos modos desconec-tados.
Nota:- HSS y SCS están disponibles en modos ETTL y Manual, pero no en multi-modo.
Botón de TestAl pulsar el botón de test se dispara el flash. Esto puede usarse para medición (solo en modo manual). En modo de flash principal sin cables, al pulsar el botón de test se dispararán los flashes esclavos del mismo canal controlados por el flash principal. Los niveles de salida del botón de Test se pueden configurar (ver más abajo C.Fn-07).
Funciones de ahorro de energíaPara ahorrar baterías, el flash Phottix Mitros+ TTL está equipado con modos de suspensión (Idle) y desconexión automática.
1. En modos esclavo no Wireless: el flash entrará en modo automático de sus-pensión tras 90 segundos si no se pulsa ningún botón o si no ha sido dispara-do. La pantalla LCD se apagará. Al pulsar hasta la mitad el botón disparador de la cámara o al pulsar el botón de test del flash el Phottix Mitros+ volverá a estar operativo.
2. En modo esclavo Wireless, el flash entrará en modo de suspensión esclavo tras 60 minutos si no se pulsa ningún botón o si no ha sido disparado, apare-cerá en la pantalla LCD del flash la indicación “IDLE”. Al pulsar por completo el disparador de la cámara o al pulsar el botón de test del flash principal se activarán de nuevo los flashes esclavos en modo suspensión. El tiempo de entrada en suspensión se puede cambiar de 60 minutos a 10 minutos (ver más abajo C.Fn-10). El flash entrará en modo automático de desconexión en esclavo tras 8 horas si no se pulsa ningún botón o si no ha sido disparado tras mostrar “IDLE” en la pantalla LCD del flash. Se activará al pulsar el botón de test en el flash. El tiempo de entrada en desconexión automática en esclavo se puede cambiar de 8 horas a 1 hora (ver más abajo C.Fn-11).
Destello de modelaje1. Al pulsar el botón de previsualización de profundidad de campo de la cámara (en caso de que la cámara disponga de él) se disparará el flash de forma contin-ua durante 1 segundo. Este destello de modelaje es útil para apreciar efectos de iluminación en el sujeto. (Consulte el manual de su cámara para más infor-mación sobre el botón de previsualización de profundidad de campo).
2. El destello de modelaje está disponible en todos los modos, ETTL, Multi y Manual.
3. El destello de modelaje se puede usar tanto en disparo normal como sin cable y se puede ajustar (ver más abajo C.Fn-02).
Notas: 1. El uso excesivo del destello de modelaje puede producir sobrecalentami-ento y/o daños. No lo use más de 20 veces seguidas.
2. Al sobrecalentar el flash, el tiempo de recarga se incrementará automática-mente hasta que disminuya la temperatura del flash.
Luz de asistencia al Autofocus (AF)1. En situaciones de poca luz o bajo contraste, la luz de asistencia al Autofocus integrada en el Phottix Mitros+ se activará para ayudar a la función AF. Esta luz de asistencia AF en el frontal del flash proyecta un patrón de enfoque sobre el sujeto.
2. La función de la luz de asistencia al AF se puede conectar o desconectar (ver más abajo C.Fn-08).
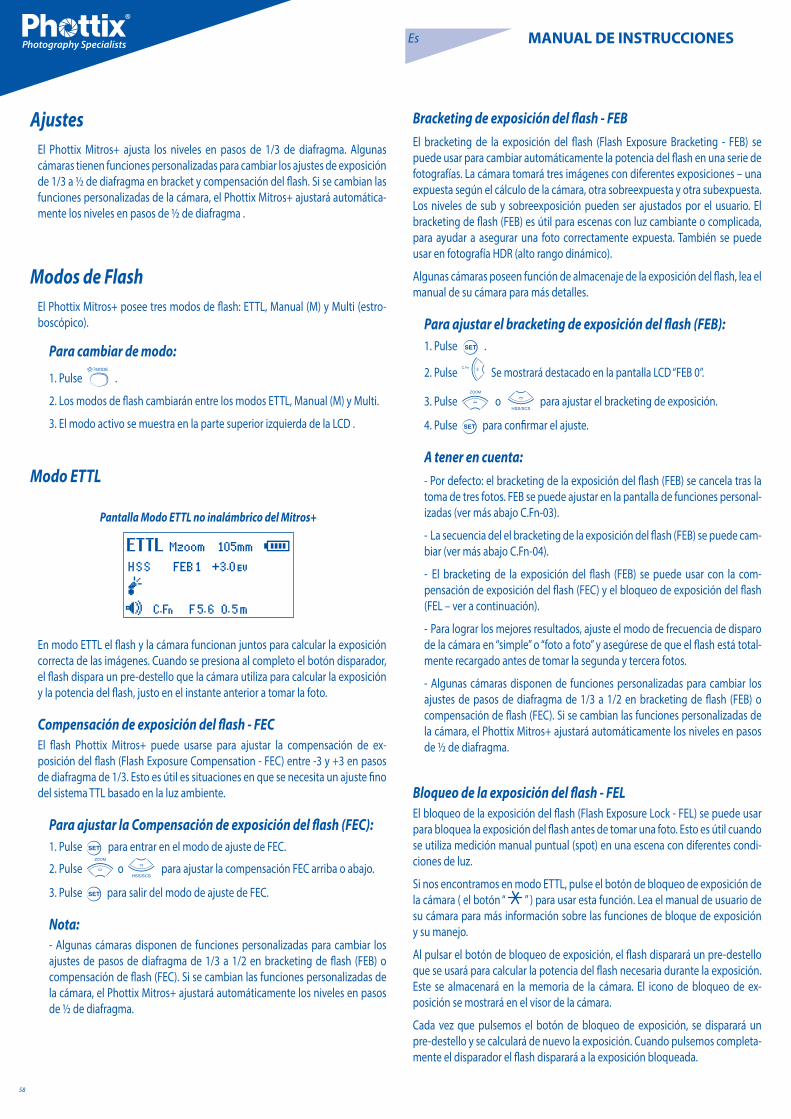
58
Es MANUAL DE INSTRUCCIONES
AjustesEl Phottix Mitros+ ajusta los niveles en pasos de 1/3 de diafragma. Algunas cámaras tienen funciones personalizadas para cambiar los ajustes de exposición de 1/3 a ½ de diafragma en bracket y compensación del flash. Si se cambian las funciones personalizadas de la cámara, el Phottix Mitros+ ajustará automática-mente los niveles en pasos de ½ de diafragma .
Modos de FlashEl Phottix Mitros+ posee tres modos de flash: ETTL, Manual (M) y Multi (estro-boscópico).
Para cambiar de modo:
1. Pulse .
2. Los modos de flash cambiarán entre los modos ETTL, Manual (M) y Multi.
3. El modo activo se muestra en la parte superior izquierda de la LCD .
Modo ETTL
Pantalla Modo ETTL no inalámbrico del Mitros+
En modo ETTL el flash y la cámara funcionan juntos para calcular la exposición correcta de las imágenes. Cuando se presiona al completo el botón disparador, el flash dispara un pre-destello que la cámara utiliza para calcular la exposición y la potencia del flash, justo en el instante anterior a tomar la foto.
Compensación de exposición del flash - FECEl flash Phottix Mitros+ puede usarse para ajustar la compensación de ex-posición del flash (Flash Exposure Compensation - FEC) entre -3 y +3 en pasos de diafragma de 1/3. Esto es útil es situaciones en que se necesita un ajuste fino del sistema TTL basado en la luz ambiente.
Para ajustar la Compensación de exposición del flash (FEC):1. Pulse para entrar en el modo de ajuste de FEC.
2. Pulse o para ajustar la compensación FEC arriba o abajo.
3. Pulse para salir del modo de ajuste de FEC.
Nota:- Algunas cámaras disponen de funciones personalizadas para cambiar los ajustes de pasos de diafragma de 1/3 a 1/2 en bracketing de flash (FEB) o compensación de flash (FEC). Si se cambian las funciones personalizadas de la cámara, el Phottix Mitros+ ajustará automáticamente los niveles en pasos de ½ de diafragma.
Bracketing de exposición del flash - FEBEl bracketing de la exposición del flash (Flash Exposure Bracketing - FEB) se puede usar para cambiar automáticamente la potencia del flash en una serie de fotografías. La cámara tomará tres imágenes con diferentes exposiciones – una expuesta según el cálculo de la cámara, otra sobreexpuesta y otra subexpuesta. Los niveles de sub y sobreexposición pueden ser ajustados por el usuario. El bracketing de flash (FEB) es útil para escenas con luz cambiante o complicada, para ayudar a asegurar una foto correctamente expuesta. También se puede usar en fotografía HDR (alto rango dinámico).
Algunas cámaras poseen función de almacenaje de la exposición del flash, lea el manual de su cámara para más detalles.
Para ajustar el bracketing de exposición del flash (FEB):1. Pulse .
2. Pulse Se mostrará destacado en la pantalla LCD “FEB 0”.
3. Pulse o para ajustar el bracketing de exposición.
4. Pulse para confirmar el ajuste.
A tener en cuenta:- Por defecto: el bracketing de la exposición del flash (FEB) se cancela tras la toma de tres fotos. FEB se puede ajustar en la pantalla de funciones personal-izadas (ver más abajo C.Fn-03).
- La secuencia del el bracketing de la exposición del flash (FEB) se puede cam-biar (ver más abajo C.Fn-04).
- El bracketing de la exposición del flash (FEB) se puede usar con la com-pensación de exposición del flash (FEC) y el bloqueo de exposición del flash (FEL – ver a continuación).
- Para lograr los mejores resultados, ajuste el modo de frecuencia de disparo de la cámara en “simple” o “foto a foto” y asegúrese de que el flash está total-mente recargado antes de tomar la segunda y tercera fotos.
- Algunas cámaras disponen de funciones personalizadas para cambiar los ajustes de pasos de diafragma de 1/3 a 1/2 en bracketing de flash (FEB) o compensación de flash (FEC). Si se cambian las funciones personalizadas de la cámara, el Phottix Mitros+ ajustará automáticamente los niveles en pasos de ½ de diafragma.
Bloqueo de la exposición del flash - FELEl bloqueo de la exposición del flash (Flash Exposure Lock - FEL) se puede usar para bloquea la exposición del flash antes de tomar una foto. Esto es útil cuando se utiliza medición manual puntual (spot) en una escena con diferentes condi-ciones de luz.
Si nos encontramos en modo ETTL, pulse el botón de bloqueo de exposición de la cámara ( el botón “ ” ) para usar esta función. Lea el manual de usuario de su cámara para más información sobre las funciones de bloque de exposición y su manejo.
Al pulsar el botón de bloqueo de exposición, el flash disparará un pre-destello que se usará para calcular la potencia del flash necesaria durante la exposición. Este se almacenará en la memoria de la cámara. El icono de bloqueo de ex-posición se mostrará en el visor de la cámara.
Cada vez que pulsemos el botón de bloqueo de exposición, se disparará un pre-destello y se calculará de nuevo la exposición. Cuando pulsemos completa-mente el disparador el flash disparará a la exposición bloqueada.

59
Es MANUAL DE INSTRUCCIONES
Funcionamiento:
1. Pulse hasta que aparezca M en la pantalla LCD del flash.
2. Pulse para entrar en la pantalla de ajuste de potencia. El nivel de po-tencia se verá destacado y parpadeará.
3. Pulse o para ajustar la potencia del flash.
4. Pulse para salir de la pantalla de ajuste de potencia.
5. Cuando la luz de flash listo se ilumine en rojo, el flash estará totalmente cargado y listo para disparar.
6. Al pulsar el flash se disparará al nivel de potencia manual que hay-amos ajustado. Esto es útil al tomar mediciones de exposición.
Nota:- Al pulsar hasta la mitad el botón disparador se mostrará el alcance efectivo de potencia del flash manual en la pantalla LCD del flash.
Multi: modo estroboscópicoEn el modo Multi estroboscópico se disparan una serie de flashes rápidamente. El número, frecuencia y potencia de destellos se puede programar en el Phottix Mitros+. El modo Multi es útil para capturar múltiples imágenes de un sujeto en movimiento en la misma foto y otros efectos especiales.
Se puede ajustar la frecuencia del efecto (en Hz. – número de flashes por segun-do), el número total de flashes y el nivel de salida.
Uso:1. Pulse hasta que se muestre “Multi” en la pantalla LCD del flash.
2. Pulse para ajustar los parámetros del modo Multi. Se muestran (de izquierda a derecha en la pantalla LCD) Potencia, Frecuencia (HZ) y Número de destellos. La potencia queda destacada y parpadea tras entrar en la pan-talla de ajuste.
3. Pulse o para seleccionar Potencia, Frecuencia (HZ) y Número de destellos.
4. Pulse y mientras del ajuste se mantenga destacado para ajustar Potencia, Frecuencia (HZ) y Número de destellos a los niveles desea-dos.
5. Pulse para salir de la pantalla de ajuste.
Nota:1. El uso excesivo del modo Multi estroboscópico puede ocasionar sobre-calentamiento y/o daños si lo utilizamos en exceso. No lo use más de 20 veces seguidas.
2. Al sobrecalentar el flash, el tiempo de recarga se incrementará automática-mente hasta que disminuya la temperatura del flash.
Modo estroboscópico y velocidades de obturaciónPara determinar la velocidad correcta de obturación en la cámara para usar con diversas variables de modo estroboscópico, use la fórmula siguiente:
Número de destellos / Frecuencia = Velocidad de obturación
Ejemplo: 5x (número de destellos) / 10 Hz (Frecuencia) = velocidad de obtura-ción de 0,5 segundos
Esta es una guía aproximada: necesitarás incrementar o disminuir la velocidad de obturación para lograr el resultado deseado .
Notas:- Si el sujeto está demasiado lejano, el resultado quedará subexpuesto, y el icono de bloqueo de exposición “FEL” parpadeará durante aproximadamente 0,5 segundos en el visor de la cámara.
- Si el sujeto es demasiado pequeño en el visor, el bloque de exposición (FEL) podría no ser efectivo.
Sincronización a alta velocidad (High Speed Sync – HSS)En modo HSS, la velocidad máxima de sincronización de la cámara /flash puede alcanzar la velocidad de obturación máxima de la cámara. Esto es práctico al usar modo de prioridad a la apertura o para limitar la luz ambiente. HSS puede variar según el modelo de cámara utilizada – lea el manual de usuario de su cámara para más detalles.
Para usar el modo HSS:1. Pulse .
2. El icono HSS aparecerá en la pantalla LCD del flash.
3. Ajuste la velocidad de obturación más rápida que la velocidad de sin-cronización del flash y tome fotos.
Para salir del modo HSS:1. Pulse dos veces .
2. Cambiará de HSS a SCS y de vuelta al modo estándar FCS.
Tenga en cuenta:- Compruebe que el icono HSS aparece en el visor.
- HSS reduce drásticamente la potencia del flash, la energía de las baterías y el alcance del destello.
Sincronización a la segunda cortinilla – SCSLa función de sincronización a la segunda cortinilla (Second Curtain Sync – SCS) hace que el flash emita su destello al final de la exposición, no al principio. Esto puede ser útil con velocidades de obturación bajas para capturar efectos espe-ciales.
Manejo: Pulse dos veces. Cambiará el icono de FCS a HSS y a continuación a modo SCS.
Para cancelar:pulse una vez. Esto hará que volvamos al modo estándar FCS.
Nota: Las funciones SCS no son operativas en modos Wireless o Multi.
Modo Manual (M)En modo Manual el flash se dispara al nivel de potencia que nosotros ajustamos. El flash Phottix Mitros+ se puede ajustar desde 1/1 (máxima potencia) a 1/128 – 8 pasos de diafragma en pasos de 1/3. La apertura, velocidad de obturación y ISO de la cámara deben ser ajustados manualmente. Para lograr el mejor re-sultado use el modo M-Manual en la cámara.

60
Es MANUAL DE INSTRUCCIONES
Modo de disparo remoto inalámbricoEl flash transceptor Phottix Mitros+ TTL incorpora diversos modos de trans-misión y recepción inalámbrica. El Mitros+ ofrece compatibilidad integrada con el sistema de disparo remoto Phottix Odin TTL para Canon y el Phottix Strato II Multi para Canon. Para información sobre los sistemas Odin o Strato II consulte los manuales de producto.
El Mitros+ puede funcionar como:
Phottix Odin Tx(Transmisor)
Ajuste completo de la potencia manual y TTL remota o local y el zoom del flash sobre flashes Mitros+ (en modo Odin Rx) o flashes compatibles equipados con receptores Phottix Odin. Los flashes de zapata o estudio con receptores Strato, Strato II o Atlas II se pueden disparar en modo manual mediante el Mitros+ en modo Odin Tx.
Phottix Odin Rx (Receptor)
El Mitros+ en modo inalámbrico Odin Rx se puede disparar por otro Mitros+ en modo Odin Tx o por transmisores (TCU) Phottix Odin.
Phottix Strato II Rx (Receptor)
El Mitros+ en modo inalámbrico Strato Rx puede ser disparado por transmisores Phottix Strato II, Phottix Odin (TCU) y flashes Phottix Mitros+ en modo Odin Tx.
OP Tx (Master-Maestro) – Usando el sistema de disparo IR de Canon
Usando pulsos de luz, un flash en la cámara ajusta y dispara flashes remotos.
OP Rx (Slave-Esclavo) - Usando el sistema de disparo IR de Canon
Los flashes remotos en modo OP Rx son controlados y disparados por flashes montados en la cámara y en modo OP Tx Master. Usando pulsos de luz, un flash en la cámara ajusta y dispara flashes remotos.
OP Slave- Optical Slave – Esclavo óptico
En modo esclavo OP, los destellos de otros flashes cercanos dispararán el Mi-tros+, únicamente en modo manual.
Note:El Mitros+ no puede ser disparado por transmisores Phottix Strato, Strato II o Ares o por transceptores Atlas II en modo Tx.
Selección del modo de disparo inalámbricoPara acceder y ajustar el modo de disparo inalámbrico en el Mitros+:
1. Pulse y mantenga pulsado el botón hasta que el menú de modos aparezca.
2. Use los botones o para seleccionar el modo inalámbrico.
3. Pulse el botón para seleccionar el modo inalámbrico.
4. Ajuste los parámetros necesarios del modo inalámbrico (grupo, canal).
Nota:
Si no se pulsa el botón el Mitros+ usará la selección destacada si no se pulsa ningún botón durante aproximadamente 16 segundos.
Odin Tx (Modo transmisor)El uso del Mitros+ en modo Odin Tx permite usar el flash montado en la cámara en modo TTL o Manual, así como controlar tres grupos (A, B, C) – ajustando los niveles de potencia TTL y manual, así como el cabezal zoom en flashes Mitros+ ajustados en modo Odin Rx u otros flashes compatibles equipados con recep-tores Phottix Odin.
Usando el modo Odin Tx
Pantalla en modo Odin Tx
Tras seleccionar el modo Odin Tx (arriba)
1. Pulse el botón para editar los grupos.
2. Los teclas o cambiarán entre los grupos L, A, B, C.
3. Al pulsar el botón mientras un gripo está seleccionado cambia el modo entre TTL, M (manual) y Off.
4. Al pulsar las teclas o cuando un grupo está seleccionado per-mite el ajuste del nivel EV ±3EV en pasos de 1/3 en modo TTL o ajustes del nivel de potencia (1/128 a 1/1 en pasos de 1/3) en modo manual.
Tabla de nivel de salida de flash en modo Multi estroboscópico
Si el número de destellos se muestra como “N---”, el número máximo de destel-los será tal como se muestra en la tabla siguiente sin importar la frecuencia de disparo.
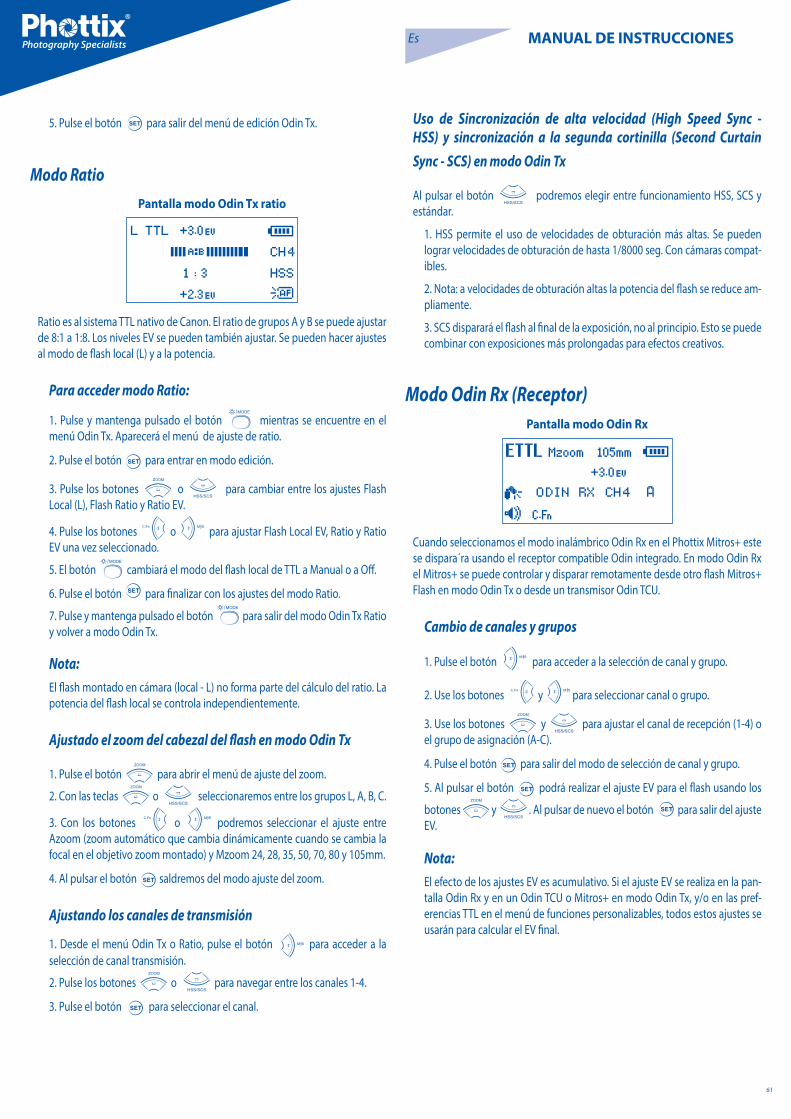
61
Es MANUAL DE INSTRUCCIONES
5. Pulse el botón para salir del menú de edición Odin Tx.
Modo RatioPantalla modo Odin Tx ratio
Ratio es al sistema TTL nativo de Canon. El ratio de grupos A y B se puede ajustar de 8:1 a 1:8. Los niveles EV se pueden también ajustar. Se pueden hacer ajustes al modo de flash local (L) y a la potencia.
Para acceder modo Ratio:
1. Pulse y mantenga pulsado el botón mientras se encuentre en el menú Odin Tx. Aparecerá el menú de ajuste de ratio.
2. Pulse el botón para entrar en modo edición.
3. Pulse los botones o para cambiar entre los ajustes Flash Local (L), Flash Ratio y Ratio EV.
4. Pulse los botones o para ajustar Flash Local EV, Ratio y Ratio EV una vez seleccionado.
5. El botón cambiará el modo del flash local de TTL a Manual o a Off.
6. Pulse el botón para finalizar con los ajustes del modo Ratio.
7. Pulse y mantenga pulsado el botón para salir del modo Odin Tx Ratio y volver a modo Odin Tx.
Nota:El flash montado en cámara (local - L) no forma parte del cálculo del ratio. La potencia del flash local se controla independientemente.
Ajustado el zoom del cabezal del flash en modo Odin Tx
1. Pulse el botón para abrir el menú de ajuste del zoom.
2. Con las teclas o seleccionaremos entre los grupos L, A, B, C.
3. Con los botones o podremos seleccionar el ajuste entre Azoom (zoom automático que cambia dinámicamente cuando se cambia la focal en el objetivo zoom montado) y Mzoom 24, 28, 35, 50, 70, 80 y 105mm.
4. Al pulsar el botón saldremos del modo ajuste del zoom.
Ajustando los canales de transmisión
1. Desde el menú Odin Tx o Ratio, pulse el botón para acceder a la selección de canal transmisión.
2. Pulse los botones o para navegar entre los canales 1-4.
3. Pulse el botón para seleccionar el canal.
Uso de Sincronización de alta velocidad (High Speed Sync - HSS) y sincronización a la segunda cortinilla (Second Curtain Sync - SCS) en modo Odin Tx
Al pulsar el botón podremos elegir entre funcionamiento HSS, SCS y estándar.
1. HSS permite el uso de velocidades de obturación más altas. Se pueden lograr velocidades de obturación de hasta 1/8000 seg. Con cámaras compat-ibles.
2. Nota: a velocidades de obturación altas la potencia del flash se reduce am-pliamente.
3. SCS disparará el flash al final de la exposición, no al principio. Esto se puede combinar con exposiciones más prolongadas para efectos creativos.
Modo Odin Rx (Receptor) Pantalla modo Odin Rx
Cuando seleccionamos el modo inalámbrico Odin Rx en el Phottix Mitros+ este se dispara´ra usando el receptor compatible Odin integrado. En modo Odin Rx el Mitros+ se puede controlar y disparar remotamente desde otro flash Mitros+ Flash en modo Odin Tx o desde un transmisor Odin TCU.
Cambio de canales y grupos
1. Pulse el botón para acceder a la selección de canal y grupo.
2. Use los botones y para seleccionar canal o grupo.
3. Use los botones y para ajustar el canal de recepción (1-4) o el grupo de asignación (A-C).
4. Pulse el botón para salir del modo de selección de canal y grupo.
5. Al pulsar el botón podrá realizar el ajuste EV para el flash usando los
botones y . Al pulsar de nuevo el botón para salir del ajuste EV.
Nota:El efecto de los ajustes EV es acumulativo. Si el ajuste EV se realiza en la pan-talla Odin Rx y en un Odin TCU o Mitros+ en modo Odin Tx, y/o en las pref-erencias TTL en el menú de funciones personalizables, todos estos ajustes se usarán para calcular el EV final.

62
Es MANUAL DE INSTRUCCIONES
Modo Strato II RxPantalla modo Strato II Rx
Al seleccionar el modo Strato II Rx el Mitros+ podrá ser disparado remotamente por transmisores Phottix Strato II Multi, Phottix Odin TCU o un flash Phottix Mi-tros+ en modo Odin Tx.
1. Pulse el botón para acceder a la selección de canal y grupo.
2. Use los botones y para seleccionar canal o grupo.
3. Use los botones y para ajustar el canal de recepción (1-4) o el grupo de asignación (A-C).
4. Pulse el botón para ajustar el nivel de potencia manual del Mitros+ (desde 1/1 a 1/128 en pasos de 1/3) Pulse el botón de nuevo para salir del modo de ajuste manual de potencia.
5. Pulse el botón para seleccionar el ajuste del cabezal de zoom del
flash. Al pulsar los botones y podremos seleccionar los ajustes AZoom y MZoom. Pulse el botón para volver al menú principal.
Nota:En modo Strato II Rx (Receptor) no disponemos de funciones TTL inalámbri-cas como HSS o SCS, o de control inalámbrico de potencia o del zoom. El nivel de potencia y el zoom deben ajustarse manualmente en el flash Mitros+ si seleccionamos el modo Strato II Rx.
Modos inalámbricos OP Tx (Master - Principal) y OP Rx (Slave - Esclavo)
Los modos OP Tx (Master – Principal) y OP Rx (Slave - Esclavo) usan el siste-ma de control y disparo inalámbrico de Canon. Un flash Mitros+ ajustado a OP Tx (Master – Principal) se necesita en la cámara para controlar flashes remotos (slave) ajustados a OP Rx (Slave - esclavo). Es necesario ajustar el mismo canal de transmisión tanto en los flashes Master como Slave. Se deben ajustar los grupos para los flashes esclavo, y las funciones de ratio de grupo en los principales. Un Mitros+ ajustado a OP Tx (Master - Principal) u otro flash compatible en modo Master se puede usar en la cámara para controlar y disparar flashes Mitros+ en modo OP Rx (Slave - esclavo), u otros flashes compatibles en modo Slave.
Modo OP Tx (Master - Principal):
1. Al pulsar el botón podremos cambiar el disparo del flash, el canal de transmisión, el modo ratio y el ratio.
2. Con el símbolo de flash destacado y parpadeando, pulse los botones
o para conectar o desconectar el disparo del flash (ver más abajo).
3. Con los canales de transmisión destacados, pulse los botones o
para cambiar el canal entre 1-4.
4. Con el modo ratio destacado, pulse los botones o para cam-bar el modo de ratio inalámbrico (ver más abajo).
5. Con el ratio destacado, pulse los botones o para cambiar el ratio inalámbrico. En modos M o Multi, los parámetros del flash de las un-idades esclavas se pueden ajustar individualmente en el flash OP Tx (Master – principal). (ver más abajo).
6. Pulse el botón para confirmar y salir de la pantalla.
Modo Master con Flash : El flash principal montado en la cámara disparará al tomar la foto.
Modo Master sin Flash : El flash principal montado en la cámara no disparará al tomar la foto. El flash emitirá un corto destello de luz para comunicarse con los flashes esclavos pero dicho destello no será parte de la exposición.
Para ajustar el modo OP Rx (Slave - Esclavo):
1. Al pulsar el botón podremos cambiar el canal y grupo del flash.
2. Con los canales de transmisión destacados, pulse los botones o
para seleccionar el canal entre 1-4.
3. Con el grupo destacado, pulse los botones o para cambiar el grupo al que el flash está asignado (A,B,C).
4. Pulse el botón para confirmar y salir de la pantalla.
5. Cuando los flashes en OP Rx (Slave - Esclavo) están listos para disparar, la luz de asistencia al enfoque AF en el frontal del flash parpadeará una vez por segundo.
6. Para ajustar los modos Multi o M para el flash esclavo pulse y mantenga
pulsado el botón durante aproximadamente 2 segundos.
7. Ajuste el nivel de potencia o la frecuencia del flash múltiple / número de destellos usando los botones de dirección.
Nota: - Asegúrese que los flashes en modo OP Tx (Master – Principal) y OP Rx (Slave - Esclavo) están ajustados al mismo canal de transmisión (1-4).
- No sitúe obstáculos entre la unidad principal y la(s) esclava(s). Los obstácu-los pueden bloquear las transmisiones de señales.
- Al usar flash rebotado inalámbrico, asegúrese por favor de que el área de recepción inalámbrica del flash esclavo está encarada hacia el flash principal.
- Al usar una sola unidad de flash ajuste modo inalámbrico en “Off”.
Canales de transmisión
El sistema inalámbrico Phottix Mitros+ OP Tx/Rx posee cuatro canales de trans-misión: 1, 2, 3 y 4. La señales desde el flash OP Tx (Master - principal) se envían a los flashes OP Rx (Slave – esclavos) en dichos canales. Si el flash principal y los es-clavos están ajustados en diferentes canales los flashes esclavos no dispararán.
Usando el disparo inalámbrico OP Tx/Rx
Con un flash en modo OP Tx (Master – principal) montado en la cámara y flash-es remotos en modo OP Rx Slave (esclavo), al pulsar el disparador se disparará

63
Es MANUAL DE INSTRUCCIONES
el flash OP Tx (Master - principal) (si está ajustado para disparar) y los flashes ajustados a OP Rx (Slave – Esclavo) dentro del alcance de OP Tx (Master - princi-pal). La cámara y el flash medirán la escena y dispararán los flashes en modo TTL para exponer correctamente la escena.
Modos Ratio Los flashes esclavos se pueden controlar por el flash principal en diferentes mo-dos ratio. Los modos disponibles son:
Modos ETTL
A+B+C Los tres grupos disparan a una media de la salida total calculada.
A:BC Los grupos A y B se pueden ajustar por Flash Ratio (ver más abajo). El grupo C es independiente con su nivel de salida de flash asignado por la cámara.
La compensación EV de los grupos A y B se puede ajustar.
1. Pulse el botón tras salir de la pantalla de ajuste de Flash Ratio.
2. Pulse los botones o para ajustar el valor EV para los grupos A y B.
3. La compensación EV para el grupo C también se puede ajustar.
4. Al pulsar el botón tras ajustar el flash ratio, se desplazará la selección de EV al grupo Group C.
5. Pulse los botones o para ajustar el nivel EV para el grupo C.
A:B Los grupos A y B se pueden ajustar en Flash Ratio (ver más abajo). El grupo C no se puede ajustar y no dispara.
La compensación EV de los grupos A y B se puede ajustar.
1. Pulse el botón tras salir de la pantalla de ajuste de Flash Ratio.
2. Pulse los botones o para ajustar el valor EV para los grupos A y B.
Ajustando los modos Ratio
Modos ETTL
1. Tras entrar en modo OP Tx (Master - principal) (más arriba) pulse el botón
para editar los parámetros OP Tx (Master – principal).
2. Pulse el botón tres veces para destacar el área de ratio.
3. Seleccione el modo Ratio. Al pulsar los botones y podremos seleccionar entre los modos A+B+C, A:B y A:BC.
4. Cuando A:B o A:BC estén destacadas, al pulsar el botón se iluminará la selección de ajuste de ratio bajo dicho ratio.
5. Al pulsar el botón se cambiará el ratio entre 1:1 y 1:8 en pasos de 1:1.5, 1:2, 1:3, 1:4, 1:6, 1:8.
6. Al pulsar el botón se cambiará el ratio desde 1:1 a 1.5:1, 2:1, 3:1, 4:1, 6:1, 8:1.
7. Pulse el botón para confirmar y salir de la pantalla.
Modos Manuales
A+B+C En modo manual los tres grupos disparan al mismo nivel de potencia. Dicho nivel de potencia es ajustable.
A:B:C El nivel de salida de cada grupo se ajusta individualmente por el usuario (ver más abajo). Cada grupo es independiente, los cambios en uno de ellos no afectan a los otros.
A:B El nivel de potencia de los grupos A y B se puede ajustar individualmente por el usuario (ver más abajo). El grupo C no es ajustable y no disparará.
Ajustando los modos Manuales
1. Tras entrar en modo OP Tx (Master - principal) (ver arriba) pulse el botón
para cambiar el flash en modo Manual (M).
2. Pulse el botón para editar los parámetros OP Tx (Master - principal).
3. Pulse el botón tres veces para destacar el área ratio.
4. Pulse los botones y para navegar entre los modos A+B+C, A:B y A:B:C.
5. Pulse el botón para confirmar y salir de la pantalla.
6. Pulse el botón para ajustar los niveles de potencia.
7. Al pulsar los botones o se podrá cambiar el nivel de potencia del flash (1/1 a 1/128 en paso de 1/3).
8. Al pulsar el botón podremos navegar por los grupos A a B a C, con el
botón desde C a B a A (si fuera necesario).
9. Pulse el botón para salir del modo de ajuste de potencia.
Modo Multi
A+B+C Los tres grupos dispara en modo Multi al mismo nivel de potencia, frecuencia y número de destellos.
A:B:C El nivel de salida de cada grupo se ajusta individualmente por el usuario (ver más abajo). La frecuencia y el número de destellos del multidisparo de cada grupo son los mismos y se pueden ajustar solo en grupo A .
A:B En los grupos A y B se puede ajustar individualmente el nivel de potencia por parte del usuario (ver más abajo). La frecuencia y el número de destellos del mutidisparo de los grupos A y B son idénticos y solo se pueden ajustar en el grupo A. el grupo C no se puede ajustar y no disparará.
Ajustando el modo Multi1. Tras entrar en modo OP Tx (Master - principal) (más arriba) pulse el botón
para cambiar el flash a modo Multi.
2. Pulse el botón para editar los parámetros OP Tx (Master - principal).
3. Pulse el botón tres veces para destacar el área ratio.
4. Al seleccionar el modo Ratio, pulsando los botones y nave-garemos entre los modos A+B+C, A:B y A:B:C.
5. Pulse el botón para confirmar y salir de la pantalla.
6. Pulse el botón para ajustar los niveles de potencia.

64
Es MANUAL DE INSTRUCCIONES
7. Al pulsar los botones o podremos cambiar el nivel de salida del flash (1/1 a 1/128 en pasos de 1/3).
8. Al pulsar el botón cambiaremos los grupos de A a B a C, y con el
botón de C a B a A (si fuera necesario), y podremos cambiar el nivel de potencia en dichos grupos.
9. Al pulsar el botón tras navegar entre los grupos entraremos en la selección de frecuencia y número de destellos.
10. Al pulsar los botones o podremos realizar los cambios en frecuencia y número de destellos. Estos ajustes solo se pueden cambiar en el grupo Group A y, si fuera necesario, se aplicarían igualmente a los grupos B o C.
11. Pulse el botón para salir del modo de ajuste de nivel de potencia.

65
Es MANUAL DE INSTRUCCIONES
Funciones personalizadas El flash Phottix Mitros+ TTL incorpora una serie de funciones personalizables por el usuario. Para editar dichas funciones (ver lista más abajo):
1. Pulse durante 2 segundos para entrar en la pantalla de menú C.Fn .
2. Pulse o para navegar entre los elementos del menú – C.Fn 0 a 15.
3. Pulse o para cambiar el valor de la función seleccionada.
4. Pulse para salir del menú C.Fn.
Tabla de funciones personalizadas

66
Es MANUAL DE INSTRUCCIONES
Función de flash rápido (Quick Flash)La función de flash rápido (Quick Flash) permite al flash disparar entre 1/6 y 1/2 de la potencia total. Los tiempos de recarga de flash en este modo son más rápidos. Son prácticos para instantáneas de sujetos cercanos.
La función de flash rápido (Quick flash) se puede usar en modo de disparo con-tinuo; esta función se puede activar o desactivar en la función personalizada C.fn-06 (ver más arriba).
A tener en cuenta: La función de flash rápido (Quick Flash) hace del disparo de flash la prioridad de funcionamiento. Se puede producir subexposición si el sujeto está situado demasiado lejos de la cámara.
Luz de la pantalla LCD (Auto Backlight)La pantalla LCD se ilumina durante 8 segundos y se desconecta si no se pulsa ningún botón. Cuando la función de luz de la pantalla LCD automática (auto backlight function) está habilitada, al pulsar cualquier botón la LCD se ilumi-nará. Si dicha función personalizada está ajustada a “deshabilitada”, se iluminará al pulsar el botón Mode.
TTL Pref (TTL preferido)La medición TTL puede variar ligeramente al usar el flash en distintas cámaras. La función personalizada TTL Pref (C.Fn-15) permite a los usuarios ajustar de forma exacta la exposición EV entre +3 y -3 en pasos de 1/3 para compensar estas sutiles variaciones. Este ajuste es una preferencia personal basada en la medición estándar TTL y se almacena en la memoria del flash. Cuando se ajusta este nivel de preferencia del EV, dicha compensación se utilizará en las imágenes tomadas en modo TTL. Esta compensación EV no se mostrará en la pantalla LCD durante el uso normal del flash.
Función Memoria
El flash Phottix Mitros+ está equipado con una función de memoria programa-ble. El uso de la Función Memoria permite que podamos guardar los parámet-ros, datos y funciones personalizadas del flash para poder volver a usarlos en el futuro recuperándolos rápidamente. Los modos de flash, los ajustes inalám-bricos, el nivel de potencia del flash – toda la programación actual del flash se almacenará para su uso posterior.
Pantalla modo Memoria
Menú:
Disponemos de tres ajustes para grabar y recuperar los datos del flash en modo Memoria:
SAVE TO 1 (guardar en …)
SAVE TO 2
SAVE TO 3
LOAD FROM 1 (recuperar desde …)
LOAD FROM 2
LOAD FROM 3
Para entrar en modo Memoria
Pulse y mantenga pulsado el botón para entrar en modo Memoria.
Para guardar datos:
1. Tras ajustar los datos del flash, pulse y mantenga pulsado el botón para entrar en modo Memoria.
2. Pulse los botones y para seleccionar donde guardar la infor-mación: SAVE TO 1, SAVE TO 2 y SAVE TO 3.
3. Pulse el botón para seleccionar y confirmar la grabación de los datos.
4. La pantalla LCD saldrá del modo Memoria y volverá a la última pantalla utilizada.
5. Para cancelar la acción de grabación, pulse el botón para salir de la pantalla de modo Memoria y volver a la última pantalla utilizada.
Para recuperar los datos:
1. Tras entrar en modo Memoria (ver más arriba), pulse los botones y
para seleccionar LOAD FROM 1, LOAD FROM 2. LOAD FROM 3.
2. Pulse el botón para recuperar la información grabada.
Nota:Tras recuperar los datos grabados y salir del modo memoria, los datos recu-perados aparecerán en pantalla. Los ajustes de flash usados antes de la recu-peración de datos se perderán. Para evitar perder datos guarde los ajustes actuales antes de recuperar los datos grabados.
Volver a los ajustes de fábrica (reset)El flash Phottix Mitros+ se puede ajustar volviendo a los ajustes de origen en fábrica (reset).
Para volver a los ajustes originales:
1. Pulse y mantenga pulsados a la vez y durante 3 segundos.
2. El flash volverá a los ajustes originales de fábrica.
3. Todas las funciones personalizadas volverán a los valores originales de fábrica.
Visualización de la información del flashPara obtener soporte técnico o para las actualizaciones de firmware puede ser necesario acceder a la información del Phottix Mitros+. Para visualizar hardware, software, biblioteca de iconos y número de serie:

67
Es MANUAL DE INSTRUCCIONES
Especificaciones técnicasModos: E-TTL y E-TTL II, Manual, y Multi estroboscópico
Número guía: 58/190 metros/pies (a una longitud focal de 105mm, ISO 100)
Cobertura del flash: 24-105mm (14mm con el panel difusor gran angular)
Auto zoom (la cobertura del flash se ajusta automáticamente según la longi-tud focal del objetivo)
Zoom manual (el zoom se puede ajustar cambiando el ajuste en el flash)
Giro: 360 grados, desplazamiento vertical: -7 a 90 grados
FEC (Flash exposure compensation – Compensación de exposición del flash): Manual
FEB (Flash exposure bracketing – Bracketing de exposición del flash): ±3 pasos de diafragma en intervalos de 1/3 (Se puede combinar con la compen-sación de exposición de flash manual - FEB)
Modos de sincronización: sincronización a la primera cortinilla, sin-cronización a la segunda cortinilla, y sincronización de alta velocidad (High Speed Sync – HSS)
Flash estroboscópico: 1-199Hz. Número de destellos: 1-100
Confirmación de exposición del flash: luz LED azul se ilumina en modo E-TTL
Recarga del flash (con baterías alcalinas de tamaño AA)
Tiempo de recarga /indicador de flash listo:
Flash estándar: Aprox. 0,1 - 5 segundos/se ilumina indicador LED rojo.
Flash rápido (Quick flash): Aprox. 0,1 - 2,5 segundos/se ilumina indicador LED verde.
Alimentación interna: Cuatro baterías alcalinas tamaño AA o baterías Ni-MH tamaño AA
Batería externa (opcional): Compatible con Phottix Battery Pack y el pack compacto Canon CP-E4 a través de adaptador específico
Ahorro de energía: en modo esclavo no inalámbrico: 90 segundos, en modo esclavo inalámbrico (programable): 10 minutos o 60 minutos
Flash inalámbrico
Método de transmisión: radiofrecuencia o pulso óptico
Canales: 4
Opciones inalámbricas: Odin Tx, Odin Rx, Strato II Rx, OP Tx (Master - princi-pal), OP Rx (Slave – esclavo), OP Slave (esclavo), OFF
Alcance de la transmisión (Aprox.): Radio: 100m +, Óptico: Interior: 12-16m, Exterior: 7-9m
Ángulo de recepción: radio: 360º en todas direcciones. Óptico: ±40° (horizon-tal), ±30°(vertical)
Grupos controlados en modo esclavo: 3 (A, B, y C)
Control de ratio de flash: 1:8-1:1-8:1
Corriente en modo reposo: ≤100uA en modo reposo
Dimensiones: (L x An x Al): 202,8×77,5×58,3 mm
Peso: 427g (solo flash, sin baterías)
1. Pulse al conectar el flash.
2. Pulse cualquier otro botón para cancelar esta pantalla y visualizar la LCD en modo estándar.
Cambios en el condensador:Si el flash no se utiliza durante un periodo largo, se producen cambios físicos en el condensador del mismo. Asegúrese de conectar el flash un mínimo de 10 minutos cada tres meses para evitar dichos cambios.

68
Es MANUAL DE INSTRUCCIONES
www.phottix.com
Declaración de conformidad EC Nosotros: Phottix (HK) Ltd.
en: 10/F Block A, Yip Fat Factory Building, Phase 1, 77 Hoi Yuen Rd, Kwun Tong, Kln, Hongkong
el Representante Europeo Autorizado
Phottix Europe Sp. z o.o.
Piotrkowska 66
90-105 Lodz, Polonia
KRS 0000327336
Declaramos que el producto abajo designado:
Nombre de producto: Phottix Mitros+ TTL Transceiver Flash
Número de modelo: Mitros+
Cumple con los pertinentes requerimientos fundamentales según la directi-va R&TTE 1999/5/EC, siempre que el producto sea usado correctamente, y los siguientes estándares u otros documentos normativos:
ETSI EN 300 440-1 V1.6.1(2010-08)
ETSI EN 300 440-2 V1.4.1(2010-08)
ETSI EN 301 489-1 V1.9.2/2011-09
ETSI EN 301 489-3 V1.4.1/2002-08
EN 62479: 2010-09
Firmado por:
Paul Czernik
CEO/Director gerente
Phottix Europe Sp. z o.o.
CEO/Prezes zarządu
Lodz, septiembre 2013
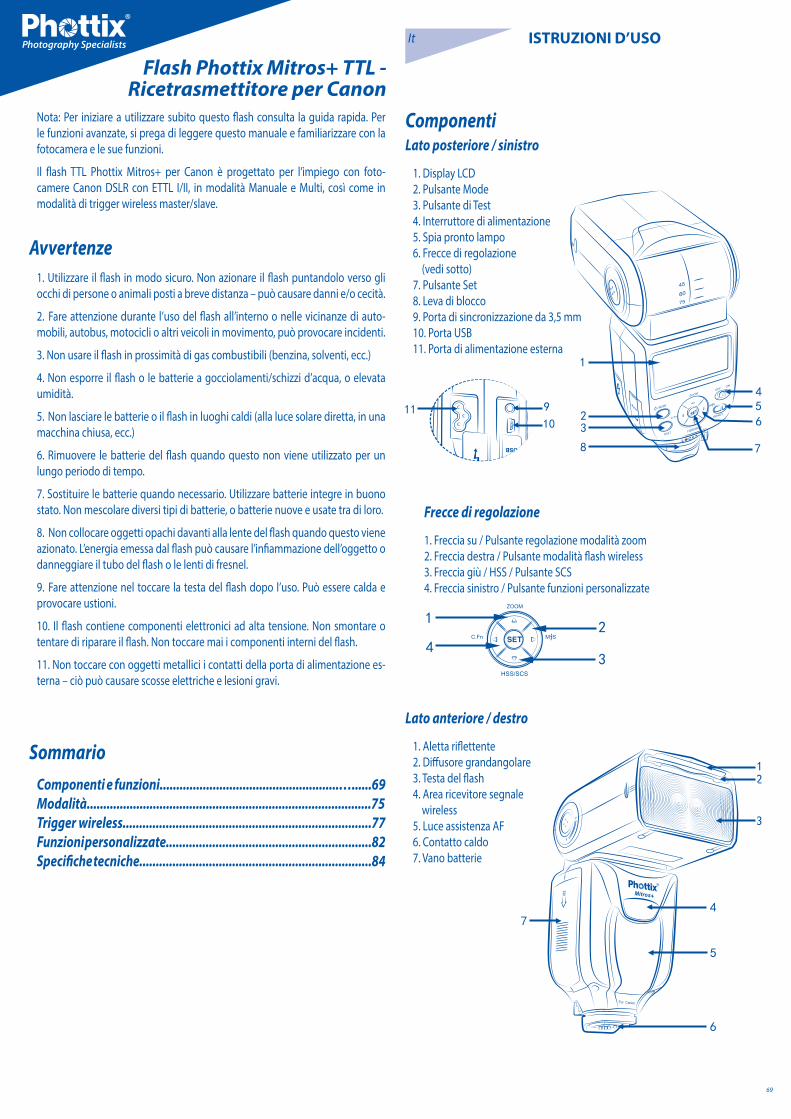
69
It ISTRUZIONI D’USO
Nota: Per iniziare a utilizzare subito questo flash consulta la guida rapida. Per le funzioni avanzate, si prega di leggere questo manuale e familiarizzare con la fotocamera e le sue funzioni.
Il flash TTL Phottix Mitros+ per Canon è progettato per l’impiego con foto-camere Canon DSLR con ETTL I/II, in modalità Manuale e Multi, così come in modalità di trigger wireless master/slave.
Avvertenze1. Utilizzare il flash in modo sicuro. Non azionare il flash puntandolo verso gli occhi di persone o animali posti a breve distanza – può causare danni e/o cecità.
2. Fare attenzione durante l’uso del flash all’interno o nelle vicinanze di auto-mobili, autobus, motocicli o altri veicoli in movimento, può provocare incidenti.
3. Non usare il flash in prossimità di gas combustibili (benzina, solventi, ecc.)
4. Non esporre il flash o le batterie a gocciolamenti/schizzi d’acqua, o elevata umidità.
5. Non lasciare le batterie o il flash in luoghi caldi (alla luce solare diretta, in una macchina chiusa, ecc.)
6. Rimuovere le batterie del flash quando questo non viene utilizzato per un lungo periodo di tempo.
7. Sostituire le batterie quando necessario. Utilizzare batterie integre in buono stato. Non mescolare diversi tipi di batterie, o batterie nuove e usate tra di loro.
8. Non collocare oggetti opachi davanti alla lente del flash quando questo viene azionato. L’energia emessa dal flash può causare l’infiammazione dell’oggetto o danneggiare il tubo del flash o le lenti di fresnel.
9. Fare attenzione nel toccare la testa del flash dopo l’uso. Può essere calda e provocare ustioni.
10. Il flash contiene componenti elettronici ad alta tensione. Non smontare o tentare di riparare il flash. Non toccare mai i componenti interni del flash.
11. Non toccare con oggetti metallici i contatti della porta di alimentazione es-terna – ciò può causare scosse elettriche e lesioni gravi.
Sommario Componenti e funzioni......................................................…......69Modalità......................................................................................75Trigger wireless...........................................................................77Funzioni personalizzate..............................................................82Specifiche tecniche......................................................................84
Flash Phottix Mitros+ TTL - Ricetrasmettitore per Canon
ComponentiLato posteriore / sinistro
1. Display LCD 2. Pulsante Mode3. Pulsante di Test 4. Interruttore di alimentazione5. Spia pronto lampo6. Frecce di regolazione (vedi sotto)7. Pulsante Set8. Leva di blocco9. Porta di sincronizzazione da 3,5 mm10. Porta USB 11. Porta di alimentazione esterna
Frecce di regolazione
1. Freccia su / Pulsante regolazione modalità zoom2. Freccia destra / Pulsante modalità flash wireless3. Freccia giù / HSS / Pulsante SCS 4. Freccia sinistro / Pulsante funzioni personalizzate
Lato anteriore / destro
1. Aletta riflettente2. Diffusore grandangolare3. Testa del flash4. Area ricevitore segnale wireless5. Luce assistenza AF6. Contatto caldo7. Vano batterie

70
It ISTRUZIONI D’USO
Nota:In queste istruzioni si presuppone che:
1. Il flash e la fotocamera siano accesi.
2. Il flash e la fotocamera siano stati impostati con le stesse impostazioni ripor-tate in questo manuale.
3. Il menu della fotocamera ed il menu delle funzioni personalizzate del flash siano impostati su valori predefiniti.
4. Il flash venga utilizzato con una fotocamera Canon DSLR compatibile.
Installazione delle batterie1. Premere il coperchio del vano batteria, spingendolo verso la parte inferiore del flash. Il coperchio del vano batteria si aprirà e si solleverà.
2. Inserire le batterie AA come mostrato dal diagramma all’interno del vano bat-teria.
3. Abbassare il coperchio del vano batteria e spingerlo verso la parte superiore del flash, bloccandolo.
Nota:
- Si prega di utilizzare quattro batterie standard di alta qualità della stessa marca. Assicurarsi che tutte le batterie abbiano livelli di carica simili.
- Le batterie possono surriscaldarsi durante l’utilizzo del flash. Fare attenzione durante la sostituzione delle batterie.
- Se non si utilizza il flash per un lungo periodo di tempo, rimuovere le bat-terie dal flash.
Collegamento del flash alla fotocameraSpegnere sia la fotocamera che il flash
1. Allineare il contatto caldo del flash con la slitta del contatto caldo della foto-camera.
2. Fare scorrere il flash nel contatto caldo della fotocamera fino al suo completo inserimento.
3. Bloccare il flash in posizione, premendo la leva di blocco verso destra, fino a quando il blocco non emette un clic.
4. Per sbloccare, premere il pulsante di rilascio sulla leva di bloccaggio e farla scorrere verso sinistra.
Accensione/Spegnimento del flash1. Per accendere il flash portare l’interruttore in posizione ON.
2. Per spegnere il flash portare l’interruttore in posizione OFF.
Indicatore livello carica della batteriaL’indicatore del livello di carica della batteria sul display LCD (vedi sotto) mostra approssimativamente il livello di carica delle batterie nel flash. Utilizzare ques-ta informazione approssimativa per sapere quando è necessario sostituire le
batterie. Se il tempo di ricarica del flash è eccessivamente lungo (30 secondi) cambiare le batterie.
Alzare e ruotare la testa del flash1. La testa del flash può essere sollevata da -7 a 90 gradi con intervalli a -7, 0, 45, 60, 75 e 90 gradi. Sollevare o abbassare delicatamente la testa del flash, portan-dola nella posizione desiderata.
2. La testa del flash ruoterà di 180 gradi in entrambe le direzioni con intervalli a 60, 75, 90, 120, 150 e 180 gradi. Ruotare delicatamente la testa del flash, portan-dola nella posizione desiderata.
3. Quando la testa del flash è sollevata o ruotata rispetto alla posizione standard di 0 gradi in avanti, il valore dello zoom del flash verrà impostato su 50 mm. ver-rà visualizzato “--” sul display LCD. Lo zoom del flash, quando la testa è sollevata o ruotata, può essere modificato in modalità MZoom (vedi sotto).
4. A -7 gradi lo zoom del flash sarà uguale a 0 gradi – non verrà modificata nes-suna impostazione.
Utilizzo dell’aletta riflettente o del diffusore gran-dangolare
Il flash Phottix Mitros+ è dotato di aletta riflettente bianca e pannello diffusore grandangolare integrati nella testa del flash.
1. Il pannello diffusore grandangolare farà sì che il flash diffonda il fascio lumino-so ad un equivalente di 14 mm.
2. L’aletta riflettente bianca può essere utilizzata quando la testa del flash è in posizione sollevata, per riflettere la luce in avanti al fine di facilitare l’effetto catchlight negli occhi di un soggetto.
Utilizzo:
1. Tirare delicatamente il pannello diffusore e l’aletta riflettente dalla testa del flash, utilizzando il bordo sulla parte inferiore del pannello diffusore.
2. Se si utilizza il pannello diffusore, questo scenderà in posizione sopra la testa del flash. Spingere delicatamente l’aletta riflettente nella testa del flash, se questa non risulta necessaria.
3. Se si utilizza solo l’aletta riflettente, spingere delicatamente il pannello dif-fusore nella testa del flash.
Utilizzo del diffusore della testa del flashIl flash Phottix Mitros+ è dotato di un diffusore applicabile, che può essere aggi-unto alla parte anteriore della testa del flash, quando necessario. È utile per am-morbidire la luce, ridurre i punti caldi e le ombre, e offre una copertura migliore per la fotografia macro.
Utilizzo:
1. Allineare il diffusore con la testa del flash, con il segno “UP” posto sul diffu-sore rivolto verso l’alto.
2. Fissare un lato del supporto del diffusore, al supporto corrispondente sulla testa del flash.
3. Ripetere il passaggio 2 sull’altro lato del diffusore.

71
It ISTRUZIONI D’USO
Protezione contro il surriscaldamentoIl flash Phottix Mitros+ è dotato di un circuito di protezione contro il surriscal-damento che rallenterà il tempo di ricarica flash per evitare danni legati al surriscaldamento. Circa 20 scatti di flash a piena potenza in un breve periodo attiveranno questa protezione. L’icona [Hot! ] apparirà quando il circuito di pro-tezione contro il surriscaldamento è in funzione.
Per evitare un ulteriore surriscaldamento o possibili danni, il flash aumenterà il tempo di ricarica per aiutare a ridurre la sua temperatura. Attendere 10 minuti prima di utilizzare nuovamente il flash.
Se il flash continua ad essere utilizzato dopo la comparsa del segnale [Hot! ] e non viene lasciato raffreddare, l’icona [Stop] apparirà sullo schermo LCD. Ces-sare di utilizzare il flash e attendere 10 minuti per lasciarlo raffreddare.
Porta USB e porta sincro1. La porta di sincronizzazione da 3.5 mm è utilizzabile con un cavo di sincroniz-zazione da 3,5 mm per lo scatto del flash – collegato ad un flash trigger o alla fo-tocamera. Questa porta è solo d’ingresso – non vi sono segnali di flash in uscita.
2. La porta USB viene utilizzata per aggiornamenti del firmware. Istruzioni e comunicati di aggiornamento del firmware saranno resi disponibili sui siti web Phottix.
LED di statoLED sinistro: Spia di pronto flash. In modalità flash rapido, il LED lampeggerà con una luce verde quando il flash ha la carica minima. Lampeggerà invece con una luce rossa quando sarà completamente carico.
LED destro: Spia di conferma dell’esposizione del flash. Se si ottiene un’espo-sizione flash standard, la spia di conferma esposizione del flash lampeggerà di luce blu per circa 3 secondi. Se la spia di conferma esposizione del flash non si accende, avvicinarsi al soggetto o aumentare l’impostazione ISO della foto-camera.
Porta per batteria esternaLa porta per batteria esterna è un progetto di proprietà della Phottix, per uso con cavi flash Phottix. La porta esterna è compatibile con il battery pack com-patto Canon CP-E4 o modelli compatibili quando viene utilizzato l’apposito adattatore.
Nota: - Le batterie devono essere presenti nel flash anche quando viene utilizzato un battery pack esterno.
- Non usare mai battery pack non compatibili con quelli Canon.
72
It ISTRUZIONI D’USO
Display LCD
Modalità E-TTL II/E-TTL Automatico
Modalità Manuale Scatto senza fili tramite Impulso ottico e Segnale Radio
Modalità senza fili
Modalità Multi
M: Modalità manuale
Multi: Modalità Multi
Conteggio dei flash
Frequenza
Livello di potenza
Azoom- zoom automaticoMzoom- zoom manuale
E-TTL II/E-TTL automatico
Lampo verso l’alto standard verso il basso
Segnale acustico ON OFF
Funzione personalizzata
Distanza Flash
Informazione FEB
Informazione FEC
Lunghezza focale
Indicatore livello carica della batteria
spia di surriscaldamento
m: in metri f: in piedi
Diaframma
HSS SCS
Radio: trasmettitore ODIN
Radio: ricevitore STRATO II
Modalità senza fili disattivata
Ottico: slave ottico
Radio: ricevitore ODIN
Ottico: trasmettitore ottico (Master)
Ottico: ricevitore ottico (Slave)
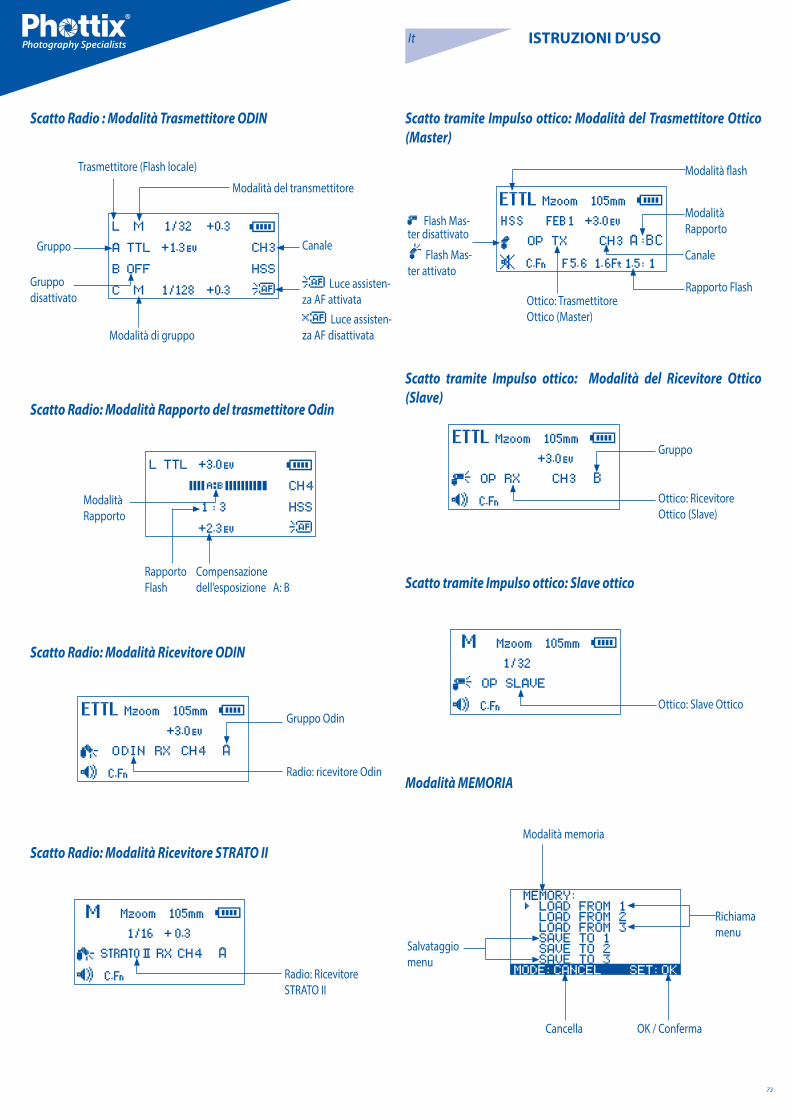
73
It ISTRUZIONI D’USO
Scatto Radio : Modalità Trasmettitore ODIN
Scatto tramite Impulso ottico: Modalità del Ricevitore Ottico (Slave)
Scatto Radio: Modalità Rapporto del trasmettitore Odin
Scatto Radio: Modalità Ricevitore ODIN
Scatto Radio: Modalità Ricevitore STRATO II
Scatto tramite Impulso ottico: Modalità del Trasmettitore Ottico (Master)
Gruppo Odin
Radio: ricevitore Odin
Trasmettitore (Flash locale)
Gruppo
Gruppo disattivato
Modalità di gruppo
Modalità del transmettitore
Canale
Luce assisten-za AF attivata
Luce assisten-za AF disattivata
Modalità Rapporto
Rapporto Flash
Compensazione dell’esposizione A: B
Radio: Ricevitore STRATO II
Modalità flash
Modalità Rapporto
Canale
Ottico: Trasmettitore Ottico (Master)
Rapporto Flash
Flash Mas-ter disattivato
Flash Mas-ter attivato
Gruppo
Ottico: Ricevitore Ottico (Slave)
Scatto tramite Impulso ottico: Slave ottico
Ottico: Slave Ottico
Modalità MEMORIA
Modalità memoria
Salvataggio menu
Cancella
Richiama menu
OK / Conferma

74
It ISTRUZIONI D’USO
Funzioni di salvataggio automaticoIl flash Phottix Mitros+ memorizzerà le impostazioni del flash. Modalità, livelli di potenza, ecc. verranno memorizzate nel flash se questo viene spento e poi riacceso.
Impostazione dello zoom del flashIl flash Phottix Mitros+ possiede due modalità di zoom della testa del flash – Auto (Azoom) e Manuale (Mzoom). Lo zoom automatico cambierà dinamica-mente lo zoom della testa del flash al variare dello zoom dell’obiettivo della fo-tocamera, per assicurare un’illuminazione ottimale. Lo zoom manuale permette all’utente di impostare lo zoom della testa del flash.
Per impostarer:
1. Premere il pulsante .
2. L’area di zoom sul display LCD sarà evidenziata e lampeggerà.
3. Premere o per impostare lo zoom della testa del flash su Azoom o sul livello manuale Mzoom desiderato.
4. Premere il pulsante quando lo zoom è impostato correttamente.
Nota:1. Quando la testa del flash è in Azoom ed è sollevata o ruotata rispetto alla posizione standard di 0 gradi in avanti - il valore dello zoom del flash verrà impostato su 50 mm. verrà visualizzato “--” sul display LCD. Lo zoom del flash non cambierà se la testa è abbassata a -7 gradi.
2. AZoom funziona SOLO quando la testa del flash è impostata su 0 o -7 gradi.
3. Quando la testa del flash in Mzoom è sollevata o ruotata rispetto alla po-sizione standard di 0 gradi in avanti - il valore dello zoom del flash non verrà modificato rispetto all’impostazione precedente.
4. Lo zoom del flash può essere regolato quando la testa è sollevata o ruotata, passando in modalità Mzoom ed effettuando le regolazioni desiderate.
Impostazione della Sincronizzazione ad Alta Velocità o della Sincronizzazione sulla Seconda Tendina
Il flash Phottix Mitros+ possiede entrambe le funzioni di Sincronizzazione ad Alta Velocità e Sincronizzazione sulla Seconda Tendina. Vedi ulteriori dettagli nel capitolo Sincronizzazione ad Alta Velocità e Sincronizzazione sulla Seconda Tendina, più avanti in questo manuale.
Per impostare:
1. Premere il pulsante .
2. Il pulsante consente di selezionare HSS, SCS o spegnere entrambe.
Nota:- le funzioni HSS e SCS sono disponibili in modalità ETTL e nelle modalità manuali, ma non in modalità Multi.
Pulsante TestPremendo il pulsante test faremo scattare il flash. Questo può essere utilizzato per misurazioni (solo in modalità manuale). In modalità wireless Master, pre-mendo il pulsante test faremo scattare i flash in slave impostati sullo stesso can-ale, controllato dal flash master. I livelli di uscita del pulsante test possono essere configurati (vedi C.Fn-07 qui sotto).
Funzioni di stand-by automaticoPer risparmiare la carica della batteria, il flash Phottix Mitros+ è dotato di mo-dalità di stand-by e spegnimento automatico.
1. Nelle modalità Slave non wireless : Il flash passerà in modalità stand-by dopo 90 secondi se non è stato premuto nessun pulsante o il flash non è stato azionato. Il display LCD del flash apparirà vuoto. Premendo a metà il pulsante di scatto della fotocamera, o premendo il pulsante test del flash, riattiveremo il flash Phottix Mitros+.
2. In modalità Slave senza fili, il flash passerà in modalità stand-by Slave dopo 60 minuti se nessun pulsante è stato premuto o se il flash non è stato azion-ato, verrà visualizzata la scritta “IDLE” sul display LCD del flash. Premendo a fondo il pulsante di scatto della fotocamera o premendo il pulsante test del flash Master riattiveremo il flash in modalità stand-by. Il timer della modalità stand-by in Slave può essere modificato da 60 minuti a 10 minuti (vedi C.Fn-10 qui sotto). Il flash passerà in modalità di spegnimento automatico in Slave dopo 8 ore, se non è stato premuto nessun pulsante o il flash non è stato azionato dopo che il messaggio”IDLE” è stato visualizzato sul display LCD del flash. Premendo il pulsante test posto sul flash riattiveremo quest’ultimo. La modalità di spegnimento automatico in Slave può essere cambiata da 8 ore a 1 ora (vedi C.Fn-11 qui sotto).
Lampo flash pilota1. Premendo il pulsante di anteprima profondità di campo della fotocamera (se disponibile) azioneremo continuamente il flash per 1 secondo. Questo lampo pilota è utile per vedere gli effetti della luce e la compensazione sul soggetto. (Consultare il manuale dell’utente della fotocamera per ulteriori informazioni sull’utilizzo di questa funziona).
2. La funzione lampo flash pilota è disponibile in tutte le modalità, ETTL, Multi e Manuale.
3. Il lampo flash pilota può essere utilizzato in riprese normali e wireless, ed è impostabile (vedi C.Fn-02 qui sotto).
Nota: 1. L’uso eccessivo del lampo flash pilota può portare al surriscaldamento del flash e può causare danni. Non azionare il flash più di 20 volte consecutiva-mente.
2. In caso di surriscaldamento il flash aumenterà automaticamente il tempo di carica, fino a quando la temperatura di flash non sarà diminuita.
Luce assistenza autofocus (AF)1. In situazioni di bassa luce/contrasto, la luce di assistenza autofocus incorpora-ta nel Phottix Mitros+ si accenderà per assistere l’AF. La luce assistenza AF, posta sulla parte anteriore del flash, proietterà un bersaglio per la messa a fuoco sul soggetto.

75
It ISTRUZIONI D’USO
2. Le funzioni di luce assistenza AF possono essere attivate oppure disattivate (vedi C.FN-08 qui sotto).
RegolazioniIl Phottix Mitros+ modificherà i livelli con incrementi di 1/3 di stop. Alcune fo-tocamere hanno funzioni personalizzate per modificare le regolazioni con in-crementi da 1/3 a 1/2 di stop per FEB e FEC. Se le funzioni personalizzate della fotocamera sono state modificate, il flash Phottix Mitros+ regolerà automatica-mente i livelli con 1/2 di stop.
Modalità flashIl flash Phottix Mitros+ possiede tre modalità di flash: ETTL, Manuale (M) e Multi (Stroboscopico).
Per cambiare modalità:
1. Premere il pulsante .
2. La modalità di flash scorrerà attraverso le modalità ETTL, Manuale (M) e Multi.
3. La modalità corrente verrà visualizzata nell’angolo superiore sinistro del display LCD.
Modalità ETTL (la modalità Senza Fili disattivata)
Schermata della modalità ETTL
In modalità ETTL il flash e la fotocamera collaboreranno per calcolare la corretta esposizione per le immagini catturate. Quando il pulsante di scatto è comple-tamente premuto, il flash emetterà un pre-lampo nell’istante prima che la foto venga scattata, che verrà utilizzato dalla fotocamera per calcolare l’esposizione e la potenza del flash.
Compensazione dell’esposizione del flash - FECIl flash Phottix Mitros+ può essere utilizzato per regolare la compensazione dell’esposizione del flash (FEC) da -3 a + 3, con intervalli di 1/3 di stop. Ciò risulta utile in situazioni, dove è richiesta una precisa messa a punto del sistema TTL in funzione all’ambiente.
Impostare il FEC:
1. Premere il pulsante per accedere alla modalità regolazione FEC.
2. Premere il pulsante o per regolare FEC su o giù.
3. Premere il pulsante per uscire dalla modalità regolazione FEC.
Nota:- Alcune fotocamere possiedono funzioni personalizzate per modificare le regolazioni con incrementi da 1/3 a 1/2 di stop per FEB e FEC. Se le funzioni personalizzate della fotocamera sono state modificate, il flash Phottix Mitros+ regolerà automaticamente i livelli con incrementi di 1/2 stop.
Bracketing dell’esposizione con il flash - FEBIl bracketing dell’esposizione con il flash (FEB) può essere utilizzato per modifi-care automaticamente la potenza del flash per una serie di foto. La fotocamera registrerà tre immagini con esposizioni diverse – una esposta secondo i calcoli della fotocamera, una sovraesposta e un’altra sottoesposta. I livelli di sovra- e sottoesposizione possono essere impostati dall’utente. Il FEB è utile in situazioni mordi e fuggi, sia quando si riprendono scene con diverse condizioni d’illumi-nazione, per contribuire ad assicurare foto correttamente esposte. Può essere utilizzato anche per fotografia HDR.
Alcune fotocamere hanno la funzione di memorizzazione dell’esposizione flash, per maggiori dettagli vedi il manuale dell’utente della tua fotocamera.
Impostare il FEB:1. Premere il pulsante .
2. Premere il pulsante il comunicato “FEB 0” verrà visualizzato ed evi-denziato sul display LCD.
3. Premere il pulsante e per regolare il valore del bracketing dell’esposizione.
4. Premere il pulsante per confermare l’impostazione.
Nota:- Impostazione predefinita: I valori FEB verranno cancellati dopo aver scattato tre foto. Il FEB può essere impostato nella schermata delle funzioni personal-izzate (vedi C. FN-03 qui sotto).
- la sequenza di scatti FEB può essere modificata (vedi C.Fn-04 qui sotto).
- il FEB può essere utilizzato con le funzioni FEC e FEL (vedi sotto).
- Per ottenere migliori risultati impostare la fotocamera in modalità singola, e assicurarsi che il flash sia completamente ricaricato prima di scattare la sec-onda e la terza foto.
- Alcune fotocamere possiedono funzioni personalizzate per modificare le regolazioni con incrementi da 1/3 a 1/2 di stop per FEB e FEC. Se le funzioni personalizzate della fotocamera sono state modificate, il flash Phottix Mitros+ regolerà automaticamente i livelli con incrementi di 1/2 stop.
Blocco esposizione flash - FEL
Il blocco esposizione flash (FEL) può essere utilizzato per bloccare l’esposizione, prima che venga scattata una foto. Questo è utile quando la misurazione spot manuale viene utilizzata in una scena con diverse condizioni d’illuminazione.
In modalità ETTL per utilizzare questa funzione, premere il pulsante FEL della fotocamera ( pulsante “ ” ) . Per ulteriori informazioni sull’utilizzo e sulle fun-zioni FEL consultare il manuale dell’utente della fotocamera.
Premendo il pulsante fel, il flash emetterà con un pre-lampo, che verrà utilizzato per calcolare la potenza del flash durante l’esposizione. Tale informazione verrà conservata nella memoria della fotocamera. L’icona FEL verrà visualizzata nel mirino della fotocamera.

76
It ISTRUZIONI D’USO
fotocamera devono essere impostati manualmente. Per risultati ottimali utiliz-zare la fotocamera in modalità M-Manuale.
Utilizzo:
1. Premere il pulsante finché la lettera M non viene visualizzata sul display LCD del flash.
2. Premere il pulsante per accedere alla schermata di regolazione della potenza. Il livello di potenza lampeggerà e sarà evidenziato.
3. Premere i pulsanti e per regolare la potenza del flash.
4. Premere il pulsante per uscire dalla schermata di regolazione della potenza.
5. Quando la spia di pronto flash s’illumina di colore rosso, il flash è complet-amente carico e pronto ad essere azionato.
6. Premendo il pulsante azioneremo il flash al livello di potenza manu-ale impostato. Ciò risulta utile quando si effettuano misurazioni.
Nota:- Premendo a metà il pulsante di scatto, verrà visualizzata sul display LCD del flash l’effettiva gamma della potenza del flash in manuale.
Multi: Modalità stroboscopicaIn modalità Multi stroboscopica sarà azionata una serie di brevi flash. Il flash Phottix Mitros+ consente di programmare il conteggio dei lampi e la frequenza e la potenza di questi lampi. La modalità Multi è utile per l’acquisizione d’im-magini multiple di un soggetto in movimento nella stessa foto e altri effetti speciali.
La frequenza dell’effetto (in Hz. - numero di lampi al secondo), il numero totale di lampi ed i livelli di uscita possono essere impostati.
Utilizzo:
1. Premere il pulsante finché Multi non viene visualizzato sul display LCD del flash.
2. Premere il pulsante per modificare le impostazioni della modalità Mul-ti. Verranno visualizzati (da sinistra verso destra sul display LCD) potenza, fre-quenza (HZ) e conteggio dei lampi. La potenza viene evidenziata e lampeg-gia dopo l’accesso alla schermata di regolazione.
3. Premere il pulsante e per scorrere tra potenza, frequenza (HZ) e conteggio dei lampi.
4. Premere i pulsanti e mentre l’impostazione è evidenzia-ta, per regolare ai livelli desiderati potenza, frequenza (HZ) e conteggio dei lampi.
5. Premere il pulsante per uscire dalla schermata di regolazione.
Nota:1. L’uso eccessivo della modalità Multi stroboscopica può portare al surriscal-damento e causare danni. Non azionare il flash più di 20 volte consecutiva-mente.
2. In caso di surriscaldamento, il flash aumenterà automaticamente il tempo di carica, fino a quando la temperatura del flash non sarà diminuita.
Ogni qual volta verrà premuto il pulsante FEL, verrà azionato un pre-lampo e sarà calcolata una nuova esposizione. Quando il pulsante dell’otturatore viene premuto completamente, il flash verrà azionato con l’esposizione bloccata.
Nota:- Se il soggetto è troppo lontano la foto sarà sottoesposta, l’icona “FEL” lampeggerà per circa 0,5 sec nel mirino della fotocamera.
- Se il soggetto risulta troppo piccolo nel mirino, la funzione FEL non sarà efficace.
Sincronizzazione ad alta velocità - HSSIn modalità HSS, la velocità massima di sincronizzazione fotocamera/flash può raggiungere la velocità massima di chiusura dell’otturatore della fotocamera. Ciò risulta utile quando si utilizza la modalità a priorità di diaframma o per limi-tare la luce dell’ambiente. La modalità HSS può variare secondo i diversi modelli di fotocamera - per dettagli controllare il manuale dell’utente della fotocamera.
Per utilizzare la modalità HSS:
1. Premere il pulsante .
2. L’icona HSS verrà visualizzata sul display LCD del flash.
3. Impostare una velocità di scatto superiore alla velocità di sincronizzazione della fotocamera e scattare le foto.
Per uscire dalla modalità HSS:
1. Premere due volte il pulsante .
2. Scorrere da HSS a SCS e tornare alla normale modalità di FCS.
Nota:- Verificare che l’icona HSS venga visualizzata nel mirino.
- La funzione HSS riduce drasticamente la potenza del flash, la carica delle batterie e la portata.
Sincronizzazione sulla seconda tendina – SCSLa funzione Phottix Mitros+ di sincronizzazione sulla seconda tendina consente di azionare il flash al termine di un’esposizione, non all’inizio di quest’ultima. Può risultare utile con tempi di posa prolungati, per catturare effetti speciali.
Utilizzo:
1. Premere due volte il pulsante Scorrere da FCS a HSS e quindi pas-sare in modalità SCS.
2. Per annullare: Premere una volta il pulsante Ritorneremo in mo-dalità standard FCS.
Nota: Le funzioni SCS non opereranno nelle modalità Senza Fili o Multi.
Modalità Manuale (M)In modalità Manuale il flash scatterà al livello di potenza impostato. Il flash Phot-tix Mitros+ può essere regolato da 1/1 (piena potenza) a 1/128 – 8 stop con intervalli da 1/3 di stop. Diaframma, velocità dell’otturatore e valore ISO della

77
It ISTRUZIONI D’USO
Modalità Scatto senza fili (wireless)Il flash TTL Phottix Mitros+ è dotato di diverse modalità di scatto senza fili del tr-asmettitore e del ricevitore. Il flash Mitros+ offre una compatibilità integrata con il sistema Phottix Odin TTL per Canon e il Strato II Multi per Canon. Per ulteriori informazioni sui sistemi Odin o Strato II, consultare i manuali di questi prodotti.
Il Mitros+ funziona come:
Trasmettitore Phottix Odin
Il pieno controllo del flash locale e del flash remoto in TTL e la regolazione man-uale della potenza del flash e dello zoom su altri flash Mitros+ (in modalità Rice-vitore Odin) o sui flash compatibili, con i ricevitori Phottix Odin. I flash o le luci da studio con i ricevitori Strato, Strato II oppure Atlas II possono essere attivati in modalità Manuale dal Mitros+ in modalità Trasmettitore Odin.
Ricevitore Phottix Odin
Il Mitros+ in modalità Ricevitore Odin può essere attivato da un altro flash Mi-tros+ in modalità Trasmettitore Odin oppure da un Trasmettitore Phottix Odin.
Ricevitore Phottix
Il Mitros+ in modalità Ricevitore Strato II può essere attivato da un trasmettitore Phottix Strato II, da un trasmettitore Phottix Odin oppure da un altro flash Mi-tros+ in modalità Trasmettitore Odin.
Trasmettitore Ottico (Master) - utilizzando il sistema Trigger a infrarossi Canon
Utilizzando impulsi di luce, il flash montato sulla fotocamera imposta ed aziona i flash remoti.
Ricevitore Ottico (Slave) - utilizzando il sistema Trigger a infra-rossi Canon
I flash remoti in modalità Ricevitore Ottico sono controllati ed attivati dai flash montati sulla fotocamera in modalità Trasmettitore Ottico. Utilizzando impulsi di luce, il flash montato sulla fotocamera imposta ed aziona i flash remoti.
Slave Ottico
In modalità Slave Ottico altri flash azionati in prossimità attiveranno il flash Mi-tros+ esclusivamente in modalità manuale.
Nota:Il Mitros+ non può essere attivato dai trasmettitori Strato, Strato II, Ares ed Atlas II in modalità Trasmettitore.
Per impostare le modalità Scatto Senza FiliPer accedere ed impostare le modalità Scatto Senza Fili sur Mitros+:
1. Premere e tenere premuto il pulsante fino a visualizzare il Menu Mode.
2. Premere i pulsanti freccia o per selezionare la modalità Senza FIli.
3. Premere il pulsante per confermare la selezione della modalit.à Senza Fili.
4. Impostare i parametri della modalità Senza fili (gruppo, canale) se necessairo.
Nota:
Se non si preme il pulsante il Mitros+ utilizzerà la selezione evidenziata. Questo accade se dopo circa 16 secondi non viene premuto alcun pulsante.
Odin TX (Modalità Trasmettitore Odin)L’utilizzo del flash Mitros+ in modalità Trasmettitore Odin consente di utilizzare il flash sulla fotocamera in modalità TTL oppure in modalità Manuale, nonché di controllare 3 gruppi (A, B, C) - impostando le potenze dei flash in modalità TTL o manuale e lo zoom dei flash Mitros+ in modalità Ricevitore Odin o di altri flash compatibili, dotati dei ricevitori Phottix Odin.
Modalità stroboscopica e velocità dell’otturatorePer determinare l’adeguata velocità dell’otturatore della fotocamera che deve essere utilizzata con diverse variabili della modalità stroboscopica, utilizzare la seguente formula:
Numero di lampi / frequenza = velocità dell’otturatore
Esempio: 5 x (numero di lampi) / 10 Hz (frequenza) = 0,5 secondi velocità dell’ot-turatore
Si tratta di un’indicazione di massima: Potrebbe essere necessario aumentare o diminuire la velocità dell’otturatore per ottenere il risultato desiderato.
Grafico di resa in modalità stroboscopica Multi
Se il numero di lampi è visualizzato come “N---”, il numero massimo di lampi sarà visualizzato nella tabella qui di seguito, indipendentemente dalla frequenza di azionamento del flash.
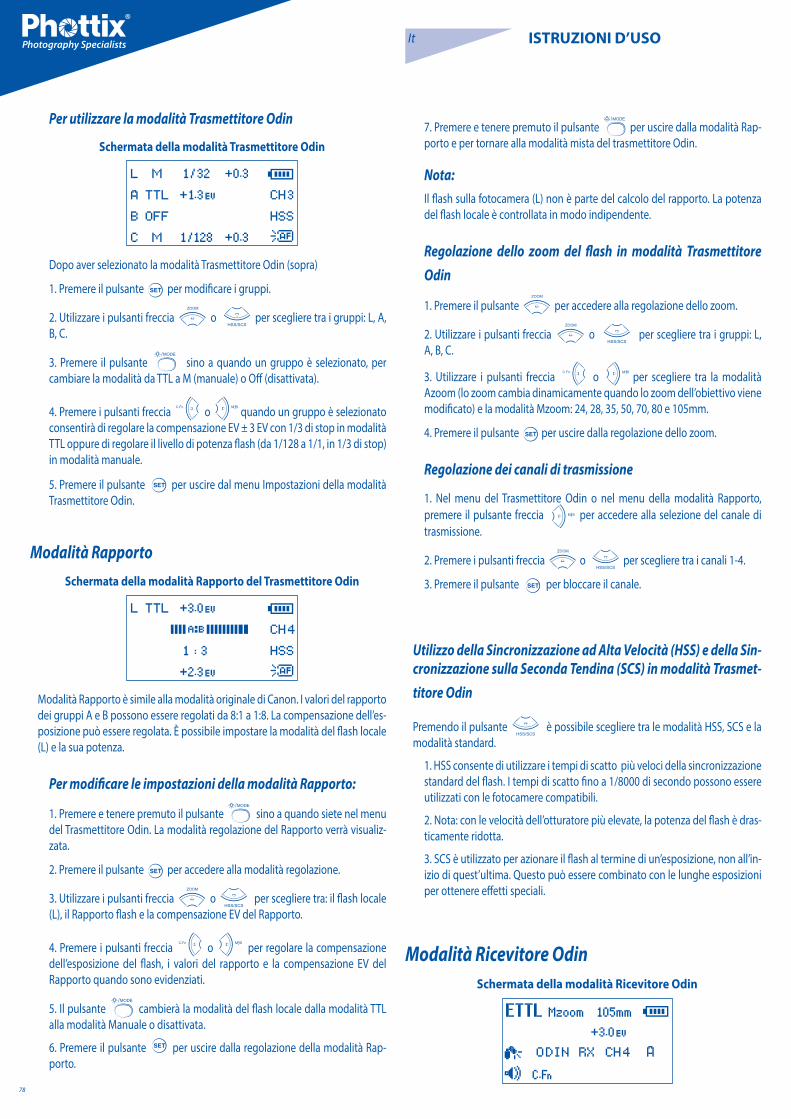
78
It ISTRUZIONI D’USO
Per utilizzare la modalità Trasmettitore Odin
Schermata della modalità Trasmettitore Odin
Dopo aver selezionato la modalità Trasmettitore Odin (sopra)
1. Premere il pulsante per modificare i gruppi.
2. Utilizzare i pulsanti freccia o per scegliere tra i gruppi: L, A, B, C.
3. Premere il pulsante sino a quando un gruppo è selezionato, per cambiare la modalità da TTL a M (manuale) o Off (disattivata).
4. Premere i pulsanti freccia o quando un gruppo è selezionato consentirà di regolare la compensazione EV ± 3 EV con 1/3 di stop in modalità TTL oppure di regolare il livello di potenza flash (da 1/128 a 1/1, in 1/3 di stop) in modalità manuale.
5. Premere il pulsante per uscire dal menu Impostazioni della modalità Trasmettitore Odin.
Modalità RapportoSchermata della modalità Rapporto del Trasmettitore Odin
Modalità Rapporto è simile alla modalità originale di Canon. I valori del rapporto dei gruppi A e B possono essere regolati da 8:1 a 1:8. La compensazione dell’es-posizione può essere regolata. È possibile impostare la modalità del flash locale (L) e la sua potenza.
Per modificare le impostazioni della modalità Rapporto:
1. Premere e tenere premuto il pulsante sino a quando siete nel menu del Trasmettitore Odin. La modalità regolazione del Rapporto verrà visualiz-zata.
2. Premere il pulsante per accedere alla modalità regolazione.
3. Utilizzare i pulsanti freccia o per scegliere tra: il flash locale (L), il Rapporto flash e la compensazione EV del Rapporto.
4. Premere i pulsanti freccia o per regolare la compensazione dell’esposizione del flash, i valori del rapporto e la compensazione EV del Rapporto quando sono evidenziati.
5. Il pulsante cambierà la modalità del flash locale dalla modalità TTL alla modalità Manuale o disattivata.
6. Premere il pulsante per uscire dalla regolazione della modalità Rap-porto.
7. Premere e tenere premuto il pulsante per uscire dalla modalità Rap-porto e per tornare alla modalità mista del trasmettitore Odin.
Nota:Il flash sulla fotocamera (L) non è parte del calcolo del rapporto. La potenza del flash locale è controllata in modo indipendente.
Regolazione dello zoom del flash in modalità Trasmettitore Odin
1. Premere il pulsante per accedere alla regolazione dello zoom.
2. Utilizzare i pulsanti freccia o per scegliere tra i gruppi: L, A, B, C.
3. Utilizzare i pulsanti freccia o per scegliere tra la modalità Azoom (lo zoom cambia dinamicamente quando lo zoom dell’obiettivo viene modificato) e la modalità Mzoom: 24, 28, 35, 50, 70, 80 e 105mm.
4. Premere il pulsante per uscire dalla regolazione dello zoom.
Regolazione dei canali di trasmissione
1. Nel menu del Trasmettitore Odin o nel menu della modalità Rapporto, premere il pulsante freccia per accedere alla selezione del canale di trasmissione.
2. Premere i pulsanti freccia o per scegliere tra i canali 1-4.
3. Premere il pulsante per bloccare il canale.
Utilizzo della Sincronizzazione ad Alta Velocità (HSS) e della Sin-cronizzazione sulla Seconda Tendina (SCS) in modalità Trasmet-titore Odin
Premendo il pulsante è possibile scegliere tra le modalità HSS, SCS e la modalità standard.
1. HSS consente di utilizzare i tempi di scatto più veloci della sincronizzazione standard del flash. I tempi di scatto fino a 1/8000 di secondo possono essere utilizzati con le fotocamere compatibili.
2. Nota: con le velocità dell’otturatore più elevate, la potenza del flash è dras-ticamente ridotta.
3. SCS è utilizzato per azionare il flash al termine di un’esposizione, non all’in-izio di quest’ultima. Questo può essere combinato con le lunghe esposizioni per ottenere effetti speciali.
Modalità Ricevitore Odin Schermata della modalità Ricevitore Odin
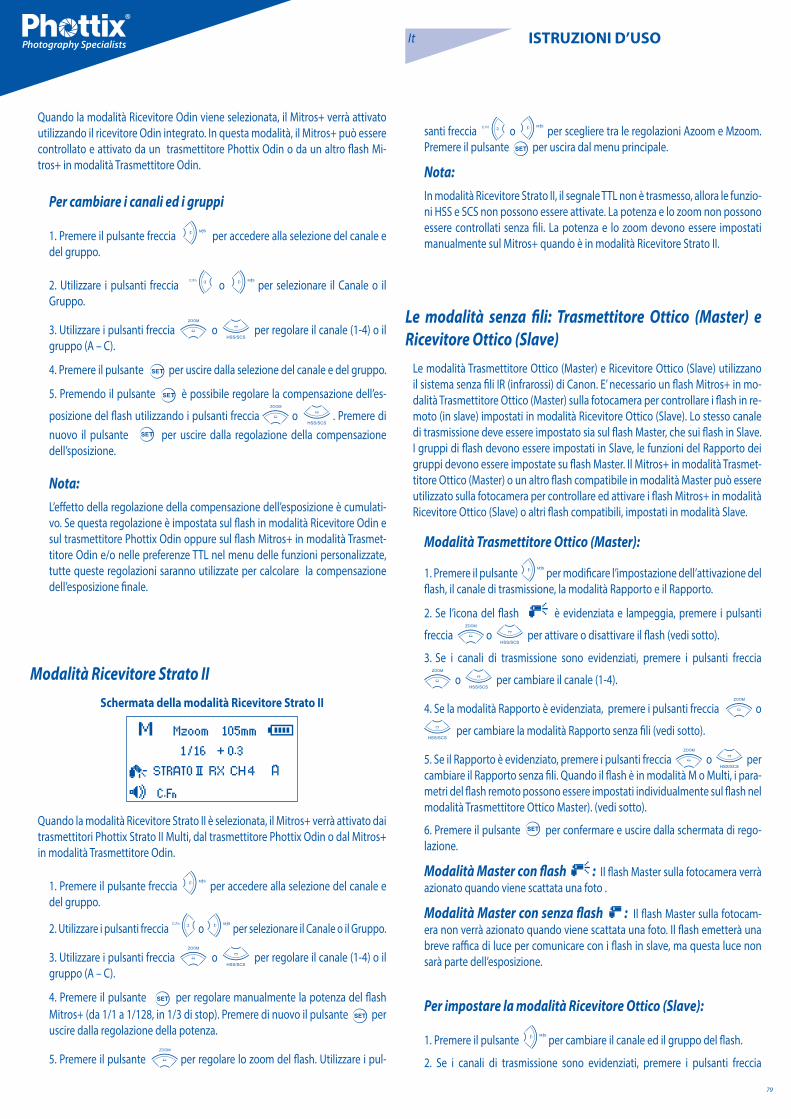
79
It ISTRUZIONI D’USO
Quando la modalità Ricevitore Odin viene selezionata, il Mitros+ verrà attivato utilizzando il ricevitore Odin integrato. In questa modalità, il Mitros+ può essere controllato e attivato da un trasmettitore Phottix Odin o da un altro flash Mi-tros+ in modalità Trasmettitore Odin.
Per cambiare i canali ed i gruppi
1. Premere il pulsante freccia per accedere alla selezione del canale e del gruppo.
2. Utilizzare i pulsanti freccia o per selezionare il Canale o il Gruppo.
3. Utilizzare i pulsanti freccia o per regolare il canale (1-4) o il gruppo (A – C).
4. Premere il pulsante per uscire dalla selezione del canale e del gruppo.
5. Premendo il pulsante è possibile regolare la compensazione dell’es-
posizione del flash utilizzando i pulsanti freccia o . Premere di nuovo il pulsante per uscire dalla regolazione della compensazione dell’sposizione.
Nota:L’effetto della regolazione della compensazione dell’esposizione è cumulati-vo. Se questa regolazione è impostata sul flash in modalità Ricevitore Odin e sul trasmettitore Phottix Odin oppure sul flash Mitros+ in modalità Trasmet-titore Odin e/o nelle preferenze TTL nel menu delle funzioni personalizzate, tutte queste regolazioni saranno utilizzate per calcolare la compensazione dell’esposizione finale.
Modalità Ricevitore Strato IISchermata della modalità Ricevitore Strato II
Quando la modalità Ricevitore Strato II è selezionata, il Mitros+ verrà attivato dai trasmettitori Phottix Strato II Multi, dal trasmettitore Phottix Odin o dal Mitros+ in modalità Trasmettitore Odin.
1. Premere il pulsante freccia per accedere alla selezione del canale e del gruppo.
2. Utilizzare i pulsanti freccia o per selezionare il Canale o il Gruppo.
3. Utilizzare i pulsanti freccia o per regolare il canale (1-4) o il gruppo (A – C).
4. Premere il pulsante per regolare manualmente la potenza del flash Mitros+ (da 1/1 a 1/128, in 1/3 di stop). Premere di nuovo il pulsante per uscire dalla regolazione della potenza.
5. Premere il pulsante per regolare lo zoom del flash. Utilizzare i pul-
santi freccia o per scegliere tra le regolazioni Azoom e Mzoom. Premere il pulsante per uscira dal menu principale.
Nota:In modalità Ricevitore Strato II, il segnale TTL non è trasmesso, allora le funzio-ni HSS e SCS non possono essere attivate. La potenza e lo zoom non possono essere controllati senza fili. La potenza e lo zoom devono essere impostati manualmente sul Mitros+ quando è in modalità Ricevitore Strato II.
Le modalità senza fili: Trasmettitore Ottico (Master) e Ricevitore Ottico (Slave)
Le modalità Trasmettitore Ottico (Master) e Ricevitore Ottico (Slave) utilizzano il sistema senza fili IR (infrarossi) di Canon. E’ necessario un flash Mitros+ in mo-dalità Trasmettitore Ottico (Master) sulla fotocamera per controllare i flash in re-moto (in slave) impostati in modalità Ricevitore Ottico (Slave). Lo stesso canale di trasmissione deve essere impostato sia sul flash Master, che sui flash in Slave. I gruppi di flash devono essere impostati in Slave, le funzioni del Rapporto dei gruppi devono essere impostate su flash Master. Il Mitros+ in modalità Trasmet-titore Ottico (Master) o un altro flash compatibile in modalità Master può essere utilizzato sulla fotocamera per controllare ed attivare i flash Mitros+ in modalità Ricevitore Ottico (Slave) o altri flash compatibili, impostati in modalità Slave.
Modalità Trasmettitore Ottico (Master):
1. Premere il pulsante per modificare l’impostazione dell’attivazione del flash, il canale di trasmissione, la modalità Rapporto e il Rapporto.
2. Se l’icona del flash è evidenziata e lampeggia, premere i pulsanti
freccia o per attivare o disattivare il flash (vedi sotto).
3. Se i canali di trasmissione sono evidenziati, premere i pulsanti freccia
o per cambiare il canale (1-4).
4. Se la modalità Rapporto è evidenziata, premere i pulsanti freccia o
per cambiare la modalità Rapporto senza fili (vedi sotto).
5. Se il Rapporto è evidenziato, premere i pulsanti freccia o per cambiare il Rapporto senza fili. Quando il flash è in modalità M o Multi, i para-metri del flash remoto possono essere impostati individualmente sul flash nel modalità Trasmettitore Ottico Master). (vedi sotto).
6. Premere il pulsante per confermare e uscire dalla schermata di rego-lazione.
Modalità Master con flash : Il flash Master sulla fotocamera verrà azionato quando viene scattata una foto .
Modalità Master con senza flash : Il flash Master sulla fotocam-era non verrà azionato quando viene scattata una foto. Il flash emetterà una breve raffica di luce per comunicare con i flash in slave, ma questa luce non sarà parte dell’esposizione.
Per impostare la modalità Ricevitore Ottico (Slave):
1. Premere il pulsante per cambiare il canale ed il gruppo del flash.
2. Se i canali di trasmissione sono evidenziati, premere i pulsanti freccia

80
It ISTRUZIONI D’USO
o per cambiare il canale (1-4).
3. Se il gruppo è evidenziato, premere i pulsanti freccia o per cambiare un gruppo al quale il flash è assegnato (A, B o C).
4. Premere il pulsante per confermare ed uscire dalla schermata di reg-olazione.
5. Quando i flash in modalità Ricevitore Ottico (Slave) sono pronti a scattare, la luce di assistenza AF, posta sulla parte anteriore del flash, lampeggia una volta al 1 secondo.
6. Per impostare le modalità Multi o M per lo Slave – premere e tenere premu-
to il pulsante per circa 2 sec.
7. Impostare i livelli di potenza o la frequenza Multi Strobe / Conteggio dei Lampi utilizzando i pulsanti freccia.
Nota: - Assicurarsi che i flash in modalità Trasmettitore Ottico (Master) e Ricevitore Ottico (Slave) siano impostati sullo stesso canale di trasmissione (1-4).
- Non collocare eventuali ostacoli tra l’unità master e le unità slave. Gli ostacoli possono impedire la trasmissione del segnale.
- Durante l’uso del flash con diffusore in modalità Senza Fili assicurarsi che l’area di copertura del ricevitore del segnale wireless dei flash in slave sia ri-volta verso il flash Master.
- Quando si utilizza un solo flash impostare la modalità Senza Fili su “Off”.
Canali di trasmissione
Il sistema senza fili delle modalità Trasmettitore Ottico (Master) e Ricevitore Ot-tico (Slave) del Phottix Mitros+ dispone di quattro canali di trasmissione: 1, 2, 3 e 4. I segnali provenienti dal flash in modalità Trasmettitore Ottico (Master) vengono inviati ai flash in modalità Ricevitore Ottico (Slave) su questi canali. Se il flash Master e gli Slave sono impostati su canali differenti, i flash in Slave non verranno azionati.
Utilizzo dello scatto ottico
Con un flash in modalità Trasmettitore Ottico (Master) sulla fotocamera ed i flash remoti in modalità Ricevitore Ottico (Slave), premendo il pulsante dell’ot-turatore azioneremo il flash in modalità Trasmettitore Ottico (Master) (se im-postato sullo scatto) ed i flash impostati in modalità Ricevitore Ottico (Slave) all’interno del campo del flash in modalità Trasmettitore Ottico (Master). La fo-tocamera ed il flash misureranno la scena ed azioneranno i flash in modalità TTL per esporre correttamente l’inquadratura.
Modalità Rapporto I flash in slave possono essere controllati dal flash master in differenti modalità di rapporto. Modalità disponibili:
Modalità ETTL
A+B+C Tutti i tre gruppi scattano ad una media della potenza totale calcolata.
A:BC I gruppi A e B possono essere impostati con il Rapporto flash (vedi sotto). Il gruppo C è indipendente, azionato con il livello di potenza del flash assegnato dalla fotocamera.
La compensazione EV dei gruppi A e B è regolabile.
1. Premere il pulsante dopo l’uscita della schermata di impostazione del Rapporto Flash.
2. Premere il pulsante o per regolare verso l’alto o verso il basso la compensazione EV per i gruppi A e B.
3. Inoltre è possibile regolare la compensazione EV per il gruppo C.
4. Premendo il pulsante dopo aver impostato il rapporto flash, questo sposta la selezione evidenziata sulla regolazione EV per il gruppo C.
5. Premere il pulsante o per regolare la compensazione EV per il gruppo C.
A:B I gruppi A e B possono essere impostati con Rapporto Flash (vedi sotto). Il gruppo C non è regolabile e non verrà azionato.
La compensazione EV dei gruppi A e B è regolabile.
1. Premere il pulsante dopo l’uscita della schermata d’impostazione del Rapporto Flash.
2. Premere il pulsante o per regolare verso l’alto o verso il basso la compensazione EV per i gruppi A e B.
Impostazione e regolazione delle modalità Rapporto
Modalità ETTL
1. Dopo l’attivazione della modalità Trasmettitore Ottico (Master) (qui sopra), premere il pulsante freccia per modificare le impostazioni della modal-ità Trasmettitore Ottico (Master).
2. Premere il pulsante freccia tre volte per evidenziare la modalità Rapporto.
3. Selezionare la modalità Rapporto. Premendo il pulsante e scorrere tra le modalità A+B+C, A:B e A:BC.
4. Quando A:B o A:BC sono evidenziate, premendo il pulsante eviden-zieremo la selezione della regolazione del rapporto sotto il rapporto.
5. Premendo il pulsante modificheremo il rapporto da 1:1 a 1:8, con intervalli a 1:5, 1:2, 1:3, 1:4, 1:6, 1:8.
6. Premendo il pulsante modificheremo il rapporto da 1:1 a 1.5:1, 2:1, 3:1, 4:1, 6:1, 8:1.
7. Premere il pulsante per confermare e uscire dalla schermata di reg-olazione.
Modalità manuale
A+B+C In modalità manuale tutti i tre gruppi sono azionati allo stesso livello di potenza. Tale livello di potenza può essere impostato.
A:B:C Il livello di potenza di ogni gruppo è individualmente regolato dall’utente (vedi sotto). Ogni gruppo è indipendente, senza che un gruppo in-fluenzi gli altri.
A:B Il livello di potenza dei gruppi A e B può essere impostato individualmente dall’utente (vedi sotto). Il gruppo C non è regolabile e non verrà azionato.

81
It ISTRUZIONI D’USO
Impostazione e regolazione delle modalità Manuali1. Dopo l’attivazione della modalità Trasmettitore Ottico (Master) (sopra),
premere il pulsante per impostare il flash in modalità Manuale (M).
2. Premenre il pulsante freccia per modificare i parametri della modal-ità Trasmettitore Ottico (Master).
3. Premere il pulsante freccia tre volte per evidenziare la modalità Rapporto.
4. Premendo il pulsante e scorrere tra le modalità A+B+C, A:B e A:B:C.
5. Premere il pulsante per confermare e uscire dalla schermata di rego-lazione.
6. Premere il pulsante per regolare i livelli di potenza.
7. Premendo il pulsante o modificheremo il livello di potenza Flash (da 1/1 a 1/128, in 1/3 stop).
8. Premendo il pulsante modificheremo i gruppi da A a B a C, con il
pulsante da C a B ad A (se applicabile).
9. Premere il pulsante per uscire dalla modalità regolazione del livello di potenza.
Modalità Multi
A+B+C Tutti e tre i gruppi scattano in modalità Multi allo stesso livello di po-tenza, frequenza e conteggio dei lampi.
A:B:C Il livello di potenza di ogni gruppo è impostato individualmente dall’utente (vedi sotto). La frequenza ed il conteggio dei lampi del multi strobe di ciascun gruppo sono gli stessi, e possono essere modificati soltanto sul grup-po A.
A:B I gruppi A e B possono essere impostati su livelli di potenza individual-mente dall’utente (vedi sotto). La frequenza ed il conteggio dei lampi del multi strobe dei gruppi A e B sono gli stessi, e possono essere modificati soltanto sul gruppo A. Il gruppo C non è regolabile e non verrà azionato.
Impostazione e regolazione delle modalità Multi
1. Dopo l’attivazione della modalità Trasmettitore Ottico (Master) (sopra),
premere il pulsante per impostare il flash in modalità Multi.
2. Premenre il pulsante freccia per modificare i parametri della modal-ità Trasmettitore Ottico (Master).
3. Premere il pulsante freccia tre volte per evidenziare la modalità Rap-porto.
4. Selezionare la modalità Rapporto. Premendo il pulsante e scorrere tra le modalità A+B+C, A:B e A:B:C.
5. Premere il pulsante per confermare e uscire dalla schermata di rego-lazione.
6. Premere il pulsante per regolare i livelli di potenza.
7. Premendo il pulsante o modificheremo il livello di potenza Flash (da 1/1 a 1/128, in 1/3 stop).
8. Premendo il pulsante modificheremo i gruppi da A a B a C, con il
pulsante da C a B ad A (se applicabile), e consentiremo di modificare il livello di potenza di questi gruppi.
9. Premendo il pulsante dopo essere passati tra i gruppi spostare il cursore sulle selezioni frequenza e conteggio dei lampi.
10. Premendo il pulsante e potremo modificare la frequenza ed il conteggio dei lampi. Queste impostazioni possono essere modificate solo per il gruppo A e saranno applicate al gruppo B o C (se applicabile).
11. Premere il pulsante per uscire dalla modalità regolazione del livello di potenza.
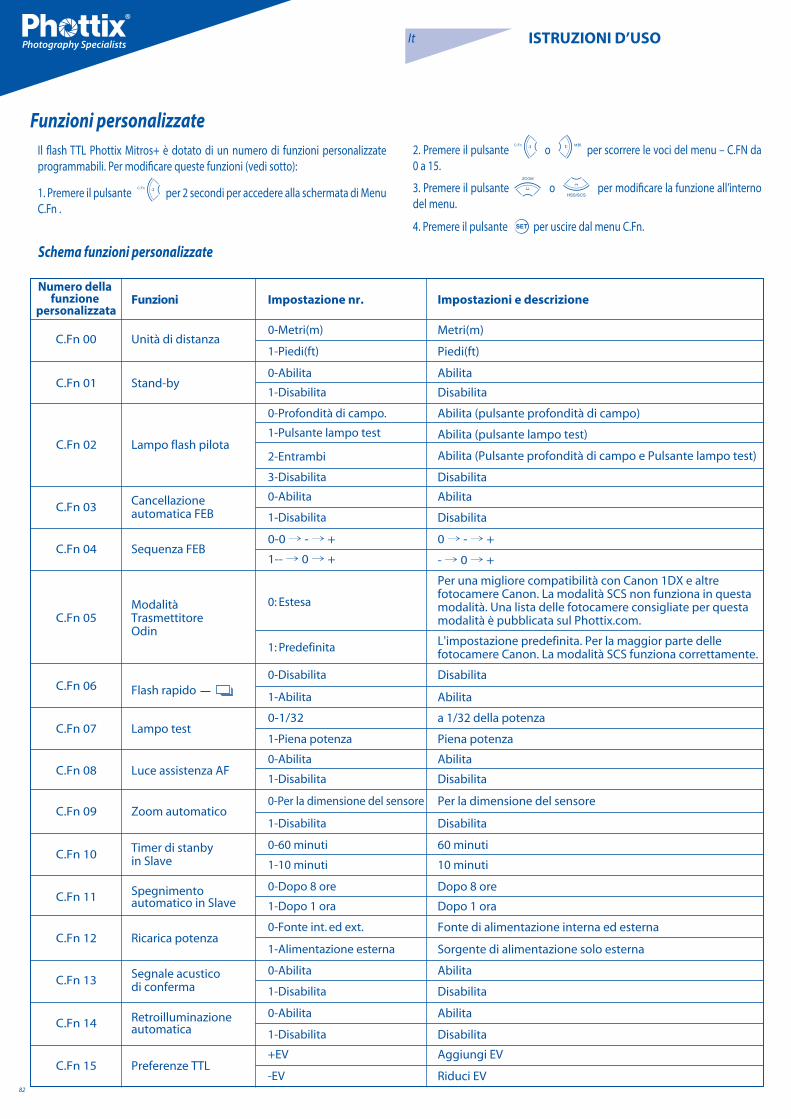
82
It ISTRUZIONI D’USO
Funzioni personalizzate Il flash TTL Phottix Mitros+ è dotato di un numero di funzioni personalizzate programmabili. Per modificare queste funzioni (vedi sotto):
1. Premere il pulsante per 2 secondi per accedere alla schermata di Menu C.Fn .
2. Premere il pulsante o per scorrere le voci del menu – C.FN da 0 a 15.
3. Premere il pulsante o per modificare la funzione all’interno del menu.
4. Premere il pulsante per uscire dal menu C.Fn.
Schema funzioni personalizzate
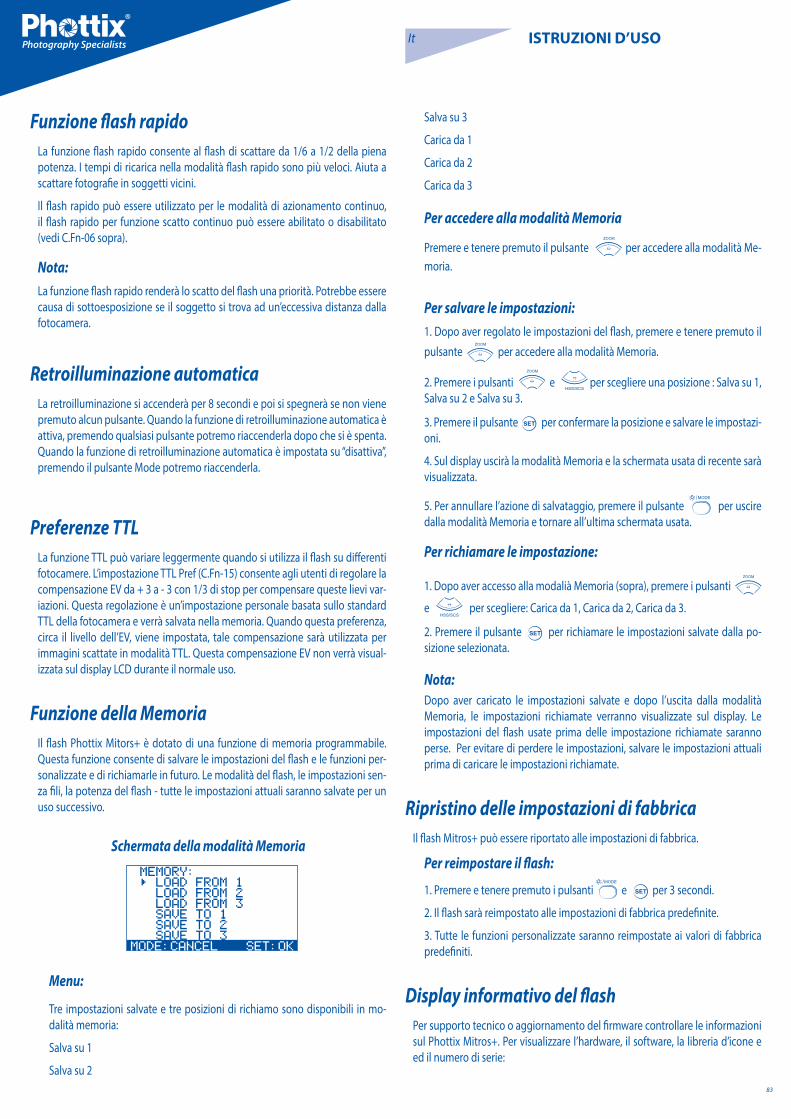
83
It ISTRUZIONI D’USO
Funzione flash rapidoLa funzione flash rapido consente al flash di scattare da 1/6 a 1/2 della piena potenza. I tempi di ricarica nella modalità flash rapido sono più veloci. Aiuta a scattare fotografie in soggetti vicini.
Il flash rapido può essere utilizzato per le modalità di azionamento continuo, il flash rapido per funzione scatto continuo può essere abilitato o disabilitato (vedi C.Fn-06 sopra).
Nota: La funzione flash rapido renderà lo scatto del flash una priorità. Potrebbe essere causa di sottoesposizione se il soggetto si trova ad un’eccessiva distanza dalla fotocamera.
Retroilluminazione automaticaLa retroilluminazione si accenderà per 8 secondi e poi si spegnerà se non viene premuto alcun pulsante. Quando la funzione di retroilluminazione automatica è attiva, premendo qualsiasi pulsante potremo riaccenderla dopo che si è spenta. Quando la funzione di retroilluminazione automatica è impostata su “disattiva”, premendo il pulsante Mode potremo riaccenderla.
Preferenze TTLLa funzione TTL può variare leggermente quando si utilizza il flash su differenti fotocamere. L’impostazione TTL Pref (C.Fn-15) consente agli utenti di regolare la compensazione EV da + 3 a - 3 con 1/3 di stop per compensare queste lievi var-iazioni. Questa regolazione è un’impostazione personale basata sullo standard TTL della fotocamera e verrà salvata nella memoria. Quando questa preferenza, circa il livello dell’EV, viene impostata, tale compensazione sarà utilizzata per immagini scattate in modalità TTL. Questa compensazione EV non verrà visual-izzata sul display LCD durante il normale uso.
Funzione della Memoria
Il flash Phottix Mitors+ è dotato di una funzione di memoria programmabile. Questa funzione consente di salvare le impostazioni del flash e le funzioni per-sonalizzate e di richiamarle in futuro. Le modalità del flash, le impostazioni sen-za fili, la potenza del flash - tutte le impostazioni attuali saranno salvate per un uso successivo.
Schermata della modalità Memoria
Menu:
Tre impostazioni salvate e tre posizioni di richiamo sono disponibili in mo-dalità memoria:
Salva su 1
Salva su 2
Salva su 3
Carica da 1
Carica da 2
Carica da 3
Per accedere alla modalità Memoria
Premere e tenere premuto il pulsante per accedere alla modalità Me-moria.
Per salvare le impostazioni:1. Dopo aver regolato le impostazioni del flash, premere e tenere premuto il
pulsante per accedere alla modalità Memoria.
2. Premere i pulsanti e per scegliere una posizione : Salva su 1, Salva su 2 e Salva su 3.
3. Premere il pulsante per confermare la posizione e salvare le impostazi-oni.
4. Sul display uscirà la modalità Memoria e la schermata usata di recente sarà visualizzata.
5. Per annullare l’azione di salvataggio, premere il pulsante per uscire dalla modalità Memoria e tornare all’ultima schermata usata.
Per richiamare le impostazione:
1. Dopo aver accesso alla modalià Memoria (sopra), premere i pulsanti
e per scegliere: Carica da 1, Carica da 2, Carica da 3.
2. Premere il pulsante per richiamare le impostazioni salvate dalla po-sizione selezionata.
Nota:Dopo aver caricato le impostazioni salvate e dopo l’uscita dalla modalità Memoria, le impostazioni richiamate verranno visualizzate sul display. Le impostazioni del flash usate prima delle impostazione richiamate saranno perse. Per evitare di perdere le impostazioni, salvare le impostazioni attuali prima di caricare le impostazioni richiamate.
Ripristino delle impostazioni di fabbricaIl flash Mitros+ può essere riportato alle impostazioni di fabbrica.
Per reimpostare il flash:
1. Premere e tenere premuto i pulsanti e per 3 secondi.
2. Il flash sarà reimpostato alle impostazioni di fabbrica predefinite.
3. Tutte le funzioni personalizzate saranno reimpostate ai valori di fabbrica predefiniti.
Display informativo del flashPer supporto tecnico o aggiornamento del firmware controllare le informazioni sul Phottix Mitros+. Per visualizzare l’hardware, il software, la libreria d’icone e ed il numero di serie:
84
It ISTRUZIONI D’USO
Specifiche tecnicheModalità: E-TTL ed E-TTL II, Manuale e Multi stroboscopico
Guida No.: 58/190 (a 105 mm di lunghezza focale, ISO 100 in metri/piedi)
Copertura del flash: 24-105 mm (14 mm con pannello diffusore grandangolare)
Zoom automatico (la copertura flash si regola automaticamente per adattarsi alla lunghezza focale dell’obiettivo)
Zoom manuale (lo zoom può essere regolato cambiando l’impostazione sulla fotocamera/flash)
Rotazione: 360 gradi, Su-Giù: da -7 a 90 gradi
FEC (Compensazione dell’esposizione del flash): Manuale
FEB (Bracketing dell’esposizione con il flash): ± 3 stop con incrementi di 1/3 di stop (Compensazione manuale dell’esposizione del flash e funzione FEB possono essere combinate)
Modalità di sincronizzazione: Sincronizzazione sulla prima tendina, sin-cronizzazione sulla seconda tendina, sincronizzazione ad alta velocità
Flash stroboscopico: 1-199 Hz Numero di lampi: 1-100
Indicatore di conferma dell’esposizione del flash: In modalità E-TTL s’illumi-nano le spie LED di colore blu
Ricarica del flash (con batterie alcaline di formato AA)
Indicatore tempo di ricarica/pronto flash:
Flash normale: ca. 0.1-5 sec/La spia LED rossa s’illumina.
Flash rapido: ca. 0.1-2.5 sec/La spia LED verde s’illumina.
Alimentazione interna: Quattro batterie alcaline formato AA o batterie Ni-MH formato AA
Batteria esterna: Compatibile con Phottix Battery Pack e battery pack com-patto Canon CP-E4 usato con l’apposito adattatore
Risparmio energetico: In modalità slave non wireless: 90 secondi, in modalità slave wireless: (programmabile) 10 o 60 minuti
Flash wireless
Metodo di trasmissione: Impulso ottico e Segnale radio
Canali: 4
Opzioni wireless: Trasmettitore Odin, Ricevitore Odin, Ricevitore Strato II, Trasmettitore Ottico (Master), Ricevitore Ottico (Slave), OFF, Slave Ottico
Gamma di trasmissione (ca.): Radio: 100m+, Ottico: in ambienti chi-usi:12-16m/39.3-52.4 piedi, all’aperto: 7-9m/22.9-29.5 piedi.
Angolo di ricezione: ±40°(orizzontale), ±30°(verticale)
Gruppi slave controllati: 3 (A, B e C)
Controllo Rapporto flash: 1:8-1:1-8:1
Corrente di standby: ≤100uA in modalità sleep
Dimensioni: (Lung. x Larg. x Alt.): 202.8×77.5×58.3 mm
Peso: 427 g (solo flash, batterie escluse)
1. Premere il pulsante quando il flash è acceso.
2. Premere un qualsiasi pulsante per uscire da questa schermata e accedere allo schermo LCD.
Modifiche al condensatore del flash:Se il flash non viene utilizzato per un certo periodo di tempo posso avere luogo cambiamenti fisici all’interno del condensatore del flash. Assicurarsi di attivare il flash per un minimo di 10 minuti ogni tre mesi, per evitare eventuali cambia-menti fisici.

85
It ISTRUZIONI D’USO
www.phottix.com
Dichiarazione CE di conformità Noi: Phottix (HK) Ltd.
Indirizzo: 10/F Block A, Yip Fat Factory Building, Phase 1, 77 Hoi Yuen Rd, Kwun Tong, Kln, Hongkong
e
Rappresentante autorizzato per l’Europa
Phottix Europe Sp. z o.o.
Piotrkowska 66
90-105 Lodz, Polonia
KRS 0000327336
dichiariamo che il prodotto indicato sotto:
nome del prodotto: Phottix Mitros+ TTL Transceiver Flash
numero di modello: Mitros+
è conforme ai requisiti fondamentali secondo la Direttiva R&TTE 1999/5/EC, purché il prodotto sia utilizzato correttamente, ed alle seguenti norme o altri documenti normativi:
ETSI EN 300 440-1 V1.6.1(2010-08)
ETSI EN 300 440-2 V1.4.1(2010-08)
ETSI EN 301 489-1 V1.9.2/2011-09
ETSI EN 301 489-3 V1.4.1/2002-08
EN 62479: 2010-09
Firmato da:
Paul Czernik
CEO/Direttore generale
Phottix Europe Sp. z o.o.
Lodz, Settembre 2013
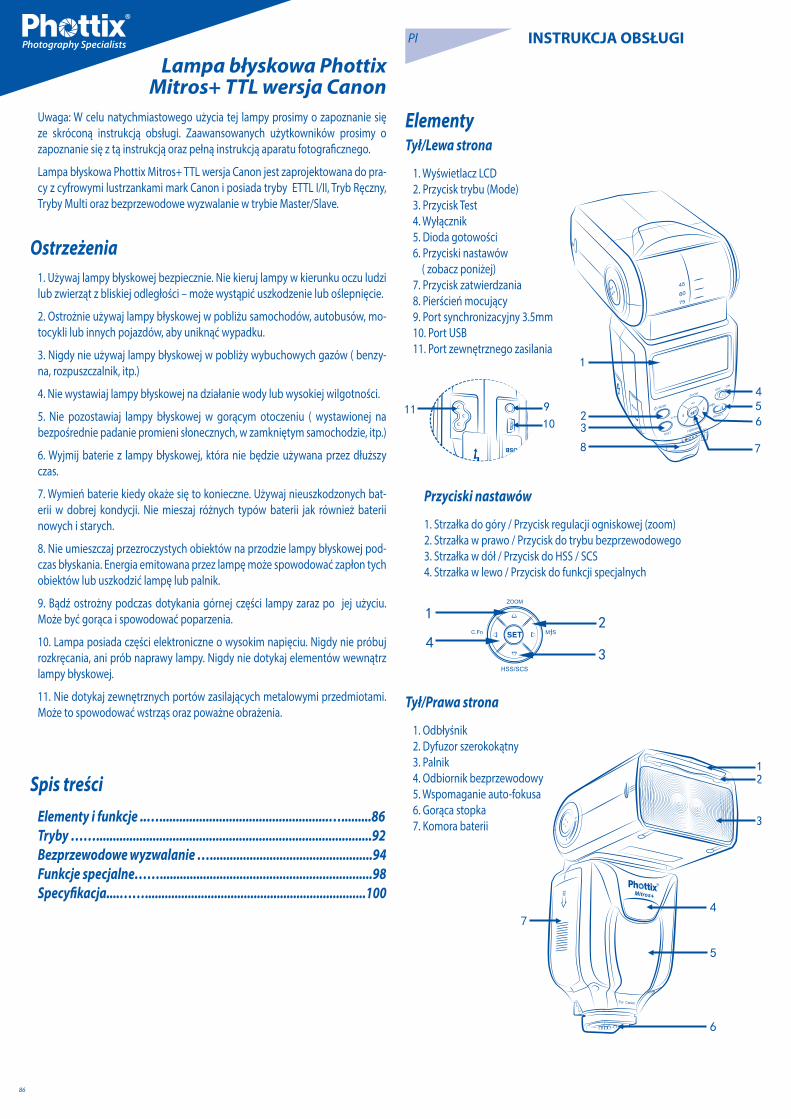
86
Pl INSTRUKCJA OBSŁUGI
Uwaga: W celu natychmiastowego użycia tej lampy prosimy o zapoznanie się ze skróconą instrukcją obsługi. Zaawansowanych użytkowników prosimy o zapoznanie się z tą instrukcją oraz pełną instrukcją aparatu fotograficznego.
Lampa błyskowa Phottix Mitros+ TTL wersja Canon jest zaprojektowana do pra-cy z cyfrowymi lustrzankami mark Canon i posiada tryby ETTL I/II, Tryb Ręczny, Tryby Multi oraz bezprzewodowe wyzwalanie w trybie Master/Slave.
Ostrzeżenia1. Używaj lampy błyskowej bezpiecznie. Nie kieruj lampy w kierunku oczu ludzi lub zwierząt z bliskiej odległości – może wystąpić uszkodzenie lub oślepnięcie.
2. Ostrożnie używaj lampy błyskowej w pobliżu samochodów, autobusów, mo-tocykli lub innych pojazdów, aby uniknąć wypadku.
3. Nigdy nie używaj lampy błyskowej w pobliży wybuchowych gazów ( benzy-na, rozpuszczalnik, itp.)
4. Nie wystawiaj lampy błyskowej na działanie wody lub wysokiej wilgotności.
5. Nie pozostawiaj lampy błyskowej w gorącym otoczeniu ( wystawionej na bezpośrednie padanie promieni słonecznych, w zamkniętym samochodzie, itp.)
6. Wyjmij baterie z lampy błyskowej, która nie będzie używana przez dłuższy czas.
7. Wymień baterie kiedy okaże się to konieczne. Używaj nieuszkodzonych bat-erii w dobrej kondycji. Nie mieszaj różnych typów baterii jak również baterii nowych i starych.
8. Nie umieszczaj przezroczystych obiektów na przodzie lampy błyskowej pod-czas błyskania. Energia emitowana przez lampę może spowodować zapłon tych obiektów lub uszkodzić lampę lub palnik.
9. Bądź ostrożny podczas dotykania górnej części lampy zaraz po jej użyciu. Może być gorąca i spowodować poparzenia.
10. Lampa posiada części elektroniczne o wysokim napięciu. Nigdy nie próbuj rozkręcania, ani prób naprawy lampy. Nigdy nie dotykaj elementów wewnątrz lampy błyskowej.
11. Nie dotykaj zewnętrznych portów zasilających metalowymi przedmiotami. Może to spowodować wstrząs oraz poważne obrażenia.
Spis treściElementy i funkcje ..…...................................................….........86Tryby ……...................................................................................92Bezprzewodowe wyzwalanie ….................................................94Funkcje specjalne……................................................................98Specyfikacja....……...................................................................100
Lampa błyskowa Phottix Mitros+ TTL wersja Canon
ElementyTył/Lewa strona
1. Wyświetlacz LCD 2. Przycisk trybu (Mode)3. Przycisk Test4. Wyłącznik5. Dioda gotowości6. Przyciski nastawów ( zobacz poniżej)7. Przycisk zatwierdzania8. Pierścień mocujący9. Port synchronizacyjny 3.5mm10. Port USB11. Port zewnętrznego zasilania
Przyciski nastawów
1. Strzałka do góry / Przycisk regulacji ogniskowej (zoom)2. Strzałka w prawo / Przycisk do trybu bezprzewodowego3. Strzałka w dół / Przycisk do HSS / SCS 4. Strzałka w lewo / Przycisk do funkcji specjalnych
Tył/Prawa strona
1. Odbłyśnik2. Dyfuzor szerokokątny3. Palnik4. Odbiornik bezprzewodowy5. Wspomaganie auto-fokusa6. Gorąca stopka7. Komora baterii

87
Pl INSTRUKCJA OBSŁUGI
Uwaga:Te wskazówki zakładają iż:
1. Aparat i lampa są włączone.
2. Lampa i aparat mają takie same nastawy jak w tej instrukcji.
3. Funkcje specjalne aparatu oraz lampy ustawione są na domyślne.
4. Lampa błyskowa jest kompatybilna z cyfrową lustrzanką Canon.
Umieszczanie baterii1. Naciśnij na przykrywkę baterii i przesuń do dołu. Przykrywka otworzy się i uniesie.
2. Umieść baterie AA w sposób pokazany na diagramie wewnątrz komory na baterie.
3. Opuść przykrywkę baterii i przesuń do góry lampy zamykając ją na swoim miejscu.
Uwaga:
- Prosimy o używanie standardowych baterii AA dobrej jakości, tego samego typu i marki. Upewnij się, że wszystkie baterie mają podobny poziom naład-owania.
- Baterie mogą być gorące podczas używania lampy. Prosimy o ostrożność podczas zmiany baterii.
- Jeśli lampa nie będzie używana przez dłuższy czas przechowuj z wyjętymi bateriami.
Umieszczanie lampy na aparacieWyłącz lampę i aparat
1. Umieść lampę na gorącej stopce aparatu.
2. Wsuń lampę na gorącą stopkę.
3. Zablokują lampę na tej pozycji dokręcając pierścień mocujący w prawą stronę, aż do kliknięcia.
4. Aby odblokować, przesuń pierścień mocujący w lewą stronę.
Włączanie/wyłączanie lampy błyskowej1. Aby włączyć lampę przesuń wyłącznik na pozycję ON.
2. Aby wyłączyć lampę przesuń wyłącznik na pozycję OFF.
Wskaźnik naładowania bateriiWskaźnik naładowania baterii na wyświetlaczu (zobacz poniżej) będzie poka-zywał orientacyjny poziom naładowania baterii. Używaj tego jako ogólną ws-kazówkę kiedy należy wymienić baterie. Jeśli cykle ładowania lampy trwają bardzo długo (30 sekund) niezbędna jest wymiana baterii.
Podnoszenie i obracanie palnika lampy1. Palnik lampy podnosi się w poziomach od -7 do 90 stopni z odstępami co -7, 0, 45, 60, 75 i 90 stopni. Delikatnie zmieniaj pozycję palnika do wybranej pozycji.
2. Palnik będzie obracał się o 180 stopni w każdą ze stron z odstępami co 60, 75, 90, 120, 150 i 180 stopni. Delikatnie zmieniaj pozycję palnika do wybranej pozycji.
3. Kiedy palnij lampy jest podniesiony lub obrócony z domyślnej pozycji 0 stop-ni na wprost ogniskowa ustawi się na 50mm. “- -” wyświetli się na wyświetlaczu LCD. Lampa zmienia ogniskową kiedy palnik jest podniesiony lub obrócony. Może to być ustawione w trybie Mzoom. (zobacz poniżej).
4. Na pozycji -7° lampa będzie działała na domyślnych ustawieniach.
Korzystanie z odbłyśnika i dyfuzora szerokokąt-nego
Lampa Phottix Mitros+ Flash jest wyposażona w biały odbłyśnik i dyfuzor szer-okokątny umieszczony przy palniku.
1. Dyfuzor szerokokątny spowoduje rozproszenie światła do ekwiwalentu ogn-iskowej 14mm.
2. Odbłyśnik może być wykorzystany jeśli palnik lampy skierowany jest ku górze, aby odbić światło do przodu.
Sposób użycia:
1. Delikatnie wyjmij dyfuzor i odbłyśnik górnej części lampy chwytając są grzbiet na dole dyfuzora.
2. Jeśli dyfuzor jest opuszczony na palniku lampy, delikatnie wsuń odbłyśnik do środka jeśli nie jest potrzebny.
3. W celu korzystania wyłącznie z odbłyśnika wsuń delikatnie dyfuzor do środka lampy.
Korzystanie z zewnętrznego dyfuzoraLampa Phottix Mitros+ posiada w zestawie zewnętrzny dyfuzor, który może być umieszczony na palniku lampy. Jest to dobry sposób na zmiękczenie świata, re-dukcję przepaleń i cieni oraz lepszego wypełnienia w fotografii makro.
Sposób użycia:
1. Umieść zewnętrzny dyfuzor na palniku lampy znaczkiem ”UP” do góry.
2. Umieść jeden bok dyfuzora w zatrzasku na lampie.
3. Wykonaj to samo na przeciwnym boku.
88
Pl INSTRUKCJA OBSŁUGI
Zabezpieczenie przed przegrzaniemLampa Phottix Mitros+ posiada zabezpieczenie przed przegrzaniem zwalnia-jące czasy ładowania lampy aby uchronić lampę od uszkodzenia. 20 błysków pełnej mocy aktywuje to zabezpieczenie. Ikona [Hot!] pojawi się na wyświet-laczu kiedy zabezpieczenie będzie aktywne.
W celu uniknięcia dalszego przegrzania lub trwałego uszkodzenia lampy czasy ładowania zostaną zwiększone w celu zmniejszenia temperatury palnika. Od-czekaj 10 minut przed ponownym użyciem.
Jeśli lampa będzie nadal używana po tym jak pojawi się ikona [Hot!] i palnik nie zostanie schłodzony ikona [Stop] pojawi się na wyświetlaczu lampy. Zaprzestań używania lampy i poczekaj 10 minut na jej ochłodzenie.
Port synchronizacyjny i USB1. 3.5mm port synchronizacyjny może być wykorzystany, przy użyciu przewodu synchronizacyjnego 3.5mm, do wyzwolenia lampy za pomocą wyzwalacza lamp lub aparatu. Port ten jedynie odbiera sygnał.
2. Port USB wykorzystywany jest do wykonywania aktualizacji oprogramowania lampy. Informacje o dostępnych aktualizacjach dostępne są na stronach Phottix.
Dioda gotowościLewa dioda: Sygnalizuje gotowość lampy do pracy. W trybie “Quick Flash” dioda migała na zielono gdy lampa jeśli minimalnie naładowana. Dioda ta będzie mi-gała na czerwono kiedy lampa będzie w pełni naładowana.
Prawa dioda: Potwierdzenie ekspozycji. Jeśli standardowa ekspozycja zostanie ustawiona dioda będzie świeciła na niebiesko przez ok. 3 sekundy. Jeśli lampa nie zapali się podejdź bliżej do obiektu lub zwiększ czułość ISO w ustawieniach aparatu.
Port zewnętrznego zasilaniaPort zewnętrznego zasilania to zastrzeżony wzór Phottix pasujący do prze-wodów zasilających Phottix. Port ten jest kompatybilny z battery-packiem firmy Canon CP-E4 i podobnymi modelami poprzez dołączony adapter.
Uwaga: - Baterie muszą być w lampie podczas pracy z battery-packiem.
- Nigdy nie podłączaj battery-packów nie kompatybilnych z systemem Canon.

89
Pl INSTRUKCJA OBSŁUGI
Wyświetlacz LCD
Tryb E-TTL II/E-TTL automatyczny
Tryb ręczny Bezprzewodowe wyzwalania lampy przez sygnał op-tyczny (fotocelę) oraz sygnał radiowy
Tryb bezprzewodowy
Tryb Multi
Azoom : zoom automatycznyMzoom : zoom ręczny
Tryb E-TTL II/E-TTL
Kierunek palnika do góry Na wprost Do dołu
Sygnał dźwiękowy Wł Wył
Funkcje specjalne
Zasięg lampy
Infomacja FEB
Informacja FEC
Ogniskowa
Wskaźnik baterii
Ikona przegrzania
m: metryf: stopy
Przysłona
HSS SCS
M: Tryb ręczny
Moc lampyRadio : Nadajnik ODIN
Radio : Odbiornik STRATO II
Tryb bezprzewodowy wyłączony
Fotocela : Lampa zależna SLAVE
Radio : Odbiornik ODINFotocela: Optyczny nadajnik MASTER
Fotocela: Optyczny odbiornik
Tryb Mutli
Liczba błysków
Częstotliwość

90
Pl INSTRUKCJA OBSŁUGI
Wyzwalanie radiowe : Tryb nadajnika ODIN
Wyzwalanie optyczne: OP odbiornik (SLAVE)
Wyzwalanie optyczne: OP Slave
Zapisywanie ustawień
Wyzwalanie radiowe : Tryb proporcji nadajnika ODIN
Wyzwalanie radiowe : Tryb odbiornika ODIN
Wyzwalanie radiowe : STRATO II RX mode
Wyzwalanie optyczne : OP nadajnik (Master)
Nadajnik (Lampa lokalna)
Grupa
Grupa wyłączona (Off)
Group Mode
Tryb nadajnika
Kanał
Wspoma-ganie AF wł
Wspoma-ganie AF wył
Proporcje
Proporcje błysku
Kompencacja EV A: B
Grupa ODIN
Tryb bezprzewodowy : Odin RX (Odbiornik)
Tryb bezprzewodowy : STRATO II RX (Odbiornik)
Tryb lampy
Tryb proporcji
Kanał
Optical : OP TX (Master)Wartość proporcji
Lampa Mater wł
Lampa Mas-ter wył.
Grupa
Wyzwlanie optyczne: OP Nadajnik(Slave)
Wyzwalanie optyczne : OP zależne
Pamięć
Zapisywanie
Anuluj
Wczytanie ustawień
OK / Zatwierdź

91
Pl INSTRUKCJA OBSŁUGI
Funkcje Auto-ZapisuLampa Phottix Mitros+ zapamięta ustawione wcześniej parametry, tryb, ustaw-ioną moc itp. po wyłączeniu i włączeniu lampy.
Ustawianie ogniskowej lampyLampa Phottix Mitros+ posiada dwa tryby ogniskowania – automatyczny (Azomm) i ręczny (Mzoom). Automatyczny dynamicznie zmienia ogniskową lampy podczas zmiany ogniskowej na aparacie fotograficznym, aby zapewnić optymalne oświetlenie. Ręczny sposób ustawiania ogniskowej pozwala użyt-kownikowi na ustawienie wybranej wartości.
W celu ustawienia:
1. Wciśnij .
2. Obszar ogniskowej na wyświetlaczu będzie migał oraz zostanie podświet-lony.
3. Wciśnij lub , aby ustawić ogniskową lampy na Azoom lub na Mzoom i wybraną ręcznie wartość.
4. Wciśnij kiedy zostanie ustawiona już żądana wartość.
Uwaga:1. W trybie Azoom i palniku skierowanym ku górze lub innym kącie niż 0° lub obróconym od standardowej pozycji na wprost – lampa zmieni swoją ogn-iskową na 50mm. ”- -” wyświetli się na wyświetlaczu LCD. Ogniskowa lampy nie zmieni się, jeśli palnik będzie pochylony na ” -7° ” .
2. Tryb Azoom będzie dostępny tylko kiedy palnik lampy ustawiony jest na 0 lub -7° .
3. W trybie Mzoom i podniesionym lub obróconym palniku od pozycji do-myślnej ogniskowa nie zmieni swojej wartości od wcześniej ustawionej.
4. Ogniskowa lampy może zostać ustawiona kiedy palnik jest skierowany ku górze lub obrócony poprzez zmianę na tryb Mzoom i zastosowanie żądanych nastawów.
Ustawianie trybu szybkiego wyzwalania (HSS) i wyzwolenia na drugą kurtynę (SCS)
Lampa Phottix Mitros+ posiada obie funkcje trybu szybkiego wyzwalania (HSS) i wyzwolenia na drugą kurtynę (SCS). Więcej informacji w dalszej części tej in-strukcji.
W celu ustawienia:
1. Wciśnij przycisk .
2. Przycisk będzie zmieniał pomiędzy trybem HSS, SCS i wyłączaniem obu.
Uwaga::- Tryb HSS i SCS są dostępne w trybach ETTL oraz trybie ręcznym. Nie są dostępne w trybie Multi.
Przycisk TestWciśnięcie przycisku test spowoduje wyzwolenie lampy. Może to być stosowane do wykonania pomiaru (tylko w trybie ręcznym). W trybie bezprzewodowego wyzwalania na lamie z ustawieniem Master wciśnięcie przycisku test wyzwo-li lampy z podporządkowane Slave ustawione na tym samym kanale. Są one sterowane przez lampę nadrzędną Master. Poziom błysku wyzwalanego przez przycisk Test można regulować. (Szczegóły poniżej C.Fn-07).
Funkcja przechodzenia w stan czuwania W celu oszczędzania baterii lampa Phottix Mitros+ wyposażona jest w funkcję przechodzenia w stan czuwania i automatyczne wyłączenie.
1. Przy wyłączonym trybie bezprzewodowym i włączonym trybie lampy pod-porządkowanej Slave: lampa przejdzie w stan czuwania po 90 sekundach bezczynności. Wyświetlacz lampy wyłączy się. Wciśnięcie spustu migawki do połowy lub wciśnięcie przycisku Test na lampie wybudzi lampę .
2. Przy włączonym trybie bezprzewodowym i włączonym trybie lampy pod-porządkowanej Slave: lampa przejdzie w stan czuwania po 60 minutach bez-czynności. Na wyświetlaczu wyświetli się napis ”IDLE” Pełne wciśnięcie przy-cisku migawki lub wciśnięcie przycisku Test na lampie Master wybudzi lampę. Czas przechodzenia w stan czuwania może być ustawiony od 60 do 10 minut. (Szczegóły poniżej C.Fn-11) .
Lampa modelująca1. Wciśnięcie przycisku podglądu głębi ostrości w aparacie (jeśli dostępny) wy-zwoli lampę w sposób ciągły przez 1 sekundę. Taka lampa modelująca przydat-na jest przy podglądzie efektu oświetlenia oraz balansu na obiekcie.
2. Lampa modelująca dostępna jest we wszystkich trybach, ETTL, Multi i Ręcz-nym.
3. Lampa modelująca może być użyta zarówno w trybie normalnym jak i sterow-ania bezprzewodowego. Dostępne są również ustawienia. (Szczegóły poniżej C.Fn-02).
Uwaga: : 1. Przegrzanie i trwałe uszkodzenie może powstać wskutek nadmiernego użycia lampy modelującej. Proszę nie używać więcej niż 20 razy pod rząd.
2. Kiedy lampa zostanie przegrzana, automatycznie zwiększy czas ładować dopóki temperatura panika nie zmniejszy się.
Wspomaganie (AF) autofokusa1. Przy słabym oświetleniu/kontraście wbudowane wspomaganie pracy aut-ofokusa zostanie włączone. Światło wspomagania na przodzie lampy będzie wyświetlało punkt ustawiania ostrości na celu.
2. Funkcje wspomagania autofokusa można włączyć lub wyłączyć. (Szczegóły poniżej C.Fn-08).
Zmiana parametrów przysłonyLampa Phottix Mitros+ umożliwia zmianę przysłon co 1/3. Niektóre aparaty po-siadają specjalne funkcje zmiany kroków z 1/3 na 1/2 dla FEB i FEC. Jeśli funkcja ta zostanie zmieniona w aparacie lampa automatycznie będzie zmieniała para-metry przysłony co 1/2.
92
Pl INSTRUKCJA OBSŁUGI
Tryby pracy lampyLampa Phottix Mitros+ ma trzy tryby pracy: ETTL, Ręczny (M) i Multi ( Stro-boskop) .
W celu zmiany trybu:
1. Wciśnij przycisk .
2. Tryby pracy lampę będą się zmieniać kolejno: ETTL, Ręczny (M) i Multi ( Stroboskop).
3. Aktywny tryb pracy wyświetlany jest w lewym górnym rogu wyświetlacza.
Tryb ETTL (z wyłączonym trybem bezprze-wodowym)
Ekran trybu ETTL (z wyłączonym trybem bezprzewodowym)
W trybie ETTL lampa i aparat pracują wspólnie, aby ustalić właściwą wartość ekspozycji. Kiedy spust migawki jest w pełni wciśnięty lampa wykona przed-błysk, który aparat wykorzysta, aby dobrać wartość ekspozycji i mocy błysku zaraz przed wykonaniem zdjęcia.
FEC – Kompensacja ekspozycjiLampa Phottix Mitros+ posiada funkcję kompensacji ekspozycji (FEC) od -3 do +3 do 1/3 stopnia. Jest to przydatne przy kiedy zachodzi potrzeba ingerencji w automatyczne pomiary TTL .
W celu ustawienia:1. Wciśnij , aby zmieniać parametry FEC .
2. Wciśnij lub zmienić poziom kompensacji.
3. Wciśnij , aby zakończyć edycję parametrów.
Uwaga:- Niektóre aparaty posiadają specjalne funkcje zmiany kroków z 1/3 na 1/2 dla FEB i FEC. Jeśli funkcja ta zostanie zmieniona w aparacie lampa automatycznie będzie zmieniała parametry przysłony co 1/2.
FEB - BracketingBracketing (FEB) może być wykorzystany w celu automatycznej zmiany mocy lampy podczas serii zdjęć. Aparat zarejestruje trzy zdjęcia z różną ekspozycją – jedno z obliczoną ekspozycją wg aparatu, jedno prześwietlone i jedno nie-doświetlone. Poziomy prześwietlenia i niedoświetlenia mogą zostać ustawione przez użytkownika. Bracketing jest przydatny w sytuacji kiedy nie mam zbyt wiele czasu na dobranie idealne ekspozycji oraz fotografii HDR.
Niektóre aparaty posiadają funkcję przechowywania obrazów prześwietlonych, zapoznaj się z instrukcją aparatu.
W celu ustawienia:1. Wciśnij .
2. Wciśnij “FEB 0” wyświetli i podświetli się na wyświetlaczu LCD.
3. Wciśnij i , aby zmienić wartości zmiany ekspozycji.
4. Wciśnij , aby potwierdzić ustawienia.
Uwaga:- Domyślnie: Funkcja FEB zostanie wyłączona po wykonaniu 3 zdjęć. Ustawie-nia FEB można zmieniać w funkcjach specjalnych (Szczegóły poniżej C.Fn-03).
- Sekwencja wykonywania zdjęć FEB może być zmieniona. (Szczegóły poniżej C.Fn-04).
- FEB może być używane razem z z FEC i FEL ( zobacz poniżej).
- Dla uzyskania najlepszych rezultatów ustaw aparat w trybie pojedynczego zdjęcia (Single) i upewnij się czy lampa błyskowa jest w pełni naładowana przed wykonaniem drugiego i trzeciego zdjęcia.
- Niektóre aparaty posiadają specjalne funkcje zmiany kroków z 1/3 na 1/2 dla FEB i FEC. Jeśli funkcja ta zostanie zmieniona w aparacie lampa automatycznie będzie zmieniała parametry przysłony co 1/2.
Blokada pomiaru ekspozycji – FELBlokada pomiaru ekspozycji (FEL) może być używana, aby zachować pomiar ekspozycji przed wykonaniem zdjęcia. Jest to przydatne podczas punktowego pomiaru i obecnymi wieloma źródłami światła.
W trybie ETTL, wciśnij przycisk FEL na aparacie ( przycisk “ ” ) , aby skorzystać z tej funkcji. Więcej informacji o przycisku FEL znajduje się w instrukcji obsługi aparatu.
Wciśnięcie przycisku FEL spowoduje przedbłysk lampy, który zostanie użyty do pomiaru właściwej mocy błysku. Ta wartość będzie zapamiętana przez aparat. Ikona FEL będzie widoczna w wizjerze aparatu.
Za każdym razem, kiedy wciśnięty zostanie przycisk FEL, lampa wykona przed-błysk i kiedy naciśnięty zostanie spust migawki, lampa błyśnie obliczoną wcześniej mocą.
Uwaga:- Jeśli obiekt jest zbyt daleko, będzie niedoświetlony i ikona FEL będzie mi-gała przez ok. 0.5 sekundy w wizjerze aparatu.
- Jeśli obiekt jest zbyt mały, FEL może nie przynieść pożądanego rezultatu.
Tryb szybkiej synchronizacji – HSSW trybie HSS, aparat/lampa czas synchronizacji jest bliski maksymalnej szy-bkości migawki. Jest to przydatne fotografując z użyciem trybu priorytetu dla przysłony lub by wykluczyć światło zastane. Tryb HSS może się różnić w zależności od aparatu. Więcej informacji o HSS znajduje się w instrukcji obsługi aparatu.
W celu użycia trybu HSS:
1. Wciśnij .
2. Ikona HSS wyświetli się na wyświetlaczu lampy.
3. Ustaw czas migawki na większy niż czas synchronizacji z lampą i zrób zd-jęcia.
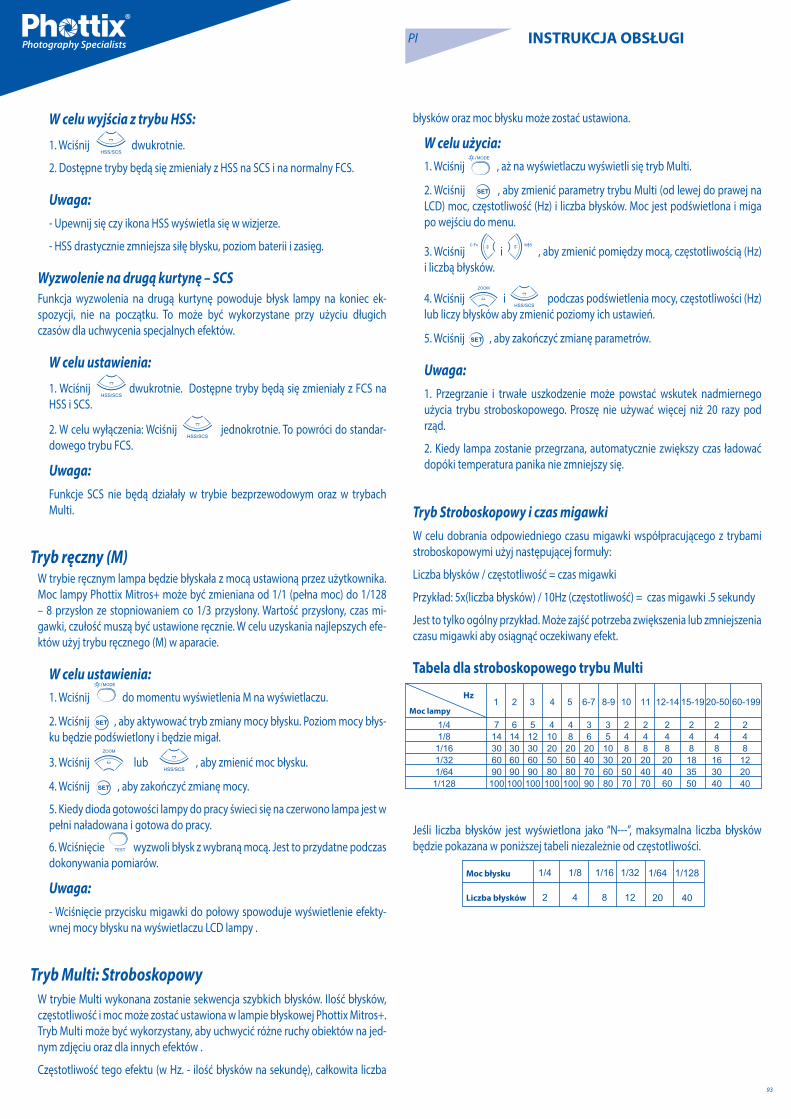
93
Pl INSTRUKCJA OBSŁUGI
W celu wyjścia z trybu HSS:
1. Wciśnij dwukrotnie.
2. Dostępne tryby będą się zmieniały z HSS na SCS i na normalny FCS.
Uwaga:- Upewnij się czy ikona HSS wyświetla się w wizjerze.
- HSS drastycznie zmniejsza siłę błysku, poziom baterii i zasięg.
Wyzwolenie na drugą kurtynę – SCSFunkcja wyzwolenia na drugą kurtynę powoduje błysk lampy na koniec ek-spozycji, nie na początku. To może być wykorzystane przy użyciu długich czasów dla uchwycenia specjalnych efektów.
W celu ustawienia:
1. Wciśnij dwukrotnie. Dostępne tryby będą się zmieniały z FCS na HSS i SCS.
2. W celu wyłączenia: Wciśnij jednokrotnie. To powróci do standar-dowego trybu FCS.
Uwaga: Funkcje SCS nie będą działały w trybie bezprzewodowym oraz w trybach Multi.
Tryb ręczny (M)W trybie ręcznym lampa będzie błyskała z mocą ustawioną przez użytkownika. Moc lampy Phottix Mitros+ może być zmieniana od 1/1 (pełna moc) do 1/128 – 8 przysłon ze stopniowaniem co 1/3 przysłony. Wartość przysłony, czas mi-gawki, czułość muszą być ustawione ręcznie. W celu uzyskania najlepszych efe-któw użyj trybu ręcznego (M) w aparacie.
W celu ustawienia:1. Wciśnij do momentu wyświetlenia M na wyświetlaczu.
2. Wciśnij , aby aktywować tryb zmiany mocy błysku. Poziom mocy błys-ku będzie podświetlony i będzie migał.
3. Wciśnij lub , aby zmienić moc błysku.
4. Wciśnij , aby zakończyć zmianę mocy.
5. Kiedy dioda gotowości lampy do pracy świeci się na czerwono lampa jest w pełni naładowana i gotowa do pracy.
6. Wciśnięcie wyzwoli błysk z wybraną mocą. Jest to przydatne podczas dokonywania pomiarów.
Uwaga:- Wciśnięcie przycisku migawki do połowy spowoduje wyświetlenie efekty-wnej mocy błysku na wyświetlaczu LCD lampy .
Tryb Multi: StroboskopowyW trybie Multi wykonana zostanie sekwencja szybkich błysków. Ilość błysków, częstotliwość i moc może zostać ustawiona w lampie błyskowej Phottix Mitros+. Tryb Multi może być wykorzystany, aby uchwycić różne ruchy obiektów na jed-nym zdjęciu oraz dla innych efektów .
Częstotliwość tego efektu (w Hz. - ilość błysków na sekundę), całkowita liczba
błysków oraz moc błysku może zostać ustawiona.
W celu użycia:1. Wciśnij , aż na wyświetlaczu wyświetli się tryb Multi.
2. Wciśnij , aby zmienić parametry trybu Multi (od lewej do prawej na LCD) moc, częstotliwość (Hz) i liczba błysków. Moc jest podświetlona i miga po wejściu do menu.
3. Wciśnij i , aby zmienić pomiędzy mocą, częstotliwością (Hz) i liczbą błysków.
4. Wciśnij i podczas podświetlenia mocy, częstotliwości (Hz) lub liczy błysków aby zmienić poziomy ich ustawień.
5. Wciśnij , aby zakończyć zmianę parametrów.
Uwaga:1. Przegrzanie i trwałe uszkodzenie może powstać wskutek nadmiernego użycia trybu stroboskopowego. Proszę nie używać więcej niż 20 razy pod rząd.
2. Kiedy lampa zostanie przegrzana, automatycznie zwiększy czas ładować dopóki temperatura panika nie zmniejszy się.
Tryb Stroboskopowy i czas migawkiW celu dobrania odpowiedniego czasu migawki współpracującego z trybami stroboskopowymi użyj następującej formuły:
Liczba błysków / częstotliwość = czas migawki
Przykład: 5x(liczba błysków) / 10Hz (częstotliwość) = czas migawki .5 sekundy
Jest to tylko ogólny przykład. Może zajść potrzeba zwiększenia lub zmniejszenia czasu migawki aby osiągnąć oczekiwany efekt.
Tabela dla stroboskopowego trybu Multi
Moc lampy
Jeśli liczba błysków jest wyświetlona jako “N---”, maksymalna liczba błysków będzie pokazana w poniższej tabeli niezależnie od częstotliwości.
94
Pl INSTRUKCJA OBSŁUGI
Bezprzewodowe wyzwalanieLampa błyskowa Mitros+ jest wyposażona kilka trybów bezprzewodowego na-dajnika i odbiornika. Mitros+ oferuje wbudowaną kompatybilność z systemem Phottix Odin oraz Strato II Multi w wersji Canon. Więcej informacji znaleźć moż-na w instrukcji obsługi urządzeń.
Mitros+ działa jako:
Nadajnik Phottix Odin
Pełne sterowanie lampy lokalnej i zdalnej w TTL oraz manualne ustawianie mocy i zoomu lampy na innych lampach Mitros+ (w trybie odbiornika) lub kom-patybilnych z odbiornikami Phottix Odin. Lampy aparatowe lub studyjne z odbi-ornikami Strato, Strato II oraz Atlas II mogą być wyzwolone w trybie manualnym przez lampę Mitros+ w trybie nadajnika Odin.
Tryb odbiornika Odin
Lampa Mitros+ w trybie odbiornika Odin może być wyzwolona przez inną lampę Mitros+ a trybue nadajnika Odin lub przez nadajnik Odin.
Tryb Odbiornika Strato II
Lampa Mitros+ w trybie odbiornika Strato II może być wyzwolona przez nada-jnik Strato II, nadajnik Odin oraz lampę Mitros+ w trybie nadajnika Odin.
Wyzwalanie optyczne tryb nadajnika – korzystając z systemu na podczerwień Canon
Wykorzystuje impuls świetlny, lampa na aparacie kontroluje i wyzwala lampy.
Wyzwalanie optyczne tryb odbiornika - korzystając z systemu na podczerwień Canon
Zdalne lampy w trybie odbiornika optycznego kontrolowane są przez lampy w trybie master umieszczone na aparacie. Za pomocą impulsu świetlnego aparat kontroluje i wyzwala lampy.
Tryb optyczny zależny
W trybie optycznym zależnym lampy błysk lampy w pobliżu wyzwoli lampę Mi-tros+ tylko w trybie manualnym
Uwaga
Lampa Mitros+ nie może być wyzwolona przez Phottix nadajniki Strato, Stra-to II lub Ares oraz Atlas II w trybie nadawania.
Wybieranie trybów bezprzewodowychDostęp i wybór trybów bezprzewodowych w lampie Mitros+:
1. Wciśnij i przytrzymaj przycisk do momentu wyświetlenia menu Mode Menu.
2. Użyj strzałek / , aby wybrać tryb bezprzewodowy.
3. Wciśnij przycisk , aby wybrać właściwy tryb bezprzewodowy.
4. Ustaw parametry bezprzewodowe ( grupy, kanały) wg potrzeb.
Uwaga:
Jeśli przycisk nie zostanie wciśnięty, Mitros+ użyje podświetlonego wy-boru po 16 sekundach bezczynności.
Odin TX ( Tryb nadajnika)Używanie lampy Mitros+ w trybie nadajnika Odin pozwala na wykorzystanie lampy na aparacie w trybie TTL lub manualnym jak również kontrolowanie grup (A, B, C) – ustawianie mocy lamp w trybie TTL lub manualnym, zoomu w lampach Mitros+ w trybie odbiornika Odin lub kompatybilnych lampach wy-posażonych w odbiorniki Odin.
Używanie trybu nadajnika Odin
Ekran trybu nadajnika Odin
Po wybraniu trybu Odin TX (powyżej)
1. Wciśnij przycisk , aby edytować grupy.
2. Strzałki / będą przełączały pomiędzy grupami L, A, B, C
3. Wciśnięcie przycisku kiedy wybrana jest grupa zmieni tryb: TTL, M(Manualny) Off(Wył).
4. Wciśnięcie strzałki / kiedy wybrana jest grupa pozwoli na zmianę ekwiwalentu ±3EV co 1/3 w trybie TTL lub zmianę mocy lampy (1/128 do 1/1 co 1/3) w trybie manualnym.
5. Wciśnij przycisk aby wyjść z trybu edycji parametrów menu trybu na-dajnika Odin
Tryb ProporcjiEkran trybu proporcji Odin w trybie nadajnika
Tryb proporcji jest zbliżony do własnego trybu firmy Canon. Proporcje pomiędzy grupą A i B mogą być ustawione od 8:1 do 1:8. Istnieje możliwość zmiany ekwi-walentu. Istnieje możliwość ustawienia trybu lampy lokalnej (L) i oraz jej mocy.
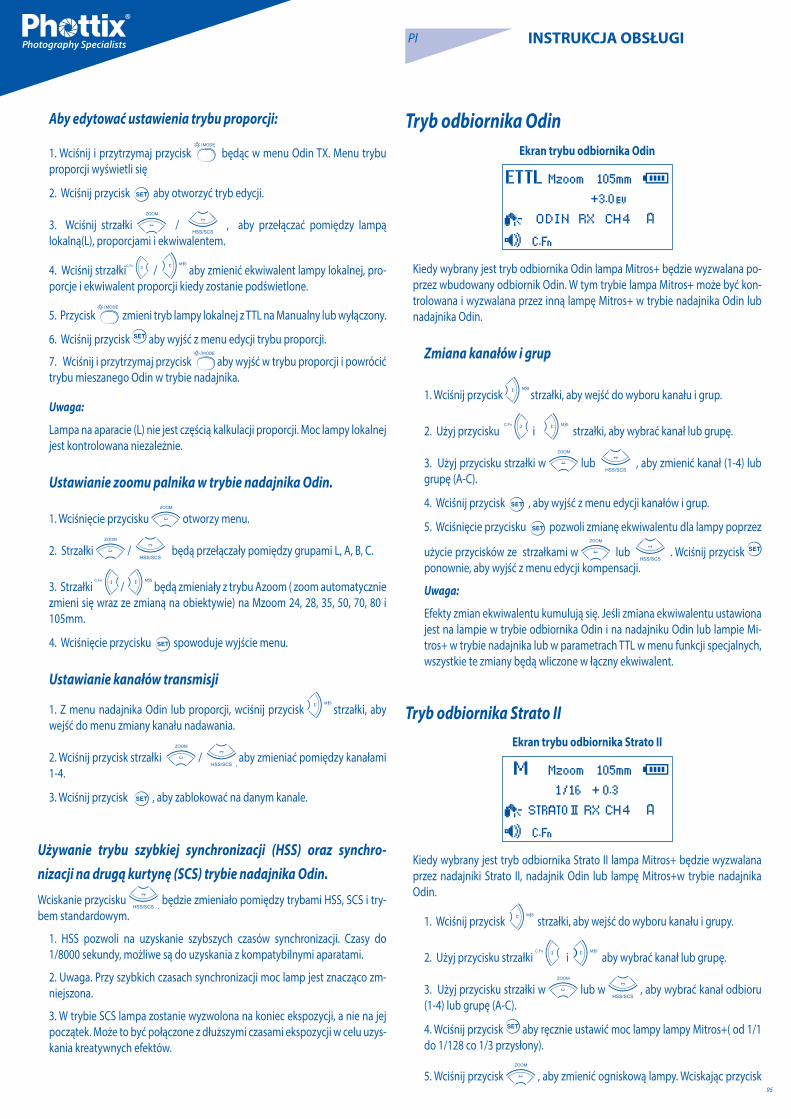
95
Pl INSTRUKCJA OBSŁUGI
Aby edytować ustawienia trybu proporcji:
1. Wciśnij i przytrzymaj przycisk będąc w menu Odin TX. Menu trybu proporcji wyświetli się.
2. Wciśnij przycisk aby otworzyć tryb edycji.
3. Wciśnij strzałki / , aby przełączać pomiędzy lampą lokalną(L), proporcjami i ekwiwalentem.
4. Wciśnij strzałki / aby zmienić ekwiwalent lampy lokalnej, pro-porcje i ekwiwalent proporcji kiedy zostanie podświetlone.
5. Przycisk zmieni tryb lampy lokalnej z TTL na Manualny lub wyłączony.
6. Wciśnij przycisk aby wyjść z menu edycji trybu proporcji.
7. Wciśnij i przytrzymaj przycisk aby wyjść w trybu proporcji i powrócić trybu mieszanego Odin w trybie nadajnika.
Uwaga:
Lampa na aparacie (L) nie jest częścią kalkulacji proporcji. Moc lampy lokalnej jest kontrolowana niezależnie.
Ustawianie zoomu palnika w trybie nadajnika Odin.
1. Wciśnięcie przycisku otworzy menu.
2. Strzałki / będą przełączały pomiędzy grupami L, A, B, C.
3. Strzałki / będą zmieniały z trybu Azoom ( zoom automatycznie zmieni się wraz ze zmianą na obiektywie) na Mzoom 24, 28, 35, 50, 70, 80 i 105mm.
4. Wciśnięcie przycisku spowoduje wyjście menu.
Ustawianie kanałów transmisji
1. Z menu nadajnika Odin lub proporcji, wciśnij przycisk strzałki, aby wejść do menu zmiany kanału nadawania.
2. Wciśnij przycisk strzałki / , aby zmieniać pomiędzy kanałami 1-4.
3. Wciśnij przycisk , aby zablokować na danym kanale.
Używanie trybu szybkiej synchronizacji (HSS) oraz synchro-nizacji na drugą kurtynę (SCS) trybie nadajnika Odin.
Wciskanie przycisku , będzie zmieniało pomiędzy trybami HSS, SCS i try-bem standardowym.
1. HSS pozwoli na uzyskanie szybszych czasów synchronizacji. Czasy do 1/8000 sekundy, możliwe są do uzyskania z kompatybilnymi aparatami.
2. Uwaga. Przy szybkich czasach synchronizacji moc lamp jest znacząco zm-niejszona.
3. W trybie SCS lampa zostanie wyzwolona na koniec ekspozycji, a nie na jej początek. Może to być połączone z dłuższymi czasami ekspozycji w celu uzys-kania kreatywnych efektów.
Tryb odbiornika OdinEkran trybu odbiornika Odin
Kiedy wybrany jest tryb odbiornika Odin lampa Mitros+ będzie wyzwalana po-przez wbudowany odbiornik Odin. W tym trybie lampa Mitros+ może być kon-trolowana i wyzwalana przez inną lampę Mitros+ w trybie nadajnika Odin lub nadajnika Odin.
Zmiana kanałów i grup
1. Wciśnij przycisk strzałki, aby wejść do wyboru kanału i grup.
2. Użyj przycisku i strzałki, aby wybrać kanał lub grupę.
3. Użyj przycisku strzałki w lub , aby zmienić kanał (1-4) lub grupę (A-C).
4. Wciśnij przycisk , aby wyjść z menu edycji kanałów i grup.
5. Wciśnięcie przycisku pozwoli zmianę ekwiwalentu dla lampy poprzez
użycie przycisków ze strzałkami w lub . Wciśnij przycisk ponownie, aby wyjść z menu edycji kompensacji.
Uwaga:
Efekty zmian ekwiwalentu kumulują się. Jeśli zmiana ekwiwalentu ustawiona jest na lampie w trybie odbiornika Odin i na nadajniku Odin lub lampie Mi-tros+ w trybie nadajnika lub w parametrach TTL w menu funkcji specjalnych, wszystkie te zmiany będą wliczone w łączny ekwiwalent.
Tryb odbiornika Strato IIEkran trybu odbiornika Strato II
Kiedy wybrany jest tryb odbiornika Strato II lampa Mitros+ będzie wyzwalana przez nadajniki Strato II, nadajnik Odin lub lampę Mitros+w trybie nadajnika Odin.
1. Wciśnij przycisk strzałki, aby wejść do wyboru kanału i grupy.
2. Użyj przycisku strzałki i aby wybrać kanał lub grupę.
3. Użyj przycisku strzałki w lub w , aby wybrać kanał odbioru (1-4) lub grupę (A-C).
4. Wciśnij przycisk aby ręcznie ustawić moc lampy lampy Mitros+( od 1/1 do 1/128 co 1/3 przysłony).
5. Wciśnij przycisk , aby zmienić ogniskową lampy. Wciskając przycisk

96
Pl INSTRUKCJA OBSŁUGI
i strzałki będzie można wybierać pomiędzy ustawieniami try-bów AZoom i MZoom. Wciśnij przycisk aby powrócić do głównego menu. Uwaga
W trybie odbiornika Strato II sygnał TTL nie jest przekazywany, jak również nie działają funkcje takie jak HSS i SCS, lub bezprzewodowa kontrola mocy/ogniskowej lamp. Moc i ogniskowa musi zostać ustawiona ręcznie na lampie Mitros+ działającej w trybie odbiornika Strato.
Tryb nadajnika(Master) i odbiornika(Slave) optycznegoTryby nadajnika i odbiornika optycznego korzystają z bezprzewodowego sys-temu na podczerwień firmy Canon. Lampa Mitros+ ustawiona w trybie nadajni-ka optycznego (Master) musi znajdować się na gorącej stopce aparatu, aby kon-trolować lampy zależne (Slave) ustawione w trybie optycznego odbiornika. Taki sam kanał musi zostać ustawiony na lampie Master jak i lampach Slave. Grupy muszą zostać ustawione dla lamp zależnych (Slave), funkcje proporcji grup muszą być ustawione dla lampy master. Lampa Mitros+ ustawiona w trybie na-dajnika (Master) lub inna kompatybilna lampa pracująca w trybie Master może być użyta na gorącej stopce aparatu, aby sterować i wyzwalać lampy Mitros+ w trybie optycznego odbiornika (Slave) lub inne kompatybilne.
Tryb nadajnika(Master):
1. Wciśnięcie przycisku pozwoli na dokonanie zmian lampy sterującej, kanału transmisji i proporcji.2. Kiedy ikona zostanie podświetlona i będzie mrugała wciśnięcie
przycisków strzałek do lub włączy wyzwalanie lampy lub je wyłączy.( zob.poniżej).3. Kiedy podświetlone będą kanały transmisji, wciśnij przycisk strzałki do
lub aby zmienić kanał od 1 do 4.
4. W podświetlonym trybie proporcji, wciśnij przycisk strzałki do lub
, aby zmienić bezprzewodowy tryb proporcji.
5. 5. W podświetlonym trybie proporcji, wciśnij przycisk strzałko do
lub , aby zmienić bezprzewodowy tryb proporcji. Kiedy lampa będzie w trybie M lub Multi, parametry lampy zależnej mogą zostać ustawione indy-widualnie na lampie w trybie nadajnika. (zob. poniżej)6. Wciśnij przycisk aby zatwierdzić i opuścić menu.
Tryb master z błyskiem lampy : Lampa sterująca na aparacie zos-tanie wyzwolona podczas wykonywania zdjęcia.
Tryb master bez błysku lampy : Lampa sterująca na aparacie nie będzie wyzwolona podczas wykonywania zdjęcia. Lampa będzie emitowała sygnał świetlny, aby komunikować się lampami podrzędnymi, ale nie będzie brała udziału w ekspozycji.
Wybieranie trybu odbiornika(Slave) optycznego:
1.Wciśnięcie przycisku pozwoli na dokonanie zmian kanału i grupy lampy. 2. Kiedy opcja kanałów będzie podświetlona, wciśnij przycisk strzałki w
lub , aby zmienić kanał 1-4.
3. Kiedy opcja grup będzie podświetlona, wciśnij przycisk strzałki w
lub aby zmienić grupę, do której lampa jest przypisana (A,B,C).
4. Wciśnij przycisk aby zatwierdzić i opuścić menu.
5. Kiedy lampy w trybie optycznego odbiornika (Slave) są gotowe to błysku, lampa wspomagania autofokusa będzie migała co 1 sekundę.
6.W celu ustawienie trybu Multi lub M w lampie zależnej (Slave) wciśnij i
przytrzymaj przycisk przez ok. 2 sekundy.
7. Ustaw moc i częstotliwość/liczbę błysków używając przycisków strzałek.
Uwaga:
- Upewnij się czy lampa sterująca (Master) i zależna (Slave) mają ustawiony ten sam kanał transmisji (1-4).
- Nie umieszczaj żadnych obiektów pomiędzy lampą Master i lampami Slave. Obiekty zasłaniające pole widzenia mogą zakłócić transmisję sygnału optycz-nego.
- Korzystając ze światła odbitego lampy bezprzewodowej upewnij się, że odbiornik impulsów optycznych w lampie Slave skierowany jest w kierunku lampy Master.
- Używając tylko jednej lampy, należy wyłączyć tryb bezprzewodowy.
Kanały transmisji
System bezprzewodowego, optycznego wyzwalania lamp Mitros+ posiada cz-tery kanały transmisji: 1, 2, 3 i 4. Sygnał z lampy Master wysyłany jest do lampy Slave na tych kanałach. Jeśli lampa Master ustawiona jest na innym kanale niż lampa Slave – nie zostanie wyzwolona.
Używanie wyzwalania optycznego
Używając lampy na aparacie w trybie nadajnika optycznego (Master) oraz lamp zdalnych w trybie odbiornika optycznego (Slave), wciśnięcie spustu migawki spowoduje wyzwolenie lampy Master oraz lamp Slave będących w zasięgu. Aparat i lampa dokona pomiaru ekspozycji w trybie TTL.
Tryby proporcjiLampy Slave mogą być kontrolowane przez lampę Master w różnych trybach proporcji. Dostępne tryby:
Tryby ETTL A+B+C Wszystkie trzy grupy wyzwolone zostaną ze średnią obliczoną łącznie mocą.
A:BC Grupy A i B mogą byś ustawione z proporcjami błysku ( zobacz poniżej). Grupa C jest niezależna i moc błysku określona jest przez aparat.
Kompensacja grup A i B może być ustawiona.
1. Wciśnij przycisk po wyjściu z menu z menu ustawień proporcji .
2. Wciśnij lub aby zmniejszyć lub zwiększyć poziom kompen-sacji dla grup A i B.
3. Poziom kompensacji dla grupy C może być również zmieniony.
4. Wciskając po ustawieniu proporcji zmieni aktywne podświetlenie na

97
Pl INSTRUKCJA OBSŁUGI
wybór kompensacji dla grupy C.
5. Wciśnij lub aby zmienić poziom kompensacji dla grupy C.
A:B Grupy A i B mogą być ustawione poprzez proporcje lampy (zobacz poniżej). Parametrem dla grupy C nie da się sterować i nie będzie wyzwolona.
Kompensacja grup A i B może być ustawiona.
1. Wciśnij przycisk po wyjściu z menu z menu ustawień proporcji.
2. Wciśnij lub aby zmniejszyć lub zwiększyć poziom kompen-sacji dla grup A i B.
Ustawianie trybów proporcji
Tryby ETTL
1. Po aktywowaniu trybu nadajnika optycznego (Master) wciśnij strzałę, aby edytować parametry nadajnika optycznego.
2. Wciśnij strzałkę trzy razy, aby podświetlić tryb proporcji.
3. Wybierz menu proporcji. Przyciski and buttons will cycle be-tween A+B+C, A:B and A:BC modes.
4. When A:B or A:BC are highlighted pressing the button will highlight the ratio adjustment selection below the ratio.
5. Wciśnięcie przycisku zmieni proporcje z 1:1 do 1:8 w krokach co 1:1.5, 1:2, 1:3, 1:4, 1:6, 1:8.
6. Wciśnięcie przycisku zmieni proporcje z 1:1 do 1.5:1, 2:1, 3:1, 4:1, 6:1, 8:1.
7. Wciśnij przycisk aby zatwierdzić i opuścić menu.
Tryby Manualne
A+B+C W trybie manualnym wszystkie trzy grupy mają ten zam poziom mocy. Poziom ten może być ustawiony.
A:B:C Mocy błysku dla każdej grupy jest ustawiany indywidualnie przez użyt-kownika. (zobacz poniżej) Każda grupa ustawiana jest niezależnie, nie mając wpływu na inną.
A:B Moc błysku grupy A i B może być ustawiany indywidualnie przez użyt-kownika (zobacz poniżej). Parametrami grupy C nie można sterować i lampa nie będzie wyzwalana.
Ustawianie trybów manualnych
1. Po wejściu do trybu nadajnika optycznego (Master) (powyżej) wciśnij przy-
cisk aby zmienić tryb na manualny (M).
2. Wciśnij przycisk strzałki, aby edytować parametry trybu nadajnika optycznego (Master).
3. Wciśnij przycisk strzałki trzy razy aby podświetlić menu proporcji.
4. Wciśnięcie przycisku lub zmieni pomiędzy trybami A+B+C, A:B i A:B:C.
5. Wciśnij przycisk aby zatwierdzić i opuścić menu.
6. Wciśnij przycisk aby ustawić moc lamp.
7. Wciśnięcie przycisku lub zmieni moc lamp (1/1 do 1/128 co 1/3 przysłonę).
8. Wciśnięcie przycisku zmieni grupy z A do B do C, przycisk zmieni grupy z C na B na A (jeśli dostępne).
9. Wciśnij przycisk aby zatwierdzić i opuścić menu edycji mocy lamp.
Tryb Multi
A+B+C Wszystkie trzy grupy błyskają w trybie Multi z taką samą mocą, częs-totliwością oraz liczbą błysków.
A:B:C Moc lamp dla każdej grupy ustawiany jest indywidualnie przez użyt-kownika (zobacz poniżej). Częstotliwość i liczba błysków lampy w trybie multi jest taki sam dla każdej z grup i parametry mogą być ustawiana tylko dla grupy grupy A.
A:B Grupy A i B mogą być ustawione z indywidualną mocą przez użytkownika (zobacz poniżej). Częstotliwość i liczba błysków dla grupy A jest taka sama jak dla grupy B i parametry mogą być ustawiana tylko dla grupy grupy A. Parame-trami grupy C nie można sterować i lampa nie będzie wyzwalana.
Ustawianie trybu Multi1. Po wejściu do trybu nadajnika optycznego (Master) (powyżej) wciśnij przy-
cisk aby zmienić tryb na Multi.
2. Wciśnij przycisk strzałki, aby edytować parametry trybu nadajnika optycznego (Master).
3. Wciśnij przycisk strzałki trzy razy aby podświetlić menu proporcji.
4. Wybierz try proporcji. Wciśnięcie przycisku i zmieni pomiędzy trybami A+B+C, A:B i A:B:C.
5. Wciśnij przycisk aby zatwierdzić i opuścić menu.
6. Wciśnij przycisk aby ustawić moc lamp.
7. Wciśnięcie przycisku lub zmieni moc lamp (1/1 do 1/128 co 1/3 przysłonę).
8. Wciśnięcie przycisku zmieni grupy z A do B do C, przycisk zmieni grupy z C na B na A (jeśli dostępne) i pozwoli na zmianę mocy błysku dla tych grup.
9. Wciśnięcie przycisku po wyborze grup zmieni na edycję częstotli-wości i liczy błysków.
10. Wciśnięcie przycisku lub pozwoli na zmianę częstotli-wości i liczby błysków. Te ustawienia mogą być zmieniane dla grupy A i będą powielone dla grup B lub C (jeśli dostępne).
11. Wciśnij przycisk aby wyjść z menu edycji mocy błysku.

98
Pl INSTRUKCJA OBSŁUGI
Funkcje specjalne Lampa The Phottix Mitros+ TTL posiada szereg programowalnych funkcji spec-jalnych. W celu zmiany tych funkcji:
1. Wciśnij na 2 sekundy aby wejść do menu funkcji specjalnych.
2. Wciśnij lub , aby zmieniać dostępne opcje menu C.Fn 0 do 15.
3. Wciśnij lub aby zmienić wartość wybranej funkcji.
4. Wciśnij aby opuścić menu funkcji specjalnych.
Tablica funkcji specjalnych

99
Pl INSTRUKCJA OBSŁUGI
Funkcja szybkiego błysku Quick FlashFunkcja szybkiego błysku pozwala na wyzwolenie lampy z mocą 1/6 do 1/2 pełnej mocy. Czasy ładowania lampy w tym trybie są szybsze. Pomaga to na uchwycenie szczegółów.
Tryb szybkiego błysku może być aktywowany dla zdjęć seryjnych za pomocą funkcji specjalnej (zobacz C.fn-06 powyżej).
Uwaga: Funkcja szybkiego błysku ustawia priorytet na błysk. Mogą mieć miejsce nie-doświetlenia jeśli obiekt znajduje się daleko od aparatu.
Automatyczne podświetleniePodświetlenie włączy się na 8 sekund, a następnie wyłączy jeśli żaden z przy-cisków nie zostanie naciśnięty. Kiedy funkcja automatycznego podświetlenia jest włączona, przyciskanie jakiegokolwiek przycisku włączy podświetlenie. Kiedy funkcja automatycznego podświetlenie jest wyłączona jedynie wciśnięcie
włączy podświetlenie.
TTL KompensacjaTTL may vary slightly when using the flash on different cameras. TTL Pref (C.Fn-15) setting allows users to adjust EV from +3 to -3 in 1/3rd stops to compensate for these slight variations. This adjustment is a personal preference based on camera standard TTL and will be stored in memory. When this EV level prefer-ence is set, this compensation will be used for images taken in TTL mode. This EV compensation will not be displayed on the LCD during regular use.
Funkcja pamięci
Lampa Phottix Mitros+ wyposażona jest w funkcję pamięci ustawień. Umożliwia to zapamiętanie ustawień i funkcji specjalnych i szybkie wczytanie w przyszłoś-ci. Tryby lamp, ustawienia bezprzewodowe, moc lamp – wszystkie ustawienia będą zapamiętane do przyszłego wykorzystania.
Ekran Funkcji Pamięci
Menu:
Trzy pozycje na na zapisanie ustawień i trzy pozycje do wczytania zapisanych ustawień:Zapisz do 1Zapisz do 2Zapisz do 3Wczytaj z 1Wczytaj z 2 Wczytaj z 3
Wejście do menu pamięci
1. Wciśnij i przytrzymaj przycisk aby wejść do menu pamięci..
Aby zapisać ustawienia:1. Po ustawieniu parametrów lampy wciśnij i przytrzymaj przycisk aby wejść do menu pamięci.
2. Wciśnij przycisk i aby wybrać pozycję: Zapisz do 1, Zapisz do 2 czy Zapisz do 3.
3. Wciśnij przycisk aby zatwierdzić pozycję i zapisać dane.
4. Menu pamięci zniknie z ekranu lampy i powróci do ostatnio używanego ekranu
5. Aby anulować zapis, wciśnij przycisk aby powrócić do ostatnio uży-wanego ekranu.
Aby wczytać ustawienia:1. Po wejściu do menu pamięci (zobacz powyżej) wciśnij przycisk i
i wybierz: Wczytaj z 1, Wczytaj z 2 lub Wczytaj z 3.
2. Wciśnij przycisk aby wczytać zapisane wcześniej ustawienia.
Uwaga:Po wczytaniu zapisanych wcześniej ustawień i wyjściu z menu pamięci, przy-wrócone ustawienia wyświetlone zostaną na ekranie. Ustawienia lampy przez przywróceniem będą skasowane. Aby zapobiec utracie obecnych ustawień zapisz obecne ustawienia przez przywróceniem.
Przywracanie fabrycznych ustawieńUstawienia lampy Phottix Mitros+ TTL mogą zostać przywrócone do fabry-cznych.
W celu zresetowania ustawień:
1. Wciśnij i przytrzymaj i przez 3 sekundy.
2. Lampa zresetuje ustawienia do ustawień fabrycznych.
3. Wszystkie funkcje specjalne zostaną zresetowane.
Wyświetlanie informacji o lampieW celach pomocy technicznej lub aktualizacji oprogramowania, mogą być wymagane pewne informacje o lampie. Aby wyświetlić informacje o urządze-niu, oprogramowaniu, numerze seryjnym:
1. Wciśnij kiedy lampa jest włączona.
2. Wciśnij którykolwiek klawisz aby powrócić.
Zmiany kondensatora lampy błyskowej:Jeśli lampa nie jest użytkowana, mogą zajść pewne zmiany fizyczne w konden-satorze lampy. Upewnij się, żeby lampa była włączona na minimum 10 min raz na trzy miesiące, aby zapobiec tym zmianom.

100
Pl INSTRUKCJA OBSŁUGI
Specyfikacja technicznaTryby: E-TTL i E-TTL II, Ręczny i Multi Stroboskopowy
Liczba przewodnia.: 58/190 (przy ogniskowej 105mm, ISO 100 w metrach/stopach)
Zasięg lampy: 24-105mm (14mm z dyfuzorem szerokokątnym)
Auto zoom (Zasięg lampy zmienia się automatycznie, aby dopasować się ogniskowej obiektywu)
Ręczny zoom (Ogniskowa lampy może być ustawiana poprzez zmianę para-metrów lampy/aparatu)
Obrót: 360 stopni, Góra-Dół: -7 do 90 stopni
FEC (Kompensacja): Ręczna
FEB (Bracketing): ±3 co 1/3 przysłony (Funkcje ręcznej kompensacji i brack-etingu mogą być łączone)
Tryby synchronizacji: Synchronizacja na pierwszą kurtynę, na drugą kurtynę oraz tryb szybkiej synchronizacji HSS.
Błysk stroboskopowy: 1-199Hz
Potwierdzenie ekspozycji: Niebieskie diody w trybie E-TTL
Ładowanie lampy (przy użyciu alkalicznych baterii AA)
Czas Ładowania/Wskaźnik gotowości lampy:
Normalny błysk: ok. 0.1-5 sek./ Czerwona dioda świeci się.Szybki błysk: ok. 0.1-2.5 sek./ Zielona dioda świeci się.
Zasilanie wewnętrzne: Cztery baterie AA Alkaliczne lub Ni-MH
Zasilanie zewnętrzne: Kompatybilne z battery-packiem Phottix lub Canon CP-E4 przy zastosowaniu odpowiedniego adaptera.
Oszczędzanie energii: W trybie normalnym Slave: 90 sekund, Tryb bezprze-wodowy Slave: 60 minut
Bezprzewodowa lampa
Tryby bezprzewodowe: Częstotliwość radiowa i optyczne impulsy optyczne
Ilość kanałów: 4
Opcje bezprzewodowe: Nadajnik Odin, Odbiornik Odin, Odbiornik Strato II Rx, Nadajnik optyczny (Master), Odbiornik optyczny (Slave), Optyczny zależny, Wyłączony
Zasięg działania (W przybliżeniu): Tryb radiowy: 100m +, Tryb optyczny: Wewnątrz: 12-16m/39.3-52.4 stóp, Na zewnątrz: 7-9m/22.9-29.5 stóp
Kąty odbioru: Radio: 360 ° we wszelkich kierunkach, Nadawanie impulsów optycznych:±40°(poziomo), ±30°(pionowo)
Programowalne grupy: 3 (A, B, and C)
Sterowanie współczynnikiem lampy: 1:8-1:1-8:1
Napięcie: ≤100uA w trybie czuwania
Wymiary: (D x S x W): 202.8×77.5×58.3 mm
Waga: 427g (bez baterii)

101
Pl INSTRUKCJA OBSŁUGI
Deklaracja Zgodności CE Phottix (HK) Ltd.
z siedzibą 10/F Block A, Yip Fat Factory Building, Phase 1, 77 Hoi Yuen Rd, Kwun Tong, Kln, Hongkong
oraz
Autoryzowany przedstawiciel europejski:
Phottix Europe Sp. z o.o.
Piotrkowska 66
90-105 Łódź, Polska
KRS 0000327336
niniejszym oświadczają, iż produkt wskazany poniżej:
Nazwa produktu: Phottix Mitros+ TTL Transceiver Flash
Model: Mitros+
jest zgodny z odpowiednimi wymaganiami zgodnie z dyrektywą R&TTE 1999/5/EC, jeśli produkt jest używany prawidłowo, oraz poniższymi normami
ETSI EN 300 440-1 V1.6.1 (2010-08)
ETSI EN 300 440-2 V1.4.1 (2010-08)
ETSI EN301 489-1 V1.9.2/2011-09
ETSI EN301 489-3 V1.4.1/2002-08
EN 62479: 2010-09
Podpisane przez:
Paul Czernik
CEO/Prezes Zarządu
Phottix Europe Sp. z o.o.
Lodz, wrzesień 2013
www.phottix.com

102
Ru РУКОВОДСТВО ПОЛЬЗОВАТЕЛЯ
Внимание: Прежде чем приступить к работе со вспышкой, пожалуйста, обратитесь к руководству для Быстрого Старта. Для использования расширенных функциональных возможностей изучите данную инструкцию, а также ознакомьтесь с руководством по эксплуатации и управления вашей камерой.
Phottix Mitros+ TTL вспышка-трансивер для Canon предназначен для работы с камерами Canon DSLR и поддерживают работу в режимах ETTL I/II, Manual, Multi, а также в режиме беспроводного управления Ведущей/Ведомой.
Предупреждения1. Соблюдайте безопасность при использовании вспышки. Не следует направлять вспышку в глаза людей или животных при её срабатывании с близкого расстояния - это может привести к потере зрения.
2. С осторожностью пользуйтесь вспышкой, находясь вблизи движущегося транспорта, во избежание аварийных ситуаций.
3. Никогда не используйте вспышку в непосредственной близости от горючих газов (бензин, растворители ит.д.)
4. Избегайте попадания воды на поверхность вспышки. Не подвергайте её воздействию повышенной влажности.
5. Не оставляйте вспышку и батареи в местах повышенной температуры (прямой солнечный свет, в закрытом автомобиле ит.д.)
6. Следует извлечь элементы питания вспышки, если вспышка не будет использована в течение длительного времени.
7. При необходимости замените элементы питания на новые. Используйте новые, неиспользованные элементы питания. Не следует использовать одновременно старые и новые элементы питания.
8. Не располагайте легковоспламеняющиеся объекты в непосредственной близости головки вспышки - срабатывание вспышки может быть причиной их возгорания, ожогов, повреждения вспышки.
9. Будьте осторожны, прикасаясь к головке вспышки непосредственно после использования. Она может оказаться горячей и привести к ожогам.
10. Данная вспышка состоит из электрических компонентов высокого напряжения. Не пытайтесь разобрать или ремонтировать вспышку. Никогда не притрагивайтесь к внутренним компонентам вспышки.
11. Не прикасайтесь к контактам разъема для внешнего источника питания металлическими предметами - это может привезти к увечью и электрическому замыканию.
Таблица КомпонентовЧасти и Функции …...................................................…..….. 102Режимы ….…..........................................................................108Беспроводное управление….................................................110Пользовательские функции……..........................................115Технические спецификации……...........................................117
Phottix Mitros+ TTL вспышка-трансивер
для CanonОбозначенияЗадняя / Левая сторона
1. ЖК-дисплей 2. Кнопка выбора Режима3. Кнопка Тест4. Выключатель питания5. Индикатор готовности6. Кнопки Настроек (см. ниже)7. Кнопка выбора/установки 8. Рычаг фиксатора установо чной пяты9. Разъём внешней синхронизации (PC 3.5мм)10. Разъём для USB11. Разъём для внешнего питания
Кнопки настройки
1. Вверх / Кнопка режима настройки зума 2. Вправо / Кнопка режима беспроводного управления3. Вниз / Кнопка режимов HSS / SCS 4. Влево / Кнопка пользовательских функций
Передняя/ правая сторона
1. Отражающая панель 2. Широкоугольный рассеиватель3. Головка вспышки 4. Область приёмника беспроводного сигнала5. Вспомогательный луч света для автофокусировки6. Крепление “горячий башмак”7. Батарейный отсек
103
Ru РУКОВОДСТВО ПОЛЬЗОВАТЕЛЯ
Внимание:В данной инструкции подразумевается, что:
1. Вспышка и камера включены.
2. Вспышка и камера настроены так, как это требуется в данном руководстве.
3. Настройки меню камеры и пользовательские функции вспышки настроены по умолчанию.
4. Вспышка используется с совместимой камерой Canon DSLR.
Установка элементов питания1. Нажмите на крышку батарейного отсека и переместите её в направлении нижней части вспышки. Крышка откроется и приподнимется.
2. Вставьте элементы питания типоразмера АА в соответствии с указаниями диаграммы, расположенной внутри батарейного отсека.
3. Нажмите на крышку отсека и переместите её вновь в изначальное положение до полного закрытия.
Внимание:
- Пожалуйста, используйте четыре стандартных элемента питания одного производителя. Убедитесь, что элементы питания имеют одинаковый уровень мощности.
- Элементы питания могу нагреваться при длительном использовании вспышки. Будьте осторожны при замене элементов питания.
- Следует извлечь элементы питания, если вспышка не будет использована в течение длительного времени.
Установка вспышки на камеруВыключите фотоаппарат и вспышку.
1. Установите горячий башмак вспышки на крепление башмака фотоаппарата.
2. До упора вставьте вспышку в крепление горячего башмака камеры.
3. Зафиксируйте вспышку в данной позиции, сдвинув рычаг фиксатора вправо до щелчка.
4. Для снятия вспышки нажмите кнопку фиксатора и сдвиньте рычаг фиксатора влево.
Включение питания1. Для включения вспышки установите выключатель питания в положение “ON”
2. Для выключения вспышки установите выключатель питания в положение “OFF”
Индикатор уровня зарядкиИндикатор уровня зарядки элементов питания на жк-экране (см. ниже) отражает приблизительную информацию о том, какой уровень зарядки элементов питания остается до их полной разрядки. Он необходим для сигнализации о своевременной замене элементов питания при их низком
уровне зарядки. Если время зарядки вспышки стало слишком длительным (30 секунд), необходимо заменить элементы питания.
Изменение положения головки вспышки1. Головка вспышки может быть поднята в границах от -7 до 90 градусов со стопом на -7, 0, 45, 60, 75 и 90 градусов. Осторожно поднимите или опустите головку вспышки установив её в требуемой позиции.
2. Головка вспышки вращается на 180 градусов в любом направлении со стопом на 60, 75, 90, 120, 150 и 180 градусов. Аккуратно установите головку вспышки в требуемом положении.
3. В случае изменения положения головки вспышки из стандартной прямой позиции 0 градусов (поднятие, вращение), зум вспышки будет автоматически установлен на 50мм. “- - “ будет отображено на ЖК-дисплее. Если головка вспышки была приподнята или повёрнута, то зум вспышки может быть изменён в режиме MZoom (см. ниже).
4. Находясь в положении -7 градусов зум вспышки будет работать так же, как и при 0 градусов - установочные параметры не изменятся.
Использование отражающей панели и широкоугольного рассеивателя
Головка вспышки Phottix Mitros+ оснащена белой отражающей панелью и широкоугольным рассеивателем.
1. При использовании панели рассеивателя, угол освечивания вспышки расширяется до угла зрения объективов с фокусным расстоянием 14 мм.
2. Белая отражающая панель может быть использована, если головка вспышки находится в приподнятой позиции для отражения света таким образом, чтобы создать блик в глазах объекта.
Способ применения:
1. Осторожно вытяните панель рассеивателя и отражателя из специального отсека, находящегося в головке вспышке используя выступ в нижней части рассеивателя.
2. Во время использования рассеиватель прикрывает головку вспышки. Осторожно переместите панель отражателя назад вовнутрь головки вспышки после её использования.
3. Если Вы не пользуетесь отражающей панелью, осторожно переместите рассеивающую панель в изначальное положение.
Использование рассеивателяВспышка Phottix Mitros+ TTL имеет съёмный рассеиватель, который может быть расположен при необходимости спереди головки вспышки. Рассеиватель помогает смягчить свет, уменьшить зоны горячих точек и теней, а также улучшает покрытие при использовании вспышки для макро-фотографии.
Способ применения:
1. Расположите рассеиватель вдоль головки вспышки таким образом, чтобы метка “UP” была направлена вверх.
2. Установите и защёлкните рассеиватель в соответствующем креплении головки вспышки.

104
Ru РУКОВОДСТВО ПОЛЬЗОВАТЕЛЯ
3. Повторите шаг 3 для крепления второй стороны рассеивателя.
Защита от перегреваВспышка Phottix Mitros+ имеет встроенную защиту от чрезмерного перегрева вспышки, которая увеличит время зарядки вспышки. При серии непрерывного срабатывания вспышки состоящей из около 20 раз. сработает данная защита. Значок [ Hot! ] появится при активации данной защиты.
Для избежания перегрева и возможной поломки вспышки, время её перезарядки увеличится для того, чтобы понизить рабочую температуру. В этом случае сделайте перерыв работы вспышки на 10 минут.
Если вы будете продолжать использовать вспышку после появления сигнала [ Hot! ], на экране вспышки появится сигнал [ Stop ]. Приостановите работу вспышки и подождите 10 минут пока она не остынет.
Разъёмы синхронизации и USB1. Разъём синхронизации 3.5 мм может быть использован для управления вспышкой радиохинсронизатором либо камерой при помощи 3.5 мм синхрокабеля. Данный разъём функционирует как вход. Он не предназначен для вывода сигналов вспышки.
2. Разъём для USB используется для обновления ПО вспышки (прошивки). Новые версии ПО и инструкции будут доступны на веб-страницах Phottix.
Лампочка-индикатор статусаЛевая лампочка: Индикатор готовности вспышки. В режиме быстрой вспышки лампочка будет гореть зелёным цветом при достижении минимального заряда для работы вспышки. Лампочка будет гореть красным цветом, если вспышка полностью заряжена.
Правая лампочка: Лампочка-индикатор подтверждения экспозиции при съёмке со вспышкой. Если достигнута стандартная экспозиция при съемке со вспышкой, индикатор подтверждения экспозиции при съемке со вспышкой в течение приблизительно 3 сек. Будет гореть синим цветом. Если индикатор подтверждения экспозиции при съемке со вспышкой не загорается, подойдите ближе к объекту и увеличьте чувствительность ISO камеры.
Разъём для внешнего электропитанияДанный разъём для внешнего электропитания является собственной разработкой Phottix, и предназначен для использования с кабелями для вспышек Phottix. Данный разъём предназначен для подключения к компактному батарейному блоку Canon CP-E4 либо совместимыми моделями, если используется соответствующий адаптер.
Внимание: - При использовании внешнего батарейного блока в качестве источника питания вспышки, элементы питания должны всегда находиться в батарейном отсеке вспышки.
- Никогда не используйте батарейные блоки несовместимые с Canon.

105
Ru РУКОВОДСТВО ПОЛЬЗОВАТЕЛЯ
ЖК-экран
Режим вспышки автоматический E-TTL II/E-TTL
Режим ручной настройки вспышки Беспроводное управление через оптический импульс и радиочастотную передачу сигнала
Режим беспроводного управления
Режим настройки Multi
Azoom – авто зумMzoom – ручн. зум
E-TTL II/E-TTL режимы вспышки авто
Отражение вверх Стандартное Отражение вниз
Зв. сигнал вкл. выкл.
Польз. Функци
M: Режим ручной настройки
Multi: Режим вспышки Multi
Количество срабатываний
Частота
Уровень мощностиРадио: ODIN передатчик
Радио: STRATO II приёмник
Беспроводное Выкл. Оптически: ведомая
Радио: ODIN приёмник
Оптически: передатчик ведомая
Оптически: приёмник ведомая
Дальность
FEB иформация
FEC информация
Фокусное расст.
Индикатор уровня зарядки баттареи
Икона перегрева
m: метры f: футы
Диафрагма
HSS SCS

106
Ru РУКОВОДСТВО ПОЛЬЗОВАТЕЛЯ
Радиочастотная передача: режим передатчика ODIN TX
Передача при помощи оптического импульса: режим OP RX (приёмник)
при помощи оптического импульса: режим OP Slave (ведомая)
Режим MEMORY (память)
Радиочастотная передача: режим передатчика ODIN TX ratio (соотношение вспышек)
Радиочастотная передача: режим приёмника Radio ODIN RX
Радиочастотная передача: режим приёмника STRATO II RX
Передача при помощи оптического импульса: режим OP TX (Ведущая)
Группа ODIN
Радио: Odin приёмник
Радио: STRATO II приёмник
Группа ведомой
Оптически: приёмник ведомая
Оптически: Ведомая
Режим Memory
Меню записи
Отмен
Меню загрузки
OK / Подтверждение
Передатчик (Локальная вспышка)
Группа
Группа Выкл.
Режим Группы
Режим вспышки –передатчика
Номер канала
Подсветка AF вкл.
Подсветка AF выкл.
Режим соотношения
Соотношение вспышек
EV компенсация для A: B
Режим вспышки
Режим Ratio
Номер канала
Оптически: передатчик ведущая
Соотношение вспышек
Ведущая вспышка выкл.
Ведущая вспышка вкл.

107
Ru РУКОВОДСТВО ПОЛЬЗОВАТЕЛЯ
Функции авто сохраненияВспышка Phottix Mitros+ запомнит ваши настройки. Режим, уровни мощности и т.д. будут сохранены в памяти при выключении и последующем включении вспышки.
Установка Зума вспышкиВспышка Phottix Mitros+ имеет два режима установки зума головки вспышки - Автоматический (Azoom) и Ручной (Mzoom). Автоматический зум будет изменять фокусное расстояние головки вспышки динамически в соответствии с изменениями фокусного расстояния объектива, что обеспечит оптимальный уровень освещения. Ручной зум позволит пользователю установить зум вспышки вручную.
Способ применения:
1. Нажмите кнопку .
2. Область Зума на экране будет выделена и станет мигать.
3. Нажмите кнопку или для установки головки вспышки в режим Azoom, либо на желаемом уровне в режиме Mzoom.
4. После установки зума нажмите кнопку .
Внимание:1. Находясь в режиме Azoom, при изменении позиции головки вспышки (поворот её вверх/вниз, вправо/влево) из стандартной прямой позиции в 0 градусов, зум вспышки установится автоматически на 50мм. “- -” будет отображено на экране. Зум вспышки не будет изменён при изменение её головки в положение -7 градусов прямо.
2. Azoom будет работать ТОЛЬКО если головка вспышки расположена в позиции 0 или -7 градусов.
3. Находясь в режиме Mzoom, при изменении позиции головки вспышки из стандартной прямой позиции в 0 градусов, зум вспышки не изменится.
4. Если головка вспышки находится в поднятом/повёрнутом положении, то настройки зума вспышки могут быть изменены, переключившись в режим Mzoom.
Установка высокоскоростной синхронизации HSS или синхронизации по задней шторке SCS
Вспышка Phottix Mitros+ поддерживает функции HSS и синхронизации по задней шторке SCS. Далее в настоящем руководстве будет изложено подробная информация по использованию данных функций.
Способ применения:
1. Нажмите кнопку .
2. Нажатие кнопки позволит перемещаться между функциями HSS, SCS и их выключением.
Внимание:- Функции HSS и SCS доступны только в режимах ETTL и Manual, и не доступны в режиме Multi.
Кнопка ТестНажатие кнопки Test приведет к срабатыванию вспышки. Это может быть использовано для замера (только в ручном режиме). В режиме беспроводной ведущей вспышки, нажатие кнопки Test приведет к срабатыванию ведомых вспышек настроенных на тот же канал, установленном на ведущей вспышке. Уровень мощности при нажатии кнопки Test можно так же изменять (см. ниже C.Fn-07)
Функции автоматического выключения питания
Для экономии энергии элементов питания, вспышка Phottix Mitros+ TTL имеет режимы спящий и авто выключение.
1. В режимах не-беспроводной ведомой: Вспышка выключится автоматически после 90 секунд простоя, если кнопки не были нажаты или вспышка не срабатывала. Экран вспышки потухнет. Неполное нажатие кнопки спуска затвора камеры, либо нажатие кнопки тест на вспышке приведет к активации вспышки Phottix Mitros+.
2. В режиме беспроводной ведомой, вспышка перейдет в спящий режим ведомой после 60 минут бездействия (кнопки не нажаты, вспышка не срабатывала). “IDLE” будет отображено на экране. Полное нажатие кнопки спуска затвора камеры либо нажатие кнопки Test на ведущей вспышке позволит пробудить вспышки из спящего режима. Таймер спящего режима для ведомой вспышки может быть изменён от 60 минут до 10 минут (см. ниже C.Fn-10) Ведомая вспышка автоматически выключится после 8 часов простоя, если ни одна из кнопок не была нажата, и вспышка не была в действии после появления сообщения на экране “IDLE”. Нажатие кнопки Test пробудит вспышку. Таймер режима автоматического выключения для ведомой вспышки может быть изменён с 8 часов до 1 часа (см. ниже C.Fn-11 below).
Моделирующая вспышка1. Если камера оснащена кнопкой предварительного просмотра глубины резкости, при ее нажатии вспышка непрерывно горит в течение 1 секунды. Данная моделирующая вспышка позволяет оценить световые эффекты и баланс освещенности объекта (Более подробную информацию по использованию кнопки глубины резкости и настроек кнопок можно узнать в инструкции по эксплуатации фотоаппарата).
2. Моделирующая вспышка может быть использована во всех режимах, ETTL, Multi и Manual.
3. Моделирующую вспышку можно использовать как при обычной съёмке со вспышкой, так и при беспроводном управлении вспышкой (см. ниже C.Fn-02 below).
Внимание: 1. Перегрев и повреждение вспышки может случиться из-за чрезмерно долгого и частого использования моделирующей вспышки. Не используйте моделирующую вспышку для более 20 раз подряд.
2. Если вспышка перегрелась, время её зарядки автоматически увеличится в целях охлаждения вспышки.

108
Ru РУКОВОДСТВО ПОЛЬЗОВАТЕЛЯ
Лампа помощи Autofocus (AF)1. В условиях низкого освещения/контрастности во вспышке Phottix Mi-tros+ загорится встроенная лампа помощи AF для поддержки автофокуса. Вспомогательный луч света для автофокусировки осветит цель на объекте.
2. Вспомогательная лампа помощи AF может быть включена и отключена (см. ниже C.Fn-08).
НастройкиВспышка Phottix Mitros+ позволяет настроить уровни с шагом 1/3 ступени. Некоторые камеры имеют пользовательские функции, чтобы изменить шаговые настройки с 1/3 на 1/2 ступени для FEB и FEC. Если пользовательские настройки камеры изменены таким образом, вспышка Phottix Mitros+ также автоматически будет изменять уровень настроек с шагом 1/2 ступени .
Режимы ВспышкиВспышка Phottix Mitros+ имеет три режима: ETTL, Ручной (M) и Стробоскопический (Multi).
Для изменения режимов:
1. Нажмите кнопку .
2. Выбор режима вспышки будет перемещаться между ETTL, Ручной (M) и Стробоскопический (Multi).
3. Выбранный режим будет отображен в верхнем левом углу экрана.
Режим ETTL
Экран режима ETTL на вспышке Mitros+
В режиме ETTL вспышка и камера будут совместно автоматически рассчитывать правильную экспозицию при съёмке. При полном нажатии кнопки спуска сработает предварительная вспышка, используемая камерой для определения экспозиции и мощности вспышки непосредственно перед основным снимком.
Компенсация экспозиции при съёмке со вспышкой - FECВспышка Phottix Mitros+ позволяет производить компенсацию экспозиции при съёмке со вспышкой (FEC) в пределах от -3 до +3 с шагом 1/3 ступени. Это помогает в ситуациях, когда требуется точная настройка системы TTL в определенных условиях
Для установки FEC:1. Нажмите кнопку , чтобы войти в режим настройки FEC.
2. Кнопками либо установите требуемое значение FEC.
3. Нажмите кнопку для выхода из режима настройки FEC.
Внимание:- Некоторые камеры имеют возможность установки пользовательской функции, изменяющие шаг настройки с 1/3 до 1/2 ступени для FEB и FEC. Если пользовательские функции камеры были изменены, вспышка Phot-tix Mitros+ настроится на шаг в 1/2 ступени.
Брекетинг при съёмке со вспышкой - FEBБрекетинг при съёмке со вспышкой (FEB) позволяет снять серию кадров со вспышкой с автоматическим изменением мощности вспышки. Камера произведет 3 снимка с различной экспозицией - один с экспозицией допускаемой камерой, второй с переэкспонированием, третий с недоэкспонированием. Уровень пере- или недоэкспонирования может выбрать пользователь. Функция FEB полезна при съёмке в ситуациях, когда у вас нет достаточного времени для подготовки, либо при изменяющихся условиях освещения для достижения оптимального уровня экспозиции снимков. Также функция FEB может быть использована для фотографии HDR.
Некоторые камеры имеют функцию сохранения экспозиции вспышки - ознакомьтесь с подробностями данной фукции в руководстве по эксплуатации вашей камеры.
Для установки FEB:1. Нажмите кнопку .
2. Нажмите кнопку “FEB 0” будет отображено и обозначено на экране.
3. При помощи кнопок и настройте значение для брекетинга эскпозиции.
4. Нажмите для подтверждения выбора настроек.
Внимание:- По определению: Функция FEB будет отключена сразу после произведения трёх снимков. Функция FEB может быть установлена в пользовательских настройках (см. ниже C.Fn-03).
- Последовательность съемки кадров в режиме FEB можно изменить (см. ниже C.Fn-04)
- Функция FEB может быть использована вместе с FEC и FEL (см. ниже).
- Для достижения лучшего результата установите в камере режим покадровой съемки, и перед съемкой убедитесь, что вспышка готова для второго и третьего снимка.
- Некоторые камеры имеют пользовательские функции для изменения шага настроек с 1/3 на 1/2 ступень для FEB и FEC. Если пользовательские функции камеры изменены таким образом, вспышка Phottix Mitros+ также изменит шаг изменений на 1/2 ступени соответственно.
Фиксация Экспозиции при съемке со вспышкой - FELФиксация экспозиции при съемке со вспышкой (FEL) обеспечивает фиксацию экспозиции при съёмке со вспышкой. Использование данной функции помогает при использовании ручного замера по точке на сцене с изменяющимися условиями осветления.
Находясь в режиме ETTL, нажмите кнопку камеры FEL (the “ ”button) для использования данной функции. Подробно ознакомьтесь с использованием данной функции FEL в руководстве по эксплуатации данной вспышкой.
Нажатие кнопки FEL приведет к срабатыванию предварительной вспышки, которая будет использована камерой для вычисления оптимальной

109
Ru РУКОВОДСТВО ПОЛЬЗОВАТЕЛЯ
Внимание: Функции SCS не будут работать в режимe беспроводного управления и стробоскопическом.
Ручной Режим (M)В режиме ручной вспышки (М) вспышка сработает исходя из индивидуального установленного уровня мощности. Уровень мощности на вспышке Phottix Mitros+ TTL может быть установлен от 1/1 (полная мощность) до 1/128 - по 8 стопов настроек с шагом в 1/3 ступени. Значения диафрагмы, выдержки и светочувствительности ISO камеры должны быть установлены вручную. Для достижения лучших результатов используйте режим M на камере.
Способ применения:1. Нажмите кнопку до тех пор, пока не появится значок M на экране.
2. Нажмите кнопку чтобы войти в меню установки уровня мощности. Уровень мощности будет мигать.
3. Нажмите кнопку либо для настройки уровня мощности.
4. Нажмите кнопку для выхода из меню настройки мощности.
5. Если лампочка готовности вспышки горит красным цветом, это означает, что вспышка полностью заряжена и готова к срабатыванию.
6. Нажатие кнопки приведёт к срабатыванию вспышки исходя из выбранного вами уровня мощности вспышки. Это может помочь при произведении замеров экспозиции.
Внимание:- Неполное нажатие кнопки спуска затвора отразит на экране эффективный радиус мощности ручной вспышки.
Multi: Стробоскопический режимПри помощи стробоскопического режима Multi можно произвести серию быстрых вспышек. Их количество, частота и мощность может быть запрограммирована на вспышке Phottix Mitros+. Режим Multi способствует запечатлению множества снимков движущегося объекта на одной фотографии и множество других эффектов.
Частота эффекта (в Гц. - количество вспышек в секунду), общее количество вспышке и их выходная мощность может быть установлены.
Способ применения:1. Нажмите кнопку пока не появится значок Multi на экране.
2. Нажмите кнопку для изменения установок Multi. Расположены (слева на право на экране) Мощность, Частота (Гц) и Количество вспышек. Значение мощности мигает при входе в меню данной настройки.
3. Кнопками и выберите между настойками мощности, частоты (Гц) и количеством срабатываний вспышки.
4. Кнопками и можно установить необходимый уровень значения находясь в меню одной из каждой настроек: мощность, частота (Гц) и количество срабатываний вспышки.
5. Нажав кнопку вы выйдете из меню настройки.
мощности вспышки необходимой для экспозиции. Данная информация сохраняется в памяти камеры. Значок FEL будет отображаться в видоискателе камеры.
Всякий раз при нажатии кнопки FEL сработает предварительная вспышка и фиксируется новое значение экспозиции при съемке со вспышкой. Если кнопка спуска нажата полностью, вспышка сработает исходя из зафиксированного значения экспозиции.
Внимание:- Если объект находится слишком далеко и будет недоэкспонирован, в видоискателе камеры будет мигать значок “FEL” в течение 0,5 секунды.
- Если размеры объекта слишком малы, фиксация экспозиции при съемке со вспышкой может оказаться малоэффективной.
Высокоскоростная синхронизация - HSSВ режиме высокоскоростной синхронизации HSS максимальная скорость синхронизации камеры/вспышки может достигнуть скорости самой короткой выдержки камеры. Использование данной функции помогает при съёмке в режиме приоритета выдержки, а также для ограничения рассеянного света. Возможности HSS могут быть разными, и зависят от модели фотоаппарата - ознакомьтесь с данными техническими возможностями в руководстве по эксплуатации вашего фотоаппарата.
Способ применения режима HSS:
1. Нажмите кнопку .
2. На экране появится значок HSS.
3. Выберите значение выдержки высшую, чем скорость синхронизации камеры со вспышкой и произведите снимок.
Для выхода из режима HSS:
1. Нажмите дважды кнопку .
2. Выбор будет циклично перемещаться между режимами HSS, SCS и FCS.
Внимание: - Убедитесь, что значок HSS отображен в экране.
- Использование функции HSS существенно уменьшает уровень мощности вспышки, заряд элементов питания и радиус действия вспышки.
Синхронизация по второй шторке - SCSВспышка Phottix Mitros+ срабатывать непосредственно перед закрытием затвора. Данная функция может быть полезной при длительных выдержках для создания специальных эффектов.
Способ применения:
1. Нажмите два раза на кнопку Выбор будет перемещаться между режимами HSS, SCS и FCS.
2. Для выхода: Нажмите на кнопку один раз. Вы вернетесь в стандартный режим FCS.

110
Ru РУКОВОДСТВО ПОЛЬЗОВАТЕЛЯ
Режим Беспроводного управленияВспышка-трансивер Phottix Mitros+ TTL оснащена несколькими режимами передатчика и приёмника для систем беспроводного управления. Вспышка Mitros+ имеет встроенную совместимость с системами TTL радиосинхронизаторов работы вспышек Phottix Odin TTL для Canon, а также с радиосинхронизатором Phottix Strato II Multi для Canon. Более подробную информацию по системам Odin или Strato II можно найти в инструкциях по эксплуатации данных устройств.
Вспышка Mitros+ может функционировать как:
Phottix Odin Tx(Передатчик системы Odin)Полный контроль установок на удалённых вспышках в TTL и ручной настройке, а также зума вспышек Mitros+ (установленных в режиме Odin Rx) либо совместимых вспышек, оснащенных приёмниками Phot-tix Odin. Системные либо студийные вспышки будут также срабатывать в
режиме ручной настройки от вспышки Mitros+ в режиме Odin Tx, если они подключены к приёмникам Strato, Strato II либо Atlas II.
Phottix Odin Rx ( Приёмник системы Odin)
Вспышка Mitros+ в беспроводном режиме Odin Rx Wireless будет срабатывать от другой вспышки Mitros+ установленной в режиме Odin Tx, либо от передатчика Phottix Odin TCU.
Phottix Strato II Rx (Приёмник системы Strato II)Вспышка Mitros+ в беспроводном режиме Strato Rx будет срабатывать от передатчика Phottix Strato II, передатчика Phottix Odin или вспышки Phottix Mitros+ установленной в режиме Odin Tx.
OP Tx (Ведущая) – Используя систему беспроводного управления Canon ИКИспользуя инфракрасный сигнал, вспышка на камере регулирует мощность и приводит к срабатыванию удалённых вспышек.
OP Rx (Ведомая) - Используя систему беспроводного управления Canon ИКУдалённые вспышки, установленные в режиме in OP Rx Mode, регулируются и срабатывают от вспышки на камере, установленной в режиме OP Tx Ведущая. Используя инфракрасный сигнал, вспышка на камере регулирует мощность и приводит к срабатыванию удалённых вспышек.
OP Slave- Оптически ведомаяВ режиме OP slave срабатывание других вспышек поблизости приводит к срабатыванию вспышки Mitros+ только в ручном режиме.
Внимание:Вспышка Mitros+ не будет срабатывать от передатчиков Phottix Strato, Strato II либо Ares, а также трансиверов Atlas II в режиме Tx.
Выбор режима беспроводного управленияДля входа в меню выбора режима беспроводного управления на вспышке Mitros+:
1. Нажмите и удерживайте кнопку до тех пор, пока не появится меню Mode.
2. Кнопками или выберите необходимый режим. 3. Для подтверждения выбора нажмите кнопку .
4. Установите параметры данного режима беспроводного управления (группа, канал), если это необходимо.
Внимание:
Если не нажать кнопку вспышка Mitros+ применит выделенный выбор, если в течение 16 секунд кнопки не нажимались.
Внимание:1. Слишком долгое использования вспышки в стробоскопическом режиме может привести к перегреву и повреждению вспышки. Не используйте стробоскопическую вспышку более чем 20 раз подряд.
2. Если вспышка перегрета, автоматически увеличится время её зарядки, чтобы снизить рабочую температуру.
Стробоскопический режим и скорость выдержкиДля определения оптимальной скорости выдержки камеры необходимой для использования при различных непостоянных значениях стробоскопического режима, пользуйтесь следующей формулой:
Количество вспышек / Частота = Скорость Выдержки
Пример: 5x (количество вспышек) / 10 Гц (Частота) = .5 секунды выдержка
Это приблизительная рекомендация: Возможно, вам придется увеличить или уменьшить выдержку для достижения желаемого результата.
Таблица мощности вспышки в стробоскопическом режиме
Если количество вспышек отображается в виде “N---”, максимальное количество вспышек будет равно указанному в приведенной ниже таблице независимо от частоты срабатывания.

111
Ru РУКОВОДСТВО ПОЛЬЗОВАТЕЛЯ
Odin Tx (режим передатчика Odin)Использование вспышки Mitros+ в режиме Odin Tx делает возможным использование вспышки на камере в режиме TTL или ручной настройке, а также управлять тремя группами вспышек (A, B, C). Таким образом, при помощи вспышки в режиме Odin ТХ можно дистанционно регулировать уровень мощности в TTL либо ручной настройке уровня мощности, а также регулировать фокусное расстояние зума вспышек Mitros+ в режиме Odin Rx, либо других совместимых вспышек, оснащённых приёмниками Phottix Odin.
Использование режима Odin Tx
Экран режима Odin Tx
После выбора режима Odin Tx (см.выше):
1. Нажмите кнопку для настроек групп.
2. При помощи кнопок и можно переместить выбор между группами L, A, B, C.
3. Нажатие кнопки при выбранной группе позволит изменить режим между TTL, M (ручным) и Off (выкл.).
4. Кнопками либо при выбранной группе можно скорректировать уровень EVl ±3EV в 1/3 стопа находясь в режиме TTL, либо установить необходимый уровень мощности (от 1/128 до 1/1 в 1/3 стопа) находясь в режиме ручной настройки.
5. Нажмите кнопку для выхода из меню установок режима Odin Tx.
Режим RatioЭкран режима Odin Tx ratio (соотношения вспышек)
Режим Ratio схож с родной системой TTL Canon. Соотношение группы вспышек может быть установлено от 8:1 до 1:8. Уровень EV может быть скорректирован. Регулировка режима и уровня локальной вспышки (L) также возможна.
Для входа в режим Ratio:
1. Нажмите и удерживайте кнопку button, находясь в режим Odin Tx. Вскоре появится меню установок режима Ratio.
2. Нажмите кнопку для входа в режим регулировки.
3. Нажмите кнопки или buttons to cycle though Local Flash(L) , Flash Ratio and Ratio EV adjustment.
4. Нажмите кнопки или для корректировки уровня EV локальной вспышки, пропорции либо уровня EV пропорции при выбранной опции.
5. Кнопка изменит режим работы локальной вспышки TTL – М (ручная настройка) – Off (выкл.).
6. Нажмите кнопку для выхода из установок режима Ratio.
7. Нажмите и удерживайте кнопку для выхода из режима Odin Tx Ra-tio и возвращения в смешанный режим Odin Tx.
Примечание
Вспышка, установленная на камере, не является частью расчёта пропорции уровня мощности вспышек. Мощность локальной вспышки регулируется индивидуально.
Настройка зума головки вспышки в режиме Odin Tx1. Нажатие кнопки откроет меню настройки зума вспышки.
2. При помощи кнопок и можно переместить выбор между группами L, A, B, и C.
3. Кнопками и можно сделать выбор между режимом Azoom (автоматическая регулировка зума – изменяется автоматически в соответствии с изменениями зума объектива) и режимом Mzoom (24, 28, 35, 50, 70, 80 и 105мм).
4. Нажмите кнопку для выхода из настройки режима зума.
Настройка каналов передачи
1. Находясь в меню Odin Tx либо Ratio, нажмите кнопку для входа в меню выбора канала передачи.
2. Кнопками и переместите выбор между каналами 1-4.
3. Нажмите кнопку для фиксации канала.
Использование функций высокоскоростной синхронизации (HSS) и синхронизации по задней шторке (SCS) в режиме Odin Tx
Нажатие кнопки позволит сделать выбор между функциями HSS, SCS и стандартной синхронизацией.
1. Функция HSS сделает возможным синхронизацию срабатывания вспышки при более быстрых выдержках. Выдержка до 1/8000 секунды возможна на совместимых фотоаппаратах.
2. Внимание: при использовании высокoскоростной синхронизации мощность вспышки значительно снижается.
3. Функция SCS позволит произвести срабатывание вспышки в конце экспозиции, а не в начале. Эта функция способствует достижению творческих эффектов при длительной выдержке.
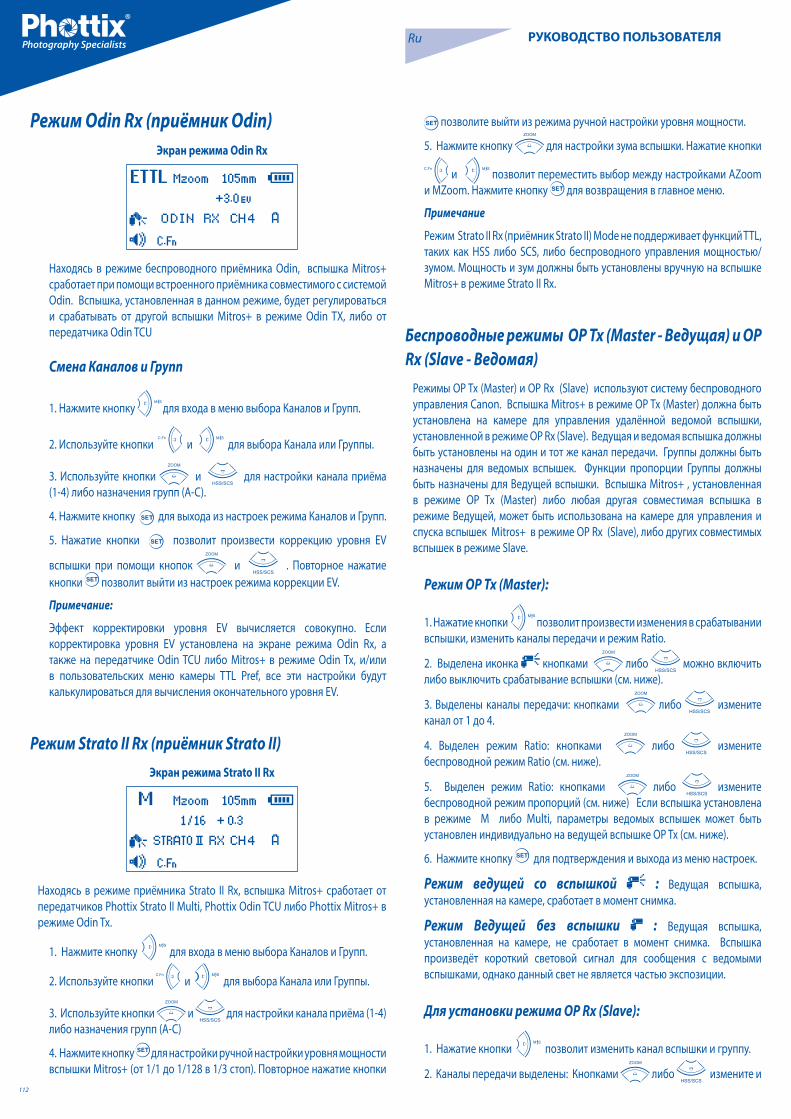
112
Ru РУКОВОДСТВО ПОЛЬЗОВАТЕЛЯ
Режим Odin Rx (приёмник Odin) Экран режима Odin Rx
Находясь в режиме беспроводного приёмника Odin, вспышка Mitros+ сработает при помощи встроенного приёмника совместимого с системой Odin. Вспышка, установленная в данном режиме, будет регулироваться и срабатывать от другой вспышки Mitros+ в режиме Odin TX, либо от передатчика Odin TCU
Смена Каналов и Групп
1. Нажмите кнопку для входа в меню выбора Каналов и Групп.
2. Используйте кнопки и для выбора Канала или Группы.
3. Используйте кнопки и для настройки канала приёма (1-4) либо назначения групп (A-C).
4. Нажмите кнопку для выхода из настроек режима Каналов и Групп.
5. Нажатие кнопки позволит произвести коррекцию уровня EV
вспышки при помощи кнопок и . Повторное нажатие кнопки позволит выйти из настроек режима коррекции EV.
Примечание:
Эффект корректировки уровня EV вычисляется совокупно. Если корректировка уровня EV установлена на экране режима Odin Rx, а также на передатчике Odin TCU либо Mitros+ в режиме Odin Tx, и/или в пользовательских меню камеры TTL Pref, все эти настройки будут калькулироваться для вычисления окончательного уровня EV.
Режим Strato II Rx (приёмник Strato II)Экран режима Strato II Rx
Находясь в режиме приёмника Strato II Rx, вспышка Mitros+ сработает от передатчиков Phottix Strato II Multi, Phottix Odin TCU либо Phottix Mitros+ в режиме Odin Tx.
1. Нажмите кнопку для входа в меню выбора Каналов и Групп.
2. Используйте кнопки и для выбора Канала или Группы.
3. Используйте кнопки и для настройки канала приёма (1-4) либо назначения групп (A-C)
4. Нажмите кнопку для настройки ручной настройки уровня мощности вспышки Mitros+ (от 1/1 до 1/128 в 1/3 стоп). Повторное нажатие кнопки
позволите выйти из режима ручной настройки уровня мощности.
5. Нажмите кнопку для настройки зума вспышки. Нажатие кнопки
и позволит переместить выбор между настройками AZoom и MZoom. Нажмите кнопку для возвращения в главное меню.
Примечание
Режим Strato II Rx (приёмник Strato II) Mode не поддерживает функций TTL, таких как HSS либо SCS, либо беспроводного управления мощностью/зумом. Мощность и зум должны быть установлены вручную на вспышке Mitros+ в режиме Strato II Rx.
Беспроводные режимы OP Tx (Master - Ведущая) и OP Rx (Slave - Ведомая)
Режимы OP Tx (Master) и OP Rx (Slave) используют систему беспроводного управления Canon. Вспышка Mitros+ в режиме OP Tx (Master) должна быть установлена на камере для управления удалённой ведомой вспышки, установленной в режиме OP Rx (Slave). Ведущая и ведомая вспышка должны быть установлены на один и тот же канал передачи. Группы должны быть назначены для ведомых вспышек. Функции пропорции Группы должны быть назначены для Ведущей вспышки. Вспышка Mitros+ , установленная в режиме OP Tx (Master) либо любая другая совместимая вспышка в режиме Ведущей, может быть использована на камере для управления и спуска вспышек Mitros+ в режиме OP Rx (Slave), либо других совместимых вспышек в режиме Slave.
Режим OP Tx (Master):
1. Нажатие кнопки позволит произвести изменения в срабатывании вспышки, изменить каналы передачи и режим Ratio.
2. Выделенa иконка кнопками либо можно включить либо выключить срабатывание вспышки (см. ниже).
3. Выделены каналы передачи: кнопками либо измените канал от 1 до 4.
4. Выделен режим Ratio: кнопками либо измените беспроводной режим Ratio (см. ниже).
5. Выделен режим Ratio: кнопками либо измените беспроводной режим пропорций (см. ниже) Если вспышка установлена в режиме M либо Multi, параметры ведомых вспышек может быть установлен индивидуально на ведущей вспышке OP Tx (см. ниже).
6. Нажмите кнопку для подтверждения и выхода из меню настроек.
Режим ведущей со вспышкой : Ведущая вспышка, установленная на камере, сработает в момент снимка.
Режим Ведущей без вспышки : Ведущая вспышка, установленная на камере, не сработает в момент снимка. Вспышка произведёт короткий световой сигнал для сообщения с ведомыми вспышками, однако данный свет не является частью экспозиции.
Для установки режима OP Rx (Slave):
1. Нажатие кнопки позволит изменить канал вспышки и группу.
2. Каналы передачи выделены: Кнопками либо измените и

113
Ru РУКОВОДСТВО ПОЛЬЗОВАТЕЛЯ
выберите канал от 1 до 4.
3. Группы выделены: Кнопками либо обозначьте группу, к которой принадлежит данная вспышка (A,B,C).
4. Нажмите кнопку для подтверждения и выхода из меню настроек.
5. Когда вспышки OP Rx (Ведомые) готовы к срабатыванию, подсветка автофокуса на передней панели вспышки начнёт мигать с частотой в 1 секунду. 6. Для установки режимов Multi либо M на ведомых вспышках – нажмите
и удерживайте кнопку в течение 2 сек.
7. Установите уровень мощности либо частоту мульти строба / количества срабатываний вспышки при помощи кнопок- стрелок.
Внимание:
- Убедитесь в том, что вспышка OP Tx (Master) и OP Rx (Slave) настроены на одинаковый канал передачи (1-4).
- Не располагайте никаких предметов на линии видимости ведущей и ведомой вспышек. Это может послужить помехой для передачи сигнала.
- При использовании удалённой отражающей вспышки, убедитесь в том, что панель приёма беспроводного сигнала данной вспышки обращена в сторону ведущей вспышки.
- Если вы используете только одну вспышку, выключите режим беспроводного управления.
Каналы трансмиссии
Беспроводная система Phottix Mitros+ OP Tx/Rx Wireless имеет четыре канала трансмиссии : 1, 2, 3 и 4. Сигналы от ведущей вспышки OP Tx передаются ведомой вспышке OP Rx по этим каналам. Если ведущая и ведомая вспышки настроены на разные каналы трансмиссии, синхронизация вспышек не будет возможна.
Использование системы беспроводного управления OP Tx/Rx
Вспышка установлена в режиме OP Tx (Master) на фотоаппарате, а удалённые вспышки установлены в режиме ведомых OP Rx: нажатие кнопки спуска затвора приведёт к срабатыванию ведущей вспышки OP Tx (если она установлена в режиме срабатывания), а также ведомых вспышек OP Rx, находящихся в радиусе действия ведущей вспышки OP Tx. Камера и вспышка произведут замер экспозиции, и приведут к срабатыванию вспышек в режиме TTL.
Режимы соотношений вспышек (Ratio)Ведомые вспышки могут управляться ведущей вспышкой в различных режимах соотношений. Доступные режимы:
Режимы ETTL A+B+C All Все три группы срабатывают на среднем значении уровня мощности.
A:BC Группы А и В могут быть установлены при помощи функции
соотношения вспышек (см. ниже). Группа С независима, и её уровень мощности определяется камерой.
Компенсация значения экспозиции может быть установлена в ручную для групп А и В.
1. Нажмите кнопку после выхода из меню режима соотношения вспышек.
2. Кнопками либо выберите необходимый уровень соотношения компенсации EV для групп А и В.
3. Компенсация EV для группы С также можно настроить.
4. Нажатие кнопки после настройки соотношения переместит вспышку выбор на установку EV для группы С.
5. Кнопками либо выберите необходимый уровень компенсации EV для группы С.
A:B Группы А и В могут быть установлены при помощи функции компенсации вспышки (см. ниже). Группа С не настраивается и не активна.
Компенсация EV группы А и В могут быть настроена.
1. Нажмите кнопку после выхода и меню установок соотношений вспышек.
2. При помощи кнопок либо настройте компенсацию EV для групп А и В.
Установка и настройка режимов соотношения
Режимы ETTL 1. Войдя в режим вспышки OP Tx (ведущей – см. выше), нажмите кнопку
для изменений установок параметров режимa OP Tx.
2. Нажмите три раза кнопку для выделения области Ratio.
3. Выберите режим Ratio. Нажатие кнопки и позволит вам перемещать выбор между режимами A+B+C, A:B и A:BC
4. Если выбраны A:B или A:BC, тогда нажатие кнопки выделит установку настройки соотношения.
5. Нажатие кнопки позволит изменить соотношение от 1:1 до 1:8 с шагом 1:1.5, 1:2, 1:3, 1:4, 1:6, 1:8
6. Нажатие кнопки изменит соотношение с 1:1 до 1.5:1, 2:1, 3:1, 4:1, 6:1, 8:1.
7. Нажмите кнопку для подтверждения или выхода из экрана.
Режимы Ручной настройки
A+B+C В режиме ручной настройки все три группы сработают на одном и том же уровне мощности. Данный уровень мощности может быть установлен.
A:B:C Мощность каждой группы устанавливается индивидуально пользователем (см. ниже). Каждая группа независима и не влияет на остальные группы.
A:B Уровень мощности групп А и В пользователь может устанавливать

114
Ru РУКОВОДСТВО ПОЛЬЗОВАТЕЛЯ
индивидуально. Группу С нельзя настроить и она неактивна.
Установка и настройка ручных режимов
1. Войдя в режим вспышки OP Tx (ведущей – см. выше), нажмите кнопку
для установки в режим ручной настройки (M).
2. Нажмите кнопку для изменения параметров режима OP Tx (Mas-ter).
3. Нажмите три раза кнопку для выделения области Ratio.
4. Нажатие кнопки и позволит вам переместить выбор между режимами A+B+C, A:B и A:B:C.
5. Нажмите кнопку для подтверждения или выхода из экрана.
6. Кнопками для настройки уровней мощности.
7. Кнопками либо можно изменять уровень мощности вспышек (от 1/1 до1/128 в шаг 1/3).
8. Нажатие кнопки изменит группы от А до В до С, нажатие кнопки
изменит группы от C до B до A (если это применимо).
9. Нажмите кнопку для выхода из режима настройки уровня мощности.
Режим Multi
A+B+C В режиме Multi все три группы срабатывают на одинаковом уровне мощности, частоте и количестве вспышек.
A:B:C Уровень мощности каждой группы настраивается пользователем индивидуально (см. ниже). Частота и количество вспышек мульти строба каждой группы одинаковы, и могут быть настроенными единственно для группы А.
A:B Группы А и В могут быть настроены пользователем индивидуально (см. ниже). Частота и количество вспышек мульти строба группы А и В одинаковы и могут быть настроены для группы а. Группа С не настраивается и неактивна.
Настройка и установка режима Multi 1. Войдя в режим вспышки OP Tx (ведущей – см. выше), нажмите кнопку
для установки в режим Multi.
2. Нажмите кнопку для изменения параметров режима OP Tx (Mas-ter).
3. Нажмите три раза кнопку для выделения области Ratio.
4. Нажатие кнопки и позволит вам переместить выбор между режимами A+B+C, A:B и A:B:C
5. Нажмите кнопку для подтверждения или выхода из экрана.
6. Кнопками для настройки уровней мощности.
7. Кнопками либо можно изменять уровень мощности вспышек (от 1/1 до1/128 в шаг 1/3).
8. Нажатие кнопки изменит группы от А до В до С, нажатие кнопки
изменит группы от C до B до A (если это приемлемо), и позволит изменить уровень мощности на этих группах.
9. Нажатие кнопки после выбора групп переместит вас на выбор частоты и количества вспышек.
10. Нажатие кнопки либо произведет изменение в выборе частоты и количества срабатываний вспышек. Эти изменения настроек можно произвести только для группы А, и будут соответственно изменены для групп В или С (если это применимо).
11. Нажмите кнопку для выхода из режима настройки уровня мощности.

115
Ru РУКОВОДСТВО ПОЛЬЗОВАТЕЛЯ
Пользовательские функции C.Fn Вспышка Phottix Mitros+ TTL имеет возможность программирования множества пользовательских настроек. Для установки данных функций:
1. Нажмите кнопку и удерживайте её в течение 2 секунд для входа в меню C.Fn.
2. Кнопками либо переместите выбор между меню функций C.Fn от 0 до 15.
3. Кнопками либо измените функцию выбранного меню.
4. Нажмите кнопку , чтобы выйти из меню пользовательских функций C.Fn.
Таблица пользовательских функций
116
Ru РУКОВОДСТВО ПОЛЬЗОВАТЕЛЯ
Функция быстрой вспышкиФункция быстрой вспышки позволяет срабатывать вспышке от 1/6 до 1/2 её полной мощности. Время зарядки быстрой вспышки короче. Данная функция эффективна для близких объектов, когда требуется малое время зарядки вспышки.
Быстрая вспышка может быть использована для режима серийной съемки. Функция быстрой вспышки для серийной съемки может быть включена и отключена (см. польз. функ. C.fn-06 выше)
Внимание: Функция быстрой вспышки устанавливает приоритет срабатывания вспышки. Если объект находится слишком далеко от камеры, это может привести к недоэкспонированию.
Автоматическая подсветка.Подсветка сработает в течение 8 секунд и выключится, если кнопки не будут нажаты. Если функция автоматической подсветки включена, нажатие любой кнопки включит подсветку после того, как она погаснет. Если функция авто подсветки выключена, нажатие кнопки включит подсветку.
Функция TTL PrefTTL может незначительно отличаться при использовании вспышки на различных камерах. Функция TTL Pref (C.Fn-15) позволяет пользователям настроить значение EV от +3 до -3 с шагом 1/3 ступени для компенсации этих небольших отличий. Данная настройка является индивидуальным предпочтением пользователя исходя из стандартов TTL камеры. Она будет сохранена в памяти. Если уровень EV будет изменён, данная компенсация будет использована для снимков сделанных в режиме TTL. Данная компенсация EV не будет отражена на экране при обычном использовании вспышки.
Функция Памяти (Memory)
Вспышка Phottix Mitros+ оснащена программированной функцией Mem-ory. Данная функция позволяет сохранить параметры вспышки, данные и установки пользовательских настроек, и восстановить их из памяти в будущем. Режимы вспышки, установки беспроводного управления, уровень мощности вспышки – все текущие настройки вспышки будут записаны для пользования в будущем.
Экран режима Memory
Меню:
В режиме Memory доступны три ячейки для записи данных (SAVE TO) и их дальнейших загрузок (LOAD FROM).SAVE TO 1
SAVE TO 2SAVE TO 3LOAD FROM 1LOAD FROM 2 LOAD FROM 3
Для входа в режим Memory
1. Нажмите и удерживайте кнопку для входа в режиме Memory.
Для записи данных:1. Установив данные вспышки, нажмите и удерживайте кнопку для входа в режим Memory.
2. Кнопками и выберите ячейку для записи: SAVE TO 1, SAVE TO 2 и SAVE TO 3.
3. Нажмите кнопку для подтверждения ячейки и записи данных.
4. Дисплей выйдет из режима Memory и возвратится в предыдущий экран.
5. Для отмены записи, нажмите кнопку для выхода из экрана режима Memory и возврата в предыдущий экран.
Для восстановления данных:
1. Войдя в режим Memory (см. Выше), нажмите кнопки и для выбора LOAD FROM 1, LOAD FROM 2. LOAD FROM 3.
2. Нажатие кнопки загрузит данные, сохранённые в выбранной ячейке.
Внимание:После загрузки сохранённых данных и выхода из меню режима Mem-ory, загруженные данные будут отображены на экране. Прежде установленные параметры вспышки будут утрачены. Во избежание потери данных, сохраните текущие установочные данные вспышки до того момента, когда будут загружены новые.
Сброс текущих и восстановление стандартных настроек
Вспышка Phottix Mitros+ имеет возможность восстановления стандартных настроек.
Для восстановления стандартных настроек вспышки:
1. Нажмите и удерживайте кнопки и в течение 3 секунд.
2. Стандартные настройки вспышки восстановлены.
3. Все настройки пользовательских функций будут сброшены и установлены по умолчанию.
Отображение информации о вспышкеДля технической поддержки либо обновления ПО, возможно, появится необходимость, чтобы узнать информацию о вспышке Phottix Mitros+. Для того, чтобы отобразить аппаратные средства, программное обеспечение, библиотеку символов и серийный номер вспышки:

117
Ru РУКОВОДСТВО ПОЛЬЗОВАТЕЛЯ
Технические характеристикиРежимы: E-TTL и E-TTL II, Ручной, и Multi стробоскопический
Ведущее число: 58/190 (м/футы, при фокусном расстоянии 105мм, ISO 100)
Угол освечивания вспышки: 24 - 105 мм (14 мм с широкоугольной панелью)
Автозумирование (угол освечивания вспышки устанавливается автоматически в соответствии с фокусным расстоянием объектива)
Ручное зумирование (Зум устанавливается вручную на вспышке/камере)
Вращаемость: 360 градусов, вверх-вниз: от -7 до 90 градусов
FEC (Компенсация экспозиция при съемке со вспышкой): Ручная
FEB (брекетинг FEB): ±3 ступени с шагом 1/3 ступени (ручная компенсация и брекетинг FEB могут задаваться совместно)
Режимы синхронизации: Синхронизация по передней шторке, синхронизация по задней шторке SCS, и высокоскоростная синхронизация HSS.
Режим стробоскопической вспышки: 1-199Гц Количество срабатываний вспышек : 1-100
Подтверждение экспозиции при съемке со вспышкой: Загорается синяя индикаторная лампа в режиме E-TTL
Зарядка вспышки (со щелочными элементами питания типоразмера AA)
Время зарядки/ Индикатор готовности вспышки:
Обычная вспышка: прибл. 0,1 - 5 с /Загорается красная индикаторная лампа Быстрая вспышка: прибл. 0,1 - 2,5 с /Загорается зеленая индикаторная лампа
Внутреннее питание: Четыре щелочных либо Ni-MH элемента питания типоразмера AA
Внешнее питание: Совместимость с блоком питания Phottix Battery Pack или компактным блоком элементов питания Canon CP-E4 через соответствующий адаптер.
Энергосбережение: Не-беспроводные режимы ведомой: 90 секунд, Беспроводной режим ведомой : (программируемо) 10 минут либо 60 минут
Беспроводное управление вспышкой
Способ трансмиссии: Радио Частота и Оптический импульс
Каналы: 4
Режимы беспроводного управления: Odin Tx, Odin Rx, Strato II Rx, OP Tx (Master), OP Rx (Slave), OP Slave, OFF
Дальность передачи (прибл.): Радио: 100м +; Оптически:: В помещении: 12-16м/39,3-52,4 фута., Вне помещения: 7-9м/22,9-29,5 фута
Угол приема ведущей вспышки: Радио: 360 ° во все стороны; Оптическая трансмиссия : ±40° (по горизонтали), ±30° (по вертикали)
Управляемые группы ведомых вспышек: 3 (A, B и C)
Соотношение мощностей вспышек: 1:8 - 1:1 - 8:1
Ток в режиме простоя: ≤100uA в спящем режиме
Габариты (Д x Ш x В): 202.8×77.5×58.3 мм
Вес: 427г (только вспышка, без элементов питания).
1. При включенной вспышке нажмите кнопку .
2. Нажмите любую кнопку для отмены отображения и входа в обычный режим.
Изменения конденсатора вспышки:Если вспышка не используется в течение длительного времени, возможны некоторые физические изменения конденсатора вспышки. Для избежания таких изменений рекомендуется включать вспышку как минимум на 10 минут раз в три месяца.

118
Cn Simp 说明书
提示:如需立即使用该闪光灯,请参阅快速使用指南卡。如需了解更多高级设置,请阅读此闪光灯说明书及熟悉您的相机使用手册与相关操作。
Phottix Mitros+ 收发一体TTL闪光灯(佳能版)是专为搭配佳能数码单反相机使用而设计的,具有ETTL I/II模式、手动模式、频闪模式及无线主控/从属引闪功能。
警告1. 请安全使用您的闪光灯。切勿在短距离内直接对着人或动物的眼睛触发闪光灯,否则会损伤眼睛,甚至导致失明。
2. 在汽车、公交车、摩托车或其他移动的交通工具上或周围,请谨慎使用闪光灯,因为可能会导致交通事故。
3. 请勿在可燃气体(如汽油、溶剂等)附近使用闪光灯,有爆炸的危险!
4. 请勿让闪光灯或电池接触到滴水/溅水或高湿度物体。
5. 请勿将闪光灯或电池置于高温环境下(如直射阳光、封闭的汽车等)。
6. 若一定时间内不使用闪光灯,请将所有电池取出。
7. 请按照需要更换电池。请使用未破损的状态良好的电池。请勿混用不同型号的电池。请勿混用新旧电池。
8. 闪光灯闪光时,请勿在闪光灯镜片的前方放置不透光的物体,否则闪光灯发出的热量将可能烧灼放置的物体或是损坏闪光灯管或菲涅尔镜片!
9. 闪光灯头在使用后可能会很烫,请勿触摸,有灼伤的危险!
10. 闪光灯内部有高压电子部件,请勿拆开或试图修理闪光灯。切勿触摸闪光灯的内部组件,有触电的危险!
11. 请勿用金属物体接触闪光灯的外置电源端口,有可能触电或造成重伤!
目录部件和功能 …..................…......................................…......118模式 ……................................................................................124无线引闪……..............…......................................................126自定义功能……....................…...........................................129规格参数…….......................................................................132
Phottix Mitros+ 收发一体TTL 闪光灯(佳能版)
部件后面/左侧
1. 液晶显示屏2. 模式按钮3. 测试按钮4. 电源开关5. 就绪指示灯6. 箭头调整按钮(见下文)7. 设置按钮8. 锁定杆9. 3.5mm 同步端口10. USB端口11. 外置电源端口
箭头调整按钮
1. 向上箭头/变焦调节模式按钮2. 向右箭头/无线闪光模式按钮3. 向下箭头/ 高速同步/后帘同步按钮4. 向左箭头/自定义功能按钮
前面/右侧
1. 反射板2. 广角散光板3. 闪光灯头4. 无线信号接收区域5. 自动对焦辅助灯6. 热靴7. 电池仓

119
Cn Simp 说明书
注意事项:此说明书中假定以下内容:
1. 闪光灯和相机的电源开关都设为开启。
2. 闪光灯和相机的设置与本说明书中所述的设置一致。
3. 相机菜单和闪光灯自定义功能都设置为默认值。
4. 闪光灯是搭配一款兼容的佳能单反数码相机使用。
安装电池1. 按住电池仓盖并向闪光灯底部方向滑动,电池仓盖将会弹起打开。
2. 按照电池仓中的指示图插入AA电池。
3. 按住电池仓盖并向闪光灯顶部方向推动 – 电池仓盖将会锁定到位。
请注意:
- 请使用4节同一品牌的标准规格高品质电池。请确保所有电池的电量保持一致。
- 闪光灯在使用时,电池可能会很烫,更换电池时需小心!
- 如果一定时间不使用闪光灯,请取出电池。
将闪光灯安装到相机上关闭相机和闪光灯
1. 将闪光灯热靴与相机热靴对准。
2. 滑动闪光灯使其完全插入相机热靴。
3. 滑动锁定杆到右侧直至发出咔哒声将闪光灯锁定到位。
4. 锁定释放:按住锁定杆上的锁定释放按钮的同时将锁定杆滑动到左侧。
开启/关闭闪光灯1. 开启闪光灯:将电源开关拨到“ON”的位置。
2. 关闭闪光灯:将电源开关拨到“OFF”的位置。
电池电量显示液晶显示屏上的电池电量显示器(见下文)将会显示闪光灯里电池大概的剩余电量,可以此作为一个粗略的参考来更换电池。如果闪光灯回电时间很长(30秒),请更换电池。
倾斜和旋转闪光灯头1. 闪光灯头的倾斜角度可以在-7度至90度之间调节(可倾斜档位:-7度、45度、60度、75度、90度)。轻轻倾斜闪光灯头到您拍摄所需要的角度。
2. 闪光灯头可左右各旋转180度(可旋转档位:60度、75度、90度、120度、150度、180度)。轻轻旋转闪光灯头
到您拍摄所需要的角度。
3. 如果将闪光灯头从标准的0度前倾位置倾斜或旋转到其他的位置,闪光灯焦距将会自动设置为50毫米,液晶显示屏上会显示“- -”。闪光灯头倾斜或旋转后,可以在手动变焦模式下(MZoom)改变闪光灯焦距(见下文)。
4. 在-7度的位置时,闪光灯变焦和在0度位置一样,将不会改变任何设置。
使用反射板或广角散光板Phottix Mitros+闪光灯的灯头内置有一个白色反射板和一个广角散光板。
1. 使用广角散光板,闪光覆盖范围可以扩展为14mm广角镜头。
2. 当闪光灯头仰起反射闪光时,白色反射板可用来在被摄体的眼睛里创建眼神光。
使用步骤:
1. 利用散光板底部边缘将散光板和反射板从闪光灯头内轻轻拉出。
2. 散光板拉出后会置于闪光灯头上。如果不需要使用反射板,请将它轻轻推回至闪光灯头内。
3. 如果只使用反射板,请将散光板轻轻推回至闪光灯头内。
使用闪光灯头柔光罩Phottix Mitros+ TTL闪光灯随附一个柔光罩,在需要的情况下,此柔光罩可以安装在闪光灯头前面,它对于柔化光线、减少热点和阴影及增加微距摄影的覆盖范围很有帮助。
使用步骤:
1.将柔光罩与闪光灯头对准,让柔光罩上的“UP”标记朝上。
2. 将柔光罩上一边的卡口与闪光灯头上相对应的卡口接合。
3. 重复第2步的步骤,使另一边的卡口接合。
过热保护闪光灯具有的过热保护电路功能,将会通过放慢闪光回电时间来避免过热造成部件损坏。在短时间内,以全功率闪光约20次后,将会激活该过热保护功能。过热保护功能生效时,闪光灯屏幕上将会出现“Hot!”图标。
为避免过热及可能的损坏,闪光灯会自动增加回电时间来降低闪光灯温度。请等待10分钟再使用。
如果在出现“Hot!”图标之后继续使用闪光灯,闪光灯将不会冷却,显示屏上将会出现”Stop”图标,请停止使用闪光灯,等待10分钟使其冷却后再使用。
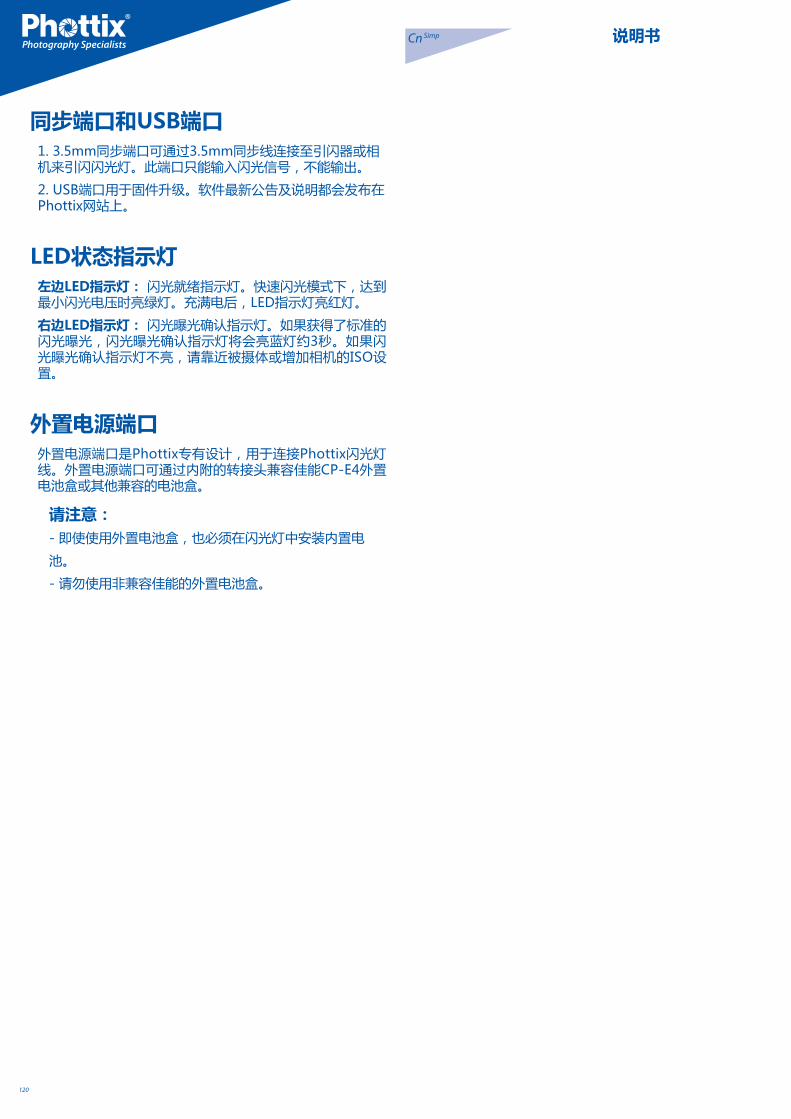
120
Cn Simp 说明书
同步端口和USB端口1. 3.5mm同步端口可通过3.5mm同步线连接至引闪器或相机来引闪闪光灯。此端口只能输入闪光信号,不能输出。
2. USB端口用于固件升级。软件最新公告及说明都会发布在Phottix网站上。
LED状态指示灯左边LED指示灯: 闪光就绪指示灯。快速闪光模式下,达到最小闪光电压时亮绿灯。充满电后,LED指示灯亮红灯。
右边LED指示灯: 闪光曝光确认指示灯。如果获得了标准的闪光曝光,闪光曝光确认指示灯将会亮蓝灯约3秒。如果闪光曝光确认指示灯不亮,请靠近被摄体或增加相机的ISO设置。
外置电源端口外置电源端口是Phottix专有设计,用于连接Phottix闪光灯线。外置电源端口可通过内附的转接头兼容佳能CP-E4外置电池盒或其他兼容的电池盒。
请注意: - 即使使用外置电池盒,也必须在闪光灯中安装内置电
池。
- 请勿使用非兼容佳能的外置电池盒。

121
Cn Simp 说明书
液晶显示屏显示E-TTL II/E-TTL自动闪光模式显示界面
Azoom : 自动变焦Mzoom : 手动变焦
E-TTL II/E-TTL 自动闪光
: 向上反射 : 标准 : 向下反射
提示音 开
关
自定义功能
有效闪光范围
闪光包围曝光
闪光曝光补偿
焦距
电量显示 温度过热
距离指示显示:m:米ft:英尺
光圈值
HSS:高速同步SCS:后帘同步
手动闪光
M:手动闪光
手动闪光输出
频闪闪光
Multi:频闪
闪光次数
闪光频率
光学传输无线拍摄/无线电传输无线拍摄
无线模式
无线电传输 : ODIN发射模式
无线电传输:STRATOⅡ接收模式
无线功能关闭
光学传输:光感从属单元
无线电传输:ODIN接收模式
光学传输:主控单元
光学传输:从属单元

122
Cn Simp 说明书
无线电传输:ODIN发射模式
发射单元
组
关闭组
组模式
无线电传输发射单元闪光模式
无线电传输频道
辅助对焦灯开 辅助对焦灯关
无线电传输:ODIN发射模式比率模式
比率模式
比率比值 A:B的EV补偿
无线电传输:ODIN接收模式
ODIN组别
无线电传输:ODIN接收模式
无线电传输:STRATO II接收模式
无线电传输:Strato II接收模式
光学传输:发射(主控)单元
闪光模式
比率模式
Ch:频道
光学传输:发射(主控)单元
闪光光比
主控闪光灯闪光关 主控闪光灯闪光开
光学传输:接收(从属)单元
从属单元组
光学传输:接收(从属)单元
光学传输:光感从属单元
MEMORY记忆模式显示界面
光学传输:光感从属单元
记忆模式
保存菜单
取消
下载菜单
OK/确认
123
Cn Simp 说明书
自动存储功能Phottix Mitros+能够保存闪光灯设置。即使关机重启后,模式、功率水平等设置将会保存在闪光灯内。
设置闪光灯变焦Phottix Mitros+闪光灯灯头具有两种变焦方式– 自动变焦(Azoom) 和手动变焦(Mzoom)。自动变焦时,焦距将会随相机变焦镜头的改变而改变以提供最佳灯光效果;手动变焦时,用户可自行设置闪光灯头焦距。
设置步骤:1. 按 按钮。
2. 液晶显示屏上的变焦调整区域将会闪烁显示。
3. 按 或 按钮将闪光灯头变焦设置为自动变焦(Azoom)或所需的手动变焦(Mzoom)值。
4. 完成设置后,按 按钮确认。
请注意:1. 在自动变焦模式(Azoom)下,闪光灯头从标准的0度前倾位置倾斜或旋转到其他的位置时,闪光灯焦距将会自动设置为50毫米,液晶显示屏上会显示“- -”。灯头从0度倾斜到-7度时,闪光灯焦距将不会改变。
2. 自动变焦(Azoom)只有在闪光灯头设置为0度或-7度时才有效。
3. 在手动变焦模式(Mzoom)下,闪光灯头从标准的0度前倾位置倾斜或旋转到其他的位置时,闪光灯焦距将会保持原来的设置,不会改变。
4. 倾斜或旋转闪光灯头后,可以通过将自动变焦模式(Azoom)切换为手动变焦模式(Mzoom)来调节闪光灯焦距。
设置高速同步或后帘同步 Phottix Mitros+闪光灯具有高速同步和后帘同步功能。详情请参阅下文有关高速同步和后帘同步功能的详细说明。
设置步骤:
1. 按 按钮。
2. 按 按钮将会在高速同步,后帘同步和前帘同步之间循环切换。
请注意:只有ETTL模式和手动模式下具有高速同步和后帘同步功能,频闪模式下没有这两项功能。
测试按钮按测试按钮将会触发闪光灯闪光,这可用于手动模式下测光。在无线主控模式下,按测试按钮将会触发由主控闪光灯控制的设置为同一个频道的从属闪光灯。测试闪光的输出功率可以在自定义功能中设置(见下文C.Fn-07)。
自动待机功能Phottix Mitros+ 收发一体TTL闪光灯具备待机和自动关闭模式来节省电池电量。
1. 在非无线从属模式下, 90秒钟没有按键操作或没有被引闪,闪光灯将进入自动待机模式,液晶显示屏将无显示,半按相机快门按钮或按闪光灯上的测试按钮可唤醒闪光灯。
2. 在无线从属模式下,如果无按键操作或没有被引闪,闪光灯在60分钟后将进入从属待机模式,液晶显示屏上将显示“IDLE”,全按相机快门按钮或按主控闪光灯上的测试按钮可唤醒从属模式下的闪光灯。您可以选择从属待机计时器的时间 — 60分钟或10分钟(见下文C.fn-10)。当显示屏上出现”IDLE”后,如果无按键操作或没有被引闪,闪光灯在8小时后将进入从属自动关闭电源模式,按闪光灯上的测试按钮可唤醒闪光灯。您可以选择从属自动关闭电源的时间 — 8小时后或1小时后(见下文C.fn-11)。
造型闪光1. 按相机上的景深预览按钮(如果相机上有)将会触发闪光灯连续闪光约1秒。造型闪光有利于看到被摄体的光影效果和光平衡。(请阅读您的相机使用说明书获得更多关于景深预览按钮功能的信息)
2. 所有模式(ETTL、频闪和手动模式)下都可以使用造型闪光。
3. 普通拍摄和无线拍摄时都可以使用造型闪光,造型闪光可以通过自定义功能设置(见下文C.fn-02)。
请注意:
1. 过多使用造型闪光可能会导致过热甚至损坏闪光灯,请勿连续使用造型闪光超过20次。
2. 如果过热,闪光灯将会自动增加回电时间,直至闪光灯温度降低到正常。
自动对焦(AF)辅助灯1. 在低照度/低对比度条件下,Phottix Mitros+内置的自动对焦辅助灯将会点亮来辅助自动对焦。闪光灯前面的自动对焦辅助灯将会在被摄体上投射一个聚焦目标。
2. 自动对焦辅助灯功能可以设置为开启或关闭(见下文C.fn-08)。
调整Phottix Mitros+闪光灯将会以1/3档为增量调节闪光曝光补偿(FEC)和闪光包围曝光(FEB)。一些相机的自定义功能中可以将调整增量从1/3档调为1/2档,如果相机的自定义功能改变了,Phottix Mitros+将会以1/2档为增量调节。

124
Cn Simp 说明书
闪光模式Phottix Mitros+闪光灯具有三种闪光模式:ETTL、手动(M)和频闪(Multi)。
改变闪光模式:
1. 按 按钮。
2. 闪光模式将会在ETTL、手动(M)和频闪(Multi)模式之间循环切换。
3. 当前模式将会显示在液晶显示屏的左上方。
非无线ETTL模式非无线ETTL模式的界面
在ETTL模式下,闪光灯和相机将会共同工作来计算拍摄图像需要的正确曝光。全按快门按钮,闪光灯将会发出一个预闪,在拍照前瞬间,相机将会使用此预闪计算出曝光和闪光功率。
闪光曝光补偿- FECPhottix Mitros+闪光灯可以在±3档间以1/3档为增量调节闪光曝光补偿(FEC)。闪光曝光补偿对于基于环境的需要而需要微调TTL系统的情况有很大帮助。
设置闪光曝光补偿:1. 按 按钮进入闪光曝光补偿调节模式。
2. 按 或 按钮将增加或减少闪光曝光补偿值。
3. 按 按钮退出闪光曝光补偿调节模式。
请注意:一些相机的自定义功能中可以将闪光曝光补偿(FEC)和闪光包围曝光(FEB)的调整增量从1/3档调为1/2档,如果相机的自定义功能改变了,Phottix Mitros+将会以1/2档为增量调节。
闪光包围曝光 – FEB闪光包围曝光(FEB)可用来自动改变一组照片的闪光功率。相机将记录3张不同曝光的照片,1张按相机的计算正常曝光,1张相对曝光不足,1张相对曝光过度,用户可自行设置曝光不足和曝光过度量。在拍摄移动的主体及在一个拍摄场景中有多种不同灯光效果的情况下,使用闪光包围曝光可以确保记录到合适曝光的照片。闪光包围曝光也可用于高动态范围摄影。
一些相机具备闪光曝光存储功能,详情请查阅相机使用手册。
设置闪光包围曝光:1. 按 按钮。
2. 按 按钮。“FEB 0”图标将会在液晶显示屏上闪烁显示。
3. 按 和 按钮调整包围曝光量。
4. 设置完成后,按 按钮确认。
请注意:- 默认设置:拍完3张照片,闪光包围曝光将会自动取消。闪光包围曝光可以在自定义功能界面进行设置(见下文C.fn-03)。
- 闪光包围曝光拍摄顺序可以在自定义功能界面进行改变(见下文C.fn-04)。
- 闪光包围曝光可以组合闪光曝光补偿及闪光曝光锁定使用(见下文)。
- 为获得最佳效果,请将相机驱动模式设置为“单拍”,并确保在拍摄第2张和第3张照片前闪光灯已充满电。
- 一些相机的自定义功能中可以将闪光曝光补偿(FEC)和闪光包围曝光(FEB)的调整增量从1/3档调为1/2档,如果相机的自定义功能改变了,Phottix Mitros+将会以1/2档为增量调节。
闪光曝光锁定– FEL闪光曝光锁定(FEL)可用来在拍摄照片前锁定闪光曝光量,这对于在使用手动点测光的情况下,在一个场景中有多种不同灯光效果很有帮助。
在ETTL模式下,按相机上的FEL按钮(“ ” 按钮)可以开启闪光曝光锁定功能,更多闪光曝光锁定功能和使用详情,请参阅相机使用手册。
按FEL按钮可以使闪光灯发出一个预闪,此预闪可用于在曝光过程中计算闪光功率,此闪光功率将会保存在相机内存中。相机取景器中将会显示“FEL”图标。
每按一次FEL按钮,闪光灯将进行预闪并计算出一个新的曝光。全按相机上的快门按钮时,闪光灯将会以锁定的曝光量闪光。
请注意:- 如果被摄体太远,可能会导致曝光不足,“FEL”图标会在相机取景器中闪烁显示约0.5秒。
- 如果取景器中的被摄体太小,闪光曝光锁定效果可能不太好。
高速同步– HSS在高速同步模式下,相机/闪光灯最大同步速度可以达到相机的最大快门速度。在您需要使用光圈优先模式或限制环境光的情况下,高速同步功能将很有帮助。高速同步速度将可能随相机型号的改变而改变,详情请参阅相机使用手册。
使用高速同步模式:
1. 按 按钮。
2. “HSS”图标将会显示在闪光灯的液晶显示屏上。
3. 将快门速度设置为快于相机的闪光同步速度进行拍摄。

125
Cn Simp 说明书
像以达到特殊效果。
频闪的频率(每秒的闪光次数,以Hz表示),总的闪光次数和功率水平可以设置。
使用频闪模式:
1. 按 按钮直至“Multi”图标显示在闪光灯液晶显示屏上。
2. 按 按钮调整频闪设置。液晶显示屏上将会从左至右显示功率、频率(HZ)和闪光次数。进入频闪调整屏幕后,功率将会在屏幕上闪烁显示。
3. 按 和 按钮将会在功率、频率(HZ)和闪光次数设置之间切换。
4. 当功率、频率(HZ)和闪光次数图标闪烁显示时,按
, 和 按钮可相应地调整功率、频率(HZ)和闪光次数。
5. 按 按钮退出调节屏幕。
请注意:1. 过多使用频闪可能会导致过热甚至损坏闪光灯,请勿连续使用频闪超过20次。
2. 如果过热,闪光灯将会自动增加回电时间,直至闪光灯温度降低到正常才可再次使用。
频闪模式和快门速度使用以下公式来确保正确的相机快门速度和不同的频闪模式参数搭配使用:
闪光次数/闪光频率=快门速度
例如,5次(闪光次数)/10赫兹(频率)=0.5秒(快门速度)
这是一个粗略的参考,您还需要加快或减慢快门速度来得到预期的结果。
最大频闪闪光次数
闪光输出
如果闪光次数显示为“N---”,不论闪光频率是多少,最大闪光次数如下表所示。
闪光输出
闪光次数
退出高速同步模式:
1. 按 按钮2次。
2. 按 按钮将会在高速同步、后帘同步和前帘同步模式之间循环切换。
请注意:- 请检查“HSS”图标是否显示在取景器中。
- 使用高速同步,将会大大地降低闪光功率和电池电量及减小闪光范围。
后帘同步– SCS后帘同步是在曝光快结束时触发闪光灯,而不是在曝光开始时触 发闪光灯,它可以结合低快门速度达到创意性效果。
使用后帘同步:
1. 按 按钮2次将会从前帘同步切换到高速同步,然后到后帘同步。
2. 取消后帘同步:按 按钮1次,将会回到前帘同步模式。
请注意: 后帘同步功能在无线模式和频闪模式下不可用。
手动(M)模式在手动模式下,闪光灯将会以您设置的功率水平闪光。 Phottix Mitros+ TTL闪光灯可以在1/1全功率至1/128功率(共8档)之间以1/3档为增量进行功率调节。相机的光圈和快门速度需要手动调节。为达到最佳效果,请将相机调为M-手动模式。
使用手动模式:
1. 按 按钮直至闪光灯的液晶显示屏上显示 “M”图标。
2. 按 按钮进入功率调节屏幕。功率水平将会在屏幕上闪烁显示。
3. 按 或 按钮可以调整闪光功率。
4. 按 按钮退出功率调节屏幕。
5. 当闪光就绪指示灯亮红灯,表示闪光灯充满电,可用于拍摄闪光。
6. 按 按钮将会使闪光灯以您设置的手动功率水平闪光,这有利于测光。
请注意:- 半按快门按钮将会使有效的手动闪光功率范围显示在闪光灯液晶显示屏上。
Multi:频闪模式使用Multi频闪模式,可以发出一系列快速的闪光。您可以在Phottix Mitros+闪光灯上设置功率、频率和闪光次数。频闪模式有利于在同一张照片上拍摄移动的被摄体的多个图

126
Cn Simp 说明书
无线引闪模式Phottix Mitros+收发一体TTL闪光灯具有几种无线发射和接收模式。Mitros+闪光灯具有内置兼容Phottix Odin TTL 触发器(佳能)和Phottix Strato II Multi 第二代多功能无线电触发器(佳能)的功能。更多关于Odin和Strato II 触发器的功能信息,请参考产品说明书。
Mitros+闪光灯的无线功能如下:Phottix Odin Tx(发射器)可对本机主控闪光灯进行全方位调节,还可以对其他处于Odin Rx模式下的Mitros+从属闪光灯或者安置在Odin接收器上的兼容闪光灯,远程调节TTL和M模式下的闪光功率和zoom值。连接在Strato、Strato II 和 Atlas II接收器上且设置为M手动模式的闪光灯或影楼灯,可以被处于ODIN TX模式下的Mitros+闪光灯触发。
Phottix Odin Rx(接收器)处于ODIN RX无线模式的Mitros+闪光灯可以被另一个设置为ODIN TX模式的Mitros+闪光灯或者Phottix Odin 发射器触发。
Phottix Strato II Rx 接收器处于Strato II RX无线模式的Mitros+闪光灯可以被Phottix Strato II 发射器和Phottix Odin发射器触发,也可以被处于ODIN TX 无线模式的Mitros+闪光灯触发。
OP Tx(主控 )-使用佳能的红外触发系统机顶闪光灯可通过光学脉冲调节和引闪远程闪光灯。
OP Rx ( 从属 )- 使用佳能的红外触发系统设置为OP RX无线模式的从属Mitros+闪光灯可以被设置为OP TX的主控模式的机顶闪光灯控制和引闪。机顶闪光灯可通过光学脉冲调节和引闪远程闪光灯。
光感从属(OP SLAVE)处于OP SLAVE模式的Mitros+闪光灯可以被附近的闪光灯发出的闪光触发,同时处于OP SLAVE模式的闪光灯也只能以M手动模式被触发。
请注意:Mitros+闪光灯不能被Phottix Strato、Strato II、Ares发射器和处于 Tx 模式下的 Atlas II 收发器触发。
选择无线引闪模式如何进入并设置Mitros+闪光灯上的无线引闪模式:
1. 长按 按钮直至模式菜单出现。
2. 按 或 箭头按钮选择无线模式。
3. 按 按钮选择无线模式。
4. 根据需要设置该无线模式的参数(如:组、频道)。
请注意:如果没有按下 按钮,并且约16秒内没有任何按键操作,Mitros+将会自行进入当前高亮显示的无线模式选项。
Odin Tx(发射器模式)当Mitros+闪光灯设置为Odin Tx发射模式时,该闪光灯将可以安装在相机上,并且可以通过该主控闪光灯设置其自身的和从属闪光灯的闪光模式为TTL或M。它可以控制三组(A、B、C三组)从属闪光灯——可以对设置为ODIN RX无线模式的Mitros+从属闪光灯或者其他安装在ODIN接收器上的兼容闪光灯进行TTL模式下的EV调节或M模式下的闪光功率调节,同时还可以调整主灯和从灯的灯头焦距。
使用 Odin Tx 模式
Odin Tx 模式界面
选择Odin Tx 模式后(请参考上面的图片)
1. 按 按钮设置各组参数。
2. 按 和 按钮键将会在L、A、B、C四组之间循环切换。
3. 选定一组后,按 按鈕,可使该组模式在TTL、M(手动)和OFF之间循环切换。
4. 选定一组后,按 或 按钮,可以在TTL模式下调节EV水平(±3EV,以1/3档为增量进行调节)或者在手动模式下调节功率水平(在1/128到1/1之间以1/3档为增量进行调节)。
5. 请按 按钮确定,并退出ODIN TX模式调节界面。
比率模式 Odin Tx 比率模式界面
本闪光灯的比率模式和佳能原装的TTL系统相似。A组和B组的比率可以在8:1到1:8之间进行设置。也可以设置EV水平。同时,还可以设置本机闪光灯的闪光模式和闪光功率。

127
Cn Simp 说明书
如何进入比率模式:
1. 在Odin Tx界面下,长按 按扭,将会显示闪光比调节界面。
2. 按 按钮打开编辑模式。
3. 按 或 按键可以在L本机闪光灯、闪光比率和闪光比率EV调节设置项中循环切换。
4. 选定一个设置后,按 或 按键将可以调节各设置项的具体参数(本机闪光灯的闪光功率、从属闪光单元的闪光比和闪光比的EV补偿值)。
5. 按 按钮,将会使本机闪光灯的模式在TTL、M(手动模式) 和OFF之间依次切换。
6. 按 按钮退出比率模式调节状态。
7. 长按 按键,将会退出ODIN TX的比率模式,返回到ODIN TX的一般模式。
请注意: 相机上的闪光灯(L)不属于闪光比计算的一部分。本机闪光灯的闪光功率是独立控制的。
Odin Tx 模式下调节灯头焦距1. 按 按钮,将会进入zoom参数调节界面。
2. 按 或 按钮,将会在L、A、B、C四组之间循环切换。
3. 按 或 按钮,将从Azoom模式(将会随着相机镜头焦距的改变而自动变焦)依次切换至Mzoom24 mm,28 mm,35 mm,50 mm,70 mm,80 mm和105mm模式。
4. 按 按钮退出zoom调节模式。
调节传输频道
1. 在Odin Tx一般模式或比率模式显示界面下,按 按钮进入传输频道选择状态。
2. 按 或 按钮,将会在1-4频道之间循环切换。
3. 设置完成后,按 按钮设置锁定频道。
Odin Tx 模式下使用高速同步(HSS)和后帘同步(SCS)
按 按钮将在高速同步(HSS)、后帘同步(SCS)和标准模式之间循环切换。
1. 在HSS模式下,可以使用更快的快门速度。与兼容的相机使用时,快门速度可高达1/8000秒。
2. 注意:在使用高速同步时,闪光灯将会非常耗电。
3. SCS后帘同步将会在曝光快结束时触发闪光灯,而不是在曝光开始时触发闪光灯。SCS后帘同步可以和长时间曝光结合使用,从而达到创意效果。
Odin Rx(接收器)模式Odin Rx 模式界面
当选择Odin Rx无线模式后,Phottix Mitros+闪光灯将会使用一个内置的兼容Odin的接收器触发闪光灯。处于ODIN RX无线模式的Mitros+闪光灯,将会被其他处于ODIN TX发射模式下的Mitros+闪光灯或ODIN发射器控制和触发。
改变频道和组数
1. 按 按钮,进入频道和组选择状态。
2. 按 或 按钮选择频道或组。
3. 按 或 按钮调节接收频道(1-4频道)或者组别(A-C组)。
4. 按 按钮退出频道和组别调节模式。
5. 按 按钮将可以进入闪光灯的EV水平调整界面,按
或 按钮调节EV值。再次按 按钮,退出EV调节模式。
请注意:最终的EV值是所有的EV设定值累计计算而得出来的。如果在处于ODIN RX模式的Mitros+闪光灯上、ODIN发射器上、处于ODIN TX模式的Mitros+闪光灯上,及自定义功能“TTL pref.”中都设定了EV值,那么所有这些设定的EV值将会累计计算,从而得出最终的EV值。
Strato II Rx(接收器)模式 Strato II Rx模式界面
选定Strato II Rx无线接收器模式后,Mitros+闪光灯将可以由处于相同频道和设置了对应组别的Phottix Strato II Multi的发射器触发,也可以由ODIN发射器或处于ODIN TX模式的Mitros+闪光灯触发。
1. 按 按钮,进入频道和组选择状态。
2. 按 或 按钮选择频道或组。
3. 按 或 按钮调节接收频道(1-4频道)或者组别(A-C组)。
4. 按 按钮调节Mitros+闪光灯的手动功率水平(在1/1

128
Cn Simp 说明书
至1/128之间以1/3档为增量进行调节)。重按 按钮退出手动闪光功率调节模式。
5. 按 按钮,调节闪光灯灯头焦距。按 或 按按钮,将在Azoom模式和Mzoom设置模式之间切换。按
按钮返回主菜单。
请注意:在Strato II Rx (接收器) 模式下,闪光灯没有无线TTL功能,也不支持高速同步(HSS)或后帘同步(SCS)功能、无线闪光功率/zoom变焦控制功能。选择Strato II Rx 模式后,闪光功率水平和zoom值必需在处于该模式的Mitros+闪光灯上手动调节。
OP Tx(光学传输主控)和OP Rx(光学传输从属)无线模式OP Tx(主控)和OP Rx(从属)模式使用佳能无线控制和触发系统。设置为OP Tx(主控)模式的Mitros+闪光灯需要安置在相机上,才能控制设置为OP Rx(从属)模式的Mitros+闪光灯。主控闪光灯和从属闪光灯需要设置成相同频道。需要在从属闪光灯上设置组别,在主控闪光灯上可以设置从属闪光单元组的闪光比率。设置为OP Tx(主控)模式的Mitros+闪光灯或者其他兼容的设置为主控模式的闪光灯安置在相机上,用以控制和触发设置为OP Rx(从属)模式的Mitros+闪光灯,或者其他兼容的设置为从属模式的闪光灯。
OP Tx(主控)模式:
1. 按 按钮,可以进入主控闪光开启/关闭设置状态、频道、比率方式和比率比值调节状态。
2. 当闪光灯图标 高亮显示且闪烁时,按 或 按钮,可设置主控闪光灯闪光开启或关闭)(请查看下文)。
3. 高亮显示频道调节区域后,按 或 按钮可在频道1至4之间切换。
4. 高亮显示比率方式调节区域后,按 或 按钮可以设置从属闪光单元组的比率方式(请查看下文)
5. 高亮显示比率比值调节区域后,按 或 按钮可以设置从属闪光单元组的比率比值。当设置为M/Multi模式时,可以单独设置每个从属单元的闪光参数。(请查看下文)
6. 设置完成后,按 按钮确认退出参数调节状态。
开启主控闪光 :在拍照时,机顶主控闪光灯将会闪光。
关闭主控闪光 :在拍照时,机顶主控闪光灯将不会闪光。闪光灯会发出短促的光学脉冲,用以向从属闪光灯发出信号,但此时所发出的光将不会计算在曝光里。
OP Rx (从属)模式:
1. 按 按钮,可以进入频道和从属单元的组别设置状态。
2. 高亮显示频道调节区域后,按 或 按钮可在频道1至4之间切换。
3. 高亮显示组别调节区域后,按 或 按钮将可设置该从属闪光单元的组别)(A、B或C组)。
4. 设置完成后,按 按钮确认并退出了参数设置状态。
5. 设置为OP Rx (从属)模式的闪光灯拍摄准备就绪时,位于闪光灯前方的自动对焦辅助灯将会每秒闪烁一次。
6. 将从属闪光灯设置为Multi(频闪)或者M(手动)模
式——长按 按钮约2s进入调节状态。
7. 按箭头按钮设置闪光功率水平、频闪闪光频率或者闪光次数。
请注意:- 确保OP Tx (主控)与OP Rx (从属)模式下的闪光灯都设置成相同的频道(频道1-4)。
- 切勿在主控单元与从属单元之间放任何障碍物,以免阻碍无线信号的传递。
- 使用无线反射闪光时,请确保从属闪光灯的无线信号接收区域朝向主控闪光灯。
- 如果无需使用无线功能,请将无线模式设置为“OFF“。
传输频道Phottix Mitros+ 闪光灯OP Tx/Rx无线系统有4个传输频道:1、2、3 和4。信号将从OP Tx (主控)模式下的闪光灯发出,传输至OP Rx (从属)模式下的闪光灯。如果主控闪光灯和从属闪光灯的频道不一致,从属闪光灯将不会被触发闪光。
使用OP Tx/Rx无线引闪将设置为OP Tx (主控)模式的闪光灯安置在相机上,并将远程闪光灯设置为OP Rx (从属)模式,按相机快门将会触发OP Tx (主控) 模式下的闪光灯(如果设置主控闪光已开启)和OP Rx (从属)模式下的闪光灯(处在OP Tx 模式下的主控闪光灯光学无线传输距离范围内)。在TTL模式下,相机和闪光灯将会对周围环境和拍摄主体进行测光,从而使拍摄主体得到正确曝光 。
比率方式主控闪光灯可以按照不同的比率方式控制从属闪光灯,包括以下3种方式:
ETTL模式A+B+C 3组闪光灯均以总输出量的平均值闪光。
A:BC A组和B组的闪光输出可以通过闪光比进行设置(见下文)。C组是独立的,它的闪光输出由相机决定。
A组和B组的EV补偿可以设置。
1. 退出闪光比设置屏幕后按 按钮。
2. 按 或 按钮来调节A组和B组的EV水平。
3. C组的EV补偿也可以调节。

129
Cn Simp 说明书
4. 设置完闪光比后按 按钮将会使光标移动到C组的EV调节区域。
5. 按 或 按钮调节C组的EV水平。
A:B A组和B组的闪光输出可以通过闪光比进行设置(见下文)。C组是不可调节的,C组将不会闪光。
A组和B组的EV补偿可以设置。
1. 退出闪光比设置屏幕后按 按钮。
2. 按 或 按钮来调节A组和B组的EV水平。
设置和调节比率方式
ETTL模式
1. 进入OP Tx (主控)模式后(按上述步骤),按 按钮,进入OP Tx (主控)模式参数调节界面。
2. 按三下 按钮,将高亮显示比率方式调节区域。
3. 选择比率方式。按 和 按钮将在A+B+C,A:B,A:BC三种模式之间循环切换。
4. A:B 或A:BC 闪烁显示后,按 按钮,使光标移至比率选项下方的闪光比调节区域。
5. 按 按钮调节闪光比,调节范围:1:1 至1:8(可调档位:1:1.5、1:2、1:3、1:4、1:6、1:8)。
6. 按 按钮可以调节比率,调节范围:1:1 至8:1(可调档位:1.5:1、2:1、3:1、4:1、6:1、8:1)。
7. 设置完成后,按 按钮确认并退出显示屏幕。
手动模式A+B+C在手动模式下,三组闪光灯3组闪光灯均以设置的同一闪光输出量闪光。
A:B:C每组闪光灯的闪光输出可由用户单独设置(见下文)。每组都是独立的,互不影响。
A:BA组和B组的闪光输出可由用户单独设置(见下文)。C组是不可调节的,C组将不会闪光。
设置和调节手动模式1. 进入 OP Tx(主控)模式后(按上述步骤),按 按钮,将闪光模式切换至手动模式(M)。
2. 按 按钮,进入OP Tx (主控)模式参数调节界面。
3. 按三下 按钮,将高亮显示比率方式调节区域。
4. 按 和 按钮按在A+B+C, A:B 和 A:B:C三组模式之间循环切换。
5. 设置完成后,按 按钮确认并退出显示屏幕。
6. 按 按钮调节功率水平。
7. 按 和 按钮将改变闪光功率水平(在1/1 到1/8之间以1/3档为增量进行调节)。
8. 按 按钮将会从A组依次切换到B组和C组,按 按钮将从C组依次切换到B组和A组(如适用)。
9. 按 按钮退出功率水平调节模式。
频闪模式A+B+C三组闪光灯均以相同的功率水平、频率和闪光次数闪光。
A:B:C每组闪光灯的功率水平可由用户单独设置(见下文)。A、B和C三组的频率和闪光次数是相同的,且只能在A组调节。
A:B A组和B组的闪光输出可通过功率水平由用户单独设置(见下文)。A组和B组的频率和闪光次数是相同的,且只能在A组调节。C组是不可调节的,C组将不会闪光。
设置和调节频闪模式1. 进入 OP Tx(主控)模式后(按上述步骤),按 按钮,将闪光模式切换至频闪模式(Multi)。
2. 按 按钮,进入OP Tx (主控)模式参数调节界面。
3. 按三下 按钮,将高亮显示比率方式调节区域。
4. 选择比率方式。按 和 按钮按在A+B+C, A:B 和 A:B:C三组模式之间循环切换。
5. 设置完成后,按 按钮确认并退出显示屏幕。
6. 按 按钮调节功率水平。
7. 按 和 按钮将改变闪光功率水平(在1/1 到1/8之间以1/3档为增量进行调节)。
8. 按 按钮将会从A组依次切换到B组和C组,按 按钮将从C组依次切换到B组和A组(如适用)。
9. 在循环完组选择之后按 按钮将会使光标切换至频率和闪光次数选择。
10. 按 或 按钮可以改变频率和闪光次数。频率和闪光次数只能在A组设置,且这些设置将会应用于B组或C组(如适用)。
11. 按 按钮退出功率水平调节模式。
自定义功能Phottix Mitros+ TTL闪光灯具备许多可编辑的自定义功能。
编辑自定义功能步骤如下:
1. 按住 按钮2秒将进入自定义功能菜单屏幕。
2. 按 或 按钮将循环自定义功能菜单项 – C.Fn 00至C.Fn15。
3. 按 或 按钮可在菜单内改变自定义功能。
4. 按 按钮退出自定义功能菜单。
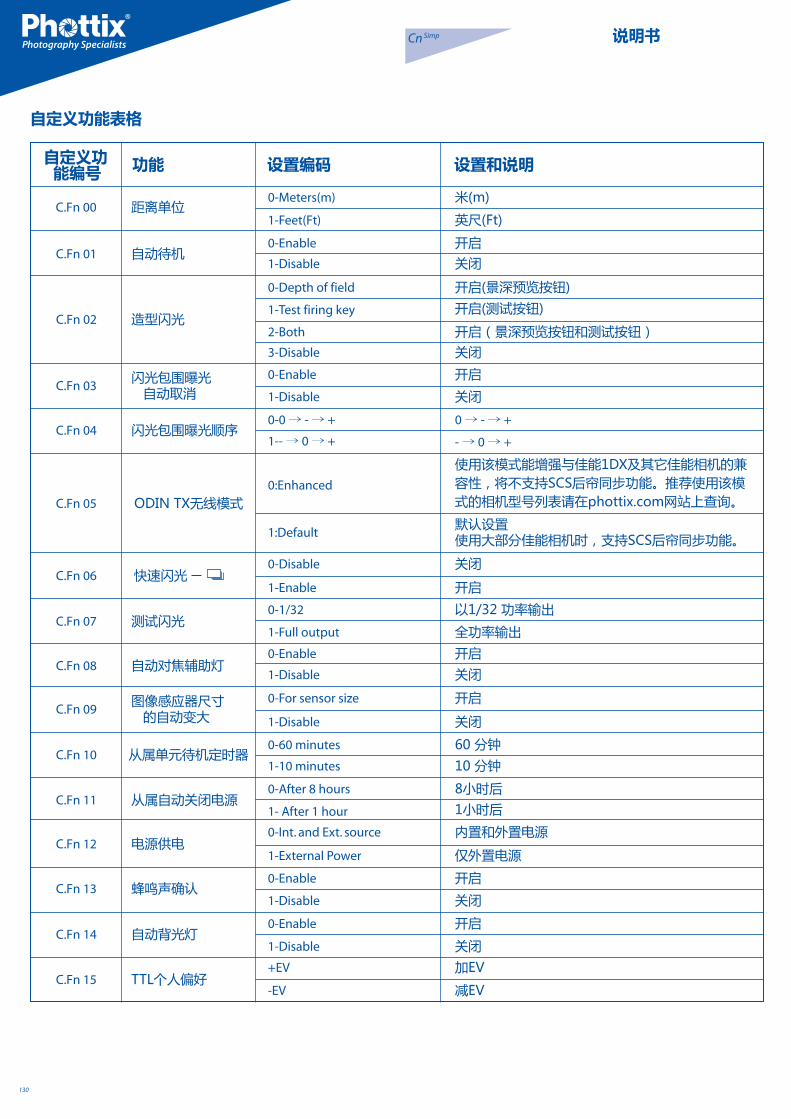
130
Cn Simp 说明书
自定义功能表格

131
Cn Simp 说明书
快速闪光功能快速闪光功能允许闪光灯以全功率的1/2至1/6进行闪光。快速闪光回电时间较快。快速闪光对于短距离内的抓拍很有帮助。
快速闪光功能可以用于连拍模式,您可以在自定义功能中选择快速闪光用于连拍模式功能开启或关闭(见上文C.Fn-06)。
请注意: 快速闪光以闪光为优先。使用快速闪光拍摄较远处景物时,可能会导致曝光不足。
自动背光灯如果没有按键操作,背光灯将会亮8秒后熄灭。如果自动背光灯功能开启,按任一按钮将会使它点亮;如果自动背光灯设置为关闭,按模式按钮将使其点亮。
TTL个人偏好当 闪 光 灯 使 用 在 不 同 的 相 机 上 时 , T T L 可 能 会 稍 有 不同。TTL个人偏好(C.fn-15)功能允许用户在±3档间以1/3档为增量进行微补偿,它是基于相机标准TTL的个人偏好的调节,且TTL个人偏好设置能够保存在闪光灯内。当设置好偏好的EV后,此补偿将会应用于TTL模式下的照片拍摄。在正常的使用过程中,此EV补偿将不会显示在闪光灯液晶显示屏上。
Memory 记忆功能Mitros+闪光灯具有可编辑的“MEMORY”记忆功能,使用该功能可以记忆保存个人设定的闪光参数、数据和自定义功能,方便以后快速调用。闪光灯当前所有可编辑的参数设置(如闪光模式,无线设置,闪光功率等)都可以保存下来方便以后使用。
记忆功能模式显示界面
菜单:Memory记忆模式有三个数据保存路径和三个数据调用路径:
SAVE TO 1保存到路径1
SAVE TO 2保存到路径2
SAVE TO 3保存到路径3
LOAD FROM 1从路径1调取数据
LOAD FROM 2从路径2调取数据
LOAD FROM 3从路径3调取数据
进入“MEMORY”记忆模式:长按 键进入“MEMORY”记忆模式。
保存数据:1. 设置好闪光数据后,长按 鍵进入MEMORY记忆模式。
2. 按 和 按钮在SAVE TO 1,SAVE TO 2和SAVE TO 3三个保存路径中选一个保存数据。
3. 按 按钮确认并保存数据。
4. 显示屏将会自动退出MEMORY记忆模式显示界面,返回到之前的操作显示界面。
5. 如果想取消保存操作,按 鍵将会退出MEMORY记忆模式显示界面,返回到之前的操作显示界面。
调用数据:1. 进入MEMORY记忆模式后(按上述步骤),按 和
按键从LOAD FROM 1,LOAD FROM 2,LOAD FROM 3三个数据调用路径中选择一个。
2. 按 键确定,将会从选择的路径下调取之前保存的数据。
注意:在调取保存的数据并退出MEMORY记忆模式后,显示屏上显示的将是调取后的界面和数据,而不是调取前的参数设置。为防止闪光灯当前数据的丢失,请在数据调用前保存当前的参数设置。
闪光灯恢复默认值Phottix Mitros+闪光灯可恢复出厂设置。
闪光灯重设:1. 同时按住 和 按钮3秒。
2. 闪光灯将会恢复出厂设置。
3. 所有自定义功能将会重设为出厂默认值。
闪光灯信息显示如需技术支持或进行软件升级,有可能需要检查Phottix Mitros+闪光灯信息。硬件版本、软件版本、图标库及序列号信息显示步骤如下:
1. 闪光灯开启后按 按钮。
2. 按任一按钮可以取消闪光灯信息显示,回到液晶显示屏显示界面。
闪光灯电容器的物理变化:如果闪光灯一段时间内未使用,闪光灯内的电容器会发生物理变化。请每三个月将闪光灯开启至少10分钟以避免电容器的物理变化。

132
Cn Simp 说明书
规格参数闪光模式:E-TTL 和 E-TTL II、手动和频闪
闪光指数:58/190(105mm焦距,ISO 100,以米/英尺为
单位)
闪光覆盖范围:24 – 105mm(使用广角散光板为14mm)
自动变焦(自动调整为适合相机镜头焦距的闪光覆盖范围)
手动变焦(闪光灯焦距可随闪光灯/相机的设置而改变)
旋转:360度,向上-向下:-7度至90度
闪光曝光补偿(FEC):手动
闪光包围曝光(FEB):在±3档间以1/3档为增量调节(可
以组合使用手动闪光曝光补偿和闪光包围曝光)
同步方式:前帘同步,后帘同步和高速同步
频闪闪光: 频率: 1-199Hz;闪光次数:1-100次
闪光曝光确认:E-TTL模式下蓝色指示灯亮起
闪光灯充电(使用AA型碱性电池)
充电时间/闪光就绪指示灯:
普通闪光:约0.1至5秒/红色指示灯亮起快速闪光:约0.1至2.5秒/绿色指示灯亮起
内置电源:4节AA型碱性电池或AA型镍氢电池
外置电源:兼容Phottix电池盒和佳能CP-E4电池盒(需使用
特定的转接头)
省电模式:非无线从属模式: 90秒钟;无线从属模式(可编辑):10分钟或60分钟
无线闪光
传输方法:光学脉冲和无线电无线传输
频道: 4
无线选项:ODIN TX, ODIN RX, STRATO II RX, OP TX-(MASTER), OP RX(SLAVE), OP SLAVE, OFF
传输范围(约):无线电传输:100m以上:;光学传输:12-16米/39.36-52.48英尺(室内), 7-9米/22.96-29.52英尺(室外)
接收角度: 无线电传输:360度全方位; 光学传输:±40度(水平),±30度(垂直)
可控制从属单元组: 3组 (A、B和C)
闪光比控制:1:8 - 1:1 - 8:1
待机电流:睡眠模式下≤100uA.
尺寸(长×宽×高):202.8×77.5×58.3 mm
重量:427 克(仅闪光灯,不包括电池)
www.phottix.com
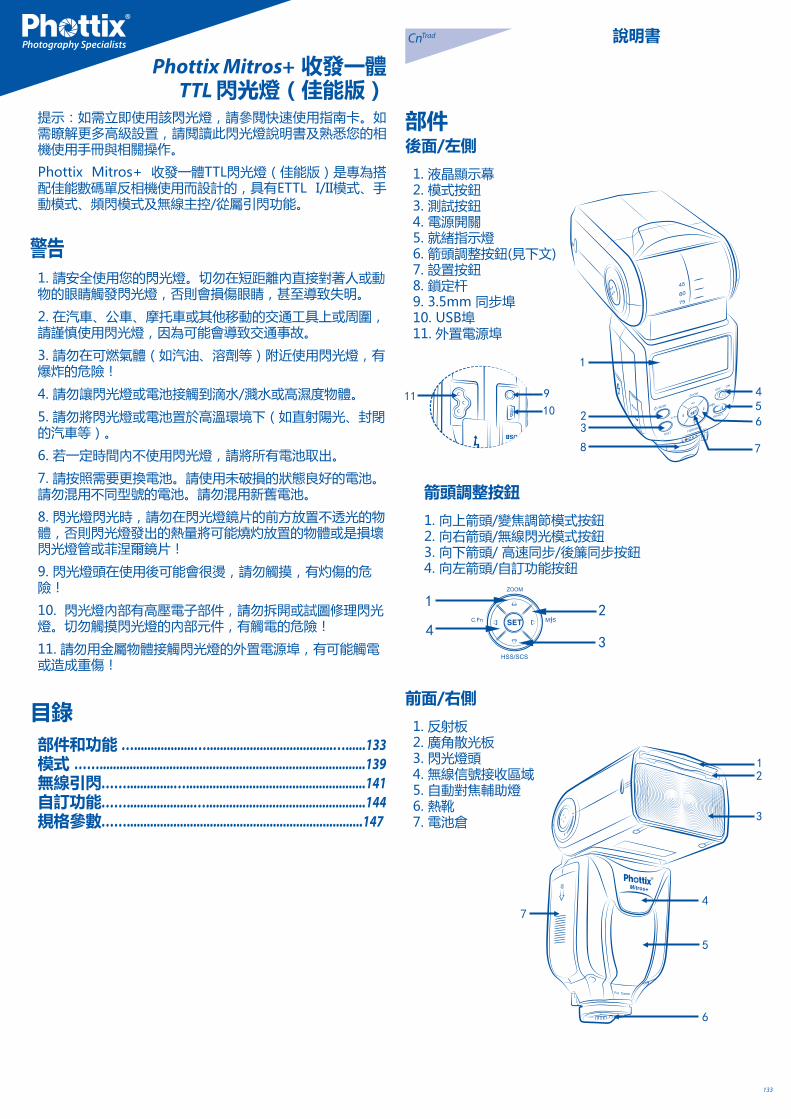
133
CnTrad 說明書
提示:如需立即使用該閃光燈,請參閱快速使用指南卡。如需瞭解更多高級設置,請閱讀此閃光燈說明書及熟悉您的相機使用手冊與相關操作。
Phottix Mitros+ 收發一體TTL閃光燈(佳能版)是專為搭配佳能數碼單反相機使用而設計的,具有ETTL I/II模式、手動模式、頻閃模式及無線主控/從屬引閃功能。
警告1. 請安全使用您的閃光燈。切勿在短距離內直接對著人或動物的眼睛觸發閃光燈,否則會損傷眼睛,甚至導致失明。
2. 在汽車、公車、摩托車或其他移動的交通工具上或周圍,請謹慎使用閃光燈,因為可能會導致交通事故。
3. 請勿在可燃氣體(如汽油、溶劑等)附近使用閃光燈,有爆炸的危險!
4. 請勿讓閃光燈或電池接觸到滴水/濺水或高濕度物體。
5. 請勿將閃光燈或電池置於高溫環境下(如直射陽光、封閉的汽車等)。
6. 若一定時間內不使用閃光燈,請將所有電池取出。
7. 請按照需要更換電池。請使用未破損的狀態良好的電池。請勿混用不同型號的電池。請勿混用新舊電池。
8. 閃光燈閃光時,請勿在閃光燈鏡片的前方放置不透光的物體,否則閃光燈發出的熱量將可能燒灼放置的物體或是損壞閃光燈管或菲涅爾鏡片!
9. 閃光燈頭在使用後可能會很燙,請勿觸摸,有灼傷的危險!
10. 閃光燈內部有高壓電子部件,請勿拆開或試圖修理閃光燈。切勿觸摸閃光燈的內部元件,有觸電的危險!
11. 請勿用金屬物體接觸閃光燈的外置電源埠,有可能觸電或造成重傷!
目錄部件和功能 …..................…......................................…......133模式 ……................................................................................139無線引閃……..............…......................................................141自訂功能……....................…................................................144規格參數…….......................................................................147
Phottix Mitros+ 收發一體TTL 閃光燈(佳能版)
部件後面/左側
1. 液晶顯示幕2. 模式按鈕3. 測試按鈕4. 電源開關5. 就緒指示燈6. 箭頭調整按鈕(見下文)7. 設置按鈕8. 鎖定杆9. 3.5mm 同步埠10. USB埠11. 外置電源埠
箭頭調整按鈕
1. 向上箭頭/變焦調節模式按鈕2. 向右箭頭/無線閃光模式按鈕3. 向下箭頭/ 高速同步/後簾同步按鈕4. 向左箭頭/自訂功能按鈕
前面/右側
1. 反射板2. 廣角散光板3. 閃光燈頭4. 無線信號接收區域5. 自動對焦輔助燈6. 熱靴7. 電池倉

134
CnTrad 說明書
注意事項:此說明書中假定以下內容:
1. 閃光燈和相機的電源開關都設為開啟。
2. 閃光燈和相機的設置與本說明書中所述的設置一致。
3. 相機功能表和閃光燈自訂功能都設置為預設值。
4. 閃光燈是搭配一款相容的佳能單反數碼相機使用。
安裝電池1. 按住電池倉蓋並向閃光燈底部方向滑動,電池倉蓋將會彈起打開。
2. 按照電池倉中的指示圖插入AA電池。
3. 按住電池倉蓋並向閃光燈頂部方向推動 – 電池倉蓋將會鎖定到位。
請注意:
- 請使用4節同一品牌的標準規格高品質電池。請確保所有電池的電量保持一致。
- 閃光燈在使用時,電池可能會很燙,更換電池時需小心!
- 如果一定時間不使用閃光燈,請取出電池。
將閃光燈安裝到相機上關閉相機和閃光燈
1. 將閃光燈熱靴與相機熱靴對準。
2. 滑動閃光燈使其完全插入相機熱靴。
3. 滑動鎖定杆到右側直至發出哢噠聲將閃光燈鎖定到位。
4. 鎖定釋放:按住鎖定杆上的鎖定釋放按鈕的同時將鎖定杆滑動到左側。
開啟/關閉閃光燈1. 開啟閃光燈:將電源開關撥到“ON”的位置。
2. 關閉閃光燈:將電源開關撥到“OFF”的位置。
電池電量顯示液晶顯示幕上的電池電量顯示器(見下文)將會顯示閃光燈裡電池大概的剩餘電量,可以此作為一個粗略的參考來更換電池。如果閃光燈回電時間很長(30秒),請更換電池。
傾斜和旋轉閃光燈頭1. 閃光燈頭的傾斜角度可以在-7度至90度之間調節(可傾斜檔位:-7度、45度、60度、75度、90度)。輕輕傾斜閃光燈頭到您拍攝所需要的角度。
2. 閃光燈頭可左右各旋轉180度(可旋轉檔位:60度、75度、90度、120度、150度、180度)。輕輕旋轉閃光燈頭
到您拍攝所需要的角度。
3. 如果將閃光燈頭從標準的0度前傾位置傾斜或旋轉到其他的位置,閃光燈焦距將會自動設置為50毫米,液晶顯示幕上會顯示“- -”。閃光燈頭傾斜或旋轉後,可以在手動變焦模式下(MZoom)改變閃光燈焦距(見下文)。
4. 在-7度的位置時,閃光燈變焦和在0度位置一樣,將不會改變任何設置。
使用反射板或廣角散光板Phottix Mitros+閃光燈的燈頭內置有一個白色反射板和一個廣角散光板。
1. 使用廣角散光板,閃光覆蓋範圍可以擴展為14mm廣角鏡頭。
2. 當閃光燈頭仰起反射閃光時,白色反射板可用來在被攝體的眼睛裡創建眼神光。
使用步驟:
1. 利用散光板底部邊緣將散光板和反射板從閃光燈頭內輕輕拉出。
2. 散光板拉出後會置於閃光燈頭上。如果不需要使用反射板,請將它輕輕推回至閃光燈頭內。
3. 如果只使用反射板,請將散光板輕輕推回至閃光燈頭內。
使用閃光燈頭柔光罩Phottix Mitros+ TTL閃光燈隨附一個柔光罩,在需要的情況下,此柔光罩可以安裝在閃光燈頭前面,它對於柔化光線、減少熱點和陰影及增加微距攝影的覆蓋範圍很有幫助。
使用步驟:
1.將柔光罩與閃光燈頭對準,讓柔光罩上的“UP”標記朝上。
2. 將柔光罩上一邊的卡口與閃光燈頭上相對應的卡口接合。
3. 重複第2步的步驟,使另一邊的卡口接合。
過熱保護閃光燈具有的過熱保護電路功能,將會通過放慢閃光回電時間來避免過熱造成部件損壞。在短時間內,以全功率閃光約20次後,將會啟動該過熱保護功能。過熱保護功能生效時,閃光燈螢幕上將會出現“Hot!”圖示。
為避免過熱及可能的損壞,閃光燈會自動增加回電時間來降低閃光燈溫度。請等待10分鐘再使用。
如果在出現“Hot!”圖示之後繼續使用閃光燈,閃光燈將不會冷卻,顯示幕上將會出現”Stop”圖示,請停止使用閃光燈,等待10分鐘使其冷卻後再使用。

135
CnTrad 說明書
同步埠和USB埠1. 3.5mm同步埠可通過3.5mm同步線連接至引閃器或相機來引閃閃光燈。此埠只能輸入閃光信號,不能輸出。
2. USB埠用於固件升級。軟體最新公告及說明都會發佈在Phottix網站上。
LED狀態指示燈左邊LED指示燈: 閃光就緒指示燈。快速閃光模式下,達到最小閃光電壓時亮綠燈。充滿電後,LED指示燈亮紅燈。
右邊LED指示燈: 閃光曝光確認指示燈。如果獲得了標準的閃光曝光,閃光曝光確認指示燈將會亮藍燈約3秒。如果閃光曝光確認指示燈不亮,請靠近被攝體或增加相機的ISO設置。
外置電源埠外置電源埠是Phottix專有設計,用於連接Phottix閃光燈線。外置電源埠可通過內附的轉接頭相容佳能CP-E4外置電池盒或其他相容的電池盒。
請注意: -即使使用外置電池盒,也必須在閃光燈中安裝內置電
池。
-請勿使用非相容佳能的外置電池盒。

136
CnTrad 說明書
液晶顯示幕顯示E-TTL II/E-TTL自動閃光模式顯示介面
Azoom : 自動變焦Mzoom : 手動變焦
E-TTL II/E-TTL自動閃光
: 向上反射 : 標準 : 向下反射
提示音 開
關
自訂功能
有效閃光範圍
閃光包圍曝光
閃光曝光補償
焦距
電量顯示
溫度過熱
距離指示顯示:m:米ft:英尺
光圈值
HSS:高速同步SCS:後簾同步
手動閃光
M:手動閃光
手動閃光輸出
頻閃閃光
Multi:頻閃
閃光次數
閃光頻率
光學傳輸無線拍攝/無線電傳輸無線拍攝
無線模式
無線電傳輸 : ODIN發射模式
無線電傳輸:STRATOⅡ接收模式
無線功能關閉
光學傳輸:光感從屬單元
無線電傳輸:ODIN接收模式
光學傳輸:主控單元
光學傳輸:從屬單元

137
CnTrad 說明書
無線電傳輸:ODIN發射模式
發射單元
組
關閉組
組模式
無線電傳輸發射單元閃光模式
無線電傳輸頻道
輔助對焦燈開 輔助對焦燈關
無線電傳輸:ODIN發射模式比率模式
比率模式
比率比值 A:B的EV補償
無線電傳輸:ODIN接收模式
ODIN組別
無線電傳輸:ODIN接收模式
無線電傳輸:STRATO II接收模式
無線電傳輸:Strato II接收模式
光學傳輸:發射(主控)單元
閃光模式
比率模式
Ch:頻道
光學傳輸:發射(主控)單元
閃光光比
主控閃光燈閃光關 主控閃光燈閃光開
光學傳輸:接收(從屬)單元
從屬單元組
光學傳輸:接收(從屬)單元
光學傳輸:光感從屬單元
MEMORY記憶模式顯示介面
光學傳輸:光感從屬單元
記憶模式
保存菜單
取消
下載菜單
OK/確認
138
CnTrad 說明書
自動存儲功能Phottix Mitros+能夠保存閃光燈設置。即使關機重啟後,模式、功率水準等設置將會保存在閃光燈內。
設置閃光燈變焦Phottix Mitros+閃光燈燈頭具有兩種變焦方式– 自動變焦(Azoom) 和手動變焦(Mzoom)。自動變焦時,焦距將會隨相機變焦鏡頭的改變而改變以提供最佳燈光效果;手動變焦時,用戶可自行設置閃光燈頭焦距。
設置步驟:1. 按 按鈕。
2. 液晶顯示幕上的變焦調整區域將會閃爍顯示。
3. 按 或 按鈕將閃光燈頭變焦設置為自動變焦(Azoom)或所需的手動變焦(Mzoom)值。
4. 完成設置後,按 按鈕確認。
請注意:1. 在自動變焦模式(Azoom)下,閃光燈頭從標準的0度前傾位置傾斜或旋轉到其他的位置時,閃光燈焦距將會自動設置為50毫米,液晶顯示幕上會顯示 “- -”。燈頭從0度傾斜到-7度時,閃光燈焦距將不會改變。
2. 自動變焦(Azoom)只有在閃光燈頭設置為0度或-7度時才有效。
3. 在手動變焦模式(Mzoom)下,閃光燈頭從標準的0度前傾位置傾斜或旋轉到其他的位置時,閃光燈焦距將會保持原來的設置,不會改變。
4. 傾斜或旋轉閃光燈頭後,可以通過將自動變焦模式(Azoom)切換為手動變焦模式(Mzoom)來調節閃光燈焦距。
設置高速同步或後簾同步 Phottix Mitros+閃光燈具有高速同步和後簾同步功能。詳情請參閱下文有關高速同步和後簾同步功能的詳細說明。
設置步驟:
1. 按 按鈕。
2. 按 按鈕將會在高速同步,後簾同步和前簾同步之間迴圈切換。
請注意:只有ETTL模式和手動模式下具有高速同步和後簾同步功能,頻閃模式下沒有這兩項功能。
測試按鈕按測試按鈕將會觸發閃光燈閃光,這可用於手動模式下測光。在無線主控模式下,按測試按鈕將會觸發由主控閃光燈控制的設置為同一個頻道的從屬閃光燈。測試閃光的輸出功率可以在自訂功能中設置(見下文C.Fn-07)。
自動待機功能Phottix Mitros+ 收發一體TTL閃光燈具備待機和自動關閉模式來節省電池電量。
1. 在非無線從屬模式下,90秒鐘沒有按鍵操作或沒有被引閃,閃光燈將進入自動待機模式,液晶顯示幕將無顯示,半按相機快門按鈕或按閃光燈上的測試按鈕可喚醒閃光燈。
2. 在無線從屬模式下,如果無按鍵操作或沒有被引閃,閃光燈在60分鐘後將進入從屬待機模式,液晶顯示幕上將顯示“IDLE”,全按相機快門按鈕或按主控閃光燈上的測試按鈕可喚醒從屬模式下的閃光燈。您可以選擇從屬待機計時器的時間 — 60分鐘或10分鐘(見下文C.fn-10)。當顯示幕上出現”IDLE”後,如果無按鍵操作或沒有被引閃,閃光燈在8小時後將進入從屬自動關閉電源模式,按閃光燈上的測試按鈕可喚醒閃光燈。您可以選擇從屬自動關閉電源的時間 — 8小時後或1小時後(見下文C.fn-11)。
造型閃光1. 按相機上的景深預覽按鈕(如果相機上有)將會觸發閃光燈連續閃光約1秒。造型閃光有利於看到被攝體的光影效果和光平衡。(請閱讀您的相機使用說明書獲得更多關於景深預覽按鈕功能的信息)
2. 所有模式(ETTL、頻閃和手動模式)下都可以使用造型閃光。
3. 普通拍攝和無線拍攝時都可以使用造型閃光,造型閃光可以通過自訂功能設置(見下文C.fn-02)。
請注意:
1. 過多使用造型閃光可能會導致過熱甚至損壞閃光燈,請勿連續使用造型閃光超過20次。
2. 如果過熱,閃光燈將會自動增加回電時間,直至閃光燈溫度降低到正常。
自動對焦(AF)輔助燈1. 在低照度/低對比度條件下,Phottix Mitros+內置的自動對焦輔助燈將會點亮來輔助自動對焦。閃光燈前面的自動對焦輔助燈將會在被攝體上投射一個聚焦目標。
2. 自動對焦輔助燈功能可以設置為開啟或關閉(見下文C.fn-08)。
調整Phottix Mitros+閃光燈將會以1/3檔為增量調節閃光曝光補償(FEC)和閃光包圍曝光(FEB)。一些相機的自訂功能中可以將調整增量從1/3檔調為1/2檔,如果相機的自訂功能改變了,Phottix Mitros+將會以1/2檔為增量調節。

139
CnTrad 說明書
閃光模式Phottix Mitros+閃光燈具有三種閃光模式:ETTL、手動(M)和頻閃(Multi)。
改變閃光模式:
1. 按 按鈕。
2. 閃光模式將會在ETTL、手動(M)和頻閃(Multi)模式之間迴圈切換。
3. 當前模式將會顯示在液晶顯示幕的左上方。
非無線ETTL模式的介面非無線ETTL模式的介面
在ETTL模式下,閃光燈和相機將會共同工作來計算拍攝圖像需要的正確曝光。全按快門按鈕,閃光燈將會發出一個預閃,在拍照前瞬間,相機將會使用此預閃計算出曝光和閃光功率。
閃光曝光補償- FECPhottix Mitros+閃光燈可以在±3檔間以1/3檔為增量調節閃光曝光補償(FEC)。閃光曝光補償對於基於環境的需要而需要微調TTL系統的情況有很大幫助。
設置閃光曝光補償:1. 按 按鈕進入閃光曝光補償調節模式。
2. 按 或 按鈕將增加或減少閃光曝光補償值。
3. 按 按鈕退出閃光曝光補償調節模式。
請注意:一些相機的自訂功能中可以將閃光曝光補償(FEC)和閃光包圍曝光(FEB)的調整增量從1/3檔調為1/2檔,如果相機的自訂功能改變了,Phottix Mitros+將會以1/2檔為增量調節。
閃光包圍曝光 – FEB閃光包圍曝光(FEB)可用來自動改變一組照片的閃光功率。相機將記錄3張不同曝光的照片,1張按相機的計算正常曝光,1張相對曝光不足,1張相對曝光過度,用戶可自行設置曝光不足和曝光過度量。在拍攝移動的主體及在一個拍攝場景中有多種不同燈光效果的情況下,使用閃光包圍曝光可以確保記錄到合適曝光的照片。閃光包圍曝光也可用於高動態範圍攝影。
一些相機具備閃光曝光存儲功能,詳情請查閱相機使用手冊。
設置閃光包圍曝光:1. 按 按鈕。
2. 按 按鈕。“FEB 0”圖示將會在液晶顯示幕上閃爍顯示。
3. 按 和 按鈕調整包圍曝光量。
4. 設置完成後,按 按鈕確認。
請注意:- 默認設置:拍完3張照片,閃光包圍曝光將會自動取消。閃光包圍曝光可以在自訂功能介面進行設置(見下文C.fn-03)。
- 閃光包圍曝光拍攝順序可以在自訂功能介面進行改變(見下文C.fn-04)。
- 閃光包圍曝光可以組合閃光曝光補償及閃光曝光鎖定使用(見下文)。
- 為獲得最佳效果,請將相機驅動模式設置為“單拍”,並確保在拍攝第2張和第3張照片前閃光燈已充滿電。
- 一些相機的自訂功能中可以將閃光曝光補償(FEC)和閃光包圍曝光(FEB)的調整增量從1/3檔調為1/2檔,如果相機的自訂功能改變了,Phottix Mitros+將會以1/2檔為增量調節。
閃光曝光鎖定– FEL閃光曝光鎖定(FEL)可用來在拍攝照片前鎖定閃光曝光量,這對於在使用手動點測光的情況下,在一個場景中有多種不同燈光效果很有幫助。
在ETTL模式下,按相機上的FEL按鈕(“ ”按鈕)可以開啟閃光曝光鎖定功能,更多閃光曝光鎖定功能和使用詳情,請參閱相機使用手冊。
按FEL按鈕可以使閃光燈發出一個預閃,此預閃可用於在曝光過程中計算閃光功率,此閃光功率將會保存在相機記憶體中。相機取景器中將會顯示“FEL”圖示。
每按一次FEL按鈕,閃光燈將進行預閃並計算出一個新的曝光。全按相機上的快門按鈕時,閃光燈將會以鎖定的曝光量閃光。
請注意:- 如果被攝體太遠,可能會導致曝光不足,“FEL”圖示會在相機取景器中閃爍顯示約0.5秒。
- 如果取景器中的被攝體太小,閃光曝光鎖定效果可能不太好。
高速同步– HSS在高速同步模式下,相機/閃光燈最大同步速度可以達到相機的最大快門速度。在您需要使用光圈優先模式或限制環境光的情況下,高速同步功能將很有幫助。高速同步速度將可能隨相機型號的改變而改變,詳情請參閱相機使用手冊。
使用高速同步模式:
1. 按 按鈕。
2. “HSS”圖示將會顯示在閃光燈的液晶顯示幕上。
3. 將快門速度設置為快於相機的閃光同步速度進行拍攝。

140
CnTrad 說明書
像以達到特殊效果。
頻閃的頻率(每秒的閃光次數,以Hz表示),總的閃光次數和功率水準可以設置。
使用頻閃模式:
1. 按 按鈕直至“Multi”圖示顯示在閃光燈液晶顯示幕上。
2. 按 按鈕調整頻閃設置。液晶顯示幕上將會從左至右顯示功率、頻率(HZ)和閃光次數。進入頻閃調整螢幕後,功率將會在螢幕上閃爍顯示。
3. 按 和 按鈕將會在功率、頻率(HZ)和閃光次數設置之間切換。
4. 當功率、頻率(HZ)和閃光次數圖示閃爍顯示時,按
, 和 按鈕可相應地調整功率、頻率(HZ)和閃光次數。
5. 按 按鈕退出調節螢幕。
請注意:1. 過多使用頻閃可能會導致過熱甚至損壞閃光燈,請勿連續使用頻閃超過20次。
2. 如果過熱,閃光燈將會自動增加回電時間,直至閃光燈溫度降低到正常才可再次使用。
頻閃模式和快門速度使用以下公式來確保正確的相機快門速度和不同的頻閃模式參數搭配使用:
閃光次數/閃光頻率=快門速度
例如,5次(閃光次數)/10赫茲(頻率)=0.5秒(快門速度)
這是一個粗略的參考,您還需要加快或減慢快門速度來得到預期的結果。
最大頻閃閃光次數
如果閃光次數顯示為“N---”,不論閃光頻率是多少,最大閃光次數如下表所示。
退出高速同步模式:
1. 按 按鈕2次。
2. 按 按鈕將會在高速同步、後簾同步和前簾同步模式之間迴圈切換。
請注意:- 請檢查“HSS”圖示是否顯示在取景器中。
- 使用高速同步,將會大大地降低閃光功率和電池電量及減小閃光範圍。
後簾同步– SCS後簾同步是在曝光快結束時觸發閃光燈,而不是在曝光開始時觸發閃光燈,它可以結合低快門速度達到創意性效果。
使用後簾同步:
1. 按 按鈕2次將會從前簾同步切換到高速同步,然後到後簾同步。
2. 取消後簾同步:按 按鈕1次,將會回到前簾同步模式。
請注意: 後簾同步功能在無線模式和頻閃模式下不可用。
手動(M)模式在手動模式下,閃光燈將會以您設置的功率水準閃光。 Phottix Mitros+ TTL閃光燈可以在1/1全功率至1/128功率(共8檔)之間以1/3檔為增量進行功率調節。相機的光圈和快門速度需要手動調節。為達到最佳效果,請將相機調為M-手動模式。
使用手動模式:
1. 按 按鈕直至閃光燈的液晶顯示幕上顯示 “M”圖示。
2. 按 按鈕進入功率調節螢幕。功率水準將會在螢幕上閃爍顯示。
3. 按 或 按鈕可以調整閃光功率。
4. 按 按鈕退出功率調節螢幕。
5. 當閃光就緒指示燈亮紅燈,表示閃光燈充滿電,可用於拍攝閃光。
6. 按 按鈕將會使閃光燈以您設置的手動功率水準閃光,這有利於測光。
請注意:- 半按快門按鈕將會使有效的手動閃光功率範圍顯示在閃光燈液晶顯示幕上。
Multi:頻閃模式使用Multi頻閃模式,可以發出一系列快速的閃光。您可以在Phottix Mitros+閃光燈上設置功率、頻率和閃光次數。頻閃模式有利於在同一張照片上拍攝移動的被攝體的多個圖

141
CnTrad 說明書
無線引閃模式Phottix Mitros+收發一體TTL閃光燈具有幾種無線發射和接收模式。Mitros+閃光燈具有內置相容Phottix Odin TTL 觸發器(佳能)和Phottix Strato II Multi 第二代多功能無線電觸發器(佳能)的功能。更多關於Odin和Strato II 觸發器的功能信息,請參考產品說明書。
Mitros+閃光燈的無線功能如下:Phottix Odin Tx(發射器)可對本機主控閃光燈進行全方位調節,還可以對其他處於Odin Rx模式下的Mitros+從屬閃光燈或者安置在Odin接收器上的相容閃光燈,遠端調節TTL和M模式下的閃光功率和zoom值。連接在Strato、Strato II 和 Atlas II接收器上且設置為M手動模式的閃光燈或影樓燈,可以被處於ODIN TX模式下的Mitros+閃光燈觸發。
Phottix Odin Rx(接收器)處於ODIN RX無線模式的Mitros+閃光燈可以被另一個設置為ODIN TX模式的Mitros+閃光燈或者Phottix Odin 發射器觸發。
Phottix Strato II Rx 接收器處於Strato II RX無線模式的Mitros+閃光燈可以被Phottix Strato II 發射器和Phottix Odin發射器觸發,也可以被處於ODIN TX 無線模式的Mitros+閃光燈觸發。
OP Tx(主控 )-使用佳能的紅外觸發系統機頂閃光燈可通過光學脈衝調節和引閃遠端閃光燈。
OP Rx ( 從屬 )- 使用佳能的紅外觸發系統設置為OP RX無線模式的從屬Mitros+閃光燈可以被設置為OP TX的主控模式的機頂閃光燈控制和引閃。機頂閃光燈可通過光學脈衝調節和引閃遠端閃光燈。
光感從屬(OP SLAVE)處於OP SLAVE模式的Mitros+閃光燈可以被附近的閃光燈發出的閃光觸發,同時處於OP SLAVE模式的閃光燈也只能以M手動模式被觸發。
請注意:Mitros+閃光燈不能被Phottix Strato、Strato II、Ares發射器和處於 Tx 模式下的 Atlas II 收發器觸發。
選擇無線引閃模式如何進入並設置Mitros+閃光燈上的無線引閃模式:
1. 長按 按鈕直至模式功能表出現。
2. 按 或 箭頭按鈕選擇無線模式。
3. 按 按鈕選擇無線模式。
4. 根據需要設置該無線模式的參數(如:組、頻道)。
請注意:如果沒有按下 按鈕,並且約16秒內沒有任何按鍵操作,Mitros+將會自行進入當前高亮顯示的無線模式選項。
Odin Tx(發射器模式)當Mitros+閃光燈設置為Odin Tx發射模式時,該閃光燈將可以安裝在相機上,並且可以通過該主控閃光燈設置其自身的和從屬閃光燈的閃光模式為TTL或M。它可以控制三組(A、B、C三組)從屬閃光燈——可以對設置為ODIN RX無線模式的Mitros+從屬閃光燈或者其他安裝在ODIN接收器上的相容閃光燈進行TTL模式下的EV調節或M模式下的閃光功率調節,同時還可以調整主燈和從燈的燈頭焦距。
使用 Odin Tx 模式
Odin Tx 模式介面
選擇Odin Tx 模式後(請參考上面的圖片)
1. 按 按鈕設置各組參數。
2. 按 和 按鈕鍵將會在L、A、B、C四組之間迴圈切換。
3. 選定一組後,按 按鈕,可使該組模式在TTL、M (手動)和OFF之間迴圈切換。
4. 選定一組後,按 或 按鈕,可以在TTL模式下調節EV水準(±3EV,以1/3檔為增量進行調節)或者在手動模式下調節功率水準(在1/128到1/1之間以1/3檔為增量進行調節)。
5. 請按 按鈕確定,並退出ODIN TX模式調節介面。
比率模式 Odin Tx 比率模式介面
本閃光燈的比率模式和佳能原裝的TTL系統相似。A組和B組的比率可以在8:1到1:8之間進行設置。也可以設置EV水準。同時,還可以設置本機閃光燈的閃光模式和閃光功率。

142
CnTrad 說明書
如何進入比率模式:
1. 在Odin Tx介面下,長按 按扭,將會顯示閃光比調節介面。
2. 按 按鈕打開編輯模式。
3. 按 或 按鍵可以在L本機閃光燈、閃光比率和閃光比率EV調節設置項中迴圈切換。
4. 選定一個設置後,按 或 按鍵將可以調節各設置項的具體參數(本機閃光燈的閃光功率、從屬閃光單元的閃光比和閃光比的EV補償值)。
5. 按 按鈕,將會使本機閃光燈的模式在TTL、M(手動模式) 和OFF之間依次切換。
6. 按 按鈕退出比率模式調節狀態。
7. 長按 按鍵,將會退出ODIN TX的比率模式,返回到ODIN TX的一般模式。
請注意: 相機上的閃光燈(L)不屬於閃光比計算的一部分。本機閃光燈的閃光功率是獨立控制的。
Odin Tx模式下調節燈頭焦距1. 按 按鈕,將會進入zoom參數調節介面。
2. 按 或 按鈕,將會在L、A、B、C四組之間迴圈切換。
3. 按 或 按鈕,將從Azoom模式(將會隨著相機鏡頭焦距的改變而自動變焦)依次切換至Mzoom24 mm,28 mm,35 mm,50 mm,70 mm,80 mm和105mm模式。
4. 按 按鈕退出zoom調節模式。
調節傳輸頻道
1. 在Odin Tx一般模式或比率模式顯示介面下,按 按鈕進入傳輸頻道選擇狀態。
2. 按 或 按鈕,將會在1-4頻道之間迴圈切換。
3. 設置完成後,按 按鈕設置鎖定頻道。
Odin Tx 模式下使用高速同步(HSS)和後簾同步(SCS)按 按鈕將在高速同步(HSS)、後簾同步(SCS)和標準模式之間迴圈切換。
1. 在HSS模式下,可以使用更快的快門速度。與相容的相機使用時,快門速度可高達1/8000秒。
2. 注意:在使用高速同步時,閃光燈將會非常耗電。
3. SCS後簾同步將會在曝光快結束時觸發閃光燈,而不是在曝光開始時觸發閃光燈。SCS後簾同步可以和長時間曝光結合使用,從而達到創意效果。
Odin Rx(接收器)模式Odin Rx 模式介面
當選擇Odin Rx無線模式後,Phottix Mitros+閃光燈將會使用一個內置的相容Odin的接收器觸發閃光燈。處於ODIN RX無線模式的Mitros+閃光燈,將會被其他處於ODIN TX發射模式下的Mitros+閃光燈或ODIN發射器控制和觸發。
改變頻道和組數
1. 按 按鈕,進入頻道和組選擇狀態。
2. 按 或 按鈕選擇頻道或組。
3. 按 或 按鈕調節接收頻道(1-4頻道)或者組別(A-C組)。
4. 按 按鈕退出頻道和組別調節模式。
5. 按 按鈕將可以進入閃光燈的EV水準調整介面,按
或 按鈕調節EV值。再次按 按鈕,退出EV調節模式。
請注意:最終的EV值是所有的EV設定值累計計算而得出來的。如果在處於ODIN RX模式的Mitros+閃光燈上、ODIN發射器上、處於ODIN TX模式的Mitros+閃光燈上,及自訂功能“TTL pref.”中都設定了EV值,那麼所有這些設定的EV值將會累計計算,從而得出最終的EV值。
Strato II Rx(接收器)模式 Strato II Rx模式介面
選定Strato II Rx無線接收器模式後,Mitros+閃光燈將可以由處於相同頻道和設置了對應組別的Phottix Strato II Multi的發射器觸發,也可以由ODIN發射器或處於ODIN TX模式的Mitros+閃光燈觸發。
1. 按 按鈕,進入頻道和組選擇狀態。
2. 按 或 按鈕選擇頻道或組。
3. 按 或 按鈕調節接收頻道(1-4頻道)或者組別(A-C組)。
4. 按 按鈕調節Mitros+閃光燈的手動功率水準(在1/1

143
CnTrad 說明書
至1/128之間以1/3檔為增量進行調節)。重按 按鈕退出手動閃光功率調節模式。
5. 按 按鈕,調節閃光燈燈頭焦距。按 或 按鈕,將在Azoom模式和Mzoom設置模式之間切換。按
按鈕返回主功能表。
請注意:在Strato II Rx (接收器) 模式下,閃光燈沒有無線TTL功能,也不支持高速同步(HSS)或後簾同步(SCS)功能、無線閃光功率/zoom變焦控制功能。選擇Strato II Rx 模式後,閃光功率水準和zoom值必需在處於該模式的Mitros+閃光燈上手動調節。
OP Tx(光學傳輸主控)和OP Rx(光學傳輸從屬)無線模式OP Tx(主控)和OP Rx(從屬)模式使用佳能無線控制和觸發系統。設置為OP Tx(主控)模式的Mitros+閃光燈需要安置在相機上,才能控制設置為OP Rx(從屬)模式的 Mitros+閃光燈。主控閃光燈和從屬閃光燈需要設置成相同頻道。需要在從屬閃光燈上設置組別,在主控閃光燈上可以設置從屬閃光單元組的閃光比率。設置為OP Tx(主控)模式的Mitros+閃光燈或者其他相容的設置為主控模式的閃光燈安置在相機上,用以控制和觸發設置為OP Rx(從屬)模式的Mitros+閃光燈,或者其他相容的設置為從屬模式的閃光燈。
OP Tx(主控)模式:
1. 按 按鈕,可以進入主控閃光開啟/關閉設置狀態、頻道、比率方式和比率比值調節狀態。
2. 當閃光燈圖示 高亮顯示且閃爍時,按 或 按鈕,可設置主控閃光燈閃光開啟或關閉)(請查看下文)。
3. 高亮顯示頻道調節區域後,按 或 按鈕可在頻道1至4之間切換。
4. 高亮顯示比率方式調節區域後,按 或 按鈕可以設置從屬閃光單元組的比率方式。(請查看下文)
5. 高亮顯示比率比值調節區域後,按 或 按鈕可以設置從屬閃光單元組的比率比值。當設置為M/Multi模式時,可以單獨設置每個從屬單元的閃光參數。(請查看下文)
6. 設置完成後,按 按鈕確認退出參數調節狀態。
開啟主控閃光 :在拍照時,機頂主控閃光燈將會閃光。
關閉主控閃光 :在拍照時,機頂主控閃光燈將不會閃光。閃光燈會發出短促的光學脈衝,用以向從屬閃光燈發出信號,但此時所發出的光將不會計算在曝光裡。
OP Rx (從屬)模式:
1. 按 按鈕,可以進入頻道和從屬單元的組別設置狀態。
2. 高亮顯示頻道調節區域後,按 或 按鈕可在頻道1至4之間切換。
3. 高亮顯示組別調節區域後,按 或 按鈕將可設置該從屬閃光單元的組別)(A、B或C組)。
4. 設置完成後,按 按鈕確認並退出了參數設置狀態。
5. 設置為OP Rx (從屬)模式的閃光燈拍攝準備就緒時,位於閃光燈前方的自動對焦輔助燈將會每秒閃爍一次。
6. 將從屬閃光燈設置為Multi(頻閃)或者M(手動)模
式——長按 按鈕約2s進入調節狀態。
7. 按箭頭按鈕設置閃光功率水準、頻閃閃光頻率或者閃光次數。
請注意:- 確保OP Tx (主控)與OP Rx (從屬)模式下的閃光燈都設置成相同的頻道(頻道1-4)。
- 切勿在主控單元與從屬單元之間放任何障礙物,以免阻礙無線信號的傳遞。
- 使用無線反射閃光時,請確保從屬閃光燈的無線信號接收區域朝向主控閃光燈。
- 如果無需使用無線功能,請將無線模式設置為“OFF”。
傳輸頻道Phottix Mitros+ 閃光燈OP Tx/Rx無線系統有4個傳輸頻道:1、2、3 和4。信號將從OP Tx (主控)模式下的閃光燈發出,傳輸至OP Rx (從屬)模式下的閃光燈。如果主控閃光燈和從屬閃光燈的頻道不一致,從屬閃光燈將不會被觸發閃光。
使用OP Tx/Rx無線引閃將設置為OP Tx (主控)模式的閃光燈安置在相機上,並將遠端閃光燈設置為OP Rx (從屬)模式,按相機快門將會觸發OP Tx (主控) 模式下的閃光燈(如果設置主控閃光已開啟)和OP Rx (從屬)模式下的閃光燈(處在OP Tx 模式下的主控閃光燈光學無線傳輸距離範圍內)。在TTL模式下,相機和閃光燈將會對周圍環境和拍攝主體進行測光,從而使拍攝主體得到正確曝光 。
比率方式主控閃光燈可以按照不同的比率方式控制從屬閃光燈,包括以下3種方式:
ETTL模式A+B+C 3組閃光燈均以總輸出量的平均值閃光。
A:BC A組和B組的閃光輸出可以通過閃光比進行設置(見下文)。C組是獨立的,它的閃光輸出由相機決定。
A組和B組的EV補償可以設置。
1. 退出閃光比設置螢幕後按 按鈕。
2. 按 或 按鈕來調節A組和B組的EV水準。
3. C組的EV補償也可以調節。

144
CnTrad 說明書
4. 設置完閃光比後按 按鈕將會使游標移動到C組的EV調節區域。
5. 按 或 按鈕調節C組的EV水準。
A:B A組和B組的閃光輸出可以通過閃光比進行設置(見下文)。C組是不可調節的,C組將不會閃光。
A組和B組的EV補償可以設置。
1. 退出閃光比設置螢幕後按 按鈕。
2. 按 或 按鈕來調節A組和B組的EV水準。
設置和調節比率方式
ETTL模式 1. 進入OP Tx (主控)模式後(按上述步驟),按“右”按鈕,進入OP Tx (主控)模式參數調節介面。
2. 按三下 按鈕,將高亮顯示比率方式調節區域。
3. 選擇比率方式。按 和 按鈕將在A+B+C,A:B,A:BC三種模式之間迴圈切換。
4. A:B 或A:BC 閃爍顯示後,按 按鈕,使游標移至比率選項下方的閃光比調節區域。
5. 按 按鈕調節閃光比,調節範圍:1:1 至1:8(可調檔位:1:1.5、1:2、1:3、1:4、1:6、1:8)。
6. 按 按鈕可以調節比率,調節範圍:1:1 至8:1(可調檔位:1.5:1、2:1、3:1、4:1、6:1、8:1)。
7. 設置完成後,按 按鈕確認並退出顯示屏幕。
手動模式A+B+C在手動模式下,三組閃光燈3組閃光燈均以設置的同一閃光輸出量閃光。
A:B:C每組閃光燈的閃光輸出可由用戶單獨設置(見下文)。每組都是獨立的,互不影響。
A:BA組和B組的閃光輸出可由用戶單獨設置(見下文)。C組是不可調節的,C組將不會閃光。
設置和調節手動模式1. 進入 OP Tx(主控)模式後(按上述步驟),按 按鈕,將閃光模式切換至手動模式(M)。
2. 按 按鈕,進入OP Tx (主控)模式參數調節介面。
3. 按三下 按鈕,將高亮顯示比率方式調節區域。
4. 按 和 按鈕按在A+B+C, A:B 和 A:B:C三組模式之間迴圈切換。
5. 設置完成後,按 按鈕確認並退出顯示屏幕。
6. 按 按鈕調節功率水準。
7. 按 和 按鈕將改變閃光功率水準(在1/1 到1/8
之間以1/3檔為增量進行調節)。
8. 按 按鈕將會從A組依次切換到B組和C組,按 按鈕將從C組依次切換到B組和A組(如適用)。
9. 按 按鈕退出功率水準調節模式。
頻閃模式A+B+C三組閃光燈均以相同的功率水準、頻率和閃光次數閃光。
A:B:C每組閃光燈的功率水準可由用戶單獨設置(見下文)。A、B和C三組的頻率和閃光次數是相同的,且只能在A組調節。
A:B A組和B組的閃光輸出可通過功率水準由用戶單獨設置(見下文)。A組和B組的頻率和閃光次數是相同的,且只能在A組調節。C組是不可調節的,C組將不會閃光。
設置和調節頻閃模式1. 進入 OP Tx(主控)模式後(按上述步驟),按 按鈕,將閃光模式切換至頻閃模式(Multi)。
2. 按 按鈕,進入OP Tx (主控)模式參數調節介面。
3. 按三下 按鈕,將高亮顯示比率方式調節區域。
4. 選擇比率方式。按 和 按鈕按在A+B+C, A:B 和 A:B:C三組模式之間迴圈切換。
5. 設置完成後,按 按鈕確認並退出顯示屏幕。
6. 按 按鈕調節功率水準。
7. 按 和 按鈕將改變閃光功率水準(在1/1 到1/8之間以1/3檔為增量進行調節)。
8. 按 按鈕將會從A組依次切換到B組和C組,按 按鈕將從C組依次切換到B組和A組(如適用)。
9. 在迴圈完組選擇之後按 按鈕將會使游標切換至頻率和閃光次數選擇。
10. 按 或 按鈕可以改變頻率和閃光次數。頻率和閃光次數只能在A組設置,且這些設置將會應用於B組或C組(如適用)。
11. 按 按鈕退出功率水準調節模式。
自訂功能Phottix Mitros+ TTL閃光燈具備許多可編輯的自訂功能。
編輯自訂功能步驟如下:
1. 按住 按鈕2秒將進入自訂功能功能表螢幕。
2. 按 或 按鈕將迴圈自訂功能功能表項目 – C.Fn 00至C.Fn15。
3. 按 或 按鈕可在功能表內改變自訂功能。
4. 按 按鈕退出自訂功能功能菜單。

145
CnTrad 說明書
自訂功能表格

146
CnTrad 說明書
快速閃光功能快速閃光功能允許閃光燈以全功率的1/2至1/6進行閃光。快速閃光回電時間較快。快速閃光對於短距離內的抓拍很有幫助。
快速閃光功能可以用於連拍模式,您可以在自訂功能中選擇快速閃光用於連拍模式功能開啟或關閉(見上文C.Fn-06)。
請注意: 快速閃光以閃光為優先。使用快速閃光拍攝較遠處景物時,可能會導致曝光不足。
自動背光燈如果沒有按鍵操作,背光燈將會亮8秒後熄滅。如果自動背光燈功能開啟,按任一按鈕將會使它點亮;如果自動背光燈設置為關閉,按模式按鈕將使其點亮。
TTL個人偏好當 閃 光 燈 使 用 在 不 同 的 相 機 上 時 , T T L 可 能 會 稍 有 不同。TTL個人偏好(C.fn-15)功能允許用戶在±3檔間以1/3檔為增量進行微補償,它是基於相機標準TTL的個人偏好的調節,且TTL個人偏好設置能夠保存在閃光燈內。當設置好偏好的EV後,此補償將會應用於TTL模式下的照片拍攝。在正常的使用過程中,此EV補償將不會顯示在閃光燈液晶顯示幕上。
Memory 記憶功能Mitros+閃光燈具有可編輯的“MEMORY”記憶功能,使用該功能可以記憶保存個人設定的閃光參數、資料和自訂功能,方便以後快速調用。閃光燈當前所有可編輯的參數設置(如閃光模式,無線設置,閃光功率等)都可以保存下來方便以後使用。
記憶功能模式顯示介面
菜單:Memory記憶模式有三個資料保存路徑和三個資料調用路徑:
SAVE TO 1保存到路徑1
SAVE TO 2保存到路徑2
SAVE TO 3保存到路徑3
LOAD FROM 1從路徑1調取資料
LOAD FROM 2從路徑2調取資料
LOAD FROM 3從路徑3調取資料
進入“MEMORY”記憶模式:長按 鍵進入“MEMORY”記憶模式。
保存資料:1. 設置好閃光資料後,長按 鍵進入MEMORY記憶模式。
2. 按 和 按鈕在SAVE TO 1,SAVE TO 2和SAVE TO 3三個保存路徑中選一個保存資料。
3. 按 按鈕確認並保存資料。
4. 顯示幕將會自動退出MEMORY記憶模式顯示介面,返回到之前的操作顯示介面。
5. 如果想取消保存操作,按 鍵將會退出MEMORY記憶模式顯示介面,返回到之前的操作顯示介面。
調用數據:1. 進入MEMORY記憶模式後(按上述步驟),按 和
按鍵從LOAD FROM 1,LOAD FROM 2,LOAD FROM 3三個資料調用路徑中選擇一個。
2. 按 鍵確定,將會從選擇的路徑下調取之前保存的資料。
注意:在調取保存的資料並退出MEMORY記憶模式後,顯示幕上顯示的將是調取後的介面和資料,而不是調取前的參數設置。為防止閃光燈當前資料的丟失,請在資料調用前保存當前的參數設置。
閃光燈恢復預設值Phottix Mitros+閃光燈可恢復出廠設置。
閃光燈重設:1. 同時按住 和 按鈕3秒。
2. 閃光燈將會恢復出廠設置。
3. 所有自訂功能將會重設為出廠預設值。
閃光燈信息顯示如需技術支援或進行軟體升級,有可能需要檢查Phottix Mitros+閃光燈信息。硬體版本、軟體版本、圖示庫及序列號信息顯示步驟如下:
1. 閃光燈開啟後按 按鈕。
2. 按任一按鈕可以取消閃光燈信息顯示,回到液晶顯示幕顯示介面。
閃光燈電容器的物理變化:如果閃光燈一段時間內未使用,閃光燈內的電容器會發生物理變化。請每三個月將閃光燈開啟至少10分鐘以避免電容器的物理變化。

147
CnTrad 說明書
規格參數閃光模式:E-TTL 和 E-TTL II、手動和頻閃
閃光指數:58/190(105mm焦距,ISO 100,以米/英尺為
單位)
閃光覆蓋範圍:24 – 105mm(使用廣角散光板為14mm)
自動變焦(自動調整為適合相機鏡頭焦距的閃光覆蓋範圍)
手動變焦(閃光燈焦距可隨閃光燈/相機的設置而改變)
旋轉:360度,向上-向下:-7度至90度
閃光曝光補償(FEC):手動
閃光包圍曝光(FEB):在±3檔間以1/3檔為增量調節(可
以組合使用手動閃光曝光補償和閃光包圍曝光)
同步方式:前簾同步,後簾同步和高速同步
頻閃閃光: 頻率: 1-199Hz;閃光次數:1-100次
閃光曝光確認: E-TTL模式下藍色指示燈亮起
閃光燈充電(使用AA型鹼性電池)
充電時間/閃光就緒指示燈:
普通閃光:約0.1至5秒/紅色指示燈亮起快速閃光:約0.1至2.5秒/綠色指示燈亮起
內置電源:4節AA型鹼性電池或AA型鎳氫電池
外置電源:相容Phottix電池盒和佳能CP-E4電池盒(需使用
特定的轉接頭)
省電模式:非無線從屬模式: 90秒鐘;無線從屬模式(可編輯):10分鐘或60分鐘
無線閃光
傳輸方法:光學脈衝和無線電無線傳輸
頻道: 4
無線選項:ODIN TX, ODIN RX, STRATO II RX, OP TX-(MASTER), OP RX(SLAVE), OP SLAVE, OFF
傳輸範圍(約): 無線電傳輸:100m以上:;光學傳輸:12-16米/39.36-52.48英尺(室內), 7-9米/22.96-29.52英尺(室外)
接收角度: 無線電傳輸:360度全方位; 光學傳輸:±40度(水準),±30度(垂直)
可控制從屬單元組: 3組 (A、B和C)
閃光比控制:1:8 - 1:1 - 8:1
待機電流:睡眠模式下≤100uA.
尺寸(長×寬×高):202.8×77.5×58.3 mm
重量:427 克(僅閃光燈,不包括電池)
www.phottix.com
Printed in China