physical assessment class 5 - catstcmnotes assessment/physical... · physical assessment class 5...
TRANSCRIPT

Physical Assessment Class 5

• Class 5: • ## Spot Test and assessment 2 (Class material form 3‐4)• Goals:• Learn the questions to be asked to elaborate the history of present illness in
patients with joint complaints• Learn the review of systems questions to elicit information about the
musculoskeletal system• Learn to diagnose TM joint illnesses Understand applied anatomy of the axial
spine• Be able to examine the cervical, thoracic, and lumbo‐sacral regions • Identify specific muscle groups/ tendons/ nerves affected by joint injury/disease• Know the normal ROM of each joint • Understand the structural relationship of vertebrae, cartilage and spinal nerves• Learn about various specific tests for cervical, thoracic, and lumbo‐sacral joints
and their ROM•

• Objectives:• At the end of the class, the student will be able to:• List the questions to be asked when elaborating history of present
illness• Describe the principle types of joints, including the three types of
synovial joints• Understand the concept and significance of ROM testing• Perform TM joint examination Identify the anatomical landmarks of
the shoulder• Perform complete axial spine examination• Demonstrate tests for the axial spine• Name the various tests and significance of a positive test• Demonstrate specific test for the spine and interpret them• Recognize important neurological complications of spinal disease
*ROS for joints and muscles
• A review of systems and specifically questions that elicit responses related to muscular and joint topics include:
1. Have you had any recent physical injuries?2. Do you have joint or muscle pains?3. Do you have weakness?4. Are you able to perform daily tasks of living/work duties? If no, why not?
5. Do you have pains with motion, activity?6. Is your pain alleviated by rest?7. Is it worse in the A.M. or P.M.

*Temporomandibular JointCan you ID muscles in # 2, 10, 5?
Do you remember the what bones and bone specific anatomy comprise the TMJ?
Do you remember if the is a fibrous, synovial, or cartilaginous joint?
What is its primary action? Secondary actions?
Does it have a meniscus?

*TMJ
Evaluate by:
1.Evaluating tracking with slow opening and closing of the joint
2.Evaluate ranges of motion
3.Is there any pain? Deviation?
4.What is the patient’s pertinent dental, maxillofacial, orthodontic history?
5.Test with external auditory canal palpation

*TMJ
Test with external auditory canal palpation
1.Insert gloved 5th fingers into both ear canals
2.Have patient slowly open and close jaw
3.Palpate for restrictions, clicking, locking, deviation
4.Note in chart
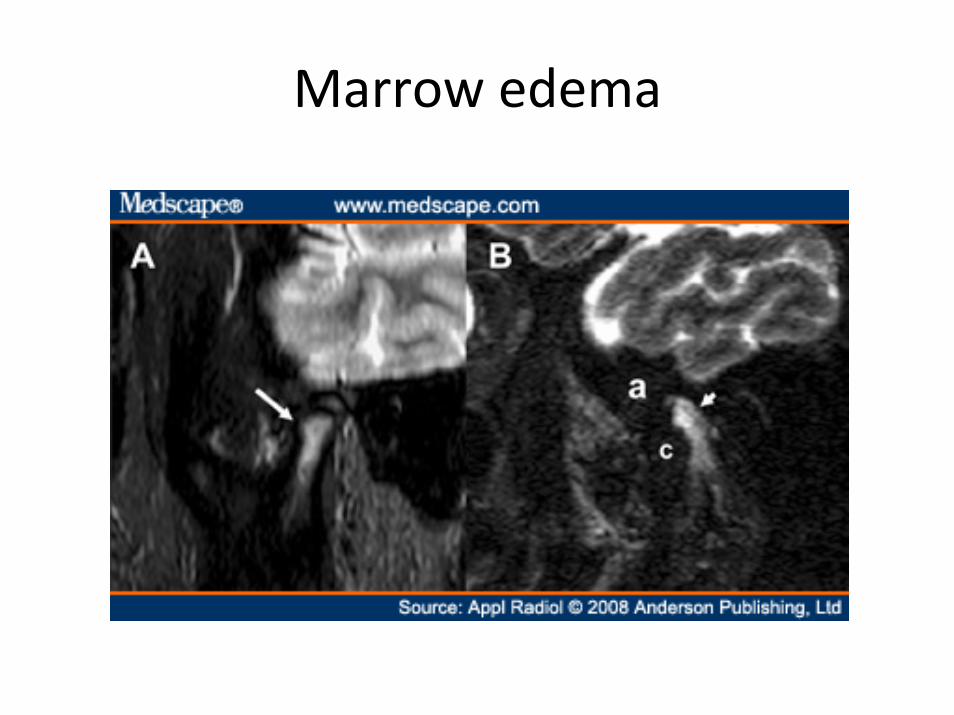
Marrow edema

Fibrosis of Disc Insertion

*Examining the Spine
Anatomy review1. 7 cervical vertebrae
1. Bifid spinous processes, transverse foramina with vertebral arteries/veins, C1/C2 uniques features
2. 12 thoracic vertebrae with bilateral ribs1. Accessory costal facets
3. 5 Lumbar vertebrae1. Very thick and stubby
4. 5 fused sacral vertebrae5. Coccyx

Examining the SpineRecall the spinal nerves:
How many pairs in the cervical spine?
Thoracic?
Lumbar?
Sacral?
Where does the spinal cord end?
What is the CaudaEquina?

Examining the Spine: muscular review
Superficial Deeper
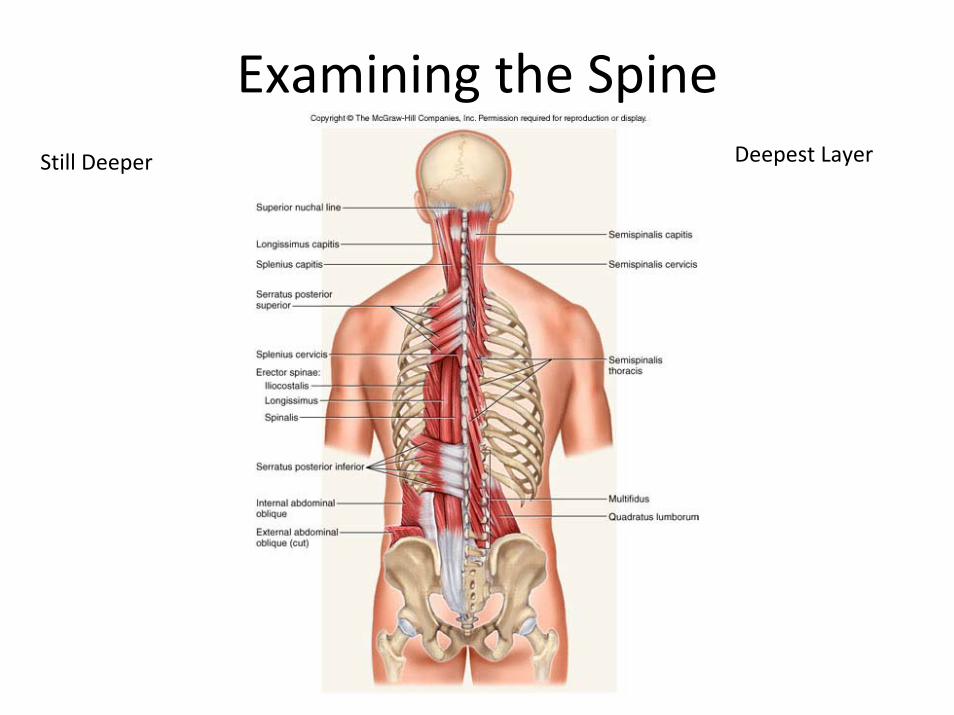
Examining the SpineStill Deeper Deepest Layer

*Cervical‐Thoracic‐Lumbar Evaluation(the same procedures are reproduced in many areas)
1. Evaluate soft tissues, lymph nodes, pulses, general surface inspections, skin
2. Evaluate active Range of Motion (ROM)
3. Evaluate Passive ROM for pain
4. Perform orthopedic testing
5. Perform Neurological evaluation (dermatomes, muscle strength, reflexes)

*Cervical Ranges of Motion (ROM)(Best measured with a goniometer)
NECK:• Flexion: 70‐90 degrees(Touch sternum with chin)
• Extension: 55 degrees(Try to point up with chin)
• Lateral bending: 35 degrees(Bring ear close to shoulder)
• Rotation: 70 degrees left & right

*Clinical Pearl
• If a person has pain with active range of motion, but no pain with passive range of motion, what does this tell you?
• Which tissues/structures are most likely involved? (bone, skin, muscle, tendon, ligament)
____________________________________
____________________________________

*Cervical Anatomy Review

*Cervical Anatomy Review

*Cervical Anatomy Review
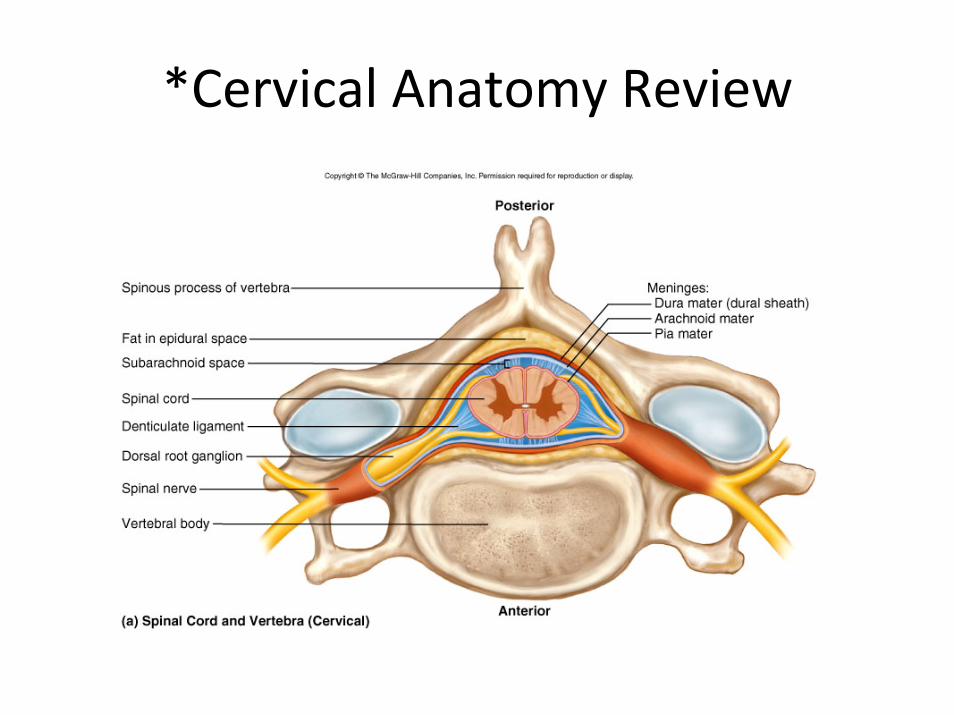
*Cervical Anatomy Review

*Common Cervical Pathologies
1. Traumatic1. Most common in a clinical setting, evaluate abnormal posture (head
forward)2. Injured muscles, ligaments, tendons, connective tissues, nerves
2. Joint Related1. Arthritis (joint overgrowth that encroaches on nerves or cord, normal joint
mechanics, vascular flow to joint, etc.)2. Disc pathology (herniation, extrusion, bulge, etc.)
3. Infectious1. Abcess2. Stapholococcus infection3. Lymph node swelling
4. Tumor1. Spinal cord tumor (meningioma)
5. Endocrine1. Thyroid tumor, goiter
Orthopedic & Neurological testing
1. Doing a detailed examination including skin evaluation, orthopedic and neurological testing is essential in making a precise assessment of the cervicalgia patient.
2. Try to discern where the patient’s problem is arising with the tools you have (history, exam, blood work up, imaging, etc.)
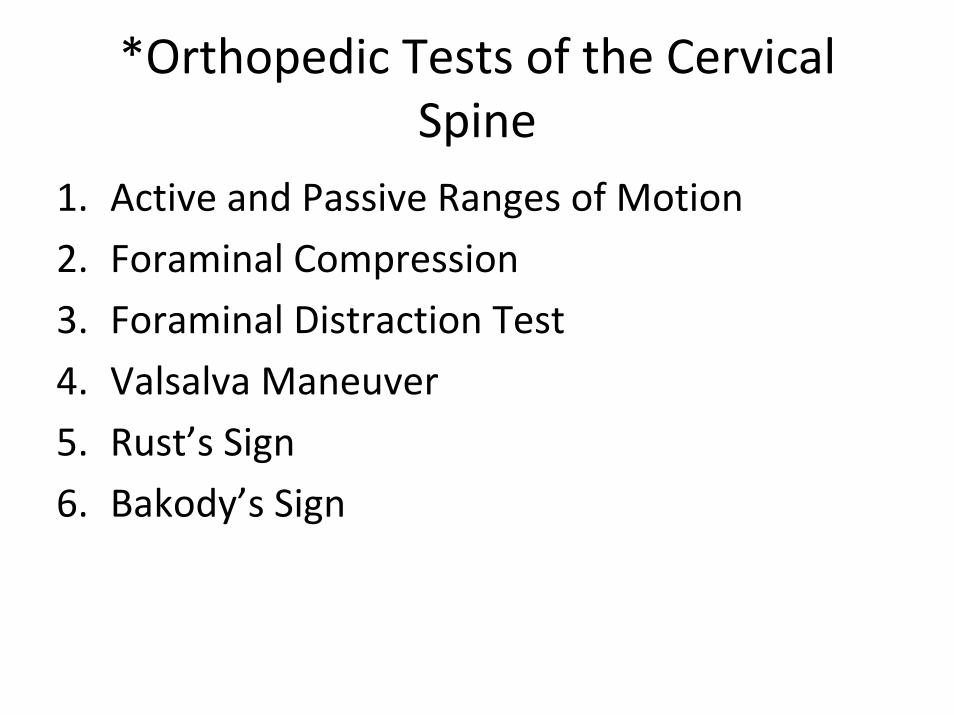
*Orthopedic Tests of the Cervical Spine
1. Active and Passive Ranges of Motion
2. Foraminal Compression
3. Foraminal Distraction Test
4. Valsalva Maneuver
5. Rust’s Sign
6. Bakody’s Sign

*Foraminal Compression‐Direct Downward Pressure

*Foraminal Compression with maximal Foraminal closure at right IVF (Do bilaterally)

*Foraminal Compression (2.2)
1. Purpose:1. To evaluate cervical soft tissues
2. Pain with direct downward compression stresses the disc, facet joints, and may cause foraminal closure
3. How to Perform:1. Tester locks fingers and compresses patients head with stead and
increasing pressure2. Tester Repeats test bilaterally adding maximal lateral bending with
slight neck extension (to maximally close intervertebral foramen (IVF) on the side of lateral bending)
4. Positive test:1. Pain in a radicular pattern may indicate swelling/mass lesion in the
IVF which compresses the spinal nerve2. General pain may be more indicative joint or soft tissue
inflammation outside of the IVF

*Foraminal Compression
1. Adding the lateral bend component more effectively compresses the IVF. Swelling/mass lesions/intervertebralforaminal encroachment may show up with radiculitis upon testing

*Foraminal Distraction Test

*Foraminal Distraction Test (2.3)
1. Purpose:– Distraction/traction of cervical spine may alleviate pressure
from swelling or compressed tissues (facets, disc lesion, foraminal encroachment)
2. How To Perform– Tester places thumbs under patient’s mastoid process and
fingers along the zygomatic or temoral region and applies a steady and increasing pressure in a superior direction.
3. Positive Test:– Alleviation of pain/radicular symptoms may indicate foraminal
encroachment, facet swelling, nerve compression from a disc, etc. This may also be useful in determining if traction is a viable treatment option for the patient.

*Valsalva Maneuver (2.4)

*Valsalva Maneuver (2.4)
1. Purpose:– To increase intra‐abdominal pressures and intrathecal
pressures (thecal sac encloses the spinal cord and is the duralsheath covering the spinal nerves)
2. How To Perform– Have Patient “bear down” like straining. Ask about straining
during bowel movements, coughing, sneezing, laughing as irritating actions to their pain.
3. Positive Test:– If patient notes an increase in pain with this maneuver (or
questions) this may indicate inflammation that is pressing on the thecal sac. This may indicate a disc herniation, nerve root compression, mass lesion in the cord/IVF area

*Rust’s Sign

*Rust’s Sign (2.5)
1. Purpose:– Sign may indicate more severe pathology
2. How To Perform– Look for patient that visibly decompresses or
stabilizes their neck, or does this when changing positions (sitting to lying, lying to standing, etc.)
3. Positive Test:– Seeing this sign may indicate C1‐C2 instability,
fracture, or more severe pathology of the neck
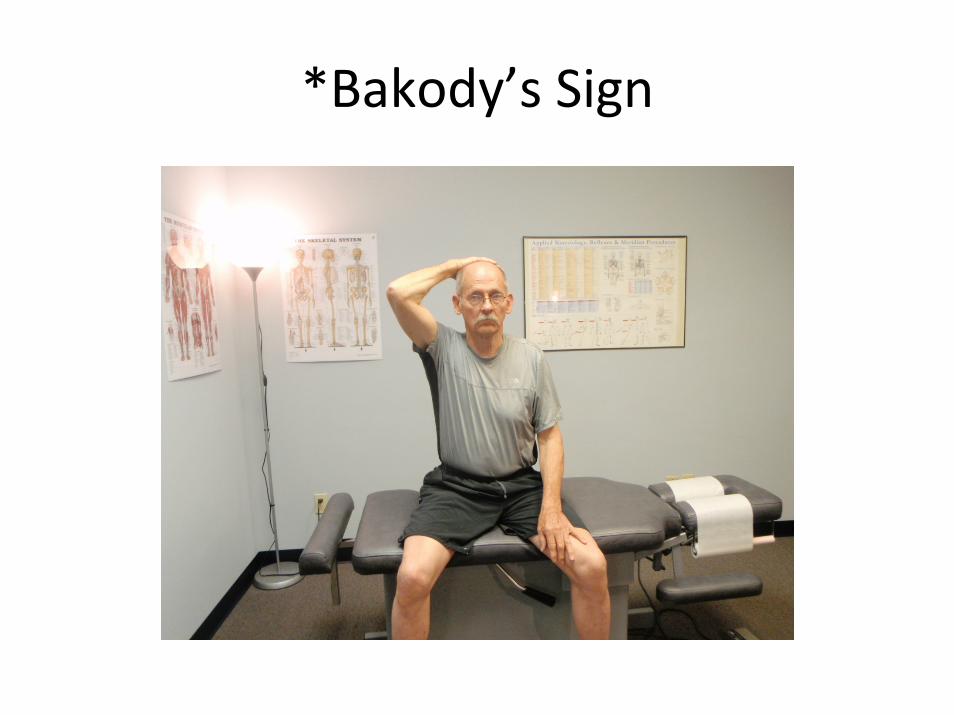
*Bakody’s Sign

*Bakody’s Sign (2.6)
1. Purpose:– Visible sign may indicate relief from nerve compression
in the neck or brachial plexus. This test takes pressure off of the suprascapular nerve and decreases tug on the lower trunk of the brachial plexus
2. How To Perform– Look for patient that walks in this position, or test this
position ( have patient touch the back of their head)3. Positive Test:
– This test may relieve stretch/pressure on nerve roots that are swollen/compressed/inflamed. It may indicate IVF encroachment and nerve root compression, brachial plexus inflammation, etc.

*Tinel’s Tapping at Erb’s Point

*Tinel’s Tapping at Erb’s Point (2.7)
1. Purpose:– Evaluate for brachial plexus
inflammation/involvement where it is most superficial
2. How To Perform– Examiner gently taps the cervical area near Erb’s
point. This is located anterior to the transverse process of C6, approximately 2 cm superior to the location of the clavicle
3. Positive Test:– Tingling and/or pain in the arm or locally may
indicate brachial plexitis or involvement

*Thoracic spine evaluation
1. Evaluation includes: History, skin evaluation, muscular evaluation, dermatomes, thoraco‐abdominal reflexes, rib compression, scoliosis evaluation, auscultation‐percussion of heart/lungs (PA 1),etc.
2. The thoracic evaluation is somewhat limited due to the costovertebral joints preventing much intervertebral range of motion.

*Thoracic spine evaluation
1. Common problems include:1. Joint pain (costovertbral subluxation)2. Rib fracture3. Scoliotic pain4. Myofascial (muscular pain) Very common5. Herpes Zoster (shingles)6. Visceral pain referral7. Named nerve pathology (suprascapular or long
thoracic, etc.)

*Thoracic spine evaluation
• Perform all neurological tests, muscular and skin palpation, etc.
• Palpate the spinous processes and evaluate for scoliotic curvature

T‐spine Fracture on T1 MRI

*Lumbar Spine Evaluation
Common Pathologies:1. Soft tissue injury
– Lumbar strain/sprain of muscles, aponeurosis, ligaments2. Biomechanical alteration
– Altered biomechanics from sitting, lack of exercise, leg length inequality, differing hemi‐pelvis size, etc.
3. Mass lesion– Disc herniation, spinal stenosis, spinal tumor, joint abcess
4. Joint related– Arthritic spurring, loss of disc height/hydration, arthritic joint fusion,
etc.5. Infection
– Disc infection, staph infection, etc. (most common with IV drug users, diabetics, immunodeficient patients)

*Lumbar Spine Evaluation: Orthopedic Tests
1. Unilateral straight leg raise test: 6.1
2. Unilateral Straight Leg Raise Test (LasegueTest) 6.2
3. Hoover test: 6.3
4. Thomas Test: 6.4
5. Trendlenburg’s Test: 6.5
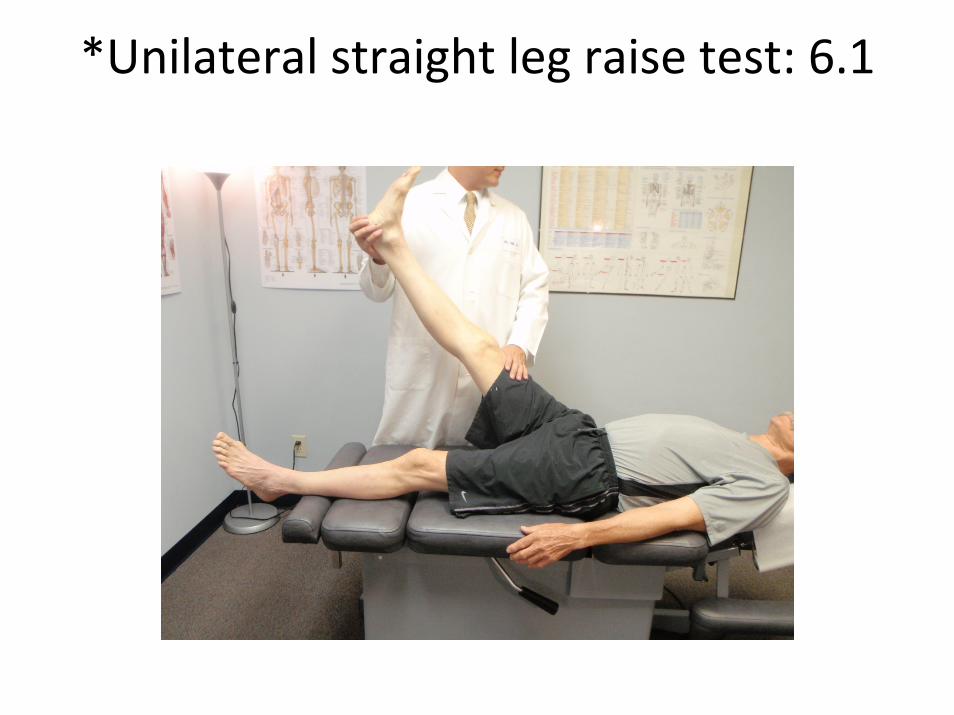
*Unilateral straight leg raise test: 6.1

*Unilateral straight leg raise test: 6.1

*Unilateral straight leg raise test(Lasegue): 6.1
1. Purpose:– Evaluates dural/nerve involvement in low back
2. How To Perform– Have patient relax in a lying or sitting position. Slowly raise one leg until
patient complains of low back or leg pain. Low leg until pain resolves. Maintain that position while having patient flex head to chest and while the examiner dorsi flexes the foot.
3. Positive Test:– A positive test for pain after the patient flexes head or doctor dorsiflexes the
foot indicates dural involvement. Pain with only leg raising may also indicate the same, though is less precise. Common dural involvement includes dural inflammation/pressure from herniated/inflamed discs, spinal tumors, etc. This test stretches the nerves (sciatic nerve) and thus the duralroot sleeve. Pain may also refer to the contralateral side as well. False positives may be from muscles if the patient is not relaxed. This is often very indicative of disc pathology.

*Bilateral straight leg raise test 6.2
1. Purpose:– To evaluate sacroiliac vs. lumbar pain
2. How To Perform– Slowly lift both patient’s leg simultaneously from the
heels in a lying or sitting position. Stop when pain is perceived or aggravated.
3. Positive Test:– Pain aggravated below 70 degrees is most commonly
sacroiliac joint involvement. Pain after 70 degrees is most commonly lumbar spine involvement.

*Hoover Test (6.3)
1. Purpose:– Evaluate for muscular or nerve weakness
2. How To Perform– Have patient lay on their back. Tell them to lift
one leg to 90 degrees (if possible).
3. Positive Test:– Inability to lift the leg may indicate a
neuromuscular weakness (nerve pathology, muscular dystrophy, etc.)

*Thomas Test (6.4): Starting position

*Thomas Test (6.4): Examiner can stabilize the patient during the exam
(patients buttocks should be further towards the edge of the table)

*Thomas Test (6.4)
1. Purpose:– To test for hip range of motion restriction and determine possible tissues
involved.2. How To Perform
– Have patient lie on a table with their buttocks almost of the edge. Have the patient grab one knee (opposite of the side being evaluated) and pull it to the chest. Have them relax the other leg and let in dangle towards the floor.
3. Positive Test:– A lack of hip extension with knee flexion greater than 45 degrees indicates
iliopsoas tightness. Full hip extension with knee flexion less that 45 degrees indicates rectus femoris tightness. Look for hip external rotation during this test as that may also indicate Iliotibial band (IT) tightness.* It is important to have the patients buttocks off the table if possible so the posterior thigh is not restricted by the table itself. The examiner should help the patient maintain balance throughout this test.

*Trendelenburg’s Test (6.5)
1. Purpose:– Evaluate the gluteus medius muscle and nerve supply
2. How To Perform– Have patient stand on one leg for 10 seconds. Make sure
patient’s knee is flexed and hip is flexed. Have patient aim to keep pelvis level. You are evaluating the gluteus medius of the standing leg and its ability to maintain hip postion/posture.
3. Positive Test:– Drooping of hip towards to flexed leg indicates weakness
of the straight leg’s gluteus medius muscle and or nerve supply.

*Trendelenburg’s Test (6.5)

*Valsalva Maneuver (2.4)
1. Purpose:– To increase intra‐abdominal pressures and intrathecal
pressures (thecal sac encloses the spinal cord and is the duralsheath covering the spinal nerves)
2. How To Perform– Have Patient “bear down” like straining. Ask about straining
during bowel movements, coughing, sneezing, laughing as irritating actions to their pain.
3. Positive Test:– If patient notes an increase in pain with this maneuver (or
questions) this may indicate inflammation that is pressing on the thecal sac. This may indicate a disc herniation, nerve root compression, mass lesion in the cord/IVF area

Lumbar L4/5 HNP on T2 MRI

*Sacral Spine Tests
1. Gillet Sacroiliac joint fixation test: 7.1
2. Sacral joint stress test: 7.2
3. Patrick or FABER test: 7.3

*Gillet Sacroiliac joint fixation test (7.1):(Find the PSIS “dimples”)

*1:Gillet Sacroiliac joint fixation test (7.1): Thumbs at bilateral PSIS. Look for level and symmetry

*1: Gillet Sacroiliac joint fixation test (7.1): Both thumbs at PSISs, and patient flexes hip on side being evaluated. Look
for fixation, excess motion, pain, etc.
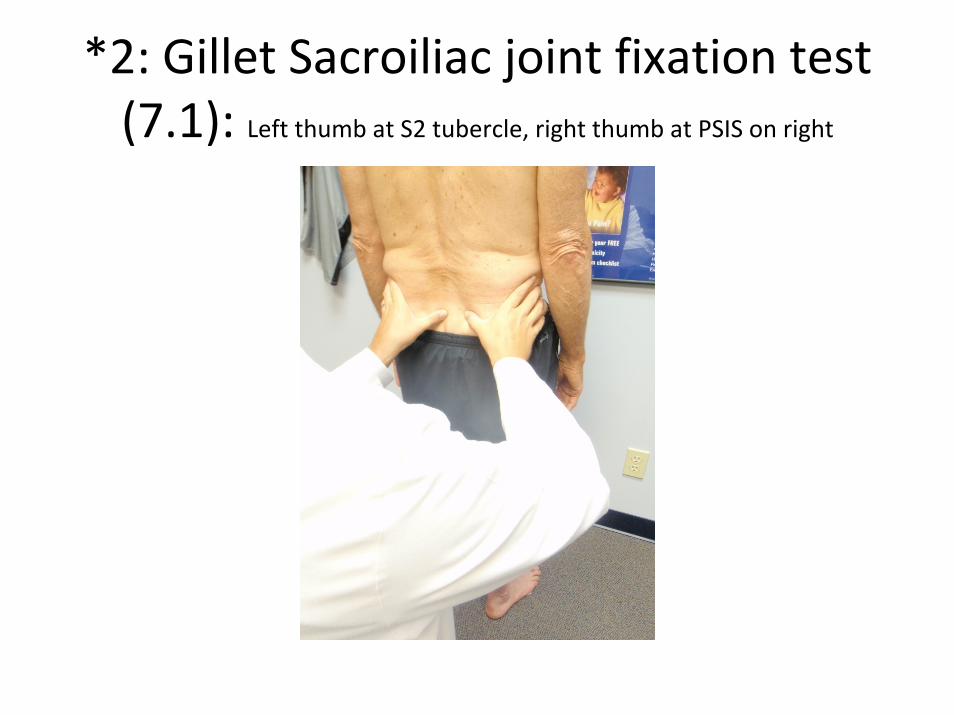
*2: Gillet Sacroiliac joint fixation test (7.1): Left thumb at S2 tubercle, right thumb at PSIS on right
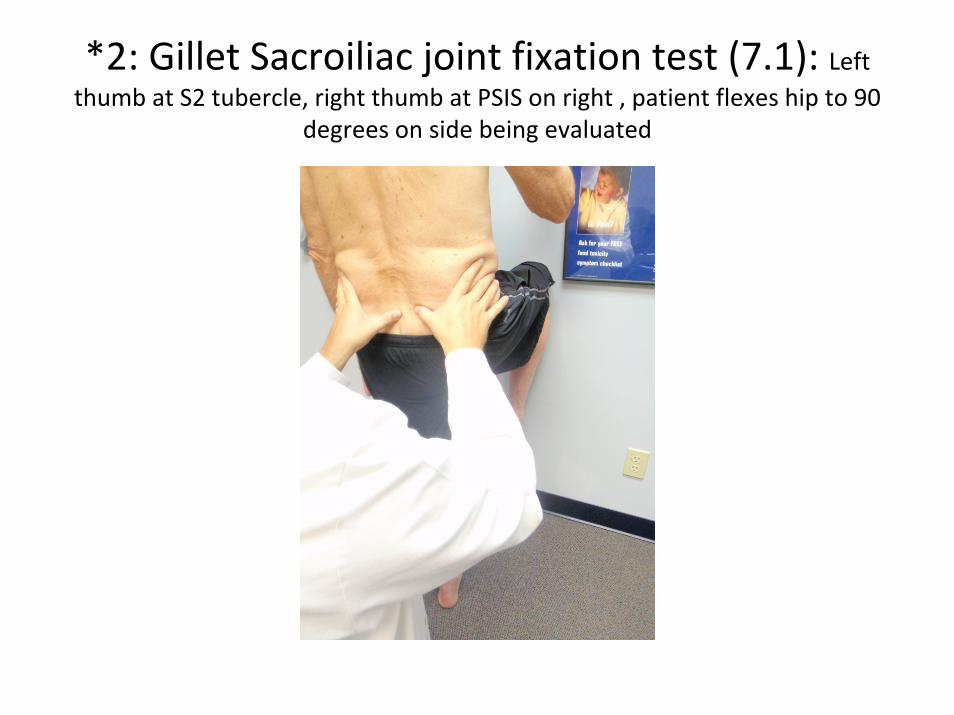
*2: Gillet Sacroiliac joint fixation test (7.1): Left thumb at S2 tubercle, right thumb at PSIS on right , patient flexes hip to 90
degrees on side being evaluated

*3: Gillet Sacroiliac joint fixation test (7.1): Palpate right Ischial Tuberosity
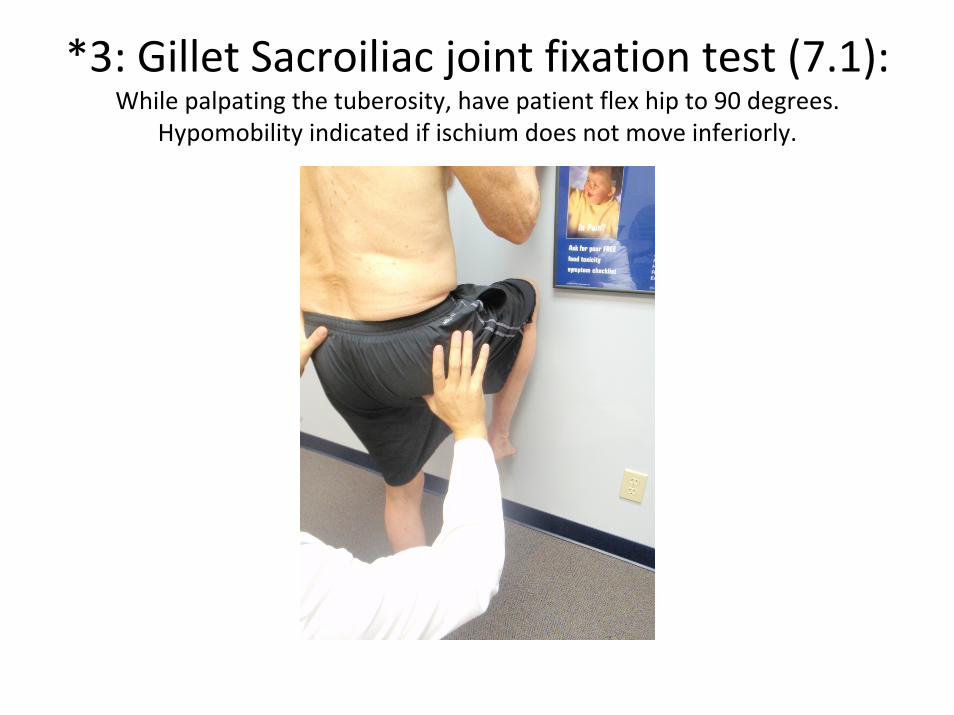
*3: Gillet Sacroiliac joint fixation test (7.1): While palpating the tuberosity, have patient flex hip to 90 degrees.
Hypomobility indicated if ischium does not move inferiorly.

*Gillet Sacroiliac joint fixation test (7.1)
1. Purpose:– This test evaluates sacroiliac function
2. How To Perform and Positive Tests– There are three test components to this one test.
• PSIS palpation and palpation with flexion– If the PSIS are not symmetrical in height, SI fixation is indicated (no
determined side). If the PSIS does not move posteriorly with ipsilateral hip flexion, ipsilateral SI fixation is indicated.
• Stabilizing hand on S2 tubercle. Other hand PSIS palpation on testing side. Have patient flex hip on PSIS palpated side.
– If the PSIS does not move posteriorly with ipsilateral hip flexion, ipsilateralSI fixation is indicated.
• Stabilizing hand on S2 tubercle. Other hand ischial tuberositypalpation on testing side. Have patient flex hip on ischial tuberositypalpated side.
– If the ischial tuberosity does not move posteriorly with ipsilateral hip flexion, ipsilateral SI fixation is indicated.

*1: Sacral joint stress test (7.2):SI compression by pushing posteriorly on ASIS, examiner is caudal
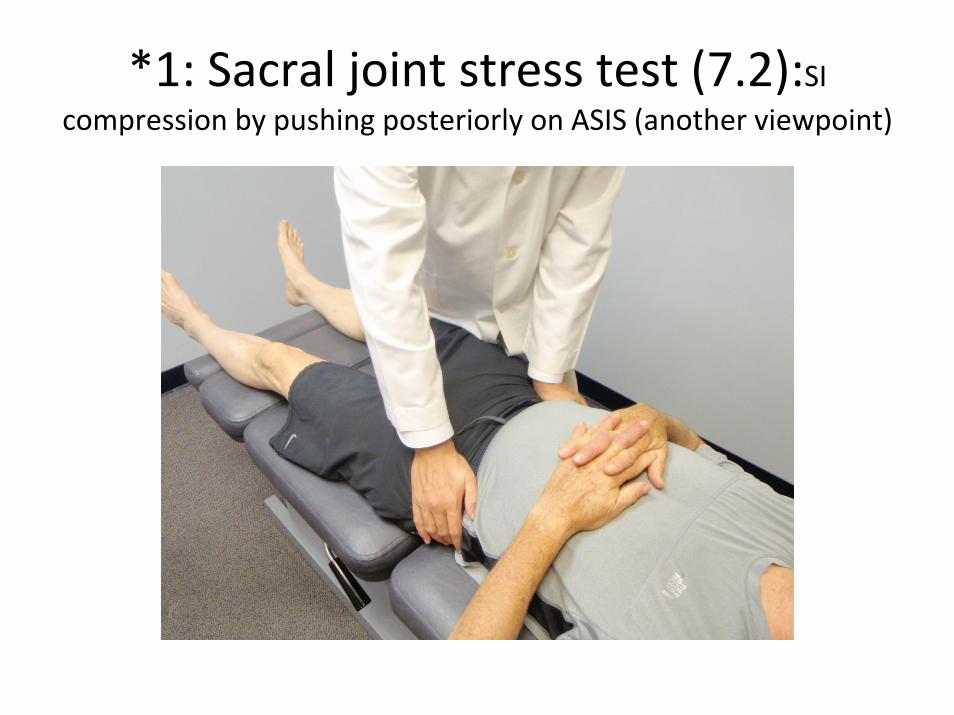
*1: Sacral joint stress test (7.2):SI compression by pushing posteriorly on ASIS (another viewpoint)

*1: Sacral joint stress test (7.2):SI compression by pushing posteriorly on ASIS, examine is cephalad

*2: Sacral joint stress test (7.2):SI compression by pushing anteriorly on sacrum (shearing SI joint)

*3: Sacral joint stress test (7.2):SI compression by pushing medially on patient in side‐lying position

*Sacral joint stress test:
1. Purpose:– Test for Sacroiliac Joint (SI) involvement
2. How To Perform– There are three basic testing methods that should be
combined to get the most information about a patient.• Anterior Posterior pressure over ASIS (compresses SI joint
posteriorly)• Posterior anterior pressure over sacrum (shears SI joint)• Medial pressure over ilium‐iliac crest in side‐lying patient
(compresses and stretches the SI joint)
3. Positive Test:– Pain in the SI joint indicates involvement of joint synovium,
ligaments, joint malposition, activated nociception, etc.

*Yeoman’s Test (7.4)

*Yeoman’s Test (7.4)
1. Purpose:– SI joint evaluation
2. How To Perform– Prone patient relaxes muscles. Examiner bends
patients knee on ipsilateral side being assessed to 90 degrees while lifting the knee (taking the femur into hip extension). This compresses and stresses the SI joint.
3. Positive Test:– Pain in SI joint indicates SI pathology. Anterior hip
pain may indicate iliopsoas or rectus femorisinvolvement.