pictorial index - drivers.lexus.com · driving tips winter driving tips..... 374 off-road...
TRANSCRIPT

GX460_OM_OM60T19U_(U)
Pictorial index Search by illustration
1For safety and security Make sure to read through them
2 Instrument cluster How to read the gauges and meters, the variety of warning lights and indicators, etc.
3Operation of each component
Opening and closing the doors and windows, adjustment before driving, etc.
4 Driving Operations and advice which are necessary for driving
5 Interior features Usage of the interior features, etc.
6Maintenance and care Caring for your vehicle and maintenance procedures
7When trouble arises What to do in case of malfunction or emergency
8Vehicle specifications Vehicle specifications, customizable features, etc.
9 For ownersReporting safety defects for U.S. owners, and seat belt, SRS airbag and headlight aim instructions for Canadian owners
IndexSearch by symptom
Search alphabetically

TABLE OF CONTENTS2
GX460_OM_OM60T19U_(U)
For your information................................... 8
Reading this manual...................................12
How to search..............................................13
Pictorial index...............................................14
1-1. For safe use
Before driving ................................ 26
For safe driving .............................. 28
Seat belts ..........................................30
SRS airbags..................................... 36
Front passenger occupant classification system ..................47
Safety information for children .......................................... 53
Child restraint systems............... 54
Installing child restraints.............58
Exhaust gas precautions............ 70
1-2. LEXUS Enform
LEXUS Enform Safety Connect........................................... 71
1-3. Theft deterrent system
Engine immobilizer system........77
Alarm ................................................. 79
2. Instrument cluster
Warning and indicators lights ................................................ 84
Gauges and meters.....................90
Multi-information display .......... 93
Fuel consumption information ................................. 100
3-1. Key information
Keys.................................................. 104
3-2. Opening, closing and locking the doors
Side doors...................................... 108
Back door ........................................ 115
Glass hatch ....................................120
Smart access system with push-button start.......................125
3-3. Adjusting the seats
Front seats ......................................132
Rear seats .......................................134
Driving position memory..........145
Head restraints ............................ 150
3-4. Adjusting the steering wheel and mirrors
Steering wheel ..............................153
Inside rear view mirror ............. 155
Outside rear view mirrors .......157
3-5. Opening, closing the windows and moon roof
Power windows ........................... 160
Moon roof.......................................163
1 For safety and security
2 Instrument cluster
3 Operation of each component

3
1
8
7
6
5
4
3
2
GX460_OM_OM60T19U_(U)
9
4-1. Before driving
Driving the vehicle ..................... 168
Cargo and luggage ....................176
Vehicle load limits ...................... 180
Trailer towing (with towing hitch) .....................181
Dinghy towing...............................199
4-2. Driving procedures
Engine (ignition) switch...........200
Automatic transmission ..........206
Turn signal lever ............................ 211
Parking brake................................212
4-3. Operating the lights and wipers
Headlight switch ..........................213
Automatic High Beam...............216
Fog light switch .............................221
Windshield wipers and washer ......................................... 222
Rear window wiper and washer ......................................... 226
Headlight cleaner switch........ 228
4-4. Refueling
Opening the fuel tank cap ..... 229
4-5. Using the driving support systems
Lexus Safety System +............. 233
PCS (Pre-Collision System) ....................................... 239
LDA (Lane Departure Alert)............................................250
Dynamic radar cruise control .........................................258
Intuitive parking assist.............. 270
Rear view monitor system...... 278
Multi-terrain Select...................288
Multi-terrain Monitor............... 292
Rear height control air suspension ................................. 339
AVS (Adaptive Variable Suspension System) .............. 343
Four-wheel drive system ........ 344
Crawl Control.............................348
Downhill assist control system.......................................... 352
Driving assist systems ..............355
BSM (Blind Spot Monitor).......361
• The Blind Spot Monitor function .................................... 366
• The Rear Cross Traffic Alert function......................... 369
4-6. Driving tips
Winter driving tips..................... 374
Off-road precautions................377
4 Driving

TABLE OF CONTENTS4
GX460_OM_OM60T19U_(U)
5-1. Using the air conditioning system and defogger
Front automatic air conditioning system...............384
Rear air conditioning system.......................................... 394
Heated steering wheel/seat heaters/seat ventilators ....... 397
5-2. Using the interior lights
Interior lights list .........................400
• Personal/interior lights main switch.............................. 401
• Personal/interior lights ...... 401
5-3. Using the storage features
List of storage features ............403
• Glove box...............................404
• Console box ..........................404
• Coin holder ............................406
• Cup holders/bottle holders/door pockets........406
• Auxiliary boxes .....................408
Luggage compartment features ........................................ 410
5-4. Using the other interior features
Other interior features..............417
• Cool box....................................417
• Sun visors ..................................419
• Vanity mirror ...........................419
• Conversation mirror .......... 420
• Clock ........................................ 420
• Power outlets ..........................421
• USB charging ports............ 425
• Armrest.....................................427
• Coat hooks............................. 428
• Assist grips ............................. 428
Compass ....................................... 429
Garage door opener ............... 433
5 Interior features

5
1
8
7
6
5
4
3
2
GX460_OM_OM60T19U_(U)
9
6-1. Maintenance and care
Cleaning and protecting the vehicle exterior ................ 442
Cleaning and protecting the vehicle interior.................. 445
6-2. Maintenance
Maintenance requirements ............................448
General maintenance................451
Emission inspection and maintenance (I/M)programs.................................... 454
6-3. Do-it-yourself maintenance
Do-it-yourself service precautions................................455
Hood ...............................................458
Engine compartment ............... 459
Tires ..................................................472
Tire inflation pressure ..............484
Wheels ...........................................488
Air conditioning filter ...............490
Electronic key battery.............. 492
Checking and replacing fuses.............................................. 494
Headlight aim .............................. 497
Light bulbs .................................... 499
7-1. Essential information
Emergency flashers ..................508
If your vehicle has to be stopped in an emergency ..........................509
If the vehicle is trapped in rising water................................. 510
7-2. Steps to take in an emergency
If your vehicle needs to be towed .................................. 511
If you think something is wrong.............................................516
Fuel pump shut off system........517
If a warning light turns on or a warning buzzer sounds .......................................... 518
If a warning message is displayed .................................... 527
If you have a flat tire ....................531
If the engine will not start ........ 545
If the electronic key does not operate properly............. 547
If the vehicle battery is discharged.................................550
If your vehicle overheats.........553
If the vehicle becomes stuck .............................................556
6 Maintenance and care 7 When trouble arises

TABLE OF CONTENTS6
GX460_OM_OM60T19U_(U)
8-1. Specifications
Maintenance data (fuel, oil level, etc.) ..................560
Fuel information ......................... 570
Tire information .......................... 573
8-2. Customization
Customizable features ............584
8-3. Items to initialize
Items to initialize.........................593
Reporting safety defects for U.S. owners .................................... 596
Seat belt instructions for Canadian owners (in French).............................................. 597
SRS airbag instructions for Canadian owners (in French)..............................................599
Headlight aim instructions for Canadian owners (in French).............................................. 607
What to do if... (Troubleshooting)................................ 610
Alphabetical index ..................................614
8 Vehicle specifications
9 For owners
Index
For vehicles with navigation system or multimedia system, refer to the “NAVI-GATION SYSTEM OWNER’S MANUAL” or “MULTIMEDIA OWNER’SMANUAL” for information regarding the equipment listed below.• Navigation system• Audio/video system• Rear seat entertainment system• Hands-free system (for cellular phone)• Lexus Enform

7
1
8
7
6
5
4
3
2
GX460_OM_OM60T19U_(U)
9

8
GX460_OM_OM60T19U_(U)
For your information
Please note that this manual applies to all models and explains all equipment, includingoptions. Therefore, you may find some explanations for equipment not installed on yourvehicle. All specifications provided in this manual are current at the time of printing. However,because of the Lexus policy of continual product improvement, we reserve the right tomake changes at any time without notice.Depending on specifications, the vehicle shown in the illustrations may differ from yourvehicle in terms of color and equipment.
Approximately five hours after the engine is turned off, you may hear sound coming fromunder the vehicle for several minutes. This is the sound of a fuel evaporation leakagecheck and, it does not indicate a malfunction.
A wide variety of non-genuine spare parts and accessories for Lexus vehicles are cur-rently available in the market. You should know that Toyota does not warrant these prod-ucts and is not responsible for their performance, repair, or replacement, or for anydamage they may cause to, or adverse effect they may have on, your Lexus vehicle.This vehicle should not be modified with non-genuine Lexus products. Modification withnon-genuine Lexus products could affect its performance, safety or durability, and mayeven violate governmental regulations. In addition, damage or performance problemsresulting from the modification may not be covered under warranty.
The installation of a mobile two-way radio system in your vehicle could affect electronicsystems such as:● Multiport fuel injection system/sequential multiport fuel injection system● Lexus Safety System +● Anti-lock brake system● SRS airbag system● Seat belt pretensioner systemBe sure to check with your Lexus dealer for precautionary measures or special instruc-tions regarding installation of a mobile two-way radio system.
Main Owner’s Manual
Noise from under vehicle after turning off the engine
Accessories, spare parts and modification of your Lexus
Installation of a mobile two-way radio system

GX460_OM_OM60T19U_(U)
9
The vehicle is equipped with sophisticated computers that will record certain data, suchas:
• Engine speed/Electric motor speed (traction motor speed)• Accelerator status• Brake status• Vehicle speed• Operation status of the driving assist systems• Images from the cameras
Your vehicle is equipped with cameras. Contact your Lexus dealer for the locationof recording cameras.
The recorded data varies according to the vehicle grade level and options with which it isequipped.These computers do not record conversations or sounds, and only record images out-side of the vehicle in certain situations.● Data Transmission
Your vehicle may transmit the data recorded in these computers to Lexus without noti-fication to you.
● Data usageLexus may use the data recorded in this computer to diagnose malfunctions, conductresearch and development, and improve quality.Lexus will not disclose the recorded data to a third party except:• With the consent of the vehicle owner or with the consent of the lessee if the vehicle
is leased• In response to an official request by the police, a court of law or a government
agency• For use by Lexus in a lawsuit• For research purposes where the data is not tied to a specific vehicle or vehicle
owner● Recorded image information can be erased by your Lexus dealer.
The image recording function can be disabled. However, if the function is disabled,data from when the system operates will not be available.
● To learn more about the vehicle data collected, used and shared by Lexus,please visit www.lexus.com/privacyvts/.
If your Lexus has Lexus Enform and if you have subscribed to those services, please referto the Lexus Enform Telematics Subscription Service Agreement for information on datacollected and its usage.● To learn more about the vehicle data collected, used and shared by Lexus,
please visit www.lexus.com/privacyvts/.
Vehicle data recording
Usage of data collected through Lexus Enform (U.S. mainland only)

10
GX460_OM_OM60T19U_(U)
This vehicle is equipped with an event data recorder (EDR). The main purpose of an EDRis to record, in certain crash or near crash-like situations, such as an air bag deploymentor hitting a road obstacle, data that will assist in understanding how a vehicle’s systemsperformed. The EDR is designed to record data related to vehicle dynamics and safetysystems for a short period of time, typically 30 seconds or less.The EDR in this vehicle is designed to record such data as:
• How various systems in your vehicle were operating;• Whether or not the driver and passenger safety belts were buckled/fastened;• How far (if at all) the driver was depressing the accelerator and/or brake pedal; and,• How fast the vehicle was traveling.
These data can help provide a better understanding of the circumstances in whichcrashes and injuries occur.NOTE: EDR data are recorded by your vehicle only if a non-trivial crash situation occurs;no data are recorded by the EDR under normal driving conditions and no personal data(e.g., name, gender, age, and crash location) are recorded. However, other parties, suchas law enforcement, could combine the EDR data with the type of personally identifyingdata routinely acquired during a crash investigation. To read data recorded by an EDR, special equipment is required, and access to the vehi-cle or the EDR is needed. In addition to the vehicle manufacturer, other parties, such aslaw enforcement, that have the special equipment, can read the information if they haveaccess to the vehicle or the EDR.● Disclosure of the EDR data
Lexus will not disclose the data recorded in an EDR to a third party except when:• An agreement from the vehicle’s owner (or the lessee for a leased vehicle) is
obtained• In response to an official request by the police, a court of law or a government
agency• For use by Lexus in a lawsuit
However, if necessary, Lexus may:• Use the data for research on vehicle safety performance• Disclose the data to a third party for research purposes without disclosing informa-
tion about the specific vehicle or vehicle owner
Event data recorder

GX460_OM_OM60T19U_(U)
11
The SRS airbag and seat belt pretensioner devices in your Lexus contain explosivechemicals. If the vehicle is scrapped with the airbags and seat belt pretensioners left asthey are, this may cause an accident such as fire. Be sure to have the systems of the SRSairbag and seat belt pretensioner removed and disposed of by a qualified service shop orby your Lexus dealer before you scrap your vehicle.
Special handling may apply, See www.dtsc.ca.gov/hazardouswaste/perchlorate. Your vehicle has components that may contain perchlorate. These components mayinclude airbag, seat belt pretensioners, and wireless remote control batteries.
Scrapping of your Lexus
Perchlorate Material
WARNING
■ General precautions while drivingDriving under the influence: Never drive your vehicle when under the influence ofalcohol or drugs that have impaired your ability to operate your vehicle. Alcohol andcertain drugs delay reaction time, impair judgment and reduce coordination, whichcould lead to an accident that could result in death or serious injury.Defensive driving: Always drive defensively. Anticipate mistakes that other drivers orpedestrians might make and be ready to avoid accidents.Driver distraction: Always give your full attention to driving. Anything that distracts thedriver, such as adjusting controls, talking on a cellular phone or reading can result in acollision with resulting death or serious injury to you, your occupants or others.
■ General precaution regarding children’s safetyNever leave children unattended in the vehicle, and never allow children to have or usethe key.Children may be able to start the vehicle or shift the vehicle into neutral. There is also adanger that children may injure themselves by playing with the windows, the moonroof, or other features of the vehicle. In addition, heat build-up or extremely cold tem-peratures inside the vehicle can be fatal to children.
12
GX460_OM_OM60T19U_(U)
Reading this manual
WARNING: Explains something that, if not obeyed, could cause death or serious injuryto people.
NOTICE: Explains something that, if not obeyed, could cause damage to or a mal-function in the vehicle or its equipment.
Indicates operating or working procedures. Follow the steps innumerical order.
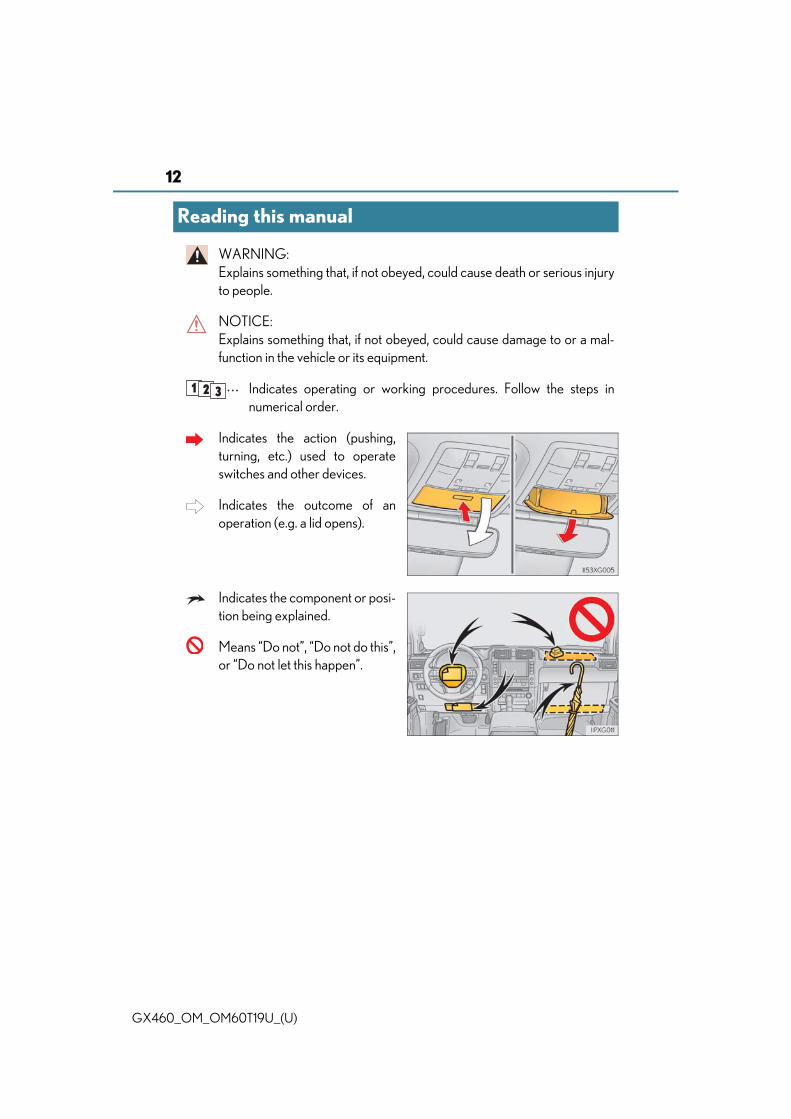
Indicates the action (pushing,turning, etc.) used to operateswitches and other devices.
Indicates the outcome of anoperation (e.g. a lid opens).
Indicates the component or posi-tion being explained.
Means “Do not”, “Do not do this”,or “Do not let this happen”.

13
GX460_OM_OM60T19U_(U)
How to search
■ Searching by name• Alphabetical index................. P. 614
■ Searching by installation position• Pictorial index............................. P. 14
■ Searching by symptom or sound• What to do if...
(Troubleshooting) ..................P. 610
■ Searching by title• Table of contents .........................P. 2

14 Pictorial index
GX460_OM_OM60T19U_(U)
Pictorial index
■ Exterior
Side doors . . . . . . . . . . . . . . . . . . . . . . . . . . . . . . . . . . . . . . . . . . . . . . . . . . . . . . . . . . . P. 108Locking/unlocking. . . . . . . . . . . . . . . . . . . . . . . . . . . . . . . . . . . . . . . . . . . . . . . . . . . . . .P. 108Opening/closing the door glasses . . . . . . . . . . . . . . . . . . . . . . . . . . . . . . . . . . . . . P. 160Locking/unlocking by using the mechanical key . . . . . . . . . . . . . . . . . . . . . . . P. 547Warning lights/warning messages . . . . . . . . . . . . . . . . . . . . . . . . . . . . . . . . . P. 114, 520
Back door . . . . . . . . . . . . . . . . . . . . . . . . . . . . . . . . . . . . . . . . . . . . . . . . . . . . . . . . . . . . . P. 115Opening from outside . . . . . . . . . . . . . . . . . . . . . . . . . . . . . . . . . . . . . . . . . . . . . . . . . . .P. 116Opening/closing the glass hatch. . . . . . . . . . . . . . . . . . . . . . . . . . . . . . . . . . . . . . . . P. 120Warning lights/warning messages . . . . . . . . . . . . . . . . . . . . . . . . . . . . . . . . . P. 114, 520
Outside rear view mirrors. . . . . . . . . . . . . . . . . . . . . . . . . . . . . . . . . . . . . . . . . . . P. 157Adjusting the mirror angle . . . . . . . . . . . . . . . . . . . . . . . . . . . . . . . . . . . . . . . . . . . . . . P. 157Folding the mirrors . . . . . . . . . . . . . . . . . . . . . . . . . . . . . . . . . . . . . . . . . . . . . . . . . . . . . P. 157Driving position memory. . . . . . . . . . . . . . . . . . . . . . . . . . . . . . . . . . . . . . . . . . . . . . . . P. 145Defogging the mirrors . . . . . . . . . . . . . . . . . . . . . . . . . . . . . . . . . . . . . . . . . . . . . . . . . P. 389
1
2
3

15Pictorial index
GX460_OM_OM60T19U_(U)
Windshield wipers . . . . . . . . . . . . . . . . . . . . . . . . . . . . . . . . . . . . . . . . . . . . . . . . . . .P. 222Precautions against winter season . . . . . . . . . . . . . . . . . . . . . . . . . . . . . . . . . . . . . P. 374To prevent freezing (windshield wiper de-icer*) . . . . . . . . . . . . . . . . . . . . . . . P. 389Precautions against car wash . . . . . . . . . . . . . . . . . . . . . . . . . . . . . . . . . . . . . . . . . . P. 443
Fuel filler door . . . . . . . . . . . . . . . . . . . . . . . . . . . . . . . . . . . . . . . . . . . . . . . . . . . . . . .P. 229Refueling method. . . . . . . . . . . . . . . . . . . . . . . . . . . . . . . . . . . . . . . . . . . . . . . . . . . . . . P. 229Fuel type/fuel tank capacity. . . . . . . . . . . . . . . . . . . . . . . . . . . . . . . . . . . . . . . . . . . . P. 562
Tires . . . . . . . . . . . . . . . . . . . . . . . . . . . . . . . . . . . . . . . . . . . . . . . . . . . . . . . . . . . . . . . . . .P. 472Tire size/inflation pressure. . . . . . . . . . . . . . . . . . . . . . . . . . . . . . . . . . . . . . . . . . . . . P. 568Winter tires/tire chain . . . . . . . . . . . . . . . . . . . . . . . . . . . . . . . . . . . . . . . . . . . . . . . . . P. 374Checking/rotation/tire pressure warning system . . . . . . . . . . . . . . . . . . . . . . P. 472Coping with flat tires . . . . . . . . . . . . . . . . . . . . . . . . . . . . . . . . . . . . . . . . . . . . . . . . . . . . P. 531
Hood . . . . . . . . . . . . . . . . . . . . . . . . . . . . . . . . . . . . . . . . . . . . . . . . . . . . . . . . . . . . . . . . P. 458Opening. . . . . . . . . . . . . . . . . . . . . . . . . . . . . . . . . . . . . . . . . . . . . . . . . . . . . . . . . . . . . . . P. 458Engine oil . . . . . . . . . . . . . . . . . . . . . . . . . . . . . . . . . . . . . . . . . . . . . . . . . . . . . . . . . . . . . . P. 562Coping with overheat. . . . . . . . . . . . . . . . . . . . . . . . . . . . . . . . . . . . . . . . . . . . . . . . . . P. 553Warning lights/warning messages . . . . . . . . . . . . . . . . . . . . . . . . . . . . . . . . . P. 114, 520
Camera*. . . . . . . . . . . . . . . . . . . . . . . . . . . . . . . . . . . . . . . . . . . . . . . . . . . . . . .P. 278, 292
Headlights . . . . . . . . . . . . . . . . . . . . . . . . . . . . . . . . . . . . . . . . . . . . . . . . . . . . . . . . . . . P. 213
Parking lights/daytime running lights. . . . . . . . . . . . . . . . . . . . . . . . . . . . . . . P. 213
Fog lights* . . . . . . . . . . . . . . . . . . . . . . . . . . . . . . . . . . . . . . . . . . . . . . . . . . . . . . . . . . . P. 221
Turn signal lights . . . . . . . . . . . . . . . . . . . . . . . . . . . . . . . . . . . . . . . . . . . . . . . . . . . . . . P. 211
Stop/tail lightsHill-start assist control . . . . . . . . . . . . . . . . . . . . . . . . . . . . . . . . . . . . . . . . . . . . . . . . . P. 356Downhill assist control system* . . . . . . . . . . . . . . . . . . . . . . . . . . . . . . . . . . . . . . . . P. 352
License plate lights . . . . . . . . . . . . . . . . . . . . . . . . . . . . . . . . . . . . . . . . . . . . . . . . . . P. 213
Back-up lightsShifting the shift lever to R . . . . . . . . . . . . . . . . . . . . . . . . . . . . . . . . . . . . . . . . . . . . . P. 206
Side marker lights . . . . . . . . . . . . . . . . . . . . . . . . . . . . . . . . . . . . . . . . . . . . . . . . . . . P. 213
4
5
6
7
8
Light bulbs of the exterior lights for driving(Replacing method: P. 499, Watts: P. 569)
*: If equipped
9
10
11
12
13
14
15
16

16 Pictorial index
GX460_OM_OM60T19U_(U)
■ Instrument panel
Engine switch . . . . . . . . . . . . . . . . . . . . . . . . . . . . . . . . . . . . . . . . . . . . . . . . . . . . . . . P. 200Starting the engine/changing the modes. . . . . . . . . . . . . . . . . . . . . . . . . . . . . . . P. 200Emergency stop of the engine . . . . . . . . . . . . . . . . . . . . . . . . . . . . . . . . . . . . . . . . . P. 509When the engine will not start . . . . . . . . . . . . . . . . . . . . . . . . . . . . . . . . . . . . . . . . . P. 545Warning messages . . . . . . . . . . . . . . . . . . . . . . . . . . . . . . . . . . . . . . . . . . . . . . . . . . . . P. 527
Shift lever . . . . . . . . . . . . . . . . . . . . . . . . . . . . . . . . . . . . . . . . . . . . . . . . . . . . . . . . . . . .P. 206Changing the shift position. . . . . . . . . . . . . . . . . . . . . . . . . . . . . . . . . . . . . . . . . . . . . P. 206Precautions against towing . . . . . . . . . . . . . . . . . . . . . . . . . . . . . . . . . . . . . . . . . . . . . .P. 511When the shift lever does not move. . . . . . . . . . . . . . . . . . . . . . . . . . . . . . . . . . . . P. 209
Meters . . . . . . . . . . . . . . . . . . . . . . . . . . . . . . . . . . . . . . . . . . . . . . . . . . . . . . . . . . . . . . . . P. 90Reading the meters/adjusting the instrument panel light . . . . . . . . . . . . . . . . .P. 90Warning lights/indicators. . . . . . . . . . . . . . . . . . . . . . . . . . . . . . . . . . . . . . . . . . . . . . . .P. 84When the warning lights come on . . . . . . . . . . . . . . . . . . . . . . . . . . . . . . . . . . . . . . P. 518
1
2
3

17Pictorial index
GX460_OM_OM60T19U_(U)
Multi-information display . . . . . . . . . . . . . . . . . . . . . . . . . . . . . . . . . . . . . . . . . . . . P. 93Display . . . . . . . . . . . . . . . . . . . . . . . . . . . . . . . . . . . . . . . . . . . . . . . . . . . . . . . . . . . . . . . . . . P. 93When the warning messages are displayed . . . . . . . . . . . . . . . . . . . . . . . . . . . . P. 527
Parking brake . . . . . . . . . . . . . . . . . . . . . . . . . . . . . . . . . . . . . . . . . . . . . . . . . . . . . . . P. 212Applying/releasing . . . . . . . . . . . . . . . . . . . . . . . . . . . . . . . . . . . . . . . . . . . . . . . . . . . . . P. 212Precautions against winter season . . . . . . . . . . . . . . . . . . . . . . . . . . . . . . . . . . . . . P. 375Warning buzzer/message . . . . . . . . . . . . . . . . . . . . . . . . . . . . . . . . . . . . . . . . . P. 212, 519
Turn signal lever . . . . . . . . . . . . . . . . . . . . . . . . . . . . . . . . . . . . . . . . . . . . . . . . . . . . . . P. 211Headlight switch. . . . . . . . . . . . . . . . . . . . . . . . . . . . . . . . . . . . . . . . . . . . . . . . . . . . . P. 213Headlights/parking lights/tail lights/daytime running lights . . . . . . . . . . . . . P. 213Fog lights*1 . . . . . . . . . . . . . . . . . . . . . . . . . . . . . . . . . . . . . . . . . . . . . . . . . . . . . . . . . . . . . P. 221
Windshield wiper and washer switch . . . . . . . . . . . . . . . . . . . . . . . . . . . . . . .P. 222Rear window wiper and washer switch . . . . . . . . . . . . . . . . . . . . . . . . . . . . .P. 226Usage . . . . . . . . . . . . . . . . . . . . . . . . . . . . . . . . . . . . . . . . . . . . . . . . . . . . . . . . . . . . P. 222, 226Adding washer fluid . . . . . . . . . . . . . . . . . . . . . . . . . . . . . . . . . . . . . . . . . . . . . . . . . . . . P. 471Warning messages . . . . . . . . . . . . . . . . . . . . . . . . . . . . . . . . . . . . . . . . . . . . . . . . . . . . . P. 471
Emergency flasher switch . . . . . . . . . . . . . . . . . . . . . . . . . . . . . . . . . . . . . . . . . . P. 508
Fuel filler door opener. . . . . . . . . . . . . . . . . . . . . . . . . . . . . . . . . . . . . . . . . . . . . . . P. 231
Hood lock release lever . . . . . . . . . . . . . . . . . . . . . . . . . . . . . . . . . . . . . . . . . . . . P. 458
Tilt and telescopic steering control switch. . . . . . . . . . . . . . . . . . . . . . . . . . P. 153Adjustment . . . . . . . . . . . . . . . . . . . . . . . . . . . . . . . . . . . . . . . . . . . . . . . . . . . . . . . . . . . . . P. 153Driving position memory. . . . . . . . . . . . . . . . . . . . . . . . . . . . . . . . . . . . . . . . . . . . . . . . P. 145
Air conditioning system . . . . . . . . . . . . . . . . . . . . . . . . . . . . . . . . . . . . . . . . . . . . P. 384Usage . . . . . . . . . . . . . . . . . . . . . . . . . . . . . . . . . . . . . . . . . . . . . . . . . . . . . . . . . . . . . . . . . P. 384Rear window defogger . . . . . . . . . . . . . . . . . . . . . . . . . . . . . . . . . . . . . . . . . . . . . . . . P. 389
Audio system*2
Hands-free system*2
*1: If equipped
*2: Refer to “NAVIGATION SYSTEM OWNER’S MANUAL” or“MULTIMEDIA OWNER’S MANUAL”.
4
5
6
7
8
9
10
11
12
13

18 Pictorial index
GX460_OM_OM60T19U_(U)
■ Switches
Outside rear view mirror switches. . . . . . . . . . . . . . . . . . . . . . . . . . . . . . . . . . P. 157
Instrument cluster light control switch. . . . . . . . . . . . . . . . . . . . . . . . . . . . . . . . P. 91
VIEW switch*1 . . . . . . . . . . . . . . . . . . . . . . . . . . . . . . . . . . . . . . . . . . . . . . . . . . . . . . .P. 296
Odometer/trip meter and trip meter reset button . . . . . . . . . . . . . . . . . . . P. 91
Heated steering wheel switch*1 . . . . . . . . . . . . . . . . . . . . . . . . . . . . . . . . . . . .P. 397
Automatic High Beam switch . . . . . . . . . . . . . . . . . . . . . . . . . . . . . . . . . . . . . . . P. 216
VSC OFF switch. . . . . . . . . . . . . . . . . . . . . . . . . . . . . . . . . . . . . . . . . . . . . . . . . . . . .P. 357
Headlight cleaner switch*1. . . . . . . . . . . . . . . . . . . . . . . . . . . . . . . . . . . . . . . . . P. 228
Second start mode switch . . . . . . . . . . . . . . . . . . . . . . . . . . . . . . . . . . . . . . . . . . .P. 207
Center differential lock/unlock switch . . . . . . . . . . . . . . . . . . . . . . . . . . . . P. 345
Window lock switch . . . . . . . . . . . . . . . . . . . . . . . . . . . . . . . . . . . . . . . . . . . . . . . . . P. 160
Door lock switches . . . . . . . . . . . . . . . . . . . . . . . . . . . . . . . . . . . . . . . . . . . . . . . . . . . P. 110
Power window switches . . . . . . . . . . . . . . . . . . . . . . . . . . . . . . . . . . . . . . . . . . . . . P. 160
Driving position memory buttons . . . . . . . . . . . . . . . . . . . . . . . . . . . . . . . . . . . P. 145
1
2
3
4
5
6
7
8
9
10
11
12
13
14

19Pictorial index
GX460_OM_OM60T19U_(U)
Audio remote control switches*2
Talk switch*2
Telephone switches*2
Meter control switches. . . . . . . . . . . . . . . . . . . . . . . . . . . . . . . . . . . . . . . . . . . . . . . P. 94
Vehicle-to-vehicle distance switch . . . . . . . . . . . . . . . . . . . . . . . . . . . . . . . . .P. 264
LDA (Lane Departure Alert) switch . . . . . . . . . . . . . . . . . . . . . . . . . . . . . . . .P. 252
Cruise control switch. . . . . . . . . . . . . . . . . . . . . . . . . . . . . . . . . . . . . . . . . . . . . . . P. 258
*1: If equipped
*2: Refer to “NAVIGATION SYSTEM OWNER’S MANUAL” or“MULTIMEDIA OWNER’S MANUAL”.
1
2
3
4
5
6
7

20 Pictorial index
GX460_OM_OM60T19U_(U)
Front seat heater/ventilator switches* . . . . . . . . . . . . . . . . . . . . . . . . . . . . .P. 397
Height control switch* . . . . . . . . . . . . . . . . . . . . . . . . . . . . . . . . . . . . . . . . . . . . . P. 339
Height control OFF button* . . . . . . . . . . . . . . . . . . . . . . . . . . . . . . . . . . . . . . . P. 339
AVS switch* . . . . . . . . . . . . . . . . . . . . . . . . . . . . . . . . . . . . . . . . . . . . . . . . . . . . . . . . P. 343
Four-wheel drive control switch . . . . . . . . . . . . . . . . . . . . . . . . . . . . . . . . . . . .P. 344
Multi-terrain Select mode selector switch* . . . . . . . . . . . . . . . . . . . . . . . P. 288Crawl Control speed selector switch* . . . . . . . . . . . . . . . . . . . . . . . . . . . . P. 348
Crawl Control ON/OFF switch* . . . . . . . . . . . . . . . . . . . . . . . . . . . . . . . . . . P. 348
“DAC” switch* . . . . . . . . . . . . . . . . . . . . . . . . . . . . . . . . . . . . . . . . . . . . . . . . . . . . . P. 352
1
2
3
4
5
6
7
8

21Pictorial index
GX460_OM_OM60T19U_(U)
■ Interior
7-passenger models
*: If equipped

22 Pictorial index
GX460_OM_OM60T19U_(U)
6-passenger models
SRS airbags . . . . . . . . . . . . . . . . . . . . . . . . . . . . . . . . . . . . . . . . . . . . . . . . . . . . . . . . . . . P. 36
Floor mats. . . . . . . . . . . . . . . . . . . . . . . . . . . . . . . . . . . . . . . . . . . . . . . . . . . . . . . . . . . . . P. 26
Front seats . . . . . . . . . . . . . . . . . . . . . . . . . . . . . . . . . . . . . . . . . . . . . . . . . . . . . . . . . . . P. 132
Second seats. . . . . . . . . . . . . . . . . . . . . . . . . . . . . . . . . . . . . . . . . . . . . . . . . . . . . . . . . P. 134
Third seats . . . . . . . . . . . . . . . . . . . . . . . . . . . . . . . . . . . . . . . . . . . . . . . . . . . . . . . . . . . P. 134
Head restraints . . . . . . . . . . . . . . . . . . . . . . . . . . . . . . . . . . . . . . . . . . . . . . . . . . . . . . P. 150
Seat belts . . . . . . . . . . . . . . . . . . . . . . . . . . . . . . . . . . . . . . . . . . . . . . . . . . . . . . . . . . . . . P. 30
Console box*1 . . . . . . . . . . . . . . . . . . . . . . . . . . . . . . . . . . . . . . . . . . . . . . . . . . . . . . P. 404Cool box*1 . . . . . . . . . . . . . . . . . . . . . . . . . . . . . . . . . . . . . . . . . . . . . . . . . . . . . . . . . . . P. 417
Inside lock buttons. . . . . . . . . . . . . . . . . . . . . . . . . . . . . . . . . . . . . . . . . . . . . . . . . . . . P. 110
Cup holders. . . . . . . . . . . . . . . . . . . . . . . . . . . . . . . . . . . . . . . . . . . . . . . . . . . . . . . . . .P. 406
Auxiliary boxes . . . . . . . . . . . . . . . . . . . . . . . . . . . . . . . . . . . . . . . . . . . . . . . . . . . . . P. 408
Rear air conditioning system*1. . . . . . . . . . . . . . . . . . . . . . . . . . . . . . . . . . . . . .P. 394
Rear seat entertainment system*1, 2
1
2
3
4
5
6
7
8
9
10
11
12
13

23Pictorial index
GX460_OM_OM60T19U_(U)
Inside rear view mirror . . . . . . . . . . . . . . . . . . . . . . . . . . . . . . . . . . . . . . . . . . . . . . P. 155
Sun visors . . . . . . . . . . . . . . . . . . . . . . . . . . . . . . . . . . . . . . . . . . . . . . . . . . . . . . . . . . . . P. 419
Vanity mirrors . . . . . . . . . . . . . . . . . . . . . . . . . . . . . . . . . . . . . . . . . . . . . . . . . . . . . . . P. 419
Personal/interior lights*3 . . . . . . . . . . . . . . . . . . . . . . . . . . . . . . . . . . . . . . . . . . . P. 401
Moon roof switches . . . . . . . . . . . . . . . . . . . . . . . . . . . . . . . . . . . . . . . . . . . . . . . . . P. 163
Conversation mirror . . . . . . . . . . . . . . . . . . . . . . . . . . . . . . . . . . . . . . . . . . . . . . . P. 420Auxiliary boxes . . . . . . . . . . . . . . . . . . . . . . . . . . . . . . . . . . . . . . . . . . . . . . . . . . . . . P. 408
“SOS” button*1 . . . . . . . . . . . . . . . . . . . . . . . . . . . . . . . . . . . . . . . . . . . . . . . . . . . . . . . . P. 71
Garage door opener buttons . . . . . . . . . . . . . . . . . . . . . . . . . . . . . . . . . . . . . . P. 433
*1: If equipped
*2: Refer to “NAVIGATION SYSTEM OWNER’S MANUAL” or“MULTIMEDIA OWNER’S MANUAL”.
*3: The illustration shows the front, but they are also equipped in the rear.
1
2
3
4
5
6
7
8

24 Pictorial index
GX460_OM_OM60T19U_(U)

25
GX460_OM_OM60T19U_(U)
For safety and security 1
1-1. For safe use
Before driving................................. 26
For safe driving ..............................28
Seat belts ..........................................30
SRS airbags ..................................... 36
Front passenger occupant classification system.................. 47
Safety information for children ..........................................53
Child restraint systems ...............54
Installing child restraints.............58
Exhaust gas precautions............ 70
1-2. LEXUS Enform
LEXUS Enform Safety Connect...........................................71
1-3. Theft deterrent system
Engine immobilizer system........77
Alarm ................................................. 79

26 1-1. For safe use
GX460_OM_OM60T19U_(U)
Before driving
Use only floor mats designed specifically for vehicles of the same model andmodel year as your vehicle. Fix them securely in place onto the carpet.
Insert the retaining hooks (clips) intothe floor mat eyelets.
Turn the upper knob of each retain-ing hook (clip) to secure the floormats in place.
*: Always align the marks.
The shape of the retaining hooks (clips) may differ from that shown in the illustration.
Floor mat
1
*
2

271-1. For safe use
GX460_OM_OM60T19U_(U)
1
For safety and security
WARNING
Observe the following precautions. Failure to do so may cause the driver’s floor mat to slip, possibly interfering with the ped-als while driving. An unexpectedly high speed may result or it may become difficult tostop the vehicle. This could lead to an accident, resulting in death or serious injury.■ When installing the driver’s floor mat
● Do not use floor mats designed for other models or different model year vehicles,even if they are Lexus Genuine floor mats.
● Only use floor mats designed for the driver’s seat.● Always install the floor mat securely using the retaining hooks (clips) provided.● Do not use two or more floor mats on top of each other.● Do not place the floor mat bottom-side up or upside-down.
■ Before driving
● Check that the floor mat is securely fixed inthe correct place with all the provided retain-ing hooks (clips). Be especially careful to per-form this check after cleaning the floor.
● With the engine stopped and the shift lever inP, fully depress each pedal to the floor tomake sure it does not interfere with the floormat.

28 1-1. For safe use
GX460_OM_OM60T19U_(U)
For safe driving
Adjust the angle of the seatback sothat you are sitting straight up and sothat you do not have to lean forwardto steer. (P. 132)
Adjust the seat so that you candepress the pedals fully and so thatyour arms bend slightly at the elbowwhen gripping the steering wheel.(P. 132)
Lock the head restraint in place with the center of the head restraint closest tothe top of your ears. (P. 150)
Wear the seat belt correctly. (P. 30)
Make sure that all occupants are wearing their seat belts before driving the vehi-cle. (P. 30)Use a child restraint system appropriate for the child until the child becomeslarge enough to properly wear the vehicle’s seat belt. (P. 54)
For safe driving, adjust the seat and mirror to an appropriate position beforedriving.
Correct driving posture
1
2
Correct use of the seat belts
3
4

291-1. For safe use
GX460_OM_OM60T19U_(U)
1
For safety and security
Make sure that you can see backward clearly by adjusting the inside and outsiderear view mirrors properly. (P. 155, 157)
Adjusting the mirrors
WARNING
Observe the following precautions.Failure to do so may result in death or serious injury.● Do not adjust the position of the driver’s seat while driving.
Doing so could cause the driver to lose control of the vehicle.● Do not place a cushion between the driver or passenger and the seatback.
A cushion may prevent correct posture from being achieved, and reduce the effec-tiveness of the seat belt and head restraint.
● Do not place anything under the front seats.Objects placed under the front seats may become jammed in the seat tracks and stopthe seat from locking in place. This may lead to an accident and the adjustment mech-anism may also be damaged.
● Always observe the legal speed limit when driving on public roads.● When driving over long distances, take regular breaks before you start to feel tired.
Also, if you feel tired or sleepy while driving, do not force yourself to continue drivingand take a break immediately.

30 1-1. For safe use
GX460_OM_OM60T19U_(U)
Seat belts
● Extend the shoulder belt so that itcomes fully over the shoulder, butdoes not come into contact with theneck or slide off the shoulder.
● Position the lap belt as low as possi-ble over the hips.
● Adjust the position of the seatback.Sit up straight and well back in theseat.
● Do not twist the seat belt.
To fasten the seat belt, push the plateinto the buckle until a click sound isheard.
To release the seat belt, press therelease button.
Make sure that all occupants are wearing their seat belts before driving thevehicle.
Correct use of the seat belts
Fastening and releasing the seat belt
Release button
1
2

311-1. For safe use
GX460_OM_OM60T19U_(U)
1
For safety and security
Push the seat belt shoulder anchordown while pressing the release but-ton.
Push the seat belt shoulder anchorup.
Move the height adjuster up and downas needed until you hear a click.
The pretensioners help the seat belts toquickly restrain the occupants byretracting the seat belts when the vehi-cle is subjected to certain types ofsevere frontal or side collision or a vehi-cle rollover.
The pretensioners do not activate in theevent of a minor frontal impact, a minorside impact or a rear impact.
Adjusting the seat belt shoulder anchor height (front and outer secondseats for 7-passenger models, front and second seats for 6-passengermodels)
1
2
Seat belt pretensioners (front and outer second seats for 7-passengermodels, front and second seats for 6-passenger models)

32 1-1. For safe use
GX460_OM_OM60T19U_(U)
■ Emergency locking retractor (ELR)The retractor will lock the belt during a sudden stop or on impact. It may also lock if youlean forward too quickly. A slow, easy motion will allow the belt to extend so that you canmove around fully.
■ Automatic locking retractor (ALR)When a passenger’s shoulder belt is completely extended and then retracted evenslightly, the belt is locked in that position and cannot be extended. This feature is used tohold the child restraint system (CRS) firmly. To free the belt again, fully retract the beltand then pull the belt out once more. (P. 58)
■ Child seat belt usageThe seat belts of your vehicle were principally designed for persons of adult size.● Use a child restraint system appropriate for the child, until the child becomes large
enough to properly wear the vehicle’s seat belt. (P. 54)● When the child becomes large enough to properly wear the vehicle’s seat belt, follow
the instructions on P. 30 regarding seat belt usage.■ Replacing the belt after the pretensioner has been activated
If the vehicle is involved in multiple collisions, the pretensioner will activate for the firstcollision, but will not activate for the second or subsequent collisions.
■ Seat belt extender
If your seat belts cannot be fastened securelybecause they are not long enough, a personal-ized seat belt extender is available from yourLexus dealer free of charge.

331-1. For safe use
GX460_OM_OM60T19U_(U)
1
For safety and security
WARNING
Observe the following precautions to reduce the risk of injury in the event of suddenbraking, sudden swerving or an accident.Failure to do so may cause death or serious injury.■ Wearing a seat belt
● Ensure that all passengers wear a seat belt.● Always wear a seat belt properly.● Each seat belt should be used by one person only. Do not use a seat belt for more
than one person at once, including children.● Lexus recommends that children be seated in the rear seat and always use a seat belt
and/or an appropriate child restraint system.● To achieve a proper seating position, do not recline the seat more than necessary. The
seat belt is most effective when the occupants are sitting up straight and well back inthe seats.
● Do not wear the shoulder belt under your arm.● Always wear your seat belt low and snug across your hips.
■ Pregnant women
■ People suffering illnessObtain medical advice and wear the seat belt in the proper way. (P. 30)
Obtain medical advice and wear the seat beltin the proper way. (P. 30)Women who are pregnant should position thelap belt as low as possible over the hips in thesame manner as other occupants, extendingthe shoulder belt completely over the shoulderand avoiding belt contact with the rounding ofthe abdominal area.If the seat belt is not worn properly, not only thepregnant woman, but also the fetus could sufferdeath or serious injury as a result of suddenbraking, sudden swerving or a collision.

34 1-1. For safe use
GX460_OM_OM60T19U_(U)
WARNING
■ When the children are in the vehicleDo not allow children to play with the seat belt. If the seat belt becomes twisted arounda child’s neck, it may lead to choking or other serious injuries that could result in death.If this occurs and the buckle cannot be unfastened, scissors should be used to cut thebelt.
■ Seat belt pretensioners● Do not place anything, such as a cushion, on the front passenger’s seat. Doing so will
disperse the passenger’s weight, which prevents the sensor from detecting the pas-senger’s weight properly. As a result, the seat belt pretensioner for the front passen-ger’s seat may not activate in the event of a collision.
● If the pretensioner has activated, the SRS warning light will come on. In that case, theseat belt cannot be used again and must be replaced at your Lexus dealer.
■ Adjustable shoulder anchorAlways make sure the shoulder belt is positioned across the center of your shoulder.The belt should be kept away from your neck, but not falling off your shoulder. Failure todo so could reduce the amount of protection in an accident and cause death or seriousinjuries in the event of a sudden stop, sudden swerve or accident. (P. 31)
■ Seat belt damage and wear● Do not damage the seat belts by allowing the belt, plate, or buckle to be jammed in
the door.● Inspect the seat belt system periodically. Check for cuts, fraying, and loose parts. Do
not use a damaged seat belt until it is replaced. Damaged seat belt cannot protect anoccupant from death or serious injury.
● Ensure that the belt and plate are locked and the belt is not twisted.If the seat belt does not function correctly, immediately contact your Lexus dealer.
● Replace the seat assembly, including the belts, if your vehicle has been involved in aserious accident, even if there is no obvious damage.
● Do not attempt to install, remove, modify, disassemble or dispose of the seat belts.Have any necessary repairs carried out by your Lexus dealer. Inappropriate handlingmay lead to incorrect operation.

351-1. For safe use
GX460_OM_OM60T19U_(U)
1
For safety and security
WARNING
■ Using a seat belt extender● Do not wear the seat belt extender if you can fasten the seat belt without the extender.● Do not use the seat belt extender when installing a child restraint system because the
belt will not securely hold the child restraint system, increasing the risk of death orserious injury in the event of an accident.
● The personalized extender may not be safe on another vehicle, when used by anotherperson, or at a different seating position other than the one originally intended.
NOTICE
■ Using a seat belt extenderWhen releasing the seat belt, press on the buckle release button on the extender, noton the seat belt. This helps prevent damage to the vehicle interior and the extender itself.

36 1-1. For safe use
GX460_OM_OM60T19U_(U)
SRS airbags
◆ SRS front airbags
SRS driver airbag/front passenger airbagCan help protect the head and chest of the driver and front passenger fromimpact with interior components
SRS knee airbagsCan help provide driver and front passenger protection
The SRS airbags inflate when the vehicle is subjected to certain types ofsevere impacts that may cause significant injury to the occupants. They worktogether with the seat belts to help reduce the risk of death or serious injury.
1
2

371-1. For safe use
GX460_OM_OM60T19U_(U)
1
For safety and security
◆ SRS side and curtain shield airbags
SRS front side airbagsCan help protect the torso of the front seat occupants
SRS rear side airbagsCan help protect the torso of occupants in the outer second seats (7-pas-senger models) or second seats (6-passenger models)
SRS curtain shield airbags● Can help protect primarily the head of occupants in the outer seats● Can help prevent the occupants from being thrown from the vehicle in
the event of vehicle rollover
3
4
5

38 1-1. For safe use
GX460_OM_OM60T19U_(U)
SRS airbag system components
Knee airbags
Curtain shield airbags
Front passenger airbag
Side impact sensors (front door)
“AIR BAG ON” and “AIR BAG OFF” indicator lights
Front side airbags
SRS warning light
Side impact sensors (rear)
Rear side airbags (outer secondseats [7-passenger models] or sec-ond seats [6-passenger models])
Driver airbag
Driver’s seat belt buckle switch
Safing sensor (rear)
Front passenger’s seat belt buckleswitch
Airbag sensor assembly
Front impact sensors
Seat belt pretensioners and forcelimiters
Front passenger occupant classifi-cation system (ECU and sensors)
1
2
3
4
5
6
7
8
9
10
11
12
13
14
15
16
17

391-1. For safe use
GX460_OM_OM60T19U_(U)
1
For safety and security
Your vehicle is equipped with ADVANCED AIRBAGS designed based on theUS motor vehicle safety standards (FMVSS208). The airbag sensor assembly(ECU) controls airbag deployment based on information obtained from the sen-sors etc. shown in the system components diagram above. This informationincludes crash severity and occupant information. As the airbags deploy, achemical reaction in the inflators quickly fills the airbags with non-toxic gas tohelp restrain the motion of the occupants.
WARNING
■ SRS airbag precautionsObserve the following precautions regarding the SRS airbags. Failure to do so may cause death or serious injury.● The driver and all passengers in the vehicle must wear their seat belts properly.
The SRS airbags are supplemental devices to be used with the seat belts.● The SRS driver airbag deploys with considerable force, and can cause death or seri-
ous injury especially if the driver is very close to the airbag. The National HighwayTraffic Safety Administration (NHTSA) advises:Since the risk zone for the driver’s airbag is the first 2 - 3 in. (50 - 75 mm) of inflation,placing yourself 10 in. (250 mm) from your driver airbag provides you with a clearmargin of safety. This distance is measured from the center of the steering wheel toyour breastbone. If you sit less than 10 in. (250 mm) away now, you can change yourdriving position in several ways:• Move your seat to the rear as far as you can while still reaching the pedals com-
fortably.• Slightly recline the back of the seat. Although vehicle designs vary, many drivers
can achieve the 10 in. (250 mm) distance, even with the driver seat all the way for-ward, simply by reclining the back of the seat somewhat. If reclining the back ofyour seat makes it hard to see the road, raise yourself by using a firm, non-slipperycushion, or raise the seat if your vehicle has that feature.
• If your steering wheel is adjustable, tilt it downward. This points the airbag towardyour chest instead of your head and neck.
The seat should be adjusted as recommended by NHTSA above, while still maintain-ing control of the foot pedals, steering wheel, and your view of the instrument panelcontrols.

40 1-1. For safe use
GX460_OM_OM60T19U_(U)
WARNING
■ SRS airbag precautions
● The SRS front passenger airbag also deploys with considerable force, and can causedeath or serious injury especially if the front passenger is very close to the airbag. Thefront passenger seat should be as far from the airbag as possible with the seatbackadjusted, so the front passenger sits upright.
● Improperly seated and/or restrained infants and children can be killed or seriouslyinjured by a deploying airbag. An infant or child who is too small to use a seat beltshould be properly secured using a child restraint system. Lexus strongly recom-mends that all infants and children be placed in the rear seats of the vehicle and prop-erly restrained. The rear seats are safer for infants and children than the frontpassenger seat. (P. 54)
● If the seat belt extender has been connectedto the front seat belt buckles but the seat beltextender has not also been fastened to thelatch plate of the seat belt, the SRS front air-bags will judge that the driver and front pas-senger are wearing the seat belt even thoughthe seat belt has not been connected. In thiscase, the SRS front airbags may not activatecorrectly in a collision, resulting in death orserious injury in the event of a collision. Besure to wear the seat belt with the seat beltextender.
● Do not sit on the edge of the seat or leanagainst the dashboard.
● Do not allow a child to stand in front of theSRS front passenger airbag unit or sit on theknees of a front passenger.
● Do not allow the front seat occupants to holditems on their knees.
411-1. For safe use
GX460_OM_OM60T19U_(U)
1
For safety and security
WARNING
■ SRS airbag precautions
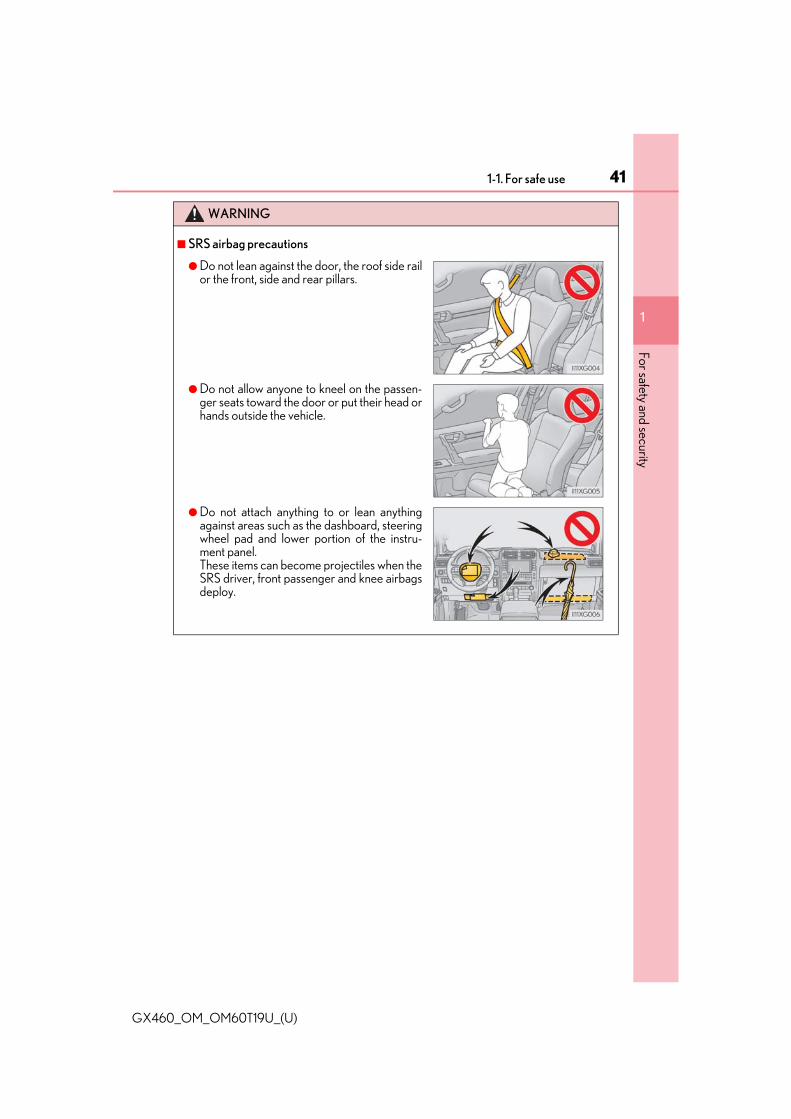
● Do not lean against the door, the roof side railor the front, side and rear pillars.
● Do not allow anyone to kneel on the passen-ger seats toward the door or put their head orhands outside the vehicle.
● Do not attach anything to or lean anythingagainst areas such as the dashboard, steeringwheel pad and lower portion of the instru-ment panel. These items can become projectiles when theSRS driver, front passenger and knee airbagsdeploy.

42 1-1. For safe use
GX460_OM_OM60T19U_(U)
WARNING
■ SRS airbag precautions
● Do not hang coat hangers or other hard objects on the coat hooks. All of these itemscould become projectiles and may cause death or serious injury, should the SRS cur-tain shield airbags deploy.
● If a vinyl cover is put on the area where the SRS knee airbag will deploy, be sure toremove it.
● Do not use seat accessories which cover the parts where the SRS side airbags inflateas they may interfere with inflation of the SRS airbags. Such accessories may preventthe side airbags from activating correctly, disable the system or cause the side airbagsto inflate accidentally, resulting in death or serious injury.
● Do not strike or apply significant levels of force to the area of the SRS airbag compo-nents. Doing so can cause the SRS airbags to malfunction.
● Do not touch any of the component parts immediately after the SRS airbags havedeployed (inflated) as they may be hot.
● If breathing becomes difficult after the SRS airbags have deployed, open a door orwindow to allow fresh air in, or leave the vehicle if it is safe to do so. Wash off any resi-due as soon as possible to prevent skin irritation.
● If the areas where the SRS airbags are stored, such as the steering wheel pad andfront and rear pillar garnishes, are damaged or cracked, have them replaced by yourLexus dealer.
● Do not place anything such as a cushion on the front passenger’s seat. Doing so willdisperse the passenger’s weight, which prevents the sensor from detecting the pas-senger’s weight properly. As a result, the SRS front airbags for the front passengermay not deploy in the event of a collision.
● Do not attach anything to areas such as adoor, windshield, side door glass, front or rearpillar, roof side rail and assist grip.

431-1. For safe use
GX460_OM_OM60T19U_(U)
1
For safety and security
■ If the SRS airbags deploy (inflate)● Slight abrasions, burns, bruising etc., may be sustained from SRS airbags, due to the
extremely high speed deployment (inflation) by hot gases.● A loud noise and white powder will be emitted.● Parts of the airbag module (steering wheel hub, airbag cover and inflator) as well as the
front seats, parts of the front and rear pillars and roof side rails, may be hot for severalminutes. The airbag itself may also be hot.
● The windshield may crack.● All of the doors will be unlocked. (P. 114)● Fuel supply to the engine will be stopped. (P. 517)● For Lexus Enform Safety Connect subscribers, if any of the following situations occur,
the system is designed to send an emergency call to the response center, notifyingthem of the vehicle’s location (without needing to push the “SOS” button) and an agentwill attempt to speak with the occupants to ascertain the level of emergency and assis-tance required. If the occupants are unable to communicate, the agent automaticallytreats the call as an emergency and helps to dispatch the necessary emergency ser-vices. (P. 71)• An SRS airbag is deployed.• A seat belt pretensioner is activated.• The vehicle is involved in a severe rear-end collision.
WARNING
■ Modification and disposal of SRS airbag system componentsDo not dispose of your vehicle or perform any of the following modifications withoutconsulting your Lexus dealer. The SRS airbags may malfunction or deploy (inflate)accidentally, causing death or serious injury.● Installation, removal, disassembly and repair of the SRS airbags● Repairs, modifications, removal or replacement of the steering wheel, instrument
panel, dashboard, seats or seat upholstery, front, side and rear pillars or roof side rails● Repairs or modifications of the front fender, front bumper, or side of the occupant
compartment● Installation of a grille guard (bull bars, kangaroo bar, etc.), snow plows, winches or
roof luggage carrier● Modifications to the vehicle’s suspension system● Installation of electronic devices such as mobile two-way radios and CD players● Modifications to your vehicle for a person with a physical disability

44 1-1. For safe use
GX460_OM_OM60T19U_(U)
■ SRS airbag deployment conditions (SRS front airbags)● The SRS front airbags will deploy in the event of an impact that exceeds the set thresh-
old level (the level of force corresponding to an approximately 12 - 18 mph [20 - 30km/h] frontal collision with a fixed wall that does not move or deform).However, this threshold velocity will be considerably higher in the following situations:• If the vehicle strikes an object, such as a parked vehicle or sign pole, which can move
or deform on impact• If the vehicle is involved in an underride collision, such as a collision in which the
front of the vehicle “underrides”, or goes under, the bed of a truck● Depending on the type of collision, it is possible that only the seat belt pretensioners will
activate.● The SRS front airbags for the front passenger will not activate if there is no passenger
sitting in the front passenger seat. However, the SRS front airbags for the front passen-ger may deploy if luggage is put in the seat, even if the seat is unoccupied.
■ SRS airbag deployment conditions (SRS side and curtain shield airbags)● The SRS side and curtain shield airbags will deploy in the event of an impact that
exceeds the set threshold level (the level of force corresponding to the impact forceproduced by an approximately 3300 lb. [1500 kg] vehicle colliding with the vehiclecabin from a direction perpendicular to the vehicle orientation at an approximatespeed of 12 - 18 mph [20 - 30 km/h]).
● Both SRS curtain shield airbags will deploy in the event of vehicle rollover.● All SRS side and curtain shield airbags will deploy in the event of a severe frontal colli-
sion.■ Conditions under which the SRS airbags may deploy (inflate), other than a collision
The SRS front airbags, SRS side and curtain shield airbags may also deploy if a seriousimpact occurs to the underside of your vehicle. Some examples are shown in the illustra-tion.
The SRS curtain shield airbags may also deploy under the situations shown in the illustra-tion.
● Hitting a curb, edge of pavement or hard sur-face
● Falling into or jumping over a deep hole● Landing hard or falling
● The angle of vehicle tip-up is marginal● The vehicle skids and hits a curb stone

451-1. For safe use
GX460_OM_OM60T19U_(U)
1
For safety and security
■ Types of collisions that may not deploy the SRS airbags (SRS front airbags)The SRS front airbags do not generally inflate if the vehicle is involved in a side or rearcollision, if it rolls over, or if it is involved in a low-speed frontal collision. But, whenever acollision of any type causes sufficient forward deceleration of the vehicle, deployment ofthe SRS front airbags may occur.
■ Types of collisions that may not deploy the SRS airbags (SRS side and curtain shield airbags)The SRS side and curtain shield airbags may not activate if the vehicle is subjected to acollision from the side at certain angles, or a collision to the side of the vehicle body otherthan the passenger compartment.
The SRS side airbags do not generally inflate if the vehicle is involved in a rear collision, ifit rolls over, or if it is involved in a low-speed side or low-speed frontal collision.
The SRS curtain shield airbags do not generally inflate if the vehicle is involved in a rearcollision, if it pitches end over end, or if it is involved in a low-speed side or low-speedfrontal collision.
● Collision from the side● Collision from the rear● Vehicle rollover
● Collision from the side to the vehicle bodyother than the passenger compartment
● Collision from the side at an angle
● Collision from the rear● Vehicle rollover
● Collision from the rear● Pitching end over end

46 1-1. For safe use
GX460_OM_OM60T19U_(U)
■ When to contact your Lexus dealerIn the following cases, the vehicle will require inspection and/or repair. Contact yourLexus dealer as soon as possible.● Any of the SRS airbags have been inflated.
● The front of the vehicle is damaged ordeformed, or was involved in an accident thatwas not severe enough to cause the SRS frontairbags to inflate.
● A portion of a door or its surrounding area isdamaged or deformed, or the vehicle wasinvolved in an accident that was not severeenough to cause the SRS side and curtainshield airbags to inflate.
● The pad section of the steering wheel, dash-board near the front passenger airbag orlower portion of the instrument panel isscratched, cracked, or otherwise damaged.
● The surface of the seats with the SRS side air-bag is scratched, cracked or otherwise dam-aged.
● The portion of the front pillars, rear pillars orroof side rail garnishes (padding) containingthe SRS curtain shield airbags inside isscratched, cracked, or otherwise damaged.

471-1. For safe use
GX460_OM_OM60T19U_(U)
1
For safety and security
Front passenger occupant classification system
Your vehicle is equipped with a front passenger occupant classification sys-tem. This system detects the conditions of the front passenger seat and acti-vates or deactivates the front passenger airbag, front passenger knee airbag,and front passenger’s seat belt pretensioner.
U.S.A.
Canada
SRS warning light
Front passenger’s seat belt reminder light
“AIR BAG OFF” indicator light
“AIR BAG ON” indicator light
1
2
3
4

48 1-1. For safe use
GX460_OM_OM60T19U_(U)
■ Adult*1
■ Child*4 or child restraint system*5
Condition and operation in the front passenger occupant classificationsystem
Indicator/warning light
“AIR BAG ON” and “AIR BAG OFF” indicator lights “AIR BAG ON”
SRS warning light Off
Front passenger’s seat belt reminder light Off*2 or flashing*3
Devices
Front passenger airbag
ActivatedFront passenger knee airbag
Front passenger’s seat belt pretensioner
Indicator/warning light
“AIR BAG ON” and “AIR BAG OFF” indicator lights “AIR BAG OFF”*6
SRS warning light Off
Front passenger’s seat belt reminder light Off*2 or flashing*3
Devices
Front passenger airbagDeactivated
Front passenger knee airbag
Front passenger’s seat belt pretensioner Activated

491-1. For safe use
GX460_OM_OM60T19U_(U)
1
For safety and security
■ Unoccupied
■ There is a malfunction in the system
Indicator/warning light
“AIR BAG ON” and “AIR BAG OFF” indicator lights Not illuminated
SRS warning lightOff
Front passenger’s seat belt reminder light
Devices
Front passenger airbagDeactivated
Front passenger knee airbag
Front passenger’s seat belt pretensionerActivated*7
or deactivated*8
Indicator/warning light
“AIR BAG ON” and “AIR BAG OFF” indicator lights “AIR BAG OFF”
SRS warning lightOn
Front passenger’s seat belt reminder light
Devices
Front passenger airbagDeactivated
Front passenger knee airbag
Front passenger’s seat belt pretensioner Activated

50 1-1. For safe use
GX460_OM_OM60T19U_(U)
*1: The system judges a person of adult size as an adult. When a smaller adult sits inthe front passenger seat, the system may recognize him/her as a child dependingon his/her physique and posture.
*2: In the event the front passenger is wearing a seat belt.
*3: In the event the front passenger does not wear a seat belt
*4: When a larger child who has outgrown a child restraint system sits in the front pas-senger seat, the system may recognize him/her as an adult depending on his/herphysique or posture.
*5: Never install a rear-facing child restraint system on the front passenger seat. A for-ward-facing child restraint system should only be installed on the front passengerseat when it is unavoidable. (P. 54)
*6: In case the indicator light is not illuminated, consult this manual on how to install thechild restraint system properly. (P. 58)
*7: In the event of a side collision.
*8: In the event of a frontal collision or rollover.

511-1. For safe use
GX460_OM_OM60T19U_(U)
1
For safety and security
WARNING
■ Front passenger occupant classification system precautionsObserve the following precautions regarding the front passenger occupant classifica-tion system. Failure to do so may cause death or serious injury.● Wear the seat belt properly.● Make sure the front passenger’s seat belt plate has not been left inserted into the
buckle before someone sits in the front passenger seat.● Make sure the “AIR BAG OFF” indicator light is not illuminated when using the seat
belt extender for the front passenger seat. If the “AIR BAG OFF” indicator light is illu-minated, disconnect the extender tongue from the seat belt buckle, and reconnectthe seat belt. Reconnect the seat belt extender after making sure the “AIR BAG ON”indicator light is illuminated. If you use the seat belt extender while the “AIR BAGOFF” indicator light is illuminated, the SRS airbags for the front passenger will notactivate, which could cause death or serious injury in the event of a collision.
● Do not apply a heavy load to the front passenger seat or equipment (e.g. seatbackpocket).
● Do not put weight on the front passenger seat by putting your hands or feet on thefront passenger seat seatback from the rear passenger seat.
● Do not let a rear passenger lift the front passenger seat with their feet or press on theseatback with their legs.
● Do not put objects under the front passenger seat.

52 1-1. For safe use
GX460_OM_OM60T19U_(U)
WARNING
■ Front passenger occupant classification system precautions● Do not recline the front passenger seatback so far that it touches a rear seat. This may
cause the “AIR BAG OFF” indicator light to be illuminated, which indicates that theSRS airbags for the front passenger will not activate in the event of a severe accident.If the seatback touches the rear seat, return the seatback to a position where it doesnot touch the rear seat. Keep the front passenger seatback as upright as possiblewhen the vehicle is moving. Reclining the seatback excessively may lessen the effec-tiveness of the seat belt system.
● If an adult sits in the front passenger seat, the “AIR BAG ON” indicator light is illumi-nated. If the “AIR BAG OFF” indicator is illuminated, ask the passenger to sit upstraight, well back in the seat, feet on the floor, and with the seat belt worn correctly. Ifthe “AIR BAG OFF” indicator still remains illuminated, either ask the passenger tomove to the rear seat, or if that is not possible, move the front passenger seat fullyrearward.
● When it is unavoidable to install a forward-facing child restraint system on the frontpassenger seat, install the child restraint system on the front passenger seat in theproper order. (P. 58)
● Do not modify or remove the front seats.● Do not kick the front passenger seat or subject it to severe impact. Otherwise, the
SRS warning light may come on to indicate a malfunction of the front passengeroccupant classification system. In this case, contact your Lexus dealer immediately.
● Child restraint systems installed on the rear seat should not contact the front seat-backs.
● Do not use a seat accessory, such as a cushion and seat cover, that covers the seatcushion surface.
● Do not modify or replace the upholstery of the front seat.

531-1. For safe use
GX460_OM_OM60T19U_(U)
1
For safety and security
Safety information for children
● It is recommended that children sit in the rear seats to avoid accidental con-tact with the shift lever, wiper switch etc.
● Use the rear door child-protector lock or the window lock switch to avoidchildren opening the door while driving or operating the power window acci-dentally. (P. 111, 160)
● Do not let small children operate equipment which may catch or pinch bodyparts, such as the power window, hood, back door, seats etc.
Observe the following precautions when children are in the vehicle.Use a child restraint system appropriate for the child, until the child becomeslarge enough to properly wear the vehicle’s seat belt.
WARNING
Never leave children unattended in the vehicle, and never allow children to have or usethe key.Children may be able to start the vehicle or shift the vehicle into neutral. There is also adanger that children may injure themselves by playing with the windows, the moon roofor other features of the vehicle. In addition, heat build-up or extremely cold tempera-tures inside the vehicle can be fatal to children.

54 1-1. For safe use
GX460_OM_OM60T19U_(U)
Child restraint systems
Studies have shown that installing a child restraint on a rear seat is much saferthan installing one on the front passenger seat.● Choose a child restraint system that suits your vehicle and is appropriate to
the age and size of the child. ● For installation details, follow the instructions provided with the child restraint
system.General installation instructions are provided in this manual. (P. 58)
A child restraint system for a small child or baby must itself be properlyrestrained on the seat with the LATCH anchors or the lap portion of the lap/shoulder belt.
The laws of all 50 states of the U.S.A. and Canada now require the use of childrestraint systems.
Points to remember

551-1. For safe use
GX460_OM_OM60T19U_(U)
1
For safety and security
Child restraint systems are classified into the following 3 types according to theage and size of the child:
■ Selecting an appropriate child restraint system● Use a child restraint system appropriate for the child until the child becomes large
enough to properly wear the vehicle’s seat belt.● If the child is too large for a child restraint system, sit the child on a rear seat and use the
vehicle’s seat belt. (P. 30)
Types of child restraints
Rear facing Infant seat/convert-ible seat
Forward facing Convertibleseat
Booster seat

56 1-1. For safe use
GX460_OM_OM60T19U_(U)
WARNING
■ Child restraint precautions● For effective protection in automobile accidents and sudden stops, a child must be
properly restrained, using a seat belt or child restraint system depending on the ageand size of the child. Holding a child in your arms is not a substitute for a child restraintsystem. In an accident, the child can be crushed against the windshield, or betweenyou and the vehicle’s interior.
● Lexus strongly urges the use of a proper child restraint system that conforms to thesize of the child, installed on the rear seat. According to accident statistics, the child issafer when properly restrained in the rear seat than in the front seat.
● Never install a rear-facing child restraint system on the front passenger seat even ifthe “AIR BAG OFF” indicator light is illuminated. In the event of an accident, the force of the rapid inflation of the front passenger air-bag can cause death or serious injury to the child if the rear-facing child restraint sys-tem is installed on the front passenger seat.
● A forward-facing child restraint system may be installed on the front passenger seatonly when it is unavoidable. A child restraint system that requires a top tether strapshould not be used in the front passenger seat since there is no top tether strapanchor for the front passenger seat. Adjust the seatback as upright as possible andalways move the seat as far back as possible even if the “AIR BAG OFF” indicatorlight is illuminated, because the front passenger airbag could inflate with considerablespeed and force. Otherwise, the child may be killed or seriously injured.
● Do not use the seat belt extender when installing a child restraint system on the frontor rear passenger seat. If installing a child restraint system with the seat belt extenderconnected to the seat belt, the seat belt will not securely hold the child restraint sys-tem, which could cause death or serious injury to the child or other passengers in theevent of a sudden stop, sudden swerve or accident.
● Do not allow the child to lean his/her head or any part of his/her body against thedoor or the area of the seat, front, center and rear pillars or roof side rails from whichthe SRS side airbags or SRS curtain shield airbags deploy even if the child is seated inthe child restraint system. It is dangerous if the SRS side airbags and curtain shield air-bags inflate, and the impact could cause death or serious injury to the child.
● Make sure you have complied with all installation instructions provided by the childrestraint manufacturer and that the system is properly secured. If it is not securedproperly, it may cause death or serious injury to the child in the event of a suddenstop, sudden swerve or accident.

571-1. For safe use
GX460_OM_OM60T19U_(U)
1
For safety and security
WARNING
■ When children are in the vehicleDo not allow children to play with the seat belt. If the seat belt becomes twisted arounda child’s neck, it may lead to choking or other serious injuries that could result in death.If this occurs and the buckle cannot be unfastened, scissors should be used to cut thebelt.
■ When the child restraint system is not in use● Keep the child restraint system properly secured on the seat even if it is not in use. Do
not store the child restraint system unsecured in the passenger compartment.● If it is necessary to detach the child restraint system, remove it from the vehicle or
store it securely in the luggage compartment. This will prevent it from injuring passen-gers in the event of a sudden stop, sudden swerve or accident.

58 1-1. For safe use
GX460_OM_OM60T19U_(U)
Installing child restraints
Child restraint LATCH anchors
7-passenger models
LATCH anchors are provided for theright side second seat and between thecenter and left side second seats. (But-tons displaying the location of theanchors are attached to the seats.)
6-passenger models
LATCH anchors are provided for bothsecond seats. (Buttons displaying thelocation of the anchors are attached tothe seats.)
Seat belts equipped with a childrestraint locking mechanism (ALR/ELR belts except driver’s seat belt)(P. 32)
Follow the child restraint system manufacturer’s instructions. Firmly securechild restraints to the seats using the LATCH anchors or a seat belt. Attach thetop tether strap when installing a child restraint.The lap/shoulder belt can be used if your child restraint system is not compati-ble with the LATCH (Lower Anchors and Tethers for Children) system.

591-1. For safe use
GX460_OM_OM60T19U_(U)
1
For safety and security
Anchor brackets (for top tether strap)
7-passenger models
An anchor bracket is provided for eachsecond seat.
6-passenger models
Anchor brackets are provided for bothsecond seats and right side third seat.

60 1-1. For safe use
GX460_OM_OM60T19U_(U)
Fold the seatback forward. Thenreturn the seatback and secure it atthe first lock position (most uprightposition). (P. 134)
Type A
Flip the cover, and latch the hooks ofthe lower straps onto the LATCHanchors. If the child restraint has atop tether strap, the top tether strapshould be latched onto the toptether strap anchor. (P. 66)
For owners in Canada:The symbol on a child restraint sys-tem indicates the presence of alower connector system.
Installation with LATCH system
1
Canada only
2

611-1. For safe use
GX460_OM_OM60T19U_(U)
1
For safety and security
Type B
Flip the cover, and latch the bucklesonto the LATCH anchors. If the childrestraint has a top tether strap, thetop tether strap should be latchedonto the top tether strap anchor.(P. 66)
For owners in Canada:The symbol on a child restraint sys-tem indicates the presence of alower connector system.
Canada only
2

62 1-1. For safe use
GX460_OM_OM60T19U_(U)
■ Rear-facing Infant seat/convertible seat
Fold the seatback forward. Thenreturn the seatback and secure itat the first lock position (mostupright position). (P. 134)
Place the child restraint systemon the seat facing the rear of thevehicle.
Run the seat belt through thechild restraint system and insertthe plate into the buckle. Makesure that the belt is not twisted.
Fully extend the shoulder belt andallow it to retract to put it in lockmode. In lock mode, the belt can-not be extended.
Installing child restraints using a seat belt (child restraint lock functionbelt)
1
2
3
4

631-1. For safe use
GX460_OM_OM60T19U_(U)
1
For safety and security
While pushing the child restraintsystem down into the seat, allowthe shoulder belt to retract untilthe child restraint system issecurely in place.
After the shoulder belt has retractedto a point where there is no slack inthe belt, pull the belt to check that itcannot be extended.
■ Forward-facing Convertible seat
Fold the seatback forward. Thenreturn the seatback and secure itat the first lock position (mostupright position). (P. 134)
Place the child restraint systemon the seat facing the front of thevehicle.
5
1
2

64 1-1. For safe use
GX460_OM_OM60T19U_(U)
Run the seat belt through thechild restraint system and insertthe plate into the buckle. Makesure that the belt is not twisted.
Fully extend the shoulder belt andallow it to retract to put it in lockmode. In lock mode, the belt can-not be extended.
While pushing the child restraintsystem into the seat, allow theshoulder belt to retract until thechild restraint system is securelyin place.
After the shoulder belt has retractedto a point where there is no slack inthe belt, pull the belt to check that itcannot be extended.If the child restraint has a top tether strap, the top tether strap should belatched onto the top tether strap anchor. (P. 66)
3
4
5
6

651-1. For safe use
GX460_OM_OM60T19U_(U)
1
For safety and security
■ Booster seat
Fold the seatback forward. Thenreturn the seatback and secure itat the first lock position (mostupright position). (P. 134)
Place the child restraint systemon the seat facing the front of thevehicle.
Sit the child in the child restraintsystem. Fit the seat belt to thechild restraint system accordingto the manufacturer’s instructionsand insert the plate into thebuckle. Make sure that the belt isnot twisted.
Check that the shoulder belt is cor-rectly positioned over the child’sshoulder and that the lap belt is aslow as possible. (P. 30)
Push the buckle release button and fullyretract the seat belt.
1
2
3
Removing a child restraint installed with a seat belt

66 1-1. For safe use
GX460_OM_OM60T19U_(U)
Secure the child restraint systemusing the seat belt or LATCHanchors and move the head restraintin place at the upmost position.
7-passenger models
Open the anchor bracket cover,latch the hook onto the anchorbracket and tighten the top tetherstrap.
Make sure the top tether strap issecurely latched.
6-passenger models
Latch the hook onto the anchorbracket and tighten the top tetherstrap.
Make sure the top tether strap issecurely latched.
Child restraint systems with a top tether strap (second seats)
1
2
2
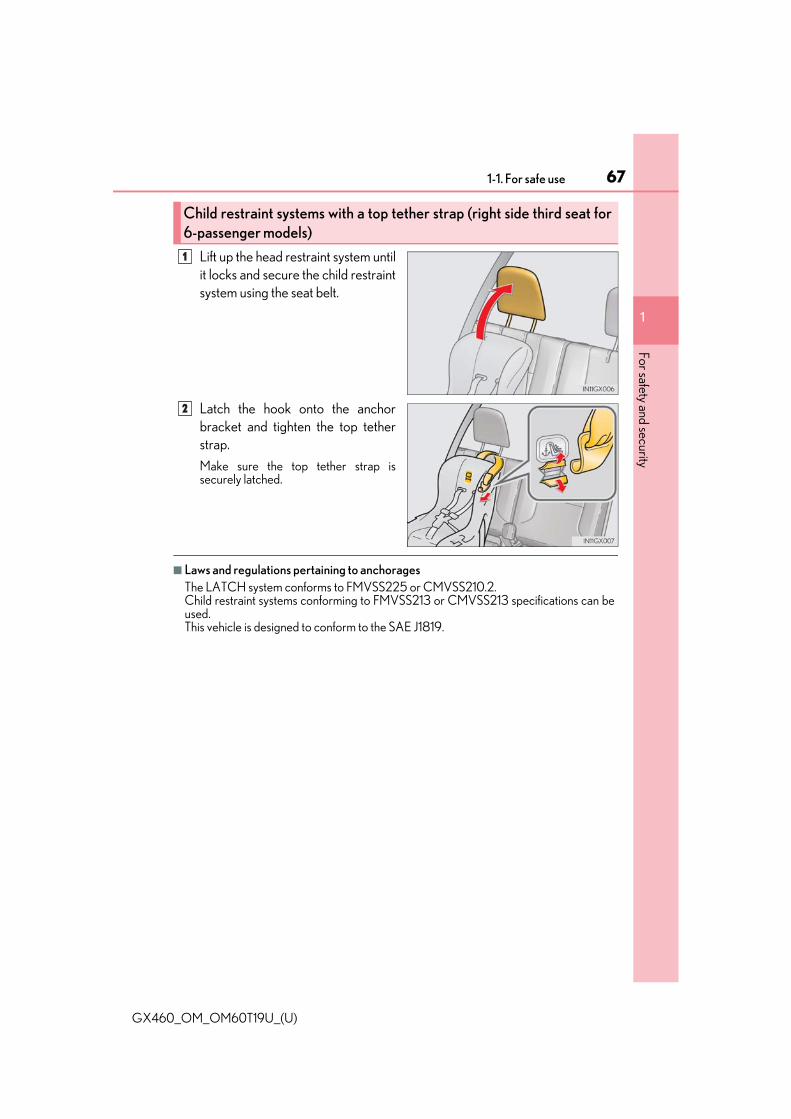
671-1. For safe use
GX460_OM_OM60T19U_(U)
1
For safety and security
Lift up the head restraint system untilit locks and secure the child restraintsystem using the seat belt.
Latch the hook onto the anchorbracket and tighten the top tetherstrap.
Make sure the top tether strap issecurely latched.
■ Laws and regulations pertaining to anchoragesThe LATCH system conforms to FMVSS225 or CMVSS210.2.Child restraint systems conforming to FMVSS213 or CMVSS213 specifications can beused.This vehicle is designed to conform to the SAE J1819.
Child restraint systems with a top tether strap (right side third seat for6-passenger models)
1
2

68 1-1. For safe use
GX460_OM_OM60T19U_(U)
WARNING
■ When installing a booster seat To prevent the belt from going into ALR lock mode, do not fully extend the shoulderbelt. ALR mode causes the belt to tighten only. This could cause injury or discomfort tothe child. (P. 32)
■ When installing a child restraint systemFollow the directions given in the child restraint system installation manual and fix thechild restraint system securely in place.If the child restraint system is not correctly fixed in place, the child or other passengersmay be seriously injured or even killed in the event of sudden braking, sudden swervingor an accident.
● When installing a child restraint system in the center second seat, adjust both seat-backs at the same angle.
● When using the LATCH anchors for a child restraint system, move the seat as farback as possible (second seat only), with the seatback close to the child restraint sys-tem.
● If the driver’s seat interferes with the childrestraint system and prevents it from beingattached correctly, attach the child restraintsystem to the right-hand rear seat.
● Adjust the front passenger seat so that it doesnot interfere with the child restraint system.
● Child restraint system installed on the thirdseat should not contact the second seatbacks.
● Only put a forward-facing child restraint sys-tem on the front seat when unavoidable.When installing a forward-facing childrestraint system on the front passenger seat,move the seat as far back as possible even ifthe “AIR BAG OFF” indicator light is illumi-nated. Failure to do so may result in death orserious injury if the airbags deploy (inflate).

691-1. For safe use
GX460_OM_OM60T19U_(U)
1
For safety and security
WARNING
■ When installing a child restraint system● When a booster seat is installed, always ensure that the shoulder belt is positioned
across the center of the child’s shoulder. The belt should be kept away from the child’sneck, but not so that it could fall off the child’s shoulder. Failing to do so may result indeath or serious injury in the event of sudden braking, sudden swerving or an acci-dent.
● Ensure that the belt and plate are securely locked and the seat belt is not twisted.● Shake the child restraint system left and right, and forward and backward to ensure
that it has been securely installed.● After securing a child restraint system, never adjust the seat.● Follow all installation instructions provided by the child restraint system manufacturer.● When securing some types of child restrain systems in second or third row seats, it
may not be possible to properly use the seat belts in positions next to the childrestraint without interfering with it or affecting seat belt effectiveness. Be sure yourseat belt fits snugly across your shoulder and low on your hips. If it does not, or if itinterferes with the child restraint, move to a different position. Failure to do so mayresult in death or serious injury.
■ Do not use a seat belt extenderIf a seat belt extender is used when installing a child restraint system, the seat belt willnot securely hold the child restraint system, which could cause death or serious injuryto the child or other passengers in the event of sudden braking, sudden swerving or anaccident.
■ To correctly attach a child restraint system to the anchorsWhen using the LATCH anchors, be sure that there are no foreign objects around theanchors and that the seat belt is not caught behind the child restraint system. Make surethe child restraint system is securely attached, or it may cause death or serious injury tothe child or other passengers in the event of a sudden stop, sudden swerve or accident.

70 1-1. For safe use
GX460_OM_OM60T19U_(U)
Exhaust gas precautions
Harmful substance to the human body is included in exhaust gases if inhaled.
WARNING
Exhaust gases include harmful carbon monoxide (CO), which is colorless and odorless.Observe the following precautions.Failure to do so may cause exhaust gases enter the vehicle and may lead to an accidentcaused by light-headedness, or may lead to death or a serious health hazard.■ Important points while driving
● Keep the back door closed.● If you smell exhaust gases in the vehicle even when the back door is closed, open the
windows and have the vehicle inspected at your Lexus dealer as soon as possible.■ When parking
● If the vehicle is in a poorly ventilated area or a closed area, such as a garage, stop theengine.
● Do not leave the vehicle with the engine running for a long time.If such a situation cannot be avoided, park the vehicle in an open space and ensurethat exhaust fumes do not enter the vehicle interior.
● Do not leave the engine running in an area with snow build-up, or where it is snowing.If snowbanks build up around the vehicle while the engine is running, exhaust gasesmay collect and enter the vehicle.
■ Exhaust pipeThe exhaust system needs to be checked periodically. If there is a hole or crack causedby corrosion, damage to a joint or abnormal exhaust noise, be sure to have the vehicleinspected and repaired by your Lexus dealer.

711-2. LEXUS Enform
GX460_OM_OM60T19U_(U)
1
For safety and security
LEXUS Enform Safety Connect
Microphone
LED light indicators
“SOS” button
: If equipped
Safety Connect is a subscription-based telematics service that uses GlobalPositioning System (GPS) data and embedded cellular technology to providesafety and security features to subscribers. Safety Connect is supported byLexus’ designated response center, which operates 24 hours per day, 7 daysper week.
Safety Connect service is available by subscription on select, telematics hard-ware-equipped vehicles.
By using the Safety Connect service, you are agreeing to be bound by theTelematics Subscription Service Agreement and its Terms and Conditions, asin effect and amended from time to time, a current copy of which is availableat Lexus.com. All use of the Safety Connect service is subject to such then-applicable Terms and Conditions.
System components
1
2
3

72 1-2. LEXUS Enform
GX460_OM_OM60T19U_(U)
Subscribers have the following Safety Connect services available:● Automatic Collision Notification*
Helps drivers receive necessary response from emergency service providers.(P. 74)
*: U.S. Patent No. 7,508,298 B2
● Stolen Vehicle LocationHelps drivers in the event of vehicle theft. (P. 74)
● Emergency Assistance Button (“SOS”)Connects drivers to response-center support. (P. 74)
● Enhanced Roadside AssistanceProvides drivers various on-road assistance. (P. 74)
After you have signed the Telematics Subscription Service Agreement and areenrolled, you can begin receiving services.
A variety of subscription terms is available for purchase. Contact your Lexusdealer, call the following or push the “SOS” button in your vehicle for further sub-scription details.• The United States
1-800-25-LEXUS (1-800-255-3987)• Canada
1-800-26-LEXUS (1-800-265-3987)• Puerto Rico
1-877-539-8777
Services
Subscription

731-2. LEXUS Enform
GX460_OM_OM60T19U_(U)
1
For safety and security
■ Safety Connect Services Information● Phone calls using the vehicle’s Bluetooth® technology will not be possible during
Safety Connect.● Safety Connect is available beginning Fall 2009 on select Lexus models (in the contig-
uous United States only). Contact with the Safety Connect response center is depen-dent upon the telematics device being in operative condition, cellular connectionavailability, and GPS satellite signal reception, which can limit the ability to reach theresponse center or receive emergency service support. Enrollment and TelematicsSubscription Service Agreement required. A variety of subscription terms is available;charges vary by subscription term selected and location.
● Automatic Collision Notification, Emergency Assistance and Stolen Vehicle Locationwill function in the United States, including Hawaii and Alaska, Puerto Rico and in Can-ada, and Enhanced Roadside Assistance will function in the United States, Puerto Ricoand in Canada.
● Automatic Collision Notification, Emergency Assistance, Stolen Vehicle and EnhancedRoad Assistance will not function in the United States Virgin Islands.For vehicles first sold in the USVI, no Safety Connect services will function in and out-side the United States Virgin Islands.
● Safety Connect services are not subject to section 255 of the Telecommunications Actand the device is not TTY compatible.
■ LanguagesThe Safety Connect response center will offer support in multiple languages. The SafetyConnect system will offer voice prompts in English, Spanish, and French. Please indicateyour language of choice when enrolling.
■ When contacting the response centerYou may be unable to contact the response center if the network is busy.
When the engine switch is turned to IGNITION ON mode, the red indicatorlight comes on for 2 seconds then turns off. Afterward, the green indicator lightcomes on, indicating that the service is active.The following indicator light patterns indicate specific system usage conditions:● Green indicator light on = Active service● Green indicator light flashing = Safety Connect call in process● Red indicator light (except at vehicle start-up) = System malfunction (contact
your Lexus dealer)● No indicator light (off) = Safety Connect service not active
Safety Connect LED light Indicators

74 1-2. LEXUS Enform
GX460_OM_OM60T19U_(U)
■ Automatic Collision Notification
In case of either airbag deployment or severe rear-end collision, the system isdesigned to automatically call the response center. The responding agentreceives the vehicle’s location and attempts to speak with the vehicle occu-pants to assess the level of emergency. If the occupants are unable to commu-nicate, the agent automatically treats the call as an emergency, contacts thenearest emergency services provider to describe the situation, and requeststhat assistance be sent to the location.
■ Stolen Vehicle Location
If your vehicle is stolen, Safety Connect can work with local authorities toassist them in locating and recovering the vehicle. After filing a police report,call the Safety Connect response center at 1-800-25-LEXUS (1-800-255-3987) in the United States, 1-877-539-8777 in Puerto Rico or 1-800-265-3987 in Canada, and follow the prompts for Safety Connect to initiate thisservice.
In addition to assisting law enforcement with recovery of a stolen vehicle,Safety-Connect-equipped vehicle location data may, under certain circum-stances, be shared with third parties to locate your vehicle. Further informa-tion is available at Lexus.com.
■ Emergency Assistance Button (“SOS”)
In the event of an emergency on the road, push the “SOS” button to reach theSafety Connect response center. The answering agent will determine yourvehicle’s location, assess the emergency, and dispatch the necessary assis-tance required.
If you accidentally press the “SOS” button, tell the response-center agent that youare not experiencing an emergency.
■ Enhanced Roadside Assistance
Enhanced Roadside Assistance adds GPS data to the already included war-ranty-based Lexus roadside service.Subscribers can press the “SOS” button to reach a Safety Connect response-center agent, who can help with a wide range of needs, such as: towing, flattire, fuel delivery, etc. For a description of the Roadside Assistance servicesand their limitations, please see the Safety Connect Terms and Conditions,which are available at Lexus.com.
Safety Connect services

751-2. LEXUS Enform
GX460_OM_OM60T19U_(U)
1
For safety and security
Important! Read this information before using Safety Connect.
■ Exposure to radio frequency signals
The Safety Connect system installed in your vehicle is a low-power radiotransmitter and receiver. It receives and also sends out radio frequency (RF)signals.
In August 1996, the Federal Communications Commission (FCC) adoptedRF exposure guidelines with safety levels for mobile wireless phones. Thoseguidelines are consistent with the safety standards previously set by the fol-lowing U.S. and international standards bodies.● ANSI (American National Standards Institute) C95.1 [1992]● NCRP (National Council on Radiation Protection and Measurement)
Report 86 [1986]● ICNIRP (International Commission on Non-Ionizing Radiation Protection)
[1996]
Those standards were based on comprehensive and periodic evaluations ofthe relevant scientific literature. Over 120 scientists, engineers, and physi-cians from universities, and government health agencies and industriesreviewed the available body of research to develop the ANSI Standard(C95.1).
The design of Safety Connect complies with the FCC guidelines in addition tothose standards.
Safety information for Safety Connect

76 1-2. LEXUS Enform
GX460_OM_OM60T19U_(U)
■ Certification for Lexus Enform Safety Connect

771-3. Theft deterrent system
GX460_OM_OM60T19U_(U)
1
For safety and security
Engine immobilizer system
The indicator light flashes after theengine switch has been turned off toindicate that the system is operating.
The indicator light stops flashing afterthe engine switch has been turned toACCESSORY or IGNITION ONmode to indicate that the system hasbeen canceled.
■ System maintenanceThe vehicle has a maintenance-free type engine immobilizer system.
■ Conditions that may cause the system to malfunction● If the grip portion of the key is in contact with a metallic object● If the key is in close proximity to or touching a key to the security system (key with a
built-in transponder chip) of another vehicle■ Certifications for the engine immobilizer system For vehicles sold in the U.S.A., Hawaii, Guam, Saipan and Puerto Rico
The vehicle’s keys have built-in transponder chips that prevent the enginefrom starting if a key has not been previously registered in the vehicle’s on-board computer.
Never leave the keys inside the vehicle when you leave the vehicle.
This system is designed to help prevent vehicle theft but does not guaranteeabsolute security against all vehicle thefts.

78 1-3. Theft deterrent system
GX460_OM_OM60T19U_(U)
For vehicles sold in Canada
NOTICE
■ To ensure the system operates correctlyDo not modify or remove the system. If modified or removed, the proper operation ofthe system cannot be guaranteed.

791-3. Theft deterrent system
GX460_OM_OM60T19U_(U)
1
For safety and security
Alarm
The alarm uses light and sound to give an alert when an intrusion is detected.
The alarm is triggered in the following situations when the alarm is set:● For the U.S.A.: A locked door or glass hatch is unlocked or opened in any way
other than using the entry function, wireless remote control or mechanicalkey. (The doors will lock again automatically.)
● For Canada: A locked door or glass hatch is unlocked or opened in any wayother than using the entry function or the wireless remote control. (The doorswill lock again automatically.)
● The hood is opened.
Close the doors, glass hatch and hood,and lock all the doors. The system willbe set automatically after 30 seconds.
The indicator light changes from beingon to flashing when the system is set.
Do one of the following to deactivate or stop the alarms:● Unlock the doors.● Turn the engine switch to ACCESSORY or IGNITION ON mode, or start
the engine. (The alarm will be deactivated or stopped after a few seconds.)
The alarm
Setting the alarm system
Deactivating or stopping the alarm

80 1-3. Theft deterrent system
GX460_OM_OM60T19U_(U)
■ System maintenanceThe vehicle has a maintenance-free type alarm system.
■ Items to check before locking the vehicleTo prevent unexpected triggering of the alarm and vehicle theft, make sure of the follow-ing.● Nobody is in the vehicle.● The windows and moon roof are closed before the alarm is set.● No valuables or other personal items are left in the vehicle.
■ Triggering of the alarmThe alarm may be triggered in the following situations:(Stopping the alarm deactivates the alarm system.)
■ Alarm-operated door lockIn the following cases, depending on the situation, the door may automatically lock toprevent improper entry into the vehicle:● When a person remaining in the vehicle unlocks the door and the alarm is activated.● While the alarm is activated, a person remaining in the vehicle unlocks the door.● When recharging or replacing the battery.
● For vehicles sold in Canada: The doors areunlocked using the mechanical key.
● A person inside the vehicle opens a door orhood, or unlocks the vehicle using an insidelock button.
● The battery is recharged or replaced when thevehicle is locked. (P. 551)

811-3. Theft deterrent system
GX460_OM_OM60T19U_(U)
1
For safety and security
■ Alarm memory functionAfter the alarm is activated, when you unlock any door using a entry function, wirelessremote control or mechanical key, the tail lights turn on for about 2 seconds to informyou that the system was activated.
NOTICE
■ To ensure the system operates correctlyDo not modify or remove the system. If modified or removed, the proper operation ofthe system cannot be guaranteed.

82 1-3. Theft deterrent system
GX460_OM_OM60T19U_(U)

83
GX460_OM_OM60T19U_(U)
Instrument cluster 2
2. Instrument cluster
Warning and indicators lights ................................................84
Gauges and meters .....................90
Multi-information display ..........93
Fuel consumption information ................................. 100

84
GX460_OM_OM60T19U_(U)
2. Instrument cluster
Warning and indicators lights
The units used on the speedometer may differ depending on the target region.
The warning and indicators lights on the instrument cluster and center panelinform the driver of the status of the vehicle’s various systems.
For the purpose of explanation, the following illustrations display all warninglights and indicators illuminated.

GX460_OM_OM60T19U_(U)
852. Instrument cluster
2
Instrument cluster
Warning lights inform the driver of malfunctions in any of the vehicle’s systems.
Warning lights
*1
(U.S.A.)
Brake system warning light (P. 518)
*1
(flashes or illuminates)
PCS warning light (P. 519)
*1
(Canada)
Brake system warning light (P. 518)
*1Slip indicator light (P. 519)
*1Charging system warning light (P. 518)
*1 Kinetic dynamic suspension system warning light (P. 519)
*2High coolant temperaturewarning light (P. 518)
(flashes)
Low speed four-wheel drive indicator light (P. 520)
*2Low engine oil pressure warning light (P. 518)
(flashes)
Center differential lock indicator light (P. 520)
*1
(U.S.A.)
Malfunction indicator lamp (P. 518)
Open door warning light (P. 520)
*1
(Canada)
Malfunction indicator lamp (P. 518)
Low fuel level warning light (P. 520)
*1SRS warning light (P. 518)
Seat belt reminder light (P. 520)
*1
(U.S.A.)
ABS warning light (P. 519)
*1Tire pressure warning light (P. 520)
*1
(Canada)
ABS warning light (P. 519)
*2
LDA indicator (P. 521)

86
GX460_OM_OM60T19U_(U)
2. Instrument cluster
*1: These lights turn on when the engine switch is turned to IGNITION ON mode toindicate that a system check is being performed. They will turn off after the engine ison, or after a few seconds. There may be a malfunction in a system if the lights do notturn on, or turn off. Have the vehicle inspected by your Lexus dealer.
*2: This light is displayed on the multi-information display.
(flashes)(U.S.A.)
Parking brake indicator (P. 519)
*2 Brake Override System warning light /Drive-Start Control warning light (P. 521)
(flashes)(Canada)
Parking brake indicator (P. 519)
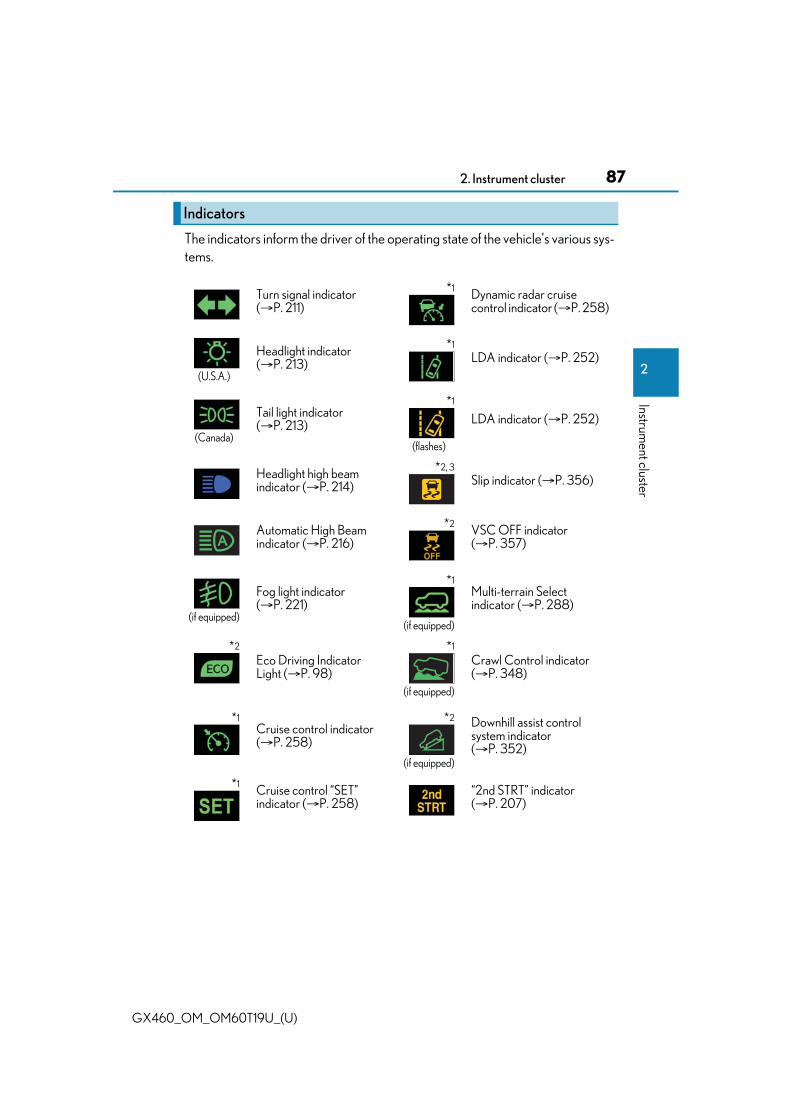
GX460_OM_OM60T19U_(U)
872. Instrument cluster
2
Instrument cluster
The indicators inform the driver of the operating state of the vehicle’s various sys-tems.
Indicators
Turn signal indicator (P. 211)
*1Dynamic radar cruise control indicator (P. 258)
(U.S.A.)
Headlight indicator (P. 213)
*1
LDA indicator (P. 252)
(Canada)
Tail light indicator (P. 213)
*1
(flashes)
LDA indicator (P. 252)
Headlight high beam indicator (P. 214)
*2, 3
Slip indicator (P. 356)
Automatic High Beam indicator (P. 216)
*2VSC OFF indicator (P. 357)
(if equipped)
Fog light indicator (P. 221)
*1
(if equipped)
Multi-terrain Select indicator (P. 288)
*2
Eco Driving Indicator Light (P. 98)
*1
(if equipped)
Crawl Control indicator(P. 348)
*1Cruise control indicator(P. 258)
*2
(if equipped)
Downhill assist control system indicator (P. 352)
*1Cruise control “SET” indicator (P. 258)
“2nd STRT” indicator (P. 207)

88
GX460_OM_OM60T19U_(U)
2. Instrument cluster
Low speed four-wheel drive indicator light (P. 344)
*2TRAC OFF indicator (P. 357)
Center differential lock indicator (P. 345)
*1
(if equipped)
MUD & SAND mode indicator (P. 289)
(if equipped)
Intuitive parking assist indicator (P. 270)
*1
(if equipped)
MOGUL mode indicator (P. 289)
*2, 4PCS warning light (P. 242)
*1
(if equipped)
ROCK mode indicator (P. 289)
*1 Smart access system with push-button start indicator (P. 200)
*1
(if equipped)
LOOSE & ROCK mode indicator (P. 289)
(if equipped)
BSM indicator (P. 361)*1
(if equipped)
ROCK & DIRT mode indicator (P. 289)
*5, 6
(if equipped)
BSM (Blind Spot Monitor) outside rear view mirror indicators (P. 361)
*1
(if equipped)
MTS AUTO indicator (P. 289)
*1, 7Low outside temperature indicator (P. 90)
*2, 8
(U.S.A.)
“AIR BAG ON/OFF” indicator (P. 47)
*2, 8
(Canada)
“AIR BAG ON/OFF” indicator (P. 47)

GX460_OM_OM60T19U_(U)
892. Instrument cluster
2
Instrument cluster
*1: This light is displayed on the multi-information display.
*2: These lights turn on when the engine switch is turned to IGNITION ON mode toindicate that a system check is being performed. They will turn off after the engine ison, or after a few seconds. There may be a malfunction in a system if the lights do notturn on, or turn off. Have the vehicle inspected by your Lexus dealer.
*3: The light flashes to indicate that the system is operating.
*4: The light comes on when the system is turned off.
*5: In order to confirm operation, the BSM outside rear view mirror indicators illumi-nate in the following situations:
• When the engine switch is turned to IGNITION ON mode while the system is setto on.
• When the system is set to on while the engine switch is in IGNITION ON mode.If the system is functioning correctly, the BSM outside rear view mirror indicatorswill turn off after a few seconds. If the BSM outside rear view mirror indicators do not illuminate or do not turn off,there may be a malfunction with the system. If this occurs, have the vehicle inspected by your Lexus dealer.
*6: This light illuminates on the outside rear view mirrors.
*7: When the outside temperature is approximately 37°F (3°C) or lower, the indicatorwill flash for approximately 10 seconds, then stay on.
*8: This light illuminates on the center panel.
WARNING
■ If a safety system warning light does not come onShould a safety system light such as the ABS/Multi Terrain ABS and the SRS warninglight not come on when you start the engine, this could mean that these systems are notavailable to help protect you in an accident, which could result in death or seriousinjury. Have the vehicle inspected by your Lexus dealer immediately if this occurs.
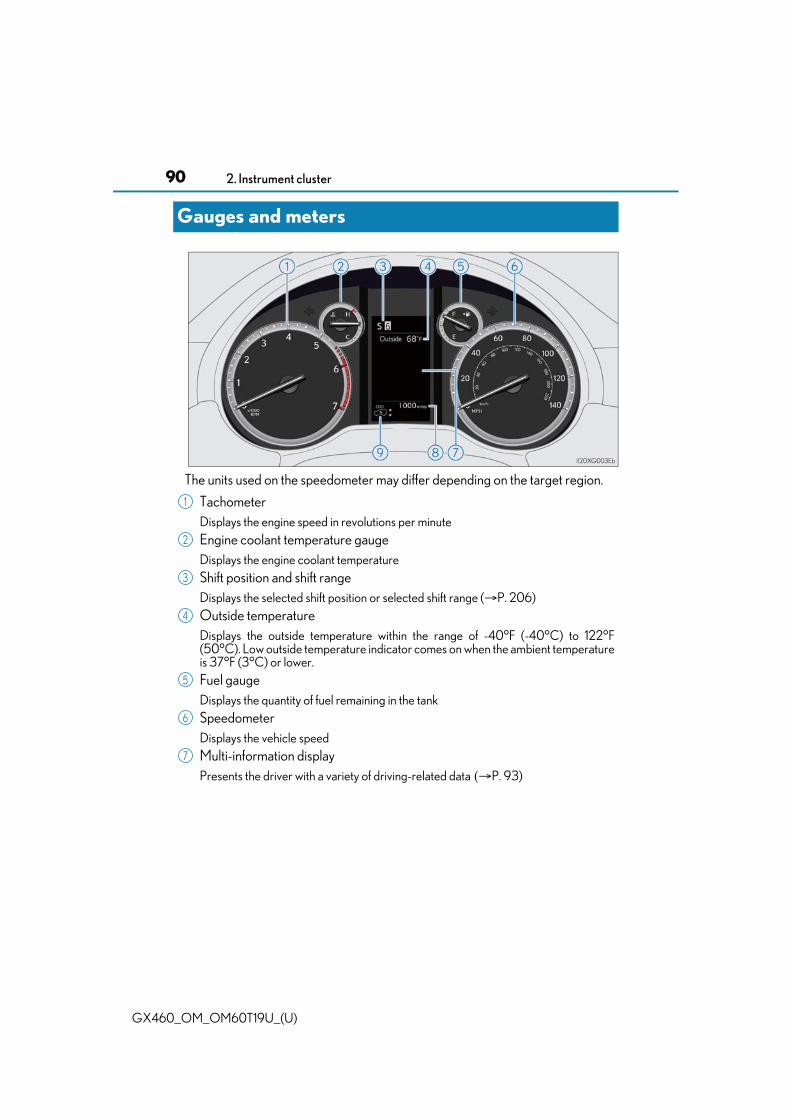
90
GX460_OM_OM60T19U_(U)
2. Instrument cluster
Gauges and meters
The units used on the speedometer may differ depending on the target region.
TachometerDisplays the engine speed in revolutions per minuteEngine coolant temperature gaugeDisplays the engine coolant temperatureShift position and shift rangeDisplays the selected shift position or selected shift range (P. 206)Outside temperatureDisplays the outside temperature within the range of -40°F (-40°C) to 122°F(50°C). Low outside temperature indicator comes on when the ambient temperatureis 37°F (3°C) or lower.Fuel gaugeDisplays the quantity of fuel remaining in the tankSpeedometerDisplays the vehicle speedMulti-information displayPresents the driver with a variety of driving-related dataP. 93)
1
2
3
4
5
6
7
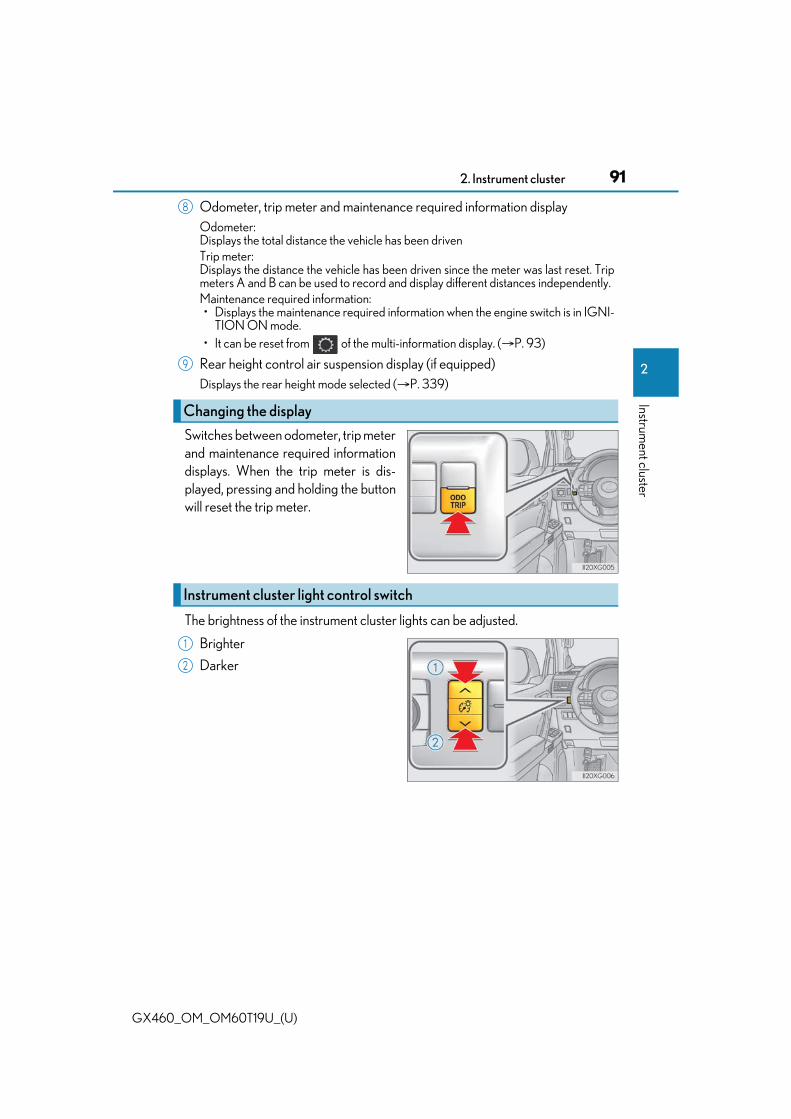
GX460_OM_OM60T19U_(U)
912. Instrument cluster
2
Instrument cluster
Odometer, trip meter and maintenance required information displayOdometer:Displays the total distance the vehicle has been drivenTrip meter:Displays the distance the vehicle has been driven since the meter was last reset. Tripmeters A and B can be used to record and display different distances independently.Maintenance required information:• Displays the maintenance required information when the engine switch is in IGNI-
TION ON mode.• It can be reset from of the multi-information display. (P. 93)
Rear height control air suspension display (if equipped)Displays the rear height mode selected (P. 339)
Switches between odometer, trip meterand maintenance required informationdisplays. When the trip meter is dis-played, pressing and holding the buttonwill reset the trip meter.
The brightness of the instrument cluster lights can be adjusted.
Brighter
Darker
Changing the display
8
9
Instrument cluster light control switch
1
2

92
GX460_OM_OM60T19U_(U)
2. Instrument cluster
■ The meters and display illuminate whenThe engine switch is in IGNITION ON mode.
■ Instrument cluster brightness adjustmentThe instrument cluster brightness levels when the tail lights are on and off can beadjusted.
■ The brightness of the instrument cluster lightsWhen the tail lights are on, the brightness will change. However, when the surroundingsare bright (daytime, etc.) turning on the tail lights will not change the instrument clusterbrightness.In addition, the brightness of the instrument cluster lights is automatically adjusted basedon the light sensor detecting how bright the surroundings are.
■ CustomizationThe meter display can be customized on the multi-information display. (P. 584)
WARNING
■ The information display at low temperaturesAllow the interior of the vehicle to warm up before using the liquid crystal informationdisplay. At extremely low temperatures, the information display monitor may respondslowly, and display changes may be delayed.For example, there is a lag between the driver’s shifting and the new gear numberappearing on the display. This lag could cause the driver to downshift again, causingrapid and excessive engine braking and possibly an accident resulting in death orinjury.
NOTICE
■ To prevent damage to the engine and its components● Do not let the indicator needle of the tachometer enter the red zone, which indicates
the maximum engine speed.● The engine may be overheating if the engine coolant temperature gauge is in the red
zone (H). In this case, immediately stop the vehicle in a safe place, and check theengine after it has cooled completely. (P. 553)

93
GX460_OM_OM60T19U_(U)
2. Instrument cluster
2
Instrument cluster
Multi-information display
The following information will be dis-played when a menu icon is selected.(P. 94)
Some of the information may be dis-played automatically depending on thesituation.
Drive information
Select to display various drive data. (P. 95)
Vehicle information display
Select to display the vehicle information. (P. 96)
Driving assist system information
Select to display the operational status of the following systems:• Dynamic radar cruise control (P. 258)• LDA (Lane Departure Alert) (P. 250)
Warning message display
Select to display warning messages and measures to be taken if a malfunction isdetected. (P. 527)
Settings display
Select to change the meter display settings and the operation settings of somevehicle functions. (P. 97)
Display contents

94
GX460_OM_OM60T19U_(U)
2. Instrument cluster
The multi-information display is operated using the meter control switches.
: Switch menu
: Change displayed con-
tent, scroll up/down thescreen and move thecursor up/down
Press: Enter/Set
Press and hold: Reset
Return to the previous screen
Press: Displays the screen registered to
When no screen has been registered, the drive information screen will be dis-played.Press and hold: Registers the currently displayed screen to
When the confirmation screen is displayed, select yes to register the screen. If theselected screen cannot be registered, a registration failure message will be shown.
Operating the meter control switches
1
2
3
4

GX460_OM_OM60T19U_(U)
952. Instrument cluster
2
Instrument cluster
● Current fuel consumption (bar type)
Displays the current rate of fuel consumption.● Average fuel consumption (after reset*2/after start/after refuel)*1
Displays the average fuel consumption since the function was reset, theengine was started, and the vehicle was refueled, respectively.
● Average vehicle speed (after reset*2/after start)
Displays the average vehicle speed since the function was reset and theengine was started, respectively.
● Elapsed time (after reset*2/after start)
Displays the elapsed time since the function was reset and the engine wasstarted, respectively.
● Distance (driving range)
Displays the estimated maximum distance that can be driven with the quantityof fuel remaining.• This distance is computed based on your average fuel consumption.
As a result, the actual distance that can be driven may differ from that dis-played.
• When only a small amount of fuel is added to the tank, the display may notbe updated.When refueling, turn the engine switch off. If the vehicle is refueled withoutturning the engine switch off, the display may not be updated.
*1: Use the displayed average fuel consumption as a reference.
*2: The function can be reset by pressing for longer than 1 second when the item toreset is displayed. If there is more than one item that can be reset, the item selectionscreen will appear.
Drive information

96
GX460_OM_OM60T19U_(U)
2. Instrument cluster
■ Eco Indicator (Eco Driving Indicator Zone Display)
P. 98
■ Speed
Displays the vehicle speed.
■ Sway warning
Detects the sway of the vehicle within a lane, which is often associated with adecrease in the driver’s attention level, and displays the decrease in attentionusing a bar display.The shorter the bar length, the more the driver may need to rest.
This display is a part of the LDA (Lane Departure Alert) system. The display isenabled when the operating conditions of the vehicle sway warning function aremet. (P. 250)
■ Blank screen (display off)
Drive information is not displayed.
■ Front tire angle
Displays the direction of the front tires.
The tire direction is displayed in 3 stages for both left and right, in accordance withthe angle of the tire.If a battery terminal is disconnected and reconnected, the display may be disabledtemporarily. After driving the vehicle for a while, the display will be enabled.
■ Tire inflation pressure
Displays inflation pressure of each tire.
The inflation pressure of the spare tire will also be displayed.
Vehicle information

GX460_OM_OM60T19U_(U)
972. Instrument cluster
2
Instrument cluster
The settings of the following items can be changed. (P. 584)
For functions that can be enabled or disabled, the function switches between on andoff each time is pressed.
■ LDA (Lane Departure Alert) (P. 250)
■ BSM (Blind Spot Monitor)* (P. 361)
■ PCS (Pre-Collision System) (P. 239)
■ Intuitive parking assist* (P. 270)
■ Vehicle settings● Tire pressure warning system (P. 473)● Scheduled maintenance* (P. 449)● Oil maintenance (P. 462)
■ Meter settings
Select to set the following items.● Language
Select to change the language on the display.● Units
Select to change the unit for measure.● Eco Driving Indicator Light
Select to activate/deactivate the Eco Driving Indicator Light.● Switch settings
You can register 1 screen as the top screen. To register, press and hold while the desired screen is displayed.
● InitializationRegistered or changed meter settings will be deleted or returned to theirdefault setting.
*: If equipped
Settings display

98
GX460_OM_OM60T19U_(U)
2. Instrument cluster
■ Eco Driving Indicator
● The shift lever is in any position other than D.● Vehicles with adaptive variable suspension system: The driving mode is set to sport
mode.● The vehicle speed is approximately 81 mph (130 km/h) or higher.
■ When disconnecting and reconnecting battery terminalsThe drive information other than the current fuel consumption will be reset.
■ Tire inflation pressure● It may take a few minutes to display the tire inflation pressure after the engine switch is
turned to IGNITION ON mode. It may also take a few minutes to display the tire infla-tion pressure after inflation pressure has been adjusted.
● “---” may be displayed if the tire information cannot be determined due to unfavorableradio wave conditions.
● Tire inflation pressure changes with temperature. The displayed values may also be dif-ferent from the values measured using a tire pressure gauge.
■ When setting up the displayStop the vehicle in a safe place, apply the parking brake, and shift the shift lever to P.
■ Suspension of the settings displayIn the following situations, the settings display using the meter control switches will besuspended.● When a warning message appears on the multi-information display● When the vehicle begins to move
■ Liquid crystal displaySmall spots or light spots may appear on the display. This phenomenon is characteristicof liquid crystal displays, and there is no problem continuing to use the display.
Eco Driving Indicator LightDuring Eco-friendly acceleration operation(Eco driving), the Eco Driving Indicator Lightwill turn on. When the acceleration exceedsZone of Eco driving, or when the vehicle isstopped, the light turns off.Eco Driving Indicator Zone DisplaySuggests the Zone of Eco driving with currentEco driving ratio based on acceleration.Eco driving ratio based on accelerationIf the acceleration exceeds Zone of Eco driv-ing, the right side of Eco Driving IndicatorZone Display will illuminate.Zone of Eco driving
Eco Driving Indicator will not operate under thefollowing conditions:
1
2
3
4

GX460_OM_OM60T19U_(U)
992. Instrument cluster
2
Instrument cluster
WARNING
■ Caution for use while drivingFor safety, avoid operating the meter control switch while driving as much as possible,and do not look continuously at the multi-information display while driving. Stop thevehicle and operate the meter control switch. Failure to do so may cause a steeringwheel operation error, resulting in an unexpected accident.
■ Cautions while setting up the displayAs the engine needs to be running during setting up the display, ensure that the vehicleis parked in a place with adequate ventilation. In a closed area such as a garage,exhaust gases including harmful carbon monoxide (CO) may collect and enter thevehicle. This may lead to death or a serious health hazard.
NOTICE
■ While setting up the displayTo prevent battery discharge, ensure that the engine is running while setting up the dis-play features.

100
GX460_OM_OM60T19U_(U)
2. Instrument cluster
Fuel consumption information
Press the “INFO”/“APPS” button, and then select “Fuel consumption”/“Eco” onthe screen.
■ Trip information
If the “Past Record” screen is displayed, select “Trip Information”.
Resetting the consumption data
Fuel consumption in the past 15minutes
Current fuel consumption
Average vehicle speed since theengine was started.
Elapsed time since the enginewas started.
Cruising range (P. 101)
Average fuel consumption for the past 15 minutes is divided by color into pastaverages and averages attained since the engine switch was last turned to IGNI-TION ON mode. Use the displayed average fuel consumption as a reference.The image is an example only, and may vary slightly from actual conditions.
Fuel consumption information can be displayed on the multimedia screen ornavigation system screen.
1
2
3
4
5
6

GX460_OM_OM60T19U_(U)
1012. Instrument cluster
2
Instrument cluster
■ Past record
If the “Trip Information” screen is displayed, select “Past Record”.
Resetting the past record data
Best recorded fuel economy
Average fuel consumption
Previous fuel consumption record
Updating the average fuel con-sumption data
The average fuel consumption his-tory is divided by color into pastaverages and the average fuel con-sumption since the last reset. Use thedisplayed average fuel consumptionas a reference.The image is an example only, and may vary slightly from actual conditions.
■ Updating the past record dataUpdate the average fuel consumption by selecting “Update” to measure the current fuelconsumption again.
■ Resetting the dataThe data can be deleted by selecting “Clear”.
■ Cruising rangeDisplays the estimated maximum distance that can be driven with the quantity of fuelremaining.This distance is computed based on your average fuel consumption. As a result, theactual distance that can be driven may differ from that displayed.
1
2
3
4
5

102
GX460_OM_OM60T19U_(U)
2. Instrument cluster

103
GX460_OM_OM60T19U_(U)
3Operation ofeach component
3-1. Key information
Keys .................................................. 104
3-2. Opening, closing and locking the doors
Side doors ...................................... 108
Back door.........................................115
Glass hatch.................................... 120
Smart access system with push-button start...................... 125
3-3. Adjusting the seats
Front seats...................................... 132
Rear seats....................................... 134
Driving position memory......... 145
Head restraints ............................ 150
3-4. Adjusting the steering wheel and mirrors
Steering wheel ............................. 153
Inside rear view mirror ............. 155
Outside rear view mirrors........157
3-5. Opening, closing the windows and moon roof
Power windows ........................... 160
Moon roof ...................................... 163

104
GX460_OM_OM60T19U_(U)
3-1. Key information
Keys
The following keys are provided with the vehicle.
Electronic keys• Operating the smart access system
with push-button start (P. 125)• Operating the wireless remote con-
trol functionMechanical keys
Key number plate
Locks the doors (P. 108)
Unlocks the doors (P. 108)
Opens the windows and moon roof*(P. 108)
Opens the glass hatch (P. 120)
Sounds the alarm (P. 105)
*: These settings must be customized at your Lexus dealer.
The keys
1
2
3
Wireless remote control
1
2
3
4
5

GX460_OM_OM60T19U_(U)
1053-1. Key information
3
Operation of each com
ponent
To take out the mechanical key, pushthe release button and take the key out.
The mechanical key can only beinserted in one direction, as the key onlyhas grooves on one side. If the key can-not be inserted in a lock cylinder, turn itover and re-attempt to insert it.After using the mechanical key, store itin the electronic key. Carry the mechan-ical key together with the electronic key.If the electronic key battery is depletedor the entry function does not operateproperly, you will need the mechanicalkey. (P. 547)
■ Panic mode
■ When required to leave the vehicle’s key with a parking attendantLock the glove box as circumstances demand. (P. 404) Remove the mechanical key for your own use and provide the attendant with the elec-tronic key only.
■ If you lose your mechanical keysNew genuine mechanical keys can be made by your Lexus dealer using anothermechanical key and the key number stamped on your key number plate. Keep the platein a safe place such as your wallet, not in the vehicle.
Using the mechanical key
When is pressed for longer than aboutone second, an alarm will sound intermittentlyand the vehicle lights will flash to deter any per-son from trying to break into or damage yourvehicle.To stop the alarm, press any button on the elec-tronic key.

106
GX460_OM_OM60T19U_(U)
3-1. Key information
■ When riding in an aircraftWhen bringing an electronic key onto an aircraft, make sure you do not press any but-tons on the electronic key while inside the aircraft cabin. If you are carrying an electronickey in your bag etc., ensure that the buttons are not likely to be pressed accidentally.Pressing a button may cause the electronic key to emit radio waves that could interferewith the operation of the aircraft.
■ Electronic key battery depletion● The standard battery life is 1 to 2 years.● If the battery becomes low, an alarm will sound in the cabin when the engine is stopped.● As the electronic key always receives radio waves, the battery will become depleted
even if the electronic key is not used. The following symptoms indicate that the elec-tronic key battery may be depleted. Replace the battery when necessary. (P. 492)• The smart access system with push-button start or the wireless remote control does
not operate.• The detection area becomes smaller.• The LED indicator on the key surface does not turn on.
● To avoid serious deterioration, do not leave the electronic key within 3 ft. (1 m) of thefollowing electrical appliances that produce a magnetic field:• TVs• Personal computers• Cellular phones, cordless phones and battery chargers• Recharging cellular phones or cordless phones• Table lamps• Induction cookers
● Battery-saving mode can reduce the power consumption of electronic keys that are notused for long periods of time. (P. 127)
■ Replacing the batteryP. 492
■ Certification for the wireless remote control For vehicles sold in the U.S.A., Hawaii, Guam, Saipan and Puerto Rico

GX460_OM_OM60T19U_(U)
1073-1. Key information
3
Operation of each com
ponent
For vehicles sold in the Canada
NOTICE
■ To prevent key damage● Do not drop the keys, subject them to strong shocks or bend them.● Do not expose the keys to high temperatures for long periods of time.● Do not get the keys wet or wash them in an ultrasonic washer etc.● Do not attach metallic or magnetic materials to the keys or place the keys close to
such materials.● Do not disassemble the keys.● Do not attach a sticker or anything else to the surface of the electronic key.● Do not place the keys near objects that produce magnetic fields, such as TVs, audio
systems and induction cookers.● Do not place the keys near medical electrical equipment such as low-frequency ther-
apy equipment or microwave therapy equipment, and do not receive medical atten-tion with the keys on your person.
■ Carrying the electronic key on your personCarry the electronic key 3.9 in. (10 cm) or more away from electric appliances that areturned on. Radio waves emitted from electric appliances within 3.9 in. (10 cm) of theelectronic key may interfere with the key, causing the key to not function properly.
■ In case of a smart access system with push-button start malfunction or other key-related problemsTake your vehicle with all the electronic keys provided with your vehicle to your Lexusdealer.
■ When an electronic key is lostIf the electronic key remains lost, the risk of vehicle theft increases significantly. Visityour Lexus dealer immediately with all remaining electronic keys that were providedwith your vehicle.

108
GX460_OM_OM60T19U_(U)
3-2. Opening, closing and locking the doors
Side doors
◆ Smart access system with push-button start
Carry the electronic key to enable this function.
Grip the driver’s door handle tounlock the door. Grip the passen-ger’s door handle to unlock all thedoors.*Make sure to touch the sensor on theback of the handle.The doors cannot be unlocked for3 seconds after the doors are locked.
*: The door unlock settings can bechanged. (P. 113)
Touch the lock sensor (the indentation on the upper part or lower part ofthe front door handle) to lock the doors.
Check that the door is securely locked.
◆ Wireless remote control
Locks all the doors
Check that the door is securelylocked.Unlocks all the doors
Pressing the button unlocks thedriver’s door. Pressing the buttonagain within 3 seconds unlocks theother doors.Press and hold to open the windowsand moon roof.*
*: These settings must be customized at your Lexus dealer.
The vehicle can be locked and unlocked using the entry function, wirelessremote control, key or door lock switch.
Locking and unlocking the doors from the outside
1
2
1
2

GX460_OM_OM60T19U_(U)
1093-2. Opening, closing and locking the doors
3
Operation of each com
ponent
■ Operation signalsDoors: A buzzer sounds and the emergency flashers flash to indicate that the doors havebeen locked/unlocked. (Locked: once; Unlocked: twice)Windows and moon roof: A buzzer sounds to indicate that the windows and moon roofare operating.
■ Security featureIf a door or the glass hatch is not opened within approximately 60 seconds after the vehi-cle is unlocked, the security feature automatically locks the vehicle again.
■ When the door cannot be locked by the lock sensor on the upper part of the door han-dle
■ Door lock buzzerIf an attempt to lock the doors is made when a door and/or the glass hatch is not fullyclosed, a buzzer sounds continuously. Fully close the door and/or the glass hatch to stopthe buzzer, and lock the vehicle once more.
■ Setting the alarmLocking the doors will set the alarm system. (P. 79)
■ If the smart access system with push-button start or the wireless remote control doesnot operate properly● Use the mechanical key to lock and unlock the doors. (P. 547)● Replace the battery with a new one if it is depleted. (P. 492)
If the door will not lock even when the topsidesensor area is touched, try touching both thetopside and underside sensor areas at the sametime.When gloves are being worn, remove thegloves.

110
GX460_OM_OM60T19U_(U)
3-2. Opening, closing and locking the doors
◆ Door lock switches
Locks all the doors
Unlocks all the doors
◆ Inside lock buttons
Locks the door
Unlocks the door
The front doors can be opened bypulling the inside handle even if thelock button is in the lock position.
Locking and unlocking the doors from the inside
1
2
1
2
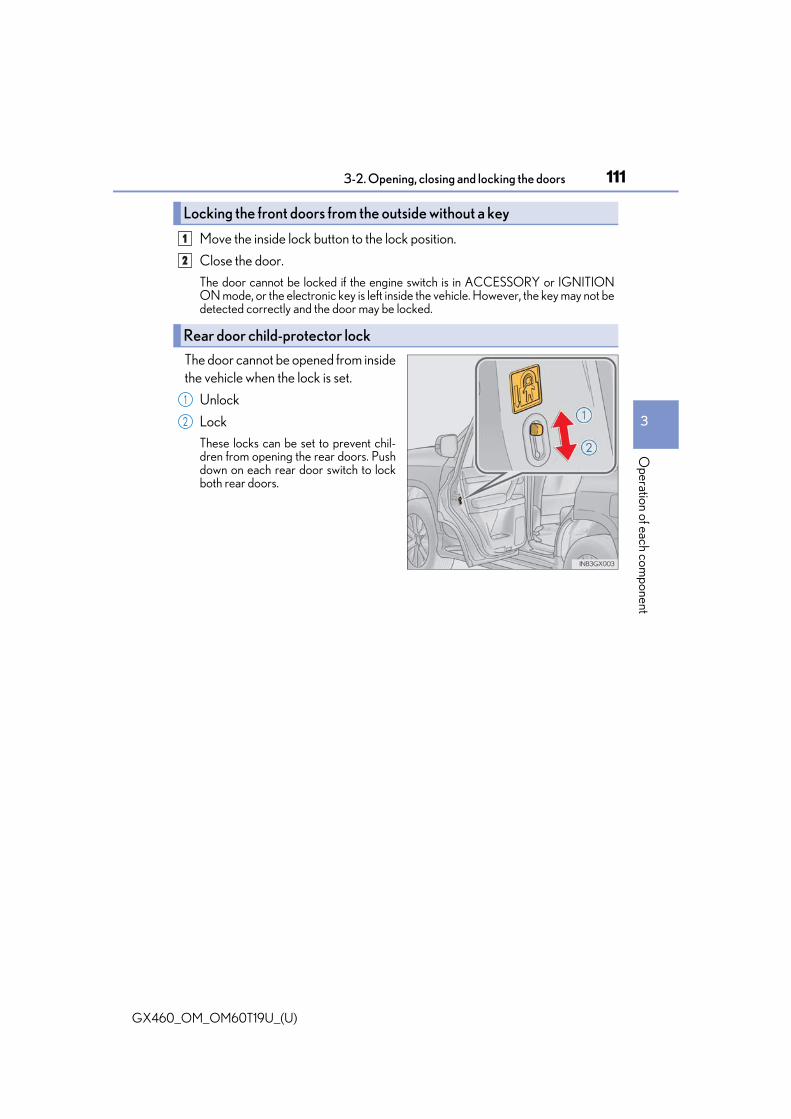
GX460_OM_OM60T19U_(U)
1113-2. Opening, closing and locking the doors
3
Operation of each com
ponent
Move the inside lock button to the lock position.
Close the door.
The door cannot be locked if the engine switch is in ACCESSORY or IGNITIONON mode, or the electronic key is left inside the vehicle. However, the key may not bedetected correctly and the door may be locked.
The door cannot be opened from insidethe vehicle when the lock is set.
Unlock
Lock
These locks can be set to prevent chil-dren from opening the rear doors. Pushdown on each rear door switch to lockboth rear doors.
Locking the front doors from the outside without a key
Rear door child-protector lock
1
2
1
2

112
GX460_OM_OM60T19U_(U)
3-2. Opening, closing and locking the doors
The following functions can be set or canceled:
For instructions on customizing, refer to P. 584.
Automatic door locking and unlocking systems
Function Operation
Shift position linked door lock-ing function Shifting the shift lever out of P locks all the doors.
Shift position linked doorunlocking function Shifting the shift lever to P unlocks all the doors.
Speed linked door lockingfunction
All the doors are locked when the vehicle speed isapproximately 12 mph (20 km/h) or higher.
Driver’s door linked doorunlocking function
All the doors are unlocked when the driver’s door isopened within 43 seconds after turning the engineswitch off.

GX460_OM_OM60T19U_(U)
1133-2. Opening, closing and locking the doors
3
Operation of each com
ponent
■ Changing the door unlock function settingIt is possible to set which doors the entry function unlocks using the wireless remote con-trol.
Turn the engine switch off.
When the indicator light on the key surface is not on, press and hold or
for approximately 5 seconds while pressing and holding .
The setting changes each time an operation is performed, as shown below. (Whenchanging the setting continuously, release the buttons, wait for at least 5 seconds, andrepeat step .)
To prevent unintended triggering of the alarm, unlock the doors using the wirelessremote control and open and close a door once after the settings have been changed. (Ifa door or the glass hatch is not opened within 60 seconds after is pressed, thedoors will be locked again and the alarm will automatically be set.)In a case that the alarm is triggered, immediately stop the alarm. (P. 79)
1
2
2
Multi-information display Unlocking function Beep
Holding the driver’s door handleunlocks only the driver’s door.
Exterior: Beeps 3 timesInterior: Pings onceHolding the front passenger’s
door handle unlocks all thedoors.
Holding either front door handleunlocks all the doors.
Exterior: Beeps twiceInterior: Pings once

114
GX460_OM_OM60T19U_(U)
3-2. Opening, closing and locking the doors
■ Impact detection door lock release systemIn the event that the vehicle is subject to a strong impact, all the doors are unlocked.Depending on the force of the impact or the type of accident, however, the system maynot operate.
■ Using the mechanical keyThe doors can also be locked and unlocked with the mechanical key. (P. 547)
■ If a symbol indicating one or more doors are open is shown on the multi-information dis-playThe hood or one or more of the doors or glass hatch are not fully closed. The system alsoindicates which doors are not fully closed. If the vehicle reaches a speed of 3 mph (5 km/h), a buzzer sounds to indicate that the door(s) are not yet fully closed.Make sure that the hood, all the doors and glass hatch are closed.
■ Conditions affecting the operation of the smart access system with push-button startor wireless remote controlP. 127
■ CustomizationSettings (e.g. unlocking function using a key) can be changed. (Customizable features: P. 584)
WARNING
■ To prevent an accidentObserve the following precautions while driving the vehicle.Failure to do so may result in a door opening and an occupant being thrown out of thevehicle, resulting in death or serious injury.● Ensure that all doors are properly closed and locked.● Do not pull the inside handle of the doors while driving.
Be especially careful for the front doors, as the doors may be opened even if theinside lock buttons are in locked position.
● Set the rear door child-protector locks when children are seated in the rear seats. ■ When using the wireless remote control and operating the power windows or moon
roofOperate the power window or moon roof after checking to make sure that there is nopossibility of any passenger having any of their body parts caught in the window ormoon roof. Also, do not allow children to operate the wireless remote control. It is pos-sible for children and other passengers to get caught in the power window or moonroof.

115
GX460_OM_OM60T19U_(U)
3-2. Opening, closing and locking the doors
3
Operation of each com
ponent
Back door
◆ Smart access system with push-button start
Carry the electronic key to enable this function.
Locks all the doors
Check that the door is securelylocked.Unlocks all the doors
The doors cannot be unlocked for 3seconds after the doors are locked.
◆ Wireless remote control
P. 108
◆ Door lock switch
P. 110
The back door can be locked/unlocked and opened by the following proce-dures.
Locking and unlocking the back door from the outside
1
2
Locking and unlocking the back door from the inside

116
GX460_OM_OM60T19U_(U)
3-2. Opening, closing and locking the doors
Pull the handle
Open the back door
The back door can be kept open at adesired position.
Unlocks the back door stopper
Locks the back door stopper
The back door stopper can only beoperated when the back door is fullyopen.When closing the back door, check thatthe back door stopper is unlocked.
Close the back door using the backdoor handle, and make sure to push theback door from the outside to close it.
Opening the back door from the outside
1
2
Keeping the back door open
1
2
When closing the back door

GX460_OM_OM60T19U_(U)
1173-2. Opening, closing and locking the doors
3
Operation of each com
ponent
The rear step bumper is for rear endprotection and easier step-up loading.
Rear step bumper
WARNING
■ While driving● Keep the back door closed while driving.
If the back door is left open, it may hit near-by objects while driving or luggage maybe unexpectedly thrown out, causing an accident.In addition, exhaust gases may enter the vehicle, causing death or a serious healthhazard. Make sure to close the back door before driving.
● Before driving the vehicle, make sure that the back door is fully closed. If the backdoor is not fully closed, it may open unexpectedly while driving, causing an accident.
● Never let anyone sit in the luggage compartment. In the event of sudden braking,sudden swerving or a collision, they are susceptible to death or serious injury.
■ When children are in the vehicleObserve the following precautions.Failure to do so may result in death or serious injury.● Do not allow children to play in the luggage compartment.
If a child is accidentally locked in the luggage compartment, they could have heatexhaustion or other injuries.
● Do not allow a child to open or close the back door.Doing so may cause the back door to move unexpectedly, or cause the child’s hands,head, or neck to be caught by the closing back door.

118
GX460_OM_OM60T19U_(U)
3-2. Opening, closing and locking the doors
WARNING
■ Operating the back doorObserve the following precautions.Failure to do so may cause parts of the body to be caught, resulting in death or seriousinjury.● When opening or closing the back door, thoroughly check to make sure the sur-
rounding area is safe.● If anyone is in the vicinity, make sure they are safe and let them know that the back
door is about to open or close.● Use caution when opening or closing the back door in windy weather as it may move
abruptly in strong wind.
● The back door may suddenly shut if the backdoor stopper is not locked. It is more difficultto open or close the back door on an inclinethan on a level surface, so beware of the backdoor unexpectedly opening or closing byitself. Make sure that the back door stopper islocked and secure before using the luggagecompartment.
● Even with the back door stopper locked, theback door stopper may unlock and the backdoor may close when excessive force such asa strong wind is applied to the back door. Takeextra care to prevent any part of your bodyfrom being caught.
● When closing the back door, take extra careto prevent your fingers etc. from beingcaught. Also pay attention to your personalbelongings such as bags and ties.
● When closing the back door, make sure topress it lightly on its outer surface. If the backdoor handle is used to fully close the backdoor, it may result in hands or arms beingcaught.

GX460_OM_OM60T19U_(U)
1193-2. Opening, closing and locking the doors
3
Operation of each com
ponent
WARNING
● Do not pull on the back door damper stay to close the back door, and do not hang onthe back door damper stay.Doing so may cause hands to be caught or the back door damper stay to break, caus-ing an accident.
● If a bicycle carrier or similar heavy object is attached to the back door, it may sud-denly shut again after being opened, causing someone’s hands, head or neck to becaught and injured. When installing an accessory part to the back door, using a genu-ine Lexus part is recommended.
NOTICE
■ Back door damper stayThe back door is equipped with damper stay that hold the back door in place.Observe the following precautions.Failure to do so may cause damage to the back door damper stay, resulting in malfunc-tion.
● Do not attach any accessories other thangenuine Lexus parts to the back door.
● Do not lean against, climb on or place lug-gage on the damper stay, or apply lateralforces to it.
Damper stay

120
GX460_OM_OM60T19U_(U)
3-2. Opening, closing and locking the doors
Glass hatch
◆ Glass hatch opener
Press the button to pop up theglass hatch.
Raise
The glass hatch cannot be openedwhen the back door is locked.Unlock the back door to open theglass hatch. (P. 115)
◆ Smart access system with push-button start
While carrying the electronic key,press the button to pop up theglass hatch.
Raise
The glass hatch can be opened evenwhen the back door is locked.
◆ Wireless remote control
Press and hold the button to openthe glass hatch. The glass hatch willpop up.
The glass hatch can be opened using the glass hatch opener or wirelessremote control.
Opening the glass hatch
1
2
1
2

GX460_OM_OM60T19U_(U)
1213-2. Opening, closing and locking the doors
3
Operation of each com
ponent
■ When opening the glass hatch● Open the glass hatch slowly and carefully.● Use the glass hatch opener or wireless remote control when the back door is closed.
■ Operation signals (when opening with the wireless remote control)A buzzer sounds once to indicate that the glass hatch have been opened.
■ Opening the glass hatch while the rear window wiper is in operationRear window wiper operation will stop moving. Operation will recommence after theglass hatch has been closed.
■ Function to prevent the glass hatch being locked with the electronic key inside● When all doors are being locked, closing the glass hatch with the electronic key left
inside the luggage compartment will sound an alarm.In this case, the glass hatch can be opened using the entry function.
● Even when the spare electronic key is put in the luggage compartment with all thedoors locked, the key confinement prevention function can be activated so the glasshatch can be opened. In order to prevent theft, take all electronic keys with you whenleaving the vehicle.
● Even when the electronic key is put in the luggage compartment with all the doors arelocked, the key may not be detected depending on the places and the surroundingradio wave conditions. In this case, the key confinement prevention function cannot beactivated, causing the doors to lock when the glass hatch is closed. Make sure to checkwhere the key is before closing the glass hatch.
● If you want to lock the spare electronic key in the vehicle, do not open or close the glasshatch after locking all doors. Otherwise, the glass hatch can be opened due to the keyconfinement prevention function and the risk of vehicle theft increases significantly.
■ After closing the glass hatchCheck that the glass hatch is firmly locked. If it is not firmly locked, the rear window wiperand washer will not operate correctly.
■ CustomizationThe glass hatch opening operation can be changed. (Customizable features: P. 584)

122
GX460_OM_OM60T19U_(U)
3-2. Opening, closing and locking the doors
WARNING
■ While driving● Keep the glass hatch closed while driving.
If the glass hatch is left open, it may hit near-by objects while driving or luggage maybe unexpectedly thrown out, causing an accident.In addition, exhaust gases may enter the vehicle, causing death or a serious healthhazard. Make sure to close the glass hatch before driving.
● Before driving the vehicle, make sure that the glass hatch is fully closed. If the glasshatch is not fully closed, it may open unexpectedly while driving, causing an accident.
■ When children are in the vehicleDo not allow a child to open or close the glass hatch.Doing so may cause the glass hatch to move unexpectedly, or cause the child’s hands,head, or neck to be caught by the closing glass hatch.

GX460_OM_OM60T19U_(U)
1233-2. Opening, closing and locking the doors
3
Operation of each com
ponent
WARNING
■ Operating the glass hatchObserve the following precautions.Failure to do so may cause parts of the body to be caught, resulting in death or seriousinjury.● Remove any heavy loads, such as snow and ice, from the glass hatch before opening
it. Failure to do so may cause the glass hatch suddenly shut again after it is opened.● When opening or closing the glass hatch, thoroughly check to make sure the sur-
rounding area is safe.● If anyone is in the vicinity, make sure they are safe and let them know that the glass
hatch is about to open or close.● Use caution when opening or closing the glass hatch in windy weather as it may move
abruptly in strong wind.
● Do not pull on the glass hatch damper stay to close the glass hatch, and do not hangon the glass hatch damper stay.Doing so may cause hands to be caught or the glass hatch damper stay to break,causing an accident.
● Do not attach any accessories other than genuine Lexus parts to the glass hatch.Such additional weight on the glass hatch may cause the glass hatch to suddenly shutagain after it is opened.
● The glass hatch may close if it is not openedfully. It is more difficult to open or close theglass hatch on an incline than on a level sur-face, so beware of the glass hatch unexpect-edly opening or closing by itself. Make surethat the glass hatch is fully open and securebefore using the luggage compartment. Alsopay attention to your personal belongingssuch as bags and ties.
● When closing the glass hatch, take extra careto prevent your fingers etc. from beingcaught. Also pay attention to your personalbelongings such as bags and ties.
● When closing the glass hatch, make sure topress it lightly on its outer surface.

124
GX460_OM_OM60T19U_(U)
3-2. Opening, closing and locking the doors
NOTICE
■ Glass hatch damper staysThe glass hatch is equipped with damper stays that hold the glass hatch in place.Observe the following precautions.Failure to do so may cause damage to the glass hatch damper stay, resulting in mal-function.
● Do not attach any foreign objects, such asstickers, plastic sheets, or adhesives to thedamper stay rod.
● Do not touch the damper stay rod with glovesor other fabric items.
● Do not attach any accessories other thangenuine Lexus parts to the glass hatch.
● Do not place your hand or foot on the damperstay or apply lateral forces to it.
Damper stays

125
GX460_OM_OM60T19U_(U)
3-2. Opening, closing and locking the doors
3
Operation of each com
ponent
Smart access system with push-button start
● Locks and unlocks the side doors (P. 108)● Locks and unlocks the back door (P. 115)● Opens the glass hatch (P. 120)● Starts the engine (P. 200)
■ Antenna location
The following operations can be performed simply by carrying the electronickey on your person, for example in your pocket. The driver should alwayscarry the electronic key.
Antennas outside the cabinAntennas inside the cabinAntenna outside the luggage compartment
1
2
3

126
GX460_OM_OM60T19U_(U)
3-2. Opening, closing and locking the doors
■ Effective range (areas within which the electronic key is detected)
When starting the engine or changing engine switch modesThe system can be operated when the electronic key is inside the vehicle.
■ Alarms and warning indicatorsA combination of exterior and interior alarms as well as warning messages shown on themulti-information display are used to prevent theft of the vehicle and accidents resultingfrom erroneous operation. Take appropriate measures in response to any warning mes-sage on the multi-information display.
When locking or unlocking the doors
The system can be operated when the elec-tronic key is within about 2.3 ft. (0.7 m) ofeither of the outside front door handle.(Only the doors detecting the key can beoperated.)
When opening the glass hatch and lockingor unlocking the back doorThe system can be operated when the elec-tronic key is within about 2.3 ft. (0.7 m) ofthe back door handle.
Alarm Situation Correction procedure
Exterior alarm sounds once for 5 seconds
An attempt was made to lockthe vehicle while a door and/orthe glass hatch was open.
Close all of the doorsand/or the glass hatch,and lock the doorsagain.
An attempt was made to closethe glass hatch while the elec-tronic key was still inside thevehicle.
Open the glass hatchagain and retrieve theelectronic key from thevehicle.
Interior alarm pingscontinuously
The engine switch was turned toACCESSORY mode while thedriver’s door was open (or thedriver’s door was opened whilethe engine switch was inACCESSORY mode).
Turn the engine switchoff and close the driver’sdoor.

GX460_OM_OM60T19U_(U)
1273-2. Opening, closing and locking the doors
3
Operation of each com
ponent
■ Battery-saving functionThe battery-saving function will be activated in order to prevent the electronic key bat-tery and the vehicle battery from being discharged while the vehicle is not in operationfor a long time.● In the following situations, the smart access system with push-button start may take
some time to unlock the doors.• The electronic key has been left in an area of approximately 6 ft. (2 m) of the outside
of the vehicle for 10 minutes or longer.• The smart access system with push-button start has not been used for 5 days or lon-
ger.● If the smart access system with push-button start has not been used for 14 days or lon-
ger, the doors cannot be unlocked at any doors except the driver’s door. In this case,take hold of the driver’s door handle, or use the wireless remote control or the mechan-ical key, to unlock the doors.
■ Electronic Key Battery-Saving Function● When battery-saving mode is set, battery depletion is minimized by stopping the elec-
tronic key from receiving radio waves.
● Electronic keys that will not be used for long periods of time can be set to the battery-saving mode in advance.
■ Conditions affecting operationThe smart access system with push-button start uses weak radio waves. In the followingsituations, the communication between the electronic key and the vehicle may beaffected, preventing the smart access system with push-button start, wireless remotecontrol and engine immobilizer system from operating properly. (Ways of coping: P. 547)● When the electronic key battery is depleted● Near a TV tower, electric power plant, gas station, radio station, large display, airport or
other facility that generates strong radio waves or electrical noise● When the electronic key is in contact with, or is covered by the following metallic
objects• Cards to which aluminum foil is attached• Cigarette boxes that have aluminum foil inside• Metallic wallets or bags• Coins• Hand warmers made of metal• Media such as CDs and DVDs
● When other wireless keys (that emit radio waves) are being used nearby
Press twice while pressing and holding
. Confirm that the electronic key indi-cator flashes 4 times.While the battery-saving mode is set, thesmart access system with push-button startcannot be used. To cancel the function, pressany of the electronic key buttons.

128
GX460_OM_OM60T19U_(U)
3-2. Opening, closing and locking the doors
● When carrying the electronic key together with the following devices that emit radiowaves• Portable radio, cellular phone, cordless phone or other wireless communication
devices• Another vehicle’s electronic key or a wireless key that emits radio waves• Personal computers or personal digital assistants (PDAs)• Digital audio players• Portable game systems
● If window tint with a metallic content or metallic objects are attached to the rear win-dow
● When the electronic key is placed near a battery charger or electronic devices● When the vehicle is parked in a pay parking spot where radio waves are emitted
■ Note for the entry function● Even when the electronic key is within the effective range (detection areas), the system
may not operate properly in the following cases:• The electronic key is too close to the window or outside door handle, near the
ground, or in a high place when the doors are locked or unlocked.• The electronic key is on the instrument panel, luggage cover or floor, or in the door
pockets or glove box when the engine is started or engine switch modes arechanged.
● Do not leave the electronic key on top of the instrument panel or near the door pocketswhen exiting the vehicle. Depending on the radio wave reception conditions, it may bedetected by the antenna outside the cabin and the doors will become lockable from theoutside, possibly trapping the electronic key inside the vehicle.
● As long as the electronic key is within the effective range, the doors may be locked orunlocked by anyone. However, only the doors detecting the electronic key can be usedto unlock the vehicle.
● Even if the electronic key is not inside the vehicle, it may be possible to start the engineif the electronic key is near the window.
● The doors may lock or unlock if a large amount of water splashes on the door handle,such as in the rain or in a car wash, when the electronic key is within the effective range.(The doors will automatically be locked after approximately 60 seconds if the doors orthe glass hatch are not opened and closed.)
● If the wireless remote control is used to lock the doors when the electronic key is nearthe vehicle, there is a possibility that the door may not be unlocked by the entry func-tion. (Use the wireless remote control to unlock the doors.)
● Touching the door lock sensor while wearing gloves may prevent lock operation.● When the lock operation is performed using the lock sensor, recognition signals will be
shown up to two consecutive times. After this, no recognition signals will be given.*● If the door handle becomes wet while the electronic key is within the effective range,
the door may lock and unlock repeatedly. In this case, follow the following correctionprocedures to wash the vehicle.• Place the electronic key in a location 6 ft. (2 m) or more away from the vehicle. (Take
care to ensure that the key is not stolen.)• Set electronic key to battery-saving mode to disable the smart access system with
push-button start. (P. 127)

GX460_OM_OM60T19U_(U)
1293-2. Opening, closing and locking the doors
3
Operation of each com
ponent
● If the electronic key is inside the vehicle and a door handle becomes wet during a carwash, a buzzer may sound outside the vehicle and “KEY DETECTED IN VEHICLE”/“Key detected in vehicle” may be shown on the multi-information display. To turn off thealarm, lock all the doors.
● The lock sensor may not work properly if it comes into contact with ice, snow, mud, etc.Clean the lock sensor and attempt to operate it again, or use the lock sensor on thelower part of the door handle.
● A sudden approach to the effective range or door handle may prevent the doors frombeing unlocked. In this case, return the door handle to the original position and checkthat the doors unlock before pulling the door handle again.
● Unlocking the vehicle may take more time if another electronic key is within the effec-tive range.
*: This setting can be customized at your Lexus dealer.
■ When the vehicle is not driven for extended periods● To prevent theft of the vehicle, do not leave the electronic key within 6 ft. (2 m) of the
vehicle.● The smart access system with push-button start can be deactivated in advance.
(P. 584)● Setting the electronic key to battery-saving mode helps to reduce key battery deple-
tion. (P. 127)■ To operate the system properly
Make sure to carry the electronic key when operating the system. Do not get the elec-tronic key too close to the vehicle when operating the system from the outside of thevehicle.Depending on the position and holding condition of the electronic key, the key may notbe detected correctly and the system may not operate properly. (The alarm may go offaccidentally, or the door lock prevention function may not operate.)
■ If the smart access system with push-button start does not operate properly● If the doors cannot be locked or unlocked, perform the following.
• Bring the electronic key close to the door handle and perform a lock or unlockoperation.
• Use the wireless remote control.If the doors cannot be locked or unlocked by perform the above, use the mechanicalkey. (P. 547)
● If the engine cannot be started, refer to P. 548■ Customization
Settings (e. g. smart access system with push-button start) can be changed. (Customizable features: P. 584)
■ If the smart access system with push-button start has been deactivated in a customizedsetting● Locking and unlocking the doors:
Use the wireless remote control or mechanical key. (P. 108, 547)● Starting the engine and changing engine switch modes:P. 548● Stopping the engine: P. 201

130
GX460_OM_OM60T19U_(U)
3-2. Opening, closing and locking the doors
■ Certification for the smart access system with push-button start For vehicles sold in the U.S.A., Hawaii, Guam, Saipan and Puerto Rico
For vehicles sold in Canada

GX460_OM_OM60T19U_(U)
1313-2. Opening, closing and locking the doors
3
Operation of each com
ponent
WARNING
■ Caution regarding interference with electronic devices● People with implantable cardiac pacemakers, cardiac resynchronization therapy-
pacemakers or implantable cardioverter defibrillators should keep away from thesmart access system antennas. (P. 125)The radio waves may affect the operation of such devices. If necessary, the entryfunction can be disabled. Ask your Lexus dealer for details, such as the frequency ofradio waves and timing of the emitted radio waves. Then, consult your doctor to see ifyou should disable the entry function.
● Users of any electrical medical device other than implantable cardiac pacemakers,cardiac resynchronization therapy-pacemakers or implantable cardioverter defibril-lators should consult the manufacturer of the device for information about its opera-tion under the influence of radio waves.Radio waves could have unexpected effects on the operation of such medicaldevices.
Ask your Lexus dealer for details on disabling the entry function.
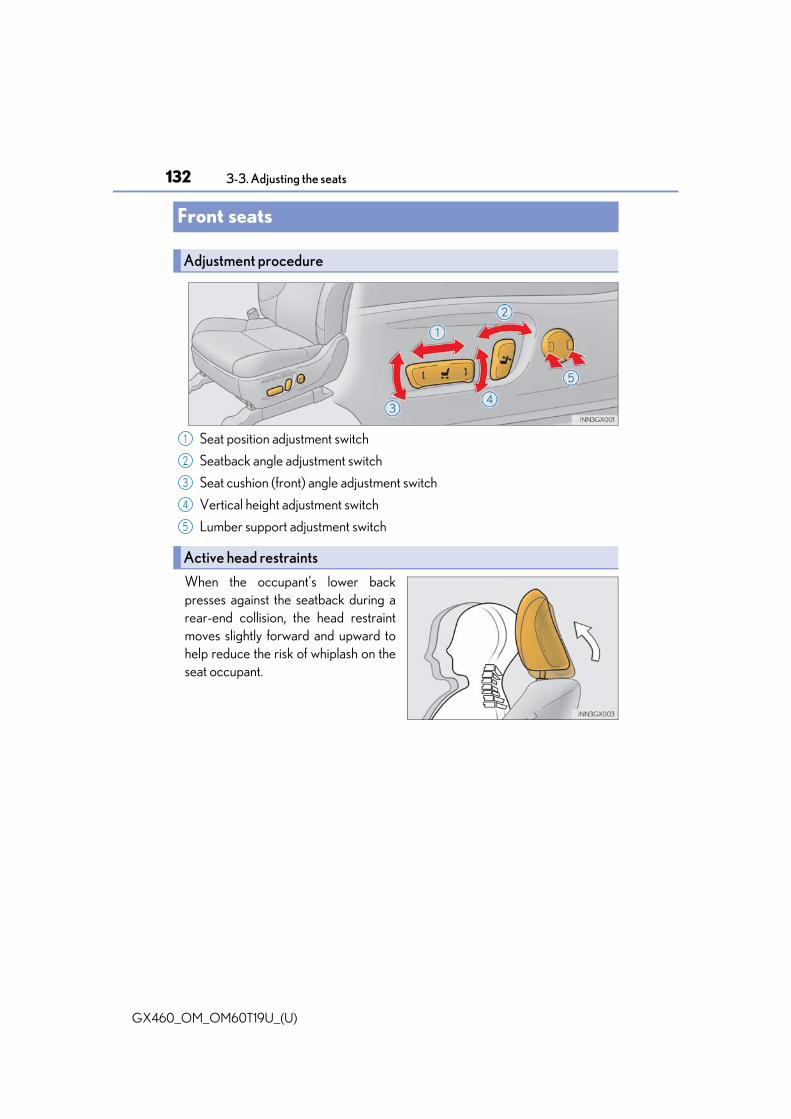
132
GX460_OM_OM60T19U_(U)
3-3. Adjusting the seats
Front seats
Seat position adjustment switch
Seatback angle adjustment switch
Seat cushion (front) angle adjustment switch
Vertical height adjustment switch
Lumber support adjustment switch
When the occupant’s lower backpresses against the seatback during arear-end collision, the head restraintmoves slightly forward and upward tohelp reduce the risk of whiplash on theseat occupant.
Adjustment procedure
Active head restraints
1
2
3
4
5

GX460_OM_OM60T19U_(U)
1333-3. Adjusting the seats
3
Operation of each com
ponent
■ Power easy access systemThe driver’s seat and steering wheel move in accordance with engine switch mode andthe driver’s seat belt condition. (P. 145)
■ Active head restraintsEven small forces applied to the seatback may cause the head restraint to move. Pushingup a locked head restraint forcibly may appear the head restraint inner structure. Thesedo not indicate problems.
WARNING
■ When adjusting the seat position● Take care when adjusting the seat position to ensure that other passengers are not
injured by the moving seat.● Do not put your hands under the seat or near the moving parts to avoid injury.
Fingers or hands may become jammed in the seat mechanism.■ Seat adjustment
To reduce the risk of sliding under the lap belt during a collision, do not recline the seatmore than necessary.If the seat is too reclined, the lap belt may slide past the hips and apply restraint forcesdirectly to the abdomen, or your neck may contact the shoulder belt, increasing the riskof death or serious injury in the event of an accident.Adjustments should not be made while driving as the seat may unexpectedly move andcause the driver to lose control of the vehicle.
Inner structure
During rear-end collision

134
GX460_OM_OM60T19U_(U)
3-3. Adjusting the seats
Rear seats
■ Second seats
Seatback angle adjustment lever
Seat position adjustment lever
■ Third seats (power seat)
Seatback angle adjustment switch
Adjustment procedure
1
2

GX460_OM_OM60T19U_(U)
1353-3. Adjusting the seats
3
Operation of each com
ponent
■ Getting in the vehicle
Pull the seatback angle adjustmentlever and fold down the seatback.The seat will slide forward.
Move the seat to the front-mostposition
■ Getting out of the vehicle
Pull the release lever and fold downthe seatback. The seat will slide for-ward.
Move the seat to the front-mostposition
Make sure that no passenger isseated on the second seat beforepulling the release lever.
■ After passengers have entered/exited the vehicle
Lift up the seatback and slide the seat backward until it locks.
Moving a second seat for third seat access (right side only for 7-passen-ger models, both side for 6-passenger models)

136
GX460_OM_OM60T19U_(U)
3-3. Adjusting the seats
■ Before folding down the second seatbacks
Lower the head restraints to the low-est position.
■ Folding down second seatbacks
Pull the seatback lock release leverand fold them down.
To return the second seatbacks totheir original positions, lift them upuntil they lock.
Folding down the second seatbacks

GX460_OM_OM60T19U_(U)
1373-3. Adjusting the seats
3
Operation of each com
ponent
■ Folding down second center seatback only (for 7-passenger models)
■ If you cannot raise the second seatback
Pull the center seatback lock release leverbehind the seatback and fold it down.To return the center seatback to its original posi-tion, lift it up until it locks.
Release the seat belt lock by:Pushing on the lower front edge of the seat-back to slacken the seat belt.Let the seat belt retract a little.
1
2

138
GX460_OM_OM60T19U_(U)
3-3. Adjusting the seats
■ Before folding down the third seats
Use the seat belt hanger to preventthe belt from being tangled.
Make sure that the seat belts areremoved from the hangers beforeusing them.
■ Folding down the third seats
From rear door side
Pull the strap to fold the headrestraint.
Pull the seat cushion lock releaselever.
The seat cushion is stowed automati-cally.
Pull the seatback lock releaselever and fold the seatback down.
Folding down the third seats (manual seat)
1
2
3

GX460_OM_OM60T19U_(U)
1393-3. Adjusting the seats
3
Operation of each com
ponent
From back door side
Pull the strap to fold the headrestraint.
Pull the seat cushion/seatbacklock release lever.
The seat cushion is stowed automati-cally.
Fold the seatback down.
■ Returning the third seats
From rear door side, unlock theseatbacks by pulling the lockrelease lever, and lift them up untilthey lock.
1
2
3
1

140
GX460_OM_OM60T19U_(U)
3-3. Adjusting the seats
Pull the grip and carry the seatcushion out.
Lift the head restraint up until itlocks.
Right seat return switch
Right seat fold switch
Left seat return switch
Left seat fold switch
The switches can be operated from boththe rear door side and the back doorside.
2
3
Folding down the third seats (power seat)
1
2
3
4

GX460_OM_OM60T19U_(U)
1413-3. Adjusting the seats
3
Operation of each com
ponent
■ Before folding down the third seats
Use the seat belt hangers to preventthe belts from being tangled.
Make sure that the seat belts areremoved from the hangers beforeusing them.
■ Folding down the third seats
Press and hold . Two
beeps sound and the seatbackwill rise.
When operating is completed, twobeeps sound again.
Press and hold again. Two
beeps sound, the head restraintswill fold forward, and the seat willbe stowed.
When operating is completed, twobeeps sound again.
1
2

142
GX460_OM_OM60T19U_(U)
3-3. Adjusting the seats
■ Returning the third seats
Press and hold .
Two beeps sound and seatbackand seat cushion begin to move.When operating is completed,two beeps sound again.
Lift the head restraints up untilthey lock.
■ The third power seats can be operated when● The engine switch is off.● The shift lever is in P position with the engine switch in IGNITION ON mode.
■ During third power seat stowing operationDo not remove your hand from the switch until the operation stops automatically. If youremove your hand from the switch, the operation will stop and the buzzer will sound con-tinuously. The seat cannot be used in this state. The buzzer will stop when the switch ispressed again.
1
2

GX460_OM_OM60T19U_(U)
1433-3. Adjusting the seats
3
Operation of each com
ponent
■ Enlarging the luggage compartmentThe third seat can be used for sitting when it is in the position shown in step of the fold-ing down the third seats. (P. 138, 140)This can be convenient for enlarging the luggage compartment, for instance when theluggage is against the back of the seatback.
■ If the warning buzzer sounds continuouslyIf there is an abnormality in the system, the warning buzzer will sound continuously whilethe engine switch is in IGNITION ON mode. In this case, take the following operations:
Press and hold to return the seat.
Press and hold to stow the seat.
For each step, wait until the seat movement stops automatically and the two beeps soundtwice before removing your hand from the switch.If the warning buzzer does not stop even after performing the above procedure cor-rectly, perform the following operations:
Press and hold on the rear door side.
While holding , press forward on 5 times within 10 seconds and keep
holding until 3 beeps sound. The beep will then sound continuously again.
Repeat step and .
2
1
2
3
4
5 1 2

144
GX460_OM_OM60T19U_(U)
3-3. Adjusting the seats
WARNING
■ When folding the seatbacks downObserve the following precautions. Failure to do so may result in death or seriousinjury.● Do not fold the seatbacks down while driving.● Stop the vehicle on level ground, set the parking brake and shift the shift lever to P.● Do not allow anyone to sit on a folded seatback or in the luggage compartment while
driving.● Do not allow children to enter the luggage compartment.
■ Seat adjustmentObserve the following precautions. Failure to do so may result in death or seriousinjury.● To reduce the risk of sliding under the lap belt during a collision, do not recline the
seat more than necessary.If the seat is too reclined, the lap belt may slide past the hips and apply restraint forcesdirectly to the abdomen, or your neck may contact the shoulder belt, increasing therisk of death or serious injury in the event of an accident.Adjustments should not be made while driving as the seat may unexpectedly moveand cause the driver to lose control of the vehicle.
● Be careful not to get hands or feet pinched between the rear console box and thesecond seat when folding down the rear seatback.
■ When stowing the third seatsObserve the following precautions. Failure to do so may result in death or seriousinjury.● Check that there is no luggage and that there are no other people around the seat
before stowing operation.● Do not insert hands or feet into the moving parts of the seat.● Do not allow children to operate the seat.
■ After returning the seatbacks to the upright positionObserve the following precautions. Failure to do so may result in death or seriousinjury.● Make sure the seatback is securely locked by pushing it forward and rearward on the
top.● Check that the seat belts are not twisted or caught in the seatback.
NOTICE
■ When returning the third seat (vehicles with luggage cover)If the luggage cover is installed in the luggage compartment, make sure you remove itbefore returning the third seat. (P. 412) The luggage cover may be damaged by theseat.

145
GX460_OM_OM60T19U_(U)
3-3. Adjusting the seats
3
Operation of each com
ponent
Driving position memory
The seat and steering wheel are automatically adjusted to allow the driver toenter and exit the vehicle easily.
When all of the following have beenperformed, the driver’s seat and steer-ing wheel are automatically adjusted toa position that allows driver to enterand exit the vehicle easily.• The shift lever has been shifted to P.• The engine switch has been turned
off.• The driver’s seat belt has been unfas-
tened.
When any of the following has been performed, the driver’s seat and steeringwheel automatically return to their original positions.• The engine switch has been turned to ACCESSORY mode or IGNITION
ON mode.• The driver’s seat belt has been fastened.
■ Operation of the power easy access systemWhen exiting the vehicle, the power easy access system may not operate if the seat isalready close to the rearmost position, etc.
■ CustomizationThe seat movement amount settings of the power easy access system can be custom-ized. (Customizable features: P. 584)
This feature automatically adjusts the driver’s seats, steering wheel and out-side rear view mirrors to make entering and exiting the vehicle easier or tosuit your preferences.
Power easy access system

146
GX460_OM_OM60T19U_(U)
3-3. Adjusting the seats
Your preferred driving position (the position of the driver’s seat, steering wheeland outside rear view mirrors) can be recorded and recalled by pressing a but-ton.
Two different driving positions can be recorded into memory.
■ Recording procedure
Check that the shift lever is in P.
Turn the engine switch to IGNITION ON mode.
Adjust the driver’s seat, steering wheel, and outside rear view mirrors to thedesired positions.
While pressing the “SET” button,or within 3 seconds after the“SET” button is pressed, pressbutton “1” or “2” until the buzzersounds.
If the selected button has alreadybeen preset, the previously recordedposition will be overwritten.
■ Recall procedure
Check that the shift lever is in P.
Turn the engine switch to IGNITION ON mode.
Press one of the buttons for thedriving position you want to recalluntil the buzzer sounds.
Driving position memory
1
2
3
4
1
2
3

GX460_OM_OM60T19U_(U)
1473-3. Adjusting the seats
3
Operation of each com
ponent
■ To stop the position recall operation part-way throughPerform any of the following:● Press the “SET” button.● Press button “1” or “2”.● Operate any of the seat adjustment switches (only cancels seat position recall).● Operate the tilt and telescopic steering control switch (only cancels steering wheel
position recall).■ Seat positions that can be memorized ( P. 132)
The adjusted positions other than the position adjusted by lumbar support switch can berecorded.
■ Operating the driving position memory after turning the engine switch offRecorded seat positions can be activated up to 180 seconds after the driver’s door isopened and another 60 seconds after it is closed again.
■ In order to correctly use the driving position memory functionIf a seat position is already in the furthest possible position and the seat is operated in thesame direction, the recorded position may be slightly different when it is recalled.
Each electronic key can be registered to recall your preferred driving position.
■ Registering procedure
Record your driving position to button “1” or “2” before performing the follow-ing:
Carry only the key you want to register, and then close the driver’s door. If 2 or more keys are in the vehicle, the driving position cannot be recordedproperly.
Check that the shift lever is in P.
Turn the engine switch to IGNITION ON mode.
Recall the driving position that you want to record.
Memory recall function
1
2
3

148
GX460_OM_OM60T19U_(U)
3-3. Adjusting the seats
While pressing the recalled but-ton, press and hold the door lockswitch (either lock or unlock) untilthe buzzer sounds.
If the button could not be registered,the buzzer sounds continuously forapproximately 3 seconds.
■ Recall procedure
Make sure that the doors are locked before recalling the driving position.Carry the electronic key that has been registered to the driving position,and then unlock and open the driver’s door using the smart access systemwith push-button start or wireless remote control.
The driving position will move to the recorded position (not including the steeringwheel). However, the seat will move to a position slightly behind the recorded posi-tion in order to make entering the vehicle easier.If the driving position is in a position that has already been recorded, the seat andoutside rear view mirrors will not move.Turn the engine switch to ACCESSORY mode or IGNITION ON mode,or fasten a seat belt.
The seat and steering wheel will move to the recorded position.■ Cancelation procedure
Carry only the key you want to cancel and then close the driver’s door.If 2 or more keys are in the vehicle, the driving position cannot be canceledproperly.
Turn the engine switch to IGNITION ON mode.
While pressing the “SET” button, press and hold the door lock switch(either lock or unlock) until the buzzer sounds twice.
If the button could not be canceled, the buzzer sounds continuously for approxi-mately 3 seconds.
4
1
2
1
2

GX460_OM_OM60T19U_(U)
1493-3. Adjusting the seats
3
Operation of each com
ponent
■ Recalling the driving position using the memory recall function● Different driving positions can be registered for each electronic key. Therefore, the
driving position that is recalled may be different depending on the key being carried.● If a door other than the driver’s door is unlocked with the smart access system with
push-button start, the driving position cannot be recalled. In this case, press the drivingposition button which has been set.
■ CustomizationThe unlock door settings of the memory recall function can be customized. (Customizable features: P. 584)
WARNING
■ Seat adjustment cautionTake care during seat adjustment so that the seat does not strike the rear passenger orsqueeze your body against the steering wheel.

150
GX460_OM_OM60T19U_(U)
3-3. Adjusting the seats
Head restraints
Vertical adjustment
Up
Pull the head restraints up.Down
Push the head restraint down whilepressing the lock release button.
Front seats only: Angle adjustment (ifequipped)
To fold the head restraints, pull the lockrelease strap.
To return the head restraints, lift them upuntil they lock.
Head restraints are provided for all seats.
Front and second seats
Lock release button
1
2
Third seats (manual seat)

GX460_OM_OM60T19U_(U)
1513-3. Adjusting the seats
3
Operation of each com
ponent
■ Removing the head restraints Front and second seats
Third seatsThe head restraint cannot be removed.
■ Installing the head restraints (front and second seats)
■ Adjusting the height of the head restraints (front and second seats)
■ Using the second center seat head restraint (for 7-passenger models)
■ Using the third seatsAlways lift the head restraints up until they lock when using.
Pull the head restraint up while pressing the lockrelease button.
Align the head restraint with the installationholes and push it down to the lock position.Press and hold lock release button when lower-ing the head restraint.
Make sure that the head restraints are adjustedso that the center of the head restraint is closestto the top of your ears.
Always raise the head restraint one level fromthe stowed position when using.
Lock release button
Lock release button

152
GX460_OM_OM60T19U_(U)
3-3. Adjusting the seats
WARNING
■ Head restraint precautionsObserve the following precautions regarding the head restraints. Failure to do so mayresult in death or serious injury.● Use the head restraints designed for each respective seat.● Adjust the head restraints to the correct position at all times.● After adjusting the head restraints, push down on them and make sure they are
locked in position.● Do not drive with the head restraints removed.

1533-4. Adjusting the steering wheel and mirrors
3
Operation of each com
ponent
GX460_OM_OM60T19U_(U)
Steering wheel
Up
Down
Toward the driver
Away from the driver
To sound the horn, press on or close to
the mark.
Adjustment procedure
1
2
3
4
Horn

154 3-4. Adjusting the steering wheel and mirrors
GX460_OM_OM60T19U_(U)
■ The steering wheel can be adjusted whenThe engine switch is in ACCESSORY or IGNITION ON mode*.*: If the driver’s seat belt is fastened, the steering wheel can be adjusted regardless of
engine switch mode.
■ Automatic adjustment of the steering positionA desired steering position can be entered to memory and recalled automatically by thedriving position memory system. (P. 146)
■ Power easy access systemThe steering wheel and driver’s seat move in accordance with engine switch mode andthe driver’s seat belt condition. (P. 145)
WARNING
Do not adjust the steering wheel while driving.Doing so may cause the driver to mishandle the vehicle and cause an accident, result-ing in death or serious injury.

1553-4. Adjusting the steering wheel and mirrors
3
Operation of each com
ponent
GX460_OM_OM60T19U_(U)
Inside rear view mirror
The height of the rear view mirror can be adjusted to suit your driving posture.
Adjust the height of the rear view mir-ror by moving it up and down.
Responding to the level of brightness of the headlights of vehicles behind, thereflected light is automatically reduced.
Changing automatic anti-glare func-tion mode ON/OFF
When the automatic anti-glare functionis in ON mode, the indicator illuminates. The function will set to ON mode eachtime the engine switch is turned toIGNITION ON mode. Pressing the button turns the function toOFF mode. (The indicator also turnsoff.)
The rear view mirror’s position can be adjusted to enable sufficient confirma-tion of the rear view.
Adjusting the height of rear view mirror
Anti-glare function
Indicator

156 3-4. Adjusting the steering wheel and mirrors
GX460_OM_OM60T19U_(U)
■ To prevent sensor errorTo ensure that the sensors operate properly, donot touch or cover them.
WARNING
Do not adjust the position of the mirror while driving.Doing so may lead to mishandling of the vehicle and an accident, resulting in death orserious injury.

1573-4. Adjusting the steering wheel and mirrors
3
Operation of each com
ponent
GX460_OM_OM60T19U_(U)
Outside rear view mirrors
To select a mirror to adjust, press theswitch.
Left
Right
To adjust the mirror, press the switch.
Up
Right
Down
Left
Manual type
Push the mirror back in the direction ofthe vehicle’s rear.
Adjustment procedure
1
1
2
2
1
2
3
4
Folding and extending the mirrors

158 3-4. Adjusting the steering wheel and mirrors
GX460_OM_OM60T19U_(U)
Power type
Extends the mirrors
Folds the mirrors
When the mirror select switch is in the L or R position, the outside rear view mir-rors will automatically angle downwards when the vehicle is reversing in order togive a better view of the ground.
To disable this function, move the mirror select switch to the neutral position(between L and R).
■ Mirror angle can be adjusted whenThe engine switch is in ACCESSORY or IGNITION ON mode.
■ When the mirrors are fogged upThe outside rear view mirrors can be cleared using the mirror defoggers. Turn on therear window defogger to turn on the outside rear view mirror defoggers. (P. 389)
■ Automatic adjustment of the mirror angle A desired mirror face angle can be entered to memory and recalled automatically by thedriving position memory. (P. 145)
■ Auto anti-glare function (driver’s side only)When the anti-glare inside rear view mirror is set to automatic mode, the outside rearview mirrors will activate in conjunction with the anti-glare inside rear view mirror toreduce reflected light. (P. 155)
1
2
Linked mirror function when reversing

1593-4. Adjusting the steering wheel and mirrors
3
Operation of each com
ponent
GX460_OM_OM60T19U_(U)
WARNING
■ Important points while drivingObserve the following precautions while driving.Failing to do so may result in loss of control of the vehicle and cause an accident, result-ing in death or serious injury.● Do not adjust the mirrors while driving.● Do not drive with the mirrors folded.● Both the driver and passenger side mirrors must be extended and properly adjusted
before driving.■ When a mirror is moving
To avoid personal injury and mirror malfunction, be careful not to get your hand caughtby the moving mirror.
■ When the mirror defoggers are operatingDo not touch the rear view mirror surfaces, as they can become very hot and burn you.
NOTICE
■ If ice should jam the mirrorDo not operate the control or scrape the mirror face. Use a spray de-icer to free themirror.

160
GX460_OM_OM60T19U_(U)
3-5. Opening, closing the windows and moon roof
Power windows
The power windows can be opened and closed using the switches.
Operating the switch moves the windows as follows:
Closing
One-touch closing*Opening
One-touch opening**: To stop the window partway, operate the
switch in the opposite direction.
Press the switch down to lock the pas-senger window switches.
The indicator will come on.Use this switch to prevent children fromaccidentally opening or closing a pas-senger window.The passenger windows can still beopened and closed using the powerwindow switches on the driver’s sideeven if the lock switch is on.
Opening and closing procedures
1
2
3
4
Window lock switch
Indicator

GX460_OM_OM60T19U_(U)
1613-5. Opening, closing the windows and moon roof
3
Operation of each com
ponent
■ The power windows can be operated whenThe engine switch is in IGNITION ON mode.
■ Operating the power windows after turning the engine offThe power windows can be operated for approximately 45 seconds even after theengine switch is turned to ACCESSORY mode or turned off. They cannot, however, beoperated once either front door is opened.
■ Jam protection functionIf an object becomes jammed between the window and the window frame while the win-dow is closing, window movement is stopped and the window is opened slightly.
■ Catch protection functionIf an object becomes caught between the door and window while the window is opening,window movement is stopped.
■ When the window cannot be opened or closedWhen the jam protection function or catch protection function operates unusually andthe door window cannot be opened and closed, perform the following operations withthe power window switch of that door.● Stop the vehicle. With the engine switch in IGNITION ON mode, within 4 seconds of
the jam protection function or catch protection function activating, continuously oper-ate the power window switch in the one-touch closing direction or one-touch openingdirection so that the door window can be opened and closed.
● If the door window can not be opened and closed even when performing the aboveoperations, perform the following procedure for function initialization.
Turn the engine switch to IGNITION ON mode.Pull and hold the power window switch in the one-touch closing direction and com-pletely close the door window.Release the power window switch for a moment, resume pulling the switch in theone-touch closing direction, and hold it there for approximately 6 seconds or more.Press and hold the power window switch in the one-touch opening direction. Afterthe door window is completely opened, continue holding the switch for an additional1 second or more.Release the power window switch for a moment, resume pushing the switch in theone-touch opening direction, and hold it there for approximately 4 seconds ormore.Pull and hold the power window switch in the one-touch closing direction. After thedoor window is completely closed, continue holding the switch for a further 1 secondor more.
If you release the switch while the window is moving, start again from the beginning. If the window reverses and cannot be fully closed or opened, have the vehicleinspected by your Lexus dealer.
■ Door lock linked window operation● The power windows can be opened and closed using the mechanical key*. (P. 547)● The power windows can be opened using the wireless remote control*. (P. 108)*: These settings must be customized at your Lexus dealer.
1
2
3
4
5
6

162
GX460_OM_OM60T19U_(U)
3-5. Opening, closing the windows and moon roof
■ Power window open reminder functionThe buzzer sounds and a message is shown on the multi-information display in the instru-ment cluster when the engine switch is turned off and the driver’s door is opened with thepower windows open.
■ CustomizationSettings (e.g. linked door lock operation) can be changed. (Customizable features: P. 584)
WARNING
Observe the following precautions. Failure to do so may result in death or serious injury.■ Closing the windows
● The driver is responsible for all the power window operations, including the operationfor the passengers. In order to prevent accidental operation, especially by a child, donot let a child operate the power windows. It is possible for children and other passen-gers to have body parts caught in the power window. Also, when riding with a child, itis recommended to use the window lock switch. (P. 160)
● Check to make sure that all passengers do not have any part of their body in a posi-tion where it could be caught when a window is being operated.
● When using the wireless remote control or mechanical key and operating the powerwindows, operate the power window after checking to make sure that there is no pos-sibility of any passenger having any of their body parts caught in the window. Also, donot let a child operate window by the wireless remote control or mechanical key. It ispossible for children and other passengers to get caught in the power window.
● When exiting the vehicle, turn the engine switch off, carry the key and exit the vehiclealong with the child. There may be accidental operation, due to mischief, etc., thatmay possibly lead to an accident.
■ Jam protection function● Never use any part of your body to intentionally activate the jam protection function.● The jam protection function may not work if something gets jammed just before the
window is fully closed. Be careful not to get any part of your body jammed in the win-dow.
■ Catch protection function● Never use any part of your body or clothing to intentionally activate the catch protec-
tion function.● The catch protection function may not work if something gets caught just before the
window is fully opened. Be careful not to get any part of your body or clothing caughtin the window.

163
GX460_OM_OM60T19U_(U)
3-5. Opening, closing the windows and moon roof
3
Operation of each com
ponent
Moon roof
Opens the moon roof*The moon roof stops slightly before thefully open position to reduce wind noise.Press the switch again to fully open themoon roof.Closes the moon roof*
*: Lightly press either end of the moon roofswitch to stop the moon roof partway.
Tilts the moon roof up*Tilts the moon roof down*
*: Lightly press either end of the moon roofswitch to stop the moon roof partway.
Use the overhead switches to open and close the moon roof and tilt it up anddown.
Opening and closing
1
2
Tilting up and down
1
2

164
GX460_OM_OM60T19U_(U)
3-5. Opening, closing the windows and moon roof
■ The moon roof can be operated whenThe engine switch is in IGNITION ON mode.
■ Operating the moon roof after turning the engine offThe moon roof can be operated for approximately 45 seconds after the engine switch isturned to ACCESSORY mode or turned off. It cannot, however, be operated once eitherfront door is opened.
■ Jam protection functionIf an object is detected between the moon roof and the frame while the moon roof is clos-ing or tilting down, travel is stopped and the moon roof opens slightly.
■ SunshadeThe sunshade can be opened and closed manually. However, the sunshade will openautomatically when the moon roof is opened.
■ Door lock linked moon roof operation● The moon roof can be opened and closed using the mechanical key*. (P. 547)● The moon roof can be opened using the wireless remote control*. (P. 108)*: These settings must be customized at your Lexus dealer.
■ Moon roof open reminder functionA buzzer sounds and a message is shown on the multi-information display in the instru-ment cluster when the engine switch is turned off and the driver’s door is opened with themoon roof open.
■ When the moon roof does not close normallyPerform the following procedure:● If the moon roof closes but then re-opens slightly
Stop the vehicle.
Press and hold “” on the .*1
The moon roof will close, re-open and pause for approximately 10 seconds.*2 Thenit will close again, tilt up and pause for approximately 1 second. Finally, it will tilt down,open and close.Check to make sure that the moon roof is completely closed and then release theswitch.
1
2
3

GX460_OM_OM60T19U_(U)
1653-5. Opening, closing the windows and moon roof
3
Operation of each com
ponent
● If the moon roof tilts down but then tilts back upStop the vehicle.
Press and hold “” on the *1 until the moon roof moves into the tilt up position
and stops.
Release “” on the once and then press and hold “” on the again.*1
The moon roof will pause for approximately 10 seconds in the tilt up position.*2
Then it will adjust slightly and pause for approximately 1 second.Finally, it will tilt down, open and close.Check to make sure that the moon roof is completely closed and then release theswitch.
*1: If the switch is released at the incorrect time, the procedure will have to be per-formed again from the beginning.
*2: If the switch is released after the above mentioned 10 second pause, automatic
operation will be disabled. In that case, press and hold “” on the or “” on the
and the moon roof will tilt up and pause for approximately 1 second. Then it
will tilt down, open and close. Check to make sure that the moon roof is completelyclosed and then release the switch.
If the moon roof does not fully close even after performing the above procedure cor-rectly, have the vehicle inspected by your Lexus dealer.
■ CustomizationSettings (e.g. linked door lock operation) can be changed. (Customizable features: P. 584)
1
2
3
4

166
GX460_OM_OM60T19U_(U)
3-5. Opening, closing the windows and moon roof
WARNING
Observe the following precautions.Failure to do so may result in death or serious injury.■ Opening the moon roof
● Do not allow any passengers to put their hands or heads outside the vehicle while it ismoving.
● Do not sit on top of the moon roof.■ Closing the moon roof
● The driver is responsible for moon roof opening and closing operations.In order to prevent accidental operation, especially by a child, do not let a child oper-ate the moon roof. It is possible for children and other passengers to have body partscaught in the moon roof.
● Check to make sure that all passengers do not have any part of their bodies in a posi-tion where it could be caught when the moon roof is being operated.
● When using the wireless remote control or mechanical key and operating the moonroof, operate the moon roof after checking to make sure that there is no possibility ofany passenger having any of their body parts caught in the moon roof. Also, do not leta child operate moon roof by the wireless remote control or mechanical key. It is pos-sible for children and other passengers to get caught in the moon roof.
● When exiting the vehicle, turn the engine switch off, carry the key and exit the vehiclealong with the child. There may be accidental operation, due to mischief, etc., thatmay possibly lead to an accident.
■ Jam protection function● Never use any part of your body to intentionally activate the jam protection function.● The jam protection function may not work if something gets caught just before the
moon roof fully closes.

167
GX460_OM_OM60T19U_(U)
4Driving
4-1. Before driving
Driving the vehicle......................168
Cargo and luggage.................... 176
Vehicle load limits.......................180
Trailer towing (with towing hitch) .................... 181
Dinghy towing .............................. 199
4-2. Driving procedures
Engine (ignition) switch .......... 200
Automatic transmission.......... 206
Turn signal lever.............................211
Parking brake ............................... 212
4-3. Operating the lights and wipers
Headlight switch.......................... 213
Automatic High Beam .............. 216
Fog light switch ............................ 221
Windshield wipers and washer..........................................222
Rear window wiper and washer..........................................226
Headlight cleaner switch ........228
4-4. Refueling
Opening the fuel tank cap......229
4-5. Using the driving support systems
Lexus Safety System + .............233
PCS (Pre-Collision System)........................................239
LDA (Lane Departure Alert) ............................................250
Dynamic radar cruise control .........................................258
Intuitive parking assist .............. 270
Rear view monitor system...... 278
Multi-terrain Select.................. 288
Multi-terrain Monitor............... 292
Rear height control air suspension .................................339
AVS (Adaptive Variable Suspension System)...............343
Four-wheel drive system ........344
Crawl Control.............................348
Downhill assist control system..........................................352
Driving assist systems ..............355
BSM (Blind Spot Monitor) ...... 361
• The Blind Spot Monitor function ....................................366
• The Rear Cross Traffic Alert function.........................369
4-6. Driving tips
Winter driving tips ..................... 374
Off-road precautions............... 377

168
GX460_OM_OM60T19U_(U)
4-1. Before driving
Driving the vehicle
P. 200
With the brake pedal depressed, shift the shift lever to D. (P. 206)
Release the parking brake. (P. 212)
Gradually release the brake pedal and gently depress the accelerator pedalto accelerate the vehicle.
With the shift lever in D, depress the brake pedal.
If necessary, set the parking brake.
If the vehicle is to be stopped for an extended period of time, shift the shift lever to P orN. (P. 206)
With the shift lever in D, depress the brake pedal.
Set the parking brake (P. 212), and shift the shift lever to P (P. 206).
Press the engine switch to stop the engine.
Lock the door, making sure that you have the key on your person.
If parking on a hill, block the wheels as needed.
Make sure that the parking brake is set and shift the shift lever to D.
Gently depress the accelerator pedal.
Release the parking brake.
The following procedures should be observed to ensure safe driving:
Starting the engine
Driving
Stopping
Parking the vehicle
Starting off on a steep uphill
1
2
3
1
2
1
2
3
4
1
2
3

GX460_OM_OM60T19U_(U)
1694-1. Before driving
4
Driving
■ When starting off on a uphillThe hill-start assist control is available. (P. 356)
■ Driving in the rain● Drive carefully when it is raining, because visibility will be reduced, the windows may
become fogged-up, and the road will be slippery.● Drive carefully when it starts to rain, because the road surface will be especially slip-
pery.● Refrain from high speeds when driving on an expressway in the rain, because there may
be a layer of water between the tires and the road surface, preventing the steering andbrakes from operating properly.
■ Engine speed while drivingIn the following conditions, the engine speed may become high while driving. This is dueto automatic up-shifting control or down-shifting implementation to meet driving condi-tions. It does not indicate sudden acceleration.● The vehicle is judged to be driving uphill or downhill● When the accelerator pedal is released
■ Restraining the engine output (Brake Override System)● When the accelerator and brake pedals are depressed at the same time, the engine
output may be restrained.● A warning message is displayed on the multi-information display while the system is
operating. (P. 528)

170
GX460_OM_OM60T19U_(U)
4-1. Before driving
■ Restraining sudden start (Drive-Start Control)● When the following unusual operation is performed, the engine output may be
restrained.• When the shift lever is shifted from R to D, D to R, N to R, P to D, or P to R (D
includes S) with the accelerator pedal depressed, a warning message appears onthe multi-information display. If a warning message is shown on the multi-informa-tion display, read the message and follow the instructions.
• When the accelerator pedal is depressed too much while the vehicle is in reverse.● While Drive-Start Control is being activated, your vehicle may have trouble escaping
from the mud or fresh snow. In such case, perform the following actions to cancel DriveStart Control so that the vehicle may become able to escape from the mud or freshsnow.• Deactivate Active TRAC (P. 357)• Put the four-wheel drive control switch in L4. (P. 344)• Push the center differential lock/unlock switch to lock the center differential.
(P. 345)■ Breaking in your new Lexus
To extend the life of the vehicle, observing the following precautions is recommended:● For the first 200 miles (300 km):
Avoid sudden stops.● For the first 500 miles (800 km):
Do not tow a trailer.● For the first 600 miles (1000 km):
• Do not drive at extremely high speeds.• Avoid sudden acceleration.• Do not drive continuously in the low gears.• Do not drive at a constant speed for extended periods.
■ Drum-in-disc type parking brake systemYour vehicle has a drum-in-disc type parking brake system.This type of brake system needs bedding-down of the brake shoes periodically or when-ever the parking brake shoes and/or drum are replaced.Have your Lexus dealer, perform the bedding-down operation.
■ Operating your vehicle in a foreign countryComply with the relevant vehicle registration laws and confirm the availability of the cor-rect fuel. (P. 562)
■ When turning off the engineEmission system operating sounds may continue for a short time after the engine isturned off. This is not a malfunction, and helps to ensure optimal performance of theemission system.

GX460_OM_OM60T19U_(U)
1714-1. Before driving
4
Driving
WARNING
Observe the following precautions. Failure to do so may result in death or serious injury.■ When starting the vehicle
Always keep your foot on the brake pedal while stopped with the engine running. Thisprevents the vehicle from creeping.
■ When driving the vehicle● Do not drive if you are unfamiliar with the location of the brake and accelerator ped-
als to avoid depressing the wrong pedal. • Accidentally depressing the accelerator pedal instead of the brake pedal will
result in sudden acceleration that may lead to an accident.• When backing up, you may twist your body around, leading to a difficulty in oper-
ating the pedals. Make sure to operate the pedals properly.• Make sure to keep a correct driving posture even when moving the vehicle only
slightly. This allows you to depress the brake and accelerator pedals properly.• Depress the brake pedal using your right foot. Depressing the brake pedal using
your left foot may delay response in an emergency, resulting in an accident.● Do not drive the vehicle over or stop the vehicle near flammable materials.
The exhaust system and exhaust gases can be extremely hot. These hot parts maycause a fire if there is any flammable material nearby.
● During normal driving, do not turn off the engine. Turning the engine off while drivingwill not cause loss of steering or braking control, but the power assist to these systemswill be lost. This will make it more difficult to steer and brake, so you should pull overand stop the vehicle as soon as it is safe to do so.However, in the event of an emergency, such as if it becomes impossible to stop thevehicle in the normal way: P. 509
● Use engine braking (downshift) to maintain a safe speed when driving down a steephill.Using the brakes continuously may cause the brakes to overheat and lose effective-ness. (P. 206)
● Do not adjust the positions of the steering wheel, the seat, or the inside or outside rearview mirrors while driving.Doing so may result in a loss of vehicle control.
● Always check that all passengers’ arms, heads or other parts of their body are notoutside the vehicle.
● Do not drive in excess of the speed limit. Even if the legal speed limit permits it, do notdrive over 85 mph (140 km/h) unless your vehicle has high-speed capability tires.Driving over 85 mph (140 km/h) may result in tire failure, loss of control and possibleinjury. Be sure to consult a tire dealer to determine whether the tires on your vehicleare high-speed capability tires or not before driving at such speeds.

172
GX460_OM_OM60T19U_(U)
4-1. Before driving
WARNING
Observe the following precautions.Failure to do so may result in death or serious injury.■ When driving on slippery road surfaces
● Sudden braking, acceleration and steering may cause tire slippage and reduce yourability to control the vehicle.
● Sudden acceleration, engine braking due to shifting, or changes in engine speedcould cause the vehicle to skid.
● After driving through a puddle, lightly depress the brake pedal to make sure that thebrakes are functioning properly. Wet brake pads may prevent the brakes from func-tioning properly. If the brakes on only one side are wet and not functioning properly,steering control may be affected.
■ When shifting the shift lever● Do not let the vehicle roll backwards while the shift lever is in a driving position, or roll
forward while the shift lever is in R.Doing so may cause the engine to stall or lead to poor brake and steering perfor-mance, resulting in an accident or damage to the vehicle.
● Do not shift the shift lever to P while the vehicle is moving.Doing so can damage the transmission and may result in a loss of vehicle control.
● Do not shift the shift lever to R while the vehicle is moving forward. Doing so can damage the transmission and may result in a loss of vehicle control.
● Do not shift the shift lever to a driving position while the vehicle is moving backward.Doing so can damage the transmission and may result in a loss of vehicle control.
● Moving the shift lever to N while the vehicle is moving will disengage the engine fromthe transmission. Engine braking is not available when N is selected.
● Be careful not to shift the shift lever with the accelerator pedal depressed. Shifting theshift lever to a gear other than P or N may lead to unexpected rapid acceleration ofthe vehicle that may cause an accident.
■ If you hear a squealing or scraping noise (brake pad wear limit indicators)Have the brake pads checked and replaced by your Lexus dealer as soon as possible.Rotor damage may result if the pads are not replaced when needed.It is dangerous to drive the vehicle when the wear limits of the brake pads and/or thoseof the brake discs are exceeded.

GX460_OM_OM60T19U_(U)
1734-1. Before driving
4
Driving
WARNING
Observe the following precautions.Failure to do so may result in death or serious injury.■ When the vehicle is stopped
● Do not race the engine.If the vehicle is in any gear other than P or N, the vehicle may accelerate suddenlyand unexpectedly, causing an accident.
● In order to prevent accidents due to the vehicle rolling away, always keep depressingthe brake pedal while the engine is running, and apply the parking brake as neces-sary.
● If the vehicle is stopped on an incline, in order to prevent accidents caused by thevehicle rolling forward or backward, always depress the brake pedal and securelyapply the parking brake as needed.
● Avoid revving or racing the engine. Running the engine at high speed while the vehi-cle is stopped may cause the exhaust system to overheat, which could result in a fire ifcombustible material is nearby.
■ When the vehicle is parked● Do not leave glasses, cigarette lighters, spray cans, or soft drink cans in the vehicle
when it is in the sun.Doing so may result in the following:• Gas may leak from a cigarette lighter or spray can, and may lead to a fire.• The temperature inside the vehicle may cause the plastic lenses and plastic mate-
rial of glasses to deform or crack.• Soft drink cans may fracture, causing the contents to spray over the interior of the
vehicle, and may also cause a short circuit in the vehicle’s electrical components.● Do not leave cigarette lighters in the vehicle. If a cigarette lighter is in a place such as
the glove box or on the floor, it may be lit accidentally when luggage is loaded or theseat is adjusted, causing a fire.
● Do not attach adhesive discs to the windshield or windows. Do not place containerssuch as air fresheners on the instrument panel or dashboard. Adhesive discs or con-tainers may act as lenses, causing a fire in the vehicle.
● Do not leave a door or window open if the curved glass is coated with a metallizedfilm such as a silver-colored one. Reflected sunlight may cause the glass to act as alens, causing a fire.
● Always apply the parking brake, shift the shift lever to P, stop the engine and lock thevehicle.Do not leave the vehicle unattended while the engine is running.If the vehicle is parked with the shift lever in P but the parking brake is not set, thevehicle may start to move, possibly leading to an accident.
● Do not touch the exhaust pipes while the engine is running or immediately after turn-ing the engine off. Doing so may cause burns.

174
GX460_OM_OM60T19U_(U)
4-1. Before driving
WARNING
Observe the following precautions.Failure to do so may result in death or serious injury.■ When taking a nap in the vehicle
Always turn the engine off. Otherwise, if you accidentally move the shift lever ordepress the accelerator pedal, this could cause an accident or fire due to engine over-heating. Additionally, if the vehicle is parked in a poorly ventilated area, exhaust gasesmay collect and enter the vehicle, leading to death or a serious health hazard.
■ When braking● When the brakes are wet, drive more cautiously.
Braking distance increases when the brakes are wet, and this may cause one side ofthe vehicle to brake differently than the other side. Also, the parking brake may notsecurely hold the vehicle.
● If the brake booster device does not operate, do not follow other vehicles closely andavoid hills or sharp turns that require braking. In this case, braking is still possible, butthe brake pedal should be depressed more firmly than usual. Also, the braking dis-tance will increase. Have your brakes fixed immediately.
● Do not pump the brake pedal if the engine stalls. Each push on the brake pedal uses up the reserve for the power-assisted brakes.
● The brake system consists of 2 individual hydraulic systems: If one of the systems fails,the other will still operate. In this case, the brake pedal should be depressed morefirmly than usual and the braking distance will increase.Have your brakes fixed immediately.
■ If the vehicle becomes stuckDo not spin the wheels excessively when any of the tires is up in the air, or the vehicle isstuck in sand, mud, etc. This may damage the driveline components or propel the vehi-cle forward or backward, causing an accident.

GX460_OM_OM60T19U_(U)
1754-1. Before driving
4
Driving
NOTICE
■ When driving the vehicle● Do not depress the accelerator and brake pedals at the same time during driving, as
this may restrain the engine output.● Do not use the accelerator pedal or depress the accelerator and brake pedals at the
same time to hold the vehicle on a hill.■ When parking the vehicle
Always set the parking brake, and shift the shift lever to P. Failure to do so may causethe vehicle to move or the vehicle may accelerate suddenly if the accelerator pedal isaccidentally depressed.
■ Avoiding damage to vehicle parts● Do not turn the steering wheel fully in either direction and hold it there for an
extended period of time. Doing so may damage the power steering pump.
● When driving over bumps in the road, drive as slowly as possible to avoid damagingthe wheels, underside of the vehicle, etc.
■ If you get a flat tire while drivingA flat or damaged tire may cause the following situations. Hold the steering wheelfirmly and gradually depress the brake pedal to slow down the vehicle.● It may be difficult to control your vehicle.● The vehicle will make abnormal sounds or vibrations.● The vehicle will lean abnormally.Information on what to do in case of a flat tire. (P. 531)
■ When encountering flooded roadsDo not drive on a road that has flooded after heavy rain etc. Doing so may cause thefollowing serious damage to the vehicle:● Engine stalling● Short in electrical components● Engine damage caused by water immersionIn the event that you drive on a flooded road and the vehicle is flooded, be sure to haveyour Lexus dealer check the following:● Brake function● Changes in quantity and quality of oil and fluid used for the engine, transmission,
transfer, differentials, etc.● Lubricant condition for the propeller shaft, bearings and suspension joints (where
possible), and the function of all joints, bearings, etc.

176
GX460_OM_OM60T19U_(U)
4-1. Before driving
Cargo and luggage
Cargo capacity depends on the total weight of the occupants.
(Cargo capacity) = (Total load capacity) (Total weight of occupants)
Steps for Determining Correct Load Limit
(1) Locate the statement “The combined weight of occupants and cargo shouldnever exceed XXX kg or XXX lbs.” on your vehicle’s placard.
(2) Determine the combined weight of the driver and passengers that will be rid-ing in your vehicle.
(3) Subtract the combined weight of the driver and passengers from XXX kg orXXX lbs.
(4) The resulting figure equals the available amount of cargo and luggage loadcapacity.
For example, if the “XXX” amount equals 1400 lbs. and there will be five 150lb passengers in your vehicle, the amount of available cargo and luggage loadcapacity is 650 lbs. (1400 750 (5150) = 650 lbs.)
(5) Determine the combined weight of luggage and cargo being loaded on thevehicle. That weight may not safely exceed the available cargo and luggageload capacity calculated in Step 4.
(6) If your vehicle will be towing a trailer, load from your trailer will be transferredto your vehicle. Consult this manual to determine how this reduces the avail-able cargo and luggage load capacity of your vehicle. (P. 180)
Take notice of the following information about storage precautions, cargocapacity and load:
Capacity and distribution

GX460_OM_OM60T19U_(U)
1774-1. Before driving
4
Driving
Cargo capacity
Total load capacity (vehicle capacityweight) (P. 560)
When 2 people with the combined weight of A lb. (kg) are riding in your vehicle,which has a total load capacity (vehicle capacity weight) of B lb. (kg), the avail-able amount of cargo and luggage load capacity will be C lb. (kg) as follows:
B*2 lb. (kg) A*1 lb. (kg) = C*3 lb. (kg)
*1: A = Weight of people*2: B = Total load capacity*3: C = Available cargo and luggage load
In this condition, if 3 more passengers with the combined weight of D lb. (kg) get on,the available cargo and luggage load will be reduced E lb. (kg) as follows:
C lb. (kg) D*4 lb. (kg) = E*5 lb. (kg)
*4: D = Additional weight of people*5: E = Available cargo and luggage load
As shown in the example above, if the number of occupants increases, the cargoand luggage load will be reduced by an amount that equals the increased weightdue to the additional occupants. In other words, if an increase in the number ofoccupants causes an excess of the total load capacity (combined weight of occu-pants plus cargo and luggage load), you must reduce the cargo and luggage onyour vehicle.
Calculation formula for your vehicle
1
2

178
GX460_OM_OM60T19U_(U)
4-1. Before driving
WARNING
■ Things that must not be carried in the luggage compartmentThe following things may cause a fire if loaded in the luggage compartment:● Receptacles containing gasoline● Aerosol cans
■ Storage precautionsObserve the following precautions.Failure to do so may prevent the pedals from being depressed properly, may block thedriver’s vision, or may result in items hitting the driver or passengers, possibly causingan accident.● Stow cargo and luggage in the luggage compartment whenever possible.● Do not stack cargo and luggage in the luggage compartment higher than the seat-
backs. ● Do not place cargo or luggage in or on the following locations.
• At the feet of the driver• On the front passenger or rear seats (when stacking items)• On the luggage cover (if equipped)• On the instrument panel• On the dashboard
● Secure all items in the occupant compartment.● When you fold down the rear seats, long items should not be placed directly behind
the front seats.● Never allow anyone to ride in the luggage compartment. It is not designed for pas-
sengers. They should ride in their seats with their seat belts properly fastened. Other-wise, they are much more likely to suffer death or serious bodily injury, in the event ofsudden braking, sudden swerving or an accident.

GX460_OM_OM60T19U_(U)
1794-1. Before driving
4
Driving
WARNING
■ Capacity and distribution● Do not exceed the maximum axle weight rating or the total vehicle weight rating. ● Even if the total load of occupant’s weight and the cargo load is less than the total load
capacity, do not apply the load unevenly. Improper loading may cause deteriorationof steering or braking control which may cause death or serious injury.
■ Roof luggage carrier precautions (if equipped)To use the roof rails as a roof luggage carrier, you must fit the roof rails with two or moregenuine Lexus cross rails or their equivalent.Follow the manufacturer’s instructions and precautions when installing the cross rails ortheir equivalent.When you load cargo on the roof luggage carrier, observe the following:● Place the cargo so that its weight is distributed evenly between the front and rear
axles.● If loading long or wide cargo, never exceed the vehicle overall length or width.
(P. 560)● Before driving, make sure the cargo is securely fastened on the roof luggage carrier.● Loading cargo on the roof luggage carrier will make the center of gravity of the vehi-
cle higher. Avoid high speeds, sudden starts, sharp turns, sudden braking or abruptmaneuvers, otherwise it may result in loss of control or vehicle rollover due to failureto operate this vehicle correctly and result in death or serious injury.
● If driving for a long distance, on rough roads, or at high speeds, stop the vehicle nowand then during the trip to make sure the cargo remains in its place.
● Do not exceed 176 lb. (80 kg) cargo weight on the roof luggage carrier.
NOTICE
■ When loading cargo on the roof luggage carrier (if equipped)Be careful not to scratch the surface of the moon roof.

180
GX460_OM_OM60T19U_(U)
4-1. Before driving
Vehicle load limits
◆ Total load capacity (vehicle capacity weight): P. 560
Total load capacity means the combined weight of occupants, cargo and lug-gage.
◆ Seating capacity: P. 560
Seating capacity means the maximum number of occupants whose estimatedaverage weight is 150 lb. (68 kg) per person.
◆ TWR (Trailer Weight Rating): P. 185, 560
TWR means the maximum gross trailer weight (trailer weight plus its cargoweight) that your vehicle is able to tow.
◆ Cargo capacity
Cargo capacity may increase or decrease depending on the weight and thenumber of occupants.
■ Total load capacity and seating capacityThese details are also described on the tire and loading information label. (P. 484)
Vehicle load limits include total load capacity, seating capacity, TWR (TrailerWeight Rating) and cargo capacity.
WARNING
■ Overloading the vehicleDo not overload the vehicle.It may not only cause damage to the tires, but also degrade steering and braking ability,resulting in an accident.

181
GX460_OM_OM60T19U_(U)
4-1. Before driving
4
Driving
Trailer towing (with towing hitch)
Your vehicle is designed primarily as a passenger-and-load-carrying vehicle.Towing a trailer can have an adverse impact on handling, performance, brak-ing, durability, and fuel consumption. For your safety and the safety of others,you must not overload your vehicle or trailer. You must also ensure that youare using appropriate towing equipment, that the towing equipment has beeninstalled correctly and used properly, and that you employ the requisite driv-ing habits.
Vehicle-trailer stability and braking performance are affected by trailer sta-bility, brake performance and setting, trailer brakes, the hitch and hitch sys-tems (if equipped).
To tow a trailer safely, use extreme care and drive the vehicle in accordancewith your trailer’s characteristics and operating conditions.
Lexus warranties do not apply to damage or malfunction caused by towing atrailer for commercial purposes.
Contact your Lexus dealer for further information about additional require-ments such as towing kits, etc.

182
GX460_OM_OM60T19U_(U)
4-1. Before driving
■ GCWR (Gross Combination Weight Rating)
The maximum allowable gross com-bination weight. The gross combina-tion weight is the sum of the totalvehicle weight (including the occu-pants, cargo and any optional equip-ment installed on the vehicle) andthe weight of the trailer being towed(including the cargo in the trailer).
■ GVWR (Gross Vehicle Weight Rating)
The maximum allowable gross vehi-cle weight. The gross vehicle weightis the total weight of the vehicle.When towing a trailer, it is the sum ofthe vehicle weight (including theoccupants, cargo and any optionalequipment installed on the vehicle)and the tongue weight.
Towing related terms

GX460_OM_OM60T19U_(U)
1834-1. Before driving
4
Driving
■ GAWR (Gross Axle Weight Rating)
The maximum allowable gross axleweight. The gross axle weight is theload placed on each axle (front andrear).
■ TWR (Trailer Weight Rating)
The maximum allowable gross trailerweight. The gross trailer weight isthe sum of the trailer weight and theweight of the cargo in the trailer.
TWR is calculated assuming basevehicle with one driver, one frontpassenger, towing package (if avail-able), hitch and hitch systems (ifrequired).
Additional optional equipment, passengers and cargo in the vehicle will reduce thetrailer weight rating so as not to exceed GCWR, GVWR and GAWR.If the gross trailer weight exceeds 3000 lb. (1360 kg), it is recommended to use atrailer with 2 or more axles.
Front GAWR
Rear GAWR
(With brakes)

184
GX460_OM_OM60T19U_(U)
4-1. Before driving
■ Unbraked TWR (Unbraked Trailer Weight Rating)
The trailer weight rating for towing atrailer without a trailer service brakesystem.
■ Tongue Weight
The load placed on the trailer hitchball. (P. 186)
(Without brakes)

GX460_OM_OM60T19U_(U)
1854-1. Before driving
4
Driving
● The gross trailer weight must never exceed 6500 lb. (2950 kg).● The gross combination weight must never exceed 13100 lb. (5940 kg).
● The gross vehicle weight must neverexceed the GVWR indicated on theCertification Label.
● The gross axle weight on each axlemust never exceed the GAWR indi-cated on the Certification Label.
● If the gross trailer weight is over the unbraked TWR, trailer service brakes arerequired.
● If the gross trailer weight is over 2000 lb. (907 kg), a sway control device withsufficient capacity is required.
● If the gross trailer weight is over 5000 lb. (2268 kg), a weight distributinghitch with sufficient capacity is required.
Confirm that the gross trailer weight, gross combination weight, gross vehicleweight, gross axle weight and tongue weight are all within the limits.
■ GCWR*13100 lb. (5940 kg)
■ TWR*6500 lb. (2950 kg)
■ Unbraked TWR*1000 lb. (453 kg)
Weight limits
GCWR, TWR and Unbraked TWR
*: This model meets the tow-vehicle trailering requirement of SAE International per SAEJ2807.

186
GX460_OM_OM60T19U_(U)
4-1. Before driving
● A recommended tongue weight varies in accordance with the types of trailersor towing as described below.
● To ensure the recommended values shown below, the trailer must be loadedby referring to the following instructions.• Tongue Weight
The gross trailer weight should be distributed so that the tongue weight is9 % to 11 %. (Tongue weight/Gross trailer weight 100 = 9 % to 11 %)
Gross trailer weight
Tongue weight
If using a weight distributing hitch when towing, return the front axle to thesame weight as before the trailer connection.
If front axle weight cannot be measured directly, measure the front fenderheight above the front axle before connection. Adjust weight distributinghitch torque until front fender is returned to the same height as before con-nection.
The gross trailer weight, gross axle weight and tongue weight can be mea-sured with platform scales found at a highway weighing station, buildingsupply company, trucking company, junk yard, etc.
Trailer Tongue Weight
1
2

GX460_OM_OM60T19U_(U)
1874-1. Before driving
4
Driving
Trailer hitch assemblies have different weight capacities. Lexus recommends theuse of Lexus hitch/bracket for your vehicle. For details, contact your Lexusdealer.● If you wish to install a trailer hitch, contact your Lexus dealer.● Use only a hitch that conforms to the gross trailer weight requirement of your
vehicle.● Follow the directions supplied by the hitch manufacturer.● Lubricate the hitch ball with a light coating of grease.● Remove the hitch ball whenever you are not towing a trailer. Remove the
trailer hitch if you do not need it. After removing the hitch, seal any mountinghole in the vehicle body to prevent entry of any substances into the vehicle.
Hitch

188
GX460_OM_OM60T19U_(U)
4-1. Before driving
Use the correct trailer ball for your application.
Trailer ball load rating
Matches or exceeds the gross trailerweight rating of the trailer.Ball diameter
Matches the size of the trailer coupler.Most couplers are stamped with therequired trailer ball size.
Shank length
Protrudes beyond the bottom of the lock washer and nut by at least 2 threads.Shank diameter
Matches the ball mount hole diameter size.
Selecting trailer ball
Trailer class Typical trailer ball size
IV 2 5/16 in.
II and III 2 in.
I 1 7/8 in.
1
2
3
4

GX460_OM_OM60T19U_(U)
1894-1. Before driving
4
Driving
Vehicles without rear height controlair suspension
Weight carrying ball position: 50.4 in. (1280.6 mm)*Hitch receiver pin hole position: 41.1 in. (1044.2 mm)*
Vehicles with rear height control airsuspension
Weight carrying ball position: 50.5 in. (1282.7 mm)*Hitch receiver pin hole position: 41.2 in. (1046.6 mm)*
*: Unladen vehicles
Use the wire harness stored in the rearend under the vehicle body.
Please consult your dealer when installing trailer lights, as incorrect installationmay cause damage to the vehicle’s lights. Please take care to comply with yourstate’s laws when installing trailer lights.
Positions for towing hitch receiver and hitch ball
1
2
Connecting trailer lights
1
2

190
GX460_OM_OM60T19U_(U)
4-1. Before driving
Stop your vehicle and a trailer in line and perform the following:● Connecting a trailer
Set the rear height control air suspension (if equipped) to N mode.
Turn off the engine switch or the rear height control air suspension (ifequipped).
Connect the trailer.
Turn on the switch that was turned off on step .● Disconnecting a trailer
Set the rear height control air suspension (if equipped) to N mode.
Turn off the rear height control air suspension (if equipped).
Turn off the engine switch.
Set the supporting leg of the trailer on the ground and raise the hitch by4 in. (100 mm)
Turn on the engine switch.
Turn on the rear height control air suspension (if equipped).
Wait until vehicle height is stabilized.
Make sure the hitch is disconnected. If the hitch does not disconnect, raise thehitch higher and repeat steps through .
Connecting and disconnecting a trailer
1
2
3
4 2
1
2
3
4
5
6
7
2 7

GX460_OM_OM60T19U_(U)
1914-1. Before driving
4
Driving
Your vehicle will handle differently when towing a trailer. Help to avoid an acci-dent, death or serious injury, keep the following in mind when towing:● Speed limits for towing a trailer vary by state or province. Do not exceed the
posted towing speed limit.● Lexus recommends that the vehicle-trailer speed limit is 65 mph (104 km/h)
on a flat, straight, dry road. Do not exceed this limit, the posted towing speedlimit or the speed limit for your trailer as set forth in your trailer owner’s man-ual, whichever is lowest. Instability of the towing vehicle-trailer combination(trailer sway) increases as speed increases. Exceeding speed limits may causeloss of control.
● Before starting out, check the trailer lights, tires and the vehicle-trailer con-nections. Recheck after driving a short distance.
● Practice turning, stopping and reversing with the trailer attached in an areaaway from traffic until you become accustomed to the feel of the vehicle-trailer combination.
● Reversing with a trailer attached is difficult and requires practice. Grip thebottom of the steering wheel and move your hand to the left to move thetrailer to the left. Move your hand to the right to move the trailer to the right.(This is generally opposite to reversing without a trailer attached.) Avoid sharpor prolonged turning. Have someone guide you when reversing to reduce therisk of an accident.
● As stopping distance is increased when towing a trailer, vehicle-to-vehicle dis-tance should be increased. For each 10 mph (16 km/h) of speed, allow at leastone vehicle and trailer length.
● Avoid sudden braking as you may skid, resulting in the trailer jackknifing andloss of vehicle control. This is especially true on wet or slippery surfaces.
Trailer towing tips
192
GX460_OM_OM60T19U_(U)
4-1. Before driving
● Avoid jerky starts or sudden acceleration.● Avoid jerky steering and sharp turns, and slow down before making a turn.● Note that when making a turn, the trailer wheels will be closer than the vehicle
wheels to the inside of the turn. Compensate by making a wider than normalturning radius.
● Slow down before making a turn, in crosswinds, on wet or slippery surfaces,etc.Increasing vehicle speed can destabilize the trailer.
● Take care when passing other vehicles. Passing requires considerable dis-tance. After passing a vehicle, do not forget the length of your trailer, and besure you have plenty of room before changing lanes.
● To maintain engine braking efficiency and charging system performancewhen using engine braking, do not put the transmission in D.If in the S mode, the transmission shift range position must be in 5 or lower.
● Instability happens more frequently when descending steep or long downhillgrades. Before descending, slow down and downshift. Do not make suddendownshifts while descending steep or long downhill grades.
● Avoid holding the brake pedal down too long or applying the brakes too fre-quently. This could cause the brakes to overheat and result in reduced brakingefficiency.
● Due to the added load of the trailer, your vehicle’s engine may overheat on hotdays (at temperatures over 85°F [30°C]) when driving up a long or steepgrade. If the engine coolant temperature gauge indicates overheating, imme-diately turn off the air conditioning (if in use), pull your vehicle off the road andstop in a safe spot. (P. 553)

GX460_OM_OM60T19U_(U)
1934-1. Before driving
4
Driving
● Always place wheel blocks under both the vehicle’s and the trailer’s wheelswhen parking. Apply the parking brake firmly, and put the transmission in P.Avoid parking on a slope, but if unavoidable, do so only after performing thefollowing:
Apply the brakes and keep them applied.
Have someone place wheel blocks under both the vehicle’s and trailer’swheels.
When the wheel blocks are in place, release the brakes slowly until theblocks absorb the load.
Apply the parking brake firmly.
Shift into P and turn off the engine.● When restarting after parking on a slope:
With the transmission in P, start the engine. Be sure to keep the brake pedalpressed.
Shift into 3, 2, L, or R (if reversing).
Release the parking brake and brake pedal, and slowly pull or back awayfrom the wheel blocks. Stop and apply the brakes.
Have someone retrieve the blocks.
1
2
3
4
5
1
2
3
4

194
GX460_OM_OM60T19U_(U)
4-1. Before driving
■ Matching trailer ball height to trailer coupler height
■ Before towingCheck that the following conditions are met:● Ensure that your vehicle’s tires are properly inflated. (P. 568)● Trailer tires are inflated according to the trailer manufacturer’s recommendation.● All trailer lights work as required by law.● All lights work each time you connect them.● The trailer ball is set at the proper height for the coupler on the trailer.● The trailer is level when it is hitched.
Do not drive if the trailer is not level, and check for improper tongue weight, overload-ing, worn suspension, or other possible causes.
● The trailer cargo is securely loaded.● The rear view mirrors conform to all applicable federal, state/provincial or local regula-
tions. If they do not, install rear view mirrors appropriate for towing purposes.
No matter which class of tow hitch applies, for amore safe trailer hookup, the trailer ball setupmust be the proper height for the coupler on thetrailer.
Trailer ballCoupler
1
2

GX460_OM_OM60T19U_(U)
1954-1. Before driving
4
Driving
■ AVS (adaptive variable suspension system) (if equipped)The suspension can be switched for improvement in driveability. (P. 343)
■ Break-in scheduleIf your vehicle is new or equipped with any new power train components (such as anengine, transmission, differential or wheel bearing), Lexus recommends that you do nottow a trailer until the vehicle has been driven for over 500 miles (800 km).After the vehicle has been driven for over 500 miles (800 km), you can start towing.However, for the next 500 miles (800 km), drive the vehicle at a speed of less than50 mph (80 km/h) when towing a trailer, and avoid full throttle acceleration.
■ Maintenance● If you tow a trailer, your vehicle will require more frequent maintenance due to the addi-
tional load. (See “Owner’s Guide”, “Warranty and Services Guide”, “Owner’s ManualSupplement” or “Warranty Booklet”.)
● Retighten the fixing bolts of the towing ball and bracket after approximately 600 miles(1000 km) of trailer towing.
■ If trailer sway occursOne or more factors (crosswinds, passing vehicles, rough roads, etc.) can adverselyaffect handling of your vehicle and trailer, causing instability.● If trailer swaying occurs:
• Firmly grip the steering wheel. Steer straight ahead.Do not try to control trailer swaying by turning the steering wheel.
• Begin releasing the accelerator pedal immediately but very gradually to reducespeed.Do not increase speed. Do not apply vehicle brakes.
If you make no extreme correction with the steering or brakes, your vehicle and trailershould stabilize.

196
GX460_OM_OM60T19U_(U)
4-1. Before driving
● After the trailer swaying has stopped:• Stop in a safe place. Get all occupants out of the vehicle.• Check the tires of the vehicle and the trailer.• Check the load in the trailer.
Make sure the load has not shifted.Make sure the tongue weight is appropriate, if possible.
• Check the load in the vehicle.Make sure the vehicle is not overloaded after occupants get in.
If you cannot find any problems, the speed at which trailer swaying occurred is beyondthe limit of your particular vehicle-trailer combination.Drive at a lower speed to prevent instability. Remember that swaying of the towing vehi-cle-trailer increases as speed increases.
WARNING
■ Trailer towing precautions● To tow a trailer safely, use extreme care and drive the vehicle in accordance with the
trailer’s characteristics and operating conditions. Failure to do so could cause an acci-dent resulting in death or serious injury. Vehicle stability and braking performance areaffected by trailer stability, brake setting and performance, and the hitch. Your vehiclewill handle differently when towing a trailer.
● Set the vehicle height to the LO mode and turn off the rear height control air suspen-sion when you connect a trailer, otherwise the vehicle height may change due to theautomatic leveling function, and you may catch part of your body in the vehicle,resulting in an accident.

GX460_OM_OM60T19U_(U)
1974-1. Before driving
4
Driving
WARNING
■ To avoid accident or injury● Do not exceed the TWR, unbraked TWR, GCWR, GVWR or GAWR.● If the gross trailer weight is over 2000 lb. (907 kg), a sway control device with suffi-
cient capacity is required.● If the gross trailer weight is over 5000 lb. (2268 kg), a weight distributing hitch with
sufficient capacity is required.● Adjust the tongue weight within the appropriate range. Place heavier loads as close
to the trailer axle as possible.● Do not exceed 65 mph (104 km/h), the posted towing speed limit or the speed limit
for your trailer as set forth in your trailer owner’s manual, whichever is lowest. Slowdown sufficiently before making a turn, in crosswinds, on wet or slippery surface, etc.to help avoid an accident. If you experience a vehicle-trailer instability from reducinga certain speed, slow down and make sure you keep your vehicle speed under thespeed of which you experience the instability.
● Do not make jerky, abrupt or sharp turns.● Do not apply the brakes suddenly as you may skid, resulting in jackknifing and loss of
vehicle control. This is especially true on wet or slippery surfaces.● Do not exceed the trailer hitch assembly weight, gross vehicle weight, gross axle
weight and trailer tongue weight capacities.● Do not use cruise control when towing.● Slow down and downshift before descending steep or long downhill grades. Do not
make sudden downshifts while descending steep or long downhill grades.● Vehicle-trailer instability is more likely on steep long down hills. Before descending
steep or long downhill grades, slow down and downshift. Do not make sudden down-shifts when descending steep or long downhill grades. Avoid holding the brake pedaldown too long or applying the brakes too frequently. This could cause the brakes tooverheat and result in reduced braking efficiency.

198
GX460_OM_OM60T19U_(U)
4-1. Before driving
WARNING
■ HitchTrailer hitch assemblies have different weight capacities established by the hitch manu-facturer. Even though the vehicle may be physically capable of towing a higher weight,the operator must determine the maximum weight rating of the particular hitch assem-bly and never exceed the maximum weight rating specified for the trailer-hitch.Exceeding the maximum weight rating set by the trailer-hitch manufacturer can causean accident resulting in death or serious personal injuries.
■ When towing a trailerLexus recommends trailers with brakes that conform to any applicable federal andstate/provincial regulations.● If the gross trailer weight exceeds unbraked TWR, trailer brakes are required. Lexus
recommends trailers with brakes that conform to all applicable federal and state/pro-vincial regulations.
● Never tap into your vehicle’s hydraulic system, as this will lower the vehicle’s brakingeffectiveness.
● Never tow a trailer without using a safety chain securely attached to both the trailerand the vehicle. If damage occurs to the coupling unit or hitch ball, there is danger ofthe trailer wandering into another lane.
NOTICE
■ When installing a trailer hitchUse only the position recommended by your Lexus dealer. Do not install the trailerhitch on the bumper; this may cause body damage.
■ Do not directly splice trailer lightsDo not directly splice trailer lights. Directly splicing trailer lights may damage yourvehicle’s electrical system and cause a malfunction.

199
GX460_OM_OM60T19U_(U)
4-1. Before driving
4
Driving
Dinghy towing
Your vehicle is not designed to be dinghy towed (with 4 wheels on the ground)behind a motor home.
NOTICE
■ To avoid serious damage to your vehicleDo not tow your vehicle with four wheels on the ground.

200
GX460_OM_OM60T19U_(U)
4-2. Driving procedures
Engine (ignition) switch
Check that the parking brake is set.
Check that the shift lever is set in P.
Firmly depress the brake pedal.
and a message will be displayed on the multi-information display.
If it is not displayed, the engine cannot be started.
Press the engine switch shortly andfirmly.
When operating the engine switch, oneshort, firm press is enough.It is not necessary to press and hold theswitch.The engine will crank until it starts or forup to 30 seconds, whichever is less.Continue depressing the brake pedaluntil the engine is completely started.The engine can be started from anyengine switch mode.
Performing the following operations when carrying the electronic key on yourperson starts the engine or changes engine switch modes.
Starting the engine
1
2
3
4

GX460_OM_OM60T19U_(U)
2014-2. Driving procedures
4
Driving
Stop the vehicle.
Set the parking brake (P. 212), and shift the shift lever to P.
Press the engine switch.
Release the brake pedal and check that “ACCESSORY” or “IGNITION ON”is not shown on the meter.
Modes can be changed by pressing the engine switch with brake pedal released.(The mode changes each time the switch is pressed.)
Off*The emergency flashers can be used.ACCESSORY mode
Some electrical components such as theaudio system can be used.“ACCESSORY” will be displayed on themulti-information display.IGNITION ON mode
All electrical components can be used.“IGNITION ON” will be displayed onthe multi-information display.
*: If the shift lever is in a position other thanP when turning off the engine, theengine switch will be turned to ACCES-SORY mode, not to off.
Stopping the engine
Changing engine switch modes
1
2
3
4
1
2
3

202
GX460_OM_OM60T19U_(U)
4-2. Driving procedures
If the engine is stopped with the shift lever in a position other than P, the engineswitch will not be turned off but instead be turned to ACCESSORY mode. Per-form the following procedure to turn the switch off:
Check that the parking brake is set.
Shift the shift lever to P.
Check that “TURN POWER OFF”/“Turn power off” is displayed on the multi-information display and then press the engine switch once.
Check that “TURN POWER OFF”/“Turn power off” on the multi-informationdisplay is off.
■ Auto power off functionWhen the shift lever is in P, if the vehicle is left in ACCESSORY or IGNITION ON modewith the engine not running for more than 20 minutes (ACCESSORY mode) or onehour (IGNITION ON mode), the engine switch will automatically turn off. However, thisfunction cannot entirely prevent battery discharge. Do not leave the vehicle with theengine switch in ACCESSORY or IGNITION ON mode for long periods of time whenthe engine is not running.
■ Electronic key battery depletionP. 106
■ Conditions affecting operationP. 127
■ Note for the entry functionP. 128
■ If the engine does not startThe engine immobilizer system may not have been deactivated. (P. 77)Contact your Lexus dealer.
■ Steering lockAfter turning the engine switch off and opening and closing the doors, the steering wheelwill be locked due to the steering lock function. Operating the engine switch again auto-matically cancels the steering lock.
When stopping the engine with the shift lever in a position other than P
1
2
3
4

GX460_OM_OM60T19U_(U)
2034-2. Driving procedures
4
Driving
■ When the steering lock cannot be released
■ Steering lock motor overheating preventionTo prevent the steering lock motor from overheating, the motor may be suspended if theengine is turned on and off repeatedly in a short period of time. In this case, refrain fromrunning the engine. After about 10 seconds, the steering lock motor will resume func-tioning.
■ When the engine switch indicator flashes in amberThe system may be malfunctioning. Have the vehicle inspected by your Lexus dealer,immediately.
■ If the electronic key battery is depletedP. 492
■ Operation of the engine switch● If the switch is not pressed shortly and firmly, the engine switch mode may not change
or the engine may not start.● If attempting to restart the engine immediately after turning the engine switch off, the
engine may not start in some cases. After turning the engine switch off, please wait afew seconds before restarting the engine.
■ Automatic engine shut off feature● The vehicle is equipped with a feature that automatically shuts off the engine when the
shift lever is in P with the engine running for an extended period.● The engine will automatically shut off after approximately 1 hour if it has been left run-
ning while the shift lever is in P.● The timer for the automatic engine shut off feature will reset if the brake pedal is
depressed or if the shift lever is in a position other than P.● After the vehicle is parked, if the door is locked with the door lock switch (P. 110)
from the inside or the mechanical key (P. 547) from the outside, the automaticengine shut off feature will be disabled. The timer for the automatic engine shut off fea-ture will be re-enabled if the driver’s door is opened.
■ If the smart access system with push-button start has been deactivated in a customizedsettingP. 547
“PUSH THE ENGINE SWITCH WHILETURNING THE STEERING WHEEL INEITHER DIRECTION”/“Push the engine switchwhile turning the steering wheel in either direc-tion” will be displayed on the multi-informationdisplay.Check that the shift lever is set in P. Press theengine switch shortly and firmly while turningthe steering wheel left and right.

204
GX460_OM_OM60T19U_(U)
4-2. Driving procedures
WARNING
■ When starting the engineAlways start the engine while sitting in the driver’s seat. Do not depress the acceleratorpedal while starting the engine under any circumstances.Doing so may cause an accident resulting in death or serious injury.
■ Caution while drivingIf engine failure occurs while the vehicle is moving, do not lock or open the doors untilthe vehicle reaches a safe and complete stop. Activation of the steering lock in this cir-cumstance may lead to an accident, resulting in death or serious injury.
■ Stopping the engine in an emergency● If you want to stop the engine in an emergency while driving the vehicle, press and
hold the engine switch for more than 2 seconds, or press it briefly 3 times or more insuccession. (P. 509)However, do not touch the engine switch while driving except in an emergency. Turn-ing the engine off while driving will not cause loss of steering or braking control, butthe power assist to these systems will be lost. This will make it more difficult to steerand brake, so you should pull over and stop the vehicle as soon as it is safe to do so.
● If the engine switch is operated while the vehicle is running, a warning message will beshown on the multi-information display and a buzzer sounds.
● When restarting the engine after it was turned off while driving, shift the shift lever toN and press the engine switch.
■ When parkingExhaust gases include harmful carbon monoxide (CO), which is colorless and odor-less. Observe the following precautions.Failure to do so may cause exhaust gases to enter the vehicle and may lead to an acci-dent caused by light-headedness, or may lead to death or a serious health hazard.● If the vehicle is in a poorly ventilated area or a closed area, such as a garage, stop the
engine.● Do not leave the vehicle with the engine running for a long time. If such a situation
cannot be avoided, park the vehicle in an open space and ensure that exhaust fumesdo not enter the vehicle interior.
● Do not leave the engine running in an area with snow build-up, or where it is snowing.If snowbanks build up around the vehicle while the engine is running, exhaust gasesmay collect and enter the vehicle.

GX460_OM_OM60T19U_(U)
2054-2. Driving procedures
4
Driving
NOTICE
■ To prevent battery discharge● Do not leave the engine switch in ACCESSORY or IGNITION ON mode for long
periods of time without the engine running.● If the indicator on the engine switch is illuminated, the engine switch is not off. When
exiting the vehicle, always check that the engine switch is off. ● Do not stop the engine when the shift lever is in a position other than P. If the engine is
stopped in another shift lever position, the engine switch will not be turned off butinstead be turned to ACCESSORY mode. If the vehicle is left in ACCESSORYmode, battery discharge may occur.
■ When starting the engine● Do not race a cold engine.● If the engine becomes difficult to start or stalls frequently, have your vehicle checked
by your Lexus dealer immediately.■ Symptoms indicating a malfunction with the engine switch
If the engine switch seems to be operating somewhat differently than usual, such as theswitch sticking slightly, there may be a malfunction. Contact your Lexus dealer immedi-ately.

206
GX460_OM_OM60T19U_(U)
4-2. Driving procedures
Automatic transmission
While the engine switch is in IGNITION ON mode, move the shift lever
with the brake pedal depressed.
When shifting the shift lever between P and D, make sure that the vehicle iscompletely stopped.
*1: Shifting to the D position allows the system to select a gear suitable for the drivingconditions. Setting the shift lever to the D position is recommended for normal driv-ing.
*2: Selecting shift ranges using S mode restricts the upper limit of the possible gearranges, controls engine braking forces, and prevents unnecessary upshifting.
Shifting the shift lever
Shift position purpose
Shift position Purpose and condition
P Parking the vehicle/starting the engine
R Reversing
N Neutral (Condition in which the power is not transmitted)
D Normal driving*1
S S mode driving*2 (P. 207)

GX460_OM_OM60T19U_(U)
2074-2. Driving procedures
4
Driving
Use second start mode for accelerating and driving on slippery road surfacessuch as snow.
Press the button to use second startmode.
The “2nd STRT” indicator will come on.Press the button again to cancel secondstart mode.
When the shift lever is in the S position, the shift lever can be operated as follows:
Upshifting
Downshifting
The selected shift range, from 1 to 6, willbe displayed in the meter.
The initial shift range in S mode is setautomatically to 5 or 4 according tovehicle speed. However, the initial shiftrange may be set to 3 or 2 if AI-SHIFThas operated while the shift lever was inthe D position. (P. 208)
■ Shift ranges and their functions● You can choose from 6 levels of engine braking force.● A lower shift range will provide greater engine braking force than a higher
shift range, and the engine speed will also increase.
Selecting the second start mode
Changing shift ranges in S mode
1
2

208
GX460_OM_OM60T19U_(U)
4-2. Driving procedures
■ Driving on a downhillOn declines, there may be case where the vehicle shifts down automatically to obtainengine braking. As a result of the downshifting, the engine speed may increase.
■ Second start mode automatic deactivationSecond start mode is automatically deactivated if the engine is turned off after driving insecond start mode.
■ S modeWhen the shift range is 5 or lower, holding the shift lever toward “+” sets the shift range to6.
■ AI-SHIFTAI-SHIFT automatically shifts the gear to the suitable position according to driver perfor-mance and driving conditions.AI-SHIFT automatically operates when the shift lever is in the D position. (Shifting theshift lever to the S position cancels the function.)
■ When driving with dynamic radar cruise control activatedEven when performing the following actions with the intent of enabling engine braking,engine braking will not activate because dynamic radar cruise control will not be can-celed.● While driving in S mode, downshifting to 5 or 4. (P. 258)● Vehicles with adaptive variable suspension system: When switching the driving mode
to sport mode while driving in D position. (P. 343)■ Restraining sudden start (Drive-Start Control)P. 170
■ Shift lock systemThe shift lock system is a system to prevent accidental operation of the shift lever in start-ing.The shift lever can be shifted from P only when the engine switch is in the IGNITION ONmode and the brake pedal is being depressed.

GX460_OM_OM60T19U_(U)
2094-2. Driving procedures
4
Driving
■ If the shift lever cannot be shifted from PFirst, check whether the brake pedal is being depressed.If the shift lever cannot be shifted with your foot on the brake pedal, there may be a prob-lem with the shift lock system. Have the vehicle inspected by your Lexus dealer, immedi-ately.The following steps may be used as an emergency measure to ensure that the shift levercan be shifted.Releasing the shift lock:
Set the parking brake.Turn the engine switch off.Depress the brake pedal.
■ If the “S” indicator does not come on even after shifting the shift lever to SThis may indicate a malfunction in the automatic transmission system. Have the vehicleinspected by your Lexus dealer immediately. (In this situation, the transmission will operate in the same manner as when the shift leveris in D.)
■ Downshift restriction warning buzzer (S mode)To help ensure safety and driving performance, downshifting operation may sometimesbe restricted. In some circumstances, downshifting may not be possible even when theshift lever is operated. (A buzzer will sound twice.)
Pry the cover up with a flathead screwdriveror tool.To prevent damage to the cover, cover the tipof the screwdriver with a rag.
Press the shift lock override button.The shift lever can be shifted while the buttonis pressed.
1
2
3
4
5

210
GX460_OM_OM60T19U_(U)
4-2. Driving procedures
WARNING
■ When driving on slippery road surfacesDo not accelerate or shift gears suddenly. Sudden changes in engine braking may cause the vehicle to spin or skid, resulting in anaccident.
■ To prevent an accident when releasing the shift lockBefore pressing the shift lock override button, make sure to set the parking brake anddepress the brake pedal.If the accelerator pedal is accidentally depressed instead of the brake pedal when theshift lock override button is pressed and the shift lever is shifted out of P, the vehiclemay suddenly start, possibly leading to an accident resulting in death or serious injury.

211
GX460_OM_OM60T19U_(U)
4-2. Driving procedures
4
Driving
Turn signal lever
The turn signal lever can be used to show the following intentions of the driver:
Right turn
Lane change to the right (move thelever partway and then release it)
Lane change to the left (move thelever partway and then release it)
Left turn
■ Turn signals can be operated whenThe engine switch is in IGNITION ON mode.
■ If the indicator flashes faster than usualCheck that a light bulb in the front or rear turn signal lights has not burned out.
■ If the turn signals stop flashing before a lane change has been performedOperate the lever again.
Operating instructions
1
2
3
4

212
GX460_OM_OM60T19U_(U)
4-2. Driving procedures
Parking brake
To set the parking brake, fully depressthe parking brake pedal with your leftfoot while depressing the brake pedalwith your right foot. (Depressing thepedal again releases the parkingbrake.)
■ Parking the vehicleP. 168
■ Parking brake engaged warning buzzerA buzzer will sound if the vehicle is driven with the parking brake engaged. “ReleaseParking Brake” is displayed on the multi-information display (with the vehicle reached aspeed of 3 mph [5 km/h]).
■ Usage in winter timeP. 374
U.S.A. Canada
NOTICE
■ Before drivingFully release the parking brake.Driving the vehicle with the parking brake set will lead to brake components overheat-ing, which may affect braking performance and increase brake wear.

213
GX460_OM_OM60T19U_(U)
4-3. Operating the lights and wipers
4
Driving
Headlight switch
Operating the switch turns on the lights as follows:
The headlights can be operated manually or automatically.
Operating instructions
U.S.A. Canada
The side marker, parking,tail, license plate, instru-ment panel lights, anddaytime running lights(P. 214) turn on.
The headlights and all thelights listed above (exceptdaytime running lights)turn on.
The headlights, daytimerunning lights (P. 214)and all the lights listedabove turn on and off auto-matically.
Off.
1
2
3
4
(U.S.A. only)

214
GX460_OM_OM60T19U_(U)
4-3. Operating the lights and wipers
With the headlights on, push thelever away from you to turn on thehigh beams.
Pull the lever toward you to the centerposition to turn the high beams off.Pull the lever toward you and releaseit to flash the high beams once.
You can flash the high beams with theheadlights on or off.
■ Daytime running light system● The daytime running lights illuminate using the same lights as the parking lights and illu-
minate brighter than the parking lights.● To make your vehicle more visible to other drivers during daytime driving, the daytime
running lights turn on automatically when all of the following conditions are met. (Thedaytime running lights are not designed for use at night.)• The engine is running• The parking brake is released• The headlight switch is in the or “AUTO”* position*: When the surroundings are bright
The daytime running lights remain on after they illuminate, even if the parking brake isset again.
● For the U.S.A.: Daytime running lights can be turned off by operating the switch.● Compared to turning on the headlights, the daytime running light system offers greater
durability and consumes less electricity, so it can help improve fuel economy.■ Headlight control sensor
Turning on the high beam headlights
1
2
The sensor may not function properly if anobject is placed on the sensor, or anything thatblocks the sensor is affixed to the windshield.Doing so interferes with the sensor detectingthe level of ambient light and may cause theautomatic headlight system to malfunction.

GX460_OM_OM60T19U_(U)
2154-3. Operating the lights and wipers
4
Driving
■ Automatic light off system● When only the tail lights are on: The tail lights turn off automatically if the engine switch
is turned off and the driver’s door is opened.● When the headlights are on: The headlights and tail lights turn off 30 seconds after the
engine switch is turned off and a door is opened and all of the doors and glass hatch areclosed. (The lights turn off immediately if on the key is pressed after all the doorsare closed.)
For the U.S.A.: To turn the lights on again, turn the engine switch to IGNITION ONmode, or turn the light switch off once and then back to or .
For Canada: To turn the lights on again, turn the engine switch to IGNITION ON mode,or turn the light switch to position once and then back to or .
If any of the doors or glass hatch is kept open, the lights automatically turn off after 20minutes.
■ Automatic headlight leveling systemThe level of the headlights is automatically adjusted according to the number of passen-gers and the loading condition of the vehicle to ensure that the headlights do not inter-fere with other road users.
■ Welcome lightingIf the headlight switch is turned to AUTO and the surrounding area is dark, unlocking thedoors using the smart access system with push-button start or wireless remote controlwill turn the parking lights and tail lights on automatically.
■ CustomizationSettings (e.g. light sensor sensitivity) can be changed.(Customizable features:P. 584)
NOTICE
■ To prevent battery dischargeDo not leave the lights on longer than necessary when the engine is not running.

216
GX460_OM_OM60T19U_(U)
4-3. Operating the lights and wipers
Automatic High Beam
Press the Automatic High Beamswitch.
Turn the headlight switch to the
or position.
The Automatic High Beam indicator willcome on when the system is operating.
The Automatic High Beam uses an in-vehicle camera sensor to assess thebrightness of streetlights, the lights of vehicles ahead etc., and automaticallyturns the high beam on or off as necessary.
WARNING
■ Limitations of the Automatic High BeamDo not rely on the Automatic High Beam. Always drive safely, taking care to observeyour surroundings and turning the high beam on or off manually if necessary.
■ To prevent incorrect operation of the Automatic High Beam systemDo not overload the vehicle.
Activating the Automatic High Beam system
1
2

GX460_OM_OM60T19U_(U)
2174-3. Operating the lights and wipers
4
Driving
■ Switching to the high beam
Push the lever away from you.
The Automatic High Beam indicatorwill turn off and the high beam indi-cator will turn on.Pull the lever to its original position toactivate the Automatic High Beamsystem again.
■ Switching to the low beam
Press the Automatic High Beamswitch.
The Automatic High Beam indicatorwill turn off.Press the switch to activate the Auto-matic High Beam system again.
■ Temporarily switching to the low beams
Pull the lever toward you and then return it to its original position.
The high beams are on while the lever is pulled toward you, however, after the leveris returned to its original position, the low beams remain on for a certain amount oftime. Afterwards, the Automatic High Beam will be activated again.
Turning the high beam on/off manually

218
GX460_OM_OM60T19U_(U)
4-3. Operating the lights and wipers
■ High beam automatic turning on or off conditions● When all of the following conditions are fulfilled, the high beam will be automatically
turned on (after approximately 1 second):• Vehicle speed is above approximately 21 mph (34 km/h).• The area ahead of the vehicle is dark.• There are no vehicles ahead with headlights or tail lights turned on.• There are few streetlights on the road ahead.
● If any of the following conditions are fulfilled, the high beam will be automatically turnedoff:• Vehicle speed drops below approximately 17 mph (27 km/h).• The area ahead of the vehicle is not dark.• Vehicles ahead have headlights or tail lights turned on.• There are many streetlights on the road ahead.
■ Camera sensor detection information● The high beam may not be automatically turned off in the following situations:
• When oncoming vehicles suddenly appear from a curve• When the vehicle is cut in front of by another vehicle• When vehicles ahead are hidden from sight due to repeated curves, road dividers or
roadside trees• When vehicles ahead appear from the faraway lane on wide road• When vehicles ahead have no lights
● The high beam may be turned off if a vehicle ahead that is using fog lights without usingthe headlights is detected.
● House lights, street lights, traffic signals, and illuminated billboards or signs may causethe high beam to switch to the low beams, or the low beams to remain on.
● The following factors may affect the amount of time taken to turn the high beam on oroff:• The brightness of headlights, fog lights, and tail lights of vehicles ahead• The movement and direction of vehicles ahead• When a vehicle ahead only has operational lights on one side• When a vehicle ahead is a two-wheeled vehicle• The condition of the road (gradient, curve, condition of the road surface etc.)• The number of passengers and amount of luggage
● The high beam may be turned on or off when the driver does not expect it.● Bicycles or similar objects may not be detected.

GX460_OM_OM60T19U_(U)
2194-3. Operating the lights and wipers
4
Driving
● In the situations shown below, the system may not be able to accurately detect sur-rounding brightness levels. This may cause the low beams to remain on or the highbeams to cause problems for pedestrians, vehicles ahead or other parties. In thesecases, manually switch between the high and low beams.• In bad weather (rain, snow, fog, sandstorms etc.)• The windshield is obscured by fog, mist, ice, dirt etc.• The windshield is cracked or damaged.• The camera sensor is deformed or dirty.• The camera sensor temperature is extremely high.• Surrounding brightness levels are equal to those of headlights, tail lights or fog lights.• Vehicles ahead have headlights that are either switched off, dirty, are changing color,
or are not aimed properly.• When driving through an area of intermittently changing brightness and darkness.• When frequently and repeatedly driving ascending/descending roads, or roads with
rough, bumpy or uneven surfaces (such as stone-paved roads, gravel tracks etc.).• When frequently and repeatedly taking curves or driving on a winding road.• There is a highly reflective object ahead of the vehicle, such as a sign or a mirror.• The back of a vehicle ahead is highly reflective, such as a container on a truck.• The vehicle’s headlights are damaged or dirty.• The vehicle is listing or tilting, due to a flat tire, a trailer being towed etc.• The high beam and low beam are repeatedly being switched between in an abnor-
mal manner.• The driver believes that the high beam may be causing problems or distress to other
drivers or pedestrians nearby.

220
GX460_OM_OM60T19U_(U)
4-3. Operating the lights and wipers
■ Temporarily lowering sensor sensitivityThe sensitivity of the sensor can be temporarily lowered.
Turn the engine switch off while the following conditions are met.
• The headlight switch is in or .• The headlight switch lever is in the original position.• Automatic High Beam switch is on.Turn the engine switch to IGNITION ON mode.Within 60 seconds after step , repeat pushing the headlight switch lever to the highbeam position then pulling it to the original position quickly 10 times, then leave thelever in the original position.If the sensitivity is changed, the Automatic High Beam indicator turns on and off 3times.
■ Temporarily switching to the low beamsIt is recommended to switch to the low beams when the high beam may cause problemsor distress to other drivers or pedestrians nearby.
1
2
3 2
4

221
GX460_OM_OM60T19U_(U)
4-3. Operating the lights and wipers
4
Driving
Fog light switch
*1or *2
Turns the fog lights off
Turns the fog lights on
*1: For the U.S.A.
*2: For Canada
■ Fog lights can be used whenThe headlights are on in low beam.
: If equipped
The fog lights secure excellent visibility in difficult driving conditions, such asin rain and fog.
1
2
NOTICE
■ To prevent battery dischargeDo not leave the lights on longer than necessary when the engine is not running.

222
GX460_OM_OM60T19U_(U)
4-3. Operating the lights and wipers
Windshield wipers and washer
Operating the lever operates the wipers or washer as follows.
Intermittent windshield wipers with interval adjuster
Off
Intermittent operation
Low speed operation
High speed operation
Temporary operation
Wiper intervals can be adjusted when intermittent operation is selected.
Increases the intermittent windshieldwiper frequency
Decreases the intermittent wind-shield wiper frequency
Operating the wiper lever
1
2
3
4
5
6
7

GX460_OM_OM60T19U_(U)
2234-3. Operating the lights and wipers
4
Driving
Washer/wiper dual opera-tion
Pulling the lever operates the wipersand washer.The wipers will automatically operate acouple of times after the washer squirts.Vehicles with headlight cleaners: If theheadlights are on, the headlight cleanerswill operate once.
Rain-sensing windshield wipers
*1 or *2 Off
Rain-sensing operation
*1 or *2
Low speed operation
*1 or *2
High speed operation
*1 or *2
High speed operation
*1: For the U.S.A.
*2: For Canada
When “AUTO” is selected, the wiperswill operate automatically when the sen-sor detects falling rain. The system auto-matically adjusts wiper timing inaccordance with rain volume and vehi-cle speed.
8
1
2
3
4
5

224
GX460_OM_OM60T19U_(U)
4-3. Operating the lights and wipers
The sensor sensitivity can be adjusted when “AUTO” is selected.
Increases the sensitivity
Decreases the sensitivity
Washer/wiper dual opera-tion
Pulling the lever operates the wipersand washer.The wipers operate automatically. (Afteroperating several times, the wipersoperate one more time after a shortdelay to prevent dripping.)Vehicles with headlight cleaners: If theheadlights are on, the headlight cleanerswill operate once.
■ The windshield wiper and washer can be operated whenThe engine switch is in IGNITION ON mode.
■ Raindrop sensor (vehicles with rain-sensing windshield wipers)
● If the wiper switch is turned to the “AUTO” position while the engine switch is inIGNITION ON mode, the wipers will operate once to show that “AUTO” mode is acti-vated.
● When the sensor sensitivity ring is turned toward high while in “AUTO” mode, the wip-ers will operate once to indicate that the sensor sensitivity is enhanced.
● If the temperature of the rain drop sensor is 194F (90C) or higher, or 5F (-15C) orlower, the automatic operation may not occur. In this case, operate the wipers in anymode other than “AUTO”.
6
7
8
● The raindrop sensor judges the amount ofraindrops.An optical sensor is adopted. It may not oper-ate properly when sunlight from the rising orsetting of the sun intermittently strikes thewindshield, or if bugs etc. are present on thewindshield.

GX460_OM_OM60T19U_(U)
2254-3. Operating the lights and wipers
4
Driving
■ Effects of vehicle speed on wiper operation (vehicles with rain-sensing windshield wip-ers)With the settings other than “AUTO” also, the time until drip prevention wiper sweepoccurs is changed depending on vehicle speed.With the low speed wiper operation selected, wiper operation will be switched from lowspeed to intermittent wiper operation only when the vehicle is stationary. (However,when the sensor sensitivity is adjusted to the highest level, the mode cannot be switched.)
■ If no windshield washer fluid spraysCheck that the washer nozzles are not blocked if there is washer fluid in the windshieldwasher fluid reservoir.
WARNING
■ Caution regarding the use of windshield wipers in “AUTO” mode (vehicles with rain-sensing windshield wipers)The windshield wipers may operate unexpectedly if the sensor is touched or the wind-shield is subject to vibration in “AUTO” mode. Take care that your fingers etc. anythingelse does not become caught in the windshield wipers.
■ Caution regarding the use of washer fluidWhen it is cold, do not use the washer fluid until the windshield becomes warm. Thefluid may freeze on the windshield and cause low visibility. This may lead to an accident,resulting in death or serious injury.
NOTICE
■ When the windshield is dryDo not use the wipers, as they may damage the windshield.
■ When the washer fluid tank is emptyDo not operate the switch continually as the washer fluid pump may overheat.
■ When there is no washer fluid spray from the nozzleDamage to the washer fluid pump may be caused if the lever is pulled toward you andheld continually.
■ When a nozzle becomes blockedIn this case, contact your Lexus dealer. Do not try to clear it with a pin or other object. The nozzle will be damaged.

226
GX460_OM_OM60T19U_(U)
4-3. Operating the lights and wipers
Rear window wiper and washer
Operating the switch operates the rear wiper as follows.
*1 or *2 Off
*1 or *2
Intermittent operation
*1 or *2
Normal operation
*1: For the U.S.A.
*2: For Canada
Washer/wiper dual opera-tion
Pushing the lever operates the wiperand washer.The wipers will automatically operate acouple of times after the washer squirts.
■ The rear window wiper and washer can be operated when● The engine switch is in IGNITION ON mode.● The glass hatch is closed.
■ If no windshield washer fluid spraysCheck that the washer nozzles are not blocked if there is washer fluid in the windshieldwasher fluid reservoir.
1
2
3
4

GX460_OM_OM60T19U_(U)
2274-3. Operating the lights and wipers
4
Driving
NOTICE
■ When the rear window is dryDo not use the wiper, as it may damage the rear window.
■ When the washer fluid tank is emptyDo not operate the switch continually as the washer fluid pump may overheat.

228
GX460_OM_OM60T19U_(U)
4-3. Operating the lights and wipers
Headlight cleaner switch
Press the switch to clean the headlights.
■ The headlight cleaners can be operated whenThe engine switch is in IGNITION ON mode and the headlight switch is turned on.
■ Windshield washer linked operationWhen the windshield washer is operated with the engine switch in IGNITION ON modeand the headlights on, the headlight cleaners will operate once. (P. 222)
: If equipped
Washer fluid can be sprayed on the headlights.
NOTICE
■ When the washer fluid tank is emptyDo not press the switch continually as the washer fluid pump may overheat.

229
GX460_OM_OM60T19U_(U)
4-4. Refueling
4
Driving
Opening the fuel tank cap
● Turn the engine switch off and ensure that all the doors and windows areclosed.
● Confirm the type of fuel.
■ Fuel typesP. 570
■ Fuel tank opening for unleaded gasolineTo help prevent incorrect fueling, your Lexus has a fuel tank opening that only accommo-dates the special nozzle on unleaded fuel pumps.
■ If the malfunction indicator lamp illuminatesThe malfunction indicator lamp may illuminate erroneously if refueling is performedrepeatedly when the fuel tank is nearly full.
Perform the following steps to open the fuel tank cap.
Before refueling the vehicle

230
GX460_OM_OM60T19U_(U)
4-4. Refueling
WARNING
■ When refueling the vehicleObserve the following precautions while refueling the vehicle. Failure to do so mayresult in death or serious injury.● After exiting the vehicle and before opening the fuel door, touch an unpainted metal
surface to discharge any static electricity. It is important to discharge static electricitybefore refueling because sparks resulting from static electricity can cause fuel vaporsto ignite while refueling.
● Always hold the grips on the fuel tank cap and turn it slowly to remove it. A whooshing sound may be heard when the fuel tank cap is loosened. Wait until thesound cannot be heard before fully removing the cap. In hot weather, pressurized fuelmay spray out of the filler neck and cause injury.
● Do not allow anyone that has not discharged static electricity from their body to comeclose to an open fuel tank.
● Do not inhale vaporized fuel.Fuel contains substances that are harmful if inhaled.
● Do not smoke while refueling the vehicle.Doing so may cause the fuel to ignite and cause a fire.
● Do not return to the vehicle or touch any person or object that is statically charged.This may cause static electricity to build up, resulting in a possible ignition hazard.
■ When refuelingObserve the following precautions to prevent fuel overflowing from the fuel tank:● Securely insert the fuel nozzle into the fuel filler neck.● Stop filling the tank after the fuel nozzle automatically clicks off.● Do not top off the fuel tank.
NOTICE
■ RefuelingDo not spill fuel during refueling.Doing so may damage the vehicle, such as causing the emission control systems tooperate abnormally or damaging fuel system components or the vehicle’s painted sur-face.

GX460_OM_OM60T19U_(U)
2314-4. Refueling
4
Driving
Press the opener to open the fuelfiller door.
Turn the fuel tank cap slowly to open,and hang the fuel tank cap on theback of the fuel filler door.
Opening the fuel tank cap
1
2

232
GX460_OM_OM60T19U_(U)
4-4. Refueling
■ When the fuel filler door cannot be opened by pressing the inside switch
After refueling, turn the fuel tank capuntil you hear a click. Once the cap isreleased, it will turn slightly in the oppo-site direction.
Remove the cover inside the luggage compart-ment and pull the lever.
Closing the fuel tank cap
WARNING
■ When replacing the fuel tank capDo not use anything but a genuine Lexus fuel tank cap designed for your vehicle. Doingso may cause a fire or other incident which may result in death or serious injury.

233
GX460_OM_OM60T19U_(U)
4-5. Using the driving support systems
4
Driving
Lexus Safety System +
◆ PCS (Pre-Collision System)
P. 239
◆ LDA (Lane Departure Alert)
P. 250
◆ AHB (Automatic High Beam)
P. 216
◆ Dynamic radar cruise control
P. 258
The Lexus Safety System + consists of the following drive assist systems andcontributes to a safe and comfortable driving experience:
WARNING
■ Lexus Safety System +The Lexus Safety System + is designed to operate under the assumption that the driverwill drive safely, and is designed to help reduce the impact to the occupants and thevehicle in the case of a collision or assist the driver in normal driving conditions.As there is a limit to the degree of recognition accuracy and control performance thatthis system can provide, do not overly rely on this system. The driver is always responsi-ble for paying attention to the vehicle’s surroundings and driving safely.

234
GX460_OM_OM60T19U_(U)
4-5. Using the driving support systems
Two types of sensors, located behind the front grille and windshield, detect infor-mation necessary to operate the drive assist systems.
Radar sensor
Front camera
Sensors
1
2
WARNING
■ To avoid malfunction of the radar sensorObserve the following precautions.Otherwise, the radar sensor may not operate properly, possibly leading to an accidentresulting in death or serious injury.● Keep the radar sensor and the radar sensor cover clean at all times.
● Do not attach accessories, stickers (including transparent stickers) or other items tothe radar sensor, radar sensor cover or surrounding area.
● Do not subject the radar sensor or its surrounding area to a strong impact. If the radar sensor, front grille, or front bumper has been subjected to a strong impact,have the vehicle inspected by your Lexus dealer.
● Do not disassemble the radar sensor.● Do not modify or paint the radar sensor or radar sensor cover.● In the following cases, the radar sensor must be recalibrated. Contact your Lexus
dealer for details.• When the radar sensor or front grille are removed and installed, or replaced• When the front bumper is replaced
Radar sensorRadar sensor cover
If the front of the radar sensor or the front orback of the radar sensor cover is dirty orcovered with water droplets, snow, etc., cleanit. Clean the radar sensor and radar sensorcover with a soft cloth to avoid damagingthem.
1
2

GX460_OM_OM60T19U_(U)
2354-5. Using the driving support systems
4
Driving
WARNING
■ To avoid malfunction of the front cameraObserve the following precautions.Otherwise, the front camera may not operate properly, possibly leading to an accidentresulting in death or serious injury.● Keep the windshield clean at all times.
• If the windshield is dirty or covered with an oily film, water droplets, snow, etc.,clean the windshield.
• If a glass coating agent is applied to the windshield, it will still be necessary to usethe windshield wipers to remove water droplets, etc. from the area of the wind-shield in front of the front camera.
• If the inner side of the windshield where the front camera is installed is dirty, con-tact your Lexus dealer.
● If the part of the windshield in front of the front camera is fogged up or covered withcondensation or ice, use the windshield defogger to remove the fog, condensation orice. (P. 388)
● If water droplets cannot be properly removed from the area of the windshield in frontof the front camera by the windshield wipers, replace the wiper insert or wiper blade.
● Do not attach window tint to the windshield.● Replace the windshield if it is damaged or cracked.
After replacing the windshield, the front camera must be recalibrated. Contact yourLexus dealer for details.
● Do not allow liquids to contact the front camera.● Do not allow bright lights to shine into the front camera.● Do not dirty or damage the front camera.
When cleaning the inside of the windshield, do not allow glass cleaner to contact thelens of the front camera. Also, do not touch the lens. If the lens is dirty or damaged, contact your Lexus dealer.
● Do not subject the front camera to a strong impact.● Do not change the installation position or direction of the front camera or remove it.● Do not disassemble the front camera.
● Do not attach objects, such as stickers, trans-parent stickers, etc., to the outer side of thewindshield in front of the front camera(shaded area in the illustration).A: From the top of the windshield to approxi-mately 0.4 in. (1 cm) below the bottom of thefront cameraB: Approximately 7.9 in. (20 cm) (Approxi-mately 4.0 in. [10 cm] to the right and leftfrom the center of the front camera)

236
GX460_OM_OM60T19U_(U)
4-5. Using the driving support systems
■ Certification For vehicles sold in the U.S.A., Hawaii, Guam, Puerto Rico and Saipan
WARNING
● Do not modify any components of the vehicle around the front camera (inside rearview mirror, etc.) or ceiling.
● Do not attach any accessories to the hood, front grille or front bumper that mayobstruct the front camera. Contact your Lexus dealer for details.
● If a surfboard or other long object is to be mounted on the roof, make sure that it willnot obstruct the front camera.
● Do not modify the headlights or other lights.

GX460_OM_OM60T19U_(U)
2374-5. Using the driving support systems
4
Driving
For vehicles sold in Canada

238
GX460_OM_OM60T19U_(U)
4-5. Using the driving support systems
■ If a warning message is displayed on the multi-information displayA system may be temporarily unavailable or there may be a malfunction in the system● In the following situations, perform the actions specified in the table. When the normal
operating conditions are detected, the message will disappear and the system willbecome operational. If the message does not disappear, contact your Lexus dealer.
● In the following situations, if the situation has changed (or the vehicle has been drivenfor some time) and the normal operating conditions are detected, the message will dis-appear and the system will become operational. If the message does not disappear, contact your Lexus dealer.• When the temperature around the radar sensor is outside of the operational range,
such as when the vehicle is in the sun or in an extremely cold environment• When the front camera cannot detect objects in front of the vehicle, such as when
driving in the dark, snow, or fog, or when bright lights are shining into the front cam-era
Situation Actions
When the area around a sensor iscovered with dirt, moisture (foggedup, covered with condensation, ice,etc.), or other foreign matter
To clean the part of the windshield in front ofthe front camera, use the windshield wipers orthe windshield defogger of the air conditioningsystem (P. 388).
When the temperature around thefront camera is outside of the opera-tional range, such as when the vehi-cle is in the sun or in an extremelycold environment
If the front camera is hot, such as after the vehi-cle had been parked in the sun, use the air con-ditioning system to decrease the temperaturearound the front camera.
If a sunshade was used when the vehicle wasparked, depending on its type, the sunlightreflected from the surface of the sunshademay cause the temperature of the front cam-era to become excessively high.
If the front camera is cold, such after the vehicleis parked in an extremely cold environment, usethe air conditioning system to increase the tem-perature around the front camera.
The area in front of the front camerais obstructed, such as when thehood is open or a sticker is attachedto the part of the windshield in frontof the front camera.
Close the hood, remove the sticker, etc. toclear the obstruction.

239
GX460_OM_OM60T19U_(U)
4-5. Using the driving support systems
4
Driving
PCS (Pre-Collision System)
◆ Pre-collision warning
When the system determines thatthe possibility of a frontal collision ishigh, a buzzer will sound and a warn-ing message will be displayed on themulti-information display to urge thedriver to take evasive action.
◆ Pre-collision brake assist
When the system determines that the possibility of a frontal collision is high,the system applies greater braking force in relation to how strongly the brakepedal is depressed.
The pre-collision system uses a radar sensor and front camera to detect vehi-cles and pedestrians in front of your vehicle. When the system determinesthat the possibility of a frontal collision with a vehicle or pedestrian is high, awarning operates to urge the driver to take evasive action and the potentialbrake pressure is increased to help the driver avoid the collision. If the systemdetermines that the possibility of a frontal collision with a vehicle or pedes-trian is extremely high, the brakes are automatically applied to help avoid thecollision or help reduce the impact of the collision.
The pre-collision system can be disabled/enabled and the warning timing canbe changed. (P. 242)

240
GX460_OM_OM60T19U_(U)
4-5. Using the driving support systems
◆ Pre-collision braking
When the system determines that the possibility of a frontal collision is high,the system warns the driver. If the system determines that the possibility of afrontal collision is extremely high, the brakes are automatically applied to helpavoid the collision or reduce the collision speed.
◆ Suspension control (if equipped)
When the system determines that the possibility of a frontal collision is high,the Adaptive Variable Suspension System (P. 343) will control the dampingforce of the shock absorbers to help maintain an appropriate vehicle posture.
WARNING
■ Limitations of the pre-collision system● The driver is solely responsible for safe driving. Always drive safely, taking care to
observe your surroundings. Do not use the pre-collision system instead of normal braking operations under anycircumstances. This system will not prevent collisions or lessen collision damage orinjury in every situation. Do not overly rely on this system. Failure to do so may lead toan accident, resulting in death or serious injury.
● Although this system is designed to help avoid a collision or help reduce the impact ofthe collision, its effectiveness may change according to various conditions, thereforethe system may not always be able to achieve the same level of performance. Read the following conditions carefully. Do not overly rely on this system and alwaysdrive carefully.• Conditions under which the system may operate even if there is no possibility of a
collision: P. 244• Conditions under which the system may not operate properly: P. 247
● Do not attempt to test the operation of the pre-collision system yourself. Depending on the objects used for testing (dummies, cardboard objects imitatingdetectable objects, etc.), the system may not operate properly, possibly leading to anaccident.

GX460_OM_OM60T19U_(U)
2414-5. Using the driving support systems
4
Driving
WARNING
■ Pre-collision braking● When the pre-collision braking function is operating, a large amount of braking force
will be applied.● If the vehicle is stopped by the operation of the pre-collision braking function, the pre-
collision braking function operation will be canceled after approximately 2 seconds.Depress the brake pedal as necessary.
● The pre-collision braking function may not operate if certain operations are per-formed by the driver. If the accelerator pedal is being depressed strongly or the steer-ing wheel is being turned, the system may determine that the driver is taking evasiveaction and possibly prevent the pre-collision braking function from operating.
● In some situations, while the pre-collision braking function is operating, operation ofthe function may be canceled if the accelerator pedal is depressed strongly or thesteering wheel is turned and the system determines that the driver is taking evasiveaction.
● If the brake pedal is being depressed, the system may determine that the driver is tak-ing evasive action and possibly delay the operation timing of the pre-collision brakingfunction.
■ When to disable the pre-collision systemIn the following situations, disable the system, as it may not operate properly, possiblyleading to an accident resulting in death or serious injury:● When the vehicle is being towed● When your vehicle is towing another vehicle● When transporting the vehicle via truck, boat, train or similar means of transportation● When the vehicle is raised on a lift with the engine running and the tires are allowed to
rotate freely● When inspecting the vehicle using a drum tester such as a chassis dynamometer or
speedometer tester, or when using an on vehicle wheel balancer● When a strong impact is applied to the front bumper or front grille, due to an accident
or other reasons● If the vehicle cannot be driven in a stable manner, such as when the vehicle has been
in an accident or is malfunctioning● When the vehicle is driven in a sporty manner or off-road● When the tires are not properly inflated● When the tires are very worn● When tires of a size other than specified are installed● When tire chains are installed● When a compact spare tire or an emergency tire puncture repair kit is used● If equipment (snow plow, etc.) that may obstruct the radar sensor or front camera is
temporarily installed to the vehicle

242
GX460_OM_OM60T19U_(U)
4-5. Using the driving support systems
■ Enabling/disabling the pre-collision system
The pre-collision system can be enabled/disabled on (P. 93) of the
multi-information display.
The system is automatically enabled each time the engine switch is turned to IGNI-TION ON mode.
If the system is disabled, the PCSwarning light will turn on and a mes-sage will be displayed on the multi-information display.
■ Changing the pre-collision warning timing
The pre-collision warning timing can be changed on (P. 93) of themulti-information display.
The operation timing setting is retained when the engine switch is turned off.
Far
The warning will begin to operateearlier than with the default timing.Middle
This is the default setting.Near
The warning will begin to operatelater than with the default timing.
Changing settings of the pre-collision system
1
2
3

GX460_OM_OM60T19U_(U)
2434-5. Using the driving support systems
4
Driving
■ Operational conditionsThe pre-collision system is enabled and the system determines that the possibility of afrontal collision with a vehicle or pedestrian is high.Each function is operational at the following speeds:● Pre-collision warning:
• Vehicle speed is between approximately 7 and 110 mph (10 and 180 km/h). (Fordetecting a pedestrian, vehicle speed is between approximately 7 and 50 mph [10and 80 km/h].)
• The relative speed between your vehicle and the vehicle or pedestrian ahead isapproximately 7 mph (10 km/h) or more.
● Pre-collision brake assist: • Vehicle speed is between approximately 20 and 110 mph (30 and 180 km/h). (For
detecting a pedestrian, vehicle speed is between approximately 20 and 50 mph[30 and 80 km/h].)
• The relative speed between your vehicle and the vehicle or pedestrian ahead isapproximately 20 mph (30 km/h) or more.
● Pre-collision braking:• Vehicle speed is between approximately 7 and 110 mph (10 and 180 km/h). (For
detecting a pedestrian, vehicle speed is between approximately 7 and 50 mph [10and 80 km/h].)
• The relative speed between your vehicle and the vehicle or pedestrian ahead isapproximately 7 mph (10 km/h) or more.
The system may not operate in the following situations:● If a battery terminal has been disconnected and reconnected and then the vehicle has
not been driven for a certain amount of time● If the shift lever is in R● If VSC is disabled (only the pre-collision warning function will be operational)● If the low speed four-wheel drive indicator is illuminated (only the pre-collision warning
function will be operational)

244
GX460_OM_OM60T19U_(U)
4-5. Using the driving support systems
■ Pedestrian detection function
■ Cancelation of the pre-collision brakingIf either of the following occur while the pre-collision braking function is operating, it willbe canceled:● The accelerator pedal is depressed strongly.● The steering wheel is turned sharply or abruptly.
■ Conditions under which the system may operate even if there is no possibility of a colli-sion● In some situations such as the following, the system may determine that there is a possi-
bility of a frontal collision and operate.• When passing a vehicle or pedestrian• When changing lanes while overtaking a preceding vehicle• When overtaking a preceding vehicle that is changing lanes
The pre-collision system detects pedestriansbased on the size, profile, and motion of adetected object. However, a pedestrian may notbe detected depending on the surroundingbrightness and the motion, posture, and angle ofthe detected object, preventing the system fromoperating properly. (P. 248)
• When overtaking a preceding vehicle thatis making a left/right turn
• When passing a vehicle in an oncominglane that is stopped to make a right/left turn

GX460_OM_OM60T19U_(U)
2454-5. Using the driving support systems
4
Driving
• When rapidly closing on a vehicle ahead• If the front of the vehicle is raised or lowered, such as when the road surface is
uneven or undulating• When approaching objects on the roadside, such as guardrails, utility poles, trees, or
walls
• When driving on a narrow path surrounded by a structure, such as in a tunnel or onan iron bridge
• When there is a metal object (manhole cover, steel plate, etc.), steps, or a protrusionon the road surface or roadside
• When driving on a road where relativelocation to vehicle ahead in an adjacentlane may change, such as on a windingroad
• When there is a vehicle, pedestrian, orobject by the roadside at the entrance of acurve
• When a crossing pedestrian approachesvery close to the vehicle
• When passing through a place with a lowstructure above the road (low ceiling, trafficsign, etc.)
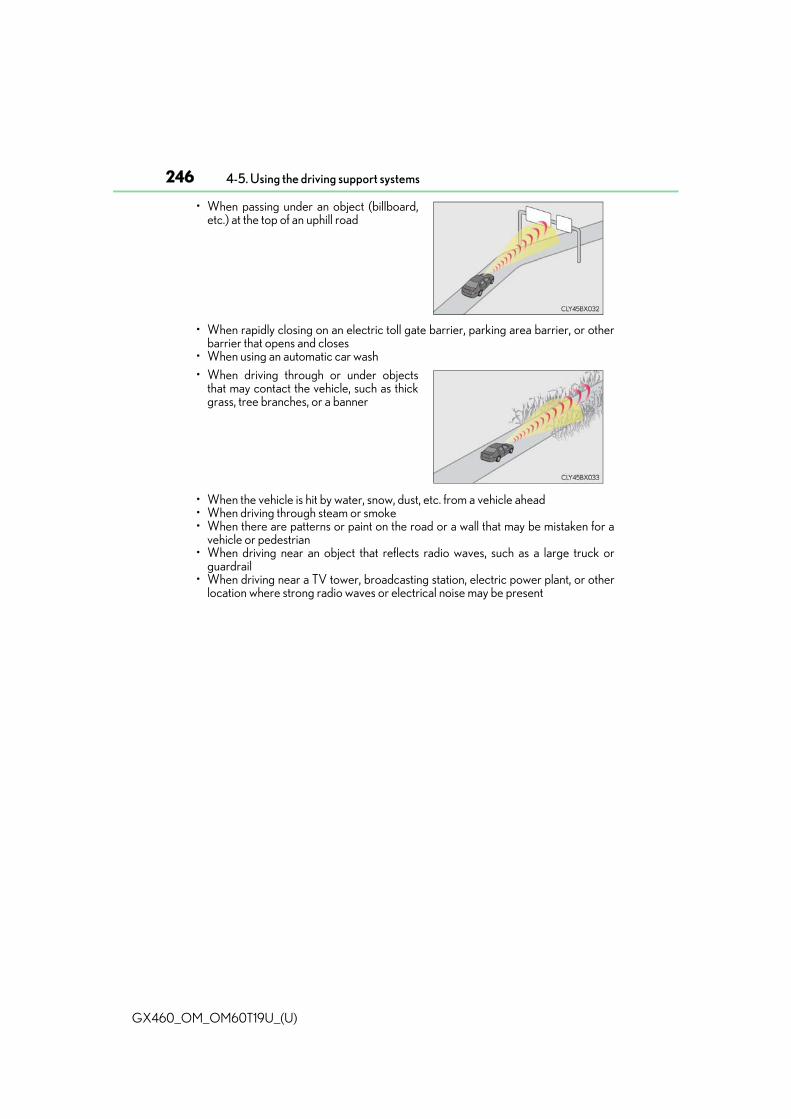
246
GX460_OM_OM60T19U_(U)
4-5. Using the driving support systems
• When rapidly closing on an electric toll gate barrier, parking area barrier, or otherbarrier that opens and closes
• When using an automatic car wash
• When the vehicle is hit by water, snow, dust, etc. from a vehicle ahead• When driving through steam or smoke• When there are patterns or paint on the road or a wall that may be mistaken for a
vehicle or pedestrian• When driving near an object that reflects radio waves, such as a large truck or
guardrail• When driving near a TV tower, broadcasting station, electric power plant, or other
location where strong radio waves or electrical noise may be present
• When passing under an object (billboard,etc.) at the top of an uphill road
• When driving through or under objectsthat may contact the vehicle, such as thickgrass, tree branches, or a banner

GX460_OM_OM60T19U_(U)
2474-5. Using the driving support systems
4
Driving
■ Situations in which the system may not operate properly● In some situations such as the following, a vehicle may not be detected by the radar
sensor and front camera, preventing the system from operating properly:• If an oncoming vehicle is approaching your vehicle• If a vehicle ahead is a motorcycle or bicycle• When approaching the side or front of a vehicle• If a preceding vehicle has a small rear end, such as an unloaded truck
• If a vehicle ahead is carrying a load which protrudes past its rear bumper
• If a vehicle ahead is irregularly shaped, such as a tractor or side car• If the sun or other light is shining directly on a vehicle ahead• If a vehicle cuts in front of your vehicle or emerges from beside a vehicle• If a vehicle ahead makes an abrupt maneuver (such as sudden swerving, accelera-
tion or deceleration)• When suddenly cutting behind a preceding vehicle
• When driving in inclement weather such as heavy rain, fog, snow or a sandstorm• When the vehicle is hit by water, snow, dust, etc. from a vehicle ahead• When driving through steam or smoke• When driving in a place where the surrounding brightness changes suddenly, such
as at the entrance or exit of a tunnel• When a very bright light, such as the sun or the headlights of oncoming traffic, shines
directly into the front camera• When the surrounding area is dim, such as at dawn or dusk, or while at night or in a
tunnel
• If a preceding vehicle has a low rear end,such as a low bed trailer
• If a vehicle ahead has extremely highground clearance
• When a vehicle ahead is not directly in frontof your vehicle

248
GX460_OM_OM60T19U_(U)
4-5. Using the driving support systems
• After the engine has started the vehicle has not been driven for a certain amount oftime
• While making a left/right turn and for a few seconds after making a left/right turn• While driving on a curve and for a few seconds after driving on a curve• If your vehicle is skidding
• If the wheels are misaligned• If a wiper blade is blocking the front camera• The vehicle is wobbling.• The vehicle is being driven at extremely high speeds.• When driving on a hill • If the radar sensor or front camera is misaligned
● In some situations such as the following, sufficient braking force may not be obtained,preventing the system from performing properly:• If the braking functions cannot operate to their full extent, such as when the brake
parts are extremely cold, extremely hot, or wet• If the vehicle is not properly maintained (brakes or tires are excessively worn,
improper tire inflation pressure, etc.)• When the vehicle is being driven on a gravel road or other slippery surface
● Some pedestrians such as the following may not be detected by the radar sensor andfront camera, preventing the system from operating properly:• Pedestrians shorter than approximately 3.2 ft. (1 m) or taller than approximately
6.5 ft. (2 m)• Pedestrians wearing oversized clothing (a rain coat, long skirt, etc.), making their sil-
houette obscure• Pedestrians who are carrying large baggage, holding an umbrella, etc., hiding part
of their body• Pedestrians who are bending forward or squatting• Pedestrians who are pushing a stroller, wheelchair, bicycle or other vehicle• Groups of pedestrians which are close together• Pedestrians who are wearing white and look extremely bright• Pedestrians in the dark, such as at night or while in a tunnel• Pedestrians whose clothing appears to be nearly the same color or brightness as
their surroundings• Pedestrians near walls, fences, guardrails, or large objects• Pedestrians who are on a metal object (manhole cover, steel plate, etc.) on the road• Pedestrians who are walking fast• Pedestrians who are changing speed abruptly• Pedestrians running out from behind a vehicle or a large object• Pedestrians who are extremely close to the side of the vehicle (outside rear view
mirror, etc.)
• If the front of the vehicle is raised or low-ered

GX460_OM_OM60T19U_(U)
2494-5. Using the driving support systems
4
Driving
■ If VSC is disabled● If VSC is disabled (P. 357), the pre-collision brake assist and pre-collision braking
functions are also disabled.● The PCS warning light will turn on and “VSC Turned Off Pre-Collision Brake System
Unavailable” will be displayed on the multi-information display.

250
GX460_OM_OM60T19U_(U)
4-5. Using the driving support systems
LDA (Lane Departure Alert)
When driving on roads with white (yellow) lines, this function alerts the driverwhen the vehicle might depart from its lane.
The LDA system recognizes visiblewhite (yellow) lines with the camerasensor on the upper portion of the frontwindshield.
◆ Lane departure alert function
When the system determines thatthe vehicle might depart from itslane, a warning is displayed on themulti-information display, and eitherthe warning buzzer sounds or thesteering wheel vibrates to alert thedriver.
When the warning buzzer sounds orthe steering wheel vibrates, checkthe surrounding road situation andcarefully operate the steering wheelto move the vehicle back to the cen-ter of the lane.
Summary of functions
Functions included in LDA system

GX460_OM_OM60T19U_(U)
2514-5. Using the driving support systems
4
Driving
◆ Vehicle sway warning function
When the vehicle is swaying orappears as if it may depart from itslane multiple times, the warningbuzzer sounds and a message is dis-played on the multi-information dis-play to alert the driver.
WARNING
■ Before using LDA systemDo not rely solely upon the LDA system. The LDA system does not automatically drivethe vehicle or reduce the amount of attention that must be paid to the area in front ofthe vehicle. The driver must always assume full responsibility for driving safely by pay-ing careful attention to the surrounding conditions and operating the steering wheel tocorrect the path of the vehicle. Also, the driver must take adequate breaks whenfatigued, such as from driving for a long period of time.Failure to perform appropriate driving operations and pay careful attention may lead toan accident, resulting in death or serious injury.
■ To avoid operating LDA system by mistakeWhen not using the LDA system, use the LDA switch to turn the system off.
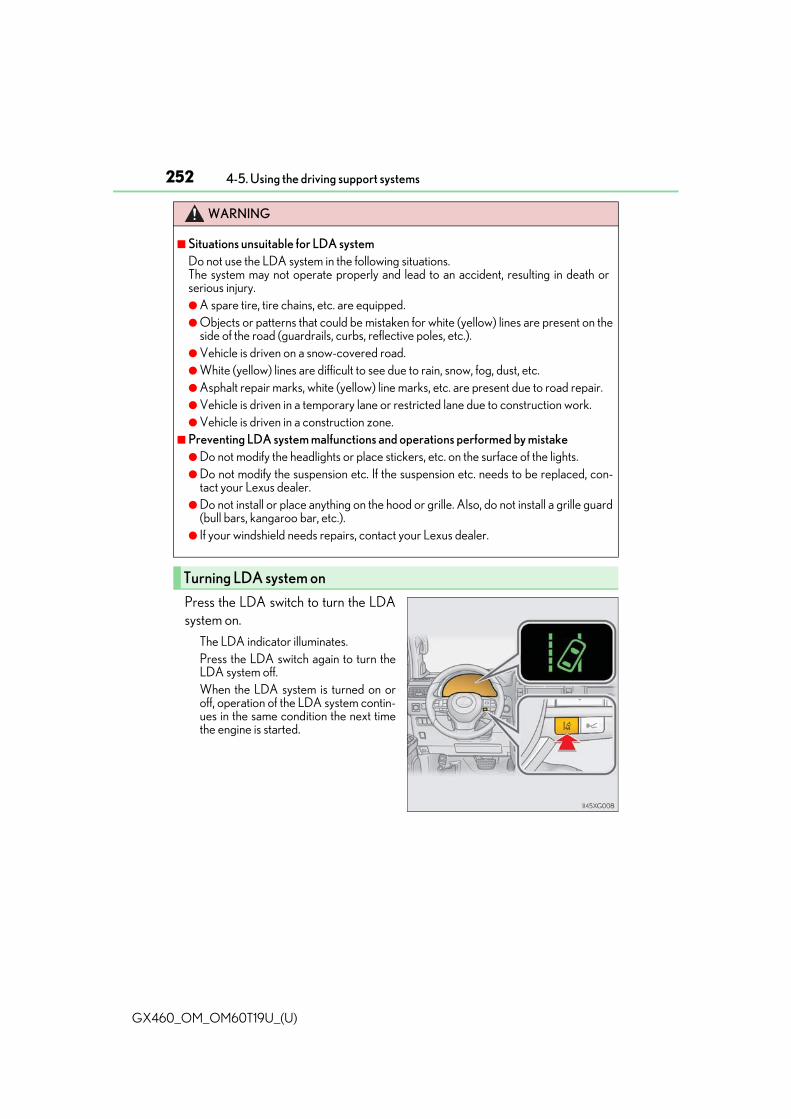
252
GX460_OM_OM60T19U_(U)
4-5. Using the driving support systems
Press the LDA switch to turn the LDAsystem on.
The LDA indicator illuminates.Press the LDA switch again to turn theLDA system off.When the LDA system is turned on oroff, operation of the LDA system contin-ues in the same condition the next timethe engine is started.
WARNING
■ Situations unsuitable for LDA systemDo not use the LDA system in the following situations.The system may not operate properly and lead to an accident, resulting in death orserious injury.● A spare tire, tire chains, etc. are equipped.● Objects or patterns that could be mistaken for white (yellow) lines are present on the
side of the road (guardrails, curbs, reflective poles, etc.).● Vehicle is driven on a snow-covered road.● White (yellow) lines are difficult to see due to rain, snow, fog, dust, etc.● Asphalt repair marks, white (yellow) line marks, etc. are present due to road repair.● Vehicle is driven in a temporary lane or restricted lane due to construction work.● Vehicle is driven in a construction zone.
■ Preventing LDA system malfunctions and operations performed by mistake● Do not modify the headlights or place stickers, etc. on the surface of the lights.● Do not modify the suspension etc. If the suspension etc. needs to be replaced, con-
tact your Lexus dealer.● Do not install or place anything on the hood or grille. Also, do not install a grille guard
(bull bars, kangaroo bar, etc.).● If your windshield needs repairs, contact your Lexus dealer.
Turning LDA system on

GX460_OM_OM60T19U_(U)
2534-5. Using the driving support systems
4
Driving
LDA indicator
The illumination condition of theindicator informs the driver of thesystem operation status.
Illuminated in green: LDA system is operating.Flashing in orange: Lane departure alert function is operat-ing.Lane departure alert function display
Displayed when the multi-information display is switched to the driving assistsystem information screen.
Indications on multi-information display
1
2
Inside of displayed white lines iswhite
Inside of displayed white lines isblack
Indicates that the system is recognizingwhite (yellow) lines. When the vehicledeparts from its lane, the white line dis-played on the side the vehicle departsfrom flashes orange.
Indicates that the system is not able torecognize white (yellow) lines or istemporarily canceled.

254
GX460_OM_OM60T19U_(U)
4-5. Using the driving support systems
■ Operation conditions of each function● Lane departure alert function
This function operates when all of the following conditions are met.• LDA is turned on.• Vehicle speed is approximately 32 mph (50 km/h) or more.• System recognizes white (yellow) lines.• Width of traffic lane is approximately 9.8 ft. (3 m) or more.• Turn signal lever is not operated.• Vehicle is driven on a straight road or around a gentle curve with a radius of more
than approximately 492 ft. (150 m).• No system malfunctions are detected. (P. 256)
● Vehicle sway warning functionThis function operates when all of the following conditions are met.
• Setting for “Sway Warning” in of the multi-information display is set to “On”.(P. 93)
• Vehicle speed is approximately 32 mph (50 km/h) or more.• Width of traffic lane is approximately 9.8 ft. (3 m) or more.• No system malfunctions are detected. (P. 256)
■ Temporary cancellation of functionsWhen the operation conditions are no longer met, a function may be temporarily can-celed. However, when the operation conditions are met again, operation of the functionis automatically restored. (P. 254)
■ Lane departure alert functionThe warning buzzer may be difficult to hear due to external noise, audio playback, etc.Also, it may be difficult to feel steering wheel vibrations due to the road conditions etc.
■ Vehicle sway warning function
■ White (yellow) lines are only on one side of roadThe LDA system will not operate for the side on which white (yellow) lines could not berecognized.
When the system determines that the vehicle isswaying while the vehicle sway warning functionis operating, a buzzer sounds and a warningmessage urging the driver to rest and the sym-bol shown in the illustration are simultaneouslydisplayed on the multi-information display.Depending on the vehicle and road conditions,the warning may not operate.

GX460_OM_OM60T19U_(U)
2554-5. Using the driving support systems
4
Driving
■ Conditions in which functions may not operate properlyIn the following situations, the camera sensor may not detect white (yellow) lines and var-ious functions may not operate normally.● There are shadows on the road that run parallel with, or cover, the white (yellow) lines.● The vehicle is driven in an area without white (yellow) lines, such as in front of a tollgate
or checkpoint, or at an intersection, etc.● The white (yellow) lines are cracked, “Botts’ dots”, “Raised pavement marker” or stones
are present.● The white (yellow) lines cannot be seen or are difficult to see due to sand, etc.● The vehicle is driven on a road surface that is wet due to rain, puddles, etc.● The traffic lines are yellow (which may be more difficult to recognize than lines that are
white).● The white (yellow) lines cross over a curb, etc.● The vehicle is driven on a bright surface, such as concrete.● The vehicle is driven on a surface that is bright due to reflected light, etc.● The vehicle is driven in an area where the brightness changes suddenly, such as at the
entrances and exits of tunnels, etc.● Light from the headlights of an oncoming vehicle, the sun, etc. enters the camera.● The vehicle is driven where the road diverges, merges, etc.● The vehicle is driven on a slope.● The vehicle is driven on a road which tilts left or right, or a winding road.● The vehicle is driven on an unpaved or rough road.● The vehicle is driven around a sharp curve.● The traffic lane is excessively narrow or wide.● The vehicle is extremely tilted due to carrying heavy luggage or having improper tire
pressure.● The distance to the preceding vehicle is extremely short.● The vehicle is moving up and down a large amount due to road conditions during driv-
ing (poor roads or road seams).● The headlight lenses are dirty and emit a faint amount of light at night, or the beam axis
has deviated.● The vehicle has just changed lanes or crossed an intersection.

256
GX460_OM_OM60T19U_(U)
4-5. Using the driving support systems
■ Warning messageIf the following warning message is displayed on the multi-information display and theLDA indicator illuminates in orange, follow the appropriate troubleshooting procedure.
If a different warning message is displayed, follow the instructions displayed on thescreen.
Warning message Details/Actions
“Lane Departure Alert
MalfunctionVisit Your Dealer”
The system may not be operating properly.Have the vehicle inspected at your Lexus
dealer.
“Front Camera Unavailable
See Owner’s Manual”
Dirt, rain, condensation, ice, snow, etc. arepresent on the windshield in front of the cam-era sensor. Turn the LDA system off, remove any dirt,
rain, condensation, ice, snow, etc. from thewindshield, and then turn the LDA systemback on.
“Front Camera Unavailable”
The operation conditions of the camera sen-sor (temperature, etc.) are not met.When the operation conditions of the cam-
era sensor (temperature, etc.) are met, theLDA system will become available. Turnthe LDA system off, wait for a little while,and then turn the LDA system back on.
“Lane Departure Alert Unavailable”
The LDA system is temporarily canceled dueto a malfunction in a sensor other than thecamera sensor. Turn the LDA system off and follow the
appropriate troubleshooting proceduresfor the warning message. Afterward, drivethe vehicle for a short time, and then turnthe LDA system back on.
“Lane Departure Alert
Unavailable Below Approx
32MPH”
The LDA system cannot be used as the vehiclespeed is less than approximately 32 mph(50 km/h).Drive the vehicle at approximately 32 mph
(50 km/h) or more.

GX460_OM_OM60T19U_(U)
2574-5. Using the driving support systems
4
Driving
■ CustomizationThe following settings can be changed.
For how to change settings, refer to P. 584.
Function Setting details
Lane departure alert functionAdjust alert sensitivity
Adjust alert type
Vehicle sway warning functionTurn function on and off
Adjust alert sensitivity

258
GX460_OM_OM60T19U_(U)
4-5. Using the driving support systems
Dynamic radar cruise control
In vehicle-to-vehicle distance control mode, the vehicle automatically acceler-ates and decelerates to match the speed changes of the preceding vehicle evenif the accelerator pedal is not depressed. In constant speed control mode, thevehicle runs at a fixed speed.
Use the dynamic radar cruise control on freeways and highways.● Vehicle-to-vehicle distance control mode (P. 261)● Constant speed control mode (P. 266)
Indicators
Set speed
Vehicle-to-vehicle distance switch
Display
Cruise control switch
Summary of functions
1
2
3
4
5

GX460_OM_OM60T19U_(U)
2594-5. Using the driving support systems
4
Driving
WARNING
■ Before using dynamic radar cruise control● Driving safely is the sole responsibility of the driver. Do not rely solely on the system,
and drive safely by always paying careful attention to your surroundings. ● The dynamic radar cruise control provides driving assistance to reduce the driver’s
burden. However, there are limitations to the assistance provided. Read the following conditions carefully. Do not overly rely on this system and alwaysdrive carefully.• When the sensor may not be correctly detecting the vehicle ahead: P. 268• Conditions under which the vehicle-to-vehicle distance control mode may not
function correctly: P. 269● Set the speed appropriately depending on the speed limit, traffic flow, road condi-
tions, weather conditions, etc. The driver is responsible for checking the set speed.● Even when the system is functioning normally, the condition of the preceding vehicle
as detected by the system may differ from the condition observed by the driver.Therefore, the driver must always remain alert, assess the danger of each situationand drive safely. Relying on this system or assuming the system ensures safety whiledriving can lead to an accident, resulting in death or serious injury.
● Switch the dynamic radar cruise control off using the “ON/OFF” button when not inuse.
■ Cautions regarding the driving assist systemsObserve the following precautions, as there are limitations to the assistance providedby the system.Failure to do so may cause an accident resulting in death or serious injury.● Assisting the driver to measure following distance
The dynamic radar cruise control is only intended to help the driver in determiningthe following distance between the driver’s own vehicle and a designated vehicletraveling ahead. It is not a mechanism that allows careless or inattentive driving, and itis not a system that can assist the driver in low-visibility conditions. It is still necessaryfor driver to pay close attention to the vehicle’s surroundings.
● Assisting the driver to judge proper following distanceThe dynamic radar cruise control determines whether the following distancebetween the driver’s own vehicle and a designated vehicle traveling ahead is within aset range. It is not capable of making any other type of judgement. Therefore, it isabsolutely necessary for the driver to remain vigilant and to determine whether or notthere is a possibility of danger in any given situation.
● Assisting the driver to operate the vehicleThe dynamic radar cruise control has limited capability to prevent or avoid a collisionwith a vehicle traveling ahead. Therefore, if there is ever any danger, the driver musttake immediate and direct control of the vehicle and act appropriately in order toensure the safety of all involved.

260
GX460_OM_OM60T19U_(U)
4-5. Using the driving support systems
WARNING
■ Situations unsuitable for dynamic radar cruise controlDo not use dynamic radar cruise control in any of the following situations.Doing so may result in inappropriate speed control and could cause an accident result-ing in death or serious injury.● Roads where there are pedestrians, cyclists, etc.● In heavy traffic● On roads with sharp bends● On winding roads● On slippery roads, such as those covered with rain, ice or snow● On steep downhills, or where there are sudden changes between sharp up and down
gradients Vehicle speed may exceed the set speed when driving down a steep hill.
● At entrances to freeways and highways● When weather conditions are bad enough that they may prevent the sensors from
detecting correctly (fog, snow, sandstorm, heavy rain, etc.)● When there is rain, snow, etc. on the front surface of the radar sensor or camera sen-
sor● In traffic conditions that require frequent repeated acceleration and deceleration● When your vehicle is towing a trailer (with towing hitch) or during emergency towing● When an approach warning buzzer is heard often

GX460_OM_OM60T19U_(U)
2614-5. Using the driving support systems
4
Driving
This mode employs a radar sensor to detect the presence of vehicles up toapproximately 328 ft. (100 m) ahead, determines the current vehicle-to-vehiclefollowing distance, and operates to maintain a suitable following distance fromthe vehicle ahead.
Note that vehicle-to-vehicle distance will close in when traveling on long downhillslopes.
Example of constant speed cruisingWhen there are no vehicles ahead
The vehicle travels at the speed set by the driver. The desired vehicle-to-vehicle dis-tance can also be set by operating the vehicle-to-vehicle distance switch.Example of deceleration cruising and follow-up cruisingWhen a preceding vehicle driving slower than the set speed appears
When a vehicle is detected running ahead of you, the system automatically deceler-ates your vehicle. When a greater reduction in vehicle speed is necessary, the systemapplies the brakes (the stop lights will come on at this time). The system will respond tochanges in the speed of the vehicle ahead in order to maintain the vehicle-to-vehicledistance set by the driver. Approach warning warns you when the system cannotdecelerate sufficiently to prevent your vehicle from closing in on the vehicle ahead.Example of acceleration When there are no longer any preceding vehicles driving slower than the setspeed
The system accelerates until the set speed is reached. The system then returns to con-stant speed cruising.
Driving in vehicle-to-vehicle distance control mode
1
2
3

262
GX460_OM_OM60T19U_(U)
4-5. Using the driving support systems
Press the “ON/OFF” button to acti-vate the cruise control.
Radar cruise control indicator will comeon and a message will be displayed onthe multi-information display.Press the button again to deactivate thecruise control.If the “ON/OFF” button is pressed andheld for 1.5 seconds or more, the systemturns on in constant speed controlmode. (P. 266)
Accelerate or decelerate, withaccelerator pedal operation, to thedesired vehicle speed (at or aboveapproximately 30 mph [50 km/h])and push the lever down to set thespeed.
Cruise control “SET” indicator will comeon.The vehicle speed at the moment thelever is released becomes the set speed.
Setting the vehicle speed (vehicle-to-vehicle distance control mode)
1
2

GX460_OM_OM60T19U_(U)
2634-5. Using the driving support systems
4
Driving
To change the set speed, operate the lever until the desired set speed is dis-played.
Increases the speed
Decreases the speed
Fine adjustment: Momentarily movethe lever in the desired direction.
Large adjustment: Hold the lever up ordown to change the speed, and releasewhen the desired speed is reached.
In the vehicle-to-vehicle distance control mode, the set speed will be increasedor decreased as follows:
For the U.S.A. and Hawaii
Fine adjustment: By 1 mph (1.6 km/h)*1 or 1 km/h (0.6 mph)*2 each time the lever isoperated
Large adjustment: Increases or decreases in 1 mph (1.6 km/h)*1 or 1 km/h(0.6 mph)*2 increments for as long as the lever is held
Except for the U.S.A. and Hawaii
Fine adjustment: By 1 mph (1.6 km/h)*1 or 1 km/h (0.6 mph)*2 each time the lever isoperated
Large adjustment: Increases or decreases in 5 mph (8 km/h)*1 or 5 km/h(3.1 mph)*2 increments for as long as the lever is held
In the constant speed control mode (P. 266), the set speed will be increasedor decreased as follows:
Fine adjustment: By 1 mph (1.6 km/h)*1 or 1 km/h (0.6 mph)*2 each time the lever isoperatedLarge adjustment: The speed will continue to change while the lever is held.
*1: When the set speed is shown in “MPH”
*2: When the set speed is shown in “km/h”
Adjusting the set speed
1
2

264
GX460_OM_OM60T19U_(U)
4-5. Using the driving support systems
Pressing the switch changes the vehi-cle-to-vehicle distance as follows:
Long
Medium
Short
The vehicle-to-vehicle distance is setautomatically to long mode when theengine switch is turned to IGNITIONON mode.If a vehicle is running ahead of you, the preceding vehicle mark will also be displayed.
Select a distance from the table below. Note that the distances shown corre-spond to a vehicle speed of 50 mph (80 km/h). Vehicle-to-vehicle distanceincreases/decreases in accordance with vehicle speed.
Changing the vehicle-to-vehicle distance (vehicle-to-vehicle distancecontrol mode)
Preceding vehicle mark
1
2
3
Vehicle-to-vehicle distance settings (vehicle-to-vehicle distance con-trol mode)
Distance options Vehicle-to-vehicle distance
Long Approximately 160 ft. (50 m)
Medium Approximately 130 ft. (40 m)
Short Approximately 100 ft. (30 m)

GX460_OM_OM60T19U_(U)
2654-5. Using the driving support systems
4
Driving
Pulling the lever toward you cancelsthe speed control.
The speed control is also canceled whenthe brake pedal is depressed.Pushing the lever up resumes thecruise control and returns vehiclespeed to the set speed.
However, cruise control does notresume when the vehicle speed isapproximately 25 mph (40 km/h) orless.
When your vehicle is too close to avehicle ahead, and sufficient automaticdeceleration via the cruise control isnot possible, the display will flash andthe buzzer will sound to alert the driver.An example of this would be if anotherdriver cuts in front of you while you arefollowing a vehicle. Depress the brakepedal to ensure an appropriate vehicle-to-vehicle distance.
■ Warnings may not occur when
In the following instances, warnings may not occur even when the vehicle-to-vehicle distance is small.● When the speed of the preceding vehicle matches or exceeds your vehicle
speed● When the preceding vehicle is traveling at an extremely slow speed● Immediately after the cruise control speed was set● When depressing the accelerator pedal
Canceling and resuming the speed control
1
2
Approach warning (vehicle-to-vehicle distance control mode)

266
GX460_OM_OM60T19U_(U)
4-5. Using the driving support systems
When constant speed control mode is selected, your vehicle will maintain a setspeed without controlling the vehicle-to-vehicle distance. Select this mode onlywhen vehicle-to-vehicle distance control mode does not function correctly dueto a dirty radar sensor, etc.
With the cruise control off, press andhold the “ON/OFF” button for 1.5seconds or more.
Immediately after the “ON/OFF” but-ton is pressed, the radar cruise controlindicator will come on. Afterwards, itswitches to the cruise control indicator.Switching to constant speed controlmode is only possible when operatingthe lever with the cruise control off.
Accelerate or decelerate, withaccelerator pedal operation, to thedesired vehicle speed (at or aboveapproximately 25 mph [40 km/h])and push the lever down to set thespeed.
Cruise control “SET” indicator will comeon.The vehicle speed at the moment thelever is released becomes the set speed.Adjusting the speed setting: P. 263Canceling and resuming the speed setting: P. 265
Selecting constant speed control mode
1
2

GX460_OM_OM60T19U_(U)
2674-5. Using the driving support systems
4
Driving
■ Dynamic radar cruise control can be set when● The shift lever is in D.● Vehicle speed is at or above approximately 30 mph (50 km/h).
■ Accelerating after setting the vehicle speedThe vehicle can accelerate by operating the accelerator pedal. After accelerating, theset speed resumes. However, during vehicle-to-vehicle distance control mode, the vehi-cle speed may decrease below the set speed in order to maintain the distance to the pre-ceding vehicle.
■ Automatic cancelation of vehicle-to-vehicle distance control modeVehicle-to-vehicle distance control mode is automatically canceled in the following situ-ations:● Actual vehicle speed falls at or below approximately 25 mph (40 km/h).● VSC is activated.● Active TRAC is activated for a period of time.● When the VSC or Active TRAC system is turned off.● When second start mode is set.● The sensor cannot detect correctly because it is covered in some way.● Pre-collision braking is activated.● The switching operation continues for 5 seconds or more after the center differential
lock switch has been operated.If vehicle-to-vehicle distance control mode is automatically canceled for any other rea-son, there may be a malfunction in the system. Contact your Lexus dealer.
■ Automatic cancelation of constant speed control modeConstant speed control mode is automatically canceled in the following situations:● Actual vehicle speed is more than approximately 10 mph (16 km/h) below the set vehi-
cle speed.● Actual vehicle speed falls below approximately 25 mph (40 km/h).● VSC is activated.● Active TRAC is activated for a period of time.● When the VSC or Active TRAC system is turned off.● Pre-collision braking is activated.● The switching operation continues for 5 seconds or more after the center differential
lock switch has been operated.If constant speed control mode is automatically canceled for any other reason, there maybe a malfunction in the system. Contact your Lexus dealer.
■ Brake system operation soundIf the brakes are applied automatically while the vehicle is in vehicle-to-vehicle distancecontrol mode, a brake system operation sound may be heard. This does not indicate amalfunction.

268
GX460_OM_OM60T19U_(U)
4-5. Using the driving support systems
■ Warning messages and buzzers for dynamic radar cruise controlWarning messages and buzzers are used to indicate a system malfunction or to informthe driver of the need for caution while driving. If a warning message is shown on themulti-information display, read the message and follow the instructions.
■ When the sensor may not be correctly detecting the vehicle aheadIn the case of the following and depending on the conditions, operate the brake pedalwhen deceleration of the system is insufficient or operate the accelerator pedal whenacceleration is required.As the sensor may not be able to correctly detect these types of vehicles, the approachwarning (P. 265) may not be activated.● Vehicles that cut in suddenly● Vehicles traveling at low speeds● Vehicles that are not moving in the same lane● Vehicles with small rear ends (trailers with no load on board, etc.)
● Motorcycles traveling in the same lane● When water or snow thrown up by the surrounding vehicles hinders the detecting of
the sensor
● When your vehicle is pointing upwards(caused by a heavy load in the luggage com-partment, etc.)
● Preceding vehicle has an extremely highground clearance

GX460_OM_OM60T19U_(U)
2694-5. Using the driving support systems
4
Driving
■ Conditions under which the vehicle-to-vehicle distance control mode may not functioncorrectlyIn the case of the following conditions, operate the brake pedal (or accelerator pedal,depending on the situation) as necessary.As the sensor may not be able to correctly detect vehicles ahead, the system may notoperate properly.
● When the vehicle ahead of you decelerates suddenly● When driving on a road surrounded by a structure, such as in a tunnel or on a bridge● While the vehicle speed is decreasing to the set speed after the vehicle accelerates by
depressing the accelerator pedal
● When the road curves or when the lanes arenarrow
● When steering wheel operation or your posi-tion in the lane is unstable

270
GX460_OM_OM60T19U_(U)
4-5. Using the driving support systems
Intuitive parking assist
Front center sensors
Front corner sensors
Rear corner sensors
Rear center sensors
Press or of the meter control switches and select on the multi-
information display.
Press or of the meter control switches and select , and then
press .
Each pressing of the switch turns the intuitive parking assist on and off.When ON is selected, Intuitive parking assist indicator will come on.
: If equipped
The distance from your vehicle to nearby obstacles when parallel parking ormaneuvering into a garage is measured by the sensors and communicated viathe multi-information display, the multimedia screen (if equipped), the naviga-tion system screen (if equipped), and a buzzer. Always check the surroundingarea when using this system.
Types of sensors
1
2
3
4
Turning the intuitive parking assist on/off
1
2

GX460_OM_OM60T19U_(U)
2714-5. Using the driving support systems
4
Driving
When the sensors detect an obstacle, a graphic is shown on the multi-informa-tion display, multimedia screen (if equipped) and navigation system screen (ifequipped) depending on the position and distance to the obstacle.
Multi-information display
Front corner sensor operation
Front center sensor operation
Rear corner sensor operation
Rear center sensor operation
Multimedia screen or navigation system screen
Intuitive parking assist display
When the Multi-terrain Monitor* isnot displayed.
A graphic is automatically displayedwhen an obstacle is detected. Thescreen can be set so that the graphic isnot displayed. (P. 274)Insert display
When the Multi-terrain Monitor* is dis-played.A simplified image is displayed on theupper corner of the screen when anobstacle is detected.*: If equipped
Display
1
2
3
4
1
2

272
GX460_OM_OM60T19U_(U)
4-5. Using the driving support systems
■ Distance display
Sensors that detect an obstacle will illuminate continuously or blink.
Sensor detection display, obstacle distance
Multi-information
display
Multimedia screen or navigation
system screen
Insert display
Approximate distance to obstacle
Front corner sensor/front
center sensor
Rear corner sensor/rear
center sensor
(continuous) (continuous) (blinking slowly)
Front center sensor:3.3 ft. (100 cm) to 2.0 ft. (60 cm)
Rear center sensor:4.9 ft. (150 cm) to 2.1 ft. (65 cm)
(continuous) (continuous) (blinking)
Front corner sensor:1.6 ft. (50 cm) to 1.3 ft. (40 cm)
Front center sensor:2.0 ft. (60 cm) to 1.5 ft. (45 cm)
Rear corner sensor:1.8 ft. (55 cm) to 1.2 ft. (37.5 cm)
Rear center sensor:2.1 ft. (65 cm) to 1.6 ft. (50 cm)
(continuous) (continuous) (blinking rapidly)
Front corner sensor:1.3 ft. (40 cm) to 1.0 ft. (30 cm)
Front center sensor:1.5 ft. (45 cm) to 1.0 ft. (30 cm)
Rear corner sensor:1.2 ft. (37.5 cm) to 0.8 ft. (25 cm)
Rear center sensor:1.6 ft. (50 cm) to 1.3 ft. (40 cm)
(blinking) (continuous) (continuous)
Less than 1.0 ft. (30 cm)
Rear corner sensor:Less than 0.8 ft. (25 cm)
Rear center sensor:Less than 1.3 ft. (40 cm)

GX460_OM_OM60T19U_(U)
2734-5. Using the driving support systems
4
Driving
■ Buzzer operation and distance to an obstacle
A buzzer sounds when the sensors are operating.● The buzzer sounds faster as the vehicle approaches an obstacle.
When the vehicle comes within the following distance of the obstacle, thebuzzer sounds continuously.• Front corner sensors: Approximately 1.0 ft. (30 cm)• Front center sensors: Approximately 1.0 ft. (30 cm)• Rear corner sensors: Approximately 0.8 ft. (25 cm)• Rear center sensors: Approximately 1.3 ft. (40 cm)
● When 2 or more obstacles are detected simultaneously, the buzzer systemresponds to the nearest obstacle. If one or both come within the above dis-tances, the beep will repeat a long tone, followed by fast beeps.
● You can change the volume of the warning beeps. (P. 274)
Approximately 3.3 ft. (100 cm)
Approximately 4.9 ft. (150 cm)
Approximately 1.6 ft. (50 cm)
Approximately 1.8 ft. (55 cm)
The diagram shows the detection rangeof the sensors. Note that the sensorsmay not be able to detect obstacles thatare extremely close to the vehicle.The range of the sensors may changedepending on the shape of the objectetc.
Detection range of the sensors
1
2
3
4

274
GX460_OM_OM60T19U_(U)
4-5. Using the driving support systems
You can change the buzzer sounds volume and the screen operating conditions.
Press the “SETUP” button.
Select “Vehicle”, and then select “LEXUS Park Assist”/“LEXUS Park AssistSettings” on the screen.
Select the desired item.
The buzzer sounds volume can be adjusted.
On or off can be selected for intuitive parking assist display.
Front or rear center sensors display and tone indication can be set.
Setting up intuitive parking assist
1
2
3
Multimedia screen Navigation system screen
1
2
3

GX460_OM_OM60T19U_(U)
2754-5. Using the driving support systems
4
Driving
■ The intuitive parking assist can be operated when● Front corner sensors:
• The engine switch is in IGNITION ON mode.• The shift lever is in a position other than P.• The vehicle speed is less than approximately 6 mph (10 km/h).
(At any speed when the shift lever is in R)● Front center sensors:
• The engine switch is in IGNITION ON mode.• The shift lever is in a position other than P or R.• The vehicle speed is less than about 6 mph (10 km/h).
● Rear corner and rear center sensors:• The engine switch is in IGNITION ON mode.• The shift lever is in R.
■ Intuitive parking assist displayWhen an obstacle is detected while the rear view monitor system or Multi-terrain Moni-tor is in use, the warning indicator will appear in the upper corner of the screen even if thedisplay setting has been set to off.
■ Sensor detection information● The sensor’s detection areas are limited to the areas around the vehicle’s bumper.● Certain vehicle conditions and the surrounding environment may affect the ability of a
sensor to correctly detect an obstacle. Particular instances where this may occur arelisted below.• There is dirt, snow or ice on the sensor. (Wiping the sensors will resolve this prob-
lem.)• The sensor is frozen. (Thawing the area will resolve this problem.)
In especially cold weather, if a sensor is frozen the screen may show an abnormaldisplay, or obstacles may not be detected.
• The sensor is covered in any way.• The vehicle is leaning considerably to one side.• On an extremely bumpy road, on an incline, on gravel, or on grass.• The vicinity of the vehicle is noisy due to vehicle horns, motorcycle engines, air
brakes of large vehicles, or other loud noises producing ultrasonic waves.• There is another vehicle equipped with parking assist sensors in the vicinity.• The sensor is coated with a sheet of spray or heavy rain.• The vehicle is equipped with a fender pole or wireless antenna.• The bumper or sensor receives a strong impact.• The vehicle is approaching a tall or curved curb.• In harsh sunlight or intense cold weather.• The area directly under the bumpers is not detected.• If obstacles draw too close to the sensor.• A non-genuine Lexus suspension (lowered suspension etc.) is installed.• People may not be detected if they are wearing certain types of clothing.In addition to the examples above, there are instances in which, because of their shape,signs and other objects may be judged by a sensor to be closer than they are.

276
GX460_OM_OM60T19U_(U)
4-5. Using the driving support systems
● The shape of the obstacle may prevent a sensor from detecting it. Pay particular atten-tion to the following obstacles:• Wires, fences, ropes, etc.• Cotton, snow and other materials that absorb sound waves• Sharply-angled objects• Low obstacles• Tall obstacles with upper sections projecting outwards in the direction of your vehi-
cle● The following situations may occur during use.
• Depending on the shape of the obstacle and other factors, the detection distancemay shorten, or detection may be impossible.
• Obstacles may not be detected if they are too close to the sensor.• There will be a short delay between obstacle detection and display. Even at slow
speeds, there is a possibility that the obstacle will come within the sensor’s detectionareas before the display is shown and the buzzer sounds.
• Thin posts or objects lower than the sensor may not be detected when approached,even if they have been detected once.
• It might be difficult to hear beeps due to the volume of audio system or air flow noiseof the air conditioning system.
■ If “Clean Park Sonar”/“Clean Parking Assist Sensor” is displayed on the multi-informa-tion displayA sensor may be dirty or covered with snow or ice. In such cases, if it is removed from thesensor, the system should return to normal.Also, due to the sensor being frozen at low temperatures, a malfunction display mayappear or an obstacle may not be detected. If the sensor thaws out, the system shouldreturn to normal.
■ If “Check Park Sonar System”/“Parking Assist Malfunction” is displayed on the multi-information displayDepending on the malfunction of the sensor, the device may not be working normally.Have the vehicle inspected by your Lexus dealer.
■ Certification for the intuitive parking assist (Canada only)This ISM device complies with Canadian ICES-001.
■ CustomizationSettings (e.g. buzzer sounds volume) can be changed. (Customizable features: P. 584)

GX460_OM_OM60T19U_(U)
2774-5. Using the driving support systems
4
Driving
WARNING
■ When using the intuitive parking assistObserve the following precautions.Failing to do so may result in the vehicle being unable to be driven safely and possiblycause an accident.● Do not use the sensor at speeds in excess of 6 mph (10 km/h).● The sensors’ detection areas and reaction times are limited. When moving forward or
reversing, check the areas surrounding the vehicle (especially the sides of the vehi-cle) for safety, and drive slowly, using the brake to control the vehicle’s speed.
● Do not install accessories within the sensors’ detection areas.
NOTICE
■ When using intuitive parking assistIn the following situations, the system may not function correctly due to a sensor mal-function etc. Have the vehicle checked by your Lexus dealer.● A buzzer does not sound when you turn the intuitive parking assist on.● The intuitive parking assist operation display flashes, and a buzzer sounds when no
obstacles are detected.● If the area around a sensor collides with something, or is subjected to strong impact.● If the bumper collides with something.● If the display shows continuously without a beep.● If a display error occurs, first check the sensor.
If the error occurs even if there is no ice, snow or mud on the sensor, it is likely that thesensor is malfunctioning.
■ Notes when washing the vehicleDo not apply intensive bursts of water or steam to the sensor area.Doing so may result in the sensor malfunctioning.

278
GX460_OM_OM60T19U_(U)
4-5. Using the driving support systems
Rear view monitor system
The rear view image is displayed whenthe shift lever is in R and the engineswitch is in IGNITION ON mode.
The rear view monitor system will bedeactivated when the shift lever is in anyposition other than R.When the shift lever is shifted to R andany mode button (such as “SETUP”) ispressed, the rear view monitor system iscanceled, and the screen is switched tothe mode of the button that was pressed.
: If equipped
The rear view monitor system assists the driver by displaying guide lines andan image of the view behind the vehicle while backing up, for example whileparking.
The screen illustrations used in this text are intended as examples, and may dif-fer from the image that is actually displayed on the screen.

GX460_OM_OM60T19U_(U)
2794-5. Using the driving support systems
4
Driving
■ Screen description
The rear view monitor system screen will be displayed if the shift lever isshifted to R while the engine switch is in IGNITION ON mode.
Vehicle width extension guide line
The line indicates a guide path when the vehicle is being backed straight up.The displayed width is wider than the actual vehicle width.Vehicle center guide line
The line indicates the estimated vehicle center on the ground.Distance guide line (red)
The line shows distance behind the vehicle, a point approximately 1.5 ft. (0.5 m) fromthe edge of the bumper.Distance guide line (blue)
The line shows distance behind the vehicle, a point approximately 3 ft. (1 m) from theedge of the bumper.
Using the rear view monitor system
1
2
3
4

280
GX460_OM_OM60T19U_(U)
4-5. Using the driving support systems
■ Area displayed on screen
The rear view monitor system dis-plays an image of the view from thebumper of the rear area of the vehi-cle.
The image on the rear view monitorsystem screen can be adjusted, referto the “MULTIMEDIA OWNER’SMANUAL” or “NAVIGATIONSYSTEM OWNER’S MANUAL”.• The area displayed on the screen
may vary according to vehicle orien-tation conditions.
• Objects which are close to eithercorner of the bumper or under thebumper cannot be displayed.
• The camera uses a special lens. Thedistance of the image that appearson the screen differs from the actualdistance.
• Items which are located higher than the camera may not be displayed on the mon-itor.
• If your vehicle is equipped with a backlit license plate, it may interfere with the dis-play.
Rear view monitor system precautions
Corners of bumper

GX460_OM_OM60T19U_(U)
2814-5. Using the driving support systems
4
Driving
■ Rear view monitor system camera
The camera for the rear view moni-tor system is located above thelicense plate.
● Using the camera
If dirt or foreign matter (such as water droplets, snow, mud etc.) is adheringto the camera, it cannot transmit a clear image. In this case, flush it with alarge quantity of water and wipe the camera lens clean with a soft and wetcloth.
■ Differences between the screen and the actual road
The distance guide lines and the vehicle width extension guide lines may notactually be parallel with the dividing lines of the parking space, even whenthey appear to be so. Be sure to check visually.
The distances between the vehicle width extension guide lines and the left andright dividing lines of the parking space may not be equal, even when theyappear to be so. Be sure to check visually.
The distance guide lines give a distance guide for flat road surfaces. In any ofthe following situations, there is a margin of error between the fixation guidelines on the screen and the actual distance/course on the road.

282
GX460_OM_OM60T19U_(U)
4-5. Using the driving support systems
● When the ground behind the vehicle slopes up sharply
The distance guide lines willappear to be closer to the vehiclethan the actual distance. Becauseof this, objects will appear to befarther away than they actuallyare. In the same way, there will bea margin of error between theguide lines and the actual dis-tance/course on the road.
● When the ground behind the vehicle slopes down sharply
The distance guide lines willappear to be further from thevehicle than the actual distance.Because of this, objects willappear to be closer than theyactually are. In the same way,there will be a margin of errorbetween the guide lines and theactual distance/course on theroad.

GX460_OM_OM60T19U_(U)
2834-5. Using the driving support systems
4
Driving
● When any part of the vehicle sags
When any part of the vehicle sagsdue to the number of passengersor the distribution of the load,there is a margin of error betweenthe fixation guide lines on thescreen and the actual distance/course on the road.
■ When approaching three-dimensional objects
The distance guide lines are displayed according to flat surfaced objects (suchas the road). It is not possible to determine the position of three-dimensionalobjects (such as vehicles) using the distance guide lines. When approaching athree-dimensional object that extends outward (such as the flatbed of a truck),be careful of the following.● Vehicle width extension guide lines
Visually check the surroundingsand the area behind the vehicle.In the case shown in the illustra-tion, the truck appears to be out-side of the vehicle widthextension guide lines and thevehicle does not look as if it hitsthe truck. However, the rear bodyof the truck may actually crossover the vehicle width extensionguide lines. In reality if you backup as guided by the vehicle widthextension guide lines, the vehiclemay hit the truck.
A margin of error

284
GX460_OM_OM60T19U_(U)
4-5. Using the driving support systems
● Distance guide lines
Visually check the surroundingsand the area behind the vehicle.On the screen, it appears that atruck is parking at point . How-ever, in reality if you back up topoint , you will hit the truck.On the screen, it appears that is closest and is farthest away.However, in reality, the distance to
and is the same, and isfarther than and .
2
1
1
3
1 3 2
1 3

GX460_OM_OM60T19U_(U)
2854-5. Using the driving support systems
4
Driving
■ If you notice any symptoms
If you notice any of the following symptoms, refer to the likely cause and thesolution, and re-check.
If the symptom is not resolved by the solution, have the vehicle inspected byyour Lexus dealer.
Things you should know
Likely cause Solution
The image is difficult to see
• The vehicle is in a dark area• The temperature around the lens is
either high or low• The outside temperature is low• There are water droplets on the cam-
era• It is raining or humid• Foreign matter (mud etc.) is adhering to
the camera• There are scratches on the camera• Sunlight or headlights are shining
directly into the camera• The vehicle is under fluorescent lights,
sodium lights, mercury lights etc.
If this happens due to these causes, itdoes not indicate a malfunction.Back up while visually checking the vehi-cle’s surroundings. (Use the monitoragain once conditions have beenimproved.) The image on the rear view monitor sys-tem screen can be adjusted, refer to the“MULTIMEDIA OWNER’S MANUAL”or “NAVIGATION SYSTEM OWNER’SMANUAL”.
The image is blurry
Dirt or foreign matter (such as waterdroplets, snow, mud etc.) is adhering tothe camera.
Flush the camera with a large quantity ofwater and wipe the camera lens cleanwith a soft and wet cloth.
The image is out of alignment
The camera or surrounding area hasreceived a strong impact.
Have the vehicle inspected by your Lexusdealer.
The fixed guide lines are very far out of alignment
The camera position is out of alignment. Have the vehicle inspected by your Lexusdealer.
• The vehicle is tilted (there is a heavyload on the vehicle, tire pressure is lowdue to a tire puncture, etc.)
• The vehicle is used on an incline.
If this happens due to these causes, itdoes not indicate a malfunction.Back up while visually checking the vehi-cle’s surroundings.

286
GX460_OM_OM60T19U_(U)
4-5. Using the driving support systems
WARNING
■ When using the rear view monitor system The rear view monitor system is a supplemental device intended to assist the driverwhen backing up. When backing up, be sure to check visually behind and all aroundthe vehicle before proceeding.Observe the following precautions to avoid an accident that could result in death orserious injuries.● Never depend on the rear view monitor system entirely when backing up. The image
and the position of the guide lines displayed on the screen may differ from the actualstate.Use caution, just as you would when backing up any vehicle.
● Be sure to back up slowly, depressing the brake pedal to control vehicle speed.● The instructions given are only guide lines.
When and how much to turn the steering wheel will vary according to traffic condi-tions, road surface conditions, vehicle condition, etc. when parking. It is necessary tobe fully aware of this before using the rear view monitor system.
● When parking, be sure to check that the parking space will accommodate your vehi-cle before maneuvering into it.
● Do not use the rear view monitor system in the following cases:• On icy or slick road surfaces, or in snow• When using tire chains• When the back door is not closed completely• On roads that are not flat or straight, such as curves or slopes.
● In low temperatures, the screen may darken or the image may become faint. Theimage could distort when the vehicle is moving, or you may become unable to see theimage on the screen. Be sure to check direct visually and with the mirrors all aroundthe vehicle before proceeding.
● If the tire sizes are changed, the position of the fixed guide lines displayed on thescreen may change.
● The camera uses a special lens. The distances between objects and pedestrians thatappear in the image displayed on the screen will differ from the actual distances. (P. 281)

GX460_OM_OM60T19U_(U)
2874-5. Using the driving support systems
4
Driving
NOTICE
■ How to use the camera● The rear view monitor system may not operate properly in the following cases.
• If the back of the vehicle is hit, the position and mounting angle of the camera maychange.
• As the camera has a water proof construction, do not detach, disassemble ormodify it. This may cause incorrect operation.
• When cleaning the camera lens, flush the camera with a large quantity of waterand wipe it with a soft and wet cloth. Strongly rubbing the camera lens may causethe camera lens to be scratched and unable to transmit a clear image.
• Do not allow organic solvent, car wax, window cleaner or glass coat to adhere tothe camera. If this happens, wipe it off as soon as possible.
• If the temperature changes rapidly, such as when hot water is poured on the vehi-cle in cold weather, the system may not operate normally.
• When washing the vehicle, do not apply intensive bursts of water to the camera orcamera area. Doing so may result in the camera malfunctioning.
• When the camera is used under fluorescent lights, sodium light or mercury lightetc., the lights and the illuminated areas may appear to flicker.
● Do not expose the camera to strong impact as this could cause a malfunction. If thishappens, have the vehicle inspected by your Lexus dealer as soon as possible.

288
GX460_OM_OM60T19U_(U)
4-5. Using the driving support systems
Multi-terrain Select
When the Crawl Control is turned off
Select a mode that most closely matches the type of terrain on which you aredriving from among 5 modes. Brake control can be optimized in accordance with the selected mode.
When the Crawl Control is turned on
A mode which matches the road conditions is automatically selected bydepressing the accelerator pedal (AUTO mode).
Multi-information display
The selected Multi-terrain Select modewill be displayed on the multi-informa-tion display.Multi-terrain Select mode selectorswitch
Multi-terrain Select indicator
: If equipped
Multi-terrain Select is a system that helps drivability in off-road situations.
Multi-terrain Select switch/indicators
1
2
3

GX460_OM_OM60T19U_(U)
2894-5. Using the driving support systems
4
Driving
When the Crawl Control is turned off
A mode which matches the road condi-tions can be selected from among thefollowing 5 modes.
: MUD & SAND mode
Suitable for muddy roads, sandy roads,snow-covered roads, dirt trails andother slippery or dirty conditions. TheMUD&SAND mode indicator illumi-nates on the multi-information display.
: LOOSE & ROCK mode
Suitable for slippery conditions consisting of mixtures of earth and loose rock. TheLOOSE & ROCK mode indicator illuminates on the multi-information display.
: MOGUL mode
Suitable for very bumpy road conditions, such as mogul roads. MOGUL mode indi-cator illuminates on the multi-information display.
: ROCK & DIRT mode
Suitable for very bumpy road conditions, such as mogul or rocky roads. ROCK&DIRT mode indicator illuminates on the multi-information display.
: ROCK mode
Suitable for rocky roads. ROCK mode indicator illuminates on the multi-informationdisplay.
When the Crawl Control is turned on
: MTS AUTO mode
The most suitable mode is automatically selected according to the selected CrawlControl mode. MTS AUTO indicator illuminates on the multi-information display.
Selectable modes
1
2
3
4
5

290
GX460_OM_OM60T19U_(U)
4-5. Using the driving support systems
When all of the following conditions are satisfied, the Multi-terrain Select indica-tor will come on, the mode select screen will be displayed on the multi-informa-tion display, and Multi-terrain Select control will begin.● The four-wheel drive control switch is in “L4”.● Both Active TRAC and VSC are not off.
Operate the Multi-terrain Select modeselector switch during Multi-terrainSelect control to select a mode.
Once the mode is confirmed, the modename will be displayed and the controlwill switch.
■ Automatic system cancelationIn the following situations, the Multi-terrain Select indicator will go off, and Multi-terrainSelect will be canceled automatically.● When the four-wheel drive control switch is in H4.● When Active TRAC and VSC are off.
■ When it is difficult to generate tractionMUD & SAND mode provides the largest amount of tire slippage, followed by LOOSEROCK, MOGUL, ROCK & DIRT and ROCK mode. Drivability can be improved by selecting a mode which provides a smaller amount of tireslippage than the current mode when the amount of tire slippage is large, or converselyselecting a mode which provides a larger amount of tire slippage than the current modewhen the amount of tire slippage is small.
■ When the vehicle is stuckSwitching the transfer and differential For the operation of the following functions, refer to the following pages.● Four-wheel drive system (P. 344)● Center differential lock (P. 345)
■ When the brake system operates continuouslyThe brake system may overheat. In this case, a buzzer will sound, the TRAC OFF indica-tor will flash, and Multi-terrain Select will be temporarily inoperable. In this event, stopthe vehicle immediately in a safe place, and allow the brake system to cool down suffi-ciently. (There is no problem with continuing normal driving.) After a short time, the TRAC OFF indicator will go off, and you will be able to use Multi-terrain Select.
Multi-terrain Select control starting conditions
Switching modes

GX460_OM_OM60T19U_(U)
2914-5. Using the driving support systems
4
Driving
■ When there is a malfunction in the systemThe slip indicator light will come on. Have the vehicle inspected by your Lexus dealerimmediately.
WARNING
■ When using the Multi-terrain SelectObserve the following precautions to avoid an accident that could result in death orserious injuries:● There is a chance that the selected mode may not be the most appropriate in terms of
road conditions such as pitch, slipperiness, undulation, etc. (P. 289)● Multi-terrain Select is not intended to expand the limits of the vehicle. Check the road
conditions thoroughly beforehand, and drive safely and carefully.
NOTICE
■ Precaution for useThe Multi-terrain Select is intended for use during off-road driving. Do not use the sys-tem at any other time.

292
GX460_OM_OM60T19U_(U)
4-5. Using the driving support systems
Multi-terrain Monitor
The following screens can be selected according to driving conditions.• Screens that can be selected vary depending on conditions such as shift posi-
tion and vehicle speed. (P. 298)• Depending on the displayed screen, the display can be switched from normal
to wide view display.
: If equipped
The Multi-terrain Monitor helps the driver to check the vehicle surroundings.It assists in determining the conditions around the driver in a variety of situa-tions, such as when judging conditions during off-road driving or checking forobstacles when parking.
WARNING
■ When using the Multi-terrain Monitor systemObserve the following precautions to avoid an accident that could result in death orserious injuries.● Never rely solely on the Multi-terrain Monitor. As with unequipped vehicles, drive
carefully while directly confirming the safety of your surroundings and the area to therear of the vehicle. Take particular care to avoid parked cars and other obstacles.
● Due to the characteristics of the camera lens, the actual position and distance of peo-ple and other obstacles will differ from those shown on the Multi-terrain Monitorscreen. Directly confirm the safety of your surroundings before driving.
● Do not drive while only looking at the screen. When driving, make sure to directlyconfirm the safety of your surroundings, such as by visually checking the area andusing the vehicle’s mirrors.
● In low temperatures, the screen may darken or the images may become faint.Images of moving objects in particular may distort or disappear from the screen.Therefore, make sure to drive carefully while directly visually confirming the safety ofyour surroundings.
Multi-terrain Monitor screens

GX460_OM_OM60T19U_(U)
2934-5. Using the driving support systems
4
Driving
■ Screens when the four-wheel drive control switch is in L4● When checking the area to the front and sides of the vehicle
● When checking the condition of the road surface under the vehicle
Front view & dual side view Front view & dual side view (frontmagnified)
P. 301 P. 301
Under vehicle terrain view & dualside view
Under vehicle terrain view & dualside view (front magnified)
P. 305 P. 305

294
GX460_OM_OM60T19U_(U)
4-5. Using the driving support systems
● When checking the area to the rear of the vehicle
■ Screens when the four-wheel drive control switch is in H4● When checking the area to the front of the vehicle (panoramic view & wide
front view)
P. 309
● When checking the area to the sides of the vehicle (side views)
P. 311
Rear view & dual side view Wide rear view
P. 307 P. 307

GX460_OM_OM60T19U_(U)
2954-5. Using the driving support systems
4
Driving
● When checking the area to the rear of the vehicle
● When checking the area to the sides, front and rear of the vehicle (with out-side rear view mirrors retracted)
Panoramic view & rear view Wide rear view
P. 314 P. 314
Wide front view & side view Rear view & side view
P. 320 P. 320
Side views
P. 320

296
GX460_OM_OM60T19U_(U)
4-5. Using the driving support systems
■ Displaying the Multi-terrain Monitor screen
The Multi-terrain Monitor screen will be displayed when the VIEW switch ispressed while the engine switch is in IGNITION ON mode.
When the vehicle speed exceeds a certain value for a specific amount of time, thedisplay returns to the navigation or information display screen.The amount of time that the Multi-terrain Monitor is displayed differs dependingon conditions such as the vehicle speed. (P. 301)
VIEW switch
Display
Using the Multi-terrain Monitor screen
1
2
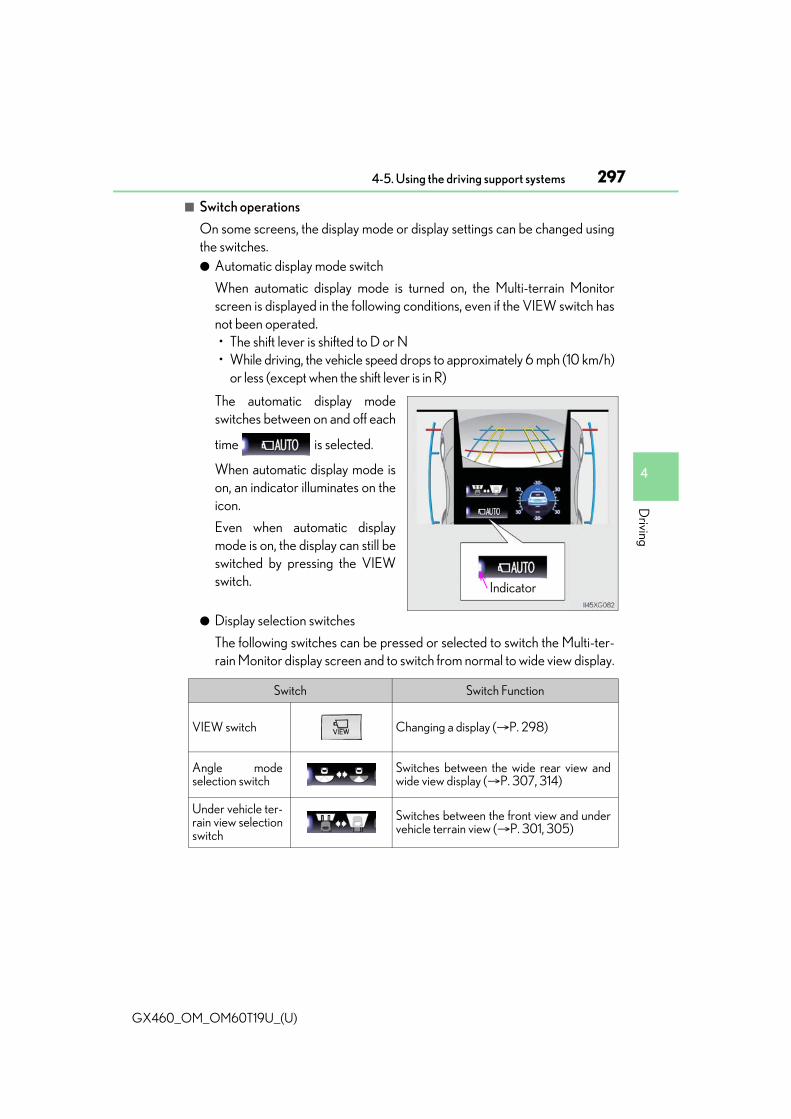
GX460_OM_OM60T19U_(U)
2974-5. Using the driving support systems
4
Driving
■ Switch operations
On some screens, the display mode or display settings can be changed usingthe switches.● Automatic display mode switch
When automatic display mode is turned on, the Multi-terrain Monitorscreen is displayed in the following conditions, even if the VIEW switch hasnot been operated.• The shift lever is shifted to D or N• While driving, the vehicle speed drops to approximately 6 mph (10 km/h)
or less (except when the shift lever is in R)
The automatic display modeswitches between on and off each
time is selected.
When automatic display mode ison, an indicator illuminates on theicon.
Even when automatic displaymode is on, the display can still beswitched by pressing the VIEWswitch.
● Display selection switches
The following switches can be pressed or selected to switch the Multi-ter-rain Monitor display screen and to switch from normal to wide view display.
Indicator
Switch Switch Function
VIEW switch Changing a display (P. 298)
Angle modeselection switch
Switches between the wide rear view andwide view display (P. 307, 314)
Under vehicle ter-rain view selectionswitch
Switches between the front view and undervehicle terrain view (P. 301, 305)

298
GX460_OM_OM60T19U_(U)
4-5. Using the driving support systems
The screen display can be switched by operating the switches as follows whilethe Multi-terrain Monitor screen is displayed. (Screens that can be displayed willvary depending on the positions of the shift lever and four-wheel drive controlswitch)
■ Screens when the four-wheel drive control switch is in L4
: Press
: Select
: Select
: Operate the shift lever
Changing the Multi-terrain Monitor screen

GX460_OM_OM60T19U_(U)
2994-5. Using the driving support systems
4
Driving
*: The screen display can be switched by touching the image from the camera on thescreen.
*
*
*
Front view & dual side view: P. 301
Under vehicle terrain view & dualside view: P. 305
Front view & dual side view (frontmagnified): P. 301
Under vehicle terrain view & dualside view (front magnified): P. 305
Rear view & dual side view: P. 307
Wide rear view: P. 307
1
2
3
4
5
6

300
GX460_OM_OM60T19U_(U)
4-5. Using the driving support systems
■ Screens when the four-wheel drive control switch is in H4
: Press
: Select
: Operate the shift lever
*1: The displayed screen differs when the outside rear view mirrors are retracted.
*2: The screen display can be switched by touching the image from the camera on thescreen.
*1
*2*1
Navigation screen, information set-tings screen, etc.
Side views: P. 311
Panoramic view & wide front view:P. 309
Panoramic view & rear view: P. 314
Wide rear view: P. 314
1
2
3
4
5

GX460_OM_OM60T19U_(U)
3014-5. Using the driving support systems
4
Driving
■ Multi-terrain Monitor screen displayThe amount of time that the Multi-terrain Monitor screen is displayed changes as followsaccording to the vehicle speed at the time the VIEW switch was pressed.The Multi-terrain Monitor screen is displayed if the vehicle speed is approximately 7 mph(12 km/h) or less when the camera switch is pressed.If the vehicle speed exceeds approximately 7 mph (12 km/h), the Multi-terrain Monitordisplay is canceled.
The various screens of the Multi-terrain Monitor display information to supportseveral different driving situations, such as when checking for obstacles whenmoving forward or in reverse, or when judging road surface conditions duringoff-road driving.
■ Front view & dual side view
Front view & dual side view can be used to check the area around the front ofthe vehicle.• In addition to an image of the front of the vehicle, guide lines are displayed
in a composite view to provide reference for when deciding a direction tomove forward in.
• If the VIEW switch is pressed while the screen is displayed, the screenswitches from normal to magnified display. (Pressing the switch againreturns the screen to the normal display)
• If the steering wheel is turned 270 or more, guide lines and other featuresto support turning are automatically displayed.
Screen display and functions

302
GX460_OM_OM60T19U_(U)
4-5. Using the driving support systems
● Screen description
Under vehicle terrain view selectionswitch
Switches between front view and undervehicle terrain view display each timethe switch is selected.Automatic display mode selectionswitch
P. 297Tilt meter/slip display
Displays the vehicle’s estimated degreeof incline or indicates a tire slippage.(P. 303)Vehicle width lines (blue)
Indicate the width of the vehicle includ-ing the outside rear view mirror.1.5 ft. (0.5 m) distance guide line(red)
3 ft. (1 m) distance guide line (blue)
6 ft. (2 m) distance guide line(blue)
Items to indicate the estimateddistance from the front end of the vehi-cle.Front tire course line (yellow)
Indicates the estimated course of thefront tires according to steering wheelposition.Forward movement guide line(blue)
Indicates the estimated tire course ofthe tightest possible turn.Front tire contact line (blue)
Rear tire contact line (blue)
Items and indicate estimated tirepositions on the image.Rear tire course line (yellow)
Indicates the estimated course of therear tires.
1
2
3
4
5
6
7
5 7
8
9
10
11
10 11
12

GX460_OM_OM60T19U_(U)
3034-5. Using the driving support systems
4
Driving
● Front view rotating display function
This function operates when the four-wheel drive control switch is in L4.
The front view image is automatically adjusted to be parallel and assist thedriver to check road surface conditions regardless of the vehicle inclina-tion.
● Tilt meter
Tilt meter displays the vehicleinclination to the front, rear, leftand right within a range of 0 toapproximately 30.
Degree markers of incline tothe front and rear
Indicates the vehicle inclination indegrees in the front and reardirections.Degree markers of incline to the left and right
Indicates the vehicle inclination in degrees in the left and right directions.Pointer
Indicates the degree of the vehicle inclination in comparison to a parallel line.
1
2
3

304
GX460_OM_OM60T19U_(U)
4-5. Using the driving support systems
● Slip display
When tire slippage is detected,the tilt meter display area is auto-matically switched to the slip dis-play.
Tire display
Indicates the position of freelyspinning tires in yellow if the tirespins. (During Crawl Control isoperating, all of the tires are indi-cated in yellow.)Pop-up display of the intuitive parking assist
Displayed if an obstacle is detected while the intuitive parking assist is turnedon.Pop-up display of the Rear Cross Traffic Alert function
Displayed if a vehicle approaching from right or left rear of the vehicle isdetected while the Rear Cross Traffic Alert function is turned on.
■ Front view & dual side view displayThe screen can be displayed when the shift lever is in P, D or N.
■ Front view rotating display function● The vehicle inclination displayed on the screen may differ from the actual state.● When the rotated screen is displayed, the corners of the front bumper may not be seen
on the screen.■ Tilt meter display
● The display indicates the incline of the vehicle in degrees shown by the movement ofthe pointer and the rotation of the vehicle image.
● The color of the degree markers of incline to the front, rear, left and right changesaccording to the current incline of the vehicle.
● After the engine switch is turned to IGNITION ON mode, the degree of incline is notdisplayed until such information is determined.
● The degree of incline showed on the tilt meter is only an approximate indication, andmay differ from the degree of incline measured using other equipment.
■ Tilt meter/slip displayWhen the intuitive parking assist or the Rear Cross Traffic Alert function detects anobstacle or another vehicle, a warning message pops up in the tilt meter/slip display area.
1
2
3

GX460_OM_OM60T19U_(U)
3054-5. Using the driving support systems
4
Driving
■ Under vehicle terrain view & dual side view
Lines indicating current vehicle and tire position are displayed in a compositeview on an image taken approximately 10 ft. (3 m) behind the current vehicleposition and assists the driver to check conditions underneath the vehicle ordetermine the position of the front tires.
Current vehicle position
Image displayed in the under vehicle terrain view (image taken approximately10 ft. [3 m] behind the current vehicle position)
Vehicle position at the time the image was taken (approximately 10 ft. [3 m]behind the current vehicle position)● Displaying the under vehicle terrain view
While the front view is displayed, stop the vehicle completely, and then
press .
Pressing again returns the screen to the front view display.
● Screen description
Tire position indicator lines(black)
Indicates the estimated position ofthe front tires.Vehicle position indicator lines(blue)
Indicates the estimated position ofthe vehicle.Icon (flashing)
Indicates that the under vehicle terrain view display is of an image taken in thepast.
1
2
3
1
2
3

306
GX460_OM_OM60T19U_(U)
4-5. Using the driving support systems
■ Under vehicle terrain view & dual side view● The screen can be displayed when the shift lever is in D or N.● While the under vehicle terrain view is displayed, if the vehicle speed reaches or
exceeds approximately 3 mph (5 km/h), the screen automatically returns to the frontview display.
● In the following situations, the under vehicle terrain view selection switch cannot beoperated.• The vehicle is not completely stopped• After the engine starts, a fixed distance or more has not been driven• After the four-wheel drive control switch is shifted to L4, a fixed distance or more
has not been driven● In the following situations, the system may not operate normally, or it may not be possi-
ble to switch to the under vehicle terrain view.• The road is covered with snow• It is nighttime and the road has no illumination• Dirt or foreign matter is adhering to the camera lens• There is water in front of the vehicle (a river, puddle, sea water, etc.)
WARNING
■ Guide linesThe tire position indicator lines and vehicle position indicator lines may differ fromactual vehicle positions depending on the number of passengers, cargo weight, roadgrade, road surface conditions, brightness of the surrounding environment, etc. Alwaysdrive the vehicle while confirming the safety of your surroundings.
■ Under vehicle terrain view displayThe image displayed is one that was previously taken at a point approximately 10 ft.(3 m) behind the current vehicle position. In cases such as when objects move after theimage is taken, the image displayed on the screen may differ from the actual state.

GX460_OM_OM60T19U_(U)
3074-5. Using the driving support systems
4
Driving
■ Rear view & dual side view/wide rear view
Guide lines are displayed in a composite view on an image of the area to therear of the vehicle to use as a reference when deciding a course of movementand assist the driver to check the safety of the area to the rear of the vehicle orto park the vehicle.● Screen description
The following 2 types of display mode can be selected according to condi-tions.
Angle selection switch
Switches between rear view & dual side view display and wide rear view display eachtime the switch is selected.Tilt meter/slip display
P. 303Projected course lines (yellow)
Indicate the estimated course of the vehicle according to steering operations.1.5 ft. (0.5 m) distance guide line (red)
3 ft. (1 m) distance guide line (yellow)
8 ft. (2.5 m) distance guide line (yellow)
, and indicate the estimated distance from the rear end of the vehicle.Vehicle width extension guide line (blue)
Indicates the estimated vehicle width including the outside rear view mirrors.Front tire contact line (blue)
Rear tire contact line (blue)
Items and indicate estimated tire positions on the image.
Rear view & dual side view display Wide rear view display
1
2
3
4
5
6
4 5 6
7
8
9
8 9

308
GX460_OM_OM60T19U_(U)
4-5. Using the driving support systems
■ Rear view & dual side view/wide rear viewThe screen can be displayed when the shift lever is in R.
■ Guide linesIf the back door is not closed, guide lines will not be displayed. If the guide lines do notdisplay even when the back door is closed, have the vehicle inspected at your Lexusdealer.
WARNING
■ Guide linesThe tire position indicator lines and vehicle position indicator lines may differ fromactual vehicle positions depending on the number of passengers, cargo weight, roadgrade, road surface conditions, brightness of the surrounding environment, etc. Alwaysdrive the vehicle while confirming the safety of your surroundings.

GX460_OM_OM60T19U_(U)
3094-5. Using the driving support systems
4
Driving
■ Panoramic view & wide front view
The image looking down at the vehicle from above and the image from thefront camera are displayed simultaneously and assist the driver to check con-ditions in front, and to the right and left, of the vehicle at intersections or T-junctions with poor visibility.● Screen description
The following 2 types of display mode can be selected according to condi-tions.
Panoramic view
Displays an image looking down at the vehicle from above.Wide front view
Displays an image of the area to the front of the vehicle.Display area
Guide line display selection switch
P. 310Automatic display mode selection switch
P. 297Front distance guide line (blue)
Indicates a distance approximately 3 ft. (1 m) from the front end of the vehicle.Forward projected course lines
Automatically displayed when the steering wheel is turned 90 or more from the cen-ter position.Indicates the estimated course of the vehicle according to steering wheel operations.
Distance guide line display mode Projected course line display mode
1
2
3
4
5
6
7

310
GX460_OM_OM60T19U_(U)
4-5. Using the driving support systems
● Switching to automatic display mode
P. 297
● Switching guide line display modes
The mode switches and the switch display changes each time the guide linedisplay selection switch is selected.
■ Panoramic view & wide front viewThe screen can be displayed when the shift lever is in P, D or N.
Selected mode Distance guide line display mode
Projected course line display mode
Switch display
WARNING
■ Guide linesThe tire position indicator lines and vehicle position indicator lines may differ fromactual vehicle positions depending on the number of passengers, cargo weight, roadgrade, road surface conditions, brightness of the surrounding environment, etc. Alwaysdrive the vehicle while confirming the safety of your surroundings.

GX460_OM_OM60T19U_(U)
3114-5. Using the driving support systems
4
Driving
■ Side views
The image from the both side cameras is displayed and assists the driver tocheck conditions on the sides of the vehicle or to confirm the safety of narrowroads.● Screen description
Side view (left front side)
Side view (right front side)
Display area
Vehicle width lines (blue)
Indicate the estimated vehiclewidth including the outside rearview mirrors.Front distance guide line (red)
Indicates a distance approximately 1.6 ft. (0.5 m) from the front end of the vehi-cle.Front tire contact line (blue)
Indicates the estimated front tire position on the image.Automatic display mode selection switch
P. 297Intuitive parking assist*When the intuitive parking assist is on, an icon will be displayed when an obsta-cle is detected. (Refer to P. 270 for information about the intuitive parkingassist.)
*: If equipped
1
2
3
4
5
6
7
8

312
GX460_OM_OM60T19U_(U)
4-5. Using the driving support systems
● Using the vehicle width lines
The relative distance of obstacles from the vehicle width lines can be con-firmed.
Example 1: When there is an obstacle in front of the vehicle Operate the steering wheel so that the vehicle width line andthe obstacle do not overlap.
Example 2: When parking on the shoulderApproach the shoulder, but do not allow the vehicle widthline to overlap the curb or other obstacles.After confirming the distance to the shoulder of the road,maneuvering the vehicle so that the vehicle width line andthe curb or other obstacle are parallel allows the vehicle tobe parked evenly.

GX460_OM_OM60T19U_(U)
3134-5. Using the driving support systems
4
Driving
■ Side views● The screen can be displayed when the shift lever is in P, D or N.● When the outside rear view mirrors are retracted, the displayed area changes (the area
on the screen that is not masked in black). (P. 320)
WARNING
■ Guide linesThe tire position indicator lines and vehicle position indicator lines may differ fromactual vehicle positions depending on the number of passengers, cargo weight, roadgrade, road surface conditions, brightness of the surrounding environment, etc. Alwaysdrive the vehicle while confirming the safety of your surroundings.

314
GX460_OM_OM60T19U_(U)
4-5. Using the driving support systems
■ Panoramic view & rear view/wide rear view• Panoramic view & rear view:
The image looking down at the vehicle from above and the image from therear camera are displayed simultaneously and assist the driver to check thesafety of the area when parking.
• Wide rear view:
The image from the rear camera is displayed in a range of approximately180 and assists the driver to check the safety of the area when backing up.
● Screen description
Guide line selection switch
P. 310Angle mode selection switch
Switches between the panoramic view & rear view and wide rear view display eachtime the switch is selected.Panoramic view & rear view
Rear view
Switches the screen to wide rear view display when you touch the display.Wide rear view
Switches the screen to the panoramic & rear view display when the display is touched.
Panoramic view & rear view Wide rear view
1
2
3
4
5
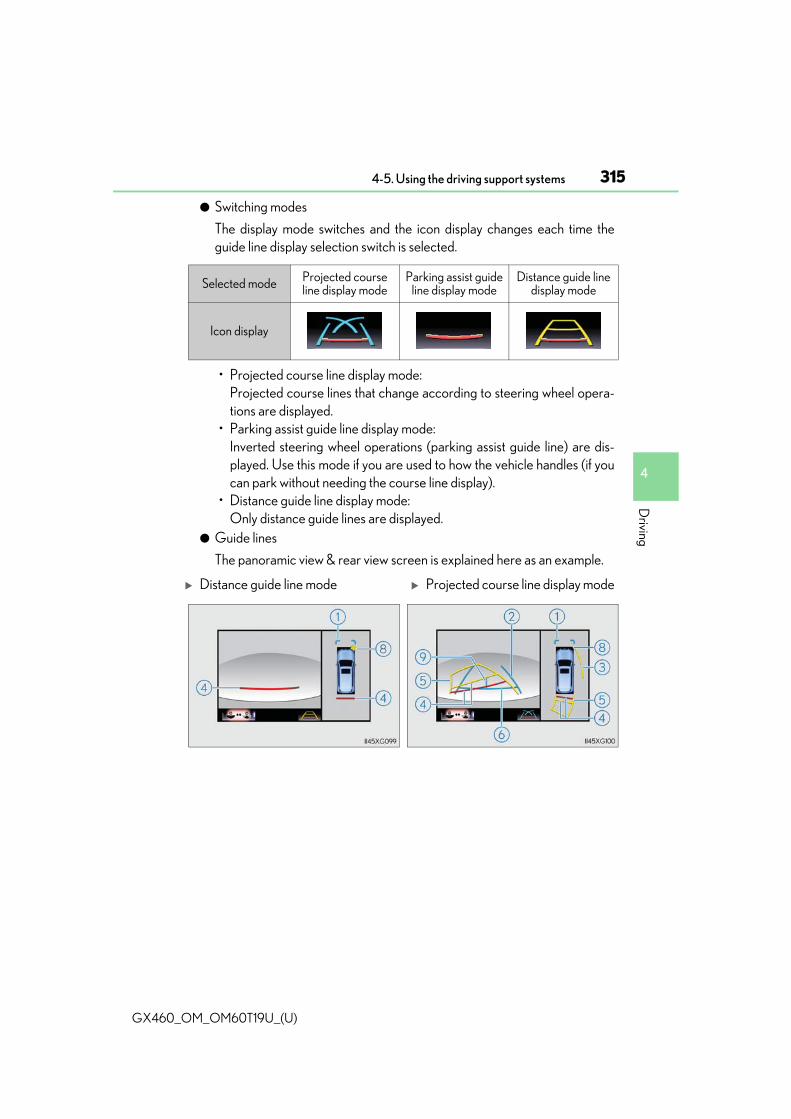
GX460_OM_OM60T19U_(U)
3154-5. Using the driving support systems
4
Driving
● Switching modes
The display mode switches and the icon display changes each time theguide line display selection switch is selected.
• Projected course line display mode:Projected course lines that change according to steering wheel opera-tions are displayed.
• Parking assist guide line display mode:Inverted steering wheel operations (parking assist guide line) are dis-played. Use this mode if you are used to how the vehicle handles (if youcan park without needing the course line display).
• Distance guide line display mode:Only distance guide lines are displayed.
● Guide lines
The panoramic view & rear view screen is explained here as an example.
Selected mode Projected course line display mode
Parking assist guide line display mode
Distance guide line display mode
Icon display
Distance guide line mode Projected course line display mode

316
GX460_OM_OM60T19U_(U)
4-5. Using the driving support systems
Front distance guide line (blue)
Indicates a distance approximately 3 ft. (1 m) from the front end of the vehicle.Rear vehicle width extension guide lines
Indicate the estimated course of the vehicle when backing up straight.• The displayed width is wider than the actual vehicle width.• In projected course line display mode, this item overlaps the projected course lines
when going straight.Side projected course line (yellow)
Indicates the projected reverse course calculated by the angle of the steering wheel.The projected reverse course line on the outside of the turn is displayed according tothe direction of the steering wheel.Rear distance guide line
Indicates the estimated distance from the end of the rear bumper (at the center). (Redline: approximately 1.5 ft. [0.5 m] away. Yellow line: approximately 3 ft. [1 m] away.)In projected course line display mode, the rear distance guide line changes accordingto steering wheel operations.Projected reverse course (yellow)
Changes according to steering wheel operations and indicates the estimated courseof the vehicle.Rear distance guide line (blue)
Indicates a distance approximately 1.5 ft. (0.5 m) from the end of the rear bumper (atthe center).Parking assist guide line (blue)
Indicates the estimated tire course of the tightest possible turn in reverse.Intuitive parking assist*When the intuitive parking assist is on, an icon will be displayed when an obstacle isdetected. (Refer to P. 270 for information about the intuitive parking assist.)Vehicle center line (blue)
Indicates the estimated vehicle center on the ground.*: If equipped
Parking assist guide line display mode
1
2
3
4
5
6
7
8
9

GX460_OM_OM60T19U_(U)
3174-5. Using the driving support systems
4
Driving
● Parking operation (using the estimated curse line)
When parking in a space which is in the reverse direction to the spacedescribed in the procedure below, the steering directions will be reversed.
Shift the shift lever to the R position.
Turn the steering wheel so thatthe estimated course lines arewithin the parking space, andback up slowly.
Parking space
Estimated course lines
When the rear position of thevehicle has entered the parkingspace, turn the steering wheel sothat the vehicle width extensionguide lines are within the left andright dividing lines of the parkingspace.
Vehicle width extension guideline
1
2
1
2
3
3

318
GX460_OM_OM60T19U_(U)
4-5. Using the driving support systems
Once the vehicle width extension guide lines and the parking space linesare parallel, straighten the steering wheel and back up slowly until the vehi-cle has completely entered the parking space.
Stop the vehicle in an appropriate place, and finish parking.● Parking operation (using the parking assist guide line)
When parking in a space which is in the reverse direction to the spacedescribed in the procedure below, the steering directions will be reversed.
Shift the shift lever to the R position.
Back up until the parking assistguide line meets the edge of theleft-hand dividing line of the park-ing space.
Parking assist guide line
Parking space dividing line
Turn the steering wheel all the way to the right, and back up slowly.
Once the vehicle is parallel with the parking space, straighten the steeringwheel and back up slowly until the vehicle has completely entered theparking space.
Stop the vehicle in an appropriate place, and finish parking.
4
5
1
2
1
2
3
4
5

GX460_OM_OM60T19U_(U)
3194-5. Using the driving support systems
4
Driving
■ Panoramic view & rear view/wide rear viewThe screen can be displayed when the shift lever is in R.
■ Guide linesIf the back door is not closed, guide lines will not be displayed. If the guide lines do notdisplay even when the back door is closed, have the vehicle inspected at your Lexusdealer.
WARNING
■ Guide linesThe tire position indicator lines and vehicle position indicator lines may differ fromactual vehicle positions depending on the number of passengers, cargo weight, roadgrade, road surface conditions, brightness of the surrounding environment, etc. Alwaysdrive the vehicle while confirming the safety of your surroundings.
■ When using panoramic view & rear view or wide rear view● If the vehicle width extension guide lines and projected course lines are not aligned
with the steering wheel in the center position, drive straight on a road without as littletraffic and as few bends or curves as possible for approximately 5 minutes or more. Ifthe symptom is not resolved, have the vehicle inspected by your Lexus dealer.
● Rear vehicle width extension guide lines are displayed wider than the actual vehiclewidth. When backing up, always confirm the safety of your surroundings and the areato the rear of the vehicle.

320
GX460_OM_OM60T19U_(U)
4-5. Using the driving support systems
■ Display when the outside rear view mirrors are retracted (side view andside views)
When the outside rear view mirrors are retracted, one of the followingscreens is displayed and assists the driver to confirm the safety of the areaaround the vehicle, or park alongside and close to another object.● Screen description
For information about other than the side view and side views display area, referto the page for the respective screen.
Front distance guide line (red)
Indicates a distance approximately 1.5 ft. (0.5 m) from the front end of the vehicle.Front tire contact line (blue)
Indicates the estimated front tire position on the image.Vehicle width lines (blue)
Indicate the estimated vehicle width including the outside rear view mirrors.Rear tire contact line (blue)
Indicates the estimated rear tire position on the image.
When the wide front view is dis-played
When the rear view is displayed
When the side views is displayed
1
2
3
4
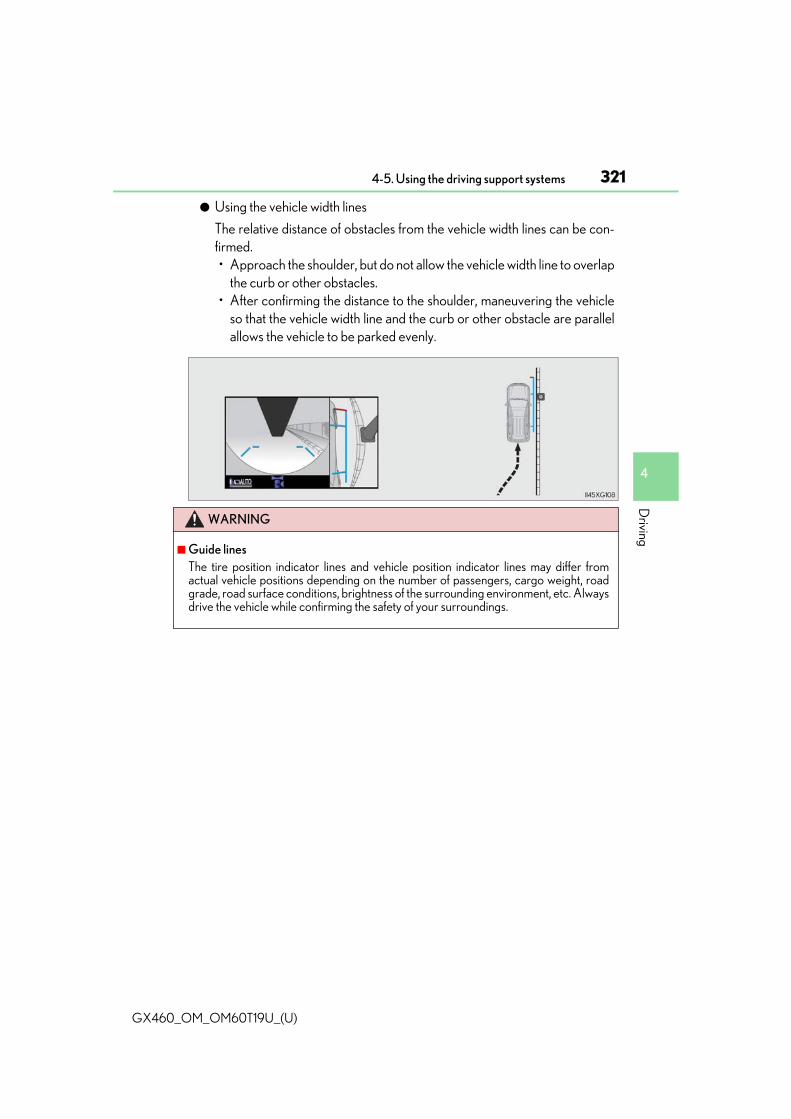
GX460_OM_OM60T19U_(U)
3214-5. Using the driving support systems
4
Driving
● Using the vehicle width lines
The relative distance of obstacles from the vehicle width lines can be con-firmed.• Approach the shoulder, but do not allow the vehicle width line to overlap
the curb or other obstacles.• After confirming the distance to the shoulder, maneuvering the vehicle
so that the vehicle width line and the curb or other obstacle are parallelallows the vehicle to be parked evenly.
WARNING
■ Guide linesThe tire position indicator lines and vehicle position indicator lines may differ fromactual vehicle positions depending on the number of passengers, cargo weight, roadgrade, road surface conditions, brightness of the surrounding environment, etc. Alwaysdrive the vehicle while confirming the safety of your surroundings.

322
GX460_OM_OM60T19U_(U)
4-5. Using the driving support systems
■ Intuitive parking assist and RCTA cooperative display
When either the Intuitive parking assist (P. 270) or Blind Spot Monitor(P. 361) is turned on, a popup icon warns the driver when an obstacle isdetected.
Example of pop-up display in the panoramic view
Example of pop-up display in the wide rear view
Example of pop-up display in the side view (with mirrors retracted)
Example of pop-up display in the front view & dual side view, under vehicleterrain view & dual side view or rear view & dual side view
■ Intuitive parking assist pop-up displayWhile the Intuitive parking assist is in use, a pop-up is displayed when an obstacle isdetected (P. 270).However, this function only informs the driver that an obstacle is close to the vehicle andthe detected obstacle is not displayed on the screen. Be sure to visually confirm thesafety of your surroundings.
1
2
3
4

GX460_OM_OM60T19U_(U)
3234-5. Using the driving support systems
4
Driving
Observe the following precautions. Failure to do so may result in an unexpectedaccident. Also, when driving, make sure to directly confirm the safety of your sur-roundings and the area to the rear of the vehicle.
When using the Multi-terrain Monitor
WARNING
■ Conditions under which the Multi-terrain Monitor should not be usedDo not use the Multi-terrain Monitor in the following situations. The system may notoperate properly, resulting in an unexpected accident.● When driving on an icy, snow-covered or otherwise slippery road surface● When using tire chains or a spare tire● When either front door or the back door is not completely closed● When driving on an uneven road, such as a hill● When tires or suspension parts other than those specified are equipped
When the tires are replaced, the position indicated by the guide lines displayed on thescreen may differ.
■ Guide linesThe tire position indicator lines and vehicle position indicator lines may differ fromactual vehicle positions depending on the number of passengers, cargo weight, roadgrade, road surface conditions, brightness of the surrounding environment, etc. Alwaysdrive the vehicle while confirming the safety of your surroundings.

324
GX460_OM_OM60T19U_(U)
4-5. Using the driving support systems
NOTICE
■ Panoramic view● In the panoramic view, the system combines images taken from the front, back, left
and right side cameras into a single image. There are limits to the range and contentthat can be displayed. Understand the characteristics of this system before using.
● Image clarity may decline at the four corners of the panoramic view. However, this isnot a malfunction, as these are the regions along the border of each camera imagewhere the images are combined.
● Depending on lighting conditions near each of the cameras, bright and dark patchesmay appear on the panoramic view.
● The panoramic view display does not extend higher than the installation position andimage capture range of each camera.
● There are blind spots around the vehicle and there are regions that are not displayedin the panoramic view.
● Three-dimensional objects displayed in wide front view or rear view may not be dis-played in the panoramic view.
● People and other three-dimensional obstacles may appear differently when dis-played in the panoramic view. (These differences include, among others, cases inwhich displayed objects appear to have fallen over, disappear near image processingareas, appear from image processing areas, or when the actual distance to an objectdiffers from the displayed position.)
● The panoramic view will not be properly displayed when either front door or the backdoor is open.
● The vehicle icon displayed in the panoramic view is a computer generated image, andproperties such as the color, shape and size will differ from the actual vehicle. There-fore, nearby three-dimensional objects may appear to be touching the vehicle, andactual distances to three-dimensional objects may differ from those displayed.

GX460_OM_OM60T19U_(U)
3254-5. Using the driving support systems
4
Driving
■ Display range● Panoramic view
Not displayed.
Not displayed. (Displayed in black around the vehicle icon.)
● Wide front view
Masking
Parts of the vehicle (such as the bumper or grille) are displayed on the screen.
Camera visibility range
Object detectable by camera
Object not detectable by camera
1
2
1
2
3
4
5

326
GX460_OM_OM60T19U_(U)
4-5. Using the driving support systems
● Side views
The side of the vehicle is displayed on the screen.
Camera visibility range
Object detectable by camera
● Side view
The side of the vehicle is displayed on the screen.
Camera visibility range
Object detectable by camera
1
2
3
1
2
3

GX460_OM_OM60T19U_(U)
3274-5. Using the driving support systems
4
Driving
● Rear view
The corners of the bumper are not seen on the screen.● Wide rear view
The corners of the bumper are not seen on the screen.
1
1

328
GX460_OM_OM60T19U_(U)
4-5. Using the driving support systems
■ Panoramic view display range● In the panoramic view, the system processes and displays images acquired form the 4
cameras under the assumption that the vehicle is on a flat road surface. Therefore, thedisplay may appear as follows.• Three-dimensional objects may appear to have fallen over, and be long and thin or
bigger than they actually are• Three-dimensional objects at a point higher than the surface of the road may appear
further away than they actually are, or may not appear• Tall objects may appear to emerge from the image processing seams
● Inconsistencies in the brightness of images from each camera may occur depending onlighting conditions.
● The displayed image may not be aligned when the tilt or height of the vehicle changeddue to the number of passengers, cargo weight or remaining quantity of gasoline.
● The displayed image may not be aligned when the vehicle is in other than “N” (normal)height mode. (P. 339)
● Images and guide lines may not be properly displayed when the doors are not com-pletely closed.
● The relative distances between the vehicle icon and road surface or an obstacle dis-played in the panoramic view may differ from the actual state.
● If an illuminated license plate is used, it may appear on the screen.● The black area around the vehicle icon is an area that is not appear in the camera.
Check these areas directly.
■ Wide front view display range● Certain areas at the front of the vehicle have a different sense of distance, and are
masked in black so that they do not appear on the screen.● There are limits to the range displayed on the screen. Objects at either corner of the
bumper or directly below the bumper are not displayed.● The perceived distance in images displayed on the screen differs from the actual dis-
tance.■ Images displayed on the screen
Cameras of the Multi-terrain Monitor system use special lenses. The distance of theimage that appears on the screen differs from the actual distance.
● The circled areas shown in the illustration maybe difficult to see, as these are points whereimages are combined.

GX460_OM_OM60T19U_(U)
3294-5. Using the driving support systems
4
Driving
■ Multi-terrain Monitor cameras● Camera positions
The cameras of the Multi-terrain Monitor system are installed as follows.
Side camera (left and rightsides)
Front camera
Rear camera
● Using the cameras
If dirt or foreign matter (such as water droplets, snow, mud, etc.) is adheringto the camera, it cannot transmit a clear image. In this case, flush it with alarge quantity of water and wipe the camera lens with a soft and wet cloth.
1
2
3
NOTICE
■ How to use the cameras● Observe the following precautions. Failure to do so may prevent the Multi-terrain
Monitor from operating properly.• Do not strike the camera area, or allow any objects to bump into it
If the camera or surrounding area has received a strong impact, the camera posi-tion, installation angle, etc., may deviate. If the camera is accidentally subjected toan impact, have the vehicle inspected at your Lexus dealer.
• Do not remove, disassemble or modify the camera or surrounding partsDoing so may result in the camera malfunctioning. This also may result in a loss ofwaterproof performance.
• If the camera lens is dirty, follow the above procedures to clean itIf the camera lens is damaged it cannot transmit a clear image.Do not allow organic solvent, car wax, oil film remover, glass coating, etc. to con-tact the camera coverDoing so will negatively affect the camera cover (resin). If this happens, wipe it offimmediately.
• When the outside temperature is cold, do not cause any sudden changes in tem-perature, such as by applying hot water
● When washing the vehicle, do not apply water with a high-pressure washer to thecamera or surrounding area. Doing so may cause the camera to receive a strongimpact, and the camera may not operate properly

330
GX460_OM_OM60T19U_(U)
4-5. Using the driving support systems
■ Differences between the panoramic view screen and the actual road
The distance guide lines, the combined panoramic view image, guide lines,etc., indicate estimated distances on a flat road surface. In the following situa-tions, actual distances and vehicle course will differ from the guide lines on thescreen.● When the ground behind the vehicle slopes up sharply
The distance guide lines will appear to be closer to the vehicle than theactual distance. Therefore, obstacles on an upward slope appear furtheraway than they actually are. In the same way, the actual course of the vehi-cle will differ from the course indicated by the guide lines.
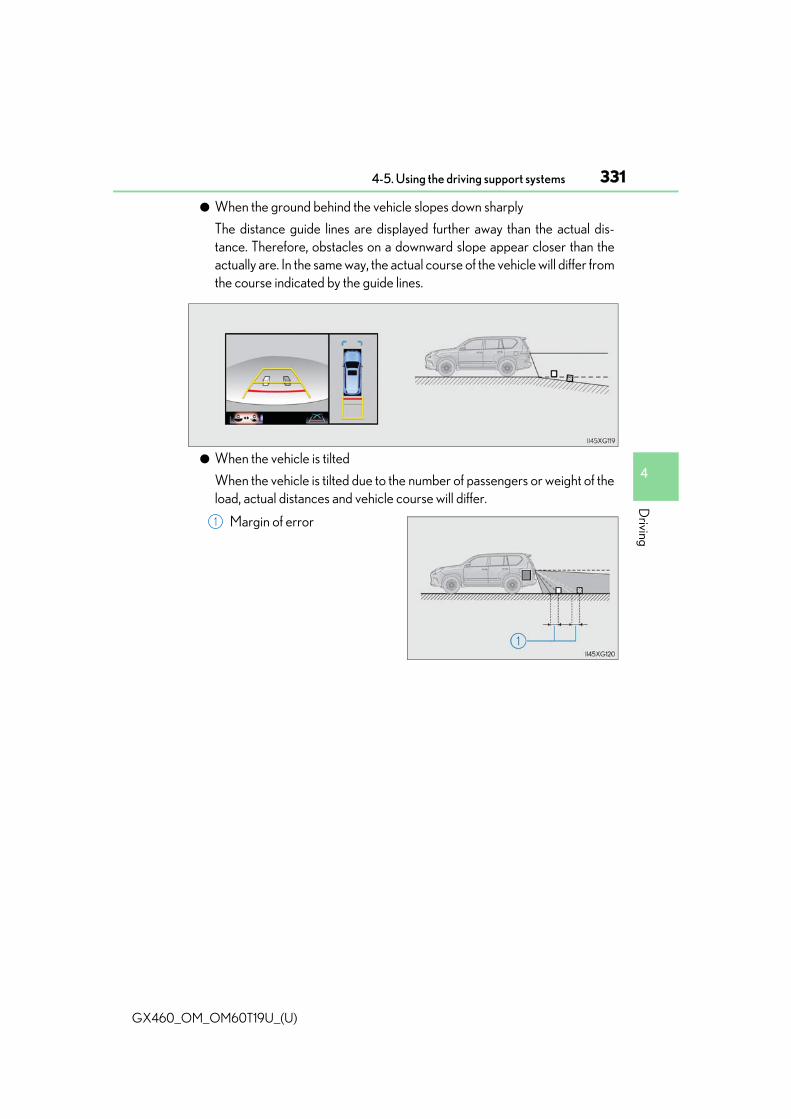
GX460_OM_OM60T19U_(U)
3314-5. Using the driving support systems
4
Driving
● When the ground behind the vehicle slopes down sharply
The distance guide lines are displayed further away than the actual dis-tance. Therefore, obstacles on a downward slope appear closer than theactually are. In the same way, the actual course of the vehicle will differ fromthe course indicated by the guide lines.
● When the vehicle is tilted
When the vehicle is tilted due to the number of passengers or weight of theload, actual distances and vehicle course will differ.
Margin of error1

332
GX460_OM_OM60T19U_(U)
4-5. Using the driving support systems
■ Differences between the panoramic view display and actual three-dimen-sional objects
Be aware of the following points when three-dimensional objects higher thanthe surface of the road (such as a vehicle bumper) are nearby.● Panoramic view display
In the panoramic view, the system processes and displays images under theassumption that the vehicle is on a flat road surface. Therefore, the positionof three-dimensional objects higher than the road surface (such as a vehi-cle bumper) cannot be determined. Even if it seems that a collision will notoccur according to the screen, there may not actually be any extra spacebetween the vehicle and an obstacle higher than the road surface, resultingin a collision. In these cases, confirm the safety of your surroundingsdirectly.
WARNING
■ Intuitive parking assist pop-up displayWhen the intuitive parking assist pop-up display is red, park the vehicle and make sureto confirm the safety of your surroundings.Failure to do so may lead to an unexpected accident.

GX460_OM_OM60T19U_(U)
3334-5. Using the driving support systems
4
Driving
● Projected course lines
Projected course lines are displayed under the assumption that the vehicleis on a flat road surface. Therefore, the position of three-dimensionalobjects higher than the road surface (such as a vehicle bumper) cannot bedetermined. Even if it seems that an obstacle is outside of the projectedcourse lines and a collision will not occur according to the screen, anobstacle may actually be in the vehicle course, resulting in a collision.
Projected course lines
Three-dimensional objects in high positions (such as walls with protrusionsor the loading areas of trucks) may not be displayed on the screen. Con-firm the safety of your surroundings directly.
Protrusion of a wall
1
1

334
GX460_OM_OM60T19U_(U)
4-5. Using the driving support systems
■ Differences between the rear view or wide rear view and actual roads
The guide lines on the screen are intended for flat surfaces (such as the road).Be aware of the following points when three-dimensional objects with protru-sions (obstacles such as the cargo bed of a truck) are nearby.● Projected course lines
Guide lines are displayed in reference to a level road surface and cannotbe used to determine the location of three-dimensional objects. Confirmthe safety of your surroundings directly. Even if it seems that the cargo bedof a truck is outside the projected course lines and a collision will not occuraccording to the screen, it may actually be in the vehicle course, resulting ina collision.
Projected course lines1
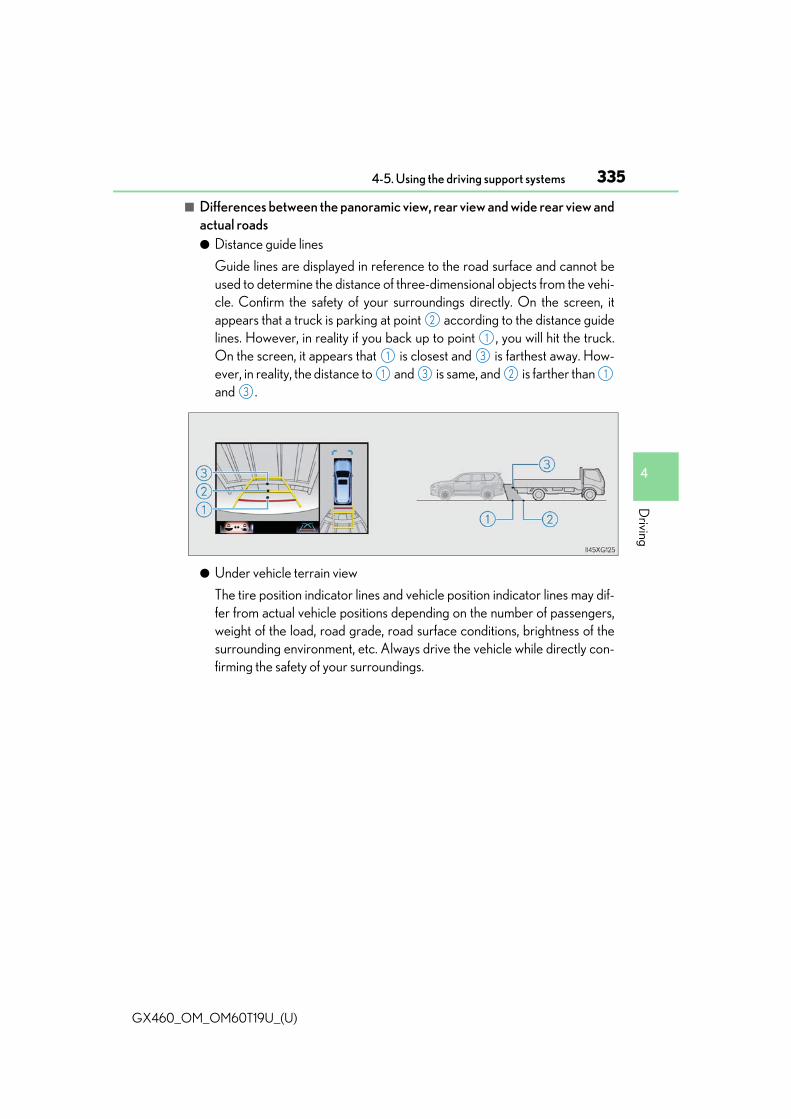
GX460_OM_OM60T19U_(U)
3354-5. Using the driving support systems
4
Driving
■ Differences between the panoramic view, rear view and wide rear view andactual roads● Distance guide lines
Guide lines are displayed in reference to the road surface and cannot beused to determine the distance of three-dimensional objects from the vehi-cle. Confirm the safety of your surroundings directly. On the screen, itappears that a truck is parking at point according to the distance guidelines. However, in reality if you back up to point , you will hit the truck.On the screen, it appears that is closest and is farthest away. How-ever, in reality, the distance to and is same, and is farther than and .
● Under vehicle terrain view
The tire position indicator lines and vehicle position indicator lines may dif-fer from actual vehicle positions depending on the number of passengers,weight of the load, road grade, road surface conditions, brightness of thesurrounding environment, etc. Always drive the vehicle while directly con-firming the safety of your surroundings.
2
1
1 3
1 3 2 1
3

336
GX460_OM_OM60T19U_(U)
4-5. Using the driving support systems
■ Using under vehicle terrain view● The images displayed were previously taken approximately 10 ft. (3 m) behind the cur-
rent vehicle position.Therefore, actual conditions may differ from those shown on the screen in the followingsituations.• An obstacle has appeared after the image was taken• Loose material like sand or snow has crumbled or shifted• An obstacle has moved• There is a puddle, tract of mud, etc., within the display range• The vehicle slips
● In the following situations, actual tire positions and vehicle position may differ fromthose indicated by the tire position indicator lines and vehicle position indicator lines.• Tires have been replaced• Optional equipment has been installed
WARNING
■ Guide linesThe displayed guide lines are composed with the image that was previously taken andmay differ from the actual state.Always drive the vehicle while confirming your surroundings.

GX460_OM_OM60T19U_(U)
3374-5. Using the driving support systems
4
Driving
■ If you notice any symptoms
If you notice any of the following symptoms, refer to the likely cause and thesolution, and re-check.If the symptom is not resolved by the solution, have the vehicle inspected byyour Lexus dealer.
Likely cause Solution
The image is difficult to see
• The vehicle is in a dark area• The temperature around the lens is
either high or low• The outside temperature is low• There are water droplets on the cam-
era• It is raining or humid• Foreign matter (mud etc.) is adhering to
the camera• Sunlight or headlights are shining
directly into the camera• The vehicle is under fluorescent lights,
sodium lights, mercury lights, etc.
Drive while visually checking the vehicle’ssurroundings. (Use the Multi-terrainMonitor again once conditions have beenimproved.)The procedure for adjusting the picturequality of the Multi-terrain Monitor issame as the procedure for adjusting thenavigation screen. Refer to the“NAVIGATION SYSTEM OWNER’SMANUAL”.
The image is blurry
Dirt or foreign matter (such as waterdroplets, snow, mud, etc.) is adhering tothe camera
Flush the camera with a large quantity ofwater and wipe the camera lens with asoft and wet cloth.
The image is out of alignment
The camera or surrounding area hasreceived a strong impact
Have the vehicle inspected by your Lexusdealer.
The guide lines are very far out of alignment
The camera position is out of alignment Have the vehicle inspected at your Lexusdealer.
• The vehicle is tilted (there is a heavyload on the vehicle, tire pressure is lowdue to a tire puncture, etc.)
• The vehicle is used on an incline
If this happens due to these causes, itdoes not indicate a malfunction.Drive while visually checking the vehicle’ssurroundings.

338
GX460_OM_OM60T19U_(U)
4-5. Using the driving support systems
The projected course lines move even though the steering wheel is straight (vehi-cle width extension guide lines and projected course lines are not aligned)
There is a malfunction in the signals beingoutput by the steering sensor
Have the vehicle inspected by your Lexusdealer.
Guide lines are not displayed
The back door is open
Close the back door.If this does not resolve the symptom, havethe vehicle inspected by your Lexusdealer.
“!” is displayed
The battery is disconnected and recon-nected
Turn the steering wheel fully to right andleft.If this does not resolve the symptom, havethe vehicle inspected by your Lexusdealer.
There is a malfunction in the Multi-terrainMonitor
Have the vehicle inspected by your Lexusdealer.
NOTICE
■ How to use the camera● The Multi-terrain Monitor system may not operate properly in the following cases.
• If the front or the rear of the vehicle or the outside rear view mirror has been hit,the camera’s position and mounting angle may have changed.
• As the camera has a water proof construction, do not detach, disassemble ormodify it. This may cause incorrect operation.
• When cleaning the camera lens, flush the camera with a large quantity of waterand wipe it with a soft and wet cloth. Strongly rubbing the camera lens may causethe camera lens to be scratched and unable to transmit a clear image.
• Do not allow organic solvent, car wax, window cleaner or glass coat to adhere tothe camera. If this happens, wipe it off as soon as possible.
• If the temperature changes rapidly, such as when hot water is poured on the vehi-cle in cold weather, the system may not operate normally.
• When washing the vehicle, do not apply intensive bursts of water to the camera orcamera area. Doing so may result in the camera malfunctioning.
• When the camera is used under fluorescent lights, sodium light or mercury lightetc., the lights and the illuminated areas may appear to flicker.
• The camera can be damaged by flying rocks and other debris.● Do not expose the camera to strong impact as this could cause a malfunction. If this
happens, have the vehicle inspected by your Lexus dealer as soon as possible.
Likely cause Solution

339
GX460_OM_OM60T19U_(U)
4-5. Using the driving support systems
4
Driving
Rear height control air suspension
Height control OFF button
Height control switch
Operating the switch changes vehicle rear height as follows:
Higher
Lower
Vehicle height can be adjusted onlywhen the engine is running.
The selected height mode will beshown on the multi-information display.
The selected mode will flash while theheight mode is being changed.
: If equipped
The rear height control air suspension allows the driver to control vehicle rearheight in order to adjust driving conditions. Select the desired height with theheight control switch.
1
2
Selecting vehicle height
1
2

340
GX460_OM_OM60T19U_(U)
4-5. Using the driving support systems
■ Height modes● N mode (normal mode): For ordinary driving
Normal height● HI mode (high mode): For driving on bumpy roads
1.6 in. (40 mm) higher than the normal rear height
HI mode cannot be selected when vehicle speed exceeds 18 mph (30km/h).
● LO mode (low mode): For the ease of egress/ingress and loading luggage
0.8 in. (20 mm) lower than the normal rear height
LO mode cannot be selected when vehicle speed exceeds 7 mph (12 km/h).
When the height control OFF button ispressed with the vehicle stopped, thevehicle height is fixed at the currentheight.
This status is memorized in the systemeven after the engine is stopped.
The height can be adjusted by pressingthe height control OFF button again.
When vehicle speed exceeds 18 mph (30 km/h), the rear height control air suspen-sion turns on automatically.
Disabling the height control

GX460_OM_OM60T19U_(U)
3414-5. Using the driving support systems
4
Driving
■ When HI mode is selectedThe vehicle height will change to N mode when driving at the speeds of 18 mph (30 km/h). Even if vehicle speed is then reduced to under 18 mph (30 km/h), height will not return toHI mode.
■ When LO mode is selectedThe vehicle height will change to N mode when vehicle speed exceeds 7 mph (12 km/h). Even if vehicle speed is then reduced to under 7 mph (12 km/h), height will not return toLO mode.
■ Automatic leveling functionRegardless of the number of occupants and the luggage load, vehicle height in any modeis always adjusted to a fixed height by the automatic leveling function.
■ The rear height control air suspension will not operate in the following cases:● The underbody of the vehicle is touching the surface of the road.● The area around the suspension is covered with ice.
■ Even if you hear an operating noiseThis does not indicate a problem in the rear height control air suspension.
■ Parking and stopping tips● If you immediately stop the engine after off-road driving, or park the vehicle for a long
time, the vehicle height may gradually lower. When parking, make sure there is nothingunder the vehicle that may come in contact with the underbody. The vehicle will returnto the set height when the engine is started.
● The vehicle height may change as the temperature changes when the engine isstopped. The vehicle will return to the set height when the engine is started.
■ When lowering the vehicleIn order to prevent the vehicle height from rising as occupants leave the vehicle, loweringcontrol will occur for a short while after the engine has been stopped.
■ The rear height control air suspension failure warning● If a malfunction occurs in the rear height control air suspension, N mode is automati-
cally selected. However, the system may not switch to N mode depending on the loca-tion of the malfunction.
● The “CHECK AIR SUSPENSION SYSTEM”/“Check air suspension system” is dis-played on the multi-information display, and the rear height control air suspension can-not be activated until the malfunction is corrected.Stop the engine and start it again. If the warning message turns off, the system is operat-ing correctly. If the warning message continues to be displayed, have your vehicleinspected by your Lexus dealer as soon as possible.

342
GX460_OM_OM60T19U_(U)
4-5. Using the driving support systems
WARNING
■ The rear height control air suspension must be turned offBe sure to observe the following precautions. Otherwise, the automatic leveling func-tion may cause vehicle height to change, and you may catch part of your body in thevehicle, resulting in an accident:● When jacking up the vehicle, installing tire chains or tying the vehicle with chains/
wires for transportation via flatbed truck, turn off the rear height control air suspen-sion and stop the engine.
● When the vehicle must be towed or disconnecting a trailer, put the vehicle height in Nmode and turn off the rear height control air suspension.
● When the vehicle is stuck, turn off the rear height control air suspension.■ Selecting the correct height mode
● HI mode should only be used when driving on rough roads, for example when drivingoff-road.Because the vehicle’s center of gravity will become higher when in the mode, thevehicle may become unstable when turning abruptly, resulting in an accident.
● Do not select HI mode when loading cargo on the roof luggage carrier. Because the vehicle’s center of gravity will become higher when in the mode, thevehicle may become unstable when turning abruptly, resulting in an accident.
● Before lowering vehicle height, check that there is no one under the vehicle.
NOTICE
■ Be careful in any place where overhead space is limitedThe vehicle height will rise when a higher mode is selected or cargo is unloaded. Thismay cause damage to the vehicle.
■ Do not select LO mode when driving on bumpy roadsIf the underbody of the vehicle touches a rugged road surface, the vehicle may bedamaged.
■ Changing vehicle heightDo not change vehicle height frequently.The compressor may overheat and stop operation.
■ When on the extremely uneven roads with rocksSometimes the vehicle height is not adjusted because it is judged as uneven road driv-ing.

343
GX460_OM_OM60T19U_(U)
4-5. Using the driving support systems
4
Driving
AVS (Adaptive Variable Suspension System)
Sport mode
For winding mountain road driving orhigh speed drivingNormal mode
For normal drivingComfort mode
When compared to normal mode, ridecomfort is improved.
■ Driving mode● Mode is suitable for heavy load or driving on a unpaved road.● With the four-wheel drive control switch at L4, the damping effect suitable for off-road
driving will be provided, regardless of the position of the AVS switch.
: If equipped
The driving modes can be selected to suit driving condition.
1
2
3
1

344
GX460_OM_OM60T19U_(U)
4-5. Using the driving support systems
Four-wheel drive system
H4 (high speed position)
Normal driving on all types of roads.L4 (low speed position)
Driving requiring maximum power andtraction such as climbing or descendingsteep hills, off-road driving, and hardpulling in sand or mud, etc.The low speed four-wheel drive indica-tor will come on.
Use the four-wheel drive control switch and center differential lock/unlockswitch to select the following transfer and center differential modes.
Four-wheel drive control switch
1
2
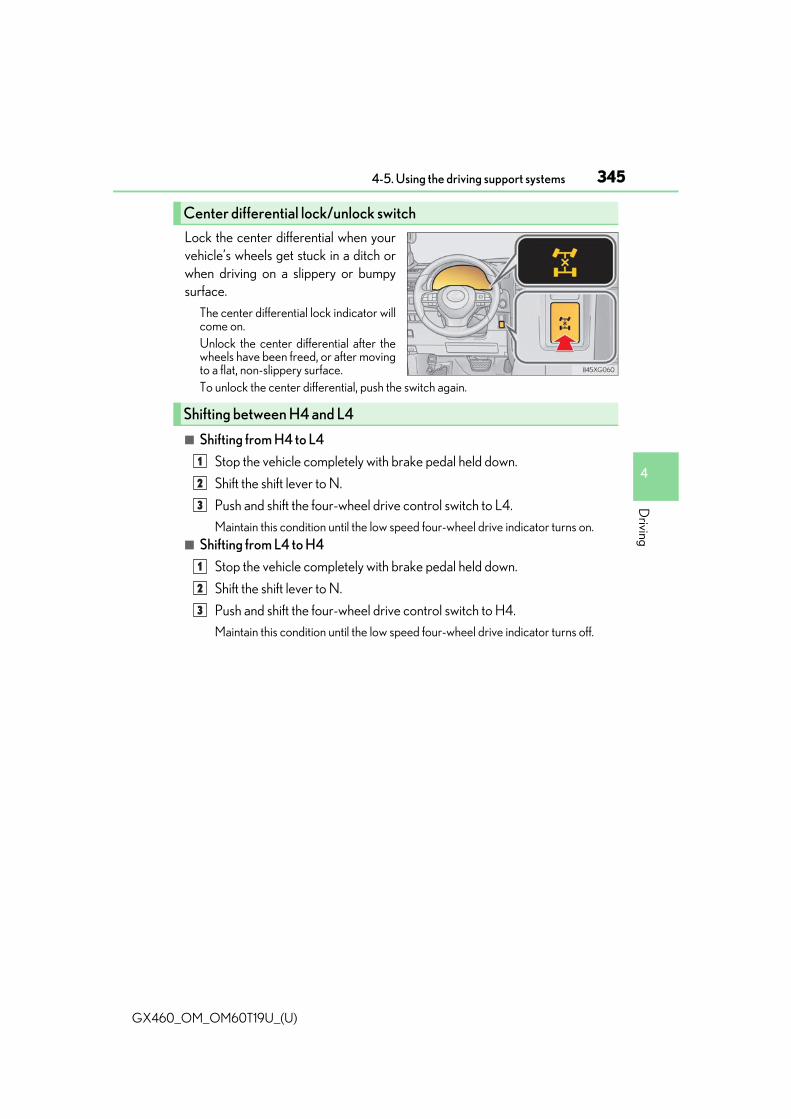
GX460_OM_OM60T19U_(U)
3454-5. Using the driving support systems
4
Driving
Lock the center differential when yourvehicle’s wheels get stuck in a ditch orwhen driving on a slippery or bumpysurface.
The center differential lock indicator willcome on.Unlock the center differential after thewheels have been freed, or after movingto a flat, non-slippery surface.To unlock the center differential, push the switch again.
■ Shifting from H4 to L4
Stop the vehicle completely with brake pedal held down.
Shift the shift lever to N.
Push and shift the four-wheel drive control switch to L4.
Maintain this condition until the low speed four-wheel drive indicator turns on.■ Shifting from L4 to H4
Stop the vehicle completely with brake pedal held down.
Shift the shift lever to N.
Push and shift the four-wheel drive control switch to H4.
Maintain this condition until the low speed four-wheel drive indicator turns off.
Center differential lock/unlock switch
Shifting between H4 and L4
1
2
3
1
2
3

346
GX460_OM_OM60T19U_(U)
4-5. Using the driving support systems
■ When the four-wheel drive control switch can be operated● The engine switch is in IGNITION ON mode.● The shift lever is in the N position.● The vehicle is stopped completely.
■ The low speed four-wheel drive indicator● The indicator blinks while switching between H4 and L4.● If the low speed four-wheel drive indicator continues to blink when you operate the
four-wheel drive control switch to the H4 or L4 position, stop the vehicle completely,shift the shift lever securely into N and then operate the switch again.
● If the shift lever is moved before the low speed four-wheel drive indicator turns on/off,the transfer mode may not be shifted completely. The transfer mode disengages boththe front and rear drive shafts from the powertrain and allows the vehicle to moveregardless of the shift position. (At this time, the indicator blinks and the buzzer sounds.) Therefore, the vehicle is free to roll even if the shift lever is in P. You or someone elsecould be seriously injured. You must complete the shifting of the transfer mode andconfirm that the indicator has turned off (H4) or turned on (L4).
● If the engine coolant temperature is too low, the four-wheel drive control system maynot be able to shift. When the engine is warmer operate the switch again.
If the indicator continue to blink even if doing so, have the vehicle inspected by yourLexus dealer as soon as possible. There may be a trouble in the four-wheel drive system.
■ When the transfer mode is switched to L4VSC is automatically turned off. (The VSC OFF indicator will come on.)
■ When the center differential lock/unlock switch can be operatedThe engine switch is in IGNITION ON mode.
■ The center differential lock indicator● The indicator blinks while locking/unlocking the center differential.● If the center differential lock indicator blinks and the buzzer sounds when the center
differential is locked, stop the slipping or spinning and push the switch again.If the indicator continue to blink even if doing so, have the vehicle inspected by yourLexus dealer as soon as possible. There may be a trouble in the four-wheel drive system.

GX460_OM_OM60T19U_(U)
3474-5. Using the driving support systems
4
Driving
■ Locking/unlocking the center differential● If the operation is not completed, the center differential lock indicator blinks. If the indi-
cator does not turn off when unlocking the center differential, drive straight aheadwhile accelerating or decelerating, or drive in reverse.
● Avoid turning suddenly while the center differential is locked. If you do turn suddenly,the difference in turning speeds between the front and rear wheels may have a similareffect to braking, thus making driving difficult.
WARNING
■ While drivingObserve the following precautions. Failure to do so may cause an accident resulting indeath or serious injury.● Never move the four-wheel drive control switch if the wheels have lost traction.● Do not operate the center differential lock/unlock when the vehicle is turning or
when its wheels are spinning freely off the ground.
NOTICE
■ To prevent damage to the center differential● For normal driving on dry and hard surface roads, unlock the center differential.● Unlock the center differential after the wheels are out of the ditch or off the slippery
or bumpy surface.

348
GX460_OM_OM60T19U_(U)
4-5. Using the driving support systems
Crawl Control
Crawl Control ON/OFF switch
The indicator light on the switch comeson when operating.Crawl Control speed selectorswitch
Crawl Control indicators
The Crawl Control indicator is lit andthe slip indicator flashes when operat-ing.Multi-information display
The selected multi-terrain select modewill be displayed on the multi-informa-tion display.
: If equipped
Allows travel on extremely rough off-road surfaces at a fixed low speed with-out pressing the accelerator or brake pedal. Minimizes loss of traction orvehicle slip when driving on slippery road surfaces, helping for stable driving.
Crawl Control switch/indicators
1
2
3
4

GX460_OM_OM60T19U_(U)
3494-5. Using the driving support systems
4
Driving
The following table shows some typical terrains and the recommended speedmodes.
Lo
Lo-Med
Med
Med-Hi
Hi
*: Depending on the road surface, it may not be the most effective.
Operate the Crawl Control speedselector switch during Crawl Controlto select a mode.
Speed modes
1
2
3
4
5
Mode Road condition
Lo Rock, mogul (downhill) and gravel (downhill)*Lo-Med
Mogul (uphill)*Med
Snow, mud, gravel (uphill), sand, dirt, mogul (uphill) andgrass*
Med-Hi
Hi
Switching modes
1
2
3
4
5

350
GX460_OM_OM60T19U_(U)
4-5. Using the driving support systems
■ The Crawl Control can be operated when● The shift lever is in any gear other than P or N.● The four-wheel drive control switch is in L4.● The driver’s door is closed.
■ Automatic system cancelationIn the following situations, the system is canceled automatically:At that time, the buzzer will sound, the slip indicator turns off, and the Crawl Control indi-cator flashes.A notification will be displayed on the multi-information display for several seconds. (P. 527)● When the shift lever is moved to P or N.● When the four-wheel drive control switch is in H4.● When the driver’s door is opened.When turning off Crawl Control while traveling, stop the vehicle before the Crawl Con-trol indicator turns off, or drive extremely carefully.
■ Function limit● In the following situations, you will be able to use brake control to drive downhill at a
fixed low speed, but you will be unable to use engine control to drive uphill at a fixed lowspeed.• When the driving mode is set to second start mode.• When the vehicle speed is higher than 6 mph (10 km/h).
● When the vehicle speed is higher than 15 mph (25 km/h), engine control and brakecontrol will stop temporarily. At that time, the Crawl Control indicator flashes.

GX460_OM_OM60T19U_(U)
3514-5. Using the driving support systems
4
Driving
■ When the Crawl Control system is operated continuouslyThis may cause the brake actuator to overheat. In this case, the Crawl Control system willstop operating, a buzzer will sound, the Crawl Control indicator will turn off after flashingand the “TRAC OFF” indicator will come on. In this case, quickly stop the vehicle in a safeplace and give the actuator adequate time to cool off. Refrain from using the system untilthe “TRAC OFF” indicator turns off. (The vehicle can be driven normally during thistime.)
■ When depressing the accelerator pedal while the Crawl Control is operatingMulti-terrain Select operates in AUTO mode. (P. 288)
■ If the automatic transmission system overheatsThe system will cease operation, a buzzer will sound and a warning message will be dis-played to alert the driver. Stop the vehicle in a safe place until the warning message turnsoff. (P. 528)
■ Sounds and vibrations caused by the Crawl Control system● A sound may be heard from the engine compartment when the engine is started or just
after the vehicle begins to move. This sound does not indicate that a malfunction hasoccurred in Crawl Control system.
● Either of the following conditions may occur when the Crawl Control system is operat-ing. None of these are indicators that a malfunction has occurred.• Vibrations may be felt through the vehicle body and steering. • A motor sound may be heard after the vehicle comes to a stop.
■ If the slip indicator comes on...It may indicate a malfunction in the system. Consult your Lexus dealer.
WARNING
■ When using Crawl ControlDo not rely solely on the Crawl Control. This function does not extend the vehicle’sperformance limitations. Always thoroughly check the road conditions, and drivesafely.
■ These conditions may cause the system not to operate properlyWhen driving on the following surfaces, the system may not be able to maintain a fixedlow speed, which may result in an accident:● Extremely steep inclines.● Extremely uneven surfaces.● Snow-covered roads, or other slippery surfaces.

352
GX460_OM_OM60T19U_(U)
4-5. Using the driving support systems
Downhill assist control system
Shift the “DAC” switch to ON. Thedownhill assist control system indicatorwill comes on and the system will oper-ate.
When the system is in operation, the slipindicator will flash, and the stop lights/high mounted stop lights will be lit. Asound may also occur during the opera-tion. This does not indicated a malfunc-tion.
Shift the “DAC” switch to OFF while the system is in operation. The downhillassist control system indicator will flash as the system gradually ceases operation,and will turn off when the system is fully off.Shift the “DAC” switch to ON while the downhill assist control system indicator isflashing to start the system again.
: If equipped
The downhill assist control system helps to prevent excessive speed on steepdownhill slopes. The system will operate when the vehicle is traveling under 15 mph (25 km/h)with the accelerator and brake pedals released and the transfer mode is in L4.
System operation
Turning off the system

GX460_OM_OM60T19U_(U)
3534-5. Using the driving support systems
4
Driving
■ Operating tipsThe system will operate when the shift lever is in a position other than P, however to makeeffective use of the system it is recommended to select a lower shift range.
■ The system will not operate whenThe transfer mode is in H4.
■ If the downhill assist control system indicator flashes● In the following situations, the indicator flashes and the system will not operate:
• The transfer mode is not in L4.• The shift lever is in P.• The accelerator or brake pedal is depressed.• The vehicle speed exceeds approximately 15 mph (25 km/h).• The brake system overheats.
● In the following situations, the indicator flashes to alert the driver, but the system willoperate:• The shift lever is in N.• The “DAC” switch is turned off while the system is operating.
The system will gradually ceases operation. The indicator will flash during operation,and then go off when the system is fully off.
■ When the downhill assist control system is operated continuouslyThis may cause the brake actuator to overheat. In this case, the downhill assist controlsystem will stop operating, a buzzer will sound and the downhill assist control systemindicator will start flashing, and the “TRAC OFF” indicator light will come on. Refrainfrom using the system until the downhill assist control system indicator stays on and“TRAC OFF” indicator light turns off. (The vehicle can be driven normally during thistime.)
■ Sounds and vibrations caused by the downhill assist control system● A sound may be heard from the engine compartment when the engine is started or just
after the vehicle begins to move. This sound does not indicate that a malfunction hasoccurred in downhill assist control system.
● Either of the following conditions may occur when the downhill assist control system isoperating. None of these are indicators that a malfunction has occurred.• Vibrations may be felt through the vehicle body and steering.• A motor sound may be heard after the vehicle comes to a stop.
■ System malfunctionIn the following cases, have your vehicle checked by your Lexus dealer.● The downhill assist control system indicator does not come on when the engine switch
is turned to IGNITION ON mode.● The downhill assist control system indicator does not come on when the “DAC” switch
is shifted to ON.● The slip indicator comes on.

354
GX460_OM_OM60T19U_(U)
4-5. Using the driving support systems
WARNING
■ When using downhill assist control systemDo not rely overmuch on the downhill assist control system. This function does notextend the vehicle’s performance limitations. Always thoroughly check the road condi-tions, and drive safely.
■ The system may not operate on the following surfaces, which may lead to an accidentcausing death or serious injury● Slippery surfaces such as wet or muddy roads● Icy surface● Unpaved roads

355
GX460_OM_OM60T19U_(U)
4-5. Using the driving support systems
4
Driving
Driving assist systems
◆ ABS (Anti-lock Brake System)
Helps to prevent wheel lock when the brakes are applied suddenly, or if the brakes areapplied while driving on a slippery road surface
◆ Multi Terrain ABS (Anti-lock Brake System)
Helps to prevent wheel lock when the brakes are applied suddenly, or if the brakes areapplied while driving on a slippery road surface, or in off-road conditions (such asrough roads, sand and mud)Vehicles with Multi-terrain Select system: The Multi Terrain ABS operates in synchro-nization with the Multi-terrain Select
◆ Brake assist
Generates an increased level of braking force after the brake pedal is depressedwhen the system detects a panic stop situation
◆ VSC (Vehicle Stability Control)
Helps the driver to control skidding when swerving suddenly or turning on slipperyroad surfaces
◆ TRAC (Traction Control) for H4 position
Helps to maintain drive power and prevent the drive wheels from spinning when start-ing the vehicle or accelerating on slippery roads
To keep driving safety and performance, the following systems operate auto-matically in response to various driving situations. Be aware, however, thatthese systems are supplementary and should not be relied upon too heavilywhen operating the vehicle.
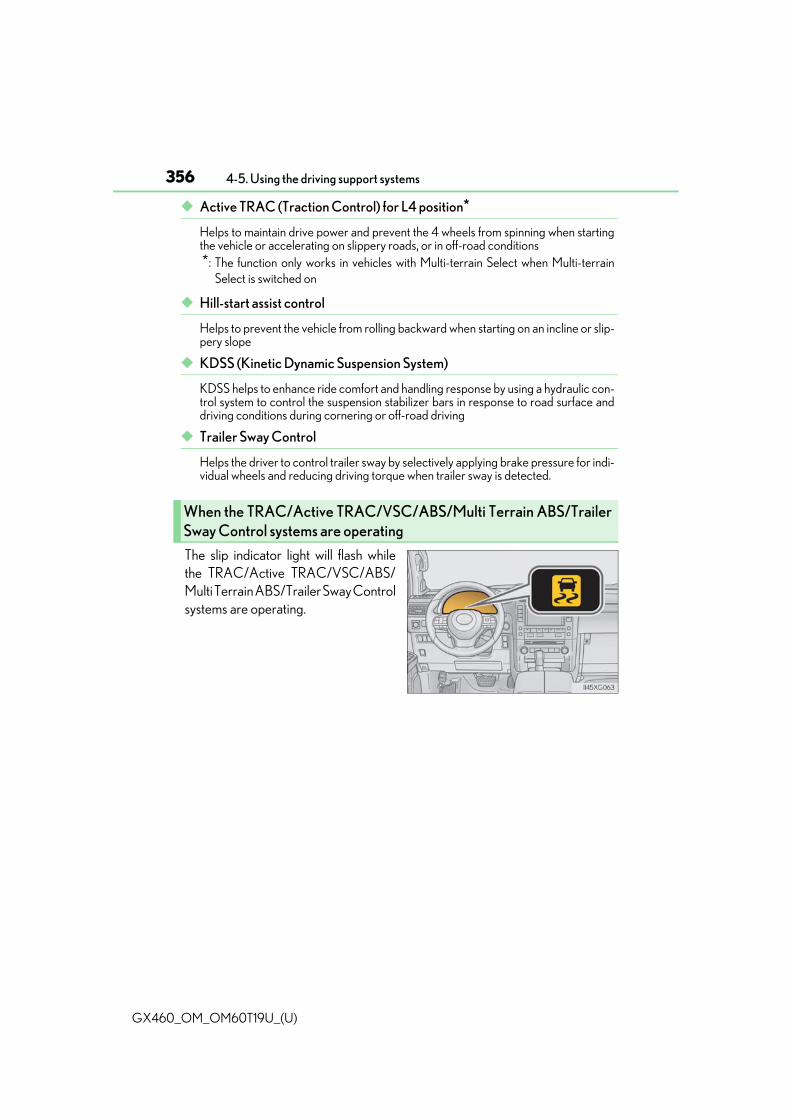
356
GX460_OM_OM60T19U_(U)
4-5. Using the driving support systems
◆ Active TRAC (Traction Control) for L4 position*
Helps to maintain drive power and prevent the 4 wheels from spinning when startingthe vehicle or accelerating on slippery roads, or in off-road conditions*: The function only works in vehicles with Multi-terrain Select when Multi-terrain
Select is switched on
◆ Hill-start assist control
Helps to prevent the vehicle from rolling backward when starting on an incline or slip-pery slope
◆ KDSS (Kinetic Dynamic Suspension System)
KDSS helps to enhance ride comfort and handling response by using a hydraulic con-trol system to control the suspension stabilizer bars in response to road surface anddriving conditions during cornering or off-road driving
◆ Trailer Sway Control
Helps the driver to control trailer sway by selectively applying brake pressure for indi-vidual wheels and reducing driving torque when trailer sway is detected.
The slip indicator light will flash whilethe TRAC/Active TRAC/VSC/ABS/Multi Terrain ABS/Trailer Sway Controlsystems are operating.
When the TRAC/Active TRAC/VSC/ABS/Multi Terrain ABS/TrailerSway Control systems are operating
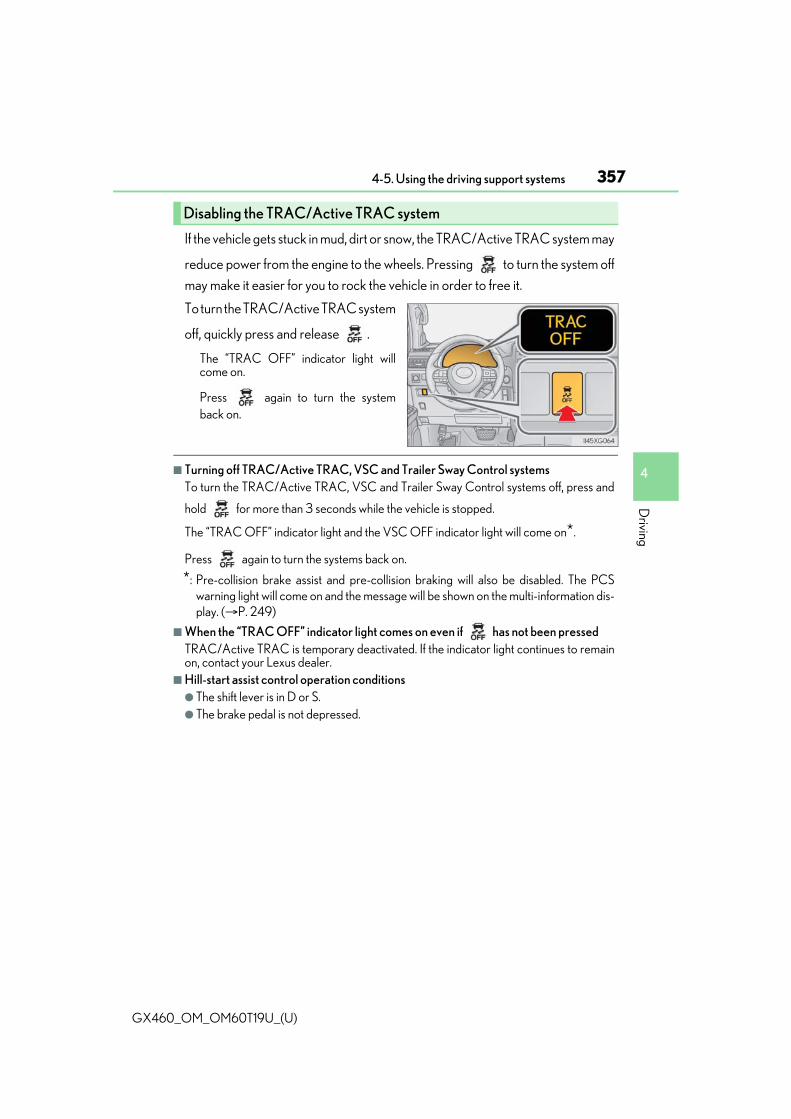
GX460_OM_OM60T19U_(U)
3574-5. Using the driving support systems
4
Driving
If the vehicle gets stuck in mud, dirt or snow, the TRAC/Active TRAC system may
reduce power from the engine to the wheels. Pressing to turn the system off
may make it easier for you to rock the vehicle in order to free it.
To turn the TRAC/Active TRAC system
off, quickly press and release .
The “TRAC OFF” indicator light willcome on.
Press again to turn the systemback on.
■ Turning off TRAC/Active TRAC, VSC and Trailer Sway Control systemsTo turn the TRAC/Active TRAC, VSC and Trailer Sway Control systems off, press and
hold for more than 3 seconds while the vehicle is stopped.
The “TRAC OFF” indicator light and the VSC OFF indicator light will come on*.
Press again to turn the systems back on.
*: Pre-collision brake assist and pre-collision braking will also be disabled. The PCSwarning light will come on and the message will be shown on the multi-information dis-play. (P. 249)
■ When the “TRAC OFF” indicator light comes on even if has not been pressedTRAC/Active TRAC is temporary deactivated. If the indicator light continues to remainon, contact your Lexus dealer.
■ Hill-start assist control operation conditions● The shift lever is in D or S.● The brake pedal is not depressed.
Disabling the TRAC/Active TRAC system

358
GX460_OM_OM60T19U_(U)
4-5. Using the driving support systems
■ Sounds and vibrations caused by the ABS/Multi Terrain ABS, brake assist, VSC, TrailerSway Control, TRAC/Active TRAC and hill-start assist control systems● A sound may be heard from the engine compartment when the brake pedal is
depressed repeatedly, when the engine is started or just after the vehicle begins tomove. This sound does not indicate that a malfunction has occurred in any of these sys-tems.
● Any of the following conditions may occur when the above systems are operating.None of these indicates that a malfunction has occurred. • Vibrations may be felt through the vehicle body and steering.• A motor sound may be heard also after the vehicle comes to a stop.• The brake pedal may pulsate slightly after the ABS/Multi Terrain ABS is activated.• The brake pedal may move down slightly after the ABS/Multi Terrain ABS is acti-
vated.■ Automatic reactivation of TRAC/Active TRAC, Trailer Sway Control and VSC systems
After turning the TRAC/Active TRAC, Trailer Sway Control and VSC systems off, thesystems will be automatically re-enabled in the following situations:● When the engine switch is turned off● If only the TRAC/Active TRAC system is turned off, the TRAC/Active TRAC will turn
on when vehicle speed increasesIf both the TRAC/Active TRAC and VSC systems are turned off, automatic re-enablingwill not occur when vehicle speed increases.
■ When the brake system operates continuouslyThe brake actuator may overheat. In this case, the TRAC/Active TRAC and hill-startassist control systems will stop operating, a buzzer will sound and the “TRAC OFF” indi-cator will come on. Refrain from using the system until the message goes off. (There is noproblem with continuing normal driving.)
■ If the slip indicator comes on...It may indicate a malfunction in the TRAC/Active TRAC, VSC/Trailer Sway Control orhill-start assist control system. Consult your Lexus dealer.
■ KDSSSome difference of vehicle height between left and right side can appear. This does notindicate a malfunction in the KDSS system. For more information, contact your Lexusdealer.

GX460_OM_OM60T19U_(U)
3594-5. Using the driving support systems
4
Driving
WARNING
■ The ABS/Multi Terrain ABS does not operate effectively when● The limits of tire gripping performance have been exceeded (such as excessively
worn tires on a snow covered road).● The vehicle hydroplanes while driving at high speed on wet or slick roads.
■ Stopping distance when the ABS/Multi Terrain ABS is operating may exceed that ofnormal conditionsThe ABS/Multi Terrain ABS is not designed to shorten the vehicle’s stopping distance.Always maintain a safe distance from the vehicle in front of you, especially in the follow-ing situations:● When driving on dirt, gravel or snow-covered roads● When driving with tire chains● When driving over bumps in the road● When driving over roads with potholes or uneven surfaces
■ TRAC/Active TRAC/VSC may not operate effectively whenDirectional control and power may not be achievable while driving on slippery roadsurfaces, even if the TRAC/Active TRAC/VSC system is operating.Drive the vehicle carefully in conditions where stability and power may be lost.
■ Hill-start assist control does not operate effectively whenDo not overly rely on the hill-start assist control. The hill-start assist control may notoperate effectively on steep inclines and roads covered with ice.
■ When the TRAC/Active TRAC/VSC/Trailer Sway Control is activatedThe slip indicator light flashes. Always drive carefully.Reckless driving may cause an accident. Exercise particular care when the indicatorlight flashes.
■ When the TRAC/Active TRAC/VSC/Trailer Sway Control systems are turned offBe especially careful and drive at a speed appropriate to the road conditions. As theseare the systems to help ensure vehicle stability and driving force, do not turn theTRAC/Active TRAC/VSC/Trailer Sway Control systems off unless necessary.Trailer Sway Control is part of the VSC system and will not operate if VSC is turned offor experiences a malfunction.

360
GX460_OM_OM60T19U_(U)
4-5. Using the driving support systems
WARNING
■ Replacing tiresMake sure that all tires are of the specified size, brand, tread pattern and total loadcapacity. In addition, make sure that the tires are inflated to the recommended tire infla-tion pressure level.The ABS/Multi Terrain ABS, TRAC/Active TRAC, Trailer Sway Control and VSC sys-tems will not function correctly if different tires are installed on the vehicle.Contact your Lexus dealer for further information when replacing tires or wheels.
■ Handling of tires and the suspensionUsing tires with any kind of problem or modifying the suspension will affect the drivingassist systems, and may cause a system to malfunction.
■ Trailer Sway Control precautionThe Trailer Sway Control system is not able to reduce trailer sway in all situations.Depending on many factors such as the conditions of the vehicle, trailer, road surfaceand driving environment, the Trailer Sway Control system may not be effective. Refer toyour trailer owner’s manual for information on how to tow your trailer properly.
■ If trailer sway occursObserve the following precautions.Failing to do so may cause death or serious injury.● Firmly grip the steering wheel. Steer straight ahead.
Do not try to control trailer sway by turning the steering wheel.● Begin releasing the accelerator pedal immediately but very gradually to reduce
speed.Do not increase speed. Do not apply vehicle brakes.
If you make no extreme correction with the steering or brakes, your vehicle and trailershould stabilize. (P. 195)

361
GX460_OM_OM60T19U_(U)
4-5. Using the driving support systems
4
Driving
BSM (Blind Spot Monitor)
The Blind Spot Monitor is a system that has 2 functions;● The Blind Spot Monitor function
Assists the driver in making the decision when changing lanes● The Rear Cross Traffic Alert function
Assists the driver when backing up
These functions use same sensors.
: If equipped
Summary of the Blind Spot Monitor

362
GX460_OM_OM60T19U_(U)
4-5. Using the driving support systems
The Blind Spot Monitor on/off screen and indicator
The Blind Spot Monitor system can be turned on/off on the multi-information display.When the system is set to on, the indicator illuminates in the meter and the buzzersounds. The Blind Spot Monitor function and the Rear Cross Traffic Alert function areturned on/off simultaneously.Outside rear view mirror indicator
The Blind Spot Monitor function: When a vehicle is detected in the blind spot, the outside rear view mirror indicatorcomes on while the turn signal lever is not operated. If the turn signal lever is operatedtoward the detected side, the outside rear view mirror indicator flashes.The Rear Cross Traffic Alert function: When a vehicle approaching from the right or left rear of the vehicle is detected, theoutside rear view mirror indicators flash.Monitor screen display (The Rear Cross Traffic Alert function only)
If a vehicle approaching from the right or left at the rear of the vehicle is detected, theRear Cross Traffic Alert icon (P. 370) for the detected side will be displayed on themonitor screen.This illustration shows an example of a vehicle approaching from the left at the rear ofthe vehicle.The Rear Cross Traffic Alert buzzer (The Rear Cross Traffic Alert functiononly)
When a vehicle approaching from the right or left rear of the vehicle is detected, abuzzer sounds from behind the rear seat.
Press or of the meter control switches and select on the multi-
information display.
Press or of the meter control switches and select , and then
press .
Each pressing of the switch turns the Blind Spot Monitor on and off.
Turning the Blind Spot Monitor system on/off
1
2
3
4
1
2

GX460_OM_OM60T19U_(U)
3634-5. Using the driving support systems
4
Driving
■ The outside rear view mirror indicators visibilityWhen under strong sunlight, the outside rear view mirror indicator may be difficult tosee.
■ The Rear Cross Traffic Alert buzzer hearingThe Rear Cross Traffic Alert buzzer may be difficult to hear over loud noises such as highaudio volume.
■ When “BSM NOT AVAILABLE”/“BSM not available” is shown on the multi-informa-tion displayThe sensor voltage has become abnormal, water, snow mud, etc., may be built up in thevicinity of the sensor area of bumper (P. 365). Removing the water, snow, mud, etc.,from the vicinity of the sensor area bumper should return it to normal. Also, the sensormay not function normally when used in extremely hot or cold weather.
■ When “CHECK BSM SYSTEM”/“Check BSM system” is shown on the multi-informa-tion displayThere may be a sensor malfunction or misaligned. Have the vehicle inspected by yourLexus dealer.
■ Certification for the Blind Spot Monitor For vehicles sold in the U.S.A., Hawaii, Guam, Puerto Rico and Saipan

364
GX460_OM_OM60T19U_(U)
4-5. Using the driving support systems
For vehicles sold in Canada

GX460_OM_OM60T19U_(U)
3654-5. Using the driving support systems
4
Driving
WARNING
■ Handling the radar sensorOne Blind Spot Monitor sensor is installed inside the left and right side of the vehiclerear bumper respectively. Observe the following to ensure the Blind Spot Monitor canfunction correctly.
● Do not subject a sensor or its surrounding area on the rear bumper to a strongimpact.If a sensor is moved even slightly off position, the system may malfunction and vehi-cles may not be detected correctly.In the following situations, have your vehicle inspected by your Lexus dealer.• A sensor or its surrounding area is subject to a strong impact.• If the surrounding area of a sensor is scratched or dented, or part of them has
become disconnected.● Do not disassemble the sensor.● Do not attach accessories or stickers to the sensor or surrounding area on the
bumper.● Do not modify the sensor or surrounding area on the bumper.● Do not paint the rear bumper any color other than an official Lexus color.
● Keep the sensor and its surrounding area onthe bumper clean at all times.

366
GX460_OM_OM60T19U_(U)
4-5. Using the driving support systems
The Blind Spot Monitor function uses radar sensors to detect vehicles that aretraveling in an adjacent lane in the area that is not reflected in the outside rearview mirror (the blind spot), and advises the driver of the vehicle’s existence viathe outside rear view mirror indicator.
The areas that vehicles can be detected in are outlined below.
The range of the detection area extends to:
Approximately 11.5 ft. (3.5 m) fromthe side of the vehicle
The first 1.6 ft. (0.5 m) from the side ofthe vehicle is not in the detection areaApproximately 9.8 ft. (3 m) from therear bumper
Approximately 3.3 ft. (1 m) forwardof the rear bumper
The Blind Spot Monitor function
The Blind Spot Monitor function detection areas
1
2
3
WARNING
■ Cautions regarding the use of the systemThe driver is solely responsible for safe driving. Always drive safely, taking care toobserve your surroundings.The Blind Spot Monitor function is a supplementary function which alerts the driverthat a vehicle is present in the blind spot. Do not overly rely on the Blind Spot Monitorfunction. The function cannot judge if it is safe to change lanes, therefore over reliancecould cause an accident resulting in death or serious injury.According to conditions, the system may not function correctly. Therefore the driver’sown visual confirmation of safety is necessary.

GX460_OM_OM60T19U_(U)
3674-5. Using the driving support systems
4
Driving
■ The Blind Spot Monitor function is operational when● The Blind Spot Monitor system turned on.● Vehicle speed is greater than approximately 10 mph (16 km/h).
■ The Blind Spot Monitor function will detect a vehicle when● A vehicle in an adjacent lane overtakes your vehicle.● You overtake a vehicle in adjacent lane slowly.● Another vehicle enters the detection area when it changes lanes.
■ Conditions under which the Blind Spot Monitor function will not detect a vehicleThe Blind Spot Monitor function is not designed to detect the following types of vehiclesand/or objects:● Small motorcycles, bicycles, pedestrians etc.*● Vehicles traveling in the opposite direction● Guardrails, walls, signs, parked vehicles and similar stationary objects*● Following vehicles that are in the same lane*● Vehicles driving 2 lanes across from your vehicle*● Vehicles which are being overtaken rapidly by your vehicle**: Depending on conditions, detection of a vehicle and/or object may occur.

368
GX460_OM_OM60T19U_(U)
4-5. Using the driving support systems
■ Conditions under which the Blind Spot Monitor function may not function correctly● The Blind Spot Monitor function may not detect vehicles correctly in the following situ-
ations:• When the sensor is misaligned due to a strong impact to the sensor or its surround-
ing area• When mud, snow, ice, a sticker, etc. is covering the sensor or surrounding area on
the rear bumper• When driving on a road surface that is wet with standing water during bad weather,
such as heavy rain, snow, or fog• When multiple vehicles are approaching with only a small gap between each vehicle• When the distance between your vehicle and a following vehicle is short• When there is a significant difference in speed between your vehicle and the vehicle
that enters the detection area• When the difference in speed between your vehicle and another vehicle is changing• When a vehicle enters a detection area traveling at about the same speed as your
vehicle• As your vehicle starts from a stop, a vehicle remains in the detection area• When driving up and down consecutive steep inclines, such as hills, dips in the road,
etc.• When driving on roads with sharp bends, consecutive curves, or uneven surfaces• When vehicle lanes are wide, or when driving on the edge of a lane, and the vehicle
in an adjacent lane is far away from your vehicle• When your vehicle is towing a trailer (with towing hitch)• When a bicycle carrier or other accessory is installed to the rear of the vehicle• When there is a significant difference in height between your vehicle and the vehicle
that enters the detection area• Immediately after the Blind Spot Monitor function is turned on
● Instances of the Blind Spot Monitor function unnecessarily detecting a vehicle and/orobject may increase in the following situations:• When the sensor is misaligned due to a strong impact to the sensor or its surround-
ing area• When the distance between your vehicle and a guardrail, wall, etc. that enters the
detection area is short• When driving up and down consecutive steep inclines, such as hills, dips in the road,
etc.• When vehicle lanes are narrow, or when driving on the edge of a lane, and a vehicle
traveling in a lane other than the adjacent lanes enters the detection area• When driving on roads with sharp bends, consecutive curves, or uneven surfaces• When the tires are slipping or spinning• When the distance between your vehicle and a following vehicle is short• When a bicycle carrier or other accessory is installed to the rear of the vehicle

GX460_OM_OM60T19U_(U)
3694-5. Using the driving support systems
4
Driving
The Rear Cross Traffic Alert functions when your vehicle is in reverse. It candetect other vehicles approaching from the right or left rear of the vehicle. It usesradar sensors to alert the driver of the other vehicle’s existence through flashingthe outside rear view mirror indicators and sounding a buzzer.
The Rear Cross Traffic Alert function
Approaching vehicles Detection areas1 2

370
GX460_OM_OM60T19U_(U)
4-5. Using the driving support systems
■ The Rear Cross Traffic Alert icon display
When a vehicle approaching from the right or left at the rear of the vehicle isdetected, the following will be displayed on the monitor screen
Display Content
A vehicle is approaching from the left at the rear of the vehi-cle
A vehicle is approaching from the right at the rear of thevehicle
Vehicles are approaching from both sides of the vehicle
The Rear Cross Traffic Alert function is malfunctioning (P. 363)
WARNING
■ Cautions regarding the use of the systemThe driver is solely responsible for safe driving. Always drive safely, taking care toobserve your surroundings.The Rear Cross Traffic Alert function is only an assist and is not a replacement for care-ful driving. Driver must be careful when backing up, even when using the Rear CrossTraffic Alert function. The driver’s own visual confirmation of behind you and your vehi-cle is necessary and be sure there are no pedestrians, other vehicles etc. before back-ing up. Failure to do so could cause death or serious injury.According to conditions, the system may not function correctly. Therefore the driver’sown visual confirmation of safety is necessary.

GX460_OM_OM60T19U_(U)
3714-5. Using the driving support systems
4
Driving
The areas that vehicles can be detected in are outlined below.
To give the driver a more consistent time to react, the buzzer can alert for fastervehicles from farther away.
Example:
■ The Rear Cross Traffic Alert function is operational when● The Blind Spot Monitor system turned on.● The shift lever is in R.● Vehicle speed is less than approximately 5 mph (8 km/h).● Approaching vehicle speed is between approximately 5 mph (8 km/h) and 18 mph (28
km/h).
The Rear Cross Traffic Alert function detection areas
Approaching vehicle Speed Approximate alert distance
Fast 18 mph (28 km/h) 65 ft. (20 m)
Slow 5 mph (8 km/h) 18 ft. (5.5 m)
1
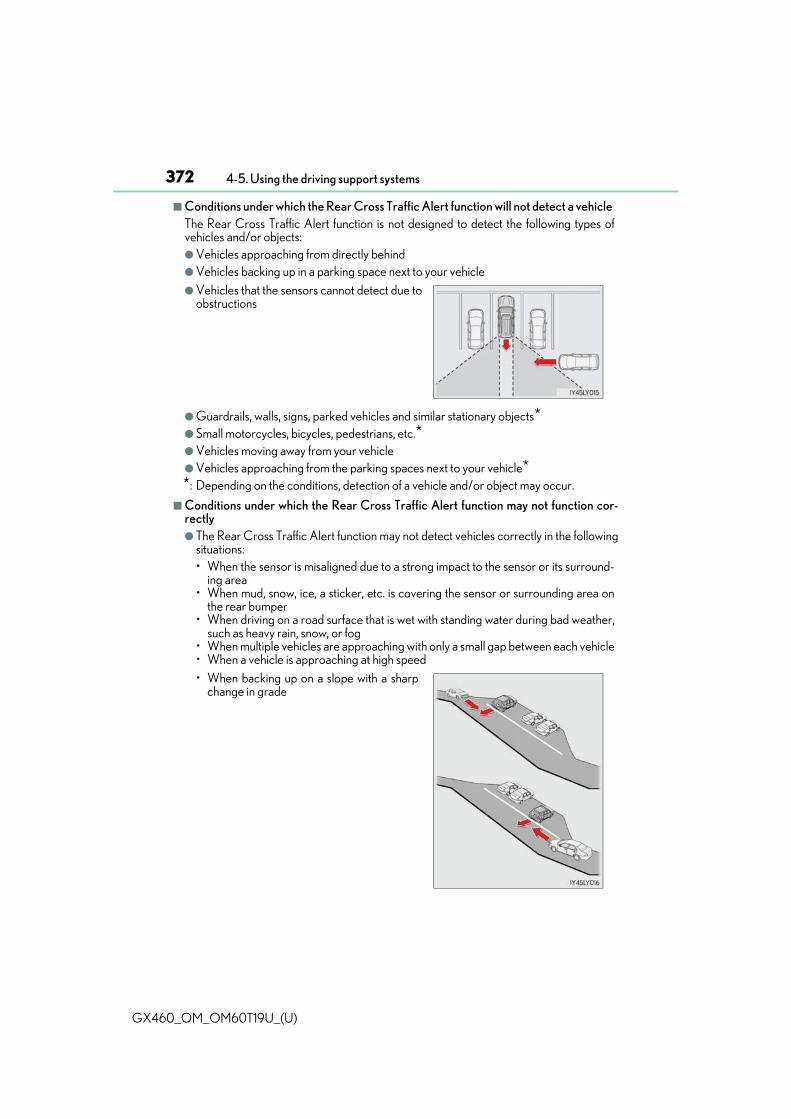
372
GX460_OM_OM60T19U_(U)
4-5. Using the driving support systems
■ Conditions under which the Rear Cross Traffic Alert function will not detect a vehicleThe Rear Cross Traffic Alert function is not designed to detect the following types ofvehicles and/or objects:● Vehicles approaching from directly behind● Vehicles backing up in a parking space next to your vehicle
● Guardrails, walls, signs, parked vehicles and similar stationary objects*● Small motorcycles, bicycles, pedestrians, etc.*● Vehicles moving away from your vehicle● Vehicles approaching from the parking spaces next to your vehicle**: Depending on the conditions, detection of a vehicle and/or object may occur.
■ Conditions under which the Rear Cross Traffic Alert function may not function cor-rectly● The Rear Cross Traffic Alert function may not detect vehicles correctly in the following
situations:• When the sensor is misaligned due to a strong impact to the sensor or its surround-
ing area• When mud, snow, ice, a sticker, etc. is covering the sensor or surrounding area on
the rear bumper• When driving on a road surface that is wet with standing water during bad weather,
such as heavy rain, snow, or fog• When multiple vehicles are approaching with only a small gap between each vehicle• When a vehicle is approaching at high speed
● Vehicles that the sensors cannot detect due toobstructions
• When backing up on a slope with a sharpchange in grade

GX460_OM_OM60T19U_(U)
3734-5. Using the driving support systems
4
Driving
• Immediately after the Blind Spot Monitor function is turned on• Immediately after the engine is started with the Blind Spot Monitor function on
● Instances of the Rear Cross Traffic Alert function unnecessarily detecting a vehicleand/or object may increase in the following situations:• When a vehicle passes by the side of your vehicle
• When the distance between your vehicle and metal objects, such as a guardrail,wall, sign, or parked vehicle, which may reflect electrical waves toward the rear ofthe vehicle, is short
• When backing out of a shallow angle park-ing spot
• When the sensors cannot detect a vehicledue to obstructions
• When the parking space faces a street andvehicles are being driven on the street

374
GX460_OM_OM60T19U_(U)
4-6. Driving tips
Winter driving tips
● Use fluids that are appropriate to the prevailing outside temperatures.• Engine oil• Engine coolant• Washer fluid
● Have a service technician inspect the condition of the battery.● Have the vehicle fitted with four snow tires or purchase a set of tire chains for
the rear tires.
Ensure that all tires are the same size and brand, and that chains match the size of thetires.
Perform the following according to the driving conditions:● Do not try to forcibly open a window or move a wiper that is frozen. Pour
warm water over the frozen area to melt the ice. Wipe away the water imme-diately to prevent it from freezing.
● To ensure proper operation of the climate control system fan, remove anysnow that has accumulated on the air inlet vents in front of the windshield.
● Check for and remove any excess ice or snow that may have accumulated onthe exterior lights, vehicle’s roof, chassis, around the tires or on the brakes.
● Remove any snow or mud from the bottom of your shoes before getting in thevehicle.
Carry out the necessary preparations and inspections before driving the vehi-cle in winter. Always drive the vehicle in a manner appropriate to the prevail-ing weather conditions.
Pre-winter preparations
Before driving the vehicle

GX460_OM_OM60T19U_(U)
3754-6. Driving tips
4
Driving
Accelerate the vehicle slowly, keep a safe distance between you and the vehicleahead, and drive at a reduced speed suitable to road conditions.
● Park the vehicle and move the shift lever to P without setting the parkingbrake. The parking brake may freeze up, preventing it from being released. Ifthe vehicle is parked without setting the parking brake, make sure to block thewheels.Failure to do so may be dangerous because it may cause the vehicle to moveunexpectedly, possibly leading to an accident.
● If the vehicle is parked without setting the parking brake, confirm that the shiftlever cannot be moved out of P*.
*: The shift lever will be locked if it is attempted to be shifted from P to any other positionwithout depressing the brake pedal. If the shift lever can be shifted from P, there maybe a problem with the shift lock system. Have the vehicle inspected by your Lexusdealer immediately.
Use the correct tire chain size when mounting the tire chains. Chain size is regulated for each tire size.
Side chain(0.20 in. [5 mm] in diameter)
Cross chain(0.25 in. [6.3 mm] in diameter)
Regulations regarding the use of tire chains vary depending on location and typeof road. Always check local regulations before installing chains.
When driving the vehicle
When parking the vehicle
Selecting tire chains
1
2
Regulations on the use of tire chains

376
GX460_OM_OM60T19U_(U)
4-6. Driving tips
■ Tire chain installationObserve the following precautions when installing and removing chains:● Install and remove tire chains in a safe location.● Install tire chains on the rear tires. Do not install tire chains on the front tires.● Install tire chains on rear tires as tightly as possible. Retighten chains after driving 1/4 -
1/2 mile (0.5 - 1.0 km).● Install tire chains following the instructions provided with the tire chains.
WARNING
■ Driving with snow tiresObserve the following precautions to reduce the risk of accidents.Failure to do so may result in a loss of vehicle control and cause death or serious injury.● Use tires of the specified size.● Maintain the recommended level of air pressure.● Do not drive in excess of 75 mph (120 km/h), regardless of the type of snow tires
being used.● Use snow tires on all, not just some wheels.● Do not use LDA (Lane Departure Alert) system.
■ Driving with tire chainsObserve the following precautions to reduce the risk of accidents.Failing to do so may result in the vehicle being unable to be driven safely, and maycause death or serious injury.● Do not drive in excess of the speed limit specified for the tire chains being used, or 30
mph (50 km/h), whichever is lower.● Avoid driving on bumpy road surfaces or over potholes.● Avoid sudden acceleration, abrupt steering, sudden braking and shifting operations
that cause sudden engine braking.● Slow down sufficiently before entering a curve to ensure that vehicle control is main-
tained.● Do not use LDA (Lane Departure Alert) system.
NOTICE
■ Repairing or replacing snow tiresRequest repairs or replacement of snow tires from Lexus dealers or legitimate tireretailers.This is because the removal and attachment of snow tires affects the operation of thetire pressure warning valves and transmitters.
■ Fitting tire chainsThe tire pressure warning valves and transmitters may not function correctly when tirechains are fitted.

377
GX460_OM_OM60T19U_(U)
4-6. Driving tips
4
Driving
Off-road precautions
● Specific design characteristics give it a higher center of gravity than ordinarypassenger cars. This vehicle design feature causes this type of vehicle to bemore likely to rollover. And, utility vehicles have a significantly higher rolloverrate than other types of vehicles.
● An advantage of the higher ground clearance is a better view of the roadallowing you to anticipate problems.
● It is not designed for cornering at the same speeds as ordinary passenger carsany more than low-slung sports cars are designed to perform satisfactorilyunder off-road conditions. Therefore, sharp turns at excessive speeds maycause the vehicle to rollover.
This vehicle belongs to the utility vehicle class, which has higher ground clear-ance and narrower tread in relation to the height of its center of gravity tomake it capable of performing in a wide variety of off-road applications.
Off-road vehicle features

378
GX460_OM_OM60T19U_(U)
4-6. Driving tips
WARNING
■ Off-road vehicle precautionsAlways observe the following precautions to minimize the risk of death, serious injuryor damage to your vehicle:● In a rollover crash, an unbelted person is significantly more likely to die than a person
wearing a seat belt. Therefore, the driver and all passengers should always fastentheir seat belts.
● Avoid sharp turns or abrupt maneuvers, if at all possible. Failure to operate this vehicle correctly may result in loss of control or vehicle rollovercausing death or serious injury.
● Loading cargo on the roof luggage carrier will make the center of the vehicle gravityhigher. Avoid high speeds, sudden starts, sharp turns, sudden braking or abruptmaneuvers, otherwise it may result in loss of control or vehicle rollover due to failureto operate this vehicle correctly.
● Always slow down in gusty crosswinds. Because of its profile and higher center ofgravity, your vehicle is more sensitive to side winds than an ordinary passenger car.Slowing down will allow you to have better control.
● Do not drive horizontally across steep slopes. Driving straight up or straight down ispreferred. Your vehicle (or any similar off-road vehicle) can tip over sideways muchmore easily than forward or backward.

GX460_OM_OM60T19U_(U)
3794-6. Driving tips
4
Driving
When driving your vehicle off-road, please observe the following precautions toensure your driving enjoyment and to help prevent the closure of areas to off-road vehicles:● Drive your vehicle only in areas where off-road vehicles are permitted to
travel.● Respect private property. Get owner’s permission before entering private
property.● Do not enter areas that are closed. Honor gates, barriers and signs that
restrict travel.● Stay on established roads. When conditions are wet, driving techniques
should be changed or travel delayed to prevent damage to roads.
■ Additional information for off-road driving For owners in U.S. mainland, Hawaii and Puerto Rico:To obtain additional information pertaining to driving your vehicle off-road, consult thefollowing organizations:● State and Local Parks and Recreation Departments● State Motor Vehicle Bureau● Recreational Vehicle Clubs● U.S. Forest Service and Bureau of Land Management
Off-road driving

380
GX460_OM_OM60T19U_(U)
4-6. Driving tips
WARNING
■ Off-road driving precautionsAlways observe the following precautions to minimize the risk of death, serious injuryor damage to your vehicle:● Drive carefully when off the road. Do not take unnecessary risks by driving in danger-
ous places.● Do not grip the steering wheel spokes when driving off-road. A bad bump could jerk
the wheel and injure your hands. Keep both hands and especially your thumbs on theoutside of the rim.
● Always check your brakes for effectiveness immediately after driving in sand, mud,water or snow.
● After driving through tall grass, mud, rock, sand, rivers, etc., check that there is nograss, bush, paper, rags, stone, sand, etc. adhering or trapped on the underbody.Clear off any such matter from the underbody. If the vehicle is used with these materi-als trapped or adhering to the underbody, a breakdown or fire could occur.
● When driving off-road or in rugged terrain, do not drive at excessive speeds, jump,make sharp turns, strike objects, etc. This may cause loss of control or vehicle rollovercausing death or serious injury. You are also risking expensive damage to your vehi-cle’s suspension and chassis.

GX460_OM_OM60T19U_(U)
3814-6. Driving tips
4
Driving
NOTICE
■ To prevent the water damageTake all necessary safety measures to ensure that water damage to the engine or othercomponents does not occur.● Water entering the engine air intake will cause severe engine damage. ● Water entering the automatic transmission will cause deterioration in shift quality,
locking up of your transmission accompanied by vibration, and ultimately damage.● Water can wash the grease from wheel bearings, causing rusting and premature fail-
ure, and may also enter the differentials, transmission and transfer case, reducing thegear oil’s lubricating qualities.
■ When you drive through waterIf driving through water, such as when crossing shallow streams, first check the depth ofthe water and the bottom of the riverbed for firmness. Drive slowly and avoid deepwater.
■ Inspection after off-road driving● Sand and mud that has accumulated in brake drums and around brake discs may
affect braking efficiency and may damage brake system components.● Always perform a maintenance inspection after each day of off-road driving that has
taken you through rough terrain, sand, mud, or water. For scheduled maintenanceinformation, refer to the “Warranty and Services Guide”, “Owner’s Manual Supple-ment” or “Scheduled Maintenance”.

382
GX460_OM_OM60T19U_(U)
4-6. Driving tips

383
GX460_OM_OM60T19U_(U)
5Interior features
5-1. Using the air conditioning system and defogger
Front automatic air conditioning system .............. 384
Rear air conditioning system ..........................................394
Heated steering wheel/seat heaters/seat ventilators........397
5-2. Using the interior lights
Interior lights list ........................ 400
• Personal/interior lights main switch .............................. 401
• Personal/interior lights....... 401
5-3. Using the storage features
List of storage features ............403
• Glove box ...............................404
• Console box...........................404
• Coin holder ............................406
• Cup holders/bottle holders/door pockets........406
• Auxiliary boxes .................... 408
Luggage compartment features ........................................ 410
5-4. Using the other interior features
Other interior features ..............417
• Cool box....................................417
• Sun visors ................................. 419
• Vanity mirror........................... 419
• Conversation mirror ..........420
• Clock ........................................420
• Power outlets...........................421
• USB charging ports ............425
• Armrest.................................... 427
• Coat hooks.............................428
• Assist grips..............................428
Compass ....................................... 429
Garage door opener ...............433

384
GX460_OM_OM60T19U_(U)
5-1. Using the air conditioning system and defogger
Front automatic air conditioning system
◆ Control panel
◆ Control screen
Air outlets and fan speed are automatically adjusted according to the tem-perature setting.
Press the to display the air conditioning control screen.
Vehicles without navigation sys-tem
Vehicles with navigation system

GX460_OM_OM60T19U_(U)
3855-1. Using the air conditioning system and defogger
5
Interior features
■ Adjusting the temperature setting
Press to increase the temperature and to decrease the tempera-
ture.
If the “A/C” indicator is turned off, the system will blow ambient temperature air orheated air.
■ Adjusting the fan speed setting
Press to increase the fan speed and to decrease the fan speed.
Press the “OFF” button to turn the fan off.
■ Changing the air flow mode
Select an air outlet switch.
: Air flows to the upper body
: Air flows to the upper body and feet
: Air flows to the feet
■ Option control screen
Touch on the climate screen to display the option control screen. Thefunctions can be switched on and off.
Select to set cooling and dehu-midification function on/off
Adjust the temperature for driverand passenger seats separately(“DUAL” mode)/driver, passen-ger and rear seats separately (“3-ZONE” mode) (P. 386)
Prevent ice from building up onthe windshield and wiper blades(if equipped) (P. 389)
Remove pollen from the air (P. 389)
1
2
3
4

386 5-1. Using the air conditioning system and defogger
GX460_OM_OM60T19U_(U)
Press to operate the speech
command system. (Refer to the“NAVIGATION SYSTEM OWNER’SMANUAL”.)
■ Using the automatic mode
Press the “AUTO” button.
Press to switch to automatic air intake mode. (if equipped)
The air conditioning system automatically switches between outside air and recir-culated air modes.Adjust the temperature setting.
To stop the operation, press the “OFF” button.
■ Automatic mode indicator
If the fan speed setting or air flow modes are operated, the automatic modeindicator goes off. However, automatic mode for functions other than thatoperated is maintained.
■ Adjusting the temperature for driver and passenger seats separately(“DUAL” mode)/driver, passenger and rear seats separately (“3-ZONE”mode)
To turn on the “DUAL”/“3-ZONE” mode, perform any of the following proce-dures:● Press the “DUAL”/“3-ZONE” button.● Select “DUAL”/“3-ZONE” on the option control screen.● Adjust the passenger’s side temperature setting.
The indicator comes on when the “DUAL”/“3-ZONE” mode is on.
While in “DUAL” mode, the temperature of the rear air outlets is set at thepassenger’s side temperature setting.
Using the speech command system (vehicles with navigation system)
Air conditioning controls
1
2
3
4

GX460_OM_OM60T19U_(U)
3875-1. Using the air conditioning system and defogger
5
Interior features
Press or touch to display the rear air conditioning control screen.
■ Control screen
Adjust the fan speed setting
Adjust the rear seats temperature setting
Display the rear seats temperature setting
Turn the fan off
Select to set automatic mode
■ Using the automatic mode
Touch “REAR AUTO”.
Touch to increase the temperature and to decrease the tem-perature.
To stop the operation, touch “REAR OFF”.
■ If the system is operated manually in automatic mode
If the fan speed setting is operated, the automatic mode indicator goes off.However, automatic mode for functions other than that operated are main-tained.
Changing the rear seat settings (vehicles with rear air conditioning sys-tem)
Vehicles without navigation sys-tem
Vehicles with navigation system
1
2
3
4
5
1
2
3

388 5-1. Using the air conditioning system and defogger
GX460_OM_OM60T19U_(U)
■ Switching between outside air and recirculated air modes
Vehicles without rear air conditioning system
Press .
The mode switches between (recirculated air mode) and (outsideair mode) modes each time the button is pressed.
Vehicles with rear air conditioning system
Press .
The mode switches among (recirculated air mode), automatic and (outside air mode) modes each time the button is pressed.When the system is switched to automatic mode, the air conditioning system oper-ates automatically.
■ Defogging the windshield
Defoggers are used to defog the windshield and front side windows.
Press .
Set the outside/recirculated air mode button to outside air mode if the recirculatedair mode is used. (It may switch automatically.)To defog the windshield and the side windows early, turn the air flow and tempera-ture up.To return to the previous mode, press again when the windshield isdefogged.
Other functions

GX460_OM_OM60T19U_(U)
3895-1. Using the air conditioning system and defogger
5
Interior features
■ Defogging the rear window and outside rear view mirrors
Defoggers are used to defog the rear window, and to remove raindrops, dewand frost from the outside rear view mirrors.
Press .
The defoggers will automatically turn off after a period of time.■ Micro dust and pollen filter mode
Pollen is removed from the air and the air flows to the upper part of the body.
Touch on the option control screen.
When the micro dust and pollen filter mode is on, is displayed on the airconditioning control screen.In order to prevent the windshield from fogging up when the outside air is cold, thedehumidification function may operate.The pollens are filtered out even if the micro dust and pollen filter mode is turnedoff.
■ Windshield wiper de-icer (if equipped)
This feature is used to prevent ice from building up on the windshield andwiper blades.
Touch on the option control screen.
When the windshield wiper de-icer is on, is displayed on the air condition-ing control screen.The windshield wiper de-icer will automatically turn off after a period of time.
■ The windshield wiper de-icer can be operated when (vehicles with windshield wiperde-icer)The engine switch is in IGNITION ON mode.
■ When the windshield wiper de-icer is on (vehicles with windshield wiper de-icer)The windshield wiper de-icer will automatically turn off after approximately 15 minutes.
WARNING
■ When the windshield wiper de-icer is on (vehicles with windshield wiper de-icer)Do not touch the glass at the lower part of the windshield or the side of the front pillarsas the surfaces can become very hot and burn you.

390 5-1. Using the air conditioning system and defogger
GX460_OM_OM60T19U_(U)
■ Location of air outlets
The air outlets and air volumechanges according to the selectedair flow mode.
: Vehicles without rear airconditioning system
■ Adjusting the air flow direction and opening/closing the air outlets
Air outlets
Front outlets Rear outlets (vehicles without rear air conditioning system)
Direct air flow to the left or right, up or down.
Turn the knob to open or close the vent.
1
2
GX460_OM_OM60T19U_(U)
3915-1. Using the air conditioning system and defogger
5
Interior features
■ Registering air conditioning settings to electronic keys● Unlocking the vehicle using an electronic key and turning the engine switch to
IGNITION ON mode will recall that key’s registered air conditioning settings.● When the engine switch is turned off, the current air conditioning settings will automat-
ically be registered to the electronic key that was used to unlock the vehicle.The system may not operate correctly if more than one electronic key is in the vicinity orif the smart access system with push-button start is used to unlock a passenger door.Settings for the electronic key and the corresponding door can be changed. Contact your Lexus dealer.
■ Using automatic modeFan speed is adjusted automatically according to the temperature setting and the ambi-ent conditions.Therefore, the fan may stop for a while until warm or cool air is ready to flow immediatelyafter the “AUTO” button is pressed.
■ When the outside temperature exceeds 75F (24C) and the air conditioning systemis on● In order to reduce the air conditioning power consumption, the air conditioning system
may switch to recirculated air mode automatically.This may also reduce fuel consumption.
● Recirculated air mode is selected as a default mode when the engine switch is turned toIGNITION ON mode.
● It is possible to switch to outside air mode at any time by pressing or
.■ Fogging up of the windows
● The windows will easily fog up when the humidity in the vehicle is high. Touching “A/C”on will dehumidify the air from the outlets and defog the windshield effectively.
● If you turn “A/C” off, the windows may fog up more easily.● The windows may fog up if the recirculated air mode is used.
■ When driving on dusty roadsClose all windows. If dust thrown up by the vehicle is still drawn into the vehicle after clos-ing the windows, it is recommended that the air intake mode be set to outside air modeand the fan speed to any setting except off.
■ Outside/recirculated air mode
● Setting to the recirculated air mode temporarily is recommended in preventing dirty airfrom entering the vehicle interior and helping to cool the vehicle when the outside airtemperature is high.
● Outside/recirculated air mode may automatically switch depending on the tempera-ture setting or the inside temperature.

392 5-1. Using the air conditioning system and defogger
GX460_OM_OM60T19U_(U)
■ Automatic mode for air intake control (vehicles with rear air conditioning system)In automatic mode, the system detects exhaust gas and other pollutants and automati-cally switches between outside air and recirculated air modes.When the dehumidification function is off, and the fan is operating, turning automaticmode on will activate the dehumidification function.
■ When the outside temperature is lowThe dehumidification function may not operate even when “A/C” is touched.
■ Ventilation and air conditioning odors● To let fresh air in, set the air conditioning system to the outside air mode.● During use, various odors from inside and outside the vehicle may enter into and accu-
mulate in the air conditioning system. This may then cause odor to be emitted from thevents.
● To reduce potential odors from occurring: • It is recommended that the air conditioning system be set to outside air mode prior
to turning the vehicle off.• The start timing of the blower may be delayed for a short period of time immediately
after the air conditioning system is started in automatic mode.■ Air conditioning filterP. 490
■ Air conditioning system refrigerant
● The meaning of each symbol on the label are as follows:
● A label regarding the refrigerant of the airconditioning system is attached to the hood atthe location shown in the following illustration.
Caution
Air conditioning system
Air conditioning system lubricant type
Requires registered technician to ser-vice air conditioning system
Flammable refrigerant

GX460_OM_OM60T19U_(U)
3935-1. Using the air conditioning system and defogger
5
Interior features
■ CustomizationSettings (e.g. A/C automatic mode switch operation) can be changed. (Customizable features: P. 584)
WARNING
■ To prevent the windshield from fogging up
● Do not use during cool air operation in extremely humid weather. The differ-ence between the temperature of the outside air and that of the windshield can causethe outer surface of the windshield to fog up, blocking your vision.
■ To prevent burns● Do not touch the rear view mirror surfaces when the outside rear view mirror defog-
gers are on.● Do not touch the glass at lower part of the windshield or to the side of the front pillars
when the windshield wiper de-icer is on. (vehicles with windshield wiper de-icer)
NOTICE
■ To prevent battery dischargeDo not leave the air conditioning system on longer than necessary when the engine isoff.
■ When repairing/replacing parts of the air conditioning systemHave repair/replacement performed by your Lexus dealer. When a part of the air con-ditioning system, such as the evaporator, is to be replaced, it must be replaced with anew one.
● Do not place anything on the instrumentpanel which may cover the air outlets. Other-wise, air flow may be obstructed, preventingthe windshield defoggers from defogging.

394
GX460_OM_OM60T19U_(U)
5-1. Using the air conditioning system and defogger
Rear air conditioning system
■ Adjusting the temperature setting
Press “” on the “TEMP” button to increase the temperature and “” todecrease the temperature.
Touch on the climate screen to display the option control screen. (P. 385)
If the “A/C” indicator is turned off, the system will blow ambient temperature air orheated air.
■ Adjusting the fan speed setting
Press “” on to increase the fan speed and “” to decrease the fanspeed.
Press the “OFF” button to turn the fan off.
■ Changing the air flow mode
Press .
The air flow mode change as follows each time is pressed.
: Air flows to the upper body.
: Air flows to the upper body and feet.
: Air flows to the feet.
: If equipped
Air outlets and fan speed are automatically adjusted according to the tem-perature setting.

GX460_OM_OM60T19U_(U)
3955-1. Using the air conditioning system and defogger
5
Interior features
■ Using the automatic mode
Press the “AUTO” button.
Adjust the temperature setting.
To stop the operation, press the “OFF” button.
■ If the system is operated manually in automatic mode
If the fan speed setting or air flow modes are operated, the automatic modeindicator goes off. However, automatic mode for functions other than thatoperated are maintained.
■ Location of air outlets
The air outlets and air volumechanges according to the selectedair flow mode.
■ Adjusting the air flow direction and opening/closing the air outlets
Direct air flow to the left or right,up or down.
Turn the knob fully to the back ofthe vehicle to close the vent.
Air conditioning controls
Air outlets
1
2
3
1
2

396 5-1. Using the air conditioning system and defogger
GX460_OM_OM60T19U_(U)
■ Registering air conditioning settings to electronic keys● Unlocking the vehicle using an electronic key and turning the engine switch to
IGNITION ON mode will recall that key’s registered air conditioning settings.● When the engine switch is turned off, the current air conditioning settings will automat-
ically be registered to the electronic key that was used to unlock the vehicle.The system may not operate correctly if more than one electronic key is in the vicinity orif the smart access system with push-button start is used to unlock a passenger door.Settings for the electronic key and the corresponding door can be changed. Contact your Lexus dealer.
NOTICE
■ To prevent battery dischargeDo not leave the air conditioning system on longer than necessary when the engine isoff.

397
GX460_OM_OM60T19U_(U)
5-1. Using the air conditioning system and defogger
5
Interior features
Heated steering wheel/seat heaters/seat ventilators
Turns the heated steering wheel on/off
The indicator light comes on when theheated steering wheel is operating.
: If equipped
Heated steering wheel and seat heaters heat the side grips of the steeringwheel and seats. Seat ventilators maintain good airflow by blowing air fromthe seats.
WARNING
● Care should be taken to prevent injury if anyone in the following categories comes incontact with the steering wheel and seats when the heater is on:• Babies, small children, the elderly, the sick and the physically challenged• Persons with sensitive skin• Persons who are fatigued• Persons who have taken alcohol or drugs that induce sleep (sleeping drugs, cold
remedies, etc.)● Observe the following precautions to prevent the minor burns or overheating:
• Do not cover the seat with a blanket or cushion when using the seat heater.• Do not use seat heater more than necessary.
NOTICE
● Do not put heavy objects that have an uneven surface on the seat and do not sticksharp objects (needles, nails, etc.) into the seat.
● To prevent battery discharge, do not use the functions when the engine is off.
Heated steering wheel (if equipped)

398 5-1. Using the air conditioning system and defogger
GX460_OM_OM60T19U_(U)
● The heated steering wheel can be used when the engine switch is in IGNITION ONmode.
● The heated steering wheel will automatically turn off after about 30 minutes.● If the indicator light flashes, press the switch to turn the heated steering wheel off and
then press the switch again. If the indicator light still flashes, a malfunction may beoccurring. Turn the heated steering wheel off and have the vehicle inspected by yourLexus dealer.
■ Front seat
Turns the seat heater on
The indicator light comes on. The higher the number of dots, thewarmer the seat becomes.
■ Rear seat (if equipped)
For left second seat
For right second seat
High heating temperature
Low heating temperature
To turn on the seat heater, press “HI”or “LO”. The indicator light on “HI” or “LO”switch indicates that the seat heateris on.Off
To turn off, press “OFF”.
The seat heaters can be used when the engine switch is in IGNITION ON mode.
Seat heaters (if equipped)
1
2
3
4
5

GX460_OM_OM60T19U_(U)
3995-1. Using the air conditioning system and defogger
5
Interior features
Heats the seat
The indicator light comes on.The higher the number of dots, thewarmer the airflow becomes.Blows air from the seat
The indicator light comes on.The higher the number of dots, thestronger the airflow becomes.
The seat heaters and ventilators can be used when the engine switch is in IGNITIONON mode.
Seat heaters and ventilators (if equipped)
1
2

400
GX460_OM_OM60T19U_(U)
5-2. Using the interior lights
Interior lights list
Personal/interior lights (P. 401)
Inside door handle lights
Shift lever lights
Engine switch light
Scuff lights (if equipped)
Footwell lights
Door courtesy lights
Running board lights
1
2
3
4
5
6
7
8

GX460_OM_OM60T19U_(U)
4015-2. Using the interior lights
5
Interior features
Turns the lights off
Turns the door position on
Turns the lights on
Personal/interior lights main switch
Personal/interior lights
1
2
3
Front Rear
Turns the lights on/off Turns the lights on/off

402
GX460_OM_OM60T19U_(U)
5-2. Using the interior lights
■ Illuminated entry systemThe lights automatically turn on/off according to engine switch mode, the presence of theelectronic key, whether the doors are locked/unlocked, and whether the doors areopen/closed.
■ To prevent battery dischargeIf the following lights remain on when the engine switch is turned off the lights will go offautomatically after 20 minutes:● Personal/interior light● Inside door handle lights● Footwell lights● Running board lights
■ CustomizationSettings (e.g. adjust the time elapsed before the interior lights automatically turn off) canbe changed. (Customizable features: P. 584)
NOTICE
To prevent battery discharge, do not leave the lights on longer than necessary when theengine is not running.

403
GX460_OM_OM60T19U_(U)
5-3. Using the storage features
5
Interior features
List of storage features
Cup holders (P. 406)
Auxiliary boxes (P. 408)
Bottle holders/door pockets (P. 407)
Glove box (P. 404)
Console box (if equipped) (P. 404)
Cool box (if equipped) (P. 417)
Coin holder (if equipped) (P. 406)
WARNING
● Do not leave glasses, lighters or spray cans in the storage spaces, as this may causethe following when cabin temperature becomes high:• Glasses may be deformed by heat or cracked if they come into contact with other
stored items.• Lighters or spray cans may explode. If they come into contact with other stored
items, the lighter may catch fire or the spray can may release gas, causing a firehazard.
● When driving or when the storage compartments are not in use, keep the lids closed.In the event of sudden braking or sudden swerving, an accident may occur due to anoccupant being struck by an open lid or the items stored inside.
1
2
3
4
5
6

404
GX460_OM_OM60T19U_(U)
5-3. Using the storage features
Unlock with the mechanical key
Lock with the mechanical key
Open (push the button)
The glove box light turns on when the tail lights are on.
Your vehicle is equipped with either a console box or cool box.
For vehicles with the cool box, refer to P. 417.
Lift the lid while pulling up the lowerlever to release the lock.
Glove box
1
2
3
Console box (if equipped)

GX460_OM_OM60T19U_(U)
4055-3. Using the storage features
5
Interior features
● The console box light turns on when the tail lights are on.
● When using the console box lid as an armrest,slide the console box lid forward or backwardas needed. Slide the lid while pulling up theupper lever to release the lock.
● The tray slides forward/backward and can beremoved.
NOTICE
Do not insert items exceeding the height of the tray. Doing so may prevent opening andclosing of the lid.

406
GX460_OM_OM60T19U_(U)
5-3. Using the storage features
The coin holder is located in the console box.
■ Cup holders
Coin holder (if equipped)
Cup holders/bottle holders/door pockets
Front seats Second seats (7-passenger mod-els)
Press down and release the cupholder lid.
Pull the armrest down, and then pressin and release the button.
Second seats (6-passenger mod-els)
Third seats (if equipped)
Pull the cup holder up.

GX460_OM_OM60T19U_(U)
4075-3. Using the storage features
5
Interior features
■ Bottle holders/door pockets
■ Cup holder lights (front seats)● The cup holder lights turn on when the tail lights are on.● The brightness of the cup holder lights change in conjunction with the instrument clus-
ter light. (P. 91)■ When using the holder as a bottle holder
● Close the cap.● The bottle may not be stored depending on its size or shape.
■ Removing the cup holders (second seats for 6-passenger models)
Front Rear
The cup holders can be removed.
WARNING
■ Items unsuitable for the cup holders/bottle holders● Do not place anything other than cups or beverage cans in the cup holders. Even
when the lid is closed, items must not be stored in the cup holders. Other items may be thrown out of the holders in the event of sudden braking, suddenswerving or an accident, cause injury. If possible, cover hot drinks to prevent burns.
● Do not place anything other than bottles in the bottle holders.In the event of an accident or sudden braking, other items may be thrown out of theholders and cause injury.
■ When not in useKeep the cup holders closed.Injuries may result in the event of sudden braking, sudden swerving or an accident.

408
GX460_OM_OM60T19U_(U)
5-3. Using the storage features
NOTICE
● To prevent damage, stow the rear cup holders before stowing the armrest. (secondseats for 7-passenger models)
● To prevent damage, do not fold down the second seatbacks when using a cup holderon the second seats. (6-passenger models)
● To prevent damage, do not rest your hands on the cup holders or kick them.● Do not place open bottles or glass and paper cups containing liquid in the bottle hold-
ers. The contents may spill and glasses may break.
Auxiliary boxes
Type A Type B
Press in the button and then pull downthe lid.
The overhead console is useful for tem-porarily storing sunglasses and similarsmall items.
Push the lid.
Type C (if equipped)

GX460_OM_OM60T19U_(U)
4095-3. Using the storage features
5
Interior features
■ Auxiliary box light (type B)● The auxiliary box light turns on when the tail lights are on.● The brightness of the auxiliary box light changes in conjunction with the instrument
cluster light. (P. 91)■ Closing the auxiliary box lid
Slide the auxiliary box lid forward.
WARNING
■ Caution while drivingDo not place cups, beverage cans or bottles in the box. They may be thrown out of thebox in the event of sudden braking, sudden swerving or an accident, resulting in injury.(type B and C)
■ Items unsuitable for storing (type A)● Do not store items heavier than 0.4 lb. (0.2 kg).
Doing so may cause the auxiliary box to open and the items inside may fall out, result-ing in an accident.
● Do not put large items in the overhead console.The overhead console may not be able to be shut from the conversation mirror state.

410
GX460_OM_OM60T19U_(U)
5-3. Using the storage features
Luggage compartment features
Raise the hook to use.
The cargo hooks are provided forsecuring loose items.When using the cargo hooks, the thirdseat must be fold down. (P. 138, 140)
Open the cover.
Turn the knob clockwise.
Open the cover.
Secure the warning reflector.
The warning reflector itself is notincluded as an original equipment.
Cargo hooks
Warning reflector holder
1
1
2
2

GX460_OM_OM60T19U_(U)
4115-3. Using the storage features
5
Interior features
To hang the cargo net, use the cargo net hooks.
The cargo net itself is not included as an original equipment.
Remove the cover.
Cargo net hooks
Auxiliary box (if equipped)
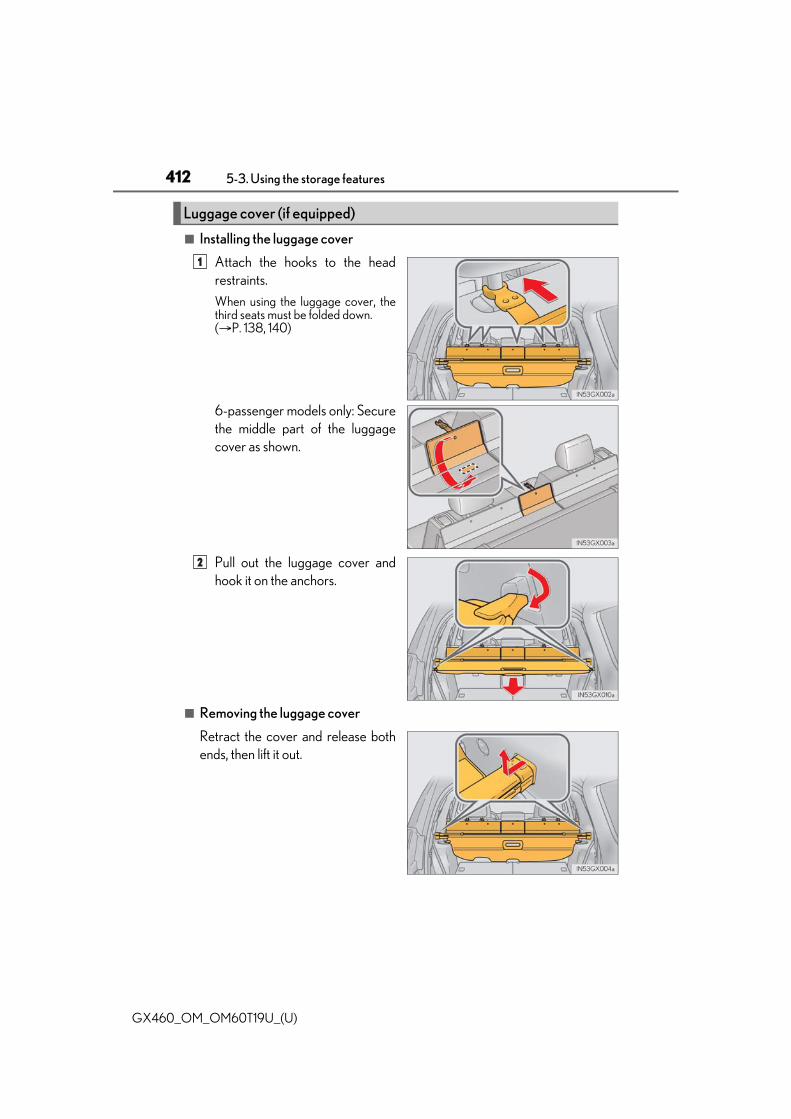
412
GX460_OM_OM60T19U_(U)
5-3. Using the storage features
■ Installing the luggage cover
Attach the hooks to the headrestraints.
When using the luggage cover, thethird seats must be folded down. (P. 138, 140)
6-passenger models only: Securethe middle part of the luggagecover as shown.
Pull out the luggage cover andhook it on the anchors.
■ Removing the luggage cover
Retract the cover and release bothends, then lift it out.
Luggage cover (if equipped)
1
2

GX460_OM_OM60T19U_(U)
4135-3. Using the storage features
5
Interior features
■ Stowing the luggage cover
Push the case while pressing thelock release button.
Vehicles without rear automatic airconditioning system: Shorten oneside only.Vehicles with rear automatic air con-ditioning system: Shorten both sides.
Push the case until it locks.
Check that the lock release buttoncan be seen.Vehicles without a rear automatic airconditioning system: Shorten oneside only.Vehicles with a rear automatic airconditioning system: Shorten bothsides.
Secure the luggage cover withluggage cover restraining bands.
Check that luggage cover and lug-gage cover restraining bands aresecured.
Fold over the cover and the subcover.
Lock release button
1
Lock releasebutton
2
3
4

414
GX460_OM_OM60T19U_(U)
5-3. Using the storage features
Stow the hooks.
Fold over the sub cover.
■ Extending the case
Push the lock release button.
Pull the case until it locks.
Check that the lock release buttoncan be seen.
5
6
Lock releasebutton
1
Lock release button
2

GX460_OM_OM60T19U_(U)
4155-3. Using the storage features
5
Interior features
■ Adjusting the sub cover
Fasten the button when the second seats are in the rear-most position.Unfasten the buttons before sliding the second seats forward.
WARNING
● To avoid injury, always return the cargo hooks to their stowed positions when not inuse.
● Keep the auxiliary box closed. In the event of sudden braking or sudden swerving, anaccident may occur due to an occupant being struck by an open auxiliary box or theitems stored inside.
● Keep the both sides of the luggage cover case locked. Otherwise, the luggage covermay fly out in case of the sudden braking, sudden swerving or an accident, resulting indeath or serious injury.
● When stowing the luggage cover in the luggage compartment, use the luggagecover restraining bands to secure the left and right sides of the luggage cover. Other-wise, the luggage cover may fly out in case of the sudden braking, sudden swerving oran accident, resulting in death or serious injury.
● Do not allow children to climb on the luggage cover. Climbing on the luggage covercould result in damage to the luggage cover, possibly causing death or serious injuryto the child.

416
GX460_OM_OM60T19U_(U)
5-3. Using the storage features
NOTICE
■ To prevent damage to the luggage coverWhen stowing the luggage cover, do not put luggage on the luggage cover.
● Do not use the luggage cover restraining bands for anything other than securing theluggage cover.
● Do not insert coins etc. into the area shown inthe illustration.

417
GX460_OM_OM60T19U_(U)
5-4. Using the other interior features
5
Interior features
Other interior features
Lift the lid while pulling up the lowerlever to release the lock.
Turns the cool box on/off
When on, the indicator light comes on.
■ The cool box can be operated whenThe engine switch is in IGNITION ON mode.
■ If the front air conditioning system is not in use when the cool box is turned onThe front air conditioning system is automatically turned on.
Cool box (if equipped)
1
2

418
GX460_OM_OM60T19U_(U)
5-4. Using the other interior features
■ While the cool box is onThe front air conditioning system cannot be turned off.
■ Items unsuitable for the cool box● Drinks in unsealed containers● Fragile items, perishables or anything with strong odor● Owner’s manual, electronic devices, CDs, etc.
■ When the indicator light flashesThe cool box is not operated when any of the following conditions occurs.● When the air conditioning system is off
Turn the air conditioning system on also turns on the cool box.● When outside air temperature is about 32F (0C) or below.If the indicator light continues to flash, there may be a malfunction in the system. Turn theair conditioning system off and have it inspected by your Lexus dealer.
■ When using the cool box lid as an armrestSlide the cool box lid forward or backward asneeded. Slide the lid while pulling up the upperlever to release the lock.
WARNING
Keep the cool box closed. In the event of sudden braking or sudden swerving, an acci-dent may occur due to an occupant being struck by the open cool box or the itemsstored inside.
NOTICE
To prevent battery discharge, do not leave the cool box on longer than necessary whenthe engine is not running.

GX460_OM_OM60T19U_(U)
4195-4. Using the other interior features
5
Interior features
To set the visor in the forward posi-tion, flip it down.
To set the visor in the side position,flip down, unhook, and swing it to theside.
To use the side extender, place thevisor in the side position, then slide itbackward.
Slide the cover to open.
The light turns on when the cover isopened.
If the vanity lights remain on when the engine switch is turned off, the lights will go offautomatically after 20 minutes.
Sun visors
1
2
3
Vanity mirror
NOTICE
To prevent battery discharge, do not leave the vanity lights on for extended periodswhen the engine is not running.

420
GX460_OM_OM60T19U_(U)
5-4. Using the other interior features
The conversation mirror can provide the driver and the front passenger with aview of the rear seat area without the need to turn around.
Press in the button.
To use the overhead console when the conversation mirror is open, further extend the lid. (P. 408)
Vehicles with navigation system
Refer to the “NAVIGATION SYSTEM OWNER’S MANUAL”.
Vehicles without navigation system
The clock can be adjusted by pressing the buttons.
Adjusts the hours
Adjusts the minutes
■ The clock is displayed whenThe engine switch is in IGNITION ON mode.
■ When disconnecting and reconnecting battery terminalsThe clock data will be reset.
Conversation mirror
Clock
1
2

GX460_OM_OM60T19U_(U)
4215-4. Using the other interior features
5
Interior features
■ Center of console (12 V DC)
Please use as a power supply for electronic goods that use less than 12 VDC /10 A (power consumption of 120 W).
Slide the auxiliary box lid.
Open the lid.
Power outlets

422
GX460_OM_OM60T19U_(U)
5-4. Using the other interior features
■ Luggage compartment (120 V AC)
The power outlet can be used for 120 V AC accessories that run on less than100 W.
■ The power outlet can be used when12 V DC: The engine switch is in ACCESSORY or IGNITION ON mode.120 V AC: The engine switch is in IGNITION ON mode.
■ When turning the engine switch off (12 V DC)Disconnect electrical devices with charging functions, such as mobile battery packs. Ifsuch devices are left connected, the engine switch may not be turned off normally.
■ The protection circuit may be activated to cut the power supply if any of the followingconditions apply (120 V AC):● Use of electrical appliances exceeding 100 W is attempted.
A sound may be heard when the protection circuit is activated. This is normal and doesnot indicate a malfunction.
● The total power usage by all electrical features (headlights, air conditioning, etc.) hasexceeded the total vehicle maximum for an extended period of time.
■ If the protection circuit is activated and the power supply is cut, conduct the followingprocedure (120 V AC):
Park the vehicle in a safe place, and then securely apply the parking brake.Make sure that the power consumption of the electric appliance is within the maxi-mum capacity of the power outlet and the appliance is not broken.Turn the engine switch to IGNITION ON mode again.
When the cabin temperature is high, open the windows to cool the temperature down.Once it reaches the normal temperature, turn the engine switch to IGNITION ONmode again.If the power supply does not resume even after the above procedure has been per-formed, have the vehicle inspected by your Lexus dealer.
1
2
3

GX460_OM_OM60T19U_(U)
4235-4. Using the other interior features
5
Interior features
WARNING
■ Using a power outlet (120 V AC)Observe the following precautions to reduce the risk of injury.● Use of the power outlet when it is wet with water or snow may result in electrical
shocks and is extremely dangerous. The power outlet must be thoroughly driedbefore use.
● Do not allow children to use or play with the power outlet.● Be careful not to get any part of your body caught in the power outlet lid.● When using electrical appliances, strictly follow any cautions and notices written on
their labels and in the manufacturers’ instruction manuals.● Do not modify, disassemble or repair the power outlet or its inverter in any way. Doing
so may result in unexpected malfunctions or accidents, which could cause seriousdamage or injuries. Contact your Lexus dealer for any necessary repairs.
■ To prevent injuries and accidents, secure all electric appliances before use and do notuse any appliances that may do any of the following (120 V AC):● Distract the driver while driving, or hamper safe driving.● Result in a fire or burn injuries due to the appliance rolling, falling or overheating while
driving.● Emit steam while the windows of the cabin are closed.
■ To prevent unexpected accidents, such as electric shocks, do not perform any of thefollowing actions (120 V AC):● Using the power outlet for electric heaters while sleeping.● Contaminating the power outlet with liquid substances or mud.● Handling electrical appliance plugs at the power outlet with wet hands or feet.● Inserting foreign objects into the power outlet.● Using malfunctioning electric appliances.● Inserting inappropriate or badly fitting plugs into the power outlet.
NOTICE
■ To avoid damaging the power outlet and the plug (120 V AC)● Close the power outlet lid when not in use.● Do not allow foreign objects or liquids to enter the power outlet, as this may cause a
short circuit.● Do not use plug adaptors to connect too many plugs to the power outlet. (120 V AC)● After removing a plug, gently close the power outlet lid. (120 V AC)

424
GX460_OM_OM60T19U_(U)
5-4. Using the other interior features
NOTICE
■ To prevent the fuse from being blown12 V DC: Do not use an accessory that uses more than 12 V 10 A.120 V AC: Do not use a 120 V AC appliance that requires more than 100 W. If a 120 V AC appliance that consumes more than 100 W is used, the protection circuitwill cut the power supply.
■ Appliances that may not operate properly (120 V AC)The following 120 V AC appliances may not operate even if their power consumptionis under 100 W.● Appliances with high initial peak wattage● Measuring devices that process precise data.● Other appliances that require an extremely stable power supply
■ To prevent battery discharge12 V DC: Do not use the power outlet longer than necessary when the engine is notrunning.120 V AC: Turn off all the vehicle’s electronic equipment and accessories, such as theheadlights and air conditioning, when electrical appliances that consume in excess of100 W are used continuously for long periods of time.
■ To prevent any damage caused by heat (120 V AC)● Do not use any electrical appliances that give off intense heat, such as toasters, in any
locations including the internal or external trim, seats and deck.● Do not use any electrical appliances that are easily affected by vibration or heat inside
the vehicle. Vibration while driving, or the heat of the sun while parking, may result indamage to those electrical appliances.
■ If any electrical appliances are to be used while driving (120 V AC)Securely fasten both the appliances and their cables to prevent them from falling orgetting caught in any of the power train components.
■ If the power outlet is loose when an electrical appliance plug is connected (120 VAC)Replace the outlet. Contact your Lexus dealer for any necessary replacements.
■ If the power outlet gets dirty (120 V AC)Turn the main switch off and use a soft, clean cloth to wipe it gently. Do not use anycleansing materials, such as organic solvents, wax, or compound cleaners, as thesemay damage the power outlet or cause it to malfunction.

GX460_OM_OM60T19U_(U)
4255-4. Using the other interior features
5
Interior features
The USB charging ports are used to supply 2.1 A of electricity at 5 V to externaldevices.
The USB charging ports are for charging only. They are not designed for datatransfer or other purposes.
Depending on the external device, it may not charge properly. Refer to the man-ual included with the device before using a USB charging port.
■ Using the USB charging ports
■ The USB charging ports can be used whenThe engine switch is in ACCESSORY or IGNITION ON mode.
■ Situations in which the USB charging ports may not operate correctly● If a device which consumes more than 2.1 A at 5 V is connected● If a device designed to communicate with a personal computer, such as a USB memory
device, is connected● If the connected external device is turned off (depending on device)● If the temperature inside the vehicle is high, such as after the vehicle has been parked in
the sun■ About connected external devices
Depending on the connected external device, charging may occasionally be suspendedand then start again. This is not a malfunction.
USB charging ports
Type A Type B
Open the lid. Open the lid.

426
GX460_OM_OM60T19U_(U)
5-4. Using the other interior features
NOTICE
■ To prevent damage to the USB charging ports● Do not insert foreign objects into the ports.● Do not spill water or other liquids into the ports.● When the USB charging ports are not in use, close the lids. If a foreign object or liquid
enters a port may cause a short circuit.● Do not apply excessive force to or impact the USB charging ports.● Do not disassemble or modify the USB charging ports.
■ To prevent damage to external devices● Do not leave external devices in the vehicle. The temperature inside the vehicle may
become high, resulting in damage to an external device.● Do not push down on or apply unnecessary force to an external device or the cable of
an external device while it is connected.■ To prevent battery discharge
Do not use the USB charging ports for a long period of time with the engine stopped.

GX460_OM_OM60T19U_(U)
4275-4. Using the other interior features
5
Interior features
7-passenger models
Fold down the armrest for use.
6-passenger models
To adjust the armrest angle, raise thearmrest to the highest position and thenlower the armrest to the lowest posi-tion. Raise the armrest again to thedesired position and the armrest will belocked at that position.
When the armrest is locked, the armrestcannot be lowered. To lower the armrest, raise the armrestto the highest position again.
Armrest
NOTICE
To prevent damage, do not apply a too heavy load on the armrest.

428
GX460_OM_OM60T19U_(U)
5-4. Using the other interior features
The coat hooks are provided with thesecond rear assist grips.
An assist grip (type A) can be used to support your body while sitting on the seat.
An assist grip (type B) can be used when getting in or out of the vehicle and oth-ers.
Assist grip (type A)
Assist grip (type B)
Coat hooks
WARNING
Do not hang coat hangers or other hard or sharp objects on the hook. If the SRS cur-tain shield airbags deploy, these items may become projectiles, causing death or seri-ous injury.
Assist grips
1
2
WARNING
Do not use the assist grip (type A) when getting in or out of the vehicle or rising fromyour seat.
NOTICE
To prevent damage, do not hang heavy objects or put a heavy load on the assist grip.

429
GX460_OM_OM60T19U_(U)
5-4. Using the other interior features
5
Interior features
Compass
To turn the compass on or off, push andhold the button for longer than 3 sec-onds.
: If equipped
The compass on the inside rear view mirror indicates the direction in whichthe vehicle is heading.
Operation
Displays and directions
Display Direction
“N” North
“NE” Northeast
“E” East
“SE” Southeast
“S” South
“SW” Southwest
“W” West
“NW” Northwest

430
GX460_OM_OM60T19U_(U)
5-4. Using the other interior features
For U.S. mainland and Canada
Except for U.S. mainland and Canada
Calibrating the compass

GX460_OM_OM60T19U_(U)
4315-4. Using the other interior features
5
Interior features
The direction display deviates from the true direction determined by the earth’smagnetic field. The amount of deviation varies according to the geographic posi-tion of the vehicle.
If you cross over a map boundary shown in illustration, the compass will deviate.To obtain higher precision or perfect calibration, refer to the following.
■ Deviation calibration
Stop the vehicle where it is safe to drive in a circle.
Press and hold the button for 6seconds.
A number (1 to 15) appears on thecompass display.
Referring to the map above, press the button to select the number of thezone you are in.
If the direction is displayed several seconds after adjustment, the calibration iscomplete.
■ Circling calibration
Stop the vehicle in a place where it is safe to drive in a circle.
Press and hold the button for 9seconds.
“C” appears on the compass display.
Drive the vehicle at 5 mph (8km/h) or less in a circle until adirection is displayed.
If there is not enough space to drivein a circle, drive around the blockuntil a direction is displayed.
1
2
3
1
2
3
432
GX460_OM_OM60T19U_(U)
5-4. Using the other interior features
■ Conditions unfavorable to correct operationThe compass may not show the correct direction in the following conditions:● The vehicle is stopped immediately after turning.● The vehicle is on an inclined surface.● The vehicle is in a place where the earth’s magnetic field is subject to interference by
artificial magnetic fields (underground car park/parking lot, under a steel tower,between buildings, roof car park/parking lot, near an intersection, near a large vehicle,etc.).
● The vehicle has become magnetized.(There is a magnet or metal object near the inside rear view mirror.)
● The battery has been disconnected.● A door is open.
WARNING
■ While driving the vehicleDo not adjust the display. Adjust the display only when the vehicle is stopped.
■ When doing the circling calibrationSecure a wide space, and watch out for people and vehicles in the vicinity. Do not vio-late any local traffic rules while performing circling calibration.
NOTICE
■ To avoid compass malfunctionsDo not place magnets or any metal objects near the inside rear view mirror. Doing this may cause the compass sensor to malfunction.
■ To ensure normal operation of the compass● Do not perform circling calibration of the compass in a place where the earth’s mag-
netic field is subject to interference by artificial magnetic fields.● During calibration, do not operate electric systems (moon roof, power windows, etc.)
as they may interfere with the calibration.

433
GX460_OM_OM60T19U_(U)
5-4. Using the other interior features
5
Interior features
Garage door opener
The HomeLink® wireless control system in your vehicle has 3 buttons which canbe programmed to operate 3 different devices. Refer to the programming meth-ods on the following pages to determine the method which is appropriate for thedevice.
HomeLink® indicator light
Garage door operation indicators
HomeLink® icon
Illuminates while HomeLink® is operat-ing.Buttons
■ Before programming HomeLink®
● During programming, it is possible that garage doors, gates, or otherdevices may operate. For this reason, make sure that people and objectsare clear of the garage door or other devices to prevent injury or otherpotential harm.
● It is recommended that a new battery be placed in the remote controltransmitter for more accurate programming.
● Garage door opener motors manufactured after 1995 may be equippedwith rolling code protection. If this is the case, you may need a stepladderor other sturdy, safe device to reach the “Learn” or “Smart” button on thegarage door opener motor.
The garage door opener can be programmed to operate garage doors, gates,entry doors, door locks, home lighting systems, security systems, and otherdevices.
Programming HomeLink®
1
2
3
4

434
GX460_OM_OM60T19U_(U)
5-4. Using the other interior features
■ Programming the HomeLink®
Steps through must be performed within 60 seconds, otherwise theindicator light will stop flashing and programming will not be able to be com-pleted.
Press and release the HomeLink® button you want to program and checkthat the HomeLink® indicator light flashes (orange).
Point the remote control transmit-ter for the device at the rear viewmirror, 1 to 3 in. (25 to 75 mm)from the HomeLink® buttons.
Keep the HomeLink® indicator lightin view while programming.
Program a device.
Programming a device otherthan an entry gate (for U.S.A.owners)
Press and hold the remote controltransmitter button until theHomeLink® indicator lightchanges from slowly flashingorange to rapidly flashing green(rolling code) or continuously litgreen (fixed code), then releasethe button.
Programming an entry gate (for U.S.A. owners)/Programming a devicein the Canadian market
Press and release the remote control transmitter button at 2 second inter-vals, repeatedly, until the HomeLink® indicator light changes from slowlyflashing (orange) to rapidly flashing (green) (rolling code) or continuouslylit (green) (fixed code).
Test the HomeLink® operation by pressing the newly programmed buttonand observing the indicator light:● Indicator light illuminates: Programming of a fixed code device has com-
pleted. The garage door or other device should operate when a Home-Link® button is pressed and released.
1 3
1
2
3
4

GX460_OM_OM60T19U_(U)
4355-4. Using the other interior features
5
Interior features
● Indicator light flashes rapidly: The garage door opener motor or otherdevice is equipped with a rolling code. To complete programming, firmlypress and hold the HomeLink® button for 2 seconds then release it.
● If the garage door or other device does not operate, proceed to “Pro-gramming a rolling code system”.
Repeat the steps above to program another device for any of the remainingHomeLink® buttons.
■ Programming a rolling code system
2 or more people may be necessary to complete rolling code programming.
Locate the “Learn” or “Smart”button on the garage dooropener motor in the garage.
This button can usually be foundwhere the hanging antenna wire isattached to the unit. The name andcolor of the button may vary by man-ufacturer. Refer to the owner’s man-ual supplied with the garage dooropener motor for details.
Press and release the “Learn” or“Smart” button.Perform within 30 secondsafter performing .
Press and hold the desiredHomeLink® button (inside thevehicle) for 2 seconds andrelease it. Repeat this sequence(press/hold/release) up to 3times to complete programming.
If the garage door opener motoroperates when the HomeLink®
button is pressed, the garagedoor opener motor recognizesthe HomeLink® signal.
5
1
2
3
2
3

436
GX460_OM_OM60T19U_(U)
5-4. Using the other interior features
■ Enabling 2-way communication with a garage door (only available for com-patible devices)
When enabled, 2-way communication allows you to check the status of theopening and closing of a garage door through indicators in your vehicle.
2-way communication is only available if the garage door opener motor usedis a compatible device. (To check device compatibility, refer to www.Home-Link.com.)
Within 5 seconds after programming the garage door opener has beencompleted, if the garage door opener motor is trained to HomeLink®,both garage door operation indicators will flash rapidly (green) and thelight on the garage door opener motor will blink twice, indicating that 2-way communication is enabled.
If the indicators do not flash, perform and within the first 10 presses ofthe HomeLink® button after programming has been completed.
Press a programmed HomeLink® button to operate a garage door.
Within 1 minute of pressing the HomeLink® button, after the garage dooroperation has stopped, press the “Learn” or “Smart” button on the garagedoor opener motor. Within 5 seconds of the establishment of 2-way com-munication with the garage door opener, both garage door operation indi-cators in the vehicle will flash rapidly (green) and the light on the garagedoor opener motor will blink twice, indicating that 2-way communication isenabled.
■ Reprogramming a single HomeLink® button
When the following procedure is performed, buttons which already havedevices registered to them can be overwritten:
With one hand, press and hold the desired HomeLink® button.
When the HomeLink® indicator starts flashing (orange), continue to holdthe HomeLink® button and perform “Programming HomeLink®” (ittakes 20 seconds for the HomeLink® indicator to start flashing).
Press the appropriate HomeLink® button. The HomeLink® indicator lightshould turn on.
Operating HomeLink®
1
2 3
2
3
1
2
1

GX460_OM_OM60T19U_(U)
4375-4. Using the other interior features
5
Interior features
The status of the opening and closing ofa garage door is shown by the indica-tors.
Opening
Closing
This function is only available if thegarage door opener motor used is acompatible device. (To check devicecompatibility, refer to www.Home-Link.com.)
The indicators can operate within approximately 820 ft. (250 m) of thegarage door. However, if there are obstructions between the garage door andthe vehicle, such as houses and trees, feedback signals from the garage doormay not be received. To recall the previous door operation status, press and release either Home-
Link® buttons and or and simultaneously. The
last recorded status will be displayed for 3 seconds.
Press and hold the 2 outside buttons for10 seconds until the HomeLink® indi-cator light changes from continuouslylit (orange) to rapidly flashing (green).
If you sell your vehicle, be sure to erasethe programs stored in the HomeLink®
memory.
Garage door operation indicators
1
2
Color Status
Orange (flashing) Currently opening/closing
Green Opening/closing has completed
Red (flashing) Feedback signals cannot be received
Erasing the entire HomeLink® memory (all three codes)

438
GX460_OM_OM60T19U_(U)
5-4. Using the other interior features
■ Codes stored in the HomeLink® memory● The registered codes are not erased even if the battery cable is disconnected.● If learning failed when registering a different code to a HomeLink® button that already
has a code registered to it, the already registered code will not be erased.■ Before programming
● Install a new battery in the transmitter.● The battery side of the transmitter must be pointed away from the HomeLink®.
■ Certification for the garage door opener For vehicles sold in the U.S.A., Hawaii, Guam, Saipan and Puerto Rico
For vehicles sold in Canada
■ When support is necessaryVisit on the web at www.homelink.com/lexus or call 1-800-355-3515.

GX460_OM_OM60T19U_(U)
4395-4. Using the other interior features
5
Interior features
WARNING
■ When programming a garage door or other remote control deviceThe garage door or other device may operate, so ensure people and objects are out ofdanger to prevent potential harm.
■ Conforming to federal safety standardsDo not use the HomeLink® compatible transceiver with any garage door opener ordevice that lacks safety stop and reverse features as required by federal safety stan-dards.This includes any garage door that cannot detect an interfering object. A door ordevice without these features increases the risk of death or serious injury.
■ When operating or programming HomeLink®
Never allow a child to operate or play with the HomeLink® buttons.

440
GX460_OM_OM60T19U_(U)
5-4. Using the other interior features

441
GX460_OM_OM60T19U_(U)
6Maintenance and care
6-1. Maintenance and care
Cleaning and protecting the vehicle exterior ................ 442
Cleaning and protecting the vehicle interior..................445
6-2. Maintenance
Maintenance requirements ............................448
General maintenance............... 451
Emission inspection and maintenance (I/M)programs....................................454
6-3. Do-it-yourself maintenance
Do-it-yourself service precautions................................455
Hood ...............................................458
Engine compartment ...............459
Tires ................................................. 472
Tire inflation pressure...............484
Wheels .......................................... 488
Air conditioning filter ...............490
Electronic key battery.............. 492
Checking and replacing fuses..............................................494
Headlight aim .............................. 497
Light bulbs.....................................499

442
GX460_OM_OM60T19U_(U)
6-1. Maintenance and care
Cleaning and protecting the vehicle exterior
● Working from top to bottom, liberally apply water to the vehicle body, wheelwells and underside of the vehicle to remove any dirt and dust.
● Wash the vehicle body using a sponge or soft cloth, such as a chamois.● For hard-to-remove marks, use car wash soap and rinse thoroughly with
water.● Wipe away any water.● Wax the vehicle when the waterproof coating deteriorates.
If water does not bead on a clean surface, apply wax when the vehicle body is cool.
■ Automatic car washes● Fold the mirrors back before washing the vehicle. Start washing from the front of the
vehicle. Make sure to extend the mirrors before driving.● Brushes used in automatic car washes may scratch the vehicle surface, parts (wheel,
etc.) and harm your vehicle’s paint.■ High pressure car washes
● As water may enter the cabin, do not bring the nozzle tip near the gaps around thedoors or perimeter of the windows, or spray these areas continuously.
● For vehicles with rear height control air suspension, do not bring the nozzle tip near therear air suspension unit.
■ Wheels and wheel ornaments● Remove any dirt immediately by using a neutral detergent.● Wash detergent off with water immediately after use.● To protect the paint from damage, make sure to observe the following precautions.
• Do not use acidic, alkaline or abrasive detergent• Do not use hard brushes• Do not use detergent on the wheels when they are hot, such as after driving or park-
ing in hot weather■ Bumpers and side moldings
Do not scrub with abrasive cleaners.
Perform the following to protect the vehicle and maintain it in prime condi-tion:

GX460_OM_OM60T19U_(U)
4436-1. Maintenance and care
6
Maintenance and care
■ Front side windows water-repellent coating● The following precautions can extend the effectiveness of the water-repellent coating.
• Remove any dirt, etc. from the front side windows regularly.• Do not allow dirt and dust to accumulate on the windows for a long period.
Clean the windows with a soft, damp cloth as soon as possible.• Do not use wax or glass cleaners that contain abrasives when cleaning the windows.• Do not use any metallic objects to remove condensation build up.
● When the water-repellent performance has become insufficient, the coating can berepaired. Contact your Lexus dealer.
■ Plated portionsIf dirt cannot be removed, clean the parts as follows:● Use a soft cloth dampened with an approximately 5% solution of neutral detergent and
water to clean the dirt off.● Wipe the surface with a dry, soft cloth to remove any remaining moisture.● To remove oily deposits, use alcohol wet wipes or a similar product.
WARNING
■ When washing the vehicleDo not apply water to the inside of the engine compartment. Doing so may cause theelectrical components etc. to catch fire.
■ When cleaning the windshield (vehicles with rain-sensing windshield wiper)
● When the upper part of the windshield where the raindrop sensor is located istouched by hand
● When a wet rag or similar is held close to the raindrop sensor● If something bumps against the windshield● If you directly touch the raindrop sensor body or if something bumps into the raindrop
sensor■ Precautions regarding the exhaust pipe
Exhaust gasses cause the exhaust pipe to become quite hot.When washing the vehicle, be careful not to touch the pipe until it has cooled suffi-ciently, as touching a hot exhaust pipe can cause burns.
■ Precautions regarding the Blind Spot Monitor (if equipped)If the paint of the rear bumper is chipped or scratched, the system may malfunction.If this occurs, consult your Lexus dealer.
Set the wiper switch to off.If the wiper switch is in “AUTO”, the wipers mayoperate unexpectedly in the following situa-tions, and may result in hands being caught orother serious injuries and cause damage to thewiper blades.
Off
AUTO

444
GX460_OM_OM60T19U_(U)
6-1. Maintenance and care
NOTICE
■ To prevent paint deterioration and corrosion on the body and components (aluminumwheels etc.)● Wash the vehicle immediately in the following cases:
• After driving near the sea coast• After driving on salted roads• If coal tar or tree sap is present on the paint surface• If you see dead insects, insect droppings or bird droppings on the paint• After driving in an area contaminated with soot, oily smoke, mine dust, iron pow-
der or chemical substances• If the vehicle becomes heavily soiled in dust or mud• If liquids such as benzene and gasoline are spilled on the paint surface
● If the paint is chipped or scratched, have it repaired immediately.● To prevent the wheels from corroding, remove any dirt and store in a place with low
humidity when storing wheels.■ Cleaning the exterior lights
● Wash carefully. Do not use organic substances or scrub with a hard brush. This may damage the surfaces of the lights.
● Do not apply wax on the surfaces of the lights.Wax may cause damage to the lenses.
■ To prevent damage to the windshield wiper armsWhen lifting the wiper arms away from the windshield, pull the driver side wiper armupward first, and repeat for the passenger side. When returning the wipers to theiroriginal position, do so from the passenger side first.
■ When using an automatic car wash (vehicles with rain-sensing windshield wiper)Set the wiper switch to the off position.If the wiper switch is in “AUTO”, the wipers may operate and the wiper blades may bedamaged.
■ When using a high pressure car wash● Do not bring the nozzle tip close to boots (rubber or resin manufactured cover), con-
nectors or the following parts. The parts may be damages if they come into contactwith high-pressure water.• Traction related parts• Steering parts• Suspension parts• Brake parts
● Keep the cleaning nozzle at least 11.9 in. (30 cm) away from the vehicle body. Other-wise resin section, such as moldings and bumpers, may be deformed and damaged.Also, do not continuously hold the nozzle in the same place.
● Do not spray the lower part of the windshield continuously. If water enters the air con-ditioning system intake located near the lower part of the windshield, the air condi-tioning system may not operate correctly.
● Do not wash the underside of the vehicle using a high pressure car washer.

445
GX460_OM_OM60T19U_(U)
6-1. Maintenance and care
6
Maintenance and care
Cleaning and protecting the vehicle interior
● Remove dirt and dust using a vacuum cleaner. Wipe dirty surfaces with a clothdampened with lukewarm water.
● If dirt cannot be removed, wipe it off with a soft cloth dampened with neutraldetergent diluted to approximately 1 %.
● Wring out any excess water from the cloth and thoroughly wipe off remainingtraces of detergent and water.
● Remove dirt using a water-dampened soft cloth or synthetic chamois.● Wipe the surface with a dry soft cloth to remove any remaining moisture.
● Remove dirt and dust using a vacuum cleaner.● Wipe any excess dirt and dust with a soft cloth dampened with diluted deter-
gent.
Use a diluted water solution of approximately 5 % neutral wool detergent.● Wring out any excess water from the cloth and thoroughly wipe off all remain-
ing traces of detergent.● Wipe the surface with a dry, soft cloth to remove any remaining moisture.
Allow the leather to dry in a shaded ventilated area.
● Remove dirt and dust using a vacuum cleaner.● Wipe it off with a soft cloth dampened with neutral detergent diluted to
approximately 1 %.● Wring out any excess water from the cloth and thoroughly wipe off remaining
traces of detergent and water.
The following procedures will help protect your vehicle’s interior and keep itin top condition:
Protecting the vehicle interior
Cleaning the areas with satin-finish metal accents
Cleaning the leather areas
Cleaning the synthetic leather areas

446
GX460_OM_OM60T19U_(U)
6-1. Maintenance and care
■ Cleaning the areas with satin-finish metal accentsThe metal areas use a layer of real metal for the surface. It is necessary to clean them reg-ularly. If dirty areas are left uncleaned for long periods of time, they may be difficult toclean.
■ Caring for leather areasLexus recommends cleaning the interior of the vehicle at least twice a year to maintainthe quality of the vehicle’s interior.
■ Shampooing the carpetsThere are several commercial foaming-type cleaners available. Use a sponge or brush toapply the foam. Rub in overlapping circles. Do not use water. The excellent results areobtained when keeping the carpet as dry as possible.
■ Seat beltsClean with mild soap and lukewarm water using a cloth or sponge. Also check the beltsperiodically for excessive wear, fraying or cuts.
WARNING
■ Water in the vehicle● Do not splash or spill liquid in the vehicle.
Doing so may cause electrical components etc. to malfunction or catch fire.● Do not get any of the SRS components or wiring in the vehicle interior wet. (P. 38)
An electrical malfunction may cause the airbags to deploy or not function properly,resulting in death or serious injury.
■ Cleaning the interior (especially instrument panel) Do not use polish wax or polish cleaner. The instrument panel may reflect off the wind-shield, obstructing the driver’s view and leading to an accident, resulting in death orserious injury.
NOTICE
■ Cleaning detergents● Do not use the following types of detergent, as they may discolor the vehicle interior
or cause streaks or damage to painted surfaces:• Non-seat portions: Organic substances such as benzene or gasoline, alkaline or
acidic solutions, dye, and bleach• Seats: Alkaline or acidic solutions, such as thinner, benzene, and alcohol
● Do not use polish wax or polish cleaner. The instrument panel’s or other interior part’spainted surface may be damaged.

GX460_OM_OM60T19U_(U)
4476-1. Maintenance and care
6
Maintenance and care
NOTICE
■ Preventing damage to leather surfacesObserve the following precautions to avoid damage to and deterioration of leathersurfaces:● Remove any dust or dirt from leather surfaces immediately.● Do not expose the vehicle to direct sunlight for extended periods of time. Park the
vehicle in the shade, especially during summer.● Do not place items made of vinyl, plastic, or containing wax on the upholstery, as they
may stick to the leather surface if the vehicle interior heats up significantly.■ When cleaning the inside of the windshield
Do not allow glass cleaner to contact the lens. Also, do not touch the lens. (P. 234)■ Water on the floor
Do not wash the vehicle floor with water.Vehicle systems such as the audio system may be damaged if water comes into contactwith electrical components such as the audio system above or under the floor of thevehicle. Water may also cause the body to rust.
■ Cleaning the inside of the rear window● Do not use glass cleaner to clean the rear window, as this may cause damage to the
rear window defogger heater wires or antenna. Use a cloth dampened with luke-warm water to gently wipe the window clean. Wipe the window in strokes runningparallel to the heater wires or antenna.
● Be careful not to scratch or damage the heater wires or antenna.

448
GX460_OM_OM60T19U_(U)
6-2. Maintenance
Maintenance requirements
General maintenance should be performed on a daily basis. This can be done byyourself or by a Lexus dealer.
Scheduled maintenance should be performed at specified intervals according tothe maintenance schedule.
For details about maintenance items and schedules, refer to the “Warranty andService Guide”, “Owner’s Manual Supplement” or “Scheduled Maintenance”.
You can perform some maintenance procedures by yourself. Please be aware that do-it-yourself maintenance may affect warranty coverage.
The use of Lexus repair manuals is recommended.For details about warranty coverage, refer to the separate “Owner’s Guide”, “War-ranty and Service Guide”, “Owner’s Manual Supplement” or “Warranty Booklet”.
To ensure safe and economical driving, day-to-day care and regular mainte-nance are essential. It is the owner’s responsibility to perform regular checks.Lexus recommends the following maintenance:
General maintenance
Scheduled maintenance
Do-it-yourself maintenance

GX460_OM_OM60T19U_(U)
4496-2. Maintenance
6
Maintenance and care
■ Repair and replacementIt is recommended that genuine Lexus parts be used for repairs to ensure performanceof each system. If non-Lexus parts are used in replacement or if a repair shop other thana Lexus dealer performs repairs, confirm the warranty coverage.
■ Resetting the message indicating maintenance is required (U.S.A. only)After the required maintenance is performed according to the maintenance schedule,please reset the message.To reset the message, follow the procedures described below:
Press or of the meter control switches and select on the multi-informa-tion display.
Press or of the meter control switches and select “Vehicle Settings”, and thenpress .
Press or of the meter control switches and select “Scheduled Maintenance”,and then press .Select the “Yes” and press .
“The Data Has Been Reset” will be displayed when the reset procedure has been com-pleted.
■ Allow inspection and repairs to be performed by a Lexus dealer● Lexus technicians are well-trained specialists and are kept up to date with the latest ser-
vice information. They are well informed about the operation of all systems on yourvehicle.
● Keep a copy of the repair order. It proves that the maintenance that has been per-formed is under warranty coverage. If any problem should arise while your vehicle isunder warranty, your Lexus dealer will promptly take care of it.
1
2
3
4

450
GX460_OM_OM60T19U_(U)
6-2. Maintenance
WARNING
■ If your vehicle is not properly maintainedImproper maintenance could result in serious damage to the vehicle and possible seri-ous injury or death.
■ Handling of the battery● Engine exhaust, some of its constituents, and a wide variety of automobile compo-
nents contain or emit chemicals known to the State of California to cause cancer andbirth defects and other reproductive harm. Work in a well ventilated area.
● Oils, fuels and fluids contained in vehicles as well as waste produced by componentwear contain or emit chemicals known to the State of California to cause cancer andbirth defects or other reproductive harm. Avoid exposure and wash any affected areaimmediately.
● Battery posts, terminals and related accessories contain lead and lead compoundswhich are known to cause brain damage. Wash your hands after handling. (P. 468)

451
GX460_OM_OM60T19U_(U)
6-2. Maintenance
6
Maintenance and care
General maintenance
Listed below are the general maintenance items that should be performed atthe intervals specified in the “Warranty and Service Guide” or “Owner’sManual Supplement”. It is recommended that any problem you notice shouldbe brought to the attention of your Lexus dealer or qualified service shop foradvice.
Engine compartment
Items Check points
Battery Check the connections. (P. 468)
Brake fluid Is the brake fluid at the correct level? (P. 465)
Engine coolant Is the engine coolant at the correct level? (P. 463)
Engine oil Is the engine oil at the correct level? (P. 461)
Exhaust system There should not be any fumes or strange sounds.
Power steering fluid Is the power steering fluid at the correct level?(P. 467)
Radiator/condenser The radiator and condenser should be free from foreign objects. (P. 465)
Washer fluid Is there sufficient washer fluid? (P. 471)

452
GX460_OM_OM60T19U_(U)
6-2. Maintenance
Vehicle interior
Items Check points
Accelerator pedal • The accelerator pedal should move smoothly (without uneven pedal effort or catching).
Automatic transmission “Park” mechanism
• When parked on a slope and the shift lever is in P, isthe vehicle securely stopped?
Brake pedal
• Does the brake pedal move smoothly?• Does the brake pedal have appropriate clearance
from the floor? (P. 567)• Does the brake pedal have the correct amount of
free play? (P. 567)
Brakes
• The vehicle should not pull to one side when thebrakes are applied.
• The brakes should work effectively.• The brake pedal should not feel spongy.• The brake pedal should not get too close to the floor
when the brakes are applied.
Head restraints • Do the head restraints move smoothly and locksecurely?
Indicators/buzzers • Do the indicators and buzzers function properly?
Lights • Do all the lights come on?• Are the headlights aimed correctly? (P. 497)
Parking brake• Does the parking brake pedal move smoothly?• When parked on a slope and the parking brake is on,
is the vehicle securely stopped?
Seat belts • Do the seat belts operate smoothly?• The seat belts should not be damaged.
Seats • Do the seat controls operate properly?
Steering wheel
• Does the steering wheel rotate smoothly?• Does the steering wheel have the correct amount of
free play?• There should not be any strange sounds coming
from the steering wheel.

GX460_OM_OM60T19U_(U)
4536-2. Maintenance
6
Maintenance and care
Vehicle exterior
Items Check points
Doors • Do the doors operate smoothly?
Engine hood • Does the engine hood lock system work properly?
Fluid leaks • There should not be any signs of fluid leakage afterthe vehicle has been parked.
Tires
• Is the tire inflation pressure correct?• The tires should not be damaged or excessively
worn.• Have the tires been rotated according to the mainte-
nance schedule?• The wheel nuts should not be loose.
Windshield wipers/rear window wiper
• The wiper blades should not show any signs of crack-ing, splitting, wear, contamination or deformation.
• The wiper blades should clear the windshield/rearwindow without streaking or skipping.
WARNING
■ If the engine is runningTurn off the engine and ensure that there is adequate ventilation before performingmaintenance checks.

454
GX460_OM_OM60T19U_(U)
6-2. Maintenance
Emission inspection and maintenance (I/M) programs
The OBD system determines that a problem exists somewhere in the emissioncontrol system. Your vehicle may not pass the I/M test and may need to berepaired. Contact your Lexus dealer to service the vehicle.
● When the battery is disconnected or discharged
Readiness codes that are set during ordinary driving are erased.Also, depending on your driving habits, the readiness codes may not be com-pletely set.
● When the fuel tank cap is loose
The malfunction indicator lamp comes on indicating a temporary malfunctionand your vehicle may not pass the I/M test.
The error code in the OBD system will not be cleared unless the vehicle is driven40 or more times.
Contact your Lexus dealer to prepare the vehicle for re-testing.
Some states have vehicle emission inspection programs which include OBD(On Board Diagnostics) checks. The OBD system monitors the operation ofthe emission control system.
If the malfunction indicator lamp comes on
Your vehicle may not pass the I/M test in the following situations:
When the malfunction indicator lamp still remains on after several driv-ing trips
If your vehicle does not pass the I/M test

455
GX460_OM_OM60T19U_(U)
6-3. Do-it-yourself maintenance
6
Maintenance and care
Do-it-yourself service precautions
If you perform maintenance yourself, be sure to follow the correct proceduresas given in these sections.
Items Parts and tools
Battery condition (P. 468)
• Warm water • Baking soda • Grease
• Conventional wrench (for terminal clamp bolts)
Brake fluid level (P. 465)
• FMVSS No.116 DOT 3 or SAE J1703 brake fluid
• Rag or paper towel
• Funnel (used only for adding brake fluid)
Engine coolant level (P. 463)
• “Toyota Super Long Life Coolant” or similar high quality eth-ylene glycol based non-silicate, non-amine, non-nitrite andnon-borate coolant with long-life hybrid organic acid tech-nology.
For the U.S.A.: “Toyota Super Long Life Coolant” is pre-mixed with 50 %coolant and 50 % deionized water.
For Canada: “Toyota Super Long Life Coolant” is pre-mixed with 55 %coolant and 45 % deionized water.
• Funnel (used only for adding coolant)
Engine oil level (P. 461)
• “Toyota Genuine Motor Oil” or equivalent
• Rag or paper towel
• Funnel (used only for adding engine oil)
Fuses (P. 494) • Fuse with same amperage rating as original

456
GX460_OM_OM60T19U_(U)
6-3. Do-it-yourself maintenance
Headlight aim (P. 497) • Phillips-head screwdriver
Light bulbs (P. 499)
• Bulb with same number and wattage rating as original
• Phillips-head screwdriver • Flathead screwdriver
• Wrench
Power steering fluidlevel (P. 467)
• Automatic transmission fluid DEXRON® II or III
• Rag or paper towel • Clean funnel
Radiator and con-denser (P. 465)
Tire inflation pres-sure (P. 484) • Tire pressure gauge • Compressed air source
Washer fluid (P. 471)
• Water or washer fluid containing antifreeze (for winter use)
• Funnel (used only for adding water or washer fluid)
Items Parts and tools

GX460_OM_OM60T19U_(U)
4576-3. Do-it-yourself maintenance
6
Maintenance and care
WARNING
The engine compartment contains many mechanisms and fluids that may move suddenly,become hot, or become electrically energized. To avoid death or serious injury, observethe following precautions:■ When working on the engine compartment
● Keep hands, clothing and tools away from the moving fan and engine drive belt.● Be careful not to touch the engine, radiator, exhaust manifold, etc. right after driving
as they may be hot. Oil and other fluids may also be hot.● Do not leave anything that may burn easily, such as paper or rags, in the engine com-
partment.● Do not smoke, cause sparks or expose an open flame to fuel or the battery. Fuel and
battery fumes are flammable.● Be extremely cautious when working on the battery. It contains poisonous and corro-
sive sulfuric acid.■ When working near the electric cooling fans or radiator grille
Be sure the engine switch is off. With the engine switch in IGNITION ON mode, theelectric cooling fans may automatically start to run if the air conditioning is on and/orthe coolant temperature is high. (P. 465)
■ When working on or under the vehicleDo not get under the vehicle with just the jack supporting it.Always use automotive jack stands or other solid supports.
■ Safety glassesWear safety glasses to prevent flying or falling material, fluid spray, etc. from getting inyour eyes.
NOTICE
■ If you remove the air cleaner filterDriving with the air cleaner filter removed may cause excessive engine wear due to dirtin the air.

458
GX460_OM_OM60T19U_(U)
6-3. Do-it-yourself maintenance
Hood
Pull the hood lock release lever.
The hood will pop up slightly.
Move the auxiliary catch lever toside direction and lift the hood.
Release the lock from the inside of the vehicle to open the hood.
1
2
WARNING
■ Pre-driving checkCheck that the hood is fully closed and locked.If the hood is not locked properly, it may open while the vehicle is in motion and causean accident, which may result in death or serious injury.
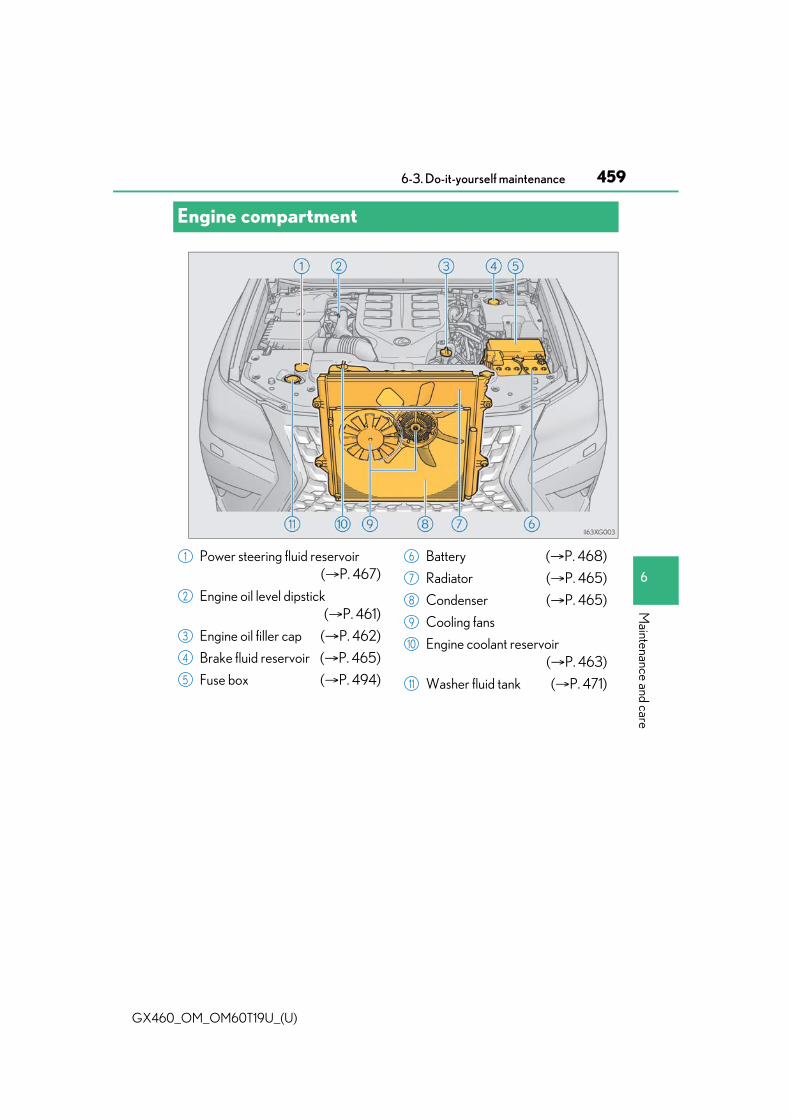
459
GX460_OM_OM60T19U_(U)
6-3. Do-it-yourself maintenance
6
Maintenance and care
Engine compartment
Power steering fluid reservoir(P. 467)
Engine oil level dipstick(P. 461)
Engine oil filler cap (P. 462)
Brake fluid reservoir (P. 465)
Fuse box (P. 494)
Battery (P. 468)
Radiator (P. 465)
Condenser (P. 465)
Cooling fans
Engine coolant reservoir(P. 463)
Washer fluid tank (P. 471)
1
2
3
4
5
6
7
8
9
10
11

460
GX460_OM_OM60T19U_(U)
6-3. Do-it-yourself maintenance
■ Removing the engine compartment cover
■ Installing the clips
Push up center portion
Insert
Press
Engine compartment cover
1
2
3
NOTICE
■ After installing an engine compartment coverMake sure the cover is securely installed in its original position.

GX460_OM_OM60T19U_(U)
4616-3. Do-it-yourself maintenance
6
Maintenance and care
With the engine at operating temperature and turned off, check the oil level onthe dipstick.
■ Checking the engine oil
Park the vehicle on level ground. After warming up the engine and turningit off, wait more than 5 minutes for the oil to drain back into the bottom ofthe engine.
Holding a rag under the end, pullthe dipstick out.
Wipe the dipstick clean.
Reinsert the dipstick fully.
Holding a rag under the end, pull the dipstick out and check the oil level.
Low
Normal
Excessive
The shape of the dipstick may dif-fer depending on the type of vehi-cle or engine.
Wipe the dipstick and reinsert it fully.
Engine oil
1
2
3
4
5
1
2
3
6

462
GX460_OM_OM60T19U_(U)
6-3. Do-it-yourself maintenance
■ Adding engine oilIf the oil level is below or near thelow level mark, add engine oil of thesame type as already in the engine.
Make sure to check the oil type and prepare the items needed before addingoil.
Remove the oil filler cap by turning it counterclockwise.
Add engine oil slowly, checking the dipstick.
Install the oil filler cap by turning it clockwise.
■ Engine oil consumptionA certain amount of engine oil will be consumed while driving. In the following situations,oil consumption may increase, and engine oil may need to be refilled in between oilmaintenance intervals.● When the engine is new, for example directly after purchasing the vehicle or after
replacing the engine● If low quality oil or oil of an inappropriate viscosity is used ● When driving at high engine speeds or with a heavy load, when towing, or when driving
while accelerating or decelerating frequently● When leaving the engine idling for a long time, or when driving frequently through
heavy traffic■ After changing the engine oil
The engine oil maintenance data should be reset. Perform the following procedures:
Press or of the meter control switches and select on the multi-informa-tion display.
Press or of the meter control switches and select “Vehicle Settings”, and thenpress .
Press or of the meter control switches and select “Oil Maintenance”, and thenpress .Select the “Yes” and press .
“Reset Complete” will be displayed when the reset procedure has been completed.
Engine oil selection P. 562
Oil quantity (Low Full) 1.6 qt. (1.5 L, 1.3 Imp.qt.)
Items Clean funnel
1
2
3
1
2
3
4

GX460_OM_OM60T19U_(U)
4636-3. Do-it-yourself maintenance
6
Maintenance and care
The coolant level is satisfactory if it is between the “F” and “L” lines on the reser-voir when the engine is cold.
Reservoir cap
“F”
“L”
If the level is on or below the “L” line, addcoolant up to the “F” line.
WARNING
■ Used engine oil● Used engine oil contains potentially harmful contaminants which may cause skin dis-
orders such as inflammation or skin cancer, so care should be taken to avoid pro-longed and repeated contact. To remove used engine oil from your skin, washthoroughly with soap and water.
● Dispose of used oil and filters only in a safe and acceptable manner. Do not dispose ofused oil and filters in household trash, in sewers or onto the ground. Call your Lexusdealer, service station or auto parts store for information concerning recycling or dis-posal.
● Do not leave used engine oil within the reach of children.
NOTICE
■ To prevent serious engine damageCheck the oil level on regular basis.
■ When replacing the engine oil● Be careful not to spill engine oil on the vehicle components.● Avoid overfilling, or the engine could be damaged.● Check the oil level on the dipstick every time you refill the vehicle.● Be sure the engine oil filler cap is properly tightened.
Engine coolant
1
2
3

464
GX460_OM_OM60T19U_(U)
6-3. Do-it-yourself maintenance
■ Coolant selectionOnly use “Toyota Super Long Life Coolant” or a similar high quality ethylene glycolbased non-silicate, non-amine, non-nitrite, and non-borate coolant with long-life hybridorganic acid technology.U.S.A.: “Toyota Super Long Life Coolant” is a mixture of 50 % coolant and 50 % deion-ized water. (Minimum temperature: -31F [-35C])Canada: “Toyota Super Long Life Coolant” is a mixture of 55 % coolant and 45 % deion-ized water. (Minimum temperature: -44F [-42C])For more details about engine coolant, contact your Lexus dealer.
■ If the coolant level drops within a short time of replenishingVisually check the radiator, hoses, engine coolant reservoir cap, radiator cap, drain cockand water pump. If you cannot find a leak, have your Lexus dealer test the cap and checkfor leaks in the cooling system.
WARNING
■ When the engine is hotDo not remove the radiator cap. The cooling system may be under pressure and may spray hot coolant if the cap isremoved, causing serious injuries, such as burns.
NOTICE
■ When adding coolantCoolant is neither plain water nor straight antifreeze. The correct mixture of water andantifreeze must be used to provide proper lubrication, corrosion protection and cool-ing. Be sure to read the antifreeze or coolant label.
■ If you spill coolantBe sure to wash it off with water to prevent it from damage to parts or paint.

GX460_OM_OM60T19U_(U)
4656-3. Do-it-yourself maintenance
6
Maintenance and care
Check the radiator and condenser and clear any foreign objects.If either of the above parts is extremely dirty or you are not sure of their condi-tion, have your vehicle checked by your Lexus dealer.
■ Checking fluid level
The brake fluid level should bebetween the “MAX” and “MIN” lineson the tank.
■ Adding fluid
Make sure to check the fluid type and prepare the necessary item.
Radiator and condenser
WARNING
■ When the engine is hotDo not touch the radiator or condenser as they may be hot and cause serious injuries,such as burns.
Brake fluid
Fluid type FMVSS No.116 DOT 3 or SAE J1703 brake fluid
Items Clean funnel

466
GX460_OM_OM60T19U_(U)
6-3. Do-it-yourself maintenance
■ Brake fluid can absorb moisture from the airExcess moisture in the fluid can cause a dangerous loss of braking efficiency. Use onlynewly opened brake fluid.
WARNING
■ When filling the reservoirTake care because brake fluid can harm your hands or eyes and damage painted sur-faces. If fluid gets on your eyes, flush the affected area with clean water immediately. Ifyou still experience discomfort, see a doctor.
NOTICE
■ If the fluid level is low or highIt is normal for the brake fluid level to go down slightly as the brake pads wear or whenthe fluid level in the accumulator is high. If the reservoir needs frequent refilling, it mayindicate a serious problem.

GX460_OM_OM60T19U_(U)
4676-3. Do-it-yourself maintenance
6
Maintenance and care
■ Fluid level
The fluid level should be within the appropriate range.
Full (when cold)
Add fluid (when cold)
Full (when hot)
Add fluid (when hot)
Hot: The vehicles has been driven around 50 mph (80 km/h) for 20 min-utes, or slightly longer in frigid temperatures. (Fluid temperature, 140F - 175F [60C - 80C]).
Cold: The engine has not been run for about 5 hours. (Room temperature, 50F - 85F [10C - 30C]).
■ Checking the fluid level
Make sure to check the fluid type and prepare the necessary items.
Clean all dirt off the reservoir.
Remove the cap by turning it counterclockwise.
Wipe the dipstick clean.
Reinstall the cap and remove it again.
Check the fluid level.
Power steering fluid
1
2
3
4
Fluid type Automatic transmission fluid DEXRON® II or III
Items Rag or paper, clean funnel (only for adding fluid)
1
2
3
4
5

468
GX460_OM_OM60T19U_(U)
6-3. Do-it-yourself maintenance
Check the battery as follows.
■ Battery exterior
Make sure that the battery terminals are not corroded and that there are noloose connections, cracks, or loose clamps.
Terminals
Hold-down clamp
WARNING
■ When checking the reservoirTake care as the reservoir may be hot.
NOTICE
■ When adding fluidAvoid overfilling, or the power steering may be damaged.
■ After replacing the reservoir capCheck the steering box case, vane pump and hose connections for leaks or damage.
Battery
1
2

GX460_OM_OM60T19U_(U)
4696-3. Do-it-yourself maintenance
6
Maintenance and care
■ Before rechargingWhen recharging, the battery produces hydrogen gas which is flammable and explosive.Therefore, observe the following before recharging:● If recharging with the battery installed on the vehicle, be sure to disconnect the ground
cable.● Make sure the power switch on the charger is off when connecting and disconnecting
the charger cables to the battery.■ After recharging/reconnecting the battery
The engine may not start. Follow the procedure below to initialize the system.Shift the shift lever to POpen and close any of the doors.Restart the engine.
● Unlocking the doors using the smart access system with push-button start may not bepossible immediately after reconnecting the battery. If this happens, use the wirelessremote control or the mechanical key to lock/unlock the doors.
● Start the engine with the engine switch in ACCESSORY mode. The engine may notstart with the engine switch turned off. However, the engine will operate normally fromthe second attempt.
● The engine switch mode is recorded by the vehicle. If the battery is reconnected, thevehicle will return the engine switch mode to the status it was in before the battery wasdisconnected. Make sure to turn off the engine before disconnect the battery. Takeextra care when connecting the battery if the engine switch mode prior to discharge isunknown.
If the system will not start even after multiple attempts, contact your Lexus dealer.
WARNING
■ Chemicals in the batteryBatteries contain poisonous and corrosive sulfuric acid and may produce hydrogengas which is flammable and explosive. To reduce the risk of death or serious injury, takethe following precautions while working on or near battery:● Do not cause sparks by touching the battery terminals with tools.● Do not smoke or light a match near the battery.● Avoid contact with eyes, skin and clothes.● Never inhale or swallow electrolyte.● Wear protective safety glasses when working near the battery.● Keep children away from the battery.
■ Where to safely charge the batteryAlways charge the battery in an open area. Do not charge the battery in a garage orclosed room where there is not sufficient ventilation.
1
2
3

470
GX460_OM_OM60T19U_(U)
6-3. Do-it-yourself maintenance
WARNING
■ How to recharge the batteryOnly perform a slow charge (5A or less). The battery may explode if charged at aquicker rate.
■ Emergency measures regarding electrolyte● If electrolyte gets in your eyes
Flush your eyes with clean water for at least 15 minutes and get immediate medicalattention. If possible, continue to apply water with a sponge or cloth while traveling tothe nearest medical facility.
● If electrolyte gets on your skinWash the affected area thoroughly. If you feel pain or burning, get medical attentionimmediately.
● If electrolyte gets on your clothesIt can soak through clothing on to your skin. Immediately take off the clothing and fol-low the procedure above if necessary.
● If you accidentally swallow electrolyteDrink a large quantity of water or milk. Get emergency medical attention immedi-ately.
NOTICE
■ When recharging the batteryNever recharge the battery while the engine is running. Also, be sure all accessoriesare turned off.

GX460_OM_OM60T19U_(U)
4716-3. Do-it-yourself maintenance
6
Maintenance and care
If any washer does not work or “Wind-shield Washer Fluid Low” appears onthe multi-information display, thewasher tank may be empty. Addwasher fluid.
Washer fluid
WARNING
■ When adding washer fluidDo not add washer fluid when the engine is hot or running as washer fluid containsalcohol and may catch fire if spilled on the engine etc.
NOTICE
■ Do not use any fluid other than washer fluidDo not use soapy water or engine antifreeze instead of washer fluid. Doing so may cause streaking on the vehicle’s painted surfaces, as well as damagingthe pump leading to problems of the washer fluid not spraying.
■ Diluting washer fluidDilute washer fluid with water as necessary. Refer to the freezing temperatures listed on the label of the washer fluid bottle.

472
GX460_OM_OM60T19U_(U)
6-3. Do-it-yourself maintenance
Tires
Check if the treadwear indicators are showing on the tires. Also check the tiresfor uneven wear, such as excessive wear on one side of the tread. Check the spare tire condition and pressure if not rotated.
New tread
Worn tread
Treadwear indicator
The location of treadwear indicators is shown by a “TWI” or “ ” mark, etc., moldedinto the sidewall of each tire. Replace the tires if the treadwear indicators are showing on a tire.
Rotate the tires in the order shown.
To equalize tire wear and extend tire life,Lexus recommends that tire rotation iscarried out at the same interval as tireinspection.Do not fail to initialize the tire pressurewarning system after tire rotation.
Replace or rotate tires in accordance with maintenance schedules and tread-wear.
Checking tires
Tire rotation
1
2
3
Front

GX460_OM_OM60T19U_(U)
4736-3. Do-it-yourself maintenance
6
Maintenance and care
Your vehicle is equipped with a tire pressure warning system that uses tire pres-sure warning valves and transmitters to detect low tire inflation pressure beforeserious problems arise.● If the tire pressure drops below a predetermined level, the driver is warned by
a screen display and a warning light. (P. 520)
● The tire pressure detected by thetire pressure warning system can bedisplayed on the multi-informationdisplay. (P. 93)
The illustration used is intended as anexample, and may differ from the imagethat is actually displayed on the multi-information display.
◆ Installing tire pressure warning valves and transmitters
When replacing tires or wheels, tire pressure warning valves and transmittersmust also be installed.
When new tire pressure warning valves and transmitters are installed, new IDcodes must be registered in the tire pressure warning computer and the tirepressure warning system must be initialized. (P. 475)
◆ Initializing the tire pressure warning system
■ The tire pressure warning system must be initialized in the following circum-stances:● When changing the tire size.● When rotating the tires.● When the tire inflation pressure is changed such as when changing travel-
ing speed or load weight.● After registering the ID codes. (P. 475)
When the tire pressure warning system is initialized, the current tire inflationpressure is set as the benchmark pressure.
Tire pressure warning system

474
GX460_OM_OM60T19U_(U)
6-3. Do-it-yourself maintenance
■ How to initialize the tire pressure warning system
Park the vehicle in a safe place and stop the engine for 20 minutes or more.
Initialization cannot be performed while the vehicle is moving.Adjust the tire inflation pressure to the specified cold tire inflation pressurelevel. (P. 568)
Make sure to adjust the tire pressure to the specified cold tire inflation pressurelevel. The tire pressure warning system will operate based on this pressure level.Start the engine. (P. 200)
Press or of the meter control switches and select .
Press or of the meter control switches and select “Vehicle
Settings”, and then press .
Press or of the meter control switches and select “TPWS”, and
then press .
Press or of the metercontrol switches and select “SetPressure”, and then press and
hold until the tire pressurewarning light starts blinking.
A message is displayed on the multi-information display. Also, “--” is dis-played for inflation pressure of eachtire on the multi-information displaywhile the tire pressure warning sys-tem determines the position.Drive at approximately 25 mph (40 km/h) or more for approximately 10 to30 minutes.
When initialization is complete, the inflation pressure of each tire will be displayedon the multi-information display.Even if the vehicle is not driven at approximately 25 mph (40 km/h) or more, ini-tialization can be completed by driving for a long time. However, if initializationdoes not complete after driving for 1 hour or more, park the vehicle in a safe placefor approximately 20 minutes and then drive the vehicle again.
1
2
3
4
5
6
7
8

GX460_OM_OM60T19U_(U)
4756-3. Do-it-yourself maintenance
6
Maintenance and care
◆ Registering ID codes
Every tire pressure warning valve and transmitter has a unique ID code.
When replacing a tire pressure warning valve and transmitter, it is necessaryto register the ID code.
When registering the ID codes, perform the following procedure.
Park the vehicle in a safe place, wait for approximately 20 minutes, andthen start the engine. (P. 200)
Press or of the meter control switches and select .
Press or of the meter control switches and select “Vehicle
Settings”, and then press .
Press or of the meter control switches and select “TPWS”, and
then press .
Press or of the metercontrol switches and select“Change Wheel Set”, and then
press and hold until the tirepressure warning light startsslowly blinking 3 times.
Then a message will be displayed onthe multi-information display.When registration is being performed, the tire pressure warning light will blink forapproximately 1 minute then illuminate and “--” will be displayed for the inflationpressure of each tire on the multi-information display.
Drive at approximately 25 mph (40 km/h) or more for approximately 10 to30 minutes.
Registration is complete when the tire pressure warning light turns off and theinflation pressure of each tire is displayed on the multi-information display.Even if the vehicle is not driven at approximately 25 mph (40 km/h) or more, reg-istration can be completed by driving for a long time. However, if registration doesnot complete after driving for 1 hour or more, perform the procedure again fromthe beginning.
Initialize the tire pressure warning system. (P. 474)
1
2
3
4
5
6
7

476
GX460_OM_OM60T19U_(U)
6-3. Do-it-yourself maintenance
■ When to replace your vehicle’s tiresTires should be replaced if:● The treadwear indicators are showing on a tire.● You have tire damage such as cuts, splits, cracks deep enough to expose the fabric, and
bulges indicating internal damage● A tire goes flat repeatedly or cannot be properly repaired due to the size or location of
a cut or other damageIf you are not sure, consult with your Lexus dealer.
■ Replacing tires and wheelsIf the ID code of the tire pressure warning valve and transmitter is not registered, the tirepressure warning system will not work properly. After driving for about 20 minutes, thetire pressure warning light blinks for 1 minute and stays on to indicate a system malfunc-tion.
■ Tire lifeAny tire over 6 years old must be checked by a qualified technician even if it has seldomor never been used or damage is not obvious.
■ Routine tire inflation pressure checksThe tire pressure warning system does not replace routine tire inflation pressure checks.Make sure to check tire inflation pressure as part of your routine of daily vehicle checks.
■ Maximum load of tireCheck that the number given by dividing the maximum load by 1.10 of the replacementtire is greater than 1/2 of the Gross Axle Weight Ratings (GAWR) of either the front axleor the rear axle, whichever is greater.
For the GAWR, see the Certification Label. Forthe maximum load of the tire, see the load limitat maximum cold tire inflation pressure men-tioned on the sidewall of the tire. (P. 573)

GX460_OM_OM60T19U_(U)
4776-3. Do-it-yourself maintenance
6
Maintenance and care
■ Tire types● Summer tires
Summer tires are high-speed performance tires best suited to highway driving underdry conditions. Since summer tires do not have the same traction performance assnow tires, summer tires are inadequate for driving on snow-covered or icy roads. Fordriving on snow-covered roads or icy roads, the use of snow tires is recommended.When installing snow tires, be sure to replace all four tires.
● All season tiresAll season tires are designed to provide better traction in snow and to be adequate fordriving in most winter conditions as well as for use year-round. All season tires, how-ever, do not have adequate traction performance compared with snow tires in heavyor loose snow. Also, all season tires fall short in acceleration and handling perfor-mance compared with summer tires in highway driving.
● Snow tiresFor driving on snow-covered roads or icy roads, we recommend using snow tires. Ifyou need snow tires, select tires of the same size, construction and load capacity as theoriginally installed tires. Since your vehicle has radial tires as original equipment, makesure your snow tires also have radial construction. Do not install studded tires withoutfirst checking local regulations for possible restrictions. Snow tires should be installedon all wheels. (P. 374)

478
GX460_OM_OM60T19U_(U)
6-3. Do-it-yourself maintenance
■ If the tread on snow tires wears down below 0.16 in. (4 mm)The effectiveness of the tires as snow tires is lost.
■ Situations in which the tire pressure warning system may not operate properly● In the following cases, the tire pressure warning system may not operate properly.
• If non-genuine Lexus wheels are used. • A tire has been replaced with a tire that is not an OE (Original Equipment) tire.• A tire has been replaced with a tire that is not of the specified size.• Tire chains etc. are equipped.• An auxiliary-supported run-flat tire is equipped.• If a window tint that affects the radio wave signals is installed.• If there is a lot of snow or ice on the vehicle, particularly around the wheels or wheel
housings.• If the tire inflation pressure is extremely higher than the specified level.• If the spare tire is in a location subject to poor radio wave signal reception.• If a large metallic object which can interfere with signal reception is put near the
spare tire.• If tires not equipped with the tire pressure warning valves and transmitters are used.• If the ID code on the tire pressure warning valves and transmitters is not registered
in the tire pressure warning computer.● Performance may be affected in the following situations.
• Near a TV tower, electric power plant, gas station, radio station, large display, air-port or other facility that generates strong radio waves or electrical noise
• When carrying a portable radio, cellular phone, cordless phone or other wirelesscommunication device
If tire position information is not correctly displayed due to the radio wave conditions,the display may be corrected by driving and changing the radio wave conditions.
● When the vehicle is parked, the time taken for the warning to start or go off could beextended.
● When tire inflation pressure declines rapidly for example when a tire has burst, thewarning may not function.

GX460_OM_OM60T19U_(U)
4796-3. Do-it-yourself maintenance
6
Maintenance and care
■ The initialization operation● Make sure to carry out initialization after adjusting the tire inflation pressure.
Also, make sure the tires are cold before carrying out initialization or tire inflation pres-sure adjustment.
● If you have accidentally turned the engine switch off during initialization, it is not neces-sary to manually restart the initialization again, as initialization will restart automaticallythe next time the engine switch is turned to IGNITION ON mode.
● If you accidentally perform initialization when initialization is not necessary, adjust thetire inflation pressure to the specified level when the tires are cold, and conduct initial-ization again.
● While the position of each tire is being determined and the inflation pressures are notbeing displayed on the multi-information display, if the inflation pressure of a tire drops,the tire pressure warning light will come on.
■ Warning performance of the tire pressure warning systemThe warning of the tire pressure warning system will change in accordance with the con-ditions under which it was initialized. For this reason, the system may give a warning evenif the tire pressure does not reach a low enough level, or if the pressure is higher than thepressure that was adjusted to when the system was initialized.
■ When initialization of the tire pressure warning system has failed● Do not move the vehicle backward during initialization. Initialization is started again
from the beginning and it may take longer than usual.● Initialization may take longer to complete if the vehicle is driven on an unpaved road.
When performing initialization, drive on a paved road if possible. Depending on thedriving environment and condition of the tires, initialization will be completed inapproximately 10 to 30 minutes.• If initialization is not complete after driving approximately 30 minutes, continue
driving for a while.• If initialization is not complete after driving approximately 1 hour, park the vehicle in
a safe place for approximately 20 minutes. Then drive straight (with occasional leftand right turns) at approximately 25 mph (40 km/h) or more* for approximately 10to 30 minutes.
If initialization is still not complete, have the vehicle inspected by your Lexus dealer.*: Except when making a left/right turn
● In the following situations, the tire inflation pressure will not be recorded and the systemwill not operate properly. Perform initialization again.• If, when attempting to start initialization, the tire pressure warning light does not
blink 3 times.• If, when the vehicle has been driven for about 20 minutes after performing initializa-
tion, the tire pressure warning light blinks for approximately 1 minute and then illumi-nates.

480
GX460_OM_OM60T19U_(U)
6-3. Do-it-yourself maintenance
■ When registering ID codes● ID code registration is performed while driving at a vehicle speed of approximately 25
mph (40 km/h) or more.● Before performing ID code registration, make sure that no wheels with tire pressure
warning valve and transmitters installed are near the vehicle.● Initialize the tire pressure warning system after ID code registration. Initialization is dis-
abled if the system was initialized before registration.● After ID code registration, the tires are hot by driving. Initialize the tire pressure warn-
ing system after the tires become cold.● ID codes can be registered by yourself, but depending on the driving conditions and
driving environment, registration may take some time to complete.■ Canceling the change wheel set mode
● If turning the engine switch off when in the change wheel set mode before driving, thechange wheel set mode is canceled.
● After driving when in the change wheel set mode, the change wheel set mode cannotbe canceled. To cancel the mode, perform the procedure for ID code registration againand turn the engine switch off before driving.
● If the change wheel set mode is canceled, the ID codes that have already been regis-tered are communicated. When communication is finished, the tire pressure warninglight will turn off.
■ When ID code registration has failed● Registration may take long time or the ID codes may not be registered in the following
situations.• When the vehicle is moved backward during registration.
Registration is started again from the beginning and it may take longer than usual.• When another vehicle is running the side of the vehicle such as in heavy traffic.
It may take longer to detect the vehicle’s tire pressure warning valves and transmit-ters.
• If tire pressure warning valves and transmitters are in the vehicle.The ID codes may not be registered.
● When performing registration, drive on a paved road if possible. Depending on thedriving environment and condition of the tires, registration will be completed in approx-imately 10 to 30 minutes.• If registration is not complete after driving approximately 30 minutes, continue driv-
ing for a while.• If registration is not complete after driving approximately 1 hour, park the vehicle in a
safe place for approximately 20 minutes. Then drive straight (with occasional leftand right turns) at approximately 25 mph (40 km/h) or more* for approximately 10to 30 minutes.
If registration is still not complete, have the vehicle inspected by your Lexus dealer.*: Except when making a left/right turn
● When the tire pressure warning light does not blink slowly 3 times, the ID code will notbe registered and the system will not operate properly. Perform registration again.

GX460_OM_OM60T19U_(U)
4816-3. Do-it-yourself maintenance
6
Maintenance and care
■ Certification for tire pressure warning system For vehicles sold in the U.S.A., Hawaii, Guam, Saipan and Puerto Rico
For vehicles sold in Canada

482
GX460_OM_OM60T19U_(U)
6-3. Do-it-yourself maintenance
WARNING
■ Tire pressure warning system operationThe tire pressure warning system may not provide warning immediately if a tire burstsor if sudden air leakage occurs.
■ When inspecting or replacing tiresObserve the following precautions to prevent accidents. Failure to do so may causedamage to parts of the drive train as well as dangerous handling characteristics, whichmay lead to an accident resulting in death or serious injury.● Do not mix tires of different makes, models or tread patterns.
Also, do not mix tires of remarkably different treadwear.● Do not use tire sizes other than those recommended by Lexus.● Do not mix differently constructed tires (radial, bias-belted or bias-ply tires).● Do not mix summer, all season and snow tires.● Do not use tires that have been used on another vehicle.
Do not use tires if you do not know how they were used previously.■ When initializing the tire pressure warning system
Do not initialize tire inflation pressure without first adjusting the tire inflation pressure tothe specified level. Otherwise, the tire pressure warning light may not come on even ifthe tire inflation pressure is low, or it may come on when the tire inflation pressure isactually normal.

GX460_OM_OM60T19U_(U)
4836-3. Do-it-yourself maintenance
6
Maintenance and care
NOTICE
■ Repairing or replacing tires, wheels, tire pressure warning valves, transmitters andtire valve caps● When removing or fitting the wheels, tires or the tire pressure warning valves and
transmitters, contact your Lexus dealer as the tire pressure warning valves and trans-mitters may be damaged if not handled correctly.
● Make sure to install the tire valve caps. If the tire valve caps are not installed, watercould enter the tire pressure warning valves and the tire pressure warning valvescould be bound.
● When replacing tire valve caps, do not use tire valve caps other than those specified.The cap may become stuck.
■ To avoid damage to the tire pressure warning valves and transmittersWhen a tire is repaired with liquid sealants, the tire pressure warning valve and trans-mitter may not operate properly. If a liquid sealant is used, contact your Lexus dealer orother qualified service shop as soon as possible. Make sure to replace the tire pressurewarning valve and transmitter when replacing the tire. (P. 473)
■ Driving on rough roadsTake particular care when driving on roads with loose surfaces or potholes.These conditions may cause losses in tire inflation pressure, reducing the cushioningability of the tires. In addition, driving on rough roads may cause damage to the tiresthemselves, as well as the vehicle’s wheels and body.
■ If tire inflation pressure of each tire becomes low while drivingDo not continue driving, or your tires and/or wheels may be ruined.

484
GX460_OM_OM60T19U_(U)
6-3. Do-it-yourself maintenance
Tire inflation pressure
The recommended cold tire inflationpressure and tire size are displayed onthe tire and loading information label.(P. 568)
Tire inflation pressure

GX460_OM_OM60T19U_(U)
4856-3. Do-it-yourself maintenance
6
Maintenance and care
Tire valve
Tire pressure gauge
Remove the tire valve cap.
Press the tip of the tire pressure gauge onto the tire valve.
Read the pressure using the gauge gradations.
If the tire inflation pressure is not at the recommended level, adjust the pres-sure.If you add too much air, press the center of the valve to deflate.
After completing the tire inflation pressure measurement and adjustment,apply soapy water to the valve and check for leakage.
Put the tire valve cap back on.
Inspection and adjustment procedure
1
2
1
2
3
4
5
6

486
GX460_OM_OM60T19U_(U)
6-3. Do-it-yourself maintenance
■ Tire inflation pressure check intervalYou should check tire inflation pressure every two weeks, or at least once a month. Donot forget to check the spare.
■ Effects of incorrect tire inflation pressureDriving with incorrect tire inflation pressure may result in the following:● Reduced fuel economy● Reduced driving comfort and poor handling● Reduced tire life due to wear● Reduced safety● Damage to the drive trainIf a tire needs frequent inflating, have it checked by your Lexus dealer.
■ Instructions for checking tire inflation pressureWhen checking tire inflation pressure, observe the following:● Check only when the tires are cold.
If your vehicle has been parked for at least 3 hours and has not been driven for morethan 1 mile or 1.5 km, you will get an accurate cold tire inflation pressure reading.
● Always use a tire pressure gauge.It is difficult to judge if a tire is properly inflated based only on its appearance.
● It is normal for the tire inflation pressure to be higher after driving as heat is generatedin the tire. Do not reduce tire inflation pressure after driving.
● Never exceed the vehicle capacity weight.Passengers and luggage weight should be placed so that the vehicle is balanced.

GX460_OM_OM60T19U_(U)
4876-3. Do-it-yourself maintenance
6
Maintenance and care
WARNING
■ Proper inflation is critical to save tire performanceKeep your tires properly inflated.If the tires are not properly inflated, the following conditions may occur which couldlead to an accident resulting in death or serious injury:● Excessive wear● Uneven wear● Poor handling● Possibility of blowouts resulting from overheated tires● Air leaking from between tire and wheel● Wheel deformation and/or tire damage● Greater possibility of tire damage while driving (due to road hazards, expansion
joints, sharp edges in the road, etc.)
NOTICE
■ When inspecting and adjusting tire inflation pressureBe sure to put the tire valve caps back on.If a valve cap is not installed, dirt or moisture may get into the valve and cause an airleak, resulting in decreased tire inflation pressure.

488
GX460_OM_OM60T19U_(U)
6-3. Do-it-yourself maintenance
Wheels
When replacing wheels, care should be taken to ensure that they are equivalentto those removed in load capacity, diameter, rim width, and inset*.Replacement wheels are available at your Lexus dealer.
*: Conventionally referred to as “offset”.
Lexus does not recommend using the following:● Wheels of different sizes or types● Used wheels● Bent wheels that have been straightened
● Use only Lexus wheel nuts and wrenches designed for use with your alumi-num wheels.
● When rotating, repairing or changing your tires, check that the wheel nuts arestill tight after driving 1000 miles (1600 km).
● Be careful not to damage the aluminum wheels when using tire chains.● Use only Lexus genuine balance weights or equivalent and a plastic or rubber
hammer when balancing your wheels.
■ When replacing wheelsThe wheels of your vehicle are equipped with tire pressure warning valves and transmit-ters that allow the tire pressure warning system to provide advance warning in the eventof a loss in tire inflation pressure. Whenever wheels are replaced, tire pressure warningvalves and transmitters must be installed. (P. 473)
If a wheel is bent, cracked or heavily corroded, it should be replaced.Otherwise, the tire may separate from the wheel or cause loss of handlingcontrol.
Wheel selection
Aluminum wheel precautions

GX460_OM_OM60T19U_(U)
4896-3. Do-it-yourself maintenance
6
Maintenance and care
WARNING
■ When replacing wheels● Do not use wheels that are a different size from those recommended in the Owner’s
Manual, as this may result in a loss of handling control.● Never use an inner tube in a leaking wheel which is designed for a tubeless tire. Doing
so may result in an accident, causing death or serious injury.■ Use of defective wheels prohibited
Do not use cracked or deformed wheels.Doing so could cause the tire to leak air during driving, possibly causing an accident.
NOTICE
■ Replacing tire pressure warning valves and transmitters● Because tire repair or replacement may affect the tire pressure warning valves and
transmitters, make sure to have tires serviced by your Lexus dealer or other qualifiedservice shop. In addition, make sure to purchase your tire pressure warning valvesand transmitters at your Lexus dealer.
● Ensure that only genuine Lexus wheels are used on your vehicle.Tire pressure warning valves and transmitters may not work properly with non-genu-ine wheels.

490
GX460_OM_OM60T19U_(U)
6-3. Do-it-yourself maintenance
Air conditioning filter
Turn the engine switch off.
Open the glove box and remove theglove box cover.
Remove the filter cover.
The air conditioning filter must be changed regularly to maintain air condi-tioning efficiency.
Removal method
1
2
3

GX460_OM_OM60T19U_(U)
4916-3. Do-it-yourself maintenance
6
Maintenance and care
Slide and pull out the filter. Replacethe filter with a new one.
The “UP” marks shown on the filtershould be pointing up.
■ Changing intervalInspect and replace the air conditioning filter according to the maintenance schedule. Industy areas or areas with heavy traffic flow, early replacement may be required. (For scheduled maintenance information, please refer to the “Owner’s ManualSupplement” or “Scheduled Maintenance”.)
■ If air flow from the vents decreases dramaticallyThe filter may be clogged. Check the filter and replace if necessary.
4
NOTICE
■ When using the air conditioning systemMake sure that a filter is always installed.Using the air conditioning system without a filter may cause damage to the system.

492
GX460_OM_OM60T19U_(U)
6-3. Do-it-yourself maintenance
Electronic key battery
● Flathead screwdriver● Small flathead screwdriver● Lithium battery CR2032
Take out the mechanical key.
Remove the cover.
To prevent damage to the key, cover thetip of the screwdriver with tape.
Remove the depleted battery.
Insert a new battery with the “+” termi-nal facing up.
Replace the battery with a new one if it is depleted.
You will need the following items:
Replacing the battery
1
2
3

GX460_OM_OM60T19U_(U)
4936-3. Do-it-yourself maintenance
6
Maintenance and care
■ Use a CR2032 lithium battery● Batteries can be purchased at your Lexus dealer, local electrical appliance shops or
camera stores.● Replace only with the same or equivalent type recommended by the manufacturer.● Dispose of used batteries according to the local laws.
■ If the electronic key battery is depletedThe following symptoms may occur:● The smart access system with push-button start and wireless remote control will not
function properly.● The operational range will be reduced.
WARNING
■ Battery precautionsObserve the following precautions.Failure to do so may result in death or serious injury.● Do not swallow the battery. Doing so may cause chemical burns.● A coin battery or button battery is used in the electronic key. If a battery is swallowed,
it may cause severe chemical burns in as little as 2 hours and may result in death orserious injury.
● Keep away new and removed batteries from children.● If the cover cannot be firmly closed, stop using the electronic key and stow the key in
the place where children cannot reach, and then contact your Lexus dealer.● If you accidentally swallow a battery or put a battery into a part of your body, get
emergency medical attention immediately.■ To prevent battery explosion or leakage of flammable liquid or gas
● Replace the battery with a new battery of the same type. If a wrong type of battery isused, it may explode.
● Do not expose batteries to extremely low pressure due to high altitude or extremelyhigh temperatures.
● Do not burn, break or cut a battery.
NOTICE
■ For normal operation after replacing the batteryObserve the following precautions to prevent accidents:● Always work with dry hands.
Moisture may cause the battery to rust.● Do not touch or move any other component inside the remote control.● Do not bend either of the battery terminals.

494
GX460_OM_OM60T19U_(U)
6-3. Do-it-yourself maintenance
Checking and replacing fuses
Turn the engine switch off.
Open the fuse box cover.
Remove the fuse with the pull-out tool.
Only type A fuse can be removed usingthe pull-out tool.
If any of the electrical components do not operate, a fuse may have blown. Ifthis happens, check and replace the fuses as necessary.
1
2
Engine compartment Driver’s side instrument panel
Push the tab in and lift the lid off. Remove the lid.
3

GX460_OM_OM60T19U_(U)
4956-3. Do-it-yourself maintenance
6
Maintenance and care
Check if the fuse is blown.
Normal fuse
Blown fuse
Type A:Replace the blown fuse with a new fuse of an appropriate amperage rating. Theamperage rating can be found on the fuse box lid.Type B, C and D:Contact your Lexus dealer.
4
1
2
Type A Type B
Type C Type D

496
GX460_OM_OM60T19U_(U)
6-3. Do-it-yourself maintenance
■ After a fuse is replaced● If the lights do not turn on even after the fuse has been replaced, a bulb may need
replacement. (P. 499)● If the replaced fuse blows again, have the vehicle inspected by your Lexus dealer.
■ If there is an overload in a circuitThe fuses are designed to blow, protecting the wiring harness from damage.
WARNING
■ To prevent system breakdowns and vehicle fireObserve the following precautions.Failure to do so may cause damage to the vehicle, and possibly a fire or injury.● Never use a fuse of a higher amperage rating than indicated, or use any other object
in place of a fuse.● Always use a genuine Lexus fuse or equivalent.
Never replace a fuse with a wire, even as a temporary fix.● Do not modify the fuses or the fuse boxes.
NOTICE
■ Before replacing fusesHave the cause of electrical overload determined and repaired by your Lexus dealer,as soon as possible.

497
GX460_OM_OM60T19U_(U)
6-3. Do-it-yourself maintenance
6
Maintenance and care
Headlight aim
Adjustment bolt A
Adjustment bolt B
Make sure the vehicle has a full tank of gasoline and the area around theheadlight is not deformed.
Park the vehicle on level ground.
Sit in the driver’s seat.
Bounce the vehicle several times.
Vertical movement adjusting bolts
1
2
Before checking the headlight aim
1
2
3
4

498
GX460_OM_OM60T19U_(U)
6-3. Do-it-yourself maintenance
Using a Phillips-head screwdriver, turn bolt A in either direction.
Remember the turning direction and the number of turns.
Turn bolt B the same number of turnsand in the same direction as step .
If the headlight cannot be adjusted usingthis procedure, take the vehicle to yourLexus dealer to adjust the headlight aim.
Adjusting the headlight aim
1
Left-hand side Right-hand side
2
1

499
GX460_OM_OM60T19U_(U)
6-3. Do-it-yourself maintenance
6
Maintenance and care
Light bulbs
Check the wattage and color of the light bulb being replaced. (P. 569)
■ Front
Front turn signal light
You may replace the following bulbs yourself. The difficulty level of replace-ment varies depending on the bulb. If necessary bulb replacement seems diffi-cult to perform, contact your Lexus dealer.
For more information about replacing other light bulbs, contact your Lexusdealer.
Preparing for light bulb replacement
Bulb locations
1

500
GX460_OM_OM60T19U_(U)
6-3. Do-it-yourself maintenance
■ Rear
Rear turn signal light
Back-up light
Rear side marker light
Running board lights
1
2
3
4

GX460_OM_OM60T19U_(U)
5016-3. Do-it-yourself maintenance
6
Maintenance and care
■ Front turn signal lights
Turn the bulb base counterclock-wise.
Remove the light bulb.
When installing, reverse the steps listed.
Replacing light bulbs
1
2
3

502
GX460_OM_OM60T19U_(U)
6-3. Do-it-yourself maintenance
■ Rear turn signal lights and rear side marker lights
Open the back door.
Left-hand side
Remove the bolts and lamp assem-bly.
Right-hand side
Remove the bolts.
Close the back door half wayand remove the lamp assem-bly.
1
1
2

GX460_OM_OM60T19U_(U)
5036-3. Do-it-yourself maintenance
6
Maintenance and care
Unplug the connector whilepushing the lock release.
Turn the bulb bases counter-clockwise.
Rear turn signal light
Rear side marker light
Remove the light bulb.
Rear turn signal light
Rear side marker light
When installing, reverse the steps listed.
2
3
1
2
4
1
2
5

504
GX460_OM_OM60T19U_(U)
6-3. Do-it-yourself maintenance
■ Back-up lights
Remove the bolts and pull downthe under cover.
Turn the bulb base counterclock-wise.
Remove the light bulb.
When installing, reverse the steps listed.
1
2
3
4

GX460_OM_OM60T19U_(U)
5056-3. Do-it-yourself maintenance
6
Maintenance and care
■ Running board lights
Turn the bulb bases counter-clockwise.
Remove the light bulb.
When installing, reverse the steps listed.
■ Replacing the following bulbs
If any of the lights listed below has burnt out, have it replaced by your Lexusdealer.● Headlights● Parking lights/daytime running lights● Front side marker lights● Fog lights (if equipped)● Side turn signal lights● High mounted stoplight● Stop/tail lights● License plate lights
1
2
3
506
GX460_OM_OM60T19U_(U)
6-3. Do-it-yourself maintenance
■ LED lightsThe headlights, parking lights/daytime running lights, front side marker lights, fog lights,side turn signal lights, high mounted stoplight, stop/tail lights and license plate lights con-sist of a number of LEDs. If any of the LEDs burn out, take your vehicle to your Lexusdealer to have the light replaced.
■ Condensation build-up on the inside of the lensTemporary condensation build-up on the inside of the headlight lens does not indicate amalfunction. Contact your Lexus dealer for more information in the following situations: ● Large drops of water are built up on the inside of the lens.● Water has built up inside the headlight.
WARNING
■ Replacing light bulbs● Turn off the headlights. Do not attempt to replace the bulb immediately after turning
off the headlights.The bulbs become very hot and may cause burns.
● Do not touch the glass portion of the light bulb with bare hands. When it is unavoid-able to hold the glass portion, use and hold with a clean dry cloth to avoid gettingmoisture and oils on the bulb.Also, if the bulb is scratched or dropped, it may blow out or crack.
● Fully install light bulbs and any parts used to secure them. Failure to do so may resultin heat damage, fire, or water entering the headlight unit. This may damage the head-lights or cause condensation to build up on the lens.
● Do not attempt to repair or disassemble light bulbs, connectors, electric circuits orcomponent parts.Doing so may result in death or serious injury due to electric shock.
■ To prevent damage or fire● Make sure bulbs are fully seated and locked.● Check the wattage of the bulb before installing to prevent heat damage.

507
GX460_OM_OM60T19U_(U)
7When trouble arises
7-1. Essential information
Emergency flashers ................. 508
If your vehicle has to be stopped in an emergency ..........................509
If the vehicle is trapped in rising water ................................. 510
7-2. Steps to take in an emergency
If your vehicle needs to be towed...................................511
If you think something is wrong............................................ 516
Fuel pump shut off system........517
If a warning light turns on or a warning buzzer sounds........................................... 518
If a warning message is displayed..................................... 527
If you have a flat tire ................... 531
If the engine will not start ........545
If the electronic key does not operate properly ............. 547
If the vehicle battery is discharged ................................ 550
If your vehicle overheats.........553
If the vehicle becomes stuck .............................................556

508
GX460_OM_OM60T19U_(U)
7-1. Essential information
Emergency flashers
Press the switch.
All the turn signals will flash. To turn them off, press the switch onceagain.
■ Emergency flashersIf the emergency flashers are used for a long time while the engine is not operating, thebattery may discharge.
The emergency flashers are used to warn other drivers when the vehicle hasto be stopped in the road due to a breakdown, etc.

509
GX460_OM_OM60T19U_(U)
7
When trouble arises
7-1. Essential information
If your vehicle has to be stopped in an emergency
Steadily step on the brake pedal with both feet and firmly depress it.
Do not pump the brake pedal repeatedly as this will increase the effort required toslow the vehicle.Shift the shift lever to N.
If the shift lever is shifted to N
After slowing down, stop the vehicle in a safe place by the road.
Stop the engine.
If the shift lever cannot be shifted to N
Keep depressing the brake pedal with both feet to reduce vehicle speed asmuch as possible.
To stop the engine, press and holdthe engine switch for 2 consecutiveseconds or more, or press it briefly 3times or more in succession.
Stop the vehicle in a safe place by the road.
Only in an emergency, such as if it becomes impossible to stop the vehicle inthe normal way, stop the vehicle using the following procedure:
1
2
3
4
3
Press and hold for 2 seconds or more, or press briefly 3 times or more
4
WARNING
■ If the engine has to be turned off while drivingPower assist for the brakes and steering wheel will be lost, making the brake pedalharder to depress and the steering wheel heavier to turn. Decelerate as much as possi-ble before turning off the engine.
5

510
GX460_OM_OM60T19U_(U)
7-1. Essential information
If the vehicle is trapped in rising water
● Remove the seat belt first.● If the door can be opened, open the door and exit the vehicle.● If the door can not be opened, open the window using the power window
switch and exit the vehicle through the window.● If the window can not be opened using the power window switch, remain
calm, wait until the water level inside the vehicle rises to the point that thewater pressure inside of the vehicle equals the water pressure outside of thevehicle, and then open the door and exit the vehicle.
In the event the vehicle is submerged in water, remain calm and perform thefollowing.
WARNING
■ Using an emergency hammer* for emergency escapeThe rear side windows and rear window of this vehicle can be shattered by an emer-gency hammer* used for emergency escape, however, since the windshield and frontside windows are laminated glass they can not be shattered by an emergency ham-mer*.*: Contact your Lexus dealer or aftermarket accessory manufacturer for further infor-
mation about an emergency hammer.
■ Escaping the vehicle from the windowThere are cases where escaping the vehicle from the window is not possible due toseating position, passenger body type, etc.When using an emergency hammer, consider your seat location and the size of thewindow opening to ensure that the opening is accessible and large enough to escape.

511
GX460_OM_OM60T19U_(U)
7
When trouble arises
7-2. Steps to take in an emergency
If your vehicle needs to be towed
The following may indicate a problem with your transmission. Contact yourLexus dealer or commercial towing service before towing.● The engine is running but the vehicle does not move.● The vehicle makes an abnormal sound.
If towing is necessary, we recommend having your vehicle towed by yourLexus dealer or commercial towing service, using a wheel-lift type truck orflatbed truck.Use a safety chain system for all towing, and abide by all state/provincial andlocal laws.
If towing your vehicle with a wheel-lift type truck, use a towing dolly. (P. 512, 514)
Situations when it is necessary to contact dealers before towing

512 7-2. Steps to take in an emergency
GX460_OM_OM60T19U_(U)
When using a flatbed truck to transport the vehicle, use tire strapping belts. Referto the owner’s manual of the flatbed truck for the tire strapping method.
In order to suppress vehicle movement during transportation, set the parkingbrake and turn the engine switch off.
If a tow truck is not available in an emergency, your vehicle may be temporarilytowed using cables or chains secured to the emergency towing hooks. Thisshould only be attempted on hard surfaced roads for at most 50 miles (80 km)at under 18 mph (30 km/h).A driver must be in the vehicle to steer and operate the brakes. The vehicle’swheels, drive train, axles, steering and brakes must be in good condition.
Towing with a wheel-lift type truck
From the front From the rear
Use a towing dolly under the rearwheels.
Use a towing dolly under the frontwheels.
Using a flatbed truck
Emergency towing

5137-2. Steps to take in an emergency
GX460_OM_OM60T19U_(U)
7
When trouble arises
Securely attach cables or chains tothe towing hooks.
Take care not to damage the vehiclebody.
Enter the vehicle being towed and start the engine.If the engine does not start, turn the engine switch to IGNITION ON mode.
Set the four-wheel drive control switch in H4 and push the center differentiallock/unlock switch to unlock the center differential. (P. 344)
For models with the rear height control air suspension: Change the vehicleheight to N (normal) mode and end the vehicle height control operation. (P. 339)
Shift the shift lever to N and release the parking brake.When the shift lever cannot be shifted: P. 209
■ While towingIf the engine is not running, the power assist for the brakes and steering will not function,making steering and braking more difficult.
Emergency towing procedure
1
2
3
4
5

514 7-2. Steps to take in an emergency
GX460_OM_OM60T19U_(U)
WARNING
Observe the following precautions. Failure to do so may result in death or serious injury.■ When towing the vehicle
■ While towing● When towing using cables or chains, avoid sudden starts, etc. which place excessive
stress on the towing eyelets, cables or chains. The towing eyelets, cables or chainsmay become damaged, broken debris may hit people, and cause serious damage.
● For models with the rear height control air suspension: Make sure to disable all func-tions of the vehicle height control of the rear height control air suspension. Other-wise, the vehicle height may change and part of your body may be caught under thevehicle, possibly causing injury. (P. 339)
● Do not turn the engine switch off.There is a possibility that the steering wheel is locked and cannot be operated.
Be sure to transport the vehicle with all fourwheels raised off the ground. If the vehicle istowed with the tires contacting the ground, thedrivetrain or related parts may be damaged,the vehicle may fly off the truck.

5157-2. Steps to take in an emergency
GX460_OM_OM60T19U_(U)
7
When trouble arises
NOTICE
■ To avoid serious damage to your vehicle
■ Towing with a sling-type truck
■ To prevent damage to the vehicle when towing using a wheel-lift type truck● Do not tow the vehicle from the rear when the engine switch is off. The steering lock
mechanism is not strong enough to hold the front wheels straight.● When raising the vehicle, ensure adequate ground clearance for towing at the oppo-
site end of the raised vehicle. Without adequate clearance, the vehicle could be dam-aged while being towed.
■ To prevent damage to the vehicle when towing with a sling-type truckDo not tow with a sling-type truck, either from the front or rear.
■ To prevent damage to the vehicle during emergency towing Do not secure cables or chains to the suspension components.
■ Recreational towing (behind motor home, etc.)
Do not use the rear emergency towing hook.
Do not tow with a sling-type truck to preventbody damage.
Never dinghy tow your vehicle to prevent caus-ing serious damage to the Four-wheel drivesystem and transmission. (P. 199)

516
GX460_OM_OM60T19U_(U)
7-2. Steps to take in an emergency
If you think something is wrong
● Fluid leaks under the vehicle(Water dripping from the air conditioning after use is normal.)
● Flat-looking tires or uneven tire wear● Engine coolant temperature gauge needle continually points higher than nor-
mal
● Changes in exhaust sound● Excessive tire squeal when cornering● Strange noises related to the suspension system● Pinging or other noises related to the engine
● Engine missing, stumbling or running roughly● Appreciable loss of power● Vehicle pulls heavily to one side when braking● Vehicle pulls heavily to one side when driving on a level road● Loss of brake effectiveness, spongy feeling, pedal almost touches the floor
If you notice any of the following symptoms, your vehicle probably needsadjustment or repair. Contact your Lexus dealer as soon as possible.
Visible symptoms
Audible symptoms
Operational symptoms

517
GX460_OM_OM60T19U_(U)
7
When trouble arises
7-2. Steps to take in an emergency
Fuel pump shut off system
Follow the procedure below to restart the engine after the system is activated.
Turn the engine switch to ACCESSORY mode or turn it off.
Restart the engine.
To minimize the risk of fuel leakage when the engine stalls or when an airbaginflates upon collision, the fuel pump shut off system stops the supply of fuel tothe engine.
NOTICE
■ Before starting the engineInspect the ground under the vehicle.If you find that fuel has leaked onto the ground, the fuel system has been damaged andis in need of repair. Do not restart the engine.
1
2

518
GX460_OM_OM60T19U_(U)
7-2. Steps to take in an emergency
If a warning light turns on or a warning buzzer sounds
Calmly perform the following actions if any of the warning lights comes on orflashes. If a light comes on or flashes, but then goes off, this does not necessar-ily indicate a malfunction in the system. However, if this continues to occur,have the vehicle inspected by your Lexus dealer.
Warning light and warning buzzer list
Warning light Warning light/Details/Actions
(U.S.A.)
(Canada)
Brake system warning light (warning buzzer)Indicates that:• The brake fluid level is low; or• The brake system is malfunctioning.
Immediately stop the vehicle in a safe place and contact yourLexus dealer. Continuing to drive the vehicle may be dangerous.
Charging system warning lightIndicates a malfunction in the vehicle’s charging system
Immediately stop the vehicle in a safe place and contact yourLexus dealer.
Low engine oil pressure warning light*1
Indicates that the engine oil pressure is too low Immediately stop the vehicle in a safe place and contact your
Lexus dealer.
(U.S.A.)
(Canada)
Malfunction indicator lampIndicates a malfunction in:• The electronic engine control system;• The electronic throttle control system; or• The electronic automatic transmission control system
Have the vehicle inspected by your Lexus dealer immediately.
High coolant temperature warning light (warning buzzer)*1
Indicates that the engine coolant temperature is too high Immediately stop the vehicle in a safe place. Handling method
(P. 553)
SRS warning lightIndicates a malfunction in:• The SRS airbag system;• The front passenger occupant classification system; or• The seat belt pretensioner system
Have the vehicle inspected by your Lexus dealer immediately.

5197-2. Steps to take in an emergency
GX460_OM_OM60T19U_(U)
7
When trouble arises
(U.S.A.)
(Canada)
ABS warning lightIndicates a malfunction in:• The ABS; or• The brake assist system
Have the vehicle inspected by your Lexus dealer immediately.
(Flashes or illuminates)
PCS warning lightWhen a buzzer sounds simultaneously:Indicates a malfunction has occurred in the PCS (Pre-CollisionSystem).
Have the vehicle inspected by your Lexus dealer immediately.When a buzzer does not sound: The PCS (Pre-Collision System) has become temporarily unavail-able, corrective action may be necessary.
Follow the instructions displayed on the multi-information dis-play. (P. 238)
If the PCS (Pre-Collision System) or VSC (Vehicle Stability Con-trol) system is disabled, the PCS warning light will illuminate.
P. 249
Slip indicatorIndicates a malfunction in:• The Multi-terrain Select (if equipped);• The Crawl Control (if equipped);• The downhill assist control system (if equipped);• The VSC (Vehicle Stability Control) system;• The TRAC (Traction Control) system;• Active TRAC (Traction Control) system;• Trailer Sway Control; or• The hill-start assist control systemThe light will flash when any of the above systems other than theMulti-terrain Select are operating.
Have the vehicle inspected by your Lexus dealer immediately.
(Flashes)(U.S.A.)
(Flashes)(Canada)
Parking brake indicatorIndicates a malfunction in the parking brake system
Have the vehicle inspected by your Lexus dealer immediately.
Kinetic dynamic suspension system warning lightIndicates a malfunction in the kinetic dynamic suspension system.
Have the vehicle inspected by your Lexus dealer immediately.
Warning light Warning light/Details/Actions

520 7-2. Steps to take in an emergency
GX460_OM_OM60T19U_(U)
(Flashes)
Low speed four-wheel drive indicator lightIndicates a malfunction in the four-wheel drive system if the lightcontinues flashing. (P. 344)
Have the vehicle inspected by your Lexus dealer immediately.
(Flashes)
Center differential lock indicator lightIndicates a malfunction in the four-wheel drive system if the lightcontinues flashing. (P. 344)
Have the vehicle inspected by your Lexus dealer immediately.
Open door warning light (warning buzzer)*2
Indicates that a hood, door or the glass hatch is not fully closedCheck that all the doors and the glass hatch are closed.
Low fuel level warning lightIndicates that remaining fuel is approximately 3.5 gal. (13.1 L, 2.9Imp. gal.) or less
Refuel the vehicle.
Driver’s and front passenger’s seat belt reminder light (warningbuzzer)*3
Warns the driver and/or front passenger to fasten their seat belts Fasten the seat belt.
If the front passenger’s seat is occupied, the front passenger’sseat belt also needs to be fastened to make the warning light(warning buzzer) turn off.
Tire pressure warning lightIndicates that:• Flat tire• Natural causes• The tire pressure warning system is malfunctioning
Immediately stop the vehicle in a safe place. Handling method(P. 523)
Warning light Warning light/Details/Actions
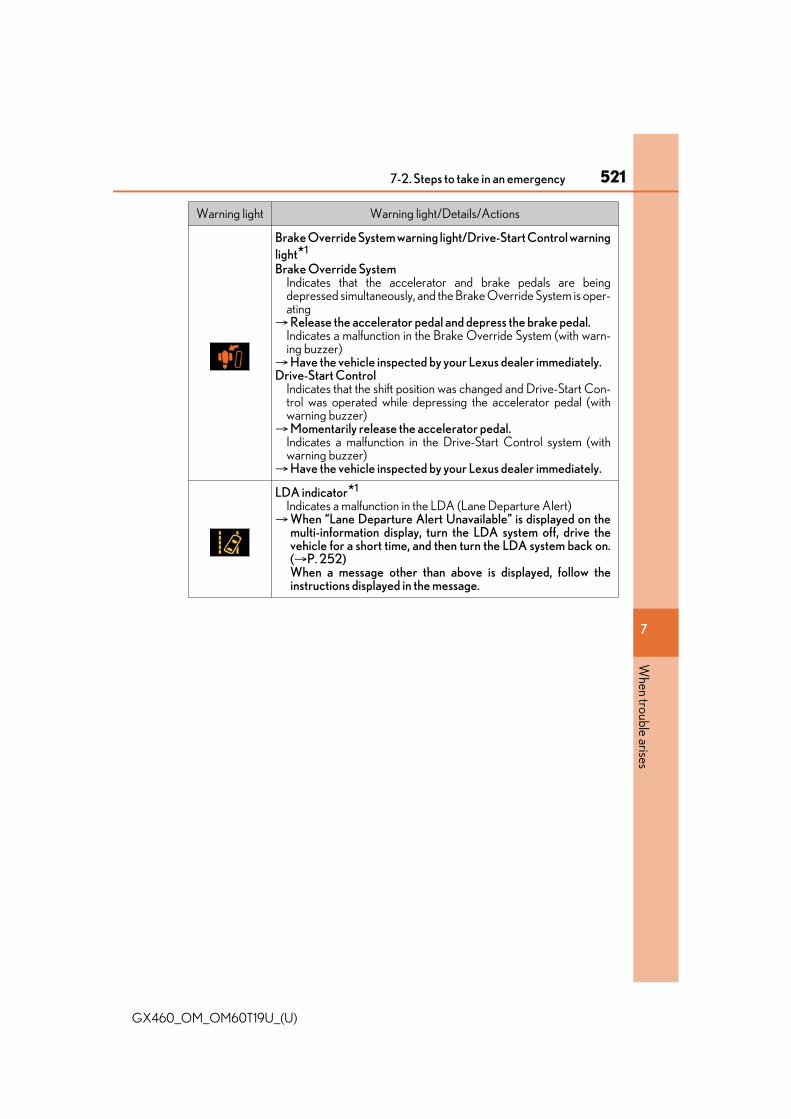
5217-2. Steps to take in an emergency
GX460_OM_OM60T19U_(U)
7
When trouble arises
Brake Override System warning light/Drive-Start Control warninglight*1
Brake Override SystemIndicates that the accelerator and brake pedals are beingdepressed simultaneously, and the Brake Override System is oper-ating
Release the accelerator pedal and depress the brake pedal.Indicates a malfunction in the Brake Override System (with warn-ing buzzer)
Have the vehicle inspected by your Lexus dealer immediately.Drive-Start Control
Indicates that the shift position was changed and Drive-Start Con-trol was operated while depressing the accelerator pedal (withwarning buzzer)
Momentarily release the accelerator pedal.Indicates a malfunction in the Drive-Start Control system (withwarning buzzer)
Have the vehicle inspected by your Lexus dealer immediately.
LDA indicator*1
Indicates a malfunction in the LDA (Lane Departure Alert)When “Lane Departure Alert Unavailable” is displayed on the
multi-information display, turn the LDA system off, drive thevehicle for a short time, and then turn the LDA system back on.(P. 252) When a message other than above is displayed, follow theinstructions displayed in the message.
Warning light Warning light/Details/Actions

522 7-2. Steps to take in an emergency
GX460_OM_OM60T19U_(U)
*1: This light illuminates on the multi-information display.
*2: Open door warning buzzer: The open door warning buzzer sounds to alert hood or one or more of the doors orglass hatch are not fully closed (with the vehicle having reached a speed of 3 mph [5km/h]).
*3: Driver’s seat belt warning buzzer:
The driver’s seat belt warning buzzer sounds to alert the driver that his or her seat beltis not fastened. Once the engine switch is turned to ON, the buzzer sounds. If the seatbelt is still unfastened, the buzzer sounds intermittently for a certain period of timeafter the vehicle reaches a certain speed.
Front passenger’s seat belt warning buzzer:
The front passenger’s seat belt warning buzzer sounds to alert the front passengerthat his or her seat belt is not fastened. If the seat belt is unfastened, the buzzer soundsintermittently for a certain period of time after the vehicle reaches a certain speed.
■ SRS warning lightThis warning light system monitors the airbag sensor assembly, front airbag sensors, sideand curtain shield airbag sensors, rear side and curtain shield airbag sensors, floor sen-sor, driver’s seat belt buckle switch, front passenger occupant classification system (ECUand sensors), “AIR BAG ON” indicator light, “AIR BAG OFF” indicator light, front pas-senger’s seat belt buckle switch, seat belt pretensioner assemblies, airbags, intercon-necting wiring and power sources. (P. 36)
■ Front passenger detection sensor, seat belt reminder and warning buzzer● If luggage is placed on the front passenger seat, the front passenger detection sensor
may cause the warning light to flash and the warning buzzer to sound even if a passen-ger is not sitting in the seat.
● If a cushion is placed on the seat, the sensor may not detect a passenger, and the warn-ing light may not operate properly.
■ If the malfunction indicator lamp comes on while drivingFirst check the following:● Is the fuel tank empty?
If it is, fill the fuel tank immediately.● Is the fuel tank cap loose?
If it is, tighten it securely.The light will go off after several driving trips. If the light does not go off even after several trips, contact your Lexus dealer as soon aspossible.

5237-2. Steps to take in an emergency
GX460_OM_OM60T19U_(U)
7
When trouble arises
■ If the low speed four-wheel drive indicator light or the center differential lock indicatorlight blinksTake the specified steps. (P. 346)
■ When the tire pressure warning light comes onInspect the tires to check if a tire is punctured.If a tire is punctured: P. 531If none of the tires are punctured:Turn the engine switch off then turn it to IGNITION ON mode. Check if the tire pressurewarning light comes on or flashes. If the tire pressure warning light comes on
After the temperature of the tires has lowered sufficiently, check the inflation pressureof each tire and adjust them to the specified level.If the warning light does not turn off even after several minutes have elapsed, checkthat the inflation pressure of each tire is at the specified level and perform initialization.(P. 474)
If the warning light does not turn off even after several minutes have elapsed, have thevehicle inspected by your Lexus dealer immediately. If the tire pressure warning light flashes for 1 minute then stay onThere may be a malfunction in the tire pressure warning system. Have the vehicleinspected by your Lexus dealer immediately.
■ The tire pressure warning light may turn on due to natural causesThe tire pressure warning light may turn on due to natural causes such as natural air leaksor tire inflation pressure changes caused by temperature. In this case, adjusting the tireinflation pressure will turn off the warning light (after a few minutes).
■ When a tire is replaced with a spare tireThe tire pressure warning light will turn on if the tire inflation pressure of the spare tire islow. If a tire goes flat, the tire pressure warning light will not turn off even though the flattire has been replaced with the spare tire.
■ Conditions that the tire pressure warning system may not function properlyP. 478
■ If the tire pressure warning light frequently comes on after blinking for 1 minuteIf the tire pressure warning light frequently comes on after blinking for 1 minute when theengine switch is turned to IGNITION ON mode, have it checked by your Lexus dealer.
■ Warning buzzerIn some cases, the buzzer may not be heard due to being in a noisy location or audiosound.
■ CustomizationThe vehicle speed linked seat belt reminder buzzer can be disabled.(Customizable features: P. 584)
1
2

524 7-2. Steps to take in an emergency
GX460_OM_OM60T19U_(U)
WARNING
■ If both the ABS and the brake system warning lights remain onStop your vehicle in a safe place immediately and contact your Lexus dealer. The vehi-cle will become extremely unstable during braking, and the ABS system may fail, whichcould cause an accident resulting in death or serious injury.
■ If the tire pressure warning light comes onBe sure to observe the following precautions. Failure to do so could cause loss of vehi-cle control and result in death or serious injury.● Stop your vehicle in a safe place as soon as possible. Adjust the tire inflation pressure
immediately. ● If the tire pressure warning light comes on even after tire inflation pressure adjust-
ment, it is probable that you have a flat tire. Check the tires. If the tire is flat, change tothe spare tire and have the flat tire repaired by the nearest Lexus dealer.
● Avoid abrupt maneuvering and braking. If the vehicle tires deteriorate, you could losecontrol of the steering wheel or the brakes.
■ If a blowout or sudden air leakage should occurThe tire pressure warning system may not activate immediately.

5257-2. Steps to take in an emergency
GX460_OM_OM60T19U_(U)
7
When trouble arises
WARNING
■ Maintenance of the tiresEach tire, including the spare (if provided), should be checked monthly when cold andinflated to the inflation pressure recommended by the vehicle manufacturer on thevehicle placard or tire inflation pressure label (tire and load information label). (If yourvehicle has tires of a different size than the size indicated on the vehicle placard or tireinflation pressure label [tire and load information label], you should determine theproper tire inflation pressure for those tires.)As an added safety feature, your vehicle has been equipped with a tire pressure moni-toring system (TPMS-tire pressure warning system) that illuminates a low tire pressuretelltale (tire pressure warning light) when one or more of your tires is significantlyunder-inflated. Accordingly, when the low tire pressure telltale (tire pressure warninglight) illuminates, you should stop and check your tires as soon as possible, and inflatethem to the proper pressure. Driving on a significantly under-inflated tire causes thetire to overheat and can lead to tire failure. Under-inflation also reduces fuel efficiencyand tire tread life, and may affect the vehicle’s handling and stopping ability.Please note that the TPMS (tire pressure warning system) is not a substitute for propertire maintenance, and it is the driver’s responsibility to maintain correct tire pressure,even if under-inflation has not reached the level to trigger illumination of the TPMS lowtire pressure telltale (tire pressure warning light).Your vehicle has also been equipped with a TPMS (tire pressure warning system) mal-function indicator to indicate when the system is not operating properly. The TPMS(tire pressure warning system) malfunction indicator is combined with the low tire pres-sure telltale (tire pressure warning light). When the system detects a malfunction, thetelltale will flash for approximately one minute and then remain continuously illumi-nated. This sequence will continue upon subsequent vehicle start-ups as long as themalfunction exists. When the malfunction indicator is illuminated, the system may notbe able to detect or signal low tire pressure as intended.TPMS (tire pressure warning system) malfunctions may occur for a variety of reasons,including the installation of replacement or alternate tires or wheels on the vehicle thatprevent the TPMS (tire pressure warning system) from functioning properly. Alwayscheck the TPMS (tire pressure warning system) malfunction telltale after replacing oneor more tires or wheels on your vehicle to ensure that the replacement or alternatetires and wheels allow the TPMS (tire pressure warning system) to continue to functionproperly.

526 7-2. Steps to take in an emergency
GX460_OM_OM60T19U_(U)
NOTICE
■ To ensure the tire pressure warning system operates properlyDo not install tires with different specifications or makers, as the tire pressure warningsystem may not operate properly.

527
GX460_OM_OM60T19U_(U)
7
When trouble arises
7-2. Steps to take in an emergency
If a warning message is displayed
Multi-information display
Handling method
Follow the instructions of the mes-sage on the multi-information dis-play.
If any of the warning lights comes on again after the following actions have beenperformed, contact your Lexus dealer.
The warning lights and warning buzzers operate as follows depending on thecontent of the message. If a message indicates the need for inspection by adealer, have the vehicle inspected by your Lexus dealer immediately.
*: A buzzer sounds the first time a message is shown on the multi-information display.
The multi-information display shows warnings of system malfunctions, incor-rectly performed operations, and messages that indicate a need for mainte-nance. When a message is shown, perform the correction procedureappropriate to the message.
1
2
Messages and warnings
Warning lightWarning buzzer* Warning
Sounds
• Indicates an important situation, such as when a sys-tem related to driving is malfunctioning or that dan-ger may result if the correction procedure is notperformed
• Indicates a situation, such as when damage to thevehicle or danger may result
Comes on or flashes Sounds
Indicates an important situation, such as when the sys-tems shown on the multi-information display may bemalfunctioning
Does not sound
• Indicates a condition, such as malfunction of electri-cal components, their condition, or indicates theneed for maintenance
• Indicates a situation, such as when an operation hasbeen performed incorrectly, or indicates how to per-form an operation correctly

528 7-2. Steps to take in an emergency
GX460_OM_OM60T19U_(U)
■ Warning messagesThe warning messages explained below may differ from the actual messages accordingto operation conditions and vehicle specifications.
■ Warning buzzerIn some cases, the buzzer may not be heard due to being in a noisy location or audiosound.
■ If “ENGINE OIL LOW”/“Engine Oil Level Low Add or Replace” is shownThe engine oil level is low. Check the level of the engine oil, and add if necessary.This message may appear if the vehicle is stopped on a slope. Move the vehicle to a levelsurface and check to see if the message disappears.
■ If “AUTO POWER OFF TO CONSERVE BATTERY”/“Auto power off to conserve bat-tery” is shownPower was turned off due to the automatic power off function. Next time when startingthe engine, increase the engine speed slightly and maintain that level for approximately 5minutes to recharge the battery.
■ If “ENGINE OIL PRESSURE LOW”/“Oil Pressure Low Stop in a Safe Place SeeOwner’s Manual” is shownIndicates abnormal engine oil pressure.Immediately stop the vehicle in a safe place and contact your Lexus dealer. Continuing todrive the vehicle may be dangerous.
■ If “HIGH TRANSMISSION FLUID TEMPERATURE”/“High Transmission Fluid TempSee Owner’s Manual” is shown.It indicates that the automatic transmission fluid temperature is too high.Immediately stop the vehicle in a safe place, shift the shift lever to P and wait until thewarning message disappear. If the warning message disappears, you may start the vehi-cle again. If the warning message does not disappear, contact your Lexus dealer.
■ If “Check Transmission System” is shown.The automatic transmission system is malfunctioning.Have the vehicle inspected by your Lexus dealer.
■ If “ACCELERATOR AND BRAKE PEDALS DEPRESSED SIMULTANEOUSLY”/“Accelerator and Brake Pedals Pressed Simultaneously” is shown on the multi-informa-tion displayThe accelerator and brake pedal are being depressed simultaneously. (P. 169)Release the accelerator pedal and depress the brake pedal.
■ If “HEADLIGHT SYSTEM MALFUNCTION VISIT YOUR DEALER”/“Headlight Sys-tem Malfunction Visit Your Dealer” is displayedThe following systems may be malfunctioning. Have the vehicle inspected by your Lexusdealer immediately.● The LED headlight system● The automatic headlight leveling system● Automatic High Beam

5297-2. Steps to take in an emergency
GX460_OM_OM60T19U_(U)
7
When trouble arises
■ If a message that indicates the malfunction of front camera is displayedThe following systems may be suspended until the problem shown in the message isresolved. (P. 238, 518)● PCS (Pre-Collision System)● LDA (Lane Departure Alert)● Automatic High Beam● Dynamic radar cruise control
■ If “Radar Cruise Control Unavailable” is shownThe dynamic radar cruise control system cannot be used temporarily.Use the system when it becomes available again.
■ If “Maintenance Required Soon” is shown (U.S.A. only)Indicates that all maintenance according to the driven distance on the maintenanceschedule* should be performed soon. Comes on approximately 4500 miles (7200 km)after the message has been reset. If necessary, perform maintenance. Please reset themessage after the maintenance is performed. (P. 449)*: Refer to the separate “Scheduled Maintenance” or “Owner’s Manual Supplement” for
the maintenance interval applicable to your vehicle.
■ If “Maintenance Required Visit Your Dealer” is shown (U.S.A. only)Indicates that all maintenance is required to correspond to the driven distance on themaintenance schedule*.Comes on approximately 5000 miles (8000 km) after the message has been reset.(The indicator will not work properly unless the message has been reset.) Perform thenecessary maintenance. Please reset the message after the maintenance is performed.(P. 449)*: Refer to the separate “Scheduled Maintenance” or “Owner’s Manual Supplement” for
the maintenance interval applicable to your vehicle.
■ If “Oil Maintenance Required Soon” is shownIndicates that the engine oil should be scheduled to be changed.Check the engine oil and change it if necessary. After changing the engine oil, make sureto reset the message. (P. 462)
■ If “OIL MAINTENANCE REQUIRED” “Oil Maintenance Required Visit Your Dealer”is shownIndicates that the engine oil should be scheduled to be changed.Check and change the engine oil, and oil filter by your Lexus dealer. After changing theengine oil, make sure to reset the message. (P. 462)
■ If “Check Access System with Elec. Key” is shownThe smart access system with push-button start may be malfunctioning. Have the vehicleinspected by your Lexus dealer immediately.

530 7-2. Steps to take in an emergency
GX460_OM_OM60T19U_(U)
■ If “SEE OWNER’S MANUAL”/“See Owner’s Manual” is shown● If any of the following messages are shown on the multi-information display, follow the
instructions.• “Engine Coolant Temp High” (P. 553)
● If any of the following messages are shown on the multi-information display, it may indi-cate a malfunction. Immediately stop the vehicle and contact your Lexus dealer.• “BRAKING POWER LOW”/“Braking Power Low”• “Charging System Malfunction”
■ If a following message is shown, take appropriate action and confirm that the messagehas disappeared. (P. 348) (if equipped)● “CRAWL NOT AVAILABLE SELECT L4 AND SHIFT TO D OR R POSITION”/
“Crawl Not Available Select L4 and Shift to D or R Position”● “CRAWL NOT AVAILABLE CHECK SYSTEM OPERATION CONDITIONS”/
“Crawl Not Available Check System Operation Conditions”■ If “VISIT YOUR DEALER”/“Visit Your Dealer” or “CHECKED BY A DEALER”/
“checked by a dealer” is shownThe system or part shown on the multi-information display is malfunctioning. Have thevehicle inspected by your Lexus dealer immediately.

531
GX460_OM_OM60T19U_(U)
7
When trouble arises
7-2. Steps to take in an emergency
If you have a flat tire
● Stop the vehicle in a safe place on a hard, flat surface.● Set the parking brake.● Shift the shift lever to P.● Turn off the rear height control air suspension (if equipped). (P. 339)● Stop the engine.● Turn on the emergency flashers. (P. 508)
Your vehicle is equipped with a spare tire. The flat tire can be replaced withthe spare tire.For details about tires: P. 472
WARNING
■ If you have a flat tireDo not continue driving with a flat tire.Driving even a short distance with a flat tire can damage the tire and the wheel beyondrepair, which could result in an accident.
Before jacking up the vehicle

532 7-2. Steps to take in an emergency
GX460_OM_OM60T19U_(U)
Jack
Tool box
Spare tire
Location of the spare tire, jack and tools
1
2
3

5337-2. Steps to take in an emergency
GX460_OM_OM60T19U_(U)
7
When trouble arises
WARNING
■ Using the tire jackImproper use of the tire jack may cause the vehicle to suddenly fall off the jack, leadingto death or serious injury.● Do not use the tire jack for any purpose other than replacing tires or installing and
removing tire chains.● Only use the tire jack that comes with this vehicle for replacing a flat tire.
Do not use it on other vehicles, and do not use other tire jacks for replacing tires onthis vehicle.
● Always check that the tire jack is securely set to the jack point.● Do not put any part of your body under the vehicle while it is supported by the jack.● Do not start or run the engine while your vehicle is supported by the jack.● Do not raise the vehicle while someone is inside.● When raising the vehicle, do not put an object on or under the jack.● Do not raise the vehicle to a height greater than that required to replace the tire.● Use a jack stand if it is necessary to get under the vehicle.● Vehicles with rear height control air suspension: Be sure to turn off the height control
and stop the engine.Take particular care when lowering the vehicle to ensure that no one working on ornear the vehicle will be injured.
■ Using the jack handleTighten all the jack handle bolts securely using a Phillips-head screwdriver, to preventthe extension parts from coming apart unexpectedly.

534 7-2. Steps to take in an emergency
GX460_OM_OM60T19U_(U)
Remove the cover.
Unhook the rubber band and takeout the jack.
For loosening
For tightening
Remove the cover.
Take out the tool box.
Taking out the jack
1
2
1
2
Taking out the tool box
1
2

5357-2. Steps to take in an emergency
GX460_OM_OM60T19U_(U)
7
When trouble arises
Assembling the jack handle.Remove the jack handle and the jack handle extension bar from the tool boxand assemble by following these steps.
Loosen the bolt and the screwusing either the jack handle endor a screwdriver.
Assemble the jack handle exten-sion bar and the jack handle andtighten the bolt and the screw.
Check that the bolt and screw arefirmly tightened.
Remove the cover.
To protect the bodywork, place a ragbetween the screwdriver and the vehi-cle body.
Taking out the spare tire
1
1
2
2

536 7-2. Steps to take in an emergency
GX460_OM_OM60T19U_(U)
Insert the jack handle extension intothe lowering socket.
Lower
Raise
Place a rag under the jack handleextension to protect the rear bumper.
Lower the spare tire completely tothe ground.
If the spare tire becomes caught on the suspension components, raise the tire,pull it towards the rear of the vehicle, and begin lowering it again.
Pull out the spare tire and removethe holding bracket.
3
1
2
4
5

5377-2. Steps to take in an emergency
GX460_OM_OM60T19U_(U)
7
When trouble arises
Chock the tires.
Pry off the wheel ornament, usingthe beveled end of the wheel nutwrench as shown.
To protect the wheel ornament, place arag between the wheel nut wrench andthe wheel ornament.
Slightly loosen the wheel nuts (oneturn).
Replacing a flat tire
1
Flat tire Wheel chock position
FrontLeft-hand side Behind the rear right-hand side tire
Right-hand side Behind the rear left-hand side tire
RearLeft-hand side In front of the front right-hand side tire
Right-hand side In front of the front left-hand side tire
2
3

538 7-2. Steps to take in an emergency
GX460_OM_OM60T19U_(U)
Assembling the jack handle.Remove the jack handle, jack handle extension bar and jack handle bar fromthe tool box and assemble by following these steps.
Loosen the bolt and the screwusing either the jack handle endor a screwdriver.
Assemble the jack handle exten-sion bar and the jack handle barand tighten the bolts.
Check that the bolts are firmly tight-ened.
Assemble the jack handle exten-sion bar and the jack handle andtighten the screw.
Check that the screw is firmly tight-ened.
4
1
2
3

5397-2. Steps to take in an emergency
GX460_OM_OM60T19U_(U)
7
When trouble arises
Position the jack at the jack points asshown.
Front
Under the chassis frame side railRear
Under the rear axle housing
Raise the vehicle until the tire isslightly raised off the ground.
Remove all the wheel nuts and thetire.
When resting the tire on the ground,place the tire so that the wheel designfaces up to avoid scratching the wheelsurface.
5
1
2
6
7

540 7-2. Steps to take in an emergency
GX460_OM_OM60T19U_(U)
WARNING
■ Replacing a flat tire● Observe the following precautions.
Failure to do so may result in serious injury:• Lower the spare tire completely to the ground before removing it from under the
vehicle.• Do not try to remove the wheel ornament by hand. Take due care in handling the
ornament to avoid unexpected personal injury. • Do not touch the disc wheels or the area around the brakes immediately after the
vehicle has been driven.After the vehicle has been driven the disc wheels and the area around the brakeswill be extremely hot. Touching these areas with hands, feet or other body partswhile changing a tire, etc. may result in burns.
● Failure to follow these precautions could cause the nuts to loosen and the wheel mayfall off, which could lead to an accident causing death or serious injury.• Never use oil or grease on the wheel bolts or wheel nuts.
Oil and grease may cause the wheel nuts to be excessively tightened, leading tobolt or disc wheel damage. In addition, the oil or grease can cause the wheel nutsto loosen and the wheel may fall off, causing a serious accident. Remove any oil orgrease from the wheel bolts or wheel nuts.
• Have the wheel nuts tightened with a torque wrench to 76 ft•lbf (103 N•m,10.5 kgf•m) as soon as possible after changing wheels.
• Do not attach a heavily damaged wheel ornament, as it may fly off the wheel whilethe vehicle is moving.
• When installing a tire, only use wheel nuts that have been specifically designed forthat wheel.
• If there are any cracks or deformations in the bolt screws, nut threads or bolt holesof the wheel, have the vehicle inspected by your Lexus dealer.

5417-2. Steps to take in an emergency
GX460_OM_OM60T19U_(U)
7
When trouble arises
Remove any dirt or foreign matterfrom the wheel contact surface.
If foreign matter is on the wheel contactsurface, the wheel nuts may loosenwhile the vehicle is in motion, and thetire may come off the vehicle.
Install the spare tire and looselytighten each nut by hand to approxi-mately the same amount.
Turn the lug nuts until the washers comeinto contact with the disc wheel.
Lower the vehicle.
Installing the spare tire
1
Wheel nut
Washer
Disc wheel
2
3

542 7-2. Steps to take in an emergency
GX460_OM_OM60T19U_(U)
Firmly tighten each nut two or threetimes in the order shown in the illus-tration.
Tightening torque:76 ft•lbf (103 N•m, 10.5 kgf•m)
Reinstall the wheel ornament.
4
5
WARNING
■ Stowing the flat tireFailure to follow steps listed under stowing the tire may result in damage to the sparetire carrier and loss of the tire, which could result in death or serious injury.

5437-2. Steps to take in an emergency
GX460_OM_OM60T19U_(U)
7
When trouble arises
Lay down the tire with the valve stemfacing up and install the holdingbracket, inserting the claw into thewheel lug nut hole. Turn the jackhandle extension clockwise to takeup slack in the chain.
Then, check to ensure the claw is in thewheel lug nut hole and the holdingbracket is centered in the wheel hub.
Claw
Holding bracket
Raise the tire.
While raising, pull the tire towards therear of the vehicle, taking care that thetire goes up without catching on anysurrounding part, to prevent it from fly-ing forward during a collision or suddenbraking.After the tire goes half way up, checkthat the suspended chain is able to enterthe tire hole, for proper storage.Tightening torque:
34.4 ft•lbf (46.6 N•m, 4.8 kgf•m)
Confirm that the tire is not looseafter tightening:
Push and pull the tire
Try rotating
Visually check to ensure the tire isnot hung on surrounding parts.
If looseness or misassembly exists, repeat step and step .Repeat step , any time the tire is lowered or disturbed.
Stow the tools and jack securely.
Stowing the flat tire, jack and all tools
incorrect
correct
1
1
2
2
3
1
2
2 3
4 3
5

544 7-2. Steps to take in an emergency
GX460_OM_OM60T19U_(U)
WARNING
■ After using the tools and jackBefore driving, make sure all the tools and jack are securely in place in their storagelocation to reduce the possibility of personal injury during a collision or sudden brak-ing.
NOTICE
■ When stowing the flat tireEnsure that there is no object caught between the tire and the vehicle underbody.

545
GX460_OM_OM60T19U_(U)
7
When trouble arises
7-2. Steps to take in an emergency
If the engine will not start
One of the following may be the cause of the problem:● There may not be sufficient fuel in the vehicle’s tank.
Refuel the vehicle.● The engine may be flooded.
Try to restart the engine again following correct starting procedures. (P. 200)
● There may be a malfunction in the engine immobilizer system. (P. 77)
One of the following may be the cause of the problem:● The battery may be discharged. (P. 550)● The battery terminal connections may be loose or corroded.
The engine starting system may be malfunctioning due to an electrical problemsuch as an open circuit or a blown fuse. However, an interim measure is availableto start the engine. (P. 546)
If the engine will not start even though correct starting procedures are beingfollowed (P. 200), consider each of the following points:
The engine will not start even when the starter motor operates nor-mally.
The starter motor turns over slowly, the interior lights and headlightsare dim, or the horn does not sound or sounds at a low volume.
The starter motor does not turn over.

546 7-2. Steps to take in an emergency
GX460_OM_OM60T19U_(U)
One of the following may be the cause of the problem:● One or both of the battery terminals may be disconnected.● The battery may be discharged. (P. 550)● There may be a malfunction in the steering lock system.
Contact your Lexus dealer if the problem cannot be repaired, or if repair proceduresare unknown.
When the engine does not start, the following steps can be used as an interimmeasure to start the engine if the engine switch is functioning normally.
Set the parking brake.
Shift the shift lever to P.
Turn the engine switch to the ACCESSORY mode.
Press and hold the engine switch for about 15 seconds while depressing thebrake pedal firmly.
Even if the engine can be started using the above steps, the system may be mal-functioning. Have the vehicle inspected by your Lexus dealer.
The starter motor does not turn over, the interior lights and headlightsdo not turn on, or the horn does not sound.
Emergency start function
1
2
3
4

547
GX460_OM_OM60T19U_(U)
7
When trouble arises
7-2. Steps to take in an emergency
If the electronic key does not operate properly
Use the mechanical key (P. 105) inorder to perform the following opera-tions (driver’s door only):
Locks all the doors
Closes the windows and moon roof*(turn and hold)
Unlocks the doors
Turning the key rearward unlocks thedriver’s door. Turning the key once againunlocks the other doors.Opens the windows and moon roof* (turn and hold)
*: These settings must be customized at your Lexus dealer.
If communication between the electronic key and vehicle is interrupted(P. 127) or the electronic key cannot be used because the battery isdepleted, the smart access system with push-button start and wirelessremote control cannot be used. In such cases, the doors can be opened andthe engine can be started by following the procedure below.
Locking and unlocking the doors and key linked functions
1
2
3
4

548 7-2. Steps to take in an emergency
GX460_OM_OM60T19U_(U)
Ensure that the shift lever is in P and depress the brake pedal.
Touch the Lexus emblem side of theelectronic key to the engine switch.
When the electronic key is detected, abuzzer sounds and the engine switchwill turn to IGNITION ON mode.When the smart access system withpush-button start is deactivated in cus-tomization setting, the engine switch willturn to ACCESSORY mode.
Firmly depress the brake pedal and check that is shown on the multi-
information display.
Press the engine switch shortly and firmly.
In the event that the engine still cannot be started, contact your Lexus dealer.
■ Stopping the engineShift the shift lever to P and press the engine switch as you normally do when stoppingthe engine.
■ Replacing the key batteryAs the above procedure is a temporary measure, it is recommended that the electronickey battery be replaced immediately when the battery is depleted. (P. 492)
■ Changing engine switch modesWithin 10 seconds of the buzzer sounding, release the brake pedal and press the engineswitch.The engine does not start and modes will be changed each time the switch is pressed.(P. 201)
■ When the electronic key does not work properly● Make sure that the smart access system with push-button start has not been deacti-
vated in the customization setting. If it is off, turn the function on.(Customizable features: P. 584)
● Check if battery-saving mode is set. If it is set, cancel the function. (P. 127)
Starting the engine
1
2
3
4

5497-2. Steps to take in an emergency
GX460_OM_OM60T19U_(U)
7
When trouble arises
WARNING
■ When using the mechanical key and operating the power windows or moon roofOperate the power window or moon roof after checking to make sure that there is nopossibility of any passenger having any of their body parts caught in the window ormoon roof.Also, do not allow children to operate the mechanical key. It is possible for children andother passengers to get caught in the power window or moon roof.

550
GX460_OM_OM60T19U_(U)
7-2. Steps to take in an emergency
If the vehicle battery is discharged
If you have a set of jumper (or booster) cables and a second vehicle with a 12-voltbattery, you can jump start your Lexus by following the steps below.
Confirm that the electronic key isbeing carried.
When connecting the jumper (orbooster) cables, depending on the situa-tion, the alarm may activate and thedoors locked. (P. 80)
Open the hood. (P. 458)
Connecting the jumper cables according to the following procedure:
Positive (+) battery terminal on your vehicle.
Positive (+) battery terminal on the second vehicle.
Negative (-) battery terminal on the second vehicle.
Connect the jumper cable to ground on your vehicle as shown in the illus-tration.
The following procedures may be used to start the engine if the vehicle’s bat-tery is discharged.You can call your Lexus dealer, or qualified repair shop.
1
2
3
1
2
3
4

5517-2. Steps to take in an emergency
GX460_OM_OM60T19U_(U)
7
When trouble arises
Start the engine of the second vehicle. Increase the engine speed slightly andmaintain at that level for approximately 5 minutes to recharge the battery ofyour vehicle.
Open and close any of the doors of your vehicle with the engine switch off.
Maintain the engine speed of the second vehicle and start the engine of yourvehicle by turning the engine switch to IGNITION ON mode.
Once your vehicle’s engine has started, remove the jumper cables in the exactreverse order in which they were connected.
Once the engine starts, have the vehicle checked at your Lexus dealer as soonas possible.
■ Starting the engine when the battery is dischargedThe engine cannot be started by push-starting.
■ To prevent battery discharge● Turn off the headlights and the audio system while the engine is off.● Turn off any unnecessary electrical components when the vehicle is running at a low
speed for an extended period, such as in heavy traffic.■ Charging the battery
The electricity stored in the battery will discharge gradually even when the vehicle is notin use, due to natural discharge and the draining effects of certain electrical appliances. Ifthe vehicle is left for a long time, the battery may discharge, and the engine may beunable to start. (The battery recharges automatically during driving.)
■ When recharging or replacing the battery● In some cases, it may not be possible to unlock the doors using the smart access system
with push-button start when the battery is discharged. Use the wireless remote controlor the mechanical key to lock or unlock the doors.
● The engine may not start on the first attempt after the battery has recharged but willstart normally after the second attempt. This is not a malfunction.
● The engine switch mode is memorized by the vehicle. When the battery is recon-nected, the system will return to the mode it was in before the battery was discharged.Before disconnecting the battery, turn the engine switch off. If you are unsure whatmode the engine switch was in before the battery discharged, be especially carefulwhen reconnecting the battery.
4
5
6
7

552 7-2. Steps to take in an emergency
GX460_OM_OM60T19U_(U)
WARNING
■ Avoiding battery fires or explosionsObserve the following precautions to prevent accidentally igniting the flammable gasthat may be emitted from the battery:● Make sure the jumper cable is connected to the correct terminal and that it is not
unintentionally in contact with any other than the intended terminal.● Do not allow the + and - clamps of the jumper cables to come into contact with each
other.● Do not smoke, use matches, cigarette lighters or allow open flame near the battery.
■ Battery precautionsThe battery contains poisonous and corrosive acidic electrolyte, while related partscontain lead and lead compounds. Observe the following precautions when handlingthe battery:● When working with the battery, always wear safety glasses and take care not to allow
any battery fluids (acid) to come into contact with skin, clothing or the vehicle body.● Do not lean over the battery.● In the event that battery fluid comes into contact with the skin or eyes, immediately
wash the affected area with water and seek medical attention.Place a wet sponge or cloth over the affected area until medical attention can bereceived.
● Always wash your hands after handling the battery support, terminals, and other bat-tery-related parts.
● Do not allow children near the battery.
NOTICE
■ When handling jumper cablesWhen connecting the jumper cables, ensure that they do not become entangled in thecooling fans or belt.

553
GX460_OM_OM60T19U_(U)
7
When trouble arises
7-2. Steps to take in an emergency
If your vehicle overheats
Stop the vehicle in a safe place and turn off the air conditioning system, andthen stop the engine.
If you see steam: Carefully lift the hood after the steam subsides.
If you do not see steam:Carefully lift the hood.
After the engine has cooled down sufficiently, inspect the hoses and radiatorcore (radiator) for any leaks.
Radiator
Cooling fans
If a large amount of coolant leaks,immediately contact your Lexusdealer.
The following may indicate that your vehicle is overheating.● The needle of the engine coolant temperature gauge (P. 90) enters the
red zone or a loss of engine power is experienced. (For example, the vehiclespeed does not increase.)
● Steam is coming from under the hood.
Correction procedures
1
2
3
1
2

554 7-2. Steps to take in an emergency
GX460_OM_OM60T19U_(U)
The coolant level is satisfactory if it is between the “F” and “L” lines on the res-ervoir.
Reservoir
“F”
“L”
Radiator cap
Add coolant if necessary.
Water can be used in an emergency ifcoolant is unavailable.
Start the engine and turn the air conditioning system on to check that the radi-ator cooling fans operate and to check for coolant leaks from the radiator orhoses.
The fans operate when the air conditioning system is turned on immediately after acold start. Confirm that the fans are operating by checking the fan sound and air flow.If it is difficult to check these, turn the air conditioning system on and off repeatedly. (The fans may not operate in freezing temperatures.)If the fans are not operating: Stop the engine immediately and contact your Lexus dealer.
If the fans are operating: Have the vehicle inspected at the nearest Lexus dealer.
4
1
2
3
4
5
6
7

5557-2. Steps to take in an emergency
GX460_OM_OM60T19U_(U)
7
When trouble arises
WARNING
■ When inspecting under the hood of your vehicleObserve the following precautions. Failure to do so may result in serious injury such as burns.● If steam is seen coming from under the hood, do not open the hood until the steam
has subsided. The engine compartment may be very hot.● Keep hands and clothing (especially a tie, a scarf or a muffler) away from the fans and
belts. Failure to do so may cause the hands or clothing to be caught, resulting in seri-ous injury.
● Do not loosen the radiator cap or the coolant reservoir cap while the engine and radi-ator are hot. High temperature steam or coolant could spray out.
NOTICE
■ When adding engine coolantAdd coolant slowly after the engine has cooled down sufficiently. Adding cool coolantto a hot engine too quickly can cause damage to the engine.
■ To prevent damage to the cooling systemObserve the following precautions:● Avoid contaminating the coolant with foreign matter (such as sand or dust etc.).● Do not use any coolant additive.

556
GX460_OM_OM60T19U_(U)
7-2. Steps to take in an emergency
If the vehicle becomes stuck
Stop the engine. Set the parking brake and shift the shift lever to P.
Remove the mud, snow or sand from around the stuck tire.
Place wood, stones or some other material under the tires to help providetraction.
Restart the engine.
Lock the center differential. (P. 345)
Shift the shift lever to the D or R position and release the parking brake. Then,while exercising caution, depress the accelerator pedal.
■ When it is difficult to free the vehicleTurn off TRAC/Active TRAC/VSC/Trailer Sway Control if these functions are hamper-ing your attempts to free the vehicle. (P. 357)
Carry out the following procedures if the tires spin or the vehicle becomesstuck in mud, dirt, or snow:
Press to turn off TRAC/Active TRAC/VSC/Trailer Sway Control.
1
2
3
4
5
6

5577-2. Steps to take in an emergency
GX460_OM_OM60T19U_(U)
7
When trouble arises
WARNING
■ When attempting to free a stuck vehicleIf you choose to push the vehicle back and forth to free it, make sure the surroundingarea is clear, to avoid striking other vehicles, objects or people. The vehicle may alsolunge forward or lunge back suddenly as it becomes free. Use extreme caution.
■ When shifting the shift leverBe careful not to shift the shift lever with the accelerator pedal depressed.This may lead to unexpected rapid acceleration of the vehicle that may cause an acci-dent and result in death or serious injury.
NOTICE
■ To avoid damaging the transmission and other components● Avoid spinning the wheels and depressing the accelerator pedal more than neces-
sary.● If the vehicle remains stuck even after these procedures are performed, the vehicle
may require towing to be freed.● When a warning message for the automatic transmission fluid temperature is dis-
played while attempting to free a stuck vehicle, immediately remove your foot fromthe accelerator pedal and wait until the warning message disappears. Otherwise, thetransmission may become damaged. (P. 528)

558 7-2. Steps to take in an emergency
GX460_OM_OM60T19U_(U)

559
GX460_OM_OM60T19U_(U)
8Vehicle specifications
8-1. Specifications
Maintenance data (fuel, oil level, etc.) ..................560
Fuel information..........................570
Tire information .......................... 573
8-2. Customization
Customizable features ............584
8-3. Items to initialize
Items to initialize.........................593

560
GX460_OM_OM60T19U_(U)
8-1. Specifications
Maintenance data (fuel, oil level, etc.)
*1: Unladen vehicles
*2: Vehicles without shark fin antenna and roof rails
*3: Vehicles without shark fin antenna and with roof rails
*4: Vehicles with shark fin antenna
*5: Vehicles without rear height control air suspension
*6: Vehicles with rear height control air suspension
Dimensions and weights
Overall length 189.2 in. (4880 mm)
Overall width 74.2 in. (1885 mm)
Overall height*1
71.7 in. (1820 mm)*2, 6
72.0 in. (1830 mm)*2, 5
72.2 in. (1835 mm)*3, 6
72.6 in. (1845 mm)*3, 5
73.8 in. (1875 mm)*4, 6
74.2 in. (1885 mm)*4, 5
Wheelbase 109.8 in. (2790 mm)
Front and rear tread 62.4 in. (1585 mm)
Vehicle capacity weight (Occupants + luggage)
1280 lb. (580 kg)*6
1315 lb. (595 kg)*5
TWR (trailer weight + cargo weight) (With towing hitch)
With brake 6500 lb. (2950 kg)
Without brake 1000 lb. (453 kg)
Seating capacity
Seating capacity7-passenger models 6-passenger models
7 (Front 2, Rear 5) 6 (Front 2, Rear 4)

GX460_OM_OM60T19U_(U)
5618-1. Specifications
8
Vehicle specifications
■ Vehicle identification number
The vehicle identification number (VIN) is the legal identifier for your vehicle.This is the primary identification number for your Lexus. It is used in register-ing the ownership of your vehicle.
This number is stamped on the frontright frame.
This number is also stamped on thetop left of the instrument panel.
This number is also on the Certifica-tion label on the left-hand side cen-ter pillar.
Vehicle identification

562
GX460_OM_OM60T19U_(U)
8-1. Specifications
■ Engine number
The engine number is stamped onthe engine block as shown.
*: The engine oil capacity is a reference quantity to be used when changing the engineoil. Warm up and turn off the engine, wait more than 5 minutes, and check the oil levelon the dipstick.
Engine
Model 4.6 L 8-cylinder (1UR-FE)
Type 8-cylinder V type, 4-cycle, gasoline
Bore and stroke 3.70 3.27 in. (94.0 83.0 mm)
Displacement 281.2 cu.in. (4608 cm3)
Valve clearance Automatic adjustment
Drive belt tension Automatic adjustment
Fuel
Fuel type Unleaded gasoline only
Octane rating 91 (Research Octane Number 96) or higher
Fuel tank capacity (Reference) 23.0 gal. (87 L, 19.1 Imp.gal.)
Lubrication system
Oil capacity(Drain and refill — reference*)
With filterWithout filter
8.2 qt. (7.8 L, 6.9 Imp.qt.)7.8 qt. (7.4 L, 6.5 Imp.qt.)

GX460_OM_OM60T19U_(U)
5638-1. Specifications
8
Vehicle specifications
■ Engine oil selection
“Toyota Genuine Motor Oil” is used in your Lexus vehicle. Use Lexusapproved “Toyota Genuine Motor Oil” or equivalent to satisfy the followinggrade and viscosity.
Oil grade: ILSAC GF-5 multigrade engine oil
Recommended viscosity: SAE 0W-20
SAE 0W-20 is the best choice forgood fuel economy and good start-ing in cold weather.
If SAE 0W-20 is not available, SAE5W-20 oil may be used. However, itmust be replaced with SAE 0W-20at the next oil change.
Oil viscosity (0W-20 is explained here as an example):• The 0W in 0W-20 indicates the characteristic of the oil which allows cold
startability. Oils with a lower value before the W allow for easier starting ofthe engine in cold weather.
• The 20 in 0W-20 indicates the viscosity characteristic of the oil when theoil is at high temperature. An oil with a higher viscosity (one with a highervalue) may be better suited if the vehicle is operated at high speeds, orunder extreme load conditions.
How to read oil container label:
The International Lubricant Specifi-cation Advisory Committee (ILSAC)Certification Mark is added to someoil containers to help you select theoil you should use.
Outside temperature

564
GX460_OM_OM60T19U_(U)
8-1. Specifications
Cooling system
Capacity (reference)
With rear heater 16.3 qt. (15.4 L, 13.6 Imp.qt.)
Without rear heater 14.5 qt. (13.7 L, 12.1 Imp.qt.)
Coolant type Use either of the following:• “Toyota Super Long Life Coolant” • A similar high-quality ethylene glycol-based
non-silicate, non-amine, non-nitrite, andnon-borate coolant with long-life hybridorganic acid technology
Do not use plain water alone.
Ignition system (spark plug)
Make DENSO SK20HR11
Gap 0.043 in. (1.1 mm)
NOTICE
■ Iridium-tipped spark plugsUse only iridium-tipped spark plugs. Do not adjust the spark plug gap.

GX460_OM_OM60T19U_(U)
5658-1. Specifications
8
Vehicle specifications
*: Your Lexus vehicle is filled with “Toyota Genuine Differential Gear Oil” at the factory.Use Lexus approved “Toyota Genuine Differential Gear Oil” or an equivalent ofmatching quality to satisfy the above specification. Please contact your Lexus dealerfor further details.
*: Your Lexus vehicle is filled with “Toyota Genuine Differential Gear Oil” at the factory.Use Lexus approved “Toyota Genuine Differential Gear Oil” or an equivalent ofmatching quality to satisfy the above specification. Please contact your Lexus dealerfor further details.
Electrical system (battery)
Specific gravity reading at 68F (20C):
12.3 V or higher
In the case the voltage is less than standard,charge battery.(Voltage is checked 20 minutes after the engine)
Charging rates 5 A max.
Front differential
Oil capacity 1.48 qt. (1.40 L, 1.23 Imp.qt.)
Oil type and viscosity* Toyota Genuine Differential Gear Oil LT 75W-85GL-5 or equivalent
Rear differential
Oil capacity 2.85 qt. (2.70 L, 2.38 Imp.qt.)
Oil type and viscosity* Toyota Genuine Differential Gear Oil LT 75W-85GL-5 or equivalent

566
GX460_OM_OM60T19U_(U)
8-1. Specifications
*: The fluid capacity is a reference quantity. If replacement is necessary, contact yourLexus dealer.
*: Your Lexus vehicle is filled with “Toyota Genuine Transfer Gear oil LF” at the factory.Use Lexus approved “Toyota Genuine Transfer Gear oil LF” or an equivalent ofmatching quality to satisfy the above specification. Please contact your Lexus dealerfor further details.
Automatic transmission
Fluid capacity*
With air-cooled typeATF cooler 11.8 qt. (11.2 L, 9.9 Imp.qt.)
Without air-cooledtype ATF cooler 11.6qt. (11.0 L, 9.7 Imp.qt.)
Fluid type Toyota Genuine ATF WS
NOTICE
■ Transmission fluid typeUsing transmission fluid other than the above type may cause abnormal noise or vibra-tion, or damage the transmission of your vehicle.
Transfer
Oil capacity 1.5 qt. (1.4 L, 1.2 Imp.qt.)
Oil type* Toyota Genuine Transfer Gear oil LF or equivalent
Recommended oil viscosity SAE 75W

GX460_OM_OM60T19U_(U)
5678-1. Specifications
8
Vehicle specifications
*1: Minimum pedal clearance when depressed with a force of 110 lbf (490 N, 50 kgf)while the engine is running
*2: Parking brake pedal travel when pulled up with a force of 44.1 lbf (196 N, 20.0 kgf)
Brakes
Pedal clearance*1 3.5 in. (90 mm) Min.
Pedal free play 0.04 0.24 in. (1 6 mm)
Brake pad wear limit 0.04 in. (1.0 mm)
Parking brake lining wear limit 0.04 in. (1.0 mm)
Parking brake pedaltravel*2 5 7 clicks
Fluid type SAE J1703 or FMVSS No. 116 DOT 3SAE J1704 or FMVSS No. 116 DOT 4
Chassis lubrication (Propeller shafts)
Spider Lithium base chassis grease, NLGI No.2
Slide yoke Molybdenum-disulfide lithium base chassis grease,NLGI No.2 or lithium base chassis grease, NLGI No.2

568
GX460_OM_OM60T19U_(U)
8-1. Specifications
18-inch tires
19-inch tires
Steering
Free play Less than 1.2 in. (30 mm)
Power steering fluid type Automatic transmission fluid DEXRON® II or III
Tires and wheels
Tire size P265/60R18 109H
Tire inflation pressure (Recommended cold tire inflation pressure)
Front tire32 psi (220 kPa, 2.2 kgf/cm2 or bar)
Rear tire32 psi (220 kPa, 2.2 kgf/cm2 or bar)
Spare tire32 psi (220 kPa, 2.2 kgf/cm2 or bar)
Wheel size 18 7 1/2J
Wheel nut torque 76 ft•lbf (103 N•m, 10.5 kgf•m)
Tire size 265/55R19 109V
Tire inflation pressure (Recommended cold tire inflation pressure)
Front tire32 psi (220 kPa, 2.2 kgf/cm2 or bar)
Rear tire32 psi (220 kPa, 2.2 kgf/cm2 or bar)
Spare tire32 psi (220 kPa, 2.2 kgf/cm2 or bar)
Wheel size 19 7 1/2J
Wheel nut torque 76 ft•lbf (103 N•m, 10.5 kgf•m)

GX460_OM_OM60T19U_(U)
5698-1. Specifications
8
Vehicle specifications
A: Wedge base bulb (amber)
B: Wedge base bulb (clear)
Light bulbs
Light bulbs Bulb No. W Type
Exterior
Front turn signal lights 21 A
Rear turn signal lights 21 A
Back-up lights 921 16 B
Rear side marker lights 5 B
Running board lights 5 B
Interior
Personal/Interior lights
Front 5 B
Rear 5 B
Vanity lights 8 B
Door courtesy lights 5 B

570
GX460_OM_OM60T19U_(U)
8-1. Specifications
Fuel information
■ Gasoline qualityIn very few cases, driveability problems may be caused by the brand of gasoline you areusing. If driveability problems persist, try changing the brand of gasoline. If this does notcorrect the problem, consult your Lexus dealer.
■ Recommendation of the use of gasoline containing detergent additives● Lexus recommends the use of gasoline that contains detergent additives to avoid the
build-up of engine deposits.● All gasoline sold in the U.S.A. contains minimum detergent additives to clean and/or
keep clean intake systems, per EPA’s lowest additives concentration program.● Lexus strongly recommends the use of Top Tier Detergent Gasoline. For more informa-
tion on Top Tier Detergent Gasoline and a list of marketers, please go to the officialwebsite www.toptiergas.com.
■ Recommendation of the use of low emissions gasolineGasolines containing oxygenates such as ethers and ethanol, as well as reformulatedgasolines, are available in some cities. These fuels are typically acceptable for use, pro-viding they meet other fuel requirements. Lexus recommends these fuels, since the formulations allow for reduced vehicle emis-sions.
You must only use unleaded gasoline.Select premium unleaded gasoline with an octane rating of 91 (ResearchOctane Number 96) or higher required for optimum engine performanceand fuel economy. If the octane rating is less than 91, damage to the enginemay occur and may void the vehicle warranty.
At minimum, the gasoline you use should meet the specifications of ASTMD4814 in the U.S.A..

GX460_OM_OM60T19U_(U)
5718-1. Specifications
8
Vehicle specifications
■ Non-recommendation of the use of blended gasoline
● If you use gasohol in your vehicle, be sure that it has an octane rating no lower than 91.● Lexus does not recommend the use of gasoline containing methanol.
■ Non-recommendation of the use of gasoline containing MMTSome gasoline contains an octane enhancing additive called MMT (Methylcy clopenta-dienyl Manganese Tricarbonyl).Lexus does not recommend the use of gasoline that contains MMT. If fuel containingMMT is used, your emission control system may be adversely affected.The malfunction indicator lamp on the instrument cluster may come on. If this happens,contact your Lexus dealer for service.
■ If your engine knocks● Consult your Lexus dealer.● You may occasionally notice light knocking for a short time while accelerating or driv-
ing uphill. This is normal and there is no need for concern.
● Use only gasoline containing up to 15% etha-nol.DO NOT use any flex-fuel or gasoline thatcould contain more than 15% ethanol, includ-ing from any pump labeled E30, E50, E85(which are only some examples of fuel con-taining more than 15% ethanol).
DO NOT use gasoline con-taining more than 15% ethanol.
(30% ethanol)
(50% ethanol)
(85% ethanol)

572
GX460_OM_OM60T19U_(U)
8-1. Specifications
NOTICE
■ Notice on fuel quality● Do not use improper fuels. If improper fuels are used, the engine will be damaged.● Do not use leaded gasoline.
Leaded gasoline can cause damage to your vehicle’s three-way catalytic converterscausing the emission control system to malfunction.
● Do not use gasohol other than the type previously stated.Other gasohol may cause fuel system damage or vehicle performance problems.
● Using unleaded gasoline with an octane number or rating lower than the level previ-ously stated may cause persistent heavy knocking.At worst, this may lead to engine damage and will void the vehicle warranty.
■ Fuel-related poor driveabilityIf poor driveability (poor hot starting, vaporization, engine knocking, etc.) is encoun-tered after using a different type of fuel, discontinue the use of that type of fuel.
■ When refueling with gasoholTake care not to spill gasohol. It can damage your vehicle’s paint.

573
GX460_OM_OM60T19U_(U)
8-1. Specifications
8
Vehicle specifications
Tire information
Tire size (P. 575)
DOT and Tire Identification Number (TIN) (P. 574)
Location of treadwear indicators (P. 472)
Tire ply composition and materials
Plies are layers of rubber-coated parallel cords. Cords are the strands which form theplies in a tire.Radial tires or bias-ply tires
A radial tire has “RADIAL” on the sidewall. A tire not marked “RADIAL” is a bias-plytire.TUBELESS or TUBE TYPE
A tubeless tire does not have a tube and air is directly put into the tire. A tube type tirehas a tube inside the tire and the tube maintains the air pressure.Load limit at maximum cold tire inflation pressure (P. 579)
Maximum cold tire inflation pressure (P. 579)
This means the pressure to which a tire may be inflated.Uniform tire quality grading
For details, see “Uniform Tire Quality Grading” that follows.Summer tires or all season tires (P. 477)
An all season tire has “M+S” on the sidewall. A tire not marked “M+S” is a summertire.
Typical tire symbols
1
2
3
4
5
6
7
8
9
10

574
GX460_OM_OM60T19U_(U)
8-1. Specifications
DOT symbol*Tire Identification Number (TIN)
Tire manufacturer’s identification mark
Tire size code
Manufacturer’s optional tire type code (3 or 4 letters)
Manufacturing week
Manufacturing year
Manufacturer’s code
*: The DOT symbol certifies that the tire conforms to applicable Federal Motor VehicleSafety Standards.
Typical DOT and Tire Identification Number (TIN)
Type A Type B
1
2
3
4
5
6
7
8

GX460_OM_OM60T19U_(U)
5758-1. Specifications
8
Vehicle specifications
■ Typical tire size information
The illustration indicates typical tiresize.
Tire use (P = Passenger car, T = Temporary use)
Section width (millimeters)
Aspect ratio (tire height to section width)
Tire construction code (R = Radial, D = Diagonal)
Wheel diameter (inches)
Load index (2 digits or 3 digits)
Speed symbol (alphabet with one letter)
■ Tire dimensions
Section width
Tire height
Wheel diameter
Tire size
1
2
3
4
5
6
7
1
2
3

576
GX460_OM_OM60T19U_(U)
8-1. Specifications
Bead
Sidewall
Shoulder
Tread
Belt
Inner liner
Reinforcing rubber
Carcass
Rim lines
Bead wires
Chafer
Tire section names
1
2
3
4
5
6
7
8
9
10
11

GX460_OM_OM60T19U_(U)
5778-1. Specifications
8
Vehicle specifications
This information has been prepared in accordance with regulations issued by theNational Highway Traffic Safety Administration of the U.S. Department of Trans-portation.It provides the purchasers and/or prospective purchasers of Lexus vehicles withinformation on uniform tire quality grading.
Your Lexus dealer will help answer any questions you may have as you read this infor-mation.
■ DOT quality grades
All passenger vehicle tires must conform to Federal Safety Requirements inaddition to these grades. Quality grades can be found where applicable onthe tire sidewall between tread shoulder and maximum section width.
For example: Treadwear 200 Traction AA Temperature A■ Treadwear
The treadwear grade is a comparative rating based on the wear rate of the tirewhen tested under controlled conditions on a specified government testcourse.
For example, a tire graded 150 would wear one and a half (1 - 1/2) times as well onthe government course as a tire graded 100.The relative performance of tires depends upon the actual conditions of their use.Performance may differ significantly from the norm due to variations in drivinghabits, service practices and differences in road characteristics and climate.
■ Traction AA, A, B, C
The traction grades, from highest to lowest, are AA, A, B and C, and they rep-resent the tire’s ability to stop on wet pavement as measured under controlledconditions on specified government test surfaces of asphalt and concrete.
A tire marked C may have poor traction performance.Warning: The traction grade assigned to this tire is based on braking (straightahead) traction tests and does not include cornering (turning) traction.
Uniform Tire Quality Grading

578
GX460_OM_OM60T19U_(U)
8-1. Specifications
■ Temperature A, B, C
The temperature grades are A (the highest), B, and C, representing the tire’sresistance to the generation of heat and its ability to dissipate heat whentested under controlled conditions on a specified indoor laboratory testwheel.
Sustained high temperature can cause the material of the tire to degenerate andreduce tire life, and excessive temperature can lead to sudden tire failure.Grade C corresponds to a level of performance which all passenger car tires mustmeet under the Federal Motor Vehicle Safety Standard No. 109.Grades B and A represent higher levels of performance on the laboratory testwheel than the minimum required by law.Warning: The temperature grades of a tire assume that it is properly inflated andnot overloaded.Excessive speed, underinflation, or excessive loading, either separately or in com-bination, can cause heat buildup and possible tire failure.

GX460_OM_OM60T19U_(U)
5798-1. Specifications
8
Vehicle specifications
Glossary of tire terminology
Tire related term Meaning
Cold tire inflation pressureTire pressure when the vehicle has been parked forthree hours or more, or has not been driven more than 1mile or 1.5 km under that condition
Maximum inflation pres-sure
The maximum cold inflated pressure to which a tire maybe inflated, shown on the sidewall of the tire
Recommended inflationpressure
Cold tire inflation pressure recommended by a manu-facturer
Accessory weight
The combined weight (in excess of those standard itemswhich may be replaced) of automatic transmission,power steering, power brakes, power windows, powerseats, radio and heater, to the extent that these items areavailable as factory-installed equipment (whetherinstalled or not)
Curb weight
The weight of a motor vehicle with standard equipment,including the maximum capacity of fuel, oil and coolant,and if so equipped, air conditioning and additionalweight optional engine
Maximum loaded vehicleweight
The sum of:(a) Curb weight(b) Accessory weight(c) Vehicle capacity weight(d) Production options weight
Normal occupant weight 150 lb. (68 kg) times the number of occupants specifiedin the second column of Table 1* that follows
Occupant distribution Distribution of occupants in a vehicle as specified in thethird column of Table 1* below
Production options weight
The combined weight of installed regular productionoptions weighing over 5 lb. (2.3 kg) in excess of thestandard items which they replace, not previously con-sidered in curb weight or accessory weight, includingheavy duty brakes, ride levelers, roof rack, heavy dutybattery, and special trim
Rim A metal support for a tire or a tire and tube assemblyupon which the tire beads are seated

580
GX460_OM_OM60T19U_(U)
8-1. Specifications
Rim diameter(Wheel diameter) Nominal diameter of the bead seat
Rim size designation Rim diameter and width
Rim type designation The industry manufacturer’s designation for a rim bystyle or code
Rim width Nominal distance between rim flanges
Vehicle capacity weight(Total load capacity)
The rated cargo and luggage load plus 150 lb. (68 kg)times the vehicle’s designated seating capacity
Vehicle maximum load onthe tire
The load on an individual tire that is determined by dis-tributing to each axle its share of the maximum loadedvehicle weight, and dividing by two
Vehicle normal load on thetire
The load on an individual tire that is determined by dis-tributing to each axle its share of curb weight, accessoryweight, and normal occupant weight (distributed inaccordance with Table 1* below), and dividing by two
Weather side The surface area of the rim not covered by the inflatedtire
BeadThe part of the tire that is made of steel wires, wrappedor reinforced by ply cords and that is shaped to fit therim
Bead separation A breakdown of the bond between components in thebead
Bias ply tireA pneumatic tire in which the ply cords that extend tothe beads are laid at alternate angles substantially lessthan 90 degrees to the centerline of the tread
Carcass The tire structure, except tread and sidewall rubberwhich, when inflated, bears the load
Chunking The breaking away of pieces of the tread or sidewall
Cord The strands forming the plies in the tire
Cord separation The parting of cords from adjacent rubber compounds
Cracking Any parting within the tread, sidewall, or innerliner ofthe tire extending to cord material
Tire related term Meaning

GX460_OM_OM60T19U_(U)
5818-1. Specifications
8
Vehicle specifications
CT
A pneumatic tire with an inverted flange tire and rimsystem in which the rim is designed with rim flangespointed radially inward and the tire is designed to fit onthe underside of the rim in a manner that encloses therim flanges inside the air cavity of the tire
Extra load tire A tire designed to operate at higher loads and at higherinflation pressures than the corresponding standard tire
Groove The space between two adjacent tread ribs
Innerliner The layer(s) forming the inside surface of a tubeless tirethat contains the inflating medium within the tire
Innerliner separation The parting of the innerliner from cord material in thecarcass
Intended outboard sidewall
(a) The sidewall that contains a whitewall, bears whitelettering, or bears manufacturer, brand, and/ormodel name molding that is higher or deeper thanthe same molding on the other sidewall of the tire,or
(b) The outward facing sidewall of an asymmetrical tirethat has a particular side that must always face out-ward when mounted on a vehicle
Light truck (LT) tireA tire designated by its manufacturer as primarilyintended for use on lightweight trucks or multipurposepassenger vehicles
Load rating The maximum load that a tire is rated to carry for a giveninflation pressure
Maximum load rating The load rating for a tire at the maximum permissibleinflation pressure for that tire
Maximum permissible infla-tion pressure
The maximum cold inflation pressure to which a tire maybe inflated
Measuring rim The rim on which a tire is fitted for physical dimensionrequirements
Open splice Any parting at any junction of tread, sidewall, or inner-liner that extends to cord material
Outer diameter The overall diameter of an inflated new tire
Tire related term Meaning

582
GX460_OM_OM60T19U_(U)
8-1. Specifications
Overall widthThe linear distance between the exteriors of the side-walls of an inflated tire, including elevations due to label-ing, decorations, or protective bands or ribs
Passenger car tireA tire intended for use on passenger cars, multipurposepassenger vehicles, and trucks, that have a gross vehicleweight rating (GVWR) of 10,000 lb. or less.
Ply A layer of rubber-coated parallel cords
Ply separation A parting of rubber compound between adjacent plies
Pneumatic tire
A mechanical device made of rubber, chemicals, fabricand steel or other materials, that, when mounted on anautomotive wheel, provides the traction and containsthe gas or fluid that sustains the load
Radial ply tireA pneumatic tire in which the ply cords that extend tothe beads are laid at substantially 90 degrees to thecenterline of the tread
Reinforced tire A tire designed to operate at higher loads and at higherinflation pressures than the corresponding standard tire
Section widthThe linear distance between the exteriors of the side-walls of an inflated tire, excluding elevations due tolabeling, decoration, or protective bands
Sidewall That portion of a tire between the tread and bead
Sidewall separation The parting of the rubber compound from the cordmaterial in the sidewall
Snow tire
A tire that attains a traction index equal to or greaterthan 110, compared to the ASTM E-1136 Standard Ref-erence Test Tire, when using the snow traction test asdescribed in ASTM F-1805-00, Standard Test Methodfor Single Wheel Driving Traction in a Straight Line onSnow-and Ice-Covered Surfaces, and which is marked
with an Alpine Symbol ( ) on at least one sidewall
Tire related term Meaning

GX460_OM_OM60T19U_(U)
5838-1. Specifications
8
Vehicle specifications
*: Table 1 Occupant loading and distribution for vehicle normal load for various des-ignated seating capacities
Test rim The rim on which a tire is fitted for testing, and may beany rim listed as appropriate for use with that tire
Tread That portion of a tire that comes into contact with theroad
Tread rib A tread section running circumferentially around a tire
Tread separation Pulling away of the tread from the tire carcass
Treadwear indicators (TWI)The projections within the principal grooves designedto give a visual indication of the degrees of wear of thetread
Wheel-holding fixture The fixture used to hold the wheel and tire assemblysecurely during testing
Tire related term Meaning
Designated seating capac-ity, Number of occupants
Vehicle normal load, Num-ber of occupants
Occupant distribution in a normally loaded vehicle
2 through 4 2 2 in front
5 through 10 3 2 in front, 1 in second seat
11 through 15 5 2 in front, 1 in second seat, 1 in third seat, 1 in fourth seat
16 through 20 72 in front, 2 in second seat,
2 in third seat, 1 in fourth seat

584
GX460_OM_OM60T19U_(U)
8-2. Customization
Customizable features
■ Changing by using the multi-information display
Press or of the meter control switches, select .
Press or of the meter control switches, select the item or the
desired setting, and then press .
To go back to the previous screen, press .
■ Changing by using the multimedia system or navigation system
Press the “SETUP” button on the multimedia system or navigation system.
Select “Vehicle” on the “Setup” screen and select “Vehicle Customization”.
Various setting can be changed. Refer to the list of settings that can bechanged for details.
Your vehicle includes a variety of electronic features that can be personalizedto suit your preferences. The settings of these features can be changed byusing the multi-information display, the multimedia system or navigation sys-tem or at your Lexus dealer.
Customizing vehicle features
1
2
1
2
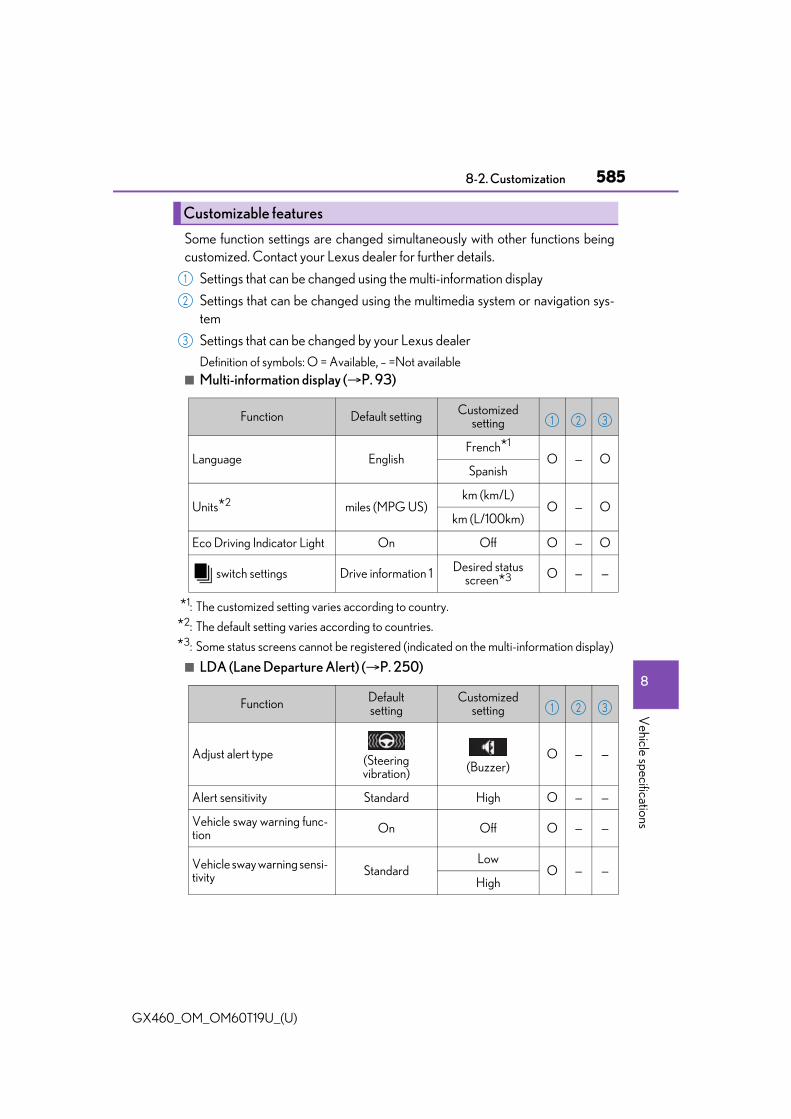
GX460_OM_OM60T19U_(U)
5858-2. Customization
8
Vehicle specifications
Some function settings are changed simultaneously with other functions beingcustomized. Contact your Lexus dealer for further details.
Settings that can be changed using the multi-information display
Settings that can be changed using the multimedia system or navigation sys-tem
Settings that can be changed by your Lexus dealer
Definition of symbols: O = Available, – =Not available■ Multi-information display (P. 93)
*1: The customized setting varies according to country.
*2: The default setting varies according to countries.
*3: Some status screens cannot be registered (indicated on the multi-information display)
■ LDA (Lane Departure Alert) (P. 250)
Customizable features
1
2
3
Function Default setting Customized setting
Language EnglishFrench*1
O — OSpanish
Units*2 miles (MPG US)km (km/L)
O — Okm (L/100km)
Eco Driving Indicator Light On Off O — O
switch settings Drive information 1 Desired status screen*3 O — —
1 2 3
Function Defaultsetting
Customized setting
Adjust alert type (Steering vibration) (Buzzer)
O — —
Alert sensitivity Standard High O — —
Vehicle sway warning func-tion On Off O — —
Vehicle sway warning sensi-tivity Standard
LowO — —
High
1 2 3

586
GX460_OM_OM60T19U_(U)
8-2. Customization
■ PCS (Pre-Collision System) (P. 239)
■ Door lock (P. 108, 115, 547)
■ BSM (Blind Spot Monitor)* (P. 361)
*: If equipped
Function Defaultsetting
Customized setting
PCS (Pre-Collision Sys-tem) On Off O — —
Adjust alert timing
(Middle)
(Far)O — —
(Near)
1 2 3
Function Default setting Customized setting
Unlocking using amechanical key
Driver’s doorunlocked in onestep, all doorsunlocked in twosteps
All doorsunlocked in onestep
— — O
Automatic door lockingfunction
Shift positionlinked door lock-ing operation
Off
— O OSpeed linked doorlocking operation
Automatic door unlockingfunction
Shift positionlinked doorunlocking opera-tion
Off
— O ODriver’s doorlinked doorunlocking opera-tion
1 2 3
Function Defaultsetting
Customized setting
BSM (Blind Spot Monitor) On Off O — —
1 2 3

GX460_OM_OM60T19U_(U)
5878-2. Customization
8
Vehicle specifications
■ Smart access system with push-button start and wireless remote control (P. 108, 125)
Function Default setting Customized setting
Operation buzzer volume Level 5Off
— O OLevel 1 to 7
Operation signal (buzzer) On Off — — O
Operation signal(emergency flashers) On Off — O O
Time elapsed before theautomatic door lockfunction is activated if adoor is not opened afterbeing unlocked
60 seconds
Off
— O O30 seconds
120 seconds
Open door warning buzzer(when locking the vehicle) On Off — — O
1 2 3

588
GX460_OM_OM60T19U_(U)
8-2. Customization
■ Smart access system with push-button start (P. 125)
■ Wireless remote control (P. 104)
Function Default setting Customized setting
Smart door unlocking Driver’s door All the doors — O O
Smart access system withpush-button start On Off — O —
Number of consecutivedoor lock operations 2 times As many as
desired — — O
1 2 3
Function Default setting Customized setting
Wireless remote control On Off — — O
Unlocking operation
Driver’s doorunlocked in onestep, all doorsunlocked in twosteps
All doorsunlocked in onestep
— O O
Panic function On Off — — O
Glass hatch opening operation
Push and hold(Short)
Push twice
— — O
One short push
Push and hold (Long)
Off
1 2 3

GX460_OM_OM60T19U_(U)
5898-2. Customization
8
Vehicle specifications
■ Automatic light control system (P. 213)
*: Except for Canada
■ Interior lights (P. 400)
Function Default setting Customized setting
Time elapsed before head-lights automatically turn offafter doors are closed
30 seconds
Off
— O O60 seconds
90 seconds
Light sensor sensitivity Standard -2 to 2 — O O
Daytime running light sys-tem On Off* — O O
Welcome lighting illumina-tion control On Off — — O
1 2 3
Function Default setting Customized setting
Time elapsed before theinterior lights turn off 15 seconds
Off
— O O7.5 seconds
30 seconds
Operation after the engineswitch is turned to OFF On Off — — O
Operation when the doorsare unlocked with the smartaccess system with push-button start or wirelessremote control
On Off — — O
Operation when youapproach the vehicle withthe electronic key on yourperson
On Off — — O
Shift lever light On Off — — O
Footwell lighting On Off — — O
Lounge illumination control On Off — — O
1 2 3

590
GX460_OM_OM60T19U_(U)
8-2. Customization
■ Exterior lights (P. 400)
■ Front automatic air conditioning system (P. 384)
*: If equipped
Function Default setting Customized setting
Time elapsed before therunning board lights turn off 15 seconds
Off
— O O7.5 seconds
30 seconds
Operation of the runningboard lights when the doorsare unlocked with the smartaccess system with push-button start or wirelessremote control
On Off — — O
Operation of the runningboard lights when youapproach the vehicle withthe electronic key on yourperson
On Off — — O
Running board lights On Off — — O
Operation of the runningboard lights when the dooris opened
On Off — — O
1 2 3
Function Default setting Customized setting
Switching between outsideair and recirculated airmode linked to automaticmode switch operation*
Auto Manual — O O
A/C automatic modeswitch operation Auto Manual — O O
Exhaust gas sensor sensitiv-ity Standard -3 to 3 — O O
1 2 3
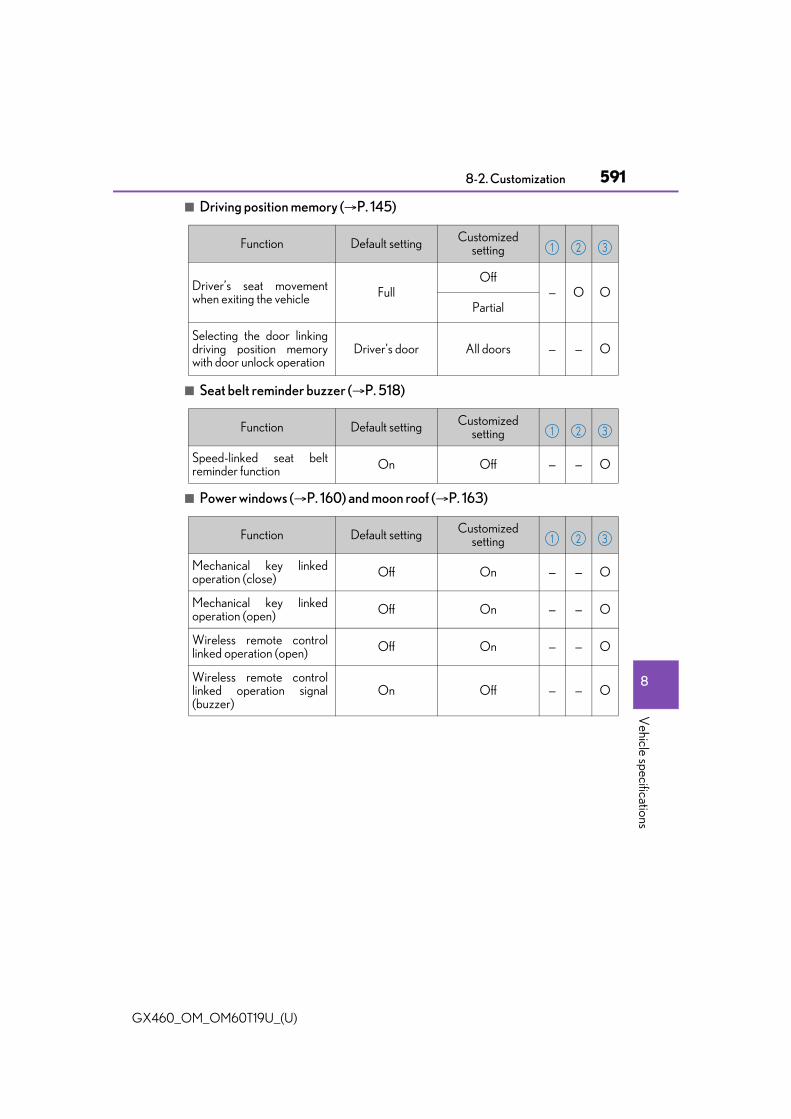
GX460_OM_OM60T19U_(U)
5918-2. Customization
8
Vehicle specifications
■ Driving position memory (P. 145)
■ Seat belt reminder buzzer (P. 518)
■ Power windows (P. 160) and moon roof (P. 163)
Function Default setting Customized setting
Driver’s seat movementwhen exiting the vehicle Full
Off— O O
Partial
Selecting the door linkingdriving position memorywith door unlock operation
Driver’s door All doors — — O
1 2 3
Function Default setting Customized setting
Speed-linked seat beltreminder function On Off — — O
1 2 3
Function Default setting Customized setting
Mechanical key linkedoperation (close) Off On — — O
Mechanical key linkedoperation (open) Off On — — O
Wireless remote controllinked operation (open) Off On — — O
Wireless remote controllinked operation signal(buzzer)
On Off — — O
1 2 3

592
GX460_OM_OM60T19U_(U)
8-2. Customization
■ Intuitive parking assist* (P. 270)
*: If equipped
■ Alarm (P. 79)
*: The default setting varies according to country.
■ In the following situations, customize mode will automatically be turned off.● A warning message appears after the customize mode screen is displayed.● The engine switch is turned to OFF.● The vehicle begins to move while the customize mode screen is displayed.
Function Default setting Customized setting
Intuitive parking assist On Off O — —
Buzzer volume Level 3 Level 1 to 5 — O O
Display setting All sensors displayed Display off — O O
Detection distance of thefront center sensor Far Near — O O
Detection distance of therear center sensor Far Near — O O
1 2 3
Function Default setting Customized setting
Deactivates the alarm whenthe doors are unlockedusing the mechanical key*
On Off – – O
1 2 3
WARNING
■ During customizationAs the engine needs to be running during customization, ensure that the vehicle isparked in a place with adequate ventilation. In a closed area such as a garage, exhaustgases including harmful carbon monoxide (CO) may collect and enter the vehicle. Thismay lead to death or a serious health hazard.
NOTICE
■ During customizationTo prevent battery discharge, ensure that the engine is running while customizing fea-tures.

593
GX460_OM_OM60T19U_(U)
8-3. Items to initialize
8
Vehicle specifications
Items to initialize
*1: U.S.A. only
*2: If equipped
The following item must be initialized for normal system operation after suchcases as the battery being reconnected, or maintenance being performed onthe vehicle:
Item When to initialize Reference
Message indicating mainte-nance is required*1 After the maintenance is per-
formed
P. 449
Oil maintenance P. 462
Tire pressure warning system
• When rotating the tires• When the tire inflation pressure
is changed by changing tire size.(When there are multiple speci-fied pressures)
• After registering the ID codes
P. 474
Power windowWhen functioning abnormally
P. 161
Moon roof P. 164
Multi-terrain Monitor*2 After reconnecting or changing thebattery P. 337

594
GX460_OM_OM60T19U_(U)
8-3. Items to initialize

595
GX460_OM_OM60T19U_(U)
9For owners
Reporting safety defects for U.S. owners.....................................596
Seat belt instructions for Canadian owners (in French).............................................. 597
SRS airbag instructions for Canadian owners (in French)..............................................599
Headlight aim instructions for Canadian owners (in French)..............................................607

596
GX460_OM_OM60T19U_(U)
Reporting safety defects for U.S. owners
If you believe that your vehicle has a defect which could cause a crash or couldcause injury or death, you should immediately inform the National HighwayTraffic Safety Administration (NHTSA) in addition to notifying the LexusDivision of Toyota Motor Sales, U.S.A., Inc. (Toll-free: 1-800-25-LEXUS).
If NHTSA receives similar complaints, it may open an investigation, and if itfinds that a safety defect exists in a group of vehicles, it may order a recall andremedy campaign. However, NHTSA cannot become involved in individualproblems between you, your dealer, or Lexus Division of Toyota Motor Sales,U.S.A., Inc.
To contact NHTSA, you may call the Vehicle Safety Hotline toll-free at 1-888-327-4236 (TTY: 1-800-424-9153); go to http://www.safercar.gov ; orwrite to: Administrator, NHTSA, 1200 New Jersey Ave. SE., Washington, DC20590. You can also obtain other information about motor vehicle safety fromhttp://www.safercar.gov.
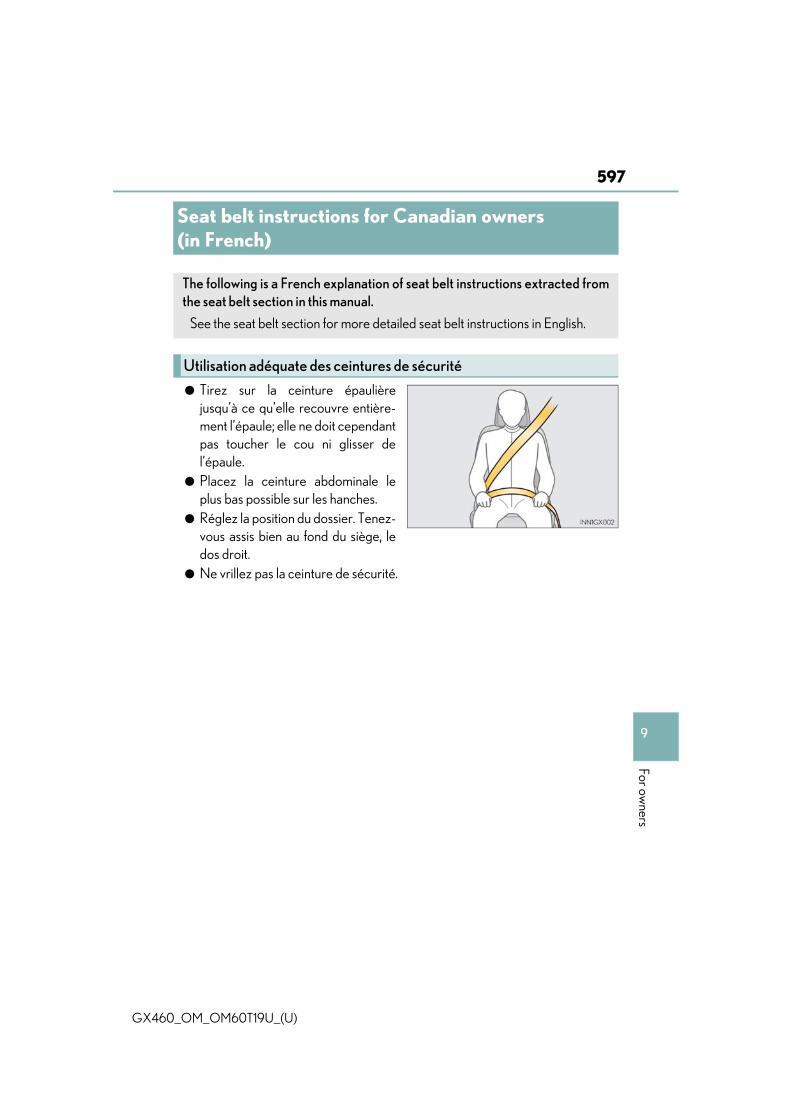
597
GX460_OM_OM60T19U_(U)
9
For owners
Seat belt instructions for Canadian owners (in French)
● Tirez sur la ceinture épaulièrejusqu’à ce qu’elle recouvre entière-ment l’épaule; elle ne doit cependantpas toucher le cou ni glisser del’épaule.
● Placez la ceinture abdominale leplus bas possible sur les hanches.
● Réglez la position du dossier. Tenez-vous assis bien au fond du siège, ledos droit.
● Ne vrillez pas la ceinture de sécurité.
The following is a French explanation of seat belt instructions extracted fromthe seat belt section in this manual.
See the seat belt section for more detailed seat belt instructions in English.
Utilisation adéquate des ceintures de sécurité

598
GX460_OM_OM60T19U_(U)
■ Ceintures de sécurité
Avec un chiffon ou une éponge, nettoyez à l’aide d’un savon doux et de l’eautiède. Vérifiez aussi les ceintures régulièrement pour vous assurer qu’elles neprésentent pas d’usure excessive, d’effilochage ou de coupures.
Entretien et soin
AVERTISSEMENT
■ Dommages et usure de la ceinture de sécuritéVérifiez périodiquement le système de ceintures de sécurité. Vérifiez qu’il n’y a pas decoupures, d’effilochures ni de pièces desserrées. N’utilisez pas une ceinture de sécu-rité endommagée avant qu’elle ne soit remplacée. Une ceinture de sécurité endom-magée ne peut pas protéger les occupants contre des blessures graves, voiremortelles.

599
GX460_OM_OM60T19U_(U)
9
For owners
SRS airbag instructions for Canadian owners (in French)
◆ Coussins gonflables SRS avant
Coussin gonflable SRS du conducteur/coussin gonflable SRS du passageravant Peuvent aider à protéger la tête et la poitrine du conducteur et du passageravant contre les impacts avec des composants intérieurs
Coussins gonflables SRS de protection des genoux Peuvent aider à protéger le conducteur et le passager avant
The following is a French explanation of SRS airbag instructions extractedfrom the SRS airbag section in this manual.
See the SRS airbag section for more detailed SRS airbag instructions inEnglish.
1
2

600
GX460_OM_OM60T19U_(U)
◆ Coussins gonflables SRS latéraux et en rideau
Coussins gonflables SRS latéraux avant Peuvent aider à protéger le torse des occupants des sièges avant
Coussins gonflables SRS latéraux arrière Peuvent aider à protéger le torse des occupants des sièges latéraux de ladeuxième rangée de sièges (modèles à 7 passagers) ou des sièges de ladeuxième rangée (modèles à 6 passagers)
Coussins gonflables SRS en rideau● Peuvent aider à protéger principalement la tête des occupants des
sièges latéraux● Peuvent aider à empêcher les occupants d’être éjectés du véhicule en
cas de tonneaux
3
4
5

GX460_OM_OM60T19U_(U)
601
9
For owners
Composants du système de coussins gonflables SRS
Coussins gonflables de protectiondes genoux
Coussins gonflables en rideau
Coussin gonflable du passageravant
Capteurs d’impact latéral (portièreavant)
Voyants “AIR BAG ON” et “AIR BAG OFF”
Coussins gonflables latéraux avant
Lampe témoin SRS
Capteurs d’impact latéral (arrière)
Coussins gonflables latéraux arrière(sièges latéraux de la deuxièmerangée de sièges [modèles à 7 pas-sagers] ou sièges de la deuxièmerangée [modèles à 6 passagers])
Coussin gonflable du conducteur
Contacteur de boucle de ceinturede sécurité du conducteur
Capteur de sûreté (arrière)
Contacteur de boucle de ceinturede sécurité du passager avant
Module de capteur de coussingonflable
Capteurs d’impact avant
Limiteurs de force et dispositifs detension des ceintures de sécurité
Système de classification del’occupant du siège du passageravant (ECU et capteurs)
1
2
3
4
5
6
7
8
9
10
11
12
13
14
15
16
17

602
GX460_OM_OM60T19U_(U)
Votre véhicule est doté de COUSSINS GONFLABLES ÉVOLUÉS dont la con-ception s’appuie sur les normes de sécurité des véhicules à moteur américains(FMVSS208). Le module de capteur de coussin gonflable (ECU) contrôle ledéploiement des coussins gonflables en fonction des informations obtenues descapteurs et d’autres éléments affichés dans le diagramme des composants dusystème ci-dessus. Ces informations comprennent des données relatives à lagravité de l’accident et aux occupants. Au moment du déploiement des coussinsgonflables, une réaction chimique se produit dans les gonfleurs de coussin gon-flable et les coussins gonflables se remplissent rapidement d’un gaz non toxiquepour aider à limiter le mouvement des occupants.
AVERTISSEMENT
■ Précautions relatives aux coussins gonflables SRSObservez les précautions suivantes en ce qui concerne les coussins gonflables SRS. Négliger de le faire pourrait occasionner des blessures graves, voire mortelles.● Le conducteur et tous les passagers du véhicule doivent porter leur ceinture de sécu-
rité de la manière appropriée. Les coussins gonflables SRS sont des dispositifs supplémentaires qui doivent être util-isés avec les ceintures de sécurité.
● Le coussin gonflable SRS du conducteur se déploie avec une force considérable etpeut occasionner des blessures graves, voire mortelles, notamment lorsque le con-ducteur se trouve très près du coussin gonflable. La National Highway Traffic SafetyAdministration (NHTSA), aux États-Unis, fait les recommandations suivantes :La zone à risque du coussin gonflable du conducteur couvre 2 à 3 in. (50 à 75 mm)de la zone de déploiement du coussin gonflable. Pour assurer une marge de sécuritésuffisante, restez à 10 in. (250 mm) du coussin gonflable. Cette distance estmesurée depuis le centre du volant jusqu’à votre sternum. Si maintenant vous voustenez assis à moins de 10 in. (250 mm), vous pouvez changer votre position de con-duite de plusieurs manières :• Reculez votre siège à la position maximale vous permettant d’atteindre encore
aisément les pédales.• Inclinez légèrement le dossier du siège. Bien que les véhicules soient conçus dif-
féremment, la plupart des conducteurs peuvent maintenir une distance de 10 in.(250 mm), même si leur siège se trouve complètement vers l’avant, simplementen inclinant un peu le dossier du siège vers l’arrière. Si la visibilité avant est moin-dre après avoir incliné le dossier de votre siège, utilisez un coussin ferme et nonglissant pour être assis plus haut ou relevez le siège si cette option est disponiblesur votre véhicule.
• Si votre volant est réglable en hauteur, inclinez-le vers le bas. Cela vous permetd’orienter le coussin gonflable vers votre buste plutôt que vers votre tête et versvotre cou.
Le siège doit être réglé de la manière recommandée ci-dessus par la NHTSA, touten gardant le contrôle des pédales et du volant, ainsi que la vue sur les commandesdu tableau de bord.

GX460_OM_OM60T19U_(U)
603
9
For owners
AVERTISSEMENT
■ Précautions relatives aux coussins gonflables SRS
● Le coussin gonflable SRS du passager avant se déploie également avec une forceconsidérable et peut occasionner des blessures graves, voire mortelles, notammentlorsque le passager avant se trouve très près du coussin gonflable. Le siège du pas-sager avant doit se trouver le plus loin possible du coussin gonflable et le dossier doitêtre réglé de manière à ce que le passager avant soit assis bien droit.
● Le déploiement d’un coussin gonflable risque d’infliger des blessures graves, voiremortelles, aux bébés et aux enfants mal assis et/ou mal attachés. Un bébé ou unenfant trop petit pour utiliser une ceinture de sécurité doit être correctement retenu àl’aide d’un dispositif de retenue pour enfants. Lexus recommande vivement de placeret d’attacher correctement tous les bébés et tous les enfants sur les sièges arrière duvéhicule à l’aide de dispositifs de retenue adaptés. Les sièges arrière sont plus sécu-ritaires pour les bébés et les enfants que le siège du passager avant.
● N’installez jamais un dispositif de retenue pour enfants de type dos à la route sur lesiège du passager avant, même si le voyant “AIR BAG OFF” est allumé. En cas d’acci-dent, la force et la vitesse de déploiement du coussin gonflable du passager avantpourraient infliger à l’enfant des blessures graves, voire mortelles, si le dispositif deretenue pour enfants de type dos à la route était installé sur le siège du passageravant.
● Si la rallonge de ceinture de sécurité a étéreliée à la boucle des ceintures de sécuritédes sièges avant sans avoir aussi été attachéeà la plaque de blocage des ceintures de sécu-rité, les coussins gonflables SRS avant con-sidéreront que le conducteur et le passageravant portent tout de même leur ceinture desécurité même si les ceintures de sécurité nesont pas attachées. Les coussins gonflablesSRS avant peuvent alors ne pas s’activer cor-rectement lors d’une collision, ce qui pourraitoccasionner des blessures graves, voire mor-telles, en cas de collision. Assurez-vous detoujours porter la ceinture de sécurité avec larallonge de ceinture de sécurité.

604
GX460_OM_OM60T19U_(U)
AVERTISSEMENT
■ Précautions relatives aux coussins gonflables SRS
● Ne vous asseyez pas sur le bord du siège etne vous appuyez pas sur la planche de bord.
● Ne laissez pas un enfant se tenir face au cous-sin gonflable SRS du passager avant ni s’asse-oir sur les genoux d’un passager avant.
● Ne laissez pas les occupants des sièges avanttenir des objets sur leurs genoux.
● Ne vous appuyez pas sur la portière ou sur lebrancard de pavillon, ni sur les montantsavant, latéraux ou arrière.
● Ne laissez personne s’agenouiller face à laportière sur les sièges des passagers ni sortirla tête ou les mains à l’extérieur du véhicule.
● Ne fixez et n’appuyez rien sur des zonestelles que la planche de bord, le tampon devolant ou encore la partie inférieure du tab-leau de bord. Ces objets peuvent se transformer en projec-tiles lorsque les coussins gonflables SRS duconducteur, du passager avant et de protec-tion des genoux se déploient.

GX460_OM_OM60T19U_(U)
605
9
For owners
AVERTISSEMENT
■ Précautions relatives aux coussins gonflables SRS
● N’accrochez pas de cintres ni d’autres objets rigides sur les crochets porte-vête-ments. Tous ces objets pourraient se transformer en projectiles et vous occasionnerdes blessures graves, voire mortelles, en cas de déploiement des coussins gonflablesSRS en rideau.
● Si un recouvrement de vinyle est placé sur la zone de déploiement du coussin gon-flable SRS de protection des genoux, veillez à le retirer.
● N’utilisez pas d’accessoires recouvrant les parties du siège où les coussins gonflablesSRS latéraux se déploient, car ces accessoires pourraient entraver le déploiementdes coussins gonflables SRS. De tels accessoires peuvent empêcher les coussinsgonflables latéraux de se déployer correctement, rendre le système inopérant ouprovoquer accidentellement le déploiement des coussins gonflables latéraux, occa-sionnant des blessures graves, voire mortelles.
● Ne frappez pas et n’appliquez pas une pression importante à l’emplacement descomposants des coussins gonflables SRS. Cela peut provoquer un mauvais fonctionnement des coussins gonflables SRS.
● Ne touchez à aucun composant des coussins gonflables SRS immédiatement aprèsleur déploiement (gonflage), car ils pourraient être chauds.
● Si vous avez de la difficulté à respirer après le déploiement des coussins gonflablesSRS, ouvrez une portière ou une glace pour laisser entrer l’air frais, ou quittez levéhicule si vous pouvez le faire en toute sécurité. Dès que possible, nettoyez tous lesrésidus afin d’éviter les irritations cutanées.
● Si les emplacements de stockage des coussins gonflables SRS, tels que le tampon devolant et les garnitures des montants avant et arrière, sont endommagés ou fissurés,faites-les remplacer par votre concessionnaire Lexus.
● Ne placez aucun objet, par exemple un coussin, sur le siège du passager avant. Celadisperserait le poids du passager, ce qui empêcherait le capteur de le détecter cor-rectement. Cela pourrait empêcher le déploiement des coussins gonflables SRS dupassager avant en cas de collision.
● Ne fixez rien sur des zones telles que lesportières, le pare-brise, les glaces deportières, les montants avant ou arrière, lebrancard de pavillon et la poignée de main-tien.

606
GX460_OM_OM60T19U_(U)
AVERTISSEMENT
■ Modification et mise au rebut des composants du système de coussins gonflablesSRSNe mettez pas votre véhicule au rebut et n’effectuez aucune des modifications suiva-ntes sans d’abord consulter votre concessionnaire Lexus. Les coussins gonflables SRSpourraient fonctionner de manière incorrecte ou se déployer (gonfler) accidentelle-ment, ce qui serait susceptible d’occasionner des blessures graves, voire mortelles.● Installation, retrait, démontage et réparation des coussins gonflables SRS● Réparations, modifications, retrait ou remplacement du volant, du tableau de bord,
de la planche de bord, des sièges ou du capitonnage des sièges, des montants avant,latéraux et arrière ou des brancards de pavillon
● Réparations ou modifications de l’aile avant, du pare-chocs avant ou du côté del’habitacle
● Installation d’une protection de calandre (barre safari, barre kangourou, etc.), delames de déneigement, de treuils ou d’un porte-bagages de toit
● Modifications du système de suspension du véhicule● Installation d’appareils électroniques tels qu’un émetteur-récepteur radio ou un lec-
teur de CD● Modifications à votre véhicule pour une personne aux capacités physiques réduites

607
GX460_OM_OM60T19U_(U)
9
For owners
Headlight aim instructions for Canadian owners (in French)
Boulon de réglage A
Boulon de réglage B
Assurez-vous que le réservoir de carburant du véhicule est plein et que lapartie de carrosserie située autour des phares n’est pas déformée.
Garez le véhicule sur un sol parfaitement horizontal.
Asseyez-vous sur le siège du conducteur.
Faites rebondir le véhicule à plusieurs reprises.
The following is a French explanation of headlight aim instructions from theheadlight aim section in this manual.
Boulons de réglage vertical
1
2
Avant de vérifier la portée des phares
1
2
3
4

608
GX460_OM_OM60T19U_(U)
Tournez le boulon A vers la droite ou vers la gauche à l’aide d’un tourneviscruciforme.
Retenez le sens de rotation et le nombre de tours.
Tournez le boulon B du même nom-bre de tours et dans le même sensqu’à l’étape .
Si vous n’arrivez pas à régler vos pharesen suivant cette procédure, apportez levéhicule chez votre concessionnaireLexus afin qu’il règle la portée desphares.
Réglage de la portée des phares
1
Côté gauche Côté droit
2
1

609
GX460_OM_OM60T19U_(U)
Index
What to do if... (Troubleshooting)................................ 610
Alphabetical index.................................. 614
For vehicles with navigation system or multimedia system, refer tothe “NAVIGATION SYSTEM OWNER’S MANUAL” or “MUL-TIMEDIA OWNER’S MANUAL” for information regarding theequipment listed below.• Navigation system• Audio/video system• Rear seat entertainment system• Hands-free system (for cellular phone)• Lexus Enform

610 What to do if... (Troubleshooting)
GX460_OM_OM60T19U_(U)
What to do if... (Troubleshooting)
● If you lose your mechanical keys, new genuine mechanical keys can be madeby your Lexus dealer. (P. 105)
● If you lose your electronic keys, the risk of vehicle theft increases significantly.Contact your Lexus dealer immediately. (P. 107)
● Is the electronic key battery weak or depleted? (P. 492)
● Is the engine switch in IGNITION ON mode? When locking the doors, turn the engine switch off. (P. 201)
● Is the electronic key left inside the vehicle? When locking the doors, make sure that you have the electronic key on yourperson.
● The function may not operate properly due to the condition of the radio wave.(P. 127)
● Is the child-protector lock set?The rear door cannot be opened from inside the vehicle when the lock is set.Open the rear door from outside and then unlock the child-protector lock.(P. 111)
If you have a problem, check the following before contacting your Lexusdealer.
The doors cannot be locked, unlocked, opened or closed
You lose your keys
The doors cannot be locked or unlocked
The rear door cannot be opened

611What to do if... (Troubleshooting)
GX460_OM_OM60T19U_(U)
● Did you press the engine switch while firmly depressing the brake pedal?(P. 200)
● Is the shift lever in P? (P. 200)
● Is the electronic key anywhere detectable inside the vehicle? (P. 126)
● Is the steering wheel unlocked? (P. 203)
● Is the electronic key battery weak or depleted? In this case, the engine can be started in a temporary way. (P. 548)
● Is the battery discharged? (P. 550)
● Is the engine switch in IGNITION ON mode?If you cannot release the shift lever by depressing the brake pedal with theengine switch in IGNITION ON mode (P. 209)
If you think something is wrong
The engine does not start
The shift lever cannot be shifted from P even if you depress the brakepedal

612 What to do if... (Troubleshooting)
GX460_OM_OM60T19U_(U)
● It is locked automatically to prevent theft of the vehicle. (P. 202)
● Is the window lock switch pressed?The power window except for the one at the driver’s seat cannot be operatedif the window lock switch is pressed. (P. 160)
● The auto power off function will be operated if the vehicle is left in ACCES-SORY or IGNITION ON mode (the engine is not running) for a period oftime. (P. 202)
● The seat belt reminder light is flashing
Are the driver and the front passenger wearing the seat belts? (P. 520)
● The parking brake indicator is on
Is the parking brake released? (P. 212)Depending on the situation, other types of warning buzzer may also sound. (P. 518, 527)
● Did anyone inside the vehicle open a door during setting the alarm? The sensor detects it and the alarm sounds. (P. 79)
To stop the alarm, turn the engine switch to IGNITION ON mode or start theengine.
The steering wheel cannot be turned after the engine is stopped
The windows do not open or close by operating the power windowswitches
The engine switch is turned off automatically
A warning buzzer sounds during driving
An alarm is activated and the horn sounds

613What to do if... (Troubleshooting)
GX460_OM_OM60T19U_(U)
● Is the electronic key left inside the vehicle or the moon roof opened?Check the message on the multi-information display. (P. 527)
● When a warning light turns on or a warning message is displayed, refer to P. 518, 527.
● Stop the vehicle in a safe place and replace the flat tire with the spare tire.(P. 531)
● Try the procedure for when the vehicle becomes stuck in mud, dirt, or snow.(P. 556)
A warning buzzer sounds when leaving the vehicle
A warning light turns on or a warning message is displayed
When a problem has occurred
If you have a flat tire
The vehicle becomes stuck

614 Alphabetical index
GX460_OM_OM60T19U_(U)
Alphabetical index
A/C ................................................ 384, 394
Air conditioning filter....................... 490
ABS (Anti-lock Brake System).......355
Function ................................................. 355
Warning light ........................................ 519
Active Traction Control ....................356
Air conditioning filter ..........................490
Air conditioning system......... 384, 394
Air conditioning filter....................... 490
Micro dust and pollen filter .......... 389
Airbags ........................................................ 36
Airbag operating conditions...........44
Airbag precautions
for your child........................................39
Airbag warning light..........................518
Correct driving posture ....................28
Curtain shield airbag
operating conditions........................44
Curtain shield airbag
precautions...........................................39
General airbag precautions............39
Locations of airbags ............................36
Modification and
disposal of airbags............................43
Side airbag operating
conditions..............................................44
Side airbag precautions.....................39
Side and curtain shield airbags
operating conditions........................44
Side and curtain shield airbags
precautions...........................................39
SRS airbags..............................................36
SRS warning light................................518
Alarm
Alarm........................................................... 79
Warning buzzer ..................................518
Anchor brackets...................................... 58
Antennas (smart access system
with push-button start) ..................... 125
Anti-lock brake system (ABS)........ 355
Function..................................................355
Warning light.........................................519
Armrest .....................................................427
Assist grip................................................ 428
Audio input*Audio system*Automatic headlight
leveling system.....................................215
Automatic High Beam ......................... 216
Automatic light control system ........ 214
Automatic transmission..................... 206
If the shift lever cannot be
shifted from P...................................209
S mode.................................................... 207
AUX port*Auxiliary boxes .............................408, 411
AVS ........................................................... 343
Back door................................................... 115
Back-up lights
Replacing light bulbs .......................504
Wattage .................................................569
Battery ...................................................... 468
Battery checking................................468
If the vehicle battery is
discharged........................................ 550
Preparing and checking
before winter .................................... 374
Warning light........................................ 518
Bluetooth®*
A
B

615Alphabetical index
GX460_OM_OM60T19U_(U)
Bottle holders......................................... 407
Brake
Fluid...........................................................567
Parking brake.........................................212
Warning light ........................................518
Brake assist .............................................355
Break-in tips..............................................170
Brake Override System.......................169
Brightness control
Instrument panel light
control .......................................................91
BSM (Blind Spot Monitor)..................361
The Blind Spot Monitor
function ............................................... 366
The Rear Cross Traffic Alert
function ............................................... 369
Care................................................442, 445
Aluminum wheels ..............................442
Exterior....................................................442
Interior .....................................................445
Seat belts ................................................446
Cargo hooks ........................................... 410
Cargo net hooks...................................... 411
Center differential................................ 344
CD player*Chains ....................................................... 375
Child restraint system............................ 54
Booster seats, definition ....................55
Booster seats, installation..................65
Convertible seats, definition............55
Convertible seats, installation.........62
Installing child restraint system
with LATCH system........................60
Installing child restraint system
with seat belts...................................... 62
Installing child restraint system
with top tether strap......................... 66
Infant seats, definition..........................55
Infant seats, installation....................... 62
Child safety................................................ 53
Airbag precautions.............................. 39
Back door precautions.......................117
Battery precautions ..............469, 552
Child restraint system......................... 54
Glass hatch precaution.................... 122
How your child should wear
the seat belt ...........................................32
Installing child restraints ....................58
Moon roof precautions ....................166
Power window lock switch............ 160
Power window precautions........... 162
Rear door child-protectors ............... 111
Removed key battery
precautions .......................................493
Seat belt precautions .......................... 33
Seat heater precautions ................. 397
Child-protectors ....................................... 111
Cleaning
Aluminum wheels.............................. 442
Exterior ................................................... 442
Interior .....................................................445
Seat belts................................................446
Clock......................................................... 420
Coat hooks ............................................. 428
Compass ..................................................429
Condenser.............................................. 465
C
*: Refer to the “NAVIGATION SYSTEM OWNER’S MANUAL” or“MULTIMEDIA OWNER’S MANUAL”.

616 Alphabetical index
GX460_OM_OM60T19U_(U)
Console box ...........................................404
Cool box ....................................................417
Cooling system ..................................... 463
Engine overheating.......................... 553
Conversation mirror ........................... 420
Crawl Control .......................................348
Cruise control
Dynamic radar cruise control..... 258
Cup holders............................................406
Curtain shield airbags ........................... 36
Current fuel consumption ................... 95
Customizable features.......................584
DAC (Downhill Assist Control
system)................................................... 352
Daytime running light system............214
Defogger
Front windshield ................................388
Outside rear view mirrors............ 389
Rear window ....................................... 389
Differential...............................................565
Dimension ...............................................560
Display
Drive information ..................................95
Multi-information display ..................93
Warning message.............................527
Do-it-yourself maintenance.............455
Doors.......................................................... 108
Back door................................................. 115
Door glasses ......................................... 160
Door lock................................................108
Open door warning light.............. 520
Outside rear view mirrors.............. 157
Rear door child-protector..................111
Drive information .................................... 95
Drive-Start Control ...............................170
Driver’s seat position memory.......... 145
Driving ........................................................168
AVS switch ........................................... 343
Break-in tips ...........................................170
Correct posture .................................... 28
Procedures ............................................ 168
Winter drive tips ................................ 374
Dynamic radar cruise control ......... 258
Eco Driving Indicator ............................ 98
EDR (Event data recorder)...................10
Electronic key..........................................104
Battery-saving function .................... 127
If the electronic key does not
operate properly ............................ 547
Replacing the battery ...................... 492
Emergency, in case of
If the electronic key does not
operate properly ............................ 547
If the engine will not start ...............545
If the vehicle has
discharged battery ....................... 550
If the vehicle is trapped in rising
water...................................................... 510
If the warning buzzer sounds....... 518
If the warning light turns on ........... 518
If you have a flat tire............................531
If you lose your keys................105, 107
If you think something is
wrong.....................................................516
If your vehicle becomes
stuck......................................................556
If your vehicle needs to be
towed ...................................................... 511
If your vehicle overheats ................553
D
E

617Alphabetical index
GX460_OM_OM60T19U_(U)
Emergency flashers.............................508
Engine
Accessory mode................................. 201
Brake Override System .................. 169
Compartment..................................... 459
Drive-Start Control............................ 170
Hood ....................................................... 458
How to start the engine ................. 200
Identification number .......................562
If the engine will not start............... 545
Ignition switch (engine switch)... 200
Overheating ........................................ 553
Engine compartment cover.............460
Engine coolant....................................... 463
Capacity ................................................ 564
Checking................................................463
Preparing and checking
before winter ....................................374
Engine immobilizer system ..................77
Engine oil ...................................................461
Capacity .................................................562
Checking................................................. 461
Preparing and checking
before winter ....................................374
Warning message.............................529
Engine oil maintenance data ........... 462
Engine switch .........................................200
Engine switch light ...............................400
Event data recorder (EDR)...................10
Flat tire ........................................................531
Floor mats....................................................26
Fluid
Automatic transmission..................566
Brake........................................................567
Steering ................................................. 568
Washer ..................................................... 471
Fog lights.................................................... 221
Replacing light bulbs ...................... 505
Switch ........................................................ 221
Four-wheel drive system....................344
Front passenger occupant
classification system ............................47
Front passenger’s seat belt
reminder light ..................................... 520
Front seats................................................. 132
Adjustment.............................................. 132
Cleaning.................................................445
Correct driving posture.................... 28
Driving position memory.................145
Head restraints .................................... 150
Seat heaters..........................................398
Seat position memory .......................145
Front turn signal lights ............................211
Replacing light bulbs ........................ 501
Turn signal lever.....................................211
Wattage .................................................569
F

618 Alphabetical index
GX460_OM_OM60T19U_(U)
Fuel ............................................................. 562
Capacity .................................................562
Fuel gauge................................................90
Fuel pump shut off system.............. 517
Information ........................................... 570
Refueling.................................................229
Type ............................................. 562, 570
Warning light ...................................... 520
Fuel consumption information ......... 100
Fuel filler door ........................................ 229
Refueling.................................................229
Fuel gauge.................................................. 90
Fuel pump shut off system...................517
Fuses .......................................................... 494
Garage door opener .......................... 433
Gauges........................................................ 90
Glass hatch .............................................. 120
Glove box................................................404
Hands-free system
(for cellular phone)*
Head restraints....................................... 150
Headlights .................................................213
Light switch .............................................213
Replacing light bulbs.......................505
Headlights cleaner............................... 228
Heaters
Automatic air conditioning
system ..................................... 384, 394
Seat heaters ......................................... 398
Outside rear view mirrors............ 389
Height control........................................339
Hill-start assist control........................356
Hood ......................................................... 458
Hooks
Cargo hooks ................................410, 411
Coat hooks...........................................428
Retaining hooks (floor mat)............. 26
Horn.............................................................153
I/M test ..................................................... 454
Identification
Engine .....................................................562
Vehicle......................................................561
Ignition switch (engine switch) ....... 200
Ignition switch light .............................. 400
Illuminated entry system ................... 402
Immobilizer system ................................. 77
Indicators.................................................... 84
Initialization
Items to initialize .................................593
Maintenance data..................449, 462
Moon roof ...............................................164
Power windows..................................... 161
Tire pressure warning system..... 474
Inside rear view mirror.........................155
Instrument panel light control.............. 91
Interior lights .......................................... 400
Switch ........................................................401
Wattage .................................................569
Jack
Vehicle-equipped jack ...................532
Jack handle ............................................. 535
Jam protection function
Moon roof ...............................................164
Power windows..................................... 161
G
H
I
J

619Alphabetical index
GX460_OM_OM60T19U_(U)
Keyless entry
Smart access system with
push-button start ............................. 125
Wireless remote control ................. 104
Keys............................................................. 104
Battery-saving function.....................127
Electronic key ....................................... 104
If the electronic key does not
operate properly.............................547
If you lose your keys ............... 105, 107
Key number plate ............................... 104
Keyless entry ..................... 108, 115, 125
Mechanical key ....................................105
Replacing the battery.......................492
Wireless remote control ................. 104
KDSS .........................................................356
Warning light ........................................ 519
Lane Departure Alert (LDA) ..........250
Lever
Auxiliary catch lever ........................ 458
Hood lock release lever ................ 458
Shift lever............................................... 206
Turn signal lever .................................... 211
Wiper lever ........................................... 222
Lexus Enform Safety Connect............. 71
Lexus Safety System +........................ 233
Automatic High Beam ..................... 216
Dynamic radar cruise control..... 258
LDA (Lane Departure Alert) ...... 250
PCS (Pre-Collision System)........239
License plate lights ................................ 213
Light switch.............................................213
Replacing light bulbs ...................... 505
Light
Engine switch light ........................... 400
Fog light switch..................................... 221
Headlight switch ..................................213
Illuminated entry system.................402
Interior light.............................................401
Interior light list................................... 400
Personal light .........................................401
Replacing light bulbs .......................499
Turn signal lever.....................................211
Vanity lights ............................................419
Wattage .................................................569
Welcome lighting................................215
Light bulbs
Replacing...............................................499
Wattage .................................................569
Lock steering column......................... 202
Luggage cover........................................ 412
K
L
*: Refer to the “NAVIGATION SYSTEM OWNER’S MANUAL” or“MULTIMEDIA OWNER’S MANUAL”.

620 Alphabetical index
GX460_OM_OM60T19U_(U)
Maintenance
Do-it-yourself maintenance......... 455
Maintenance data.............................560
Maintenance requirements.......... 448
Resetting the message
indicating maintenance is
required...............................................449
Malfunction indicator lamp ............... 518
Meter
Indicators...................................................84
Instrument panel light control...........91
Meters.........................................................90
Multi-information display ..................93
Warning lights ........................................84
Micro dust and pollen filter ..............389
Mirrors
Inside rear view mirror ..................... 155
Outside rear view mirror
defoggers .......................................... 389
Outside rear view mirrors.............. 157
Vanity mirrors....................................... 419
Moon roof..................................................163
Jam protection function................... 164
Operation ............................................... 163
MP3 disc*
Multi-information display ..................... 93
BSM (Blind Spot Monitor)............. 361
Crawl Control .................................... 348
Display contents ....................................93
Drive information ..................................95
Dynamic radar cruise control..... 258
Intuitive parking assist ........................271
Language..............................................585
LDA (Lane Departure Alert) .......253
Multi-terrain Select........................... 288
Warning message.............................527
Multi-terrain Monitor ..........................292
Multi-terrain Select ............................. 288
Navigation system*
Odometer .................................................. 90
Off-road precautions ..........................377
Oil
Engine oil ...............................................562
Front differential oil ...........................565
Rear differential oil ............................565
Transfer...................................................566
Opener
Back door................................................. 116
Fuel filler door........................................231
Hood........................................................458
Outside rear view mirrors.................. 157
Adjusting and folding ........................ 157
Blind Spot Monitor .............................361
Outside rear view mirror
defoggers...........................................389
Outside temperature display............. 90
Overheating, Engine .......................... 553
Parking assist sensors
(intuitive parking assist)...................270
Parking brake .......................................... 212
Operation................................................ 212
Parking brake engaged
warning buzzer................................. 212
Parking lights
Light switch.............................................213
Replacing light bulbs ...................... 505
M
N
O
P

621Alphabetical index
GX460_OM_OM60T19U_(U)
Personal lights........................................400
Switch........................................................ 401
Wattage................................................. 569
Power outlet .............................................421
Power windows...................................... 160
Jam protection function..................... 161
Operation ............................................... 160
Window lock switch.......................... 160
Pre-Collision System (PCS)............ 239
Enabling/disabling the system....242
Function ..................................................239
Warning light ........................................ 519
Radiator.................................................... 465
Radio*Rear seat ....................................................134
Adjustment ............................................. 134
Rear turn signal lights ............................ 211
Replacing light bulbs....................... 502
Turn signal lever .................................... 211
Wattage................................................. 569
Rear view mirror
Inside rear view mirror ..................... 155
Outside rear view mirrors.............. 157
Rear view monitor system ................ 278
Rear window defogger ......................389
Rear window wiper.............................. 226
Refueling .................................................. 229
Capacity .................................................562
Fuel types ...............................................562
Opening the fuel tank cap...............231
Replacing
Electronic key battery ..................... 492
Fuses ........................................................494
Light bulbs.............................................499
Tires ............................................................531
Wireless remote control
battery.................................................. 492
Reporting safety defects
for U.S. owners .................................. 596
Reset the maintenance data.............449
Safety connect............................................ 71
Seat belts .................................................... 30
Adjusting the seat belt.......................... 31
Automatic Locking Retractor .........32
Child restraint system
installation .............................................58
Cleaning and maintaining
the seat belt .......................................446
Emergency Locking Retractor.......32
How to wear your seat belt............. 28
How your child should wear
the seat belt ...........................................32
Pregnant women,
proper seat belt use......................... 33
Reminder light and buzzer...........520
Seat belt pretensioners........................ 31
Seat belt extender .................................32
SRS warning light ............................... 518
R
S
*: Refer to the “NAVIGATION SYSTEM OWNER’S MANUAL” or“MULTIMEDIA OWNER’S MANUAL”.

622 Alphabetical index
GX460_OM_OM60T19U_(U)
Seat heaters ............................................398
Seat ventilators ......................................399
Seat position memory...........................145
Seats...................................................132, 134
Adjustment ................................... 132, 134
Adjustment precautions ........ 133, 144
Child seats/child restraint
system installation............................. 58
Cleaning.................................................445
Driving position memory ................ 145
Head restraint .......................................150
Properly sitting in the seat ................28
Seat position memory....................... 145
Ventilators ............................................ 399
Sensor
Automatic headlight system...........214
Automatic High Beam system..... 216
Inside rear view mirror ..................... 156
Intuitive parking assist-sensor .....270
LDA (Lane Departure Alert) ...... 250
Radar sensor ........................................234
Rain-sensing windshield
wipers...................................................224
Service reminder indicators ............... 84
Shift lever
Automatic transmission ................. 206
If the shift lever cannot be
shifted from P .................................. 209
Shift lock system....................................208
Side airbags ............................................... 36
Side mirrors ..............................................157
Adjusting and folding........................ 157
Blind Spot Monitor............................. 361
Side turn signal lights..............................211
Replacing light bulbs ...................... 505
Turn signal lever.....................................211
Smart access system with
push-button start................................. 125
Antenna location..................................125
Starting the engine............................200
Snow tires.................................................376
Spare tire ...................................................531
Inflation pressure............................... 568
Storage location.................................532
Spark plug ............................................... 564
Specifications......................................... 560
Speedometer............................................ 90
Steering lock
Column lock release .......................203
Steering wheel ........................................153
Adjustment..............................................153
Audio switches*Heated steering wheel ................... 397
Steering wheel position
memory.................................................145
Stop/tail lights
Replacing light bulbs ...................... 505
Storage feature ..................................... 403
Stuck
If the vehicle becomes stuck........556
Sunshade
Roof ............................................................164
Sun visors...................................................419
Switch
Automatic High Beam switch.......216
AVS switch ........................................... 343
BSM (Blind Spot Monitor)
switch ................................................... 362
Center differential lock/
unlock switch....................................345

623Alphabetical index
GX460_OM_OM60T19U_(U)
Crawl Control switch ..................... 348
Cruise control switch...................... 258
“DAC” switch.......................................352
Door lock switches ..............................110
Driving position memory
switches................................................ 145
Emergency flashers switch ..........508
Engine switch...................................... 200
Fog light switch .....................................221
Four-wheel drive control
switch....................................................344
Headlight cleaner switch ...............228
Height control switch.......................339
LDA (Lane Departure Alert) .......252
Light switches ........................................213
Moon roof switches........................... 163
Multi-terrain Monitor switch ........292
Multi-terrain Select switch............ 288
“ODO TRIP” button..............................91
Outside rear view mirror
switches................................................ 157
Parking assist........................................270
Power door lock switch .................... 115
Power window switch ...................... 160
Rear window wiper and
washer switch...................................226
Rear window and outside
rear view mirror
defoggers switch ........................... 389
Second start mode switch.............207
Seat heater switches........................ 398
Talk switch*Tilt and telescopic steering
control switch .................................... 153
Vehicle-to-vehicle distance
switch ................................................... 264
VSC OFF switch............................... 357
Window lock switch ......................... 160
Windshield wipers and
washer switch ...................................222
Tachometer ............................................... 90
Tail lights .................................................... 213
Light switch.............................................213
Replacing light bulbs ...................... 505
Talk switch*
Telephone switch*
Theft deterrent system
Alarm ...........................................................79
Engine immobilizer system ..............77
Tire inflation pressure......................... 484
Maintenance data............................. 568
Tire pressure warning system..........473
Function.................................................. 473
Initializing ............................................... 473
Initializing procedures..................... 474
Installing tire pressure warning
valves and transmitters................ 473
Registering ID codes....................... 475
Warning light.......................................520
Tires ............................................................472
Chains ..................................................... 374
Checking ................................................472
If you have a flat tire............................531
Inflation pressure................................484
Information............................................ 573
Replacing.................................................531
Rotating tires .........................................472
T
*: Refer to the “NAVIGATION SYSTEM OWNER’S MANUAL” or“MULTIMEDIA OWNER’S MANUAL”.

624 Alphabetical index
GX460_OM_OM60T19U_(U)
Size...........................................................568
Snow tires ..............................................374
Spare tire................................................. 531
Tire pressure warning
system ..................................................473
Tools........................................................... 532
Towing
Dinghy towing ...................................... 199
Emergency towing............................. 512
Towing hooks ....................................... 513
Trailer Sway Control....................... 356
Trailer towing ..........................................181
Trailer Sway Control...........................356
TRAC (Traction Control) .................355
Transmission
Automatic transmission ................. 206
AVS switch ...........................................343
If the shift lever cannot be
shifted from P .................................. 209
Trip meters ................................................. 90
Turn signal lights ...................................... 211
Replacing light
bulbs..............................501, 502, 505
Turn signal lever .................................... 211
Wattage................................................. 569
USB port*
Vanity lights
Vanity lights ........................................... 419
Wattage................................................. 569
Vanity mirrors ..........................................419
Vehicle identification number...........561
VSC (Vehicle Stability Control) ....355
Warning buzzers ...................................518
Brake system ........................................ 518
Downshifting........................................209
Intuitive parking assist.......................273
LDA (Lane Departure Alert).......250
Open back door....................................114
Open door ...............................................114
Pre-collision warning....................... 239
Radar cruise control ........................265
Seat belt remainder ..........................520
Warning lights .........................................518
ABS ............................................................519
Brake Override System...................521
Brake system ........................................ 518
Charging system ................................ 518
Drive-Start Control ............................521
High coolant temperature ............. 518
KDSS..........................................................519
Low engine oil pressure ................. 518
Low fuel level .......................................520
Malfunction indicator lamp............ 518
Open door ...........................................520
Parking brake indicator....................519
PCS ............................................................519
Seat belt reminder light ..................520
Slip indicator ..........................................519
SRS............................................................. 518
Tire pressure warning light...........520
Warning message.................................527
Warning reflector holder....................410
Washer......................................................222
Checking ................................................. 471
Preparing and checking
before winter .................................... 374
Switch .......................................................222
Washing and waxing ...........................442
U
V
W

625Alphabetical index
GX460_OM_OM60T19U_(U)
Weight
Cargo capacity ....................................180
Load limits...............................................180
Weight....................................................560
Wheels......................................................488
Replacing wheels................................ 531
Size...........................................................568
Window glasses ..................................... 160
Window lock switch ............................. 160
Windows
Power windows................................... 160
Rear window defogger.................. 389
Windshield wipers ............................... 222
Intermittent windshield wipers
with interval adjuster ..................... 222
Rain-sensing windshield
wipers...................................................223
Windshield wiper de-icer .................389
Winter driving tips................................ 374
Wireless remote control .................... 104
Battery-Saving Function...................127
Locking/Unlocking ......................... 104
Replacing the battery.......................492
WMA disc*
XM® Satellite Radio*X
*: Refer to the “NAVIGATION SYSTEM OWNER’S MANUAL” or“MULTIMEDIA OWNER’S MANUAL”.

626 Alphabetical index
GX460_OM_OM60T19U_(U)

627Alphabetical index
GX460_OM_OM60T19U_(U)

628
GX460_OM_OM60T19U_(U)
GAS STATION INFORMATION
Auxiliary catch lever Fuel filler door
P. 458 P. 231
Hood lock release lever Fuel filler door opener Tire inflation pressure
P. 458 P. 231 P. 568
Fuel tank capacity(Reference) 23.0 gal. (87 L, 19.1 Imp.gal.)
Fuel typeUnleaded gasoline with a Octane Rating of 91 or higher(Research Octane Number 96)
P. 562, 570
Cold tire inflation pressure P. 568
Engine oil capacity(Drain and refill — reference)
With filterWithout filter
8.2 qt. (7.8 L, 6.9 Imp.qt.)7.8 qt. (7.4 L, 6.5 Imp.qt.)
Engine oil type “Toyota Genuine Motor Oil” or equivalentP. 562