pittsburgh steelers - national football leagueprod.static.steelers.clubs.nfl.com/assets/docs/... ·...
TRANSCRIPT

PITTSBURGH STEELERS TICKET MANAGER: DESKTOP

PRINT TICKETS (desktop)
STEP 1: Visit the Pittsburgh Steelers Season Ticket Holders website: Steelers.com/AccountManager
STEP 3: A new window/tab will appear. Enter your ACCOUNT ID and PASSWORD.
STEP 2: Click SIGN IN in the top-right corner.
STEP 4: Click the SIGN IN button at the bottom.
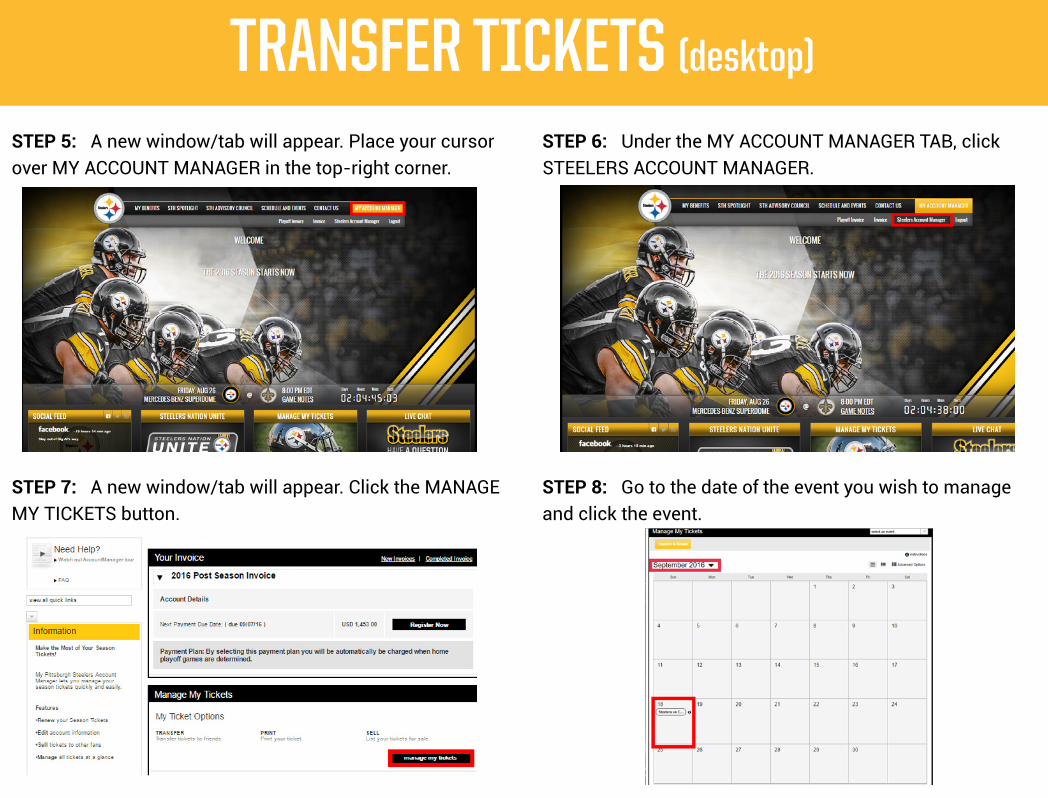
STEP 5: A new window/tab will appear. Place your cursor over MY ACCOUNT MANAGER in the top-right corner.
STEP 7: A new window/tab will appear. Click the MANAGE MY TICKETS button.
STEP 6: Under the MY ACCOUNT MANAGER TAB, click STEELERS ACCOUNT MANAGER.
STEP 8: Go to the date of the event you wish to manage and click the event.
PRINT TICKETS (desktop)

PRINT TICKETS (desktop)
STEP 1: Visit the Pittsburgh Steelers Season Ticket Holders website: Steelers.com/AccountManager
STEP 3: A new window/tab will appear. Enter your ACCOUNT ID and PASSWORD.
STEP 2: Click SIGN IN in the top-right corner.
STEP 4: Click the SIGN IN button at the bottom.
STEP 5: A new window/tab will appear. Place your cursor over MY ACCOUNT MANAGER in the top-right corner.
STEP 7: A new window/tab will appear. Click the MANAGE MY TICKETS button.
STEP 6: Under the MY ACCOUNT MANAGER TAB, click STEELERS ACCOUNT MANAGER.
STEP 8: Go to the date of the event you wish to manage and click the event.
PRINT TICKETS (desktop)

PRINT TICKETS (desktop) PRINT TICKETS (desktop)
STEP 9: Click the PRINT-AT-HOME button.
STEP 11: Click the Print (# of seats) button in the top-right corner.
STEP 10: Check the box next to the seat(s) you would like to PRINT.
STEP 12: When a white box pops up on your screen, click the CONTINUE TO PRINT button. NOTE: If you wish to have new bar codes, please check the box.
STEP 13: Carefully review the terms of use. Check the box to “Agree to the terms of use.”
STEP 14: Click the SUBMIT button in the bottom-right corner.
STEP 15: Please select “Open or Save on the PDF to view your tickets.”

TRANSFER TICKETS (desktop) TRANSFER TICKETS (desktop)
STEP 1: Visit the Pittsburgh Steelers Season Ticket Holders website: Steelers.com/AccountManager
STEP 3: A new window/tab will appear. Enter your ACCOUNT ID and PASSWORD.
STEP 2: Click SIGN IN in the top-right corner.
STEP 4: Click the SIGN IN button at the bottom.
STEP 5: A new window/tab will appear. Place your cursor over MY ACCOUNT MANAGER in the top-right corner.
STEP 7: A new window/tab will appear. Click the MANAGE MY TICKETS button.
STEP 6: Under the MY ACCOUNT MANAGER TAB, click STEELERS ACCOUNT MANAGER.
STEP 8: Go to the date of the event you wish to manage and click the event.

TRANSFER TICKETS (desktop) TRANSFER TICKETS (desktop)
STEP 9: Click on the TRANSFER TICKETS button. STEP 10: Check the box next to the seat(s) you would like to TRANSFER.
STEP 11: Click the TRANSFER (# of seats) button inthe top-right corner.
STEP 12: Choose a recipient. If you have not previously entered contacts to your profile or the contact is not listed, click “Enter a New Contact.”
STEP 13: Select how many hours or days prior to the event a reminder email is sent.
NOTE: This reminder email is only sent if the recipient hasn’t accepted your offer.

TRANSFER TICKETS (desktop)
STEP 14: Select if you would like the price to display on the transfer offer.
STEP 15: Click the NEXT STEP button in the bottom-right corner.
TRANSFER TICKETS (desktop)
STEP 16: Carefully review the details of your ticket transfer to ensure they are correct. Check the box to “Agree to the terms of use.”
STEP 17: Click the COMPLETE TRANSFER button in the bottom-right corner.
STEP 18: When completed, an email invite will be sent to the recipient to accept or decline the transferred ticket. If accepted, your original ticket will no longer be valid. Note: do not destroy or discard your original ticket until the recipient has completed the acceptance process. You will receive an email confirmation when the recipient either accepts or declines the transfer invite.

TRANSFER TICKETS (desktop)
STEP 14: Select if you would like the price to display on the transfer offer.
STEP 15: Click the NEXT STEP button in the bottom-right corner.
TRANSFER TICKETS (desktop)
STEP 16: Carefully review the details of your ticket transfer to ensure they are correct. Check the box to “Agree to the terms of use.”
STEP 17: Click the COMPLETE TRANSFER button in the bottom-right corner.
STEP 18: When completed, an email invite will be sent to the recipient to accept or decline the transferred ticket. If accepted, your original ticket will no longer be valid. Note: do not destroy or discard your original ticket until the recipient has completed the acceptance process. You will receive an email confirmation when the recipient either accepts or declines the transfer invite.

SELL ON TICKET EXCHANGE (desktop) SELL ON TICKET EXCHANGE (desktop)
STEP 1: Visit the Pittsburgh Steelers Season Ticket Holders website: Steelers.com/AccountManager
STEP 3: A new window/tab will appear. Enter your ACCOUNT ID and PASSWORD.
STEP 2: Click SIGN IN in the top-right corner.
STEP 4: Click the SIGN IN button at the bottom.
STEP 5: A new window/tab will appear. Place your cursor over ACCOUNT MANAGER in the top-right corner.
STEP 7: A new window/tab will appear. Click the MANAGE MY TICKETS button.
STEP 6: Under the MY ACCOUNT MANAGER TAB, click STEELERS ACCOUNT MANAGER.
STEP 8: Go to the date of the event you wish to manage and click the event.

SELL ON TICKET EXCHANGE (desktop) SELL ON TICKET EXCHANGE (desktop)
STEP 9: Click on the SELL TICKETS button.
STEP 11: Click the POST FOR SALE (# of seats) button in the top-right corner.
STEP 10: Check the box next to the seat(s) you would like to SELL.
STEP 12: When the white box pops up, click CONTINUE TO POST FOR SALE button in the bottom-right corner.
STEP 13: When a new white box pops up on your screen, update your seller information.
STEP 15: Once you have updated your seller profile information, you will need to select between three pricing methods: fixed, market or declining.
STEP 14: Click the SAVE button in the bottom-right corner.
STEP 16: Input the amount you would like to receiveper ticket.
SELL ON TICKET EXCHANGE (desktop)
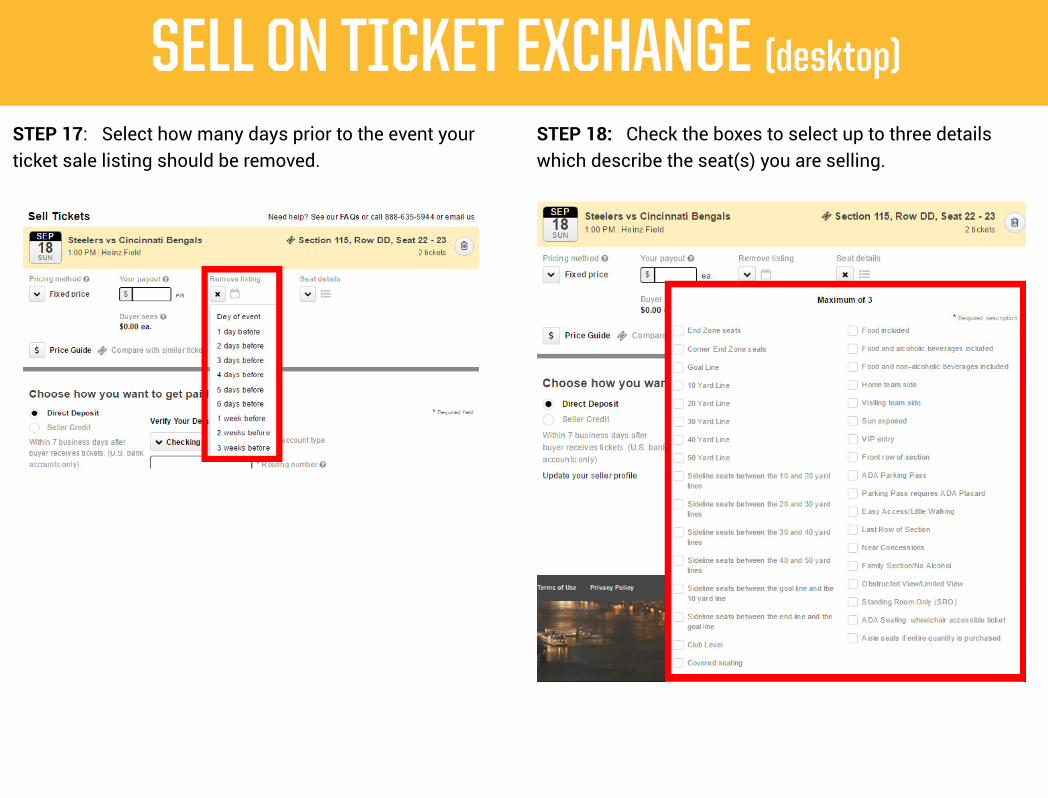
STEP 18: Check the boxes to select up to three details which describe the seat(s) you are selling.
SELL ON TICKET EXCHANGE (desktop)
STEP 17: Select how many days prior to the event your ticket sale listing should be removed.
STEP 19: Click on the Price Guide. This guide reflects actual listing prices of other tickets currently posted for sale.
STEP 20: Choose between two methods of payment: Direct Deposit or Seller Credit. If you choose DIRECT DEPOSIT, enter your bank account type, routing and account number.
OR select SELLER CREDIT– Payments will be applied to your Pittsburgh Steelers season ticket account. This money will be applied to the next billing cycle (Regular Season, Post Season, etc.)

SELL ON TICKET EXCHANGE (desktop)
STEP 21: Click the CONTINUE button in the bottom-right corner.
STEP 23: Click the SUBMIT LISTING button in the bottom-right corner.
STEP 22: Carefully review the terms of use. Check the box to “Agree to the terms of use.”
PITTSBURGH STEELERS TICKET MANAGER: MOBILE APP

DOWNLOAD TICKETS TO PHONE (Mobile App)
STEP 1: Open the Steelers App.
STEP 3: Click SEASON TICKET HOLDER.
STEP 2: Click the menu button in the top-left corner.
STEP 4: Sign in to your Steelers or Ticketmaster account using your EMAIL and PASSWORD.
DOWNLOAD TICKETS TO PHONE (Mobile App)
STEP 5: Click the SIGN IN button at the bottom.
STEP 7: Click ADD TO APPLE WALLET button on each ticket. To select more tickets, swipe left or right. Apple Wallet is only available for iOS users. NOTE: You can scan the QRF code directly if you do not want to download them to your phone.
STEP 6: To select the event you want to manage, click the event date.

DOWNLOAD TICKETS TO PHONE (Mobile App)
STEP 1: Open the Steelers App.
STEP 3: Click SEASON TICKET HOLDER.
STEP 2: Click the menu button in the top-left corner.
STEP 4: Sign in to your Steelers or Ticketmaster account using your EMAIL and PASSWORD.
DOWNLOAD TICKETS TO PHONE (Mobile App)
STEP 5: Click the SIGN IN button at the bottom.
STEP 7: Click ADD TO APPLE WALLET button on each ticket. To select more tickets, swipe left or right. Apple Wallet is only available for iOS users. NOTE: You can scan the QRF code directly if you do not want to download them to your phone.
STEP 6: To select the event you want to manage, click the event date.

TICKET TRANSFER (Mobile App)
STEP 1: Open the Steelers App.
STEP 3: Click SEASON TICKET HOLDER.
STEP 2: Click the menu button in the top-left corner.
STEP 4: Sign in to your Steelers or Ticketmaster account using your EMAIL and PASSWORD.
STEP 5: Click the SIGN IN button at the bottom.
STEP 7: Click SELECT in the top-right corner.
STEP 6: To select the event you want to manage, click the event date.
STEP 8: Select the ticket(s) you would like to manage by swiping right or left to view more.
TICKET TRANSFER (Mobile App)

TICKET TRANSFER (Mobile App)
STEP 9: After you have selected your tickets, click TRANSFER in the bottom-left corner.
STEP 11: Click DONE.
STEP 10: To transfer tickets, click the ADD FROM CONTACTS button. NOTE: By clicking “Add from Contacts” requires the app to access your contacts from your phone. If you do not want the app to access your contacts, you must manually enter the recipient’s information.
SELL TICKETS (Mobile App)
STEP 1: Open the Steelers App.
STEP 3: Click SEASON TICKET HOLDER.
STEP 2: Click the menu button in the top-left corner.
STEP 4: Sign in to your Steelers or Ticketmaster account using your EMAIL and PASSWORD.

STEP 5: Click the SIGN IN button at the bottom.
STEP 7: Click SELECT in the top-right corner.
STEP 6: To select the event you want to manage, click the event date.
STEP 8: Select the ticket(s) you would like to manage by swiping right or left to view more.
SELL TICKETS (Mobile App) SELL TICKETS (Mobile App)
STEP 9: Click the SELL button in the bottom-right corner.
STEP 11: Choose a pricing method and click the NEXT button.
STEP 10: Click the START button.
STEP 12: Select a day to remove your listing.

SELL TICKETS (Mobile App)
STEP 13: Select a time to remove your listing.
STEP 15: Determine how you want to get paid. Select Direct Deposit and enter your bank account type, routing and account number or choose Seller Credit - Payments will be applied to your Pittsburgh Steelers season ticket account. This money will be applied to the next billing cycle (Regular Season, Post Season, etc.)
Once you have chosen your payment method, click the NEXT button.
STEP 14: Click the NEXT button at the bottom.
SELL TICKETS (Mobile App)
STEP 16: Enter the price amount per ticket and Listing Price per ticket.
STEP 17: Click the POST FOR SALE button at the bottom.

SELL TICKETS (Mobile App)
STEP 13: Select a time to remove your listing.
STEP 15: Determine how you want to get paid. Select Direct Deposit and enter your bank account type, routing and account number or choose Seller Credit - Payments will be applied to your Pittsburgh Steelers season ticket account. This money will be applied to the next billing cycle (Regular Season, Post Season, etc.)
Once you have chosen your payment method, click the NEXT button.
STEP 14: Click the NEXT button at the bottom.
SELL TICKETS (Mobile App)
STEP 16: Enter the price amount per ticket and Listing Price per ticket.
STEP 17: Click the POST FOR SALE button at the bottom.