pocket guide minimally invasive hip endoprosthetics · pocket guide minimally invasive hip ....
TRANSCRIPT

Pocket guide
Minimally invasive hip endoprostheticsDirect Anterior Approach for Total Hip Replacement Michael Leunig, Switzerland
This material is not approved for use in the US

Disclaimer Great care has been taken to maintain the accuracy of the information contained in the publication. However, neither KLEOS, nor the authors can be held responsible for errors or any consequences arising from the use of the information contained in this publication. The statements or opinions contained in editorials and articles in this journal are solely those of the authors thereof and not of KLEOS. The products, procedures, and therapies described are only to be applied by certified and trained medical professionals in environments specially designed for such procedures. No suggested test or procedure should be carried out unless, in the reader’s professional judgment, its risk is justified. Because of rapid advances in the medical sciences, we recommend that independent verification of diagnosis, drugs dosages, and operating methods should be made before any action is taken. Although all advertising material is expected to conform to ethical (medical) standards, inclusion in this publication does not constitute a guarantee or endorsement of the quality or value of such product or of the claims made of it by its manufacturer. Some of the products, names, instruments, treatments, logos, designs, etc. referred to in this journal are also protected
by patents and trademarks or by other intellectual property protection laws even though specific reference to this fact is not always made in the text. Therefore, the appearance of a name, instrument, etc. without designation as proprietary is not to be construed as a representation by the publisher that it is in the public domain. This publication, including all parts thereof, is legally protected by copyright. Any use, exploitation or commercialization outside the narrow limits of copyrights legislation, without the publisher’s consent, is illegal and liable to prosecution. This applies in particular to photostat reproduction, copying, scanning or duplication of any kind, translating, preparation of microfilms and electronic data processing and storage. Institutions’ subscriptions allow to reproduce tables of content or prepare lists of articles including abstracts for internal circulation within the institutions concerned. Permission of the publisher is required for resale or distribution outside the institutions. Permission of the publisher is required for all other derivative works, including compilations and translations. Permission of the publisher is required to store or use electronically any material contained in this journal, including any article or part of an article. For inquiries contact the publisher at the address indicated.

Direct anterior approach for total hip arthroplasty Pocket guide 3
Table of contentsIntroduction 5
Instruments 6
Anatomy 8
Description of the approach 9
Patient positioning 10
Defining the skin incision 11
Disinfection and draping 12
Operative procedure 13 Incise the skin 13 Conduct the epifascial approach 14 Identify the anterior superior iliac spine 15 Conduct the subfascial approach 16 Identifythelateralcircumflexarteryandperformhemostasis 17 Identify the anterior edge of the greater trochanter 18 Exposethecapsuleandidentifythereflectedheadoftherectusfemoris 20 Dislocatethefemoralhead 22 Performthefemoralneckosteotomyandextractthehead 23 Positionthepatientforpreparingthefemurandreleasingthecapsule 24 Mobilizethefemuranteriorly 25 Placethepatientinaninversefigure-of-fourpositionforfemoralexposure 26 Preparethefemur(femur-firsttechnique) 27 Preparetheacetabulum 28 Insertthecup 30 Assess cup orientation and stability 31 Insertthestem 32 Close the wound 33
Pocket guide Direct anterior approach for total hip arthroplasty4
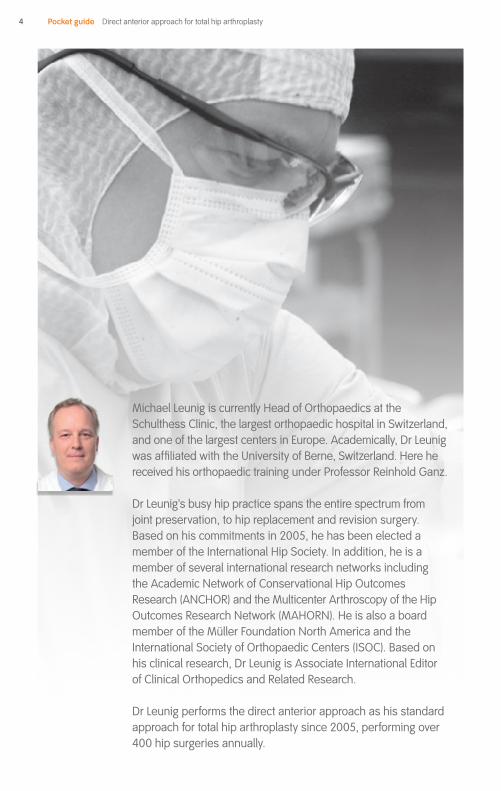
Michael Leunig is currently Head of Orthopaedics at the Schulthess Clinic, the largest orthopaedic hospital in Switzerland, and one of the largest centers in Europe. Academically, Dr Leunig wasaffiliatedwiththeUniversityofBerne,Switzerland.Herehereceived his orthopaedic training under Professor Reinhold Ganz.
Dr Leunig’s busy hip practice spans the entire spectrum from joint preservation, to hip replacement and revision surgery. Basedonhiscommitmentsin2005,hehasbeenelectedamember of the International Hip Society. In addition, he is a member of several international research networks including the Academic Network of Conservational Hip Outcomes Research(ANCHOR)andtheMulticenterArthroscopyoftheHipOutcomesResearchNetwork(MAHORN).Heisalsoaboardmember of the Müller Foundation North America and the InternationalSocietyofOrthopaedicCenters(ISOC).Basedonhis clinical research, Dr Leunig is Associate International Editor of Clinical Orthopedics and Related Research.
Dr Leunig performs the direct anterior approach as his standard approachfortotalhiparthroplastysince2005,performingover400hipsurgeriesannually.

Direct anterior approach for total hip arthroplasty Pocket guide 5
IntroductionMinimallyinvasivetotalhiparthroplasty(THA)hasgainedinpopularityinrecentyears. One of the approaches commonly used for this is the direct anterior approach(DAA).AdvantagesoftheDAAinclude:
- Sparingofmuscles(1,2)- Improvedjointstabilityandlowdislocationrate(3)- Rapidpostoperativerecoveryandasimplerehabilitationregimen(4)- Easybilateralhipreplacement[5]
Duetotheseadvantages,theindicationsforTHAcanbeexpanded.Forexample,patientswithneuropathicdisease(wheredislocationrateishigher),canbeoperated on as the dislocation risk is reduced.
Outlined in this ‘Pocket guide’ are the key steps and refresher information for performing the DAA. A clinical video ‘Minimally Invasive Anterior Approach for Total Hip Replacement using POLARSTEM™* and R3™ Cup’ is also available online and as a DVD.
References1. Bergin PF, Doppelt JD, Kephart CJ, et al (2011)Comparisonofminimallyinvasivedirectanterior versusposteriortotalhiparthroplastybasedoninflammationandmuscledamagemarkers. J Bone Joint Surg Am93(15):1392-8.
2.Bremer AK, Kalberer F, Pfirrmann CW, et al (2011)Soft-tissuechangesinhipabductormusclesandtendonsaftertotalhipreplacement:comparisonbetweenthedirectanteriorandthetransglutealapproaches. J Bone Joint Surg Br93(7):886-9.
3. Masonis J, Thompson C, Odum S(2008)Safeandaccurate:learningthedirectanteriortotalhiparthroplasty. Orthopedics31(12Suppl2).
4. Mayr E, Nogler M, Benedetti MG, et al(2009)AprospectiverandomizedassessmentofearlierfunctionalrecoveryinTHApatientstreatedbyminimallyinvasivedirectanteriorapproach:agait analysis study. Clin Biomech(Bristol,Avon)24(10):812-8.
5. Aghayev E, Beck A, Staub LP, et al(2010)Simultaneousbilateralhipreplacementrevealssuperioroutcomeandfewercomplicationsthantwo-stageprocedures:aprospectivestudyincluding1819 patientsand5801follow-upsfromatotaljointreplacementregistry.BMC Musculoskelet Disord11:245
*POLARSTEMhasnotbeenclearedorapprovedforcommercialdistributionbytheUSFoodand Drug Administration

SBoneLeverw.longsoft-tissueprotectionArt. No. 24.5137.L SAP No. 75100665
SBoneleverexpandeddoublecurvedArt. No. 24.51.57 SAP No. 775023836
SBoneleverdoublecurvedw.longsoft-tissueprotectionArt. No. 24.51.48L SAP No. 75100666
SHiplever,bluntw.longsoft-tissueprotectionArt. No. 24.51.40L SAP No. 75100667
S Trochanteric leverArt. No. 24.51.72 SAP No. 75023837
Retractors for anterior approachSet.-no 75210259
InstrumentsFor a direct anterior approach to hip arthroplasty, in addition to standard surgicalinstrumentsfoundineveryoperatingroom,useasetofsoft-tissue-sparing instruments. The retractors’ supporting surface is enlarged to better distribute the stress and the edges are curved to prevent them from cutting intotissue.Youwillfindtheseinstruments,dedicatedtothedirectanteriorapproach, highlighted within this pocket guide.
S Hip LeverArt. No. 24.51.90 SAP No. 775100668
S Pelvis leverArt. No. 24.51.73 SAP No. 75100669
3
6
7
5
4
1
2
Pocket guide Direct anterior approach for total hip arthroplasty6

Direct anterior approach for total hip arthroplasty Pocket guide 7
Subfascial approach
Capsularexposure
Femoral preparation
Acetabular preparation
Anterior mobilization of the femur
Capsularexposure(cont)
SBoneleverexpandeddoublecurvedArt. No. 24.51.57 SAP No. 775023836
SHiplever,bluntw.longsoft-tissueprotectionArt. No. 24.51.40L SAP No. 75100667
Short blunt retractors(non-approach specific instruments)
SBoneleverexpandeddoublecurvedArt. No. 24.51.57 SAP No. 775023836
S Trochanteric leverArt. No. 24.51.72 SAP No. 75023837
SBoneLeverw.longsoft-tissueprotectionArt. No. 24.5137.L SAP No. 75100665
SBoneleverexpandeddoublecurvedArt. No. 24.51.57 SAP No. 775023836
SHiplever,bluntw.longsoft-tissueprotectionArt. No. 24.51.40L SAP No. 75100667
Bluntretractors(non-approach specific instruments)
SBoneleverexpandeddoublecurvedArt. No. 24.51.57 SAP No. 775023836
S Trochanteric leverArt. No. 24.51.72 SAP No. 75023837
S Hip LeverArt. No. 24.51.90 SAP No. 775100668
S Pelvis leverArt. No. 24.51.73 SAP No. 75100669
2
2
4
4
42
22
1
2
2
6/5
4
5
2
5
7
7
5
4
1
Retractors for anterior approach
4
6

8 Pocket guide Direct anterior approach for total hip arthroplasty
Anatomy
Fig. 1–3
1. Caput femoris2. M. glutaeus medius3. M. glutaeus minimus4. M. tensor fasciae latae5. M. satorius6. M. iliopsoas7. M. rectus femoris8. M. vastus lateralis9. Tractus Iliotibialis10. M.glutaeusmaximus11. Nervus cutaneus femoralis lateralis
Fig.2
Fig. 1
1
2
3
4
5
6
7
8
9
11

Direct anterior approach for total hip arthroplasty Pocket guide 9
Description of the approachThe Direct Anterior Approach to hip arthroplasty, can be summarized as follows:- makeanobliqueincisionintheskincrease- incisethesheathofthetensorfascialongitudinallyandpeelitout- performbluntdissection,toopenupthegapbetweenthetensorfasciasheath
and the tensor fascia muscle, to locate the femoral neck.
Fig. 3
Anterior
2 10345 71 6

Pocket guide Direct anterior approach for total hip arthroplasty10
Afootplateonthenon-operatedsidepreventsthepatientfromslidingoffthetable.Additionally,asidepost,locatedonthenon-operatedside,canbeusedtopositiontheoperatedleginafigure-of-fourpositionduringsurgery.Thesurgeonstands to the left of his assistant, while the second assistant stands on the opposite side of the table.
Patient positioning
It is important to correctly position the patient on the operating table. The table must have the option of lowering both legs, with the break in the table directly under the hip joint.
Fig. 5
Fig. 4

Direct anterior approach for total hip arthroplasty Pocket guide 11
Definingtheskinincision
Whendefiningtheincision,itisimportanttolocatethelandmarksoftheanteriorsuperioriliacspine(ASIS).
The traditional approach is longitudinal, two centimeters distal and lateral to the ASIS.However,inthisapproach,useanobliqueincisionintheskincrease,whichisidentifiedduringflexionofthehip.(Figures6a-c)
Theclassiclongitudinalincisionisperpendiculartothetension(Langer’s)lines.Thiscanresultinawidescarandwoundhealingproblems.Theoblique(bikini-type)incision, however, is in the same direction as the tension lines. This means there is reduced wound stress, which can lead to better wound healing and a less pronounced scar.
Fig. 6
a b
c

Pocket guide Direct anterior approach for total hip arthroplasty12
Disinfection and draping
Now mark the ASIS and the skin incision. You can either drape both legs or the side of the arthritic hip only. Draping both legs is particularly helpful for beginners of the direct anterior approach, as it permits a much better range of motion for bothextremitiesduringsurgeryandmakesiteasiertooperateondifficulthips.Withmoreexperiencewiththeprocedure,justthehip(s)canbedraped,whichcanreduce time in surgery.
Draping of both legs: 1)Holdeachhipinslightflexionandabductionwithextendedknees.Adduct
the arthritic hip to also disinfect the buttock and put a sterile paper towel underneath.Betweenbothlegs,placeasterilediaper.
2)Finishdisinfectionincludingbothfeetandputsterilestockingson.3)UsefirstaU-andthenaW-papertowelandclosethefieldwithasterilecurtain.4)Transparentadhesivetapesprotecttheskinduringsurgery.
Draping the hip only:This method is similar to a horizontal drape used for hip fractures.1)Disinfectthehipfromthefirstribtotheabdominalmiddlelinedowntothemid-thigh. 2)Covertheareawithatransparenttape,followedbythehorizontaldrape(3M).
Fig.7

Direct anterior approach for total hip arthroplasty Pocket guide 13
Operative procedureIncise the skin
Beforeincisingtheskin,identifytheASISoncemoreandfollowyourpreviously-drawn marking.
Theskinisincisedobliquely.Thefirstincisioninvolvescuttingthroughthedermallayer, followed by hemostasis. Avoid going too far medially when incising.
Fig. 8

Pocket guide Direct anterior approach for total hip arthroplasty14
Thereafter, proceed with the incision in a longitudinal direction to avoid the course of the lateral femoral cutaneous nerve.
The transverse view of the femur shows where you have to go through the fascia layer.
Leunig_DAA_01a_V03
Fig. 9
lateral femoral cutaneous nerve
Fig.10
a b
c d
Conduct the epifascial approach

Direct anterior approach for total hip arthroplasty Pocket guide 15
Identify the anterior superior iliac spine
Identify the anterior superior iliac spine to ensure that you are above the sheath of the tensor fascia. The bluish appearance of this fascial layer indicates your incision site.Useasecuringsuturetopreventtheincisionextendingmedially.
Fig. 11

Pocket guide Direct anterior approach for total hip arthroplasty16
Conduct the subfascial approach
As previously mentioned, proceed with the incision in a longitudinal direction, ratherthantheobliquedirection.
Incise the sheath of the tensor fascia longitudinally and peel it out. It is helpful to put a towel roll under the knee to release the tension on the rectus femoris and tensorfasciaelatae(TFL)muscles.
Insertyourfingerandperformbluntdissection,openingupthegapbetweenthe tensor fascia sheath and the tensor fascia muscle. The three short blunt retractors are then used to open up a window, enabling you to go deeper with your dissection.
Fig. 12 Fig. 13
Fig. 14

Direct anterior approach for total hip arthroplasty Pocket guide 17
Identify the lateral circumflex artery and perform hemostasis
Identifythevascularbranchofthelateralcircumflexartery,whichislocatedatthe inferior margin of your incision. You can either coagulate this blood vessel in younger patients, or ligate it in older patients with arteriosclerosis. Sometimes it is not even neccessary to ligate this vessel. Now descend to the deeper part of the tissue and the capsule.
Fig. 15

Pocket guide Direct anterior approach for total hip arthroplasty18
Identify the anterior edge of the greater trochanter
Itishelpfultopalpatetheanterioredgeofthegreatertrochanterwithyourfinger,asit acts as a landmark to help you locate the femoral neck.
Fig. 16

Direct anterior approach for total hip arthroplasty Pocket guide 19
Once you have located the femoral neck, use a Cobb elevator to lift the gluteus minimusmuscleoffthecapsule.(Figure17)
Then place curved retractors between the capsule and the gluteus minimus (SHiplever,bluntw.longsoft-tissueprotection 4 ),betweenthetrochanterand the tensor fasciae latae (SBoneleverexpandeddoublecurved 2 )and,finally,around the medial part of the femoral neck into the obturator foramen ( 4 ). Thesethreeretractorsallowgoodexposureofthejoint.(Figure18)
Fig.17 Fig. 18
2
4
4

Pocket guide Direct anterior approach for total hip arthroplasty20
Expose the capsule and identify the reflected head of the rectus femoris
Now you have reached the capsule. After removing the fatty tissue, you have a good view of the top of the capsule and you need to identify the indirect head of the rectus femoris. Here you see the rectus femoris muscle.
Fig. 19

Direct anterior approach for total hip arthroplasty Pocket guide 21
2 2
44
4 1
The incision follows the rectus femoris muscle down to the anterior edge of the greatertrochanter(1)-thefirststepofthecapsulotomy.Inthesecondstep,theincisionthencurvestowardsthemedialaspectofthefemoralneck(2).(Figure20)
Afterthecapsuleisopened(3),theretractorsareplacedintracapsularly.Placeoneretractor on top of the femoral head (SBoneleverw.longsoft-tissueprotection 1 ), thenextaroundthemedialaspectofthefemoralneck(SHiplever,bluntw.longsoft-tissueprotection 4 ),andthefinalretractoraroundthelateralaspectofthefemoral head ( 4 ).(Figure21)
Fig.20 Fig.21
4

Pocket guide Direct anterior approach for total hip arthroplasty22
Dislocate the femoral head
A corkscrew is then inserted into the femoral head. Optionally, it can be helpful to dislocate the femoral head before performing the neck cut. To do this, insert a spoon into the gap between the femoral head and the socket. With the combined rotationofbothinstruments,thefemoralheadcanbesubluxatedoutofthejoint to tear the round ligament.
Fig.22
Direct anterior approach for total hip arthroplasty Pocket guide 23
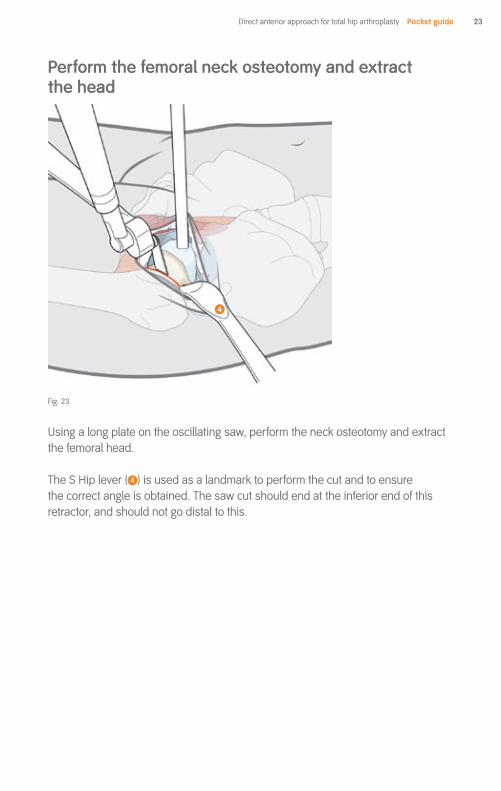
Perform the femoral neck osteotomy and extract the head
Usingalongplateontheoscillatingsaw,performtheneckosteotomyandextractthe femoral head.
The S Hip lever ( 4 ) is used as a landmark to perform the cut and to ensure the correct angle is obtained. The saw cut should end at the inferior end of this retractor, and should not go distal to this.
Fig.23
4
Pocket guide Direct anterior approach for total hip arthroplasty24
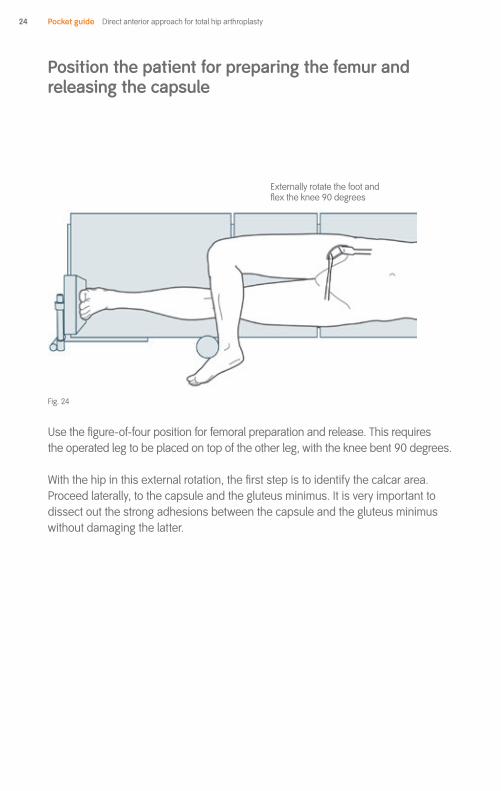
Position the patient for preparing the femur and releasing the capsule
Usethefigure-of-fourpositionforfemoralpreparationandrelease.Thisrequires theoperatedlegtobeplacedontopoftheotherleg,withthekneebent90degrees.
Withthehipinthisexternalrotation,thefirststepistoidentifythecalcararea.Proceed laterally, to the capsule and the gluteus minimus. It is very important to dissect out the strong adhesions between the capsule and the gluteus minimus without damaging the latter.
Fig.24
Externallyrotatethefootand flextheknee90degrees

Direct anterior approach for total hip arthroplasty Pocket guide 25
Mobilize the femur anteriorly
The most crucial part of the direct anterior approach is mobilization of the femur.
Itisveryimportanttobeabletomobilizethefemuranteriorly(Figure25).Withthenurse pulling on the leg, separate the capsule from the gluteus minimus. Incise the capsule within the trochanter with your electric knife, pulling the femur anteriorly (Figure26).Placeoneretractorbehindthegreatertrochanter(STrochantericlever 5 ), andonearoundthemedialpartofthefemur(SBoneleverexpandeddoublecurved 2 )(Figure27)
Fig. 27
Fig.25 Fig.26
5
2

Pocket guide Direct anterior approach for total hip arthroplasty26
Place the patient in the inverse figure-of-four position for femoral exposure
Afterreleasingthefemur,usetheso-calledinversefigure-of-fourpositiontoexposethefemur.Findthetworetractorsplacedaroundtheproximalfemur.Sometimesthefigure-of-four(notinversefigure-of-four)positionissufficient toexposethefemur.
Inpreparingthecup,startingwiththefemurcanbeveryhelpful.Usethetablebreaktoexposetheproximalfemur,byloweringthetable.
Fig.28
Externallyrotatethefootand flextheknee90degrees
Fig.29

Direct anterior approach for total hip arthroplasty Pocket guide 27
Proceed with the preparation and broaching of the femoral shaft in accordance withthepreferredsurgicaltechnique(Theuseofcurvedinstrumentsmaymakethiseasier).Inaddition,useofadoubleoffsetbroachhandleisrequired.
Prepare the femur (femur-first technique)
Fig.30
2
5

Pocket guide Direct anterior approach for total hip arthroplasty28
Prepare the acetabulum
Again,retractorplacementisveryimportantforensuringsufficientexposure. Thefirstretractorisplacedintheacetabularfossa(SBoneleverdoublecurvedw.longsoft-tissueprotection 3 ),thesecondaroundtheposterioracetabularwall (SBoneleverexpandeddoublecurved 2 )andthethird(SHiplever 6 , or sometimes S Trochanteric lever 5 )goesaroundtheposteriorwallandinferiorhorn of the posterior wall of the acetabulum. These three retractors allow an initial assessment of the entire acetabulum.
Aftersufficient“softtissue”debridement(cleaning)ofthejoint,replacethefirstretractor ( 3 )withanother(SPelvislever 7 ).Thisisplacedontheanterosuperioracetabular rim within the capsule, so not to endanger the anterior neurovascular structures. Correct placement of this retractor is important.
Fig. 31
2
2
7
3
6/5 6/5
a b
6/5

Direct anterior approach for total hip arthroplasty Pocket guide 29
Having replaced one retractor anteriorly with another inserted in the area of the anterior superior iliac spine, you can start the preparation and reaming of the acetabuluminaccordancewithyourpreferredsurgicaltechnique(Theuseofcurvedinstrumentsmakesthiseasier)
Fig.32
2
7
6/5

Pocket guide Direct anterior approach for total hip arthroplasty30
Insert the cup
Insertthecupinaccordancewithyourpreferredsurgicaltechnique,ensuring the necessary abduction and anteversion angles.
Fig. 33
2
6
7

Direct anterior approach for total hip arthroplasty Pocket guide 31
Alternatively,checkforleglengthasshownhere.Bothlegsareheldinparallel.Palpate both patellae, as well as both medial malleoli and the heels, and check for correct leg length. Also ensure the the pelvis is not tilted by palpating the ASIS. This is particularly important for unilateral cases. In bilateral cases it is easier to adjust.
Thefemur-firsttechniqueallowsyoutoassesscuporientation.Ifthereisaproblemwiththeorientation,itispossibletorectifyatthisstage.Whensatisfied,proceedwithinsertingthefinalcomponents.
Usingatrialheadandtrialneck,reduceandrunthroughtherangeofmotionmovements to assess leg length and hip joint stability.
Fig. 34
malleoluspatella
a b
Fig. 34
malleoluspatella
a b
Assess cup orientation and stability
Pocket guide Direct anterior approach for total hip arthroplasty32
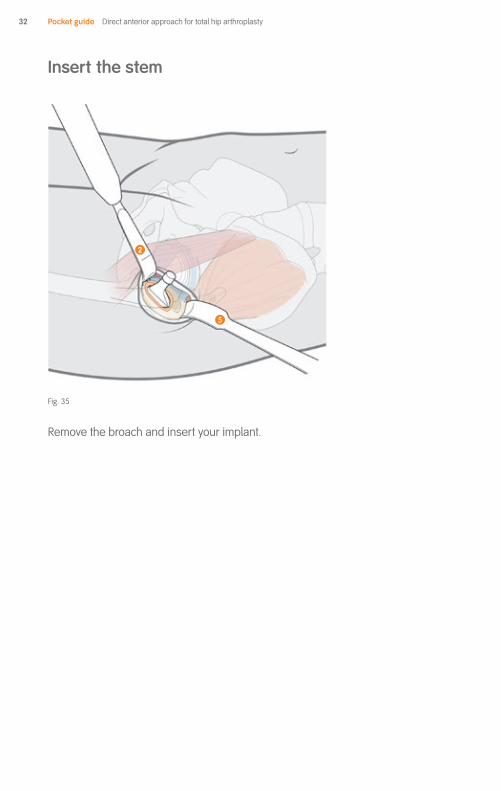
Insert the stem
Remove the broach and insert your implant.
Fig. 35
2
5

Direct anterior approach for total hip arthroplasty Pocket guide 33
Close the wound
Usingtwoshortbluntretractors,elevatethesubcutaneoustissueandtheskin;insert a running suture through the fascia layer of the tensor fasciae latae muscle. Next,insertinterruptedstitchesinthesubcutaneoustissueand,finally,closetheskin with an intracutaneous running suture using absorbable material.
To allow patients to take a shower soon after surgery, it is recommended to place an adhesive dressing over the wound.
Fig. 36

Pocket guide Direct anterior approach for total hip arthroplasty34

Direct anterior approach for total hip arthroplasty Pocket guide 35
Notes

Smith & Nephew Orthopaedics AG Oberneuhofstrasse10d6340Baar,Switzerland T+41417662255
Come and visit us at www.smith-nephew.com/education
Copyright©2014bySmith&NephewOrthopaedicsAGLit.No.01931-en(7138-1720)V103/14
™ TrademarkofSmith&Nephew. All Trademarks acknowledged.