pocket loox user’s manual - fujitsu global · pocket loox user’s manual ... for life support...
TRANSCRIPT

i
� CopyrightFujitsu Limited has made every effort to ensure the accuracy and completeness of thisdocument. However, as ongoing development efforts are continually improving thecapabilities of our products, we cannot guarantee the accuracy of the contents of thisdocument. We disclaim liability for errors, omissions, or future changes.
� TrademarksBluetoothTM is the trademark of the BluetoothTM SIG and is licensed to this company.
Microsoft®, Windows®, Windows® XP, Outlook, Pocket Outlook, and ActiveSync areregistered trademarks of the Microsoft Corporation of the United States in the UnitedStates and elsewhere.
Intel, Pentium, Celeron and PXA255 Applications Processor are registered trademarksof the Intel Corporation of the United States.
Other product names are trademarks or registered trademarks of their respectivecompanies.
Other products are copyrighted items of their respective companies.
All Right Reserved, Copyright© Fujitsu Limited 2003
© Copyright 2003 Fujitsu Limited. All rights reserved. No part of this publication may becopied, reproduced, or translated, without the prior written consent of Fujitsu Limited.No part of this publication may be stored or transmitted in any electronic form withoutthe written consent of Fujitsu Limited.
Website : www.pc-ap.fujitsu.com
Pocket LOOX User’s Manual
Section 00 LOOX (Intro) 16/10/03, 6:56 PM1

ii
Notation Used in this Manual
� Sample Screens and IllustrationsThe screens and illustrations in this manual are samples. The screens and illustrationscan vary slightly by model and with circumstances.
� Notation in TextIcon Meaning
This gives items requiring attention during use or items that must beavoided. Always read these notes.
This gives information related to operations. Read these notes asnecessary.
This gives the manual to read.
This indicates a CD-ROM.
� Product DesignationsThis manual uses the following product name abbreviations.
Important
Product Name Notation in this Manual
Pocket LOOX This device
Microsoft® Pocket PC 2003 Pocket PC 2003
Microsoft® Windows® XP Professional Windows XP
Microsoft® Windows® XP Home Edition Windows XP
Microsoft® Windows® 2000 Professional Windows 2000
Microsoft® Word Word
Microsoft® Excel Excel
Microsoft® Outlook® Outlook
Microsoft® ActiveSync® ActiveSync
Microsoft® Internet Explorer Internet Explorer
Microsoft® Pocket Word Pocket Word
Microsoft® Pocket Excel Pocket Excel
Microsoft® Pocket Outlook® Pocket Outlook
Microsoft® Pocket Internet Explorer Pocket Internet Explorer
Critical Point
Section 00 LOOX (Intro) 16/10/03, 6:56 PM2

iii
CAUTION
WARNING
Icon Meaning
This icon indicates that if the contents of the message are ignoredand the device mishandled, this can result in death or serious injury.
This icon indicates that if the contents of the message are ignoredand the device mishandled, this can result in injury or materialdamage.
Safety Precautions
� Icons for Safe Usage
Icon Meaning
∆ The symbol within the triangle indicates that the item is a warningor caution. Within the symbol is indicated the concrete nature of thewarning. (The example on the left is a caution against getting fingerstrapped.)
indicates that the message is about behavior that must beavoided (prohibited behavior). Within the symbol is indicated theconcrete nature of the prohibition. (The example on the left is ageneral prohibition.)
� indicates that the contents should always be followed. (Theexample on the left is a general mandatory item.)
In order to distinguish the type of contents for danger and damage warnings, thefollowing symbols are used together with the above icons.
Data Storage Media and Customer Responsibilities
The only effective protection for the data stored in a computer, such as on a hard disk, is for you,Purchaser to regularly back up the data. Fujitsu and its affiliates, suppliers, service providers andresellers shall not be responsible for any software programs, data or other information stored or usedon any media or part of any Product returned to Fujitsu or its service providers for Warranty Serviceor other repair, including but not limited to the costs of recovering such programs, data or otherinformation. It is solely your responsibility as the Purchaser to back up any software programs, data,or information stored on any storage media or any part of a Product returned for Warranty Service orrepair to the designated service centers.
High Safety Required Use
This Product is designed, developed and manufactured as contemplated for general use, includingwithout limitation, general office use, personal use, household use and ordinary industrial use, but isnot designed,developed and manufactured as contemplated for use accompanying fatal risks ordangers that, unless extremely high safety is secured, could lead directly to death, personalinjury,severe physical damage or other loss (hereinafter ‘High Safety Required Use’), including with-out limitation, nuclear power reactioncore control in nuclear atomic facility, airplane automatic aircraftflight control, air traffic control, operation control in mass transport control system,medical instrumentfor life support system, missile launching control in weapon system. You shall not use this Productwithout securing the sufficient safety required for the High Safety Required Use.
Section 00 LOOX (Intro) 16/10/03, 6:56 PM3

iv
Electrical shock
In the unlikely event of an abnormality with this device involving heat or smoke,abnormal smell, or abnormal noise, immediately switch off the power for thisdevice and unplug the power plug for the AC adapter from the socket.
Make sure that the smoke stops, then notify the contact point for inquiriesconcerning Fujitsu products or the store you purchased this device from. Donot attempt to make repairs yourself. That would be dangerous.
Using the device in an abnormal state can result in electrical shock and fire.
Electrical shock
If foreign matter (metal, liquid, etc.) gets inside this device, immediately switchoff the power for this device and unplug the power plug for the AC adapter fromthe socket.
Then, notify the contact point for inquiries concerning Fujitsu products or thestore you purchased this device from. Using the device in this state can resultin electrical shock and fire.
Be particularly careful in households with young children.
Electrical shock
If this device is dropped or otherwise subject to strong shock and damage,switch off the power for this device and unplug the power plug for the ACadapter from the socket.
Then, notify the contact point for inquiries concerning Fujitsu products or thestore you purchased this device from.
Using the device in this state can result in electrical shock and fire.
Distraction
Do not use this device while driving an automobile.
Doing so can interfere with safe driving and cause an accident. First park theautomobile safely, then use this device.
Electrical shock
Connect the AC adapter to the ordinary household electrical supply (100-240VAC).
Electrical shock
Do not plug or unplug the AC adapter with wet hands. Doing so can causeelectrical shock.
WARNING
Section 00 LOOX (Intro) 16/10/03, 6:56 PM4

v
Electrical shock
Do not touch the metal parts of connectors or the AC adapter. Doing so cancause electrical shock.
Fire
If dust gets on the AC adapter electrodes or the socket, wipe it off with a drycloth. Continuing to use this device with the dust can result in fire.
Electrical shock
Do not use this device if the AC adapter power cable is damaged or the socketis loose. Using this device under these conditions can result in electrical shockand fire.
Electrical shock
Do not damage or work on the AC adapter power cable. If you place a heavyobject on it, yank on it, bend or twist it too forcibly, or heat it, this can damagethe power cable and result in electrical shock and fire.
Electrical shock
Do not disassemble or alter this device yourself. Doing so can result inelectrical shock and fire.
Electrical shock
Do not use this device if the LCD screen is not working and can not displayanything.
For repairs, contact the contact point for inquiries concerning Fujitsu productsor the store you purchased this device from. Using the device in this state canresult in electrical shock and fire.
Electrical shock
Do not use this device anywhere with excessive humidity, dust, or oily smoke,for example a kitchen, or any location with poor ventilation, or anywhere withan open flame. Doing so can result in electrical shock and fire.
Electrical shock
Do not use this device anywhere water can get on it, for example in rooms withbath tubs or showers. Doing so can result in electrical shock and fire.
WARNING
Section 00 LOOX (Intro) 18/10/03, 5:17 PM5
vi
PRECAUTIONS ON RADIO WAVE
Wireless InteroperabilityThis product is designed to achieve compatibility with a two-way communication systemfor wireless LAN products based on DS-SS (Direct Sequence Spread Spectrum) radiotechnologies. Additionally, this product complies with the Wi-Fi wireless LAN standarddefined by the Wi-Fi Alliance, an organization for verifying interconnectivity of wirelessLAN products.
Environmental Influence of Radio Wave Emission• Like other high-frequency devices, this product emits high-frequency electro-
magnetic energy. However, the level of the energy emitted from this product iscontrolled to a much lower level, compared to wireless devices like mobile phones.
• Since this product operates within the guidelines based on the high-frequency safetystandards and recommendations, we have confidence in user safety of this product.The standards and recommendations reflect the unified view of the scientificcommunity and are based on studies and discussions by study groups andcommittees composed of scientists engaged in ongoing and extensive literatureresearch and interpretation.
• Under certain circumstances or environment, the building owner or the authorizedrepresentative of an organization may restrict use of this product. Such casesinclude the following:- Use of this product in an airplane- Use of this product in an environment where there is a risk of interference with
other devices or services• If the policy applicable to use of wireless devices is not clear to you with a certain
organization or in a certain environment (in an airport, for example), contact theperson responsible to make sure that use of this product is permitted before turningon its power.
Health Influence of Radio Wave EmissionThe output power from this product is much lower than the FCC radio wave emissionlimit. Still, care should be taken to use this product so that potential is minimized to theperson contacting the device under the normal operation. Avoid contacting the antennasection of this product whenever you can.
Precautions on Radio Interference• This product generates, uses and emits high-frequency energy.• Setting and/or using this product against the instructions in this manual may create
hazardous interference with wireless communications.• If this product is causing hazardous interference with a radio or television receiver
(which can be checked by powering on/off the device), remove the interference byfollowing the steps below.- Re-set the antenna orientation and/or position.- Relocate this product and/or the receiver concerned to be wider apart.
Section 00 LOOX (Intro) 16/10/03, 6:56 PM6

vii
Contents
SECTION 1
1 Notice Concerning Usage ...................................................2LCD Display Characteristics .............................................................. 2Handling Precautions ......................................................................... 2Locations to Avoid for Usage and Storage ......................................... 2Cleaning ............................................................................................. 3
2 Battery ...................................................................................4Installing/Removing a Battery Pack .................................................... 4Charging ............................................................................................. 6Checking the Remaining Battery Capacity ......................................... 8Considerations ................................................................................... 8
3 Switching the Power On/Off ..............................................10
4 Resets .................................................................................13Normal Reset ................................................................................... 13Full Resets ....................................................................................... 14
5 Connecting to a Computer ................................................15Connecting ....................................................................................... 15
6 Installing Expansion Units ................................................17Expansion Units That Can Be Used with This Device ...................... 17Setting a CF Card ............................................................................ 17Setting an SD Card .......................................................................... 20
SECTION 2
1 Initial Screen and Application Startup .............................24Today Screen ................................................................................... 24Screen Configuration ....................................................................... 24Starting/Switching Applications ........................................................ 25Starting/Switching from the Menu .............................................. 26Starting/Switching Applications from Application Buttons ................ 26Differences between Switching Applicationsand Ending Applications ................................................................... 27Ending Applications .......................................................................... 27
2 Operations Common to All Programs ..............................28Navigation Bar and Command Bar .................................................. 28Pop-Up Menus ................................................................................. 29
3 Data Input ............................................................................30Soft Input Panel ................................................................................ 32Editing Text ....................................................................................... 38
Section 00 LOOX (TOC) 18/10/03, 5:18 PM7

viii
4 Sound Recording ...............................................................40
5 Help .....................................................................................41
6 Searches .............................................................................42
7 File Operations Using File Explorer .................................43
SECTION 3
1 Connection Settings ..........................................................46Preparations ..................................................................................... 46Settings for Connecting to the Internet ............................................. 46Settings for Sending/Receiving Email .............................................. 49
2 Viewing Web Pages ............................................................53Connecting/Disconnecting ............................................................... 53Basic Pocket Internet Explorer Operation ........................................ 54
3 Sending/Receiving Email ..................................................57Email Writing and Sending/Receiving .............................................. 57Connecting to the Email Server and Sending/Receiving ................. 59Basic Inbox Operations .................................................................... 60
4 Exchanging Instant Messages ..........................................66Preparations ..................................................................................... 66Sign-in and Sign-out ......................................................................... 67Basic MSN Messenger Operations .................................................. 69
SECTION 4
1 Summary .............................................................................74Pocket Outlook Functions ................................................................ 74Reminder Settings ............................................................................ 74
2 Calendar ..............................................................................76Screen Configuration ....................................................................... 76Creating New Appointments ............................................................ 77Using the Summary Screen ............................................................. 78Revising/Deleting an Appointment ................................................... 78Automatic Creation of a Meeting Reminder ..................................... 79
Section 00 LOOX (TOC) 18/10/03, 5:18 PM8

ix
3 Contacts ..............................................................................80Screen Configuration ....................................................................... 80Creating a New Contact ................................................................... 81Searching the Contacts .................................................................... 81Using the Summary Screen ............................................................. 82Revising/Deleting Contacts .............................................................. 82
4 Tasks ...................................................................................83Screen Configuration ....................................................................... 83Creating a New Task ........................................................................ 84Using the Summary Screen ............................................................. 85Revising/Deleting Tasks ................................................................... 85
5 Notes ...................................................................................86Screen Configuration ....................................................................... 86Creating a New Note ........................................................................ 87
SECTION 5
1 Program List .......................................................................90Built-In Programs ............................................................................. 90Bundled Applications ........................................................................ 91
2 Standard Pocket PC 2003 Built-In Programs ...................92Pocket Word ..................................................................................... 92Pocket Excel ..................................................................................... 94Windows Media Player for Pocket PC .............................................. 96Pocket Internet Explorer ................................................................... 97Pocket Outlook ................................................................................. 97MSN Messenger .............................................................................. 97
3 Other Built-in Application ..................................................98LX Launcher ..................................................................................... 98Automatic Storage Device Startup/Inf File Editor ........................... 101LX-Backup ...................................................................................... 103LX Diagnostics ............................................................................... 105
SECTION 6
1 ActiveSync Summary ......................................................108ActiveSync ..................................................................................... 108Installing ......................................................................................... 109Starting Synchronization ................................................................ 109Detailed Synchronization Settings ................................................. 110Synchronization Settings ................................................................ 111Synchronization Options ................................................................ 111Copying Files ................................................................................. 113Synchronizing Files ........................................................................ 113
Section 00 LOOX (TOC) 18/10/03, 5:18 PM9

x
2 Synchronizing Web Pages and Email .............................114Synchronizing Web Pages ............................................................. 114Synchronizing Email ....................................................................... 116
3 Synchronizing Pocket Word/Pocket Excel .....................117Linking with Word ........................................................................... 117Linking with Excel ........................................................................... 117
4 Backing Up and Restoring ..............................................118Backing up Data ............................................................................. 118Restoring Data ............................................................................... 119
SECTION 7
1 Connection Configurations That Can Be Used .............122
2 Wireless LAN Connections .............................................123What is a Wireless LAN? ............................................................... 123Settings .......................................................................................... 125
3 Wired LAN Connections ..................................................129What is a Wired LAN? .................................................................... 129Settings .......................................................................................... 130
4 Bluetooth™ Connections ................................................131What is Bluetooth™? ..................................................................... 131BluetoothTM Connections Using Pocket Plugfree(for wireless model only) ................................................................ 133Pocket Plugfree Screen Configuration ........................................... 139File Operations ............................................................................... 147Exchanging Business Cards .......................................................... 150Connecting to the Internet .............................................................. 152Using ActiveSync ........................................................................... 155
Section 00 LOOX (TOC) 18/10/03, 5:18 PM10

xi
SECTION 8
1 Settings .............................................................................158List of Setting Items ........................................................................ 158Adjusting the Display ...................................................................... 160Adjusting the Memory .................................................................... 161CPU Settings .................................................................................. 162Setting the Date/Time .................................................................... 163Menu Settings ................................................................................ 163Setting the Owner Information ....................................................... 164Setting the Password ..................................................................... 164Power Settings ............................................................................... 165Today Screen Settings ................................................................... 166Application Buttons Settings .......................................................... 167Infrared Communications Settings ................................................. 169Setting Sound and Recording ........................................................ 170Checking System Information ........................................................ 170
2 Adding/Removing Applications ......................................171Applications You Can Add .............................................................. 171Adding Applications Using Your Computer ..................................... 171Adding Applications from the Internet ............................................ 171Removing Applications ................................................................... 172
SECTION 9
1 Troubleshooting and Tips ................................................174Installing New Software .................................................................. 174Date or Time of the Pocket PC is Incorrect .................................... 174The Display of the Pocket PC Remains Dark ................................. 174The Information on the Display of the Pocket PCis Difficult to Read .......................................................................... 174The Pocket PC Switches Off .......................................................... 175The Pocket PC does not Start after Switch On .............................. 175The Pocket PC Stops Working ....................................................... 176The Battery Discharges Too Quickly .............................................. 179The Suspend Button does not Respond Properly .......................... 180No Sound or Minimal Volume ......................................................... 180Contact Help Desk ......................................................................... 180
Section 00 LOOX (TOC) 18/10/03, 5:18 PM11

xii
Section 00 LOOX (TOC) 16/10/03, 7:29 PM12

11SECTIONSECTION
Section 01 LOOX (01-09) 18/10/03, 5:18 PM1

2
1 Notice Concerning Usage
Please watch out for the following, which can cause malfunction and accidents.
� LCD Display CharacteristicsThe following are characteristics of the LCD display. Please understand that they do notsignal any breakdown of the equipment.
• TFT LCD displays use high-level technology. The screen is comprised of over 230,000 pixels(dots) (for this device). Therefore, there may be dots on the screen that do not light up or thatnever turn off. Please understand that these do not signal any breakdown of the equipment.
• Due to the nature of the manufacturing process, the colors for the LCD display used in thisdevice can vary from product to product. Also, temperature fluctuation and the like can causea certain level of color unevenness.
� Handling Precautions• Do not subject this device to mechanical shock or vibration.• Do not disassemble this device.• If this device is used for prolonged periods of time, the temperature of the surface of this
device rises and becomes hot. This is because heat radiates from the device as a whole oncethe temperature within the device reaches a certain level. It does not signal breakdown of thedevice.
� Locations to Avoid for Usage and StorageAvoid using this device in locations such as the following.
• Locations with extremely high or low temperaturesOperating temperatures of this device are 0 ~ 40°C and storage temperatures is –25 ~ 60°C
• Locations subject to direct sunlight• Locations subject to mechanical shock or vibration• Excessively dusty locations• Locations where water or any other liquid might get on this device• Locations with high humidity• Locations where BluetoothTM signals could be harmful (hospitals, within aircraft, in crowded
trains, etc.)• The wireless device marked as shown above uses 2.4 GHz. It uses the DS-SS modulation
method and the estimated distance over which the device might cause interference is within40 m.
• This device uses the 2.4-GHz band. This band is also used by industrial, scientific and medialequipment such as microwave-ovens and other similar radio stations, on-premise radiostations for identifying movable bodies used under license on factory production lines andlicense-free, specified low-power radio stations and amateur radio stations (hereafter referredto as “other radio stations”).
• Check that three is no medical institute or factory in the vicinity prior to using this device.• If any radio interference ever occurs with “other radio stations”, immediately change the
channel on this device, change the location of use or stop the operation on the device.• For other issues that require clarification or assistance, contact your dealer or the “Contact
point for inquiries concerning Fujitsu personal products”.
SECTION 1
Section 01 LOOX (01-09) 18/10/03, 5:18 PM2

3
� How to Stop the BluetoothTM FunctionsIn locations such as hospitals, aircraft, and crowded trains, where BluetoothTM signalscould be harmful, either stop using it or use this device with its BluetoothTM functionsstopped.
� Cleaning
WARNINGIn order to prevent electrical shock or injury, always execute the followingbefore cleaning.• Switch Off the power for this device and disconnect the AC adapter.• If this device is connected to a computer, remove this device from its
cradle.
� Cleaning the Main UnitTo clean this device, wipe it gently with a soft dry cloth.
If the dirt is stubborn, use a cloth dipped in water or water with diluted neutral cleaningsolution and well-wrung out. When wiping off this device with diluted neutral cleaningsolution, wipe off the cleaning solution with a cloth dipped in water and well-wrung out.When wiping this device, be careful not to let any water get into it. Never use paintthinner, benzene, or any other strongly volatile solution or any washcloth with chemicalsimbedded in it.
� Cleaning the Touch Screen (LCD display)Gently wipe the touch screen clean with a soft, dry cloth or eyeglasses cloth.
Important� Never rub the touch screen surface with anything hard or press strongly against it. Doing so
could break the touch screen.
Section 01 LOOX (01-09) 18/10/03, 5:18 PM3

4
2 Battery
This product operates on an external power via the AC adaptor or on a batterypack. To operate this product on a battery pack, it is necessary to charge itbeforehand. While using this product, if appears on the upper right corner onthe screen, promptly recharge the battery or replace it with a charged sparebattery pack.
� Installing/Removing a Battery PackFollow the procedures below for installing/removing a battery pack.
Important� Do not leave this product without a battery pack.
While the battery pack is being replaced, the internal backup battery preserves the databeing worked on, data that you have created and applications that you have added. Since thebackup battery is exhausted in about thirty minutes if it has been fully charged, batteryreplacement should be performed quickly. Leaving the device for a long time without a batterypack may result in data loss.
� Be sure to lock the battery pack’s lock when using or carrying the device.Until you lock the battery pack’s lock, the power of this product cannot be switched on.Additionally, do not release the lock unless you are installing/removing a battery pack. Carryingthis product while the lock is released may cause the battery pack to fall and be damaged.
Critical PointInstalling/Removing Separate Expansion Battery PackThe separately purchased expansion batteries can also be installed and remedied by followingthe same procedure.
� InstallingWhen using this product for the first time after purchasing it, install a battery pack afterturning the backup memory switch on.
1 Place a battery pack onto the location indicated in the figure, and slide it upto install it.
SECTION 1
Battery pack
Section 01 LOOX (01-09) 18/10/03, 5:18 PM4

5
2 Slide the battery pack’s lock toward the side, using a stylus pen.
� Removing
1 If the power of this product is turned on, turn it off by pressing the powerbutton.
2 Slide the battery pack’s lock toward the side, using a stylus pen.
3 After sliding the battery pack, lift it and remove it.
Battery pack’s lock
Power button
Section 01 LOOX (01-09) 18/10/03, 5:18 PM5

6
� ChargingThe following three charging methods are available:
• Charging in the cradle• Direct charging with the AC adaptor• Charging with a charger
When using this product for the first time, install a battery pack after turning the backupmemory switch on, referring to “Information Before You Start”
� Charging in the CradleYou can charge this product by setting it in the cradle.
As shown below, (1) connect the AC adaptor to the cradle, (2) connect one end of thepower cable to the AC adaptor, (3) connect the other cable end into the socket and (4)place this product in the cradle.
Cradle
AC adapterPower cable
Section 01 LOOX (01-09) 18/10/03, 5:18 PM6

7
� Direct ChargingConnect the AC adaptor to this product and charge its battery.
As shown below, (1) connect the AC adaptor to this product’s DC-IN connector, (2)connect one end of the power cable to the AC adaptor and (3) connect the other cableend into the socket.
� Charging with a ChargerTo charge a battery pack separately, you can use a charger sold separately.
(1) connect the accompanying AC adaptor to the charger, (2) connect one end of thepower cable to the AC adaptor, (3) connect the other cable end into the socket and (4)set the battery pack onto the charger.
� Behavior during Charging and Charging Time• During charging, the indicator on the power button flashes green.
• Charging takes about four hours (when charging for the first time after the purchaseor charging a battery pack for the first time after purchasing it, it takes longer).When charging is completed, the indicator lights up green.
Indicator
AC adapter
Power cable
DC-IN connector
Section 01 LOOX (01-09) 18/10/03, 5:18 PM7

8
� Checking the Remaining Battery CapacityAfter turning on this product’s power, you can check the remaining battery capacityfollowing the procedure below.
1 Tap → “Settings” → “System” tab → “Power” → “Battery” tab.
Check the remaining battery capacity at “Battery power remaining”.
� Considerations
� Remaining Battery Capacity and Data ProtectionNote the following concerning protection of data stored in this product.
Important� The internal backup battery operates when the battery pack used is being replaced or is
totally exhausted to temporarily preserve the data being worked, data created that you havecreated and applications you have added. The backup battery can operate for about thirtyminutes when it is fully charged. Thus, data loss may occur if this product is left without abattery pack for a long time or recharging is not performed properly.
� Even when the device’s power is turned off, the battery is operating to preserve the databeing worked on, data you have created and applications you have added. Therefore, leavingthe device for a long time without recharging will lead to total exhaustion of both the batterypack and the backup battery, leading to data loss.
� In order to prevent data loss, if appears on the upper right corner on the screen, promptlycharge the battery or replace it with a charged spare battery pack.Fujitsu shall not be liable for loss of your data due to failure to recharge properly or to replacethe battery pack. Please be aware of the above provision in case of any data loss.
� To avoid any possible data loss, regularly back up your data.
Section 01 LOOX (01-09) 18/10/03, 5:18 PM8

9
� Notes on Charging• When using this product for the first time or after a long interval, or when the
remaining battery capacity is low, charge the battery before using it.• Give a generous amount of time for charging to have the battery fully charged.• Note that an excessively high or low ambient temperature reduces the battery
charge capacity.• In order to avoid battery deterioration, charge it once in two weeks, even if you are
not using this product.
� Battery’s Service LifeThe battery has a certain service life. Repeated charging/discharging over timegradually shortens its operable hours. When you have realized that the battery’soperable time has become extremely short, replace it with a battery pack separatelysold (the internal backup battery needs to be replaced by a competent repair shop).
Also note that the battery’s service life varies depending on the operating conditions.Comply with the following precautions.• Do not leave this product in a high/low-temperature environment. It would
accelerate exhaustion and deterioration of the battery.• Instead of repeating complete discharging and recharging, repeating moderate
charging frequently extends its service life.
Section 01 LOOX (01-09) 18/10/03, 5:18 PM9

10
3 Switching the Power On/Off
You can easily switch the power on/off, with some precautions to follow.
� Powering On
Important� Note for power on
When planning to use this product for a long time or to use it for the communications purpose,or when performing operations that consume large amounts of power, we recommend use ofthis device with the AC adaptor connected to it.
� Note for using a battery packIn the following cases, the battery may not be charged. Check the remaining battery capacityand recharge it as needed.• At the time of purchase• About seven days or later after the last charging
� Information Before You Start
When using this product for the first time after purchase, turn on the backupmemory switch on and supply power to the memory.
1 Use the stylus pen to slide the backup memory switch to the ON position.
2 Place a battery pack onto the location indicated in the figure, and slide it upto install it.
SECTION 1
Backupmemoryswitch
Battery pack
Section 01 LOOX (10-14) 18/10/03, 5:19 PM10

11
3 Slide the battery pack’s lock toward the side, using a stylus pen.
� Normal Power On
1 When using this product with the AC adaptor, see “Direct Charging” toconnect the AC adaptor to the device.
2 Press the power button.
� Power Off
1 Tap on the upper right corner on the screen to end the current operation.
This saves all data used in the current operation.
Important� Even though the device resumes the data from the last session when the power is turned on
again after power off, we recommend to make it a rule to explicitly save data whenever youturn off the power. Without this data-saving practice, data could be lost in case of applicationfailure or battery exhaustion.
Battery pack’s lock
Power button
Section 01 LOOX (10-14) 18/10/03, 5:19 PM11

12
2 Press the power button.
Important� Note for disconnecting the AC Adaptor
When disconnecting the AC adaptor while using this product to switch to battery-drivenoperation, check that the battery is charged. For details on how to check the remaining batterycapacity, see “Checking the Remaining Battery Capacity”.
� Note for prolonged out-of-service timeFollow the steps below when putting this product out of service for a long time:1. Back up the current data, data you have created and applications you have added.2. Disconnect the AC adaptor.3. Remove the battery pack.4. Slide the backup memory switch to the CLEAR position.
Power button
Section 01 LOOX (10-14) 18/10/03, 5:19 PM12

13
4 Resets
Resetting is required when an OS or application failure has occurred.
There are two types of resets:
• Normal reset
• Full reset
� Normal ResetNormal reset is equivalent to restarting a computer, and is required when a trouble hasoccurred such as loss of response from the application.
Executing normal reset causes the current data to be discarded.
To execute normal reset, press the reset switch on the left-side of the device body withthe stylus pen, as shown in the figure below.
Important� When pressing the reset switch, be sure to use the accompanying stylus pen.
Using a ball-poin pen or the like may damage the device body.
SECTION 1
Reset switch
Section 01 LOOX (10-14) 18/10/03, 5:19 PM13

14
� Full ResetsFull reset is equivalent to recovery on a computer, and restores the state of this productat the time of purchase. This operation is needed when problems such as inability tostart the OS occur.
Executing full reset causes the following data to be discarded:• Current data• Data you have created• Applications you have added
To execute full reset, (1) hold down the power button, and (2) press the reset switch onthe left-side face of the device body with the stylus pen, as shown in the figure below.
Section 01 LOOX (10-14) 18/10/03, 5:19 PM14
15
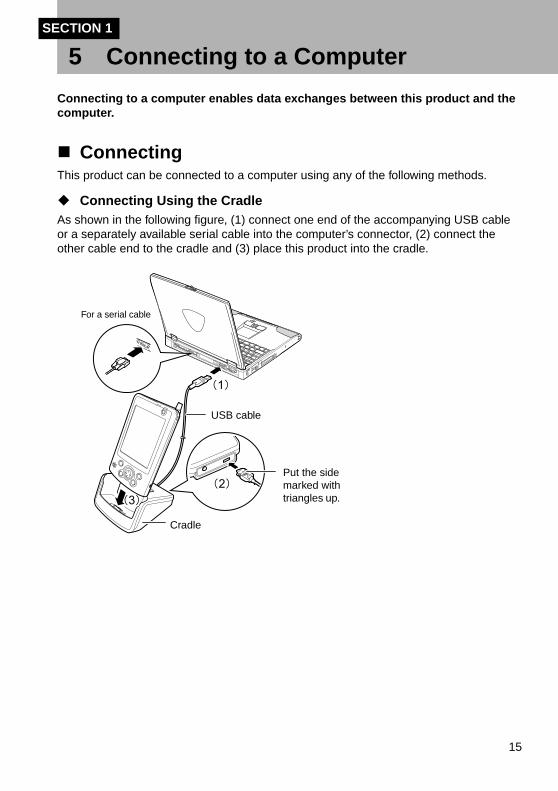
5 Connecting to a Computer
Connecting to a computer enables data exchanges between this product and thecomputer.
� ConnectingThis product can be connected to a computer using any of the following methods.
� Connecting Using the CradleAs shown in the following figure, (1) connect one end of the accompanying USB cableor a separately available serial cable into the computer’s connector, (2) connect theother cable end to the cradle and (3) place this product into the cradle.
SECTION 1
USB cable
Cradle
For a serial cable
Put the sidemarked withtriangles up.
Section 01 LOOX (15-22) 18/10/03, 5:20 PM15

16
USB cable
For a serial cable
Put the sidemarked withtriangles up.
� Connecting Using a CableAs shown in the following figure, (1) connect one end of the accompanying USB cableor a separately available serial cable into the computer’s connector and (2) connect theother cable end to this product’s external connection port.
Critical PointTo remove the cable:(1) Hold down the buttons at both ends of the connector and (2) disconnect the cable.
Section 01 LOOX (15-22) 18/10/03, 5:20 PM16

17
6 Installing Expansion Units
You can enhance this product’s functionality by installing expansion units suchas a memory.
� Expansion Units That Can Be Used with ThisDevice
The following units can be installed in this product.• CF card
Installing a memory card enables you to save high-volume data files such as digital camerapictures and additional software applications. You can also install an I/O type CF card (suchas a data communications card).
• SD cardInstalling a memory card enables you to save high-volume data files such as digital camerapictures and additional applications. Note that I/O type SD cards are not supported.
� Setting a CF CardFollow the procedure below to set/remove a CF card.
� Setting
1 Press the CF card eject button.
The button head comes out.
SECTION 1
CF card eject button
Section 01 LOOX (15-22) 18/10/03, 5:20 PM17

18
2 Press down the button that has come out to pull out the dummy card byholding its projected section.
Critical PointKeep the removed dummy card in safekeeping.
3 Set a CF card in place.
Set the card so that its protruding section and removal groove may face the rearside of the device body.
Dummy card
Protrudingsection andremovalgroove
Section 01 LOOX (15-22) 18/10/03, 5:20 PM18

19
� Removing
1 Press the CF card eject button.
The button head comes out.
2 Press down the button that has come out to pull out the CF card by holdingits projected section.
3 Set the dummy card in place.
CF card eject button
Section 01 LOOX (15-22) 18/10/03, 5:20 PM19

20
� Setting an SD CardFollow the procedure below to set/remove an SD card.
� Setting
1 Push the dummy card and release it when you hear a click.
The dummy card is ejected.
Important� The card ejection mechanism uses a spring. Be prepared as the card may be pushed out with
some force.
2 Pull out the dummy card.
Critical PointKeep the removed dummy card in safekeeping.
Dummy card
Section 01 LOOX (15-22) 18/10/03, 5:20 PM20

21
3 Set an SD card in place.
With the cut-off section of the card facing the left-hand side, insert the card untilyou hear a click.
� Removing
1 Push the SD card and release it when you hear a click.
The SD card is ejected.
Important� The card ejection mechanism uses a spring. Be prepared as the card may be pushed out with
some force.
2 Pull out the SD card.
Section where the tiphas been cut off
Dummy card
Section 01 LOOX (15-22) 18/10/03, 5:20 PM21
22
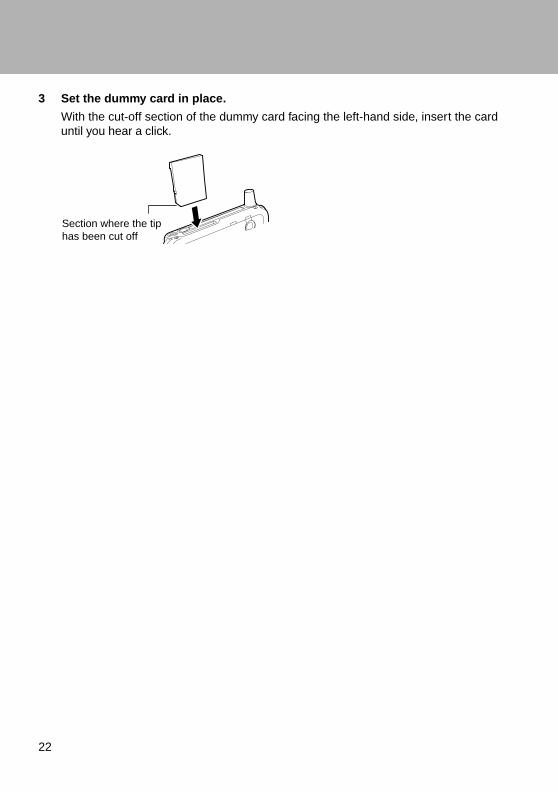
3 Set the dummy card in place.
With the cut-off section of the dummy card facing the left-hand side, insert the carduntil you hear a click.
Section where the tiphas been cut off
Section 01 LOOX (15-22) 18/10/03, 5:20 PM22

22SECTIONSECTION
Section 02 LOOX (23-31) 18/10/03, 5:21 PM23

24
1 Initial Screen and Application Startup
This section explains the initial screen for this device and methods for starting/ending application.
� Today ScreenThe Today screen is the initial screen for this device. This screen shows importantinformation for the day at a glance. The Today screen is displayed in cases such as thefollowing.
• Each day, the first time the power switched on• When this device has not been used for more than four hours (initial setting)• When you tap → “Today” in that order
� Screen Configuration
SECTION 2
Tap to switch toa program.
Tap to view NetworkConnection.
Tap to change volumeor mute all sounds.
Tap to change date and time.
Tap to open an item.
Your day at a glance.
Tap to create a new item.
Tap to view connection status.
Section 02 LOOX (23-31) 18/10/03, 5:21 PM24

25
Critical PointCustomizing the Today screenYou can change the Today screen background, items displayed, etc. Tap → “Settings” →“Personal” tab → “Today” in that order to make the settings.
� Status IconsThe status icons are displayed at the bottom right of the Today’s screen. You can checkthe status of this device with the status icons. The status icons and the meanings are asfollows.
Status Icon Meaning
All audio is On. To switch Off ( ) all the audio, tap here and checkwith the dialog box displayed. You can also use this same dialog boxto adjust the volume.
The battery is charging.
The battery is fully charged.
The battery is running low.
The battery is running extremely low.
The device is connected to a network.
The device is connected to a computer.
Synchronization with a computer has been started.
You have an instant message.
You have mail.
� Starting/Switching ApplicationsYou can start or switch an application from the menu or with an application button.
Section 02 LOOX (23-31) 18/10/03, 5:21 PM25

26
� Starting/Switching from the Menu1 Tap the menu.
2 From the displayed menu, select the application you want to start or switchto.
The selected application is started. If the application you selected has already beenstarted, this device switches to that application.To start an application not registered for the menu, tap → “Programs” in thatorder, then tap the application you want from the displayed application list.
Critical PointTo change an application displayed on the menuYou can change the applications displayed when you tap the menu.
� Starting/Switching Applications from ApplicationButtons
The applications registered to the application buttons on the front of this device can bestarted or switched to by pressing the corresponding application buttons. For eachbutton, one application is started by pressing and releasing the button and anotherapplication is started by holding down the button for about one second (long press).
Critical PointTo change an application assigned to an application buttonYou can change the applications started by pressing the application buttons.
Section 02 LOOX (23-31) 18/10/03, 5:21 PM26

27
� Differences between Switching Applications andEnding ApplicationsEven when you switch the application you are using or tap the at the top right,the application is not ended. (The currently displayed application is closed and thisdevice returns to the previously started application.)
Details on how to completely end an application are given in “Ending Applications”.
� Ending Applications1 Tap → “Settings” → “System” tab in that order.
2 From the list of setting items, tap “Memory” → “Running Programs” tab inthat order.
3 Select the application to end.
Critical PointEnding from the LX LauncherYou can also end from the LX Launcher task.
Section 02 LOOX (23-31) 18/10/03, 5:21 PM27

28
2 Operations Common to All Programs
This section explains the operations common to all programs.
� Navigation Bar and Command BarThe blue section that is displayed at the top of the screen is the navigation bar. Thecurrent time, the programs running, etc. are displayed.
The gray section always displayed at the bottom of the screen is the command bar. Anoperation menu, buttons, etc. are displayed.
SECTION 2
Tap to change volume or mute the device.
Tap to quickly select a programyou have recently used.
Tap to select a program.
Tap to see additional programs.
Tap to customize the device.
This is the navigation bar. New button.
Menu names.Buttons
Input panel button.
Section 02 LOOX (23-31) 18/10/03, 5:21 PM28

29
� Pop-Up MenusUsing pop-up menus makes it possible to execute desired operations quickly and easily.
1 If you tap-and-hold the item for the operation with the stylus pen, a pop-upmenu is displayed.
2 Remove the stylus pen from the screen, then tap the desired operation fromthe menu.
The pop-up menu displayed depends on the application.
If you tap anywhere other than the menu, the pop-up menu is closed without anyoperation being executed.
Tap and hold to displaythe pop-up menu.
Lift the stylus pen and tapthe action you want.
Tap outside the menu to close itwithout performing an action.
Section 02 LOOX (23-31) 18/10/03, 5:21 PM29
30
SECTION 2
3 Data Input
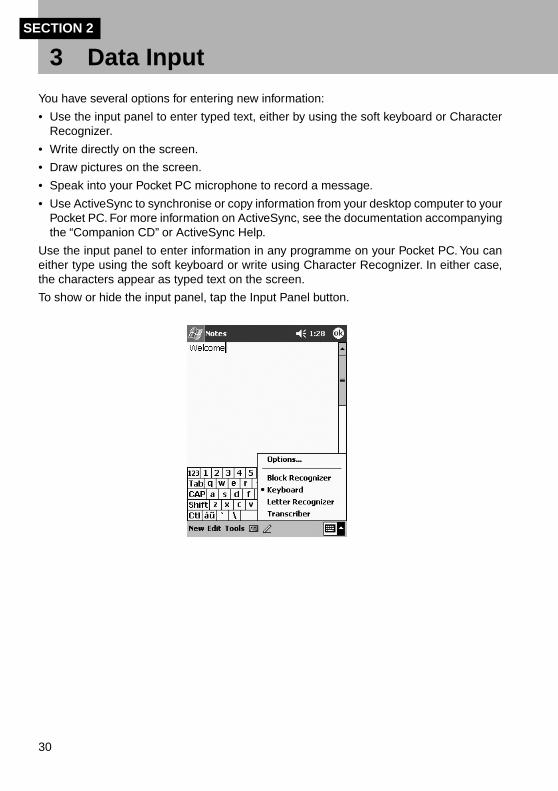
You have several options for entering new information:
• Use the input panel to enter typed text, either by using the soft keyboard or CharacterRecognizer.
• Write directly on the screen.
• Draw pictures on the screen.
• Speak into your Pocket PC microphone to record a message.
• Use ActiveSync to synchronise or copy information from your desktop computer to yourPocket PC. For more information on ActiveSync, see the documentation accompanyingthe “Companion CD” or ActiveSync Help.
Use the input panel to enter information in any programme on your Pocket PC. You caneither type using the soft keyboard or write using Character Recognizer. In either case,the characters appear as typed text on the screen.
To show or hide the input panel, tap the Input Panel button.
Section 02 LOOX (23-31) 18/10/03, 5:21 PM30
31
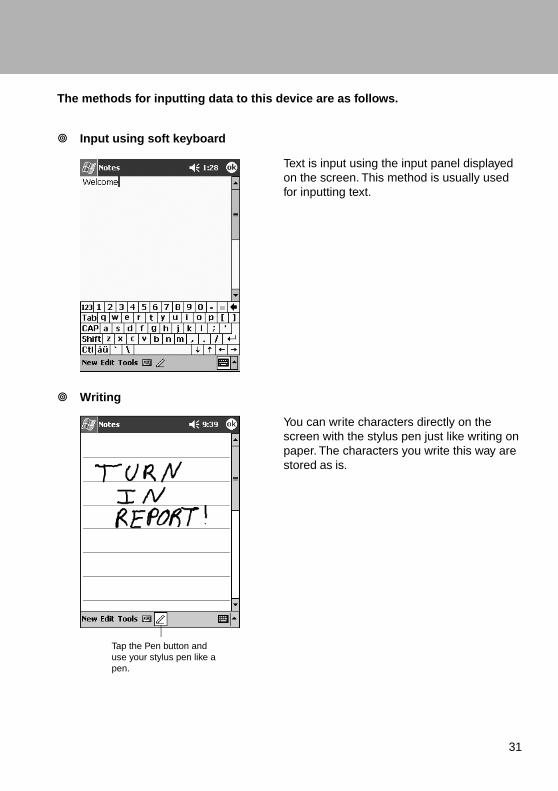
The methods for inputting data to this device are as follows.
� Input using soft keyboard
Text is input using the input panel displayedon the screen. This method is usually usedfor inputting text.
� Writing
You can write characters directly on thescreen with the stylus pen just like writing onpaper. The characters you write this way arestored as is.
Tap the Pen button anduse your stylus pen like apen.
Section 02 LOOX (23-31) 18/10/03, 5:21 PM31

32
� Soft Input PanelWhen you use the input panel, your Pocket PC anticipates the word you are typing orwriting and displays it above the input panel. When you tap the displayed word, it isinserted into your text at the insertion point. The more you use your Pocket PC, themore words it learns to anticipate.
To change word suggestion options, such as the number of words suggested at onetime, tap , Settings, Personal tab, Input, and then the Word Completion tab.
� To type with the soft keyboard1 Tap the arrow next to the input method button and then Keyboard.
2 On the soft keyboard that is displayed, tap the keys with your stylus pen.
� To use Character Recognizer1 Tap the arrow next to the Input method button and then Letter Recognizer.
2 Write a letter in the box.
When you write a letter, it is converted to typed text that appears on the screen.
Tap here if this is the right word.
Section 02 LOOX (32-39) 18/10/03, 5:21 PM32

33
You can cut, copy, and paste text by tapping and holding the selected words and thentapping an editing command on the pop-up menu, or by tapping the command on theEdit menu.
In any programme that accepts writing, such as the Notes programme and the Notestab in Calendar, Contacts, and Tasks, you can use your stylus pen to write directly onthe screen. Write the way you do on paper. You can edit and format what you’ve writtenand convert the information to text at a later time.
� To write on the screenTap the Pen button to switch to writing mode. This action displays lines on the screen tohelp you write.
Some programs that accept writing may not have the Pen buttton. See thedocumentation for that programme to find out how to switch to writing mode.
Tap the Pen button and use your stylus pen like apen.
Section 02 LOOX (32-39) 18/10/03, 5:21 PM33

34
� To select writingIf you want to edit or format writing, you must select it first.
1 Tap and hold the stylus pen next to the text you want to select until the insertionpoint appears.
2 Without lifting, drag the stylus pen across the text you want to select.
If you accidentally write on the screen, tap Edit and then Undo and try again. You canalso select text by tapping the Pen button to deselect it and then dragging the styluspen across the screen.
You can cut, copy, and paste written text in the same way you work with typed text: tapand hold the selected words and then tap an editing command on the pop-up menu, ortap the command on the Edit menu.
� To convert writing to textTap Tools and then Recognize.
If you want to convert only certain words, select them before tapping Recognize on theTools menu (or tap and hold the selected words and then tap Recognize on the pop-up menu). If a word is not recognised, it is left as writing.
Select the text you want to convertand tap Recognize on the pop-upmenu.
The writing is turned into text.
Section 02 LOOX (32-39) 18/10/03, 5:22 PM34

35
If the conversion is incorrect, you can select different words from a list of alternatives orreturn to the original writing. To do so, tap and hold the incorrect word (tap one word ata time). On the pop-up menu, tap Alternates. A menu with a list of alternate wordsappears. Tap the word you want to use, or tap the writing at the top of the menu toreturn to the original writing.
Tips for getting good recognition• Write neatly.• Write on the lines and draw descenders below the line. Write the cross of the “t” and apostrophes
below the top line so that they are not confused with the word above. Write full stops andcommas above the line.
• For better recognition, try increasing the zoom level to 300% using the Tools menu.• Write the letters of a word closely and leave big gaps between words so that the Pocket PC
can easily tell where words begin and end.• Hyphenated words, foreign words that use special characters such as accents, and some
punctuation cannot be converted.• If you add writing to a word to change it (such as changing a “3” to an “8”) after you attempt to
recognise the word, the writing you add will not be included if you attempt to recognise thewriting again.
Tap to return to your original writing.
Alternatively, tap the word you want to use.
Section 02 LOOX (32-39) 18/10/03, 5:22 PM35

36
� Inputting Writing with Pocket Word
When you tap the “View” menu → “Writing” in that order, the ruled line is displayedand you can input by writing.
1 This is the toolbar
Tap "View" →"Toolbar" to switch the operation mode. When writing withthe stylus pen, switch to the view with the frame. When you want to executea format change or other operation on written text, switch to the displaywithout the frame.
Tap here to change the line thickness for characters.
This is used to input a space. Tap, switch to the display with the frame, thendrag the section where you want to input the space. While you aredragging, an arrow is displayed on the screen to show you how large thespace will be. A space the size of the dragged section is inserted. If youdrag in the opposite direction, the space is deleted.
Returns to the previous operation.
Marks with the light pen. Drag the range to be marked, then tap.
Critical PointWhen writing is handled as drawingIf your writing extends over three or more of the ruled lines, it is handled as drawing.
Section 02 LOOX (32-39) 18/10/03, 5:22 PM36

37
You can draw on the screen in the same way that you write on the screen. Thedifference between writing and drawing on the screen is how you select items and howthey can be edited. For example, selected drawings can be resized, while writingcannot.
� To create a drawingCross three ruled lines on your first stroke. A drawing box appears. Subsequent strokesin or touching the drawing box become part of the drawing. Drawings that do not crossthree ruled lines will be treated as writing.
You may want to change the zoom level so that you can more easily work on or viewyour drawing. Tap Tools and then a zoom level.
� To select a drawingIf you want to edit or format a drawing, you must select it first.
• Tap and hold the stylus pen on the drawing until the selection handle appears. Toselect multiple drawings, deselect the Pen button and then drag to select thedrawings you want.
You can cut, copy, and paste selected drawings by tapping and holding the selecteddrawing and then tapping an editing command on the pop-up menu, or by tapping thecommand on the Edit menu. To resize a drawing, make sure the Pen button is notselected and drag a selection handle.
The drawing box indicates theboundaries of the drawing.
Pen button
Section 02 LOOX (32-39) 18/10/03, 5:22 PM37

38
� Editing Text� Adding characters
1 Tap the location where you want to add characters.The cursor is displayed flashing.
2 Input the characters.The characters are added at the cursor position.
� Deleting characters
1 To delete a single character, tap immediately after the character to delete it.To delete multiple characters, drag the range to be deleted.When one character is being deleted, the cursor flashes. When multiple charactersare being deleted, the character string in the dragged range is inverted.
2 Tap .When one character is deleted, the character immediately before the cursor isdeleted. When multiple characters are deleted, the entire inverted range is deleted.
� Changing Text
1 Drag the character string you want to change.The selected range is inverted.
2 Input the new characters, then .The text is replaced with the new characters.
� Copying Text
1 Drag the character string you want to copy.The selected range is inverted.
2 Tap the “Edit” menu → “Copy” in that order.
3 Tap the location to which you want to copy.The cursor flashes.
4 Tap the “Edit” menu → “Paste” in that order.The copied text is inserted at the position of the cursor.
Section 02 LOOX (32-39) 18/10/03, 5:22 PM38

39
� Moving Text
1 Drag the character string you want to move.The selected range is inverted.
2 Tap the “Edit” menu → “Cut” in that order.
3 Tap the location to which you want to move the text.The cursor flashes.
4 Tap the “Edit” menu → “Paste” in that order.The cut text is inserted at the position of the cursor.
Section 02 LOOX (32-39) 18/10/03, 5:22 PM39

40
4 Sound RecordingSECTION 2
The recording function enables you to capture thoughts, reminders or voicemessages quickly. The recorded messages can be inserted into your documentor stored as audio file.
You can record using the recording tool bar.• Pocket Word
Tap the “View” menu → “Recording” in that order to display the recording tool bar.• Notes
Tapping displays the recording tool bar.
Indicates an embeddedrecording.
Tap to begin recording.
Tap to show or hide the recording toolbar.
Section 02 LOOX (40-44) 18/10/03, 5:22 PM40

41
SECTION 2
5 Help
Tapping → “Help” in that order displays the help screen for the active application.
You can check in the help to see how to operate the applications built into thisdevice and other applications installed on it.
The help function explains how to operate the programs built into this device.
Section 02 LOOX (40-44) 18/10/03, 5:22 PM41

42
6 SearchesSECTION 2
You can find the information you need quickly, search for file names and for textstrings included in files.
Tapping → “Search” in that order displays the search screen.
1 Input the text string you want to search for. Tapping 9 displays previouslysearched for text strings. This is used to search for the same text stringagain.
2 Selects the type of information to search for.
3 Tapping here starts the search.
4 The results of the search are displayed. Tapping the information for a filedisplays that file.
You can also use File Explorer to search files.
1
2
4
3
Section 02 LOOX (40-44) 22/10/03, 3:57 PM42

43
7 File Operations Using File ExplorerSECTION 2
You can manage files using File Explorer.
Tap → “Programs” → “File Explorer” in that order to display the File Explorer screen.
� Creating a new folder
1 Move to the directory level in which you want to create the new folder.
2 Tap the “Edit” menu → “New Folder” in that order.
3 Input the folder name, then tap to finalize it.
Tap to change folders.
Select the sort orderfor the list.
Tap the folder name toopen it.
Tap and hold tocreate a new folder.
Section 02 LOOX (40-44) 18/10/03, 5:22 PM43

44
� Deleting Folders/Files
1 Tap the folder/file you want to delete and hold down on it.
2 From the displayed pop-up menu, select “Delete”.
A dialog box is displayed to confirm that you want to delete the folder or file.
3 Tap “Yes”.
� Copying Folders/Files
1 Tap the folder/file you want to copy and hold down on it.
2 From the displayed pop-up menu, select “Copy”.
3 Move to the folder you want to copy to.
4 Tap the “Edit” menu → “Paste” in that order.
� Moving Folders/Files
1 Tap the folder/file you want to move and hold down on it.
2 From the displayed pop-up menu, select “Cut”.
3 Move to the folder you want to move to.
4 Tap the “Edit” menu → “Paste” in that order.
� Changing the Names of Folders/Files
1 Tap-and-hold the folder/file you want to change the name of.
2 From the displayed pop-up menu, select “Rename”.
3 Input the desired new name, then tap to finalize it.
Critical PointWhen sending files with emailYou can specify a file with File Explorer and send it with email. On the pop-up menu for the fileyou want to send, tap “Send via Email” to display the Inbox. For details on sending from theInbox, see “Preparing and Sending/Receiving Email”.Using infrared communicationsFrom File Explorer, you can communicate with other devices via infrared.
Section 02 LOOX (40-44) 18/10/03, 5:22 PM44

33SECTIONSECTION
Section 03 LOOX (45-50) 18/10/03, 5:23 PM45

46
1 Connection SettingsSECTION 3
This sets the parameters necessary for using the Internet.
This section explains connecting using a CF modem card. For details on connecting inany other way, see help.
� PreparationsThe requirements for connecting to the Internet are as follows.
• This device• CF modem card
It is also necessary to sign up for service with an Internet service provider. Sign up forInternet service before making these settings.
For access to your company network, check the settings and other information with thenetwork administrator beforehand.
� Settings for Connecting to the Internet1 Set your CF modem card in the CF card slot.
When your FC card is set in this device for the first time, the “A new modem was
detected.” dialog box is displayed.
2 Tap “Internet”.
Section 03 LOOX (45-50) 18/10/03, 5:23 PM46

47
3 Operate as follows.
1 Input any name that will remind you what the contents of these connectionsettings are. The name of the service provider is often a good choice.
2 Make sure it is the name for the CF card you installed.
3 Tap “Next”.
4 (1) Enter the access point (phone number) for your Internet service provider.(2) Tap “Next”.
1
2
3
1
2
Section 03 LOOX (45-50) 21/10/03, 6:13 PM47

48
5 (1) Input your user name, password and domain, then (2) tap “Advanced”.
The detailed settings screen is displayed. Make settings if necessary, according tothe provider’s instructions.
Genaral setting Port Settings
TCP/IP setting Servers settings
1
2
Section 03 LOOX (45-50) 18/10/03, 5:23 PM48

49
6 When you finished the advanced settings, tap .The display returns to the screen where you entered your user name, passwordand domain.
7 Tap “Finish”.
� Settings for Sending/Receiving Email1 Tap → “Inbox” in that order.
The Inbox screen is displayed.
2 Tap the “Account” menu → “New Account” in that order.
The Email setup screen (1/5) is displayed.
Critical PointWhat is a serviceThe setting information for one email address is considered as one service. If you have multipleemail addresses, each one is registered as a separate service. When sending/receiving emailyou can switch among these services.
Section 03 LOOX (45-50) 18/10/03, 5:23 PM49

50
3 (1) Input the email address. (2) Tap “Next”.
4 (1) Check the “Status:”and if it is “Completed”, tap “Next”.
1
2
21
Section 03 LOOX (45-50) 18/10/03, 5:23 PM50

51
5 Input the user information.
1 Input your own name. This is the sender name given to the receiver.
2 Input the “User name” and “Password” required for connecting to the email server.
3 Tap “Next”.
Critical PointUser names and passwordsSome providers use different designations. For example, the user name may be called theemail account, user ID, or email login name. The password may be called the email passwordor login password.
6 Execute the following operation.
1 Select “POP3” or “IMAP4”. “POP3” is the most widely used.
2 Input a service name. The name of the service provider is often a good choice.
3 Tap “Next”.
12
3
12
3
Section 03 LOOX (51-58) 18/10/03, 5:23 PM51

52
7 Input the server information.
1 Input the reception email server and transmission email server names specifiedby the provider.
2 Set this for network connection. This does not need to be specified whenconnecting with a CF card.
3 Set this as necessary. For the options, see help.
4 Tap “Finish”.
This completes the Inbox settings.
2
34
1
Section 03 LOOX (51-58) 18/10/03, 5:23 PM52

53
2 Viewing Web PagesSECTION 3
Once you have completed the settings for connecting to the Internet, you canview Web pages using Pocket Internet Explorer.
This section explains how to view Web pages using a CF modem card. For details onconnecting in any other way, see help.
� Connecting/Disconnecting
� Connection Method
1 Set the card in this device.
2 Tap → “Internet Explorer” in that order.
3 Input the necessary items.
- Input the user name and password for connecting to the provider.
- Tap OK.
The connection is started and Pocket Internet Explorer is started up.
� DisconnectingThe method for ending the connection is as follows.
1 Tap the navigation bar → “Exit” in that order.
Section 03 LOOX (51-58) 18/10/03, 5:24 PM53

54
� Basic Pocket Internet Explorer Operation
� Screen ConfigurationTap → “Internet Explorer” in that order.
The operations of the buttons are as follows.
This returns the display to the previous page.
During reading-in, this stops the reading-in. At any other time, this updates
the page to the latest status.
This returns the display to the page set as the homepage. The homepage
can be set with the “Tools” menu → “Options” → “Homepage”.
This display is a list of your favorites.
Favorites button.
Home button.
Refresh button.
Section 03 LOOX (51-58) 18/10/03, 5:24 PM54

55
� Specifying and Opening Web Pages
Critical PointWhen the address bar is not displayedTap the “View” menu → “Address Bar” in that order to display the address bar.
When you start Pocket Internet Explorer, the homepage is displayed first.
1 Input the URL for the Web page you want to display in the address bar.
2 Tap at the right of the address bar.
The specified Web page is displayed.
� Using FavoritesRegistering pages that you view frequently in “Favorites” makes it easier to view themagain.
1 While you are displaying the page you want to register in the favorites, tap on the command bar.
The “Favorites” screen is displayed.
2 Tap the “Add/Delete” tab → “Add” in that order.
Section 03 LOOX (51-58) 18/10/03, 5:24 PM55

56
3 (1) Change the name to be displayed in the favorites list if necessary, then (2)Tap “Add”.
The Web page is registered in the favorites list.
Critical PointDeleting a Web page from the favorites
1 Tap on the command bar → “Add/Delete” in that order.2 Select the page to be deleted from the favorites list, then tap “Delete”.
To display a Web page registered in the favorites, tap on the command bar, then tapthe desired page from the favorites.
Tap the favorite youwant to view.
Tap to add or delete afolder or favorite link.
Section 03 LOOX (51-58) 18/10/03, 5:24 PM56

57
3 Sending/Receiving EmailSECTION 3
You can use send/receive email through the Internet. Email sending and receivinguse the Pocket Outlook Inbox.
This section explains sending/receiving email using a CF modem card. For details onconnecting in any other way, see help.
� Email Writing and Sending/ReceivingIn order to send and receive email, it is necessary that the settings for connecting to theemail server are already completed.
� Writing EmailThis section explains how to write the new piece of email.
1 Tap → “Inbox” in that order.
The Inbox list is displayed.
2 Tap “Inbox” and select the service to be used for connection. This operationis not necessary if only one service is registered.
3 Tap the “New” menu item.
4 Input the “To” and “Subj.”, then input the text.
Tap to send the message.
Tap to show or hide thecomplete header.
Tap to show/hide the recording toolbar.
Tap to display the Address Book.
Tap to insert common messages.
Section 03 LOOX (51-58) 21/10/03, 3:44 PM57

58
Critical PointAttaching files to emailOn the email writing screen, tap the “Edit” menu → “Attach File” in that order. A list of files isdisplayed, so tap the one you want to send.Using My TextOn the new email writing screen, you can write email easily by selecting frequently used textfrom My Text. Tap “My Text”, then select the text to input into your email from the list of textsregistered in My Text.Editing texts registered in My TextOn the Inbox screen, tap the “Tools” menu → “Edit My Text messages” in that order. The MyText message screen is displayed, so tap the desired message and edit it.
5 When input is complete, tap to the left of “To” and “Subj.”
The email you have written is stored and placed in the “Outbox”. If you areconnected to the email server, your email is sent immediately.
Critical PointWhen not temporarily storing email you have writtenFor email that is still being edited and that you do not want to put in the “Outbox” yet, tap to end. The email you have written is put in “Pending”.After you edit email in “Pending” again, tap (ok) to move it to the “Outbox”.
Section 03 LOOX (51-58) 18/10/03, 5:24 PM58

59
� Connecting to the Email Server and Sending/Receiving
When you connect the email server, your email is automatically sent/received.• Any email in the “Outbox” is sent.• Any unread mail on the email server is received. Received email is put in the “Inbox.
The following operations are carried out with the Inbox. For details, see help.
1 Set the card in this device.
2 Tap the “Accounts” menu → “Connect”.
The services registered with “Settings for Sending/Receiving Email” are displayedin the menu.
3 Tap .The connection screen for the service you are connecting to is displayed.
4 Input the password etc., then tap “OK”.The connection is started. Any email in the “Outbox” is sent and any unread mail onthe email server is placed in the “Inbox”.
5 When email sending/reception is complete, tap the “Accounts” menu →“Disconnect” in that order.The connection with the email server is ended.
Section 03 LOOX (59-72) 18/10/03, 5:25 PM59

60
� Basic Inbox Operations
� Screen configurationTap → “Inbox” in that order.
1 Select the folder and service displayed.
2 Select the order for email list display.
3 The sender addresses and subjects of the emails are displayed. If you tap-and-hold, a pop-up menu is displayed and you can carry out such operationsas deleting or forwarding the email or replying to it.
4 At “Tools”, you can set options; at “Account”, you can select the service.
5 Tapping here connects you to the selected service.
6 Tapping here connects you to the selected service and sends and receivesemail.
1
2
3
456
Section 03 LOOX (59-72) 18/10/03, 5:25 PM60

61
� Viewing Received Email
1 Tap → “Inbox” in that order.
A list of the email is displayed. If you want to look at email from other services, tap“Inbox”, then select the other service.
2 In the email list, tap the email you want to view.
3 Tapping here returns the display to the Inbox screen.
� Replying to/Forwarding Email
� Replying
1 Display the received email according to Steps 1 and 2 of the procedure in“Viewing Received Email”.
2 Tap on the command bar →“Reply”.
For “Reply”, the email you write is sent only to the sender of the original email. Toreply to all the addresses on the original email, including the cc’s, tap “Reply to all”.
3 Write your email reply.
4 Tap to the left of “To”, “Subj.”
The email you have written is put in the “Outbox”. If you are connected to the emailserver, your email is sent immediately.
Section 03 LOOX (59-72) 18/10/03, 5:25 PM61

62
� Forwarding
1 Display the received email according to Steps 1 and 2 of the procedure in“Viewing Received Email”.
2 Tap on the command bar → “Forward”.
3 Specify the email address to forward to as the “To”. When forwarding to anemail address registered in your Contacts, you can tap , then select thecontact.
4 Prepare your forward email, then tap to the left of “To”, “Subj.”The email you have written is put in the “Outbox”. If you are connected to the emailserver, your email is sent immediately.For details on the method for sending email in the “Outbox”, see “Connecting to theEmail Server and Sending/Receiving”.
� Deleting Email
1 From the list of the email in the Inbox, tap-and-hold the email you want to delete.
2 Tap “Delete” from the displayed pop-up menu.The deleted email is moved to “Recycled items (local)”.
Section 03 LOOX (59-72) 18/10/03, 5:25 PM62

63
Critical PointTo completely delete email in “Recycled items (local)”Tap the “Tools” menu → “Empty Recycle Bin” in that order.
� Managing Email
Important� Operating on folders with this device
When executing the following operations on folders on this device, then connecting to youremail server, the operations depend on the service used (ActiveSync, SMS/POP3/IMAP4).For details, see the Inbox help.• Moving or deleting email• Creating or editing folders
Email is managed with preset folders prepared by each service. The basic programs ofthese preset folders are as follows.
• DraftsContains email being edited
• Recycled itemsContains deleted email
• InboxContains received email.
• OutboxContains email to be sent in the next connection.
• Sent boxContains email that has been sent.
� Creating New Folders
New folders can be created for such tasks as managing email.
1 Tap the “Tools” menu → “Manage Folders” in that order.The folder management screen is displayed.
2 (1) Select the folder to create the new folder under (normally, the Inbox).(2) Tap the “New” menu.
Section 03 LOOX (59-72) 18/10/03, 5:25 PM63

64
2
3 (1) Input the folder name. (2) Tap .
� Moving Email
1 From the email list, tap-and-hold the email you want to move.2 From the displayed pop-up menu, tap “Move to folder”.
The screen for specifying the folder to move to is displayed. Email can not bemoved to a service folder.
3 Tap the folder to move the email to, then tap .
The email is moved to the destination folder.
2
1
Section 03 LOOX (59-72) 18/10/03, 5:25 PM64

65
� Changing Folder NamesIt is not possible to change the name of an existing folder. Only the names offolders that have just been created can be changed.
1 Tap the “Tools” menu → “Manage folders” in that order.The folder management screen is displayed.
2 Tap the folder whose name you want to change, then tap “Change name”.The folder name change screen is displayed.
3 (1) Input the folder name. (2) Tap .
� Deleting FoldersIt is not possible to change the name of an existing folder. Only the names offolders that have just been created can be changed.
1 Tap the “Tools” menu → “Manage folders” in that order.The folder management screen is displayed.
2 Tap the folder you want to delete, then tap .The”Delete?” is displayed.
3 Tap “Yes”.The selected folder is deleted.
4 Tap to complete the operation.
Section 03 LOOX (59-72) 18/10/03, 5:25 PM65

66
SECTION 3
4 Exchanging Instant Messages
You can use the Pocket PC edition of MSN Messenger to exchange instantmessages and hold conversations (called chats) with multiple people.
This section explains simple MSN Messenger usage methods. For further details, seethe help for this device or the MSN Messenger help.
� Preparations
� Obtaining AccountsUsing MSN Messenger requires either of the following accounts.
• Passport account• Microsoft Exchange email account
Critical PointObtaining a Passport AccountA Passport account is a Microsoft or Hotmail account. A Passport account can be obtainedfrom the following Web pages.• Microsoft Passport account (http://www.passport.com)• Hotmail Passport account (http://www.hotmail.com)
� SettingsAfter obtaining a Passport account or Microsoft Exchange email account, make thesettings for MSN Messenger.
1 Tap → Program → “MSN Messenger” in that order.
The MSN Messenger screen is displayed.
2 Tap the “Tools” menu → “Options” → “Account” tab.
3 Input the items required on the account setting screen.
Section 03 LOOX (59-72) 18/10/03, 5:25 PM66

67
1 Select a Passport or Exchange account, then input the sign-in name andpassword.
2 Select the account to sign in first.
3 Tap .
� Sign-in and Sign-outYou must sign in to use MSN Messenger and you sign out when you exit MSNMessenger.
� Sign-in
1 Set the CF card in place.
2 Tap → “Programs” → “MSN Messenger” in that order.
3 Tap the screen and sign in.
3
1
2
Section 03 LOOX (59-72) 21/10/03, 3:47 PM67
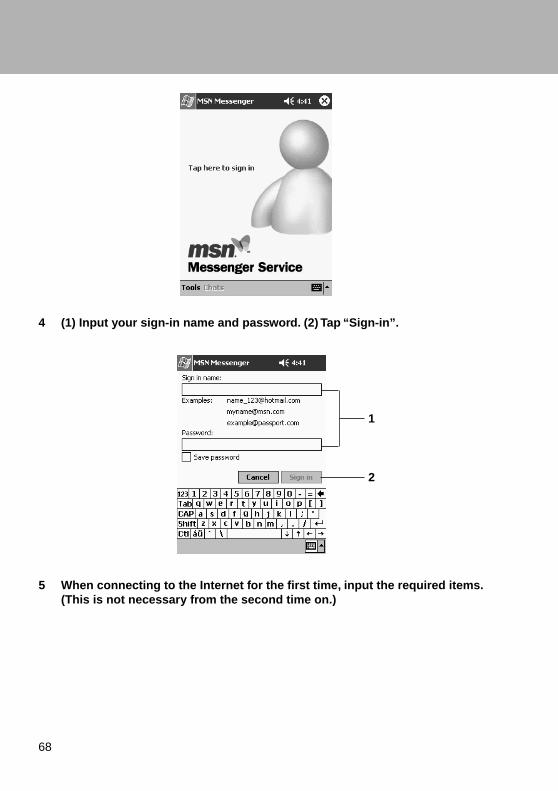
68
4 (1) Input your sign-in name and password. (2) Tap “Sign-in”.
5 When connecting to the Internet for the first time, input the required items.(This is not necessary from the second time on.)
1
2
Section 03 LOOX (59-72) 18/10/03, 5:25 PM68

69
1 Input the user name and password for connecting to your provider.
2 Normally, this does not need to be input.
3 To store the password, tap the checkbox to select it .
4 Tap “OK”.
The MSN Messenger screen is displayed.
� Sign-out
1 Tap the “Tools” menu → “Sign-out” in that order.
� Basic MSN Messenger Operations
� Screen ConfigurationWhen you sign in, the following screen is displayed.
1 Displays your own status, online, offline, temporarily away from your seat,busy with a call, etc.
2 Displays the status of other participants. You can chat with those who areonline.
3 You can set-up the additional participants, your own status and options.
� Adding/Deleting ContactsYou register chat contacts beforehand.
1 Tap the “Tools” menu → “Add Contact” in that order.
2 (1) Input the sign-in name for the contact to be added. (2) Tap “Next”.
The completion screen is displayed and the new chat contact is added.
Section 03 LOOX (59-72) 18/10/03, 5:25 PM69

70
When adding a chat contact, tap the “Tools” menu → “Add Contact” in that order, thenadd the contact according to the instructions on the screen.
To delete a chat contact, tap-and-hold the name of the contact to be deleted, then tap“Delete Contact”.
Enter message.
Tap to send message.
� Adding/Deleting ContactsYou register chat contacts beforehand.
1 Tap the “Tools” menu → “Add Contact” in that order.
2 (1) Input the sign-in name for the contact to be added. (2) Tap “Next”.
The completion screen is displayed and the new chat contact is added.
Section 03 LOOX (59-72) 18/10/03, 5:25 PM70

71
� ChattingYou can exchange instant messages and chat with other participants.
1 Tap those you want to chat with from among those chat contacts who areonline.
2 (1) Use the input panel to input your message into the text box displayed inthe center of the screen. (2) Tap “Send”.
The message you sent is delivered to the other party and your messages back andforth are displayed as a dialog on the screen.
When an instant message arrives for you from a chat contact, you are notified with apop-up.
Critical PointUsing My TextYou can write messages simply by selecting frequently used phrases registered in My Text.
If you tap “Chat”, you can switch to a separate chat with the contact who sent thenew message. If you tap “Ignore”, the chat with the current contacts is continued.
Section 03 LOOX (59-72) 18/10/03, 5:25 PM71

72
Section 03 LOOX (59-72) 18/10/03, 5:25 PM72

44SECTIONSECTION
Section 04 LOOX (73-79) 18/10/03, 5:26 PM73

74
1 SummarySECTION 4
As functions for using this device as a notebook, you can use the Pocket PCedition of Microsoft Outlook (Pocket Outlook). This chapter is a simpleexplanation of Pocket Outlook information, see the help.
� Pocket Outlook FunctionsThe functions you can use with Pocket Outlook are as follows. This section explainshow to use “Calendar”, “Contacts”, “Tasks”, and “Notes”.
Function Summary
Calendar This program can be used as a schedule pad. You can writeappointments on the calendar and set alarms for appointments.
Contacts This program can be used as a contact list. You can recordaddresses, telephone numbers, email addresses, etc.
Tasks You can manage a list of tasks to do. You can also set alarms for tasks.
Notes You can use this device as a notebook. You can write characters andfigures and also record sound.
Inbox This sends and receives email and manages email.
Critical PointWhen using Microsoft Outlook on a computer, you can synchronize this device and thecomputer.
� Reminder SettingsWhen there is something that must be done, such as a task or appointment, an alarm,message, or other notice can be given when the scheduled time arrives.
The reminder methods are as follows. You can also specify multiple forms of reminderfor the same event.
• A message box is displayed on the screen.• An alarm is sounded. You can specify the type of sound.• The indicator flashes.
The setting messages as follows.
1 Tap → “Settings” → “Personal” tab → “Sounds and Notifications” in thatorder.
2 (1) Tap the “Volume” tab. (2) Select the “Programs” → “Reminder (alarm,appointments, etc.)” checkbox .
Section 04 LOOX (73-79) 18/10/03, 5:26 PM74

75
3 Tap the “Notification” tab and specify the reminder method.
• If you want an audible reminder, select the checkbox and specify the type ofsound from the list box on the right.
4 Tap .
Section 04 LOOX (73-79) 18/10/03, 5:26 PM75

76
2 CalendarSECTION 4
This program can be used as a schedule pad. This application can be used as aschedule pad. Appointments can be checked on calendars of various formats.You can also set reminder by alarm or message for the calendar date and time.
� Screen ConfigurationTap → “Calendar” in that order. The Calendar is displayed in the selected format.
1 Displays today’s appointments. For a monthly or annual calendar, thecalendar for today’s month or year is displayed.
2 Each time you tap here, the display proceeds to the next appointments in theunits of the displayed calendar: day, week, month, or year. Each time you tap;, the display moves back to the previous appointments.
3 This displays the calendar. If you tap-and-hold here, a pop-up menu isdisplayed showing operations you can carry out on the appointment list.
4 You can write a new appointment.
5 You can set calendar options, such as the font size and time interval.
6 You can switch the display format for the calendar.
Tap to go to today.
Tap to display or editthe appointment details.
Tap to create a new appointment.
Section 04 LOOX (73-79) 18/10/03, 5:26 PM76

77
� Switching the DisplayYou can switch the display by tapping the icon on the command bar. The screensdisplayed for each icon are as follows.
Icon Screen Name Summary
Agenda display Lists the appointments for one day.
Day display Displays the appointments for one day in a timetable.
Week display Displays the appointments for one week. Tapping on adate switches to the daily display for that day.
Month display Displays the appointments for one month. Tapping on adate switches to the daily display for that day.
Year display Displays the calendar for the year.Tapping the date switches to the day-by-day displayscreens.
� Creating New Appointments1 Select the date and time for the new appointment.
• “Day Display” screen or “Week Display” screenTap the time or date into which you wish to enter the appointment.
• “Month Display” screen or “Year Display” screenTap the date into which you wish to enter the appointment, then tap the time on the “Daydisplay” screen.
2 Tap the “New” menu item.
3 Tap the item you want to input, then input the necessary items.
Tap to return to the calender(the appointment is save automatically).
Tap to choosen frompredefined text.
Tap to choosen frompreviously entered locations.
Tap to select a time.Tap to select a date.
Notes is a good place formaps and directions.
Section 04 LOOX (73-79) 18/10/03, 5:26 PM77

78
4 When the input is complete, tap .
The appointment is saved and the display returns to the Calendar screen.
� Using the Summary ScreenThe “Summary” screen is displayed when you tap an appointment on the “Agendadisplay” screen or the “Day display” screen.
� Revising/Deleting an Appointment
� Revising an Appointment
1 The summary screen for the appointment to be revised is displayed.
2 Tap the “Edit” menu.
3 Input the revised items in the same manner as when creating a new appointment.
4 When the revision is complete, tap .
The display returns to the appointment list.
� Deleting an Appointment
1 In Calendar, tap-and-hold the appointment to be deleted.
2 On the “Pop-up” menu → tap “Delete Appointment”.The selected appointment is deleted.
3 Tap “Yes”.
View appointment details.
View.
Tap to changeappointment.
Section 04 LOOX (73-79) 18/10/03, 5:26 PM78

79
� Automatic Creation of a Meeting ReminderThe Calendar can be used to send a meeting notice email to an Outlook or PocketOutlook user.
Critical PointBefore writing a meeting notice• The email addresses for the meeting attendees must be input in Contacts beforehand.• The settings for the Inbox handling email sending/reception must be complete.
1 Input the appointment.
2 Tap the command bar input panel button ( or the like) on the appointmentinput screen, to switch off the input panel display.
3 Tap the attendees.A list of the email addresses already input to the Contacts are displayed.
4 From the email address list, select the contacts to send the meeting noticeintroduction to by tapping them to select them.
5 Tap .
The meeting notice is created automatically and placed in the Outbox.The next time you synchronize with the computer or connect to the network, themeeting notice is sent to the attendees.The sending method can be specified by tapping the “Tools” menu, “Option” →“Meeting Attendance Request Reply Method”.
Section 04 LOOX (73-79) 18/10/03, 5:26 PM79

80
3 ContactsSECTION 4
In Contacts, addresses, telephone numbers, email addresses, etc. can beregistered. Also, the registered data can be shared quickly between this deviceand another Pocket PC using.
� Screen ConfigurationTap → “Contacts” in that order.
Critical PointChanging the Contacts display methodTap the “Tools” menu → “Option” in that order to change the display method.
Select the category of contactsdisplayed in the list.
Tap and enter part of nameto quickly find it in the list.Tap to see additional phone numbersand e-mail addresses.Tap to display or edit the contact details.
Tap and hold to display apop-up menu of actions.
Tap to create a new contact.
Section 04 LOOX (80-88) 18/10/03, 5:27 PM80

81
� Creating a New Contact1 Tap the “New” menu.
2 Tap the item to be input, then input the required item.
3 When the input is complete, tap .
The information is stored and the display returns to the Contacts list screen.
� Searching the ContactsYou can search using the input box under the navigation bar.
1 Input the character string you want to search for.
2 The search results are displayed.To display the contact list again after the search, either clear the character stringfrom the input box or tap to the right of the input box.
Section 04 LOOX (80-88) 18/10/03, 5:27 PM81

82
� Using the Summary ScreenTo display the “Summary” screen, tap a contact on the Contacts list.
� Revising/Deleting Contacts
� Revising Contacts
1 In the Contacts list, tap the contact to be revised.
The summary screen is displayed.
2 Tap the “Edit” menu.
The contact list editing screen is displayed.
3 Input the revised items in the same manner as when creating a new contact.
4 When the revision is complete, tap .
The display returns to the Calendar list.
� Deleting a Contact
1 In the Calendar, tap-and-hold the contact to be deleted.
To select multiple contacts, drag and specify the range. Next, tap-and-hold theselected range.
2 From the displayed pop-up menu, tap “Delete Contact”.
“Continue?” is displayed.
3 Tap “Yes”.
View contact details.
Tap to view notes.
Tap to change contact information.
Section 04 LOOX (80-88) 18/10/03, 5:27 PM82

83
4 TasksSECTION 4
Tasks that need to be executed can be managed in Tasks. You can also set alarmsfor registered tasks.
� Screen ConfigurationTap → “Tasks” in that order.
Critical PointChanging the Tasks display methodTap the “Tools” menu → “Options” in that order to change the display method.
Select the category of tasks youwant displayed in the list.
Select the short order of the list.
Indicates high priority.
Tap to display or edit the task details.
Tap and hold to display a pop-upmenu of actions.
Tap to create a new task.
Section 04 LOOX (80-88) 18/10/03, 5:27 PM83

84
� Creating a New Task1 Tap the “New” menu item.
2 Tap the item to be input, then input the required item.
3 When the input is complete, tap .
The information is stored and the display returns to the Tasks screen.
Critical PointCreating a Task list simplyTap the “Tools” menu → select “Input Bar” to display the “Input” bar.To set high priority, tap to set low priority, tap .
Section 04 LOOX (80-88) 18/10/03, 5:27 PM84
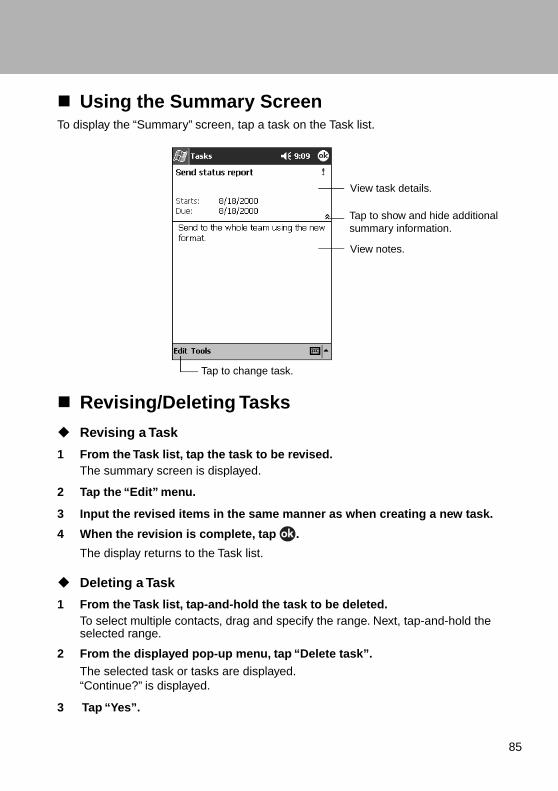
85
� Using the Summary ScreenTo display the “Summary” screen, tap a task on the Task list.
� Revising/Deleting Tasks
� Revising a Task
1 From the Task list, tap the task to be revised.The summary screen is displayed.
2 Tap the “Edit” menu.
3 Input the revised items in the same manner as when creating a new task.
4 When the revision is complete, tap .
The display returns to the Task list.
� Deleting a Task
1 From the Task list, tap-and-hold the task to be deleted.To select multiple contacts, drag and specify the range. Next, tap-and-hold theselected range.
2 From the displayed pop-up menu, tap “Delete task”.The selected task or tasks are displayed.“Continue?” is displayed.
3 Tap “Yes”.
View task details.
Tap to show and hide additionalsummary information.
View notes.
Tap to change task.
Section 04 LOOX (80-88) 18/10/03, 5:27 PM85

86
5 NotesSECTION 4
This device can be used as a notepad when you want to write something downquickly. In addition to text and figures, you can also record sound.
� Screen ConfigurationTap → Notes in that order.
Tap to change the sort order ofthe list.
Tap to open a note or play arecording.
Tap-and-hold to display a pop-upmenu of actions.
Tap to record.
Tap to show or hide theRecording toolbar.
Tap to create a new item.
Section 04 LOOX (80-88) 18/10/03, 5:27 PM86

87
� Creating a New Note1 Tap the “New” menu item.
2 Input the contents of the note.
3 When the input is complete, tap .
The information is saved and the display returns to the note list screen.
Tap to return to the note list(the note is saved automatically).
Tap to show or hide the input panel.
Tap to write on the screen.
Tap to add a recording to the note.
Section 04 LOOX (80-88) 18/10/03, 5:27 PM87

88
Section 04 LOOX (80-88) 18/10/03, 5:27 PM88

55SECTIONSECTION
Section 05 LOOX (89-97) 18/10/03, 5:27 PM89

90
1 Program ListSECTION 5
This displays a list of the applications built into this device and accessoryapplications.
� Built-In ProgramsIcon Program Name Function Summary Reference
ActiveSync
Pocket InternetExplorer
Windows MediaPlayer for PocketPC
Notes
Task“
Inbox
Calendar
Contacts
Find
Help
MSN Messenger
Pocket Excel
Pocket Word
You can connect this device andcomputer and synchronize thedata on this device and on thecomputer.
Views Web pages over theInternet.
Plays back MP3 and WindowsMedia audio and video.
You can use this device as a notepad. In addition to text andfigures, you can also recordsound.
Manages tasks. Can also setalarms for registered tasks.
You can send and receive emailand manage received email.
You can use this device as aCalendar pad. You can writeappointments into the calendarand set alarms for appointments.
You can use this device as anaddress book. You can recordaddresses, telephone numbers,email addresses, etc.
You can search for characterstrings included in file names anddata in files.
Displays help. You can check thebasic operations of this deviceusing this help file.
Exchanges instant messages.
This is the Pocket PC edition ofMicrosoft Excel, which is used oncomputers.
This is the Pocket PC edition ofthe Microsoft Word used oncomputers.
“ActiveSync Summary”
“Viewing Web Pages”
Windows Media Player forPocket PC
“Notes”
“Tasks”
“Sending/Receiving Email”
“Calendar”
“Contacts”
“Searches”
“Help”
“Exchanging InstantMessages”
“Pocket Excel”
“Pocket Word”
Section 05 LOOX (89-97) 18/10/03, 5:27 PM90

91
� Bundled Applications Additional applications are stored on the “Applications CD”. These applications must
be installed on Pocket LOOX in order to be used. Please refer to your CD to setup theapplications.
Icon Program Name Function Summary Reference
File Explorer
Beam
Calculator
Game
LX Launcher
LX Backup
LX Diagnostic
Automatic storagedevice startup/InfFile Editor
Pocket Plugfree
“File Explorer”
“Infrared reception”
“Calculator”
“Game”
“LX Launcher”
“LX Backup”
"LX Diagnostic"
“Automatic storage devicestartup”
“Pocket Plugfree”
Manages files and folders.
You can use the infraredcommunications port to exchangedata with other Pocket PCs andother devices with infraredcommunications ports.
You can calculate using thecalculator.
You can play solitaire (card game).
Displays a list of application iconsso you can start applicationseasily. This is the Pocket PCedition of Microsoft Excel, which isused on computers.
Backs up the data on this device’sRAM to a CF card or SD/MMCcard.
LX diagnostic is an application thattest the device hardware.
You can set so that when aCFcard/SD/MMC card is set in thisdevice, the application on it isstarted automatically.
Connects through BluetoothTM.
Section 05 LOOX (89-97) 18/10/03, 5:28 PM91

92
SECTION 5
2 Standard Pocket PC 2003 Built-In Programs
This section explains the programs that come built-in with Pocket PC.
� Pocket WordWith Pocket Word, you can create documents in the same way as when creating Worddocuments on a computer. In addition to text, drawings and sound may also be storedin these documents. You can create new documents on this device, transfer documentscreated on a computer to this device and edit them on this device, and transferdocuments created on this device to a computer and edit them there. You can alsosynchronize files on this device and on the computer, so you can keep the most up-to-date data on both units. Note however that there are points to watch out for concerningdata compatibility.
Documents created can be managed in separate folders. This section provides a simpleexplanation of Pocket Word operation. For more details, see help.
� Screen ConfigurationTap → “Programs” → “Pocket Word” in that order.
Select the type of folder youwant displayed in the list.
Tap to change the sortorder of the list.
Tap to open a document.
Tap and hold an item to seea pop-up menu of actions.
Tap to create a new document.
Section 05 LOOX (89-97) 18/10/03, 5:28 PM92

93
Critical PointIf no file list is displayed when you start Pocket WordThe first time you start Pocket Word or if you start Pocket Word with no Pocket Word documentsstored, the screen for editing a new file is displayed.
� File OperationsTo copy/delete a file or move a file to another folder, operate as follows.
Copying/deleting files
1 In the file list, tap-and-hold the file you want to copy/delete.
2 From the pop-up menu displayed, tap “Copy” or “Delete”.
If you tap “Copy”, a copy is made with the name “Copy Source File Name (1)”.(The number in the parentheses is the number of files copied.)If you tap “Delete”, “Completely delete selected item?” is displayed, so tap “Yes”.
Moving files
1 In the file list, tap-and-hold the file you want to move.
2 From the pop-up menu displayed, tap “Change Name/Move”.
3 At “Folder” on the “Change Name/Move” screen, specify the folder to movethe file to, then tap .
The file is moved.
Critical PointPocket Word save formatsPocket Word has a variety of save formats, including Pocket Word (.psw), rich text format (.rtf),and text (.txt). The format the file is saved in can be specified by tapping the “Tools” menu →“Save As” → “Save As Type” in that order when the file is displayed.To check the type of a file in the Pocket Word file list, from the pop-up menu for the file, tap“Change Name/Move” .
� Input ModesThe input modes you can use with Pocket Word are as follows.
Typing
You can input using the software input panel.
Section 05 LOOX (89-97) 18/10/03, 5:28 PM93

94
Handwriting
You can handwrite characters directly on the screen.
Drawing
You can use the stylus pen to draw freely on the screen.
Recording
You can insert sound into documents.
� Pocket ExcelThe same as when using Microsoft Excel on a computer, you can edit workbooks (filescreated with Excel) with Pocket Excel. You can create new workbooks on this device,transfer workbooks created on a computer to this device and edit them on this device,and transfer documents created on this device to a computer and edit them there. Youcan also synchronize files on this device and on the computer, so you can keep themost up-to-date data on both units. Note however that there are points to watch out forconcerning data compatibility. Documents created can be managed in separate folders.This section provides a simple explanation of Pocket Excel operation. For more details,see help.
� Screen ConfigurationTap → “Programs” → “Pocket Excel” in that order.
The configuration of the file list screen is basically the same as for Pocket Word. See“Screen Configuration”.
Zoom button.
Auto Sum button.Format button.
Cell contents appear hereas you enter them.
Section 05 LOOX (89-97) 18/10/03, 5:28 PM94

95
� File Operations
The operations for copying/deleting a file or moving a file to another folder are basicallythe same as for Pocket Word.
Critical PointPocket Excel save formatsPocket Excel has a variety of save formats, including Pocket Excel (.pxl) and Excel (.xsl). Theformat the file is saved in can be specified by tapping the “Tools” menu → “Save As” → “SaveAs Type” in that order when the file is displayed.To check the type of a file in the Pocket Excel file list, from the pop-up menu for the file, tap“Change name/Move”.
� Usage Hints
� Widening the Screen
In order to display the worksheet as wide as possible on the screen, switch to full-screen display. Tap “View” → “Full Screen”. When you switch to full screen display,the tool bar, row and column numbers, and other window elements are no longerdisplayed. The worksheet can be displayed over the entire screen. To return to theoriginal display, tap “Close Full Screen” displayed at the top right of the screen.
Critical PointTo switch display of individual window elements on/offYou can switch display of the tool bar, row and column numbers, and other window elementson/off. Tap “View” and select only those elements that you want to display.
� To Fix a Cell Frame
If there are any cells that you want displayed even when the screen is scrolled, youcan fix the window frame in units of rows and columns.
1 Select the range of cells for which the frame is to be fixed.
2 Tap the “View” menu → “Freeze Panes” in that order.
The column to the left side of the selected cell and the row above the cell are fixed. Toend this setting, tap the “View” menu → “Unfreeze Panes” in that order.
Section 05 LOOX (89-97) 18/10/03, 5:28 PM95

96
� Splitting the Screen and Displaying Different Areas
Since you can scroll through each part of the split screen, you can display differentregions on the same worksheet at the same time. This is useful for viewing andediting different areas on large worksheets.
1 Select the cell to split at.
2 Tap the “View” menu → “Split” in that order.
A double line is displayed splitting the screen above or to the left of the selectedcell.
To end the split display, tap the “ View” menu → “Remove Split” in that order.
� Switching off the display for specified rows/columns
You can switch off the display in units of rows or columns.
1 Select the row(s) or column(s) you do not want to display.
2 Tap “Format” → “Row” or “Column” → “Hide” in that order.
To end this setting and display the row/column again, tap the “Format” menu →“Row”/”Column”, “Unhide” in that order.
� Setting Passwords for Files
You can protect the file by setting a password for it. While editing the file you wantto protect, select the “Edit” menu → “Password” in that order, then set thepassword. From the next time, the password must be input in order to open that file.
� Windows Media Player for Pocket PCYou can use Windows Media Player for Pocket PC to play back audio and video in thefollowing formats.
• MP3• Windows Media Audio (wma)• Windows Media Video (wmv)
� Screen ConfigurationTap → “Windows Media Player”.
Section 05 LOOX (89-97) 18/10/03, 5:28 PM96

97
� Pocket Internet ExplorerFor details on Pocket Internet Explorer, please refer help.
� Pocket OutlookFor details on Pocket outlook, please refer help.
� MSN MessengerFor details please refer help.
Indicates the progressof the current track.
Tap to adjust volume.
Tap to play or pause.
Tap to stop.
Tap to play a previous song.
Tap to skip to the next song.
Section 05 LOOX (89-97) 18/10/03, 5:28 PM97

98
SECTION 5
3 Other Built-in Application
This section introduces built-in programs that are in addition to the standardPocket PC 2003 programs.
Critical PointFor details on each application, see help.
� LX LauncherLX Launcher makes it easier to launch pre-registered applications. You can registerapplications that you use frequently with classifications that are easy for you to use.This application can also set a picture you like to be displayed as the screenbackground.
� Startup
There are two ways to start the LX Launcher, from the menu or from theApplications button.
� Starting from the Menu
Tap → “Programs” → “LX Launcher” in that order.
� Starting from the Applications button.
Press the Applications button at the bottom right of the Navigation button.
Section 05 LOOX (98-106) 18/10/03, 5:28 PM98

99
� Screen Configuration
1 Application icon
This is a registered program. Tapping one of these icons starts the application.Tapping-and-holding an icon displays a pop-up menu that allows you to register/delete/edit the application.
2 Tab
Switches the program type.
3 Edit
Adds and deletes tabs, changes the wallpaper, etc.
4 Switching to large icon display
Switches to large program icons.
5 Switching to small icon display
Switches to small program icons.
2
1
4567
8
3
Section 05 LOOX (98-106) 18/10/03, 5:28 PM99

100
6 Task
Displays a screen for closing other applications currently running.Tap the application to close among the running tasks, then tap “Stop”. The selectedapplication is closed. If you tap “Stop all”, all the displayed applications are closed.
7 Wireless function
This is where you can either turn on or off the Wireless LAN or Bluetooth. You caneither used one of the Wireless function at a time.
8 Battery level indicator
Section 05 LOOX (98-106) 18/10/03, 5:28 PM100
101
� Automatic Storage Device Startup/Inf File EditorAutomatic storage device startup refers to the following three applications forautomatically starting up the application in a CF card or SD/MMC card when it is set inthis device.
• Automatic startup editing tool: Creates the automatic startup file (autorun.inf).• Automatic startup setting tool: Sets whether or not to start up programs from cards
automatically.• Automatic startup tool: Reads in the automatic startup file from the card and runs the
application on the card or in the main memory.
Critical PointThe only applications that can be started automatically are executable files. If you set a cardcontaining only data files, the application related to the files is not started.
� Creating the Automatic Startup FileAutomatically starting up a CF/SD/MMC card application requires the automatic startupfile (autorun.inf). The automatic startup editing tool is used to set the automatic startupfile.
1 Load the CF card/SD/MMC card containing the application.
Write enable the card before setting it.
2 Tap → “Programs” → “Inf File Editor” in that order.
Important� When user applies Pocket LOOX with the system password security, please set the Autorun
function to “Disable”. In the case Autorun is set to “Enable”, a program can be started withoutcanceling the password lock.
Section 05 LOOX (98-106) 18/10/03, 5:28 PM101

102
3 Operate as follows.
1 Tap the card in which the automatic startup file was created.
2 Tap the executable file on the card or in the main memory.
3 Tap “Create”.
The automatic startup file is created and written onto the card.
4 Tap .
� Startup SettingsThis sets whether or not to start the application automatically when the card is set inplace.
1 Load the CF card/SD/MMC card containing the program and the automaticstartup file.
2 Tap → “Settings” → “System” tab in that order.
3 Select whether automatic startup will be enabled or disabled. (2) Tap .
When “Enable” is selected , the applications called in automatic startup files arestarted up automatically.
When “Disable” is selected , the applications called in automatic startup files arenot started up automatically.
Section 05 LOOX (98-106) 18/10/03, 5:28 PM102

103
� LX-BackupLX-Backup is an application that backs up the data on this device’s RAM to Flash Disk,CF card or SD/MMC card. If the memory in this device is ever cleared, for example by afull reset, you can restore your data from this backup data.
Important� Contents set for “Inbox” “Service”
Some of the contents set for “Inbox” “Service” can not be backed up to a memory card.Therefore, the contents of “Service” can not be fully recovered even by restoring the data.Write down the contents of “Service” on a piece of paper ahead of time. After a restoration,create a new service with the contents you wrote down, then use that new service from thenon.
� Backing up
1 If possible, connect the AC adaptor.
If the AC adaptor can not be used, check that the remaining battery capacity isadequate.
2 Close any programs that are running.
3 Set the CF card/SD/MMC card in place.
Critical PointChecking the contents of a cardUse File Explorer to check the contents of the CF card, SD/MMC card and check that it is OKto store backup data on the card. The contents of the backup card can not be checked fromthe LX-Backup Tool screen.
Section 05 LOOX (98-106) 21/10/03, 3:48 PM103

104
4 Tap → “Programs” → “LX-Backup” in that order.
5 (1) Tap either of the memory cards or Flash Disk as the backup destination.(They are displayed as “Memory Card” and “Memory Card 2”, depending onthe order in which they were set in place.) (2) Tap “Backup”.
The backup starts.
� Restoring
1 Follow Steps 1-4 of the procedure in “Backing up”.
2 (1) Tap either of the memory cards or Flash Disk to select it as the backupdestination. (They are displayed as “Memory Card” and “Memory Card 2”,depending on the order in which they were set in place.) (2) Tap “Restore”.
The restore starts.
1
2
Section 05 LOOX (98-106) 21/10/03, 3:48 PM104

105
� LX DiagnosticsThe LX Diagnostics application checks this device for faults and displays the cause ofthe problem and the solution.
� Usage MethodThe usage method for the LX Diagnostics application is as follows.
1 Please follow the step below before checking.
• Close any applications that are running.
For details on how to close applications that are running, see “ClosingApplications” .
• When a wireless model is used with this device, diagnosis on both wirelessLAN and BluetoothTM cannot be done simultaneously. Either of these functionsmust be turned on before starting this program (the diagnosis on the otherfunction is skipped).
For details on how to switch the functions, see “LX Menu”.
• If the audio status icon is Off ( ), switch it On ( ).
• If the volume is 0, tap the audio status icon ( ) to raise the volume.
• If One-Touch Mute is enabled, tap the audio status icon ( ) to raise thevolume.
2 Tap → “Programs” → “LX Diagnostics” in that order.
3 Tap “Start Diagnostics”.
The diagnostics start.
Section 05 LOOX (98-106) 18/10/03, 5:28 PM105

106
Critical PointThe diagnostics take 1-2 minutes to run.The touch screen diagnostics require you to operate the stylus according to the instructionson the screen.For the button diagnostics, press the buttons according to the instructions on the screen.For the audio diagnostics, reply to the dialog box for checking the diagnostics results.For the LED diagnosis, check that the right indicator flashes and an alarm is sounded.For a wireless modelFor the wireless LAN diagnosis, check that the left indicator lights up or flashes.For the BluetoothTM diagnosis, check that the left indicator lights up or flashes.For the display diagnostics, a diagnostic screen is displayed. Therefore, a different screen isdisplayed when the screen is switched. This is normal and does not indicate a problem withthis device.
When the diagnostics end, the following screen is displayed.
4 If there is a problem, tap “Hint” and check the cause of the problem and thesolution.
Correct the problem according to the information given. If you cannot solve theproblem yourself, write down the contents of the information and contact the“Contact point for inquiries concerning Fujitsu personal products”.
5 Tap “Close” to close the application.
Critical Point
If you tap “Make a log” checkbox ( ) before starting the diagnostics, then a record is kept ofthe diagnostics. The log file is FMLX-TpLog.txt in the “My Documents” folder. You can transferthem to a computer with ActiveSync and read them with Word Pad or other text editor.
Section 05 LOOX (98-106) 18/10/03, 5:28 PM106

66SECTIONSECTION
Section 06 LOOX (107-120) 18/10/03, 5:29 PM107
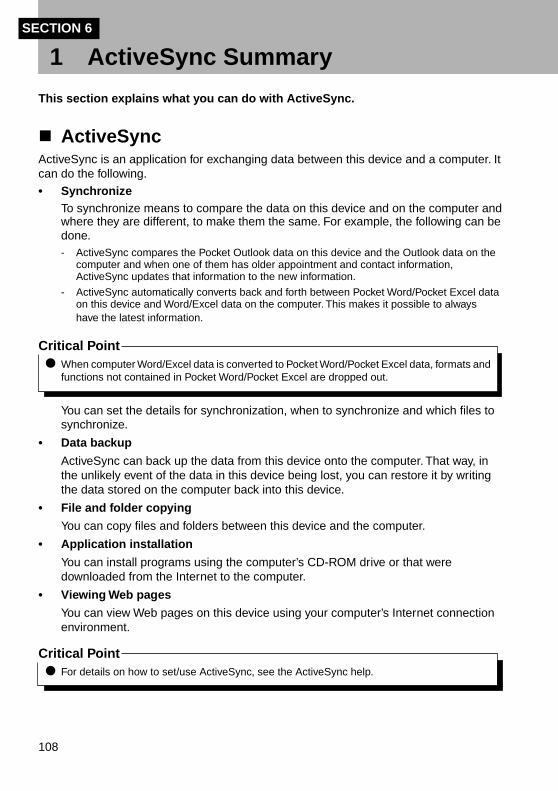
108
SECTION 6
1 ActiveSync Summary
This section explains what you can do with ActiveSync.
� ActiveSyncActiveSync is an application for exchanging data between this device and a computer. Itcan do the following.
• SynchronizeTo synchronize means to compare the data on this device and on the computer andwhere they are different, to make them the same. For example, the following can bedone.- ActiveSync compares the Pocket Outlook data on this device and the Outlook data on the
computer and when one of them has older appointment and contact information,ActiveSync updates that information to the new information.
- ActiveSync automatically converts back and forth between Pocket Word/Pocket Excel dataon this device and Word/Excel data on the computer. This makes it possible to alwayshave the latest information.
Critical PointWhen computer Word/Excel data is converted to Pocket Word/Pocket Excel data, formats andfunctions not contained in Pocket Word/Pocket Excel are dropped out.
You can set the details for synchronization, when to synchronize and which files tosynchronize.
• Data backup
ActiveSync can back up the data from this device onto the computer. That way, inthe unlikely event of the data in this device being lost, you can restore it by writingthe data stored on the computer back into this device.
• File and folder copying
You can copy files and folders between this device and the computer.
• Application installation
You can install programs using the computer’s CD-ROM drive or that weredownloaded from the Internet to the computer.
• Viewing Web pages
You can view Web pages on this device using your computer’s Internet connectionenvironment.
Critical PointFor details on how to set/use ActiveSync, see the ActiveSync help.
Section 06 LOOX (107-120) 18/10/03, 5:29 PM108

109
� InstallingWhen you install Microsoft ActiveSync, you are prompted to connect your Pocket LOOXand create a partnership. The Fujitsu USB sync driver ( in Companion CD ) must beinstalled to establish a connection.
The first time you connect, the New Partnership Wizard on your desktop PC helps youto establish a partnership and sets synchronize options.
ActiveSync is on “Companion CD”. For details on how to install it, refer to the CDcontents.
� Starting SynchronizationWith the default settings for ActiveSync, when this device is set in its cradle, ActiveSyncstarts automatically and synchronization starts. Also, while this device is in its cradle, ifinformation on either the computer or this device is updated, it is immediatelysynchronized. When synchronizing manually, start synchronization with the followingprocedure.
• Starting synchronization from the computer
Tap the “File” menu → “Synchronize” in that order, then click (synchronize).Synchronization is started.
Critical PointWhen you want to synchronize only certain information, right-click the “Information type” itemname, then click “Synchronization”.
• Starting synchronization from this device
1 Tap → in that order.
2 Tap .
Synchronization is started.
Section 06 LOOX (107-120) 18/10/03, 5:29 PM109

110
� Detailed Synchronization SettingsThe ActiveSync “Options” set the timing for synchronization and which files tosynchronize.To start the “Options” dialog, tap the “Tools” menu → “Options” in that order.Alternatively, click (Options).
� Synchronization SettingsThe “Synchronization Settings” tab sets which information is to be synchronized.
1 Mobile device
Select the items you want to synchronize with a computer.
2 Settings
This is for detailed settings for synchronization. When you select an item from“Mobile Device”, its button goes into the pushed state.
Section 06 LOOX (107-120) 18/10/03, 5:29 PM110

111
� Synchronization SettingsThe “Synchronization Settings” tab sets which information is to be synchronized.
� Synchronization ModeThe “Synchronization Mode” tab sets when synchronization is executed.
Synchronize continuously while device is connected
As long as this device is in its cradle, if information is updated on either the computer orthis device, it is synchronized immediately.
Synchronize only when connecting
Synchronization is only started when this device is first placed in its cradle.
Synchronize manually
Synchronization is started when you click the “File” menu → “Synchronization” in that
order or click (synchronization) on the computer or tap → → on thisdevice.
� Synchronization OptionsThe “Synchronization Options” tab sets when synchronization is executed.
Section 06 LOOX (107-120) 21/10/03, 3:49 PM111

112
1 Resolving Conflicts
Select the way how to resolve a conflict when it occurs.
- Leave conflicts unresolved
When a conflict occurs, this setting leaves undecided the decision as to whichcontents to unify on. In this case, “Synchronization completed. 1 conflict item” isdisplayed after synchronization ends.If you click the “Resolve conflicts” that is displayed at the same time, the“Resolve conflicts” dialog is displayed and you can specify how to resolve theconflict.
- Always replace with computer item.
If a conflict occurs, the information is always unified to the computer version.
- Always replace with this device’s item.
If a conflict occurs, the information is always unified to the version on this device.
2 Set replacement
Relationships are assigned for mutual replacement of files between the computerand this device.
3 Connecting
This selects where to connect when viewing Web pages on this device using yourcomputer’s Internet connection environment. When using a company LAN at work,select “Company Network”; when using a dial-up connection at home, select“Internet”.
4 Open ActiveSync when connecting to the mobile device.
When this device is set in its cradle, the “Microsoft ActiveSync” window isautomatically opened.
Section 06 LOOX (107-120) 21/10/03, 3:49 PM112

113
� Copying FilesTo copy files from the computer to this device, operate as follows.
1 Set this device in the cradle connected to the computer.
2 If ActiveSync is not set to be opened automatically, double-click (Microsoft ActiveSync) on the desktop to start ActiveSync.
3 Click the “File” menu → “Explorer” in that order or click (WindowsExplorer).
The “Mobile Device” window is opened and the folders and files on this device aredisplayed.
Critical Point
You can also open the “Mobile Device” window by double-clicking (Mobile Device) in the
“My Computer” window.
4 Open the folder to copy into, then drag the file to be copied using thecomputer’s “Windows Explorer” or the like.
� Synchronizing FilesTo synchronize any files other than Pocket Outlook files, use the synchronization folder.When “Files” is selected during ActiveSync installation or “Files” is selected from the“Synchronization Settings” tab in the ActiveSync Options dialog, then thesynchronization folder is created with the default name of “My Documents”. Thissynchronization folder can be opened from the desktop shortcut.If you put the files you want synchronized into the synchronization folder, they aresynchronized the next time synchronization is executed.
Section 06 LOOX (107-120) 21/10/03, 3:49 PM113

114
SECTION 6
2 Synchronizing Web Pages and Email
You can use ActiveSync to transfer Web pages viewed on the computer and emailreceived on it to this device so you can read them on the go.
� Synchronizing Web PagesIf you find a Web page using your computer but do not have time to read it right away,you can transfer it to this device to read on the go. Another advantage of taking in Webpages with your computer ahead of time is that this allows you to read them on thisdevice regardless of communications conditions and the like.
� Transferring FavoritesWhen you install ActiveSync, “Mobile Device Favorites” is added to the computer’sInternet Explorer “Favorites” menu.With the “Favorites” menu → “Add to Favorites”, if you create a favorite in the “MobileDevice Favorites”, it is transferred to this device’s favorites during synchronization.What is transferred in this case is just the URL for the Web page added to the favorites.To view the contents of this page requires that you connect to the Internet.
Critical PointTransferring a favorite requires Internet Explorer Version 4.0.1 Service Pack 1 or later.
� Transferring Web PagesWhen you install ActiveSync, “Create Mobile Device Favorites” is added to thecomputer’s Internet Explorer “Tools” menu.When you use this menu, the data for Web pages in “Mobile Device Favorites” in the“Favorites” are copied and during synchronization, the contents of the Web pages aretransferred to this device.
Critical PointTransferring a Web page requires Internet Explorer Version 5.0 or later.
Section 06 LOOX (107-120) 18/10/03, 5:29 PM114

115
� Creating Mobile Favorites
The method for downloading transfer Web pages from the Internet is as follows.
1 Display the Web page to transfer.
2 On Internet Explorer on the computer, click the “Tools” menu → “CreateMobile Favorite” in that order.
3 (1) If necessary, change the name of the favorite. (2) Set the update schedule.(3) Click “OK”.
The next time synchronization is executed, the Web page is transferred to thisdevice.
Critical PointWhen the update schedule is specified, the newest information is downloaded to the computerperiodically.Even if no update schedule is specified, you can update to the newest information manuallyfrom Internet Explorer on the computer by clicking the “Tools” menu → “Synchronize” in thatorder.To add to the update Calendar or specify the depth of the links for downloading, execute thefollowing operations.1 With Internet Explorer on the computer, click the “Favorites” menu → “Mobile Favorites” in
that order, then right-click the displayed favorites.2 Click “Properties”.3 With the “Schedule” tab, you can add to the update schedule and with the “Download” tab,
you can specify the depth of the links for downloading etc.
� To Conserve Memory
When a Web page is transferred to this device, the memory area is compressed.The following operations are executed to conserve memory.
• With “Mobile Favorites” Properties, set the link depth for downloading to “1”.
• With the following procedure, change the settings to not download pictures andsounds.1 If ActiveSync is set not to start automatically, double-click (Microsoft ActiveSync) on
the desktop, start ActiveSync.2 Click the “Tools” menu → “Options” in that order. Or click (Options).3 Click “Favorites”, then click “Settings”.4 (1) On the “User Settings” tab, click the “Synchronize pictures” and “Synchronize sounds”
checkboxes to unselect them. (2) Click “OK”.
Section 06 LOOX (107-120) 18/10/03, 5:29 PM115

116
� Mobile ChannelMobile Channel provides text-centric Web pages to make them easier to view on PocketPCs. On the computer, if you execute the procedure called “Read”, the Web page isdownloaded to the computer and transferred to this device during synchronization.
Critical PointReading Mobile Channel requires Internet Explorer Version 4.0 or higher.
� Synchronizing EmailIn the ActiveSync “Options” dialog, if the “Inbox” is selected, the Pocket Outlook Inboxand computer Outlook Inbox. Email synchronization allows the following. For details onthe “Options” dialog settings, see “Detailed Synchronization Settings”.
• Unread and newly arrived messages on the computer are transferred to the Inbox of thisdevice during synchronization. When there is no time to read email on the computer, you canread them on the go.
• If you create email on this device and put it in the “Outbox” folder, it is transferred to the“Outbox” folder on the computer during synchronization and can be sent from the computer.This allows you to write emails on the go and send them all afterwards.
Critical PointIf you delete email on this device, the copy of that email on the computer is also deletedduring synchronization. Be careful not to delete important email by mistake.
Section 06 LOOX (107-120) 18/10/03, 5:29 PM116

117
SECTION 6
3 Synchronizing Pocket Word/Pocket Excel
Pocket Word/Excel files can be synchronized with computer Word/Excel files. Thissection explains the points to watch out for during synchronization.
� Linking with WordWhen the synchronization folder is used, files can be synchronized between PocketWord on this device and Word on the computer. The points to watch out for duringsynchronization are as follows.
• When synchronization is executed, Word documents (with the doc extension) on the computerare converted to Pocket Word data format (with the psw extension). At this time, informationfor functions that Pocket Word does not have (for example, double ruled lines for tables) isdropped out. For details on file compatibility, see the ActiveSync help.
• If a Pocket Word document is deleted on this device, the same Word document is also deletedfrom the synchronization folder on the computer during synchronization. For critical documents,do not put the original in the synchronization folder; put in a copy instead.
• If you edit a Pocket Word document on this device, then synchronize, some of the functionsnot found in Pocket Word are deleted without being restored in the Word document. For complexWord documents that use many formats, do not put the original in the synchronization folder;put in a copy instead.
� Linking with ExcelWhen the synchronization folder is used, files can be synchronized between PocketExcel on this device and Excel on the computer. The points to watch out for duringsynchronization are as follows.
• When synchronization is executed, Excel documents (with the xls extension) on the computerare converted to Pocket Excel data format (with the pxl extension). At this time, information forfunctions that Pocket Excel does not have (for example, macros) is dropped out. For detailson file compatibility, see the ActiveSync help.
• If a Pocket Excel document is deleted on this device, the same Excel document is also deletedfrom the synchronization folder on the computer during synchronization. For critical documents,do not put the original in the synchronization folder; put in a copy instead.
• If you edit a Pocket Excel document on this device, then synchronize, some of the functionsnot found in Pocket Excel are deleted without being restored in the Excel document. Forcomplex Excel functions that use many formats, do not put the original in the synchronizationfolder; put in a copy instead.
Section 06 LOOX (107-120) 18/10/03, 5:29 PM117

118
SECTION 6
4 Backing Up and Restoring
This section explains how to back up the data of this device to your computerand restore it from your computer.
� Backing up Data
IMPORTANT� Always backup
Always backup just in case. If you can not back up to a computer, see “LX Backup” and backup to the Flash Disk, CF card or SD/MMC card.
1 Set this device in its cradle connected to the computer.
2 If ActiveSync is set not to start automatically, double-click (MicrosoftActiveSync) on the desktop to start ActiveSync.
3 Click the “Tools” menu → “Backup/Restore” in that order.
4 This sets how to backup.
1 This backs up all the data on this device. Select this when backing up for the firsttime.
2 This backs up only the files that have changed since the previous backup.
3 Starts the backup.
4 If you click this checkbox to select it, the backup is executed automatically whenthis device is set in its cradle.
1
2
3
4
Section 06 LOOX (107-120) 18/10/03, 5:29 PM118

119
5 To save these settings, click “OK”. To start the backup immediately, click“Backup”.
When the backup is started, “Backup processing is complete.” is displayed after theend of the backup.
6 Click “OK”.
Critical PointThe first time you back up, execute a batch backup. After the batch backup has been completedonce, if you set to execute differential backups automatically, from then on the latest informationwill be backed up reliably.
� Restoring DataIf the memory in this device is cleared, for example by a full reset, restore the data withthe following procedure.
1 Set this device in its cradle connected to the computer.
2 If ActiveSync is set not to start automatically, double-click (MicrosoftActiveSync) on the desktop to start ActiveSync.
3 If the “New Partnership” dialog is displayed, click No to set , then click“Next”.
4 Click the “Tools” menu → “Backup/Restore” in that order.
5 Click the “Restore” tab, then click “Restore”.
If the “Select Partnership” dialog is displayed, select the name of the device onwhich the files to be restored from are stored, then click “OK”.The “Continue Restoration” dialog is displayed.
Section 06 LOOX (107-120) 18/10/03, 5:29 PM119

120
6 Click “Restore”.
The restoration starts. After the restoration completes, “Restoration complete” isdisplayed.
7 Click “OK”.
8 Remove this device from its cradle.
9 Read “Normal reset”, then execute a normal reset.
Critical PointWhen you synchronize for the first time after a restoration, the “Append/Replace” dialog boxmay be displayed. If so, click one of the following three options.– Append this device’s item to the item on this computer– Replace this device’s item with the item on this computer– Do not synchronize this type of data at this time
Section 06 LOOX (107-120) 18/10/03, 5:29 PM120

77SECTIONSECTION
Section 07 LOOX (121-138) 18/10/03, 5:30 PM121
122
SECTION 7
1 Connection Configurations That Can Be Used
This section explains connection devices and connection modes available onthis device.
� Connecting through Wireless LANOur wireless Pocket LOOX models are equipped with wireless LAN modules. Thesemodels can be wirelessly connected to your corporate LAN or access to the Internetfrom shops offering wireless LAN services.
� Connecting through Wired LANInserting a NE2000-compatible wired LAN card into this device allows you to connect toyour corporate LAN or other network.
� Connecting with a CF Modem card.When a CF modem card is set in this device, you can make dial-up connections to theInternet.
� Connecting through Bluetooth™Our wireless Pocket LOOX models are equipped with Bluetooth modules. You canexchange data with another one of these devices or with another device equipped withBluetooth (cell phone, notebook computer, etc.) without needing to connect a cable.
� Connecting through InfraredThis device is equipped with an infrared communication port. You can exchange datawith another one of these devices or with another device equipped with an infraredcommunications ports (cell phone, notebook computer, etc.) without needing to connecta cable.
� Connecting with the CradleUsing the cradle enables you to connect to a computer.
Section 07 LOOX (121-138) 18/10/03, 5:30 PM122

123
SECTION 7
2 Wireless LAN Connections
This section explains how to connect your Pocket LOOX to your corporate LAN orgain access to the Internet from a shop offering a wireless LAN service via a wirelessLAN.
� What is a Wireless LAN?
� FeaturesA wireless LAN connects devices using radio frequency technology without using cables.It allows mobile users to carry and use their wireless LAN-enabled devices within reach ofradio signals and has the following features. (The following are general features of wirelessLANs and do not represent the specifications of this device.)
• Provides transmission rates of 11 to 54 Mbps (depends on the wireless LAN standard applied).Currently, there are three wireless LAN standards as shown below.- IEEE802.11b: Uses 2.4 GHz band and provides transmission rates of 11 Mbps. Requires
IEEE802.11b-compatible wireless LAN cards and access points. The wireless LAN modulecontained in this device complies with IEEE802.11b.
- IEEE802.11g: Uses the same 2.4 GHz band as IEEE802.11b and provides fastertransmission rates up to 54 Mbps. Requires IEEE802.11g-compatible wireless LAN cardsand access points.
- IEEE802.11a: Uses 5.2 GHz band and provides transmission rates of 54 Mbps. RequiresIEEE802.11a-compatible wireless LAN cards and access points.
• Provides the following security mechanisms.- Network name (SSID): An SSID (service set identifier) is a common network name used to
protect the system against unauthorized access.- Network key (WEP key): A WEP key is used to encrypt data to help prevent unauthorized
users from accessing the data.
Important� Be sure to observe the following!
Signals sent from wireless LAN devices can affect the operation of electronic medicalequipment. In some cases, they could cause an accident, so in the following locations, eitherswitch off the power to this device or stop the Bluetooth functions.
Section 07 LOOX (121-138) 21/10/03, 3:53 PM123

124
� Connection ModesThere are two wireless LAN connection modes.
� Infrastructure mode
Multiple devices are connected using transceiver devices called “access points. On anaccess point side, network settings (network name, network key, etc.) are configured;on a device side, wireless LAN is set up to the access point’s settings. For details onaccess points, refer to the relevant manuals.
� Ad Hoc connection
In Ad Hoc connection, devices communicate directly with each other, without the use ofan access point. All devices connected in this mode use the same SSID and WEPsettings.
� In order to secure good communicationsTo ensure good communications, observe the following:
• Other wireless LAN devices with which you want to communicate should be in a range up toa line of sight. The maximum communications distance may be reduced by the ambientenvironment (walls, furniture, etc.) or the building structure.In particular, in reinforced concrete buildings, communications may be impossible betweenrooms that are separated by walls or floors reinforced with steel.
Access point
Section 07 LOOX (121-138) 21/10/03, 3:53 PM124

125
• Use your Pocket LOOX with Bluetooth at least 2 meters away from other equipment (electricalequipment/AV equipment/office computer equipment/digital cordless telephones/faxes, etc.).If you must use Pocket LOOX with Bluetooth near a microwave oven, then a distance of atleast 3 meters from the microwave oven, as the reception is subject to interference with regardto microwaves. If you come too close to other equipment while its power is on, this devicemay stop communicating normally or cause noise in or interfere with radio or televisionreception. (On certain UHF and satellite broadcast channels, television pictures may bedisrupted.)
• When a broadcast station, transmitter, or the like is nearby and normal communications arenot possible, move to a different location. If the signal field in the area is too strong, normalcommunications may be impossible.
• Interference with Bluetooth™Since wireless LANs (IEEE802.11b/g) and Bluetooth™ use the same frequency band (2.4GHz), if you use this device near another devices equipped with Bluetooth, signal interferencewill occur, causing transmission speed drop and lost connections. In such a case, take thefollowing countermeasures.- Use this device at least 10 meters from Bluetooth devices.- When using this device within 10 meters of a Bluetooth™ device, switch off either of these
devices.• It is not possible to concurrently use a wireless LAN and Bluetooth™.
Note: Enable Wireless LAN or Bluetooth™ via the LX-Launcher.
LX-Launcher screen 1.Tap Pocket LOOX icon to go to next.appear. 2. Tap Use Wireless LAN to enable.
� SettingsThis section explains how to connect to a wireless access point.
1 Tap → “Settings” → “Connection” tab → “Advanced” in that order.
2 Tap “Network Card” tab.
3 Operate as follows.
1 To connect to your company’s network, select “Work settings”; to connect tointernet from your home, select “The internet settings”.
2 Tap “WiFi driver”.
1
2
Section 07 LOOX (121-138) 22/10/03, 4:03 PM125

126
4 Operate as follows.
� When DHCP server functions are enabled on an access point:
Check that “Use server-assigned IP address” is selected , then tap .
� When a fixed IP address has been registered to an access point:
1 Tap “Use server-assigned IP address” to select it .
2 Set the information such as IP address.
3 Tap the “Name Server” tab.
4 Set information concerning the DNS server and WINS server.
5 Tap .
The “Adapter” dialog box is displayed.
5 Tap .
The display returns to the “Configure Network Adapters” screen.
6 Tap “Wireless” tab.
If there is a nearby active access point, a list of network names (SSID) is displayed.
7 Tap the desired network name (SSID) or tap “Add new settings”.
8 Operate as follows.
1 When you tapped “Add new settings”, input the network name set as an accesspoint.
2 To connect to your company’s network, select “Work settings”; to connect tointernet from your home, select “The internet settings”.
4
1
2
3
Section 07 LOOX (121-138) 21/10/03, 3:53 PM126

127
3 Check that this checkbox is deselected � (for ad hoc connection not requiring
an access point, select this checkbox ).
4 Tap .
9 Tap the “Authentication” tab, then operate as follows.
1 Check that this checkbox is selected when the network key (WEP key) has
been set on an access point. If the network key has not been set, tap � to
select it and tap .
2 When the network authentication is set to “Shared mode”, tap to select it.
When it is set to open, check that this checkbox is deselected �.
3 Tap this checkbox to deselect it �.
4 Input the network key according to the setting on the access point.
5 Input the key index according to the setting on the access point.
6 When the access point has been set to use the IEEE 802.1x authentication, tap to select it and select the encryption method from EAP Types.
When the IEEE 802.1x authentication is not used, check that this checkbox is
deselected �.
7
123
4
5
6
Section 07 LOOX (121-138) 21/10/03, 3:53 PM127

128
7 Tap .
The display returns to the “Wireless Network Configurations” screen.
Tapping and holding the network name from the “Wireless Network” and tapping“Connection” in the displayed pop-up menu enables you to connect to theaccess point.
Critical PointYou can check the MAC address for a wireless LAN built into a wireless model by tapping
→ “Settings” → “System” tab → “System Information” in that order.
Section 07 LOOX (121-138) 21/10/03, 3:53 PM128
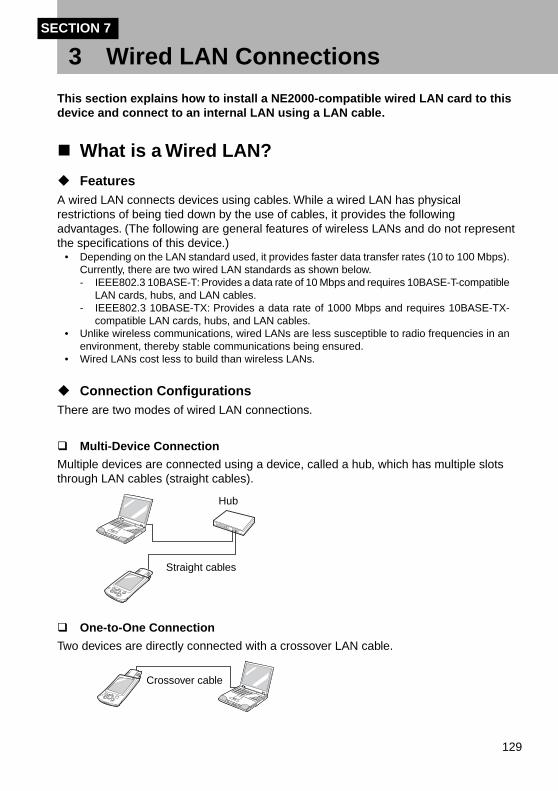
129
SECTION 7
3 Wired LAN Connections
This section explains how to install a NE2000-compatible wired LAN card to thisdevice and connect to an internal LAN using a LAN cable.
� What is a Wired LAN?
� FeaturesA wired LAN connects devices using cables. While a wired LAN has physicalrestrictions of being tied down by the use of cables, it provides the followingadvantages. (The following are general features of wireless LANs and do not representthe specifications of this device.)
• Depending on the LAN standard used, it provides faster data transfer rates (10 to 100 Mbps).Currently, there are two wired LAN standards as shown below.- IEEE802.3 10BASE-T: Provides a data rate of 10 Mbps and requires 10BASE-T-compatible
LAN cards, hubs, and LAN cables.- IEEE802.3 10BASE-TX: Provides a data rate of 1000 Mbps and requires 10BASE-TX-
compatible LAN cards, hubs, and LAN cables.• Unlike wireless communications, wired LANs are less susceptible to radio frequencies in an
environment, thereby stable communications being ensured.• Wired LANs cost less to build than wireless LANs.
� Connection ConfigurationsThere are two modes of wired LAN connections.
� Multi-Device Connection
Multiple devices are connected using a device, called a hub, which has multiple slotsthrough LAN cables (straight cables).
� One-to-One Connection
Two devices are directly connected with a crossover LAN cable.
Hub
Straight cables
Crossover cable
Section 07 LOOX (121-138) 18/10/03, 5:30 PM129

130
� SettingsThis section explains how to connect to a corporate LAN
1 Set a LAN card in the CF Card slot.
2 Tap → ”Settings” → ”Connections” tab → “Advanced” in that order.
3 Tap “Network Adapter” tab.
4 Operate as follows.
1 To connect to your company’s network, select “Work settings”; to connect toInternet from your home, select “The internet settings”.
2 Tap your LAN card name.
5 Operate as follows.
� For a DHP server:
Check that “Use server-assigned IP address” is selected , then tap .
� When specifying a fixed IP address
1 Tap “Use server-assigned IP address” to select it .
2 Set the information such as IP address.
3 Tap the “Name Server” tab.
4 Set information concerning the DNS server and WINS server.
5 Tap .
The “Adapter” dialog box is displayed.
6 Tap .
The display returns to the “Network Adapter Configurations” screen.
7 Tap .
The display returns to the “Connection” tab on the “Settings”.
8 Tap .
Now, you can connect to a network such as a corporate LAN.
Section 07 LOOX (121-138) 18/10/03, 5:30 PM130

131
SECTION 7
4 Bluetooth™ Connections
This section explains how to exchange data with other Bluetooth device usingBluetooth™.
� What is Bluetooth™?
� FeaturesBluetooth™ is a wireless communication technology that transfers data using thefrequency range of 2,400 to 2483.5 MHz.
It has the following features. (The following are general features of wireless LANs anddo not represent the specifications of this device.)
• Allows you to encrypt data to prevent unwanted access to it. It also supports authenticationusing a password called “passkey.”
• Bluetooth devices need not to face each other and can maintain uninterrupted connectionseven when in a pocket or briefcase.
Important� Be sure to observe the following!
The signals given off by Bluetooth equipment can affect the operation of electronic medicalequipment. In some cases, Bluetooth™ equipment could cause an accident, so in the followinglocations, either switch off the power to this device or stop the Bluetooth™ functions.
� In hospitals/in trains/in aircraft/at gas stations and other locations with flammable gas/nearautomatic doors and fire alarms.
Section 07 LOOX (121-138) 18/10/03, 5:30 PM131

132
� ServiceWhen connecting to other Bluetooth device, select the connection method prepared foreach function, called the “Service.” Which services can be used and which cannot beused depends on the device you are connecting to. Also, even services for functionsthat the other device has cannot be used if this device does not support them.
� In order to secure good communicationsTo ensure good communications, observe the following:
• Other Bluetooth devices, which you want to communicate with, should be located at line ofsight. The maximum communications distance may be reduced by the ambient environment(walls, furniture, etc.) or the building structure.In particular, in reinforced concrete buildings, communications may be impossible betweenrooms that are separated by walls or floors reinforced with steel.
• Communicate at least 2 meters away from other equipment (electrical equipment/AVequipment/office computer equipment/digital cordless telephones/faxes, etc.). (In particular,microwave ovens easily affect Bluetooth™ communications, so be at least 3 meters awayfrom them.) If you come too close to other equipment while its power is on, this device maystop communicating normally or cause noise in or interfere with radio or television reception.(On certain UHF and satellite broadcast channels, television pictures may be disrupted.)
• When a broadcast station, transmitter, or the like is nearby and normal communications arenot possible, move to a different location. If the signal field in the area is too strong, normalcommunications may be impossible.
• Interference with wireless LANsSince BluetoothTM equipment and wireless LANs use the same frequency band (2.4 GHz), ifyou use this device near equipment that has wireless LAN, signal interference will occur andcommunications may drop and connections be lost.In such a case, take the followingcountermeasures.- Use this device at least 10 meters from wireless LAN devices.- When using this device within 10 meters of a wireless LAN device, switch off either of
these devices.• It is not possible to concurrently use a wireless LAN and BluetoothTM.
Services supported by this device
Access to files
Sharing name cards
Other services
Other services
Section 07 LOOX (121-138) 18/10/03, 5:30 PM132

133
� BluetoothTM Connections Using Pocket Plugfree(for wireless model only)
� Pocket PlugfreePocket Plugfree is a program for connecting through Bluetooth™.
It has a user-friendly interface that is consistent with the Pocket PC 2003 operationssystem.
� List of ServicesPocket Plugfree provides the following services.
Critical PointFor details on Pocket Plugfree, see the help.
Critical PointMeaning of “Access” and “Share”The functions “access” and “share” appear in the services in the table below. The differencebetween these two is as follows.- Access: Function for connecting to other BluetoothTM device (client).- Share: Function for connecting from other Bluetooth device (server).
Section 07 LOOX (121-138) 21/10/03, 3:53 PM133

134
Service
Accessing filesSharing files
Accessing name cardsSharing name cards
Accessing calendar
Accessing the Internet
Serial port typeActiveSyncNetwork typeActiveSync
Accessing serial portSharing serial port
Accessing notes
Summary of Service
File copying/renaming/deleting/editing with another BluetoothTM
device.
Exchanges name cards (name and contact information) withanother BluetoothTM device. Name cards received from anotherBluetoothTM device are added to the Pocket Outlook “Contacts”.
This device exchanges calendars with another BluetoothTM device.Calendars received from another BluetoothTM device are added tothe Pocket Outlook “Calendar”.
Connects to the Internet via a BluetoothTM-equipped cell phone/CF/data access point/computer (set for Internet connectionsharing).
- Serial port type ActiveSync: Connects this device to a computervia BluetoothTM and causes ActiveSync to start synchronization.
- Network type ActiveSync: Connects this device to a computervia BluetoothTM PAN (Personal Area Networking) and causesActiveSync to start synchronization.
The above two services cannot be used simultaneously.
This adds a serial port and connects to another BluetoothTM devicethrough a COM connection. This is used when the program usingthe serial port is installed.
This service exchanges notes with another BluetoothTM device.Since this device does not have a built-in program related to notes,the contents of notes received from other devices cannot beviewed on this device.
� Starting Up and Initial SettingsThis section explains how to start up and set Pocket Plugfree.
1 Tap → “Programs” → “Pocket Plugfree in that order.
When you start Pocket Plugfree for the first time, the setup wizard for making theinitial settings is started up.
Section 07 LOOX (121-138) 18/10/03, 5:30 PM134

135
2 (1) Input your name. (2) Input the pass key you want, and then input it again.(3) Tap “Next”.
The “Name” set with “Name” is displayed on another BluetoothTM device. (Thedefault setting is “Plugfree Device.”). You can input up to 16 single-byte Englishalphanumerics as the pass key.
3 In order to test whether or not Bluetooth™ is operating properly, tap “Test”.
When the test ends, the program automatically proceeds to the next step.
Critical PointWhen one of the other BluetoothTM devices accesses this device, it does not usually requestthe input of the pass key. (If bonding is requested, the input of the pass key is required.) Youcan set the conditions for requesting the input of the pass key by selecting “My Device” →”Settings” → ”Device” in that order.
Critical PointIf the test does not go well, “Test ended abnormally. BluetoothTM module may be switched off.Or, it is required to reset the module. To re-execute the hardware test, click “Test”” is displayed.Tap the Wireless Networking icon in the LX-Launcher command bar to determine whetherBluetooth™ is inactive, then tap “Test” again.
1
2
3
Section 07 LOOX (121-138) 18/10/03, 5:30 PM135
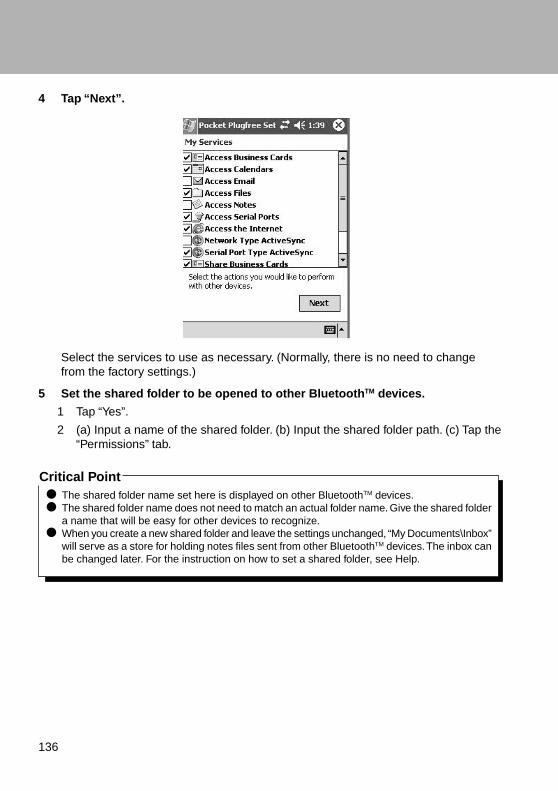
136
4 Tap “Next”.
Select the services to use as necessary. (Normally, there is no need to changefrom the factory settings.)
5 Set the shared folder to be opened to other BluetoothTM devices.
1 Tap “Yes”.
2 (a) Input a name of the shared folder. (b) Input the shared folder path. (c) Tap the“Permissions” tab.
Critical PointThe shared folder name set here is displayed on other BluetoothTM devices.The shared folder name does not need to match an actual folder name. Give the shared foldera name that will be easy for other devices to recognize.When you create a new shared folder and leave the settings unchanged, “My Documents\Inbox”will serve as a store for holding notes files sent from other BluetoothTM devices. The inbox canbe changed later. For the instruction on how to set a shared folder, see Help.
Section 07 LOOX (121-138) 18/10/03, 5:31 PM136

137
3 (1) Set the folder access rights. (2) Tap .
• Full access
Tap this to select it , then input the password. After inputting the passwordin the left box, input it again for verification in the right box. OtherBluetooth™ devices can read, write and delete files on this device.
• Read-only access
Tap this to select it , then input the password. After inputting the passwordin the left box, input it again for verification in the right box. Other Bluetooth™devices can only read files on this device.
• Password access
When you tap this to select it , other Bluetooth™ devices can access filesstored on this device if the password set with “Full access” or “Read-onlyaccess” is input on that other Bluetooth™ device.
2
1
Section 07 LOOX (121-138) 18/10/03, 5:31 PM137

138
Critical PointTo re-execute the setup wizard, tap on “Device List” screen → “Setup Wizard” in that order.
4 Tap “Next.”
To add other shared folders, tap “Add.”
6 Tap “Finish.”
7 Click “Yes.”
Section 07 LOOX (121-138) 22/10/03, 4:02 PM138

139
� Pocket Plugfree Screen Configuration
� Device ListThis is the first screen displayed when Pocket Plugfree is started up. At the same time,BluetoothTM devices in the area are searched for and if any are found, their names aredisplayed.
1 My Device
The setting screen is displayed.
12
3
8 7 6 5 4
Section 07 LOOX (139-148) 18/10/03, 5:31 PM139

140
2 Other BluetoothTM devices
BluetoothTM devices in the area are displayed. If a device is set to “Bonded” or“Always display this device in the device list” in “Properties”, the device’s icon is
always displayed in the device list. When is tapped and other devices searched
for again, if a device is not in the BluetoothTM communications range, the icon forthat device is grayed out. (It is only valid if “When they are outside thecommunications range, devices with the “Bonded” or “Always display” property aredisplayed grayed out.” is selected .)Tapping one of the devices in the list displays the shared folder set for that deviceand a list of services that device is equipped with.
Section 07 LOOX (139-148) 18/10/03, 5:31 PM140

141
3 Pop-up Menu
This pop-up menu is displayed if you tap and hold each of another BluetoothTM
device.
• Bonded: Bonding means establishing a relationship of trust between this deviceand another BluetoothTM device. If pass keys are exchanged and they match, abonded relationship is established. When this is checked, this means that it ispossible to connect with this device without inputting the pass key. If this notchecked and the device is tapped, the other BluetoothTM requests you to inputthe pass key. When you input the pass key, the connection becomes bondedand the check mark is displayed.
• Always displayed: If this is checked, this means that this device set to always bedisplayed in the device list.
• Delete: Deletes this device from the device list.
• Disconnect: Disconnects the connection with this device.
• Properties: This displays the device address and type for this device. Also, itsets whether or not connection with the device is permitted without a pass keyand whether or not to always display it in the device list. For details, see“Properties”.
4
Registers the connection with this device to simplify reconnection.
5When you tap here, you can enable/disable BluetoothTM functions and execute thesetup wizard.
6
Tap here to search again for BluetoothTM devices in the area and update the screen.
Tapping during the search stops the search.
7
Returns the display to the previous screen.
8 Add
Specifies the device address and adds other BluetoothTM devices to the device list.
Section 07 LOOX (139-148) 22/10/03, 4:00 PM141

142
� PropertiesThis is the screen displayed when you tap and hold a device in the device list, thentap “Properties” from the displayed pop-up menu.
1 Address/Type/Name
This displays the device address, type (desktop computer, notebook computer,etc), and name.
2 Bonded
To connect a relationship of trust with the device, tap and select it. When you tap
, the other BluetoothTM device requests you to input the pass key. When youinput the pass key, the connection becomes bonded and from then on, you canconnect with that device without inputting the pass key.
3 Always displayed:
To always display device in the device list, tap and select it.
1
2
3
Section 07 LOOX (139-148) 18/10/03, 5:31 PM142

143
� My DeviceThis is the screen displayed when you select “My Device” from the device list. Thisscreen is for setting basic such basic items as the device name and password andfor setting services.
1 Files
This is the folder used for exchanging files with other BluetoothTM devices. After filesform the other devices are copied, they can be pasted and files to be copied to theother device can be selected.
2 Business Cards
Tap and select the name card to be automatically sent in response to BusinessCards requests from other BluetoothTM devices.
3 Services
Tap and select the services to use as necessary. Normally, there is no need tochange these settings.
4 Settings
This sets such basic parameters as the device name and pass key.
5 Shared Folders
This sets or adds shared folders.
Normally, the shared folders set with Step 5 in “Starting Up and Initial Settings” isdisplayed.
1
2
3
4
5
Section 07 LOOX (139-148) 18/10/03, 5:31 PM143

144
� SettingsThe settings screen is divided into the “Device” tab, “Detection” tab, “Object” tab,and “Others” tab.
“Device” tab
This sets the name displayed on other BluetoothTM devices and the pass key input otherdevices access this device.
1 Name
Sets the name displayed on other devices.
2 Type
Select either “Palm Sized” or “Audio Device.” Normally, there will be no problemswith the “Palm Sized” setting, but if you cannot connect with some BluetoothTM
headsets, select “Audio Device”.
3 Pass key
This sets the pass key input when another device accesses this device.After inputting the password at “Pass key”, select one of the following options.
• Required for connection: Requires the pass key each time another deviceaccesses this device.
• Required to use service: Other devices can access this device and view theservices, but each time another device tries to use a service of this device, thisdevice requires the pass key.
• Required only for bonding: Handles devices that access this device as devicesthat can be trusted and does not require the pass key.If bonding is requested, the input of pass key is required.
1
2
3
Section 07 LOOX (139-148) 18/10/03, 5:31 PM144

145
"Discovery" tab
This sets such parameters as the interval at which to search for other BluetoothTM
devices and whether or not this device can be seen from other devices.
1 Discover devices at start up
Sets how many seconds to search for other devices when Pocket Plugfree isstarted. Tap to select it �, then input the number of seconds into “Devices tosearch for”.
2 When they are outside commnunications range, devices with the “Bonded” or“Always display” property are displayed grayed out.
When is tapped and other devices searched again, if a device for which“Bonded” or “Always display” is set with the Properties is not in the BluetoothTM
communications range, the icon for that device is grayed out.
3 Can other devices reference this device?
This sets whether or not this device can be seen from other devices. Tap “Yes”,“No”, or “60 seconds” to select it . When you tap “Start”, the selected status isenabled.
1
2
3
Section 07 LOOX (139-148) 18/10/03, 5:31 PM145

146
“Advanced” tab
Normally, there is no need to make the settings on this screen. When making thesesettings, see the help.
1 Set “Encryption” On.
When you tap and select , data exchanged with other BluetoothTM equipment isencrypted.
2 Enable Bluetooth PAN Adapter™
Tap to toggle Enable/Disable BluetoothTM PAN Adapter. A reset is requested toenable the setting after you changed it.
3 Normal Power/Low Power
This sets the strength of the signals emitted by BluetoothTM.
Note: The signal strength depends on communication environments.
1
2
3
Section 07 LOOX (139-148) 18/10/03, 5:31 PM146

147
Critical PointWhen the following screen is displayed
Input the same pass key as input on the other device, then tap “OK”.
2 From the displayed services, tap “File”.
3 Tap and hold the file or folder that you want to copy to this device.
4 From the displayed pop-up menu, tap “Copy”.
5 (1) Display the device list. (2) Tap “My Device”. (3) Tap “Files”.
6 Tap the Edit menu → “Paste” in that order.
The file or folder pasted on the above screen is copied directly under “My Device”.
7 Tap → “Programs” → “File Explorer” in that order to start File Explorer.
8 Open “My Device” and move the copied file to another folder.
� File OperationsWhen the “Access files” or “Share files” service is used, files can be copied/renamed/deleted/edited between this device and other BluetoothTM devices. Note also thatunlike “ActiveSync usage”, file copying is only used for exchanging data that requiresno data format conversion.
� Copying from Other BluetoothTM DevicesThis section explains how to copy files and folders from other BluetoothTM devices.
1 Tap the other device from the device list screen.
Section 07 LOOX (139-148) 18/10/03, 5:31 PM147

148
� Copying to Another BluetoothTM DeviceThis section explains how to copy files and folders from this device to anotherBluetoothTM device.
1 Tap → “Programs” → “File Explorer” in that order to start File Explorer.
2 Move or copy the files to be copied to directly under “My Device”.
3 Start Pocket Plugfree. (1) Display the device list. (2) Tap “My Device”. (3) Tap“Files”.
4 Tap and hold the file or folder that you want to copy to this device.
5 From the displayed pop-up menu, tap “Copy”.
6 Tap the other device from the device list screen.
Critical PointInput the same pass key as input on the other device, then tap “OK”.
7 From the displayed services, tap “File”.
8 Tap the Edit menu → “Paste” in that order.
The file or folder is copied to the other device.
Section 07 LOOX (139-148) 18/10/03, 5:31 PM148

149
� Deleting/Renaming/Editing Files on Other BluetoothTM DevicesWhen file access is permitted on the other BluetoothTM device, you can directly delete,rename, or edit files. In order to edit, it is necessary that the program related to the filebeing edited be installed on this device.
� Deleting
1 Execute Steps 1-3 of “Copying from Other BluetoothTM Devices”.
2 Tap “Delete” from the displayed pop-up menu.
� Renaming
1 Execute Steps 1-3 of “Copying from Other BluetoothTM Devices”.
2 From the displayed pop-up menu, tap “Rename”.
3 Input the new name.
Critical PointIf file renaming fails because file deletion on the other BluetoothTM device is not permitted, thecopy of the file you tried to change remains on the other device. In this case, delete theunnecessary file from the other device.Renaming large files can take time.
� Editing
1 Execute Steps 1-3 of “Copying from Other BluetoothTM Devices” .
2 Tap the file to edit.
The program related to the file is started and it can be edited and saved.
Section 07 LOOX (149-156) 18/10/03, 5:32 PM149

150
� Exchanging Business CardsWhen the “Access Business Cards” or “Share Business Cards” service is used,Business Cards (name and contact information) with another Bluetooth device.
� Sending Business Cards
Critical PointBefore starting the sending, use Pocket Outlook “Contacts” to input the information aboutyourself you want to send. For details on creating a contact, see “Creating a New Contact”.
1 From the device list, tap the other device.
Critical PointInput the same pass key as input on the other device, then tap “OK”.
2 From the displayed services, tap “Business Cards”.
3 Tap “Send Business Cards”.
Section 07 LOOX (149-156) 18/10/03, 5:32 PM150
151
4 (1) Tap the Business Cards you want to send to select it . (2) Tap “Send”.
When the other device approves reception of the Business Cards, the BusinessCards is sent from this device and “(Business Cards) sent correctly” is displayed.
When the other device refuses reception of the Business Cards, “Request denied”is displayed on this device.
� Requesting Business Cards
Critical PointIt is necessary that the device from which you request Business Cards be equipped with afunction for sending its Business Cards. Please understand that BluetoothTM PC cards andBluetoothTM computers from this company do not support functions for sending BusinessCards.It is necessary that the other device be set so that it can share Business Cards. If the otherdevice is a Pocket LOOX, go to “My Device” ) and set sharing with the “Business Cards”settings.
1 From the device list screen, tap the other device.
Critical PointInput the same pass key as input on the other device, then tap “OK”.
Section 07 LOOX (149-156) 18/10/03, 5:32 PM151

152
2 From the displayed services, tap “Business Card”.
3 Tap “Request Business Card”.The request is sent.When the other device approves the request, the Business card is sent to thisdevice and displayed as Pocket Outlook “Contacts” data.When the other device refuses the request, “Request denied” is displayed on thisdevice.
� Connecting to the Internet
� Connecting using a cell phone or CFA dialup connection to the Internet is made through a BluetoothTM cell phone or CF.
1 Put the cell phone or CF in the state to wait for BluetoothTM signals.
For details on how to make this setting, see the manual for the cell phone or CF.
2 Start up Pocket Plugfree and tap the cell phone or CF from the device listscreen.
3 If you are requested on the cell phone or CF to input the pass key, input it.
4 Input the same pass key on this device, then tap “OK”.
5 From the displayed services, tap “Internet”.
6 (1) Input the access point for your Internet service provider. (2) Tap .
Section 07 LOOX (149-156) 21/10/03, 3:54 PM152

153
7 (1) Input the “User name” and “Password” for connecting to the Internetservice provider. (2) Tap OK.If necessary, tap “Store password” to select it .For the information for connecting, see the material provided by your Internetservice provider.
Critical PointIf you are requested on the cell phone or CF side to input the pass keyOn some models, you may be requested to input the pass key. If this happens, input the passkey on the cell phone or CF side, input the same pass key on this device too, then tap “OK”.
When this device is connected to the Internet, Pocket Internet Explorer is startedup automatically.
Section 07 LOOX (149-156) 18/10/03, 5:32 PM153

154
� Connecting Using Internet Connection SharingThis method connects to the Internet via a computer set to share its Internetconnection.
Critical PointThe connecting computer must have a BluetoothTM utility equipped with the personal areanetworking (PAN) profile.For details on how to set Internet connection sharing, see the BluetoothTM manual for yourcomputer or optional product or the Windows help.
1 From the device list screen, tap the computer for which Internet connectionsharing is set.
Critical PointInput the same pass key as input on the other device, then tap “OK”.
2 From the displayed services, tap “Internet”.
3 From the displayed services, tap the “Personal Area Networking (PAN)”.
When this device is connected to the Internet, Pocket Internet Explorer is started upautomatically.
Section 07 LOOX (149-156) 18/10/03, 5:32 PM154

155
Critical PointConcerning “Dialup Network (DUN)” and “Local Area Network (LAN)”On some computers, the “Dialup Network (DUN)” and “Local Area Network (LAN)” serviceson the above screen can not be used.
� Using ActiveSyncEven when this device is not set in its cradle, it can be synchronized with a computerusing BluetoothTM. When exchanging data in ways that involve converting data formats,for example synchronizing such files as a computer’s Word/Excel files and this device’sPocket Word/Pocket Excel files, use ActiveSync, not “File Operations”.
Critical PointCheck the following points beforehand.– Make the settings for partnership with a computer on which ActiveSync has been installed.– Check that the NetBIOS settings on the computer are valid. For details on how, see the
help for your operating system.– Remove this device from its cradle before making the BluetoothTM connection.
1 From the device list screen, tap the computer with which you want to set thepartnership.
Critical PointInput the same pass key as input on the other device, then tap “OK”.
2 From the displayed services, tap “ActiveSync”.
When you connect with the computer, the “ActiveSync” screen is displayedautomatically and synchronization starts.
Critical PointWhen automatic IP address assignment is enabled, connecting may take about 1-2 minutes.
Section 07 LOOX (149-156) 18/10/03, 5:32 PM155

156
Section 07 LOOX (149-156) 18/10/03, 5:32 PM156

SECTIONSECTION
88
Section 08 LOOX (157-172) 18/10/03, 5:33 PM157

158
SECTION 8
1 Settings
You can set the basic operating environment for this device and make varioushardware adjustments.
� List of Setting ItemsTo configure settings for this device, use the screen shown below, which is displayed bytapping → “Settings” in that order.
From this screen, tap the item that you want to set up.You can set the following items on the “Personal”, “System” and “Connection” tabs.
� “Personal” tab
Setting Item Description
Today Set information to be displayed on the “Today” screen.
Owner Information You can set personalized information for this device.
Password Set the password prompted for when turning on the power orusing this device after it has been out of service for a certainperiod of time.
Buttons You can assign frequently-used applications to application buttons.
Wakeup Setting Specify to turn on or not to turn on this device’s power when anapplication button is pressed.
Menus You can customize the menu and “New” menu.
Input Set the input methods (such as handwriting). You can also setaudio recording.
Sounds and Notifications Set the system sound volume, sound types by context and alarmreminders.
Section 08 LOOX (157-172) 18/10/03, 5:33 PM158

159
� “System” tab
Setting Item Setting Contents
Brightness Set the brightness of the backlight.
CPU Setting Specify to use or not to use the CPU in power-saving mode.
IR Setting Use to adjust transmissions rate of infrared.
Mic Record Adjust the input sensitivity and volume for audio recording.Setting
Power You can set to have the power automatically turned off when thisdevice is out of use for a certain periods of time, in addition tohave the remaining battery capacity to be indicated.
System Information This item displays information on this device’s resources (such asthe memory size and the OS version).
Audio Setting Adjusts volume, balance high/low pitch sound.
Backlight You can specify to turn off the backlight when this device is out ofservice for a certain period of time.
About This item displays the CPU name and other important informationon this device, and also sets this device’s device name underwhich it can be identified on the network.
Remove Programs You can remove any applications that you have installed on thedevice.
Memory Configure the memory space allocations for storing data and forexecuting applications. You can also check the memory cardutilization with this item.
Regional Settings Set the date and currency display formats by region (for theJapanese/English-speaking region) so that you can switch thedisplay according to the region you are visiting.
Clock You can set this device’s system clock and switch the displayaccording to the time zone of the places that you visit frequently.You can also set wake-up alarms.
Screen You can correct the touch screen operation in case display tappingis not responded to correctly.
Certificate Manage digital certificates used for authenticating the deviceowner or for authenticating the user that you communications with.
Autorun Specify to start or not start the application automatically whensetting a CF/SD card.
Section 08 LOOX (157-172) 18/10/03, 5:33 PM159

160
� “Connection” tab
Setting Item Setting Contents
Beam Configure the infrared communications settings.
Connections Connection manager that creates and manage Internetconnections.
� Adjusting the Display
� Adjusting the screen brightnessTap → “Settings” → “System” tab → “Brightness” in that order.
1 When using battery power
Adjust the backlight brightness for running this device on the battery power bydragging the knob sideways.
2 When using external power
Adjust the backlight brightness for running this device via the AC adaptor bydragging the knob sideways.
� Adjusting the BacklightTap → “Settings” → “System” tab → “Backlight” in that order.Set the operations for running the device on the battery power.
1 Idling time before turning off the backlight
Set this checkbox to to automatically turn off the backlight when this product isout of use for a certain period of time. Tap 9 to set the time interval before turningof the light.
2 Turn on the backlight when a button is pressed or the display is tapped.
Set this checkbox to to turn on the backlight when the display is tapped or abutton is pressed.
3 “External Power” tab
From the screen that appears when this tab is tapped, you can set operations forrunning the device via the AC adaptor. You can set the same items as those on the“Battery” tab.
Section 08 LOOX (157-172) 18/10/03, 5:33 PM160

161
� Adjusting the Touch ScreenYou can activate this function by either of the following two methods.
• Tap → “Settings” → “System” tab → “Screen” in that order.• Press the Enter button while holding down the Power button on this device.
Tap “Adjust Touch Screen” to start screen adjustment.
Following the instructions on the screen, tap “+” to perform adjustment.
� Adjusting the Memory
� Reallocating Memory SpaceTap → “Settings” → “System” tab → “Memory” in that order.
1 Drag the knob sideways too adjust memory allocations for storing data andfor executing applications.
2 Space for application execution
This bar represents the valid space for executing applications. The blue portion onthe bar represents the free space.
3 Space for data storage
This bar represents the valid space for storing data. The blue portion on the barrepresents the free space.
4 This section displays details on the memory for application execution.
5 This section displays details on the memory for data storage.
Power button
Enter button
Section 08 LOOX (157-172) 18/10/03, 5:33 PM161

162
� Checking the Available Memory CapacitySet a CF/SD card beforehand, and tap → “Settings” → System” tab → “Memory” →“Memory Card” tab in that order.
1 Total capacity of the data storage memory card:
This field indicates the total capacity of the memory card inserted in the card slot.
2 Occupied space:
This field indicates the occupied space.
3 Available space:
This field indicates the available capacity.
4 If both a CF and an SD cards are set, use this to select the one subject toinformation display.
� Terminating an Active ApplicationFor the procedure for terminating an application, see “Terminating Applications”.
� CPU SettingsTap → “Settings” → “System” tab → “CPU Setting” in that order.
1 Turbo mode
Set the button to improves the processing power, but only with greater powerconsumption.
2 Standard mode
This is the normal operating mode.
3 Power-saving mode
Set the button to reduces the processing power, and also lowers powerconsumption.
4 Enables automatic power-saving mode.
Set this button to enables automatic mode adjustment according to the CPUutilization.
Section 08 LOOX (157-172) 18/10/03, 5:33 PM162

163
� Setting the Date/TimeTap → “Settings” → “System” tab → “Clock” in that order.
1 Current region/Visiting region
Select from the two region categories, the current or the visiting (overseas).
2 Select the region.
3 Set the time by tapping and setting the hour, minutes and seconds,respectively. Tap 9 to increase the number, and tap 9 to reduce it.
4 Tap 9 to display the Calendar.
Select the date that you want to set.
5 “Alarm” tab
On the screen displayed when this tab is tapped, you can set up to four alarms fora certain time on a certain day of the week.
� Menu SettingsTap → “Settings” → “Personal” tab → Menu in that order.
1 Select this option to enable addition selected applications to menu.
2 “New menu” tab
Next you can set up “New menu”.On the “New menu” tab, you can set the items that are displayed when the “New”menu is tapped on the “Today” screen.
3 Enable the “New” menu.
Select this option to add the new menu to the “New” menu in each of the“Calendar”, “Contacts”, “Notes”, “Pocket Word” and “Pocket Excel” applications.
4 Tapping the checkbox next to an application displays the selectedapplication on the “New” menu.
Section 08 LOOX (157-172) 18/10/03, 5:33 PM163

164
� Setting the Owner InformationTap → “Settings” → “Personal” tab → “Owner Information” in that order.
1 Name/Company/Address/Phone number/Email
Tap each item to enter information on the owner of this device.
2 Display this information when the device’s power is turned on.
Select this option to display the “Owner Information” on the “My Information”screen.
3 “Note” tab
Tap this tab to display the note entry screen.
� Setting the PasswordTap → “Settings” → “Personal” tab → “Password” in that order.
1 The time interval after which password entry is prompted.
To have the password entry screen appear after this device is left out of service for
a certain period of time, tap the checkbox (� → ) and select the length of out-of-service time after which the password entry Prompt if device unsed screen is
displayed. If you are not going to set a password, clear the checkbox �.
2 Simple four-digit password
Use the key pad to set a four-digit number as the password.
3 Strong alphanumerical password
From the input panel, set a password using at least seven characters by combiningsingle-byte alphanumerical characters (uppercase or lowercase) and delimiters(such as - and _).
4 Password
Tap this option to re-enter the password.
5 Enter a four-digit number from this key pad for setting a simple password.
After you have entered a four-digit number, tap to display the password
setting confirmation screen. Tap to erase the password entered.
Section 08 LOOX (157-172) 18/10/03, 5:33 PM164

165
6 Hint
Enter a reminder for the password on the screen that appears when tapping thisoption.
After you have failed in entering the correct password on the password entryscreen four times, what you have entered in this field is displays. Enter informationthat provides you a hint for recalling your password, but not the password itself oranything directly associated with it.
Critical PointDo not forget your password.If you do, you will need to fully reset this device.
� Power SettingsTap → “Settings” → “System” tab → “Power” in that order.
� Battery Tab Screen
1 Main battery
Displays the type of the main battery.
2 Remaining main battery capacity
Displays the remaining battery capacity.
3 Battery backup
Displays the type of the backup battery.
4 Remaining backup battery capacity
Displays the remaining backup battery capacity.
� Advanced Tab Screen
1 Battery power: Turns off power when it is not in use.
Select this checkbox to have the power turned off when running this device on abattery after the out-of-service interval specified by tapping 9.
2 External power: Turns off power when it is not in use.
Select this checkbox to have the power turned off when running this device onan external power supply after the out-of-service interval specified by tapping 9.
Section 08 LOOX (157-172) 18/10/03, 5:33 PM165

166
� Today Screen SettingsTap → “Settings” → “Personal” tab → “Today” → “Item” tab in that order.
1 Tap the item for which you want to change the display order to highlight theitem, and tap “Move up” or “Move down”.
2 Tap an item you want to display on the “Today” screen .
3 Select this option to set the time after which the “Today” screen is displayedafter the screen is turned off.
To set the time, tap this option and select the time.
Section 08 LOOX (157-172) 18/10/03, 5:33 PM166

167
� Application Buttons Settings
� Assigning ApplicationsThe following operation assigns applications to the respective buttons so that anapplication is started when the relevant application button is pressed.Pressing and immediately releasing each of the four application buttons and holding itdown for about one second (long-pressing) activate different applications. You canassign applications to these buttons two each, that is, eight applications in all.
The factory settings are as follows.
Button 1(Calendar)“One-Touch Mute” (long press)
Button 2 (Tasks)User assign (long press)
Button 3(Contacts)User assign (long press)
Button 4(LX Launcher)User assign(long press)
Follow the procedure below to assign applications to the respective buttons.
Tap → “Settings” → “Personal” tab → “Buttons” in that order.
Section 08 LOOX (157-172) 18/10/03, 5:33 PM167

168
1 Buttons
Select the button that you want to set.
2 Assignments
Displays the states currently assigned to the respective buttons.
3 Programs to be assigned to the buttons:Select additional applications to be assigned to the buttons.
4 Reset to the default settings.Restores the initial settings.
5 “Up/Down Control” tabNext you can set up “Up/Down Control” settings.
The “Up/Down Control” tab enables you to adjust the response speed when thisdevice’s Up or Down button is pressed.
1 Latency before moving starts:
This section adjusts the latency between the time you pressed the Down buttonand the time the relevant item starts moving.
2 Moving speed:
This section adjusts the speed at which the relevant item moves with the UP orDown button pressed down.
� Setting Startup with ButtonSpecify to turn on or not to turn on this device’s power when an application button ispressed.
Tap → “Settings” → “Personal” tab → “Wakeup Setting” in that order.
When you tap “Turn on power when an application button is pressed.” to select it , thisdevice’s power is turned on when an application button is pressed.
Button 1 For each button, set an application to be started when theButton 2 button is pressed and released immediately.Button 3Button 4
Button 1 long press For each button, set an application to be started when theButton 2 long press button is pressed and held down for one second orButton 3 long press longer.Button 4 long press
Section 08 LOOX (157-172) 18/10/03, 5:33 PM168

169
� Infrared Communications Settings
� Setting Methods for Receiving FilesThis operation sets the method for receiving files sent from other Pocket PCs.
Tap → “Settings” → “Connection” → “Beam” in that order.
1 Receive all incoming beams.
Select this checkbox to receive files beamed from other PCs at any time.
Clear this checkbox � to reject files beamed from other PCs.
� Setting Baud Rate for Infrared CommunicationsThis operation sets the baud rate for infrared communications.
Tap → “Settings” → “System” tab → “IR Settings” in that order.
1 FIR (max. 4 Mbps)
Sets the maximum transfer rate to 4 Mbps.
2 SIR (max. 115.2 Kbps)
Sets the maximum transfer rate to 115.2 Kbps.
Section 08 LOOX (157-172) 18/10/03, 5:33 PM169

170
� Setting Sound and Recording
� Setting volume, etc.Adjusts volume, balance high/low pitch sound.
Tap → “Settings” → “System” tab → “Audio Setting” in that order.
Drag the knob sideways to make adjustments.
� Setting Recording Through MicAdjust the input sensitivity and volume for audio recording.
Tap → “Settings” → “System” tab → “MIC Record Setting” in that order.
1 Automatic setting
When you tap this checkbox to select it , the volume is automatically adjusted tothe input volume.
2 Setting input volume
Drag the knob sideways to adjust microphone sensitivity.
3 Setting recording volume
Drag the knob sideways to adjust the recording volume.
� Checking System Information
� Checking AssetsAdjust volume, balance high/low pitch sound.
Tap → “Settings” → “System” tab → “System Information” in that order.
Section 08 LOOX (157-172) 18/10/03, 5:33 PM170

171
2 Adding/Removing ApplicationsSECTION 8
You can install/delete applications to/from this device.
� Applications You Can AddThis device can run applications supported by Pocket PC 2003.
Applications for other operating systems cannot be installed.
� Adding Applications Using Your ComputerYou can connect this device to your computer and install applications from thecomputer. To do so, ActiveSync must be installed in the computer beforehand.
1 Download an application to your computer or set the CD-ROM containing anapplication in your computer’s CD drive.
2 Set this device in its cradle connected to the computer.
3 Start the application’s installer on the computer.
The application is automatically transferred and installed to this device.
Critical PointIf an installer does not accompany the application:According to the application’s manual, copy the application to this device.
� Adding Applications from the InternetYou can connect this device to the Internet and download an application. Then start itsinstaller directly on this device to install it.
Critical PointIf an installer does not accompany the application:According to the application’s manual, copy the application to this device.
Section 08 LOOX (157-172) 18/10/03, 5:33 PM171

172
� Removing ApplicationsYou can remove any applications that you have installed on the device. However, thepre-installed applications cannot be deleted.
1 Tap → “Settings” → “System” tab → “Remove Programs” in that order.
2 Tap and highlight the application you want to delete from “Applications inData Storage Memory” and tap “Remove”.
3 Tap “Yes”.
Section 08 LOOX (157-172) 18/10/03, 5:33 PM172

99SECTIONSECTION
Section 09 LOOX (173-180) 18/10/03, 5:35 PM173

174
1 Troubleshooting and Tips
If a fault occurs in your Pocket PC, try to eliminate it with the measures describedin this chapter. If you fail to correct the problem, proceed as follows:
• Make a note of the steps and the circumstances that led to the fault. Also make a note of anyerror messages displayed.
• Switch the Pocket PC off.• Contact your sales outlet or our hotline/help desk.
� Installing New SoftwareYou will find information on installing supplementary programs in the ActiveSync helpfile that you can call up after installing ActiveSync on your PC/notebook.
When installing programmes or drivers, important files may be overwritten andmodified. To be able to access the original files in case of problems followinginstallation, you should make a backup copy prior to installation
� Date or Time of the Pocket PC is Incorrect• Touch Start.• Select the Settings entry in the menu.• Select the System tab.• Touch the Clock symbol.• Depending on your preference, you can change the time by moving the click hands or by
entering the desired time.• Touch OK (navigation bar) to confirm your setting.
� The Display of the Pocket PC Remains Dark
� Display lighting is switched off• Press the Suspend button longer than 1 second.
� The Information on the Display of the Pocket PCis Difficult to Read
� Reflection• Turn the Pocket PC until you can see the information in the display again.
SECTION 9
Section 09 LOOX (173-180) 18/10/03, 5:35 PM174

175
� The Pocket PC Switches Off
� If you operate the Pocket PC too long with only the battery, the PocketPC switches into the Suspend mode when the battery charging levelis too low.
• Connect the power adapter to charge the battery.• Press the Suspend button.
� The Pocket PC does not Start after Switch OnIf the Pocket PC does not start after switch on, this may be due to one of the following:
� The battery is dead• Charge the battery.• Connect the power adapter to the cradle with the Pocket PC.• Check whether the power adapter is connected correctly to the cradle.• Check whether the power cable is plugged properly into the power adapter and into the mains
outlet. The indicator on the power adapter should illuminate.The battery is charged. LED is blinking green.
� The power adapter is not connected correctlyIf the Pocket PC does not start after switch on, this may be due to one of the following:
• Switch the Pocket PC off.• Check whether the power adapter is connected correctly to the Pocket PC.• Check whether the power cable is plugged properly into the power adapter and into the mains
outlet.• Then switch the Pocket PC on again
Section 09 LOOX (173-180) 18/10/03, 5:35 PM175

176
� The Pocket PC Stops WorkingIf the Pocket PC stops working, this may have the following reasons:
� An application programme has caused the malfunction• Restart the Pocket PC (soft reset).Or• Reset the Pocket PC to the delivered state with the Full Reset switch.
• Slide the lock in the direction of the arrow with the stylus.
• Slide the battery slightly in the direction of the arrow (1).• Lift out the battery upward in the direction of the arrow (2).
Critical PointWhen you reset the Pocket PC to the delivered state, your data are lost!
12
Section 09 LOOX (173-180) 18/10/03, 5:35 PM176

177
• Slide the Full Reset switch to the right with the stylus.
• After waiting a few moments, slide the Full Reset switch to the left with the stylus.Please note that your Pocket PC does not start up immediately after actuating the full resetswitch, but rather a few seconds after installing the battery and connecting the mains powercable.
Section 09 LOOX (173-180) 18/10/03, 5:35 PM177

178
• Install the battery as shown in the diagram and then slide it in the direction of the arrow untilthe edge of the battery is flush with the edge of the device.
• Slide the lock in the direction of the arrow with the stylus.
Section 09 LOOX (173-180) 18/10/03, 5:35 PM178

179
Important� If the device is switched off with the Full Reset switch, the battery is switched off so that the
RAM contents are lost. This means you lose all data (documents, additionally installedprograms, personal settings) that you haven’t saved elsewhere.
� Therefore, remember to make a regular data backup with synchronisation or on correspondingmemory cards.
� The battery is dead• Connect the power adapter to the Pocket PC to charge the battery.Or• Connect the power adapter to the cradle and place the Pocket PC in the cradle for charging.
� The Battery Discharges Too Quickly
� The battery is either too hot or too cold.• Bring the Pocket PC up / down to a normal temperature again. If the operating time of the
battery mode is extremely short, the battery is probably old and should be replaced. Pleaseconsult your local distributor if you want to buy a new Pocket LOOX 610 battery.
Critical PointAfter approximately 10 seconds a picture appears on the display and a tone sounds.
Section 09 LOOX (173-180) 18/10/03, 5:35 PM179
180
� The Suspend Button does not Respond Properly
� You have pressed the Suspend button too long to switch the PocketPC on or off.
• Briefly press the Suspend button until the Pocket PC switches on or off.
� No Sound or Minimal Volume
� Check whether the volume is set correctly.• Touch the loudspeaker symbol in the navigation bar and set the volume with the slide control.
Make sure that the sound is switched on (marking in On selection box).Or• Touch Start.• Select the Settings entry in the menu.• Select the Personal tab.• Touch the Sounds & Notifications symbol.• Set the desired volume with the slide control.• Touch OK (navigation bar) to confirm your setting.
� Contact Help DeskIf you are unable to solve a certain problem, please contact our help desk. http://www.pc-ap.fujitsu.com/contactus. Please have the following information ready when youcall:
• The model name and serial number of the Pocket PC. The serial number is located on asticker on the backside of the Pocket PC.
• Notes of any messages that appear on the screen and information on acoustic signals.• Any changes you have made to the hardware or software after receiving the Pocket PC.• Your system configuration and all peripheral devices connected to your system (e. g. keyboard).• Country of Purchase.
Section 09 LOOX (173-180) 18/10/03, 5:35 PM180