preparation / assembly phase
TRANSCRIPT

Last Updated: July 19, 2012
ROLL OVER THE COMPLETED & NEXT STEPS ABOVE TO LEARN MORE
YOU ARE HERE
In this Preparation / Assembly workflow phase process, you review the rights and permissions plan and coordinate with the Rights and Permissions Group to enter detailed information as appropriate. Next, you conclude the Rights & Permissions plan by checking on any outstanding rights information and submitting invoices to pay for rights and permissions.
In this job aid, you will learn how to:
• Identify content assets where rights & permissions are needed
• Conclude the rights & permissions plan
Identify Content Assets Where Rights & Permissions Needed
PROGRAm mANAGER
RIGHts ANd PERmIssIONs APPROvAls
INtEGRAtEd WORKFlOW
PREPARAtION / AssEmBlY PHAsE

Learning Objectives
Pearson Integrated Workflow
1Preparation / Assembly
In this Job Aid, you will learn how to:
1 Identify Content Assets Where Rights and Permissions are Needed 2
2 Conclude Rights and Permissions Plan 11
Clear Outstanding Rights 14
Submit Invoices 17
Approve Invoice Payment 20
PREPARATION / ASSEMBLY
RIGHTS AND PERMISSIONS APPROVALS
SYSTEMS & TOOLS
For this process, you will use the following systems and tools:
Documentum (DCTM)
Publishing Control System (PCS)

Pearson Integrated Workflow
Preparation / Assembly 2
1 Identify Content Assets Where Rights and Permissions are Needed
In this step, you will review the rights and permissions plan and coordinate with Rights and Permissions Group to enter detailed information as appropriate.
This step begins with a Documentum email notification. Work on the task itself will be completed in PCS.
1 When it is time to complete the Determine Rights and Perms Outstanding task, you will receive a Documentum email notification. Go to My Dashboard at http://workflow.pearson.com.
2 The Sign In screen appears.
a Type your user name in the User Name text box.
b Type your password in the Password text box.
c Click the button.
a
b
c

Pearson Integrated Workflow
Preparation / Assembly 3
3 The My Dashboard screen appears. Click the Documentum (DCTM) link.
4 The Documentum Location screen appears.
a Select your repository from the Repository drop-down menu.
b Select your location from the Location drop-down menu. If your location does not appear or if you are working remotely, select the Other option.
c Click the button.
a
b
c
Quick Tip USHE users select the PNA_Higher_Ed repository.

Pearson Integrated Workflow
Preparation / Assembly 4
5 The Documentum interface appears.
a Select the Inbox node in the Navigation pane.
b Double-click the Determine Rights and Perms Outstanding task in the Content pane to open it.
a
b
6 The workflow task displays in the Content pane.
a Read the workflow task instructions.
b Click the button to begin work on the task.
c Click the Workflow Applications menu, and then select PCS to perform work in the task.
a
b
c

Pearson Integrated Workflow
Preparation / Assembly 5
7 In PCS, click the tab, and then select the sub-tab. The Rights Strategy screen appears. Review the Rights and Permissions plan, make any necessary changes, and then click the button.

Pearson Integrated Workflow
Preparation / Assembly 6
8 Select the sub-tab, and then add any appropriate information for asset specs. Coordinate with rights people in an offline conversation to obtain any necessary information.
For each asset:
a Review the Rights Cleared column for each component that the asset is part of.
b Click the icon in the Rights Info column to view rights information from PRISM.
c Click the icon in the Edit column to update information for the asset.
abc
9 Generate a list of assets needing permissions by clicking the Actions drop-down, and selecting the Search option.

Pearson Integrated Workflow
Preparation / Assembly 7
10 The Search Assets screen appears. To run a search for the appropriate permissions action (example: Permission Action: Acquire):
a Select the appropriate search criteria.
b Click the button.
a
b
11 Search results appear. Click the button.

Pearson Integrated Workflow
Preparation / Assembly 8
12 The Export to Excel screen appears.
a Select checkbox(es) for the appropriate Details.
b Click the button.
a
b
13 An exported Excel file named ContentPlanExport.xls appears in the Downloads folder on your computer. Route the list, which can be routed offline via email, to the Rights Administrator for the program.
14 When necessary information is returned to you by the Rights Administrator, click the tab, select the sub-tab, and then adjust information as appropriate.
15 When work is complete, click the PCS menu, and then select DCTM.
For PC At the File Download dialog box, click the [insert PC_Save_Button.png] button to save the Excel file to the Downloads folder on your computer.

Pearson Integrated Workflow
Preparation / Assembly 9
16 Select the Documentum Inbox node, and then double-click the Determine Rights and Perms Outstanding task to open it.
17 Click the button.
NOTES
• Clickthe button to access the tab where you can view or add comments.
• Clickthe button again to access the tab where you can view upcoming steps, as well as view previous workflow steps.
Note Make sure all appropriate information has been communicated before forwarding the task.

Pearson Integrated Workflow
Preparation / Assembly 10
18 The ‘Determine Rights and Perms Outstanding’ successfully forwarded confirmation message appears, and the workflow task is sent to the next actor.

Pearson Integrated Workflow
Preparation / Assembly 11
2 Conclude Rights and Permissions Plan
In this step, you will conclude the Rights and Permissions Plan by checking on any outstanding rights information and submitting invoices to pay for rights and permissions.
This step begins with a Documentum email notification. Work on the task itself will be completed in PCS and PRISM.
1 When it is time to complete the Conclude Rights and Permissions task, you will receive a Documentum email notification. Go to My Dashboard at http://workflow.pearson.com.
2 The Sign In screen appears.
a Type your user name in the User Name text box.
b Type your password in the Password text box.
c Click the button.
a
b
c

Pearson Integrated Workflow
Preparation / Assembly 12
3 The My Dashboard screen appears. Click the Documentum (DCTM) link.
4 The Documentum Location screen appears.
a Select your repository from the Repository drop-down menu.
b Select your location from the Location drop-down menu. If your location does not appear or if you are working remotely, select the Other option.
c Click the button.
a
b
c
Quick Tip USHE users select the PNA_Higher_Ed repository.
Pearson Integrated Workflow
Preparation / Assembly 13
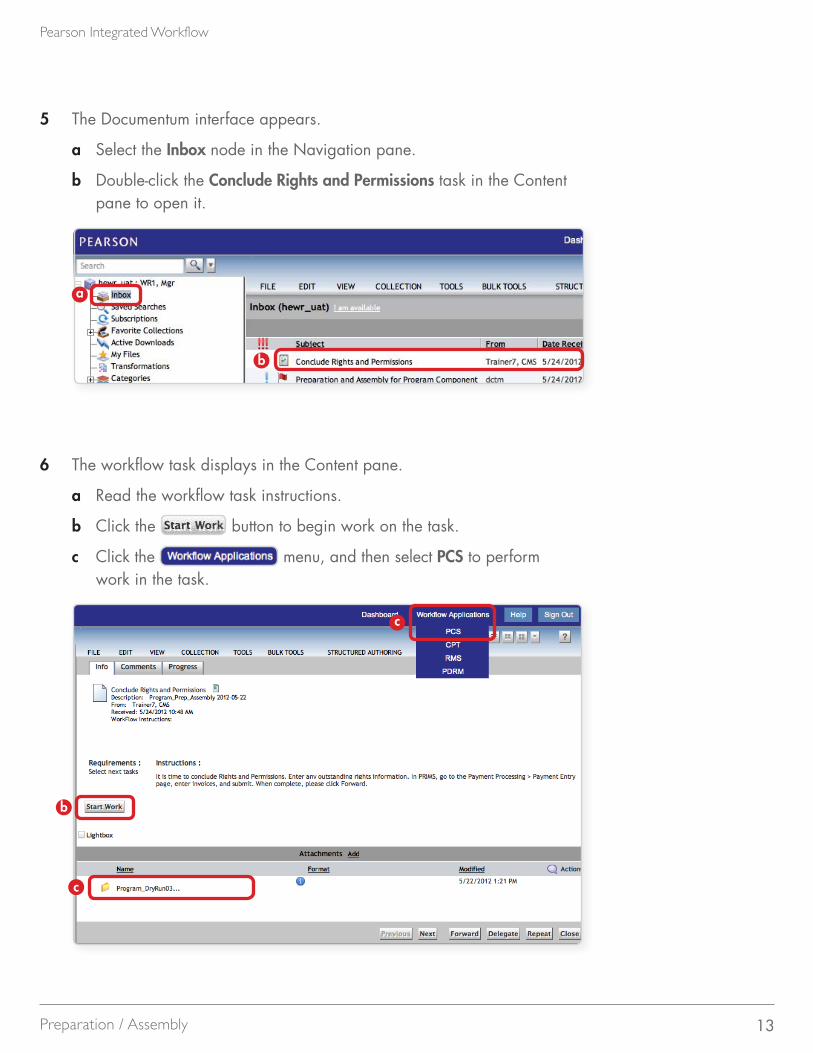
5 The Documentum interface appears.
a Select the Inbox node in the Navigation pane.
b Double-click the Conclude Rights and Permissions task in the Content pane to open it.
a
b
6 The workflow task displays in the Content pane.
a Read the workflow task instructions.
b Click the button to begin work on the task.
c Click the menu, and then select PCS to perform work in the task.
c
b
c

Pearson Integrated Workflow
Preparation / Assembly 14
Clear Outstanding Rights
1 In PCS, click the tab, and then select the sub-tab.
2 The Content Plan screen appears. Click the button.
3 The Content Assets Status screen appears. All of the program’s assets and asset usage display.
a Type your comments or exceptions in all of the Comments/Exceptions text boxes.
b Click the button. The This record has been saved successfully confirmation message appears.
c Click the button.
a
bc
Quick Tip To access a program, click My Programs or run a search.
Quick Tip To return to the Content Plan screen, click the button.

Pearson Integrated Workflow
Preparation / Assembly 15
4 The Rights Clearance Status Report displays. If there were no exceptions and if all rights have been cleared, you can click the Approve button to approve the rights status without routing. If exceptions were needed, then you must route the report for approval. Click the button.
5 The PDRM application opens. Select the due date, roles, and corresponding users, and their email addresses, who will approve the component.
Quick Tips• Select the Draft Review
check box to route the report as a draft only (no actual approval occurs).
• Click the button to export a copy of the report.
• Click the button to print a copy of the report.

Pearson Integrated Workflow
Preparation / Assembly 16
6 When all roles and users have been added, click the button to send the Rights Clearance Status Report to the approvers.
7 The Project initiated successfully confirmation message appears. PDRM notifies the approvers that rights exceptions have been captured for a program component and are awaiting approval. Approvers log into PDRM, review the Rights Clearance Status Report, and then approve or reject the document. If the document is rejected, you must return to PCS and make the necessary adjustments. Generate the Rights Clearance Status report again and then re-route it for approval.
NoteThe Rights Clearance Status Report can be routed for only one program at a time.
Pearson Integrated Workflow
Preparation / Assembly 17
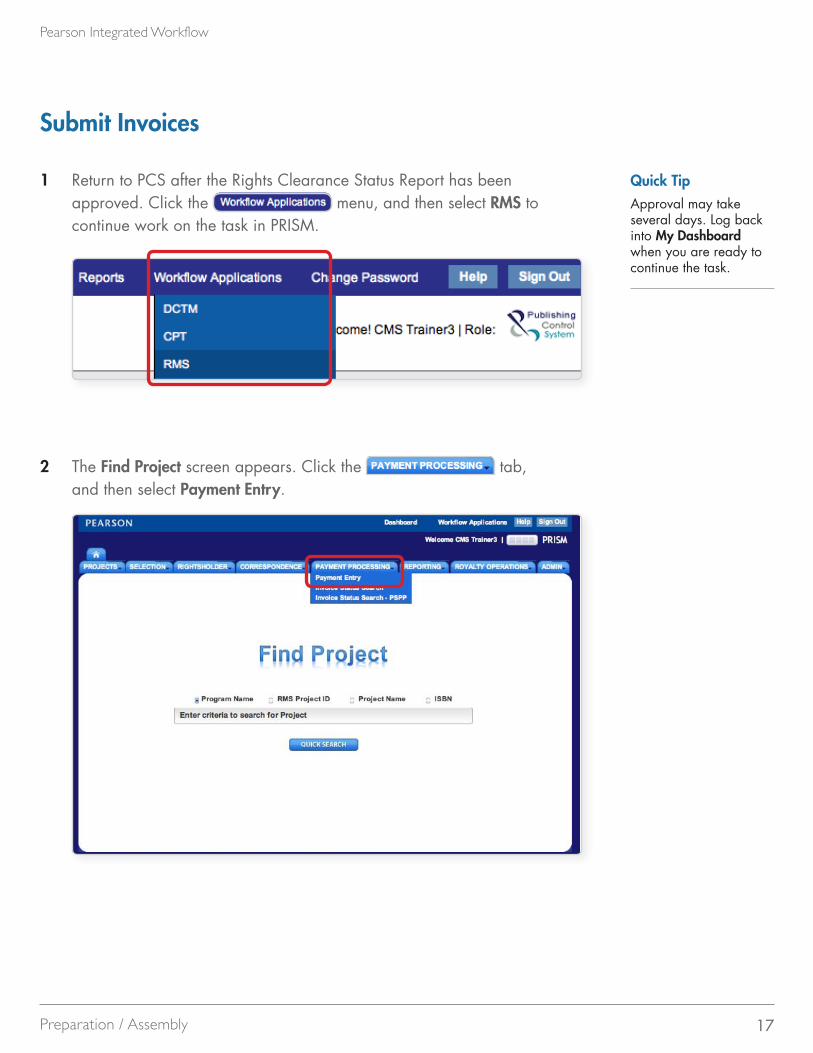
Submit Invoices
1 Return to PCS after the Rights Clearance Status Report has been approved. Click the menu, and then select RMS to continue work on the task in PRISM.
2 The Find Project screen appears. Click the tab, and then select Payment Entry.
Quick Tip Approval may take several days. Log back into My Dashboard when you are ready to continue the task.

Pearson Integrated Workflow
Preparation / Assembly 18
3 The Payment Entry Detail screen appears.
a Type or select search criteria, such as Charge To ISBN or Group.
b Click the button.
a
b
4 Individual assets that have attached invoices are returned in the search results. To open an invoice, double-click the appropriate search result.
Quick Tip Scroll to the right of the screen to see additional columns and information, such as Actual Amount, SAP Vendor Name, Rights Clearance Editor, and Rejection/Void Reason.
Note Many rights holders/ vendors attach their own invoices. When an invoice is attached, it must be linked to a SAP Vendor.
Quick Tip The icon indicates an error or missing information. To view a message about the error or missing information, hover your mouse over the icon.

Pearson Integrated Workflow
Preparation / Assembly 19
5 The Payment Entry Summary screen appears. To send the invoice into the invoice approval queue, click the button.
Note If an invoice covers multiple assets, all the assets are listed at the bottom of the Payment Entry Summary screen.
Note A scanned image of the invoice appears on the right. On the left, data in the grayed-out fields is automatically generated. The vendor enters data in the white fields.

Pearson Integrated Workflow
Preparation / Assembly 20
Approve Invoice Payment
1 To approve payment of invoices, click the tab, and then select Payment Approval.
2 The Payment Approval Detail screen appears.
a Type or select search criteria, such as Charge To ISBN or Group.
b Click the button.
a
b
Note Only rights and permissions managers can approve invoices. Signature cards indicate the maximum amount that an individual manager can sign off on. Managers generally approve invoices within their discipline.

Pearson Integrated Workflow
Preparation / Assembly 21
3 Assets with invoices submitted for approval are returned in the search results. To review an invoice, double-click the appropriate search result.

Pearson Integrated Workflow
Preparation / Assembly 22
4 The Payment Approval Summary screen appears. Compare the data on the left with the information in the scanned image on the right to ensure accuracy.
a To approve payment of the invoice, click the button. The payment is processed, and a check will be cut.
OR
b If you do not approve, type an explanation in the Rejected Reason text box, and then click the button. The invoice is returned to the Payment Entry screen.
a
b

Pearson Integrated Workflow
Preparation / Assembly 23
5 After all invoices have been submitted, click the menu, and then select DCTM.
6 Return to your Documentum Inbox.
a Select the Inbox node in the Navigation pane.
b Double-click the Conclude Rights and Permissions task in the Content pane to open it.
a
b

Pearson Integrated Workflow
Preparation / Assembly 24
7 Click the button to complete the task.
NOTES
• Clickthe button to access the tab where you can view or add comments.
• Clickthe button again to access the tab where you can view upcoming steps, as well as view previous workflow steps.