prepare for redeployment
TRANSCRIPT

CA
LL OF D
UTY
®: MO
DER
N W
AR
FAR
E® 2
SIGN
ATU
RE SER
IES
$19.99 USA/$22.99 CAN/£12.99 Net UK
© 2009 Activision Publishing, Inc. Activision and Modern Warfare are registered trademarks of Activision Publishing, Inc. All rights reserved.
The ratings icon is a registered trademark of the Entertainment Software Association. All other trademarks and trade names are the properties
of their respective owners
www.bradygames.com www.infinityward.comwww.activision.com
PREPARE FOR REDEPLOYMENTThe multiple Game-of-the-Year award winning Call of Duty: Modern Warfare series makes its highly anticipated return, upping the ante on all counts. Devastating new weapons and attachments, more compelling perks, exciting new game modes, more character class options, a gripping new campaign—more of everything you love about the uncompromising Call of Duty experience! Master it all with this essential Signature Series guide!
INCOMPARABLE MULTIPLAYER COVERAGE
EXCLUSIVE MULTIPLAYER AND SINGLE-PLAYER MAPS
COMPREHENSIVE WALKTHROUGH COVERS EVERY MISSION
THERE’S MORE!
We reveal the Achievements and Trophies, unlockable Weapons and Attachments, cool game features, novel play modes, and much more!
SINGLE-PLAYER MAPSSINGLE-PLAYER MAPSWe give you maps for every Campaign and Spec Ops mission, as well as every Multiplayer level. We reveal Intel and Objective locations, Spawn Points, Mounted Guns, and much more. Custom versions of each MP map reveal crucial locations for every game mode!
COVERS EVERY MISSIONCOVERS EVERY MISSIONWe lead you through all 18 Campaign missions, as well as all 23 Special Ops missions. Engagement-based strategy gets you through every skirmish. Co-Op tactics help you get the most from your Spec Ops partner!
INCOMPARABLE MULTIPLAYER COVERAGE
We provide all the tools to maximize your Multiplayer experience. Optimize your combat effectiveness with our analysis of every Perk, Weapon, Attachment, Camoufl age, and more! Our Create a Class recommendations ensure that you pick the perfect loadout. Expert tactics for team-based and solo play, Killstreak and Deathstreak bonuses, Ranks, and much more!
SandblasterPRIMARY/ATTACHMENT Barrett .50 cal / Silencer
SECONDARY/ATTACHMENT Model 1887 / Akimbo
EQUIPMENT Claymore
SPECIAL GRENADE Smoke
PERK 1 Sleight of Hand
PERK 2 Stopping Power
PERK 3 Steady Aim
DEATHSTREAK Final Stand
COVERS XBOX 360®, SONY PLAYSTATION® 3 COMPUTER ENTERTAINMENT SYSTEM, AND PC DVD-ROM Phillip Marcus and the Sea Snipers
1164-7ModernWAR_cov.indd 1 10/19/09 3:59:58 PM
PREPARE FOR REDEPLOYMENT
Sandblaster
1164-7ModernWAR_cov.indd 2 10/19/09 4:00:02 PM

1164-7ModernWAR_cov.indd 3 10/19/09 4:00:09 PM
Multiplayer Briefi ng 146
Multiplayer Warfare 153
Tactical 172
Clans 181
Intel Charts 186
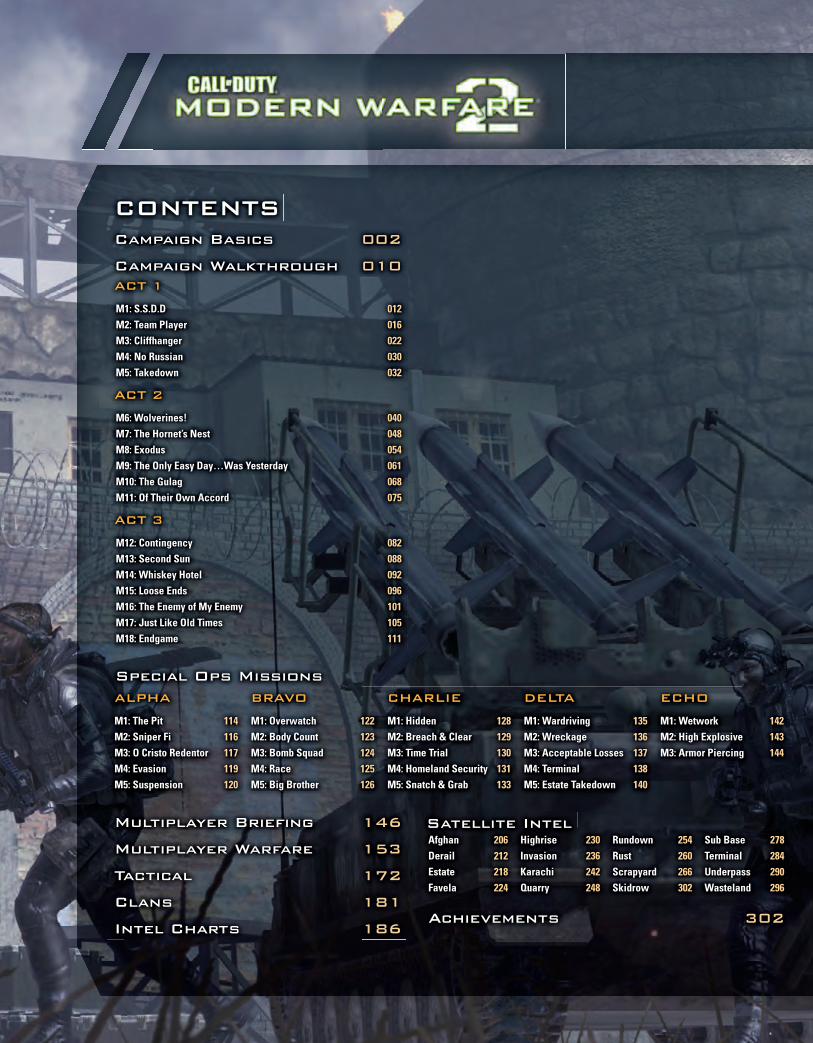
CONTENTSCampaign Basics 002
Campaign Walkthrough 010ACT 1
M1: S.S.D.D 012 M2: Team Player 016 M3: Cliffhanger 022 M4: No Russian 030 M5: Takedown 032
ACT 2
M6: Wolverines! 040 M7: The Hornet’s Nest 048 M8: Exodus 054 M9: The Only Easy Day…Was Yesterday 061 M10: The Gulag 068 M11: Of Their Own Accord 075
ACT 3
M12: Contingency 082 M13: Second Sun 088 M14: Whiskey Hotel 092 M15: Loose Ends 096 M16: The Enemy of My Enemy 101 M17: Just Like Old Times 105 M18: Endgame 111
ALPHA
M1: The Pit 114M2: Sniper Fi 116M3: O Cristo Redentor 117M4: Evasion 119M5: Suspension 120
BRAVO
M1: Overwatch 122M2: Body Count 123M3: Bomb Squad 124M4: Race 125M5: Big Brother 126
CHARLIE
M1: Hidden 128M2: Breach & Clear 129M3: Time Trial 130M4: Homeland Security 131M5: Snatch & Grab 133
DELTA
M1: Wardriving 135M2: Wreckage 136M3: Acceptable Losses 137M4: Terminal 138M5: Estate Takedown 140
ECHO
M1: Wetwork 142M2: High Explosive 143M3: Armor Piercing 144
Special Ops Missions
Achievements 302
Afghan 206Derail 212Estate 218Favela 224
Highrise 230Invasion 236Karachi 242Quarry 248
Rundown 254Rust 260Scrapyard 266Skidrow 302
Sub Base 278Terminal 284Underpass 290Wasteland 296
Satellite Intel
00 SS TOC.indd 1 10/22/09 9:04:57 PM

TRAIN THELOCAL FORCES
Your mission begins in the dusty hills of
Afghanistan, during a live-fire training
exercise, demonstrating Ranger shooting
techniques to the native military.
This mission is a simple tutorial, but don’t miss the Intel! It gives you a chance to
become acclimated—or re-acclimated—to the controls.
S.S.D.DMISSION 01:
ENGAGEMENT 1Your fi rst task is simply to spray bullets at the targets from the hip, in order to demonstrate the technique’s inaccuracy.
After that, you can pick off the targets properly by crouching, sighting down the barrel, and fi ring aimed shots.
ACT 1
12
INTEL: 1
OBJECTIVE: TRAIN LOCAL
MILITARY FORCES
OPERATIVE: PFC. JOSEPH
ALLEN, RANGERS
OPFOR: NONE
LOCATION: CAMP PHOENIX,
AFGHANISTAN MILITARY
BASE
M4A1
INITIAL LOADOUT
02 ACT01 M1-3.indd 12 10/22/09 9:15:00 PM
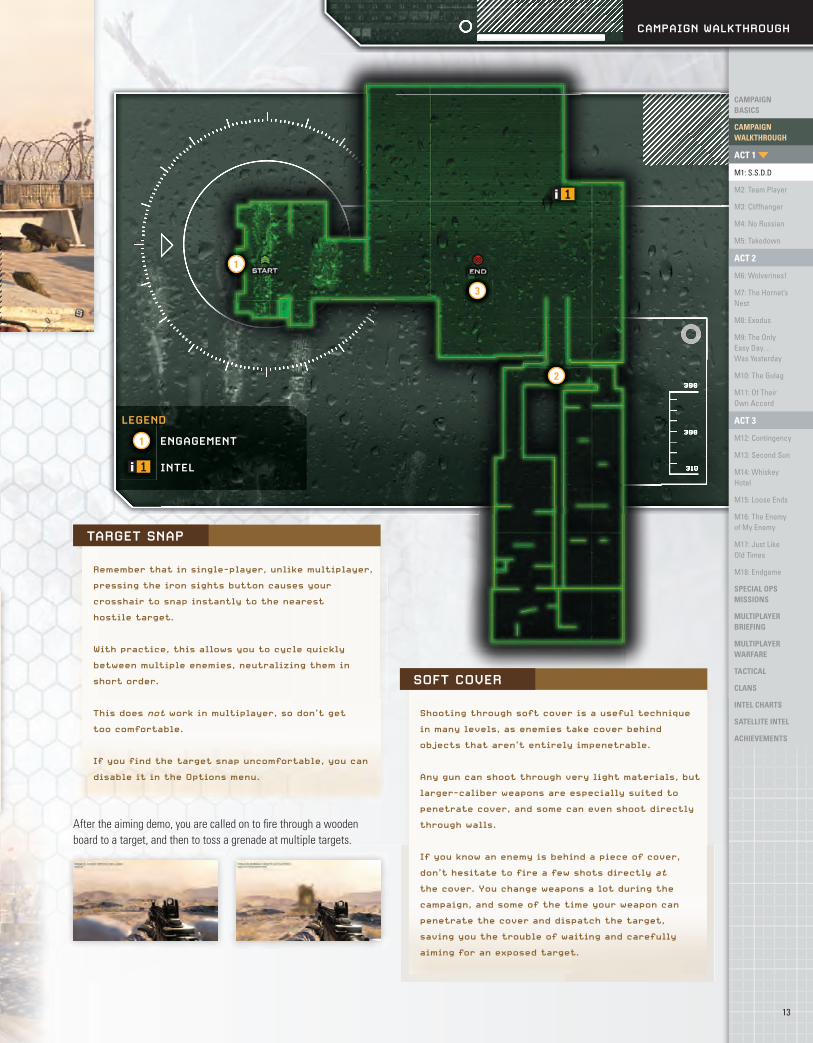
After the aiming demo, you are called on to fi re through a wooden board to a target, and then to toss a grenade at multiple targets.
ENGAGEMENT
TARGET SNAP
Remember that in single-player, unlike multiplayer,
pressing the iron sights button causes your
crosshair to snap instantly to the nearest
hostile target.
With practice, this allows you to cycle quickly
between multiple enemies, neutralizing them in
short order.
This does not work in multiplayer, so don’t get
too comfortable.
If you find the target snap uncomfortable, you can
disable it in the Options menu.
SOFT COVER
Shooting through soft cover is a useful technique
in many levels, as enemies take cover behind
objects that aren’t entirely impenetrable.
Any gun can shoot through very light materials, but
larger-caliber weapons are especially suited to
penetrate cover, and some can even shoot directly
through walls.
If you know an enemy is behind a piece of cover,
don’t hesitate to fire a few shots directly at
the cover. You change weapons a lot during the
campaign, and some of the time your weapon can
penetrate the cover and dispatch the target,
saving you the trouble of waiting and carefully
aiming for an exposed target.
13
CAMPAIGN WALKTHROUGH
CAMPAIGN BASICS
CAMPAIGN WALKTHROUGH
ACT 1
M1: S.S.D.D
M2: Team Player
M3: Cliffhanger
M4: No Russian
M5: Takedown
ACT 2
M6: Wolverines!
M7: The Hornet’s Nest
M8: Exodus
M9: The Only Easy Day… Was Yesterday
M10: The Gulag
M11: Of Their Own Accord
ACT 3
M12: Contingency
M13: Second Sun
M14: Whiskey Hotel
M15: Loose Ends
M16: The Enemy of My Enemy
M17: Just Like Old Times
M18: Endgame
SPECIAL OPS MISSIONS
MULTIPLAYER BRIEFING
MULTIPLAYER WARFARE
TACTICAL
CLANS
INTEL CHARTS
SATELLITE INTEL
ACHIEVEMENTS
1
1
2
3
1
1
LEGEND
INTEL
02 ACT01 M1-3.indd 13 10/22/09 9:15:44 PM
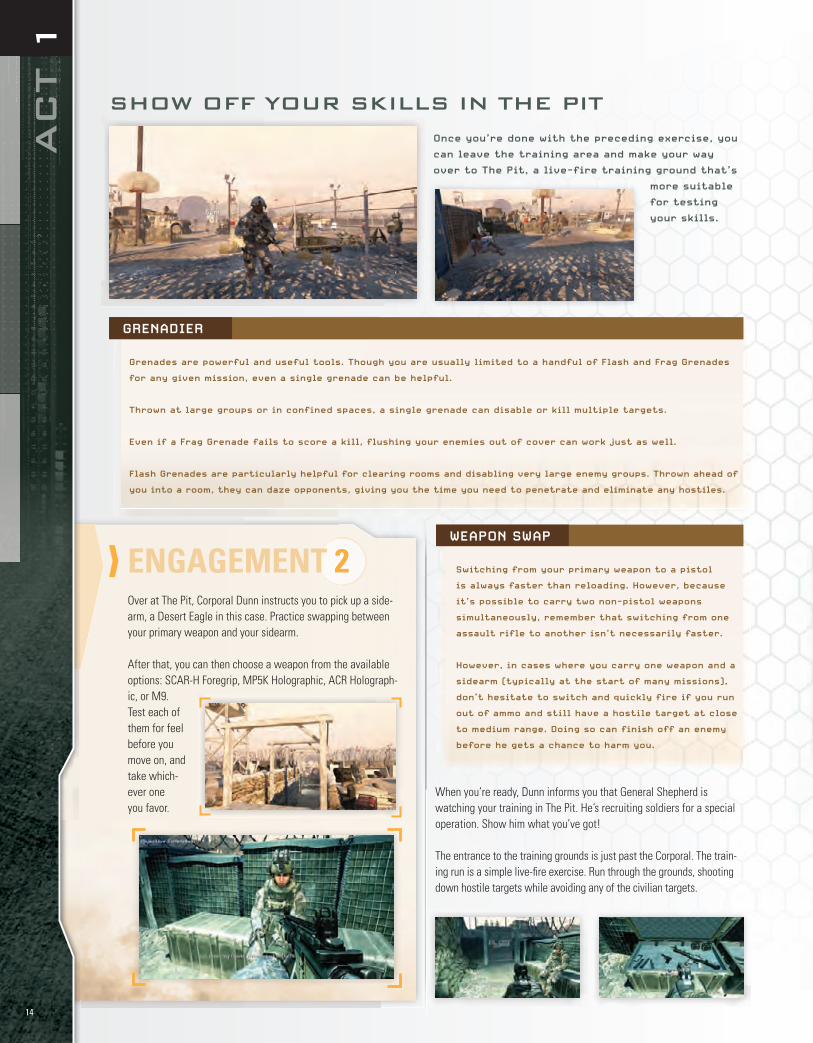
SHOW OFF YOUR SKILLS IN THE PIT
Once you’re done with the preceding exercise, you
can leave the training area and make your way
over to The Pit, a live-fire training ground that’s
more suitable
for testing
your skills.
WEAPON SWAP
Switching from your primary weapon to a pistol
is always faster than reloading. However, because
it’s possible to carry two non-pistol weapons
simultaneously, remember that switching from one
assault rifle to another isn’t necessarily faster.
However, in cases where you carry one weapon and a
sidearm (typically at the start of many missions),
don’t hesitate to switch and quickly fire if you run
out of ammo and still have a hostile target at close
to medium range. Doing so can finish off an enemy
before he gets a chance to harm you.
When you’re ready, Dunn informs you that General Shepherd is watching your training in The Pit. He’s recruiting soldiers for a special operation. Show him what you’ve got!
The entrance to the training grounds is just past the Corporal. The train-ing run is a simple live-fi re exercise. Run through the grounds, shooting down hostile targets while avoiding any of the civilian targets.
GRENADIER
Grenades are powerful and useful tools. Though you are usually limited to a handful of Flash and Frag Grenades
for any given mission, even a single grenade can be helpful.
Thrown at large groups or in confined spaces, a single grenade can disable or kill multiple targets.
Even if a Frag Grenade fails to score a kill, flushing your enemies out of cover can work just as well.
Flash Grenades are particularly helpful for clearing rooms and disabling very large enemy groups. Thrown ahead of
you into a room, they can daze opponents, giving you the time you need to penetrate and eliminate any hostiles.
ENGAGEMENT 2Over at The Pit, Corporal Dunn instructs you to pick up a side-arm, a Desert Eagle in this case. Practice swapping between your primary weapon and your sidearm.
After that, you can then choose a weapon from the available options: SCAR-H Foregrip, MP5K Holographic, ACR Holograph-ic, or M9. Test each of them for feel before you move on, and take which-ever one you favor.
14
AC
T 1
02 ACT01 M1-3.indd 14 10/22/09 9:16:08 PM
ON-THE-FLY DIFFICULTY
Remember that, while you’re on a mission, you can
always change its difficulty setting!
If you’ve chosen a higher difficulty level and you
find one mission or area too frustrating, you can
always lower the difficulty and come back later
from the mission select to try again.
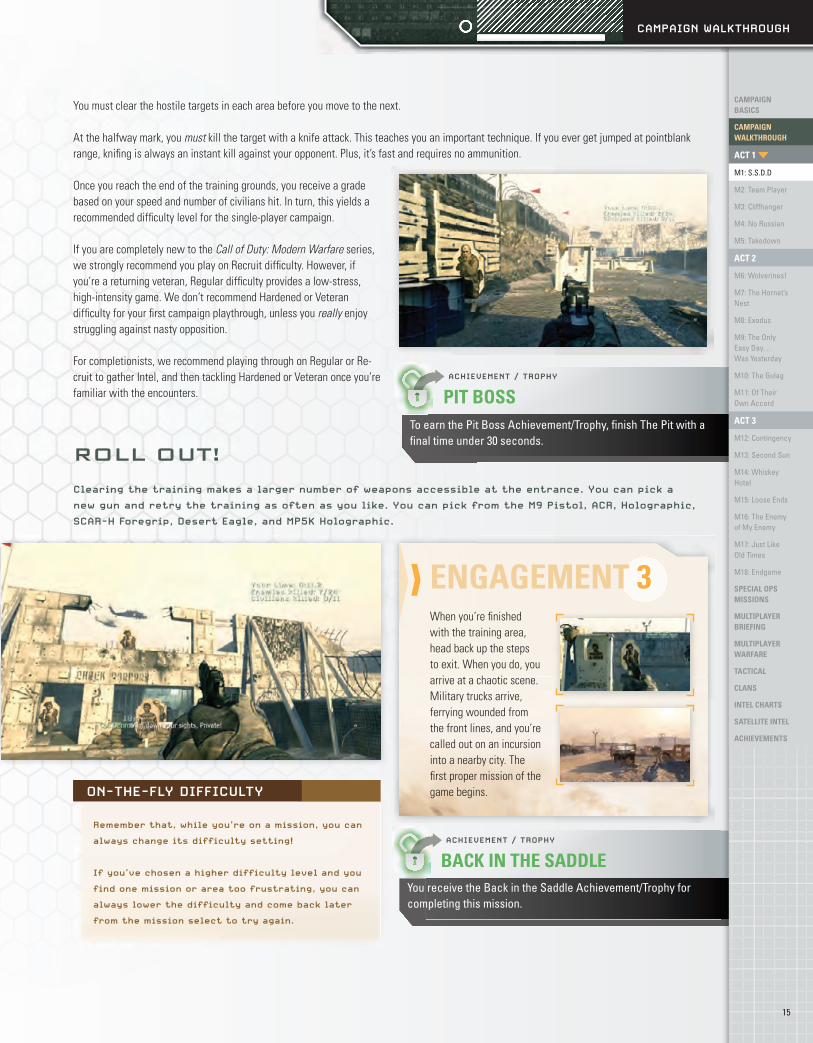
You must clear the hostile targets in each area before you move to the next.
At the halfway mark, you must kill the target with a knife attack. This teaches you an important technique. If you ever get jumped at pointblank range, knifi ng is always an instant kill against your opponent. Plus, it’s fast and requires no ammunition.
Once you reach the end of the training grounds, you receive a grade based on your speed and number of civilians hit. In turn, this yields a recommended diffi culty level for the single-player campaign.
If you are completely new to the Call of Duty: Modern Warfare series, we strongly recommend you play on Recruit diffi culty. However, if you’re a returning veteran, Regular diffi culty provides a low-stress, high-intensity game. We don’t recommend Hardened or Veteran diffi culty for your fi rst campaign playthrough, unless you really enjoy struggling against nasty opposition.
ROLL OUT!
Clearing the training makes a larger number of weapons accessible at the entrance. You can pick a
new gun and retry the training as often as you like. You can pick from the M9 Pistol, ACR, Holographic,
SCAR-H Foregrip, Desert Eagle, and MP5K Holographic.
BACK IN THE SADDLEACHIEVEMENT / TROPHY
You receive the Back in the Saddle Achievement/Trophy for completing this mission.
PIT BOSSACHIEVEMENT / TROPHY
To earn the Pit Boss Achievement/Trophy, fi nish The Pit with a fi nal time under 30 seconds.
ENGAGEMENT 3When you’re fi nished with the training area, head back up the steps to exit. When you do, you arrive at a chaotic scene. Military trucks arrive, ferrying wounded from the front lines, and you’re called out on an incursion into a nearby city. The fi rst proper mission of the game begins.
For completionists, we recommend playing through on Regular or Re-cruit to gather Intel, and then tackling Hardened or Veteran once you’re familiar with the encounters.
15
CAMPAIGN WALKTHROUGH
CAMPAIGN BASICS
CAMPAIGN WALKTHROUGH
ACT 1
M1: S.S.D.D
M2: Team Player
M3: Cliffhanger
M4: No Russian
M5: Takedown
ACT 2
M6: Wolverines!
M7: The Hornet’s Nest
M8: Exodus
M9: The Only Easy Day… Was Yesterday
M10: The Gulag
M11: Of Their Own Accord
ACT 3
M12: Contingency
M13: Second Sun
M14: Whiskey Hotel
M15: Loose Ends
M16: The Enemy of My Enemy
M17: Just Like Old Times
M18: Endgame
SPECIAL OPS MISSIONS
MULTIPLAYER BRIEFING
MULTIPLAYER WARFARE
TACTICAL
CLANS
INTEL CHARTS
SATELLITE INTEL
ACHIEVEMENTS
02 ACT01 M1-3.indd 15 10/22/09 9:16:20 PM
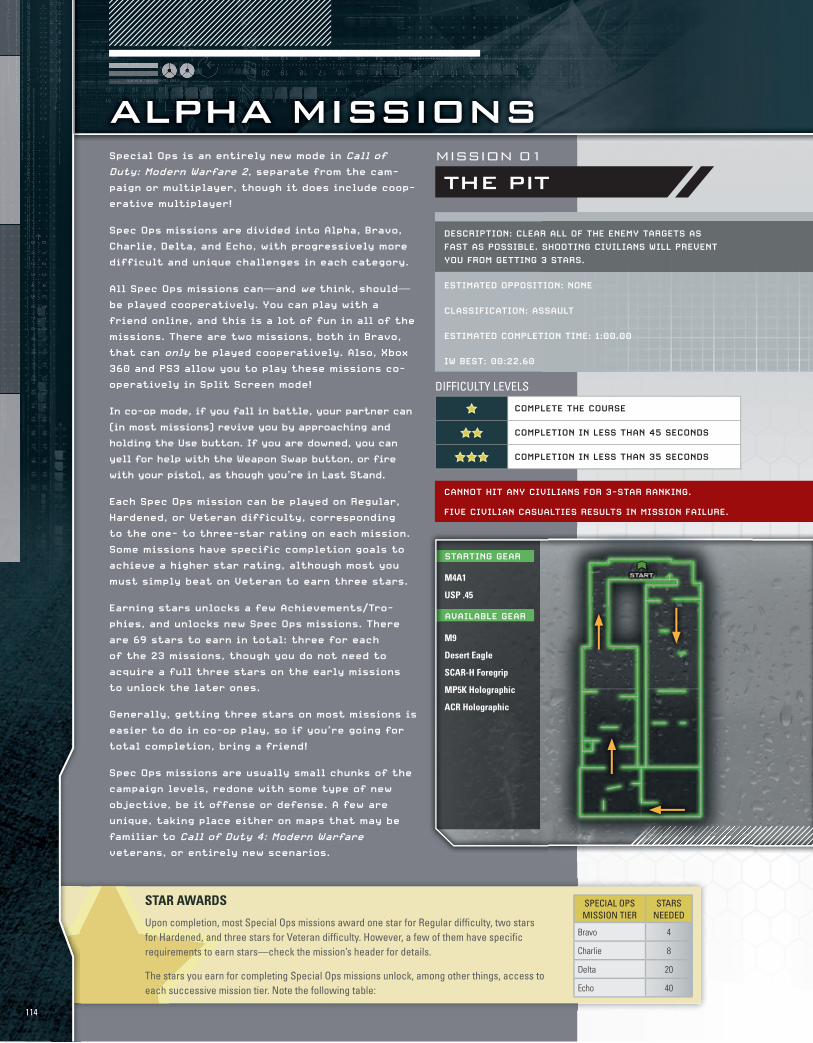
THE piTMISSION 01
difficulty levels
Complete the Course
Completion in less than 45 seConds
Completion in less than 35 seConds
desCription: Clear all of the enemy targets as fast as possible. shooting Civilians will prevent you from getting 3 stars.
estimated opposition: none
ClassifiCation: assault
estimated Completion time: 1:00.00
iw best: 00:22.60
Cannot hit any Civilians for 3-star ranking.
five Civilian Casualties results in mission failure.
M4A1
USP .45
starting gear
available gear
M9
Desert Eagle
SCAR-H Foregrip
MP5K Holographic
ACR Holographic
special ops is an entirely new mode in Call of
duty: modern warfare 2, separate from the cam-
paign or multiplayer, though it does include coop-
erative multiplayer!
spec ops missions are divided into alpha, bravo,
Charlie, delta, and echo, with progressively more
difficult and unique challenges in each category.
all spec ops missions can—and we think, should—be played cooperatively. you can play with a
friend online, and this is a lot of fun in all of the
missions. there are two missions, both in bravo,
that can only be played cooperatively. also, Xbox
360 and ps3 allow you to play these missions co-
operatively in split screen mode!
in co-op mode, if you fall in battle, your partner can
(in most missions) revive you by approaching and
holding the use button. if you are downed, you can
yell for help with the weapon swap button, or fire
with your pistol, as though you’re in last stand.
each spec ops mission can be played on regular,
hardened, or veteran difficulty, corresponding
to the one- to three-star rating on each mission.
some missions have specific completion goals to
achieve a higher star rating, although most you
must simply beat on veteran to earn three stars.
earning stars unlocks a few achievements/tro-
phies, and unlocks new spec ops missions. there
are 69 stars to earn in total: three for each
of the 23 missions, though you do not need to
acquire a full three stars on the early missions
to unlock the later ones.
generally, getting three stars on most missions is
easier to do in co-op play, so if you’re going for
total completion, bring a friend!
spec ops missions are usually small chunks of the
campaign levels, redone with some type of new
objective, be it offense or defense. a few are
unique, taking place either on maps that may be
familiar to Call of duty 4: modern warfare
veterans, or entirely new scenarios.
StAR AwARDS
upon completion, most special Ops missions award one star for Regular difficulty, two stars for Hardened, and three stars for veteran difficulty. However, a few of them have specific requirements to earn stars—check the mission’s header for details.
the stars you earn for completing special Ops missions unlock, among other things, access to each successive mission tier. Note the following table:
special Ops MissiON tieR
staRs Needed
Bravo 4
Charlie 8
Delta 20
Echo 40
114
AlpHA Missions
09 Spec-Ops Alpha - Resized.indd 114 10/22/09 9:22:11 PM

veteran tips
while you carry a pistol, you run faster.
Consequently, a good way to go for a fast time on
this mission is to carry two pistols. take your .45
and grab the m9 at the start.
this gives you the benefit of faster movement and
faster switching, because you’re swapping to a
pistol.
otherwise, simply make sure you’re sprinting when
you’re not shooting!
To start the level, walk through the gate and into The Pit. The first engagement is three enemies and no civilians. You can easily spray down all three of the enemies with an automatic rifle and proceed to the next engagement.
The next engagement is immediately behind the previous one. It has enemies on both floors of the destroyed building. The first floor has two moving and one stationary enemy target, while the second floor has one
moving target and one stationary target. Avoid the two civil-ians on the first floor. Consider switching to your pistol at this point to avoid running out of ammo in the next level.
The next wave consists of four enemies and two civilians. Carefully take out both of the enemies on the left. Next, shoot the two targets to the right while you move toward the rooftop’s edge. Drop down for the next wave, reloading as you run.
Move forward, and the next crop of enemy targets appears. There is one stationary target to the right, and one moving target, which is oc-casionally obscured by a civilian target in front. Carefully take out the enemies without hitting the civilian.
A precise shot during your fall can take out one hostile in this wave on the left side. Next, move around the right side, carefully taking out the enemy targets and avoiding the civilian in the background. If you’re using a Desert Eagle here, the shot will go straight through the two enemies and take out the civilian.
Run straight ahead to the exit as you take out the two enemy targets in your way.
Just getting warmed up
the first spec ops mission is very straightforward.
it’s simply the training run session of s.s.d.d., only
this time you can play it co-op.
most, though not all, spec ops missions are small
slices of campaign missions, but often with
significantly different opposition or goals.
some are target elimination, while some are
simple defense.
in this case, you need to clear the pit quickly and
without hitting any civilians. it’s good practice for
fast movement and weapon swapping!
Move into the building for the next engagement, which consists of one moving and two stationary enemy targets. Take out the two stationary enemy targets to the right before you enter the build-ing. Then carefully take out the moving target behind the civilian. Reload your pistol if necessary, and run up the stairs. Knife the target at the top of the stairs to trigger the next wave.
115
CAMPAign bASiCS
CAMPAign wALKtHROUgH
SPECiAL OPS MiSSiOnS
ALPHA
M1: The Pit
M2: sniper fi
M3: O cristoRedentor
M4: evasion
M5: suspension
bRAvO
M1: Overwatch
M2: Body count
M3: Bomb squad
M4: Race
M5: Big Brother
CHARLiE
M1: Hidden
M2: Breach & clear
M3: time trial
M4: Homeland security
M5: snatch & Grab
DELtA
M1: Wardriving
M2: Wreckage
M3: acceptable losses
M4: terminal
M5: estate takedown
ECHO
M1: Wetwork
M2: High explosive
M3: armor piercing
MULtiPLAyER bRiEFing
MULtiPLAyER wARFARE
tACtiCAL
CLAnS
intEL CHARtS
SAtELLitE intEL
ACHiEvEMEntS
speC-ops missions
09 Spec-Ops Alpha - Resized.indd 115 10/22/09 9:22:36 PM
We have received your volunteer application for service with the elite forces. We appreciate your
dedication. After careful screening, we have decided to accept you as a recruit. Welcome aboard!
Your training takes you from the Afghan desert to the radioactive Wasteland. Along the way, you will
fight among the best the world has to offer, through the Highrise and the Quarry, the Sub Base and
the Underpass. Learn from your mistakes but endeavor to learn from others’ as well. We supply you
with all of the basics, including weapons training and intel, Perk utilization and implementation, and
detailed satellite data for every theater of war. You are cleared to receive advanced intelligence on
everything from combat movement and squad management to Killstreak acquisition, weapon Attachment
customization, and standard operating procedures for all modes of combat.
You may have done this sort of thing before, but now you can expect deployment in 16 new theaters of war and
exposure to a multitude of unfamiliar weapon systems and equipment, so read on. Once you are in country, we will
provide you with detailed charts, unlockables, and specs for all Perks, Attachments, equipment, and weapons. You
will learn various modes of engagement as you progress. Can you wield dual shotguns effectively? Do you know
how to deploy a nuclear warhead? Can you operate the 40mm cannon on an AC-130? We’ll show you how. Prepare for
deployment…
BRIEFINGCall of Duty: Modern Warfare 2 is one of the most beautiful, in-depth, hardcore shooters available today. Players wage war in multiple combat modes and in 16 different theaters of war. Attack with a vast weapon collection, or create many lethal character classes by combining Attach-ments, equipment, Perks, and Killstreak rewards. Climb the ranks and outfi t yourself with a variety of deadly loadout combinations. Engage the most highly skilled soldiers in the world online, challenging up to 18 players in battle. With new modes like Capture the Flag and Demolition, and new weapons like the ACR Assault Rifl e and the WA2000 Sniper Rifl e, you’re in for a completely different experience. Get ready for all of the tacti-cal training you’ll need to succeed. Remember, history is written by the victors!
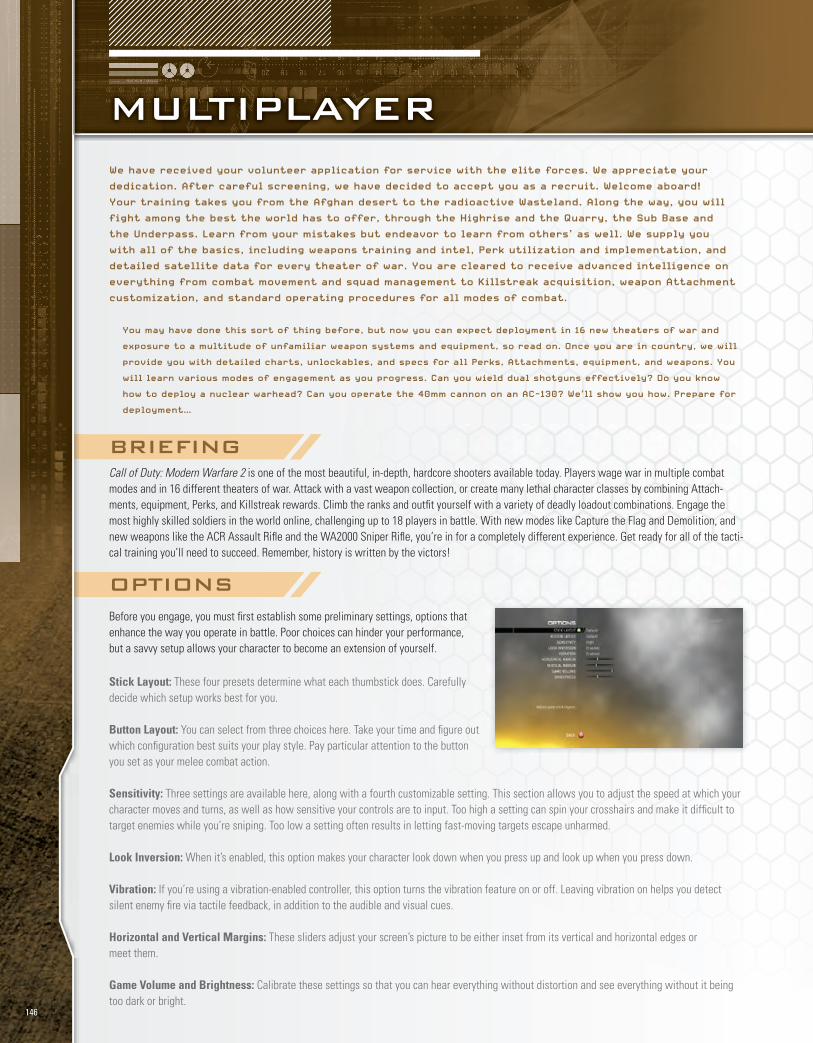
OPTIONSBefore you engage, you must fi rst establish some preliminary settings, options that enhance the way you operate in battle. Poor choices can hinder your performance, but a savvy setup allows your character to become an extension of yourself.
Stick Layout: These four presets determine what each thumbstick does. Carefully decide which setup works best for you.
Button Layout: You can select from three choices here. Take your time and fi gure out which confi guration best suits your play style. Pay particular attention to the button you set as your melee combat action.
Sensitivity: Three settings are available here, along with a fourth customizable setting. This section allows you to adjust the speed at which your character moves and turns, as well as how sensitive your controls are to input. Too high a setting can spin your crosshairs and make it diffi cult to target enemies while you’re sniping. Too low a setting often results in letting fast-moving targets escape unharmed.
Look Inversion: When it’s enabled, this option makes your character look down when you press up and look up when you press down.
Vibration: If you’re using a vibration-enabled controller, this option turns the vibration feature on or off. Leaving vibration on helps you detect silent enemy fi re via tactile feedback, in addition to the audible and visual cues.
Horizontal and Vertical Margins: These sliders adjust your screen’s picture to be either inset from its vertical and horizontal edges or meet them.
Game Volume and Brightness: Calibrate these settings so that you can hear everything without distortion and see everything without it being too dark or bright.
146
MULTIPLAYER
17 Multi Basics A.indd 146 10/22/09 9:24:45 PM

Check the mini-map often, particularly when someone fi res a shot. Enemies do not stay visible for long. They appear as a Red Dot on your mini-map, so do your best to call out their locations to your team as soon as you see them. In objective-based game modes, the mini-map also shows your current objectives. Your HUD displays these points in the virtual world with fl oating icons marking their locations. Look for these when you play modes like Search and Destroy, Sabotage, Domi-nation, or any other objective-based scenario. The bottom-left of your HUD shows the game mode you’re currently playing, the score for each side, and how much time remains in the mission. The rank progress bar, a slanted bar along that bottom that spans the screen’s width, fi lls as you rank up. When you reach the next rank, the bar resets, ready to fi ll again from the beginning. The HUD’s bottom right displays your compass, the number of rounds in your current weapon, the special grenades and other explosives you carry, and any Killstreaks you acquire. Use your compass often to call out to your team where you are heading or where you’ve seen an enemy. Familiarize yourself with the most critical information so you aren’t hunting for it when you need it most. Remember that in any Hardcore mode, your HUD disappears. This mode hides all icons and objectives, the mini-map, and even crosshairs! When you play Hardcore modes, choose a weapon you can sight with easily because your crosshairs are inactive.
Your crosshairs automatically turn red when focused on an enemy. You can use this to your advantage in locations that have a lot of cover. Pass your crosshairs over the cover to see if they turn red. If they do, fi re a shot. If you hit someone, your crosshairs turn to an “X,” indicat-ing a successful hit.
Your crosshairs also spread apart when you are moving quickly. They tighten again when you stop moving. You can increase your crosshairs’ accuracy and size by moving more slowly, crouching, or going prone (to tighten them considerably). When you get hit, your HUD identifi es the direction from which the attack originated. This is displayed by a red arc appearing around your crosshair—it points in the direction of attack. This works with bullets as well as grenades or explosions. Use this arc to determine the direction of enemy fi re, and evade or engage accordingly.
The HUD displays other important data, including radar with a scrolling map of your location. This map depicts the basic area of engagement as well as your position, your teammates’ positions, and enemy positions.
Hardcore settings remove all elements from your HUD. It’s not broken.
Sea Sniper Tip: Where’s My HUD?
HEAD-UP DISPLAY (HUD)Your HUD delivers all of the information pertaining to your current objective, from how much time remains in the mission to how much ammo you have left.
Several indicators inform you of a hit. In addition to controller vibration and the red arc indicator, blood droplets appear onscreen, impairing your vision and movement. This effect subsides over time if you do not suffer any further damage. Seek cover as quickly as possible when you start to bleed.
147
CAMPAIGN BASICS
CAMPAIGN WALKTHROUGH
SPECIAL OPS MISSIONS
MULTIPLAYER BRIEFING
MULTIPLAYER WARFARE
TACTICAL
CLANS
INTEL CHARTS
SATELLITE INTEL
ACHIEVEMENTS
MULTIPLAYER
17 Multi Basics A.indd 147 10/22/09 9:25:01 PM
A B C D
1
2
3
4
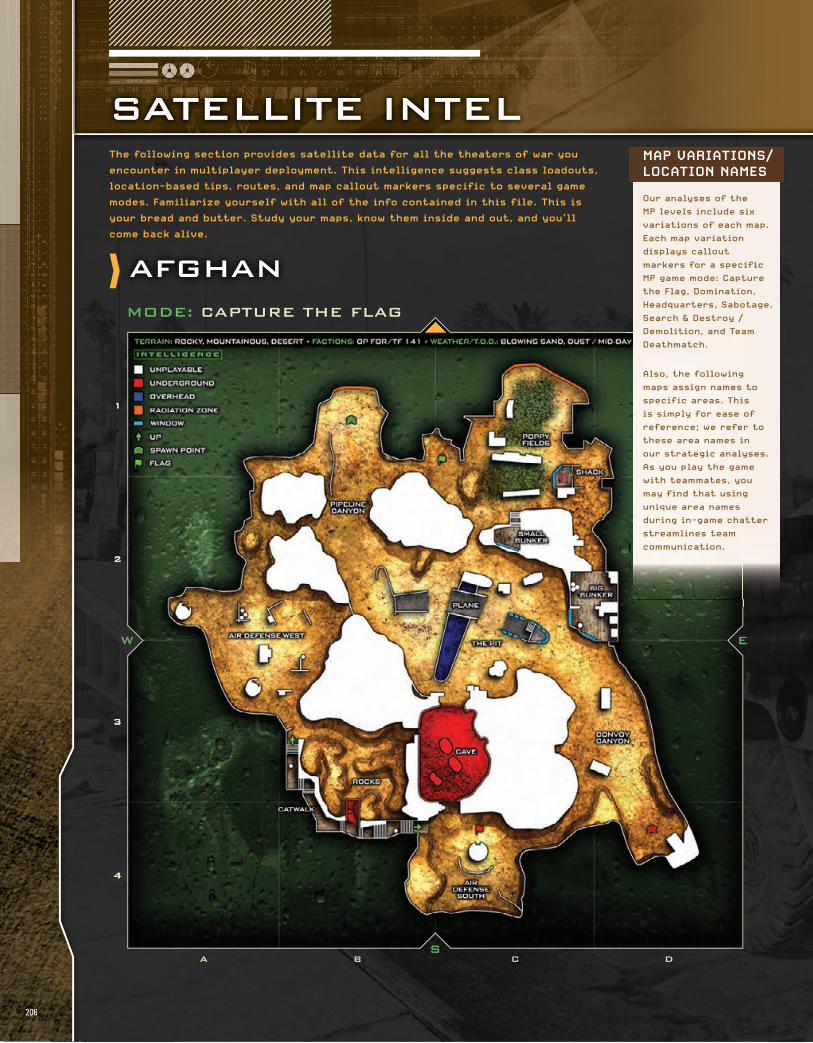
MODE: CApturE thE flAg
The following section provides satellite data for all the theaters of war you
encounter in multiplayer deployment. This intelligence suggests class loadouts,
location-based tips, routes, and map callout markers specific to several game
modes. Familiarize yourself with all of the info contained in this file. This is
your bread and butter. Study your maps, know them inside and out, and you’ll
come back alive.
AfghAn
206
SAtEllItE IntElMap VariaTionS/ LocaTion naMeS
our analyses of the Mp levels include six variations of each map. each map variation displays callout markers for a specific Mp game mode: capture the Flag, Domination, Headquarters, Sabotage, Search & Destroy / Demolition, and Team Deathmatch.
also, the following maps assign names to specific areas. This is simply for ease of reference; we refer to these area names in our strategic analyses. as you play the game with teammates, you may find that using unique area names during in-game chatter streamlines team communication.
19 Satellite Intel A.indd 206 10/22/09 9:27:05 PM
A B C D
1
2
3
4
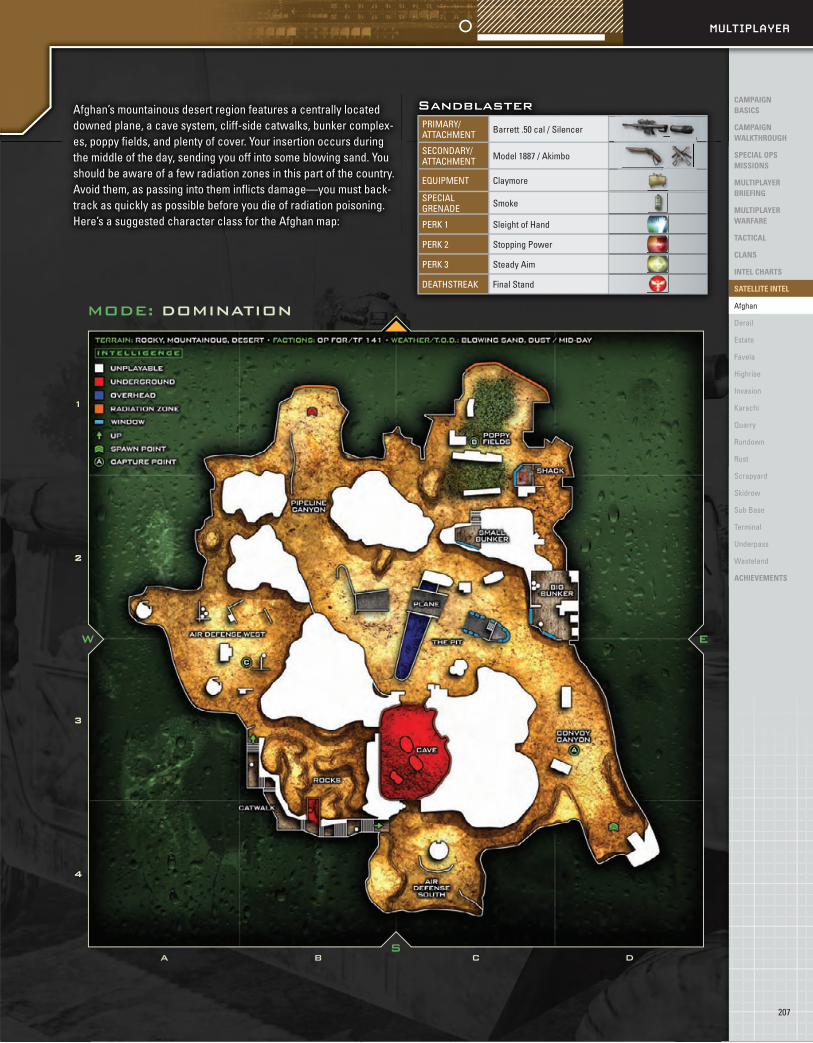
MODE: DOMInAtIOn
SandblasterPrimary/attachment Barrett .50 cal / Silencer
Secondary/attachment model 1887 / akimbo
equiPment claymore
SPecial Grenade Smoke
Perk 1 Sleight of hand
Perk 2 Stopping Power
Perk 3 Steady aim
deathStreak Final Stand
afghan’s mountainous desert region features a centrally located downed plane, a cave system, cliff-side catwalks, bunker complex-es, poppy fields, and plenty of cover. your insertion occurs during the middle of the day, sending you off into some blowing sand. you should be aware of a few radiation zones in this part of the country. avoid them, as passing into them inflicts damage—you must back-track as quickly as possible before you die of radiation poisoning. here’s a suggested character class for the afghan map:
207
MULTipLaYer
campaign basics
campaign WaLKTHROUgH
spEciaL Ops missiOns
mULTipLayER bRiEfing
mULTipLayER WaRfaRE
TacTicaL
cLans
inTEL cHaRTs
saTELLiTE inTEL
afghan
derail
estate
Favela
highrise
invasion
karachi
quarry
rundown
rust
Scrapyard
Skidrow
Sub Base
terminal
underpass
Wasteland
acHiEvEmEnTs
19 Satellite Intel A.indd 207 10/22/09 9:27:16 PM
By Phillip Marcus and the Sea Snipers
© 2009 DK/BradyGAMES, a division of Penguin Group (USA) Inc. BradyGAMES® is a registered trademark of Penguin Group (USA) Inc. All rights reserved, including the right of reproduction in whole or in part in any form.
DK/BradyGames, a division of Penguin Group (USA) Inc.800 East 96th Street, 3rd FloorIndianapolis, IN 46240
© 2009 Activision Publishing, Inc. Activision, Call of Duty and Modern Warfare are trademarks or registered trademarks of Activision Publishing, Inc. All rights reserved. The ratings icon is a registered trademark of the Entertainment Software Association. All other trademarks and trade names are the properties of their respective owners..
Please be advised that the ESRB ratings icons, “EC”, “E”, “E10+”, “T”, “M”, “AO”, and “RP” are trademarks owned by the Entertainment Software Association, and may only be used with their permission and authority. For information regarding whether a product has been rated by the ESRB, please visit www.esrb.org. For permission to use the ratings icons, please contact the ESA at [email protected].
ISBN-10: 0-7440-1164-7
ISBN-13: 978-0-7440-1164-7
Printing Code: The rightmost double-digit number is the year of the book’s printing; the rightmost single-digit number is the number of the book’s printing. For example, 09-1 shows that the fi rst printing of the book occurred in 2009.
12 11 10 09 4 3 2 1
Printed in the USA.
Title ManagerTim Fitzpatrick
Screenshot EditorMichael Owen
Lead DesignerKeith Lowe
DesignerTim Amrhein
Map Foldout DesignerDan Caparo
Production DesignerTracy Wehmeyer
All map illustrations by Rich Hunsinger (generatorstudios.com).
This guide’s multiplayer section was created by the Sea Snipers (seasnipers.net).
PublisherDavid Waybright
Editor-In-ChiefH. Leigh Davis
Licensing DirectorMike Degler
Marketing DirectorDebby Neubauer
International TranslationsBrian Saliba
BradyGAMES sincerely thanks everyone at Activision and Infi nity Ward for their gracious support from the very beginning of this project, and for another uncompromising installment in the Call of Duty: Modern Warfare series. Very special thanks to Vince Zampella, Mark Rubin, Pete Blumel, Robert Bowling, Zied Rieke, David Wang, Letam Biira, Byron Beede, Kap Kang, and Amanda O’Keeffe for opening your doors to us and making this guide possible. A thousand thanks for your hospitality and for all your hard work during an incredibly busy time—thank you!
Rich Hunsigner: Special thanks to the S.T.R.A.D.T. team (Sea Snipers Tactical Research And Development Team), consisting of following Sea Snipers, for their tireless efforts in helping to create the content for this guide. Without their help, I would never have gotten this guide done on time or to this level of quality. I worked them almost to death, and one of them to the emergency room!
[SS]Rator a.k.a. Rich Hunsinger[SS]SportoFu a.k.a. Jordan Evans[SS]Grifter a.k.a. Ian Bardecki[SS]Midnight a.k.a. Ammon Terpening[SS]Wally a.k.a. Jon Toney
Since we started writing and illustrating strategy guides, we have always tried to make each guide better than the last. We try to give players what you want, because we want it too. If it’s in the game, we will do everything in our power to bring it to you in the guide.
The Sea Snipers would like to thank BradyGAMES for this awesome opportunity, specifi cally Leigh Davis, Tim Fitzpatrick, Debby Neubauer, and the rest of the BradyGAMES staff. Big thanks to all of the guys at Infi nity Ward. Every time we get the privilege to work at your studio, you make us feel like part of your team, and we really appreciate that. Thank you to Producers Mark Rubin and Pete Blumel for taking care of us while we were there. You guys got us everything we needed on top of trying to fi nish your game. Very cool. I’d sincerely like to thank CEO Vince Zampella and 402, a.k.a. Robert Bowling, who had everyone who worked on Call of Duty 4: Modern Warfare sign my guide for me—wow, thank you guys! Todd Alderman, Geoff Smith, Royce, Brad Allen, and Soupy: thank you guys for all your help. I hope we didn’t bug you too much that week. Thanks to [SS]Chief, a.k.a. Michael Fry, who is currently serving in the U.S. Navy, for getting us the opportunities we have now. Thanks to all our families for putting up with us while we were working on this guide, and to the S.T.R.A.D.T. team who worked at Infi nity Ward with me. I worked you guys hard and you never complained—you just passed out. That’s hardcore. You all did what was asked of you within the deadline. Without all your help, I’d still be marking objectives on the maps. Finally, thank you to my beautiful wife Kate, who always stops whatever she’s doing to make sure everything I need is taken care of, so I can concentrate on these guides. I love you, baby girl.
Phillip Marcus: Like so many others out there, I spent many long nights with friends online in Call of Duty 4: Modern Warfare. When I was asked to work on the sequel, the answer was rather obvious.
To Pete Blumel at Infi nity Ward, a big thank you for being both friendly and welcoming to us during a busy time, and quickly providing us with any details or access we needed—it was a pleasure to work with you. Thanks as well to Candice Capen and Anthony Rubin for sharing their expertise on all matters single-player and co-op, and for sanity-checking our work. Finally, a special thanks to Jason Fox, a good friend who took a week off from life to help with Spec Ops, and Rich Hunsinger, who created the other half of this tome.
Call of Duty: Modern Warfare 2 is an excellent game, and I hope this guide enhances your enjoyment of it in some small way!
Jason Fox: I would like to thank Tim and Leigh from BradyGAMES for giving me the opportunity to help with this guide, and Phil for comforting me at every moment of transformation from simple game controller to angry projectile. I’d also like to thank Rich for helping on a few of the more challenging missions. Most importantly, a huge thank you to my wife Lindsey and my son Jake for letting me do crazy things like this all the time.
CREDITS BRADYGAMES STAFF
ACKNOWLEDGMENTS
25 SS BM.indd 304 10/22/09 9:28:29 PM