presto user guide - deutsche bank online user guide.pdf · presto user guide . deutsche bank...
TRANSCRIPT
Deutsche Bank Channel Islands
The information contained herein is the property of Deutsche Bank Group and may not be copied, used or disclosed in whole or in part, stored in a retrieval system or transmitted in any form or by any
means (electronic, mechanical, reprographic, recording or otherwise) outside of Deutsche Bank Group without prior written permission.
Presto User Guide
Deutsche Bank Channel Islands Presto User Guide
DBIL 5006v20130719 Page 2 of 61
Contents 1. Contact Details.............................................................................................................. 5
1.1. Channel Islands ............................................................................................................ 5 1.2. Cayman Islands ............................................................................................................ 5 1.3. Mauritius........................................................................................................................ 5
2. Otserp - Security Overview ........................................................................................... 5 3. How to Log On .............................................................................................................. 5
3.1. Creating a Secure Connection ..................................................................................... 6 3.2. Setting Up Your Connection ......................................................................................... 6
4. Groups .......................................................................................................................... 6 4.1. To Create a Group ........................................................................................................ 7 4.2. To Modify a Group ........................................................................................................ 9
5. Users ........................................................................................................................... 11 5.1. Users Screen .............................................................................................................. 11 5.2. To Create a User ........................................................................................................ 12 5.3. Add to Group ............................................................................................................... 13 5.4. Confirm/ Create User .................................................................................................. 14 5.5. To Verify a User .......................................................................................................... 14 5.6. To Modify a User......................................................................................................... 15 5.7. To Delete a User ......................................................................................................... 16 5.8. Locked Users .............................................................................................................. 17 5.9. Hidden Customers ...................................................................................................... 17 5.10. Payments .................................................................................................................... 18 5.11. Delegated or Underlying Client Access ...................................................................... 18
6. Exceptional Mandates ................................................................................................ 18 6.1. What Are Exceptional Mandates? .............................................................................. 18
7. Presto On-Line Overview............................................................................................ 19 7.1. Where to Find Presto On-Line .................................................................................... 19 7.2. How to Log On ............................................................................................................ 19 7.3. First Time Log On ....................................................................................................... 19 7.4. Change Password....................................................................................................... 19 7.5. General Navigation ..................................................................................................... 20 7.6. Top Option List............................................................................................................ 20 7.7. Bottom Option List ...................................................................................................... 20
8. Account Details ........................................................................................................... 20 8.1. Account Groups .......................................................................................................... 20 8.2. View by Customer Name ............................................................................................ 21 8.3. View by Account Group, Type or Currency ................................................................ 21 8.4. View by Account Number ........................................................................................... 21 8.5. Payment Listing – By Account .................................................................................... 23 8.6. Transaction Listing ...................................................................................................... 23 8.7. Static Data .................................................................................................................. 24 8.8. Account Financial Data ............................................................................................... 24
Deutsche Bank Channel Islands Presto User Guide
DBIL 5006v20130719 Page 3 of 61
8.9. Maintain Groups.......................................................................................................... 25 8.10. Creating a New Custom Group .................................................................................. 25 8.11. Amend an Existing Custom Group ............................................................................. 25 8.12. Deleting a Custom Group ........................................................................................... 25
9. Reporting .................................................................................................................... 25 9.1. Account Search........................................................................................................... 25 9.2. Transaction Search ..................................................................................................... 26 9.3. Search Results............................................................................................................ 28 9.4. Storing Searches ........................................................................................................ 29
10. Payments .................................................................................................................... 30 10.1. Payment User Types .................................................................................................. 30 10.2. Allocating Payment Permission .................................................................................. 30 10.3. Creating New Payments ............................................................................................. 31 10.4. Create EFT ................................................................................................................. 31 10.5. Create BACS .............................................................................................................. 33 10.6. Create TRF ................................................................................................................. 34 10.7. Create OIN .................................................................................................................. 34 10.8. Create Batch ............................................................................................................... 35 10.9. Stored Payments ........................................................................................................ 36 10.10. Creating Stored Payments.......................................................................................... 36 10.11. Searching for Stored Payments / Creating Payments from Stored Payments / Modify / Delete 36 10.12. Creating Payments from Stored Payments ................................................................ 37 10.13. Modifying Stored Payments ........................................................................................ 37 10.14. Deleting Stored Payments .......................................................................................... 37 10.15. Copy and Modify Pending Payments ......................................................................... 38 10.16. Copying Payments from Pending Payments. ............................................................. 38 10.17. Copying Payments from Transaction Listing .............................................................. 38 10.18. Modifying Payments from Pending Payments............................................................ 39 10.19. Modifying Batches....................................................................................................... 40
11. Authorisation ............................................................................................................... 40 11.1. Setting Up Authorisation ............................................................................................. 40 11.2. Authorising Payments ................................................................................................. 41 11.3. Authorising Batches .................................................................................................... 42 11.4. View Authorised Payments ......................................................................................... 44 11.5. Deleting Payments ...................................................................................................... 44 11.6. Deleting Batches ......................................................................................................... 45 11.7. Cancelling Batches ..................................................................................................... 45
12. Presto Link .................................................................................................................. 45 12.1. Granting Presto Link Access Rights – Intermediary Security Officer (ISO) ............... 45 12.2. Modify Your Profile ..................................................................................................... 46 12.3. Retrieve Files .............................................................................................................. 47 12.4. Importing Payments Using the Batch Spreadsheet ................................................... 50

Deutsche Bank Channel Islands Presto User Guide
DBIL 5006v20130719 Page 4 of 61
12.5. Importing Your Batch .................................................................................................. 52 12.6. Viewing Imported Batches within Presto .................................................................... 52 12.7. Printing / Deleting Imported Batches .......................................................................... 53 12.8. Effect Of Exceptional Mandates On Batch Imports .................................................... 53
13. Portfolio Valuations ..................................................................................................... 53 14. Notices ........................................................................................................................ 54 15. User Preferences ........................................................................................................ 54 16. Troubleshooting User Guide ....................................................................................... 54
16.1. Contents ...................................................................................................................... 54 16.2. Invalid Login Details Entered ...................................................................................... 54 16.3. Unable to Type............................................................................................................ 55 16.4. Invalid Passcode –Payments Authorisation ............................................................... 56 16.5. Caching Issues ........................................................................................................... 56 16.6. Determining Your Internet Browser ............................................................................ 58
17. Additional Assistance .................................................................................................. 59 17.1. Setting Presto On-Line as a Trusted Site ................................................................... 59 17.2. Printing Problems........................................................................................................ 60
Deutsche Bank Channel Islands Presto User Guide
DBIL 5006v20130719 Page 5 of 61
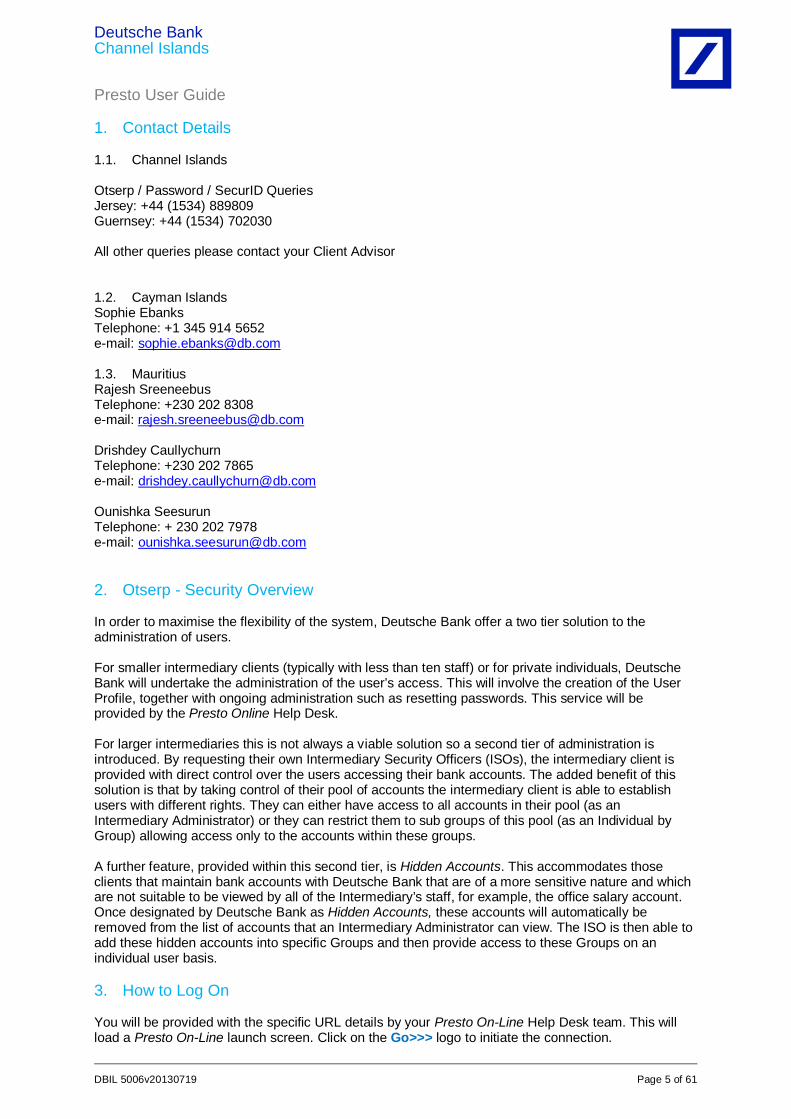
1. Contact Details 1.1. Channel Islands Otserp / Password / SecurID Queries Jersey: +44 (1534) 889809 Guernsey: +44 (1534) 702030 All other queries please contact your Client Advisor 1.2. Cayman Islands Sophie Ebanks Telephone: +1 345 914 5652 e-mail: [email protected] 1.3. Mauritius Rajesh Sreeneebus Telephone: +230 202 8308 e-mail: [email protected] Drishdey Caullychurn Telephone: +230 202 7865 e-mail: [email protected] Ounishka Seesurun Telephone: + 230 202 7978 e-mail: [email protected] 2. Otserp - Security Overview In order to maximise the flexibility of the system, Deutsche Bank offer a two tier solution to the administration of users. For smaller intermediary clients (typically with less than ten staff) or for private individuals, Deutsche Bank will undertake the administration of the user’s access. This will involve the creation of the User Profile, together with ongoing administration such as resetting passwords. This service will be provided by the Presto Online Help Desk. For larger intermediaries this is not always a viable solution so a second tier of administration is introduced. By requesting their own Intermediary Security Officers (ISOs), the intermediary client is provided with direct control over the users accessing their bank accounts. The added benefit of this solution is that by taking control of their pool of accounts the intermediary client is able to establish users with different rights. They can either have access to all accounts in their pool (as an Intermediary Administrator) or they can restrict them to sub groups of this pool (as an Individual by Group) allowing access only to the accounts within these groups. A further feature, provided within this second tier, is Hidden Accounts. This accommodates those clients that maintain bank accounts with Deutsche Bank that are of a more sensitive nature and which are not suitable to be viewed by all of the Intermediary’s staff, for example, the office salary account. Once designated by Deutsche Bank as Hidden Accounts, these accounts will automatically be removed from the list of accounts that an Intermediary Administrator can view. The ISO is then able to add these hidden accounts into specific Groups and then provide access to these Groups on an individual user basis.
3. How to Log On You will be provided with the specific URL details by your Presto On-Line Help Desk team. This will load a Presto On-Line launch screen. Click on the Go>>> logo to initiate the connection.
Deutsche Bank Channel Islands Presto User Guide
DBIL 5006v20130719 Page 6 of 61
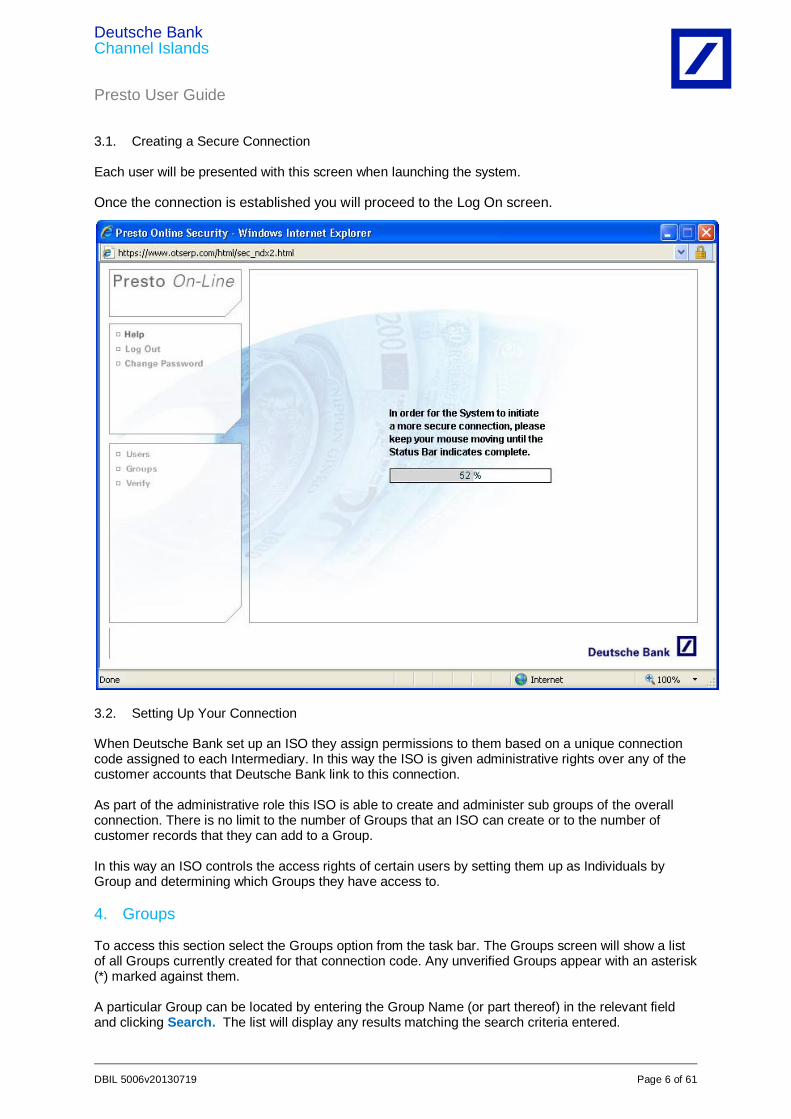
3.1. Creating a Secure Connection
Each user will be presented with this screen when launching the system. Once the connection is established you will proceed to the Log On screen.
3.2. Setting Up Your Connection
When Deutsche Bank set up an ISO they assign permissions to them based on a unique connection code assigned to each Intermediary. In this way the ISO is given administrative rights over any of the customer accounts that Deutsche Bank link to this connection. As part of the administrative role this ISO is able to create and administer sub groups of the overall connection. There is no limit to the number of Groups that an ISO can create or to the number of customer records that they can add to a Group. In this way an ISO controls the access rights of certain users by setting them up as Individuals by Group and determining which Groups they have access to.
4. Groups
To access this section select the Groups option from the task bar. The Groups screen will show a list of all Groups currently created for that connection code. Any unverified Groups appear with an asterisk (*) marked against them. A particular Group can be located by entering the Group Name (or part thereof) in the relevant field and clicking Search. The list will display any results matching the search criteria entered.
Deutsche Bank Channel Islands Presto User Guide
DBIL 5006v20130719 Page 7 of 61
Click Clear to remove any details entered in the search criteria fields.
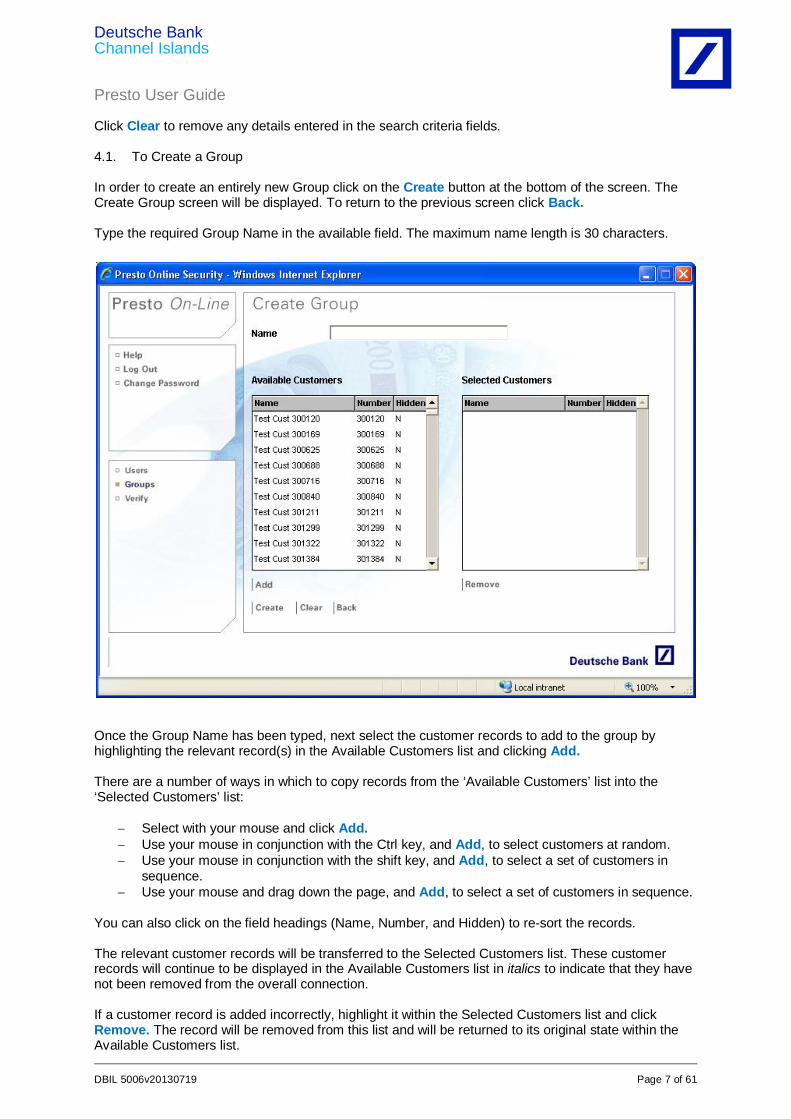
4.1. To Create a Group In order to create an entirely new Group click on the Create button at the bottom of the screen. The Create Group screen will be displayed. To return to the previous screen click Back. Type the required Group Name in the available field. The maximum name length is 30 characters.
Once the Group Name has been typed, next select the customer records to add to the group by highlighting the relevant record(s) in the Available Customers list and clicking Add. There are a number of ways in which to copy records from the ‘Available Customers’ list into the ‘Selected Customers’ list:
Select with your mouse and click Add. Use your mouse in conjunction with the Ctrl key, and Add, to select customers at random. Use your mouse in conjunction with the shift key, and Add, to select a set of customers in
sequence. Use your mouse and drag down the page, and Add, to select a set of customers in sequence.
You can also click on the field headings (Name, Number, and Hidden) to re-sort the records. The relevant customer records will be transferred to the Selected Customers list. These customer records will continue to be displayed in the Available Customers list in italics to indicate that they have not been removed from the overall connection. If a customer record is added incorrectly, highlight it within the Selected Customers list and click Remove. The record will be removed from this list and will be returned to its original state within the Available Customers list.
Deutsche Bank Channel Islands Presto User Guide
DBIL 5006v20130719 Page 8 of 61
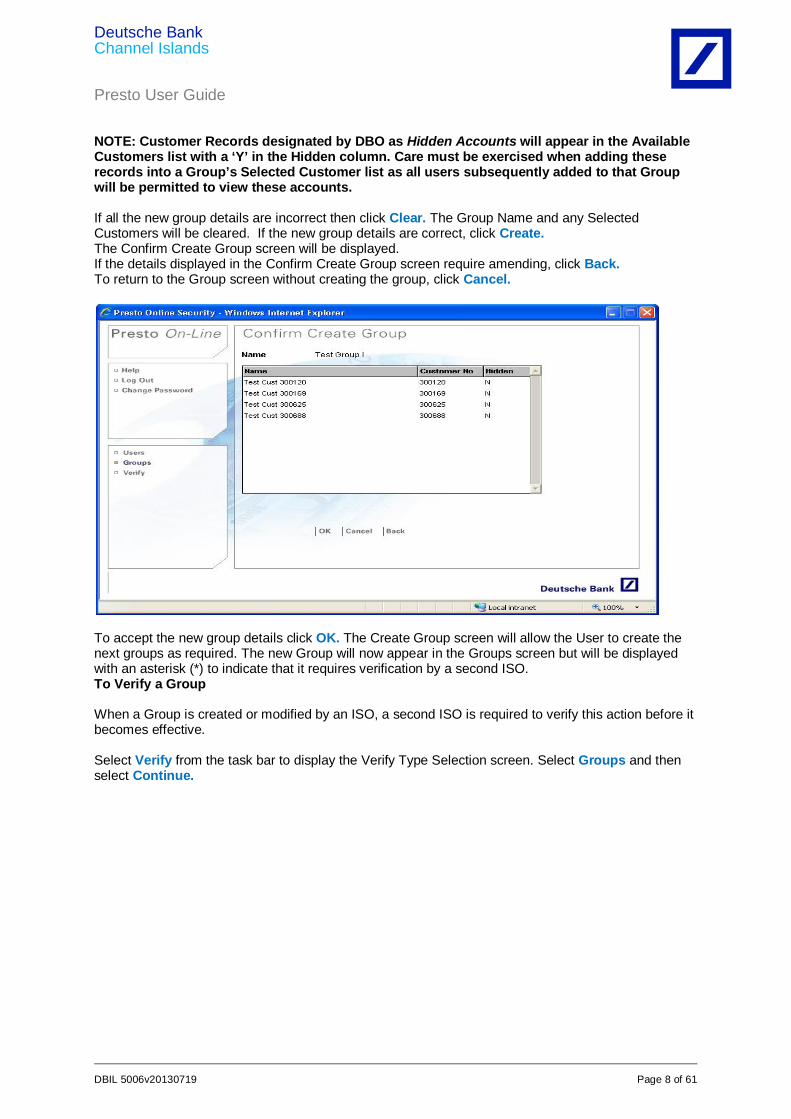
NOTE: Customer Records designated by DBO as Hidden Accounts will appear in the Available Customers list with a ‘Y’ in the Hidden column. Care must be exercised when adding these records into a Group’s Selected Customer list as all users subsequently added to that Group will be permitted to view these accounts. If all the new group details are incorrect then click Clear. The Group Name and any Selected Customers will be cleared. If the new group details are correct, click Create. The Confirm Create Group screen will be displayed. If the details displayed in the Confirm Create Group screen require amending, click Back. To return to the Group screen without creating the group, click Cancel.
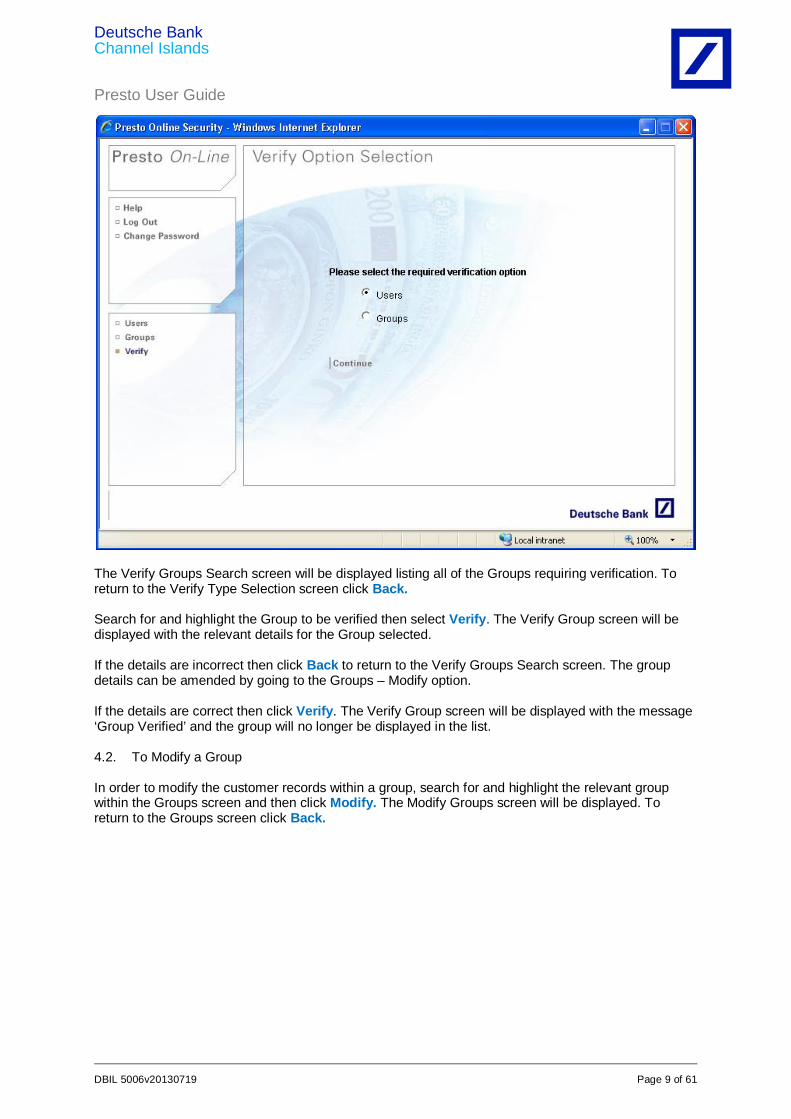
To accept the new group details click OK. The Create Group screen will allow the User to create the next groups as required. The new Group will now appear in the Groups screen but will be displayed with an asterisk (*) to indicate that it requires verification by a second ISO. To Verify a Group When a Group is created or modified by an ISO, a second ISO is required to verify this action before it becomes effective. Select Verify from the task bar to display the Verify Type Selection screen. Select Groups and then select Continue.
Deutsche Bank Channel Islands Presto User Guide
DBIL 5006v20130719 Page 9 of 61
The Verify Groups Search screen will be displayed listing all of the Groups requiring verification. To return to the Verify Type Selection screen click Back. Search for and highlight the Group to be verified then select Verify. The Verify Group screen will be displayed with the relevant details for the Group selected. If the details are incorrect then click Back to return to the Verify Groups Search screen. The group details can be amended by going to the Groups – Modify option. If the details are correct then click Verify. The Verify Group screen will be displayed with the message ‘Group Verified’ and the group will no longer be displayed in the list.
4.2. To Modify a Group
In order to modify the customer records within a group, search for and highlight the relevant group within the Groups screen and then click Modify. The Modify Groups screen will be displayed. To return to the Groups screen click Back.
Deutsche Bank Channel Islands Presto User Guide
DBIL 5006v20130719 Page 10 of 61
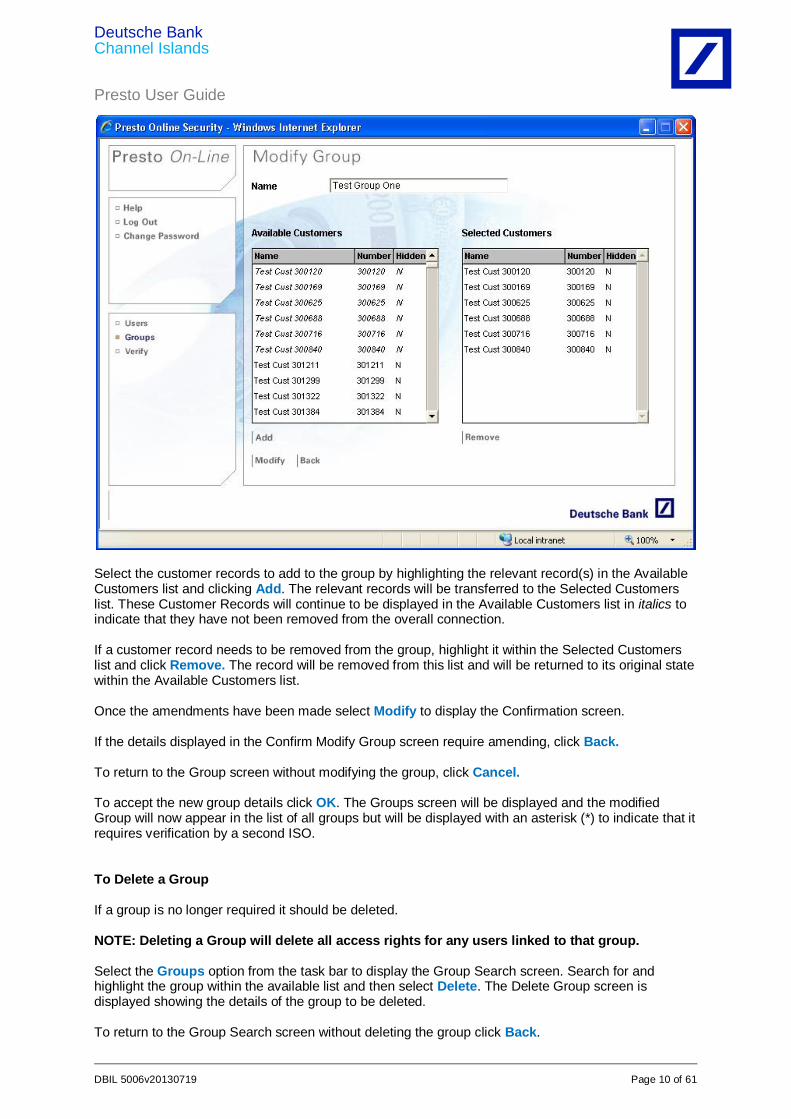
Select the customer records to add to the group by highlighting the relevant record(s) in the Available Customers list and clicking Add. The relevant records will be transferred to the Selected Customers list. These Customer Records will continue to be displayed in the Available Customers list in italics to indicate that they have not been removed from the overall connection. If a customer record needs to be removed from the group, highlight it within the Selected Customers list and click Remove. The record will be removed from this list and will be returned to its original state within the Available Customers list. Once the amendments have been made select Modify to display the Confirmation screen. If the details displayed in the Confirm Modify Group screen require amending, click Back. To return to the Group screen without modifying the group, click Cancel. To accept the new group details click OK. The Groups screen will be displayed and the modified Group will now appear in the list of all groups but will be displayed with an asterisk (*) to indicate that it requires verification by a second ISO. To Delete a Group If a group is no longer required it should be deleted. NOTE: Deleting a Group will delete all access rights for any users linked to that group. Select the Groups option from the task bar to display the Group Search screen. Search for and highlight the group within the available list and then select Delete. The Delete Group screen is displayed showing the details of the group to be deleted. To return to the Group Search screen without deleting the group click Back.
Deutsche Bank Channel Islands Presto User Guide
DBIL 5006v20130719 Page 11 of 61
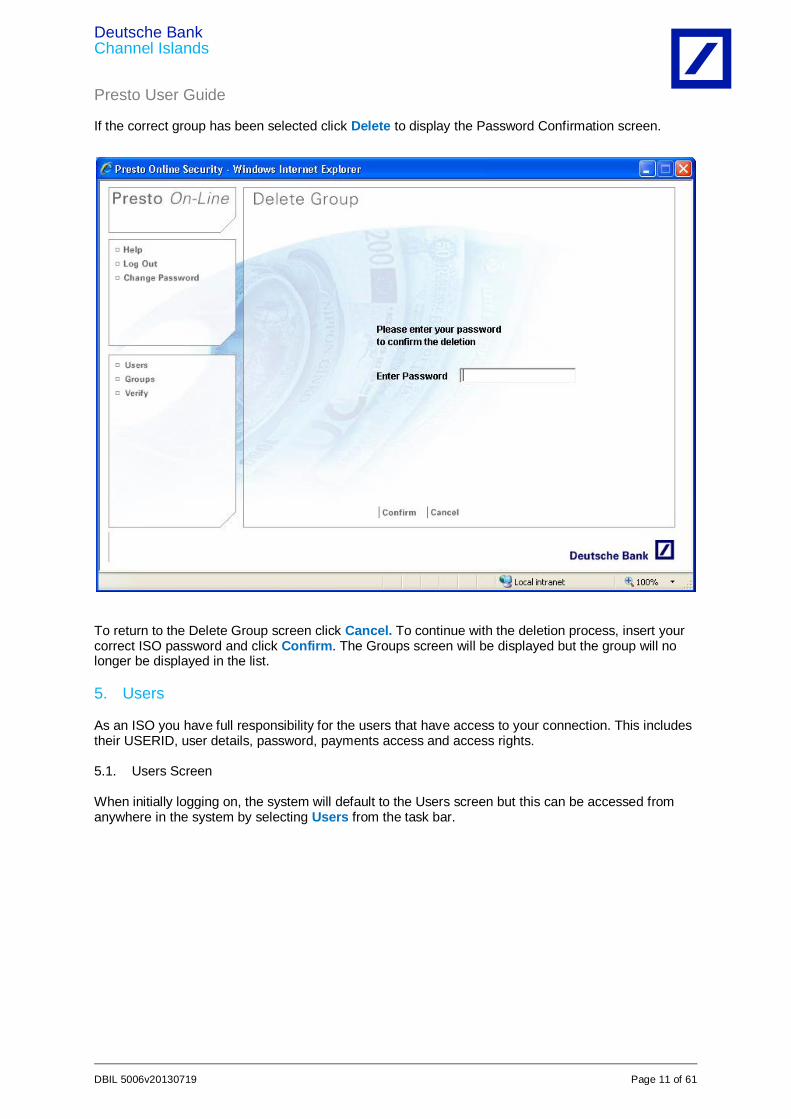
If the correct group has been selected click Delete to display the Password Confirmation screen.
To return to the Delete Group screen click Cancel. To continue with the deletion process, insert your correct ISO password and click Confirm. The Groups screen will be displayed but the group will no longer be displayed in the list.
5. Users
As an ISO you have full responsibility for the users that have access to your connection. This includes their USERID, user details, password, payments access and access rights. 5.1. Users Screen When initially logging on, the system will default to the Users screen but this can be accessed from anywhere in the system by selecting Users from the task bar.
Deutsche Bank Channel Islands Presto User Guide
DBIL 5006v20130719 Page 12 of 61
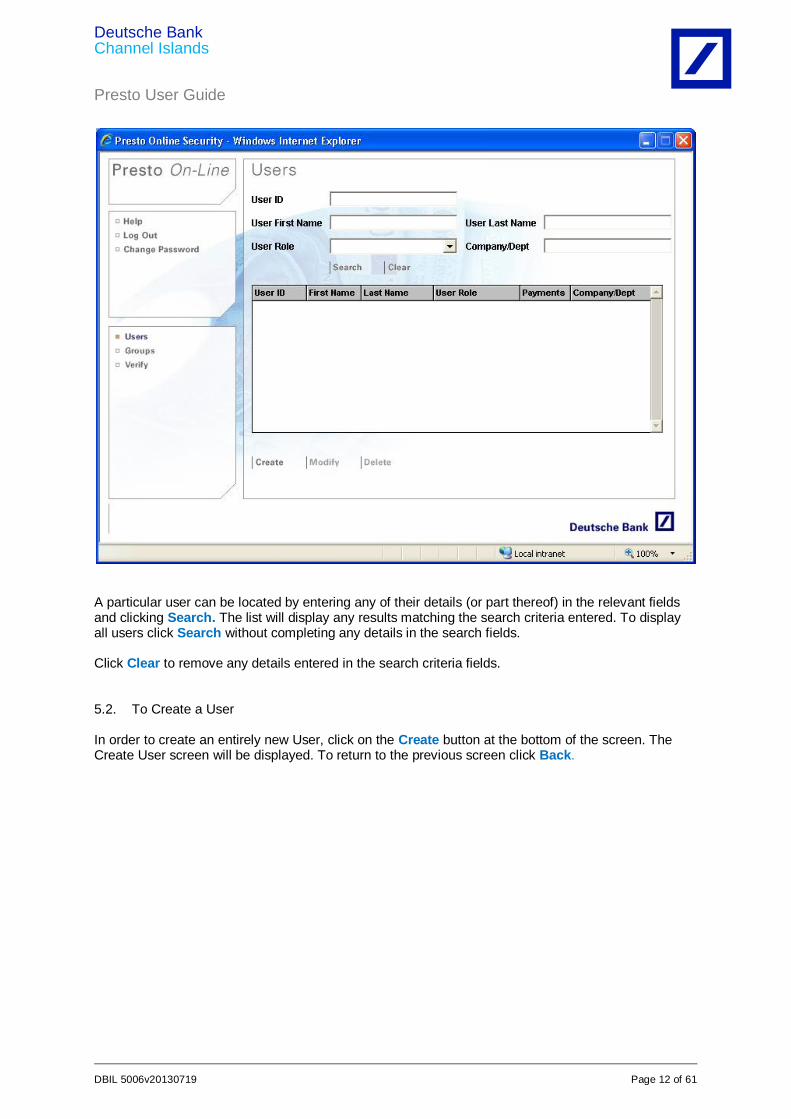
A particular user can be located by entering any of their details (or part thereof) in the relevant fields and clicking Search. The list will display any results matching the search criteria entered. To display all users click Search without completing any details in the search fields. Click Clear to remove any details entered in the search criteria fields. 5.2. To Create a User In order to create an entirely new User, click on the Create button at the bottom of the screen. The Create User screen will be displayed. To return to the previous screen click Back.
Deutsche Bank Channel Islands Presto User Guide
DBIL 5006v20130719 Page 13 of 61
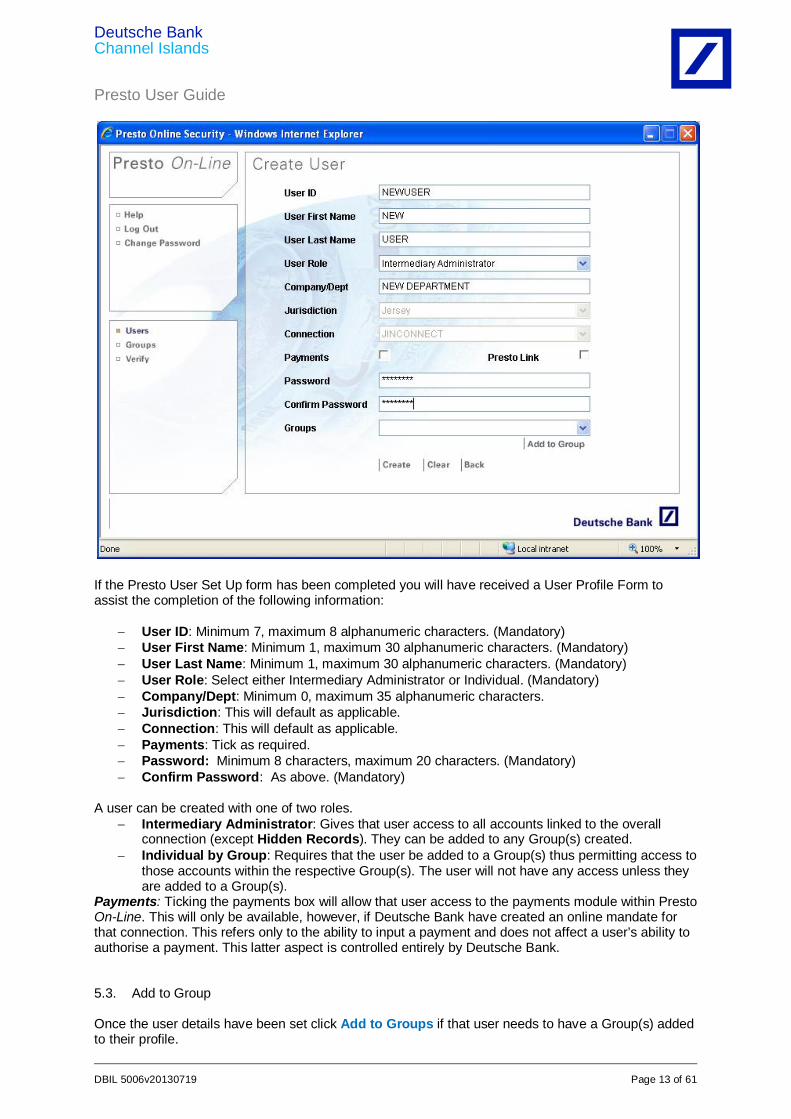
If the Presto User Set Up form has been completed you will have received a User Profile Form to assist the completion of the following information:
User ID: Minimum 7, maximum 8 alphanumeric characters. (Mandatory) User First Name: Minimum 1, maximum 30 alphanumeric characters. (Mandatory) User Last Name: Minimum 1, maximum 30 alphanumeric characters. (Mandatory) User Role: Select either Intermediary Administrator or Individual. (Mandatory) Company/Dept: Minimum 0, maximum 35 alphanumeric characters. Jurisdiction: This will default as applicable. Connection: This will default as applicable. Payments: Tick as required. Password: Minimum 8 characters, maximum 20 characters. (Mandatory) Confirm Password: As above. (Mandatory)
A user can be created with one of two roles.
Intermediary Administrator: Gives that user access to all accounts linked to the overall connection (except Hidden Records). They can be added to any Group(s) created.
Individual by Group: Requires that the user be added to a Group(s) thus permitting access to those accounts within the respective Group(s). The user will not have any access unless they are added to a Group(s).
Payments: Ticking the payments box will allow that user access to the payments module within Presto On-Line. This will only be available, however, if Deutsche Bank have created an online mandate for that connection. This refers only to the ability to input a payment and does not affect a user’s ability to authorise a payment. This latter aspect is controlled entirely by Deutsche Bank.
5.3. Add to Group Once the user details have been set click Add to Groups if that user needs to have a Group(s) added to their profile.
Deutsche Bank Channel Islands Presto User Guide
DBIL 5006v20130719 Page 14 of 61
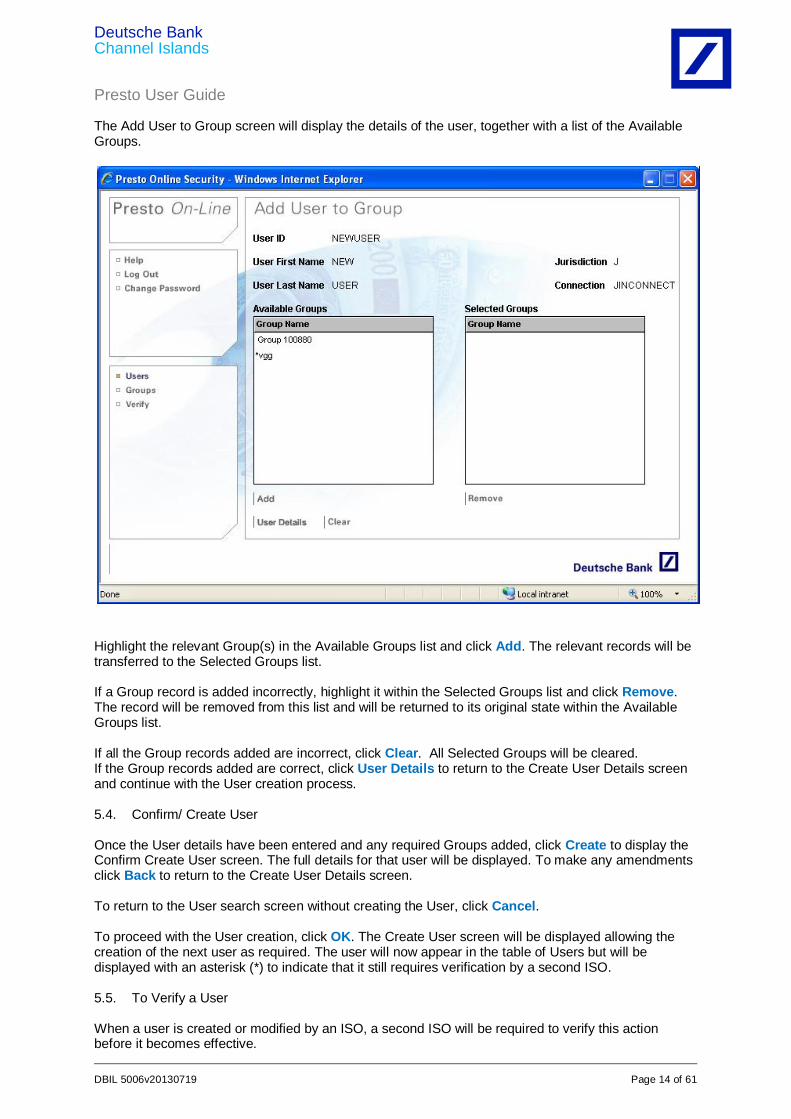
The Add User to Group screen will display the details of the user, together with a list of the Available Groups. Highlight the relevant Group(s) in the Available Groups list and click Add. The relevant records will be transferred to the Selected Groups list. If a Group record is added incorrectly, highlight it within the Selected Groups list and click Remove. The record will be removed from this list and will be returned to its original state within the Available Groups list. If all the Group records added are incorrect, click Clear. All Selected Groups will be cleared. If the Group records added are correct, click User Details to return to the Create User Details screen and continue with the User creation process. 5.4. Confirm/ Create User
Once the User details have been entered and any required Groups added, click Create to display the Confirm Create User screen. The full details for that user will be displayed. To make any amendments click Back to return to the Create User Details screen. To return to the User search screen without creating the User, click Cancel. To proceed with the User creation, click OK. The Create User screen will be displayed allowing the creation of the next user as required. The user will now appear in the table of Users but will be displayed with an asterisk (*) to indicate that it still requires verification by a second ISO. 5.5. To Verify a User
When a user is created or modified by an ISO, a second ISO will be required to verify this action before it becomes effective.
Deutsche Bank Channel Islands Presto User Guide
DBIL 5006v20130719 Page 15 of 61
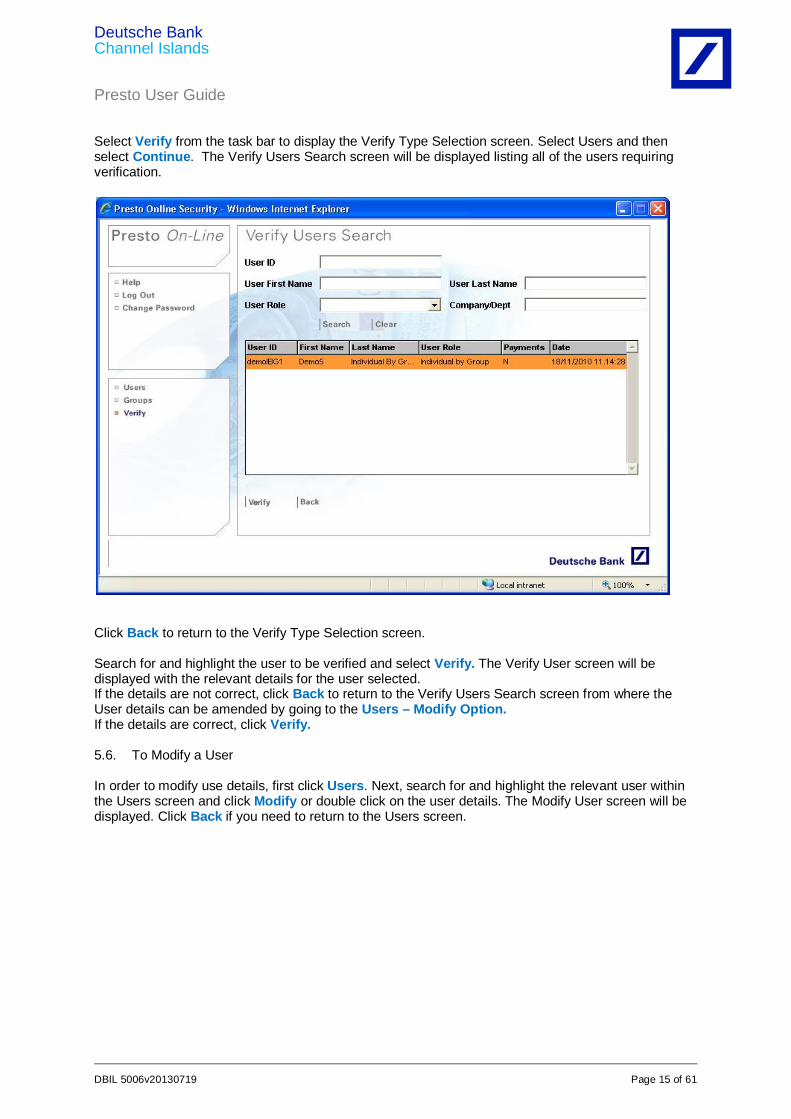
Select Verify from the task bar to display the Verify Type Selection screen. Select Users and then select Continue. The Verify Users Search screen will be displayed listing all of the users requiring verification.
Click Back to return to the Verify Type Selection screen. Search for and highlight the user to be verified and select Verify. The Verify User screen will be displayed with the relevant details for the user selected. If the details are not correct, click Back to return to the Verify Users Search screen from where the User details can be amended by going to the Users – Modify Option. If the details are correct, click Verify. 5.6. To Modify a User In order to modify use details, first click Users. Next, search for and highlight the relevant user within the Users screen and click Modify or double click on the user details. The Modify User screen will be displayed. Click Back if you need to return to the Users screen.

Deutsche Bank Channel Islands Presto User Guide
DBIL 5006v20130719 Page 16 of 61
Any of the user details can now be amended except for the User ID. Select Add to Group to amend the list of Groups that have been added to that user. Add and remove groups and then click User Details to return to the Modify User screen. Once the details have been modified accordingly, select Modify to display the Confirm Modify User screen. If the details displayed in the Confirm Modify User screen require amending click Back. To return to the Users screen without modifying the user click Cancel. To accept the new user details click OK. The Users screen will be displayed with a message confirming ‘User Modified’. Dependent on the fields modified, the user will now appear in the list of all users but will be displayed with an asterisk (*) to indicate that it requires verification by a second ISO. NOTE: Amendments to the Password fields and the Account Locked field do not require further verification. 5.7. To Delete a User If a user no longer requires access to the system they should be deleted. Select the Users option from the task bar to display the Users Search screen. Search for and highlight the User within the available list and then select Delete. The Delete User screen is displayed showing the details of the user to be deleted.
Deutsche Bank Channel Islands Presto User Guide
DBIL 5006v20130719 Page 17 of 61
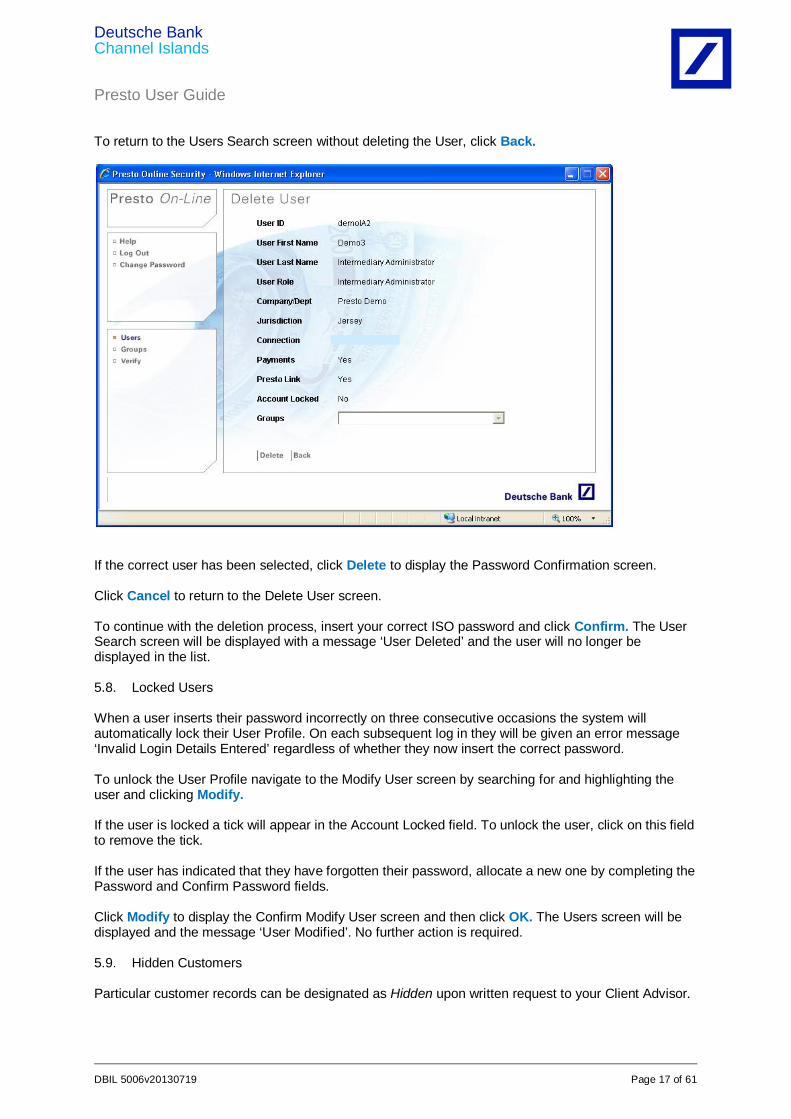
To return to the Users Search screen without deleting the User, click Back.
If the correct user has been selected, click Delete to display the Password Confirmation screen. Click Cancel to return to the Delete User screen. To continue with the deletion process, insert your correct ISO password and click Confirm. The User Search screen will be displayed with a message ‘User Deleted’ and the user will no longer be displayed in the list. 5.8. Locked Users When a user inserts their password incorrectly on three consecutive occasions the system will automatically lock their User Profile. On each subsequent log in they will be given an error message ‘Invalid Login Details Entered’ regardless of whether they now insert the correct password. To unlock the User Profile navigate to the Modify User screen by searching for and highlighting the user and clicking Modify. If the user is locked a tick will appear in the Account Locked field. To unlock the user, click on this field to remove the tick. If the user has indicated that they have forgotten their password, allocate a new one by completing the Password and Confirm Password fields. Click Modify to display the Confirm Modify User screen and then click OK. The Users screen will be displayed and the message ‘User Modified’. No further action is required. 5.9. Hidden Customers Particular customer records can be designated as Hidden upon written request to your Client Advisor.
Deutsche Bank Channel Islands Presto User Guide
DBIL 5006v20130719 Page 18 of 61
This will provide the ISOs with increased administration rights over these records, since an Intermediary Administrator will not be able to view these customer records. Ordinarily, as soon as a customer record is attached to a connection code it will be visible to any Intermediary Administrators. To enable a Hidden Customer to be viewed, the record must first be added into a Group. Once added, the users that require access to view this customer record must then be added to this Group. This process can be used for setting up management accounts, fee accounts or even personal accounts without the need for additional User IDs. 5.10. Payments
An ISO is also able to control the ability of users to create online payment instructions. A Payments tick box is located within the User Creation screen and must be ticked in order for the user to access the Payment Instruction screens. An ISO will only be able to select this tick box if Deutsche Bank have already received and processed the Presto On-Line mandate and signatory documentation. Users will only be able to input and / or authorise payments over customer records they have been assigned access to. A user’s payments permission can be amended at any time by modifying their details. This action is subject to verification by a second ISO. 5.11. Delegated or Underlying Client Access
A key benefit of the grouping feature together with the flexibility of Presto On-Line’s true internet provision, is that users external to the Intermediary can be set up to access their own customer record(s). This can equally be extended to related companies, accountants etc. In the first instance the underlying client or entity will be required to complete two copies of the Presto On-Line Terms & Conditions of Use (these can be forwarded by email upon request to your Client Advisor). These should be returned to Deutsche Bank upon completion for countersignature. For your own purposes you may also wish each potential user to complete an Underlying Client Access form. This will provide you with a set structure for their User ID together with a list of personal details that can be used to identify each user should they call you at a later time to request a new password or to have their USERID unlocked. Once the necessary documentation has been completed, a new Group must be created for the client or entity and the relevant customer records added. Each required user should then be created as an Individual by Group and be attached to this new Group. 6. Exceptional Mandates 6.1. What Are Exceptional Mandates?
Increasingly, Deutsche Bank’s intermediary clients are introducing customers on their connection that require different mandate limits and signatories to the overall connection. Exceptional mandates provide a mechanism for one customer to have exceptional rules applied to it, such as:
Different signatories Varying signatory levels Different charges Different email addresses specified for payment confirmation emails.
Deutsche Bank Channel Islands Presto User Guide
DBIL 5006v20130719 Page 19 of 61
Different currency Varying mandate limits Different retrocession accounts
An exceptional mandate functions in the same way as a standard mandate, the main difference being it allows clients to apply exceptional rules to the account featured on the exceptional mandate. Only one customer can be featured on an exceptional mandate.
7. Presto On-Line Overview Presto On-Line is a real time Internet based system enabling our external clients to access accounts and transaction information. In addition, our clients can:
Send electronic payment instructions directly to Deutsche Bank. Export details of their accounts and transactions. Download files of their transactions for import into their bookkeeping / ledger systems,
reducing manual processing. Import payment batches.
7.1. Where to Find Presto On-Line
Enter www.db-ci.com into your web browser to open our website. From here, select the option to Launch Presto On-Line. 7.2. How to Log On
Enter your User ID and password to log on to the system. These will have been provided either by the Presto On-Line Help Desk or by your Intermediary Security Officers. For security purposes we recommend you should never leave Presto On-Line open or unattended whilst away from your PC, however, after 15 minutes of inactivity the system will begin to shut down automatically. Shortly before this happens you will be notified and given the option to continue or to terminate your current session. 7.3. First Time Log On
When entering the system for the first time you will be required to read and accept the Terms & Conditions of Use and to change your password. On first log in you will be instructed to specify your preferred start up screen (i.e. the first screen to be displayed at subsequent log in). Depending on your allocated access permissions there is a choice of:
Account Details Payments Reporting Presto Link Authorisation
7.4. Change Password
To change your password at any time, select User Preferences in the task bar followed by Change Password. Passwords must meet the following criteria to be permitted by the system:
Minimum eight characters / Maximum twenty characters with a minimum of 3 from the 4 character types – UPPER CASE, lowercase, numeric & special character (eg % , * - + / . , ‘)
No sequential numbers (e.g. 123) or letters (e.g. abc) Must not be the same as the previous 12 passwords
Deutsche Bank Channel Islands Presto User Guide
DBIL 5006v20130719 Page 20 of 61
7.5. General Navigation Every screen within Presto On-Line has two option lists on the left hand side. The top option list is permanent and remains the same regardless of your location within the system. Your current location is highlighted and the options available to you, dependant on your access rights, will be highlighted. The bottom list displays available options dependent on your location within the system and your access rights. 7.6. Top Option List
Use the top list to navigate between the different functions:
Account Details: Payments: Authorisation: Reporting: Presto Link: Portfolio Valuations: Notices: User Preferences: Contact Us: Log Off:
7.7. Bottom Option List This list comprises further options that will become available as you navigate through the above mentioned functions. An option is available for selection when highlighted in dark grey. 8. Account Details Search for and view data relating to all accounts held with DBIL. 8.1. Account Groups
Deutsche Bank Channel Islands Presto User Guide
DBIL 5006v20130719 Page 21 of 61
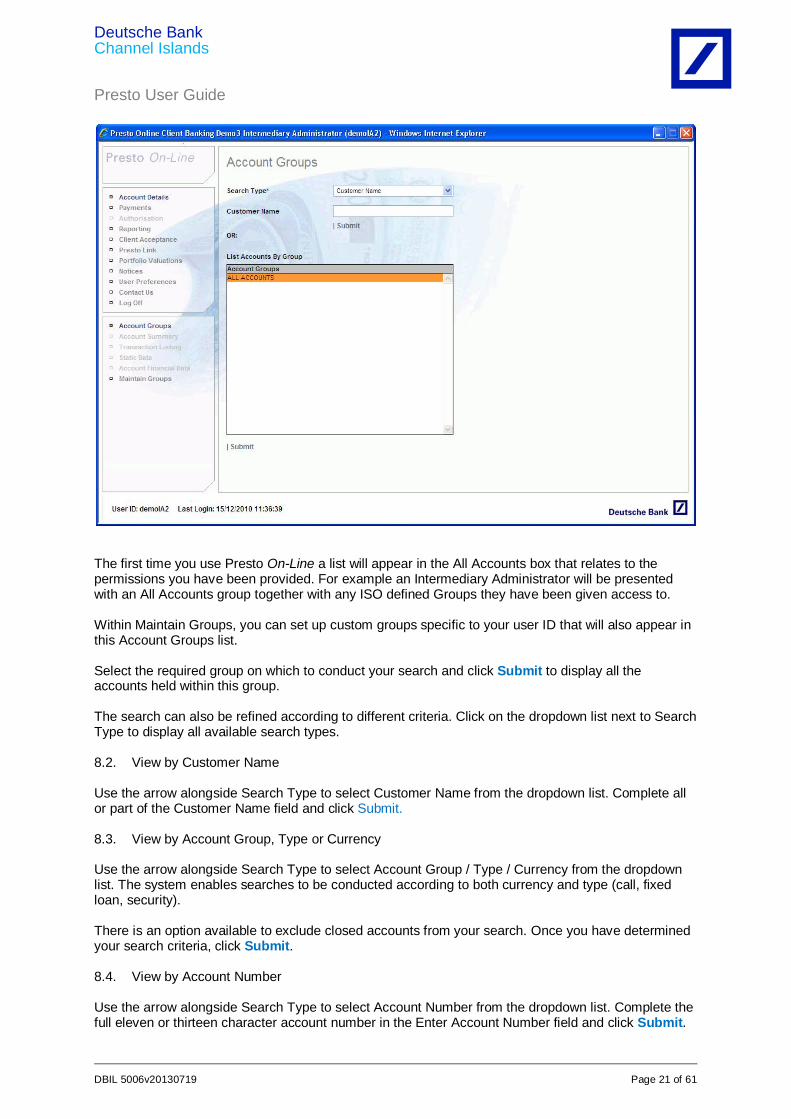
The first time you use Presto On-Line a list will appear in the All Accounts box that relates to the permissions you have been provided. For example an Intermediary Administrator will be presented with an All Accounts group together with any ISO defined Groups they have been given access to. Within Maintain Groups, you can set up custom groups specific to your user ID that will also appear in this Account Groups list. Select the required group on which to conduct your search and click Submit to display all the accounts held within this group. The search can also be refined according to different criteria. Click on the dropdown list next to Search Type to display all available search types. 8.2. View by Customer Name Use the arrow alongside Search Type to select Customer Name from the dropdown list. Complete all or part of the Customer Name field and click Submit. 8.3. View by Account Group, Type or Currency Use the arrow alongside Search Type to select Account Group / Type / Currency from the dropdown list. The system enables searches to be conducted according to both currency and type (call, fixed loan, security). There is an option available to exclude closed accounts from your search. Once you have determined your search criteria, click Submit. 8.4. View by Account Number Use the arrow alongside Search Type to select Account Number from the dropdown list. Complete the full eleven or thirteen character account number in the Enter Account Number field and click Submit.
Deutsche Bank Channel Islands Presto User Guide
DBIL 5006v20130719 Page 22 of 61
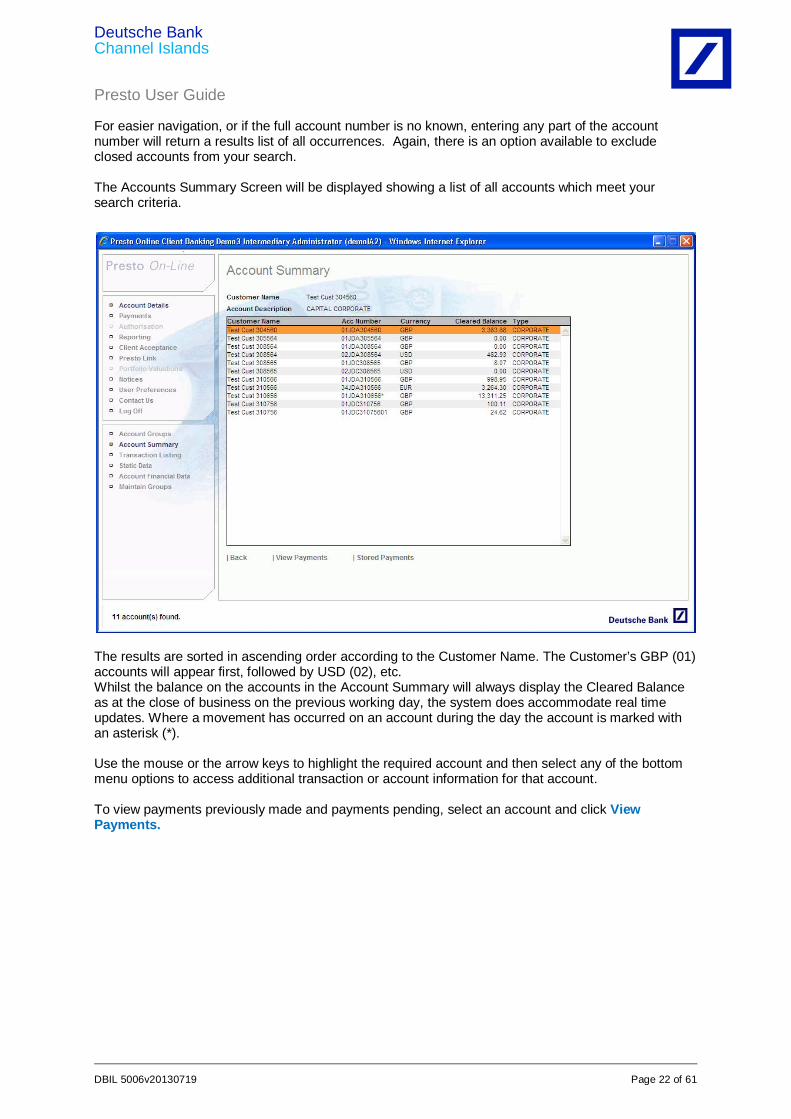
For easier navigation, or if the full account number is no known, entering any part of the account number will return a results list of all occurrences. Again, there is an option available to exclude closed accounts from your search. The Accounts Summary Screen will be displayed showing a list of all accounts which meet your search criteria.
The results are sorted in ascending order according to the Customer Name. The Customer’s GBP (01) accounts will appear first, followed by USD (02), etc. Whilst the balance on the accounts in the Account Summary will always display the Cleared Balance as at the close of business on the previous working day, the system does accommodate real time updates. Where a movement has occurred on an account during the day the account is marked with an asterisk (*). Use the mouse or the arrow keys to highlight the required account and then select any of the bottom menu options to access additional transaction or account information for that account. To view payments previously made and payments pending, select an account and click View Payments.
Deutsche Bank Channel Islands Presto User Guide
DBIL 5006v20130719 Page 23 of 61
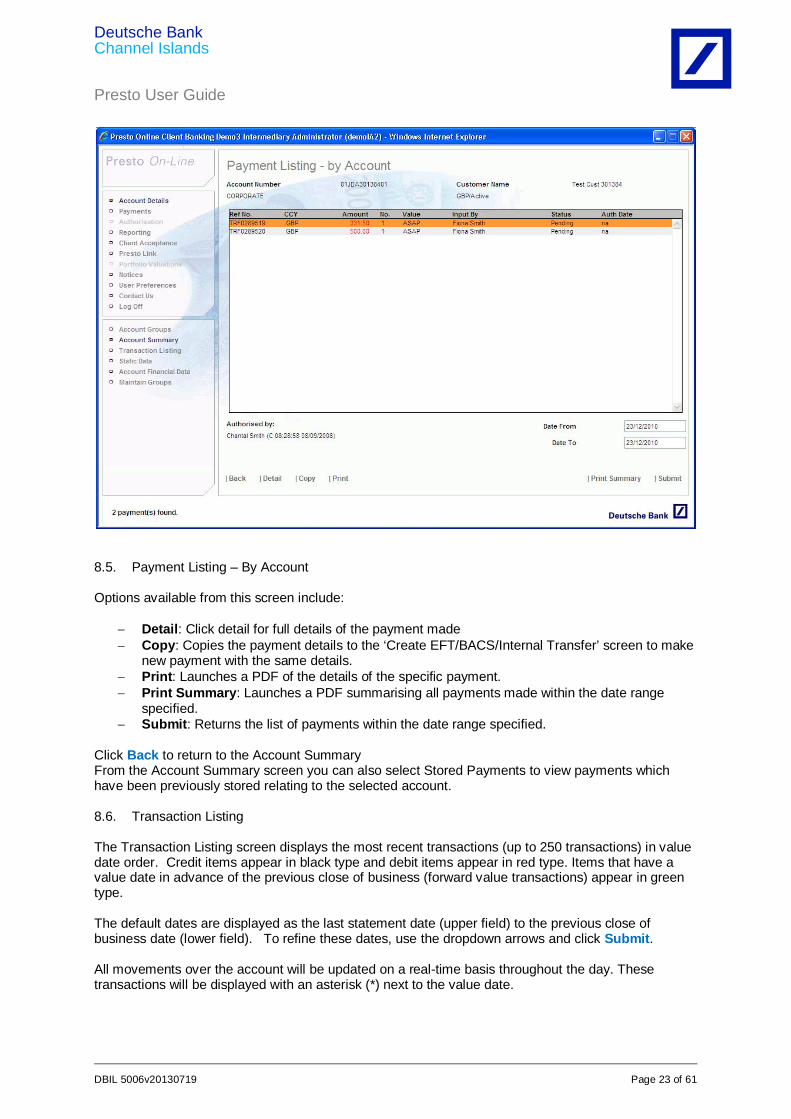
8.5. Payment Listing – By Account Options available from this screen include:
Detail: Click detail for full details of the payment made Copy: Copies the payment details to the ‘Create EFT/BACS/Internal Transfer’ screen to make
new payment with the same details. Print: Launches a PDF of the details of the specific payment. Print Summary: Launches a PDF summarising all payments made within the date range
specified. Submit: Returns the list of payments within the date range specified.
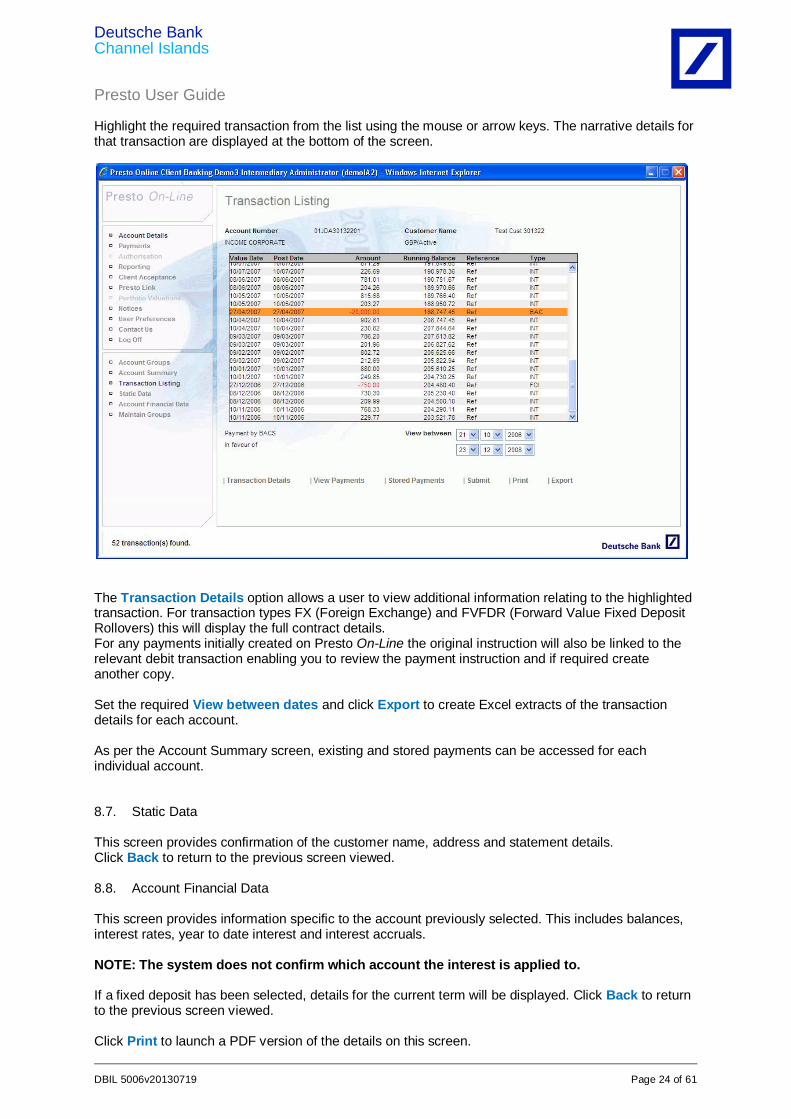
Click Back to return to the Account Summary From the Account Summary screen you can also select Stored Payments to view payments which have been previously stored relating to the selected account. 8.6. Transaction Listing The Transaction Listing screen displays the most recent transactions (up to 250 transactions) in value date order. Credit items appear in black type and debit items appear in red type. Items that have a value date in advance of the previous close of business (forward value transactions) appear in green type. The default dates are displayed as the last statement date (upper field) to the previous close of business date (lower field). To refine these dates, use the dropdown arrows and click Submit. All movements over the account will be updated on a real-time basis throughout the day. These transactions will be displayed with an asterisk (*) next to the value date.
Deutsche Bank Channel Islands Presto User Guide
DBIL 5006v20130719 Page 24 of 61
Highlight the required transaction from the list using the mouse or arrow keys. The narrative details for that transaction are displayed at the bottom of the screen.
The Transaction Details option allows a user to view additional information relating to the highlighted transaction. For transaction types FX (Foreign Exchange) and FVFDR (Forward Value Fixed Deposit Rollovers) this will display the full contract details. For any payments initially created on Presto On-Line the original instruction will also be linked to the relevant debit transaction enabling you to review the payment instruction and if required create another copy. Set the required View between dates and click Export to create Excel extracts of the transaction details for each account. As per the Account Summary screen, existing and stored payments can be accessed for each individual account. 8.7. Static Data This screen provides confirmation of the customer name, address and statement details. Click Back to return to the previous screen viewed. 8.8. Account Financial Data This screen provides information specific to the account previously selected. This includes balances, interest rates, year to date interest and interest accruals. NOTE: The system does not confirm which account the interest is applied to. If a fixed deposit has been selected, details for the current term will be displayed. Click Back to return to the previous screen viewed. Click Print to launch a PDF version of the details on this screen.
Deutsche Bank Channel Islands Presto User Guide
DBIL 5006v20130719 Page 25 of 61
8.9. Maintain Groups Maintain Groups aids navigation by allowing you to set up your own individual groups of accounts. These groups then appear on the Account Groups screen and are also available within the Reporting section of the system. Access the Maintain Groups screen from the bottom option list. This will display any groups already set up for your UserID. 8.10. Creating a New Custom Group Select Create and enter a name for the new group. This can be up to 20 characters. Add accounts to the group by selecting accounts from the left hand list (to select more than one account, hold down the Ctrl key on your keyboard) and click Add. These will be added to the list on the right hand side of the screen. To search for an account within the left hand list, enter the account name in the search field. Accounts can be removed from the group by selecting the account from the right hand screen and clicking Remove. To remove all accounts from the group, click Clear. 8.11. Amend an Existing Custom Group Access the Maintain Groups screen from the bottom option list. This will display any groups already set up for your UserID. Select the group to be amended and select Modify. 8.12. Deleting a Custom Group Access the Maintain Groups screen from the bottom option list. Select the group to be deleted and select Delete.
9. Reporting
Users of Presto On-Line are able to interrogate balances, transaction details and fixed deposit maturities. The resulting information can be printed or exported to facilitate further automation in the clients’ office. Searches can be performed:
By Account By Transaction By Fixed Deposit
Select Reporting from the upper navigation menu and then either Account Search, Transaction Search or Fixed Deposit Search as required from the bottom option list. 9.1. Account Search The Account Search enables users to obtain account balance information in a nominated reporting currency by account group.

Deutsche Bank Channel Islands Presto User Guide
DBIL 5006v20130719 Page 26 of 61
Select your search criteria as required. Mandatory fields are marked with an asterisk (*).
Searches can be performed using the following criteria:
Date: Accounts returned can be restricted to either the most recent close of business date, the previous month or a specified date within the last 35 days.
Account Group: Lists the account groups available to the logged in user. Reporting Currency: Allows users to select the base currency that the cleared balance will
be converted to. Exclude Closed Accounts: Specifies whether or not closed accounts are to be excluded
from the search results. Once you have selected your search criteria, simply click on Submit Search to perform the search. The results will then be displayed in the ‘Account Search Results’ screen. 9.2. Transaction Search The Transaction Search facility allows users to obtain information on transactions posted within a specified date range by account group. Select your search criteria as required. Mandatory fields are marked with an asterisk (*). Searches can be performed using the following criteria:
Deutsche Bank Channel Islands Presto User Guide
DBIL 5006v20130719 Page 27 of 61
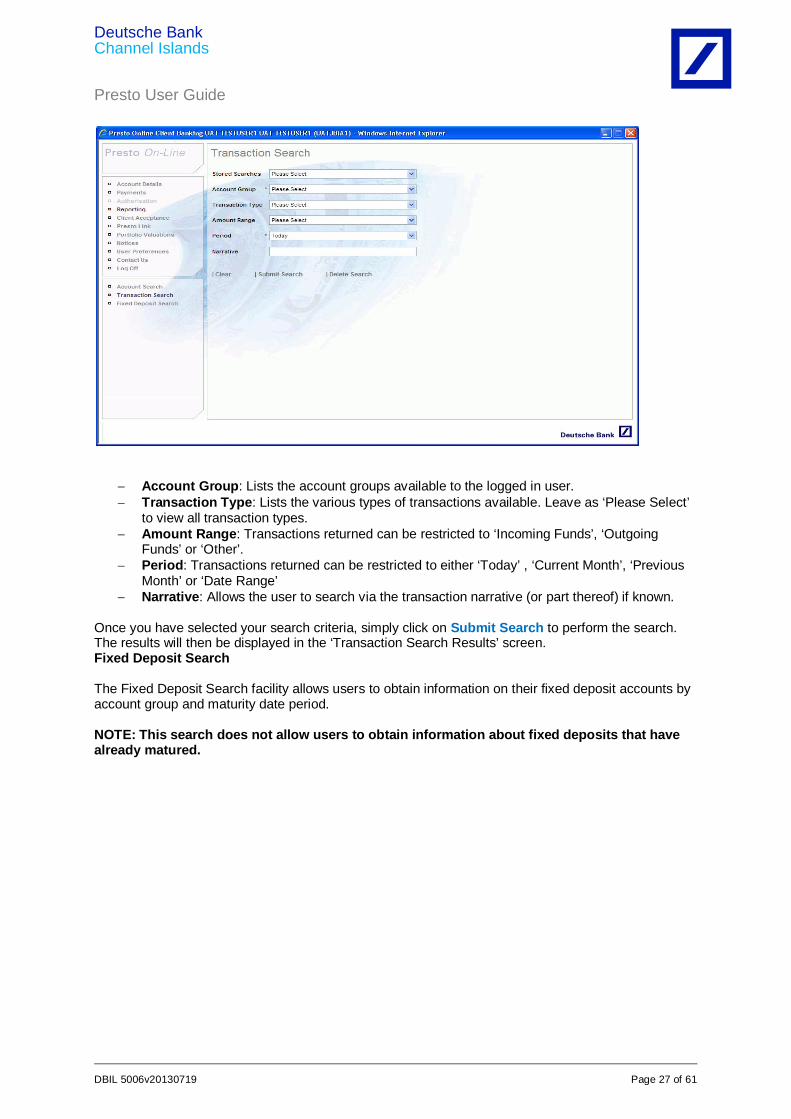
Account Group: Lists the account groups available to the logged in user. Transaction Type: Lists the various types of transactions available. Leave as ‘Please Select’
to view all transaction types. Amount Range: Transactions returned can be restricted to ‘Incoming Funds’, ‘Outgoing
Funds’ or ‘Other’. Period: Transactions returned can be restricted to either ‘Today’ , ‘Current Month’, ‘Previous
Month’ or ‘Date Range’ Narrative: Allows the user to search via the transaction narrative (or part thereof) if known.
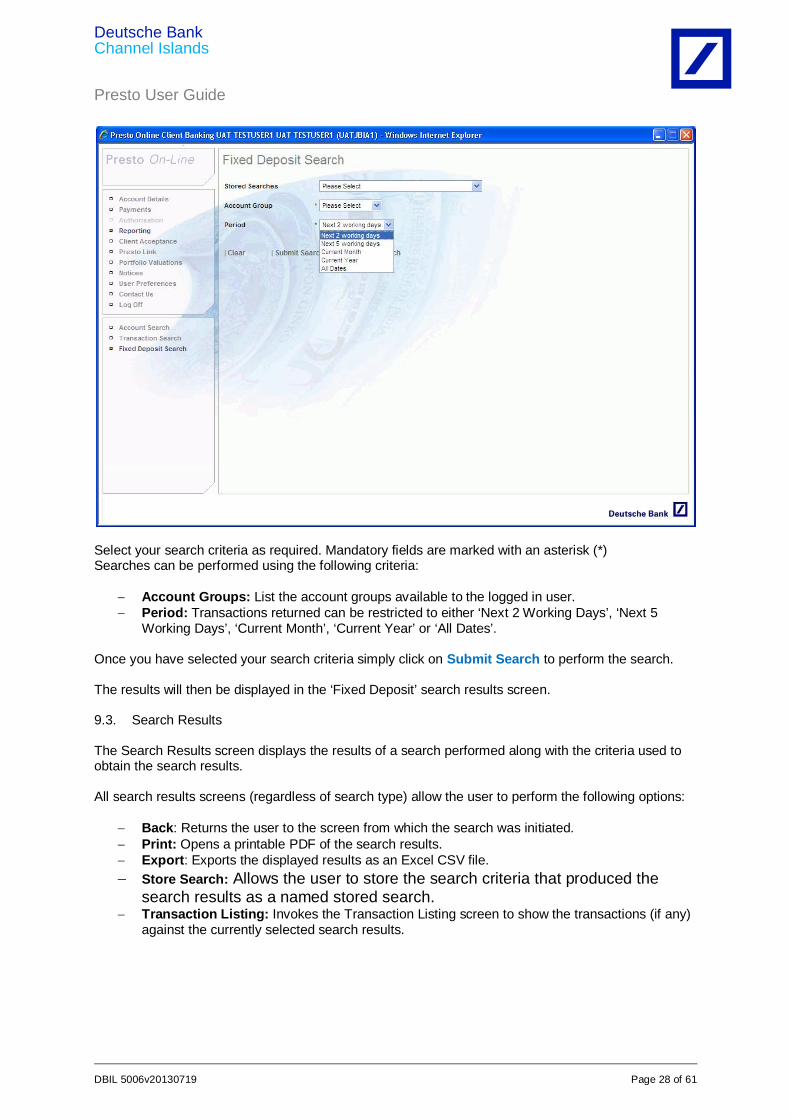
Once you have selected your search criteria, simply click on Submit Search to perform the search. The results will then be displayed in the ‘Transaction Search Results’ screen. Fixed Deposit Search The Fixed Deposit Search facility allows users to obtain information on their fixed deposit accounts by account group and maturity date period. NOTE: This search does not allow users to obtain information about fixed deposits that have already matured.
Deutsche Bank Channel Islands Presto User Guide
DBIL 5006v20130719 Page 28 of 61
Select your search criteria as required. Mandatory fields are marked with an asterisk (*) Searches can be performed using the following criteria:
Account Groups: List the account groups available to the logged in user. Period: Transactions returned can be restricted to either ‘Next 2 Working Days’, ‘Next 5
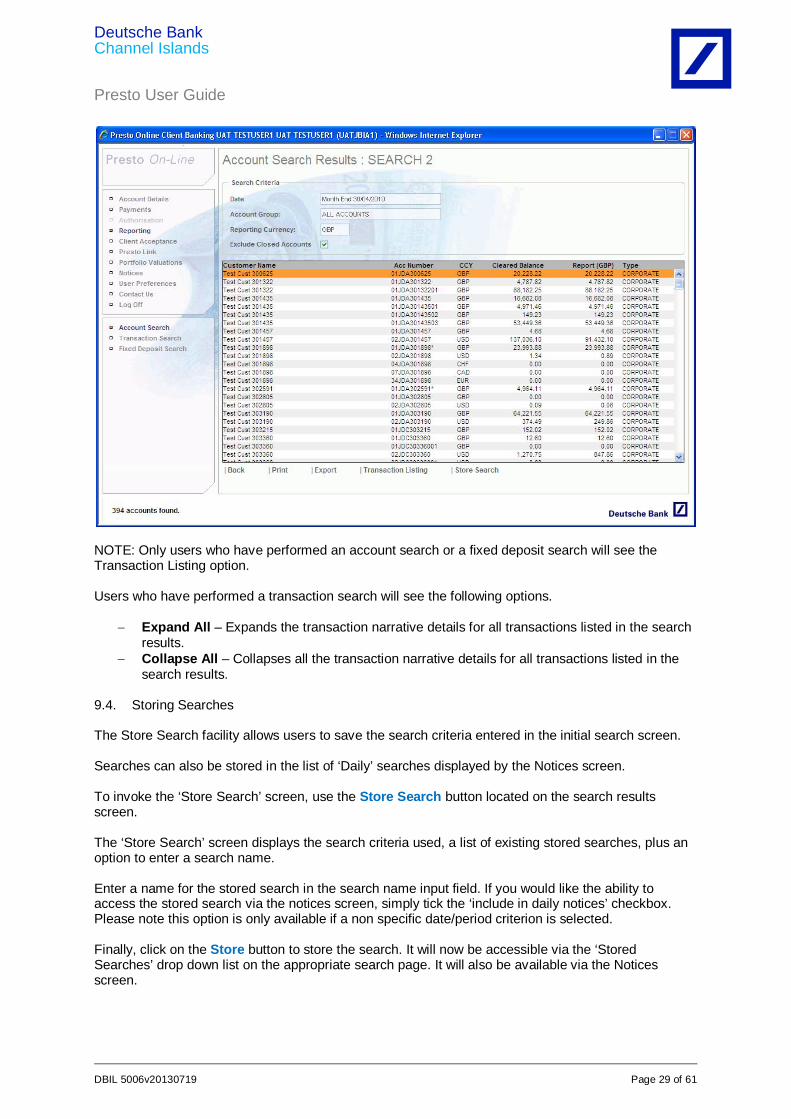
Working Days’, ‘Current Month’, ‘Current Year’ or ‘All Dates’. Once you have selected your search criteria simply click on Submit Search to perform the search. The results will then be displayed in the ‘Fixed Deposit’ search results screen. 9.3. Search Results The Search Results screen displays the results of a search performed along with the criteria used to obtain the search results. All search results screens (regardless of search type) allow the user to perform the following options:
Back: Returns the user to the screen from which the search was initiated. Print: Opens a printable PDF of the search results. Export: Exports the displayed results as an Excel CSV file. Store Search: Allows the user to store the search criteria that produced the
search results as a named stored search. Transaction Listing: Invokes the Transaction Listing screen to show the transactions (if any)
against the currently selected search results.
Deutsche Bank Channel Islands Presto User Guide
DBIL 5006v20130719 Page 29 of 61
NOTE: Only users who have performed an account search or a fixed deposit search will see the Transaction Listing option. Users who have performed a transaction search will see the following options.
Expand All – Expands the transaction narrative details for all transactions listed in the search results.
Collapse All – Collapses all the transaction narrative details for all transactions listed in the search results.
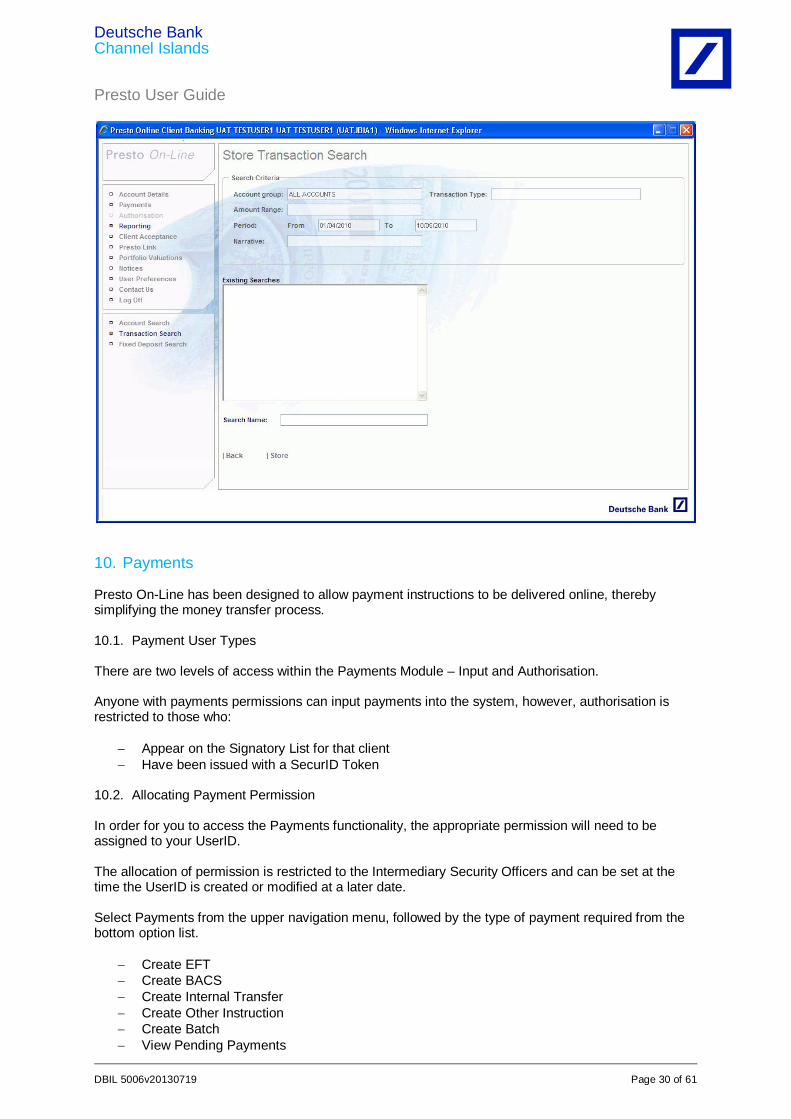
9.4. Storing Searches The Store Search facility allows users to save the search criteria entered in the initial search screen. Searches can also be stored in the list of ‘Daily’ searches displayed by the Notices screen. To invoke the ‘Store Search’ screen, use the Store Search button located on the search results screen. The ‘Store Search’ screen displays the search criteria used, a list of existing stored searches, plus an option to enter a search name. Enter a name for the stored search in the search name input field. If you would like the ability to access the stored search via the notices screen, simply tick the ‘include in daily notices’ checkbox. Please note this option is only available if a non specific date/period criterion is selected. Finally, click on the Store button to store the search. It will now be accessible via the ‘Stored Searches’ drop down list on the appropriate search page. It will also be available via the Notices screen.
Deutsche Bank Channel Islands Presto User Guide
DBIL 5006v20130719 Page 30 of 61
10. Payments Presto On-Line has been designed to allow payment instructions to be delivered online, thereby simplifying the money transfer process. 10.1. Payment User Types There are two levels of access within the Payments Module – Input and Authorisation. Anyone with payments permissions can input payments into the system, however, authorisation is restricted to those who:
Appear on the Signatory List for that client Have been issued with a SecurID Token
10.2. Allocating Payment Permission In order for you to access the Payments functionality, the appropriate permission will need to be assigned to your UserID. The allocation of permission is restricted to the Intermediary Security Officers and can be set at the time the UserID is created or modified at a later date. Select Payments from the upper navigation menu, followed by the type of payment required from the bottom option list.
Create EFT Create BACS Create Internal Transfer Create Other Instruction Create Batch View Pending Payments
Deutsche Bank Channel Islands Presto User Guide
DBIL 5006v20130719 Page 31 of 61
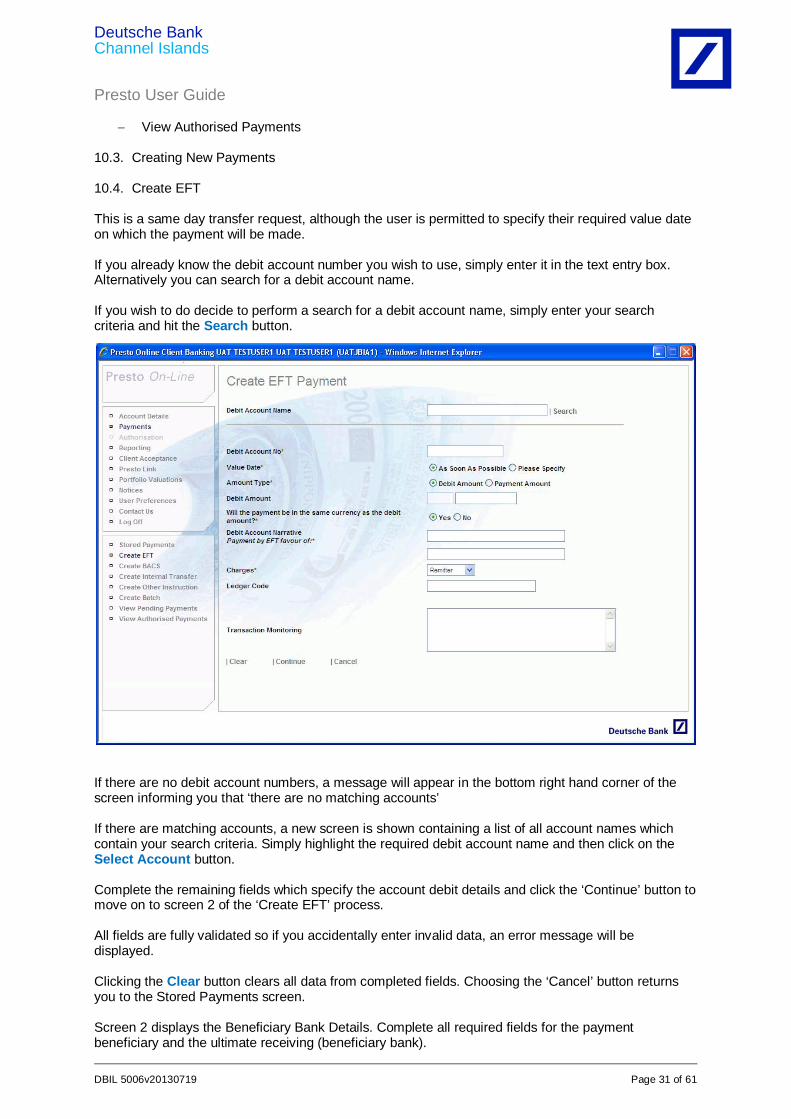
View Authorised Payments 10.3. Creating New Payments 10.4. Create EFT This is a same day transfer request, although the user is permitted to specify their required value date on which the payment will be made. If you already know the debit account number you wish to use, simply enter it in the text entry box. Alternatively you can search for a debit account name. If you wish to do decide to perform a search for a debit account name, simply enter your search criteria and hit the Search button.
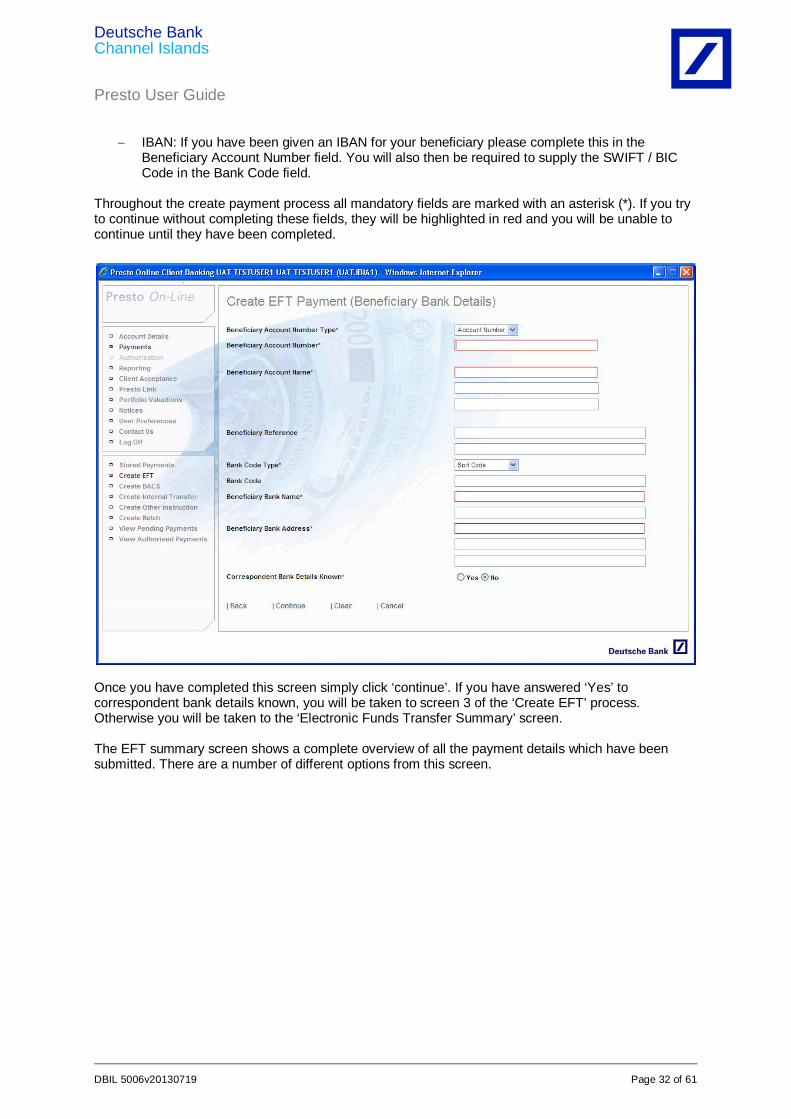
If there are no debit account numbers, a message will appear in the bottom right hand corner of the screen informing you that ‘there are no matching accounts’ If there are matching accounts, a new screen is shown containing a list of all account names which contain your search criteria. Simply highlight the required debit account name and then click on the Select Account button. Complete the remaining fields which specify the account debit details and click the ‘Continue’ button to move on to screen 2 of the ‘Create EFT’ process. All fields are fully validated so if you accidentally enter invalid data, an error message will be displayed. Clicking the Clear button clears all data from completed fields. Choosing the ‘Cancel’ button returns you to the Stored Payments screen. Screen 2 displays the Beneficiary Bank Details. Complete all required fields for the payment beneficiary and the ultimate receiving (beneficiary bank).
Deutsche Bank Channel Islands Presto User Guide
DBIL 5006v20130719 Page 32 of 61
IBAN: If you have been given an IBAN for your beneficiary please complete this in the
Beneficiary Account Number field. You will also then be required to supply the SWIFT / BIC Code in the Bank Code field.
Throughout the create payment process all mandatory fields are marked with an asterisk (*). If you try to continue without completing these fields, they will be highlighted in red and you will be unable to continue until they have been completed.
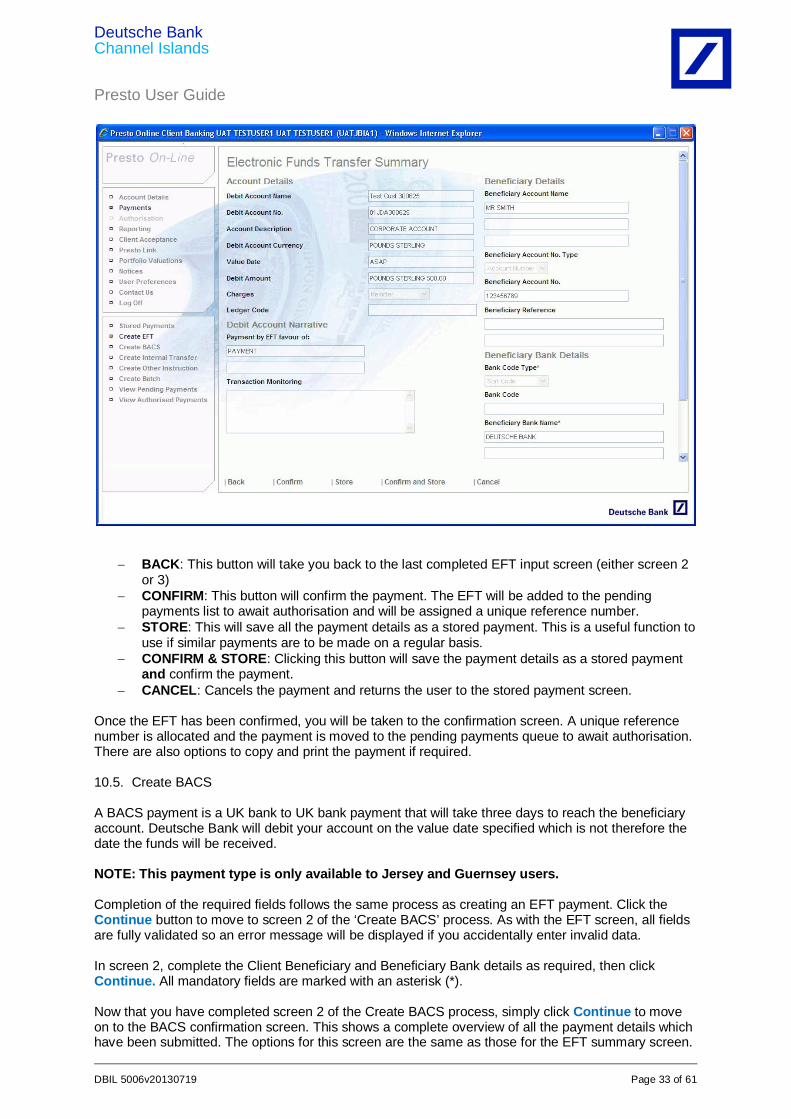
Once you have completed this screen simply click ‘continue’. If you have answered ‘Yes’ to correspondent bank details known, you will be taken to screen 3 of the ‘Create EFT’ process. Otherwise you will be taken to the ‘Electronic Funds Transfer Summary’ screen. The EFT summary screen shows a complete overview of all the payment details which have been submitted. There are a number of different options from this screen.
Deutsche Bank Channel Islands Presto User Guide
DBIL 5006v20130719 Page 33 of 61
BACK: This button will take you back to the last completed EFT input screen (either screen 2 or 3)
CONFIRM: This button will confirm the payment. The EFT will be added to the pending payments list to await authorisation and will be assigned a unique reference number.
STORE: This will save all the payment details as a stored payment. This is a useful function to use if similar payments are to be made on a regular basis.
CONFIRM & STORE: Clicking this button will save the payment details as a stored payment and confirm the payment.
CANCEL: Cancels the payment and returns the user to the stored payment screen. Once the EFT has been confirmed, you will be taken to the confirmation screen. A unique reference number is allocated and the payment is moved to the pending payments queue to await authorisation. There are also options to copy and print the payment if required. 10.5. Create BACS A BACS payment is a UK bank to UK bank payment that will take three days to reach the beneficiary account. Deutsche Bank will debit your account on the value date specified which is not therefore the date the funds will be received. NOTE: This payment type is only available to Jersey and Guernsey users. Completion of the required fields follows the same process as creating an EFT payment. Click the Continue button to move to screen 2 of the ‘Create BACS’ process. As with the EFT screen, all fields are fully validated so an error message will be displayed if you accidentally enter invalid data. In screen 2, complete the Client Beneficiary and Beneficiary Bank details as required, then click Continue. All mandatory fields are marked with an asterisk (*). Now that you have completed screen 2 of the Create BACS process, simply click Continue to move on to the BACS confirmation screen. This shows a complete overview of all the payment details which have been submitted. The options for this screen are the same as those for the EFT summary screen.
Deutsche Bank Channel Islands Presto User Guide
DBIL 5006v20130719 Page 34 of 61
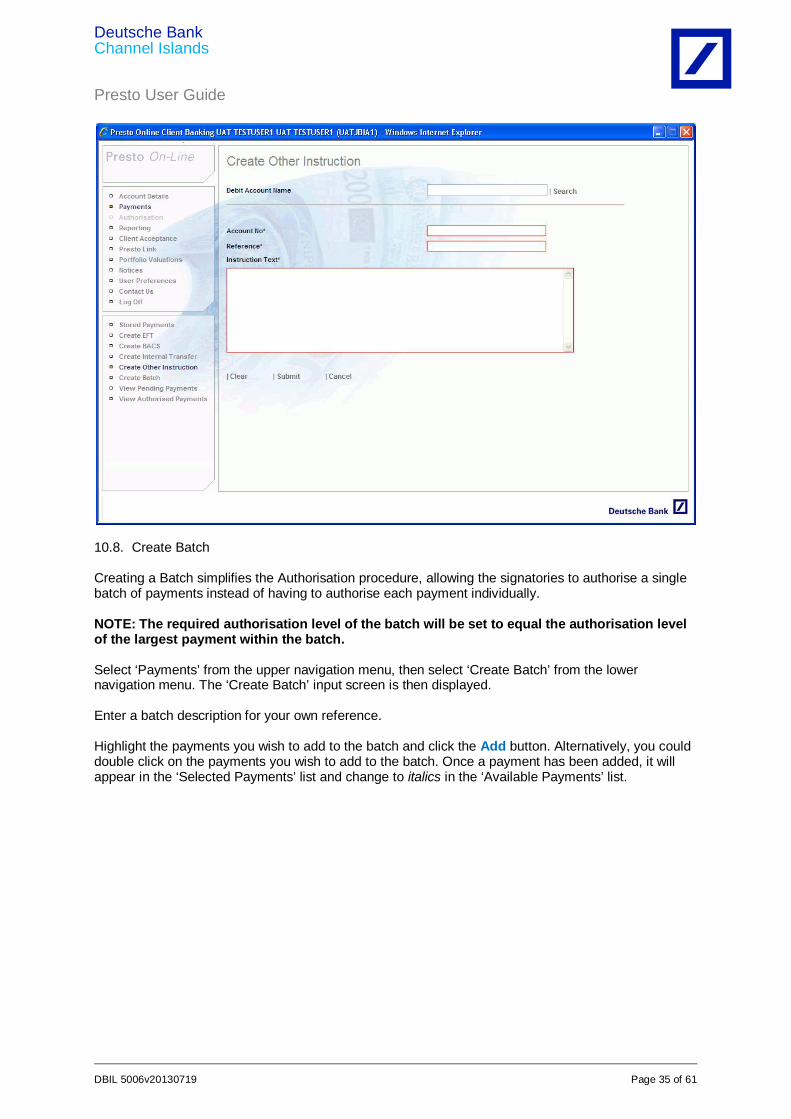
Once the BACS payment has been confirmed you will be taken to the confirmation screen. A unique reference number is assigned and the payment is moved to the pending payments queue to await authorisation. 10.6. Create TRF This option allows you to transfer funds between accounts held at the same location of Deutsche Bank. Select ‘Create Internal Transfer’ from the lower navigation menu. The ‘Create Internal Transfer’ input screen is then displayed. Internal Transfer requires that both a credit account number and a debit account number are specified. If you already know the credit/debit account numbers you wish to use, simply enter them in the text boxes provided. Alternatively, you can search for the account name following the same process as for EFT and BACS payments. Complete the rest of the form with valid data and click the Submit button to move on to the Internal Transfer summary screen which provides a complete overview of all the payment details that have been submitted. Once the Internal Transfer has been confirmed, you will be taken to the confirmation screen where the unique reference number is assigned and the transfer moved to the pending payments queue for authorisation. 10.7. Create OIN Other Instructions can be used to send secure instruction to Deutsche Bank that do not fit the above payment scenarios. For example, cheques or drafts can be requested through this process. NOTE: Due to the free format nature of this instruction type, the authorisation level will always be set at the highest level of the relevant mandate. The process for selecting/searching for a debit account and completion of the ‘Other Instruction’ screens follows the same format as ‘Create ETF’, ‘Create BACS’ and ‘Create TRF’.
Deutsche Bank Channel Islands Presto User Guide
DBIL 5006v20130719 Page 35 of 61
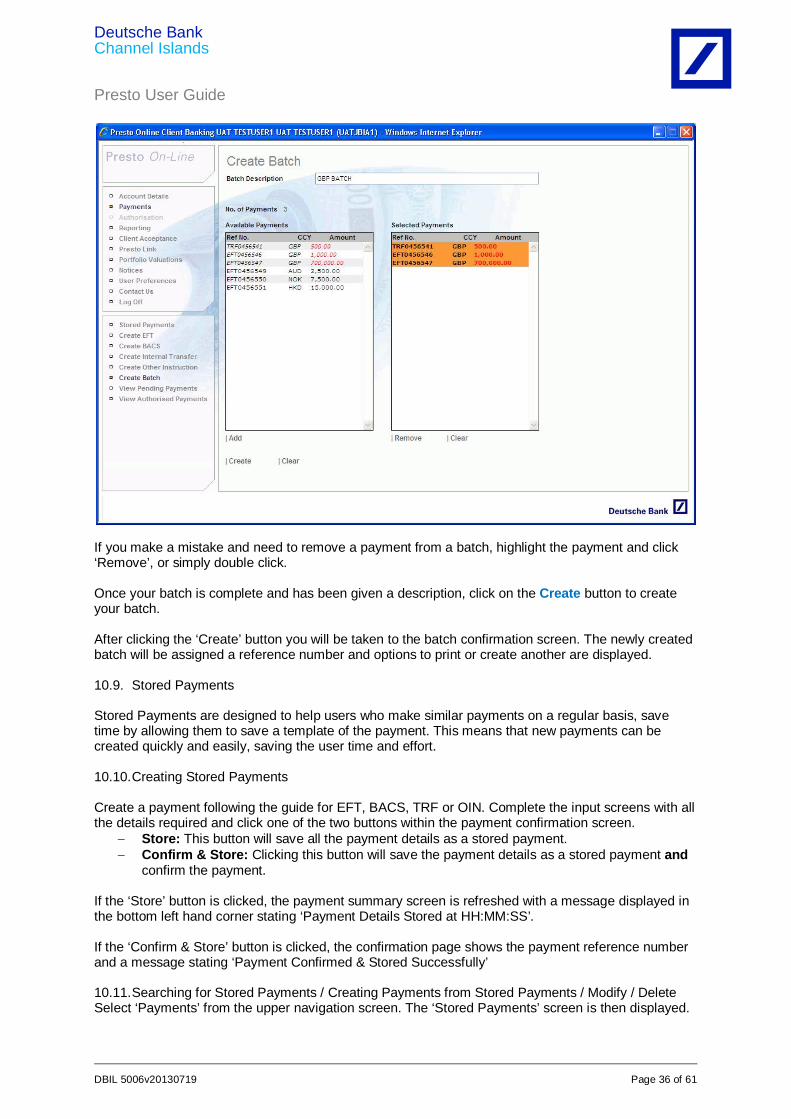
10.8. Create Batch Creating a Batch simplifies the Authorisation procedure, allowing the signatories to authorise a single batch of payments instead of having to authorise each payment individually. NOTE: The required authorisation level of the batch will be set to equal the authorisation level of the largest payment within the batch. Select ‘Payments’ from the upper navigation menu, then select ‘Create Batch’ from the lower navigation menu. The ‘Create Batch’ input screen is then displayed. Enter a batch description for your own reference. Highlight the payments you wish to add to the batch and click the Add button. Alternatively, you could double click on the payments you wish to add to the batch. Once a payment has been added, it will appear in the ‘Selected Payments’ list and change to italics in the ‘Available Payments’ list.
Deutsche Bank Channel Islands Presto User Guide
DBIL 5006v20130719 Page 36 of 61
If you make a mistake and need to remove a payment from a batch, highlight the payment and click ‘Remove’, or simply double click. Once your batch is complete and has been given a description, click on the Create button to create your batch. After clicking the ‘Create’ button you will be taken to the batch confirmation screen. The newly created batch will be assigned a reference number and options to print or create another are displayed. 10.9. Stored Payments Stored Payments are designed to help users who make similar payments on a regular basis, save time by allowing them to save a template of the payment. This means that new payments can be created quickly and easily, saving the user time and effort. 10.10. Creating Stored Payments Create a payment following the guide for EFT, BACS, TRF or OIN. Complete the input screens with all the details required and click one of the two buttons within the payment confirmation screen.
Store: This button will save all the payment details as a stored payment. Confirm & Store: Clicking this button will save the payment details as a stored payment and
confirm the payment. If the ‘Store’ button is clicked, the payment summary screen is refreshed with a message displayed in the bottom left hand corner stating ‘Payment Details Stored at HH:MM:SS’. If the ‘Confirm & Store’ button is clicked, the confirmation page shows the payment reference number and a message stating ‘Payment Confirmed & Stored Successfully’ 10.11. Searching for Stored Payments / Creating Payments from Stored Payments / Modify / Delete Select ‘Payments’ from the upper navigation screen. The ‘Stored Payments’ screen is then displayed.
Deutsche Bank Channel Islands Presto User Guide
DBIL 5006v20130719 Page 37 of 61
To search for a specific stored payment, enter your search criteria into the appropriate search field and then click on the Submit button. Stored Payments can be searched for using a combination of the following criteria.
Customer Number Customer Name Payment Type Payment Currency Beneficiary Name Beneficiary Reference Beneficiary Bank
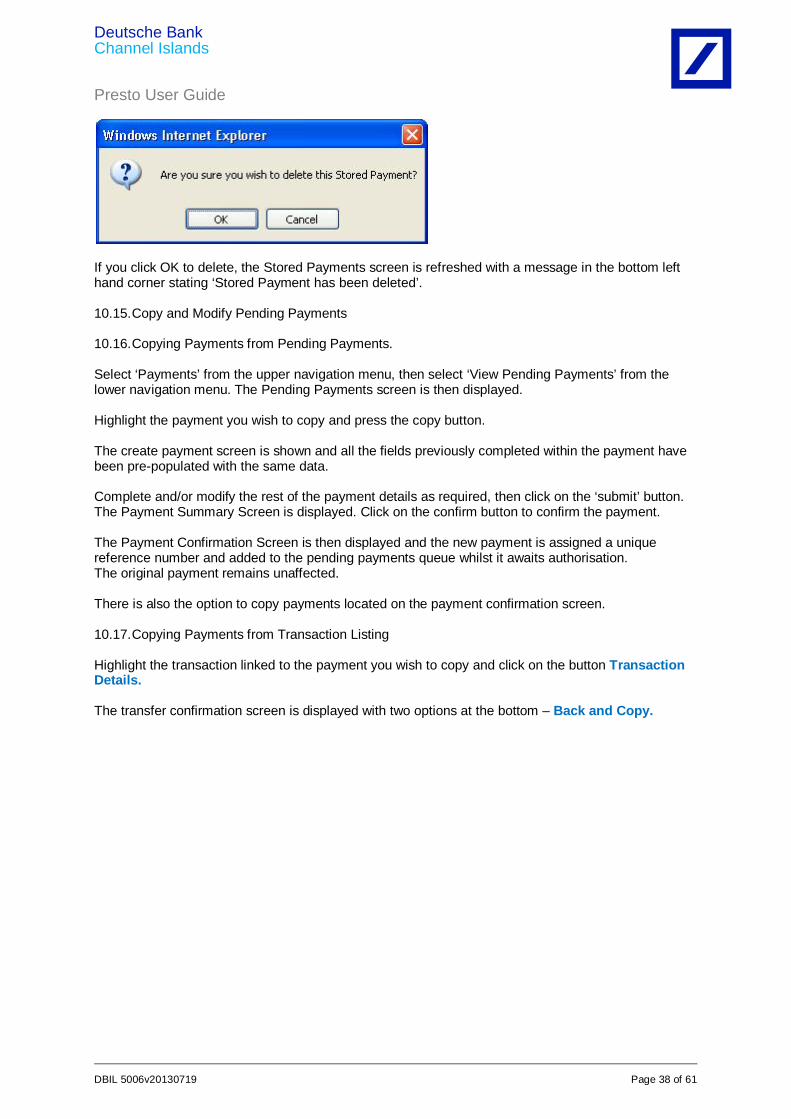
To bring up a list of all stored searches simply click on the ‘Submit’ button without entering any search criteria. Your search results are now displayed. If your search criterion does not return any results a message appears in the bottom left hand corner of the screen stating ‘No Stored Payments Found’ 10.12. Creating Payments from Stored Payments To create a payment from a stored payment for the same customer that originally created the payment, first highlight the payment you wish to use, then press ‘Create New Payment (default customer)’ button. Complete the additional payment details as required and continue the payment process as usual. If you wish to create a payment from a stored payment but for a different customer, first highlight the payment you wish to use, then click the ‘Create New Payment (other customer)’ button. Modify the details as required and complete the payment as usual. 10.13. Modifying Stored Payments First highlight the stored payment you wish to modify and then click the ‘Modify’ button. Modify the details as required and click ‘Submit’. NOTE: Certain fields such as debit account number, value date and transaction monitoring information are not stored and are therefore not available for modification. The payment confirmation screen is then displayed with two options – ‘back’ and ‘store’. Click the ‘back’ button to make further changes to the stored payment or ‘store’ to confirm the modifications. Once the changes have been confirmed the stored payment screen is reloaded and a message is displayed in the bottom left hand corner of the screen stating ‘Stored Payment Details Modified’ 10.14. Deleting Stored Payments To delete a stored payment, first highlight the payment you wish to delete then click ‘Delete’. A pop up message will be displayed asking you to confirm that you wish to delete. Click ‘OK’ to continue or ‘Cancel’ to return to the stored payment.
Deutsche Bank Channel Islands Presto User Guide
DBIL 5006v20130719 Page 38 of 61
If you click OK to delete, the Stored Payments screen is refreshed with a message in the bottom left hand corner stating ‘Stored Payment has been deleted’. 10.15. Copy and Modify Pending Payments 10.16. Copying Payments from Pending Payments. Select ‘Payments’ from the upper navigation menu, then select ‘View Pending Payments’ from the lower navigation menu. The Pending Payments screen is then displayed. Highlight the payment you wish to copy and press the copy button. The create payment screen is shown and all the fields previously completed within the payment have been pre-populated with the same data. Complete and/or modify the rest of the payment details as required, then click on the ‘submit’ button. The Payment Summary Screen is displayed. Click on the confirm button to confirm the payment. The Payment Confirmation Screen is then displayed and the new payment is assigned a unique reference number and added to the pending payments queue whilst it awaits authorisation. The original payment remains unaffected. There is also the option to copy payments located on the payment confirmation screen. 10.17. Copying Payments from Transaction Listing Highlight the transaction linked to the payment you wish to copy and click on the button Transaction Details. The transfer confirmation screen is displayed with two options at the bottom – Back and Copy.
Deutsche Bank Channel Islands Presto User Guide
DBIL 5006v20130719 Page 39 of 61
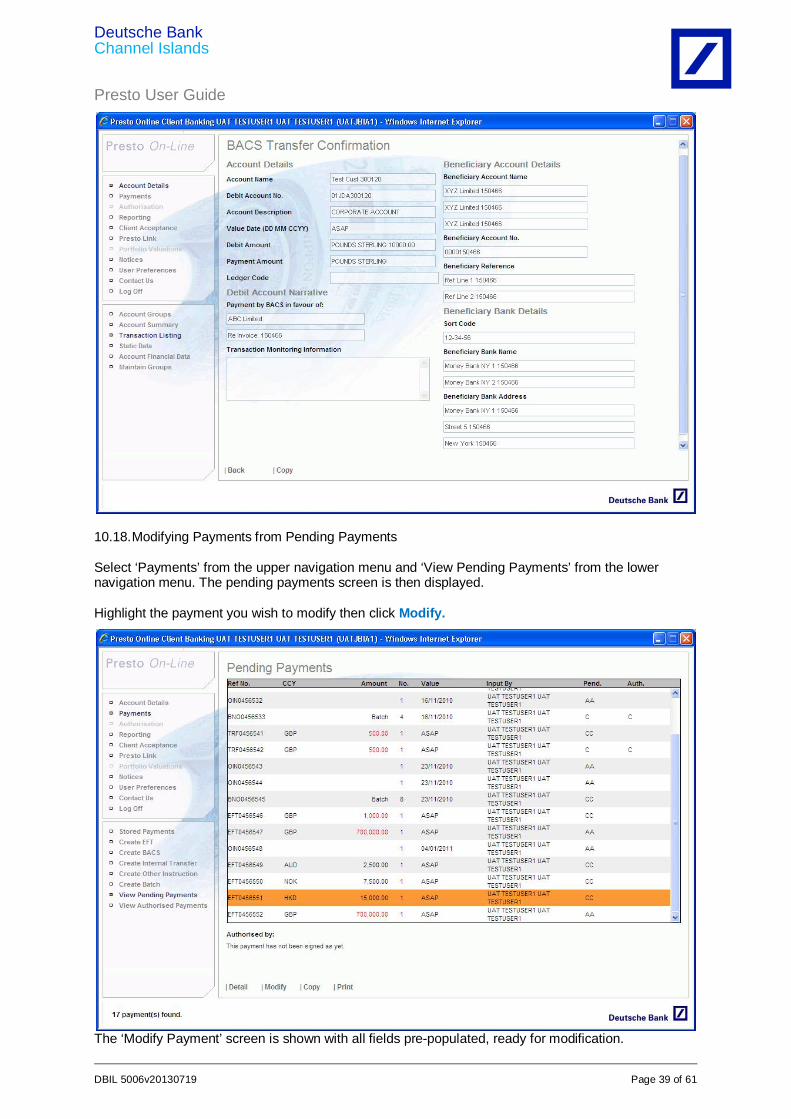
10.18. Modifying Payments from Pending Payments Select ‘Payments’ from the upper navigation menu and ‘View Pending Payments’ from the lower navigation menu. The pending payments screen is then displayed. Highlight the payment you wish to modify then click Modify.
The ‘Modify Payment’ screen is shown with all fields pre-populated, ready for modification.

Deutsche Bank Channel Islands Presto User Guide
DBIL 5006v20130719 Page 40 of 61
Make any changes required and click ‘Continue’ until you reach the payment summary screen. Click on the Confirm button to confirm the payment. The payment confirmation screen is then displayed and the modified payment is assigned a new unique reference number and added to the pending payments queue whilst it awaits authorisation. The original payment is deleted and removed from the pending payments queue. NOTE: Payments imported using the Presto Link function cannot be modified. 10.19. Modifying Batches Highlight the batch you wish to modify then click Modify. The modify batch screen is shown with all details pre-filled ready for modification. Make any changes as required then click on the Modify button. The confirm batch screen is now displayed showing the new batch details. A new batch reference number is assigned and the old reference is discarded. A message is also displayed in the bottom right hand corner of the screen stating ‘Batch Modified’. 11. Authorisation 11.1. Setting Up Authorisation Presto On-Line uses a two factor authentication process provided by the SecurID system to ensure that only authorised signatories may access the payments authorisation screen. You will be sent a SecurID token in deactivated mode by the Presto On-Line Help Desk upon receipt of the appropriate documentation. Upon receipt of the SecurID token you need to complete and return the user authentication form and a confirmation email will then be sent advising of the token activation. The two factor authorisation is provided by the Passcode which is made up of:
A secret memorised 4 digit personal identification number (PIN) The current 6 digit code displayed by the SecurID token. This code is randomly generated and
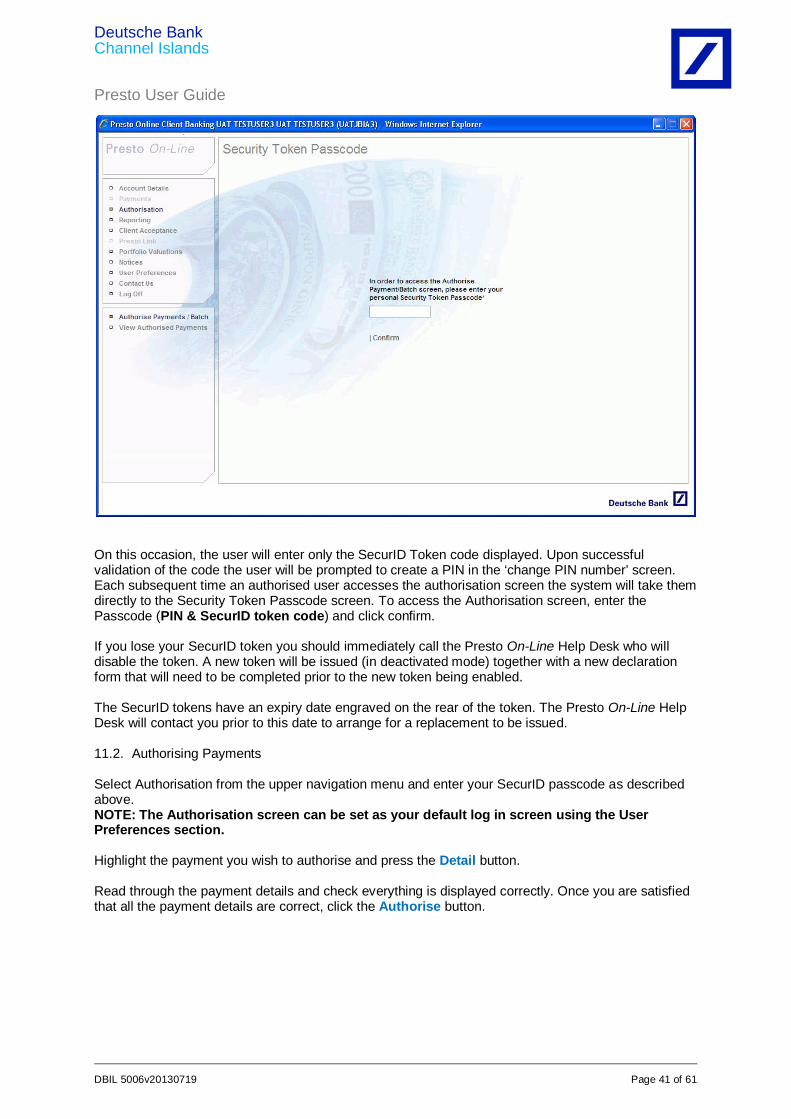
will change every 60 seconds. The first time the authorised user accesses the authorisation screen the system will take them directly to the Security Token Password screen.
Deutsche Bank Channel Islands Presto User Guide
DBIL 5006v20130719 Page 41 of 61
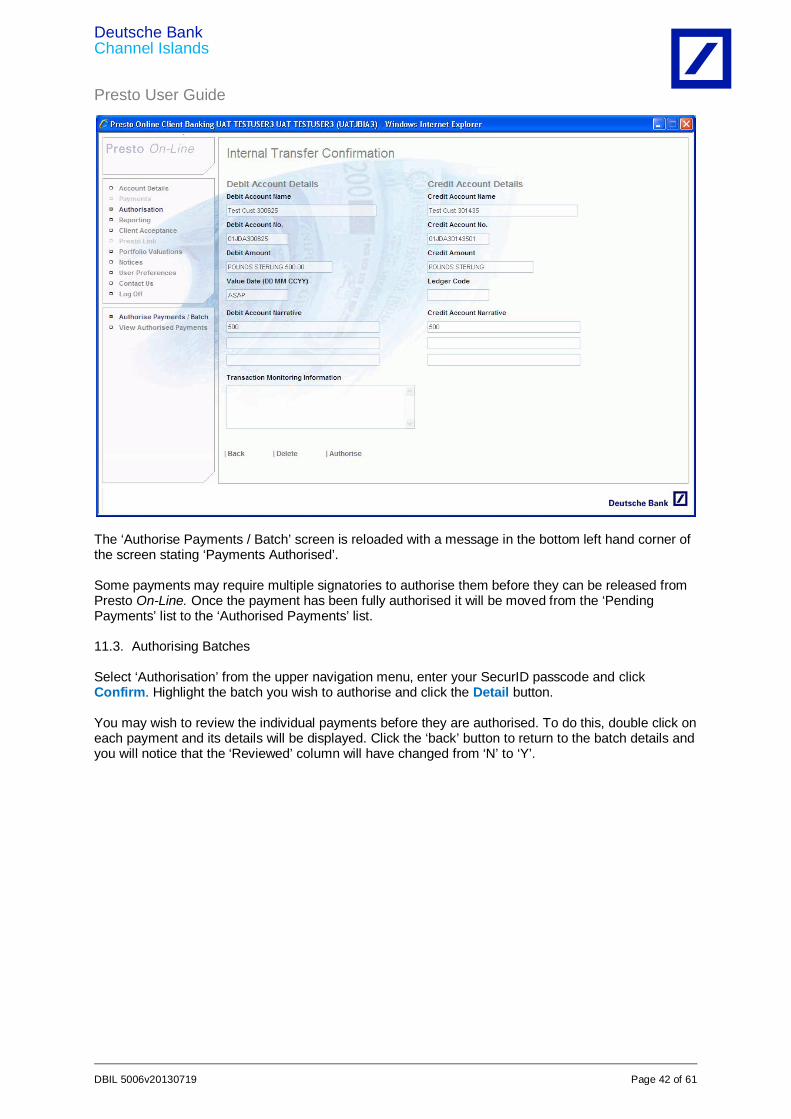
On this occasion, the user will enter only the SecurID Token code displayed. Upon successful validation of the code the user will be prompted to create a PIN in the ‘change PIN number’ screen. Each subsequent time an authorised user accesses the authorisation screen the system will take them directly to the Security Token Passcode screen. To access the Authorisation screen, enter the Passcode (PIN & SecurID token code) and click confirm. If you lose your SecurID token you should immediately call the Presto On-Line Help Desk who will disable the token. A new token will be issued (in deactivated mode) together with a new declaration form that will need to be completed prior to the new token being enabled. The SecurID tokens have an expiry date engraved on the rear of the token. The Presto On-Line Help Desk will contact you prior to this date to arrange for a replacement to be issued. 11.2. Authorising Payments Select Authorisation from the upper navigation menu and enter your SecurID passcode as described above. NOTE: The Authorisation screen can be set as your default log in screen using the User Preferences section. Highlight the payment you wish to authorise and press the Detail button. Read through the payment details and check everything is displayed correctly. Once you are satisfied that all the payment details are correct, click the Authorise button.
Deutsche Bank Channel Islands Presto User Guide
DBIL 5006v20130719 Page 42 of 61
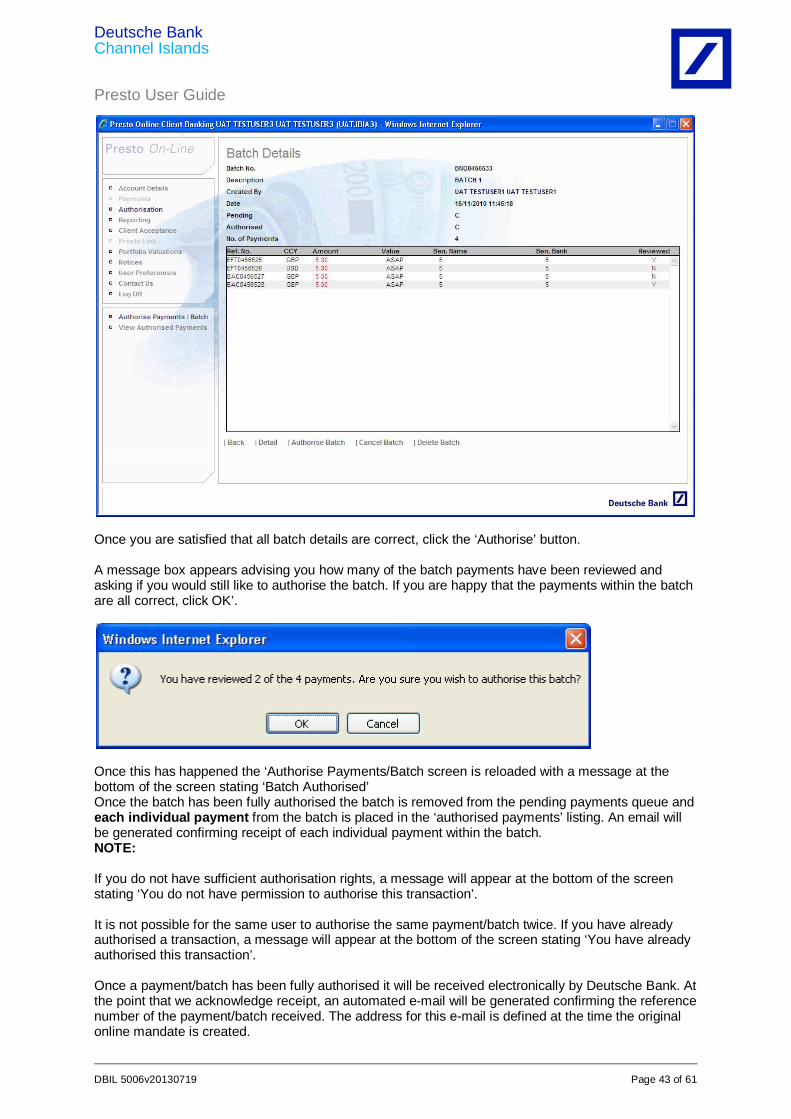
The ‘Authorise Payments / Batch’ screen is reloaded with a message in the bottom left hand corner of the screen stating ‘Payments Authorised’. Some payments may require multiple signatories to authorise them before they can be released from Presto On-Line. Once the payment has been fully authorised it will be moved from the ‘Pending Payments’ list to the ‘Authorised Payments’ list. 11.3. Authorising Batches Select ‘Authorisation’ from the upper navigation menu, enter your SecurID passcode and click Confirm. Highlight the batch you wish to authorise and click the Detail button. You may wish to review the individual payments before they are authorised. To do this, double click on each payment and its details will be displayed. Click the ‘back’ button to return to the batch details and you will notice that the ‘Reviewed’ column will have changed from ‘N’ to ‘Y’.
Deutsche Bank Channel Islands Presto User Guide
DBIL 5006v20130719 Page 43 of 61
Once you are satisfied that all batch details are correct, click the ‘Authorise’ button. A message box appears advising you how many of the batch payments have been reviewed and asking if you would still like to authorise the batch. If you are happy that the payments within the batch are all correct, click OK’.
Once this has happened the ‘Authorise Payments/Batch screen is reloaded with a message at the bottom of the screen stating ‘Batch Authorised’ Once the batch has been fully authorised the batch is removed from the pending payments queue and each individual payment from the batch is placed in the ‘authorised payments’ listing. An email will be generated confirming receipt of each individual payment within the batch. NOTE: If you do not have sufficient authorisation rights, a message will appear at the bottom of the screen stating ‘You do not have permission to authorise this transaction’. It is not possible for the same user to authorise the same payment/batch twice. If you have already authorised a transaction, a message will appear at the bottom of the screen stating ‘You have already authorised this transaction’. Once a payment/batch has been fully authorised it will be received electronically by Deutsche Bank. At the point that we acknowledge receipt, an automated e-mail will be generated confirming the reference number of the payment/batch received. The address for this e-mail is defined at the time the original online mandate is created.
Deutsche Bank Channel Islands Presto User Guide
DBIL 5006v20130719 Page 44 of 61
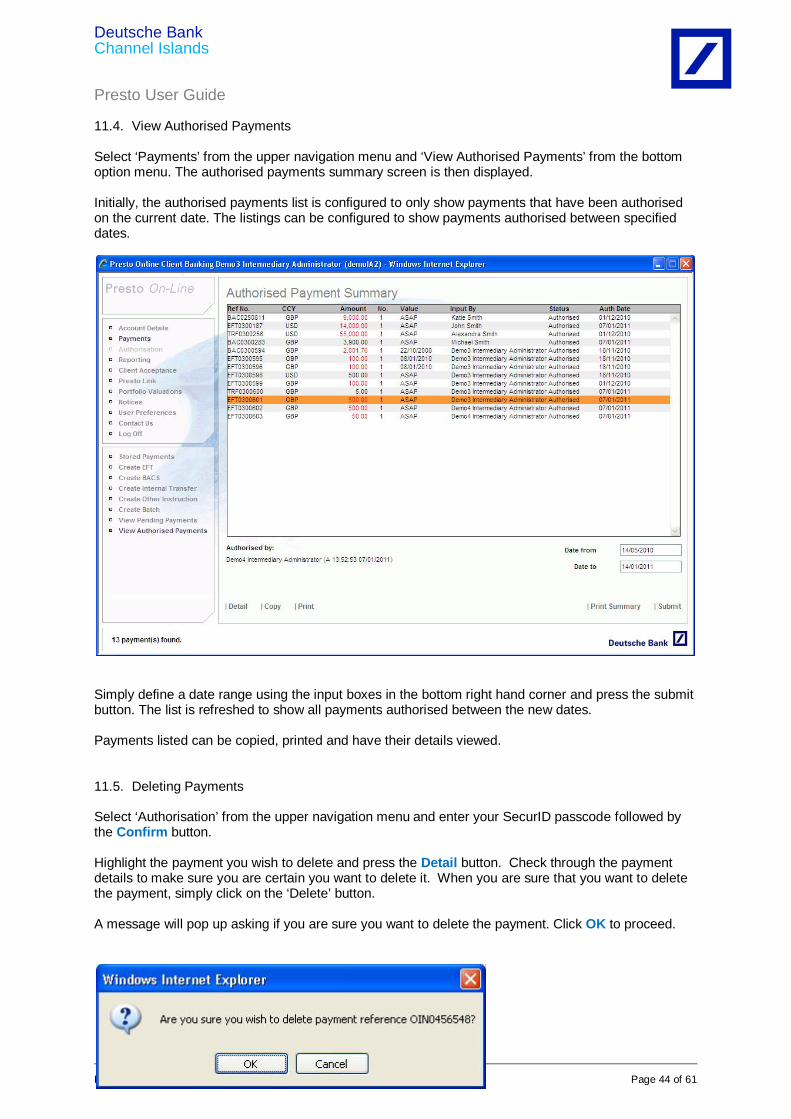
11.4. View Authorised Payments Select ‘Payments’ from the upper navigation menu and ‘View Authorised Payments’ from the bottom option menu. The authorised payments summary screen is then displayed. Initially, the authorised payments list is configured to only show payments that have been authorised on the current date. The listings can be configured to show payments authorised between specified dates.
Simply define a date range using the input boxes in the bottom right hand corner and press the submit button. The list is refreshed to show all payments authorised between the new dates. Payments listed can be copied, printed and have their details viewed. 11.5. Deleting Payments Select ‘Authorisation’ from the upper navigation menu and enter your SecurID passcode followed by the Confirm button. Highlight the payment you wish to delete and press the Detail button. Check through the payment details to make sure you are certain you want to delete it. When you are sure that you want to delete the payment, simply click on the ‘Delete’ button. A message will pop up asking if you are sure you want to delete the payment. Click OK to proceed.
Deutsche Bank Channel Islands Presto User Guide
DBIL 5006v20130719 Page 45 of 61
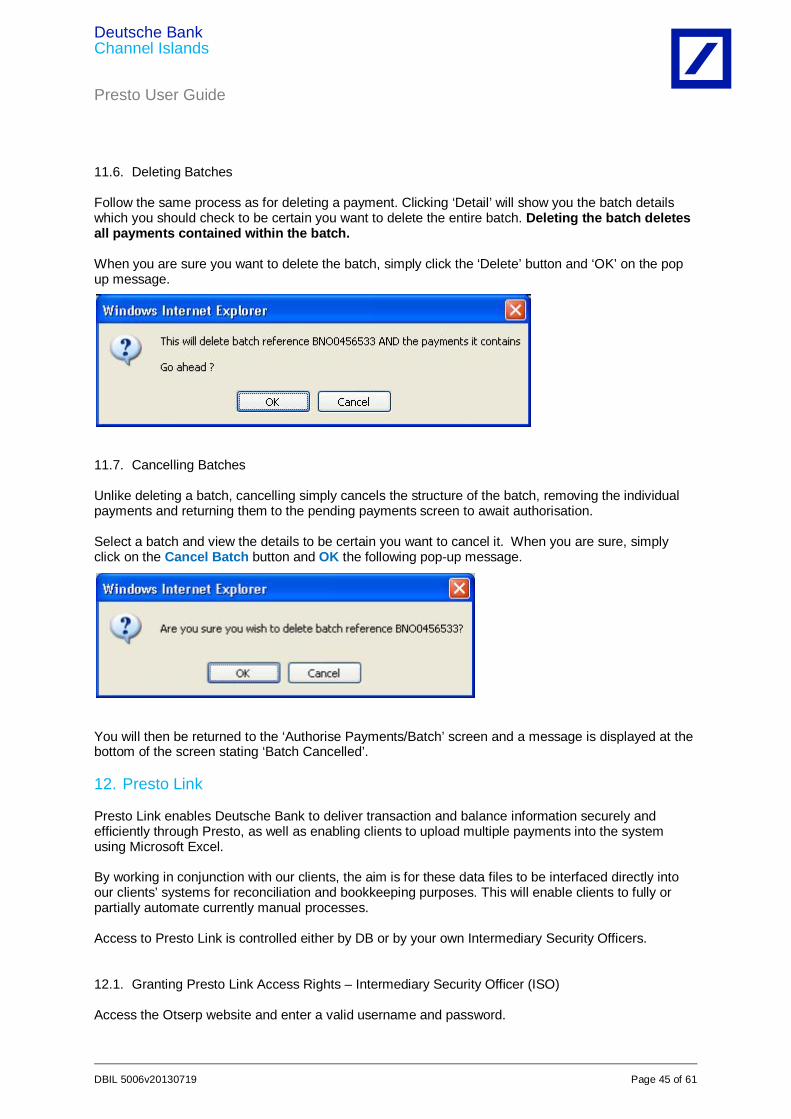
11.6. Deleting Batches Follow the same process as for deleting a payment. Clicking ‘Detail’ will show you the batch details which you should check to be certain you want to delete the entire batch. Deleting the batch deletes all payments contained within the batch. When you are sure you want to delete the batch, simply click the ‘Delete’ button and ‘OK’ on the pop up message.
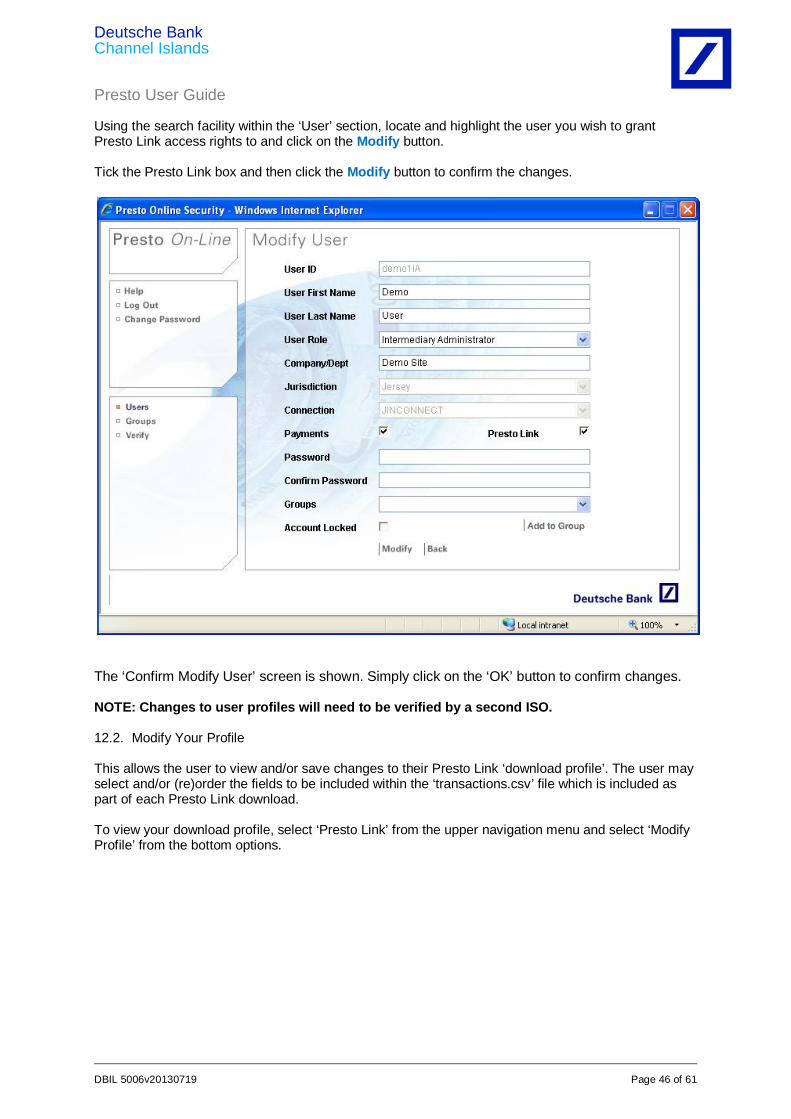
11.7. Cancelling Batches Unlike deleting a batch, cancelling simply cancels the structure of the batch, removing the individual payments and returning them to the pending payments screen to await authorisation. Select a batch and view the details to be certain you want to cancel it. When you are sure, simply click on the Cancel Batch button and OK the following pop-up message.
You will then be returned to the ‘Authorise Payments/Batch’ screen and a message is displayed at the bottom of the screen stating ‘Batch Cancelled’.
12. Presto Link Presto Link enables Deutsche Bank to deliver transaction and balance information securely and efficiently through Presto, as well as enabling clients to upload multiple payments into the system using Microsoft Excel. By working in conjunction with our clients, the aim is for these data files to be interfaced directly into our clients’ systems for reconciliation and bookkeeping purposes. This will enable clients to fully or partially automate currently manual processes. Access to Presto Link is controlled either by DB or by your own Intermediary Security Officers. 12.1. Granting Presto Link Access Rights – Intermediary Security Officer (ISO) Access the Otserp website and enter a valid username and password.
Deutsche Bank Channel Islands Presto User Guide
DBIL 5006v20130719 Page 46 of 61
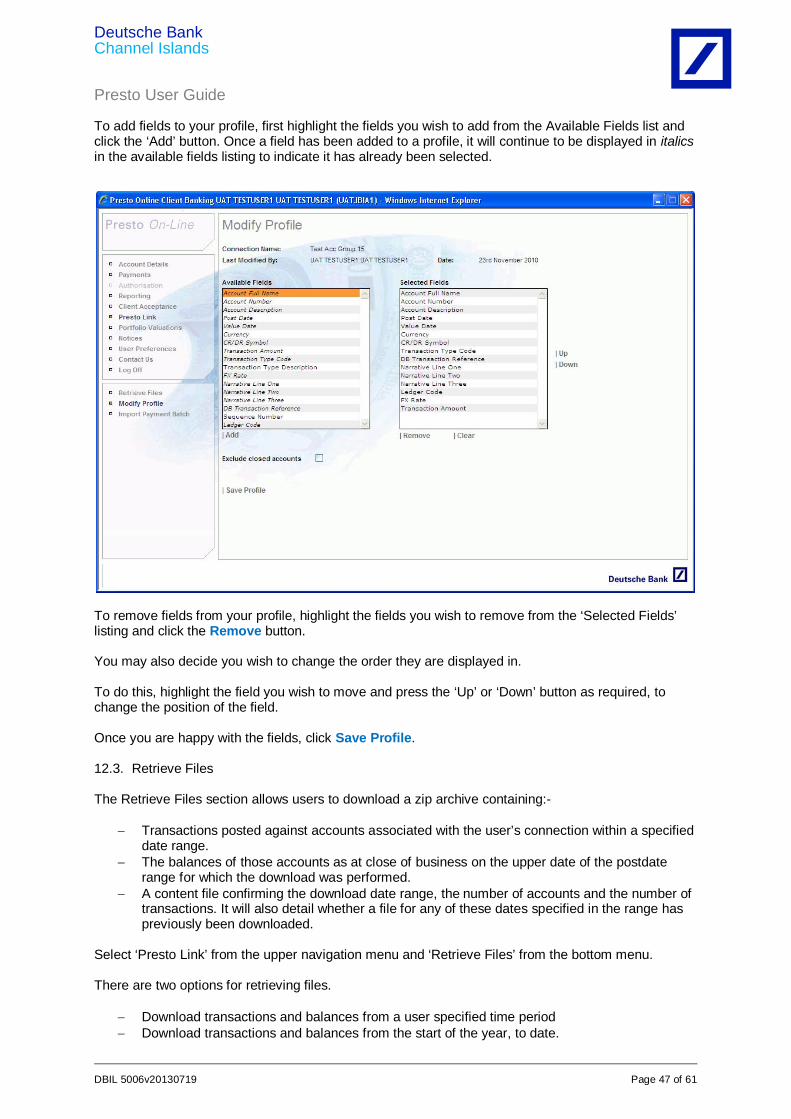
Using the search facility within the ‘User’ section, locate and highlight the user you wish to grant Presto Link access rights to and click on the Modify button. Tick the Presto Link box and then click the Modify button to confirm the changes. The ‘Confirm Modify User’ screen is shown. Simply click on the ‘OK’ button to confirm changes. NOTE: Changes to user profiles will need to be verified by a second ISO. 12.2. Modify Your Profile This allows the user to view and/or save changes to their Presto Link ‘download profile’. The user may select and/or (re)order the fields to be included within the ‘transactions.csv’ file which is included as part of each Presto Link download. To view your download profile, select ‘Presto Link’ from the upper navigation menu and select ‘Modify Profile’ from the bottom options.
Deutsche Bank Channel Islands Presto User Guide
DBIL 5006v20130719 Page 47 of 61
To add fields to your profile, first highlight the fields you wish to add from the Available Fields list and click the ‘Add’ button. Once a field has been added to a profile, it will continue to be displayed in italics in the available fields listing to indicate it has already been selected.
To remove fields from your profile, highlight the fields you wish to remove from the ‘Selected Fields’ listing and click the Remove button. You may also decide you wish to change the order they are displayed in. To do this, highlight the field you wish to move and press the ‘Up’ or ‘Down’ button as required, to change the position of the field. Once you are happy with the fields, click Save Profile. 12.3. Retrieve Files The Retrieve Files section allows users to download a zip archive containing:-
Transactions posted against accounts associated with the user’s connection within a specified date range.
The balances of those accounts as at close of business on the upper date of the postdate range for which the download was performed.
A content file confirming the download date range, the number of accounts and the number of transactions. It will also detail whether a file for any of these dates specified in the range has previously been downloaded.
Select ‘Presto Link’ from the upper navigation menu and ‘Retrieve Files’ from the bottom menu. There are two options for retrieving files.
Download transactions and balances from a user specified time period Download transactions and balances from the start of the year, to date.
Deutsche Bank Channel Islands Presto User Guide
DBIL 5006v20130719 Page 48 of 61
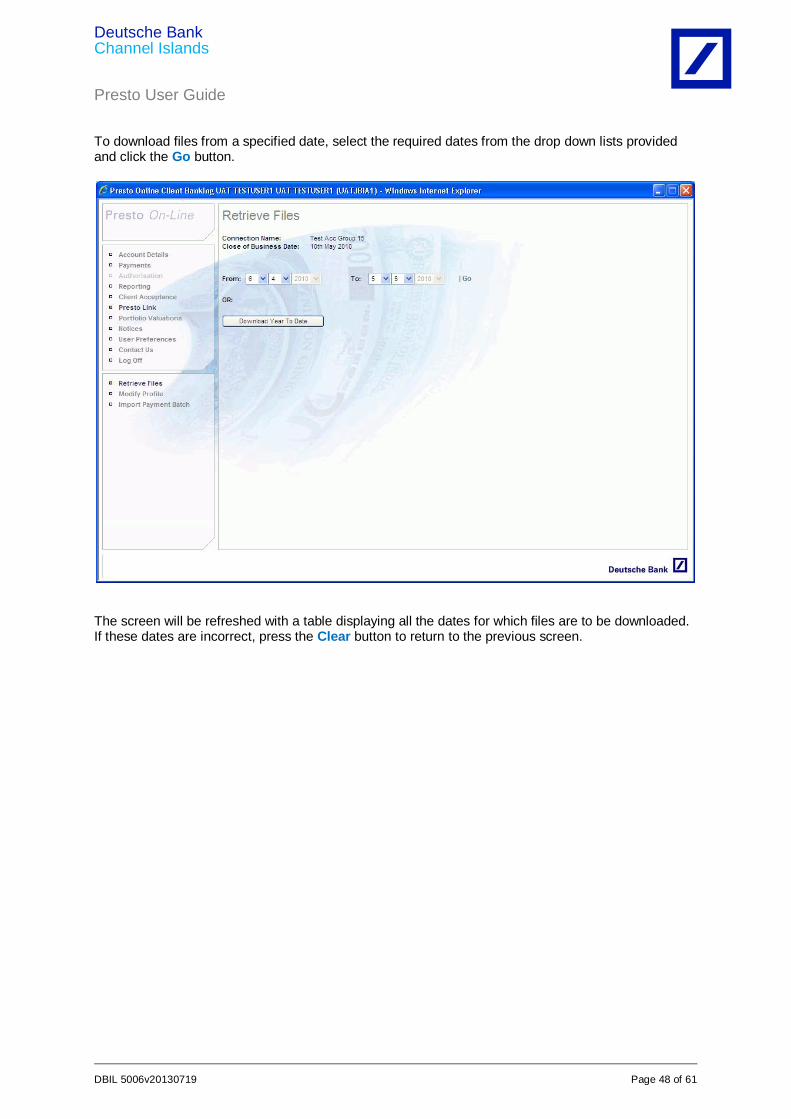
To download files from a specified date, select the required dates from the drop down lists provided and click the Go button.
The screen will be refreshed with a table displaying all the dates for which files are to be downloaded. If these dates are incorrect, press the Clear button to return to the previous screen.
Deutsche Bank Channel Islands Presto User Guide
DBIL 5006v20130719 Page 49 of 61
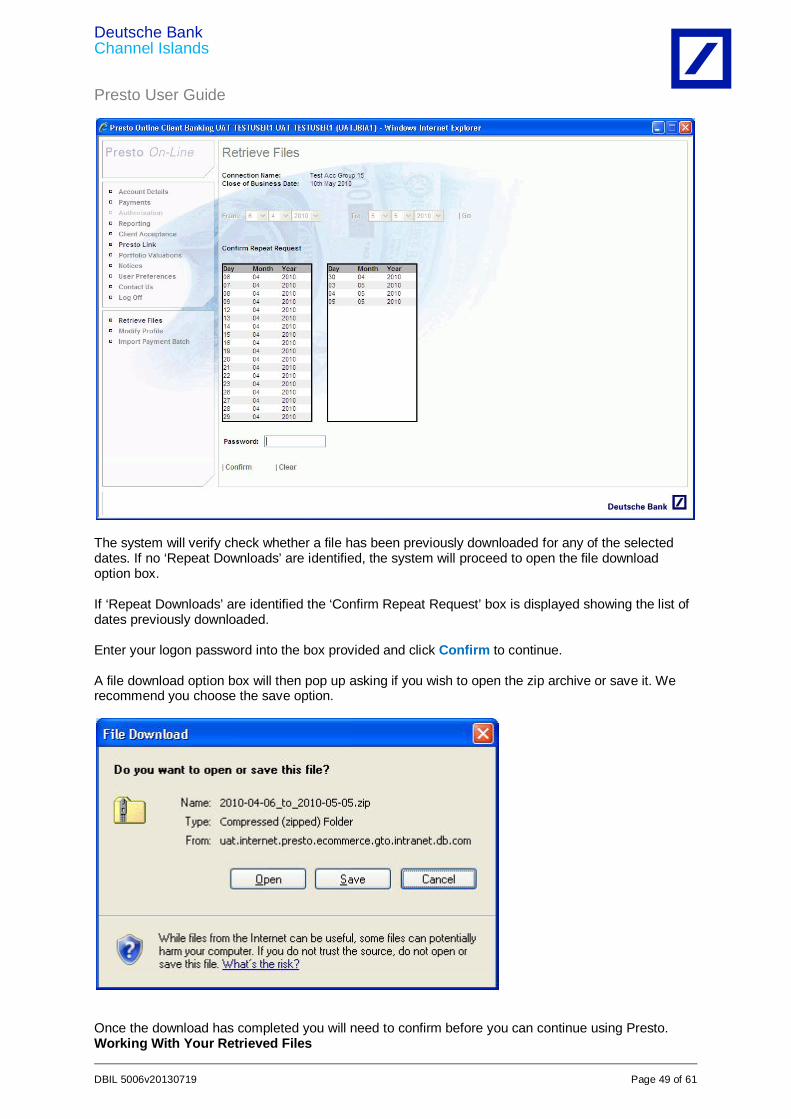
The system will verify check whether a file has been previously downloaded for any of the selected dates. If no ‘Repeat Downloads’ are identified, the system will proceed to open the file download option box. If ‘Repeat Downloads’ are identified the ‘Confirm Repeat Request’ box is displayed showing the list of dates previously downloaded. Enter your logon password into the box provided and click Confirm to continue. A file download option box will then pop up asking if you wish to open the zip archive or save it. We recommend you choose the save option.
Once the download has completed you will need to confirm before you can continue using Presto. Working With Your Retrieved Files
Deutsche Bank Channel Islands Presto User Guide
DBIL 5006v20130719 Page 50 of 61
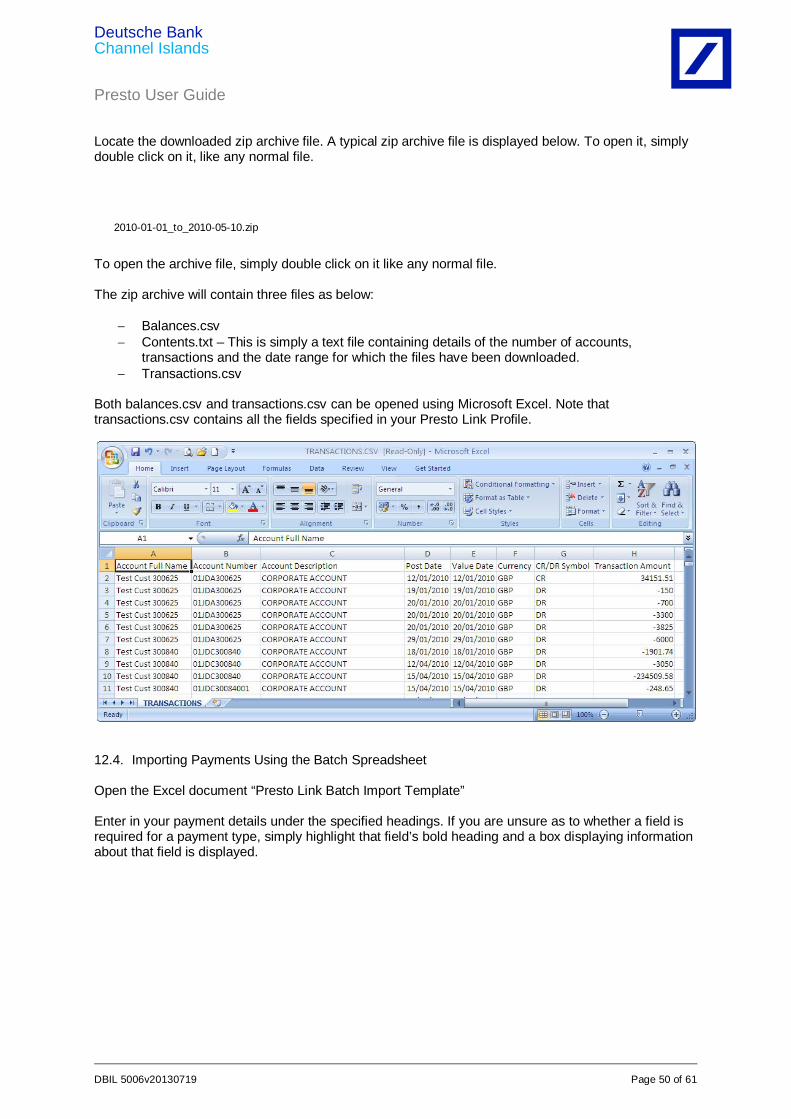
Locate the downloaded zip archive file. A typical zip archive file is displayed below. To open it, simply double click on it, like any normal file.
2010-01-01_to_2010-05-10.zip To open the archive file, simply double click on it like any normal file. The zip archive will contain three files as below:
Balances.csv Contents.txt – This is simply a text file containing details of the number of accounts,
transactions and the date range for which the files have been downloaded. Transactions.csv
Both balances.csv and transactions.csv can be opened using Microsoft Excel. Note that transactions.csv contains all the fields specified in your Presto Link Profile.
12.4. Importing Payments Using the Batch Spreadsheet Open the Excel document “Presto Link Batch Import Template” Enter in your payment details under the specified headings. If you are unsure as to whether a field is required for a payment type, simply highlight that field’s bold heading and a box displaying information about that field is displayed.
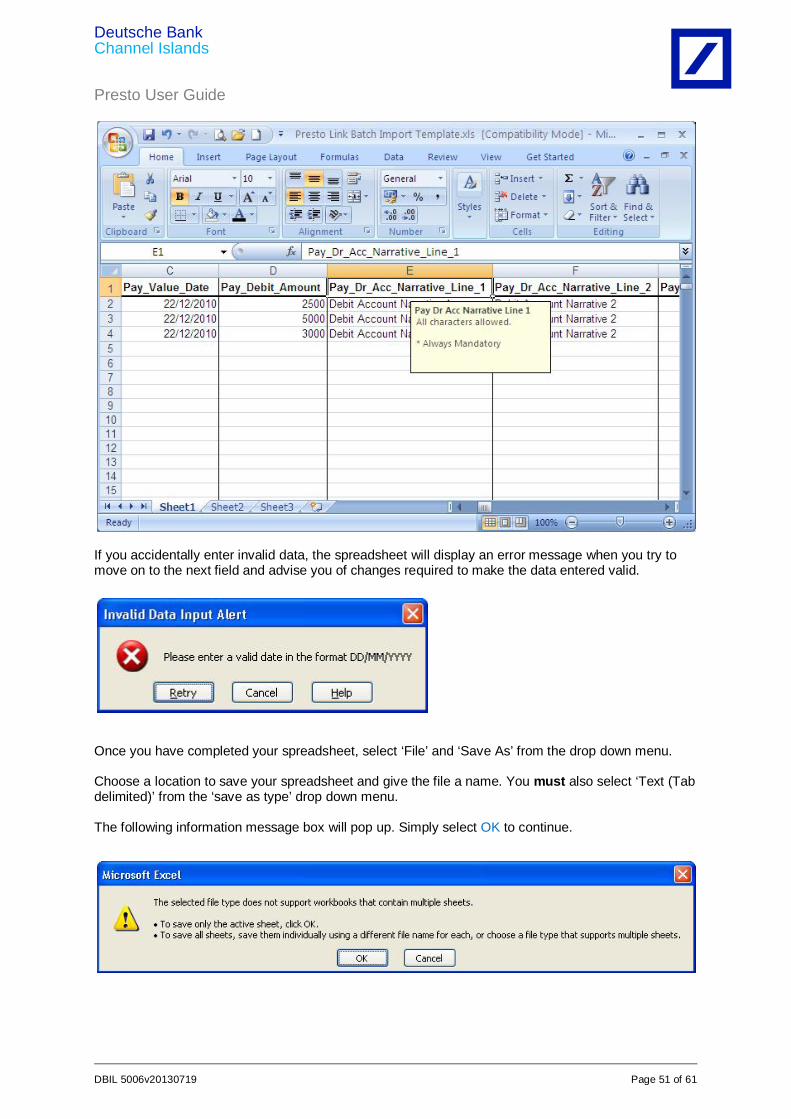
Deutsche Bank Channel Islands Presto User Guide
DBIL 5006v20130719 Page 51 of 61
If you accidentally enter invalid data, the spreadsheet will display an error message when you try to move on to the next field and advise you of changes required to make the data entered valid.
Once you have completed your spreadsheet, select ‘File’ and ‘Save As’ from the drop down menu. Choose a location to save your spreadsheet and give the file a name. You must also select ‘Text (Tab delimited)’ from the ‘save as type’ drop down menu. The following information message box will pop up. Simply select OK to continue.
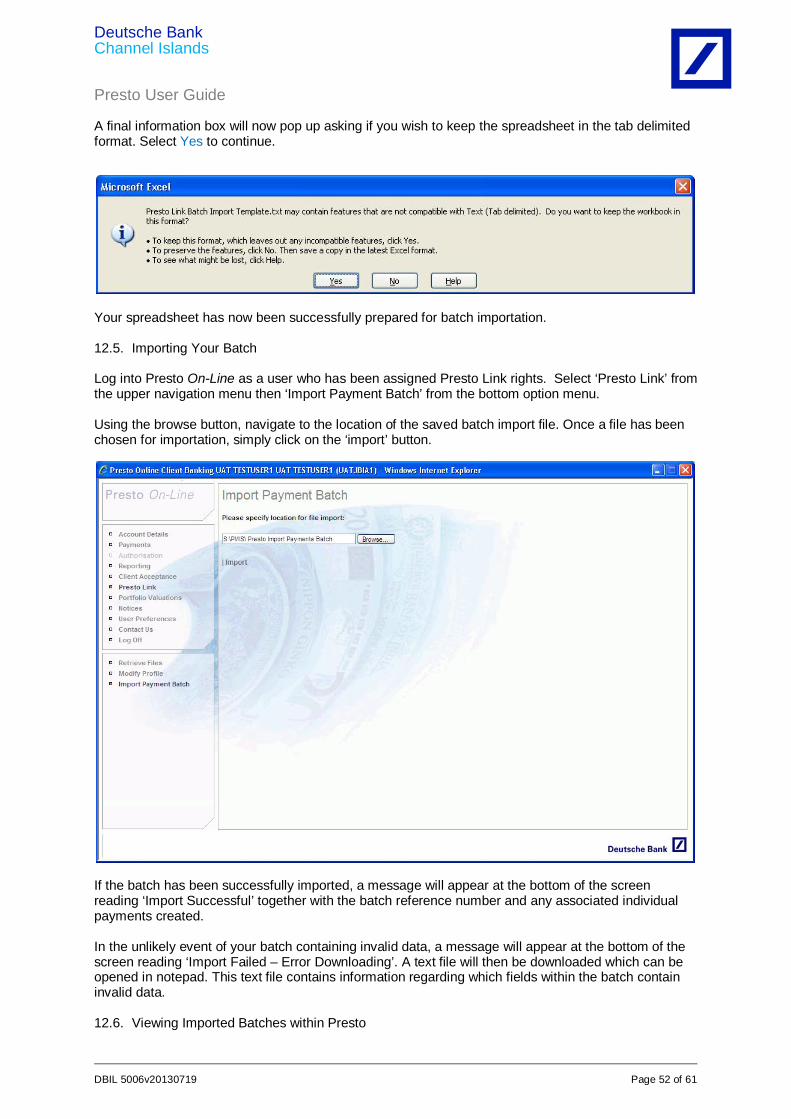
Deutsche Bank Channel Islands Presto User Guide
DBIL 5006v20130719 Page 52 of 61
A final information box will now pop up asking if you wish to keep the spreadsheet in the tab delimited format. Select Yes to continue.
Your spreadsheet has now been successfully prepared for batch importation. 12.5. Importing Your Batch Log into Presto On-Line as a user who has been assigned Presto Link rights. Select ‘Presto Link’ from the upper navigation menu then ‘Import Payment Batch’ from the bottom option menu. Using the browse button, navigate to the location of the saved batch import file. Once a file has been chosen for importation, simply click on the ‘import’ button.
If the batch has been successfully imported, a message will appear at the bottom of the screen reading ‘Import Successful’ together with the batch reference number and any associated individual payments created. In the unlikely event of your batch containing invalid data, a message will appear at the bottom of the screen reading ‘Import Failed – Error Downloading’. A text file will then be downloaded which can be opened in notepad. This text file contains information regarding which fields within the batch contain invalid data. 12.6. Viewing Imported Batches within Presto
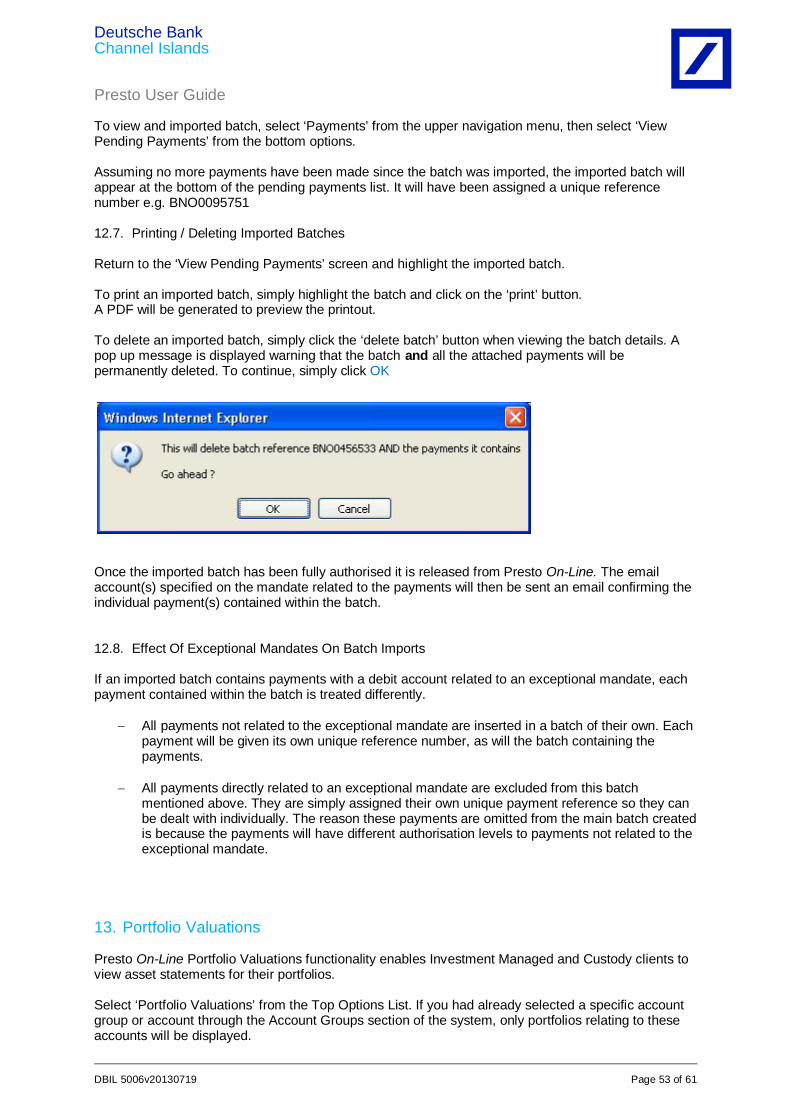
Deutsche Bank Channel Islands Presto User Guide
DBIL 5006v20130719 Page 53 of 61
To view and imported batch, select ‘Payments’ from the upper navigation menu, then select ‘View Pending Payments’ from the bottom options. Assuming no more payments have been made since the batch was imported, the imported batch will appear at the bottom of the pending payments list. It will have been assigned a unique reference number e.g. BNO0095751 12.7. Printing / Deleting Imported Batches Return to the ‘View Pending Payments’ screen and highlight the imported batch. To print an imported batch, simply highlight the batch and click on the ‘print’ button. A PDF will be generated to preview the printout. To delete an imported batch, simply click the ‘delete batch’ button when viewing the batch details. A pop up message is displayed warning that the batch and all the attached payments will be permanently deleted. To continue, simply click OK
Once the imported batch has been fully authorised it is released from Presto On-Line. The email account(s) specified on the mandate related to the payments will then be sent an email confirming the individual payment(s) contained within the batch. 12.8. Effect Of Exceptional Mandates On Batch Imports If an imported batch contains payments with a debit account related to an exceptional mandate, each payment contained within the batch is treated differently.
All payments not related to the exceptional mandate are inserted in a batch of their own. Each payment will be given its own unique reference number, as will the batch containing the payments.
All payments directly related to an exceptional mandate are excluded from this batch
mentioned above. They are simply assigned their own unique payment reference so they can be dealt with individually. The reason these payments are omitted from the main batch created is because the payments will have different authorisation levels to payments not related to the exceptional mandate.
13. Portfolio Valuations Presto On-Line Portfolio Valuations functionality enables Investment Managed and Custody clients to view asset statements for their portfolios. Select ‘Portfolio Valuations’ from the Top Options List. If you had already selected a specific account group or account through the Account Groups section of the system, only portfolios relating to these accounts will be displayed.
Deutsche Bank Channel Islands Presto User Guide
DBIL 5006v20130719 Page 54 of 61
Alternatively, if no account is selected prior to selecting Portfolio Valuations from the upper navigation menu, all available portfolios will be displayed. Select a portfolio and click View Valuation Dates to view a list of valuation dates available. Either select a valuation and click on the PDF icon or double click on the required valuation to launch a PDF which can be printed or saved. Please advise your Client Advisor if you wish to use this function. 14. Notices The DB Notices section provides important announcements, for example changes to cut-off times over Bank Holidays, changes to the Deutsche Bank Sensitive Countries and Industries list, and links to documentation such as standard settlement instructions. Any stored searches that you have created can also be launched from the Notices screen. 15. User Preferences Select User Preferences from the Top Option List. The following Options are available.
- Login Sequence - Customise your login so the most relevant screen appears first when you log in.
Depending on your allocation permissions, there is a choice of:
o Account Details o Payments o Reporting o Presto Link o Authorisation
- Change Password
Please see password section on page 19 of this guide for further information
- Legal Notice Opens a pop-up window containing details of the disclaimer made by Deutsche Bank.
- Useful Links Opens a pop-up window of website links for the Deutsche Bank Group and Adobe Acrobat.
16. Troubleshooting User Guide 16.1. Contents
Invalid Login Details Entered Unable to Type Invalid Passcode Caching Issues Determining Your Internet Browser Setting Presto On-Line as a Trusted Site Printing Problems Additional Assistance
16.2. Invalid Login Details Entered
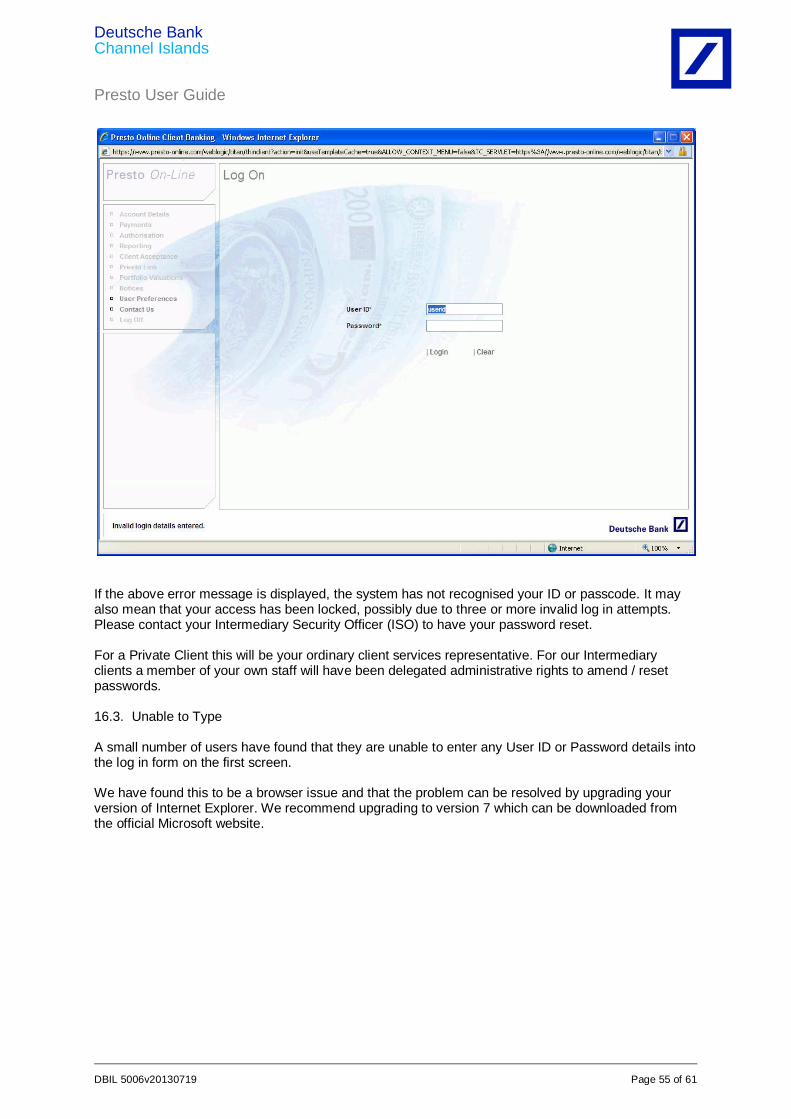
Deutsche Bank Channel Islands Presto User Guide
DBIL 5006v20130719 Page 55 of 61
If the above error message is displayed, the system has not recognised your ID or passcode. It may also mean that your access has been locked, possibly due to three or more invalid log in attempts. Please contact your Intermediary Security Officer (ISO) to have your password reset. For a Private Client this will be your ordinary client services representative. For our Intermediary clients a member of your own staff will have been delegated administrative rights to amend / reset passwords. 16.3. Unable to Type A small number of users have found that they are unable to enter any User ID or Password details into the log in form on the first screen. We have found this to be a browser issue and that the problem can be resolved by upgrading your version of Internet Explorer. We recommend upgrading to version 7 which can be downloaded from the official Microsoft website.
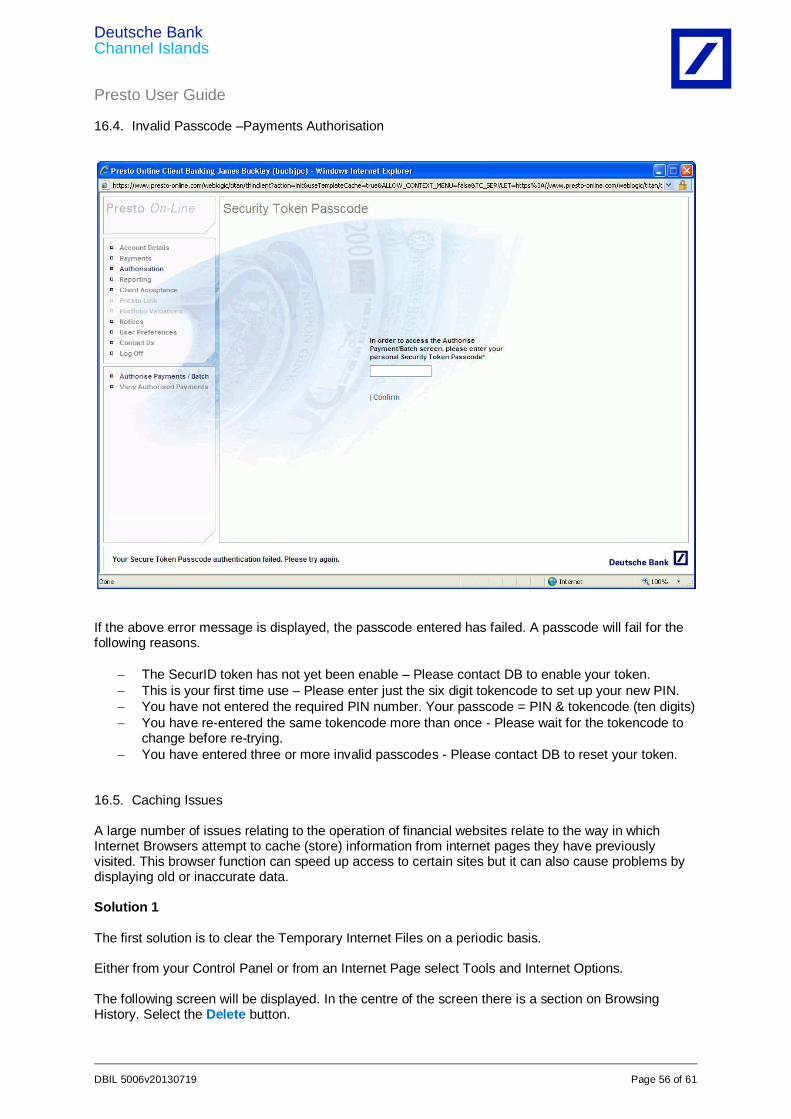
Deutsche Bank Channel Islands Presto User Guide
DBIL 5006v20130719 Page 56 of 61
16.4. Invalid Passcode –Payments Authorisation
If the above error message is displayed, the passcode entered has failed. A passcode will fail for the following reasons.
The SecurID token has not yet been enable – Please contact DB to enable your token. This is your first time use – Please enter just the six digit tokencode to set up your new PIN. You have not entered the required PIN number. Your passcode = PIN & tokencode (ten digits) You have re-entered the same tokencode more than once - Please wait for the tokencode to
change before re-trying. You have entered three or more invalid passcodes - Please contact DB to reset your token.
16.5. Caching Issues A large number of issues relating to the operation of financial websites relate to the way in which Internet Browsers attempt to cache (store) information from internet pages they have previously visited. This browser function can speed up access to certain sites but it can also cause problems by displaying old or inaccurate data. Solution 1 The first solution is to clear the Temporary Internet Files on a periodic basis. Either from your Control Panel or from an Internet Page select Tools and Internet Options. The following screen will be displayed. In the centre of the screen there is a section on Browsing History. Select the Delete button.
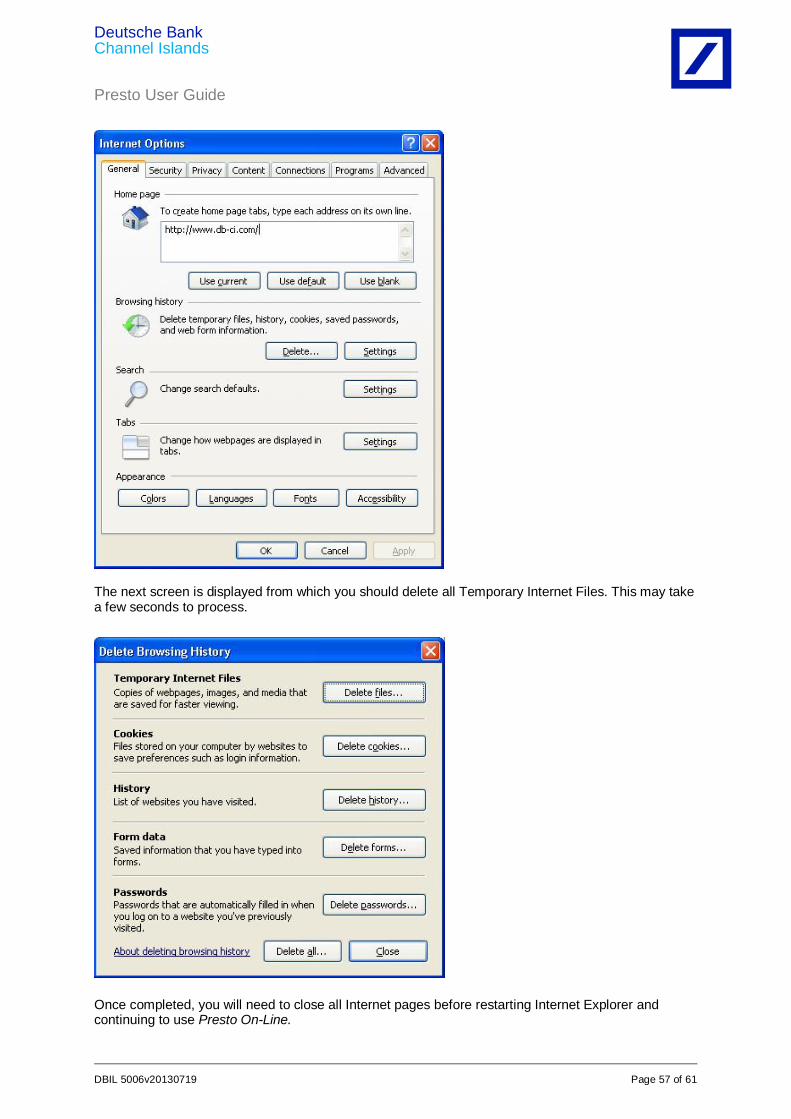
Deutsche Bank Channel Islands Presto User Guide
DBIL 5006v20130719 Page 57 of 61
The next screen is displayed from which you should delete all Temporary Internet Files. This may take a few seconds to process.
Once completed, you will need to close all Internet pages before restarting Internet Explorer and continuing to use Presto On-Line.
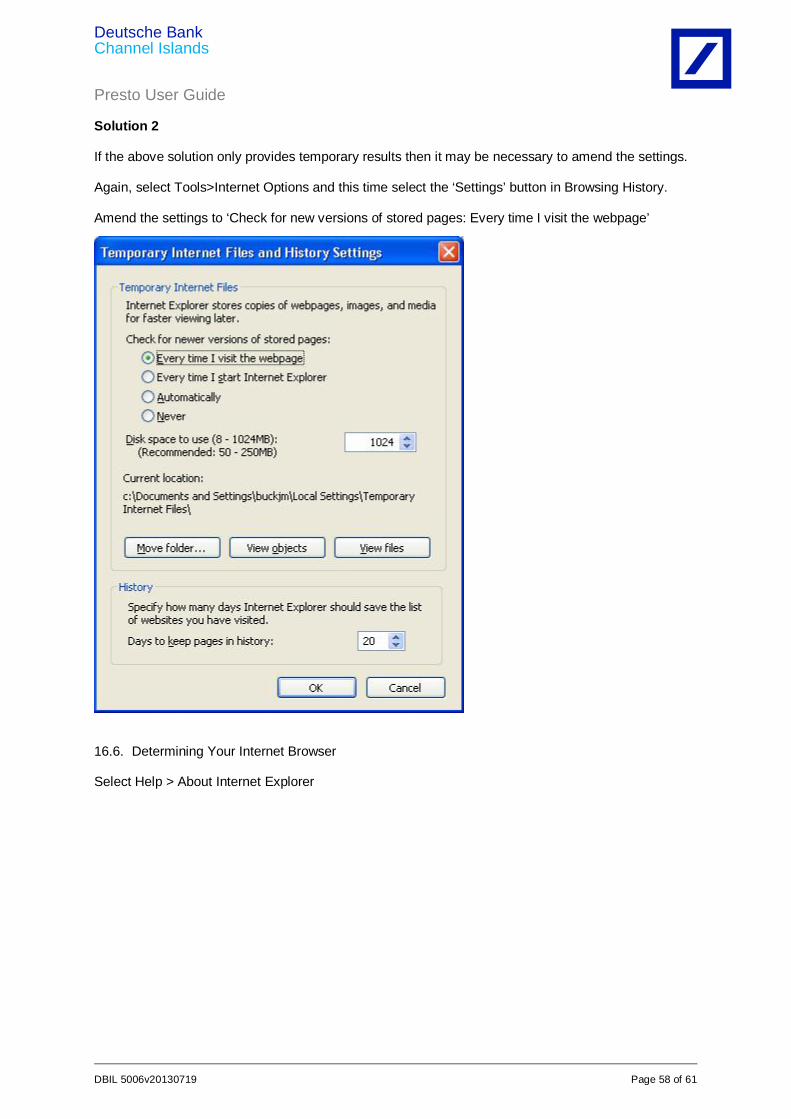
Deutsche Bank Channel Islands Presto User Guide
DBIL 5006v20130719 Page 58 of 61
Solution 2 If the above solution only provides temporary results then it may be necessary to amend the settings. Again, select Tools>Internet Options and this time select the ‘Settings’ button in Browsing History. Amend the settings to ‘Check for new versions of stored pages: Every time I visit the webpage’
16.6. Determining Your Internet Browser Select Help > About Internet Explorer

Deutsche Bank Channel Islands Presto User Guide
DBIL 5006v20130719 Page 59 of 61
The next screen will detail the Version in the top line. Please note that the system is only supported for Internet Explorer 5.5 and above. If you are operating a different version please visit the official Microsoft website to download the latest version.
17. Additional Assistance 17.1. Setting Presto On-Line as a Trusted Site
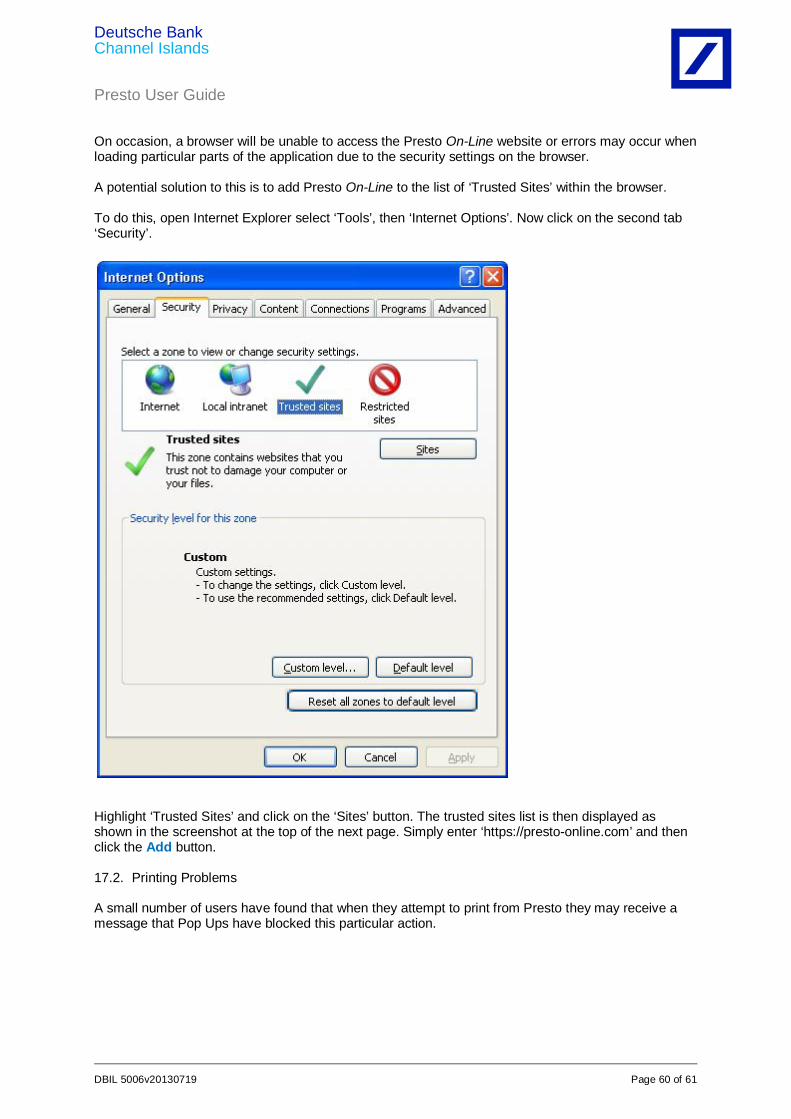
Deutsche Bank Channel Islands Presto User Guide
DBIL 5006v20130719 Page 60 of 61
On occasion, a browser will be unable to access the Presto On-Line website or errors may occur when loading particular parts of the application due to the security settings on the browser. A potential solution to this is to add Presto On-Line to the list of ‘Trusted Sites’ within the browser. To do this, open Internet Explorer select ‘Tools’, then ‘Internet Options’. Now click on the second tab ‘Security’.
Highlight ‘Trusted Sites’ and click on the ‘Sites’ button. The trusted sites list is then displayed as shown in the screenshot at the top of the next page. Simply enter ‘https://presto-online.com’ and then click the Add button. 17.2. Printing Problems A small number of users have found that when they attempt to print from Presto they may receive a message that Pop Ups have blocked this particular action.
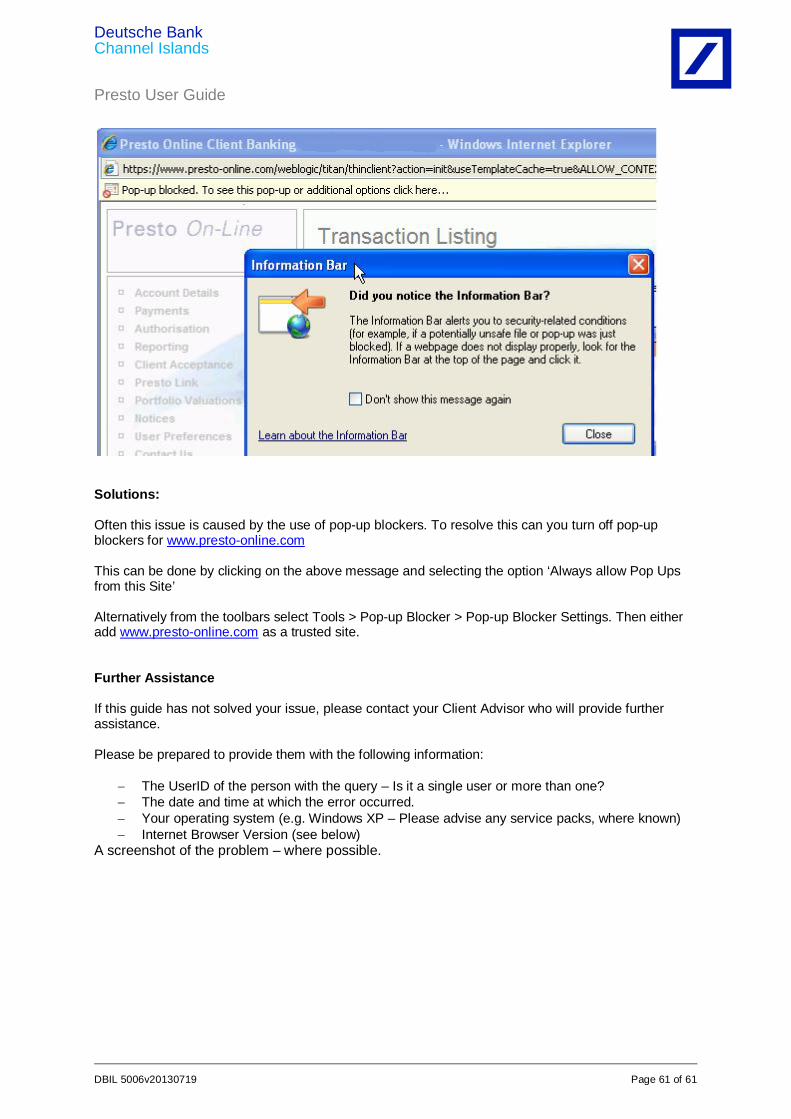
Deutsche Bank Channel Islands Presto User Guide
DBIL 5006v20130719 Page 61 of 61
Solutions: Often this issue is caused by the use of pop-up blockers. To resolve this can you turn off pop-up blockers for www.presto-online.com This can be done by clicking on the above message and selecting the option ‘Always allow Pop Ups from this Site’ Alternatively from the toolbars select Tools > Pop-up Blocker > Pop-up Blocker Settings. Then either add www.presto-online.com as a trusted site. Further Assistance If this guide has not solved your issue, please contact your Client Advisor who will provide further assistance. Please be prepared to provide them with the following information:
The UserID of the person with the query – Is it a single user or more than one? The date and time at which the error occurred. Your operating system (e.g. Windows XP – Please advise any service packs, where known) Internet Browser Version (see below)
A screenshot of the problem – where possible.