printed in germany
TRANSCRIPT

WKD 471 620 2,1 M 7/82 Edition 1983 © Dr. Ing. h. c. F. Porsche Aktiengesellschaft Reprint, even if partially, is not allowed without our prior approval. Printed in Germany Variations of equipment and engineering as com- pared to the figures and descriptions in this Driver's Manual are because of the continuous developments of our vehicles. Because of different laws in the individual countries, the equipment of your vehicle may slightly differ from the description. Some of the equipment described in this Driver’s Manual is not standard. Your authorized Porsche dealer will be pleased to advise you on later installa- tion possibilities. If your Porsche is fitted with equipment that is not described hare, please consult your Porsche dealer.

Judging by the car you have chosen, you are a motorist of a special breed. Although you are probably no novice when it comes to automobiles, we have compiled much useful informa- tion. Always have your Driver's Man- ual with you when you take
your car to an authorized dealer for service. .. it provides your Service Adviser with the information he needs and enables him to make the necessary entries for you. Please read this manual before you drive your new Porsche. Acquaint yourself with its
features, and know how to operate it more safely... because knowing your Porsche enhances the pleasure of driving it. We wish you many miles of safe and pleasurable driving in your

Index A/B Air conditioner Air filter replacement Alarm system Alternator warning lamp Aluminium wheels Antenna, cleaning Ashtray Automatic transmission Axle alignment Backrest adjustment Battery Brake booster - fluid - pads - pedal Brakes Brake warning light Breakdown assistance Break-in instructions Bulb replacement Bulbs
28,29 51 10 19 42 42
24, 66 33-36
77 11
43, 61 30
52, 74 31, 32
30 78 22
45-70 31
62-66 60
C Car care instructions Carpets Cavity protection
40-42 42 45
Changing bulbs Changing engine oil Chassis number Cigarette lighter Cleaning car Clock Clutch pedal Collapsible tire Combi instrument Cooling system
62-66 47
6, 87 22
4G-42 21 30 58
19, 20 43, 47-49
D/E Dimensions Dimmer Dipstick Direction indicator-dimmer headlight flasher switch Doorlocks Draining coolant Econometer Electric window controls Emergency equipment - flasher Engine hood Engine oil - oil level - serial number - starting
79 16 46
16
9, 43 49 18 9
45-69 22 37
43,46,47,74,75 46 7
31
F Fan 47
Filling capacities Filling up Fog lights Fresh air nozzles Fuel consumption Fuel gauge Fuel tank Fuses
74 53 22 27 72
19, 20 53 59
G/H Gas station information Gear-shifting Glove compartment Guarantee Handbrake Hatchback Headlight adjustment - dimmer - flasher - washer Heater Hood releases
95-97 32 24
92,93 30 38 67 16 16 23 27
37, 38
I/J/K Identification plate Ignition lock Interior light Instrument panel Jack Jack ports Keys
7 15
17, 66 14
45,56,57 56 8
Page 4
L/M Light switch Lock-up wheel nuts Long-life guarantee Loudspeaker balance control Luggage cover Maintenance hints - record - schedule Maximum engine speeds
16 57
92, 93 26 38
47-70 82, 83 90, 19 31,32
O/P Oil change - consumption - filter change - pressure gauge Oils, recommended Paint code number Paint damage Parking brake - light Performance Polishing Pop-up headlights Power assisted steering Power train
47 72 47 21 74 7
41 30 16 78 40 68 50 73
R Rack load Rear hood
76 38
Rear view mirrors Rear window defogger - wiper Refuelling Relays Removable roof Reservoirs, water Roof load Running-in
25 22 23 53 59 39
43, 53 76 31
S Safe-driving hints Safety belts Seats Service schedule Snow chains Spare wheel Spark plugs Speed changes Speedometer Spots and stains Starting Steering lock Storing your car Sun visors
8 12, 13
11 90, 91
44 56-58
72 32 18 41 31 15 42 24
T/U Tachometer Technical data Tyre pressures
18 72-83 77, 97
Tool kit Towing Transmission diagram - oil level Turn signal-dimmer headlight flasher switch Underseal Upholstery
45 69
82, 83 51
16 41 42
V/W Valve clearance V-belt Ventilation Voltmeter Warning lights Washing Water reservoirs Weights Wheel adjustment Wheel nuts Wheel change Wheel rims Windshield wipers Winter operation Winter tires
72 72 27 27
19, 20 40
43, 53 76 77
57, 58 57, 58
77 17, 23 43, 44 40, 77
Page 5

Location of Data Bank, Identification Plate, Chassis Serial Number, Paint and Engine Number
When ordering spare parts or submitting inquiries, always quote chassis and engi- ne number to ensure correct and prompt service.
Data Bank
The data bank is mounted on the rear body panel in the trunk. It is located next to the left-hand tail light, under the carpet.
Chassis number The chassis number is stamped on the rear right side of the engine compartment in the front of the battery
Page 6
Identification plate
The identification plate is riveted on the right side of the engine compartment, on the right of the battery.
Paint number The paint number is located on the left hand side in the engine compartment.
Engine number
The engine number is stamped on the left, in direction of travel, of the crankcase, next to the clutch housing.
Page 7

Before you start off, carefully check the following points: Air pressure and condition of all tires. Cleanliness of headlight lenses, rear lights, turn signals and windows. Function of headlights, brake lights and turn signals with the ignition switched on. Ample fuel supply. Adjustment of inside and outside rear view mirrors for perfect rear view. Fastening of seat belts - also for your passengers.
a) key for doors, ignition jack, hatchback and tank lock b) key for glove compartment
Key for doors, Ignition lock, hatchback and tank lock Because of the symmetrical shape of the key shaft, there is no "wrong" way of inserting the key with the black plastic handle in the locks.
Do not forget to have the oil and coolant levels checked regularly, even between normal maintenance periods
Keys Two sets of keys come with your Porsche. Do not remove the key from the steering lock while you are driving or as the car is rolling to a stop. The steering column is locked when you remove the key, and you will not be able to steer the car.
Key number The key number of the ignition key is impressed on a plastic tag which comes with the keys. Detach this tag and keep it in a safe place. The key numbers of the other keys are embossed on the key heads. It is a good ides to record your key numbers and keep them with your car papers. If you should lose a key, provide your authorized dealer with the key number to obtain a duplicate key.
Page 8
Doors Squeeze trigger in door handle when opening door. To lock and unlock doors from the outside - All doors can be locked with the ignition key.
- The passenger door can be locked with-
out a key by first depressing the locking knob and then closing the door.
- The driver's door can only be locked from the outside with the key. This precaution was taken to prevent locking the driver's door while the key is still inside the car.
To lock, unlock and open doors from the inside
- Lock or unlock by depressing or raising the locking knob.
- Open door by pulling inside door handle located above the armrest.
When driving, the locking button should not be depressed, so that in an emergency the door can be opened from the outside.
Electric Window Controls Both door windows are raised and lowered by tumbler switches in the door panels. By means of the front switch it is possible to operate the passenger side window. The windows only function with the ignition switched on Pos. 1. Caution! Due to the danger of injury when the windows are opened and closed by an uninstructed occupant (children), the driver should always remove the ignition key even when leaving the car just briefly.
Page 9

Alarm System If your vehicle is equipped with an alarm system you will receive two additional keys to operate the system. The alarm system can only be switched on or off with these keys. The lock for the alarm system is mounted behind the drivers side door lock. To activate the, alarm system the key must be turned 90° to the right. If the drivers side or passengers door or the front bonnet or the
rear hood are opened, the alarm horn will sound for approx. 30 seconds. The engine cannot be started when the alarm system is switched on. Should the alarm system be set off again the alarm horn will sound once more for approx. 30 seconds. To switch off the alarm system turn the key back to it's original position.
Page 10
Seat Adjustment In longitudinal direction the seats can be individually adjusted. After pulling the catch on the outer side of the seat, the seat can be adjusted forward or backward.
Seat Rest Lock In order to prevent the back rest from tilting forward when suddenly stepping on the brake, the back rest is locked. To release pull up the button provided in the side of the rest.
Back Seats - Luggage Compartment The back seat rests can be tilted forward which allows additional luggage room. By pulling the loop the lock is released and the back rest can be tilted forward.
Do not attempt to adjust the driver's seat while driving! Your se at may suddenly jerk forward or backward causing loss of control.
Adjusting the Back Rest By turning the hand wheel on the outer side of the seat, the back rest can be continuously adjusted to rest position.
Luggage Compartment Light Is to be found on the left hand side of the luggage compartment. It is switched in the same manner as the interior light and can be switched on or off independently from the vehicle lighting system.
Page 11

Inertia Reel Safety Belt
The inertia reel safety belt provides safety with freedom of movement. It adjusts automatically to your size and movements as long as the pull on the belt is slow. A sudden motion locks the belt. The automatic locking mechanism in the retractor will also lock the belt when driving down a steep hill or in a curve, and when the car's speed is reduced. For your and your passenger's protection, we recommend you wear safety belts at all times, while the car is in motion. Shoulder belts should not be worn by per- sons less then approximately 4' 7" (140 cm)
in height. Loosely worn clothing interferes with the perfect seating of the belt. Therefore, you should not wear an overcoat. Comfortable seating and freedom of your motion are important for your ease and safety as well. Make sure your shoulder strap does not press against solid or fragile items such as spectacles, ball point pen, pipe, lighter etc. When you drive in foreign countries remember that the regulations of same of them require belts to be fastened.
Fastening the belt:
Sit back in your seat, with your body supported by the backrest. Grasp the belt tongue and pull the belt in a slow continuous motion across your chest and lap. Insert the belt tongue into the anchor housing on the inboard side of the seat. Push down until it is securely locked with an audible click. Be sure the belts are not twisted.
Page 12
Adjusting the belt: Remove slack by pulling the shoulder section of the belt in direction of the arrow to make sure the belt is drawn snug around the hips. Do not wear the belts loosely. Do not strap in more than one person with each belt. Releasing the belt:
To unfasten the belt, push in the red release marked PRESS on the anchor housing. The belt tongue will spring out of the anchor housing.
To store the belt, guide the belt tongue to its stowed
position on the door post. With the movable stop you can mark the section across your lap and at the same time keep the belt tongue from gliding down when the belt is wound up. Warning. Please do not make any alterations or additions. In case of doubt please consult your authorized dealer or, if you live in Great Britain, contact Porsche Cars Great Britain Ltd. 26-30 Richfield Ave. Reading RG 1 8 PH Berkshire Tel. (0734) 595411 Telex 849180
Rear Seat Belts
The rear seats are fitted with manual lap belts. Do not twist the belt when fastening. To release, press the red button. Make sure that the belts are always fully retracted when not in use. This will prevent them becoming dirty and avoid unnecessary damage to the belts themselves. You should check your seat belts regularly for signs of damage to the webbing. Make sure that the locks and anchorage points are in good condition. If the belts have been subjected to high loads or stretched in an accident, have them replaced in the interests of your own safety.
Page 13

1 Side window ventilation 2 Turn signal/headlight dimmer lever 3 Combi-instrument 4 Speedometer 5 Tachometer 6 Wiper/washer lever 7 Oil pressure gauge 8 Clock/Air Conditioning
9 Voltmeter/Clock 10 Fresh air nozzles 11 Glove compartment 12 Engine Hood 13 Light switch 14 Horn 15 Ignition/steering lock 16 Rear window defogger switch
17 Emergency flasher switch 18 Fog light switch/rear fog light switch 19 Speaker Balance Control 20 Blower switch 21 Cigarette lighter 22 Heating and ventilation control levers 23 Brake warning light
Page 14
l - Ignition on. All electric circuits can be switched on. With the engine stopped, the red alternator and red oil pressure signal lamps will light up.
2 -The starter is operated by turning the ignition key to the right. As soon as the engine runs, release the ignition key so that it can return automatically to "Ignition on" position. With the engine running, the signal lamps for oil pressure and alternator die out. While the starter is cranking the engine, the main circuits (headlamp, dimmer and wiper-washer) are interrupted. The radio functions in every ignition lock position when the ignition key is inserted. Do not forget to remove the ignition key when leaving the vehicle
The steering column will lock when you remove the key. Therefore do not remove the key while you are driving or as the car is rolling to a stop. In your own interest, always make sure that the Ignition key is withdrawn and the steering has correctly snapped in when you leave the car. Check this by turning the steering wheel slightly to the left and to the right. Never start or let the engine run in an enclosed unventilated area. Exhaust fumes from the engine contain carbon monoxide which is colorless and odorless. Carbon monoxide, however, is a very harmful gas, and may be fatal if inhaled.
Ignition/Steering Lock The ignition key has 3 positions:
0 -
The steering is blocked by the steering lock: all circuits wired through the ignition are switched off. The ignition key can only be withdrawn in the "O" position. When the ignition key is returned to "O" position the steering lock will not engage unless the key is withdrawn. In this position, the parking light can be switched on via the blinker lever.
The starter should be operated for not more than 10 to 15 seconds. If necessary, repeat starting procedure after a short interval of approx. 10 seconds. The ignition key must be returned to position 1 first because the starter non-repeat lock in the switch prevents the starter from being operated while the engine is running.
See also Starting Hints and Break-in Rules.
Page 15

If the lever is moved only as far as the point of resistance, the direction indicators operate until the lever is released. Failure of a direction indicator is indicated by a quicker flasher pulse of the indicator lamp. The direction indicators operate only with the ignition switched an. With the ignition key withdrawn, the AH parking light is on in position "AH direction indicator" and the LH parking light in position "LH direction indicator". For parking light the front side marker and rear light of the corresponding side light up.
Light Switch (two-stage)
Parking light - 1st stop Headlights - 2nd stop (with ignition on) The rear lights. the license plate and instrument panel lights are on in either position; blue indicator light with high beam is an. The retractable headlights come out at the second stop. Instrument lamps The instrument lighting comes on as soon as the vehicle lights are turned on. The brightness can be infinitely varied by turning the knurled knob.
Direction Indicator/Headlight Dimmer/Headlight Flasher Switch This switch controls tour operations: Operating headlight flasher. main beam and dimmed light. direction indicators, and parking lights. Direction indicator switch Move lever upward past the point of resistance: AH direction indicator flashes. Move lever downward past the point of resistance: LH direction indicator flashes.
Main beam and dimming
(light switch in 2nd stop) Move the direction indicator switch towards the steering wheel. A relay switches from dipped to high beam or vice versa. The blue indicator light in the combi-instrument comes on with the high beam. Headlight flasher The headlight flasher operates by slightly pulling the lever towards the steering wheel (even if the vehicle lighting is 011) and continues operating as long as actuated.
0 - Additional driving lights only
1 - Fog lights only
2 - No headlight flasher, only switching high/low beam.
Page 16
Windshield Wiper/Washer Lever
Interior Light
The windshield wiper/washer switch has three positions:
1 - Low wiping speed
2 - High wiping speed
3 - Intermittent wiper operation (about every 10 seconds). If the lever is pulled towards the steering wheel in the "O" position the screen washer pump and the wipers are actuated. After releasing the lever the wiper completes several strokes to dry the screen.
The electric windshield washer system and wipers are actuated by pulling the lever toward the steering wheel. Before operating the wiper/washer system, the windshield must be sufficiently wet to prevent the glass surface from being scratched. Check wiper blades frequently and replace at least once a year.
The interior light is controlled via the button. Control positions: a) Lamp lights continuously b) Lamp switched off c) Lamp lights when openings door.
Page 17

Econometer
Speedometer The upper odometer records total miles driven. The dally mileage indicator can be reset to zero at any time via a
reset button.
Tachometer The transistorized tachometer operates on the pulse count principle and indicates the engine speed in 1000 rpm. The mark on the tachometer dial has been provided as a reminder for maximum permissible engine speed. Do not exceed 6,500 rpm. The control unit cuts off the fuel supply at approx. 6,500 rpm to prevent the engine being over revved.
The econometer is integrated into the upper part of the tachometer. When the car is stationary or travelling at speeds up to approx. 30 km/h, the econometer indicates momentary fuel consumption in liters per hour. At higher speeds, regardless of the speed selected or automatic transmission range, it shows the consumption in liters per 100 km. The econometer indicates how external influences and/or your personal driving style affect fuel consumption, e. g., frequent acceleration or driving the car mainly at high revs.
Page 18
Needle in center striped field - normal Under normal driving conditions, needle should remain in center field. The needle may reach the red field, especially at high engine loads, but should go back when engine load is reduced. Needle in right field - warning If needle enters the right field (which may be due to high outside temperatures, continuous mountain and city driving, trailer towing), the engine is overheating. Reduce speed and engine rpm. If the needle does not return to the center field, the radiator fan may not be working to provide sufficient
engine cooling. Pull off the road and turn off the engine. The fan should still be running for a while.
If the coolant level is normal, you may proceed to the nearest workshop. Avoid idling speed and stop-an d-go driving. But with an inoperative fan, the coolant will heat up again. When the needle enters the right field, stop again and let the engine cool down before you continue driving. If you do not feel secure driving, contact your dealer to have the cause of overheating located and corrected.
Combi-Instrument The combi-instrument contains the fuel and coolant temperature gauges as well as the warning lamps for the alternator, oil pressure, fuel reserve, high beam, blinker and hand brake.
Water temperature indicator Needle in left field - engine is cold
Avoid high speeds and high engine rpm. Do not lug the engine.
NOTE: The radiator fan switches on automatically when the coolant reaches 92° C (198° F) and continues running - even with engine turned off - until the coolant temperature has dropped to 87° C (189° F). If the fan is not working, the fuse for the fan may be burned, or the relay may be defective. See "Fuses and Relays". After the engine has cooled down, check the coolant level (see "Cooling System"). If the coolant level is low, top it up with water. Check for possible leaks.
Alternator Warning Lamp
This lamp enables you to monitor the function of the alternator. It lights up when the ignition is switched on and goes out when the engine reaches a certain speed. If the lamp flickers or suddenly comes on while you are driving, the Polyrib belt may be loose or broken. However, the fault may be in the voltage regulator or the alternator itself. Normally you can continue your journey, but if possible you should only drive as far as the nearest specialist workshop. Do not switch on any current consumers unless it is absolutely necessary.
Page 19

Oil Pressure Warning Light
The oil pressure warning light comes on when the ignition is turned on, and goes out when the engine is started and the correct oil pressure has been reached. It the light comes on during driving stop the engine and check the oil level. If the oil level is correct. The next workshop should be called in to rectify the fault. An occasional flickering of the warning light when the engine is hot, at idle speed, is normal and no cause for concern.
Fuel Reserve Warning Light
The light comes on when about 9 liter (1.98 Imp. gals.) of fuel remain.
Fuel Gauge The fuel gauge indicates the amount of fuel in the tank. If the needle enters the field on the left, and the reserve warning light comes on, you should refuel.
Hand Brake Warning Light
The warning light flashes with the ignition on until the handbrake is fully released. The Brake Warning Light is in the middle console.
Turn Signal Indicator Light
The turn signal light will flash when you operate the turn signal lever. If a turn signal fails, the control light flashes at about twice the normal frequency. Have your dealer check and repair it for you.
High Beam Indicator
The high beam indicator comes on in the combi-instrument when the headlights are on high beam, or when the headlight flasher is operated. It goes out when the headlights are dipped.
Page 20
Oil Pressure Gauge The lubricating oil pressure is indicated in bar pressure. The oil pressure should be approx. 4 bar at 5000 rpm, with the engine at normal operating temperature. A drop in oil pressure at high temperatures is normal. At idle speed, with the engine oil hot, it is permissible for the red warning light to light up - this does not indicate any loss of engine reliability. However, if the oil pressure drops suddenly while you are driving, or if the warning light comes an, move off the road and stop the
engine immediately. Check the engine oil level. If the oil level is normal, contact the nearest dealer.
Clock The clock can be set to the correct time by pushing and turning the button in the centre of the clock.
Voltmeter With the engine running and headlights, rear window defogger or other loads turned an, the needle should normally be between 12 and 14 volts. If the reading is constantly below the 12 volt mark, the charging system should be checked. If necessary, the battery should be replaced. A temporary voltage decrease below 12 volt when starting the engine is normal. The voltmeter is not installed, if your Porsche is equipped with an air conditioner.
Page 21

Important: Note during foreign travel that some countries have special regulations on the use of fog lights.
Cigarette Lighter
Push the knob in. When ready for use, the lighter will snap back. With the cigarette lighter removed, the socket may be used for small electrical appliances, such as electric light or compressor. The maximum rating of such equipment should not exceed 120 W/12 Volt.
Brake Warning Light
The warning light comes on when the ignition is turned on and must go out when the engine is started. If it does not come on when you turn on the ignition, have the fault rectified without delay to ensure that the light can perform its monitoring and warning function reliably. If the warning light comes on during a journey, it indicates that either the brake fluid level is too low or, if accompanied by usually long brake pedal travel, one of the two brake circuits has failed. In such a case your stopping distances will also be increased. Pull to the side of the road and carefully test the brakes a few times. If you feel safe and confident enough, drive slowly to the nearest authorized dealer and allow for the change in braking efficiency. Do not drive any longer than absolutely necessary with a faulty brake system.
Rear Window Defogger
Depress the rocker switch. An indicator in the switch lights up when the defogger is on.
Emergency Flasher
If your car is disabled or parked under emergency conditions, depress the switch to make all four turn signals flash simultaneously. The light in the switch flashes at the same frequency. The emergency flasher works independently of the ignition switch position.
Fog Lights / Rear Fog Guard Light
The fog lights and rear fog guard light are operated by a two position rocker switch on the central console. Position 1 - Fog lights only
Position 2 - Fog lights and rear fog guardlight.
A telltale lamp glows in the rocker switch when the fog lights or rear fog guard light are on. If your car is equipped with a rear fog guard light only, it is operated in switch position 1. The switch has only one position in this case.
Page 22
Headlight Washer
To operate the headlight washer, depress and release the switch on the center console. The washer system only operates with the headlights turned on. A separate pump supplies high-pressure water to the spray nozzles located in front of the headlights on the bumper. The high pressure stream soaks the dirt on the headlamp and washes it off. Repeat the wash cycle as necessary to remove heavy dirt accumulation.
Since the system uses a lot of water, a reservoir holding approx. 6.5 liters (1.43 Imp. gals.) is installed. At the same time it supplies the windshield washer with water. Add an anti-freeze cleaning solution before the cold season starts, so that both the headlight washer system and the screen wash r system remain operational at freezing temperatures. Check the cleaning action of the headlight washer system regularly.
Rear Window Wiper
To actuate the wiper, depress the corresponding switch on the center console. To avoid scratching the glass, the rear window should be sufficiently wet before turning on the wiper.
Page 23
Ashtray The ashtray is located on the central panel. To empty remove it by lifting. To put it back make sure the light inlet opening points toward the bulb.
Glove Compartment Open the glove compartment by squeezing both latches together. The glove compartment is lockable after swiveling the Porsche emblem to the left or right. With the car lights turned an, the glove compartment light can be turned on and off.
Sun Visors To avoid dazzling by direct light, the sun visors can be pivoted downwards and also against the side windows. A vanity mirror is provided on the back on the passenger's sun visor.
Page 24
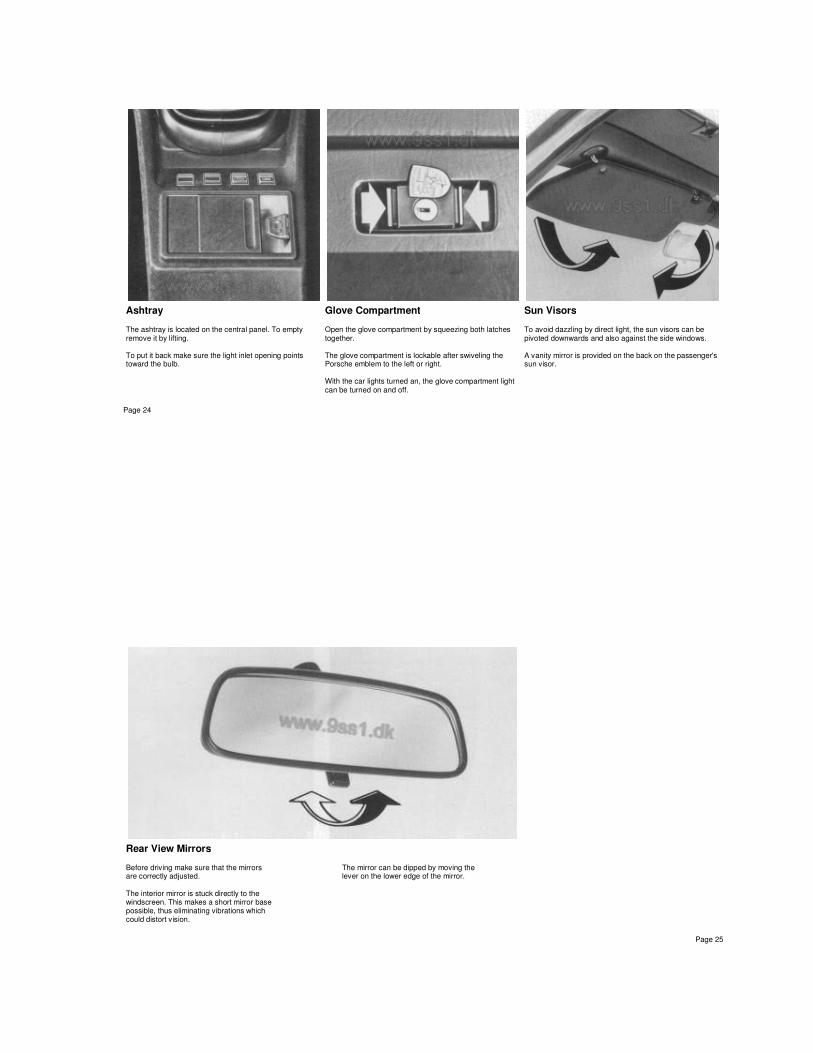
Rear View Mirrors Before driving make sure that the mirrors are correctly adjusted. The interior mirror is stuck directly to the windscreen. This makes a short mirror base possible, thus eliminating vibrations which could distort vision.
The mirror can be dipped by moving the lever on the lower edge of the mirror.
Page 25

Electric Exterior Mirror The electrically adjustable exterior mirror is operated by the switch in the doer panel. The same switch also operates the pas- senger side mirror (optional extra) when the built in rocker switch in the middle console is moved correspondingly. The mirror glass can also the adjusted by hand if necessary. The mirror is also heated electrically when the rear window heating is switched an.
Speaker Balance Control The balance between the front and rear speakers can be adjusted as required by turning the balance control knob.
Page 26
Heating and Ventilation
The fan runs at minimum speed whenever the ignition is on. The upper air distributor revers are indepen- dently adjustable. The upper left-hand lever distributes the air supply to the footwell, center and side outlets. The center and side outlets can be opened or closed manually by means of the revers at the sides of the ventilation grilles. Lever pushed over to left - footwell ventilation. Lever pushed over to right - center and side ventilation when outlets are open. The upper right-hand lever controls the air
supply to the windscreen. Lever pushed over to left - defroster off. Lever pushed over to right - defroster on. The lower lever controls air temperature. Lever pushed over to left - cold (fresh air). Lever pushed over to right - warm (heated air). The rotary fan switch controls three fan speeds.
0 - fan running at minimum speed whenignition is on.
1 - fan running at low speed.
2 - fan running at medium speed.
3 - fan running at high speed. Since the heating depends on the tempera- ture of the engine coolant, it is only fully effective when the engine has reached nor- mal operating temperature. For maximum efficiency of the defroster all the control levers should be pushed as far to the right as possible and the center and side outlets closed. Set the rotary fan switch to 3. When the center and side outlets are opened they will emil warm air.
Side and Center Outlets Side lever in top position - outlet closed. Side lever in bottom position - outlet open. The air stream can be deflected upward and to the side by swiveling the entire outlet.
Page 27

Air Conditioning The air conditioner only works when the engine is running. The air conditioner compressor is switched on by
a magnetic clutch when the system is turned en. The cool-ed air is kept at a constant temperature by a thermostat, which is installed between the evaporator and the air vents. Switching on the air conditioner causes the fresh air fan to be switched off via a relay. Air is drawn from the interior and passed through the evaporator, where it is cooled and demoisturized. The cooled air flows through the middle and side vents back into the passenger compartment. Should the air conditioner cease to function, eg. uncooled air comes out of the vents when the unit is switched on, the air conditioner must be switched off immediately otherwise the compressor may be damaged. Operation:
The temperature and the blower output are controlled by the dual knob in the middle console. The smaller knob switches the system on and off and controls the blower fan speed.
Switch 0 - system switched OFF Switch 1 - system switched ON low fan
speed Switch 2 - intermediate fan speed Switch 3 - high fan speed. The larger knob behind regulates the air temperature. By turning to the right continual increase of the cooling performance.
The optimum cooling effect is achieved by moving the left-hand upper lever as far to the right as it will go, the right hand upper lever and the lower lever as far to the left as they will go and by turning both control knobs of the air conditioner to full power. The centre and side vents must be open and the windows closed. If necessary, fresh air (with adjustable temperature) can be added via the windscreen vents and/or footwell vents: the quantity of air is, however, dependent on the driving speed.
Page 28
If the car has been standing in the sun for a longer period, it is best to open the windows and ventilate the interior for a short time. Once the required temperature has been reached the cooling performance can be reduced.
Air conditioner maintenance The air conditioner must be operated at least once a month for a short period. This is particularly important during the cold season and ensures that the compressor crankshaft seal and the expansion valve are lubricated. To do this switch the temperature control to maximum cooling (right stop). The tension of the compressor Polyrib belt is checked regularly when the car is serviced.
Due to 1055 of coolant it is necessary to check the system coolant level at least once a year. If gas bubbles are visible in the inspection glass for a longer period; with the system switched en, this indicates at there is not enough coolant in the system. Bubbles will be visible for a short period which is normal. If necessary have the system topped up in an appropriately equipped service workshop.
Page 29

To release the parking brake,
- pull the lever slightly up as you depress the re lease button. Keep the button depressed as you lower the lever. The brake warning light will go out after the engine is started and the parking brake is fully released.
Brake Pedal With a correctly adjusted brake and properly working brake system, the pedal travel to the point of brake actuation should be 1 3/16" to 1 9/16" (30 to 40 mm). Whenever the brake pedal travel exceeds this distance, have the brake system checked. Failure of a brake circuit will be indicated by the brake warning light, which will light up when you apply the brake pedal. Brake booster The brake booster only assists braking when the engine is running. If the engine stalls or the brake booster is defective or when towing the car with the engine not running, power assist to the brakes is interrupted. After the reserve power from the brake booster is used up (generally after two or three brake pedal applications), more pressure on the brake pedal is required to bring the car to a halt.
Clutch Pedal The clutch free travel at the clutch pedal is approx. 2.5 mm. The given free play is to be strictly adhered to, because in the event of too little free play the clutch can slip and wear out and by too much free play the clutch will not fully disengage and place excess strain on the synch rotation. If the pedal travel should alter suddenly it is possible that there is a malfunction. Proceed to the next authorized dealer to have the fault rectified.
Parking Brake Lever Parking brake force is mechanically transferred to the rear wheels by means of cables. To set the parking brake,
- press in the release button at the end of the lever as you pull the lever up. The parking brake is engaged as soon as you release the button in the raised lever.
Page 30
Starting the Engine When the engine is cold or hot, component parts being controlled in dependence of the temperature automatically provide the correct fuel-air mixture required for starting. Therefore, special starting instructions are not necessary. Do not allow the engine to warm up in neutral, but drive off immediately while avoiding high rpm and full throttle until the engine has reached its normal operating temperature.
Tips for "Running-in" There are no particular rules to be observed when "running-in" your new Porsche, however the following tips will be helpful in obtaining the optimum running properties. Despite the most modem manufacturing methods with their high precision, it cannot be completely avoided that the moving parts have to wear in with each other. This wearing-in occurs mainly in the first 1000 km (600 miles). Oil consumption can be somewhat higher than normal during the "running-in" period.
Permissible Maximum RPM
The control unit cuts off the fuel supply at approx. 6,500 rpm to prevent the engine being overloaded. Bedding in new brake pads Brake pads do not possess maximum braking efficiency when the car is new. Therefore more pedal force is necessary during the first 120 miles (200 km). This also applies to replacement brake pads.
At low ambient temperatures, fully depress the clutch pedal when starting a vehicle equipped with mechanical transmission also if no gear is engaged. If the engine does not start after 10 to 15 seconds, repeat the starting procedure after 10 seconds. Neither start nor let the engine run in an enclosed area! The exhaust gas contains the colorless and odorless carbon monoxide; even minor concentration causes symptoms of poisoning.
Therefore you should
never over-rev a cold engine, either in neutral or in gear, continually change the demands made upon the engine and transmission, never exceed 5000 rpm in the individual gears, always change gear in good time, and thereby keep the engine in the optimum revolution range (note the Transmission diagram). This of course also applies after running-in.
New tires New tires do not possess maximum traction. They tend to be slippery. Break in new tires by driving at moderate speeds during the first 60 to 120 miles (100 to 200 km).
Page 31

Manual Transmission
The Porsche fully synchromesh transmission permits rapid and precise shifting of gears. But be sure when changing gears that the clutch pedal is fully depressed to the floor, and that the gearshift lever is completely engaged. The shift lever positions can be taken from the shift diagrams on this page. On the 5-speed transmission, the clutch pedal must be depressed several seconds before shifting into reverse. Only then move the gearshift lever to the left, overcoming the spring resistance, and to the front. Only shift into reverse when the car has come to a complete stop.
Both back-up lights gone on when the transmission is put into reverse (with ignition an). The specified maximum rpm figures should not be exceeded when shifting down, as otherwise the engine speed would be too high. For smooth shifting, observe the following shift points (applies to standard gear ratios only):
5th to 4th gear 4th to 3rd gear 3rd to 2nd gear 2nd to 1st gear
. . . . . . . . . . . . .
. . . . . . . . . . . . .
. . . . . . . . . . . . .
. . . . . . . . . . . . .
5000 rpm 4750 rpm 4500 rpm 3850 rpm
Page 32
Automatic Transmission The selector lever has 6 positions:
Park ReverseNeutral Drive Low Low
Start in neutral or park The selector lever has a push button in the handle. The push button must be depressed when selecting the following positions:
From P to R R to P N to R 2 to 1
depress push buttonin handle
Driving the Automatic Transmission There are a few points you should know if you want to take full advantage of the Automatic Transmission. Remember the following basic rules: ... Apply the parking brake or. foot brake before selecting a driving range. When the selector lever is in a driving range, the car may creep even at idle speed. Therefore, do not release the parking brake or foot brake until you are ready to move. ... Do not accelerate while selecting a driving range. At this time the engine must run at idle speed so that no undue stress will be placed on the automatic clutches in the transmission. ... If the selector lever is unintentionally moved into Neutral (N) while driving, take your foot on the accelerator pedal and wait until the engine speed has dropped to idling before selecting a driving range.
Position D is the driving range to be normally used for day-to-day driving and highway driving. It ranges from zero to top speed, and all three gears engage automatically while driving. Position 2 and 1 are to be used for mountain driving or slow driving, when towing a trailer and also when you want to make use of the engine's braking effect. Position 2
should only be used to 60 mph (100 km/h). In "2", only the first and second gears will engage automatically. Therefore, only shift down into driving range "2" when the speed is below 60 mph (100 km/h). It is not necessary to let up on the accelerator.
The selector lever can be moved freely between the other positions. The selector console is illuminated when the ignition is turned on.
The driving ranges The Automatic Transmission has 3 forward driving ranges and one reverse. In the driving ranges D and 2 the Automatic Transmission changes gears automatically while driving.
Position 1
is needed on rare occasions. It should only be used up to 25 mph (40 km/h). In "1" the transmission will stay in first gear and not shift into the second or third gear. Only shift down into "1" when the car speed is below 25 mph (40 km/h).
Page 33

The reverse driving range The reverse driving range should be selected only when the car has come to a full stop and the engine is running at idle speed. The back-up lights come on automatically when you engage Reverse (with ignition on). Starting the engine is only possible when the selector lever is in Neutral or in Park. As long as one of the driving ranges is engaged a
safety switch prevents the engine from being started. Moving off With the parking brake or foot brake set, shift into the range you wish to use, usually position D. To move off, release the brake and accelerate. Do not release the brake before you are prepared to move, because power is transmitted to the wheels as soon as a driving range is engaged. Selecting a driving range while driving is easy. Simply release the accelerator pedal and move the selector lever from the range you are into the range you want. Then step on the accelerator again. Stopping When stopping temporarily, at traffic lights for example, it is not necessary to move the
selector lever to Neutral. Simply apply the brakes. To start again release the brake and accelerate. Parking When parking your car, apply the parking brake first, and then move the selector lever to position P. To do this, depress the button and push the lever through R to P. The transmission is then mechanically locked. Park may only be engaged when the car is stationary. Shift out of the Park position, before releasing the parking
brake. When the car is parked on a steep hill, shifting out of Park may be a little harder. This is due to the weight the car exerts on the transmission. Mountain driving When driving on long, steep and winding mountain roads select range 2 or 1. Accelerator "Kickdown"
If you need quick acceleration to pass moving vehicles or to climb steep grades, make use of the accelerator "kickdown" in your Porsche with Automatic Transmission.
It gives you the possibility to shift into a lower gear without moving the selector lever. The accelerator kickdown can only be applied with the selector lever in the driving ranges D and "2". When depressing the accelerator pedal you will find resistance at the throttle position. By applying greater pressure the pedal can be pushed beyond this point to the kickdown position. The transmission will now shift automatically into the next lower gear to give you maximum acceleration, and only shift up again after the engine has reached maximum speed in that particular gear. Be careful when using the kickdown on slippery roads. Rapid acceleration may cause skidding. Please observe the following when applying the accelerator kickdown: With the selector lever in D, you can apply the kickdown to make the transmission shift down into second gear when driving below 55 mph (90 km/h) and down to first gear when driving below 30 mph (50 km/h). With the selector lever in "2", you can apply the kickdown to make the transmission shift down into first gear when driving below 30 mph (50 km/h). As soon as you release the pedal from the kickdown position the next higher gear is automatically engaged.
Page 34
Towing a trailer
Selector lever at "2". Shift down to "1" in good time for driving up or down gradients, to have sufficient engine power and braking effect and to relieve the brakes. Towing When towing your car with automatic transmission, observe the following: The towing speed should not exceed 30 mph (50 km/h), and the towing distance should not be longer than 30 miles (50 km). This is very important because the transmission will not be adequately lubricated due to the jack of oil pressure normally provided when the engine is running. These limitations do not apply if the car is lifted at the rear, or if both rear axle drive shafts are disconnected.
Emergency starting
Your Porsche with Automatic Transmission cannot be started by pushing or towing. Should the engine fail to
start consult your nearest authorized Porsche dealer. Do not start or tow the car without ATF in the transmission, as this will result in serious damage to transmission and torque converter.
Without ATF in the torque converter or automatic transmission, the engine must not be started and the car not towed. The automatic transmission and torque converter have a common filling of ATF. The final drive is filled with SAE 90 hypoid oil. Refer to "Filling Capacities" for filling capacities and specifications. Correct ATF level is exceptionally important for perfect operation and service life of the automatic transmission. For this reason it is necessary to check the level regularly even between normal service intervals.
Page 35

Relation of shift points to accelerator pedal position (selector lever at "D")
A. When accelerating slowly with accelerator pedal partially depressed, theautomatic transmission will shift at lower speeds. For best possible fuel economy, always start off gradually and accelerate smoothly.
B. When accelerating fast, the automatic
transmission will shift at higher speed ranges.
C. For maximum acceleration, depress theaccelerator pedal fully to the floor bey- ond the point of resistance. In this posi- tion, shifting of the automatic transmis- sion will take place at maximum speedsfor each gear.
Page 36
Engine Hood To unlock the engine hood, pull the release lever on the left underneath the instrument panel. The hood springs up slightly under spring pressure.
Opening the hood Pull the handle underneath the hood to disengage the safety catch. The hood is opened automatically by the two gas-pressure springs. Make sure the windshield wipers are not tilted forward! When the car's lights are on the engine compartment is illuminated by a lamp mounted on the hood.
Closing the hood Lower the hood and press it into the jack until you hear an audible click. Pull up on the hood to make sure it is securely locked.
Page 37

Rear Hood To open the rear doer unlock with the door/ ignition key.
Turn the key to the left and lift the hood. To close, push the hood down using both hands until both locks snap shut. Pull up on the hood to make sure it is securely locked. Do not drive with the hatchback open to prevent exhaust gas from being drawn into the car. If you must drive with the hatchback open, open the windows and operate the fan to force fresh air inside the car.
Luggage cover Luggage in the car can be protected against sunshine and "nosy persons" by pulling out the luggage cover attached on the back of the rear seats and hooking it to the locks of the rear hood. The luggage cover winds up automatically when released from its holders.
To prevent luggage from sliding around when braking or cornering, they can be held in place with the luggage net, offered by your Porsche dealer. Holders for this purpose are provided on the rear seat backrest and luggage compartment floor.
Page 38
Removable Roof The removable roof is secured by tour clamps facilitating easy removal and installation. Always make sure that the 4 clamps are properly locked when the removable roof panel is in position. If you wish to drive with the roof panel raised at the rear, it must be secured by means of the anchor strap and the front clamps must remain securely locked.
Removing the roof
1. Open the four clamps, two at the front and two at the rear.
2. Turn the rear clamps 90° so that they point to the sides.
3. Lift the roof at the rear and remove it. Store it in the luggage compartment.
Installing the roof
4. Install the roof at the front first. Insert it from above into the. wind deflector grooves and front guides.
5. The rear clamps must point to the sides as described under 2. Install roof at the rear. Turn clamps 90° and close them.
6. Fold front clamps back and close them. Make sure roof is properly seated.
Page 39

Car Care Instructions Regular and correct care helps to maintain the value of your car and is also a precondition for the long-life guarantee. Washing The best method of protecting your car from the damaging effects of the environment is frequent washing and the re-application of a preservative. The salt spread on winter roads, road dust and dirt, airborne industrial emissions, dead insects, bird droppings etc. can have a damaging effect on the bodywork if allowed to remain on the car for a long time. Salts have a particularly corrosive effect on body seams. flanges and joints. It is therefore necessary to clean such areas thoroughly with a sponge when you wash the car - or after going through an automatic car wash, then rinse them with
water and rub dry with a leather. New cars should be washed carefully with plenty of clear water to protect the fresh paintwork. Dark paint finishes show up the
smallest of surface damage (scratches) more readily than light colors. Dark colors are also slightly more susceptible to scratches because of the composition of their pigments and therefore require special care and attention. Use an abundant supply of water, a soft sponge or wash brush and a suitable, mild car shampoo. Begin by spraying the body thoroughly with water to rinse away loose dust. Do not wash your Porsche in bright sunlight or while the bodywork is still hot. After washing, rinse the car plenty of water and then leather dry. Remember to clean the seams, flanges and joints! Do not use the same wash leather for rubbing down as you use for cleaning the windshield and windows. The moisture, which gets on to the brakes during a car wash can reduce braking efficiency or make the brakes pull unevenly. Always test the brakes a few times after washing your car to make sure they are properly dried off. Dust should never be wiped off the car with a dry cloth since dust particles are abrasive and could dull and damage the surface finish. Preservation The paintwork contains certain fats which maintain its high lustre and prevent it becoming brittle. Climatic effects can remove these fats from the paintwork. This
should be counteracted by applying a paint preservative in good time to restore the fats and thus retain the high lustre. Please use only the preservatives and washing agents recommended by your Porsche dealer. Provided it is washed and treated with preservative regularly, the brand new finish of your car will be retained for years to come. Apply the paint preservative after the car wash and polish it dry to obtain a bright finish or simply add a preservative to the final rinse water and rub down with a leather. Polishing
The use of polishes is recommended only after it becomes evident that the normal preservatives no longer produce the desired finish. Caution: Do not apply silicone polishes to the windshield or windows. The paintwork of your car is exposed to all manner of mechanical and chemical stresses, particularly climatic thing such as bright sunlight, rain, frost and snow. Ultraviolet light, rapid changes in temperature. rain, snow, industrial dust and chemical deposit a constantly attack the paint which is only able to withstand such exposure in the long term if it is given regular care and attention. Matt painted parts should not be treated with preservatives or polishes as this will spoil the matt effect.
Page 40
Spots and strains
Tar strains, grease, oil spots and dead insects cannot always be removed by washing alone. They can cause discoloration if allowed to remain on the paintwork. They should therefore be removed without delay with a suitable cleaner (tar, stain or insect remover). Wash the affected area immediately after treating it. Minor paint damage
Minor paint damage, such as scratches, seeres or chips caused by flying stones, should be covered immediately with print before corrosion sets in. However, if there are already traces of corrosion they must first be removed carefully and thoroughly. Coat the area with a rust-proofing primer (applicator or aerosol) and finish off with a top coal. The print code and color number are on a plate affixed to the left hand side of the engine compartment. Undersealing The underside of the car is thorough protected by a factory applied undersealing material. As it is not possible to exclude the risk of damage to this protective coating in day-to-day driving, it is advisable to have the underside of the car inspected at certain intervals - preferably before the start of the cold season and again in spring - and the undersealing repaired as necessary.
The oil industry has developed undersealing and rust-proofing compounds based on bitumen or wax. Unlike conventional spray oils, these preservatives do not attack the anti-drumming materials applied at the factory. Before applying fresh underseal, carefully remove deposits of dirt and grease. Once it has dried the new undersealing compound forms a tough protective coating which provides efficient rust-proofing of the floor panels and components. Always apply a fresh coating of suitable preservative to unprotected areas after cleaning the underside of the body or the engine or carrying out repairs to underbody components.
Your Porsche dealer is familiar with the bodyseal treatment procedures and has the necessary equipment for applying factory approved materials. We recommend that you entrust him with all such work and inspections. Cleaning and preserving engine compartment The engine compartment and the surface of the engine are treated with a corrosion inhibitor at the facto ry. If grease solvents are used for cleaning the engine compartment or the engine itself, they invariably destroy the corrosion inhibiting coating. It is then absolutely necessary to have a durable
preservative applied to all surfaces, body seams, joints and components in the engine compartment. Also, whenever the engine is cleaned, the throttle valve pipe (throttle valve bearing) must be covered up, to prevent any risk to the permanent lubrication of the bearing. Effective rust-proofing is particularly important during the cold weather season. If the car is driven frequently in areas where salt has been spread on the roads, the whole engine compartment should be cleaned thoroughly after the cold weather season to prevent the salt causing any lasting damage. A full underbody wash should be performed at the same time. Windows The read dust which settles on the windshield and windows contains particles of lire rubber and oil residue. The interior trim and upholstery gives off deposits, particularly in strong sunlight, which, collect on the inside of the windows. These deposits are augmented by impurities in the air which enter the car through the fresh air vents. A lukewarm soap and water solution or a normal window cleaner can be used for cleaning the insides and outsides of windows. Remember to clean the wiper blades as well. If you use a chamois leather for the windows, do not use it for the paintwork as it will otherwise pick up a certain amount of
Page 41

preservative or polish and could smear the windows and thus impair vision. use a special sponge for removing dead insects from the windshield. In the Gold weather season you should add antifreeze in the required concentration to the water in the windshield and headlight washer reservoir. Lights, plastics Use only a soap and water solution for cleaning the plastic light lenses. Never use chemical cleaning agents for this purpose. The same applies to other plastic parts and finishes. Door, lid and window seals
Rubber seals tend to age and become brittle or crack if they are not treated occasionally with glycerin or talcum powder. Aluminium wheels Pitting can occur if metallic particles which cause contact corrosion (e.g. brass or copper in brake dust) are allow to remain on the aluminium for too long. Regular care is necessary in order to retain the attractive surface finish. The wheels should be washed down with a sponge or wash brush about every two weeks. In areas where salt is spread on winter roads or there is a area of airborne industrial dust, it is best to clean the wheels weekly.
Every three months you should coat the wheels with a non-corrosive grease (Vaseline) after cleaning. use a clean cloth to thoroughly rub the grease into the surface. Polishes which dissolve oxide, as frequently used for other metals, or abrasive tools or agents are unsuitable because they break down the paint-resp. oxide film. Leather care
Cleaning is best performed with a white, soft woolen cloth and a weak soap and water solution. Don't use aggressive cleaners and rough cleaning materials. Take special care not to dampen the other side of perforated leather trim. When you have cleaned the leather (especially the very stressed leather seats) treat it with "Karneol" preservative Porsche part-No. 000.043.007.00 -. Ask your Porsche dealer for further details. Leather should be cleaned and treated several times a year, depending on how quickly it becomes dirty. We recommend that "Karneol" be applied initially after the first few weeks or after the car has driving a few thousand miles. The natural surface markings of leather skins, such as creases, healed scratches, insect bites and slight variations in shade and grain add to the attractiveness of the real leather product.
Fabric upholstery, carpets Use only a vacuum cleaner or a medium stiff brush. Remove stains and spots with a lukewarm soap and water solution or a reputable spot remover. Care of seat belts If it becomes necessary to clean the belts, you can use any mild washing agent. Allow the belts to dry, but avoid direct sunlight. If unsuitable cleaners are used or any attempt is made to dye or bleach the belts, the webbing may be weakened and thus constitute safety risk. Cleaning the antenna To insure perfect radio reception and smooth action, the telescopic antenna must be cleaned regularly (weekly) with a soft cloth moistened with oil. Operate the antenna several times while cleaning it. use only light, non-resinous oil, e.g. sewing machine oil, or special antenna cleaning cloths. Storing your car If you intend to store your Porsche for a prolonged period, please consult your Porsche dealer. He will be glad to advise you on the most suitable and necessary methods of corrosion protection.
Page 42
Hints for Winter Operation
The anti-freeze additive does not only offer protection against freezing but also prevents formation of corrosion and calcareous deposits in the cooling and heating system. In spite of this, check at the beginning of the winter season to see that there is still enough anti-freeze available; top up if necessary. See mixture fable in section "Filling Capacities".
Corrosion protection
The salt spread on winter roads can have a detrimental effect on your car's bodywork. You should therefore wash the car as often as convenient in accordance with our car cafe instructions. Have a preservative applied and the underseal checked in an authorized workshop before and after the cold weather season.
Engine oil Change the engine oil and refill with oil of the correct viscosity before the cold season begins. If you are using multi-grade oil then it is not necessary to carry out temperature related oil changes and you can take advantage of the extended oil change intervals to the full. (See also filling capacities.)
Brakes After driving for extended periods on salt covered roads it is possible that a film will build up on the brake discs and pads which considerably reduces friction and thus the braking efficiency.
Door jacks In order to prevent the door jacks from freezing, tape the jack cylinders when washing your car during the cold season. To open a frozen jack, apply a commercial de-icer. Another solution is a warmed up key. Never apply any force!
Coolants At temperatures below the freezing point of water, make sure you don't drive without having anti-freeze added to the cooling water. The permanent cooling system filling from the factory offers protection up to at least -25° C (-13° F). Northern countries to -35°C (-31°F).
Battery When outside temperatures fall, the battery's capacity decreases while the load placed on it increases considerably. Therefore, check the condition of the battery in time and have it charged, if necessary. Check also the electrolyte level and apply terminal protecting grease to the connectors. Also see "Checking and Servicing" section.
Washer reservoir
To assure that the windshield washer and the headlight washer (optional) also function at freezing temperatures, antifreeze must be added to the water beforehand. Follow the instructions on the can for the right amount to be used. You can also add a mixture composed of one part of alcohol (commercial spirit) and three parts of water.
Page 43

Door and rear window seals To prevent the sealing rubbers freezing it is recommended that the rubber be lightly coated with either Glycerin or talcum powder. Winter tyres and snow chains Because of the limited effectiveness of summer tyres in winter we recommend that when ice and snow are expected, special winter tyres should be fitted beforehand. When M + S radial tyres are used they must be fitted to all tour wheels. Take note of the chapter "Wheels". The various regulations in different countries regarding maximum speed should be taken into consideration. Snow chains may be fitted on the drive wheels only with standard size tires or the winter tires specified under "Technical Data". Use only fine link chains to ensure enough clearance between the wheels and wheel arches. Your authorized dealer will be pleased to assist you in choosing the appropriate chains. Before fitting chains remove packed snow and ice from the wheel arches. Observe also the manufacturer’s instructions. In winter you may find it useful to carry a folding shovel in the car to free the wheels from snow, a hand brush and a plastic
windows, a board as a support base for the car jack, and some dry sand to facilitate starting on icy slopes. Tests carried out with commercially offered "Traction Sprays" and "Traction Clamps" have produced no positive results, therefore we cannot recommend such aids. Note: We recommend that a maintenance service be carried out prior to the start pf the cold season and in accordance with the maintenance instructions. Roof Racks Normal commercially available roof racks cannot be fitted. If an original Porsche rack (as available hitherto) is fitted, the permitted roof load is 77 lbs/35 kg. With the "New Porsche Roof Transport System" you can transport a wide variety of sports and hobby equipment, up to a roof load of 165 lbs./75 kg. There are many different racks to choose from. Your Porsche dealer will be glad to advise you on the versatility of the "New Roof Transport System". To ensure minimum noise, maximum economy and a desirable level of safety when driving with an unloaded roof rack, you should not exceed a maximum speed of 180 km/h. When the roof rack is loaded, the recommended maximum speed depends on the nature, size and weight of the load.
You should not however exceed a speed of 140 km/h at any time. Make sure that the load is firmly and securely fastened.
Page 44
Maintenance and Emergency Service The recommended service intervals, as listed in the Maintenance Record, apply under normal driving conditions. The condition of oil, and of wear and tear items depends greatly on the amount of driving and on driving habits. Therefore, oil and wear and tear items should be checked more frequently and possibly changed at shorter intervals. Incomplete or improper servicing may cause problems in the operation of the car and affect your warranty coverage. If in doubt about any servicing, have it done by a qualified mechanic or by your authorized dealer. Before working on any part in the engine compartment, turn off the engine and let it cool down sufficiently. If work has to be done with the engine running, exercise extreme caution to prevent neckties, jewelry or long hair from getting caught in the V-belt or fan. Even after the engine is stopped the fan may continue running until the temperature of the coolant has dropped to a certain level.
Be mindful of how you dispose of used engine oil. Do not dump it on garden soil, wooded areas, into open streams or down sewage drains. Your zoning regulations or environmental rules will tell you how you can dispose of it. Should the discarding of the old oil present a problem to you, we suggest that you have your oil changed at your dealer or at a service station.
Tool Kit and Car Jack The tool kit and jack are stored in the luggage compartment under the floor mat. The tool kit contains tools needed for miner roadside repairs, adjustments and wheel changing. Regulations in some countries require additional tools. Details should be obtained before leaving for a foreign country. The jack is a tool for changing a wheel only. When you work underneath the car, mind your safety and use appliances especially designed for that purpose.
Page 45

Engine Oil Level The engine in your car depends on oil to lubricate and cool all of its moving parts. Therefore the engine oil should be checked regularly and kept at the required level. Make it a habit to have the engine oil level checked with every second fuel filling. When operating the vehicle under extreme conditions, such as prolonged high-speed and mountain driving at high outside temperatures, the oil level should be kept just below the upper mark on the dipstick. Checking oil level To get a true reading, the car should be on level ground. After turning off the engine,
wait a few minutes for the oil to return to the oil sump.
1. Pull out dipstick and wipe it clean with a rag.
2. Reinsert dipstick; push it in all the way foran accurate reading.
3. Pull dipstick out again. The oil level is correct if it is between the "max" and "min" marks on the dipstick.
4. If oil level is below "min" mark, or not showing on dipstick, add oil immediately.
The difference between the "max" and "min" marks is about 1.3 liter (1.14 lmp. qts).
Adding engine oil
Only add the amount of oil that is needed. The correct oil grade and viscosity recommendation is given under "Filling Capacities".
1. Remove oil filler cap.
2. Top up with quality oil labeled "For Service APl/SE or SF".
3. Check oil level on dipstick - upper markshould not be exceeded.
4. Replace cap and tighten.
Page 46
Changing Engine Oil When changing the engine oil and the oil filter, the splash shield under the car has to be removed first. The engine oil should be changed regularly. This is very important as the lubricating properties of oil diminish gradually during normal operation of the car. The oil change intervals are listed in the ".Maintenance" section of this manual. If you drive mostly short distances or in dusty areas, the engine oil should be changed more frequently. quantities required for oil change: with filter cartridge change 5.5 liters (4.84 lmp. qts.).
1. With engine at operating temperature, unscrew the oil
drain plug (arrow), remove the oil filler cap and allow oil to drain completely.
2. Drain engine oil completely.
3. Replace oil filter.
4. Clean oil drain plug and use a new gasket when reinstalling the plug. Tighten to a torque of 60 Nm (6 mkp).
5. Add new engine oil, check oil level and install cap.
6. Check engine for leaks.
Changing Oil filter When fitting a new filter avoid over-tightening of the filter housing (lightly oil the sealing ring) otherwise it will be difficult to remove at a later date.
1. Screw new filter on until the gasket contacts the housing.
2. Tighten the filter to the correct torque 20 Nm (2.0 kpm).
3. Run the engine and check for leaks.
Page 47

Cooling system capacity and specified antifreeze and water ratios are listed under "Filling Capacities". Only use additives recommended for aluminum engines and radiators. Your authorized Porsche dealer will be able to advise you. The anti-corrosion properties and the antifreeze consistency will diminish gradually. We recommend to renew the coolant mixture at least every 2 years. Radiator fan The radiator fan is electrically driven. It is switched on automatically by a thermostat when the coolant reaches 92° C (198° F). The fan will continue running - even with the engine turned off - until the coolant temperature has dropped to 87° C (189° F). Checking coolant level The coolant level should be checked at regular intervals - at least before a long journey at the expansion tank. There must always be coolant in the expansion tank. With the engine cold, till the expansion tank so that the level is between the "min" and "max" marks. If too much coolant is tillad then the excess will escape as the engine temperature increases, via the release valve in the filler
Cap. Only when the coolant level falls below the "cold max" or "min" level marking must it be topped up. The filler cap need not be removed to check coolant level because the expansion tank is transparent. Topping up expansion tank Since the closed cooling system roses almost no coolant, topping up is normally not required. An obvious loss of coolant indicates leakage. In this case, contact your dealer. Caution: Do not open the filler cap when the engine is
hot because of the danger of scalding. Allow the engine to cool down. Protect your hands, arms and face. Open the filler cap to the first catch to allow excess pressure to escape before removing the cap. To avoid damage to the engine, only add cold antifreeze and cold water to the cooling system when the engine is also cold. A warm engine should only be topped up if the coolant level had dropped appreciably below the filler mark. Too much added coolant will escape through the pressure cap when coolant warms up. If more than approx. 1 liter (0.88 Imp. qts.) must be added, the cooling system should be bled. Before topping up, allow the engine to cool down. Then turn the expansion tank cap slowly to the left to release the pressure. Then remove the cap.
Cooling System For year round driving, antifreeze is added at the factory, protecting the cooling and heating system against frost up to -25° C (-13° F) as well as against corrosion. Because, of its anti-corrosion properties, antifreeze should also remain in the cooling system for summer operation.
Page 48
Draining coolant
(only when engine is cold) Set the heater lever to "warm". Remove the expansion tank cap and then unscrew the coolant drain plugs on the radiator and engine block.
Filling and bleeding cooling system
Screw in and tighten the radiator drain plug. Tightening torque 5 Nm (0.5 mkp). Fit a new sealing ring to the coolant drain plug and screw it into the block. Tightening torque: 20 Nm (2.0 kpm). Set the heater lever to "warm" loosen the hose clip and remove the bleed plug. Fill the system with coolant slowly until the fluid level in the expansion tank remains constant at the "max." mark.
Start the engine and run it at a high idle speed until the thermostat opens (after about 5 minutes), i. e. until coolant emerges bubble-free at vent hole. Observe the
coolant level during this warm-up period and add coolant as necessary. Then allow engine to run at idle speed until the cooling fan comes an. Tighten down the bleed screw and refit the filler cap. Check the coolant level again and top up if necessary.
* Coolant quantity - see "Capacities".
Page 49

Power assisted steering
With power-assisted steering, the turning action on the steering wheel is assisted by a hydraulic mechanism. At low engine speeds, e.g. when parking or when driving slowly, the power-assisted steering is fully effective. The power assistance reduces with increasing engine revolutions or increasing vehicle speed and has the effect of producing increasingly positive steering action. The audible rushing noise that occurs at full steering lock is a characteristic of the construction and does not indicate a fault in the steering assembly. Note that when the engine is not running (when being towed) or when the hydraulic steering mechanism is faulty, there is no power-assist action present. In this case, a greater effort is required to steer the vehicle.
Checking hydraulic fluid The reservoir is secured in the engine compartment on the right-hand wheel housing.
1. Unscrew the reservoir cap.
2. Wipe the dipstick clean. Let the engine run at idle speed. Screw on the cap and then screw it off once again. The fluid level should lie between the upper and lower marks. Top-up with hydraulic fluid if necessary. The grade of fluid used should be as specified in the chapter entitled "Filling capacities".
3. Put the cap back on and screw tight.
Page 50
Automatic Transmission Checking ATF level The ATF level should be checked regularly, even between the normal service intervals. The ATF level is visible at the transparent reservoir, which is mounted at the end of the transmission casing. The fluid level must be between the minimum and maximum marks. To check the ATF level the vehicle must be standing level. Gear selector lever in position "N" with the engine running at id le speed. The transmission must be at operational temperature. If too much ATF is added it must be drained.
Checking Oil Level in Transmission 1. Clean the outside of the transmission oil filler plug and
remove plug.
2. When the car is on level, the oil level should come up to the lower edge of the filler neck.
3. If the oil level is too low, top up with hypoid oil according to specifications listed under "Filling Capacities".
4. Clean filler plug and reinstall.
Air Filter Replacement 1. Undo hose clip on the filter cover and disconnect hose.
2. Slacken the retaining screws with a screwdriver and remove the filter cover.
3. Remove the filter cartridge.
4. Clean the inside of the filter housing with a lightly oiled lint free cloth.
5. Renew the filter cartridge, carefully replace the filter cover, tighten the retaining screws, reconnect the hose and tighten the hose clip.
Page 51

If, however, the fluid level drops visibly, leaks in the brake system are indicated. Do not hesitate to immediately contact an authorized workshop to check the brake system. Brake fluid is hygroscopic! Since too high a water content in the brake fluid has a negative effect on the entire braking system, the brake fluid has to be renewed every two years. After this the brake system must be bled.
Only new, unused brake fluid that meets SAE recommendation J 1703 or DOT 3 must be used. Caution: Brake fluid being corrosive attacks the paint. The brake power assist unit operates pneumatically, i. e. with vacuum which is only available when the engine runs. When driving without engine (e. g. towing), brake pedal operation requires more force because in this case there is no vacuum serve effect, although this does not affect the braking action. On the 944 the hydraulic clutch system is supplied with fluid from the rear chamber of the brake fluid reservoir. On right hand drive vehicles there is a separate reservoir in the engine compartment on the right hand side.
Checking Brake Pads Brake pad wear will mainly depend upon the degree of usage, type of driving, and
Brake Fluid Reservoir The brake fluid reservoir is located in the engine compartment and provided with two chambers, one for each brake circuit. The screw cap for the common filling hole has a vent bore which must be kept free at all times. The reservoir is transparent so that the fluid level can be checked from outside; the level should always be positioned between "Min" and "Max" marks. Same dropping of the fluid level occurs, when driving, by wear and automatic adjustment of the disc brake pads. This is quite normal.
condition of the roads. It may be expected that the pads will wear faster on dirty and wet roads. Thickness of the pads should be checked during preventive maintenance or whenever the wheels are taken off (visual check). The brake pads must be thick enough between the brake pad plate and the brake disc to allow a reserve for further wear (see illustration). The permissible wear limit is approx. 0.08 in. or 2 mm. We also suggest that the condition of the brake pads be checked prior to departure on long trips.
Page 52
Fuel Recommendation Your Porsche can be driven with all commercial fuel brands on the market. Minimum octane rating: 98 RON (premium). Octane rating indicates a gasoline's ability to resist detonation. Therefore, -buying the correct octane gas is important to prevent engine "knock". To avoid cold start difficulties even at extremely low ambient temperatures, an anti-icing additive (e. g. iso propyl alcohol at a ratio of 1 : 50) should added to the fuel. During the cold season, however, antiicing additives are added to the brand name gasoline’s at the refinery. To prevent ignition knock (pinging) when driving in countries with low-octane fuel, you should accelerate gently, change speeds in good time and avoid driving at top engine speeds. If you intend to stay in one of these countries for some time, you should consult your Porsche dealer regarding adjustment of the ignition timing.
Fuel Tank The fuel tank holds approx. 66 liters. If the yellow indicator lamp in the combi-instrument comes en, there are only about 9 liters of gasoline left.
Reservoir for Windshield and Headlight Washer System The transparent washer reservoir is under the engine hood on the right (front) and holds approx 6.5 liters (1.43 Imp. gals.) of washing fluid. It is advantageous when you add a screen cleaning and anti-freeze agent, in the ratio recommended by the manufacturer, to the water. Clear water is in general not sufficient to clean the windscreen and the headlights.
Adding Fuel The fuel filler neck is installed in the side panel above the right rear wheel. There is additional space for expansion to prevent a full tank from overflowing when hot, and therefore the tank should not be tillad to the last drop. The tank is "full" as soon as the correctly operated automatic fuel hose nellie cuts off. Install the lockable tank cap carefully and twist it clockwise until it stops with an audible click. We recommend you turn off the engine when filling the fuel tank.
Page 53

Tyres and tyre care Steel braced radial-ply tyres are high quality engineering products. Like the engine, they need to be run under the correct operating conditions at all times. If treated properly they will be a long lasting safety element on your car. The following points demonstrate what is necessary. Your tyres will thank you for regular care. 1 Tyre pressure
It is absolutely essential to keep your tyres at the right pressure. The tyre pressures are shown in the "technical data" and must always be regarded as minimum pressures! Always check pressures when the tyres are cold. Never let air out of hot tyres! Check regularly every 14 days. 2 Valve caps Valve caps protect the valve against dust and dirt as well as leaks. Always screw the caps firmly into position and replace missing ones immediately. Check every 14 days.
3 Load and speed Do not overload your car. Never exceed the specified roof and trailer coupling loads. A combination of overload + low tyre pressures + high speed + high ambient temperatures is extremely dangerous. 4 Winter tyres Do not exceed the maximum speed limit (e. g. 160 km/h/100 m.p.h. for M + S (Q) radial-ply tyres). An appropriate sticker must be affixed in the driver's field of vision if the tyres maximum speed is less than the car's maximum speed. 5 Tread The risk of aquaplaning increases as the tread depth decreases. Appearance of the wear indicators (webs in tread grooves 1.6 mm high) should be taken as a signal for early tyre replacement. Check regularly, particularly before and after long journeys. 6 Lateral and radial run-out Take the precaution of having the tyres balanced in spring (summer tyres) and before the start of winter (M + S tyres).
Note that only the specified weights may be used for balancing. (Self-adhesive weights must not come into contact with cleaning agents as they might otherwise drop off.) Uneven tread wear indicates that the wheel is not running true. A specialist should be consulted in such a case. See also "Wheel alignment". Uniform tyre wear can be achieved by periodically changing round the wheels (e. g, after 5000 km/3000 miles or longer). But only change the wheels at one side from front to back and vice versa so that the tyres always run in the same direction. Balancing and checking should be performed by a specialist workshop. 7 Tyre damage Examine tyres at regular intervals for foreign matter, nicks, cuts, cracks and bulges (sidewalls). In case of tyre damage where it is uncertain whether there is a break in the ply with all its consequences or tyre damage caused by thermal or mechanical overloading due to a loss of pressure or any other prior damage, we recommend that the tyre be replaced for safety reagens. If one faulty tyre is replaced it should be noted that the difference in tread depth on one axle must not be more than 30%. Visual inspection.
Page 54
8 Curbs Hard impact against curbs (traffic islands too) is dangerous. It can result in hidden tyre damage which only becomes noticeable later on (risk of high speed failure); tyres have a memory! For this reason you should only drive over curbs slowly and preferably at right angles. Take care when parking at or on curbs. 9 Tyre replacement
The tyres approved for your car are listed in the Technical data. Only buy new tyres which comply with these specifications. Always replace the tyres on one axle at a time. Only tyres of the same make and type should be used together. New tyres should be fitted on the front axle because
a) the rear axle is more critical from a stability point of view and
b) in wet conditions it is the front wheels which hit deep water first, while the rear wheels run mostly in the track of the front ones.
Make sure that new valves are fitted whenever the tyres are changed. During their initial break in period new tyres do not have their full grip. It is therefore necessary to run them at only moderate speeds during the first 100-200 km (60-120 miles). Never use different types of tyre. Have tyres fitted by a specialist.
10 New Tyre Designations New tyre designations are being introduced in accordance with ECE Regulation no. 30. In some European countries they are already mandatory. As far as your Porsche is concerned only SR
and HR tyres are affected; VR tyres are not covered by this regulation. The tyres listed in the chapter "Rims/Tyres" comply with the new regulation. During the transitional period, tyres may bear a dual designation, e. g., 185/70 SA 15 M + S 88 Q. The new tyre designation is used here.
Example: Old Designation 185/70 SR 15 M + S
New Designation 185/70 R 15 M + S 88 Q
185 Tyre width in mm same
/70 Ratio of height to width (70:100) same
S Code letter for permitted top speed discarded
R Tyre construction: radial same
15 Rim diameter in inches same
M + S Winter tread same
88 - code number for load rating
Q - code letter for permitted top speed
Permitted top speed: Q = 160 km/h T = 190 km/h H = 210 km/h
11 Tyre storage Always store tyres in a cool, dry and dark place. Tyres not on rims should be stood up. Avoid any contact with fuel, oil or grease. The life of your tyres depends not only on
correct inflation and wheel alignment but also on your style of driving: Full throttle acceleration, very high cornering speeds and hard braking increase tyre wear. Moreover, tread wear is greater on rough road surfaces and in very hot weather.
Page 55

Spar Wheel, Jack The spare wheel and the jack are located in the luggage compartment, under the floor mat. The car jack must be screwed open a little before it can be removed from the holder.
Jacking Points There are indentations in the frame side rails on the right and left, below the centre of the door. The jack must be applied only at these points. Insert the car jack at these points only.
Changing Wheels If you have a flat tyre, move off the road. Turn on the emergency flasher. In addition, mark the position of your car with flares or other warning devices to alert other motorists. Before you change a wheel, be sure the ground is level and firm, especially near the jack supports. Set the parking brake and block the wheels opposite the defective wheel on the other side of the car. The jack is only to be used for changing a wheel. Do not use it as a support to work under the car.
Page 56
Steps for wheel changing
1. Slacken wheel nuts. 2. Fit jack into jacking point, tilting out ward. 3. Jack the car up until the wheel to be changed is
completely clear of the ground. 4. Remove wheel nuts and change wheel. 5. When fitting the spare wheel, first gently tighten
opposing pairs of wheel nuts. The spherical collar of the nut must fit into the recess in the wheel brace. Make sure that the surface behind the nut is clean.
6. Lower car and remove jack. 7. Tighten opposing wheel nuts fully. 8. Check that the tire pressure is correct.
Correct tightness of the wheel bolts is important. Torque for steel rims is 80 ft. lb. (11 kpm/108 Nm), for light alloy rims 94 ft lb. (13 kpm/128 Nm).
Lock-up wheel nuts The wheels of your vehicle can be made theft-proof by means of a wheel nut lock. The wheel nut lock consists of a wheel nut and a plug-on sleeve with lock. The same lock is used on all 4 wheels. To remove the wheel nut lock, take off the plastic cap,
insert the key as far as it will go into the lock, turn approx. 90° to left or right and remove the sleeve with the key.
To fit the wheel nut lock, insert the key as far as it will go into the lock and slip the sleeve onto the wheel nut. Before removing the key check whether the sleeve is up against the shoulder of the wheel nut. When removing the key press the sleeve against the wheel nut. Fit the plastic cap.
It is not usually necessary to re-balance the wheels.
Page 57

Collapsible Spare Tyre If the spare wheel of your car has a collapsible tyre, inflate tyre with the electric air compressor that comes with your Porsche. Do not use other equipment! The collapsible tyre cannot be repaired or installed with conventional workshop equipment. This work must only be done by the manufacturer. Installation instructions
1. Install spare wheel before inflating the tyre.
2. Attach hose of the compressor to tyre valve, insert plug of electric cord into cigarette lighter socket.
3. After a few minutes the required tyre pressure (32 psi or 2.2 bar for front or rear use) will be reached. Check pressure with the pressure gauge.
The spare wheel with collapsible tyre is for emergency use and short distances only. Therefore do not drive more than 60 mph (100 km/h). As required by law, the tread depth of the collapsible tyre is the same as that of the original equipment tyre. Replace a worn collapsible spare tyre in time. When the air is released from the collapsible tyre, it will return to its original shape.
Wheel Nuts When changing from alloy to steel wheels (eg. for winter tyres) only the appropriate wheel nuts should be used.
a) For alloy wheels only
Part no. 999.182.003.36 b) For steel wheels only
Part. no. 900.182.001.01 (in continuous use)
Fuses, Relays To eliminate damage caused by short circuits and overload on cables and equipment of the electrical system, the individual circuits are protected by fusible cutouts. The fuse box is located underneath the instrument panel on the driver's side and protected by a plastic cover.
Page 58
Replacing fuses Switch off the equipment involved. Lift up the fuse box cover. A burnt fuse can be recognized by the molten metal strip. Carefully remove burnt fuses from the spring clamps. Replace new fuse between spring clamps so that the metal strip remains visible. Do not touch the metal strip and be careful not to bend the spring clamps. The fuse must fit snugly between the clamps. Plug-in relays are provided on top of the fuse box for various switching functions. A defective relay should be checked and changed in an authorized workshop. Hints If a replaced fuse blows soon afterwards, the electrical system must be checked immediately for short circuit in an authorized workshop to remedy the fault. Do not attempt to repair fuses with wire or foil since this may cause serious damage to other electrical components. Always carry an assortment of spare fuses in the car.
Fuse Chart The numbering of the fuses goes from left toright.
No. Equipment Amps
1 2 3 4 5 6 7
8 9
10 11
12
13 14
15
Dipped beam left Dipped beam right High beam left High beam right Additional headlights Brake lights, Emergency flasher Cigar lighter, Clock, interior lights, Radio Turn indicators Reversing light, Rear window wiper, External rear view mirror Fresh air blower Windshield wipers, Screen wash pump License plate light, Luggage compartment and Ashtray lights Side marker light right Side marker light left, Engine compartment light Fog lights
8 8 8 8
16 8
8 8
8
16
8
8 8
8
16
A further fuse box can be found above the central-electric
1 2 3 4 5 6 7 8 9
Retractable headlights Fuel pump Cooling fan Heated rear window Condenser fan Air conditioner/Evaporator Rear fog guard light Electric windows Not used
8 16 16 25 16 25 8
25 -
Relays
Nr.
I II III IV V VI VII VIII IX X XI XII
Cooling fan Fuel pump Air conditioning Headlight washers - Heated rear window - Additional headlights Horn, Fuse 8 Amps Windshield wiper interval Turn indicators -
Page 59

Bulb Chart
Location Rating Designation (Official) Shape Base
Main headlight 60/55 W Headlight lamp H 4 YD P 43 t
Extra headlight Fog light
55 W Headlight lamp H 3 YC PK 22 s
Turn signal, front and real Stop light Tail fog light
21 W Single filament bulb RL BA 15 s
Turn signal/marker light, front* 21/5 W Double filament bulb SL BAY 15 d
Marker light front License plate light
4 W Tubular lamp HL BA 9 s
Side marker light 4 W Tubular lamp HL BA 9 s
Marker, light rear 5 W Spherical lamp G BA 15 s
Engine compartment light 10 W Spherical lamp G BA 15 s
Courtsy lamp Luggage compartment light
10 W Soffite lamp K SV 8,5-8
Glove box light 3 W Soffite lamp M SV 7-8
Battery charge indicator lamp 3 W Indicator lamp VA W 2,1 * 9,5 d
All other bulbs (instrument light, indicator lamps, etc.)
1.2 W Indicator lamp W W 2 x 4,6 d
* Valid only for several export countries. Page 60
Battery Checking and Servicing To prevent short circuit, the battery must be disconnected prior to working on the electrical system. First remove the ground wire. When re-installing attach the positive wire first. Never run the engine with the battery disconnected as this immediately results in the destruction of the alternator. This applies also to cars which were later equipped with a main battery switch. Good engine starting depends on good condition of the battery. Therefore, check its condition regularly. The battery is located in the right corner of the engine compartment, behind the splash wall. Prior to charging with a quick-charger, disconnect the battery to prevent destruction of the alternator. The battery capacity decreases, of course, with low outdoor temperatures. Furthermore, higher strain is imposed on the battery during the winter: rear window heating, frequent use of additional lights, blower, windshield wipers, etc. Therefore, special attention should be paid, particularly when driving in city traffic or during shorter trips, to switching off all electrical equipment not absolutely necessary.
Checking electrolyte level
Unscrew all plugs. With the car standing level, the electrolyte level in each cell should reach the filling mark. If the level must be corrected, use distilled water (no acid). Do not fill in more than necessary. In summer and in hot countries, frequent checking of the electrolyte level is advisable. Checking specific gravity of electrolyte
With a well attended battery, the state of charge can be determined by the specific gravity of the electrolyte. The specific gravity is indicated in g/cm3 and measured with a gravity meter (aerometer). Testing battery voltage We recommend that the battery voltage be tested by an authorized dealer who has the proper equipment. Battery care Battery terminals must be clean. Protect them with an acid-binding special grease and check the electrode terminals for tight fitting. Check the cell caps for tight fitting; the vent caps must not be plugged by dirt or dust. Spilled electrolyte must be rinsed off at once from clothes or metal, using a solution of soda.
Explosion hazard! Do not expose the battery to an open
frame or right. Even if you do not drive your Porsche over a longer period of time, the battery will discharge. To maintain its usability, the battery must be charged every 6 weeks because a discharged battery is liable to suffer from permanent damages. When checking, also check the electrolyte level and replenish if necessary.
Page 61

Changing Bulbs To avoid short circuits, switch off the respective equipment when changing bulbs. New bulbs must be free of dirt and grease. Handle them with a clean cloth or smooth paper. For safety reasons you should always carry same spare bulbs in your car so that your Porsche is correctly lighted if any one of the bulbs should fail. It is also advisable to have a few spare bulbs when going abroad, as some countries insist on spare bulbs being carried in the car!
To clean the plastic bulb lenses use soap water only. Do not clean with chemical cleansers.
Front Direction Indicators 1. Slacken screw on rubber buffer with a screwdriver and
remove buffer. Then slacken screws on lamp trim and remove trim.
2. Loosen the recessed head screws of the bulb lens and remove bulb.
3. Press the defective bulb into the socket and turn to the left (bayonet base).
4. Take out bulb and replace.
5. Press the bulb into socket, turn to the right until the pins snap in.
6. Replace lens and tighten the screws alternately.
7. Replace lamp trim and tighten screws. Then replace rubber buffer and tighten screw.
8. Check operation of lights.
Page 62
Rear - Turn Signal Lights/ Stop Lights/Parking Lights/ Back-up Lights 1. Open the rear hood and loosen the luggage
compartment panel.
2. Remove the knurled nuts on the wall of the rear luggage compartment and take off the bulb brackets.
3. Press the defective bulb into the socket and turn to the left (bayonet base). Take out the bulb and replace.
4. Press the bulb into the bracket, turn to the right until the
socket pins snap into position.
5. Insert bulb bracket and tighten knurled nut.
6. Install luggage compartment panel and check operation of lights.
License Plate Light
1. Open the rear hood and loosen the luggage
compartment panel.
2. Remove both screws and take off the bulb bracket.
3. Replace defective bulb and mount the bulb bracket. Check the sealing for correct fitting.
4. Mount the luggage compartment panel and check operation of bulb.
Page 63

Headlights 1. Raise the headlights by switching on the headlights and
the ignition. Once the headlights are raised turn off the ignition.
2. Loosen the recessed head screws from the headlight surround and remove the headlight.
3. Turn back the rubber sleeve, pull off the three-pin plug, press back the retainer strap and take out the defective bulb.
4. Install new bulb, attach retainer strap, insert three-pin
plug and replace rubber sleeve.
5. Mount headlight and headlight casing.
6. Check headlights for correct operation and adjustment.
Page 64
Additional Headlights 1. Slacken screw on rubber buffer with a screwdriver and
remove buffer. Then slacken screws on lamp trim and remove trim.
2. Unscrew three screws from the headlight (arrow) and remove the headlight assembly.
3. Unscrew the water protection cap. Disconnect the cable from the lamp plug and loosen the retaining clips. Replace defective bulb and check for correct position.
4. Fasten retaining clips and push cable onto plug.
5. Install water protection cap and tighten. Be sure rubber
seal fits correctly.
6. Mount headlights and fasten screws. Mount rubber buffer.
7. Replace lamp trim and tighten screws. Then replace rubber buffer and tighten screw.
8. Check operation and adjustment.
Parking Light (front) The parking light is built into the additional headlight.
1. Slacken screw on rubber buffer with a screwdriver and
remove buffer. Then slacken screws on lamp trim and remove trim.
2. Remove headlight and screw off water protection cap.
3. Press retaining clips together and remove bulb bracket.
4. Replace defective bulb and mount head light.
5. Replace lamp trim and tighten screws. Then replace rubber buffer and tighten screw.
6. Check operation.
Page 65

Interior Light 1. Carefully apply small screwdriver and push interior light
assembly out of covering.
2. Take out defective bulb between spring contacts and replace.
3. Insert light assembly into cutout first from one side and then from the other side and press in. Check operation of light.
Attention: Retaining clip may fall out when removing the interior light.
Ashtray Light 1. Lift ashtray and remove. Push lamp bracket with bulb
out of support.
2. Pull defective bulb out of socket and press in new bulb. Insert lamp bracket into support.
3. Check bulb for operation with the lighting turned on.
4. Re-install ashtray. Light entry opening must piont to bulb.
Page 66
Adjusting the Headlights
Upper set screw: Lateral adjustment Lower set screw: Vertical adjustment
Optimum road illumination can only be achieved if the main headlights, including low beams, are correctly set so that oncoming traffic is not subjected to glare or dazzle. Beam setting is always done with a headlight aiming device at the car's curb weight, i. e. ready for the road and with a full tank. A 165 ibs./75 kg weight must be placed on the driver's seat or alternatively a person must sit there. Tire pressure must be correct. After loading, the car must be rolled forward a few feet so that the suspension is in the normally loaded position.
Set screws Each headlight has a vertical and a lateral set screw. By turning the screws either to the right or to the left, the adjustment is varied accordingly. Adjusting additional headlights The additional high beam is adjusted so that the centre of the beam remains at the same height as that of the main headlights. If your car is equipped with asymmetric low beam, and you enter a country in which
traffic runs on the opposite side as compared to your home country, you must cover the prism sectors of the light-diffusing lenses with an opaque adhesive tape before crossing the border. Doing this, the low beams become symmetric and do not blind oncoming traffic.
Page 67

Manual Operation of Pop-Up Headlights If the pop-up headlights cannot be opened or closed due to drive motor failure, they may be operated manually by turning the knob on the end of the motor drive shaft. The connecting rod assembly is designed in such a way that it need only be turned to the left either to close or to open the headlights
Do not turn the knob on the drive shaft as long as the mechanism functions normally and the pop-up headlights open and close when pulling the light switch. Injury risk.
The headlight circuit is designed so that the headlight motor continues to run until the mechanism has completed one half turn (180°). In other words, after the manually operated knob has rotated several times, an electrical contact will close and the pop-up headlights will then be fully opened or closed.
Page 68
Important: The brake booster does not operate when the engine is not running. When the accumulated vacuum is exhausted, much more pressure must be applied to the footbrake.
It is impossible to start your Porsche by towing or pushing it when the battery is defective or completely flat. The engine can only be started by replacing the battery or using jump cables. Always observe road traffic regulations when towing the car. If you tow another vehicle, it must not weigh more than your Porsche (approx. 1000 kg). Refer to the chapter "Automatic Transmission" when towing vehicles with automatic transmission.
Towing If the car has to be towed, screw the towing eye (in the tool kit) into the hole on the right hand side of the front bumper. First loosen the screw on the right-hand rubber buffer and remove the buffer.
To tow another vehicle, remove the plastic plug on the right underneath the rear bumper and screw in the towing eye.
Page 69

Starting Aid
If the engine will not start, e. g., because the battery is flat in winter, or after the car has been left standing for a prolonged period of time, the battery of another vehicle can be used as an auxiliary. For thus you will need jump cables. When starting your car in this way keep the following in mind: 1. Both batteries must be 12-volt batteries. The capacity
(Ah) of the feed battery must not be too much lower than that of the flat battery.
2. The jump cables must have a sufficiently large cross-section. See manufacturer's data.
3. A flat battery can freeze at -10° C. A frozen battery must be thawed out before jump cables are connected to it.
4. There must be no contact between the two vehicles. Otherwise current could flow as soon as the positive terminals are connected.
5. The flat battery must be properly connected to the car's electrical system.
6. Start the engine of the vehicle with the feed battery. 7. Connect the jump leads in the following order:
First: + read: connect to the terminal of the flat battery, then to the terminal of the feed battery. Second: - read: connect to the terminal of the feed battery, then to the terminal of the flat battery. Care must be taken to ensure that the clamps of the leads do not touch, and that the read clamped to the + terminal does not come into contact with electrically conductive parts of the vehicle (risk of short circuit).
8. Start the engine as described in the section "Starting the Engine".
9. When the engine is running, remove the two leads in exactly the reverse order.
A - Flat battery B - Feed battery
Page 70
Technical Data
Page 71

Engine Number of cylinders Bore Stroke Displacement Compression ratio DIN-horsepower DIN-torque Fuel octane rating Max. permissible rpm Fuel consumption in l/100 km (according to ECE A 70) at 90 km/h at 120 km/h Urban cycle Oil consumption Spark plugs Electrode gap Battery Alternator Firing order Ignition timing Drive belt Drive belt (with air-conditioner) Drive belt (servopump) Valve clearance
4 3.94 in. (100 mm) 3.11 in. (78,9 mm) 151.26 cu. in (2479 cm3) 10,6:1 120 kW (163 hp) at 5800 rpm 205 Nm (20,9 kpm) at 3000 rpm 98 RON (Premium) 6500
Manual Transmission Automatic Transmission 7,0 7,9 8.7 9,4 11,4 11,2 up to 1.5 liters/1000 km Bosch WR 7 D Beru 14. R-7 D 0.028 in. + 0.004 in. (0,7 mm + 0,1 mm) 12 volts 50 Ah, optional 12 volts 63 Ah Three-phase 1260 watts/90 amp. 1-3-4-2 10° +- 2° b. T. D. C. at 800 + 50 1/min Warning: high voltage! Risk of electrocution when working on any part of ignition system
or tachometer. Polyrib K 5 736 Lw Polyrib K 5 1005 Lw 9,5 x 950 Self-adjusting hydraulically operated
Page 72
Engine Design Specifications
Design Cooling Lubrication Cylinder block Cylinder head Valve operation Camshaft drive Crankshaft Conrad bearings Fuel supply Fuel injection
4-cylinder, 4-stroke, in-line engine, front mount Water Pressure oil circulation from oil sump Light metal Light metal Overhead camshaft, hydraulic tappet Spur belt drive Forged Plain Electric fuel pump L-Jetronic
Power Train Manual transmission Automatic Transmission Gear ratios 1) Drive ratio 1) Clutch
1st gear 2nd gear 3rd gear 4th gear 5th gear Reverse gear
(36/10) 3.600:1
(34/16) 2.125:1
(35/24) 1.458:1
(30/28) 1.071:1
(29/35) 0.828:1
(42/12) 3.500:1
(35/9) 3.889:1 Single plate dry disc, hydraulically operated
Gear ratios 1) Drive ratio 1) Clutch
1st gear 2nd gear 3rd gear Reverse gear
2.551:1 1.448:1 1.000:1 2.461:1 3.083:1 Hydrodynamic torque converter
Page 73

Filling Capacities Engine oil Cooling system with heating Transmission with differential Automatic transmission with torque converter Differential of automatic transmission Fuel tank Power steering Brake fluid Windshield washer system and headlight washing system
Total oil quantity approx. 5.5 liters* Difference between max. and min. mark on the dipstick is approx. 1.3 liters. Total quantity approx. 7.8 liters coolant. Factory filled antifreeze up to -25°C. Use only specially developed antifreeze and anticorrosion agents for light-alloy engines and radiators, which have been approved by Porsche. Your authorized Porsche dealer will be glad to advise you. Approx. 2.6 liter hypoid gear oil SAE 80 APl classification GL 4 (mil-L 2105). Approx. 6.5 liter total filling quantity. Changing quantity, approx. 2.8 liter ATF (Dexron). Approx. 1 liter hypoid gear oil SAE 90 APl classification GL 5 (mil-L 2105 B). Approx. 66 liter inclusive 9.0 liter reserve. Required octane rating: 98 RON (premium). Approx. 0.6 liter hydraulic fluid ATF (Dexron). Approx. 0.2 liter. Only use brake fluid according to SAE J 1703 or DOT 3. Approx. 6.5 liter.
Mixing Chart (Approximate values) Anti-freeze - cooling water Only use additives recommended for aluminum engines and radiators. Consult your authorized dealer on the approved antifreeze mixtures. * Measuring with oil dipstick being decisive
Frost Resistance up to Anti-freeze Water Anti-freeze Water
-25 ºC (-13 °F) 40% 60% 3,10 liters (2.73 lmp. qts.)
4,70 liters (4.14 lmp. qts.)
-30 ºC (-23 °F) 45% 55% 3,5 liters (3.08 lmp. qts.)
4,3 liters (3.78 lmp. qts.)
-35 ºC (-30 °F) 50% 50% 3,9 liters (3.43 lmp. qts.)
3,9 liters (3.43 lmp. qts.)
Page 74
Motor Oils Use only branded HD oils which satisfy the APl classification APl SE or SF for gasoline engines. These classifications are often given together with the classifications for diesel engines, e. g., SE/CG, SF/CC or SF/CD. Single-grade, multi-grade and light-grade oils can be mixed provided the viscosity grades correspond to outdoor temperatures. Single-grade Oils Single-grade oils may only be used when multi-grade oils are not available and the car is being used under normal conditions. To prevent damage, the oil must be changed as required when temperatures change considerably. Multi-grade Oils The oil change intervals given in the service schedule apply when multi-grade oils are used. For all-season use only the multi-grade oils indicated the table opposite may be used, in accordance with prevailing air temperatures. Full economy oils
In addition to single-grade and multi-grade oils, "fuel economy" oils are available (developed for all-year round use). Before using these unconventional oils, consult your authorized Porsche dealer.
Page 75

Weights DIN curb weight Total permissible weight Maximum axle load, front* Maximum axle load, rear* Permissible trailer weight, free wheel**/*** Permissible trailer weight, braked**/*** Total permissible pulling weight (vehicle + trailer)*** Permissible roof load*/***/**** Permissible trailer-nose weight***
2601 lbs (1180 kg)
3306 lbs (1500 kg)
1588 lbs (720 kg)
1940 lbs (880 kg)
1103 lbs (500 kg)
2646 lbs (1200 kg)
5952 lbs (2700 kg)
169 lbs (75 kg)
110 lbs (50 kg)
*
** ***
****
Do not exceed total permissible weight Attention: Installation or additional equipment (air conditioner etc.) reduces load capacity accordingly. Gradient up to 12%. Only applicable to original Porsche parts. Only with the original Porsche basic luggage rack; otherwise max. roof load 110 lbs (35 kg)
Page 76
Rims, Tyres, Wheel Adjustment
Rims, tyres Winter tyres Spare wheel Tyre pressure (on cold tyre) Snow chains Wheel camber* Toe* Toe angle difference* Caster*
or
or
7 J x 15 with tyres 185/70 VR 15 7 J x 15 with tyres 215/60 VR 15** 7 J x 16 with tyres 205/55 VR 16 5 1/2 J x 15,6 J x 15 or 7 J x 15 with tyres 185/70 R 15 M + S 90 Q or T 6 J x 16 or 7 J x 16 with tyres 205/55 R 16 M + S 88 Q or T Collapsible spare wheel 5 1/2 J x 15 with tyre 165-15 4 PR 83 P Great Britain only: 5 1/2 J x 15 with tyre 165 R 15 86 S Maximum speed 60 mph (100 km/h) Front: 2.0 bar (29 psi) Rear: 2.5 bar (36 psi) Spare tyre, front or rear 2.2 bar (32 psi) Fitting is possible only on the driven wheels for all given tyre sizes; Maximum speed 31 mph (50 km/h) Front -20' +- 15'; rear -25' +- 30' Front 0° + 5' -15' with 15 kp pressure; rear 0° +- 10' At 20° lock to left and right: -1° +- 20' 2° 30' + 30' -15'
* **
at DIN curb weight With 215/60 VR 15 tyres on 7 J x 15 rims the snow chains must be tensioned and re-tensioned with the utmost care, to insure unimpeded rotation.
Page 77

Performance*
Maximum speed Acceleration 0-62 mph (0-100 km/h) Kilometer with standing start
Manual transmission 137 mph/220 km/h 8.4 seconds 28.8 seconds
Automatic transmission 137 mph/220 km/h 9.6 seconds 30.5 seconds
* With curb weight to DIN and halt-load. Without extras which impair performance (air-condition. special tyres).
Steigleistungen
1st gear 2nd gear 3rd gear 4th gear 5th gear
Manual transmission approx. 63% approx. 36% approx. 23% approx. 15% approx. 10%
Automatic transmission approx. 55% approx. 25% approx. 15%
Approximate values at DIN curb weight and half-load capacity
Brake System
Dual-circuit hydraulic brake system with black/white brake circuit identification for front/rear. Internally ventilated disc brakes front and rear. Brake serve unit. Hand brake acting mechanically on rear wheels.
Page 78
Dimensions
(at DIN curb weight)
Wheel base 94.49 in./2400 mm
Front track (rims 7 J x 15 and 7J x 16) 58.15 in./1477 mm
Rear track (rims 7 J x 15 and 7J x 16) 57.13 in./1451 mm
Length 165.35 in./4200 mm
Width 68.31 in./1735 mm
Height 50.20 in./1275 mm
Ground clearance* 4.92 in./125 mm
Turning circle approx. 31.38 ft./10.3 m
Overhang angle front* 14º
rear* 15º
* At total permissibie weight
Page 79

Page 80
Page 81

Page 82
Page 89

Service Schedule The recommended service intervals apply under normal driving conditions and do not take into consideration all of the optional equipment available. Dusty areas require more frequent checking and possibly replacement of the air filter cartridge. Tire, clutch and brake wear as well as the condition of the oil in the engine in particular depend greatly on the driving habits and are adversely influenced by extreme operating conditions; this might necessitate shorter intervals for checking and replacement and applies logically also for the item "check battery acid level". Also, the moving components of the chassis require a certain running-in period. We recommend, therefore, having an alignment check performed after the first 2000 to 3000 miles (3000 to 5000 km). Maintenance service should be carried out at least once a year and precautionary measures against corrosion should be taken before winter. The brake fluid and the coolant should be renewed at least every two years.
300 to 1200 miles/ 500 to 2000 km
Service Required Then at and every
12000 miles / 20000 km
1 Check tension of camshaft toothed belt
2 Check tension of balancer shaft toothed belt
3 Check tightness of exhaust flanges; check exhaust system for leaks
4 Check cooling and heating system for leaks
5 Check level of coolant (anti-freeze)
6 Renew spark plugs
7 Renew air filter element and check tightness of hose connections
8 Check intake air and crankshaft venting hoses for tightness and leaks
9 Renew fuel filter
10 Check fuel and injection lines for tightness and leaks
11 Set idling (CO content and speed)
12 Change engine oil
Page 90
300 to 1200 miles/ 500 to 2000 km
Service Required Then at and every
12000 miles / 20000 km
13 Change engine oil filter
14 Check engine for leaks
15 Check clutch play (play between forcing lever and master cylinder)
16 Lubricate pop-up headlight linkage (also after every engine wash)
17 Check brake fluid level in reservoir. Check thickness of brake pads, play of forcing lever between brake pedal and brake servo unit. Check free travel of hand and foot brakes. Check all lines, hoses and hose connections for damage and corrosion, and check entire brake system for leaks. Test foot and hand brakes (trial run or test-bed)
18 Check play in front wheel bearings
19 Steering - Check tightness of all connections to steering gear, track rods and suspension control arms; check function and tightness of protective caps and joints (remove cover plate). Check fluid level in steering servo unit, and check unit for leaks.
20 Manual transmission: check oil level
21 Manual transmission: change oil (clean drain plugs or magnetic plugs) every 80000 km
22 Automatic transmission: check ATF level (if there is a loss, remedy leak)
23 Automatic transmission: change ATF and clean ATF filter (remove oil pan) every 40000 km
24 Automatic transmission: check oil level in rear axle drive
25 Treat seals on doors, hoods and hard-top; remove abraded rubber, check door arresters
26 Check tire pressure
27 Check function of heater, ventilator and/or air conditioning (driver's and passenger's side)
28 Check battery electrolyte level. Check headlight setting and function of entire lighting system as well as windshield wipers and horns. Check setting of washer jets; top up washer fluid (add anti-freeze if necessary)
Page 91

Gas Station Information As a filling station attendant might not be fully acquainted with your Porsche, we have described in the following the most necessary servicing operations. A detailed exposition can be found within this operation manual.
Seat adjustment Pull lover in front of seat.
Backrest Lift lever on side of seatback.
Water reservoir
The water reservoir for windshield and headlight washing system is located in the right front of the engine compartment.
Fuel tank
Fill up with premium gasoline of 98 octane RON min. only. Tank capacity is approx. 66 liters (14.52 lmp. gals.)
Page 95
Battery In cowl area in engine compartment. Check each cell. Top up with distilled water. Never disconnect battery while engine is running: this will destroy the alternator. Before connecting quickcharger, battery must be disconnected.
Engine hood release Pull lever on left underneath dashboard. Pull safety hook under hood. Lift engine hood and support on rod.
Brake fluid reservoir Level should be between MIN and MAX marks. Only use new, unused brake fluid according to SAE recommendation J 1703 or DOT 3.
Fuses and relays On left under dashboard.
Hatchback Unlock hatchback with door and ignition key. Turn key counterclockwise.
Coolant level The coolant level should be up to the filling mark on the expansion tank when the engine is cold. Warning: When the engine is hot turn the cap to the first position slowly and release the pressure. Danger of scalding!
Page 96

Engine oil dipstick Check oil level a few minutes after engine has stopped. Level should be between upper and lower marks on dipstick. Difference between marks is approx. 1.3 liter (1 lmp. qts.). Engine oil Use only quality HD oils "For Service APl/SE or SF". Details under "Filling Capacities"; with filter change 5.5 liters (4.84 Imp. qts.). Check oil level as prescribed. Manual transmission For transmission and differential use hypoid oils API/GL 4 (or Mil-L 2105), viscosity SAE 80. Total quantity approx 2.6 liters (2.29 lmp. qts.). Automatic transmission ATF lubricates torque converter and transmission. Use ATF (Dexron) only. Quantity at oil change: approx. 2.8 liters (2.46 Imp. qts.). Check ATF level visually through transparent reservoir at rear end of transmission housing. Difference between marks approx. 0.4 liter (0.9 lmp. pint). Check ATF level when ATF is warm, with engine idling, selector lever in Neutral and car on level ground. For differential use oils API/GL 5 (or Mil-L 2105 B), viscosity SAE 90.
Jacking Points
Black arrow
White arrow
Spare wheel
Car jack and tools Tyre Pressure (cold)
Jacking point for car jack Jacking point for hoist and workshop jack In the luggage compartment under the carpet In front of the spare wheel in luggage compartment under the carpet. Car jack only to be used for wheel changing. Front 2.0 bar (29 psi) Rear 2.5 bar (36 psi) Collapsible tyre front/rear 2.2 bar (32 psi)
Page 97
Download more manuals from: http://www.9ss1.dk/porsche944