príprava dát na tlačový stroj - bittner · color type (druh farby) navoľte na spot color...
TRANSCRIPT

Príprava dát na tlačový stroj Durst s výrezom Esko Kongsberg XL
Táto príručka popisuje postup, ktorý sa odporúča na prípravu korektných dát na tlačovom stroji Durst s výrezom na Esko Kongsberg XL

Príprava súboru s výsekovou linkouNa výrobu výrezovej linky použite vektorový program (napr. Adobe Illustrator, Corel Draw)
Vytvorenú výrezovú linku musíte nadefinovať nasledovne (ako príklad použijeme Adobe Illustrator):
Nastavte fill (výplň) na žiadna a na stroke (obrys) navoľte ľubovolnú farbu (obr. 1).
Hrúbku výrezovej linky navolte na 0.1 pt (bodu) (obr.2).
Farbu nadefinujte v paletke Color (obr.3) alebo vyberte z paletky Swatches (vzorník) (obr.4).
Ak ste si navolili farbu pomocou paletky Color, kliknite v paletke Swatches na New Swatch alebo pri výbere zo Swatches vyvolajte dvojklikom možnosti. (obr. 5).
P R I N T I N G A N D C U T T I N G : H O W T O P R E P A R E T H E F I L E S
3
6. For the contour to be taken into account in the Caldera Graphics software, it MUST be given a color. Therefore, make sure that the Background color icon is deactivated, and that the Contour icon has been given a color, as in the following screenshot:
To give a color to the contour, you can either set it in the Colors palette, or pick one among the color patches.
7. The next step is to name your color. To do so, double-click on the corresponding patch of color in the palette to edit it. The Swatch options window will then appear:
obr. 1
obr. 3
obr. 5
obr.4
P R I N T I N G A N D C U T T I N G : H O W T O P R E P A R E T H E F I L E S
2
Adobe Illustrator CS/CS2/CS3
1. Start Adobe Illustrator. Two methods are possible here: either you want to add a contour and perform a cut on a vector image, or you want to add a contour to a raster image.
2. If you wish to use an existing vector file, click File > Open, navigate to the file itself, select it, and click Open. Then, follow the same procedure as described on step 4 and beyond.
3. If you wish to import a raster image into an AI document to add a contour to it, click File > New, and choose the name, dimensions and color mode you want your file to have.
Once this is done, click File > Import. In the file browser that appears, select the image for which you need to create a contour, and click Import.
4. In the Tools palette, select the Pen tool.
5. Draw the contour around the image, exactly where you want it to be cut later on. In order to prevent some exports problem, please give a thickness of 0.1 point to your contour in the Stroke panel.
obr. 2
2
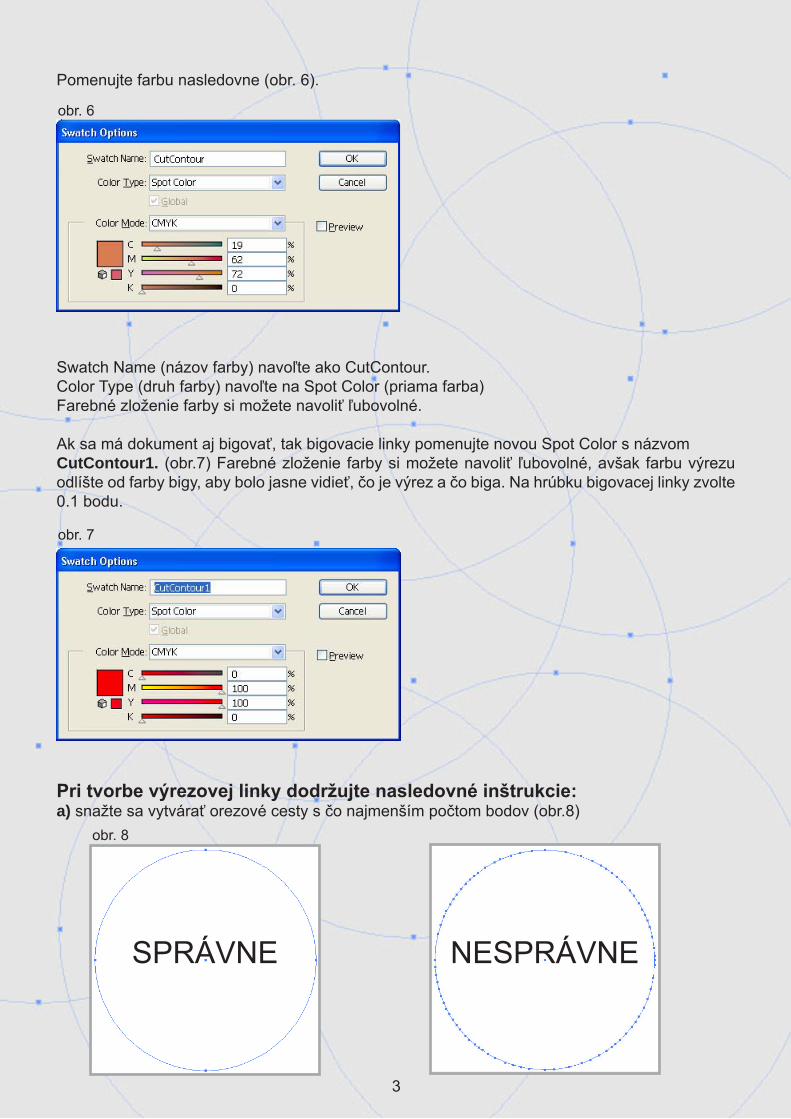
Pomenujte farbu nasledovne (obr. 6).
Swatch Name (názov farby) navoľte ako CutContour. Color Type (druh farby) navoľte na Spot Color (priama farba)Farebné zloženie farby si možete navoliť ľubovolné.
Ak sa má dokument aj bigovať, tak bigovacie linky pomenujte novou Spot Color s názvom CutContour1. (obr.7) Farebné zloženie farby si možete navoliť ľubovolné, avšak farbu výrezu odlíšte od farby bigy, aby bolo jasne vidieť, čo je výrez a čo biga. Na hrúbku bigovacej linky zvolte 0.1 bodu.
Pri tvorbe výrezovej linky dodržujte nasledovné inštrukcie:a) snažte sa vytvárať orezové cesty s čo najmenším počtom bodov (obr.8)
obr. 6
obr. 7
obr. 8
SPRÁVNE NESPRÁVNE
3
b) výrezové linky netvorte prekrývaním viacerých liniek, ale koncové body vždy spojte do jedného celku
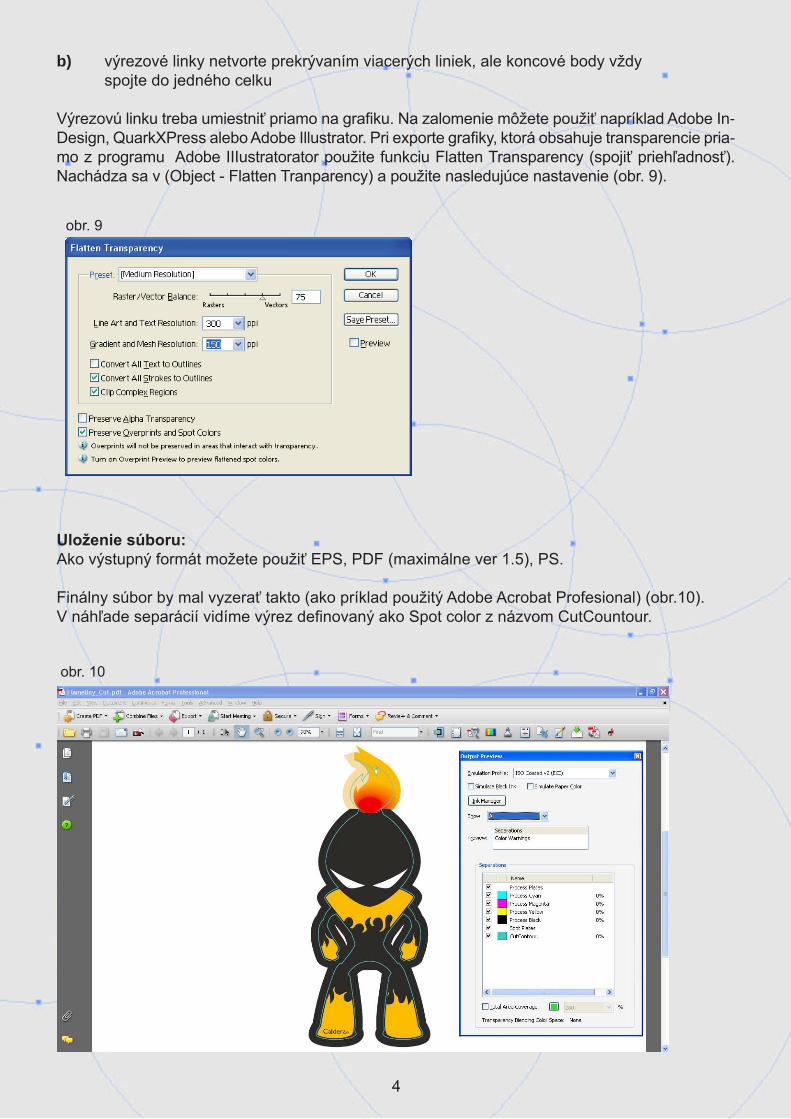
Výrezovú linku treba umiestniť priamo na grafiku. Na zalomenie môžete použiť napríklad Adobe In-Design, QuarkXPress alebo Adobe Illustrator. Pri exporte grafiky, ktorá obsahuje transparencie pria-mo z programu Adobe IIIustratorator použite funkciu Flatten Transparency (spojiť priehľadnosť). Nachádza sa v (Object - Flatten Tranparency) a použite nasledujúce nastavenie (obr. 9).
Uloženie súboru:Ako výstupný formát možete použiť EPS, PDF (maximálne ver 1.5), PS.
Finálny súbor by mal vyzerať takto (ako príklad použitý Adobe Acrobat Profesional) (obr.10).V náhľade separácií vidíme výrez definovaný ako Spot color z názvom CutCountour.
P R I N T I N G A N D C U T T I N G : H O W T O P R E P A R E T H E F I L E S
4
8. For the contour to be recognized in the Caldera Graphics software, its name must start with “CutContour” (for instance, “CutContourFast”). It MUST also be defined as a spot color:
9. Once this is done, click OK.
10. Since there are reported problems with the Adobe Illustrator software when attempting to export a file with spot colors and transparency, it is important to flatten all transparent shapes before the export step. If you have used transparency in your document, click Object > Flatten Transparency…, choose an appropriate preset (Low Resolution, Medium Resolution, High Resolution or a custom preset), and let the Preserve Overprints and SpotColors option enabled.
11. Click File > Save as..., and choose EPS or PDF for the file format. Your image is now ready to be opened in your Caldera Graphics software.
obr. 9
obr. 10
4