process control system pcs 7 simatic batch · batch? 1 product introduction and installation 2...
TRANSCRIPT

s
Preface, Contents What's New in SIMATIC BATCH?
1Product introduction and installation 2Technological basics in accordance with ISA S88.01 3 Introduction to SIMATIC BATCH 4 Configuration in the ES 5 Batch Control Center (BatchCC) 6 BATCH Recipe Editor 7 Redundancy 8 Migration V4.02 -> V6.0 9 Appendices A Glossary, Index
SIMATIC
Process Control System PCS 7 SIMATIC BATCH Manual
10/2006 A5E00495287-01

Siemens AG Automation and Drives Postfach 4848 90437 NÜRNBERG GERMANY
A5E00495287-01 10/2006
Copyright © Siemens AG 2006 Technical data subject to change
Safety Guidelines This manual contains notices you have to observe in order to ensure your personal safety, as well as to prevent damage to property. The notices referring to your personal safety are highlighted in the manual by a safety alert symbol, notices referring to property damage only have no safety alert symbol. The notices shown below are graded according to the degree of danger.
! Danger indicates that death or severe personal injury will result if proper precautions are not taken.
! Warning indicates that death or severe personal injury may result if proper precautions are not taken.
! Caution with a safety alert symbol indicates that minor personal injury can result if proper precautions are not taken.
Caution
without a safety alert symbol indicates that property damage can result if proper precautions are not taken.
Notice
indicates that an unintended result or situation can occur if the corresponding notice is not taken into account.
If more than one degree of danger is present, the warning notice representing the highest degree of danger will be used. A notice warning of injury to persons with a safety alert symbol may also include a warning relating to property damage.
Qualified Personnel The device/system may only be set up and used in conjunction with this documentation. Commissioning and operation of a device/system may only be performed by qualified personnel. Within the context of the safety notices in this documentation qualified persons are defined as persons who are authorized to commission, ground and label devices, systems and circuits in accordance with established safety practices and standards.
Prescribed Usage Note the following:
! Warning This device and its components may only be used for the applications described in the catalog or the technical description, and only in connection with devices or components from other manufacturers which have been approved or recommended by Siemens. Correct, reliable operation of the product requires proper transport, storage, positioning and assembly as well as careful operation and maintenance.
Trademarks All names identified by ® are registered trademarks of the Siemens AG. The remaining trademarks in this publication may be trademarks whose use by third parties for their own purposes could violate the rights of the owner.
Disclaimer of Liability
We have reviewed the contents of this publication to ensure consistency with the hardware and software described. Since variance cannot be precluded entirely, we cannot guarantee full consistency. However, the information in this publication is reviewed regularly and any necessary corrections are might infringe upon the rights of the trademark owners.

SIMATIC BATCH A5E00495287-01 iii
Preface
Purpose of the Manual This manual describes how batch processes can be automated using the BATCH program package from SIMATIC PCS 7.
Required Basic Knowledge To understand this manual, you require general experience in the field of automation engineering and process control. You must also be familiar with working with PCs or similar devices (for example programming devices) and the Windows operating system. Before you install PCS 7 components you should always read the readme.wri file of the current version of PCS 7.
Where is this Manual valid? This manual is valid for the SIMATIC BATCH software V7.0 and the PCS 7 Process Control System V7.0.
The electronic manual is largely identical to the content of the online help. Due to technical reasons involving the production of electronic manuals, there may be slight differences between the manual and online help systems. In such cases, the information in the online helps is more recent and takes precedence over the information in the manual.
Further Support If you have any technical questions, please get in touch with your Siemens representative or agent responsible.
You will find your contact person at:
http://www.siemens.com/automation/partner
You will find a guide to the technical documentation offered for the individual SIMATIC Products and Systems here at:
http://www.siemens.com/simatic-tech-doku-portal
The online catalog and order system is found under:
http://www.mall.ad.siemens.com/

Preface
SIMATIC BATCH iv A5E00495287-01
Training Centers Siemens offers a number of training courses to familiarize you with the Process Control System PCS 7. Please contact your regional training center or our central training center in D 90327 Nuremberg, Germany for details: Telephone: +49 (911) 895-3200. Internet: http://www.sitrain.com
Technical Support You can reach the Technical Support for all A&D products
• Via the Web formula for the Support Request http://www.siemens.com/automation/support-request
• Phone: + 49 180 5050 222
• Fax: + 49 180 5050 223
Additional information about our Technical Support can be found on the Internet pages http://www.siemens.com/automation/service
Service & Support on the Internet In addition to our documentation, we offer our Know-how online on the internet at: http://www.siemens.com/automation/service&support
where you will find the following:
• The newsletter, which constantly provides you with up-to-date information on your products.
• The right documents via our Search function in Service & Support.
• A forum, where users and experts from all over the world exchange their experiences.
• Your local representative for Automation & Drives.
• Information on field service, repairs, spare parts and more under "Services".

SIMATIC BATCH A5E00495287-01 v
Contents
1 What's new in SIMATIC BATCH? 1-1 1.1 Version 7.0........................................................................................................ 1-1 1.1.1 Overview of SIMATIC BATCH Version 7.0....................................................... 1-1 1.1.2 Document landscape for SIMATIC BATCH V7.0 ............................................. 1-2 1.1.3 Migration of PCS 7 projects to V7.0 ................................................................. 1-2 1.1.4 New authorizations/licenses ............................................................................. 1-4 1.1.5 User-specific session profile............................................................................. 1-5 1.1.6 Changing languages in runtime........................................................................ 1-7 1.1.7 Illegal characters............................................................................................... 1-7 1.1.8 Change log ....................................................................................................... 1-8 1.1.9 Deleting text entries in the UNIT block ............................................................. 1-8 1.1.10 System-aided versioning .................................................................................. 1-9 1.1.11 Dependent elements in master recipes and libraries ....................................... 1-9 1.1.12 Integration of Route Control ........................................................................... 1-10 1.1.13 Information on block icons and faceplates ..................................................... 1-10 1.1.14 Arithmetic operations in transitions and recipes............................................. 1-13 1.1.15 Progress bar for the process cell update status ............................................. 1-14 1.2 Version 6.1 SP1.............................................................................................. 1-15 1.2.1 Overview SIMATIC BATCH Version 6.1 +SP1............................................... 1-15 1.2.2 New archiving methods for completed batches.............................................. 1-15 1.2.3 Simplified configuration of the SIMATIC BATCH faceplates .......................... 1-16 1.2.4 Improved user interface of the SIMATIC BATCH faceplates ......................... 1-16 1.2.5 Migration of an S7 project to V6.1 SP1 .......................................................... 1-17 1.2.6 Document landscape for SIMATIC BATCH V6.1 SP1 ................................... 1-19 1.3 Version 6.1...................................................................................................... 1-20 1.3.1 Overview SIMATIC BATCH Version 6.1......................................................... 1-20 1.3.2 General information about the version V6.1................................................... 1-20 1.3.3 Configuration in the engineering system ........................................................ 1-21 1.3.4 Fault-tolerant Batch Control............................................................................ 1-21 1.3.5 Recipe creation............................................................................................... 1-22 1.3.6 Working in BatchCC ....................................................................................... 1-22 1.3.7 Operation in process mode ............................................................................ 1-22 1.4 Version 6.0...................................................................................................... 1-23 1.4.1 Overview SIMATIC BATCH Version 6.0......................................................... 1-23 1.4.2 General information about the version ........................................................... 1-23 1.4.3 Configuration in the engineering system ........................................................ 1-24 1.4.4 Fault-tolerant Batch Control............................................................................ 1-25 1.4.5 Recipe creation............................................................................................... 1-26 1.4.6 Working in BatchCC ....................................................................................... 1-28 1.4.7 BATCH interface blocks.................................................................................. 1-28 1.4.8 Operation in runtime ....................................................................................... 1-29

Contents
SIMATIC BATCH vi A5E00495287-01
2 Product introduction and installation 2-1 2.1 What is SIMATIC BATCH?............................................................................... 2-1 2.2 Functions of SIMATIC BATCH ......................................................................... 2-2 2.3 Migration from older projects ............................................................................ 2-2 2.4 Components of SIMATIC BATCH .................................................................... 2-4 2.4.1 Components of SIMATIC BATCH .................................................................... 2-4 2.4.2 BATCH Start Coordinator ................................................................................. 2-4 2.4.3 Batch Control Center (BatchCC) ...................................................................... 2-6 2.4.4 BATCH Recipe Editor ....................................................................................... 2-7 2.4.5 BATCH Report.................................................................................................. 2-9 2.4.6 BATCH Control Server ................................................................................... 2-10 2.4.7 Batch CDV ...................................................................................................... 2-11 2.4.8 BATCH interface blocks.................................................................................. 2-12 2.5 Configuration options for SIMATIC BATCH.................................................... 2-13 2.5.1 Client/server architecture of SIMATIC BATCH............................................... 2-13 2.5.2 Distribution of the BATCH applications .......................................................... 2-14 2.5.3 Interface to MES/ERP..................................................................................... 2-15 2.6 Installation....................................................................................................... 2-16 2.6.1 The SIMATIC BATCH product........................................................................ 2-16 2.6.2 Requirements for installation .......................................................................... 2-18 2.6.3 Required authorization.................................................................................... 2-19 2.6.4 Installing the components of SIMATIC BATCH.............................................. 2-20 2.6.5 Readme file with the latest information........................................................... 2-22
3 Technological basics in accordance with ISA S88.01 3-1 3.1 Which standards is SIMATIC BATCH based on? ............................................ 3-1 3.2 Introduction to technical terminology ................................................................ 3-2 3.3 Basic structure of a recipe ................................................................................ 3-5 3.4 Material and production data (formula)............................................................. 3-6 3.5 Basic structure of a recipe procedure............................................................... 3-7 3.6 Relationship between recipe procedure, formula and master recipe ............... 3-8 3.7 What is a formula category?............................................................................. 3-9 3.8 Internal and external formulas ........................................................................ 3-10 3.9 ISA S88.01 models ......................................................................................... 3-11 3.9.1 Overview of the models of the ISA S88.01 standard...................................... 3-11 3.9.2 Procedural control model................................................................................ 3-12 3.9.3 Physical model................................................................................................ 3-13 3.9.4 Process model ................................................................................................ 3-15
4 Introduction to SIMATIC BATCH 4-1 4.1 Overview of the procedure................................................................................ 4-1 4.2 Process cell configuration................................................................................. 4-2 4.3 Permission management.................................................................................. 4-2 4.4 Recipe creation (offline).................................................................................... 4-2 4.5 Process mode................................................................................................... 4-2
5 Configuration in the ES 5-1 5.1 Introduction ....................................................................................................... 5-1 5.2 Engineering with SIMATIC BATCH .................................................................. 5-2 5.2.1 Difference between single project and multiproject engineering...................... 5-2 5.2.2 Single project engineering ................................................................................ 5-3 5.2.2.1 Flow chart: Engineering procedure for a single project .................................... 5-3 5.2.3 Multiproject engineering.................................................................................... 5-5 5.2.3.1 General information .......................................................................................... 5-5 5.2.3.2 Central multiproject engineering....................................................................... 5-7 5.2.3.3 Flow Chart: Engineering Procedure for a multiproject...................................... 5-7 5.2.3.4 Removing projects for editing and restoring them.......................................... 5-10

Contents
SIMATIC BATCH A5E00495287-01 vii
5.2.3.5 Distributed multiproject engineering ............................................................... 5-11 5.2.3.6 Overview and important remarks.................................................................... 5-11 5.2.3.7 Step 1: Archiving and removing project(s) and the master data library
in the CMP...................................................................................................... 5-14 5.2.3.8 Step 2: Restoring and inserting project(s) and master data library
in the DMP, and adapting the project............................................................. 5-15 5.2.3.9 Step 3: Editing, testing and archiving project(s) in the DMP ......................... 5-18 5.2.3.10 Step 4: Restoring and inserting project(s) in the CMP .................................. 5-18 5.2.3.11 Errors sources in distributed multiproject engineering with
SIMATIC BATCH............................................................................................ 5-21 5.3 PCS 7 Wizard ................................................................................................. 5-24 5.3.1 Using the PCS 7 Wizard................................................................................. 5-24 5.4 Configuring BATCH servers and clients ......................................................... 5-25 5.4.1 Basics of configuration.................................................................................... 5-25 5.4.2 Configuring the BATCH server ....................................................................... 5-27 5.4.3 Configuring the BATCH clients....................................................................... 5-29 5.4.4 Installing on BATCH servers and BATCH clients........................................... 5-30 5.5 Basics of the plant hierarchy .......................................................................... 5-31 5.5.1 Structure of the plant hierarchy ...................................................................... 5-31 5.5.2 Extending the plant hierarchy by adding neutral folders ................................ 5-34 5.5.3 Relationship between plant hierarchy, blocks and recipes............................. 5-36 5.5.4 Interface to the equipment phase (CFC charts) ............................................. 5-37 5.5.4.1 Introduction ..................................................................................................... 5-37 5.5.4.2 Use of the BATCH interface blocks ................................................................ 5-38 5.5.4.3 Using SFC types............................................................................................. 5-40 5.6 Creating the plant hierarchy ........................................................................... 5-41 5.6.1 Use of the BATCH hierarchy folder ................................................................ 5-41
5.6.1.1 "Process cell" hierarchy folder .............................................................. 5-41
5.6.1.2 "Unit" hierarchy folder........................................................................... 5-42
5.6.1.3 "Equipment module" hierarchy folder.................................................... 5-43 5.6.2 Editing the plant hierarchy .............................................................................. 5-43 5.6.2.1 How to create the plant hierarchy................................................................... 5-43 5.6.2.2 Specifying the basic settings for the plant hierarchy ...................................... 5-44 5.6.2.3 Assigning the "Process cell", "Unit" or "Equipment phase" object type.......... 5-45 5.6.2.4 Specifying predecessors for a unit ................................................................. 5-46 5.6.2.5 Rules for inserting CFC charts ....................................................................... 5-47 5.7 Inserting BATCH interface blocks in CFC charts ........................................... 5-49 5.7.1 Introduction ..................................................................................................... 5-49 5.7.2 Rules for the IEPH and IEOP interface blocks ............................................... 5-50 5.7.3 Rules for the IUNIT_BLOCK interface block .................................................. 5-55 5.7.4 Rules for the TAG_COLL interface block ....................................................... 5-56 5.8 Creating and inserting SFC types in CFC charts ........................................... 5-57 5.8.1 How to work with SFC types........................................................................... 5-57 5.8.2 Creating a new SFC type................................................................................ 5-58 5.8.3 Specifying the parameters.............................................................................. 5-60 5.8.4 Inserting an instance of the SFC type in the CFC chart ................................. 5-62 5.8.5 Displaying the number of units ....................................................................... 5-65 5.9 Creating and inserting user process tag types in CFC charts ........................ 5-66 5.9.1 Introduction ..................................................................................................... 5-66 5.9.2 Option 1: Create new function block............................................................... 5-67 5.9.3 Option 2: Creating a CFC chart and compiling it as a block type................... 5-69 5.10 Self-terminating and non-self-terminating equipment phases........................ 5-72 5.10.1 Self-terminating equipment phases ................................................................ 5-72 5.10.2 Non-self-terminating equipment phases......................................................... 5-73

Contents
SIMATIC BATCH viii A5E00495287-01
5.11 Equipment properties and their use................................................................ 5-74 5.11.1 Introduction ..................................................................................................... 5-74 5.11.2 Creating equipment properties ....................................................................... 5-75 5.11.3 Assigning equipment properties to the units................................................... 5-76 5.11.4 Configuring unit group .................................................................................... 5-77 5.11.5 Specifying units using conditions.................................................................... 5-78 5.12 Defining the type description of the process cell ............................................ 5-79 5.12.1 Type description of the process cell ............................................................... 5-79 5.12.2 Type description in a single project ................................................................ 5-80 5.12.3 Executable functions in a single project ......................................................... 5-82 5.12.4 Type description in a multiproject ................................................................... 5-83 5.12.5 Executable functions in a multiproject ............................................................ 5-85 5.12.6 Executable functions in a project of a multiproject ......................................... 5-86 5.12.7 Executable functions in a removed project..................................................... 5-87 5.12.8 Specifying the control strategies for a type..................................................... 5-88 5.12.9 Propagating a type description to other projects (multiproject) ...................... 5-90 5.13 Configuring use of archive data from WinCC archives................................... 5-91 5.13.1 Configuring use of archive data from WinCC archives................................... 5-91 5.14 Compiling the OS............................................................................................ 5-94 5.15 Compiling and downloading process cell data ............................................... 5-95 5.15.1 How to compile and download the process cell data ..................................... 5-95 5.15.2 Compiling the Batch process cell data in single project engineering ............. 5-97 5.15.3 Compiling the process cell data in multiproject engineering .......................... 5-98 5.15.4 Downloading the process cell data to the target system.............................. 5-100 5.15.5 Simultaneous compilation and download ..................................................... 5-102 5.15.6 Working with several process cell projects................................................... 5-103
6 Batch Control Center (BatchCC) 6-1 6.1 Startup and operation ....................................................................................... 6-1 6.1.1 Starting BatchCC.............................................................................................. 6-1 6.1.2 Getting Help...................................................................................................... 6-2 6.1.3 User interface and operator control .................................................................. 6-3 6.1.3.1 Layout of the main window ............................................................................... 6-3 6.1.3.2 Creating and manipulating objects ................................................................... 6-5 6.1.3.3 System settings ................................................................................................ 6-7 6.1.3.4 Overviews ......................................................................................................... 6-8 6.1.3.5 Output window for messages ......................................................................... 6-10 6.1.3.6 Editing window with the batch objects ............................................................ 6-11 6.1.3.7 Logbook .......................................................................................................... 6-12 6.1.3.8 Window for displaying active applications ...................................................... 6-13 6.1.4 Objects and object hierarchy .......................................................................... 6-14 6.1.4.1 Libraries with library operations...................................................................... 6-15 6.1.4.2 Master recipes ................................................................................................ 6-16 6.1.4.3 Formulas......................................................................................................... 6-17 6.1.4.4 Production orders ........................................................................................... 6-18 6.1.4.5 Materials ......................................................................................................... 6-19 6.1.4.6 Permission management................................................................................ 6-19 6.2 Specifying user permissions........................................................................... 6-20 6.2.1 Introduction to permission management ........................................................ 6-20 6.2.2 Specifying user permissions........................................................................... 6-22 6.2.3 Changing user permissions ............................................................................ 6-26 6.2.4 Displaying user permissions........................................................................... 6-26 6.3 Reading the ES data....................................................................................... 6-27 6.3.1 Reading process cell data into SIMATIC BATCH .......................................... 6-27 6.3.2 Updating process cell data after changes in the engineering system ............ 6-28 6.4 Specifying the material ................................................................................... 6-30 6.4.1 Editing materials ............................................................................................. 6-30

Contents
SIMATIC BATCH A5E00495287-01 ix
6.4.2 Changing the quality ....................................................................................... 6-31 6.5 Recipes........................................................................................................... 6-32 6.5.1 Flow chart: How to create and edit a master recipe ....................................... 6-32 6.5.2 Flow chart: How to create/edit a library operation .......................................... 6-33 6.5.3 Basics of recipe creation................................................................................. 6-34 6.5.3.1 Relationship between header parameters, formula category and
external formula.............................................................................................. 6-34 6.5.3.2 Interconnecting parameters............................................................................ 6-35 6.5.4 Editing master recipes .................................................................................... 6-36 6.5.4.1 How to configure a master recipe................................................................... 6-36 6.5.4.2 Creating a new master recipe......................................................................... 6-38 6.5.4.3 Opening and editing recipes........................................................................... 6-39 6.5.4.4 Specifying the properties of master recipes ................................................... 6-40 6.5.4.5 Creating a new formula category.................................................................... 6-42 6.5.4.6 Specifying the properties of the formula category .......................................... 6-42 6.5.4.7 Creating a new external formula..................................................................... 6-43 6.5.4.8 Specifying the properties of a formula ............................................................ 6-44 6.5.4.9 Interconnecting master recipe header parameters with an external formula . 6-46 6.5.4.10 Working with the recipe overview ................................................................... 6-49 6.5.4.11 Working with the formula overview................................................................. 6-50 6.5.5 Working with libraries...................................................................................... 6-51 6.5.5.1 How to configure library operations ................................................................ 6-51 6.5.6 Status and validity of recipes.......................................................................... 6-53 6.5.6.1 Validating recipes ........................................................................................... 6-55 6.5.6.2 Releasing recipes for testing .......................................................................... 6-56 6.5.6.3 Releasing recipes for production .................................................................... 6-56 6.5.6.4 Validating formulas ......................................................................................... 6-57 6.5.6.5 Status of the recipes and status changes....................................................... 6-58 6.5.6.6 Status of the formula and status changes ...................................................... 6-59 6.5.6.7 Working with externally created modules for validation ................................. 6-60 6.5.7 Recipe reports ................................................................................................ 6-61 6.5.8 Exporting and importing.................................................................................. 6-62 6.5.8.1 Exporting/importing Batch objects .................................................................. 6-62 6.5.8.2 Exporting using assistants.............................................................................. 6-63 6.5.8.3 Importing using assistants .............................................................................. 6-63 6.5.8.4 Tooltips and shortcut menu of the Import Assistant ....................................... 6-65 6.6 Batch planning ................................................................................................ 6-66 6.6.1 Flow chart: How to create/edit a batch ........................................................... 6-66 6.6.2 Order of batch processing .............................................................................. 6-67 6.6.3 Planning batches ............................................................................................ 6-68 6.6.3.1 How to configure batches ............................................................................... 6-68 6.6.3.2 Creating a new production order .................................................................... 6-69 6.6.3.3 Assigning batches to a the production order .................................................. 6-71 6.6.3.4 Displaying the properties of a production order.............................................. 6-74 6.6.3.5 Adding batches to a the production order....................................................... 6-75 6.6.3.6 Specifying the properties of the batch ............................................................ 6-76 6.6.3.7 Setting the Start mode for batch processing .................................................. 6-77 6.6.3.8 Displaying and modifying unit allocation......................................................... 6-78 6.6.3.9 Displaying and modifying formula parameters ............................................... 6-79 6.6.3.10 Displaying and, if necessary, modifying the batch ......................................... 6-80 6.6.3.11 Setting the order of batches ........................................................................... 6-80 6.6.3.12 Displaying the run time of a batch .................................................................. 6-82 6.6.3.13 Planning the unit allocation............................................................................. 6-82 6.6.4 Opening the control recipe for the batch ........................................................ 6-84 6.6.4.1 Overview of the control recipes ...................................................................... 6-85 6.6.5 Processing status of the batches.................................................................... 6-86 6.6.5.1 Status of the batches...................................................................................... 6-86

Contents
SIMATIC BATCH x A5E00495287-01
6.6.5.2 Status of production orders ............................................................................ 6-87 6.6.5.3 Releasing batches .......................................................................................... 6-88 6.6.5.4 Locking a batch............................................................................................... 6-88 6.6.5.5 Canceling a batch ........................................................................................... 6-89 6.7 Electronic signature ........................................................................................ 6-90 6.7.1 Specifying electronic signatures ..................................................................... 6-90 6.7.2 Signing operator actions and status changes ................................................ 6-93 6.8 Batch control................................................................................................... 6-95 6.8.1 Requirements for batch processing................................................................ 6-95 6.8.2 Starting the BATCH server ............................................................................. 6-95 6.8.3 Flow chart: How is a batch started and controlled?........................................ 6-97 6.8.4 Basics of batch control.................................................................................... 6-98 6.8.4.1 Principle of Batch Control ............................................................................... 6-98 6.8.4.2 Order of batch processing .............................................................................. 6-99 6.8.4.3 Processing the recipe structure ...................................................................... 6-99 6.8.4.4 Status changes of a batch ............................................................................ 6-101 6.8.4.5 State transition diagram of an equipment phase.......................................... 6-102 6.8.4.6 Self-terminating and non-self-terminating recipe phase............................... 6-103 6.8.4.7 Parameter trigger and start lock ................................................................... 6-106 6.8.4.8 Continuous operation of equipment phases................................................. 6-107 6.8.5 Starting batch control.................................................................................... 6-109 6.8.5.1 Working with lists for Batch Control.............................................................. 6-109 6.8.5.2 Opening the control recipe............................................................................ 6-111 6.8.5.3 Starting production of a batch....................................................................... 6-114 6.8.5.4 Locking a batch............................................................................................. 6-115 6.8.5.5 Canceling a batch ......................................................................................... 6-115 6.8.6 Operator control during batch control ........................................................... 6-116 6.8.6.1 Commands for controlling batches ............................................................... 6-116 6.8.6.2 Commands for recipe steps.......................................................................... 6-119 6.8.6.3 Entering comments on a running batch........................................................ 6-123 6.8.6.4 Displaying operator dialogs during runtime .................................................. 6-124 6.8.6.5 Operator prompts using group displays in WinCC ....................................... 6-125 6.8.6.6 Setting breakpoints ....................................................................................... 6-126 6.8.6.7 States of a transition ..................................................................................... 6-127 6.8.6.8 States of the batch steps .............................................................................. 6-128 6.8.6.9 Aborting a batch when no AS connection is available.................................. 6-134 6.8.7 Changes during batch processing ................................................................ 6-136 6.8.7.1 Changing setpoints ....................................................................................... 6-136 6.8.7.2 Changing the unit allocation ......................................................................... 6-138 6.8.7.3 Resuming a batch at the old position after changing a unit.......................... 6-139 6.8.8 Display of operator and status messages .................................................... 6-143 6.8.8.1 Displaying messages.................................................................................... 6-143 6.9 Batch data management............................................................................... 6-145 6.9.1 Batch reports ................................................................................................ 6-145 6.9.2 Archiving batches ......................................................................................... 6-147 6.9.3 Setting up the FTP Server ............................................................................ 6-148 6.9.4 Create SQL Server database ....................................................................... 6-150 6.9.5 Setting up the logon and password for SQL Server 2000............................ 6-151 6.9.6 Setting up the logon and password for SQL Server 2005............................ 6-152
7 BATCH Recipe Editor 7-1 7.1 Introduction ....................................................................................................... 7-1 7.2 Startup and operation ....................................................................................... 7-3 7.2.1 Starting the BATCH Recipe Editor ................................................................... 7-3 7.2.2 Requirements for working with the BATCH Recipe Editor ............................... 7-4 7.2.3 User interface and operator control .................................................................. 7-5 7.2.3.1 Layout of the main window ............................................................................... 7-5

Contents
SIMATIC BATCH A5E00495287-01 xi
7.2.3.2 Options for customizing the editing window ..................................................... 7-7 7.2.3.3 Project and user settings .................................................................................. 7-9 7.2.3.4 Creating and manipulating objects ................................................................. 7-10 7.2.3.5 Selecting objects............................................................................................. 7-12 7.3 Topology of recipes ........................................................................................ 7-13 7.3.1 Flat recipes ..................................................................................................... 7-13 7.3.1.1 Using substructures in the BATCH Recipe Editor .......................................... 7-14 7.3.2 Hierarchical recipes ........................................................................................ 7-15 7.3.2.1 Hierarchical recipes with ROPs ...................................................................... 7-15 7.3.2.2 Hierarchical recipes with RPHs ...................................................................... 7-16 7.3.2.3 Hierarchical recipes with ROPs and RPHs..................................................... 7-17 7.3.2.4 Representation of the hierarchy in the BATCH Recipe Editor........................ 7-18 7.3.2.5 Synchronization between recipe unit procedures........................................... 7-20 7.3.3 Necessary and possible recipe structure elements........................................ 7-22 7.3.3.1 Structure elements of recipes......................................................................... 7-22 7.3.3.2 Recipe procedure (RP) ................................................................................... 7-23 7.3.3.3 Recipe unit procedure (RUP) ......................................................................... 7-23 7.3.3.4 Recipe operation (ROP) ................................................................................. 7-24 7.3.3.5 Recipe steps in a recipe operation (RPH) ...................................................... 7-24 7.3.3.6 Substructure ................................................................................................... 7-24 7.3.3.7 Library reference............................................................................................. 7-24 7.3.3.8 Operator instruction ........................................................................................ 7-25 7.3.3.9 Transition ........................................................................................................7-25 7.3.3.10 Simultaneous branch...................................................................................... 7-25 7.3.3.11 Alternative branch........................................................................................... 7-26 7.3.3.12 Synchronization line........................................................................................ 7-26 7.3.3.13 Synchronization point ..................................................................................... 7-26 7.3.3.14 Loop................................................................................................................7-26 7.3.3.15 Step placeholder............................................................................................. 7-27 7.3.3.16 Transition placeholder .................................................................................... 7-27 7.4 Recipe creation............................................................................................... 7-28 7.4.1 How to edit a flat recipe .................................................................................. 7-28 7.4.2 How to edit a hierarchical recipe .................................................................... 7-29 7.4.3 Unit assignment .............................................................................................. 7-31 7.4.3.1 Assignment of the unit with a flat recipe......................................................... 7-31 7.4.3.2 Assignment of the unit with a hierarchical recipe ........................................... 7-32 7.4.3.3 Unit selection using conditions for a flat recipe .............................................. 7-33 7.4.3.4 Unit selection using conditions for a hierarchical recipe................................. 7-35 7.4.3.5 Process cell optimization with online assignment of a unit............................. 7-37 7.4.3.6 Supplemental information about online assignment of a unit for flat recipes . 7-39 7.4.4 Inserting and labeling recipe elements ........................................................... 7-40 7.4.4.1 Recipe procedural element (Insert menu) ...................................................... 7-40 7.4.4.2 Library reference (Insert menu) ...................................................................... 7-41 7.4.4.3 Filtering library references .............................................................................. 7-41 7.4.4.4 Recipe phase/operation (Insert menu) ........................................................... 7-42 7.4.4.5 Operator instruction (Insert menu).................................................................. 7-43 7.4.4.6 Transition (Insert menu).................................................................................. 7-44 7.4.4.7 Simultaneous branch (Insert menu) ............................................................... 7-45 7.4.4.8 Alternative branch (Insert menu) .................................................................... 7-46 7.4.4.9 Synchronization (Insert menu)........................................................................ 7-47 7.4.4.10 Synchronization examples.............................................................................. 7-49 7.4.4.11 Loop (Insert menu) ......................................................................................... 7-51 7.4.4.12 Working with substructures............................................................................. 7-53 7.4.4.13 Adding comments to structure elements ........................................................ 7-54 7.4.5 Creating recipe properties .............................................................................. 7-54 7.4.5.1 Passing formula parameters in the recipe...................................................... 7-54 7.4.5.2 Parameter interconnections............................................................................ 7-55

Contents
SIMATIC BATCH xii A5E00495287-01
7.4.5.3 Setting the properties of the recipe header parameters ................................. 7-56 7.4.5.4 Setting the properties of steps........................................................................ 7-58 7.4.5.5 Setting a recipe phase for "Continuous operation"......................................... 7-62 7.4.5.6 Setting the control strategy of a recipe phase ................................................ 7-62 7.4.5.7 Allowing online modification of setpoints ........................................................ 7-63 7.4.5.8 Setting the properties of transitions ................................................................ 7-65 7.4.5.9 Specifying the properties of the library objects............................................... 7-67 7.4.5.10 Overview of the properties of master recipes................................................. 7-68 7.5 Addition functions ........................................................................................... 7-70 7.5.1 Saving recipes and library objects.................................................................. 7-70 7.5.2 Validating recipes ........................................................................................... 7-70 7.5.3 Releasing a recipe for testing or production................................................... 7-71 7.5.4 Revoking a release......................................................................................... 7-72
8 Redundancy 8-1 8.1 Introduction ....................................................................................................... 8-1 8.2 Example configuration - Fault-tolerant Batch Control....................................... 8-3 8.3 Runtime characteristics .................................................................................... 8-4 8.4 Data replication................................................................................................. 8-5 8.5 Configuration of the redundant BATCH server................................................. 8-7 8.6 Time monitoring on the PCS 7 OS ................................................................... 8-9
9 Migration V4.02 -> V6.0 9-1 9.1 Basics of migration ........................................................................................... 9-1 9.2 Migration requirements..................................................................................... 9-4 9.3 Basic procedure................................................................................................ 9-6 9.4 Migrating step-by-step ...................................................................................... 9-7
A Appendices A-1 A.1 Abbreviations ....................................................................................................A-1 A.2 S88 Terms German - English ...........................................................................A-2
Glossary Glossary-1
Index Index-1

SIMATIC BATCH A5E00495287-01 1-1
1 What's new in SIMATIC BATCH?
1.1 Version 7.0
1.1.1 Overview of SIMATIC BATCH Version 7.0
The following provides you with an overview of the new functions in SIMATIC BATCH V7.0:
• Document landscape for SIMATIC BATCH V7.0
• Migration of PCS 7 projects
• New authorizations/licenses
• User-specific session profile
• Changing languages in runtime
• Illegal characters
• Change log
• Deleting text entries in the UNIT block
• System-aided versioning
• Dependent elements in master recipes and libraries
• Integration of Route Control
• Information on faceplates
• Arithmetic operations in transitions and recipes
• Progress bar for the plant update status

What's new in SIMATIC BATCH?
SIMATIC BATCH 1-2 A5E00495287-01
1.1.2 Document landscape for SIMATIC BATCH V7.0
The PDF file "bfpccapb.pdf" is located in the SIMATIC BATCH installation directory under <drive>:\Program Files\SIEMENS\BATCH\Example\BFPccApi\_doc. This file contains the documentation "SIMATIC BATCH PCC API", which is only available in English. This documentation describes the PCC-API functions of SIMATIC BATCH.
The PDF file "plugin_programminguide_english.pdf" is located in the SIMATIC BATCH installation directory under <drive>:\Program Files\SIEMENS\BATCH\Example\PlugIn\. This file contains the documentation "SIMATIC BATCH Plug-in Concept", which is only available in English. This documentation describes how to program the plug-in modules for SIMATIC BATCH.
The help file "BFAPICMB.hlp" is located in the SIMATIC BATCH installation directory under <drive>:\Program Files\SIEMENS\BATCH\Example\BFApi\_doc. This file contains the documentation "SIMATIC BATCH V7.0 COM APi Help", which is only available in English. This documentation describes the Application Programming Interface (API) for the SIMATIC BATCH System.
1.1.3 Migration of PCS 7 projects to V7.0
Note before performing the software update Before installing the new "SIMATIC BATCH PCS 7 V7.0" software, we recommend you back up the following project data:
• Archive your entire PCS 7 project in the SIMATIC Manager.
• Archive all completed batches in the Batch Control Center.
• Create a backup file of your Batch data. Caution: Batch data is not saved in the backup file. This means that you should complete and archive all current batches in the system.

What's new in SIMATIC BATCH?
SIMATIC BATCH A5E00495287-01 1-3
Compatibility to previous versions / supported versions • Direct migration from BATCH flexible V4.02 to SIMATIC BATCH V7.0 is no
longer possible.
• Migration to PCS 7 V7.0 is only allowed and possible through PCS 7 versions with SIMATIC BATCH V6.0 / V6.0 SP1-X or V6.1 / V6.1 SP1.
• Further configuration with the old interface blocks AF6, AF12, AF24, AF16S and TRANS from BATCH flexible V4.02 is no longer supported as of version V7.0. This configuration option has only been removed in SIMATIC BATCH Engineering. Visualization of the old interface blocks is still possible.
• There is no automatic migration from SIMATIC BATCH V5.3 versions. You must use manual support and special conversion tools.
Batch project data that is migrated The following project data are automatically migrated when you start the Batch configuration dialog in the SIMATIC Manager.
• Equipment properties: During the migration, all units and equipment properties defined in Batch in "Shared Declaration" are migrated. The user data types can then be viewed in the "Configure batch process cell" dialog but they cannot be edited. Identical names are assigned to the names and display names of the equipment properties.
• New IPAR_ENUM block
• Attributes for multiinstances
If you migrate data from versions older than SIMATIC BATCH V6.1 SP1 to V7.0, all of the required migration tasks are also performed for the respective intermediate version. Automatic migration of the Batch project data ensures that a full migration will be performed from both version 6.0 and 6.1.
Backup and restore: Reusing SIMATIC BATCH data With the "Backup" and "Restore" functions in the Batch Control Center, you can save and restore your Batch data such as libraries, recipes, formulas, materials and User settings.
The restore function requires a backup file created in the SIMATIC BATCH version 6.0 or 6.1.
SIMATIC BATCH V7.0 ensures that backup files from both SIMATIC BATCH V6.0 and V6.1 are fully and automatically restored in SIMATIC BATCH V7.0. Automatic migration of V5.3 versions is not supported. You must use manual support and special conversion tools.

What's new in SIMATIC BATCH?
SIMATIC BATCH 1-4 A5E00495287-01
Import and export: SIMATIC BATCH export data Export data, such as recipe, formula and library data, can continued to be used regardless of the SIMATIC BATCH versions.
Additional information • Backup and Restore
• Exporting and importing
• Migration of an S7 project to V6.1+ SP1
• Manual PCS 7 - Software Update with / without Utilization of New Functions
1.1.4 New authorizations/licenses
As of SIMATIC BATCH V7.0, you need to install new authorizations/licenses for SIMATIC BATCH. The following licenses are available:
• BATCH 10 UNITs
• BATCH 20 UNITs
• BATCH 40 UNITs
• BATCH 100 UNITs
• BATCH unlimited
UNITs correspond to units that can be configured and allocated. The authorization to be ordered depends on the number of units configured and used.
Additional information • The SIMATIC BATCH product
• Required authorization
• Displaying the number of units

What's new in SIMATIC BATCH?
SIMATIC BATCH A5E00495287-01 1-5
1.1.5 User-specific session profile
Introduction User-specific session information is saved automatically and for a long period when the user logs off, using SIMATIC Logon for example and is made available again when the user logs again on with the same name, even on another PC in the network. This functionality is available in both the BATCH Control Center and the recipe editor.
Restrictions • Project settings: Project settings are part of the user-specific session
information.
• Backup / restore: Session information is not saved in the backup file.
Constraints The described constraints apply to the two client applications, the BATCH Control Center and the recipe editor:
• If you do not use SIMATIC Logon, the applications use the user logged on in Windows.
• If you use SIMATIC Logon, the applications use the user logged on in SIMATIC Logon.
• If the "Default user" option is activated for SIMATIC Logon, SIMATIC Logon automatically logs on the "Default user" when the user currently logged on logs off. This automation is transparent for SIMATIC BATCH. A session profile is generated and stored in the Batch data base for this user, too.
• If a user is logged on to more than on PC at any one time, the changes in regard to his session information is not immediately (during the current session) displayed on the other PC. Example: If the user closes his session on computer "A" and has previously changed session information on computer "B", he will find such session information stored in the database for computer "B" when he logs on again to computer "A".

What's new in SIMATIC BATCH?
SIMATIC BATCH 1-6 A5E00495287-01
Time period in which the user-specific data is save
A session is defined as the time period in which a specific user is logged on to a client application (BCC or BRE). If SIMATIC Logon installed and the application s already started, the session begins with the logon. If the application is started after a logon, the current SIMATIC LOGON user is used automatically. In this case, the session begins with the start of the BATCH Control Center application. The session ends with the logoff, the logon of another user or the closing of the application.
Session information that is saved The following data is part of a session and is therefore saved as session information in the database:
• Size and position of the main window (BCC and BRE) are only changed after these applications are started, not when the user changes.
• Size and position of dialogs that are scalable.
• Configured language.
• Selected shortcuts.
• If the column widths in a list can be changed or the column display can be toggled on and off: width of the columns, arrangement of columns and visibility of columns.
• Position, size and visibility of the menu bars.
• The most recently selected directory in all dialogs in which such select is possible.
• Window settings for batches (size and position).
• Open control recipe window are saved for each user at the end of the session and reopened at the beginning of the next session. If you wish to avoid this, press the Ctrl key when logging on or when changing users.

What's new in SIMATIC BATCH?
SIMATIC BATCH A5E00495287-01 1-7
1.1.6 Changing languages in runtime
The language can be changed in runtime in both the BATCH Control Center and the BATCH Recipe Editor with the menu command Options > Settings > User settings > Language tab >, activate the check box with the desired language and confirm your setting with "OK".
Additional information "Language" tab
1.1.7 Illegal characters
The following characters are not allowed in the SIMATIC Manager: / \ [ ] : | < > + ; , ? " * = . ! @ { } space
The names "EPH" and "EOP" are keywords. Do not use these names when naming SFC types in the SIMATIC Manager. In addition, the following characters are not allowed in names (name of the control strategy): Special characters except _, space
When changing the name of the control strategy, for example from "CONTSTRAT1" to "contstrat1" in the characteristics dialog for SFC types, this change to the control strategy name is not applied after the generation of the batch types.
The following characters are not allowed in WinCC projects: , ; : ! ? " ' + = / \ @ * % [ ] { } < > space
The following characters are not allowed for AS-OS connection names: : ? " ' \ * % space
The following characters are not allowed for hierarchy folders: " ' / \ %
The following characters are not allowed for shared declarations (enumerations): Space " % . ' \ ? * : @
Note:
Read the wide-ranging information in the online help of the PCS 7 OS (WinCC Information System). Search for "invalid characters". We recommend you always avoid the use of special characters for the configuration in the SIMATIC Manager. The special character [ _ ] (underscore) represents an exception.

What's new in SIMATIC BATCH?
SIMATIC BATCH 1-8 A5E00495287-01
1.1.8 Change log
In the "Change log" tab of the "Properties" dialog, there is a new "Computer name" column for the Batch element types master recipe, batch, library, formula category, formula and material .
Note:
If you use the data from old SIMATIC BATCH versions that you have imported or copied with a "Restore", this column is empty.
All new actions for a Batch element type contain the specification of the computer name. The computer name is the name on which an action has been performed.
Additional information "Change log" tab
1.1.9 Deleting text entries in the UNIT block
With "Delete all text entries in the UNIT block upon release" function in the "Settings" tab of the "Settings" dialog, you can specify whether to use the old standard response or the new response.
How to open the dialog 1. Select the top folder in the left window of the Component view in the SIMATIC
Manager and right-click.
2. Click "SIMATIC BATCH" in the shortcut menu.
3. Select the top folder in the left window in the "Configure batch process cell" dialog.
4. Click on "Settings" in the right window pane.
5. Click on the "System Response" tab.
Standard response Only the text entries "Batch name" and "Batch ID" in the block or "IUNIT-BLOCK" faceplate are deleted when the unit is released. If you want to use this response, deactivate the check box in the area for the runtime behavior under the units.
New response All text entries in the block or "IUNIT-BLOCK" faceplate are deleted when the unit is released. If you want to use this response, activate the check box in the area for the runtime behavior under the units.

What's new in SIMATIC BATCH?
SIMATIC BATCH A5E00495287-01 1-9
Additional information "System Response" tab
1.1.10 System-aided versioning
The system-aided versioning is offered in the "Versioning" tab under Settings > Project settings in the "Options" menu in both the BATCH Control Center and Batch recipe editor.
There, you can set what type of versioning you wish to use, "free versioning " or "system-aided versioning".
The default setting in this tab is "free versioning".
You should now select the new method of "system-aided versioning" to increment the major or minor version number for modified recipes, formulas or libraries.
Additional information "Versioning" tab
1.1.11 Dependent elements in master recipes and libraries
When you open the "Properties of " dialog with the "Properties" command in the shortcut menu of a selected master recipe or a library, the new "Dependencies" tab opens. In this dialog, all elements related to the selected element are displayed in tabular form. Dependent elements might be library, master recipe or formula elements.
Additional information "Dependencies" tab (Properties of ...)

What's new in SIMATIC BATCH?
SIMATIC BATCH 1-10 A5E00495287-01
1.1.12 Integration of Route Control
Route Control functions are integrated in SIMATIC BATCH V7.0. This allows you to configure, control and monitor material transfer.
Normally, SIMATIC BATCH has no information about the structure of a plant if its units are not configured as elements according to ISA S88 specification. The following configuration changes are required in the SIMATIC Manager to read the additional information about the plant structure.
New data types Data types are available in SIMATIC PCS 7 V7.0 which you can use to define location types. These location types represent special equipment properties which, when instanced, refer to concrete plant locations. Plant location have their own location ID that can only be assigned once per process cell.
Additional information • "Transfer parameters" tab
• "Transfer key parameters" tab
1.1.13 Information on block icons and faceplates
There are three ways to generate process pictures with the corresponding block icons for opening the faceplate:
• Automatically generate all process pictures in the plant hierarchy
• Automatically generate process pictures area-by-area
• Manually generate process pictures
Requirement for all procedures The basic engineering and BATCH allocation in the SIMATIC Manager is completed. There are not requirements for manual creation of the process pictures.

What's new in SIMATIC BATCH?
SIMATIC BATCH A5E00495287-01 1-11
Procedure for "Automatically generate all process pictures" To generate all process pictures within their plant hierarchy and connect them to the corresponding process tag, proceed as follows:
1. In the SIMATIC Manager, select the respective process pictures one after the other in the PH.
2. Right-click and select "Object properties" in the shortcut menu.
3. Open the "Block Icon" tab.
4. Activate the "Derive block icon from the plant hierarchy" check box.
Result "Automatically generate all process pictures" When the OS is compiled, the corresponding block icons are automatically inserted into your process pictures and connected to the appropriate process tags.
Procedure for "Automatically generate process pictures by area" As an option to the above-mentioned procedure, you can also automatically generate process pictures area-by-area in the plant hierarchy of the SIMATIC Manager.
1. Select the desired area folder in the plant hierarchy of the SIMATIC Manager (Plant view).
2. Right-click to open the shortcut menu and select Plant hierarchy > Generate/Update Block Icons.
Result "Automatically generate process pictures by area" Only the process pictures for the selected area are automatically generated with interconnected block icons.

What's new in SIMATIC BATCH?
SIMATIC BATCH 1-12 A5E00495287-01
Procedure for "Manual Generation" Proceed as follows to manually generate process pictures with block icons for the opening faceplates:
1. Open the desired process picture in the Graphics Designer.
2. Select the menu command File > Open to open the template file "@Template_Batch.pdl".
3. The following block icons are available in the template file:
- IUNIT Use this block icon to display unit allocation and the equipment operations and phases assigned to the unit.
- UNIT Use this block icon to work with UNIT_BLOCK of version V5.0.
- IEPH Use this block icon to display the equipment phases in the faceplate.
- EPH Use this block icon to work only with the EPH block of version V5.0.
- IEOP Use this block icon to display the equipment operations in the faceplate.
- EOP Use this block icon to work only with the EOP block of version V5.0.
4. Select the desired block icon in the template file and copy it into your process picture.
5. Select the block icon in your process picture.
6. In the window of the Dynamic Wizard, double click on the PCS 7 function "Connect faceplate to process tag" under "Standard Dynamics".
7. In the Dynamic Wizard, click "Next" and then click the find function "...".
8. All instanced blocks are displayed in the tag selection dialog. Select the desired block and click "OK" > Next > Finish.
Result "Manual Generation" The process picture you have edited features the desired block icon which is used to open the corresponding faceplate.
Additional information In the WinCC Information System: "Making Process Pictures Dynamic" and "Dynamics with the Dynamic Wizard".

What's new in SIMATIC BATCH?
SIMATIC BATCH A5E00495287-01 1-13
1.1.14 Arithmetic operations in transitions and recipes
As of SIMATIC BATCH V7.0, you can configure arithmetic expressions at transitions and recipe parameters of recipe unit procedures (RUPs), recipe operations (ROPs) and recipe phases (RPHs) in order to calculate setpoints from recipe variables and constants.
The following dialogs have been expanded for this:
• A "Formula" column has been added for each parameter line in the dialogs for the "Properties of RUPs, ROPs and RPHs" in the "Input material", "Output material" and "Parameters" tabs. Clicking on the "..." button in this box opens the "Edit expression" dialog. You can find additional information with the reference below.
• In the dialogs for the configuration of the transition condition, if you select "Formula" as operand 2. You can open the transition wizard by double-clicking on a transition in a recipe phase > "Condition" tab > New > Change > Operand 1, for example, process tag and operand 2 "Formula". You can find additional information with the reference below.
Permitted operators and operands Four basic types of logic (+;-;/;*) are offered for selection as operators. Only recipe variables (data type: real and integer) of the next highest recipe level and constants are offered for selection as operands.
Restrictions • You cannot perform arithmetic operations on recipe procedures.
• The result of an arithmetic expression is not monitored in regard to limits.
• Parameters that are calculated by a formula cannot be changed by an API (Application Programming Interface) or by the user in a control recipe.
Additional information • "Edit expression" dialog
• "Properties of ..." dialog, "Parameters" tab
• "General" dialog in the Transition Wizard

What's new in SIMATIC BATCH?
SIMATIC BATCH 1-14 A5E00495287-01
1.1.15 Progress bar for the process cell update status
If you use the "Update process cell" function in the shortcut menu for a selected Batch process cell in the Batch Control Center, all released elements are checked.
A progress bar in a dialog that appears informs you of the status of the check. The dialog disappears after a certain time. If you want to display the dialog again, position the mouse over the attention symbol at the lower right in the status bar of the Batch Control Center.

What's new in SIMATIC BATCH?
SIMATIC BATCH A5E00495287-01 1-15
1.2 Version 6.1 SP1
1.2.1 Overview SIMATIC BATCH Version 6.1 +SP1
The new and enhanced functions of SIMATIC BATCH V6.1+SP1 compared with V6.1 are described in the following sections:
• New archiving methods for completed batches
• Simplified configuration of the SIMATIC BATCH faceplates
• Improved user interface of the SIMATIC BATCH faceplates
• Migration of an S7 project to V6.1+SP1
• Document landscape for SIMATIC BATCH V6.1 SP1
1.2.2 New archiving methods for completed batches
A new "FTP Server" archiving method is available for secure backup of completed batches. It requires an FTP server to be installed and configured. To learn how to install and configure an FTP server under the Windows 2000, Windows 2000 Server, Windows XP and Windows 2003 Server operating systems, refer to the Windows help of the respective operating system.
The settings for archiving Batch data are made in the "Change Settings" dialog that opens in the BATCH Control Center by selecting the menu command Options > Settings and then by opening the "Archive" tab.
The previous methods "Copy XML File" and "BLOB in SQL Server" can also still be used. In safety-related environments such as those governed by the FDA (Food and Drug Administration), archiving by copying the XML file can no longer be used. This method can now only be used in "non-safety" environments because the Windows authorization must grant write permission for "Everyone".

What's new in SIMATIC BATCH?
SIMATIC BATCH 1-16 A5E00495287-01
1.2.3 Simplified configuration of the SIMATIC BATCH faceplates
The configuration of the SIMATIC BATCH faceplates has now be made as simple as it is for the SIMATIC PCS 7 standard faceplates.
The block icons for opening the faceplates can be automatically inserted and dynamically configured in process pictures using the "Create/Update Block Icons" option in the "Compile OS" wizard.
Note about existing PCS 7 projects The new faceplates and block icons are copied into the project data using the OS Project Editor. The old block icons have been retained. New faceplates can also be displayed using the old block icons.
Requirement: The plant hierarchy path remains unchanged; you can also change it by editing the control properties "THPathUNIT" or "THPathEPH" for the block icons.
1.2.4 Improved user interface of the SIMATIC BATCH faceplates
The user interface of the IEPH faceplates has been adapted to the SFC_TYPE because both blocks have the same interface in relationship to SIMATIC BATCH. The following user interface components have been modified or adapted:
• The operator control button starting, stopping, etc. are now positioned identically.
• The setpoint/actual value table now features identical columns and the material parameters are integrated there.
• For available control strategies, only parameters actually used in the current value of a control strategy are displayed.
• For the IUNIT faceplate, errors and manual operation can now also be seen in the status displays of the individual function.

What's new in SIMATIC BATCH?
SIMATIC BATCH A5E00495287-01 1-17
1.2.5 Migration of an S7 project to V6.1 SP1
Opening the configuration dialog of a SIMATIC BATCH project with a version prior to SB V6.1 SP1, automatically migrates the project to SB V6.1 SP1.
There is no automatic migration from BATCH versions prior to SB V6.0. During the migration from SB V6.1 to SB V6.1 SP1, all users data types defined in the "shared declaration" in Batch are migrated. The user data types can then be viewed in the "Configure batch process cell" dialog but they cannot be edited. An enumeration of identical names are assigned to the names and display names.
Successive migration The individual elements migrated depend on the SIMATIC BATCH version of the specific project. The migration is performed successively, in other words, it progresses from version X to version X+1. In relationship to BATCH Engineering, this means:
• SB V6.0 to SB V6.0 SP1
• SB V6.0+SP1 to SB V6.0 SP2
• SB V6.0+SP2 to SB V6.0 SP3
• SB V6.0+SP3 to SB V6.0 SP4
• SB V6.0+SP4 to SB V6.1
• SB V6.1 to SB V6.1 SP1
There is no automatic migration from BATCH versions prior to SB V6.0. During the migration from SB V6.1 to SB V6.1 SP1, all users data types defined in the "Shared declaration" in Batch are migrated. The user data types can then be viewed in the "Configure batch process cell" dialog but they cannot be edited. An enumeration of identical names are assigned to the names and display names.
Note:
Before migrating to SIMATIC BATCH V6.1 SP1, you yourself must ensure that all projects within your multiproject are consistent.
If this requirement is not met, the following will occur:
• All user data types in SIMATIC BATCH are migrated.
• If there is already a user data type in the "Shared Declaration" of a project, a new name is assigned. This will also be used in projects in which the original name does not exist. The changed names are published in a list.

What's new in SIMATIC BATCH?
SIMATIC BATCH 1-18 A5E00495287-01
Caution:
If the changed name from a previous project already exists in the next project, it is changed again. The multiproject therefore becomes inconsistent.
• For single projects, the objects changed by the migration are automatically updated in the CFC charts. Example: the ENUM parameter at the (I)EPAR_ENUM block. In the multiproject the updating is performed by the "Propagate...", "Merge..." or "Update" functions in the project.
• Special characters are replaced by the "_" character.
Shared declarations • After migration, the user data types can then be viewed in the "Configure batch
process cell" dialog but they cannot be edited.
• SIMATIC BATCH only considers projects with a batch process cell within a multiproject. This applies to the functions "Migrate", "Generate" and "Compile".
• If there inconsistencies in the "Shared declarations" of individual projects when the "Generate" function is performed for a multiproject, the following happens:
- All user data types are imported.
- When the same user data types (display names, etc.) are present, the value of the most recently imported user data types applies.
• If the display name of an enumeration changed in the "Shared Declaration", all CFC charts in the single project are automatically updated with the Generate function. In the multiproject the updating is performed at the multiproject by the "Generate" function and then by calling "Propagate", "Merge" or "Update" at the project.
• Since all user data types are usually imported from the "Shared Declaration" with the "Generate" function, the "Delete" function is offered in the "Configure batch process cell" dialog to allow you to delete unneeded user data types. The import process applies for a single project as well as a multiproject.
• In a project that has been "removed for editing" from a multiproject, the "Generate" function for the batch types is available in the "Configure batch process cell" dialog.
• If the user data types still being used by Batch are deleted in the "Shared Declaration", the "Generate" function also deletes them in Batch. Type parameters referring to such objects are marked accordingly.
Additional information You can find additional information about migration in the following section "Migration V4.02 -> V6.0"

What's new in SIMATIC BATCH?
SIMATIC BATCH A5E00495287-01 1-19
1.2.6 Document landscape for SIMATIC BATCH V6.1 SP1
The PDF file "bfpccapb.pdf" is located in the SIMATIC BATCH installation directory under <drive>:\Program Files\SIEMENS\BATCH\Example\BFPccApi\_doc. This file contains the documentation "SIMATIC BATCH PCC API", which is only available in English. This documentation describes the PCC-API functions of SIMATIC BATCH.
The Word file "plugin_programminguide_english.doc" is located in the SIMATIC BATCH installation directory under <drive>:\Program Files\SIEMENS\BATCH\Example\PlugIn\. This file contains the documentation "SIMATIC BATCH Plug-in Concept", which is only available in English. This documentation describes how to program the plug-in modules for SIMATIC BATCH.
The help file "BFAPICMB.hlp" is located in the SIMATIC BATCH installation directory under <drive>:\Program Files\SIEMENS\BATCH\Example\BFApi\_doc. This file contains the documentation "SIMATIC BATCH V6.1 COM APi Help", which is only available in English. This documentation describes the Application Programming Interface (API) for the SIMATIC BATCH System.

What's new in SIMATIC BATCH?
SIMATIC BATCH 1-20 A5E00495287-01
1.3 Version 6.1
1.3.1 Overview SIMATIC BATCH Version 6.1
The new and enhanced functions of SIMATIC BATCH V6.1 compared with V6.0 are described in the following sections:
• General information about the version
• Configuration in the engineering system
• Fault-tolerant Batch Control
• Recipe creation
• Working in BatchCC
• Operation in process mode
1.3.2 General information about the version V6.1
• BATCH clients V6.1 + SP1 run under Windows XP Professional.
• BATCH server V6.1 + 6.1 runs under Windows Server 2003 or Advanced Server .
• An additional license for 300 PO and a corresponding upgrade license 300 PO -> 600 PO is available for SIMATIC BATCH.
• The SIMATIC BATCH Getting Started with a sample project is available in the languages German, English and French.
• The full range of functions is available for operating SIMATIC BATCH with Teleperm M automation systems.
• Functional add-ons enable communication with the SIMATIC CONTROL INTERFACE (SCI).
• Status changes of Batch objects can be read by other programs using the Sequence Interception Server (SIS). This fulfills one requirement for connecting to higher level management systems of SIMATIC IT.
• The SIS events recovery system is available.

What's new in SIMATIC BATCH?
SIMATIC BATCH A5E00495287-01 1-21
1.3.3 Configuration in the engineering system
• Up to eight hierarchy levels are possible (instead of the previous five) in the plant hierarchy when additional neutral folders are used.
• The user interface for engineering Batch process cell data can be performed in the user-friendly SIMATIC Manager. The entire project engineering work is performed within the BATCH configuration dialog.
• New functions in the BATCH configuration dialog:
- The plausibility check of the batch process cell data can be performed for the entire process cell with the "Validation" function.
- Any errors or warnings are now also symbolically displayed (red or yellow lightning bolt) on individual Batch objects for the "Validation", "Compile" or "Generate" functions. This enables you to correct errors successively.
- Enhancements for the print, copy, paste and import functions
• In the object properties of the "Unit" hierarchy folder, you can specify the same or another project from another unit as a successor for each unit. This prevents units that have no connection in the plant structure from being selected during recipe creation.
• The "Download entire program" function (compile and download objects) has been improved.
• SIMATIC BATCH supports the new function, area-based compiling of the OS
1.3.4 Fault-tolerant Batch Control
You can now operate redundant BATCH servers with data replication.

What's new in SIMATIC BATCH?
SIMATIC BATCH 1-22 A5E00495287-01
1.3.5 Recipe creation
• Recipes can be configured neutral to the process cell. The validation check shows limit value violations of parameters only after the required units are assigned.
• Conditions can be defined for units on the recipe levels (RP, RUP) to enable selection of suitable units. Then all units that fulfill these conditions (cut-set) are available when units are selected.
• New strategy for allocating a unit during runtime: unit can be manually allocated in an operator dialog. The "Operator selection" strategy is configured for this.
• The validation can be based on external modules (plug-ins) that can be both set and modified.
• Further settings for representation of the recipe:
- Chronological display of indexes
- Larger display of one-line labels
• Additional options are available in the operator dialog (OD). The "Hide parameter" option hides the parameter from the operator. The "Process value modifiable" option allows manual input of parameter process values. The "Setpoint modifiable" option allows setpoints to be specified for inactive operator dialogs.
1.3.6 Working in BatchCC
• An import/export assistant can be used to save master recipes, libraries and formula categories in SBX format and subsequently imported again for reuse in an open process cells in BatchCC.
• User roles can now be assigned to user groups in the Batch Control Center (adapted to SIMATIC LOGON).
• Electronic signatures (ESIG) can be optionally configured for operator actions as well as for the cancellation of batches or status transitions. This meets the requirements of the FDA (Food and Drug Administration) for good manufacturing practice.
1.3.7 Operation in process mode
• Affected units can be aborted, reset and reallocated during batch control.
• In addition to the open control recipe, a "Full view control recipe" including an excerpt marker for better orientation can be displayed.
• The step transition times for the BATCH control server have been shortened.
• The "Effective immediately" function causes immediate transfer of parameter changes to a recipe phase in the automation system. The function can be disabled for each parameter.

What's new in SIMATIC BATCH?
SIMATIC BATCH A5E00495287-01 1-23
1.4 Version 6.0
1.4.1 Overview SIMATIC BATCH Version 6.0
The new and enhanced functions of SIMATIC BATCH V6.0 compared with V4.02 are described in the following sections:
• General information about the version
• Configuration in the engineering system
• Fault-tolerant Batch Control
• Recipe creation
• Working in BatchCC
• BATCH interface blocks
• Operation in runtime
1.4.2 General information about the version
• BATCH flexible has been renamed to SIMATIC BATCH.
• Windows 2000 compliant
SIMATIC BATCH V6.0 runs under the Windows 2000 operating system.
• Basic package - expansion of Batch objects in gradual stages
The basic SIMATIC BATCH V6.0 package provides all the tools needed to automate batch processes. The basic package allows you to implement a batch application with up to 150 process objects and allows you to work with flat recipes. Power packs are available to increase the capacity to 600, 1800 or more than 1800 process objects.
• Optional packages
The functionality of SIMATIC BATCH V6.0 can be expanded by adding optional packages to the basic package. The following optional packages are available:
- Batch Planning
- Hierarchical recipes
- ROP Library
- Separation of Procedure/Formula
- API Interface
Additional information: See readme for SIMATIC BATCH V6.0.
• XML-based report and archive data
All the report data (recipe report, manufacturing instruction, batch report) and archive data are stored in the XML format allowing them to be further processed in XML processing programs.

What's new in SIMATIC BATCH?
SIMATIC BATCH 1-24 A5E00495287-01
• BATCH Report
Along with the basic package SIMATIC BATCH V6.0, the report viewer of BATCH Report is also supplied. With this tool, log and archive files stored in XML format can be displayed and printed at any time even without a BatchCC being installed.
• Interface to MES/ERP
With the optional package SIMATIC BATCH API, you can link online and offline functions of SIMATIC BATCH directly to an OEM system or to any MES/ERP application. The API interface provides a COM connection (XML data format).
• Redundancy
SIMATIC BATCH allows the BATCH server for batch control, Batch data management and the entire database to be structured redundantly to achieve permanent availability (refer to the section "Fault-tolerant Batch Control".
• Integration in PCS 7 OS
SIMATIC BATCH V6.0 is tightly integrated with PCS 7 OS with faceplates and improved cross-selection between WinCC pictures and BATCH operator control and monitoring.
1.4.3 Configuration in the engineering system
• BATCH servers and BATCH clients
BATCH servers and BATCH clients are configured similar to the OS servers and clients from the SIMATIC Manager of the Engineering Station and downloaded from there to the Batch server and client.
• Large PCS 7 projects with distributed PCS 7 operator stations
SIMATIC BATCH V6.0 supports the model of distributed operator stations in large PCS 7 projects. This means that BATCH has access to all operator stations and therefore to all programmable controllers in the PCS 7 project.
• Multiproject engineering
SIMATIC BATCH V6.0 supports the "multiproject engineering" function of PCS 7 V6.0.
• Type-based engineering (batch types)
All batch types (operation, phase, measured value, user data types and unit classes) are created, synchronized and managed in the engineering system. Master recipes can be created conveniently in BATCH based on these batch types.

What's new in SIMATIC BATCH?
SIMATIC BATCH A5E00495287-01 1-25
• Interface to the processing programs
The interface between SIMATIC BATCH V6.0 and the actual processing on a programmable controller is implemented as follows:
- The interface uses either the new SFC types that can be generated with the SFC standard tools as of PCS 7 V6.0 or
- The interface uses the BATCH interface blocks (see Section "BATCH interface blocks")
• Using SFC types
All SIMATIC BATCH equipment operations/phases can be generated and managed with the new SFC type blocks available in PCS 7 V6.0. The operation/phase SFC type templates created using the SFC type block are displayed in the block libraries in CFC and can be inserted in the CFC charts as an SFC type instance. The SFC instance is displayed in the CFC chart like a CFC block. If the SFC type of an equipment operation/phase is changed, all SFC type instances created from this SFC type template are automatically updated.
• Plant hierarchy in the plant view
The three-level plant hierarchy described in S88.01 (process cell, unit, equipment module) can be created in the plant view of the engineering system and be assigned Batch attributes. To improve the structure and display of your Batch process cell, the plant hierarchy can be expanded by adding neutral folders. The neutral folders can be created at any level in the hierarchy. The maximum number of hierarchy levels supported is five.
1.4.4 Fault-tolerant Batch Control
To increase availability and to allow software updates during operation, the BATCH servers can be structured redundantly. If there is a failure in the redundant system, there is a standby/master failover between the two BATCH servers.
Redundancy is achieved with two redundant BATCH servers, each having local data management. To allow the batch applications to access the current data of the BATCH server, the data is constantly synchronized between the two local data management systems (data replication). If one BATCH server fails, the other continues with the same data.

What's new in SIMATIC BATCH?
SIMATIC BATCH 1-26 A5E00495287-01
1.4.5 Recipe creation
• Hierarchical recipes
Using the SIMATIC BATCH V6.0 Recipe Editor, recipes can be created that contain the four-level hierarchical recipe procedures described in the ANSI/ISA S88.01 standard:
- Recipe procedure (RP) - First Level
- Recipe unit procedure (RUP) - Second Level
- Recipe operation (ROP) - Third Level
- Recipe phase (RPH) - Fourth Level
The fourth hierarchy level can also be omitted.
• Formula (material and production data)
By separating the formula and recipe procedure, a wide variety of master recipes can be created in the BatchCC based on a recipe procedure and the assignment of different formulas. The great advantage of this is that modifications to procedures due to a recipe procedure only need to be made at one point.
• Formula category
Formula categories support the creation of a wide variety of master recipes based on the same recipe procedure and whose formulas only differ slightly from each other. The formula category is a "template" for different material and production data records.
• Unit-neutral recipes
In the BATCH Recipe Editor, the master unit recipe procedures can be created independent of a particular unit (conforming with S88.01). In this case, a unit class is assigned to the master unit recipe procedure. A unit class is a grouping of units that share a common subset of processing capabilities (recipe phases). When you assign the unit class, you can also select the allowed candidate units.
• Assignment of a unit during runtime
To optimize the use of a process cell, the units can be assigned at the last possible moment. If the unit for a recipe unit procedure (RUP) is not assigned when the batch is running, the "assignment of the unit during runtime" function becomes active with one of the following allocation strategies:
- Preferred unit
- The unit unused for the longest time is selected.
- The unit is selected by a process parameter.

What's new in SIMATIC BATCH?
SIMATIC BATCH A5E00495287-01 1-27
• Library for recipe operations (ROP)
In the BATCH Recipe Editor, you can create reusable library operations (ROPs) for specific unit classes and manage them in a library in BatchCC. The library operations are formed as a structure of recipe phases (RPH) and can be inserted in a master recipe as follows:
- As a library reference (i.e., link to a library operation in the library, changes to the operation can only be made to the master stored in the library) or
- Fully embedded (i.e., insertion of the contents of the library operation into the ROP followed by dissolution of the link between the instances in the ROP and the ROP in the library. Changes can be made directly to the ROP in the recipe).
• Control strategies
Equipment phases can be implemented with various control strategies (set of setpoints) that can be used in the manual mode or in the automatic mode (recipe mode). The control strategies are configured along with their parameters in the engineering system. In the recipe editor, the control strategies defined in this way are available in plain language under the name of the control strategy. During parameter assignment, only the parameters belonging to the selected control strategy are displayed.
• Continuous operation
During creation of a recipe, a flag can be set to define a recipe phase that is not self-terminating so that this recipe phase (equipment phase) is not completed in run time until it receives a termination command from another recipe phase or until the unit recipe procedure that it is in completes.
- This is necessary when an equipment phase (for example, agitating) is required to continue after recipe operations.
- A second application is the setting of different parameters for the equipment phase without having to turn it off and on again (for example during a flying control strategy change).

What's new in SIMATIC BATCH?
SIMATIC BATCH 1-28 A5E00495287-01
1.4.6 Working in BatchCC
• Integrated batch planning and batch control
In SIMATIC BATCH V6.0, the client applications batch planning, batch control and BATCH Report are fully integrated in the user interface of BatchCC.
• Display of operator and status messages in BatchCC
BatchCC shares the same message display as the PCS 7 OS. In other words, when a batch message appears, the message will be the same regardless of whether you are viewing the message from PCS 7 OS or from SIMATIC BATCH.
• Permission management
SIMATIC BATCH V6.0 supports the central user management "SIMATIC Logon" of PCS 7.
• Electronic signature
This function allows you to add an electronic signature in SIMATIC BATCH V6.0 that complies with FDA requirements, for example, when you release a batch or when you change the status of a batch.
1.4.7 BATCH interface blocks
SIMATIC BATCH V6.0 can use the new functionality of the SFC types in the engineering system. As an alternative, SIMATIC BATCH V6.0 continues to provide special interface blocks in a new technical version as the communications interface to the processing programs on the programmable controller:
• IEPH, IEOP
These blocks serve as the interface between the recipe phases or recipe operations and the processing blocks of the CFC charts. Using these blocks, the control commands of the batch control are passed on to the processing program and the status messages of the processing program are prepared for batch control.
• IEPAR_...
Setpoints are set and the actual values of recipe parameters are adopted via the IEPAR_... parameter blocks connected directly to the IEPH or IEOP block. Each IEPAR block represents a parameter value. For each possible data type, there is a special IEPAR block available (real, string, Boolean, double integer, enumeration type, process input, process output).
• IUNIT_BLOCK
This block is used to allocate or release a unit during execution of a control recipe:
• TAG_COLL
This block is used to collect process values to be used in transition conditions and for logging measured value sequences in the batch report.

What's new in SIMATIC BATCH?
SIMATIC BATCH A5E00495287-01 1-29
1.4.8 Operation in runtime
• Faceplates
For operator input and control on the PCS 7 OS, there are faceplates available for the following phases:
- SFC instances for equipment operations/phases
- BATCH interface blocks IEOP, IEPH and IUNIT_BLOCK
• Operator prompts
- The SIMATIC BATCH operator prompts are displayed with group display on the PCS 7 OS.
• Start mode of a batch
The following batch Start modes are available with SIMATIC BATCH (assuming that the units required at the beginning of the control recipe are available):
Operator: The start of the released batch is triggered by an operator action.
Immediate: The batch is started when it is released as soon as the units required at the start of the control recipe are free.
Time-driven: The batch is started on a particular day, at a particular time. The start time and date must be specified.
• Comment during runtime
During or after the processing of a batch, the operator can enter comments for each control recipe element (recipe unit procedure, recipe operation or recipe phase) or for the entire batch (control recipe header) without having to put the batch on hold. Once comments have been entered, they can no longer be modified; it is only possible to add new comments. The date, time and user name are automatically added to the comments.
• Batch report during runtime
It is also possible to output a batch report while the batch is still running. The preliminary batch report then contains all the Batch data from the start up to the active recipe step.
• Parallel updating of the process cell data
If Batch equipment changes are made to the process cell data using the engineering system, this process cell data must be updated in BatchCC. The updating of the process cell data takes place only on the BATCH client on which this phase has just been started. Updating of the process cell can be triggered from every BATCH client. All other BATCH clients continue to have access to the BATCH server (batch process).
- During the update, all released master recipes are set to the status "Testing release". Master recipes not affected by the modifications are automatically released again. The release of master recipes affected by the modifications is revoked.
- Active batches affected by changes are neither locked nor held. They continue, possibly with errors.

What's new in SIMATIC BATCH?
SIMATIC BATCH 1-30 A5E00495287-01

SIMATIC BATCH A5E00495287-01 2-1
2 Product introduction and installation
2.1 What is SIMATIC BATCH?
What is SIMATIC BATCH? SIMATIC BATCH is a SIMATIC PCS 7 program package with which discontinuous processes, known as batch processes, can be configured, planned, controlled and logged.
Simple batch processes with configurable sequential control systems are automated with the CFC and SFC tools included in the PCS 7 Engineering System. SIMATIC BATCH is used for higher demands with recipe control strategies. With SIMATIC BATCH, recipe structures are designed, modified and started graphically on an operator station or on a separate PC.
All process and operator data can be collected for a specific batch while it is being made and can then be processed and printed out in a batch log.
Possible applications of SIMATIC BATCH SIMATIC BATCH is suitable for batch processes of any complexity. It provides simple support for batch applications ranging from small to extremely large.
The main features of SIMATIC BATCH are as follows:
• Simple, graphic recipe creation
• Control and monitoring of recipe execution with the same graphic representation as used in recipe creation
• Control strategy with data from multiple programmable logic controllers
• Integrated permission management with detailed access permissions
• End-to-end logging of all events (including manual intervention) for comprehensive production documentation
• Simple and clear batch planning, when required with interfacing to higher level PPS systems
• Modular expandability
• Application of NAMUR and ISA SP88 standards

Product introduction and installation
SIMATIC BATCH 2-2 A5E00495287-01
2.2 Functions of SIMATIC BATCH
SIMATIC BATCH supports you throughout all the stages involved in the automation of batch processes. The functions provided by SIMATIC BATCH can be divided into four basic areas:
• Recipe system: Creation and management of any number of master recipes and library operations
• Batch planning: Planning and replanning of batches and production orders
• Batch control: Execution, visualization and control of batches released for production and the corresponding control recipes as well as visualization of the current unit allocation
• Batch data management (Batch CDV): Acquisition, storage and logging of Batch data
2.3 Migration from older projects
Migration Projects created with BATCH flexible V4.02 can be converted to SIMATIC BATCH V6.0. A migration tool is provided to help in the conversion.
Note:
BATCH flexible V4.02 projects can be migrated so that they can continue to be used in SIMATIC BATCH V6.0 with all the functionality of the V4.02 version.
BATCH flexible V4.02 and V6.0 use different interface blocks in the programmable controller for controlling the batch process. Migration can be performed in such a way that after migrating to V6.0:
• You will not have to interconnect the interface blocks again.
• You will not have to modify the content of the programmable controller.

Product introduction and installation
SIMATIC BATCH A5E00495287-01 2-3
Migrated data The migration tools enable you to move the following data from BATCH flexible V4.02 to V6.0:
• Process cell data (including units of measure, user data types and materials)
• Unit recipes (new term in V6.0: master recipe)
The following data are not moved from the BATCH flexible V4.02 database to V6.0 during a migration:
• Production order data
• Batch data (including control recipes)
• Users/user permissions
Additional information You will find information on migrating from V4.02 to V6.0 in the section "Migration V4.02 -> V6.0". This section describes the following in detail:
• Migration requirements
• Overview of the basic migration procedure
• Migration step-by-step

Product introduction and installation
SIMATIC BATCH 2-4 A5E00495287-01
2.4 Components of SIMATIC BATCH
2.4.1 Components of SIMATIC BATCH
SIMATIC BATCH consists of the following components:
• BATCH Start Coordinator
• Batch Control Center (BatchCC)
• BATCH Recipe Editor
• BATCH Report
• BATCH Control Server
• Batch CDV
• BATCH interface blocks
2.4.2 BATCH Start Coordinator
Introduction The BATCH Start Coordinator is responsible for the following:
• Communication to the OS
• Data storage for SIMATIC BATCH
• Monitoring of the SIMATIC BATCH data storage
• Controlling, monitoring, starting and stopping the SIMATIC BATCH server applications
Startup The BATCH Start Coordinator starts automatically at logon on the computer on which the BATCH server is installed. It is displayed as an icon in the task bar (lower right) and is in the "READY" status.
The Batch Control Server and the Batch data management, SIMATIC BATCH CDV, are automatically started in addition to the BATCH Start Coordinator. These two server applications are also displayed as icons in the task bar. The Batch Control Server and the Batch data management are then in the "READY" status.
If the BATCH Start Coordinator are not started automatically with the two server applications after the PC boots and are not shown in the task bar, start them with the command Start > SIMATIC > BATCH > BATCH Launch Coordinator.

Product introduction and installation
SIMATIC BATCH A5E00495287-01 2-5
Shortcut menu of the BATCH Start Coordinator The BATCH Start Coordinator, which is shown as an icon in the task bar, offers the following settings and functions. When you right-click on the BATCH Start Coordinator icon in the task bar, its shortcut menu is displayed. You can set the startup characteristics under "Settings". Select on of the three options:
• SIMATIC BATCH starts automatically after WinCC starts:
• SIMATIC BATCH starts automatically regardless of WinCC
• SIMATIC BATCH is started manually
The preferred setting is the start option "Start Simatic BATCH automatically after starting WinCC". This means that the BATCH Start Coordinator is automatically started as soon as you start your WinCC project in process mode (activate runtime).
You can also configure the startup characteristics of the Start Coordinator in the "Configure batch process cell" dialog of the SIMATIC Manager. These settings there only go into effect when the Start Coordinator is not active in the task bar at the time the changes are made.
The "Start" function is displayed under "Startup/shutdown". Click "Start" to set the BATCH Start Coordinator from the "READY" status to "RUNNING" status. The Start Coordinator then starts the two other BATCH applications. You can only work and communication with the SIMATIC BATCH editors (BCC and BRE) when all BATCH applications are in the "RUNNING" status, indicated by a green triangle in the icons of the applications in the task bar.
Note:
If the server applications do not start, indicated by a red triangle, generate, compile and download the Batch data again. Check the configuration of the PC station (computer name, IP address, etc.).
Additional information • BATCH Control Server
• BATCH CDV
• Starting the BATCH server

Product introduction and installation
SIMATIC BATCH 2-6 A5E00495287-01
2.4.3 Batch Control Center (BatchCC)
Definition The Batch Control Center (BatchCC) is the central component in SIMATIC BATCH for batch planning and batch control. BatchCC manages all the data relevant to SIMATIC BATCH. This means that all Batch data is logged in BatchCC.
The Batch Control Center is started on the runtime computers according to the settings made in the Batch Launch Coordinator.
Functions With the Batch Control Center (BatchCC), you can:
• Read in the process cell data from the basic control
• Specify the user permissions for all functions of BATCH
• Define the names and codes of the materials used.
• Manage master recipes and start the BATCH Recipe Editor to configure the recipe structure
• Manage libraries with recipe elements (library operations)
• Edit and manage the formula categories and corresponding formulas.
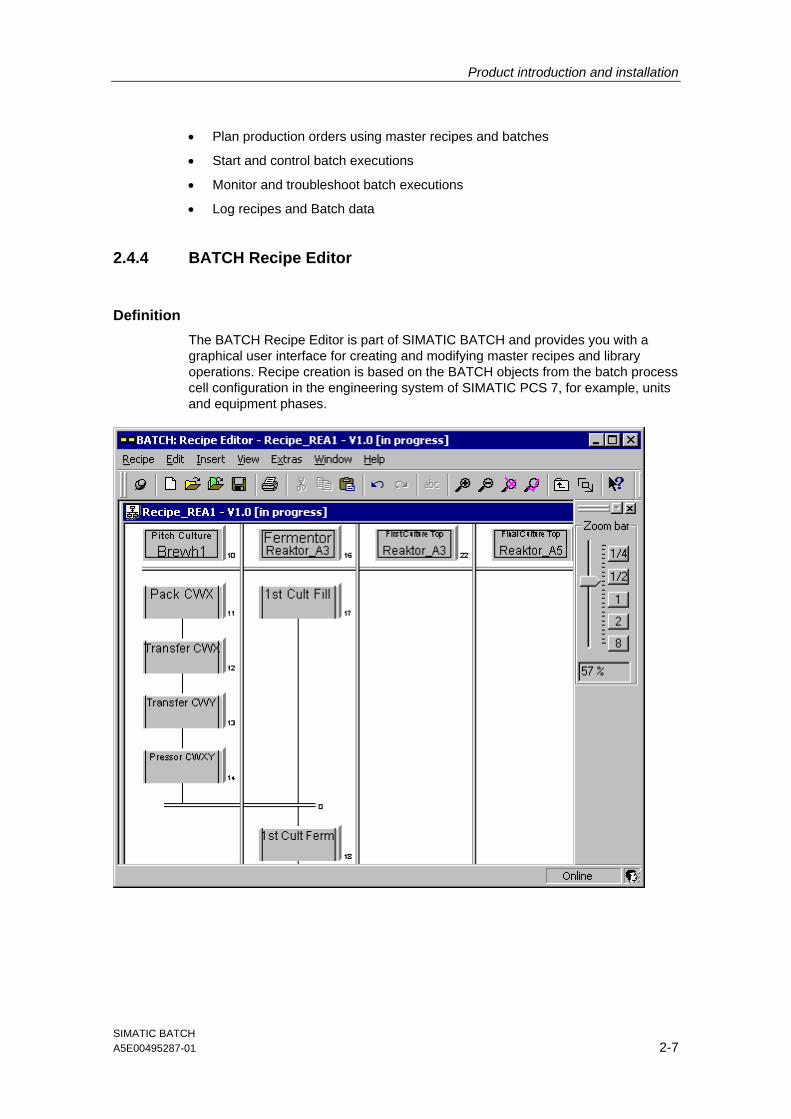
Product introduction and installation
SIMATIC BATCH A5E00495287-01 2-7
• Plan production orders using master recipes and batches
• Start and control batch executions
• Monitor and troubleshoot batch executions
• Log recipes and Batch data
2.4.4 BATCH Recipe Editor
Definition The BATCH Recipe Editor is part of SIMATIC BATCH and provides you with a graphical user interface for creating and modifying master recipes and library operations. Recipe creation is based on the BATCH objects from the batch process cell configuration in the engineering system of SIMATIC PCS 7, for example, units and equipment phases.

Product introduction and installation
SIMATIC BATCH 2-8 A5E00495287-01
Functions With the BATCH Recipe Editor, you can do the following:
• Create new master recipes and library operations.
• Modify existing master recipes and library operations (structural or parameter modifications).
• Log the master recipes and library operations.
• Release master recipes and library operations for testing or for production.
• Validate recipes.
When working in the editor, the familiar functions known from MS Windows programs such as paste, cut, copy, undo and redo can be used on single or grouped objects.

Product introduction and installation
SIMATIC BATCH A5E00495287-01 2-9
2.4.5 BATCH Report
Definition BATCH Report allows documentation of recipes and Batch data in the form of logs.
• The "off-the-shelf" recipe report contains all the data required for production. This includes the recipe header data, the input material and output material list and the procedural rules.
• The batch report contains all the information required for the reproducibility of the batch process, quality assurance and the fulfillment of legal requirements. These include the identification data, control recipe data, effective production data, chronological sequence of the steps, error and disturbance messages as well as operator intervention.
BATCH Report is fully integrated in the user interface of BatchCC. The recipe reports and batch reports are created in BatchCC and can be displayed and printed out in BatchCC at any time.
To be able to view recipe reports and batch reports on other computers, for example, at a later time, the Viewer of BATCH Report is available as a separate setup.

Product introduction and installation
SIMATIC BATCH 2-10 A5E00495287-01
Functions Within an open report (recipe or batch report) you can browse through the individual elements using a hierarchical table of contents:
• Recipe/batch
• Recipe unit procedure
• Recipe operation
• Recipe phase
• Transition
2.4.6 BATCH Control Server
Definition The BATCH Control server is a component of SIMATIC BATCH. The BATCH Control server handles communication with the process and controls and monitors execution of the current batches.
The BATCH Control Server does not have its own user interface. The BATCH Control Server is started on the runtime computer (redundancy).
Functions Once a batch has been released and started, the BATCH Control server takes over monitoring of its execution. The batch data (online data) of SIMATIC BATCH are stored temporarily in the online data management of SIMATIC BATCH.
To acquire Batch data (messages), there is a connection to the message server and to the process data acquisition of the PCS 7 OS (WinCC).

Product introduction and installation
SIMATIC BATCH A5E00495287-01 2-11
2.4.7 Batch CDV
Definition BATCH CDV is a component of SIMATIC BATCH. It is a server component responsible for acquisition, storage and logging of Batch data.
BATCH CDV does not have its own user interface. It is displayed as an icon in the Windows task bar. The status of the application is displayed with an information button in the shortcut menu. The Batch CDV is started on the runtime computer (redundancy) according to the settings made in the Batch Launch Coordinator.
Functions The Batch CDV server performs the following three tasks:
1. Collects and stores WinCC messages.
2. Collects and stores WinCC measured values. Only the measured values configured in the running batches are collected and stored.
3. Closing batches. This process is divided into two steps. The transition state "Closing" leads to the final state "Closed".

Product introduction and installation
SIMATIC BATCH 2-12 A5E00495287-01
2.4.8 BATCH interface blocks
Introduction SIMATIC BATCH as of V6.0 can use the new functionality of the SFC types in the engineering system to define operation and phase types. As an alternative, SIMATIC BATCH as of V6.0 continues to provide special interface blocks as the communications interface to the processing programs on the programmable controller. These so-called BATCH interface blocks are supplied as a block library with SIMATIC BATCH (see also section "Using BATCH interface blocks").
Definition The BATCH interface blocks form the communications interface between SIMATIC BATCH and the processing programs of the process cell control system in the automation system. The BATCH interface blocks are implemented as CFC blocks and are inserted in the CFC charts according to their function and stored in the corresponding hierarchy folders in the plant view in the SIMATIC Manager.
Functions Using the BATCH interface blocks along with SIMATIC BATCH, makes the following functions available:
• Controlling the procedure: The IEPH/IEOP blocks are used for this purpose. These provide the commands (for example start or put on hold) of the recipe control steps from the batch control to the processing blocks (for example,. SFC_CTL or user blocks). The processing blocks report their current statuses back to the batch control.
• Assigning and releasing a unit via a running control recipe: The IUNIT_BLOCK blocks are used for this purpose.
• Summing up actual values for the creation of transition conditions and for logging measured values in the batch log: The TAG_COLL blocks are used for this purpose.
• Transferring setpoint and actual values: The IEPAR blocks are used for this purpose. The batch control writes the recipe parameters (setpoints) for the processing blocks into these blocks via the IEPH/IEOP blocks. The processing blocks write the result data (actual values) into the IEPAR blocks so that they can be stored as Batch data by the batch control once again using the IEPH/IEOP blocks.

Product introduction and installation
SIMATIC BATCH A5E00495287-01 2-13
2.5 Configuration options for SIMATIC BATCH
2.5.1 Client/server architecture of SIMATIC BATCH
Client/server architecture SIMATIC BATCH is usually distributed on several BATCH clients and a BATCH server all working with the same process cell project. The BATCH server provides the services for the BATCH clients that form the interface to the operator (the HMI) in other words function as operator control terminals.
Interaction with PCS 7 OS SIMATIC BATCH is linked to the PCS 7 OS at run time.
• Communication with the programmable controller (for example writing recipe parameters or reading process values) is handled by the data manager of the PCS 7 OS. In other words, SIMATIC BATCH does not have its own interface to the programmable controller.
• The BATCH server and the OS server of the PCS 7 operator stations generally run on separate computers. In the batch process cell configuration, the PCS 7 operator stations that are relevant for the batches are made known to the BATCH server.
• BATCH Clients can run on a PC as well as together with OS Clients on a computer.
Example configuration

Product introduction and installation
SIMATIC BATCH 2-14 A5E00495287-01
Large PCS 7 projects with distributed PCS 7 operator stations SIMATIC BATCH supports the model of distributed operator stations in large PCS 7 projects. This means that with suitable configuration in the engineering system, SIMATIC BATCH can access all operator stations and therefore all programmable controllers in the PCS 7 project.
Solution with One PCS 7 OS (No Distributed PCS 7 Operator Stations) The configuration described until now applies to designs with distributed PCS 7 OSs. If one PCS 7 OS is used in a small configuration, this PCS 7 OS and the BATCH server will be on the same computer. This computer then also has an interface to the SIMATIC S7-400.
Configuration in the engineering system BATCH servers and BATCH clients are configured just like the OS servers and OS of the PCS 7 operator stations in the SIMATIC Manager of the Engineering Station and downloaded from there.
Maximum Number of BATCH Clients A maximum of 32 BATCH clients can be connected to one BATCH server.
2.5.2 Distribution of the BATCH applications
SIMATIC BATCH provides a wide range of options for distributing BATCH applications on various computers:
Variant Label Possible configurations
1 Standalone level 1 BATCH Control Server, all data storage, BATCH client application on one computer - together with a PCS 7 OS server and OS client.
2 Standalone level 2 BATCH Control Server, all data storage, BATCH client application on one computer - separated from a PCS 7 OS server and OS client.
3 Distributed system level 1 BATCH Control Server and all data storage on one computer, BATCH client application on the corresponding separated computer – separated from PCS 7 OS server and OS client
Data storage systems SIMATIC BATCH operates with the following three databases:
• Project DB: data store of user rights
• Offline DB: data store of recipes, formulas, materials
• Online DB: data store of batches

Product introduction and installation
SIMATIC BATCH A5E00495287-01 2-15
BATCH server The BATCH Control Server and the Batch data management (Batch CDV) are always located on the BATCH server.
BATCH clients The following BATCH client applications can be distributed on the BATCH clients as options:
• Batch Control Center (BatchCC)
• BATCH Recipe Editor
• API Interface
Further references You will find a detailed description of the possible distribution and installation of batch applications in the manual Process Control System PCS 7; PC Configuration and Authorizations.
2.5.3 Interface to MES/ERP
With the API Interface add-on package for SIMATIC BATCH, you can interface online and offline functions of SIMATIC BATCH to an OEM system or any MES/ERP application. The API interface provides a COM connection (XML data format).
Please check the readme and the online help on the optional software API interface for information on its usage and configuration options.

Product introduction and installation
SIMATIC BATCH 2-16 A5E00495287-01
2.6 Installation
2.6.1 The SIMATIC BATCH product
Introduction SIMATIC BATCH is available as a basic package with a series of optional packages for step-by-step expansion and optimization.
Basic package The basic package supports you throughout all the stages involved in the automation of batch processes. The basic package provides you with the following components:
Note:
BATCH Engineering: The number of units is the sum of the "IUNIT_BLOCK" BATCH interface blocks.
The number of configured and used units is displayed in the log that can be opened from the BATCH configuration dialog. See section "Displaying the number of units".

Product introduction and installation
SIMATIC BATCH A5E00495287-01 2-17
Optional packages The following optional packages can also be installed in addition to the basic package:
Component Application
Batch Planning Allows configuration of batches in BatchCC Hierarchical recipes Allows the creation of hierarchical recipes according to S88.01 with RP, RUP,
ROP and RPH ROP Library (library operations)
Allows the creation and management of library operations
Separation Procedure/Formula
Allows you to work with formulas and formula categories. Any number of formulas can be created for a procedure.
API Interface Powerful functions for online and offline operation, for example interfacing to MES

Product introduction and installation
SIMATIC BATCH 2-18 A5E00495287-01
2.6.2 Requirements for installation
Hardware requirements To be able to work with SIMATIC BATCH V6.X, the same hardware requirements must be met as for PCS7 V6.X (see pcs7-readme.htm).
SIMATIC BATCH also requires:
• Approximately 260 Mbytes of free space on your hard disk to install files. Additional space is also required for projects and the database.
Note:
Problems may arise during operation of SIMATIC BATCH when the database and Batch data increases beyond the available storage capacity. Data will no longer be saved. Therefore, ensure that sufficient storage space is available (> 300 MB).
• A printer for recipe reports. All printers with graphics capability supported by Windows are suitable.
• The software was tested with the HP-Laser Jet.
Software requirements SIMATIC BATCH is a 32-bit application that requires MS Windows as an operating system.
To use SIMATIC BATCH components, the following software requirements must be met:
Component Property
PC operating system Microsoft Windows 2000 or Windows XP Internet Explorer Microsoft Internet Explorer V6.0 (for displaying recipe reports) TCP/IP configured See Windows system settings
Additional information • Make sure that you read the latest information on SIMATIC BATCH in the SB-
Readme.wri on the software DVD.
• You can find a detailed information about the installation requirements of the PC stations for PCS 7 plants in the manual Process Control System PCS 7; PC Configuration and Authorization

Product introduction and installation
SIMATIC BATCH A5E00495287-01 2-19
Access rights for the operating system set by SIMATIC BATCH After the installation of SIMATIC BATCH, the program configures the local group "SIMATIC BATCH" in the Windows user and group management. The members of this group have full access to the SIMATIC BATCH shared folders, "sbdata" and "sbdata_backup". By default, the user who installed SIMATIC BATCH is considered the local administrator in this group. Additional members of this group must be added manually by an administrator.
2.6.3 Required authorization
Authorization To use the SIMATIC BATCH software, you require an authorization (right to use the software). This means that the software protected in this way can only be used properly when the authorization required for this software package is detected on the hard disk of the relevant PG/PC. Otherwise, a dialog regularly appears informing you of the missing authorizations, which is inconvenient.
Different authorizations are required for the basic package, the three expansion stages of the basic package and the optional packages.
Installing and removing the authorization To install the authorization, you require the copy-protected authorization diskette supplied with the particular software package. The number of possible authorizations depends on an authorization counter on the authorization diskette. When you install an authorization, the counter is decremented by 1. Once the counter reaches the value 0, there are no more authorizations on the diskette.
The authorizations for SIMATIC BATCH are installed and uninstalled in exactly the same way as for PCS 7 and the PCS 7 optional packages. You will find detailed information on installing and handling an authorization, for example in the basic help of the SIMATIC Manager and in the help for the Automation License Manager.
Adding authorizations If you require numerous units due the requirements of your project, you may need to add new authorizations in the Automation License Manager from the authorization diskette to the affected PC. With SIMATIC BATCH, units are IUNIT_BLOCK instances.
Additional information • Make sure that you read the latest information on SIMATIC BATCH in the SB-
Readme.wri on the software DVD.
• You will find an overview of the authorizations required for the individual Batch applications in the manual Process Control System PCS 7; PC Configuration and Authorizations.
• Displaying the number of units

Product introduction and installation
SIMATIC BATCH 2-20 A5E00495287-01
2.6.4 Installing the components of SIMATIC BATCH
Installation You can start the installation program of SIMATIC BATCH within the system setup of PCS 7. On-screen prompts guide you step by step through the entire installation. The system setup of PCS 7 is started with the normal procedure under Windows for installing software.
Note:
Make sure that you read the information on installing SIMATIC BATCH in the SB-readme file. The readme file is on the same DVD-ROM as SIMATIC BATCH.
You can find a detailed information about the installation and configuration of the PC stations for PCS 7 plants in the manual Process Control System PCS 7; PC Configuration and Authorization
Options for installing the components When you install the components with the installation program of SIMATIC BATCH, you can decide whether you want a single station installation with all components or whether you require a distributed installation on several BATCH client/server computers. If you require a distributed installation, start the installation program on each client/server computer.
When you start to install the basic package, the following applications are offered for installation. You can select the applications you want to install.
• SBBase (Basic Software, API; does not need to be selected; it is installed automatically)
• SBBUILDER (BATCH Engineering)
• SBClient (Batch Control Center (BatchCC), BATCH Recipe Editor, BATCH Report)
• SBServer (BATCH Control Server, Batch data management (Batch CDV))
• SBBLOCK (BATCH interface blocks)
• SB WINCCOPTION (faceplates)
• SBFastobjects (for database server)

Product introduction and installation
SIMATIC BATCH A5E00495287-01 2-21
SBBUILDER (BATCH Engineering)
Note: • BATCH Engineering is only installed when SIMATIC PCS 7 (SIMATIC
Manager) is already installed on the ES PC.
• It is possible to install only BATCH Engineering on an ES PC (without client or server functionality). This installation is perfectly adequate for configuring batch objects and their distribution. The BATCH interface blocks must be installed separately, if required.
Removing
Note: If you remove SIMATIC BATCH, you must always do this before removing the planthierarchy (SIMATIC PH).
Installation in a redundant system
Note: Some special features are to be taken note of in a redundant PCS 7 System. For a detailed description of the installation, refer to the section "Redundancy".
BATCH Report The BATCH Report is fully integrated in the user interface of BatchCC. The recipe reports and batch reports are created in BatchCC in XML format and can be displayed and printed out in BatchCC at any time.
The Viewer of BATCH Report is available as a separate Setup SBReport on the Toolset DVD. This allows you to view recipe reports and batch reports on other computers, for example, at a later time, without needing a Batch Control Center installation on the computer. You can copy and run the Setup SBReport on any Windows 2000 computer.
After installation along with the basic package, start the Viewer as follows:
Start > SIMATIC > SIMATIC BATCH > BATCH Report

Product introduction and installation
SIMATIC BATCH 2-22 A5E00495287-01
2.6.5 Readme file with the latest information
Readme File
Note: Make sure that you read the latest information on SIMATIC BATCH in the SB-Readme on the software DVD.
The readme file opens as follows: • Double-click on SB-Readme on the DVD-ROM or
• Start > SIMATIC > Notes > Englisch > SIMATIC BATCH - Readme

SIMATIC BATCH A5E00495287-01 3-1
3 Technological basics in accordance with ISA S88.01
3.1 Which standards is SIMATIC BATCH based on?
Standards SIMATIC BATCH was developed based on the ANSI/ISA S88.01 (1995) Batch Control, Part 1: Models and Terminology standard.
Use of SFC In the "Technical Report" ISA-TR88.0.03-1996, the use of SFC (Sequential Function Charts, DIN/IEC 1131) as a graphic language for describing recipe procedures is also recommended. The creation of recipes with the BATCH Recipe Editor follows the structures and functions described in this standard.
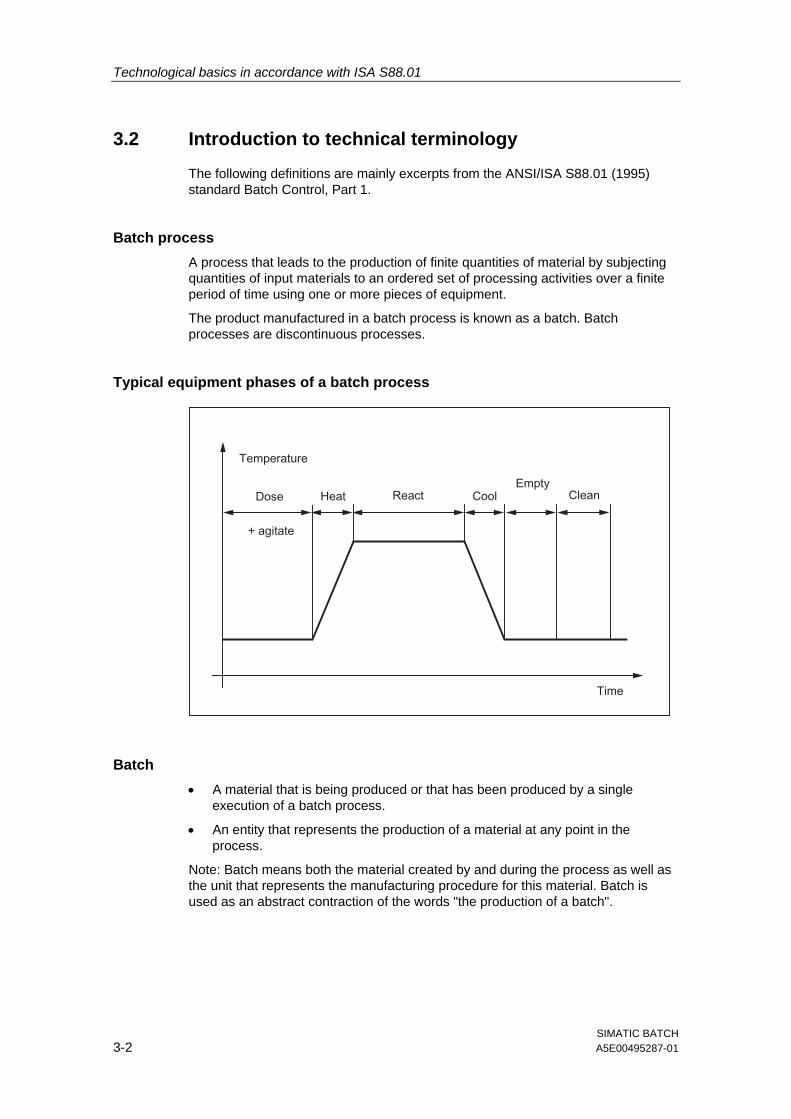
Technological basics in accordance with ISA S88.01
SIMATIC BATCH 3-2 A5E00495287-01
3.2 Introduction to technical terminology
The following definitions are mainly excerpts from the ANSI/ISA S88.01 (1995) standard Batch Control, Part 1.
Batch process A process that leads to the production of finite quantities of material by subjecting quantities of input materials to an ordered set of processing activities over a finite period of time using one or more pieces of equipment.
The product manufactured in a batch process is known as a batch. Batch processes are discontinuous processes.
Typical equipment phases of a batch process
Batch • A material that is being produced or that has been produced by a single
execution of a batch process.
• An entity that represents the production of a material at any point in the process.
Note: Batch means both the material created by and during the process as well as the unit that represents the manufacturing procedure for this material. Batch is used as an abstract contraction of the words "the production of a batch".
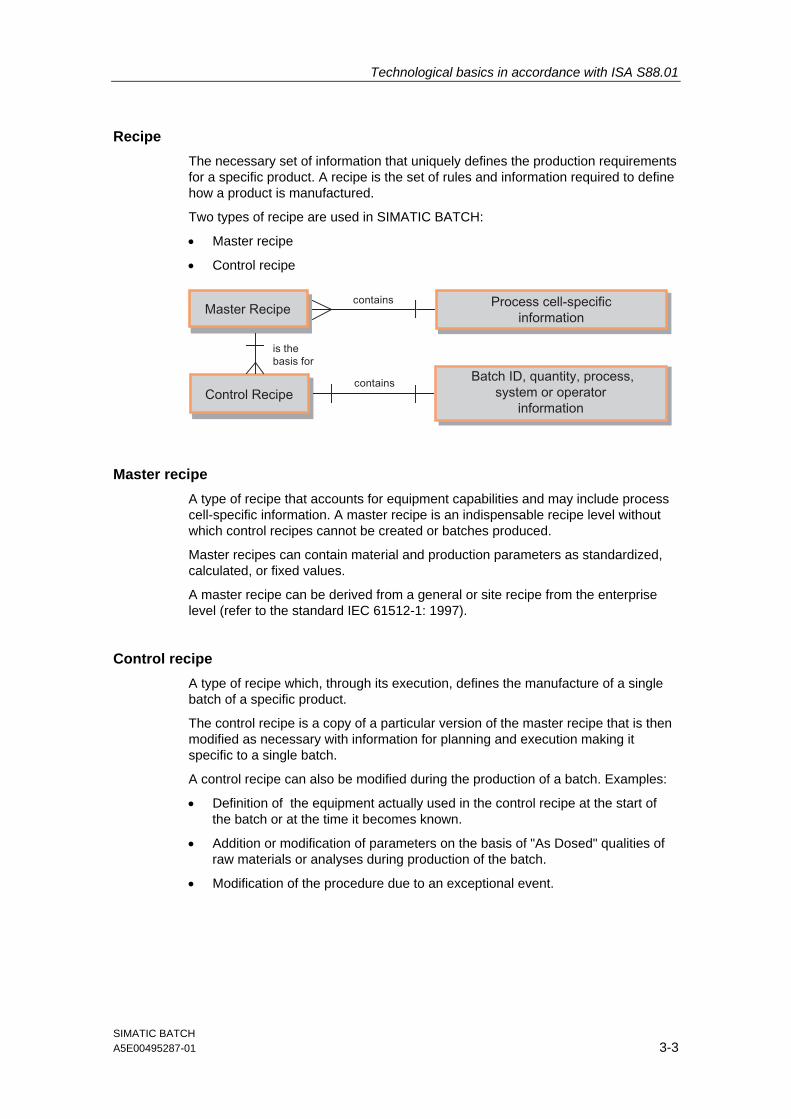
Technological basics in accordance with ISA S88.01
SIMATIC BATCH A5E00495287-01 3-3
Recipe The necessary set of information that uniquely defines the production requirements for a specific product. A recipe is the set of rules and information required to define how a product is manufactured.
Two types of recipe are used in SIMATIC BATCH:
• Master recipe
• Control recipe
Master recipe A type of recipe that accounts for equipment capabilities and may include process cell-specific information. A master recipe is an indispensable recipe level without which control recipes cannot be created or batches produced.
Master recipes can contain material and production parameters as standardized, calculated, or fixed values.
A master recipe can be derived from a general or site recipe from the enterprise level (refer to the standard IEC 61512-1: 1997).
Control recipe A type of recipe which, through its execution, defines the manufacture of a single batch of a specific product.
The control recipe is a copy of a particular version of the master recipe that is then modified as necessary with information for planning and execution making it specific to a single batch.
A control recipe can also be modified during the production of a batch. Examples:
• Definition of the equipment actually used in the control recipe at the start of the batch or at the time it becomes known.
• Addition or modification of parameters on the basis of "As Dosed" qualities of raw materials or analyses during production of the batch.
• Modification of the procedure due to an exceptional event.

Technological basics in accordance with ISA S88.01
SIMATIC BATCH 3-4 A5E00495287-01
Control strategy Different and (in terms of the same run) mutually exclusive equipment phases of the same equipment module = control strategy of this equipment module.
Process A sequence of chemical, physical, or biological activities for the conversion, transport, or storage of material or energy.

Technological basics in accordance with ISA S88.01
SIMATIC BATCH A5E00495287-01 3-5
3.3 Basic structure of a recipe
Components of a recipe Recipes contain the following four categories of recipe information:
Additional information • Material and production data (formula)
• Basic structure of a recipe procedure

Technological basics in accordance with ISA S88.01
SIMATIC BATCH 3-6 A5E00495287-01
3.4 Material and production data (formula)
Material and production data (formula) for recipe creation is comprised of:
• Process inputs
• Process outputs
• Process parameters
Process inputs Process inputs are the input materials (resources) required to make the product. Each input material has the following characteristics:
• Name of parameter
• Name of the input material
• Lower limit value for the quantity
• Set point for the quantity
• Upper limit value for the quantity
• Unit of measure
• Name of the scaling algorithm
Process outputs The process outputs are the output materials (main, interim, by and waste products) resulting from the manufacture of a product. Each output material has the following properties:
• Name of parameter
• Name of the product
• Name of the output material
• Lower limit value for the quantity
• Set point for the quantity
• Upper limit value for the quantity
• Unit of measure
• Name of the scaling algorithm
Process parameters Process parameters are physical parameters such as speed, pressure or temperature.
Process parameters can also be logic parameters and character chains: For example, release number of loop of type integer or material information HCL of type string or Boolean values e.g., releases.

Technological basics in accordance with ISA S88.01
SIMATIC BATCH A5E00495287-01 3-7
3.5 Basic structure of a recipe procedure
Recipe procedure and its elements according to the standard:

Technological basics in accordance with ISA S88.01
SIMATIC BATCH 3-8 A5E00495287-01
3.6 Relationship between recipe procedure, formula and master recipe
How the master recipe is formed By assigning formulas to a recipe procedure, different master recipes can be created for a process cell or a grouping of equipment belonging to a process cell. The schematic below illustrates this relationship.
=
+
+
=
=
+

Technological basics in accordance with ISA S88.01
SIMATIC BATCH A5E00495287-01 3-9
3.7 What is a formula category?
Definition A formula category is a grouping of recipe formulas associated with a single master procedure each having the same attributes. The only differences between the formulas in a formula category are the concrete parameter values.
The formula category is a therefore a "template" / a "type" for different material and production data records.
The formula category contains the parameters that can be manipulated by the operator during batch planning. These parameters are included in the formula category with their data type and unit of measure.
Note:
Formula categories can be defined independently of the recipe.
Purpose Working with formula categories makes it much easier to maintain master recipes based on the same recipe procedures. Modifications only need to be made at one point (of a recipe procedure) and not in "n" recipe procedures!
ISA S88.01 does not mention the formula category. The formula category does not, however, contradict the formula definition in ISA S88.01, but rather expands it (see also "Models of the ANSI/ISA S88.01 Standard").
Additional information • Material and production data (formula)
• Relationship between recipe procedure, formula and master recipe

Technological basics in accordance with ISA S88.01
SIMATIC BATCH 3-10 A5E00495287-01
3.8 Internal and external formulas
To support you better when using formulas and formula categories, BATCH makes a distinction between internal and external formulas.
Internal formula If you want to keep your material and production data directly in the master recipe procedure, you can do this in the "internal" formula in the master recipe. The parameters can be set there during the creation of the master recipe procedure and modified during batch planning and/or also while a batch is executing.
External formula If you want to manage several material and production data lists separate from the master recipe procedure, you can do this using "external" formulas belonging to a formula category. You simply need to assign a master recipe procedure to the external formula to establish the association with the master recipe procedure. The parameters of external formulas can also be modified during batch planning and/or while a batch is executing.

Technological basics in accordance with ISA S88.01
SIMATIC BATCH A5E00495287-01 3-11
3.9 ISA S88.01 models
3.9.1 Overview of the models of the ISA S88.01 standard
Introduction The following sections describe the models of the ISA S88.01 standard that relate directly to the use of SIMATIC BATCH. You will find information on other topics in the standard itself.
ISA S88.01 models The following models of the ANSI/ISA S88.01 standard provide the foundation for batch-oriented control strategies with SIMATIC BATCH.
• Procedural control model
• Physical model
• Process model
Hierarchical structure of the models The figure below illustrates the hierarchical structure and relationship of the models – Afrom the sequential control on the equipment as far as the processing functionality.

Technological basics in accordance with ISA S88.01
SIMATIC BATCH 3-12 A5E00495287-01
Implementation of the models The hierarchical structure of the models is the basis for the configuration of the batch-oriented control strategies with PCS 7:
• The plant hierarchy of your process cell is structured in the SIMATIC Manager (Plant view) based on the S88.01 physical model.
See section: Structure of the plant hierarchy
• You structure the recipes for batch control with the BATCH Recipe Editor based on the S88.01 procedural control model.
See section: Structure of a hierarchical recipe
3.9.2 Procedural control model
Procedural control model with example – How do we want to produce?

Technological basics in accordance with ISA S88.01
SIMATIC BATCH A5E00495287-01 3-13
Function A phase is the smallest element of procedural control that can accomplish a process-oriented task. The purpose of a phase is to define or cause a process-oriented action.
Characteristics of a phase:
• Can be subdivided into smaller parts in the form of steps and transitions (as described in IEC 848: 1988).
• A step can cause one or more actions
• The execution of a phase can result in the following
- Commands to basic control
- Commands to other phases (either in the same or another equipment entity)
- The collection of data
3.9.3 Physical model
Physical model with example – What do we use to produce?
Process cell A process cell contains all the equipment required to make a batch. Process cells are often divided into trains. A train is made up of all units and other equipment that can be used by a particular batch. Trains can be left unchanged from batch to batch or can be defined differently for each batch.

Technological basics in accordance with ISA S88.01
SIMATIC BATCH 3-14 A5E00495287-01
Unit A unit is made up of equipment modules and control modules. A unit is an independent grouping of equipment usually centered around a major piece of processing equipment, such as a mixing tank or reactor.
Characteristics of a unit:
• A unit can execute one or more major processing activities, such as react, crystallize and make a solution.
• Units operate relatively independently of each other.
• A unit often contains a complete batch of material at some point in the processing sequence of the batch.
• A unit cannot process more than one batch at the same time.
Equipment module An equipment module can be made up of control modules and subordinate equipment modules. An equipment module is usually centered on a piece of processing equipment, such as a filter.
Characteristics of an equipment module:
• Can be part of a unit or stand-alone grouping of equipment within a process cell
• Can carry out a finite number of specific minor processing activities, such as dosing or weighing
• Can, but does not need to contain the raw materials for a batch
Control module A control module is usually a collection of sensors, actuators, other control modules and associated processing equipment that can be operated as a single entity from the point of view of control engineering.
A control module can also be made up of other control modules. As an example, a dosing control module could be defined as the combination of several automatic switching valve control modules.
There is no figure for the individual control modules in the procedural model and the process model (see also figure in section "Overview of the models of the ISA S88.01 Standard"). Therefore, it cannot be addressed in SIMATIC BATCH either.

Technological basics in accordance with ISA S88.01
SIMATIC BATCH A5E00495287-01 3-15
3.9.4 Process model
Process model with example – What do we want to produce?

Technological basics in accordance with ISA S88.01
SIMATIC BATCH 3-16 A5E00495287-01

SIMATIC BATCH A5E00495287-01 4-1
4 Introduction to SIMATIC BATCH
4.1 Overview of the procedure
Requirement The components of the basic package of SIMATIC BATCH are installed on the PG/PCs of the BATCH OS (BATCH server, BATCH clients) and those of the engineering system.
Basic procedure If you are working with SIMATIC BATCH for the first time, you will find the following list of the most important steps a useful overview.
Process cell configuration 1. Process cell configuration in the engineering
system (ES) 2. Compiling the process cell data in multiproject engineering 3. Downloading the process cell data to the target system 4. Reading process cell data into SIMATIC BATCH
Permission management 2. 1. Specifying user permissions Recipe creation (offline) 3rd 1. Editing materials
2. Creating and processing master recipes 4th 3. Creating and processing library operations 5th 4. Validating recipes 6th 5. Releasing the recipes for production 7th 6. Creating a new formula category (only for
external formula) 8th 7. Creating formulas (only for external formula) 9th 8. Interconnecting parameters between the master
recipe and formula Process mode 10th 1. Creating Production Orders
11th 2. Creating and Processing Batches 12th 3. Releasing batches 13th 4. Starting production of a batch 14th 5. Operator control during batch production 15th 6. Batch reports 16th 7. Archiving batches

Introduction to SIMATIC BATCH
SIMATIC BATCH 4-2 A5E00495287-01
4.2 Process cell configuration
Configuration of the batch process cell takes place along with the basic engineering of the S7-400 on the Engineering Station (ES) of SIMATIC PCS 7 in the SIMATIC Manager (for example phase and operation types, equipment properties, user data types, units of measure etc.).
The Batch process cell data are compiled on the Engineering Station and are transferred to the database (project directory) of SIMATIC BATCH using the "Download target system" function.
Using the "Read in process cell" or "Update process cell" function in BatchCC, the process cell data of BatchCC are read in to the BATCH clients.
4.3 Permission management
SIMATIC BATCH uses the central user management of PCS 7.
You define user roles for SIMATIC BATCH (for example operator) and their assignment to the defined Windows user groups using the SIMATIC Logon software. Within SIMATIC BATCH (BatchCC), you can restrict the user permissions of a user role even further - for a specific computer and for a specific unit.
4.4 Recipe creation (offline)
Reading in the batch process cell data (Batch engineering data) on any BATCH client with BatchCC allows the creation of offline data. You create the materials, formula categories and formulas with the Batch Control Center. You create libraries and master recipes with the Recipe Editor. Releasing master recipes, library elements and formulas allows their use in process mode.
4.5 Process mode
The first phase of process mode is batch planning. Here, a production order is created first. This is divided into individual batch orders (at least one) that are then released and started. The actual Batch processing programs (equipment phases) run on the programmable controller and are coordinated by the batch control (BATCH Control Server). Communication with the equipment phases is done through the WinCC data manager.
The batch data management (Batch CDV) also makes use of individual WinCC components. From the measured value archive, the values for the required measured value sequences are obtained for the batch report and all batch-relevant messages are filtered out of the message archive.
A further important process function is the operator control and monitoring of a batch or the control recipe. This takes place partly in SIMATIC BATCH itself and partly using Batch faceplates in WinCC (OS).

SIMATIC BATCH A5E00495287-01 5-1
5 Configuration in the ES
5.1 Introduction
Engineering Basic Control A batch process is automated using the programs on the programmable logic controller (PLC). This so-called "basic control" is created with CFC and/or SFC for the specific PLC. The software charts to be created are managed in the plant hierarchy in the SIMATIC Manager. Fixed hierarchy levels must be used for SIMATIC BATCH.
Interface to the processing programs The interface between SIMATIC BATCH and the actual processing on the programmable controller is implemented as follows:
• Either using the SFC types that can be created with the SFC standard tools as of PCS 7 V6.0 (refer to the section "Using SFC Types") or
• By using the BATCH interface blocks (see section "Application of the BATCH interface blocks")
In the engineering system (ES), the equipment phases (for example dosing, agitating, heating) are interconnected and their parameter values set with the PLC structuring tools (CFC).
Note:
Mixed use of both variants (SFC types, BATCH interface blocks) within a project is possible.
Editing the type description of the process cell The data required by SIMATIC BATCH for creating recipes and for producing batches must be specified for a process cell. This data is also specified in the engineering system (ES). The type description for a process cell, for example equipment properties of units or function types, can be edited in the SIMATIC Manager independent of the basic control. Before creating the process cell data for SIMATIC BATCH, the type description must be synchronized with the SFC types and the CFC charts (block instances).

Configuration in the ES
SIMATIC BATCH 5-2 A5E00495287-01
Compiling and downloading process cell data To be able to download the process cell data distribute it to the BATCH server and the BATCH clients according to the configured plant hierarchy, you create and configure SIMATIC PC stations with server and client applications in the SIMATIC Manager. The process cell data can then be derived from the plant hierarchy and downloaded to the BATCH server and the BATCH clients. Prior to downloading, the OS and Batch process cell data must always be compiled.
5.2 Engineering with SIMATIC BATCH
5.2.1 Difference between single project and multiproject engineering
The engineering involved in a batch process cell can be done both on one PC (single project) or on several PCs (multiproject).
Single project engineering In small Batch process cells and when only one configuration engineer is available, engineering is done in a single project; in other words, on one PC.
Multiproject engineering In larger Batch process cells, simultaneous configuration is necessary on different PCs and by different configuration engineers. This is made possible by multiproject engineering. Access to the data on the other PCs is possible. The individual projects of the process cell are merged on a central ES PC using the "Multiproject" object.

Configuration in the ES
SIMATIC BATCH A5E00495287-01 5-3
5.2.2 Single project engineering
5.2.2.1 Flow chart: Engineering procedure for a single project
Introduction Below you will see a recommended sequence of configuration tasks. The order of the steps shown in the schematic is not absolutely necessary. We have selected a method on which the following more detailed description is oriented.
Requirement The basic control has been created; in other words, the PLC hardware is configured, the CFC and SFC charts have been created and compiled. The information below relates only to the supplementary ES configuration for creating recipes and batch control with SIMATIC BATCH.
Example of a configuration for single project engineering

Configuration in the ES
SIMATIC BATCH 5-4 A5E00495287-01
What is involved in the ES configuration for SIMATIC BATCH?

Configuration in the ES
SIMATIC BATCH A5E00495287-01 5-5
Updating process cell data
Note: If you modify the basic control (CFC/SFC charts, hardware configuration, plant hierarchy etc.), the process cell data must be updated again and downloaded to the CPU (BATCH server, BATCH clients) and batch-relevant data must be transferred to the operator stations.
Prior to this, the OS must be compiled and downloaded again.
5.2.3 Multiproject engineering
5.2.3.1 General information
General documentation on multiproject engineering An introduction to multiproject engineering with PCS7 is provided by the manual Process Control System PCS 7; Engineering System. This documentation is on the "Electronic Manuals, PCS 7" DVD. This is general documentation that describes the configuration of a multiproject and the interaction between individual S7 projects from a neutral perspective.
You will find further information in the online help in PCS 7 in the topic "What you Should Know about Multiprojects".
The following information relates to the additional engineering steps involved in configuring batch processes with the components of SIMATIC BATCH.
Uniqueness of the names
Note: Please note that if you distribute the configuration work on several ES PCs, the project names and the names of the project objects contained must be unique on all ES PCs. The process cell name must be identical in all projects.
The name of the Batch projects (multiprojects and projects) may only occur once in the PCS 7 environment.
You must declare required type information, such as units of measure, equipment properties and enumerations in the shared declarations in the SIMATIC Manager.

Configuration in the ES
SIMATIC BATCH 5-6 A5E00495287-01
Consistency of the projects
Caution: As the user, you yourself are responsible for the consistency of the projects within a multiproject. This applies especially to the shared declarations and the SFC types.
Project languages
Caution: All projects in multiprojects must be configured in the same language. If a project is removed and then configured in another language, SIMATIC BATCH will not be able to compile it correctly when the project is reinserted. The reason for this is the lingually differing display names for the parameters of enumerations.

Configuration in the ES
SIMATIC BATCH A5E00495287-01 5-7
5.2.3.2 Central multiproject engineering
5.2.3.3 Flow Chart: Engineering Procedure for a multiproject
Example configuration for centrally managed multiproject for SIMATIC BATCH
The first step is to create a "Multiproject" object on a central ES PC in the SIMATIC Manager. You set up all the S7 projects along with drive information relating to the ES PCs on which the S7 projects will be configured below the multiproject. The individual S7 projects can then be configured at the same time on the ES PCs (PC 1, PC 2, PC 3, etc.). The data for the BATCH server is configured on one of the ES PCs (PC 1).
Note: It is, of course, also possible to configure one of the projects on the central ES PC, for example the computer with the BATCH server configuration. To keep the picture clear, however, the description that follows is based on the configuration shown in the schematic below.

Configuration in the ES
SIMATIC BATCH 5-8 A5E00495287-01
...
...

Configuration in the ES
SIMATIC BATCH A5E00495287-01 5-9
What is involved in the ES configuration for SIMATIC BATCH in a multiproject?

Configuration in the ES
SIMATIC BATCH 5-10 A5E00495287-01
Updating process cell data
Note: If you modify the basic control (CFC/SFC charts, hardware configuration, plant hierarchy etc.), the process cell data must be compiled again, batch-relevant data must be transferred to the operator stations and downloaded to the CPU (DB server, BATCH server, BATCH clients).
Before data is transferred to the operator stations, the OS must be recompiled.
5.2.3.4 Removing projects for editing and restoring them
You can transfer your projects to other engineering stations in the network with the command "Remove for editing". You can completely configure the project there.
Preciously, you could only edit batch types in a removed project. As of SIMATIC BATCH V7.0, you can now remove any project from a multiproject for editing. The batch types can still be edited in each project.
Procedure 1. Select the project to be removed in the SIMATIC Manager, right-click and
select the command Multiproject > Remove for Editing ... in the shortcut menu.
2. Then select a local directory or network path for storage. The complete project data is copied to the selected path and removed from your multiproject directory. The removed project is display grayed-out in the multiproject. It can no longer be edited there.
3. Select the grayed-out project, right-click and select the shortcut menu command Multiproject > Reapply after Editing. This copies the project data back to the multiproject directory. You can now continue configuration for the multiproject as usual.
Configuration in the ES
SIMATIC BATCH A5E00495287-01 5-11
5.2.3.5 Distributed multiproject engineering
5.2.3.6 Overview and important remarks
Introduction In this document, we explain distributed multiproject engineering with SIMATIC BATCH. This involves the exchange of projects between central and several distributed multiprojects. These projects can only contain SIMATIC AS stations.
These projects are exchanged by removing them from a central multiproject, inserting them into a distributed multiproject, editing them in the distributed multiproject, removing them from the distributed multiproject and finally inserting them back into the central multiproject.
Since BATCH multiproject configuration was only designed for editing within the context of a single multiproject, a few important rules and restrictions must be taken into consideration for distributed multiproject engineering with SIMATIC BATCH. These rules are described in this section.
Central multiproject engineering: scope In contrast to distributed multiproject engineering, central multiproject engineering is used for centralized tasks. Central multiproject engineering is, therefore, not a topic in this documentation.
Note:
The procedure for multiproject engineering is described in the document "PCS7 V6.1+SP1 Configuration Guide for Multiproject Engineering" with the article ID 22258951 (http://support.automation.siemens.com/WW/view/de/22258951).

Configuration in the ES
SIMATIC BATCH 5-12 A5E00495287-01
Definition of terms
Term Meaning Abbreviation in the text
Transfer project A transfer project is part of a multiproject and only contains SIMATIC AS components (CPU stations).
Multiproject A multiproject is the linkage of several projects and libraries to form a comprehensive automation solution. The project data continues to be stored in the projects.
MP
Multiproject Engineering Project configuration in a multiproject. MPE Central multiproject A multiproject stored on the central ES. CMP Central multiproject engineering
A multiproject created on a central ES PC with its individual S7 projects. These are configured in synchronization on different ES PCs in the network.
CMPE
Distributed multiproject A multiproject in which a project is inserted for further editing and subsequent testing.
DMP
Distributed multiproject engineering
An example for this is when work is contracted to several engineering firms that develop and test the desired function at different locations. They perform the engineering in a distributed engineering environment.
DMPE
Engineering station PC on which the SIMATIC PCS 7 configuration software is used.
ES
Requirements for distributed multiproject engineering with SIMATIC BATCH The following requirements must be fulfilled to perform DMPE with SIMATIC BATCH.
• The projects to be exchanged may only contain AS stations.
• The transfer project can be used in any environment regardless of the hardware configuration. Only the connections need to be adapted.
• The same PCS 7 version, including the corresponding hotfixes and IT integration software must be installed on the involved PCs or on all PCs in the project.
• All configurations, such as Save as, Delete, Archive, Retrieve etc., must be performed in the SIMATIC Manager.
• The master data library is located in the CMP and may only be modified here. It is a template for all involved DMPs. The master data library must always be transferred to all involved DMPs.
• You can only use the SFC types in your CMP. You cannot use the BATCH interface blocks EPH, IEPH,EOP, IEOP, EPAR, IEPAR and AF blocks in the DMPE.
• You can perform the following configurations only in the master data library of the CMP:
- Changes to the SFC types, as well as project-specific blocks.
- Shared declarations.
• You cannot change names of existing and instanced SFC types.
• You cannot rename projects.

Configuration in the ES
SIMATIC BATCH A5E00495287-01 5-13
• A unit cannot be distributed over several projects.
• The unit name must be identical in all Batch-relevant projects.
Possible configurations in the central multiproject All configurations that result in changes or additions to the master data library must be performed in the CMP.
• Shared declarations:
- Units of measure
- Equipment properties in the shared declarations
- Enumerations in the shared declarations
• Create and test SFC types (typicals) Typicals are phase types, for example, heating, cooling, dosing, etc. When these phase types are created, they are thoroughly tested so they can be later duplicated as instances. Any subsequent changes implies an enormous amount of work, because the duplicate type instances may already be in use and all instances may have to be inserted again.
• Create models
• Create and test custom blocks
• Create and test models
• Create and test units
• Test individual units
Possible configurations in the distributed multiproject • CFC charts
• WinCC process pictures
• Import, create, change and export recipes
What can be tested in the DMP? • Recipes, batch sequences
• Process pictures

Configuration in the ES
SIMATIC BATCH 5-14 A5E00495287-01
Up to which point in time can DMPE be performed? The point in time at which the commissioning phase for DMPE with SIMATIC BATCH is completed, depends on your own decision for the most part.
Caution:
You determine the point in time at which any unconfigured data can lead to inconsistencies in the Batch database when you perform the "Update process cell" function. The procedures described here must stop at the latest at the point when data consistency must be guaranteed in the Batch database.
In general, this is the point at which the acceptance test with parameter fine adjustment is closed or, at the latest, the start of production.
Overview of the configuration tasks Step 1: Archiving and removing project(s) and the master data library in the CMP.
Step 2: Restoring and inserting project(s) and master data library in the DMP, and adapting the project.
Step 3: Editing, testing and archiving project(s) in the DMP.
Step 4: Restoring and inserting project(s) in the CMP.
Additional information • Multiproject engineering: In the SIMATIC Manager, click on help and enter
"Multiproject engineering" in the index.
• "Multiproject Engineering" is describe in section 5.3 of the manual Process Control System PCS 7 Engineering System.
5.2.3.7 Step 1: Archiving and removing project(s) and the master data library in the CMP
The project which you wish to transfer for editing must first be archived and then removed from the multiproject. The master data library is then archived for the transfer.
Requirement The central multiproject on the central engineering station has been created with all projects of the MP, its AS and OS objects, the plant hierarchy, the batch assignment as well as the master data library.

Configuration in the ES
SIMATIC BATCH A5E00495287-01 5-15
Procedure 1. Archive your project as a user project.
2. Remove the transfer project from your multiproject if is no longer needed. Select your project folder, right-click and select the command Multiproject > Remove From Multiproject in the shortcut menu.
3. Archive your master data library. File > Archive > Library tab > select the master data library and click "OK" > select storage path and save. When changes are made in the master data library, AS projects should not be immediately updated in the CMP as a preventative measure, they should first be updated in the DMP for reasons of time optimization.
Result The transfer project and the master data library are in a Zip file ready for transfer to the DMP.
5.2.3.8 Step 2: Restoring and inserting project(s) and master data library in the DMP, and adapting the project
Introduction The project removed from a central multiproject and the corresponding master data library are transferred to the engineering firm as a Zip file. There, the project of the CMP is adapted to the local environment to allow further configuration and subsequent testing (AS, OS and BATCH process mode).
Requirement You have received the project of the CMP and the master data library as archive files.
Procedure The required tasks you need to performed on the distributed engineering station are presented below in chronological order.
1. If there is an AS project in the destination path with a name identical to the one in your distributed multiproject, archive this project for later use and then delete it in the DMP.
2. Retrieve the transfer project to the destination path of the distributed multiproject. File > Retrieve > select file and then Open > select destination directory and the OK > OK > Do you want to remove the references to the multiproject? Yes > Yes

Configuration in the ES
SIMATIC BATCH 5-16 A5E00495287-01
3. Restore the transfer master data library in the same directory.
4. Open the restored project, delete the "Batch process cell" object, remove the ISA S88 type definitions and adapt the AS address (MAC address) as required. Also delete the S7 connections.
- Select the project and then select the batch process cell > in the data window, right-click and select "Delete" in the shortcut menu.
- In the Plant view, select the folder of the batch process cell, right-click and select the shortcut menu command "Object properties > In the "S88 type definition" tab select "<neutral>" from the selection box and then > OK. The BATCH identifiers are remove in all hierarchy subfolders.
5. Insert the project and the master data library into the distributed multiproject. Select your multiproject folder, right-click and select the shortcut menu command Multiproject > Add to multiproject > Select the project or the master data library and click "OK". Specify the inserted library as the master data library.
6. Merge the subnets or adjust the subnetworks in the distributed multiproject. Select the multiproject folder, right-click and select the shortcut menu command Multiproject > Adjust Projects > In the dialog that appears, select the "Ethernet" subnet in the navigation window and then "Execute". In the dialog that appears, select the corresponding subnet in the multiproject and insert it into the "Merged" window with the right arrow. In the "Merged" window, select the displayed folder to check if the subnet has been merged. Then click "OK" > Apply.
7. Configure an S7 connection from the AS to the OS for test purposes. Open NetPro > Select the CPU in the AS > Select a free position in the connection table and the select the shortcut menu command "Insert New Connection" > In the dialog "Insert New Connection", "In the Multiproject: xxx" folder select the "WinCC Application" and click "OK" > In the "Properties S7 Connection" dialog, under the connection path, select the local and partner interface from the respective drop-down lists and click "OK" .
8. Insert the batch process cell object into your project. In the Plant view, select the multiproject folder, right-click and select the shortcut menu command Insert new object > Batch process cell.
9. Define the types for your Batch process cell. Select the top hierarchy folder, right-click and select the shortcut menu command "Object properties" > In the "S88 type definition" tab of the properties dialog, select "Process cell" as the object type and click "OK" . The folder of the batch process cell is given a light green background.
10. Is the name of the batch process cell in all projects of the CMP identical to the process cell name on the MP level? Is the correct master data library integrated?
- Compare the project names within both multiprojects. Compare the project names within the CMP with the project names within the DMP. The names must be identical.
- Compare the names in the master data library within both multiprojects.
11. Compile and download the AS of your inserted project.
12. Adapt your OS and then compile and download it.

Configuration in the ES
SIMATIC BATCH A5E00495287-01 5-17
13. Update the batch process cell, generate and propagate the batch types, merge the batch instances, transfer the messages to the OS and download the Batch data.
14. Update the Batch data in the Batch Control Center (BCC).
Caution:
If you wish to ensure a correct "update" of the Batch data, do not change the names of type objects, phase types, etc. You may need to manually adapt the object assignment using the "Update Process cell" dialog in the Batch Control Center.
Result You have transferred a CMPs from a central ES to a multiproject on a distributed ES. To test the newly configured functions in process mode, you have created a new S7 connection, compiled all ES data and downloaded it to the AS. You have also updated the batch process cell and distributed the Batch data to the respective components. You have created a new batch process cell and recipes to run the batches.

Configuration in the ES
SIMATIC BATCH 5-18 A5E00495287-01
5.2.3.9 Step 3: Editing, testing and archiving project(s) in the DMP
Introduction You would like to edit the inserted project and test it in process mode. Then you want to archive the project for transfer to the CMP. Leave the transfer project and the master data library in the DMP for any changes that may be required.
Procedure Once all tests are completed, archive your project as a user project in a new project path and close all projects. File > Archive > select project > OK > select archive and path > Save.
Result You have continued editing of the project(s) and performed testing in process mode. You then archived the project as a user project to reinsert into the CMP.
5.2.3.10 Step 4: Restoring and inserting project(s) in the CMP
Introduction In this step, you integrate the project back into the CMP.
Requirements • You have received the project of the DMP as an archive file.
• No changes were made to the master data library.

Configuration in the ES
SIMATIC BATCH A5E00495287-01 5-19
Procedure 1. If there is a project with the same name in the destination path of the CMP,
delete it. In the SIMATIC Manager > File > Delete > User Projects tab > select project > OK > Yes OK.
2. Retrieve the project to the destination directory path of the CMP. In the SIMATIC Manager > File > Retrieve > select archive > Open > select destination directory > OK > OK > Yes > Yes.
Note:
Warning dialog "Retrieve". Do you want to remove the references to this multiproject? Yes.
3. Delete the S7 connection for the communication between AS and OS configured for testing purposes. Open NetPro > Select the CPU in the AS > Select the previously of the inserted connection > Select > Delete from the shortcut menu.
Note:
If have changed the AS addresses of existing S7 connections, the addresses of the original CMP must be set again.
4. Remove the BATCH process cell identifier (ISA S88 type definition) and delete the "Batch process cell" object.
- In the Plant view, select the folder of the batch process cell in your project, right-click and select the shortcut menu command "Object properties > In the "S88 type definition" tab select "<neutral>" > OK. The light green batch identifier is removed in the folder icon.
- Select the project in the Plant view > Select the batch process cell in the data window > Select > Delete in the shortcut menu > OK.
5. You should perform the following checks. Have you removed the project from the CMP? Have all batch identifiers been removed? Is the name of the top hierarchy folder identical in all projects? Does the MAC address of the AS correspond to the CMP settings?
6. Insert the project into the CMP. In the SIMATIC Manager > select the multiproject folder > In the shortcut menu > Multiproject > Add to multiproject > User Objects tab > select project > OK. Optionally: Browse and navigate to the corresponding path.
7. Merge the Ethernet subnets. In the SIMATIC Manager > select the multiproject folder > In the shortcut menu, > Multiproject > Adjust Projects > select Ethernet > Execute > select subnet in the multiproject > Merge with right arrow > OK > Apply.

Configuration in the ES
SIMATIC BATCH 5-20 A5E00495287-01
8. Check if the S7 connection between the AS and the OS, which was deleted in the DMP, is now in the CMP. Save NetPro.
- Open NetPro, select the CPU in the AS and check the S7 connection in the connection table.
- Select the WinCC application on the OS and check the S7 connection in the connection table.
9. Add the batch process cell and the S88 type definition.
- In the Plant view of the SIMATIC Manager > Select the project > In the shortcut menu > Insert new object > Batch process cell.
- Select the process cell folder in the Plant view > In the shortcut menu > Object properties > Register "S88 type definition" > select object type "Process cell" > OK. The folder of the batch process cell is given a light green color.
10. Check if the name of the batch process cell in all projects of the CMP is identical to the process cell name on the MP level. In the Plant view of the SIMATIC Manager, check the hierarchy names and the batch process cell names in the entire MP.
11. Compile and download the AS objects (CFC charts) and the OS objects of your multiproject.
12. Update the batch process cell, generate and propagate the batch types, merge the batch instances, transfer the messages to the OS and download the Batch data.
13. Update the Batch data in the Batch Control Center (BCC).
Result You have integrated the project back into the original CMP. You have made all the preparations to start process mode in you project.

Configuration in the ES
SIMATIC BATCH A5E00495287-01 5-21
5.2.3.11 Errors sources in distributed multiproject engineering with SIMATIC BATCH
Introduction What can happen if the procedures and the requirements of the individual configuration tasks are not adhered to or inadvertently omitted?
• The batch data in the CMP and all projects may become implausible.
• The batch data in the Batch database may become implausible.
• SFC types may be changed in the master data library with confirmation.
Troubleshooting How can I correct problems that were caused by not adhering to or inadvertently omitting procedures and the requirements?
Procedure on the ES in the SIMATIC Manager 1. Open the multiproject in the SIMATIC Manager.
2. Remove the S88 type definition and delete the batch process cell in all projects (AS projects) of the multiproject. The OS projects are an exception to this.
3. Update the batch process cell, generate and propagate the batch types, merge the batch instances and transfer the messages to the OS. Only the types you have manually generated are now in the batch types. The batch instances are also empty.
4. Reinsert a batch process cell and the S88 type definition in all projects (AS projects) of the multiproject. The OS projects are an exception to this; they are retained.
5. Update the batch process cell, generate and propagate the batch types, merge the batch instances, transfer the messages to the OS and download the Batch data. Only the types you have regenerated are now in the batch types. You have merged the batch instances.
6. Check if all function blocks and SFC types are identical in all projects of the CMP and have the same version. The easiest way to ensure this, is to update the function blocks of the master data library in all projects (AS projects). You can also copy the SFC types to all chart folders of the S7 program.
- Select the block folder in your S7 program in your integrated Project > Options > Charts > Update Block Types > Select the S7 program to be check > Next > If an update is needed, this is indicated by a check mark in the "Status" check box. If an update is needed, the "Update" dialog is displayed > Select the block types that need to be updated > Check the log and close the wizard.
- Copy the SFC types in the chart folder of your integrated project to all chart folders within the CMP.

Configuration in the ES
SIMATIC BATCH 5-22 A5E00495287-01
Procedure on the Batch server 1. Delete the Batch database and then download the Batch data from the ES to
the target station. Caution: Before deleting the Batch database, you must first back up your Batch data (recipes, libraries and formula) using an export or backup in the Batch Control Center.
2. Start the Launch Coordinator and then the BATCH Start Coordinator. Open the Batch Control Center and select > Program > New process cell. Update the batch process cell data.
3. Import your master recipes, libraries, formulas from the latest export file restore file.
! Warning Before performing procedural steps one and three, consult with your Siemens service engineer. You should not lose any Batch data whatever you do.
Procedure on the OS servers Delete the batch messages on the OS servers involved.
! Warning Please consult with Siemens service engineer. You should not lose any Batch data whatever you do.
Potential problems and solutions, FAQ 1. Central settings of the configured equipment properties are lost during
attachment and detachment. Recommendation: Batch configuration without conditions only via Class view (select units with check mark) , if no conditions (such as different tank sizes) are used elsewhere. Configure the equipment properties at a later point in time.
2. Permission management and materials in Batch cannot be archived, exported and imported separately. If you need to set up a new database, the permission management and the material can no longer be imported without a "restore". Entering the permission management and material into an empty database creates an enormous amount of work. Recommendation: When the Batch database is initially created, the permissions should be configured first and saved as a backup to avoid the large amount of work involved in a repeated configuration of the permissions. If this is done at the outset, you will then have a correct backup file to perform a "restore".

Configuration in the ES
SIMATIC BATCH A5E00495287-01 5-23
3. When changing existing unit names. Recommendation: Assign the changed unit names during the update of the process cell in the BCC (update dialog). You should reassign the new or renamed unit names in the Batch configuration dialog following the update of the batch process cell. If you do not use this dialog, the recipes will be implausible and you must readapt the allocation of the units for every individual recipe.
4. When changing the names of existing equipment modules (EM). Recommendation: Assign the name change of existing equipment modules (EM) in the BCC (update dialog) when updating the process cell. You should reassign the new or renamed equipment modules in the dialog following the update of the batch process cell. If you do not use this dialog, the recipes will be implausible and you must readapt the new assignments for every individual recipe.
5. When changing / adding setpoints, control strategies at SFC types. Recommendation: Assign the name change of setpoints for SFC types in the BCC (update dialog) when updating the process cell. Renamed setpoints should be assigned in the dialog following the update of the batch process cell. If you do not use this dialog, the recipes will be implausible and you must readapt the new assignment for every individual recipe. If you add or delete setpoints or control strategies, you must always select and save the functions in which changes have been made in every recipe. Otherwise, the recipes will be implausible.

Configuration in the ES
SIMATIC BATCH 5-24 A5E00495287-01
5.3 PCS 7 Wizard
5.3.1 Using the PCS 7 Wizard
When you create a new single multiproject, you can also use the PCS 7 wizard in the SIMATIC Manager. This allows you to create a single project or multiproject with one project including a PC station for the BATCH server and a PC station for a BATCH client.
Starting the Wizard In the SIMATIC Manager, select the menu command File > "New Project" Wizard and follow the instructions in the dialogs.
Settings for SIMATIC BATCH In the third dialog box "Which objects will be used in the project?", the "SIMATIC BATCH" option is available. Select this option and three further options appear on the right in the same dialog box. Select the project version you require. Once the PCS 7 wizard is completed, the PC stations are visible in the Component view.

Configuration in the ES
SIMATIC BATCH A5E00495287-01 5-25
5.4 Configuring BATCH servers and clients
5.4.1 Basics of configuration
Principle The BATCH server and the BATCH clients of a process cell project generally run on different PCs. To download the process cell data of a project and distribute it to these PCs, a SIMATIC PC station is created for the BATCH server (BATCH control server, DB server) and each BATCH client in the Component view of the SIMATIC Manager.
! Warning Configuring applications (WinCC, SIMATIC BATCH, ...) on separate "SIMATIC PC station" objects and then merging them to create one PC station by assigning the same computer name to the "SIMATIC PC station" objects is not permitted!
Structure of the Batch project in the SIMATIC Manager (Component View)

Configuration in the ES
SIMATIC BATCH 5-26 A5E00495287-01
Functions available for BATCH configuration
Object Meaning Available functions
BATCH client application • Configuring the BATCH clients
BATCH Control Server or data storage system
• Configuring the BATCH server
Only in a redundant system: BATCH Control Server or data storage system standby
• Configuration of the redundant BATCH server
WinCC application on PCS 7 OS
• Compiling the OS
BATCH application client A "BATCH application client" stands for the BATCH Recipe Editor, the Batch Control Center (BatchCC), for batch operator control and monitoring and Batch data management (Batch CDV).
BATCH application "BATCH application" is the representative for
• DB server project: data store of user rights
• DB server offline: data store of recipes, formulas, materials
• DB server online: data store of batches
• BATCH Control Server (BCS)
BATCH application [stdby] "BATCH application [stdby]" stands for the redundant applications:
• DB server project: data store of user rights
• DB server offline: data store of recipes, formulas, materials
• DB server online: data store of batches
• BATCH Control Server (BCS)

Configuration in the ES
SIMATIC BATCH A5E00495287-01 5-27
5.4.2 Configuring the BATCH server
Rules • A SIMATIC PC station must be created and configured with a "BATCH
application" in HW Config for the PC on which the BATCH server runs.
• If you want to work locally on the ES PC with BATCH server/clients (single project engineering), only one PC station with server and client application needs to be set up and in which the runtime computer name remains empty (or the local computer name is entered).
! Warning Configuring applications (WinCC, SIMATIC BATCH, ...) on separate "SIMATIC PC station" objects and then merging them to create one PC station by assigning the same computer name to the "SIMATIC PC station" objects is not permitted!
Follow the steps in the SIMATIC Manager outlined below: 1. Select the project in the Component view.
2. Select the menu command Insert > Station > SIMATIC PC Station.
Result: A new SIMATIC PC station is inserted in the current project.
3. Set the computer name of the PC station:
- Select the SIMATIC PC station.
- Select the menu command Edit > Object properties.
- Enter the computer name in the last field.
4. Configure this SIMATIC PC station in HW Config.
- Select the SIMATIC PC station.
- Select the menu command Edit > Open object.
Result: HW Config opens.
- Insert a batch application from the hardware catalog:
Path in the hardware catalog: Standard > SIMATIC PC Station > HMI > BATCH application.
If you are using a redundant BATCH server, select "BATCH application (stdby)" instead.

Configuration in the ES
SIMATIC BATCH 5-28 A5E00495287-01
5. Select the menu command Station > Save and compile.
Result: In the Component view, the object is displayed below the configured SIMATIC PC station.

Configuration in the ES
SIMATIC BATCH A5E00495287-01 5-29
5.4.3 Configuring the BATCH clients
Rules • A SIMATIC PC station must be created and configured with a "BATCH
application client" in HW Config for every PC on which a BATCH client application runs.
• BATCH clients can also run on PC stations on which no OS client (multiclient) is installed.
Follow the steps in the SIMATIC Manager outlined below: 1. Select the project in the Component view.
2. Select the menu command Insert > Station > SIMATIC PC Station.
Result: A new SIMATIC PC station is inserted in the current project.
3. Set the computer name of the PC station.
- Select the SIMATIC PC station.
- Select the menu command Edit > Object properties.
- Enter the computer name in the last field.
4. Follow the same procedure and install a SIMATIC PC station for each additional BATCH client in the project.
5. Configure these SIMATIC PC stations in HW Config.
- Select the SIMATIC PC station.
- Select the menu command Edit > Open object.
Result: HW Config opens.
- Insert a batch client application from the hardware catalog: On a BATCH client, you insert an additional WinCC application if the BATCH client is operated along with an OS client on one PC.
Path in the hardware catalog: Standard > SIMATIC PC Station > HMI > BATCH application client.

Configuration in the ES
SIMATIC BATCH 5-30 A5E00495287-01
6. Select the menu command Station > Save and compile.
Result: In the Component view, the object is displayed below the configured SIMATIC PC station.
5.4.4 Installing on BATCH servers and BATCH clients
You will find an overview of the Batch applications that can be installed on BATCH servers and BATCH clients and the required authorizations in the manual Process Control System PCS 7; . PC Configuration and Authorizations.

Configuration in the ES
SIMATIC BATCH A5E00495287-01 5-31
5.5 Basics of the plant hierarchy
5.5.1 Structure of the plant hierarchy
Introduction With the plant hierarchy, the engineering system provides you with the means of recreating the technological structure of the process cell in the PCS 7 system. The objects such as CFC/SFC charts, OS reports, or OS operator pictures are added in the plant hierarchy.
Structure of the plant hierarchy The highest level is fixed by the system when you create a new project. The next hierarchy levels can either be neutral folders or folders with configuration data for SIMATIC BATCH. This is decided in the object properties of the relevant hierarchy folder in the "S88 type definition" tab under the object type properties.
In multiproject engineering, the top level is the "Multiproject" object, below that you will find the individual projects and the process cell below these projects.
For the configuration data for SIMATIC BATCH, the three hierarchy folders shown in the schematic below are necessary (these are generally known as Batch hierarchy folders):
Three hierarchy folders for SIMATIC BATCH: • Process cell folder • Unit folder • Equipment module folder

Configuration in the ES
SIMATIC BATCH 5-32 A5E00495287-01
Technological significance of the Batch hierarchy folders The three Batch hierarchy folders have the following defined technological significance according to the ANSI/ISA S88.01 (1995) standard:
Batch hierarchy folder
Level Meaning
Process cell Level 2 Within a project, only one process cell can currently be created. A recipe can therefore only access phases of this process cell. Examples of the process cell level might be polymerization plant, dyehouse, colored pigment plant, or multipurpose plant.
Unit Level 3 Several units can be defined in one process cell. These units can be used within a recipe. Examples of units might be neutralization, extraction, distillation, or preparation.
Equipment module Level 4 Several equipment modules such as a dosing or bottling machine can be defined in a unit. Equipment phases such as heating, cooling, ventilating, emptying can be created for the equipment modules.
Included in the naming scheme (yes/no) The name of the project exists once and is not included in the naming scheme for tags in WinCC. All other folders can be included in the naming scheme during configuration.
Note:
By default, inclusion in the naming scheme is deactivated. This means that no hierarchy folder is included in the name.
Storage of the blocks The charts with the corresponding SFC type instances or BATCH interface blocks can be stored in the appropriate Batch hierarchy folders according to their technological significance. Only TAG_COLL can be stored in the process cell folder. The IUNIT_BLOCKs along with EOPs, EPHs and TAG_COLL blocks can be stored in folders of the "Unit" object type. EPH blocks and TAG_COLL blocks can be stored in folders of the "Equipment module" object type. The IEPAR blocks should also be saved in the Batch hierarchy folder.
The charts with the function blocks (valves, controllers etc.) and sequential controls (SFC) required for the automation task can also be stored in these BATCH hierarchy folders. You can also extend the structure specified by SIMATIC BATCH for the general function blocks using neutral hierarchy folders so that you produce the ideal plant structure for your requirements.

Configuration in the ES
SIMATIC BATCH A5E00495287-01 5-33
Example:

Configuration in the ES
SIMATIC BATCH 5-34 A5E00495287-01
5.5.2 Extending the plant hierarchy by adding neutral folders
Neutral folders As already mentioned, the three-stage hierarchy for SIMATIC BATCH can be extended by adding neutral folders to improve the structuring of the project, for example to divide units into groups. The neutral folders can be created at any level. The total number of possible levels (batch hierarchy levels, levels with neutral folders) is limited to eight.
Neutral folders can, for example, be inserted above the "Unit" level. This level can then be used, for example, as the area level. A further level could, for example, be inserted below the "Equipment module" level. This level can then serve as a control module level.
Note:
No BATCH interface blocks (or EPAR blocks) should be located in the charts of neutral folders.
Example

Configuration in the ES
SIMATIC BATCH A5E00495287-01 5-35
Levels in the Example:
Process cell: CPP = Crop protection plant
Area: Subcells, production, tanks
Unit In the production area: V510, V520, V530, V540
Equipment module In the GF area: GFE, Dosing1, Heating, M-Transfer, Agitation
Control module: P020, P021, P022, T390, Y400, Y405
Batch allocations of the levels in the example:
Process cell: Data types/phase types, unit classes, units of measure
Area: None (not relevant for batches)
Areas are displayed during recipe creation as a filter criterion for unit allocation.
Unit Units and possibly equipment phases Equipment module Equipment phases Control module None (not relevant for batches)

Configuration in the ES
SIMATIC BATCH 5-36 A5E00495287-01
5.5.3 Relationship between plant hierarchy, blocks and recipes
Introduction For recipe creation and processing, the process cell and unit levels must exist at least once. Whether or not you require the equipment module level depends on how you define the equipment procedural elements.
Relationship between hierarchy folders, block instances and recipe elements for a hierarchical recipe:

Configuration in the ES
SIMATIC BATCH A5E00495287-01 5-37
Legend:
Batch hierarchy folder of a process cell
• Process cell
• Unit
• Equipment module
• Neutral folder
Block instances
IEOP Equipment operation interface IEPH Equipment phase interface IUNIT_BLOCK Unit status and allocation interface TAG_COLL Collection of process values
Recipe elements
RP Recipe procedure RUP Recipe unit procedure ROP Recipe operation RPH Recipe phase
5.5.4 Interface to the equipment phase (CFC charts)
5.5.4.1 Introduction
Interface to the equipment phase In SIMATIC BATCH, each terminal step (recipe phase) of a control recipe communicates during runtime with a programmable controller equipment phase that implements the required phase of the recipe phase. Both setpoints and process values as well as the current status of the equipment phase or control commands of the recipe phase are exchanged.
As of version V6.0, SIMATIC BATCH can use the new functionality of the SFC types in the engineering system (see section "Use of the SFC Types"). As an alternative and to ensure compatibility, SIMATIC BATCH continues to provide the BATCH interface blocks as a communications interface to the processing programs on the programmable controller (refer to the section "Using the BATCH interface block")

Configuration in the ES
SIMATIC BATCH 5-38 A5E00495287-01
BATCH interface blocks - up to SIMATIC BATCH V6.0 In the versions of SIMATIC BATCH lower than V6.0, communication between SIMATIC BATCH and the equipment phases on the programmable controller is implemented using interface blocks (IEPH, IEOP and IEPAR_xxx). These blocks are implemented as CFC blocks and are installed during the SIMATIC BATCH setup. They are interconnected with the appropriate inputs and outputs of the control block and technological blocks of the equipment phase in CFC charts.
SFC types – use as of SIMATIC BATCH V6.0 As of SIMATIC BATCH V6.0, there is a merging of interface blocks and equipment phases using the standard tools of the SFC. An SFC type (= BATCH type block) with parameters is created for each equipment phase type in the SFC chart. Each BATCH type block is displayed in the "Other Blocks" block library or the library of the family assigned to the SFC type (for example, Batch) of the CFC and can be easily inserted into the CFC chart there.
Storage in the plant hierarchy The BATCH interface blocks and BATCH type blocks are stored in the CFC charts according to their function in the corresponding hierarchy folders in the Plant view in the SIMATIC Manager.
5.5.4.2 Use of the BATCH interface blocks
Functions Using the BATCH interface blocks along with SIMATIC BATCH makes the following functions possible:
• Controlling the procedure: The IEPH/IEOP blocks are used for this purpose. These provide the commands (for example start or put on hold) of the recipe steps from the batch control to the processing blocks (for example,. SFC external view or user blocks). The processing blocks report their current statuses back to the batch control.
• Assigning and releasing a unit via a running control recipe: The IUNIT_BLOCK blocks are used for this purpose.
• Collection of process values to be used in transition conditions of third-party units and for archiving and logging. The TAG_COLL blocks are used for this purpose.
• Transferring setpoint and actual values: The IEPAR blocks are used for this purpose. The batch control writes the recipe parameters (setpoints) for the processing blocks into these blocks via the IEPH/IEOP blocks. The processing blocks write the result data (actual values) into the IEPAR blocks so that they can be stored as Batch data by the batch control once again using the IEPH/IEOP blocks. The IEPAR blocks linked to the IEPH/IEOP blocks are also used to form transition conditions for the local unit.

Configuration in the ES
SIMATIC BATCH A5E00495287-01 5-39
Overview of the BATCH interface blocks Block Application
IEPH Control of simple processes IEOP Control of complex processes IUNIT_BLOCK Management of unit allocation TAG_COLL Collecting of process values for archiving, logging and forming transitionsIEPAR_DINT Parameter block for the data type double integer IEPAR_BOOL Parameter block for the data type Boolean (binary) IEPAR_REAL Parameter block for the data type real (floating point) IEPAR_STR Parameter block for the data type string (text) IEPAR_PI Parameter block for the data type process input IEPAR_PO Parameter block for the data type process output IEPAR_ENUM Parameter block for the data type enumeration type (user-defined
enumeration type)
Online help on the BATCH interface blocks You will find a detailed description of the function, operation and input/output parameters for each individual BATCH interface block in the context-sensitive online help for the block in CFC.
With a BATCH interface block selected in the CFC chart, simply press the F1 key to open the context-sensitive help.

Configuration in the ES
SIMATIC BATCH 5-40 A5E00495287-01
5.5.4.3 Using SFC types
Functions Using the SFC types (SFC standard) along with SIMATIC BATCH makes the following functions possible:
Controlling the procedure: Here, you use the SFC type instances in the CFC charts (of the type EPH/EOP). These provide the commands (for example start or put on hold) of the recipe steps from the batch control to the internal processing. The status of the internal processing and the process values are reported back to batch control so that they can be stored by batch control as Batch data.
Supplementary Use of the BATCH interface block IUNIT_BLOCK The following function continues to use a BATCH interface block even after converting to SFC types:
Assigning and releasing a unit via a running control recipe: The IUNIT_BLOCK interface blocks are used for this purpose.
Supplementary Use of the TAG_COLL Function Block Even when using the SFC types, a standard FB is used for the following function:
Collection of process values to be used in transition conditions and for archiving and logging. TAG_COLL blocks are used for this purpose.

Configuration in the ES
SIMATIC BATCH A5E00495287-01 5-41
5.6 Creating the plant hierarchy
5.6.1 Use of the BATCH hierarchy folder
5.6.1.1 "Process cell" hierarchy folder
Introduction Below the project you create the SIMATIC BATCH hierarchy folder of the object type "Process cell". You set the object type in the properties of the hierarchy folder in the "S88 type definition" tab.
Definition of a process cell A process cell is a logical group of facilities/devices (containers, actuators, sensors, etc.) for creating one or more batches. The process cell determines the spectrum of logical control options for a set of process equipment within a plant area.
Rules for the "Process cell" hierarchy folder • Within a project, only one "Process cell" hierarchy folder can be created.
Examples of this might be a polymerization plant, dyehouse, multipurpose plant.
• When creating a master recipe in SIMATIC BATCH, the data of this process cell are made available. This means that all the units and equipment phases required in a master recipe must be created below the process cell folder.
Multiproject Each project of a multiproject contains the same "Process cell" object. Below this, you can configure different units in the individual projects.

Configuration in the ES
SIMATIC BATCH 5-42 A5E00495287-01
5.6.1.2 "Unit" hierarchy folder
Introduction Below the process cell, you create the hierarchy folder with the object type "Unit".
• If the unit folder is created directly below the process cell folder, the "Unit" objects type is assigned automatically by the system when you create it.
• If the unit folder is not created directly below the process cell folder but is inserted below a neutral folder, the inserted folder is automatically assumed to be a neutral folder. You can then set the "Unit" object type afterwards in the properties of the hierarchy folder in the "S88 type definition" tab.
"Unit" hierarchy folder Several units can be defined in one process cell. Several units can be used within a master recipe. Examples at this level could be the division of a process cell into neutralization, extraction, distillation, or preparation.
Predecessor/successor In the object properties of the "Unit" hierarchy folder, a "Unit" can be selected as the successor unit from the same project or a different project. If this successor is located in another project, it is displayed in the current project as a hierarchy folder with a link.
You can open this dialog from the object properties dialog of the hierarchy folder Unit > "S88 type definition" tab > Predecessor/successor button.
Managing unit allocation with the IUNIT_BLOCK To map the unit on the programmable controller, there is exactly one instance of the BATCH interface block UNIT_BLOCK in one of the charts of the "Unit" hierarchy folder. The batch control enters the batch ID and the batch name in the IUNIT_BLOCK block so that the allocation of units can be managed.
With suitable user configuration on the PLC, IUNIT_BLOCK can be used to prevent the use of a unit by batch control (input BA_EN: Batch enable).

Configuration in the ES
SIMATIC BATCH A5E00495287-01 5-43
5.6.1.3 "Equipment module" hierarchy folder
Introduction Below the unit, you create the hierarchy folder of the "equipment module" object type.
• If the equipment folder is created directly below the unit folder, the "Equipment module" object type is assigned automatically by the system when it is created.
• If the equipment folder is not created directly below the unit folder but is inserted below a neutral folder, the inserted folder is automatically assumed to be a neutral folder. You can then set the "Equipment module" object type afterwards in the properties of the hierarchy folder in the "S88 type definition" tab.
"Equipment module" hierarchy folder Several equipment modules such as a dosing or bottling machine can be defined in a unit. Equipment phases such as heating, cooling, ventilating or emptying can be created for the equipment modules.
5.6.2 Editing the plant hierarchy
5.6.2.1 How to create the plant hierarchy
Information on creating and setting the plant hierarchy For detailed information on creating, modifying and setting the properties of the plant hierarchy, refer to the manual Process Control System PCS 7; Engineering System.
Only the additional and special settings for the batch configuration are described in the following.
Special settings for Batch configuration The following additional settings must be made or checked for batch configuration:
• Specifying the basic settings for the plant hierarchy
• Assigning the object type "Process cell", "Unit" or "Equipment phase" to hierarchy folders
• Assigning a unit class to a unit
• Executable functions in a single project
• Executable functions in a multiproject
• Inserting CFC charts with EPHs/EOPs

Configuration in the ES
SIMATIC BATCH 5-44 A5E00495287-01
5.6.2.2 Specifying the basic settings for the plant hierarchy
Necessary Settings The following basic settings are necessary for the plant hierarchy of the current project:
• Number of hierarchy levels
• Whether or not the hierarchy names of an entire level will be included in the tag names (in WinCC) (HID = higher-level designation).
Follow the steps in the SIMATIC Manager outlined below: Once you have created the first hierarchy folder, you can make the basic settings.
1. Select any hierarchy folder in the Plant view.
2. Select the menu command Options > Plant hierarchy > Settings.
3. Make the following settings in the "Customize plant hierarchy" dialog box:
- Enter the maximum number of possible hierarchy levels that can occur in the project. For the BATCH hierarchy, only three hierarchy levels are relevant. If you decide to use neutral folders, up to eight hierarchy levels are possible.
- Using the "Include in designation" check box, you can decide whether the hierarchy folder name of any particular level will be included in the higher level designation (HID).
You can decide whether the name of an individual hierarchy folder will be included in the HID in the operator control and monitoring attributes of each individual hierarchy folder (menu command Edit > Object properties > Control and Monitoring Attributes").
4. Confirm with "OK".

Configuration in the ES
SIMATIC BATCH A5E00495287-01 5-45
5.6.2.3 Assigning the "Process cell", "Unit" or "Equipment phase" object type
To identify the BATCH hierarchy, each hierarchy folder is explicitly assigned the object type "Process cell", "Unit", or "Equipment phase". Depending on the object type, other BATCH attributes can then be set.
After creating a new hierarchy folder, one of the object types "process cell", "unit", "equipment phase" or "neutral" is automatically assigned depending on the position. You can change the object type assigned to a hierarchy folder as follows:
Follow the steps in the SIMATIC Manager outlined below: 1. Select the hierarchy folder in the Plant view.
2. Select the menu command Edit > Object properties.
3. Change to the "S88 type definition" tab.
4. Set the required type (process cell, unit, or equipment module) of the hierarchy folder for the "Object Type". If you select the "<neutral>" object type, the BATCH hierarchy will be deactivated again for this folder.
5. Confirm with "OK".
Result: The graphic display of the hierarchy folder matches the selected object type.
Neutral folders The "<neutral>" object type deactivates the BATCH hierarchy for the "process cell" object. The lower-level BATCH hierarchy folders retain their object type but are no longer relevant for the SIMATIC BATCH configuration. In "Object type", the nested hierarchy folders no longer relevant for SIMATIC BATCH are displayed in round brackets, for example: (unit).

Configuration in the ES
SIMATIC BATCH 5-46 A5E00495287-01
5.6.2.4 Specifying predecessors for a unit
Introduction In the object properties of the "Unit" hierarchy folder, a "Unit" can be selected as the successor unit from the same project or a different project. This prevents units that have no connection in the plant structure from being selected during recipe creation.
You can also enter several units as predecessor, for example, as a preliminary selection set in order to first select a required predecessor in a master recipe.
You can also specify the predecessor of a unit attributed as a successor as the next successor.
Follow the steps in the SIMATIC Manager outlined below: 1. Select a "unit" hierarchy folder in the Plant view.
2. Select the menu command Edit > Object properties.
3. Change to the "S88 type definition" tab.
4. Select the "Successor/Predecessor" button.
Result: All available units are displayed here.
5. Assign the successor for the current unit: To do this, select the desired
successor in the "Available Units" window and click .
Result: The units are moved to the "Successor" window and has the "Successor" attribute.
6. Confirm the settings with "OK".
Result: A successor is inserted as a hierarchy folder with a link in the current project if it is not already contained in this project or another project in the multiproject.
Removing a successor You can remove the successor attribute by selecting the unit in the "Successor"
window and clicking on the button to move it back to the "Available units" window. If a hierarchy folder with a link has been created for this successor (when the predecessor and successor are in different projects of the multiproject), it remains in the project and must be manually removed.

Configuration in the ES
SIMATIC BATCH A5E00495287-01 5-47
Predecessor If this is a successor for the selected unit, the hierarchy folder for the immediate predecessor is shown in the "Predecessor" window. Similar to the successor, there can be several predecessors.
Working in the multiproject
Note: Ensure that the hierarchy folders of the "Process cell" object type have the same name in the individual projects of the multiproject.
5.6.2.5 Rules for inserting CFC charts
Rules for storing CFC charts in the plant hierarchy The process cell model is created in the SIMATIC Manager based on the CFC charts and the configured plant hierarchy. When inserting CFC charts in the plant hierarchy, note the following:
• The charts with the corresponding SFC type instances or BATCH interface blocks can be stored in the appropriate Batch hierarchy folders according to their technological significance. Only TAG_COLL can be stored in the process cell folder. The IUNIT_BLOCK along with EOPs, EPHs and TAG_COLL blocks can be stored in folders of the "Unit" object type. EPHs and TAG_COLLs can be stored in folders of the "Equipment module" object type.
• The CFC charts with the function blocks (valves, controllers etc.) and sequential controls (SFC) required for the automation task can also be stored in these BATCH hierarchy folders.
• You can also extend the hierarchy specified by SIMATIC BATCH for the general function blocks using neutral hierarchy folders so that you produce the ideal plant structure for your requirements.

Configuration in the ES
SIMATIC BATCH 5-48 A5E00495287-01
Example:

Configuration in the ES
SIMATIC BATCH A5E00495287-01 5-49
5.7 Inserting BATCH interface blocks in CFC charts
5.7.1 Introduction
You drag the BATCH interface blocks from the library PCS 7 Library > SIMATIC BATCH Blocks to the CFC chart.
Engineering in CFC charts The BATCH interface blocks are inserted in the CFC charts for the following engineering tasks:
• Define units. A CFC chart is created for each unit and contains an instance of the IUNIT_BLOCK with assigned parameter values.
• Linking process blocks with SIMATIC BATCH A uniform interface is created for each equipment phase or operation. This is achieved with an IEPH or IEOP block. This is inserted in the SFC chart along with the corresponding IEPAR_xxx parameter blocks and the processing block ( using the SFC external view or user block). The control outputs QSTART, QHOLD, QABORT, QTERM, QRESET of the IEPH/IEOP block are interconnected with the corresponding inputs of the processing block (using the SFC external view or user block).
• Collecting process values together to form transition conditions and defining measured variables For IEPARs that will be used in transition conditions in the BATCH Recipe Editor and are not available as IEPAR in the IEPH, the process values can be collected. Process tags can also be included as parameters to be used in the batch measured value acquisition. Alternatively, the measured value acquisition can also be specified in the type parameters of the batch types (phase and operation types).

Configuration in the ES
SIMATIC BATCH 5-50 A5E00495287-01
5.7.2 Rules for the IEPH and IEOP interface blocks
Rules for interconnection in CFC charts • The IEPH, IEOP interface blocks for controlling the process must be inserted in
sequences before the processing block in the CFC chart.
• The IEPH block is used for a recipe step of the type RPH (recipe phase). The IEOP block is used for a recipe step of the type ROP (recipe operation).
• To pass control commands from SIMATIC BATCH to the SFC, the following and connections between IEPH, IEOP and SFC external view must be configured:
IEPH/IEOP SFC external view
QBA_EN (OUT) BA_EN (IN) VSTEP_NO (OUT) STEP_NO (IN) VBA_ID (OUT) BA_ID (IN) VBA_NAME (OUT) BA_NA (IN) Q_OCCUPI (OUT) OCCUPIED (IN) QSTART (OUT) START (IN) QHOLD (OUT) HOLD (IN) QSTOP (OUT) STOP (IN) QABORT (OUT) ABORT (IN) QRESET (OUT) RESET (IN) QTERM (OUT) COMPLETE (IN) QCONT (OUT) CONT (IN)
• For continuous operation of the equipment procedural element (CONTINUOUS mode), the following conditions must be satisfied for the SFC:
- ENASTART = 1
- SELFCOMP = 0
• The equipment procedural element must return the actual status to SIMATIC BATCH. This requires the following interconnection:
SFC external view IEPH/IEOP
BA_STATE (OUT) USTAT_L (IN)

Configuration in the ES
SIMATIC BATCH A5E00495287-01 5-51
• The underlying parameter blocks (IEPAR_xxx) must be connected at the EPE_CONN output of the IEPH/IEOP blocks. The following parameter types are possible: IEPAR_REAL Floating point
IEPAR_DINT Integer
IEPAR_BOOL Binary value
IEPAR_PI Input material
IEPAR_PO Output materials
IEPAR_STR String
IEPAR_ENUM Enumeration
With the IEPAR_ENUM enumeration time, the data type name is specified at the "ENUM" block I/O. In the batch types, the values are assigned to this data type (for example 1 = ON / 2 = OFF etc.).
• Exactly one IEPAR block for the required data type is necessary for each parameter (setpoint/process value) of an IEOP/IEPH.
• The phase/operation type name must be specified in each IEPH/IEOP block.
• In all IEPAR blocks (apart from the Bool and Enum type) the lower and upper limit value and the default setpoint must be specified. The default value must be within the limits.

Configuration in the ES
SIMATIC BATCH 5-52 A5E00495287-01
Example

Configuration in the ES
SIMATIC BATCH A5E00495287-01 5-53
Rules for supplying the equipment procedural elements with Batch data Equipment procedural elements controlled by SIMATIC BATCH must be supplied with the Batch data. The faceplates on the PCS 7 OS then indicate whether this equipment procedural element is being used by SIMATIC BATCH and which batch is running. The batch name and the batch ID are included in the messages to the PCS 7 OS.
To allow this, the five following interconnections must be configured:
IEPH/IEOP Automation function
for example SFC (external view), MEAS_MON, MOTOR...
QBA_EN BA_EN QOCCUPI OCCUPIED VBA_ID BA_ID VBA_NAME BA_NA VSTEP_NO STEP_NO

Configuration in the ES
SIMATIC BATCH 5-54 A5E00495287-01
Example Example of the interconnection between IEPH, an IEPAR_REAL, a MOTOR block and an MEAS_MON block:

Configuration in the ES
SIMATIC BATCH A5E00495287-01 5-55
Rules for control strategies with IEPH, IEOP In the CFC chart, an IEPAR_ENUM must be assigned to the BATCH interface block IEPH, IEOP to allow transfer of the control strategy number. The user data type, in this case the control strategy parameter name, must be specified at the "ENUM" block I/O.
How configuration continues is described in the section "Specifying Control Strategies for a Type".
5.7.3 Rules for the IUNIT_BLOCK interface block
Rules for interconnection in CFC charts • To map the unit on the PLC, there must be exactly one instance of the
UNIT_BLOCK in one of the charts of the "Unit" hierarchy folder.
• The block name must be entered. There are no other settings or interconnections that are absolutely necessary with the IUNIT_BLOCK.
• At the "UNIT_NAME" input of the IUNIT_Block, a unit name can be specified that differs from the unit name in the plant hierarchy. This unit name is then used in the remaining SIMATIC BATCH configuration.
Example

Configuration in the ES
SIMATIC BATCH 5-56 A5E00495287-01
5.7.4 Rules for the TAG_COLL interface block
Rules for interconnection in CFC charts • If process values of IEPAR blocks are queried in transitions and these are not
available as IEPAR_xxx in the IEPH or IEOP, a TAG_COLL must be inserted in the CFC chart. This is, for example, the case when values of other units are queried.
• The parameter blocks (IEPAR_xxx) must be connected to the EPE_CONN output of the TAG_COLL block.
• A process tag type name must be specified for each TAG_COLL.
Example

Configuration in the ES
SIMATIC BATCH A5E00495287-01 5-57
5.8 Creating and inserting SFC types in CFC charts
5.8.1 How to work with SFC types
Note:
You create SFC types and their instances in the CFC charts for SIMATIC BATCH using SFC/CFC standard tools. SIMATIC BATCH does not need to be installed!
Configuring an SFC instance Below, you will find a recommended order for creating an SFC type (equipment phase) and an instance in the CFC chart.
Basic procedure In the SFC, you create the following SFC types for SIMATIC BATCH:
• EOP (equipment operation)
• EPH (equipment phase)
The type (EOP or EPH) and the type name are specified for the SFC type. This creates the interface to SIMATIC BATCH.
The following can be created as characteristics of the SFC type:
• The control strategies of the equipment operation/phase
• The setpoints (parameters) of the equipment operation/phase
The process values of the equipment operation/phase are derived from the setpoints.
SFC types created in this way (= BATCH type blocks) are stored in the chart folder.
In the CFC, these BATCH type blocks are available in the "Other Blocks" block library or the library of the family assigned to the SFC type (for example, Batch) and can be interconnected in the CFC chart using drag-and-drop.

Configuration in the ES
SIMATIC BATCH 5-58 A5E00495287-01
5.8.2 Creating a new SFC type
Follow the steps in the SIMATIC Manager outlined below (Component view) 1. Select the "S7 Program" object in the Component view.
2. Select the menu command Insert > Insert new object > SFC Type.
3. Select the new "SFC Type" object: .
4. Select the menu command Edit > Object properties.
5. The "Properties SFC Type" dialog box opens.
- Under Name, change the phase/operation tied name (batch type).
- You can also enter the required number for the FB number and the name of the block library for the family.
- Change to the "Options" tab.
- Under Category, set the version "EOP" or "EPH" and whether this operation type/phase type is allowed as an operator instruction.
- Under Control strategies, all control strategies configured for the SFC type are listed. You can select the control strategies of the SFC type to be passed on to the SFC instances.
Note:
The "EOP" or "EPH" setting is necessary to generate the type description. Only these SFC types are read in the BATCH configuration dialog for the process cell (batch types)!

Configuration in the ES
SIMATIC BATCH A5E00495287-01 5-59
6. Select the menu command Edit > Open object.
Result: SFC opens with the new SFC type.
7. Here you can use the standard SFC tools to edit the sequential control of the equipment operation/phase.
8. Change to the characteristics view. Select the menu command Edit >
Characteristics or press
9. Enter your setpoints and control strategies here.
Note:
An enumeration data type can be assigned in the "Enumeration" column for the INT and DINT data types. This is stored as the system attribute "S7_enum" on the interface I/Os.
No text can be entered in the "Enumeration" column. The enumeration available for selection in the list box are those previously created in the SIMATIC Manager under the "Shared Declaration" object.
The enumerations are then available for operator control and monitoring of SFC instances in SIMATIC BATCH.

Configuration in the ES
SIMATIC BATCH 5-60 A5E00495287-01
Further references For more detailed information on programming a sequential control and defining the SFC characteristics, refer to the online help of SFC (<F1> or menu command Help > Contents).
5.8.3 Specifying the parameters
Features You create setpoints (parameters) and control strategies that are relevant for SIMATIC BATCH in the characteristics view in SFC:

Configuration in the ES
SIMATIC BATCH A5E00495287-01 5-61
Overview of the relevant parameters The following parameters must be set for SIMATIC BATCH: Parameter Where to edit Meaning
Setpoint Under "setpoints" characteristic
Parameters of the equipment operation/phase; you can assign predefined control strategies
Input material/ Output materials
Under "setpoints" characteristic: data type PI/PO
Input material / output material for the equipment operation / phase; you can assign predefined control strategies
Control strategy
Under the "Control strategies" characteristic
Control strategy name
Follow the steps outlined below in SFC:
1. Select the new "SFC Type" object: .
2. Select the menu command Edit > Open object.
SFC opens with the new SFC type.
3. Change to the characteristics view of SFC. Select the menu command Edit >
Characteristics or press .
The characteristics view of the SFC type opens.
4. Here, you edit all the setpoints and control strategies relevant for SIMATIC BATCH by clicking on the characteristic in the left column, for example on "Setpoints".
On the right, you can now set the parameter with all the attributes relevant for SIMATIC BATCH.
To assign setpoints for a control strategy: 1. Select the "Control strategy" in the characteristics view.
All setpoints of the SFC type are displayed in a separate table column on the right.
2. Active the check box here to select the setpoint to which control strategy should be assigned.

Configuration in the ES
SIMATIC BATCH 5-62 A5E00495287-01
5.8.4 Inserting an instance of the SFC type in the CFC chart
Introduction After creating the SFC type and storing it, the SFC type can now be dragged into the CFC chart from the Other Blocks library or the family assigned to the SFC type (for example, Batch). At the same time, the type FB is copied to the project or if it already exists, it is updated. A DB is created and therefore an instance of the SFC type. Remember the following rules:
Rules • The SFC types in a chart container are displayed in CFC in the catalogs under
"Other Blocks" or in the family assigned to the SFC type (for example, Batch).
• If you create an instance of the SFC type, the SFC type (including the FB) is copied to the project (chart container).
• After placing the SFC instance in a CFC chart, it can be interconnected.
• The SFC instance is not displayed in the chart container (only the CFC chart).
• The SFC instance is displayed in the CFC chart like a block with an interface.
• If you select an instance of the type, you can open and edit it within the CFC chart using the "Open" shortcut menu.
• The interconnection is possible with the control module level (CMs), the interlock logic and batch control.
• In the SFC, in addition to the name of the operation/phase type parameter, an I/O name must be specified in the characteristics view for setpoints. One setpoint results in several block I/Os:
I/O name Meaning
<name> (IN) Setpoint from SIMATIC BATCH or PCS 7 OS <name>_Q (OUT) Setpoint (valid value for SFC) <name>_AI (IN) Process value return input for process value <name>_ AO (OUT) Process value for SIMATIC BATCH and PCS 7 OS <name>_M (IN) Material code setpoint from SIMATIC BATCH* <name>_MQ (OUT) Material code (valid MatCode for SFC)* <name>_MAI (IN) Material code process value return input* <name>_MAO (OUT) Material code process value for PCS 7 OS* <name>_B (IN) Reserved for batch ID, not currently used <name>_BQ (OUT) Reserved for batch ID, not currently used <name>_BAI (IN) Reserved for batch ID, not currently used <name>_BAO (OUT) Reserved for batch ID, not currently used
* Only for PI or PO data types

Configuration in the ES
SIMATIC BATCH A5E00495287-01 5-63
• The following block I/Os exist for the control strategy:
I/O name Meaning
CS (IN) Control strategy from SIMATIC BATCH or PCS 7 OS QCS (OUT) Control strategy (valid control strategy for SFC)
Example
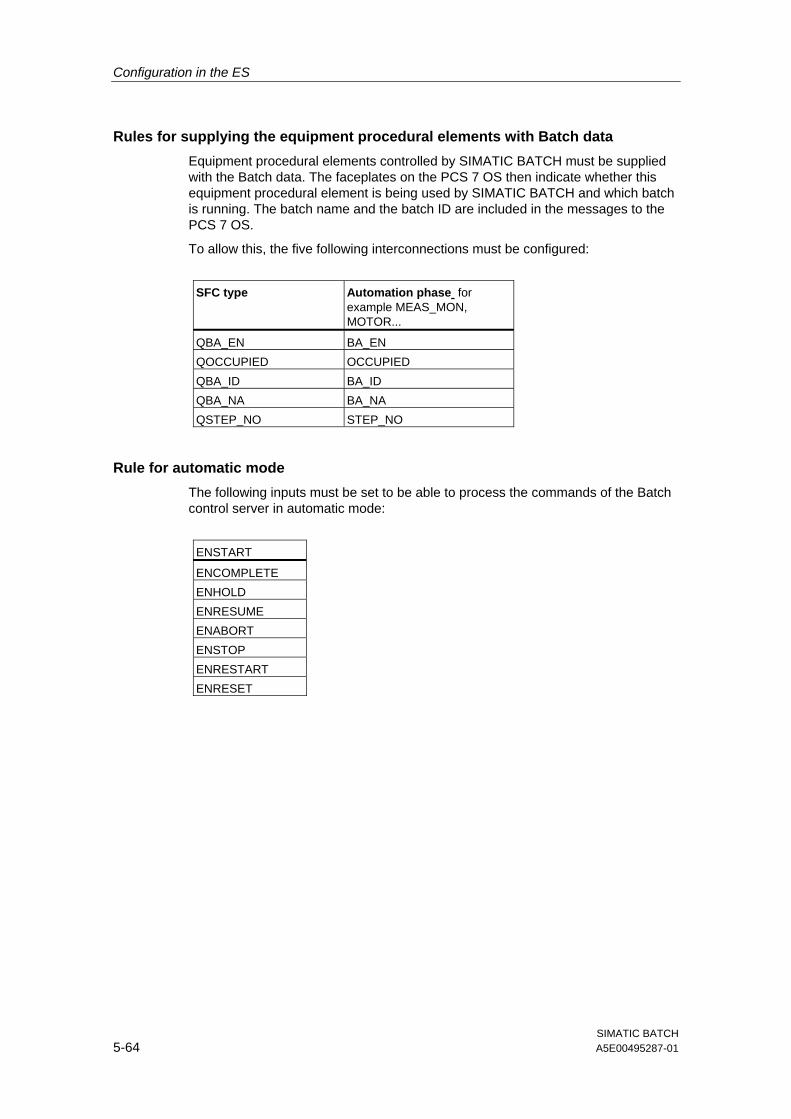
Configuration in the ES
SIMATIC BATCH 5-64 A5E00495287-01
Rules for supplying the equipment procedural elements with Batch data Equipment procedural elements controlled by SIMATIC BATCH must be supplied with the Batch data. The faceplates on the PCS 7 OS then indicate whether this equipment procedural element is being used by SIMATIC BATCH and which batch is running. The batch name and the batch ID are included in the messages to the PCS 7 OS.
To allow this, the five following interconnections must be configured:
SFC type Automation phase for
example MEAS_MON, MOTOR...
QBA_EN BA_EN QOCCUPIED OCCUPIED QBA_ID BA_ID QBA_NA BA_NA QSTEP_NO STEP_NO
Rule for automatic mode The following inputs must be set to be able to process the commands of the Batch control server in automatic mode:
ENSTART
ENCOMPLETE ENHOLD ENRESUME ENABORT ENSTOP ENRESTART ENRESET

Configuration in the ES
SIMATIC BATCH A5E00495287-01 5-65
5.8.5 Displaying the number of units
If you wish to know how many available units (IUNIT_BLOCK instances) are in your project, for example, to be able to order the required authorization for SIMATIC BATCH, open the corresponding log in the BATCH configuration dialog.
Procedure Follow the steps in the SIMATIC Manager outlined below:
1. Open the BATCH configuration dialog with the Options > SIMATIC BATCH menu command.
2. Select the folder of your Batch process cell (process cell folder) in the process data window.
3. Click on "Display" in the "Protocol" area.
Result The log window is displayed with the data. The number of configured and available units is also displayed.
Additional information The SIMATIC BATCH product

Configuration in the ES
SIMATIC BATCH 5-66 A5E00495287-01
5.9 Creating and inserting user process tag types in CFC charts
5.9.1 Introduction
Introduction to creating and inserting user process tag types in CFC charts There are two ways to collect measured values, for example to form transition conditions:
• Using the BATCH interface block TAG_COLL (as in BATCH flexible V5.x)
• Using the standard function block TAG_COLL, given the name TAG_COLLECT below to distinguish the two (new in SIMATIC BATCH as of V6.0)
Individual measured values are created in the interface or standard function block. The process tag types are then generated in the BATCH configuration dialog within the context of the batch types ("Generate" button) from the TAG_COLL/TAG_COLLECT blocks.
Using the TAG_COLL BATCH interface block When using BATCH interface blocks, the TAG_COLL block is used to collect process values to form transition conditions and for archiving and logging measured values: Description -> see section Rules for the TAG_COLL interface block), The process tag types that are then generated can be further processed and modified in the BATCH configuration dialog.
Using the TAG_COLLECT function block If you configure with SFC types it is advisable to configure a TAG_COLLECT standard function block to collect process values. The process tag types that are then generated are read-only in the BATCH configuration dialog. Modifications to the process tag type can only be made in the function block. These are then adopted in any existing instances. After modification, the batch types and the process tag types must be generated again.
Note:
Points to note:
• To allow a TAG_COLLECT FB/FC type to be read into the BATCH configuration dialog (generated) for the process cell, an instance of the TAG_COLLECT must have been created at least once in the CFC chart.
• FB types are unique only within an S7 program or a CPU. For Batch configuration, however, the uniqueness throughout the entire project or the multiproject must be ensured.

Configuration in the ES
SIMATIC BATCH A5E00495287-01 5-67
5.9.2 Option 1: Create new function block
There are two ways of creating process tag types:
• Option 1: A new FB is created immediately.
• Option 2: A new CFC chart is created and then compiled as a block.
Option 1: Creating process tag types immediately as the FB type TAG_COLLECT 1. In the Component view of the SIMATIC Manager, create a new function block
in an S7 program or a block folder by selecting the menu command Insert > Insert new object > Function Block.
2. Select the function block and select the menu command Edit > Open object.
3. Here, you can edit all the values that will be collected as measured values as input parameters.
Note:
Use only the data types permitted with SIMATIC BATCH:
Bool, Int, Dint and Real.
4. Assign the parameters the following attributes:
- If required, S7_check = true for check and "S7_unit = Unit" (unit corresponds to the name for the unit of measure).
- S7_edit = para for display and change in the Process Object view.
- S7_measval = true for archiving without automatic assignment of an archive tag
or optionally
- S7_archive = long-term or short-term for archiving with automatic assignment of an archive tag.
5. Select the function block and select the menu command Edit > Object properties.
6. Assign a symbolic name to the FB.
7. Go to the "Attributes" tab in the open properties dialog of the function block.

Configuration in the ES
SIMATIC BATCH 5-68 A5E00495287-01
8. Set the attribute "S7_tagcollect" (process tag) to "true" and the attribute "s7_m_c" to "true" for automatic assignment of an archive tag. Only then will the archiving parameters be sent to the PCS 7 OS and become available for operator control and monitoring.
9. Apply the attributes with "OK".
10. Open the CFC chart and insert the function block from the "S7 Program" folder into a CFC chart.
Result: The TAG_COLLECT FB type appears in the "Other Blocks" library or the library of the family assigned to the FB (for example, Batch) and can be immediately used for configuring additional process tag types.
Note:
The FB type TAG_COLLECT must be stored in the library, for example "Other Blocks" so that the measuring point types created in this way can be generated in the BATCH configuration dialog.
11. Open the BATCH configuration dialog with the Options > SIMATIC BATCH menu command.
12. Select the "Batch types" object in the left window.
13. Click the "Generate" button in the area on the right.
Result: The new process tags that you have defined along with the set values (input parameters) are read in and displayed (read only).
14. Confirm all settings with OK.

Configuration in the ES
SIMATIC BATCH A5E00495287-01 5-69
Result: These process tag types are available for use as process cell references in the transitions during recipe creation. If the "S7_measval" attribute or "S7_archive" are set for the parameters and the interconnection to the WinCC archive is established for the "Process variables" assigned to the units, they can be used in the "Process tags" tab for batch logging during recipe creation.
Note:
If the attribute "S7_m_c = true" is not set for the input of the TAG_COLLECT function block, the output of the interconnected block is used if the output has the attribute "S7_m_c = true".
5.9.3 Option 2: Creating a CFC chart and compiling it as a block type
Option 2: Creating process tag types using a CFC chart.
Procedure 1. In the Component view of the SIMATIC Manager, create a new CFC chart
below a chart folder by selecting the menu command Insert > Insert new object > CFC.
2. Select the CFC chart and select the menu command Edit > Open Object.
3. Open the I/O table with View > Chart Inputs/Outputs.
4. Here, you can edit all the values that will be collected as measured values as input parameters under IN.
5. Assign the parameters the following attributes (in the dialog box "Properties - Variable" for the parameter: select with a right-click and use the shortcut menu command "Object Properties"):
- If required, S7_check = true for check and "S7_unit = Unit" (unit corresponds to the name for the unit of measure).
- S7_edit = para for display and change in the Process Object view.
- S7_measval = true for archiving without automatic assignment of an archive tag

Configuration in the ES
SIMATIC BATCH 5-70 A5E00495287-01
or optionally
- S7_archive = long-term or short-term for archiving with automatic assignment of an archive tag.
6. Confirm the settings with OK.
7. Select the menu command Chart > Compile > Chart as Block Type.
8. In the "General" tab, specify the following: FB name, symbolic name and the family (for example, BATCH)
9. Change to the "Attribute" tab.
10. Set the attribute "S7_tagcollect" (process tag) to "true" and the attribute "s7_m_c" to "true" for automatic assignment of an archive tag. Only then will the archiving parameters be sent to the PCS 7 OS and become available for operator control and monitoring.

Configuration in the ES
SIMATIC BATCH A5E00495287-01 5-71
11. Accept the setting with "OK".
Result The FB type TAG_COLLECT you have created can be used immediately for configuring other process tag types. The procedure from now on is exactly the same as in Method 1 starting at Step 9.

Configuration in the ES
SIMATIC BATCH 5-72 A5E00495287-01
5.10 Self-terminating and non-self-terminating equipment phases
5.10.1 Self-terminating equipment phases
Self-terminating phases are sequences that end with a process condition, in other words, the end of the RUN sequence independently starts the COMPLETING sequence.
Example: Dosing The RUN sequence of the "Dosing" phase ends when the dosing quantity is achieved and then independently starts the first step of the COMPLETING sequence. The phase is executed after the start command and moves through the sequences STARTING-RUN-COMPLETING-COMPLETED triggered by conditions that depend on the process and not on operator intervention or SIMATIC BATCH.
The property "self-terminating or non-self-terminating phase" can be configure at the SFC type for all instances or at all SFC instance blocks. This involves the block input contact "SELFCOMP".
SELFCOMP=1: self-terminating equipment phase

Configuration in the ES
SIMATIC BATCH A5E00495287-01 5-73
5.10.2 Non-self-terminating equipment phases
Non-self-terminating phases are sequences that are not completed by a process condition. The end of the RUN sequence is only reported (Ready_TC) so that this phase can be completed by an external command. This command can given either by the operator using the "Close" in the SFC faceplate or by SIMATIC BATCH with the "Close" command.
Example: Agitation The RUN sequence of the "Agitation" phase is started. When the agitator has reached its setpoint speed, the RUN sequence ends and the phase reports that it has completed. The "COMPLETING" step can only be started by external command from the operator or from SIMATIC BATCH.
As long as no external complete command has been issued, the phase remains in the RUN sequence (RUN status), which means that the RUN sequence is started once again. If you only want the RUN sequence to be executed once and not cyclically, you must make the following settings in the sequence properties in the "Start Condition" tab.
The "self-terminating or non-self-terminating phase" property can be configure at the SFC type for all instances or at all SFC instance blocks. This involves the block input contact "SELFCOMP".
SELFCOMP=0: non-self-terminating equipment phase

Configuration in the ES
SIMATIC BATCH 5-74 A5E00495287-01
5.11 Equipment properties and their use
5.11.1 Introduction
You had the option of statically determining the unit candidates prior to SIMATIC PCS 7 V6.1. This meant that selecting the available units in which a recipe procedure was to be executed in the recipe editor when creating a recipe. You can retain this procedure with SIMATIC PCS 7 V6.1 or later.
You now have the additional option of employing a new strategy, "Unit selection according to conditions". Specific equipment properties are demanded in the conditions, for example, the size of the unit (capacity of a silo) or the material composition of the silo shell.
Equipment properties are assigned to units in the ES configuration and requested as conditions when creating recipes. When the equipment property matches the defined condition in the recipe, the unit is offered for allocation.
Additional information • Creating equipment properties
• Assigning equipment properties to the units
• Configuring unit group
• Specifying units using conditions

Configuration in the ES
SIMATIC BATCH A5E00495287-01 5-75
5.11.2 Creating equipment properties
Requirement • The "Shared declarations" folder is created with the subfolder "Equipment
properties" in the project.
Procedure 1. Select the folder "Shared declarations". In the shortcut menu, select Insert
new object > Equipment property.
2. Name the equipment property (name and display name).
3. From the drop-down list, select the desired data type and assign it an enumeration or unit of measure. For the "Location" data type, assign the additional types "Source", "Destination" and "Via". You can find information about these types in the documentation for Route Control.
4. Complete your specifications in the dialog and confirm your entries with "OK".
Result You can now assign this equipment property to your units. If you are working in a multiproject, you can adjust your created equipment properties in the MP with the command Shared declarations > Adjust in Multiproject.
Additional information Assigning equipment properties to the units
Process Control System PCS 7; Route Control, How to Configure Locations
SIMATIC CFC for S7, Configuring Equipment Properties

Configuration in the ES
SIMATIC BATCH 5-76 A5E00495287-01
5.11.3 Assigning equipment properties to the units
Requirements • The equipment properties have been created.
• The Plant view is displayed in the SIMATIC Manager.
Procedure 1. Select the hierarchy folder of the unit to which you want to assign the
equipment properties, right-click and select the shortcut menu command Insert new object > Equipment property.
2. Select die equipment property, right-click and select the shortcut menu command Object properties.
3. Select the desired equipment property in the drop-down list of the name box. The instance is then given the same name as the original in the shared declarations.
4. In the "Value" box, enter a value for the instance of the equipment property. If your equipment property contains an enumeration, you also have the option of selecting a value for the enumeration used in a drop-down list in the "Value" box.
5. Complete your specifications in the dialog and confirm your entries with "OK".
Result The selected units are now assigned with equipment properties and values. Following the generation of the batch types, these are available for allocation conditions when creating recipes in the recipe editor.
Additional information Configuring unit group

Configuration in the ES
SIMATIC BATCH A5E00495287-01 5-77
5.11.4 Configuring unit group
If you use several units with identical equipment properties, you can assemble them into unit groups. Prior to SIMATIC PCS 7 V6.1, this group was the unit class. When you migrate older projects, these groups are given the equipment property "UnitClass".
Procedure 1. In the Component view of the SIMATIC Manager, create a new "enumeration"
object in the "Enumerations" folder under the shared declarations. Then assign the group a name, for example, Pcell Groups. Insert several "Value" objects with names, for example, Group_A, Group_B, etc.
2. Create an equipment property with an appropriate name, for example, Pcell Group. Assign this process cell group the data type "INT" or "DINT" and select the newly created enumeration from the "Enumeration" drop-down list.
3. Complete your specifications in the dialog and confirm your entries with "OK".
4. Now assign each unit to one of the created unit groups. To do this, select the hierarchy folder of the unit, right-click and select the shortcut menu command Insert new object > Equipment property.
5. Select die equipment property, right-click and select the shortcut menu command Object properties.
6. In the name box, select the newly created equipment property from the drop-down list, in our example "Pcell Group".
7. Select a process group in the "Value" box.
8. Open the configuration dialog "Configure batch process cell ...".
9. After running the "Generate batch types" function, the configured data is made available.
10. If you have configure one or more enumerations as an equipment property, you can set one of them as a group criterion for the recipe editor. Select the "Pcell" folder and select the desired process cell group for the "Unit group".
Result You have assembled several units with identical properties in a unit group. When creating the recipe, you use the unit group as a criterion for the unit allocation.
Additional information Specifying units using conditions

Configuration in the ES
SIMATIC BATCH 5-78 A5E00495287-01
5.11.5 Specifying units using conditions
In the recipe editor, you can use conditions to specify units that match the required equipment properties. When a plant is changed or expanded, the list of available units is adapted automatically without change to the recipe.
Requirement The Batch Control Center is open.
Procedure 1. Select the menu command Options > Settings > Project settings and
activate the check box "Unit selection according to conditions" in the "General" tab. You have now set this strategy as the default for new recipes or expanded recipe procedures.
2. Open a new recipe in the recipe editor. Open the "Properties of ..." dialog with the menu command Recipe> Header parameter ... and open the "Allocations" tab.
3. Select the desired recipe assignment from the list and click "Edit". If there is no recipe assignment, first click "New".
4. Click "New" in the dialog that opens. This creates a new, empty condition.
5. Click "Change" to make additional settings in the subsequent wizard. In the first step, select the desired equipment property and click "Next". In the second step, select the operator ("available" means that only that it is present, not that a value of the equipment property is evaluated). In any third step, select or enter the required value of the equipment property. In the final step, click "Finish". Using the operators, you can logically associate several conditions with queries of equipment properties.
6. Close the dialog with "OK".
Result The available units in which the recipe procedure can run are displayed in the "Allocation" tab. The unit allocation is determined by SIMATIC BATCH from the recipe phases and conditions used and cannot be edited.

Configuration in the ES
SIMATIC BATCH A5E00495287-01 5-79
5.12 Defining the type description of the process cell
5.12.1 Type description of the process cell
Introduction As the basis for creating recipes in SIMATIC BATCH, the type description of the process cell must be edited or generated and, where necessary, synchronized with the block instances of the CFC charts. The following types can be defined for creating recipes.
Type description of a process cell Type Editing Options and Results
Data types The system specifies the standard data types floating point number, integer, string, input material, output material, material (V4), and Boolean. You can also create your own data types and modify their properties.
Units of measure You can create new units of measure and change their properties. Operation types, phase types and process tag types
To allow recipe creation purely on the basis of types, types must be specified without the block instances for them existing. • Operations types: Type information for the equipment
operations (EOP) • Phase types: Type information for the equipment phases (EPH)• Process tag types: Type information of the TAG_Coll blocks Operation types and phase types can be assigned control strategy parameters.
Equipment Properties
You can create equipment properties of units and change their properties.
Configuring the type description The type description is configured in the SIMATIC Manager in the BATCH configuration dialog. How this is done depends on:
• whether single or multiproject engineering is involved
• whether you are using SFC types or BATCH interface blocks

Configuration in the ES
SIMATIC BATCH 5-80 A5E00495287-01
Batch types that depend on language
Note: Batch types that depend on the language (user data types, for example) are displayed in SIMATIC BATCH in the language with which they were created during the configuration of the type descriptions. Switching the language of the Batch application has no effect in this regard.
5.12.2 Type description in a single project
Configuring the type description You configure the type description in the BATCH configuration dialog. You can open this dialog in the Component view and in the Plant view:
• using the menu command Options > SIMATIC BATCH
• by selecting any object and then the shortcut menu command SIMATIC BATCH
BATCH configuration dialog For the type description, the "Batch types" object must be selected on the left in the BATCH configuration dialog. By expanding the object (click on "+"), you will see all the possible batch type objects. The attributes of a type object are displayed on the right of the dialog under "Properties".

Configuration in the ES
SIMATIC BATCH A5E00495287-01 5-81
Displaying errors Validation errors and warnings detected by the functions "Validation", "Compile" or "Generate" are displayed in the log field and can be visualized with the "Display" button. All errors/warnings under the selected object are always displayed.
The errors and warnings are also shown as a red or yellow lightning bolt on the object. The text for errors or warnings of individual object can be displayed by right clicking on the affected object and selecting the command Display log from the shortcut menu.
error
Warning
If errors/warnings cannot be determined, for example, after a migration, a question mark is shown on the object icon.

Configuration in the ES
SIMATIC BATCH 5-82 A5E00495287-01
5.12.3 Executable functions in a single project
Executable functions for the BATCH types in the BATCH configuration dialog
Function Selected object Description
Generate Batch types • SFC types: Operation/phase types are generated from the SFC types with the EOP/EPH IDs.
• BATCH interface blocks: Batch types (units of measure, operation/phase types, process tag types) are generated from the instances of the BATCH interface blocks.
Note: If Batch instances, SFC types or TAGCOLLECT FBs are modified, the "Generate" function must be run prior to compilation. The same applies to modifications in the PH, for example after moving or copying CFC charts.
New Phase types Operation types Process tag types
Creation of phase, operation, and process tag types under the selected area and creation of the corresponding type parameters.
Delete Data type User data type (if present) Units of measure Phase types Operation types Process tag types Equipment properties
You can delete data types, user data types, units of measure and equipment properties in the selected folder. All non-instanced objects are deleted. However, they still available in the shared declarations and will appear again during the next generation. With operation types, phase types and process tag types, you can select individual objects and delete them as long as they have not been instanced.
Edit Phase types Operation types Process tag types
Editing the attributes of the batch types and type parameters. Exception: SFC types You will find a description of editing SFC types in the section "Creating a New SFC Type".
Additional functions• Print • Import
Batch types • Print: Print all batch types of the process cell in tabular form.
• Import: Importing batch types generated with the BATCH Migrator (BFMIG) from the V4.02 database.
Additional function • Display
User data type (if present) Units of measure Phase types Operation types Process tag types Equipment properties
List of all instances that refer to this type object. Certain attributes can be selected using a filter.
Log Batch types Display of the logs of the executed "Generate" function First select the executed function in the drop-down list and then click the "Display" button.

Configuration in the ES
SIMATIC BATCH A5E00495287-01 5-83
5.12.4 Type description in a multiproject
Configuring the type description In a multiproject, the type description is configured only in the multiproject itself.
The batch types cannot be modified in any of the projects booked into the multiproject; in other words, no batch types can be edited or added.
If a project is removed for editing of the multiproject, you can specify whether or not the batch types can then be modified in this project. This applies to current batch types and every project of the multiproject (enable editing for the condition). You thus have the option of adapting (updating) your own batch types in every project to those of the multiproject.
Note:
• All projects in the multiproject have the same rights and priorities.
• Projects with Batch configurations require the creation of a Batch process cell. The batch types are managed only in the specific projects.
You configure the type description in the BATCH configuration dialog. You can open this dialog in the Component view and in the Plant view:
• using the menu command Options > SIMATIC BATCH
• by selecting the multiproject and then the shortcut menu command SIMATIC BATCH

Configuration in the ES
SIMATIC BATCH 5-84 A5E00495287-01
BATCH configuration dialog For the type description, the "Batch types" object must be selected on the left in the BATCH configuration dialog. By expanding the object (click on "+"), you will see all the possible batch type objects. The attributes of a type object are displayed on the right of the dialog under "Properties".
Displaying errors Validation errors and warnings detected by the functions "Validation", "Compile" or "Generate" are displayed in the log field and can be visualized with the "Display" button. All errors/warnings under the selected object are always displayed.
The errors and warnings are also shown as a red or yellow lightning bolt on the object. The text for errors or warnings of individual object can be displayed by right clicking on the affected object and selecting the command Display log from the shortcut menu.
error
Warning
If errors/warnings cannot be determined, for example, after a migration, a question mark is shown on the object icon.

Configuration in the ES
SIMATIC BATCH A5E00495287-01 5-85
5.12.5 Executable functions in a multiproject
Executable functions for the BATCH types in the BATCH configuration dialog
Function Selected object Description
Generate Batch types • SFC types: Operation/phase types are generated from the SFC types with the EOP/EPH IDs.
• BATCH interface blocks: Batch types (units of measure, operation/phase types, process tag types) are generated from the instances of the BATCH interface blocks.
• In multiproject engineering, this command generates the batch types from the SFC types or BATCH interface blocks of all projects of the multiproject.
Note: If Batch instances, SFC types or TAGCOLLECT FBs are modified, the "Generate" function must be run prior to compilation. The same applies to modifications in the PH, for example after moving or copying CFC charts.
Propagate Batch types The complete type description is distributed to the individual projects of the multiproject. After executing this function, you can select the projects to be involved in the propagation of the batch types in a dialog box. The type descriptions of all selected projects are then consistent.
New Phase types Operation types Process tag types
Creation of phase, operation, and process tag types under the selected area and creation of the corresponding type parameters.
Delete Data type User data type (if present) Units of measure Phase types Operation types Process tag types Equipment properties
You can delete data types, user data types, units of measure and equipment properties in the selected folder. All non-instanced objects are deleted. However, they still available in the shared declarations and will appear again during the next generation. With operation types, phase types and process tag types, you can select individual objects and delete them as long as they have not been instanced.
Edit Phase types Operation types Process tag types
Editing the attributes of the batch types and type parameters. Exception: SFC types You will find a description of editing SFC types in the section "Creating a New SFC Type".
Additional functions • Print • Import
Batch types • Print: Print all batch types of the process cell in tabular form.
• Import: Importing batch types generated with the BATCH Migrator (BFMIG) from the V4.02 database.

Configuration in the ES
SIMATIC BATCH 5-86 A5E00495287-01
Function Selected object Description
Additional function • Instances:
Display
User data type (if present) Units of measure Phase types Operation types Process tag types Equipment properties
List of all instances that refer to this type object. Certain attributes can be selected using a filter.
Log Batch types Display of "Generation" log.
5.12.6 Executable functions in a project of a multiproject
Functions available in the BATCH configuration dialog
Function Selected object Description
Additional functions • Print
Batch types Print: Print all batch types of the process cell in tabular form
Additional function • Display
User data type (if present) Units of measure Phase types Operation types Process tag types Equipment properties
List of all instances that refer to this type object. Certain attributes can be selected using a filter.
Log Batch types Display of the logs for the executed "Generate" function First select the executed function in the drop-down list and then click the "Display" button.
Update Batch types Updating of the batch types in this project (reading in the batch types of the multiproject)

Configuration in the ES
SIMATIC BATCH A5E00495287-01 5-87
5.12.7 Executable functions in a removed project
Functions in the removed project with editable batch types
Function Selected object Description
Generate Batch types • SFC types: Operation/phase types are generated from the SFC types with the EOP/EPH IDs.
• BATCH interface blocks: Batch types (units of measure, operation/phase types, process tag types) are generated from the instances of the BATCH interface blocks.
• This command generates the batch types from the SFC types or BATCH interface blocks of the project removed for editing.
Note: If Batch instances, SFC types or TAGCOLLECT FBs are modified, the "Generate" function must be run prior to compilation. The same applies to modifications in the PH, for example after moving or copying CFC charts.
New Phase types Operation types Process tag types
Creation of phase, operation, and process tag types under the selected area and creation of the corresponding type parameters.
Delete Data type User data type (if present) Units of measure Phase types Operation types Process tag types Equipment properties
You can delete data types, user data types, units of measure and equipment properties in the selected folder. All non-instanced objects are deleted. However, they still available in the shared declarations and will appear again during the next generation. With operation types, phase types and process tag types, you can select individual objects and delete them as long as they have not been instanced.
Edit Phase types Operation types Process tag types
Editing the attributes of the batch types and type parameters. Exception: SFC types You will find a description of editing SFC types in the section "Creating a New SFC Type".
Additional functions • Print • Import
Batch types • Print: Print all batch types of the process cell in tabular form.
• Import: Importing batch types generated with the BATCH Migrator (BFMIG) from the V4.02 database.
Additional functions • Display
User data type (if present) Units of measure Phase types Operation types Process tag types Equipment properties
List of all instances that refer to this type object. Certain attributes can be selected using a filter.
Log Batch types Display of the logs for the executed functions "Generate" First select the executed function in the drop-down list and then click the "Display" button.

Configuration in the ES
SIMATIC BATCH 5-88 A5E00495287-01
5.12.8 Specifying the control strategies for a type
Introduction Different and (in terms of the same run) mutually exclusive equipment phases/operations of the same equipment module are known as control strategies of this equipment module.
Recipe phases/operations can be implemented with various control strategies (set of setpoints) that can be used in the manual mode or in the automatic mode (recipe mode). To be able to use the control strategies in the automatic mode, the recipe phases/operations must also be capable of the control strategies. The control strategies and their corresponding setpoint parameters are configured in the engineering system in the batch or SFC types. In the recipe editor, the control strategies defined in this way are available as a set of setpoints with a control strategy name. During parameter assignment in the recipe, only the parameters belonging to the control strategy are available.
Basic procedure • Using an SFC type: When you configure the SFC type, you can also specify
the control strategy type to be valid for this equipment phase/operation using the characteristics function. In addition to this, the amount of parameters can also be put together based on the setpoints for each control strategy.
• Using BATCH interface blocks: New control strategies are specified using new user data types ("Control Strategy" was selected in Properties) and assigning them as the data type for the control strategy parameter of operation types/phase types in the "Configure batch process cell" dialog box.
The control strategies and control strategy parameters are included in the process cell data when you compile and are therefore available later in the BATCH Recipe Editor.
Follow the steps outlined below in SFC (SFC types)
1. Select the object "SFC type": .
2. Select the menu command Edit > Open object.
SFC opens the SFC type.
3. Open the Characteristics view of SFC. Select the menu command Edit >
Characteristics or press .
The Characteristics view of the SFC type opens.

Configuration in the ES
SIMATIC BATCH A5E00495287-01 5-89
4. Here, you edit all the control strategies relevant for SIMATIC BATCH by clicking on the "Control strategy" characteristic in the left column.
Result: All newly edited control strategies are displayed in a separate table column on the right.
5. Active the check box here to select the setpoint to which control strategy should be assigned.
Result: After reading in the type description in the BATCH configuration dialog with the "Generate" button, the control strategies you have edited in this way (read-only) are indicated by a red flag: .

Configuration in the ES
SIMATIC BATCH 5-90 A5E00495287-01
Follow the steps in the SIMATIC Manager outlined below (BATCH interface blocks)
1. Open the BATCH configuration dialog with the with the menu command Options > SIMATIC BATCH.
2. Define the control strategies using a new user data type, for example FW_heat (values: hot, normal, cold). Select the "Data types" object under "Batch types" and then click the "New" button.
Result: The new control strategy is created.
3. For operation/phase type, create a new parameter (for example fw_param). Select the required "Phase type" under "Phase types" in the left-hand window and then click the "New" button.
Result: The new type parameter is created.
4. Assign the correct control strategy (for example FW_Heat) on the right in the "Assigned data type" list box.
5. Activate the check box "Control strategy parameter". Click "Edit" on the right next to the check box "Control strategy parameter". Assign the setpoints (parameter data record) to every control strategy in the open properties dialog for the control strategies "Control strategies of FW_heat".
6. Close the properties dialog with "OK".
Result: The new control strategy appears in the BATCH configuration dialog with the following icon: .
Note:
Only one control strategy parameter can be created per operation/phase type (in the example: fw_param).
5.12.9 Propagating a type description to other projects (multiproject)
To allow batch configuration in the individual projects of the multiproject and to compile unit data with the latest type description, the type description generated centrally in the multiproject can be distributed (propagated) to the individual projects of the multiproject.
Follow the steps in the SIMATIC Manager outlined below: 1. Select the "Batch types" object in the BATCH configuration dialog.
2. Click the "Propagate" button.
Result: The "Propagate types for entire process cell" dialog box opens.
3. Activate all the projects to be propagated.
4. Click the "Start" button.
Result: The complete type description is distributed to the projects of the multiproject. After running this function, the batch types are consistent in all selected projects.

Configuration in the ES
SIMATIC BATCH A5E00495287-01 5-91
5.13 Configuring use of archive data from WinCC archives
5.13.1 Configuring use of archive data from WinCC archives
Introduction The batch data also includes the values of important process variables over time. SIMATIC BATCH does not record these measured value sequences, but fetches the values from the WinCC measured value archives. For each instance parameter to be recorded as a measured value,
• the "Archive measured variable" option must activated and
• a WinCC archive tag must be assigned.
Step 1 - Set the "Archive measured variable" option Activate the "Archive measured variable" option for each instance parameter to be recorded as a measured value. You have the following options:
• Using BATCH interface blocks:
- at the IEPAR blocks for the parameter QACT_VAL or
- in the BATCH configuration dialog at the "Batch types" object.
Note:
These two settings have the same effect. Using the Generate function in the BATCH configuration dialog, the changes at the instances are entered in the batch types or by entering changes in the BATCH configuration dialog the changes are transferred to all instances in the CFC.
• When using SFC types: The "Archive" column (S7_archive attribute) of the characteristics for the setpoint is activated for the SFC type.
Note:
For SFC types, this setting can only be made directly at the SFC type. All batch types of the SFC type are read-only in the BATCH configuration dialog.
Convenient setting in the Process Object view The setting for "Archive measured variable" can also be made in the process object view. To do this open the "Parameters" tab. The settings for several parameters can be conveniently made in the "Archive" column.

Configuration in the ES
SIMATIC BATCH 5-92 A5E00495287-01
Possible settings • No archiving
• Archiving (= short-term)
• Long-term archiving (= long-term)
Inheritance with SFC Types -> SFC Instances
Note: If an instance from the SFC type is created in the CFC chart, the setting of the S7_archive attribute at SFC type is passed to the instance. This means that if the setpoint for the archiving is labeled (Para(i)_AO) at the SFC type, this setting is automatically active in all SFC instances.
You should avoid changing this setting at the SFC instances (in contrast to the SFC type) because synchronization is only made in the BATCH configuration dialog with the SFC types for operation, function and process tag types (not with SFC instances). This may lead to validation errors and therefore errors in the compilation.
Step 2 - Create WinCC archive tags To be able to later assign archive tags, you need to activate the check box "Archive measured variable" in the Batch configuration dialog at the tag of a function or operation to be archived. You can also set the tag to "Archive" in the CFC at the output "QACT_VAL" of a block. This will automatically activate the "Archive measured variable" check box the next time the batch types are generated. This will also automatically create archive tags, as described under Option 1.
The creation of the WinCC archive tags depends on the setting of the "Create/update archive tags" option in the Object Properties of the OS in the SIMATIC Manager.
There are two possibilities:
• The "Create/update archive tags" option is activated. In this case, a corresponding archive tag is automatically created in WinCC. Requirement: There must be an OS and the OS path that is the basis for the WinCC tag name is displayed under the runtime name.
• The "Create/update archive tags" option is deactivated. In this case, you have to create the archive tag manually in the WinCC Explorer. You can find additional information about this in the WinCC Information System.

Configuration in the ES
SIMATIC BATCH A5E00495287-01 5-93
Step 3 - Assign WinCC archive tags In the BATCH configuration dialog, the additional function "Instances -> Display" can be activated for the selected type parameter. All the instant parameters having a reference to this type parameter are displayed. In the next dialog, you can open the WinCC tag browser for each instance parameter in which the required WinCC archive tag can be assigned.
1. Select the required type parameter in the BATCH configuration dialog.
2. Click the "Display" button in the area on the right.
Result: The "Instances that use the <Name> type parameter" dialog box opens.
3. Click on the row on the right and then once again on the arrow that appears.
Result: The "WinCC archive tag for <Name>" dialog box opens. This displays all the operator stations and the archive tags.
4. Display the individual hierarchies in the WinCC tag browser.
5. Select the required WinCC archived tag.
6. Click the "Apply" button.
Procedure in the multiproject You set the "Archive measured variable" option in the BATCH configuration dialog of the multiproject (not in individual projects) because the batch types can only be edited in the multiproject.
The assignment of the desired WinCC archive tags to the instance parameter is done in the individual projects (not in the multiproject). To do this, first call the "Update" command for the individual project to read the latest batch types from the multiproject into the project. This assigns the WinCC archive tags to the instance parameter as described in the procedure above.
Result: The updated path to WinCC archive tags in the project is displayed for the properties for the instance parameter. The assignment of the WinCC archive tags in the multiproject can first be viewed after the command "Merge" (batch instances) has been run.

Configuration in the ES
SIMATIC BATCH 5-94 A5E00495287-01
5.14 Compiling the OS
Introduction SIMATIC BATCH communicates with the programmable controller via the defined OS (message OS). As a result, on completion of configuration and following every change to the batch process cell data, the OS must be compiled. This downloads all the batch objects as WinCC tags to the appropriate OS. Only after compiling the OS is it possible to generate the correct full runtime name when generating the batch process cell data. Before downloading the batch process cell data, the WinCC projects must first be downloaded.
Follow the steps in the SIMATIC Manager outlined below: 1. Select the menu command OS > Object properties.
2. Open the "Target OS and Standby OS" tab.
3. Activate the "Create/update archive tags" check box if you want to use archiving with automatic assignment of an archive tag (affects all parameters set with the S7_archive attribute).
4. Confirm with "OK".
5. Select the menu command Options > Wizard Compile multiple OS > Start.
Note:
The default compiling mode for PCS 7 is area-based compiling (OS area). This setting can be changed by calling the menu command Options > Wizard Compile multiple OS Compile mode.
You cannot mix area-based and AS-based compiling with a project or a multiproject!
6. Make the entries in the subsequent dialogs as you would in standard PCS 7. There are no specific SIMATIC BATCH settings necessary.
Note:
When using SIMATIC BATCH, an S7 program can be assigned to only one batch-relevant OS!

Configuration in the ES
SIMATIC BATCH A5E00495287-01 5-95
5.15 Compiling and downloading process cell data
5.15.1 How to compile and download the process cell data
Basic procedure
Compile OS See the "Compiling the OS" section above.

Configuration in the ES
SIMATIC BATCH 5-96 A5E00495287-01
Specifying the Batch-relevant operator stations, the message OS and transferring OS-relevant data to the OS
In many Batch process cells, process automation is not exclusively recipe-controlled. In other words, it is perfectly possible that there is one or more OS servers in the process cell that do not have any batch-relevant data. This means that the batch-relevant operator stations must be specified for SIMATIC BATCH. To achieve an optimum load distribution, you can select a message OS to which SIMATIC BATCH sends its messages.
• Specifying Batch-relevant operator stations
You must specify the operator stations of the project that are relevant for SIMATIC BATCH. In other words, you specify the OS in which BATCH blocks (UNIT_BLOCK, EOP/EPH, IEOP/IEPH) are accessed using faceplates.
• Specifying the message OS
You must select a suitable OS to which SIMATIC BATCH sends its messages. The message OS is also the communication OS for the BATCH server.
• Transferring OS-relevant data to the OS
The message texts of all BATCH messages and all OS-relevant data from SIMATIC BATCH are transferred automatically to the selected operator stations by the "Transfer to OS" function.
Compiling unit data To allow SIMATIC BATCH to use the process cell data, this data must be created (compiled) explicitly. The process cell data must be recompiled after the completion of configuration and following any change before downloading can be completed.
You compile the process cell data using the "Compile" function. During this process, the process cell data are compiled and validated. Any possible errors are displayed and entered in a test log. If the data is not valid, it will not be compiled.
Downloading WinCC projects WinCC projects continue to be transferred to the operator stations independent of SIMATIC BATCH with the function, "Download to CPU". The download procedure for the process cell data to the BATCH server and BATCH clients remains unchanged. You must, however, make sure that the WinCC projects are downloaded before you start the batch downloads
Downloading Batch process cell data After compiling the process cell data successfully, it is transferred to the BATCH server, DB server and the BATCH clients. The process cell data is downloaded automatically using the "PLC Download" function.

Configuration in the ES
SIMATIC BATCH A5E00495287-01 5-97
Reading Information about Batch process cell data (not included in the "Basic procedure" graphic)
To ensure controlled copying of the process cell data to the batch system, an explicit operator command is required. This can be entered at any BATCH client within BatchCC. There is an internal comparison and synchronization of the new with the old process cell data. For more information about reading in the process cell data, refer to the section "BatchCC".
5.15.2 Compiling the Batch process cell data in single project engineering
Introduction The process cell data is compiled by using the "Compile" function in the BATCH configuration dialog. At the same time, the process cell data are checked for plausibility. Any possible errors are displayed and entered in a test log. If the data is not valid, it will not be compiled.
Follow the steps in the SIMATIC Manager outlined below: 1. Open the BATCH configuration dialog with the with the menu command
Options > SIMATIC BATCH.
2. Select the "Batch instances" folder under process cell data in the left window.
3. Click the "Compile" button in the area on the right.
Result: If the validation is successful, the process cell data is compiled. A log is created that you can display as follows: In the BATCH configuration dialog: under Log >: "Compile" settings > "Display" button
4. Select the process cell object under process cell data in the left window.
5. Click the "Transfer to OS" button in the area on the right.
Result: A dialog opens with all operator stations of the project that were defined as Batch-relevant when the settings were made in the "OS objects" tab. In the "Status" column, you will see the current status displayed. Here, you can see whether or not the OS-relevant data has already been transferred.
6. Click the "Start" button.
Result The messages and the OS-relevant data are transferred. A log is created that you can display as follows: In the BATCH configuration dialog: under Protocol -> "Transfer to OS" setting -> "Display" button

Configuration in the ES
SIMATIC BATCH 5-98 A5E00495287-01
5.15.3 Compiling the process cell data in multiproject engineering
Introduction The process cell data is compiled by using the "Compile" function in the BATCH configuration dialog. At the same time, the process cell data are checked for plausibility. Any possible errors are displayed and entered in a test log. If the data is not valid, it will not be compiled.
Follow the steps in the SIMATIC Manager outlined below: 1. Open the BATCH configuration dialog with the with the menu command
Options > SIMATIC BATCH.
2. Select the "Batch instances" folder under process cell data in the left window.
3. Click the "Merge" button in the area on the right.
Result: A dialog opens display all Batch-relevant projects. In this dialog, you can compile the batch process cell data of all projects and then merge the data.
4. Here, you select the projects whose process cell data will be included.
With the central check boxes "Include" and "Compile" in the table header, all the settings for the individual projects are made automatically depending on the status. If, for example, the status for a project is "Types not up-to-date", the "Compile" check box is automatically selected as a result of including the project.

Configuration in the ES
SIMATIC BATCH A5E00495287-01 5-99
Note:
Compilation is also possible in every individual project of the multiproject.
Note:
If projects are removed for editing, the check boxes are inactive (gray). If process cell data compiled earlier for this project already exists, this data is also adopted.
5. Click the "Start" button.
6. Click the "Close" button.
7. Select the process cell object under process cell data in the left window of the BATCH configuration dialog.
8. Click the "Transfer to OS" button in the area on the right.
Result: A dialog opens with all operator stations of all projects of the multiproject that were defined as Batch-relevant when the settings were made in the "OS objects" tab.
9. Click the "Start" button.
Result: All Batch-relevant data (messages and user data types) is downloaded to the appropriate operator stations.
Results:
• If the validation is successful, the process cell data is compiled. A log is created that you can display as follows: In the BATCH configuration dialog: under Protocol ->: "Merge" setting -> "Display" button
Note:
The display of validation events in the "Merge/compile PCell..." dialog and in the BATCH configuration dialog may differ in the following situations:
• Only warnings (yellow arrow) or 'everything OK' is shown at the individual projects in the "Merge/compile PCell..." dialog. Everything within the project is correct as far as the validation is concerned.
• Errors (red arrows), are shown in the BATCH configuration dialog, however. These are errors which occur in relation to other projects and are therefore shown in the overall BATCH configuration dialog.
The concrete cause can be found in the merge log.
• The messages and the OS-relevant data are transferred. A log is created that you can display as follows: In the BATCH configuration dialog: under Protocol ->: "Transfer to OS" setting -> "Display" button

Configuration in the ES
SIMATIC BATCH 5-100 A5E00495287-01
Tip Do not forget to run the "Compile OS" function before compiling and downloading. This avoids the display of errors in the runtime names when you compile the process cell data.
5.15.4 Downloading the process cell data to the target system
Introduction You download the process cell data to the BATCH server, the DB server (data storage systems) and the BATCH clients using the "PLC -> Download" function.
Order of the Downloads
Note: To ensure data consistency, the following order must be kept to when you download:
1. Download to the OS server.
2. Download to the BATCH server and BATCH clients.
Follow the steps in the SIMATIC Manager outlined below: 1. Open the BATCH configuration dialog with the with the menu command
Options > SIMATIC BATCH.
2. Select the process cell object under process cell data in the left window.
3. Click the "Download" button.
Result: In the "Download from <plant>" dialog box, all PC stations for BATCH servers (single, redundant), DB servers and BATCH clients are displayed with information about their download status.

Configuration in the ES
SIMATIC BATCH A5E00495287-01 5-101
4. Click the "Start" button.
Updating the process cell data
Note: If you modify the basic control in the ES, for example make changes to CFC/SFC charts, SFC types, the hardware configuration, plant hierarchy, AS-OS engineering etc., the BATCH process cell data must first be generated and compiled, and then downloaded to the CPU (BATCH server, BATCH clients).
Prior to this, the OS must first be compiled and downloaded.

Configuration in the ES
SIMATIC BATCH 5-102 A5E00495287-01
5.15.5 Simultaneous compilation and download
PCS 7 also provides a complete function "Compile and Download" for all PC stations (including operator stations) that can also be used for a Batch process cell.
Follow the steps in the SIMATIC Manager outlined below: 1. In the Component view or Plant view, select the single project or multiproject
and then select PLC > Compile and download objects in the shortcut menu.
The "Compile and download objects" dialog box opens.
2. Select the "Process cell" among the objects and then click the "Edit" button in the section "Settings for compilation/download".
3. Make the following settings in the tabs:
- In the multiproject in the "Merge/compile" tab: Here, select all projects to be included when generating the batch process cell data.
- In the "Transfer" tab of the single project / multiproject: Here, select the message OS and the batch-relevant operator stations.
- In the "Download" tab of the single project / multiproject: Here, select components to be downloaded (BATCH server, BATCH clients, DB server)
4. Confirm with "OK".
In the "Compile" and "Download" columns of the "Compile and download objects" dialog box, specify the objects to be included in the compilation or download.
5. Start the procedure with the "Start" button.
Note:
In a multiproject, only the process cell below a project of the multiproject needs to be selected and the options "Compile" and "Download" only need to be specified for this project.

Configuration in the ES
SIMATIC BATCH A5E00495287-01 5-103
5.15.6 Working with several process cell projects
Several process cells of different S7 projects With SIMATIC BATCH, it is also possible to generate BATCH servers and BATCH clients in several S7 projects. For For example, you can run three S7 projects each with three PCS 7 operator stations and the same multiclient (with a BATCH client). The multiclient (with BATCH client) can communicate with the BATCH server of each S7 project.
The various process cell projects belonging to the S7 projects can be opened simultaneously by the BATCH client. In this case, the batch applications must be opened more than once. The display of several process cell projects within a batch application, for example within a BatchCC is, on the other hand, not possible.
Working with projects on one BATCH server You can run different process cell projects on one BATCH server in succession: Several projects can be loaded on a single BATCH server PC. However, only one process cell project (in other words a BATCH server) can be active at any one time. This is an advantage, for example when the "Correct" project and a test project need to be run separately without modifying the data of the other process cell project.
By selecting the OS project (PCS 7 OS changes to runtime), a switchover is made on the BATCH server PC. SIMATIC BATCH recognizes which process cell project belongs to which OS project.
Switching over the BATCH client The assignment of the BATCH client <-> BATCH server is generally made during configuration in the engineering system. After reading in the process cell data, a BATCH client then operates with the process cell project of the corresponding BATCH server.
If there is information on more than one process cell project on the BATCH server, a selection dialog with all existing process cell projects is displayed on the BATCH client after selecting the menu command Program > Read in new process cell . By selecting a process cell project, you establish the connection to the BATCH server (and therefore also to the required process cell project).
One BATCH server per project
Note: In the scenarios described above, the rule that there must be only one BATCH server per S7 project /multiproject still applies.

Configuration in the ES
SIMATIC BATCH 5-104 A5E00495287-01

SIMATIC BATCH A5E00495287-01 6-1
6 Batch Control Center (BatchCC)
6.1 Startup and operation
6.1.1 Starting BatchCC
After you have installed SIMATIC BATCH, you will find the following components in the Start menu of Windows under Simatic > BATCH:
• BATCH Control Center (also referred to in the following as BatchCC)
• BATCH Launch Coordinator
• Recipe Editor (also referred to in the following as BATCH Recipe Editor)
• SBReport
To start BatchCC: 1. Open the Start menu of Windows and select the menu command Start >
Simatic > BATCH > BATCH Control Center.
Result: If several local projects are found when you start BatchCC or if the link to the project cannot be established, a selection dialog box appears.
2. Select the project you require.
Result: Once you have made a selection, BatchCC is started with the project selected. If you select a project that does not have a link, the application is closed.
Language In both BatchCC and in the BATCH Recipe Editor, you can change languages using the menu command Options > Settings> "Languages" tab.
Additional information: Layout of the main window

Batch Control Center (BatchCC)
SIMATIC BATCH 6-2 A5E00495287-01
6.1.2 Getting Help
Online help There are various ways of getting online help:
Call Type of help
Help menu Introductory information, description of the user interface, concrete instructions
"Help" button or F1 key in a dialog box
Context-sensitive help in every dialog box
Selecting a menu command and pressing the F1 key
Context-sensitive help for every menu command
Screen Tips To display a brief text explaining the buttons in the toolbar, position the cursor on a button until the screen tip is displayed.
Changing the font size With the menu command Options > Font in the help topic window, you can set the font size to "small", "normal" or "large.
No help when starting from WinCC
Note: If the Batch Control Center or the BATCH Recipe Editor is started from WinCC, Help will not be available.

Batch Control Center (BatchCC)
SIMATIC BATCH A5E00495287-01 6-3
6.1.3 User interface and operator control
6.1.3.1 Layout of the main window
The figure below shows the basic layout of the BatchCC user interface. On the left of the main window you will see the process cell as a tree. The mid section displays the batch objects in list form. On the right, you can create shortcuts.
You can control the view with the View menu in BatchCC.

Batch Control Center (BatchCC)
SIMATIC BATCH 6-4 A5E00495287-01
Title bar The title bar of the main window contains the system buttons with which you can:
• exit BatchCC,
• minimize the main window to its icon,
• restore the window to its normal size again, and
• display the main window in full-screen size.
Menu bar The menu bar is located at the top edge of the main window. Its functions relate to the currently active window. You can only select menu commands that are feasible in the current status of the object. As an example, you can only select the menu command Edit > Delete when at least one object is selected. Menu items that cannot be selected are displayed in gray.
Toolbar The toolbar is located below the menu bar. It contains a series of buttons that trigger the more commonly required functions of the menu bar. You can see which function is triggered by a button in the toolbar by positioning the mouse pointer on the button (without clicking). A box appears with the name of the button. In the status bar, you can see more detailed information about the function. Clicking the button triggers the function. Buttons that cannot be selected are displayed in gray.
Status bar At the lower edge of the user interface, you will see the status bar that displays important information and states. The information displayed changes depending on the particular operation and object status.
In the left part of the status bar, you will see context-sensitive information, for example explanations of menu commands, operator prompts or error messages.
In the right part of the status bar, you can see the current user and the current time. The connection status to the BATCH Control Server is also displayed here:
• Online (there is a connection to the BATCH Control Server)
• Offline (there is no connection to the BATCH Control Server).
In some situations, a progress bar is also displayed for processes that require longer.
Additional information: • Objects and object hierarchy
• Overviews

Batch Control Center (BatchCC)
SIMATIC BATCH A5E00495287-01 6-5
6.1.3.2 Creating and manipulating objects
Selecting functions All important functions relating to an object are available in the shortcut menu.
As an alternative, the same functions are also available in the Edit menu. Functions that cannot be executed in the current status of an object are deactivated (displayed in gray) in the Edit menu.

Batch Control Center (BatchCC)
SIMATIC BATCH 6-6 A5E00495287-01
General functions Some basic functions are common to all objects. These common functions are listed below. The descriptions of other functions assume that you know how to use these functions.
The normal sequence of activities involving objects is as follows:
• Create the object
• Select the object
• Perform the actions with the object (for example, open, delete)
Creating objects To create a new object, select the destination of the object in the editing window of the BATCH object window (for example the "Formulas" folder if you want to create a new formula category). To start the function, you then select the menu command Edit > New.
Opening objects There are several ways of opening an object:
• Double or single click on the object icon
• Select the object and then the menu command Edit > Open. This functions only with objects that are not folders, for example master recipes.
After opening an object, you can create or modify its content.
Properties of objects Object properties are data belonging to the object that decide its behavior, for example the properties of a master recipe.
The menu command Edit > Properties opens a dialog box in which you can see and set the properties of the selected object.
Renaming objects The names of batch objects are specified when the objects are created. This name can be changed by selecting the Rename command.
The Rename command is not always available. For example with materials, qualities, or folders, it is only possible to rename in the corresponding "Properties" dialog box.

Batch Control Center (BatchCC)
SIMATIC BATCH A5E00495287-01 6-7
Deleting objects You can delete both folders and objects. It is only possible to delete most folders when they contain no elements. Exception: orders. If an order only contains batches that can be deleted, the command is available for the order and you will be informed that a specific number of batches will also be deleted.
Deleting is permanent and cannot be undone. If you are not sure whether or not you still need an object, it is advisable to archive the entire project before deleting.
6.1.3.3 System settings
You can change the system settings for the BatchCC and the BATCH Recipe Editor in tabs. The system settings contain general selections and rules about the layout, dimensions, zoom, colors and fonts of the recipe elements. You can also specify the display of messages during the batch process, the display of measured values in the batch report and the option for online modification of setpoints.
To display the system settings dialog: • Select the menu command Options > Settings.
This opens the dialog box shown below in which you can make individual settings. Use the context-sensitive help if you want more information about the possible settings ("Help" button).

Batch Control Center (BatchCC)
SIMATIC BATCH 6-8 A5E00495287-01
6.1.3.4 Overviews
The purpose of overviews Overviews are available in BatchCC both for greater clarity and to simplify the management of functions.
Which overviews are available? Depending on the context, you can display the following overviews:
• Library over list
• Master recipe overview
• Formula overview
• Order overviews
• Batch overviews
• Material overviews
To select overviews: Select a folder in the editing window (for example a master recipe folder) and then select the menu command Edit > Details.
Example

Batch Control Center (BatchCC)
SIMATIC BATCH A5E00495287-01 6-9
Working with overviews By selecting an object from the list and then clicking the right mouse button, you display the shortcut menu with the functions available for the object.
If you left-click a column header in the table, the content of the table is sorted alphabetically according to the content of the selected column.
By entering a text in the input field below the column header, you can filter the table.
You can also filter several columns at the same time. The individual filter conditions are then ANDed. This means that all the conditions entered must be satisfied before a list object appears in the table. If, for example, you enter the text "Wa" in the input field of the "Main Product" column, only the entries whose main product start with the letters "Wa" appear in the table.
Docking overviews If you click the title bar with the right mouse button, a shortcut menu opens with various options for docking the overview.
Lists for batch planning, batch control and Batch data management (Batch CDV) There are more lists and special lists for orders and batches as listed below:
List Description
Order category list List with all order categories of the process cell. Before you select this, you must select the "Orders" folder in BatchCC.
Production order list List with production orders: • If you had previously selected the "Order" folder, all production orders
are displayed. • If you had previously selected an "order category" folder, only the
production orders belonging to this category are displayed. Batch planning list List with all batches that are planned, released or locked. Using the shortcut
menu for the batch planning list, you can control or start the batches. Note: Only the planned or released batches are usually displayed in the batch planning list. If you start a batch from this list, it remains visible in the list and is shown with its new status (for example, running). If you open the batch planning list again, however, this batch is no longer displayed (see Batch status list).
Batch status list List with all batches with the released, running, held, waiting, locked or error status. The display is updated dynamically. Using the shortcut menu for the batch status list, you can control the batches.
Batch result list List with all batches with the completed, aborted, canceled, archived, stopped and completed status. The display is updated dynamically. Using the shortcut menu for the batch result list, you can archive closed batches and then delete them.

Batch Control Center (BatchCC)
SIMATIC BATCH 6-10 A5E00495287-01
Selecting lists Depending on the selection in the order hierarchy (an order, an order category, or all orders), you can open different batch overviews with all batches of an order, of an order category, or all orders.
Select the object in the "Orders" folder in the editing window and then select the required list in the Planning menu.
Select all With CRTL+A or the menu command Edit > Select All you can select all the objects of a list, for example, to release all batches using the shortcut menu.
6.1.3.5 Output window for messages
Requirement A PCS 7 OS (WinCC) runs on the BATCH client computer in process mode.
Output window All the messages for batch control (system messages, process messages, error messages) that are managed in the WinCC archives can also be displayed in BatchCC.
To display these messages, you can open the output window of the PCS 7 OS (WinCC Alarm Control) in BatchCC in a separate output window.
You open the output window with the menu command View > Message Window.
Batch Control Center (BatchCC)
SIMATIC BATCH A5E00495287-01 6-11
Customizing • You can customize the properties of the message window (familiar from
WinCC), for example the columns displayed and the selection of messages.
• User settings are entered in the global database and restored the next time you start BatchCC. Certain settings that are essential for SIMATIC BATCH are exceptions to this, for example selection of BATCH messages.
• Select the message line and then select the menu command "Open control recipe" in the shortcut menu. This opens the control recipe that matches the message.
6.1.3.6 Editing window with the batch objects
The object hierarchy can be structured in BatchCC in much the same way as the folder structure of the Windows Explorer with folders and files.
The top folder is the batch process cell with the permission management. Below the Batch process folder are the subfolders for "Libraries", "Master recipes", "Formulas", "Orders" and "Material". You can create other folders within these to store a variety of objects (libraries, recipes, formulas, etc.).
When you double-click on the permission management, the "Permission management" dialog opens.

Batch Control Center (BatchCC)
SIMATIC BATCH 6-12 A5E00495287-01
6.1.3.7 Logbook
To document all deletions, you can display these in a logbook in BatchCC.
To open the logbook in BatchCC: Select the menu command Options > Logbook.
This function opens the dialog box shown below in which you can search for specific delete actions according to filter criteria. Enter the name, type, date range, user and path and then click the "Filter" button. You can use the wild cards * or ? as filters. For example, you can use A* to search for all objects beginning with A. Using ? in a name, you can search for all objects with this name and a variable at the location of the ? character .
The current "Time window" is displayed on the right of the window. The zoom of the time window is automatically adapted to the required area of the applications and objects to be displayed. If you move the cursor over the time bar, a tooltip is displayed showing the time at which it was opened.

Batch Control Center (BatchCC)
SIMATIC BATCH A5E00495287-01 6-13
6.1.3.8 Window for displaying active applications
To check the active batch applications on the individual computers, you can display the applications in BatchCC.
Opening the display window with the active applications Select the menu command Options > Active applications.
This function opens a dialog box with the currently active applications. You can see the duration, date and time at which the individual batch applications were in operation or are still in operation on this computer x. The logged on users are also displayed.

Batch Control Center (BatchCC)
SIMATIC BATCH 6-14 A5E00495287-01
6.1.4 Objects and object hierarchy
The object hierarchy for library operations, master recipes, formulas and production orders can be structured in BatchCC in much the same way as the folder structure of the Windows Explorer with folders and files.
The figure below shows the appearance and typical positioning of these objects within BatchCC.
User-defined structure of objects and folders By default, the objects are at one level below the libraries, master recipes, formulas, production orders and materials folders.
Note:
To allow a more suitable structure and adaptation to your plant, you can also create a different, user-defined hierarchy structure for the BATCH objects in BatchCC.
The highest level cannot be changed or freely defined. This applies to "process cell", "libraries", "master recipes", "formulas", "orders", "materials" and "permission management".
The following description, however, is based on the structure shown in the figure above.

Batch Control Center (BatchCC)
SIMATIC BATCH A5E00495287-01 6-15
Showing references between BATCH objects With the menu command View > Related objects in tree view, the references to the other batch objects and the configured unit allocations are displayed below the library operation, master recipe and formula objects.
Additional information: • Libraries with library
operations
• Master recipes
• Formulas
• Production orders
• Materials
• Permission management
• Creating and manipulating objects
6.1.4.1 Libraries with library operations
You can use libraries to store recipe elements created with the BATCH Recipe Editor that you require often in the master recipes. You can store and manage recipe operations (for hierarchical recipes) and substructures (for flat recipes) in libraries. In the following descriptions, recipe operations or substructures from libraries are called library operations or library substructures.
Available functions Position of the objects
• Opening and editing recipes • Specifying the properties of
master recipes • Validating recipes • Releasing recipes for testing • Releasing recipes for production • Status of the recipes and status
changes

Batch Control Center (BatchCC)
SIMATIC BATCH 6-16 A5E00495287-01
6.1.4.2 Master recipes
In this area, you can store the recipe procedures created with the BATCH Recipe Editor according to the technological structure of your process cell. With the reference (can be set in a dialog box) to a formula category and ultimately to a concrete formula, you have a complete master recipe. There are both flat and hierarchical master recipes. If you have large numbers of master recipes, these can be stored in different folders (without semantics) to achieve a better structure.
Available functions Position of the objects
• Creating a new master recipe • Opening and editing recipes • Specifying the properties of
master recipes • Interconnecting master recipe
header parameters with an external formula
• Working with the recipe overview
• Validating recipes • Releasing recipes for testing • Releasing recipes for production • Status of the recipes and status
changes

Batch Control Center (BatchCC)
SIMATIC BATCH A5E00495287-01 6-17
6.1.4.3 Formulas
In this area, you create the formula categories with the formulas belonging to them according to the technological needs of your plant. If you have large numbers of formulas of a category, these can be stored in different folders (without semantics) to achieve a better structure.
Available functions Position of the objects
• Creating a new formula
category • Specifying the properties of the
formula category • Creating a new external formula • Specifying the formulas of the
master recipes • Interconnecting master recipe
header parameters with an external formula
• Working with the formula overview
• Validating formulas

Batch Control Center (BatchCC)
SIMATIC BATCH 6-18 A5E00495287-01
6.1.4.4 Production orders
In this area, you create the production order categories with the lower level production orders. You can create batches for a production order. You also make the settings for batch processing, for example the Start mode.
Available functions Position of the objects
• Creating a new production order • Specifying the properties of a
production order • Adding batches to a the
production order • Specifying the properties of a
batch (e.g. quantity) • Setting the Start mode for batch
processing • Displaying and modifying unit
allocation • Setting the order of batches • Displaying the run time of a
batch • Working with overviews • Status of the batches

Batch Control Center (BatchCC)
SIMATIC BATCH A5E00495287-01 6-19
6.1.4.5 Materials
To be able to use input and output materials in recipes and formulas, these must first be entered in BatchCC.
Available functions
• Defining materials • Changing the quality
6.1.4.6 Permission management
Permission management is set up by the system administrator. Here, you can specify the user permissions of the user roles for specific computers and for specific units for all the functions of BatchCC and the BATCH Recipe Editor. This is only possible if the SIMATIC Logon PCS 7 software is installed. Without this additional product, every user in SIMATIC BATCH has all permissions (comparable with a "Super user").
Available functions
• Specifying user permissions • Changing user permissions • Displaying user permissions

Batch Control Center (BatchCC)
SIMATIC BATCH 6-20 A5E00495287-01
6.2 Specifying user permissions
6.2.1 Introduction to permission management
SIMATIC BATCH supports the central user management SIMATIC Logon of PCS 7, which in turn is based on the mechanisms of the user management in Windows.
Basic procedure • You define users and user groups (available on the particular Windows server)
and define passwords centrally in Windows.
• You can define user roles for SIMATIC BATCH and assign them to Windows user groups using the Software SIMATIC Logon software.
• Within SIMATIC BATCH (BatchCC), you can make the following extra specifications:
- User permissions for one user role (global)
- Permitted user roles per computer (computer-specific)
- Permitted user roles per unit (unit-specific)
• The components of SIMATIC BATCH contained in PCS 7 are provided with the data of users as they log in from a central logon service and are informed of logon changes etc.
User roles for SIMATIC BATCH The following user roles and associated user permissions are set as default for SIMATIC BATCH. You can add additional user roles in the SIMATIC Logon AdminTool. You can find additional information in the help for the SIMATIC Logon AdminTool.
Note:
When a user is a member of several Windows user groups that have been assigned a variety of roles in SIMATIC BATCH, this user has a union set of the individual permissions from all assigned roles.
User role (default) User permissions (default)
Automation engineer Reading and updating process cell data Factory manager Editing, modifying and releasing recipes and creating batches Emergency operator No permissions (must be configured) Operator Starting, releasing, holding, resuming, locking, closing and archiving
batches. Shift manager Modifying recipes, creating batches Super user All functions including permission management (administrators) Process engineer Creating and modifying recipes

Batch Control Center (BatchCC)
SIMATIC BATCH A5E00495287-01 6-21
Super user The system administrator of SIMATIC BATCH takes on the role of "Super user". The super user has all user permissions in SIMATIC BATCH and only the super user can make changes in the permission management.
Rules for super users • There are roles (at least one) with "Super user" status.
• The name of this role can be changed in the user management. However, renaming the role may make it difficult to recognize whether or not a role has super user status!
• SIMATIC BATCH creates the "Super user" role by default when the database is generated.
• You can open the Permission management to determine which roles have
super user status. All role icons with a yellow frame indicate super user status.
• A role that is assigned all rights in the Permission management (all entries have a check mark) is not equivalent with a role with super user status.
• Roles with super user status always have all rights per definition but they also have additional rights that cannot be assigned to other users. Due to this reason, the permissions of these roles cannot be edited: all check marks are always set in the permission management.

Batch Control Center (BatchCC)
SIMATIC BATCH 6-22 A5E00495287-01
6.2.2 Specifying user permissions
Requirements SIMATIC Logon is installed on every computer with a batch application. SIMATIC Logon consists of two components:
• Simatic Logon Admin Tool
• SIMATIC Logon Service
Basic requirements for working with SIMATIC Logon:
• It is mandatory that you create the following groups in Windows: "Logon_Administrator" and "Extended_Logon_Administrator". Only users of one of these two groups can open the Roles management and define user roles in BatchCC via the menu command Options > Roles management.
Note:
If rights are managed on the BATCH server, it is not enough to simply install SIMATIC Logon on the BATCH server PC. A BATCH client must also be installed on the BATCH server PC.
Defining Windows and user groups 1. Select the menu command Start > Settings > Control Panel > Administrative
Tools > Dialog "Computer Management" > System > Local Users and Groups > Users/Groups.
2. With Action > New User/New Group, create all users (with passwords) and user groups in the Windows network (Windows server).
To define user roles for SIMATIC BATCH: 1. Open BatchCC.
The logon dialog for SIMATIC Logon Service is displayed.
2. Here, enter the user name, password and domain of Windows user, who is a member of the "Logon Administrator" group and confirm your entry with OK.
3. Launch the Roles management dialog in BatchCC with the menu command Options > Roles management.
The dialog box "SIMATIC Logon Admin Tool" is displayed:
- You can create user roles for SIMATIC BATCH in the upper half of the dialog box and then assign Windows user groups/Windows users to these user roles. This way, Windows users in SIMATIC BATCH will receive the assigned rights of BATCH user roles.
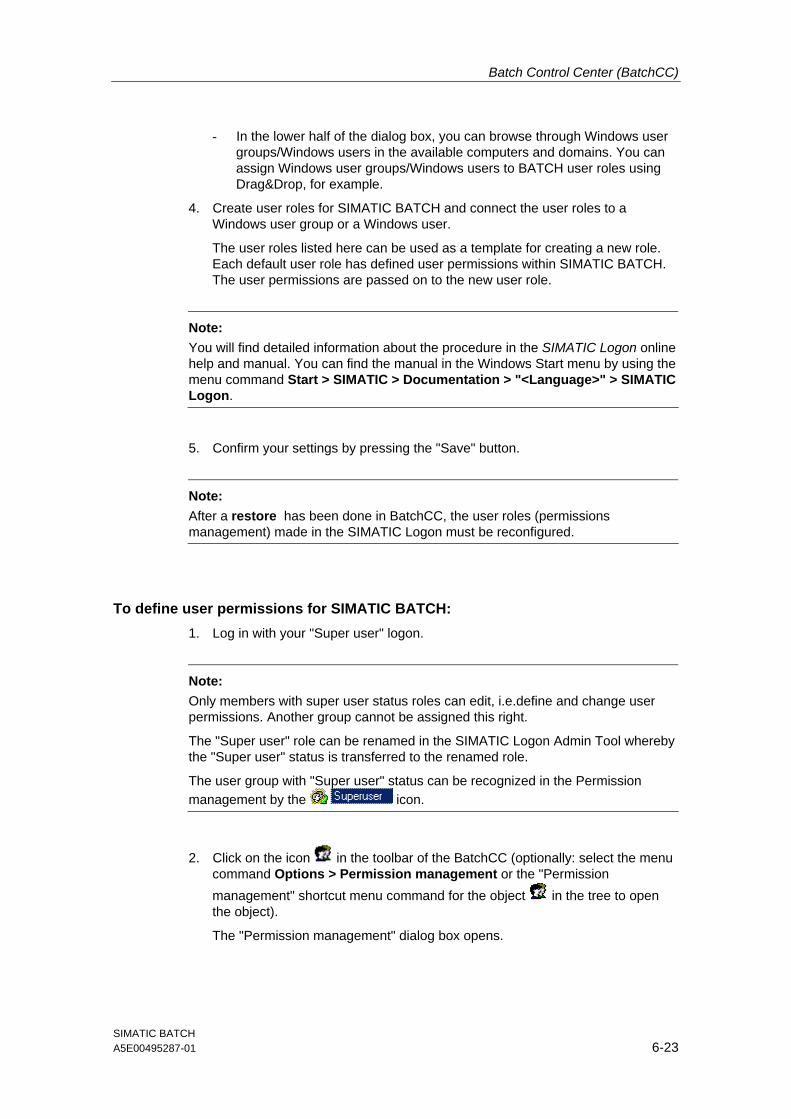
Batch Control Center (BatchCC)
SIMATIC BATCH A5E00495287-01 6-23
- In the lower half of the dialog box, you can browse through Windows user groups/Windows users in the available computers and domains. You can assign Windows user groups/Windows users to BATCH user roles using Drag&Drop, for example.
4. Create user roles for SIMATIC BATCH and connect the user roles to a Windows user group or a Windows user.
The user roles listed here can be used as a template for creating a new role. Each default user role has defined user permissions within SIMATIC BATCH. The user permissions are passed on to the new user role.
Note:
You will find detailed information about the procedure in the SIMATIC Logon online help and manual. You can find the manual in the Windows Start menu by using the menu command Start > SIMATIC > Documentation > "<Language>" > SIMATIC Logon.
5. Confirm your settings by pressing the "Save" button.
Note:
After a restore has been done in BatchCC, the user roles (permissions management) made in the SIMATIC Logon must be reconfigured.
To define user permissions for SIMATIC BATCH: 1. Log in with your "Super user" logon.
Note:
Only members with super user status roles can edit, i.e.define and change user permissions. Another group cannot be assigned this right.
The "Super user" role can be renamed in the SIMATIC Logon Admin Tool whereby the "Super user" status is transferred to the renamed role.
The user group with "Super user" status can be recognized in the Permission management by the icon.
2. Click on the icon in the toolbar of the BatchCC (optionally: select the menu command Options > Permission management or the "Permission management" shortcut menu command for the object in the tree to open the object).
The "Permission management" dialog box opens.

Batch Control Center (BatchCC)
SIMATIC BATCH 6-24 A5E00495287-01
3. In the "Individual permissions" tab, you specify the user permissions for each user role:

Batch Control Center (BatchCC)
SIMATIC BATCH A5E00495287-01 6-25
4. In the "Computers and units" tab, you specify which user roles are possible on which computer or unit.
- In the "All computers" folder, the computer names are displayed and the user roles below them.
- In the "Units of the <Process cell>" folder, the units are displayed and the user roles below them.
5. Save the new user permissions with "OK".
Changing the user To change the current user logged into a batch application (BATCH Recipe Editor, BatchCC), double-click on the logon display to the bottom right of the status line of the batch application. Result: The PCS 7 Logon Service is triggered and a new logon dialog opens.

Batch Control Center (BatchCC)
SIMATIC BATCH 6-26 A5E00495287-01
6.2.3 Changing user permissions
General The user permissions can be modified during runtime, in other words, while you are creating a recipe or editing something. At any one time, the user rights can only be modified by one person (with the "Super user" user role).
Follow the steps outlined below:
1. Click on the icon in the toolbar of the BatchCC (optionally: select the menu command Options > Permission management or the "Open Permission management" shortcut menu command for the object in the tree to open the object).
Result: The "Permission management" dialog box opens.
2. Make the changes you require to the user permissions:
3. Save the new user permissions with "OK".
6.2.4 Displaying user permissions
Follow the steps outlined below:
1. Click on the icon in the toolbar of the BatchCC (optionally: select the menu command Options > Permission management or the "Display Permission management" shortcut menu command for the object in the tree to open the object).
Result: The "Permission management" dialog box opens.
2. You can display information about the user permissions of the user roles in the "permissions" tab.
3. In the "Computers and units" tab, you can see which user roles are possible on which computer or on which unit.

Batch Control Center (BatchCC)
SIMATIC BATCH A5E00495287-01 6-27
6.3 Reading the ES data
6.3.1 Reading process cell data into SIMATIC BATCH
Importing the Process cell Data for the First Time When you first open BatchCC, no Batch objects are visible in the left editing window. To be able to use the batch-relevant process cell data created in the engineering system (ES), this data must first be read into SIMATIC BATCH. To do this, you create a new process cell object in BatchCC.
Requirement The Batch process cell data created in the engineering system (ES) has been downloaded from the engineering station to the runtime computer of the BATCH server.
Follow the steps outlined below: 1. Select the menu command Program > New process cell.
2. In the dialog, select the row for the process cell you want to read and confirm with OK.
Result: The process cell data are read in and are not available in BatchCC and in the BATCH Recipe Editor. You can now start to configure the recipes and plan the batches.
Additional information Updating process cell data after changes in the engineering system

Batch Control Center (BatchCC)
SIMATIC BATCH 6-28 A5E00495287-01
6.3.2 Updating process cell data after changes in the engineering system
Updating process cell data If you have made changes to the batch-relevant process cell data in the engineering system (ES) or have entered new data (for example added a new unit), you must also make such changes known in SIMATIC BATCH by reading the process cell data into BatchCC again. When you do this, all the Batch data is updated.
Note:
The updating of the process cell data takes place only on the BATCH client on which this phase has just been started. All other BATCH clients continue to have access to the BATCH server (batch process).
Changes in master recipes, library operations, formulas and formula categories are not, however, possible at this point. If you attempt this, a dialog indicates that it is not possible.
Requirement The Batch process cell data created in the engineering system (ES) has been downloaded from the engineering station to the runtime computer of the BATCH server.
What has been changed or added? Before you update the process cell data, you can print out a log containing all the changes, in other words, the differences between the old and new process cell data. This allows you to decide on a suitable time for the update. If the changes would be too great a risk at the current time you can abort the update.
Effects on the status of the recipes and formulas After updating, all the recipes (master recipes, library operations) and formulas of this process cell that were "released for production" and "released for testing" are changed to the "Testing release" status. After updating the process cell data, the objects in the "Testing release" status are checked automatically. If the check is successful, the objects are returned to their original status. If the check is unsuccessful, the objects are changed to the "Release invalid" status. They can now be edited and released again.
In the overviews you can, for example, release the recipes with one action by selecting several rows and the command Release for production (shortcut menu).

Batch Control Center (BatchCC)
SIMATIC BATCH A5E00495287-01 6-29
Batch status transition with "Update process cell" Batches with the status "blocked" and "released" are automatically check when the process cell is updated. They are set to the status "Testing release" for this.
During a process cell update, first the batch status is checked. The result of the check distinguishes between incorrect and correct batches.
Batch status before the check
Result of the check Batch status after the check
Released Batch is OK Released Blocked Batch is OK Blocked Released Batch has errors Release invalid Blocked Batch has errors Release invalid
If a batch has "Release invalid" status following the check, you can no longer use this batch. You can only delete it.
Follow the steps outlined below: 1. Select the menu command Edit > Updating the process cell.
2. In the dialog, select the row with the modified process cell project and confirm with OK.
Result: The "Update process cell" dialog box appears. After confirming this dialog, the process cell data are updated. Changed object data are overwritten. New objects are added.
Display of the assignments:
not assigned
element assigned and at least lower-level object not assigned
element and all lower-level objects assigned
3. If there are any assignments missing between the objects of the old and new process cell configuration, make the necessary assignments, as follows:
- Return to a selected object in the process cell tree -> a dialog box appears with the objects that are not yet assigned.
- Select the required object and make the assignment with Return.
4. Confirm all added assignments with "OK".
Result: The process cell data is updated. Master recipes, library operations and formulas in the "Release invalid" status must be modified and released again.
Batch Control Center (BatchCC)
SIMATIC BATCH 6-30 A5E00495287-01
6.4 Specifying the material
6.4.1 Editing materials
Purpose At the start of batch planning, you must define the following in SIMATIC BATCH for materials (products, by-products, waste products):
• The materials for input materials and output materials
• The quality of the main product
You define the materials in the list boxes displayed in the subsequent dialogs for recipe creation and batch planning.
Materials and qualities must be assigned a unique alphanumeric code (for example an internal company code) in the form of a string. This code can, for example, be used to specify a setpoint and process value input at the interface blocks or SFC types to identify the material or product.
Note:
If you have a central material management department in your company, you can also write the materials to the Batch data management (Batch CDV) using the user interface (API) of SIMATIC BATCH.
Rules • The material or quality can have a maximum of the 32 characters.
• The material code is alphanumeric and can have a maximum of 16 characters.
• The quality code is numeric and be set in the range from 0 to 2147483647.
• Both the material name and the material code must be unique.
• The quality and the quality code must be unique within a material.
• When you delete a material, the system checks which recipes, libraries and formulas contain use it. If this material still occurs in one of these, it cannot be deleted.

Batch Control Center (BatchCC)
SIMATIC BATCH A5E00495287-01 6-31
To create a new material: 1. Select the "Materials" folder in BatchCC.
2. Select the menu command Edit > New.
Result: The dialog box "Properties of <materials>" opens.
3. In the "Materials" tab, specify the following:
- Name of the material
- Unique alphanumeric code (string) for the material
- Whether or not it is an input or output material
4. Select the "Qualities" tab.
5. Add new qualities with the "New" button. Several qualities are possible for a material.
Note:
The definition of qualities for a material is optional.
6. Confirm the new materials you have made with "OK".
Note:
As an alternative, you can also make these settings with the commands "New" and "Properties" in the shortcut menu for the "Materials" folder in the tree.
Modifying and deleting Using the shortcut menu commands "Properties" and "Delete" you can modify or delete existing materials.
6.4.2 Changing the quality
Follow the steps outlined below: 1. Select the quality BatchCC (in the "Materials" folder).
2. Select the menu command Edit > Properties.
3. Change the settings for the quality in the "Quality" dialog.
4. Save you new entries with "OK".
Note:
As an alternative, you can also perform this settings in the tree using the command Properties in the shortcut menu of the object .

Batch Control Center (BatchCC)
SIMATIC BATCH 6-32 A5E00495287-01
6.5 Recipes
6.5.1 Flow chart: How to create and edit a master recipe
How to create and edit a master recipe

Batch Control Center (BatchCC)
SIMATIC BATCH A5E00495287-01 6-33
6.5.2 Flow chart: How to create/edit a library operation
How to create / edit library operations and insert them in master recipes

Batch Control Center (BatchCC)
SIMATIC BATCH 6-34 A5E00495287-01
6.5.3 Basics of recipe creation
6.5.3.1 Relationship between header parameters, formula category and external formula
Header parameters (internal formula) If you want to keep your material and production data directly in the master recipe, you can do this in the recipe header. This is then known as an internal formula. The material and production data can be set there during the creation of the master recipe and modified during batch planning and/or also while a batch is executing. These parameters can be passed on from the recipe header to individual recipe steps or from the recipe steps to the recipe header.
Interaction between header parameters, formula category and external formula If you want to manage several material and production data lists for a master recipe, you must do this outside the master recipe in "external" formulas belonging to a formula category.
In this case, a formula category is assigned to a master recipe. The parameters of the master recipe are then interconnected with those of the formula category, the parameters that can be manipulated by an operator using a formula during batch planning are marked. In the formula category, the parameters are listed with the data type and physical unit. Concrete parameter values, a high and low limit and a references to the procedure (master recipe), are in the formula.
The parameters of external formulas can also be modified during batch planning and/or while a batch is executing.
Note:
Internal and external formula must not be congruent, this means, all recipe header parameters must not be interconnected to an external formula. and not all the parameters of an external formula need to be used in a master recipe.

Batch Control Center (BatchCC)
SIMATIC BATCH A5E00495287-01 6-35
Example of interaction
6.5.3.2 Interconnecting parameters
Interconnecting parameters between the master recipe and external formula After assigning the master recipe and formula category, the parameters for the input materials, output materials and process parameters still need to be interconnected.
The advantage of this is that you can use independent parameter names in the formula category of a master recipe. After assigning a formula category to a master recipe, you specify the reference to the parameters in the formula category in the properties dialog. Parameters of the same data type and same physical unit are made available from the formula category.

Batch Control Center (BatchCC)
SIMATIC BATCH 6-36 A5E00495287-01
6.5.4 Editing master recipes
6.5.4.1 How to configure a master recipe
Note:
The order of the steps shown is not absolutely necessary. We have selected a method on which the more detailed description of the actions is oriented.
Note:
You can also use master recipes without using the "formula category" and "formulas" objects. In this case, the material and production data (formula) are set in the properties of the master recipe.

Batch Control Center (BatchCC)
SIMATIC BATCH A5E00495287-01 6-37
Configuring a master recipe The schematic below shows a recommended sequence for configuring a master recipe in BatchCC. It illustrates clearly how to configure the assignments between the master recipe, formula category and formula.
You create the actual recipe structure and set the properties of the recipe elements (Step 2) in the BATCH Recipe Editor. All the other steps can be made in BatchCC.
reference to formula category
reference to new formula category
reference to master recipe

Batch Control Center (BatchCC)
SIMATIC BATCH 6-38 A5E00495287-01
Basic procedure You create the master recipes in the BATCH Recipe Editor:
• For hierarchical recipes: as a structure of recipe unit procedures (RUPs), recipe operations (ROPs) and recipe phases (RPHs)
• For flat recipes: as a structure in substructures (SUBs)
In BatchCC, you can specify the reference to a formula category in the properties of the master recipe (header parameters). In the properties of the formula, you specify the reference to the procedure (master recipe). After these steps, you have a complete master recipe for batch planning.
6.5.4.2 Creating a new master recipe
There are two ways of creating a new master recipe:
• In the BATCH Recipe Editor: see section "BATCH Recipe Editor"
• In BatchCC: following description
Follow the steps outlined below in BatchCC: 1. Select the "Master recipes" folder.
2. Select the menu command Edit > New > Hierarchical/Flat.
3. Enter the name and version of the new master recipe in the dialog displayed and confirm with OK.
Result: The new master recipe is inserted as an object . The master recipe is in the initial status "In Progress" and can now be edited.

Batch Control Center (BatchCC)
SIMATIC BATCH A5E00495287-01 6-39
Editing You can now continue to edit the master recipe either using the shortcut menu for the object or alternatively using the "Edit" menu of the menu bar:
• Creating the recipe topology
To edit the master recipe, open the object with the "Open" menu command. The BATCH Recipe Editor is then opened. In the BATCH Recipe Editor, you create the topology of the master recipe with steps and transitions and define the properties of the recipe elements (RUPs, ROPs, RPHs, SUBs and transitions).
• Specifying the master recipe
To specify the properties of the recipe header parameters, select the "Properties" menu command.
• Working with the recipe overview
As an alternative to the tree, the "master recipe" objects can also be edited in the recipe overview. You can open the recipe overview with the menu command "Details". First, select the folder with the desired master recipes in the tree.
• Validating recipes.
• Releasing recipes for testing
• Releasing recipes for production
6.5.4.3 Opening and editing recipes
Editing Recipes The recipe procedures of the master recipes and the library operations are created with the BATCH Recipe Editor.
With the exception of deleting, that is only possible with the BatchCC, you can make any modifications to recipe procedures and library operations with the BATCH Recipe Editor.
Follow the steps outlined below in BatchCC: To edit master recipes and library operations, the objects must first be opened:
1. Select the master recipe or library operation in the BatchCC
2. Select the menu command Edit > Open.
Result: The BATCH Recipe Editor opens displaying the graphic structure of the highest hierarchical level of the recipe object.

Batch Control Center (BatchCC)
SIMATIC BATCH 6-40 A5E00495287-01
6.5.4.4 Specifying the properties of master recipes
Open tab dialog box There are two ways in which you can open the "Properties of <Recipe name>" tab:
• In the BATCH Recipe Editor: see section "BATCH Recipe Editor"
• In BatchCC: following description
Follow the steps outlined below in BatchCC: 1. Select the master recipe in the "Master recipes" or in one of its subfolders in
the BatchCC.
2. Select the menu command Edit > Properties.
Result: The "Properties of the <recipe name>" dialog is displayed with the header parameters. In the dialog tabs, all the Properties of the master recipe are available, which must/can be specified for a recipe in addition to the master recipe structure.
Some of the properties (parameters) already have a fixed value due to the detailed configuration of the individual recipe elements (RUPs, ROPs, RPHs, SUBs transitions) based on the process cell configuration in the engineering system. You can recognize parameters or settings that can still be modified by the white editing fields.
3. Make the settings you require in the tabs and confirm with "OK".

Batch Control Center (BatchCC)
SIMATIC BATCH A5E00495287-01 6-41
Entering properties You enter the properties of the master recipes in the following tab dialog box. Click the "Help" button for context-sensitive help on each individual input or output box in the tab.
Reference to Formula Category With the "Category" input box in the "General" tab, you assign the formula category with the required structure for material and production data (formula) to the master recipe. It is assumed that the formula category has already been created.
See also section: Relationship between header parameters, formula category and formula
Interconnecting parameters After assigning the master recipe and formula category, the parameters still need to be interconnected. After assigning a formula category to a master recipe you specify the reference to the parameters in the formula category in the properties dialog ("input materials", "output materials" and "parameters" tabs).
See also section: Interconnecting parameters between the master recipe and formula

Batch Control Center (BatchCC)
SIMATIC BATCH 6-42 A5E00495287-01
Electronic signatures Actions and status changes of recipes and recipe elements can be signed. You configure electronic signatures in the "ESIG" tab.
See also section: Specifying electronic signatures
Additional information Overview of the properties of the master recipe
6.5.4.5 Creating a new formula category
Follow the steps outlined below in BatchCC: 1. Select the "Formulas" folder.
2. Select the menu command Edit > New.
3. Enter the name of the new formula category in the dialog displayed and confirm with OK.
Result: The new formula category is inserted as an object . With the formula category, you can now create a class of formulas with the same raw material and production data structure.
Editing You can now continue to edit the formulas as follows:
• Specifying the properties of the formula category
• Creating a new external formula
6.5.4.6 Specifying the properties of the formula category
Follow the steps outlined below in BatchCC: 1. Select the formula category in the "Formulas" folder or in one of its subfolders.
2. Select the menu command Edit > Properties.
Result: The dialog box "Properties of <category name>" is displayed. In the tab dialogs, the structure of the material and production data (formula) can be specially created for this formula category (external formula).
3. Enter the structure of the formula category consisting of the parameter names, data type (only for process parameters) and physical unit and confirm with OK.
Result: With the formula category, you can now create formulas with the same raw material and production data structure by creating new formulas under this formula category in the tree.

Batch Control Center (BatchCC)
SIMATIC BATCH A5E00495287-01 6-43
Entering properties You enter the properties of the formula category in the following tab dialog box. Click the "Help" button for context-sensitive help on each individual input or output box in the tab.
6.5.4.7 Creating a new external formula
Follow the steps outlined below in BatchCC: 1. Select the required formula category in the "Formula" folder. If the formula
does not match any formula category, you have to create the corresponding formula category first.
2. Select the menu command Edit > New.
3. Enter the name and version of the new formula in the dialog that follows.
Result: The new formula is inserted as an object . In the properties dialog for the formula, you can now enter the required information for the materials, quantities and quality. |The parameters of the higher level formula category are displayed in each case. If parameters are missing, the formula category needs to be adapted.

Batch Control Center (BatchCC)
SIMATIC BATCH 6-44 A5E00495287-01
Editing You can now continue to edit the formulas as follows:
• Specifying the properties of a formula
• Interconnecting master recipe header parameters with an external formula
6.5.4.8 Specifying the properties of a formula
Follow the steps outlined below in BatchCC: 1. Select the formula under the formula category.
2. Select the menu command Edit > Properties.
Result: The dialog box "Properties of <formula name>" is displayed. The possible range of values for the parameters of the formula are displayed as the upper and lower limits.
3. Enter the required parameter values and select the corresponding master recipe.
Note:
In the "Master recipe" input field you can select those master recipes to which the formula category of the present formula has already been assigned. If the required master recipe is not listed, change to the properties dialog of the master recipe and enter the reference to the formula category there.

Batch Control Center (BatchCC)
SIMATIC BATCH A5E00495287-01 6-45
Entering properties You enter the properties of the formula in the following tab. Click the "Help" button for context-sensitive help on each individual input or output box in the tab.
Reference to the master recipe In the "Master recipe" input box in the "General" tab, you assign a specific master recipe to the formula. After these steps, you have a complete master recipe for batch planning.
See also section: Relationship between recipe header parameters, formula category and formula

Batch Control Center (BatchCC)
SIMATIC BATCH 6-46 A5E00495287-01
6.5.4.9 Interconnecting master recipe header parameters with an external formula
Interconnecting parameters After assigning the master recipe and formula category, the parameters of the input materials and process parameters must still be interconnected. Perform the parameter interconnection for the master recipe in the properties dialog, provided the formula category was assigned there (see also section Specifying the Properties of the master recipe).
Follow the steps outlined below: 1. Select the master recipe in the "Master recipes" or in one of its subfolders in
the BatchCC.
2. Select the menu command Edit > Properties.
Result: The dialog box "Properties of <recipe name>" is displayed.
3. Change to the tabs for input materials, output materials, or parameters.
4. Create the reference to a parameter in the formula category in the "Source" column.
- Left-click: The list box contains all the formula parameters of the same data type and same physical unit for selection. It may be necessary to assign the unit first in the "Phys. unit" column. "E" is shown under Value indicating external (see figure).
- Right-click: Another dialog box opens. When creating new parameters, you can use this to check whether a parameter of the same name at a different level will be overwritten and if this is the case, you can see the level at which the parameter exists.

Batch Control Center (BatchCC)
SIMATIC BATCH A5E00495287-01 6-47
5. Confirm the references with "OK".
The header parameter is connected to the parameter of the external formula using the parameter of the formula category provided this master recipe was already assigned to a formula (see also section Specifying the Properties of the Formula). The values of the formula are used in the parameters of the master recipe.

Batch Control Center (BatchCC)
SIMATIC BATCH 6-48 A5E00495287-01
Display of parameter interconnection The interconnection is displayed in the properties dialog of the formula with a connection icon in the "Usage" column:
: interconnected
: not interconnected (or no longer connected)
See also Interconnecting parameters

Batch Control Center (BatchCC)
SIMATIC BATCH A5E00495287-01 6-49
6.5.4.10 Working with the recipe overview
Recipe overview The recipe overview provides you with a list of the master recipes of a selected area. Apart from the properties from the tree, this list also shows the author and date of the last modification.
Using the shortcut menu for the list object, you can select the available functions in the same way as in the tree structure (alternative editing method).
Selecting the recipe overview • Select the required area by first selecting a master recipe folder in the tree
structure and then selecting the menu command Edit > Details.

Batch Control Center (BatchCC)
SIMATIC BATCH 6-50 A5E00495287-01
6.5.4.11 Working with the formula overview
Formula overview The formula overview provides you with a list of all the formulas of a selected area. Apart from the properties from the tree, this list also shows the author and date of the last modification.
Using the shortcut menu for the list object, you can select the available functions in the same way as in the tree structure (alternative editing method).
Selecting the formula overview Select the required area by first selecting a formula folder in the tree and then selecting the menu command Edit > Details.

Batch Control Center (BatchCC)
SIMATIC BATCH A5E00495287-01 6-51
6.5.5 Working with libraries
6.5.5.1 How to configure library operations
Configuring library operations The schematic below is a recommended sequence for configuring a library operation in the BATCH Recipe Editor. You manage library operations in the BatchCC. All the other steps can be made in the BATCH Recipe Manager.
Reference to unit class
Basic procedure You create reusable library operations in the BATCH Recipe Editor
• For hierarchical recipes: as a structure of recipe phases (RPHs)
• For flat recipes: as a structure in substructures, recipe operations ROPs and recipe phases (RPHs)
A library operation for hierarchical recipes is created for each specific unit class. The unit class is referenced in the header of the library operation. When the unit is to be selected by conditions, specify the conditions for the future unit in the library operation.
In the BATCH Recipe Editor, you store the library operations created in this way in the "Libraries" folder in the BatchCC using a menu command.

Batch Control Center (BatchCC)
SIMATIC BATCH 6-52 A5E00495287-01
When you create the recipe structure in the BATCH Recipe Editor you insert the required library operation using a library reference. The library operation is not copied but a link to the library operation within the library is created.
Any modifications required must always be made to the library operation stored in the library. Any changes made to the library operation always affect all links (library references) in the master recipes of the process cell.
Multiple use A library operation can be used in the following ways:
• More than once in a process cell
• More than once in a recipe procedure (RP)
• More than once within a recipe unit procedure (RUP) only with hierarchical recipes
• More than once within a substructure (SUB) only with flat recipes
See also Specifying the properties of master recipes

Batch Control Center (BatchCC)
SIMATIC BATCH A5E00495287-01 6-53
6.5.6 Status and validity of recipes
Status changes and validation of master recipes and library operations The initial status of a newly created master recipe or library operation is always "In Progress". You can bring about status changes using the appropriate commands. For batch planning, the master recipe must be valid.
Status Triggered by Meaning
Menu command New
A master recipe or a library operation always has the status In Progress after it has been created.
Menu command Validity check
The plausibility (validity) of the parameters in the process cell data is checked. A results list or error list is displayed that indicates, for example, which parameter settings are missing. Requirement: The master recipe or library operation has header parameters and a recipe structure.
Menu commands Release for testing Release for production
The two releases differ only in that different permissions and different user routines can be used. Both releases can be started without first running the validation check. In this case, a validation is run automatically in the background.
Menu command To revoke the release:
If a master recipe or library operation had already been released for production, the release can be revoked (for example to make modifications).
When updating the process cell data
After updating, all the recipes (master recipes, library operations) of this process cell that were "released for production" and "released for testing" are changed to the "Testing release" status. After updating the process cell data, the recipes and library operations in the "Testing release" status are checked automatically. If the check is successful, the master recipes and library operations are returned to their original status. If the check is unsuccessful, the elements are changed to the "release invalid" status. They can now be edited and released again.

Batch Control Center (BatchCC)
SIMATIC BATCH 6-54 A5E00495287-01
Difference between releasing for testing and releasing for production In the validation for release of a recipe, you can include you own test routines. Due to the distinction between release for testing and Release for production, separate test routines can be processed. You could, for example, only allow water as the product for recipes released for testing. Different user permissions can also be defined.
Recipes released for testing can also be edited directly after revoking the release. If recipes are released for production, editing is possible only with certain settings in BatchCC (Options > Settings).
Validity of the Formula For batch planning, the formula (with assigned master recipe) must be validated.
Status Triggered by Meaning
Menu command New
A formula always has the status In progress after it has been created.
Menu command Validity check
The assignment of a master recipe and the validity of the formula parameters are checked. A result or error list is displayed that indicates, for example, which parameters are not interconnected. Requirements • A master recipe released for testing or production
is assigned to the formula. • The formula parameters were interconnected
successfully The formula parameters are within the upper and lower limit values
Menu command Release
The release can be started without first running the validation check. In this case, a validation is run automatically in the background.
Menu command To revoke the release:
If a formula had already been released, the release can be revoked (for example to make modifications). This is also the status if you make modifications in the properties dialogs.
Requirements for Batch Control
Note: Only validated formulas with master recipes released for production can be used for batch control.
Only test batches (for example, test operation with water) can be created with the master recipes and library operations released for testing.

Batch Control Center (BatchCC)
SIMATIC BATCH A5E00495287-01 6-55
6.5.6.1 Validating recipes
Definition The validation covers the consistency of the library operations and process cell data used in the created recipe.
Requirement This is only possible when the recipe is edited with the elements step, transition and structure elements along with the corresponding configuration of the recipe data (header).
Follow the steps outlined below in BatchCC: 1. Select the recipe you want to validate (master recipe or library operation) in the
tree.
2. Select the menu command Edit > Validation.
Result: A result display or error list is displayed that indicates whether or not the recipe header is completed, whether materials exist, whether steps and transitions in the recipe are configured or whether the standardized quantity is correct. Validation is also possible in the BATCH Recipe Editor.
Note:
If the recipe is open in the BATCH Recipe Editor, you can also jump to the part of the recipe that caused the problem by double-clicking the entry in the error list.
Note:
You can use the validation function at any time. Validation does not change the recipe status.
External validation Validation is possible based on modules that can be created and modified externally (plug-in modules).
How you program these modules is described in the documentation SIMATIC BATCH;. Plug-in Concept.. How these modules are registered and their functions activated in SIMATIC BATCH is explained in the section "Working with externally created modules for validation".

Batch Control Center (BatchCC)
SIMATIC BATCH 6-56 A5E00495287-01
6.5.6.2 Releasing recipes for testing
Requirement: The requirement for this function is the validation of the recipe. The validity of the recipe is first checked automatically when you start this command.
Follow the steps outlined below in BatchCC: 1. Select the recipe (master recipe or library operation) in the tree.
2. Select the menu command Edit > Release for Testing.
Result: After it has been released, the recipe has the status "Released for
testing". If errors occur in the validation, the problems are displayed and the recipe status remains "In Progress...". Release is also possible in the BATCH Recipe Editor.
Note:
If the recipe is open in the BATCH Recipe Editor, you can also jump to the part of the recipe that caused the problem by double-clicking the entry in the error list.
6.5.6.3 Releasing recipes for production
Requirement: The requirement for this function is the validation of the recipe. The validity of the recipe is first checked automatically when you start this command.
Follow the steps outlined below in BatchCC: 1. Select the recipe (master recipe or library operation) in the tree.
2. Select the menu command Edit > Release for production.
Result: After it has been released, the recipe has the status "Released for Production". If errors occur in the validation, the problems are displayed and the recipe status remains "In Progress...". Release is also possible in the BATCH Recipe Editor.
Note:
If the recipe is open in the BATCH Recipe Editor, you can also jump to the part of the recipe that caused the problem by double-clicking the entry in the error list.

Batch Control Center (BatchCC)
SIMATIC BATCH A5E00495287-01 6-57
6.5.6.4 Validating formulas
Definition During validation, the formula is checked to make sure that a released master recipe is assigned. The consistency of the formula parameters and their interconnections with the parameters of the master recipe are also checked.
Requirements: • A master recipe released for testing or production is assigned.
• The formula parameters were interconnected successfully
• The formula parameters are within the upper and lower limit values
Follow the steps outlined below in BatchCC: 1. Select the formula you want to check in the tree.
2. Select the menu command Edit > Validation.
Result: A result or error list is displayed that indicates, for example, whether or not the assigned master recipe is released.
Note:
You can use the validation function at any time. The validation does not change the status of the assigned master recipe.

Batch Control Center (BatchCC)
SIMATIC BATCH 6-58 A5E00495287-01
6.5.6.5 Status of the recipes and status changes
The initial status of a new recipe is always "In progress". You can bring about status changes using the appropriate commands. You must first open the shortcut menu and select the appropriate commands to change the recipe.
Meaning of the icon: On the left is the status icon (for example, released/release revoked/ etc.), on the right is the type icon (for example hierarchical / flat).
Status displays of the recipes and their meaning
Symbol Status Meaning
In progress Initial status of a newly created and status after modifying a recipe.
Released for testing Recipes that have been released for testing can be used
for creating a batch for test purposes. If the function is given graded permissions, a distinction can be made between testing the functionality (for example a test mode with water...) and production.
Released for production This status indicates that the recipe has been tested for normal production. Following the command Revoke release, or Configure Process cell, the recipe changes to the "Release Revoked" status.
Release revoked If a recipe has already been released for production or testing, it can be changed to this status using "Revoke release", for example to correct errors.
Testing release After updating the process cell data, all the recipes (master
recipes, library operations) and formulas of this process cell that were "released for production" and "released for testing" are changed to the "Testing release" status.
Release invalid After updating the process cell data, the recipes and library
operations in the "Testing release" status are checked automatically. If the check is unsuccessful, the elements are changed to the "release invalid" status.
A recipe that is already open and being edited is locked to prevent access by other operators. This is indicated by an additional icon locked .
Released recipes are displayed in the BatchCC when you create batches.

Batch Control Center (BatchCC)
SIMATIC BATCH A5E00495287-01 6-59
6.5.6.6 Status of the formula and status changes
The initial status of a new formula is always "In progress". You can bring about status changes using the appropriate commands. You must first open the shortcut menu and select the appropriate commands to change the formula.
Meaning of the icon: On the left is the status icon (for example, released/release revoked/ etc.), on the right is the type icon.
Status displays of the formula and their meaning
Symbol Status Meaning
In progress Initial status of a newly created formula.
Released for production This status indicates that the formula is intended for normal production. Following the command Revoke release, or Configure Process cell, the recipe changes to the "Release Revoked" status.
Release revoked If a formula has already been released for production, it can be changed to this status using "Revoke release", for example to correct errors.
Testing release After updating the process cell data, all released formula of this process cell change to the "testing release" status.
Release invalid After updating the process cell data, the formula in the "Testing release" status are checked automatically. If the check is unsuccessful, the elements are changed to the "release invalid" status.
A formula that is already open and being edited is locked to prevent access by other operators. This is indicated by an additional icon locked .

Batch Control Center (BatchCC)
SIMATIC BATCH 6-60 A5E00495287-01
6.5.6.7 Working with externally created modules for validation
Validation is possible based on modules that can be created and modified externally (plug-in modules).
How you program these modules is described in the documentation SIMATIC BATCH;. Plug-in Concept.. Below, you will learn how these modules are registered in SIMATIC BATCH and how to activate their functions.
Follow the steps outlined below: 1. Install the plug-in modules on the BATCH clients.
2. Select the menu command Options > Settings in SIMATIC BATCH.
3. Change to the "Used plug-in modules" tab.
4. If necessary, add new modules not yet known in SIMATIC BATCH and whose files are located on the computer using the "Add" button.
5. Select the module you want to use in the "Used plug-in modules" tab and confirm with "OK".
6. Result: The "Plug-in details" dialog box opens.
7. Here, you configure the functionality of the module and confirm with "OK".
8. Result: If no functionality is selected, a message is displayed telling you that no functionality has been selected.
Note:
At least one of the supported functions must be selected. Only then will the module become active during the next validation.
9. Confirm with "OK".
10. Run the validation as described in the section "Validating recipes".
Result: If recipe elements are not run through due to the functionality of the modules, they are indicated by being crossed through in the open control recipe.

Batch Control Center (BatchCC)
SIMATIC BATCH A5E00495287-01 6-61
6.5.7 Recipe reports
Definition of a recipe report The "off-the-shelf" recipe report contains all the data required for production. These include the recipe header data, the recipe topology, the input materials, the output materials, the parameter list and the procedural rules.
Principle The recipe report data is available centrally in the Batch database. In BatchCC, you can print out the recipe report as documentation or view a print preview.
Follow the steps outlined below in the BatchCC: 1. Select the menu command Edit > Print preview in BatchCC with a master
recipe selected (in the tree). As an alternative, you can also select a print preview with the right mouse button when the master recipe is selected.
Result: The user interface of BATCH Report is opened. The recipe report for the master recipe is displayed. In the upper section of BATCH Report you can see the structure of the content of the master recipe with the RUPs, ROPs, RPHs and transitions.
2. Click on one of these recipe elements.
Result: You jump to the recipe element with the corresponding report data.
3. You can print out the displayed report data to provide documentation with the menu command Edit > Print.
Printing a recipe directly In BatchCC, you can print the entire report data of a recipe without a print preview.

Batch Control Center (BatchCC)
SIMATIC BATCH 6-62 A5E00495287-01
6.5.8 Exporting and importing
6.5.8.1 Exporting/importing Batch objects
A convenient assistant is available to guide you through the export and import of BATCH objects.
Batch objects that can be exported/imported • Libraries
• Master recipes
• Formula categories
Format The exported data are saved to a file with the "*.sbx" file extension.
Compatibility You can export beginning with version V6.1. Export data from the current or an older SIMATIC BATCH version are supported for importing.
Start the Import/Export Assistant • The Export Assistant can be started with the menu command Options >
Export
• The Import Assistant can be started with the menu command Options > Import
• Alternatives for starting the export process without the assistant:
- Shortcut menu (libraries, master recipe, formula categories) for each element
- Overviews (libraries, master recipes) for one or more elements
Note:
All referenced objects (such as materials, libraries, formula categories) are included in the export. All formulas in a formula category are always included in the export.

Batch Control Center (BatchCC)
SIMATIC BATCH A5E00495287-01 6-63
6.5.8.2 Exporting using assistants
Procedure 1. Select the Options > Export menu command in BatchCC.
Result: The Assistant opens.
2. Select what you wish to export, libraries and/or master recipes and/or formula categories.
Note:
All referenced objects (such as materials, libraries, formula categories) are included in the export. All formulas in a formula category are always included in the export.
3. Press the "Export selected elements" button. Result: The subsequent "Save as" dialog appears.
4. Select the storage location and file name for the export file here.
6.5.8.3 Importing using assistants
Principle of importing The Import Assistant is usually used to swap out and reenter process cell data. The process cell data are exported from a source process cell (see previous section) and then imported into the target process cell. The source and target process cells may differ, of course. The Import Assistant provides interactive dialogs to guide the user.
After selecting the desired import file and setting the type of import (recipes, libraries, formula categories), the corresponding content of the import file is displayed in the first page of the Assistant. You can specify which elements of the import file should be imported. If there is a saved object with the same name in the currently open Batch process cell, this is displayed. When this happens, enter a new name or exclude the object from the import.
In the subsequent dialogs, the Import Assistant compares the process cell data of the file to be imported with the process cell data of the batch process cell open in BatchCC (target process cell). The status of the assignments is display graphically. Missing assignments can be manually removed by activating check boxes. Assignments can only be made when the name and data type match.
If an assignment cannot be made or if an element should be excluded, the corresponding check box can be deactivated.
Note:
If you deactivate the import of individual elements, the validation is no longer guaranteed. The resulting errors in the validation check are shown in the validation log. These errors can be corrected in the recipe editor of the affected recipe.

Batch Control Center (BatchCC)
SIMATIC BATCH 6-64 A5E00495287-01
Additional parameter assignments must be made for formula categories and libraries. If a formula category is replaced, for example, the Import Assistant needs to be informed about the correspondence between the parameters of the new formula category and those of the old. This is especially important to provide the interconnected parameters in the recipe header a reference in the new formula category. The Import Assistant makes these parameter assignments where possible. These assignments should be checked and corrected as required. Parameters can only be assigned when the target data type and unit of measure of the original parameter match the data type and unit of measure of the assigned parameter.
Follow the steps outlined below: 1. Select the menu command Options > Import in the BatchCC.
Result: The "Import objects from file" dialog opens.
2. Select the file to be imported here: After selecting a file with the "*.sbx" extension, the right table "Elements contained in export file" is filled out. The type (master recipes, libraries, formula categories) and number of objects of the type are displayed on a line depending on the content of the sbx file. Select the type you want to import here.
3. Confirm your selection of the desired file with "OK".
Result: The assistant for the import process starts.
4. Following the instructions provided by the interactive dialog and always click on "Next" once you completed the settings in a dialog box. Detailed information about the respective dialog box is available in the online help (press the "Help" button).
Result: The entries are always checked for discrepancies before a dialog is closed. The system checks if all elements with a check mark have an assignment. If they do not, correct the error and press "Next" again.
Example for the import of recipes: If there is a saved recipe with the same name and same version in the currently open Batch process cell, this is indicated by a red exclamation mark in the recipe line and you cannot leave the "Import Recipes" dialog and proceed to the next dialog with the "Next" button. In this case, specify a new recipe name or a new version number or exclude the recipe from the import by removing the check mar. Then press "Next".
5. Once you have completed all dialog boxes, press the "Finish" button.
Result: All selected elements are imported and displayed in the tree.
Note:
All referenced objects (such as material, libraries, formula categories) are imported according to your settings. All formulas in a formula category are always included in the import.

Batch Control Center (BatchCC)
SIMATIC BATCH A5E00495287-01 6-65
6.5.8.4 Tooltips and shortcut menu of the Import Assistant
Tooltips in the dialog boxes of the Assistant Tooltips are shown when you move the mouse pointer over the list elements: Tooltips contain information such as name, object ID and/or unit.
Shortcut menu in the dialog boxes of the Assistant A shortcut menu can be opened for dialog boxes with assignment lists by a right click in the dialog box: Depending on the status of the list lines, the following commands are available in the shortcut menus:
Shortcut menu command
Description
Import The check box is set with this command. If the check box for the list line is not set, this entry is the only one in the shortcut menu.
Exclude from import Only when check box is set: This command clears the check box and removes any assignments or renaming that have been done.
Rename Only for activated check box and when renaming is allowed: This command allows you to assign a new name for the element to be used for importing the element.
Reject new name Only for activated check box and when renaming has been made: If you have inadvertently changed a name, you can restore the original name using this command. The entry in the corresponding column is deleted.
Release assignment Only for activated check box and when assignment has been made: This command rescinds an assignment that has been made
(corresponds to the button)

Batch Control Center (BatchCC)
SIMATIC BATCH 6-66 A5E00495287-01
6.6 Batch planning
6.6.1 Flow chart: How to create/edit a batch

Batch Control Center (BatchCC)
SIMATIC BATCH A5E00495287-01 6-67
What can be planned? A production order specifies which product will be manufactured. Batches can be assigned to a the production order manually or automatically.
The recipe on which the batch is based specifies the production process and the duration of the unit allocation.
The following can also be selected for a specific batch:
• Batch quantity
• Formula/master recipe
• Units used
• Start mode and start time
The sequence in which batches are executed can be selected by chaining the batches.
6.6.2 Order of batch processing
Order of processing The processing order of the created batches in SIMATIC BATCH (status: planned) are determined by the order of their release. All released batches are included in batch control in the order or their releases. Batches that do not use the same units and equipment modules can also be processed at the same time.
The batches are started when the units and the start of the control recipe are free depending on the selected Start mode "immediately", "time-driven" or by the "operator". If "time-driven" is set, the set time is started. Once the time has elapsed, the batch whose start time is furthest in the past is started first.
Example scenario: If a "Start allocation" for unit A was selected, the batch starts only when it can occupy unit A. If the unit is allocated to another batch, the batch does not change to the "in progress" or "waiting" status. There is another reaction if "Start allocation" is not selected: the batch changes to the "waiting" state. In other words, the batch starts and waits until unit A is released.
Chaining batches If you want the batches to be processed in a specific order (regardless of the order in which they were released), you can also chain batches. For each planned batch, you can specify which batch must be started and which batch must be completed before the planned batch is started (see "Chaining batches.").

Batch Control Center (BatchCC)
SIMATIC BATCH 6-68 A5E00495287-01
6.6.3 Planning batches
6.6.3.1 How to configure batches
Note:
You can create batches by using master recipes or formulas (with assigned master recipes). The procedure is identical in both cases. The procedure for working with formulas is described below.
Configuring batches With SIMATIC BATCH, you can plan batches and specify the chronological order of several batches without having to release the batches immediately for production. Batches can be derived from production orders.
The sequence shown below is the recommended order for configuring production orders with batches in BatchCC. The diagram shows which settings must be made for batches.
Reference to formula (with assigned
master recipe)

Batch Control Center (BatchCC)
SIMATIC BATCH A5E00495287-01 6-69
Basic procedure You create the batches for the production orders in BatchCC. By defining and selecting a master batch, numerous batches with similar properties can be created quickly. In the properties of each batch, you specify the reference to a released formula with assigned master recipe or to a released master recipe without a formula category assignment. You can specify the batch quantity and Start mode for every batch. By chaining the batches, you can define the order in which they are processed.
6.6.3.2 Creating a new production order
Follow the steps outlined below in BatchCC: 1. Select the "Orders" folder.
2. Select the menu command Edit > New.
A dialog with the "General" and "Batches" tabs opens.
3. Make the following settings for the production order in the "General" tab:
- Name of the production order
- Planned total batch quantity for the order
- Earliest start and latest end of the batches

Batch Control Center (BatchCC)
SIMATIC BATCH 6-70 A5E00495287-01
4. You then have two options as to how you continue the configuration.
1. Option
You do not want to create specific batches yet. Simply confirm the settings made up to now with "OK" at this point. Result: The production order is inserted as an object
into BatchCC. Later, you can add batches to this order and set the actual properties for each batch.
See also section: Adding batches to a the production order
2. Option
You move on immediately to the "Batches" tab.
For further settings:
See section: Assigning batches to a the production order
Additional information • Displaying the properties of a production order
• Working with overviews

Batch Control Center (BatchCC)
SIMATIC BATCH A5E00495287-01 6-71
6.6.3.3 Assigning batches to a the production order
Follow the steps outlined below in BatchCC: 1. While creating a new order, change to the "Batches" tab (properties dialog for
the order).
2. Create the batches for the production order as follows:
- You can create new batches with the "New" button. You then make the settings for the batch quantity, Start mode, formula etc.
- Working with the master batch: Select a batch in the table and then press "Copy", the selected batch then gets the status of a master batch and all subsequently created batches have the property of a master batch.
- Automatic: Using the "Automatic" button is a convenient method of calculating batches for a specific amount of material.
3. If necessary, change the assignment to a unit or to a master recipe or formula by clicking on one of the table cells "Allocations", "Product", or "Recipe/Formula".

Batch Control Center (BatchCC)
SIMATIC BATCH 6-72 A5E00495287-01
Result:
- In this dialog, you enter the product, the formula or the formula category. As a result, all the assignments with a released master recipe and/or validated formula are listed.
- Select the row with the correct assignment and confirm with "OK".
Result: The batch is assigned to the new formula/master recipe in the "Batches" tab.
Tip: First, set all the properties (batch quantity, Start mode, formula) of the master batch in the "Batches" tab or make any batch the master batch by selecting it and then creating further batches with the "Copy" button.
4. Set the batch quantity in the "Quantity" cell. The reference scale standard of the quantity has been previously configured. If you set a value outside the limits set by the minimum and maximum scale, the value is corrected to the limit value.
5. If necessary, change the Start mode and start time in the "Mode" and "Start" table cells.
6. Confirm all your entries with "OK".
Result: The information about the number of batches and the total batch quantity of the production order is updated in the "General" tab. The batches are created as objects
below the production order. The batches are in the "Planned" status.

Batch Control Center (BatchCC)
SIMATIC BATCH A5E00495287-01 6-73
Creating batches automatically In the "Batches" tab, you can also create batches automatically using the "Automatic" button.
To create batches automatically: 1. Select a batch as the master batch.
2. Click the "Automatic" button.
Result: The dialog for selecting the formula/master recipe is displayed.
3. This is where you select the formula/master recipe and confirm with "OK".
Result: The "Generate batches" dialog box appears.
4. Make all the required entries and confirm with "OK".

Batch Control Center (BatchCC)
SIMATIC BATCH 6-74 A5E00495287-01
Result The number of batches and the amount of each batch is calculated automatically and created so that the total amount is produced.
6.6.3.4 Displaying the properties of a production order
Follow the steps outlined below in BatchCC: 1. Select the production order in the "Orders" folder in BatchCC.
2. Select the menu command Edit > Properties.
Result: You can see the current status of the production order in the dialog. All the batches created for the order are listed with their properties in the "Batches" tab. The "General" tab contains the following properties of the order.
Properties of the production order
Property Meaning Modifiable
Name Name of the order Can be modified with Rename Status Processing status of the order This is updated by BatchCC. Planned quantity Batch quantity: Planned total batch
quantity for the order Cannot be modified
Actual quantity Batch quantity: Here, the sum of all the quantities of all batches of the order is displayed
This is updated by BatchCC.
Unit of measure Unit of measure for the amounts** This is updated by BatchCC. Earliest start and latest end of the batches
Time window for processing the batches
Cannot be modified
Batches Number of batches for this order This is updated by BatchCC.
* Changes can only be made with the creation of a new production order.
** If batches have different units or different materials, "***" is displayed.

Batch Control Center (BatchCC)
SIMATIC BATCH A5E00495287-01 6-75
6.6.3.5 Adding batches to a the production order
There are several ways in which you can add batches to the production order.
• When a new production order is created:See section: Assigning batches to a the production order
• By Adding batches to an existing production order: following description
Follow the steps outlined below in the BatchCC: 1. Select the production order in the "Orders" folder.
2. Select the menu command Edit > New.
Result: The "Batches" properties dialog for the production order appears.
3. Follow the same procedure as described in the section "Assigning batches to a the production order".
Additional information • Working with overviews
• Releasing batches
• Opening the control recipe for the batch

Batch Control Center (BatchCC)
SIMATIC BATCH 6-76 A5E00495287-01
6.6.3.6 Specifying the properties of the batch
There are three ways in which you can specify the properties of batches:
• When a new production order is created: See section: Assigning batches to a the production order
• When supplementing a batch for the production order: see also section Adding batches to a the production order
• When changing an existing batch: following description
Follow the steps outlined below in the BatchCC: 1. Select the "Batch" object below the production order in the "Orders" folder in
BatchCC.
2. Select the menu command Edit > Properties.
Result: The dialog box "Properties of <batch name>" is displayed. In this dialog, you can do the following:
- Display and, if required, modify the batch quantity
- Set the Start mode for batch processing
- Display and modify unit allocation
- Display and modify formula parameters
- Display and, if necessary, modify the batch
- Display the run time of a batch
3. Make all the settings you require for the batch and confirm with "OK".
Result: After it is enabled, the batch can be processed depending on the selected Start mode and the unit allocation.

Batch Control Center (BatchCC)
SIMATIC BATCH A5E00495287-01 6-77
Entering properties You enter the properties of the batches in the following dialog. Click the "Help" button for context-sensitive help on each individual input or output box in the tab.
6.6.3.7 Setting the Start mode for batch processing
Follow the steps outlined below in BatchCC: 1. Select the "Batch" object below the production order in the "Orders" folder in
BatchCC.
2. Select the menu command Edit > Properties.
Result: The dialog box "Properties of <batch name>" is displayed.
3. In the "Start mode" input field, select either manual, immediate, or time-driven.
4. You must also set a start time and date.
5. Confirm with "OK".

Batch Control Center (BatchCC)
SIMATIC BATCH 6-78 A5E00495287-01
Possible start modes
Start mode Meaning
Operator You can start the released Batch with the menu command Control > Start . Immediately The batch is started when it is released as soon as the units required at the start of the
control recipe are free. Time-driven The batch is started on a particular day, at a particular time. The start time and date
must be specified.
Note:
Batches with the "immediate" Start mode are started before batches with the "time-driven" Start mode (have higher priority) if the same units are involved.
6.6.3.8 Displaying and modifying unit allocation
Unit allocation and duration A unit can only be involved in the production of one batch at any one time. The unit allocation is displayed along with the duration of the allocation and is not related to any particular recipe. The length of time required by units involved in a batch is set when the recipe is created. The times are relative to the start of the batch and take into account the actual quantity of the batch.
If necessary, you can adapt the unit allocation in the properties dialog of the batch.
Note:
The allocation times of the units are planning values used to optimize the use of facilities. Please remember that these allocation times are not exactly the same as the actual times required for batch control.
Follow the steps outlined below in BatchCC: 1. Select the "Batch" object below the production order in the "Orders" folder in
BatchCC.
2. Select the menu command Edit > Properties.
Result: The dialog box "Properties of <batch name>" is displayed.
3. Select the "Allocation" tab.
Result: The units reserved for the recipes are displayed in the table.
4. If required, modify the unit allocation. The "Unit" list box shows only the units that also have the recipe phases being used.
5. Confirm your changes with "OK".
Overview of the unit allocations You can also open an overview (read only) of the unit allocations with the menu command Planning > Unit allocation.

Batch Control Center (BatchCC)
SIMATIC BATCH A5E00495287-01 6-79
6.6.3.9 Displaying and modifying formula parameters
Changing a formula In the properties dialog for the batch, you can make the final modifications to the formula parameters.
Note:
Formula parameters modified at this point apply only to this batch. The parameter values are not changed in the formula used or in the master recipe used in the tree of BatchCC.
Follow the steps outlined below in BatchCC: 1. Select the "Batch" object below the production order in the "Orders" folder in
BatchCC.
2. Select the menu command Edit > Properties.
Result: The dialog box "Properties of <batch name>" is displayed.
3. Change to the "Input material", "Output material", or "Parameters" tab.
Result: Tables are opened displaying all the header parameters of the master recipe with the current values of the formula parameters.
4. If required, change the values of the formula parameters. The possible range of values are displayed as the upper and lower limits.
5. Confirm your changes with "OK".

Batch Control Center (BatchCC)
SIMATIC BATCH 6-80 A5E00495287-01
6.6.3.10 Displaying and, if necessary, modifying the batch
If the batch is chained, you can modify the chaining in the properties dialog of the batch. In the "Set batch order" dialog box, you can check and, if necessary, modify the specified predecessor and/or successor (menu command Planning > Set batch order).
Note:
This function is in development and is not yet implemented in SIMATIC BATCH V6.1.
Follow the steps outlined below in BatchCC: 1. Select the "Batch" object below the production order in the "Orders" folder in
BatchCC.
2. Select the menu command Edit > Properties.
Result: The dialog box "Properties of <batch name>" is displayed.
3. Select the "Chaining" tab.
Result: The defined predecessor/successors are displayed in the table.
4. If necessary, modify the chaining.
5. Confirm your changes with "OK".
6.6.3.11 Setting the order of batches
Chaining If you want to make sure that a batch is only started after a previous batch has been completed, you can also chain planned and not yet released batches. You can, for example, specify a predecessor batch and specify whether the predecessor batch must already be started or already be completed.
Follow the steps outlined below in BatchCC: 1. Select the menu command Planning > Set batch order.
Result: The "Set batch order" dialog box opens. All batches and their start and end times are displayed on the left.
2. Select the correct time range on the right.
3. Select a planned batch in the time window that will be chained with another batch.
4. Select one of the commands Chain with predecessor or Chain with successor in the shortcut menu.
5. Then select the predecessor or the successor batch.

Batch Control Center (BatchCC)
SIMATIC BATCH A5E00495287-01 6-81
Result Chained batches are displayed with a connecting line in the time window. By selecting the batches and then the shortcut menu command Cancel connection to predecessor, the chaining is broken again.
Note:
Deleting chained batches can result in the interruption of batch chain.
Note:
Tips:
• You can zoom the time scale CTRL and the right mouse button.
• If you select a batch and "Display" in the shortcut menu command, the time slice belonging to the batch is displayed in the time window.
• If you select a batch and then the "Go to Predecessor" command in the shortcut menu, you can jump to the predecessor in the time window.
Chaining Mode You can also specify the following modes for the chaining of the batch with the command "Properties" (shortcut menu) in the "Chaining" tab:
• Start chain: This batch starts running as soon as the predecessor batch starts.
• End chain: This batch starts running only after the predecessor batch is completed. If the charge is aborted or stopped, a query is displayed asking whether the next batch should be started.

Batch Control Center (BatchCC)
SIMATIC BATCH 6-82 A5E00495287-01
6.6.3.12 Displaying the run time of a batch
Follow the steps outlined below in BatchCC: 1. Select the "Batch" object below the production order in the "Orders" folder in
BatchCC.
2. Select the menu command Edit > Properties.
Result: The dialog box "Properties of <batch name>" is displayed. The duration of the control recipe calculated from the individual step times in the recipe editor is displayed in the "Run time" box.
Note:
These batch run times can be used to optimize planning. Please remember that these times are not exactly the same as the actual times required for batch control.
6.6.3.13 Planning the unit allocation
Unit allocation An overview dialog provides you with a complete overview of all batches and their unit allocation. Symbols indicate whether or not there is a conflict or will be a conflict in the future due to double allocation of the units by pending batches.
Note:
If units are selected using "The longest out of use", "Operator selection" or "Process parameters" allocation strategies, they are not shown in the upper "Units" section.
An allocation conflict can only be clearly indicated when the "Preferred unit" allocation strategy is exclusively used.

Batch Control Center (BatchCC)
SIMATIC BATCH A5E00495287-01 6-83
To select the unit allocation overview: • Select the menu command Planning > Unit allocation.
In the upper left area, you can display the units and corresponding batches. In the lower left area, the batches are displayed at the first level and then the required units. This allows you to optimize the unit allocation with various options. A time conflict is indicated by the icon . Time conflicts can be eliminated in this overview dialog by simply moving the batches in the right-hand time window.
Meaning of the symbols • Yellow bar: Unit without conflict
• Gray bar: Batches with a run time longer than six hours. The symbol to the left of the bar indicates the current status of the batch.
• Blue bar: Batches with a run time shorter than six hours. These batches are always displayed with the same length. In other words, zooming does not enlarge/reduce the size of the time elements of these batches.
• Red bar: Units with conflict. The same unit is planned to be used by more than one batch at the same time.
Note: As long as a batch is in the "planned" status, it can be dragged and dropped in a horizontal direction (time scale) in this view.
Below a unit, all the batches that have not yet completed and for which the unit is used are displayed. A batch can therefore occur more than once under "Units".

Batch Control Center (BatchCC)
SIMATIC BATCH 6-84 A5E00495287-01
Moving the time scale The time range can be moved using the arrow symbols at the left and right ends of the scale:
• Left arrow: Moves the time scale towards the past.
• Right arrow: Moves the time scale towards the past.
As an alternative, the time range can also be moved by clicking on the area between the two arrows.
Continuous expansion and reduction of the time scale The visible time range (for example one week) can be reduced (for example, two hours) or expanded (for example, ten days).
By clicking on the area between the two arrows while holding down the "Ctrl" button, you can zoom the time scale.
• Move the mouse to the left: the times scale is reduced.
• Move the mouse to the right: the times scale is increased.
6.6.4 Opening the control recipe for the batch
Even during the batch planning, you can open the graphic recipe structure of the control recipe to check it. In this case (batch is still planned), a validation is performed when it is opened! If the batch is released, there is no validation.
Follow the steps outlined below in BatchCC: 1. Select the "Batch" object below the production order in the "Orders" folder in
BatchCC.
2. Select the menu command Control > Open control recipe.
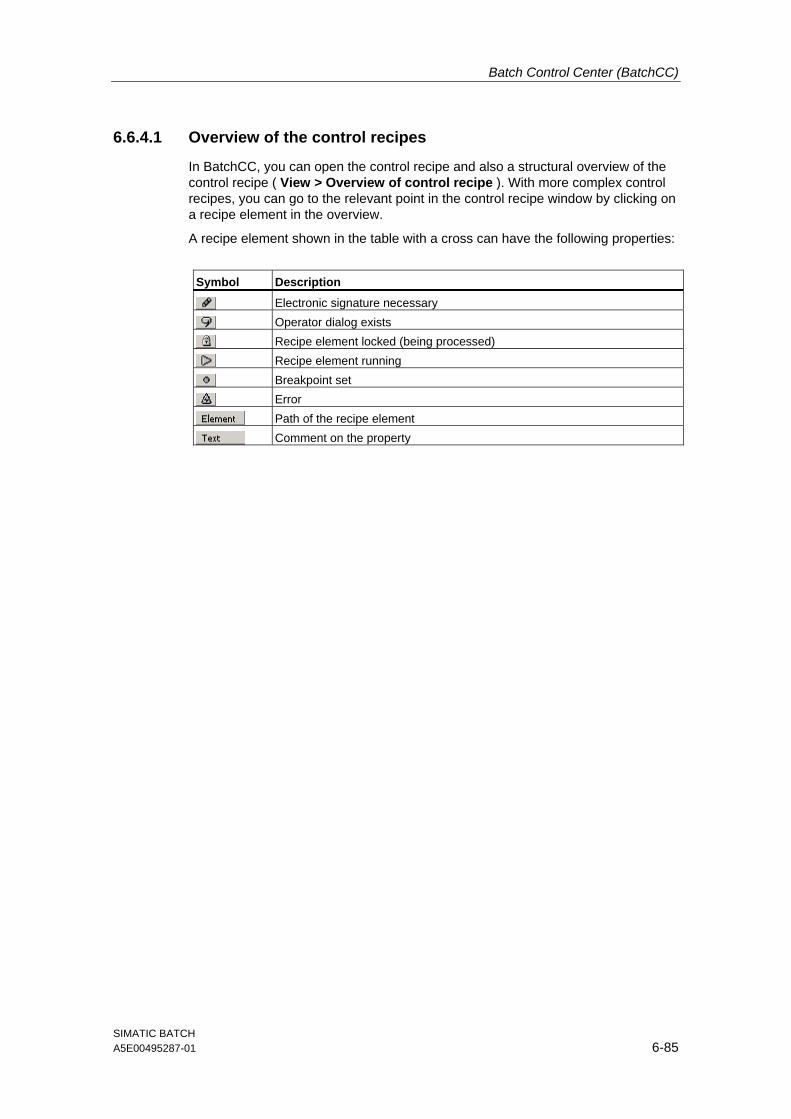
Batch Control Center (BatchCC)
SIMATIC BATCH A5E00495287-01 6-85
6.6.4.1 Overview of the control recipes
In BatchCC, you can open the control recipe and also a structural overview of the control recipe ( View > Overview of control recipe ). With more complex control recipes, you can go to the relevant point in the control recipe window by clicking on a recipe element in the overview.
A recipe element shown in the table with a cross can have the following properties:
Symbol Description
Electronic signature necessary
Operator dialog exists
Recipe element locked (being processed)
Recipe element running
Breakpoint set
Error
Path of the recipe element
Comment on the property
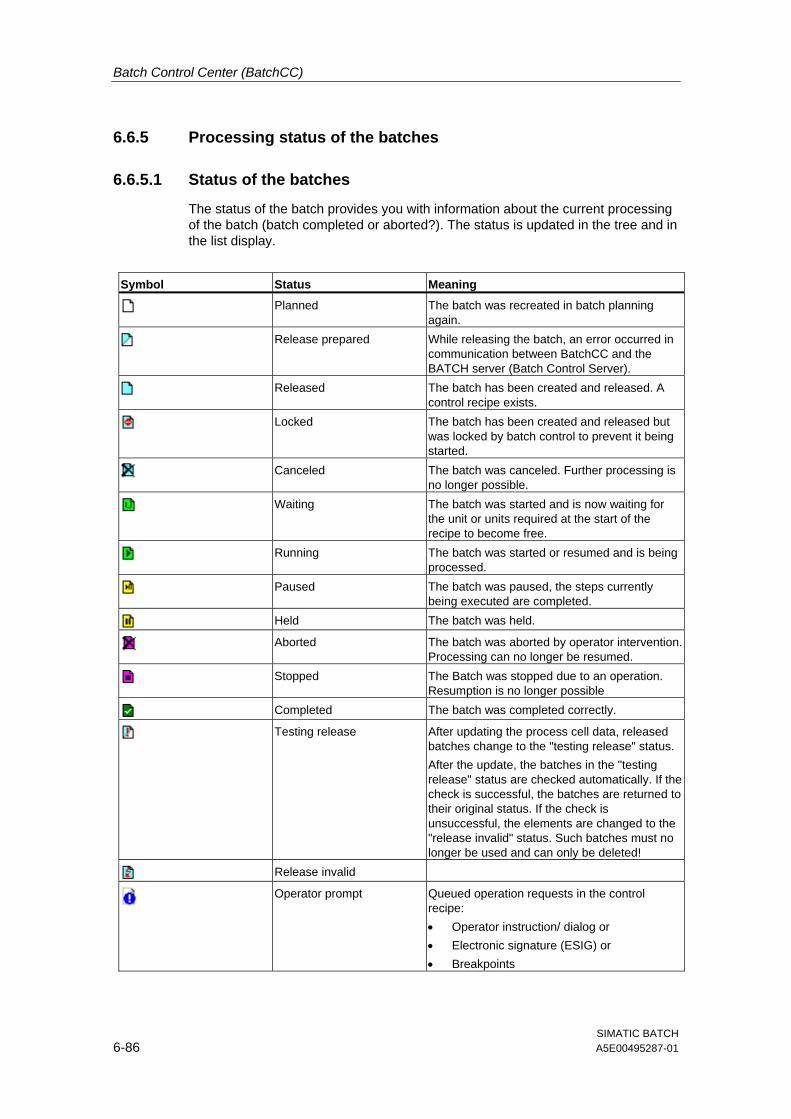
Batch Control Center (BatchCC)
SIMATIC BATCH 6-86 A5E00495287-01
6.6.5 Processing status of the batches
6.6.5.1 Status of the batches
The status of the batch provides you with information about the current processing of the batch (batch completed or aborted?). The status is updated in the tree and in the list display.
Symbol Status Meaning
Planned The batch was recreated in batch planning again.
Release prepared While releasing the batch, an error occurred in communication between BatchCC and the BATCH server (Batch Control Server).
Released The batch has been created and released. A control recipe exists.
Locked The batch has been created and released but was locked by batch control to prevent it being started.
Canceled The batch was canceled. Further processing is no longer possible.
Waiting The batch was started and is now waiting for the unit or units required at the start of the recipe to become free.
Running The batch was started or resumed and is being processed.
Paused The batch was paused, the steps currently being executed are completed.
Held The batch was held.
Aborted The batch was aborted by operator intervention. Processing can no longer be resumed.
Stopped The Batch was stopped due to an operation. Resumption is no longer possible
Completed The batch was completed correctly.
Testing release After updating the process cell data, released batches change to the "testing release" status. After the update, the batches in the "testing release" status are checked automatically. If the check is successful, the batches are returned to their original status. If the check is unsuccessful, the elements are changed to the "release invalid" status. Such batches must no longer be used and can only be deleted!
Release invalid
Operator prompt Queued operation requests in the control
recipe: • Operator instruction/ dialog or • Electronic signature (ESIG) or • Breakpoints

Batch Control Center (BatchCC)
SIMATIC BATCH A5E00495287-01 6-87
Additional status The following icons indicate other statuses in addition to those listed above. These icons are superimposed on the batch icon.
Symbol Status Meaning
Chained The batch is chained with a predecessor.
Closed The batch is closed and can be archived.
Archived The batch is archived. The batch can now be deleted.
Error At least one recipe phase in the control recipe of the batch has reported an error or the batch control itself is in an exceptional state.
Locked The batch is locked for processing (already open and in progress)
6.6.5.2 Status of production orders
The status of the production order provides the first information about the execution of the batch for an order. The status is updated in the tree and in the list display.
Symbol Status Meaning
Without batches The order does not contain any batches.
Planned There is or was no corresponding batch active; in other words, the batches have the status planned, released, release invalid, or canceled.
In progress In progress + error
• At least one batch belonging to the order is active • At least one Batch was already active and
planned/released Batches still exist. Active means waiting, running, holding, held, pausing, paused, stopping, aborting and completing. Error: At least one recipe phases in the control recipe of the batch has reported an error.
Complete Complete + closed Complete + archived
All corresponding batches are completed, aborted or stopped and closed, archived.

Batch Control Center (BatchCC)
SIMATIC BATCH 6-88 A5E00495287-01
Additional status The following icons indicate other statuses in addition to the production order status listed above. These icons are displayed with another icon for the order symbol superimposed on them.
Symbol Status Meaning
Operator prompt Queued operator prompts of a Batch of a production order: • Operator instruction/ dialog or • Electronic signature (ESIG) or • Breakpoints
Error At least one recipe phases in the control recipe of the batch has reported an error.
6.6.5.3 Releasing batches
Follow the steps outlined below: 1. Select the batch in the batch overview or in the tree (BatchCC).
2. Select the menu command Control > Release.
Result: The batch is released for production . If errors occur in the validation, the problems are displayed and the recipe status remains "planned". If no errors occur, the control recipe is compiled. Processing of the batch is started depending on the Start mode. This assumes that the units required at the start of the control recipe are free.
If errors occur in communication between BatchCC and the BATCH server (Batch Control Server), the batch only changes to the "release prepared" status. After communication between BatchCC and BATCH server (Batch Control Server) is functioning again, the release can be completed by executing "Release" again.
6.6.5.4 Locking a batch
To prevent a released batch from being started (by operator command or automatically), you can lock it.
Follow the steps outlined below: 1. Select the batch in the batch overview or in the tree (BatchCC).
2. Select the menu command Control > Lock.
Result: The batch changes to the "locked" state .
With the menu command Control > Cancel lock, you can return a locked batch to the "Released" status again.

Batch Control Center (BatchCC)
SIMATIC BATCH A5E00495287-01 6-89
6.6.5.5 Canceling a batch
Batches can also be canceled. After it has been canceled, the batch can no longer be released or started.
Follow the steps outlined below: 1. Select the batch in the batch overview or in the tree (BatchCC).
2. Select the menu command Control > Cancel.
Result
The batch changes to the "canceled" state .

Batch Control Center (BatchCC)
SIMATIC BATCH 6-90 A5E00495287-01
6.7 Electronic signature
6.7.1 Specifying electronic signatures
SIMATIC BATCH supports the function "Electronic signature" according to the requirements as regards FDA or 21 CFR Part 11.
The function "Electronic signature" offers the user the possibility of entering one or more signatures in form of dialogs according to usual logon entry prompt for defined status transitions of Batches, recipe phases etc. or for Batch objects (recipes, Batches etc.) actions defined by the operator.
The entered signature data is saved in the batch history or in the relevant object being manipulated and is available for subsequent evaluation (logging).
The actions or status transitions of objects, for which the function "Electronic signature" is to be activated can be defined using the "ESIG" dialog box subject to the user roles (permissions). The acronym "ESIG" stands for "Electronic signature".
Requirement The logon data is verified based on the SIMATIC Logon Service software. This assumes that the SIMATIC Logon Service software is installed on the BATCH clients.
What can be signed? • Status changes of batches, control recipes, unit recipes, recipe operations,
recipe phases and transitions
• Operator action relating to batches, control recipes, unit recipes, recipe operations, recipe phases and transitions
The possible status changes and operator actions can be selected in the "ESIG" dialog box.
Follow the steps outlined below: 1. Select the batch, the master recipe, or library operation in BatchCC and select
the menu command Edit > Properties.
or
In the BATCH Recipe Editor, select the recipe procedure, the recipe unit procedure, the recipe operation, the recipe phase, or the transition and then select the menu command Edit > Object properties.
Result: The dialog box "Properties of <object name>" is displayed.

Batch Control Center (BatchCC)
SIMATIC BATCH A5E00495287-01 6-91
2. Change to the "ESIG" tab (in the screenshot below, this is for a batch).
3. Select the "Activate" check box.
4. Click the "New" button.
Result: The upper table displays all the possible operator actions that can be signed.
5. Select the actions that you want to have signatures for in the "Active" column.
6. Enter the time within which all the necessary signatures must be entered after the action in the "Time" column. If the time expires, a message to this effect is displayed in the message window of the PCS 7 OS.
7. In the "sequence" column, select the actions for which the signatures must be entered in a specific order per action (assuming that more than one signature is required per action).
8. In the "All at once" column, select the conditions, for which - if several signatures are to be made per operator input – all signatures are to be entered simultaneously, this means, in one opened signature dialog box.
9. Click in the "Roles" column to define the signatures that must be entered based on the user roles.
Result: The "Configure roles" dialog box appears.

Batch Control Center (BatchCC)
SIMATIC BATCH 6-92 A5E00495287-01
10. Select the user roles here:
... with this symbol, you move the "available roles" to the "configured roles" or back again to cancel already configured user roles.
... with this button, you specify the sequence in which multiple signatures must entered. First click on a user role in the "Configured roles" list.
11. Confirm the settings with "OK".
Result: All the signatures required and the necessary sequence of signatures are displayed in the "Configured roles" table in the "ESIG" dialog box.
12. Follow the same procedure for status changes (steps 4 to 11.). You make these settings in the second table of the "ESIG" dialog box.
- Click in the "From" and "To" columns to select the status change to be signed. You can only select status changes that are possible for the BATCH object.
- Using the "New" button, you can add further rows for status changes.
13. When you have completed configuration, click "OK".
Result: When the object runs (batch, RPH, ROP, RUP, transition), the "SIMATIC BATCH: Sign" dialog box opens after each operator action or status change . To find out how to enter the electronic signature, refer to section "Signing operator actions and status changes".
Note:
Once electronic signatures are created, they can be deactivated but not deleted.
Activating/Deactivating Electronic signatures Defined electronic signatures can be centrally activated or deactivated – based on an action within the overall project. To do this select the menu command Options > Settings > "Electronic signatures" tab.

Batch Control Center (BatchCC)
SIMATIC BATCH A5E00495287-01 6-93
6.7.2 Signing operator actions and status changes
When the object runs (batch, RPH, ROP, RUP, transition), the "SIMATIC BATCH: Sign" dialog box opens after each operator action or status change.
The signature requirement of the corresponding object is also visualized in the
control recipe with the symbols and in the BatchCC tree view with the symbol . With a right-mouse click on the object to be signed and the shortcut menu command Sign, this dialog box can also be opened.
With the "Sign" button of the dialog box "SIMATIC BATCH: Sign", the entry of the signatures can be started. assuming that you have configured electronic signatures for the object.
Requirement The logon data is verified based on the SIMATIC Logon Service software. This assumes that the SIMATIC Logon Service software is installed on the BATCH clients.
Initial situation: After an operator action or during a status change, the "SIMATIC BATCH: . As the representative of a user role, you are prompted to sign the action.
Follow the steps outlined below: Your user role appears in the dialog box "SIMATIC BATCH: Sign" in the "Signatures" table:
1. Click the "Sign" button.
Result: The "SIMATIC Logon Service - Signature" dialog box opens.
2. Enter your user name and your password and then select the correct domain or correct computer.

Batch Control Center (BatchCC)
SIMATIC BATCH 6-94 A5E00495287-01
3. Confirm with "OK".
Result: The information for the signature is displayed in the "Signatures" table.
- If several signatures are required and the "All" option is active, all the signatures must be entered at the same time in one open "SIMATIC Logon Service - Signature" dialog box before clicking "OK".
- If several signatures are required and the "Individually" option is active, the open "SIMATIC Logon Service - Signature" dialog box can be closed again with "OK" after entering a signature.
In both cases, the signature is complete, only when all signatures have been entered.
4. Confirm the "SIMATIC Logon Service - Signature" dialog box with "OK".
Note:
Remember that it may be necessary to complete the signatures within a specified time. The time available and the expiration of the time is displayed in the "Times" group in the "SIMATIC Logon Service - Signature" dialog box.

Batch Control Center (BatchCC)
SIMATIC BATCH A5E00495287-01 6-95
6.8 Batch control
6.8.1 Requirements for batch processing
Requirements Batch control with SIMATIC BATCH requires the PCS 7 OS (WinCC) system. Before a batch can be processed, the following requirements must be met:
• The PCS 7 OS system must be operating in the runtime mode (online).
• The SFC type instances or BATCH-interface blocks must be known to the PCS 7 OS data manager.
• The bus connection between the PCS 7 operator stations and the programmable controllers (PLC) must be active.
• The batches for the control recipes must have been generated already; in other words, the batches have the "Released" status.
• The operator has the necessary permissions for batch control in the user management of SIMATIC BATCH.
6.8.2 Starting the BATCH server
Startup When you start the computer on which the BATCH server (BATCH Control Server, Batch data management (Batch CDV)) is installed, the SIMATIC BATCH Start Coordinator, the Batch Control Server and Batch data management (Batch CDV) are started automatically.
The Batch Control Server and the Batch data management (Batch CDV) are then in the "READY" status.

Batch Control Center (BatchCC)
SIMATIC BATCH 6-96 A5E00495287-01
Changing the BATCH server to the "RUNNING" Status How the BATCH server changes from "READY" to "RUNNING" is set with the SIMATIC BATCH Start Coordinator.
1. Right-click on the "SIMATIC BATCH Start Coordinator" in the status bar (bottom right) of the Windows window.
2. Select the shortcut menu command Settings and select one of the following start options:
Setting Meaning
SIMATIC BATCH starts automatically after WinCC starts:
Each time WinCC is started up online, the Batch Control Server and Batch data management (Batch CDV) change to "RUNNING" automatically.
SIMATIC BATCH starts automatically regardless of WinCC
The Batch Control Server and Batch data management (Batch CDV) change to "RUNNING" automatically whenever the computer starts up regardless of WinCC.
SIMATIC BATCH is started manually The Batch Control Server and Batch data management (Batch CDV) change to "RUNNING" when this is triggered manually using the shortcut menu command Startup/shut down regardless of WinCC.
Note:
Requirement: The Batch process cell data is valid, correctly compiled and downloaded.
3. Following this, you can start a BATCH client application, for example Batch Control Center using the menu command Start > Simatic > SIMATIC BATCH > Batch Control Center.
Behavior in a distributed system If BATCH and PCS 7 OS run on separate computers in a distributed system, the BATCH server automatically starts up completely after the computer starts up if one of the following options is set for the SIMATIC BATCH Start Coordinator:
• SIMATIC BATCH starts automatically after WinCC starts:
• SIMATIC BATCH starts automatically regardless of WinCC
This means, the BATCH server changes to RUNNING regardless of the WinCC status on the other computer.
BATCH server and BATCH client on one computer
Note: If the BATCH server PC is used additionally as an operating and monitoring station (BATCH Client), this may reduce performance during certain functions (e.g. when printing out a large Batch log).

Batch Control Center (BatchCC)
SIMATIC BATCH A5E00495287-01 6-97
6.8.3 Flow chart: How is a batch started and controlled?
How is a batch started and controlled?

Batch Control Center (BatchCC)
SIMATIC BATCH 6-98 A5E00495287-01
The activities involved in batch control are as follows: • Opening the control recipe
• Starting production of a batch
• Changing setpoints
• Commands for controlling batches
• Commands for recipe steps
• Locking a batch
• Canceling a batch
6.8.4 Basics of batch control
6.8.4.1 Principle of Batch Control
Definition By batch control, we mean the following:
• Executing the batches
• Visualization and control of the batches on the PCS 7 OS
Executing the batches The program checks which units are required to start each released batch. Based on the IUNIT_BLOCK interface blocks, a check is made to find out whether the units required by SIMATIC BATCH are released and are not allocated to other batches. If the units are free and released, the batch can be started, otherwise the relevant parameters are reported for monitoring.
Batch control is always ready to receive OS messages about parameter changes. If a monitored parameter changes, batch control is informed and takes the required action.
Visualization and operator control of the batches In BatchCC, the control recipe for a batch can be opened. The presentation of the control recipe represents that of the BATCH Recipe Editor. While a batch is being made, the states of steps and transitions are displayed color-coded. The dynamic display of events on the monitor also allows an operator to intervene.

Batch Control Center (BatchCC)
SIMATIC BATCH A5E00495287-01 6-99
6.8.4.2 Order of batch processing
Order of processing The processing order of the created batches in SIMATIC BATCH (status: planned) are determined by the order of their release. All released batches are included in batch control in the order or their releases. Batches that do not use the same units and equipment modules can also be processed at the same time.
The batches are started when the units and the start of the control recipe are free depending on the selected Start mode "immediately", "time-driven" or by the "operator". If "time-driven" is set, the set time is started. Once the time has elapsed, the batch whose start time is furthest in the past is started first.
Example scenario: If a "Start allocation" for unit A was selected, the batch starts only when it can occupy unit A. If the unit is allocated to another batch, the batch does not change to the "in progress" or "waiting" status. There is another reaction if "Start allocation" is not selected: the batch changes to the "waiting" state. In other words, the batch starts and waits until unit A is released.
Chaining batches If you want the batches to be processed in a specific order (regardless of the order in which they were released), you can also chain batches. For each planned batch, you can specify which batch must be started and which batch must be completed before the planned batch is started (see "Chaining batches.").
6.8.4.3 Processing the recipe structure
Principle The recipe structure of a control recipe is executed on the predecessor-successor principle at all hierarchical levels. This means, when the execution of a recipe element is completed, the execution of the successor step in the sequence is activated.
Hierarchical recipe: Within a recipe unit procedure (RUP), the individual recipe operations (ROPs) are also executed sequentially. If the ROPs of different RUPs of a recipe procedure are synchronized, several recipe operations (in different RUPs) can be started at the same time. Within a recipe operation, the individual steps (recipe phases -> EPHs) and transitions (step enabling conditions) also execute sequentially.

Batch Control Center (BatchCC)
SIMATIC BATCH 6-100 A5E00495287-01
Example of a hierarchical recipe The following schematic shows the color coding used to visualize the execution of a control recipe with a typical hierarchical recipe structure. A synchronization is currently active in the left window. In the right-hand window you can see the execution of a recipe operation. This recipe operation is given the status complete only when the synchronization is satisfied.

Batch Control Center (BatchCC)
SIMATIC BATCH A5E00495287-01 6-101
6.8.4.4 Status changes of a batch
The schematic below shows the possible statuses and status changes of a batch depending on the existing status.
Additional information • Status of the batches
• States of the batch steps
• States of a transition

Batch Control Center (BatchCC)
SIMATIC BATCH 6-102 A5E00495287-01
6.8.4.5 State transition diagram of an equipment phase
To execute a recipe, SIMATIC BATCH uses so-called equipment procedural elements (EPE). This can be of the type EPH or EOP.
To ensure problem-free cooperation with the overlying control, the equipment phase must provide the following basic states, the transitional states (framed with a broken line) are optional and not absolutely necessary:
READY TO COMPLETE and COMPLETED When using the equipment phase, the following distinction must be made:
• A self-terminating equipment phase.
After it has run, such a phase changes to the COMPLETED status.
• A non-self-terminating equipment phase.
Once it has run, such a phase changes to the READY TO COMPLETE status. In the READY TO COMPLETE status, an EPE signals that it must be completed actively by the control.
Control in Manual Mode (Batch "Operation" Start mode) With the Recipe steps operating commands, you can manually execute these state transitions, for example, during commissioning.

Batch Control Center (BatchCC)
SIMATIC BATCH A5E00495287-01 6-103
6.8.4.6 Self-terminating and non-self-terminating recipe phase
Self-terminating recipe phase For a self-terminating recipe phase, the normal transitions are from IDLE through RUNNING to COMPLETED. The diagram shown below illustrates a self-terminating recipe phase.

Batch Control Center (BatchCC)
SIMATIC BATCH 6-104 A5E00495287-01
Non-self-terminating recipe phase A non-self-terminating recipe phase changes from IDLE through RUNNING to READY TO COMPLETE and then waits for the COMPLETE/TERMINATE command from the overlying controller. With the READY TO COMPLETE status, the recipe phase signals that it needs to be completed actively by the control (non-self-terminating recipe phase). Below, you can see the flowchart of a non-self-terminating recipe phase:

Batch Control Center (BatchCC)
SIMATIC BATCH A5E00495287-01 6-105
Example of a self-terminating and non-self-terminating recipe phase "Dosing" is a self-terminating process, in other words, the phase runs independently up to the status "completed". The "Dosing" process is reset by the recipe control and the subsequent "Heating" phase is started.
"Agitation" is a non-self-terminating process, in other words, the phase reports "Ready_TC" (ready to complete) as soon as the agitator runs with the setpoint speed. The recipe control then decides with the "Complete" command when the agitator should be switched off.
As soon "Transfer" phase that follows "Agitation" is set by the control, the agitator is switched off with the "Complete" command. The "Transfer" function can start once the agitation reports the status "completed".

Batch Control Center (BatchCC)
SIMATIC BATCH 6-106 A5E00495287-01
6.8.4.7 Parameter trigger and start lock
For the control strategy change function, the equipment phase must be capable of checking new setpoints and if necessary preventing the start.
If the start lock is already set after the equipment phase is allocated, the recipe phase only writes the setpoints without the ISTART input. Instead, the recipe phase writes the IPARAM input to inform the equipment phase that there are new setpoints. The equipment phase then checks the setpoints and resets the IPARAM input and the start lock.
Even when the equipment phase reaches the HELD status, it can still set the start lock to prevent a RESUME. No parameter trigger is necessary because the recipe phase does not permit a parameter change while a step is active.

Batch Control Center (BatchCC)
SIMATIC BATCH A5E00495287-01 6-107
6.8.4.8 Continuous operation of equipment phases
With SIMATIC BATCH it is possible to
• set different parameters for an equipment phase within the recipe without having to deactivate the equipment phase and reactivate it again afterwards.
• to continue secondary activities such as agitating, temperature control or pressure control beyond the end of recipe operations. This means, for example, that an agitator does not need to be turned off at the end of an ROP and turned on again at the beginning of the next ROP.
Flowchart Below, you can see the flow chart of a non-self-terminating equipment phase set to continuous operation: During the changeover, the equipment phase remains in the "READY TO COMPLETE" status. Instead of terminating the equipment phase, the first recipe phase simply sets the CONTINUOUS ID via the ICONT input in addition to the basis status. The setpoints/actual values are read prior to this. The sequence logic handles "CONTINUOUS" and "READY TO COMPLETE" in the same way as "COMPLETED", in other words the recipe continues. Because the CONTINUOUS ID is set, the second recipe phase can occupy the equipment phase although its status is not IDLE. Once it is occupied, the CONTINUOUS ID is reset. To allow the second recipe phase to start the equipment phase, it is possible to START from "READY TO COMPLETE" in the equipment phase status transition diagram.
1

Batch Control Center (BatchCC)
SIMATIC BATCH 6-108 A5E00495287-01
1
Example of continuos operation The filling of a condenser should be performed through valve Z in two steps. Agitation is performed with speed 1 during the first filling with quantity X. There should be a pause of ten seconds between the two fillings and the agitator should continue to run at the same speed. Agitation is performed with speed 2 during the second filling with quantity Y.
In the ES configuration, you need to set the following for the block I/Os of the SFC for all instances of "Agitation":
• ENASTART = 1 Allows restart even if SFC is still running
• SELFCOMP = 0 SFC closes non-self-terminating
In the recipe editor, the "Continue" check box must be activated in the "General" tab of the "Properties" dialog box for the "Agitation" recipe phase that should continue to run. Once the agitator is running, it reports "Ready_TC" (ready to complete) and, instead of the phase for completing, is set to "CONTIUNOUS" and the recipe execution continues with the next phase.
The same phase can be given in new setpoints in the subsequent recipe execution and thereby be restarted.

Batch Control Center (BatchCC)
SIMATIC BATCH A5E00495287-01 6-109
6.8.5 Starting batch control
6.8.5.1 Working with lists for Batch Control
Selecting lists for Batch Control Select an object in the "Orders" folder in the editing window and then select the required list in the Planning > ...menu.
• Batch planning list
• Batch status list
• Batch result list
Batch planning list The Batch planning list shows all planned, released or locked batches. You can also start the batches with the shortcut menu for the Batch planning list. When a Batch is started, this batch remains visible in the Batch planning list and gets a new status (e.g. running). However, when you reopen the Batch planning list, this batch will no longer be displayed.
If you want to display all batches during batch control, work with the batch status list.

Batch Control Center (BatchCC)
SIMATIC BATCH 6-110 A5E00495287-01
Batch status list The batch status list shows the status of each released, running, held, waiting and locked batch as well as batches with errors and allows the batches to be controlled using the shortcut menu for the listed object (right-click) or using the Control menu.
As an alternative, you can, of course, select all the functions relating to batches in the tree (once again using the shortcut menu for the object). Working in the tree can, for example, be an advantage if a control recipe window is open at the same time.
Batch result list The Batch result list shows all the completed, aborted, stopped and canceled batches. The display is updated dynamically. Using the shortcut menu for the batch result list, you can archive closed batches and then remove them.

Batch Control Center (BatchCC)
SIMATIC BATCH A5E00495287-01 6-111
6.8.5.2 Opening the control recipe
You can see detailed information about the processing of the batch in the control recipe window. The control recipe of the batch is displayed as it was created in the BATCH Recipe Editor.
Follow the steps outlined below: 1. Select the batch in the batch status list or in the tree.
2. Select the command Control recipe Open in the shortcut menu for the batch (right-click) or in the Control menu.
Result: The corresponding control recipe is opened and displayed graphically (analogous to the view in the BATCH Recipe Editor). The toolbar of BatchCC displays buttons for controlling the processing of the batch. When planned batches are opened, a validation check is run!
Overview of the Control recipe In BatchCC, you can open the control recipe and also a structural overview of the control recipe. With more complex control recipes, you can go to the relevant point in the control recipe window by clicking on a recipe element in the overview.
• Select the menu command View > Overview of control recipe.
Result: The overview belonging to the active control recipe window is opened (in the figure below: bottom left). If no control recipe is open, the overview remains empty (gray).

Batch Control Center (BatchCC)
SIMATIC BATCH 6-112 A5E00495287-01
Example
Adapting PCS 7 OS (WinCC) so that BatchCC opens with the current unit recipe Using WinCC scripts, you can have the current unit recipe displayed in the application window each time BatchCC is called. The current unit recipe is taken from the current operator picture (unit) on the OS client.
Automatically opening a control recipe in BatchCC
The command line can be used to pass BatchCC a parameter specifying the control recipe to be opened.
The parameter or opening the control recipe is: /B="X;0", X specifies the batch ID.
Examples
• Open the control recipe with the ID 157: bfbatchccx.exe /B="157;0"
• Open the control recipe with the ID 12: bfbatchccx.exe /B="12;0"
• Open the control recipe with the ID 8: bfbatchccx.exe /B="8;0"
• Open the control recipe with the ID 1012: bfbatchccx.exe /B="1012;0"

Batch Control Center (BatchCC)
SIMATIC BATCH A5E00495287-01 6-113
Selecting an element (RUP/ROP/RPH/TRANS) within the control recipe
When a control recipe is opened with the '/B' parameter, an element (RUP/ROP/RPH/TRANS) can be selected within this control recipe. If this element is in a substructure (such as ROP), this substructure is automatically opened and the element is selected. The addressed element is moved together with the selection into the visible area of the control recipe view (if necessary).
To select a special element within the control recipe, the second part of the '/B' parameter needs to be filled out.
Parameter for opening the control recipe and selecting an element within the control recipe: /B="X;Y", Y specifies the element within the batch with the batch ID "X". The element is addressed by specifying the step number. The step number is also shown in every WinCC picture in the SIMATIC BATCH faceplates. The step number consists of a part specified by the container element (C-ID) and a part specified by the terminal element within the container (T-ID). These two values are merged to a single value by a formula.
The formula is: <<C-ID>>*10000 + <<T-ID>>
Container elements are all elements that are used to hold other elements, such as RUP/ROP.
Terminal elements are all elements that do not have a "container" function and therefore do not contain other elements, such as RPH/TRANS
Examples
• Open the control recipe with the ID 157, the ROP with the ID 2 and the RPH with the ID 4: bfbatchccx.exe /B="157;20004"
• Open the control recipe with the ID 12, the ROP with the ID 78 and the RPH with the ID 203: bfbatchccx.exe /B="12;780203"
• Open the control recipe with the ID 8, the ROP with the ID 12 and the RPH with the ID 24: bfbatchccx.exe /B="8;12024"

Batch Control Center (BatchCC)
SIMATIC BATCH 6-114 A5E00495287-01
6.8.5.3 Starting production of a batch
Starting a batch Only released batches can be started. Batches in the "immediate" and "time-driven" Start modes are started automatically (a manual start is also possible in these situations and has the same effect as a batch with the "operator" Start mode). Batches with the "operator" Start mode must be started explicitly in BatchCC. Below, you will find the options available for the "operator" Start mode.
Note:
You cannot start a batch if it is chained to another batch and this predecessor batch has not yet started or is not completed (depending on the chaining mode)!
Starting the entire control recipe (batch) 1. Open the control recipe.
2. Click the button or select the menu command Control > Start.
Result: The batch starts. The execution of the control recipe is visualized by the color coding of the individual steps and transitions.

Batch Control Center (BatchCC)
SIMATIC BATCH A5E00495287-01 6-115
Starting individual recipe elements Select the recipe element in the control recipe, right-click and then select "Start Step" in the shortcut menu.
Rules • A recipe element within a control recipe can only be started when the recipe
element in the next higher hierarchy level has already been started. For example, a ROP at the next level down from a RUP can only be started when the RUP has already been started.
• It is always possible to abort or halt a lower level recipe element.
• Within a sequence, only one recipe element can be executed. This means, for example, that if a recipe operation (ROP) is active, no other ROP can be started at the same time, in the same sequence or within the same RUP. An attempt to start another ROP would be rejected with an error message.
6.8.5.4 Locking a batch
To prevent a released batch from being started (by operator command or automatically), you can lock it.
Follow the steps outlined below: 1. Select the batch in the batch overview or in the tree (BatchCC).
2. Select the menu command Control > Lock.
Result: The batch changes to the "locked" state .
With the menu command Control > Cancel lock, you can return a locked batch to the "Released" status again.
6.8.5.5 Canceling a batch
Batches can also be canceled. After it has been canceled, the batch can no longer be released or started.
Follow the steps outlined below: 1. Select the batch in the batch overview or in the tree (BatchCC).
2. Select the menu command Control > Cancel.
Result
The batch changes to the "canceled" state .

Batch Control Center (BatchCC)
SIMATIC BATCH 6-116 A5E00495287-01
6.8.6 Operator control during batch control
6.8.6.1 Commands for controlling batches
With the commands for controlling batches, you can start (only in the "operator" Start mode), hold, resume or abort (only in the "operator" Start mode) the selected batch.
Buttons for controlling a batch (also available in the shortcut menu of the batch)
Controlling a batch The following table describes the functions of the control buttons and the reaction of the batches.
Button Meaning Reaction
Start Starts execution of the control recipe
With this command, you can start a released batch in the "Operation" Start mode. Batches with the Start mode "immediately" and "time-driven" are started automatically. You cannot start a batch if the batch is chained to another batch and the preceding batch has not yet been started!
Pause Control recipe execution is being held, the steps in progress will be completed
You can pause active batches using the "Pause" command. In contrast to the "Hold" command, this command simply prevents the control recipe from passing control to the next step. Active recipe phases are not affected and continue until they are complete. Batch control waits with the processing of the next transition or the start of the next recipe step until the Resume command is received.
Hold Control recipe Execution is being held, the steps in progress will not be completed
You can stop batches immediately with the "Hold" command. In contrast to the "Pause" command, not only the batch itself but also all the recipe phases currently active in the control recipe are held.
Resume Execution of the control recipe is resumed at the point at which it was stopped.
This command resumes batches that have been held in the batch control. If the recipe phases were also stopped, these also return to the "Active" state.

Batch Control Center (BatchCC)
SIMATIC BATCH A5E00495287-01 6-117
Button Meaning Reaction
Stop Processing of the control recipe is stopped.
The "Stop" command terminates batches that cannot be completed correctly. You cannot resume stopped batches! When batches are stopped, remnants may remain in the units used for the batch! Caution: When you stop a batch, all the units occupied by the batch are released. First remove any remnants of the batch from the units involved before you use the "Stop" function in batch control so that the units can then be used by a later batch.
Cancel Execution of the control recipe is aborted
The "Abort" command terminates batches that cannot be completed correctly. You cannot resume aborted batches! When batches are aborted, remnants may remain in the units used for the batch! Caution: When you abort a batch, all the units occupied by the batch are released. First remove any remnants of the batch from the units involved before you use the "Abort" function in batch control so that the units can then be used by a later batch.
Completing a batch A batch is completed:
• Automatically when all the recipe steps of the batch were executed successfully or
• With the operator command "Abort" or "Stop"
Aborting a batch when no AS connection is available See section, "Aborting a batch when no AS connection is available".

Batch Control Center (BatchCC)
SIMATIC BATCH 6-118 A5E00495287-01
Example of controlling batch processing

Batch Control Center (BatchCC)
SIMATIC BATCH A5E00495287-01 6-119
6.8.6.2 Commands for recipe steps
During the commissioning phase, you can also hold, resume or abort all the recipe procedural elements (RUP, ROP, NOP, RPH) within the hierarchical control recipe. The commands "Complete step" and "Reset step" are also available. With these commands, you can also force transitions to enable the next step.
Menu commands for controlling individual recipe elements Select any recipe procedural element (RUP, ROP, RPH, transition) within the control recipe and select the required command in the shortcut menu. Commands that are not possible in the current status of the element are gray and cannot be activated.

Batch Control Center (BatchCC)
SIMATIC BATCH 6-120 A5E00495287-01
Controlling steps The following table describes the functions of the buttons and the reaction of the recipe steps.
Command in the shortcut menu
Meaning Reaction
Start step Start execution of the control recipe at this step.
Inactive or completed steps (RUP, ROP, EPH, transition) can be restarted with this command.
Hold step (after step) Execution of the control recipe is held at this step, the currently active step is executed until it is completed.
You can stop active steps (RUP, SUB, ROP) immediately with the "Pause" command. In contrast to the "Hold" command, this command simply prevents the control recipe from passing control to the next step. Active recipe phases of the step are not stopped but continue until they are finished. Batch control, before evaluating the next transition or starting the next recipe step in the same level (RUP, SUB, ROP), waits until the "Resume step" command is received.
Hold step immediately Execution of the control recipe is held at this step, the currently active step is not completed.
You can stop active steps (RUP, SUB, ROP, RPH, transition) immediately with the "Hold" command. All the active recipe phases in the step are held.
Resume step Execution of the control recipe is resumed at the held step.
The "Resume step" command resumes steps on hold (RUP, SUB, ROP). If the recipe phases were also stopped, these also return to the "Active" state. Note: Steps in the error state can be reactivated with "Resume step".
Complete step Execution of the step is completed.
This command terminates the recipe phase of a step (RUP, SUB, ROP, RPH) that are non-self-terminating (requirement: Ready status).
Stop step Execution of the control recipe is stopped at this step.
Use the "Stop step" command to terminate steps (RUP, SUB, ROP, RPH, transition) that cannot be completed correctly. Stopped steps cannot be resumed! When steps are stopped, remnants may remain in the units used for the step!
Abort step Execution of the control recipe is aborted at this step
Use the "Abort step" command to terminate steps (RUP, SUB, ROP, RPH, transition) that cannot be completed correctly. You cannot resume aborted steps! When steps are aborted, remnants may remain in the units used for the step!
Reset step Execution of the step is reset
Following an abort, the unit or the equipment modules of the step are normally still allocated. "Reset step" cancels the allocation IDs of all the recipe phases in the step (RUP, SUB, ROP, RPH).

Batch Control Center (BatchCC)
SIMATIC BATCH A5E00495287-01 6-121
Command in the shortcut menu
Meaning Reaction
Set/remove breakpoint The breakpoint appears as a red dot beside the control recipe element.
You can find additional information in the section "Setting breakpoints".
Comment batch element ... Add comments for the individual batch elements. This can be done before, during and after the runtime of a batch.
-
Comment message ... Opens a dialog for the entry of comments on the existing messages of batch control (system messages, process messages, error messages).
-
Sign ... This function opens the dialog "SIMATIC BATCH: Sign" for entering the electronic signature.
-
Select unit ... Opens a dialog in which you can select an available unit. This function can only be used for recipe elements that has been configured with an allocation strategy.
Object properties Opens the "Object properties" dialog from which you can obtain information about the selected object and edit it.

Batch Control Center (BatchCC)
SIMATIC BATCH 6-122 A5E00495287-01
Example of controlling recipe steps

Batch Control Center (BatchCC)
SIMATIC BATCH A5E00495287-01 6-123
6.8.6.3 Entering comments on a running batch
During or after batch control, the operator can enter comments for each control recipe element (RUP, SUB, ROP, RPH) or for the entire batch (control recipe header) without having to put the batch on hold (for example entry of laboratory values or comments on important events).
Rules • Comments made on a current batch do not change or delete the original recipe
comments.
• Multiple comments can be entered for the control recipe elements or the entire Batch, for example, to correct errors or to add new information.
• The previous recipe comment appears "Read only" beside the input field for new texts.
• You can enter comments on running batches until the batch is closed.
Follow the steps outlined below: 1. Open the control recipe for the running batches (if not already open).
2. Select a control recipe element or the entire control recipe (appears on a light blue background).
3. Select the command Comment Batch or Comment Batch Element in the shortcut menu.
4. Enter any text you require in the dialog box and close the dialog box with "OK".

Batch Control Center (BatchCC)
SIMATIC BATCH 6-124 A5E00495287-01
6.8.6.4 Displaying operator dialogs during runtime
Using the "Operator instruction" recipe structure element, you can display instructions for the operator while batches are running or configure the information for manual intervention (for example manual dosing).
Requirements • The Operator instruction was configured during creation of the master recipe
as described in section Operator instruction (Insert menu) .
• The control recipe is open.
Principle An operator instruction during runtime is displayed on all active BatchCCs on which the control recipe is open. On all other BatchCCs, there is simply a display in the message window. An operator confirms responsibility for the operator instruction by clicking the "Apply" button (input is then locked in the dialogs on the other BatchCCs).
All operators not affected by the operator instruction, click Minimize or Close: This ensures that the operator dialog disappears but is still available for the process.
After the operator has executed the operator instruction and for example, entered the required process values, the operator confirms with "OK" in the operator dialog to indicate that the instruction has been executed. Once the operator dialog is acknowledged in this way, it disappears automatically from all the message windows. A process value can be entered in the "Input material", "Output material" and "Parameters" tabs of the operator dialog (refer to the figure below).
As an option, acknowledgment by the operator can be configured as a condition for continuing the batch. Actual values that have been entered can be used in steps and transitions during the remaining execution of the recipe.
Display in WinCC In WinCC, an operator prompt appears indicating that operator intervention is required. The operator is therefore informed of operator prompts even when the control recipe is closed.

Batch Control Center (BatchCC)
SIMATIC BATCH A5E00495287-01 6-125
Branching after the operator dialog After the operator has entered the actual values, it is possible to branch in the control recipe after the operator dialog.
6.8.6.5 Operator prompts using group displays in WinCC
Requests to the operator regarding processing of the batch are displayed in WinCC using the group display. The operator can then open BatchCC and take the requested action.
The following requests are triggered using a group display:
• Acknowledge operator dialog
• Enter the Electronic signature (ESIG)
• Acknowledge breakpoint
How it Works 1. The BATCH Control Server determines that an Operator dialog or a Breakpoint
is to be acknowledged or that an Electronic signature is required.
2. The Batch Control Server learns the unit involved from the unit recipe and sets an input to trigger a WinCC message (entering state) of the type "Operator Prompt" in IUNIT_BLOCK.
3. In the WinCC picture, a group display is interconnected to Unitname.EventState, to make the operator prompt visible.
4. Using the corresponding IUNIT_BLOCK faceplate, the operator can open BatchCC and take the action required.
5. The Batch Control Server then resets the input in IUNIT_BLOCK that in turn triggers an operator prompt (exiting state).

Batch Control Center (BatchCC)
SIMATIC BATCH 6-126 A5E00495287-01
Note: The area-specific group display can only indicate SIMATIC BATCH operator prompts that occur within a unit recipe.
With flat recipes, the group display appears only with operator instructions when these were configured with unit allocation.
Note:
Breakpoints cause a group display when they are within a unit recipe in hierarchical recipes. With flat recipes, this is unfortunately not possible because the unit allocation is linked to the individual steps.
Configuring pictures Within the WinCC picture tree, there are group displays interconnected with the individual IUNIT_BLOCK blocks (Unitname.EventState tag).
As a practical measure, there should also be a button in a unit group display that displays the IUNIT_BLOCK faceplate.
6.8.6.6 Setting breakpoints
During batch control, the operator can set breakpoints for each control recipe element in the open control recipe. The breakpoint appears as a red dot beside the control recipe element. If execution of the control recipe reaches a recipe element with a breakpoint, the recipe element is not activated. Only the run marker is set
and the breakpoint is turned into a control button . The recipe element can be started with this button and the control recipe continued. It is also possible to activate the element with the start command for the recipe step.
Follow the steps outlined below: 1. Open the control recipe for the running batches (if not already open).
2. Select a control recipe element.
3. Select the command Breakpoint > Set in the shortcut menu.
Result: The breakpoint appears as a red dot beside the control recipe element. With the Breakpoint > Remove menu command, you can clear the breakpoint again.
Note: When an active breakpoint is removed (the control button is displayed), the corresponding recipe element is started automatically.

Batch Control Center (BatchCC)
SIMATIC BATCH A5E00495287-01 6-127
6.8.6.7 States of a transition
A transition can adopt the following states:
Note:
You can change the colors with the menu command Options> Settings.

Batch Control Center (BatchCC)
SIMATIC BATCH 6-128 A5E00495287-01
6.8.6.8 States of the batch steps
The state of a batch step is influenced from two sides:
• By a processing block for the step functions in the controller:
This sets the states: running, ready to complete, completed, error, held, aborted.
• By the batch control:
This sets the states: waiting for unit, unit allocated, activated, (completed), passed
Structure of the status display of a batch step There are two basic statuses and additional status identifiers:
• Allocation status
• Basic status
• Added status identifiers

Batch Control Center (BatchCC)
SIMATIC BATCH A5E00495287-01 6-129
Display of the allocation status - hierarchical recipe
Appearance Label Meaning
Waiting for unit The control wants to allocate the unit required by the RUP
Unit allocated The control has allocated the unit to the RUP
ROP running The control has allocated the ROP
Waiting for equipment phase
The control wants to allocate the equipment phase required by the RPH
Equipment phase allocated
The control has allocated the RPH
Allocation error Allocation error or connection down
Missing AS-OS connection
OS has no connection to the AS
Display of the allocation status – flat recipe
Appearance Label Meaning
Waiting for unit The control wants to allocate the unit required by the RPH
Unit allocated The control has allocated the unit required by the RPH
Unit allocated and waiting of equipment phase
The control wants to allocate the equipment phase required by the RPH
Unit and equipment phase allocated
The control has allocated the RPH
Allocation error Allocation error or connection down

Batch Control Center (BatchCC)
SIMATIC BATCH 6-130 A5E00495287-01
Appearance Label Meaning
Missing AS-OS connection
OS has no connection to the AS
Display of the basic status
Additional status IDs - breakpoint and command The icon of the breakpoint operator button corresponds to the start button in the toolbar. The pending command is displayed with an icon corresponding to the operator button. The batch control sets the transitional state (for example HOLDING), only when this is sent by the block.

Batch Control Center (BatchCC)
SIMATIC BATCH A5E00495287-01 6-131
Additional status Identifiers - locks Priority: Write lock before start lock
The write lock is set when a BATCH client is currently making online parameter changes or input in operator dialogs. The start lock is set when the PLC block signals the LOCK flag.
Additional status identifiers - operator prompts A white exclamation mark on a round blue background is shown for all operator prompts in the current batch in the BCC.
Double-click on the icon or open the control recipe. The following three operator prompts can be shown in a control recipe element:
If one of the above icons for an operator prompt is displayed within a control recipe element, the batch execution is interrupted and an operator action is required from its end to resume the batch. Right-click on the corresponding control recipe element and select the appropriate command in the shortcut menu:
• Electronic signature required > Sign ...
• Acknowledge operator dialog > Open the "Object properties" dialog for applying or changing
• Unit allocation required > Select unit ...

Batch Control Center (BatchCC)
SIMATIC BATCH 6-132 A5E00495287-01
Additional status Identifiers - command, wait for user routine
Additional status Identifiers - group display (traffic light) for container objects With container objects, the group display provides information as to whether individual objects in the container are preventing processing:
• Blockages are shown on the left: The lower-level object is held, aborted, or stopped.
• Operator prompts are shown on the right: The lower-level object is waiting for input (operator dialog, breakpoint, electronic signature)
• Waiting events are displayed in the middle: The lower-level object is waiting for an external event (equipment module allocation, end of a user routine).

Batch Control Center (BatchCC)
SIMATIC BATCH A5E00495287-01 6-133
Additional status Identifiers - error, manual, run time exceeded Priority: Error before run time exceeded before manual
Note: These icons can be displayed one superimposed on the other (for example error + manual).
Note:
Note the following points about status visualization:
• If at least one recipe element in a level has the "In progress" status, the recipe elements of the higher levels are also indicated as "In progress".
• If no recipe element is in the "In progress" status, the highest priority state is reported to the higher levels. The only higher priority state reported is "Hold".
• If a recipe element changes to the "Error" status, this state is reported to the higher levels immediately. If the entire batch is to be discontinued, this must be aborted at the batch level.
Note:
You can change the colors with the menu command Options> Settings.

Batch Control Center (BatchCC)
SIMATIC BATCH 6-134 A5E00495287-01
6.8.6.9 Aborting a batch when no AS connection is available
The command Abort (Emergency) can be used to abort a batch when no AS connection is available.
The "Abort (Emergency" command can be used when the following rules are observed:

Batch Control Center (BatchCC)
SIMATIC BATCH A5E00495287-01 6-135
Rules for using Abort (Emergency) • This command is only active and visible when the user currently logged on has
a role with super user status. Note: The "super user" status has nothing to do with the name of the role. A role with super user status is indicated by a yellow
frame around the icon .
• If the "Abort (Emergency)" command is used when a connection to the AS is available, the command has the same effect as the normal "Abort" command. In other words, the batch is only in the actual "aborted" state when the states of the blocks of the AS have been reported as such.
There is no guarantee, therefore, that executing this command will result in a quicker abortion (when an AS connection is available).
• If the "Abort (Emergency)" command is used when no connection to the AS is available, the status of the batch and the active elements are aborted regardless of the block states. The user is responsible for manually bringing the blocks in the AS to a non-critical state. These SIMATIC BATCH blocks need to be reset before than can be used again once the connection is established again.
• For safety, a prompt appears asking the user if he really wants to abort the batch with the note that no AS connection is available and that the interface blocks of the used unit may need to be reset manually.
• The "Abort (Emergency)" command is not offered by the SIMATIC BATCH
API.
• BatchCC has no information as to whether or not there is a connection between the BATCH client and AS. This command is always available, therefore, even when the connection between the BATCH client and AS is intact.

Batch Control Center (BatchCC)
SIMATIC BATCH 6-136 A5E00495287-01
6.8.7 Changes during batch processing
6.8.7.1 Changing setpoints
Introduction During batch control, the parameters (setpoints) of the control recipe can be modified by the operator (for example the speed of an agitator can be changed without stopping it). The following parameter values can be changed:
• Input materials
• Output materials
• Process parameters
Provided the online modification was configured for the corresponding parameter during recipe creation (see section "Allowing online modification of setpoints")
How modification affects RPHs and the operator dialog The new values are immediately available for all Recipe phases (EPH, EOP) and Operator dialogs not yet active.
If recipe phases (EPH, EOP) and operator dialogs are running, this has the following effects:
• Parameters is "modifiable": If the recipe step is currently being processed there will be no reaction to the operator modifying the parameter. The modified parameter only becomes effective when the step is processed again.
• Parameter will be "Effective immediately": If the recipe step is currently being processed, parameter values changed by the operator will become effective immediately; in other words, they are transferred from the running recipe step in the control recipe directly to the controller where they take effect in the executing block.
How modification affects ROPs and the RUPs The new values are available immediately for all not yet active recipe elements (ROP, RUP) and operator dialogs.
Parameters is "modifiable": If the recipe element is currently being processed there will be no reaction after modifying the parameter via the operator. Modified parameter values only take effect the next time the element is executed (for example positioning within a loop).
Note:
If another BatchCC currently has the recipe element open, no modification can be made on other BatchCCs.

Batch Control Center (BatchCC)
SIMATIC BATCH A5E00495287-01 6-137
Changing setpoints You make the setpoint changes during batch control in the properties dialog of the recipe element. The figure below is an example of the dialog for changing the parameters of the "Agitate1" recipe step.
You open the properties dialog by selecting the recipe element and the Properties command in the shortcut menu.
Then only the "Input materials", "Output materials" and "Parameters" tabs are displayed if there are parameters.
If you press the "Modify" button, the parameter fields with the option "Modifiable" becomes editable (displayed in white). If applicable, modify the Setpoint value and then press the "OK" button.
Beside the parameter fields, there is a check box. If the setpoints are changed, this check box is set. Only setpoints with an activated check box are transferred to batch control with a changed value. If you do not want the change to become effective immediately, deactivate this check box temporarily.
Result: The modified setpoint values are applied. Depending on the settings, the setpoints take effect immediately or when the recipe element is processed again.
Batch Control Center (BatchCC)
SIMATIC BATCH 6-138 A5E00495287-01
Response with parameter references With parameter references (data source, data target), the response is as follows:
• If parameters are marked as "Modifiable", the operator is permitted to enter new values.
• Implicit modification by the control recipe remains possible for parameters not marked as modifiable. If, for example, an interconnected parameter in a recipe phase is not modifiable, it can nevertheless be modified by an operator making a change in the recipe operation.
Even if the parameter is locked against modification in the recipe operation, a modification by target interconnections is still possible.
6.8.7.2 Changing the unit allocation
Introduction The allocation of the unit including the batch strategy can be manually changed during batch control.
For example, if a control recipe is stopped due to a fault in the unit that was started with this control recipe, the batch process can be resumed by allocating another unit.
Note:
This change can only be made in the properties of the entire batch.
Changing units You make the unit changes during batch control in the properties dialog of the recipe procedure.
You open the properties dialog by selecting the recipe element and the Properties command in the shortcut menu.
The currently selected units are displayed in the "Allocations" tab.
If you press the "Modify" button, the "Unit", "Strategy" and "Process parameters" fields become editable (displayed in white). If applicable, modify the units and then press the "OK" button. The available settings can be selected from list boxes.
The changes first become effective when the unit is restarted.

Batch Control Center (BatchCC)
SIMATIC BATCH A5E00495287-01 6-139
6.8.7.3 Resuming a batch at the old position after changing a unit
The following describes how to resume a batch at the old position after changing a unit when a batch process has been interrupted.
The basic sequences of tasks are shown in an example.
Step 1
"Phase3" within ROP2 has been interrupted in the example. Before the batch can be continued in a new unit, the product first needs to be conveyed to an "intermediate container".

Batch Control Center (BatchCC)
SIMATIC BATCH 6-140 A5E00495287-01
Step 2 To block the execution of steps that have already been completed, the first element of each task sequence (ROP1 within recipe unit procedure and the first transition within ROP2) are marked with a breakpoint (command: "Breakpoint" > "Set").
Step 3 The interrupted recipe unit procedure can now be aborted and reset (commands: "Abort step" and "Reset step").
Step 4 Right click on the recipe procedure in the control recipe and select "Object properties" from the shortcut menu. Open the "Allocation" tab in the "Object properties" dialog. Reallocate the process cell.

Batch Control Center (BatchCC)
SIMATIC BATCH A5E00495287-01 6-141
Step 5 The new unit is allocated by starting the RUP. The breakpoint at the ROP1 blocks any additional call.
Once the unit is allocated, the product is conveyed out of the "intermediate container" into the new unit.
Step 6 Since the process should continue to ROP2, ROP1 must first be reset. ROP2 can then be restarted.

Batch Control Center (BatchCC)
SIMATIC BATCH 6-142 A5E00495287-01
Step 7 Once the transition has been reset, the batch can continue at the interrupted position by starting Phase3.

Batch Control Center (BatchCC)
SIMATIC BATCH A5E00495287-01 6-143
6.8.8 Display of operator and status messages
6.8.8.1 Displaying messages
Requirement A PCS 7 OS (WinCC) runs on the BATCH client computer during runtime. In other words, either an OS client application and/or an OS server application runs on the BATCH client computer.
Principle All the messages for batch control (system messages, process messages, error messages) that are managed in the WinCC archives can also be displayed in BatchCC.
To display these messages, you can open the message window of the PCS 7 OS (WinCC Alarm Control) in BatchCC in a separate display window.
Displaying messages • You can open the message window of the PCS 7 OS (WinCC Alarm Control)
with the menu command View > Output window.
Setting the WinCC Alarm Control To allow messages to be displayed, the PCS 7 OS must still be assigned. Proceed as follows:
1. Right-click in the message window and select the shortcut menu command "Properties".
Result: The "Properties of WinCC Alarm Control" dialog box opens.
2. Select the "Selection" button under "Server Selection".
Result: The "Select Server" dialog box opens.
3. Here, select the PCS 7 OS (message OS).
4. Confirm your selection with "OK".
Customizing • You can customize the properties of the message window (similar to WinCC),
for example the columns displayed and the selection of messages.
• User settings are entered in the global database and restored the next time you start BatchCC. Certain settings that are essential for SIMATIC BATCH are exceptions to this, for example selection of BATCH messages.
• Using the Open control recipe menu command, the control recipe that matches the message can be opened. This function corresponds to the "LoopInAlarm" function in the WinCC message window.

Batch Control Center (BatchCC)
SIMATIC BATCH 6-144 A5E00495287-01
Example
Additional information • Localizing causes of messages in the control recipe

Batch Control Center (BatchCC)
SIMATIC BATCH A5E00495287-01 6-145
6.9 Batch data management
6.9.1 Batch reports
Definition of a batch report The batch report contains all the information required for the reproducibility of the batch process, the quality assurance and the fulfillment of legal requirements. These include the identification data, control recipe data, effective production data, chronological sequence of the steps, status, error and disturbance messages as well as operator intervention.
Principle The batch report can be viewed or printed out at any time from the planning of a batch until its completion. This means that the report always includes the data up to the latest completed control recipe phase including the corresponding messages and measured values.
The batch report lists the minimum and maximum values of the process tags in a table for the levels (procedure, RUP, ROB) for the time for which the level was active; this is then followed by the trend diagrams.
Note: There is a delay when collecting the data for messages and measured values. The time delay is five minutes.
The batch report can be opened and printed in BatchCC by selecting the batch in BatchCC and opening the shortcut menu:
• Print preview > All: Preview of the Batch report
• Print preview > Summary: Preview of the Batch summary report
• Print > All: The batch report is printed immediately without a preview
• Print > Summary: The batch summary report is printed immediately without a preview
Batch Summary Report The batch summary report is an excerpt of the complete batch report and contains the report data from the top level (recipe). The batch summary report is an overview of the batch.

Batch Control Center (BatchCC)
SIMATIC BATCH 6-146 A5E00495287-01
Time-of-day synchronization
Note: The batch management collects all messages from the start of the batch until the message "Batch closed". The start and close messages include the time of day of the computer on which the Batch data management (Batch CDV) is running. To allow all messages to be detected in this time window, the time of day of all network nodes must be synchronized.
Time-of-day synchronization See manual PC Configuration and Authorizations
Time-of-day and date
Note: The time and date are displayed in the batch report lists as defined and activated in the country settings.
This is independent of the language of the operating system and the language selected in the PCS 7 setup.
No more than two characters should be used for the day, no more than three characters for the month and no more than four characters for the year. If you do not adhere to this format, the display of the date may be cut off due to the size of the output windows.
Displaying batch reports on computers without SIMATIC BATCH installation The application BATCH Report, that is integrated in BatchCC, converts the data from the archived Batch data to a Batch report. This application can also run on a computer, on which no SIMATIC BATCH is installed (on PCS 7 DVD under Additional_Products).
Start the program via Start > Simatic > BATCH > SBReport.
Using the menu command File> Open report select a Batch data file from the archive. A Batch report is then created from this file.
The displayed Batch report can be printed to a printer via File> Print Report.

Batch Control Center (BatchCC)
SIMATIC BATCH A5E00495287-01 6-147
6.9.2 Archiving batches
Introduction In BatchCC, you can also archive batches in long-term archives. These archives are used for long-term storage of Batch data in compliance with FDA rules and these are not imported back into SIMATIC BATCH.
You can only archive closed batches.
Archiving individual objects With the shortcut menu, you can archive each closed batch individually by selecting the object in the tree and then selecting the command "Archive" in the shortcut menu (right-click).
Archiving multiple Objects You can also archive several closed batches at one time by opening a batch overview and selecting the batches to be archived. Then select the menu command "Archive" in the shortcut menu (right-click).
Defaults in BatchCC Archiving is set with a fixed storage path that can be set or modified globally in the"Archive" tab of the "Project settings" dialog. All archived batches are saved in XML format.
The following three methods for archiving completed batches are offered in the "Archive" tab:
• "Directory" method The archive files are saved to a shared folder in the network. SIMATIC BATCH uses no special information about the logon name and password when accessing this folder.
• "SQL Server" method The archive files are saved in an SQL database. This method requires information about the logon name and password but not about the domain.
• "FTP Server" method The archive files are saved on an FTP server. This methods requires information a logon name and password but information about the domain is only required if the logon has been assigned to a domain.
Additional information • Setting up the FTP Server
• Creating an SQL Server Database
• Setting up the logon and password for SQL Server 2000
• Setting up the logon and password for the SQL Server 2005

Batch Control Center (BatchCC)
SIMATIC BATCH 6-148 A5E00495287-01
6.9.3 Setting up the FTP Server
An FTP server must be set up for archiving completed batches using he "FTP Server" method. The procedure for this is described in the following using the "Windows 2000" operating system as an example. The procedure is similar for the operating systems Windows 2000 Server, Windows XP and Windows 2003 Server.
Requirement Installation of the "Internet Information Services IIS" Windows component with the subcomponent "FTP Server (File Transfer Protocol)"listed under "Details". You can install these components with the command Start > Settings >Control Panel > Add/Remove Software > Add/Remove Windows Components > Internet Information Services > Details > FTP Server (File Transfer Protocol).
Note:
Once the "IIS" and "FTP Server" components are installed, reinstall the latest Service Pack for your operating system.
Due to these installations, you should update the security analysis using MBSA (Microsoft Base Security Analyzer).
If the Windows firewall is activated, ensure that FTP port 21 is enabled on the PC on which the FTP server is installed. Check the settings and change them if necessary as follows:
1. Start > Settings > Control Panel > Windows Firewall > "Advanced" tab > Click "Settings" in the area of the network connection settings.
2. Activate the check box "FTP Server".
3. In the "Service Settings" dialog that opens, click "OK". Save your entries and close all open dialogs with "OK".

Batch Control Center (BatchCC)
SIMATIC BATCH A5E00495287-01 6-149
Procedure 1. Open the "Computer Management" dialog with Start > Settings > Control
Panel and double-click on "Administration" in the Control Panel. The double-click on "Computer Management".
2. In the "Computer Management" dialog, double-click on "Services and Applications" in the navigation window and then double-click on "Internet Information Services" in the tree that opens.
3. Select the displayed folder "Default FTP Site", right-click and select the shortcut menu command "Properties". The "Properties of Default FTP Site" dialog opens with its five tabs. In this dialog, we recommend you make the following settings for your default FTP site in the various tabs. If you are using the Windows XP or Windows 2003 Server operating systems, you have the following options for setting a new FTP site. To do this, select the "FTP Sites" folder, right-click and select "New" in the shortcut menu. Then follow the instructions of the wizard. Be aware that you have to stop the current default FTP site before starting your new FTP site.
4. In the in the "Identification" area of the "FTP Site" tab, enter a virtual name for your FTP site under "Description:". Leave the default setting "All unassigned" or "21" for the IP address and for the TCP port. In the "Connection" area, you can enter a maximum of "32" for "Limited To:". This is the number of PCS 7/BATCH clients. You can leave the other defaults as they are in this tab. Save your settings with the "Apply" button.
5. In the "Security Accounts" tab, we recommend that you deactivate the "Allow Anonymous Connections" check box.After removing this check mark, a message is displayed by the Internet Service Manager that you can exit with the "Yes" button. You can leave or apply the other defaults as they are in this tab.
6. In the "Home Directory" tab, leave the option "When connecting to this resource, the content should come from a directory located on this computer" selected. In the "Local Path" text box in the "FTP Site Directory" area, enter the path to a folder in which the log file from SIMATIC BATCH will be stored.With the "Browse" button beside the box, you can select the required folder on your computer. Select the three check boxes "Read", "Write" and "Log visits" for access permissions. Leave the default for the directory listing style "MS-DOS" as it is. You have now made all the necessary settings for the default FTP site in this dialog. Save your settings and close the dialog with "OK".
7. Open the FTP site you have set up by right-clicking on it and selecting the "Open" command in the shortcut menu.
8. Position the mouse pointer on the open FTP site and right-click. Select "Properties" in the shortcut menu. The "Properties of ..." dialog opens.
9. Open the "Security Settings" tab. Here, you add the required user groups or user names and set their permissions.

Batch Control Center (BatchCC)
SIMATIC BATCH 6-150 A5E00495287-01
Result The users you have set up for access to the home directory must be entered in the Batch Control Center in the "User-specified information" area of "Archive" tab in the "Change Settings" dialog.
Additional information "Archive" tab
6.9.4 Create SQL Server database
The "Create SQL Server database" dialog offers several possibilities for creating a new SQL server database:
• Area: SQL Script: An SQL script is a file containing simple text with SQL statements. The statements in the text can be executed on an SQL server computer by an SQL administrator. This is necessary when the SQL server is not installed on the local computer and SIMATIC BATCH is not installed on this SQL server computer. The SIMATIC BATCH administrator (super user) can send this SQL script to the SQL server administrator. The SQL server administrator then uses this information to create the SQL database. "Script in file" button: The SQL script is saved as a file. "Script in clipboard" button: The SQL script is copied to the clipboard and can then be inserted into other application using the key combination "Ctrl + V".
• Area: Create database with local SQL server: If the SQL server is running on the local computer and you as the user have the necessary rights to create an SQL server database, use the "Create Database" button to create a database. No intermediate steps such as copying files or texts are necessary.

Batch Control Center (BatchCC)
SIMATIC BATCH A5E00495287-01 6-151
6.9.5 Setting up the logon and password for SQL Server 2000
In order to access an SQL database, a logon with access rights must be configured in the SQL Server Enterprise Manager.
Procedure 1. Open the SQL Server Enterprise Manager with the command Start >
Programs > MS SQL Server > Enterprise Manager.
2. Create a new user under the logons.
3. Assign this user the required "Server roles".
4. Activate the "Permit" right to have access to the new SB archive database.
Result The configured logon name and password are used in the BatchCC for the archive connection on the SQL server.
Archive storage The archives are stored under the path and file name you have specified, for example: SB6_2_29_73_1172572_Archive_dat.mdf.
Querying the archived batches with SQL The archived Batches are queried in the SQL Query Analyzer:
1. Open the SQL Query Analyzer via the menu command Programs > Microsoft SQL Server > Query Analyzer.
Result: The "Connect to SQL Server" window appears.
2. Enter your logon and corresponding password here.
3. Opening the table with the archived batches. To do this, select the object "dbo.dblBatches" in the left contents window (<Computer>\SB_2_29_73_1172572_Archive\User Tables\dbo.dblBatches) and select shortcut menu command Open.
Result: A table with the archived data opens.
4. You can read out the tables with SQL commands. For example, select StartDateTime from SB6_2_29_73_1172572_Archive.dbo.tblBatches
Note:
For more detailed information, refer to the help for the MS SQL Server.

Batch Control Center (BatchCC)
SIMATIC BATCH 6-152 A5E00495287-01
6.9.6 Setting up the logon and password for SQL Server 2005
In order to access an SQL database, a logon with access rights must be configured in the SQL Server Management Studio.
Procedure 1. Open the SQL Server Management Studio with the command Start > Program
Files > MS SQL Server 2005 > SQL Server Management Studio and log on.
2. Create a new user under Security > Login > shortcut menu > New Login.
3. Enter a logon name for this user under "Logon name" and activate the "SQL Server authentication" check box.
4. Enter a password and confirm it.
5. Deactivate the check box "Enforce password expiration".
6. Under "Default database", select your Batch database, for example, SB6_2_25269528_55_Archive.
7. In the navigation window, open "User Mapping" and select your Batch database.
8. In the lower window, "Database role membership for: …" activate the access rights "db_datareader" and "db_datawriter".
9. Save your settings with "OK".
Result The configured logon name and password are used in the BatchCC for the archive connection on the SQL server.
Archive storage The archives are stored under the path and file name you have specified, for example: SB6_2_25269528_55_Archive_dat.mdf.
Querying the archived batches with SQL The archived batches are queried through the Management Studio.
1. Open the SQL Server Management Studio with the menu command Start > Program Files > MS SQL Server 2005 > SQL Server Management Studio.
2. In the "Databases" navigation window, select the Batch database name, for example, 2_25269528_55_Archive, and the dbo.tblBatches table there, and select "Open Table" in the shortcut menu.
Result The archived batches are displayed.
Note:
You can find additional information in the help on MS SQL Server 2005.

SIMATIC BATCH A5E00495287-01 7-1
7 BATCH Recipe Editor
7.1 Introduction
The BATCH Recipe Editor allows the graphic creation and modification of recipes.
When editing recipes, a distinction is made between the following:
• Flat recipes
• Hierarchical recipes
• Library object: Recipe operations
• Library object Substructure
Flat Recipe A flat recipe is made up of substructures. The substructure is used to make large recipes clearer to read.
The recipe steps of a substructure can be as follows:
• A further substructure
• A reference to a library object: Substructure
• ROP (recipe operation) with direct access to a recipe phase of the type EOP (equipment operation)
• RPH (recipe phase) with direct access to a recipe phase of the type EPH (equipment phase)
• Operator instruction: Recipe phases of the type EOP and EPH configured for the operator instruction and NOP for a simple operator instruction

BATCH Recipe Editor
SIMATIC BATCH 7-2 A5E00495287-01
Hierarchical recipe A hierarchical recipe consists of recipe unit procedures (RUP) that are assigned to a unit. The recipe unit procedures are processed parallel to each other in a recipe. The execution of the recipe unit procedures can be coordinated using graphic synchronization lines.
The recipe steps of a RUP can be as follows:
• ROP (recipe operation) with direct access to a recipe phase of the type EOP (equipment operation)
• ROP with an underlying sequence of recipe steps of the type RPH (recipe phase).
- RPH with direct access to a recipe phase of the type EPH (equipment phase) or
- Operator instruction with or without direct access to a recipe phases of the type EPH
• Operator instruction: Recipe phases of the type EOP and EPH configured for the operator instruction and NOP for a simple operator instruction
• Library reference
Library object:Recipe operations A library of library operations can be created for hierarchical recipes. A library operation is an ROP consisting of steps of the type RPH. When creating the library step sequence, this is assigned to a unit class so that the recipe steps access the equipment phases (EPH) of this unit class. The unit allocation is made when you bind in the recipe step sequence of a recipe unit procedure (RUP).
Library object: Substructure A library consisting of substructures, in turn consisting of operator instructions, recipe operations of the type EOP or recipe phases of the type EPH can be created for flat recipes . Different unit classes/units can be assigned to the recipe steps of the substructure.

BATCH Recipe Editor
SIMATIC BATCH A5E00495287-01 7-3
7.2 Startup and operation
7.2.1 Starting the BATCH Recipe Editor
There are three different ways in which you can start the BATCH Recipe Editor:
• From the Start menu of Windows
• Using the menu command in BatchCC
• Automatically by opening a recipe in BatchCC
Starting in the Start Menu of Windows • Go to the Start menu of Windows and select the menu command Start >
Simatic > BATCH Recipe Editor.
Starting in BatchCC
• In BatchCC, select the button or the menu command Options > Start Recipe Editor to open the Batch Recipe Editor.
• If you select a master recipe or a library object in BatchCC and then select the "Open" command (right mouse button) or double-click, the BATCH Recipe Editor is automatically started with the recipe.
Note:
With the exception of deleting and renaming recipes, that is only possible with BatchCC, you can make all possible modifications to recipes using the BATCH Recipe Editor.
Additional information Layout of the main window
BATCH Recipe Editor
SIMATIC BATCH 7-4 A5E00495287-01
7.2.2 Requirements for working with the BATCH Recipe Editor
Before you can work with the BATCH Recipe Editor, the following requirements must be met:
• A recipe operates on the basis of the block instances of the SFC types or the BATCH interface blocks IUNIT_BLOCK, IEOP, IEPH, IEPAR_xxx and TAG_COLL created in the CFC charts and the additional data in the Batch hierarchy folders (SIMATIC Manager).
The Process cell data created this way has to be downloaded to the Batch Server and read in BatchCC via the menu command Program > New process cell or with the menu command Edit > Updating the process cell after modifying the Process cell data.
Note:
It is possible to create recipes before configuration of the block instances is completed. To allow this, you can edit the type description (batch types) the first time manually (without a CFC synchronization) and download it as part of the process cell data to the BATCH server.
At a later point in time when the CFC charts have been finalized, you must then repeat the menu command Edit > Update process cell in BatchCC.
• You must have the relevant permissions with an entry in the user list (user rights) allowing you to use recipe creation functions.

BATCH Recipe Editor
SIMATIC BATCH A5E00495287-01 7-5
7.2.3 User interface and operator control
7.2.3.1 Layout of the main window
The basic layout of the user interface of the BATCH Recipe Editor is shown in the figure below which illustrates an example of a hierarchical recipe. You can create or modify recipes in the editing windows using the structure elements of the Insert menu.
The first editing window displays either the structure of a recipe or a library object (editing level 1). In the other editing windows, you can edit the lower-level ROP sequences (in hierarchical recipes this is editing level 2) or substructures (in flat recipes this is editing layer 2 to 10).

BATCH Recipe Editor
SIMATIC BATCH 7-6 A5E00495287-01
Title bar The title bar of the main window displays the name of the master recipe, the recipe operation (ROP) or the library object. Here, you will also find system buttons with which you can do the following:
• Close the BATCH Recipe Editor,
• minimize the main window to its icon,
• restore the window to its normal size again, and
• maximize the display of the main window.
Menu bar The menu bar is located at the top edge of the main window. Its functions relate to the current window opened for editing. You can only select menu commands that are feasible for the current status of the object. As an example, you can only select the menu command Edit > Delete when at least one object is selected. Menu items that cannot be selected are displayed in gray.
Toolbar The toolbar is located below the menu bar. It contains a series of buttons that trigger the more commonly required functions of the menu bar. You can see which function is triggered by a button in the toolbar by positioning the mouse pointer on the button (without clicking). A box appears with the name of the button. In the status bar, you can see more detailed information about the function. Clicking the button triggers the function. Buttons that cannot be selected are displayed in gray.
Status bar At the lower edge of the user interface, you will see the status bar that displays important information and statuses. The information displayed changes depending on the particular operation and object status.
In the left part of the status bar you will see context-sensitive information, for example explanations of menu commands, operator prompts or error messages.
In the right part of the status bar, you can see the current user and the current time. In some situations, a progress bar is also displayed for processes that require longer.
Shortcut menu With the right mouse button, you can display the shortcut menu containing functions from the menu bar frequently required in the current situation. Only the functions that are feasible for the recipe element can be selected, all others are displayed in gray.
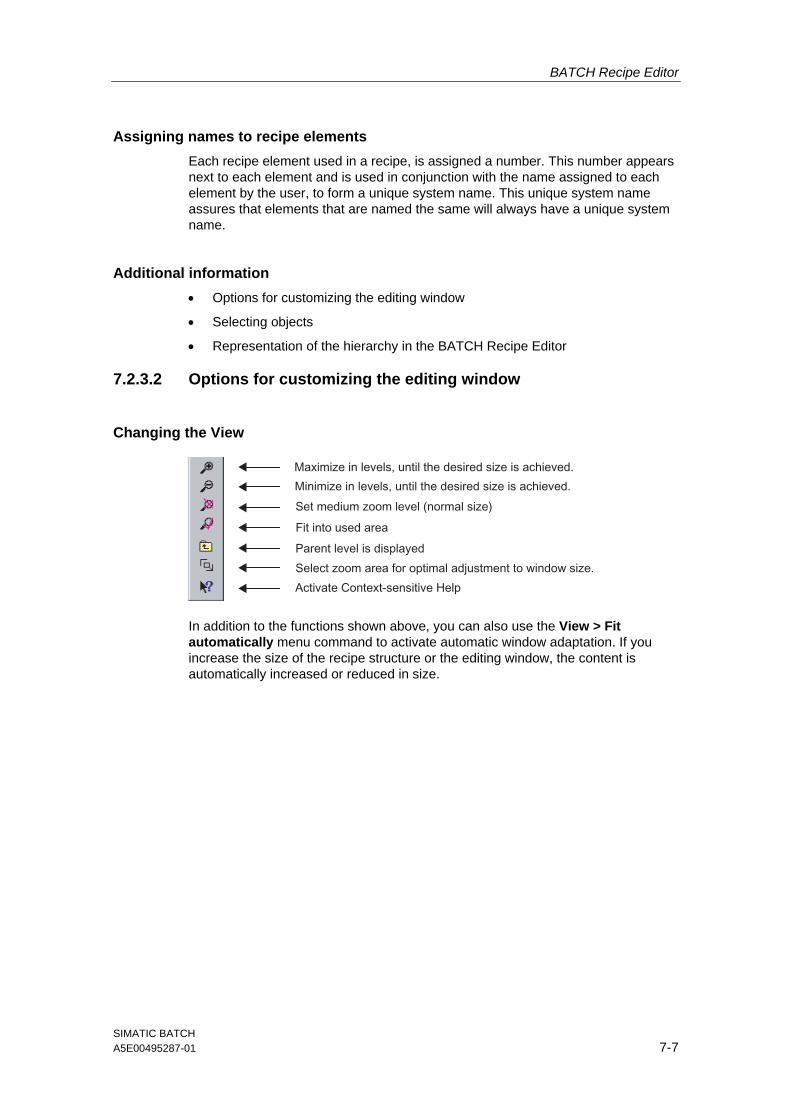
BATCH Recipe Editor
SIMATIC BATCH A5E00495287-01 7-7
Assigning names to recipe elements Each recipe element used in a recipe, is assigned a number. This number appears next to each element and is used in conjunction with the name assigned to each element by the user, to form a unique system name. This unique system name assures that elements that are named the same will always have a unique system name.
Additional information • Options for customizing the editing window
• Selecting objects
• Representation of the hierarchy in the BATCH Recipe Editor
7.2.3.2 Options for customizing the editing window
Changing the View
In addition to the functions shown above, you can also use the View > Fit automatically menu command to activate automatic window adaptation. If you increase the size of the recipe structure or the editing window, the content is automatically increased or reduced in size.

BATCH Recipe Editor
SIMATIC BATCH 7-8 A5E00495287-01
Zoom bar This is an extra zoom bar with which you can adapt the size quickly. To save space, you can also hide the zoom bar.

BATCH Recipe Editor
SIMATIC BATCH A5E00495287-01 7-9
7.2.3.3 Project and user settings
You can change the system settings for the BatchCC and the BATCH Recipe Editor using two dialogs, "Project settings" and "User settings". The "Project settings" dialog contains several tabs in which you can make general setting for the versioning , archiving and electronic signature, for example. In the "User settings" dialog, you can make settings for language, zoom, layout and format of the user interface.
Selecting dialogs • Select the menu command Options > Settings > Project settings. This
opens the dialog box shown below in which you can make individual Project settings.
• Select the menu command Options > Settings > User settings. This opens the dialog box shown below in which you can make individual User settings.

BATCH Recipe Editor
SIMATIC BATCH 7-10 A5E00495287-01
Press the "Help" button in the context-sensitive help if you want more information about the various project or User settings.
7.2.3.4 Creating and manipulating objects
Selecting functions All important functions relating to an object are available in the shortcut menu.
As an alternative, the same functions are also available in the Edit menu. Functions that cannot be executed in the current status of an object are deactivated (displayed in gray) in the Edit menu.
General functions Some basic functions are common to all objects. These common functions are listed below. The descriptions of other functions assume that you know how to use these functions.
The normal sequence of activities involving objects is as follows:
• Creating the object
• Selecting the object
• Performing actions with the object (for example, open, delete).

BATCH Recipe Editor
SIMATIC BATCH A5E00495287-01 7-11
Creating objects All objects of the master recipe are created with the Insert menu.
As an alternative, you can also use the corresponding object icons in the toolbar. You display the toolbar with View > Toolbars > Insert.
Opening objects There are several ways of opening an object:
• Double-click on the object icon.
• Select the object and then the menu command Edit > Open object.
After opening an object, you can create or modify its content.
Properties of objects Object properties are data of the object that define its behavior, for example, the properties of a recipe operation.
The menu command Edit > Properties opens a dialog box in which you can see and set the properties of the selected object.
Cut, Paste or Copy You can also cut, paste, or copy most objects as normal in Windows. The menu commands for this are in the "Edit" menu.
You can also copy objects using (Drag-and-drop). If you point to an illegal target, the cursor changes to a forbidden sign.
When you copy an object, the entire hierarchy below it is also copied. As a result you have wide options open to you if you want to use your developed components more than once.
Note:
When you insert, the target position must be specified by mouse click.
Renaming objects You can change the name of an object at a later point in time in the object properties.
Deleting objects You can delete all objects. Deleting can be undone. A master recipe or a library operation can only be deleted in BatchCC.

BATCH Recipe Editor
SIMATIC BATCH 7-12 A5E00495287-01
Undoing/Redoing actions With the Undo/Redo menu commands, you can reverse modifications step-by-step.
After undoing "n" actions, you can also redo "n" actions.
7.2.3.5 Selecting objects
Selecting by clicking
If you activate the selection mode with , you have the following options:
• By simply clicking with the mouse, all objects (Structure elements), which were selected, will be deselected.
• You can select RUPs, ROPs, RPHs, SUBs, library references and transitions by simply clicking on them with the left mouse button.
• Select sequences, diverging sequences and loops not by clicking a step or a transition but on the line between the step and transition (to select a sequence), on the upper or lower horizontal line (to select a simultaneous or alternative branch) or on the upper or lower horizontal line of the return path (to select a loop).
• Select an open ROP by selecting the initial step, the final step or the sequence containing the initial or final step.
• When you make a selection, other selected objects are deselected.
Selecting with a lasso To open a lasso, drag the mouse while holding down the left mouse button. All the elements completely enclosed in the lasso frame are selected when you release the mouse button. Previously selected elements are deselected if they are outside the lasso frame.
Selecting further objects If you want to select several objects, hold down the CTRL key and click the objects with the mouse. The element you have clicked is selected without deselecting previously selected elements.
Deselecting If you have accidentally selected an object, you can deselect it by clicking it again while holding down the CTRL key.

BATCH Recipe Editor
SIMATIC BATCH A5E00495287-01 7-13
7.3 Topology of recipes
7.3.1 Flat recipes
Flat recipes With the BATCH Recipe Editor, you create flat recipes. To make the structure clearer, you can move existing sequences of recipe elements into a substructure.
Note:
The runtime properties of the recipe are not influenced by the substructures.
Basic structure The following figure illustrates the basic structure of a flat recipe that can contain both recipe operations (ROPs) that use EOPs, as well as recipe operations made up of recipe phases (RPHs) and that use EPHs. These EOPs and EPHs are created during engineering of the basic control (refer to the section on configuring the ES).

BATCH Recipe Editor
SIMATIC BATCH 7-14 A5E00495287-01
7.3.1.1 Using substructures in the BATCH Recipe Editor
Principle The schematic below shows the basic use of substructures when editing flat recipes with the BATCH Recipe Editor. A substructure itself can be made up of other substructures.
The structure of a flat recipe can be edited in a maximum of ten levels when using substructures.
Synchronization
Using the synchronization functions, you can coordinate the execution of recipe sequences. In flat recipes, synchronization in sequences of the same simultaneous branch are possible.
At each synchronization point, you can decide whether or not the sequence is halted. If you select lock, the sequence waits until the other sequences involved have reached the synchronization line or have already passed it. If you do not select a lock, the sequence does not wait for the other sequences. The fact that the synchronization point was reached is still recorded.

BATCH Recipe Editor
SIMATIC BATCH A5E00495287-01 7-15
7.3.2 Hierarchical recipes
Hierarchical recipes With the BATCH Recipe Editor, you create hierarchical recipes. The following recipes are possible:
• Hierarchical recipes with ROPs
• Hierarchical recipes with RPHs
• Hierarchical recipes with ROPs and RPHs
7.3.2.1 Hierarchical recipes with ROPs
The following figure shows the basic structure of a hierarchical recipe with ROPs. Below the recipe unit procedure (RUP), there may be several recipe operations (ROPs). The recipe operations use the EOP blocks directly. These EOPs are created during engineering of the basic control (refer to the section on configuring the ES).

BATCH Recipe Editor
SIMATIC BATCH 7-16 A5E00495287-01
7.3.2.2 Hierarchical recipes with RPHs
The schematic below shows the basic structure of a hierarchical recipe with recipe phases RPHs. In this model, the process cell is structured in greater detail during engineering with the ES. A unit has several equipment modules that can contain several EPHs.
No recipe phases are possible directly below a recipe unit procedure (RUP). Recipe phases can, however, be used in the underlying ROP. EPHs are assigned to these recipe phases.

BATCH Recipe Editor
SIMATIC BATCH A5E00495287-01 7-17
7.3.2.3 Hierarchical recipes with ROPs and RPHs
With SIMATIC BATCH, you can also create recipes that contain both recipe operations (ROPs) that use EOPs as well as recipe operations that are made up of recipe phases (RPHs).

BATCH Recipe Editor
SIMATIC BATCH 7-18 A5E00495287-01
7.3.2.4 Representation of the hierarchy in the BATCH Recipe Editor
Principle The schematic below shows the basic representation of the hierarchical structure when editing with the BATCH Recipe Editor. The structure of a hierarchical recipe is edited at two levels (editing level 1 and 2).
Editing level 1 Editing level 1 is intended for the Plant view in which the processes of several cells can be synchronized. A recipe unit procedure (RUP) is made up of recipe operations (ROPs). To structure the process, you can use double lines to synchronize. This allows you to synchronize the timing of ROPs in different units.
Note:
Free editing mode:
In this mode, you can use all the structure elements of editing level 2 at editing level 1 (parallel ROPs, loops, transitions,...).
Since this mode does not correspond to the standard, this mode will not be described in any greater detail. The way in which the structure elements function is the same at both editing levels.

BATCH Recipe Editor
SIMATIC BATCH A5E00495287-01 7-19
Editing level 2 Editing level 2 is used to create ROP sequences. An ROP sequence begins with a Start step. The Start step is followed by a transition that defines the start conditions. Every ROP sequence ends with an End step. A transition that defines the end condition precedes every end step.
Implementation in the BATCH Recipe Editor

BATCH Recipe Editor
SIMATIC BATCH 7-20 A5E00495287-01
7.3.2.5 Synchronization between recipe unit procedures
Principle Using synchronization, you can synchronize the ROPs of several recipe unit procedures (RUPs) with each other at editing level 1. Each position where a synchronization line connects a recipe unit procedure can have a blocking or non-blocking effect. If blocking is required, the recipe unit procedure continues only when all recipe unit procedures involved in the synchronization have reached the synchronization point.
Example of synchronization (blocking) In the screen chart shown below, the synchronization lines (blocking) between the two recipe unit procedures (RUPs) shown cause the following reactions:
• Line 1: ROP 10 and ROP 6 start steps 20, 5, 13
• Line 0: ROP 5 and ROP 14 start steps 11, 16

BATCH Recipe Editor
SIMATIC BATCH A5E00495287-01 7-21
Changing over between blocking and non-blocking You can change the blocking or non-blocking effect of each synchronization point. Follow the steps outlined below:
1. Select the synchronization point.
2. Select the command "Properties" in the shortcut menu for the synchronization point.
3. Enable or disable the "Blocking" check box.
4. Confirm with "OK".
Result: The synchronization point is displayed as a single line. ROPs/NOPs in the sequence following this are started immediately (without waiting for synchronization).
Example of synchronization (non-blocking) The non-blocking positions below "Material entry 10" means
• that ROP 20 is processed further by RUP "Dosing setpoint" Immediately when ROP 10 is completed.
• that ROP 5 and ROP 13 are only started when ROP 10 and ROP 6 are completed.

BATCH Recipe Editor
SIMATIC BATCH 7-22 A5E00495287-01
7.3.3 Necessary and possible recipe structure elements
7.3.3.1 Structure elements of recipes
The following structure elements can be inserted in the sequences:
Structure element Inserted with Button/Menu Command ... Recipe procedure (RP) Recipe > New
Recipe unit procedure (RUP) Recipe procedural element (Insert menu)
Recipe operation (ROP) Recipe procedural element (Insert menu)
Recipe phase (RPH) Recipe procedural element (Insert menu)
Recipe phase (Insert menu)
Substructure (only for flat recipes) Recipe procedural element (Insert menu)
Library reference Library reference (Insert menu)
Operator instruction Operator instruction (Insert menu)
Transition Transition (Insert menu)
Simultaneous branch Simultaneous branch (Insert menu)
Alternative branch Alternative branch (Insert menu)
Synchronization line Synchronization (Insert menu)
Synchronization point Synchronization (Insert menu)
Loop Loop (Insert menu)
Step placeholder (automatically by BATCH Recipe Editor)
Transition placeholder (automatically by BATCH Recipe Editor)
Representation of the recipe elements • Container elements for ROP, libraries and substructures are indicated by two
vertical border lines in the graphic symbol (box).
• Graphic symbols (boxes) without lines are objects with nested operations and phases (EOP, EPH)

BATCH Recipe Editor
SIMATIC BATCH A5E00495287-01 7-23
Working with sequences The structure elements are inserted in sequences. A sequence is a vertical series of structure elements. The elements in the sequence are separated by a vertical line.
Meaning
Actions to be executed one after the other must be arranged vertically in a sequence. A transition is evaluated only when the recipe phase above is completed (ready to complete, or similar). The next recipe step is only triggered when the transition above it evaluates to true.
7.3.3.2 Recipe procedure (RP)
The recipe procedure includes the procedural elements required for the process engineering in a process cell. When creating a recipe procedure, the equipment-related procedural elements are used that are provided by the basic control.
Recipe procedure window The recipe procedure window displays the required units in columns. The structure elements, steps, transitions, loops etc. that determine the process sequence can be included in the columns. The processes in the unit are coordinated by the "synchronization line" structure element.
Properties The properties of the recipe procedure reflect the header parameters of a recipe. This includes specifications such as the product, parameters, reference scale, input and output materials, etc.
7.3.3.3 Recipe unit procedure (RUP)
The recipe unit procedure includes the procedural elements required for the process engineering in a unit.
The recipe unit procedures are the columns in the recipe procedure window. The recipe operations of the unit are the steps in the recipe procedure window. The name and selected unit are displayed in the column title. By double-clicking the column title, the properties dialog of the recipe unit procedure opens.
The steps in a recipe unit procedure can have the following functions: • Steps with access to a recipe phase of the type EOP
• Substitute for a step sequence for this unit integrated in the recipe
• Library reference for a library operation
• Operator instruction

BATCH Recipe Editor
SIMATIC BATCH 7-24 A5E00495287-01
7.3.3.4 Recipe operation (ROP)
The recipe operation includes the procedural elements required for the process engineering of a recipe operation. When creating a recipe procedure, the equipment-related procedural elements are used that are provided by the basic control.
Steps can take the following forms: • Operator instruction
• Steps with access to a recipe phase of the type EPH
7.3.3.5 Recipe steps in a recipe operation (RPH)
At this level, recipe phases are entered in the form of operator instructions or recipe phases of the type EPH.
7.3.3.6 Substructure
A flat recipe is made up of substructures. The substructure is used to make large recipes clearer to read. Units of the recipe that belong together can be moved to their own section and abstracted using the substructure box SUB.
A substructure can consist of recipe steps in the form of operator instructions, recipe operations of the type EOP or recipe phases of the type EPH. A different unit can be assigned to every recipe step.
Note:
The runtime properties of the recipe are not influenced by the substructures.
7.3.3.7 Library reference
A library operation is not linked directly into a recipe procedure (RUP) but uses a library reference. The library operation cannot be modified within the master recipe; the library operation must always be opened explicitly in the BATCH Recipe Editor.

BATCH Recipe Editor
SIMATIC BATCH A5E00495287-01 7-25
7.3.3.8 Operator instruction
The operator instruction allows instructions for the operator to be displayed during the processing of a recipe. A distinction is made between output of
• Pure instructions (NOP step):
- Without acknowledgment; the recipe is not stopped. Example: Please put on protective glasses!
- With acknowledgment; the recipe is stopped until the operator acknowledges. Example: Please close valve V127.
• An instruction with input option (operator dialog)
- No acknowledgment Example: Entry of analysis process values.
- With acknowledgment Example "Manual dosing": The operator is instructed which material and how much to add. The operator then enters the actual values that have been added and confirms the input (acknowledgment).
Entered values (actual values) can be used as setpoints for subsequent recipe phases/operations. The actual values can also be evaluated in transitions: Example: Good sample? yes/no. Must be configure with acknowledgment in this case.
7.3.3.9 Transition
Along with the step, a transition is a second element type used in structuring a recipe. It contains the step enabling conditions between the steps.
7.3.3.10 Simultaneous branch
A simultaneous branch consists of at least two horizontally arranged sequences joined at top and bottom by double lines.
Function
A simultaneous branch leads to simultaneous processing of several sequences. This allows processes to be executed at the same time.
With simultaneous branches, the branches are processed only if the first equipment phase can use all branches. Once it is released for Batch, the equipment phase can then be allocated regardless of whether it is automatic or manual mode. An equipment phase can only be started by Batch if it is the automatic mode.
Synchronization lines Another method of coordinating sequences is to create synchronization lines between the recipe steps.

BATCH Recipe Editor
SIMATIC BATCH 7-26 A5E00495287-01
7.3.3.11 Alternative branch
An alternative branch consists of at least two vertically arranged sequences joined at top and bottom by a single horizontal line.
Function With alternative branches, you can adapt the execution of the recipe to states in the process. The conditions in the top transitions of the sequences decide which sequence is executed.
7.3.3.12 Synchronization line
The synchronization lines coordinate the execution of recipe sequences in the units or of the recipe operations (ROPs) between the units.
7.3.3.13 Synchronization point
In each synchronization point, you can decide whether execution is continued or halted.
7.3.3.14 Loop
A loop consists of a sequence with at least one recipe step and a return path with a transition.
Meaning The loop allows multiple iterations of a sequence structure.
The transitions following the loop and in the return path decide how often the sequence is repeated. If the condition in the transition following the loop is satisfied, control exits the loop. The conditions of the two transitions should be mutually exclusive so that it is not the order in which the transitions are evaluated that is relevant but rather the logic itself.

BATCH Recipe Editor
SIMATIC BATCH A5E00495287-01 7-27
7.3.3.15 Step placeholder
Incomplete structures must be completed dynamically so that they are always syntactically correct and complete. To make sure this is done, the BATCH Recipe Editor automatically inserts placeholders for recipe phases and transitions.
A recipe phase placeholder appears as an empty recipe phase. By double-clicking or inserting a recipe phase using the menu or the toolbar, the placeholder becomes a recipe phase.
These dynamically generated placeholders are removed again when they are no longer required or they become NOP (no operation) recipe phases when the recipe is saved.
NOP elements can also be used, for example to specify a defined runtime.
7.3.3.16 Transition placeholder
Incomplete structures must be completed dynamically so that they are always syntactically correct and complete. The recipe editor therefore automatically inserts placeholders recipe phases and transitions.
A transition placeholder has the appearance of an empty transition.
To convert a transition placeholder to a transition, simply double-click on symbol, or insert a transition into the placeholder via the "Insert" menu or the toolbar.

BATCH Recipe Editor
SIMATIC BATCH 7-28 A5E00495287-01
7.4 Recipe creation
7.4.1 How to edit a flat recipe
Follow the steps outlined below in the BATCH Recipe Editor: 1. Select the menu command Recipe > New > Flat recipe (for a master recipe) or
Library element:. Substructure.
Result: A new editing window is displayed for editing level 1.
2. Enter the topological structure of the recipe in editing window 1 and any nested editing windows (substructures). Required substructures (= SUB) can be created with the "recipe procedural element". By double-clicking on a "SUB", opens the editing window for the substructure.
- To create a new recipe element, select one of the following buttons in the toolbar:
Result: The element attaches to the mouse pointer.
- Move the mouse to the required position in the editing window and click.
Result. The element is inserted. The icon for the recipe element is still attached to the mouse pointer. The function of the mouse pointer changes only when you select a different element.
- Click (selection arrow) or press the ESC button to change from the editing to the select mode again.
3. Assign the unit in the properties dialog for each recipe step. Select with the Properties command in the shortcut menu for the recipe step.
4. Select the recipe elements in sequence and make the other required settings in the corresponding properties dialog. To do this, select the Properties command in the corresponding shortcut menu (selected with a right-click).
5. Check the validity of the recipes To do this, select the menu command Recipe > Validate.
6. Save the recipe at the required location in the tree of BatchCC By selecting the menu command Recipe > Save as.
Result: After creating/inserting the recipe, its status is "in progress". In this status, it can be modified at any time or can be released for testing or production.
Help Make use of the integrated online help when editing recipes:
• Each properties dialog has a "Help" button.
• "What's this" help for each structure element: Select the recipe element in the editing window + <F1> or with

BATCH Recipe Editor
SIMATIC BATCH A5E00495287-01 7-29
Options for editing recipes You edit the recipe and the recipe elements generally using either the shortcut menu for the object or using the "Edit" menu of the menu bar:
• Assignment of the unit with a flat recipe
• Necessary and possible recipe structure elements
• Setting the properties of the recipe header parameters
• Setting the properties of steps
• Setting the properties of transitions
• Validating recipes
• Releasing a recipe for testing or production
• Revoking a release
7.4.2 How to edit a hierarchical recipe
Follow the steps outlined below in the BATCH Recipe Editor: 1. Select the menu command Recipe > New > Hierarchical recipe (for a master
recipe) or Library element: Recipe operation.
Result: When you create a hierarchical recipe, a new editing window for an RUP is displayed (editing level 1). When you create a recipe operation, a window is displayed with a basic ROP structure (with Start and End) (editing level 2).
2. If you have a hierarchical recipe, first insert a recipe procedural element (Insert > Recipe procedural element).
The first RUP is displayed.
3. Assign the unit in the properties dialog for the recipe unit procedure (RUP). Select with the command Properties in the RUP for the library operation shortcut menu ("Assignment" tab).
Note:
Always make the assignment of the unit before configuring the individual recipe steps. As a result, only the phases actually available in the unit or that correspond to the unit conditions are displayed for selection in the properties dialogs of the phases.

BATCH Recipe Editor
SIMATIC BATCH 7-30 A5E00495287-01
4. Enter the remaining topological structure of the recipe in the editing windows.
- Select one of the following buttons in the toolbar:
Result: The element attaches to the mouse pointer.
- Move the mouse to the required position in the editing window and click to deposit the element at the desired location.
Result. The element is inserted. The icon for the recipe element is still attached to the mouse pointer. The function of the mouse pointer changes only when you select a different element.
- Click (selection arrow) or press the ESC button to change from the editing to the select mode again.
5. Select the recipe elements one after the other and make the settings you require in the corresponding properties dialog To do this, select the Properties command in the corresponding shortcut menu (selected with a right-click).
6. Check the validity of the recipes To do this, select the menu command Recipe > Validate.
7. Save the recipe at the required location in the tree of BatchCC By selecting the menu command Recipe > Save as.
Result: After creating/inserting the recipe, its status is "in progress". In this status, you can modify it at any time or released it for testing or production.
Help Make use of the integrated online help when editing recipes:
• Each properties dialog has a "Help" button.
• "What's this" help for each structure element: Select the recipe element in the editing window + <F1> or with
Options for editing recipes You edit the recipe and the recipe elements generally using either the shortcut menu for the object or using the "Edit" menu of the menu bar:
• Assignment of the unit with a hierarchical recipe
• Necessary and possible recipe structure elements
• Setting the properties of the recipe header parameters
• Setting the properties of steps
• Setting the properties of transitions
• Validating recipes
• Releasing a recipe for testing or production
• Revoking a release

BATCH Recipe Editor
SIMATIC BATCH A5E00495287-01 7-31
7.4.3 Unit assignment
7.4.3.1 Assignment of the unit with a flat recipe
The units are specified individually in the object properties for each recipe step. The unit assignment is made according to the structure of the plant hierarchy in the engineering system. This means that when additional levels were added to the three-level batch hierarchy, for example an area level between process cell and unit, these are also available as selection criteria in the unit assignment to help make the hierarchy clearer.
If you are not using the online assignment of a unit, proceed as described below.
Assignment of the unit with/without conditions? • If you wish to select the units without conditions, follow the procedure
described in this section.
• If you wish to select the units with conditions, proceed to the section, "Unit selection using conditions for a flat recipe".
Steps required in the BATCH Recipe Editor 1. Open the recipe.
2. Select a recipe step.
3. Select the command Properties in the shortcut menu (selected with a right-click).
Select the "New assignment" button. The "Allocations" tab appears.
4. First select the representation of the tree:
- Class view: All unit classes without an area structure are listed in the "Unit selection" field.
- Area view: All areas with the units they contain are listed in the "Unit selection" field.
5. Select the unit class in the "Equipment selection" field and deselect the units (unit candidates) that are not suitable for this recipe unit procedure.
The unit classes and units available originate from the basic engineering. By selecting a unit class and then deselecting the unit candidates, you restrict the phases that can be used in the execution of this recipe unit procedure (displayed in the "Available functions" field).
6. If necessary, select a preferred unit in the "Preferred unit" field.
If no other allocation is made before creating a batch, the unit specified as preferred will be used to make the batch.
7. Confirm your selection with "OK".
Result: This assignment is displayed in the properties dialog of the recipe element. When assigning phases to the recipe element only the phases that can be executed by all the units selected are available.

BATCH Recipe Editor
SIMATIC BATCH 7-32 A5E00495287-01
Additional information Process cell optimization with online assignment of a unit
7.4.3.2 Assignment of the unit with a hierarchical recipe
A recipe unit procedure (RUP) is designed for specific selection of applicable units (fixed number) or a set of conditions for determining the unit selection (variable number depending on changes in the engineering system).
The unit (and the conditions when applicable) are specified in the object properties of the RUP. The unit assignment is made according to the structure of the plant hierarchy in the engineering system. This means that when additional levels were added to the three-level batch hierarchy, for example an area level between process cell and unit, these are also available as selection criteria in the unit assignment to help make the hierarchy clearer.
If you are not using the online assignment of a unit, proceed as described below.
Assignment of the unit with/without conditions? • If you wish to select the units without conditions, follow the procedure
described in this section.
• If you wish to select the units with conditions, proceed to the section, "Unit selection using conditions for a hierarchical recipe".
Steps required in the BATCH Recipe Editor 1. Open the recipe.
2. Select a RUP (the column is shown on a light blue background).
3. Select the command Properties in the shortcut menu (selected with a right-click).
4. Select the "Allocation" tab.
5. First select the representation of the tree:
- Class view: All unit classes without an area structure are listed in the "Unit selection" field.
- Area view: All areas with the units they contain are listed in the "Unit selection" field.
6. Select the unit class in the "Equipment selection" field and deselect the units (unit candidates) that are not suitable for this recipe unit procedure.
The unit classes and units available originate from the basic engineering. By selecting a unit class and then deselecting the unit candidates, you restrict the phases that can be used in the execution of this recipe unit procedure (displayed in the "Available functions" field).
7. If necessary, select a preferred unit in the "Preferred unit" field.
If no other allocation is made before creating a batch, the unit specified as preferred will be used to make the batch.
8. Confirm your selection with "OK".

BATCH Recipe Editor
SIMATIC BATCH A5E00495287-01 7-33
Result: This allocation is displayed in the properties dialog of the recipe elements shown (where it cannot be changed). When assigning phases, only the phases that can be executed by the units still selected are available.
Additional information Process cell optimization with online assignment of a unit
7.4.3.3 Unit selection using conditions for a flat recipe
Conditions can be defined for units on the recipe levels to enable selection of suitable units. Then all units that fulfill these conditions (union set) are available when units are selected. This makes it possible, for example, to include additional units in the batch process (for unreleased batches) when expanding a unit after updating it in BatchCC.
Requirement To be able to enter the conditions for the unit, the "Condition" option in the properties of the recipe procedure must be activated for the unit in the "Allocation" tab.
This can be set as the default for all new recipes using the "Unit selection according to conditions" option in the system settings in BatchCC.
Possible specifications for conditions The conditions can be created on the same recipe levels where they can be assigned to units.
When a library structure is included in a master recipe, it brings its conditions with it.
Follow these steps on the level of the unit recipe procedure: 1. Open the recipe.
2. With a flat recipe: select the recipe step.
3. Select the command Properties in the shortcut menu (selected with a right-click).
4. Click the "New assignment" button in the "General" tab. Result: The "Properties of New Allocation" dialog box is displayed.
5. Click the "New" button in the " Condition" tab. Result: A new line for entering an additional condition is inserted in the table.
6. Click the "Modify" button. Result: The "Operand 1" dialog box opens.
7. From the list, select the attribute of the unit that should fulfill a condition.
8. Click the "Next" button. Result: The "Operator" dialog box opens.

BATCH Recipe Editor
SIMATIC BATCH 7-34 A5E00495287-01
9. In the middle field select the operator that specifies the logic operation condition of the two operands and therefore defines the condition.
10. Click the "Next" button. Result: The "Operand 2" dialog box opens.
11. From the list, select the value of the unit attribute needed to fulfill the desired condition. Some values may have to be edited in a subsequent dialog. Use the context-sensitive help if you want more information in this regard ("Help" button).
12. Click the "Next" button. Result: The "Operator" dialog box opens again. All elements of the condition are displayed and cannot be changed.
13. Select the "Finish" button. Result: The completed condition is entered in the "Condition" tab. Enter additional conditions as needed in the same way.
Result: The following is displayed in the "Allocation" tab:
- Left: All units are displayed as non-modifiable under "Equipment selection". The units that should be selected are already automatically marked.
- Right: The union set of the functions from all selected units is displayed under "Available phases".
14. First select the representation of the tree:
- Class view: All unit classes without an area structure are listed in the "Unit selection" field.
- Area view: All areas with the units they contain are listed in the "Unit selection" field.
15. If necessary, select a preferred unit in the "Preferred unit" field.
If no other allocation is made before creating a batch, the unit specified as preferred will be used to make the batch.
16. Confirm your selection with "OK".
17. You can change these settings as needed by pressing the "Edit assignment" button in the "Properties of <recipe phase>" dialog box.
Additional information Process cell optimization with online assignment of a unit

BATCH Recipe Editor
SIMATIC BATCH A5E00495287-01 7-35
7.4.3.4 Unit selection using conditions for a hierarchical recipe
Conditions can be defined for units on the recipe levels to enable selection of suitable units. Then all units that fulfill these conditions (union set) are available when units are selected. This makes it possible, for example, to include additional units in the batch process (for unreleased batches) when expanding a unit after updating it in BatchCC.
Requirement To be able to enter the conditions for the unit, the "Condition" option in the properties of the recipe procedure must be activated for each unit recipe procedure (line). The properties dialog in this case is expanded by a "Condition" tab.
This can be set as the default for all new recipes using the "Unit selection according to conditions" option in the system settings in BatchCC.
Possible specifications for conditions These conditions can be created on the same recipe levels where they can be assigned to units.
When a library operation is included in a master recipe, it brings its conditions with it. The properties dialog in this case is expanded with another "Subcondition" tab.
Follow these steps on the level of the unit recipe procedure: 1. Open the recipe.
2. With a hierarchical recipe: select a RUP (column is shown with a light blue background).
3. Select the command Properties in the shortcut menu (selected with a right-click).
4. Open the " Condition" tab.
5. Click the "New" button. Result: A new line for entering an additional condition is inserted in the table.
6. Click the "Modify" button. Result: The "Operand 1" dialog box opens.
7. From the list, select the attribute of the unit that should fulfill a condition.
8. Click the "Next" button. Result: The "Operator" dialog box opens.
9. In the middle field select the operator that specifies the logic operation condition of the two operands and therefore defines the condition.
10. Click the "Next" button. Result: The "Operand 2" dialog box opens.
11. From the list, select the value of the unit attribute needed to fulfill the desired condition. Some values may have to be edited in a subsequent dialog. Use the context-sensitive help if you want more information in this regard ("Help" button).

BATCH Recipe Editor
SIMATIC BATCH 7-36 A5E00495287-01
12. Click the "Next" button. Result: The "Operator" dialog box opens again. All elements of the condition are displayed and cannot be changed.
13. Select the "Finish" button. Result: The completed condition is entered in the "Condition" tab. Enter additional conditions as needed in the same way.
14. Confirm with "OK".
Result: The following is displayed in the "Allocation" tab:
- Left: All units are displayed as non-modifiable under "Equipment selection". The units that should be selected are already automatically marked.
- Right: The union set of the functions from all selected units is displayed under "Available phases".
15. First select the representation of the tree:
- Class view: All unit classes without an area structure are listed in the "Unit selection" field.
- Area view: All areas with the units they contain are listed in the "Unit selection" field.
16. If necessary, select a preferred unit in the "Preferred unit" field.
If no other allocation is made before creating a batch, the unit specified as preferred will be used to make the batch.
Additional information Process cell optimization with online assignment of a unit

BATCH Recipe Editor
SIMATIC BATCH A5E00495287-01 7-37
7.4.3.5 Process cell optimization with online assignment of a unit
Definition When optimizing the process cell with online assignment, the unit recipe is assigned to the unit at the last possible moment. If the unit is not assigned when the batch is being made, the "online assignment" function becomes active.
"Online assignment" provides the following four options (strategies) for optimizing the utilization of units:
• Preferred unit: If no other allocation is made before creating a batch, the unit specified as preferred will be used to make the batch.
• The longest out of use: The unit that has not been used for the longest time is selected.
• Operator selection: The allocation of the unit can be performed manually in an operator dialog.
• Process parameters; The variable selected in the process parameter field decides the unit to be used.
Steps required in the BATCH Recipe Editor 1. Open the recipe.
2. Select
- With a flat recipe: the recipe step.
- With a hierarchical recipe: select a RUP (column is shown with a light blue background).
3. Select the command "Properties" in the shortcut menu (selected with a right-click).
4. Select the "Allocation" tab. (Use the "Edit assignment" button for flat recipes.)
5. In the "Strategy" box, enter one of the options described above for online assignment.
6. If you select the process parameter option, select the relevant formula parameter.
You can select the parameter with the "Unit" data type from a list box that will decide which unit is selected when the batch is made.
7. Confirm your selection with "OK".

BATCH Recipe Editor
SIMATIC BATCH 7-38 A5E00495287-01
"Operator Selection" Strategy
When the "Operator selection’ strategy is configured, the status symbol is set at the recipe step (visible in the open control recipe) as soon as SIMATIC BATCH wants to use a unit.
After selecting the RUP (with a hierarchical recipe) or the recipe phase (with a flat recipe) with the status symbol, the "Select unit" dialog box can be opened from the shortcut menu to enable you to select the desired unit.
If this unit is already in use, the batch waits until the selected units is available again. If more than one user attempts to make a selection at the same time, the allocation goes to the first user. All other selected units are ignored.

BATCH Recipe Editor
SIMATIC BATCH A5E00495287-01 7-39
7.4.3.6 Supplemental information about online assignment of a unit for flat recipes
Online assignment of several recipe phases with the same unit assignment If several recipe phases are in a flat recipe with the same unit assignment, the online assignment is only performed for the first recipe phase.
For safety reasons the assigned unit is retained for all subsequent recipe phases, even when the unit is released upon completion of a phase.
Repeated online assignment To repeat an online assignment, a completed or aborted recipe phase needs to be reset. None of the other recipe phases with the same unit assignment can be active in this case.
Recommendation To be able to repeat an online assignment in a flat recipe, recipe phases should be distributed over many different unit assignments when the recipe is originally created.

BATCH Recipe Editor
SIMATIC BATCH 7-40 A5E00495287-01
7.4.4 Inserting and labeling recipe elements
7.4.4.1 Recipe procedural element (Insert menu)
With this function, you can insert recipe steps of the type recipe procedural element within a recipe. This step element is a substitute object for the steps and step sequences stored within the nested hierarchy level.
• Hierarchical recipe RUP, ROP, RPH
• Flat Recipe Substructure
Open or double-click The window for editing the recipe steps or step sequences in the nested hierarchy level opens for the selected object.
Properties The properties of the step elements and the underlying step sequence are identical. The data in the "General", "Input material", "Output material", "Parameters" (process parameters) and "Process tags" tabs can be edited.
• Hierarchical recipe By installing it in the corresponding unit column, the unit class and, if selected, a preferred unit for creating a batch are specified.
• Flat Recipe The unit class/unit can be assigned singly (even a different unit class/unit) to each recipe step in the "General" tab.
Insert function The insert function is closed for this object by clicking the selection arrow or a different object to be inserted (menu or toolbar) or with ESC.
BATCH Recipe Editor
SIMATIC BATCH A5E00495287-01 7-41
7.4.4.2 Library reference (Insert menu)
With this function, you can insert recipe steps of the type library reference within a recipe unit procedure (RUP). This step element is the substitute object for a sequence (library operation) stored in the recipe library. In the Properties window of the library reference, you specify the link to the library operation. You can only select the library operations available for the selected unit class.
Open The window displaying the recipe step sequence that is stored in the library opens for the selected object. To change the step chain in the library, you have to open it using Open library object... (Recipe menu) .
Properties The properties of the step elements and the underlying step sequence are identical. By installing it in the corresponding unit column of a hierarchical recipe, the unit class and, if selected, a preferred unit for creating a batch are specified. The data in the "General", "Input material", "Output material", "Parameters" (process parameters) and "Process tags" tabs can be edited.
Insert function The insert function is closed for this object by clicking the selection arrow or a different object to be inserted (menu or toolbar) or with ESC.
7.4.4.3 Filtering library references
If a library reference is inserted within a recipe, all library operations / library substructures of the same unit class are offered for selection. There are no unit classes if the unit is allocation through conditions. All library operations and library substructures are thus offered for selection.
If you want to restrict the selection of library references to allowed unit classes, you should work on the basis of unit classes and thereby filter the selection.
The following library references are offered for selection For hierarchical recipes: library operations of the same unit class.
Requirement Before you can work with a unit class basis, you need to deactivate the "Unit selection according to conditions" check box in the "General" tab of the "Project settings" dialog. This setting then applies to newly created library operations or library substructures and recipes.

BATCH Recipe Editor
SIMATIC BATCH 7-42 A5E00495287-01
Procedure 1. Create a new library operation / library substructure in the Batch Control
Center.
2. Open the "Properties" dialog of the library operation or library substructure and open the "Allocations" tab.
3. Click on the "Edit" button and open the "Candidates" tab.
4. Activate only the desired unit class and close all dialogs.
Result The selection for library references in a recipe is limited to the unit class by the filter criterion.
7.4.4.4 Recipe phase/operation (Insert menu)
This function inserts recipe steps of the recipe phase type (RPH). In the properties dialog in the sequence window for the recipe unit procedure, you can link a step with a recipe phase of the type EOP or EPH. In the sequence window for the recipe operation or a single level recipe, you can link a step with a recipe phase of the type EPH.
Properties By installing it in the corresponding unit column of a hierarchical recipe, the unit class and, if selected, a preferred unit for creating a batch are specified. The data in the "General", "Input material", "Output material", "Parameters" (process parameters) and "Process tags" tabs can be edited.
To link the recipe steps with the data of the basic control, the configuration data of the corresponding process cell must be read in or updated with the BATCH object manager.
Insert function The insert function is closed for this object by clicking the selection arrow or a different object to be inserted (menu or toolbar) or with ESC.

BATCH Recipe Editor
SIMATIC BATCH A5E00495287-01 7-43
7.4.4.5 Operator instruction (Insert menu)
This function inserts recipe steps of the operator instruction type.
The operator instruction allows instructions to be displayed to operators during the processing of a recipe. A distinction is made between output of
• Pure instructions (NOP step)
- Without acknowledgment; the recipe is not stopped. Example: Please put on protective glasses!
- Without acknowledgment; the recipe is stopped until the operator acknowledges. Example: Please close valve V127.
• an instruction with input option (operator dialog) A recipe phase/operation is selected for a phase. Only the parameter set is applied. No phase is started in the AS.
- Without acknowledgment, example: Entry of analysis process values.
- With acknowledgment, example "manual dosing": The operator is instructed which material to use and how much to add. The operator enters the actual values of the material added and confirms (acknowledges).
Without acknowledgment: Activation status "Activate and do not block batch" is selected. With acknowledgment: Activation status "Activate and block batch" is selected.
Entered values (actual values) can be used as setpoints for subsequent recipe phases/operations. You can also pass default values or diagnostic values to subsequent recipe steps. An actual value entered by the operator is passed to a higher recipe level in this case. The transfer value is queried in subsequent recipe step as the source. The actual values can also be evaluated in transitions, example: Good sample? yes/no. Must be configure with acknowledgment in this case.
Properties Regardless of the unit, only those phases are available that were released for operator instructions in the engineering system. It is advisable to configure special manual operations with the engineering system that are available for all units.
The data in the "Instruction", "General", "Input materials", "Output materials", and "Parameters" (process parameters) and tabs can be edited.
Depending on the phase selected in the "General" tab, it is possible for the operator to enter parameter values (= instruction with input option). The parameter values set in the "Input material", "Output material", "Parameters" (process parameter) tabs are then the setpoints for the operator.

BATCH Recipe Editor
SIMATIC BATCH 7-44 A5E00495287-01
Insert function The insert function is closed for this object by clicking the selection arrow or a different object to be inserted (menu or toolbar) or with ESC.
Additional information Parameter interconnections
7.4.4.6 Transition (Insert menu)
With this function, you can insert a Transition .
In the recipe window with the units, the recipe operations can be executed without a transition. You can, however, also insert several transitions between steps and synchronization points.
In the sequence window for the recipe operation, when you insert a transition, you also insert a step so that there is always a step between two transitions. Depending on the point at which you insert the transition, the order of the step and transition may be reversed.
Properties Data in the "General" and "Condition" tabs can be edited. To form the transition conditions, the process variables defined in the corresponding recipe level (parameters from the properties of a ROP or RUP), fixed values and all the values acquired with the TAG_COLL block can be used.

BATCH Recipe Editor
SIMATIC BATCH A5E00495287-01 7-45
7.4.4.7 Simultaneous branch (Insert menu)
In the BATCH Recipe Editor, this function inserts an AND divergence. The steps and transitions in the simultaneous branches are executed at the same time. Control is passed to the successor transition or successor step only when the last steps and transitions of the simultaneous branches have been executed or are satisfied.
With simultaneous branches, the branches are processed only when all branches can be processed. This ensures, for example, that it is only possible to "heat" when the "agitator" is active.
Note:
If two equipment phases of the same unit are installed in one simultaneous branch and one of the two phases is in automatic mode and the other in manual, during processing, the unit will be occupied by the equipment phase in automatic mode.
At this point, execution of the simultaneous branch stops. Even the equipment phase in the automatic mode, that is occupying the unit is not processed.
Selection Clicking the double line selects the entire simultaneous branch. If you click one of the lines that join the double lines from within the simultaneous branch, you select a sequence.
To select a simultaneous branch with a lasso, both double lines and a certain amount of space to the right and left between the individual objects (structure elements) must be included within the lasso frame.
Paste Proceed as follows to insert simultaneous branches in the diagram in the BATCH Recipe Editor:
1. Select the menu command Insert > Simultaneous branch or click the corresponding button in the toolbar.
2. Click between two objects in the diagram.
Proceed as follows if you require a parallel procedure to an existing structure in the BATCH Recipe Editor:
3. Select the menu command Insert > Simultaneous branch or click the corresponding button in the toolbar.
4. Position the mouse pointer above the first object for which you require a simultaneous branch.
5. Hold down the mouse button and drag the mouse pointer below the last object to be enclosed in the simultaneous branch.

BATCH Recipe Editor
SIMATIC BATCH 7-46 A5E00495287-01
Notes • While you drag the mouse pointer, a line is displayed that indicates which parts
will be included if you release the button at the present position.
• Depending on whether you release the button to the left or right of the vertical line, a new simultaneous branch is added to the left or right.
• You can cancel this operation by returning the mouse pointer to the initial position or by pressing the ESC key.
7.4.4.8 Alternative branch (Insert menu)
In the BATCH Recipe Editor, this function inserts an OR divergence.
An alternative branch consists of at least two vertically arranged sequences joined at top and bottom by a single horizontal line. Each alternative branch begins with a transition whose evaluation decides whether the sequence is executed or not. The transitions should be created so that the results select only one path.
Selection If you click one of the two horizontal lines, you select the entire alternative branch. If you click one of the lines that join the horizontal lines, a sequence is selected.
To select an alternative branch with a lasso, both horizontal lines and a certain amount of space to the right and left of the individual objects (Structure elements must be included in the lasso frame.) must be included in the lasso frame.
Paste Proceed as follows to insert alternative branches in the diagram in the BATCH Recipe Editor:
1. Select the menu command Insert > Alternative branch or click the corresponding button in the toolbar.
2. Click between two objects in the diagram.
If you require an alternative procedure to an existing structure in the BATCH Recipe Editor, follow the steps outlined below:
1. Select the menu command Insert > Alternative branch or click the corresponding button in the toolbar.
2. Position the mouse pointer above the first object for which you require an alternative branch.
3. Hold down the mouse button and drag the mouse pointer below the last object to be included in the alternative branch.

BATCH Recipe Editor
SIMATIC BATCH A5E00495287-01 7-47
Notes: • While you drag the mouse pointer, a line is displayed that indicates which parts
will be included if you release the button at the present position.
• Depending on whether you release the button to the left or right of the vertical line, a new alternative branch is added to the left or right.
• You can cancel this operation by returning the mouse pointer to the initial position or by pressing the ESC key.
7.4.4.9 Synchronization (Insert menu)
With synchronization, you can coordinate the execution of recipe sequences in the units and between the units (hierarchical recipe). Synchronization is also possible in the sequences of the same simultaneous branch (hierarchical recipe, flat recipe).
At each synchronization point, you can decide whether or not the sequence is halted. If you select Blocking , the sequence waits until the other involved sequences have reached or had reached the synchronization line (may have continued during). If Blocking is not selected, the sequence does not wait for the other sequences. The fact that the synchronization point was reached is still recorded.
Paste Follow the steps outlined below if you require synchronization between the units of a hierarchical recipe in the BATCH Recipe Editor:
1. Select the menu command Insert > Synchronization or click the corresponding button in the toolbar.
2. Drag the mouse starting between two objects of the first recipe unit procedure (RUP) to a point between two objects of the recipe unit procedure (RUP) you want to synchronize. If there are other sequences between the RUPs, these are not included in the synchronization.
Expand 1. Select the menu command Insert > Synchronization or click the
corresponding button in the toolbar.
2. Beginning at a synchronization point (junction between the sequence line and synchronization lines) drag the mouse pointer until it is located between two objects of the recipe unit procedure (RUP) you want to add in to the synchronization.
Removing a synchronization point You can select and delete individual synchronization points or the synchronization line.

BATCH Recipe Editor
SIMATIC BATCH 7-48 A5E00495287-01
Properties You can assign a name to the synchronization and decide whether or not execution is to be halted individually for each synchronization point.
Appearance of the synchronization point: A synchronization point is displayed as a double line and the sequence line is interrupted if a synchronization point is for the sequence branch and the Blocking property was selected.
A synchronization point is displayed as a single line if a synchronization point is for the sequence branch and the "Blocking" property was not selected.
A synchronization point is displayed as a double line and the sequence line is not interrupted if it is not a synchronization point for the sequence.
Note:
A synchronization line cannot begin or end in alternative branches, simultaneous branches or loops. All intersections must be located directly in the RUPs or in sequences of the same simultaneous branch

BATCH Recipe Editor
SIMATIC BATCH A5E00495287-01 7-49
7.4.4.10 Synchronization examples
Three examples are offered below to show and explain the semantics and the handling of synchronization lines.
Example 1
Synchronization line 0 runs through two RUPs, RUP_1 and RUP_2. When all ROPs before the synchronization line, ROP_A and ROP_B in this case, are completed, the subsequent ROPs, ROP_C and ROP_D in this case, are started.

BATCH Recipe Editor
SIMATIC BATCH 7-50 A5E00495287-01
Example 2
ROP_D must wait for ROP_A and ROP_B in this recipe structure. ROP_C, in contrast, starts immediately when ROP_A is completed.

BATCH Recipe Editor
SIMATIC BATCH A5E00495287-01 7-51
Example 3 .
The synchronization is occurs between RUP_1 and RUP_3. RUP_2 is not involved.
7.4.4.11 Loop (Insert menu)
With this function, you can insert a loop in the Batch Recipe Editor Loop . In the return path, a transition is inserted first. In the straight sequence, there must also be a transition following the loop. In these transitions, you must define conditions that clearly specify the sequence.
Paste Proceed as follows to insert loops in the diagram in the BATCH Recipe Editor:
1. Select the menu command Insert > Loop or click the corresponding button in the toolbar.
2. Click between two individual objects (structure elements) to insert a loop with a step placeholder and a transition in the return path. By selecting the required recipe element and clicking on the placeholder, this is replaced by the desired function.

BATCH Recipe Editor
SIMATIC BATCH 7-52 A5E00495287-01
Follow the steps below if you want to repeat the processing an existing sequence of objects with a loop in the BATCH Recipe Editor:
1. Select the menu command Insert > Loop or click the corresponding button in the toolbar.
2. Press the left mouse button with the pointer located in the gap after the last object to be included in the loop.
3. Hold down the button and drag the mouse pointer upwards until all the required objects are included and then release the mouse button.
Remove Select the entire loop and press the delete key to delete the content. If you only select the transition in the return path, the loop body remains after deleting.
Notes • While you drag the mouse pointer, a line is displayed that indicates which parts
will be included if you release the button at the present position.
• You can cancel this operation by returning the mouse pointer to the initial position or by pressing the ESC key.
Selecting You can select a loop as follows:
• by clicking on one of the horizontal lines at the top or bottom,
• by clicking on the return path line,
• by clicking on one of the lines of the sequence in the body of the loop, or
• by opening a lasso while holding down the left mouse button that includes the entire body of the loop as well as the transition in the return path.

BATCH Recipe Editor
SIMATIC BATCH A5E00495287-01 7-53
7.4.4.12 Working with substructures
By clicking on the icon or Selecting with a lasso, you can select a substructure. To change to the substructure, double-click on the icon of the substructure. A new window opens showing the content of the substructure.
Note:
Substructures can only be created in flat recipes.
Note:
Substructures have the same functional possibilities as ROPs in hierarchical recipes (parameter assignment options, process tag definition, upload and download formula parameters in the recipe, library objects)
Paste Proceed as follows to insert substructures in the BATCH Recipe Editor:
1. Select the menu command Insert > Recipe procedural element or click the corresponding button in the toolbar.
2. Click between two individual objects (structure elements) or on a substructure placeholder.
Remove Select the substructure box and press the delete key to delete the content.
If you do not want to delete the content of the substructure, select the menu command Edit > Resolve substructure. The content of the substructure is then embedded in the diagram instead of the substructure box.
Nesting depth A substructure itself can contain other substructures. The permitted nesting depth can be set with the menu command Options > Settings.
Once the maximum depth is reached, two reactions can be configured:
• The action (pasting from the clipboard, inserting a substructure, including in a substructure) is rejected with an error message and
• the deepest substructures are resolved (embedded).
The latter can lead to an inserted substructure disappearing again before it becomes visible because it would cause the nesting depth to be exceeded.

BATCH Recipe Editor
SIMATIC BATCH 7-54 A5E00495287-01
7.4.4.13 Adding comments to structure elements
With the menu command Edit > Text, you open a dialog box in the BATCH Recipe Editor in which you can enter a comment for the object (structure element) selected in the recipe.
Note:
The text of the comment is displayed beside the objects if you activate the object comments with the menu command View
7.4.5 Creating recipe properties
7.4.5.1 Passing formula parameters in the recipe
Passing formula parameters in the recipe The same formula parameter can be used more than once in different recipe steps of various types. A formula parameter can also be used at the same time in transition conditions.
The schematic below shows the possible use of a formula parameter.

BATCH Recipe Editor
SIMATIC BATCH A5E00495287-01 7-55
7.4.5.2 Parameter interconnections
Parameter values (setpoint and process value) can be passed between the structure elements of the recipe hierarchy in both directions while the recipe is executing. During the creation of the Recipe properties and the individual recipe steps, you can enter the corresponding comment for each input material/output material and process parameters:
• Source
• Target
Reference to source A source (setpoints) from the next higher level can be assigned for the recipe objects RUP, ROP, RPH and SUB.
Example: An input material in RUP can be the source for an input material in a ROP. The name of the input material is referenced.
Source = recipe procedure (RP)
Note:
Only parameters of the recipe steps and transitions that reference the level of the recipe procedure as the source ("uploaded" recipe header parameters) can be used as formula parameters for batch planning.
Reference to target For the RUP, ROP, RPH and SUB recipe objects, the recorded process values can be passed on to the next higher level.
Example: A process value in the ROP can have a parameter in a RUP as its target. This allows the process value of a step to be used as the setpoint for a subsequent step. The name of the parameter is referenced.
Note:
Parameters with a reference to a data source cannot be used as target parameters.

BATCH Recipe Editor
SIMATIC BATCH 7-56 A5E00495287-01
Example of a hierarchical recipe
7.4.5.3 Setting the properties of the recipe header parameters
In the properties of the recipe header (recipe header parameter), configure the Properties of the recipe . The material and production data and the process parameters contain all the parameters passed up for operator instructions (formula) from those in the recipe procedure elements (RUPs, ROPs and RPHs) lower in the hierarchy. Further parameters can be added to these.
Open tab dialog box There are two ways in which you can open the "Properties of <Recipe name>" tab:
• In the BATCH Control Center: see section "BatchCC"
• In the BATCH Recipe Editor: following description

BATCH Recipe Editor
SIMATIC BATCH A5E00495287-01 7-57
Follow the steps outlined below in the BATCH Recipe Editor: 1. Open the recipe.
2. Select the menu command Recipe > Header parameters.
Result: The "Properties of the <recipe name>" dialog is displayed with the header parameters. In the dialog tabs, all the Properties of the recipe are available, which must/can be specified for a recipe in addition to the recipe structure. This is the same properties dialog that you can select with the Edit > Properties menu command in BatchCC.
Some of the properties (parameters) already have a fixed value due to the detailed configuration of the individual recipe elements (RUPs, ROP, EPHs, transitions) following the basic control. You can recognize parameters or settings that can still be modified by the white editing fields.
3. Make the settings you require in the tabs and confirm with "OK".
Entering properties You enter the properties of the recipes in the following tab. Click the "Help" button for context-sensitive help on each individual input or output box in the tab.

BATCH Recipe Editor
SIMATIC BATCH 7-58 A5E00495287-01
Reference to formula category With the "Category" input box in the "General" tab, you assign the formula category with the required structure for material and production data (formula) to the master recipe. This is only possible when the formula category has already been created in BatchCC. You can set this option in BatchCC later.
See also section: Relationship between header parameters, formula category and formula
Electronic signatures Actions and status changes of recipes can be signed. You configure electronic signatures in the "ESIG" tab.
See also section: Specifying electronic signatures
7.4.5.4 Setting the properties of steps
Properties of the steps In the object properties of the recipe procedure elements (RUP, ROP, NOP, RPH, SUB) you define the material and production data (formula) and the parameters for each individual element. The parameters for input materials, output materials and process parameters for the recipe phases in the sequences are specified by assigning the recipe phase (of the type EOP, EPH). Further parameters can be added to these.
Follow the steps outlined below in the BATCH Recipe Editor: 1. Open the master recipe.
2. Select a recipe procedure element.
3. Select the command "Properties" in the shortcut menu.
Result: The dialog box "Properties of <step name>" is displayed. The tabs in the dialog contain all the properties that must or can be specified for the relevant recipe procedural element.
4. Make the settings you require in the tabs and confirm with "OK".

BATCH Recipe Editor
SIMATIC BATCH A5E00495287-01 7-59
Entering properties You enter the properties of the step in the following tab. Click the "Help" button for context-sensitive help on each individual input or output box in the tab.
Passing parameters Using the "Source" and "Target" table columns, you can interconnect the parameters of different hierarchical levels in both directions (mouse click on the button beside the parameter):
• For the recipe objects RUP, ROP and RPH, you can select a source from the next higher level. Example: A parameter in the recipe procedure can be the source for a parameter in an RUP.
Note:
Parameters of the recipe steps that reference the recipe procedure level as the source ("uploaded" header parameters) can be used as formula parameters for batch planning.
• For the RUP, ROP, RPH and SUB recipe objects, the recorded process values can be passed on to the next higher level. Example: A process value in the RUP can have a parameter in a recipe procedure as its target. This allows the process value of a step to be used as the setpoint for a subsequent step.

BATCH Recipe Editor
SIMATIC BATCH 7-60 A5E00495287-01
Note: Parameters can only be passed when the parameter types and units of measure match.
Note:
Parameters with a reference to a data source cannot be used as target parameters.
Properties of library references
Note: In the properties dialog of a library reference, most properties of the library operation are displayed and cannot be modified. To modify the properties, you must open the library operation explicitly in the BATCH Recipe Editor.
Scaling with minimum and maximum limit The physical limits of the process cell instance is displayed as limit values. If the setpoint value is adjusted, the possible minimum and maximum setpoint values are also displayed in the tool tip.
If you remain within these limits (tooltip), the permissible quantities of a Batch between the "minimum quantity of a Batch" and the "maximum quantity of a Batch" is ensured.
Setpoints outside the limits specified in the tooltip are also possible. In the event of this, warnings are issued during the validation and the quantity of a batch is limited.
Low limit
This displays the minimum value of the parameter that would be of practical value as the setpoint. If a discrete parameter type or text parameter is set for this parameter (in other words not "floating point" type!), there is no minimum limit since only permitted entries are displayed as the value. If scaling is selected, the value depends on the reference scale and the minimum limit of the actual amount from the recipe header.
The minimum limit is calculated so that the parameter value cannot fall below the lower limit of the block following scaling.

BATCH Recipe Editor
SIMATIC BATCH A5E00495287-01 7-61
Value
Here, you can enter the set point. A default value is displayed that is taken from the data of the basic control. The value entered must be between the upper and lower limits.
There are several possible reasons for a violation of the limits:
• The limits in the process cell data are too narrow.
• Scaling is too extreme.
• The limits for the batch quantity (see header parameters) are too far away from the reference quantity.
High limit:
This displays the maximum value of the parameter that would be of practical value as the setpoint. If a discrete parameter type or text parameter is set for this parameter (in other words not "floating point" or "integer" type!), there is no upper limit since only permitted entries are displayed as the value. If scaling is selected, the value depends on the reference scale and the upper limit of the actual amount from the recipe header.
The upper limit is calculated so that the parameter value cannot exceed the upper limit of the block following scaling.
If the upper limit is lower than the lower limit, it is not possible to enter a correct value. This would occur if the range between the upper and lower limits in the header parameters is too great or if the scaling used would push the value beyond the limits.
Electronic signatures Actions and status changes of recipes steps can be signed. You configure electronic signatures in the "ESIG" tab.
See also section: Specifying electronic signatures
Additional information • Uploading and downloading formula parameters in the recipe
• Passing formula parameters in the recipe

BATCH Recipe Editor
SIMATIC BATCH 7-62 A5E00495287-01
7.4.5.5 Setting a recipe phase for "Continuous operation"
During creation of a recipe, a flag can be set to define a recipe phase that is not self-terminating so that this recipe phase (equipment phase) is not completed in run time until it receives a termination command from another recipe phase or until the unit recipe procedure that it is in completes.
• This is necessary when an equipment phase (for example, agitating) is required to continue after recipe operations.
• A second application is the setting of different parameters for the equipment phase without having to turn it off and on again (for example during a flying control strategy change).
Follow the steps outlined below in the BATCH Recipe Editor: 1. Open the master recipe.
2. Select a recipe procedure element.
3. Select the command Properties in the shortcut menu (selected with a right-click).
Result: The dialog box "Properties of <step name>" is displayed.
4. Activate the "Continue" check box
5. Confirm with "OK".
7.4.5.6 Setting the control strategy of a recipe phase
Recipe phases can be implemented with various control strategies (set of setpoints) that can be used in the manual mode or in the automatic mode (recipe mode). The control strategies are configured along with their parameters in the engineering system. In the recipe editor, the control strategies defined in this way are available in plain language under the name of the control strategy. During parameter assignment, only the parameters belonging to the selected control strategy are displayed.
Follow the steps outlined below in the BATCH Recipe Editor: 1. Open the master recipe.
2. Select a recipe procedure element.
3. Select the command "Properties" in the shortcut menu.
Result: The dialog box "Properties of <step name>" is displayed.
4. Select the required control strategy of the recipe step in the "Control strategies" field.
Result: In the tabs "Input material", "Output material" and "Parameters", only the parameter values belonging to the selected control strategy and thus the valid parameter for this recipe step are displayed.
5. Confirm with "OK".

BATCH Recipe Editor
SIMATIC BATCH A5E00495287-01 7-63
7.4.5.7 Allowing online modification of setpoints
Introduction During batch control, the parameters (setpoints) of the control recipe can be modified by the operator (for example the speed of an agitator can be changed without stopping it). The following parameter values can be changed:
• Input materials
• Output materials
• Process parameters
How modification affects RPHs and the operator dialog The new values are immediately available for all recipe phases (EPH, EOP) and operator dialogs not yet active.
If recipe phases (EPH, EOP) and operator dialogs are running, you can choose between the following two options:
• If the recipe step is currently being processed there will be no reaction to the operator modifying the parameter. The modified parameter only will become effective when the step is processed again.
• If the recipe step is currently being processed, parameter values changed by the operator will become effective immediately; they are transferred from the running recipe step in the control recipe directly to the controller where they take effect in the executing block.
How modification affects ROPs and the RUPs The new values are available immediately for all recipe elements (ROP, RUP) and operator dialogs that have not been activated.
If the recipe element is currently being executed, there is no immediate reaction to the parameter change. Modified parameter values only take effect the next time the element is executed (for example positioning within a loop).

BATCH Recipe Editor
SIMATIC BATCH 7-64 A5E00495287-01
Specifying whether parameters can be modified for RPHs, operator dialogs, ROPs and RUPs
You specify whether or not parameter values can be modified in the properties dialogs of the recipe elements RPH, operator dialog, ROP and RUP.
You open the properties dialog by selecting the recipe element and the "Properties" command in the shortcut menu.
You make the settings governing online changes to parameter values in the "Input materials", "Output materials" or "Process parameters" tabs in the "Modifiable" and "Effective immediately" columns (extra only for RPH and operator dialog).
Tip: Via the system settings (Options> Settings), you can set the default value in the "Modifiable" and "Effective immediately" columns in the "General" tab of the properties dialogs of new parameters.
Result: During batch control, the parameter input fields can be edited and parameter values modified.
Online Response with parameter references With parameter references (data source, data target), the response is as follows:
• If parameters are marked as "Modifiable", the operator is permitted to enter new values.
• Implicit modification by the control recipe remains possible for parameters not marked as modifiable. If, for example, an interconnected parameter in a recipe phase is not modifiable, it can nevertheless be modified by an operator making a change in the recipe operation.
Even if the parameter is locked against modification in the recipe operation, a modification by target interconnections is still possible.
Modifications in transitions Process parameters updated at runtime can also be used in the evaluation of transitions.
You can specify that the modification should take immediate effect in the properties dialog of the transition. Using the "Effective immediately" column for address 1 and 2, you can specify that the value of the process parameter will take immediate effect if it is changed.

BATCH Recipe Editor
SIMATIC BATCH A5E00495287-01 7-65
7.4.5.8 Setting the properties of transitions
Properties of Transitions In the properties of the transitions, you configure the step enabling conditions. The step enabling conditions are specified as "Boolean expressions". A single operation always consist of two operands Operand 1 = variable, Operand 2 = variable or number) that are logically linked by a relational operator.
Follow the steps outlined below in the BATCH Recipe Editor: 1. Open the recipe.
2. Select a transition.
3. Select the command Properties in the shortcut menu.
Result: The "Properties of <transition name>" tab is displayed. Configure the step enabling conditions in the "Condition" tab.
4. Make the desired settings:
- You can insert additional step enabling conditions with the "New" button.
- You can change an existing step enabling condition may marking it and pressing the "Change" button.
5. Change the logic operation of the individual conditions as required:
- Right click on a logic gate. A selection of Boolean logic operators appears. Select the suitable logic operation.
6. Confirm with "OK".

BATCH Recipe Editor
SIMATIC BATCH 7-66 A5E00495287-01
Entering properties You enter the properties of the transitions in the following tab. The dialog for configuring a condition appears by clicking the "New" or "Change" button. You first go to the "General" page. This is where you can specify the type of operand (parameter, constant, measured value, recipe reference). Click the "Help" button for context-sensitive help on each individual input or output box in the tab.
Parameter selection, independent of units Here you can select the parameters from basic control regardless of the units. When the batch is made, the required unit is selected along with the parameters specific to the unit.
Electronic signatures Actions and status changes of transitions can be signed. You configure electronic signatures in the "ESIG" tab.
See also section: Specifying electronic signatures

BATCH Recipe Editor
SIMATIC BATCH A5E00495287-01 7-67
7.4.5.9 Specifying the properties of the library objects
Properties of steps and transitions The properties of the steps and transitions within the library objects are entered in the relevant properties dialogs in the same way as with master recipes:
• Setting the properties of steps
• Setting the properties of transitions
Properties of the recipe header parameters The header parameters of the library operation in hierarchical recipes differ from those of master recipes only in the following way:
Unit class
A library operation is always created for a specific unit class. When you create a recipe in the BATCH Recipe Editor, the unit class is referenced in the "General" tab of the properties dialog. A unit is not allocated. This occurs only when the operation is bound into the recipe unit procedure (RUP) of a master recipe as a library reference.
All other header parameters are configured in the same way as for a master recipe:
Setting the properties of the recipe header parameters

BATCH Recipe Editor
SIMATIC BATCH 7-68 A5E00495287-01
7.4.5.10 Overview of the properties of master recipes
Definition By "Properties of Master recipes", we mean all the information complying with the standard ISA S88.01 (1995) that must or can be specified for a recipe in addition to the recipe procedure. These properties include the recipe name/version/status, material and production data (formula), parameters, measured values and unit allocations.
Selectable master recipe properties The table below lists all the properties that can be displayed and/or modified for each master recipe in the "Properties of <recipe name>" dialog. These master recipe parameters are also known as recipe header parameters.
Tab What is set or
displayed Meaning/comment
General Name and version Status Duration Formula category
Name of the master recipe, cannot be changed Status display of the master recipe, e.g. "In progress" Here, the longest time for one execution of the recipe is calculated. It is the sum of the step times of the path through the recipe. There may be a reference to an existing formula category.
Allocations Allocation map The unit allocations of the recipe specified by the detailed configuration of the recipe unit procedures (RUP) are listed here along with the calculated start time and duration. In an additional dialog, you can modify the unit class and preferred unit (along with the selection strategy). When units are selected by conditions, the available units can be specified by conditions.
Product Product, Quality Product code Reference quantity Minimum scale, maximum scale
Settings for the main product Unique numeric code for the project (e.g. an internal command code) with which the product can be identified.The reference quantity is meant for quantity scaling, this means, the parameters in the recipe relate to this value and they have to be adjusted in the event of discrepancies in the reference quantity. Limits the upper and lower limits of the batch quantity. In batch planning, the quantities specified are checked to make sure they are not lower/higher than the values entered here.

BATCH Recipe Editor
SIMATIC BATCH A5E00495287-01 7-69
Tab What is set or displayed
Meaning/comment
Input material Material list For the steps having a connection to EOP, EPH or the operator dialogs, the entries for the basic automation are applied for the library reference from the library operation. New materials can also be created. For each input material configured, the material, quality, scaling function and required quantity are specified. Either concrete values (internal formula) or reference to values of an external formula
Output material Material list For the steps having a connection to EOP, EPH or the operator dialogs, the entries for the basic automation are applied for the library reference from the library operation. New materials can also be created. For each output material configured, the material, quality, scaling function and required quantity are specified. Either concrete values (internal formula) or reference to values of an external formula
Parameter Parameter list For the steps linked to EOPs, EPHs or the operator dialogs, the parameters are taken from the basic control; for a library reference from the library operation. New parameters of the type real, bool, integer, string and enumeration can also be created. Either concrete values (internal formula) or reference to values of an external formula
Process tags Measured variables that will be logged
Measured variables for the batch report: You can select measured variables for archiving. As measured variables, the process values of the parameter blocks (EPAR_) linked with the EOP, EPH and TAG_COLL blocks are available.
Change log List of modifications List in which the modifications made to the recipe are documented.
ESIG Electronic signature Specifying electronic signatures in compliance with FDA or 21 CFR Part 11: The "electronic signatures" function allows the operator to enter one or more signatures in the form of dialogs similar to the logon prompts normal in Windows at defined status changes or when operator input is made to recipes, recipe steps etc.

BATCH Recipe Editor
SIMATIC BATCH 7-70 A5E00495287-01
7.5 Addition functions
7.5.1 Saving recipes and library objects
When you create a new recipe with the "New" menu command, it is opened with a default name. Before you complete editing, the recipe must be saved.
Follow the steps outlined below: 1. When you save for the first time, select the menu command Recipe > Save as.
2. In the next dialog you enter the name and version.
Result: The next time you save, you can use the "Save" command unless you want to change the name or version.
7.5.2 Validating recipes
Definition The validation covers the consistency of the library operations and process cell data used in the created recipe.
Requirement This is only possible when the recipe is edited with the elements step, transition and structure element along with the corresponding configuration of the recipe data (header).
Steps required in the BATCH Recipe Editor 1. Open the recipe you want to validate (master recipe or library object).
2. Select the menu command Recipe > Validate.
Result: A result display or error list is displayed that indicates whether or not the recipe header is completed, whether materials exist, whether steps and transitions in the recipe are configured and whether the normalized batch quantity is correct. Incorrect elements are displayed in red in the graphic recipe structure. Validation is also possible in BatchCC.
Note:
By double-clicking an entry in the error list, you can jump to the part of the recipe that caused the problem.

BATCH Recipe Editor
SIMATIC BATCH A5E00495287-01 7-71
Note: You can use the validation control at any time. Validation does not change the recipe status.
7.5.3 Releasing a recipe for testing or production
Requirement: The requirement for this function is the validation of the recipe. The validity of the recipe is first checked automatically when you start this command.
Follow the steps outlined below in the BATCH Recipe Editor: 1. Open the recipe you want to validate (master recipe or library object).
2. Select the menu command Recipe > Release for Testing or Release for production.
Result: When it is released, the recipe has the status "released for testing" or "released for production". If errors occur in the validation, the problems are displayed and the recipe status remains "In Progress...". You can also release a recipe in BatchCC.
Note:
By double-clicking an entry in the error list, you can jump to the part of the recipe that caused the problem.

BATCH Recipe Editor
SIMATIC BATCH 7-72 A5E00495287-01
7.5.4 Revoking a release
Note:
Only recipes that have not been released can be edited. If you want to edit master recipes or recipe objects that have already been released, the release must be revoked explicitly.
This is possible only when the option "Allow editing of recipes in the "Release revoked" status" is activated in the general settings of BatchCC. Navigate to this option via the menu command Options > Settings in the "General" tab.
Follow the steps outlined below in the BATCH Recipe Editor: 1. Open the recipe (master recipe or library objects).
2. Select the menu command Recipe > Revoke release.
Result: After revoking the release, a recipe released for testing has the status "being processed" and recipe released for production has the status "Release revoked" and can be edited.
You can also revoke a release in BatchCC.

SIMATIC BATCH A5E00495287-01 8-1
8 Redundancy
8.1 Introduction
Availability To increase the availability of the batch control and to allow a software update during operation, SIMATIC BATCH provides the option of installing a redundant BATCH server. If there is a failure in the redundant system, there is a standby/master failover between the redundant BATCH servers.
Redundancy is achieved with redundant BATCH servers each with local data management. To safeguard data and to allow the batch applications to access the current data, the data is constantly synchronized between the two local data management systems - a data replication.
This ensures that after the failure of one BATCH Control Server or database server, the redundant server can continue to work with the same data without the loss of data or gaps in the documentation.
Configuration and commissioning
Note: To establish the software and hardware requirements and when configuring and commissioning redundant servers with the SIMATIC PCS7 system, you should always consult your Siemens representative.
References for Redundant PCS 7 OS An introduction to the general redundancy mechanisms is provided in the function manual Process Control System PCS 7; Fault-tolerant Process Control Systems. You will find this documentation on the DVD "PCS 7; Electronic Manuals". This is general documentation describing the overall concept of availability in PCS 7. This also includes, for example, more information on the redundant PCS 7 OS.

Redundancy
SIMATIC BATCH 8-2 A5E00495287-01
Additional information • Example configuration - Fault-tolerant Batch Control
• Runtime characteristics
• Data replication
• Configuration of the redundant BATCH server
• Time monitoring on the PCS 7 OS

Redundancy
SIMATIC BATCH A5E00495287-01 8-3
8.2 Example configuration - Fault-tolerant Batch Control
The figure below shows an example configuration with a redundant BATCH server and redundant PCS 7 OS (WinCC):
(1) Redundant BATCH server Redundancy is achieved with two BATCH servers with a standby/master failover. The redundancy of the BATCH servers ensures the following if a BATCH server fails:
• All BATCH clients (with the BATCH Recipe Editor and BatchCC (batch planning, batch control)) are immediately operable again following the failover and
• permanent acquisition of the Batch data continues.
(2) OS redundancy of the standard PCS 7 operator stations The redundancy of the distributed PCS 7 operator stations with an interface to the SIMATIC S7-400 is achieved by interconnected OS servers with data synchronization and backup of the archive data. The WinCC archives of the redundant OS servers are synchronized and contain the same data. The functionality is implemented with the "Redundancy" optional software of WinCC. For a description of the "Redundancy" optional software, refer to the manual SIMATIC HMI; Options.
The redundancy of the PCS 7 operator stations ensures that the batch processes will continue uninterrupted even if one of the two OS servers fails. The operator remains informed about the status of the process cell and can still intervene in the process.

Redundancy
SIMATIC BATCH 8-4 A5E00495287-01
8.3 Runtime characteristics
Failover of the BATCH server The BATCH Control Server and Batch data management (Batch CDV) are permanently active on both redundant BATCH servers. From the prospective of the BATCH server, there is no preferred server; in other words, both BATCH servers access the same OS server when there are no failures in the system.
If the BATCH server configured as the master fails, there is a failover to the BATCH server (standby). This then becomes the master.
Possible causes of a failover • Failure of the BATCH server PC (master), for example hardware fault or "blue
screen"
• Failure of the network connection of the BATCH server PC (BATCH server no longer detects a client or its redundant BATCH server)
• Failure of an application (BATCH Control Server, Batch data management, Launch Coordinator)
Failover of the BATCH clients If the BATCH server (master) fails, the BATCH clients automatically fail over to the standby BATCH server.
Startup, restart of the BATCH clients
Note: Following a failover of the BATCH servers, the BATCH clients can only be operated again after a certain time has elapsed.
A message window opens informing you that the BATCH server is currently not obtainable. Once the failover is completed, the message window disappears indicating that the server application is operational again.
As long as the message window is displayed, the BATCH client cannot be operated. You can, however, close the client application by clicking the "Quit application" button. On completion of the failover, the BATCH client can be started again.
Process control messages In the event of a failover, a process control message is displayed on the message OS.

Redundancy
SIMATIC BATCH A5E00495287-01 8-5
8.4 Data replication
Each redundant BATCH server of a server pair (master, standby) has its own local database. To continually synchronize the two local databases, an independent second network adapter is used for each of the two server PCs. The following tasks are performed via this connection:
• Lifebeat monitoring of the redundant partners
• Data replication when one of the BATCH server is no longer available
• Data consistency between the redundant partners
This ensures that both BATCH server always use the same database.
Hardware requirements • Redundant BATCH server always require a second network adapters
independent from the terminal bus. These network adapters must always be of the same type. For example:
- Intel "Server Adapter Intel Pro/1000MT for the redundancy pair.
- Intel "Desktop Adapter Intel Pro/1000GT for the redundancy pair.
- 3Com Adapter for the redundancy pair
• The additional network adapters must be installed in your PCs (redundant BATCH server pair) in free PCI slots.

Redundancy
SIMATIC BATCH 8-6 A5E00495287-01
Software requirements • Installation of SIMATIC PCS 7
• The batch data replication is performed exclusively via the independent, second network adapter.
• The network adapters are configured within the operating system (IP addresses and subnet mask).
- Subnet mask: The second network adapter for the data replication may not be in the same subnet as the first network adapter for the communication with the BATCH clients via the terminal bus.
- The addresses (IP and subnet mask) of the two PCs must be in the same network, otherwise no communication is possible between the redundancy partners.
Configuration The network configuration of the independent, second network adapter for a redundant Batch system is independent of the project. It is performed in the "Simatic Shell" folder in the Windows Explorer .
1. Right-click on the "Simatic Shell" folder and select the shortcut menu command "Redundancy Settings ...".
2. In the "Serial Interface" area, select "none, or the following symbol "-------------".
3. In the "Network adapter" area, select the adapter that has been configured and is now available.
4. Close the dialog with "OK".
5. Open the "Advance Settings" dialog with the menu command Advanced > Advanced Settings. Use the buttons in this dialog to set your connections in the correct order. First configure the "Terminal bus" connection and then the Batch replication connection".
6. Repeat steps 1-5 for the redundancy partner.
Result You have now configured the required communication for the redundancy partners and can no perform database replication for SIMATIC BATCH.

Redundancy
SIMATIC BATCH A5E00495287-01 8-7
8.5 Configuration of the redundant BATCH server
! Warning Configuring applications (WinCC, SIMATIC BATCH, ...) on separate "SIMATIC PC station" objects and then merging them to create one PC station by assigning the same computer name to the "SIMATIC PC station" objects is not permitted!
Follow the steps in the SIMATIC Manager outlined below: 1. Select the project in the Component view.
2. Select the menu command Insert > Station > SIMATIC PC Station.
Result: A new SIMATIC PC station is inserted in the current project.
3. Set the computer name of the PC station.
- Select the SIMATIC PC station.
- Select the menu command Edit > Object properties.
- Enter the computer name in the last field.
4. Configure this SIMATIC PC station in HW Config.
- Select the SIMATIC PC station.
- Select the menu command Edit > Open object.
Result: HW Config opens.
- Insert a batch application from the hardware catalog:
Path in the hardware catalog: Standard > SIMATIC PC Station > HMI > BATCH application (stdby).

Redundancy
SIMATIC BATCH 8-8 A5E00495287-01
5. Select the menu command Station > Save and compile.
Result
In the Component view, the object is displayed below the configured SIMATIC PC station.

Redundancy
SIMATIC BATCH A5E00495287-01 8-9
8.6 Time monitoring on the PCS 7 OS
Time monitoring When configuring the time monitoring on the distributed PCS 7 operator stations, take the following points into consideration:
• The times involved in a redundancy failover
• The critical times in the process
The time monitoring for the batch functionality on the PCS 7 OS (batch control) is adopted along with the UNIT blocks IUNIT_BLOCK (FB 251) and (UNIT watchdog).
UNIT watchdog The time monitoring of the IUNIT_BLOCK blocks is controlled by the BATCH Control Server. If the update does not take place, IUNIT_BLOCK signals a connection abort to which the programmable controller can react. Time monitoring is active only when the unit is occupied by a batch. If a unit is occupied manually using the UNIT faceplate, the UNIT watchdog is not activated.
Using the UNIT watchdog The watchdog supplements the redundancy concept of the PCS 7 OS, it can, however, be used without OS redundancy (for example when the PCS 7 OS is operated in the stand alone mode). It is unnecessary to activate the watchdog for a failover. The watchdog should be used in particular to protect a critical automation process.
Setting the UNIT watchdog
Note: If both mechanisms (redundancy and UNIT watchdog) are active, please remember the following points when setting the watchdog interval:
The watchdog interval should always be selected to suit the process tolerance so that a significant delay in the failover time is always detected ensuring that a suitable reaction can be started.
Depending on the backup measures of the process initiated, the synchronization of batches by batch control may take longer following the failover or is no longer possible automatically. In this case, the operator will need to intervene manually to continue the batches.

Redundancy
SIMATIC BATCH 8-10 A5E00495287-01
SIMATIC BATCH A5E00495287-01 9-1
9 Migration V4.02 -> V6.0
9.1 Basics of migration
Introduction
Note: A BATCH flexible V4.02 project can be migrated to SIMATIC BATCH V6.0. All the functions configured in the V4.02 project can continue to be used in SIMATIC BATCH V 6.0.
The basis for migration is the BATCH flexible V4.02 database. This contains the required Batch data. This topic describes how to migrate the Batch data.
In addition to migration of the Batch data, the STEP 7 project must also be adapted to PCS 7 V6.0. You can find the necessary information about this in the documentation Process Control System PCS 7; Software Update on the PCS 7 Toolset DVD.
Adopted data The following data is adopted from the BATCH flexible V4.02 database in SIMATIC BATCH V6.0:
• Process cell data (including units of measure, user data types and materials)
• Unit recipes (new term in V6.0: master recipe)
Data that is not adopted The following data is not adopted from the BATCH flexible V4.02 database to SIMATIC BATCH V6.0: not adopted:
• Production orders
• Batches (including control recipe)
• Users/user permissions

Migration V4.02 -> V6.0
SIMATIC BATCH 9-2 A5E00495287-01
Note: • Since the batches are not migrated, you should save these in the form of a
batch report on paper or in PDF format!
• If the migration is on the same computer, you must save the Batch data before installing SIMATIC BATCH V6.0!
• Any exported unit recipes that no longer exist in the V4.02 database but that you will require in the future must be imported again prior to migration!
Other conditions for migration • BATCH flexible V4.02 blocks remain usable after migration (unchanged)
• Mixed operation of BATCH flexible V4.02 and SIMATIC BATCH V6.0 blocks within a unit is possible.
• Instances of a phase, operation or process tag type cannot be mixed; in other words a type has either V4.02 or V6.0 instances.
• Flat V4.02 recipes are automatically converted to flat V6.0 recipes.
• Flat V4.02 recipes can only be converted to hierarchical V6.0 recipes manually!
Options for conversion Based on the conditions listed above, the following options are open when migrating a V4.02 project to SIMATIC BATCH V6.0:
Option Aim Consequences
1 Continuing with V4.02 Functionality Only No extensions are made to the project
AS data is retained, This means that • Recompilation of the charts is not necessary • New download to the PLC is not necessary • New compilation of the OS is not necessary • Recommissioning is not necessary • Revalidation of the PLC is not necessary
2 Using the New V6 Functions Gradual conversion to the V6 functionality, old functions remain implemented with V4.02 blocks, expansions will be made with V6.0 blocks (mixed operation of V4.02 and V6.0 blocks possible) It is also possible to extend a project using V4.02 blocks or to make changes to the existing V4.02 configuration.
Mixed operation with V4.02 and V6.0 blocks, i.e. • Charts must be recompiled • New download to the PLC necessary • New compilation of the OS necessary

Migration V4.02 -> V6.0
SIMATIC BATCH A5E00495287-01 9-3
Upgrade license diskette V4.02 -> V6.0 There are four licenses on the Upgrade License V4.02 -> V6.0 diskette: three normal licenses and one upgrade license. Please install all four licenses. The licenses have the following meaning:
• 1 x A1BPP060 = Upgrade: This is a placeholder for the old license BATCH flexible Batch data management (Batch CDV) V4.02.
Note:
The old license A1BPP060 is converted to the new license A1BSP060 by the "Upgrade Batch V4.02 - V6.0" program - if the old Batch data management (Batch CDV) V4.02 license is on the PC.
• 1 x A1BSP060 = PCS 7 - SIMATIC BATCH Server Basic Package V6.0 (PO 150)
Note:
The license on the diskette has a counter position of 0.
• 1 x A1BBCC60 = PCS 7 - SIMATIC BATCH BatchCC V6.0
• 1 x A1BREC60 = PCS 7 - SIMATIC BATCH Recipe System V6.0

Migration V4.02 -> V6.0
SIMATIC BATCH 9-4 A5E00495287-01
9.2 Migration requirements
Data compatibility
Note: If you kept to the rules for data compatibility in the BATCH flexible V4.02 project (also described in the BATCH flexible V4.02 readme), you can migrate the Batch data with the support of the migration tool "SIMATIC BATCH Migrator".
If these guidelines are kept to, it is possible to migrate without compiling the OS or downloading again to the programmable controller!
If you did not keep to the guidelines, the project must be converted manually according to the guidelines before you can start the actual migration.
Database
Note: A database cannot be migrated if another database with the same name is linked to a Batch application.
Remedy: Assign another name to the database.
Identifiers for transition parameters
Note: Since the identifiers for transition parameters are derived from parameter comments of the transition block instance in BATCH flexible V4.02, before beginning the migration ensure that the maximum of 16 characters is not exceeded.
Principle To avoid having to recompile the OS, download to the programmable controller again and adapt the WinCC pictures, you must make sure that the "Compiled" WinCC tags do not change.
To achieve this, you either kept to the guidelines in the BATCH flexible V4.02 project as described below or you must make adaptations to meet these requirements before you start the actual migration.
If these requirements are not met, it will not be possible to avoid subsequent compilation of the OS, downloading to the PLC and adaptation of the WinCC pictures!

Migration V4.02 -> V6.0
SIMATIC BATCH A5E00495287-01 9-5
Guideline 1: Using the UNIT block There must not be more than one instance of this block below the "Unit" plant hierarchy.
Guideline 2: Using the TRANS block • There must only be instances of TRANS blocks in a CFC chart if these are
assigned to a unit.
• The value of the UNITNAME attribute must always correspond to the UNITNAME of the UNIT block.
• The chart must be located below the plant hierarchy folder of the corresponding unit.
• There must be no AF_x blocks or a UNIT block located in the chart that are assigned to another unit.
Guideline 3: Using the AF_x blocks • There must only be instances of AF_X blocks in a CFC chart if these are
assigned to a unit.
• The value of the UNITNAME attribute must always correspond to the UNITNAME of the UNIT block.
• The chart must be located below the plant hierarchy folder of the corresponding unit.
• There must be no TRANS blocks or a UNIT block located in the chart that are assigned to another unit.
Plant hierarchy In the BATCH flexible V4.02 readme, it was also recommended that you configure the plant hierarchy of the batch process cell in the SIMATIC Manager. The top level corresponds to the project: The following must be true in the next three hierarchy levels:
• Level 2 must have the technological significance of a process cell (S88.01).
• Level 3 must have the technological significance of a unit (S88.01).
• Level 4 must have the technological significance of an equipment module ((S88.01).
All charts belonging to a unit or equipment module in terms of technology must be located below the corresponding hierarchy folder.
Consequence: If your Batch process cell V4.02 already has the structure in the plant hierarchy as described above, this will make migration much easier. The next topic describes which migration step that you can omit if this is the case.

Migration V4.02 -> V6.0
SIMATIC BATCH 9-6 A5E00495287-01
9.3 Basic procedure
Overview of basic procedure for migration
Batch types
Unit recipes (and process
cell data with batch
types and instances)*
batch.orl Archiv.xml
Options > Restore
Edit > Update process cell

Migration V4.02 -> V6.0
SIMATIC BATCH A5E00495287-01 9-7
9.4 Migrating step-by-step
Follow the steps outlined below: 1. Create a backup of your project data so that you have a current version of
your:BATCH flexible V4.02 database and STEP 7 project.
2. Update the software of your STEP 7 project to PCS 7 V6.0. You can find the necessary steps for this in the documentation Process Control System PCS 7; Software Update on the PCS 7 Toolset DVD.
3. After successfully converting the STEP 7 project, adapt the plant hierarchy for SIMATIC BATCH:
Note:
You only have to perform step 3 if you have not yet configured a plant hierarchy for your Batch process cell in SIMATIC Manager (see also section "Requirements for Migration".
Select the first object below the S7 project name in the plant hierarchy and assign the object type "Process cell" to it using the shortcut menu command Object properties > "BATCH attributes" tab.
4. Create a SIMATIC PC station for the BATCH server and each of the BATCH clients in the Component view and configure them with HW Config with the BATCH server application or BATCH client application.
5. Create a SIMATIC PC station for each PCS 7 operator station in the Component view and configure them with the WinCC applications using HW Config.
6. Delete the automatically generated OS below the WinCC application in the Component view.
7. Include the original OS below the WinCC application.
8. Insert a "Unit" folder with any name for each UNIT block in the plant hierarchy (recommended: name of the UNIT block instance).
9. Then insert all the CFC charts with the blocks of the corresponding unit in the individual unit folders.
Note:
If a CFC chart contains more than one UNIT block or more than one AF/TRANS instances belonging to different units, these must be separated since only blocks of the unit itself are permitted below a unit.
If this step is necessary, it will not be possible to avoid a download to the PLC and compiling the OS since this step will change the tag names.
If, however, you kept to the guidelines described in Section "Requirements for Migration", this problem should not occur!

Migration V4.02 -> V6.0
SIMATIC BATCH 9-8 A5E00495287-01
10. Make sure that all hierarchy folders are marked as forming part of the HID or not exactly as they were in your original project (select Options > Plant hierarchy > Settings).
This is important because the WinCC tag names could otherwise change and the references to modified WinCC tags, for example in the OS pictures would be lost when the OS is recompiled!
11. Export the type information, process cell data and recipe data from the SIMATIC BATCH V4.02 database and import this into the converted STEP 7 project:
- Start the SIMATIC BATCH Migrator - path: ...\siemens\BATCHflexible\BFMIGRATION (can be installed from the Toolset DVD PCS 7 V6.0 - Additional_Products).
- Enter the path of the BATCH flexible V4.02 database.
- Enter a destination path for storage of the migration data.
- Specify the OS name of the WinCC project.
- Select the "Process cell data type information (batch.orl)" option to generate the batch.orl file with the type description.
- Select the "Process cell/recipe instances (archiv.xml)" option to generate the Archiv.xml file with the recipe data.
- Click the "Start" button.
Result: New batch.orl and archiv.xml files are generated and stored on the destination path.
- Open the SIMATIC Manager.
- Open the BATCH configuration dialog with the with the menu command Options > SIMATIC BATCH.
- Select the "Batch types" object in the BATCH configuration dialog.
- Press the "Import" button under "Additional functions" and select the batch.orl file in the destination path in the detail selection window. Open this and confirm the import.
Result: All batch types of the V4.02 project are displayed in the dialog. A dummy unit class was created automatically in the "Equipment properties" folder. The process tag types are also displayed.
- Now select the "Batch instances" object and compile the process cell again.
Result: All available instances in the V4.02 project are displayed in the dialog. Any error messages in the report is ignored at this time.
12. Assign the "DummyUnitClass" to each unit folder in the plant hierarchy by selecting the unit folder and then selecting the shortcut menu command Object Properties > "BATCH attributes" tab.

Migration V4.02 -> V6.0
SIMATIC BATCH A5E00495287-01 9-9
13. Configure the process tags from the WinCC archives:
- To configure the tags, the Migrator automatically creates the Tagimport.txt text file. This text file contains the assignment of the type parameter to the WinCC tags. Open the BATCH configuration dialog and select the "Batch types" object.
- Then select a function type and the corresponding parameters based on the Tagimport.txt file.
- Ensure that the check box for "Archive measured variable" is correctly set. Then display all the instances belonging to this type in the project by selecting the additional function, "Instances -> Display".
- Here, you then assign the type parameters to the WinCC archive tags. You will see the assignments in the Tagimport.txt file.
Before making the batch archive assignment, it is advisable to run a validation. This provides you with information about the instance parameters that require assignment to WinCC archive tags.
14. Start the validation to check the Batch data To do this, mark the "Batch types" object and click on the "Validation" button.
Result: If the validation does not report any further errors, the conversion of the PCS7 project is complete. On this basis, the batch process cell data must now the compiled with the standard functions in the SIMATIC Manager and downloaded to the target systems. If error messages occur, the causes must first be eliminated and the validation run again.
If no further validation errors occur, you can start BatchCC after "Downloading to the target systems" and update the recipe data with the menu command Options > Restore and then the process cell data with the menu command Edit > Update process cell.
Note:
Make sure that you read the information on migrating SIMATIC BATCH in the PCS 7 BATCH Base - readme.wri file. The readme file is on the same DVD-ROM as SIMATIC BATCH.
Assignment list for TRANS block instances After migration, the file TransImport.txt is also available. This contains a list of the TRANS block instances used BATCH flexible V4.02 referencing them to the SIMATIC BATCH generated TRANS types.

Migration V4.02 -> V6.0
SIMATIC BATCH 9-10 A5E00495287-01

SIMATIC BATCH A5E00495287-01 A-1
A Appendices
A.1 Abbreviations
Abbreviation Meaning
AF Automation function AS Programmable logic controller (PLC) API Application Programming Interface BCS BATCH Control Server BDM Batch data management CFC Continuous Function Chart EPE Equipment Procedural Element ES Engineering System ISA Instrumentation, Systems & Automation Society MES Manufacturing Execution System NOP Placeholder (empty step / empty transition) OS Operator station RPH Recipe phase ROP -Recipe operation RP -Recipe procedure RPE Recipe procedure element BRE BATCH Recipe Editor SCI SIMATIC Control Interface SFC Sequential Function Chart SUB Substructure EPH Equipment phase TIA Totally Integrated Automation EOP Equipment Operation RUP Recipe unit procedure VAB Processing block XML Extensible Markup Language

Appendices
SIMATIC BATCH A-2 A5E00495287-01
A.2 S88 Terms German - English
German English German English
Anlage Process cell Prozedursteuerung Procedural control Anlagenkomplex Plant area Prozess Process Anpassroutine Scaling function Prozessabschnitt Process stage Basisautomatisierung Basic control Prozessausstoß Process output Bediener Operator Prozesseinsatz Process input Belegung Allocation Prozessoperation Process operation Betriebsmittel Resource Prozessparameter Process parameter Charge Batch Prozessschritt Process step Chargenplan Batch schedule Rezept Recipe Chargenprotokoll Batch report Rezeptersteller Recipe author Chargenprozess Batch process Rezepterstellung Recipe creation Chargensteuerung Batch control Chargensteuerung Recipe phase Einrichtung Equipment Rezeptkopf Recipe header Einsatzstoff(e) Input material(s) Rezeptoperation Recipe operation Einzelsteuereinheit Single control module Rezeptprozedur Recipe procedure Fahrweise Control strategy Rezeptverwaltung Recipe management Formula Formula Sollwert Setpoint Formula-Kategorie Formula category Steuerfunktion Control phase Funktion Phase Steueroperation Control operation Geräte Device Steuerrezept Control recipe Grundfunktion Master recipe phase Stoff Material Grundoperation Master operation Stoffausstoß Output material Grundrezept Master recipe Strang Line Istwert Process value, actual
value Techn. Einrichtung Equipment module
Messstelle Process tag Technische Funktion Equipment phase Nebenprodukt By-product Technische Operation Equipment operation Normansatz Reference quantity Teilanlage Unit Operation Operation Teilanlagenprozedur Equipment unit
procedure Produktionsauftrag Production order Teilprozedur Unit procedure Produktionsstrang Production line Teilrezept Unit recipe Prozedur Procedure Teilrezeptprozedur Recipe unit procedure Prozedurelement Procedural element Verfahrensrezept General recipe Prozedurmodell Procedural model Werksrezept Site recipe

SIMATIC BATCH A5E00495287-01 Glossary-1
Glossary
Alternative branch Structure element of a recipe with which an OR branch or an OR divergence is achieved. An alternative branch consists of at least two vertically arranged branches joined at top and bottom by a single horizontal line. With alternative branches, you can adapt the execution of the recipe to states in the process. The conditions in the top transitions of the sequences decide which sequence is executed.
Basic control Basic control means the configuration of the programmable controller system. This must be done separately from the recipe control strategy. As tools, you have the CFC or SFC editor available.
Batch • Material that is being produced or that has been produced by a single
execution of a batch process.
• An "imaginary" object representing the procedure for producing material at any point within the process.
Note: Batch means both the material created by and during the process as well as the unit that represents the manufacturing procedure for this material. Batch is used as an abstract contraction of the words "the production of a batch".
BatchCC See Batch Control Center (BatchCC)
Batch control Allows online monitoring and control and execution of the control recipe.
Batch Control Center (BatchCC) The Batch Control Center (BatchCC) is a component of SIMATIC BATCH and provides you with a graphic user interface for monitoring and controlling batch processes. The Batch Control Center manages all the data relevant to SIMATIC BATCH.

Glossary
SIMATIC BATCH Glossary-2 A5E00495287-01
BATCH Control Server The BATCH Control server is a component of SIMATIC BATCH. The BATCH Control server handles communication with the process and controls and monitors execution of the current batches.
The BATCH Control Server does not have its own user interface. The BATCH Control Server is started on the runtime computer.
Batch plan A list of batches to be produced in a specific process cell. This contains information about when and in which order batches representing the required quantity of a product will be produced and which equipment will be used.
Batch process A discontinuous process in which a required product is manufactured in a chronological sequence of production tasks involving one or more batches according to a set of rules (recipe).
BATCH Recipe Editor The BATCH Recipe Editor is a component of SIMATIC BATCH and provides you with a graphic user interface for creating and modifying master recipes and library operations. Recipe creation is based on the BATCH objects from the batch process cell configuration in the engineering system of SIMATIC PCS 7, for example, units and equipment phases.
Batch Report BATCH Report is a component of SIMATIC BATCH and allows documentation of recipes and Batch data in the form of logs. The "off-the-shelf" recipe report contains all the data required for production. The batch report contains all the information required for the reproducibility of the batch process, the quality assurance and the fulfillment of legal requirements.
CFC Continuous Function Chart (CFC): Programming language for convenient description of continuous processes by graphic interconnection of complex functions.
Control module The lowest level of the grouping of equipment in the physical model that can implement basic control.

Glossary
SIMATIC BATCH A5E00495287-01 Glossary-3
Control recipe A type of recipe which, through its execution, defines the manufacture of a single batch of a specific product.
The control recipe is a copy of a particular version of the master recipe that is then modified as necessary with information for planning and execution making it specific to a single batch.
Control strategy Different equipment phases that are mutually exclusive in terms of simultaneous operation belonging to the same equipment module are known as the control strategies of this equipment module, for example,
Equipment module: Ventilation in level 1 for control strategy 1, ventilation in level 2 for control strategy 2
Control strategy 1: Pressure overlay
Control strategy 2: Rinsing
Device See Equipment module.
Engineering station PC station on which the process control system is adapted to the task in hand using the engineering system (ES).
Engineering system Configuration system (ES) PC-based with which the process control system can be adapted visually to the task in hand.
Equipment Collective term for: process sells, units, equipment phases and control modules.
Equipment module A functional grouping of equipment that can execute a limited number of specific smaller processing activities.
Formula Material and production data: components of the recipe, which contains the following recipe information:
• Process inputs (resources for manufacture of products)
• Process inputs: (expected results)
• Process parameters (global recipe parameters)

Glossary
SIMATIC BATCH Glossary-4 A5E00495287-01
Formula category A formula category can be assigned a class of formulas with the same raw material and production data structure. The only differences between the formulas of a formula category are the concrete parameter values.
The formula category contains the parameters that can be controlled by the operator during batch planning with SIMATIC BATCH using the formula. These parameters are included in the formula category with their data type and unit of measure.
General recipe Recipe type describing processing requirements independent of equipment and location.
Hierarchy folder The hierarchy folder is used to achieve hierarchical structuring of a process cell (of a project). It can contain further hierarchy folders or objects such as CFC/SFC charts, pictures, reports and additional documentation.
Hold The batch (control recipe execution) is held and all active steps are also held.
Input material Raw material or other resource required to manufacture a product.
Library operation You can use libraries to store recipe elements created with the BATCH Recipe Editor that you require often in the recipes of the process cell. Only recipe operations (ROPs) can be stored as recipe elements. Recipe operations that are managed in libraries are known as library operations.
Library reference A library operation is not linked directly into a recipe procedure (RUP) but uses a library reference. The library operation cannot be modified within the master recipe; the library operation must always be opened explicitly in the BATCH Recipe Editor.
Loop Structure element of a recipe consisting of a sequence with at least one recipe step and one return path with a transition.

Glossary
SIMATIC BATCH A5E00495287-01 Glossary-5
Master recipe Recipe level that takes into account the capabilities of the equipment and contains information specific to the process cell. A master recipe is an indispensable recipe level without which control recipes cannot be created or batches produced.
Master recipe is can contain material and collection parameters as normalized, calculated, or fixed values. A master recipe can be derived from a general or site recipe from the enterprise level (refer to the standard IEC 61512-1: 1997).
Operation A procedural element that controls an independent processing activity consisting of the required algorithms for triggering, organizing and controlling phases.
Operator The operator is the user of this software coordinates the batch during runtime.
Operator dialog Input and display option for an operator instruction:
• No acknowledgment Example: Entry of analysis process values.
• With acknowledgment Example "Manual dosing": The operator is instructed which material and how much to add. The operator then enters the actual values that have been added and confirms the input (acknowledgment).
Operator instruction The operator instruction allows instructions to be displayed to the operator during execution of a recipe. A distinction is made between the display of pure instructions (NOP step) and an instruction that allows operator input (operator dialog). The operator may also be required to acknowledge the instruction.
Operator station OCM: (operator control and monitoring) station
Abbreviation: OS
Output material A material (product, by-product, or waste product) expected as the result of executing a recipe.

Glossary
SIMATIC BATCH Glossary-6 A5E00495287-01
Pause A batch (control recipe execution) is paused, all active steps continue until they are completed, no new steps are started. In contrast to the "Hold" command, this command simply prevents the control recipe from passing control to the next step.
Phase The smallest element of a procedural control that can execute a process-oriented task.
Plant area A plant area consists of several equal-ranked or interacting industrial processes with corresponding auxiliaries (according to DIN 28004). This is part of a factory with batch production that is defined by physical, geographical or logical boundaries within the factory.
Plant hierarchy The plant hierarchy consists of hierarchy folders that in turn can contain further hierarchy folders, such as CFC/SFC charts, pictures, reports and additional documentation. It represents the functional structured hierarchy of the plant regardless of the assignment of programmable controllers or operator control and monitoring systems. This is displayed in the Plant view of the SIMATIC Manager.
Procedural control A control that controls equipment-oriented actions in an ordered fashion to allow execution of a process-oriented task.
Procedural element A block for procedural control defined by the model of the procedural control.
Procedure The strategy according to which a process is executed. This can relate to the production of a batch or to a non-productive process, for example a cleaning process.
Process A sequence of chemical, physical, or biological activities for the conversion, transportation, or storage of material or energy.

Glossary
SIMATIC BATCH A5E00495287-01 Glossary-7
Process Defined in DIN 28004: A sequence of chemical, physical, or biological activities for the conversion, transport, or storage of material or energy.
In everyday language a process is a method of achieving a target. In industry a process is used along with chemical, physical and biological knowledge and methods to obtain, produce, convert or eliminate materials. Example: Synthesis of ammoniac according to Haber and Bosch.
Process cell A logical grouping of facilities/devices that includes the equipment for creating one or more batches. It determines the spectrum of logical control options for a set of process equipment within a plant area.
Within the plant hierarchy, the process cell is the highest level. This is followed by units and equipment phases.
Process input The name and quantity of a raw material or other resource required to manufacture a product.
Process operation A larger processing activity that usually involves a chemical or physical conversion of the material being processed and that is specified without taking into account the target equipment configuration to be used.
Process output The name and amount of material or energy expected as the result of executing a recipe.
Process parameter Information required to manufacture a material that does not fall into the category of input material or output material. Typical information in the process parameters includes temperature, pressure and time.
Process stage A part of a process that normally executes independent of other process stages and results in a planned sequence of chemical and physical conversions of the material being processed.
Process step Smaller processing activities that are combined to form a process operation.

Glossary
SIMATIC BATCH Glossary-8 A5E00495287-01
Processing block The equipment phase/operation in SIMATIC BATCH consists of the BATCH interface block (CFC) and the processing block (usually SFC).
Production order A production order contains information on the product, quantity, required quality and deadline.
Production request Contains the specified production order data to produce a certain quantity of a product with a certain required quality at a certain time.
Programmable logic controller (PLC) A programmable controller (PLC) consisting of a central rack, a CPU and various input/output modules.
Abbreviation:AS
Project A container for all objects of an automation solution regardless of the number of stations, modules and how they are networked.
Recipe The required amount of information necessary to define the production requirements for a specific product. A recipe is a set of rules and information required to define how a product is manufactured. There are the following recipes: general recipe, site recipe, master recipe and control recipe.
In SIMATIC BATCH, the following recipe types are used:
• Master recipe
• Control recipe

Glossary
SIMATIC BATCH A5E00495287-01 Glossary-9
Recipe control strategy In a recipe control strategy, the sequence of production steps for making a product can vary from one batch to the next.
The essential aspect of a genuine recipe control strategy is that new recipes can be specified and executed ...
• by the chemist or process technician (not a programmer or control system specialist)
• using a user interface adapted to his/her needs (not using the programming/configuration user interface of the control system)
• without interventions in the software structure of the control system (in other words, without the risk of changing interlocks or validated structures)
• during operation (without reloading/restarting) of the control system.
... specify and execute new production processes (= recipes). Such changes, nevertheless, mean changes in the sequences of the process steps and not simply changes to parameter values.
Recipe header Information on the purpose, the source and the version of the recipe, for example recipe and product identification, author and output date.
Resource Resources are units (including transport and cleaning equipment, input materials, products etc. and even personnel).
Recipe operation n operation that is part of a recipe procedure in a master or control recipe. Depending on the recipe type, this becomes the master recipe operation or the control recipe operation.
Abbreviation: ROP
Recipe phase phase that is part of a recipe procedure in a master or control recipe. Depending on the recipe type, this becomes the master phase or the control phase.
Abbreviation: RPH
Recipe procedure The part of a recipe that describes the strategy for producing a batch.
Abbreviation: RP

Glossary
SIMATIC BATCH Glossary-10 A5E00495287-01
Recipe unit procedure A unit procedure that is part of a recipe procedure in a master or control recipe.
Abbreviation: RUP
Reference quantity The reference scale is the reference quantity for quantity scaling. All quantity-dependent values in the recipe relate to this quantity.
The quantity scaling factor results therefore from the ratio: specific quantity to reference scale.
Scaling function Using scaling functions, you can influence the quantities used. Depending on the concrete quantity for the batch, the parameters are corrected using the selected scaling function. By default, there are two scaling routines available:
• Linear: The value is multiplied by the quotient batch quantity/reference quantity.
• Quadratic: The value is multiplied by the quotient batch quantity/reference quantity.
Sequential control Control in which device-oriented actions are controlled in an ordered fashion to allow a process-oriented task to be performed.
SFC Sequential Function Chart (SFC): A graphic representation of a sequential program consisting of interconnected steps, actions and specific links with step enabling conditions.
SFC is a suitable method of representation (description of the processing sequence) of the entire procedural rules with sequential and parallel steps providing clarity in the process controls.
Simultaneous branch Structure element of a recipe that implements an AND branch or an AND divergence. A simultaneous branch consists of at least two horizontally arranged sequences joined at top and bottom by double lines. A simultaneous branch results in the simultaneous execution of more than one sequence. This allows processes to be executed at the same time.
Site recipe A site-specific recipe type. Site recipes can be derived from general recipes taking into account regional constraints such as language or available materials.

Glossary
SIMATIC BATCH A5E00495287-01 Glossary-11
Step A step is the smallest functional unit of an SFC chart. The smallest structural unit in a recipe is known as a recipe step.
Structure element Structure elements of a recipe consist of an arrangement of basic elements. The following are examples: "simultaneous branch", "alternative branch" and "loop".
Synchronization line The synchronization lines coordinate the execution of recipe sequences in the units or of the recipe operations (ROPs) between the units.
Synchronization point At each synchronization point, it is possible to decide whether the execution of the recipe sequence should be held.
Transition A transition contains conditions that must be satisfied so that the controller can move on from one state to the next or pass control from one step to the next.
Unit A grouping of related control modules and/or equipment modules and their equipment in which one or more larger processing activities can be performed.
Only one batch is ever processed at any one time in a unit. Units generally operate independent of each other. Examples of larger units include caustic soda, carbene addition, extraction, distillation.
Unit class Each unit can be assigned to a unit class in the plant hierarchy.
In the BATCH Recipe Editor, the candidates that can be selected as the unit and the possible associated phases (EOP/EPH) is restricted to a unit class. The great advantage of this is that when you convert the master recipe to the control recipe, the actual unit allocation is always successful since the master recipe contains only the permitted unit candidates.
Unit of measure The unit of measure is a dimension or quantity with a specific value. Examples of units: 1 m, 1 kg, 1 €.

Glossary
SIMATIC BATCH Glossary-12 A5E00495287-01
Unit procedure A strategy for executing a related process within a unit. It consists of a sequence of operations and the required algorithms for triggering, organizing and controlling these operations.
Unit recipe A part of a (control) recipe that uniquely specifies the sequence of production requirements for a unit. The unit recipe contains the unit procedure and the corresponding material and production parameters, recipe header, requirements of the equipment and other information.
WinCC WinCC is a neutral Windows-based system for solving visualization and process control tasks in production and process automation.
WinCC provides function modules designed for industry for graphic representation, messaging, archiving and logging. With its powerful process interface, fast picture updating and secure data archiving, it ensures high availability.

SIMATIC BATCH A5E00495287-01 Index-1
Index
A Abbreviations ................................................. 1-1 Aborting a batch when no AS connection
is available ............................................. 6-134 Adding batches to a the production order .... 6-75 Adding comments to structure elements...... 7-54 Alternative branch ........................................ 7-26 Alternative branch (Insert menu).................. 7-46 Archiving recipes and batches ................... 6-147 Arithmetic expressions................................. 1-13 Arithmetic operations in transitions
and recipe steps....................................... 1-13 Assigning a formula category to a recipe
procedure................................................. 6-34 Assigning batches to a the
production order....................................... 6-71 Assigning equipment properties
to the units ............................................... 5-76 Assigning names............................................ 1-7 Assigning the "process cell"
"unit" or "equipment phase" object type ... 5-45 Assigning the unit EPH ....................... 7-31, 7-32 Assigning unit classes to a unit .................... 5-46 Assignment .................................................. 5-45 Authorization......................................... 1-4, 2-19 Automation function (Insert menu) ............... 7-42 Available functions ....................................... 5-82
B Backup...........................................1-2, 1-3, 6-62 Basic structure of a recipe procedure ............ 3-7 Basics of configuration................................. 5-25 BATCH block library..................................... 2-12 BATCH CDV ................................................ 2-11 Batch Control Center ..................................... 2-6 Batch Control Center (BatchCC).................... 2-6 BATCH Control Server................................. 2-10 Batch data management.............................. 2-11 BATCH interface blocks...................... 2-12, 5-38 Batch orders................................................. 6-18 BATCH Recipe Editor ............................. 2-7, 2-8 BATCH Report ............................................... 2-9 Batch reports.............................................. 6-146 BATCH server.............................................. 5-27 BATCH server and BATCH client ................ 5-25 BATCH Start Coordinator ....................... 2-4, 2-5 Batch step.................................................. 6-128 BatchCC ........................................................ 2-6 Blocks .......................................................... 5-36 Bumpless switch of the equipment phases 6-107
C Canceling a batch..............................6-89, 6-115 CDV..............................................................2-11 Change log .....................................................1-8 Changing languages in runtime......................1-7 Changing setpoints.....................................6-136 Changing the quality.....................................6-31 Changing the unit allocation .......................6-138 Changing the user groups and the user
permissions ..............................................6-26 Changing user permissions ..........................6-26 Characteristics of user roles .........................6-22 Characters......................................................1-7 Client/server architecture of
SIMATIC BATCH......................................2-13 CMPE.............................................................5-8 Commands
commands for controlling batches..........6-116 Commands for recipe steps........................6-119 Commenting a batch ..................................6-123 Compiling the OS .........................................5-94 Components of SIMATIC BATCH ..................2-4 Configuration
faceplates .................................................1-16 Configuration of the redundant
BATCH server ............................................8-7 Configuring synchronization lines
synchronization examples ........................7-49 Configuring the BATCH clients.....................5-29 Configuring the BATCH server .....................5-27 Configuring the SIMATIC PC stations ..........5-27 Configuring unit groups ................................5-77 Configuring use of archive data from
WinCC archives........................................5-91 Consistency of the project ..............................5-6 CONT .........................................................6-107 Create
Configuring batches..................................6-68 creating a new order category .........6-67, 6-99 creating a new production order ...............6-69 creating new order categories ..................6-68 Order of batch processing ...............6-67, 6-99
Create SQL Server database .....................6-150 Creating..................................... 6-38, 6-39, 6-43
a new recipe procedure ............................6-38 creating a new formula .............................6-43 creating a new formula category ..............6-42 creating a new master recipe category.....6-42
Creating a new formula ................................6-43 Creating a new formula category..................6-42 Creating a new master recipe.......................6-38 Creating a new SFC type .............................5-58 Creating and manipulating objects ........6-5, 7-10

Index
SIMATIC BATCH Index-2 A5E00495287-01
Creating equipment properties..................... 5-75 Creating process cell data ........................... 5-98 Creating process tag types ........5-66, 5-67, 5-69
Option 1 ................................................... 5-67 Option 2 ................................................... 5-69
Creating recipe topology (SFC)........... 7-28, 7-29 Creating the process cell data in
single-project engineering........................ 5-97
D Data replication ....................................... 8-5, 8-6 Database ................................................ 8-5, 8-6 Delegating the formula parameter in
the recipe ................................................. 7-54 Deleting text entries in the UNIT block........... 1-8 Dependent elements in master recipes and
libraries ...................................................... 1-9 Difference between single project and
multiproject engineering............................. 5-2 Display user permissions ............................. 6-26 Displaying and modifying batch chaining ..... 6-80 Displaying and modifying formula ................ 6-79 Displaying and modifying unit allocation ...... 6-78 Displaying messages ................................. 6-143 Displaying operator dialogs in runtime ....... 6-124 Displaying the run time of a batch................ 6-82 Displaying user permissions ........................ 6-26 Distributed multiproject engineering............. 5-11 Distribution of the BATCH applications ........ 2-14 Document landscape
SIMATIC BATCH V6.1 SP1 ..................... 1-19 SIMATIC PCS 7 V7.0................................. 1-2
Download to CPU ........................................ 5-95 Downloading process cell data to
the CPU ................................................. 5-100 Downloading WinCC projects ...................... 5-95
E Editing window with the batch objects.......... 6-11 Electronic signature ............................ 6-90, 6-93 Entering input and output materials ............. 6-30 Equipment module ....................................... 5-43 Equipment phase ......................................... 5-45 Equipment properties
introduction .............................................. 5-74 Errors sources in multiproject engineering
with SIMATIC BATCH.............................. 5-21 Example configuration with redundant
BATCH server............................................ 8-3 Executable functions in a project of a
multiproject............................................... 5-86 Executable functions in a removed project .. 5-87 Export ............................................................ 1-4 Exporting using assistants ........................... 6-63 Exporting/importing Batch objects................ 6-62 Extending the plant hierarchy by
adding neutral folders .............................. 5-34
F Faceplate ..................................................... 1-16
Faceplates...........................................1-10, 1-16 Filtering library references ............................7-41 Flow chart
How to create/edit a batch........................6-66 Flow diagram..................................................5-8 Flow diagram for engineering procedure
for a multiproject .........................................5-8 flowchart .......................................................6-32 Flowchart...............................................5-3, 6-33 Flowchart engineering steps for a
single project ..............................................5-3 Flowchart how to configure the ES...............5-43 Flowchart how to create / edit a recipe.........6-33 Flowchart showing how a batch is made......6-97 Formula category ................................6-17, 6-34 Formulas .......................... 6-17, 6-34, 6-44, 6-57 FTP server..................................................6-148 Functions for specifying the type
description ................................................5-85 Functions of SIMATIC BATCH .......................2-2 Further editing and testing a project .............5-18
G General information about multiproject
engineering.................................................5-6 Getting Help ...................................................6-2
H Handling recipes...........................................6-59 Handling Recipes .........................................6-58 Hardware/software requirements .................2-18 Hierarchical recipe
hierarchical recipe with EOP and EPHs ...7-17 hierarchical recipe with EPHs...................7-16 hierarchical recipes with EOPs.................7-15
Hierarchical recipes hierarchical recipes..........................7-13, 7-15
Hierarchy folder ......................... 5-41, 5-42, 5-43 equipment module hierarchy folder ..........5-43 process cell hierarchy folder (PCELL) ......5-41 unit hierarchy folder ..................................5-42
How to configure a master recipe.................6-36 How to configure library operations ..............6-51 How to create and download process
cell data ...........................................5-94, 5-95 How to create the plant hierarchy.................5-43
I Icons................................................6-131, 6-133 Illegal characters ............................................1-7 Import .............................................................1-4 Importing using assistants ............................6-63 Information on faceplates .............................1-10 Inserting an instance of the SFC type
in the CFC chart .......................................5-62 Inserting CFC charts with BATCH
interface blocks ...............................5-37, 5-47 Installation ....................................................2-19 Installation requirements ..............................2-18 Installing and starting ...................................2-20

Index
SIMATIC BATCH A5E00495287-01 Index-3
Installing on BATCH servers and BATCH clients.......................................... 5-30
Instances of interface block linked to processing blocks ................................ 5-50
Integrating edited and tested projects into the central multiproject ...................... 5-18
Integration of Route Control ......................... 1-10 Interconnecting parameters ......................... 6-35 Interconnecting parameters between
the master recipe and formula ................. 6-46 Interface to the processing programs........... 5-40 Internal and external formulas...................... 3-10 Introduction ....................5-1, 5-49, 5-57, 7-1, 8-1 Introduction to permission management ...... 6-20 Introduction to SIMATIC BATCH.................... 4-1 Introduction to technical terminology.............. 3-2 ISA S88.......................................................... 1-2 ISA S88.01 models ...................................... 3-11
L Language change .......................................... 1-7 Layout of the main window (BatchCC)........... 7-5 Layout of the main window (Recipe editor) .... 6-3 Libraries with library operations ................... 6-15 Library reference.......................................... 7-24 Library reference (Insert menu).................... 7-41 Licenses................................................ 1-4, 2-19 Life cycle of a recipe .................................... 6-32 Locking a batch................................. 6-88, 6-115 Logbook ....................................................... 6-12 Logon.............................................. 6-151, 6-152 Loop............................................................. 7-26 Loop (Insert menu)....................................... 7-51
M Managing and documenting Batch data....... 6-61 Master data library .............................. 5-15, 5-16 Master recipes .................................... 6-16, 6-41 MES interface .............................................. 2-15 Message window ......................................... 6-11 Migrating step-by-step ................................... 9-7 Migration ...................................1-3, 1-4, 9-1, 9-2 Migration from older projects.......................... 2-2 Migration requirements .................................. 9-4 MPE
archiving master data library .................... 5-14 general information .................................... 5-6 removing project ...................................... 5-14
Multiproject reapplying after editing............................... 5-3 removing for editing ................................... 5-3
Multiproject engineering................................. 5-6
N Naming .......................................................... 5-6 Necessary and possible recipe structure
elements .................................................. 7-22 Non-self-terminating phases ........................ 5-73 Number of units............................................ 5-65
O Object type ...................................................5-45 Objects and object hierarchy ........................6-14 Open
opening and editing recipes......................6-39 Opening the control recipe ..............6-112, 6-113 Opening the control recipe for the batch.......6-84 Operand .......................................................1-13 Operator .......................................................1-13 Operator instruction......................................7-25 Operator instruction (Insert menu)................7-43 Operator prompt .................... 6-93, 6-124, 6-131 Operator prompts using group
displays in WinCC ..................................6-125 Options for customizing the editing window....7-7 Output window..............................................6-10 Output window for messages .......................6-10 Overview ......................................................5-14 Overview of ES configuration .........................5-1 Overview of procedures..................................4-1 Overview of the control recipes ....................6-85 Overviews..............................................6-8, 6-10
P Parameter concept .........................................3-6 Parameter interconnections..........................7-55 Parameter trigger and start lock .................6-106 Password.........................................6-151, 6-152 PC/PG configuration possibilities .................2-13 PCS 7 project .................................................1-2 Permission management...................6-20, 6-21 Permissions union set ..................................6-20 Phase
non-self-terminating..................................5-73 self-terminating.........................................5-72
Physical model .............................................3-13 Planning the unit allocation...........................6-82 PLC/OS interface blocks ..............................5-38 PO ................................................................2-19 Procedural control model..............................3-12 Procedure during Batch Control ...................6-98 Procedure during migration ............................9-6 Process cell .........................................5-41, 5-45 Process cell configuration...............................4-2 Process cell optimization with late binding ...7-37 Process cell update ......................................1-14 Process mode ................................................4-2 Process model..............................................3-15 Process objects ............................................2-19 Process pictures........................ 1-10, 1-11, 1-12 Processing steps and transitions..................6-99 Progress bar.................................................1-14 Project languages...........................................5-6 Project settings...............................................7-9 Propagating a type description to
other projects (multiproject) ......................5-90 Properties ................ 6-40, 6-41, 6-42, 6-43, 6-44
....................................................... 6-45, 7-68 displaying the properties of a
production order ...................................6-74 properties of master recipes .....................7-68

Index
SIMATIC BATCH Index-4 A5E00495287-01
properties of the library operations........... 7-67 specifying properties of a formula ............ 6-44 specifying properties of the batch ............ 6-76 specifying properties of the
formula category .................................. 6-42 specifying the properties of the recipe
procedure............................................. 6-40 Properties of master recipes ........................ 6-40
R Reading in process cell data........................ 6-27 Readme file with the latest information ........ 2-22 Recipe................................................. 5-36, 5-37 Recipe creation .............................................. 4-2 Recipe Editor ................................................. 2-7 Recipe operation (ROP)............................... 7-24 Recipe phase self-terminating and
non-self-terminating ............................... 6-105 Recipe procedural element (Insert menu).... 7-40 Recipe procedure (RP) ................................ 7-23 Recipe steps in a recipe operation (RPH).... 7-24 Redundancy.....................................8-4, 8-5, 8-6 Relationship plant hierarchy......................... 5-36
blocks recipe ................................................... 5-36
Release releasing a recipe for testing /
for production ....................................... 7-71 releasing recipes...................................... 6-56 releasing recipes for production ............... 6-56 revoke release ......................................... 7-72
Released releasing batches..................................... 6-88
Released elements ...................................... 1-14 Releasing recipes for production.................. 6-56 Releasing recipes for testing........................ 6-56 Removing projects for editing......................... 5-3 Replication ..................................................... 8-6 Representation........................................... 6-128 Representation of the hierarchy in
the BATCH Recipe Editor ........................ 7-18 Required authorization................................. 2-19 Requirements
requirements for batch processing........... 6-95 requirements for working with
the BATCH Recipe Editor ...................... 7-4 requirements when configuring library
operations ............................................ 6-51 Response of online assignment of a
unit for flat recipes.................................... 7-39 Restore .......................................................... 1-3 Restoring and adapting project .................... 5-15 Resume ..................................................... 6-107 Resuming a batch at the old position
after changing a unit .............................. 6-139 Roaming user................................................. 1-5 Rules for the IEPH and IEOP
interface blocks ........................................ 5-50 Rules for the IUNIT_BLOCK
interface block.......................................... 5-55 Rules for the TAG_COLL interface block..... 5-56 Runtime characteristics.................................. 8-4
S S88 terms German - English ..........................1-2 Selecting objects ..........................................7-12 SELFCOMP.........................................5-72, 5-73 Self-terminating and
non-self-terminating recipe phase ..........6-103 Self-terminating phases................................5-72 Setting
setting the properties of steps ..................7-58 setting the properties of the
recipe header parameter ......................7-56 setting the properties of transitions...........7-65
Setting breakpoints.....................................6-126 Setting the "continuous operation"
of a recipe phase......................................7-62 Setting the online modification of setpoints ..7-63 Setting the order of batches .........................6-80 Setting the properties of the
plant hierarchy..........................................5-44 Setting up the FTP server...........................6-148 Settings .................................................7-9, 7-10 signature..............................................6-93, 6-94 Signature ................................... 6-90, 6-91, 6-92 Signing .........................................................6-93 Signing operator actions and
status changes .........................................6-93 SIMATIC BATCH....................... 1-20, 2-18, 2-19 SIMATIC BATCH components .....................2-20 Simultaneous branch....................................7-25 Simultaneous branch (Insert menu) .............7-45 Simultaneous compilation and download ...5-102 Software update .............................................1-4 Specifying electronic signatures ...................6-90 Specifying properties of a formula ................6-44 Specifying properties of the formula
category....................................................6-42 Specifying the basic settings for the
plant hierarchy..........................................5-44 Specifying the BATCH attributes ..................5-60 Specifying the control strategies for a type...5-88 Specifying the type description of the unit ....5-85 Specifying the unit classes for a unit ............5-46 Specifying units using conditions..................5-78 Specifying user permissions.........................6-22 SQL Server 2000
setting up logon and password...............6-151 SQL Server 2005
setting up logon and password...............6-152 Start
setting the Start mode for batch processing ............................................6-77
start the Batch Object Manager..................6-1 starting and Exiting SIMATIC BATCH ........6-1 starting the BATCH RecipeMAINs..............7-3 starting the production of a batch ...........6-114
Starting the SIMATIC BATCH applications ..............................................6-95
Startup characteristics ....................................2-5 State transition diagram of an
equipment phase....................................6-102 States of a transition...................................6-127 States of the batch step..............................6-128

Index
SIMATIC BATCH A5E00495287-01 Index-5
Status and validity of recipes ....................... 6-53 Status change via action............................ 6-101 Status of production orders.......................... 6-87 Status of recipes .......................................... 6-53 Status of the batches ................................... 6-86 Status of the recipes and
status changes................................ 6-58, 6-59 Step placeholder .......................................... 7-27 Structure of a hierarchical recipe ........ 7-13, 7-15 Structure of a master recipe........................... 3-5 Structure of the plant hierarchy.................... 5-31 Substructure................................................. 7-24 Supported versions
migrating .................................................... 1-2 Synchronization ............................................. 8-5 Synchronization (Insert menu) ..................... 7-47 Synchronization between units procedures . 7-20 Synchronization line..................................... 7-26 Synchronization point................................... 7-26 System settings.............................................. 6-7 System-aided versioning................................ 1-9
T Terms............................................................. 1-2 The SIMATIC BATCH product ..................... 2-16 Time monitoring ............................................. 8-9 Tooltips and shortcut menu of the Import
Assistant .................................................. 6-65 Transferring AS-OS connection data ........... 5-95 Transferring the process cell data
to SIMATIC BATCH ............................... 5-100 Transition (Insert menu)............................... 7-44 Transition placeholder.................................. 7-27 Transition placeholder in the unit window .... 7-25 Type description in a multiproject................. 5-83 Type description in a single project.............. 5-80 Type description of the process cell............. 5-79
U Unit ..............................................1-4, 5-42, 5-45 UNIT ............................................................ 5-65 Unit classes ................................................. 5-46 Unit hierarchy container ............................... 5-42 Unit recipe (RUP)......................................... 7-23 Unit selection using conditions for
a flat recipe .............................................. 7-33 Unit selection using conditions for
a hierarchical recipe................................. 7-35 Units............................................................. 5-65 Updating process cell data after making
changes in the basic control..................... 6-28 User Interface ......................................... 6-3, 6-4 User management ....................................... 6-19 User roles ..................................6-22, 6-23, 6-25 User settings .................................................. 7-9 User-specific session profile .......................... 1-5
Using substructures in the BATCH Recipe Editor...............................7-14
Using the PCS 7 Wizards Wizards ....................................................5-24
V Validating formulas.......................................6-57 Validating recipes ...................... 6-55, 6-57, 7-70 Versioning ......................................................1-9
W What is a formula category?...........................3-9 What is SIMATIC BATCH?.............................2-1 What's new...................................................1-20 What's new in SIMATIC BATCH V6.1? ........1-20
configuration in the engineering system ...1-21 fault-tolerant batch control ........................1-21 recipe creation..........................................1-22 working in the BatchCC............................1-22
What's new in SIMATIC BATCH V7 Overview ....................................................1-1
What's new in SIMATIC BATCH? operating in runtime..................................1-22
What's new in V6.0 BATCH interface blocks ...........................1-28 configuration in the engineering system ...1-24 Fault-tolerant Batch Control......................1-25 general .....................................................1-23 operation in runtime..................................1-29 overview ...................................................1-23 recipe creation..........................................1-26 working in the BATCH Control Center ......1-28
What's new in V6.1 SP1 document landscape for
SIMATIC BATCH V6.1 SP1..................1-19 improved user interface of
the SIMATIC BATCH faceplates...........1-16 migration of an S7 project to V6.1 SP1.....1-17 new archiving methods.............................1-15 overview ...................................................1-15 simplified configuration of the
SIMATIC BATCH faceplates ................1-16 Which standards/norms is
SIMATIC BATCH based on? ......................3-1 Window for displaying active applications ....6-13 Windows group.............................................2-18 Working in the BatchCC ...............................1-20 Working with Batch overviews....................6-109 Working with externally created
modules for validation...............................6-60 Working with several process
cell projects ............................................5-103 Working with structure element ....................7-12 Working with substructures ..........................7-53 Working with the formula overview...............6-50 Working with the recipe overview ........6-49, 6-50

Index
SIMATIC BATCH Index-6 A5E00495287-01