projectdox reviewer manual - lincoln, nebraska 1 reviewer manual eplan submittal for project dox...
TRANSCRIPT
Page 1
Reviewer Manual
ePlan Submittal for Project Dox City of Lincoln & Lancaster County
Planning Department Last updated January 22, 2015
Purpose Statement This Manual provides basic documentation on the steps involved in using ProjectDox software for the City-County Planning Department’s ePlan Submittal process. The ePlan Submittal process replaces the paper-based review of all Planning applications with a computer-based approach. This process relies upon digital documents using pdfs and GIS vector files. ePlan Submittal will allow everyone participating in the review process to enter their comments and exchange ideas within a secure digital environment. This manual has been prepared for use by the Project Reviewers as a general reference guide. There are text descriptions and screen images of the step-by step tasks necessary to complete a project review using ProjectDox. It is not designed to present every detail on every element of the process. Rather it offers a basic foundation for learning the process and as a subsequent point of reference as applications are being submitted and reviewed.
Overview The ePlan Submittal process has been designed to both simplify and speed the review of Planning Department applications. To accomplish this goal requires expeditious communications between the Planning Department, the Reviewing Agencies, and the Application Contact.

Page 2
Contents Purpose Statement ............................................................................................................................................ 1
Overview ........................................................................................................................................................ 1
Project Dox Workflow ......................................................................................................................................... 3
A. Project Notification ..................................................................................................................................... 3
B. Logging In ................................................................................................................................................. 4
C. Projects Home Page .................................................................................................................................... 5
D. Project Page ............................................................................................................................................. 6
Viewing Files .............................................................................................................................................. 6
Comparing Two Files (Available in Internet Explorer ONLY) ...................................................................................... 7
Aligning Files for Comparison (Available in Internet Explorer ONLY) .......................................................................... 10
Markups .................................................................................................................................................. 11
File History .............................................................................................................................................. 12
E. eForm .................................................................................................................................................... 14
F. Steps to Reassign a Task .............................................................................................................................. 17
Reports ........................................................................................................................................................ 18
Tips ............................................................................................................................................................ 20

Page 3
Project Dox Workflow
A. Project Notification Reviewers receive email notification of a review task for an application. They will be notified via e-mail for each round of reviews a project may undergo. The e-mail will look similar to this:

Page 4
B. Logging In 1. You can log into Project Dox by clicking the link in the e-mail or going to http://lincoln.ne.gov/city/plan/dev/eplan/eplan.htm and clicking on
“Log in to Project Dox”. 2. Log into ProjectDox. 3. User name is your email address. 4. Use the temporary password included in the email notification for initial login1. Enter requested information to set up user account. At that
time, create a new password to use to access ProjectDox after the initial log in.
Note: Initial log in requires the installation of ProjectDox components. See ePlan Submittal website (lincoln.ne.gov keyword = eplan) for instructions.

Page 5
C. Projects Home Page Click the application number for the project you want to view. Note: you can do this in the Active Projects Section or in the Task Section

Page 6
D. Project Page
Take a look at the files that have been uploaded. Click on the folder, then click on the document icon to see the document. These are the documents you are being asked to review. You can make comments and draw on these documents using Markups. (See Page 10 for more information on Markups)
Viewing Files To view uploaded files, click on the thumbnail image or file name link. By default, the file will open on the right hand side of the same window. To open files in a new window, select the new window option before opening the file.
Page 7
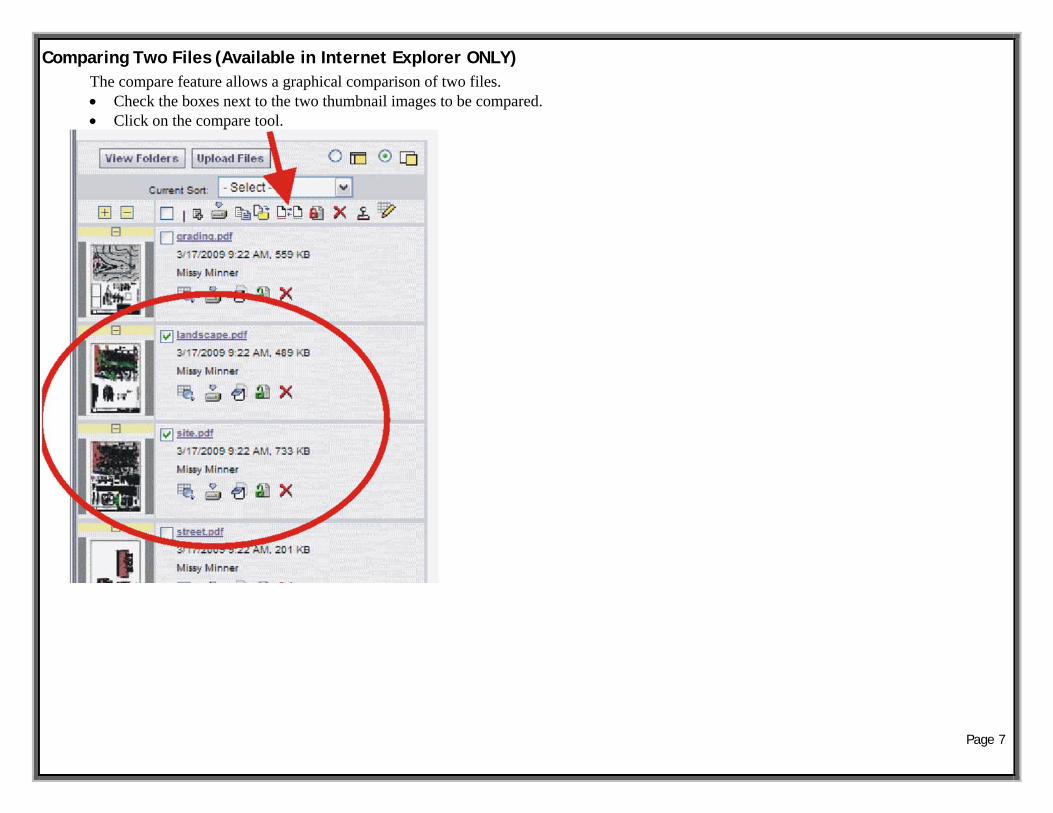
Comparing Two Files (Available in Internet Explorer ONLY) The compare feature allows a graphical comparison of two files. Check the boxes next to the two thumbnail images to be compared. Click on the compare tool.

Page 8
The comparison toolbar appears at the bottom of the viewing window. The toolbar contains several commands from a drop down menu for different comparison options. The slider tool (when present) is used to change the transparency of the two files for clearer viewing of the differences.
Overlay – Both versions are overlaid and both files display in their original colors. Overlay Differences – The compare file version opens overlaid on the open file. The open file displays in red (deleted portions), the compare file displays in green (added portions). Unchanged portions appear in grey. Side-by-Side – Both versions are displayed in a split screen. Deletions – Only deleted areas (areas present in the open version that are not in the compare version) are displayed in red. Additions – Only added areas (areas not present in the open version that are in the compare version) are displayed in green. Unchanged – Only areas that are present in both the compare and open versions are displayed in grey. Open File (only) – Only the file that was opened first is displayed. Compare File (only) – Only the file that was opened for compare is displayed.

Page 9
When using the overlay views, hot keys can be used to nudge and re-scale a compare file to an open file allowing interactive small adjustments to align the files more precisely.
Hold down the Control key (<Ctrl>) while pressing the hot keys to nudge the compare file into place.
The “Overlay Differences” viewing option is shown above.

Page 10
Aligning Files for Comparison (Available in Internet Explorer ONLY) Files that have been drawn at different scales can be aligned for overlay comparison. The Set Alignment Point tool assists you with this. It allows you to define identical locations on each file that are used as common alignment points when the two files are overlaid.
Check the boxes next to the two thumbnail images to be compared. Click the compare button Set the Alignment points on the first document
o Select Open File (Only) from the Compare toolbar
o Use the Zoom tool to select and magnify and area that includes two points that can be found on BOTH files. o Click the Set Alignment Points button.
o Left click point one o Move the mouse across the document to the second point, a blue line should appear. Left click the second point.
Set the Alignment points on the second document o Select Compare File (Only) from the Compare toolbar
o Select the exact same points on the second file that you chose on the first file
Select the Overlay or Overlay Differences option on the Compare toolbar
It may be necessary to further nudge the files into place for comparison

Page 11
Markups
1. Click the Markup tool in the upper left hand corner of the screen .
2. Select “New”.
3. Markup tools will pop up on the left hand side of the screen. Use these tools to draw, add text, arrows, bubbles and comments to the document.
4. Once you have created all your markups, click on the save icon to save the markups under your name.

Page 12
File History
Click on the History tool to open the “File Details, Versioning & History” window.

Page 13
File History– Standard Mode To view the file, click the thumbnail image or the file name link. When multiple versions of a file exist, select the desired version number from the “Go to version:” dropdown and click the thumbnail image or the file name link. Note that the file name link also indicates the version to be viewed. If markups are associated with the file, the markup icon will be available below the thumbnail image. Click this icon to select the markups you would like to view. Files can be downloaded to your computer when the download icon is present.
File History – Compare Mode When multiple versions exist for a file, select “Compare Mode” to view thumbnails images of the available versions. Select the check boxes for the two versions to be compared. Click “Compare” to view the two files in Compare Mode in the file viewer.

Page 14
E. eForm The next step after creating a markup is for reviewers to complete their individual review section of the eForm.
1. To access the eForm you may need to click the “Workflow Portals” button
2. Next you will need to accept the task by clicking “Department Review”.

Page 15
3. There will be a popup window asking you if you want to accept the task. Click “OK”.
On the eForm, all reviewers will be able to read the comments of other reviewers but will only be able to edit their own comments. All reviewers will also be able to see all of the markups on the eForm.
If an application has more than one review cycle, there will be a separate comment box on the eForm for each review. You will only be able to enter comments in the current review cycle box. However, your previous comments will be available for viewing.
If a reviewer is not part of the current review cycle, but has participated in the past, their comments will continue to show up on the eForm.

Page 16
Your task will be highlighted in red. 1. Place your comments in the empty box. 2. Change the status of your review. 3. Click either the “Save and Close” button if you are not finished with your review or click the “My Review Complete” button.

Page 17
F. Steps to Reassign a Task
1. If you are a reviewer with rights to reassign to another person or persons in your department then you will see a reassign feature on the right side of your task in the eForm. (see exhibit on previous page)
2. Click “Reassign” to give the task to someone else in your department. 3. After you click “Reassign” you may have to wait, but a dropdown will appear in the User column of your task. 4. Choose the user you wish to reassign the task to. 5. On the right hand side of your task click on “Update” 6. The task will then be reassigned to the person you designated.

Page 18
Reports There are two reports available to the project manager/planner. One report will display all of the reviewer comments. The other report will show the project manager/planner comments to the applicant and the applicant’s response.
1. To view a report click either on the “Reports” tab or click the “Project Reports” Button.

Page 19
3. Then select which report you would like to view by clicking on the View Icon.
4. Select report from the dropdown (there should be only one item in the dropdown). 5. Click “View Report”.

Page 20
Tips
1. Be patient when opening the eForm or a report. They take a long time to load the first time but should be much quicker after the initial setup.
2. Markups can be done at any time during the review process even if you have already completed your review on the eForm. 3. If you would like to revise your comments on the e-form you can do that by reopening your task and clicking on “Reaccept”.
The “Reaccept” function is only available while the workflow is still in the review step. Once the round of review is completed by all reviewers, you will no longer be able to go in and change your comments.