pumpset manual mv150ic - master hire · pdf filepumpset manual mv150ic sykes group pty ltd...
TRANSCRIPT

PUMPSET MANUAL MV150iC
Sykes Group Pty Ltd
Customer:
Reference: WO23443

Sykes MV150iC – Installation, Operation & Maintenance Manual
Sykes Group Pty Ltd Spare Parts & Service 24 hours: 1800 131950
Website: www.sykesgroup.com
TABLE OF CONTENTS
1. INTRODUCTION
2. CUSTOMER SPECIFICATION
3. TECHNICAL DATA SHEET
4. HOW TO READ A PERFORMANCE CURVE
4.1 Example Sykes’ CP150 Pump Curve
4.2 Generalisations
4.3 Radial Thrust
4.4 Cavitation
5. RISK ASSESSMENT GUIDE
6. RISK ASSESSMENT – MV150i
7. AS2417-2001 GRADE 2 ACCEPTANCE TEST
8. SITE COMMISIONING PROCEDURE
8.1 Delivery Inspection
8.2 Installation & Setup
8.3 Suction Hose Setup
8.4 Discharge Hose / Pipe Setup
8.5 Pre-Start Checks
8.6 Starting Procedure
9. AUTOMATIC PRIMING NRV FUNCTION
10. PUMP OPERATING INSTRUCTIONS
10.1 Description of Pump Unit
10.2 Procedure Prior to Pump Start Up
10.3 Failure to Prime Pump
10.3.1 Air Leaks
10.4 Pump Dynamic Test
10.5 Ejector Test
10.5.1 Dri-Prime Ejector Pack Assembly

Sykes MV150iC – Installation, Operation & Maintenance Manual
Sykes Group Pty Ltd Spare Parts & Service 24 hours: 1800 131950
Website: www.sykesgroup.com
11. PUMP MAINTENANCE INSTRUCTIONS
11.1 Pump Maintenance Schedule
11.2 General Pump Inspection Procedure
11.3 Pump Assembly Instructions
11.2.1 Pump Bearing Engine Adaptor
11.2.2 Centrifugal Pump
11.2.3 Ejector Package
11.2.4 Mechanical Seal
11.2.5 Non Return Valve Inspection Procedure
11.2.6 Engine Pump Coupling
11.3 Air Compressor
11.3.1 Preface
11.3.2 General Description
11.3.3 Performance Chart
11.3.4 Internal Detail of Compressor
11.3.5 Parts List
11.3.6 Operation
11.3.7 Accessories
11.3.8 Piping
11.3.9 Installation Dimensions
11.3.10 Maintenance
11.3.11 Fitting Instructions – Compressor Assembly
11.3.12 Compressor Belt Replacement
12. PUMP DIAGNOSTICS
12.1 Trouble Shooting Guide
13. PUMP UNIT SUB-ASSEMBLY
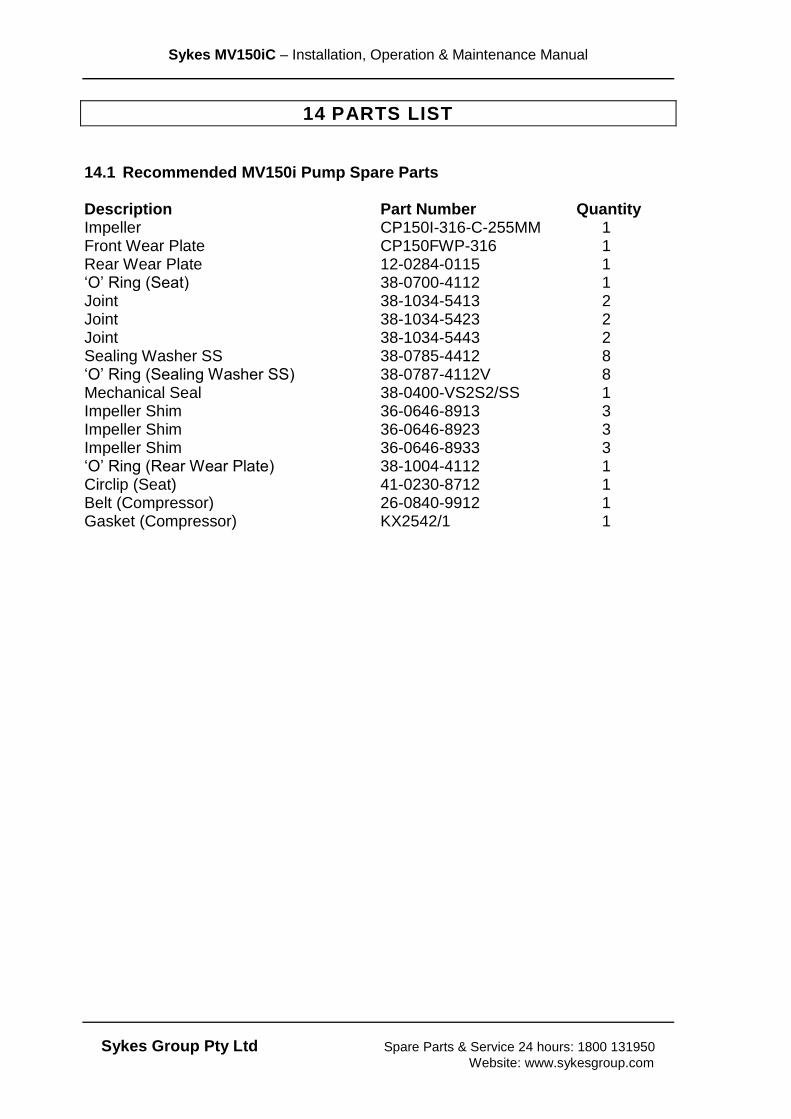
14. PARTS LIST
14.1 Recommended MV150i Pump Spare Parts
14.2 Front Cover and Volute Parts List
14.3 Bearing Bracket and Shaft Parts List
14.4 Ejector Package Parts List

Sykes MV150iC – Installation, Operation & Maintenance Manual
Sykes Group Pty Ltd Spare Parts & Service 24 hours: 1800 131950
Website: www.sykesgroup.com
14.5 Compressor Parts List
14.6 Reflux Box Non return Valve Parts List
14.7 Engine Coupling Parts List
14.8 Chassis Accessories
15. PUMP UNIT ACCESSORIES
16. DIESEL ENGINE MANUAL (if applicable)
17. ELECTRIC MOTOR MANUAL (if applicable)
18. WARRANTY CLAIM PROCEDURE
19. MISCELLANEOUS ENGINEERING INFORMATION
19.1 Main Factors Affecting Pump Suction Lift
19.2 Pump Suction Pipe Velocity
19.3 Total Dynamic Head Explanation Diagram
19.4 pH Compatibility Chart
19.5 Jet & Nozzle Information

Sykes MV150iC – Installation, Operation & Maintenance Manual
Sykes Group Pty Ltd Spare Parts & Service 24 hours: 1800 131950
Website: www.sykesgroup.com
1 INTRODUCTION
Congratulations on the purchase of your new Sykes Pump. With Sykes’ established quality control systems you can be assured your pump was manufactured with a high level of control and has undergone extensive testing on Sykes’ certified test facility. Sykes are pleased to offer a 12 month warranty on your new pump. As with all warranties, Sykes’ warranty is subject to regular maintenance as per the pump manual. To ensure your warranty is maintained, make sure your pump is regularly serviced. Sykes offer maintenance and repairs on our entire range and are able to offer regular service agreements if required. Sykes provide local service through a highly trained network of branches and are able to meet your service and spare parts requirements around the clock. For spare parts or service enquiries contact Sykes spare parts direct on 1800 131 950. Turnaround on parts is rapid with Sykes customer service ready to meet your needs 24 hours a day with spare parts located at branches Australia wide and around the globe. Sykes also offer onsite application assistance and training to ensure your pump is running at its optimum performance. Our Sykes trained staff will assess your application and help to set up optimum operating settings which will help to reduce unnecessary wear and tear on the pump whilst ensuring the pump is operating at its most efficient duty point. Should you have any after sales issues, please do not hesitate to contact your local Sykes branch or contact Sykes’ After Sales Service on 02 4954 3333.

Sykes MV150iC – Installation, Operation & Maintenance Manual
Sykes Group Pty Ltd Spare Parts & Service 24 hours: 1800 131950
Website: www.sykesgroup.com
2 CUSTOMER SPECIFICATION General Unit Information Customer Sykes Job Number WO23443 Sykes Serial Number 10MV150iC23443 Plant Number - Pump Information Pump Type MV150iC Pump Size 150mm x 150mm Pumpend Serial Number 0922542-3 Impeller Diameter Ø255mm Engine Information Engine Make Deutz F3L912 Engine Serial Number 08825109 Tacho Serial Number - Electric Motor Information Motor Make - Motor Serial Number - Chassis Information Dry Weight 1450 KG Wet Weight 1520 KG Fuel Capacity 80 LTRS Trailer Information VIN Number 6T9T26V9780EXJ003 Tyre Type - Axle Set Up -

Sykes MV150iC – Installation, Operation & Maintenance Manual
Sykes Group Pty Ltd Spare Parts & Service 24 hours: 1800 131950
Website: www.sykesgroup.com
3 TECHNICAL DATA SHEET
MV150iC Olympic Diesel Drive
Compressor Prime Pump
MATERIALS OF CONSTRUCTION DESIGN DETAILS Pump Casing: SG Iron AS1831 Grade 400/12 Pump Designation: MV150i Olympic
Suction Cover: SG Iron AS1831 Grade 400/12 Pump Description: Centrifugal Single Stage, Volute Type, 2 Bladed Fully Open Impeller.
Tee Piece: SG Iron AS1831 Grade 400/12 Suction Flange: 150mm Table ‘D’ Bearing Bracket: SG Iron AS1831 Grade 400/12 Delivery Flange: 150mm Slotted Table ‘D’ or ‘E’ Pump Shaft: 431 Stainless Steel Nominal Casing Thickness: 16mm Impeller: 316 Stainless Steel Nominal Shaft Diameter: 40mm Wear Plates: 316 Stainless Steel Impeller Eye Diameter: 161mm Air Injector: 316 Stainless Steel Maximum Impeller O.D.: 255mm Mechanical Seal: Silicon Carbide / Silicon Carbide Minimum Impeller O.D.: 255mm Non Return Valve 150mm Flapper or Ball Style NRV Solids Handling Size: 77mm Compressor Pulley: Tooth Belt ½” Heavy Pitch - 36H150 Operating Speed: MIN: 1400rpm MAX: 2200rpm Drive Pulley: Tooth Belt ½” Heavy Pitch - 28H150 Maximum Head: 44m Belt Section: Timing Belt - 390H150 Maximum Capacity: 162l/s Compressor Details: Bendix 2W 440 R Twin-in-line
cylinders 75mm x 50mm stroke, air cooled 15cfm (410L/min) at 1000rpm Lubrication from engine oil system.
Bearing Sizes: Drive End: 33111Q Tapered Roller Pump End: 33111Q Tapered Roller
Ejector Details: Jet: 23-0568-2016 Nozzle: 23-0571-2016
Bearing Lubrication: Grease Lubrication Multi Lube Lithium Grease EP Additives NLGI #2 or Equivalent

Sykes MV150iC – Installation, Operation & Maintenance Manual
Sykes Group Pty Ltd Spare Parts & Service 24 hours: 1800 131950
Website: www.sykesgroup.com
4 HOW TO READ A PERFORMANCE CURVE 4.1 Example Sykes’ CP150 Pump Curve The lines sloping downwards from left to right represent the varying quantities of liquid delivered by the pump with variations in head. The intersection of this line at 2000rpm with the zero flow line shows the shut off head (41m) of pressure developed by the pump. Total Dynamic Head (m) = Static Suction lift (m) + Static Discharge Head (m) + Friction Head (m) Where: Static Suction Lift: Difference in elevation between liquid level of the
suction and the centre line of the pump. Static Discharge Head: Difference in elevation between liquid levels of the
centre line of the pump and the discharge. Friction Head: Equivalent head necessary to overcome friction on the
interior surfaces of the pipework system including all valves, bends and fittings.

Sykes MV150iC – Installation, Operation & Maintenance Manual
Sykes Group Pty Ltd Spare Parts & Service 24 hours: 1800 131950
Website: www.sykesgroup.com
Duty Point: A pump operating at 95l/s at 29m (Total Dynamic Head).
1) Draw a line upwards from Flow (x-axis) at 95l/s (point A). 2) Draw a line across from Total Head (y-axis) at 29m (point C)
3) Where the vertical line of 95l/s intersects the horizontal line of 29m
(point B) determines the pump rpm speed and power required at this duty.
4) Pump Speed Curve = 2000rpm.
5) Power Requirement = 45kW to run the whole of the 2000rpm curve.
6) To obtain NPSHR (Net Positive Suction Head Required), draw a
line across from where the vertical line of the 95l/s intersects the NPSHR curve (point D).
7) NPSHR = 1.1m (point E).
8) Dynamic Suction Lift Available (DSLA)
DSLA = Atmosphere (m) – Velocity Head (allow 1m) – NPSHR (m)
= 10.3m – 1m –1.1m
= 8.2m
To determine the actual dynamic lift of pump, it is recommended to fit a vacuum gauge on the suction side of the pump to obtain a vacuum reading. The vacuum gauge, for this example, should read no more than 80.4kPa (8.2m). If the vacuum gauge reading is greater than 80.4kPa then the pump will experience cavitation. Note: To ensure minimal losses to the total suction lift:
Keep suction pipes as short and straight as possible.
Eliminate all possibility of air pockets being trapped in suction pipework.
When choosing foot valves, strainers, bends etc, select those, which will provide minimal restriction to the flow.
The diameter of the suction pipe should be equal in diameter to the pump inlet connection.
It is recommended to fit eccentric reducer in conjunction with pipe diameters larger than the pump inlet to avoid the possibility of air pockets in the suction pipework.
Sykes MV150iC – Installation, Operation & Maintenance Manual
Sykes Group Pty Ltd Spare Parts & Service 24 hours: 1800 131950
Website: www.sykesgroup.com
4.2 Generalisations
(1) Flow (l/s) decreases, as Total Head (m) increases. (2) Flow (l/s) increases, Power used increases.
It is not recommended to operate the pump outside the recommended pump operating range. To operate outside this area will lead to cavitation, vibration and non-uniform radial forces present in the pump. This drastically reduces the operating life of the mechanical seal, bearings and efficiency of the pump. In addition, the pump alignment will also be adversely effected due to excessive vibration. All this will result in an increase of maintenance cost of the pump. 4.3 Radial Thrust When a pump is operated at its best efficiency flow rate the velocities and hence the pressures acting on the impeller are uniform around the volute. This is shown in Figure – A. At flow rates other than best efficiency point, the pressure distribution is no longer uniform. At reduced flow rates, the pressures increase spirally towards the cutwater resulting in a radial reaction F as shown Figure – B. This will lead to the following operating problems:
Low efficiency of pump.
Noise vibration, reduced life of pump.
Increased radial loads on bearings due to unbalanced volute pressures.
Temperature rise due to dissipated energy created by low efficiency.
A similar situation exists at flow rates beyond best efficiency flow rates, with an approximate opposite (in direction) reaction. This also will lead to similar problems associated with the reduced flow rates with an addition of poor suction performance (high NPSHR). Figure – C shows typical variation of radial thrust with flow rate.

Sykes MV150iC – Installation, Operation & Maintenance Manual
Sykes Group Pty Ltd Spare Parts & Service 24 hours: 1800 131950
Website: www.sykesgroup.com
Figure A – 100% Best Efficiency Flow Figure B – Reduced Flow
Figure C – Radial Thrust

Sykes MV150iC – Installation, Operation & Maintenance Manual
Sykes Group Pty Ltd Spare Parts & Service 24 hours: 1800 131950
Website: www.sykesgroup.com
4.4 Cavitation If the Net Positive Head Available of the pump is less than the Net Positive Head Required, the pumpend liquid will vaporize in the region of the impeller eye i.e. where the local pressure is less then the vapour pressure. In this region, the fluid will consist of a liquid plus vapour cavities. This can, in the extreme, result in the formation of a vapour lock and the prevention of the fluid entering the impeller. This phenomenon is called ‘cavitation’. The cavitation cycle comprises therefore of two phase changes; one from liquid to vapour during the initiation and the other from vapour back to liquid during cavity collapse. Cavitation may be caused by excessive suction lift, insufficient NPSHA or operation at too high a speed. The resulting effects include:
(1) Pitting of material surfaces due to the continual hammering action of the collapsing vapour cavities.
(2) Significant reduction of performance due to vapour formation.
(3) The crackling noise (like gravel going through the pump) caused by vapour
cavity collapse. Severe cavitation usually results in excessive noise, vibration and damage to pump, whereas mild cavitation may produce nothing more than a small reduction in pump efficiency and moderate wear of pump components.

Sykes MV150iC – Installation, Operation & Maintenance Manual
Sykes Group Pty Ltd Spare Parts & Service 24 hours: 1800 131950
Website: www.sykesgroup.com
5 RISK ASSESSMENT GUIDE
The following RISK CLASSIFICATION table should be used to assess the degree of risk presented by hazardous situations identified when carrying out the assessment.
Consider:
Electrical Thermal Noise Mechanical Gravity
Pressure Chemical Radiant Biochemical
The numbers indicate how important it is to do something.
1 = Top priority – do something immediately
6 = Low priority – do something when possible
The table does not provide for control actions to be taken to minimise the risk and it is very important that these are documented, along with time frame and responsibilities.
How severely could it hurt
someone or how ill could it make
someone
How likely is it to happen?
(A) VERY LIKELY
could happen any time
(B) LIKELY
could happen sometime
(C) UNLIKELY
could happen but very rarely
(D) VERY UNLIKELY
could happen but probably never will
(1) Kill or cause permanent
disability or ill health
1
1
2
3
(2) Long term
illness or serious injury
1
2
3
4
(3) Medical attention and
several days off work
2
3
4
5
(4) First aid needed
3
4
5
6

Sykes MV150iC – Installation, Operation & Maintenance Manual
Sykes Group Pty Ltd Spare Parts & Service 24 hours: 1800 131950
Website: www.sykesgroup.com
6 RISK ASSESSMENT – MV150i
No.
Activity Hazard & Type of Injury Risk
Likelihood
Consequence
Risk Rating
Eliminate / Reduce / Control the risk by
1
Lifting of Pumpset by single point lifting frame
Excessive lateral movement of unit - crushing B 1 1
Only qualified personnel to use lifting equipment
Hoisting acceleration should not exceed 0.4m/sec
2
Ensure lifting equipment is in good condition
Keep all personnel away from Pumpset when it is suspended
Do not lift Pumpset by any other method than the central lifting eye
Do not lift in extreme weather conditions
Stop & think
Correct PPE
2 Setting up the Pumpset
Slips, trips, strain, sprains and pinch points B 3 3
Wear correct PPE
Stop and think
Inspect area to ensure safe working conditions
Set up on level ground
Communicate with personnel located/working in vicinity of Pumpset
Clean up any spillages causing trip hazards
Do not operate Pumpset in known unsafe conditions
Do not use Pumpset in any classification of hazardous environment unless it has been specifically designed to do so
Do not operate within a confined space
3 Operation of Pumpset
Excessive Noise – hearing loss B 2 2
Wear hearing protection at all times when working or operating around the Pumpset
Stop & think

Sykes MV150iC – Installation, Operation & Maintenance Manual
Sykes Group Pty Ltd Spare Parts & Service 24 hours: 1800 131950
Website: www.sykesgroup.com
No.
Activity Hazard & Type of Injury Risk
Likelihood
Consequence
Risk Rating
Eliminate / Reduce / Control the risk by
Operation of Pumpset
Boom movement (Suction Hose Boom) – pinch points & crushing
B 2 2
Wear correct PPE
Stop & think
Do not operate Pumpset in known unsafe conditions
Do not use Pumpset in any classification of hazardous environment unless it has been specifically designed to do so
Do not operate within a confined space
Keep all personnel away from Pumpset when boom is tilted, raised or lowered
Do not move Pumpset whilst operating the boom
Ensure boom lifting equipment is in good condition
Do not operate Boom in known unsafe conditions
Communicate with personnel located/working in vicinity of Pumpset
Operation of Pumpset
Running engine & Pump Unit – moving parts, hot pump parts, hot exhaust and manifolds on engine – possible burns, pinch points, cuts and abrasions
B 3 3
Wear correct PPE
Stop & think
Educate employees of burn hazards on engines
Keep access door on enclosures closed and locked when not required to be open
Ensure that the engine is operated only from the control panel or from the operator’s position by one person only
Keep hands, arms, long hair, loose clothing and jewelry away from pulleys, belts and other moving parts
Do not remove any safety guards or panel

Sykes MV150iC – Installation, Operation & Maintenance Manual
Sykes Group Pty Ltd Spare Parts & Service 24 hours: 1800 131950
Website: www.sykesgroup.com
No.
Activity Hazard & Type of Injury Risk
Likelihood
Consequence
Risk Rating
Eliminate / Reduce / Control the risk by
Operation of Pumpset
Hydraulic, fuel, grease, oil, radiator coolant, water pressure, movement of pump water hose and battery electrolyte leaks – environmental pollution, poisoning, burns & skin irritation
B 3 3
Stop & think
Wear correct PPE
Check all hoses for cracks and leaks
Check that all covers and caps are secure on alternator, cooling fan/radiator, engine & fuel tank
Ensure spillages are contained
MSDS available for all items used in Pumpset
Educate employees of burn hazards
Operation of Pumpset
Possible electrocution – electric shock and burns
B 1 1
Wear correct PPE
Stop & think
Only Authorised Personnel to work on electrical equipment
Check all conduits for splits, bare wires or unsecured conduit fitting prior to operation of Pumpset
Check all circuit breaker boards are secure and sealed
Check all guards covering electrical section are secured correctly
Do not attempt to connect or disconnect load while standing in water or on wet or soggy ground
Ensure all electrical power is isolated from electrical equipment being serviced
Keep all electrical equipment clean and dry
Keep terminals clean and tight
Test earth leakage equipment regularly
Ensure correct fire extinguisher is available

Sykes MV150iC – Installation, Operation & Maintenance Manual
Sykes Group Pty Ltd Spare Parts & Service 24 hours: 1800 131950
Website: www.sykesgroup.com
No.
Activity Hazard & Type of Injury Risk
Likelihood
Consequence
Risk Rating
Eliminate / Reduce / Control the risk by
Operation of Pumpset
Possible fire and explosion – burns, bodily injuries and possible death
B 1 1
Wear correct PPE
Stop & think
Ensure correct fire extinguisher is available
Do not refill the fuel tank while engine is running
Never store oily rags in metal covered containers
Do not smoke or allow sparks, flames or other sources of ignition around fuel or batteries
To avoid arcing keep grounded conductive objects, such as tools, away from exposed live electrical parts, such as terminals
Do not operate the Pumpset system with any known leaks in the fuel system
Open exhaust system drain plugs after repeated failed start attempts
4 Maintenance - Battery charging
Possible explosion – burns and bodily injuries B 1 1
Wear correct PPE
Stop & think
Correctly isolate equipment
Do not smoke or allow sparks, flames or other sources of ignition around batteries
To avoid arcing keep grounded conductive objects, such as tools, away from exposed live electrical parts, such as terminals
When disconnecting battery disconnect the negative battery terminal first
When reconnecting battery connect the negative battery terminal last
Ensure adequate ventilation
Turn off power or disconnect the power to the battery charger before making or breaking connections with the battery

Sykes MV150iC – Installation, Operation & Maintenance Manual
Sykes Group Pty Ltd Spare Parts & Service 24 hours: 1800 131950
Website: www.sykesgroup.com
No.
Activity Hazard & Type of Injury Risk
Likelihood
Consequence
Risk Rating
Eliminate / Reduce / Control the risk by
Maintenance - Electrical
Possible electrocution – electric shock and burns
B 1 1
Wear correct PPE
Stop & think
Correctly isolate equipment
Only Authorised Personnel to work on electrical equipment
Do not attempt to connect or disconnect load while standing in water or on wet or soggy ground
Ensure all electrical power is isolated from electrical equipment being serviced
Keep all electrical equipment clean and dry
Keep terminals clean and tight
Test earth leakage equipment regularly
Ensure correct fire extinguisher is available
Maintenance – refilling fuel tank
Fuel leaks – environmental pollution, poisoning, burns & skin irritation
B 3 3
Stop & think
Wear correct PPE
Correctly isolate equipment
Check all hoses and fittings for cracks and leaks
Ensure spillages are contained
MSDS available for fuel used in lighting tower
Educate employees of burn hazards

Sykes MV150iC – Installation, Operation & Maintenance Manual
Sykes Group Pty Ltd Spare Parts & Service 24 hours: 1800 131950
Website: www.sykesgroup.com
No.
Activity Hazard & Type of Injury Risk
Likelihood
Consequence
Risk Rating
Eliminate / Reduce / Control the risk by
Maintenance - mechanical
Engine, hydraulic pump and centrifugal pumpend maintenance – explosion, burns, pinch points, skin irritation
B 2 2
Stop & think
Wear correct PPE
Correctly isolate equipment
MSDS available for items used in Pumpset
Ensure spillages are contained
Check all hoses and fittings for cracks and leaks
Correctly de-energise hydraulic system
Ensure guarding is in place and secure after maintenance is finished
Do not remove the radiator filler cap until the coolant has cooled. Then loosen the cap slowly to relieve any excess pressure before removing the cap completely
Educate employees on hazards of hot coolant and oil under pressure
Educate employees of burn hazards
Ensure correct fire extinguisher is available

Sykes MV150iC – Installation, Operation & Maintenance Manual
Sykes Group Pty Ltd Spare Parts & Service 24 hours: 1800 131950
Website: www.sykesgroup.com
7 AS2417-2001 GRADE 2 ACCEPTANCE TEST Sykes Group tests all their manufactured pumps to meet AS2417-2001 Grade 2 standard. This standard outlines the acceptable performance parameters whilst testing / collecting pump hydraulic performance data. Please note that all performance test equipment at Sykes Head Office testing facility is certified to meet relevant standards.
Pump Test performed to meet AS2417 – 2001 (ISO 9906: 1999 (E)) Rotodynamic pumps – Hydraulic performance acceptance tests – Grade 2.
Permissible amplitude of fluctuations as a percentage of mean value of quantity being measured Flow Rate ±6% Pump Total Head ±6% Speed of Rotation ±2% Permissible values of overall measurement uncertainties Flow Rate ±3.5% Pump Total Head ±5.5% Speed of Rotation ±2% Values of tolerance factors Because of manufacturing uncertainties during completion, geometrical deviations from the drawings are given at every pump. Tolerances shall be allowed, including the possible deviations in operating dates between the tested pump and a pump without any manufacturing uncertainties. Flow Rate ±8% Pump Total Head ±5% Pump Efficiency -5% NPSH3 NPSH required for a drop of 3% of the total head of the first stage of the pump as a standard base for use in performance curves. NPSHR Minimum NPSH given by the manufacturer for a pump achieving a specified performance at a specified flow rate, speed and pumped liquid (occurrence of visible cavitation, increase of noise and vibration due to cavitation, beginning of head or efficiency drop, head or efficiency drop of a give amount, limitation of cavitation erosion). Tolerance factor for NPSHR The maximum permissible value of the difference between measured and guaranteed NPSHR; Grade 2: NSPHR = +6% or NPSHR = +0.3m (whichever is greater)

Sykes MV150iC – Installation, Operation & Maintenance Manual
Sykes Group Pty Ltd Spare Parts & Service 24 hours: 1800 131950
Website: www.sykesgroup.com
8 SITE COMMISIONING PROCEDURE
Customer Name:
Customer Representative:
Sykes Representative:
Pump Type:
Pump Serial Number:
Date of Commissioning:
Form: WP-04
Revision: 3
Date Issued: 28 September 2004
Commission Completed
Satisfactory: YES NO
Customer Representative Sign:
Sykes Representative Sign:
Date:

Sykes MV150iC – Installation, Operation & Maintenance Manual
Sykes Group Pty Ltd Spare Parts & Service 24 hours: 1800 131950
Website: www.sykesgroup.com
8.1 Delivery Inspection
Satisfactory
Yes No
A Pump and associated equipment has been supplied in full and in operational condition
Defects
Action Taken
Comments
Date

Sykes MV150iC – Installation, Operation & Maintenance Manual
Sykes Group Pty Ltd Spare Parts & Service 24 hours: 1800 131950
Website: www.sykesgroup.com
8.2 Installation and Set Up 8.2.1 General Set Up
Satisfactory
Yes No
A Ensure pumpset is suitable selected to match required duty
B Pumpset is level and on firm ground
C Pumpset and associated equipment is accessible by service vehicles
D Site risk assessment has been carried out
Defects
Action Taken
Comments
Date

Sykes MV150iC – Installation, Operation & Maintenance Manual
Sykes Group Pty Ltd Spare Parts & Service 24 hours: 1800 131950
Website: www.sykesgroup.com
8.3 Suction Hose Set Up
Satisfactory
Yes No
A Hose is non collapsible type, free of kinks and internal blockages
B Hose size at least to be equal or larger than pump inlet size
C Hose set up to be short and straight as possible
D No elbow fitted directly to pump inlet
E No undulating suction hose set up (i.e. no possibility of trapped air in suction hose set up)
F No excessive static suction lift
G Strainer hole size to be less than pump solids handling capability
H Strainer position to avoid air intake and clogging due to silt / mud etc. from floor of tank / pond / dam etc.
I Strainer open area to be at least four times the area of the suction hose
J No foot valve in suction hose set up, please contact Sykes for assistance.
Defects
Action Taken
Comments
Date
Recommended Suction Strainer Set Up

Sykes MV150iC – Installation, Operation & Maintenance Manual
Sykes Group Pty Ltd Spare Parts & Service 24 hours: 1800 131950
Website: www.sykesgroup.com
8.4 Discharge Hose / Pipe Set Up
Satisfactory
Yes No
A Hose diameter at least the same diameter as pump outlet
B Correctly rated discharge hose and fittings (non return valves, gearbox butterfly valves etc)
C Control valve has fine adjustment capabilities and is designed for throttling conditions
D Pressure gauge fitted in discharge pipe work as close as possible to pump outlet
E Suitable rated pressure bleed valve
F Free from air leaks, kinks and internal blockages
G Discharge hose straight and short as possible
Defects
Action Taken
Comments
Date
Recommended Pump Set Up
Suction Vacuum Gauge
Pump Operating Chart
Discharge Pressure Gauge
Butterfly Control Valve
Pressure Bleed Valve

Sykes MV150iC – Installation, Operation & Maintenance Manual
Sykes Group Pty Ltd Spare Parts & Service 24 hours: 1800 131950
Website: www.sykesgroup.com
8.5 Pre-Start Checks
Satisfactory
Yes No
A Operator familiar with pumpset stop / start operating procedures
B Condition and level of all lubricants, coolants and fuels (if required, refer to motor / pump manuals for additional assistance)
C All moving parts and rotating parts are adequately guarded
D Discharge isolation control valves are fully open for initial prime and pump operating stages
E If unit is belt drive check for belt alignment and tension
F If drive is an electric motor direction of rotation shall be checked prior to start up. It is recommended that the pump / electric motor coupling be disconnected for this check.
Defects
Action Taken
Comments
Date

Sykes MV150iC – Installation, Operation & Maintenance Manual
Sykes Group Pty Ltd Spare Parts & Service 24 hours: 1800 131950
Website: www.sykesgroup.com
8.6 Starting Procedure
Satisfactory
Yes No
A Check and inspect for undue noise, vibration and misalignment on initial start up
B For diesel drive, start engine at idle speed and check operation of all gauges. Slowly increase engine speed during pump priming process
C
Once pump is primed, increase and set engine speed to match required pump duty. The setting of a control discharge valve may be necessary to meet minimum operating speed of the engine
D
On a pumpset that is driven by an electric motor with a fixed speed a discharge control valve may be required to regulate the pump to operate within the pump’s recommended operating range
E
Monitor pumpset for a period of time. Operator should observe and monitor;
- bearing temperatures - mechanical seal coolant level - mechanical seal coolant contamination - pump discharge & suction pressure - pump system leaks - Engine temperatures, pressures, emissions and gauges
Defects
Action Taken
Comments
Date

Sykes MV150iC – Installation, Operation & Maintenance Manual
Sykes Group Pty Ltd Spare Parts & Service 24 hours: 1800 131950
Website: www.sykesgroup.com
9 AUTOMATIC PRIMING NRV FUNCTION Sykes Automatic Self Priming Pump are supplied complete with discharge check valves as a part of the pump priming system. The primary function of the check valve is for sealing the discharge side of the pump during the automatic priming process. Whilst this check valve is rated for maximum pump performance it is not intended to be used as the discharge system non return valve. Sykes recommend that a suitable system non return valve be installed as part of the discharge pipe work.

Sykes MV150iC – Installation, Operation & Maintenance Manual
Sykes Group Pty Ltd Spare Parts & Service 24 hours: 1800 131950
Website: www.sykesgroup.com
10 PUMP OPERATING INSTRUCTIONS 10.1 Description of Pump Unit The pump is basically a simple end suction pump which has a completely automatic priming system built into the design. This enables the pump to self-prime from a completely dry condition even with a long suction line. No liquid of any nature is required to prime the pump and therefore in temporary dry trench conditions the pump will 'snore' until such time as liquid is available. It can handle unscreened sewage, trade effluents, thick slurries and solids up to a normal limitation of 77mm. The impeller is fully open two bladed, 316 Stainless Steel construction, with shaft of 431stainless steel. The pump body is SG iron construction fitted with Stainless Steel wear plates secured by high tensile steel screws. The mechanical seal is fitted externally to the pump in its own self-contained oil. It is leak tight and suitable for sewage and sludges; using silicon carbide faces. Pump out vanes on the impeller ensure the seal is lightly loaded and not contaminated by the main solid content. The pump unit is supported off a SAE 4 engine flange through a heavy-duty SG iron adaptor bracket. Guards are fitted as standard to all moving parts. Suction flange 150mm Table 'D'. Delivery flange slotted 150mm Table 'D' & ‘E’. Note If your MV150i pumpset has been mounted on a trailer chassis, it is recommended that after approximately 5 km of travel that all wheel nuts be inspected and re-tightened.

Sykes MV150iC – Installation, Operation & Maintenance Manual
Sykes Group Pty Ltd Spare Parts & Service 24 hours: 1800 131950
Website: www.sykesgroup.com
10.2 Procedure Prior to Pump Start Up The pump should be placed on a level area of ground. In order to put the pump to work the following procedure should be undertaken. 1. Ensure that the pump turns freely. 2. Ensure bearings are adequately lubricated. 3. Check pump runs without excessive noise, heat or vibration. 4. Position hoses to avoid unnecessary stress. Sharp bends should be eliminated
and protective measures taken where hoses are exposed to abrasive surfaces. Collapsible type hoses MUST NOT be used on the suction side of the pump.
5. For diesel prime movers:-
Check engine fuel supply level and top up if necessary. (The fuel tank is built into the chassis).
6. Check engine oil level on dipstick and top up with recommended oil if
necessary. The pump will prime automatically once the suction hose intake is submerged. Note For engine starting instructions or starting difficulties, refer to the manufacturer's handbook.

Sykes MV150iC – Installation, Operation & Maintenance Manual
Sykes Group Pty Ltd Spare Parts & Service 24 hours: 1800 131950
Website: www.sykesgroup.com
10.3 Failure to Prime Pump 10.3.1 Air Leaks To test for air leaks, disconnect suction hose from pump and blank off suction entry. If the vacuum gauge registers a satisfactory reading, i.e. 9.14 metres, the leak will be in the suction hose. Re-couple hose to pump; remove intake and blank-off entry to hose. It should then be possible to locate leak. If the air leak is in the pump:-
a) Check that all drain plugs are screwed tightly in position b) Remove NRV Inspection cover and make sure that the valve is
seating correctly. 10.4 Pump Dynamic Test 1. Before starting the engine, check that the shaft, pulleys and belt are free to
rotate with the guards in position. 2. Start pump and run completely dry for a minimum period of 10 minutes (initial
run up speed at 900rpm increasing during test to 1100rpm). During this period, generally check and observe for any unusual vibrations, overheating, fuel, oil or air leaks.
3. These faults must be rectified immediately to prevent a possible engine seizure. 4. After the dry running period, check that the pump unit will raise a minimum
vacuum of 0.81bar (24 inches mercury). Special Note Consult engine manufacturers handbook for oil, fuel, speed control and stop details.
Sykes MV150iC – Installation, Operation & Maintenance Manual
Sykes Group Pty Ltd Spare Parts & Service 24 hours: 1800 131950
Website: www.sykesgroup.com
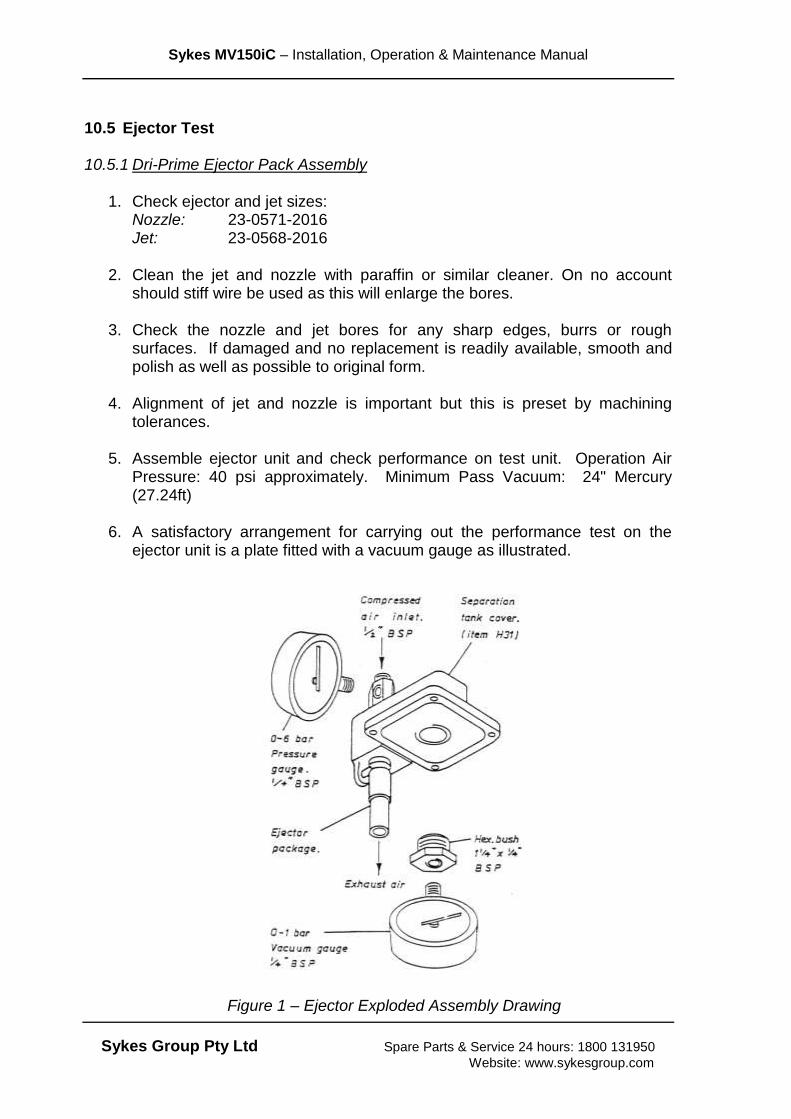
10.5 Ejector Test 10.5.1 Dri-Prime Ejector Pack Assembly
1. Check ejector and jet sizes: Nozzle: 23-0571-2016
Jet: 23-0568-2016
2. Clean the jet and nozzle with paraffin or similar cleaner. On no account should stiff wire be used as this will enlarge the bores.
3. Check the nozzle and jet bores for any sharp edges, burrs or rough
surfaces. If damaged and no replacement is readily available, smooth and polish as well as possible to original form.
4. Alignment of jet and nozzle is important but this is preset by machining
tolerances.
5. Assemble ejector unit and check performance on test unit. Operation Air Pressure: 40 psi approximately. Minimum Pass Vacuum: 24" Mercury (27.24ft)
6. A satisfactory arrangement for carrying out the performance test on the
ejector unit is a plate fitted with a vacuum gauge as illustrated.
Figure 1 – Ejector Exploded Assembly Drawing

Sykes MV150iC – Installation, Operation & Maintenance Manual
Sykes Group Pty Ltd Spare Parts & Service 24 hours: 1800 131950
Website: www.sykesgroup.com
11 PUMP MAINTENANCE INSTRUCTIONS 11.1 Pump Maintenance Schedule
Daily 250 hours 500 hours 750 hours 1,000 hours 6,000 hours
3 Months 6 months 9 months 12 months 3 years
Pump end
1 Check for mechanical seal leaks
2 Change mechanical seal oil
3 Change mechanical seal
4 Check coupling alignment & condition
5 Change pump coupling rubber/s
6 Check/Adjust wet end clearances
7 Change pump wet parts, impeller / wear plates
8 Check bearing temperature
9 Check bearing end float
10 Replace pump shaft bearings
11 Check pump shaft seals
12 Change pump shaft seals
13 Check impeller for visual blockages
14 Replace volute
Priming System Compressor
1 Change compressor air filter
2 Check compressor air hose
3 Check/Clean priming tee filter
4 Change priming tee filter
5 Check priming tee ball/seat
6 Change priming tee ball
7 Check/clean priming tee jet/nozzle
8 Change priming tee jet/nozzle
9 Check compressor drive belt
10 Replace compressor drive belt
11 Check compressor performance
12 Change compressor air
Ancillaries
1 Check non return valve
2 Change non return valve seat/flap
3 Check vacuum gauge
4 Change vacuum gauge
5 Check pressure gauge
6 Change pressure gauge
7 Check gear box butterfly valve
8 Change gear box butterfly valve
9 Check all oil, water and air hose's condition
10 Check condition of hose coupling o-rings
11 Check for all mounting bolts, skid, chassis
12 Check shut down operations engine and pump
13 All guarding
14 For diesel servicing and panel operational checks.
= Daily Check
= Minor Service
= Major Service
= As Required
1 Ancillaries are not included in major service schedule / pricing, please contact Sykes for assistance
2 Please refer to Service Schedule for detailed parts, service checks and labour information
3 Follow minor and major schedules outlined in Sykes Service Schedule. Use the service hours or
calendar time, whichever occurs first, in order to determine the maintenance intervals.
4 If the pump is operated in ambient temperatures below -180C or above 38
0C and / or under severe conditions, perform maintenance at shorter
intervals. Severe services includes the following conditions; high temperatures, continuous high loads, vibration and dusty conditions.
See relevant manuals.
Notes:
As Required

Sykes MV150iC – Installation, Operation & Maintenance Manual
Sykes Group Pty Ltd Spare Parts & Service 24 hours: 1800 131950
Website: www.sykesgroup.com
Grease Lubrication Schedule – CP150i Notes: 1. Single point grease point to grease 2 off 33111 bearings 2. Single point grease relief nipple 3. Grease relief nipple set at 3 - 5 psi 4. Grease Specification: Multi Lube Lithium Grease EP Additives NLGI #2
Grease Point
Grease Relief Nipple

Sykes MV150iC – Installation, Operation & Maintenance Manual
Sykes Group Pty Ltd Spare Parts & Service 24 hours: 1800 131950
Website: www.sykesgroup.com
Operating Conditions:
Ambient Temperature 20 0C
Humidity / Dust Moderate
Vibration Moderate
Load Moderate
Bearings 33111 (2 off) Quantity of Grease required at
250 Hour Intervals
Speed 1400 rpm 5.2 grams
Bearing Temperature 44 0C
Speed 1500 rpm 5.2 grams
Bearing Temperature 46 0C
Speed 1600 rpm 5.6 grams
Bearing Temperature 44 0C
Speed 1700 rpm 7.0 grams
Bearing Temperature 48 0C
Speed 1800 rpm 8.4 grams
Bearing Temperature 50 0C
Speed 1900 rpm 9.4 grams
Bearing Temperature 52 0C
Speed 2000 rpm 9.6 grams
Bearing Temperature 54 0C
Speed 2100 rpm 10.0 grams
Bearing Temperature 56 0C
Speed 2200 rpm 10.4 grams
Bearing Temperature 60 0C
!WARNING!
Use this re-greasing schedule as a guide only. Re-greasing quantities will change due to variances in Operating Conditions.
For re-greasing schedules to suit particular Operating Conditions please
contact Sykes for assistance.

Sykes MV150iC – Installation, Operation & Maintenance Manual
Sykes Group Pty Ltd Spare Parts & Service 24 hours: 1800 131950
Website: www.sykesgroup.com
Operating Conditions:
Ambient Temperature 40 0C
Humidity / Dust High
Vibration High
Load Heavy
Bearings 33111 (2 off) Quantity of Grease required at
250 Hour Intervals
Speed 1400 rpm 10.4 grams
Bearing Temperature 52 0C
Speed 1500 rpm 16.0 grams
Bearing Temperature 54 0C
Speed 1600 rpm 16.8 grams
Bearing Temperature 56 0C
Speed 1700 rpm 21.2 grams
Bearing Temperature 58 0C
Speed 1800 rpm 25.4 grams
Bearing Temperature 60 0C
Speed 1900 rpm 25.8 grams
Bearing Temperature 62 0C
Speed 2000 rpm 26.0 grams
Bearing Temperature 64 0C
Speed 2100 rpm 26.6 grams
Bearing Temperature 66 0C
Speed 2200 rpm 28.0 grams
Bearing Temperature 70 0C
!WARNING!
Use this re-greasing schedule as a guide only. Re-greasing quantities will change due to variances in Operating Conditions.
For re-greasing schedules to suit particular Operating Conditions please
contact Sykes for assistance.

Sykes MV150iC – Installation, Operation & Maintenance Manual
Sykes Group Pty Ltd Spare Parts & Service 24 hours: 1800 131950
Website: www.sykesgroup.com
11.2 General Pump Inspection Procedure
1. Drain the water from the pump and the non-return valve. 2. Remove the non-return valve and inspect the ball and seat for wear. 3. Drain the oil from the engine and the pump. 4. Dismantle the pump end completely. 5. If the oil seal has scored the collar, it may be pushed in 2mm to seal on an
unscored area of the sleeve. Ensure that the oil seal is positioned squarely and that it is less than 8mm from the machined face of the adaptor.
6. Worn seal faces may be reclaimed by lapping faces to a surface finish of 3
sodium light bands. Note that the stationary seat was originally lapped both sides and may be reversed in the wearplate.
7. Check that the shaft rotates freely and has an end float less than 0.2mm. 8. Clean and inspect all components and renew where necessary. Do not use
abrasive materials or solutions to clean the ejector assembly. Renew all nitrile seals.
9. Reassemble the complete pump end and non-return valve (refer to enclosed
Fitting Instructions). 10. Drain the fuel tank. 11. Detach fuel, oil and air hoses. Clean and ensure that they are not blocked.
Test the relief valves (at 3 to 5 psi, and AC78 at 90 to 100 psi). 12. Check pulley alignment and belt condition. Check the security of pulleys
and flexible couplings. 13. Reassemble the complete unit.

Sykes MV150iC – Installation, Operation & Maintenance Manual
Sykes Group Pty Ltd Spare Parts & Service 24 hours: 1800 131950
Website: www.sykesgroup.com
11.3 Pump Assembly Instructions 11.3.1 Pump Bearing Engine Adaptor
1. Ensure all items are free from burrs and rust.
2. Clean out all casting sand from the recess in the adaptor.
3. Check that all items are clean and free from foreign matter and that the bearings rotate freely.
4. Assemble the bearings and press them onto the shaft ensuring that the
tapers are correctly orientated.
5. Remove the outer race from the pump end bearings and press it 10mm into the adaptor from the pump end.
6. Insert the lip seals into the bearing covers, than smear them with grease.
Fit cover and press it fully into the adaptor. Secure with circlip.
7. Assemble the shaft and bearings into the adaptor.
8. Fit the rear bearing cover with fasteners. To ensure alignment, the screws should each be rotated a quarter turn in sequence. When the shaft becomes difficult to rotate, measure the gap between the face of the cover and adaptor, with a feeler gauge. Remove the cover and refit with shims having a total thickness slightly in excess of the gap measurement. Secure the screws and ensure that the shaft rotates freely and has an end float less than 0.2mm.
9. Check that the plug has a 1.6 diameter hole and that the relief valve is set to
3-5psi before fitting to adaptor. Fit items grease nipple & 3/8” BSP plug to the adaptor.
10. Press the lip seal squarely into the adaptor.
11. Fill the bearing housing with 0.2 litres of Shell Alvania RA grease.
12. Items set screws, lockwashers & keysteel should be fitted when assembling
to the engine.

Sykes MV150iC – Installation, Operation & Maintenance Manual
Sykes Group Pty Ltd Spare Parts & Service 24 hours: 1800 131950
Website: www.sykesgroup.com
11.3.2 Centrifugal Pump
1. Ensure all items are free from burrs and rust. 2. Visually check for porosity and blowholes in the castings and clean out all
the casting sand and swarf from the hollow in the separation tank cover. 3. Ensure that all items are clean and that the seal faces are free from score or
wear marks. 4. Fit O-ring to the shaft collar. 5. Fit the collar over the shaft and ensure that the lip seal is correctly
positioned over it. 6. To fit the tight fitting synthetic rubber friction ring in the seal onto the shaft
apply light oil or swarfega to the inside diameter of the friction ring and to the outside diameter of the shaft. Do not use heavy grease, silicon or P.T.F.E. based lubricant. Ensure that the seal is hard against the shoulder on the collar and that the spring can be compressed. Locate the seal rotating face into the seal.
7. Locate the O-ring and the seal seat, into the rear wearplate. Place the seat
into the wearplate and fit the circlip. Ensure that the seat is secure. Apply non-adhesive sealant (e.g. Boss white non-adhesive Hermatite or Locktite hydraulic sealant) to the back face of the wearplate and secure it into the adaptor with fasteners.
8. Apply 'Copperslip' to the threads on the shaft. Fit shims having a total
thickness of 2mm and the impeller, remove shims, and then refit with shims having a total thickness of 2.5mm minus the gap measurement. Fit the impeller and check that the gap behind it is between 0.3mm and 0.6mm and that the impeller rotates freely.
9. Locate the O-ring onto the wearplate. 10. Fit studs to the body. The longer studs should be in the lower holes. 11. Fit the front wearplate onto the front cover and secure with fasteners. 12. Assemble the body onto the adaptor carefully so as not to dislodge the O-
ring then secure with fasteners. 13. Assemble front cover to pump body. Secure tightly using fasteners until the
front wearplate and the impeller are just touching. Measure the gap between the mating surface of the pump body and the front cover.

Sykes MV150iC – Installation, Operation & Maintenance Manual
Sykes Group Pty Ltd Spare Parts & Service 24 hours: 1800 131950
Website: www.sykesgroup.com
14. Joints having a thickness of this gap measurement plus 0.5mm should be
fitted between the pump body and front cover. After fitting joints secure the pump body and the front cover with fasteners.
15. Check that the gap between the front wear plate and the impeller is between
0.3mm and 0.6mm and the impeller rotates freely. 16. Fit fasteners. 17. If pump units are to remain unused for a long time all adjacent clearance
surfaces should be sprayed with a coating of 'Molyprotectoslip' to prevent rust or seizure.

Sykes MV150iC – Installation, Operation & Maintenance Manual
Sykes Group Pty Ltd Spare Parts & Service 24 hours: 1800 131950
Website: www.sykesgroup.com
11.3.3 Ejector Package
1. Check that all items are clean and free from burrs. The jet and nozzle
should only be cleaned with paraffin or similar cleaner. Wire should not be used as this will enlarge the bores.
2. Do not use excessive jointing compound when fitting these items and
ensure that it does not enter the bores. This may cause a blockage in the ejector.
3. Fit, in their grooves, o-ring onto jet and o-ring onto nozzle. 4. Screw by hand, the jet and the nozzle to the collar. 5. Release the location screw and insert the assembly into the separation tank
cover, than re-tighten the screw so that it locates in the groove on the nozzle.
6. Screw the jet sleeve by hand into the separation tank cover. A spanner
should only be used for the final quarter turn. 7. Place the ball in the separation tank cover, then secure ball seat. 8. Fit the separation tank cover to the pump body with gasket filters and
fasteners. 9. Push the exhaust hose onto the nozzle. Fasten using clamp. 10. Push air muffler into the exhaust hose. Fasten using clamp.

Sykes MV150iC – Installation, Operation & Maintenance Manual
Sykes Group Pty Ltd Spare Parts & Service 24 hours: 1800 131950
Website: www.sykesgroup.com
11.3.4 Mechanical Seal 1. Drain water from pump and non-return valve. 2. Drain oil from mechanical seal cavity. 3. Remove the front cover, impeller and rear wear plate allowing direct access to
the mechanical seal. 4. Remove mechanical seal and sleeve assembly, check oil seal has not been
damaged or the adjacent sleeve scored. 5. Renew where necessary ensuring that oil seal is replaced squarely in it's
housing. 6. To renew the mechanical seal, remove shaft collar complete with mechanical
seal unit. If the mechanical seal unit is in good condition it may only be necessary to remove carbide rotating face from the mechanical seal unit. Please Note; before fitting a complete new seal assembly ensure that all sharp edges are removed and all working faces are clean and free from any foreign matter.
7. Apply light oil to the shaft / sleeve an o-ring (item 7).
Please note: do not use heavy grease, silicon based or P.T.F.E. lubricant. 8. Ensure grub screws (item 8) are not protruding beyond the inside diameter of
the mechanical seal retainer (item 5). 9. Check mechanical seal face is clean and free of debris (item 2 & 3). 10. Ensure the mechanical seal unit is pressed squarely and evenly over the shaft.
Make sure it is home hard against the shaft collar shoulder. 11. Tighten grub screws (item 8) evenly to secure mechanical seal in position. 12. Check pump rear wear plate for burrs and sharp edges. Lubricate seat o-ring
(item 9) and position in rear wear plate o-ring groove. 13. Check mechanical seal seat (item 1) is clean and free of debris. Locate in rear
wear plate and secure with circlip (item 10). 14. Lightly smear stationary mechanical seal face with clean light oil. 15. Fit rear wear plate carrying the seal static face using a non-adhesive sealant on
rear face of wear plate. Seal tension is automatically obtained when the wear plate and impeller are re-fitted.
16. Ensure rear impeller clearance is between 0.50mm and 0.65mm.

Sykes MV150iC – Installation, Operation & Maintenance Manual
Sykes Group Pty Ltd Spare Parts & Service 24 hours: 1800 131950
Website: www.sykesgroup.com
17. Fill oil chamber with SAE 20/20 grade of oil and check assembly rotates freely. 18. Rebuild pump casing assembly onto adaptor.
Sykes MV150iC – Installation, Operation & Maintenance Manual
Sykes Group Pty Ltd Spare Parts & Service 24 hours: 1800 131950
Website: www.sykesgroup.com
11.3.5 Non Return Valve Inspection Procedure
1. Ensure that all items are clean and free from burrs. 2. Visually check for porosity and blow holes in the castings and for scores or
chaffing of the valve ball and seat. 3. Fit studs into the body. 4. Fit drain plug and locate the valve seat onto the body. 5. Clean the delivery flange on the pump body and secure the valve to it with
fasteners. 6. Insert ball then fit o-ring and cover with fasteners.

Sykes MV150iC – Installation, Operation & Maintenance Manual
Sykes Group Pty Ltd Spare Parts & Service 24 hours: 1800 131950
Website: www.sykesgroup.com
11.3.6 Engine / Pump Coupling
Installation Procedure
1. The outer toothed aluminium ring is bolted (bolt complete with supplied flat
washer (refer to Photo 1)) to engine flywheel (refer to Photo 2 & 3) with tightening torque as per below listed information;
Please note that the bolts must be tightened alternately (diagonal opposites) in several steps until they have all reached the correct tightening torque. Finally the tightening torque of all bolts must be checked all around.
2. Measure from engine bell housing to aluminium ring.
3. Install shaft key.
4. Slide driven hub onto shaft.
5. Fit vulcanised ring (rubber disc) with cap screws (supplied with coupling (refer to Photo 4)) without washers.
6. Measure from pump engine adaptor flange to vulcanised ring so that
vulcanised ring locates centrally in aluminium ring (refer to Photo 5 & 6) when assembled.
7. Tighten cap screws slightly.
8. Re-check measurement and adjust if necessary.

Sykes MV150iC – Installation, Operation & Maintenance Manual
Sykes Group Pty Ltd Spare Parts & Service 24 hours: 1800 131950
Website: www.sykesgroup.com
9. Torque cap screws (refer to Photo 7 & 8);
Please note that the bolts must be tightened alternately (diagonal opposites) in several steps until they have all reached the correct tightening torque. Finally the tightening torque of all bolts must be checked all around.
10. Re-check measurement. 11. Assemble mating coupling part (pump / engine) ensure that teeth are
properly engaged (refer to Photo 9).
12. If any issues are encountered during Centamax SB coupling installation contact Supervisor and fill in relevant Quality Action Report.
Photo 1 Photo 2

Sykes MV150iC – Installation, Operation & Maintenance Manual
Sykes Group Pty Ltd Spare Parts & Service 24 hours: 1800 131950
Website: www.sykesgroup.com
Photo 3 Photo 4
Photo 5 Photo 6
Equal Distance
Equal Distance
Photo 7 Photo 8

Sykes MV150iC – Installation, Operation & Maintenance Manual
Sykes Group Pty Ltd Spare Parts & Service 24 hours: 1800 131950
Website: www.sykesgroup.com
Photo 9

Sykes MV150iC – Installation, Operation & Maintenance Manual
Sykes Group Pty Ltd Spare Parts & Service 24 hours: 1800 131950
Website: www.sykesgroup.com
11.4 Air Compressor 11.4.1 Preface This manual provides the owner with the necessary instructions to maintain its compressor properly, so that the Customer gets the best service from it. Hence, the owner is requested to go through the contents of the manual & become well acquainted with the instructions herein. In case any question arises related to the equipment or the manual the customer is requested to contact the aftermarket division of SYKES GROUP PTY LTD.

Sykes MV150iC – Installation, Operation & Maintenance Manual
Sykes Group Pty Ltd Spare Parts & Service 24 hours: 1800 131950
Website: www.sykesgroup.com
11.4.2 General Description Application These compressors are positive displacement type, reciprocating and single acting. The cylinder barrels are air-cooled while the cylinder head is cooled by water circulated from the vehicle engine cooling system. The salient features of these compressors are robust overhung design crankshaft for reliability & easy maintenance, solid end connecting rods, highly thermal efficient interfolding, totally reliable splash lubrication & force feed lubrication for smooth vibration free operation. Single Stage Compressor These compressors have cylinders of the same size. The principle of operation is as follows: On the suction stroke of the individual piston, air at atmospheric pressure enters the crankcase/cylinder through the inlet filter and the valve located in airhead. On the compression stroke of the each piston, air is forced out through the valve and passes into a common discharge.
General Specifications Bore 75 mm
Stroke 50 mm
Swept Volume 37.4 CFM
Maximum Recommended Speed 2400 RPM
Maximum Recommended Delivery Pressure 9bar (130 PSI.)
Operating Temperature Range -400C to +800C
Maximum Continuous delivery Air Temperature 2000C
Weight 20 Kg

Sykes MV150iC – Installation, Operation & Maintenance Manual
Sykes Group Pty Ltd Spare Parts & Service 24 hours: 1800 131950
Website: www.sykesgroup.com
11.4.3 Performance Chart
1150 rpm
Motor BHP
2.612.95
3.313.71
0
1
2
3
4
5
0 1 2 3 4 5 6 7 8 9 10
Discharge Pressure (bar)
Mo
tor
(BH
P)
M ODEL : 2SC15
SIZE : 50 & 50 x 75
1150 rpm
Free Air Delivery
15.35
14.38
13.4112.61
10
11
12
13
14
15
16
17
18
19
20
0 1 2 3 4 5 6 7 8 9 10
Discharge Pressure (bar)
Fre
e A
ir D
eli
ve
ry (
cfm
)
M ODEL : 2SC15
SIZE : 50 & 50 x 75
Performance Chart @ 1150 rpm Model 2SC15
Sykes MV150iC – Installation, Operation & Maintenance Manual
Sykes Group Pty Ltd Spare Parts & Service 24 hours: 1800 131950
Website: www.sykesgroup.com
11.4.4 Internal Detail of Compressor
SYKES
S YK ES
1
11
13
2
Water OutletAir Inlet
Air Delivery
28
18
White Metal Bearing BushLubricating
17
5
98
7
Oil control Ring
Piston Ring
21
19
22
Water Inlet
14
3
4
(5)
6
10
12
15
15
16
20
23
24
25
26
27
29
SECTION - 3
Internal Detail of
2SC15 Compressor
Oil Connection
Sykes MV150iC – Installation, Operation & Maintenance Manual
Sykes Group Pty Ltd Spare Parts & Service 24 hours: 1800 131950
Website: www.sykesgroup.com
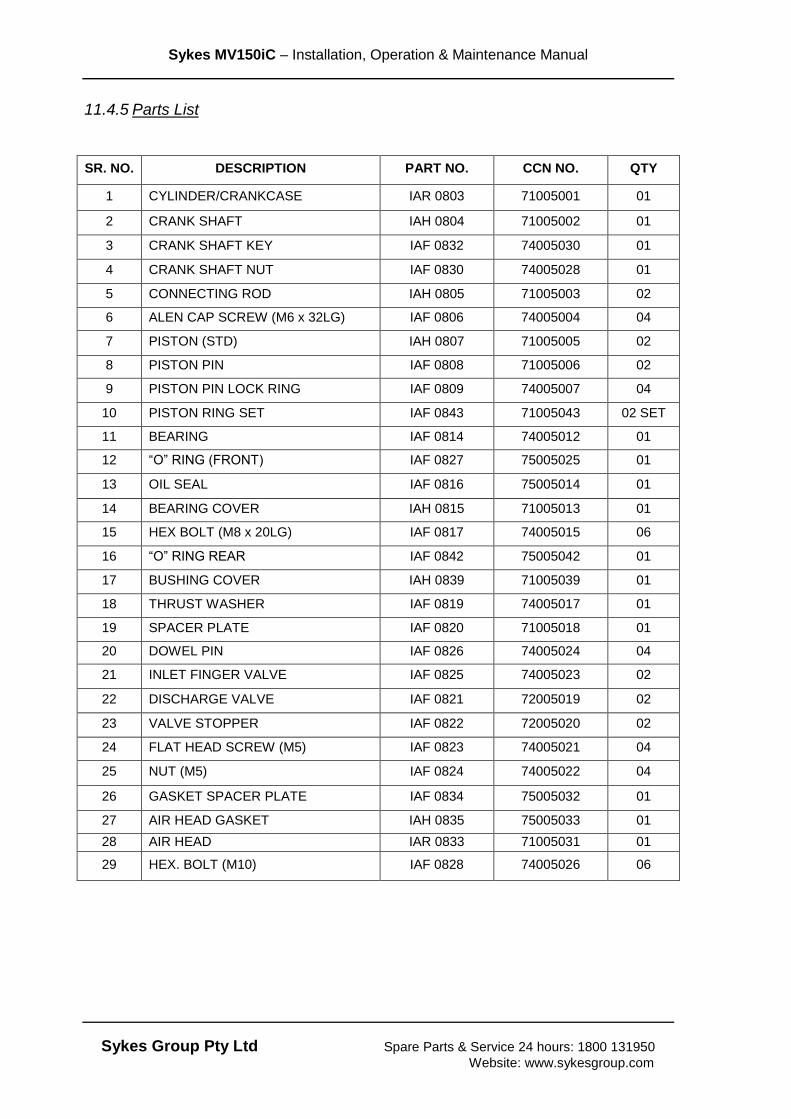
11.4.5 Parts List
SR. NO. DESCRIPTION PART NO. CCN NO. QTY
1 CYLINDER/CRANKCASE IAR 0803 71005001 01
2 CRANK SHAFT IAH 0804 71005002 01
3 CRANK SHAFT KEY IAF 0832 74005030 01
4 CRANK SHAFT NUT IAF 0830 74005028 01
5 CONNECTING ROD IAH 0805 71005003 02
6 ALEN CAP SCREW (M6 x 32LG) IAF 0806 74005004 04
7 PISTON (STD) IAH 0807 71005005 02
8 PISTON PIN IAF 0808 71005006 02
9 PISTON PIN LOCK RING IAF 0809 74005007 04
10 PISTON RING SET IAF 0843 71005043 02 SET
11 BEARING IAF 0814 74005012 01
12 “O” RING (FRONT) IAF 0827 75005025 01
13 OIL SEAL IAF 0816 75005014 01
14 BEARING COVER IAH 0815 71005013 01
15 HEX BOLT (M8 x 20LG) IAF 0817 74005015 06
16 “O” RING REAR IAF 0842 75005042 01
17 BUSHING COVER IAH 0839 71005039 01
18 THRUST WASHER IAF 0819 74005017 01
19 SPACER PLATE IAF 0820 71005018 01
20 DOWEL PIN IAF 0826 74005024 04
21 INLET FINGER VALVE IAF 0825 74005023 02
22 DISCHARGE VALVE IAF 0821 72005019 02
23 VALVE STOPPER IAF 0822 72005020 02
24 FLAT HEAD SCREW (M5) IAF 0823 74005021 04
25 NUT (M5) IAF 0824 74005022 04
26 GASKET SPACER PLATE IAF 0834 75005032 01
27 AIR HEAD GASKET IAH 0835 75005033 01
28 AIR HEAD IAR 0833 71005031 01
29 HEX. BOLT (M10) IAF 0828 74005026 06

Sykes MV150iC – Installation, Operation & Maintenance Manual
Sykes Group Pty Ltd Spare Parts & Service 24 hours: 1800 131950
Website: www.sykesgroup.com
11.4.6 Operation The following instructions should be used by the operator as a guide for the general operation of the compressor. As the operator gains experience with the compressor under actual conditions, a set routine should be established. After a general overhauling or installation of new parts, the operator should be guided by the instructions as though the compressor was new. Initial Start: Preparation When the installation of the compressor has been completed in accordance to the instructions given, carry out the following procedure before starting the machine. 1. Clean up the base from vehicle, and remove oil, dirt and dust from the exterior
of the compressor. 2. Remove the air head and clean out with safety solvent every portion of the
interior and the crankcase oil sump to ensure a clean interior, free from dust and dirt, which may have entered during shipping and installation. Never use waste or a linty cloth to clean the interior of the machine.
The running and finished parts inside the crankcase are covered with a heavy anti-rust compound previous to shipment. It is not necessary to remove this coating before starting the compressor, as it is soluble in the pump lubricating oil. 3. Fill the crankcase to the proper oil level on the oil sight glass with the
recommended grade of crankcase lubricating oil. Pour oil over all the bearings, which can be easily reached through the frame or openings. On lubricated units, fill the cylinder lubricator with the recommended grade of air cylinder lubricating oil.
4. Prime the frame lubricating oil pump. 5. On lubricated units each cylinder force feed lubricator line must be
disconnected at the point where it is attached to the oil inlet side of the check valve. The lubricator feeds must then be operated manually until all the air is forced out of the lines and oil appears. The lines should now be reconnected
IMPORTANT It is very important that the intake piping be clean and properly installed. It is
essential that this be done after installation or relocation of the compressor and
after a long shutdown or new parts installation

Sykes MV150iC – Installation, Operation & Maintenance Manual
Sykes Group Pty Ltd Spare Parts & Service 24 hours: 1800 131950
Website: www.sykesgroup.com
and the lubricator given several additional turns to assure proper lubrication of the cylinder as soon as the compressor is started. Once the compressor is started, the oil lines will remain full of oil and require no further attention.
6. Drain the air intake pipe of any moisture, which may have accumulated. Be
sure that the air intake filter if properly installed and protected. 7. Before starting a new compressor be sure you are familiar with the starting and
stopping controls, and with the regulation and regulator controlling the load and no-load operation.
8. Check the machines thoroughly to be sure there are no loose parts and that the
machine has not been tampered with since its erection. 9. The compressor lubricating oil is circulated under pressure from the vehicle
engine lubricating oil system.

Sykes MV150iC – Installation, Operation & Maintenance Manual
Sykes Group Pty Ltd Spare Parts & Service 24 hours: 1800 131950
Website: www.sykesgroup.com
11.4.7 Accessories
Inlet Air Filter The air that is drawn into a compressor should be free from dust, dirt and abrasive or gritty particles that could damage cylinders, valves & moving parts. It is the purpose of the inlet filter to remove all such particles from the ambient air, in order to safeguard the performance of the compressor and prevent what might otherwise results in high maintenance costs and needless compressor down time. Suction air filters also helps in reducing the noise level of the compressors.
Safety Valve Provided as a standard accessory on air head. Safety valve is set to open, when the maximum permissible delivery pressure of the compressor is exceeded, thus protecting compressor.
Nut Cup Inner
Filter Element Cup Housing
Washer
Lock Nut
Bottom Body
Spring
Valve Seat
Top Body Plunger
Ring

Sykes MV150iC – Installation, Operation & Maintenance Manual
Sykes Group Pty Ltd Spare Parts & Service 24 hours: 1800 131950
Website: www.sykesgroup.com
WARNING
DO NOT USE PLASTIC PIPE OR RUBBER HOSE AS DISCHARGE PIPE, AS THEY CAN RESULT IN MECHANICAL FAILURE, PROPERTY DAMAGE & SEVERE
INJURY OR DEATH
11.4.8 Piping Discharge piping is considered to be the piping between the compressor and the system. The discharge pipe should be of the full size as of the compressor outlet or larger and it should run directly to the system. The discharge should be as short and direct as possible with long radius elbows, where bends are necessary. All pipe fittings must be considered for the operating pressure. All pipe joints should be tight and having no leaks in discharge system, leaks will reduce output of the compressor. Leaks are easily located by squirting soap and water solution around all joints and watching for bubbles. Where a bare compressor is supplied, it is very important to observe the following when installing the piping between the compressor and the system.
1. Never install a shut off valve (such as a gate or globe valve) between the compressor and the system unless a safety valve is put in the piping between the valve and the compressor.
If possible, run the piping down from the compressor discharge to permit condensate to drain into the receiver. If this is not possible, install a “drain leg”. The drain leg should project down from the compressor discharge and be at least 10” long (254 mm). Put a drain valve at the end of this pipe and drain at least weekly, or as often as necessary. The compressor should be mounted where the maximum air flow will pass over it to help in ensuring that the delivered air temperature does not exceed 220˚C.

Sykes MV150iC – Installation, Operation & Maintenance Manual
Sykes Group Pty Ltd Spare Parts & Service 24 hours: 1800 131950
Website: www.sykesgroup.com
SYKES
SYKES
11.4.9 Installation Dimensions

Sykes MV150iC – Installation, Operation & Maintenance Manual
Sykes Group Pty Ltd Spare Parts & Service 24 hours: 1800 131950
Website: www.sykesgroup.com
Air Head
Valve Stopper
Cylinder/ Crankcase
Discharge Valve
Dowel
Inlet Valve
Valve Plate
11.4.10 Maintenance Maintenance Before working on or around air brake systems and components always observe the following precautions:
1) Stop the engine before working on the compressor. 2) Keep hands away from actuator push rods and slack adjusters. They
may apply as the system pressure drops. 3) Never connect or disconnect a hose or line containing air pressure. It
may whip as air escapes. 4) Never remove a component or pipe plug unless you are certain all
system pressure has been depleted. 5) Never exceed recommended air pressure.
Valve Maintenance The valves are efficient, durable, reliable and easily serviced. They are readily accessible and may be removed without disturbing piping. To clean the valves, remove the airhead bolts and take out the head and valve plate from the cylinder. Remove the valves from the valve plate and clean both the valve and valve plate by brushing with a stiff bristle brush (not wire). If necessary, use a non- flammable safety solvent to loosen dirt, oil or carbon deposits. Handle the valves with care and be careful not to dent or scratch them. While replacing a valve, make sure it will lie flat against the seating surface surrounding the valve slots; otherwise, the valve will leak, resulting in carbonization and reduced compressor output.

Sykes MV150iC – Installation, Operation & Maintenance Manual
Sykes Group Pty Ltd Spare Parts & Service 24 hours: 1800 131950
Website: www.sykesgroup.com
6) Always wear safety glasses when working with air pressure. Never look into air jets or direct them at anyone.
7) Never attempt to dismantle a component until you have read and understand recommended procedures.
8) Some units contain powerful springs and injury can result if not properly dismantled.
9) Use only the correct tools and observe all precautions pertaining to the use of these tools.
At Pump services intervals check the compressor for any leakages of water, oil, or air. If the compressor is slow to build up pressure the cylinder head and valve plate may be removed. The condition of the valve assemblies and the cylinder bores may then be checked and any excessive build up of carbon removed. Service kits of replaceable items are available on request. Basic Assembly Procedure
1) Place Bearing into the Frame. 2) Insert Crank Shaft from the opposite side of the Bearing. 3) Enclose with the Bushing Cover & Bearing Cover on both sides. 4) Insert the sub assembly of the Piston & Con-Rod on the Crank Shaft from
the Upper side of the Body. 5) For all bolts adhere to the table below.
SR. NO.
DESCRIPTION
Torque Setting
N.m Ft.lbs
Min Max Min Max
6 Con-Rod Bolts 8.1 9.5 6 7
15 Side Cover Bolt 16.3 19.0 12 14
29 Head Cover Bolt 28.5 32.6 21 24

Sykes MV150iC – Installation, Operation & Maintenance Manual
Sykes Group Pty Ltd Spare Parts & Service 24 hours: 1800 131950
Website: www.sykesgroup.com
11.4.11 Fitting Instructions – Compressor Assembly
1. Ensure all items are clean and that the hoses are free from foreign matter. 2. Do not use excessive jointing compound (eg. Stag, Neolite, Non-Adhesive
Hermatite etc) when fitting these items and ensure that it does not enter the bores. This may cause a blockage in the oil or air lines.
3. Fit gasket to the compressor position on adaptor and secure with fasteners. 4. Secure the compressor pulley to the compressor with the nut and split pin.
Remove the taperlock bush from the pump pulley then pass the pulley over the shaft. Ease the belt over the pulleys, and fit the key. Align the pulleys then refit the taperlock bush to the pump pulley and secure it to the shaft.
5. Remove and discard four cylinder head screws from the compressor and
ensure the compressed air port is located at the opposite end to fan. 6. Connect the compressed air hose between the compressor and the jet sleeve. 7. Fit the oil pipe fittings to the compressor. 8. Connect air intake fittings. 9. Secure the guard with screws. Ensure that the belt and pulleys are free to
rotate.

Sykes MV150iC – Installation, Operation & Maintenance Manual
Sykes Group Pty Ltd Spare Parts & Service 24 hours: 1800 131950
Website: www.sykesgroup.com
11.4.12 Compressor Belt Replacement Timing Belt Procedure 1. Remove pulley guard set screws and pump support nuts and draw pump
assembly away from engine flywheel housing 2. Remove old belt and taper lock bush from pump pulley. 3. Ease replacement belt over pulleys, realign pulleys and refit taper lock bush. 4. Check belt tension then refit pump unit onto engine. 5. The compressor tooth belt drive has fixed centres so no adjustment is
necessary. The normal operating air pressure is 2.75 - 4.13 bar (40-60psi). Link Belt Procedure 1 Remove pulley guard and old belt. 2 Place belt around pulleys without creating any tension. 3 Count the number of links and remove 7% (1 in 14). 4 Place belting around pump shaft and link up. 5 Fit around drive pulley and over compressor pulley rotating the drive shaft
slowly. The normal operating air pressure is 2.75 -

Sykes MV150iC – Installation, Operation & Maintenance Manual
Sykes Group Pty Ltd Spare Parts & Service 24 hours: 1800 131950
Website: www.sykesgroup.com
12 Pump Diagnostics 12.1 Trouble Shooting Guide
Pump System Problems Likely Cause
Pump Does Not Prime
- Suction lift too great - Inlet of suction pipe insufficiently
submerged - Suction inlet or strainer blocked - Excessive amount of air or gas in liquid - Viscosity and / or S.G. of liquid being
pumped too high - Suction line not air tight - Suction hose collapsed - Non return valve ball not seating - Mechanical seal / Packing drawing air
into pump - Pump’s priming system blocked or badly
worn - Separation tank cover blocked - Pump’s priming hose leaking air - Pump’s priming system not delivering
sufficient air - Pump’s priming system belt drive faulty
Not Enough Liquid
- Incorrect engine speed - Discharge head too high - Suction lift too great - Suction inlet or strainer blocked - Suction line not air tight - Suction hose collapsed - Mechanical seal drawing air into pump - Obstruction in pump casing / impeller - Impeller excessively worn - Delivery hose punctured or blocked - Pump not primed - Air pockets in suction line - Inlet of suction pipe insufficiently
submerged - Excessive amount of air or gas in liquid

Sykes MV150iC – Installation, Operation & Maintenance Manual
Sykes Group Pty Ltd Spare Parts & Service 24 hours: 1800 131950
Website: www.sykesgroup.com
Pump System Problems Likely Cause
Not Enough Pressure
- Speed too low - Excessive amount of air or gas in liquid - Incorrect direction of rotation - Viscosity and / or S.G. of liquid being
pumped too high - Impeller Damaged - Impeller out of balance
Pump Ceases to Deliver
Liquid After a Time - Suction lift too great - Insufficient water at suction inlet - Suction inlet or strainer blocked - Suction hose collapsed - Excessive air leak in suction line - Mechanical seal / Packing drawing air
into pump - Obstruction in pump casing / impeller - Delivery hose punctured or blocked
Pump Takes Excessive
Power - Engine speed too high - Obstruction between impeller and casing - Viscosity and / or SG of liquid being
pumped too high - Incorrect direction of rotation - Misalignment - Shaft bent
Pump Leaking at
Mechanical Seal Housing
- Mechanical seal damaged or worn
Pump Bearings Have Short Life
- Obstruction in pump casing / impeller - Impeller out of balance - Shaft bent - Shaft running of centre because of worn
bearings or misalignment - Misalignment - Bearings worn - Excessive thrust caused by mechanical
failure inside pump - Lack of bearing lubrication - Incorrect assembly of stacked bearings,
i.e. angular contact ball bearings fitted front-to-front instead of back-to-back
- Dirt in bearings - Rusting of bearings from water in
housing

Sykes MV150iC – Installation, Operation & Maintenance Manual
Sykes Group Pty Ltd Spare Parts & Service 24 hours: 1800 131950
Website: www.sykesgroup.com
Pump System Problems Likely Cause
Pump Vibrating or
Overheating
- Engine speed too high - Obstruction in pump casing / impeller - Impeller damaged - Cavitation due to excessive suction lift - Impeller out of balance - Shaft bent - Shaft running of centre because of worn
bearings or misalignment - Misalignment - Bearings worn - Pump not primed - Pump or suction pipe not completely
filled with water - Inlet of suction pipe insufficiently
submerged - Suction or discharge re-circulation in
volute - Excessive thrust caused by mechanical
failure inside pump - Lack of bearing lubrication - Incorrect assembly of stacked bearings,
i.e. angular contact ball bearings fitted front-to-front instead of back-to-back
- Dirt in bearings - Rusting of bearings from water in
housing

Sykes MV150iC – Installation, Operation & Maintenance Manual
Sykes Group Pty Ltd Spare Parts & Service 24 hours: 1800 131950
Website: www.sykesgroup.com
13 PUMP UNIT SUB-ASSEMBLY H Volute & Front Cover Separation Tank MA Bearing Bracket EP Ejector Pack V Non Return Ball Valve AC Compressor Assembly
Figure 2 - Typical MV150i Pumpend
H
AC V
EP
BB
Sykes MV150iC – Installation, Operation & Maintenance Manual
Sykes Group Pty Ltd Spare Parts & Service 24 hours: 1800 131950
Website: www.sykesgroup.com
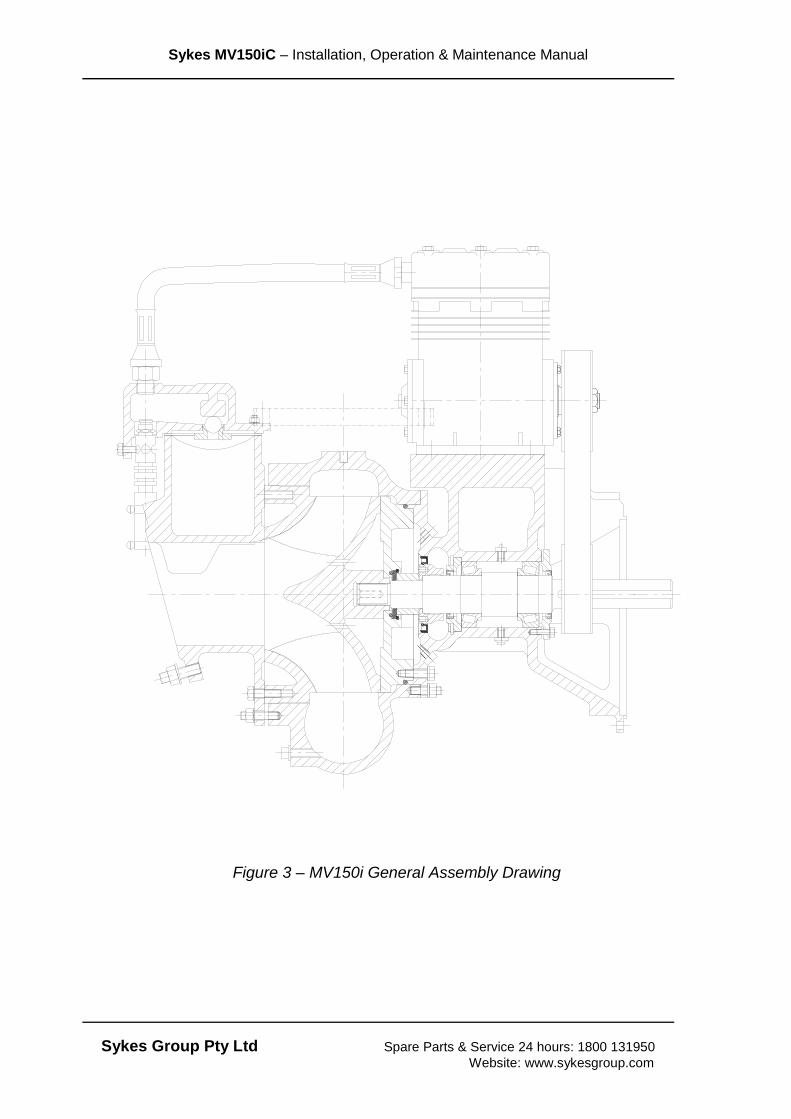
Figure 3 – MV150i General Assembly Drawing
Sykes MV150iC – Installation, Operation & Maintenance Manual
Sykes Group Pty Ltd Spare Parts & Service 24 hours: 1800 131950
Website: www.sykesgroup.com
14 PARTS LIST 14.1 Recommended MV150i Pump Spare Parts Description Part Number Quantity Impeller CP150I-316-C-255MM 1 Front Wear Plate CP150FWP-316 1 Rear Wear Plate 12-0284-0115 1 ‘O’ Ring (Seat) 38-0700-4112 1 Joint 38-1034-5413 2 Joint 38-1034-5423 2 Joint 38-1034-5443 2 Sealing Washer SS 38-0785-4412 8 ‘O’ Ring (Sealing Washer SS) 38-0787-4112V 8 Mechanical Seal 38-0400-VS2S2/SS 1 Impeller Shim 36-0646-8913 3 Impeller Shim 36-0646-8923 3 Impeller Shim 36-0646-8933 3 ‘O’ Ring (Rear Wear Plate) 38-1004-4112 1 Circlip (Seat) 41-0230-8712 1 Belt (Compressor) 26-0840-9912 1 Gasket (Compressor) KX2542/1 1

Sykes MV150iC – Installation, Operation & Maintenance Manual
Sykes Group Pty Ltd Spare Parts & Service 24 hours: 1800 131950
Website: www.sykesgroup.com
14.2 Front Cover and Volute Parts List

Sykes MV150iC – Installation, Operation & Maintenance Manual
Sykes Group Pty Ltd Spare Parts & Service 24 hours: 1800 131950
Website: www.sykesgroup.com

Sykes MV150iC – Installation, Operation & Maintenance Manual
Sykes Group Pty Ltd Spare Parts & Service 24 hours: 1800 131950
Website: www.sykesgroup.com
FRONT COVER AND VOLUTE PARTS LIST
Illustration number
Description Part Number Quantity
H1 Volute (Pump Body) CP150V-SGI 1
H3 Impeller CP150I-316-C-255MM 1
H4 Front Cover & Separation Tank 11-0259-0115 1
H5 Wearplate (Front) CP150FWP-316 1
H6 O-Ring Sealing Washer M12 38-0785-4412 8
O-Ring OR11x3 Viton 38-0787-4112V 8
H7 Stud M12 x 50 4
H9a Joint (Body) 38-1034-5413 A/R
H9b Joint (Body) 38-1034-5423 A/R
H9c Joint (Body) 38-1034-5443 2
H10 Stud (Body) M12 x 60 6
H11 Stud M12 x 45 4
H12 Wearplate (Rear) 12-0284-0115 1
H13 O-ring (Wearplate) 38-1004-4112 1
H15 O-ring (Seat) 38-0700-4112 1
H16 Circlip (Seat) 41-0230-8712 1
H18 Mechanical Seal 38-0400-VS2S2/SS 1
H20 Shaft Collar 28-0255-3215 1
H21 O-ring (Collar) 38-1036-4112 1
H22 Tolerance Ring 41-0241-6112 1
H24a Impeller Shim 0.25mm 36-0646-8913 A/R
H24b Impeller Shim 0.5mm 36-0646-8923 A/R
H24c Impeller Shim 1.0mm 36-0646-8933 A/R
H28 Skt Hd Capscrew 4
H29 Flat Washer M8 4
H30 N/A
H31 Separation Tank Cover 21-0230-7915 1
H33 Filter (Separation Tank) 23-0586-9923 1
H36 Setscrew M10 x 20 1
H37 Lockwasher M10 1
H44 Stud (Pump/Adaptor) M12 x 45 4
H45 Stud (Pump/Adaptor) M12 x 55 2
H47 Lockwasher M12 12
H48 Nut M12 12
H51 Stud (Flange) M16 x 60 8
H52 Lockwasher M16 8
H53 Nut M16 8
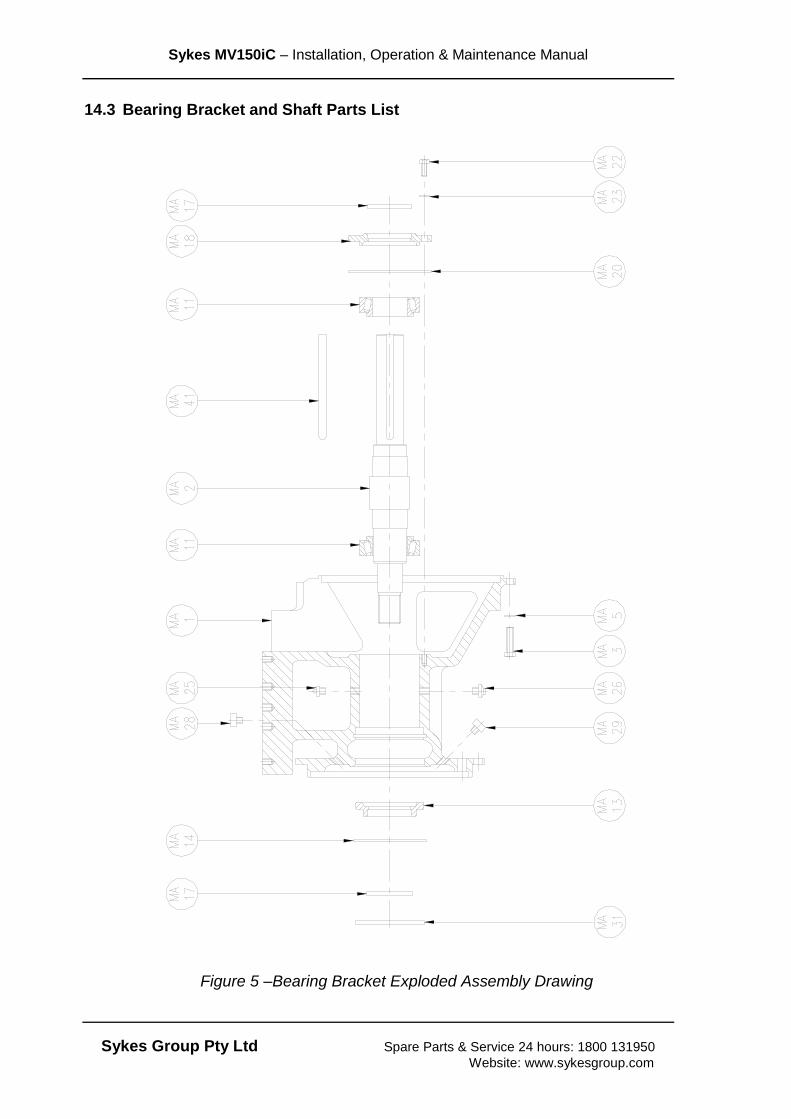
Sykes MV150iC – Installation, Operation & Maintenance Manual
Sykes Group Pty Ltd Spare Parts & Service 24 hours: 1800 131950
Website: www.sykesgroup.com
14.3 Bearing Bracket and Shaft Parts List
Figure 5 –Bearing Bracket Exploded Assembly Drawing

Sykes MV150iC – Installation, Operation & Maintenance Manual
Sykes Group Pty Ltd Spare Parts & Service 24 hours: 1800 131950
Website: www.sykesgroup.com
BEARING BRACKET & SHAFT PARTS LIST
Illustration Number
Description Part Number Quantity
MA1 Engine Adaptor 13-0174-0215 1
MA2 Shaft (* see note below) 16-0400-8011-R4R 1
MA3 Setscrew M10 x 30 9
MA5 Lockwasher 10mm 9
MA11 Taper Roller Bearing 39-0069-9912 2
MA13 Bearing Cover (Front) 13-0172-0915 1
MA14 Circlip 41-0232-8712 1
MA17 Spiroseal 38-0809-4112 2
MA18 Bearing Cover (Rear) 13-0173-0115 1
MA20 Shim (Bearing Cover) 36-0650-9903 A/R
MA20a Shim (Bearing Cover) 36-0650-9913 A/R
MA20b Shim (Bearing Cover) 36-0650-9923 A/R
MA20c Shim (Bearing Cover) 36-0650-9933 A/R
MA20d Shim (Bearing Cover) 36-0650-9943 A/R
MA22 Setscrew M8 x 25 3
MA23 Lockwasher 8mm 3
MA25 Grease Nipple 51-0003-8112 1
MA26 Relief Valve 51-0010-2012 1
MA28 Plug 3/8" BSP 43-1048-4515 1
MA29 Plug 3/8" BSP 1
MA31 Spiroseal 38-1033-4112 1
MA41 Key 1
* Note: When ordering Shaft state pump engine type so correct type of shaft length can be supplied.

Sykes MV150iC – Installation, Operation & Maintenance Manual
Sykes Group Pty Ltd Spare Parts & Service 24 hours: 1800 131950
Website: www.sykesgroup.com
14.4 Ejector Package Parts List
Figure 6 – Ejector Package Exploded Assembly Drawing
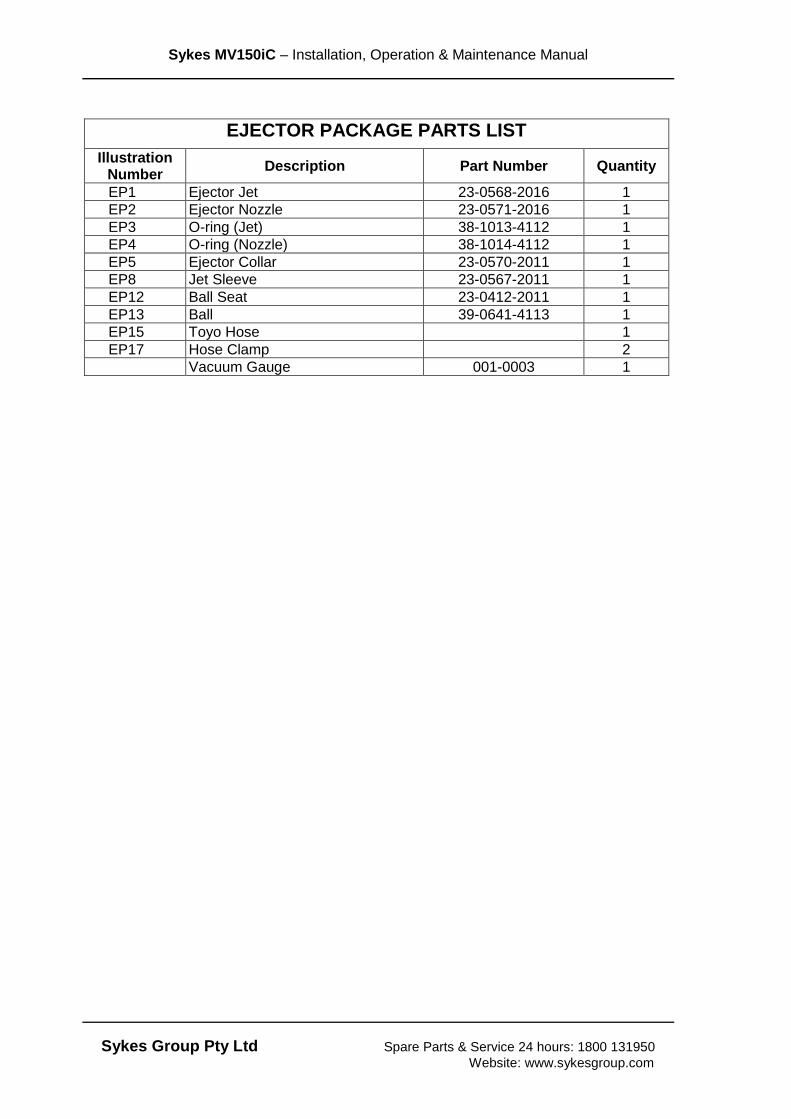
Sykes MV150iC – Installation, Operation & Maintenance Manual
Sykes Group Pty Ltd Spare Parts & Service 24 hours: 1800 131950
Website: www.sykesgroup.com
EJECTOR PACKAGE PARTS LIST
Illustration Number
Description Part Number Quantity
EP1 Ejector Jet 23-0568-2016 1
EP2 Ejector Nozzle 23-0571-2016 1
EP3 O-ring (Jet) 38-1013-4112 1
EP4 O-ring (Nozzle) 38-1014-4112 1
EP5 Ejector Collar 23-0570-2011 1
EP8 Jet Sleeve 23-0567-2011 1
EP12 Ball Seat 23-0412-2011 1
EP13 Ball 39-0641-4113 1
EP15 Toyo Hose 1
EP17 Hose Clamp 2
Vacuum Gauge 001-0003 1
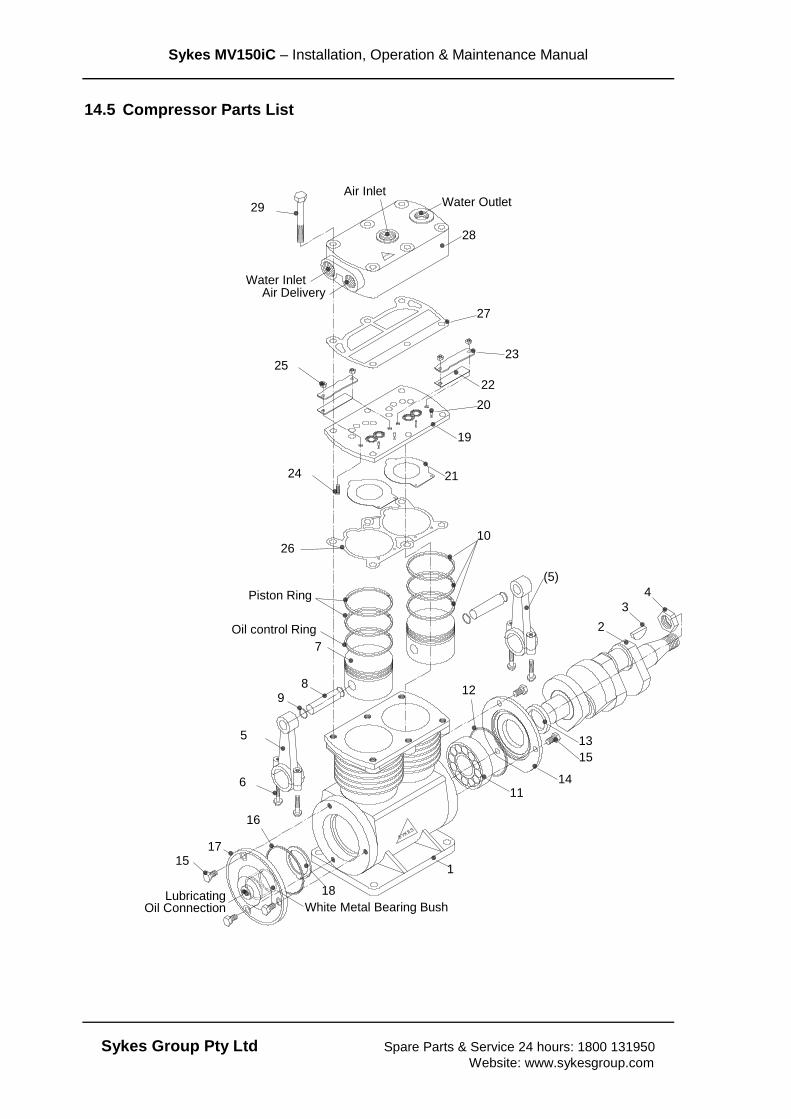
Sykes MV150iC – Installation, Operation & Maintenance Manual
Sykes Group Pty Ltd Spare Parts & Service 24 hours: 1800 131950
Website: www.sykesgroup.com
14.5 Compressor Parts List
SYKES
S YK ES
1
11
13
2
Water OutletAir Inlet
Air Delivery
28
18
White Metal Bearing BushLubricating
17
5
98
7
Oil control Ring
Piston Ring
21
19
22
Water Inlet
14
3
4
(5)
6
10
12
15
15
16
20
23
24
25
26
27
29
SECTION - 3
Internal Detail of
2SC15 Compressor
Oil Connection

Sykes MV150iC – Installation, Operation & Maintenance Manual
Sykes Group Pty Ltd Spare Parts & Service 24 hours: 1800 131950
Website: www.sykesgroup.com
SR. NO. DESCRIPTION PART NO. CCN NO. QTY
1 CYLINDER/CRANKCASE IAR 0803 71005001 01
2 CRANK SHAFT IAH 0804 71005002 01
3 CRANK SHAFT KEY IAF 0832 74005030 01
4 CRANK SHAFT NUT IAF 0830 74005028 01
5 CONNECTING ROD IAH 0805 71005003 02
6 ALEN CAP SCREW (M6 x 32LG) IAF 0806 74005004 04
7 PISTON (STD) IAH 0807 71005005 02
8 PISTON PIN IAF 0808 71005006 02
9 PISTON PIN LOCK RING IAF 0809 74005007 04
10 PISTON RING SET IAF 0843 71005043 02 SET
11 BEARING IAF 0814 74005012 01
12 “O” RING (FRONT) IAF 0827 75005025 01
13 OIL SEAL IAF 0816 75005014 01
14 BEARING COVER IAH 0815 71005013 01
15 HEX BOLT (M8 x 20LG) IAF 0817 74005015 06
16 “O” RING REAR IAF 0842 75005042 01
17 BUSHING COVER IAH 0839 71005039 01
18 THRUST WASHER IAF 0819 74005017 01
19 SPACER PLATE IAF 0820 71005018 01
20 DOWEL PIN IAF 0826 74005024 04
21 INLET FINGER VALVE IAF 0825 74005023 02
22 DISCHARGE VALVE IAF 0821 72005019 02
23 VALVE STOPPER IAF 0822 72005020 02
24 FLAT HEAD SCREW (M5) IAF 0823 74005021 04
25 NUT (M5) IAF 0824 74005022 04
26 GASKET SPACER PLATE IAF 0834 75005032 01
27 AIR HEAD GASKET IAH 0835 75005033 01
28 AIR HEAD IAR 0833 71005031 01
29 HEX. BOLT (M10) IAF 0828 74005026 06

Sykes MV150iC – Installation, Operation & Maintenance Manual
Sykes Group Pty Ltd Spare Parts & Service 24 hours: 1800 131950
Website: www.sykesgroup.com

Sykes MV150iC – Installation, Operation & Maintenance Manual
Sykes Group Pty Ltd Spare Parts & Service 24 hours: 1800 131950
Website: www.sykesgroup.com
COMPRESSOR PARTS LIST
Illustration Number
Description Part Number Quantity
AC1 Compressor (Bendix) 49-0523-9915 1
AC2 Gasket KX2542/1 1
AC3 Stud M10 x 40 4
AC4 Springwasher M10 4
AC5 Pump Pulley c/w TLB 26-0851-9912 1
AC6 Compressor Pulley 26-0724-0243 1
AC7 Belt 38wide x 78 teeth (1/2” Heavy Pitch) 26-0840-9912 1
AC8 Fan Washer 36-0556-8111 1
AC9 Relief Valve 10-0000-0004 1
AC10 Air Cleaner 54-0556-9912 1
AC11 Adaptor (Air Cleaner) A1212 1
AC13 Compressed Air Hose 42-0000-0004 1
AC14 Nipple ¾” BSP x ½” BSP N1208H 1
AC15 Pulley/Belt Guard 27-2800-1000 1

Sykes MV150iC – Installation, Operation & Maintenance Manual
Sykes Group Pty Ltd Spare Parts & Service 24 hours: 1800 131950
Website: www.sykesgroup.com
14.6 Reflux Box Non Return Valve Parts List
Figure 8 – Reflux Box Non Return Valve Exploded Assembly Drawing

Sykes MV150iC – Installation, Operation & Maintenance Manual
Sykes Group Pty Ltd Spare Parts & Service 24 hours: 1800 131950
Website: www.sykesgroup.com
REFLUX BOX NON RETURN VALVE PARTS LIST
Illustration Number
Description Part Number Quantity
REFLUX BOX COMPLETE 356-6000
V1 Reflux Box 356-4061 1
V2 Stud M16 x 65 8
V3 Nut M16 8
V4 Stud M20 x 70 4
V5 Flat Washer M20 4
V6 Nut M20 4
V7 Reflux Box Discharge (Optional) 356-4064 1
V8 O-Ring 356-4153 1
V9 Reflux Box Seat 356-4063 1
V10 Reflux Box Ball 313-4169 1
V11 Drain Cock 920-9242 1
V12 Joint 500-4051 1
V13 6" T.E Blank Flange FB150TE 1
V14 Nut M16 8
V15 Washer M16 8
V16 Bolt M20 X 70 8

Sykes MV150iC – Installation, Operation & Maintenance Manual
Sykes Group Pty Ltd Spare Parts & Service 24 hours: 1800 131950
Website: www.sykesgroup.com
14.7 Engine Coupling Parts List
ENGINE / PUMP COUPLING PARTS LIST Illustration
Number Description Part Number Quantity
Complete Coupling Assembly CM-240-50-10-42 1
DR1 Flywheel Flange CM-0240-FL1-10 1
DR2 Coupling Rubber Element CM-0240-EL-50 1
DR3 Hub (to suit 42mm shaft) CM-0240-H-SB1-42 1
DR4 Bolt Set to suit Hub CM-0240-BS 1
Figure 9– Engine / Pump Coupling Drawing
DR2
DR3
DR1
DR4

Sykes MV150iC – Installation, Operation & Maintenance Manual
Sykes Group Pty Ltd Spare Parts & Service 24 hours: 1800 131950
Website: www.sykesgroup.com
14.8 Chassis & Accessories
Figure 10 – Chassis Exploded Assembly Drawing

Sykes MV150iC – Installation, Operation & Maintenance Manual
Sykes Group Pty Ltd Spare Parts & Service 24 hours: 1800 131950
Website: www.sykesgroup.com
CHASSIS & ACCESSORIES PARTS LIST
Illustration Number
Description Part Number Quantity
1 MV Chassis MV-1000 1
2 Pump-End Support MV-1020 1
3 MV - Lifting Frame MV-1200 1
4 Control Box 1
5 MV - Sticky Back Rubber MV-2005 1
6 GALVABOND SHEET 50 x 3 MV-2006 1
7 MV -Fuel Line Pickup MV-2004 1
8 2" BSP Pipe Cap - Gal Mal c/w Breather
C50NB 1
9 Plug BSP GAL/MAL 1 1/2" P24 1
10 Plug BSPT Black 3/4" P12 1
11 80L Fuel Tank MV-2001 1
12 MV - Rubber Insert for Fuel Tank MV-2003 3
13 Magna Bulbs 6.5mmx1/4" MV-2007 4
14 GALVABOND Sheet 320 x 3 MV-2002 1
15 Battery Box 340-8002 1
16 Bolt (M12x55) 1
17 Nut (M12) 5
18 Washer (M12) 6
19 Bolt (M12x65) 1
20 Bolt (M20x55) 6
21 Washer (M20) 6
22 Nut (M20) 6

Sykes MV150iC – Installation, Operation & Maintenance Manual
Sykes Group Pty Ltd Spare Parts & Service 24 hours: 1800 131950
Website: www.sykesgroup.com
15 PUMP UNIT ACCESSORIES Your MV150iC Olympic pumpset has been mounted on a robust custom built
skid chassis and comes complete with extras include.
Description Part /Drawing Number
1
2
3
4
5
6
7
8
9
10
11
12
13
14
15
16
17
For further information please refer to the manufacturer's Operation and Maintenance Manuals.

Sykes MV150iC – Installation, Operation & Maintenance Manual
Sykes Group Pty Ltd Spare Parts & Service 24 hours: 1800 131950
Website: www.sykesgroup.com
16 DIESEL ENGINE MANUAL Your MV150iC Olympic pumpend is driven by a Deutz F3L912 Diesel Engine
and comes complete with the following.
Description Part/Drawing Number
1
2
3
4
5
For further information please refer to the manufacturer's Operation and Maintenance Manuals.

Sykes MV150iC – Installation, Operation & Maintenance Manual
Sykes Group Pty Ltd Spare Parts & Service 24 hours: 1800 131950
Website: www.sykesgroup.com
17 ELECTRIC MOTOR MANUAL
N/A
Description Part Number
1
2
3
4
5
For further information please refer to the manufacturer's Operation and Maintenance Manuals.

Sykes MV150iC – Installation, Operation & Maintenance Manual
Sykes Group Pty Ltd Spare Parts & Service 24 hours: 1800 131950
Website: www.sykesgroup.com
18 WARRANTY CLAIM PROCEDURE
SYKES WARRANTY POLICY
Sykes Group warrants all manufactured product against faulty workmanship or material for a period of 12 months from the invoice date. Lip seals, “O” rings and other “rubber” components which age/degrade naturally over time may not be covered by Sykes warranty if the failure is a result of this natural aging/degrading Subject to material inspection and completion of correct warranty claim forms, Sykes Group will re-supply faulty parts for claims arising from faulty workmanship or materials. Sykes warranty does not cover any consequential losses due to product failure. Sykes Warranty Notification Procedure; 1. Upon determining a failure, the end user will advise the Sykes Group
representative of the failure and the cause. 2. A decision will be made as to if a serviceman is sent to site or the unit is
returned to Sykes. 3. Freight is to be covered by the customer and a nil value order number raised to
cover any non-warranty issues. 4. The end user will then be required to complete a Sykes Group warranty claim
form, with all relevant information completed. (See attachment A and B). 5. Digital photos, if applicable, will be taken and attached to the warranty claim
form, to document failure and allow for a clearer interpretation of the failure. 6. Upon receiving the warranty claim form and relevant documentation Sykes will
review the cause of failure, and advise the end user of the status within a reasonable time period.
Warranty claim processing procedure: 1. The After Sales Service Manager will be the Primary Contact between the end
user and Sykes Group for all matters, relating to warranty. 2. All correspondence will be done by or backed up with e-mail, so as to create
easy tracking, Sykes claim form part A) and B) where applicable are to be completed and forwarded as an attachment to the relevant person.
3. The local Sykes Representative will be copied in on any warranty correspondence in there region.

Sykes MV150iC – Installation, Operation & Maintenance Manual
Sykes Group Pty Ltd Spare Parts & Service 24 hours: 1800 131950
Website: www.sykesgroup.com
Customer Date Report No.
Name Date Purchased Date of Failure
Pump Description Serial Number Time Operated Hrs
Description of Failure
Failed Parts.
Part No. Description Qty
Please use Sykes partnumbers
Witnessed by Sykes Representative
This section to be completed by Sykes
Y/N
Ship to Sykes Group 42 Munibung Rd, Cardiff NSW 2285
Retain for inspection by area representative or agent
To be scrapped
To be repaired on site by Sykes
Decision
Decision pending upon inspection of defective parts
Claim Approved Y/N Name Date
Total Costs Amount A$ Comments
Type of Cost
Parts Used
Other
TOTAL
Warranty Claim Form Part A

Sykes MV150iC – Installation, Operation & Maintenance Manual
Sykes Group Pty Ltd Spare Parts & Service 24 hours: 1800 131950
Website: www.sykesgroup.com
Warranty/Failure Report No.
Eg.
Warranty Claim Form Part B
DISCHARGE HOSE
I.D. TYPE LENGTH
SUCTION HOSE
I.D. TYPE LENGTH
LIQUID PUMPED
S.G. Ph TEMP
STATIC DISCHARGE HEAD (Hd)
DISCHARGE GAUGE
READING
STATIC SUCTION LIFT (HS)
SUCTION GAUGE
READING
STRAINER
Y/N?
PUMP OPERATING RPM
SUCTION RESTRICTIONS DISCHARGE RESTRICTIONS
TYPE TYPE QTYQTY
ELBOW 2 1BUTT/W

Sykes MV150iC – Installation, Operation & Maintenance Manual
Sykes Group Pty Ltd Spare Parts & Service 24 hours: 1800 131950
Website: www.sykesgroup.com
19 MISCELLANEOUS ENGINEERING INFORMATION 19.1 Main Factors Affecting Pump Suction Lift Pump’s Suction Lift / NPSHR curve capabilities can be influenced by various factors in particular altitude (refer to Table 1 – Effect of Altitude on Available Suction Lift) and temperature of fluid being pumped (refer to Table 2 – Effect of Temperature on Available Suction Lift). Sykes manufacture automatic self priming pumps where the available suction lift plays a critical part in the pump dynamic system. Therefore, any increase in fluid temperature or altitude will adversely affect the available suction lift. The higher the temperature or altitude the greater the adverse affect on the available suction lift. In addition, higher temperature will introduce thermal expansion of pump parts and reduce internal pump clearances. Pump o-rings, gaskets and associated parts are rated as listed; Viton Min -40 oC Max 176 oC Buna N Min -4.4 oC Max 121 oC Polyurethane Min -4.4 oC Max 93.3 oC Teadit NA-1002 Min -29 oC Max 260 oC (Gasket Material) Sykes recommend contacting Sykes Engineering Department with high fluid temperature (> 60 oC), altitude or any different applications to ensure the pump is correctly rated / set up.
Please note that Sykes Pump’s Suction Lift / Net Positive Suction Lift Required (NPSHR) curves as published are based on standard clean water at
15o C.

Sykes MV150iC – Installation, Operation & Maintenance Manual
Sykes Group Pty Ltd Spare Parts & Service 24 hours: 1800 131950
Website: www.sykesgroup.com
The below table show the effect of altitude on the Pump’s Suction Lift / NPSHR curve capabilities;
Altitude In basic terms, the higher the altitude the less atmospheric pressure resulting in a reduction of pressure differential between atmosphere and vacuum created in Sykes self priming system resulting in a reduction of available suction lift.
Altitude Reduction in Suction Lift
(m) (m)
0 0
250 0.30
500 0.60
750 0.89
1000 1.16
1250 1.44
1500 1.71
1750 1.97
2000 2.22
2250 2.47
2500 2.71
2750 2.95
3000 3.18
3250 3.40
3500 3.62
(International Standard Atmosphere)
Table 1 – Effect of Altitude on Available Suction Lift

Sykes MV150iC – Installation, Operation & Maintenance Manual
Sykes Group Pty Ltd Spare Parts & Service 24 hours: 1800 131950
Website: www.sykesgroup.com
The below table show the effect of temperature on the Pump’s Suction Lift / NPSHR curve capabilities; Temperature In basic terms, the higher the water temperature the greater the reduction in suction lift due to changing water vapour pressure and density.
Temperature Reduction in Suction Lift
(oC) (m)
15 0
20 0.06
30 0.22
40 0.52
50 0.98
55 1.32
60 1.73
65 2.23
70 2.85
75 3.60
80 4.51
85 5.59
90 6.88
95 8.39
100 10.18
(For Water Relative to 15oC)
Table 2 - Effect of Temperature on Available Suction Lift

Sykes MV150iC – Installation, Operation & Maintenance Manual
Sykes Group Pty Ltd Spare Parts & Service 24 hours: 1800 131950
Website: www.sykesgroup.com
19.2 Pump Suction Pipe Velocity Achieving correct suction pipe velocity is a significant part in obtaining satisfactory suction lift. Any increase of velocity (i.e. increase in flow) will result in greater friction losses and adversely affect the available suction lift. Sykes manufacture automatic self priming pumps where the available suction lift plays a critical part in the pump dynamic system and therefore it is essential to take suction pipe velocity into consideration. Sykes recommend the maximum suction pipe velocity is 4 m/s. This velocity is on the high side when comparing to other published recommended figures but Sykes supply, in most instances, mobile dewatering equipment. To achieve lower velocities would result in large hoses that would be difficult and impractical to transport or install. For Example A standard CP150i pump 108 l/sec – BEP at 1800 rpm: 150mm ID Pipe = 6.34 m/s 200mm ID Pipe = 3.57 m/s 250mm ID Pipe = 2.28 m/s In this example it is recommended to use 200mm ID pipe to ensure satisfactory suction lift performance. Please note that the suction pipe velocity is an important part of the suction lift set up but other factors also affect suction lift such as static suction lift, elbows, valves, pipe internal roughness etc. All these factors combined determine the available suction lift of the pump. Please refer to enclosed tables for recommended pipe ID by pump type (refer to Table 1) and a generic flow versus pipe diameter chart (refer to Table 2).

Sykes MV150iC – Installation, Operation & Maintenance Manual
Sykes Group Pty Ltd Spare Parts & Service 24 hours: 1800 131950
Website: www.sykesgroup.com
Suction Hose or Pipe Internal Dimension (ID) (mm)
Pump Type
80 100 150 200 250 300 350 400
CP80i 18 32 40*
CP100i 32 67*
CP150i 70 125 173*
CP220i 125 195 218*
CP300i 280 380 444*
MH300 280 340*
HH80 18 30*
HH125 57*
HH150 125 163*
HH160i 125 185*
HH220i 125 195 280*
XH80 18 28*
XH100 70 82*
XH150 125 150*
Table 1 – Recommended Pipe ID vs Flow Rates by Pump Type Matrix Unit of Measure of Flow = litres / second * = Maximum flow for pump type
Recommendation based on maximum velocity = 4 m/s
Suction pipe is based on Inside Diameter (ID) For high static suction lifts oversized suction pipe / hose may be required even
at lower flow rates
This information this should be read in conjuction with the pump curve for reference to the pump’s recommended operating flow rates

Sykes MV150iC – Installation, Operation & Maintenance Manual
Sykes Group Pty Ltd Spare Parts & Service 24 hours: 1800 131950
Website: www.sykesgroup.com
FLOW 2" 3" 4" 5" 6" 8" 10" 12" 14" 16" 18" 20"
(L/sec) 50 75 100 125 150 200 250 300 350 400 450 500
2 1.02 0.45 0.25 0.16 0.11 0.06 0.04 0.03 0.02 0.02 0.01 0.01
4 2.04 0.91 0.51 0.33 0.23 0.13 0.08 0.06 0.04 0.03 0.03 0.02
6 3.06 1.36 0.76 0.49 0.34 0.19 0.12 0.08 0.06 0.05 0.04 0.03
8 4.07 1.81 1.02 0.65 0.45 0.25 0.16 0.11 0.08 0.06 0.05 0.04
10 5.09 2.26 1.27 0.81 0.57 0.32 0.20 0.14 0.10 0.08 0.06 0.05
12 6.11 2.72 1.53 0.98 0.68 0.38 0.24 0.17 0.12 0.10 0.08 0.06
14 7.13 3.17 1.78 1.14 0.79 0.45 0.29 0.20 0.15 0.11 0.09 0.07
16 8.15 3.62 2.04 1.30 0.91 0.51 0.33 0.23 0.17 0.13 0.10 0.08
18 9.17 4.07 2.29 1.47 1.02 0.57 0.37 0.25 0.19 0.14 0.11 0.09
20 10.19 4.53 2.55 1.63 1.13 0.64 0.41 0.28 0.21 0.16 0.13 0.10
25 12.73 5.66 3.18 2.04 1.41 0.80 0.51 0.35 0.26 0.20 0.16 0.13
30 15.28 6.79 3.82 2.44 1.70 0.95 0.61 0.42 0.31 0.24 0.19 0.15
40 20.37 9.05 5.09 3.26 2.26 1.27 0.81 0.57 0.42 0.32 0.25 0.20
50 25.46 11.32 6.37 4.07 2.83 1.59 1.02 0.71 0.52 0.40 0.31 0.25
60 30.56 13.58 7.64 4.89 3.40 1.91 1.22 0.85 0.62 0.48 0.38 0.31
70 35.65 15.84 8.91 5.70 3.96 2.23 1.43 0.99 0.73 0.56 0.44 0.36
80 40.74 18.11 10.19 6.52 4.53 2.55 1.63 1.13 0.83 0.64 0.50 0.41
90 45.84 20.37 11.46 7.33 5.09 2.86 1.83 1.27 0.94 0.72 0.57 0.46
100 50.93 22.64 12.73 8.15 5.66 3.18 2.04 1.41 1.04 0.80 0.63 0.51
112 57.04 25.35 14.26 9.13 6.34 3.57 2.28 1.58 1.16 0.89 0.70 0.57
120 61.12 27.16 15.28 9.78 6.79 3.82 2.44 1.70 1.25 0.95 0.75 0.61
130 66.21 29.43 16.55 10.59 7.36 4.14 2.65 1.84 1.35 1.03 0.82 0.66
140 71.30 31.69 17.83 11.41 7.92 4.46 2.85 1.98 1.46 1.11 0.88 0.71
150 76.39 33.95 19.10 12.22 8.49 4.77 3.06 2.12 1.56 1.19 0.94 0.76
160 81.49 36.22 20.37 13.04 9.05 5.09 3.26 2.26 1.66 1.27 1.01 0.81
170 86.58 38.48 21.65 13.85 9.62 5.41 3.46 2.41 1.77 1.35 1.07 0.87
180 91.67 40.74 22.92 14.67 10.19 5.73 3.67 2.55 1.87 1.43 1.13 0.92
190 96.77 43.01 24.19 15.48 10.75 6.05 3.87 2.69 1.97 1.51 1.19 0.97
200 101.86 45.27 25.46 16.30 11.32 6.37 4.07 2.83 2.08 1.59 1.26 1.02
210 106.95 47.53 26.74 17.11 11.88 6.68 4.28 2.97 2.18 1.67 1.32 1.07
220 112.05 49.80 28.01 17.93 12.45 7.00 4.48 3.11 2.29 1.75 1.38 1.12
230 117.14 52.06 29.28 18.74 13.02 7.32 4.69 3.25 2.39 1.83 1.45 1.17
240 122.23 54.32 30.56 19.56 13.58 7.64 4.89 3.40 2.49 1.91 1.51 1.22
250 127.32 56.59 31.83 20.37 14.15 7.96 5.09 3.54 2.60 1.99 1.57 1.27
260 132.42 58.85 33.10 21.19 14.71 8.28 5.30 3.68 2.70 2.07 1.63 1.32
270 137.51 61.12 34.38 22.00 15.28 8.59 5.50 3.82 2.81 2.15 1.70 1.38
280 142.60 63.38 35.65 22.82 15.84 8.91 5.70 3.96 2.91 2.23 1.76 1.43
290 147.70 65.64 36.92 23.63 16.41 9.23 5.91 4.10 3.01 2.31 1.82 1.48
300 152.79 67.91 38.20 24.45 16.98 9.55 6.11 4.24 3.12 2.39 1.89 1.53
310 157.88 70.17 39.47 25.26 17.54 9.87 6.32 4.39 3.22 2.47 1.95 1.58
320 162.97 72.43 40.74 26.08 18.11 10.19 6.52 4.53 3.33 2.55 2.01 1.63
330 168.07 74.70 42.02 26.89 18.67 10.50 6.72 4.67 3.43 2.63 2.07 1.68
340 173.16 76.96 43.29 27.71 19.24 10.82 6.93 4.81 3.53 2.71 2.14 1.73
350 178.25 79.22 44.56 28.52 19.81 11.14 7.13 4.95 3.64 2.79 2.20 1.78
360 183.35 81.49 45.84 29.34 20.37 11.46 7.33 5.09 3.74 2.86 2.26 1.83
370 188.44 83.75 47.11 30.15 20.94 11.78 7.54 5.23 3.85 2.94 2.33 1.88
380 193.53 86.01 48.38 30.97 21.50 12.10 7.74 5.38 3.95 3.02 2.39 1.94
390 198.63 88.28 49.66 31.78 22.07 12.41 7.95 5.52 4.05 3.10 2.45 1.99
400 203.72 90.54 50.93 32.59 22.64 12.73 8.15 5.66 4.16 3.18 2.52 2.04
410 208.81 92.81 52.20 33.41 23.20 13.05 8.35 5.80 4.26 3.26 2.58 2.09
420 213.90 95.07 53.48 34.22 23.77 13.37 8.56 5.94 4.37 3.34 2.64 2.14
430 219.00 97.33 54.75 35.04 24.33 13.69 8.76 6.08 4.47 3.42 2.70 2.19
440 224.09 99.60 56.02 35.85 24.90 14.01 8.96 6.22 4.57 3.50 2.77 2.24
450 229.18 101.86 57.30 36.67 25.46 14.32 9.17 6.37 4.68 3.58 2.83 2.29
Matrix Unit of Measure is Velocity = metres / second
= Cells that can be changed - Password = pipe = Velocity > 4 m/s (in unmodified setting)
= Cells that can be changed - Password = flow = Velocity < 4 m/s (in unmodified setting)
PIPE INTERNAL DIMENSION (mm)
Table 2 – Flow vs Pipe ID Generic

Sykes MV150iC – Installation, Operation & Maintenance Manual
Sykes Group Pty Ltd Spare Parts & Service 24 hours: 1800 131950
Website: www.sykesgroup.com
19.3 Total Dynamic head Explanation Diagram
Suction Head Set Up
Suction Lift Set Up

Sykes MV150iC – Installation, Operation & Maintenance Manual
Sykes Group Pty Ltd Spare Parts & Service 24 hours: 1800 131950
Website: www.sykesgroup.com
19.4 pH Compatibility Chart The abbreviation pH means ‘hydrogen potential’ – or the ability of the liquid to take up acidic hydrogen ions and become more acid. The numbers used are the logarithms or the actual numbers, which would otherwise be in millions. pH 7.0 is neutral. An already acid solution cannot take up as much additional acid. Therefore pH less than 7.0 is acidic. pH greater than 7.0 is alkaline. As each change of 1 on the log scale is equivalent to 10 times on the linear scale, a linear scale, a solution of pH5 is ten times more acidic than a solution of pH6. Similarly, pH4 is 100 times more acidic than pH6, and so on.
Wetted Material Compatibility Guideline for Metals
Fluid pH Level Metals
Alkaline
14
Stainless Steels 13
12
11
Caustic Basic 10
Cast Iron 9
Neutral
8
Aluminium 7
6
Acid
5 Cast Iron
4
3
Stainless Steels 2
1
0
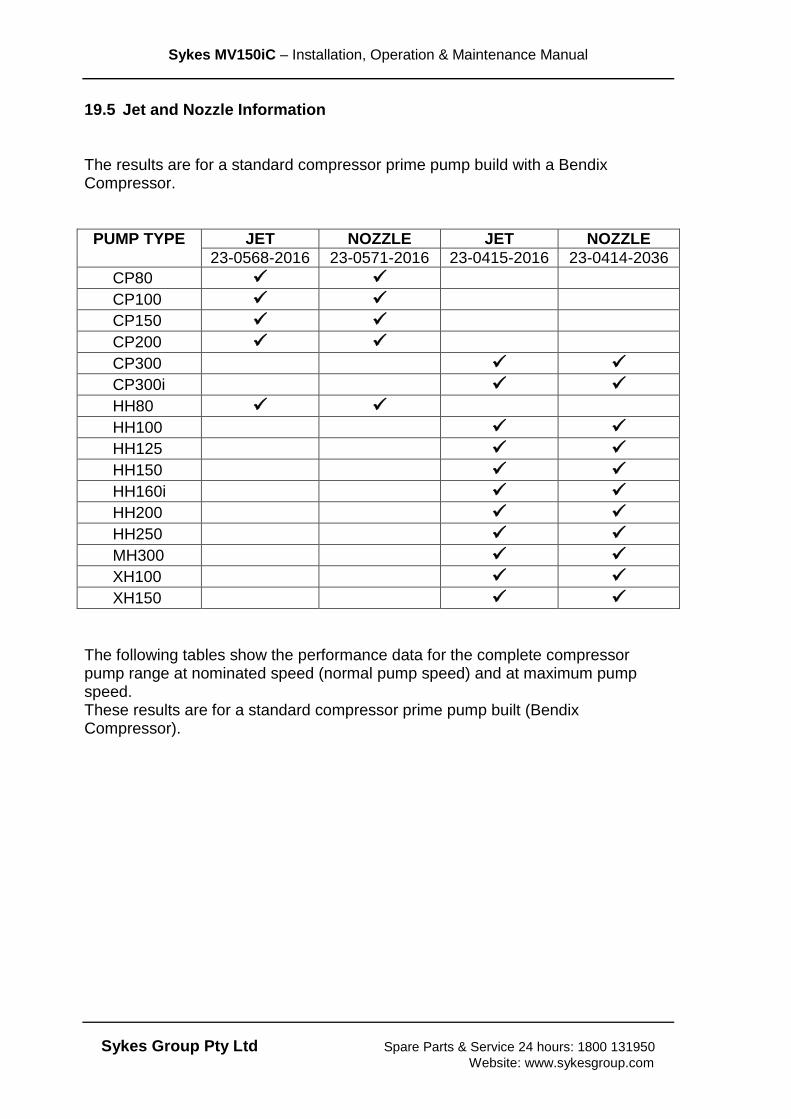
Sykes MV150iC – Installation, Operation & Maintenance Manual
Sykes Group Pty Ltd Spare Parts & Service 24 hours: 1800 131950
Website: www.sykesgroup.com
19.5 Jet and Nozzle Information The results are for a standard compressor prime pump build with a Bendix Compressor.
PUMP TYPE JET NOZZLE JET NOZZLE
23-0568-2016 23-0571-2016 23-0415-2016 23-0414-2036
CP80
CP100
CP150
CP200
CP300
CP300i
HH80
HH100
HH125
HH150
HH160i
HH200
HH250
MH300
XH100
XH150
The following tables show the performance data for the complete compressor pump range at nominated speed (normal pump speed) and at maximum pump speed. These results are for a standard compressor prime pump built (Bendix Compressor).

Sykes MV150iC – Installation, Operation & Maintenance Manual
Sykes Group Pty Ltd Spare Parts & Service 24 hours: 1800 131950
Website: www.sykesgroup.com
PUMP TYPE COMPRESSOR / PUMP PULLEY
RATIO
CP80 - 1.60
CP100 - 1.60
CP150 - 1.29
CP200 - 1.29
CP300 + 1.56
CP300i + 1.56
HH80 - 1.29
HH100 - 1.25
HH125 - 1.25
HH150 - 1.125
HH160i -1.125
HH200 - 1.125
HH250 - 1.125
MH300 - 1.125
XH100 - 1.125
XH150 - 1.125
- = Reducing Drive Ratio + = Increasing Drive Ratio
PUMP TYPE PUMP SPEED
COMPRESSOR SPEED
BACK PRESSURE
VACUUM PRESSURE
(rpm) (rpm) (psi) (kPa)
CP80 2000 1250 50 83.5
2400 1500 58 81.0
CP100 2000 1250 50 83.5
2200 1375 54 82.0
CP150 1800 1395 54 82.0
2200 1705 65 80.0
CP200 1800 1395 54 82.0
2000 1550 60 81.0
CP300 1000 1560 59 82.5
1200 1872 66 82.0
CP300i 1000 1560 59 82.5
1200 1872 66 82.0
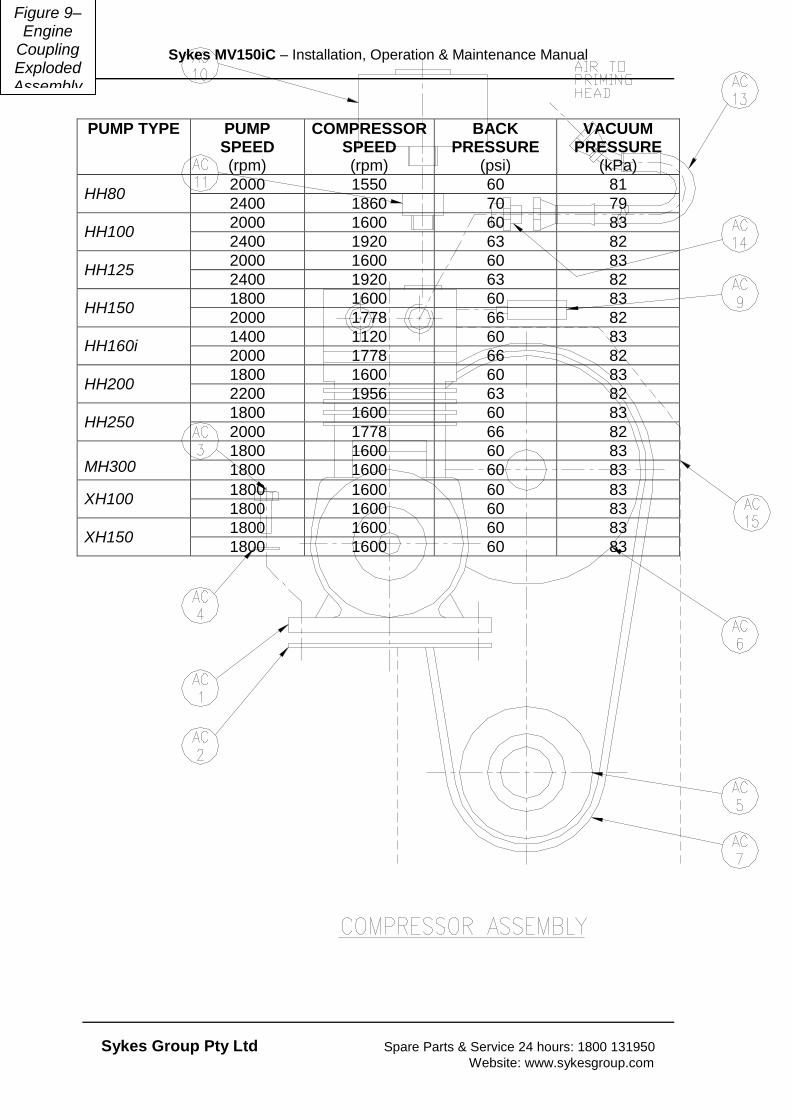
Sykes MV150iC – Installation, Operation & Maintenance Manual
Sykes Group Pty Ltd Spare Parts & Service 24 hours: 1800 131950
Website: www.sykesgroup.com
PUMP TYPE PUMP SPEED
COMPRESSOR SPEED
BACK PRESSURE
VACUUM PRESSURE
(rpm) (rpm) (psi) (kPa)
HH80 2000 1550 60 81
2400 1860 70 79
HH100 2000 1600 60 83
2400 1920 63 82
HH125 2000 1600 60 83
2400 1920 63 82
HH150 1800 1600 60 83
2000 1778 66 82
HH160i 1400 1120 60 83
2000 1778 66 82
HH200 1800 1600 60 83
2200 1956 63 82
HH250 1800 1600 60 83
2000 1778 66 82
MH300 1800 1600 60 83
1800 1600 60 83
XH100 1800 1600 60 83
1800 1600 60 83
XH150 1800 1600 60 83
1800 1600 60 83
Figure 9– Engine
Coupling Exploded Assembly Drawing