quick start guide - pixel it | it solutions for your...
TRANSCRIPT

Quick Start GuideLumension Endpoint Security 4.4 SR11
Lumension Endpoint Security
- 2 -

- 3 -
Notices
Version InformationLumension Endpoint Security Quick Start Guide - Lumension Endpoint Security Version 4.4SR11 - Published: July2012Document Number: 02_101_4.4SR11_122071035
Copyright Information
Lumension8660 East Hartford Drive, Suite 300Scottsdale, AZ 85255Phone: +1 888.725.7828Fax: +1 480.970.6323E-mail: [email protected]
Copyright© 1999-2012 Lumension Security, Inc.; all rights reserved. Covered by one or more of U.S. PatentNos. 6,990,660, 7,278,158, 7,487,495, 7,823,147, 7,870,606, and/or 7,894,514; other patents pending. Thismanual, as well as the software described in it, is furnished under license. No part of this manual may be reproduced,stored in a retrieval system, or transmitted in any form – electronic, mechanical, recording, or otherwise – except aspermitted by such license.
LIMITATION OF LIABILITY/DISCLAIMER OF WARRANTY: LUMENSION SECURITY, INC.(LUMENSION) MAKES NO REPRESENTATIONS OR WARRANTIES WITH REGARD TO THE ACCURACYOR COMPLETENESS OF THE INFORMATION PROVIDED IN THIS MANUAL. LUMENSION RESERVESTHE RIGHT TO MAKE CHANGES TO THE INFORMATION DESCRIBED IN THIS MANUAL AT ANY TIMEWITHOUT NOTICE AND WITHOUT OBLIGATION TO NOTIFY ANY PERSON OF SUCH CHANGES. THEINFORMATION PROVIDED IN THIS MANUAL IS PROVIDED “AS IS” AND WITHOUT WARRANTY OFANY KIND, INCLUDING WARRANTIES OF MERCHANTABILITY AND FITNESS FOR A PARTICULARPURPOSE. THE INFORMATION PROVIDED IN THIS MANUAL IS NOT GUARANTEED OR WARRANTEDTO PRODUCE ANY PARTICULAR RESULT, AND THE ADVICE AND STRATEGIES CONTAINED MAYNOT BE SUITABLE FOR EVERY ORGANIZATION. NO WARRANTY MAY BE CREATED OR EXTENDEDWITH RESPECT TO THIS MANUAL BY SALES REPRESENTATIVES OR WRITTEN SALES MATERIALS.LUMENSION SHALL NOT BE LIABLE TO ANY PERSON WHATSOEVER FOR ANY LOSS OF PROFIT ORDATA OR ANY OTHER DAMAGES ARISING FROM THE USE OF THIS MANUAL, INCLUDING BUT NOTLIMITED TO DIRECT, INDIRECT, SPECIAL, INCIDENTAL, CONSEQUENTIAL, OR OTHER DAMAGES.
Lumension Endpoint Security
- 4 -
Trademark Information
Lumension®, Lumension® Endpoint Management and Security Suite, Lumension® Endpoint ManagementPlatform, Lumension® Patch and Remediation, Lumension® Enterprise Reporting, Lumension® SecurityConfiguration Management, Lumension® Content Wizard, Lumension® Risk Manager, Lumension® AntiVirus,Lumension® Wake on LAN, Lumension® Power Management, Lumension® Remote Management, Lumension®
Scan™, Lumension® Security Configuration Management, Lumension® Application Control, Lumension®
Device Control, Lumension® Endpoint Security, Lumension® Intelligent Whitelisting, PatchLink®, PatchLink®
Update™, their associated logos, and all other Lumension trademarks and trade names used here are the property ofLumension Security, Inc. or its affiliates in the U.S. and other countries.
RSA Secured® is a registered trademark of RSA Security Inc.
Apache is a trademark of the Apache Software Foundation.
In addition, any other companies' names, trade names, trademarks, and products mentioned in this document maybe either registered trademarks or trademarks of their respective owners.
Feedback
Your feedback lets us know if we are meeting your documentation needs. E-mail the Lumension TechnicalPublications department at [email protected] to tell us what you like best, what you like least, and toreport any inaccuracies.

Table of Contents
- 5 -
Table of Contents
Preface: About This Document.................................................................................................................................. 7Typographical Conventions..........................................................................................................................................................7Contacting Lumension..................................................................................................................................................................8
Chapter 1: System Requirements.............................................................................................................................. 9Minimum Hardware Requirements..............................................................................................................................................9Supported Operating Systems.................................................................................................................................................... 10Supported Databases.................................................................................................................................................................. 13Other Software Requirements.................................................................................................................................................... 14Recommended Configuration.....................................................................................................................................................15Client Supported Languages...................................................................................................................................................... 16
Chapter 2: Installing Lumension Endpoint Security Components...................................................................... 17Installation Overview................................................................................................................................................................. 17Installation Checklist.................................................................................................................................................................. 18Installing the Database............................................................................................................................................................... 20Generating a Key Pair................................................................................................................................................................23Installing the Application Server............................................................................................................................................... 25Installing the Management Console.......................................................................................................................................... 34Installing the Client....................................................................................................................................................................39
Chapter 3: Using Lumension Device Control.........................................................................................................49Product Overview.......................................................................................................................................................................49Device Control Server, Database and Client Process............................................................................................................... 50Using the Management Console................................................................................................................................................51The Device Permissions Setup Process.....................................................................................................................................51Using the Management Console................................................................................................................................................52
Logging In to the Management Console.............................................................................................................................52Logging Out of the Management Console..........................................................................................................................53Lumension Device Control Modules...................................................................................................................................54Getting Started..................................................................................................................................................................... 54
Managing Devices...................................................................................................................................................................... 54Device Permission Default Settings.................................................................................................................................... 54Device Types Supported......................................................................................................................................................55Device Explorer Window.................................................................................................................................................... 56Manage Devices................................................................................................................................................................... 61Add Computers.................................................................................................................................................................... 62Assign Permissions by Devices...........................................................................................................................................63Assign Temporary Permissions to Users............................................................................................................................ 65Assign Scheduled Permissions to Users..............................................................................................................................66Add Shadowing....................................................................................................................................................................67Sending Updates to All Computers.....................................................................................................................................72
Authorizing CD/DVDs...............................................................................................................................................................73Add CD/DVD Media...........................................................................................................................................................74
Log Explorer Templates.............................................................................................................................................................74View Administrator Activity............................................................................................................................................... 74
Lumension Endpoint Security
- 6 -
Upload Latest Log Files...................................................................................................................................................... 75Reporting.....................................................................................................................................................................................76
Opening a Report.................................................................................................................................................................76Printing a Report..................................................................................................................................................................76Saving a Report....................................................................................................................................................................76
User Permissions Report............................................................................................................................................................77Computer Permissions Report....................................................................................................................................................78Using the Device Control Client............................................................................................................................................... 79
Chapter 4: Using Lumension Application Control................................................................................................ 81Product Overview.......................................................................................................................................................................81Application Control Server, Database and Client Process........................................................................................................82Using the Management Console................................................................................................................................................83The File Authorization Setup Process....................................................................................................................................... 83Using Application Control......................................................................................................................................................... 85
Logging In to the Management Console.............................................................................................................................85Logging Out of the Management Console..........................................................................................................................86Lumension Application Control Modules........................................................................................................................... 86Getting Started..................................................................................................................................................................... 87
Building a Central File Authorization List................................................................................................................................87Importing Standard File Definitions....................................................................................................................................88
Authorizing File Execution........................................................................................................................................................ 90Creating a File Scanning Template..................................................................................................................................... 90Scanning Files on a Client Computer................................................................................................................................. 93Adding a File Group............................................................................................................................................................95Assigning Files to File Groups............................................................................................................................................96Creating Parent-Child Relationships....................................................................................................................................98Assigning File Groups to Users........................................................................................................................................ 100Sending Updates to All Computers...................................................................................................................................101Viewing Database Records................................................................................................................................................101
Local Authorization..................................................................................................................................................................102Log Explorer Templates...........................................................................................................................................................104
View Administrator Activity............................................................................................................................................. 104Upload Latest Log Files.................................................................................................................................................... 105
Reporting...................................................................................................................................................................................105Opening a Report...............................................................................................................................................................106Printing a Report................................................................................................................................................................106Saving a Report..................................................................................................................................................................106File Groups by User.......................................................................................................................................................... 107User by File Group............................................................................................................................................................107User Options.......................................................................................................................................................................108
- 7 -
Preface
About This Document
This Quick Start Guide is a resource written for all users of Lumension Endpoint Security 4.4 SR11. Thisdocument defines the concepts and procedures for installing, configuring, implementing, and using LumensionEndpoint Security 4.4 SR11.
Tip: Lumension documentation is updated on a regular basis. To acquire the latest version of this or any otherpublished document, please refer to the Lumension Customer Portal (http://portal.lumension.com/).
Typographical Conventions
The following conventions are used throughout this documentation to help you identify various informationtypes.
Table 1: Typographical Conventions
Convention Usage
bold Buttons, menu items, window and screen objects.
bold italics Wizard names, window names, and page names.
italics New terms, options, and variables.
MONOSPACE UPPERCASE Keyboard keys.
BOLD UPPERCASE SQL Commands.
monospace File names, path names, programs, executables, command syntax, andproperty names.

Lumension Endpoint Security
- 8 -
Contacting Lumension
Global Headquarters
8660 East Hartford DriveSuite 300Scottsdale, AZ 85255United States of America
Phone: +1 888 725 7828Phone: +1 480 970 1025Fax: +1 480 970 6323
Ireland Office
Lumension Security Ireland Ltd.Lyrr Building, Second FloorMervue Business & Technology ParkMervue, GalwayIreland
Phone: +353 91 44 8980Fax: +353 91 76 6722
Luxembourg Office
Lumension Security SAAtrium Business ParkZ.A Bourmicht23, rue du Puits RomainL-8070 BertrangeLuxembourg
Phone: +352 265 364 11Fax: +352 265 364 12
Endpoint Security Technical Support
Phone:+1 877 713 8600 (US Toll Free)+44 800 012 1869 (UK Toll Free)+353 9142 2999 (EMEA)
Email:[email protected]
Vulnerability Management Technical Support
Phone:+1 888 725 7828 (option 2) (US Toll Free)+44 800 012 1869 (UK Toll Free)+353 9142 2999 (EMEA)+61 (02) 8223 9810 (Australia)+852 3071 4690 (Hong Kong)+65 6622 1078 (Singapore)
Email:[email protected] (US)[email protected] (APAC)[email protected] (EMEA)
Note: For additional contact information, please visit the Contact Lumension page at http://www.lumension.com/contact-us.aspx.

- 9 -
Chapter
1System Requirements
In this chapter:
• Minimum Hardware Requirements
• Supported Operating Systems
• Supported Databases
• Other Software Requirements
• Recommended Configuration
• Client Supported Languages
The following sections describe the minimum system requirementsnecessary for successful installation of Lumension Endpoint Securityand the languages supported by the client.
The listed specifications are a minimum; larger network environments,may require additional hardware and software resources. The systemrequirements for Lumension Endpoint Security are listed in thefollowing topics.
Important: For installation or upgrade to Lumension EndpointSecurity version 4.4 SR11:
• You must have a license file that is valid specifically for version4.4 or later.
• License files issued before Lumension Endpoint Security version4.4 will not work with the Application Server and may causeyour Application Servers to stop working. The LumensionEndpoint Security 4.4 license must be installed before you installor upgrade the Lumension Endpoint Security database, and thenthe Application Server.
• Request a new license file using the Downloads tab on theLumension Customer Portal (https://portal.lumension.com).
Minimum Hardware RequirementsThe minimum Lumension Endpoint Security hardware requirements depend upon your service networkenvironment, including the type of database supported, the number of Application Servers you need to support adistributed network, and the number of subscribed clients.

Lumension Endpoint Security
- 10 -
The hardware requirements for Lumension Endpoint Security vary depending upon the number of servers andclients you manage. The following minimum hardware requirements will support up to:
• 200 connected Lumension Endpoint Security clients for Lumension Device Control• 50 connected Lumension Endpoint Security clients for Lumension Application Control
Table 2: Minimum Hardware Requirements
Lumension Endpoint SecurityComponent
Requirement
Database • 1 GB (4 GB recommended) memory• Pentium® Dual-Core CPU processor or AMD equivalent• 3 GB minimum hard disk drive• 100 MBits/s NIC
Application Server • 512 MB (1 GB recommended) memory• Pentium® Dual-Core CPU or AMD equivalent• 3 GB minimum hard disk drive• 100 MBits/s NIC
Management Console • 512 MB (1 GB recommended) memory• 15 MB hard disk drive for installation, and 150 MB additional for
application files• 1024 by 768 pixels for display
Client • 256 MB (1 GB recommended) memory• 10 MB hard disk drive for installation, and several additional GB for
full shadowing feature of Lumension Device Control• 100 MBits/s NIC
Supported Operating SystemsLumension Endpoint Security supports multiple Microsoft Windows operations systems for the ApplicationServer, Management Console, database, and client.

System Requirements
- 11 -
The operating system requirements for Lumension Endpoint Security components are outlined as follows.
Table 3: Operating System Requirements
Lumension Endpoint SecurityComponent
Requirement
Database One of the following:
• Microsoft Windows ® XP Professional Service Pack 2 or higher(SP2+) (32-bit)
• Windows XP Service Pack 2 (SP2) (64-bit)• Microsoft Windows Server 2003, Standard Edition with Service
Pack 2 (SP2) or later (32-bit)• Microsoft Windows Server 2003, Enterprise Edition with SP2 or
later (32-bit)• Microsoft Windows Server 2008, Standard Edition with SP2 or
later (32-bit and 64-bit)• Microsoft Windows Server 2008, Enterprise Edition with SP2 or
later (32-bit and 64-bit)• Microsoft Windows Server 2008 R2 (64 bit only)
Application Server One of the following:
• Windows Server 2003, Standard Edition with SP2 or later (32-bit)
• Windows Server 2003, Enterprise Edition with SP2 or later (32-bit)
• Windows Server 2008, Standard Edition with SP2 or later (32-bit and 64-bit)
• Windows Server 2008, Enterprise Edition with SP2 or later (32-bit and 64-bit)
• Windows Server 2008 R2 (64 bit only)

Lumension Endpoint Security
- 12 -
Lumension Endpoint SecurityComponent
Requirement
Management Console One of the following:
• Windows XP Professional SP2+ (32-bit)• Windows Server 2003, Standard Edition with SP2 or later (32-
bit)• Windows Server 2003, Enterprise Edition with SP2 or later (32-
bit)• Windows Server 2008, Standard Edition with SP2 or later (32-
bit and 64-bit)• Windows Server 2008, Enterprise Edition with SP2 or later (32-
bit and 64-bit)• Windows Server 2008 R2 (64 bit only)• Microsoft Windows Vista™ SP1+ (32- and 64-bit)• Microsoft Windows 7 (32- and 64-bit)

System Requirements
- 13 -
Lumension Endpoint SecurityComponent
Requirement
Client One of the following:
• Microsoft Windows® Server 2000 Service Pack 4 or higher(SP4+) (32-bit)
• Microsoft Windows 2000 Professional SP4+ (32-bit)• Microsoft Windows XP Professional Service Pack 2 or higher
(SP2+) (32- and 64-bit)• Windows Server 2003, Standard Edition with SP2 or later (32-
bit)• Windows Server 2003, Enterprise Edition with SP2 or later (32-
bit)• Windows Server 2008, Standard Edition with SP2 or later (32-
bit and 64-bit)• Windows Server 2008, Enterprise Edition with SP2 or later (32-
bit and 64-bit)• Windows Server 2008 R2 (64 bit only)• Windows Vista SP1+ (32- and 64-bit)• Windows 7 (32- and 64-bit)• Microsoft Windows XP Embedded (XPe) Service Pack 2 (SP2)
(32-bit)• Microsoft Windows Embedded Point of Service (WEPOS) (32-
bit)• Microsoft Windows Embedded Standard 2009• Windows Embedded Standard 7• Microsoft Windows XP Tablet PC Edition (32-bit)• Citrix® Access Gateway™ 4.5• Citrix Presentation Server™ 4.0 for Windows Server 2003 SP1/
SR2+ (32-bit)• Citrix Presentation Server 4.5 for Windows Server 2003 SP1/
SR2+ (32- and 64-bit)• Citrix XenDesktop™
• Citrix XenApp™
Supported DatabasesLumension Endpoint Security supports multiple releases of Microsoft® SQL Server®. You should choose thedatabase instance required by your network operating environment and the number of Application Servers andsubscribed clients the application must support.

Lumension Endpoint Security
- 14 -
The database requirements for Lumension Endpoint Security components are outlined as follows.
Table 4: Database Requirements
Lumension EndpointSecurity Component
Requirement
Database One of the following:
• Microsoft SQL Server® 2005, Standard Edition with SP2 or higher (32-bitand 64-bit)
• Microsoft SQL Server 2005, Enterprise Edition with SP2 or higher (32-bitand 64-bit)
• Microsoft SQL Server 2005, Express Edition with SP2 or higher (32-bitand 64-bit)
• Microsoft SQL Server 2008, Standard Edition (32-bit and 64-bit)• Microsoft SQL Server 2008, Enterprise Edition (32-bit and 64-bit)• Microsoft SQL Server 2008, Express Edition (32-bit and 64-bit)• Microsoft SQL Server 2008 R2, Standard Edition (32-bit and 64-bit)• Microsoft SQL Server 2008 R2, Enterprise Edition (32-bit and 64-bit)• Microsoft SQL Server 2008 R2, Express Edition (32-bit and 64-bit)
Other Software RequirementsLumension Endpoint Security requires the following additional software.
Additional software requirements for Lumension Endpoint Security components are outlined as follows.
Table 5: Other Software Requirements
Lumension Endpoint SecurityComponent
Requirement
Database No additional software requirements.

System Requirements
- 15 -
Lumension Endpoint SecurityComponent
Requirement
Application Server If you will be encrypting Windows user accounts for centralizedDevice Control encryption, you will need to install an enterpriselevel Certificate Authority. See Microsoft Certificate Authority (http://technet.microsoft.com/en-us/library/cc756120.aspx) for additionalinformation about certificates.
Attention: Certificate authority installation applies to Device Controlonly for centralized encryption capability.
Certificate authority installation applies to both Device Control andApplication Control for secure server communications.
A Certificate Authority is required to use secure communicationsbetween clients and servers, and intra-server communications.
Management Console Microsoft Visual C++ 2008 Redistributable Package.
Client No additional software requirements.
Recommended ConfigurationTo maximize Lumension Endpoint Security for operation in a Microsoft Windows environment, youshould configure your network environment database and client components using the following suggestedconfigurations.
The recommended configurations for Lumension Endpoint Security components are outlined as follows. Thesesettings represent the usual default settings, but should be confirmed before beginning Lumension EndpointSecurity installation.
Table 6: Recommended Configuration
Lumension Endpoint SecurityComponent
Requirement
Database • Change the Windows Event Viewer settings to 1024 KB and chooseto overwrite events as necessary.
• Change Windows Performance settings to prioritize for backgroundapplications.
Application Server None recommended.
Management Console None recommended.

Lumension Endpoint Security
- 16 -
Lumension Endpoint SecurityComponent
Requirement
Client • If you are using Active Directory, configure a corresponding DomainName System (DNS) server as Active Directory (AD) integrated andcreate a reverse lookup zone, to provide for name resolution withinthe Management Console.
• Configure NIC to receive IP from DHCP service.• Change the Windows Event Viewer settings to 1024 KB and choose
to overwrite events as necessary.
Client Supported LanguagesThe Lumension Endpoint Security client supports multiple languages in text format.
The Lumension Endpoint Security client is supported in the following languages:
• English• French• Italian• German• Spanish• Japanese• Simplified Chinese• Traditional Chinese• Russian• Dutch• Portuguese• Swedish

- 17 -
Chapter
2Installing Lumension Endpoint Security Components
In this chapter:
• Installation Overview
• Installation Checklist
• Installing the Database
• Generating a Key Pair
• Installing the Application Server
• Installing the Management Console
• Installing the Client
Lumension Endpoint Security component installation requires thatyou follow a series of interdependent tasks in a prescribed order.Before you begin, you must have a valid license key for each softwareapplication(s) that your are installing.
Successful installation of Lumension Endpoint Security requires youto install components in the following order:
1. Install the database.2. Generate and save a public and private key pair. This action is not
required, however, Lumension strongly recommends the use of apublic-private key pair to provide the highest level of security.
3. Install the Application Server(s).4. Install the Management Console.5. Install and deploy the client.
Installation OverviewLumension Endpoint Security component installation requires that you follow a series of interdependent tasks ina prescribed order. Before you begin, you must have a valid license key for each software application(s) that yourare installing.
Lumension Endpoint Security
- 18 -
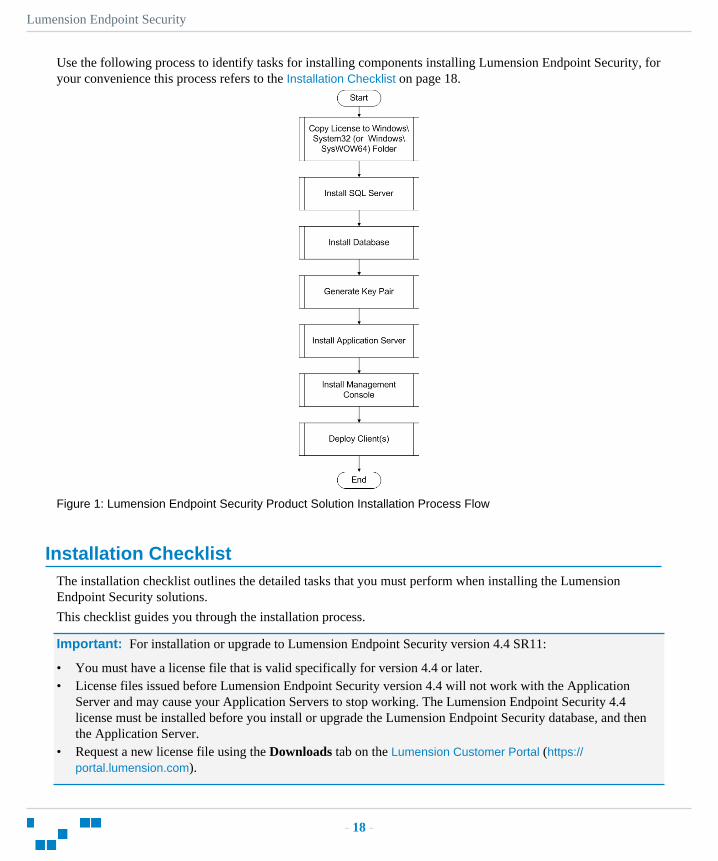
Use the following process to identify tasks for installing components installing Lumension Endpoint Security, foryour convenience this process refers to the Installation Checklist on page 18.
Figure 1: Lumension Endpoint Security Product Solution Installation Process Flow
Installation ChecklistThe installation checklist outlines the detailed tasks that you must perform when installing the LumensionEndpoint Security solutions.
This checklist guides you through the installation process.
Important: For installation or upgrade to Lumension Endpoint Security version 4.4 SR11:
• You must have a license file that is valid specifically for version 4.4 or later.• License files issued before Lumension Endpoint Security version 4.4 will not work with the Application
Server and may cause your Application Servers to stop working. The Lumension Endpoint Security 4.4license must be installed before you install or upgrade the Lumension Endpoint Security database, and thenthe Application Server.
• Request a new license file using the Downloads tab on the Lumension Customer Portal (https://portal.lumension.com).
Installing Lumension Endpoint Security Components
- 19 -
To begin your installation:
1. Copy the Lumension Endpoint Security license file to the \\Windows\System32 or \\Windows\SysWOW64folder, and rename the file to endpoint.lic. The license file may be installed after installing the database,however, the license file must installed before installing the Application Server.
2. Download the Lumension Endpoint Security application software from the Lumension Customer Portal(https://portal.lumension.com)
3. Create a device, media, or software application inventory which lists the items that you want LumensionEndpoint Security to control.
4. Document company policy that defines:
• Device permissions.• Shadowing requirements.• Device encryption requirements.• Lumension Endpoint Security administrators and their roles.• Global domain groups for Lumension Endpoint Security administrators.
5. Plan your Lumension Endpoint Security network architecture, based on capacity requirements, that list theApplication Server host names and IP addresses.
6. Create a dedicated Application Server domain user rights service account and set the following:
• User cannot change password.• Password never expires.
The domain account must have local administration rights when you plan to use the TLS communicationprotocol for client- Application Server and inter- Application Server data transfers.
7. Create Impersonate a client after authentication user rights for the Application Server. See Impersonatea Client After Authentication ( http://support.microsoft.com/kb/821546 ) for additional information aboutimpersonating a client after authentication user rights.
8. Verify that the Application Server domain account has Log on as a service user rights. See Add the Logon as a service right to an account ( http://technet.microsoft.com/en-us/library/cc739424(WS.10).aspx ) foradditional information about logging on as a service user rights.
9. Install Microsoft® Internet Information Services on the same computer as the certification authority,otherwise the enterprise root certificate cannot be generated. See Internet Information Services (IIS) ( http://www.iis.net ) for additional information about installing Internet Information Services.
10. Install a Microsoft enterprise root certification authority to enable removable device encryptionfor Lumension Device Control. See Install a Microsoft enterprise root certification authority ( http://technet.microsoft.com/en-us/library/cc776709.aspx ) for additional information about installing an enterpriseroot certificate.
11. Install a Microsoft SQL Server® . See Getting Started with SQL Server ( http://msdn.microsoft.com/en-us/sqlserver/default.aspx ) for additional information about installing a SQL server.
12. Complete Installing the Database on page 20.13. To install multiple Application Server s, create a shared file directory on a file server to share the Datafile
directory component. This action is only required if you will be using more than one Application Server.14. Complete Generating a Key Pair on page 23. This action is recommended, but not required.

Lumension Endpoint Security
- 20 -
15. Complete Installing the Application Server on page 25.
Important: The Application Server service account must have database owner (DBO) rights to theLumension Endpoint Security database.
16. Complete Installing the Management Console on page 34.17. Complete Installing the Client on page 39.18. Test your Lumension Endpoint Security product solution installation for functionality.
Installing the DatabaseThe Lumension Endpoint Security database is the first component that you install. The database serves as thecentral repository for device permissions rules and executable file authorizations.
Prerequisites:
Important: For installation or upgrade to Lumension Endpoint Security version 4.4 SR11:
• You must have a license file that is valid specifically for version 4.4 or later.• License files issued before Lumension Endpoint Security version 4.4 will not work with the Application
Server and may cause your Application Servers to stop working. The Lumension Endpoint Security 4.4license must be installed before you install or upgrade the Lumension Endpoint Security database, and thenthe Application Server.
• Request a new license file using the Downloads tab on the Lumension Customer Portal (https://portal.lumension.com).
Before you can successfully install the Lumension Endpoint Security database, you must:
• Verify that you satisfy the minimum hardware and software system requirements.• If you will be using a database cluster, you must specify an alternate TDS port during SQL server setup. See
Creating a Server Alias for Use by a Client (SQL Server Configuration Manager) (http://msdn.microsoft.com/en-us/library/ms190445.aspx) for additional information about creating a server alias. You can install theLumension Endpoint Security database on a server cluster, where there are at least two servers in the clusterrunning SQL Server. For additional information regarding database clustering, see Microsoft Cluster Service(MSCS) Installation Resources (http://support.microsoft.com/kb/259267).
1. Log in to a computer as an administrative user with access to a Microsoft® SQL Server®.
2. Close all programs running on the computer.
3. From the location where you saved the Lumension Endpoint Security application software, run the \server\db\setup.exe file.
Step Result: The Installation Wizard Welcome page opens.
Installing Lumension Endpoint Security Components
- 21 -
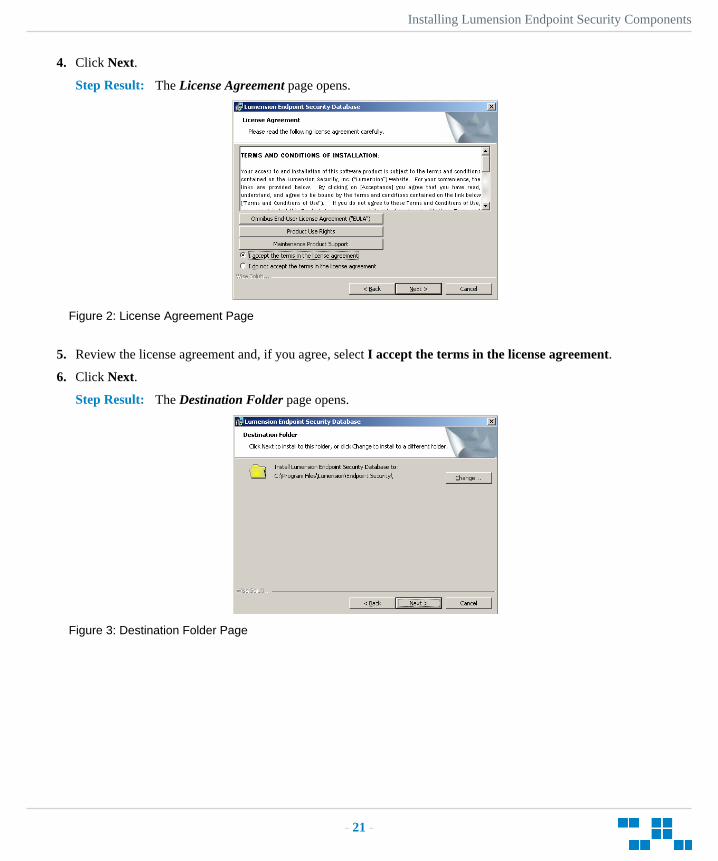
4. Click Next.
Step Result: The License Agreement page opens.
Figure 2: License Agreement Page
5. Review the license agreement and, if you agree, select I accept the terms in the license agreement.
6. Click Next.
Step Result: The Destination Folder page opens.
Figure 3: Destination Folder Page

Lumension Endpoint Security
- 22 -
7. You may choose an installation destination folder other than the default folder C:\Program Files\Lumension\Endpoint Security.
a) Click Change
Step Result: The Change Current Destination Folder page opens.
Figure 4: Change Current Destination Folder Page
b) Select a folder from the Look in: field.c) Click OK.
Step Result: The Change Current Destination Folder closes, and the Destination Folder page changesto reflect the new location.
8. Click Next.
Step Result: The Ready to Install the Program page opens.
Figure 5: Ready to Install the Program Dialog
Installing Lumension Endpoint Security Components
- 23 -
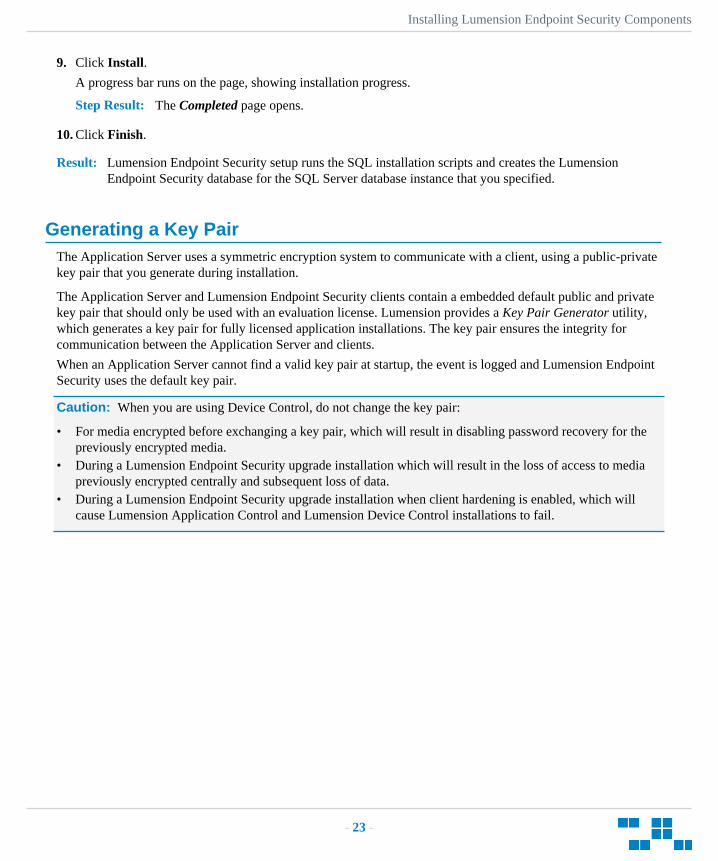
9. Click Install.
A progress bar runs on the page, showing installation progress.
Step Result: The Completed page opens.
10. Click Finish.
Result: Lumension Endpoint Security setup runs the SQL installation scripts and creates the LumensionEndpoint Security database for the SQL Server database instance that you specified.
Generating a Key PairThe Application Server uses a symmetric encryption system to communicate with a client, using a public-privatekey pair that you generate during installation.
The Application Server and Lumension Endpoint Security clients contain a embedded default public and privatekey pair that should only be used with an evaluation license. Lumension provides a Key Pair Generator utility,which generates a key pair for fully licensed application installations. The key pair ensures the integrity forcommunication between the Application Server and clients.
When an Application Server cannot find a valid key pair at startup, the event is logged and Lumension EndpointSecurity uses the default key pair.
Caution: When you are using Device Control, do not change the key pair:
• For media encrypted before exchanging a key pair, which will result in disabling password recovery for thepreviously encrypted media.
• During a Lumension Endpoint Security upgrade installation which will result in the loss of access to mediapreviously encrypted centrally and subsequent loss of data.
• During a Lumension Endpoint Security upgrade installation when client hardening is enabled, which willcause Lumension Application Control and Lumension Device Control installations to fail.
Lumension Endpoint Security
- 24 -
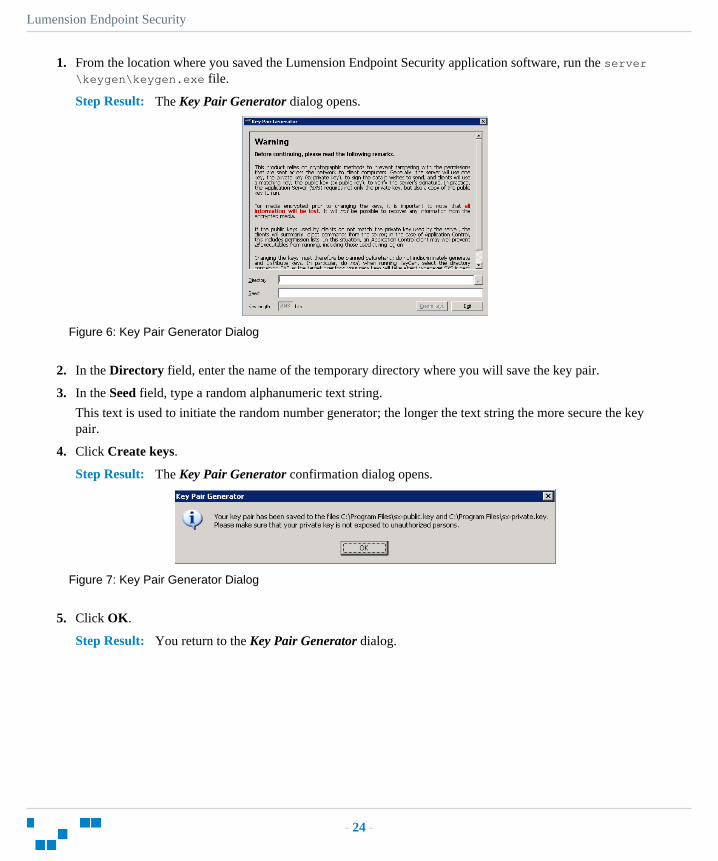
1. From the location where you saved the Lumension Endpoint Security application software, run the server\keygen\keygen.exe file.
Step Result: The Key Pair Generator dialog opens.
Figure 6: Key Pair Generator Dialog
2. In the Directory field, enter the name of the temporary directory where you will save the key pair.
3. In the Seed field, type a random alphanumeric text string.
This text is used to initiate the random number generator; the longer the text string the more secure the keypair.
4. Click Create keys.
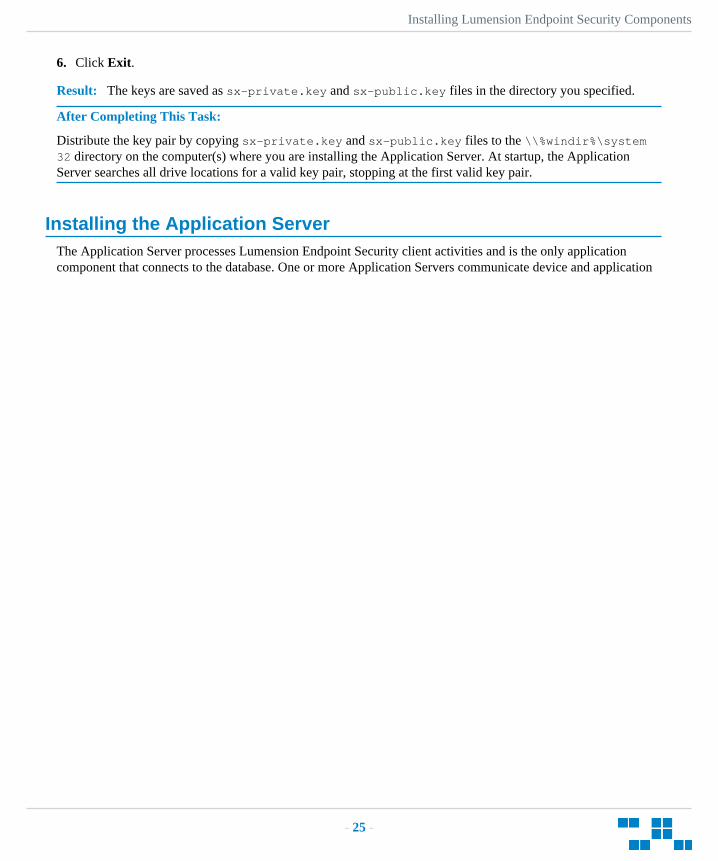
Step Result: The Key Pair Generator confirmation dialog opens.
Figure 7: Key Pair Generator Dialog
5. Click OK.
Step Result: You return to the Key Pair Generator dialog.
Installing Lumension Endpoint Security Components
- 25 -
6. Click Exit.
Result: The keys are saved as sx-private.key and sx-public.key files in the directory you specified.
After Completing This Task:
Distribute the key pair by copying sx-private.key and sx-public.key files to the \\%windir%\system32 directory on the computer(s) where you are installing the Application Server. At startup, the ApplicationServer searches all drive locations for a valid key pair, stopping at the first valid key pair.
Installing the Application ServerThe Application Server processes Lumension Endpoint Security client activities and is the only applicationcomponent that connects to the database. One or more Application Servers communicate device and application

Lumension Endpoint Security
- 26 -
control information between the Lumension Endpoint Security database and Lumension Endpoint Securityclient(s).
Prerequisites:
Before you can successfully install the Application Server, you must:
• Verify that a valid Lumension Endpoint Security license file is listed in the \Windows\System32 or \\Windows\SysWOW64 folder, and is name file to endpoint.lic.
Important: For installation or upgrade to Lumension Endpoint Security version 4.4 SR11:
• You must have a license file that is valid specifically for version 4.4 or later.• License files issued before Lumension Endpoint Security version 4.4 will not work with the Application
Server and may cause your Application Servers to stop working. The Lumension Endpoint Security 4.4license must be installed before you install or upgrade the Lumension Endpoint Security database, andthen the Application Server.
• Request a new license file using the Downloads tab on the Lumension Customer Portal (https://portal.lumension.com).
• Verify that you satisfy the minimum hardware and software system requirements.
Restriction: If you are installing the Lumension Application Control Terminal Services Edition, you mustinstall the Application Server on a computer separate from the Citrix® Metaframe® Presentation Server.
• When using TLS protocol confirm TCP ports 33115 and 65229 are open. When not using TLS protocol openTCP port 65129. Depending upon how firewalls are setup in your environment, these ports may be closed.
• Configure the TCP/IP protocol to use a fixed IP address for the computer that runs the Application Server.• Configure the Application Server host computer to perform fully qualified domain name (FQDN) resolution
for the Lumension Endpoint Security clients that the server manages.• Ensure that the Application Server host computer account is configured to read domain information using
the Microsoft® Windows® Security Account Manager. See Security Account Manager (SAM) ( http://technet.microsoft.com/en-us/library/cc756748.aspx ) for additional information about the Microsoft WindowsSecurity Account Manager.
• Synchronize the Application Server's system clock with the Lumension Endpoint Security database server'ssystem clock using the Microsoft Windows time service. See Time Service ( http://support.microsoft.com/kb/816042 ) for details about using the Microsoft Windows time service.
1. Log in with administrative user access to the computer where you are installing the Application Server.
Important: For Active Directory environments, log in using the dedicated Application Server domain userrights service account. The Application Server installation process configures the Application Server serviceaccount for access to the database.
2. Close all programs running on the computer.
3. From the location where you saved the Lumension Endpoint Security application software, run \server\sxs\setup.exe.

Installing Lumension Endpoint Security Components
- 27 -
4. Click OK.
Step Result: The Installation Wizard Welcome page opens.
5. Click Next.
Step Result: The License Agreement page opens.
Figure 8: License Agreement Page
6. Review the license agreement and, if you agree, select I accept the terms in the license agreement.
7. Click Next.
Step Result: The Setup dialog opens when the setup process detects an operating system that is subject tosecurity changes concerning Remote Procedure Calls (RPC).
Figure 9: Setup Dialog
8. Click Yes.
Step Result: A confirmation dialog opens after the registry value is reset.
Figure 10: The Setup Dialog

Lumension Endpoint Security
- 28 -
9. Click OK.
Step Result: The Destination Folder page opens.
Figure 11: Destination Folder Page
10. You may choose an installation destination folder other than the Lumension Endpoint Security default folderC:\Program Files\Lumension\Endpoint Security.
a) Click Change.
Step Result: The Change Current Destination Folder page opens.
Figure 12: Change Current Destination Folder Page
b) Select a folder from the Look in: field.

Installing Lumension Endpoint Security Components
- 29 -
c) Click OK.
Step Result: The Change Current Destination Folder closes, and the Destination Folder page changesto reflect the new location.
11. Click Next.
Step Result: The Service Account page opens.
Figure 13: Service Account Page
12. Type the name of the user or domain in the User Account field for access to the Application Server.
Enter domain account information using the Domain\User format, and local account information using theComputer\User format. Lumension Endpoint Security supports use of standard NetBIOS computer namesup to fifteen (15) characters long.
Tip: This is the user name that you created when you configured the domain service account for theApplication Server .
13. In the Password field, type the user account access password.
Lumension Endpoint Security
- 30 -
14. Click Next.
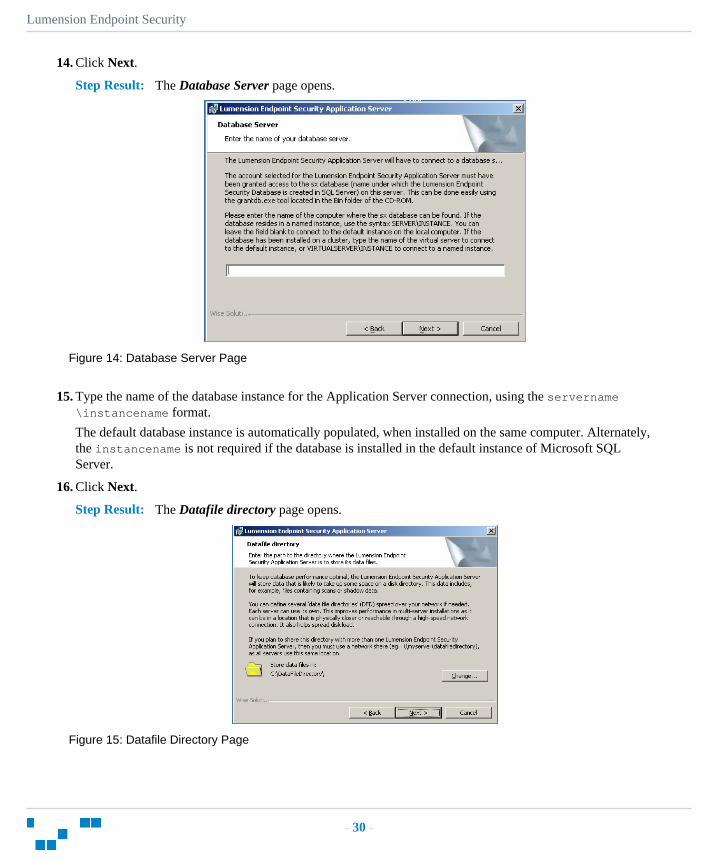
Step Result: The Database Server page opens.
Figure 14: Database Server Page
15. Type the name of the database instance for the Application Server connection, using the servername\instancename format.
The default database instance is automatically populated, when installed on the same computer. Alternately,the instancename is not required if the database is installed in the default instance of Microsoft SQLServer.
16. Click Next.
Step Result: The Datafile directory page opens.
Figure 15: Datafile Directory Page

Installing Lumension Endpoint Security Components
- 31 -
17. You may choose a folder other than the Lumension Endpoint Security default folder, C:\DataFileDirectory\ , where Application Server log, shadow, and scan files are stored.
Tip: Use a permanent network share when you are installing more than one Application Server or adedicated file server. To improve performance for a multi-server installation, assign a separate data filedirectory to each server to provide load balancing; although more than one server can access the same datafile directory. Use a Universal\Uniform Name Convention path name; do not use a mapped drivename.
a) Click Change.
Step Result: The Select datafile directory page opens.
Figure 16: Select Datafile Directory Page
b) Type the name of the datafile directory in the Folder name: field.c) Click OK.

Lumension Endpoint Security
- 32 -
18. Click Next.
Step Result: The Server communication protocol page opens.
Figure 17: Server Communication Protocol Page
19. Select an encryption option.
Restriction: The server communication protocol options shown depend upon the client version supportedand whether a certification authority digital certificate is installed.
20. Click Next.
Step Result: The Server communication protocol page opens.
Figure 18: Server Communication Protocol Ports Page
21. Specify the communication port(s).
Restriction: The port field(s) shown depend upon the encryption communication protocol that you selectedpreviously.

Installing Lumension Endpoint Security Components
- 33 -
22. Click Next.
Step Result: The Syslog Server page opens.
Figure 19: Syslog Server Page
23. Type the name or the IP address of the SysLog server in the SysLog server address field.
Important: This step is optional. You do not have to specify a Syslog server.
24. Select from the following options:
Option Description
Audit Logs Logs changes to policy administered through the Management Console.
System Logs Logs system events.
Agent Logs Logs events uploaded directly from the Lumension Endpoint Securityclient.
Lumension Endpoint Security
- 34 -
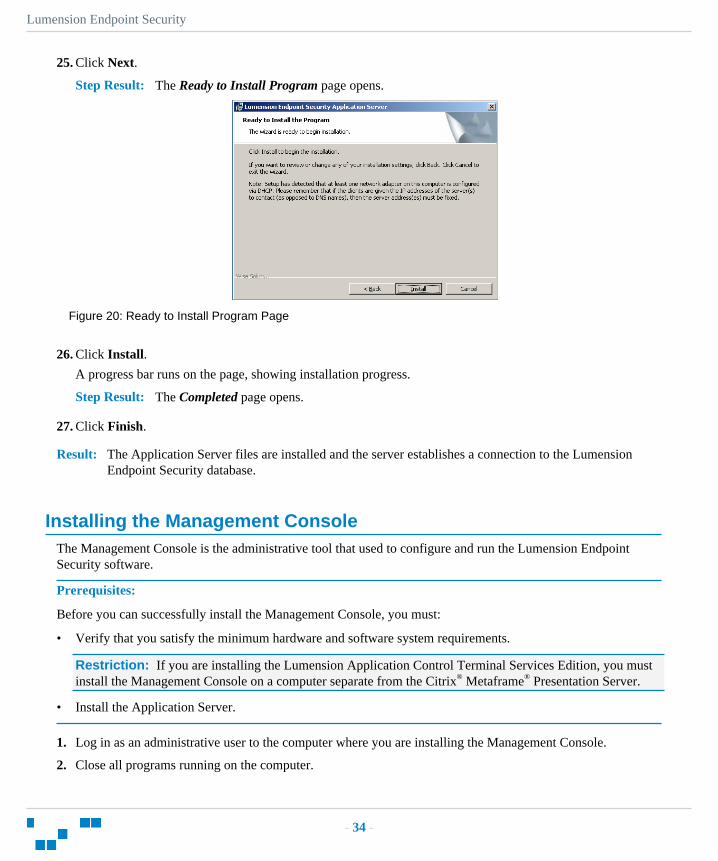
25. Click Next.
Step Result: The Ready to Install Program page opens.
Figure 20: Ready to Install Program Page
26. Click Install.
A progress bar runs on the page, showing installation progress.
Step Result: The Completed page opens.
27. Click Finish.
Result: The Application Server files are installed and the server establishes a connection to the LumensionEndpoint Security database.
Installing the Management ConsoleThe Management Console is the administrative tool that used to configure and run the Lumension EndpointSecurity software.
Prerequisites:
Before you can successfully install the Management Console, you must:
• Verify that you satisfy the minimum hardware and software system requirements.
Restriction: If you are installing the Lumension Application Control Terminal Services Edition, you mustinstall the Management Console on a computer separate from the Citrix® Metaframe® Presentation Server.
• Install the Application Server.
1. Log in as an administrative user to the computer where you are installing the Management Console.
2. Close all programs running on the computer.

Installing Lumension Endpoint Security Components
- 35 -
3. From the location where you saved the Lumension Endpoint Security application software, run the \server\smc\setup.exe.
Attention: The Management Console requires the Microsoft® Visual C++ 2008 Redistributable Packagefor proper operation. You may receive a message prompting you to allow setup to trigger the redistributablepackage installation, if Visual C++ Libraries are not already installed. After the redistributable packageinstalls, the Management Console resumes installation as follows.
Figure 21: Microsoft Visual C++ 2008 Redistributable Package Setup
Step Result: The Installation Wizard Welcome page opens.
4. Click Next.
Step Result: The License Agreement page opens.
Figure 22: License Agreement Page
5. Review the license agreement and, if you agree, select I accept the terms in the license agreement.

Lumension Endpoint Security
- 36 -
6. Click Next.
Step Result: The Setup Type page opens.
Figure 23: Setup Type Page
7. Select one of the following options:
Option Description
Complete Installs all program features.
Installing Lumension Endpoint Security Components
- 37 -
Option Description
Custom Install selected program features where you specify the location.
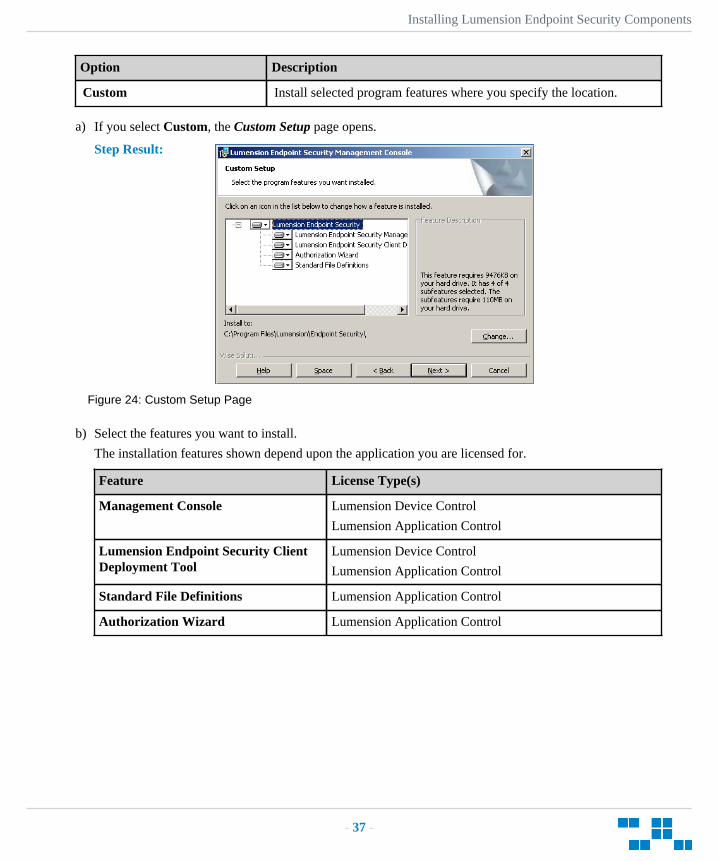
a) If you select Custom, the Custom Setup page opens.
Step Result:
Figure 24: Custom Setup Page
b) Select the features you want to install.
The installation features shown depend upon the application you are licensed for.
Feature License Type(s)
Management Console Lumension Device Control
Lumension Application Control
Lumension Endpoint Security ClientDeployment Tool
Lumension Device Control
Lumension Application Control
Standard File Definitions Lumension Application Control
Authorization Wizard Lumension Application Control
Lumension Endpoint Security
- 38 -
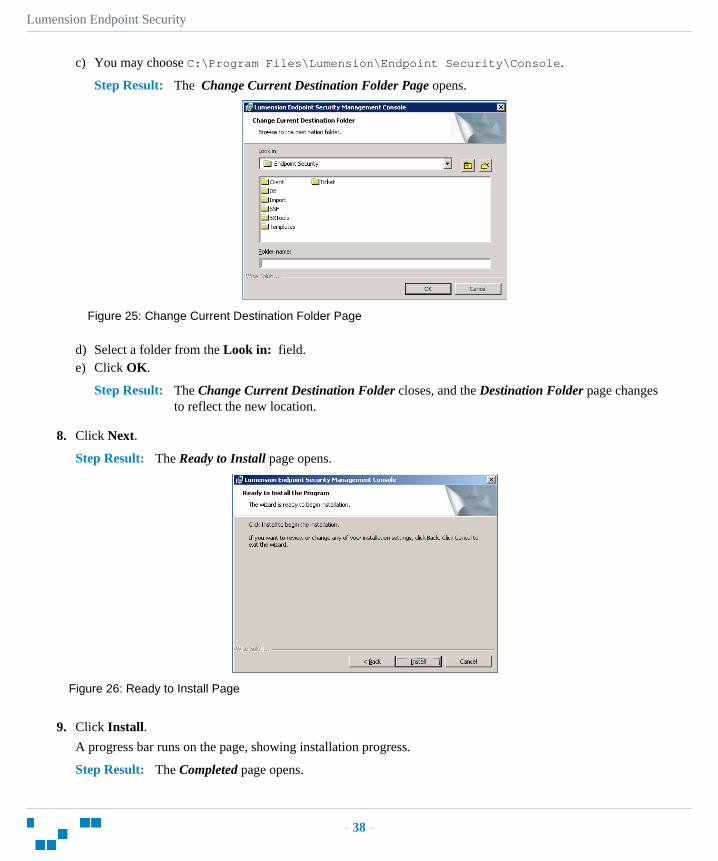
c) You may choose C:\Program Files\Lumension\Endpoint Security\Console.
Step Result: The Change Current Destination Folder Page opens.
Figure 25: Change Current Destination Folder Page
d) Select a folder from the Look in: field.e) Click OK.
Step Result: The Change Current Destination Folder closes, and the Destination Folder page changesto reflect the new location.
8. Click Next.
Step Result: The Ready to Install page opens.
Figure 26: Ready to Install Page
9. Click Install.
A progress bar runs on the page, showing installation progress.
Step Result: The Completed page opens.

Installing Lumension Endpoint Security Components
- 39 -
10. Click Finish.
Result: The Management Console files are installed.
After Completing This Task:
Define Lumension Endpoint Security administrator access as described in the Lumension Device ControlUser Guide (http://portal.lumension.com) or the Lumension Application Control User Guide (http://portal.lumension.com) depending upon your license type. By default, only users who are members of theAdministrators group for the computer running the Management Console can connect to the Application Server.
Installing the ClientThe Lumension Endpoint Security client manages permissions for device access and user access to softwareapplications for endpoint computers.
Prerequisites:
Before you can successfully install the Lumension Endpoint Security client, you must:
• Verify that you satisfy the minimum hardware and software system requirements.• Copy the sx-public.key file for the Lumension Endpoint Security client to the Client folder located
where you downloaded the Lumension Endpoint Security software. The Lumension Endpoint Security clientinstaller detects the public key during installation and copies the key to the target directory ( %windir%\sxdata ).
• Install the Application Server.• Install the Management Console.• When installing Lumension Application Control, you must create a list of authorized executable files, scripts
and macros before setting Execution blocking default option to Non-blocking mode.• When installing Lumension Application Control, you must ensure that the Execution blocking default option
is set to Non-blocking mode; otherwise the Lumension Endpoint Security client computer will not restartafter Lumension Endpoint Security client installation because executable system files cannot run until theyare centrally authorized from the Management Console.
1. Verify that the domain information in the Lumension Endpoint Security database is synchronized as follows:
a) From the Management Console, select Tools > Synchronize Domain Members.
Step Result: The Synchronize Domain dialog opens.
Figure 27: Synchronize Domain Dialog
Lumension Endpoint Security
- 40 -
b) Enter the name of the domain that you want to synchronize.
Note: When you enter a computer name that is a domain controller, the domain controller is used forsynchronization. This is useful when replication between domain controllers is slow.
c) Click OK.
Attention: When you use Lumension Endpoint Security in a Novell environment, you must runthe ndssync_ldap.vbs synchronization script found in the scripts folder where you stored theapplication software after downloading. This can be done manually when there are few changes in youreDirectory structure or you use automatically scheduling software.
2. Log in as an administrative user to the computer where you are deploying the Lumension Endpoint Securityclient.
3. Close all programs running on the computer.
4. From the location where you saved the Lumension Endpoint Security application software, run \client\setup.exe file.
Step Result: The Installation Wizard Welcome page opens.
5. Click Next.
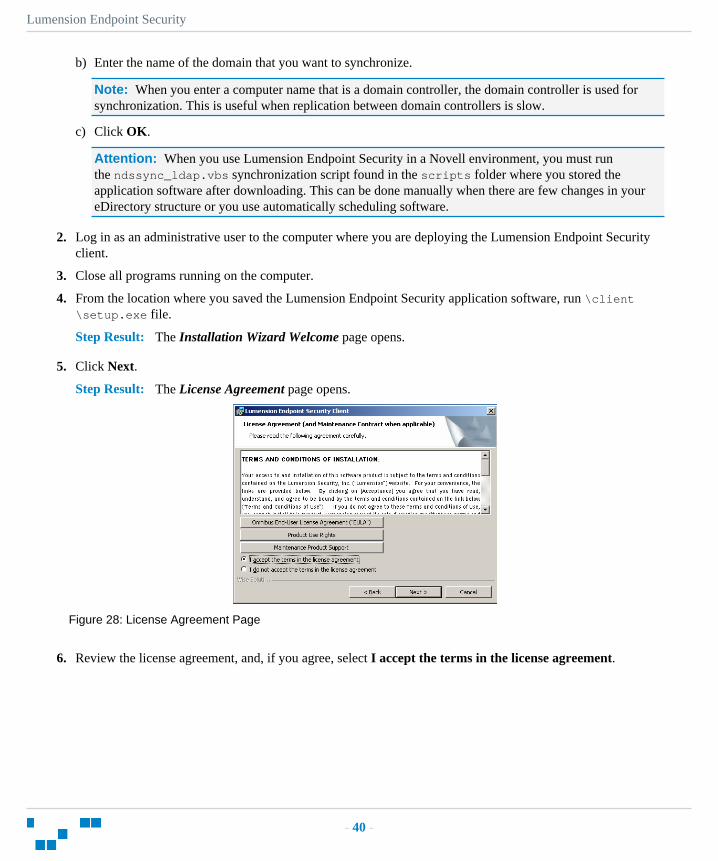
Step Result: The License Agreement page opens.
Figure 28: License Agreement Page
6. Review the license agreement, and, if you agree, select I accept the terms in the license agreement.
Installing Lumension Endpoint Security Components
- 41 -
7. Click Next.
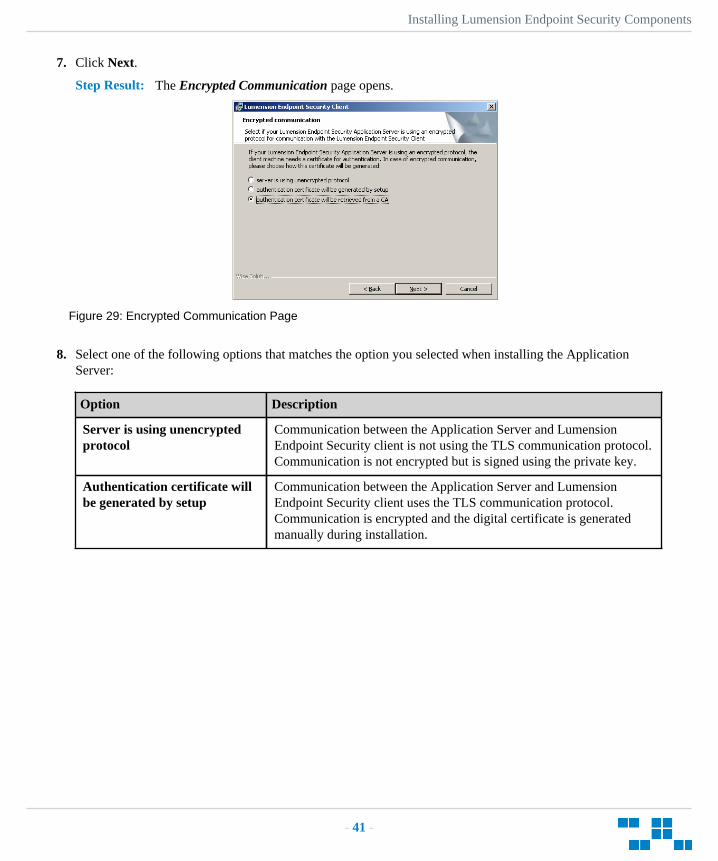
Step Result: The Encrypted Communication page opens.
Figure 29: Encrypted Communication Page
8. Select one of the following options that matches the option you selected when installing the ApplicationServer:
Option Description
Server is using unencryptedprotocol
Communication between the Application Server and LumensionEndpoint Security client is not using the TLS communication protocol.Communication is not encrypted but is signed using the private key.
Authentication certificate willbe generated by setup
Communication between the Application Server and LumensionEndpoint Security client uses the TLS communication protocol.Communication is encrypted and the digital certificate is generatedmanually during installation.

Lumension Endpoint Security
- 42 -
Option Description
Authentication certificate willbe retrieved from a CA
Communication between the Application Server and LumensionEndpoint Security client uses the TLS communication protocol.Communication is encrypted and the digital certificate is retrievedautomatically during installation.
Tip: Lumension recommends that you use the automatic TLS retrieval option to deploy Certificate Authorityinfrastructure for issuing valid digital certificates.
Step Result: If you opt to manually generate a certificate during setup, the Client Authentication dialogopens.
Figure 30: Client Authentication Dialog
9. To manually generate a certificate during setup specify the computer certificate location and parameters fromthe following options.
Option Description
Generate certificate signed bycertificate located in store
Generates a digital certificate during installation by using a signaturecertificate located in the local user store.
Generate certificate signed bycertificate located in file
Generates a digital certificate during installation by using a signaturecertificate located in a specified file.
Import into store Imports a signature certificate into the local user store.
Certificate parameters Specifies the certificate parameters for the Cryptographic serviceprovider, Key length, Validity, and Signature.

Installing Lumension Endpoint Security Components
- 43 -
10. Click Next.
Step Result: The Lumension Endpoint Security Application Servers page opens.
Figure 31: Application Server s Page
11. Specify up to three server names using fully qualified domain names (FQDN) or IP addresses that aremanaged from the Management Console.
Caution: Do not use IP address(es) when using the TLS communication protocol for encryption. You canonly use FQDNs for when using the TLS communication protocol.
12. Verify that the Lumension Endpoint Security client connects to the Application Server by clicking Test.
Caution: You can proceed with client installation if the Application Server is unavailable, by clickingOK in the following dialog. The client can establish a connection with the server later, when the server isavailable.
Figure 32: Error Dialog
Step Result: By default, Lumension Endpoint Security connects with the first available server and retrievesdefault policy settings from the server.
13. If you are specifying more than one server, select or deselect the Select a server at random to spread theload option.
Lumension Endpoint Security
- 44 -
14. Click Next.
Step Result: The Destination Folder page opens.
Figure 33: Destination Folder Page
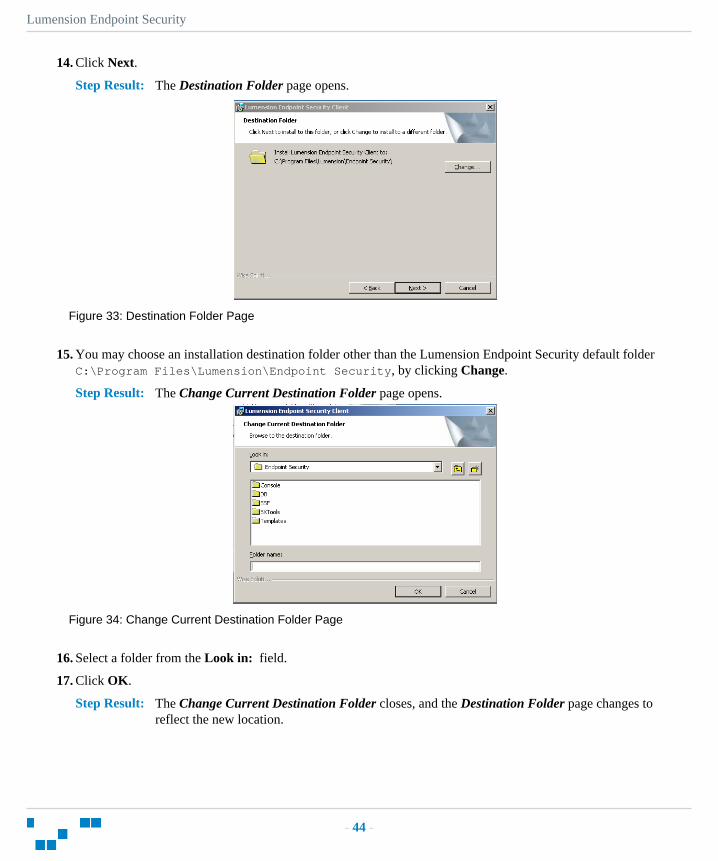
15. You may choose an installation destination folder other than the Lumension Endpoint Security default folderC:\Program Files\Lumension\Endpoint Security, by clicking Change.
Step Result: The Change Current Destination Folder page opens.
Figure 34: Change Current Destination Folder Page
16. Select a folder from the Look in: field.
17. Click OK.
Step Result: The Change Current Destination Folder closes, and the Destination Folder page changes toreflect the new location.
Installing Lumension Endpoint Security Components
- 45 -
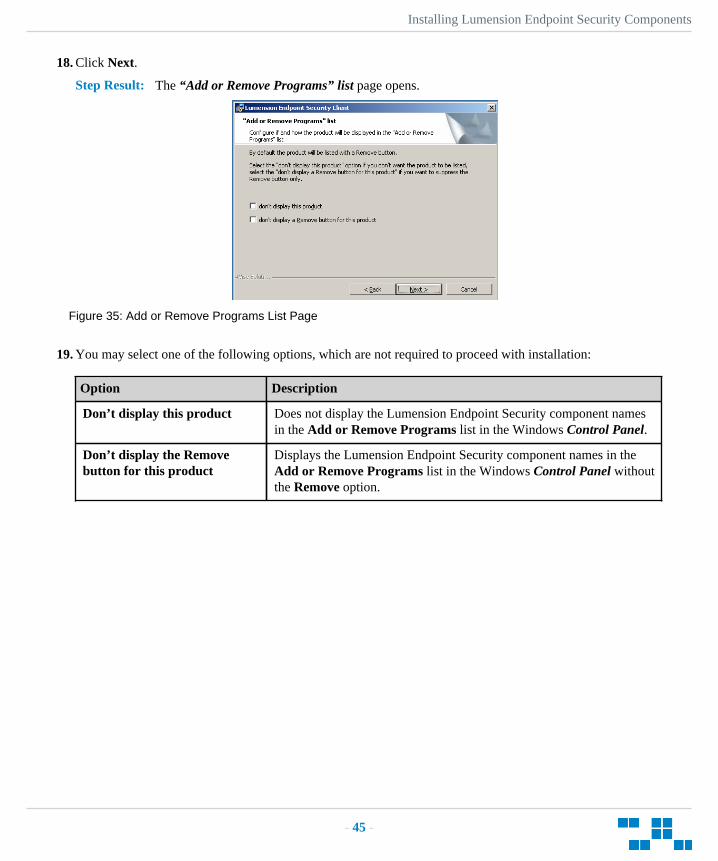
18. Click Next.
Step Result: The “Add or Remove Programs” list page opens.
Figure 35: Add or Remove Programs List Page
19. You may select one of the following options, which are not required to proceed with installation:
Option Description
Don’t display this product Does not display the Lumension Endpoint Security component namesin the Add or Remove Programs list in the Windows Control Panel.
Don’t display the Removebutton for this product
Displays the Lumension Endpoint Security component names in theAdd or Remove Programs list in the Windows Control Panel withoutthe Remove option.

Lumension Endpoint Security
- 46 -
20. Click Next.
Step Result: The NDIS Device Control page opens.
Note: NDIS enables Device Control to control 802.1x wireless adapters. If you do not needthis protection, you may disable it here.
Figure 36: NDIS Device Control Page
21. Select the disable protection for NDIS devices check box to allow the use of wireless devices.
22. Click Next.
Step Result: The Ready to Install the Program page opens.
23. Click Install.
Step Result: A progress bar runs on the page, showing installation progress.
Attention: The Setup dialog warning opens when there is an invalid, non-reachable serveraddress and no policy file exists.
24. Select one of the following options.
Option Description
Abort Does not retrieve the policy file and cancels the installation process.
Retry Attempts to retrieve the policy file and continue setup.

Installing Lumension Endpoint Security Components
- 47 -
Option Description
Ignore Skips policy file retrieval and continues setup, creating the risk ofblocking the computer from all device and executable file access.
Danger: If you select Ignore, the Lumension Endpoint Security suite installs with the most restrictivedefault file execution policy that denies use of all devices and/or executable files. This type of installationwill deny you access to devices and software that you use on your computer, which can make the computerinaccessible. When you install a client offline for use with Lumension Application Control you must providea policy settings file. Refer the Lumension Application Control User Guide (http://portal.lumension.com) formore information about creating and exporting policy settings files.
Step Result: The Completed page opens.
25. Click Finish.
Result: The Lumension Endpoint Security client is installed and connects to the Application Server.
After Completing This Task:
You must restart your computer system for the Lumension Endpoint Security client configuration changes tobecome effective and enable the use of the Lumension Endpoint Security client.
Lumension Endpoint Security
- 48 -

- 49 -
Chapter
3Using Lumension Device Control
In this chapter:
• Product Overview
• Device Control Server, Databaseand Client Process
• Using the Management Console
• The Device Permissions SetupProcess
• Using the Management Console
• Managing Devices
• Authorizing CD/DVDs
• Log Explorer Templates
• Reporting
• User Permissions Report
• Computer Permissions Report
• Using the Device Control Client
This chapter explains how Lumension Device Control works anddescribes how to define and manage device permissions.
Lumension Endpoint Security solutions include:
• Lumension Device Control, which prevents unauthorized transferof applications and data by controlling access to input and outputdevices, such as memory sticks, modems, and PDAs.
• Lumension Device Control client for Embedded Devices, whichmoves beyond the traditional desktop and laptop endpoints to avariety of platforms that include ATMs, industrial robotics, thinclients, set-top boxes, network area storage devices and the myriadof other systems running Microsoft® Windows XP® Embedded.
• Lumension Application Control, which delivers granular control ofapplication execution in an enterprise environment.
• Lumension Application Control Terminal Services Edition, whichextends application control to Citrix® or Microsoft TerminalServices ® environments that share applications among multipleusers.
• Lumension Application Control Server Edition, which deliversapplication control to protect enterprise servers, such as webservers, e-mail servers, and database servers.
Product OverviewThe Device Control software application is based on a multi-tier software architecture that processes and storesdata for Application Control and Device Control. Users can interact with the application through the clientinterface. A separate Management Console provides a user interface for network administrators.

Lumension Endpoint Security
- 50 -
The primary components of the Lumension Device Control solution are:
• The Device Control database which serves as the central repository of authorization information for devicesand applications.
• One or more Application Servers that communicate between the database, the protected clients, and theManagement Console.
• The Device Control client, which is installed on each computer, either end-point or server, that you want toprotect.
• The Management Console, which provides the administrative user interface for the Application Server.
The following figure illustrates the relationships between the Device Control components.
Figure 37: Device Control Component Relationships
Device Control Server, Database and Client ProcessThe Application Server communicates between the database and the protected client computers.

Using Lumension Device Control
- 51 -
The following describes the communication process flow between the Device Control servers, database, andclients when using Device Control.
Figure 38: Device Control Process Flow
Using the Management Console
The Management Console allows the user to communicate with an Application Server to send and retrieve devicepermissions data from the database. The data is then sent from the server to a Lumension Endpoint Securityclient, thereby establishing device control on the client.
The Device Permissions Setup ProcessAfter successfully installing Application Control, an administrator uses the Management Console to configureand define user access permissions and device permission rules required in a Lumension Endpoint Securityenvironment that specify which devices each user can access, as described by the following process flow.

Lumension Endpoint Security
- 52 -
The Enterprise Administrator defines administrative roles for networkAdministrators that have restricted access to the Management Console.
After defining Administrator roles, the Enterprise Administrator assigns the rolesto Administrators using the User Access tool.
Administrators add computers to a domain group or computer workgroup in theMachine-specific settings structure of the Device Explorer.
Define user access permission rules for a devices, device classes, device groups,device models, and computers, by assigning one or more users or user groups to thedevices. Initially, the default permissions for all devices that connect to a computerrunning the Lumension Endpoint Security client is None, which means that all useraccess is denied.
Assign permission rules for users to access devices, device classes, device groups,device models, and computers.
Assign computer-specific permission rules for users to access devices and deviceclasses.
Permissions determine access to devices for authorized users or groups on any computer protected by LumensionEndpoint Security. You can change rules to grant, extend, or deny permissions. You can allow access to CD/DVD-ROMs for specific users or groups that otherwise do not have access as defined by permissions policies,because users cannot use unauthorized CD/DVDs.
Using the Management ConsoleThe Management Console provides direct access to system management, configuration, file authorization,reporting, and logging functions.
The Management Console allows the user to communicate with an Application Server to send and retrieve devicepermissions data from the database. The data is then sent from the server to a Lumension Endpoint Securityclient, thereby establishing device control on the client.
Logging In to the Management ConsoleYou access the application by logging in to the Management Console.

Using Lumension Device Control
- 53 -
1. Select Start > Programs > Lumension > Endpoint Security > Endpoint Security Management Console> Lumension Endpoint Security Management Console.
Step Result: Each time you access the Management Console, the Connect to Lumension EndpointSecurity Application Server dialog appears.
2. From the Application Server drop-down list, select the Application Server you want to connect to.
You can type the server name as an IP address with port if required in square brackets, NetBios name, or fullyqualified domain name in the Application Server field.
3. Select one of the following options:
Option Description
Use current user By default the system connects to the Application Server using yourcredentials.
Log in as Type the user name in the Username field and type the password in thePassword field.
Tip: Precede the user name by a computer workstation name andbackslash for a local user, or by a domain name and backslash fordomain users.
4. Click OK.
Step Result: The Connect to Lumension Endpoint Security Application Server dialog closes.
Result: The Lumension Endpoint Security Management Console window opens.
Logging Out of the Management ConsoleWhen you log out from the Management Console you can choose to terminate the adminstrative session ordisconnect from the Application Server.
1. To disconnect from the Application Server, select File from the navigation bar.
2. Select one of the following options:
Option Description
Disconnect The Management Console remains open.
Exit The Management Console closes.
Result: The Disconnect or Exit action terminates your current administrative session.

Lumension Endpoint Security
- 54 -
Lumension Device Control ModulesThe Device Control Modules provide access to the functions necessary for configuring and managing and aregrouped into three modules, represented by the icons in the Modules section of the Control Panel.
The following table describes the functions of the Modules icons.
Table 7: Lumension Device Control Modules
Module Icon Description
Device Explorer Grants access to input/output (I/O) devices for specific users or groups.Establishes copy limits and activates file shadowing. Allows users toencrypt removable devices on-the-fly for decentralized encryption.
Log Explorer Shows records of files transferred from any computer to authorized I/Odevices and the contents of the files (shadowing). Shows user attemptsto access or connect unauthorized devices. Provides templates to createcustomized reports.
Media Authorizer Provides for central encryption of removable devices. Allows for users toaccess specific CD/DVD. Allows for users to use specific encrypted media.
Getting StartedThe Management Console can only be accessed by authorized network administrators.
Before you begin to use Lumension Endpoint Security, you must define the following users in the domain:
• An administrative user with local Administrator rights.• A Lumension Endpoint Security client user with domain user rights.
Managing DevicesWhen Device Control is initially installed, all removable storage devices that belong to standard MicrosoftWindows® device classes are identified and added to the database. You can set up and manage user accesspermission rules for the different models and specific device types using the Device Explorer.
Using the Device Explorer you can add devices and device types for computers and add computers that are notincluded in the Active Directory structure. You can define general user access permission policies based on thepredefined device classes.
Restriction: You can add specific device models to all base device classes, except the PS/2 ports classes.
Device Permission Default SettingsWhen Device Control is initially installed, default user access permission rules apply to all supported predefineddevice classes.
Using Lumension Device Control
- 55 -
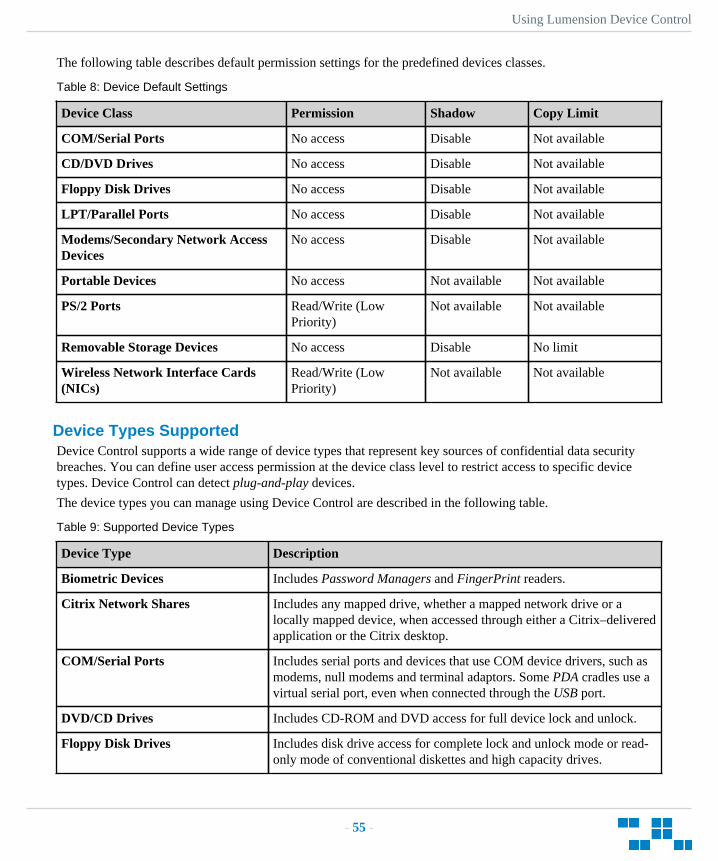
The following table describes default permission settings for the predefined devices classes.
Table 8: Device Default Settings
Device Class Permission Shadow Copy Limit
COM/Serial Ports No access Disable Not available
CD/DVD Drives No access Disable Not available
Floppy Disk Drives No access Disable Not available
LPT/Parallel Ports No access Disable Not available
Modems/Secondary Network AccessDevices
No access Disable Not available
Portable Devices No access Not available Not available
PS/2 Ports Read/Write (LowPriority)
Not available Not available
Removable Storage Devices No access Disable No limit
Wireless Network Interface Cards(NICs)
Read/Write (LowPriority)
Not available Not available
Device Types SupportedDevice Control supports a wide range of device types that represent key sources of confidential data securitybreaches. You can define user access permission at the device class level to restrict access to specific devicetypes. Device Control can detect plug-and-play devices.
The device types you can manage using Device Control are described in the following table.
Table 9: Supported Device Types
Device Type Description
Biometric Devices Includes Password Managers and FingerPrint readers.
Citrix Network Shares Includes any mapped drive, whether a mapped network drive or alocally mapped device, when accessed through either a Citrix–deliveredapplication or the Citrix desktop.
COM/Serial Ports Includes serial ports and devices that use COM device drivers, such asmodems, null modems and terminal adaptors. Some PDA cradles use avirtual serial port, even when connected through the USB port.
DVD/CD Drives Includes CD-ROM and DVD access for full device lock and unlock.
Floppy Disk Drives Includes disk drive access for complete lock and unlock mode or read-only mode of conventional diskettes and high capacity drives.

Lumension Endpoint Security
- 56 -
Device Type Description
Imaging Devices Includes USB or SCSI devices, scanners, and webcam.
LPT/Parallel Ports Includes conventional parallel printer ports and variants such as ECBand Dongles.
Modems/Secondary NetworkAccess Devices
Includes internal and external devices. Secondary network devices donot connect through normal channels.
Palm Handheld Devices Includes conventional types of this device.
Portable Devices Includes smart storage devices such as MP3 players, digital stillcameras, mobile phones, mobile storage devices, and Windows Mobile6.x OS PDAs.
Printers (USB/Bluetooth) Includes USB/Bluetooth printers.
PS/2 Ports Includes the conventional type of port used to connect keyboards.
Removable Storage Devices Includes chip- and disk-based devices that are not floppy or CD-ROMdevices, such as Jaz and PCMCIA hard drives and USB memorydevices such as memory stick, Disk on Key, AIP, and most USB-connected MP3 players and digital cameras.
Note: Non-system hard drives are treated as removable storagedevices.
RIM Blackberry Handhelds Includes handheld computers and mobile phones from Research inMotion (RIM) BlackBerry connected to a computer through a USBport.
Smart Card Readers Includes eToken and fingerprint readers for smart cards.
Tape Drives Includes conventional internal and external tape drives of any capacity.
User Defined Devices Includes devices that do not fit standard categories, such as somePDAs, non-Compaq iPAQ, USB, non-Palm handheld USB, Qtec, HTCand webcams.
Windows CE Handheld Devices Includes the HP iPAQ® or XDA, Windows Mobile 5 CE® devices andWindows CE® computers connected through a USB port.
Wireless Network Interface Cards(NICs)
Includes the device option to configure client permission rules use awireless LAN adaptor.
Device Explorer WindowAn administrator uses the Device Explorer hierarchy to create and manage device and computer user groups, aswell as, assign permission rules for online, offline, temporary and scheduled device use. The Device Explorermodule is also used to create and manage file shadowing rules.

Using Lumension Device Control
- 57 -
The main window of the Device Explorer module displays a hierarchical structure of device classes, which isdivided into two primary levels:
• Default settings which contain the user access permission rules that apply to every computer.• Machine-specific settings which contain unique user access permission rules that apply to a specific
computer or group of computers.
Figure 39: Device Explorer Main Window
The Device Explorer window is further divided into the following columns:
Table 10: Device Explorer Window Column Descriptions
Column Description
Devices Lists device classes and users or user groups with permission to access devices.
Permissions Shows a description of the type of permission provided to users and user groupslisted in the Devices column.
Priority Shows a priority of High or Low assigned to rules listed in the Permissionscolumn.
Filters Shows a description of the file type filtering rules assigned to rules listed in thePermissions column.
Details Shows a description of permissions rules details.
Comments Lumension Endpoint Security administrators can select permission rules and entercomments by clicking the Comments column heading.

Lumension Endpoint Security
- 58 -
Permissions DialogAn administrator uses the Permissions dialog to create and manage permission rules for devices and associatethese rules with user and user group access rights.
The Permissions dialog is the primary tool that an administrator uses to:
• Assign and manage user access permission rules for devices connected to client computers.• Force encryption of removable storage media that users are permitted to access.
The Permissions dialog is composed of five panels:
• User/Group• Permissions• Encryption• Bus• Drive
Figure 40: Permission Dialog
The following tables described the Permissions dialog panels.
Table 11: User/Group Panel
Column Description
Name Shows the name of the user or user group.
Location Shows the user domain or work group name.
Permissions Lists the rules defined by the Permissions panel.
Priority Shows the permission priority specified as High or Low.
Filters Shows the file types that the user or user group can access.

Using Lumension Device Control
- 59 -
Column Description
Scope Shows the permission defined in the Encryption, Bus, and Drive panels.
Table 12: Permissions Panel
Option Description
Read A user or user group has read access.
Write A user or user group has write access.
Encrypt A user or user group can encrypt devices.
Decrypt A user or user group can decrypt an encrypted device.
Export to file The passphrases or public keys from user certificates are used to create asymmetric key for device encryption. When the Self Contained Encryptionoption is selected, the encryption key can be stored in a separate file andpassword protected. This is the most secure method, because the encryptionkey and the encrypted data can be transported separately.
Export to media The passphrases or public keys from user certificates are used to createthe symmetric key used to encrypt a device. When the Self ContainedEncryption option is selected, the encryption key can be stored on the samedevice used for encryption and password protected. The only protection ofthe data is the password itself.
Import When the Self Contained Encryption option is selected, a user can accessencrypted media by specifying a separate key file, which is not stored on theencrypted media, and providing the associated password.
Restriction: Permission to Encrypt, Decrypt, Export to file, Export to media, and Import is available onlyfor the Removable Storage Devices class.
Table 13: Encryption Panel
Option Description
Self Contained Encryption The assigned Permissions apply to the device whenencrypted with Lumension Device Control self-contained encryption technology.
PGP Whole Disk Encryption (WDE) The assigned Permissions apply to the device whenencrypted with PGP Whole Disk Encryption (WDE)technology.

Lumension Endpoint Security
- 60 -
Option Description
Unencrypted (Unencrypted or unknown encryptiontype)
The assigned Permissions apply to the device whenunencrypted or encrypted with an unsupportedtechnology.
Table 14: Bus Panel
Option Description
All Permissions apply when a device is connected through any bus connection.
USB Permissions apply when a device is connected through a USB 1.1 and 2.0 or higherstandard interface.
Firewire Permissions apply when a device is connected through a Firewire IEEE 1394 standardinterface.
ATA/IDE Permissions apply when a device is connected through the ATA/IDE, SDATA-1,SATA-2 and eSATA variants interfaces.
SCSI Permissions apply when a device is connected through the SCSI narrow, wide andultra variants interfaces.
PCMCIA Permissions apply when a device is connected through the PCMCIA CARDBUSinterface, including the Expresscard/34 and /54 variants.
Bluetooth Permissions apply when a device is connected through the Bluetooth standardinterface.
IrDA Permissions apply when a device is connected through the IrDA (infrared) standardinterface.
Restriction: Only standard interface types supported by the device class you select are available for definingpermissions.
Table 15: Drive Panel
Options Description
Both Permission rules apply to the hard drive and non-hard drive for the deviceclass selected.
Hard Drive Permission rules apply only to the hard drive for the device class selected.
Non-Hard Drive Permission rules apply to the non-hard drive for the device class (includingRemovable Storage Devices) selected.
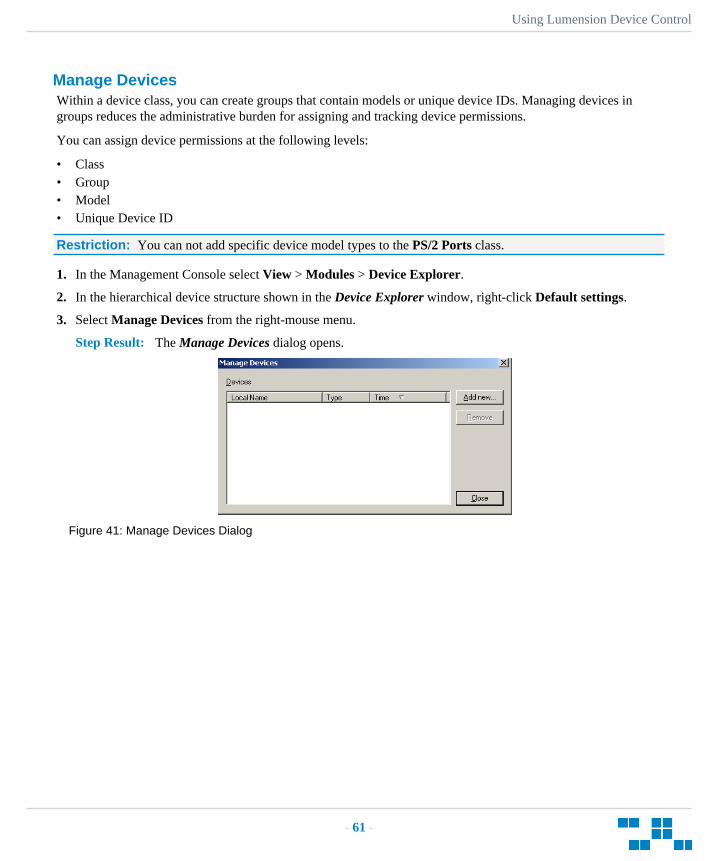
Using Lumension Device Control
- 61 -
Manage DevicesWithin a device class, you can create groups that contain models or unique device IDs. Managing devices ingroups reduces the administrative burden for assigning and tracking device permissions.
You can assign device permissions at the following levels:
• Class• Group• Model• Unique Device ID
Restriction: You can not add specific device model types to the PS/2 Ports class.
1. In the Management Console select View > Modules > Device Explorer.
2. In the hierarchical device structure shown in the Device Explorer window, right-click Default settings.
3. Select Manage Devices from the right-mouse menu.
Step Result: The Manage Devices dialog opens.
Figure 41: Manage Devices Dialog
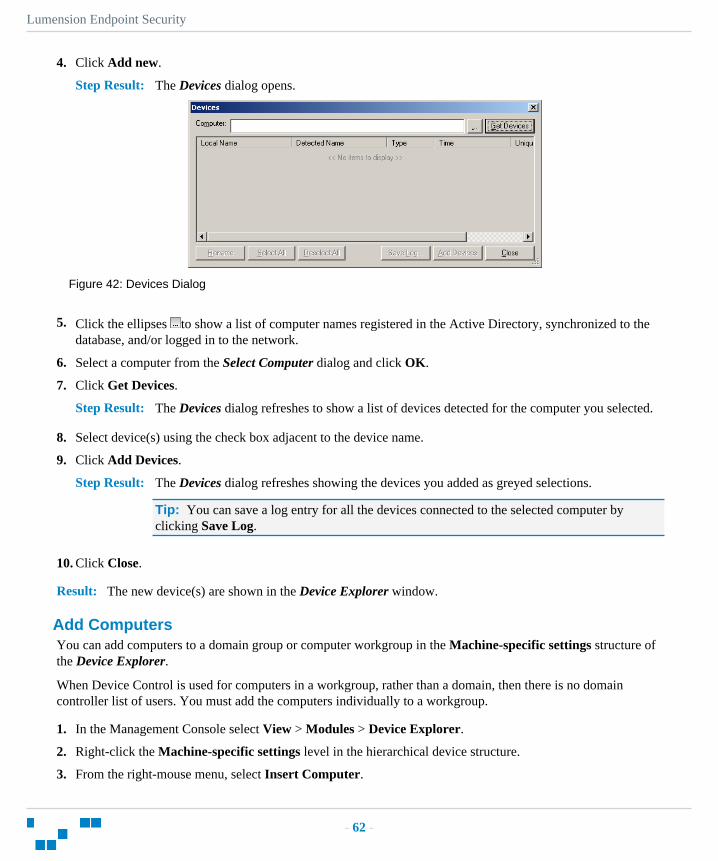
Lumension Endpoint Security
- 62 -
4. Click Add new.
Step Result: The Devices dialog opens.
Figure 42: Devices Dialog
5. Click the ellipses to show a list of computer names registered in the Active Directory, synchronized to thedatabase, and/or logged in to the network.
6. Select a computer from the Select Computer dialog and click OK.
7. Click Get Devices.
Step Result: The Devices dialog refreshes to show a list of devices detected for the computer you selected.
8. Select device(s) using the check box adjacent to the device name.
9. Click Add Devices.
Step Result: The Devices dialog refreshes showing the devices you added as greyed selections.
Tip: You can save a log entry for all the devices connected to the selected computer byclicking Save Log.
10. Click Close.
Result: The new device(s) are shown in the Device Explorer window.
Add ComputersYou can add computers to a domain group or computer workgroup in the Machine-specific settings structure ofthe Device Explorer.
When Device Control is used for computers in a workgroup, rather than a domain, then there is no domaincontroller list of users. You must add the computers individually to a workgroup.
1. In the Management Console select View > Modules > Device Explorer.
2. Right-click the Machine-specific settings level in the hierarchical device structure.
3. From the right-mouse menu, select Insert Computer.
Using Lumension Device Control
- 63 -
4. From the Select Computer dialog, click Search.
5. Select one or more computers from the list shown.
a) To add a computer that is not listed, click Add.b) Type the name of the computer to be added in the corresponding field.
6. Click OK.
Result: The computers you selected are added to the domain group.
Tip: You can drag-and-drop computers from one group to another, or you can right-click a computerand use Cut and Paste from the right-mouse menu.
Assign Permissions by DevicesYou can assign permission rules for users to access devices and device classes with any computer the userselects.
Permission rules can be assigned in the Device Explorer to the:
• Root node of the Default settings hierarchy.• Device class node of the Default settings hierarchy.• Device group within a device class node shown in the Default settings hierarchy.• Device by make and/or model.• Device by unique serial number.
Note: Root node permissions are assigned to the root of the Device Explorer hierarchy and apply to all devicesfor specific users or user groups.
1. In the Management Console select View > Modules > Device Explorer.
2. Right-click a node from the Default settings division of the Device Explorer hierarchical structure.
3. Select Add/Modify Permissions from the right-mouse menu.
Step Result: The Permissions dialog opens.
4. Click Add.
Step Result: The Select Group, User, Local Group, Local User dialog opens.
5. Click Search or Browse.
6. Select a user or user group.
7. Click OK.
8. In the Permissions dialog, select the user or user group to assign user access permission rules.
9. Select the permission options.
Important: Only the permissions options available for the device or device class selected are shown.

Lumension Endpoint Security
- 64 -
10. To limit user access to certain file types, click Filter.
Restriction: File filtering is available only for the Removable Storage Devices, Floppy Disk Drives, andCD/DVD Drives device classes.
Step Result: The File Type Filtering dialog opens.
Figure 43: File Type Filtering Dialog
11. Select one of the following options:
Option Description
All file types (Import/Export) Permission rules apply to all file types that are imported and exportedby the user or user group for the specified device or device class.
Only files selected from thislist:
Permission rules apply to only to selected file types that are importedand/or exported by the user or user group for the specified device ordevice class.
A complete list of the file filter types supported by Lumension Device Control is shown in the Targets panel.Select file types using the check boxes adjacent to the file type name.

Using Lumension Device Control
- 65 -
12. In the Permissions panel, select one or both of the following options:
Option Description
Export Allows a user to copy files from the Lumension Endpoint Securityclient computer to an external device.
Import Allows a user to copy files from an external device to the LumensionEndpoint Security client computer.
Important: You must select Import or Export at a minimum, to enforce file filtering rules.
13. Click OK.
14. In the Permissions dialog, click OK.
Result: The Permissions, Priority, and Filters you assign to the device or device class are shown in the DeviceExplorer hierarchical structure.
After Completing This Task:
You should send new or updated permissions immediately to Lumension Endpoint Security client computersusing the Control Panel > Tools > Send Updates option. If you do not send updates to protected clientsimmediately, they automatically receive updates when they restart or at next user log in.
Assign Temporary Permissions to UsersYou can assign time-limited, once-per-occurrence permission rules on a computer-specific basis for user accessto a device.
An administrator can allow access to a device for a limited period without having to subsequently delete thepermission. This provides some reduction in administrative burden.
1. In the Management Console select View > Modules > Device Explorer.
2. From the Machine-specific settings division of the Device Explorer hierarchical structure, select computeror computer group.
3. Right-click a device or device class.
4. Select Temporary Permissions from the right-mouse menu.
Step Result: The Choose User on (per selected device) dialog opens.
5. Click Add.
Step Result: The Select Group, User, Local Group, Local User dialog opens.
6. Click Search or Browse to select a user or user group.
7. Select a user or user group and click OK.
Step Result: The Choose Permission dialog opens.

Lumension Endpoint Security
- 66 -
8. Click Next.
9. Select the Read and/or Write permissions that you want to apply.
10. Click Next.
Step Result: The Choose Period dialog opens.
11. Select one of the following options:
Options Action
Immediately Permission rules apply immediately (within 5 minutes).
From Permission rules apply for the period you specify.
12. Click Next.
13. Click Finish.
Result: The temporary permission access rules appear in the Details column of the Device Explorer window.
Assign Scheduled Permissions to UsersYou can schedule user access permissions rules to limit the use of devices to hourly and daily periods of theweek.
You can assign global or computer-specific scheduled device permissions for users and user groups.
1. In the Management Console select View > Modules > Device Explorer.
2. In the Default settings division of the Device Explorer hierarchical structure, right-click a device or deviceclass.
3. Select Add Schedule from the right-mouse menu.
Step Result: The Choose User on Default Settings dialog opens, per selected device.
4. Click Add.
Step Result: The Select Group, User, Local Group, Local User dialog opens.
5. Click Search or Browse to select a user or user group.
6. Select a user or user group and click OK.
Step Result: The Choose User on Default Settings (per selected device) dialog opens.
7. Select the user or user group and click Next.
8. Select from the listed user access options.
Restriction: Only user access options for the device class selected are shown.

Using Lumension Device Control
- 67 -
9. Click Next.
Step Result: The Choose Timeframe dialog opens.
10. Specify hourly time ranges using the To and From field dropdown lists.
11. Select one or more weekdays from the Weekdays panel.
12. Click Next.
13. Click Finish.
Result: The scheduled permission access rule appears in the Details column of the Device Explorer window.
Add ShadowingAn administrator can establish visibility for the file content read from and written to devices connected to clients.This type of visibility is referred to as file shadowing.
File shadowing can be applied to the following device classes:
• COM/Serial Ports• LPT/Parallel Ports• DVD/CD Drives• Modem/Secondary Network Access Devices• Removable Storage Devices• Floppy Disk Drives
You can also apply file shadowing to:
• Device groups• Computer-specific devices or device model types
1. In the Management Console select View > Modules > Device Explorer.
2. From the Default settings division of the Device Explorer hierarchy, right-click a device, device class, ordevice type.
3. Select Add Shadow from the right-mouse menu.
4. Click Add.
Step Result: The Select Group, User, Local Group, Local User dialog opens.

Lumension Endpoint Security
- 68 -
5. Select the user or user group and click Next.
Step Result: The Choose Bus dialog opens.
Figure 44: Choose Bus Dialog
6. Select All or individual bus types.
Important: The available bus types shown are dependent upon the device class you select. The Encryptionpanel is only active, with all options selected by default, for the Removable Storage Devices and DVD/CDDrives device classes.
7. Select a Drive option.
8. Click Next.
Step Result: The Choose Permissions dialog opens.
Figure 45: Choose Permission Dialog

Using Lumension Device Control
- 69 -
9. In the Read and/or Write panels, choose one of the following options:
Option Description
Disabled File content copying is not active.
FileName File content copying is not active; only the file name for a file copied toor from a device is saved in the Lumension Endpoint Security database.
Enabled File content copying is active.
Restriction: Only the Write panel is active for the COM/Serial Ports and LPT/Parallel Ports deviceclasses.
10. Click Next.
11. From the Finish dialog, click Finish.
Result: The shadow rule permission details are shown in the Permissions column of the Device Explorerhierarchical structure. The shadow permission details are displayed in the Permissions column of theDevice Explorer module. A value of R means that shadowing is enabled for files read to and fromthe device, W means that it is on when files are written to and from the device; no letter means thatshadowing is enabled for both reading and writing files. You can review shadowed files using the LogExplorer module.
View Shadow FilesTo view shadow files, you can use predefined templates. When a predefined template does not contain the typeof data that you want to review, you can create your own template query to view shadow files.
Prerequisites:
To view shadow files, Lumension recommends that you show only log entries that display attachments byfiltering templates.
The file name, date, and administrator name are logged for every instance a shadowed file is accessed.
1. In the Management Console select View > Modules > Log Explorer > Templates.
Step Result: The Select and edit template dialog opens.
2. Select a predefined shadow template from the list shown.
Caution: Avoid opening files exceeding 350 MB unless sufficient resources are available.
3. Click Select.
4. Click Query.
5. To view shadow files using a custom query:
a) Click Settings.b) Select Attachment.
Lumension Endpoint Security
- 70 -
c) Click Criteria.d) Select With.e) Click OK.f) Click Execute Query.
Step Result: The Select and edit template dialog closes and the query runs.
Result: When the Shadow rule is enforced, the entries listed show attached files that are exact copies of theshadowed files:
• Copied to or from authorized devices• Read by users
Depending on the selected fields, the date shown for shadow files are:
• Traced On - when files were copied or read, to or from, the device• Transferred On - when a file was uploaded to the database

Using Lumension Device Control
- 71 -
Device Control tracks the:
• User name for the copied file• Computer name used for the copy action• Filename• Content• Device name
After Completing This Task:
Once you list the files, right-click any attachment showing the True value, which indicates that the full content isshadowed, and select one of the following options:
Table 16: Shadow File Output Column Descriptions
Option Description
View Allows you to view the contents of the file in an internal binary vieweradministered by Device Control.
Open Opens the file with the associated application as defined in Windows Explorer®. Ifthere is no association, this command is equivalent to Open With.
Restriction: Only available for full shadowing and when selecting one logregistry.
Open with Allows you choose the application that opens the file.
Restriction: Only available for full shadowing and when selecting one logregistry.
Save as Allows you to save the file to a local or network drive and use an external utility orprogram to open the file.
Filtering TemplatesYou can create subsets of the templates listed in the Select and Edit Templates dialog.
You can select multiple filtering criteria to narrow the focus of template sets shown, thereby reducing the numberof templates that are listed.
1. From the Management Console, select View > Modules > Log Explorer > Templates.
Step Result: The Select and Edit Templates dialog opens.

Lumension Endpoint Security
- 72 -
2. Click Filter.
Step Result: The Filter dialog opens.
Figure 46: Filter Dialog
3. Select one or more of the following options:
Option Description
Private Shows templates visible only to the template owner and EnterpriseAdministrator.
Published Shows templates visible to all Management Console users within yoursystem that can only be changed by the template owner and EnterpriseAdministrator.
Shared Shows templates viewed and changed by any Management Consoleusers within your system.
Non-scheduled Shows templates used to generate specific reports.
Scheduled Shows templates automatically run periodically to generate regularreports. These are saved in a shared folder on your network or e-mailedto specified recipients.
Created by others Shows templates created by users other than the EnterpriseAdministrator.
4. Click OK.
Result: A subset of all available templates is shown.
Sending Updates to All ComputersAfter you define or update device permissions or file permissions, you can send the information to all clientcomputers immediately. Otherwise, updated information will automatically upload the next time a user logs in orthe computers are restarted.
1. From the Management Console, select Tools > Send Updates to All Computers.
Step Result: The Send updates to all computers dialog opens.

Using Lumension Device Control
- 73 -
2. Select one of the following options from the Send updates to all computers dialog.
Option Description
Yes Immediately updates connected computers. Lumension EndpointSecurity can take a long time to send updates depending on the numberof computer connections. The Management Console dialog remainsopen until the Application Server finishes sending the updates.
No Asynchronously updates connected computers. The ManagementConsole dialog closes while the Application Server finishes sending theupdates. You can continue working with the console while the update isdone in the background.
Cancel Closes the Send updates to all computers dialog and halts the updateprocess.
Result: Updates are distributed to all computers running the Lumension Endpoint Security clients that areregistered in the Application Server (s) online table(s). A message appears in the Output window whenthe updates are complete.
Remember: Any computer that is switched off, locked, or disconnected from the network receivesthe updates at the next network connection.
Authorizing CD/DVDsThe Device Control Media Authorizer module provides administrators the ability to encrypt non-bootable harddisk or flash removable storage media, and authorize user access to the encrypted media. Removable storagemedia are defined for Device Control as any device recognized by the Windows removable storage devices classthrough the plug-and-play feature.
With the Media Authorizer you can:
• Add CD/DVD media to the database.• Authorize user access to individually specified CD/DVD media in the network environment.• Perform centralized data encryption for removable storage media.• Perform centralized data encryption for removable storage media used when computers and users are
connected to your network environment.• Rename CD/DVD disk media that has been added to the database.• Authorize user access to encrypted removable storage media in the network environment.• Export encryption keys to provide access to encrypted media used outside your network environment.

Lumension Endpoint Security
- 74 -
Add CD/DVD MediaAn administrator can add CD/DVD media to the database.
Prerequisites:
To successfully add CD/DVD media to the database, the following conditions must be met:
• The administrator have Read or Read/Write permission assigned as using the Device Explorer module.• A client is installed on the same computer as the Management Console where user access is authorized.
1. In the Management Console select View > Modules > Media Authorizer.
2. Click Add CD/DVD.
Step Result: You are prompted to insert a CD/DVD.
3. Insert the CD/DVD.
Step Result: The Media Authorizer calculates a unique cryptographic signature and displays the MediaName dialog.
4. Click OK.
Result: The Media Name label is used to register the CD/DVD in the database.
Log Explorer TemplatesThe operation of the Log Explorer module is based on templates that allow you generate custom reportscontaining results that match specific criteria.
You use the Log Explorer templates to change criteria options, column size and order, columns are displayed inthe Results panel and custom reports, and the whole sets of configurable options to create templates. A templateis a set of rules used for displaying audit and activity log data in the Log Explorer.
You can create your own templates or use predefined templates created by Lumension. You can save customizedtemplates for future use.
Note: The list of predefined templates depends upon your license type.
View Administrator ActivityYou can use the Log Explorer module to monitor Lumension Endpoint Security administrator activity.
Administrator activity includes changing user access rights, device permissions, and file authorizations. Accessto audit log information depends upon administrative user access rights established when you define user accessrights in the Tools module.
1. From the Management Console, select View > Modules > Log Explorer.
Step Result: The Log Explorer window opens.

Using Lumension Device Control
- 75 -
2. Select the Audit by Admin template.
Note: You may also use a template that you create.
3. Click Query.
Result: A list of administrator audit log events is shown in the Log Explorer window.
Upload Latest Log FilesYou may need to view the most current log information to help you quickly troubleshoot problems or verify thatpermissions or authorizations are set correctly.
Clients upload log information to the Application Server at the time specified when you define default options.You can use the Log Explorer to fetch log activity as needed, rather than waiting for the next log activity upload.
1. From the Management Console, select View > Modules > Log Explorer.
Step Result: The Log Explorer window opens.
2. Click Fetch Log.
Step Result: The Select Computer dialog opens and prompts you to specify the client computer to fetch thelogs from.
Figure 47: Fetch Logs - Select Computer
3. Click Search or Browse to select from a list.
4. Click OK.
Result: The computer logs are uploaded to the Application Server and stored in the database. Updated log filesare shown in the Log Explorer window.
Restriction: The time delay between retrieving the log entries from the client and the availability ofthe latest logs depends on the queue size and the database availability at the time of upload.

Lumension Endpoint Security
- 76 -
Reporting
Lumension Endpoint Security provides pre-defined reports designed to provide a comprehensive view of yourcomputing environment for activities.
Reports provide a way to view current device permission policy information. Reports are generated as HTMLfiles that are displayed in the main window of any module. You can be print, copy, convert, save, and modify asnecessary. In addition to the standard reports, you can customize and generate your own reports, using the LogExplorer module.
After saving a report, you can view it using any web browser that you system supports. You can change the dateformat for a report by selecting Windows Control Panel > Regional and Language Options. The regionaloptions or settings vary according to the Windows operating system you are using.
Opening a ReportYou open a report by selecting a predefined report type listed in the Reports module.
1. From the Management Console, select Reports.
2. Select a report type from the list.
Result: The report you select is displayed as an HTML file in the Management Console main window.
Printing a ReportYou may print a report that you generate.
1. From the Management Console, select File > Print.
Step Result: The standard Windows Print dialog opens.
2. Select a printer.
3. Click Print.
Step Result: The Windows Print dialog closes.
Saving a ReportYou may save a report that you generate.
1. From the Management Console, select File > Save as.
Step Result: The Windows dialog for saving a web page opens.
2. Select the file path.
3. Type the file name.
4. Select the file type from the Save as type dropdown list.
5. Select an encoding method from the Encoding dropdown list.
Using Lumension Device Control
- 77 -
6. Click Save.
Step Result: The Windows dialog for saving a web page closes.
User Permissions ReportYou can generate a report that shows the permission rules defined for each user or user group that you specify.You may select one or more users to view report results for.
The name of the specific user you select is shown preceding the report results.
Figure 48: User Permissions Report
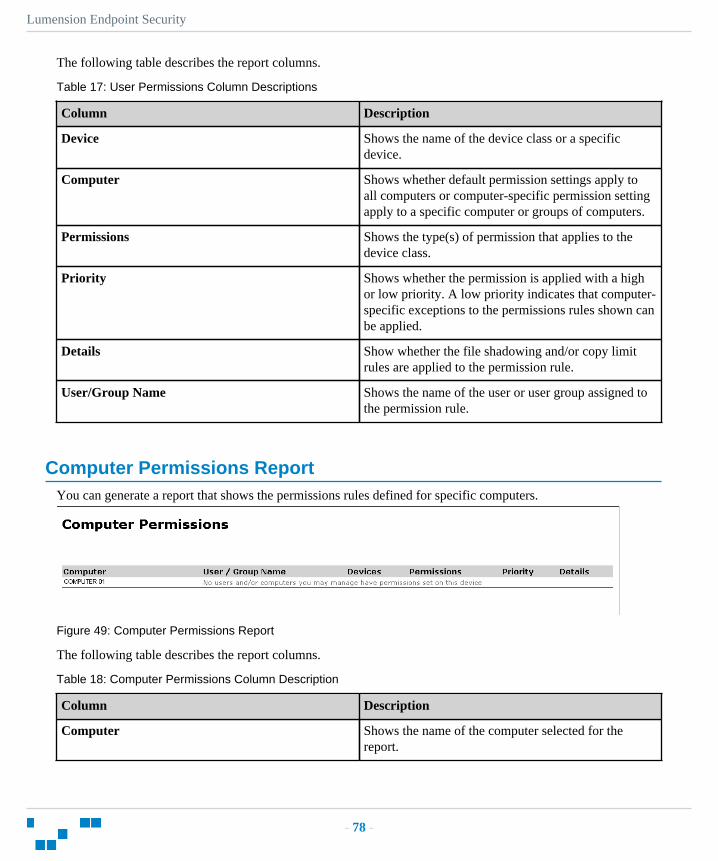
Lumension Endpoint Security
- 78 -
The following table describes the report columns.
Table 17: User Permissions Column Descriptions
Column Description
Device Shows the name of the device class or a specificdevice.
Computer Shows whether default permission settings apply toall computers or computer-specific permission settingapply to a specific computer or groups of computers.
Permissions Shows the type(s) of permission that applies to thedevice class.
Priority Shows whether the permission is applied with a highor low priority. A low priority indicates that computer-specific exceptions to the permissions rules shown canbe applied.
Details Show whether the file shadowing and/or copy limitrules are applied to the permission rule.
User/Group Name Shows the name of the user or user group assigned tothe permission rule.
Computer Permissions ReportYou can generate a report that shows the permissions rules defined for specific computers.
Figure 49: Computer Permissions Report
The following table describes the report columns.
Table 18: Computer Permissions Column Description
Column Description
Computer Shows the name of the computer selected for thereport.

Using Lumension Device Control
- 79 -
Column Description
User/Group Name Shows the name of the user or user group assigned tothe permission rule.
Device Shows the name of the device class or a specificdevice.
Permissions Shows the type(s) of permission that applies to thedevice class.
Priority Shows whether the permission is applied with a highor low priority. A low priority indicates that computer-specific exceptions to the permissions rules shown canbe applied.
Details Show whether the file shadowing and/or copy limitrules are applied to the permission rule.
Using the Device Control ClientThe client provides user access to encryption options for CD/DVDs and removable storage devices.
A user can encrypt and manage devices with the client, provided that the network administrator establishes thenecessary device permission and user access policies with the Management Console.

Lumension Endpoint Security
- 80 -

- 81 -
Chapter
4Using Lumension Application Control
In this chapter:
• Product Overview
• Application Control Server,Database and Client Process
• Using the Management Console
• The File Authorization SetupProcess
• Using Application Control
• Building a Central File AuthorizationList
• Authorizing File Execution
• Local Authorization
• Log Explorer Templates
• Reporting
This chapter explains how Lumension Application Control worksand describes how to scan, import, and manage software fileauthorizations.
Lumension Endpoint Security solutions include:
• Lumension Device Control, which prevents unauthorized transferof applications and data by controlling access to input and outputdevices, such as memory sticks, modems, and PDAs.
• Lumension Device Control client for Embedded Devices, whichmoves beyond the traditional desktop and laptop endpoints to avariety of platforms that include ATMs, industrial robotics, thinclients, set-top boxes, network area storage devices and the myriadof other systems running Microsoft® Windows XP® Embedded.
• Lumension Application Control, which delivers granular control ofapplication execution in an enterprise environment.
• Lumension Application Control Terminal Services Edition, whichextends application control to Citrix® or Microsoft TerminalServices ® environments that share applications among multipleusers.
• Lumension Application Control Server Edition, which deliversapplication control to protect enterprise servers, such as webservers, e-mail servers, and database servers.
Product OverviewLumension Endpoint Security software is based on a multi-tier software architecture that processes and storesdata for Application Control and Device Control. Users can interact with the application through the clientinterface. A separate Management Console provides a user interface for network administrators.

Lumension Endpoint Security
- 82 -
The primary components of the Lumension Application Control solution are:
• The Application Control database which serves as the central repository of authorization information fordevices and applications.
• One or more Application Servers that communicate between the database, the protected clients, and theManagement Console.
• The Management Console, which provides the administrative user interface for the Application Server.• The Application Control client, which is installed on each computer, either endpoint or server, that you want
to protect.
The following figure illustrates the relationships between the Lumension Endpoint Security components.
Figure 50: Application Control Component Relationships
Application Control Server, Database and Client ProcessThe Application Server communicates between the database and the protected client computers.
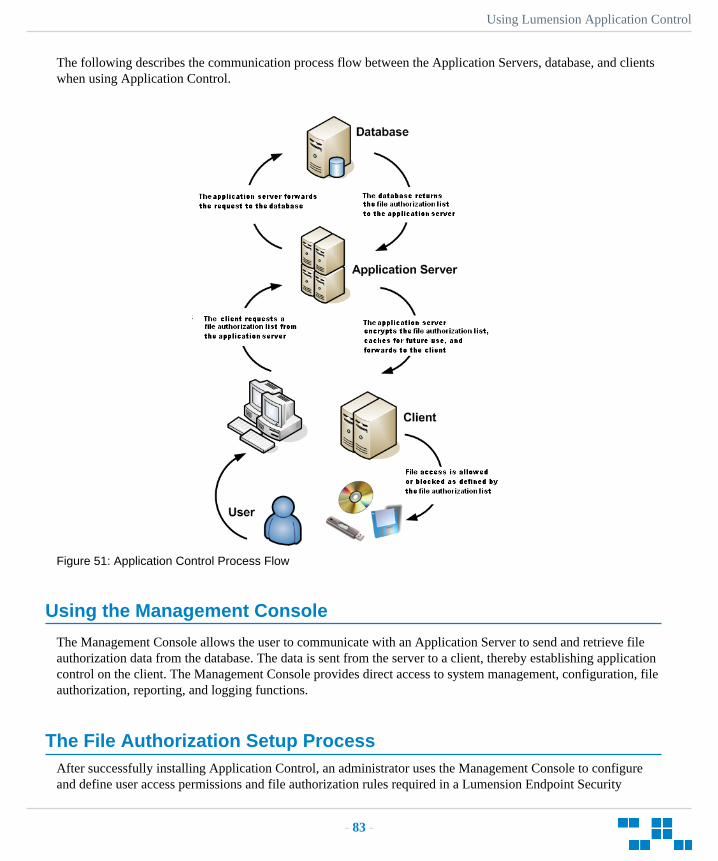
Using Lumension Application Control
- 83 -
The following describes the communication process flow between the Application Servers, database, and clientswhen using Application Control.
Figure 51: Application Control Process Flow
Using the Management Console
The Management Console allows the user to communicate with an Application Server to send and retrieve fileauthorization data from the database. The data is sent from the server to a client, thereby establishing applicationcontrol on the client. The Management Console provides direct access to system management, configuration, fileauthorization, reporting, and logging functions.
The File Authorization Setup ProcessAfter successfully installing Application Control, an administrator uses the Management Console to configureand define user access permissions and file authorization rules required in a Lumension Endpoint Security

Lumension Endpoint Security
- 84 -
environment that specify which executable files, scripts, and macros each user can use, as described by thefollowing process flow.
You can use standard Microsoft file definitions to quickly build a central fileauthorization list for executable files, macros, and scripts.
You can assign administrator access rights using the User Access tool. AnAdministrator has restricted access to the Management Console and can beassigned various administrative roles by an Enterprise Administrator.
After defining Administrator roles, you can use the User Access tool to assign thedefined roles to Administrators.
File groups simplify the process of administering large numbers of executable,script, and macro files for users. Instead of individually authorizing files, you cangroup files together logically by creating file groups.
Lumension Endpoint Security verifies which file group is associated with anexecutable, script, or macro and whether the user has access permission for the filegroup. You can assign specific permissions to local users and user groups. Onlyauthorized applications and scripts assigned to a user or a user group can run on theclient.
After creating the file groups and parent-child relationships you want to use, youcan assign file groups to users or user groups.
You can create a template and scan a target computer running the client. Youcan scan all files on a computer, or you can create a template to scan selecteddirectories or specific file types for example, *.exe, *.com, *.dll, *.ocx, *.sys,*.drv, *.cpl, *.vbs, *.js, to reduce the scan time required.
After you create the necessary file groups and required parent-child relationships,you can assign executable files, scripts, and macros to file groups.
Activating Execution blocking prohibits user access to unauthorized files. Localauthorization is permitted only for the administrators and LocalSystem account.

Using Lumension Application Control
- 85 -
Once you identify all your files, categorize them into file groups, and assign the file groups to users or usergroups, these files are centrally authorized and immediately available to be run by all allowed users.
When a user wants to run an executable, script, or macro, the following actions take place automatically:
• A file that is identified as an executable, script, or macro, by the operating system is stored in the LumensionEndpoint Security database ready for execution (but not actually executed).
• A file is identified by Lumension Endpoint Security as an executable, script, or macro, has the entire filecontent checked to determine its digital signature (hash) before being allowed to execute by the operatingsystem.
• The digital signature is compared to the digital signatures (stored in a central file authorization list) for filesthat are authorized to run.
• If, and only if, the file signature corresponds exactly to a file signature in the central file authorization list,in other words, the digital signatures are identical and the file is authorized for execution for the user orcomputer requesting authorization, can the file run.
Note: When an executable file is launched by the user, Lumension Application Control will identify anddetermine the digital signature (hash) of that executable regardless of the current mode (blocking or non-blocking). Although rarely detected by the user, this process of identifying the executable and determining thehash could result in a noticable delay on some systems.
Using Application ControlThe Management Console provides direct access to system management, configuration, file authorization,reporting, and logging functions.
The Management Console allows the user to communicate with an Application Server to send and retrieve fileauthorization data from the database. The data is sent from the server to a client, thereby establishing applicationcontrol on the client. The Management Console provides direct access to system management, configuration, fileauthorization, reporting, and logging functions.
Logging In to the Management ConsoleYou access the application by logging in to the Management Console.
1. Select Start > Programs > Lumension > Endpoint Security > Endpoint Security Management Console> Lumension Endpoint Security Management Console.
Step Result: Each time you access the Management Console, the Connect to Lumension EndpointSecurity Application Server dialog appears.
2. From the Application Server drop-down list, select the Application Server you want to connect to.
You can type the server name as an IP address with port if required in square brackets, NetBios name, or fullyqualified domain name in the Application Server field.

Lumension Endpoint Security
- 86 -
3. Select one of the following options:
Option Description
Use current user By default the system connects to the Application Server using yourcredentials.
Log in as Type the user name in the Username field and type the password in thePassword field.
Tip: Precede the user name by a computer workstation name andbackslash for a local user, or by a domain name and backslash fordomain users.
4. Click OK.
Step Result: The Connect to Lumension Endpoint Security Application Server dialog closes.
Result: The Lumension Endpoint Security Management Console window opens.
Logging Out of the Management ConsoleWhen you log out from the Management Console you can choose to terminate the adminstrative session ordisconnect from the Application Server.
1. To disconnect from the Application Server, select File from the navigation bar.
2. Select one of the following options:
Option Description
Disconnect The Management Console remains open.
Exit The Management Console closes.
Result: The Disconnect or Exit action terminates your current administrative session.
Lumension Application Control ModulesThe Application Control Modules provide access to the functions necessary for configuring and managing andare grouped into several modules, represented by the icons in the Modules section of the Control Panel.

Using Lumension Application Control
- 87 -
The Lumension Application Control Modules provide access to the functions necessary for configuring andmanaging Lumension Endpoint Security and are grouped into five modules, represented by the icons in theModules section of the Control Panel:
Table 19: Lumension Application Control Modules
Module Icon Description
DatabaseExplorer
Shows the list of executable files, scripts, and macros that are stored in theLumension Endpoint Security database and manages file assignment details.
Exe Explorer Builds a list of executable files, scripts, and macros that are allowed to runon Lumension Endpoint Security clients, and assigns files to file groups.
Log Explorer Shows logs of applications, scripts, and macros that were run, files forwhich access was denied, and files authorized locally.
Scan Explorer Scans a computer or domain to identify executable files, scripts, and macrosto be authorized, and assigns files to a file group using templates.
User Explorer Links users or user groups with file groups, granting permission to use thefiles assigned to file groups.
Getting StartedThe Management Console can only be accessed by authorized network administrators.
Before you begin to use Lumension Endpoint Security, you must define the following users in the domain:
• An administrative user with local Administrator rights.• A Lumension Endpoint Security client user with domain user rights.
Building a Central File Authorization ListYou can use Standard File Definitions (SFD) to simplify the task of building a central file authorization list.
Standard File Definitions (SFDs) contain digital signatures corresponding to standard executable files that aredistributed with Microsoft Windows operating systems.
Using SFDs:
• Simplifies initial setup.• Includes information necessary to automatically allocate files to predefined file groups and assign files to
well-known user and user groups.• Minimizes the risk of authorizing tampered versions of operating system files.• Simplifies operating system upgrades because Lumension Endpoint Security recognizes the standard files,
and respective default file groups. Lumension Endpoint Security automatically saves upgraded file definitionsto the same locations as the originals.

Lumension Endpoint Security
- 88 -
The following table describes the system users/groups that can access the default SFD file groups.
Table 20: Standard File Definition File Groups and System Users/Groups
File Group Name Users/Groups Assigned
16 Bit Applications Administrators (group)
Accessories Administrators (group), Everyone (group)
Administrative Tools Administrators (group)
Boot files Local Service (user), LocalSystem (user), Network Service (user)
Communication Administrators (group)
Control Panel Administrators (group)
DOS Applications Administrators (group)
Entertainment Administrators (group)
Logon files Everyone (group)
Lumension Endpoint Security supportfiles
Administrators (group), Everyone (group)
Setup Administrators (group)
Windows Common Everyone (group)
Importing Standard File DefinitionsYou can use standard Microsoft file definitions to quickly build a central file authorization list for executablefiles, macros, and scripts.

Using Lumension Application Control
- 89 -
1. From the Management Console, select Tools > Standard File Definitions.
Step Result: The Import Standard File Definitions dialog opens.
Figure 52: Import Standard File Definitions Dialog
2. Click Add.
Step Result: The Open dialog opens and displays files with an .sfd extension.
Tip: You can import standard file definitions from the Lumension Customer Portal (https://portal.lumension.com) by downloading to a local computer and unzipping the archived files.
3. Select the standard definition file(s) to import.
4. Click Open.
Step Result: The file(s) are shown in the Add window.
5. Select one or more of the following options:
Option Description
Assign File Groups to WellKnown Users Automatically
Assigns the executable files, scripts, and macros found in the scan tothe system users/groups.
Process Known FilesAutomatically
The wizard adds the file to the database if they have the same name butdifferent digital signature.

Lumension Endpoint Security
- 90 -
Option Description
Import SFD with file hashesand create predefined FileGroups:
Lumension Endpoint Security automatically imports standard filedefinition digital signatures, then creates and assigns the files topredefined file groups.
Import SFD without file hashesand create predefined FileGroups:
Predefined file groups for standard file definitions are created but nodigital signatures are imported. Lumension Endpoint Security partiallyassists you by identifying file names and proposing file groups forauthorization during scanning.
6. Click Import.
7. After importing standard file definitions, click OK.
8. Click Close.
Result: The designated standard file definitions are now authorized and assigned to respective predefined filegroups and system users/groups.
Caution: When you import standard file definitions, you should authorize logon and boot files. Ifthese are not authorized, the system will not work properly. This is especially important for systemupdates.
After Completing This Task:
Assign the imported predefined file groups to users/groups, if you did not select the Assign File Groups to WellKnown User Automatically option.
Authorizing File ExecutionAn initial scan using the Scan Explorer module allows you to quickly add executable files, scripts, and macrosto the Lumension Endpoint Security database.
Once your initial scan is complete, you create files groups and assign the authorized files to file groups. Youmanage the files added to the database with the User Explorer and Database Explorer modules by linking filegroups to users or user groups. Files not added to the database are designated as unauthorized and are deniedexecution.
Creating a File Scanning TemplateYou can create a template to identify new file authorization changes to make when new software is installed.
You can scan for files by creating a template with the following rules:
• Scan all executables matching the pattern *.exe or *.dll in the %SYSTEMROOT% directory andsubdirectories.
• Scan all files matching the pattern *.exe or *.dll in the %PROGRAMFILES% directory and subdirectories.

Using Lumension Application Control
- 91 -
1. From the Management Console, select View > Modules > Scan Explorer > Perform New Scan > CreateNew Template.
Step Result: The Create New Template dialog opens.
Figure 53: Create New Template Dialog
2. In the New Template name: field, enter the name for the new template.
3. Click Add.
Step Result: The New Rule dialog opens.
Figure 54: New Rule Dialog

Lumension Endpoint Security
- 92 -
4. In the Scan files matching the pattern (use * wildcard for all files) field, enter the name patterns to use forscanning.
Caution: When you specify wildcard masks, for example: *.com, you can miss scanning for files that donot use standard file extensions such as: *.exe, or *.dll, and so forth. The result is that these types of fileswill not be authorized, which means that these applications will not work or work properly.
5. In the In directory field, enter the path name for the directory you want to scan.
6. Select one or more of the following options:
Option Description
Include subdirectories Scan subdirectories of the root directory.
Scan executables Scan for executable files and ignore all other file types. The scan alsosearches for 16-bit executables.
Attention: If you do not select the Scan Executables option, youmust specify the *.exe and *.sys for the matching pattern to scan forthese types of files.
7. Click OK.
Step Result: The New rule dialog closes and the rules you define appear on the Rules box.
8. Click Save.
Result: The Perform New Scan dialog lists the new template in the From Template drop-down list.

Using Lumension Application Control
- 93 -
Scanning Files on a Client ComputerYou can scan all files on a computer, or you can create a template to scan selected directories or specific filetypes for example, *.exe, *.com, *.dll, *.ocx, *.sys, *.drv, *.cpl, *.vbs, *.js, to reduce the scan time required.
Prerequisites:
Before you scan a computer, create a file scanning template.
Important: If you are using Application Control with Device Control enabled, you must set the followingDevice Control permissions before performing a scan on a secondary hard drive.
Device Class: Removable
User: LocalSystem
Permissions: Read
Encryption: Unencrypted (Unencrypted or unknown encryption type)
Bus: All
Drive: Hard Drive
1. From the Management Console, select View > Modules > Scan Explorer.
Step Result: The Scan Explorer window opens.

Lumension Endpoint Security
- 94 -
2. Click Perform New Scan.
Step Result: The Perform New Scan dialog opens.
Figure 55: Perform New Scan Dialog
3. In the From Template field, select a template from the drop-down list.
4. Click the ellipsis adjacent to the On Computer field.
a) Type the computer name.b) Click Search or Browse.c) Select the computer from the list.d) Click OK.
You can type the computer name directly or use wildcard, such as * and ?.
Step Result: The Select Computer dialog opens.
5. Click Start Scan.
Step Result: The Perform New Scan dialog opens.
Figure 56: Perform New Scan Dialog - Comment
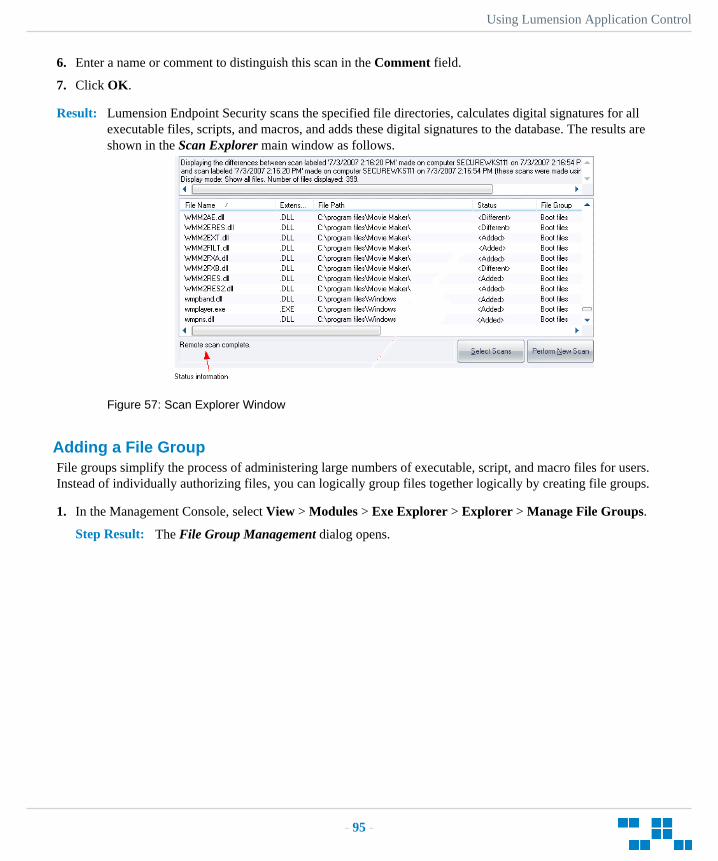
Using Lumension Application Control
- 95 -
6. Enter a name or comment to distinguish this scan in the Comment field.
7. Click OK.
Result: Lumension Endpoint Security scans the specified file directories, calculates digital signatures for allexecutable files, scripts, and macros, and adds these digital signatures to the database. The results areshown in the Scan Explorer main window as follows.
Figure 57: Scan Explorer Window
Adding a File GroupFile groups simplify the process of administering large numbers of executable, script, and macro files for users.Instead of individually authorizing files, you can logically group files together logically by creating file groups.
1. In the Management Console, select View > Modules > Exe Explorer > Explorer > Manage File Groups.
Step Result: The File Group Management dialog opens.

Lumension Endpoint Security
- 96 -
2. Click Add File Group.
Step Result: The Add File Group dialog opens.
Figure 58: Add File Group Management Dialog
3. Enter the name of the file group in the File Group field.
4. Click OK.
Step Result: The file group is added to the File Groups list.
5. Click Close.
Result: The file group is added to the list. You can now assign files to the new file group.
Note: You must grant dedicated accounts such as LocalSystem the right to use the appropriate filegroups containing services. For example, if you create a Windows File Group where you placeall operating system executable files (including Windows services that run with the LocalSystemaccount), you should grant LocalSystem the right to use this Windows file group.
Assigning Files to File GroupsAfter you create the necessary file groups and required parent-child relationships, you can assign executablefiles, scripts, and macros to file groups.
1. In the Management Console, select View > Modules > Database Explorer.
2. Select the file(s) to assign to a file group.
3. Right-click the file selection.

Using Lumension Application Control
- 97 -
4. Select the Assign to File Group option.
Step Result: The Assign Files to a File Group dialog opens.
Figure 59: Assign Files to File Groups Dialog
Table 21: Assign Files to File Groups Columns
Column Description
File Name of the file including extension.
File Path Complete file path name, including the drive.
Current File Group The file group to which the file currently belongs. Files that arenot assigned to a file group are designated as <Not Authorized>.
Suggested File Group A proposed file group based on the file name. A file having thesame name as another file in the database is suggested to belongto the same file group as the initial file.
5. Select a file group from the drop-down list in the Suggested File Group column.
6. Click OK.
Result: The file(s) are now assigned to the designated file group.
Note: You can assign a script or macro to a file group as a script, as distinguished from an executablefile.
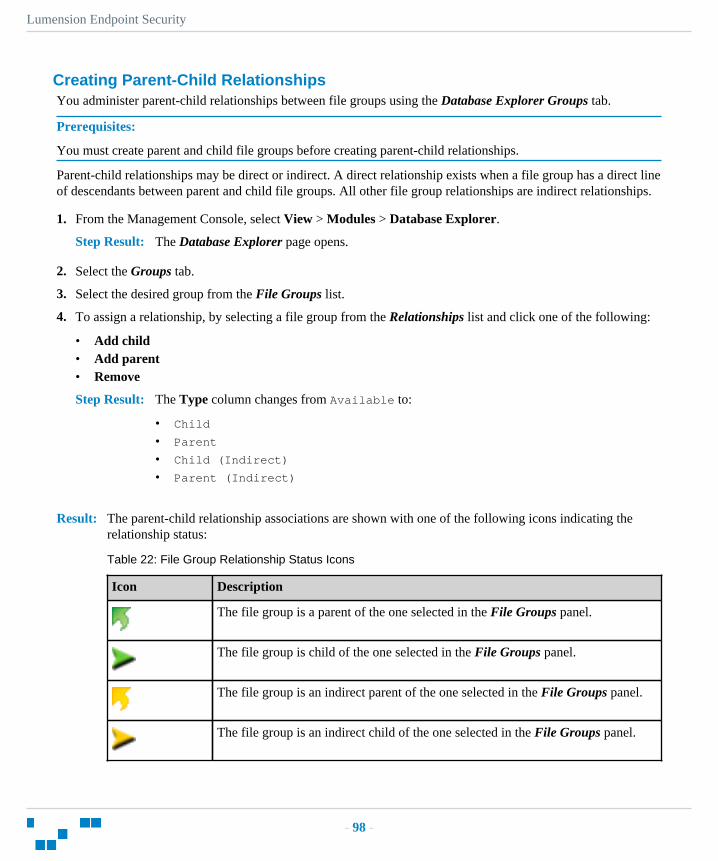
Lumension Endpoint Security
- 98 -
Creating Parent-Child RelationshipsYou administer parent-child relationships between file groups using the Database Explorer Groups tab.
Prerequisites:
You must create parent and child file groups before creating parent-child relationships.
Parent-child relationships may be direct or indirect. A direct relationship exists when a file group has a direct lineof descendants between parent and child file groups. All other file group relationships are indirect relationships.
1. From the Management Console, select View > Modules > Database Explorer.
Step Result: The Database Explorer page opens.
2. Select the Groups tab.
3. Select the desired group from the File Groups list.
4. To assign a relationship, by selecting a file group from the Relationships list and click one of the following:
• Add child• Add parent• Remove
Step Result: The Type column changes from Available to:
• Child
• Parent
• Child (Indirect)
• Parent (Indirect)
Result: The parent-child relationship associations are shown with one of the following icons indicating therelationship status:
Table 22: File Group Relationship Status Icons
Icon Description
The file group is a parent of the one selected in the File Groups panel.
The file group is child of the one selected in the File Groups panel.
The file group is an indirect parent of the one selected in the File Groups panel.
The file group is an indirect child of the one selected in the File Groups panel.

Using Lumension Application Control
- 99 -
Icon Description
A file group created by a Lumension Endpoint Security administrator that can bedeleted or renamed.
A file group created by the program that is blocked and cannot be deleted.
Note: You cannot delete indirect relationships, you must first proceed to the directly related file groupand then remove the relationship.
The following examples demonstrate hierarchical parent-child file group relationships.
Example:
The file group 16 Bit Applications is the parent of Accessories, and also has indirect childAlternative and CAD software:
Figure 60: File Group Parent Relationship
The File Group Accounting is the child of Marketing who also has an indirect child Payroll:
Figure 61: File Group Child Relationship
This is the consequence of the following parent-child assignments:
Figure 62: File Group Parent-Child Relationship

Lumension Endpoint Security
- 100 -
When assigning the file group Payroll to a user or user group; there is also an indirect assignmentbecause of this relationship:
Figure 63: File Group Indirect Assignment
You can view indirect parent-child relationship assignments by using the File Groups by User tab ofthe User Explorer module.
Assigning File Groups to UsersAfter creating file groups and parent-child relationships you want to use, you can assign file groups to users oruser groups.
1. In the Management Console, select View > Modules > User Explorer.
Step Result: The User Explorer window opens.
2. Select the File Groups by User tab.
3. In the Users, Groups, Computers and Domains panel, select a user or user group.
4. Select one or more file groups from the Not Authorized list.
5. Select one of the following options:
Command Action
Authorize Adds the selected file group to the list of file groups directly authorizedfor the selected user or user group.
Authorize All Adds the names of file listed as Not Authorized to file groups directlyauthorized for the selected user or user group.
Note: Changes to file authorizations or user membership for a file group can remove users that are indirectlyauthorized for a file group.
Result: The user or user group is now assigned to the designated file group.
After Completing This Task:
You can send the updated authorization(s) immediately to the client computers using the Control Panel > Tools> Send Updates option. If you do not send updates to protected clients, they automatically receive updates whenthey restart or at next user log in.

Using Lumension Application Control
- 101 -
Sending Updates to All ComputersAfter you define or update device permissions or file permissions, you can send the information to all clientcomputers immediately. Otherwise, updated information will automatically upload the next time a user logs in orthe computers are restarted.
1. From the Management Console, select Tools > Send Updates to All Computers.
Step Result: The Send updates to all computers dialog opens.
2. Select one of the following options from the Send updates to all computers dialog.
Option Description
Yes Immediately updates connected computers. Lumension EndpointSecurity can take a long time to send updates depending on the numberof computer connections. The Management Console dialog remainsopen until the Application Server finishes sending the updates.
No Asynchronously updates connected computers. The ManagementConsole dialog closes while the Application Server finishes sending theupdates. You can continue working with the console while the update isdone in the background.
Cancel Closes the Send updates to all computers dialog and halts the updateprocess.
Result: Updates are distributed to all computers running the Lumension Endpoint Security clients that areregistered in the Application Server (s) online table(s). A message appears in the Output window whenthe updates are complete.
Remember: Any computer that is switched off, locked, or disconnected from the network receivesthe updates at the next network connection.
Viewing Database RecordsThe Database Explorer module displays a list of the executable, script, and macro files, digital signatures, andassigned file groups stored in the Lumension Endpoint Security database.
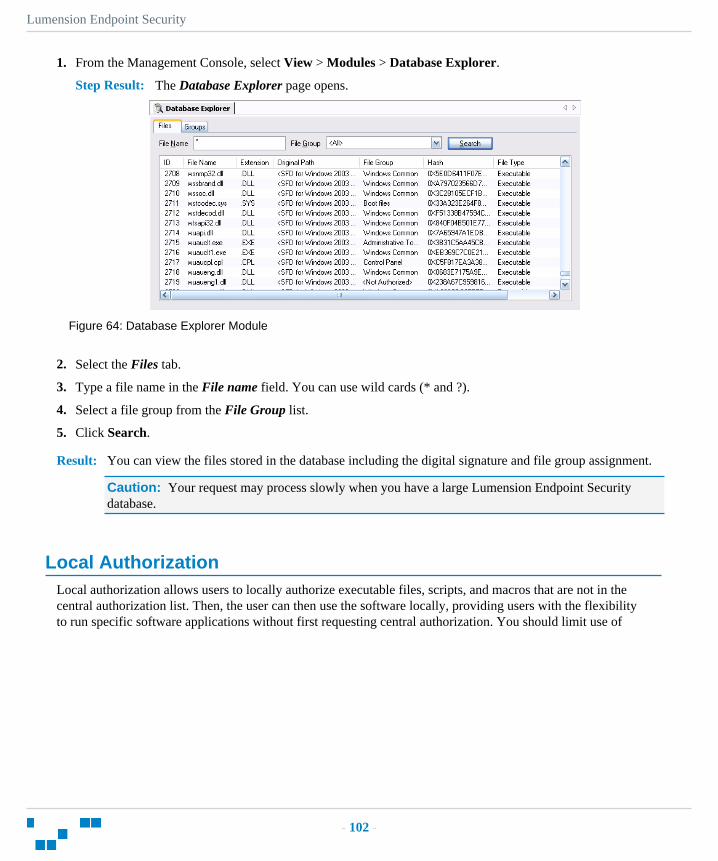
Lumension Endpoint Security
- 102 -
1. From the Management Console, select View > Modules > Database Explorer.
Step Result: The Database Explorer page opens.
Figure 64: Database Explorer Module
2. Select the Files tab.
3. Type a file name in the File name field. You can use wild cards (* and ?).
4. Select a file group from the File Group list.
5. Click Search.
Result: You can view the files stored in the database including the digital signature and file group assignment.
Caution: Your request may process slowly when you have a large Lumension Endpoint Securitydatabase.
Local AuthorizationLocal authorization allows users to locally authorize executable files, scripts, and macros that are not in thecentral authorization list. Then, the user can then use the software locally, providing users with the flexibilityto run specific software applications without first requesting central authorization. You should limit use of

Using Lumension Application Control
- 103 -
this feature to avoid compromising the central network protection policy provided by Lumension ApplicationControl.
Prerequisites:
• Using Tools > Default Options, verify that:
• On the Computer tab, the Local Authorization default option is Enabled.
Tip: You can also use this option to disable local authorization on all computers.
• On the User/User Group tab, Execution Blocking default option is set to: Ask user for *.exe only,for the Blocking mode. The user is prompted to authorize the executable only. After the executablefile is authorized, any DLLs or other executable files used by the authorized file will automatically beauthorized.
Tip: You may type a customized user notification message in the Notification Text field, such as Doyou want to authorize this file locally?
• On the User Explorer module File Groups by User tab, the users and user groups permitted to use localauthorization are listed.
1. Log in to a Lumension Endpoint Security client computer using a locally authorized user or user groupaccount.
2. Select an executable file, script, or macro to run that is not centrally authorized.
Step Result: The Lumension Endpoint Security - Unauthorized Application Detected dialog showsdetailed information about the application that is about to run.
Figure 65: Lumension Endpoint Security - Unauthorized Application Detected
Lumension Endpoint Security
- 104 -
3. Select one of the following options:
Option Description
Deny Denies local authorization of the specific executable file, script, ormacro. The user is notified the next time an attempt is made to run thesoftware application.
Deny All Denies local authorization of all executable file, scripts, and macros.
Authorize Authorizes the program locally only for that specific computer.
Result: A progress bar appears at the bottom of the dialog. The Lumension Endpoint Security - UnauthorizedApplication Detected dialog closes and the authorized application runs or is denied, based on the optionselected.
Note: The file is automatically denied and the dialog closes, if you do not respond within the time-outperiod.
Log Explorer TemplatesThe operation of the Log Explorer module is based on templates that allow you generate custom reportscontaining results that match specific criteria.
You use the Log Explorer templates to change criteria options, column size and order, columns are displayed inthe Results panel and custom reports, and the whole sets of configurable options to create templates. A templateis a set of rules used for displaying audit and activity log data in the Log Explorer.
You can create your own templates or use predefined templates created by Lumension. You can save customizedtemplates for future use.
Note: The list of predefined templates depends upon your license type.
View Administrator ActivityYou can use the Log Explorer module to monitor Lumension Endpoint Security administrator activity.
Administrator activity includes changing user access rights, device permissions, and file authorizations. Accessto audit log information depends upon administrative user access rights established when you define user accessrights in the Tools module.
1. From the Management Console, select View > Modules > Log Explorer.
Step Result: The Log Explorer window opens.
2. Select the Audit by Admin template.
Note: You may also use a template that you create.

Using Lumension Application Control
- 105 -
3. Click Query.
Result: A list of administrator audit log events is shown in the Log Explorer window.
Upload Latest Log FilesYou may need to view the most current log information to help you quickly troubleshoot problems or verify thatpermissions or authorizations are set correctly.
Clients upload log information to the Application Server at the time specified when you define default options.You can use the Log Explorer to fetch log activity as needed, rather than waiting for the next log activity upload.
1. From the Management Console, select View > Modules > Log Explorer.
Step Result: The Log Explorer window opens.
2. Click Fetch Log.
Step Result: The Select Computer dialog opens and prompts you to specify the client computer to fetch thelogs from.
Figure 66: Fetch Logs - Select Computer
3. Click Search or Browse to select from a list.
4. Click OK.
Result: The computer logs are uploaded to the Application Server and stored in the database. Updated log filesare shown in the Log Explorer window.
Restriction: The time delay between retrieving the log entries from the client and the availability ofthe latest logs depends on the queue size and the database availability at the time of upload.
Reporting
Lumension Endpoint Security provides pre-defined reports designed to provide a comprehensive view of yourcomputing environment for activities.

Lumension Endpoint Security
- 106 -
Reports provide a way to view current device permission policy information. Reports are generated as HTMLfiles that are displayed in the main window of any module. You can be print, copy, convert, save, and modify asnecessary. In addition to the standard reports, you can customize and generate your own reports, using the LogExplorer module.
After saving a report, you can view it using any web browser that you system supports. You can change the dateformat for a report by selecting Windows Control Panel > Regional and Language Options. The regionaloptions or settings vary according to the Windows operating system you are using.
Opening a ReportYou open a report by selecting a predefined report type listed in the Reports module.
1. From the Management Console, select Reports.
2. Select a report type from the list.
Result: The report you select is displayed as an HTML file in the Management Console main window.
Printing a ReportYou may print a report that you generate.
1. From the Management Console, select File > Print.
Step Result: The standard Windows Print dialog opens.
2. Select a printer.
3. Click Print.
Step Result: The Windows Print dialog closes.
Saving a ReportYou may save a report that you generate.
1. From the Management Console, select File > Save as.
Step Result: The Windows dialog for saving a web page opens.
2. Select the file path.
3. Type the file name.
4. Select the file type from the Save as type dropdown list.
5. Select an encoding method from the Encoding dropdown list.
6. Click Save.
Step Result: The Windows dialog for saving a web page closes.

Using Lumension Application Control
- 107 -
File Groups by UserYou can generate a report showing the file groups assigned to an individual user or users in a group.
Figure 67: File Groups by User Report
The following table describes the report rows.
Table 23: File Groups by User Report Row Description
Row Name Description
User Name Full user name including domain.
User Group Full user group name including domain.
Direct Group File Authorization Group files directly authorized to the user or user group by the administrator.
Indirect Group FileAuthorization
Group files indirectly authorized to the user or user group through a parent-child relationship with file groups that are directly authorized for the user oruser group.
Warning Message Warns that you do not have permission to view the user or user group filegroup assignments selected.
User by File GroupYou can generate a report showing the users assigned to each file group.

Lumension Endpoint Security
- 108 -
The report shows the users directly and indirectly assigned to the file group.
Figure 68: User by File Group Report
The following table describes the report rows.
Table 24: User by File Group Report Row Description
Row Name Description
Direct Group File Authorization Group files directly authorized to the user or user group by the administrator.
Indirect Group FileAuthorization
Group files indirectly authorized to the user or user group through a parent-child relationship with file groups that are directly authorized to the user oruser group.
User Name Full user name including domain.
User Group Full user group name including domain.
Warning Message Warning that you do not have permissions to view the file group assignmentsselected.
User OptionsYou can generate a report showing the Lumension Endpoint Security options settings status.

Using Lumension Application Control
- 109 -
The report settings describe the types of Application Control activities that the user is permitted and that aremonitored by Lumension Endpoint Security.
Figure 69: User Options Report
The following table describes the report columns.
Table 25: User Options Column Description
Column Description
Option The name of the option shown the Default Options dialog.
User/Group The user or user group for which this option is set; Default is the value configured forall users and represents the default value.
Setting The actual value of the option; the asterisk (*) indicates that the option is set to thedefault value.

Lumension Endpoint Security
- 110 -