quick start guide - huihoodocs.huihoo.com/freenas/freenas-mini-storage-device-quick-start-… ·...
TRANSCRIPT
Quick Start Guide
TOC/Welcome ............................................................................................................................ 1
Parts List ........................................................................................................................................ 2
Setting up your FreeNAS® Mini ............................................................................................ 2
. Installing Hard Drives ................................................................................................... 3
. Plugging in your FreeNAS® Mini Appliance ......................................................... 3
. Back Panel Layout and LED Indicators ................................................................... 4
. Get an IP address ............................................................................................................ 5
FreeNAS® Software Setup ..................................................................................................... 6
1. Log in for the irst time ................................................................................................ 6
2. The Initial Coniguration Wizard ............................................................................. 6
3. Volume Coniguration ................................................................................................. 7
4. Directory Services ......................................................................................................... 7
5. Shares and Permissions .............................................................................................. 8
6. Miscellaneous Settings ............................................................................................. 10
7. Finish Coniguration ................................................................................................... 11
8. Connect to your share ............................................................................................... 11
Additional Resources ............................................................................................................. 12
FreeNAS® Mini Front Panel Layout ................................................................................... 13
Welcome to the FreeNAS® Mini Storage Device Quick Start Guide. Here
you’ll ind everything you need to get started and to conigure your device
for use within your network. The FreeNAS® Mini Storage Device is designed
to be easy to setup with just a few mouse clicks from a web browser interface.
This Quick Start Guide demonstrates a coniguration that will allow the
computers in your network to access the storage device, regardless of their
operating system. It includes pointers to additional resources should you wish
to customize your coniguration or to learn more about the features provided
by FreeNAS®. By following the instructions in this Guide, you should be up and
running in about 15 minutes.
1
PARTS LIST
3 One (1) FreeNAS Mini device
3 One (1) power cord
3 Two (2) case door keys
3 One (1) FreeNAS Quick Start Guide (you’re reading it now).
If you ordered a device pre-populated with drives:
3 Four (4) drive trays, populated with drives, separated from the FreeNAS Mini device.
If you ordered a driveless model:
3 Four (4) drive trays, illed with dummy drives secured by two (2) screws each.
3 Eight (8) additional hard drive screws.
SETTING UP YOUR FREENAS® MINI
To connect to your FreeNAS Mini appliance in order to set it up you will need
the following:
3 a USB keyboard (or keyboard with USB adapter)
3 a VGA display (or display with a VGA adapter)
3 an Ethernet cable
3 a switch which is connected to the other computers in your network
3 a Phillips screwdriver (if installing your own hard drives)
3 a web browser running on a computer connected to the same network as your FreeNAS Mini. A modern web browser, such as Mozilla Firefox, Google Chrome, or Internet Exporer 10 or later, is required. If you ind that the FreeNAS Web User Interface is working incorrectly, try using the latest version of Mozilla Firefox, available at getirefox.com.
2
INSTALLING HARD DRIVES
If you ordered a FreeNAS® Mini with hard drives, they will already be
installed in the drive trays. Insert them into the drive bays, with the tray
numbered ‘0’ at the top, followed by 1, 2, and 3 at the bottom. Drive number-
ing is for your convenience only and has no bearing on the operation of your
FreeNAS® Mini.
If you ordered a driveless FreeNAS® Mini, your drive trays will be in the
FreeNAS® Mini device, illed with dummy drives secured by two screws each.
Remove the dummy drives and use those screws and the additional eight
screws in the accessories kit to install your chosen drives into the drive carriers.
PLUGGING IN YOUR FREENAS® MINI APPLIANCE
To connect the appliance to your network and prepare it for coniguration,
perform the following steps. Refer to page 4 for a guide to the back panel of
your FreeNAS Mini.
1. Connect a monitor to the VGA port using a VGA cable, or any adapter from VGA to a video device you have available.
2. Plug one end of an Ethernet cable into the Ethernet port. Connect the other end to a switch or router connected in turn to the device you plan to use to conigure your FreeNAS Mini.
3. Plug one end of the power cord into the back panel of the device and plug the other end into a power socket or UPS device.
4. Plug the USB keyboard into the USB port on the back panel.
3
4
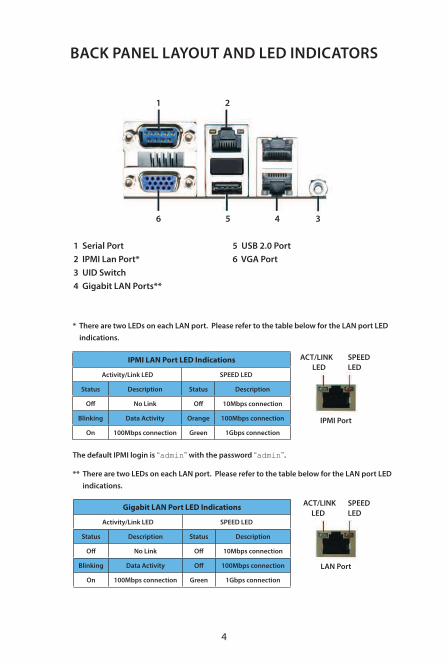
BACK PANEL LAYOUT AND LED INDICATORS
1 Serial Port
2 IPMI Lan Port*
3 UID Switch
4 Gigabit LAN Ports**
5 USB 2.0 Port
6 VGA Port
* There are two LEDs on each LAN port. Please refer to the table below for the LAN port LED
indications.
** There are two LEDs on each LAN port. Please refer to the table below for the LAN port LED
indications.
ACT/LINK
LED
SPEED
LEDIPMI LAN Port LED Indications
Activity/Link LED SPEED LED
Status Description Status Description
Of No Link Of 10Mbps connection
Blinking Data Activity Orange 100Mbps connection
On 100Mbps connection Green 1Gbps connection
IPMI Port
1 2
6 5 4 3
ACT/LINK
LED
SPEED
LED
LAN Port
Gigabit LAN Port LED Indications
Activity/Link LED SPEED LED
Status Description Status Description
Of No Link Of 10Mbps connection
Blinking Data Activity Of 100Mbps connection
On 100Mbps connection Green 1Gbps connection
The default IPMI login is “admin” with the password “admin”.

GET AN IP ADDRESS
The device will boot up and you’ll see some text messages on the VGA display
as the operating system loads. When the system has inished booting, you will
see a screen similar to Figure 1. Please be aware that all operations performed
at this console menu are performed with root privileges and will override any
existing settings.
Figure 1: Console Setup Screen
5
If there is a DHCP server in your network, the Ethernet port on the device will
automatically receive an IP address which can be used to access the device
from a web browser. In the example shown in Figure 1, the device is reachable
at http://10.2.1.231.
If your network does not have a DHCP server, refer to Section 3: Booting into
FreeNAS in the FreeNAS® 9.3 Users Guide for instructions on how to manually
set an IP address. The current version of the FreeNAS documentation can be
found at http://doc.freenas.org/9.3.
You may now unplug the USB keyboard and monitor from the back of the
FreeNAS mini, as they are not used for the rest of the coniguration process. You
are now ready to conigure your FreeNAS® device.
6
FREENAS® SOFTWARE SETUP
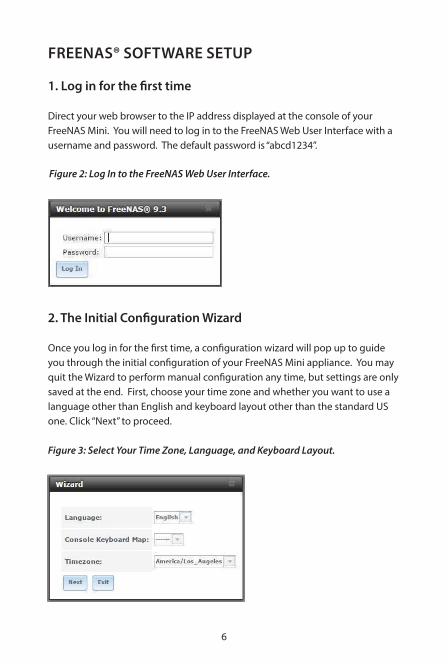
1. Log in for the irst time
Direct your web browser to the IP address displayed at the console of your
FreeNAS Mini. You will need to log in to the FreeNAS Web User Interface with a
username and password. The default password is “abcd1234”.
Figure 2: Log In to the FreeNAS Web User Interface.
2. The Initial Coniguration Wizard
Once you log in for the irst time, a coniguration wizard will pop up to guide
you through the initial coniguration of your FreeNAS Mini appliance. You may
quit the Wizard to perform manual coniguration any time, but settings are only
saved at the end. First, choose your time zone and whether you want to use a
language other than English and keyboard layout other than the standard US
one. Click “Next” to proceed.
Figure 3: Select Your Time Zone, Language, and Keyboard Layout.
7
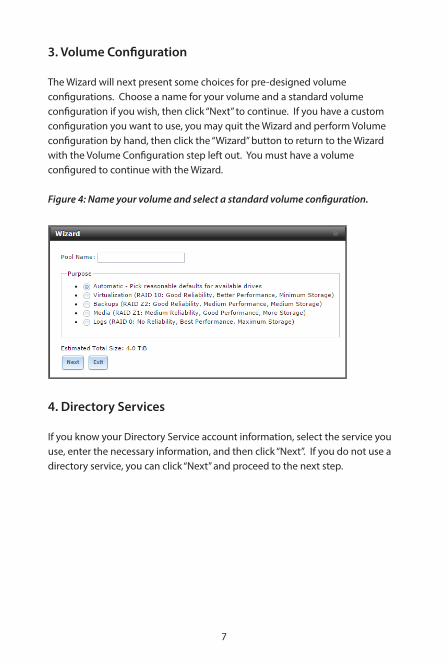
3. Volume Coniguration
The Wizard will next present some choices for pre-designed volume
conigurations. Choose a name for your volume and a standard volume
coniguration if you wish, then click “Next” to continue. If you have a custom
coniguration you want to use, you may quit the Wizard and perform Volume
coniguration by hand, then click the “Wizard” button to return to the Wizard
with the Volume Coniguration step left out. You must have a volume
conigured to continue with the Wizard.
Figure 4: Name your volume and select a standard volume coniguration.
4. Directory Services
If you know your Directory Service account information, select the service you
use, enter the necessary information, and then click “Next”. If you do not use a
directory service, you can click “Next” and proceed to the next step.

8
Figure 5: Enter your Directory Service information.
5. Shares and Permissions
Next, you will need to set up at least one share in order to store iles on your
FreeNAS Mini over the network. On this screen, choose a name for the share.
Windows shares are supported by all modern Windows versions, Mac OS X,
most popular Linux distributions, and FreeBSD, so we recommend Windows
shares if you’re not sure what type to pick. If you want the share to be used by
anyone on your network without logging in, click the “guest access” button,
then click “Add”. You may make as many shares as you want, or skip this step if
you don’t want to add shares at this time.
Figure 6: Choose a share name and type, then add your share.

9
If you instead want to assign a particular owner of the share, click the
“Ownership” button. On the Permissions screen, enter the name of the user you
want to own the share and what group you want to share it with. If those aren’t
pre-existing system users and groups, click “Create User” and “Create Group” to
add them to the system. You will be prompted to create a password to create
a new user. You may also choose what permissions are available to the user,
group, and other users. In igure 7, both john and the family group will be
able to use the share with full permissions. Once you inish changing the user
and group permissions, click “return” to go back to share coniguration. The
permissions you selected will apply to the next share you add.
Figure 7: Select a user or create a new one.
10
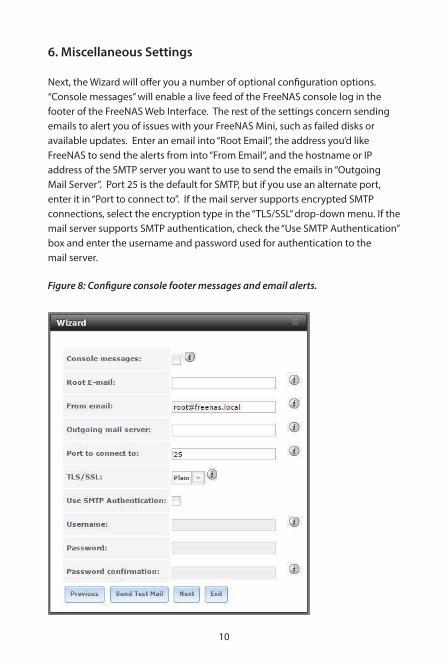
6. Miscellaneous Settings
Next, the Wizard will ofer you a number of optional coniguration options.
“Console messages” will enable a live feed of the FreeNAS console log in the
footer of the FreeNAS Web Interface. The rest of the settings concern sending
emails to alert you of issues with your FreeNAS Mini, such as failed disks or
available updates. Enter an email into “Root Email”, the address you’d like
FreeNAS to send the alerts from into “From Email”, and the hostname or IP
address of the SMTP server you want to use to send the emails in “Outgoing
Mail Server”. Port 25 is the default for SMTP, but if you use an alternate port,
enter it in “Port to connect to”. If the mail server supports encrypted SMTP
connections, select the encryption type in the “TLS/SSL” drop-down menu. If the
mail server supports SMTP authentication, check the “Use SMTP Authentication”
box and enter the username and password used for authentication to the
mail server.
Figure 8: Conigure console footer messages and email alerts.
11
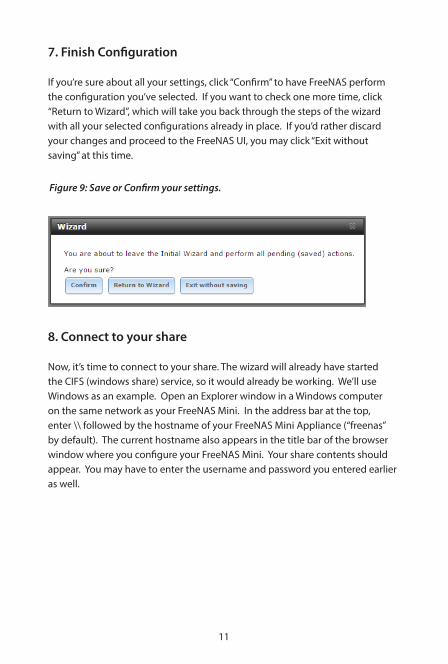
7. Finish Coniguration
If you’re sure about all your settings, click “Conirm” to have FreeNAS perform
the coniguration you’ve selected. If you want to check one more time, click
“Return to Wizard”, which will take you back through the steps of the wizard
with all your selected conigurations already in place. If you’d rather discard
your changes and proceed to the FreeNAS UI, you may click “Exit without
saving” at this time.
Figure 9: Save or Conirm your settings.
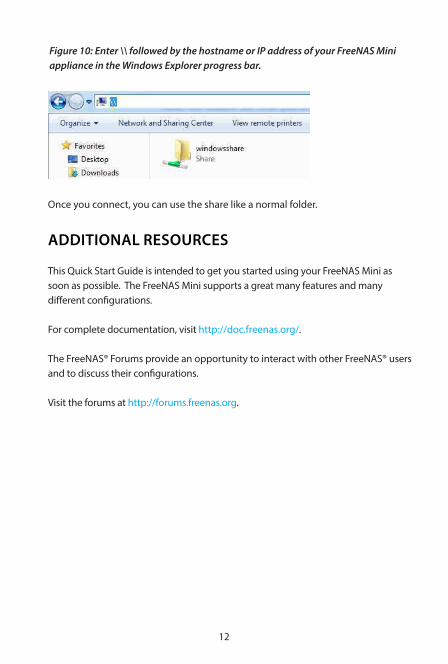
8. Connect to your share
Now, it’s time to connect to your share. The wizard will already have started
the CIFS (windows share) service, so it would already be working. We’ll use
Windows as an example. Open an Explorer window in a Windows computer
on the same network as your FreeNAS Mini. In the address bar at the top,
enter \\ followed by the hostname of your FreeNAS Mini Appliance (“freenas”
by default). The current hostname also appears in the title bar of the browser
window where you conigure your FreeNAS Mini. Your share contents should
appear. You may have to enter the username and password you entered earlier
as well.
12
Figure 10: Enter \\ followed by the hostname or IP address of your FreeNAS Mini
appliance in the Windows Explorer progress bar.
Once you connect, you can use the share like a normal folder.
ADDITIONAL RESOURCES
This Quick Start Guide is intended to get you started using your FreeNAS Mini as
soon as possible. The FreeNAS Mini supports a great many features and many
diferent conigurations.
For complete documentation, visit http://doc.freenas.org/.
The FreeNAS® Forums provide an opportunity to interact with other FreeNAS® users
and to discuss their conigurations.
Visit the forums at http://forums.freenas.org.
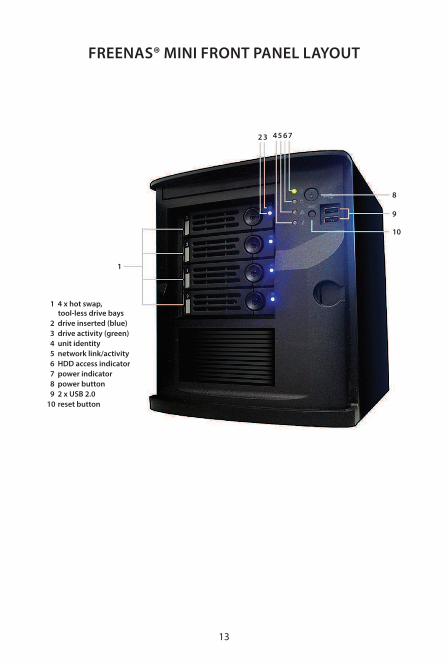
1 4 x hot swap, tool-less drive bays
2 drive inserted (blue)
3 drive activity (green)
4 unit identity
5 network link/activity
6 HDD access indicator
7 power indicator
8 power button
9 2 x USB 2.0
10 reset button
13
FREENAS® MINI FRONT PANEL LAYOUT
1
2 3 45 67
8
9
10

© 2014 iXsystems Inc. All rights reserved.
FreeNAS® and the FreeNAS® logo are registered trademarks of iXsystems.
FreeBSD® is a registered trademark of the FreeBSD Foundation used with permission.