rated voltage: 12, 17.5, 24 and 36 kv rated current: 400 ... nal/interrupteur...mounting and...
TRANSCRIPT

ABB 1
PowerIT Indoor Air Switch Disconnector, NALPowerIT Indoor Air Switch Disconnector, NALF
Mounting and Operation Manual 1YMR602171-en
Rated voltage: 12, 17.5, 24 and 36 kVRated current: 400/630, 800 and 1250 V
TM
enabled
ABB2
CONTENTS
1.0 Switch disconnector type NAL, alternative assemblies ................. 3
2.0 Installation .........................................................................................3 2.1 Assembly of the switch ........................................................................3 2.2 Mounting the hand operating mechanism type HE ...............................3 2.3 Mounting of fuse base ..........................................................................4
3.0 Adjusting the hand operating mechanism type HE ........................6 3.1 K-mechanism .......................................................................................6 3.2 KS-mechanism ....................................................................................6 3.3 A-mechanism .......................................................................................6
4.0 Mounting the mechanisms ................................................................7 4.1 Test operation of A-mechanism ............................................................7
5.0 Mounting of quick-make earth switch type E ..................................8 5.1 Mounting on switch disconnector type NAL ..........................................8 5.2 Mounting on fuse switch disconnector type NALF ................................8
6.0 Mounting of mechanical interlock between switch disconnector and earth switch ......................................................... 8
7.0 Mounting the shunt release ..............................................................9
8.0 Mounting the auxiliary switch ..........................................................9
9.0 Service and maintenance .............................................................. 10
10.0 Replacements of parts ..................................................................... 1110.1 Replacement of contact knife with draw bar ........................................ 1110.2 Replacement of fixed contact on the pivot side ................................... 1110.3 Replacement of fixed contact on the opening side .............................. 12
11.0 Replacement of the arcing chamber ............................................. 12
12.0 Replacement of insulators ..............................................................1212.1 Hollow insulators with arcing chamber ................................................ 1212.2 Pivot side support insulator ................................................................. 12
13.0 Insulator for fusebase and quick make earthing switch ............... 13
14.0 Function and controlspecification ............................................. 14-15
15.0 Changing Parts in NAL 36 kV ..................................................... 16-18
Triple-pole switch disconnector type NALand fuse switch disconnector type NALFFor indoor installation

ABB 3
Fig. 4
Fig. 3a NHP 240979
Fig. 1 R 558 B
1.0 SWITCH DISCONNECTOR TYPE NAL,ALTERNATIVE ASSEMBLIES
The switch disconnector NAL is supplied ex works as follows:1.1 Fully assembled with mechanism and auxiliaries. See item 2.01.2 Switch main frame, mechanism and auxiliaries as separate components,see item 4.0
2.0 INSTALLATION
2.1 Preparation of the switch for installation. Fig. 1For switches with A-mechanisms, the contact knives must be fully openedby hand and the draw bars connected to the cranks. Before the switchis test operated, one has to check that the surfaces of the main contactare covered by contact grease(Recommended grease: ISOFLEX TOPAS NCA 52)
Test operationsSwitches with K-mechanism will close when the operating shaft is turnedanti-clockwise. The switch open when the operation shaft is turnedclockwise.(Clockwise/anti-clockwise as seen from the mechanism side of the switch)When operating switches with A-mechanism the opening spring is firstcharged and latched by turning the operating shaft clockwise. Turning theshaft anti-clockwise charges the closing spring and the switch closes.The switches open when the operating shaft is turned clockwise.For KS-mechanism, see items 3.2
CAUTION:Keep well clear of contact knives when operating the switches.
2.2 Mounting the hand operating mechanism type HEThe bevel gears are mounted with the switch in open posistion asshown in Fig. 2 and 3.
- disconnector
Earthing switch
Triple-pole switch disconnector type NALand fuse switch disconnector type NALF

ABB4
Fig. 4a R 555 A
Fig. 4b R 563 A
The inclination of the operating tube must not exeed 40°. Fig. 3aDrilling of the operating tube. Fig. 4.2.3 Mounting of fuse base
2.3.1 The switch must be open and the main springs not charged.When mounting a fuse base with three post insulators, one set of fusecontacts and possibly fuse trip accessories are mounted directly on theswitch terminals. Fig. 4a or 4b
2.3.2 Mounting of fuse tripping. Fig. 5a) Lower part of bearing (8) is fixed to terminal (10) by one schrew(9)b)The lever(13) together with the fuse trip flap (15) are placed in the lower
bearing(8) and locked by means of upper part of bearing(14)c) The released rod(11) is mounted in the lever (13)d)The drive ring (2) is mounted to the release shaft(1) on the RHSe) The bearing(5) and washer(6) is mounted on the release shaft(1) on the
LHS and secured by split-pin(7)f) Disc.(3) is mounted to the release shaft(4) of the mechanismg)The release rods(11) are mounted onto the hooks(12) on the
release shaft(1)
2.3.3 Ajustment of the fuse tripping 5a- The ajustment apply to switch disconnectors with fuse links and fuse
tripping
- The ajustment must be made with both operating spring in themechanism in uncharged position, but the releasing spring in themechanism has to be charged as mentioned under control point 2.3.4point a
1) The split pin(7) is removed and the release shaft(1) together with thedrive ring(2) is pushed in the direction of the arrow until the tappedconnection is free from disc.(3)
2) The release rod(1) with the drive ring(2) is turned and ajusted to a holein the disc(3), while the ajustment of the fuse trip flap(15) and its distanceto the strike pin of the fuse link must be checked(Fig. 5).
Remark:- Ajusted according to above the fuse switch disconnector must open
E
Triple-pole switch disconnector type NALand fuse switch disconnector type NALF

ABB 5
Fig. 5 NHP 300025
Fig. 5a NHP 241427 NHP 401625
by tests in all phases- After fuse interruption the mechanism shall be blocked against another
operation until the fuse link has been replaced.2.3.4 Fuse tripping. Control
a) Turn the operating shaft E- Fig. 4a clockwise, max 60°, and return theoperating handle back to the neutral position(Opening spring housing F,Fig. 6, must not be latched)
b)Mount a new fuse-link, or a test fuse which is in acc. with DIN 43625, inone of the phases. Dimetionally the fuse link then will have the samedimetions as ABB-CEF fuse-links
c) If the distance between the fuse clips is longer than described - maxe + 8mm, the ajustment(point 2.3.3) must be made with the fuse linkresting on the fuse clips on the fuse base
d)The distance between the striker pin and the fuse trip flag (15) must befrom 3-6 mm. By this adjustment the fuse link is allowed to sag, but thedistance between the striker pin and the fuse trip flag must not exceed12 mm
e) If the fuse switch disconnector does not open when adjusted asmentioned above, the adjustment has to be checked and repeated
f) Remark:The hooks (12) on the release rod (1) ought to have the same position
Fig. 6 R-249 B
Triple-pole switch disconnector type NALand fuse switch disconnector type NALF

ABB6
Fig. 7 R-384 A
fig. 8 R-160 A
as shown on Fig. 5a - when the fuse switch disconnector is in openposition with both operating springs uncharged, but with the releasingspring charged. (Ref. point a)
3.0 ADJUSTING THE HAND OPERATING,MECHANISM TYPE HE
3.1 K-mechanism. Fig.1(Switch in the open position.)
ClosingArrester ring, S, on the front shaft of the HE-mechanism is removed. Fig. 3The operating handle is turned clockwise until the switch closes. Mountthe arrester ring
OpeningTurn the handle clockwise and the switch opens. Test the arrester ring forcorrect functioning.
3.2 KS-mechanism. Fig. 7
ClosingThe arrester rings on the front shaft of the HE-mechanism is removedand the operating handle is turned clockwise until it reaches the stop.The switch is now prepared for closing by means of an operating coil ora pneumatic cylinder. Mount the arrester ring
OpeningThe operating handle is turned clockwise until it reaches the stop.The switch is now prepared for opening by means of an operating coilor a pneumatic cylinder. Test the arrester ring for correct functioning.Discharging the operating spring must be done by operating the switchand not by returning the operating handle
Caution:The hand operating mechanism must be adjusted not to press on thelatch on the KS-mechanism after charging the operating spring.
3.3 A-mechanism. Fig. 8
ClosingRemove the arrester rings on the front shaft of the hand operatingmechanism. Fig. 3. Turn the operating handle anti-clockwise until theopening spring is charged and latched. Mount the arrester ring. Turn theoperating handle clockwise until the switch closes. Test the arrester ringfor correct functioning
OpeningAfter having pulled out the arrester ring, turn the operating handleanti-clockwise. The switch opens after approx. 20° rotation.
Triple-pole switch disconnector type NALand fuse switch disconnector type NALF

ABB 7
fig. 9b R-564 A
fig. 9 a R-250 B
fig. 9 R-559 A
4.0 MOUNTING THE MECHANISM ON THE SWITCH. FIG. 9
The mechanisms are mounted on the right hand side of the switch mainframe and the switch is normally operated from the same side.(Mechanism-side). When the switches have to be operated from theopposite side, an operating shaft must be connected. See Fig. 9b.The mechanism clutch is brought together with the clutch of the hollow mainshaft and the mechanism is fixed to the switch frame.
Note: Contact knives in open position.
Normally the switch disconnector is delivered without shaft extension forleft hand side operation.
4.1. Test operation of A-mechanism.
After having mounted the mechanism to the switch frame, check that thelatch H is in correct position by pulling it back to the outhermost position.
H
Triple-pole switch disconnector type NALand fuse switch disconnector type NALF

ABB8
fig. 10 R-561 B
See Fig. 9a.Test operation see item 2.1.
5.0 MOUNTING OF QUICK-MAKE EARTH SWITCH TYPE E
The switch will normally be delivered for connection of the hand operatingmechanism on the right hand side and any mechanical interlook on theleft side. The splined extension intended for connection to the handoperating mechanism will have free travel.The extension for the interlook will be bolted to the shaft. See Fig. 10.
5.1. Mounting the quick-make earth switch to the switchdisconnector type NAL
The contacts A are mounted on the terminals of the switch disconnector,and the surfaces of the main contacts are then covered by contactgrease.(Recommended grease: ISOFLEX TOPAS NCA 52)Close the earth switch slowly and adjust the fixed contacts to line upcorrectly with moving contacts.Tighten the contacts screws.
5.2 Mounting the quick-make earth switch to the fuse-switchdisconnector type NALF
Proceed as under item 5.1.The contacts A must be mounted on the terminals of the fuse base, andsecure the position with tension bushes.
6.0 MOUNTING THE MECHANICAL INTERLOCKBETWEEN SWITCH DISCONNECTOR ANDQUICK-MAKE EARTH SWITCH. Fig. 10-11
The switch disconnector must be in the open position. (for NAL-A theopening spring must be charged before assembly of the interlock. Seeitem 2.1.)The quick-make earth switch must also be in the open position.Put one half of the guide A (side plate) on the operating shafts of theswitches. Mount the interlock connection B.Mount the interlock rings Cand D on the shafts with the flat part of the ring facing towards theinterlock connection B. Fig. 11.Do not forget mounting the two distance rings E on the two screws F.
Testing the interlock.
It shall not be possible to close the switch disconnector when the earthswitch is closed.
A
fig. 11 R-148 B
C B F A D
E
F
Triple-pole switch disconnector type NALand fuse switch disconnector type NALF

ABB 9
Wiring diagram tripping coil NHP 343650
fig. 12 R 562 C
fig. 13 R-157 A
Wiring diagram auxiliary switch NHP 343651
It shall not be possible to close the earth switch disconnector when theswitch is closed.7.0 MOUNTING THE SHUNT RELEASE. Fig. 12.
Turn the operating shaft E (Fig. 4a) a maximum of 60° clockwise. Openingspring housing F, Fig. 6, must not be latched. Return the shaft to its neutralposition. Connect the bar B to the perforated disc A. Fig. 12.
8.0 MOUNTING THE AUXILIARY SWITCH. Fig. 13.
The auxiliary switch is mounted to the frame on the opening side of theswitch disconnector and the bar connected to the crank on the hollowshaft.
A
B
15
Triple-pole switch disconnector type NALand fuse switch disconnector type NALF

ABB10
9.0 SERVICE AND MAINTENANCECleaningAfter maintenance the switch disconnector must be cleaned before beingput into service. Strong solvents and alcoholic fluids must not be used.
After cleaning, the contact area of the main blades and the fixed contactsmust be greased, Type Isoflex Topas NCA 52. If the switch disconnectoris placed in a very humid and poluted area which will reduce the trackingresistance, we recomend to polish the insulators and insulatedcomponents with Silikon Type HS4.Switch disconnectors in serviceThe switch disconnector should be checked at least once a year byconducting a number of operations to check all the functions.The frequency of maintenance depends on the service and enviromentalconditions.– Moving- and fixed contacts are greased with – Isoflex Topas NCA 52.– Mechanisms do not need any greasing under normal conditions.– Note: Arcing knives, piston and cylinder must not be greased.
Mechanical overhaulAfter 1000 operations or 5 years in service a complete overhaul of theswitch disconnector should be carried out, preferably by ABB-personal.Electrical overhaulThe frequency of overhaul depends also on the number of operationsand the magnitude of the breaking current.After about 100 operations at rated current or about 500 operations athalf the rated current the main contacts, the arcing contacts and the arcextinguishing chamber should be inspected and eventually replaced.Replacement should take place when– The tip of the arcing contact knives has diminished approx. 3 mm.
(By minor damages the arcing tip might only be polished)– The fixed arcing fingers are burned or do not give any contact– The width of the slot in the arcing chamber is more than 8 mm.Control of NAL knives after mounting Fig. 14, 15, 16.Due to difference in wall and support frame straightness, it is necessaryto check the position of the main knives on the fixed contact.1. Switch with A-mechanism.By delivery the draw bars (1.1) are detached.a) Test by hand that each arcing knife (1.2) moves freely in the arc
chamber (1.3)b)Pull the main contacts by hand (1.4) to open position.
See fig. 14. Attach the draw bars to the main shaft (1.5) by theeccentric bolt (1.6), and secure with washer and circlip.
2. Switch with K-mechanismBy delivery the draw bars are connected.
3. Before operating the switch, check that the surfaces of the main contactsare covered by contact grease in the contact area. The grease typeIsoflex Topas NCA 52 must be used if additional grease is required.
4. Close the switch by operating the mechanism.Check the engagement and the contact overlap. All four contact pointson the main contacts must be in touch with the fixed contacts.The depth between the fixed and the moving contacts must be adjustedby the eccentric bolt (fig. 15) if the moving contact is outside the limit of4 mm! See fig 16.
NHP 403 489 A
NHP 403 489 B
fig. 14
fig. 15
fig. 16
2-5 mm
Triple-pole switch disconnector type NALand fuse switch disconnector type NALF

ABB 11
10.0 REPLACEMENTS OF PARTSThe switch disconnector type NAL is equipped with DMC insulators(Glassfibre-reinforced polyester) with selftaping screws for fixing ofinsulators and contacts.If the same insulator and screws are to be used after exchange of parts,the following procedure must be followed:– Unscrew the selftapping screws carefully and brush them clean, andblow out the small particles in the threaded hole. (Protect the eyes.)
When mounting, the screws must be entered carefully into the threadsin the insulator and tightened with care.– Correct torque, see page 15.If new insulator shall be mounted, the holes in the insulator should bethreaded about 10 mm deep by the selftapping screw before mounting.Remove the screw and blow the holes clean.The mounting takes place acc. to the following procedures.
10.1 Replacement of contact knife with draw bar Fig. 17.Switch disconnector in open position with both the operatingsprings uncharged.a) Remove the circlips 2.1 attaching the draw bar to the main shaft.
(Eccentric bolt not to be loosened.)b)Unscrew the screw(s) 2.2 attaching the main contact to the insulator.
Remove the fixed contact with the contact knife and draw bar.(1 pc screw on 12 kV and 2 pcs screws on 24 kV).
c) Attach the new main contact with the contact knife and draw bar tothe insulator.
d)Grease the new contact knife with ISOFLEX NCA 52, and check carefullythat it enters the fixed main contact correctly, and also that the arcingknife moves freely in the arcing chamber when closing and opening.(The arcing knife does not have the same position related to the contactknife during the closing and opening movement.) The contact knivemust rotate firmly at the pivot point, but without jerking.
e) Attach the draw bar to the main shaft by the eccentric bolt 2.3 andsecure with washer and circlips 2.1
f) The depth of the engagement between the fixed and the moving contactcan be adjusted by the eccentric bolt 2.3 or by moving the insulator 2.4back or forth.
10.2 Replacement of fixed contact on the pivot sideNormally the main contact with contact knife and draw bar is delivered asone unit.Procedure as under 10.1
NHP 403 479
fig. 17
Triple-pole switch disconnector type NALand fuse switch disconnector type NALF

ABB12
10.3 Replacements of fixed contact on the opening sideFig. 18.Switch disconnector in open position.a) Unscrew the two screws 3.1 and lift up the arcing chamber and the
thermal disc 3.4 (for 630 A) while pressing the main contact 3.5 firmlyagainst the hollow insulator 3.8.
b)Lift up the main contact 3.5 by the arcing contacts 3.6 which penetratethe main contact.Remove the pressure spring 3.7 and clean the top of the insulator andthe hole, and blow out the threaded holes. (Protect the eyes.)
c) Attach the new main contact in reverse order as described above.Demaged parts must be replaced.– Take care that the arcing contacts 3.6 are correctly placed in the
pressure spring 3.7.– By mounting the termal disc 3.4 and the arcing chamber 3.3, the
main contact 3.5 must be pressed firmly against the hollow insulator3.8. Attach the whole assembly by the screws 3.1. For correct torquesee page 15.Check correct position of the arcing contact and test correct funktion.Grease the contact area with ISOFLEX TOPAS NCA 52.
11.0 REPLACEMENT OF THE ARCING CHAMBERFig. 18.
Follow instructions under item 10.3
12.0 REPLACEMENT OF INSULATORS12.1 Hollow insulators with arcing chamberFig. 18.a) Unscrew 3.9 and detach the insulator.b)The new insulator has to be increased inside with a film of silicone, type
DOWN CORNING (DC4).c) Attach the new insulator to the frame by the two selftapping screws.
Remember to mount the piston with piston rod 3.10. For correct torquesee page 15.Note the washer and spring washer for the screws.
12.2 Pivot side support insulatorFig. 17.Detach the main contact with contact knives according to item 10.1 b.a) Unscrew 2.5 and detach the insulator.b)Attach the new insulator to the frame by the two selftapping screws 2.5.
For correct torque see page 15.Note the washer and spring washer for the screws.
c) Attach the main contact with the contact knife to the top of the insulatorand adjust according to item 10.1, page 11.
NHP 403 485
fig. 18
Triple-pole switch disconnector type NALand fuse switch disconnector type NALF

ABB 13
13.0 INSULATOR FOR FUSEBASE AND QUICKMAKE EARTHING SWITCH
Fig. 19.a) Unscrew 4.2 and detach the fuse clips and contact block respectively.b)Unscrew 4.3 at the base of the insulator and detach the insulator.c) Attach the new insulator to the frame by the two selftapping screws
4.3. For correct torque see page 15.Note the washer and spring washer for the screws.
d)Attach the fuse clips and contact block respectively to the top of theinsulator by the screws 4.2.For correct torque see page 15.
NHP 403 493
fig. 19
Triple-pole switch disconnector type NALand fuse switch disconnector type NALF

ABB14
TypeK
Closing[Nm]
Opening[Nm]
14.0 TECHNICAL SPECIFICATION FOR NAL/NALF SWITCH DISCONNECTORS
NAL 12 – 17,5 – 24 – 36/6 – 12,5 A–K–KSMain functions
NHP 403 491
Triple-pole switch disconnector type NALand fuse switch disconnector type NALF
Item Function Mechanismtype
Function limits Referencecontrol
01 Closing speed of contact knifes m/sec
02 Opening speed of contact knifes m/sec
5,5 – 5,8 6,5 – 6,8 4,7 – 6,3
4,5 – 4,8 5,5 – 5,8 5 – 7
Verified bymanufacturer
TypeA
TypeKS
Closing[Nm]
Opening[Nm]
Closing[Nm]
Opening[Nm]
70
80
90
5
90
90
90
100
110
5
90
90
100
120
120
5
120
120
03 Maximum operating torque
05 Minimum distance between fixed contact andcontact knife of open switch
060708
Contact knife penetrationContact knife penetrationContact knife alignment
05
06 Both contact spots on each sideMUST make contact.Contact area = 26 mm
Verified bymanufacturer
Verified bymanufacturer
Control 100 %by sight
Control 100 %by sight
Tolerance of contactengagement 2-5 mm
(see fig. 16)
07
Control 100 %by sight
The alignment is controlled by:The main contact knife must bealigned with the main contact.
The arcing knife runs straightand move freely in the arcingchamber, and makes fullengagement with the fixedarcing contact.
08
Must beadjusted
120 mm 212 mm 360 mm
12 kV 17,5/24 kV 36 kV

ABB 15
NAL 12 – 17,5 – 24 kV. Switch Disconnector.
Tightening torque for self tapping screws. NHP 403 492fig. 20
Triple-pole switch disconnector type NALand fuse switch disconnector type NALF

ABB16
Triple-pole switch disconnector type NALand fuse switch disconnector type NALF
15. CHANGING PARTS IN NAL 36kV
15.1 Changing contact knivesDisconnect the switch disconnector. When A-mechanism is fitted, theopening spring must NOT be charged.
a) The draw bar is detached from the crank arm of the operating shaft.(fig. 21)
b)The contact screw is detached and the contact knives are removed(fig. 22)
c) Replacement contact knifes are lubricated with ISOFLEX TOPASNB 52 and fited to the contact block with the contact screw (a).
d)Check that the contact knives can move easily and operate correctlyover the opposite contacts.
e) Before the drawbar is connected to the crank arm of the operatingshaft (fig. 21) ensure that the auxiliary knives run easily in the individualarc extinguishing chambers, and that the main knives make properly.
f) Put contact grease on the main contacts before the first test operation.The contact position is adjusted by the eccentric bolt on the operatingshaft. It can also be adjusted by adjusting the support insulator.
15.2 Changing draw bar (fig. 23)a) Disconnect the switch disconnector.b)Pull out the bolt b.c) Pull down the auxiliary knife such that the drawbar bolt (a) can be
pushed out and upper hold for the drawbar is free.d)The lower hold for the drawbar is freed by removing circlips on eccentric
bolt (fig. 21)e) New drawbar to be fitted in sequence a-b (fig. 23)
Fig. 21
b
Fig. 22
a
Fig. 23
a
b
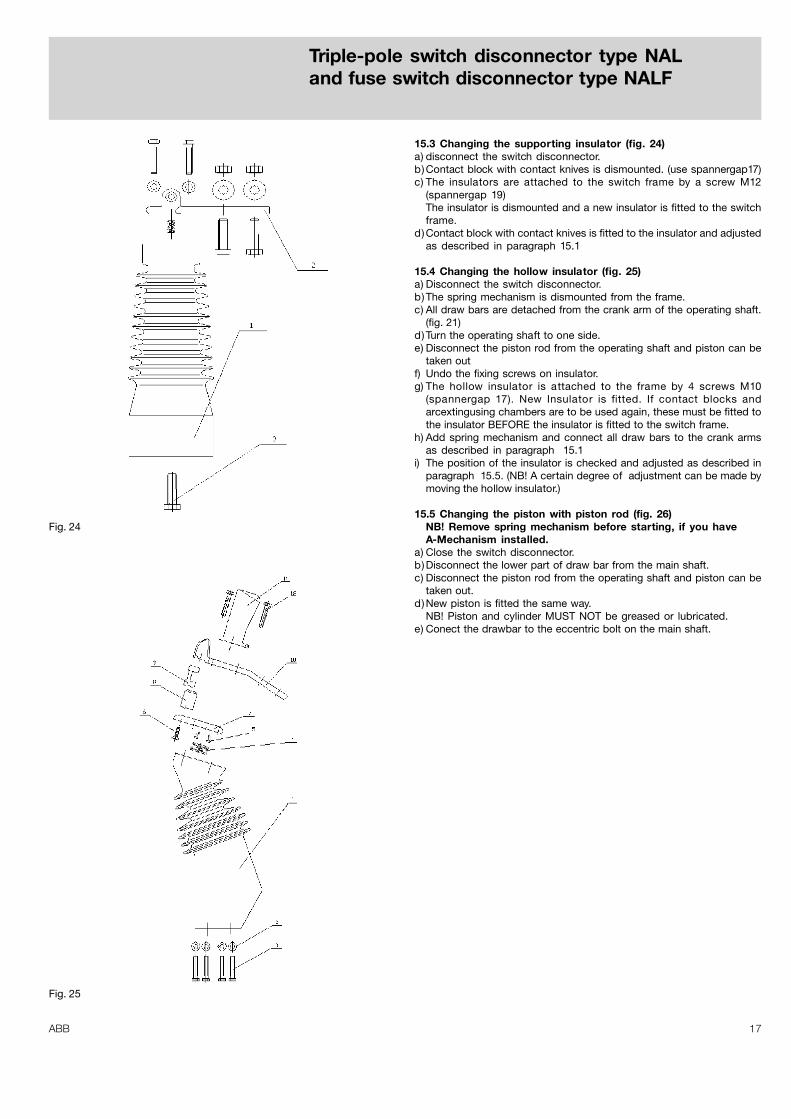
ABB 17
Triple-pole switch disconnector type NALand fuse switch disconnector type NALF
15.3 Changing the supporting insulator (fig. 24)a) disconnect the switch disconnector.b)Contact block with contact knives is dismounted. (use spannergap17)c) The insulators are attached to the switch frame by a screw M12
(spannergap 19)The insulator is dismounted and a new insulator is fitted to the switchframe.
d)Contact block with contact knives is fitted to the insulator and adjustedas described in paragraph 15.1
15.4 Changing the hollow insulator (fig. 25)a) Disconnect the switch disconnector.b)The spring mechanism is dismounted from the frame.c) All draw bars are detached from the crank arm of the operating shaft.
(fig. 21)d)Turn the operating shaft to one side.e) Disconnect the piston rod from the operating shaft and piston can be
taken outf) Undo the fixing screws on insulator.g) The hollow insulator is attached to the frame by 4 screws M10
(spannergap 17). New Insulator is fitted. If contact blocks andarcextingusing chambers are to be used again, these must be fitted tothe insulator BEFORE the insulator is fitted to the switch frame.
h) Add spring mechanism and connect all draw bars to the crank armsas described in paragraph 15.1
i) The position of the insulator is checked and adjusted as described inparagraph 15.5. (NB! A certain degree of adjustment can be made bymoving the hollow insulator.)
15.5 Changing the piston with piston rod (fig. 26)NB! Remove spring mechanism before starting, if you haveA-Mechanism installed.
a) Close the switch disconnector.b)Disconnect the lower part of draw bar from the main shaft.c) Disconnect the piston rod from the operating shaft and piston can be
taken out.d)New piston is fitted the same way.
NB! Piston and cylinder MUST NOT be greased or lubricated.e) Conect the drawbar to the eccentric bolt on the main shaft.
Fig. 24
Fig. 25

ABB18
Triple-pole switch disconnector type NALand fuse switch disconnector type NALF
Fig. 26
15.5 Changing the piston with piston rod (fig. 26)NB! Remove spring mechanism before starting, if you haveA-Mechanism installed.
a) Close the switch disconnector.b)Disconnect the lower part of draw bar from the main shaft.c) Disconnect the piston rod from the operating shaft and piston can be
taken out.d)New piston is fitted the same way.
NB! Piston and cylinder MUST NOT be greased or lubricated.e) Conect the drawbar to the eccentric bolt on the main shaft.
Tightening torque for screws.
Fig. 27

ABB 19

ABB is working to continuous improve the products. Therefore we reserve the right to change design, dimension and data without prior notice.
This product has been certified by ABB Group as Industrial IT EnabledTM - Information Level. All product information is supplied in interactiveelectronic format, based on ABB Aspect ObjectTM technology. The Industrial IT commitment from ABB ensures that every enterprise buildingblock is equipped with the integral tools necessary to install, operate, and maintain it efficiently throughout the product lifecycle.
ABB Sp. z o.o.Power Technologies Divisionul. Leszno 5906-300 Przasnysz, PolandPhone: Exchange: (+48 29) 75 33 200
Sales Office: (+48 22) 51 52 831Technical Information: (+48 29) 75 33 330
Fax: (+48 22) 51 52 689
www.abb.com
1YM
R60
2171
-en
Pub
licat
ion
06.2
004
���