relief and block printing
DESCRIPTION
downloadedTRANSCRIPT
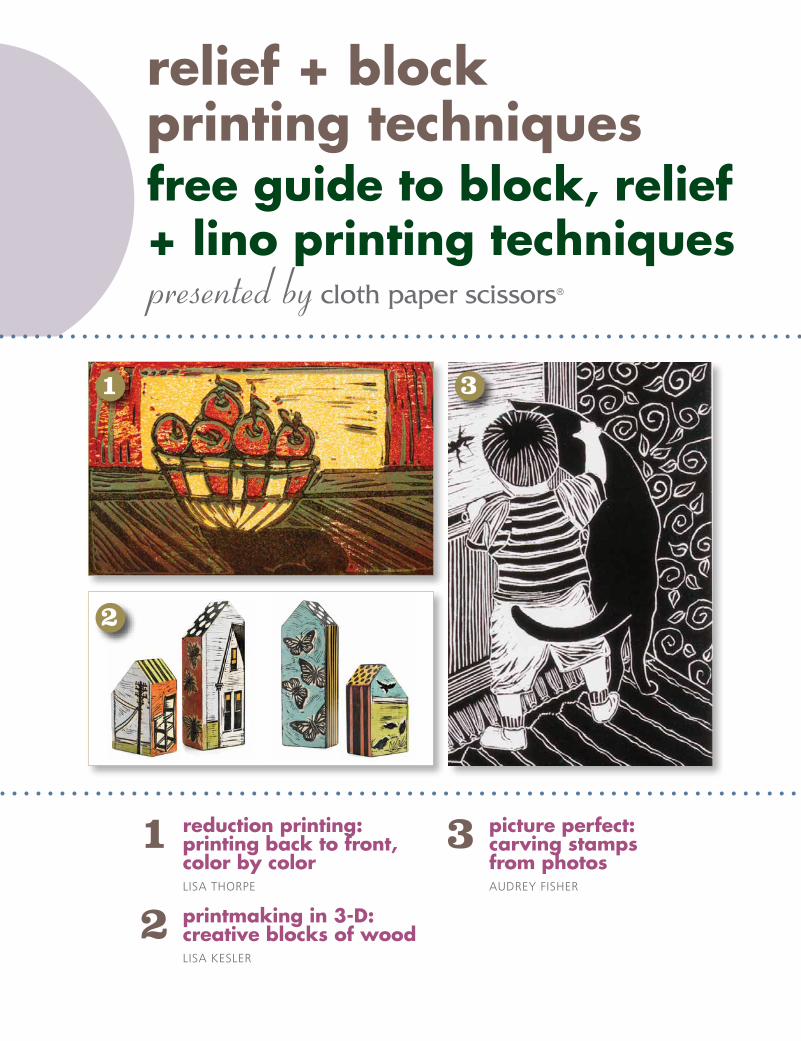
relief + block printing techniquesfree guide to block, relief + lino printing techniques
1 reduction printing: printing back to front, color by color lisa thorpe
2 printmaking in 3-D: creative blocks of wood lisa kesler
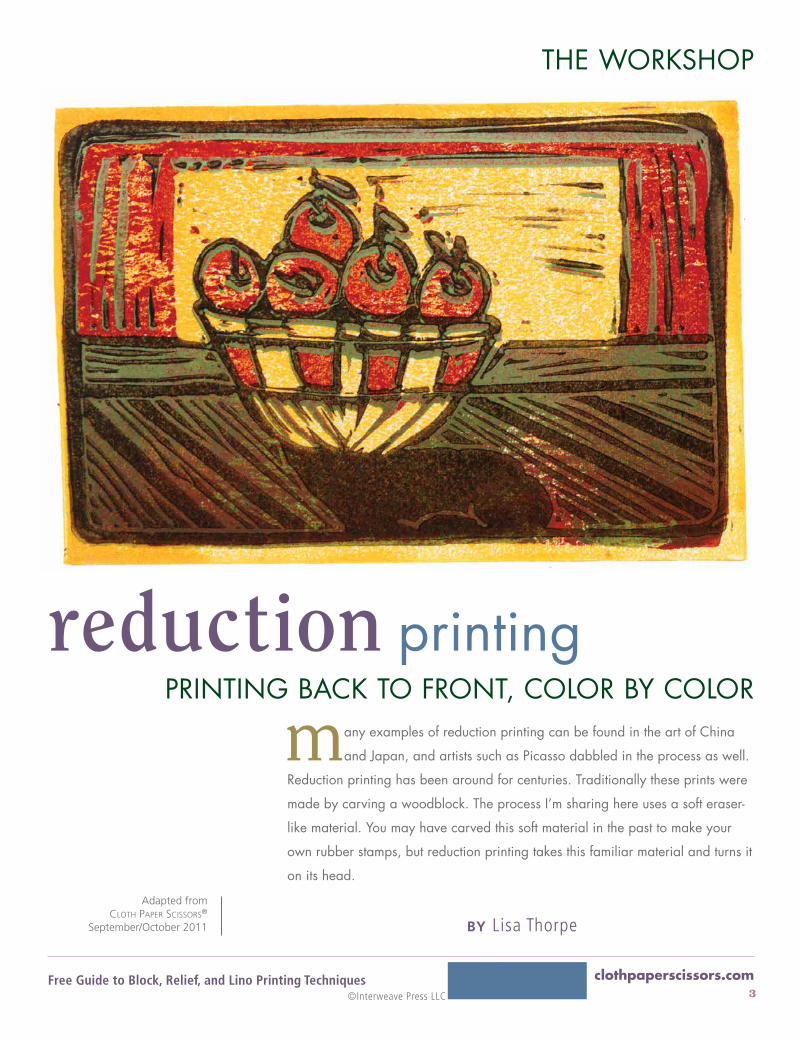
3 picture perfect: carving stamps from photos audrey fisher
presented by cloth paper scissors®
31
2
what is block printing? Block printing is a form of relief printing where
the ink or paint is applied to a raised surface and then rolled or stamped onto a substrate, similar to rubberstamping. Common forms of block printing are woodcut printing, linoleum printing, and lithography.
With a little practice and the right tools, you can make your own woodcut, linocut, or block print designs to use in your artwork. The experts featured in our new eBook, Relief and Block Printing Techniques: Free Guide to Block, Relief and Lino Printing Techniques will show you how.
In Reduction Printing: Printing back to front, color by color, Lisa Thorpe uses Safety-Kut material and regular linoleum cutting tools to create three- and four-color limited-edition linoleum block prints that have the look of woodcut printing but are much easier to carve. This relief-printing process is called reduction printing because you keep carving away at the block, reducing what is printed with each layer.
Relief and Block Printing Techniques:
Free Guide to Block, Relief, and Lino Printing Techniques
presented by Cloth Paper Scissors®
online editor Cate Prato
creative services division art director Larissa Davis
PhotograPher Larry Stein
Projects and information are for inspiration and personal use only. interweave Press is not responsible for any liability arising from errors, omissions, or mistakes contained in this eBook, and readers should proceed cautiously, especially with respect to technical information.
© F+W Media, inc. all rights reserved. F+W Media grants permission for any or all pages in this eBook to be copied for personal use.
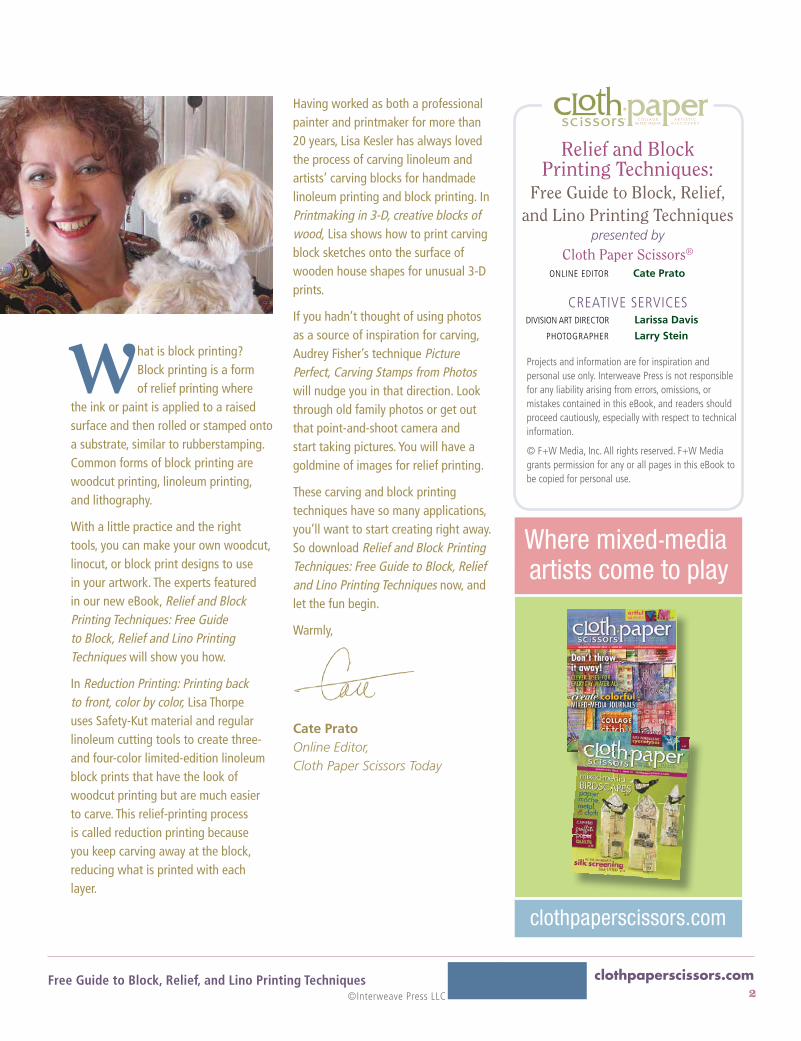
Having worked as both a professional painter and printmaker for more than 20 years, Lisa Kesler has always loved the process of carving linoleum and artists’ carving blocks for handmade linoleum printing and block printing. In Printmaking in 3-D, creative blocks of wood, Lisa shows how to print carving block sketches onto the surface of wooden house shapes for unusual 3-D prints.
If you hadn’t thought of using photos as a source of inspiration for carving, Audrey Fisher’s technique Picture Perfect, Carving Stamps from Photos will nudge you in that direction. Look through old family photos or get out that point-and-shoot camera and start taking pictures. You will have a goldmine of images for relief printing.
These carving and block printing techniques have so many applications, you’ll want to start creating right away. So download Relief and Block Printing Techniques: Free Guide to Block, Relief and Lino Printing Techniques now, and let the fun begin.
Warmly,
Cate Prato Online Editor, Cloth Paper Scissors Today
clothpaperscissors.com
Where mixed media artists come to play
-
Free Guide to Block, Relief, and Lino Printing Techniques2
clothpaperscissors.com©Interweave Press LLC
the workshop
m any examples of reduction printing can be found in the art of China
and Japan, and artists such as picasso dabbled in the process as well.
reduction printing has been around for centuries. traditionally these prints were
made by carving a woodblock. the process I’m sharing here uses a soft eraser-
like material. You may have carved this soft material in the past to make your
own rubber stamps, but reduction printing takes this familiar material and turns it
on its head.
adapted from Cloth PaPer SCiSSorS®
september/october 2011 by lisa thorpe
reduction printingprIntIng baCk to front, Color bY Color
Free Guide to Block, Relief, and Lino Printing Techniques3
clothpaperscissors.com©Interweave Press LLC
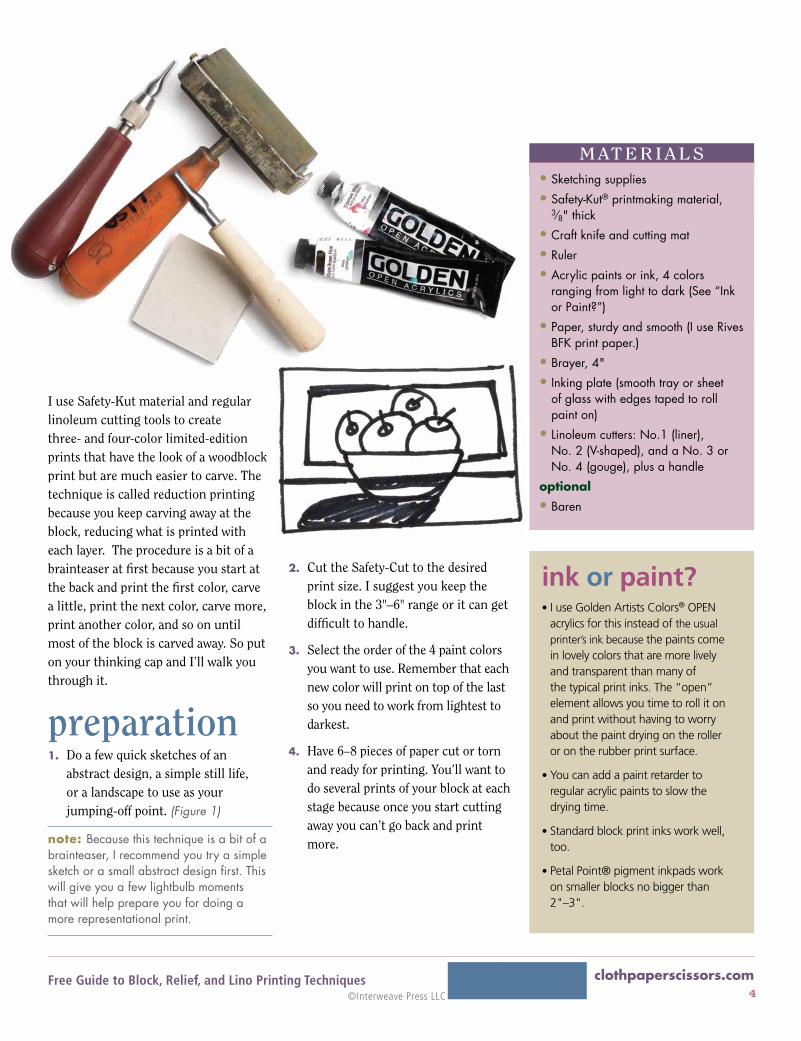
I use Safety-Kut material and regular linoleum cutting tools to create three- and four-color limited-edition prints that have the look of a woodblock print but are much easier to carve. The technique is called reduction printing because you keep carving away at the block, reducing what is printed with each layer. The procedure is a bit of a brainteaser at first because you start at the back and print the first color, carve a little, print the next color, carve more, print another color, and so on until most of the block is carved away. So put on your thinking cap and I’ll walk you through it.
preparation1. Do a few quick sketches of an
abstract design, a simple still life, or a landscape to use as your jumping-off point. (Figure 1)
note: because this technique is a bit of a brainteaser, I recommend you try a simple sketch or a small abstract design first. this will give you a few lightbulb moments that will help prepare you for doing a more representational print.
2. Cut the Safety-Cut to the desired print size. I suggest you keep the block in the 3"–6" range or it can get difficult to handle.
3. Select the order of the 4 paint colors you want to use. Remember that each new color will print on top of the last so you need to work from lightest to darkest.
4. Have 6–8 pieces of paper cut or torn and ready for printing. You’ll want to do several prints of your block at each stage because once you start cutting away you can’t go back and print more.
materials•sketching supplies
•safety-kut® printmaking material, 3⁄8" thick
•Craft knife and cutting mat
•ruler
•acrylic paints or ink, 4 colors ranging from light to dark (see “Ink or paint?”)
•paper, sturdy and smooth (I use rives bfk print paper.)
•brayer, 4"
•Inking plate (smooth tray or sheet of glass with edges taped to roll paint on)
•linoleum cutters: no.1 (liner), no. 2 (V-shaped), and a no. 3 or no. 4 (gouge), plus a handle
optional
•baren
• i use Golden artists Colors® opeN acrylics for this instead of the usual printer’s ink because the paints come in lovely colors that are more lively and transparent than many of the typical print inks. the “open” element allows you time to roll it on and print without having to worry about the paint drying on the roller or on the rubber print surface.
• you can add a paint retarder to regular acrylic paints to slow the drying time.
• standard block print inks work well, too.
• petal point® pigment inkpads work on smaller blocks no bigger than 2"–3".
ink or paint?
Free Guide to Block, Relief, and Lino Printing Techniques4
clothpaperscissors.com©Interweave Press LLC
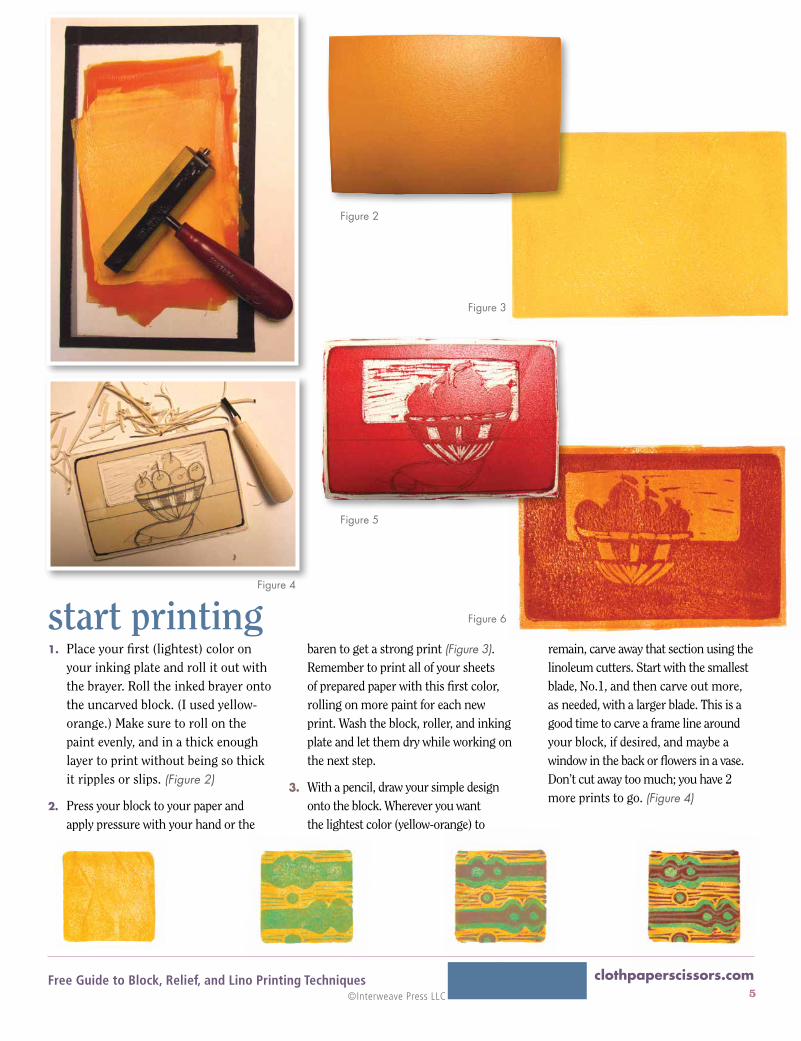
start printing1. Place your first (lightest) color on
your inking plate and roll it out with the brayer. Roll the inked brayer onto the uncarved block. (I used yellow-orange.) Make sure to roll on the paint evenly, and in a thick enough layer to print without being so thick it ripples or slips. (Figure 2)
2. Press your block to your paper and apply pressure with your hand or the
baren to get a strong print (Figure 3). Remember to print all of your sheets of prepared paper with this first color, rolling on more paint for each new print. Wash the block, roller, and inking plate and let them dry while working on the next step.
3. With a pencil, draw your simple design onto the block. Wherever you want the lightest color (yellow-orange) to
remain, carve away that section using the linoleum cutters. Start with the smallest blade, No.1, and then carve out more, as needed, with a larger blade. This is a good time to carve a frame line around your block, if desired, and maybe a window in the back or flowers in a vase. Don’t cut away too much; you have 2 more prints to go. (Figure 4)
figure 2
figure 4
figure 5
figure 6
figure 3
Free Guide to Block, Relief, and Lino Printing Techniques5
clothpaperscissors.com©Interweave Press LLC
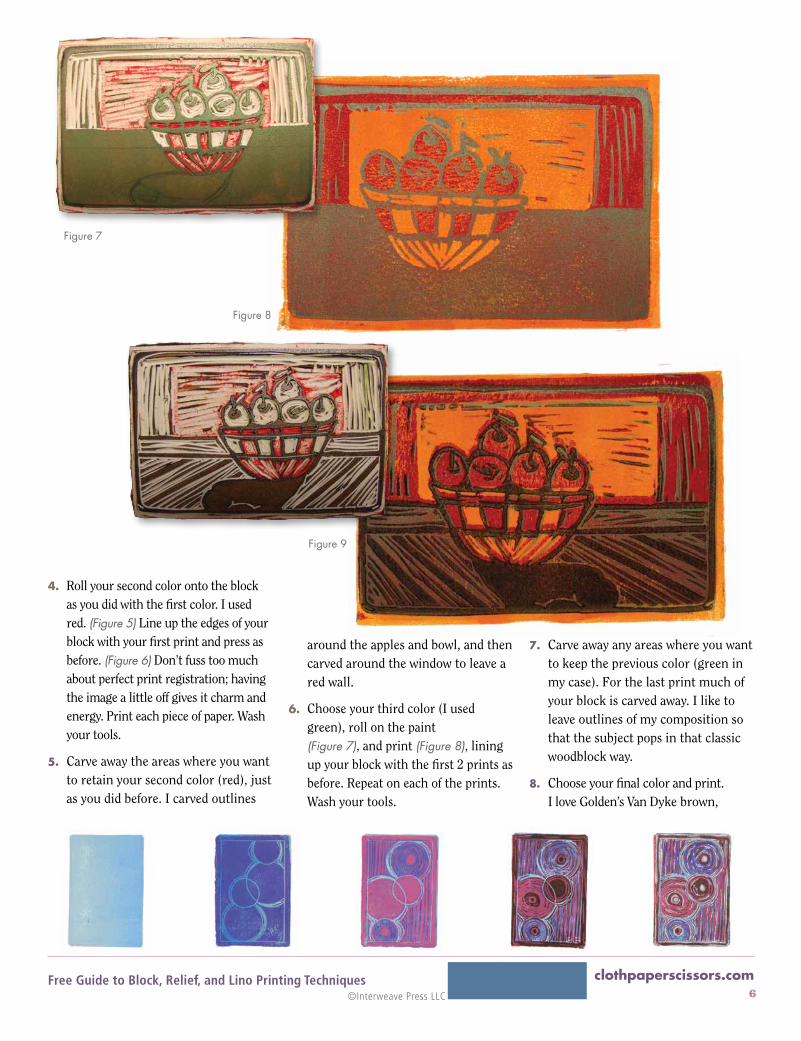
4. Roll your second color onto the block as you did with the first color. I used red. (Figure 5) Line up the edges of your block with your first print and press as before. (Figure 6) Don’t fuss too much about perfect print registration; having the image a little off gives it charm and energy. Print each piece of paper. Wash your tools.
5. Carve away the areas where you want to retain your second color (red), just as you did before. I carved outlines
around the apples and bowl, and then carved around the window to leave a red wall.
6. Choose your third color (I used green), roll on the paint (Figure 7), and print (Figure 8), lining up your block with the first 2 prints as before. Repeat on each of the prints. Wash your tools.
7. Carve away any areas where you want to keep the previous color (green in my case). For the last print much of your block is carved away. I like to leave outlines of my composition so that the subject pops in that classic woodblock way.
8. Choose your final color and print. I love Golden’s Van Dyke brown,
figure 7
figure 8
figure 9
Free Guide to Block, Relief, and Lino Printing Techniques6
clothpaperscissors.com©Interweave Press LLC
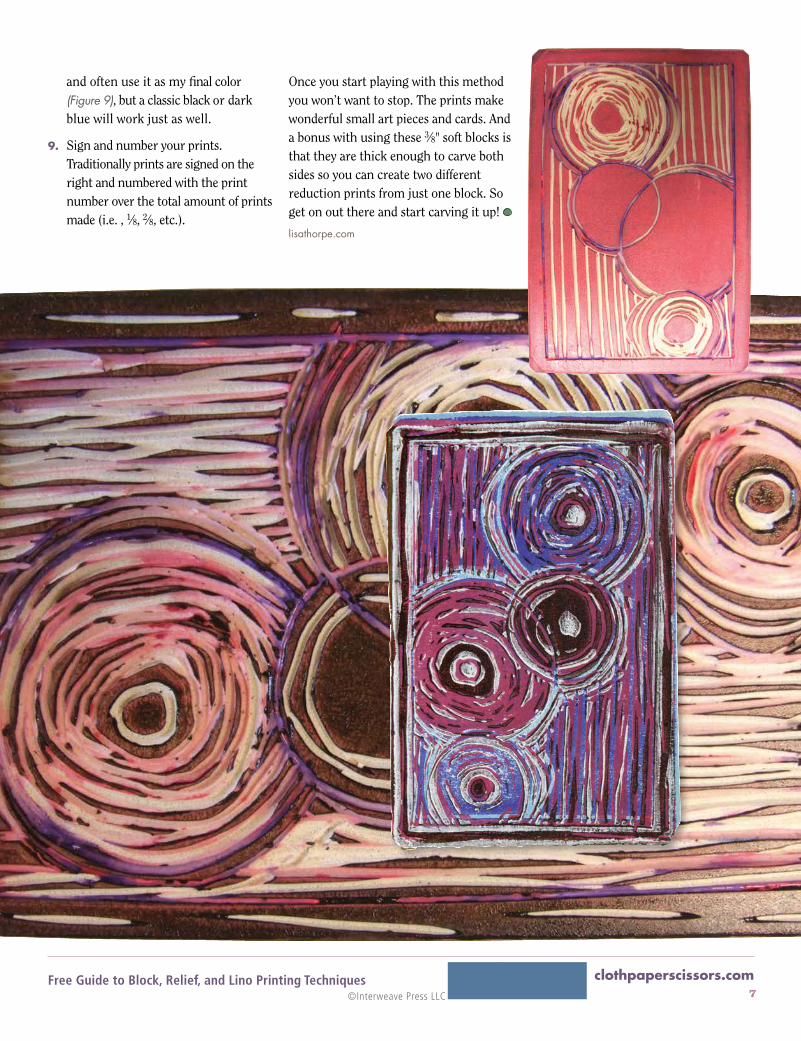
and often use it as my final color (Figure 9), but a classic black or dark blue will work just as well.
9. Sign and number your prints. Traditionally prints are signed on the right and numbered with the print number over the total amount of prints made (i.e. , 1⁄8, 2⁄8, etc.).
Once you start playing with this method you won’t want to stop. The prints make wonderful small art pieces and cards. And a bonus with using these 3⁄8" soft blocks is that they are thick enough to carve both sides so you can create two different reduction prints from just one block. So get on out there and start carving it up!
lisathorpe.com
Free Guide to Block, Relief, and Lino Printing Techniques7
clothpaperscissors.com©Interweave Press LLC
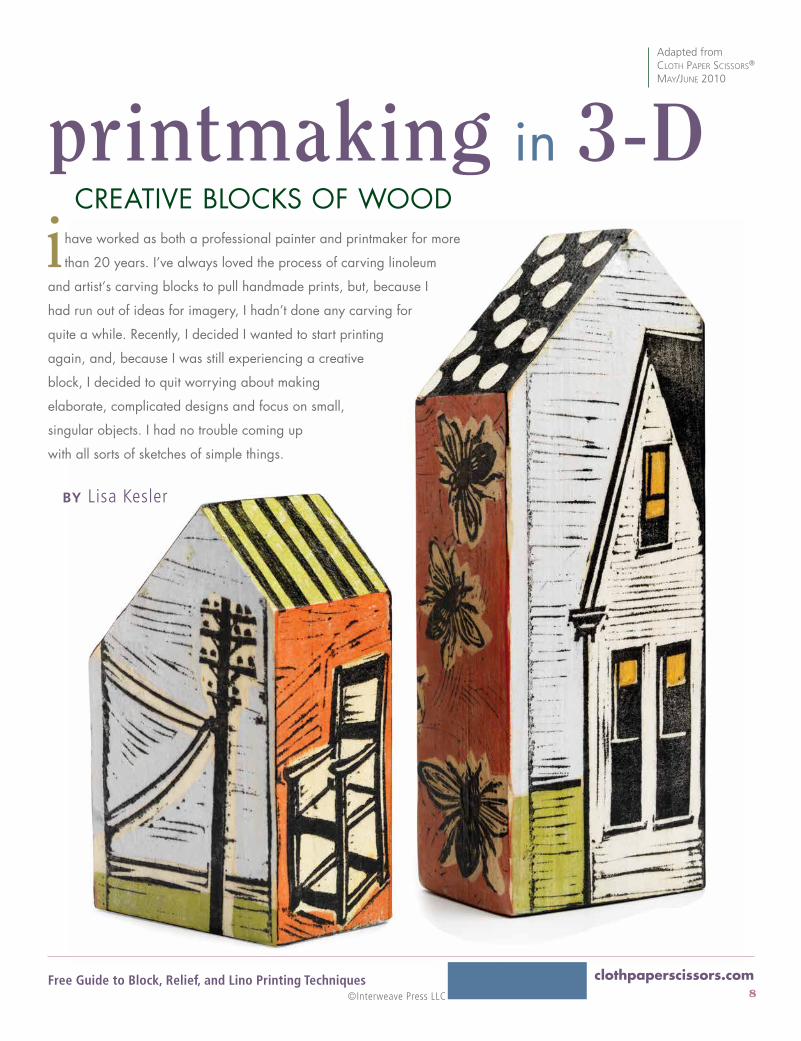
printmaking in 3-D CreatIVe bloCks of wood
by lisa Kesler
adapted from Cloth PaPer SCiSSorS® May/June 2010
i have worked as both a professional painter and printmaker for more
than 20 years. I’ve always loved the process of carving linoleum
and artist‘s carving blocks to pull handmade prints, but, because I
had run out of ideas for imagery, I hadn’t done any carving for
quite a while. recently, I decided I wanted to start printing
again, and, because I was still experiencing a creative
block, I decided to quit worrying about making
elaborate, complicated designs and focus on small,
singular objects. I had no trouble coming up
with all sorts of sketches of simple things.
Free Guide to Block, Relief, and Lino Printing Techniques8
clothpaperscissors.com©Interweave Press LLC

At about the same time, a friend offered me some scrap lumber from a project he’d just completed, and I immediately envisioned these as simple house shapes. I then imagined printing my carving block sketches onto the surface of the wooden house shapes. Printing in 3-D—I fell in love with the idea.
directionscut and carve1. Cut a piece of lumber into a simple
house shape. I used a miter box to accomplish the angle cuts, but this can easily be accomplished without one.
2. Trace each side of the house onto a piece of vellum or tracing paper with a pencil, and draw a design within each traced shape. I drew a simple everyday image or scene for 2–3 sides of the house, sometimes extending the image up onto the roof section. I decided to cover the other surfaces
with different allover patterns, like dots and stripes.
tip: Make sheets of hand-printed collage papers by carving dots, stripes, and other allover patterns on scrap pieces of the carving blocks and then printing them on light weight papers.
3. Trace over the lines of the sketches with a black Sharpie marker so they are easier to see. Turn the vellum over and, using a thick, soft graphite pencil, trace over the lines again on the back side.
4. Trace the outline of each house side onto a piece of artist’s carving block and, using the X-acto or utility knife, cut a carving block to match the shape of each house side.
5. With the graphite markings face down, lay each vellum drawing over the corresponding carving block house shape, and carefully trace over the Sharpie lines with a ballpoint pen. Apply pressure while tracing to transfer the soft graphite from the back of the drawing onto the surface of the carving block.
materials•scrap lumber (I use 2" × 4" lumber.)
•handsaw
•tracing paper or vellum
•pencils (thick, soft graphite and regular #2)
•sharpie® marker
•artist’s carving block, such as eZ-Cut, safety-kut™, or speedy Carve™)
•X-acto® or utility knife
•ballpoint pen
•set of linoleum/artist carving block tools (I used V-gouge and U-gouge blades.)
•oil-based block printing ink (I used speedball® printing ink.)
•glass palette or old cookie sheet
•brayer
•lightweight printmaking paper (Japanese rice paper and tissue paper work well.)
•spoon
•Vegetable oil and paper towels/rags for cleanup
•sandpaper
•scissors
•acrylic matte medium
•paintbrush
•acrylic varnish
optional
•Miter box
•watercolors
•acrylic paint
•Colored pencils
Free Guide to Block, Relief, and Lino Printing Techniques9
clothpaperscissors.com©Interweave Press LLC
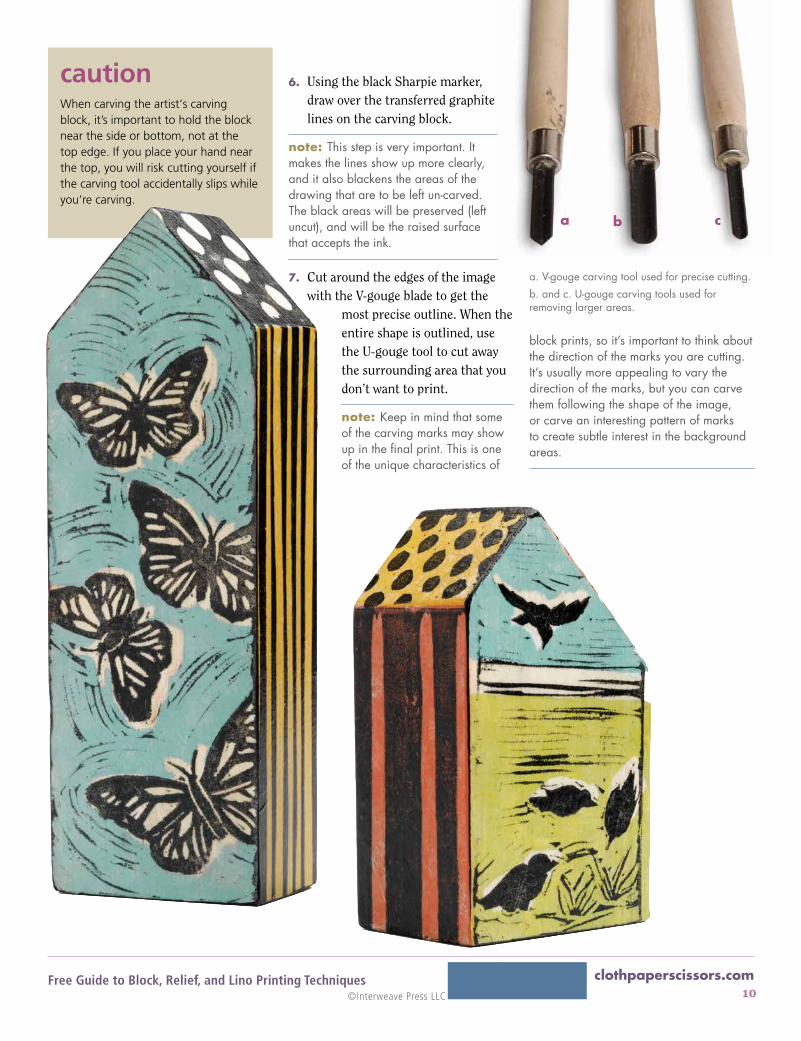
When carving the artist‘s carving block, it’s important to hold the block near the side or bottom, not at the top edge. if you place your hand near the top, you will risk cutting yourself if the carving tool accidentally slips while you’re carving.
caution
a b c
6. Using the black Sharpie marker, draw over the transferred graphite lines on the carving block.
note: this step is very important. It makes the lines show up more clearly, and it also blackens the areas of the drawing that are to be left un-carved. the black areas will be preserved (left uncut), and will be the raised surface that accepts the ink.
7. Cut around the edges of the image with the V-gouge blade to get the
most precise outline. When the entire shape is outlined, use the U-gouge tool to cut away the surrounding area that you don’t want to print.
note: keep in mind that some of the carving marks may show up in the final print. this is one of the unique characteristics of
block prints, so it’s important to think about the direction of the marks you are cutting. It’s usually more appealing to vary the direction of the marks, but you can carve them following the shape of the image, or carve an interesting pattern of marks to create subtle interest in the background areas.
a. V-gouge carving tool used for precise cutting.
b. and c. U-gouge carving tools used for removing larger areas.
Free Guide to Block, Relief, and Lino Printing Techniques10
clothpaperscissors.com©Interweave Press LLC
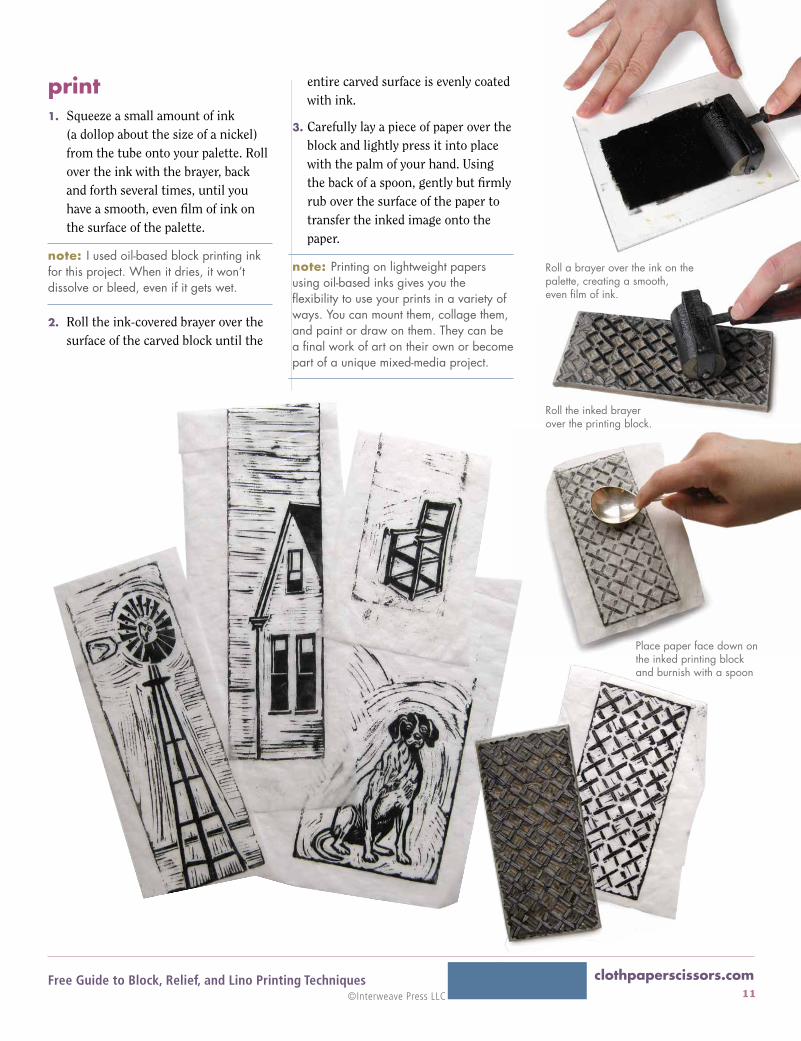
place paper face down on the inked printing block and burnish with a spoon
roll a brayer over the ink on the palette, creating a smooth, even film of ink.
roll the inked brayer over the printing block.
print1. Squeeze a small amount of ink
(a dollop about the size of a nickel) from the tube onto your palette. Roll over the ink with the brayer, back and forth several times, until you have a smooth, even film of ink on the surface of the palette.
note: I used oil-based block printing ink for this project. when it dries, it won’t dissolve or bleed, even if it gets wet.
2. Roll the ink-covered brayer over the surface of the carved block until the
entire carved surface is evenly coated with ink.
3. Carefully lay a piece of paper over the block and lightly press it into place with the palm of your hand. Using the back of a spoon, gently but firmly rub over the surface of the paper to transfer the inked image onto the paper.
note: printing on lightweight papers using oil-based inks gives you the flexibility to use your prints in a variety of ways. You can mount them, collage them, and paint or draw on them. they can be a final work of art on their own or become part of a unique mixed-media project.
Free Guide to Block, Relief, and Lino Printing Techniques11
clothpaperscissors.com©Interweave Press LLC
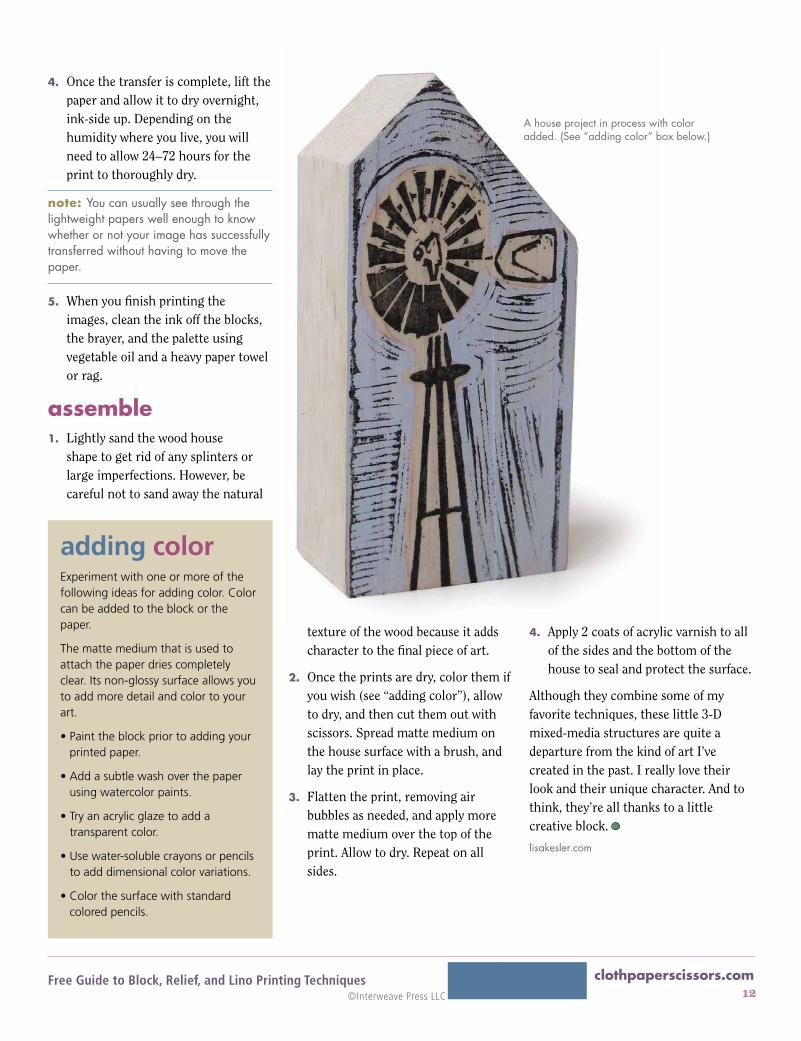
a house project in process with color added. (see “adding color” box below.)
4. Once the transfer is complete, lift the paper and allow it to dry overnight, ink-side up. Depending on the humidity where you live, you will need to allow 24–72 hours for the print to thoroughly dry.
note: You can usually see through the lightweight papers well enough to know whether or not your image has successfully transferred without having to move the paper.
5. When you finish printing the images, clean the ink off the blocks, the brayer, and the palette using vegetable oil and a heavy paper towel or rag.
assemble1. Lightly sand the wood house
shape to get rid of any splinters or large imperfections. However, be careful not to sand away the natural
texture of the wood because it adds character to the final piece of art.
2. Once the prints are dry, color them if you wish (see “adding color”), allow to dry, and then cut them out with scissors. Spread matte medium on the house surface with a brush, and lay the print in place.
3. Flatten the print, removing air bubbles as needed, and apply more matte medium over the top of the print. Allow to dry. Repeat on all sides.
4. Apply 2 coats of acrylic varnish to all of the sides and the bottom of the house to seal and protect the surface.
Although they combine some of my favorite techniques, these little 3-D mixed-media structures are quite a departure from the kind of art I’ve created in the past. I really love their look and their unique character. And to think, they’re all thanks to a little creative block.
lisakesler.com
experiment with one or more of the following ideas for adding color. Color can be added to the block or the paper.
the matte medium that is used to attach the paper dries completely clear. its non-glossy surface allows you to add more detail and color to your art.
• Paint the block prior to adding your printed paper.
• Add a subtle wash over the paper using watercolor paints.
• Try an acrylic glaze to add a transparent color.
• Use water-soluble crayons or pencils to add dimensional color variations.
• Color the surface with standard colored pencils.
adding color
Free Guide to Block, Relief, and Lino Printing Techniques12
clothpaperscissors.com©Interweave Press LLC
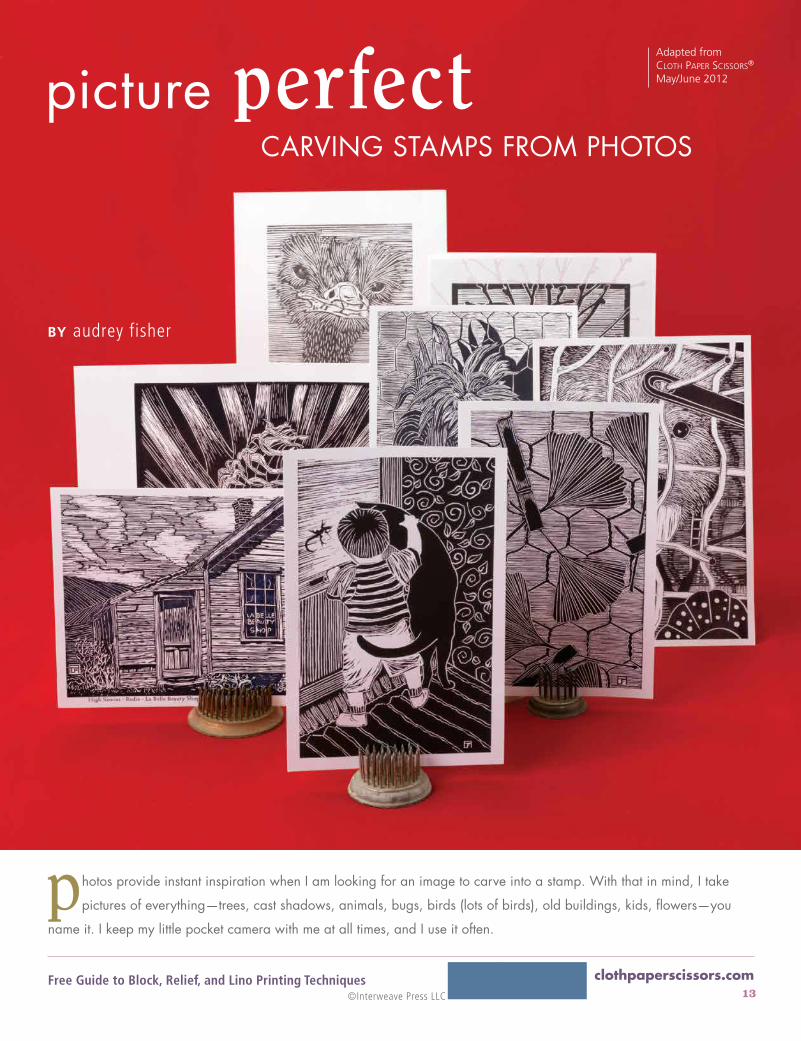
picture perfect CarVIng staMps froM photos
photos provide instant inspiration when I am looking for an image to carve into a stamp. with that in mind, I take
pictures of everything—trees, cast shadows, animals, bugs, birds (lots of birds), old buildings, kids, flowers—you
name it. I keep my little pocket camera with me at all times, and I use it often.
adapted from Cloth PaPer SCiSSorS® May/June 2012
by audrey fisher
Free Guide to Block, Relief, and Lino Printing Techniques13
clothpaperscissors.com©Interweave Press LLC
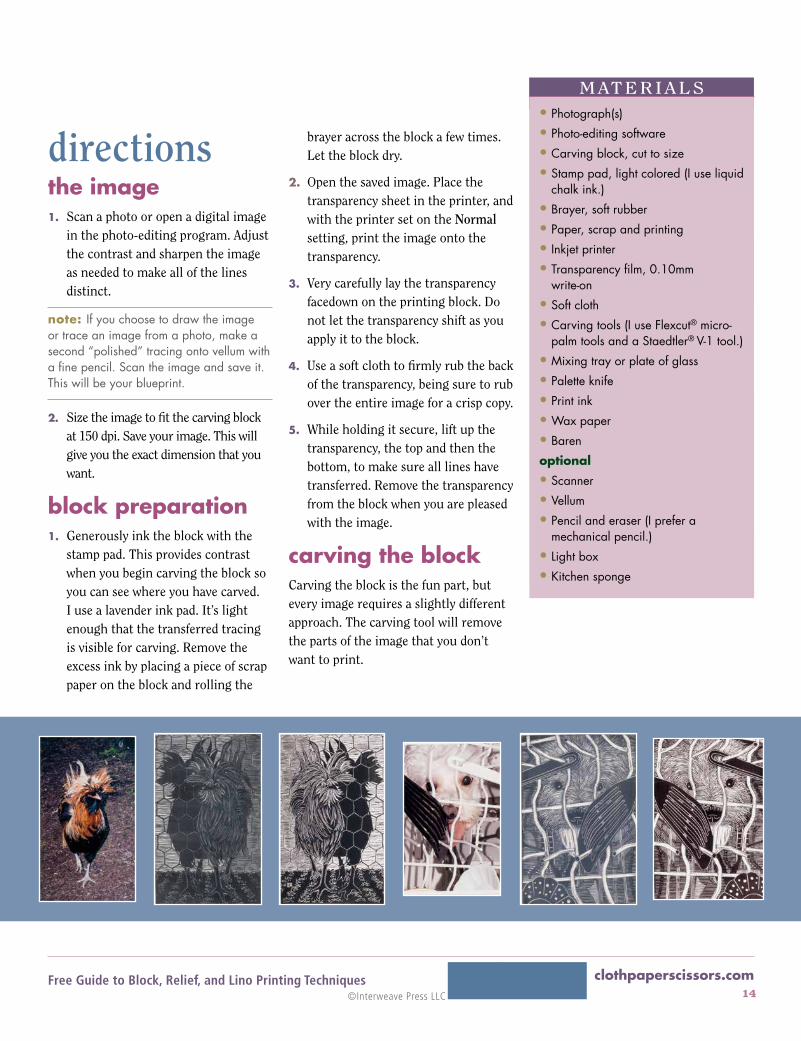
directionsthe image1. Scan a photo or open a digital image
in the photo-editing program. Adjust the contrast and sharpen the image as needed to make all of the lines distinct.
note: If you choose to draw the image or trace an image from a photo, make a second “polished” tracing onto vellum with a fine pencil. scan the image and save it. this will be your blueprint.
2. Size the image to fit the carving block at 150 dpi. Save your image. This will give you the exact dimension that you want.
block preparation 1. Generously ink the block with the
stamp pad. This provides contrast when you begin carving the block so you can see where you have carved. I use a lavender ink pad. It’s light enough that the transferred tracing is visible for carving. Remove the excess ink by placing a piece of scrap paper on the block and rolling the
brayer across the block a few times. Let the block dry.
2. Open the saved image. Place the transparency sheet in the printer, and with the printer set on the Normal setting, print the image onto the transparency.
3. Very carefully lay the transparency facedown on the printing block. Do not let the transparency shift as you apply it to the block.
4. Use a soft cloth to firmly rub the back of the transparency, being sure to rub over the entire image for a crisp copy.
5. While holding it secure, lift up the transparency, the top and then the bottom, to make sure all lines have transferred. Remove the transparency from the block when you are pleased with the image.
carving the blockCarving the block is the fun part, but every image requires a slightly different approach. The carving tool will remove the parts of the image that you don’t want to print.
materials•photograph(s)
•photo-editing software
•Carving block, cut to size
•stamp pad, light colored (I use liquid chalk ink.)
•brayer, soft rubber
•paper, scrap and printing
•Inkjet printer
•transparency film, 0.10mm write-on
•soft cloth
•Carving tools (I use flexcut® micro-palm tools and a staedtler® V-1 tool.)
•Mixing tray or plate of glass
•palette knife
•print ink
•wax paper
•baren
optional
•scanner
•Vellum
•pencil and eraser (I prefer a mechanical pencil.)
•light box
•kitchen sponge
Free Guide to Block, Relief, and Lino Printing Techniques14
clothpaperscissors.com©Interweave Press LLC

Use the following tips for a successful carve:
• Transparency film works best when the image printed on it has been drawn with fine (yet dark) lines. Lines that are too heavy can merge and cause ink blots. Trace carefully. Pay close attention to the direction of fur or feathers, etc. These details are the foundation for a successful carving.
• Print out a mirror image of your pencil drawing so that you can use it as a guide while carving.
• The finer the v-tip on the tool the better. I would buy even narrower v-tools if they were available.
• I try to carve the most difficult part first, i.e., the eyes, because if I goof up I have not invested time in other areas of a carving that might end up being tossed.
• This is a very unforgiving medium so I do a lot of planning. I often practice smaller details like eyes on scraps of block material before committing to the actual carve.
• I prefer to move around an image, carving a little here and a little there, until it all comes together.
• Sometimes I carve the negative space early on, which in my case often involves carving parallel lines that start on the line of the image and are
• A light box is a useful tool when tracing an image.
• Vellum is an ideal paper for tracing because it is transparent and takes endless erasures.
• A mechanical pencil is a must-have. the thin lead always has the good point necessary for drawing the details that will be transferred to the carving blocks.
• Take elements from two or more photos and combine them. for example, you have a bird perched on a nondescript fence. first trace the bird and then trace a branch of a tree from another photo. Combine the two images to create a more appealing picture. Make sure everything is in proportion.
tips for preparing images
Free Guide to Block, Relief, and Lino Printing Techniques15
clothpaperscissors.com©Interweave Press LLC
carved outward towards the edge of the block or border.
printing1. Spread a dab of ink onto the plate
with the palette knife and use the brayer to roll out the ink in a thin layer. I like to print with black ink and have had success with both water-based ink and soy-based intaglio ink.
2. Place the stamp face up on your work surface and roll a thin layer of ink over the entire carved surface. Carefully position the paper on top of the inked block and, with a piece of wax paper on top of the paper, press with the baren. The wax paper will allow the baren to glide across the surface of the paper.
3. Allow several hours or overnight for the ink to dry. Humidity and paper choice will determine drying time.
If you hadn’t thought of using photos as a source of inspiration for carving, I hope this technique will nudge you in that direction. Look through old family photos or get out that point-and-shoot camera and start taking pictures. You will have a gold mine of original subjects to make one-of-a-kind stamps. You can obtain exquisite detail using this method, but it is important to prepare carefully. You will be rewarded with a crisp, sharp image that will blow your socks off!
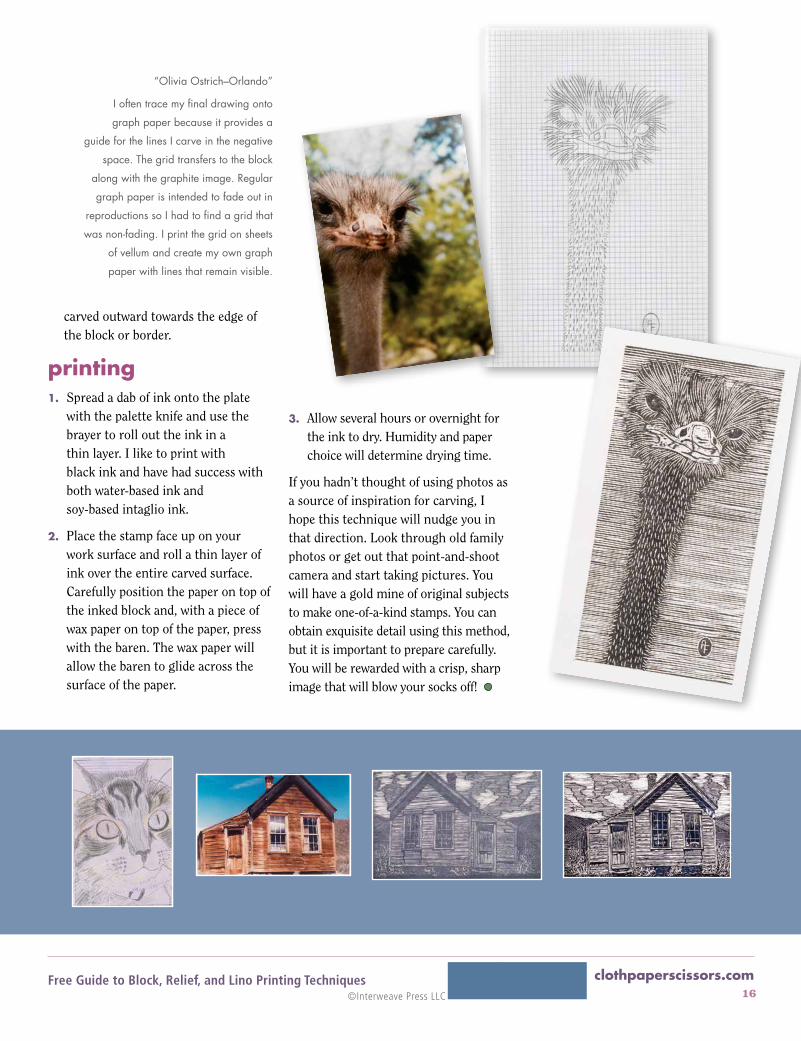
“olivia ostrich–orlando”
I often trace my final drawing onto
graph paper because it provides a
guide for the lines I carve in the negative
space. the grid transfers to the block
along with the graphite image. regular
graph paper is intended to fade out in
reproductions so I had to find a grid that
was non-fading. I print the grid on sheets
of vellum and create my own graph
paper with lines that remain visible.
Free Guide to Block, Relief, and Lino Printing Techniques16
clothpaperscissors.com©Interweave Press LLC