research of test methods to evaluate joint preparation...
TRANSCRIPT

THE SEAL/NO SEAL GROUP Research of Test Methods to Evaluate Joint Preparation for Sealing West Coxsackie, NY
Final Report
July 1, 2013 WJE No. 2011.0050
Prepared for: Mr. Scott Eilken The Seal/No Seal Group 12573 Route 9W West Coxsackie, NY 12192
Prepared by: Wiss, Janney, Elstner Associates, Inc. 330 Pfingsten Road Northbrook, Illinois 60062 847.272.7400 tel | 847.291.9599 fax

THE SEAL/NO SEAL GROUP Research of Test Methods to Evaluate Joint Preparation for Sealing West Coxsackie, NY
Matt Gries Project Engineer
Paul D. Krauss, PE Project Manager
Final Report July 1, 2013 WJE No. 2011.0050
Prepared for: Mr. Scott Eilken The Seal/No Seal Group 12573 Route 9W West Coxsackie, NY 12192
Prepared by: Wiss, Janney, Elstner Associates, Inc. 330 Pfingsten Road Northbrook, Illinois 60062 847.272.7400 tel | 847.291.9599 fax

TABLE OF CONTENTS
Literature Review ................................................................................................................................... 1 Surface Moisture Conditions ........................................................................................................... 1 Cleanliness ....................................................................................................................................... 3
Laboratory Evaluation of Test Methods ................................................................................................. 3 Relative Humidity Meter (Moisture) ............................................................................................... 4 Resistivity Probe (Moisture) ............................................................................................................ 5 Moisture / pH Sensitive Paper (Moisture) ....................................................................................... 6 Wipe Test (Cleanliness) ................................................................................................................... 7 Tape Contamination Test (Cleanliness) ........................................................................................... 8 Tape Pull Off Test (Cleanliness & Moisture) ................................................................................ 10
Development and Field Evaluation of Draft Test Methods .................................................................. 13 Discussion of Testing Frequency ......................................................................................................... 15
Statistical Basis for Sample Size .................................................................................................... 15 Recommended Testing Frequency ................................................................................................. 16
Conclusions and Future Course of Action ............................................................................................ 18 Appendix A: Literature Review Bibliography ............................................................................................ 20
Literature Review ................................................................................................................................. 21 Appendix B: Test Methods ......................................................................................................................... 23

Seal/No Seal Group
Joint Cutting and Sealing Research
July 1, 2013
Page 1
THE SEAL/NO SEAL GROUP Research of Test Methods to Evaluate Joint Preparation for Sealing West Coxsackie, NY
Wiss, Janney, Elstner Associates, Inc. (WJE) has completed research to develop practical field tests
procedures that can measure and indicate when a sawcut joint is clean and dry enough to accept sealant.
Our effort included three tasks:
Task 1: Literature Review and Testing Scope Development
Task 2: Evaluation of Test Methods
Task 3: Compile Data and Report of Findings
Reproducibility and ease of use are primary elements necessary for any practical test. To promote
acceptance, the test must be simple, quick, and not costly to perform. Upon development of the practical
tests, WJE was requested to establish a rational basis for test sampling rates based on statistical tools and
the quantitative data from laboratory data. This report provides the findings of the research and also
includes draft test methods for consideration or further development.
Literature Review
Relevant publications were reviewed that discuss test methods and technologies that are potentially useful
for detecting and measuring moisture and contamination of concrete surfaces. The publications, listed in
Appendix A, included ASTM standards, SSPC standards, and technical journal articles. Most of the
literature, research efforts, and technologies related to the evaluation of concrete moisture and cleanliness
are tailored to the flooring and coating industry, thus the methods are typically carried out on large, flat
surfaces. One of the challenges in adopting current strategies of detecting moisture and determining
cleanliness of concrete surfaces to concrete joints is the limited access to the vertical surface of the joint.
A summary of the most relevant findings of our literature review follows.
Surface Moisture Conditions
Six test methods are typically referenced in the literature for determining moisture levels in concrete
slabs. Their applicability to assessing moisture content within joints varies.
1. Plastic sheet test - ASTM D4263 "Standard Test Method for Indicating Moisture in Concrete by
the Plastic Sheet Method" provides a qualitative go/no-go test based on trapping visible moisture
in a plastic sheet. This test requires a large surface area and is performed over a minimum of 16
hours, thus it is not considered practical for our study.
2. Calcium chloride absorption (Moisture vapor transmission) rate test - ASTM F1869 "Standard
Test Method for Measuring Moisture Vapor Emission Rate of Concrete Subfloor Using
Anhydrous Calcium Chloride" involves measuring the amount of moisture over a set covered area
absorbed by a known quantity of calcium chloride. This test requires 72 hour test duration, thus is
not considered practical for our study.

Seal/No Seal Group
Joint Cutting and Sealing Research
July 1, 2013
Page 2
3. Carbide test - The carbide test is used more frequently in Europe than in the United States and is
similar to the soils moisture test in ASTM D4944 “Standard Test Method for Field Determination
of Water (Moisture) Content of Soil by the Calcium Carbide Gas Pressure Tester”. This modified
test involves taking a small chipped sample of concrete and crushing it with a hammer. Placing a
known mass of the concrete powder in a sealed vessel with an excess of calcium carbide. Shaking
the vessel causes a reaction between the moisture in the sample and the calcium carbide that
results in a measurable pressure from released acetylene gas. This test causes minor destruction of
the joint and sampling the critical surface within the joint is difficult, making this test likely not
practical for application to joints.
4. Relative humidity test - This test uses a relative humidity (RH) probe in a sealed hole in the
concrete. Over time, the RH of the air within the hole will equilibrate to that of the surrounding
concrete and can be measured. ASTM F2170 "Standard Test Method for Determining Relative
Humidity in Concrete Floor Slabs Using in situ Probes" provides a standard for performing this
test on concrete slabs. The Society for Protective Coatings and NACE International publication
SSPC-SP 13/NACE No. 6 "Joint Surface Preparation Standard" provides suggested acceptance
criteria for this test. WJE has often used this test or a modification of the test to evaluate moisture
in concrete structures and pavements. Adapting this strategy to joints may be straightforward if a
modified version of the standard RH probe is placed within a sealed section of the joint. This
method was explored in our preliminary lab investigation and is discussed below.
5. Resistivity probe - This method measures the resistance of a low-voltage current between two to
four conductive probes placed in soils or on the surface of concrete. Results provide a quantitative
reading of electrical resistance that can be correlated to moisture content; however, results can be
affected by differences in conductivity based on cement-to-aggregate ratios as well as variable
resistance of different aggregate types. Therefore, while it may be able to differentiate between
wet and dry concrete, it may be difficult to develop a universally acceptable resistance value for
all concretes. This method was explored in our preliminary lab investigation and is discussed
below.
6. Radio wave meter - Radio wave moisture meters measure an induced radio frequency field in the
concrete to quantitatively determine moisture content. Unlike the resistivity probe, the device
does not require a probe, but rather has a flat transmitter and receiver. There are no devices
currently that can measure surfaces within a sawcut directly. The level of accuracy with placing
the device adjacent to the joint on the top surface of the slab is not expected to be adequate to
differentiate joint surface conditions. Radio wave frequency is affected by the dielectric
properties of the concrete, which is affected by moisture content as well as concrete properties
such as aggregate type and age of concrete. It is suspected that differences in dielectric constant
due to properties of the concrete materials and age would make calibration difficult and
negatively affect the accuracy of evaluating moisture content to the point that the test would not
be able to be compared to an absolute threshold for acceptance. A typical meter can be found at
http://www.ndtjames.com/Aquameter-p/t-m-170.htm. This test method was not explored in our
lab investigation, as current meters would need to be significantly modified to work accurately
within joints.
In addition to the commonly referenced methods above, moisture sensitive paper and pH paper were
researched as potentially useful test methods. When wet, moisture sensitive paper changes color. pH-
detecting paper was also tested. Water leeching from the surface of the concrete at the joint surface has a

Seal/No Seal Group
Joint Cutting and Sealing Research
July 1, 2013
Page 3
pH similar to that of concrete, usually greater than 10. A reading on the pH-paper in this range indicates
that water moisture from the concrete is present at the joint surface. These methods were explored in our
preliminary lab investigation discussed below.
Cleanliness
Literature regarding assessment of concrete surface cleanliness is less specific than moisture testing.
Typical suggested methods include wiping the surface with a dark cloth or rubbing tape against the
prepared surface to pick up dust or dirt. ASTM D5295 specifically mentions the use of a “variably
aggressive material such as mystic tape”. It is not clear what is intended by the term “mystic tape”, but
other literature specifically mentions the use of translucent adhesive tape. The use of dark cloth and
various types of tapes were explored in our preliminary lab investigation and are discussed below.
Additionally, literature indicates that oils or chemicals on the concrete can be detected by using ultraviolet
light in accordance with ASTM E1135. This would require building a special inspection box to observe
joint conditions outdoors. This test method was not evaluated as it is expected that oils are not likely
prevalent within prepared joints and locations of spilled oils or chemicals would be identified through
visual inspection of the pavement surface or the other developed test methods.
Laboratory Evaluation of Test Methods
Our laboratory investigation was
intended to provide insight into the
potential usefulness of several test
methods. In our labs, we sawcut
multiple concrete samples to simulate
joints, shown in Figure 1. Some joints
were thoroughly rinsed during cutting
then cleaned through shotblasting and
dried with compressed air, as shown in
Figure 2, while others were left
unrinsed and uncleaned. Several tests
were then conducted to get a sense of
the sensitivity of test results to the
widely different joint conditions.
Figure 1. Typical sawcut joints used during laboratory testing.

Seal/No Seal Group
Joint Cutting and Sealing Research
July 1, 2013
Page 4
Figure 2. Sawcut joint being cleaned and dried with compressed air.
Relative Humidity Meter (Moisture)
A relative humidity probe was modified to fit into the sawcut joint, shown in Figure 3. An area of the
joint was sealed by placing foam rod in the joint and a plastic dish at the top, shown in Figure 4.
Testing was performed on both wet and dry joints and after equilibrating, the results were distinctly
different between the two test conditions although not by a large margin, as shown in Table 1.
Figure 3. Relative humidity probe modified to fit into
sawcut joint.
Figure 4. Relative humidity probe test.
Seal/No Seal Group
Joint Cutting and Sealing Research
July 1, 2013
Page 5
Table 1. Relative humidity probe test results
Time
(minutes)
Wet Joint
Sensor Impedance
(x^6 ohms)
Dry Joint
Sensor Impedance
(x^6 ohms)
Wet Joint
Approximate*
Relative
Humidity (%)
Dry Joint
Approximate*
Relative
Humidity (%)
Start 23.0 32.5 32 29
2 17.0 34.9 33 28
4 14.7 26.8 35 30
6 12.8 23.9 36 32
8 11.3 20.5 37 33
10 10.8 20.3 38 33
* rough approximation - gage not calibrated to actual RH
With further testing, it may be possible to correlate results with a minimum threshold value with
moderately short test periods. The equilibration time of over 10 minutes for each test is one downside to
this procedure. There may be ways to shorten this time, however, we suspect that at least 5 minutes or
more will be required to allow enough time for the air humidity to reasonably represent the concrete joint
conditions. Additionally, the difference in probe impedance and approximate relative humidity between
the saturated (wet) joint and dry joint was generally small. Delineations between damp joints and dry
joints would be even smaller. While the results using RH measurement were promising; due to the need
for equilibration time and concern over precision of the RH results, this test method was not developed
further within this study.
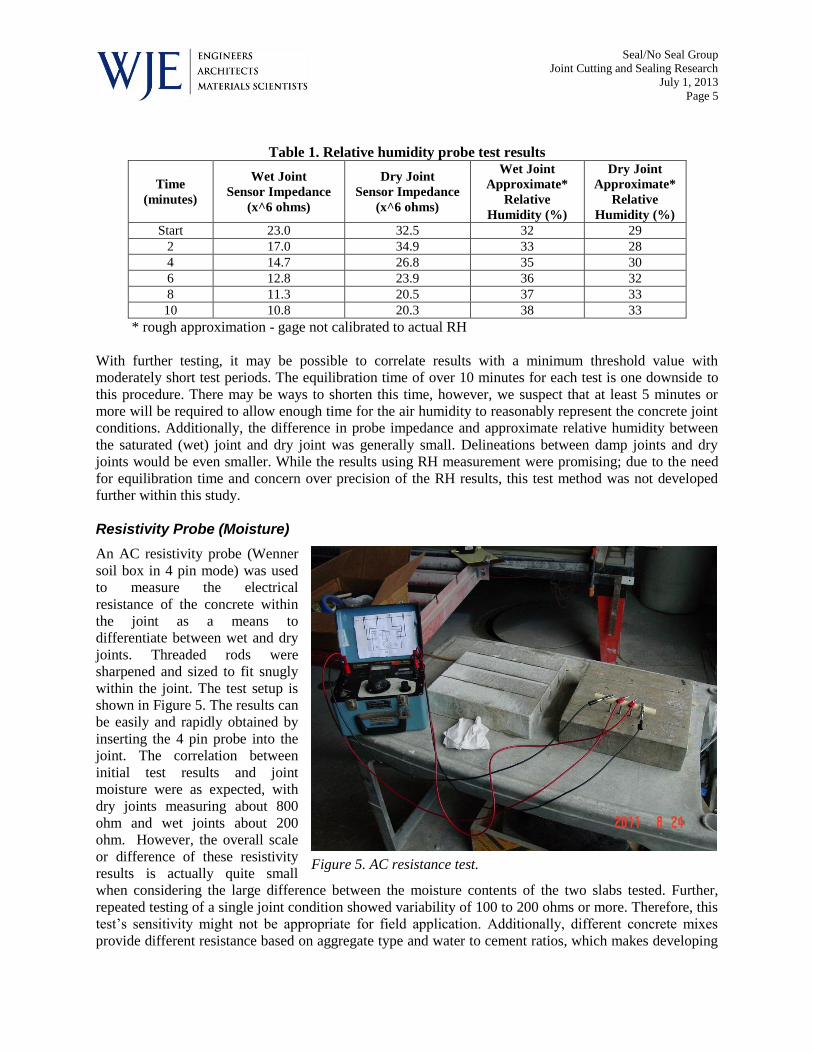
Resistivity Probe (Moisture)
An AC resistivity probe (Wenner
soil box in 4 pin mode) was used
to measure the electrical
resistance of the concrete within
the joint as a means to
differentiate between wet and dry
joints. Threaded rods were
sharpened and sized to fit snugly
within the joint. The test setup is
shown in Figure 5. The results can
be easily and rapidly obtained by
inserting the 4 pin probe into the
joint. The correlation between
initial test results and joint
moisture were as expected, with
dry joints measuring about 800
ohm and wet joints about 200
ohm. However, the overall scale
or difference of these resistivity
results is actually quite small
when considering the large difference between the moisture contents of the two slabs tested. Further,
repeated testing of a single joint condition showed variability of 100 to 200 ohms or more. Therefore, this
test’s sensitivity might not be appropriate for field application. Additionally, different concrete mixes
provide different resistance based on aggregate type and water to cement ratios, which makes developing
Figure 5. AC resistance test.

Seal/No Seal Group
Joint Cutting and Sealing Research
July 1, 2013
Page 6
a universal test method and threshold criteria difficult. As such, resistivity probe testing is a promising
technique but it was not developed further within this study.
Moisture / pH Sensitive Paper (Moisture)
Moisture sensing paper appeared promising as a qualitative go/no-go test for determining the presence of
free moisture in the joint. Figure 6 and Figure 7 shows testing with one type of moisture sensing paper.
The specific paper used in preliminary testing is reusable and returns to its initial color after air drying,
which may not be desirable because test results cannot be accurately retained for record keeping. Other
test papers which permanently change color may be preferable. Based on testing different moisture
conditions within the joints, it is clear that the moisture paper will only identify free water on the surface
of the concrete and does not provide information regarding damp concrete where high moisture content is
present within the concrete but free water is not present on the surface. A standardized test method for
using moisture sensitive paper was developed and tested in the field. Field staff reported that it only
measured water that was already visible within the joint by careful observation.
Figure 6. Moisture sensitive paper test. Purple
indicates the detection of moisture.
Figure 7. Moisture sensitive paper test results.

Seal/No Seal Group
Joint Cutting and Sealing Research
July 1, 2013
Page 7
pH paper was also tested, as shown in
Figure 8. Preliminary testing showed that this
test also appears to work as a qualitative
go/no-go test for detection of free moisture,
but does not appear to offer an additional
benefit to the moisture sensing paper.
Wipe Test (Cleanliness)
A dark cloth was used to wipe the surface of
the joint to determine the presence of
contaminants. The delineation between clean
and unclean joints, shown in Figure 9 and
Figure 10, indicated that this test is effective at
detecting concrete powder and debris on the
surface of the joints. One potential downside
to this test is that handling of the cloth can significantly affect results. The cloth may pick up
contaminants through inadvertent contact with the top surface of the slab or contaminants picked up
during the test might be inadvertently removed by rough handling of the cloth. Regardless, this test is
very rapid and simple to use and provides useful information. A test method was developed for
identifying contaminants by visually assessing cloth wipe test results.
Figure 9. Dark cloth wipe test on cleaned joint. Figure 10. Dark cloth wipe test on uncleaned
joint.
Figure 8. pH sensitive paper test result.
Seal/No Seal Group
Joint Cutting and Sealing Research
July 1, 2013
Page 8
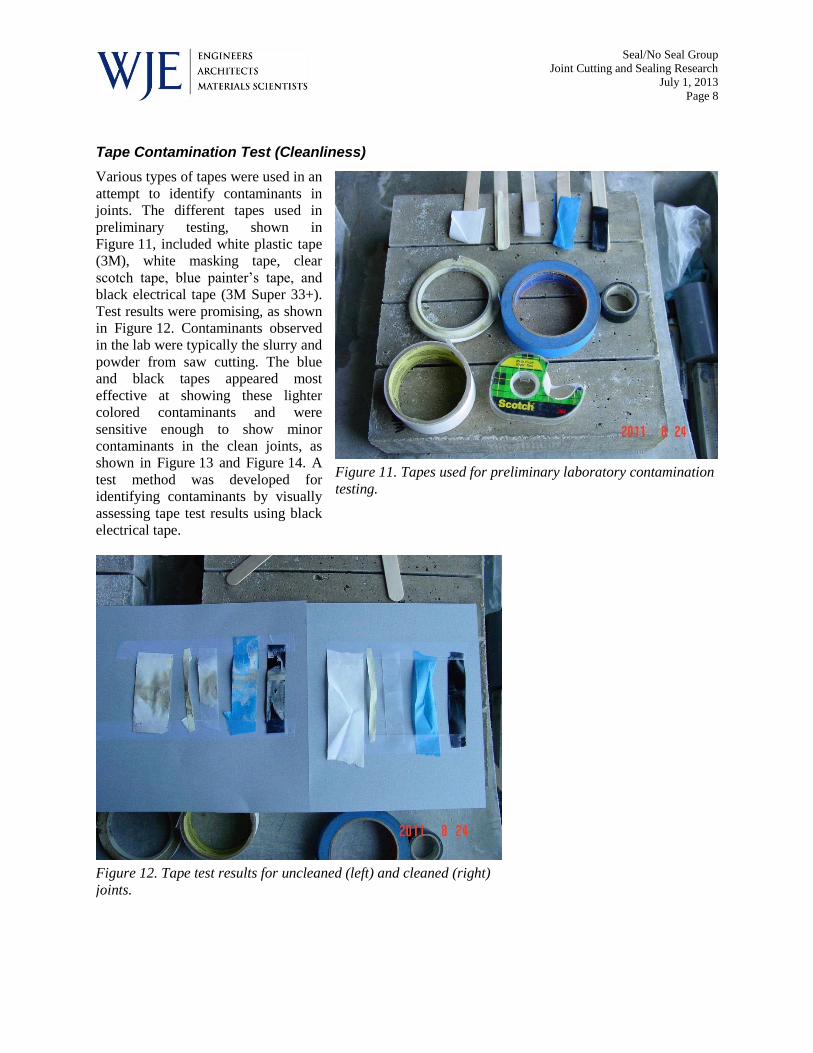
Tape Contamination Test (Cleanliness)
Various types of tapes were used in an
attempt to identify contaminants in
joints. The different tapes used in
preliminary testing, shown in
Figure 11, included white plastic tape
(3M), white masking tape, clear
scotch tape, blue painter’s tape, and
black electrical tape (3M Super 33+).
Test results were promising, as shown
in Figure 12. Contaminants observed
in the lab were typically the slurry and
powder from saw cutting. The blue
and black tapes appeared most
effective at showing these lighter
colored contaminants and were
sensitive enough to show minor
contaminants in the clean joints, as
shown in Figure 13 and Figure 14. A
test method was developed for
identifying contaminants by visually
assessing tape test results using black
electrical tape.
Figure 12. Tape test results for uncleaned (left) and cleaned (right)
joints.
Figure 11. Tapes used for preliminary laboratory contamination
testing.

Seal/No Seal Group
Joint Cutting and Sealing Research
July 1, 2013
Page 9
Figure 13. Electrical tape test result on cleaned joint.
Figure 14. Blue painters tape test result on cleaned joint.

Seal/No Seal Group
Joint Cutting and Sealing Research
July 1, 2013
Page 10
Tape Pull Off Test (Cleanliness & Moisture)
During the laboratory investigation of the tape contamination test, it was found that the tape pulled off at
different strengths depending on the level of cleanliness and moisture condition of the joint. Pull off
strength tests were performed in the laboratory by modifying the tape contamination test by using a scale
to capture the peak load when pulling the tape from the joint after burnishing. The scale was attached to a
wood tongue depressor inserted into the joint through a pair of vise grips, as shown in Figure 15. The test
was repeated for joint depths of 1 to 4 inches and with different preparation conditions. Joint preparations
included none; powerwashed and airblown; and powerwashed, sandblasted, and airblown. The uncleaned
samples and fully prepared samples were evaluated at two different moisture levels, dry and damp. The
damp moisture level represents a saturated-surface-dry condition which is not detectable by the moisture
sensitive paper. 3M Super33+ electrical tape was initially selected as the tape for trial laboratory testing
due to its being readily available across the country as well as its black color; being useful for the visual
tape contamination test. However, this tape was discovered to be undesirably ductile in tension and we
also found it to have poor adhesion characteristics at elevated temperatures up to 110°F. An alternative
tape was selected for testing, Cross Hatch Tape by SEMicro (http://www.semicro.org/testtape.aspx). This
tape is used in ASTM D3359 “Standard Test Methods for Measuring Adhesion by Tape Test” and is
certified by the manufacturer for consistency, helping to assure reproducible adhesive properties. The tape
demonstrated a stiff response in tension and did not show a change in pull-off strength when adhered to
surfaces with temperature ranging between 40°F and 110°F.
Figure 15. Initial setup for tape adhesion pull-off testing.
Scale for measuring load applied
Clamping device
Adhesive tape folded and burnished onto sides of joint
Wooden tongue depressors to fill gap between tapes

Seal/No Seal Group
Joint Cutting and Sealing Research
July 1, 2013
Page 11
The results of lab testing
are presented in
Figure 16 as the peak
force measured by the
scale and in Figure 17 as
the peak force over the
area of the tape adhered
to one side of the joint.
The results in Figure 17
are presented as the force
over the area of one-side
of the adhered tape due
to the observation that
the peak load does not
occur at a simultaneous
pull-off of the tape from
both sides of the joint,
but rather occurs when
the adhesion of the tape
on one side of the joint
fails before the second
side fails. The results
demonstrate an increase
in pull-off strength with
increased level of
cleanliness as well as a
clear delineation between
dry and damp joints
when the joint is clean.
The pull force varies
with test depth (area of
bonding surface),
although results become
less correlated when the
test is performed at a
depth beyond 3 inches.
At 1 inch depth, the pull-
off force for poorly
cleaned or damp joints
was 10 lbs. or less while the clean and dry joints was 40 lbs. or greater. At 2 inch depth, the pull-off force
for poorly cleaned or damp joints was about 35 lbs. or less while the clean and dry joints was about 70
lbs. or greater. When normalized to one-side area of the adhered tape, it appears that the delineation
between poorly cleaned or damp joints and clean, dry joints occurs at 20 psi for depths up to 3 inches, as
shown in Figure 17.
Figure 16. Tape pull off test results from laboratory testing using double-
sided test method.
Figure 17. Tape pull off test results in psi (load/one-sided area) from
laboratory testing using double-sided test method with test depth.
0
10
20
30
40
50
60
70
80
90
100
0 2 4 6
Pu
ll O
ff L
oad
(lb
f)
Test Depth (in)
uncleaned - damp
uncleaned - dry
powerwash/ airblown -dry
powerwash/ airblown/sandblasted - damp
powerwash/ airblown/sandblasted - dry
0
10
20
30
40
50
60
70
0 2 4 6
Pu
ll O
ff L
oad
(p
si)
Test Depth (in)
uncleaned - damp
uncleaned - dry
powerwash/ airblown -dry
powerwash/ airblown/sandblasted - damp
powerwash/ airblown/sandblasted - dry

Seal/No Seal Group
Joint Cutting and Sealing Research
July 1, 2013
Page 12
It is recommended that the
test be performed in excess
of the required installation
bonding depth as
established by the sealant
manufacturer, by say
approximately 1/2 deeper
than the bond depth; but
not less than 1 inch or
more than 3 inches. A
default test depth of 1 inch
is currently recommended.
Also, as an alternative to
performing the tape pull
test by adhering the tape to
both vertical surfaces of
the joints, performing the
test on one side of the
vertical surface also
exhibited similar test
results for the clean and
dry joints as shown in
Figure 18 and Figure 19.
When performing the
single-side pull test
method, doubling the
thickness of the tape by
adhering one piece of tape
to the back of another
piece of tape prior to
testing proved effective at
avoiding breaking the tape
during the test. Based on
the promising data from
laboratory testing, a
standard test method was
developed for pull off
strength testing.
Figure 18. Tape pull off test results from laboratory testing using single-side
test method for properly cleaned and dry joints.
Figure 19. Tape pull off test results in psi from laboratory testing using
single-side test method for properly cleaned and dry joints with test depth.
0
10
20
30
40
50
60
70
80
90
100
0 2 4 6
Pu
ll O
ff L
oad
(lb
f)
Test Depth (in)
powerwash/ airblown -dry - single side test
powerwash/ airblown/sandblasted - dry - singleside test
0
10
20
30
40
50
60
70
0 2 4 6
Pu
ll O
ff L
oad
(p
si)
Test Depth (in)
powerwash/ airblown -dry - single side test
powerwash/ airblown/sandblasted - dry - singleside test

Seal/No Seal Group
Joint Cutting and Sealing Research
July 1, 2013
Page 13
Development and Field Evaluation of Draft Test Methods
Four primary test methods were developed based on the preliminary laboratory study:
Moisture Paper Test (Moisture)
Wipe Test (Cleanliness)
Tape Contamination Test (Cleanliness)
Tape Pull Test (Cleanliness and Moisture)
The developed draft test methods, provided in Appendix B, include explicit written instructions, pictorial
depiction of the test process, and visual standards for scoring the test. In addition to the draft test methods,
a form was created for recording test data, also provided in Appendix B.
To better evaluate the test methods a test kit was created (Figure 20) and the draft test methods were
evaluated on field jobs by Quality Saw and Seal staff. The field testing demonstrated consistent results,
with some of the testing shown in Figure 21 and Figure 22. The field staff provided valuable feedback
regarding the speed and ease of testing which was useful for determining test practicality and acceptance
thresholds.
Figure 20. Test kit created for field evaluation of draft test methods. Pull gage has automatic
peak hold feature.
Tensile Pull Gage
Test Standards
& Data Sheets Black Cotton Cloth
& Scissors
Wood Depressors
& Adhesive Tape
Water Sensing
& pH Paper
Clamping Device
& Ruler

Seal/No Seal Group
Joint Cutting and Sealing Research
July 1, 2013
Page 14
Figure 21. Wipe test results from field testing. Top
to bottom: Not cleaned; powerwashed; and
powerwashed and sandblasted.

Seal/No Seal Group
Joint Cutting and Sealing Research
July 1, 2013
Page 15
Figure 22. Tape test results from field testing showing cleaned (top)
and uncleaned (bottom) joint test results.
Discussion of Testing Frequency
Statistical Basis for Sample Size
In order to determine appropriate rates for testing in the field, WJE leveraged statistical tools and the
quantitative data from laboratory pull tests to establish a rational basis for test sampling rates. Because the
goal of the testing is to determine whether a joint is clean and dry enough to receive sealant, the pull test
data for properly cleaned and dried joints is of statistical interest. Specifically, because the experimental
stress threshold between acceptable and unacceptable pull tests is determined to be approximately 25 psi,
the testing frequency should sample the joint often enough to be confident that the mean pull test value
for the whole population is suitably above this threshold (e.g. 1 or 2 standard deviations).
Only the data from 1 and 2 inch tape test depths were used to establish the sample population because
these results showed a clear differentiation in pull test stress from properly prepared joints to uncleaned or
damp specimens and are the basis for the suggested field test procedures. WJE calculated the mean pull
test stress and standard deviation of this target laboratory population (consisting of 20 tests). The
acceptable joints had a mean pull test stress of 44 psi, with a standard deviation of 12 psi. The cleaned and
dried samples in the laboratory study were developed to accurately replicate performance of properly
prepared joints in the field. It is not unreasonable to assume the laboratory mean and standard deviation
values as first-order statistical estimates of what acceptable conditions should be in the field.
Once this assumption is made, statistical analysis using a t-distribution can be used to determine an
appropriate test sample size for a population in the field that has an unknown variance. Specifically, WJE
used a t-distribution to examine what amount of testing is required to produce a given level of confidence
that the mean of the field population is above a certain value (a lower one-sided confidence interval on the
mean). The sample size (n) needed to produce this confidence level is calculated by the following
equation:

Seal/No Seal Group
Joint Cutting and Sealing Research
July 1, 2013
Page 16
( ⁄)
where α is a parameter that corresponds to the amount of confidence desired in the result (e.g. for 90%
confidence, α = 0.1; for 95% confidence, α = 0.05). As seen in Figure 23, which illustrates a generic t-
distribution, tα is the limiting
value that cuts off the “tail” of the
distribution such that the
probability that the value of the
variable being considered will be
above tα is equal to α. S is the
standard deviation of the sample
(estimated for our application
with the laboratory data). H is the
half-width of the confidence
interval; a wider interval will
require fewer tests for a certain
level of confidence, but will
correspondingly assume more
possible deviation in population
mean from the estimate. In this
case of a one-sided confidence
interval where the interest is in
identifying lower bound of the
mean, H represents the amount that the mean pull test stress for the whole population could be below the
mean computed from the sample data. Though not strictly accurate because the mean and variance of the
laboratory data may not fully represent field conditions, this methodology yields an estimate of the
confidence a given rate of testing produces on the average pull test result for properly prepared joints in
the field.
Recommended Testing Frequency
Based on the statistical analysis and production rates of crews and field conditions, WJE formulated
practical recommendations for testing frequency to yield a statistically meaningful assessment of joint
suitability in the field. While the population of joints being represented by the test sample could be
defined a number of different ways, WJE suggests that joints prepared by the same crew and cleaning
equipment on the same day may be reasonably expected to perform similarly, unless significant variations
in site conditions or weather are encountered (e.g. rain, steep pavement grades). Based on the assumed
daily production output of a work crew, the population of joint to be sampled in the field is roughly
20,000 linear feet (per crew, per day); the recommended frequency of testing should establish the
adequacy of this population.
Using the t-distribution statistical model described above, a sample set of 8 tests would yield a 90%
confidence level that the mean pull-test value of the entire population would be above 38 psi. This value
of the mean, considered with the variance observed in our laboratory pull-testing, indicates that the vast
majority of the joint population being sampled (roughly 85%) should be statistically expected to have a
pull-test strength in excess of the target threshold of 25 psi, indicating proper joint preparation. Given the
Figure 23. Generic t-distribution showing relevant variables for
determining sample size and confidence level on a population mean.
H S

Seal/No Seal Group
Joint Cutting and Sealing Research
July 1, 2013
Page 17
level of precision of the test methodology, the purpose of the tests (demonstrating effectiveness of the
preparation techniques and readiness of the joints to accept sealant), and the consequences associated with
inadequately prepared sections of a joint not being captured by the testing (potential sealant failure), it is
our view that a 90% level of confidence in the results is both meaningful and practicable for use in the
field. Of course, the actual mean and variance of joint performance for a given work crew, project, and
daily conditions may be well above what is statistically demonstrated by the testing, but this framework
provides a rational basis for determining sample size.
With 8 tests appropriately defining a joint population of 20,000 linear feet (provided similar conditions
exist), WJE asserts that smaller populations might be similarly represented by the same rate of testing. In
other words, projects smaller than 20,000 linear feet may be reasonably sampled at a rate of 1 set of tests
per 2,500 feet of joint. Table 1 summarizes our recommended rates of testing; a minimum of 2 test sets is
recommended to ensure a minimum level of consistency even on very small projects. Tests should be
distributed evenly over the length of the job with tests every 2,500 feet or less. Tests should be performed
at the beginning of work as soon as practical after joints preparations are complete to assess the
effectiveness of the joint preparation. Tests should also be performed immediately before sealing if delays
between joint preparation and sealing occur. Joints should be dried and retested after any rain event or if
left unsealed overnight.
Also, a significant change in conditions (e.g. weather, crew member, equipment, bird baths in pavements,
etc.) should always be regarded as a change to a new joint population for testing purposes, even if the
joints being sampled are part of the same project. This will ensure an appropriate amount of testing is
performed to demonstrate continued suitability of joint preparation as conditions change in the field.
Table 1. Recommended Sampling Rates per Production Day
Population Size Sets of Tests
< 5,000 feet 2
5,000 to 7,500 feet 3
7,500 to 10,000 feet 4
10,000 to 12,500 feet 5
12,500 to 15,000 feet 6
15,000 to 17,500 feet 7
17,500 feet to 20,000 feet 8
In the event of a failed pull test (the average value of the pulls is less than 25 psi); WJE suggests that re-
testing of that section of joint be permitted. To re-test, 2 pull-test sequences (3 pulls each) should be
performed within 12 inches to either side of the failed test area; if both sets pass, the initial result is
overturned and the location may be accepted. If one or both re-tests also fail to average 25 psi or above,
the test location shall not be accepted.
Wherever a failed tape pull test occurs, re-preparation of the joint is required. The entire area of joint
between adjacent passing tests should be re-cleaned, unless additional testing is performed on each side of
the failed test area to establish a smaller re-cleaning zone (i.e. the limits of the neighboring appropriately
prepared regions of joint).

Seal/No Seal Group
Joint Cutting and Sealing Research
July 1, 2013
Page 18
Conclusions and Future Course of Action
The intent of this test program was to develop reliable and practical test methods for assessing the
cleanliness and moisture conditions in sawcut concrete joints to determine their preparedness for
accepting sealants. The program did not seek to establish thresholds or tolerances for acceptance for any
particular type of sealant, but to rather focus on delineation of wet verse dry and unclean verse clean
conditions within the joint. Four test methods were developed as a result of the test program: Moisture
Paper Test, Wipe Test, Tape Contamination Test, and the Tape Pull Test. Conclusions with regards to
each test are as follows:
Moisture Paper Test - Serves as a go/no-go test for determining if the joint has free moisture but does not
differentiate differences in surface-dry conditions. It may be adequate for sealants that are generally
insensitive to moisture but many not be adequate for sealants sensitive to damp surfaces. This test does
not evaluate cleanliness and field staff reported that it only indicated moisture when liquid water could be
visually seen by careful inspection of the joint. Therefore, this test may be useful to confirm the presence
of liquid water within the joint but may not be useful for determining dampness and if the joint conditions
are suitable for sealant installation. We do not recommend making this test a “standard” but suggest that it
be made available as a means for use by field staff or inspectors to verify the presence of liquid water
within joints.
Wipe Test - Serves as a quick and effective means of capturing concrete dust, slurry, and contaminants in
the joint. Requires that the cloth be clean prior to testing and handled carefully during and after testing to
avoid altering results. This test is the simplest and quickest means to evaluate joint cleanliness.
Tape Contamination Test - Using black electrical tape, serves as a visual assessment for cleanliness,
similar to the wipe test. While this is a useful means to assess joint cleanliness, the same information can
be gained by careful application of the cloth Wipe Test.
Tape Pull Test - This test is the most comprehensive method found to assess joint preparation for sealants.
It quantifiably records the peak load for pull off of burnished tape to assess both joint cleanliness and
moisture conditions. Testing is straightforward and can be performed rapidly. Accurate peak load
necessitates that the correct spacers (depressors) be used; enough spacers should be used so that the tape
is held in the same plane as the vertical joint surface while the spacers are still free to move in the joint
without applying axial force to the side walls. The pull force divided by one-side area, for a test depth
between 1 and 2 inches, allows for determination of a threshold pressure between acceptable and
unacceptable joint conditions of about 20 to 25 psi. The Tape Pull Test provides the best means to assess
and compare both cleanliness and moisture within the joint in a single test.
Each proposed test method is capable of capturing adverse conditions for joint sealants, but may in rare
instances give false test results indicating favorable conditions. Therefore, multiple tests should be
performed at intervals along the prepared joint to properly assess joint preparedness. At a minimum, two
adjacent tests per location are suggested for the Wipe Test and Tape Contamination Test. It is suggested
that three tests should be performed and averaged for the Tape Pull Test per test location. Statistical tools
and the quantitative data from laboratory pull tests were used to establish a rational basis for test sampling
rates. A minimum of 8 tests for single-crew, daily production rates of 20,000 linear feet provide
reasonable testing confidence (about 90%) provided similar conditions exist.

Seal/No Seal Group
Joint Cutting and Sealing Research
July 1, 2013
Page 19
These test methods provide a means to more accurately assess the conditions of the joint than current
conventional means of visual assessment. Implementation of the cloth Wipe Test and Tape Pull Test
should provide useful information on the joint condition in preparation for sealant. It may be useful to
establish acceptance threshold values and tolerances for these tests considering the different types of
sealants used in practice. This could be done within a laboratory study by testing the various adhesion
properties of the commonly used joint sealants within varying joint conditions.

APPENDIX A: LITERATURE REVIEW BIBLIOGRAPHY

Seal/No Seal Group
Joint Cutting and Sealing Research
July 1, 2013
Page 21
Literature Review
Bayne, Heather. "Assessing the Condition of Concrete Slabs Before Applying Flooring Material." Journal of Protective Coatings & Linings, 2007: 19-21.
Bayne, Heather. "Tips on Testing Concrete for Moisture Vapor Transmission." Journal of Protective Coatings & Linings, 2007: 83.
Gubbels, Frederic, and Clementine Calvet. "Adhesion Development of Organic and Silicone Sealants on Wet and Dry Concrete." J. ASTM International. Vol. 6. West Conshohocken: ASTM International, 2009.
Hall, Charles, and Scott O'Connor. "How Water Transmission Affects Slab-on-Grade Flooring Systems." Journal of Protective Coatings & Linens, 1997: 86-102.
Harriman, Lew. "Drying Concrete." The Construction Specifier, 1995: 54-64. Huntley, Rick A. "Variables Affecting Calcium Chloride Testing for Moisture in Concrete." Journal of
Protective Coatings & Linings, 2008: 42-48. "Joint Surface Preparation Standard." SSPC-SP 13/NACE No. 6 Surface Preparation of Concrete. SSPC: The
Society for Protective Coatings and NACE International, march 17, 2003. Klemens, Tom. "How to Moisture Test Concrete Floors." Concrete Construction, 2006: 45-49. Nelson, Peter E., and Dennis J. Pinelle. "Testing Moisture Content in Concrete Subfloors Prior to
Installing Floor Coatings." Journal of Protective Coatings & Linings, 2003: 19-29. Pinelle, Dennis J. "Testing Moisture Content in Concrete Subfloors: Preventing Floor Coating Failures."
Journal of Protective Coatings & Linings, 2008: 53-67. Schnell, Don J. "Measuring and Removing Moisture in Concrete." Journal of Protective Coatings &
Linings, 1998: 52-63. "Standard for Liquid and Gelled Acid Etching of Concrete." ASTM D4260-05. ASTM International, 2005. "Standard Guide for Preliminary Evaluation of Comparative Moisture Condition of Concrete, Gypsum
Cement and Other Floor Slabs and Screeds Using a Non-Destructive Electronic Moisture Meter." ASTM F2659-10. ASTM International, 2010.
"Standard Guide for Preparation of Concrete Surfaces for Adhered (Bonded) Membrane Waterproofing Systems." ASTM D5295-00. ASTM International, 2006.
"Standard Practice for Abrading Concrete." ASTM D4259-88. ASTM International, 2006. "Standard Practice for Surface Cleaning Concrete for Coating." ASTM D4258-05. ASTM International,
2005. "Standard Test Method for Comparing the Brightness of Flourescent Penetrants." ASTM E 1135-97.
ASTM International, 2008. "Standard Test Method for Determining Relative Humidity in Concrete Floor Slabs Using in situ Probes."
ASTM F2170-09. ASTM International, 2009. "Standard Test Method for Determining Relative Humidity on the Surface of Concrete Floor Slabs Using
Relative Humidity Probe Measurement and Isulated Hood." ASTM F 2420-05. ASTM International, 2005.
"Standard Test Method for Indicating Moisture in Concrete by the Plastic Sheet Method." ASTM D4263-83. ASTM International, 2005.
"Standard Test Method for Measuring Moisture Vapor Emission Rate of Concrete Subfloor Using Anhydrous Calcium Chrloride." ASTM F1869-10. ASTM International, 2010.
"Standard Test Method for pH of Chemically Cleaned or Etched Concrete Surfaces." ASTM D 4262-05. ASTM International, 2005.

Seal/No Seal Group
Joint Cutting and Sealing Research
July 1, 2013
Page 22
"Standard Test Method for Pull-Off Adhesion Strength of Coatings on Concrete Using Portable Pull-Off Adhestion Testers." ASTM D 7234-05. ASTM International, 2005.

APPENDIX B: TEST METHODS

TEST METHOD: Moisture Sensitive Paper (Moisture) STANDARD REFERENCES: None USAGE: Test to determine the presence of moisture in concrete joints pri-or to applying sealant. EQUIPMENT / MATERIALS: 1. One-time use moisture sensitive paper (Hydrion water finding test pa-
ter, CAT#WF-130, Micro Essential Laboratory, Inc., Brooklyn NY, or equal).
2. Tongue depressor or other flat tool made of wood, metal, or stiff plas-tic. Length of the depressor should be sufficiently long to extend to the bottom of the cut joint with room to hold it above the surface of the concrete.
PROCEDURE: 1. Cut the moisture sensitive paper into strips. The length of the strips
should be at minimum two times the depth of the joint plus 2 inches. 2. Place the moisture sensitive paper strip around the tongue depressor
and insert into the joint, perpendicular to the surface of the concrete slab/pavement.
3. Press the paper against the surface of the joint with the tongue de-pressor. Press against both vertical surfaces and the bottom of the joint. Hold paper down against each surface for 10 seconds.
4. Remove the depressor and tape. Examine if the tape indicated signifi-cant moisture. Grade moisture per the visual standard.
5. Repeat the procedure at one additional location within 12 inches of the first test.
6. Report the moisture level of the two tests. REPORT: 1. Sawcut width and depth 2. Joint preparation methods 3. Time and date of the test 4. Test location 5. Length of sawcut joint represented by the test 6. Depth of test, in. 7. Test results of the two tests by visual standard level (None, Light,
Moderate, Heavy)
VISUAL STANDARD
TEST METHOD (VISUAL)
EQUIPMENT
PROCEDURE
1 2, 3 4
NONE
MODERATE
LIGHT
HEAVY
Step:
COMMENTS CAN BE DIRECTED TO PAUL KRAUSS at Wiss, Janney Elstner Assoc., 847-753-6517, [email protected]

TEST METHOD: Wipe Test (Cleanliness)
STANDARD REFERENCES: Section 5.4 and 6 of SSPC-SP 13/NACE No. 6; ASTM D 5295
USAGE: Measure of the cleanliness of the prepared concrete joint prior to application of joint sealant.
EQUIPMENT / MATERIALS: 1. Black 100% cotton cloth, tee shirt material. 2. Tongue depressor or other flat tool made of wood, metal, or stiff plas-
tic. Length of the depressor should be sufficiently long to extend to the bottom of the cut joint with room to hold it above the surface of the concrete.
PROCEDURE: 1. Cut the cloth into 2-inch wide strips. The length of the cloth strips
should be at minimum two times the depth of the joint plus 2 inches. 2. Place the cloth strip around the tongue depressor and insert into the
joint, perpendicular to the surface of the concrete slab/pavement. 3. Firmly rub the entire width of the cloth against the surface of the joint
with the tongue depressor over a 2 in. length of the joint. Rub both vertical surfaces and the bottom of the joint. Sufficient pressure should be applied so the level of contaminant removal is not affected by slight variations in pressure.
4. Remove the depressor and cloth. Use caution when handling the cloth to avoid dislodging contaminants.
5. Examine the cloth for contaminants. Grade contamination per the visu-al standard.
6. Repeat the procedure at one additional location within 12 inches of the first test.
7. Report the contamination level of the two tests. REPORT: 1. Sawcut width and depth 2. Joint preparation methods 3. Time and date of the test 4. Test location 5. Length of sawcut joint represented by the test 6. Depth of Test, in. 7. Test results of the two tests by visual standard level (None, Light,
Moderate, Heavy).
VISUAL STANDARD
TEST METHOD (VISUAL)
EQUIPMENT
PROCEDURE
1 2, 3 4, 5
None
MODERATE
LIGHT
HEAVY
Step:
COMMENTS CAN BE DIRECTED TO PAUL KRAUSS at Wiss, Janney Elstner Assoc., 847-753-6517, [email protected]

TEST METHOD: Tape Contamination Test (Cleanliness) STANDARD REFERENCES: Section 5.4 and 6 of SSPC-SP 13/NACE No. 6 USAGE: Measure of the cleanliness of the prepared concrete joint prior to application of joint sealant. EQUIPMENT / MATERIALS: 1. 3/4-inch wide black electrical tape (3m Super 33+) 2. Tongue depressor (3/4 in. wide) or other flat tool made of wood, metal,
or stiff plastic. Length of the depressor should be sufficiently long to extend to the bottom of the cut joint with room to hold it above the sur-face of the concrete.
PROCEDURE: 1. Cut a strip of black tape. The length of the strip should be at minimum
two times the test depth plus 2 inches. 2. Wrap the tape around the depressor with the adhesive side of the tape
facing away from the depressor. 3. Insert the tape and depressor into the joint, perpendicular to the sur-
face of the concrete slab/pavement. 4. Firmly rub the tape against the surface of the joint with the tongue de-
pressor. Rub both vertical surfaces. Sufficient pressure should be ap-plied so the level of contaminant removal is not affected by slight vari-ations in pressure.
5. Remove the depressor and pull both sides of the tape together per-pendicular to the joint.
6. Examine the tape for contaminants. Grade level of contaminates per the visual standard.
7. Repeat the procedure at one additional location within 12 inches of the first test.
8. Report the contamination level of the two tests. REPORT: 1. Sawcut width and depth 2. Joint preparation methods 3. Time and date of the test 4. Test location 5. Length of sawcut joint represented by the test 6. Depth of test, in. 7. Test result of the two tests by visual standard level (Trace, Light, Mod-
erate, Heavy).
VISUAL STANDARD
TEST METHOD (VISUAL)
EQUIPMENT
PROCEDURE
1, 2 3, 4 5
TRACE
MODERATE
LIGHT
HEAVY
Step:
COMMENTS CAN BE DIRECTED TO PAUL KRAUSS at Wiss, Janney Elstner Assoc., 847-753-6517, [email protected]
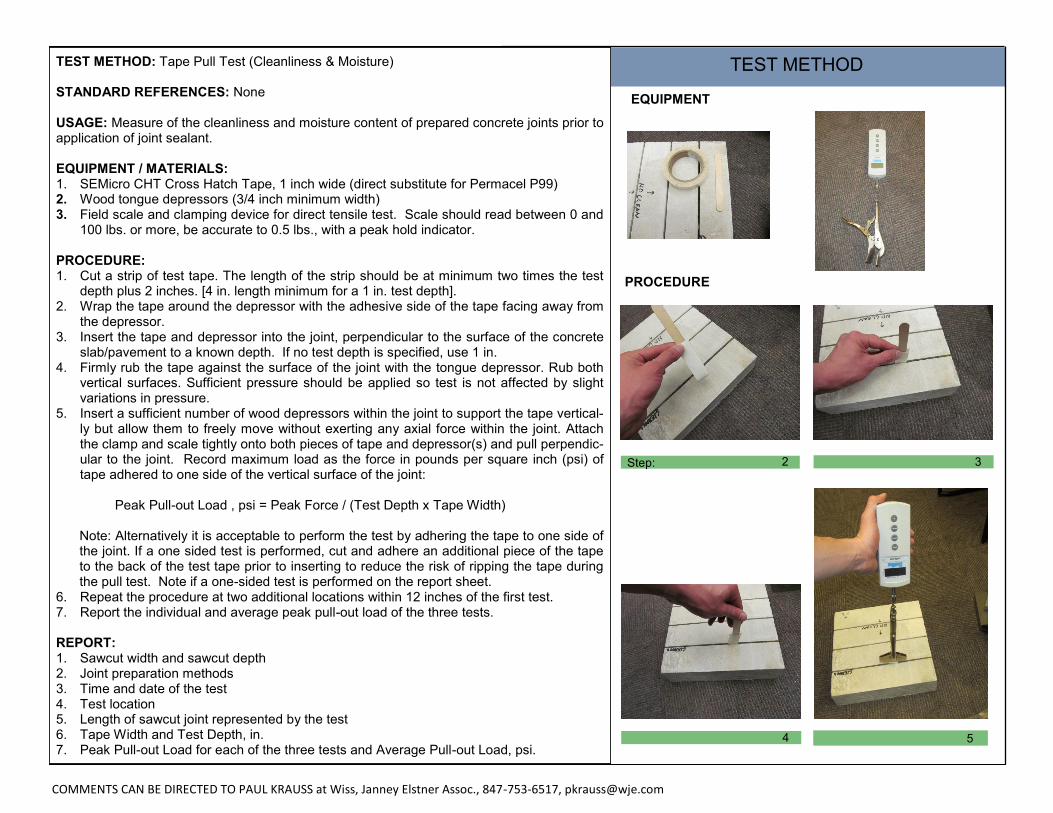
TEST METHOD: Tape Pull Test (Cleanliness & Moisture) STANDARD REFERENCES: None USAGE: Measure of the cleanliness and moisture content of prepared concrete joints prior to application of joint sealant. EQUIPMENT / MATERIALS: 1. SEMicro CHT Cross Hatch Tape, 1 inch wide (direct substitute for Permacel P99) 2. Wood tongue depressors (3/4 inch minimum width) 3. Field scale and clamping device for direct tensile test. Scale should read between 0 and
100 lbs. or more, be accurate to 0.5 lbs., with a peak hold indicator. PROCEDURE: 1. Cut a strip of test tape. The length of the strip should be at minimum two times the test
depth plus 2 inches. [4 in. length minimum for a 1 in. test depth]. 2. Wrap the tape around the depressor with the adhesive side of the tape facing away from
the depressor. 3. Insert the tape and depressor into the joint, perpendicular to the surface of the concrete
slab/pavement to a known depth. If no test depth is specified, use 1 in. 4. Firmly rub the tape against the surface of the joint with the tongue depressor. Rub both
vertical surfaces. Sufficient pressure should be applied so test is not affected by slight variations in pressure.
5. Insert a sufficient number of wood depressors within the joint to support the tape vertical-ly but allow them to freely move without exerting any axial force within the joint. Attach the clamp and scale tightly onto both pieces of tape and depressor(s) and pull perpendic-ular to the joint. Record maximum load as the force in pounds per square inch (psi) of tape adhered to one side of the vertical surface of the joint:
Peak Pull-out Load , psi = Peak Force / (Test Depth x Tape Width)
Note: Alternatively it is acceptable to perform the test by adhering the tape to one side of the joint. If a one sided test is performed, cut and adhere an additional piece of the tape to the back of the test tape prior to inserting to reduce the risk of ripping the tape during the pull test. Note if a one-sided test is performed on the report sheet.
6. Repeat the procedure at two additional locations within 12 inches of the first test. 7. Report the individual and average peak pull-out load of the three tests. REPORT: 1. Sawcut width and sawcut depth 2. Joint preparation methods 3. Time and date of the test 4. Test location 5. Length of sawcut joint represented by the test 6. Tape Width and Test Depth, in. 7. Peak Pull-out Load for each of the three tests and Average Pull-out Load, psi.
TEST METHOD
EQUIPMENT
PROCEDURE
5
2 3 Step:
COMMENTS CAN BE DIRECTED TO PAUL KRAUSS at Wiss, Janney Elstner Assoc., 847-753-6517, [email protected]
4

Project:__________________________________________ Operator: ____________
Joint Width:__________________ Sealant Type:_______________________
Joint Depth:__________________
Joint Prep: Powerwash Sandblast Air Blown
Other:_________________________
Joint Location:_______________
Length of Joint Represented by Test:________________________
Date:_________________ Time:_________________________
Moisture Sensitive Paper Test (optional): Depth of test:______________
Test A: None / Light / Moderate / Heavy
Test B: None / Light / Moderate / Heavy
Wipe Test: Depth of test:______________
Test A: None / Light / Moderate / Heavy
Test B: None / Light / Moderate / Heavy
Tape Contamination Test: Depth of test:______________
Test A: Trace / Light / Moderate / Heavy
Test B: Trace / Light / Moderate / Heavy
Tape Pull Test: Tape width:___________ Depth of test:______________
Test A Test B Test C Average
Peak Force (lbs):
Peak Load (psi):
Initials:______________ Checker:______________