rotacool - heidolph manuals/chiller/operati… · rotacool – 10 °c to + 40 °c 4. electrical...
TRANSCRIPT

Instruction manual
ROTACOOL
2
E

3
E
Key Page 2
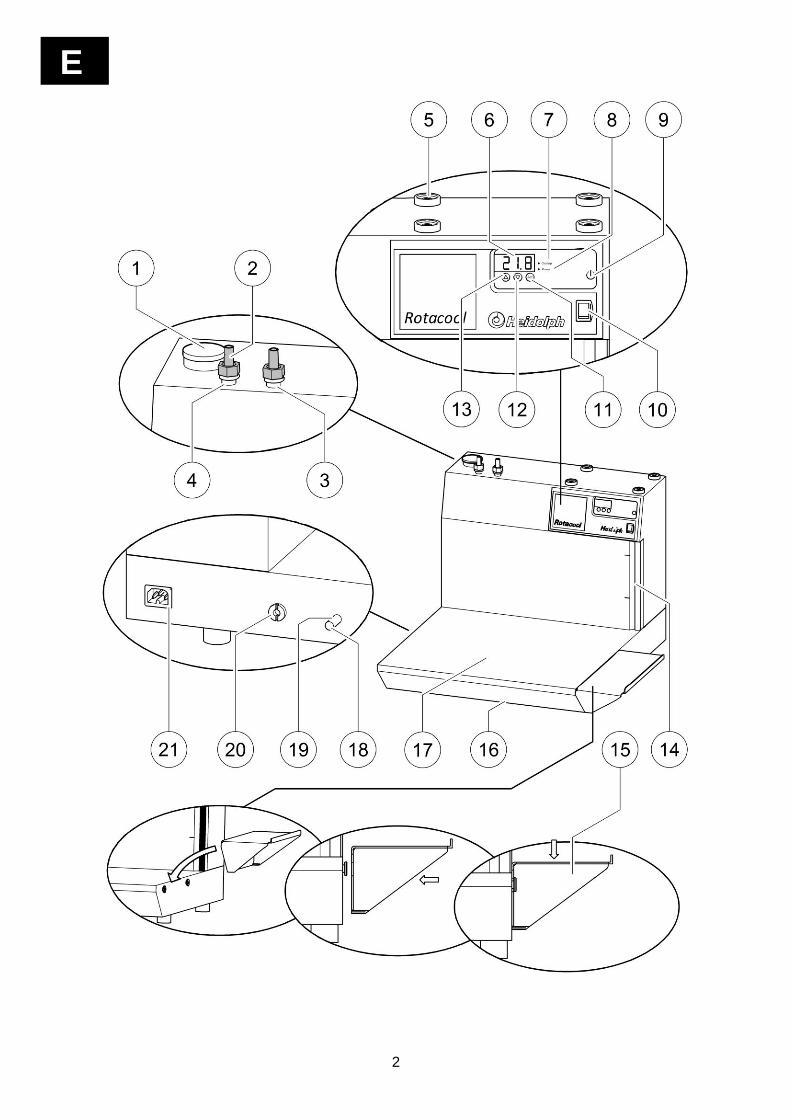
1 Cover 2 Cooling liquid connection 3 Right threaded socket 4 Left threaded socket
Page 3
5 Cup 6 Display 7 ‘Cooling’ LED 8 ‘Pump’ LED 9 On/Off button 10 Main switch 11 ‘SET’ button 12 ‘’ button (decrease value) 13 ‘’ button (increase value) 14 Filling level indicator 15 Extension kit 16 Base of the housing 17 Platform 18 Sealing screw 19 Discharge socket 20 Discharge valve 21 Unit socket 22 Rotary evaporator 23 Vacuum pump 24 Connecting tube

4
E
Thank you for buying this unit. You have acquired a product that was manufactured and tested by Heidolph in accordance with the highest quality standards. We hope it will enable you to carry out your work easily and to your complete satisfaction.
CONTENTS
PACKING LIST ..................................................................................................................... 4 OUTLINE DESCRIPTION ..................................................................................................... 5 GENERAL INFORMATION ................................................................................................... 5 SAFETY INSTRUCTIONS .................................................................................................... 6 ASSEMBLY .......................................................................................................................... 6 OPERATION ......................................................................................................................... 9 ROUTINE CLEANING AND SERVICING .............................................................................10 DISMANTLING, TRANSPORT AND STORAGE .................................................................10 DISPOSAL ...........................................................................................................................10 TROUBLESHOOTING .........................................................................................................11 TECHNICAL DATA ..............................................................................................................12 WARRANTY / EXCLUSION OF LIABILITY / COPYRIGHT .................................................12 QUESTIONS / REPAIR WORK ............................................................................................13 CE DECLARATION OF CONFORMITY ...............................................................................13
Important information
Advice about power cord / mains supply
Caution: mandatory action
PACKING LIST
Please make sure the package contains the following parts:
Description Quantity Order Number
Circulating chiller ROTACOOL 230V 50Hz 1 591-00200-00
or
Circulating chiller ROTACOOL 115V 60Hz 1 591-00200-01
Cooling liquid connection M 16 x 1/NW 8/12
2 11-300-005-23
Cover 1 23-30-01-03-12
Extension kit 1 21-300-005-57
Connection cable for Europe (230V 50Hz) 1 14-007-003-81
or
Connection cable for USA (115V 60Hz) 1 14-007-003-89
Operating instructions 1 01-005-002-77

5
E
OUTLINE DESCRIPTION
CFC-free circulating chiller in a L-shaped design for Heidolph rotary evaporators. A Heidolph rotary evaporator (22) and a Heidolph vacuum pump (23) can be fitted on the circulating chiller to save space (Heidolph Instruments or your local Heidolph Instruments dealer will be glad to provide more information about suitable models). The circulating chiller is equipped with an air-cooled refrigerating machine and a circulating pump. The heat exchanger (condenser), pump and housing are made of stainless steel. The cooling liquid is contained in an atmospherically open expansion vessel while the external coolant circuit is closed. Temperature controller with digital display for actual and target values, constant control, temperature stability 0.5 K.
GENERAL INFORMATION
Unpack the unit and its components carefully and compare the contents with the packing list. If you discover any damage or deviations from the packing list, notify your supplier immediately.
Read the instruction manual carefully and make sure that anyone else who will be operating the unit also reads it thoroughly before use.
Keep the instruction manual accessible to everyone at all times.
This unit is equipped as standard with a Euro plug (DIN 49441 CEE 7/VII 10/16 A 250 V) or with a US standard plug (NEMA Pub. No. WDI-1961 ASA C 73.1 – 1961 page 8 15 A 125 V) for use in North America. Where connection to a different mains supply is required you must use an approved adapter or arrange for an electrician to replace the supplied plug with a 3-pin plug designed and approved for the mains supply in question. The unit is delivered in earthed condition. If the original plug is ever changed, make sure that the protective earthed conductor from the unit is connected to the new plug. Color code used for wiring inside the unit: GREEN/YELLOW = earth (PE) BLUE = neutral (N) BROWN = live (L)
IN GREAT BRITAIN, AN APPROVED STANDARD 13A PLUG TO BS 1363 (3-PIN PLUG) IS NECESSARY.

6
E
SAFETY INSTRUCTIONS
Follow the applicable safety regulations for your laboratory!
Be extremely careful when dealing with inflammable substances.
Before you connect the unit to your power supply, make sure that the supply voltage is the same as that on the rating plate.
Make sure the unit stands securely!
The unit is not explosion-proof. Caution must therefore be exercised when using it near flammable and explosive substances.
ASSEMBLY
1. Important Read the following instructions before switching on. Have any work required on the electrical, electronic and refrigerating components performed only by suitably qualified professionals. Disconnect from the mains before servicing! 2. Ambient conditions Set up the unit on a flat, horizontal surface. Make sure there are no light particles (polystyrene, paper or the like) in the area of the air intake in the base of the housing (16). The admissible ambient temperature is between + 5°C and 32°C. Protect the unit against moisture.
The rotary condenser has to be set up with a clearance of at least 8 cm from any rear wall in order not to obstruct air escaping at the back of the unit.
3. Operating temperature range ROTACOOL – 10 °C to + 40 °C 4. Electrical connection Switch off the main switch (10). Observing the technical data on the type plate, connect the unit to the mains voltage from the unit socket (21) using the connection cable supplied. 5. Cooling liquid We recommend that you use a mix of 50 % water and 50 % ethanol as a coolant for both normal and low temperatures. You can also use conventional thermal fluids as a cooling medium. You should always use coolants with a freezing point of at least 10 K below the operating temperature. If you want to set an operating temperature of -10 °C, for example, the anti-freeze properties of the coolant must be ensured at -20 °C.

7
E
For temperatures under +10 °C, anti-freeze must be added to the coolant water. Check the highest and lowest permissible temperature of the selected thermal fluid against your desired operating temperature range.
For thermal fluids, please note the following:
Maximum operating temperature: The flash point of the thermofluid used should be at least 5 K higher.
Minimum operating temperature: The viscosity of the thermofluid increases at low temperatures. This impairs flow and reduces heat transfer. Viscosity should therefore be as low as possible and should not exceed 120 mm²/s.
Remember that many thermofluids are hygroscopic. The air humidity to collect in the thermofluid will form a layer of ice on the surface of the evaporator which will impair heat transfer. At temperatures below room temperature in particular, the filling apertures should be sealed with the cover (1). The water to accumulate in the thermofluid must be evaporated off from time to time, if necessary.
You may not use the following coolants, as they destroy stainless steel material 1.4301:
Cooling liquids which contain additives such as ethers, esters and amines (which are contained in some glycolenes)
Demineralized or distilled water
Mineral or sea water
No CaCl 2 Sols The bath for the cooling liquid for the circulating chiller has a capacity of approx. 2 l. 6. Connecting tubes Screw the connections for the cooling liquid (2) to the threaded sockets (3, 4) using an open-ended, 19 mm spanner. To connect the condenser of the rotary evaporator to your circulating chiller, you will need a tube with a nominal width of 7 – 8 mm for both the advance and the return. Attach the connecting tube (24) for the flow liquid-tight onto the right threaded socket (3) on the top of the unit. Connect the connecting tube (24) for the return flow with the left threaded socket (4). Protect both tubes against inadvertent slippage using hose clamps. If you want to work with advance temperatures in excess of 5 to 10 K either above or below the ambient temperature, these connecting tubes must be thermally insulated as well.
To ensure the proper circulation of the cooling liquid, make sure there are no kinks in the connecting tubes.

8
E
7. Filling the cooling liquid Only an externally closed system can be connected to the rotary chiller. Shut off the discharge valve (20) (so that the slit is vertical). Fill the circulation cooler via the filler neck after removing the cover (1) up to approx. 1 cm below the max. mark on the filling level indicator (14). The rotary evaporator cooler is vented by turning on the cooling and pump on the ROTACOOL with the On/Off button (9). The circulating condenser aerates itself via the built-in expansion vessel. The coolant overflow is on the rear of the unit.
During operation of your circulating chiller, the fluid level can fall below the min. mark on the filling level indicator (14), so that the level switch responds by switching off the cooling and pump. The warning message ‘H2o’ will flash on the display (6). Refill with cooling liquid. In order to turn off the ‘H2o’ warning message and return the unit to normal operation, turn the unit briefly off and on using the main switch (10).
At temperatures below + 10 °C, the cooling liquid can freeze (see also the chapter ‘Assembly’, ‘5. Cooling Liquid’). Should the cooling liquid freeze, the cooling and pump systems will switch off after a certain period during operation of your circulating chiller. The warning message ‘H2o’ will flash on the display (6). In order to turn off the warning message ‘H2o’ and return the unit to normal operation, wait until the cooling liquid has thawed. This can take up to 24 hours. You must also then briefly turn the unit off and on using the main switch (10).
8. Discharging the cooling liquid Remove the sealing screw (18) of the discharge socket (19) and slide a tube with an inner diameter of 8 mm over the discharge socket (19). Secure the tube to prevent inadvertent slippage. Hold the other end in a collection vessel and open the discharge valve (20) (so that the slit is horizontal).
Every time before disconnecting the condenser from the rotary evaporator you must first empty the circulating chiller in the way described if a large-capacity condenser (e.g. condenser G4) is being used. This is necessary because the circulating volume is greater in this case than the capacity of the expansion vessel.
open closed
closed open
(20)
(20)

9
E
9. Attaching the extension kit Attach the extension kit (15) to the right hand side of the platform (17). 10. Setting up the rotary evaporator Place the rotary evaporator (22) securely on circulating chiller's platform (17). 11. Setting up the vacuum pump Place the appropriate vacuum pump model (23) on the circulating chiller. The vacuum pump is placed with its rubber feet in special cups (5) on the top of the circulating chiller in order to prevent accidental slipping.
OPERATION
Before operation, check that all connecting tubes (see arrangement) are securely fitted and leak-tight.
1. Switching the unit on Press the main switch (10) to commence operation. The integrated control lamp will confirm operation. When switching on, you will see all segments light up on the display (6) for approx. 5 seconds. The actual value of the flow temperature will then appear. The temperature regulator is now ready. 2. Switching on the cooling and pump systems You can switch the cooling and pump systems on or off using the On/Off button (9). The LEDs for cooling (7) and pump (8) provide information on the respective operating state:
LED light on = pump or cooling is active
LED light off = pump or cooling is inactive.
The ROTACOOL is fitted with a level switch. In the absence of or insufficient amount of cooling liquid (liquid level below the min. mark) the cooling and pump systems will not start. The warning message ‘H2o’ will flash on the display (6). Refill the cooling liquid (see chapter ‘Assembly’, ‘7. Filling the cooling liquid’). In order to turn off the ‘H2o’ warning message and return the unit to normal operation, turn the unit briefly off and on using the main switch (10).
3. Setting the flow temperature setpoint You will first see the actual value of the flow temperature in the display (6). Bring up the setpoint by pressing and holding the ‘SET’ button (11). Adjust the setpoint by pressing the ‘’ button (13) (increase value) or the ‘’ button (12) (decrease value). If you release the ‘SET’ button (11), you will see the actual value of the flow temperature again.

10
E
ROUTINE CLEANING AND SERVICING
The cooling air for the refrigerating machine is sucked in through the liquefier in the base of the housing (16). The liquefier should be cleaned from time to time. To do this, tip the discharged unit onto its back. The fins of the black liquefier can now be cleaned using a brush or vacuum cleaner. Never use pointed or sharp-edged tools for this purpose, however, make sure the fins of the liquefier are not damaged or deformed as this will impair air flow. Use a damp cloth (mild soap solution) to wipe clean the housing and surfaces of the unit.
Never use chlorine bleach or chlorine-based detergents, scouring agents, ammonia, cleaning wool or cleaning agents with metallic components to clean the unit, as these will damage the surfaces of the unit. The unit is maintenance-free. Any repairs which may be necessary must be carried out by an authorized Heidolph technician. To do so, Heidolph Instruments or your local Heidolph Instruments Dealer will be happy to help.
DISMANTLING, TRANSPORT AND STORAGE
Dismantling Switch off the unit and disconnect from the mains. Remove the rotary evaporator and vacuum pump. Drain off all the cooling liquid still in the unit (see ASSEMBLY). Transport and storage Pack the unit and parts in the original packing and make sure they are packed upright, as indicated by the arrows on the packing. If the original packing is no longer available, make sure adequate alternative is found and that the unit is transported upright (mark the packing with arrows).
The ROTACOOL may not be tipped or laid on its side during transport.
DISPOSAL
Please make sure that any old units or defective parts are disposed of only by specialist builders of refrigeration plant (environmental disposal of the refrigerant). Please also dispose of the packing materials in an environment-friendly manner (sorting).

11
E
TROUBLESHOOTING
Have any work required on the electrical, electronic and refrigerating components performed only by suitably qualified professionals.
In the case of a malfunction, the unit will display a flashing error message on the screen. During error message output, the unit will switch between displaying the error message and the actual value of the flow temperature. An overview of possible error messages follows:
Display text Cause Action
E1 Pump motor overheating
Missing or too little cooling liquid
Cooling liquid frozen
Switch off main switch
Wait until pump motor is cool (duration up to 1 hour)
Switch on main switch
Refill cooling liquid
Briefly switch main switch off and on
Wait until cooling liquid has thawed (duration up to 24 hours)
Briefly switch main switch off and on
H2o Missing or too little cooling liquid
Cooling liquid frozen
Refill cooling liquid
Briefly switch main switch off and on
Wait until cooling liquid has thawed (duration up to 24 hours)
Briefly switch main switch off and on
(The flow temperature flashes on the display)
Warning: Over-or under-temperature (limits +/- 2 K from the setpoint)
The regulator continues operation
In the case of error messages ‘E2’, ‘E3’, ‘EP’ or ‘F1’, please contact Heidolph Instruments or your local Heidolph Instruments Dealer.

12
E
TECHNICAL DATA
ROTACOOL circulating chiller
Operating temperature range [°C] - 10 to + 40
Resolution/accuracy [K] 0.1 / 0.5
Temperature stability [K] +/- 0,5
Cooling performance in W at an ambient temperature of 20°C
at 15 °C 0.42 kW at 0 °C 0.35 kW at - 10 °C 0.22 kW
Cooling liquid capacity [I] 2
Refrigerant in the chiller (provided by manufacturer) R 134 a (CFC free) 0.18 kg
max. delivery (pressure) [l/min] 20
Delivery pressure (head) [bar] 0.2
max. delivery (suction) [l/min] 17
Delivery suction pressure (head) [bar] 0.18
Cooling liquid connection [mm] M 16 x 1 / NW 8/12
Material of the heat exchanger, pump and housing stainless steel 1.4301
Basic area (W x D) [mm] 470 x 580
Overall height/height of platform [mm] 420 / 95
Platform for rotary evaporator (W x D) [mm] 470 x 405
Mains voltage 230V/50Hz or 115V/60Hz
Power rating [W] 600
Weight [kg] 32
Protection class IP 20
Admissible ambient conditions 5 - 32 °C at 80% rel. Humidity
WARRANTY / EXCLUSION OF LIABILITY / COPYRIGHT
Warranty Heidolph Instruments guarantees warranty that the present product shall be free from defects in material (except wear parts) and workmanship for 3 years from the date shipped off the manufacturer’s warehouse. Transit damage is excluded from this warranty. To obtain such warranty service, contact Heidolph Instruments or your local Heidolph Instruments Dealer. If defects in material or workmanship are found, your item will be repaired or replaced at no charge. Misuse, abuse, neglect or improper installation are not covered by this warranty guarantee. Alterations to the present warranty guarantee need Heidolph Instruments’ consent in writing. Exclusion Clause Heidolph Instruments cannot be held liable for damage from improper use or misuse. Remedy for consequential damage is excluded. Copyright Copyright in pictures and wording of the present Instruction Manual is held by Heidolph Instruments.

13
E
QUESTIONS / REPAIR WORK
Questions Should you have further questions on the installation, operation or maintenance after reading the manual, please contact Heidolph Instruments or your local Heidolph Instruments Dealer. Repairs For repairs, please telephone Heidolph Instruments or your local Heidolph Instruments Dealer in the first instance.
When shipping items for repair that may have been contaminated by hazardous substances, please: - advise exact substance - take proper protective measures to ensure the safety of our receiving and
service personnel - mark the pack IAW Hazardous Materials Act
Contact Details You will find our contact details on the last page of this manual.
CE DECLARATION OF CONFORMITY
We declare that this product conforms to the following standards or published documents: Respective EU directives 2006/95/EG (Low Voltage Directive) 2004/108/EG (Electromagnetic Compatibility) Applied harmonized standards DIN EN 61010-1: 2002-08 DIN EN 61010-2-10: 2004-06 DIN EN 61326: 2006-10 Further national standards DIN 12876-1: 2001-12 DIN 12876-2: 2001-12 DIN 12876-3: 2001-12

Technischer Service – Technical Service – Service Technique – Servicio Técnico – Assistenza Tecnica
14
DE Deutschland, Germany
Heidolph Instruments GmbH & Co. KG Technischer Service Walpersdorfer Str. 12 91126 Schwabach Tel.: +49-09122-9920-74 Free Call: 0800-HEIDOLPH, 0800-588-9708 E-Mail: [email protected] www.heidolph.de
North America
Phone: +1-866-650-9604 E-Mail: [email protected] www.heidolphNA.com
UK United Kingdom
Phone: +44-01799-5133-20 E-Mail: [email protected] www.heidolph-instruments.co.uk
All other Countries
Phone: +49-09122-9920-74 E-Mail: [email protected] www.heidolph-instruments.com

15
01-005-002-77-4 02.08.2012
Heidolph Instruments GmbH & Co. KG Technical changes reserved. Publication not mandatory.