ruse and care guide - partselect...we have provided many important safety messages in this manual...
TRANSCRIPT
ruse and Care Guide
Electric Oven Safety ................................3
Getting to Know YourElectric Convection Oven .......................5
Using Your Electric Convection Oven...6Usingthe electronicoven control..........6Oven settings.........................................9Settingthe dock ..................................10Usingthe timer.....................................10Baking orconvection baking...............11Convectionbaking Ups........................12Convectionroasting.............................12Convectionroastingtips......................13Positioningracksand pans .................13Bakewarechoices ...............................14Usingaluminumfoil.............................15Adjustingoven temperature................15Usingthe temperatureprobe..............16UsingCONVECT FULL MEAL ...........18Using EASY CONVECT TM
Conversion...........................................20Broiling.................................................21Convectionbroiling..............................22Timed cooking......................................24Dehydrating..........................................26Proofing(raising)bread.......................27The oven vent......................................27
Using the Self-Cleaning Cycle.............28Before you start...................................28Beforesettingthe controls..................29Settingthe controls..............................29Forbest cleaningresults.....................30How thecycle works........................._..30
Caring for YourElectric ConvecUon Oven.....................31
Cleaning Char_.,,,,...,,...........................31Removing th_ oven dbor.....................32Using and replacingqyen lights..........33
T[out_leshooting,,,..................................34Requesting AtsSistanceor Service,.....36Warranty ........_.........................................40
_nffm'U.S.A, for asdstance or service,coll lhe Consum_ As_stance Center:
1-800-_,22-1230inCanada fo¢asdsfance or service,
_ee toage 37.
KITCHENAIDLowerBechJcConvectionOvenModels: KEMS307G KEMS377G
KEMS308G KEMS378G4452300A www.kitchenaid0com

Note to You
([_i_.tZ/_,yOU for buying a KITCHENAID ® appliance!
KitchenAid designs the best tools for the most important room in your house. Toensure that you enjoy many years of trouble-free operation, we developed this Useand Care Guide.It contains valuable information concerning how to operate and maintain your newappliance properly and safely. Please read it carefully. Also, please complete andmail the enclosed Product Registration Card.
Please record your model's information,
Whenever you call our Consumer Model NumberAssistance Center at 1-600..422-1230(in Canada, 1.800-807-6777) or requestservice for your appliance, you need toknow'your complete model number andserial number. You can find this informationon the model and serial number plate (seediagram in the Parts and Features sectionfor plate location on the lower oven).
Please also record the purchaseinformation.
Serial Number
Purchase/Installation Date
Builder/DealerName
Address
Phone
NOTE: You must provide proof of purchaseor installation date for in-warranty service.
Keep this book and the sales slip together in a safe place for future reference.
2

lectric Oven SafetyYour safety and the safety of others is very important.
We have provided many important safety messages in this manual and on yourappliance. Always read and obey all safety messages.
This is the safety alert symbol.
This symbol alerts you to hazards that can kill or hurt you and others.
All safety messages will be preceded by the safety alert symbol and theword "DANGER" or "WARNING," These words mean:
You will be killed or seriously injuredif you don't follow instructions.
You can be killed or seriously injuredIf you don't follow instructions.
All safety messages will identify the hazard, tell you how to reduce the chance of injury,and tell you what can happen if the instructions are not followed.
IMPORTANT SAFETY INSTRUCTIONS
WARNING: To reduce the risk of fire,electrical shock, injury to persons, ordamage when using the oven, follow basicprecautions, including the following:
• Proper Installation - Be sure the oven isproperly installed and grounded by aqualified technician.
• Never Use the Oven for Warming orHeating the Room.
• Do Not Leave Children Alone - Childrenshould not be left alone or unattendedin area where oven is in use. Theyshould never be allowed to sit or standon any part of the oven.
• Wear Proper Apparel- Loose-fitting orhanging garments should never be wornwhile using the oven.
• User Servicing - Do not repair orreplace any part of the oven unlessspecifically recommended in the manu-al. All other servicing should be referredto a qualified technician.
• Storage in Oven - Flammable materialsshould not be stored in an oven.
• Do Not Use Water on Grease Fires -Smother fire or flame or use dry chemicalor foam-type extinguisher.
• Use Only Dry Potholders - Moist or damppotholders on hot surfaces may result inburns from steam. Do not let potholdertouch hot heating elements. Do not use atowel or other bulky cloth.
• Use Care When Opening Door- Let hotair or steam escape before removing 'orreplacing food.
• Do Not Heat Unopened Food Containers- Build-up of pressure may causecontainer to burst and result in injury.
• Keep Oven Vent Ducts Unobstructed.
SAVE THESE INSTRUCTIONS

m . lectric Oven Safety
IMPORTANT SAFETY INSTRUCTIONS• Placement of Oven Racks - Always
place oven racks in desired locationwhile oven is cool. If rack must bemoved while oven is hot, do not letpotholder contact hot heating elementin oven.
oDO NOTTOUCH HEATING ELE-MENTS OR INTERIOR SURFACESOF OVEN - Heating elements may behot even though they are dark incolor. Interior surfaces of an ovenbecome hot enough to cause burns.During and after use, do not touch, orlet clothing or other flammablematerials contact heating elements orinterior surfaces of oven until theyhave had sufficient time to cool. Othersurfaces of the oven may become hotenough to cause burns - amongthese surfaces are oven ventopenings and surfaces near theseopenings, oven doors, and windows ofoven doors.
• Do Not Clean Door Gasket - The doorgasket is essential for a good seal. Careshould be taken not to rub, damage, ormove the gasket.
• Do Not Use Oven Cleaners - Nocommercial oven cleaner or oven linerprotective coating of any kind should beused in or around any part of the oven.
• Clean Only Parts Listed in Manual.
• Before Self-Cleaning the Oven -Remove broiler pan and other utensils.
SAVE THESE INSTRUCTIONS

Getting to Know YourElectric Convection Oven
m ii i,ii ii ,if if, ill
Oven partsand features
Lower convection oven Upper microwave ovenelectronic oven controls electronic oven controls
(p. 6) (see =Upper Microwave OvenUse and Care Guide")
Upper microwaveoven
Oven vent _(above ovendoor) (p. 27)
(notshown)
Ov.n,,gh,III(on left oven wall)(p. 33)
Gasket -(p. 28)
(hiddenunderovencavityfloor)
Automatic ovenlight switch
(on latchassembly)
(p. 33)
Ovenlightdght
ovenwall)(p. 33)
Temperatureprobe Jack
(p. 16)
Oven lock latch
Convection fanend element
(not shown)
Model and
serial number plate(on dght
mounting rail)
5

Using Your ElectricConvection Oven
Using the electronic oven controlTime of
Lower oven start day/timerOven display and cancel pads Number display(see below) pads (pp. 10, 11)
Oven setting EASY Timed and CONVECT OVENpads CONVECT TM delayed FULL MEAL LIGHT(pp. 11, 12, CONVERSION cooking pads pad pad15, 16, 22, pads (pp. 24, 25, (pp. 18-19) (p. 33)24, 25, 26, (pp. 20-21) 30)27, 29)
Display/clock
• When you first plug in the oven, both dis-plays will be fully lit for a few seconds.Then the microwave oven display will showthe set time and the lower oven display willshow =PF" (power failure);
• If you make an Incorrect entry, you willhear the following:- For clock entry, you will hear one short
tone and see =CLOCK" on the display.- For Timer entry, you will hear three
short tones.
- For cook time entry, you will hear threeshort tones and see "Err" on the display.
- For stop time entry, you will hear threeshort tones and see "Err" on the display.
- For temperature entry, you will hearthree short tones and see "Err" on thedisplay.
6
CLOCKTimer SET-STARTpads pad(p. 11) (p. 10)
IUpper microwaveoven controlpanel (see UpperMicrowave OvenUse and CareGuide)
Celsius/Fahrenheit
To set your oven to cook in CelsiusInstead of Fahrenheit:PRESS and hold for 5 seconds
You will know you are in Celsius when =F"disappears. To switch back to Fahrenheit,press and hold BROIL again for 5 seconds.("P will reappear.)
If you need to convert temperatures fromCelsius to Fahrenheit or vice versa, youcan refer to this chart:
Temperature replacement values
38°C to IO0°F60°C to 140°F
66°C to 150°F77°0 to 170°F93°C to 200°F
121°C to 250°F135°C to 275°F149°C to 300°F
163°C to 325°F
177°C to 350°F191°Cto375°F204°Cto400°F
218°Cto425°F232°Cto450°F246°Cto475°F
260°Cto500°F

LJsing Your Electric Convection Oven
Starting an operationAfter programming a function, you must
press START to start thefunction, if you do not pressSTART within 5 seconds of
programming, "START?" will show on thedisplay as a reminder.
Canceling an operation
LOWER OVEN CANCEL will cancel any
lower oven function. When youpress LOWER OVENCANCEL, the large display will
not show anything, unless the oven is toohot after canceling a Self-Cleaning cycle.
NOTE: You may hear a fan blowing in theoven after you press LOWER OVENCANCEL. This is the cooling fan. It will turnoff when the oven has cooled down.
Changing audible signalsAudible signals tell you if a function isentered correctly or not. They also tell youwhen a cycle is completed.
To change pitch and loudness of key tone:PRESS and hold for 5 seconds
A short tone will sound and "Snd" and "Hi" or"Lo" will appear on the display. Repeat thestep above to change to the other setting.
To turn on and off oven reminder tones:
PRESS and hold for 5 seconds
To turn on and off timer reminder tones:
PRESS and hold for 5 seconds
To turn on and off key pad entry andend-of-cycle tones:
PRESS and hold for 5 seconds
A short tone will sound and "Snd" and "ON"or "OFF" will appear on the display to tellyou the signals have been changed. Repeatthe step above to turn the signals back on.
Using the control lockThe controllockpreventsunwanteduseofthe ovenby disablingthecontrolpanelcommandpads.
NOTES:
• Control lock is available only when boththe lower oven and the microwave ovenare not in use. It is also not available duringthe Self-Cleaning cycle or the Sabbathmode.
• Control lock does not disable the Timeror Clock.
• Set control lock when cleaning the controlpanel to prevent oven from accidentallyturning on.
To lock or deactivate the control panel:
Press and hold CONTROL LOCK (Number
Pad 3) for 5 seconds. A singletone will sound and "CONTROLLOCK _" will appear on thedisplay.
To unlock the control panel:
Press and hold CONTROL LOCK (Number
Pad 3) for 5 seconds. A singletone will sound after 5 secondsand "CONTROL LOCK _" willdisappear from the display.
Prompt for start
If "START?" is lit, this means that STARThas not been pressed. If you do not pressSTART, the programmed function willautomatically be canceled in 5 minutes.

m sing Your Electric Convection Oven
Setting your oven for theSabbath
If you want to set your oven to meet "nowork" requirements for the Sabbath, followthese steps:
1. Press BAKE.
2. Press Number Pads to set the
temperature you want.Example for 325°F (163°C):
3. Press START.
4. Press and hold Number Pad 6
for 5 seconds to go intothe Sabbath mode.
NOTE: The Sabbath mode is only availablewith the Bake function. Before going into theSabbath mode make sure the timer is off.Also, make sure you are in an untimed Bakemode with no cook time or stop time specified.
What your oven will/will not dowhile in the Sabbath mode:
• The oven will not shut off automatically.• The temperature display of the lower
oven will show "Sab."
• To prevent accidental key pad presses,only the 0 to 9 and Start key pads willwork.
• No tones will sound.
• No error messages or temperature chang-es will be displayed.
• The ON indicator remains lighted.• Heating element icons flash before oven
heating elements turn on or turn off.• With the oven door closed, heating ele-
ment icons light when the oven is heatingand go off when the oven stops heating.
NOTE: If you open the oven door when theelements are off, the elements will not turn on.8
Elements will not turn on immediately after thedoor is closed. If you open the oven doorwhen the elements are on, the elements willturn off after a delay. Again, elements will notturn on immediately after the door is closed.
To change the temperature duringthe Sabbath mode for holidays:1. Press a Number Pad for the
desired temperature. EachNumber Pad is programmed fora specific set temperature:
NUMBER PADSETTEMPERATURE
1 170°F (75° C)
2 200°F (95° C)
3 250°F (120 ° C)
4 300°F (150 ° C)5 325°F (163 ° C)
6 350°F (177 ° C)
7 375°F (191 ° C)
8 400°F (204 ° C)
9 475°F (245 ° C)
2. Press and hold START for I
second.
NOTES:
• It may take the oven up to one half hourto reach the desired temperature.
• Changing the temperature will not turnthe heating elements on or off immddiately.Also, the display will not show the tempera-ture change immediately.
To end the Sabbath mode and turnoff oven:
• Press and hold Number Pad 6 for
_ 5 seconds.
If a power failure occurs duringthe Sabbath mode:
The oven will automatically return to theSabbath mode at the desired temperaturewhen power returns.
Using Your Electric Convection Oven
i i i, i ,,i,l i i i l,.,II ,,I,I I ,If,l, ,,, I ,ll,I,,_I I I ,_lll,
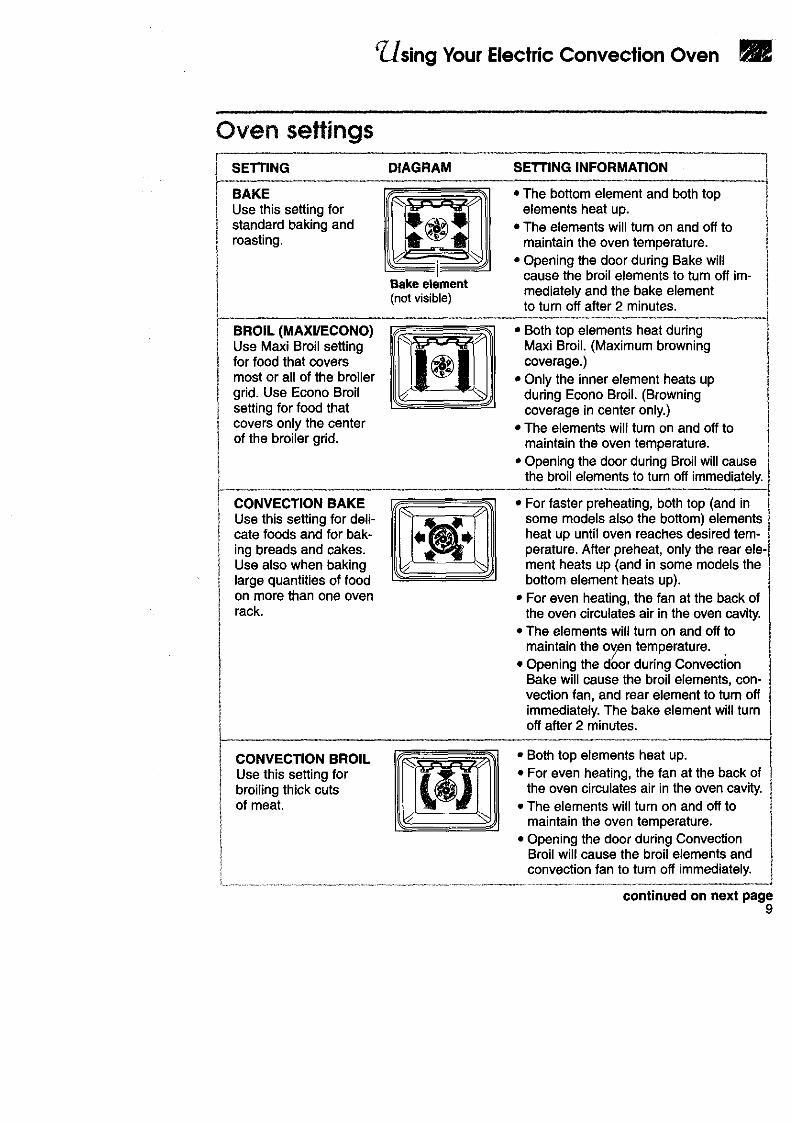
Oven settings
SETTING DIAGRAM SETI'ING INFORMATION
BAKEUse this setting forstandard baking androasting.
Bake element(notvisible)
• The bottom element and both topelements heat up.
• The elements will turn on and off tomaintain the oven temperature.
• Opening the door during Bake willcause the broil elements to turn off im-mediately and the bake elementto turn off after 2 minutes.
BROIL (MAXI/ECONO)Use Maxi Broil settingfor food that coversmost or all of the broilergrid. Use Econo Broilsetting for food thatcovers only the centerof the broiler gdd,
• Both top elements heat duringMaxi Broil. (Maximum browningcoverage.)
• Only the inner element heats upduring Econo Broil. (Browningcoverage in center only.)
• The elements will turn on and off tomaintain the oven temperature.
• Opening the door dudng Broil will causethe broil elements to turn off immediately.
CONVECTION BAKEUse this setting for deli-cate foods and for bak-ing breads and cakes.Use also when bakinglarge quantities of foodon more than one ovenrack.
• For faster preheating, both top (and insome models also the bottom) elementsheat up until oven reaches desired tem-perature. After preheat, only the rear ele-ment heats up (and in some models thebottom element heats up).
• For even heating, the fan at the back ofthe oven circulates air in the oven cavity.
• The elements will turn on and off to
maintain the o_en temperature.• Opening the door during Convection
Bake will cause the broil elements, con-vection fan, and rear element to turn offimmediately. The bake element will turnoff after 2 minutes.
CONVECTION BROILUse this setting forbroiling thick cutsof meat.
• Both top elements heat up.• For even heating, the fan at the back of
the oven circulates air in the oven cavity.• The elements will turn on and off to
maintain the oven temperature.• Opening the door during Convection
Broil will cause the broil elements andconvection fan to tum off immediately,
continued on next page9

m fusing Your Electric Convection Oven
SE'I-rlNG DIAGRAM SETTING INFORMATION
CONVECTION ROASTUse this setting forroasting and bakingon one rack.
(not visible)
Bake element(notvisible)
• The bottom element and both topelements heat up.
• For even heating and faster cooking,the tan at the back of the oven circulatesair in the oven cavity.
• The elements will turn on and off tomaintain the oven temperature.
• Opening the door during ConvectionRoast will cause the broil elements andconvection fan to turn off immediately,The bake element will turn off after2 minutes.
CLEANUse this setting forself-cleaning only.
• The bottom element and both topelements heat up.
Jill i i i IlUl i i i Umll ill _, i i
Setting the clockNOTE: You can only set the clock when thelower oven and the microwave oven are notcooking food and when the timer is notcounting down.
1. Press CLOCK SET/START.
3. Start clock.If time has not been entered correctly,one short tone will sound and =CLOCK"will reappear on the display. RepeatSteps 2 and 3 to re-enter the time of day.
PRESS OR
r c,oc.1
PRESS
2. Set time.
Example for 5:30:
PRESS
To disable the display clock:
You can clear the time of day from thedisplay by pressing and holding CLOCKSET/START for 5 seconds. Repeat to seetime of day on display again.
Using the timerThe Timer does not start or stop the oven.It works like a regular kitchen timer. It canbe set in hours and minutes up to 99 hours;59 minutes or in minutes and seconds up to99 minutes, 59 seconds.
lO

]sing Your Electric Convection Oven
rl -la
1. Press TIMER SET/START.• Once to set minutes and seconds• Twice to set hours and minutes
PRESS
2. Enter time to be counted down.
Example for 10 minutes:
PRESS
. Start countdown.The Timer will begin counting downimmediately after you press TIMERSET/START or START.
PRESS
. When time is up, turn off Timer.When time is up, you will hear four tonesunless end of cycle tone is disabled.(See "Changing audible signals_ in the"Using the electronic oven control"section.) Press TIMER CANCEL to clearthe display. Also, four tones will soundevery minute as an audible reminderunless they are disabled.
To change the timer duringits operation:
1. Press TIMER SET/START,
2. Enter new desired time,
3. Press TIMER SET/START.
To cancel the timer duringits operation:
You can cancel the Timer any time duringits operation, Press TIMER CANCEL.
PRESS
Baking or convectionbakingNOTE: If you need to convert temperaturesfrom Celsius to Fahrenheit or vice versa,see "Celsius/Fahranheit" in the "Using theelectronic oven control" section.
1. Position racks.For correct rack placement, see the"Rack placement" chart in the "Cookingtips" section.
Your lower oven has 2 racks and 5 rackpositions. Rack position 5 is the highestposition, or farthest from the bottom of theoven. Rack position 1 is the lowest posi-tion, or closest to the bottom of the oven.
NOTES:
• Before turning oven on, position ovenrack(s) in desired location.
• Be sure the rack(s) is level.• Use pot holders or oven mitts to
protect hands if reck(s) must be movedwhile oven is hot.
• Do not let pot holder or oven mitt touchoven bottom.
2. Choose baking setting.PRESS
continued on next page
11

I r'(.JsingYour Electric Convection Oven
3. Set temperature (optional).Do this step if you want to set a tempera-ture ether than 350°F (177°C) tar Bake.PRESS
NOTE: See a reliable cookbook or yourconvection oven cookbook for tempera-ture recommendations.
4. Preheat oven.PRESS
The temperaturedisplay_11show LO unlJlthe temperature reaches 170°F (77°C). Afterthat, the temperature display _11show theactual oven temperature at each 5° increaseand stop at the set temperature. One longtonev_llsoundwhen the oven is _ted.
5. Put food in oven.
NOTE: If you want to change thebaking temperature after baking hasbegun, repeat Steps 2, 3, and 4.
6. After cooking, turn off oven.PRESS
J,
Convection baking tips• Do not use aluminum toilwhen convection
baking. Aluminum foil may block airflow.• Reduce recommended recipe oven tem-
perature by approximately 25°F (16°C).Use EASY CONVECT TM CONVERSION(see the "Using EASY CONVECT CON-VERSION" section).
• For some recipes, you can reduce con-vection baking time compared to standardbaking times. Use EASY CONVECT TM
CONVERSION.
NOTE: Cooking time may be longer whenyou use more than one rack.
• When baking on two or three racks,use the CONVECTION BAKE setting formore even results. (You can also useonly one rack when convection baking.)
• To use three racks during convectionbaking, place one rack in position 5(the highest position), another rack inposition 1 (the closest to the oven bot-tom), and the third rack in position 3.This allows all three racks to be anequal distance apart for better baking.
• Stagger cake pans or other cookware inopposite directions on each rack whenthree racks are used. This will makesure pans are not directly over eachother.
Convection roastingNOTE: See the "Roasting tips" in the "Cook-ing tips" section.
1. Prepare oven.Position the rack properly. For correctrack placement, see =Baking or convec-tion baking" earlier In this section. Placefood in the oven. For large masts andturkeys, place rack in position 1 or 2.(Preheating is not necessary whenroasting.)
2. Choose setting.
PRESS
12

fusing Your Electric Convection Oven I
3. Set temperature (optional).Do this step if you want to set atemperature other than 300°F (149°C).
PRESS
NOTE: See your convection oven cook-book for temperature recommendations.
4. Start oven.
NOTES:
• After the temperature reaches 170°F(77°C), the temperature display willshow the actual oven temperature ateach 5°F (3°C) increase and stop atjust about the set temperature.
• If you want to change the roastingtemperature after roasting has begun,repeat Steps 2, 3, and 4.
5. After cooking, turn off oven.PRESS
Convectionroasting tips• Spatter can be reduced by lining the bot-
tom of the roasting pan with lightlycrushed aluminum foil
• Use an accurate meat thermometer ortemperature probe (see the =Using thetemperature probe" section) to determinewhen meat has reached desired degree ofdoneness. Insert the thermometer orprobe into the center of the thickest por-tion of the meat or inner thigh or breast ofpoultry. For an accurate reading, the tip ofthe thermometer or probe should nottouch fat, bone, or gristle.
• After reading the thermometer once,push it further into the meat _ inch(t.7 cm) or more and read again. If thetemperature drops, return the meat to theoven for more cooking.
• Check pork and poultry with athermometer in 2 to 3 places to ensureadequate doneness.
• Poultry and roasts will be easier tocarve if loosely covered with foil andallowed to stand 10 to 15 minutes afterremoval from the oven.
• You can reduce roasting times andtemperatures for most standard recipeswhen using the Convection Roast setting.See convection roasting chart in yourconvection oven cookbook for recom-mended roasting times and temperatures.
• Use the convection roasting rack on thebroiler pan and grid (all included with youroven). (The convection roasting rack restson the broiler pan and grid.) The long sideof the rack should be parallel with the ovendoor for best heat distribution and airflow.
Positioning racks andpansPlace the oven racks where you need thembefore turning on the oven.
• To move a rack pull it out to the stopposition, raise the front edge and lift it out.
• Be sure the rack(s) is level.• Use pot holders or oven mitts to protect
your hands if rack(s) must be moved whilethe oven is hot.
• For best performance cook on one rack.Place the rack sothe top of thefood will becentered in theoven.
O-
Icontinued on next paoe
93

/ Using Your Electric Convection Oven
• When cooking with two racks, arrangethe racks on the 2nd and 4th rack guides.Two sheets of cookies may be baked ifsheets are switched at approximatelythree quarters of the total bake time.Increase baking time, if necessary.
• For best results allow 2 inches (5 cm) ofspace around each pan and betweenpans and oven walls. Hot air mustcirculate around the pans in the oven foreven heat to reach all parts of tl_e oven.This results in better baking.
Where to place pans:
WHEN YOUHAVE PLACE
1 pan In center of the oven rack.
2 pans Side by side or slightlystaggered.
3 or 4 pans In opposite corners oneach oven rack. Staggerpans so no pan is directlyover another.
Rack placement for specific foods:
FOOD RACK POSfTION_
Frozen pies, large 1st or 2nd rackroasts, turkeys, guide from bottomangel food cakes
Bundt cakes, most 2nd rack guidequick breads, yeast from bottombreads, casseroles,meats
Cookies, biscuits, 2nd or 3rd rackmuffins, cakes, guide from bottomnonfrozen pies
NOTE: For information on where to placeyour rack when broiling, see "Broilingguidelines" later in this section.
Bakeware choicesBaking performance is affected by the type of bakeware used. Use the bakeware sizerecommended in the recipe.
BAKEWARETYPE BEST USED FOR GUIDELINES
Lightcolored aluminum • Lightgolden crusts Use temperature and time• Even browning recommended in recipe.
Dark aluminum and other • Brown, crisp crusts May reducebakingtemperature25°F (16°C).bakeware with dark, dull, Use suggested baking time.and/or non-stick finish Use temperature and time
recommended in recipe for pies,breads, and casseroles.
• Place rack in center of oven.
Ovenproof glassware,ceramic glass, or ceramic
l lnsulated cookie sheetsIor baking pans
t.....................i...........I Stainless stee
• Brown, crisp crusts • May reducebaking temperature 25°F (16°C).
j Place in the bottom third of oven.! • May need to increase baking time.4
• Light, golden crusts I • May need to increase baking time.
• Uttle or no bottombrowning
i I * Uneven browning
St_onewara................. i • Crisp crus.ts ........... i__.Fol!owm_a__nufacture.€s÷inst ruclions-14

(Using Your Electric Convection Oven m
L
Using aluminum foil• Do not line the oven bottom with any
type of foil,|iners, orcookware.Permanentdamage willoccur to theoven bottomfinish.
• Do notblock the ovenbottom vents.
• Do not cover the entire rack withaluminum foil. Doing so will reduce aircirculation and overall oven performance.
• To catch spillovers from pies orcasseroles place foil on the oven rackbelow. Foil should be turned up at edgesand be at least 1 inch (2.5 cm) larger thandish.
• Place tent-shaped foil loosely over meator poultry to slow down surface browningfor long term roasting. Remove foil for thelast 30 minutes.
• Use narrow strips of foil to shieldpiecrust edges if browning too quickly.
Although your new oven is propedy adjustedto provide accurate temperatures, it maycook faster or slower than your old oven.
If, after using the oven for a period oftime, you are not satisfied with thebaking/roasting results, you can change theoffset temperature by following the stepsbelow. The control will "remember" theselected offset even after the power hasbeen interrupted or lost.
NOTE: DO NOT measure oven temperaturewith a thermometer. Opening the oven doorwill lower the oven temperature and giveyou an inaccurate reading. Also, the ther-mometer temperature reading will changeas your oven cycles.
. Press and hold BAKE for5seconds.PRESS
Hold for5 seconds
Release the pad when a number andCAL appear on the temperature displayand you hear a tone.
2. Set new offset temperature.PRESS
You can set the offset temperatureadjustment as low as -35°F (-21°C) or ashigh as +35°F (21°C). Each time youpress BAKE, the displayed temperaturewill increase by 5°F (3°C). Each time youpress BROIL, the displayed temperaturewill decrease by 5°F (3°C). (To determinethe amount of adjustment needed, seethe chart later in this section.)NOTE: If there is no "F" after thetemperature, you are in the Celsiusmode.
. Enter the adjustment.PRESS
NOTE: If you press LOWER OVENCANCEL instead of START, the offsettemperature will stay the same.
continued on next page15

m Using Your Electric Convection Oven
How to determine the amount ofadjustment neededThe following chart tells you how much toadjust the offset temperature to get thedesired cooking results. You can determinecooking results by amount of browning,moistness, and rising times for baked foods.
TO COOK ADJUST BY THISFOOD ... NUMBER OF DEGREES
Alittle more +5°F to +10°F(+3°C to +6°C)+15°F to +20°FModerately more(+8°C to +11°C)
+25°F to +35°FMuch more (+14°C to +19°C)
-5°F to -10°FA little less (-3°C to -6°C)
-15°F to-20°FModerately less (-8°C to -11°C)
-25°F to-35°FMuch less (-14°C to -19°C)
Using the temperatureprobeThe Temperature Probe is the most accurateguide to the degree of doneness of meat. Useit when baking, roasting any type of meat orpoultry,or cooking casseroles with liquid.
.
.
Put food in oven.
Place meat on the convection roastingrack, place rack on broiler pan and gdd,and place pan in the center of the oven,
Connect probe to oven.Locate the Temperature Probe jack on theright side of the oven wall. Insert plug intojack. (Keep the top of the probe as far aspossible from the heat source.)
4. Close oven door.
5. Set temperature (optional).PRESS
Do this step if you want to set an internalfood temperature (from 130°F [54°C]to 190°F [88°C]) other than 160°F (72°C).
NOTE: See a reliable cookbook or yourconvection oven cookbook for internalfood temperature recommendations.
NOTES:
* Do not use the Temperature Probe whenbroiling, convection broiling, dehydrating, orraising bread.
• Unplug the Temperature Probe before self-cleaning the oven.
1. Insert probe into food.Insert the probe into the center of the thick-est portion of meat or into the inner thighor breast of poultry,away from fat or bone.
16
6. Choose cook seffing:=BAKE,
=CONVECTION BAKE, or• CONVECTION ROAST
PRESS
(examplefor Bake)
NOTE: If you press BROIL,CONVECTION BROIL, or CLEANpads the display will show =pull prb out."

Using Your Electric Convection Oven
7. Set temperature (optional).
PRESS
Do this step if you want to set an oventemperature other than the one dis-played.
NOTE: See a reliable cookbook or yourconvection oven cookbook for oven tem-perature recommendations.
8. Start oven.
PRESS
NOTES:
• If you do not choose a cook settingand press START, the oven will defaultto bake at 350°F (177°C) and start.If you want tO cook with another settingor at another temperature, do Steps 6and 7 and press START.
• The temperature display will showthe set oven temperature throughouttemperature probe cooking,
• After the food temperature reaches130°F (54°C), the probe display willshow the actual food temperature ateach 5°F (3°C) increase and stop atthe set temperature. Four tones willsound and =End" will show when foodreaches the set temperature. The oventhen shuts off.
• If you want to change the probetemperature after cooking has begun:
- Unplug the probe, then plug it backin. You will be prompted for a newprobe temperature. Next, repeatSteps 4, 5, and 8 in that order. Youmay also change the oven tempera-ture at this point by pressing thedesired cook setting pad again.
OR
- You may change the cook setting atthis point by pressing the desiredcook setting pad again.
Burn Hazard
Use an oven mitt to removetemperature probe.Do not touch broil element.
Failure to follow these Instructionscan result in burns.
9. After cooking, unplug probe.The probe symbol will remain lit untilyou unplug the Temperature Probe.
10. Remove food from oven.(This prevents overcooking.)
11. Clean probe.Wash with a soapy sponge and dry thor-oughly. Use a plastic scouring pad toremove cooked-on foods. You can alsoclean the probe in a dishwasher.
17

m Using Your Electric Convection Oven
Using CONVECT FULLMEAL
CONVECT FULL MEAL lets you choosefrom among ten preset oven convectioncooking cycles, all using the convection fan.These cycles store commonly used cookingtimes, cooking temperatures, and probetemperature settings. CONVECT FULLMEAL saves you time by limiting the num-ber of pads you have to press when cookingat a favorite setting. CONVECT FULL MEALalso lets you set your own favorite cycle(either convection or nonconvection).
1. Place food in cold oven.If you need the Temperature Probe foryour cycle (settings 6 to 0 in the"Convect full meal chart" later in this sec-tion), insert probe into food. Place food inoven and plug probe into jack.
2. Press CONVECT FULL MEALpad.PRESS
3. Press desired Number pad.
PRESS
Use the "Convect full meal chart"later in this section as your guide for se-lecting a cycle.NOTES:
• You can change the Convect full mealcycle any time before pressing the Startpad by repeating Step 3.
• You can program your own setting,which you can then select in the futureby pressing just CONVECT FULL MEALand START pads. (See "To programyour own setting" later in this section formore information.)
4. Start oven.
PRESS
5. When the Convect Full Mealcycle is done:Four tones will sound, and the display willshow "End." (Unless they have been dis-abled) Four reminder tones will soundevery minute until you open the door,remove the probe, or press LOWEROVEN CANCEL.
18

sing Your Electric Convection Oven i
Convect fullmeal chart
SEI"rlNG CONVECTION TIME orNUMBER CYCLE oven temp PROBE TEMP FOOD OR MEAL
1 Cony. Bake 325°F (163°C) 1 hr Meal#l: Spinach andricotta stuffed meat loaf,Baked potatoes, Fallapple cake
2 Conv. Roast 325°F (163°C) 1_ hrs Meal#2: Pesto stuffedturkey breast, Caramel-sweet potato casserole,Rhubarb-pineapple crisp
3 Conv. Roast 350°F (177°C) 40 rain Meal#'3: Pork chopswith currant-nut stuffing,Cherry cobbler
4 Cony. Bake 375°F (191°C) 45 rain Meal#4: Herb and pecanfded chicken, Crispypotato wedges, Apple-sauce rhubarb muffins
5 Cony. Bake 425°F (218°C) 20 min Meal#5: Spicy red snap-per, Gruyere pecanbiscuits
6 Conv. Roast 325°F (163°C) 140°F (60oc) Beef, rare
7 Cony. Roast 325°F (163°C) 155°F (68°C) Beef, medium
Pork
8 Cony. Roast 325°F (163°C) 165°F (74°C) Beef, well done
9 Cony. Roast 300°F (149°C) 135°F (56oc) Ham, fully cooked
0 Cony. Bake 325°F (163°C) 160°F (71°C) Casseroles
NOTE: For the recipes for Meals #1 - #5 see the cookbook that comes with your oven.
To program your own setting:1. Press CONVECT FULL MEAL.
2. Press the Command Pad to the cooksetting you want (for example, BAKE).
3. Enter the temperature and cook timeyou want. (The default is Bake at 170°F(75°C) for 2 hours.) Entering a cook timeof 0 minutes lets you do untimed cooking.
4. To save only, press CONVECT FULLMEAL.
To cook with this setting Immediatelyand save it, press START.
When programming your own setting:1. Start with meat or main dish items (times
are more cdtical with these items).
2. Choose baked goods with bake tempera-tures similar to those of meat or maindish items. Convection baking time of +/-10 to 15 minutes and temperatures of +/-25 to 50 degrees are acceptable.
3. Choose vegetables and fruits last.
19

m Using Your Electric Convection Oven
,, i , i i i i i i H
Using EASY CONVECTCONVERSION
EASY CONVECT Conversion lets youconvection cook without entering convectioncook temperatures and times. Simply enterthe standard cook temperature and time forthe food to be cooked. The oven will reducethe temperature, or the temperature andtime, for convection cooking. (Convectiontemperatures and times are not as longbecause the heated air is c{rculated in theoven cavity for quicker cooking.)
NOTE: The converted temperatures andtimes are not precise because the foodcategories you choose from are general.(See "EASY CONVECT Conversion settingchart" later in this section for which foodsyou can cook in each category.) To ensureproper cooking, the oven will prompt you tocheck food at the end of cook time. If foodneeds more cooking, the oven will continueto cook. If food does not need more cooking,press LOWER OVEN CANCEL.
Food Poisoning HazardDo not let food sit in oven more thanone hour before or after cooking.
Doing so can result in food poisoningor sickness.
1. Place food in oven,NOTE: For Baked Goods and OtherFoods, place food in the ovenafter theoven has been preheated,
2. Press one of three EASY
CONVECT CONVERSION pads.Example for Meats:
PRESS
2O
3. Enter standard cook
temperature.PRESS
4. Enter standard cook time.PRESS
NOTE: To delay convection cooking,afterStep 4, press STOP TiME and enter thedesired stop time. Cooking will start at thetime equal to the stoptime less the cooktime. (Example: A cook time of 1 hour anda stop time of 4:00 would give you a starttime of 3:00.)
5. Start oven.PRESS
NOTES:
• The actual temperature reduction andtime savings are different for each foodcategory and oven type,
• For Baked Goods and Other Foods,place food in the oven after the ovenhas been preheated.
6. At end of cook time (nonde-layed cooking):
7. Open door and check food(nondelayed cooking).If you want to continue cooking, closedoor and the oven will continue cooking.If you do not want to continue cooking,press LOWER OVEN CANCEL.
. When stop time is reached (de-
layed cooking only):Four tones will sound, end the displaywill show "End." Four reminder tones willsound (unless they have been disabled)every minute until you open the door orpress LOWER OVEN CANCEL.

/fusing Your Electric Convection Oven
Using EASY CONVECT TM CONVERSION (cont)
EASY CONVECT CONVERSION seffing chart
EASY CONVECT SETTING FOODS YOU CAN COOK WITH THIS SE'I-rlNG
Baked Goods Cakes: layer, angel foodBreads: quick and yeastBiscuits and cookiesCasseroles, including frozen entrees and souffl_sFish
Meats Chicken: whole and piecesRoasts: pork, beef, and hamMeat loafBaked potatoes
NOTE: Turkey or large poultry are not included becausetheir cooking times vary.
Other Foods Convenience foods: French fries, nuggets, fish sticks, pizzaPies: fruit and custard
Broiling
NOTE: Preheating is not necessary whenbroiling.
2. Put food in oven.Place food on grid in broiler pan andplace in center of the oven rack.
1. Position rack. NOTES:See =Broiling rack positions" in the=Broiling tips" section for recommendedrack positions.NOTES:
• Before turning oven on position ovenrack(s) in desired location.
• Be sure the rack(s) is level.• Use pot holders or oven mitts to
protect hands if rack(s) must bemoved while oven is hot.
• Do not let pot holder or oven mitttouch hot broil element.
NOTE: See the "Broiling tips" section foradditional broiling tips.
• Place food about 3 inches (8 cm) ormore from the broil element.
• To ensure adequate grease drainage,do not use cookie sheets or similarpans for broiling.
• If foil is used to cover broiler grid,cut slits in foil to allow grease todrain away.
3. Close door.NOTE: Do not keep the door open as onother electric ovens. Unlike other electricovens, the broilelement will only stay onwith the door closed. This gives you thehigh heat you need for broiling. However, ifyou leave the door open, the broil elementwill go off.
continued on next page21

/ fusing Your Electric Convection Oven
4. Press BROIL.Once for MAXI BROIL
PRESS
OR
Twice for ECONO BROIL
PRESS
5. Set temperature (optional).PRESS
Do this step if you want to use variabletemperature broiling
6. Start oven.PRESS
NOTE: If you want to change the broilingtemperature after broiling has begun,repeat Steps 4, 5, and 6.
7. When broiling is done,turn off oven.
PRESS
• Thicker and unevenly shaped cuts offish, chicken and other meats may cookbetter if you use lower broiling tempera-tures when cooking to well-done.
Convection broilingUse this setting when broiling thick cutsof meat.
1. Position rack.See "Broiling rack positions"in the"Broiling tips" section for recommendedrack positions.
2. Close door.
NOTE: Do not try to convection broil withthe door open. The fan and elements willnot operate.
3. Choose CONVECTION BROILsetting.PRESS
= Set temperature (optional).PRESS
Do this step if you want to set a tempera-ture (up to 500°F [260°C]) other than450°F (232°C).
NOTE: See your convection ovencookbook for temperaturerecommendations.
Variable temperature broiling• If food is cooking too fast or you want
the food to broil slower from the start, setthe broil temperature between 170°F(77°C) and 325°F (163°C). The lowertemperature will slow the cooking.
22
5. Preheat oven.
NOTE: If you want to change the convec-tion broiling temperature after broiling hasbegun, repeat Steps 3, 4, and 5.
PRESS

' sing Your Electric Convection Oven
6. Put food in oven.Place food on grid in broiler pan andplace in center of the oven rack. Turnthe pan so the long side is parallel tothe oven door for the most even heatand the best airflow.
NOTE: If you want to change the con-vection broiling temperature after broilinghas begun, repeat Steps 3, 4, and 5.
7. When broiling is over,turn off oven.PRESS
Broiling guidelines• Use only the broiler pan and grid
provided. They are designed to drain extrajuices from the cooking surface. Thisdrainage helps prevent spatter and smoke.
• Do not cover grid with foil, in order toallow juices to drain.
• Trim excess fat to reduce spattering. Slitthe fat on the edges to prevent cuding.
• Use tongs to tum meat to avoid losingjuices.• Pull out oven rack to stop position before
turning or removing food.• After broiling, remove the pan from the
oven when removing the food. Drippingswill bake on the pan if left in the heatedoven, making cleaning more difficult.
• For easier cleaning, line the bottom of thepan with aluminum foil. Clean the pan andgrid as soon as possible after each use.
Recommended rack positions are numbered• from the bottom
(1) to the top (5)._- For best results,
place food 3
0- inches (7.5 cm)or more fromO- the broil
element.
APPROXIMATERACK TOTAL TIME
MEAT POSITION TEMPERATURE (MINUTES)
Steak, 1" (2.54 cm) thick 4 500°F (260° C)• rare 15• medium 21• well-done 25
Steak, 1_" (3.815 cm) thick 4 500°F (260° C)• rare 23= medium 28
Ground meat patties or steaks,W' (1.27 cm) thick or less• medium 5 500°F (260° C) 8-12
Lamb chops, 1" (2.54 cm) thick 4 400°F (204° C) 16-20
Ham slice, W' (1.27 cm) thick 4 500°F (260° C) 10-121" (2.54 cm) thick 4 500°F (260 ° C) 20-22
Pork chops, 1" (2.54 cm) thick 4 450°F (232 ° C) 26-28
Frankfurters 4 500°F (260 ° C) 8
Chicken pieces, bone in 3 500°F (260 ° C) 32
Fish, ½" (1.27 cm) thick 3 350°F (177 ° C) 201" (2.54 cm) thick 3 350°F (177 ° C) 20-22
Calves liver, _" (1.27 cm) thick 4 350°F (177 ° C) 10-12
NOTE: Times are guidelines only and may need to be adjusted for individual tastes.23
m ]sing Your Electric Convection Oven
m
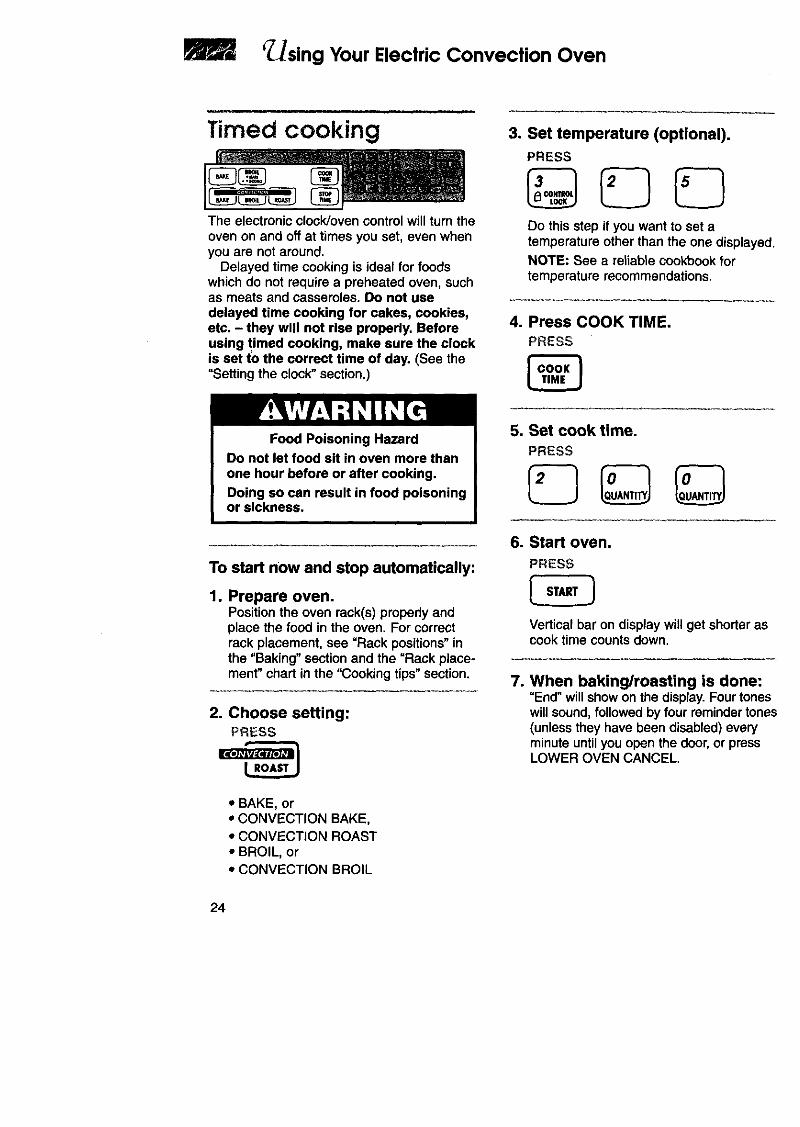
Timed cooking
The electronic clock]oven control will turn theoven on and off at times you set, even whenyou are not around.
Delayed time cooking is ideal for foodswhich do not require a preheated oven, suchas meats and casseroles. Do not usedelayed time cooking for cakes, cookies,etc. - they will not rise properly. Beforeusing timed cooking, make sure the clockis set to the correct time of day. (See the"Setting the clock" section.)
3. Set temperature (optional).
PRESS
Do this step if you want to set atemperature other than the one displayed.NOTE: See a reliable cookbook fortemperature recommendations.
4. Press COOK TIME.
PRESS
Food Poisoning HazardDo not let food sit in oven more thanone hour before or after cooking,
Doing so can result in food poisoningor sickness.
5. Set cook time.
PRESS
To start now and stop automatically:
1. Prepare oven.Position the oven rack(s) propedy andplace the food in the oven. For correctrack placement, see =Rack positions" inthe "Baking" section and the =Rack place-ment" chart in the "Cooking tips" section.
2. Choose setting:PRESS
• BAKE, or• CONVECTION BAKE,• CONVECTION ROAST• BROIL, or• CONVECTION BROIL
6. Start oven.
PRESS
Vertical bar on display will get shorter ascook time counts down.
7. When baking/roasting is done:"End" will show on the display. Four toneswill sound, followed by four reminder tones(unless they have been disabled) everyminute until you open the door, or pressLOWER OVEN CANCEL.
24
m sing Your Electric Convection Oven
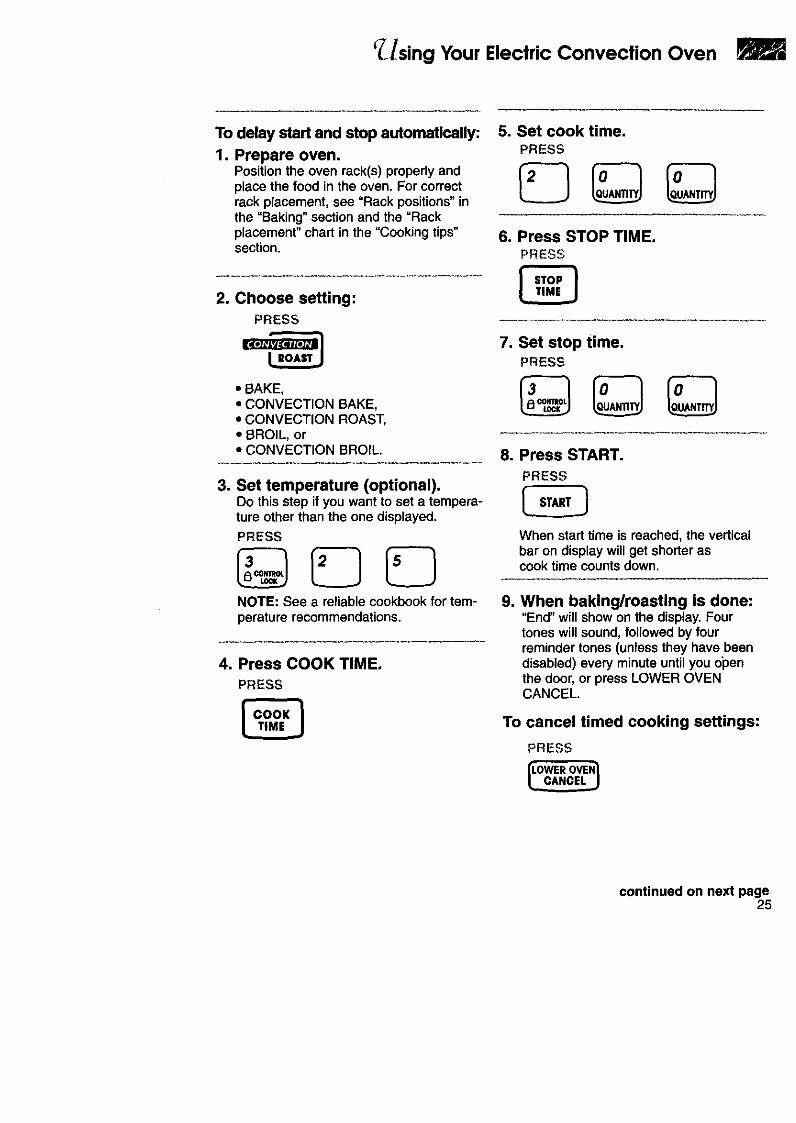
To delay start and stop automatically:
1. Prepare oven.Position the oven rack(s) properly andplace the food in the oven. For correctrack placement, see "Rack positions" inthe "Baking" section and the =Rackplacement" chart in the "Cooking tips"section.
2. Choose setting:
PRESS
"BAKE,• CONVECTION BAKE,• CONVECTION ROAS_=BROIL, or• CONVECTION BROIL.
3. Set temperature (optional).Do this step if you want to set a tempera-ture other than the one displayed.PRESS
NOTE: See a reliable cookbook for tem-perature recommendations.
4. Press COOK TIME.
PRESS
5. Set cook time.PRESS
6. Press STOP TIME.PRESS
. Set stop time.PRESS
8. Press START.
PRESS
When start time is reached, the verticalbar on display will get shorter ascook time counts down.
9. When baking/roasting is done:"End" will show on the display. Fourtones will sound, followed by fourreminder tones (unless they have beendisabled) every minute until you openthe door, or press LOWER OVENCANCEL.
To cancel timed cooking settings:
PRESS
continued on next page25

B_sing Your Electric Convection Oven
7. Start oven.
PRESS
NOTE: If you want to change the dehy-drating temperature after dehydrating hasbegun, repeat Steps 5, 6, and 7.
8. When dehydrating is done,turn off oven.
PRESS
_ ii,rll ii iii illm
Proofing(raising)breadYou can use yourconvectionoventoproof
(raise)breaddough.Firstproofing:Placethedough ina lightlygreasedbowland loosely
coverwithwaxed papercoatedwithshortening.
1. Put bowl on Rack 2.
Place the broiler pan on Rack 1 and addtwo cups of boiling water. Close oven door.
2. Choose BAKED GOODS.
PRESS
Hold for5 seconds
3. Display defaults to 100°F (38°C).
4. Start oven.PRESS
Let dough rise until nearly doubled in size.Proofing time may be faster and will varyby the type and quantity of dough. Checkdough after 20-25 minutes.
5. When proofing is done, turn offoven.
PRESS
NOTE: If you do not tum off oven afterproofing broad, the oven will keep runninguntil you press LOWER OVEN CANCEL.
Second Proofing: Shape the dough andplace in baking pan(s). Cover loosely withplastic wrap coated with cooking spray.Put pan(s) on Rack 2. Place the broilerpan on Rack 1 and add 2 cups of boilingwater. Close the oven door. Follow Steps2-4 for first proofing. When proofing isdone, remove baking pan(s) and the broil-er pan from oven. Reset oven to preheatfor baking bread. Before baking, removeplastic wrap from baking pans.
The oven ventHot air and moisture escape from the loweroven through a vent. This vent is above theoven door. It is needed for air circulation.Do not block the vent(s). Poor baking/roasting can result.
IOven vent
27

Using Your Electric Convection Oven
DehydratingYou can use your convection oven to dehy-drate a variety of foods.
NOTES:
• To learn detailed information about dehy-dration, refer to a book written specificallyabout dehydrating and/or preserving foods.
• If you do not turn off oven after dehy-drating, the oven will keep running untilyou press LOWER OVEN CANCEL.
1. Prepare food.Preparefoods as recommendedinrecipe.
4. Position door,
Attach the dehydration spacer', which isspecially designed to depress the ovenlight plunger and maintain the operationof the fan during dehydration.
The spacer provides a 1-inch (2.54)gap between the oven frame and theoven door allowing moisture to escape.
Dehydration spacer
Oven lightplunger
2. Arrange food on drying racks.Racks are not included with oven. Seebelow to order a dehydration kit1"whichincludes racks and a spacer or contact alocal store handling specialty cookwara.
3. Place drying racks in the ovento allow maximum air circula-tion around the racks.
NUMBER OF USE OVENRACKS RACK POSITION
1 rack 3
2 racks 2 and 4
3 racks 1, 3, and 5
* The dehydration spacer (Part No.814166) or the dehydration kit whichincludes racks and a spacer (Part No.4395974) can be ordered from yourdealer, or by calling 1-800-422-1230and following the instructions and tele-phone prompts you hear.
5. Press and hold CONVECTIONBAKE for 5 seconds.
PRESS
Hold for5 seconds
6. Set temperature (optional).
PRESS
DO this step if you want to set atemperature (from 100°F [38°C] to 20O°F[95°C]) other than 140°F (60°C).
26

Using the Self-CleaningCycle
Burn Hazard
Do not touch the oven during the Self-Cleaning cycle.
Keep children away from oven during Self-Cleaning cycle.
Do not use commercial oven cleaners in your oven.
Failure to follow these instructions can result in burns, orillness from inhaling dangerous fumes.
Before you start
DO NOThand-cleangasket
- Hand-clean frame
Before you start the Self-Cleaningcycle, make sure you:NOTE: DO NOT clean, move, or bend thegasket. Poor cleaning, baking, and roastingmay result.
• Hand-clean the areas shown. They donot get hot enough during the Self-Cleaning cycle for soil to burn away. Usehot water and detergent or a soapy, steel-wool pad for cleaning.
• Do not let water, cleaner, etc., enter slotson door and frame.
• Remove the broiler pan and grid and anycookware/bakeware being stored in theoven.
• Wipe out any loose soil or grease. Thiswill help reduce smoke during the Self-Cleaning cycle.
• Wipe up food spills containing sugarand/or milk as soon as possible after theoven cools down. When sugar is heatedto a high temperature in the Self-Cleaningcycle, the high temperature can cause thesugar to burn and react with theporcelain. This can cause staining andetching, pitting or faint white spots.
• Remove the oven racks from the oven ifyou want them to remain shiny. You canclean the oven racks in the Self-Cleaningcycle, but they will become harder toslide. (See the "Cleaning chart" in the"Caring for Your Electric ConvectionOven" section.) if you clean the racks inthe Self-Cleaning cycle, place them onthe 2nd and 4th rack guides. (The guidesare counted from bottom to top.)
• Heat and odors are normal during theSelf-Cleaning cycle. Keep the kitchen wellventilated by opening a window or byturning on a vent hood or other kitchenvent during the cycle.
IMPORTANT: The health of some birds isextremely sensitive to the fumes given offduring the Self-Cleaning cycle. Move birdsto another closed and well ventilated room.
28

_]sing the Self-Cleaning Cycle
NOTES:
• Clean the oven before it gets heavily soiled.Cleaning a very soiled oven takes longerand results in more smoke than usual.
• Do not block the vent during the Self-Cleaning cycle. Air must move freely forbest cleaning results.
• Do not leave any foil in the oven during theSelf-Cleaning cycle. Foil could burn ormelt and damage the oven surface.
• The oven light will not work during theSelf-Cleaning cycle,
Before setting thecontrols• Make sure clock is set to correct
time of day. The clock cannot beset during the Self-Cleaning cycle.
• Make sure the oven door iscompletely closed.
Settingthe controls
To start cleaning immediately:
1. Press CLEAN.A 3_hour Self-Cleaning cycle will beset. (The first 3 hours are for cleaning,the last 30 minutes are for cooling.)PRESS
2. Set cleaning time (optional).If you want a Self-Cleaning cycleother than 3½ hours, press thedesired Number pads for the newtime from 24 to 4_ hours.
PRESS
• Use 2_ hours for light soil.• Use 3Yzto 41,_hours for moderate
to heavy soil.
3. Start oven.
PRESS
NOTE: The door will lock right afteryou press START.
4. After the Self-Cleaningcycle ends:
YOU SEE
To delay cleaning start time:
1. Press CLEAN.A 3_-hour Self-Cleaning cycle will beset. (The first 3 hours are for cleaning,the last 30 minutes are for cooling.)
PRESS
2. Set cleaning time (optional),If you want a Self-Cleaning cycle otherthan 3_ hours, press the desired Numberpads for the new time from 2_ to 44 hours.
PRESS
• Use 2_ hours for light soil.• Use 3_ to 4_ hours for moderate to
heavy soil.
continued on next page
29
m r_sing the Self-Cleaning Cycle
3. Press STOP TIME.
PRESS
4. Set Stop time.Example for 7:00:
PRESS
5. Complete entry.
PRESS
NOTES:
• The door will lock and oven light will goout (if on) right after you press START.
6. After the Self-Cleaningcycle ends:YOU SEE
To stop the Self-Cleaning cycle atany time:
PRESS
For best cleaningresults• After the oven cools to room tempera-
ture, wipe up any residue or ash with adamp cloth or sponge. If any spots remain,clean with a mild abrasive cleanser orcleaning sponge.
• Clean the oven before it gets heavilysoiled. Cleaning a very soiled oven takeslonger and results in more smoke thanusual.
• If the Self-Cleaning cycle does not getthe oven as clean as you expected, thecycle may not have been set long enoughor you may not have prepared the ovenproperty. Set the Self-Cleaning cycle longerthe next time and hand-clean areas notedin "Before you start" earlier in this section.
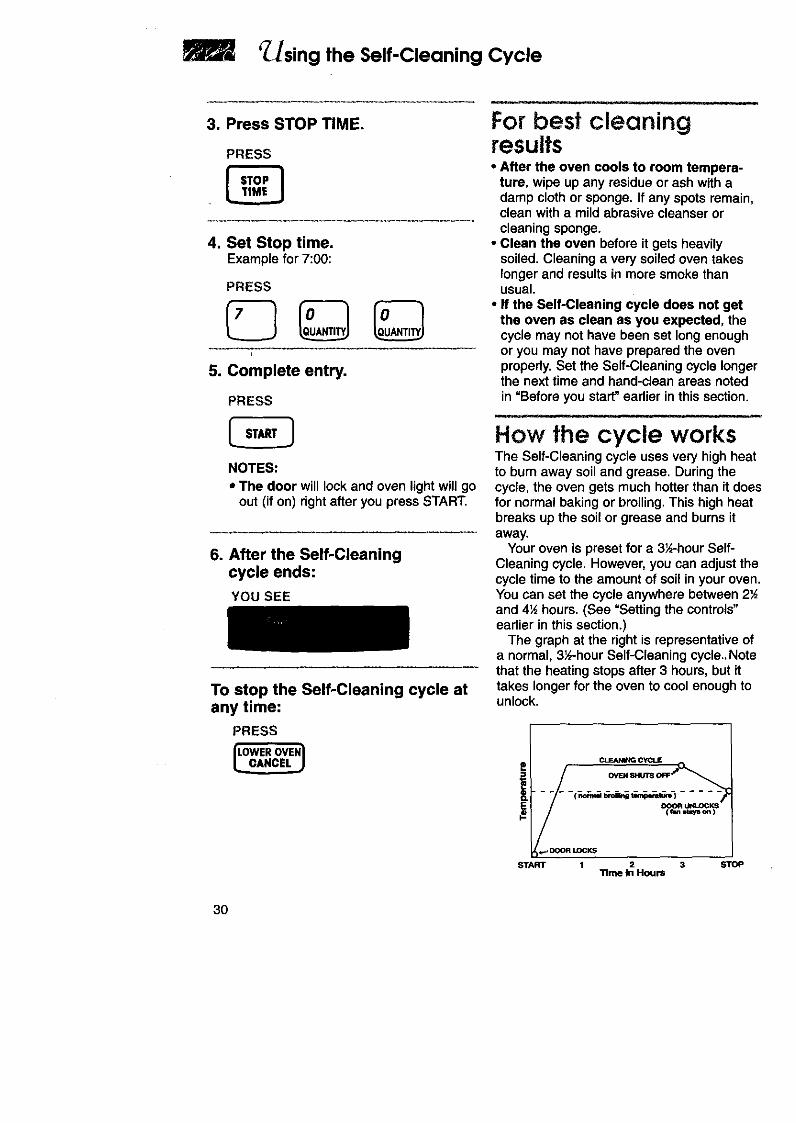
How the cycle worksThe Self-Cleaning cycle uses very high heatto burn away soil and grease. During thecycle, the oven gets much hotter than it doesfor normal baking or broiling. This high heatbreaks up the soil or grease and burns itaway.
Your oven is preset for a 3_-hour Self-Cleaning cycle. However, you can adjust thecycle time to the amount of soil in your oven.You can set the cycle anywhere between 2_and 4_ hours. (See "Setting the controls"earlier in this section.)
The graph at the right is representative ofa normal, 3_-hour Self-Cleaning cycle., Notethat the heating stops after 3 hours, but ittakes longer for the oven to cool enough tounlock.
E
i
START
( f_n _m/s e,n )
_ DOOR LOCKS
1 2 3 STOPTime In Hours
3O

Caring for YourElectricConvection Oven
Explosion Hazard
Do not store flammable materials such as gasoline nearthis appliance.
Doing so can result in death, explosion, or fire.
Cleaning ChartBefore cleaning, always make sure all controls are off and the range is cool. Refer toinstructions on all cleaning products before using them to clean your range.
PART CLEANING METHOD
Control Panel • Soap and water • W_ and dry with soft cloth. IDo not use steel wool or Iabrasive cleansers. They may Idamage the finish. I
• Spray glass cleaner
Exterior Surfaces(excluding control paneland oven door glass)
Stainless steel surfaces
Routine cleaning andfingerprints
Soap and waterMild liquid cleanerSpray glass cleaner
Non-abrasive plasticscrubbing pad
• Liquid detergent/soapand water, orall-purpose cleaner
Apply spray cleaner to paper towel;do not spray directly on panel.
|OTE: Set the Control Lock toprevent the oven from accidentallyturning on when you are cleaning thepanel. (See "Using the control lock"in the "Using Your Oven" section.)
• DO NOT use abrasive or harshcleaners like chlorine bleach,ammonia or oven cleaners.
• Wash, rinse and dry with soft cloth.
• Gently clean around the model andserial plate; too much scrubbingcould remove the numbers.
• DO NOT use steel wool or soap-filled scouring pads.
• Rub in the direction of the grainline to avoid marring the surface.
• Always wipe dry to avoid watermarks.
• If commercial cleaners are used,follow label directions. If productcontains chlorine (bleach), wipethoroughly with clean water and drywith a soft lint-free cloth. Chlorineis a corrosive substance.
• Wipe with damp cloth or sponge,then wipe with clean water and dry.
continued on next page 31

/ Caring for Your Electric Convection Oven
PART CLEANING METHOD SPECIAL INSTRUCTIONS
• Mildly abrasive cleanseror stainless-steelcleaners
Stainless steelsurfaces (cont.)
Stubborn stains andbaked-on residue
Hard water spots • Vinegar
Oven door glass
Oven cavityFood spillscontainingsugar and/or milk
All other spills
Oven racks
Broiler pan end grid
• Soap and water• Non-abrasive plastic
scrubbing pad• Spray glass cleaner
• Soap and water
• Self-cleaning cycle
• Soap and water• Steel wool pad• Self-cleaning cycle
• Soap and water• Steel wool pad• Dishwasher
• Solution of 1/2cup(125 mL) ammonia to1 gallon (3.78 L) water
• Mild abrasive cleanser orcommercial oven cleaner
• To avoid mardng the surface, rub inthe direction of grain lines with adamp cloth or sponge and cleanser.Wipe thoroughly with clean water.Repeat if necessary.
• Swab or wipe with cloth. Wipe withclean water and dry.
• Wash, rinse and dry with soft cloth.
• Wipe with paper towel.
• When oven cools, wash, rinseand dry with soft cloth or sponge.
• See the "Using the self-cleaningcycle" section.
• Wash, rinse and dry.
• Place on 2nd and 4th rack guides.Racks will discolor and becomeharder to slide. After cleaning, applyvegetable oil to rack guides foreasier sliding.
• Wash, rinse and dry.
• Soak for 20 minutes, then scrubwith plastic scrubbing pad.
• DO NOT clean the pan and gddin the self-cleaning cycle.
M., i i i, i i
Removing the ovendoorFor normal use of your oven, you do notneed to remove the door. However, you canremove the door by following the instructionsin this section.
The oven door is heavy. Use both handsto remove and replace the door. Do not liftand carry the door by the handle. To removeand replace the door you may need help.
To remove:
1. Open door all the way.
NOTE: Two "_" (4 mm) Allen wrenches ortwo nails of similar diameter may be used iffactory furnished door removal pins havebeen misplaced. Be careful not to damageporcelain finish.
32

/Caring for Your Electric Convection O /en
2. Insert small end of a door removal pininto each door hinge.
Insert small end
2. Open the door all the way. j3. Remove the door removal pins from
each hole.
3. Grasp under handle and gently closedoor as far as it will shut. Pull door outat bottom to remove.
11111
4. Set door aside on protected surface.
To replace:
1. Fit hinge arms into slots in frame. Push inat lower corners to insure that hinge armsare fully engaged.
11111
_lnhere 4. Close the door.
NOTE: If the door does not operate freely,you have not installed it properly. RepeatSteps 1 to 4.
Using and replacingthe oven lightsThe oven lights will come on when you openthe oven door. To turn the lights on when theoven door is closed, press OVEN LIGHT _]on the control panel. Press _] again toturn off the lights.
NOTES:• Make sure the oven is cool before
replacing the light bulb.• The oven lights will not work during the
Self-Cleaning cycle.
Replacing the oven light:
1. Unplug oven or disconnect power.
2. Remove glass light cover by grasping thefront edge of cover and pulling it awayfrom the side wall of the oven.
3. Remove the light bulb from its socket.Replace the bulb with another halogenbulb (12 volt, 5 watt maximum, availableat most hardware stores).
4. Replace the light cover by snapping itback into wall.
5. Plug in oven or reconnect power,
33

TroubleshootingMost cooking problems often are caused by little things you can find and fix without tools ofany kind. Check the lists below and on the next page before calling for assistance or service.If you still need help, see "Requesting Assistance or Service" on page 36 or 37.
If nothing operates, check the following:• Is the oven wired into a live circuit with the proper voltage? (See Installation
Instructions.)
• Have you blown a household fuse or tripped a circuit breaker?
Other possible problems ond their causes:PROBLEM CAUSE/SOLUTION
The oven will not • You have not set the electronic control correctly. Refer to theoperate section in this manual describing the function you are
operating.
• You have programmed a delayed start time. Wait for thestart time to be reached or cancel and reset the control.
The Self-Cleaning • You have programmed a delayed start time. Wait for thecycle will not start time to be reached or cancel and reset the control.operate
Display is blank • You have set the display not to show the clock time. Tosee the clock time again, press and hold CLOCKSET/START for 5 seconds.
The oven temper- • Adjust the oven temperature control. (See "Adjusting the ovenature seems too temperature control"section.)low or too high
Slow baking or • Increase baking or roasting time.
roasting • Increase temperature 25°F (14°C)
• Preheat oven to selected temperature before placing food inwhen preheating is recommended.
• Choose bakeware that will allow 2 inches (5 cm) of air spacearound all sides.
• Open oven door to check food when timer signals shortesttime suggested in recipe.
• Oven peeking can make cooking times longer.
Baked Items toobrown on bottom
• Preheat oven to selected temperature before placing food inoven.
• Choose bakeware that will allow 2 inches (5 cm) of air spacearound all sides.
• Position rack higher in oven.
• Decrease oven temperature 15° to 25°F (8° to 14°C).
34

r oubleshooting
PROBLEM CAUSE/SOLUTION
Unevenly baked * Check that the oven is level.
items • Bake in center of oven with 2 inches (5 cm) of space aroundeach pan.
• Check to make sure batter is level in pan.
Crust edge • Shield edge with foil.browns before pieis done
The display is • There has been a power failure. Reset the clock.showing "PF"
A letter followed • Press LOWER OVEN CANCEL. If the code reappears, noteby a number the code and call for service.shows on thedisplay (for exam-ple "E3," "FI")
The key pads do • The Control Lock has been set. Turn off the Control Lock bynot operate pressing and holding CONTROL LOCK (Number Pad 3) for 5
seconds.
• The Sabbath mode has been set ("Sab" appears on the dis-play). Tum off the Sabbath mode by pressing and holdingNumber Pad 6 for 5 seconds.
If none of these items is causing your problem, see "Requesting Assistance or Service".
35

questing Assistance orService
Before calling for assistance or service, please check the "Troubleshooting Guide" section. Itmay save you the cost of a service call. If you still need help, follow these instructions.
If you need assistance or service in the U.S.A.:Call the KitchenAid Consumer
_ ssistance Center toll
free: 1-800-422-1230.Our consultants areavailable to assist you.
When calling:Please know the purchase date, and thecomplete model and serial number of yourappliance (see the "A Note to You" sec-tion). This information will help us to bet-ter respond to your request.
Our consultants provide assistance with:
• Features and specifications on our ful!line of appliances.
• Installation information.
• Use and maintenance procedures.• Accessory and repair parts sales.
• Specialized customer assistance(Spanish speaking, hearing impaired,limited vision, etc.).
• Referrals to local dealers, servicecompanies, and repair parts distributors.
KitchenAid designated servicetechnicians are trained to fulfilltheproduct warranty and provide after-warrantyservice, anywhere in the United States.
To locate the KitchenAid designatedservice company in your area, you canalso look in your telephone directoryYellow Pages.
If you need replacement parts
If you need to order replacement pads,we recommend that you only use factoryspecified parts. These parts will fit rightand work right, because they are madewith the same precision used to build
every new KITCHENAID ® appliance. Tolocate factory specified replacement partsin your area, call our Consumer AssistanceCenter telephone number or your nearestdesignated service center.
For further assistance
If you need further assistance, you canwdte to KitchenAid with any questions orconcerns at:
KitchenAid Brand Home AppliancesConsumer Assistance Centerc/o Correspondence Dept.2000 North M-63Benton Harbor, MI 49022-2692
Please include a daytime phone number inyour correspondence.
36

_equesting Assistance or Service
If you need assistance or service in Canada:Call the KitchenAid Consumer
_ ssistance Center toll free:
8:30 a.m. - 6 p.m. (EST) at1-800-461-5681. Our consult-ants are available to assistyou.
When calling:Please know the purchase date, and thecomplete model and serial number of yourappliance (see the "A Note to You" section).This information wilt help us to betterrespond to your request,
Our _consultants provide assistance with:
• Features and specifications on our full lineof appliances.
• Accessory and repair parts sales.• Specialized customer assistance
(French speaking, hearing impaired,limited vision, etc.).
• Referrals to local dealers, servicecompanies, and repair parts distributors.
KitchenAid designated servicetechnicians are trained to fulfill theproduct warranty and provide after-warranty service, anywhere in Canada.
To locate the KitchenAid designatedservice company in your area, you canalso look in your telephone directoryYellow Pages.
If you need service:Contact Inglis Limited Appliance Service from anywhere in Canada at 1-800-807-6777.
if you need replacement partsIf you need to order replacement parts, every new KITCHENAID _ appliance. Towe recommend that you only use factory locate factory specified replacement partsspecified parts. These parts will fit right in your area, call our Consumer Assistanceand work right, because they are made Center telephone number or your nearestwith the same precision used to build designated service center.
For further assistanceIf you need further assistance, you can Please include a daytime phone number inwrite to KitchenAid with any questions or your correspondence.concerns at:
Consumer Relations DepartmentKitchenAid Canada1901 Minnesota CourtMississauga, Ontario L5N3A7
37

_tes!
38

tes
39

KitchenAidLower Electric
Convection Oven
* / arrantyLENGTH OF KITCHENAID KITCHENAIDWARRANTY: WILL PAY FOR: WILL NOT PAY FOR:
ONE-YEAR FULLWARRANTYFROM DATE OFPURCHASE,
SECOND-THROUGH FIFTH-YEAR LIMITEDWARRANTYFROM DATE OFPURCHASE.
SECOND-THROUGHTENTH-YEARLIMITEDWARRANTYFROM DATE OFPURCHASE.
Replacement parts andrepair labor costs tocorrect defects in mate-rials or workmanship.Service must beprovided by aKitchenAid designatedservicing company.
Replacement partsfor any oven electricelement to correctdefects in materialsor workmanship.Replacement parts forsolid state touch control
system to correctdefects in materials orworkmanship.
Replacement parts forthe porcelain ovencavity/inner door if thepart rusts through dueto defects in materialsor workmanship.
A. Service calls to:1• Correct the installation of the oven.
2. Instruct you how to use the oven,3. Replace house fuses or correct
house wiring.B. Repairs when oven is used in other
than normal single family householduse.
C. Damage resulting from accident,alteration, misuse, abuse, acts of God,improper installation,or installationnot
D in accordance with local electrical codes.• Any labor costs during the limitedwarranties.
E. Replacement parts or repair laborcosts for units operated outside theUnited States and Canada.
R Pickup and delivery. This product isdesigned to be repaired in the home.
G. Repairs to parts or systems resultingfrom unauthorized modifications madeto the appliance.
H. In Canada, travel or transportationexpenses for customers who reside inremote areas.. ,_
KITCHENAID AND KITCHENAID CANADA SHALL NOT BE LIABLE FOR INCIDENTALOR CONSEQUENTIAL DAMAGES. Some states or provinces do not allow the exclusion orlimitation of incidental or consequential damages, so this exclusion or limitation may notapply to you. This warranty gives you specific legal rights and you may also have otherrights which may vary from state to state or province to province.
Outside the United States and Canada, a different warranty may apply. For details,please contact your authorized KitchenAid dealer•
If you need service, first see the "Requesting Assistance or Service" section of this book.After checking "Requesting Assistance or Service," additional help can be found by callingour Consumer Assistance Center telephone number, 1-800-422-1230, from anywhere in theU.S. For service in Canada, see the "Requesting Assistance or Service" section.
4452300A ® Registered TrademarWTM Trademark of KitchenAid, U.SA. 5/99© 1999 KitchenAid KitchenAid Canada llcensse in Canada Pdnted in U.S.A.